


hopeful
-
Posts
278 -
Joined
-
Last visited
Content Type
Profiles
Forums
Gallery
Events
Posts posted by hopeful
-
-
Hi,
Thanks for taking on the Lady Nelspon, my next build. You are doing well, keep up the good work. You are right when saying we builders are in the constant would'a, could'a, should'a mode. We are all striving to do better each time we build. Patience is the key, and then more patience after that.
I like your photos. Can you make them larger so I can learn from your build?
As to a filler for walnut, I use two approaches.
One approach is to lightly sand the strakes thus filling the pores with sawdust, followed by walnut stain, and sanding sealer. Another possibility is to mix walnut stain into diluted wood filler, fill the pores, sand lightly, and follow with sanding sealer. Yet another choice is to live with the situation as is. I would live with it!!!
Other builders will have additional ideas. Suggest you start a thread. Ask the question ns the discussion portion of the forum.
Wish you well as you move along.
BFN
Cheers,
Hopeful aka David
“there is wisdom in many voices”
Completed: Sharpie Schooner (Midwest) Posted on kit build log.
Current: Sultana (MSW) Updating the build log and continuing on with the build
Next: Lady Nelson (Amati Victory)
-
Hi mates,
Post 11 of my Sultana Build Log
Task is to reduce the thickness of the hull above the wales by the thickness of one strake which is 1/16”-1.6mm.
To make this task easier I made a simple jig by drilling a 1/16” diameter hole through a 1’ long piece of dowel rod. I put a slight radius on the out board end of the dowel. Then the dowel is slipped over the end of the drill with just 1/16”of the drill protruding from the end of the dowel.
To use the jig, drill into the hull until it reaches the dowel. Presto, you now have a 1/16’ deep hole in the hull. By placing a series of holes in the hull above the wales one can begin to sand to the bottom of the holes and the hull will be 1/16” deeper than the surface at the wales.
Photo 52
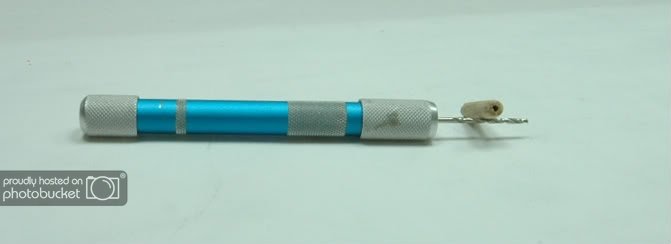
Photo 53
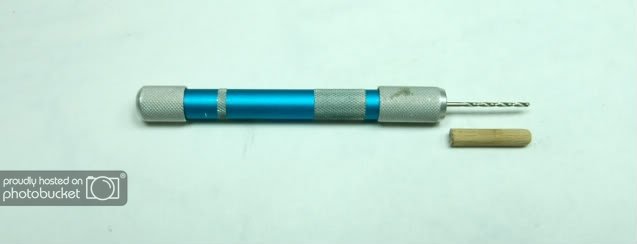
Photo 54
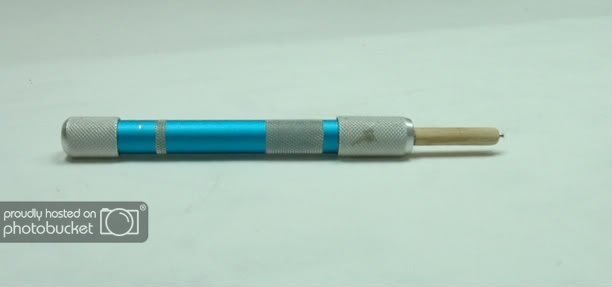
Photo 55
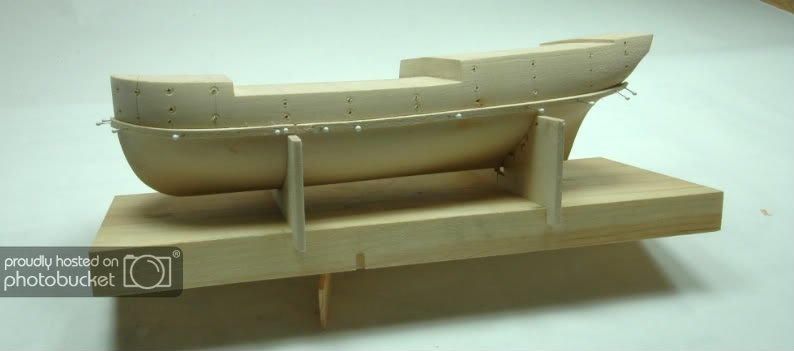
Photo 56
BFN
Cheers,
Hopeful aka David
“there is wisdom in many voices”
Completed: Sharpie Schooner (Midwest) Posted on kit build log.
Current: Sultana (MSW) Updating the build log and continuing on with the build
Next: Lady Nelson (Amati Victory)
-
Bob,
Glad to see your Syren build is being reposted, thanks. The build is so well done and clean as a whistle. I really appreciate the use of lots of photos to tell the story of a build. Look forward to more as you move along.
BFN
Cheers,
Hopeful aka David
“there is wisdom in many voices”
Completed: Sharpie Schooner (Midwest) Posted on kit build log.
Current: Sultana (MSW) Updating the build log and continuing on with the build
Next: Lady Nelson (Amati Victory)
-
Hi Dee Dee,
Thanks for stopping by my Sharpie Schooner build.
I wanted to see your current build. I read through your log and am enjoying what you are doing with the build. Very nice work, DEE DEE. The good thing about Midwest kits is one can go with their directions, or, bash the kits for all there worth adding lots of original details without a multi year commitment. They make really nice models.
Will send you a PM answering the questions you asked about gesso and slider windows.
BFN
Cheers,
Hopeful aka David
“there is wisdom in many voices”
Completed: Sharpie Schooner (Midwest) Posted on kit build log.
Current: Sultana (MSW) Updating the build log and continuing on with the build
Next: Lady Nelson (Amati Victory)
-
Hi Richard,
Am really enjoying your build! Lots to study and learn from your fine work. The many photos you provide really helps to understand the build. Think you could build one life size after your done with the scale vessel.
BFN
Cheers,
Hopeful aka David
“there is wisdom in many voices”
Completed: Sharpie Schooner (Midwest) Posted on kit build log.
Current: Sultana (MSW) Updating the build log and continuing on with the build
Next: Lady Nelson (Amati Victory)
-
HI Sara,
The Harriet Lane is an interesting vessel. Have really enjoyed your build thus far. It is hard for me to imagine what working in 1:144 scale would like until I saw the build going on, yikes.. Picked up a lot of great techniques and ideas from your build. Your hull work is really good, the funnel masteful. The many photos you have posted really helps one to understand the build. Future builders will appreciate having your log.
Wish you well as you move along.
BFN
Cheers,
Hopeful aka David
“there is wisdom in many voices”
Completed: Sharpie Schooner (Midwest) Posted on kit build log.
Current: Sultana (MSW) Updating the build log and continuing on with the build
Next: Lady Nelson (Amati Victory)
-
Hi Mates,
Post 10 of my Sultana Build log
Photo 51
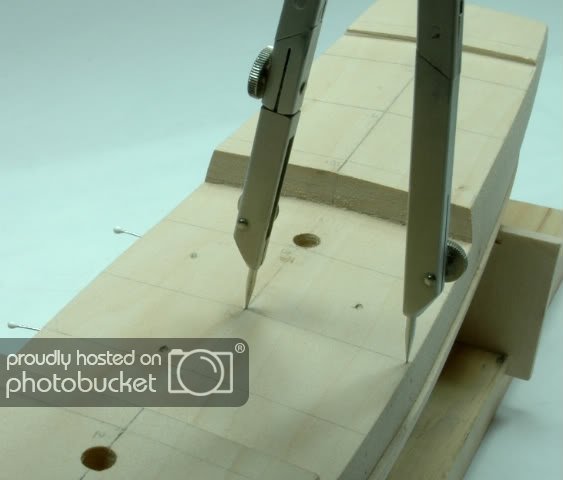
Next step is to make certain the distance from the centerline of the deck to the top edge of the hull conforms to the drawing. Simple matter of using a divider to take the dimensions from the deck drawing and match them to the deck. I took a measurements from the drawing every 1/2" the entire length of the deck.
Please note the mesaurement is wide just a tiny bit versus the drawing dimension. A little sanding needs to be done to fair the hull a bit more in that particuliar spot. It is always best to check the dimension over a distance of two-three inches to get a picture what is going on. When the dimensions of the entire lenght of the deck, both starboard and port, are correct to the drawing dimentions, one can move on to the next step in the build.
Thanks for looking in on the build.
BFN
Cheers,
Hopeful aka David
“there is wisdom in many voices”
Completed: Sharpie Schooner (Midwest) Posted on kit build log.
Current: Sultana (MSW) Updating the build log and continuing on with the build
Next: Lady Nelson (Amati Victory)
-
Hi Bill,
I can just say thank you, thank you, thank you for reposting your most wonderful build. Hopefully your actions will motivate others to repost their logs as well.
From here, I am going to do what you did and keep a running log of my build on microsoft word. I, since I fist joined MSW1, maintained my photos in three places: my computer, a zip drive, and photopbucket. I lost the verbage as did most everyone else. Won't happen to me again!
Look forward to your log as it unfolds.
BFN
Cheers,
Hopeful aka David
“there is wisdom in many voices”
Completed: Sharpie Schooner (Midwest) Posted on kit build log.
Current: Sultana (MSW) Updating the build log and continuing on with the build
Next: Lady Nelson (Amati Victory)
-
Hi Mates,
First, Thank you Russ for looking in on the build.I recall some adavice you gave me back when I was fairing the hull. The advice helped me to learn how to interpret the drawings and transfer the knowledge to fairing the hull, magic! Thanks!
Post 9 of my Sultana Build Log
Chucks practicum calls for planking the hull begining at the top of the wales. Planking above the wales elevates the look and feel of the hull and, hence the model.
Photo 46
First step is define the top of the wale. I did so by taking measurements from the drawing to establish the top of the wales and pinned a plank to the hull at that position........the top of the wale is the top of the plank. Then I marked a line following the top side of the plank.The plank went just past the centerline of the bow. This step was repeated on the port side of the vessel.
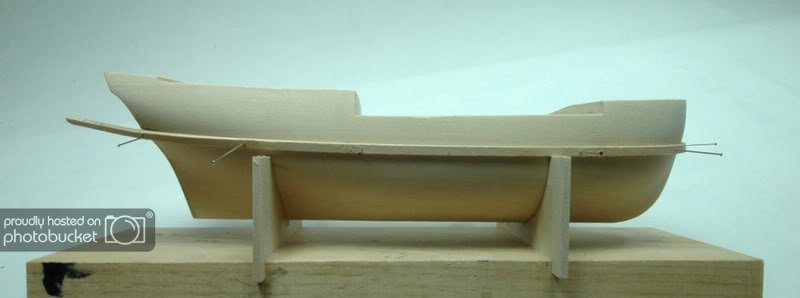
Photo 47
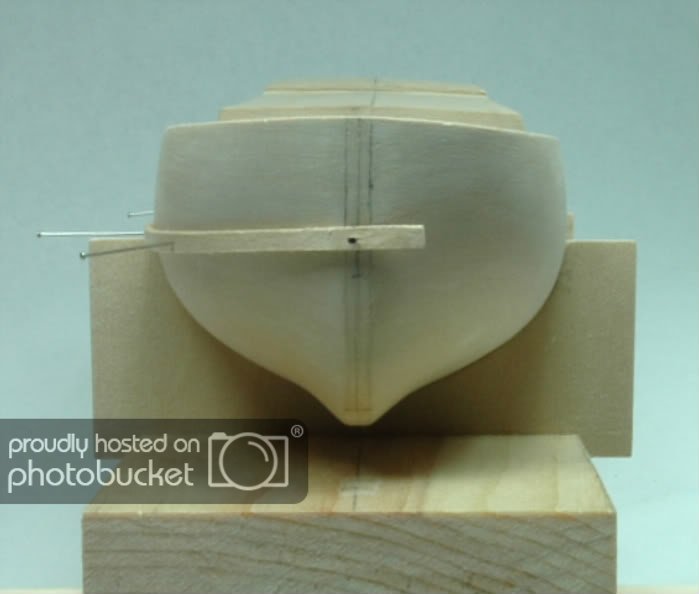
Photo 48
Indicates reference line on the hull at the top of the wales
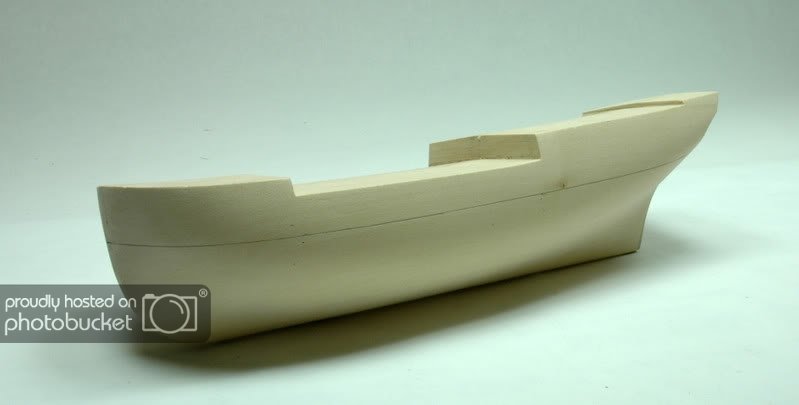
Photo 49
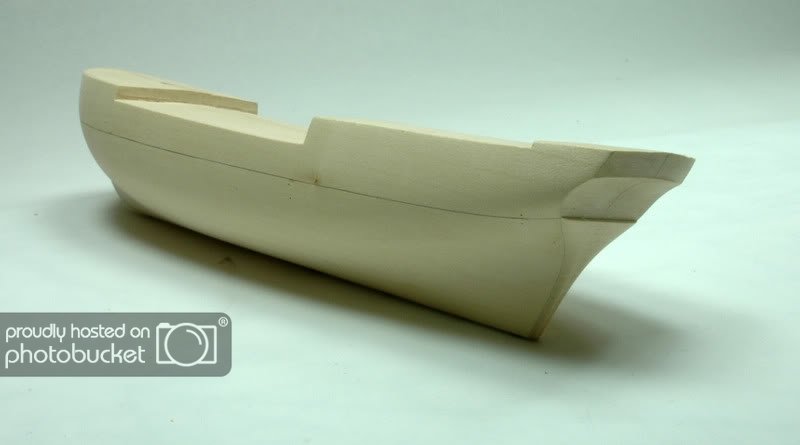
Photo 50
Notice a very slight rise at the bow.
BFN
Cheers,
Hopeful aka David
“there is wisdom in many voices”
Completed: Sharpie Schooner (Midwest) Posted on kit build log.
Current: Sultana (MSW) Updating the build log and continuing on with the build
Next: Lady Nelson (Amati Victory)
- Gentlegiant and slagoon
-
 2
2
-
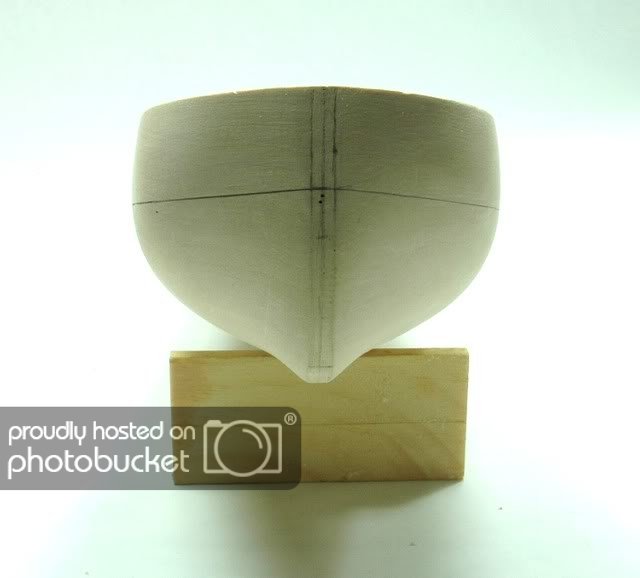
Continuing on with the repost.......
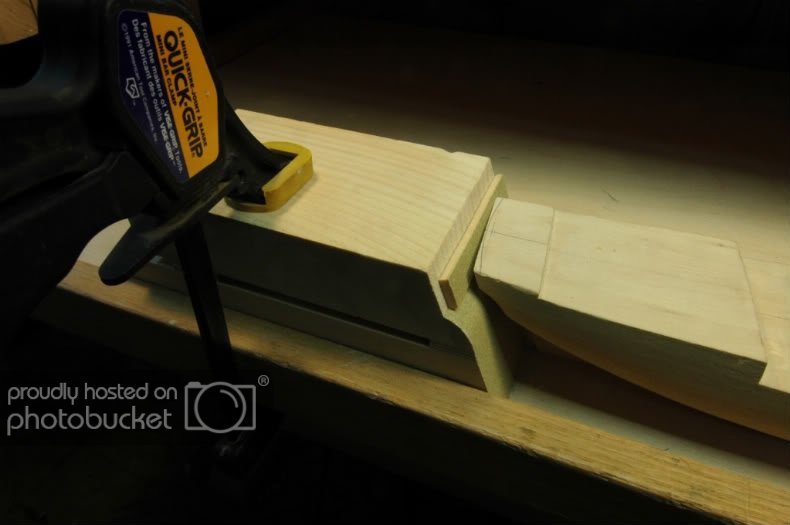
Post 8 of my Sultana Build Log
Photo 39
The stern curves every so slightly into the hull. Using low tack tape is a techinque I use from time to time is to isolate the area I want to work on, or, protect or both. In this case I so not wish to sand the edge of the counter or thin out the keel. The dark area is wood putty used to build up that particuliar area.
Photo 40Jig made to aid drilling the fore and main mast holes. The jis rests an an angle consistent with the ships drawings. I used two-sides tsape to hold the jig in place. If you look carefull you can see the jig has a centerline shich was matach to the centerline on the deck. There are a lot of ways to drill a hole. This is the method I used. Go slow with the drill.......think 3/8" is deep enough!
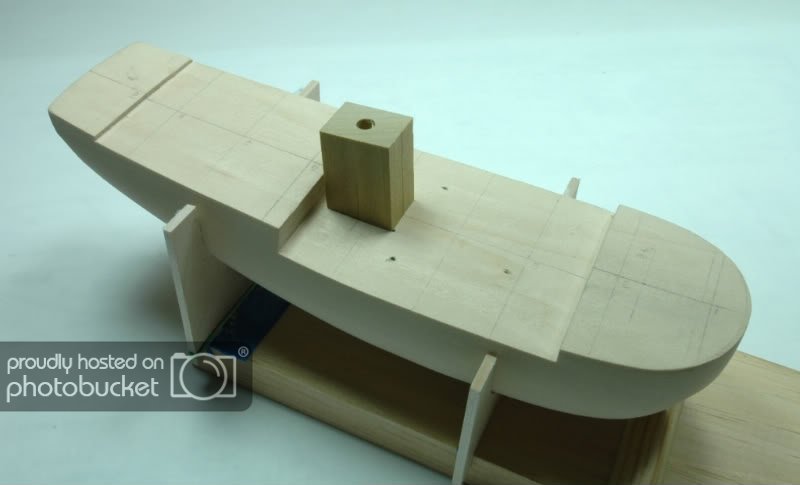
Photo 41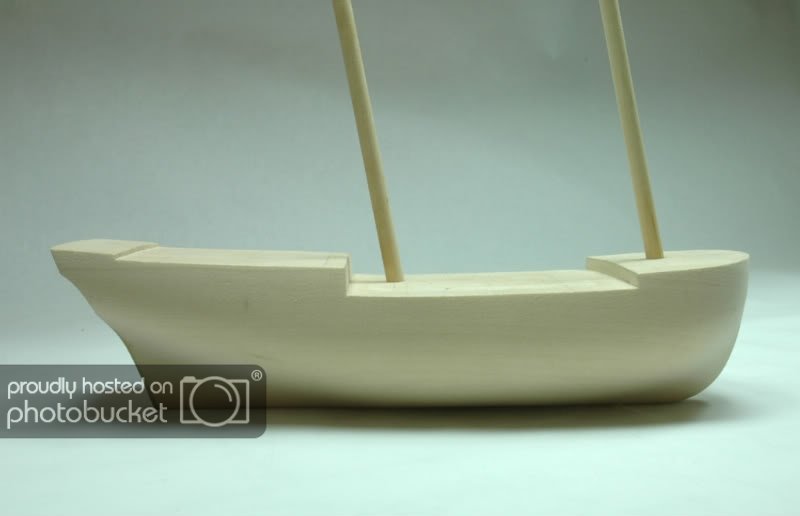
Photo 42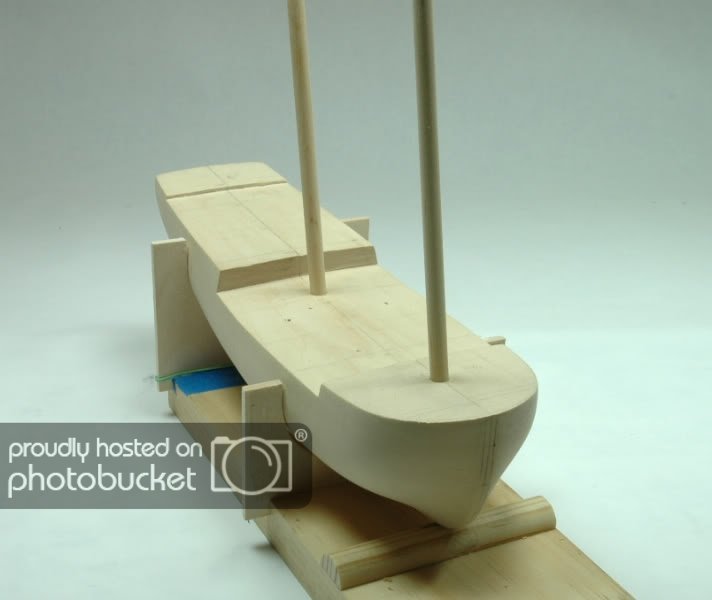
Photo 43My next step was to insure the deck had the correct camber, the radius of the deck from the centerline to the edge of the hull. I made this simple jig to help me get the camber right per the drawing.
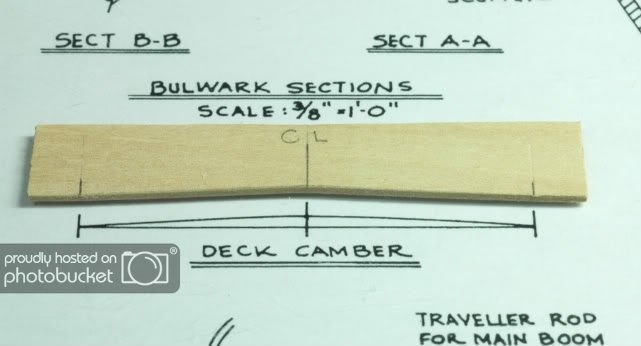
Photo 44
When light is visible under the jig the that portion if the deck is low. Removed material until the camber was correct.
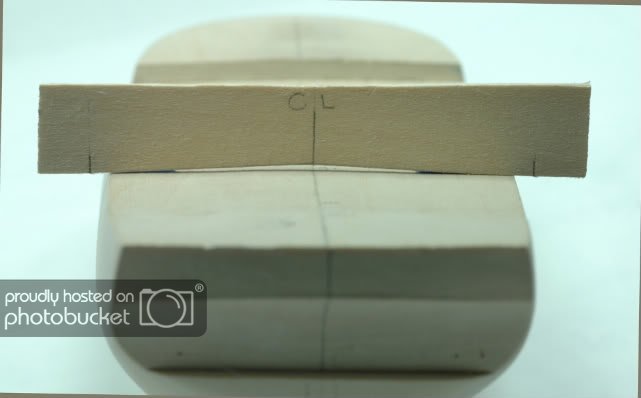
Photo 45
Noe the camber is correct on the foredeck.

Thanks for looking in on the build.
BFN
Cheers,
Hopeful aka David
“there is wisdom in many voices”
Completed: Sharpie Schooner (Midwest) Posted on kit build log.
Current: Sultana (MSW) Updating the build log and continuing on with the build
Next: Lady Nelson (Amati Victory)
-
Hi Mates,
Post 7 of my Sultana Bulid Log
Continuing along with my repost of the build.
Photo 33
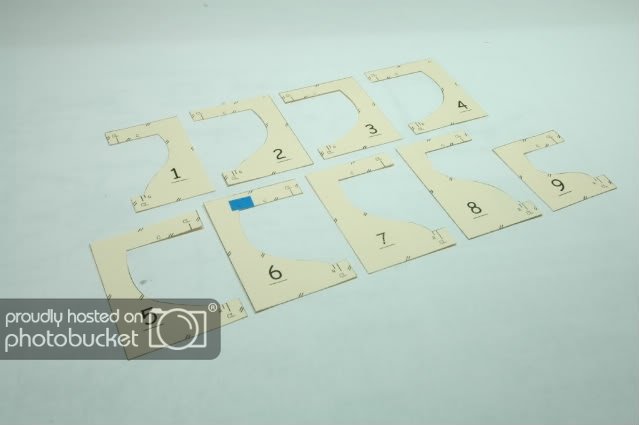
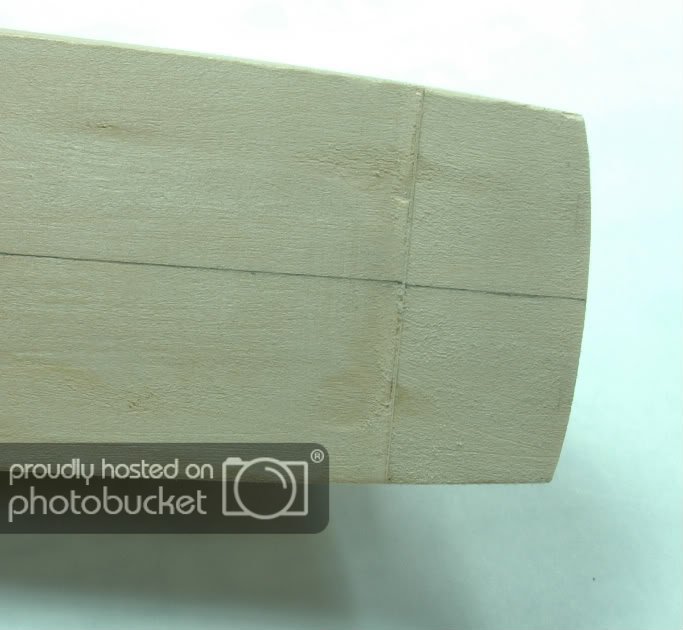
Begin fairing the hull at station 4 and work forward to the bow.
This photo shows hull template 4. Note there is a " CL" and a hash mark. The "CL" is on the top and bottom of the template. "CL" means centerline. When fairing the hull place the template at station four and place the "CL" hashmark over the centerline of the hull. The template must be level. I used a small bubble level to always make certain the templante was level each time it was against the hull.
When the template is against the hull and with the hashmark is not on the centerline matetrial must be removed.
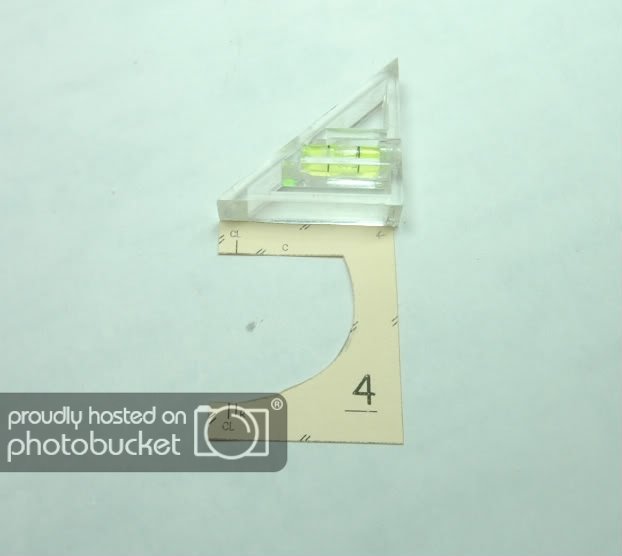
Photo 34
Pencil marks indicate high spots. High spots develop when the template is not able to be placed on the centerline. Once the high spots are removed, the templates fit properly.
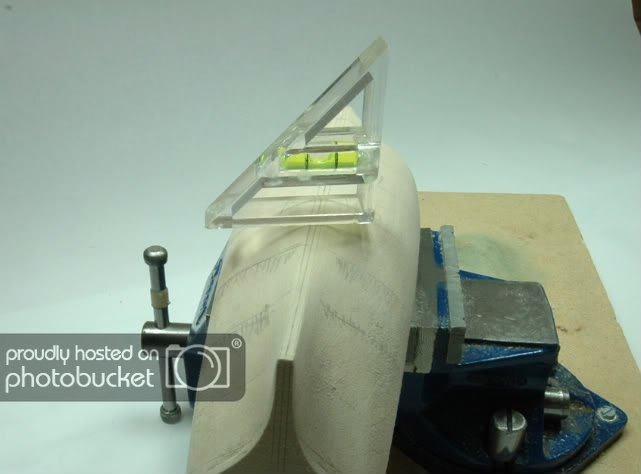
Photo 35
Working to fair the stern by removing high spots.
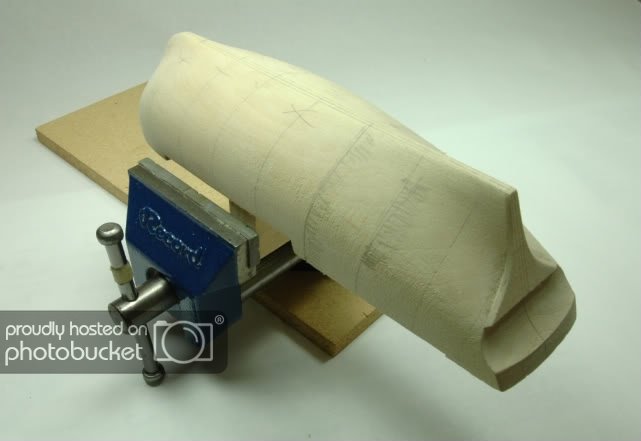
Photo 36
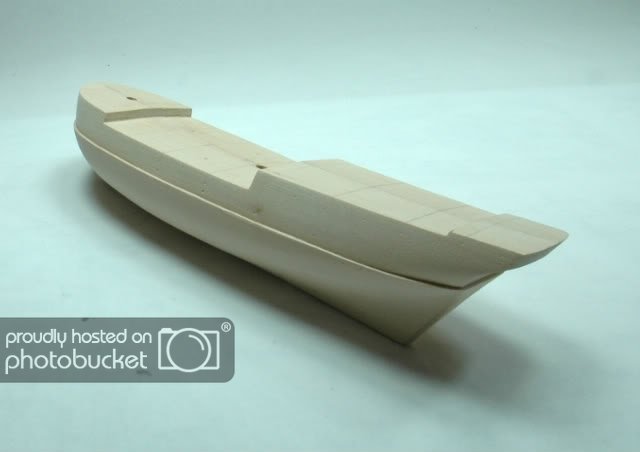
Hull faired.
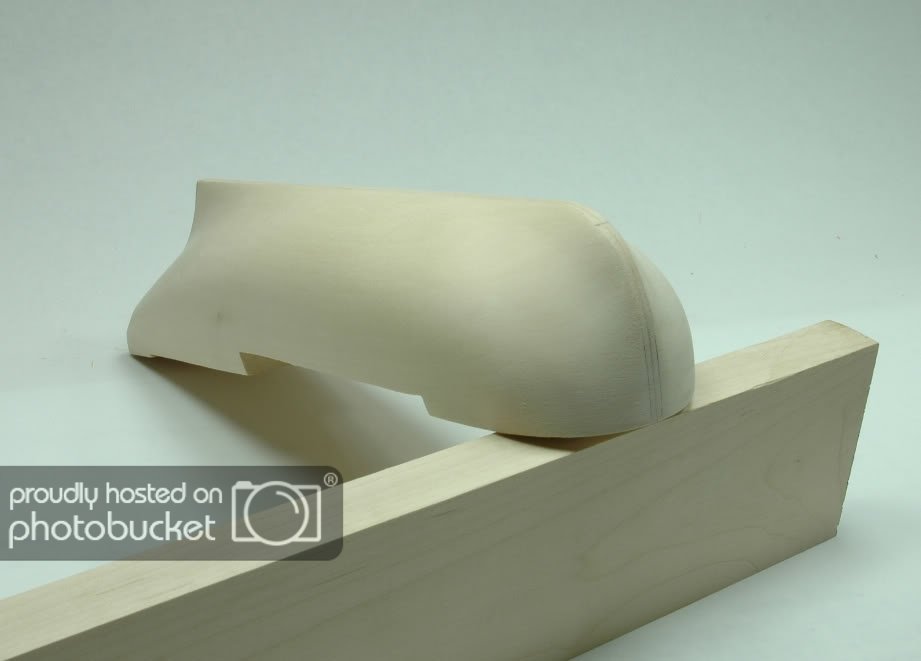
Photo 37
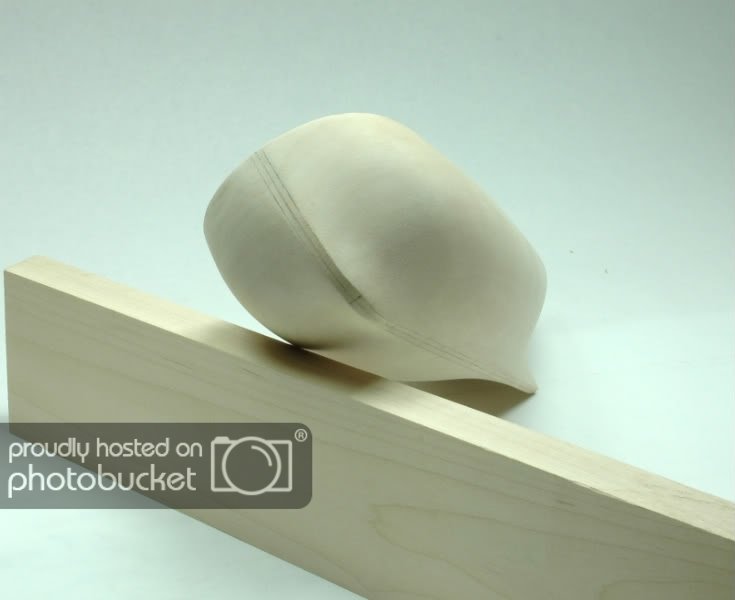
Photo 38
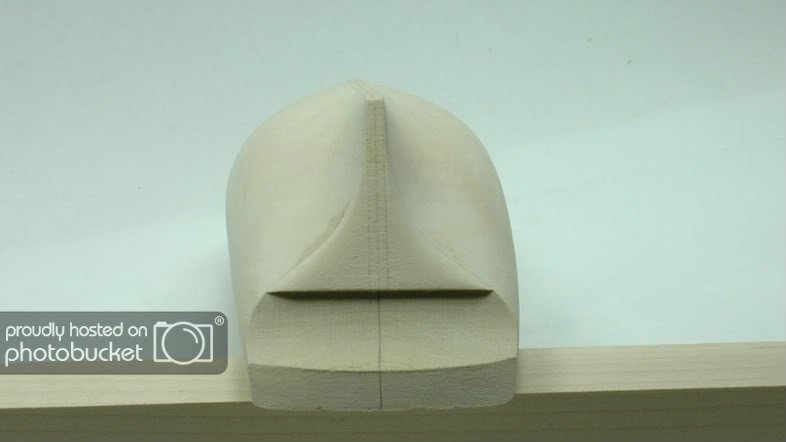
Photo 39
Completes fairing of the hull.
BFN
Cheers,
Hopeful aka David
“there is wisdom in many voices”
Completed: Sharpie Schooner (Midwest) Posted on kit build log.
Current: Sultana (MSW) Updating the build log and continuing on with the build
Next: Lady Nelson (Amati Victory)
-
Thanks Russ.
There used to be about 8-10 Sultana builds on the forum. Some completed, the rest on the ways. Hopefully we will se a few more Sultana builds up on the new forum.
I'm intersted in getting this log back up to encourgage othesr to build the Sultana and to get myself moving on the build once again.
Will keep plodding along.
BFN
Cheers,
Hopeful aka David
“there is wisdom in many voices”
Completed: Sharpie Schooner (Midwest) Posted on kit build log.
Current: Sultana (MSW) Updating the build log and continuing on with the build
Next: Lady Nelson (Amati Victory)
-
Hi Eric,
I never tire of looking at the Syren. You have a great build going on and your log is most informative and interesting. I have to admit you have courage and touch using the belt sander, yikes!! Look forward to more of your build.
BFN
Cheers,
Hopeful aka David
“there is wisdom in many voices”
Completed: Sharpie Schooner (Midwest) Posted on kit build log.
Current: Sultana (MSW) Updating the build log and continuing on with the build
Next: Lady Nelson (Amati Victory)
-
Hey Pete,
I echo what Kip just said about the restart of you build log.
Beautiful build you have going. I find section models very interesting. Your build logs are always a joy to visit. Thanks for sharing your techniques and methods.
Keep on.....
BFN
Cheers,
Hopeful aka David
“there is wisdom in many voices”
Completed: Sharpie Schooner (Midwest) Posted in kit build log.
Current: Sultana (MSW) Updating the build log and continuing on with the build
Next: Lady Nelson (Amati Victory)
-
Nice job on the completed model!
Your admiral is right! All of our admirals should spend most of the day complimenting and encouraging us, hahahaha!
BFN
Cheers,
Hopeful aka David
“there is wisdom in many voices”
Completed: Sharpie Schooner (Midwest) Posted on kit build log.
Current: Sultana (MSW) Updating the build log and continuing on with the build
Next: Lady Nelson (Amati Victory)
-
Hi Arjan,
Was not familiar with this type vessel, interesting. Thanks for posting the museum photo. I may have missed it but what is the scale of your build. Yes, I missed it. Note it is 1:50.
Will follow your as you move along.
BFN
Cheers,
Hopeful aka David
“there is wisdom in many voices”
Completed: Sharpie Schooner (Midwest) Posted on kit build log.
Current: Sultana (MSW) Updating the build log and continuing on with the build
Next: Lady Nelson (Amati Victory)
-
My vote is cutaway!
Cheers,
Hopeful aka David
“there is wisdom in many voices”
Completed: Sharpie Schooner (Midwest) Posted on kit build log.
Current: Sultana (MSW) Updating the build log and continuing on with the build
Next: Lady Nelson (Amati Victory)
-
Katz,
Its so good be watching you build again. Wish you well from here. BTW what happened to the terrific shirts you used to wear?
BFN
Cheers,
Hopeful aka David
“there is wisdom in many voices”
Completed: Sharpie Schooner (Midwest) Posted on kit build log.
Current: Sultana (MSW) Updating the build log and continuing on with the build
Next: Lady Nelson (Amati Victory)
-
HI Juan,
Thanks for reposting your log, much appreciated. We need to get as many logs back on the forum as possible.
BFN
Cheers,
Hopeful aka David
“there is wisdom in many voices”
Completed: Sharpie Schooner (Midwest) Posted on kit build log.
Current: Sultana (MSW) Updating the build log and continuing on with the build
Next: Lady Nelson (Amati Victory)
-
HI Russ,
I learn something every time I visit your log. Looks like you are back into the swing of building now which is good!
BFN
Cheers,
Hopeful aka David
“there is wisdom in many voices”
Completed: Sharpie Schooner (Midwest) Posted on kit build log.
Current: Sultana (MSW) Updating the build log and continuing on with the build
Next: Lady Nelson (Amati Victory)
-
Hey,
To: Jeff (Hobbby Mill), Greg, Mark, Martin, Frank., Pat, and Greg. Thanks for looking in on this post. Good ideas and technique makes tools a pleasure to use. What I like about milling my own wood is that I am self sufficient and can mill the material to any size.
Special thanks to Jeff for lending his expertise. After milling 500,000 planks he knows what he is talking about and we appreciate him for sharing his knowledge.
BFN
Cheers,
Hopeful aka David
“there is wisdom in many voices”
Completed: Sharpie Schooner (Midwest) Posted on kit build log.
Current: Sultana (MSW) Updating the build log and continuing on with the build
Next: Lady Nelson (Amati Victory)
-
Cheers,
Hopeful aka David
“there is wisdom in many voices”
Completed: Sharpie Schooner (Midwest) Posted on kit build log.
Current: Sultana (MSW) Reposting log and continuing on with the build)
Hi All,
Post 6 of my Sultana Build Log
Was glad to see KIP (sawdust) post his Sultana. When I started my Sultana build, Kip was rigtht there to help me along. We have had and continue to have many conversations about boat builing in general and the Sultana in particuliar. My build is a combination of our ideas as well as Chucks practicum. How does it go, " no man is an island onto oneself". As well, I too have incorporated the ideas of other Sultana builders whoes fine work is lost to us. Trust some Sultana builders will repost their fine logs for others to see.
Photo 25
Piece added to the stern from the keel to the bottom of the counter.Piece of wood is the same thicness as a deck plank. Part will be shaped along with the hull. The counter will eventially be planked later.
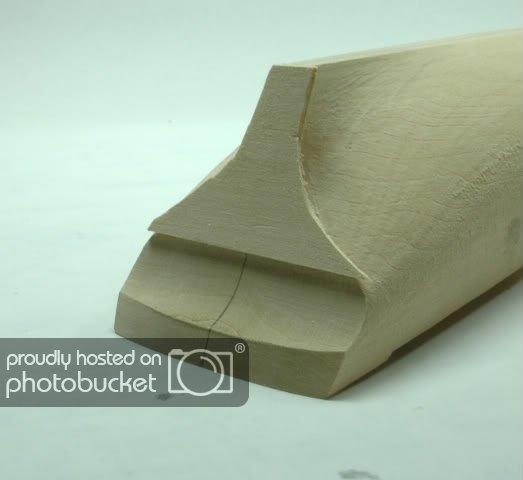
Photo 26
Fairing the hull begins.
Before fairing, make sure the fore, main, mid, and poop decks are the right length per the deck drawing. This is very important to get right prior to fairing the hull. The directions in Chucks practicum are very clear about how to accomplish this task. Screwing this step up will cause you untold grief as you continue with the build. I know because I failed to get it right the first time and had to make adjustments.

Photo 27
Center lines. The outside two lines indicate the width of the keel. Material outside the two line will be removed during the fairing process. Note I faired the piece added to the stern at this point and prior to fairing the hull.
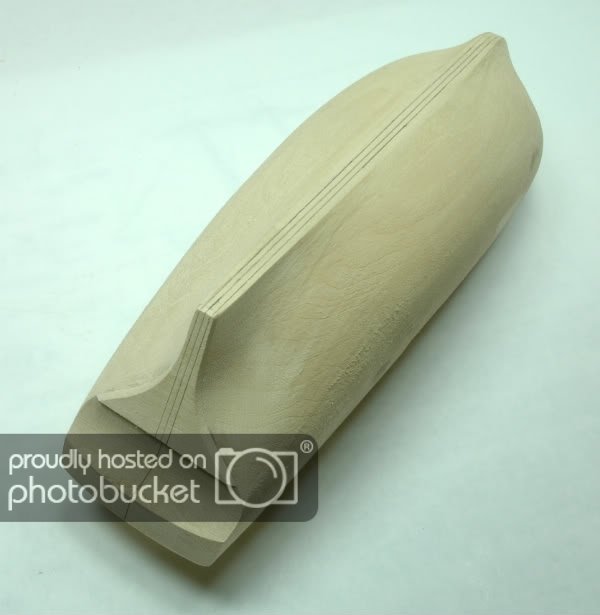
Photo 28
Station lines on hull.
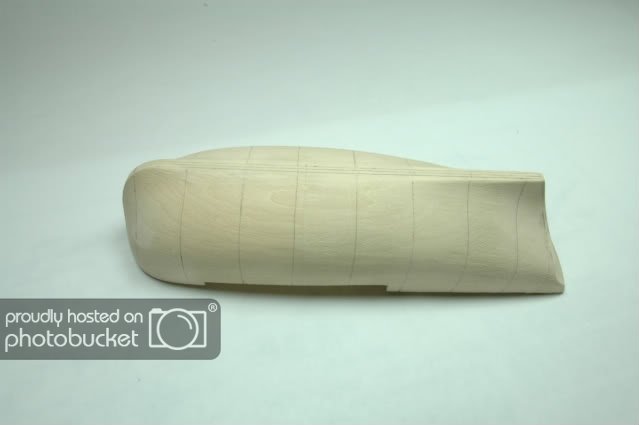
Photo 29
Station lines on deck taken from the drawings. Deck line should be indicated prior to adding those on the hull.
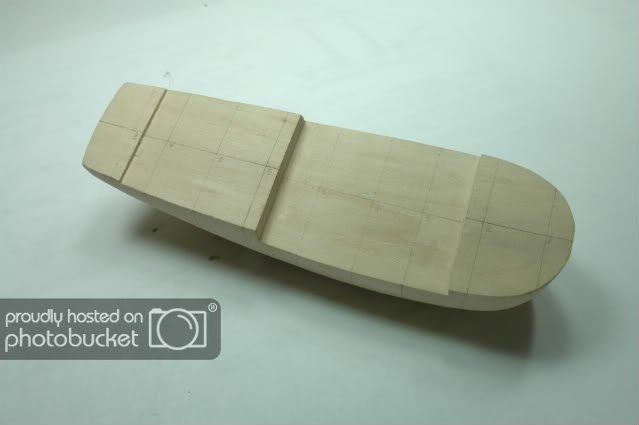
Photo 30
Station lines on the deck and hull match perfectly.
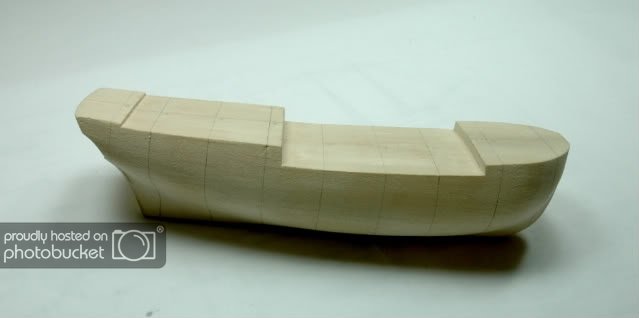
Photo 31
Added a block to the deck between station lines 4 & 5 in order to clamp the hull in a vise for the fairing operation.
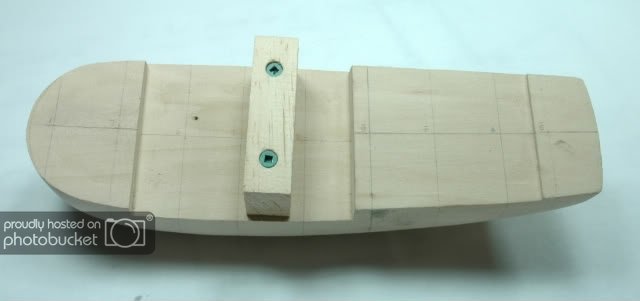
Photo 32
Station templates.
I will go back and add more dialog,
BFN
Cheers,
Hopeful aka David
“there is wisdom in many voices”
Completed: Sharpie Schooner (Midwest) Posted on kit build log.
Current: Sultana (MSW) Reposting log and continuing on with the build)
-
Hi Kip,
Welcome home. Glad to see you are posting again. Your Sultana is very nice indeed. Was glad to view it when we visted together on Vancover Island last year.
Keep on, my friend!
BFN,
Cheers,
Hopeful aka David
“there is wisdom in many voices”
Completed: Sharpie Schooner (Midwest) Posted on kit build log.
Current: Sultana (MSW) Reposting log and continuing on with the build)
-
Hi Mates,
Lost another post due to time out, yikes! Live and learn.
Post 5 of my Sultana build Log
Photo 21
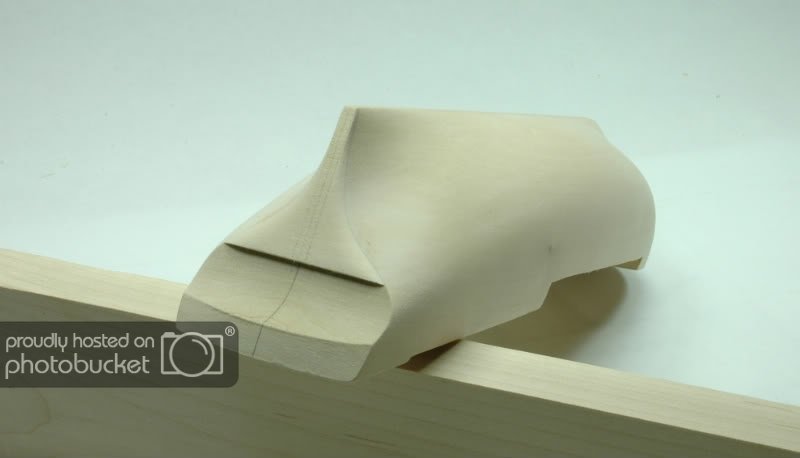
Adding radius to the transom. The stern of the vessel is not flat,
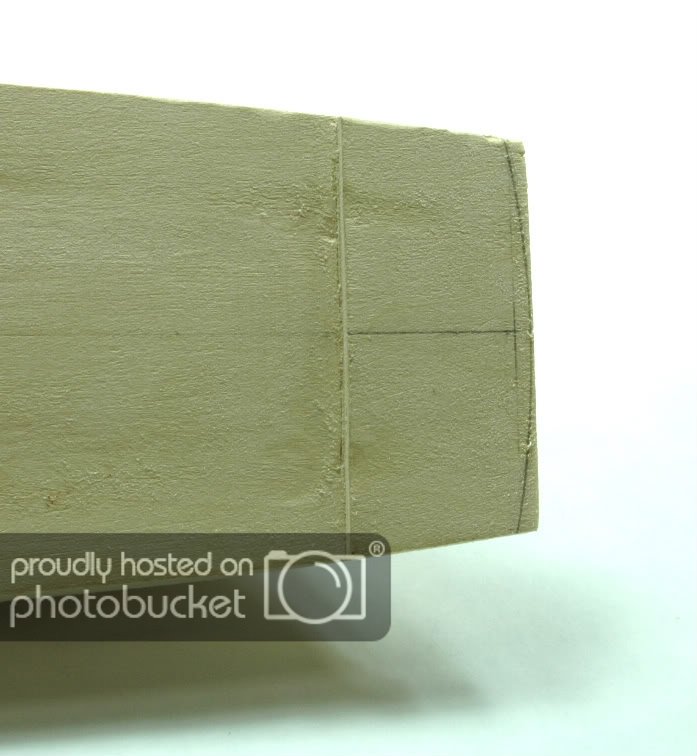
Photo 22
Added strip of wood covered with sandpaper to remove material to follow the line of the radius without taking material away from the overall length of the vessel at the center line.
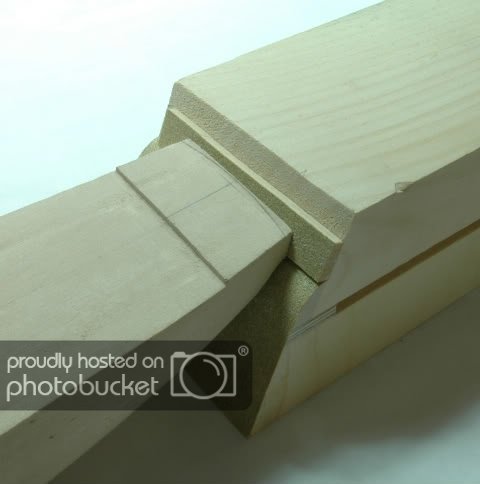
Photo 23
Moving the hull port to starboard until the transom is shaped properly.
Post 24
All is well!
More to come......
BFN.
Cheers,
Hopeful aka David
“there is wisdom in many voices”
Completed: Sharpie Schooner (Midwest) Posted on kit build log.
Current: Sultana (MSW) Reposting log and continuing on with the build)
HMC Sherbourne 1763 by tkay11 - FINISHED – Caldercraft – Scale 1:64 - A Novice’s Build
in - Kit build logs for subjects built from 1751 - 1800
Posted
Enjoyed visiting and reading through your build log today, terrific. Anyone building the Sherbourne will be very lucky to be able to refer to your log. Super photos and explanations. Very nice work indeed!
Wish you well as you continue with your build.
BFN
Cheers,
Hopeful aka David
“there is wisdom in many voices”
Completed: Sharpie Schooner (Midwest) Posted on kit build log.
Current: Sultana (MSW) Updating the build log and continuing on with the build
Next: Lady Nelson (Amati Victory)