


hopeful
-
Posts
278 -
Joined
-
Last visited
Reputation Activity
-

 hopeful got a reaction from Jaxboat in Steps when milling wood
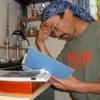
Hi Mates
Here are some photos indicating how I mill wood. Used a band saw, JB table saw, and a JB thickness sander.
Shows progression of lumber sizes starting with a milling blank through finished planks. Wood is Sugar Maple (soft maple).
Photo 1
Photo 2
Step 1 was to run my maple blank through the thicness sander to make it perfectly flat on both sides. The blank is 1 3/4" thick and approximately 14" long.
Photo 3
Ran the material through bandsaw to desired thichness. Note that blanks are cut from face grain, not edge grain.
Photo 4
Plank blank is rough on one side. Saw marks will be removed by running blank though the the thicknes sander.
Photo 5
Wodd splitter placed on table just behind blade. The splitter avoids chatter as the wood is passed away from the blade.
Photo 6
Feed the plank blank through the saw.
Photo 7
Finished plank.
Photo 8
Shows finished planks and the micrometer adjustment at the lower right edge of the photo. Microadjust helps to get all [lanks the same width each and every time.
In closing, Brynes tools deserve the high praise received from its owners. His tools are amazingly accurate, easy to use, and great fun.
BFN
Hopeful aka David
“there is wisdom in many voices”
Completed: Sharpie Schooner (Midwest) Reposting the build log at present
On the bench: Sultana (MSW) Reposting the log and keeping on with the build
Next: Lady Nelson (Amati Victory)
-
 hopeful got a reaction from Sailcat in Cutty Sark by Sailcat - FINISHED - Revell - 1/96 - PLASTIC - Rescue kit bash morphed to Dame Tisane
Hey Katz,
Just rejoined MSW and saw you are reposting your Cutty build log. Thanks, its a treasure trove for us all!
Will follow you from here.
Best wishes,
Hopeful aka David
-
 hopeful got a reaction from Salty Sea Dog in Sharpie Schooner by hopeful - FINISHED - Midwest Products - Scale 1:32
Hi Mates,
Post #14 of my Sharpie Build Log
This post is about making sails for my Sharpie Schooner. Here is a beauty shot of my completed vessel highlighting the sails.
Photo 76
More to come.
BFN,
Hopeful AKA David
-
.thumb.jpeg.fc5d633a7b34428fcf19419a73d56d55.jpeg) hopeful got a reaction from EricWilliamMarshall in Sharpie Schooner by hopeful - FINISHED - Midwest Products - Scale 1:32
hopeful got a reaction from EricWilliamMarshall in Sharpie Schooner by hopeful - FINISHED - Midwest Products - Scale 1:32
Hi Mates,
Post #11 of my Sharpie schooner Build Log
Hull painting continues.....
Photo 59
Please note that I laid Timiya tape, comes in many different widths, to keep the paint below the water line. To avoid the paint from bleeding under the tape, I first applied a very light coat of clear acrylic at the lower edge of the tape.....keep it a thin coat!!!!
Photo 60
First of 3 coats of red oxide acrylic paint. Each coat was sanded to 400 grit before poceeding with the following coat. In the end the paint was as smooth as glass without any imperfections. Haste makes wast when not taking time to get it right.
Photo 61
Hull and rudder paintwork completed.
Photo 62
One must be very patient with paint work. Some of the builders on the site are masters at brush painting; so good their paintwork looks like air brush work.
More to come......
Cheers,
Hopeful aka David
-
hopeful reacted to trippwj in Steps when milling wood
Thank you for posting this, David! I am a complete neophyte when it comes to powertools so this is really helpful for me.
-
hopeful reacted to overdale in Steps when milling wood
Most informative.
I hadn't realised the thicknesser was a sander. One of the reasons I haven't bought a thicknesser was because of the maintenence that blade thicknessers require (sharpening). I shall look into getting one. (and I'll try to pay more attention to what's going on!)
Thanks.!
Dan.
-
 hopeful got a reaction from Dan Vadas in Steps when milling wood
Hi Mates
Here are some photos indicating how I mill wood. Used a band saw, JB table saw, and a JB thickness sander.
Shows progression of lumber sizes starting with a milling blank through finished planks. Wood is Sugar Maple (soft maple).
Photo 1
Photo 2
Step 1 was to run my maple blank through the thicness sander to make it perfectly flat on both sides. The blank is 1 3/4" thick and approximately 14" long.
Photo 3
Ran the material through bandsaw to desired thichness. Note that blanks are cut from face grain, not edge grain.
Photo 4
Plank blank is rough on one side. Saw marks will be removed by running blank though the the thicknes sander.
Photo 5
Wodd splitter placed on table just behind blade. The splitter avoids chatter as the wood is passed away from the blade.
Photo 6
Feed the plank blank through the saw.
Photo 7
Finished plank.
Photo 8
Shows finished planks and the micrometer adjustment at the lower right edge of the photo. Microadjust helps to get all [lanks the same width each and every time.
In closing, Brynes tools deserve the high praise received from its owners. His tools are amazingly accurate, easy to use, and great fun.
BFN
Hopeful aka David
“there is wisdom in many voices”
Completed: Sharpie Schooner (Midwest) Reposting the build log at present
On the bench: Sultana (MSW) Reposting the log and keeping on with the build
Next: Lady Nelson (Amati Victory)
-
hopeful reacted to Garward in Methods for making Treenails
Birch treenails, Bronze 24-pdr canone Le Fleuron model
http://modelshipworld.com/index.php?/topic/454-24-pdr-bronze-gun-le-fleuron-1729-by-garward-m-124/page-3
-
hopeful reacted to Garward in Methods for making Treenails
Continuation
Bamboo treenails, Montanes model
http://modelshipworld.com/index.php?/topic/82-montanes-by-garward-occre/
-
hopeful reacted to Garward in Methods for making Treenails
For imitation of nails the toothpicks which ends are pierced to diameter 0,5мм by means of a drill and the adaptation in the form of the brass cylinder with a flat bottom thickness 3мм on which center the opening by diameter 0,5мм is drilled are used. All these operations are done before installation of decks
on the hull.
-
hopeful reacted to Pete38 in Sultana by Hopeful - Model Shipways - Scale 1:64 - Bashed Kit
Hello Hopeful David
It is great to see your Sultana back here in the build logs. I am going to follow your build again. I plan on getting back to mine after my sidetrack to the darkerside
I may go ahead a repost what I have. It can show other people what not to do
Looking forward to build, you have always done such a great job.
-
 hopeful got a reaction from butchkgs in Sultana by Hopeful - Model Shipways - Scale 1:64 - Bashed Kit
Hi Mates,
Post #1 of my Sultana Build
The Sultana is my second build and is in progress....not quite 50 percent completed. I Will repost my build log up to this point and continue posting as I continue building the vessel.
For the repost, I will provide photos and return and add some dialog later. Each post will be numbered as well as each photo so future builders can communicate with me efficiently if they any questions as they build their own Sultana.
Please note I am building the vessel following MSW's directions as well as Chucks excellent tutorial. I jump around the instructions a bit when building. My recommendation is that you follow along using Chuck's practicum.
As Shortgrass indicated there were a number of Sultana builds that we builders could refer to when building our own Sultana's. Some of the builds were completed and others not. All of the builds were lost so it is important we get a few Sultana builds back on the forum. Hopefully other Sultana builders will repost their logs as well.
Photo 1
Box art
Photo 2
Solid hull
Photo 3
Wood build materials
Photo 4
Ships boat
Photo 5
Bits and pieces along with rigging cord
Photo 6
Flags
Photo 7
Hull templates
Photo 9
I created a note book for my Sultana build incorporating both the MSW plans and Chucks Practicum.
This replica show the beauty of the Sultana on the water.
The build begins. More later.......
BFN,
Hopeful aka David
-
hopeful got a reaction from EricWilliamMarshall in Question: Essential Books for a Ship Modeler's Library?
Hi mates,
I'm a bookaholic so have most of the books mentioned in this forum. The best general overall building book I have is Model Shipbuilding from Stem to Stern by Milton Roth ISBN-13: 978-0-8306-2844-5......$20USD from amazon.com. The book contains 288 pages of great stuff and many illustrations. If I had to get rid of all my books but one, I would be happy with Roth's "how to" book.
Cheers,
Hopeful aka David
-
hopeful got a reaction from Dan Vadas in Sharpie Schooner by hopeful - FINISHED - Midwest Products - Scale 1:32
Hi Mates.
(Post #1 of my Sharpie Schooner Build Log)
The purspose of this log is to repost my Midwest Sharpie Schooner build log. The project was my first build and the kit is considered an entry level project.
The vessel is characterized by having a flat bottom and a skeg rather than a keel. I enjoyed the build immensely for many reasons. I had a lot of help from the forum while building the vessel and any success that I had along the way was in great part due to their kind and patient assistance.
Photo 1 - Box art and kit components. The drawings and plans were very good and easy to follow. The price of the kit is approx. $75 USD.
Photo 2 - Finished vessel arrived at by following the prepared plans and instructions. Photo is from box art.
Along the way I decided to bash the kit by trying to more closely replicate an ocean going Sharpie Schooner of the mid 19th century that sailed the eastern coast of the USA from New England to Florida. Two photos of the type vessel gained from research are posted for reference.
Photo 3
Photo 4
At this point I would like to show a few pics of my completed vessel.
Photo 5
Photo 6
Photo 7
I will post, lol, an album of the completed vessel in the Gallery shortly.
From here I will post the build log as to how the vessel was constructed including how to make the sails.
Thank you for looking in on the build.
Cheers,
Hopeful aka David
"there is wisdom in many voices"
Completed: Midwest Sharpie Schooner, kit bash
Current: MSW Sultana
-
 hopeful got a reaction from DORIS in ROYAL CAROLINE 1749 by Doris - 1:40 - CARD
Hi Doris,
I join others in appreciation of your amazing skills!
Cheers,
Hopeful aka David