

rdsaplala
-
Posts
602 -
Joined
-
Last visited
Reputation Activity
-

 rdsaplala got a reaction from Cap'n Rat Fink in HMS Triton (1/64) by Aldo - POB
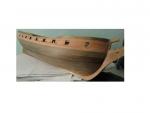
Just a wee bit of update guys, the first planking of the lower hull has been finished:
So far, the hull shape seems acceptable enough to warrant proceeding to framing the gun ports
Sigh, it's times like these that I wish I was building a 4-gun schooner, instead of a 28-gun frigate
-
rdsaplala got a reaction from Cap'n Rat Fink in HMS Triton (1/64) by Aldo - POB
Hi Sjors,
You're just in time my friend, here are my latest updates
While drawing my bulkheads, I've experienced some difficulties tracing the middle-most stations as they have incomplete lines (red boxes):
This caused some head-scratching for some time, until I recalled my previous findings:
1. The hull that I currently have has modified aft and fore bulkheads based on the "as proposed" Modified Mermaid Class Body Plan, which upon juxtaposing on CAD, is spot-on with the "as built" Triton Body Plan I am using now.
2. The deck levels and overall length of the MSW profile plan, which I used to create my centerboard were also pretty close to the as built plans.
To check for accuracy, I printed the fore and aft-most bulkheads that I drew on CAD and compared them with those on my current hull..... law and behold, they were very close indeed with a maximum difference of about 1mm in some areas.
These results, plus my hesitance to "guess" the shape of the middle-most bulkheads,prompted me to just continue working on my current hull, which is a mix of NMM-based fore and aft bulkheads and MSW-based bulkheads at the midship area.
I did some final tweaking to all my modified bulkheads using the cardboard cut outs of my CAD drawings then proceeded to drawing the stern frames. I decided to make only the innermost (green) and outermost timbers (blue)... a lazy shortcut I adapted from most of the kits I have built
With the time consuming drawing-work finally done, it was time to make some wood dust in the workshop
Of course, since this is an "experimental hull", I decided that I will double-plank her, starting with an initial layer of lime planks at the lower hull just to see how fair she would be.
Furthermore, since this is only the first planking, I will not strictly follow all the "planking rules" and just accept the "pointy" plank ends for now
If the hull shapes up nicely, I will give it a decent second planking, if not.... well, let's just say that there will be a lot of extra wood for cooking barbecue
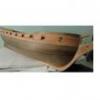
As a review on why I went through all the above intricacies, here is the "bulge" in the lower hull that had me worried hence my decision to modify my bulkheads:
Here now is my "haphazard first planking" to show how the hull is shaping up... so far no bulge is rearing its head but I'll know for sure once I'm finished
I made the extensions of the bulkheads and stern frames thicker for strength... I will trim them down to proper size once I'm finished with the planking:
Here is my "kit-inspired" stern with only four stern timbers reminiscent of my Caldercraft and Amati kits..... note also my violation of planking rules giving rise to numerous "pointy" stealers
Sigh... each time I see my NMM Plan alongside my model, I realize that I have a loooong way to go before she even starts to look like a ship
I thought I'd also make a size-comparison with my 1/64 Amati Pegasus Sloop:
They seem to be almost the same size.....
.... well, maybe not exactly the same size
That's it for now, my next update will be upon completion of the lower hull first planking, during which, I will decide if the hull shape is acceptable enough to warrant some decent second planking or if it is better suited as kindling for the barbecue grill
-
rdsaplala got a reaction from Cap'n Rat Fink in HMS Triton (1/64) by Aldo - POB
Thanks Christian, I'm pleased to know that you plan to correct the offending frames on Triton, that'll be of great help to all builders of this beautiful ship. Also if by some chance you decide to re-trace the Profile, Half-breadth and Body plan of Triton on CAD, and correct the distortions, I hope you won't mind sharing them as they would be of great help in making a more accurate centerboard and set of bulkheads
Thanks Fam, CAD is indeed the most accurate method for re-drafting new bulkheads 24 and 18, it's included in my priority list of "things to learn"
For now however, given my zero knowledge on CAD, I came up with a low-tech approach to correcting all involved bulkheads without any re-drafting. This was to make a new centerboard with no open slots then mark the stations of the draught directly onto the centerboard:
This basically allowed me to use the provided sections in the draught to make "half bulkheads" and stick these directly to their corresponding stations in the centerboard:
As seen in the pic below of the front bulkheads, I basically disregarded the bulkhead slots in the centerboard and just attached the new bulkheads traced from the draught onto their corresponding stations:
A downside to this is the stations are pretty close together so I have to use thinner bulkheads to avoid fouling the gunports.
Another major limitation is that I have to choose my bulkheads carefully, making sure I don't use the distorted ones (encircled)
Knowledge on CAD would have been very helpful in correcting all these distortions thereby allowing me a wider selection of bulkheads to choose from... of course, if anyone knowledgeable on CAD is willing to volunteer retracing my new draught when it arrives, and correcting all the distortions, I'm just a PM away
-
rdsaplala got a reaction from Cap'n Rat Fink in HMS Triton (1/64) by Aldo - POB
Thank you very much for the kind words, Christian and Fam, I appreciate it
Fam, before answering your questions, let me first clarify that these modifications are just based on my very limited understanding of nautical matters and only serve as an alternative approach to building this ship. The provided plans are more than enough to produce a beautiful model, and I just decided to do things a bit differently. Furthermore, let me add a disclaimer that my draughts were purchased way back when NMM allowed us to choose the level of resolution that we will buy, and being the cheapskate that I am, I bought the smallest sized plans, which of course would give fairly limited details. The plans I am using are about the same size as this HMS Pegasus draught that I got at about the same time:
I have purchased a much higher resolution "as built" profile/lines drawing of Triton this week, and my modifications may change depending on what I see in this more detailed draught.
Now that I've clarified these matters, here are the answers to your questions:
Presently no, because I used the inboard profile for the Modified Mermaid Class, which appears to have the least amount of distortion, for my profile comparison. As such, the bowsprit height provided in that profile may not be specific for Triton. As previously stated I purchased a high resolution as built draught of Triton and it is this that I will use for getting the bowsprit height since this is more specific to her.
Yes, the bulkheads were compared to the plans, but like I said before, my current plans don't have a very high resolution and thus my work may undergo further modification once I get my hands on the high resolution plans.
Did you find if the error is here or there?
Might you provide a comparison of the new re-drawn profiles with those provided for the community built?
Thank you so much
Fam
I took some pics with my phone to illustrate my answers here (sorry for the pic quality)
Comparison of the POB plans with the draught posed quite a challenge as not all the bulkheads corresponded to a particular station (see below):
As seen above only the aftmost stations numbered 1, 4, and 7 corresponded with bulkheads 27, 21 and 15 respectively so comparison was only possible among these. Here are the comparison results:
1. Bulkhead 27 versus 1st aftmost station: the discrepancy is pretty clear here.
2. Bulkhead 21 versus 4th aftmost station: the discrepancy does not seem very pronounced.
BUT juxtaposing the bulkhead with the station shows the discrepancy more clearly:
3. The same was true for Bulkhead 15 versus aftmost station number 7:
So, based on the pics above, it would appear that the bulkheads 15, 21 and 27 are not very consistent with the stations corresponding to them. Of course, changing these three bulkheads to correspond to their respective stations would also require modifications of the bulkheads in between them (bulkheads 18 and 24). So far, this is only what I've accomplished with this primitive little experiment.
I do have a very encouraging finding: As you go towards the waist, the discrepancy becomes less and I've noted that the middle-most bulkhead in the provided plans and the middle-most station in the draught (bulkhead/station 0) are spot on to one another, thus giving me hope that majority of the bulkheads at the waist are faithful to the draught
I have yet to work on the other bulkheads and of course, my bulkheads are still open to further changes based on what I see in the high resolution plans, as well as additional feedback/tips/corrections that you, or our other members may provide One thing is sure, I really have to learn CAD as doing these corrections manually is starting to feel a bit tedious
-
rdsaplala got a reaction from Cap'n Rat Fink in HMS Triton (1/64) by Aldo - POB
Hi guys,
Just a wee bit of update on what I've accomplished with my Triton.
First, I thought I'd share the modifications that I planned to do to my ship's center board, in the hope of decreasing the amount of detailing that I have to do and also to provide slots that will allow me to easily secure the masts/bowsprit with their proper rake (see picture below):
The modified centerboard proved fairly easy to do, however, I came upon some problems when I made the bulkheads as some of them, particularly the aft-most ones gave some odd looking shape to the hull when test planks were temporarily attached. A detailed discussion on this can be seen in the link below:
http://modelshipworld.com/index.php?/topic/1929-question-regarding-lines-of-hms-triton-1771/
I decided to compare the provided plans with the original draughts rescaled to 1/64. The original inboard profile proved to be pretty much spot on with the provided plans (save for the height of the bowsprit):
The bulkheads on the other hand, posed some challenges as some of them were not very close to the originals. I finally decided to make some new bulkheads using some of the stations in the original draughts.
Well, that's it for now, just need to make about 3 more bulkheads for the stern section then I can move on to adding the stern timbers
-
 rdsaplala got a reaction from aviaamator in HMS Triton (1/64) by Aldo - POB
Thanks for the kind words, Pete, Mark, Daniel, Grant, Christian and Guy, I appreciate it
Mark, thanks for the tips on how to minimize wood wastage, I'll give them a try
Daniel, thanks for those tips on marking the different keel parts with a knife and pencil, it'll come in really handy
Just a bit of update guys, I'm finally done cutting the keel pieces. It's a very simplified version with only a few pieces (5 to be exact)... a testament to my laziness
I made the keel slightly longer than recommended so as to allow some room for tweaking, if needed later on
I was pretty surprised to see just how big this ship really is.... at 1/96 scale, she's almost as long as my 1/64 Swan Class Sloop so I could imagine just how big she would be if I made her in 1/64 scale
Well, that's it for now, time to drop a line at the "access request page" so I can start cracking on those bulkheads
-
rdsaplala got a reaction from Cap'n Rat Fink in HMS Triton (1/64) by Aldo - POB
Hi to all,
Newbie here, respectfully requesting permission to join this elite group of HMS Triton builders, Sir!
This is my first attempt at doing a scratchbuild so I hope you guys would bare with my insufficient knowledge on nautical stuff Having very limited experience in wooden ships, I will opt for a POB build and will probably simplify most of the details as much as possible. For now, I will settle for a 1/96 scale project, using lime as my timber to minimize expense and wood wastage
Starting with the stem pieces, I will follow the path taken by most kit manufacturers, representing this as a single piece (well perhaps I could make the gripe and bobstay piece as separate parts if my tools and skills will allow).
I will use these two strips of lime to represent the single lengths of the keel and false keel. I know this approach may make some cringe, but, like I said, it's a simplified build
I plan to cut the stem and stern post at the level of the rabet (pencilled area), then add a "rabbet strip" later to allow easier planking:
All is set and it's time to start cutting:
That's it for now, comments and advice are very much welcome. This is my first scratchbuild attempt and I will need all the help I can get
EDIT: I now realize after seeing the complete set of plans that 1/96 scale would result to about 1mm thickness of the frames/bulkhead extensions Due to this, I've decided to enlarge my scale to 1/64
-
 rdsaplala got a reaction from mtaylor in Licorne 1755 by mtaylor - 3/16" scale - French Frigate - from Hahn plans - Version 2.0 - TERMINATED
Very nice choice of timber, Mark, and excellent start on the planking work
-
 rdsaplala got a reaction from GLakie in Licorne 1755 by mtaylor - 3/16" scale - French Frigate - from Hahn plans - Version 2.0 - TERMINATED
Very nice choice of timber, Mark, and excellent start on the planking work
-
 rdsaplala got a reaction from mobbsie in Bomb Vessel Granado 1742 by mobbsie - FINISHED - 1/48 - cross-section
Wow! you're working at an amazing speed Mobbsie, at this rate you'll finish her by next month, excellent work as always my friend, those frames look great
-
 rdsaplala got a reaction from gjdale in Bomb Vessel Granado 1742 by gjdale - FINISHED - 1/48 - Cross-Section
Those frames look great, Grant, beautiful and clean work, and amazingly fast too
-
 rdsaplala reacted to gjdale in Bomb Vessel Granado 1742 by gjdale - FINISHED - 1/48 - Cross-Section
Thanks Augie, Jack, Mobbsie, David (Scratch) and Mike, and all of the "likes".
Well, the frames are finally complete. Here they are prior to having the WOP finish applied:
All of the gunport and sweep port sills have been pre-cut, again thanks to Mobbsie for showing me the method for this:
And here are all the frames test-fit in the jig:
All appears to be in order. I marked all the reference lines from the frame drawings on the individual frames, and they seem to be fairly well aligned and in roughly the right place, so I think I'm good to glue up. If anyone spots any glaring errors, please let me know before I break out the glue!!!
-
rdsaplala reacted to mobbsie in Bomb Vessel Granado 1742 by mobbsie - FINISHED - 1/48 - cross-section
Hi Guys,
I thought it was about time I put pen to paper and came up with an update, just to let you know I haven't fallen of the planet.
All the frames are now glued onto the keel and that showed my first problem, not all the frames fitted the jig fully, a few were as much as 2mm in from the outside of the jig, this presented a problem when it came down to sanding the inside of the frames, they need to be tight so there is no rocking when sanding.
The problem was solved by using Spanions method which is to place elastic bands around each frame and fix to a point of your choosing, this holds the frames tight to the jig edge. I chose to drill the jig from the top and place round head pins in, the bands were then pulled tight around the pins, great, until you don't pick the jig up by the sides, I now have nicely punctured finger tips.
I glued the first 8 frames and when the glued had dried they were sanded down, I have one frame which is a little out of line and it was a case of either cut the Futtock Rider to fit or make up a new frame, I tried adjusting the Rider which worked well so that worked out ok. Once the first 8 frames were sanded I then fitted the final 4 frames and fared them down. There is a small rise in frames 9 to12 and they have to be sanded at a slightly different angle.
With the inside completed I turned my attention to the outside, first job was to mark the height, frames D1 TO 4 ( 9 frames ) are level and flat, frames 5 to 12 are sloped with frame 12 being the highest. There is still a fair bit of movement in the frames which needs to be reduced to virtually nothing, this was achieved by placing 2.5mm blocks between each frame at a point above the water line where the hull planking will cover them up, the tops of the frames were also blocked at this time, this also served to strengthen some of the weaker frames.
Next up was the Gunport Sills, Sweep Sills and Filling Lintels, more problems, these were down to my c--p joinery skills and not the drawing's. If I put the sills in place without any work they would end up looking like a mountain range, so measurements and levels were taken and out came the sanding sticks and files which were applied to the Port side. The Sills were the first to receive the treatment with new levels being made, most of the notches which had been pre-cut were sanded back, so with all the mistakes removed the Sills and Linings were added to the Gunports and Sweep Sills, The Filling Lintels were next to be attacked, as it happens they turned out to be quite easy to make and so in they went. A little more sanding and an acceptable finish was reached bearing in mind that this work will all be covered with planking. The Portside took 3 days to repair so I have the same to look forward to on the Starboard side.
Whilst waiting for glue to dry and the need to change tasks I made the following, Keelson, Mortar Pit Deck Clamps ( Upper and Lower Strakes ) and the Upper Deck Clamps ( Upper and Lower Strakes ). I also cut out on the scroll saw the Futtock and Floor riders, these are not finished yet because they will require fitting individually.
At this point I want to thank Grant for keeping me on the right track regarding the timber, I got a little confused with what timber to use and so consulted my mentor, things were explained and backsides kicked, thanks mate. At this point mate I decided to keep you on.
I should imagine your about ready for some pics, if your not suicidal by now.
Portside clamped up waiting for the glue to dry on the blocks
Just a few more clamps on the Starboard side.
This is Spanions method of holding the frames.
Profile of the frames prior to sanding down.
You can see the nature of my problem.
The finished Portside, bearing in mind it is to be planked over.
So there we are guys, your right up to date. Next job is to finish the Starboard side, fit the Keelson and work on the Futtock and Floor riders.
Be Good
mobbsie
-
-
rdsaplala reacted to popeye the sailor in Andrea Gail by popeye the Sailor - FINISHED - 1:20 scale
thanks for all the nice comments....my goodness, I'm speechless! the best compliment that a modeler can get, is when the model takes on a life of it's own. I'm glad I decided to do it now......than to keep it on the back burner for as long , as I already have. I'm glad the your all enjoying the build, as much as I am
I read your recent post Carl.......I am glad to have made you smile. your well being is just as important....I do hope that you'll be able to fins some time for yourself. the whole color thing was spontaneous.......didn't leave much time for prep. it's what the instructions called for....Emerald Green.......a very nice Irish color! March...........and even......spring!
that's a good idea Michael..........you so busy with your engine.......and you took the time to think up something for me ...you are just TOO kind! of course, I might have to take the rubber legs off, so there will be more vibrato...I'll have to try it!
no worries Augie......as mentioned, I have four other airbrushes I should do a thread and show them......I'm sure there are others that have a favorite. the green is only the beginning thanks for the good word!
thanks Marty.......if I thought to do it right away......I could have used thinner on a Q-tip, to remove most of it, and later touched it up with the white primer. I haven't decanted any yet......need to do that. thanks for the good word.
it's OK mobbsie.......I have it all down to a science my only draw-back so far, is I catch up with my browsings.....only to look in the next to be buried again! you folks are VERY busy builders I wouldn't have it any other way! I had a five day weekend.....I tried to do an update for all five day....and I failed on Friday I'm getting back up to speed.......but I wish I was where I was at...like I once was.
thanks for the good word
hello Michel......welcome to the Wharf! always glad to see new folks.......thanks for the good word!
I don't know about Greenpeace Sjors........but yepper.......she's green. hope to get more paint on her soon! thanks my friend!
thanks Aldo.........still a ways to go yet, so there's still plenty to see. glad to see your following along.....hope things are going well with you.
-
 rdsaplala got a reaction from popeye the sailor in Andrea Gail by popeye the Sailor - FINISHED - 1:20 scale
Wow! I come back here after a few weeks and she's almost complete! Fantastic work and build speed as always, Popeye
-
 rdsaplala got a reaction from augie in Andrea Gail by popeye the Sailor - FINISHED - 1:20 scale
Wow! I come back here after a few weeks and she's almost complete! Fantastic work and build speed as always, Popeye
-
rdsaplala got a reaction from GLakie in Andrea Gail by popeye the Sailor - FINISHED - 1:20 scale
Wow! I come back here after a few weeks and she's almost complete! Fantastic work and build speed as always, Popeye
-
rdsaplala reacted to Sjors in HMS Agamemnon by Sjors - FINISHED - Caldercraft/Jotika - 1:64
Wow,
What a response !!!!!!
And then all the likes.
It makes me shy............ :blush: :blush:
I will give each of you an answer.....pfffffffffff
Here goes,
@ Augie,
Thanks !
I'm glad that you like my paint work
@ Wayne,
I have ordered the cleaning crew to do a better job.
Now everything is wet.......Thank you !
And we know that the cannons are there but I can do it again !
@ Patrick,
Thanks,
Sorry to say, but you have to wait a little longer for the deck planking.
Work consumed almost all of my time.
Work is not bad but it cost me to much free time
@ Bob,
Also thanks,
Yes, I know that I can do now the things that stays visible instead of invisible
Love this part of the build.
@ Mark,
Thank you,
When I read all of this comment, I know why I post here.....
@ Grant,
Thank you,
You are not the only one who wants to see the rest.....
Me too !!!!!!!!!
@ Popeye,
I have no days off,
It was all in between...... but thank you !!!!!!
@ Piet,
You are a real Dutchman.
Watch everything in detail and yes, the doors are turning ( in your dreams or mine )
@ George,
Thanks !!
That cannon assembly line comes again
@ Aldo,
Thanks also,
That colour choice is what Caldecraft gave me and I just follow that.
And she has gonna get more teeth......
She is dangerous !
@ Mobbsie,
Thank you master of Aggy build !
Mast ?
Do I get masts ??????
Are you sure ????
maybe you are thinking of an other Aggy ?????
Just kidding....
I shall check it !
Thanks for the warning.
@ Augie,
I will not ask you how you know this.....
Wait a minute, I'm gonna ask it !
Please tell me...
This is a long post but I have done it.
I hope that everyone can read my English
If not.....sorry
Sjors
-
rdsaplala got a reaction from mtaylor in HMS Triton (1/64) by Aldo - POB
Thanks for dropping by and the good word guys
Daniel, I think I'll also cover my ships the with blanket next time I mothball them, it's amazing how much dust can accumulate in these models when left alone for months Thanks for the picture, wow! that's a lot of mothballed ships
Christian, thanks for the tip If I understand correctly, do you mean I should cut new bulkhead extensions based on the NMM plan and position them to their corresponding station lines on the NMM profile plan? If yes, then I think that was what I did:
-
 rdsaplala got a reaction from Sjors in HMS Agamemnon by Sjors - FINISHED - Caldercraft/Jotika - 1:64
Guns are looking great Sjors, now she's armed to the teeth Very neat work on the bulkhead screens too, excellent color choice
-
rdsaplala got a reaction from Sjors in HMS Triton (1/64) by Aldo - POB
Thanks for dropping by and the good word guys
Daniel, I think I'll also cover my ships the with blanket next time I mothball them, it's amazing how much dust can accumulate in these models when left alone for months Thanks for the picture, wow! that's a lot of mothballed ships
Christian, thanks for the tip If I understand correctly, do you mean I should cut new bulkhead extensions based on the NMM plan and position them to their corresponding station lines on the NMM profile plan? If yes, then I think that was what I did:
-
rdsaplala got a reaction from GLakie in USF Confederacy by Augie & Moonbug - FINISHED - Model Shipways - 1:64
Beautiful and clean work on the beams, knees, capstan and companion way Augie, it's details like these that bring out the beauty of these period ships
-
rdsaplala got a reaction from augie in USF Confederacy by Augie & Moonbug - FINISHED - Model Shipways - 1:64
Beautiful and clean work on the beams, knees, capstan and companion way Augie, it's details like these that bring out the beauty of these period ships
-
rdsaplala got a reaction from GLakie in HMS Agamemnon by Sjors - FINISHED - Caldercraft/Jotika - 1:64
Guns are looking great Sjors, now she's armed to the teeth Very neat work on the bulkhead screens too, excellent color choice