HOLIDAY DONATION DRIVE - SUPPORT MSW - DO YOUR PART TO KEEP THIS GREAT FORUM GOING! (89 donations so far out of 49,000 members - C'mon guys!)
×
Beckmann
-
Posts
432 -
Joined
-
Last visited
Content Type
Profiles
Forums
Gallery
Events
Everything posted by Beckmann
-
 Thank you everybody for your kind words and likes, Today I would like to shar this invitation with you: 4th International Ship Model Building Days at the International Maritime Museum Hamburg on 10 and 11 October 2026 We are pleased to announce that the International Ship Model Building Days will be held again next year at the International Maritime Museum Hamburg (IMMH) on 10 and 11 October 2026. The event, which has become a fixture in the museum's calendar, will take place for the fourth time next year. The set-up day is Friday, 9 October 2026. The International Ship Model Building Days are an excellent opportunity for ship model builders of all disciplines to showcase their models and exchange ideas in the historic rooms of the IMMH in Kaispeicher B on Koreastraße, in the heart of Speicherstadt and Hafencity. At the last exhibition in September 2024, around 45 exhibitors from several European countries came together and displayed around 1,000 ship models. Models from all areas of ship model building were on display. The scale ranged from large remote-controlled models up to 3.5 metres in length to tiny works of art made of cardboard, which are only a few centimetres in size when built to a scale of 1:1250. Fantastic dioramas and presentations in a wide variety of scales were also on display. One focus was on 3D printing, which was presented by several exhibitors. This new technology is playing an increasingly important role in ship modelling alongside long-established methods. As in previous years, ship model builders from all over the world are invited to meet in Hamburg in October next year. This includes individuals who wish to participate, as well as model building clubs or associations that want to present their models together. Those wishing to participate should register with the IMMH at A.Reineward@imm-hamburg.de or directly with the exhibition's organising team at f.ilse@t-online.de. The registration should include which model building category – historical ships, cardboard, wood, plastic models or RC-controlled models – is to be displayed. Photos of some models are a good reference point. In addition, the approximate space required should be specified. Exhibitors who would like to give a presentation on specific aspects of ship modelling, their group or the historical aspects of their models are kindly requested to indicate this briefly in their registration form. There is no registration deadline, but please note that very late applications may not be considered as there is limited table space available for the exhibition. Once registration is complete, confirmation of participation will be sent. The organising team will then contact clubs and individuals directly to inform them about the exhibition preparations and keep them up to date. This applies in particular to all details concerning set-up and dismantling as well as the course of the exhibition itself. So if you would like to present your model ships in the extraordinary setting of the International Maritime Museum Hamburg, please get in touch. The IMMH and the organising team look forward to receiving lots of registrations. Matthias
 -
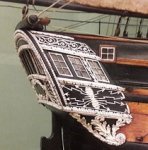
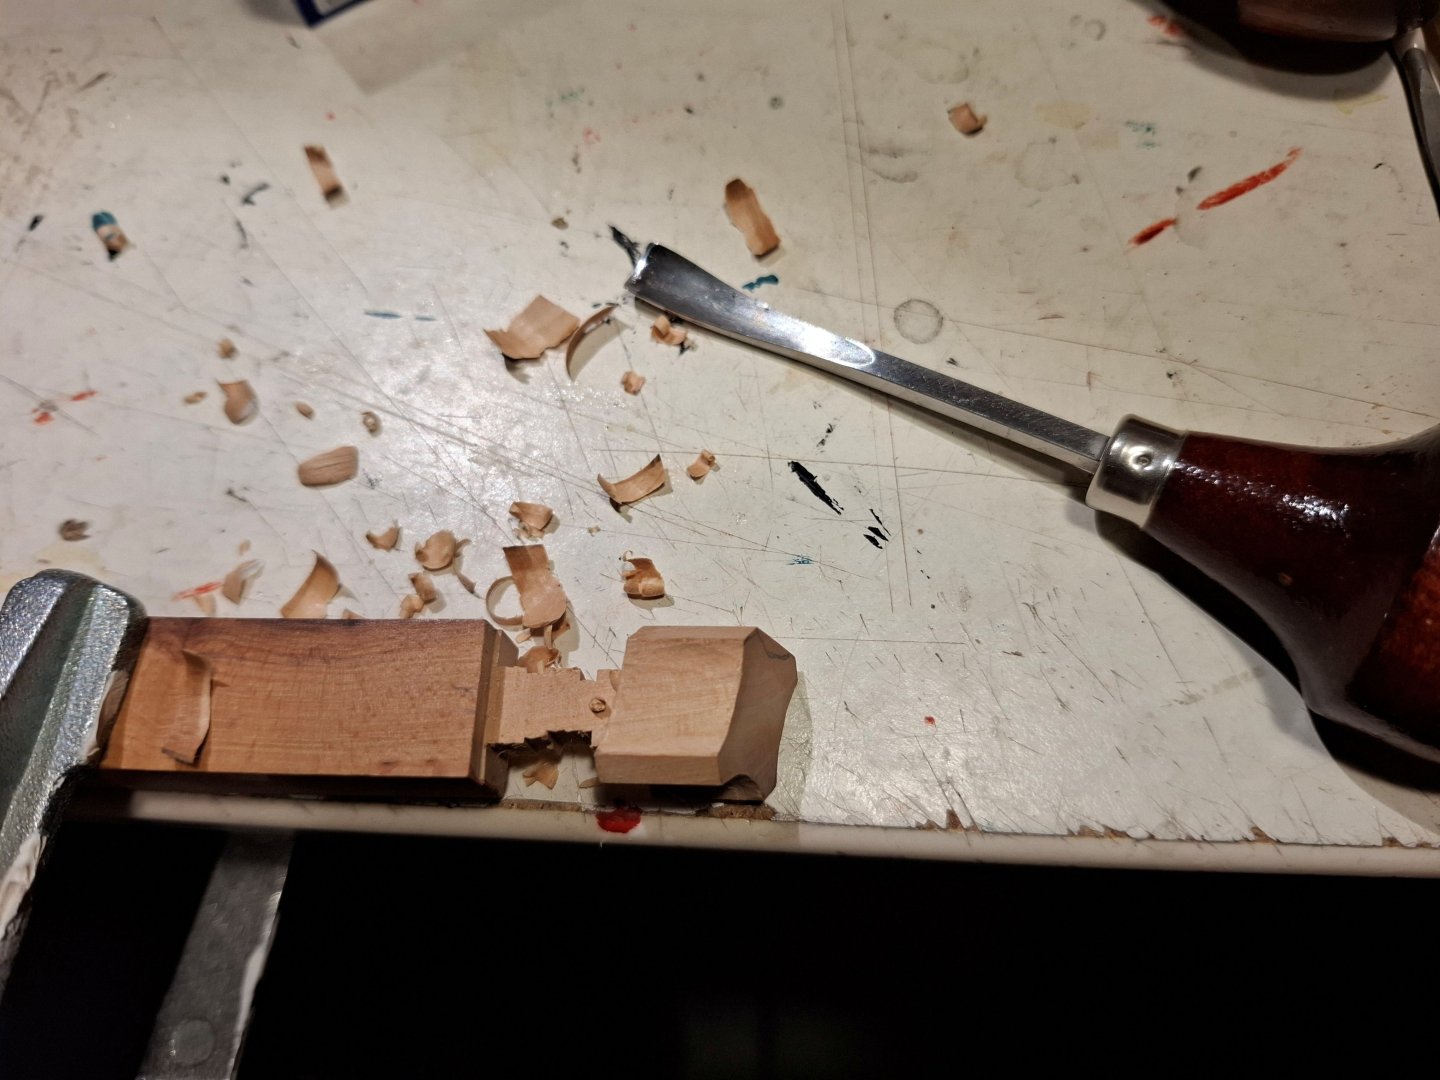
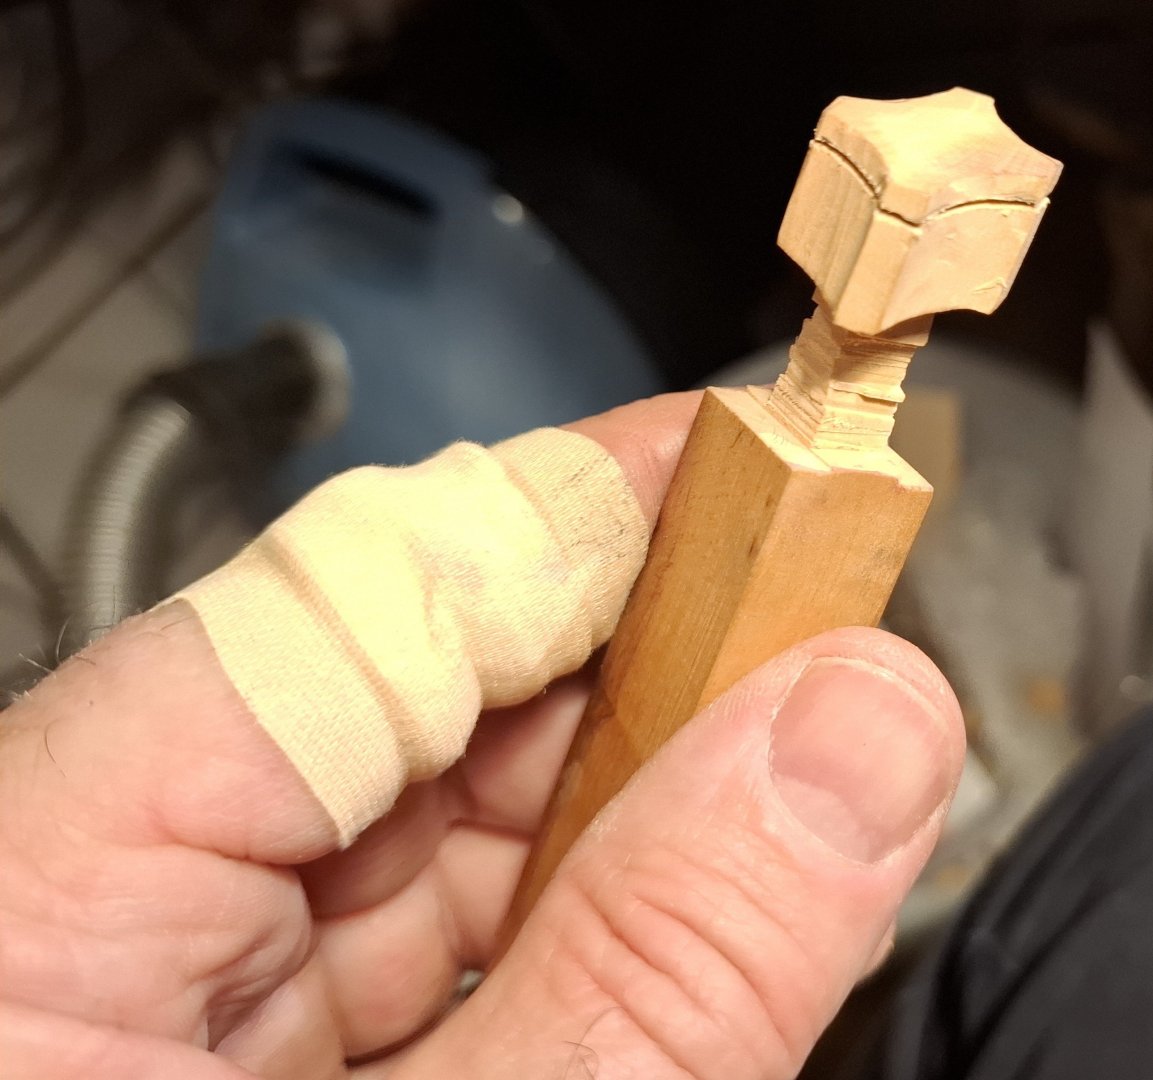
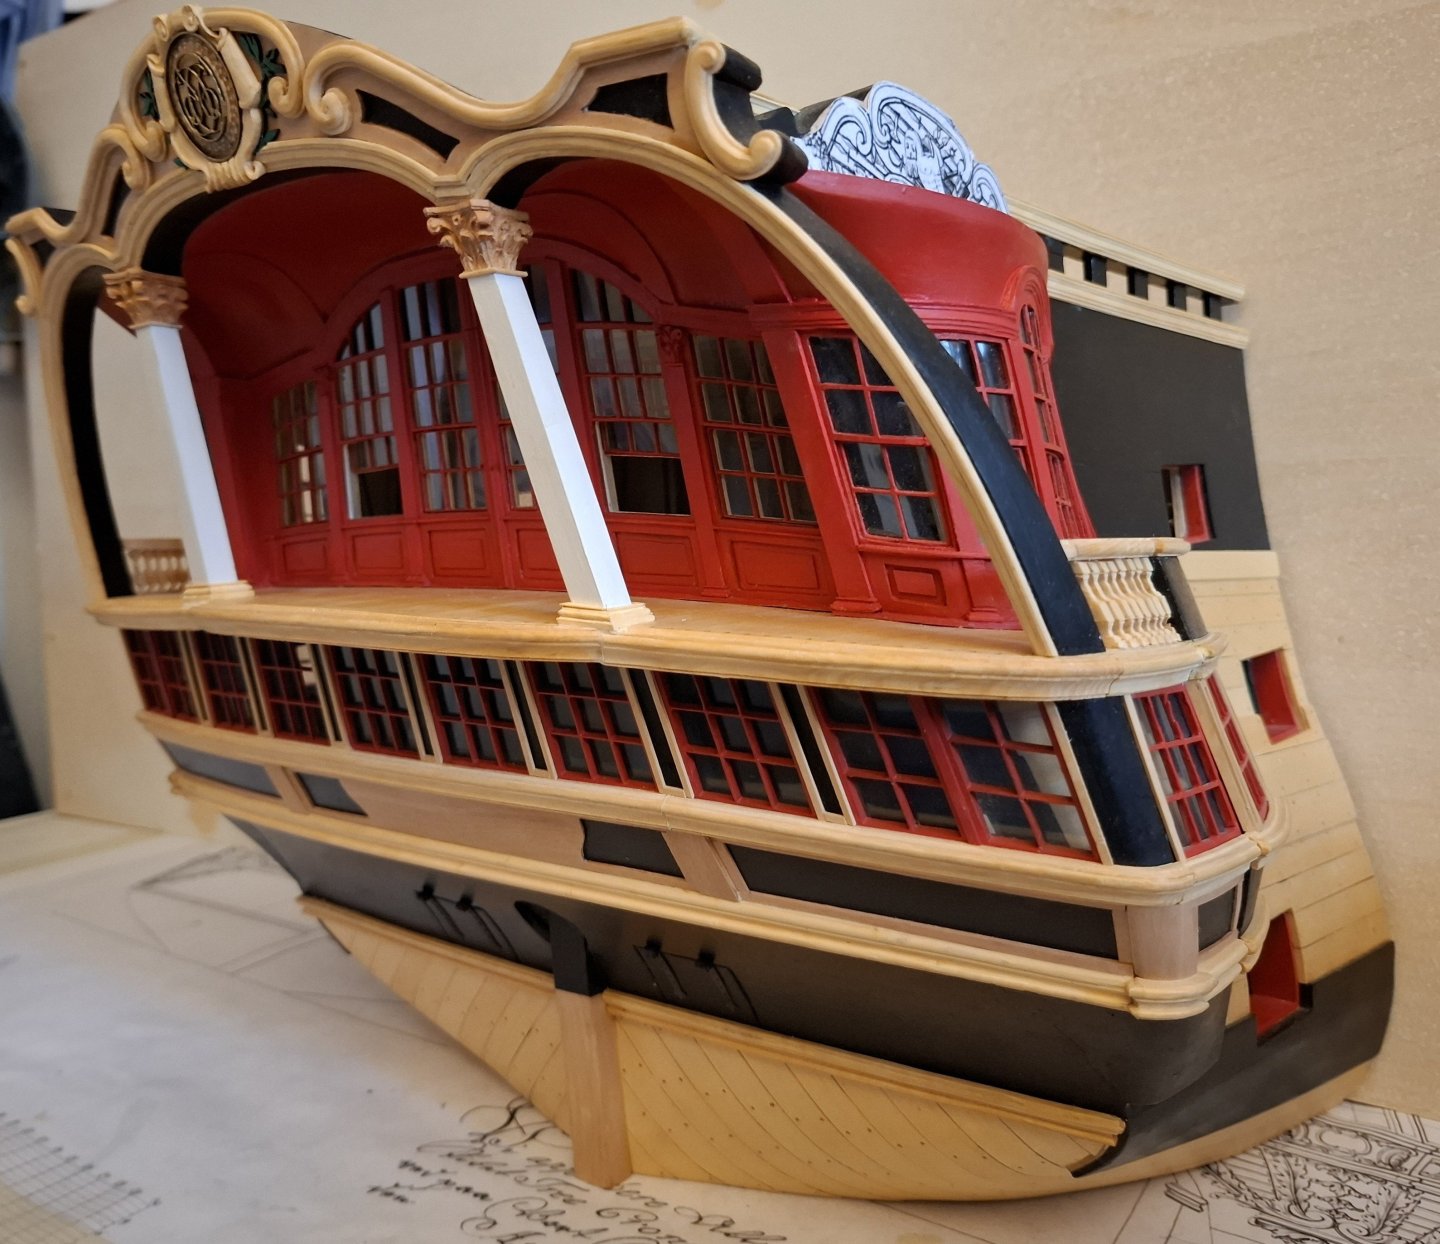
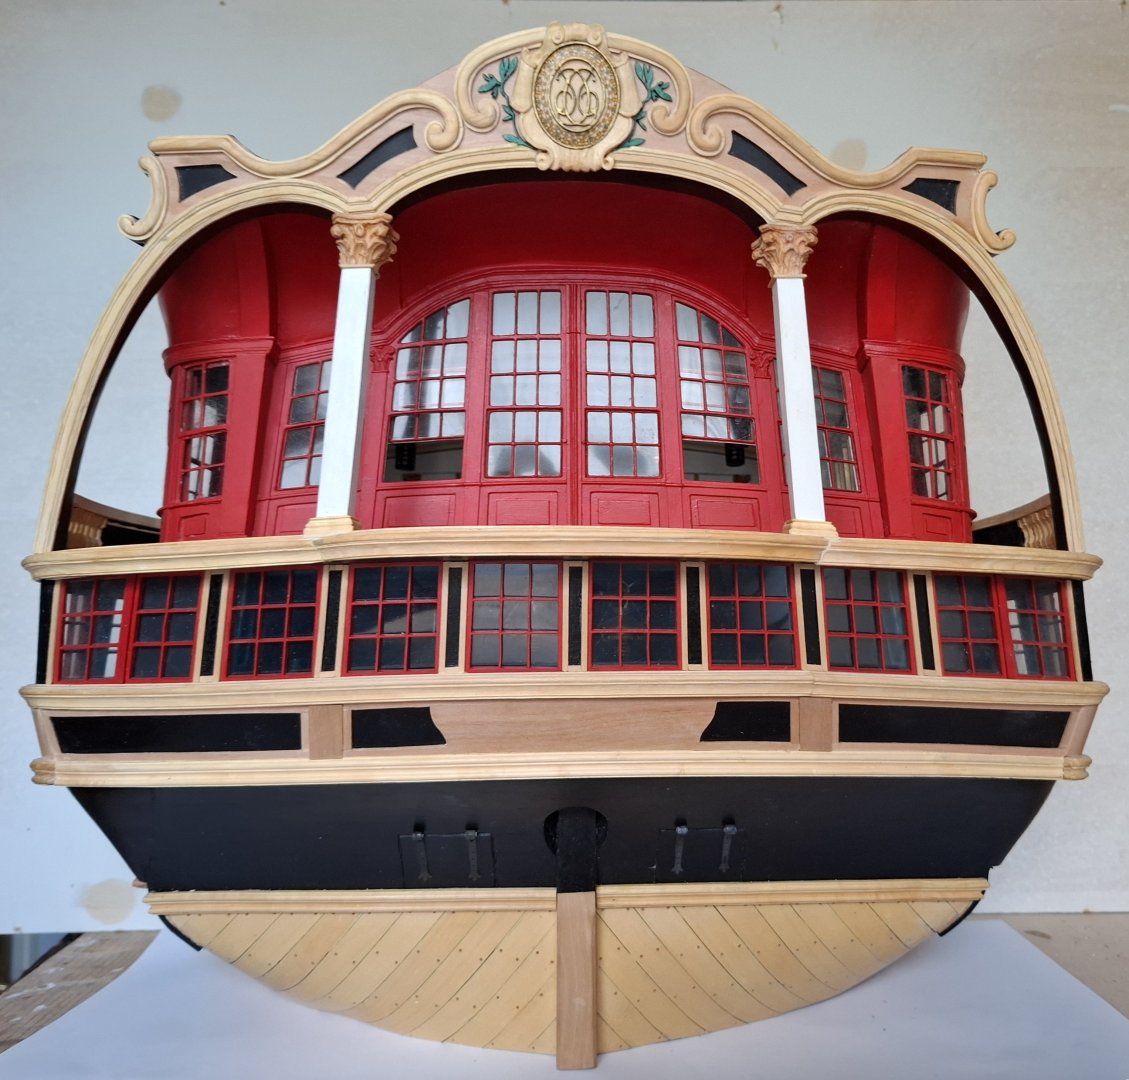
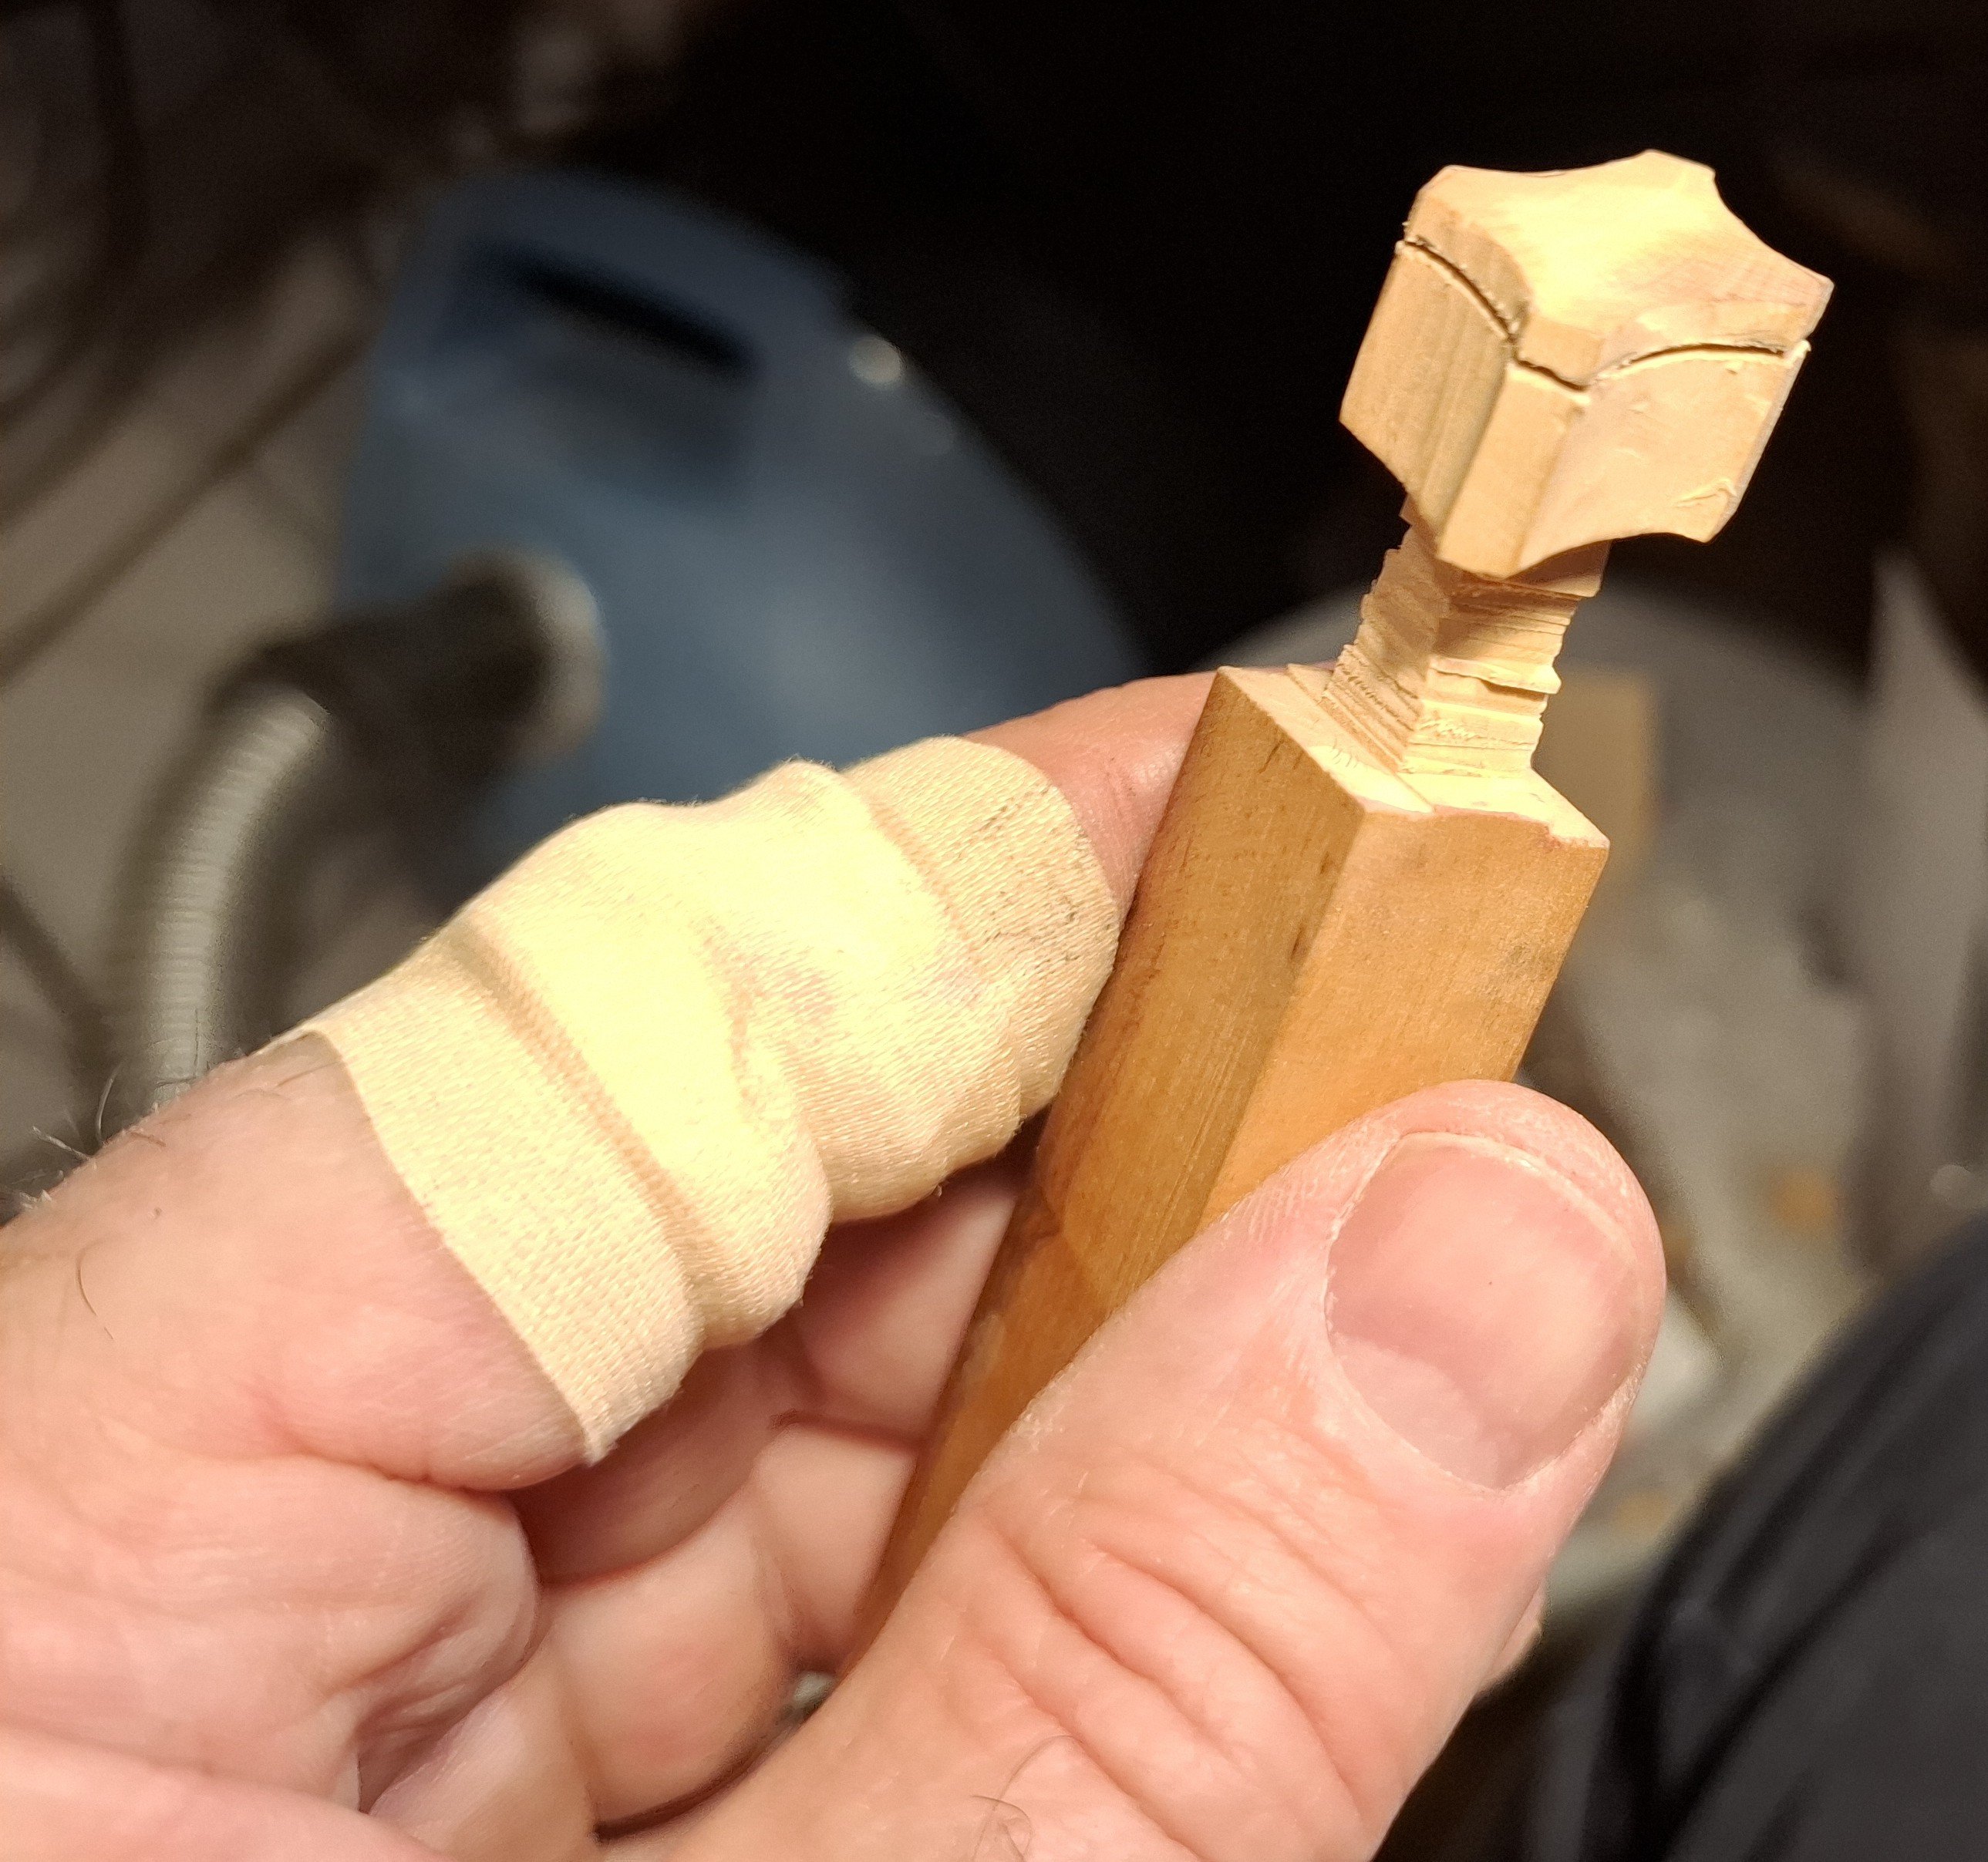
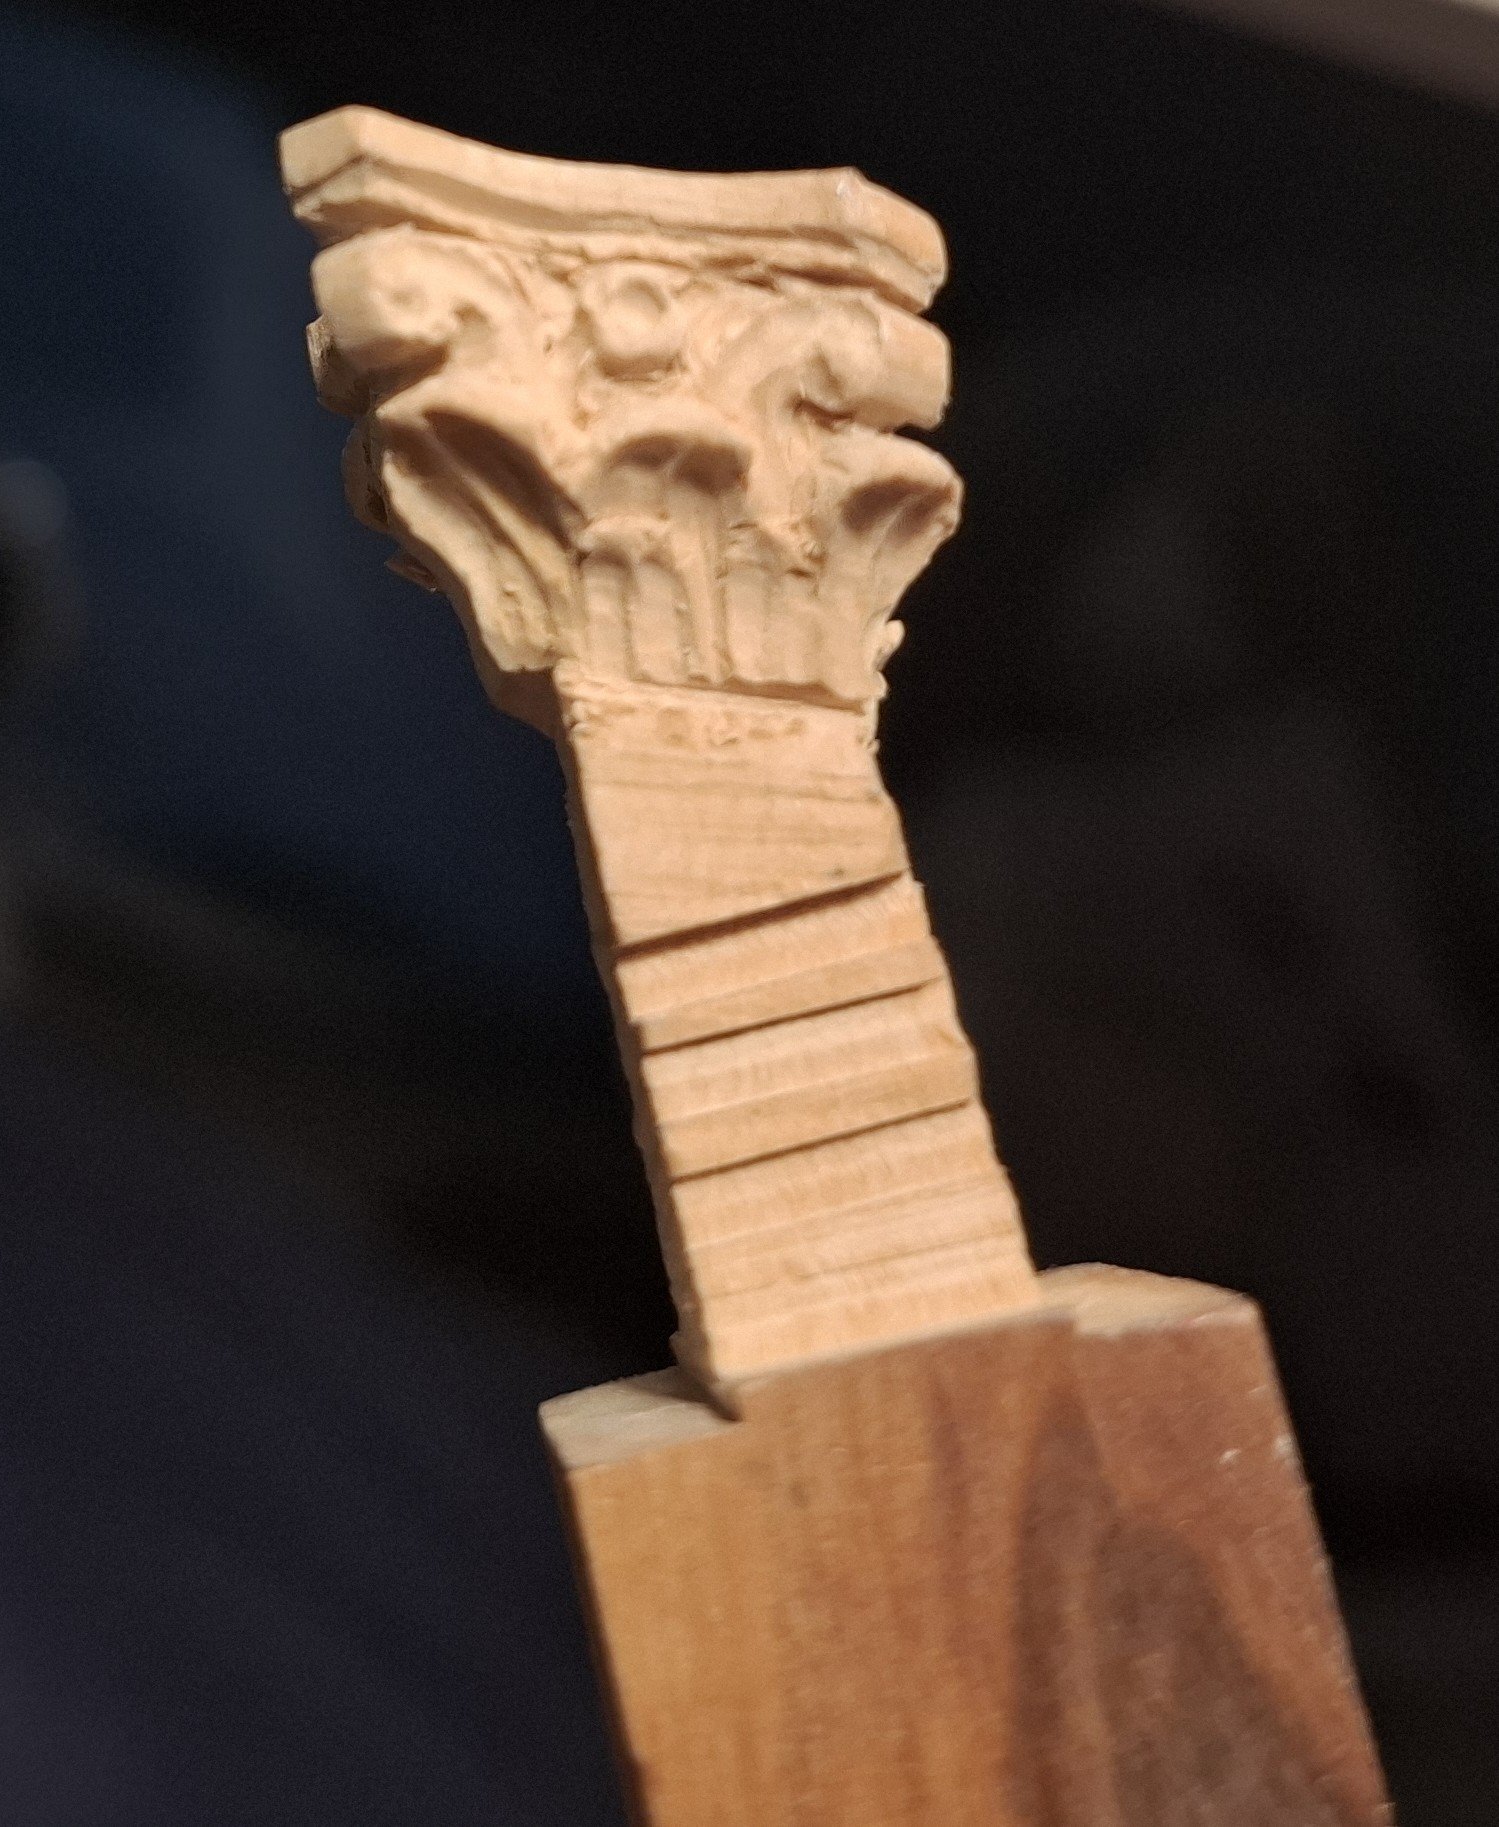
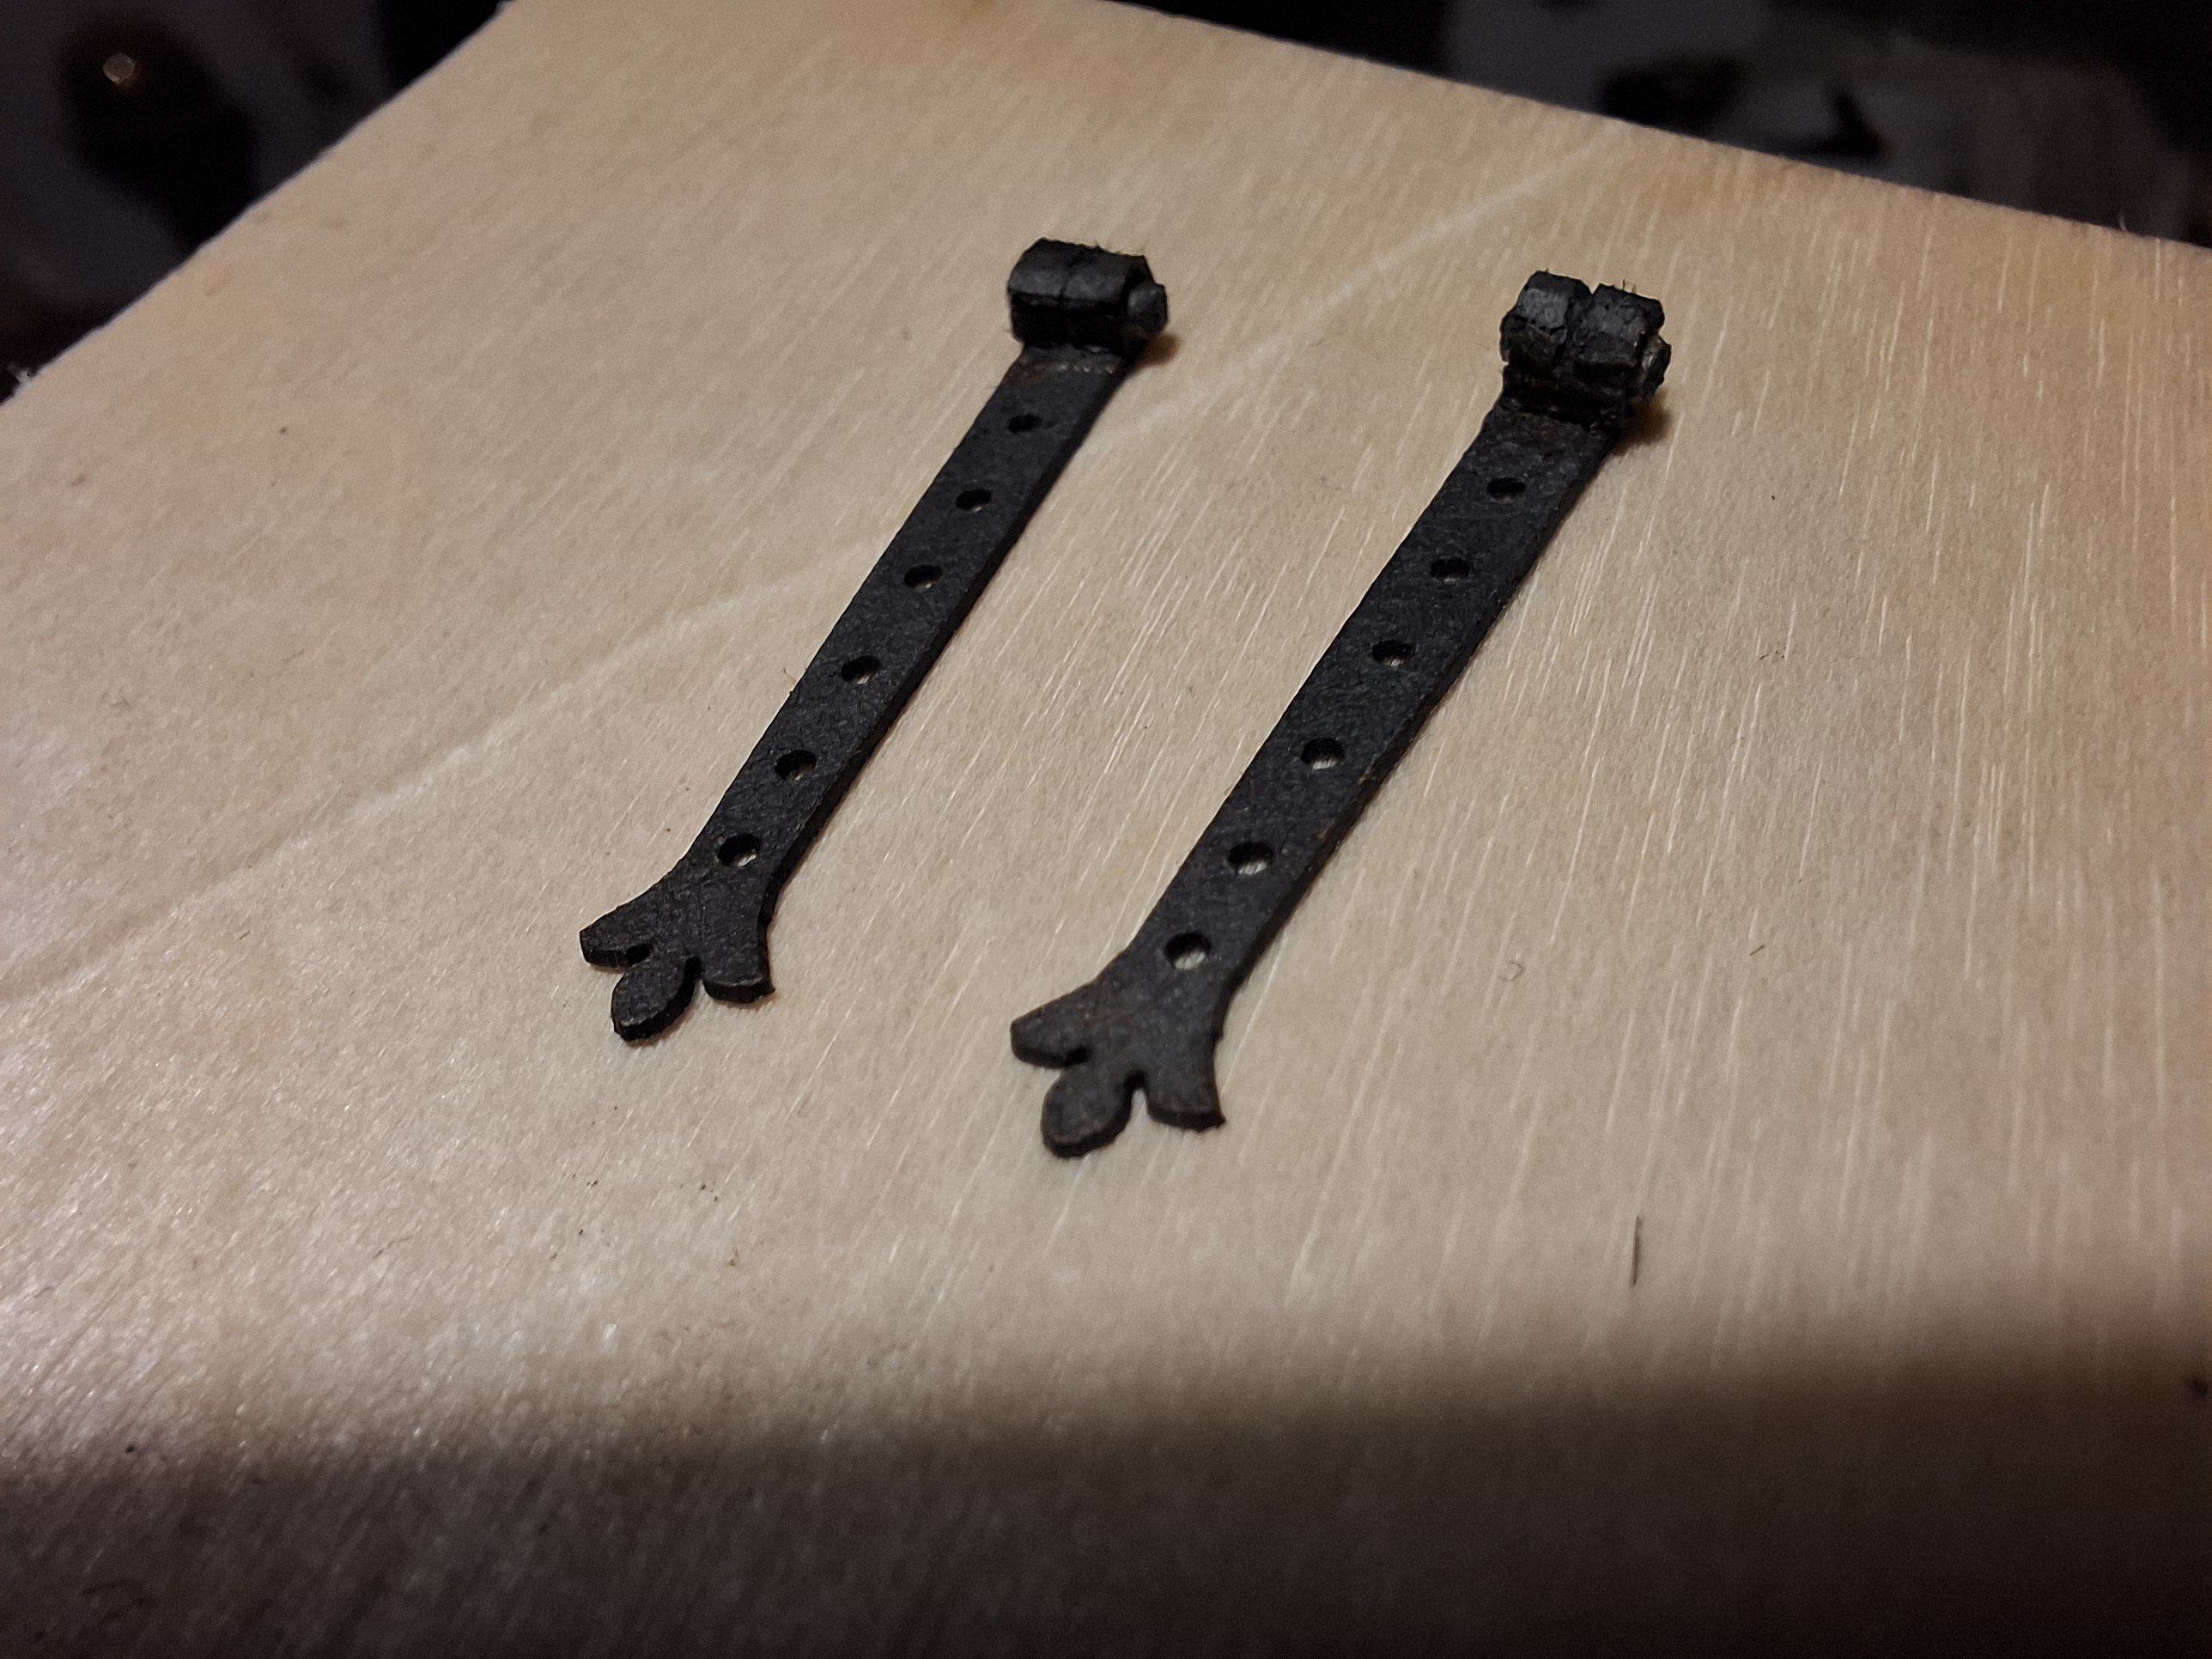
Hello everybody, Small progress has been made; the columns supporting the transom arch, are now in place. Attached are a few pictures of the corinthian capitals being made and the finished columns on the model. The corinthian capitals are difficult; apart from the scale (they are 7x7 mm at the base), they are tilted outwards and forwards. I'm trying to manage without the 3D specialists and their milling machines for this model. Of course, they can do this kind of thing better, but somehow you want to try it yourself. Let's see if I can keep it up until I get to the figures... Here are my cardboard laser-cut strips for the gun port hinges. The parts were dabbed with Tamiya aging powder, color: soot. Best regards, Matthias


-
That looks terrific, well done! Matthias
-
Hi Chuck, That are good news. Are you eventually planning to sell your design for Medway Longboat and Qeen Anne Barge as a pdf-file download? I would be very interested. Matthias
-
Hi Chuck, Nevertheless, I hope that we will see some new ship model designs from you in the coming years. We all appreciate your blocks and ropes, but even more the model development. Matthias
-
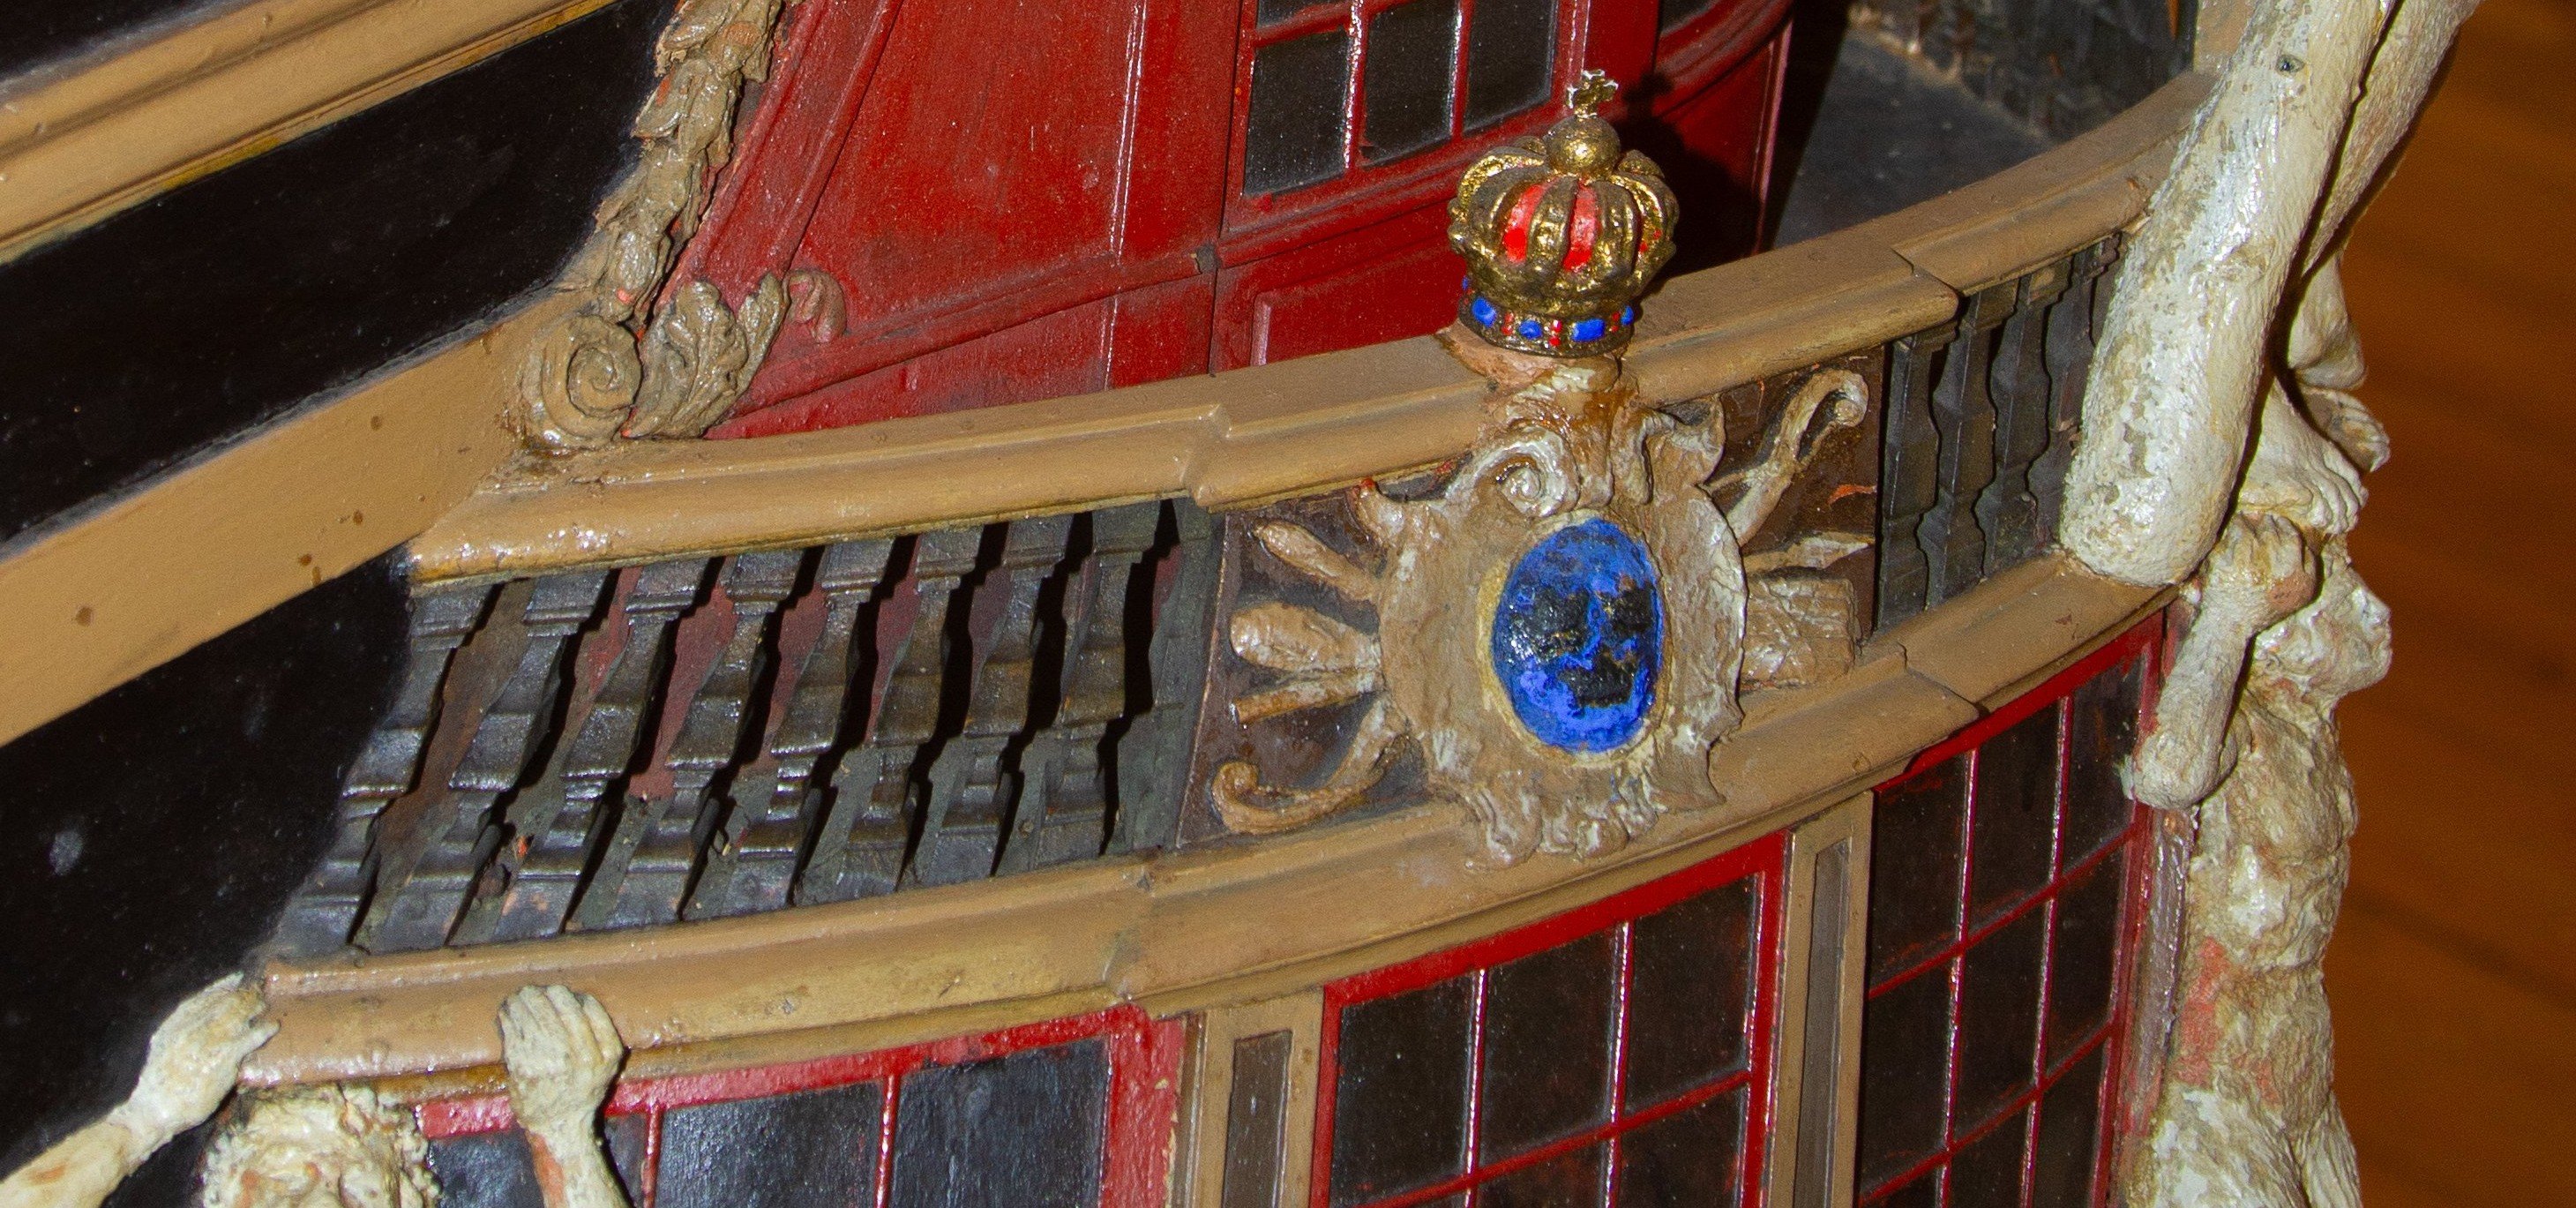
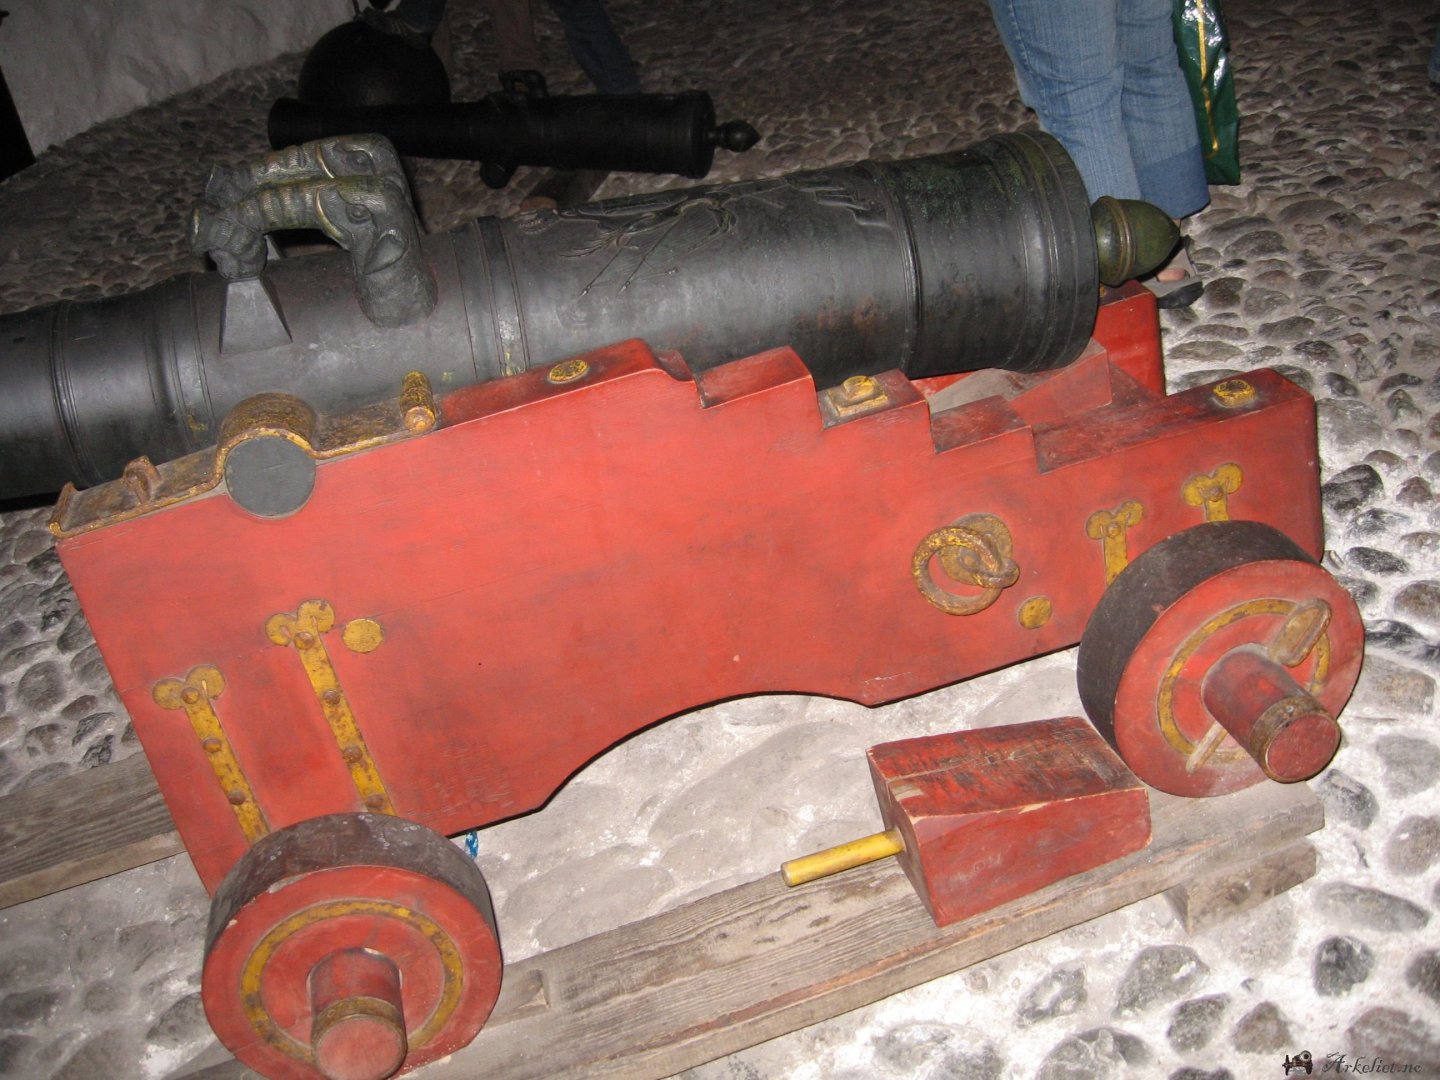
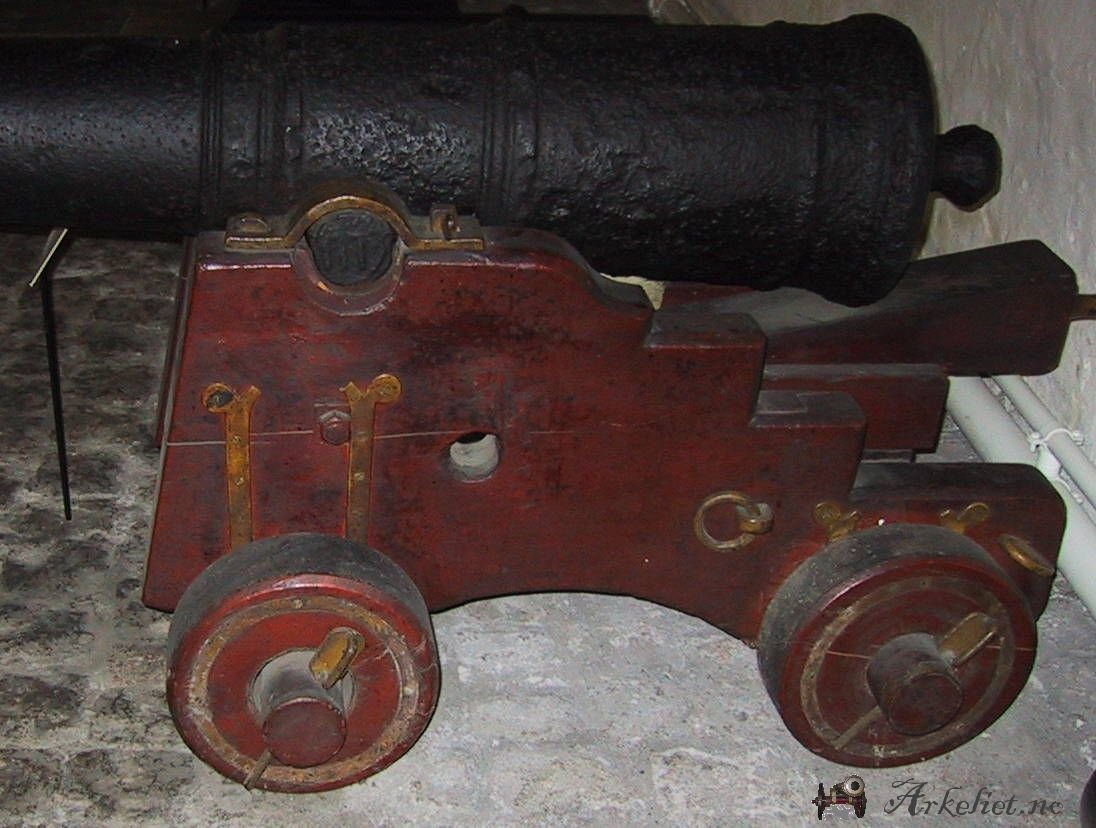
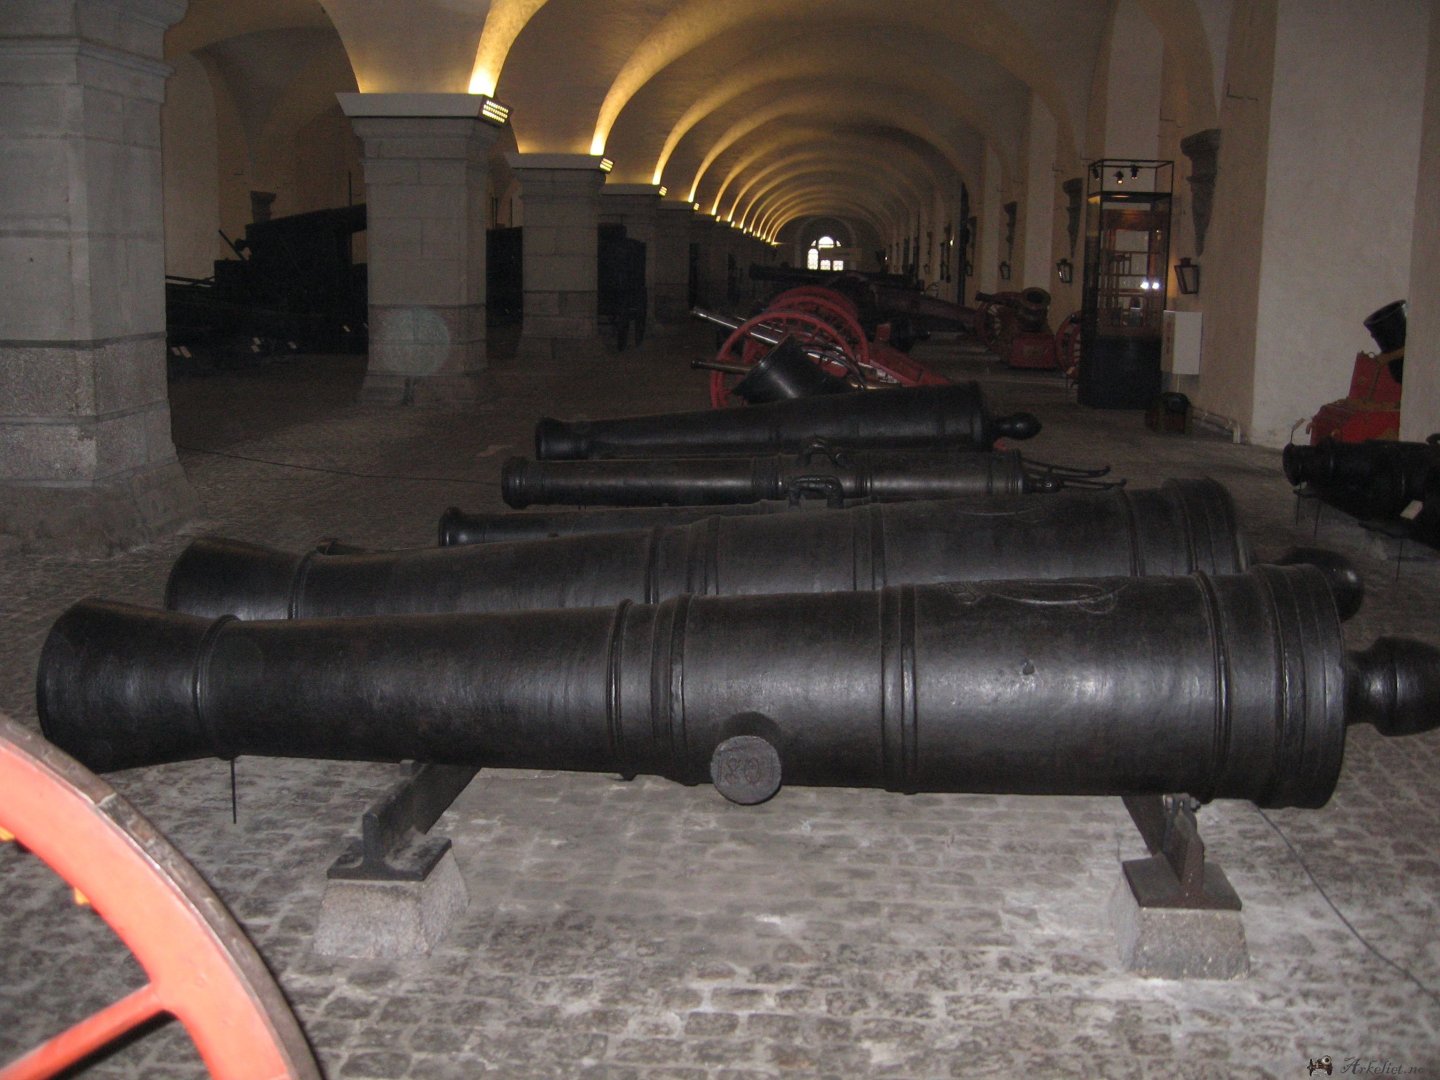
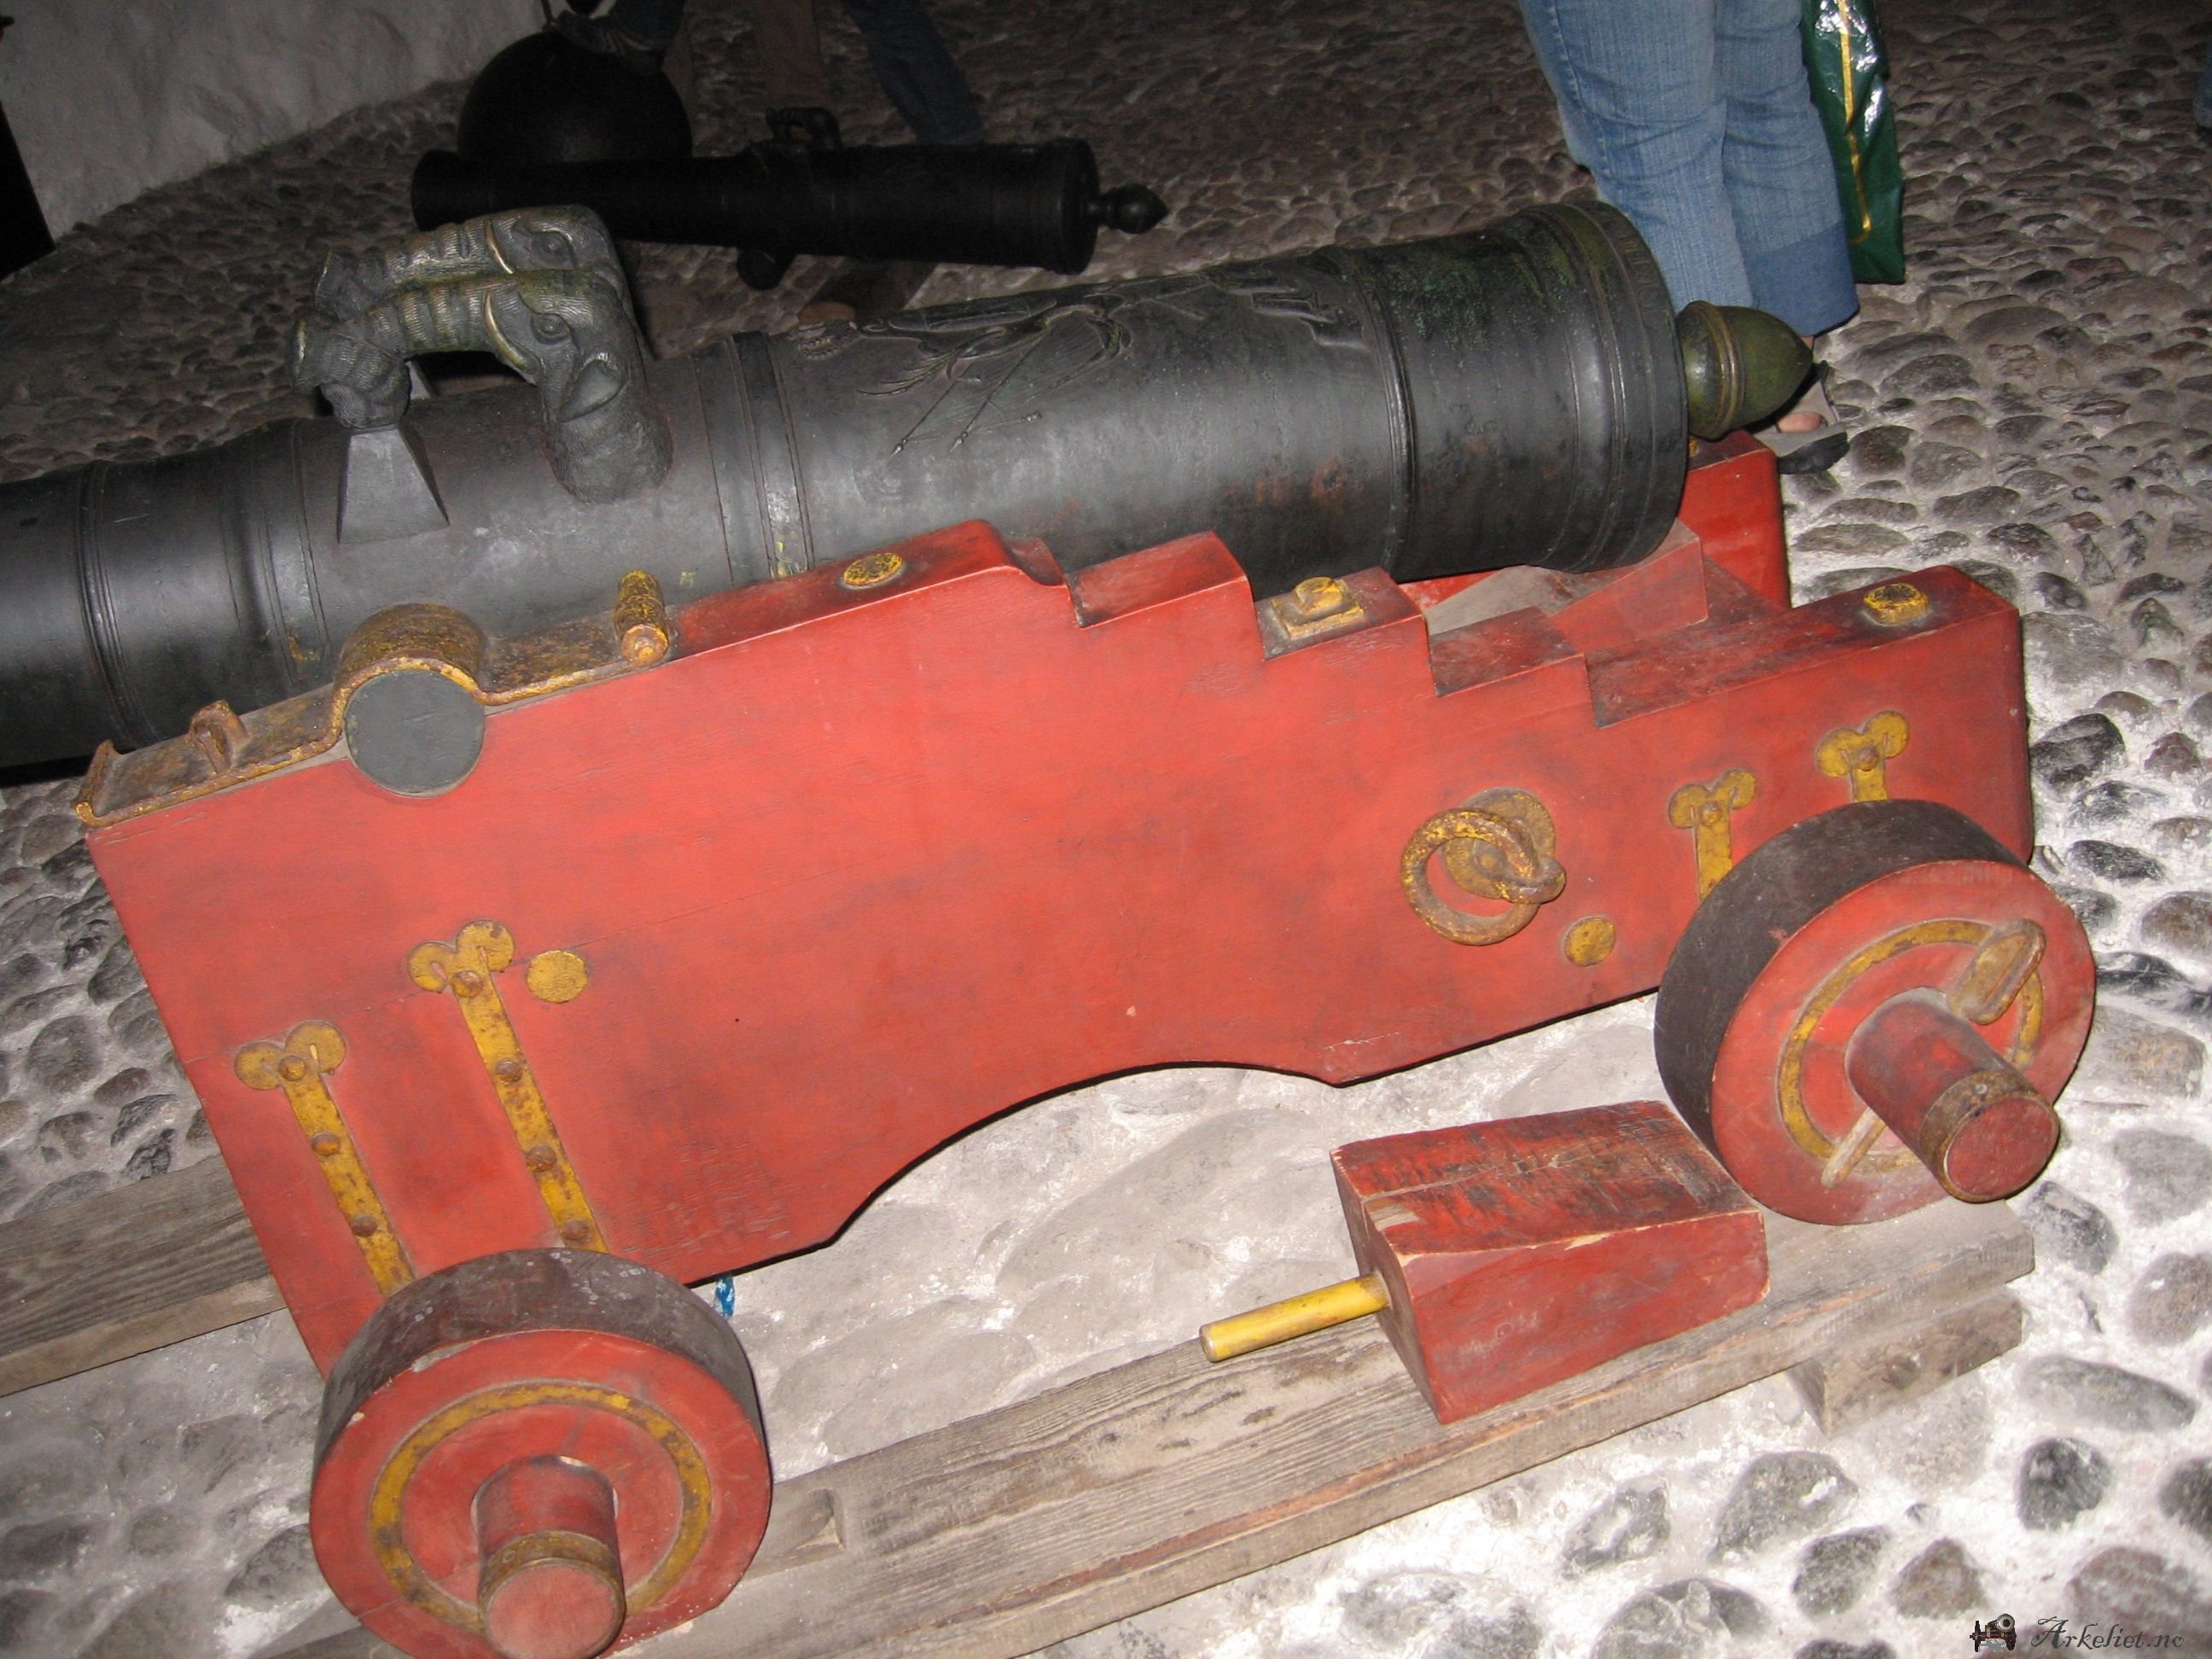
Dear fellow model builders, Today, just a quick update on the construction of the gun mounts, along with some more pictures of original naval guns that are now kept in Copenhagen. And finally, a look at preserved gun barrels with, if I interpret correctly, the monogram C6. Christan VI Was Kinc of Denmark when TRE KRONER was built. Perhaps they were once on board the TRE KRONER. Best regards Matthias


.thumb.jpg.e0242a2ef0a6fb145d27c1cd1ff65031.jpg)
-
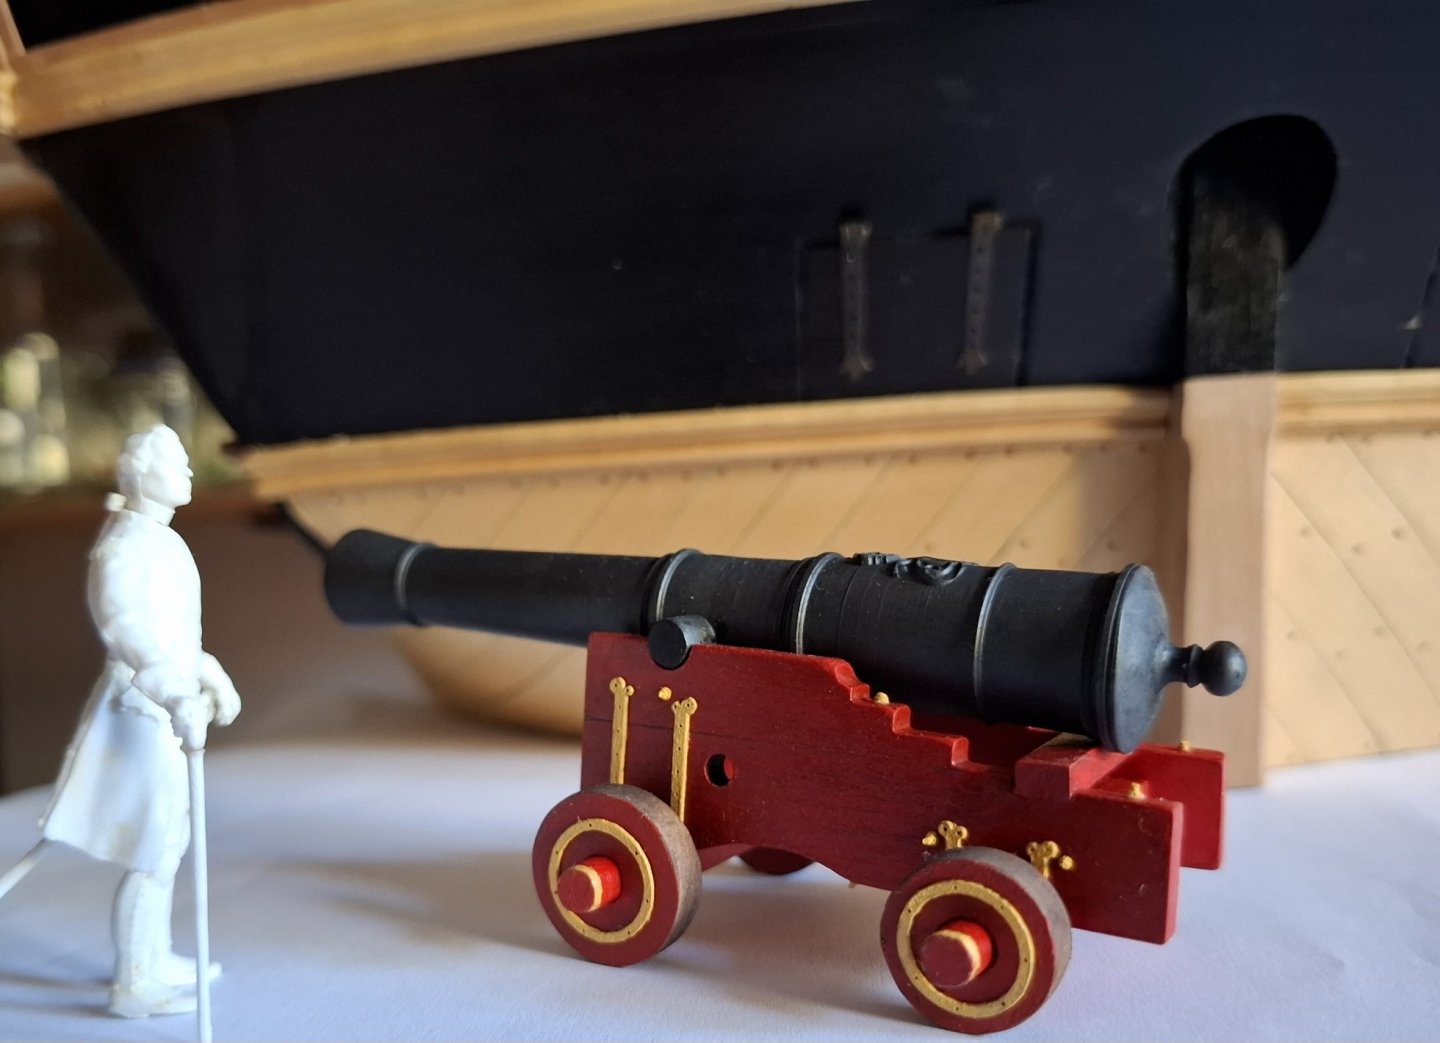
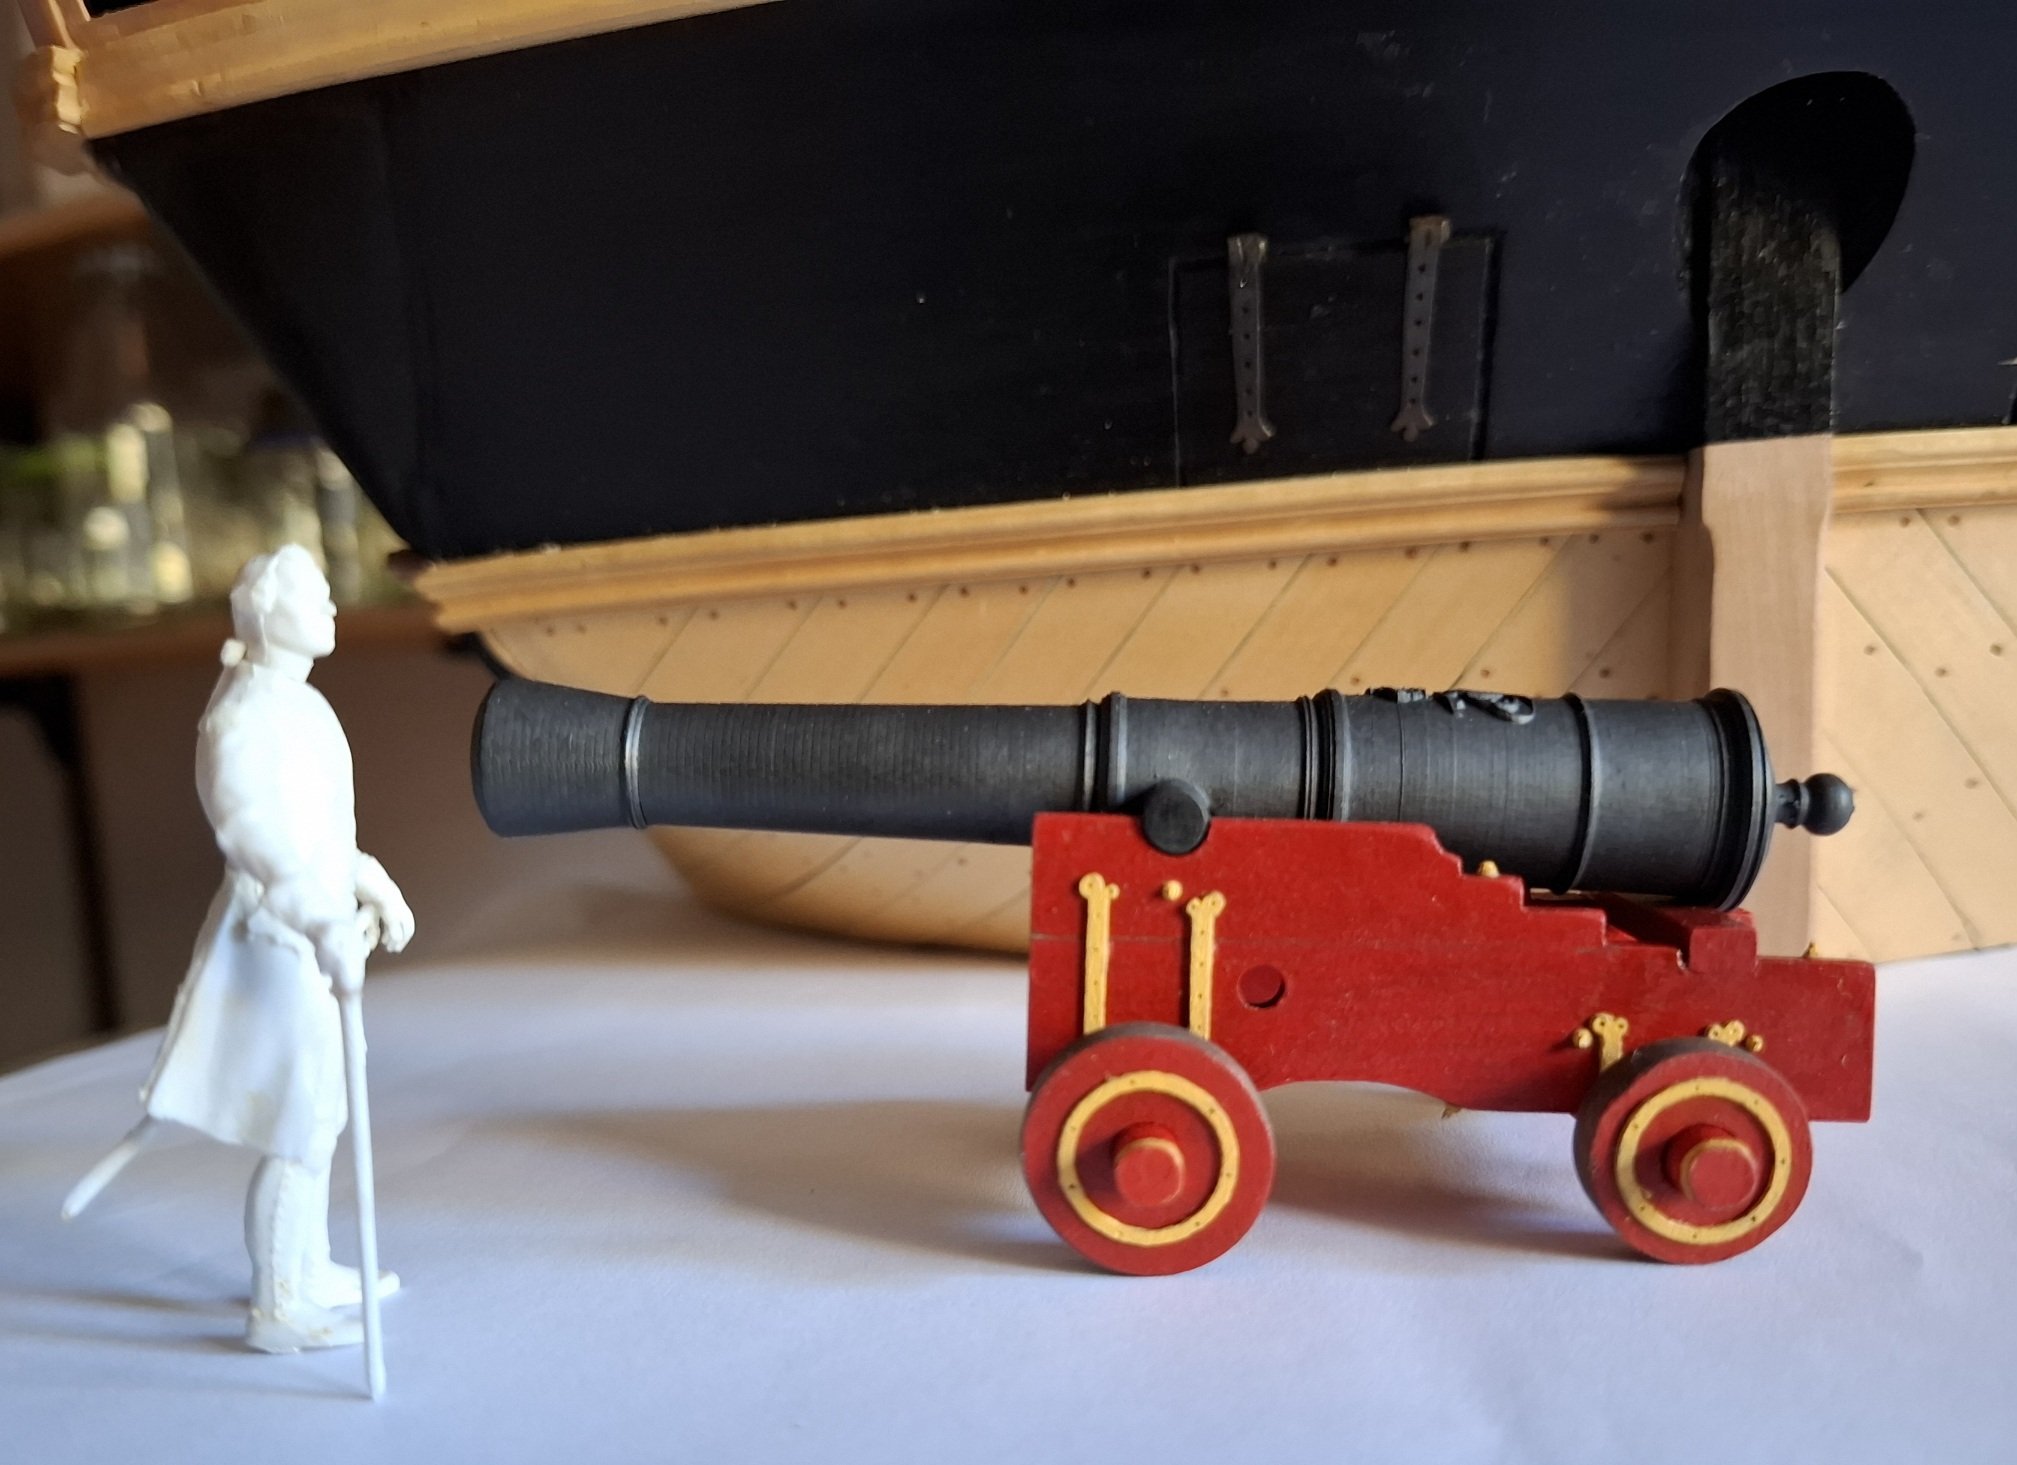
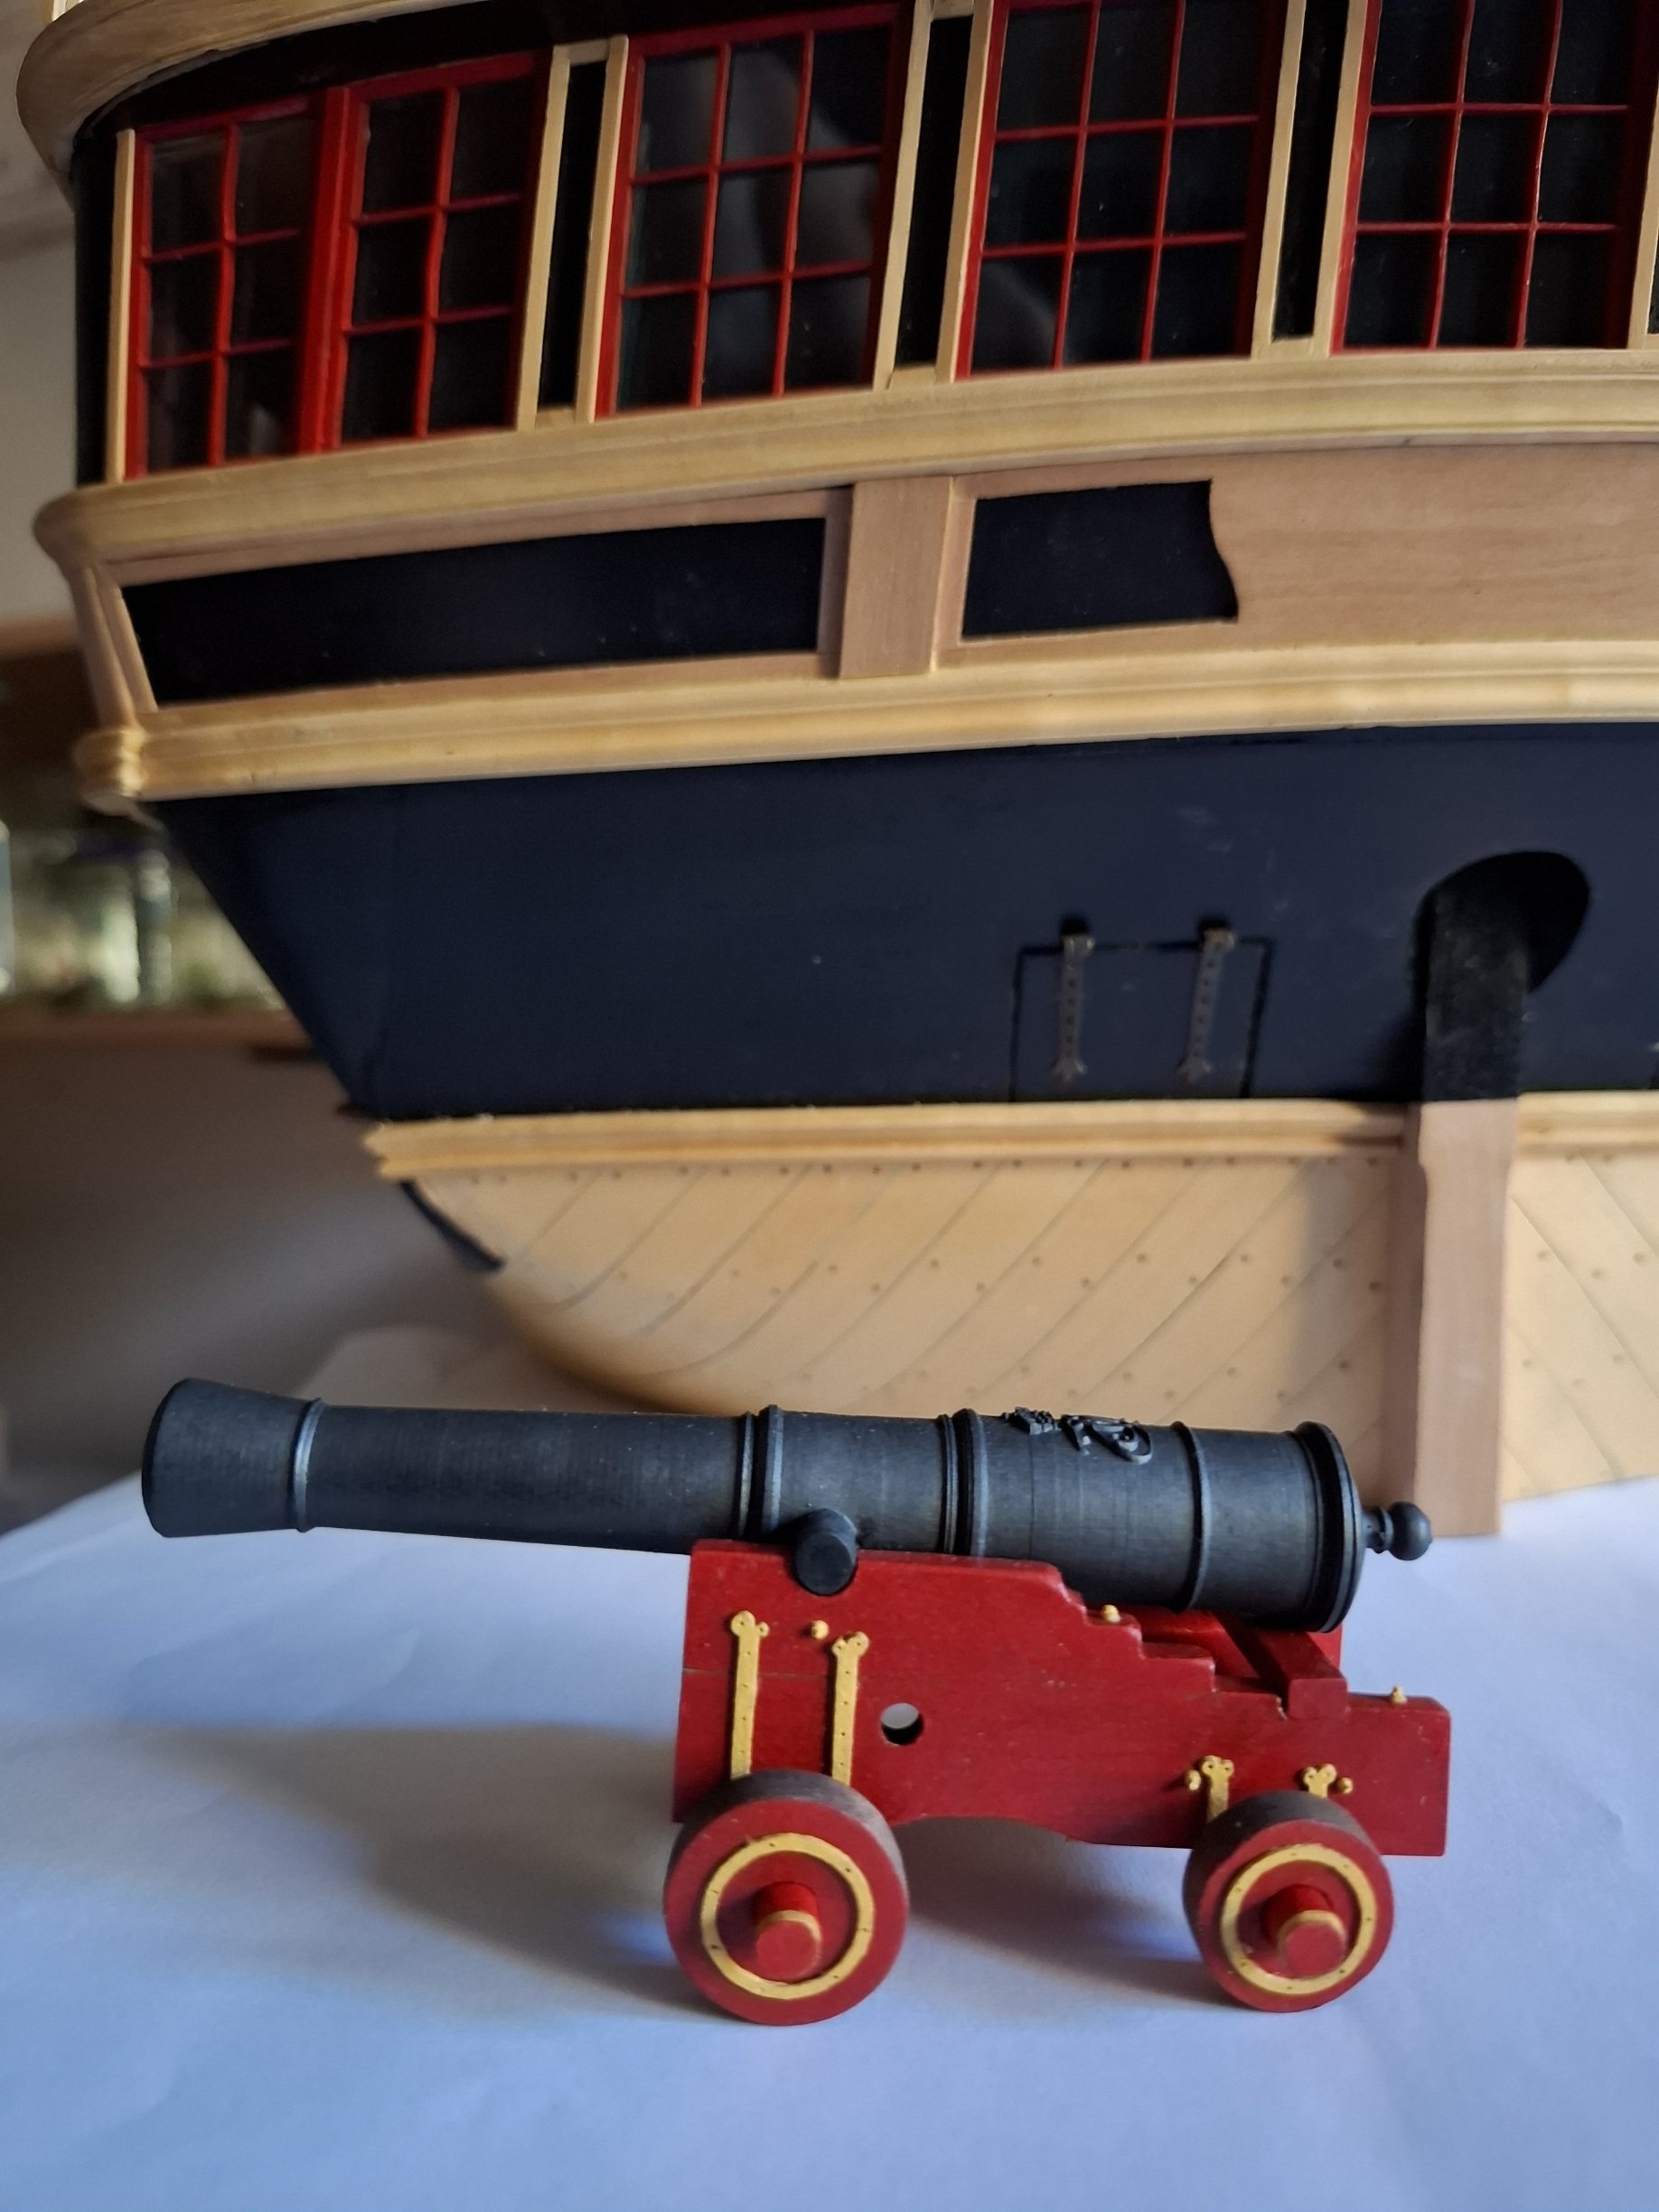
Dear fellow model builders, thank you for your kind words. I have recently been studying 18th-century Danish artillery, as I would like to include it in my stern model and possibly another section model of the TRE KRONER. As is well known, the sources here are quite good, as is generally the case with the Danish navy. There are several instruction manuals for cadets and the shipyard, where you can find contemporary drawings of gun barrels and carriages. As always, you just have to keep an eye on the chronological development. Of course, it is possible that my approach contains errors, as the carriages used specifically for the TRE KRONER are not explicitly named in the plans. First, here are a few illustrations from the mid-18th century. One significant difference from the English gun carriages is the arrangement of the aiming wedges, another is the color scheme. First, the gun carriage: There are different drawings in the archives showing an older and a newer design. I assume that the TRE KRONER already had the newer gun carriages and that the older ones belong more to the 17th century. I cannot prove this exactly, but the transition was probably a smooth one. Examples of both types have been preserved, which I find very helpful. The aiming wedge on the more modern gun carriages was apparently pushed under the end of the barrel from the side in the normal setting and rested on a kind of crossbar, as can be seen in the drawings and the illustration of the cannon. Apparently, the crossbar could also be removed for particularly high settings and the wedge could be placed directly underneath from behind. The first two images in this article illustrate this nicely. From the early 17th century until around the 1820s to 1830s, the colors were largely fixed: red iron oxide for the wood and yellow to light orange munium (a mixed lead oxide) to protect the wrought iron parts from rust. The gun barrels are also depicted in several publications. Here is a depiction of the 36-pounder gun barrel. The TRE KRONER had 36-pounders on the lower battery deck, 18-pounders on the upper battery deck, and 8-pounders on the quarterdeck and certainly also on the forecastle. A model-building colleague from Copenhagen (TJM), who has the necessary technology, kindly printed out the artillery for me and added the monogram of Christian VI. I drew the gun carriages accordingly and had them laser-cut from pear wood. In addition to the installation in the stern model, I plan to build a section of the battery deck showing the arrangement of the artillery. There is a model at the NMM in Greenwich that serves as my model here. Finally, here is a picture of the unpainted gun mounts with the gun barrels, still without fittings and wedges, which are next on the list. I painted the gun barrels black and finished them with Tamiya aging powder (soot color). Best regards, Matthias


-
That looks promising Jack. Looking forward to see more progress. Matthias
-
Looks very good Jack!!
-
Hi Jack, the size of the gunports seem to differ somehow, or ist that just a problem of perspective on the photo? Matthias
-
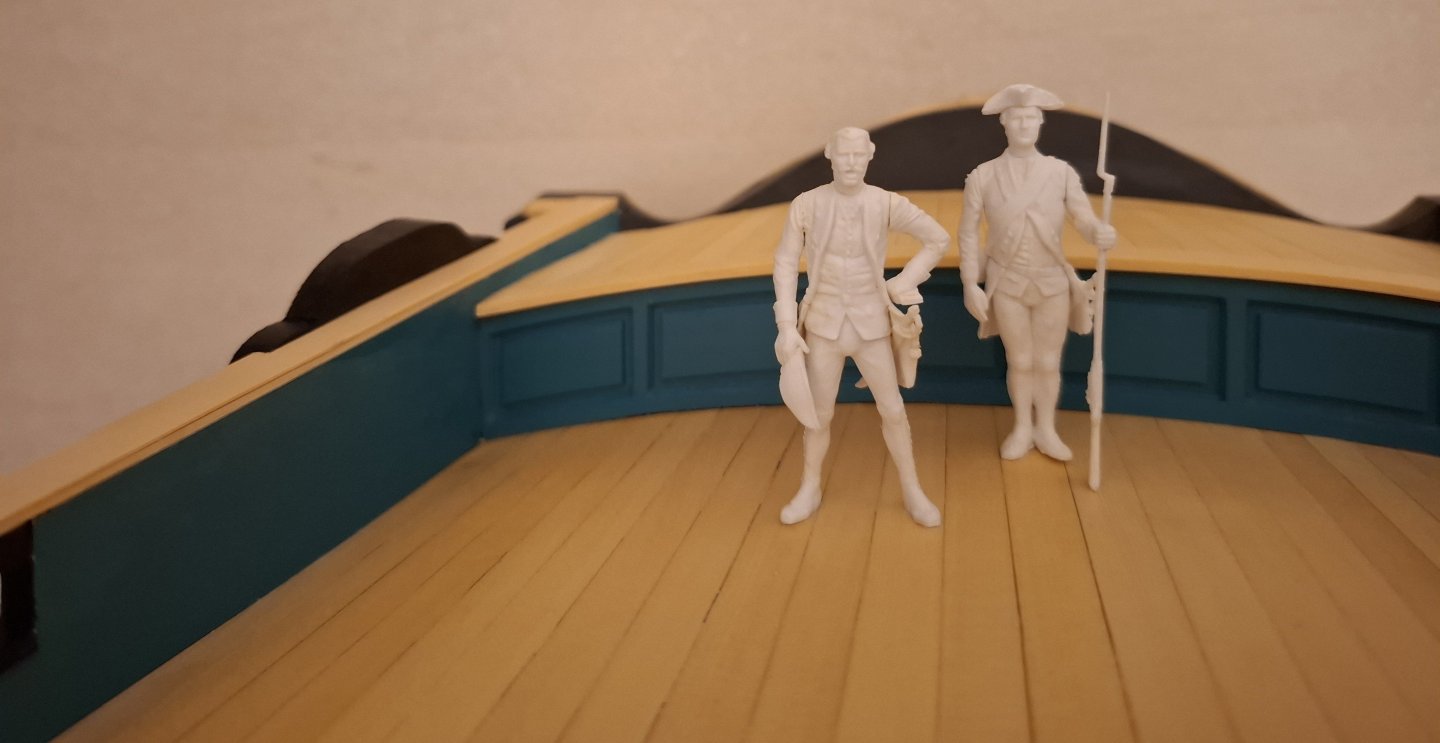
Hi Chris. Very nice. Will they be available as separate Figures as well? I play the Cello myself and would love to have them both sitting in my 1:32 scale captains cabin. Matthias
-
Hi JJ, did you develop the carvings yourself, or is there another artist involved? Matthias
-
Hi Chuck, I would take one. Great idea! Matthias
-
That looks good Jack!!
-
That looks much better now. Well done! Matthias
- 125 replies
-
- 2
-

-

-
- Christiania
- Vanguard Models
- (and 1 more)
-
Hi TJM, Somehow the QG leans backward and the roof leans forward, shouldn't both lean backward? But beautifully done anyway, Matthias
- 125 replies
-
- 2
-
-
- Christiania
- Vanguard Models
- (and 1 more)
-
Hi Jack, This looks very interesting, I have never seen a jig like this. I am curious, how good it works. Seems to be a completely new method. Matthias
-
Hi Jack, that is a nice any helpful jig you created. Well done. Matthias
-
Hi Jack, I am looking forward to this. What are your plans? With, or without planking? Frames visible or not? Matthias
-
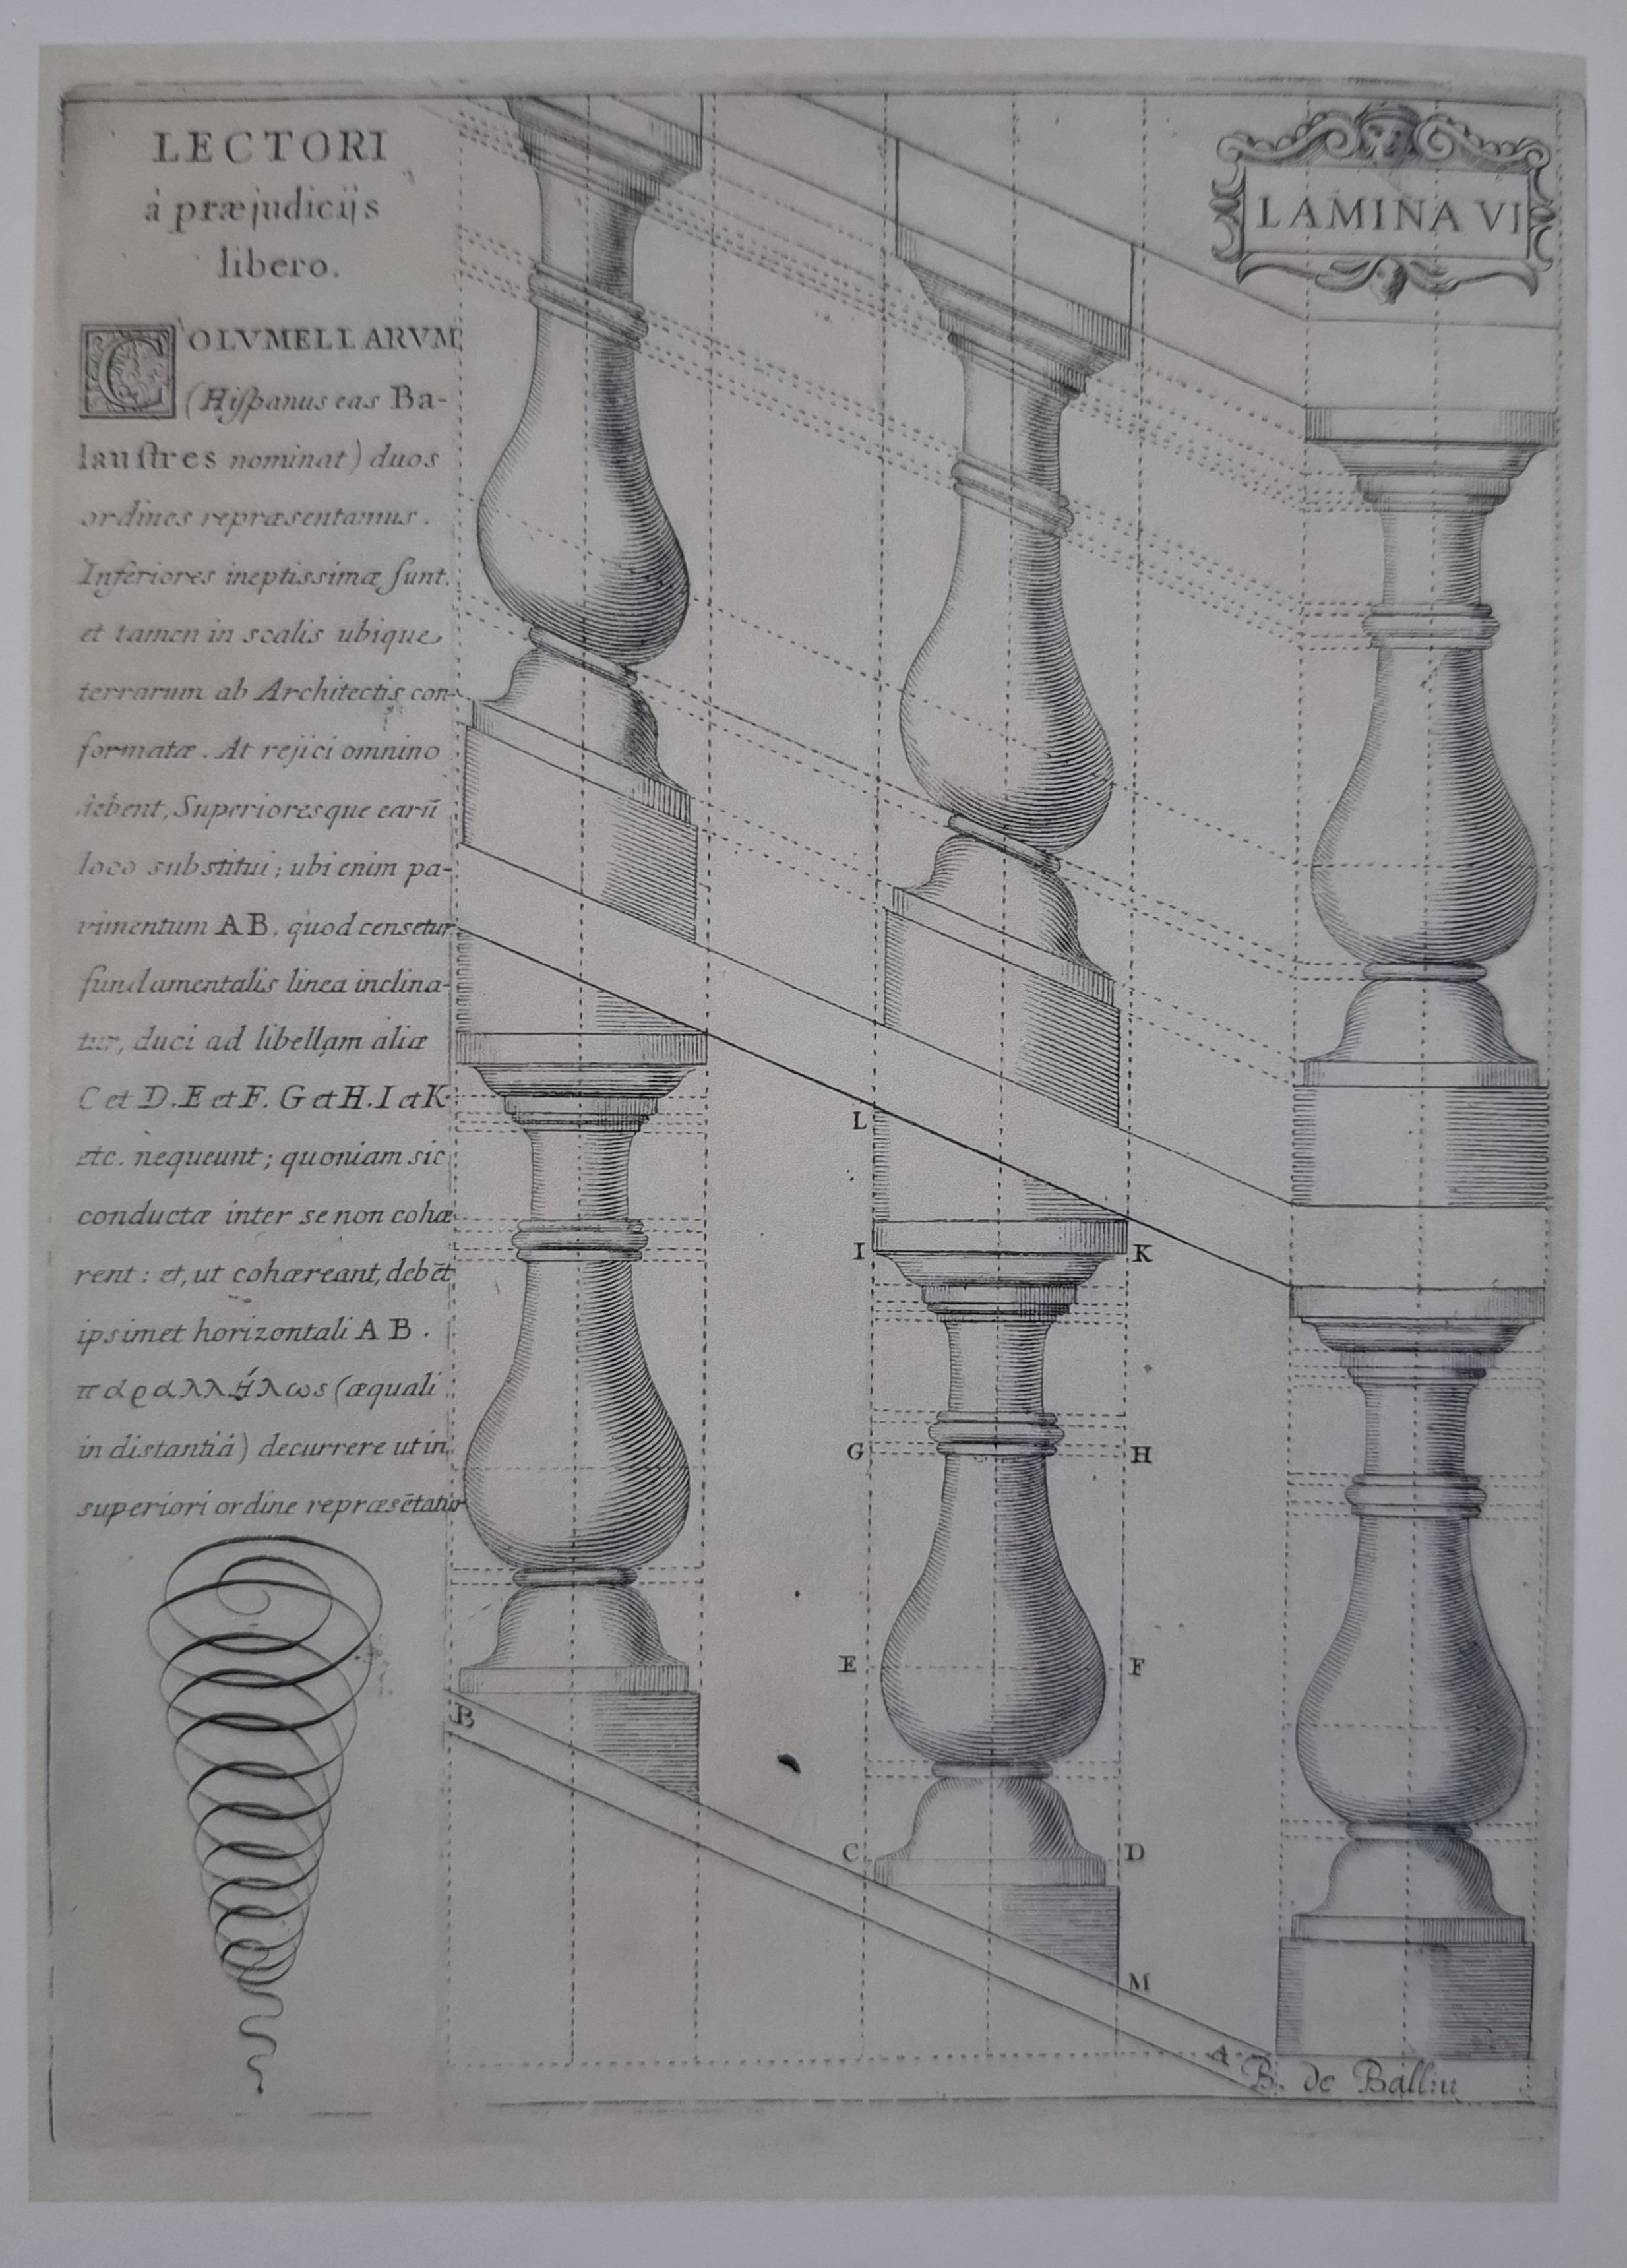
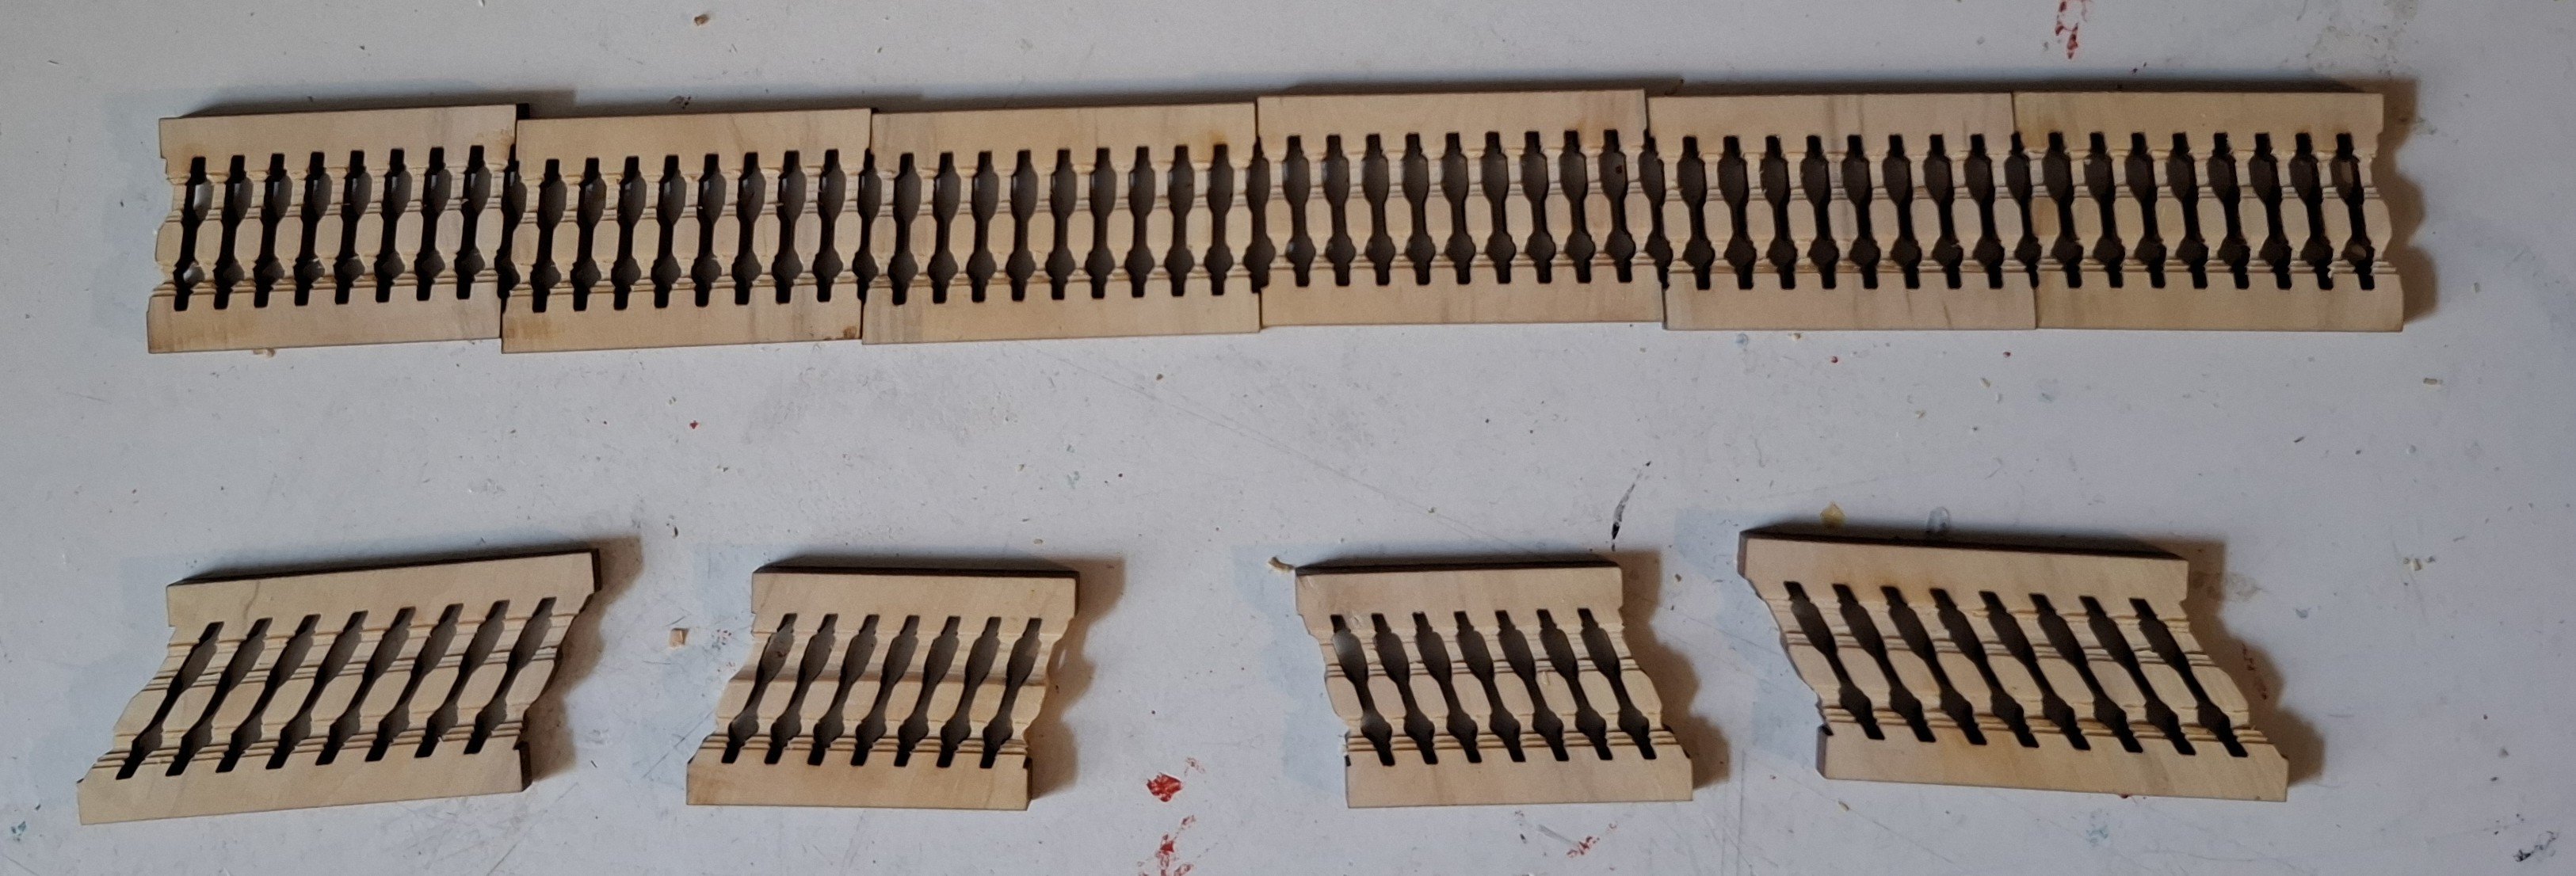
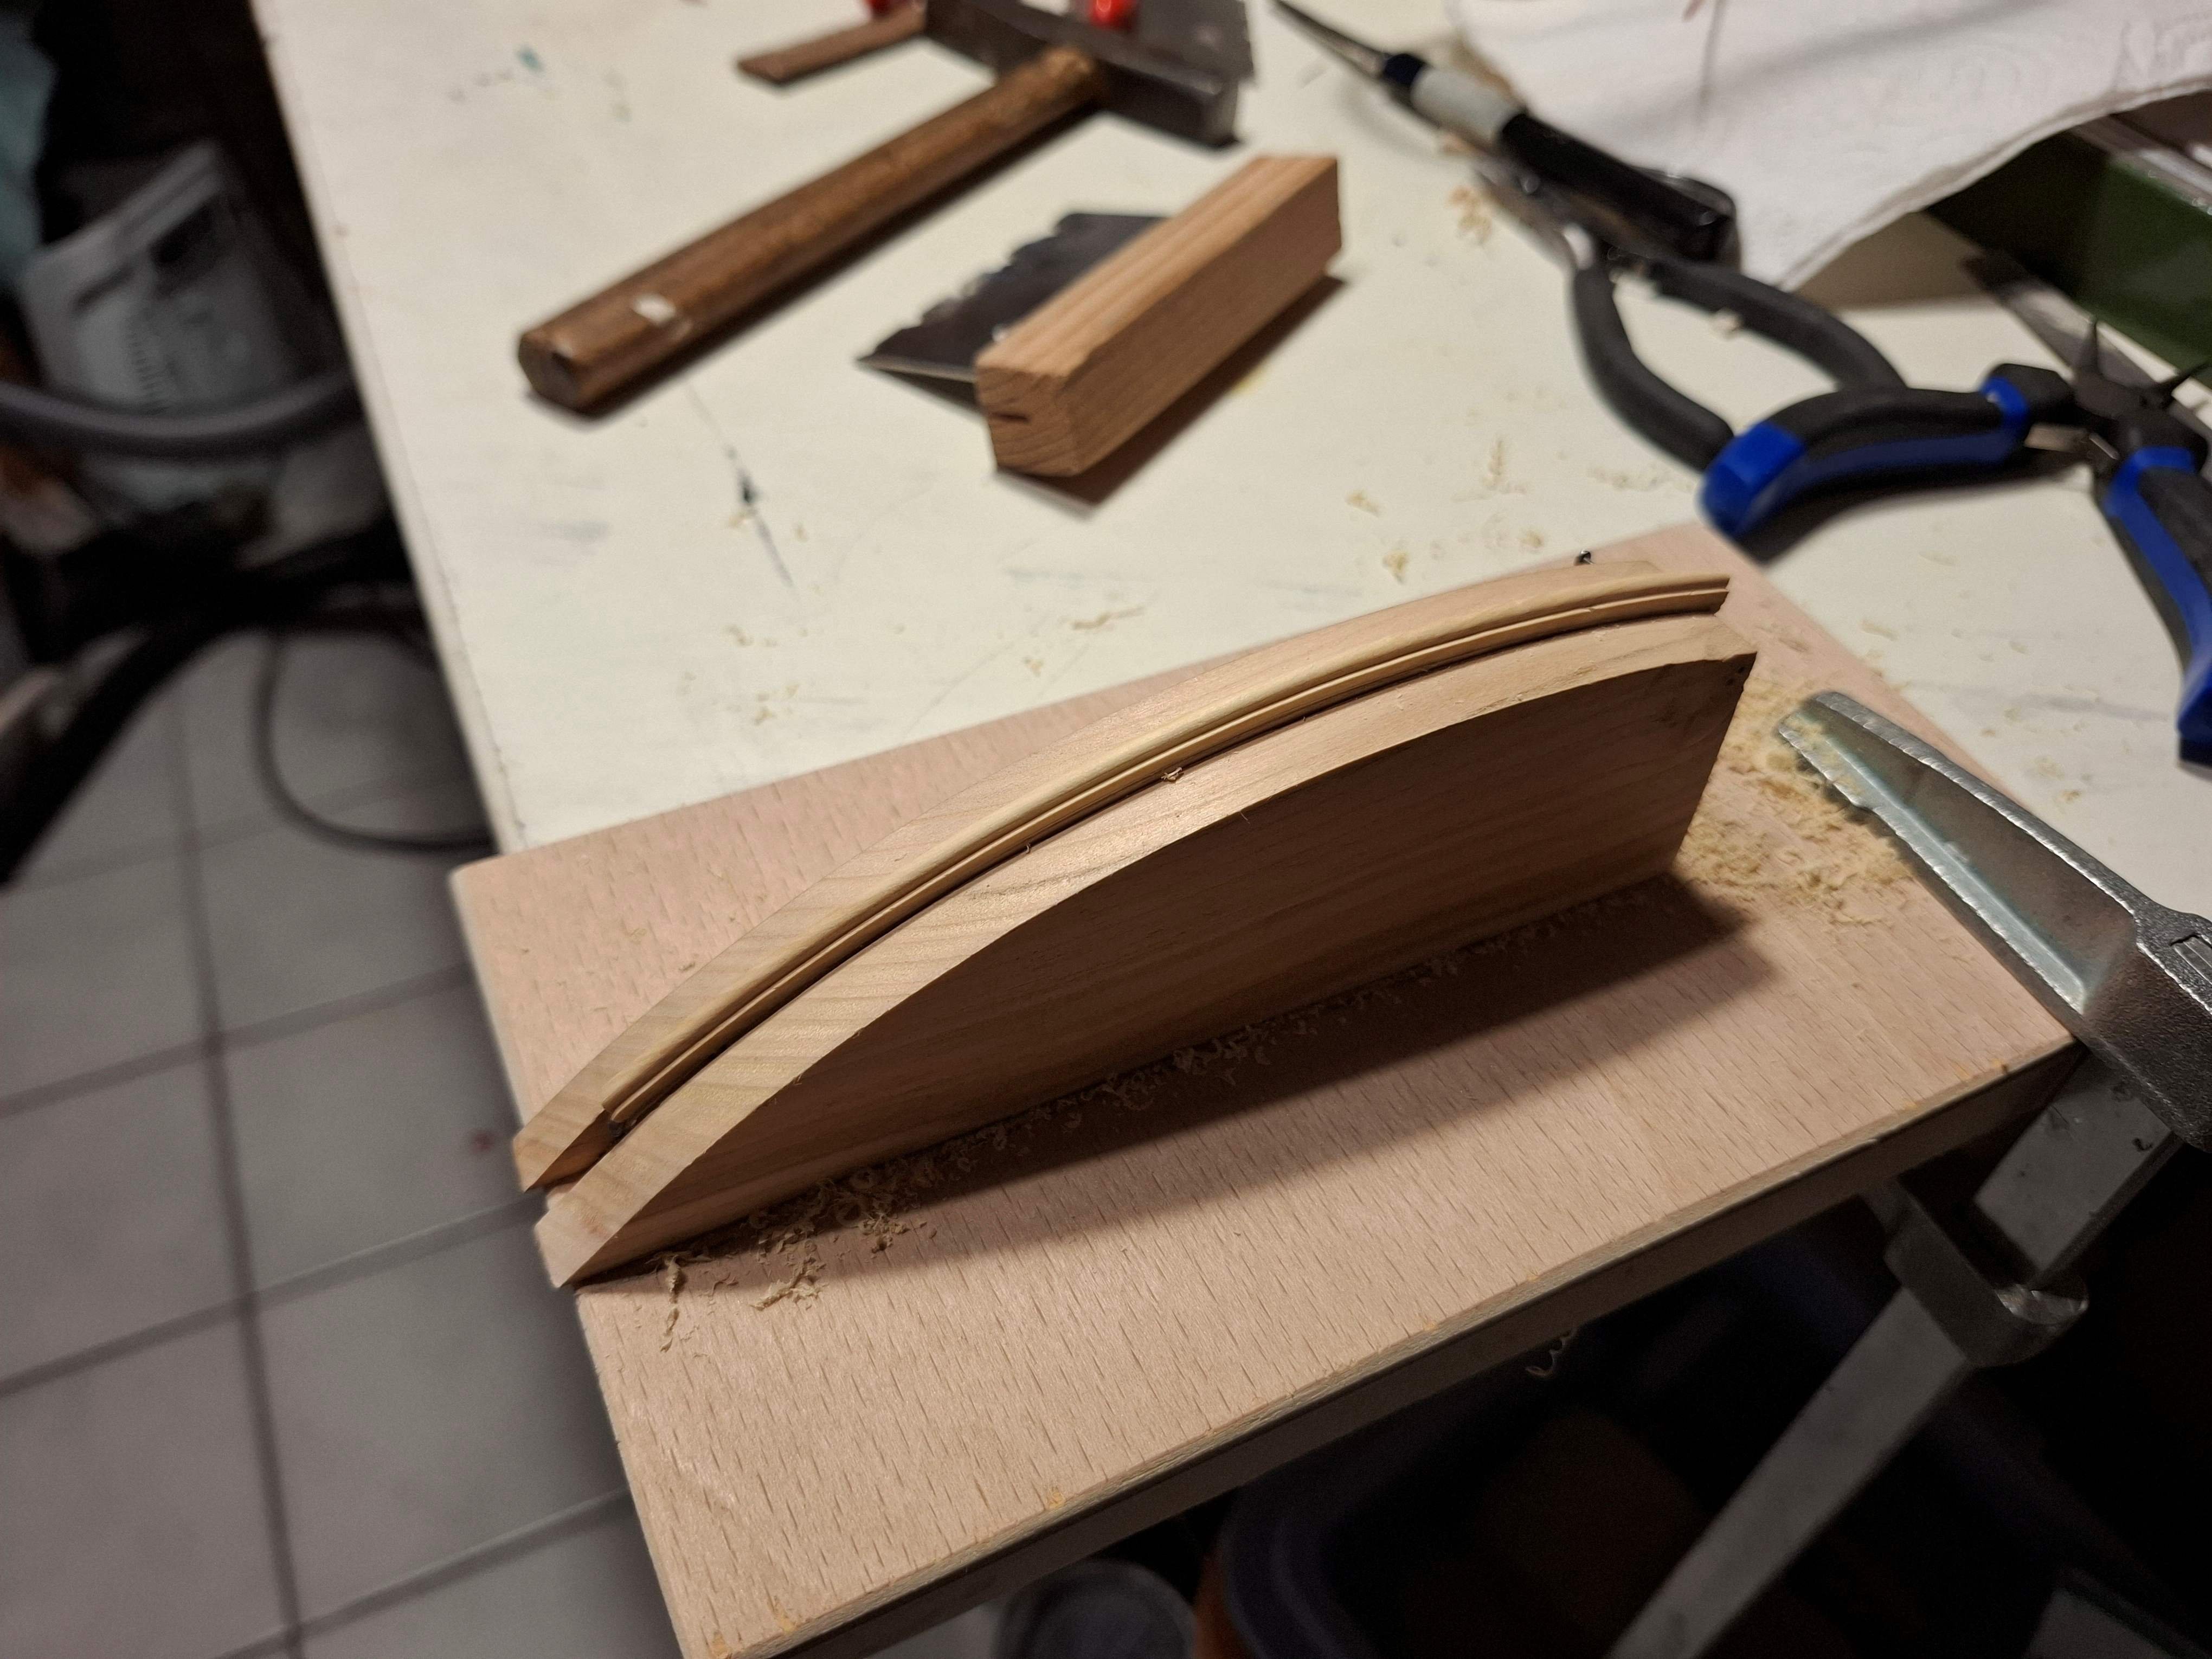
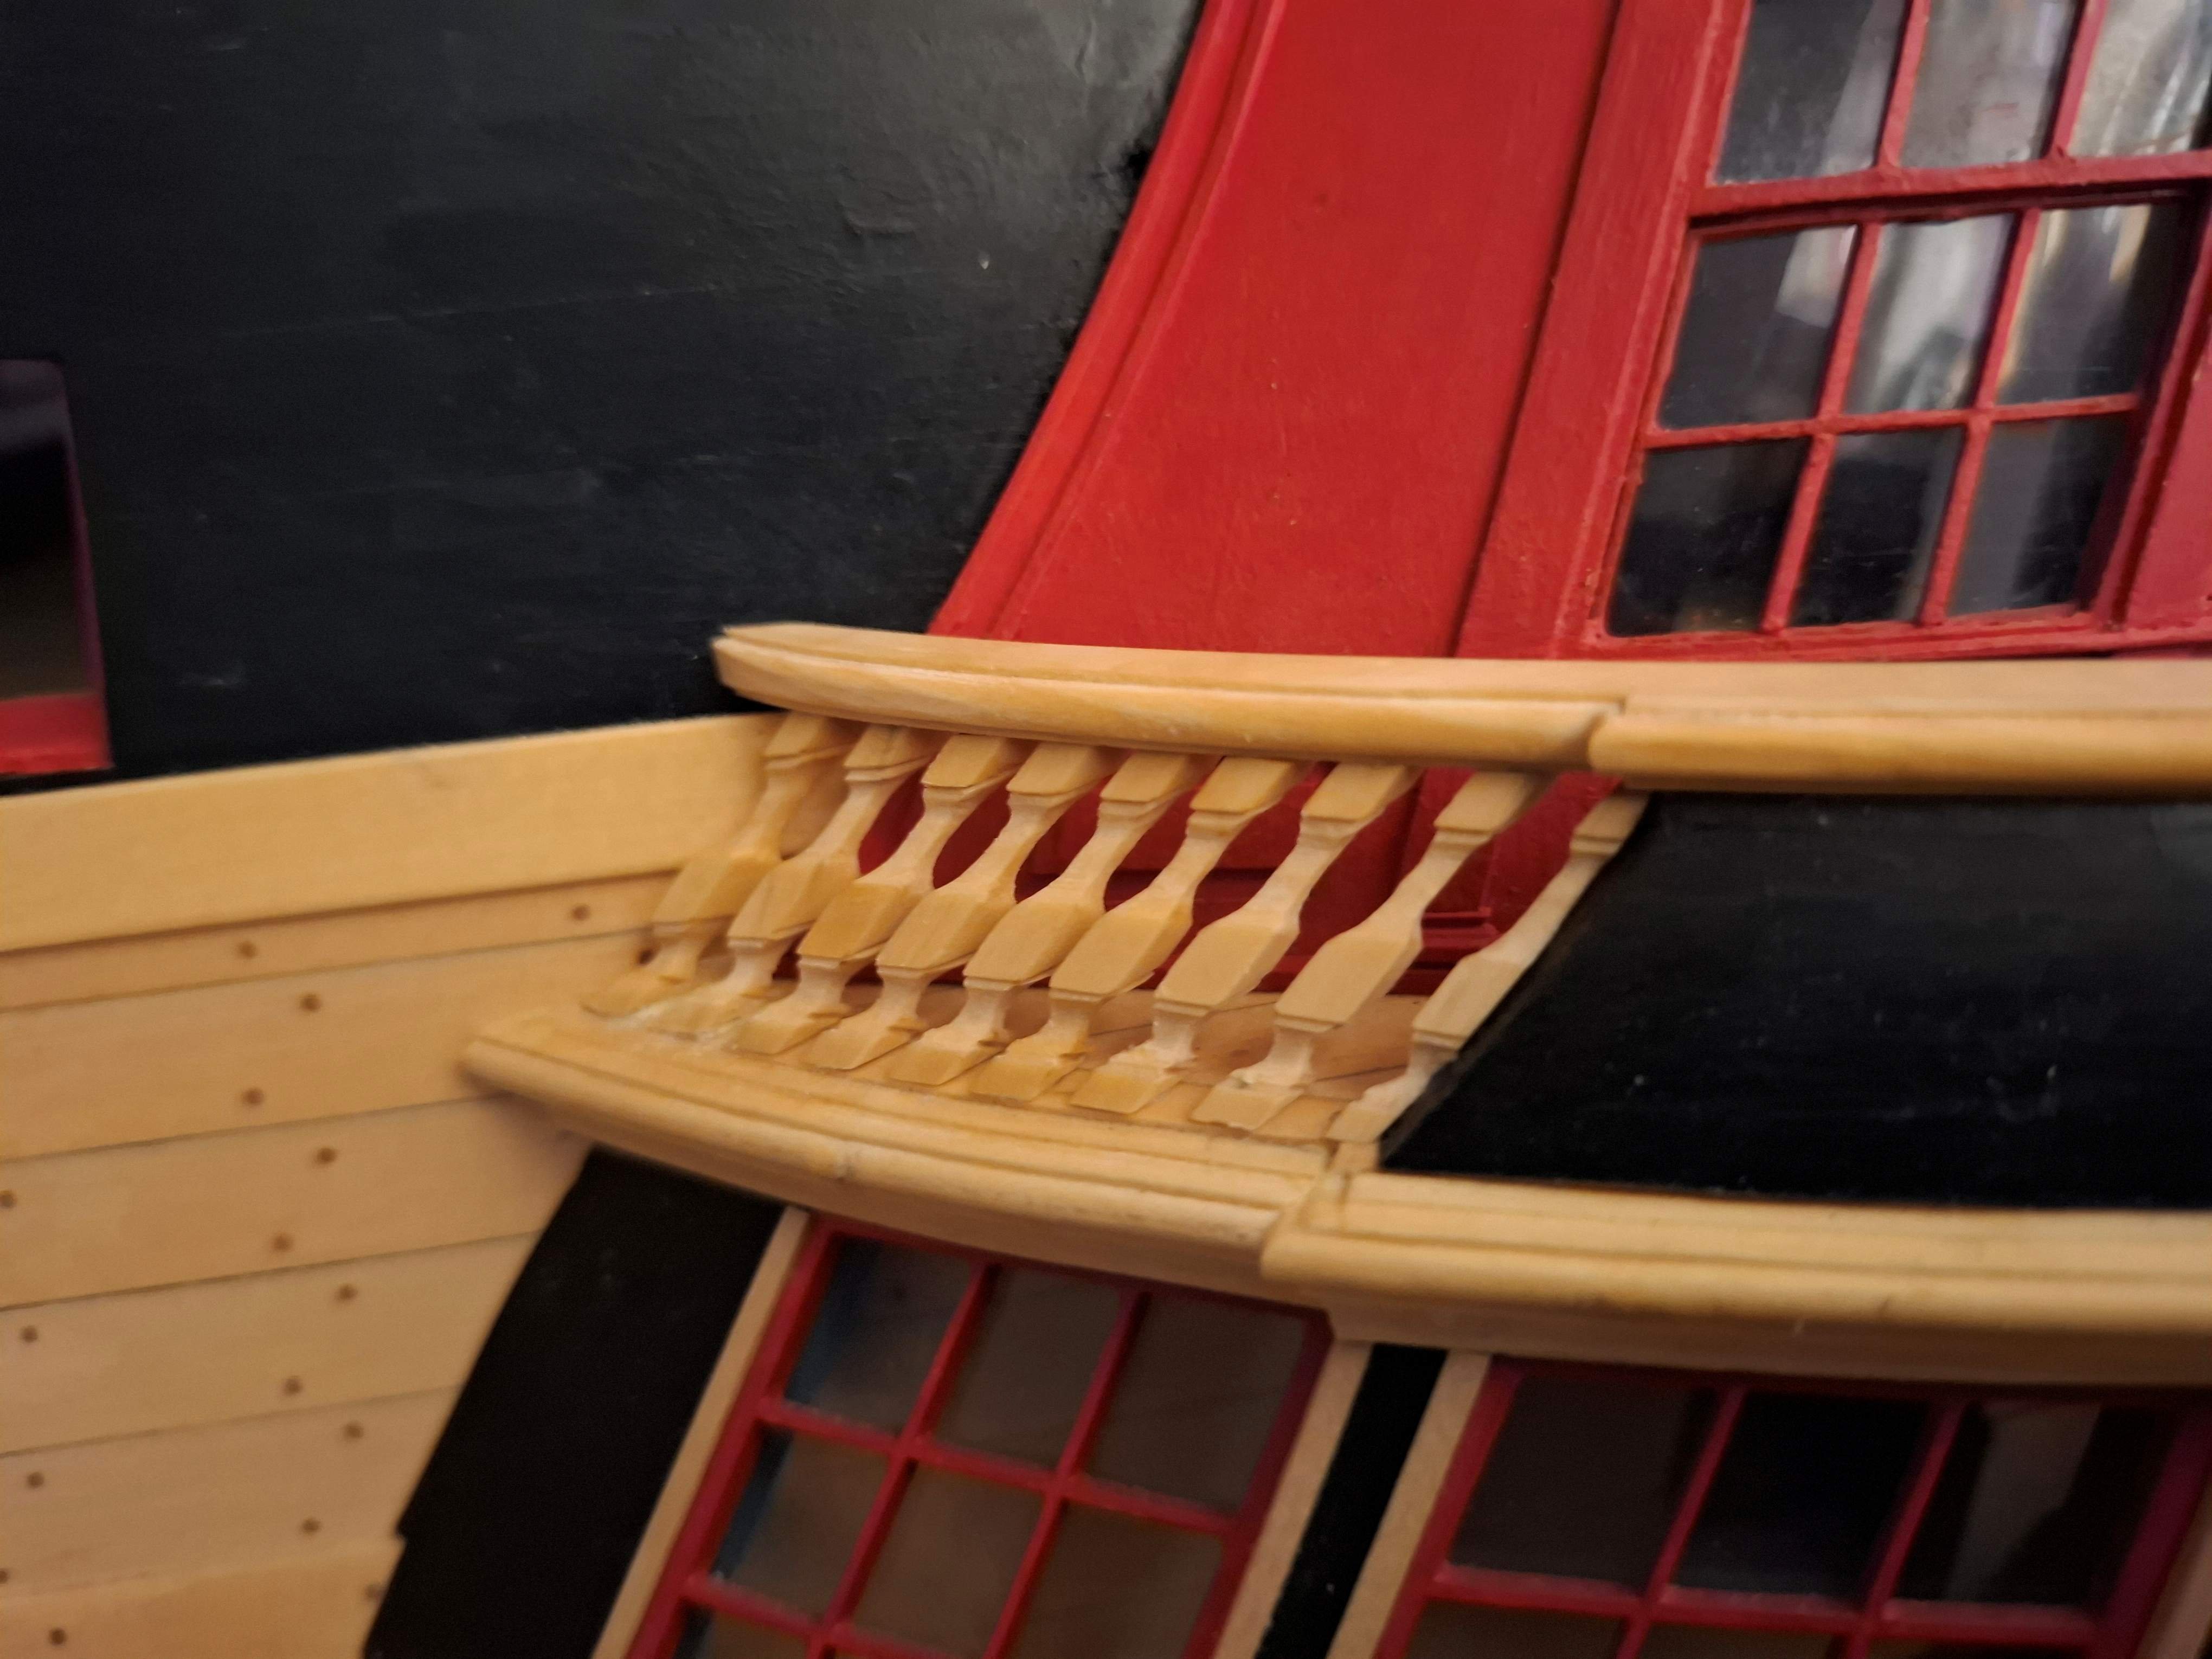
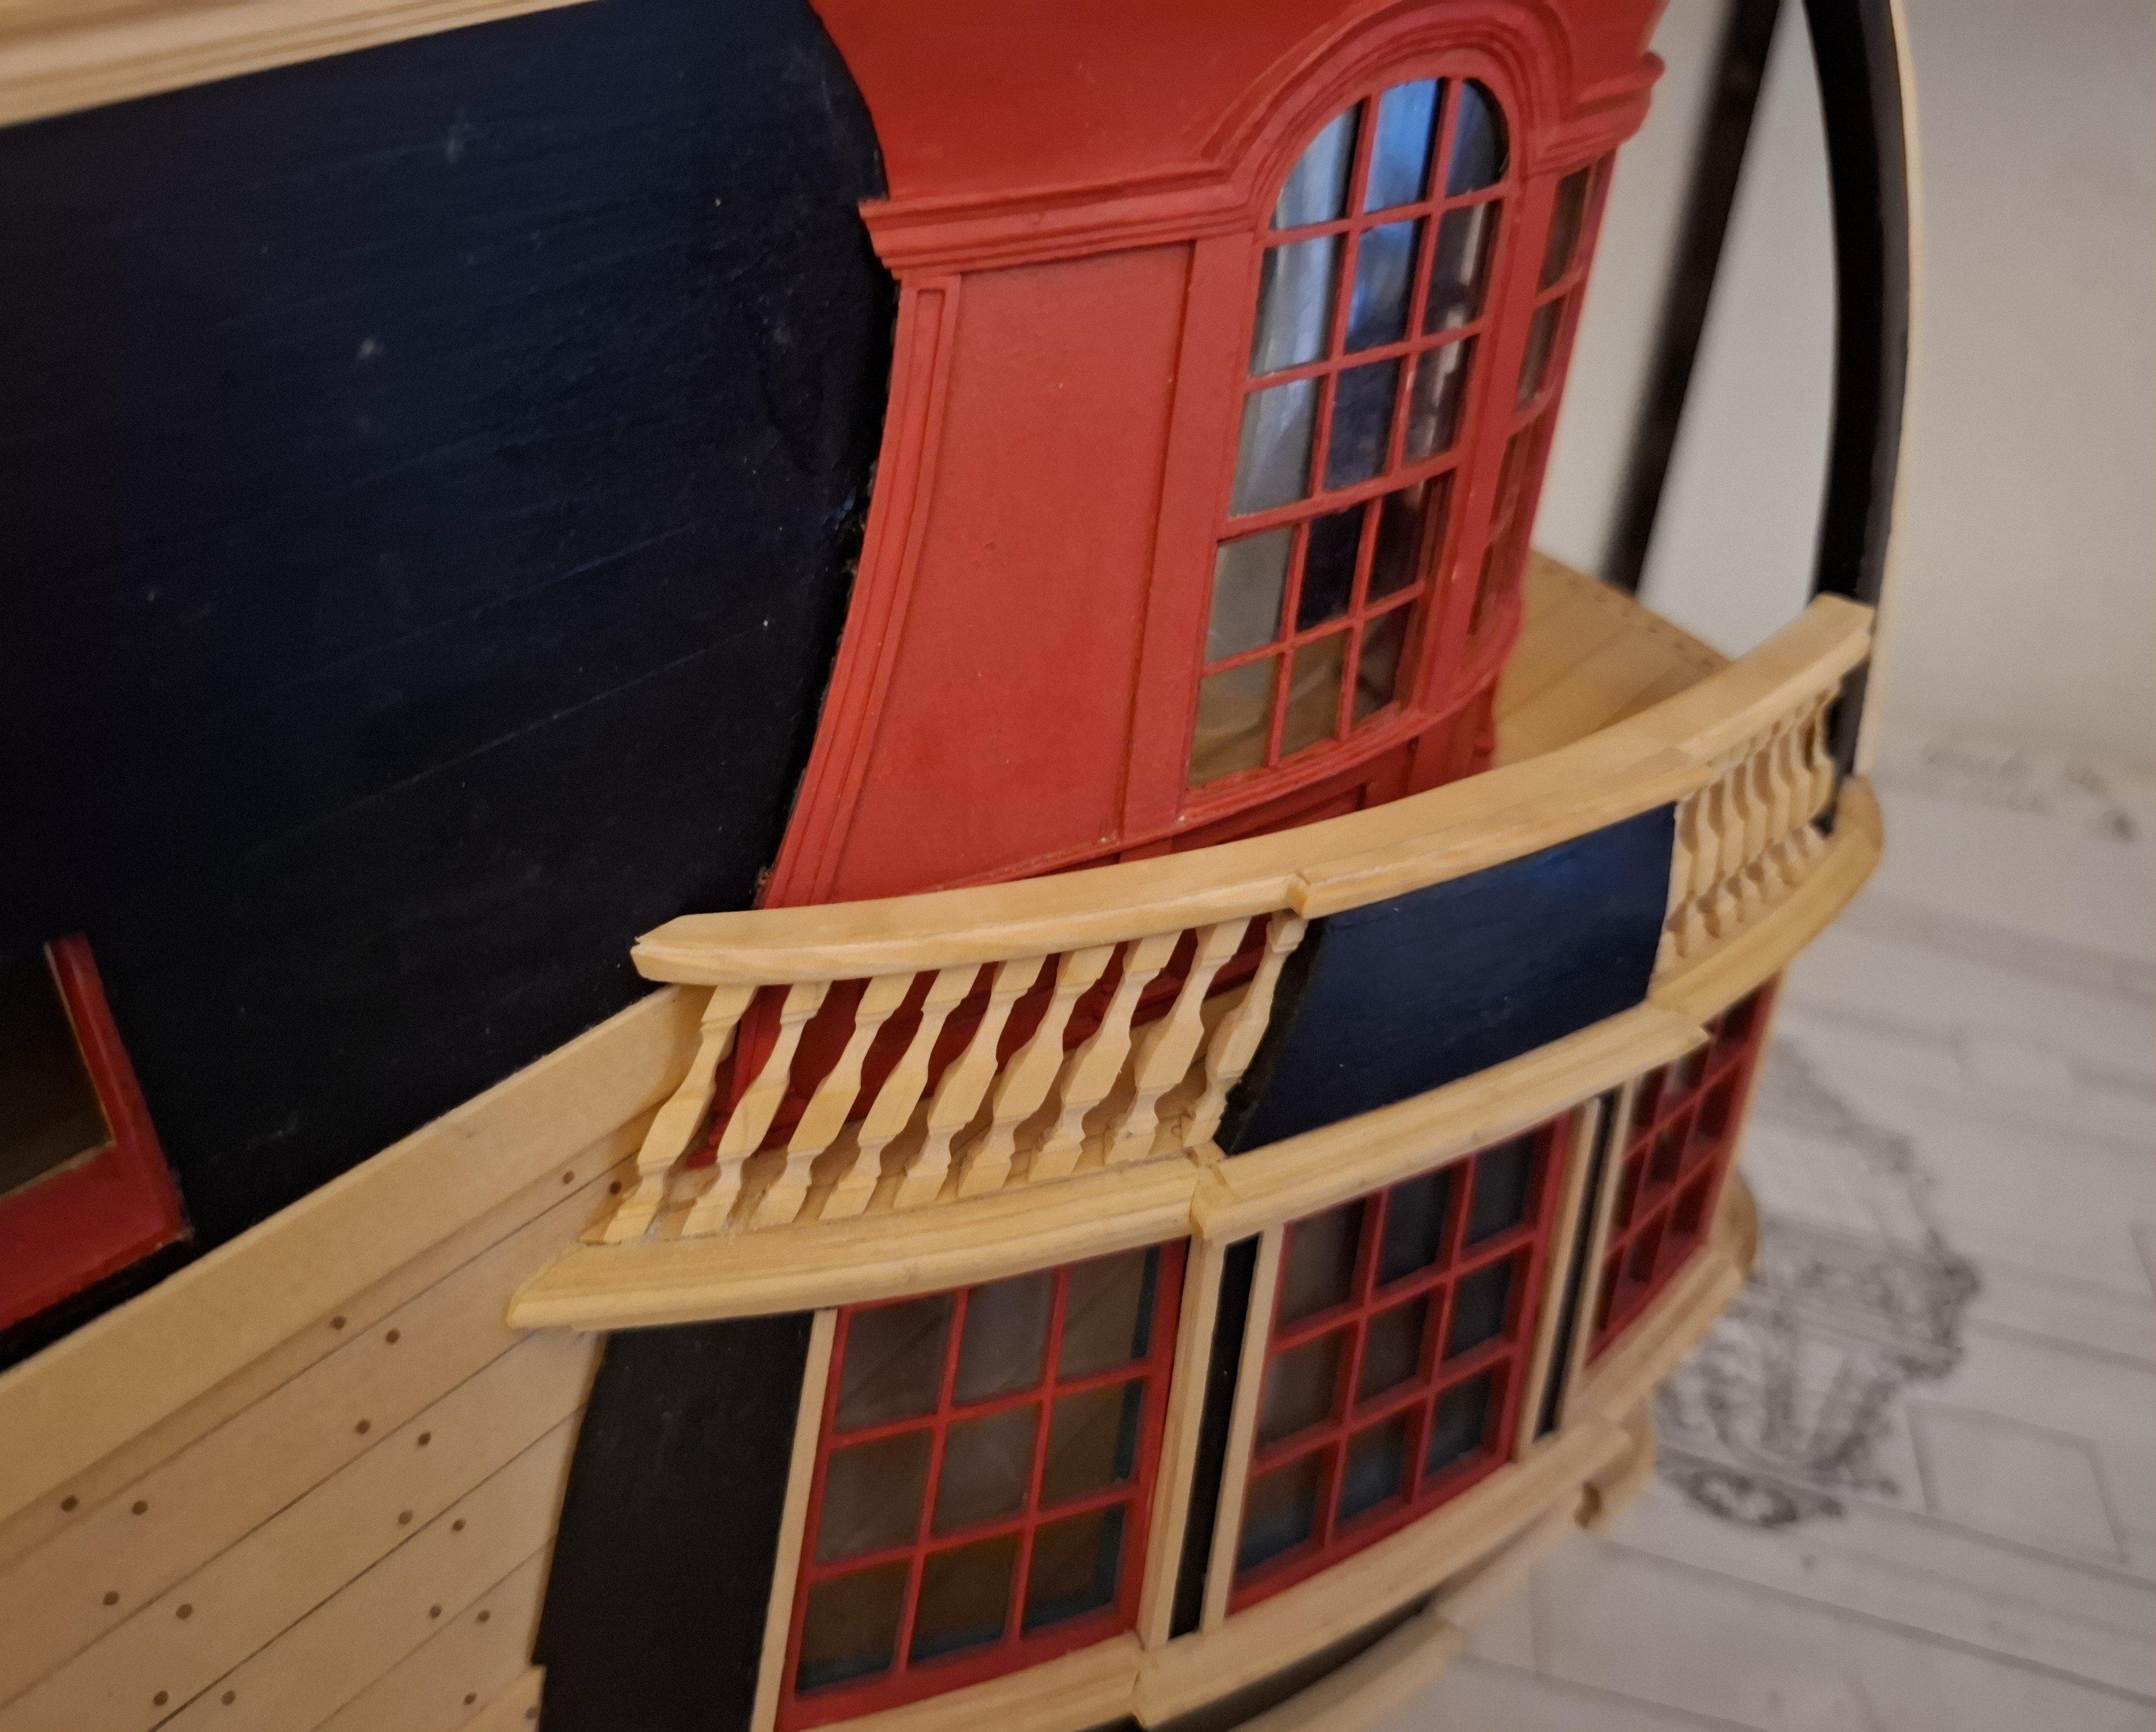
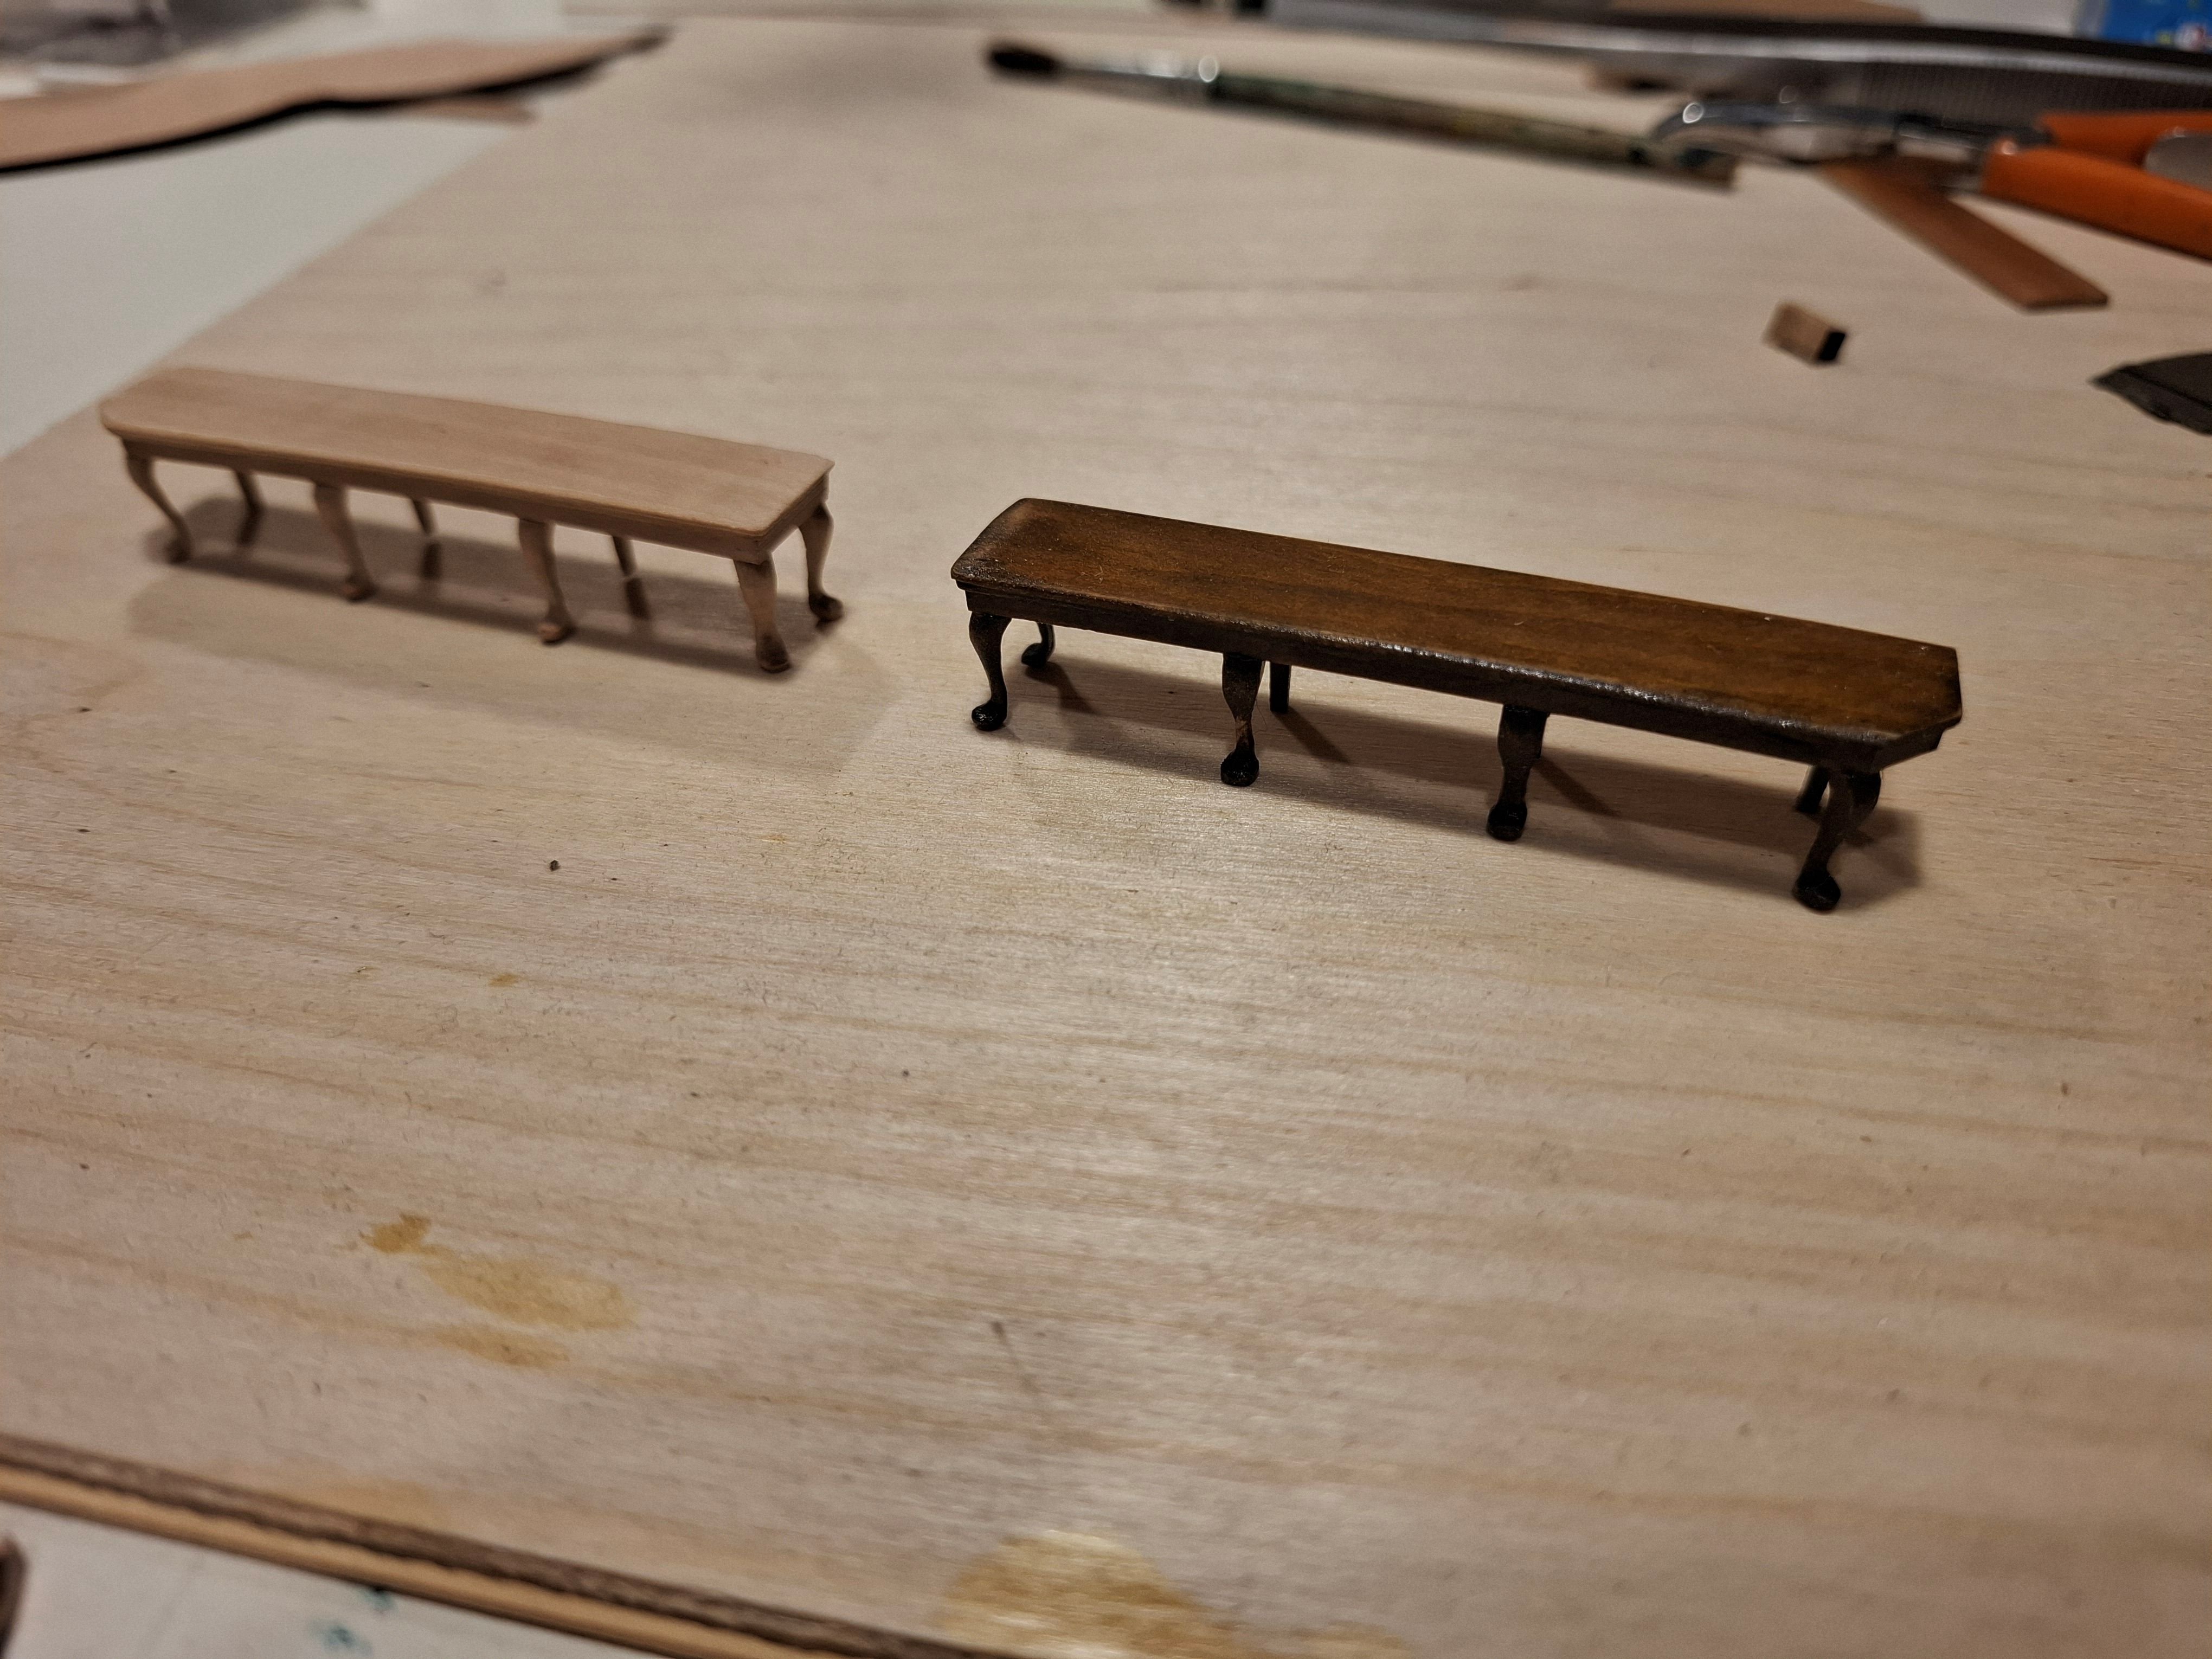
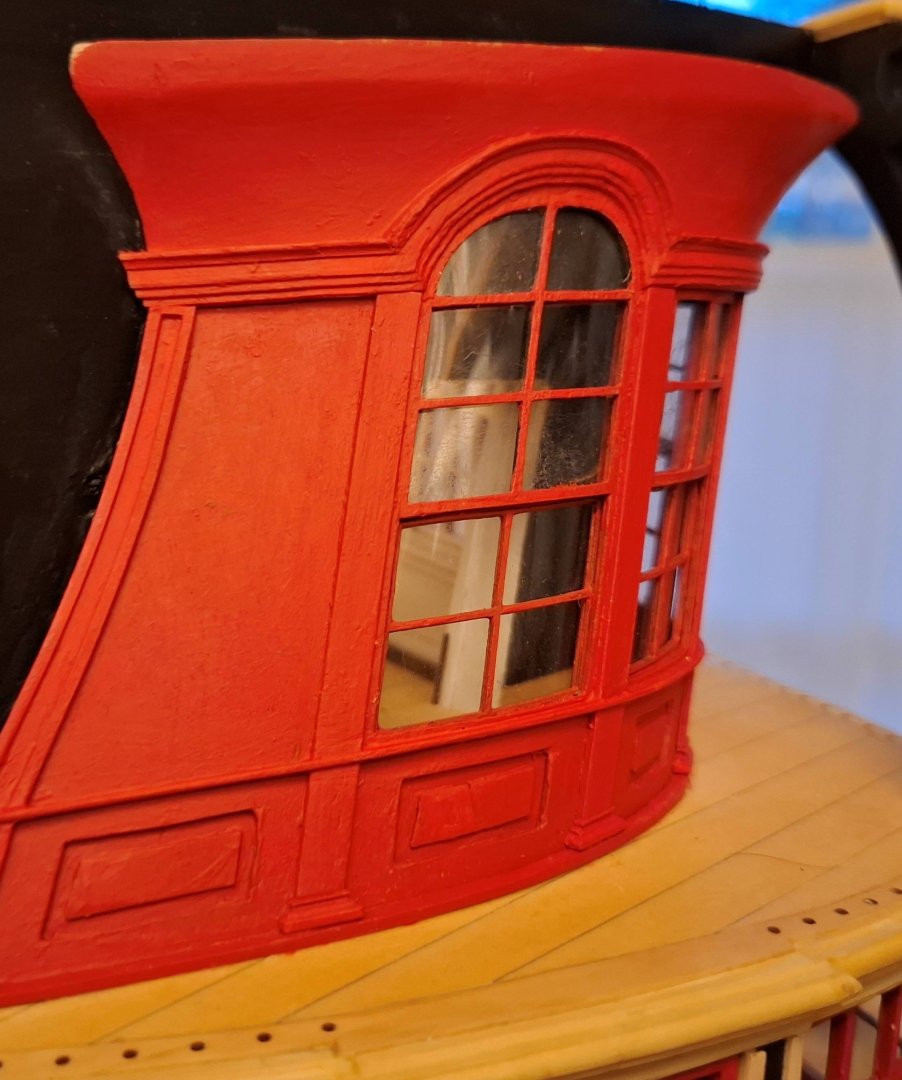
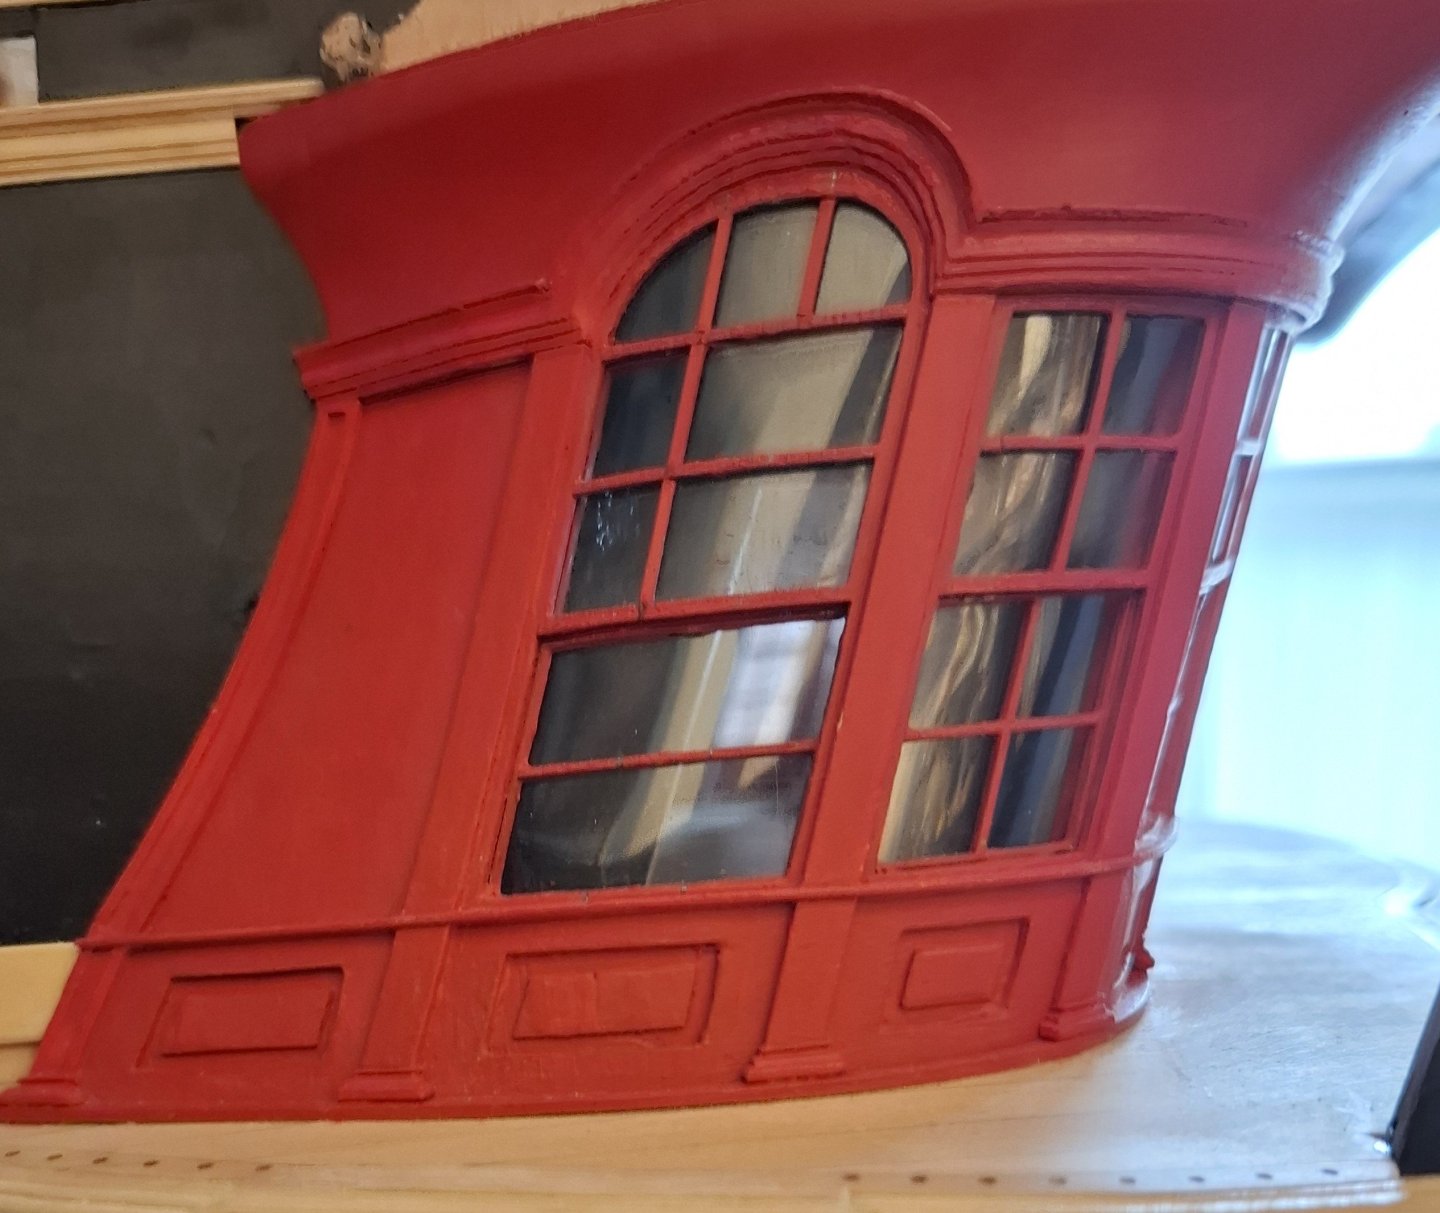
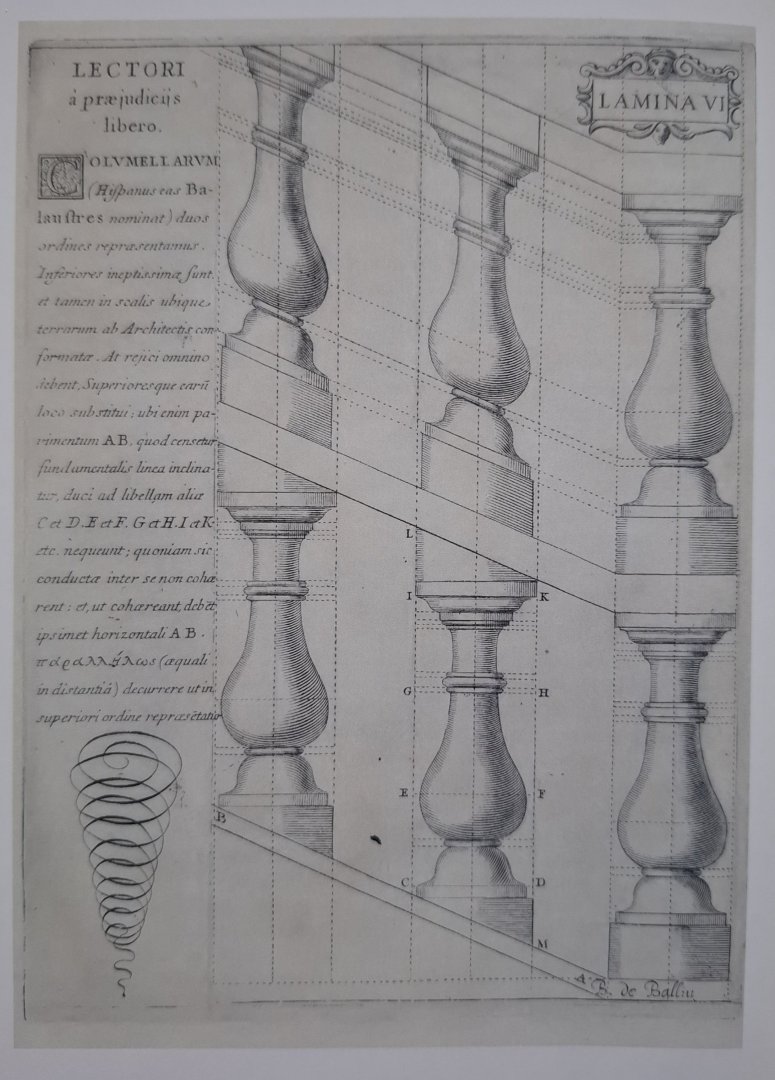
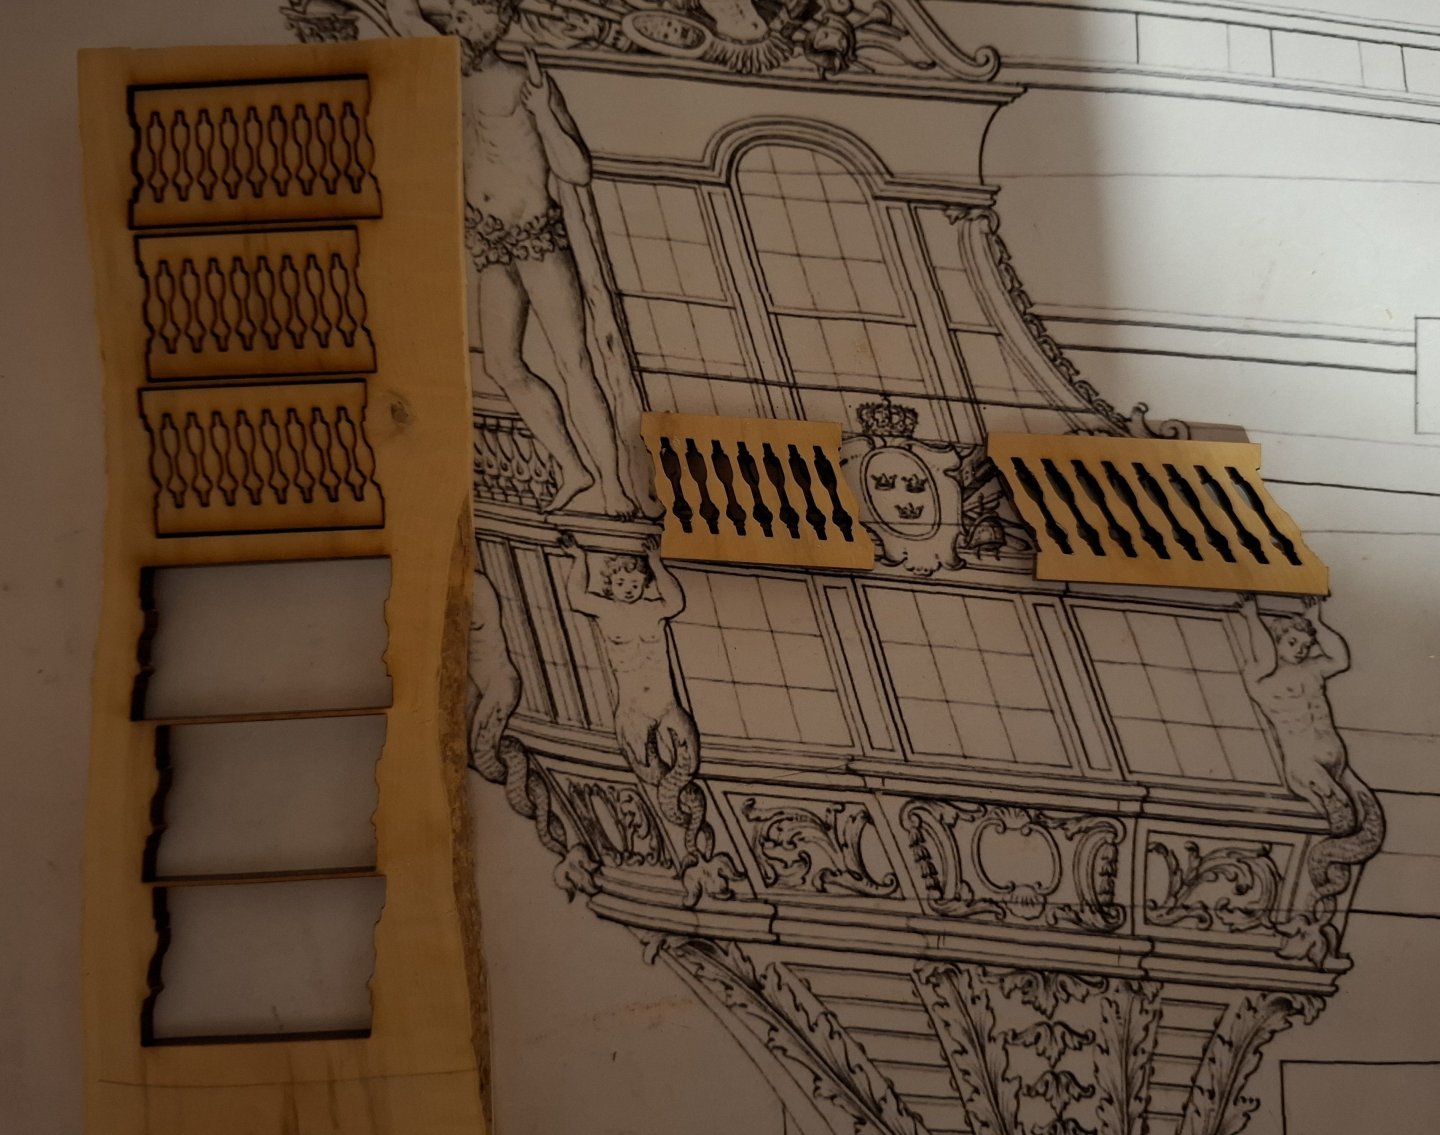
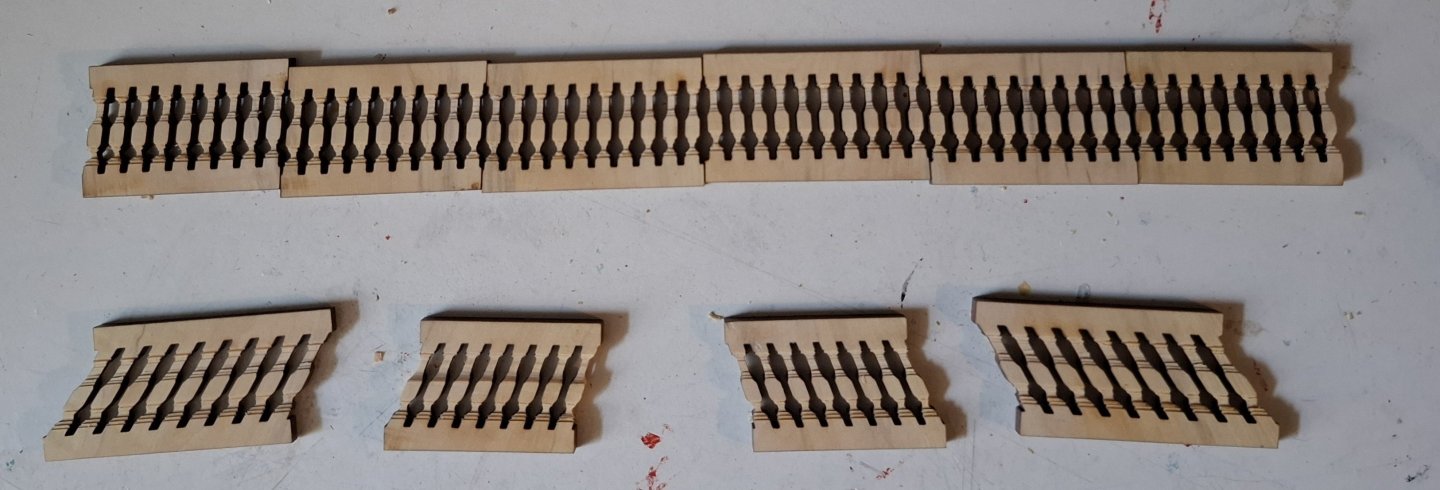
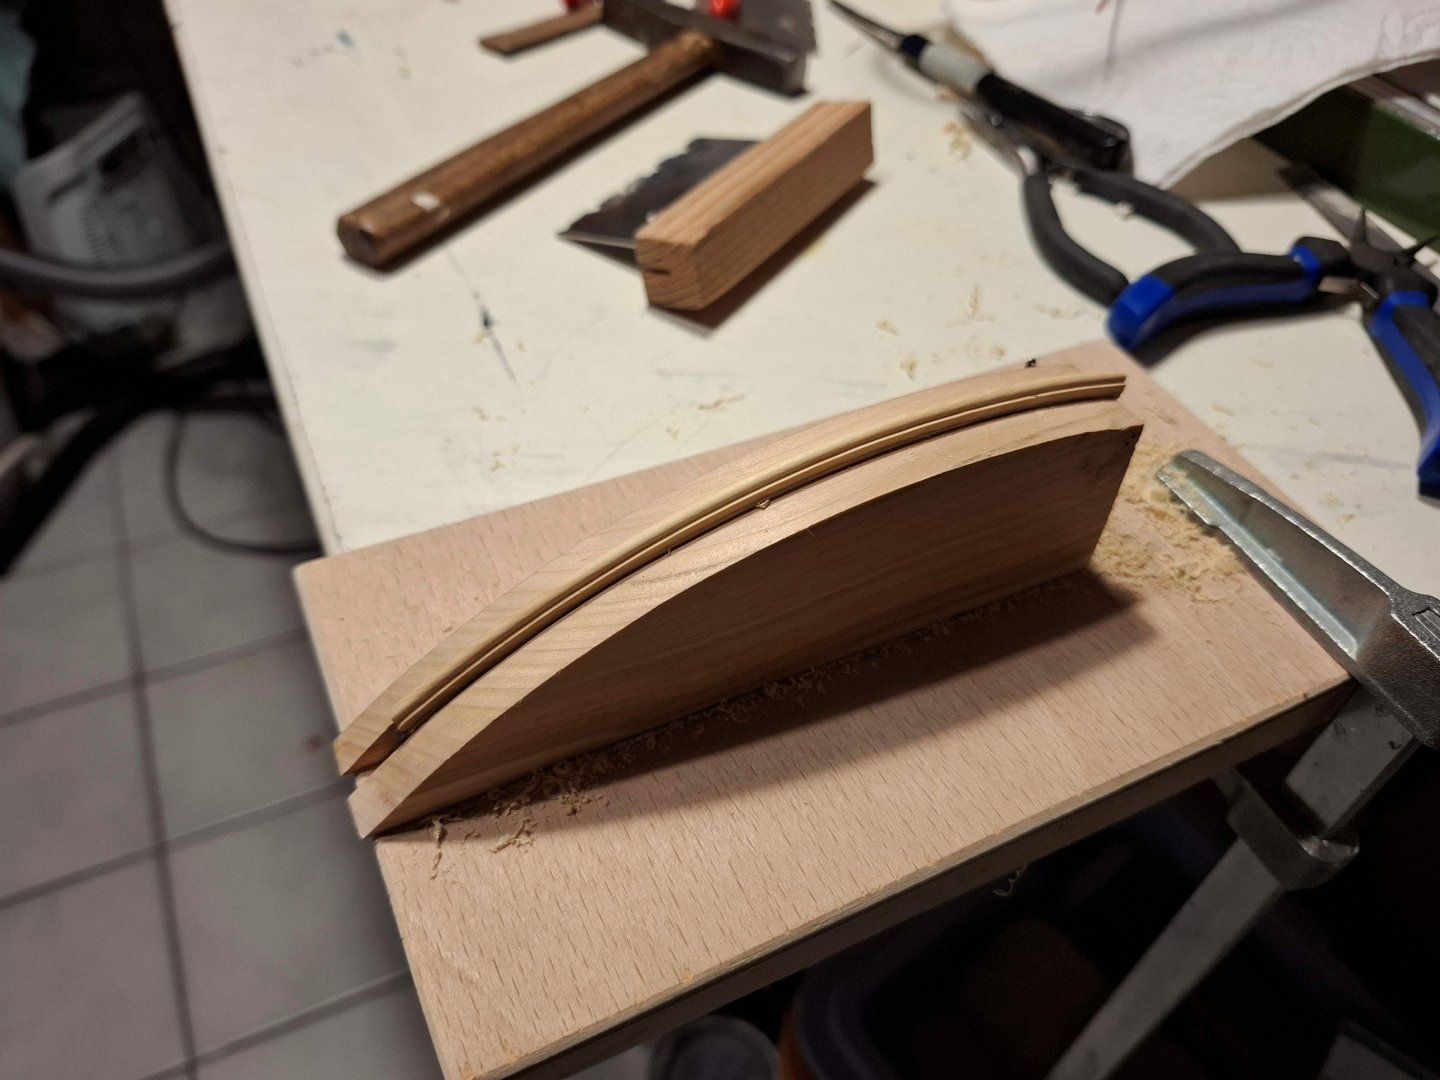
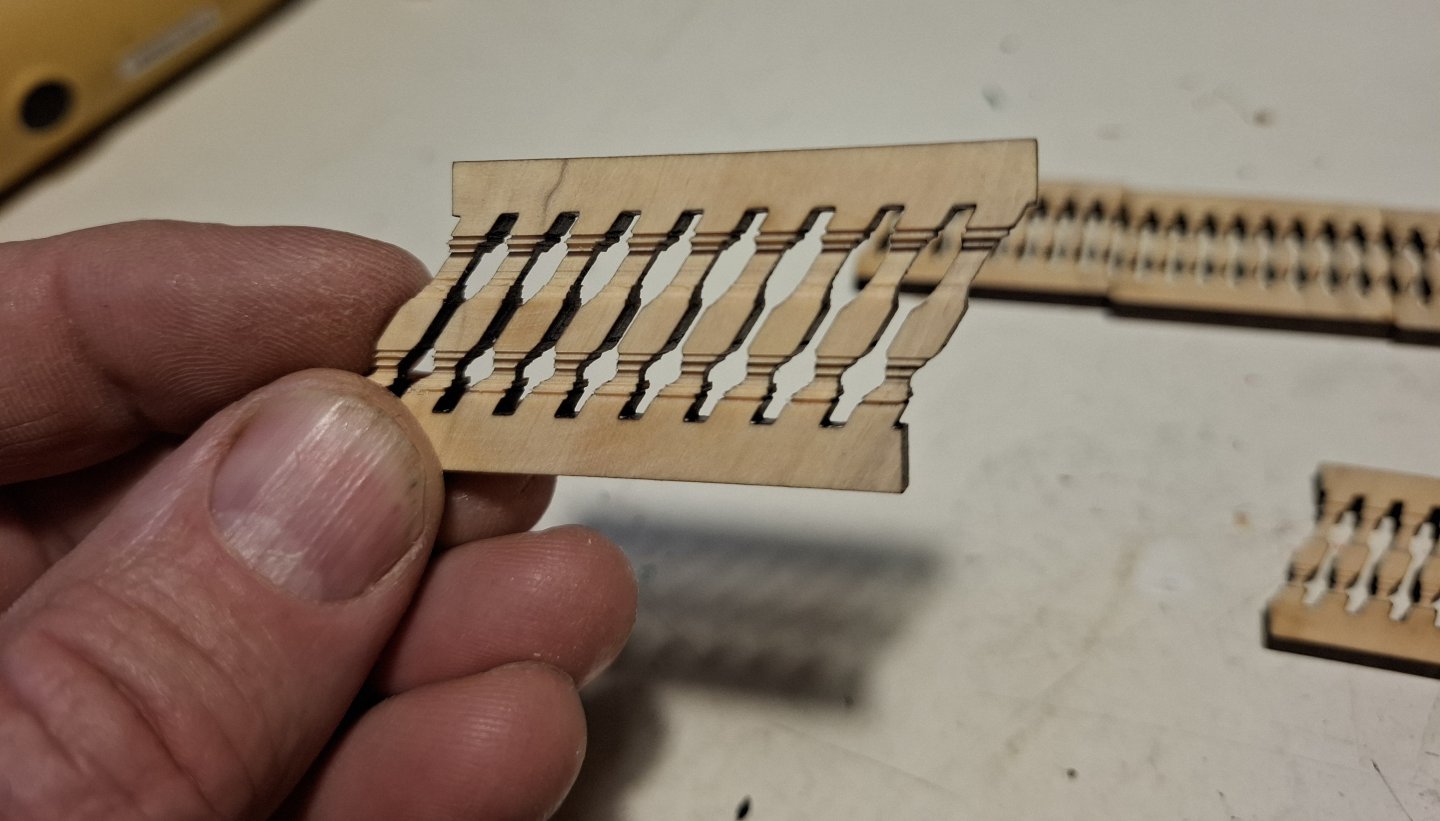
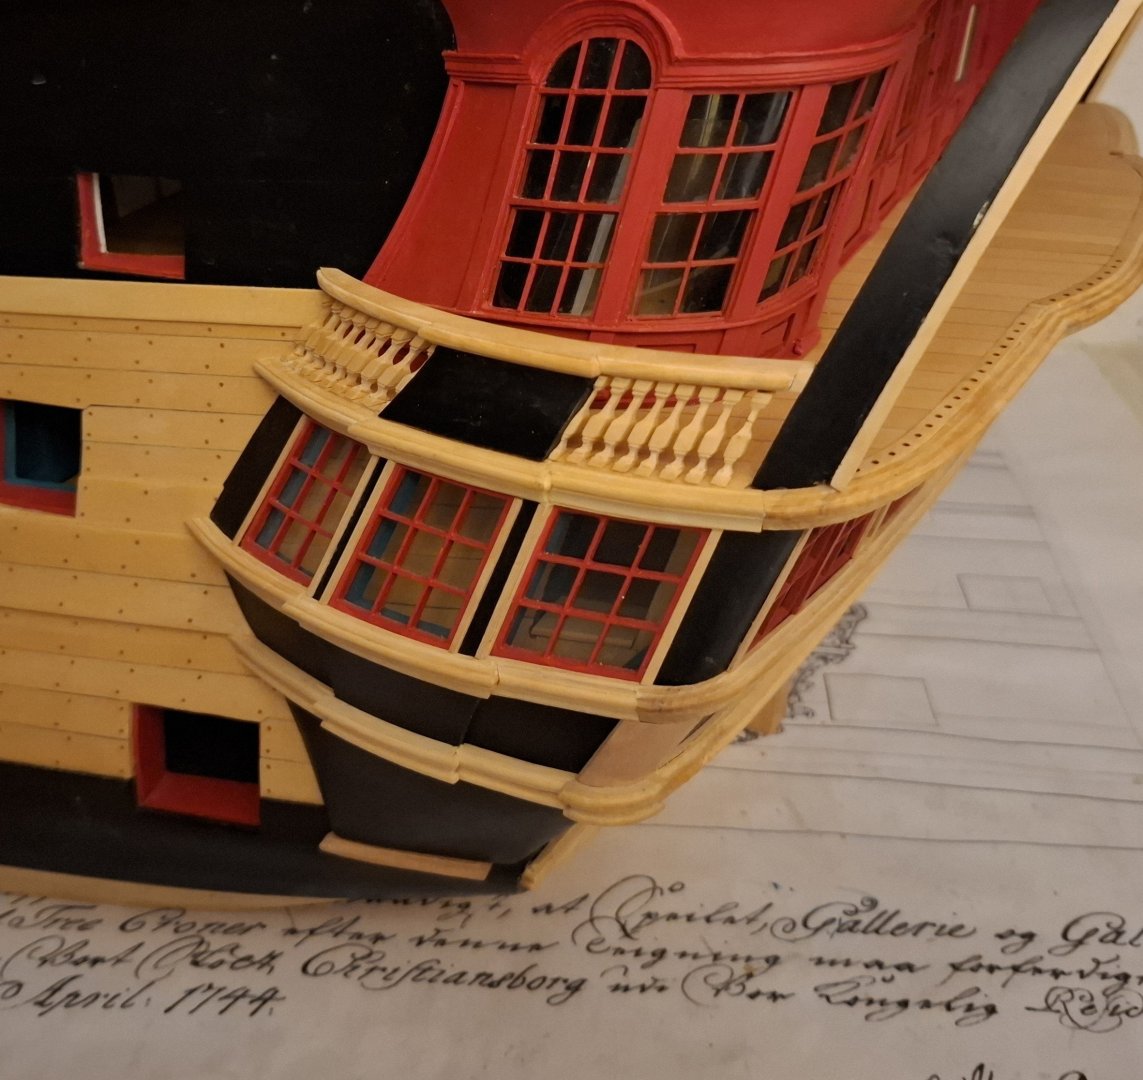
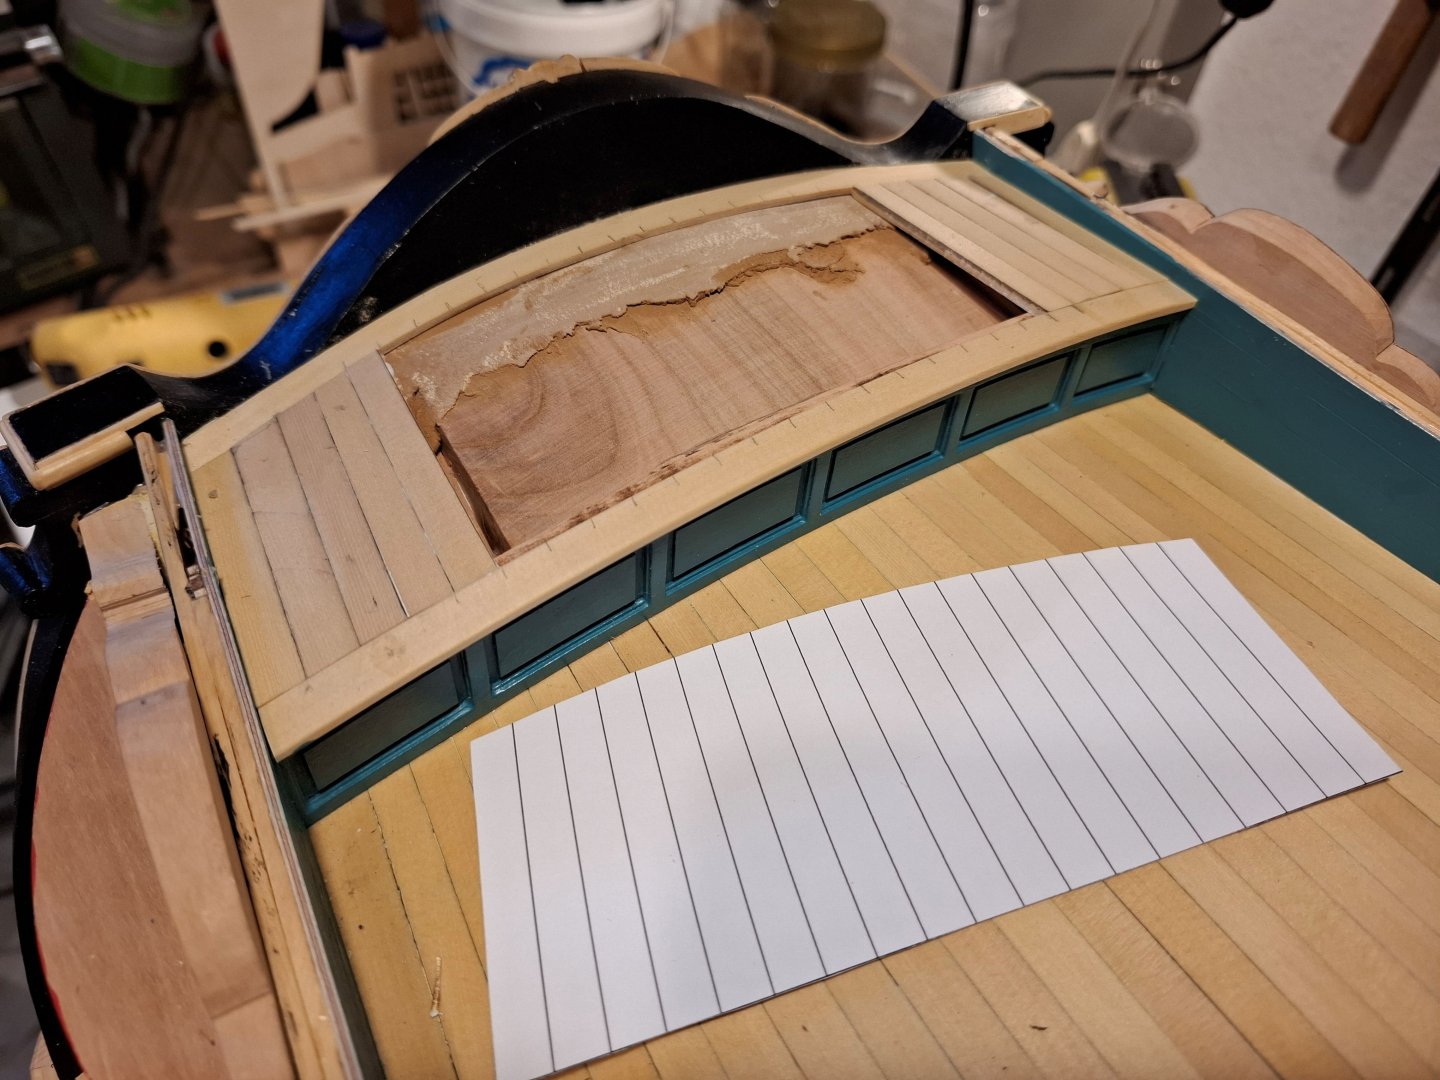
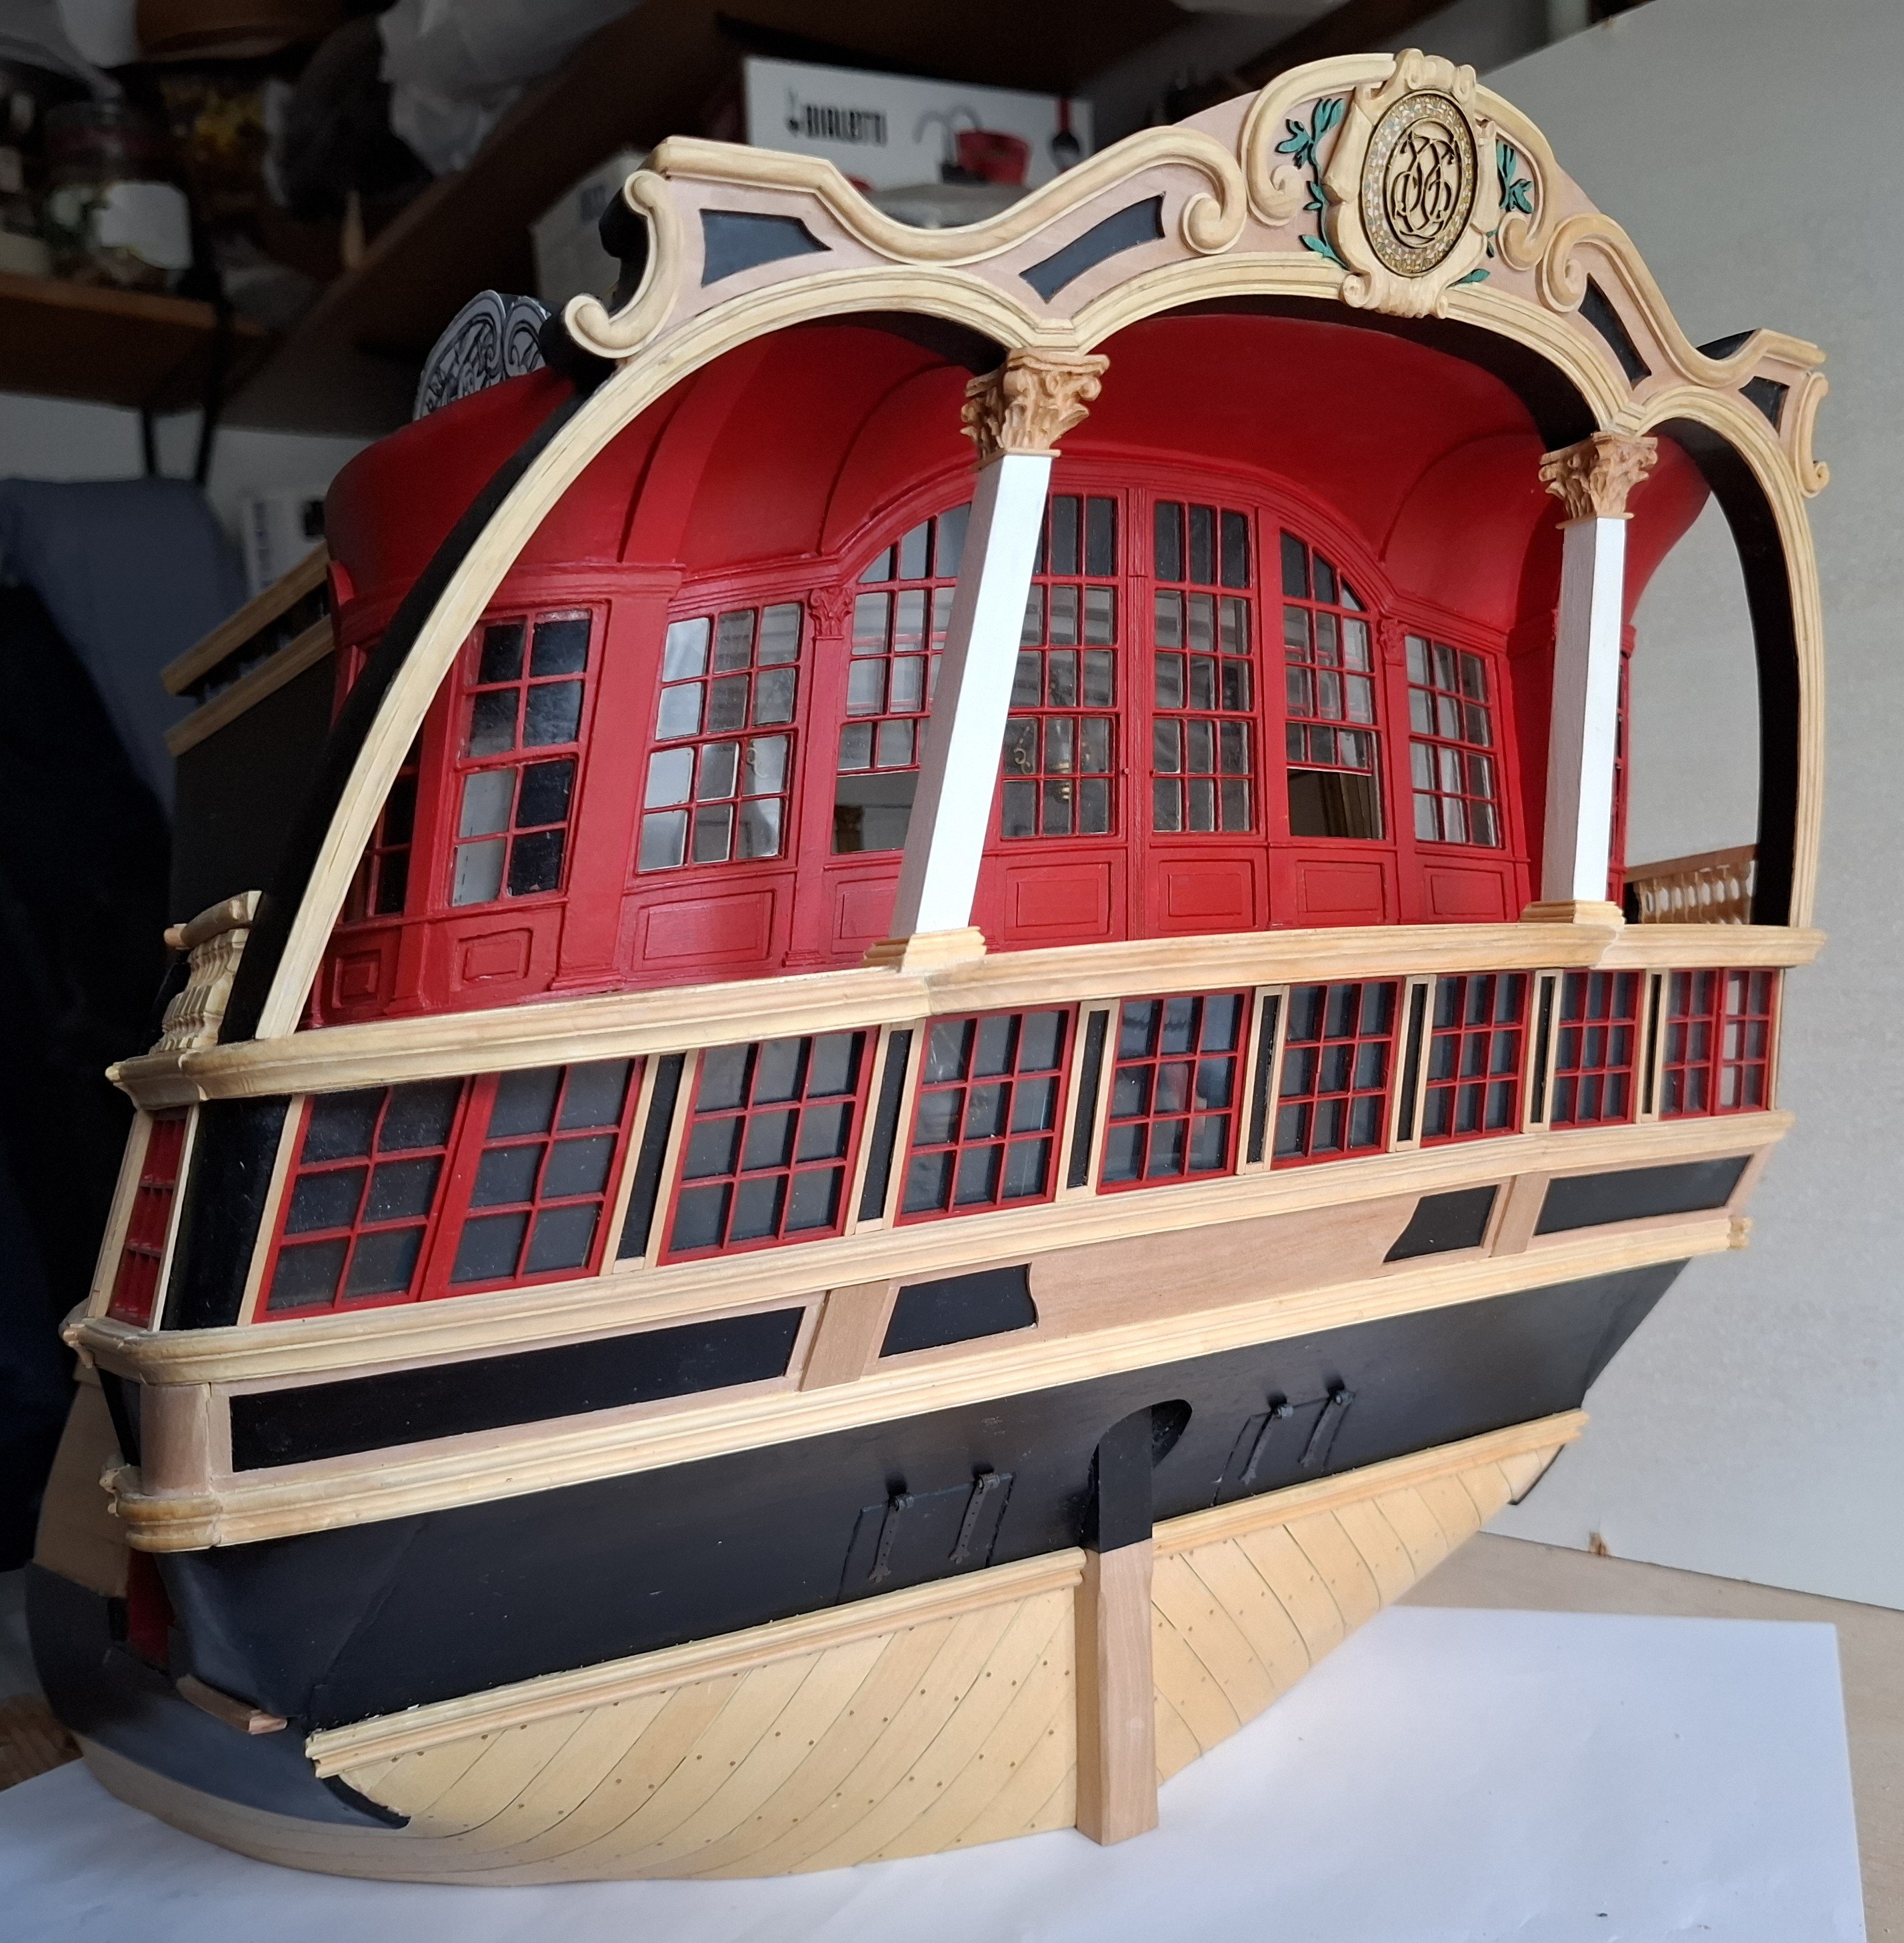
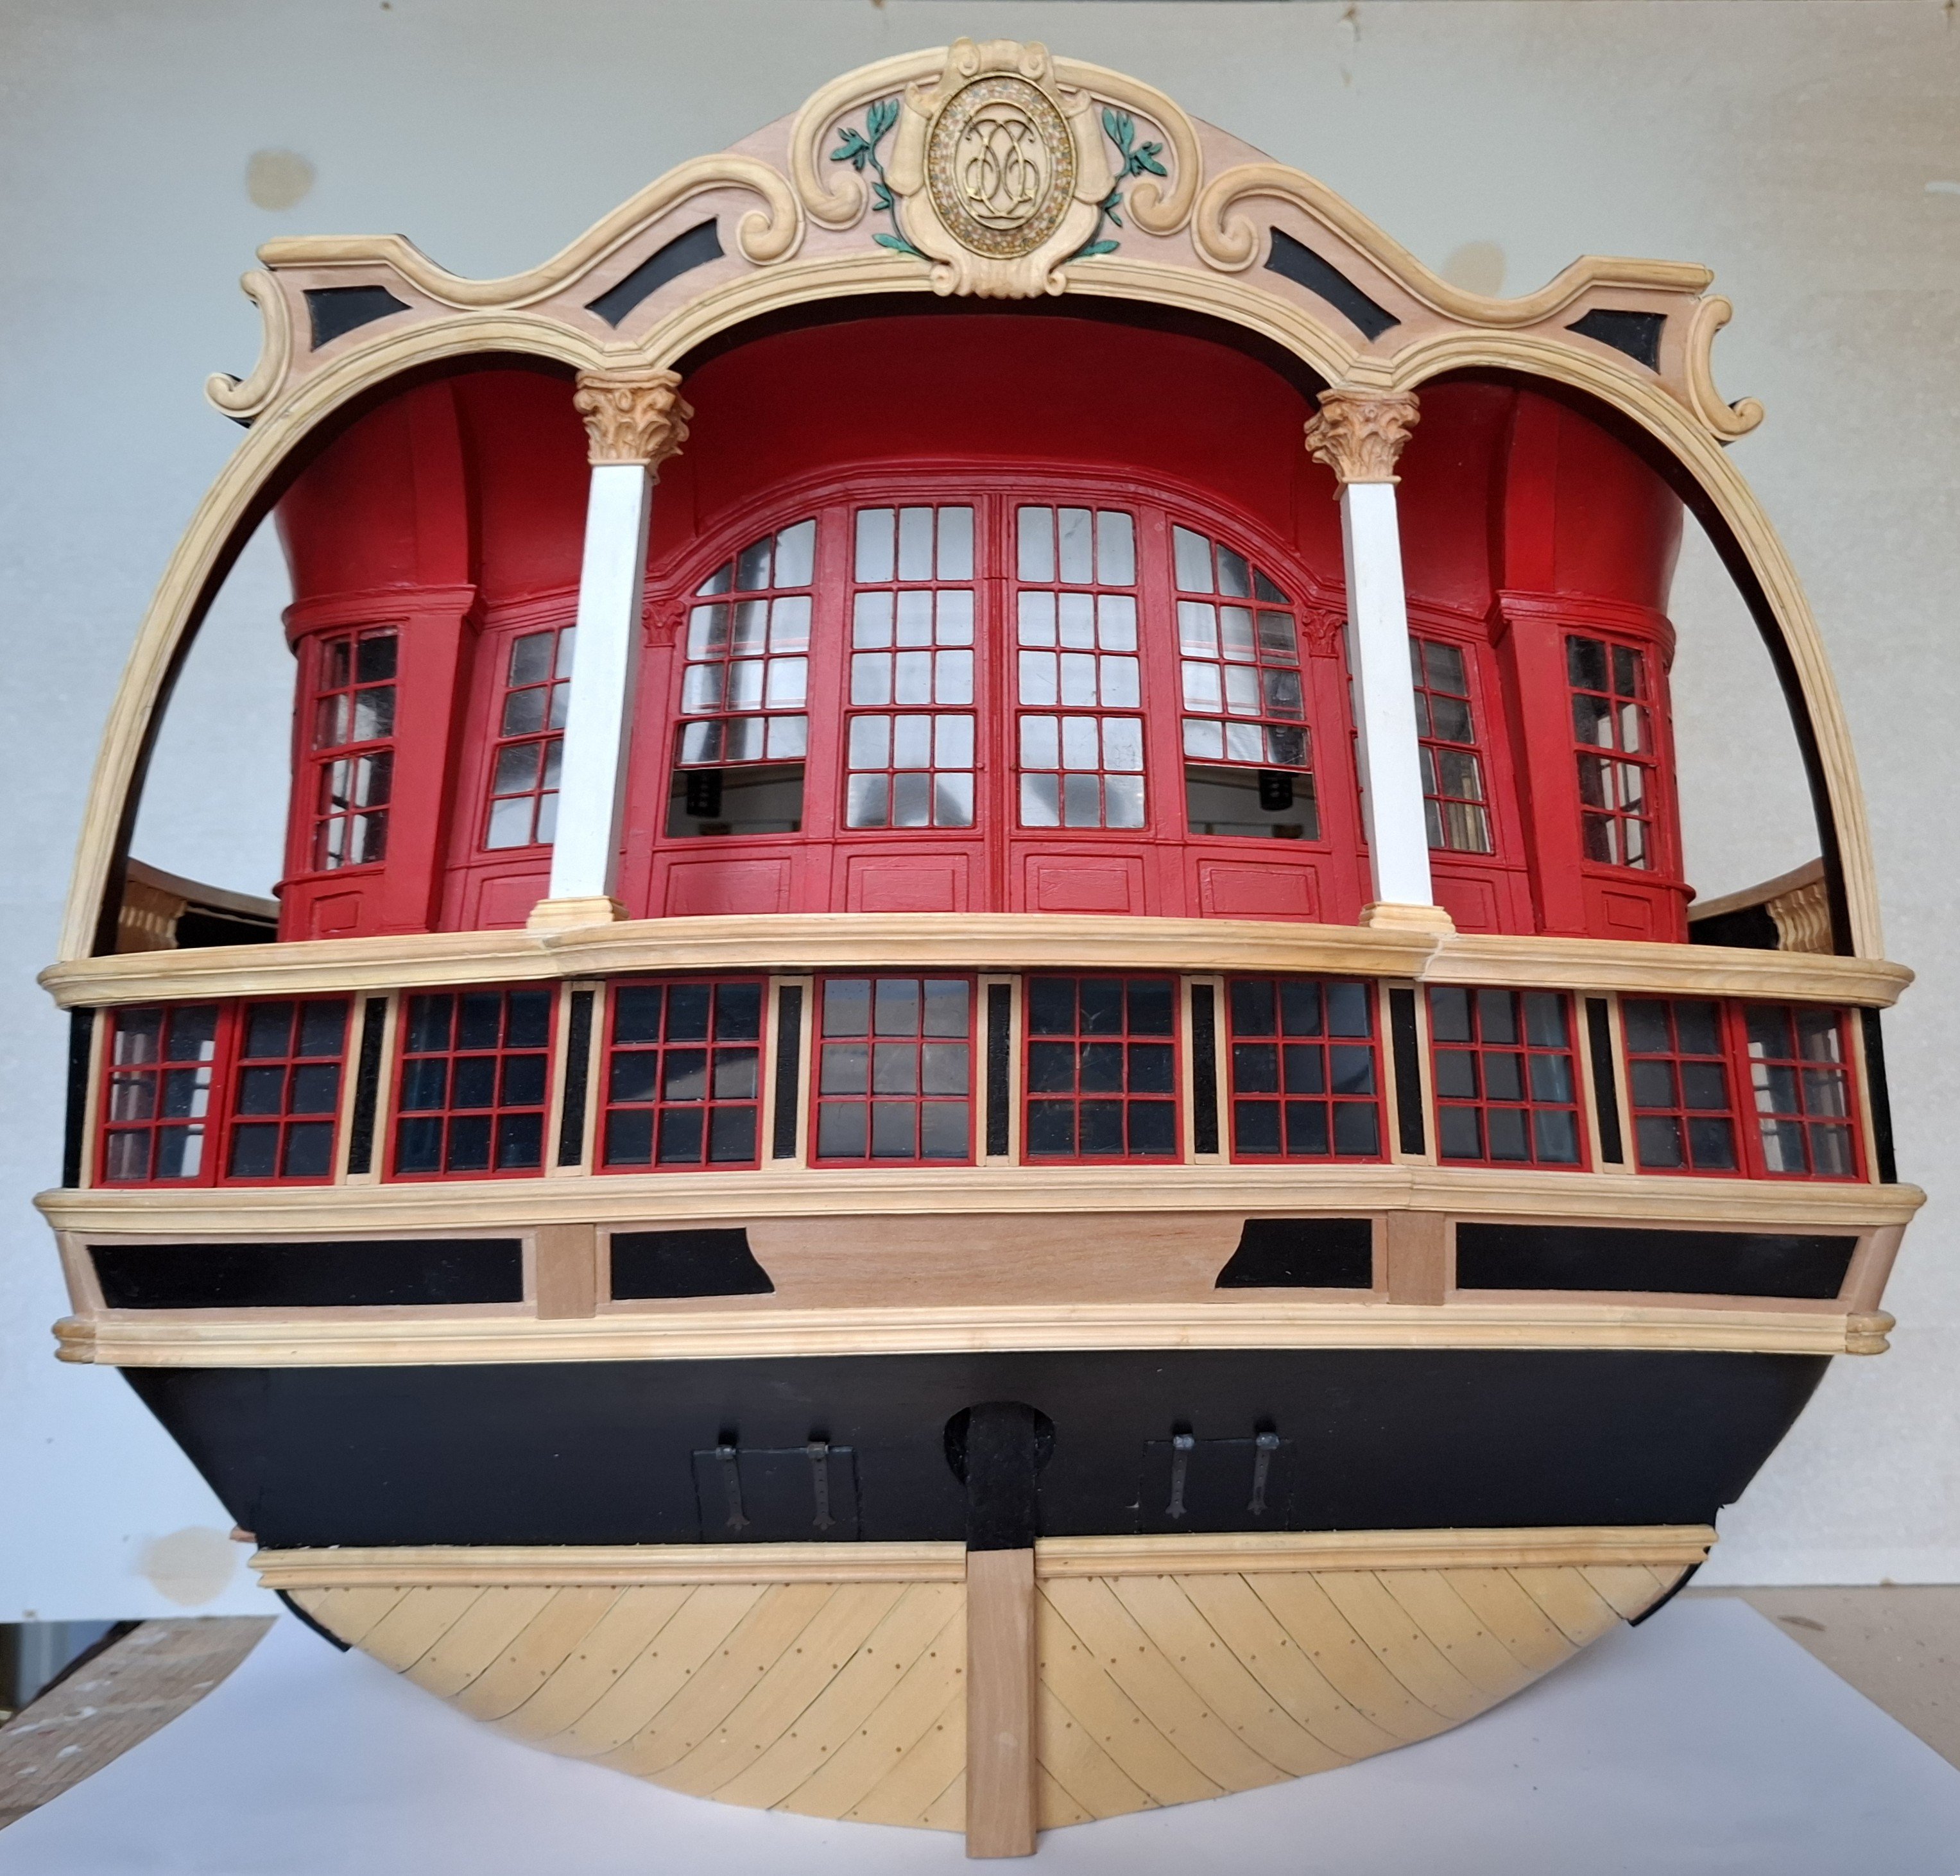
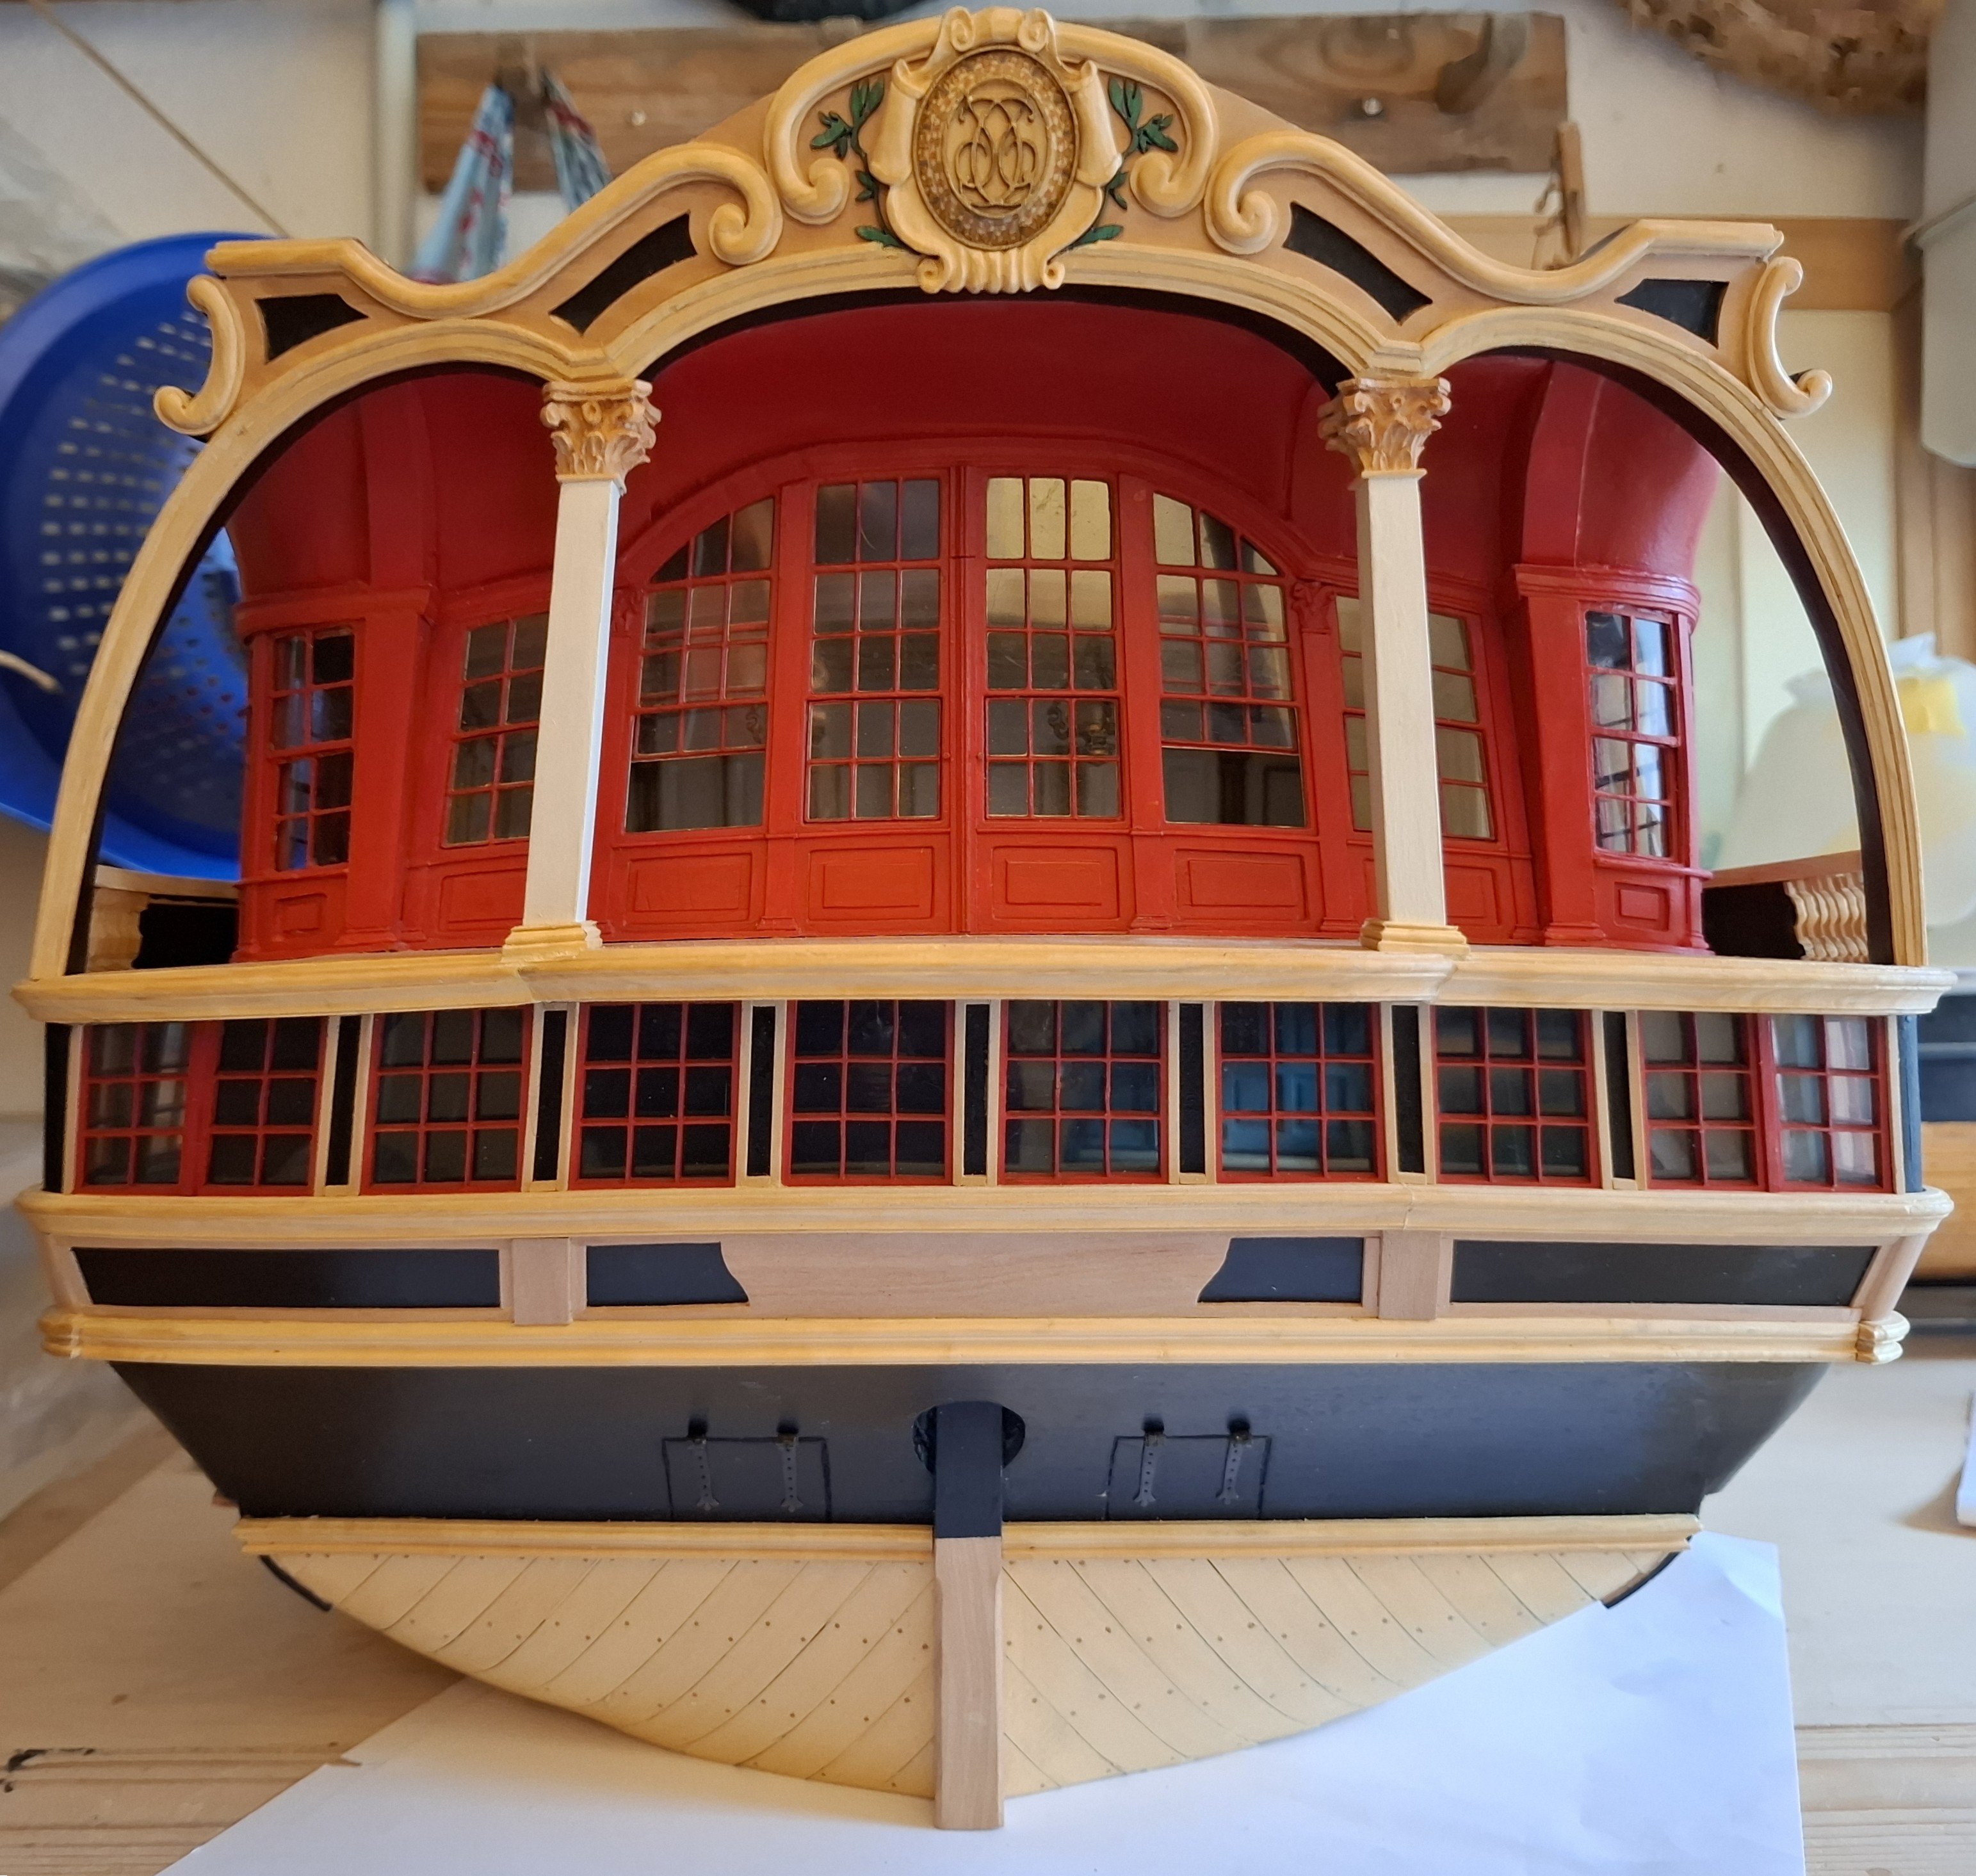
Thank you all for your encouragement and the likes! Today, I first need to address an issue, namely my incorrectly constructed window in the upper side gallery. I had a window here that was actually intended to have double glazing bars, but I inadvertently constructed it with a single central glazing bar, which resulted in horizontal window panes that should otherwise all be vertical. The problem is that the window is glazed and curved under tension. So replacing the entire muntin bar was out of the question. I would never have been able to fit the new window cross neatly into the curve. The only option was to carefully cut out the centre muntin bar and insert new muntin bars. Here is the result: Next, I turned my attention to the gallery railing, a task that I had been puzzling over for a while and which, at least on the starboard side, has not yet been satisfactorily resolved. The gallery railing consists of a balustrade, similar to those often found in stone on elaborately designed Baroque balconies or staircases. The individual gallery balusters feature multiple coving, thickening and tapering. To make matters more difficult, they are tilted, in the case of the side gallery backwards and inwards. At the rear, they are later tilted backwards and outwards. One could make things easy and make them all the same and tilt them accordingly. This is sometimes done in architecture for staircases. Then, in the transition to the inclined contact surfaces, wedges are simply placed underneath and above. To illustrate this, here is a drawing from the 17th century: However, since the TRE KRONER model has a tilt here, I have to try that too, of course. I then drew and cut out the tilt towards the rear. The profile was roughly pre-cut on the circular saw and then finished with a file. The inward tilt was also worked on as best as possible at the front ends with a file and a carving knife. The railing rail was drawn on a template. A hole was drilled and fitted with a small wooden dowel to secure it to the contact surface. Finally, everything was inserted, aligned and glued to the upper railing rail. Some of the inclines are not quite right. If you build the whole thing two or three times in a row, it will probably get better and better. But I'll leave it like this for now, as it's a lot of work. Best regards, Matthias


-
This is a lovely project, well done Scrubby. Your aproach to the building is masterly. Of course CAD helps, but one has to solve all the problems in ones own mind before drawing things. When do you plan to release the project? Matthias
-
That will be a nice feature with the coppering plates. I don't know wich one is left and wich one is right. The coppering of Fregatten Jylland is symmetric. Matthias
-
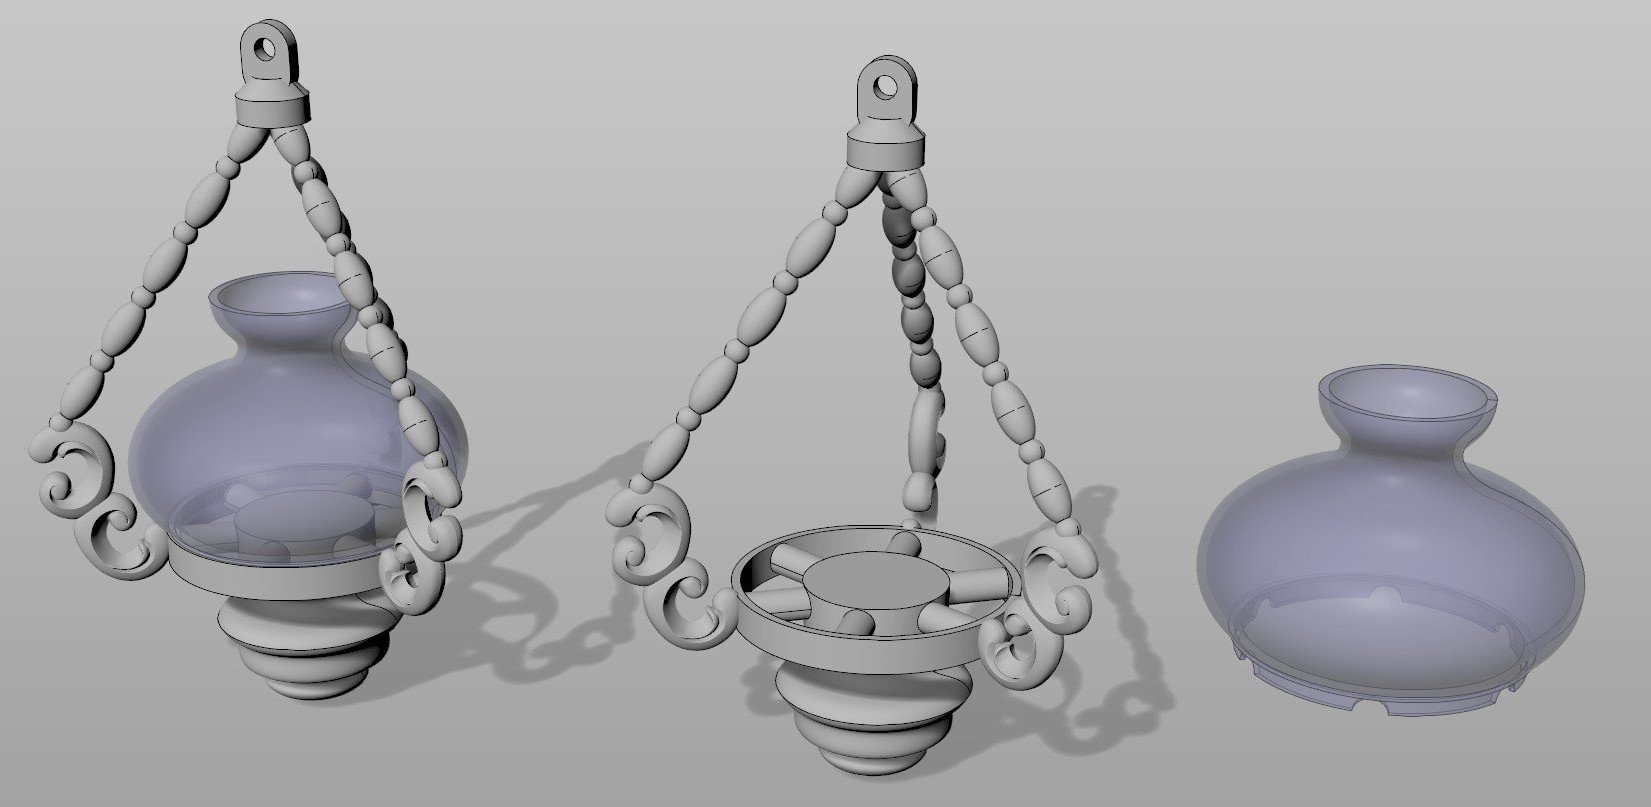
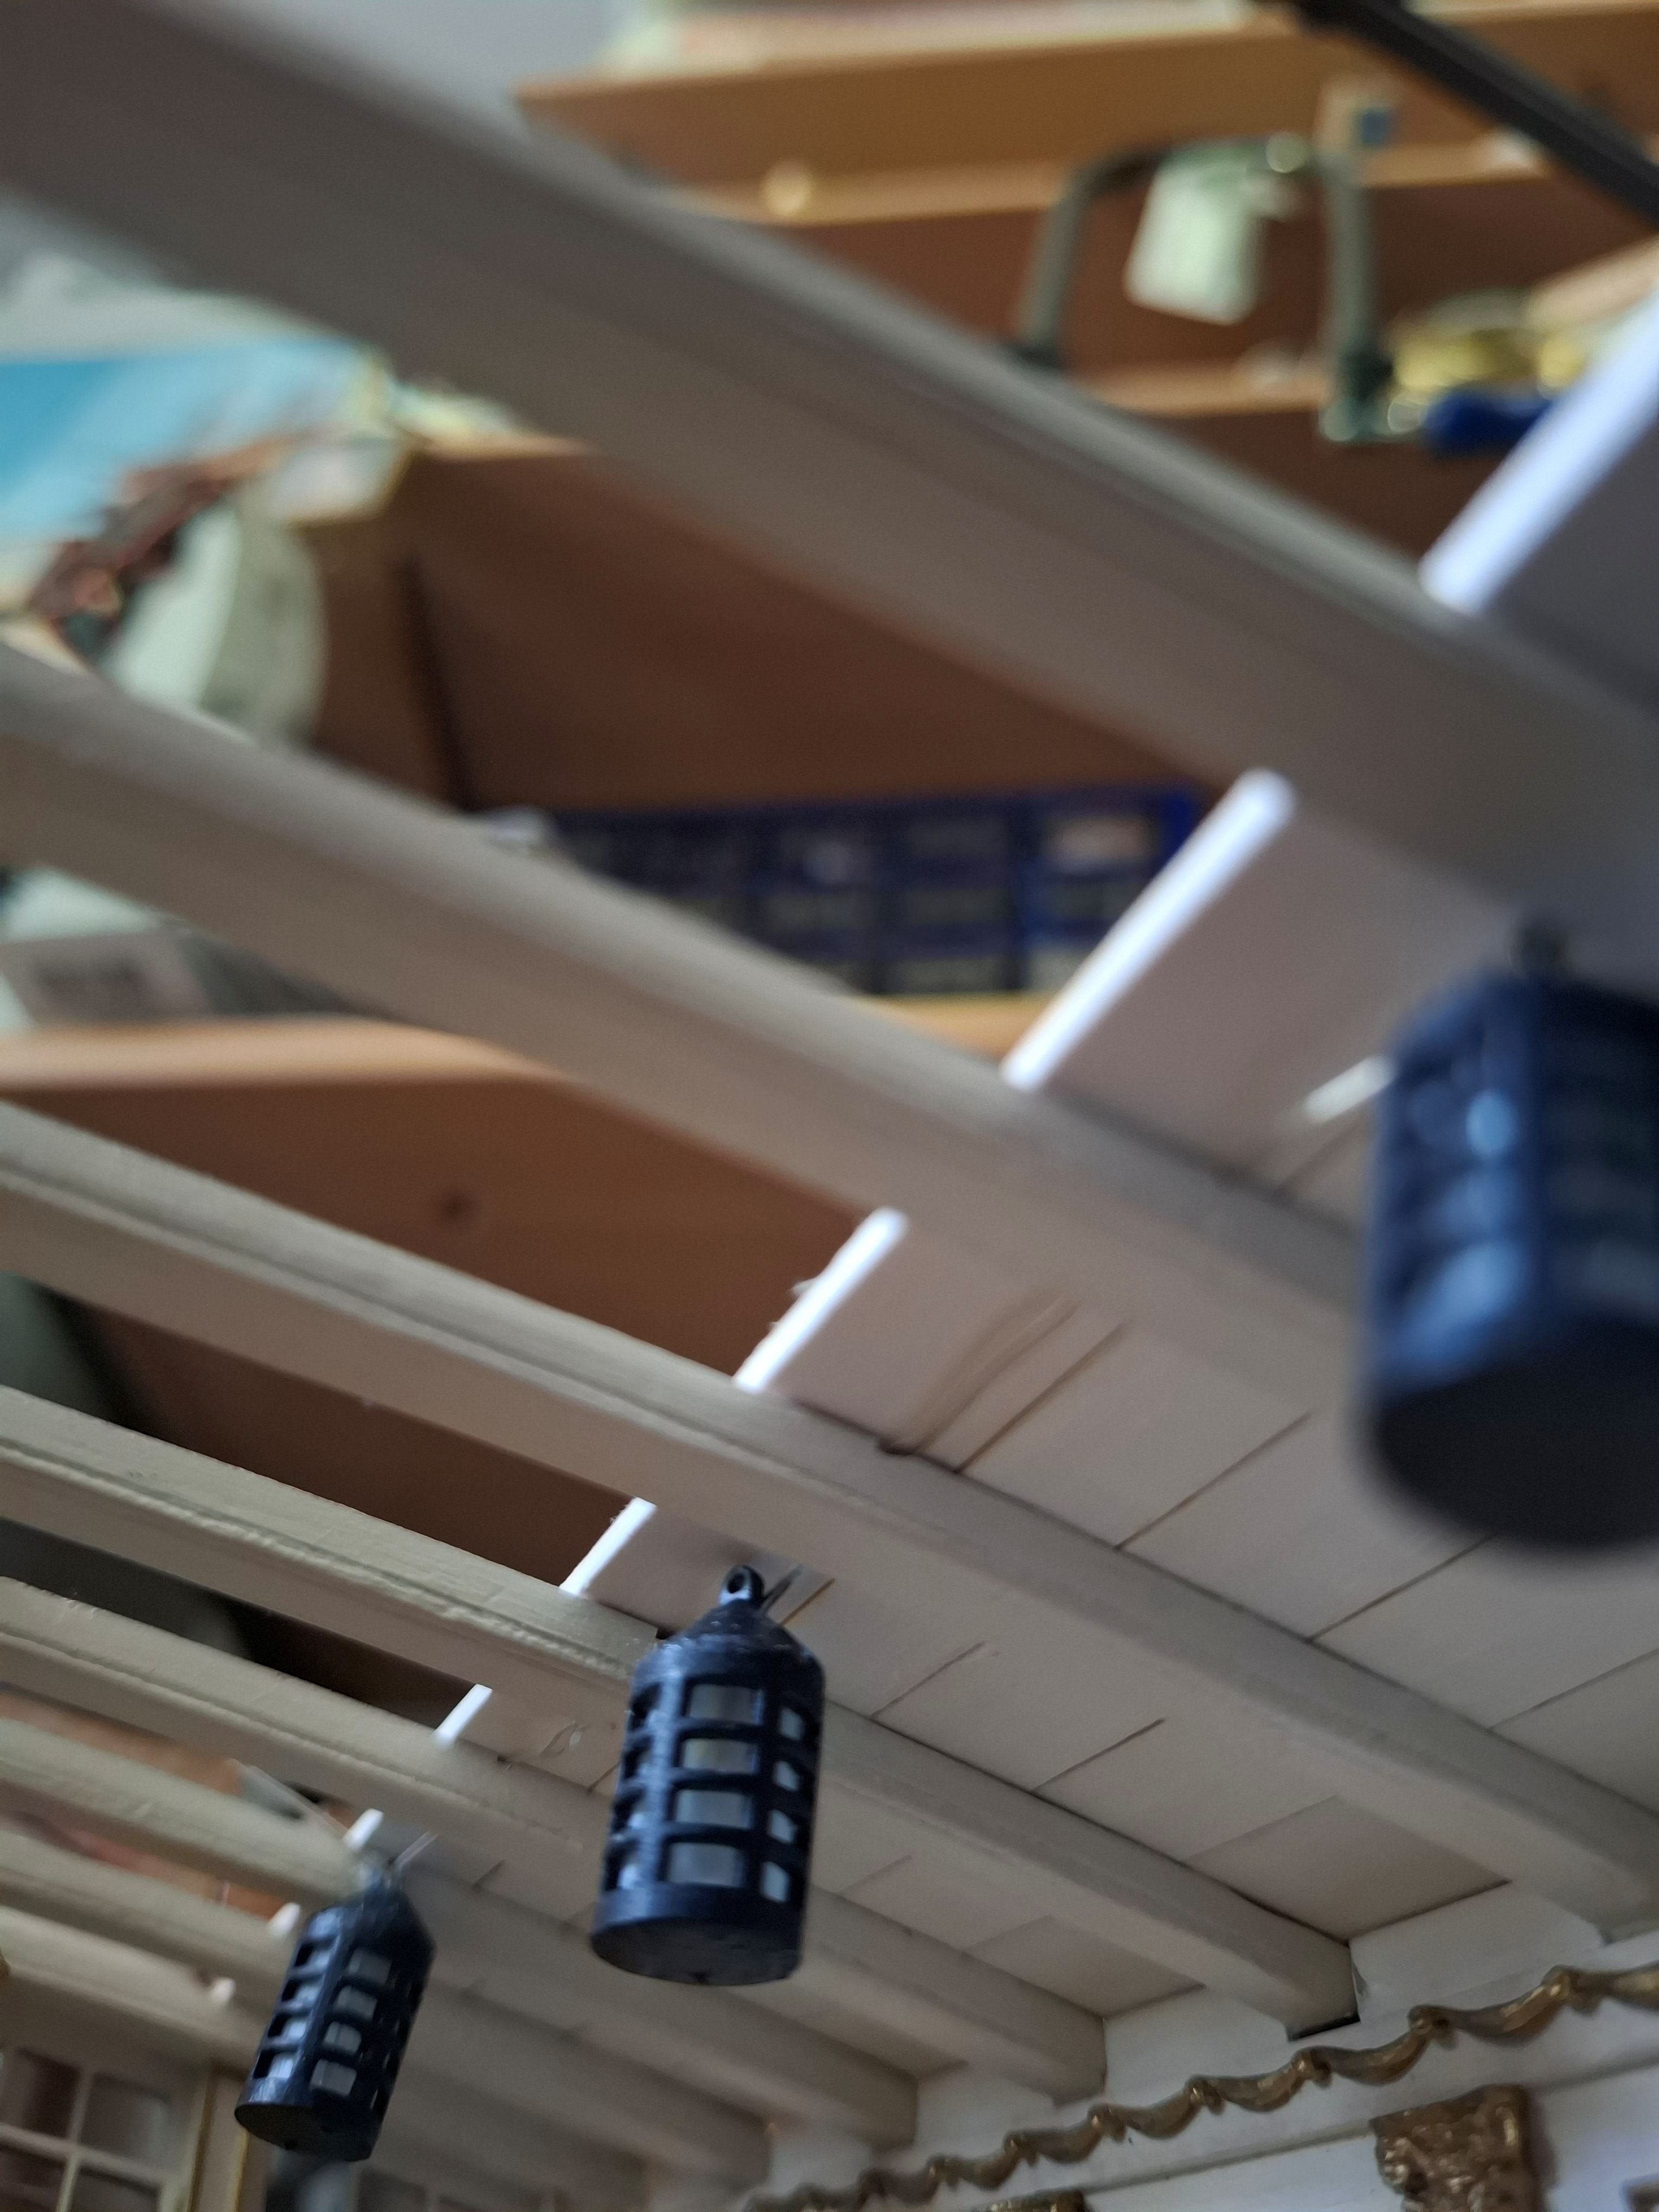
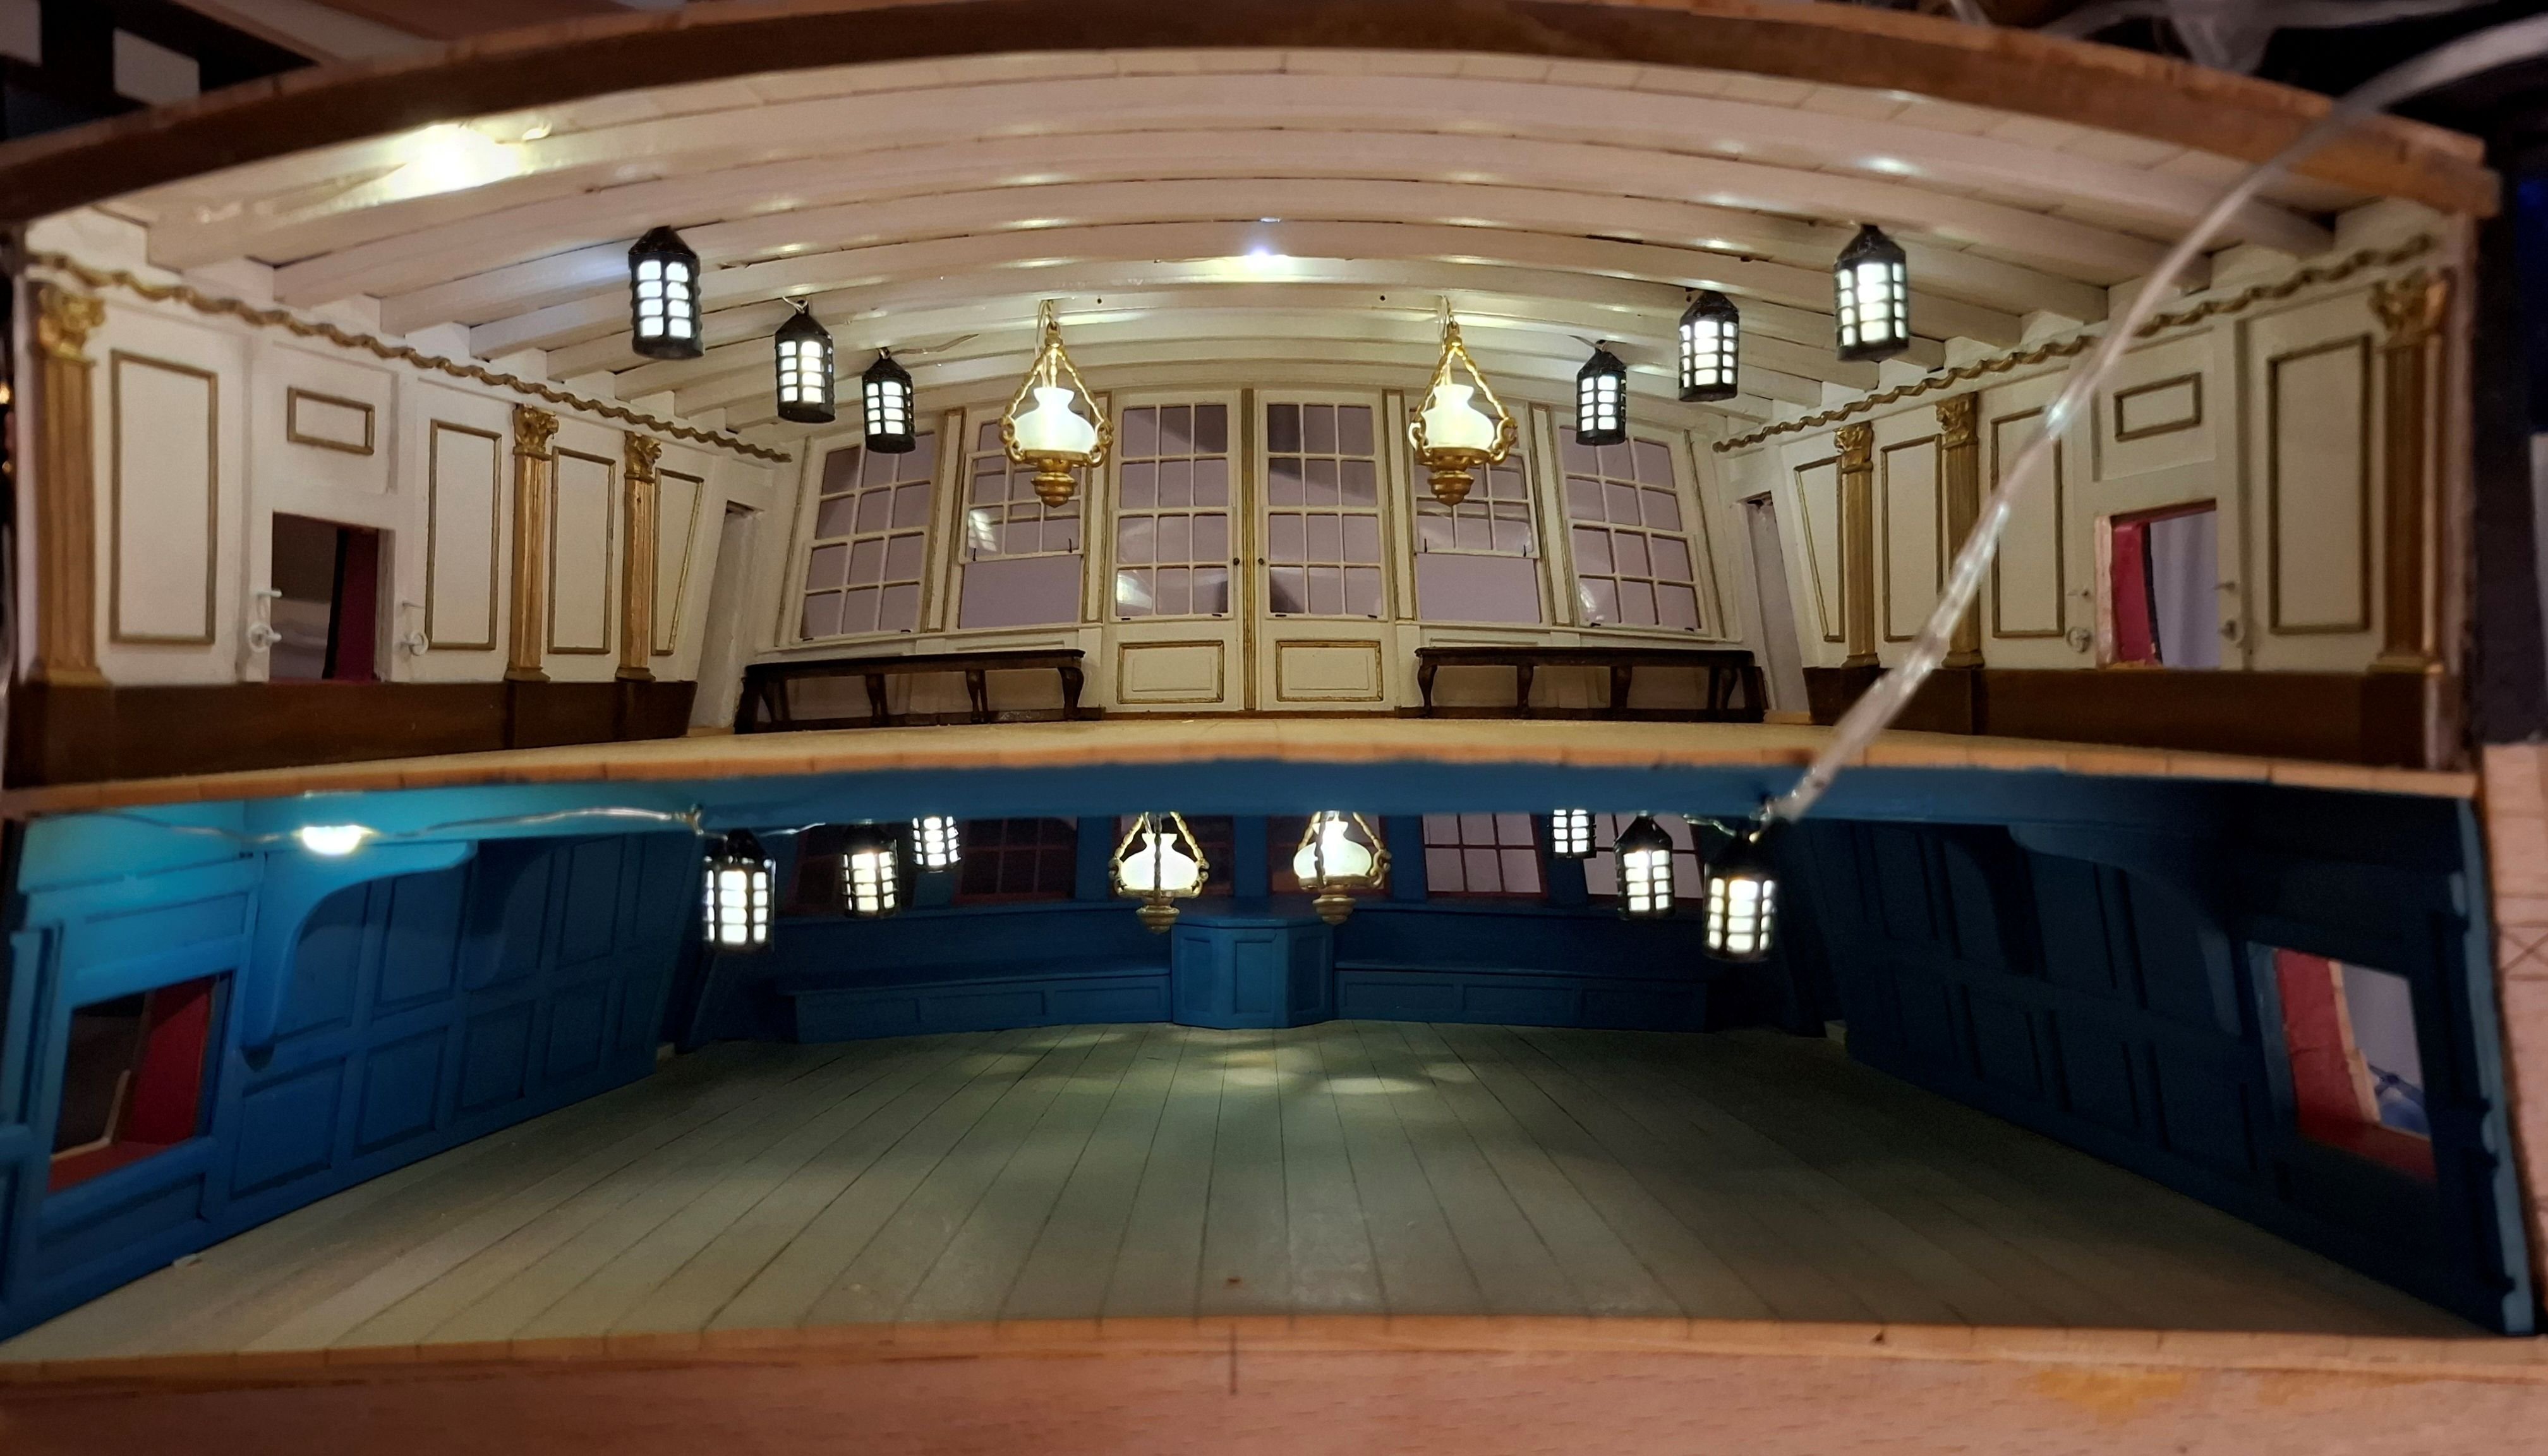
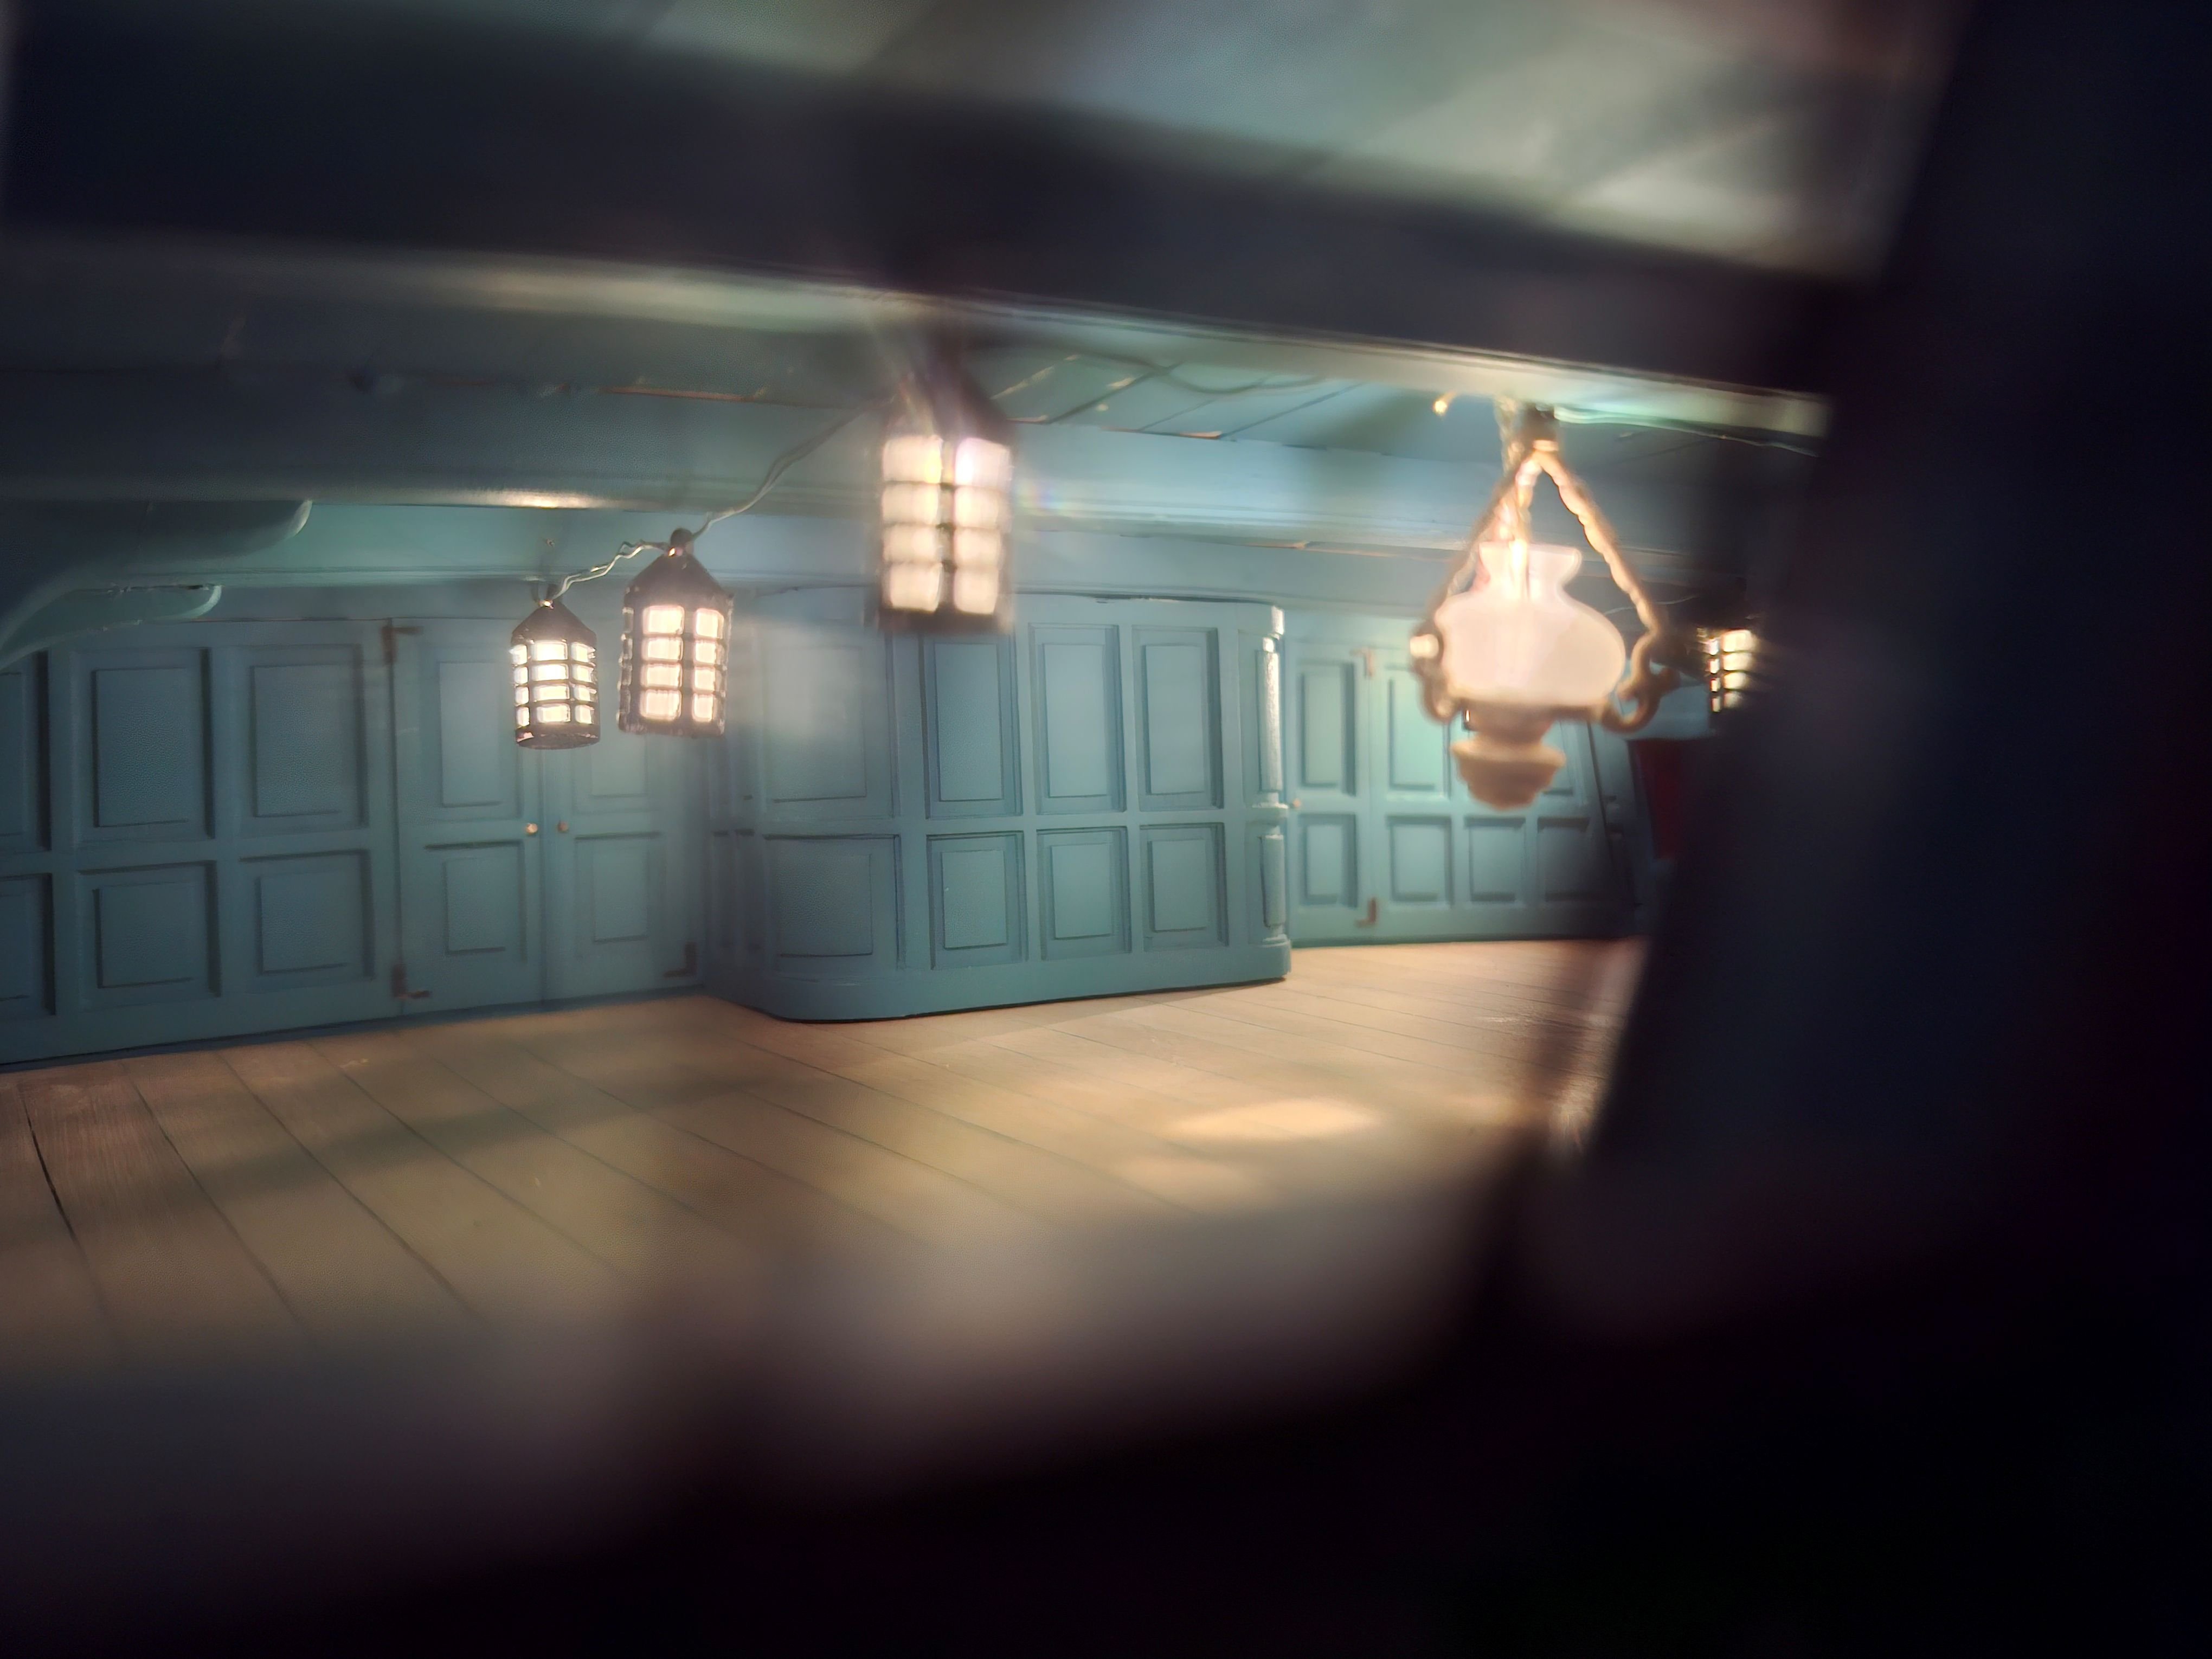
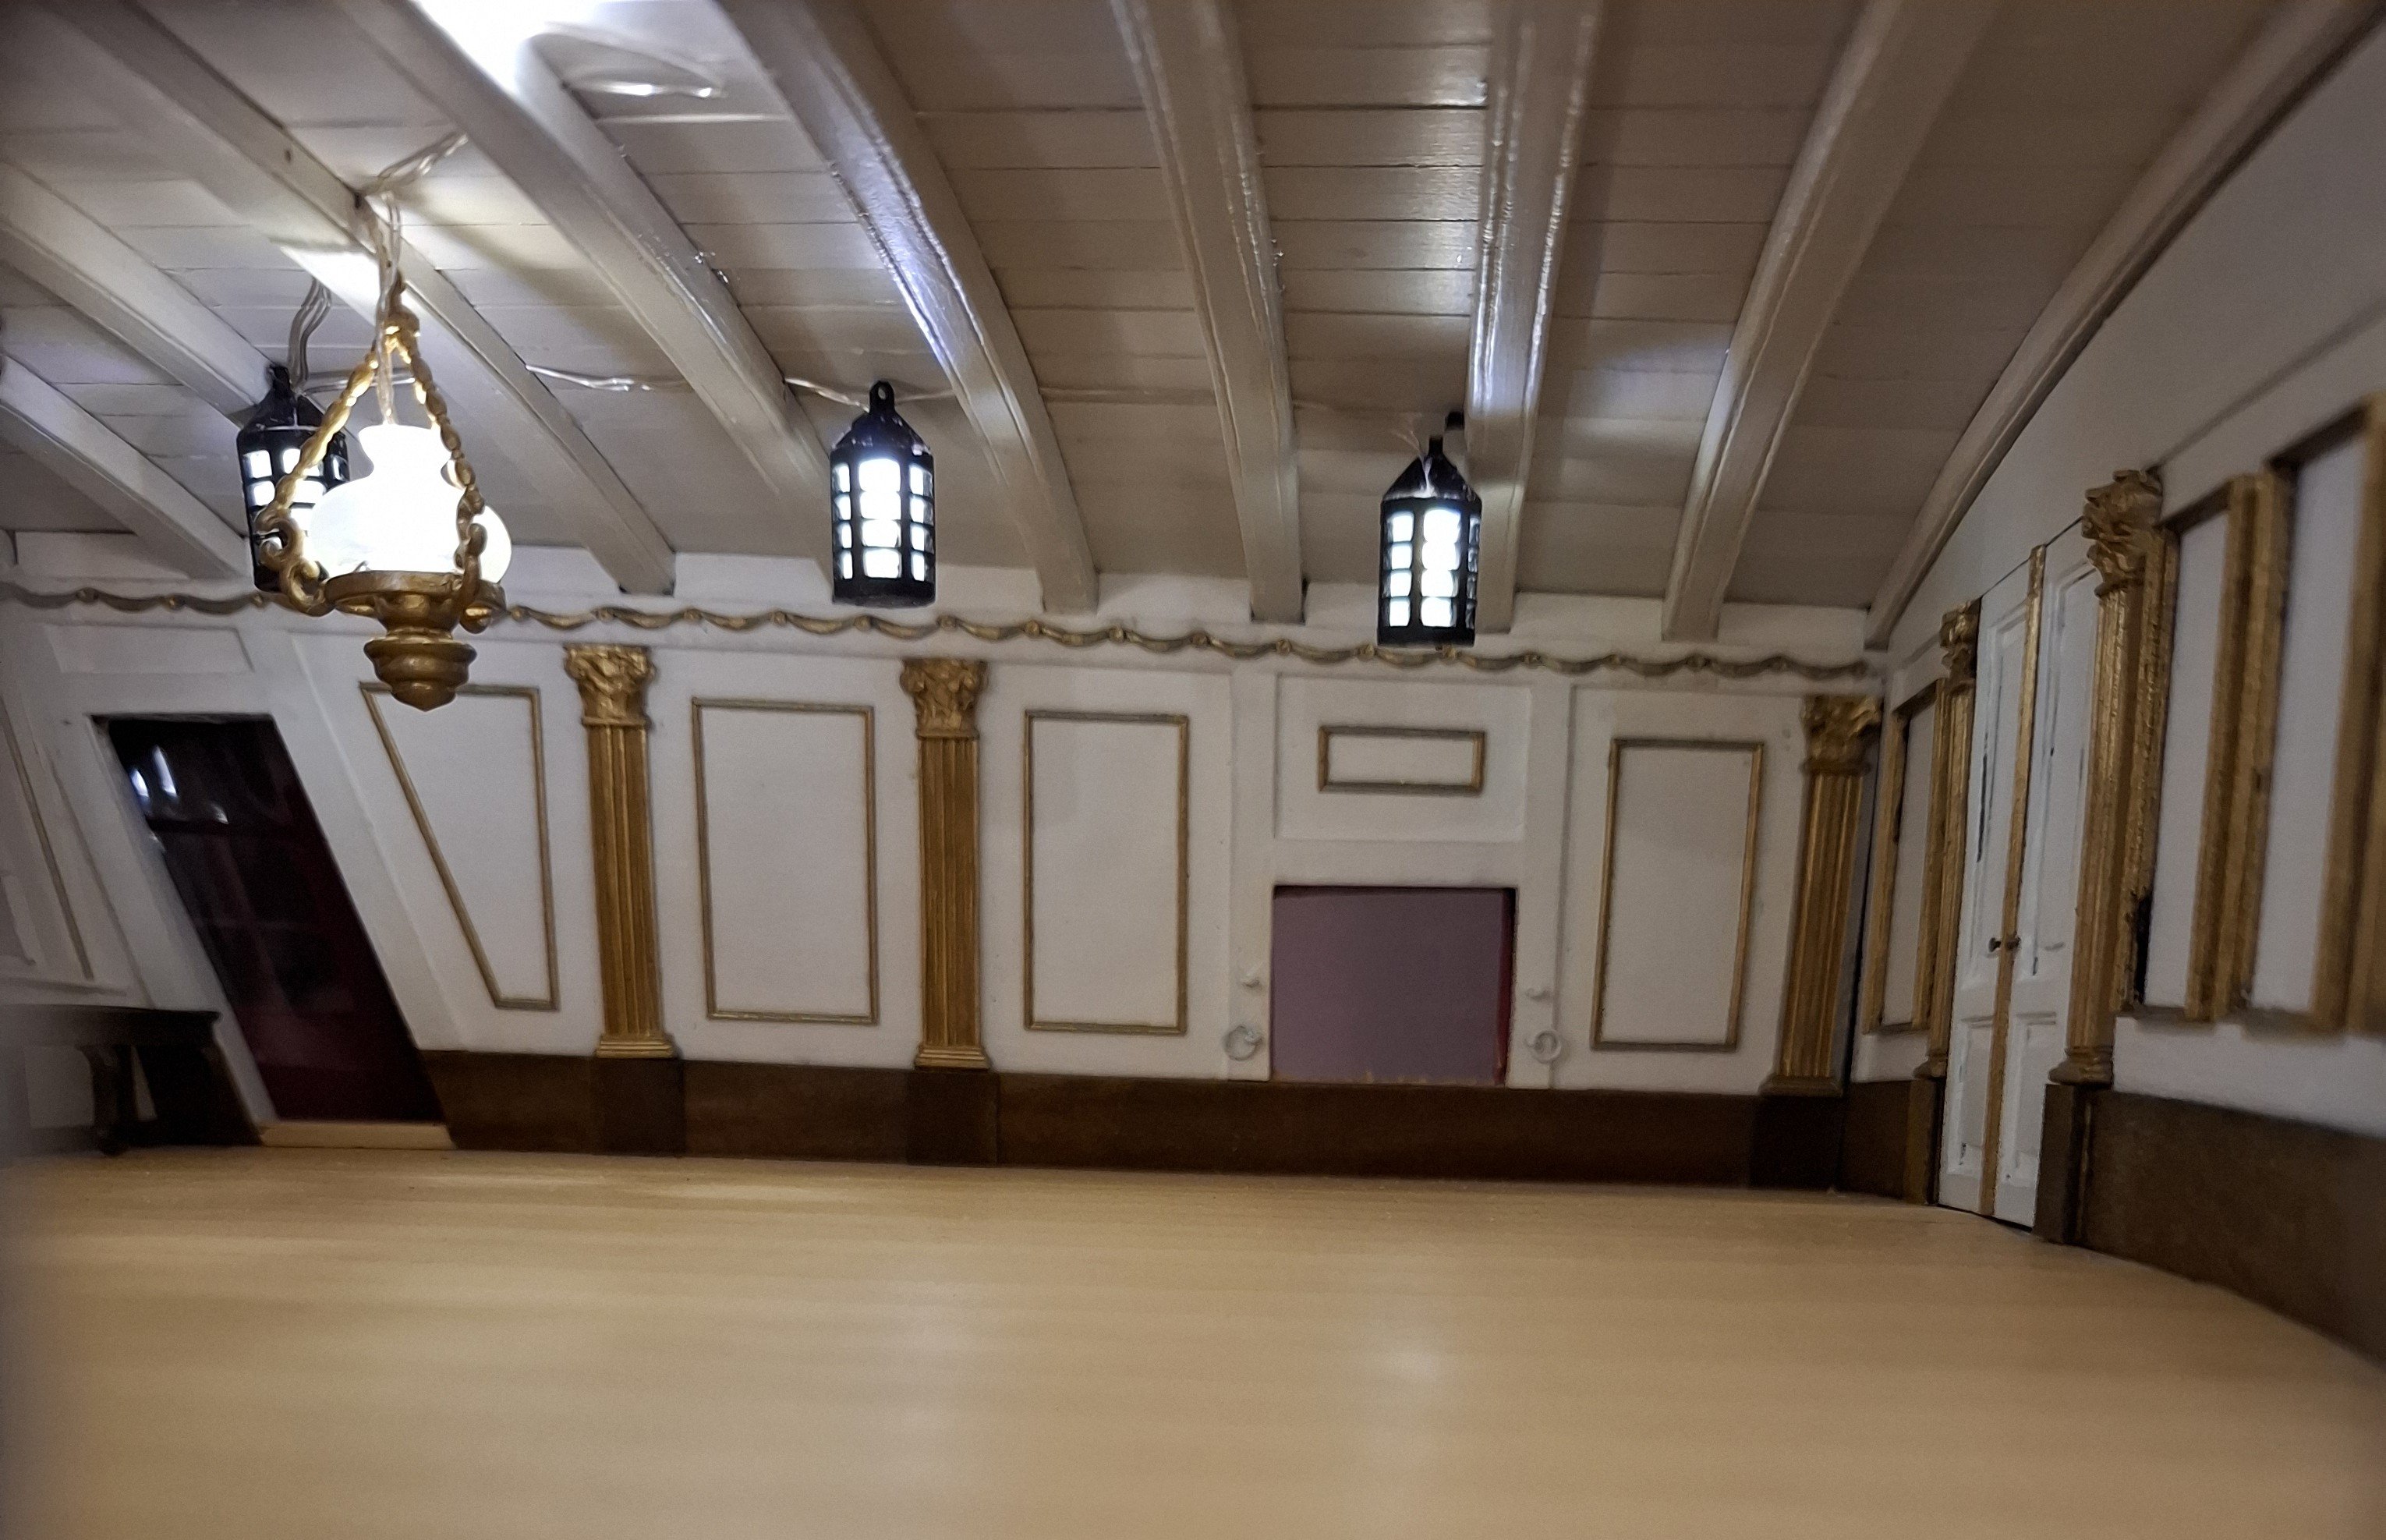
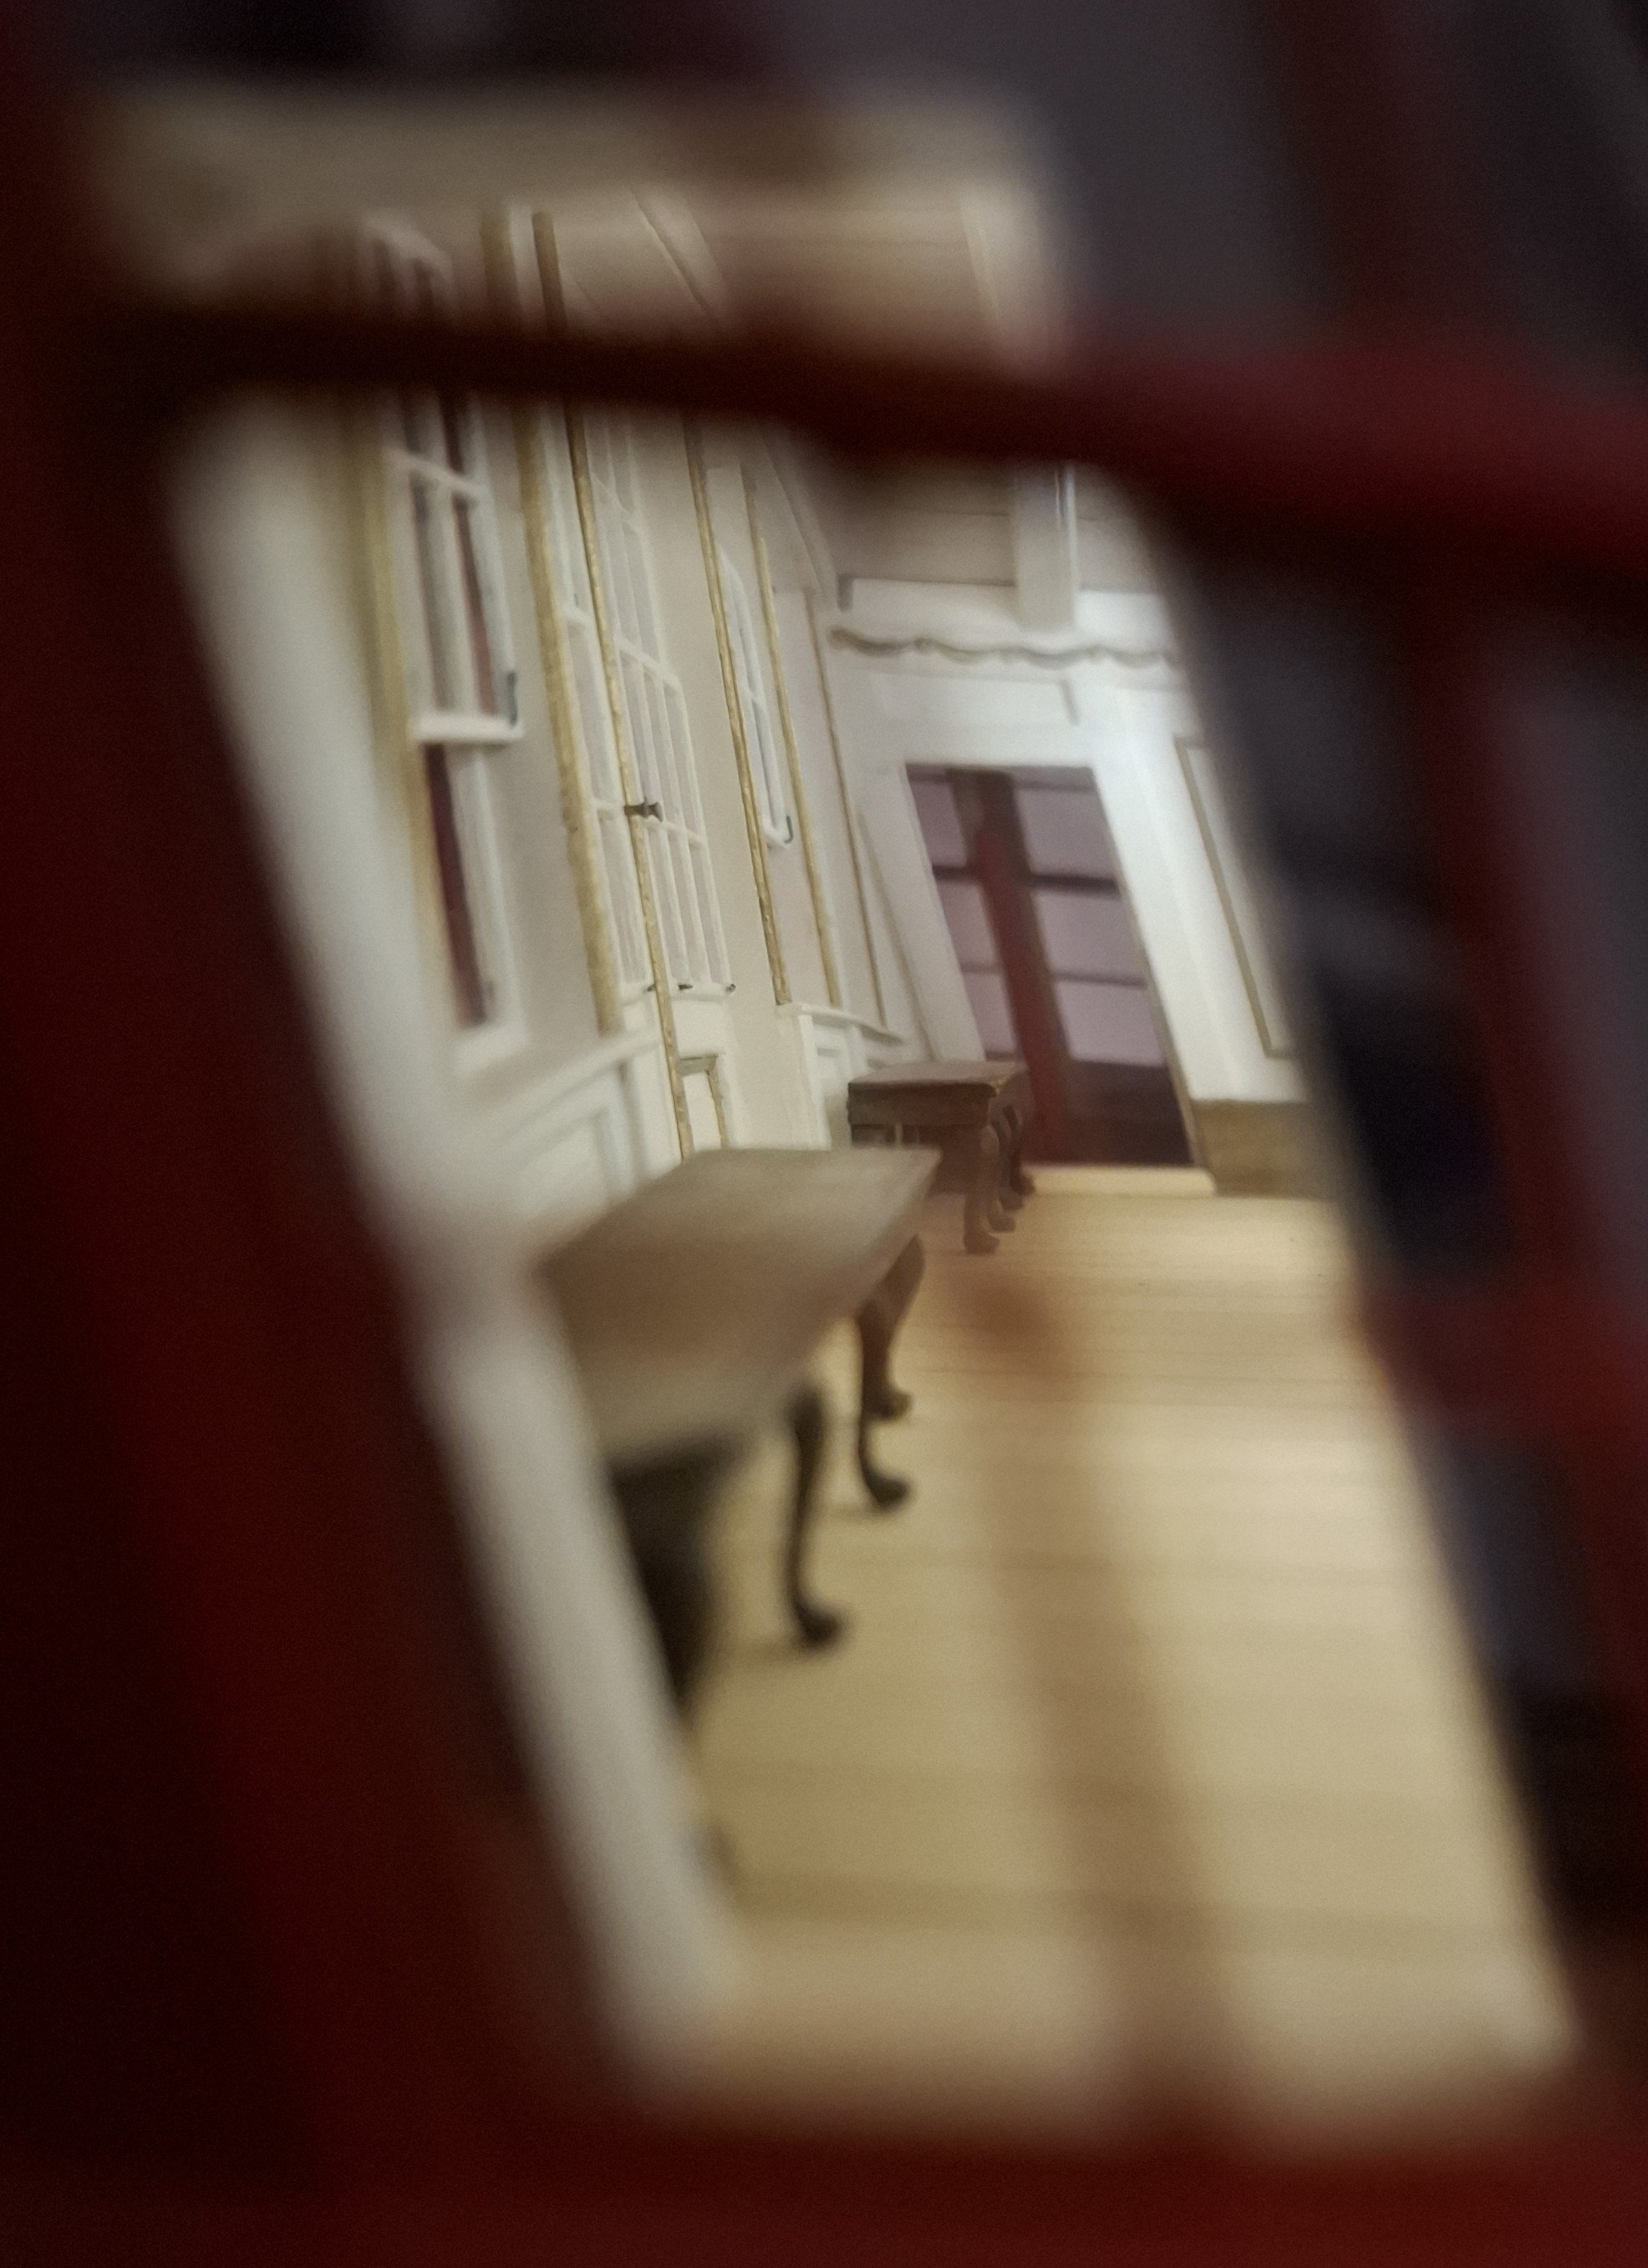
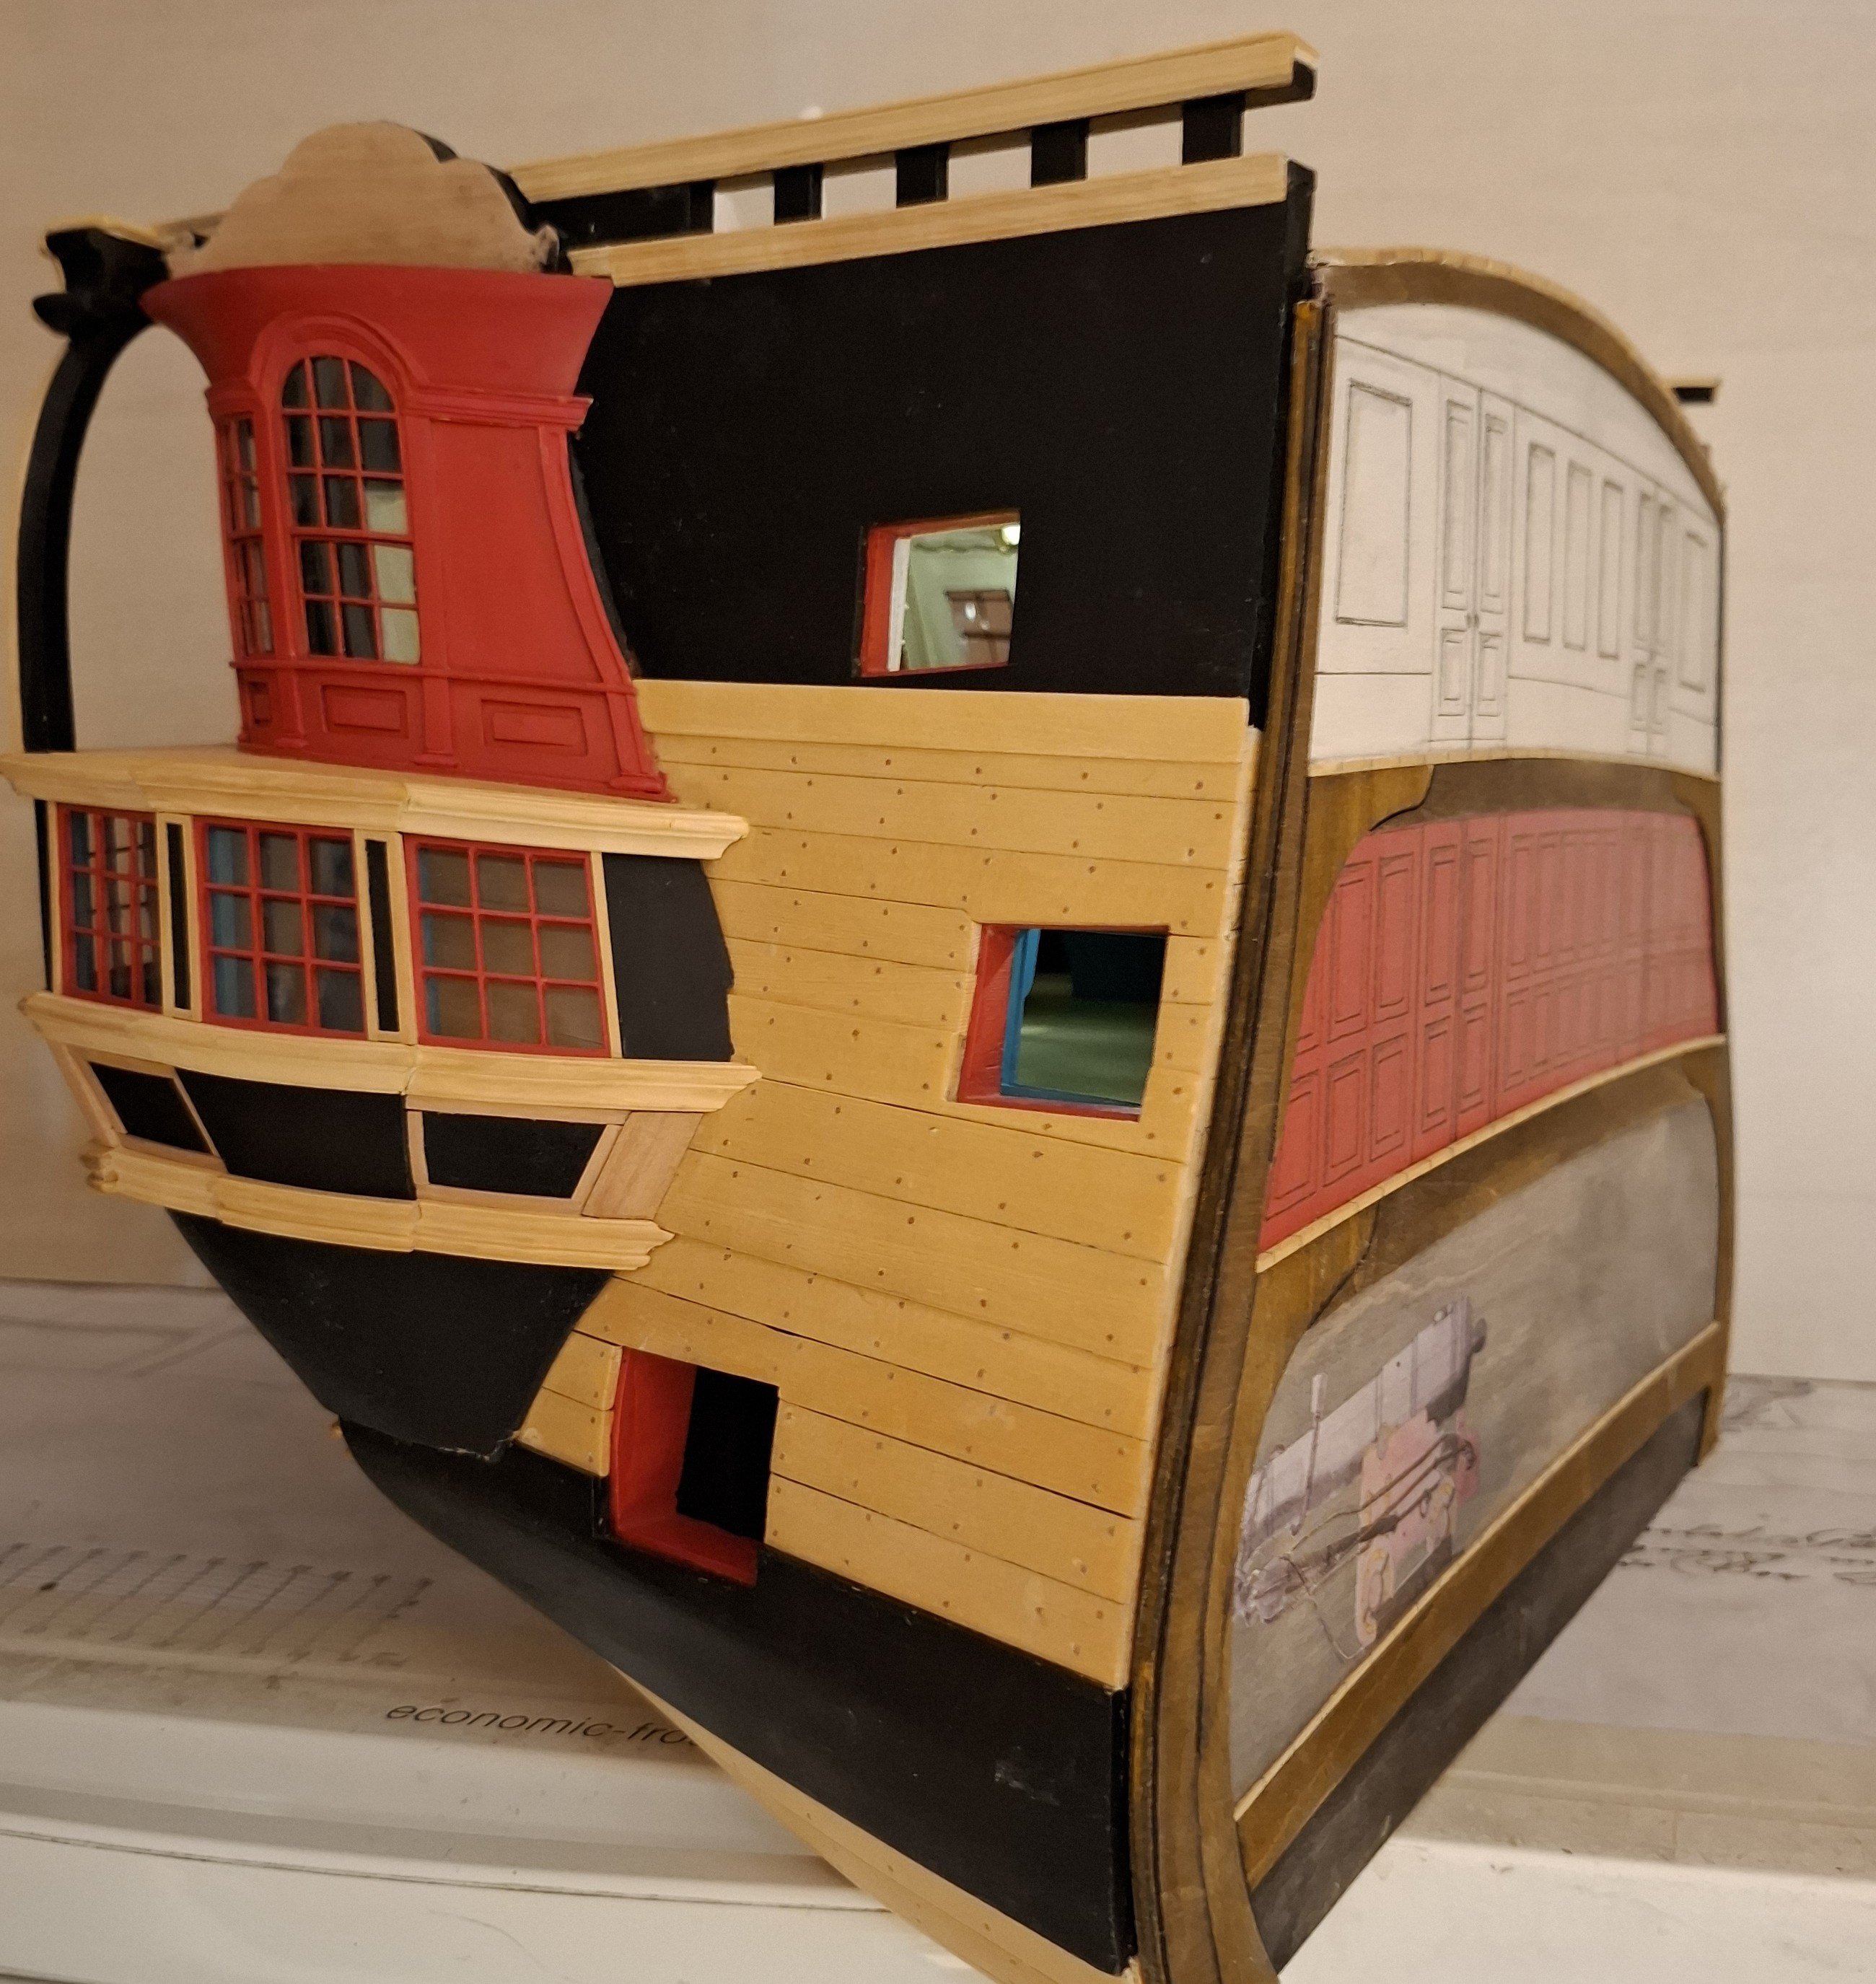
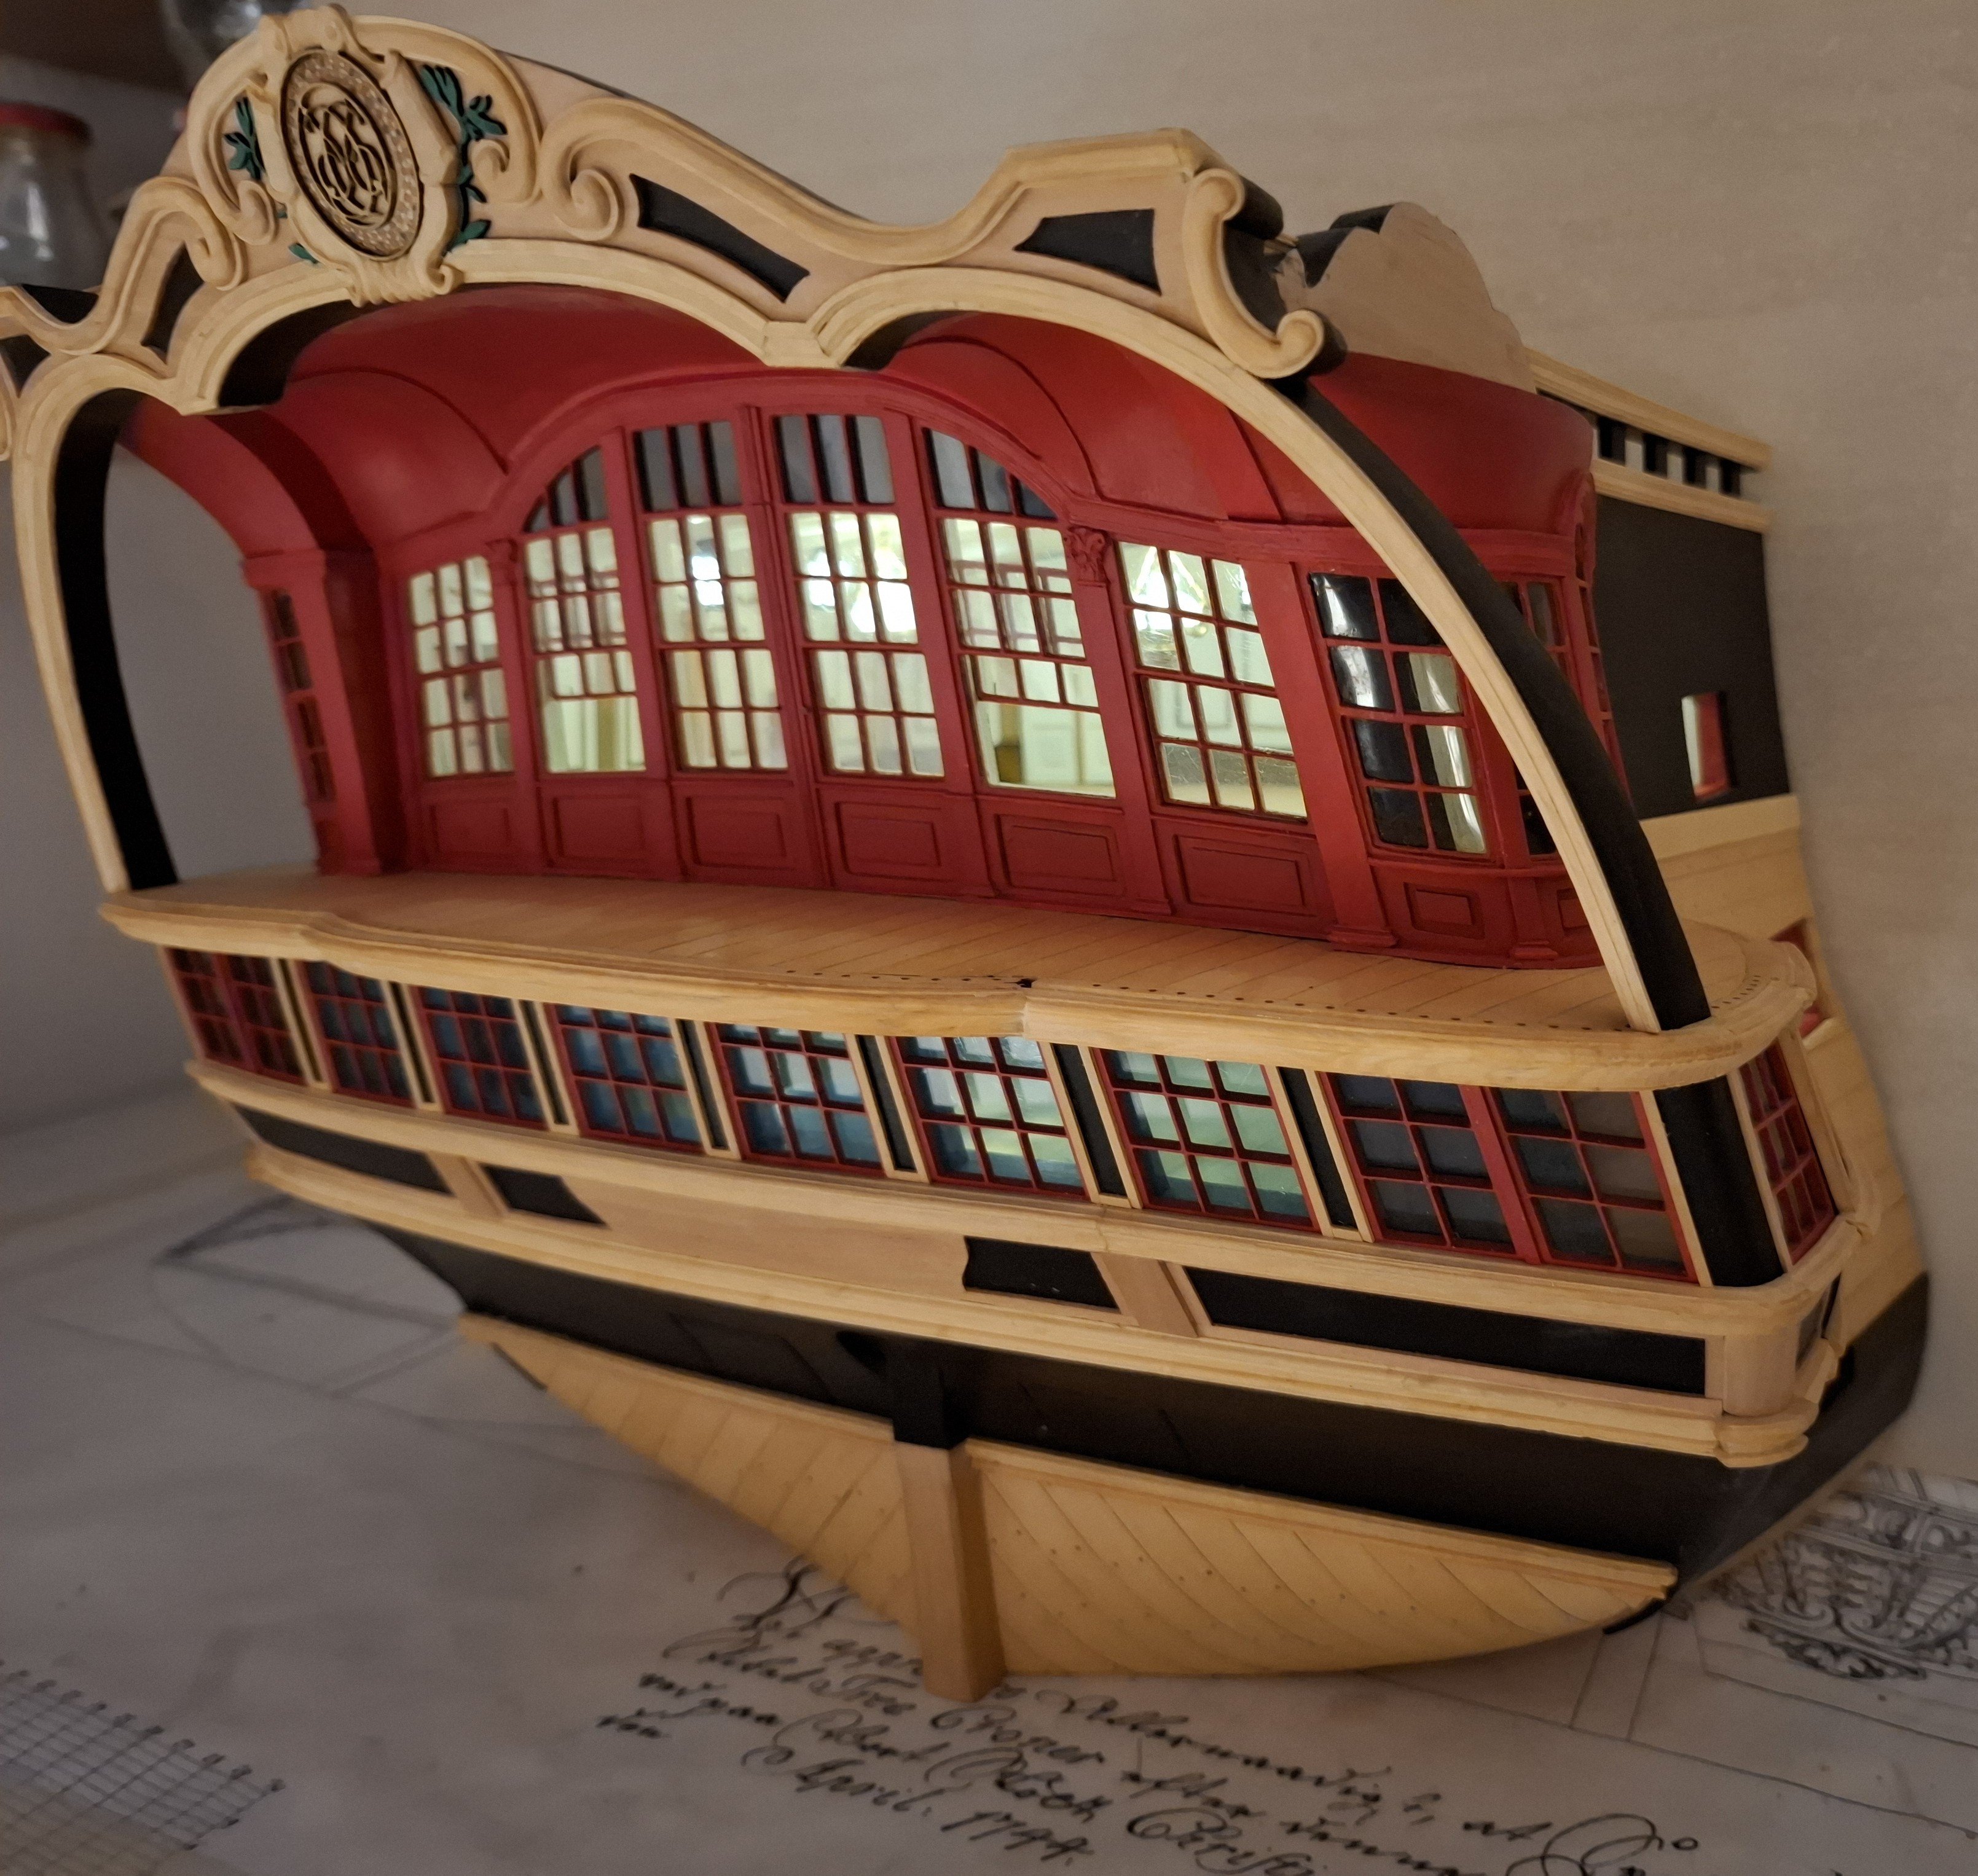
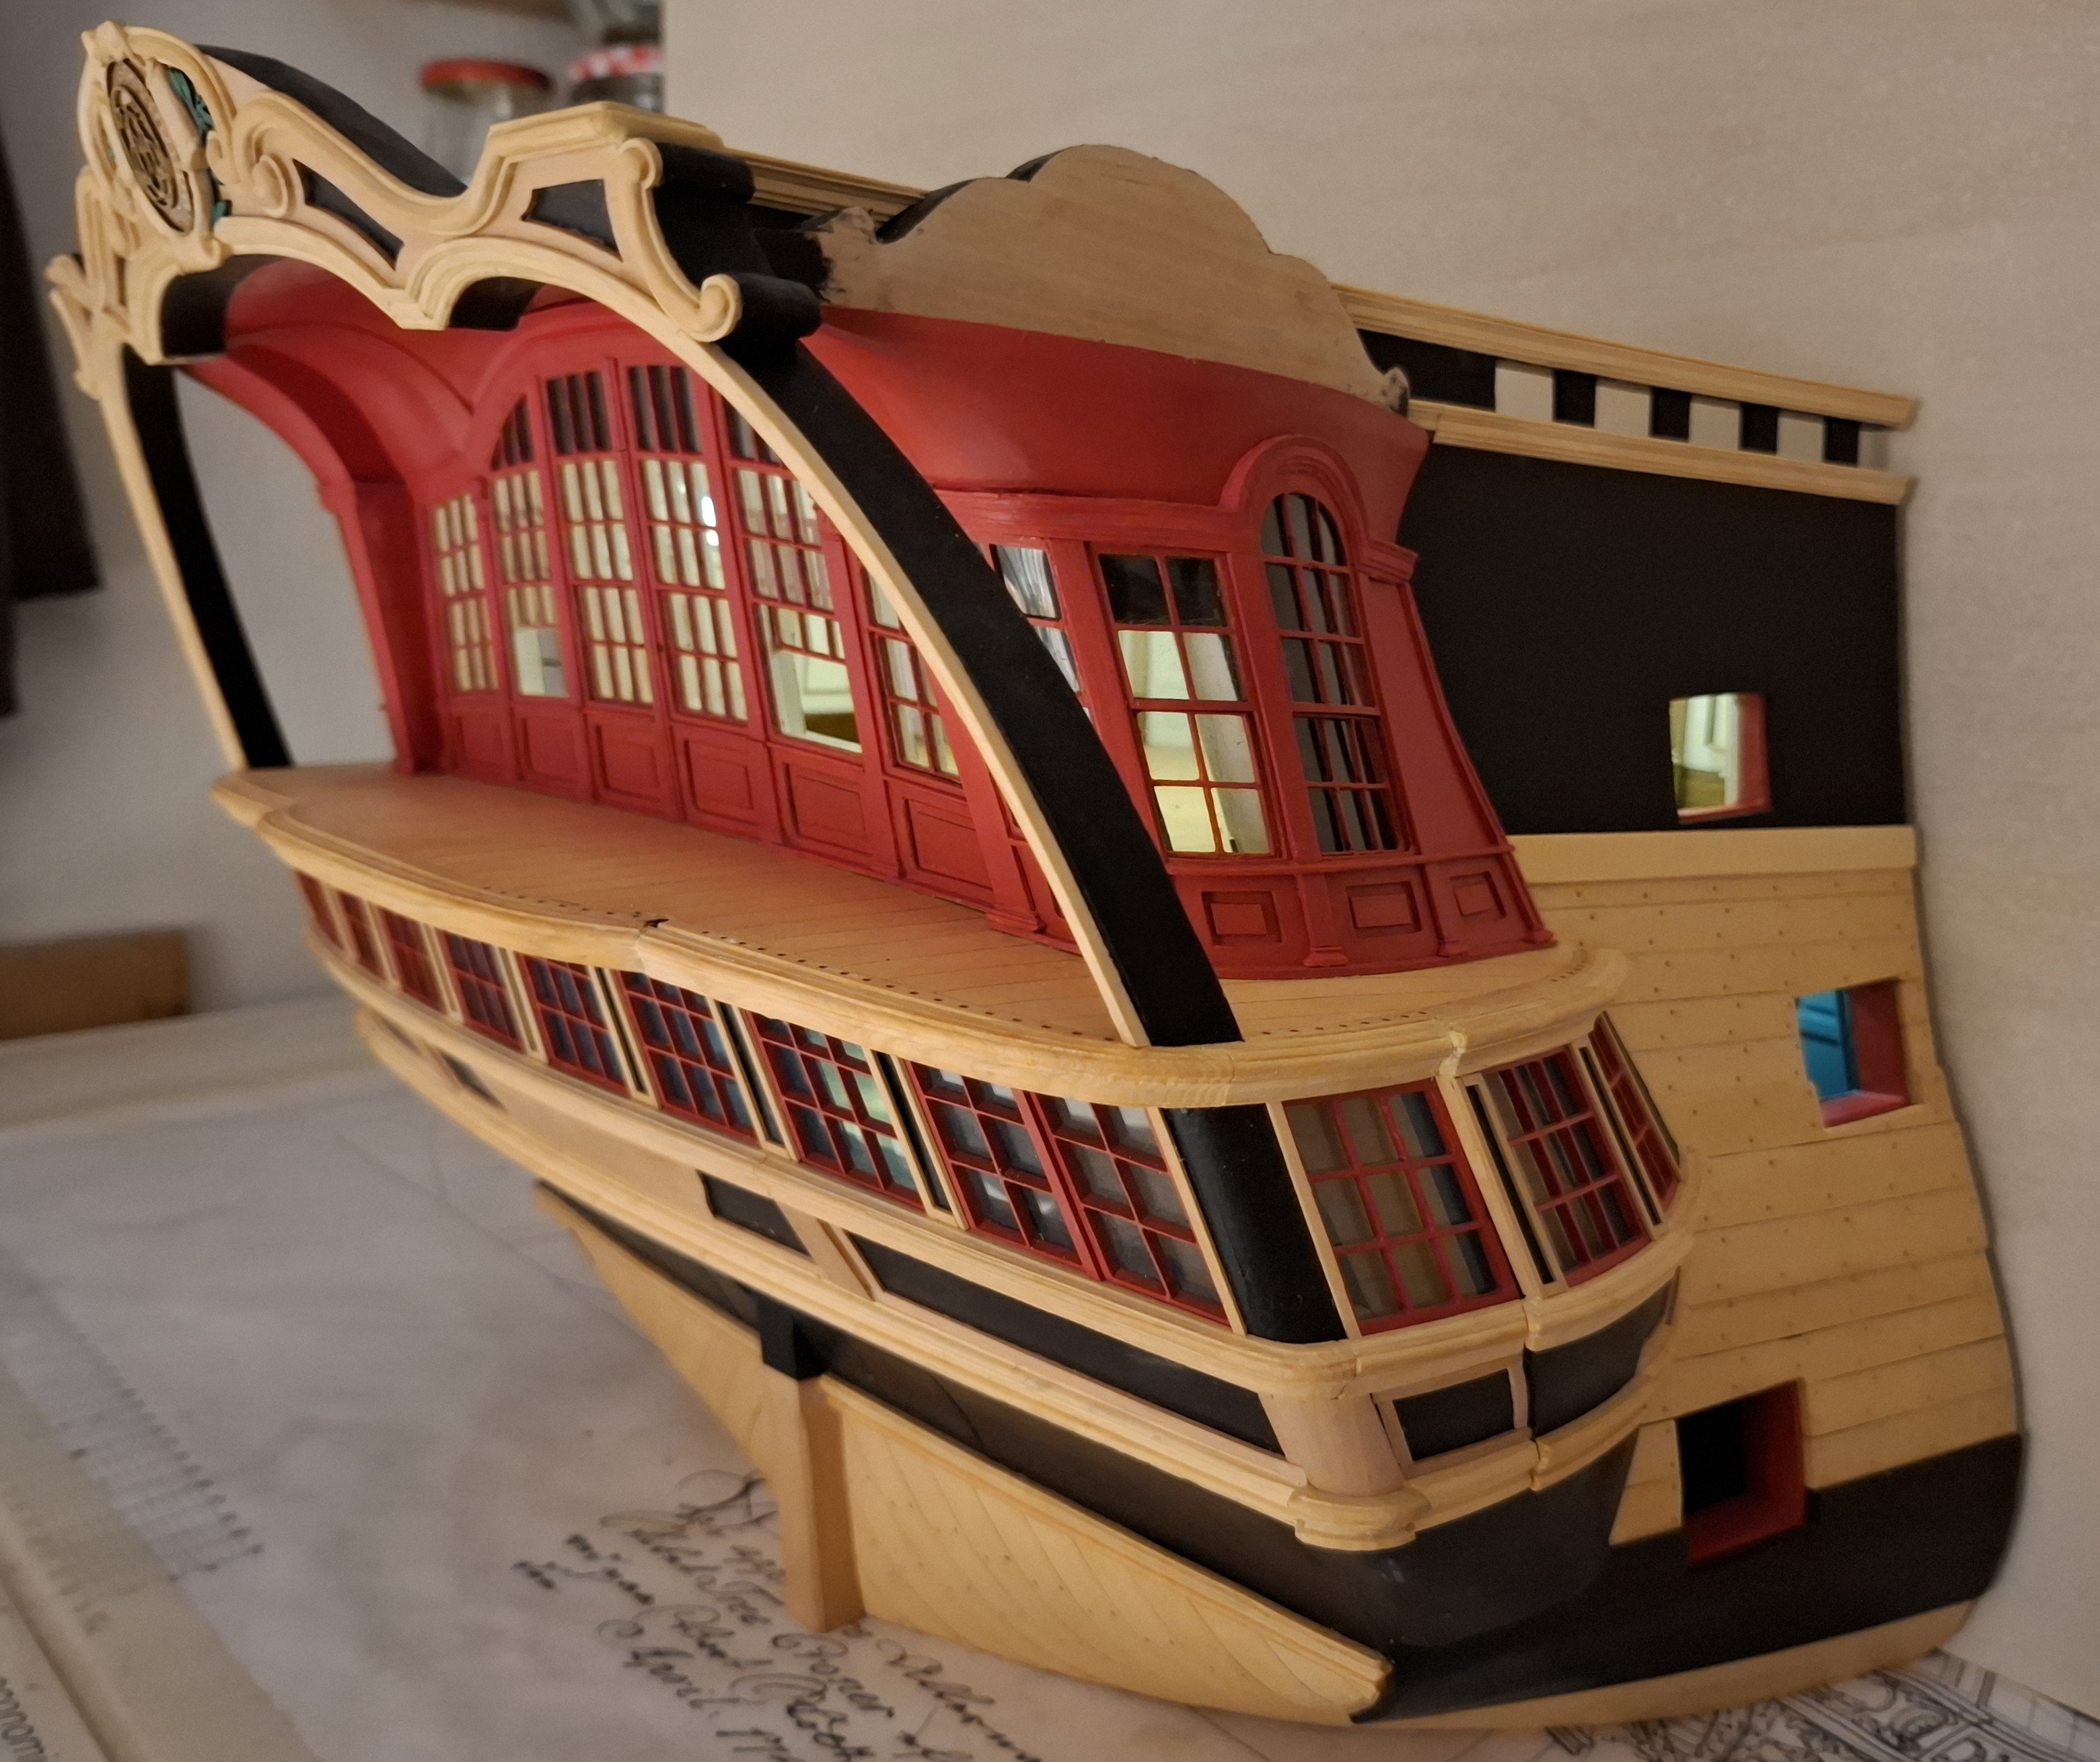
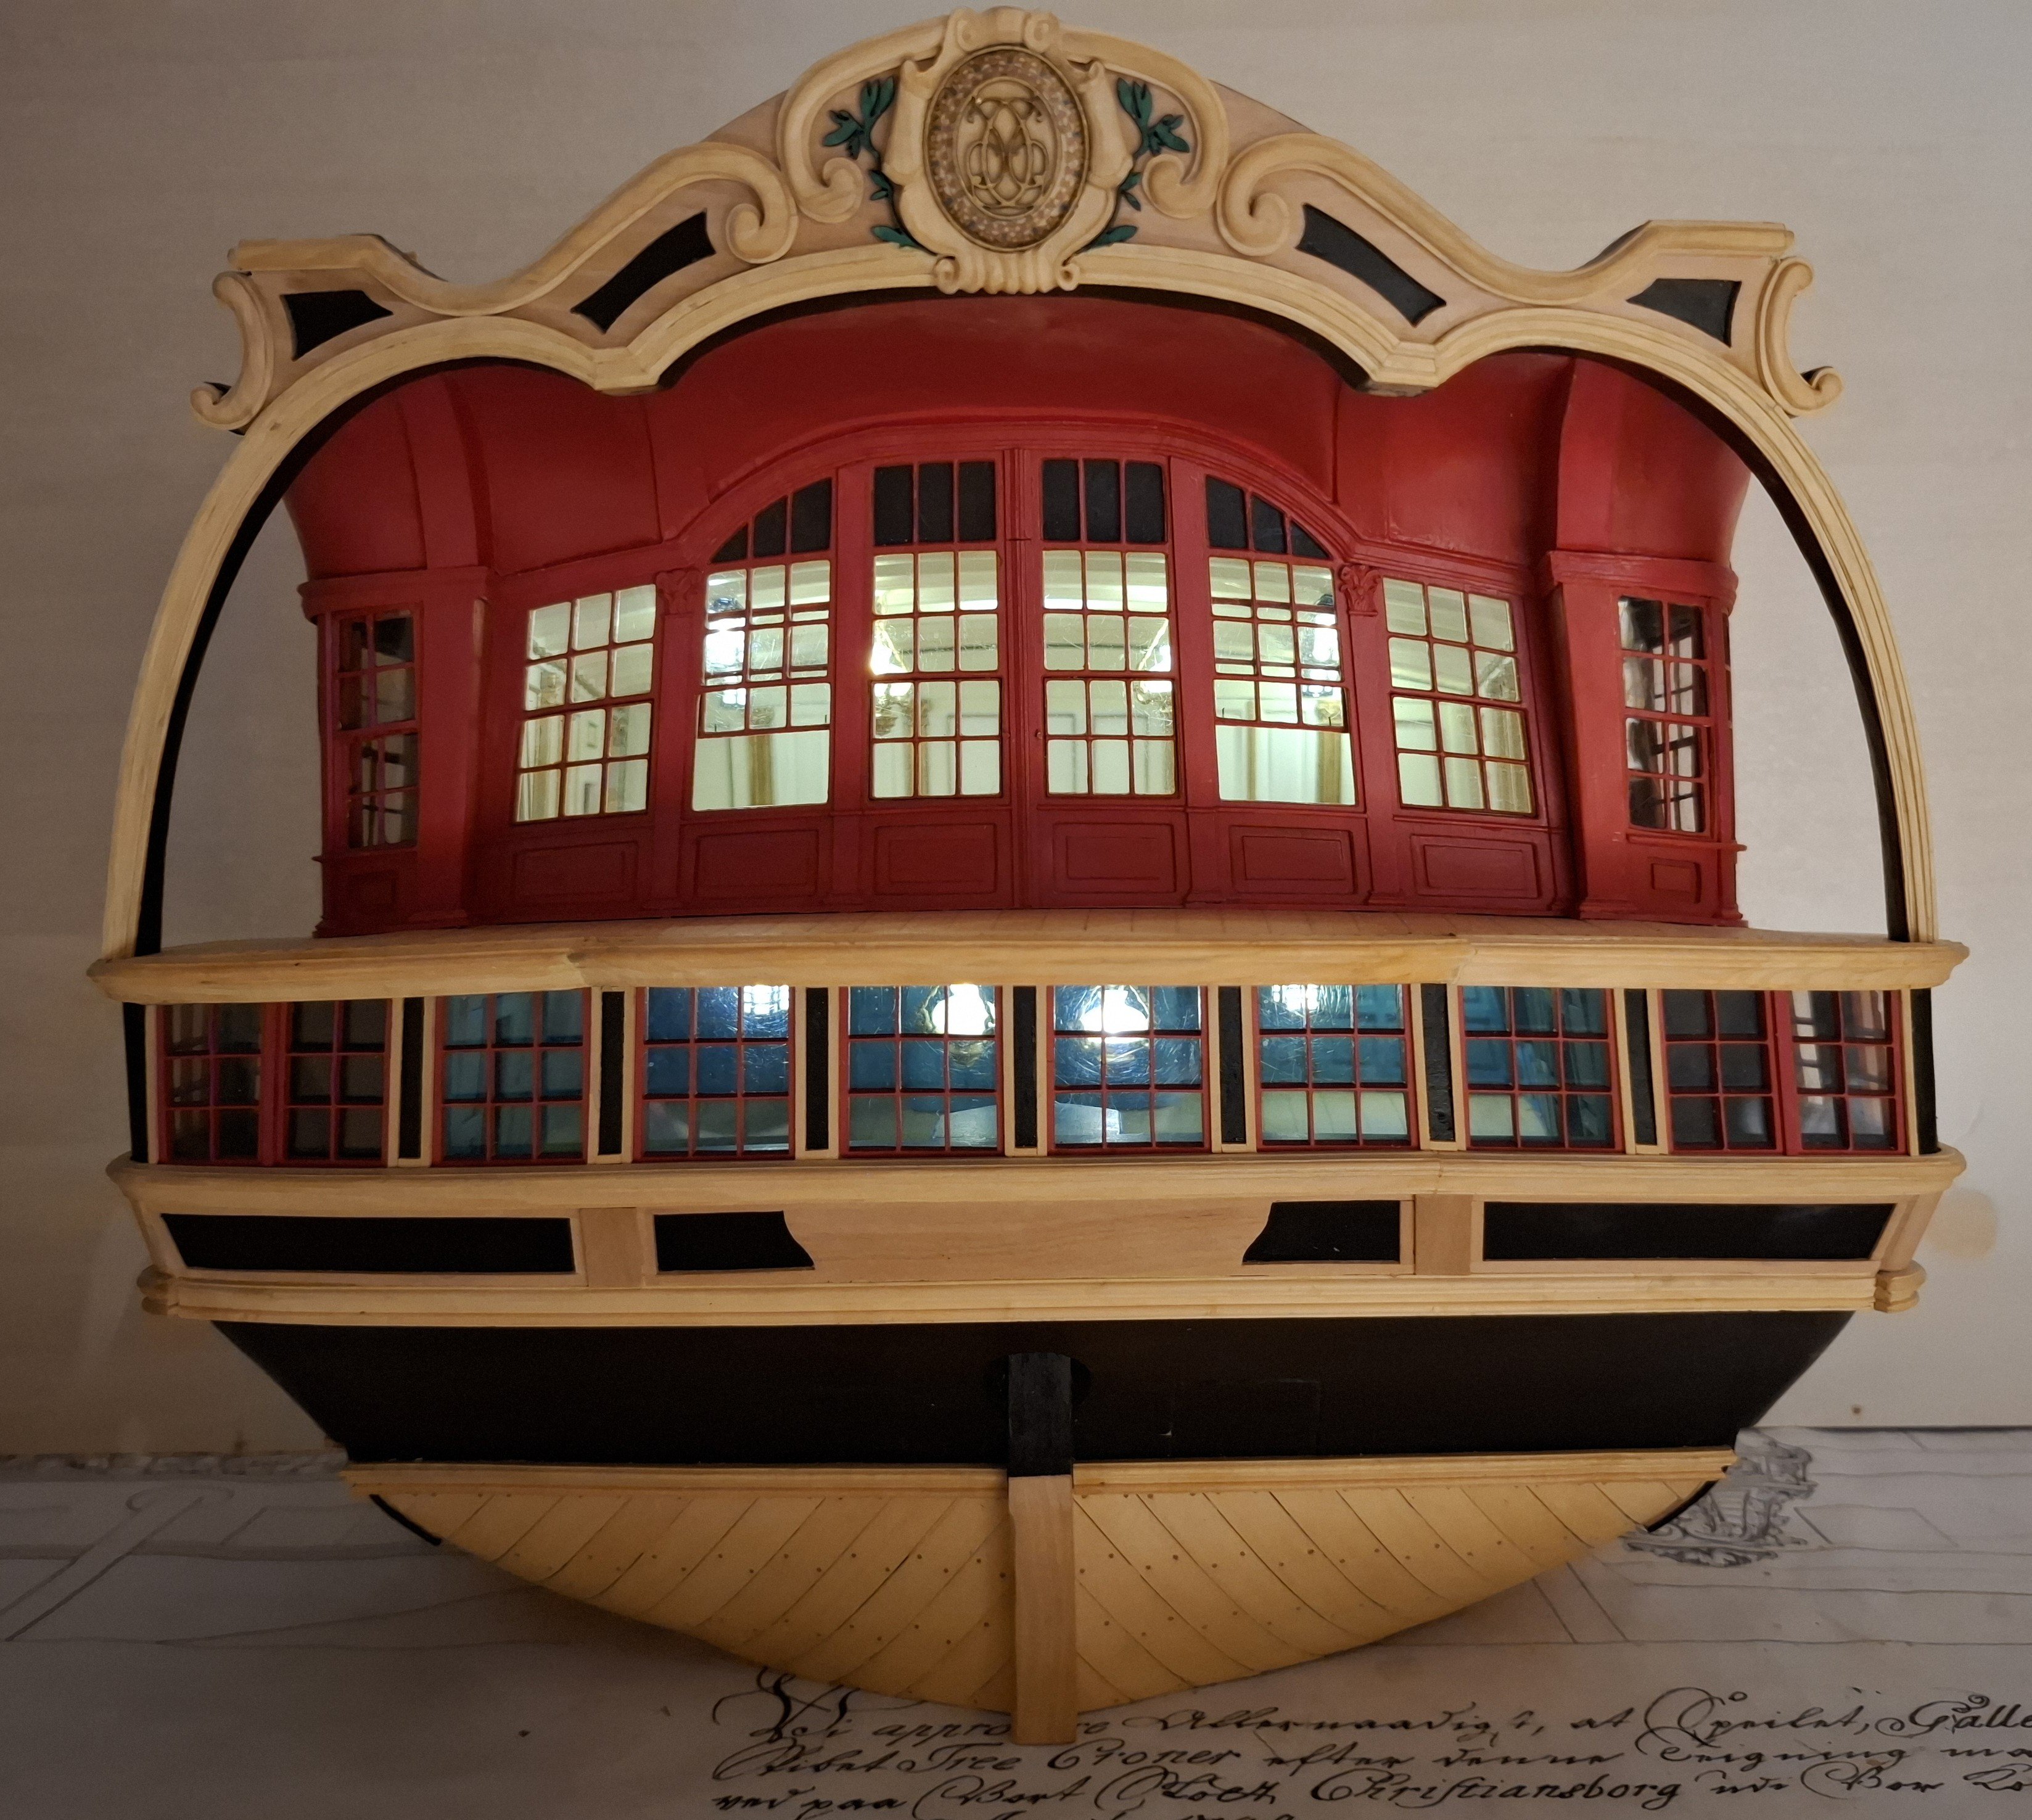
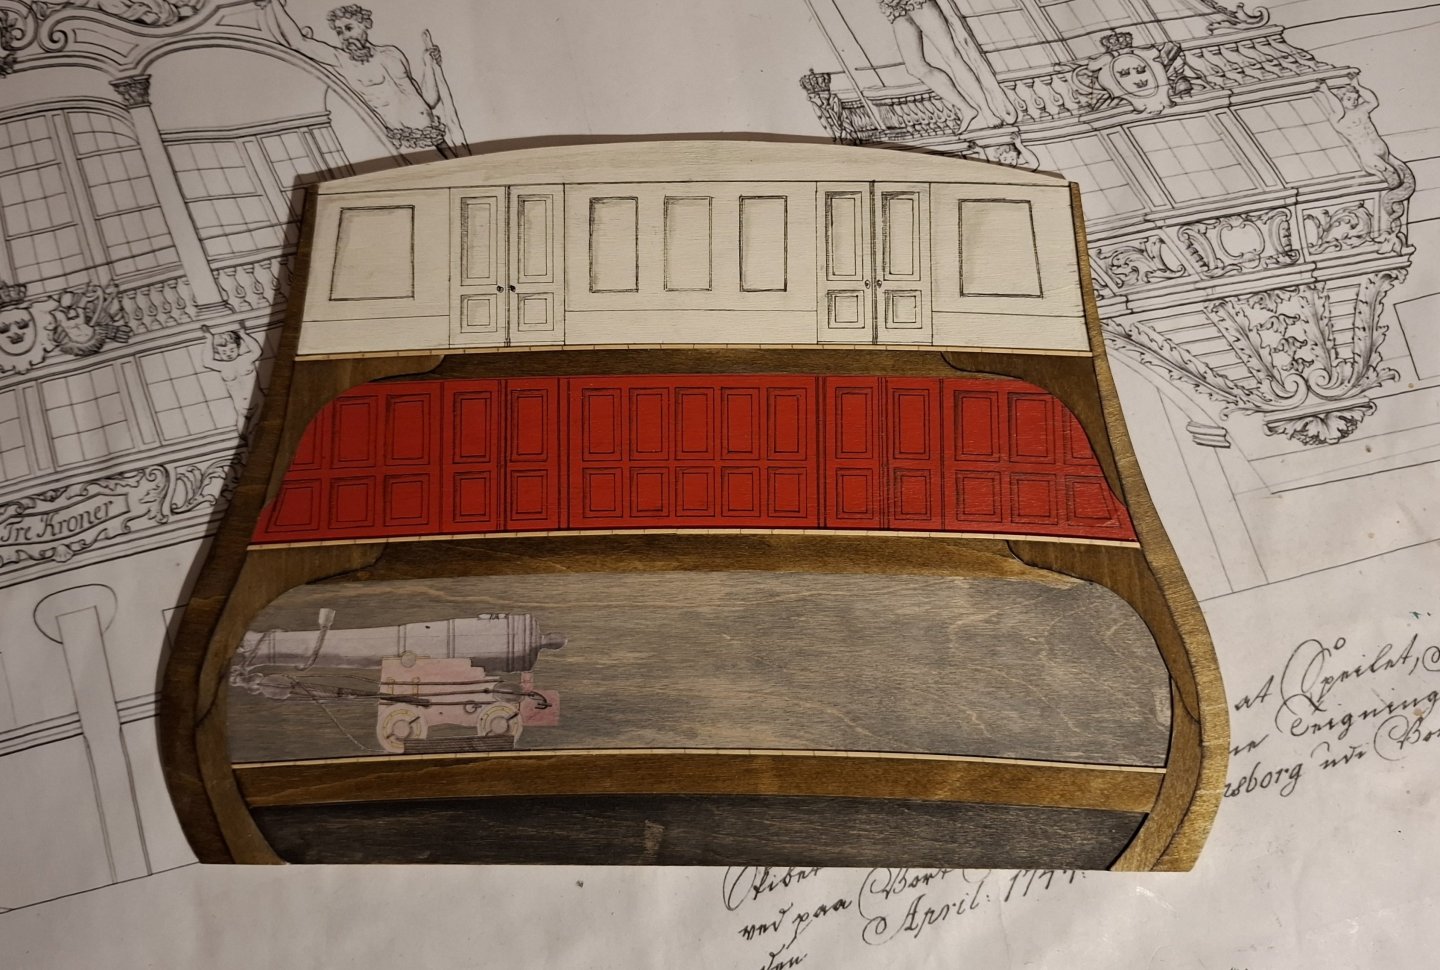
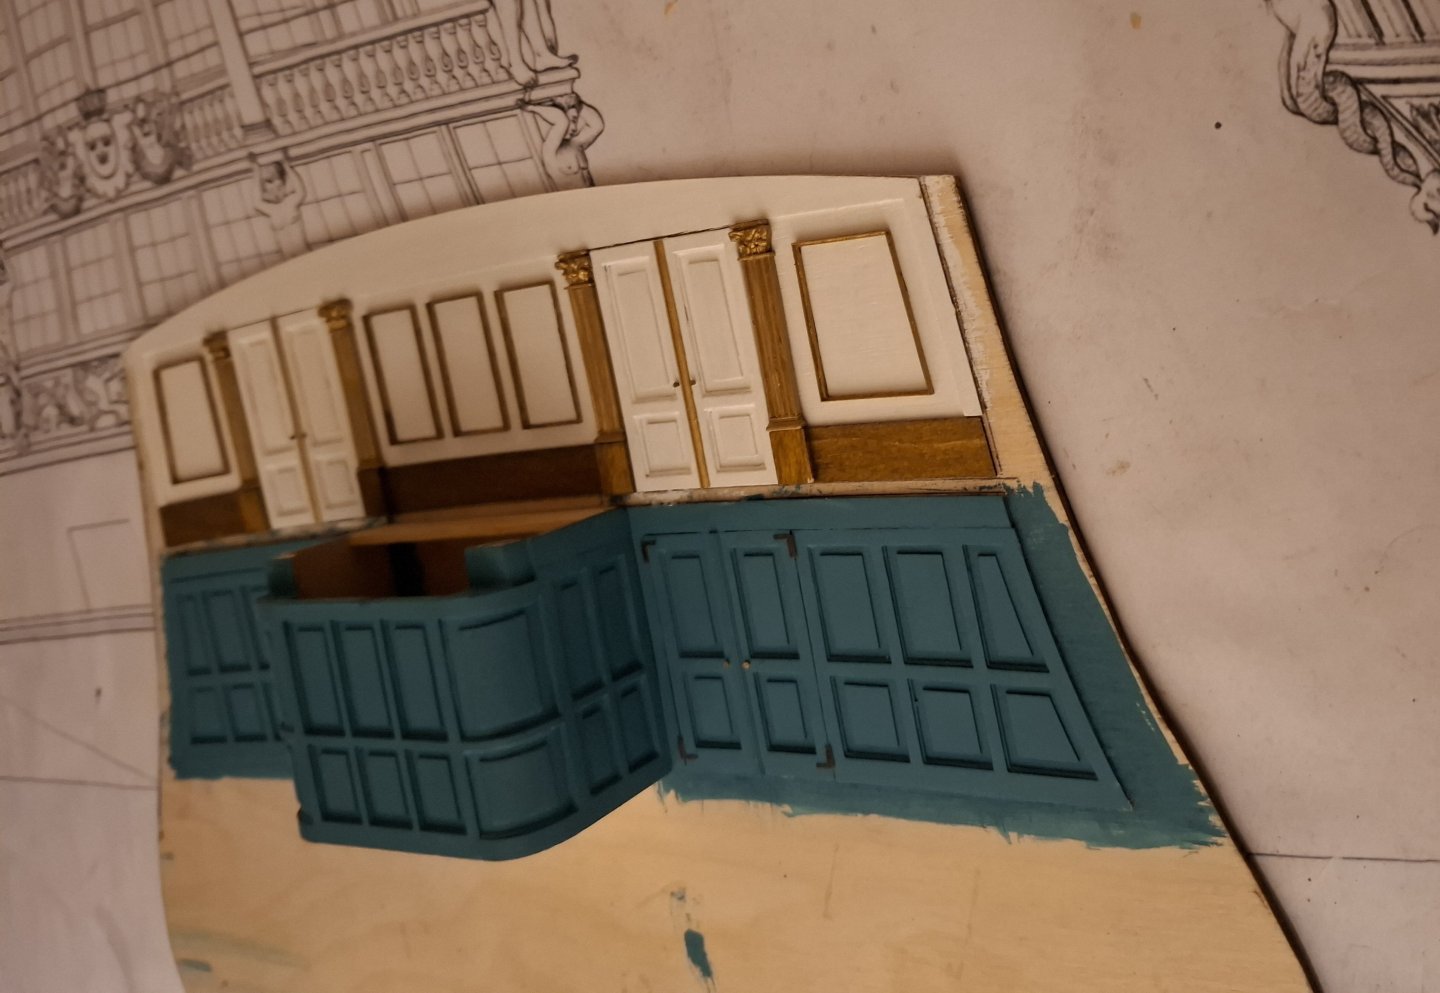
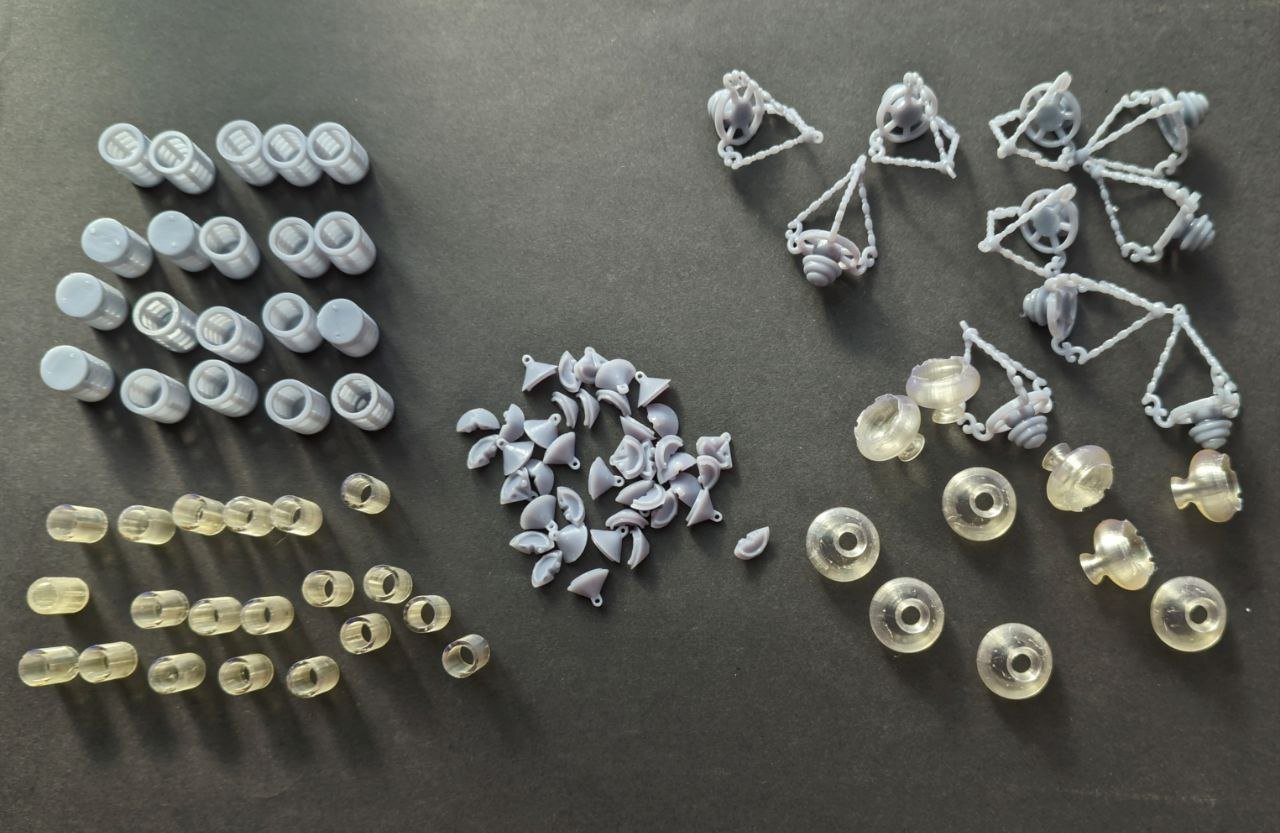
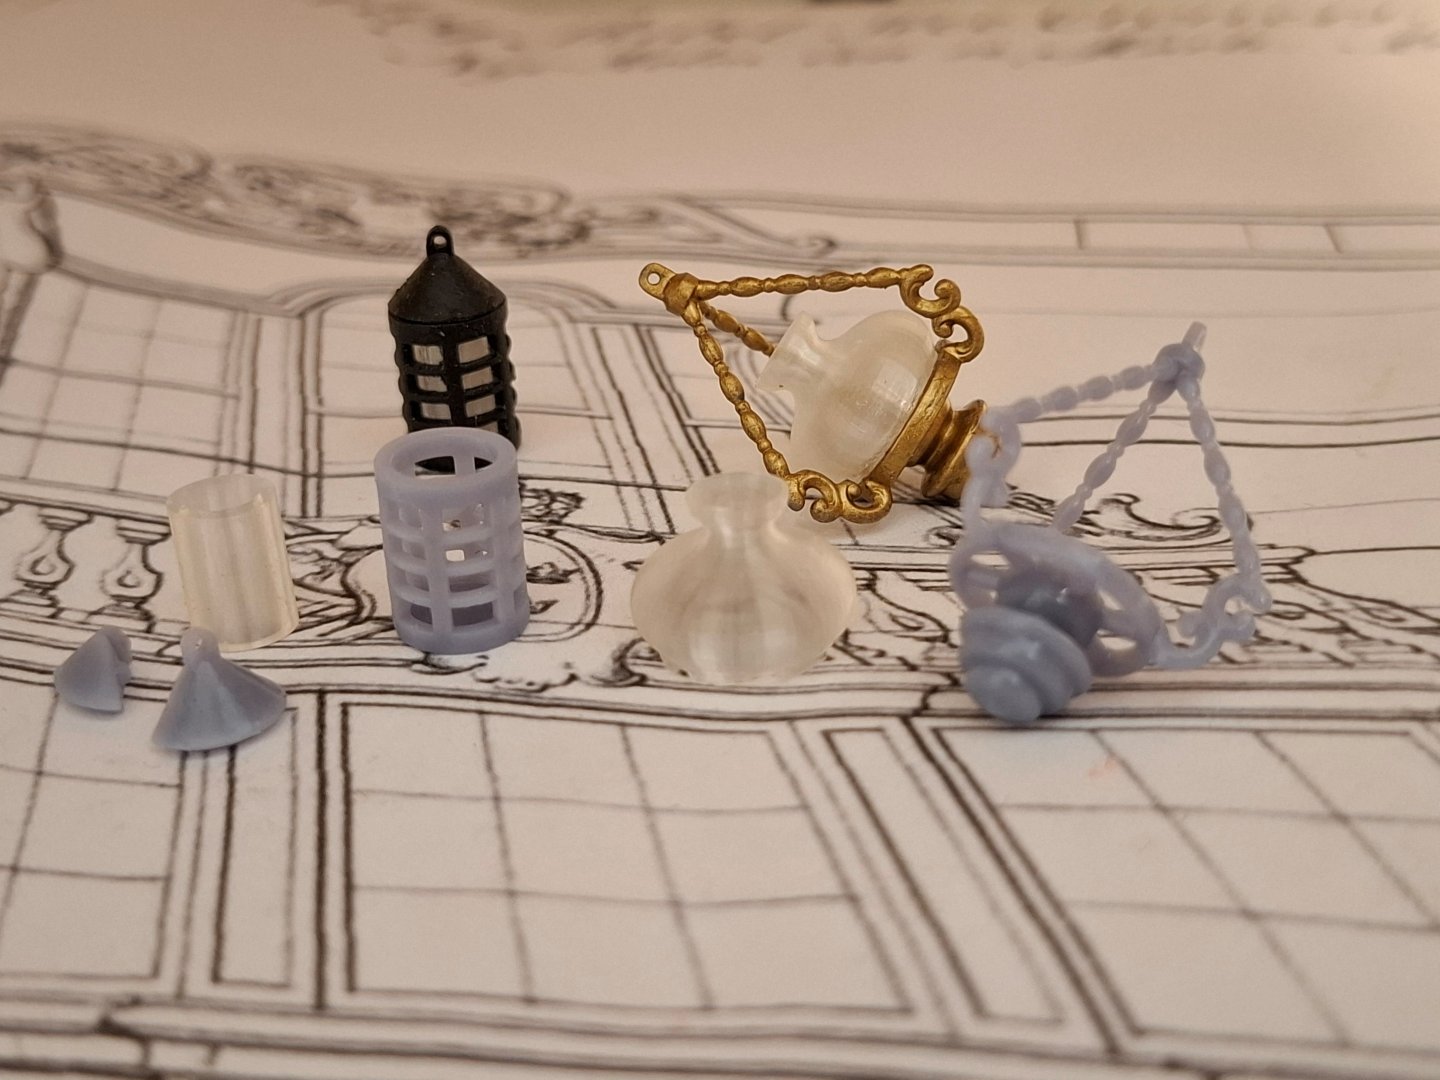
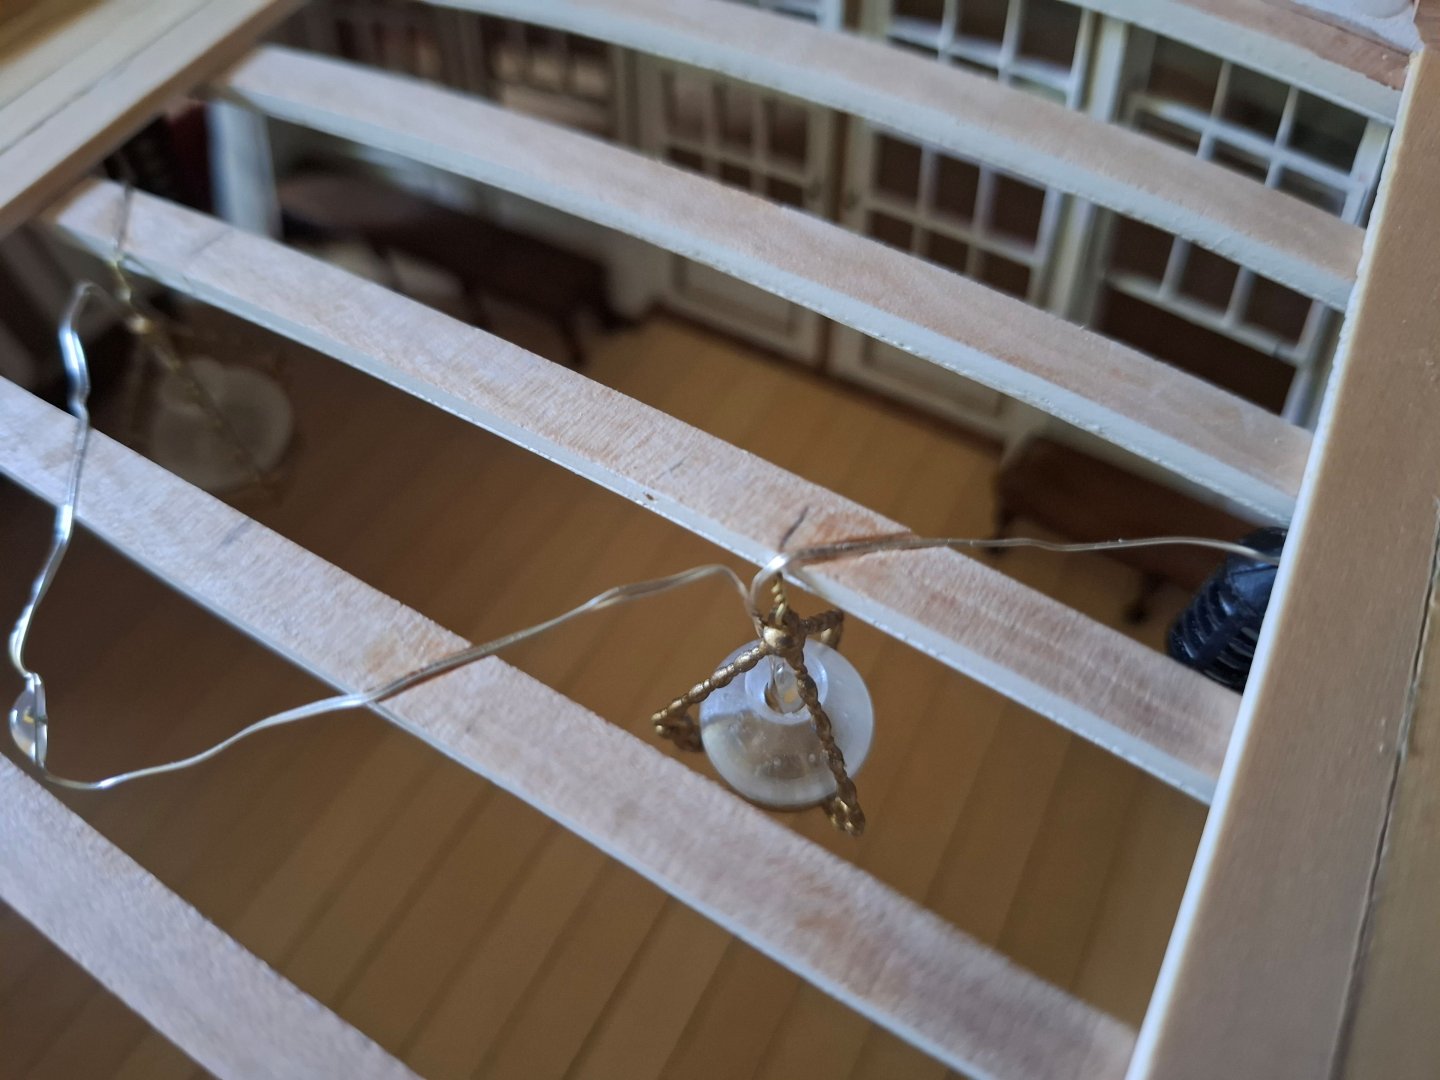
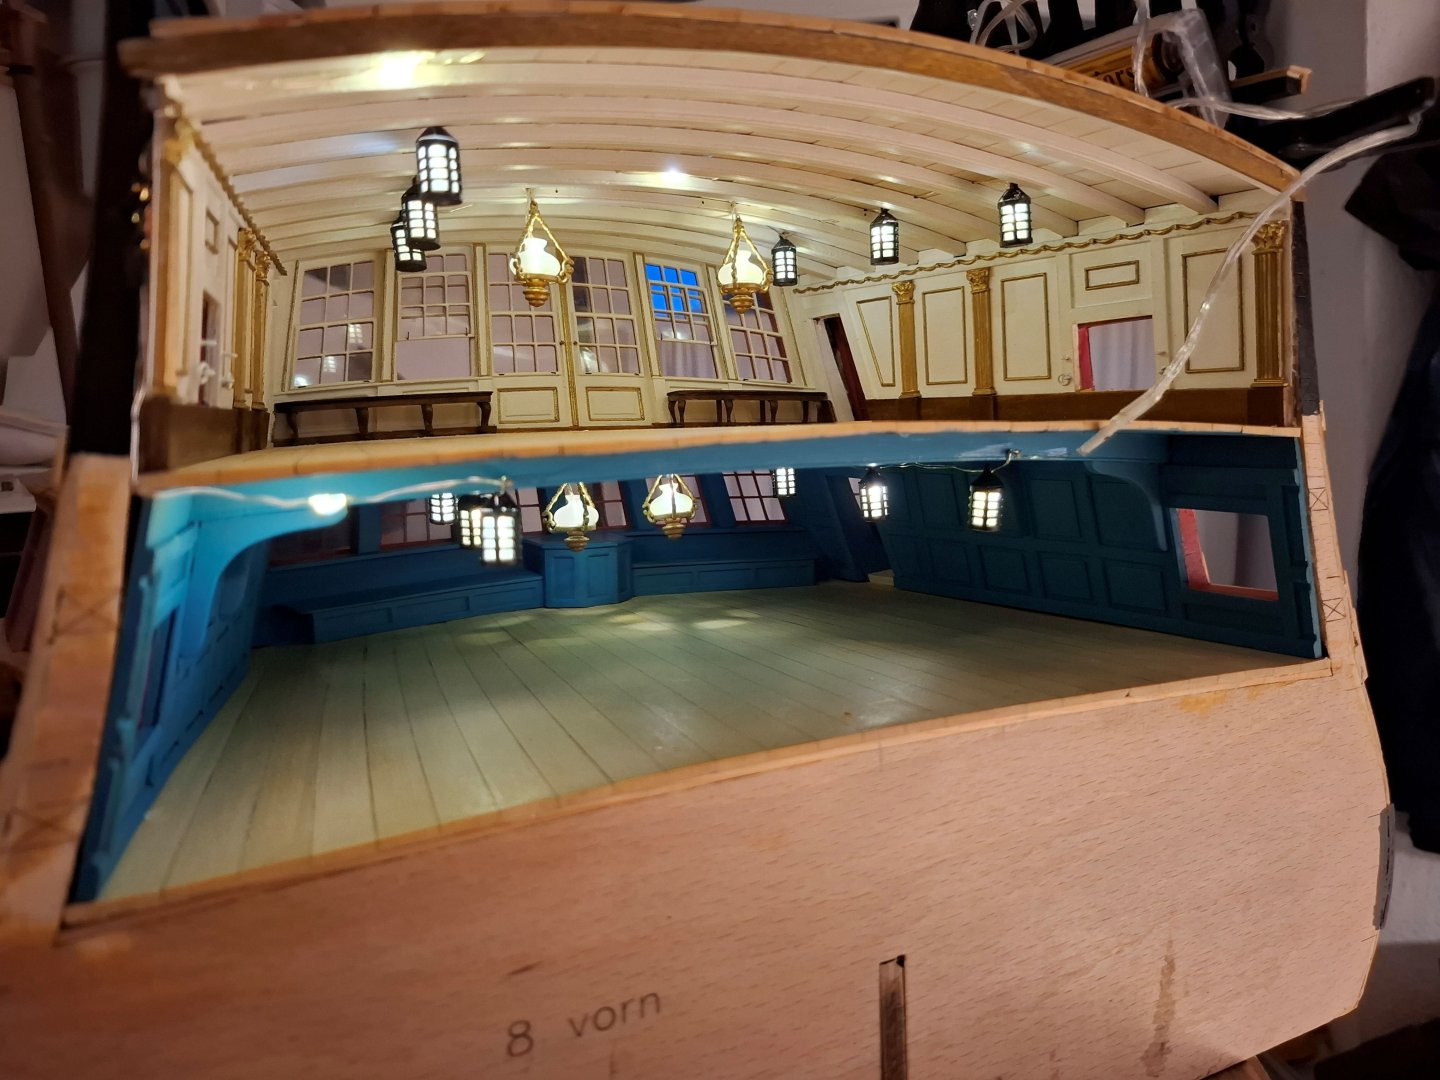
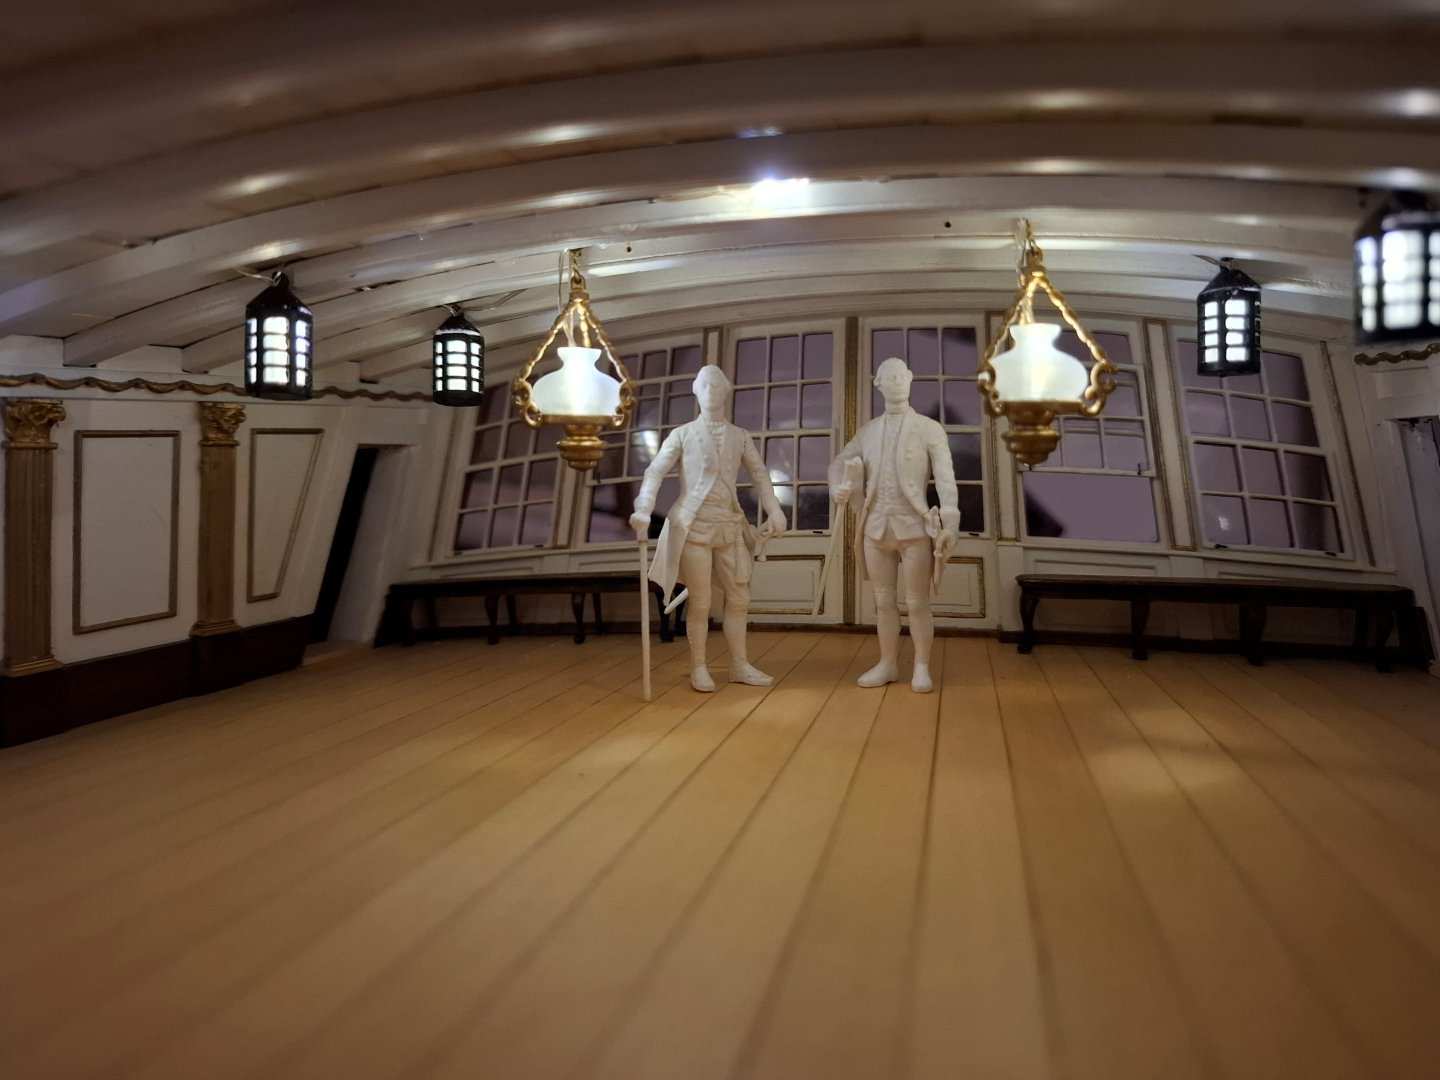
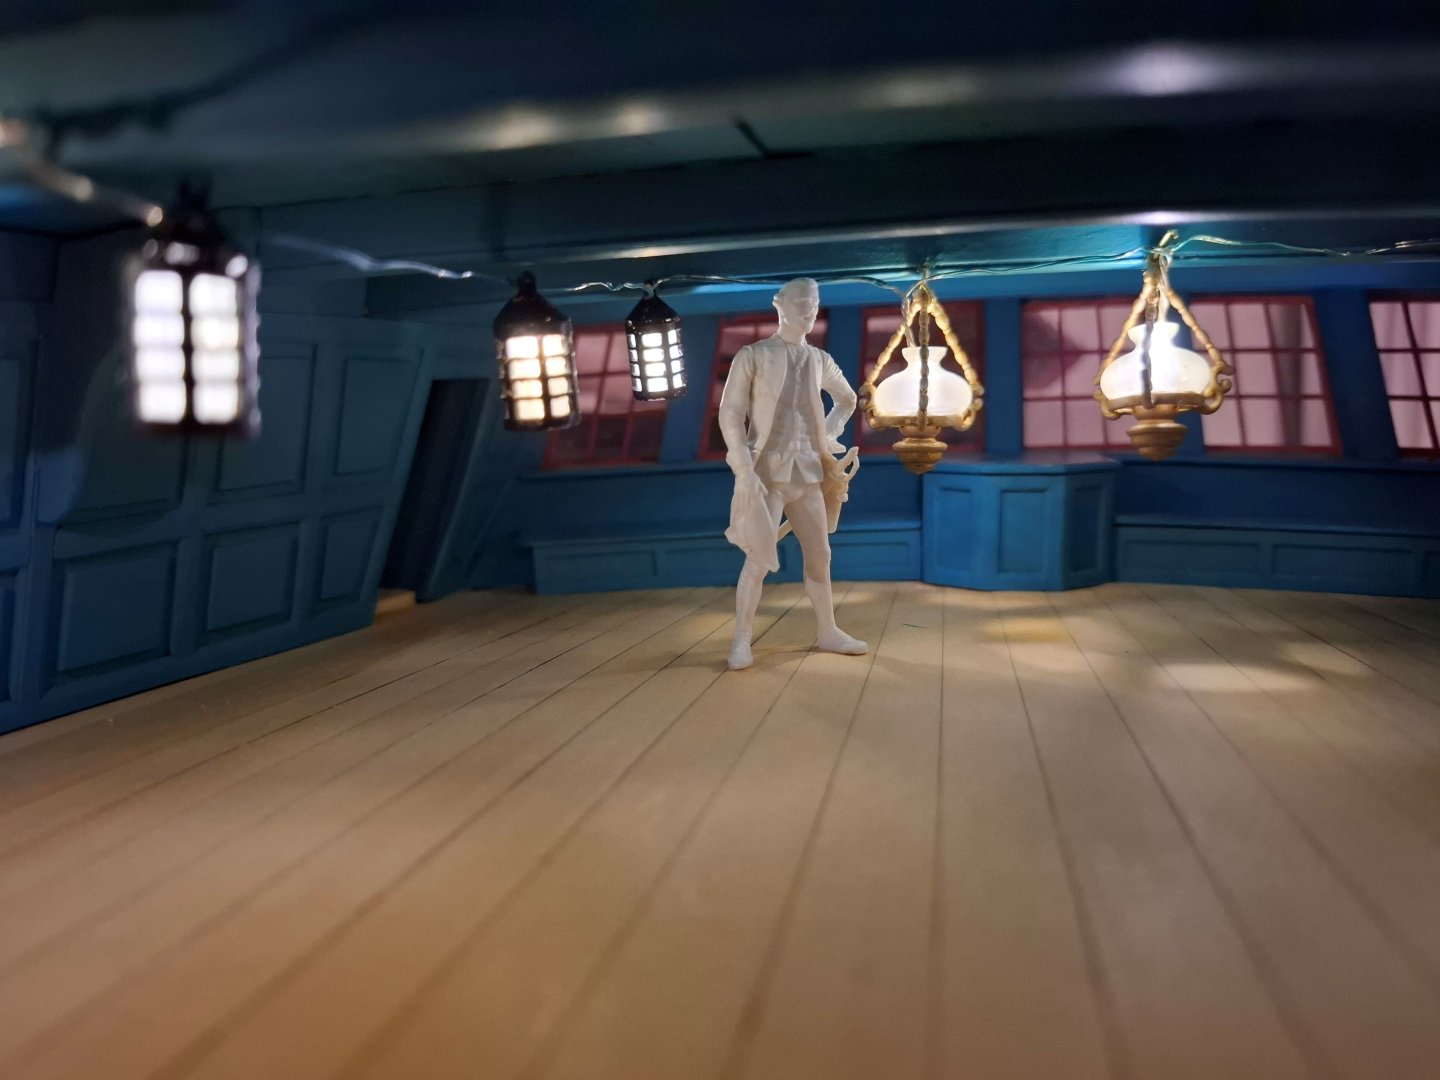
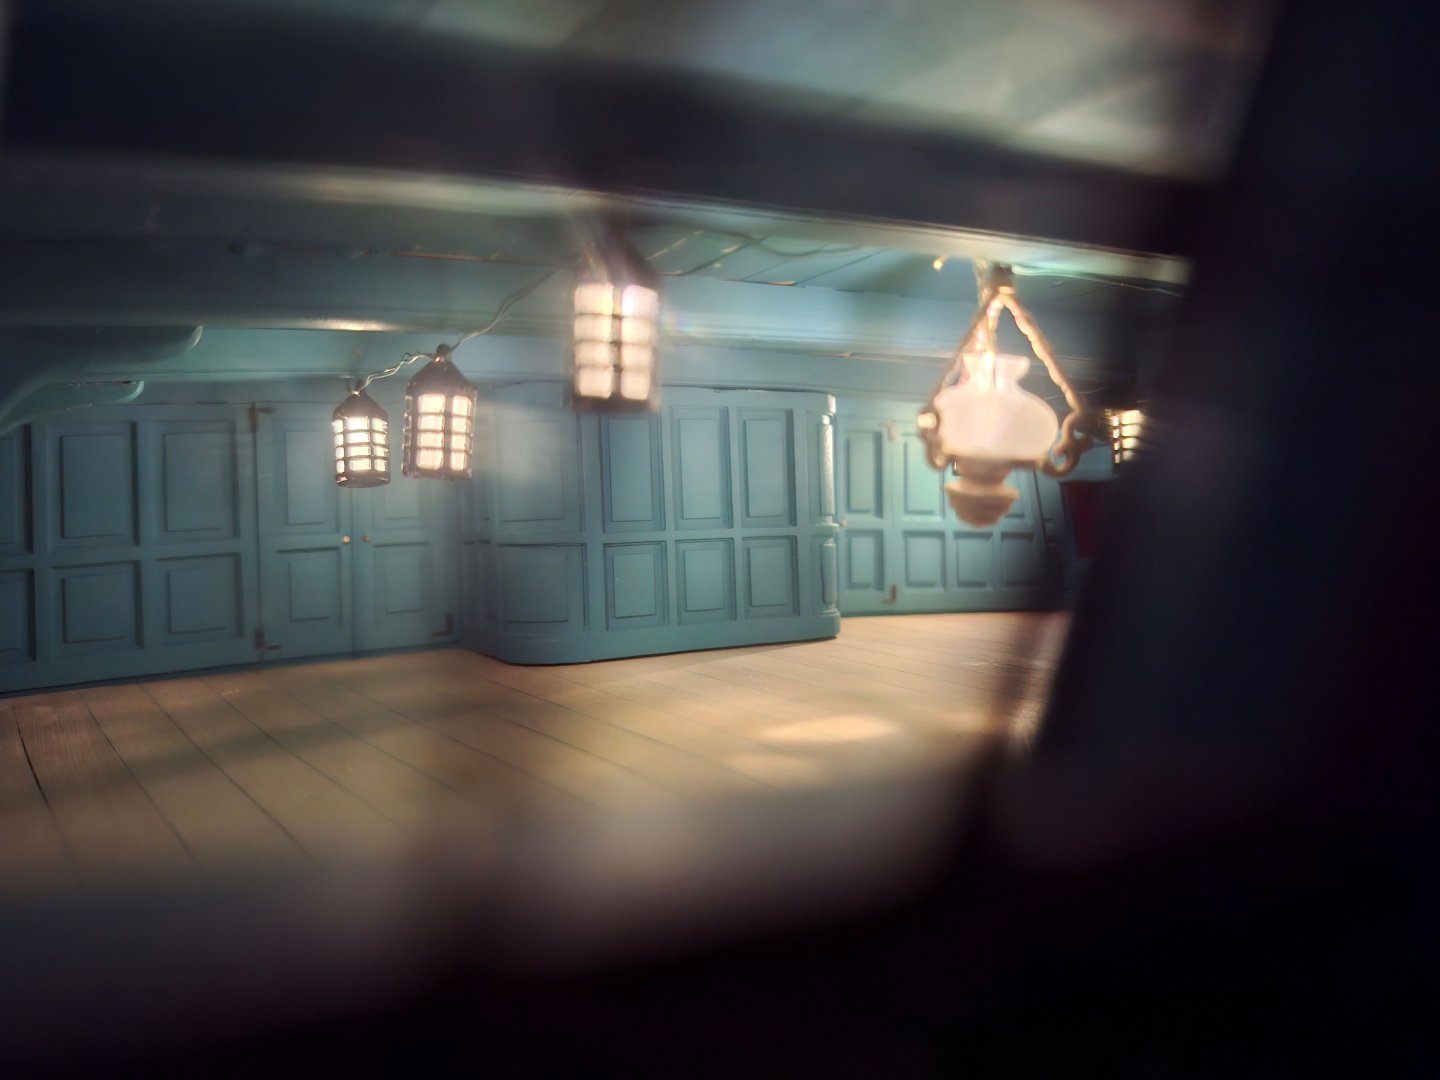
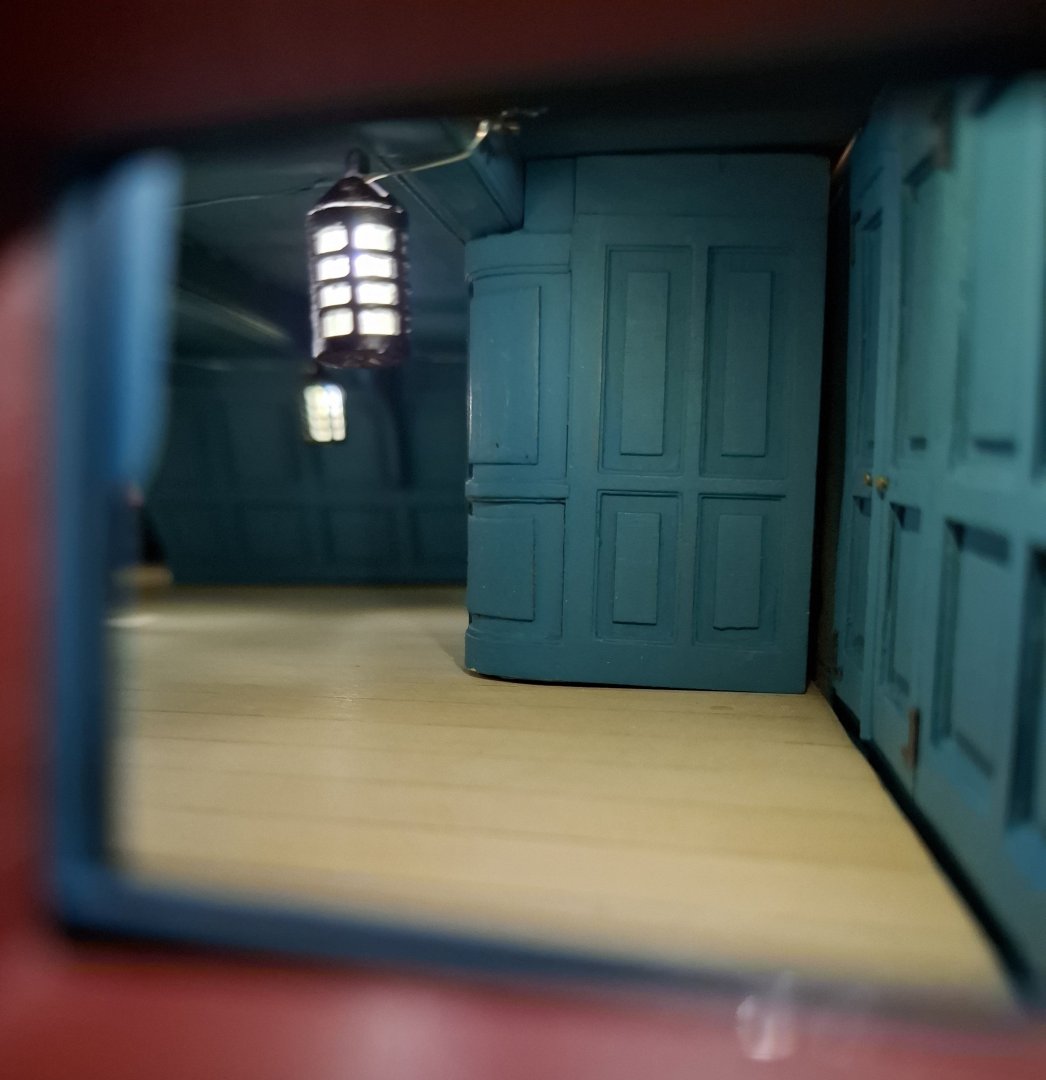
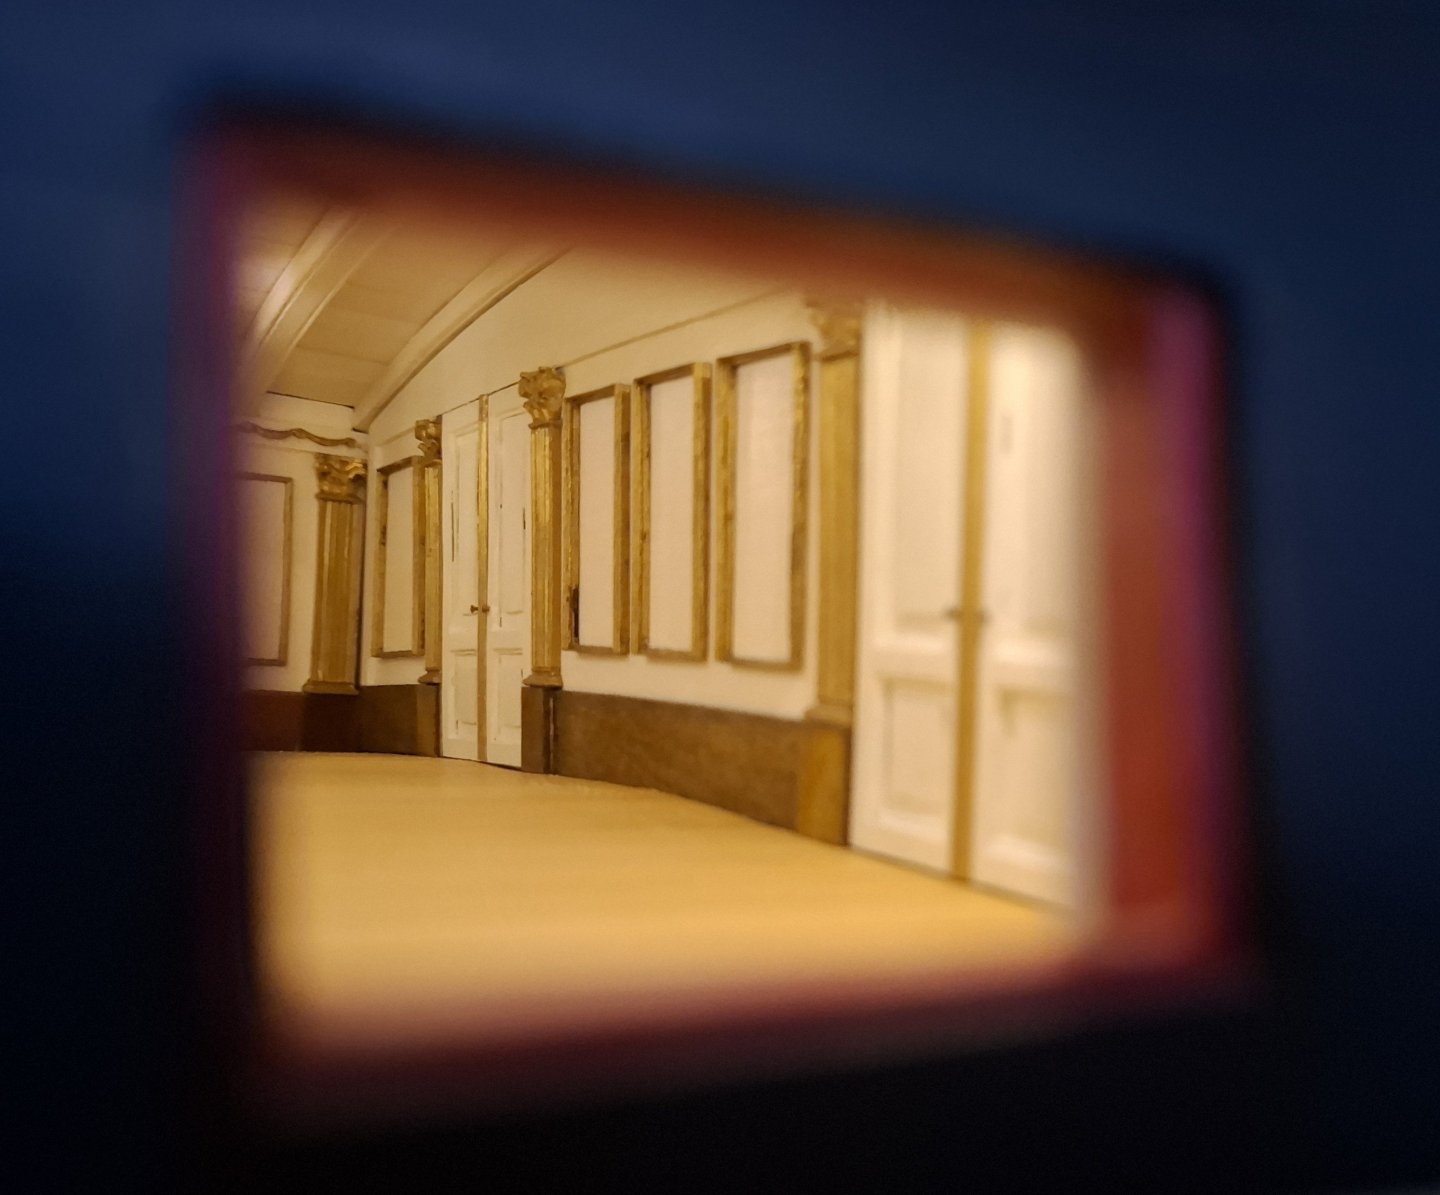
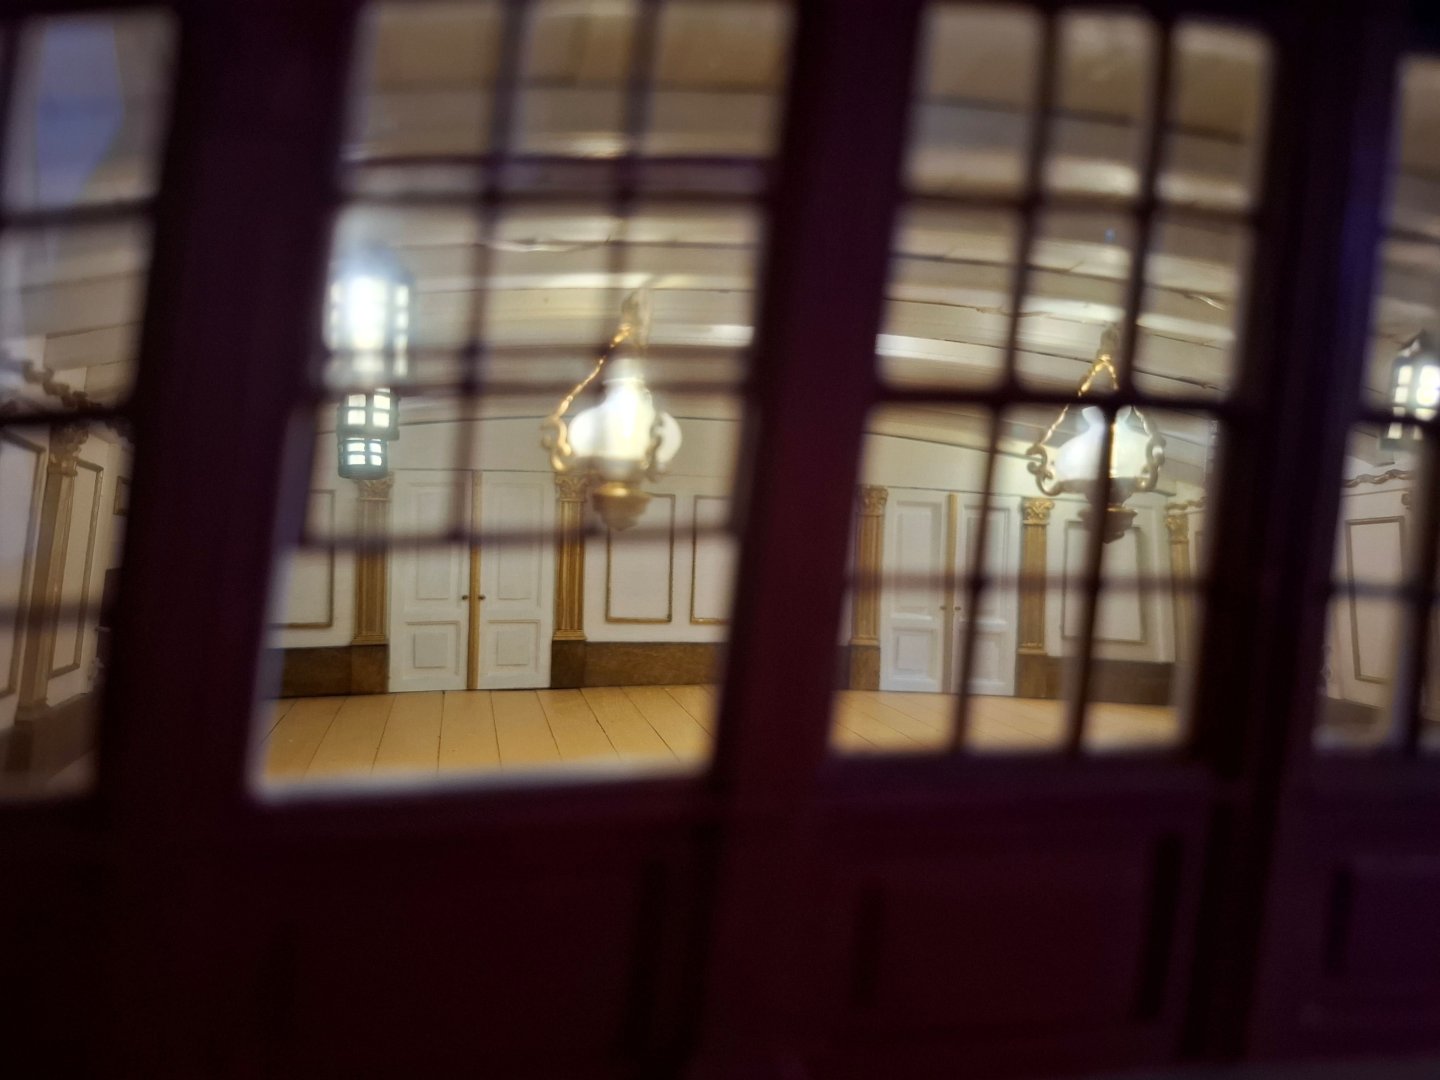
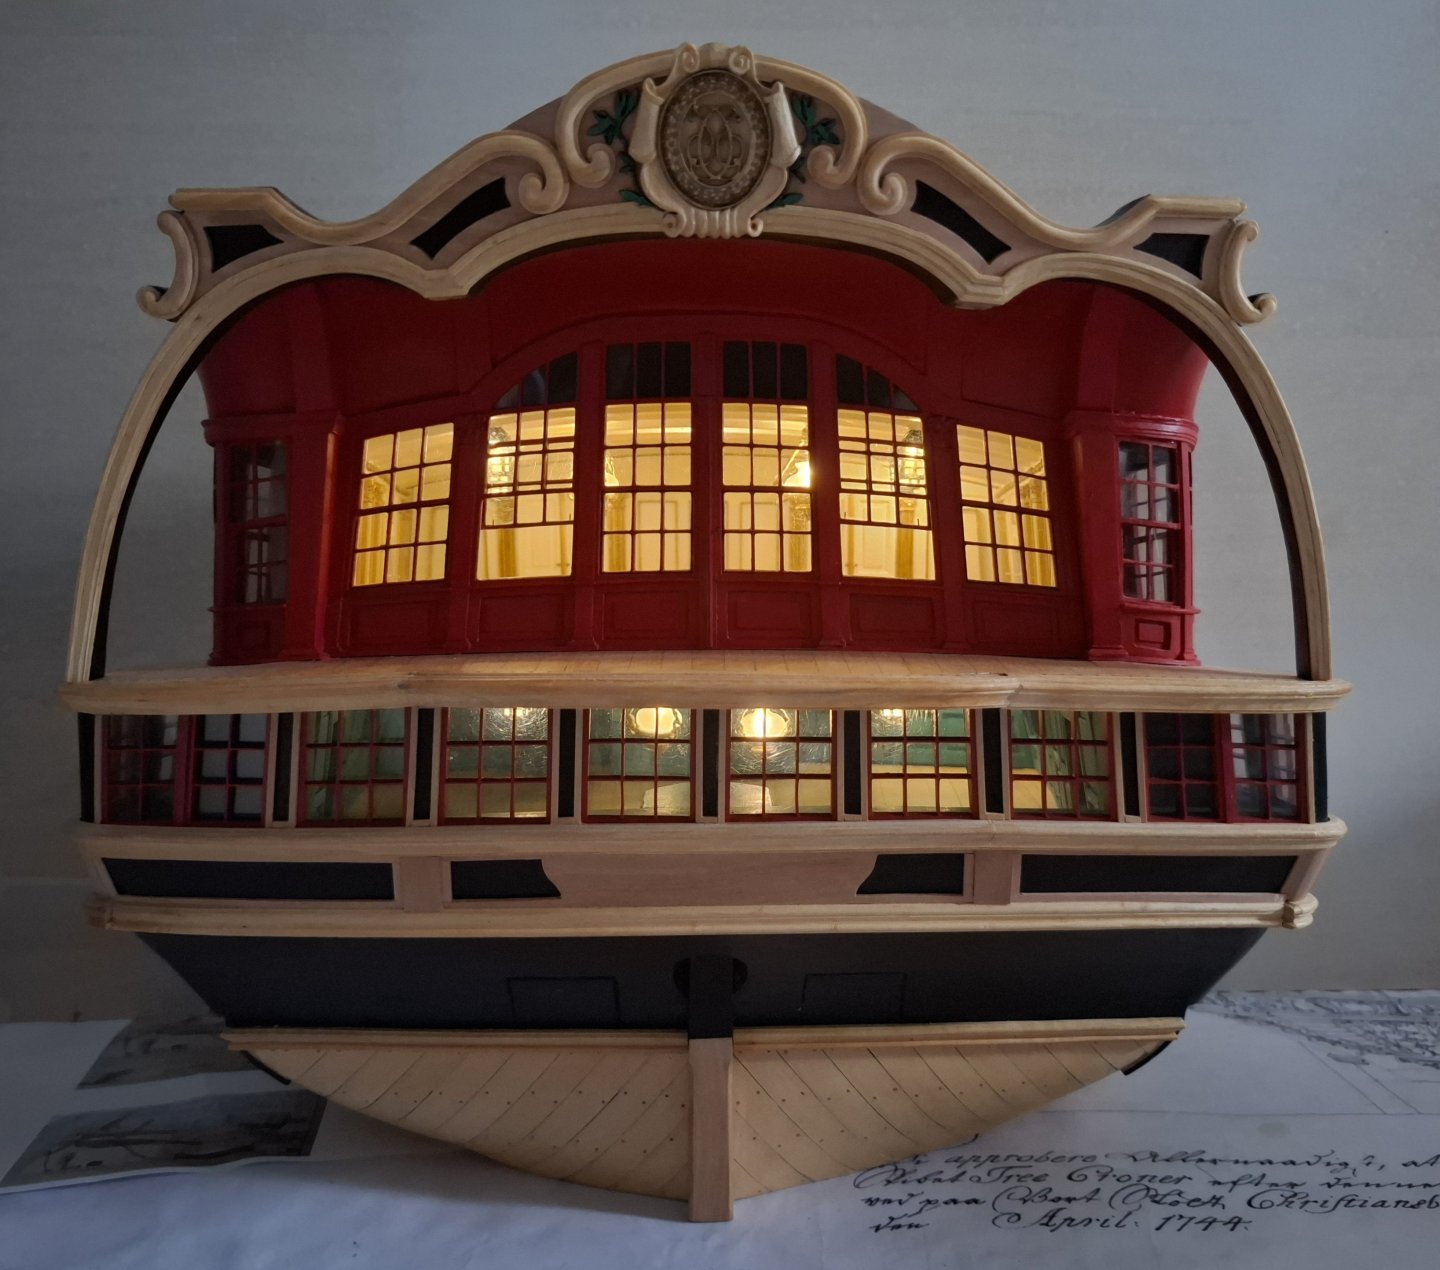
Dear fellow modellers, After quite some time, I now have some progress to report on my part. Since I am building a transom model, it will later face the viewer with its stern facing forward. I was a little bothered by the fact that when looking into the model through the stern cabins, you are looking into empty space, so to speak. To remedy this, I added a rear wall to form the missing bulkheads to the ship's interior. Below are a few pictures of the first stages of construction with the bench in front of the upper gallery windows, the deck beams and the rear wall: In order to get a good view of the interior later on, it was necessary to provide lighting. There are numerous options for model making here, which are more or less complicated, time-consuming and expensive. In the end, I chose the most primitive option imaginable and purchased a string of lights from Roßmann for €2.95. The small LED lights have a diameter of approx. 3 mm, very thin cables and are spaced 8 cm apart. I made a drawing of the lanterns and petroleum lamps that I had in mind as fittings and asked Igor Capinos to draw and print them in 3D, which I think he did very nicely. Installing the lighting in the upper part of the model went quite well, as I still had access from above, but in the lower cabin it was a compromise, as I had to run the cables under the ceiling beams, which of course is not so nice. Here are some pictures of the installed lighting on both levels: I still need to work on the fit of the rear wall here. This was followed by the completion of the aft deck with the offset above the arched canopy. My design here is speculative, as the original model does not show the built state here. I inserted a bulkhead in the front area and added a deck to the upper platform. Later, ladder ascents and brackets for the hackboard will be added there. Finally, a few pictures of the overall model as it looks now. The LED-light seems to be extremely bright, that is an effect of the camera of my mobile-phone. In reality it is more warm-white. Best regards, Matthias


-
Yes of course. The Wikipedia picture is propably the most authentic. It is said to be contemporary.


.jpg.23613fb1b1f0c6dd07f9e6d7b27c960d.jpg)