drobinson02199
-
Posts
1,079 -
Joined
-
Last visited
Content Type
Profiles
Forums
Gallery
Events
Everything posted by drobinson02199
-
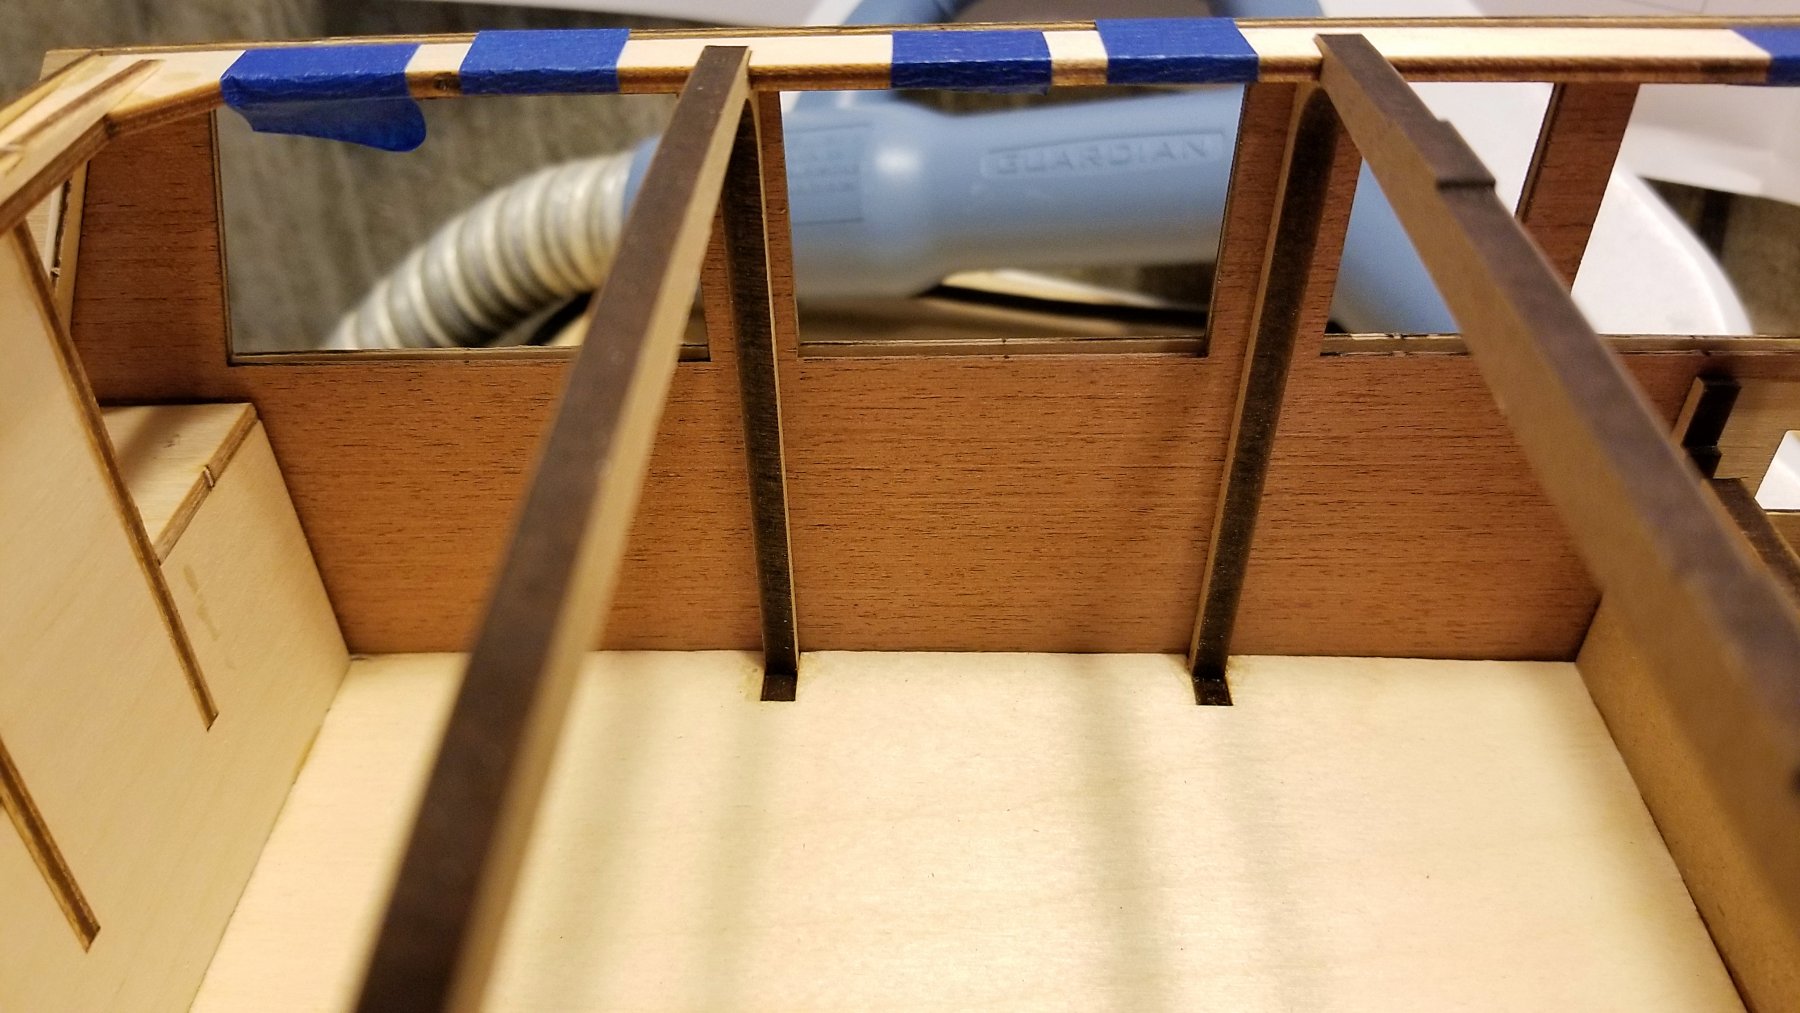
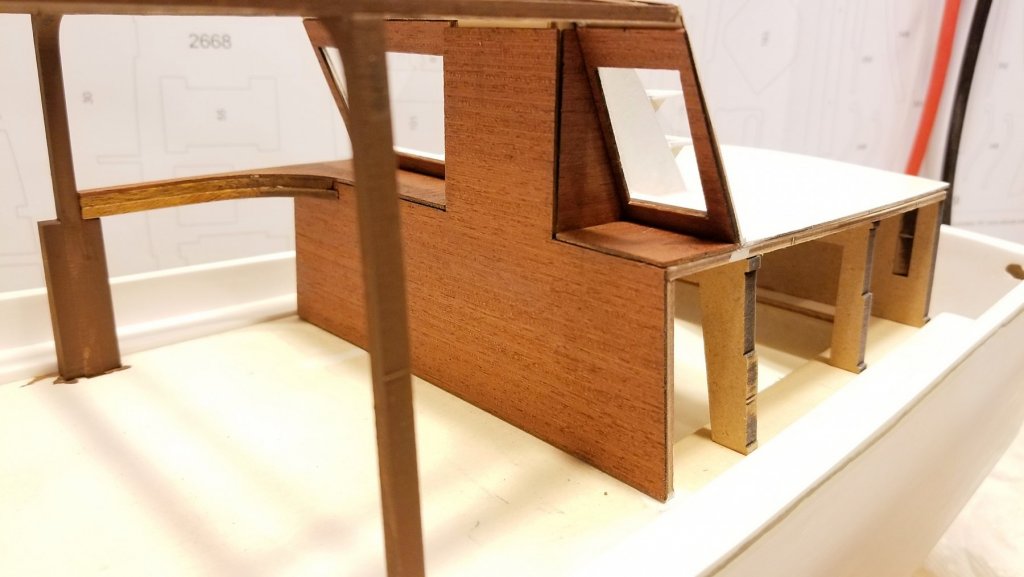
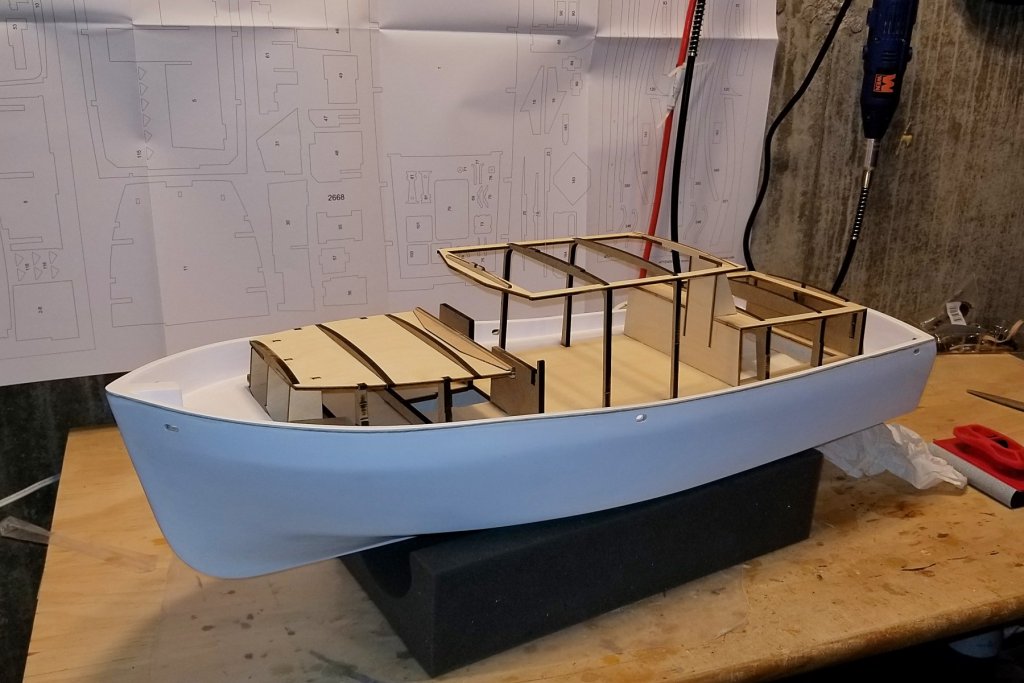
 Here's the full superstructure with the flying bridge added and some parts painted. Note that the sides are back off. The flying bridge is made to be removable so that you can see into the interior of the main cabin. The panels you see in the second picture are mahogany, which gives an idea of the finish level of the interior. The rest of the interior is made up by a lot of small pieces of cabinetry (all in mahogany) and some cushioned seats. Interior deck is "carpeted" (decorated heavy paper). So I have to build a lot of "doll house" furniture now. I'm enjoying this one. It's very different from others I have built. Regards, David
-
Chris: The build continues to look terrific. Just for fun I did a Google search for 1:50 horses and came up with this. Second item on the page. http://www.scalefarm.com/index.aspx?page=search&did=SCALE-1-50-SIKU&order=&search=horse Regards, David
-
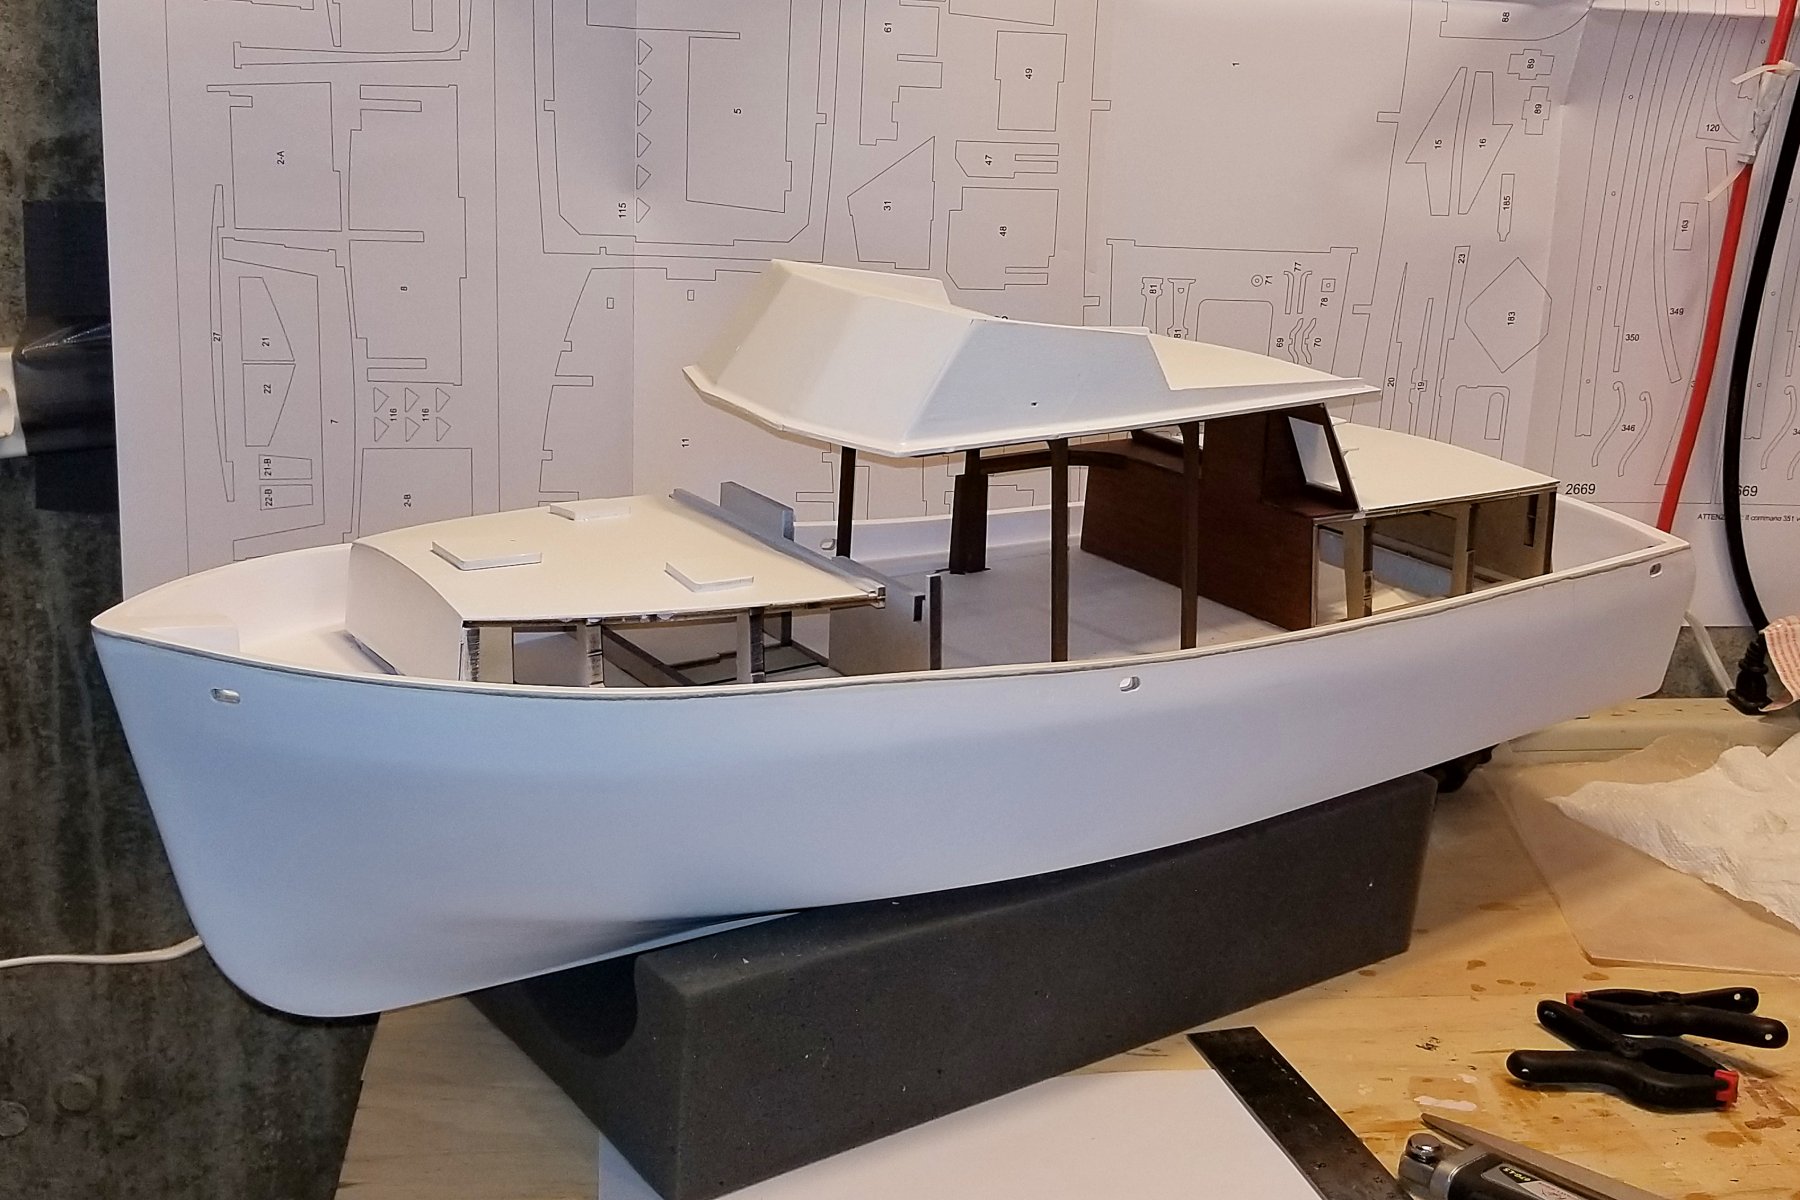
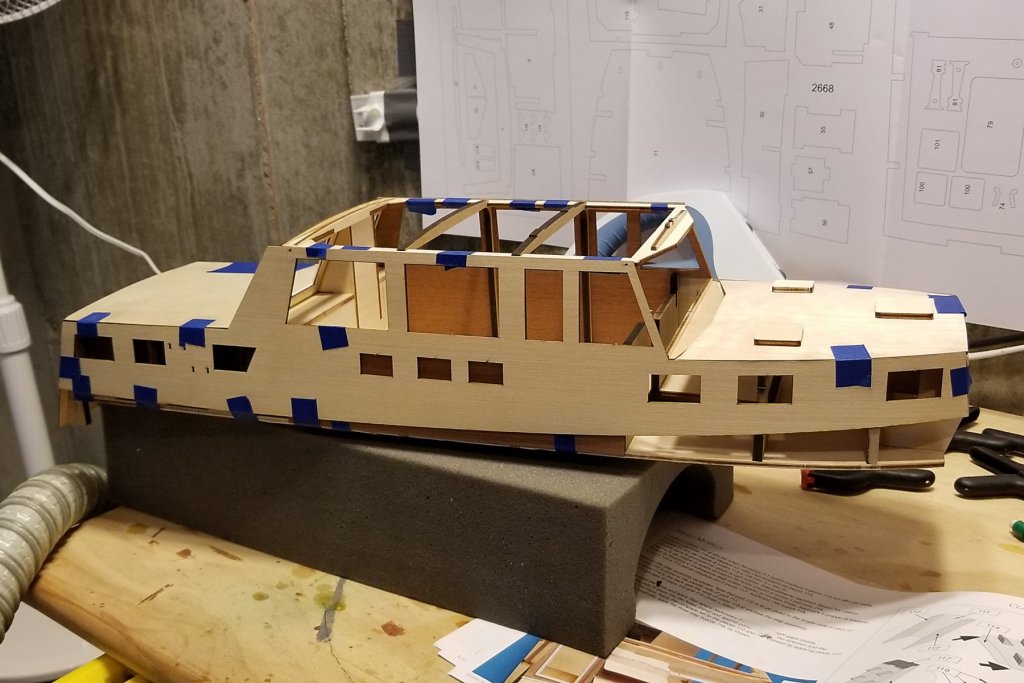
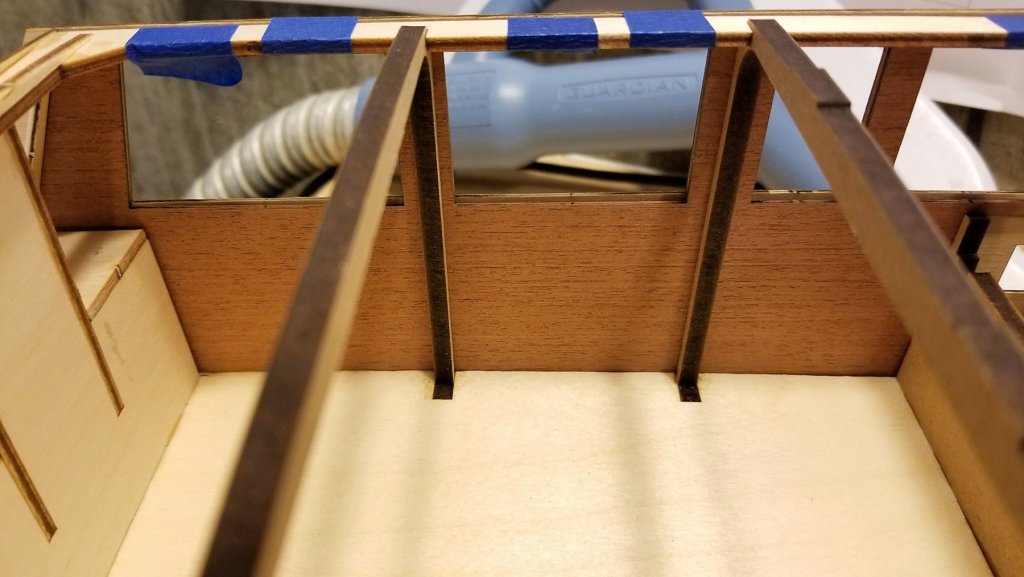
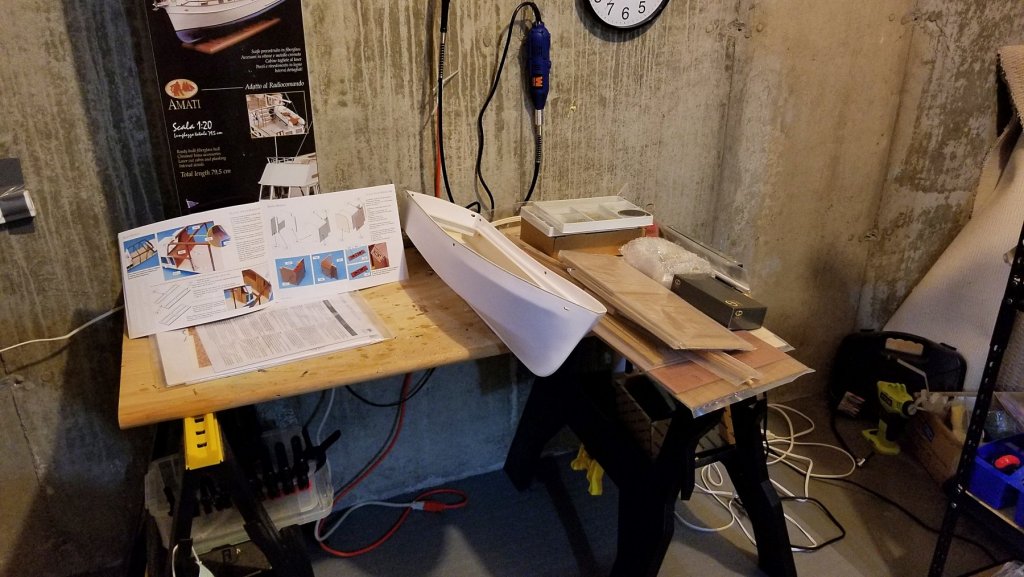
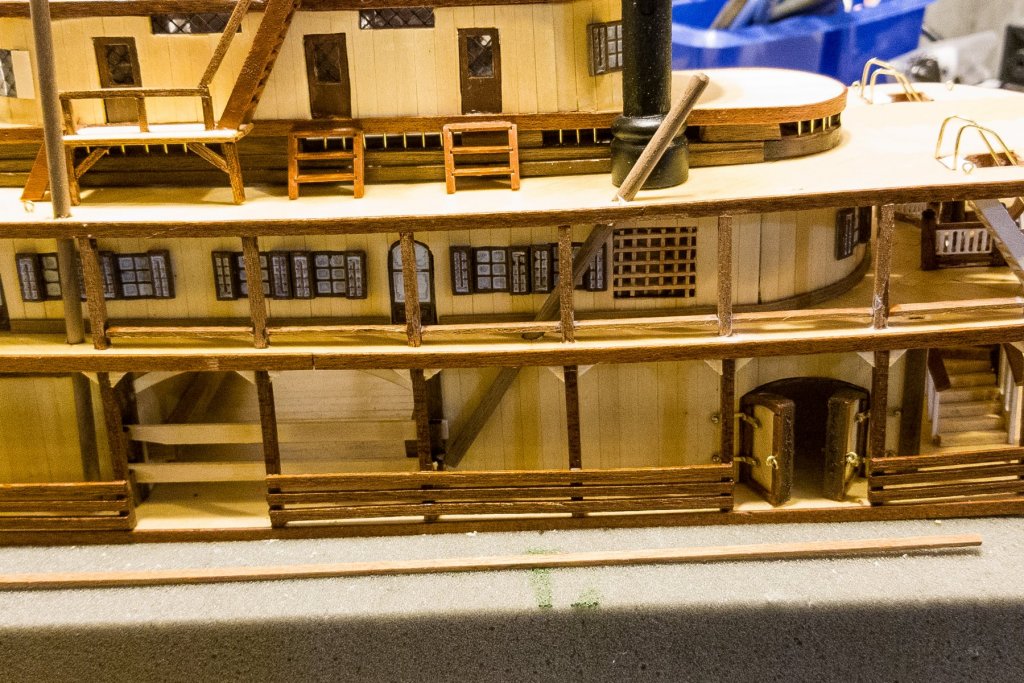
What you see is the result of a dry fit (called for in the manual) to ensure that the sides fit properly and are sanded flush with the stern. But it gives a good sense of what the boat will look like. The interior of this boat has a very high level of finish -- note the mahogany interior sides, which should look really nice when varnished. I also popped it onto the hull to get a sense of how it all fits together. There is another structure that fits on top of the center structure you see. By the way, the hull will eventually be wood-planked before it's painted. Regards, David

-
Zappto: Really, really beautiful -- the model, but also the workmanship. You mentioned that this is an old kit. I think it's now discontinued (Mamoli is out of business -- right?). Where did you get it? Regards, David
-
Chris: She looks fantastic. Your attention to detail is marvelous. I love the figures on it. Regards, David
-
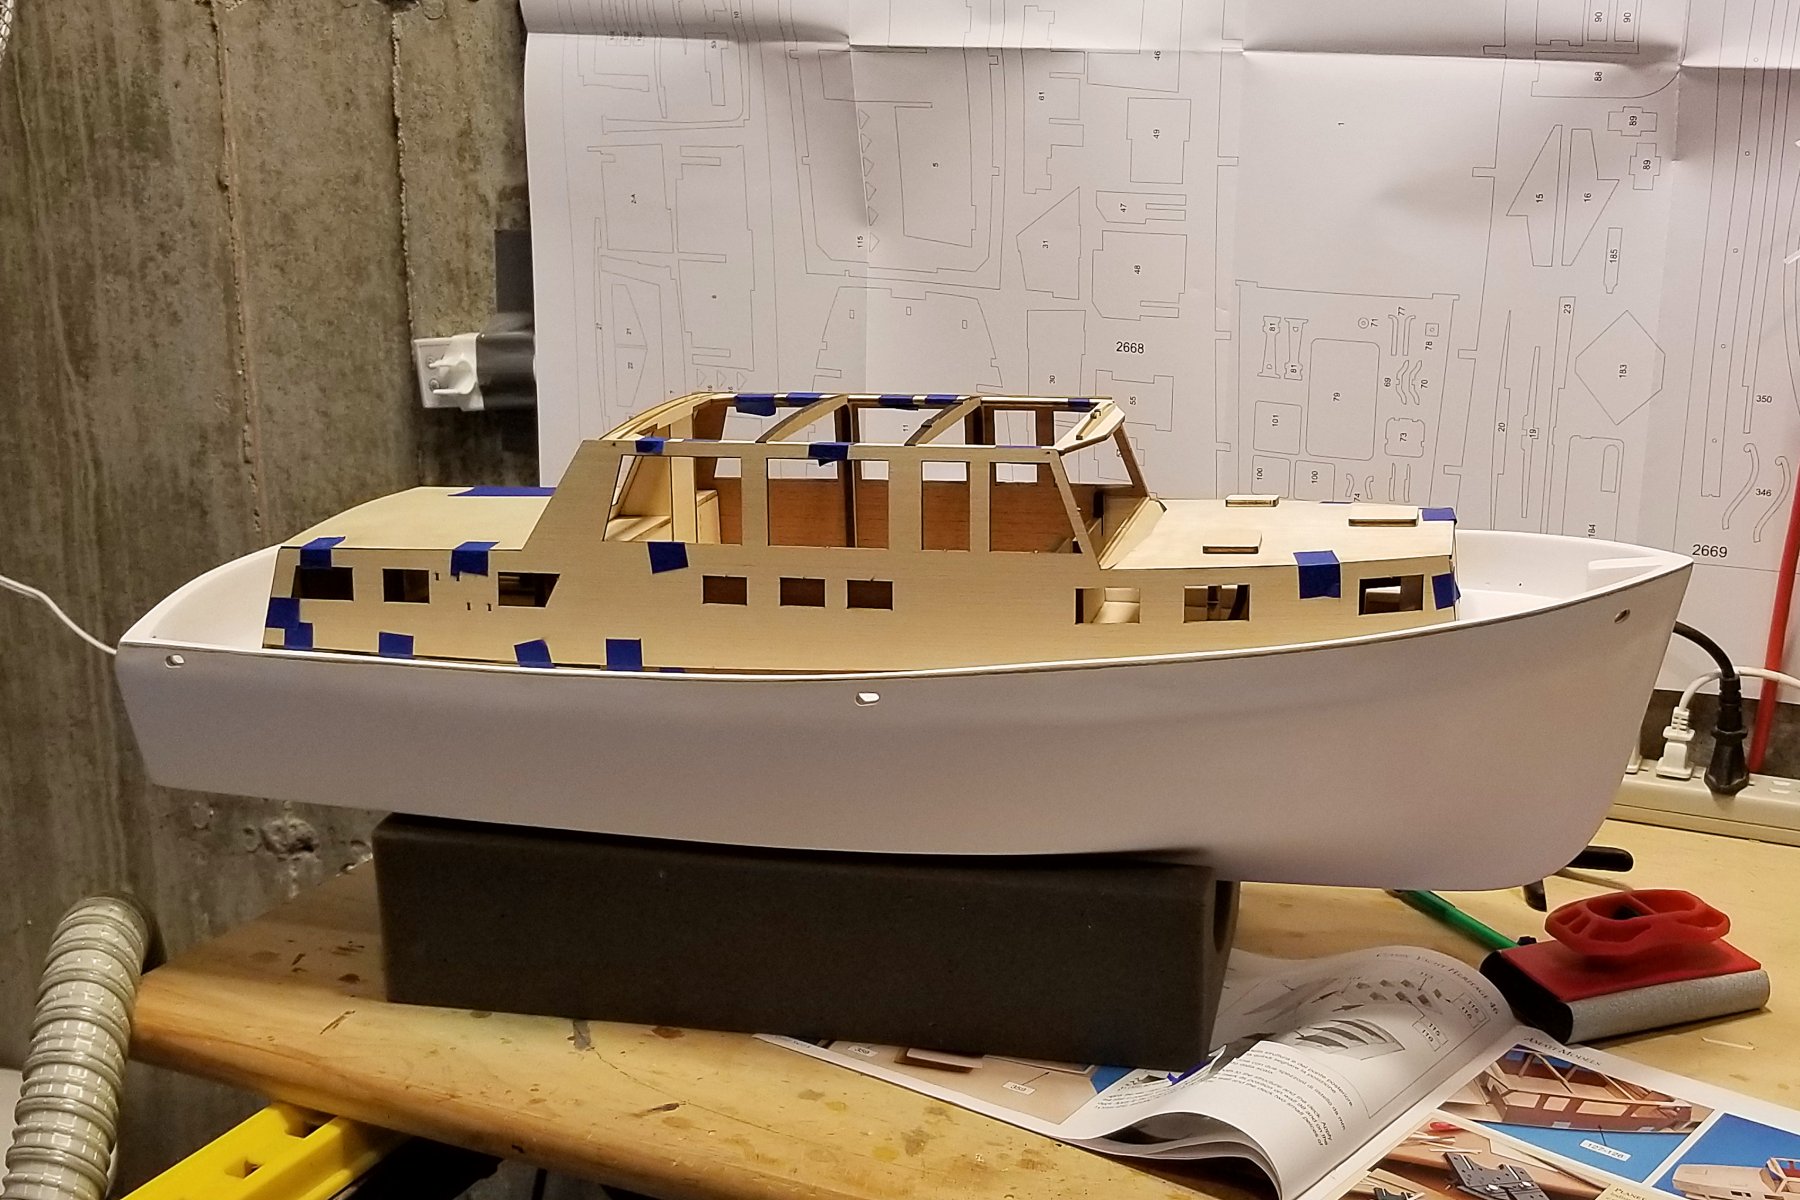
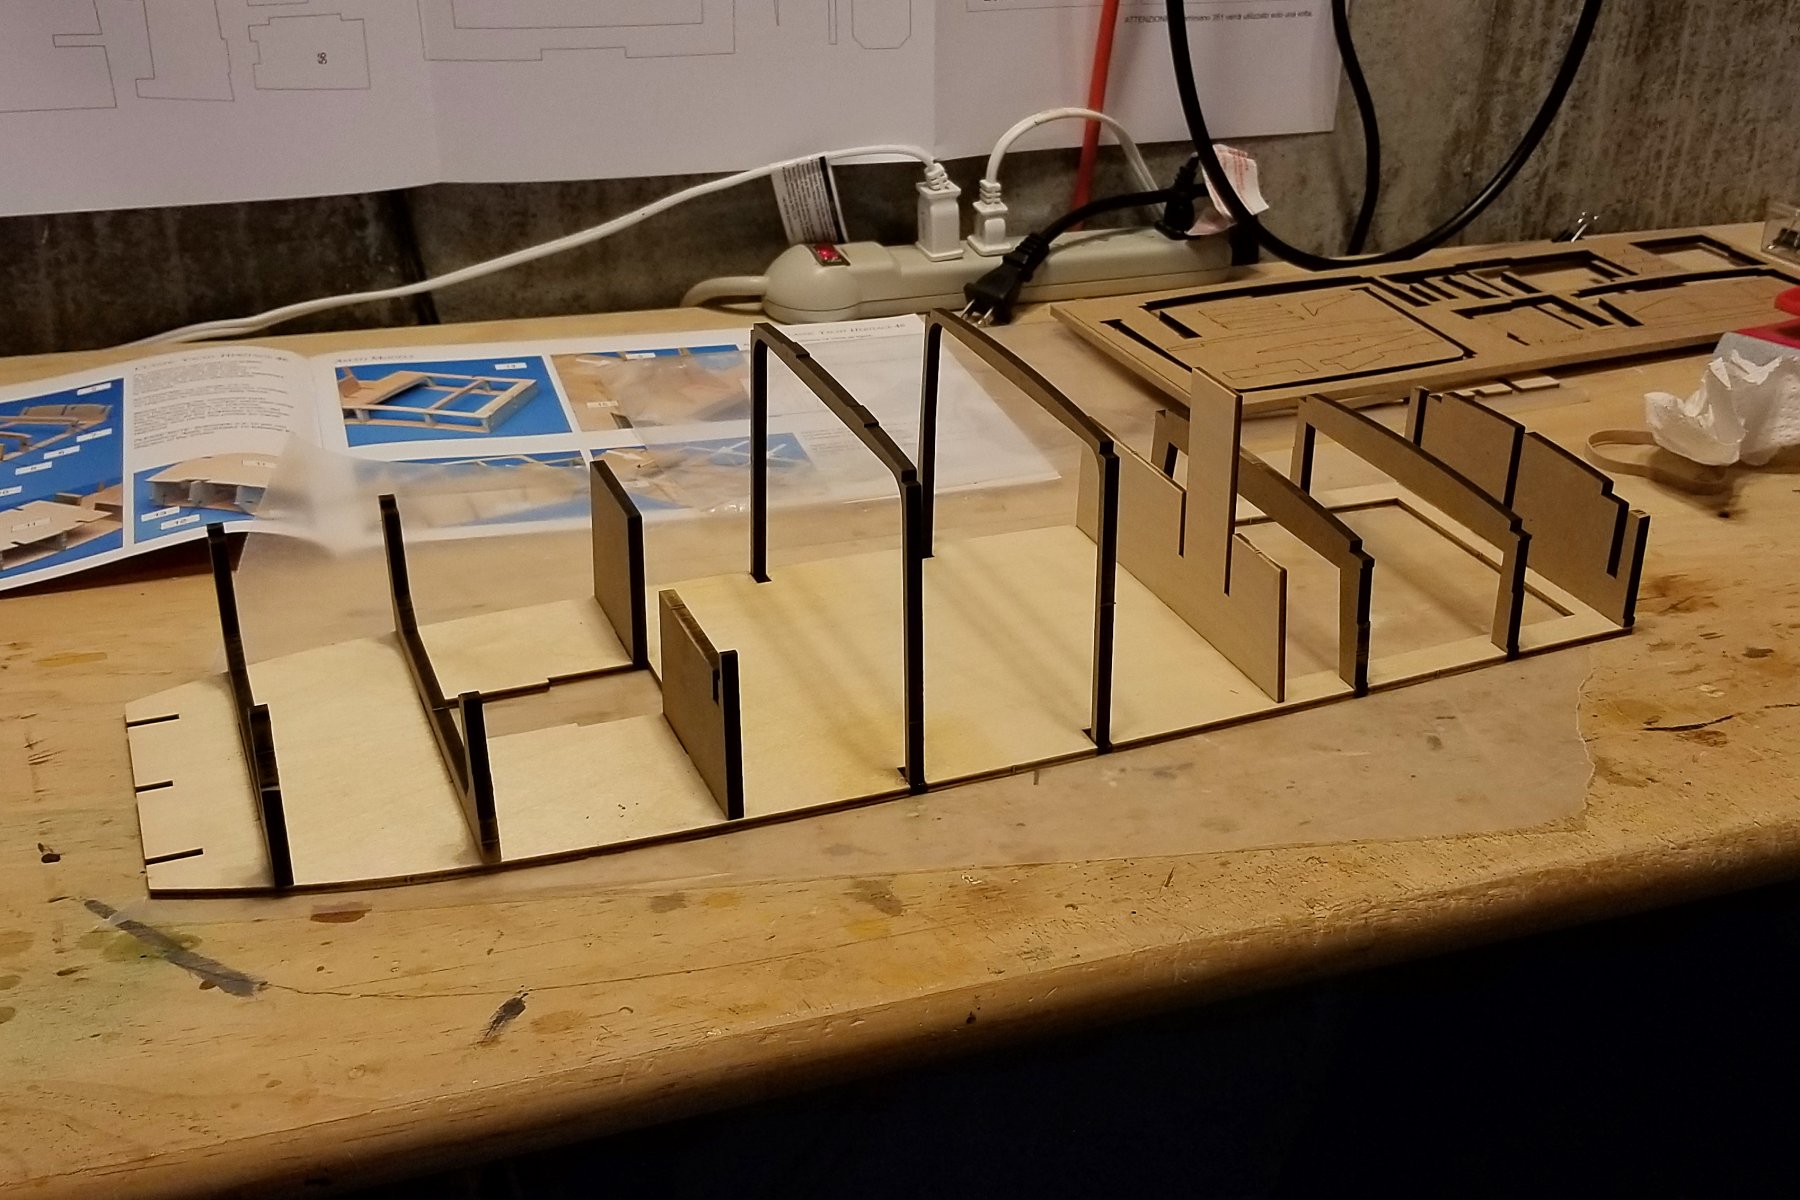
The basic frame of the superstructure is done. It fits into the fiberglass hull, but isn't glued in. It remains removable for R/C access. Since I'm not going to do R/C, when the boat is done I'll probably glue it down. But until completion, it will stay removable. The fit of these parts is really marvelous. So far, a really nice kit from Amati. Regards, David
-
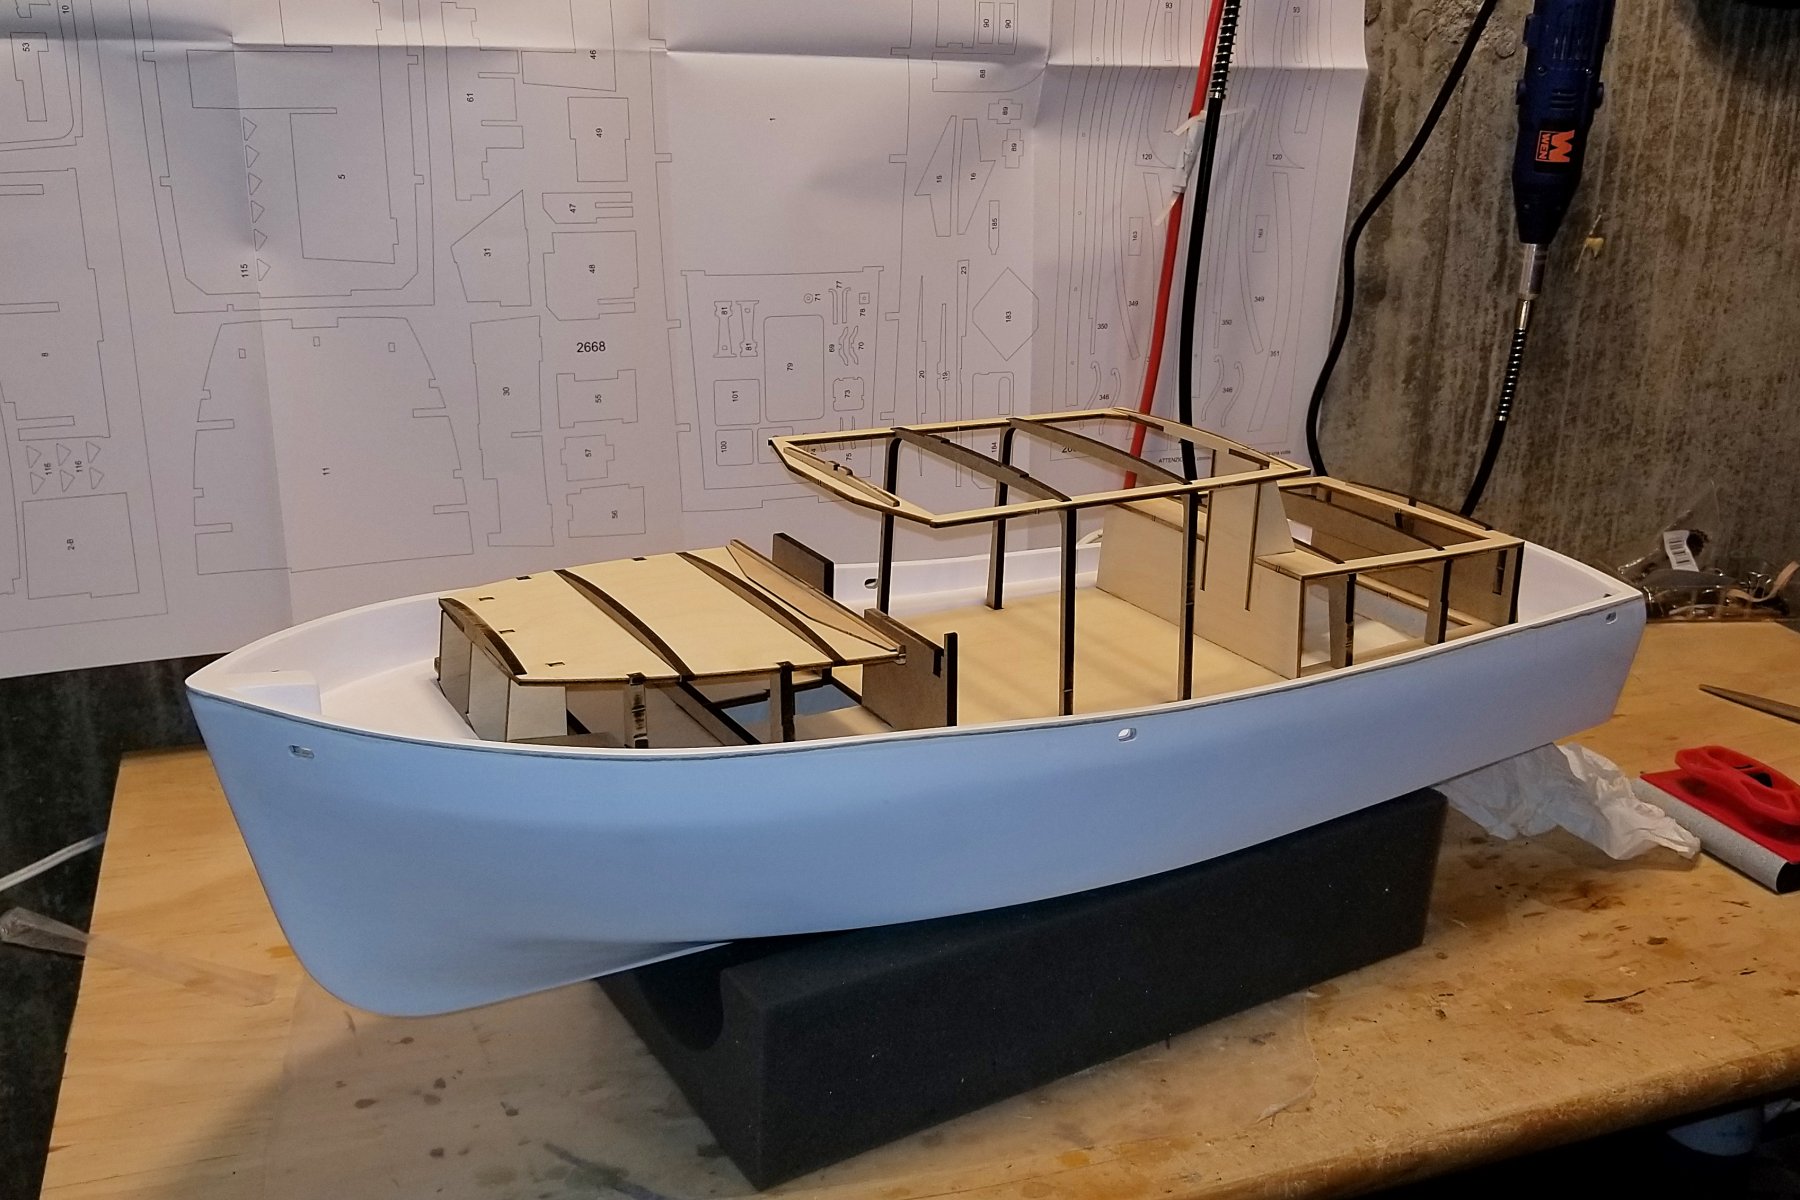
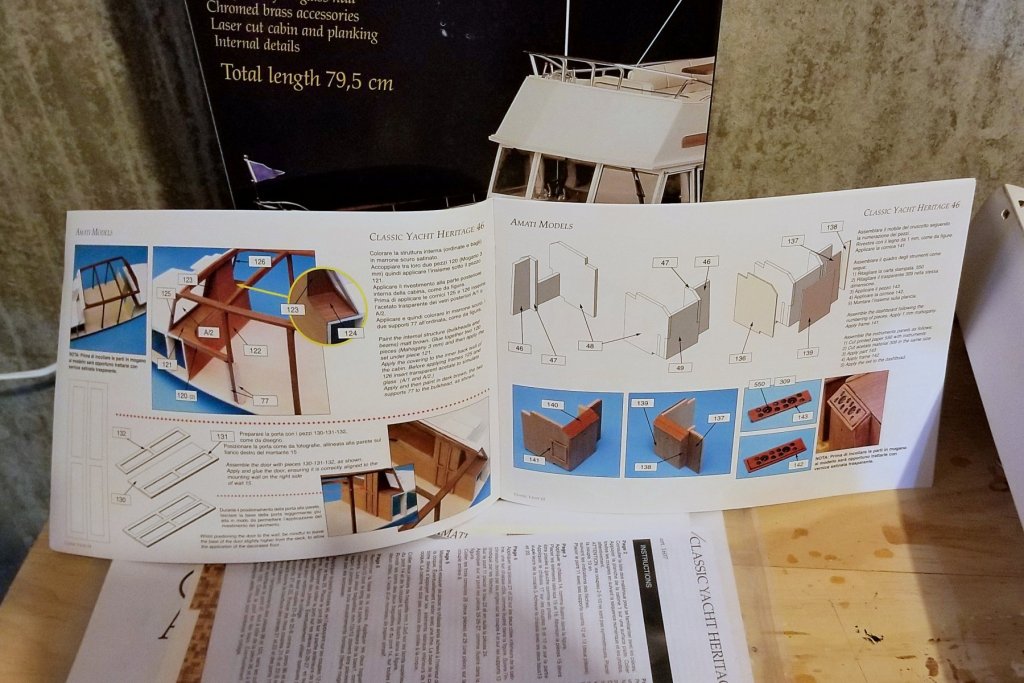
Here's the first part of the superstructure. It fits into the molded hull, and I've looked at the manual and it's built up and finished off the hull. Also made to be removable for R/C purposes. A few build points: Frames 6 and 7 are reversed in the drawings of the laser cut sheets, but it's easy to figure out because of the way they fit. The frames you see are MDF, and Amati put a note with the manual saying that they have substituted MDF for plywood for 5mm laser cut pieces, because it doesn't chip and works better. Having worked with both ply and MDF I tend to agree, but I have seen some debates about MDF on the forums here. The other thing is that the drawings showing what part is on what laser cut board require some interpretation. For example, what looks like one board with three square areas of laser cut is really two separate boards, and on the one with two areas one of them is inverted -- but it's pretty easy to figure out. More to come. Regards, David

-
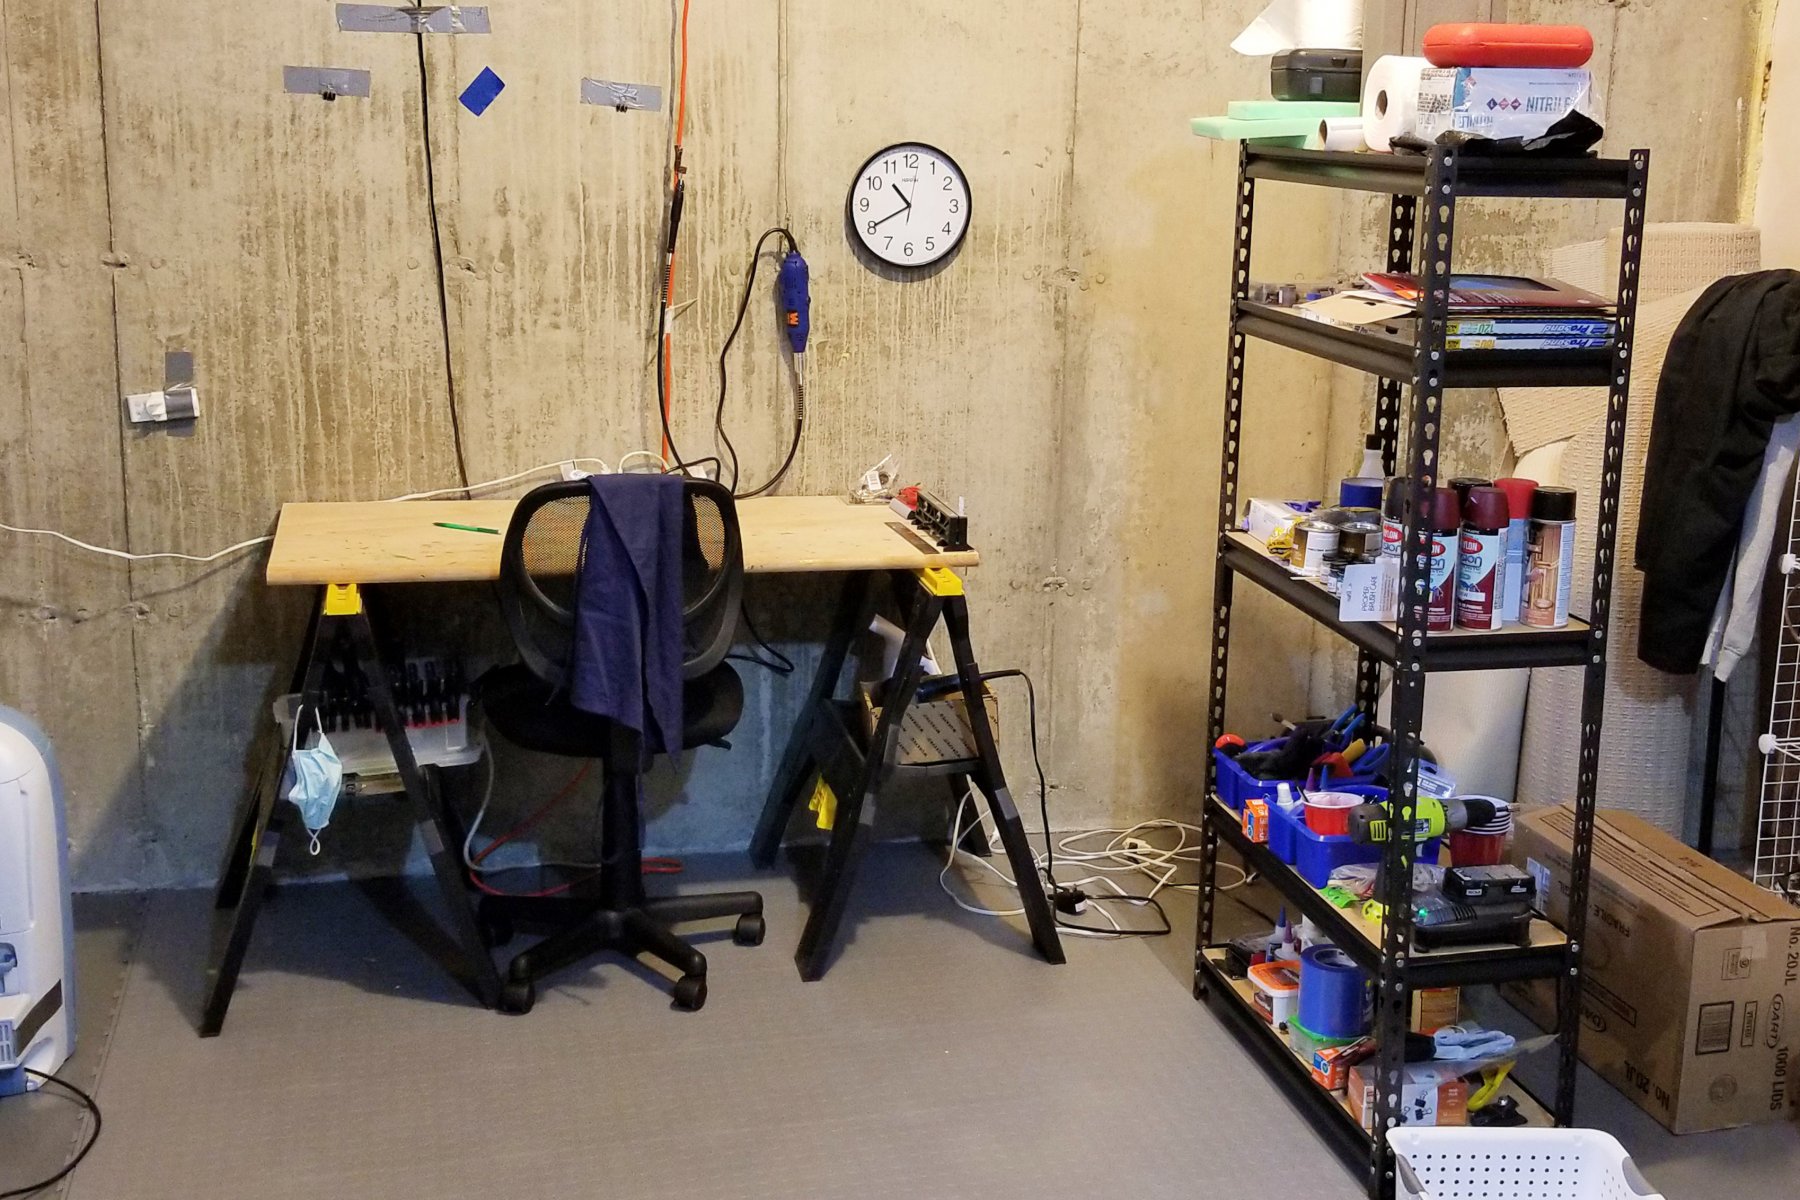
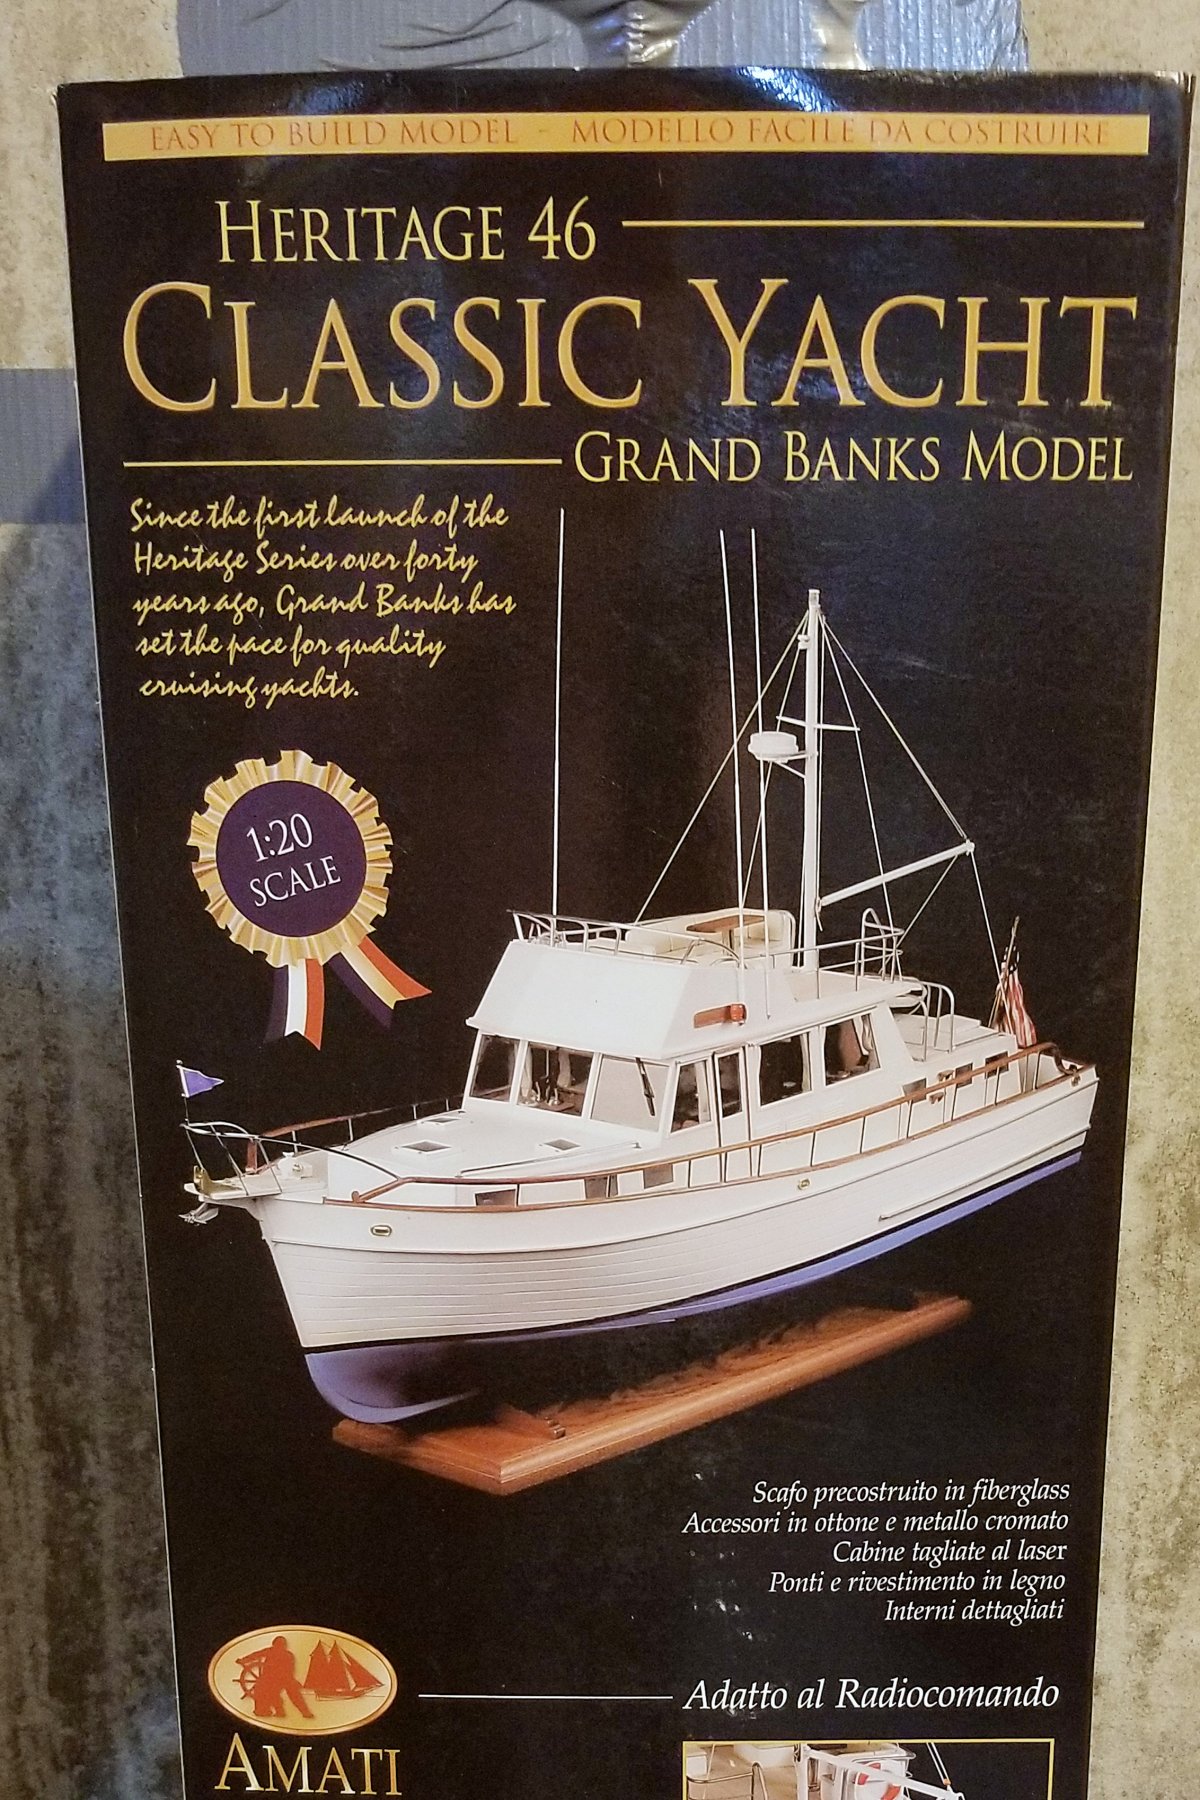
Before getting to the model itself, I revamped my model building space. The rolling chair was gouging a hole in the concrete floor, and all of my supplies were in boxes and bags scattered on the floor around my work table. So I found some industrial plastic tiles on the internet (they just interlock and lay down -- no adhesion so easy to remove). The nice thing about them is that I can replace individual tiles if the chair eventually chews some of these up, or they get too groady. Then steel shelving to hold all the "stuff". See attached picture. Now I'm ready for this model. This is the Amati Grand Banks, and I'm not sure if there has been a build log done on this one before. See picture of the box cover. I picked this one to create some variety from the historical ships, some relief from rigging after the Revenge, and finally because it's Amati. I'm getting the sense that their kits stand a head above others, at least the manufacturers I have tried (AL, Bluejacket, Constructo, Dumas). There's a "what's in the box" picture, and the usual laser cut sheets, wood, and boxed parts are there. But this one has a pre-formed fiberglass hull, because it can be built for R/C operation. I'm not going to do that. The hull is REALLY thick and solid (compared to the Dumas Mt. Washington, which was a thinner plastic and also R/C adaptable). Finally, there is a very well-illustrated manual. See pic. Plus a number of charts to go up on the wall. So I'm looking forward to this one, and because it's not the usual double-plank construction, I'm expecting some new twists. Regards, David


-
Thanks, Chris. I have some floating shelves that I use for models this size, and I'll put a new one up in my office for this model. It will be on the same wall as three others I have built that are about this size. Regards, David
- 104 replies
-
- 1
-

-
- king of the mississippi
- artesania latina
- (and 1 more)
-
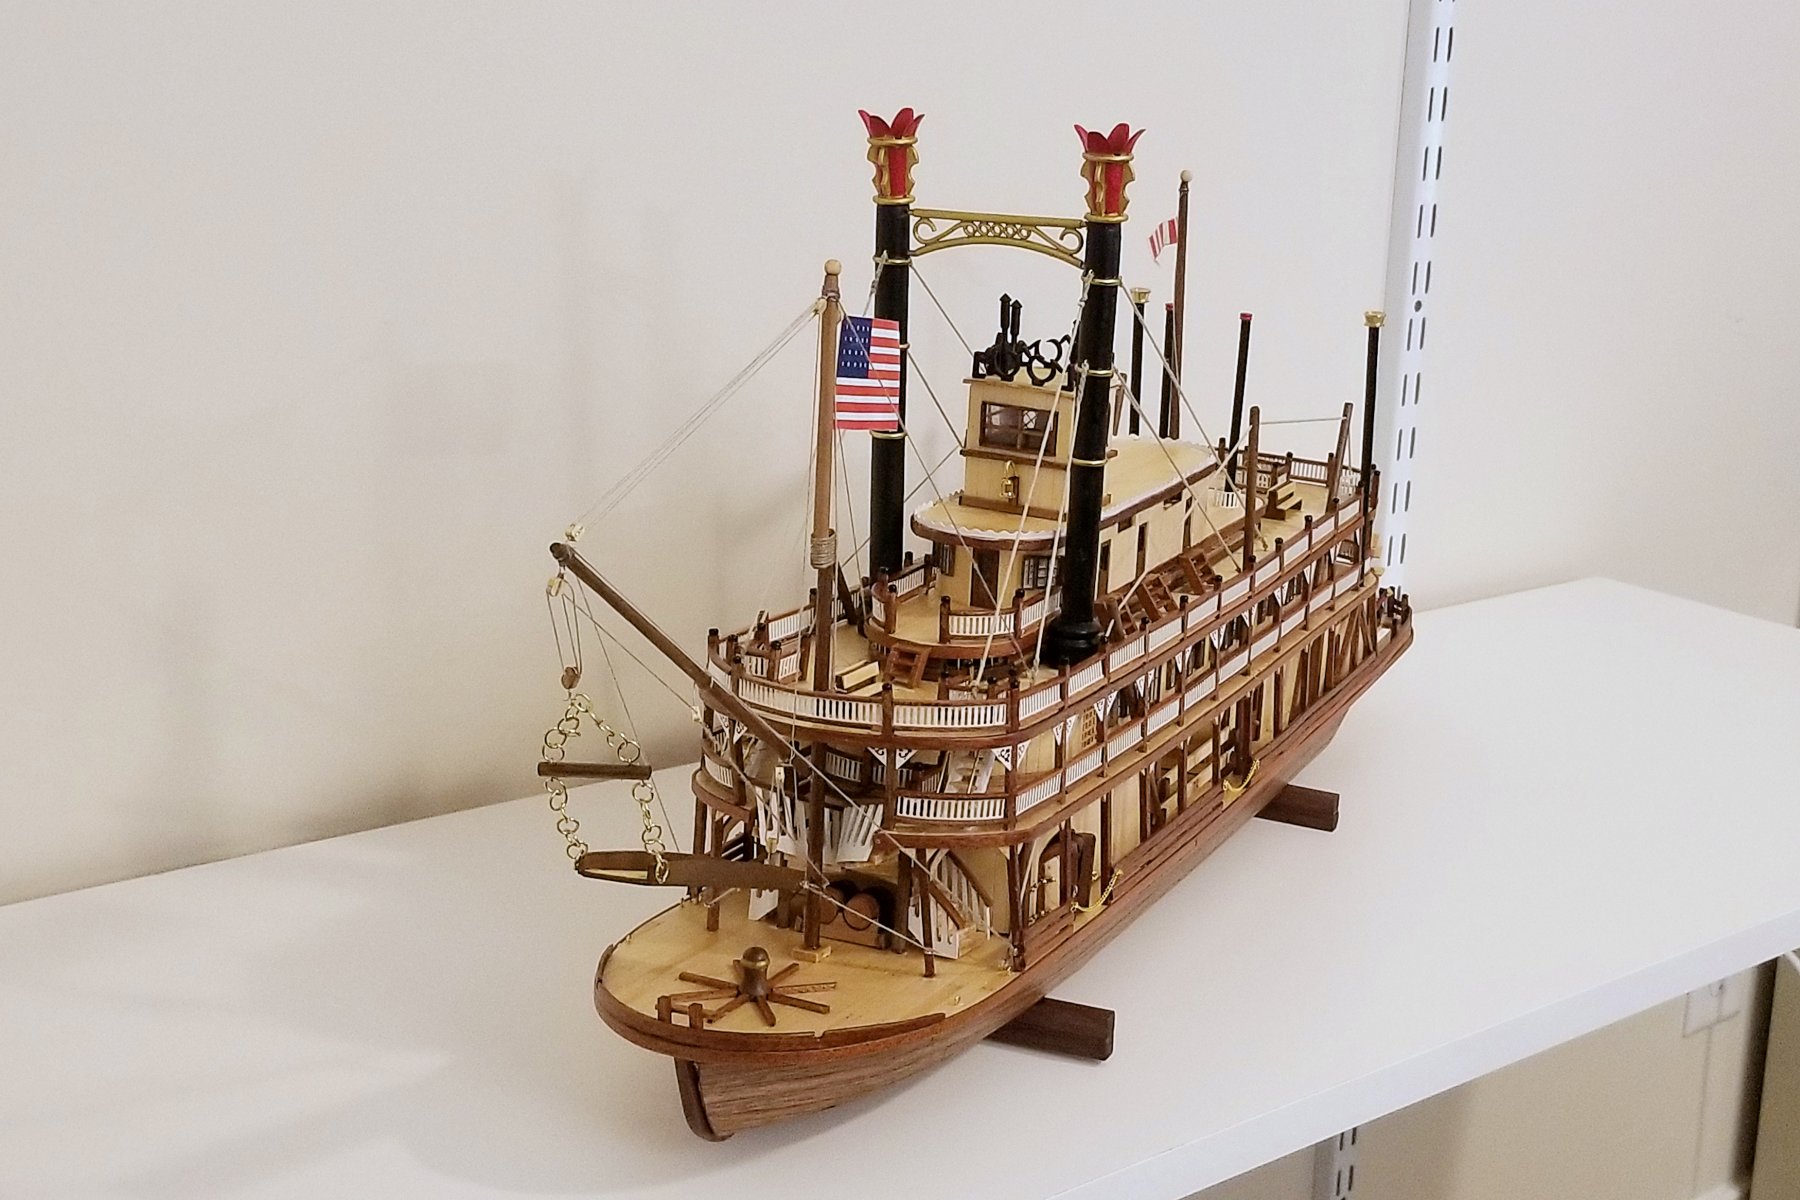
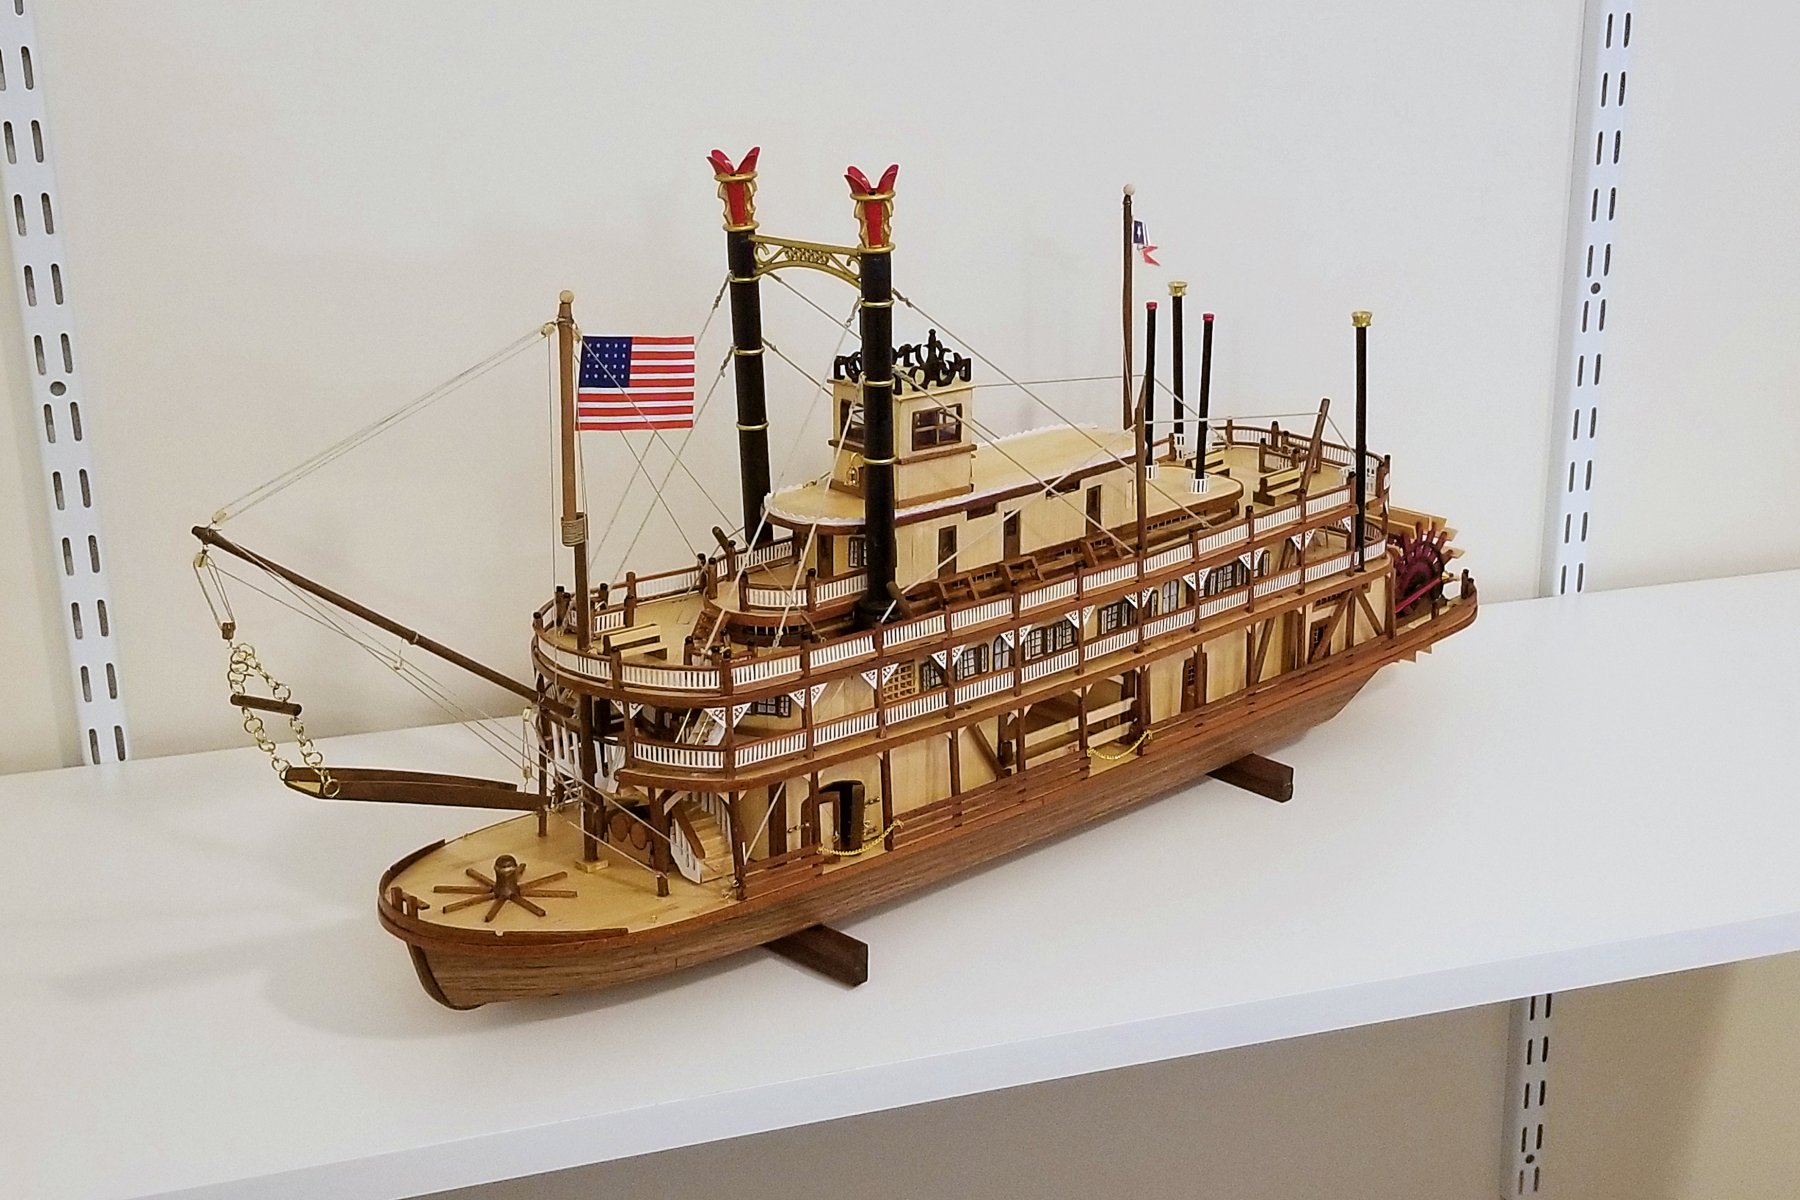
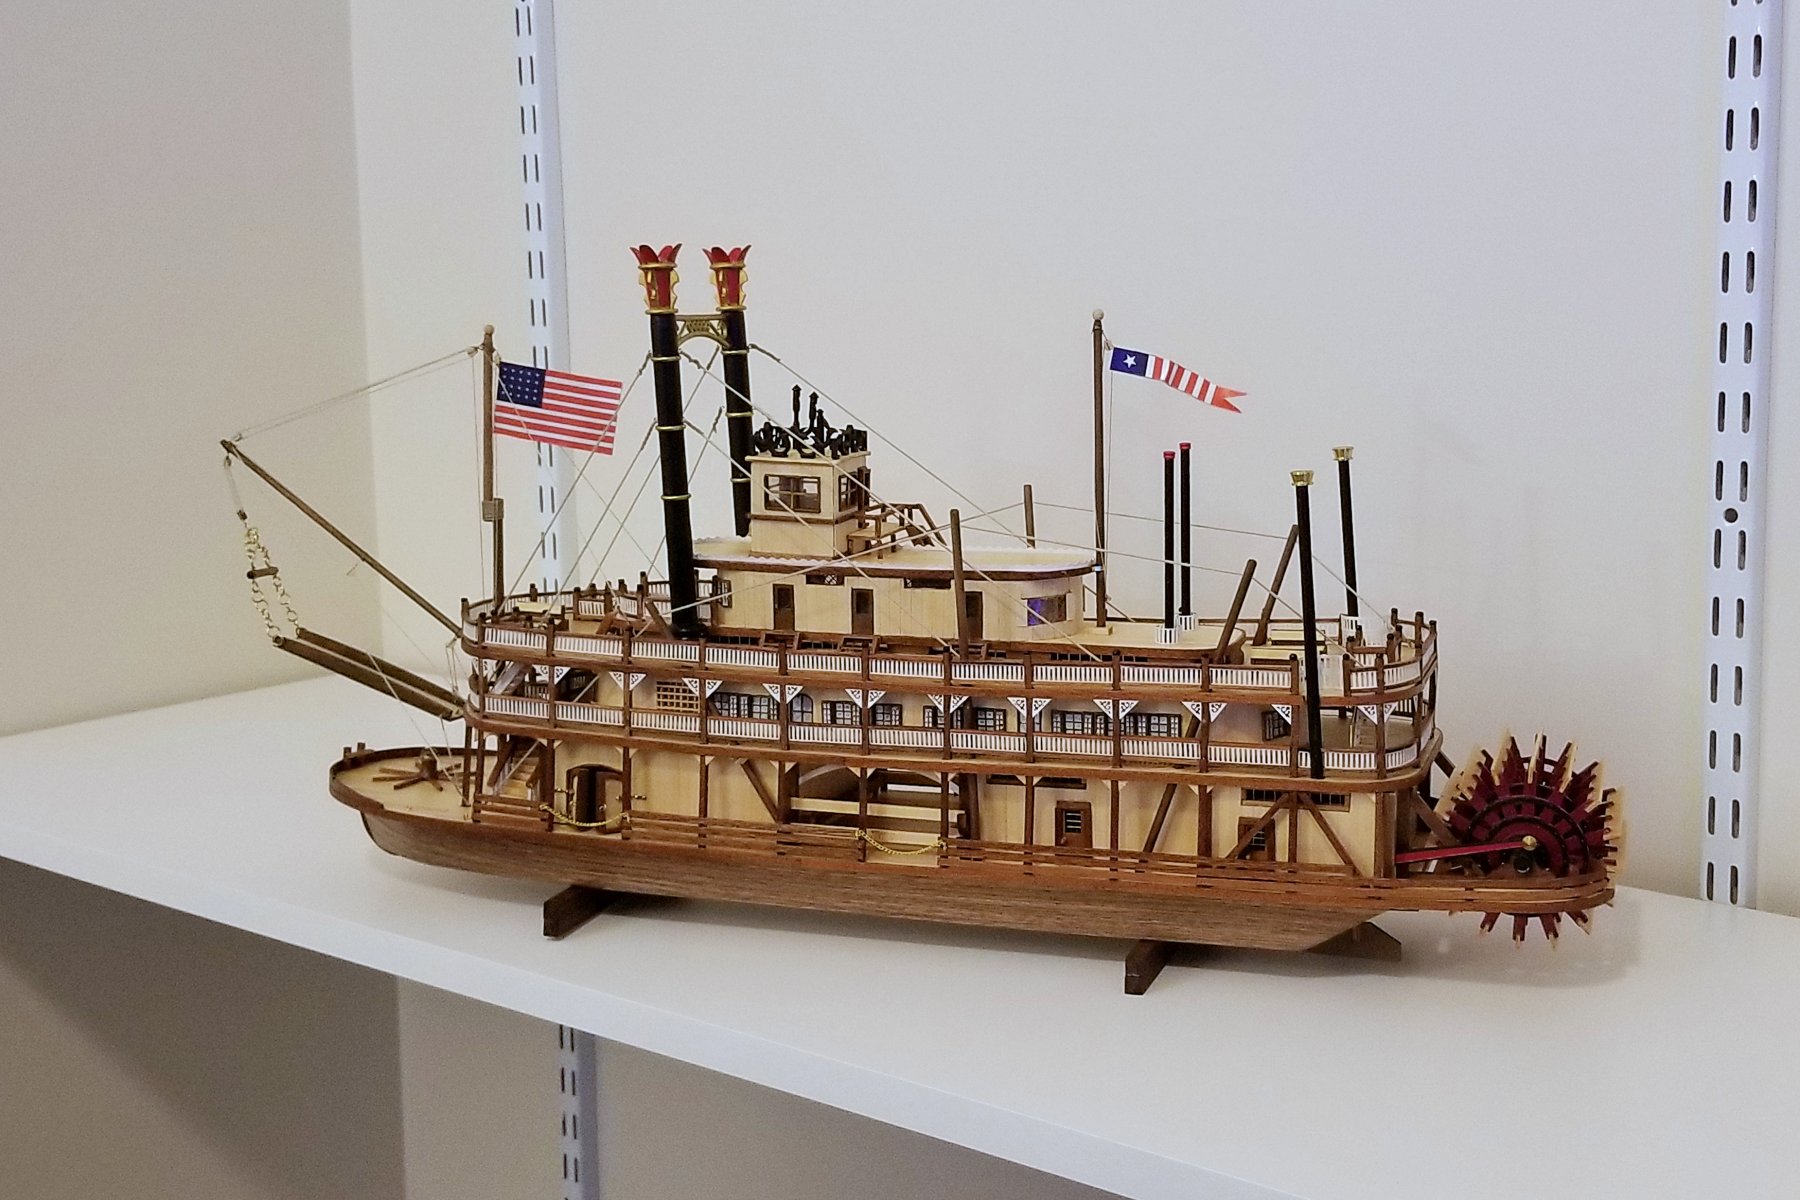
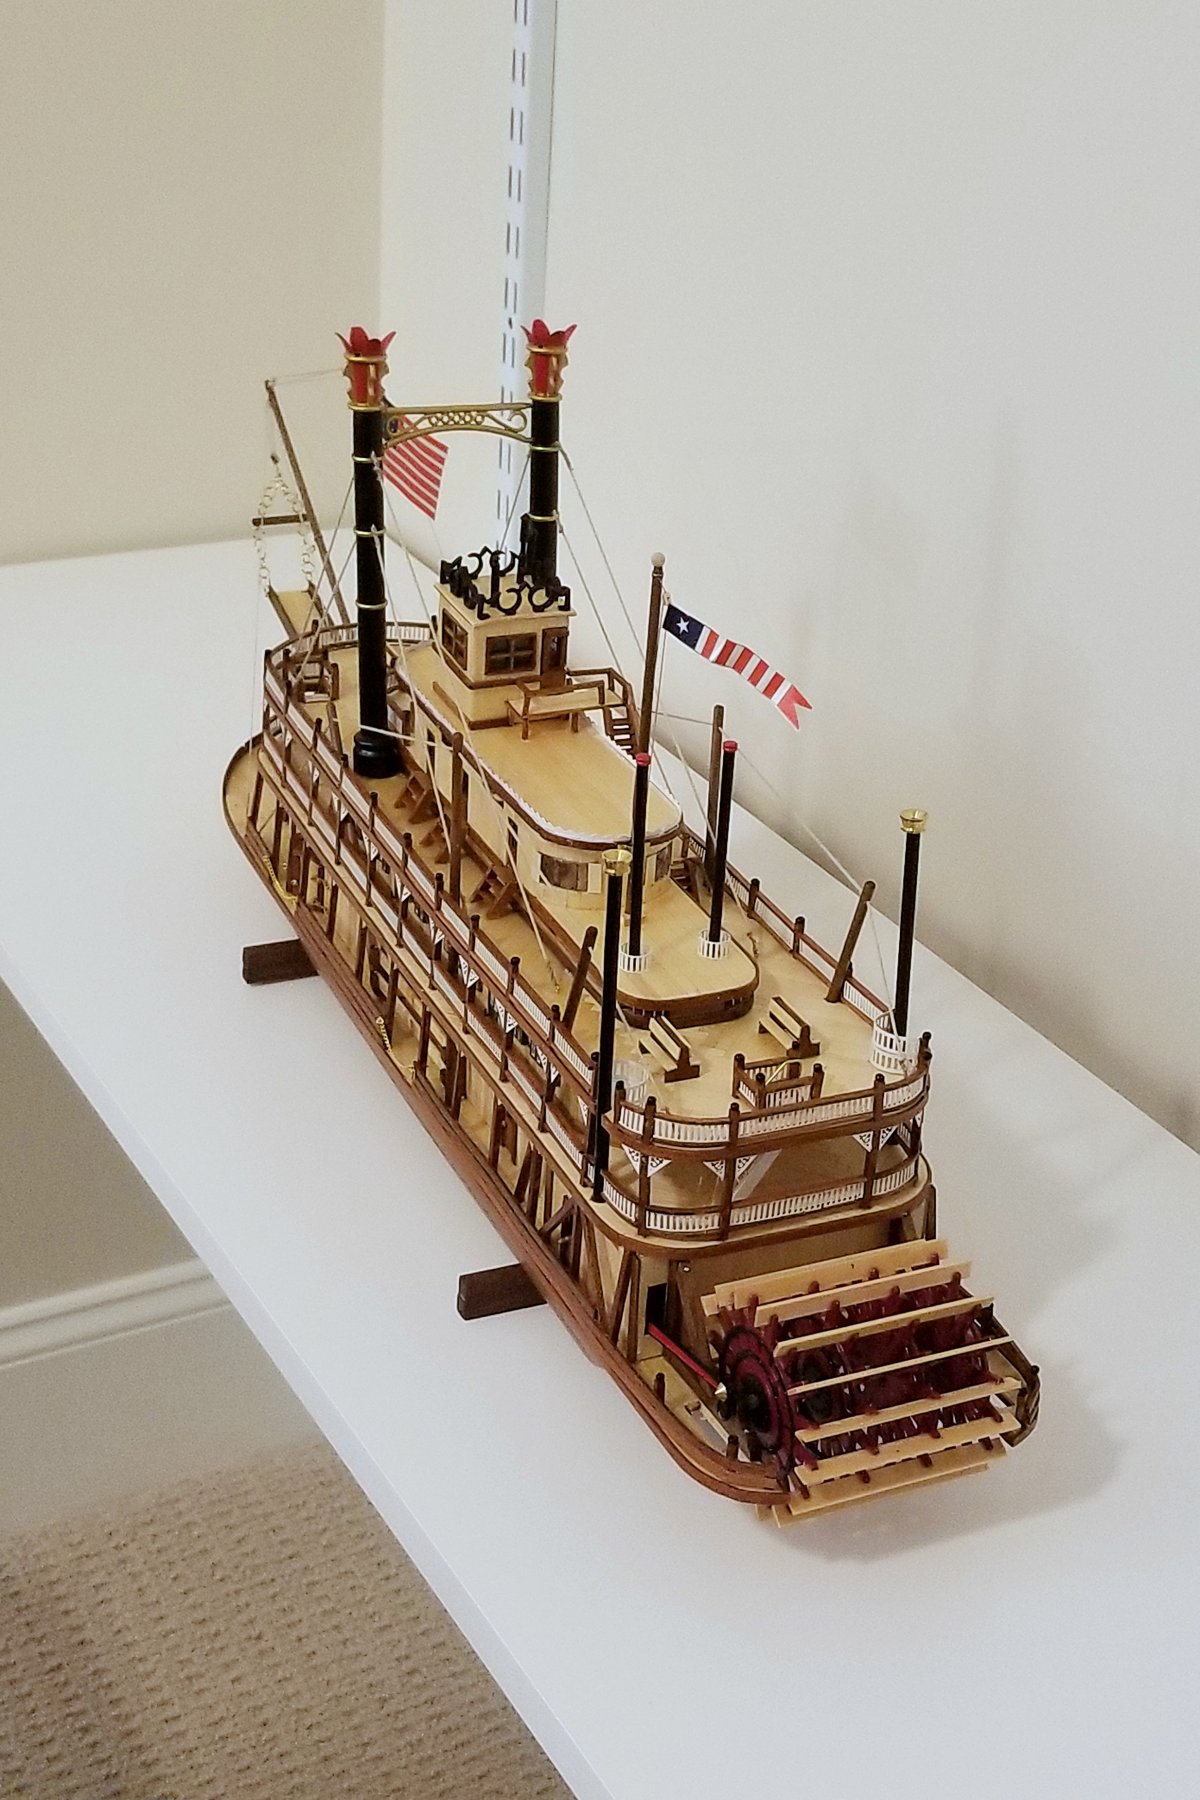
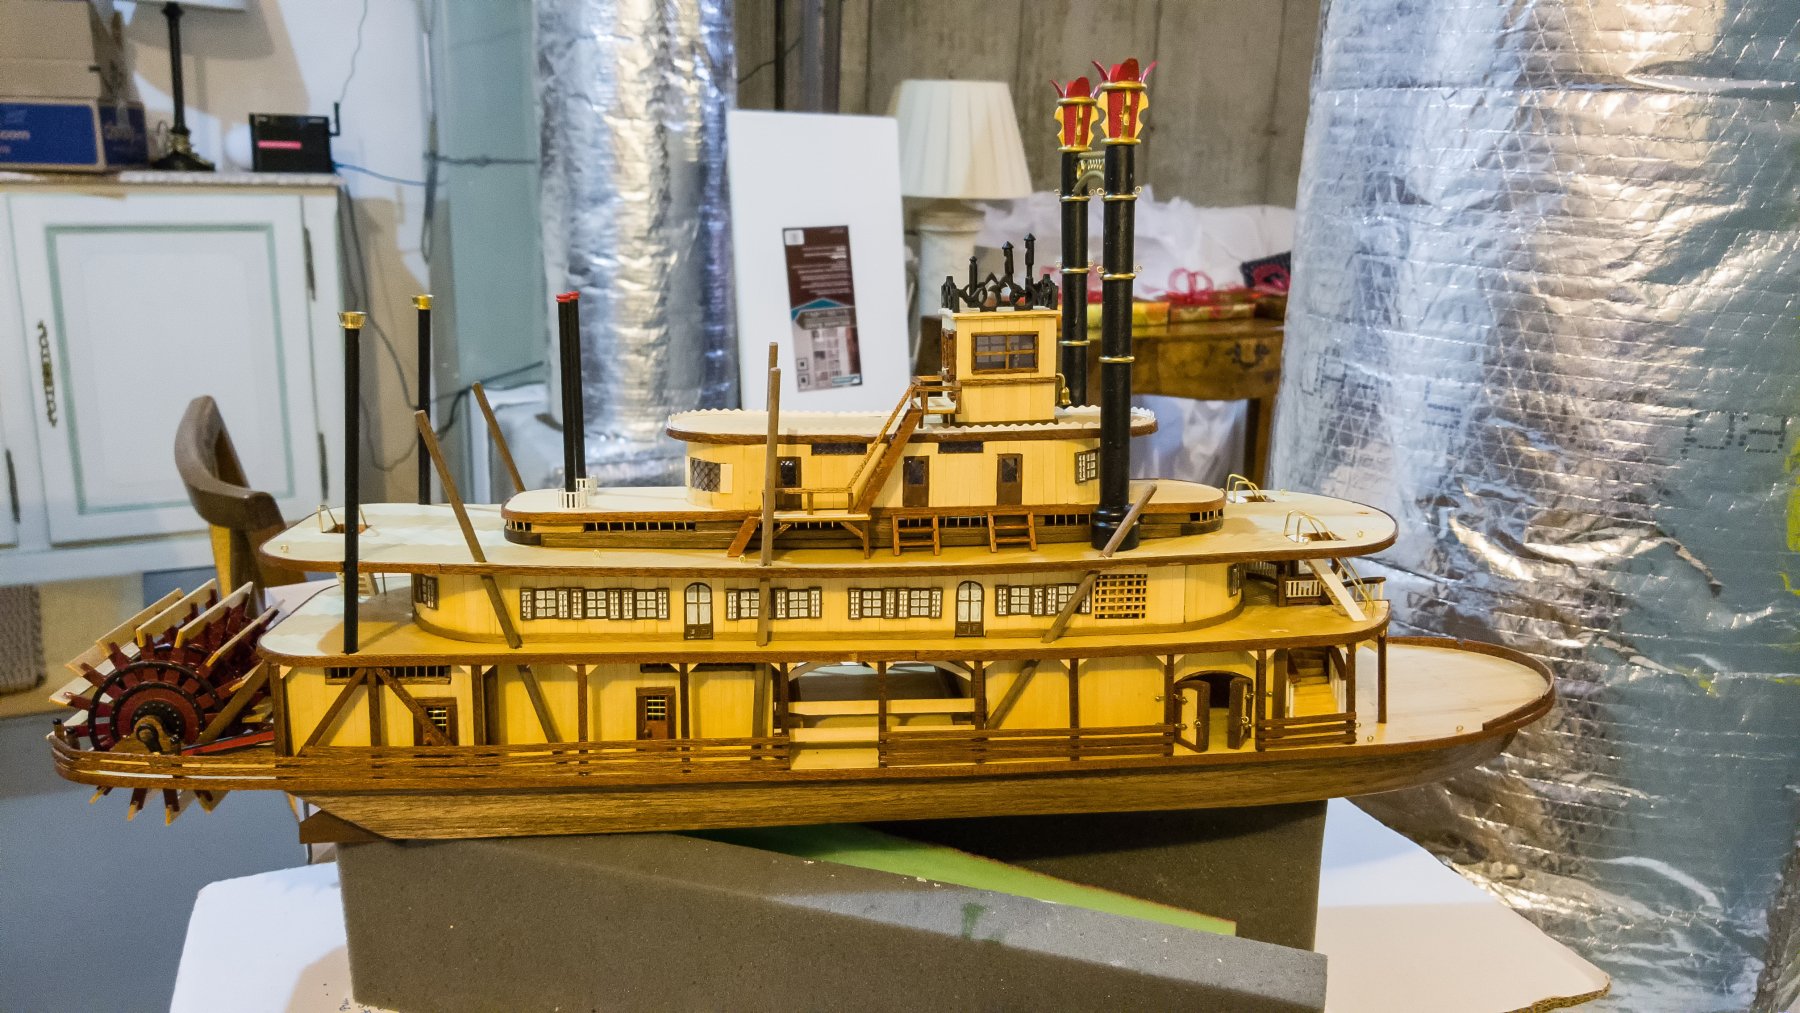
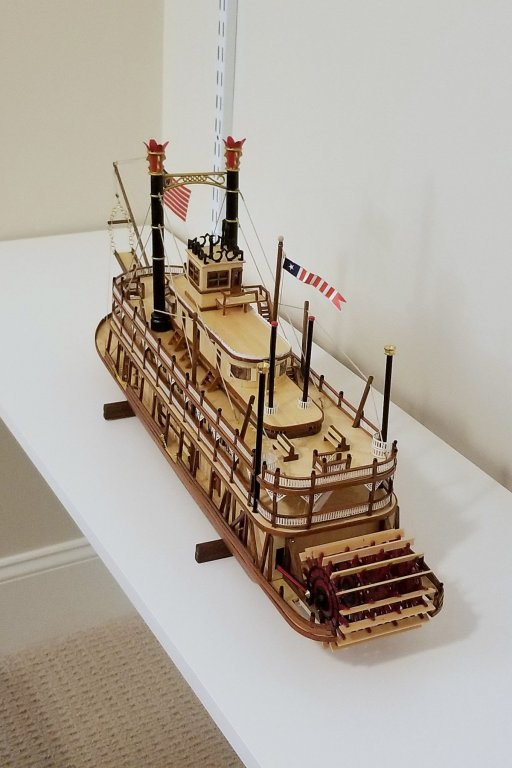
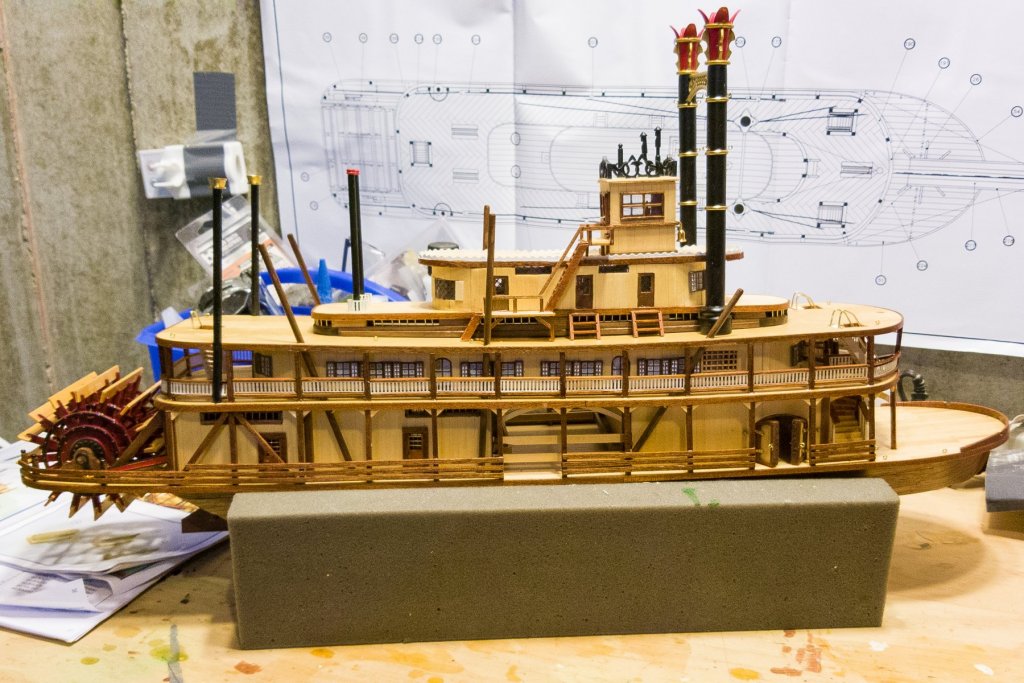
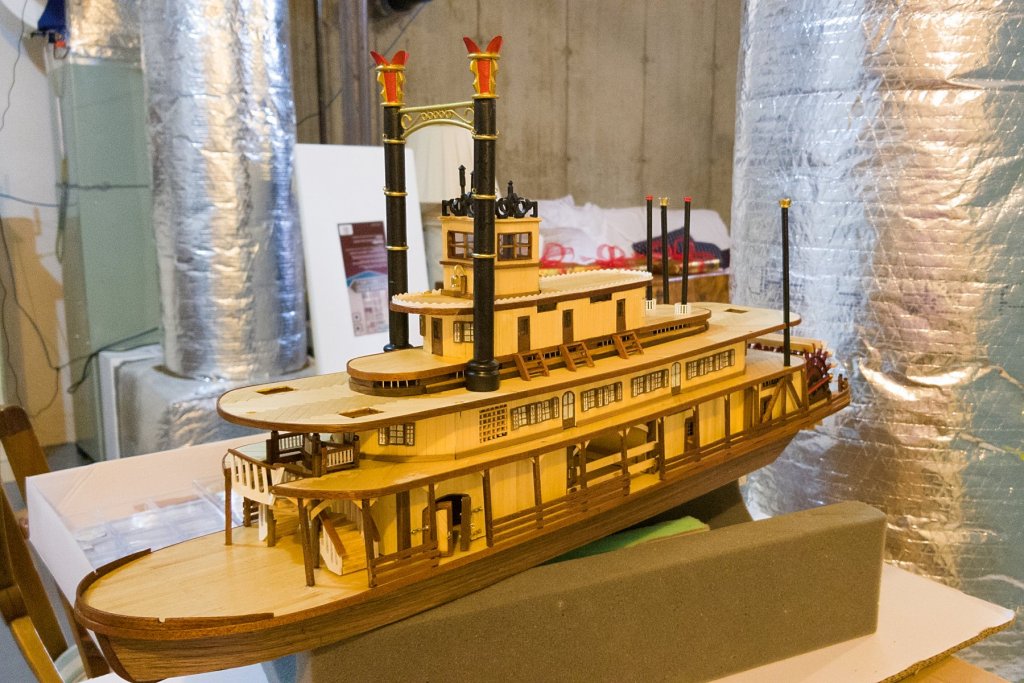
FINISHED!! My build of King of the Mississippi is now complete. Pictures attached. Need to create a shelf for this in my office, and do a cleanup on the workroom. Might start the next one (Amati Grand Banks) before I go away on the 6th for a week in the Carib. Regards, David


- 104 replies
-
- 14
-
-
- king of the mississippi
- artesania latina
- (and 1 more)
-
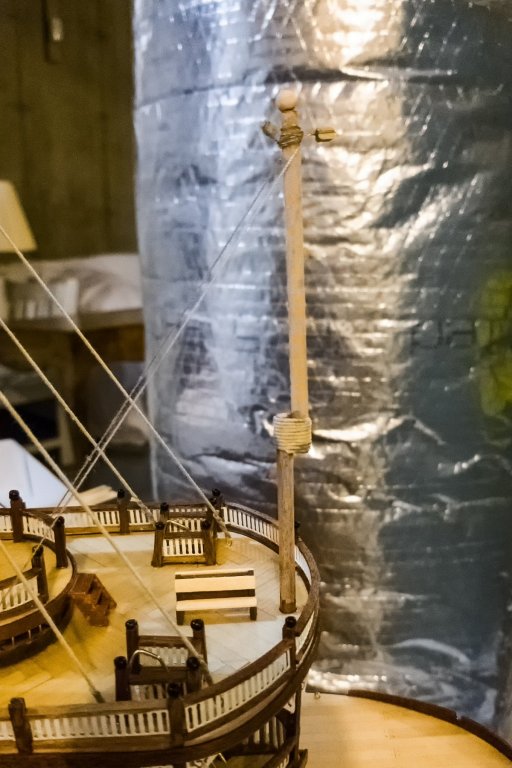
Another adaptation: one issue with this kit is the lack of any spares, and in some cases (eyebolts), some serious parts shortages. And in many cases, you get just enough wood, and you have to be careful to use it up efficiently. When it came time to make the forward mast, I found that I had just enough of the right diameter wood -- but in two pieces! Earlier cuts of that diameter had left me with two shorter pieces in place of one just barely long enough. My choices were to either use a smaller diameter, or do what I ended up doing -- which is to create a two-part mast. Looks kind of interesting. The mast in the picture isn't varnished yet. Regards, David
- 104 replies
-
- 3
-
-
- king of the mississippi
- artesania latina
- (and 1 more)
-
Scott: She is gorgeous! I'm in awe of your craftsmanship, and the model is spectacular. Regards, David
-
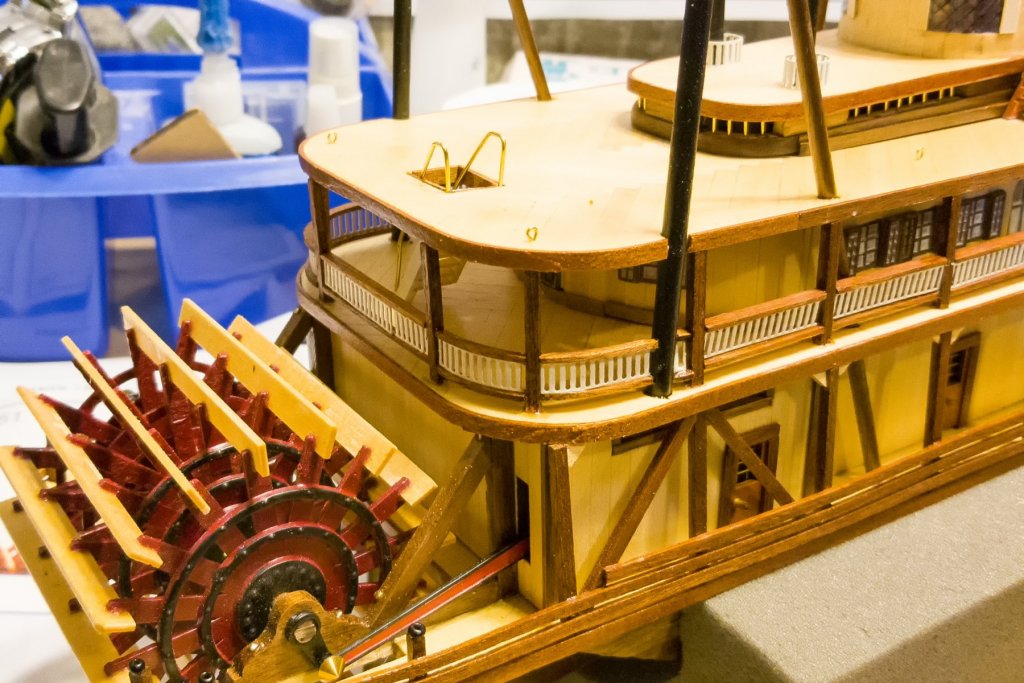
Antony: If you look at the third picture above your post, you'll see a semicircular guard on the inside of the third deck, which I assume was to keep passengers from getting close to the pipe. That replaces the handrail at that point. However, down on the second deck there IS a handrail and no internal guard, even though there would have been passengers and crew there who could get too close to the pipe. I built it the way the model pictures and drawings show, but I suspect it's historically inaccurate on the second deck. Regards, David
- 104 replies
-
- 2
-
-
- king of the mississippi
- artesania latina
- (and 1 more)
-
Now all the railings are up, so I guess I really am getting close to the end. What remains is the masts, some light rigging, and the deck ornamentation. I particularly like the look of the bow and stern curved railings. Regards, David
- 104 replies
-
- 5
-
-
- king of the mississippi
- artesania latina
- (and 1 more)
-
Chris: It's a website called Love Pops: https://www.lovepopcards.com/ They actually have a bunch of ships. Regards, David
- 104 replies
-
- 1
-
-
- king of the mississippi
- artesania latina
- (and 1 more)
-
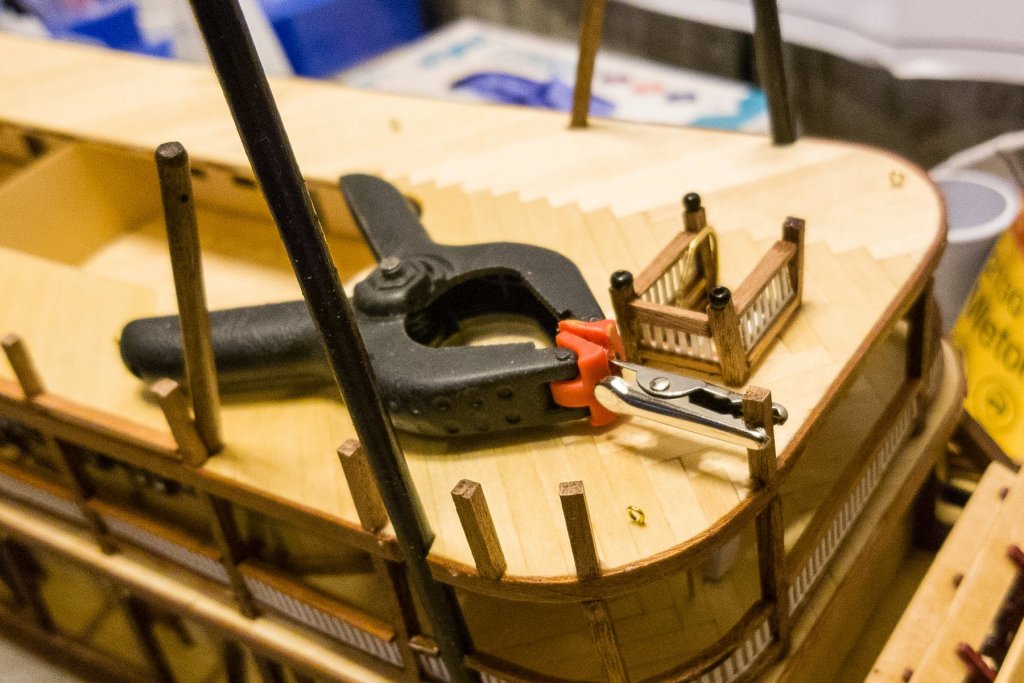
Back to the boat. I fabricated a jig to hold the third deck posts upright and in position while the glue dries. Because there's no mechanical hold on these pieces, it's taking a long time to get them all up. But the jig works and keeps them properly aligned. Regards, David
- 104 replies
-
- 1
-
-
- king of the mississippi
- artesania latina
- (and 1 more)
-
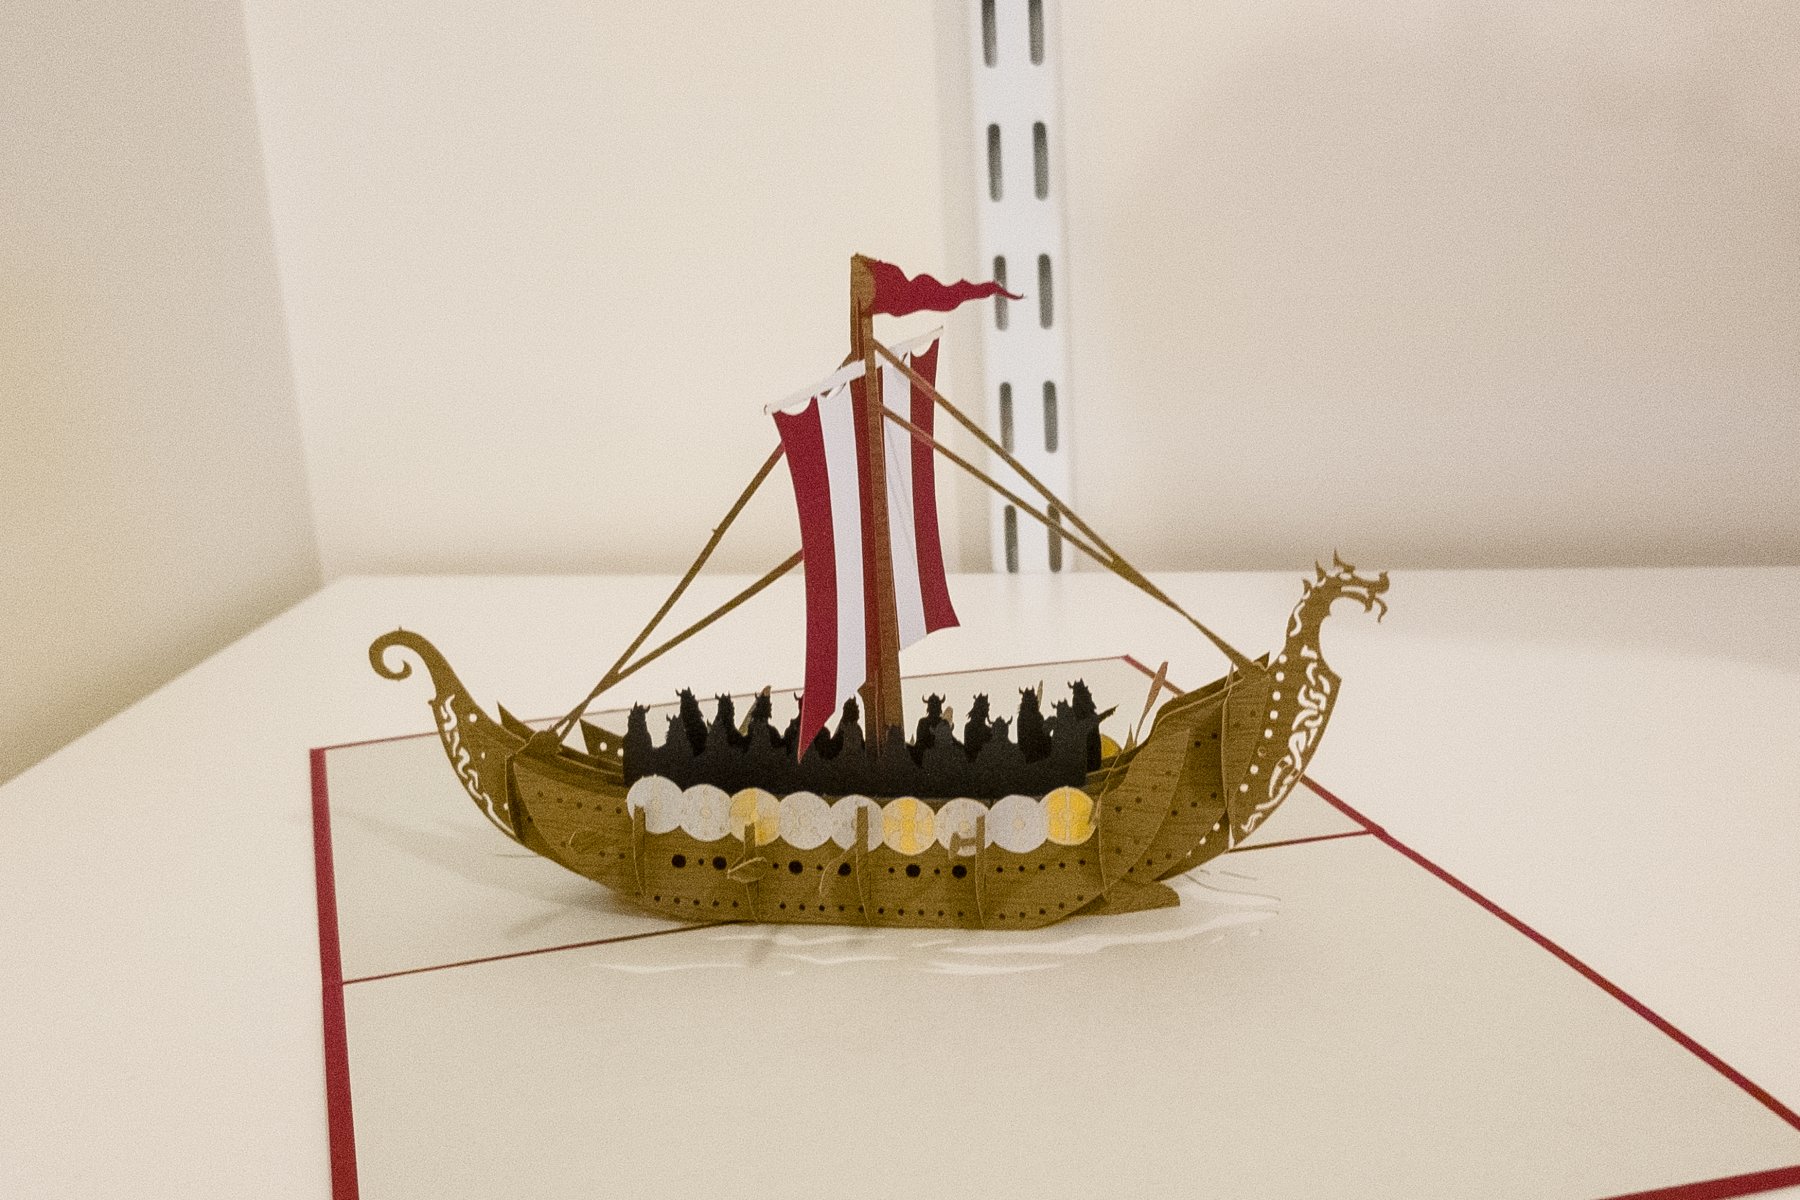
A diversion -- in honor of my new hobby, my wife gave me this detailed pop-up card for my birthday. Regards, David

- 104 replies
-
- 2
-
-
- king of the mississippi
- artesania latina
- (and 1 more)
-
Scott: I just caught up to your build log on this model. Wow! Now I see what it looks like when someone who really knows what he's doing (and has more patience and steadier hands than me) builds one. This is a spectacular piece of craftsmanship. Regards, David
-
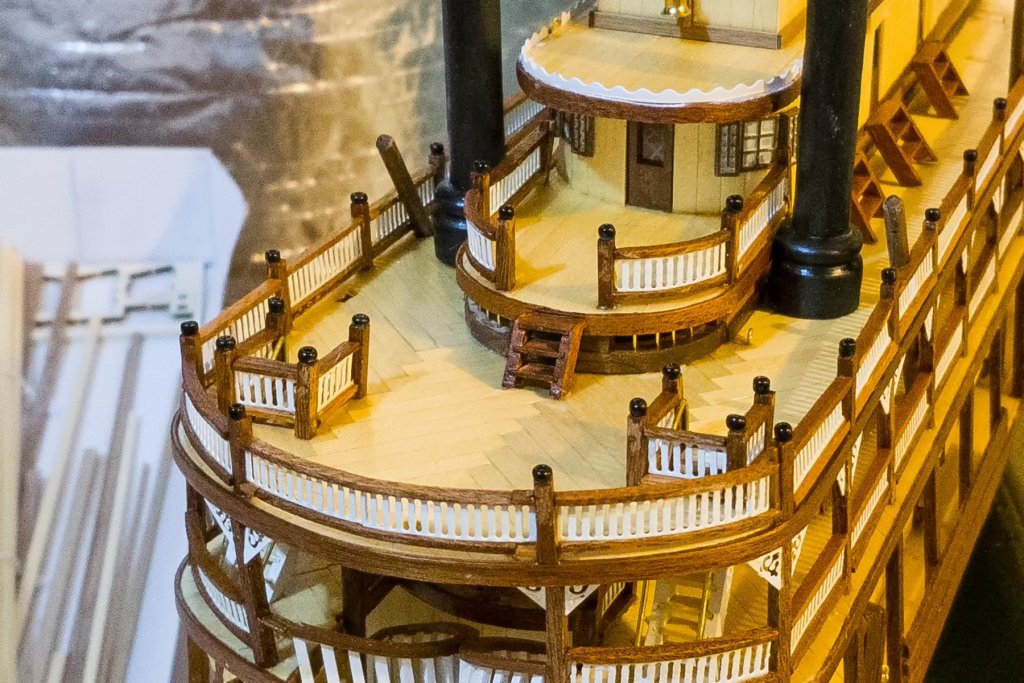
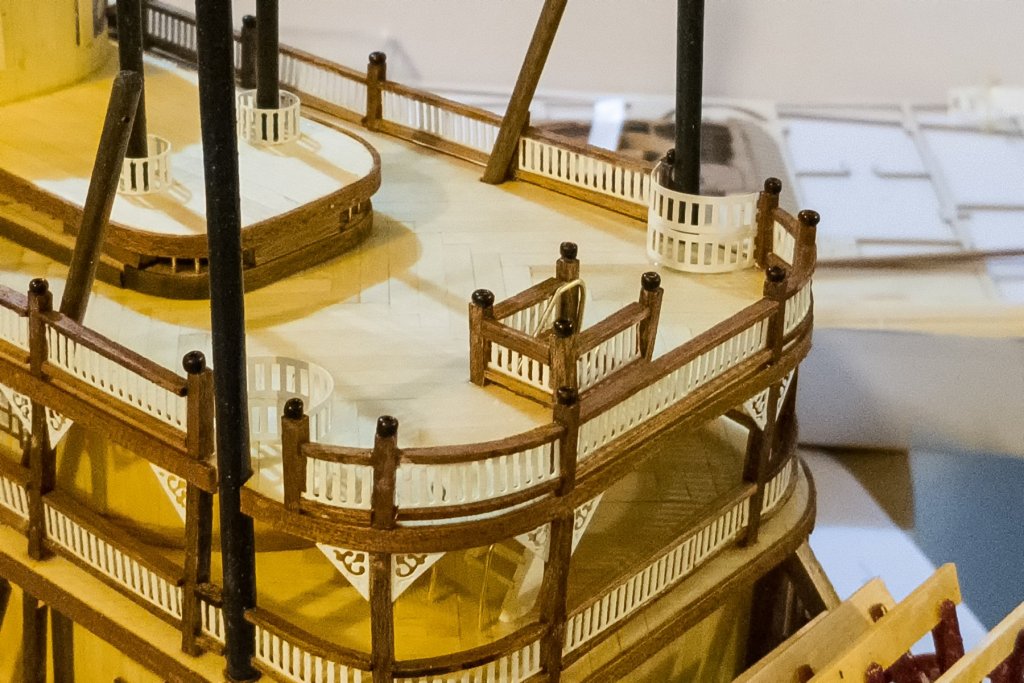
I have finished the second deck railings, and here are a couple of pics. I like the way the railing curves around at the stern. I am now more amused by the last paragraph of the manual when it said "most of the detail work is now done; just follow the pictures from here on" and then ended. In terms of detail work: every vertical post and horizontal wood railing (both under and over the white part) had to be individually hand-fitted, with lots of careful sanding to get the lengths right, as they aren't quite uniform. Same true of the white parts of the railings. So if that isn't detail work, I'm not sure what is. I will now do the railings around the stair openings on deck 3 first, because I'll have a clear shot at them before I put up the posts and railings on Deck 3. Regards, David
- 104 replies
-
- 3
-
-
- king of the mississippi
- artesania latina
- (and 1 more)
-
A construction discovery -- the third deck is not quite as wide as the second. It's 3mm narrower on both sides. That left me with two choices: If I wanted the vertical second deck posts to be flush with the edge of both deck 2 and deck 3 (as shown in the photographs in the manual), then I'd have to noticeably cant the posts inward from bottom to top. Or, I could align the posts to the edge of deck 3 and move them in on deck 2 about 3mm. I picked the second option, as I thought the canted posts would look awful, and I don't think the "indentation" of the posts looks bad. I installed some of the lower railings, and you can see how it looks in the pics here. Regards, David

- 104 replies
-
- 2
-
-
- king of the mississippi
- artesania latina
- (and 1 more)
-
Not a lot of visually interesting stuff in this post, but some useful construction tips from my experience. I looked over the plans to see what I should install before doing the railings, so I wouldn't have access issues. That turned out to be the stairs and railings fore (2) and aft (1), the three masts on either side, and most of the eyebolts. Some learnings: Once the ladder rails are painted, the paint adds width which makes them too wide for the deck openings. So I reduced the tread length from 10mm to 9mm and clamped them to be sure they were seated. It was helpful to shape one brass stair railing and then use it as a template for the others before installing any. The two slanted masts on each side require some work on the deck holes they fit into -- but the second deck holes aren't drill-accessible. I didn't have long bits, so I opened out the third deck hole on a slant, then inserted the bit and manually turned it through the second deck hole on a slant using a wrench. It worked, and wasn't much trouble, but doing the ship again I'd want to make those second deck slanted drills before installing the third deck. Now I can move on to the railings without having to maneuver around them later on. That would have been really hard if I'd tried to open those mast holes after the railings were on. Regards, David

- 104 replies
-
- 3
-
-
- king of the mississippi
- artesania latina
- (and 1 more)
-
Chris: The stacks are wood dowels. Needed some sanding to fit the rings and stack bases over, then one coat of Model Master flat black, and one coat of satin polyurethane varnish. The large stack tops are cast metal, hand-painted. The rear stack tops are solid brass pieces. As I noted earlier, I had to hijack and re-purpose two deadeyes for the small red stack tops. I really like Model Master acrylic paint since I began using it. Covers really well, but cleans up with water. Regards, David
- 104 replies
-
- 1
-
-
- king of the mississippi
- artesania latina
- (and 1 more)
-
Antony: Yes, I keep all my boats, and I'm eventually going to run out of wall space in my office! What's the alternative? What else do you do with yours besides display them? Regards, David
- 104 replies
-
- 2
-
-
- king of the mississippi
- artesania latina
- (and 1 more)
-
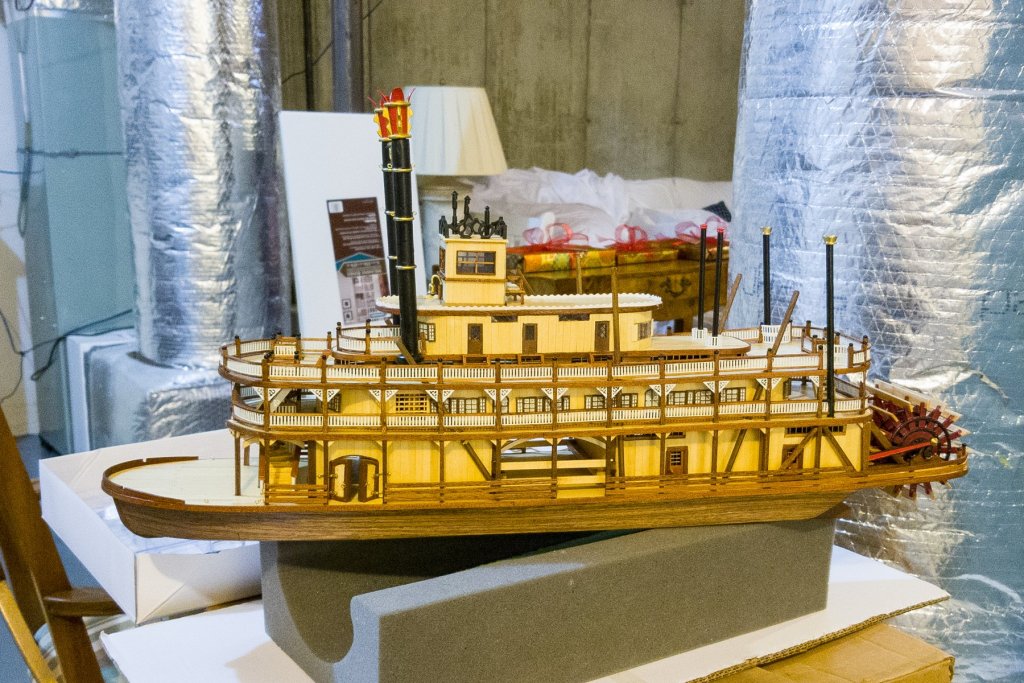
All the stacks are up now -- and I couldn't resist a picture because the color scheme on the tops of the main stacks is pretty cool. This is the scheme called for in the model. Regards, David
- 104 replies
-
- 3
-
-
- king of the mississippi
- artesania latina
- (and 1 more)