drobinson02199
-
Posts
1,079 -
Joined
-
Last visited
Content Type
Profiles
Forums
Gallery
Events
Everything posted by drobinson02199
-
 Chris: The deck colors are just a photo trick -- it's all the same stock planking from the kit. It's the ONLY thing AL provided spare amounts of -- everything else is either just enough, or short. No room for error. Regards, David
- 104 replies
-
- 1
-

-
- king of the mississippi
- artesania latina
- (and 1 more)
-
Antony: I just looked up your Turtle Ship, and your workmanship is incredible. Makes me realize how far I have to go in my own skills -- if I ever get there. Your last post was months ago. Are you still working on it? Regards, David
- 104 replies
-
- 2
-
-
- king of the mississippi
- artesania latina
- (and 1 more)
-
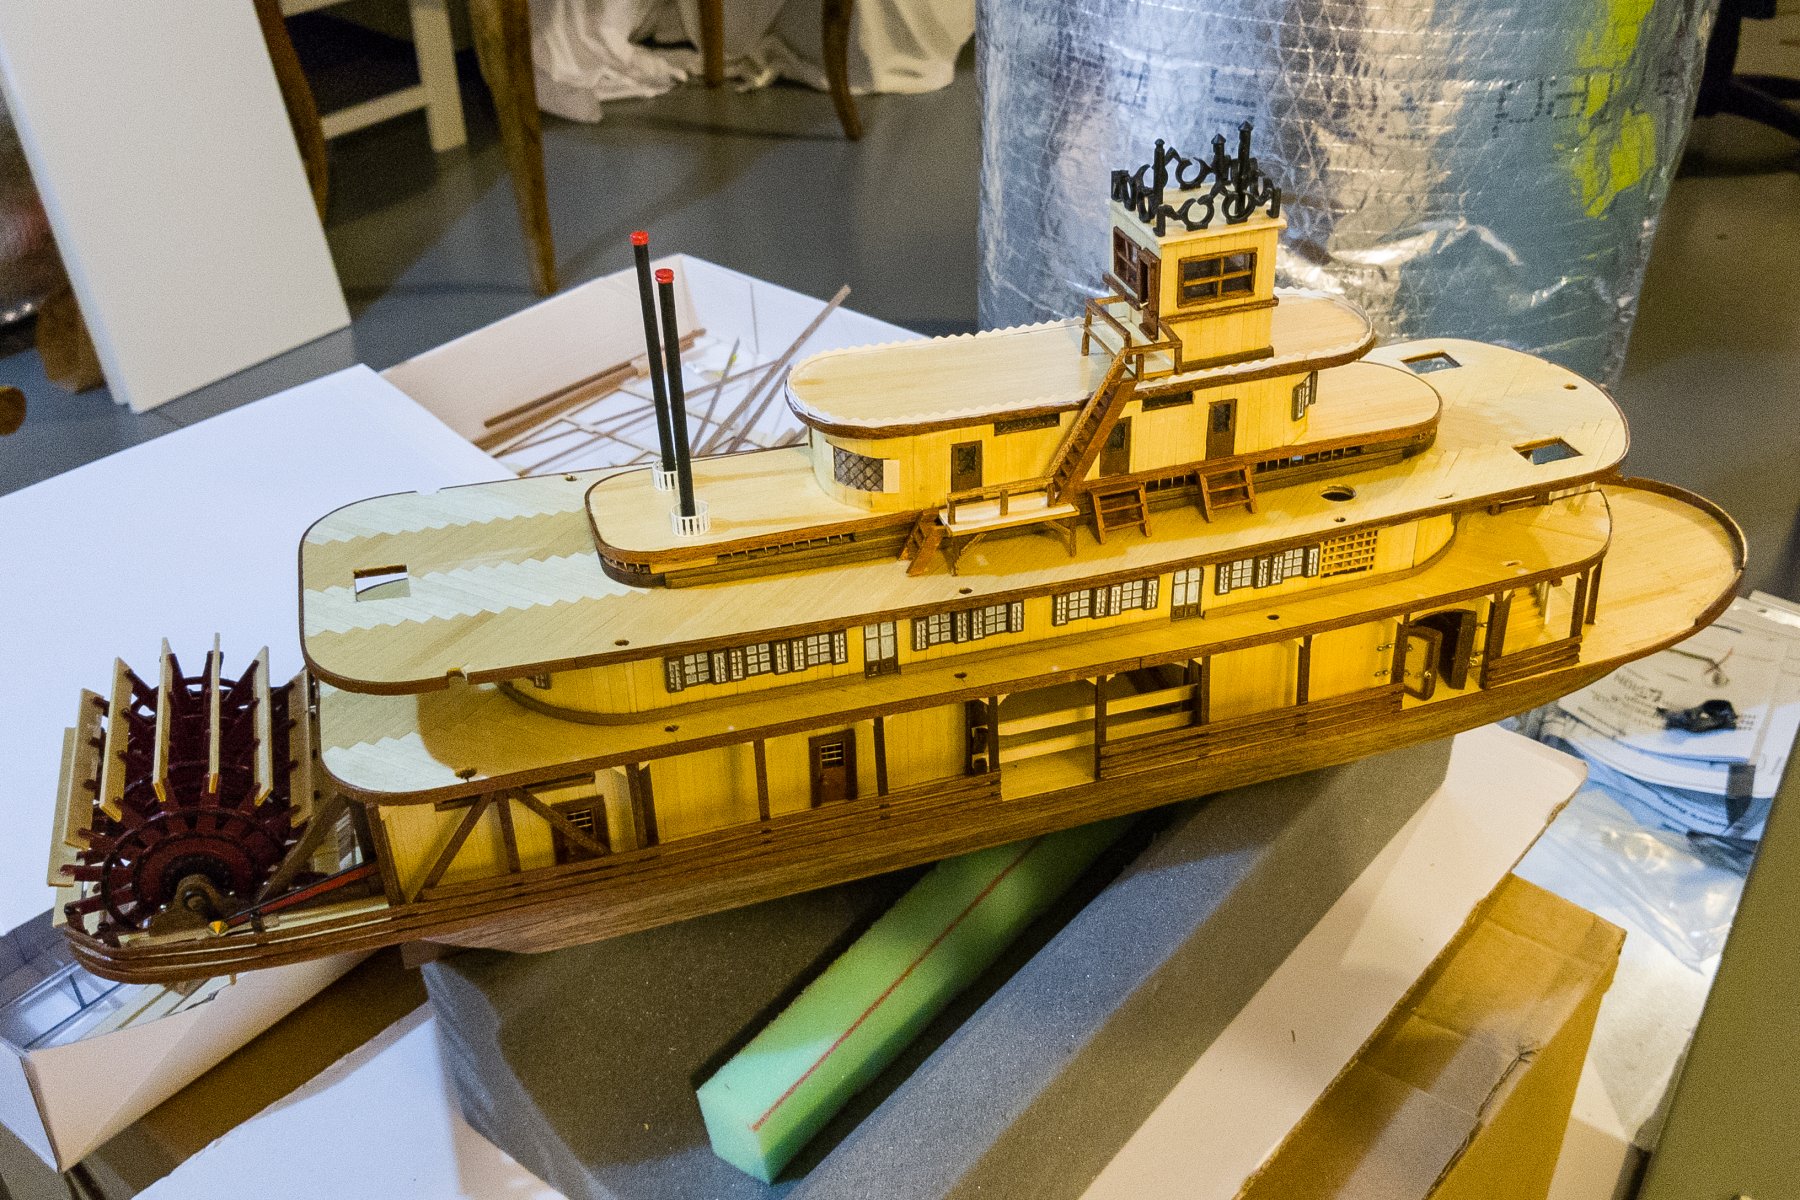
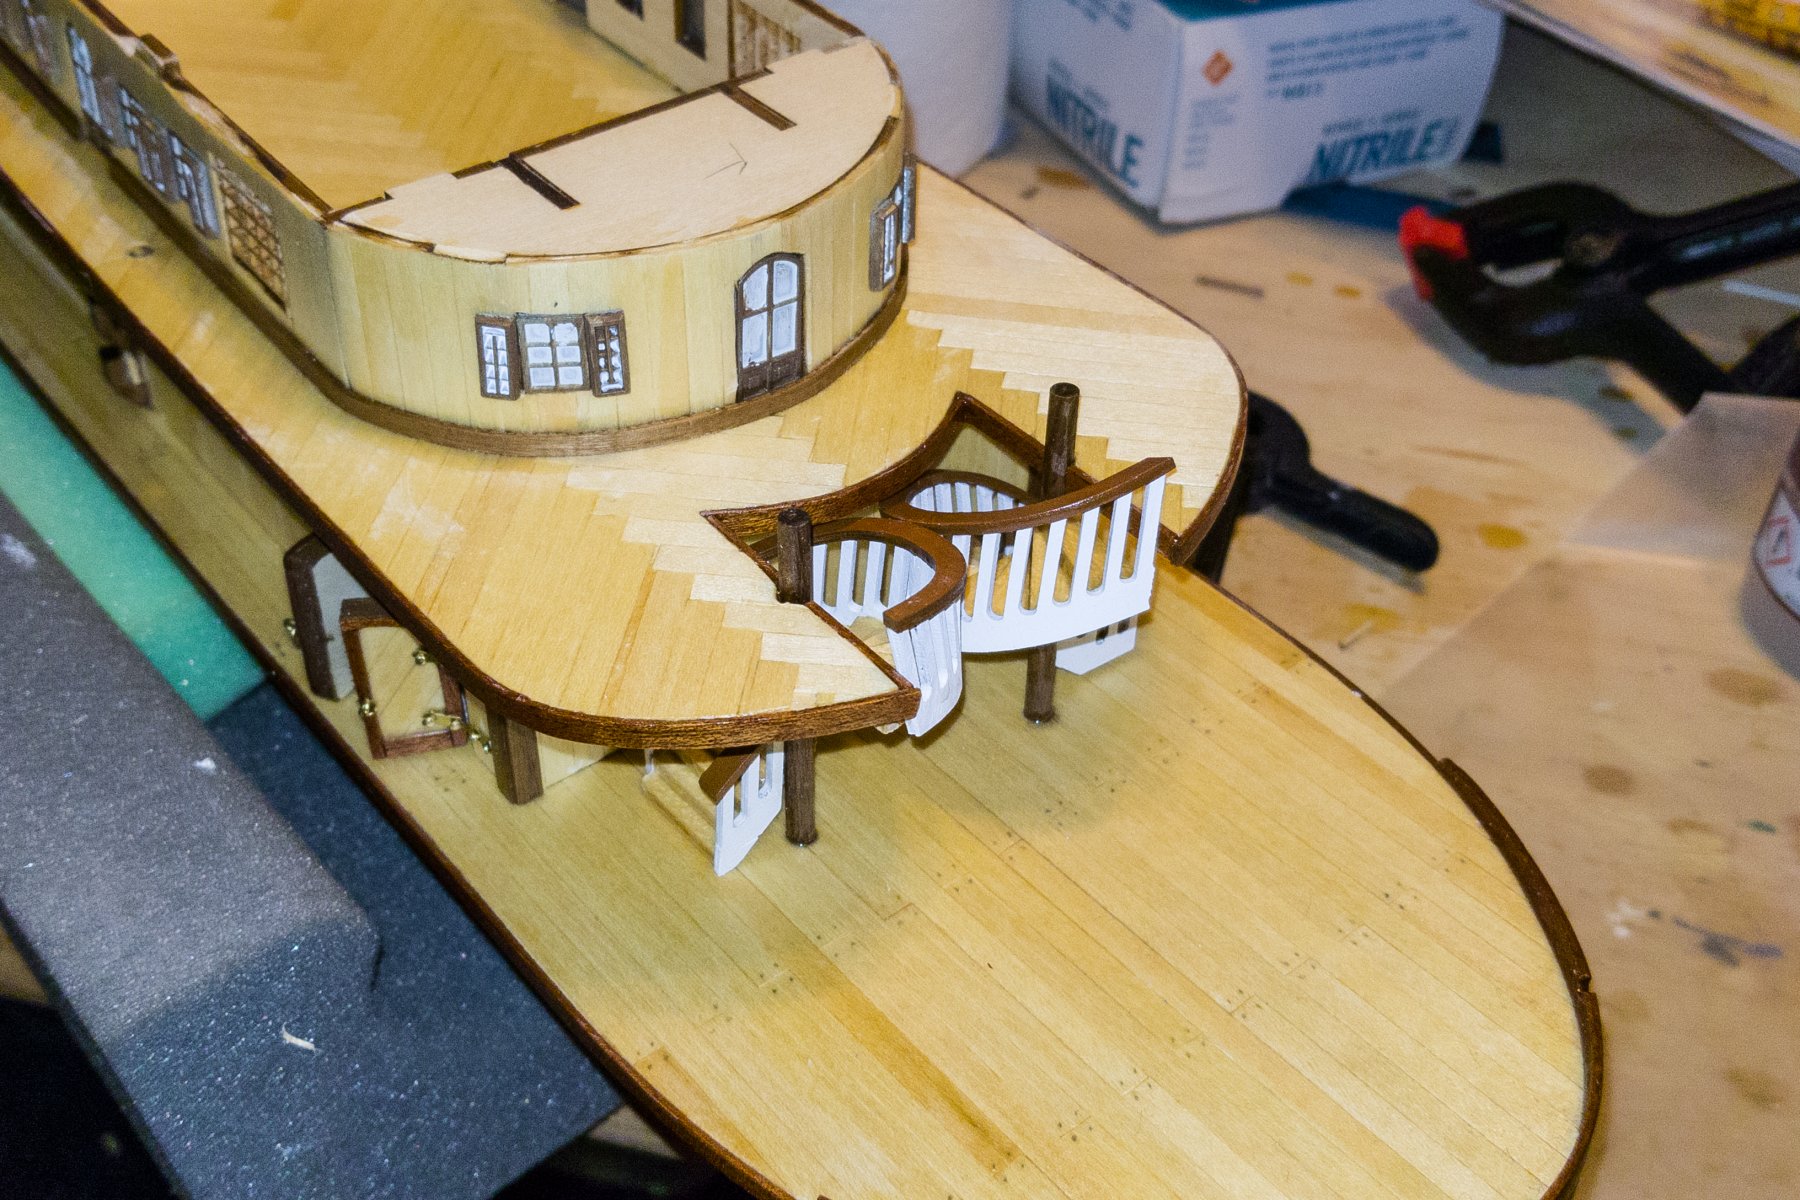
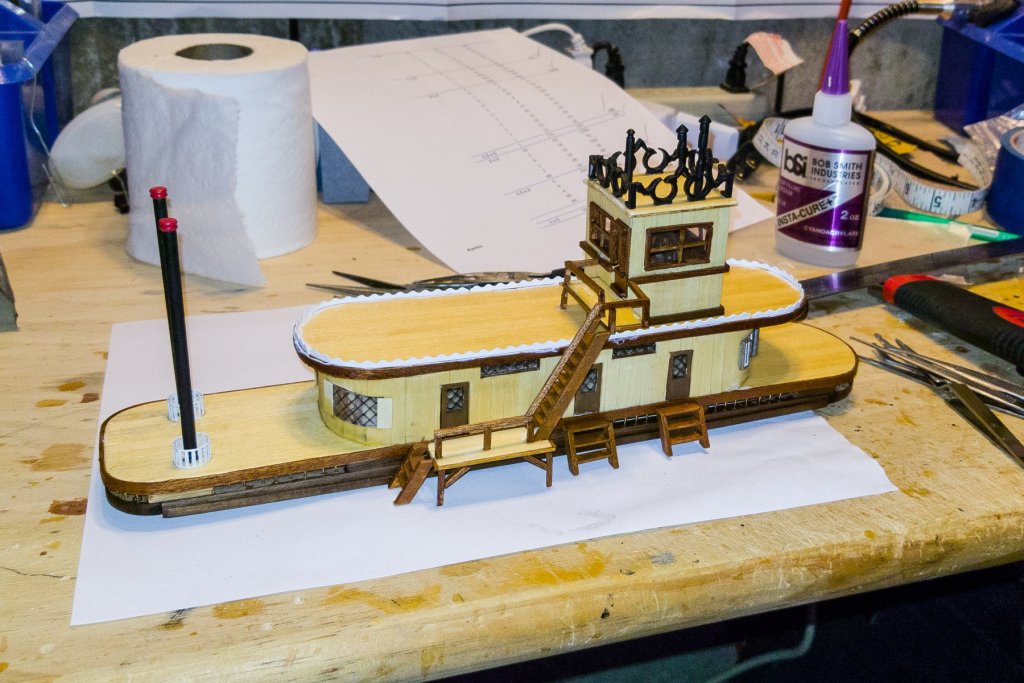
I've completed the top structure now, which has an interesting stair structure up to the wheelhouse. I kept it removable for now, not because I want to leave it that way on the finished model, but because I think the railings and other finish work on the deck it sits on will be easier to do if it's out of the way. See pictures. There were a number of construction issues here: The manual shows the ladders with white rails and natural steps, and I thought it was just the outside, so I assembled the ladder and then noticed that the entire rail needed to be painted white before assembly. So I decided to make the steps on this level brown, and go to the other color scheme on the lower decks. The ladders are constructed out of pre-cut rails, and pieces of step material that you have to cut to length. Turns out there aren't enough of those for all of the ladders on the boat (I looked ahead). So I went to my "leftover stuff" box (thank you Amati for extra material) and used ladders from that for the short ones. You'll notice that they are wider than the ladder in the structure. I have enough AL ladder material for the three on the lower decks, which is good because the Amati ladders would be too wide. The kit is also missing the top of the stacks you see. So back to the "leftover stuff" box and two small round deadeyes, wood filler in the holes, and they look pretty good. I decided to paint the tops red just to add some color to the model, and it matches red that will be on the tops of the main stacks later. The manual doesn't have the two platform edges finished, but I added some "leftover stuff" strips to finish it, since the rest of the structure has a lot of trim and finish. I also added a skirting board around the bottom of the wheelhouse to finish it off. [See Chris, I listen ] Speaking of construction, the instructions stop here, saying "most of the tedious and detailed work is now done -- follow the pictures for the rest." Since each vertical post has to be hand-sanded to fit, and there are a lot of railings to fit, I don't think the detailed work is quite done yet. Regards, David


- 104 replies
-
- 4
-
-
- king of the mississippi
- artesania latina
- (and 1 more)
-
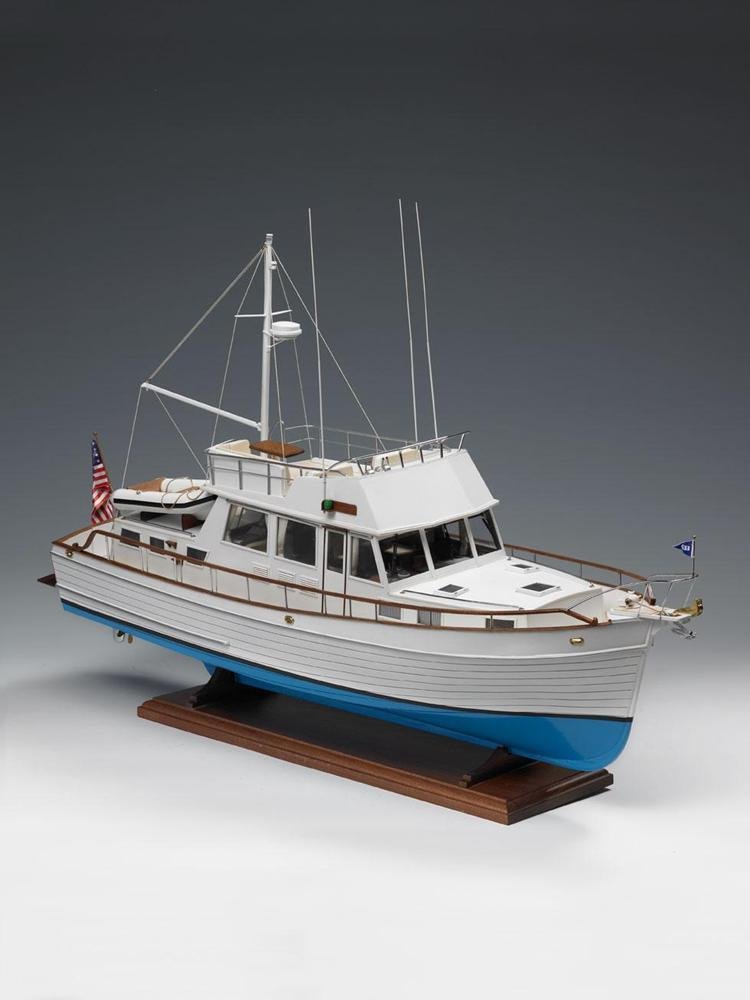
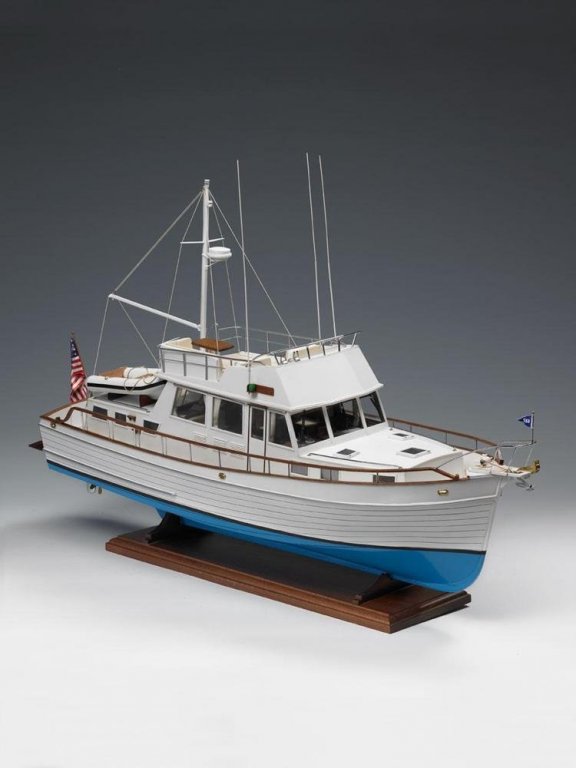
Chris: Grand Banks is a modern power boat by Amati. I have attached their stock picture. After rigging the Revenge, I wanted to work on a couple of boats with no rigging. Then I'll swing back that way. Regards, David
- 104 replies
-
- 1
-
-
- king of the mississippi
- artesania latina
- (and 1 more)
-
Chris: It would seem like I'm getting close to the end, but when I look at the model there is a lot of detail work left to do. Next model will be the Amati Grand Banks -- which I have already bought. How is your riverboat coming? I have looked for a build log but don't see one? Regards, David
- 104 replies
-
- 1
-
-
- king of the mississippi
- artesania latina
- (and 1 more)
-
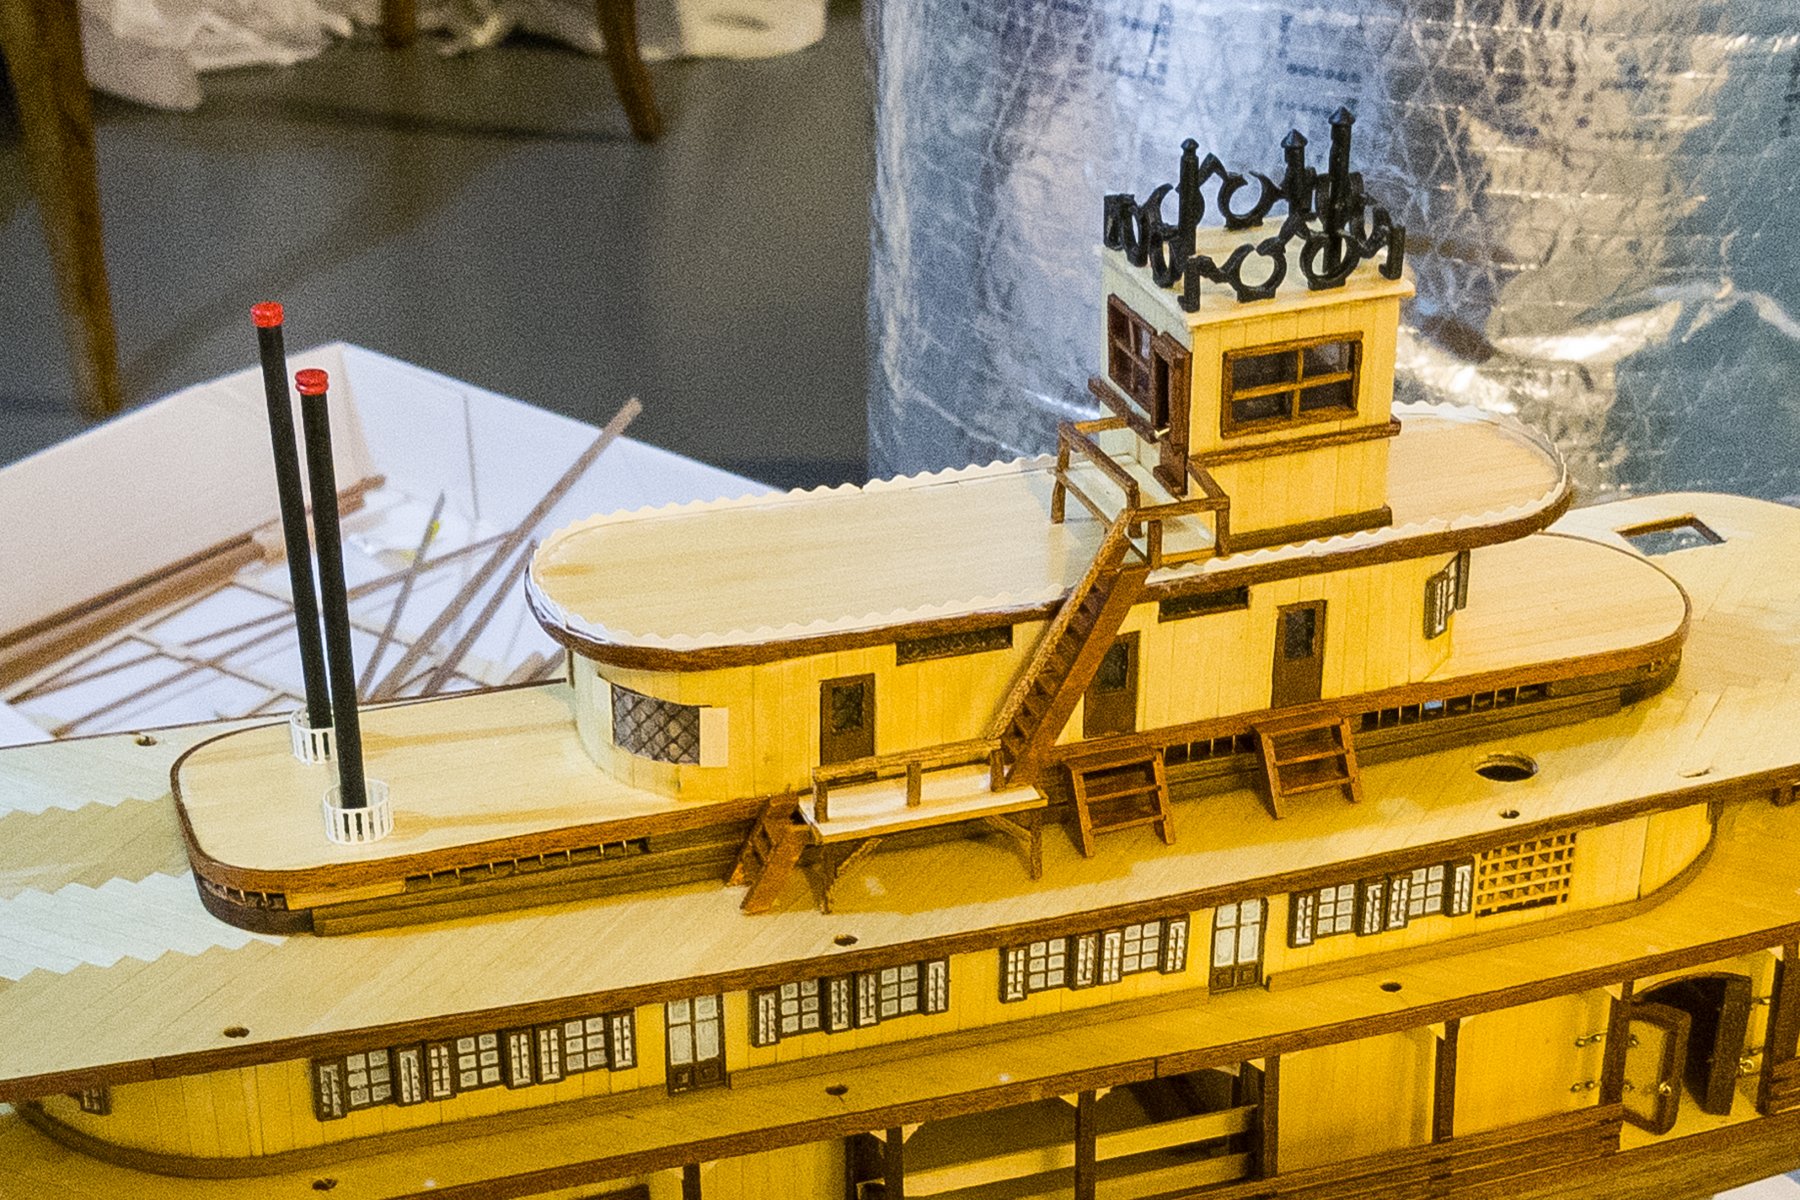
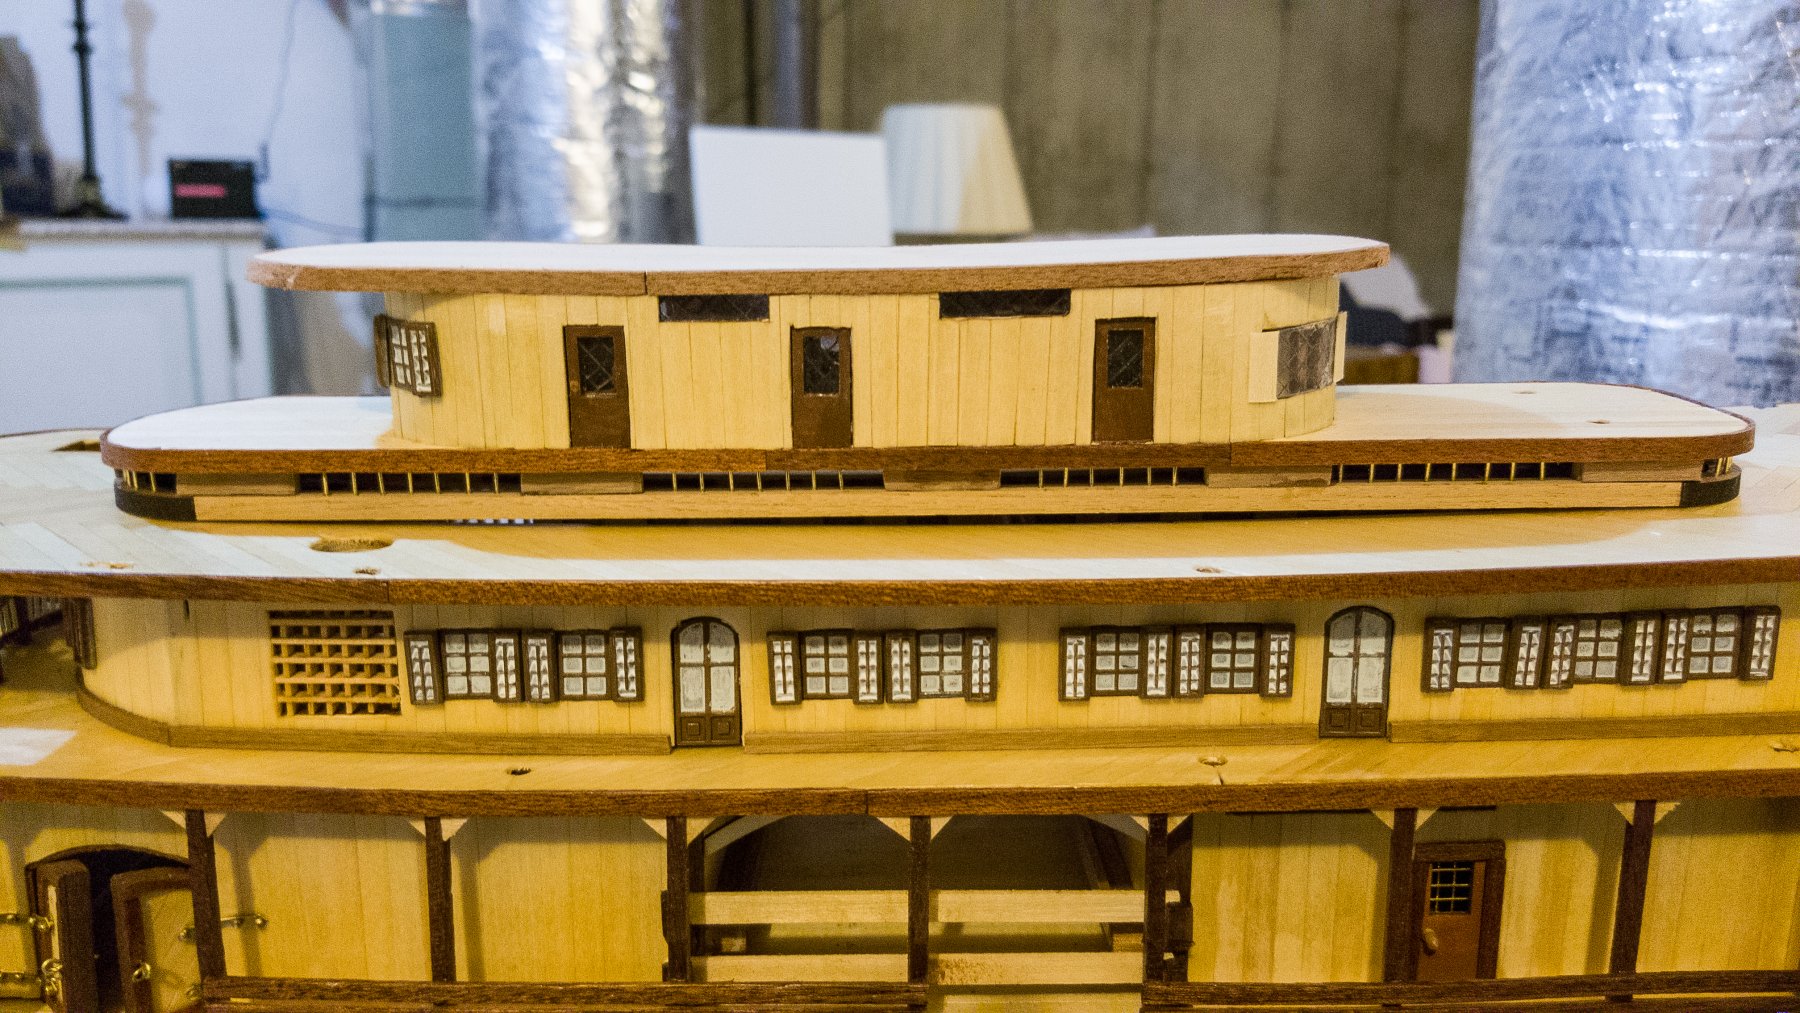
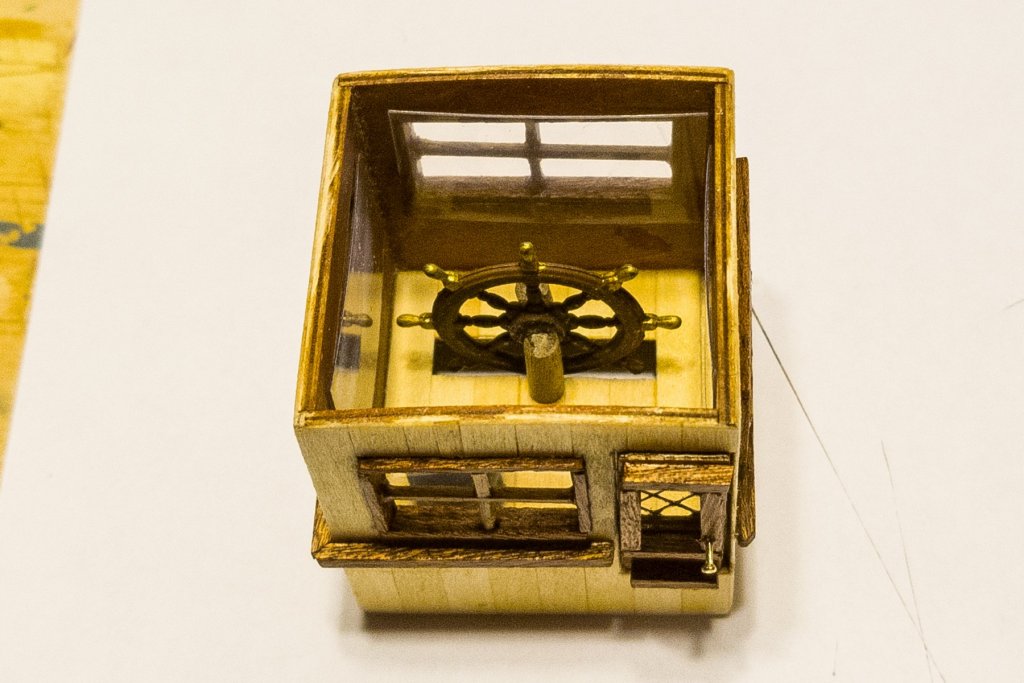
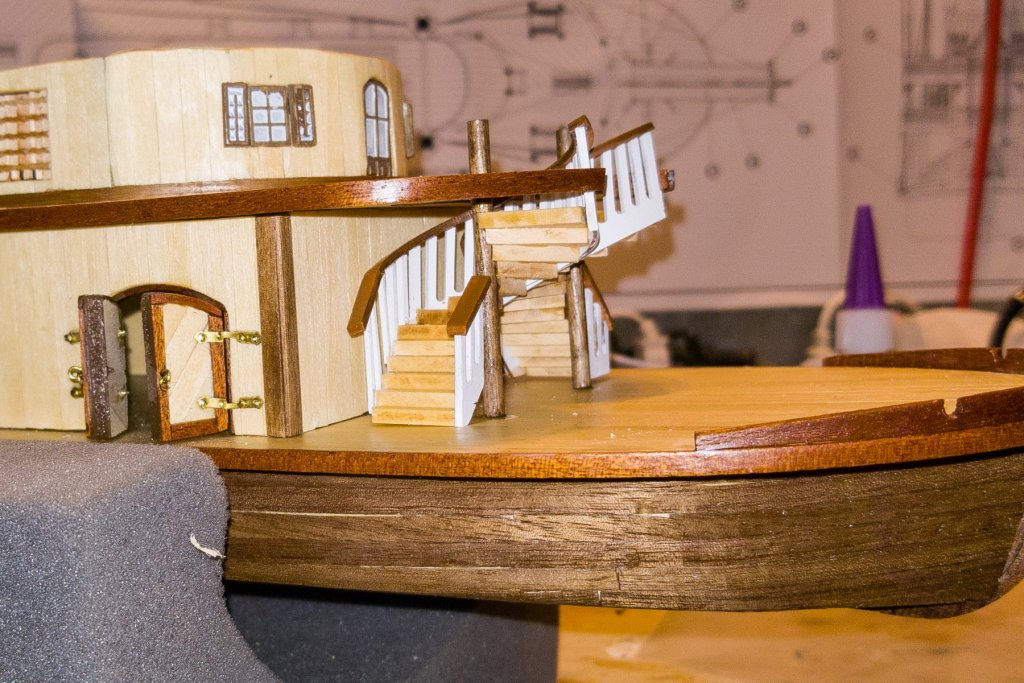
Finished the wheelhouse and have mounted it. I spent some time on the interior, with painting and also accenting the helm spokes to a brass finish, only to discover as I dry-fitted the roof that the interior goes dark. So a picture here first before I put the roof on. Some building notes: The manual calls for scoring the acetate into large panes, then painting and wiping as it did for the lower windows. I didn't like the look of that in the instructions, so I built window frames and mounted clear acetate behind it. Looks better given the level of detail on this little structure. For once with this model, the metal decoration anticipates the curve of the roof. But the manual shows it mounted on the roof before the roof is mounted on the wheelhouse, and until that happens there is no curve. So mount roof, then attach decoration. I built the decoration into a rectangle off the roof, and then mounted the whole sub-structure onto the roof. Easier to align. As I look at the pics I'm attaching, I see that a skirting board would be a good idea, but I'll wait until I've built the stairway structure, which includes platforms and landings and is the next step. Regards, David

- 104 replies
-
- 5
-
-
- king of the mississippi
- artesania latina
- (and 1 more)
-
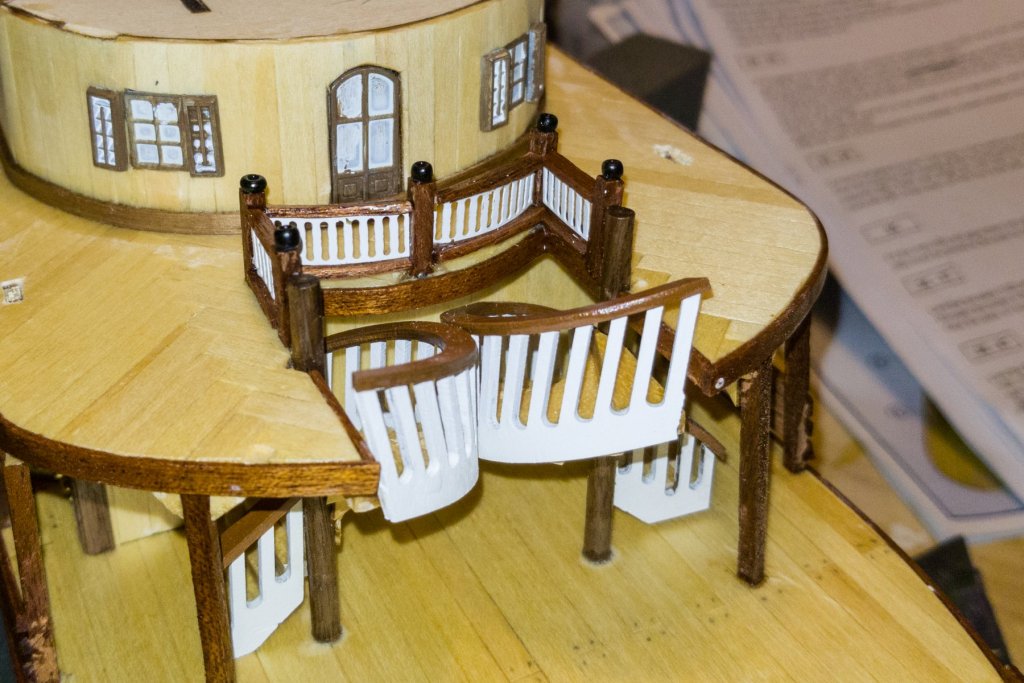
Added the skirting board, and gave it a curved shape to fill the gap. Works well. And the structure is still removable! I forgot to mention that I gritted my teeth and used the acetate for windows on this structure, and it reminded me of how much I really dislike working with that stuff around glue. In fact, the yellow "shutters" you can see on the curved window on the right are there to hide "glue mess". I think I'll try to find some thin lucite to have around. Regards, David
- 104 replies
-
- 5
-
-
- king of the mississippi
- artesania latina
- (and 1 more)
-
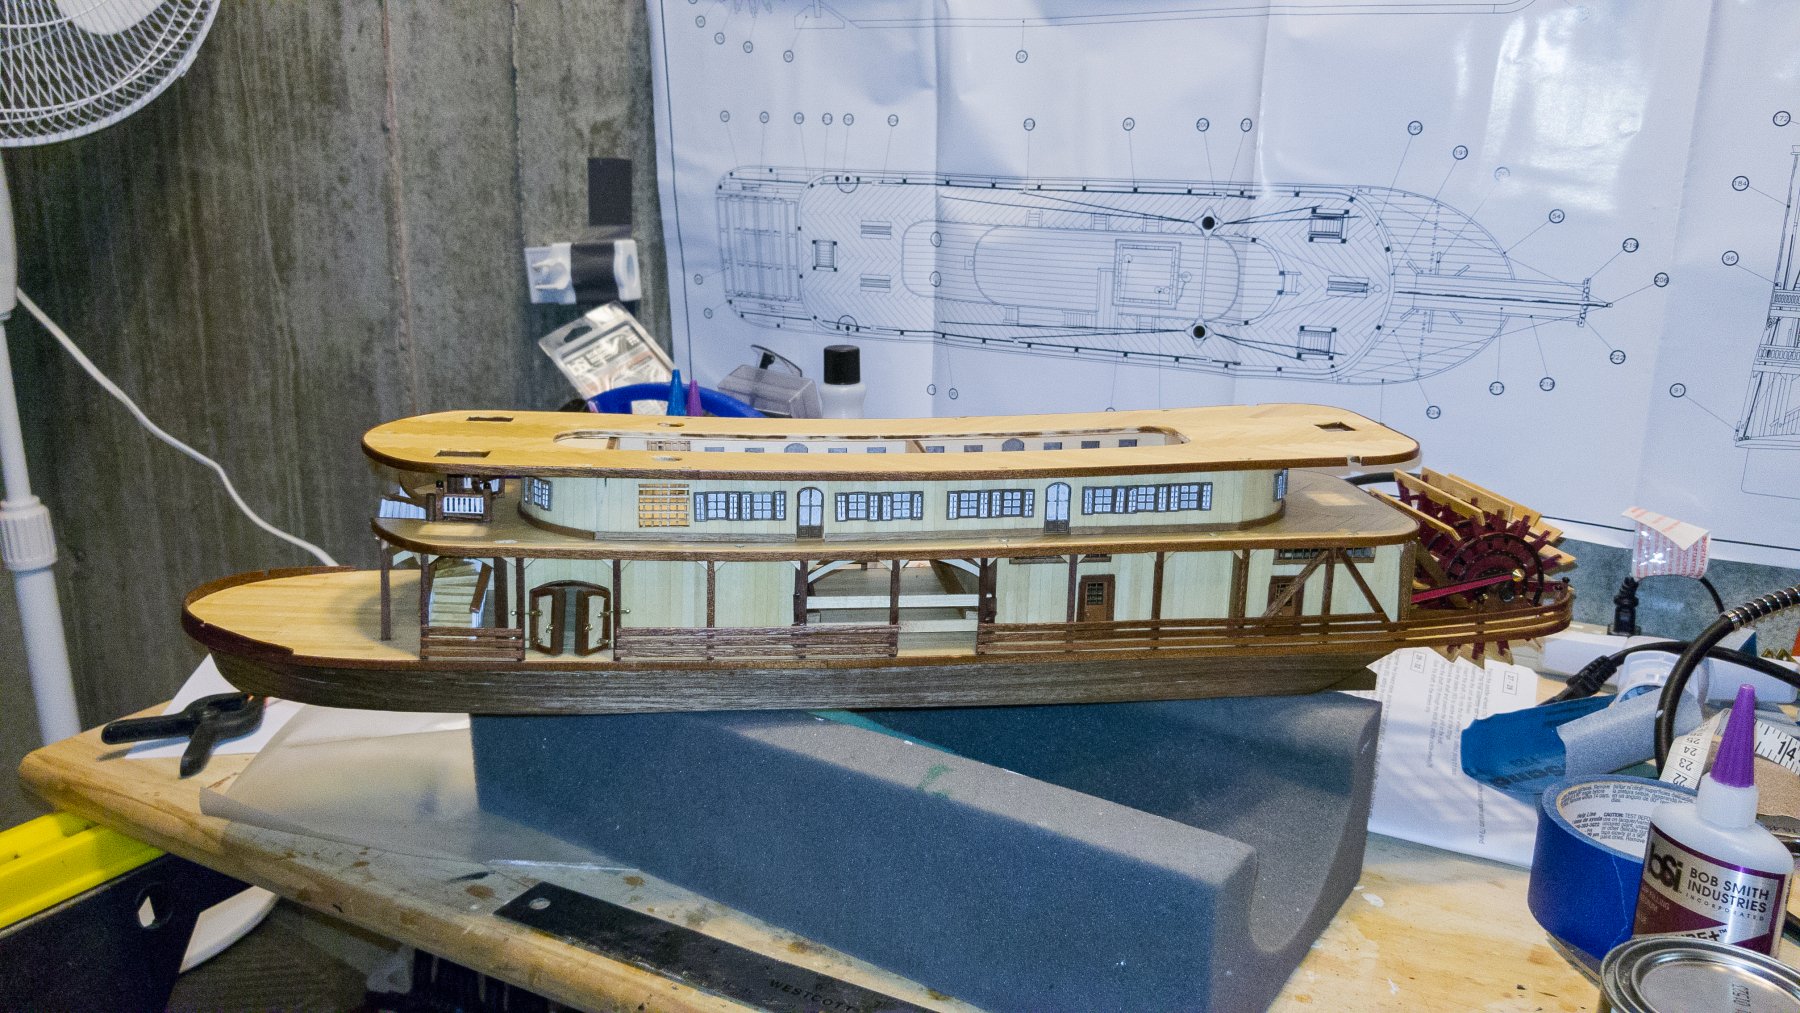
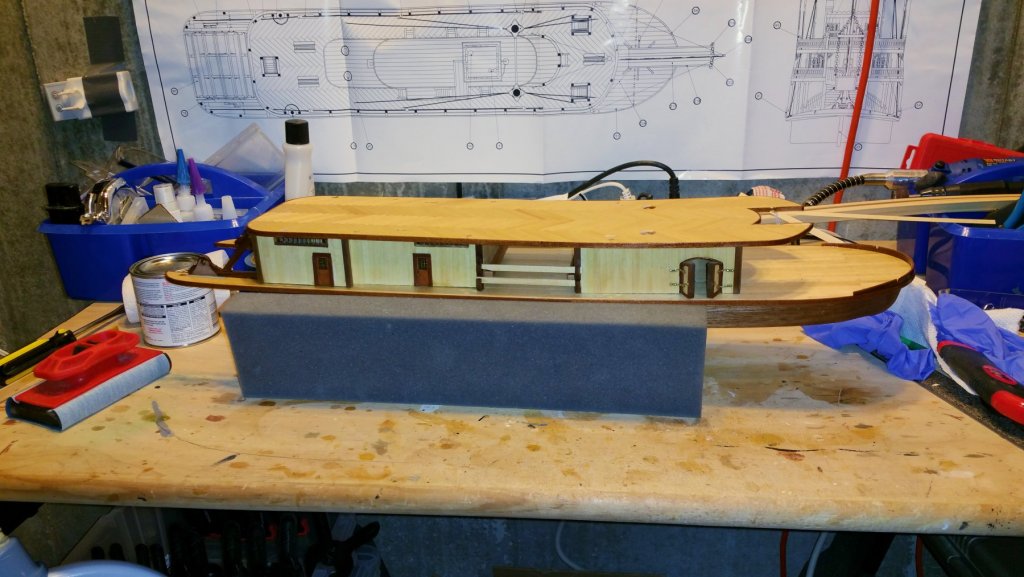
I have finished the third structure and fourth deck. A few construction items: If you look at the first picture, you'll see that all of the lower decks are slightly curved toward the center from bow to stern. This curve seems to be imparted by the top of each structure to the deck above it, even if the bottom of the next structure isn't correspondingly curved. So I had to install a molding at the bottom of the second structure, as discussed earlier. What you can see from this and the next picture is that the lower part of the third structure is dead straight, while the deck below it is curved, leaving a gap. I saw this coming, and considered trying to adjust the lower part to be curved, but thought it might mess up those little windows with the brass nails, so instead I'll again follow the guidance from Chris (Vossy) and dress it with a molding -- but I'm going to shape the molding. The manual says to drive in the nails and then file down the nail heads, but it's much easier to clip the heads off before putting them into the holes, The top of the structure isn't varnished yet. I want to shape and install the moldings and then I'll varnish the rest of this. This structure is made to be removable, and this isn't a RC model. Does anyone know why this would be? At the end, I'm going to glue it on. Regards, David

- 104 replies
-
- 3
-
-
- king of the mississippi
- artesania latina
- (and 1 more)
-
Chris: The idea of building them up at the base was one I considered before I installed them. Having built and installed them, I'd be reluctant to try to pry them out at this point for fear of really messing them up. The joins between the treads are fairly fragile. I think I'll just live with them as is. I just looked at them again, and one thing I might do at the end is dress the bottom of the curved railings up to the bottom of the second deck with a piece of Sapelli, so that there is at least a smooth transition. I'll need to do something similar at the railings. The solution to this is to build it differently, carving out an extra straight tread and adding it to provide height as I noted above. Regards, David
- 104 replies
-
- 1
-
-
- king of the mississippi
- artesania latina
- (and 1 more)
-
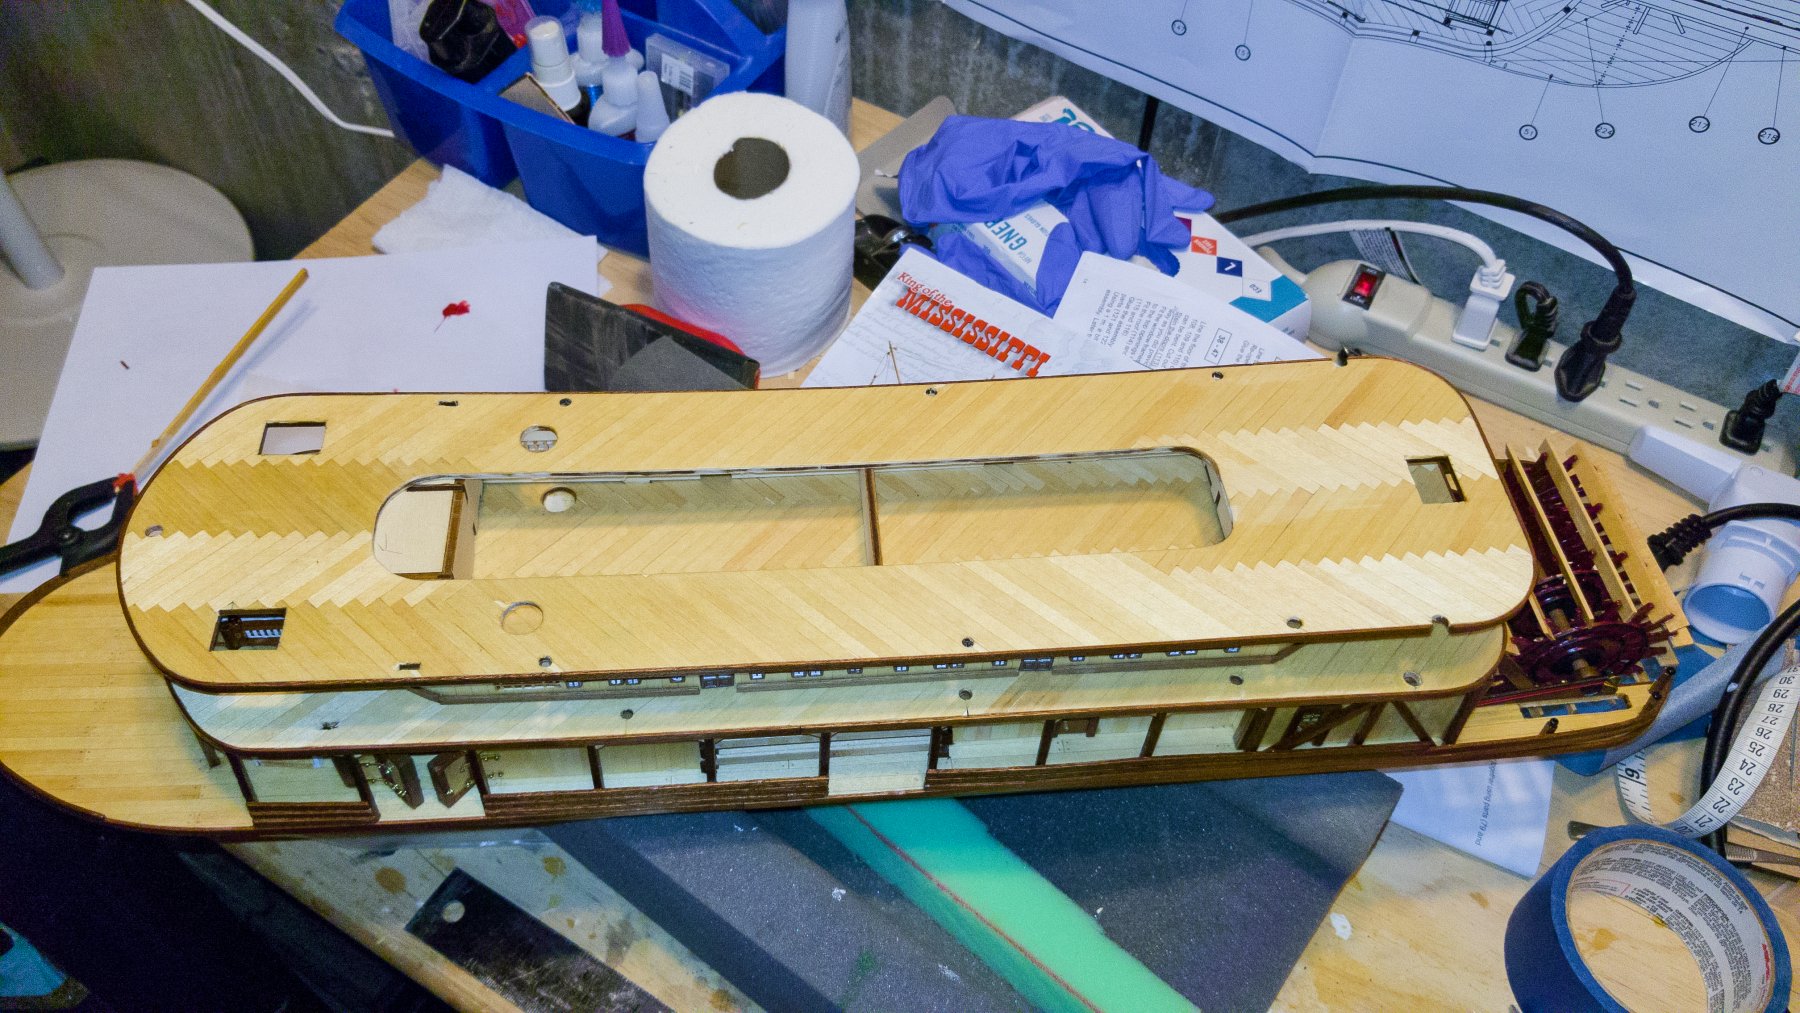
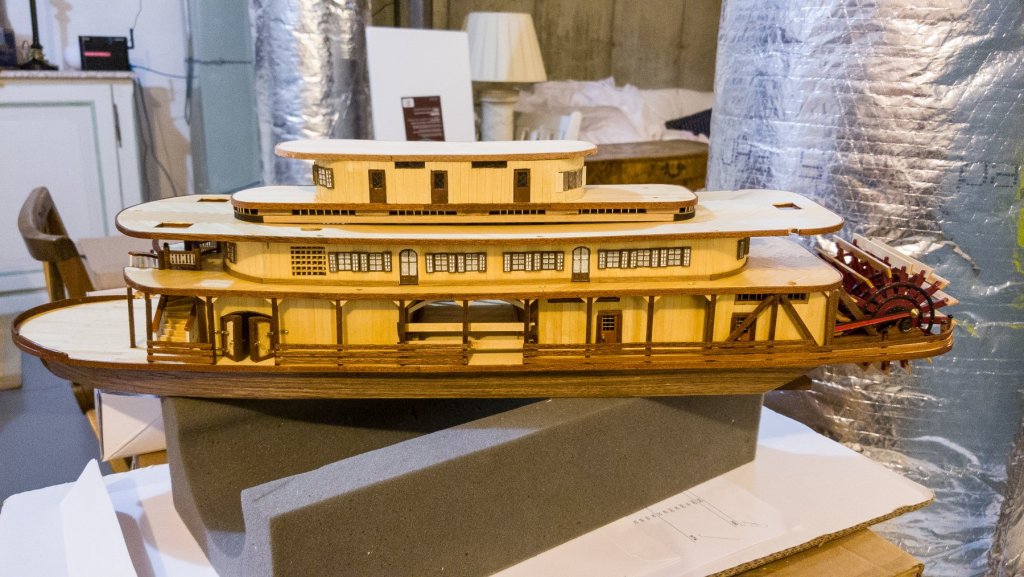
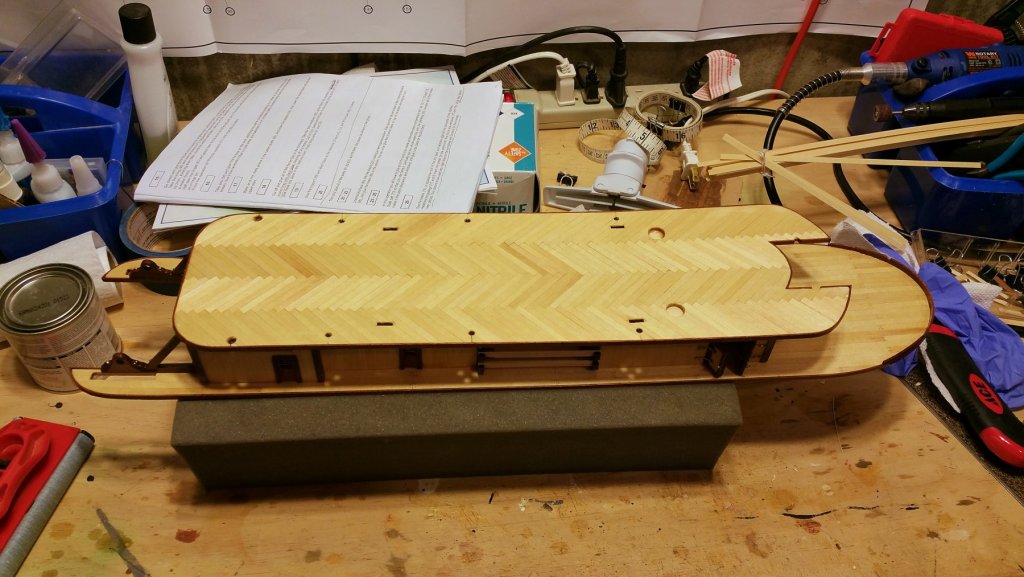
Finished the third deck and mounted it on the boat. I oriented the herringbone so that it runs in the opposite direction on the outside bands from the deck below. Thought that would be more interesting. On the side view, you can also see the drive rods on the paddlewheel. Regards, David


- 104 replies
-
- 5
-
-
- king of the mississippi
- artesania latina
- (and 1 more)
-
Chris: Some more thinking about solutions to the circular stairs. I took some measurements, and the treads are 3mm high. There are 13 of them, so that's 39mm, and the distance from the lower deck to the bottom of the second deck is 42mm -- just one tread higher. My staircase came out at 39mm on the nose, so my thought above about "drooping" may not hold. It would take a lot of precision to impart a slight uptilt of 1/4 mm on each tread, which is what it would take to add that extra 3mm over 13 treads. Another possible solution would be to cut a couple of extra straight treads out of the laser cut board they came in. I had to cut both of my straight short railing sections down, so I think they would take the extra length. I also had to cut one section off the curved railing -- so maybe it would take the extra tread as well. Thanks, David
- 104 replies
-
- 1
-
-
- king of the mississippi
- artesania latina
- (and 1 more)
-
Chris: I had another idea about how to get the curved stairs to come up to the second deck. When you assemble the stairs, you glue one tread above the other, and when it's done right in terms of length, there is very little common surface area between the two treads. It occurs to me that this might cause a very slight "droop" in the angle of the treads relative to each other, and therefore shorten the rise. The fix (and it would be very doable with this kit as is) is to sight each tread assembly while gluing and make sure that the treads are at least precisely level relative to each other, and perhaps slightly (very slightly) canted up. I can't tell now with the stairs mounted if mine had any "droop", but I suspect so -- but it would be so minor that you wouldn't see it unless you are looking for it. Over the 13 treads, that could result in the one tread height drop that I got. Regards, David
- 104 replies
-
- 2
-
-
- king of the mississippi
- artesania latina
- (and 1 more)
-
Chris: I fretted over that when I dry-fitted the staircases. They are just one step height short of ending flush under the second deck. I considered elevating them with a sort of platform on deck 1, but then looking at the finished model, it seemed to me that the part where the staircases meet the first deck will be more visible than the part where they meet the second deck. I may be wrong about that -- but I opted to have that first deck join look normal. The angle is OK -- on one of mine, the way the stair rail twisted around left it angled in just a bit. I think if they were elevated to come up to the second deck, the angle might look OK. I'm glad (sort of) to hear that it's not just me. It would initially seem that it would be an easy fix for AL to just add one more straight step -- but . . . those are in one of the laser cut panels, and the railings would have to be lengthened, and they are laser cut as well. So not an easy fix for AL. The plans and the instruction booklet pictures show the stairs coming up so that the top step fits flush under the second deck, effectively making the second deck the last step going up. The rails line up with the second deck railing. That won't happen on mine. What might cause it is the bowing of the second deck when attached to the engine and boiler rooms. I assumed that was what was intended and so glued it down with a fore-to-aft slight curve. That could cause the bow section of deck #2 to lift up just enough to cause the issue. That is probably not intended, but it's likely what caused me to have to add the skirting board you suggested. The next modeler to tackle this kit could instead glue on deck #2 without pushing the center down, and then dress the gaps in the join with the engine and boiler rooms with a molding. Or, sand down the fore and aft sections of the first deck structures to remove the bowing of the second deck. Either of those would seem to be the fix for this as I think about it. But you'd need to know that in advance, as the picture on the box suggests a slight curve. Regards, David
- 104 replies
-
- 2
-
-
- king of the mississippi
- artesania latina
- (and 1 more)
-
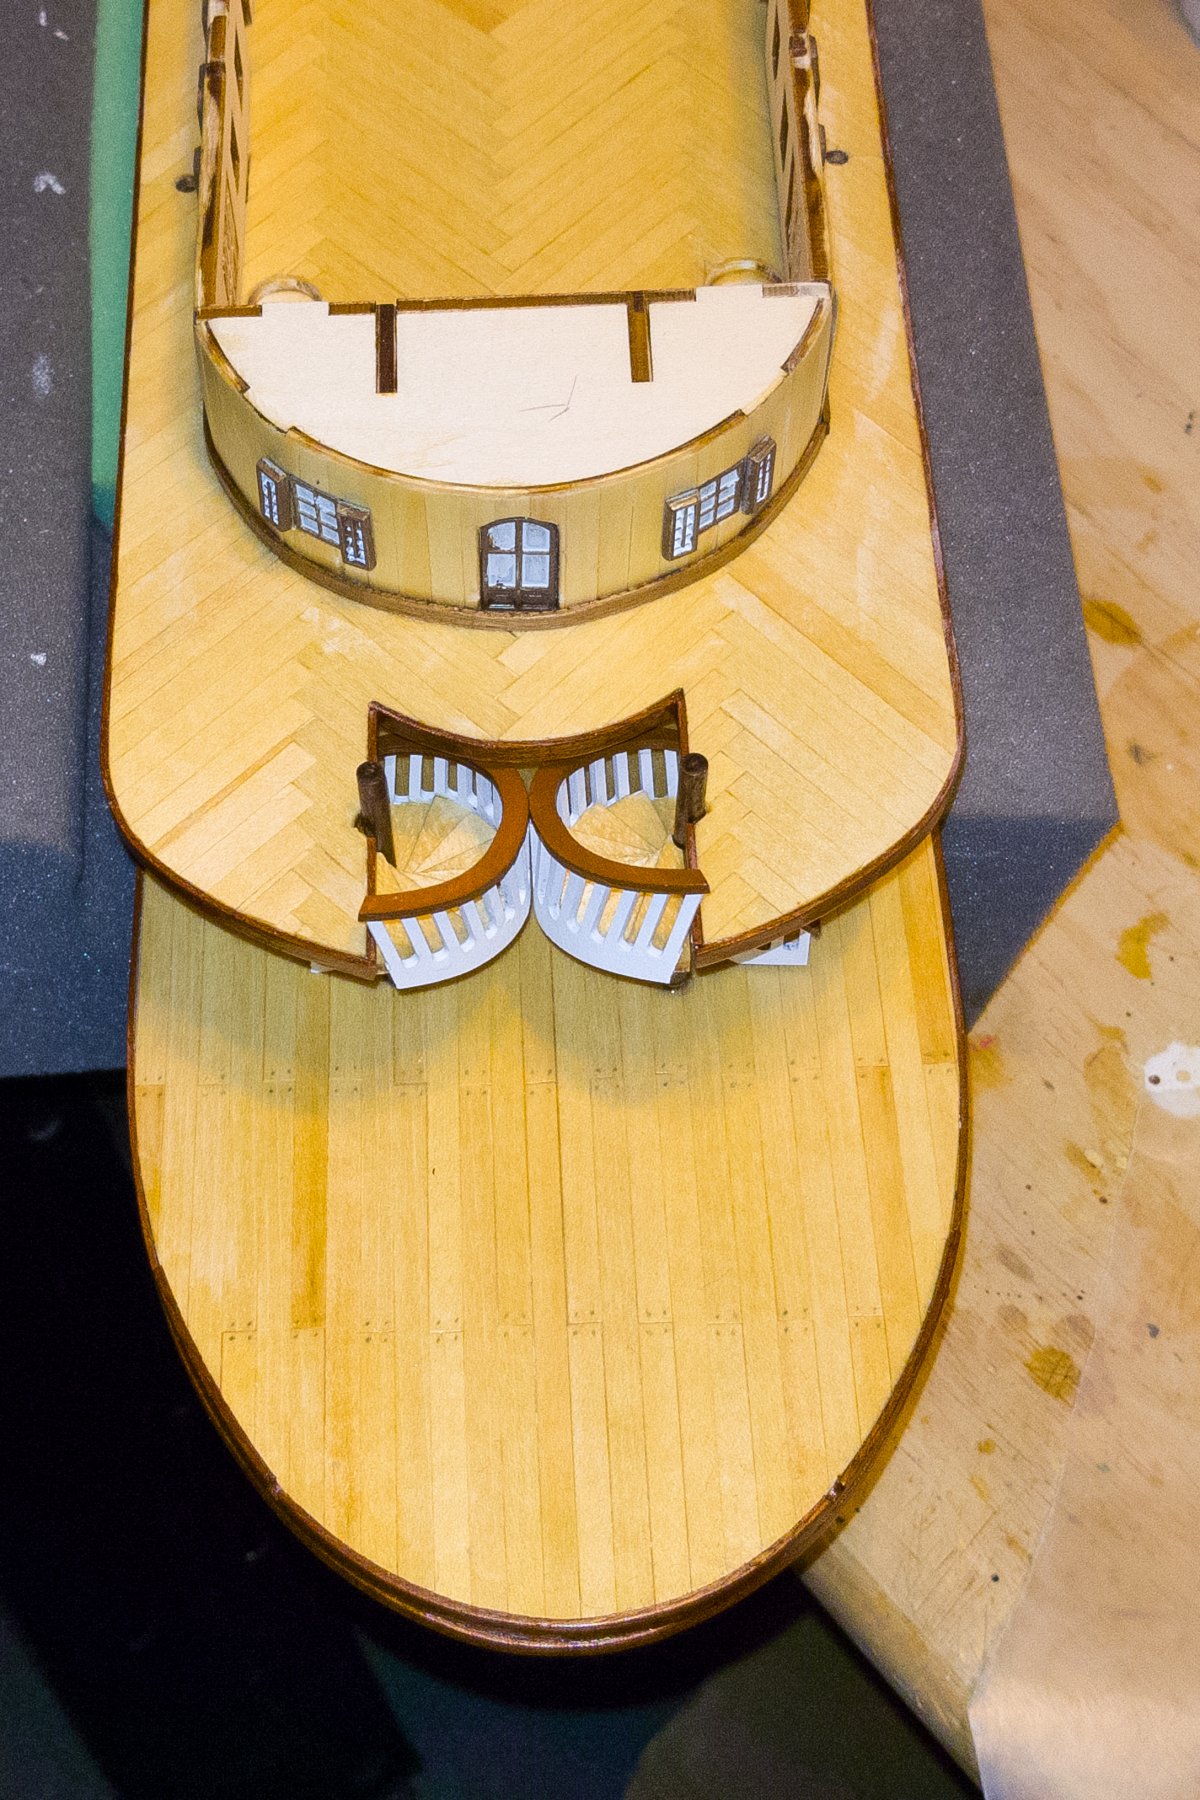
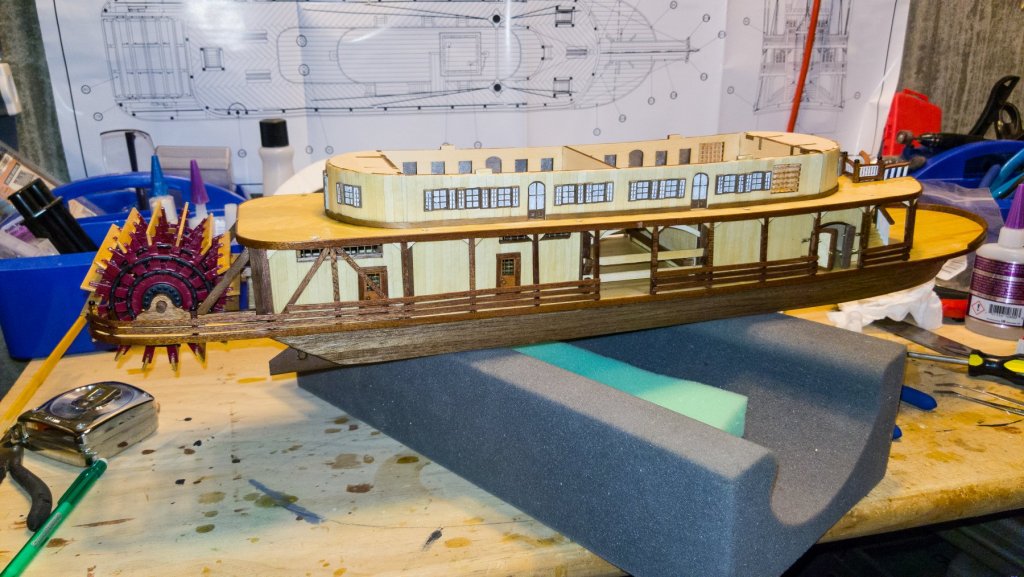
First deck posts and railings done. AL uses a lot of Sapelli in this kit, and I really like the reddish cast -- makes the natural wood combination look much better. Also take a look at the small second deck enclosure around the circular stairs. Took some work to get the sideways bend in the Sapelli strip. Best regards, David
- 104 replies
-
- 5
-
-
- king of the mississippi
- artesania latina
- (and 1 more)
-
And the curved stairs now mounted on the boat.

- 104 replies
-
- 5
-
-
- king of the mississippi
- artesania latina
- (and 1 more)
-
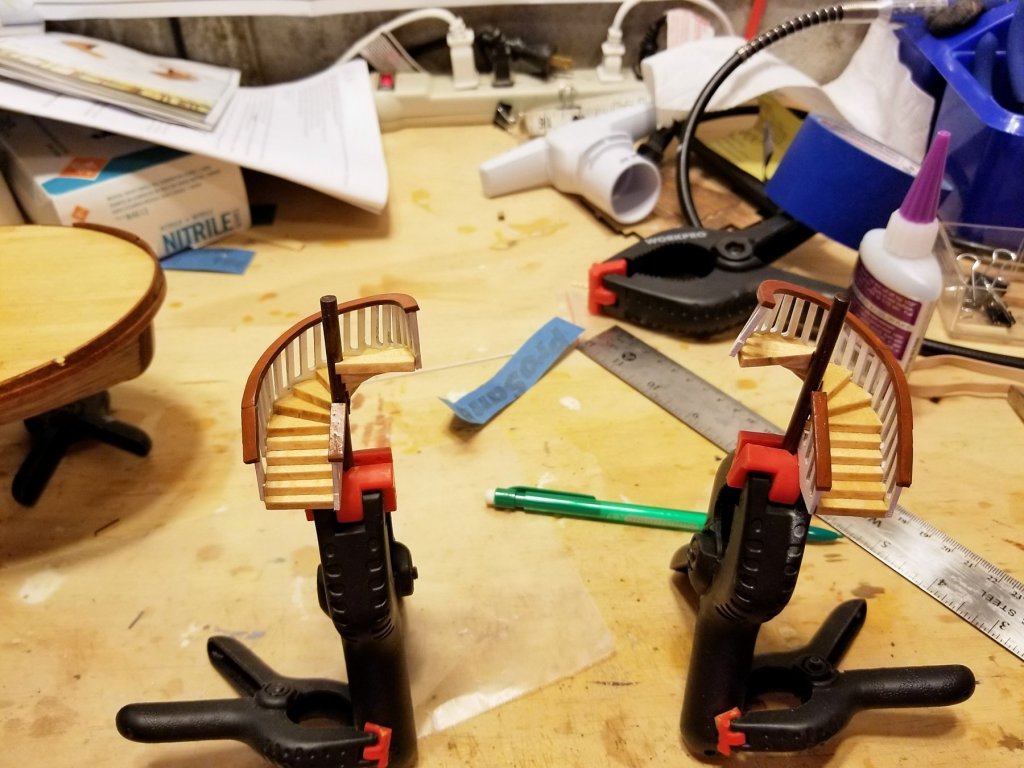
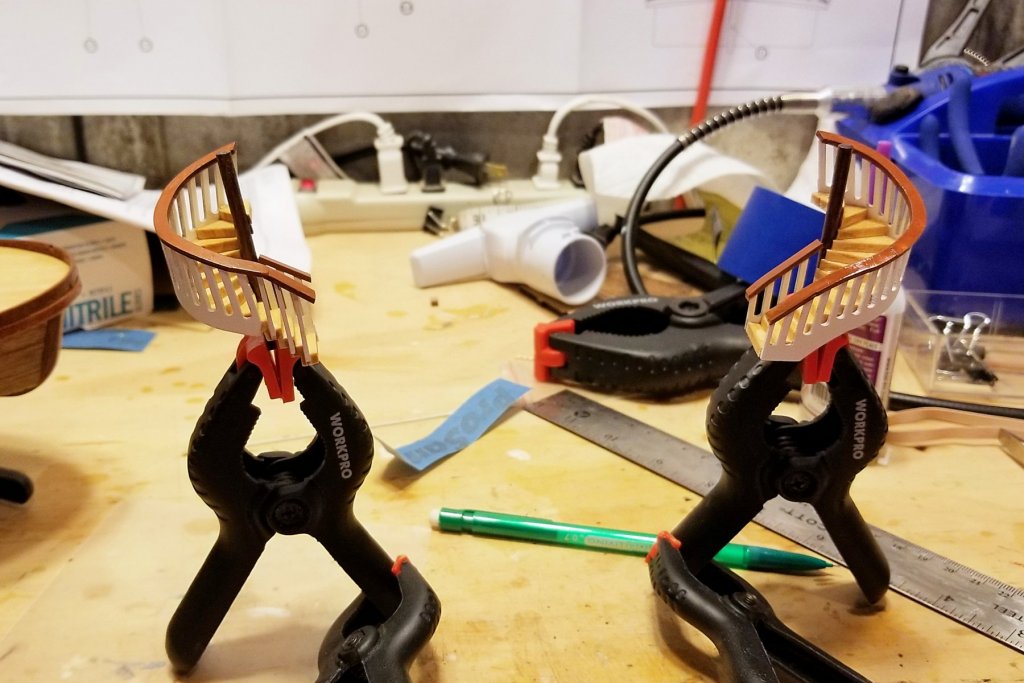
I have now finished the circular stairways, and I learned a lot. I did the first one on the left all the way through, to see what I'd learn before tackling the second, and I learned a lot. The manual says to space the stairs 2mm apart -- and aside from the ambiguity of that instruction, it leads to treads that are too short. See the top tread on the left. So I started just eyeballing the tread spacing, leaving as little as possible while still providing support. The right hand straight portion is about 3mm longer than the left one, and looks better. I didn't soak the left hand curved railing long enough, and it broke and I lost the short piece down the drain. So I had to make railings for that as you can see on the left, second picture. They won't show much as they are on the inside. On the second one, I soaked it, then ran under hot water while bending, and then put the bent piece inside a toilet paper tube overnight. I didn't soak and bend the curved railing before painting on the first one (left), and you can see the break where it slants down. On the right, I soaked and bent before painting and it has a nice continuity where it bends down. I was initially disappointed that the curved railing was plywood vs. something nicer, but I used a paint color called nutmeg brown, and when it's varnished it actually has a real wood look, so that came out OK. Need to be careful to watch the orientation of the spirals on both stairs and railings. They go in different directions, and I almost muffed that. I'll send another picture later when these fully dry and I've mounted them on the boat. Regards, David
- 104 replies
-
- 3
-
-
- king of the mississippi
- artesania latina
- (and 1 more)
-
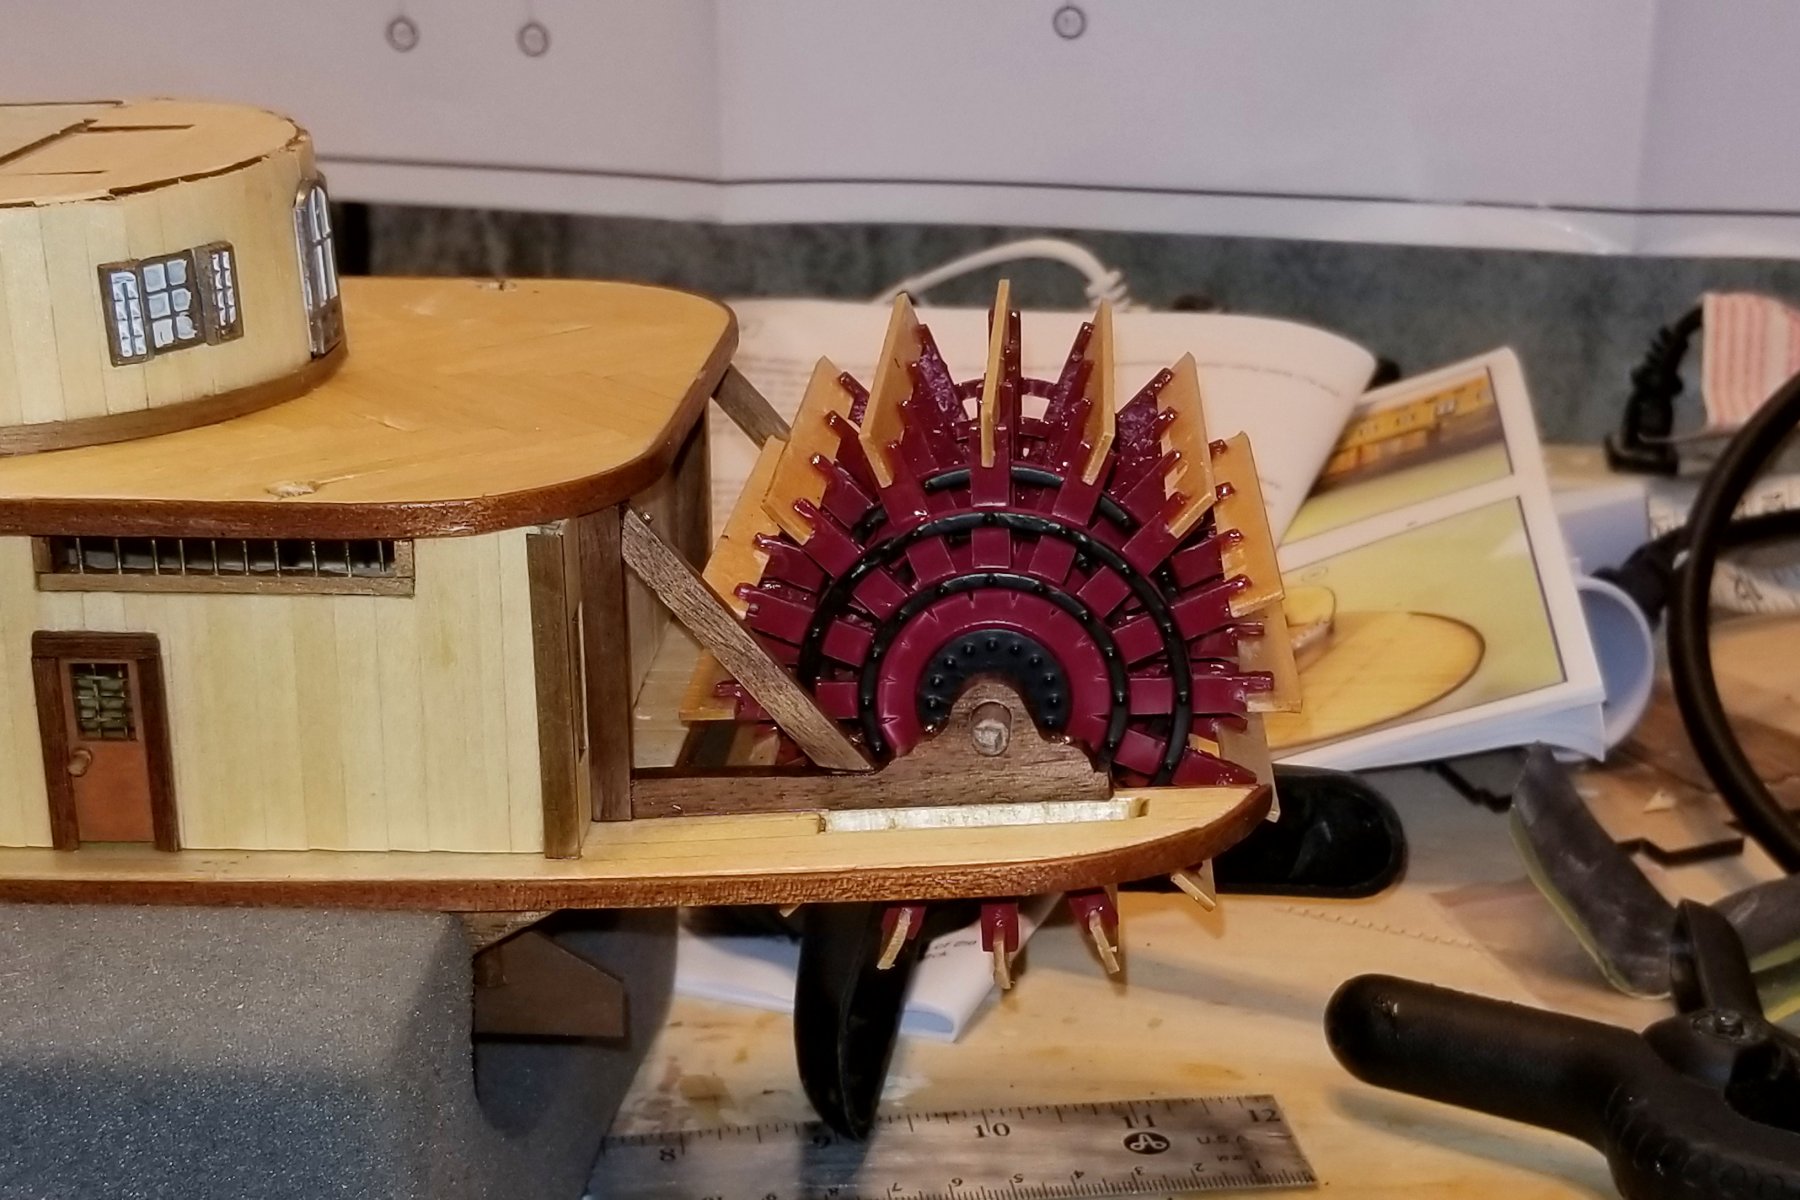
Chris: It's Krylon Fusion spray -- Satin Burgundy. I originally got it to paint the large plastic hull of the Mt. Washington, and this was the only non-gloss red that Fusion had (wanted Fusion for plastic bonding). But I really liked the color -- a maroon red and more subtle than regular red. It adheres to anything -- these wheels are metal. Regards, David
- 104 replies
-
- 1
-
-
- king of the mississippi
- artesania latina
- (and 1 more)
-
Paddle wheel now done and mounted on the boat. Regards, David

- 104 replies
-
- 5
-
-
- king of the mississippi
- artesania latina
- (and 1 more)
-
So I took Chris's (Vossy) suggestion and added a skirting board or base molding around the stateroom structure, using some walnut I had left over from previous kits. Looks really nice now. Thanks, Chris! Regards, David

- 104 replies
-
- 4
-
-
- king of the mississippi
- artesania latina
- (and 1 more)
-
Scott: Yes -- now that I've mounted it I can see that most of the herringbone I worked so hard on will be hidden. I think the next deck is also herringbone, and more of that will show. Reminds me of the Revenge. There are multiple decks inside the hull that I planked -- never to see the light of day. Regards, David
- 104 replies
-
- 2
-
-
- king of the mississippi
- artesania latina
- (and 1 more)
-
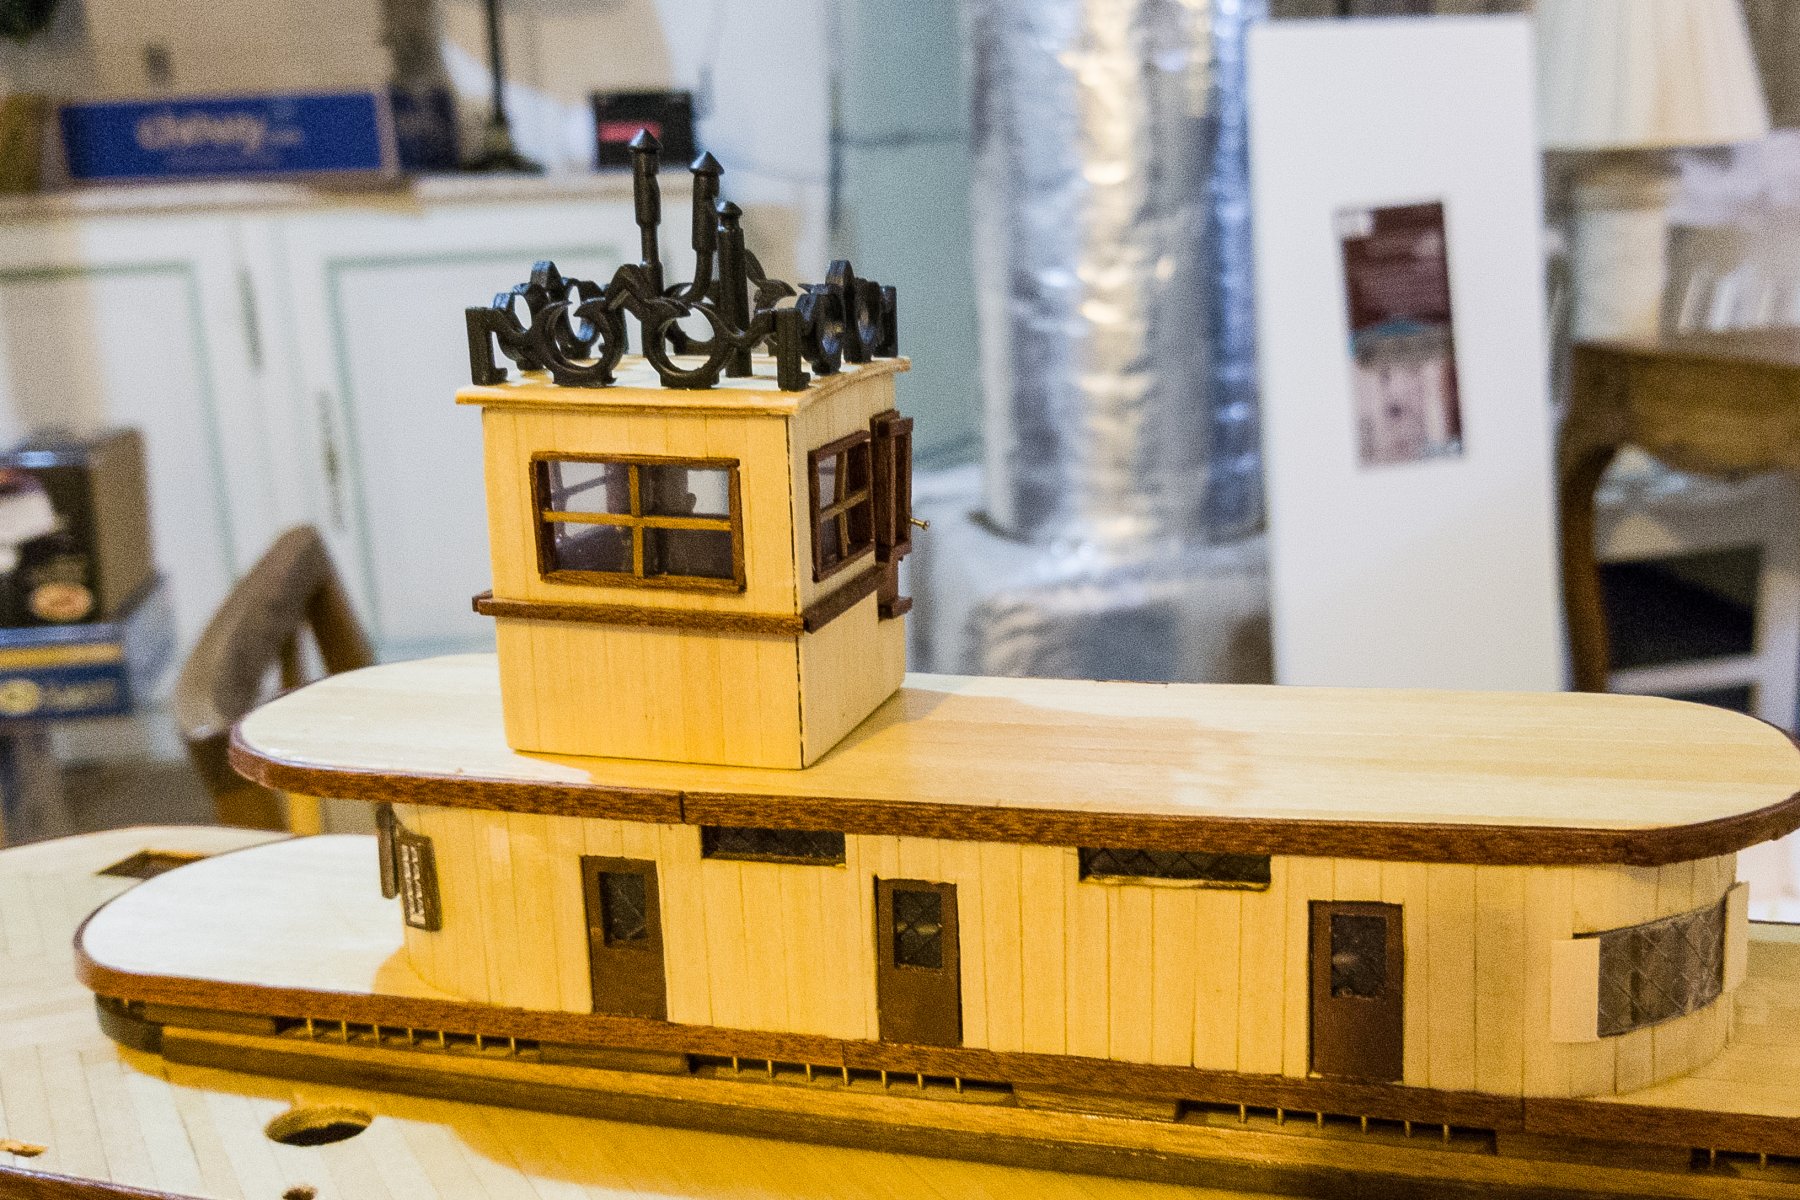
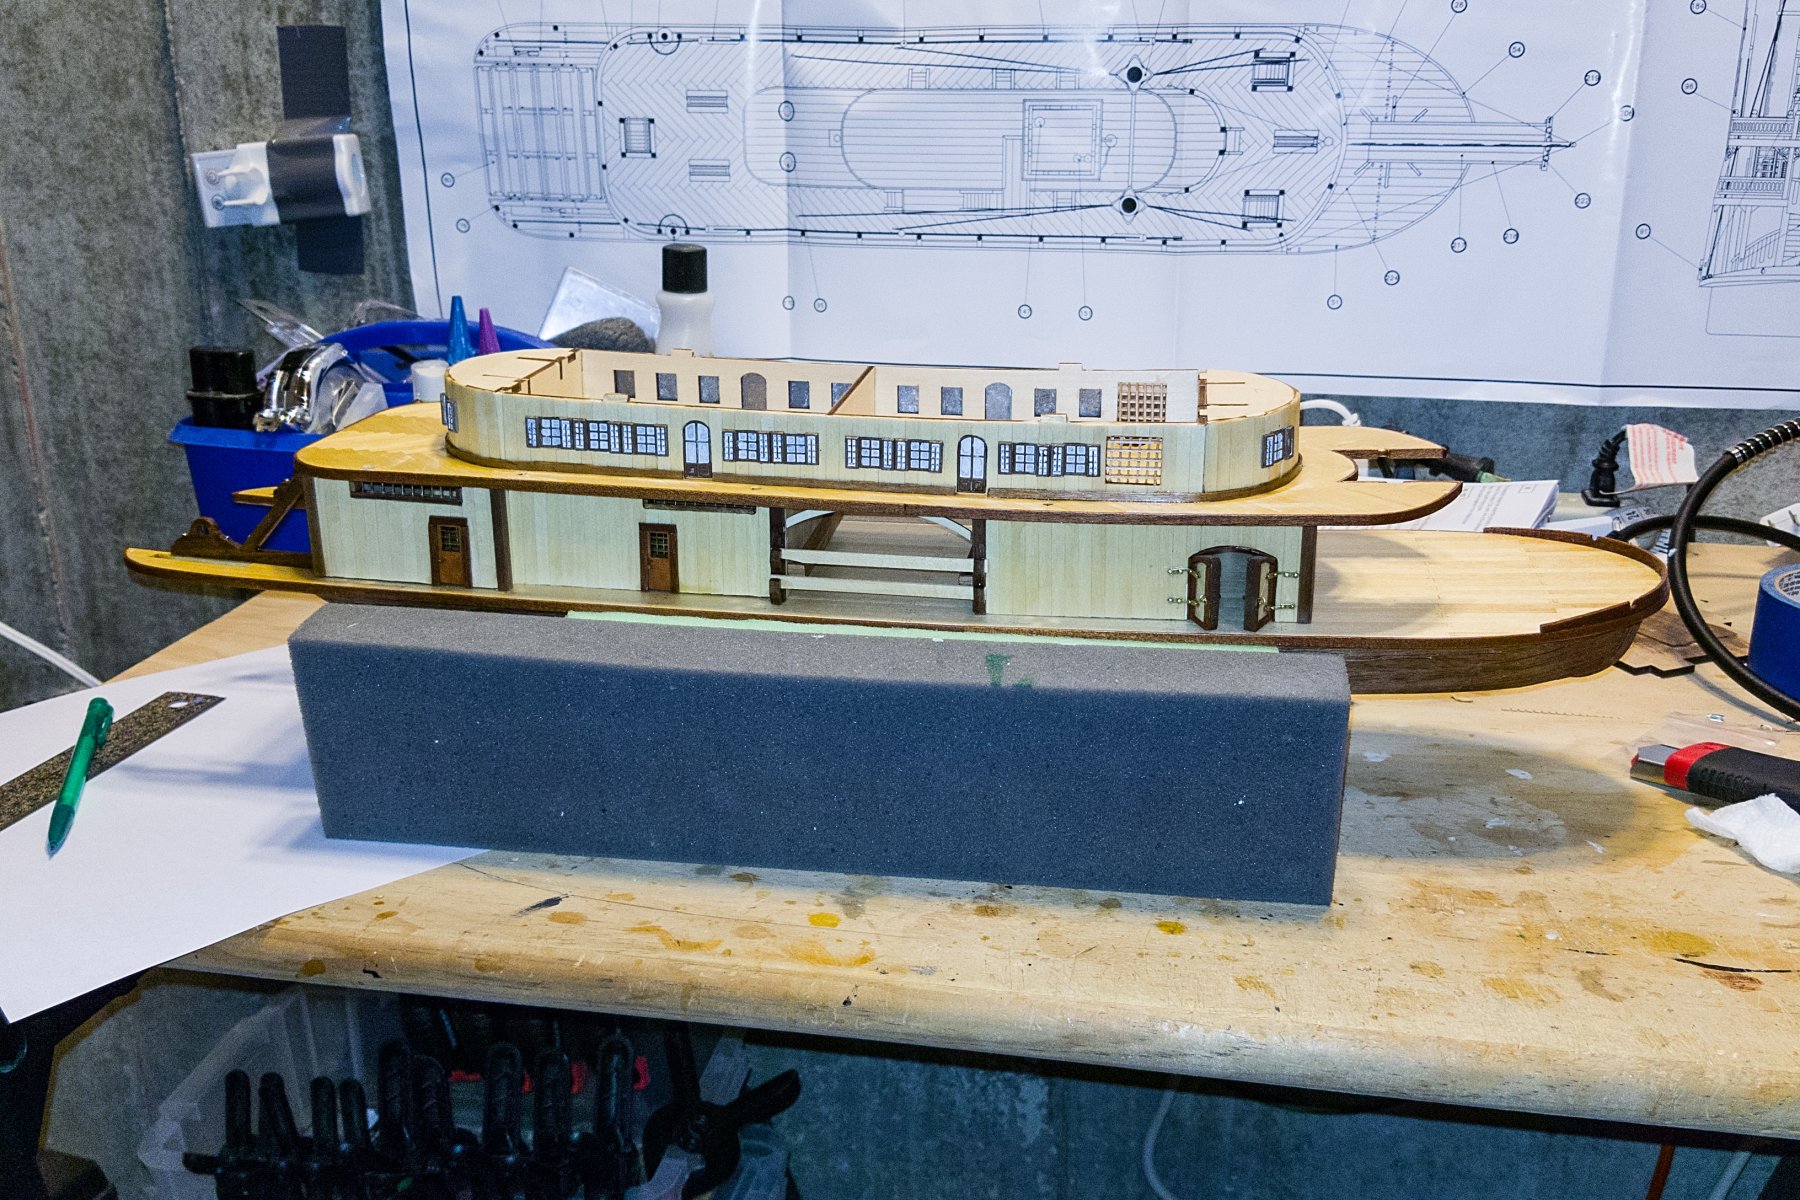
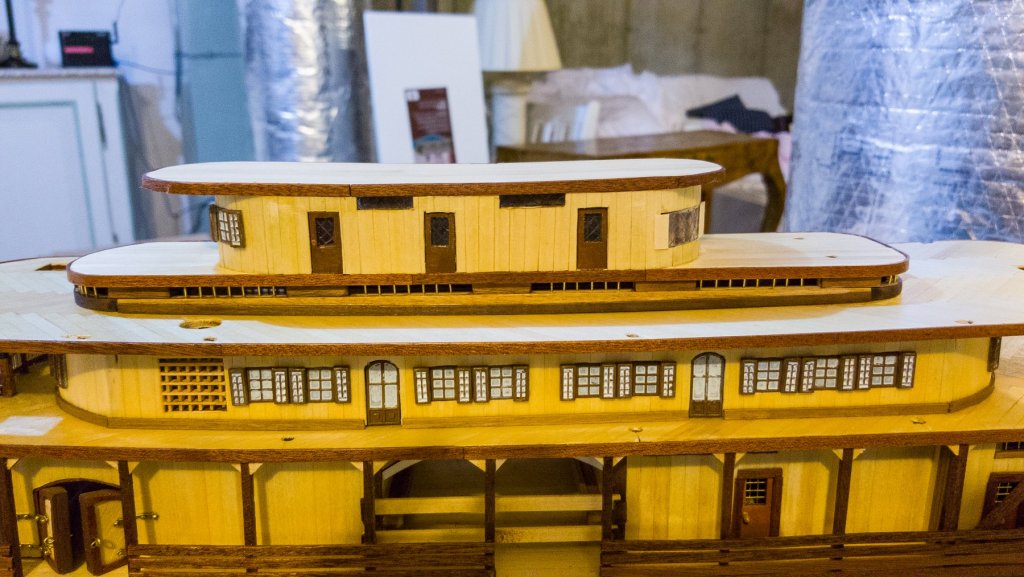
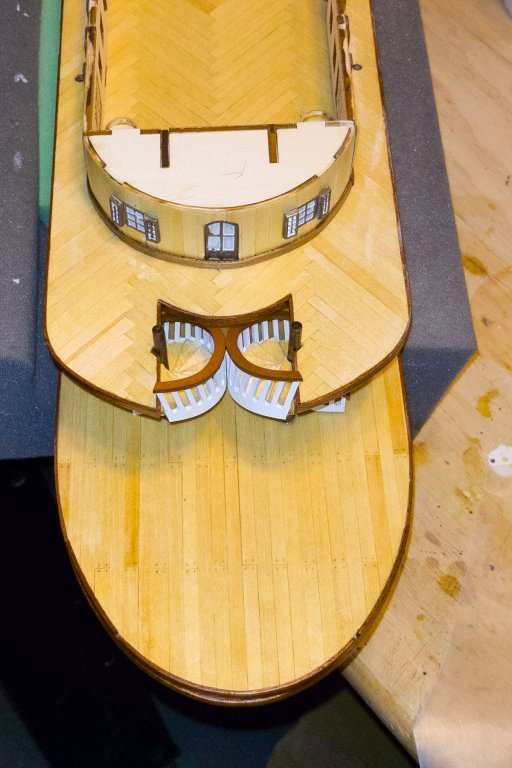
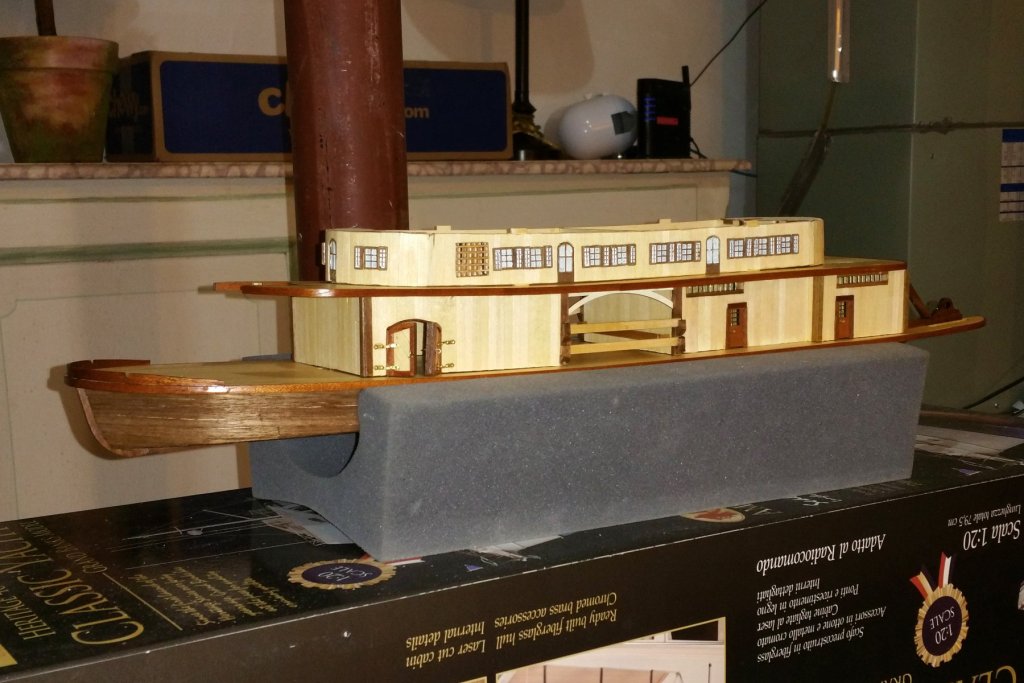
Stateroom level done now. What you see isn't glued down yet, but even when it is, there will be more gaps where the sides meet the deck than I'd like. Fortunately, all of that will be pretty much hidden by the railing.. The instructions say to mount the compartment and then install doors and windows, but I did the doors and windows before mounting, and I think it would be lots more trouble to do it the other way. The grating shown isn't varnished yet (I'll do it when I break out the varnish again), but I didn't paint it. I have that same grating in another AL boat (Sanson Tug) and it varnishes to a nice brown. Regards, David
- 104 replies
-
- 6
-
-
- king of the mississippi
- artesania latina
- (and 1 more)
-
Chris: For the deck planking, I'm just using the kit basswood, finished with at least two coats of clear satin poly. When I get inspired, I sometimes do a third coat. I think the wood that's going to make this model look really good is the Sapelli, which is liberally used on the model. It varnishes to a deep reddish brown that is very rich looking. Regards, David
- 104 replies
-
- 1
-
-
- king of the mississippi
- artesania latina
- (and 1 more)
-
Second deck completed, mounted, and first coat of varnish just applied. Regards, David
- 104 replies
-
- 4
-
-
- king of the mississippi
- artesania latina
- (and 1 more)
-
Chris: No problem at all. Your deck looks gorgeous. What wood is it? Regards, David
- 104 replies
-
- 1
-
-
- king of the mississippi
- artesania latina
- (and 1 more)
-
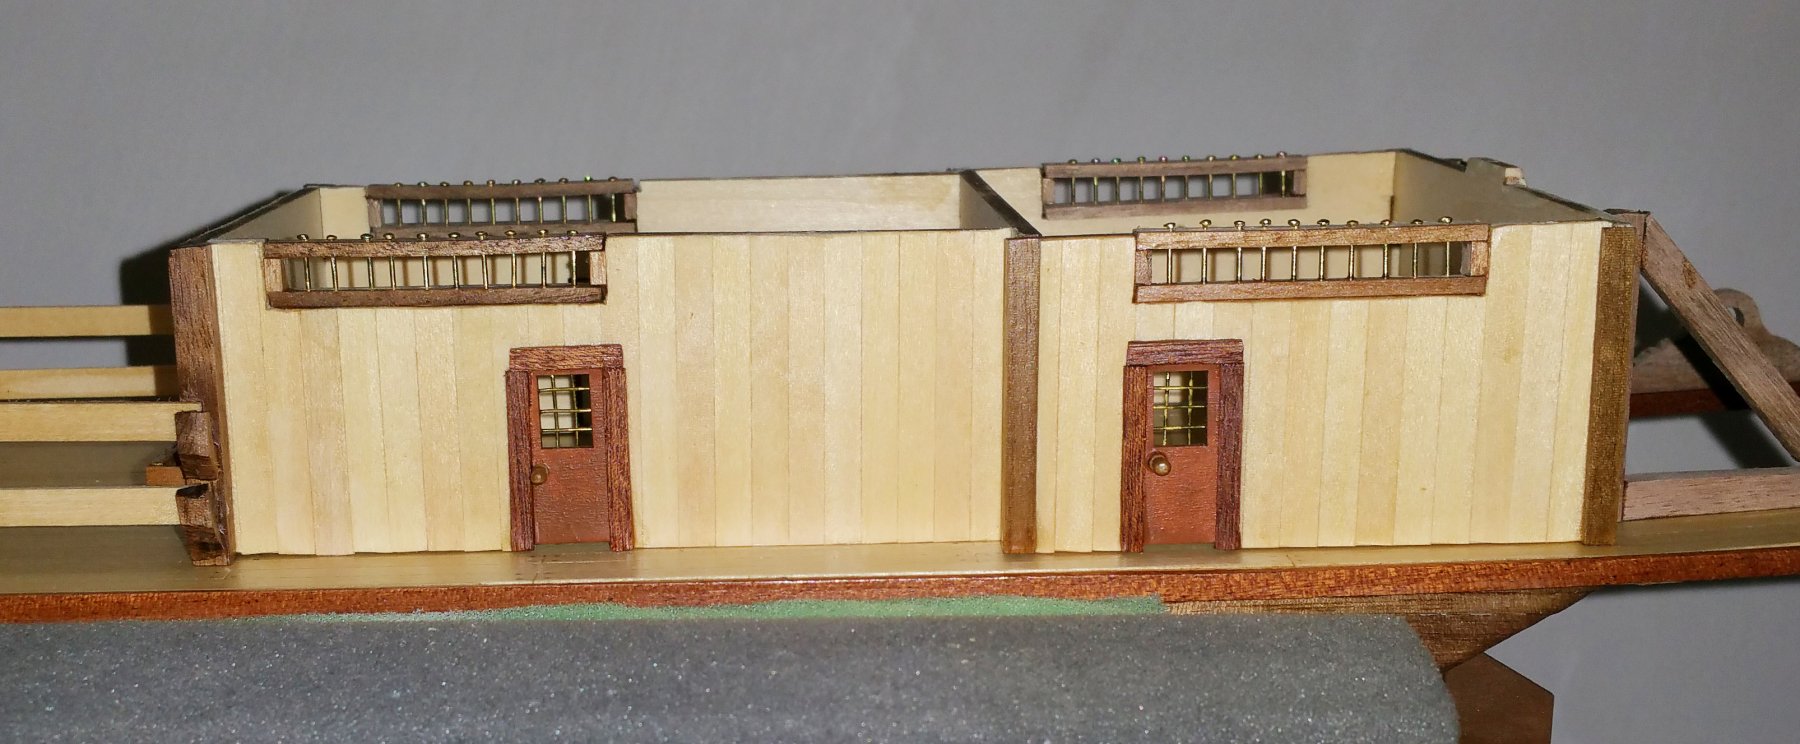
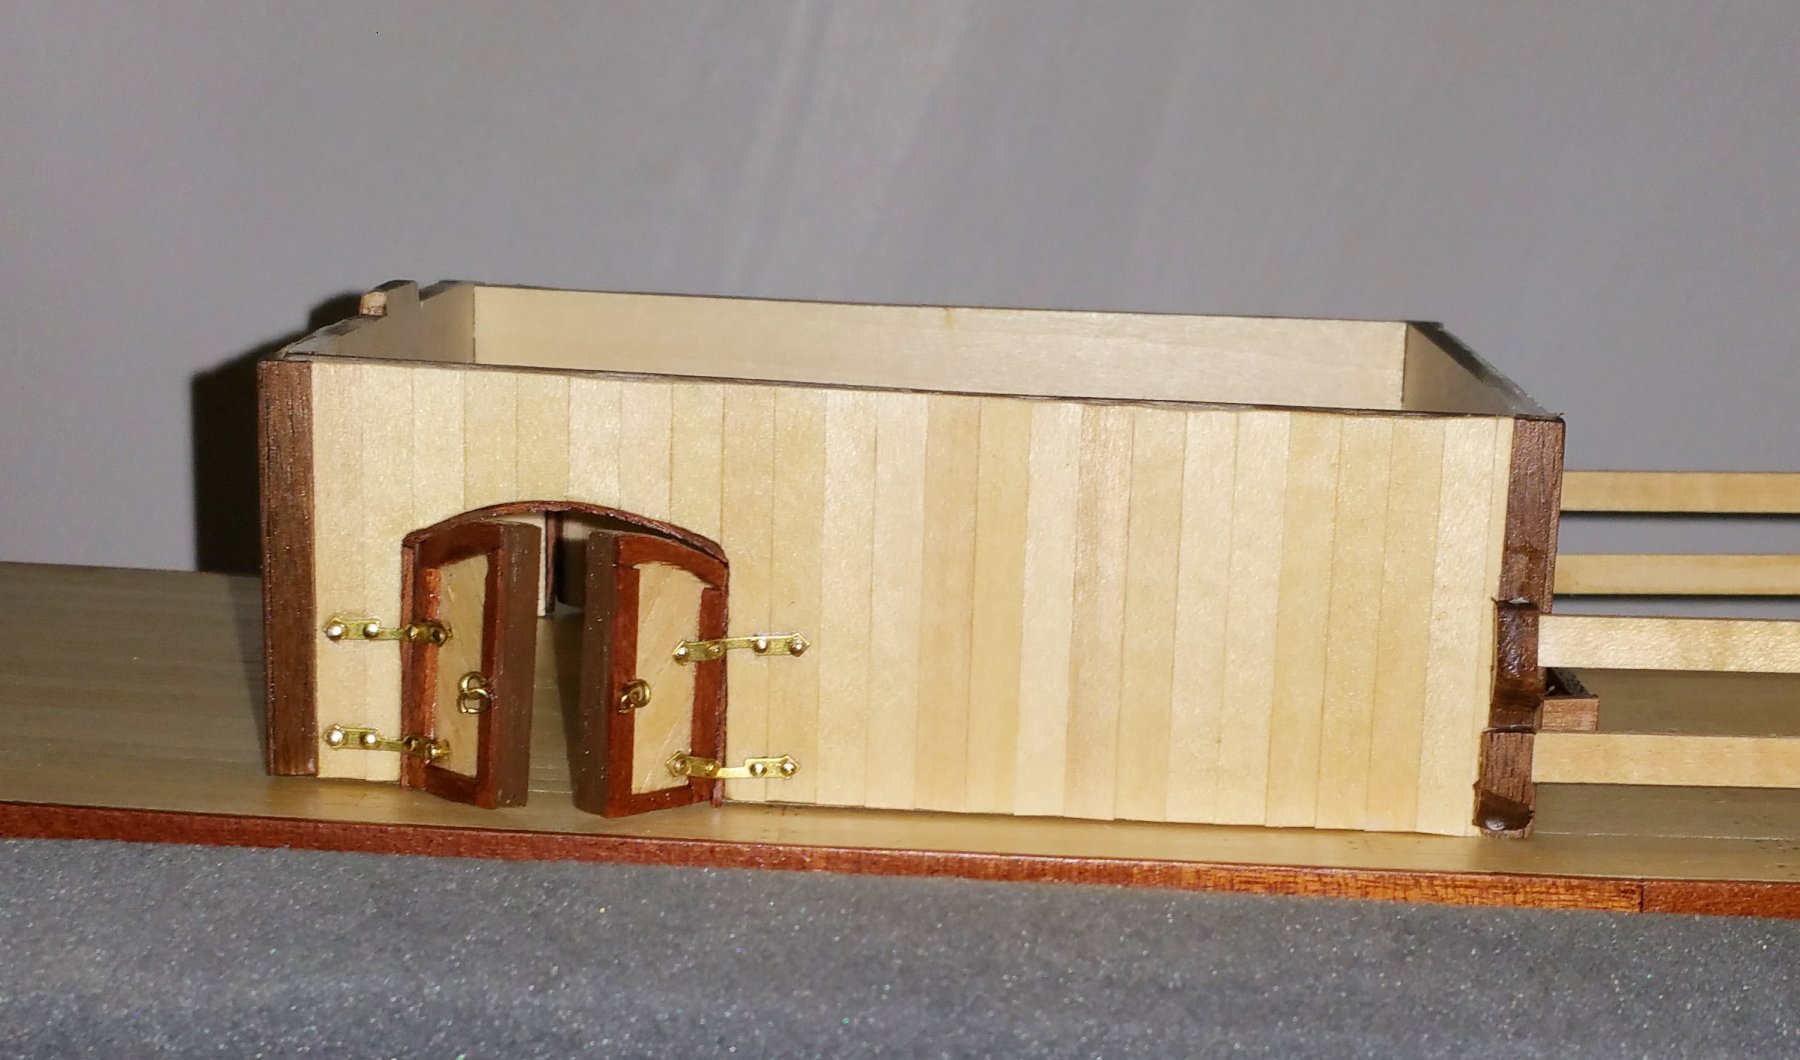
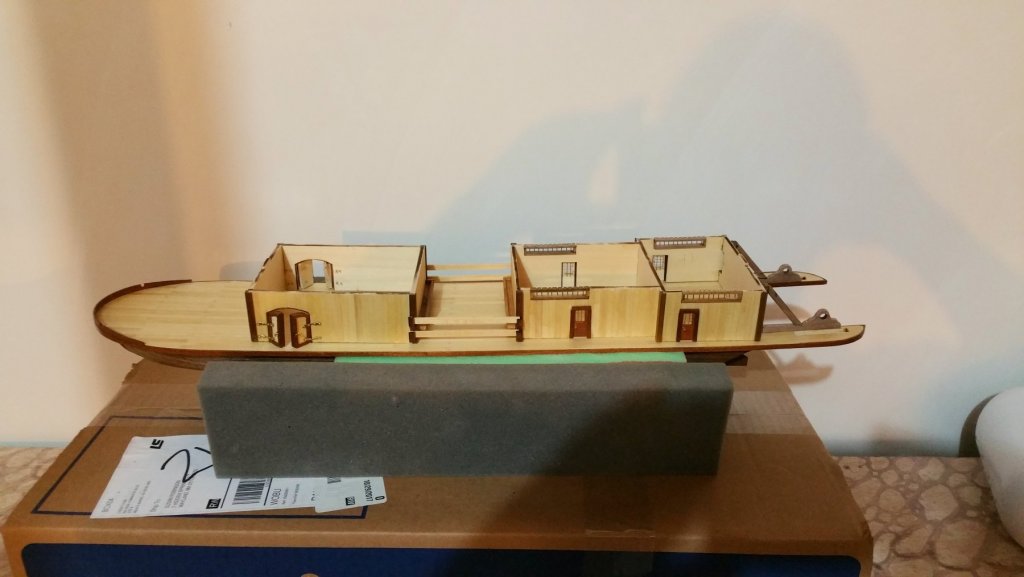
The first level structures are complete and mounted on the deck. A few construction comments: I noted above my use of wire mesh vs. acetate on the doors. Antony UK -- thanks for the wire straightening tip. Worked great and the other 3 doors look much better. Re the horizontal windows you see in the detail picture: I aligned the two long pieces and drilled them together before mounting them. That gave me aligned vertical holes for the pins. The doorknobs on the small doors are actually leftover bollards from the Revenge that I cut off. The instructions seemed to call for the same thing as is on the hinged doors, and I thought that would look off on these, so I improvised. Re the hinged doors: the instructions actually call for creating working hinges by folding over the hinge you see and using two, with a pin. I tried it and couldn't get it right, so since I don't care about working doors I just used 1/2 hinge as you see, and it looks fine to me. The rear structure for the paddlewheels isn't varnished yet, and I want to put nails in for looks. I've started on the second deck with the herringbone pattern. Mindful of S. Coleman's comments on his experience, I took a lot of measurements and pulled some old trig out of dusty memory. Have laid a few planks, and so far so good. Fingers crossed. Regards, David


- 104 replies
-
- 5
-
-
- king of the mississippi
- artesania latina
- (and 1 more)