


rwiederrich
-
Posts
5,520 -
Joined
-
Last visited
Content Type
Profiles
Forums
Gallery
Events
Everything posted by rwiederrich
-
Was he measuring that from amidships...or the entire length from stern to stem? I know he said, *About 3ft*...Staghound had a 2.5ft sheer. Rob
-
I know you did...and you are right in saying the 3ft drop made sense. But your drawings do not mimic this, thus it can be assumed by them that use them, you do feel it is enough. Even though you did show remorse in having to alter a completed model to demonstrate your senses. Rob
-
I suppose so Scott....and structural engineering as well. If McLean never gave the exact dimensions of the aft portico on FC...how did you determine its measurements? How did you determine, that 5ft was ample room for a full watch of crew with a patent windless in the middle in the forecastle? It goes beyond just reading english, it entails interpreting intent and coupling that with historical evidence. Some would call it the scientific method. Rob
-
Well...you and Scott both have claimed the hood end terminates with the feet of the angel. But McLean's description says nothing about the Angels feet...... " work on the navel hoods terminate, she has the full figure of an angel". It simply states a full figure of an angel is present. Using McLean's own lack of clarity on describing many carving and structural details.....It could easily be determined that at the termination of the hood...or in (proximity)...cuz no other place is possible......the figurehead is mounted. If we were to follow his description literally. The unreinforced stem would have to protrude at least 7ft (the length of the figurehead) beyond the cutwater to accommodate and support it. The angel could not be fully supported by its feet alone. It had to be supported by its back. Which makes the understanding of the hood coming up forward and over the figurehead more plausible. Such as we see in Glory. Rob
-
Then you are forced to explain why the figurehead is not back by the howes holes..... On Glory the termination of this structure is above the figureheads shoulders. Close enough to meat the description. Since McLean is not very exact on many of his trim descriptions, and he uses terms such as, *Somewhat, about and some*. He even fails to give the aft portico dimensions on FC. A structure that had to be calculated from other known dimensions. All this being said. Apart from the exact depictions made by McLean....it can be reasonably devised, as I and Rich have done.....a Hood of some kind existed on Staghound, FC SS, and most likely all of McKay's clippers, and they were similar to that on Glory of the Seas. Rob
-
PS: Note....Or could it be that the lower half of this structure...the 3 lobed molding, that rests approximately above the howes hole....IS the Hood (In part), and its upper portion that extends to the planksheer and forward to the figurehead is the mystery part. But as a whole, is described as the Hood. Regardless...the term might have dual meanings. Rob
-
McLean refers to this structure that extends *PAST* the owes hole as, "Her hood ends are bolted alternately from either side, through each other and the stem, so that the loss of her cutwater would not affect her safety or cause a leak". The Howes holes are nowhere near the cutwater.....but looking at Glory, you can easily identify this McLean description for FC. Earlier in his description he says, "where the line of the planksheer and the carved work on the navel hoods terminate, she has the full figure of an angel". Again, the planksheer is roughly at the level of the deck (nowhere near the howes holes). Following Glory again, you can see this structures termination point is no where hear the howes hole. Its out by the figurehead. IF the Navel hood was specific to the howes holes and structurally tied to it, for cable alignment purposes. How then does McLean on several occasions state the Hood has carvings upon it and it terminates at the figurehead, and is structurally supportive of the cutwater and stem? Rob
-
"the complex curving navel hoods " are Clipperfan's own words....used to describe the special symmetry required of the structure to transform from the hull shape of the bow, to straighten out and meet securely to the vertical aspects of the cutwater/stem. It requires a *twist* to be made, in the structure. Scott....it completely escapes me, as to your hard rejection of this structure, that is clearly evident on Glory of the Seas. A structure no other builder employed. I might remind you, if I may, that in the light of new conclusive evidence that Flying Cloud, as Staghound before her, did in fact have a spacious, Well lit, recessed forecastle that housed a patented windless below......with WC's internal to this topgallant forecastle. You have not (as of late), included these changes on your plans, but retain the highly inaccurate external wood windless under a very short(inaccessible) forecastle deck, that, in no way could house a full watch of crew. I tore out my initial errored forecastle on Glory of the Seas...long after it was installed and hardware was being applied...(When new evidence came forward), so I could create the most accurate model of Glory of the Seas. Regardless of the pain and hard work that it took....being accurate was more important. I would encourage you to do the same. So what's it gonna be......Hold your opinion on one, or willingly overlook the other? The ramifications are far reaching. Rob
-
Personally, I find it quite disheartening to find such opposition to our discovery. Modelers who profess to seek the highest level of accuracy...shy away from clear evidence. I'm amazed, I was expecting more enthusiasm. I've been researching and building scratch clippers for over 50 years and nothing so evident and clear would ever be dismissed because of, *I Just couldn't see it*. If you've studied Mckay's practices and his attentions...it is clear he was onto something, no other builder partook of. As far as I'm concerned, my Staghound, (as it has been replicated on Glory of the Seas), representation will include this *navel Hood*, as we have discovered. And I will continue to gracefully point out this omission/error misrepresented on, so many models. I'm that passionate about it. Smooth sailing friends. Rob
-
Like I said Scott. McKay built many packet ships and clipper barks in Newburyport…. Prior to his move to Boston. He had plenty of time to create…..let alone think it up….his unique stem strengtheners(hoods). His 7 year apprenticeship in Webb’s shipyard gave him ample time to develop his “Secret”.
-
Not only that , but when the Brits got her, they were so flabbergasted about her extreme convexed entry…..they made scab scarfs to fill in the depressions. She performed so badly that during one run…in high seas she lost them and Lightning sped along amazing her capt. and crew . Setting a record. McKay knew what he was doing. Rob
-
If a true understanding of McKay's tenacious dedication to the clipper model, and his secrets,(His Hood/beak)) was fully realized, you could do nothing but conclude this feature would NOT be subject to change. Because its function did not change. McKay was building clippers and perfecting them, long after his contemporaries, had quite and moved onto steam, iron hulled vessels. The most dramatic changes occurred in the hull design. Its sheer, deadrise, entry/exit profiles. The stems protection , security and stability, apparently stood the test of time. In building Glory of the Seas, McKay, reinforced his beliefs in these structures, and made them his lasting legacy. There is, just as much, or more reasons to think McKay used these *Hood* structures to distinguish his design prowess from all others. From his first to his last. Rob
-
One major reason Michael Mjelde stated that Campbella’s drawings were suspect…… because he failed to have a peer review of them. We, on the other hand combined two or more heads when concluding our facts. There is far more to the truth……then simple lack of identity in paintings, McKay probably requested slight obscurity in. To protect his secret. (educated speculation). As stated earlier, I suspect, McKay developed his devices while in Newburyport, on his earlier clipper barques. His own apprenticeship with Webb saw him experiment with building techniques and structures. Rob
-
Scott….. just to remind you. McKay built many clipper barques and other models, prior to Staghound. He had ample experimental time to perfect the structure before he began on his fabulous clipper run. Some more info to dissect. Rob
-
First, what is your website address? Second. We know from Glory of the Seas, that McKay incorporated his “Hood”. That is undisputed. We also know that he built glory of the seas on his own account, at this time in his career, he was beginning to financially falter. He could not afford patented, capstan’s or windlesses. He made easier wooden ones. He also used wooden bits as well. However, structural items such as his “Hood” remained. It was a signature piece. Images of Champion of the Seas strongly indicate a Glory of the Seas bow. The lack of ample evidence is not proof, since we actually have evidence in his last clipper. It was not a feature that evolved like his body designs(always searching for the fastest design). It was a feature that set him apart. Rob
-
You're all too funny Johnny. I appreciate your valuable input. Robin Wiederrich....aka..rwiederich
-
You said, "if those beaks were only on McKay ships they sure could have been an important development it does appear that I need to work some on my Flying Cloud drawings to better conform to what McLean describes". Rich and I have been researching this issue for quite some time...both, independently, and together as of 2009 to present. Understanding the ingenious mind of Donald McKay, with the aid of Michael Mjelde, we have concluded McKay incorporated this very unique structural element into all of his clippers. Model builders for over a hundred years have been misrepresenting his clippers, either by bias, or most likely, by simple ignorance of the fact. It is hard to identify these structures in paintings, because McKay guarded it so. Painting were like photographs of the time. Not until actual photographs of Glory of the Seas, where we able to finally identify these structures, as what they were....and their naval architectural structural significance. Noticing that every other clipper made...NEVER had them...in paintings or in photographs. This fact, in part led us to devise, , these were indeed one of McKay's well guarded *secrets*. Now it has become Rich's desire to educate and, if possible, get model manufacturers to change their inaccurate drawings. And fully represent the *Real* McKay clipper bow. to pay real honor to that visionary master, ship builder. Rob
-
Rich and I discuss it in some length on pages 11-14 or so of this log. Rob
-
No..I understand. But looking at the forecastle...does it look like there is space under it for a full watch crew to comfortably live and work? The deck of the FC is at the height(5.5ft) of the main rail. Nice model, by the way.
-
No...1/128 she would be too large for my space if she was 1/96.
-
I agree with your assessment. However, the drawing is in error. That drawing does not depict the GR as she was first built by McKay. It is an amalgamation of her original and rebuilt profiles. That is just a fact. I don't know any other way to put it.
-
It would be actually over 8ft.
-
We concluded it was a Walker *type* of patented windless. there were several other *types* that functioned in a similar fashion. I posted this image to show the arrangement. A double action capstan, works with a double action windless.
-
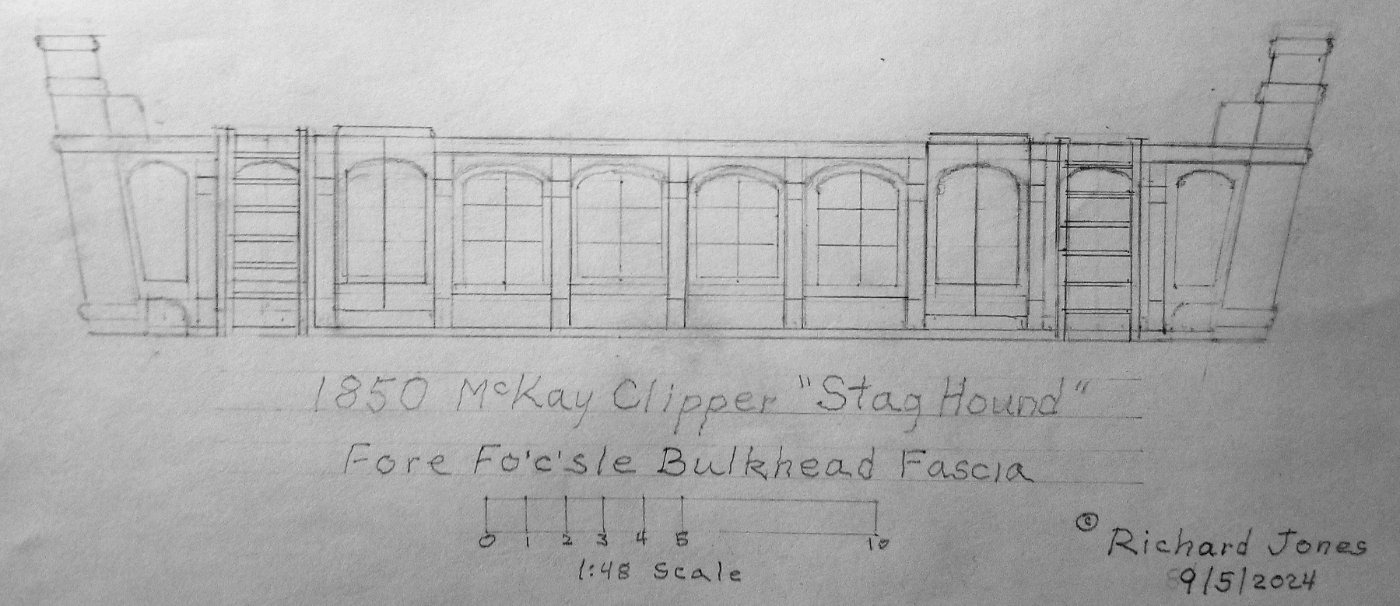
Indeed. the forecastle deck was, set at the main rail....roughly 5.5ft above deck and with the 3ft recessed floor....giving ample room for bunking. McLean states the topgallant forecastle was very spacious and amply lit. Light could only come in way of forecastle bulkhead windows(on deck), and flush deck prismatic skylights(ceiling). Rich and I have concluded the forecastle steps down just as the companion way does in the aft portico...down 3ft into the parlors below. Here is a rendering of the forecastle bulkhead on deck with companionways(leading down) and ladders leading up to the forecastle deck. This is for Staghound...and since Flying Cloud was of similar design and detailing....we concluded she too had as similar styling and function.
-
I'm sure the hull drawings have a McKay origin...but like I pointed out...her sparing profile is wrong. McKay would not draw her as she was NOT built. Good educational recourses though. Rob
