Check out our new MSW Sponsor Innocraftsman
×


rwiederrich
-
Posts
5,504 -
Joined
-
Last visited
Content Type
Profiles
Forums
Gallery
Events
Everything posted by rwiederrich
-
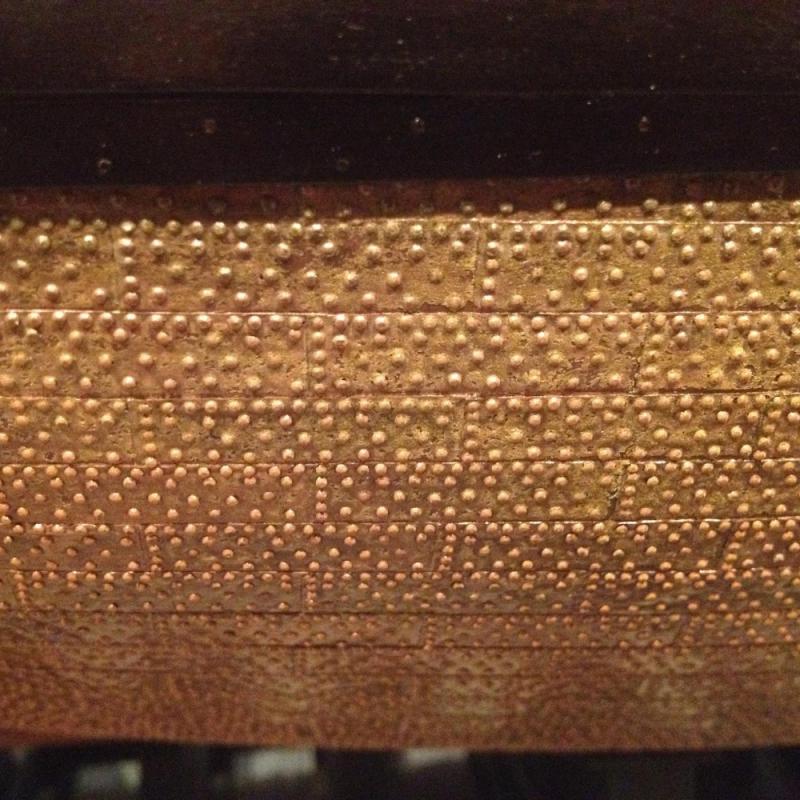
I'm almost leaning on my original montra of *Keep it simple stupid*. The clean lines of the crisp plate lines not muttled up with all the nail impressions might be the clean and safe way to go...any thoughts? Rob
- 1,208 replies
-
- 5
-

-
- great republic
- clipper
- (and 1 more)
-
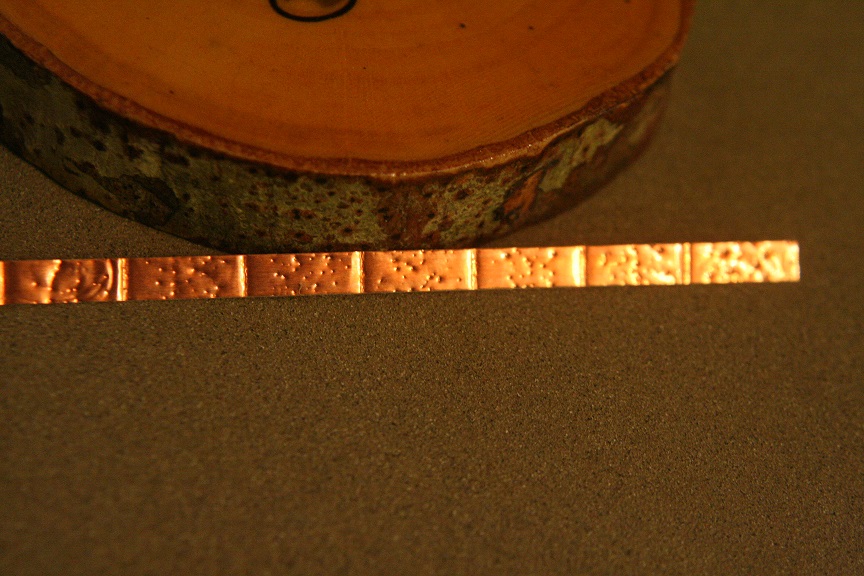
Here is pic of a strip of tape that has been pressed with both the plate and a random nail imprint...Not sure what I think. Rob
- 1,208 replies
-
- 3
-
-
- great republic
- clipper
- (and 1 more)
-
I'll refine it a bit and make sure the nail points are as evenly spaced on each plate as possible. I'll probably make a jig to mainting the ponce wheel center the tape. Rob
- 1,208 replies
-
- 1
-
-
- great republic
- clipper
- (and 1 more)
-
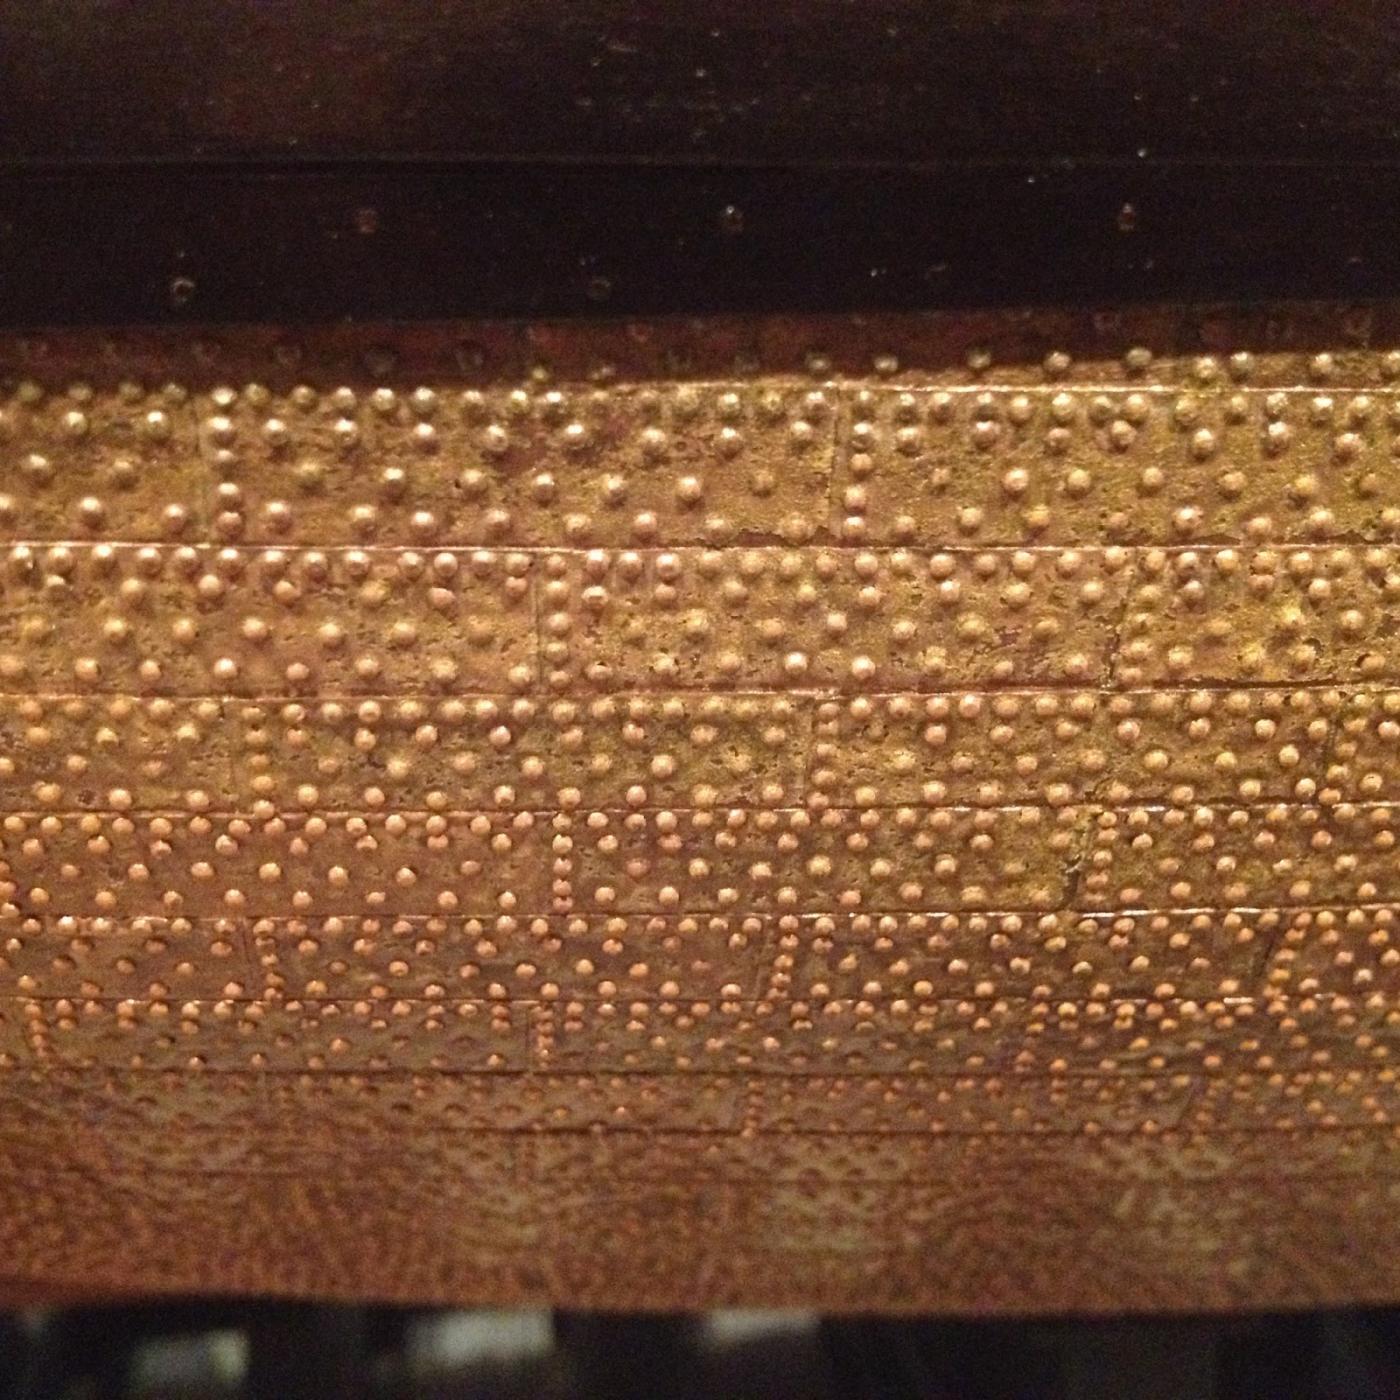
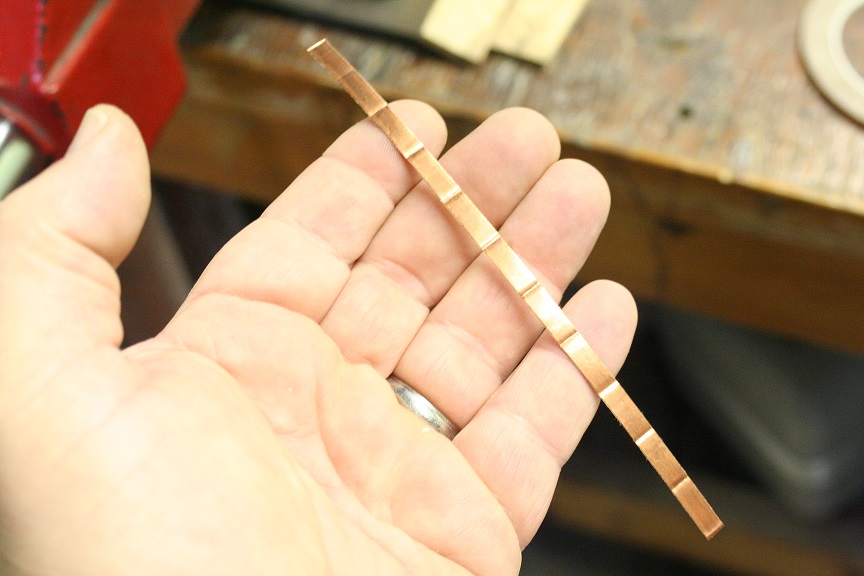
After creating my double Ponce wheel here are the results. I didn't rub the tape down hard so the details can be seen. I simply rolled each tape section with the Ponce wheel (which imprinted two sets of nail holes) then ran the tape through my plate replicator. Further refining will occur but I'm getting there I think. I might even try running the wheel on the tape after it's installed...only problem is not punching in the seam between plates. Rob


- 1,208 replies
-
- 3
-
-
- great republic
- clipper
- (and 1 more)
-
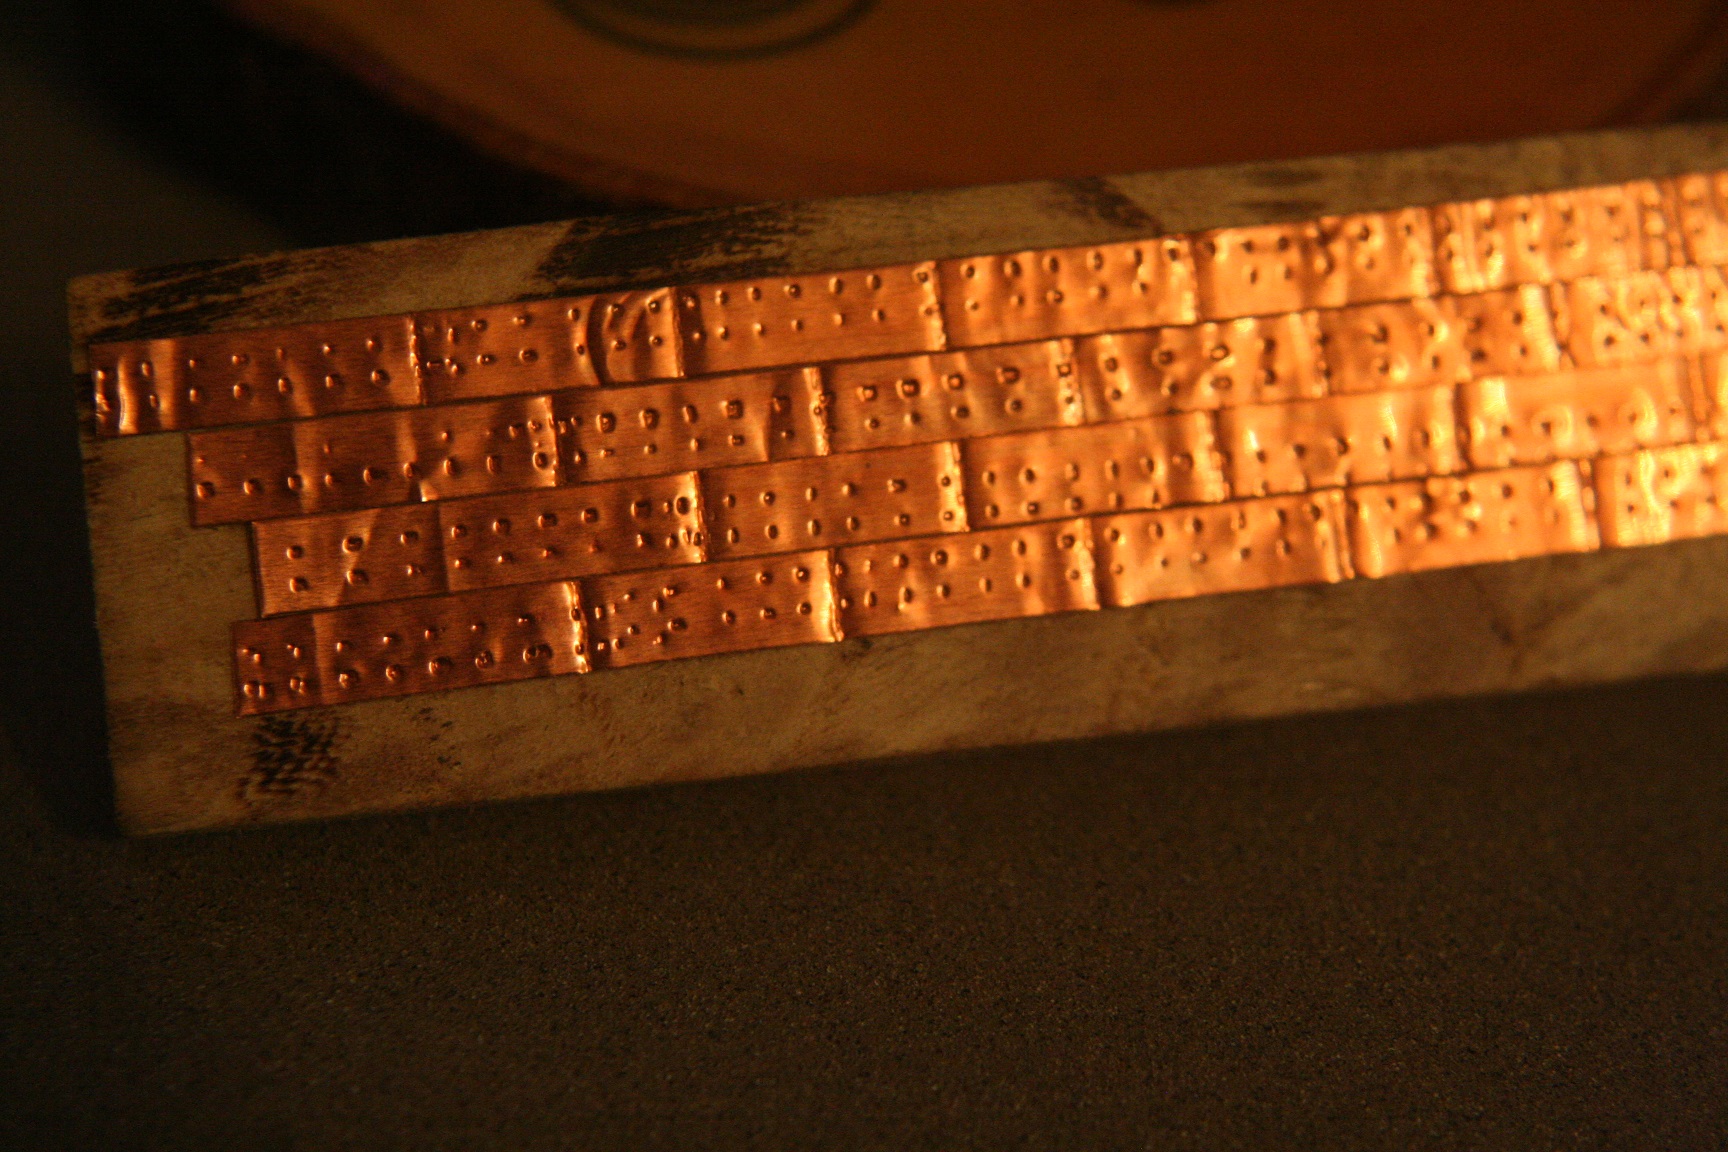
I made a rolling punch to make the nail imprints...looks cool.
- 1,208 replies
-
- 1
-
-
- great republic
- clipper
- (and 1 more)
-
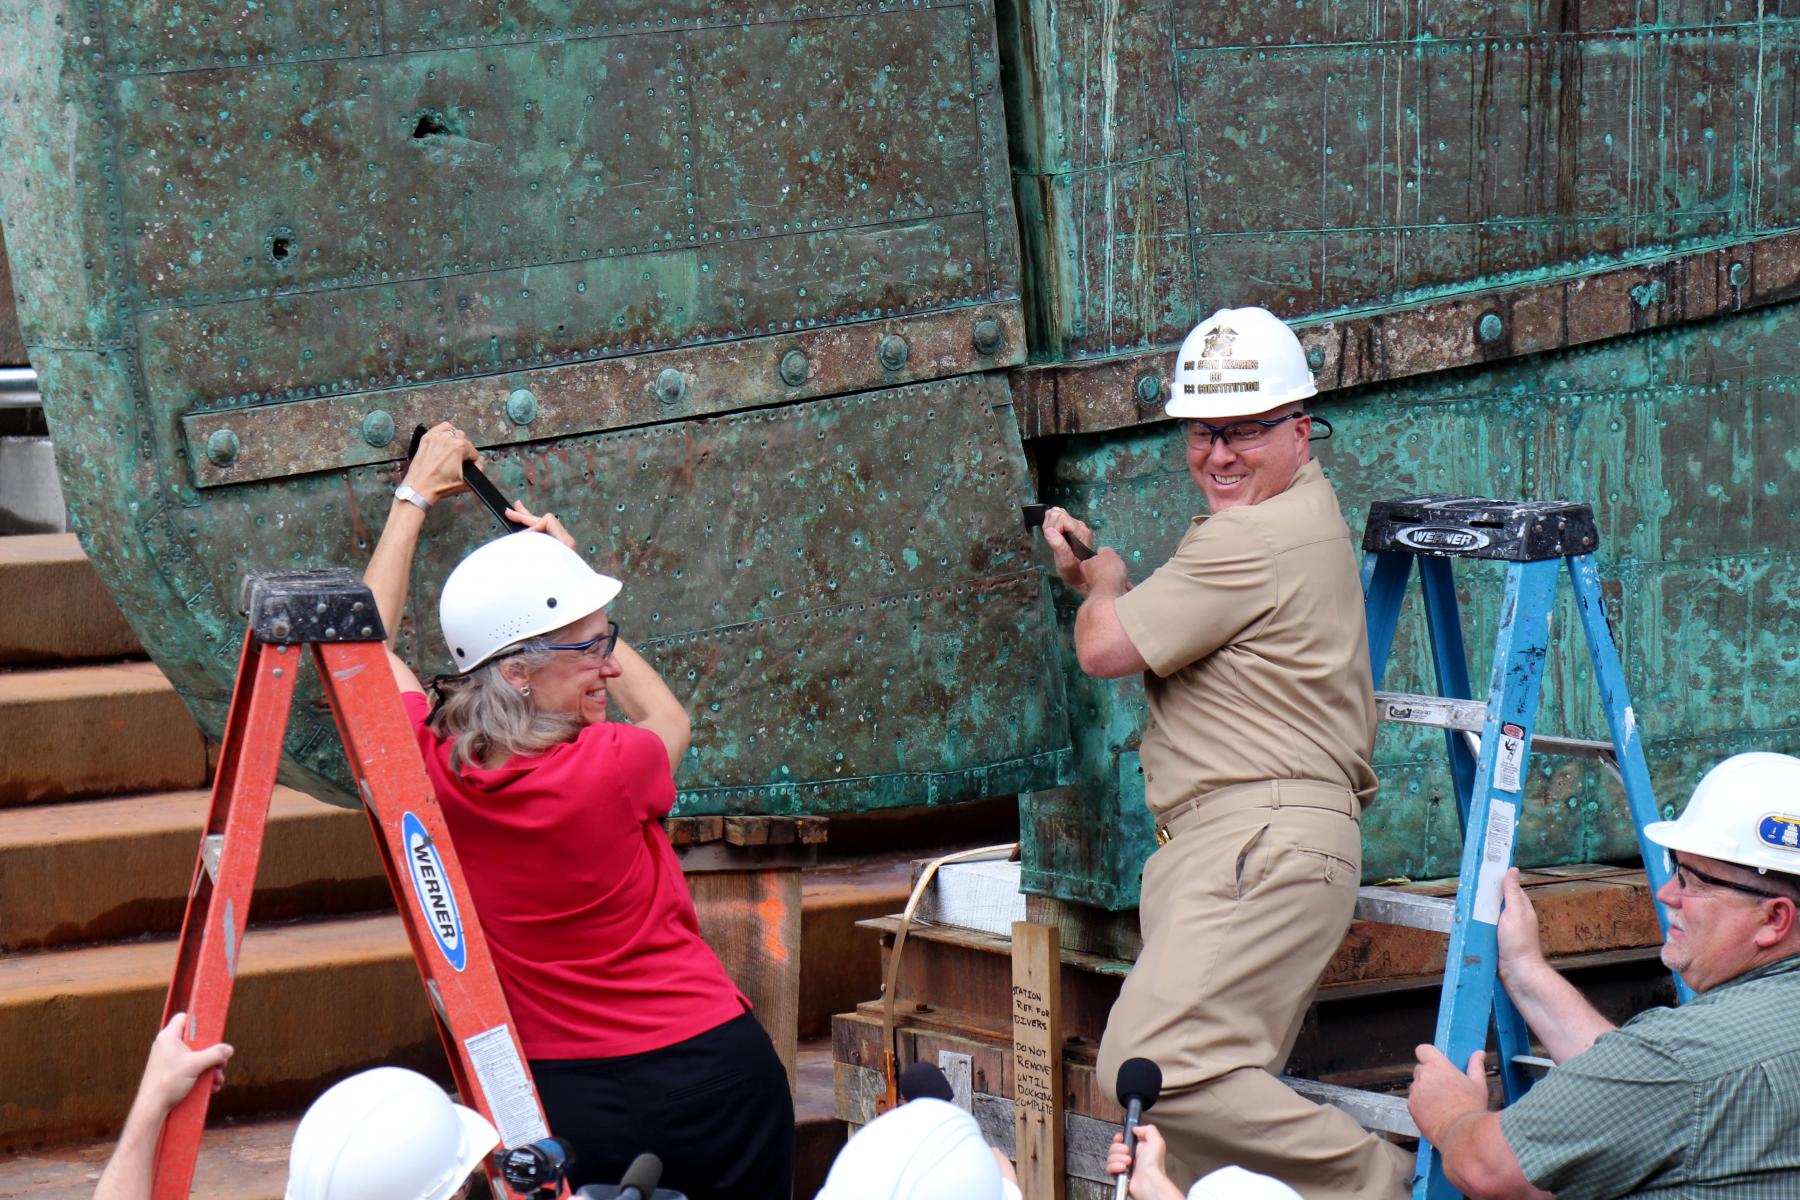
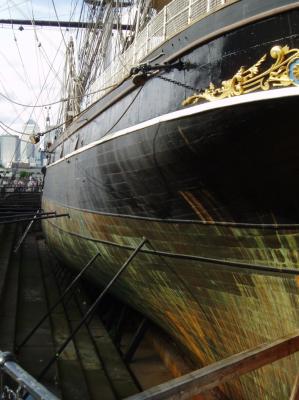
One thing I have noticed Is that along with the dedicated copper nails that each plate must retain..there is the fact that there are numerous surface defects that add to the surface detail of a copper plate. It dawned on me that a simple press against the copper tape with a heavy sand paper would indeed render the detail present on old copper plate. I tested it here at work(In the most rudimentary way) and found it satisfying. I will pre press the copper tape with heavy grit sand paper then run the tape through my rolling press and see what I get..... I present a very good example of the results of actual ware and real world action on copper plates...the USS constitution. I think I can replicate this with my suggested (NEW) idea. I'll try it as soon as I get home. Rob

- 1,208 replies
-
- 8
-
-
- great republic
- clipper
- (and 1 more)
-
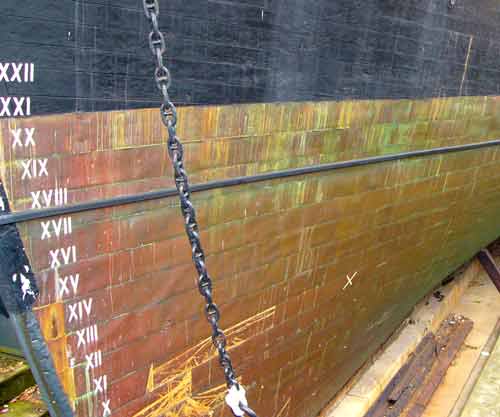
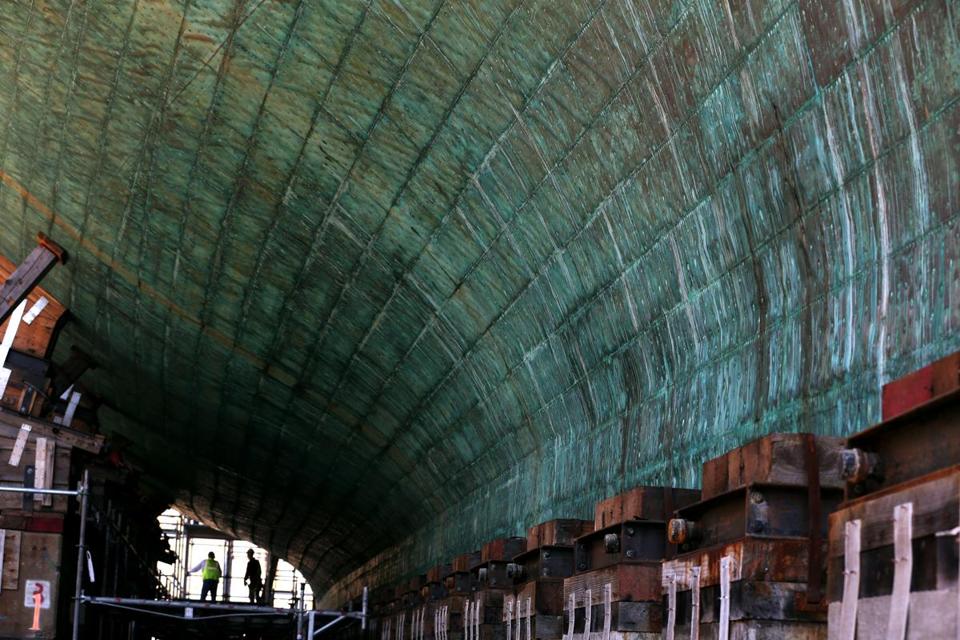
Actual coppered hulls tend to show the major elements(Individual copper plates), then the exaggerated nail holes..even though they can be seen..they are insignificant at smaller scales...IMV..but for your review..here are some examples. ie..Cutty Sark, Constitution.

- 1,208 replies
-
- 8
-
-
- great republic
- clipper
- (and 1 more)
-
Further study(I probably already knew this), is directing me to *Keep it simple stupid*. After years of evaluation and comparative study..I've determined that all the copper nail marks are not really necessary at this scale..and even may be a distraction..since scale and the evolution of time and wear, leaves its mark on installed copper plates...thus diminishing and even hiding these construction artifacts... as demonstrated by these examples. In MY View. Far too much detail...thus, far too much texture. Rob

- 1,208 replies
-
- 6
-
-
- great republic
- clipper
- (and 1 more)
-
Thanks Nils. Yeah...I'm always thinking outside the box...I just hope this idea catches on with others. Rob
- 1,208 replies
-
- 2
-
-
- great republic
- clipper
- (and 1 more)
-
Thanks Jeff....I'm all about doing it easier and faster...but retaining the fine look..My mind is always thinking of a better way to do something. Especially things that are monotonous. Rob
- 1,208 replies
-
- 3
-
-
- great republic
- clipper
- (and 1 more)
-
Go over to my Build log in scratch build models..under Great Republic and see the tools and process. Rob
-
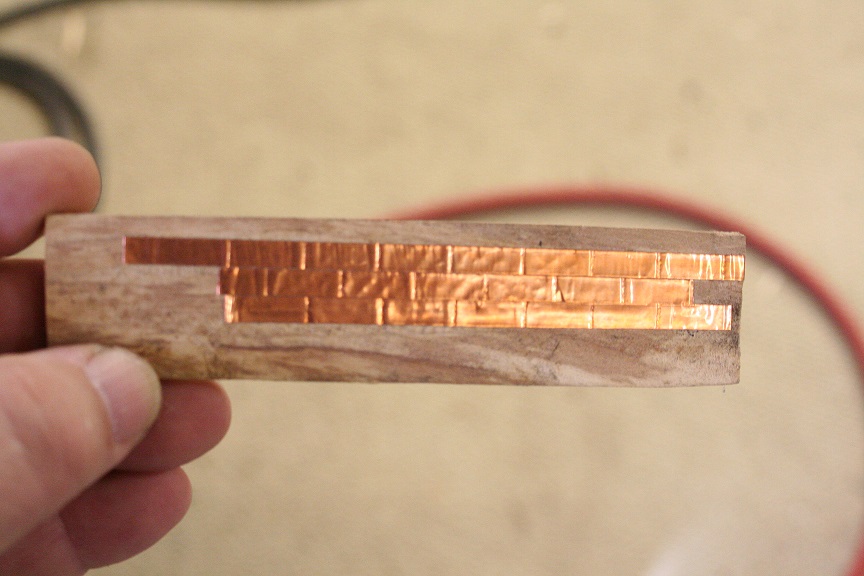
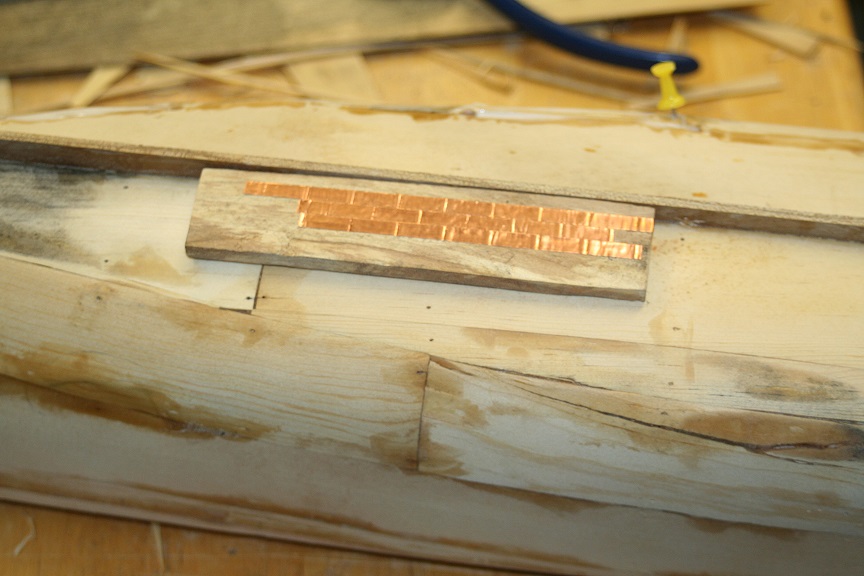
Lastly..you have a perfectly processed copper tape with the individual seam lines represented....just lay the tape down on the hull and there you go. If you really want the nail impressions...you can add them later. However I am not going that far, since the tape will incure some defects and at this scale will become too over exaggerated and become a distraction. This process, that would normally take weeks to months(Cuz I work in spurts) will now take days if not hours. And cost me about $1.95 a roll of copper tape....Yippy. Fast and inexpensive..who doesn't like that? Rob
- 1,208 replies
-
- 13
-
-
- great republic
- clipper
- (and 1 more)
-
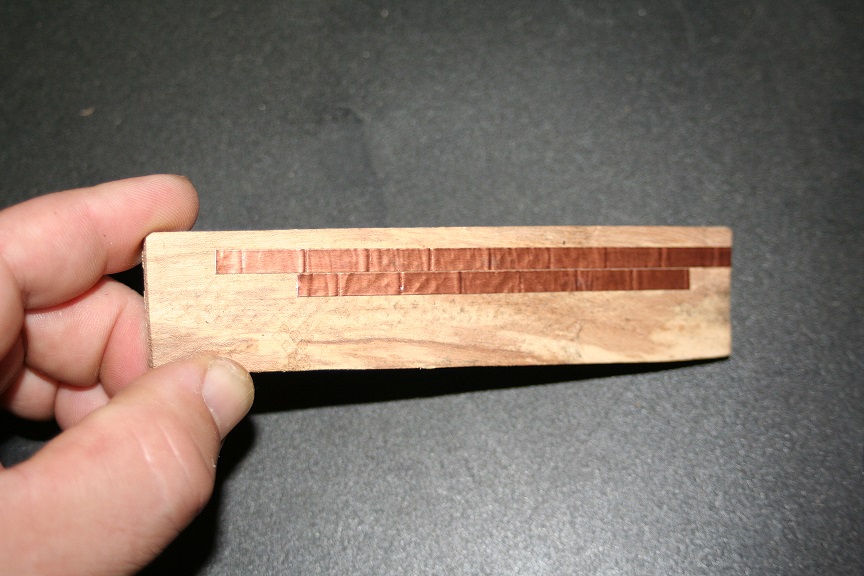
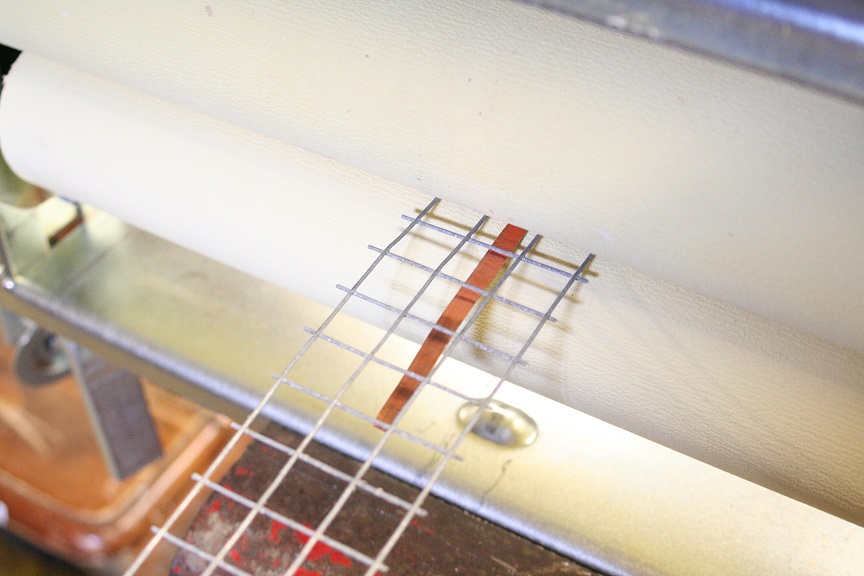
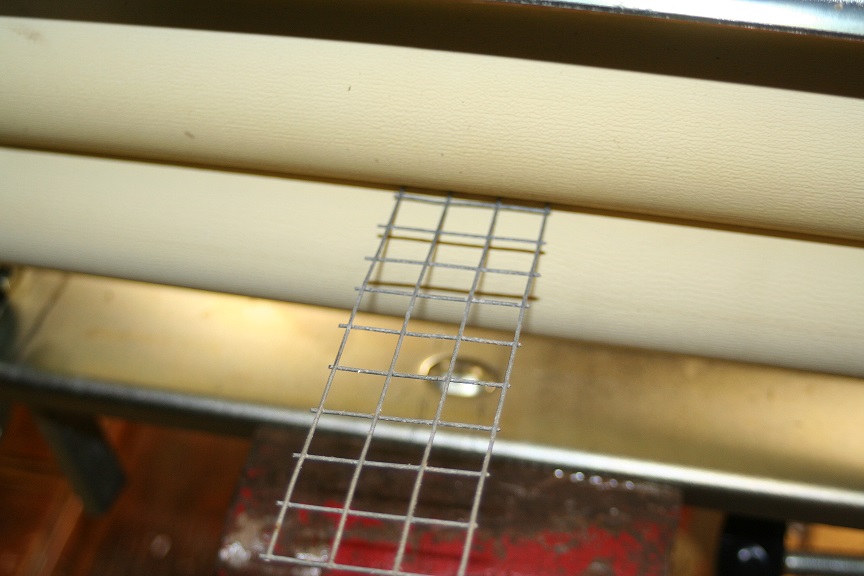
Place it in the roller and then begin to roll the tape in. It is quite easy and very effective. Here it is coming out pressed with the seam..replicating the individual plates
- 1,208 replies
-
- 3
-
-
- great republic
- clipper
- (and 1 more)
-
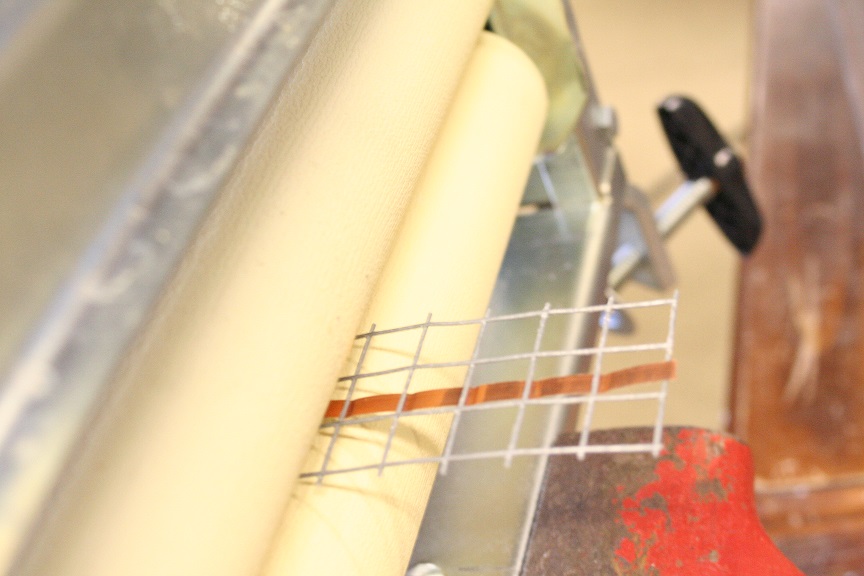
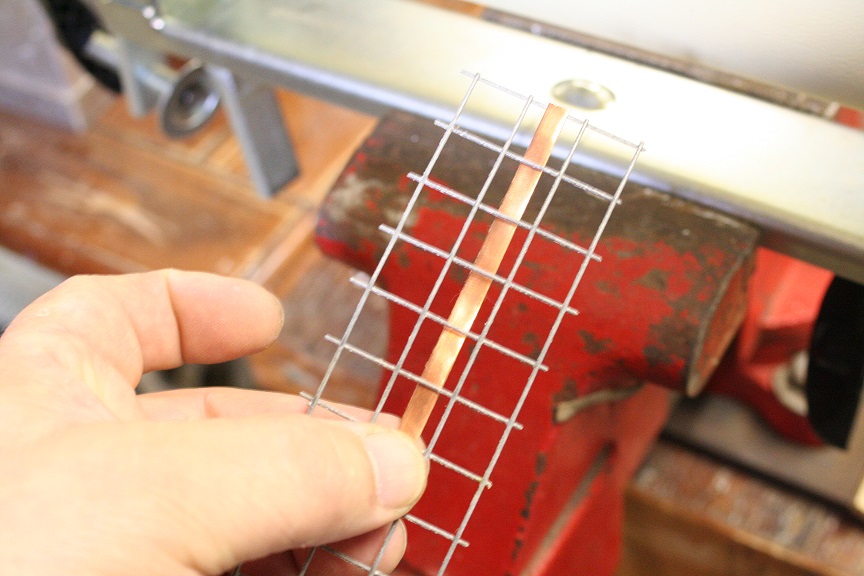
Next..take your tape of copper and lay it under the wire mesh with the lead edge over the wire..This helps align the tape with the mesh and the rollers of the roller. You want to have your copper tape under the horizontal wires..so they can press against the copper tape forming the necessary seam. By the images you can see how this works.
- 1,208 replies
-
- 4
-
-
- great republic
- clipper
- (and 1 more)
-
Here is a close up of the wire tool in the press. I cut out a section of wire mesh just the size to work the copper tape. This fencing wire can be bought at any well supplied hardware store.
- 1,208 replies
-
- 4
-
-
- great republic
- clipper
- (and 1 more)
-
Today I also finalized my design and subsequent manufacture of all my copper plates. I ain't buying $350 forth of prefabed plates that require weeks if not months to install. So I invented a means to press copper tape into individual plates. First you need an old fashioned clothes roller. Like this. With some meshed wire for the pressing tool.
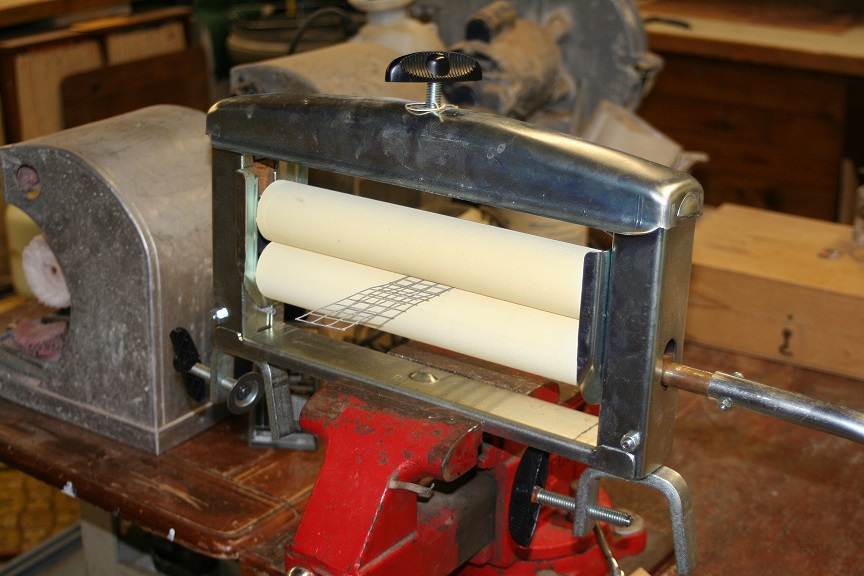
- 1,208 replies
-
- 5
-
-
- great republic
- clipper
- (and 1 more)
-
Nils....The pine is cut as a veneer..NOT plywood. That is why it bends and forms so well. I finished up planking the starboard side..letting it dry. I plan on using a bit of ill on several places...just to verify the smooth curves. I'll be adding the plank sheer and rail in my other shop and final woodworking before any paint is applied. The 3 howes holes will be added and trimmed as well. Most likely, I'll add the deck so I can build up the subrail/waterway which will directly tie into the outerhull. NOTE: the picture of the drawing of the rail timbers posted earlier.
- 1,208 replies
-
- 5
-
-
- great republic
- clipper
- (and 1 more)
-
Jeff...yep I checked that out already....and it cost money to read...or to be a member... so you can read. I've read Forbes book on the subject but he wasn't clear from what I could gather from the copy I read. I want to see a drawing of his design...if anyone happens to have one....just lying around.... Rob
- 1,208 replies
-
- 2
-
-
- great republic
- clipper
- (and 1 more)
-
I'm sure this will be of no help to you...not unless you have the tools. And the gumption. Personally...I'm exhausted by laying 1600+ individual copper plates.....so I've devised a way to save myself a ton of time and aches. First you'll need an old fashion clothes ringer......a piece of fine mesh wire or screen that represents the approximate distance/length of each plate...and your copper tape. Set the clothes ringer to a snug contact...then run in your wire mesh/screen...after your mesh is in and the ringer has a good hold of it...then run in your tape in between the opposite direction mesh wire of the creen..... then roll the clothes ringer. Being careful to make sue the tape tracks between the wire mesh. You're basically feeding it. It will impress a regular crease on the copper tape....in essence, giving you an entire lengths strip of pressed copper tape ready to be placed on the hull. I have experimented with this idea and it works. Mind you..it is technique sensitive and will require some practice to get it right. I'm waiting myself for more tape to arrive so I can proceed with this for my own current build. I hope this lunacy is helpful. I thought this idea up cuz 1600 individual acid etched copper plates cost nearly $352 plus shipping. An that ain't happening. Good luck and fair seas. Rob
-
Research HELP: I've been back and forth many times and until my copy of Crothers fine book *The Masting of American Merchant Sail in the 1850's an Illustrated Study* arrives...does anybody have any technical drawings of the differences between the Forbes Double topsail design and the Howes design? I've read Forbes depictions and those of Howes..but no actual drawings of the Forbes design. One depiction states that the bottom topsail yard is fixed to the main mast top cap(Similar to the Howes design), but that the doubling space is greatly extended to compensate for the depth of the sail. So are both topsails fixed in the Forbes design? I'm not getting anywhere fast. Also Forbes claims he reversed the topmast to be inbound of the main on several of his first design builds(1846ish)....but there after he arranged the doublings in a typical fashion with the topmast forward. Which would correspond with the etchings of the GR in her original rig. Help! Rob
-
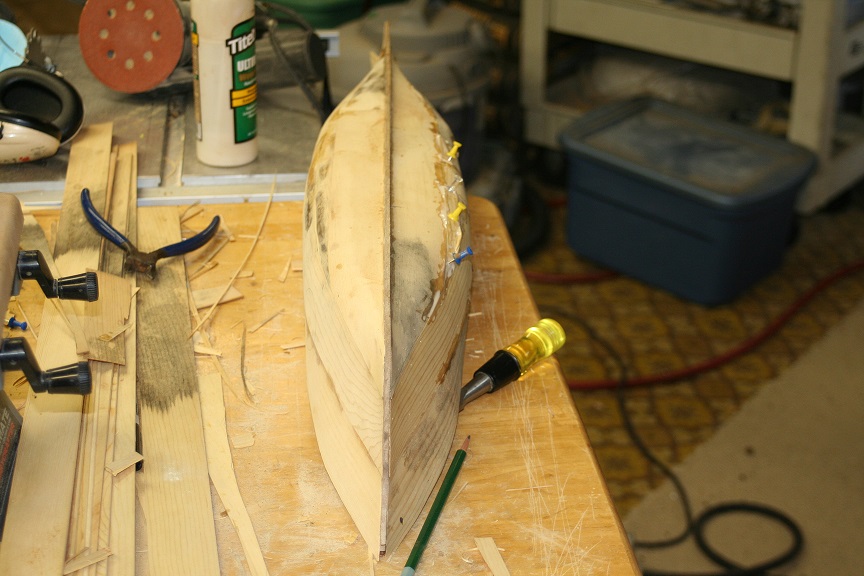
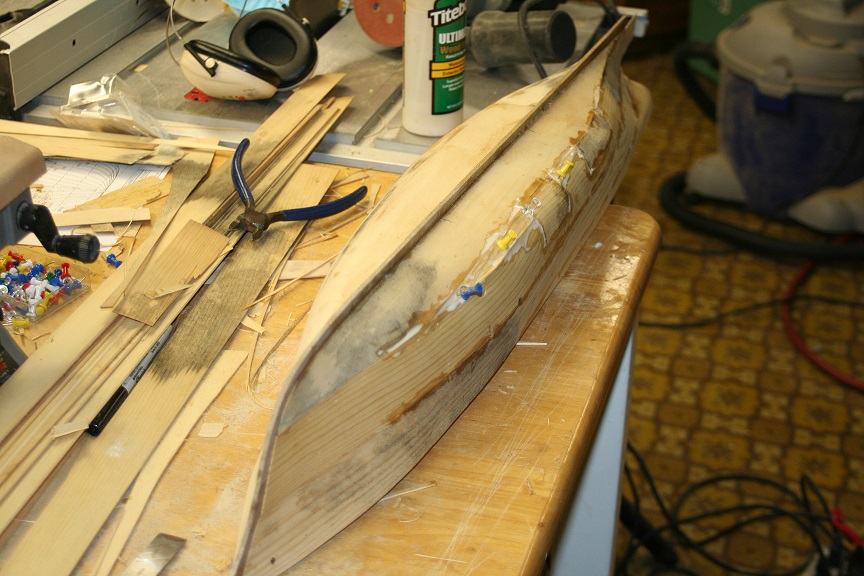
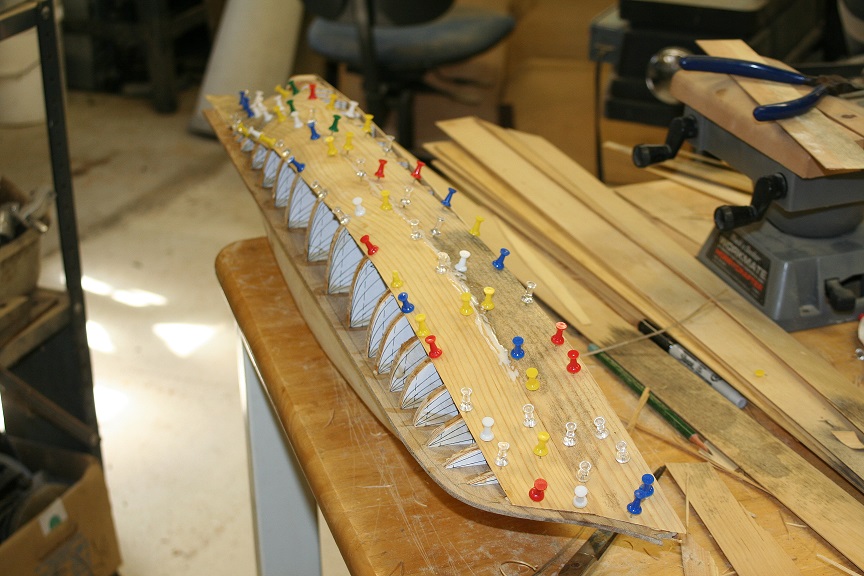
Today..I spent an hour (before work) laying more starboard planking...I finished the bow and cutwater and working my way amidships, I had to make a repair where the plank fractured. Apparently the wood at that point had a defect and could not stand the strain of bending along the extreme curves. No problem...I simply cut out the defect and patched in a new piece. I have to do some more work on the section were the spar deck and hull meet aft of the midsection...not to mention the finality of the elliptical stern. So I'm getting there...I plan on doing a bit more planking after work...Oh at about 1:00 in the morning when I get off work. No pics for this last session....no time to edit them and post them. Pics will return tomorrow. Rob
- 1,208 replies
-
- 1
-
-
- great republic
- clipper
- (and 1 more)
-
Thanks for your responce Roger. No I didn't have to steam the planks.....the wood is very pliable and it bends very nicely...that is why I use 1/16" to 1/32" material. I do have to cut radiouses to make the curves easier..but that is it. Now I had to wet the aft sections to make the curve around the stern..that is all. I kept this wood for this very purpose from my doll house manufacturing days...the wood was actually too thin and was throw away. Rob
- 1,208 replies
-
- 2
-
-
- great republic
- clipper
- (and 1 more)
-
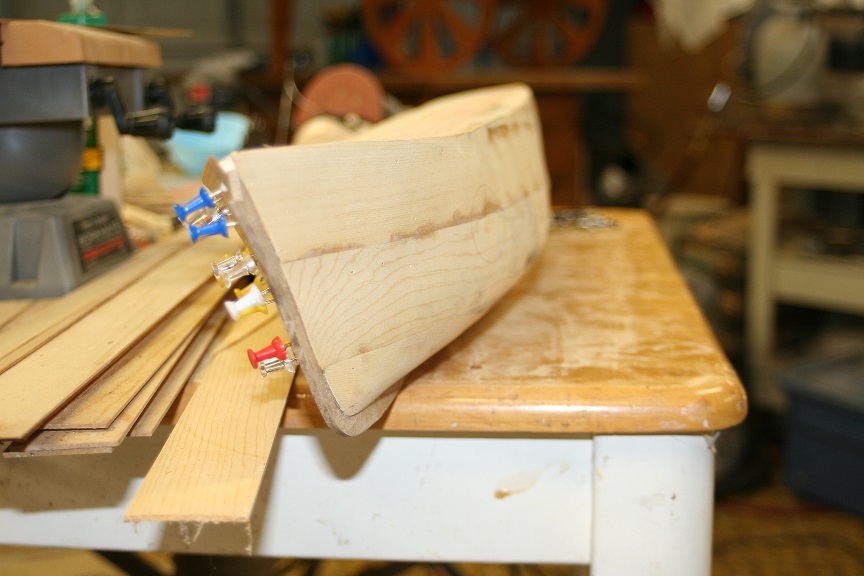
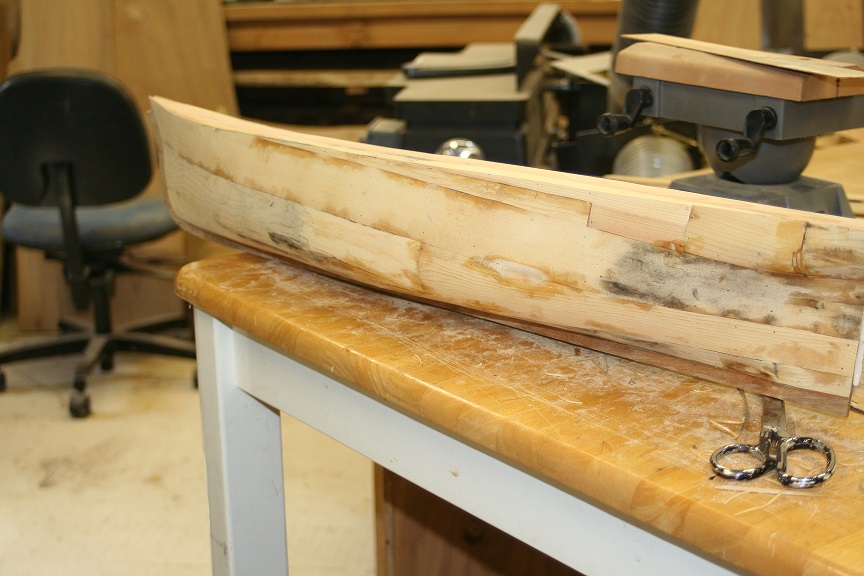
Some last images before I have to wait till tomorrow. The hull is really shaping up..though I do admit my approach is all but typical and can be viewed as sloppy...crude even lunacy.... However, I'm only after the finished look...not how I got there. Once the hull is finished at this stage I will take it to the other shop and begin the fine detail on the hull. Rob

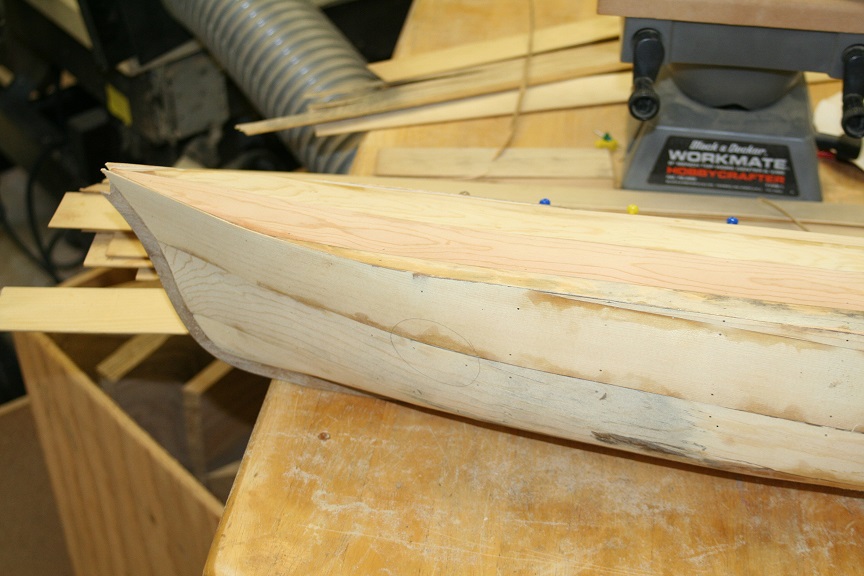
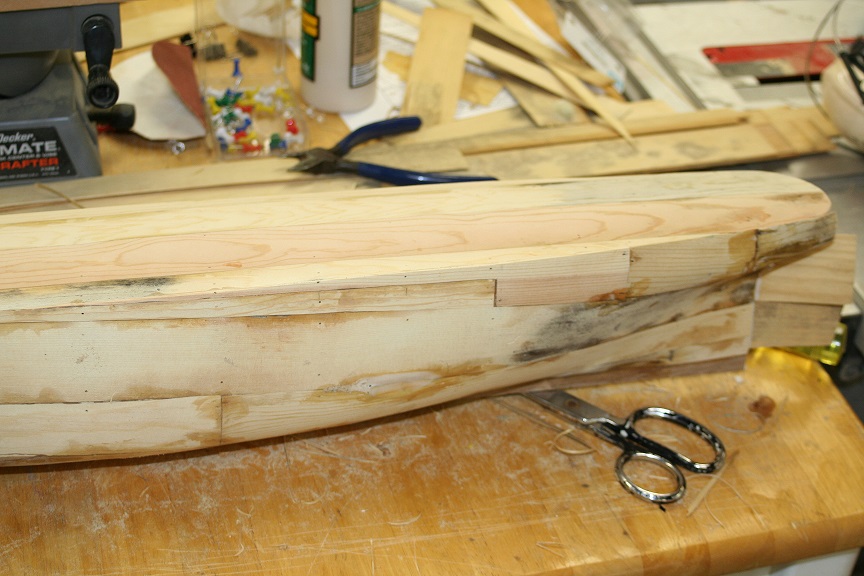
- 1,208 replies
-
- 11
-
-
- great republic
- clipper
- (and 1 more)
-
The staining of the wood gives it a weird look...but the hull is pretty finely sanded...some fill will be applied as well.
- 1,208 replies
-
- 5
-
-
- great republic
- clipper
- (and 1 more)
-
I'll be painting and coppering. Here is some images of the starboard side being planked.
- 1,208 replies
-
- 5
-
-
- great republic
- clipper
- (and 1 more)