
HOLIDAY DONATION DRIVE - SUPPORT MSW - DO YOUR PART TO KEEP THIS GREAT FORUM GOING! (Only 13 donations so far - C'mon guys!)
×
Ekis
-
Posts
526 -
Joined
-
Last visited
Content Type
Profiles
Forums
Gallery
Events
Everything posted by Ekis
-
 Well, as I get dangerously close to the end of this personnal Victory, I post a lot of photos !! More photos of the set will come later. But for that, must I go into studio photos with lighting, clean background, etc ... For the moment, it is-almost-end of construction (I still have a lot of windings of rope to put everywhere). I pierced the underside of the support, inserted 2 internal threaded rods to have the possibility of fixing from below with 2 nuts if necessary ...
- 41 replies
-
- 4
-

-
- artesania latina
- hms victory
- (and 1 more)
-
I have advanced quite a bit on the rigging ... There are still some ropes to tie on the right, on the left, the mizzen yard to put on, but this complicated rigging already has a good face! 🆒
- 41 replies
-
- 6
-
-
- artesania latina
- hms victory
- (and 1 more)
-
A real work on these sails to make them realistic: bravo!
- 236 replies
-
- 1
-
-
- artesania latina
- kitbashing
- (and 2 more)
-
Hi, I'm Ekis, 53, from France (more exactly a few kilometers from Versailles). I work in advertising. I read this forum for many weeks now, and I often find very good information about our hobby. I decided today to take the plunge and join you as a member. Excuse me in advance for my English: I read it much better than I write it! I am a fan of wood kits, especially the sailing navy 18th, but also other things if the kit is original. My current project is HMS Victory. Not that of Nelson, but the previous ship designed in 1737, wrecked in 1744. I start from an existing kit of the Victory 1803 (AL) version, and I adapt so that it looks like the one of 1737. I respect all the rules of hulls and rigs of the 18th, but I wish a boat according to my desires also for colors and some amenities. The thread is here: HMS Victory 1737 by ekis Thank you for your welcome ! 😉

-
Few new things to show: rigging this type of ship is long and repetitive. I do not have much time right now to move on, but it's progressing slowly ... So just a few close-ups for details. Few comments, the photos speak for themselves: the Victory has hair growing! More than a hundred shrouds to put in place ... it's a bit of a job. The props of the low masts are in place, the rear davits port and starboard too (but removable, it is simply to be certain of the passage of the stays). The next shipyard is already waiting for me: high masts, yards and sails ... But the masts of hune and parrot have already received their pulleys and various other stays while waiting to be in place. Still tight shots. Things are moving forward, but nothing spectacular ... The skiff in front of the castle, the nets were filled with more than 300 hammocks, the shrouds received their platforms. And many little things that take time but do not jump in the eyes... It is ultimately that all these details change a model, I think. After finishing the shrouds, I start the ratlines! I have for a long time ... I also added the ladders (we do not see it very often on the models, but it was necessary to be able to climb somewhere ...) All ropes used are tinted: either with indian ink for stays and shrouds, or with a mix of bitumen/turpentine for usual maneuvers and stays. It allows to have nuances and not a uniform industrial color ... I like it! Well, I must admit that I add annoying permanently on this boat voluntarily! 😛 I continue in the long and monotonous work of ratlines and preparation of shrouds ...These are just pictures of build. I finished the hoists of the boats, not easy to do ... I planned a system of quick disassembly to dismount them easily as I did not advance the sails of forestay and the passage of all the descending maneuvers masts. Otherwise, my big fingers do not pass! The Victory will have to go down to the basement of the house to continue mounting the upper rigging. Otherwise, it does not pass the door of the attic ... But in the meantime, I can still prepare things. The next step is to prepare all the yards, cut them, paint them, mount the dozens of pulleys and other bits used for routine operations. Besides, I would like a vessel with the sails carved. It is a difficult exercise, rather than stretching a deployed sail. Until I took care of the yards and sails, I had to do the four main anchors ... One of them is equipped with a net: it allowed when it was along the hull to have one or two sailors to do depth surveys without being hindered by the hull. And then, while I was there, a 2nd boat is mounted on an individual support. But this one has an anchor below. This is how they were moved farther away from the ship to anchor in a safer way. The boat will be attached to the boat by the cable of the anchor and a mooring end with a hook. And now, the last big yard with yards and sails! Some views of the job in progress ... It is really a considerable time this type of rigging !! I still have many, many hours to spend on it, but it goes at its own pace. As a reminder, all the sails will be carved, which adds time to spend on each one so that it is presentable and relatively realistic (taking into account that I use the sails of the kit AL which are of a quality say more than medium ...). All the lines of each sail are to rethink from the plans to be able to moor them properly once folded. Speechless Before I started assembling the sails on the yards, it was necessary to cut them correctly: it's done! It remains to fix them, to prepare the ropes for each one ... and to put them on hold until the top of the rigging is in place. But first, there were still and always details to finish ... Set up the spritsail topsail, And all the ropes that pass through the bowsprit racks, Tarred canvas protection of rudder head, rail with nets for the front platform: And finally, for fun, a 18th century buoy (image found in my archives to reproduce it): That's it, and now I'm immersing myself in the rigging of the yards ... It's a big job at the base, work on the octagonal part of the yards, aggravated by my choice to show these sails furrowed ... It is necessary to work the folds, to think the bolting otherwise for that seems realistic. I am obliged to put invisible threads to create gathers, etc ... I focus on each yard to prepare everything before building the top of the rig. Go, pulleys and ... ropes! A few close-ups of the bowsprit, the rigging of the yards, the flag pole at the stern. And then, finally, all yards rigged with high masts: a bunch of wires everywhere !! Finally, again the stern ports finished with their string shutters. Now, I'm tackling the preparation of dozens of wraps on the toggles with all kinds of threads used. Here is the current status of the shipyard: ropes everywhere, the stays in progress (the 3rd floor of the masts is also to be done) ... I put the 1st of the 3 jibsails, the spancer (english?), and the rear flag. The following: the end of the stays and ropes all over with the installation of staysails. Some images of work on the site, with some ropes! Sorry for the background of the garage where I migrated to finish without worrying about the volume of the Victory to pass the doors (my workshop is usually in the attic)...
- 41 replies
-
- 7
-
-
- artesania latina
- hms victory
- (and 1 more)
-
Some views of the 3D compass table in place, the lanterns too. The rowboats received some accessories. I could not resist, contrary to what I had decided: the boat that will be moored to the hull now has sails ... The masts are in progress, nothing is glued of course, it becomes difficult to make photos with this scale. The rowboat will finally be independent and not glued to the hull! It hid too many things by putting it next ... Small suite on the masts. I only spent a limited time on the Victory. I was busy with other things ... I focused on the foremast to determine the look of the mast. The others will follow, they are all cut, but it is necessary to dress them! But first the end of the base of the sailing boat: And so the foremast and its hune (? in english) in construction and aging: And a set up to see what it will look like: Small continuation of the construction of the rigging. It takes a long time these things ... I'm showing you just a few steps. Well, the 4 masts are made, I'll be able to equip them with various pulleys ... On the mainmast, I added some spears for the boarding, just in case !! Of course, the high masts (topmast and topgallant ) are removable. The low masts will remain alone to mount the shrouds more easily .... For the specialists, the latest details added later, like the balusters in front of the topmasts. So inevitably, on the overall photos with the boat, nothing is aligned correctly. The following rigging ... Forcibly, will have to go into the details with all these ropes. But if it helps, then I show! For now, I focus on the foremast to be sure of the look that it gives. And first, before the shrouds, you have to prepare a little. The return of the machines, especially the 1st to achieve all that. Unlike what I did on La Flore choosing the colors of the strings, this time, I decided to do more in the traditional. Take only natural colored threads, and apply either a shade to simulate the tar, or go to aging ... some tests: Then, we move to the assembly of "some" pulleys and caliornes (those who hang under the hune): Finally, big job with the guys and their alignments. Then dye in India ink to have shades, unlike a basic black thread. Finally, a little extra with the manufacture of bowsprit racks. This time, instead of cutting everything in a stick, I chose to paste 5 pulleys in series on a small band of 2x0.5 invisible. They will be glued to each side of the bridge bracket. After all, I have pulleys that are well made, so use it! Following with advancing on the bowsprit: most ropes are tinted or aged, but I'll see in the end if I have to harmonize a bit or not. On this vessel, only one strut of the main mast descends on the bow, the false, finer strut wraps around the foremast. The bowsprit racks are in place. The editing of all this is a little tricky, especially because of the gateway ...
- 41 replies
-
- 1
-
-
- artesania latina
- hms victory
- (and 1 more)
-
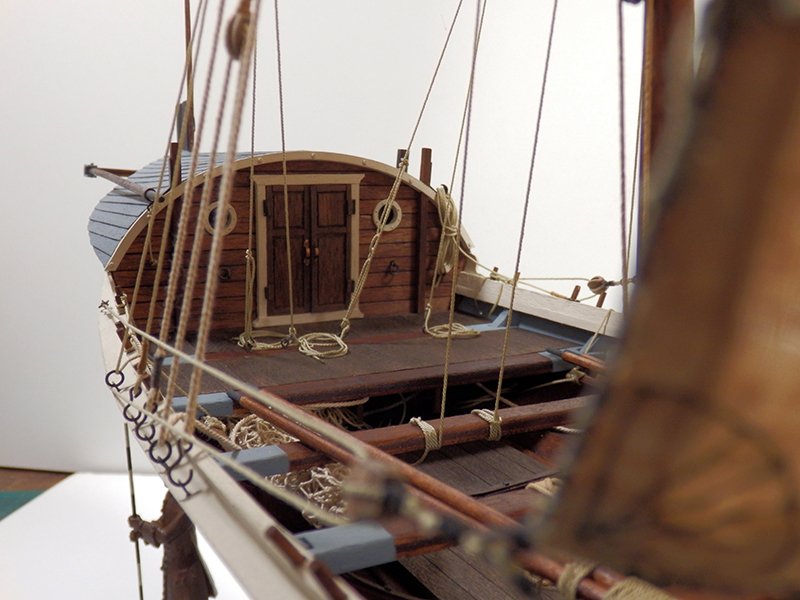
The work on the stern and the quarter galleries continues, port finishes or almost. I took the opportunity to finalize the ornamentation, put the catheads and drill the holes for the lanterns (not glued). These 3 lanterns seem very big for this boat. These are the lanterns of the Artesania Latina kit, but I'm going to check their scale before putting them on forever ... All this corresponds almost to what I had in mind from the start, it is already a satisfaction! End of the assembly of the stern with the installation of the rail of the poop and deco of the galleries. I took the opportunity to also stick the elements of the figurehead! Big work on the channels and the chain plates Deadeyes and blocks are set up and stuck with the alignment of the future shrouds. Voilà !! And that's for the chain plates. In fact, this part gave me a hard time! I'm glad I finished that ... A 1st throw of gunport lids up ... closed or not to starboard ... (except some for the scenery) With the back door open on this side (the ladder will come later). It going... An attempt at provisional placement of the ladder: And here for port, all gunport lids open and canons out! The hull is finished! There will remain some odds as the rear catheads of each edge, but after the shrouds. And now, the pedestal to decorate, the rowboats and the rigging ... This subject is not quite up to date yet ... Before I started rigging, I finished the base. It is massive, I leave it a bit raw with just a dye identical to the hull on all 4 sides. The 2 supports are in matt brass and blackened with a brass rod which enters 5 cm in the base and the hull, the central rod, passed to the browner, will be without support to lighten visually. On the top, a matte black, a fine mahogany frame (3x0.5mm) and 4 corners figures reminiscent of the model's decor, just to remind the 18th. Everything is very heavy, very stable for the weight of the model. For ship's boats, I did not want to use the elements of Artesania Latina. The quality is mediocre and they are simple boats in zamac ... By cons, Master Korabel kits are really good. So, I looked at the website of Master Korabel (thanks Google translation), and I found a great seller in Moscow. I ordered without problem by Paypal and 10 days later, all the kits were at home. I took the opportunity to order 2 or 3 other things, but it will make other threads on the forum when I do them ... I need 2 Launch (one on the deck and another with his masts along the hull). 2 barges for port and starboard aft and 1 on the deck 1 cutter for the cathts of the stern. I did not find all these scales for the Victory, but I think it will be nice anyway ... This is one of the launches in the colors of my Victory. An extremely fine kit to assemble. Must be patient, rigorous, but at least it looks like a 20-seater canoe of the time ... At my scale (1/84), the details are not bad. And the others... They have all the colors of Victory, but distributed differently to identify them at sea. The whole series: In addition, I ordered two small things printed in 3D in the Netherlands at the scale 1/84 to compare with what I had: The Victory lanterns and the compass table. Well it turns out that the lanterns of the kit are 2 times too big compared to the reality (which I suspected, the manufacturers optimize the parts between the kits ...), and the 3d printing also restores the perspective volume of the lantern. So I will keep for another model the 4 lanterns AL and put those home Shapeways. The compass table that I made is also oversized ... I'll see to use it maybe on another boat with a corresponding scale.
- 41 replies
-
- 4
-
-
- artesania latina
- hms victory
- (and 1 more)
-
The 3rd deck is being dressed. The full upper deck is yet to come, plus the forecastle at the bow, the quarterdeck and the poop at the rear. The central street is slatted in walnut stained rosewood, edged with ebony rods, the rest in limewood (under construction). The walling of the wall was done and painted in red, the mooring rings of the guns laid. The surfacing will continue upward with the 4th deck. The base of the main mast is also manufactured. A last look at the lower decorations (partially visible through the doors and stairs): Laying the planking: Mast base: That's it, this deck is slatted, aging included with more "worn out" areas under the guns, stairs and downhill as well. Not easy to restore that in artificial light and photos. Now I go to the guns rigging and stair railing. Before the installation and the rigging of all the guns of this battery of the 3rd deck, I anticipate a little and I foresee the pose of the 4th deck. It was also necessary to manufacture the passage of the mast for this future deck: the support which rests on the 3rd ... Partition of the kitchen made with the quarter bench. 3rd deck finished. The guns are rigged in combat or not according to the edge, the elements of decoration in place (balls, barrels, crates, various ropes, etc ...), the columns intended to receive the leases under the boats, the kitchen with its roof copper and chimney, ladders and stairs. I will be able to attack the 4th deck ... it will go in the personal creation !! The 4th deck is almost planked, the rest with the identical central street lined with ebony. The spirketting is made and painted in red. The kitchen and back gratings are made. The rear receives a 2nd capstan with its bars (for the decor). The wheelhouse will be in checkerboard wood 2 shades (to recall the floors of galleries), framed by the walls of the officers' cabins. A little game of patience to realize that ... Finally, the stearing gear (double wheels) will be behind the mizzen mast, unlike the restored Victory of 1805, but according to the ships of the early eighteenth. Small advance on the focsle and the upper part at the front: The 2 pumps around the main mast are in place, Various crates should also find a place either under the focsle or on the deck ... While waiting for me to take over the rear decks, here is the forecastle finished. Trompe-l'oeil decor made of crates, barrels, barrel and car ... Support frame made of chopsticks recovery The foclse has been aged as the rest before receiving the foot of mast, carronades, racks, etc ... I asked myself if I made windows at this place, but the channels will take up space, and this is the place where we go back anchors ... And then it is only a warehouse at the top of the ship. Now, I will be able to finish the head with the catheads. The stern is definitely stuck: The wheelhouse pavement and officers' square is finished: The openings of the cabins are made: I attack the structure of the square and in the center there will be the stearing gear. The following to do with the quarterdeck and poop to finish the levels ... Still a lot of work! The decks are a little advanced, I want to finish the bulk of the main structure before tackling the various arrangements. So the back of the boat was mounted with the wheelhouse, the quarter-deck. The aesthetic uses the same color and deco codes as the rest, with decks in the same colors, facades in small windows. The quarterdeck receive a skylight. The openings on the wall have also received their frames. I show you some pictures of all to see the floors. Various arrangements on the decks. suite Another little piece of fact: the focsle with its 2 carronades. After, the planksheers wait for me and I will work the first gunport lids closed side ... or I make the quarter galleries. Some close-ups, with all the flaws that shows, but too bad ... And finally, I attacked the quarter galleries !
- 41 replies
-
- 1
-
-
- artesania latina
- hms victory
- (and 1 more)
-
To stay in the color code of the castle, I finalized the head. Start of coloring of the hull: The teak hue is not uniform voluntarily to appear more "used". The top of the wall will be black. But the wales will change all the contrast with black for low and medium wales, and red or ocher for those, finer from the top. It will depend on what visually gives all the red frames of gunports. Picts were made just after the laying of the colors ... The gloss has since disappeared! After thinking, I thought that the headboard looked more like a contemporary floor than a deck of the eighteenth century. So, erase and we start again! before after And in parallel, the frames of the ports ... Go for a hundred! That's the final color code for this hull: The second deck was tinted (but not glued) with a trompe l'oeil slatted part behind the edge entrances, 2 shades to simulate the interior through the little space left by the guns, once in place. The white traces are made to simulate the wear of the hue with the rolling of the hulls ... Almost invisible also in the end, but in doubt, if it can offer nuances. The continuation of the wales and the bow a little more finalized. The red wales take a lot of space visually, but all this will blend as and when the details of the hull: gunport lids, partial nailing, scuppers, etc ... The 18th is really in the middle of the exuberance and the multicolor charged with the 17th and the sobriety almost exclusively in black and white Empire ships and 19th in general ... So red wales as the only colored element of the hull, a loaded stern and a bowsprit simpler than the eccentrics of the previous century, it seemed to me a good compromise ... I take this opportunity to show what will look like the wall a little more finalized: Some photos with the rudder in place. More picts of the Hull. The 2nd deck is also installed, the 2nd battery in progress: And I attack boarding ladder: The gunports lids under construction and the hull pulleys : An additional detail for this hull: Fenders or protections of the hull to raise the anchors way 18th. The upper part will be adjusted when the channels are in place. Second battery made! On the starboard side, back to battle, the main door and the back door are open and have been given a trompe l'oeil not to show an empty ship ... Some guns are in low gear to counter a bypass; the rest of the port lids will be closed. On the port side, in full line battle, all guns out, the main door is closed by a panel showing the color code of the boat. The finalization of the stern with the 4 ports of flight, closed gunport lids and rudder backup tips. I show you the framework of the 3rd deck. A little work beyond the kit to support all this with props and addition of some sleepers to overcome the voids created by the holes of gratings to come or passage of the masts. This is not the big carpentry, I rather recovered some used chopsticks. The goal is to get a deck without elasticity, the frame becoming totally invisible! I worked on the head. Not really a party of pleasure because it was necessary to retouch a lot of stuff ... I also redone the upper head rails to have the desired thickness and the ability to carve a little. I will finalize the piece towards the catheads later. The head has received his grating ... and his toilet! Side decors are also in place. Apart from the descent of the cathead later, the head is made. The knightheads have been added with their reinforced base, some decorations on the bowsprit, headtimbers. I'm on the 3rd deck. It is necessary to planking, to put the guns, to rig some, to create and to place the gratings with and without stairs, etc ... You also have to put some decor for the descents of stairs on the 2nd deck. For my part, I am not the planned editing, but an earlier version (1737 and / or 1765). The 4th deck is different from the Victory of 1765: the pit is longer, the gangways narrower, the main mast is not integrated into the upper deck.
- 41 replies
-
- 3
-
-
- artesania latina
- hms victory
- (and 1 more)
-
And now the assembly of the hull. It is not sanded at all, since during assembly. I still have a good time! After, it will be the piercing of the Gunports, and finally final sanding ... I took care of the base. I had to do it before the hull was closed to pierce. The brass rods fit 5 cm into the hull and the same into the wooden slab. It weighs this boat once finished! Nothing is glued of course, it is necessary to sand the plate, tint a little, but at least the holes are made. Just some picts to show the planking closely. It's my method, it can, perhaps, serve to beginners. I begin to see the end for the works! I do my best, and it will not be perfect, far from it! But I wanted to see if I knew how to model in a simple planking a hull of this size (about 80/90 cm) It's boring, longer and more rigorous than a double planking (everything is visible!), But it's a kind of personal challenge ... The hull ends, more than 2 strakes and I can move on ... Not unhappy to have completed this game. I spent the time needed! This time, this hull is over. The Sternpost and Knee of the Head are not glued. The inner bottom received a layer of glue / sawdust. The keel is about 85cm long. We go on to the following steps: Manufacture of the Rudder with taper, blackening hardware (they seem oxidized, full of greyish green: it's normal! This ship will undergo an aging everywhere... Tracing and first cutting of Gunports on a series of 100 ... this series of guns is false, just to sting. Following the drilling of the Gunports. The lower deck is laid. The supports of the false guns are also in place. To starboard, the support is moved backwards in order to be able to stick the guns, but also to close the gunports. This ship will be in port side combat with open gunports. The wall has been doubled to correctly place the interior frames of the ports. For the second deck, I put some sleepers, supported by pillars and spars to stiffen. I will continue while the strakes stick ... That's it, this hull is done! I spent this long step, but the result is rewarding. I wanted to show these views of the hull before the piercing of all ports, to realize why this is called a wall ... The stern fits perfectly in its location, well embedded in the hull. And now, the gunports, I'm going to break this hull of 75 holes! Tracing and drilling my gunports with a method to not screw up the perspective, using tape ... Cutting with an x-acto and a small flexible metal ruler. That's it, they are all pierced! But it will be necessary to double the thickness of each opening of the hull inside to put the internal frames and to have a rabbet ... Otherwise, the Gunport Lids will not be able to close! I am adapting each Gunport Lids and how to attach them to the hull, I must also make the frames of each gunport, and paste them after dyeing the hull ... For drilling, it was necessary to predict the height of each deck to come. What has nothing to do with AL plans, in addition to my transformations! Knowing that the guns will be in combat at port, gunport lids raised and tubes out and set back to starboard with gunport lids closed. I also worked in the form of the quarter galleries, since the stern does not correspond to the kit anymore: I have an extra quarterdeck (that will be 6 decks in all!), And the wales must correspond to the same perspective of the whole front and back, suddenly. And an access door has been added, closed side to port, open (with future command ladder) to starboard. I also worked in the form of the quarter galleries, since the stern does not correspond to the kit anymore: I have an extra quarterdeck (that will be 6 decks in all!), And the wales must correspond to the same perspective of the whole front and back, suddenly. And an access door has been added, closed side to port, open (with future command ladder) to starboard. I have a blueprint (1699) that shows this kind of openness. It's part of my personal choices. The color code of the ship is ok: I will be able to tint this hull! But not before having finalized the wales. And to change a bit, I finalized the head platform. And to match the architecture of the Victory of 1737, I have to add a focsle deck.
- 41 replies
-
- 2
-
-
- artesania latina
- hms victory
- (and 1 more)
-
And when to think about the future of this boat, would not it be more fun to try this kind of stuff for the castle, rather than the cheap decorations of Artesania Latina? Parallel to the curving and tedious editing of cannons, which are not yet of interest in photography, I advance on the design of the castle. I'm starting from that (the wood pieces of the kit, around, it's my personal stock): I made a cardboard model to conceptualize the perspectives, the number of openings, the depths. It will start from scratch or almost, add parts for the balconies, etc ... The parts of the kit just serving as a global template: And with some tests of decorations that will have to harmonize with each other, and with the choices of wood, hues and moldings. These are just essays, you have to make an effort of imagination to find a harmony, but it works: There, there is more than to trace all that to own, millimeter, to postpone on wood, to cut, to pierce the openings, to realize the braces (!!), to make the moldings, to adjust, etc, etc ... I simply recall that I am inspired by the Victory of 1737. Making a copy or admiralty model does not interest me. I want to respect the main lines, the main colors of 18th century shipbuilding, and give myself the freedom to create according to my desires. I blackened and polished the 100 guns and all other hardware, I finished sanding couples to receive the first strakes. By the way, I will first make the works before gluing the lower deck, to have access to the whole of the hold and the hull. All this, unlike editing AL of course ... The guns are mounted and more or less detailed depending on their visible locations or not. I will see at the time of their implementation what I detail or not (brague, trunnion, etc ...) In any case, the 6 planned (maybe more, depending on the changes that I will make the assembly) on the upper deck. I also want to do some weathering / aging on this boat, so many trials in progress, etc ... By the way, so, I advance limply on the castle and the painting especially. I made myself a model of paper cutting, a new general shape in ctp (repeated several times by changing thickness), new tests of decor more sober. In fact, in addition to balconies, I want gaps between the sides and the rounded part in the center, so it is necessary to put several layers, in short ... not simple, and especially very time-consuming! I am at the dressing openings with frame and braces (brass for finesse), cutting floors for balconies ... rethink the planned system of attachment to the hull. A little head because it is also necessary to think of the oblique of the table and the bouges of bridges. After come the wood decor, the dyes and paintings, then the metal decorations. Basically, except metal deco and wood chopsticks, it should have a contrast like this: The transom mounts slowly. Parallel to the frames and braces of windows and doors, the structure of balconies related to bridges is practically made, the shell, in fact! The pieces are all made, it will remain the assembly with the establishment of coatings, dyes and decorations. Windows are made, 1st coat of paint. The upper vault is clad in linden wood, the framing sharper. We will test the dye of this part. Next mission: make the plating of all parts. Just 2 little things: decorate the balcony floors. Things come to life: painting and first fitting windows. All parts of the assembly (the black transom, the balconies, the side walls, the ceilings) are bordered in boards of 3 or 5mm. This is a flat mount to show the colors simply: the side walls are next. There, we have no depth. There is also a lack of details in addition to the windows on the board: on the uprights at the bottom, between the windows, will come wooden columns for example. Or dressing rods under balcony windows, wooden sticks to dress the railings, etc ... The decorations for this part were painted in 2 bronze paints (bright and old bronze), then aged with the bitumen of judée, like the sticks decorations brass of the balconies. Well, it's just a color vision on the wood. I like the contrast: it corresponds to what I had planned for the stern. Continued assembly, gluing, tightening ... Then we stick and we tighten everything! To be done in several phases to find all the curves: here the 1st. Here, I arrive quietly at the end of the stern. Just for the pictures, I show a decorated side ... Well ... I had a taste of not finished. I felt obliged to add molding on the right, on the left! Some pictures : The stern will be mounted later, when the hull will be made. But this part helped me to see and determine the colors, the style for the whole ship.
- 41 replies
-
- 7
-
-
- artesania latina
- hms victory
- (and 1 more)
-
I'm doing this thread on the HMS Victory which is the current project. I've made good progress on construction, but I'm going to put the construction steps here and let it react before posting the next ones. All texts are those of a French forum, simply translated by Google Translate. Excuse me in advance for grammatical mistakes or syntax ... (2016, December) I have the Artesiana Latina kit at 1/84. The skeleton is mounted, I must attack the hull. This boat once mounted must be about 1m25: big bug! But before plunging headlong into curling for a very long time, I do as usual, a pause to think about what I want, what is done, how to tint, mount, etc ... For this, I gather a large library of models, photos of Victory, various docs. In the kit, no plan to scale, but a dvd and prints format A3. It bothers me a little not to "see" it in real size ... Moreover, I saw many Victory perfectly realized ... it does not interest me to remake! These two facts pushed me to wonder about this boat. I looked for a monograph close to the scale, I just ordered the monograph of the Superb at the AAMM (Association of Friends of the Navy Museum): a 74 french guns of the 18th. Conclusion: I will not do the real HMS Victory! But I will use this base to make a three masts of the eighteenth ... I will choose my colors and shades, change the castle, adapt a balcony or 2, perhaps redo bottles, adapt the kit in fact. I am going to make MY model respecting the historical codes, but not a copy of this ship. Of course, I will use the elements of the kit, but I will extrapolate according to my desires. In short, we'll see! Here is the end of sanding couples and keel (a long time to do everything clean), gluing the whole and a first bridge just screwed to maintain properly and check the squareness (2 couples deformed on the top, but nothing irrattrapable). I have a little attacked the sanding to border, but this step will be long, I will be very careful and take my time. It's so important to place strakes next.
- 41 replies
-
- 3
-
-
- artesania latina
- hms victory
- (and 1 more)