


mog
-
Posts
196 -
Joined
-
Last visited
Content Type
Profiles
Forums
Gallery
Events
Posts posted by mog
-
-
Attempting another start my last return to the workbench was short lived the 3 month set back turned into a year, had to go back to my notes to find the right starting sequence. however it's the enjoyment of the build not the pace
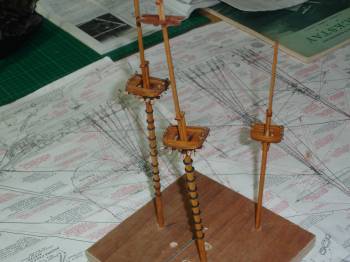
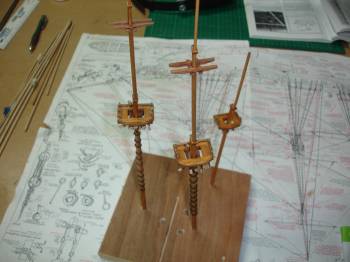
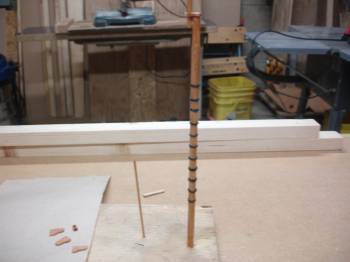
Masts dry fitted, ready for 1st stages of upper and lower shroud work. Will complete as much off ship rigging as possible. Stop cleats and aft platform stanchions will be added later to minimize damage while working in the tight spaces around the platforms.
-
Looking at the pic of the deck, whats wrong with it ? You can see the planking, the lines look good. A deck is a well worn area, about the only place you will see one look like new is maybe a yacht. My spin is it will be just fine with some stain or oil, the lines will standout and different shades of planks will come out. Your first description made it sound like the deck looked like plywood, again like Tulok said once you put something on it you will see a major difference. Just don’t try to over think this into an over fixed mess, go with what the natural wood gives you and you will be fine
MOG
-
Harbm
Agree with Hornet, not much you can do with over sanding, refitting might be your best choice, on deck planks. or anything in the .05mm range I very light sand just to smooth, stain or varnish will bring out the grain . Mark being an old hand is right about always testing on scrap first . I tend to stay away from paint as much as possible, so I use different types of wood, using stain & oil on the build. All will effect different types of woods, in allot of different ways. If your building style is no paint then trial and error on test pieces is a must. I would also highly recommend keeping a log on what works when you test, down to how many coats it took to get the right shade. So far on my Rattlesnake I have used several different stains, and mixed several to get the right shades and tones There’s no way to keep it all in your head, plus keeping a log not only tells you how you got that right shade, you will at some point have to go back and redo or touch up an item or area , you want it to look the same . So I log what I used on hulls, rails, decks ect. Again we all have our own styles; the site is a great place to get advice and good ideas while finding out what works for you and your build
MOG
-
-
Thanks Scott,
your advise and help as always is much appreciated
MOG
-
Agree with everything that has been said, it’s all a pens- on, it depends on the ship, the type of wood, the effect your looking for. Some say historical accuracy drives all, which is great if that’s the desired end. Using the Rattlesnake as an example if everyone went for the same historical colour scheme we would have allot of builds that mostly look alike. For me it’s all about the look and feel I want to achieve, when I do paint which is very little it’s for detail, I don’t like hiding the natural wood tones so I stain and oil, using different types of wood, letting the colour, tones and shades take their own course, but that’s just the way I build. Everyone is different on how they get to their final result. I guess that’s what I enjoy about this hobby you can see the same ship in so many different ways each with its own style and feel. Just my thoughts.
MOG
-
Martin,
Don't know much about the NRG, except of course this site is conected, is it a good group to belong to ?
also you know you love the world of planking gunports
all the best
MOG
also while I have you here going back a little on yourt Ratt main/fore plattforms did most of the blocks go under know about the bunt line blocks fore and aft, but what about the reef line ect...
-
Scott,
Are there buntline blocks on the AFT side of the platform ? Some folks say to put 6 on the front and 6 on the aft, however not sure what the aft side would be used for as the plans don’t really show them, your thoughts
MOG
-
-
Jon,
Your build is coming along very nice, , working thru problems and learning new techniques is what the hobby is all about, but the main goal is to enjoy the experience, I have said more than once you build for the builder, for most of us a build will never be perfect, but do it your way, overcoming the unknown is a great feeling. I have been working on my Rattlesnake for several years, the enjoyment never fades, most of the RS builds on the site are unique in their own way , I don’t like to cover up the wood so I stay away from paint, as much as possible, I try to make all my own parts, not a fan of the kit supplied metal ones, Ok sometimes my scratch built parts are not 100% like the drawings , but it’s all learning, In my log Rattlesnake by MOG you will see I have went down my own path looking for a natural old school feel. Your planking looks really good, small flaws are part of the planking process, I made allot of errors but sanding and filler helped me get over it. And I like to double hull so I buy very thin ,5mm strips for a second planking , I found double hulling not only covers some small flaws but gives a good look. On the ships long boat I spent three weeks getting the right shape and look, The site has helped me over many problem areas, some great builders JPett, Scott larkins and JSGerson to name a few are first class builders seek there help you will not go wrong. Again it’s your build do it your way , take your time and you’re your will end up with something you will look at with pride for many years. look forward to seeing your progress,
MOG
-
Kenny
One last thought on your new build, do have a reference collection started yet ? I have two books
that are must for me, “ Neophyte Ship modellers Jackstay” by George Campbell and “Ship Modeling Simplified “ by Frank Mastini Allot of reference, detailed pictures on just about every step in a build. a great need to have tool section. I go to them over and over. really could not work without them. I follow Mastini's style of building , which centers on natural wood and stain , very little paint. Just a thought that might help you along the way.
MOG
-
Welcome the world of the rattlesnake build, there are a few builds going on with a wealth of ideas and information, JPetts log is one of the best sources to follow he does excellent work, As he said the bulkheads have a few issues, on most of the Rattlesnake kits they are flimsy at best and care must be taken during this important phase. In my log “ Rattlesnake by MOG” I removed the thin deck frames, because I got tired of them snapping, I did not replace them until I was ready to do deck work. Enjoy your build and please feel free to share ideas and ask any questions you might have
-
Nothing wrong with over thinking, how many times do we find ourselfs just setting in front of the build ,your mind going in all directions, visualizing all the different ways a piece is going fit, finding the best way, only to look at it from a different direction and find a better way, guess this is why we love this hobby. You know I have all the high speed tools for quick sanding, but like you I spend hours hand sanding and filing, something about getting the feel for the part your working on.
After 6 months away I have had to rethink my entire build sequence, hoping to find some flow in the building, anyway will be following both your builds
MOG
-
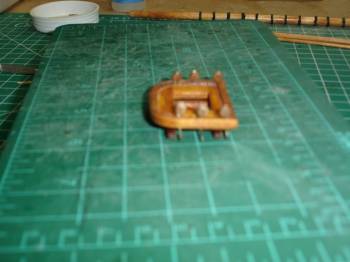

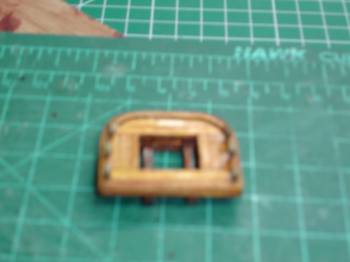
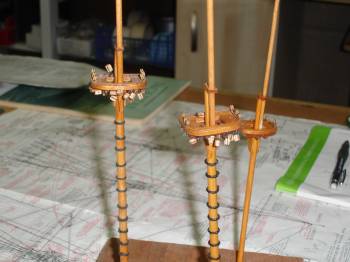
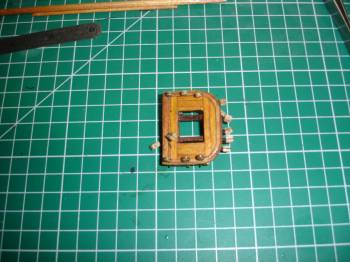
Injury recovery took a minor setback 3 extra months away from the build, gladly was able to spend some time at the workbench today, nothing big added deadeyes to the topmast platform, allot of rust to shake off, but glad to be back in the boatyard. Photography is a bit rusty also.
-
After a lengthy recovery from surgery, I’m about ready to return to the shipyard, really looking forward getting restarted. As always I will be looking to the members for advise as I shake off some rust. MOG
Mike the keel clamp is from model shipways , picked it up several years back it works well in the early stages, before to ship gets to heavy but when the hull planking starts to take shape I move to a shop made cradle. For better support
-
Bart 430,
The finish on my builds are 99% stain and oil ( reference my build log rattlesnake by MOG) water based or regular oil does not really matter to as long as I get the effect I want. I use allot of sanding seal and varnish, as with most builds you finish and seal the hull before attaching items to it. Plus I don’t know a builder who has not broken something that required gluing back on at some point. I have never had a problem gluing over any of it. The only thing is if you use seal or varnish always get a good coat stain down first , like it says seal is a seal and the stain will not penetrate fully.
MOG
-
Agree with Brain C Tung oil and most paint don’t mix well, however it sometimes depends on the type of wood, environment, brand of paint or oil. But I see it as paint is for paint and oil or stain is well oil or stain I try to stay away from paint going more for a stain and natural wood look. Of course this is just my spin on what works for me on my Rattlesnake by MOG At the end of the day it’s your build . your desired effect.,
As with any finishing it’s all trial and error on scrap wood to get the effect you like.
-
Sanding sealer works very well , clear smooth, very hard finish, fills in minor defects, however you want to stain, put at least one good well rubbed in coat first, then seal. Light sand and stain again if desired. I often rub stain over the seal, attempting to gain a different effect. As with any finishing it’s all trial and error on scrap wood to get the effect you like.
MOG
-
Brian
The shape looks good, If you want to practice , you might try planking the hull, I always double hull , really gives a nice effect , and will cover any flaws on the sold hull , have a look at my longboat in my log rattlesnake by mog, the longboat is a standout feature of the build, take your time with it as you want it to be special. Also you want it to keep to the overall style you want to present for the whole ship. The Dremel is good for rough shaping but the high speed can get away from you really fast, I use it Sparingly to get shapes started, then is allot of hand sanding , for me building is a slow thing, never a race,
anyway these are just my thoughts, as I've said many times on the site it's your build do it your way, build to please the builder.
-
Brain, Always good to see more rattlesnake builds, as Scott said are numders are growing, the build logs offer allot of good insight, enjoy your build
Build log: Rattlesnake by MOG
-
-
Everyone sees there builds a little differently and with their own opinions , so just my thoughts here
Precut parts are never perfect; most bulkheads will need some sanding and shimming along the way. Maybe allot of both And still might not fit perfect but that’s the beauty of wood you can always shape it to get darn close. I soaked my test battens to get a good bend, just to see where I was, I use allot of Rack of eye to get a visual of the lines, however I always got some gaps or dips at or between the bulkheads, that’s just the way building is, again it’s never a perfect science, I agree with the other posts your doing great, your lines are looking good, take your time, enjoy the challenge. I don’t know what your planking plans are? But it all starts with your battens and finding a good line. again take your time, it pays off later. I double plank my hulls, It does several things for me, first of all not being the best plank guy around it gives me some margin for errors, the kit supplied hull planks are thicker so you can sand , shape and fill where needed to cover a few errors, and get really good hull lines, which makes the second planking much easier as you learn from the first planking , second planking strips are generally .05 mm gives a very nice look to a well shaped hull, a little ahead of myself with all the planking talk, but you’re at the stage that sets tone for the rest of your build. Again enjoy it,
-
Mike,
Always good to have a new rattlesnake build on the site, the more ideas the better, especially with the model shipways kit, I found the instruction book lacking depth, so I relied on the plans for most of my work, plus allot of ideas from the members. I tossed all the cast metal bits and scratch built everything. During the bulkhead stage I also had the warping problems, and found the bulkheads very fragile, not to worry it all worked out, time trial and error that’s the key, every rattlesnake build is a bit different. take a look at my log “ Rattlesnake by mog” I have taken a slightly different path working for a more natural look and feel. Please feel free to ask any questions or pass along any ideas, as I like to say it’s your build, build to please the builder.
-
mike v
Stains in small quantities really starts to limit your choice, Admiralty stains from Cornwall model boats Ltd, in the UK do offer some stains .but again limited . I buy 250 mil cans , any DIY store has a large selection, and selection and easy to get is the key . My main go to stains are teak, light/medium/ oak, Antique pine, teak oil, Canadian cedar, walnut and mahogany. I only use satin stain, avoiding anything gloss. Danish oil is a good brand, but really any store brand will due plus store brand is cheaper. Ship staining is all about Trial and error , I mix different stains to get certain effects, or I might stain one color then overstrain it with another, each coat slightly changes the look. it’s all about what effect you want, and how it works on different types of wood. It is also a good idea to keep good notes on all your experiments. I even keep and label Allot of my test wood strips . You will always go back to your notebook. When I find the right mix or wood combination I want to use on the build , I always number it in a stain log just for the build I’m working on for example # 1 cedar all deck areas, or #2 light oak with teak over rub hull below the whale. This way as you progress thru the build you will know what you used in each area. I finish all staining with a light coat of matt varnish .first question on conditioner when staining is have you ever tried it ? The standard school of thought for painting wood is always prep or condition , which I guess has prompted the you should condition when staining debate. Everyone has a different mindset when it comes to picking a path you want your build to take. As for me its all stain and natural wood tones, very little paint, please see my POB build log “rattlesnake by MOG, “ it will give you some idea where I’m coming from , Like I said staining is all about trial and error , getting the right tones and depth of color , and what works on different types of wood is the whole deal. , conditioner is a sealer, holding in the grain, as so the stain will lay on top and not absorb into the wood, it also effects the stains color example a light pine or cedar stain will turn dark when applied over conditioner. Again it’s your build , so your call , I would experiment with and without conditioner to find the effect you want. For me it’s all about what statement you want your build to make. I believe staining brings a ship to life, Anyway these are just my thoughts , long winded but if it helps in anyway great,


Rattlesnake by mog - FINISHED - Model Shipways - 1:64
in - Kit build logs for subjects built from 1751 - 1800
Posted
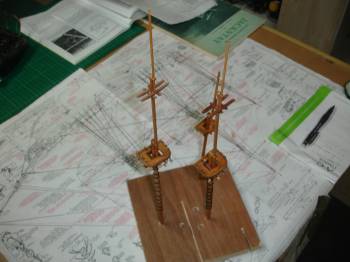
Spanker & Gaff booms, in the big scheme of the build rigging the booms is relatively simple, however in saying that I still snapped the cleat, and had a tough time threading the double block with the right slack. ( ok simple is never simple) Can only guess trying to rig once set in place, far too many lines and fragile parts All has confirmed why I’ll be sticking with the plan to rig everything I can off ship