Peter Bloemendaal
-
Posts
236 -
Joined
-
Last visited
Content Type
Profiles
Forums
Gallery
Events
Everything posted by Peter Bloemendaal
-
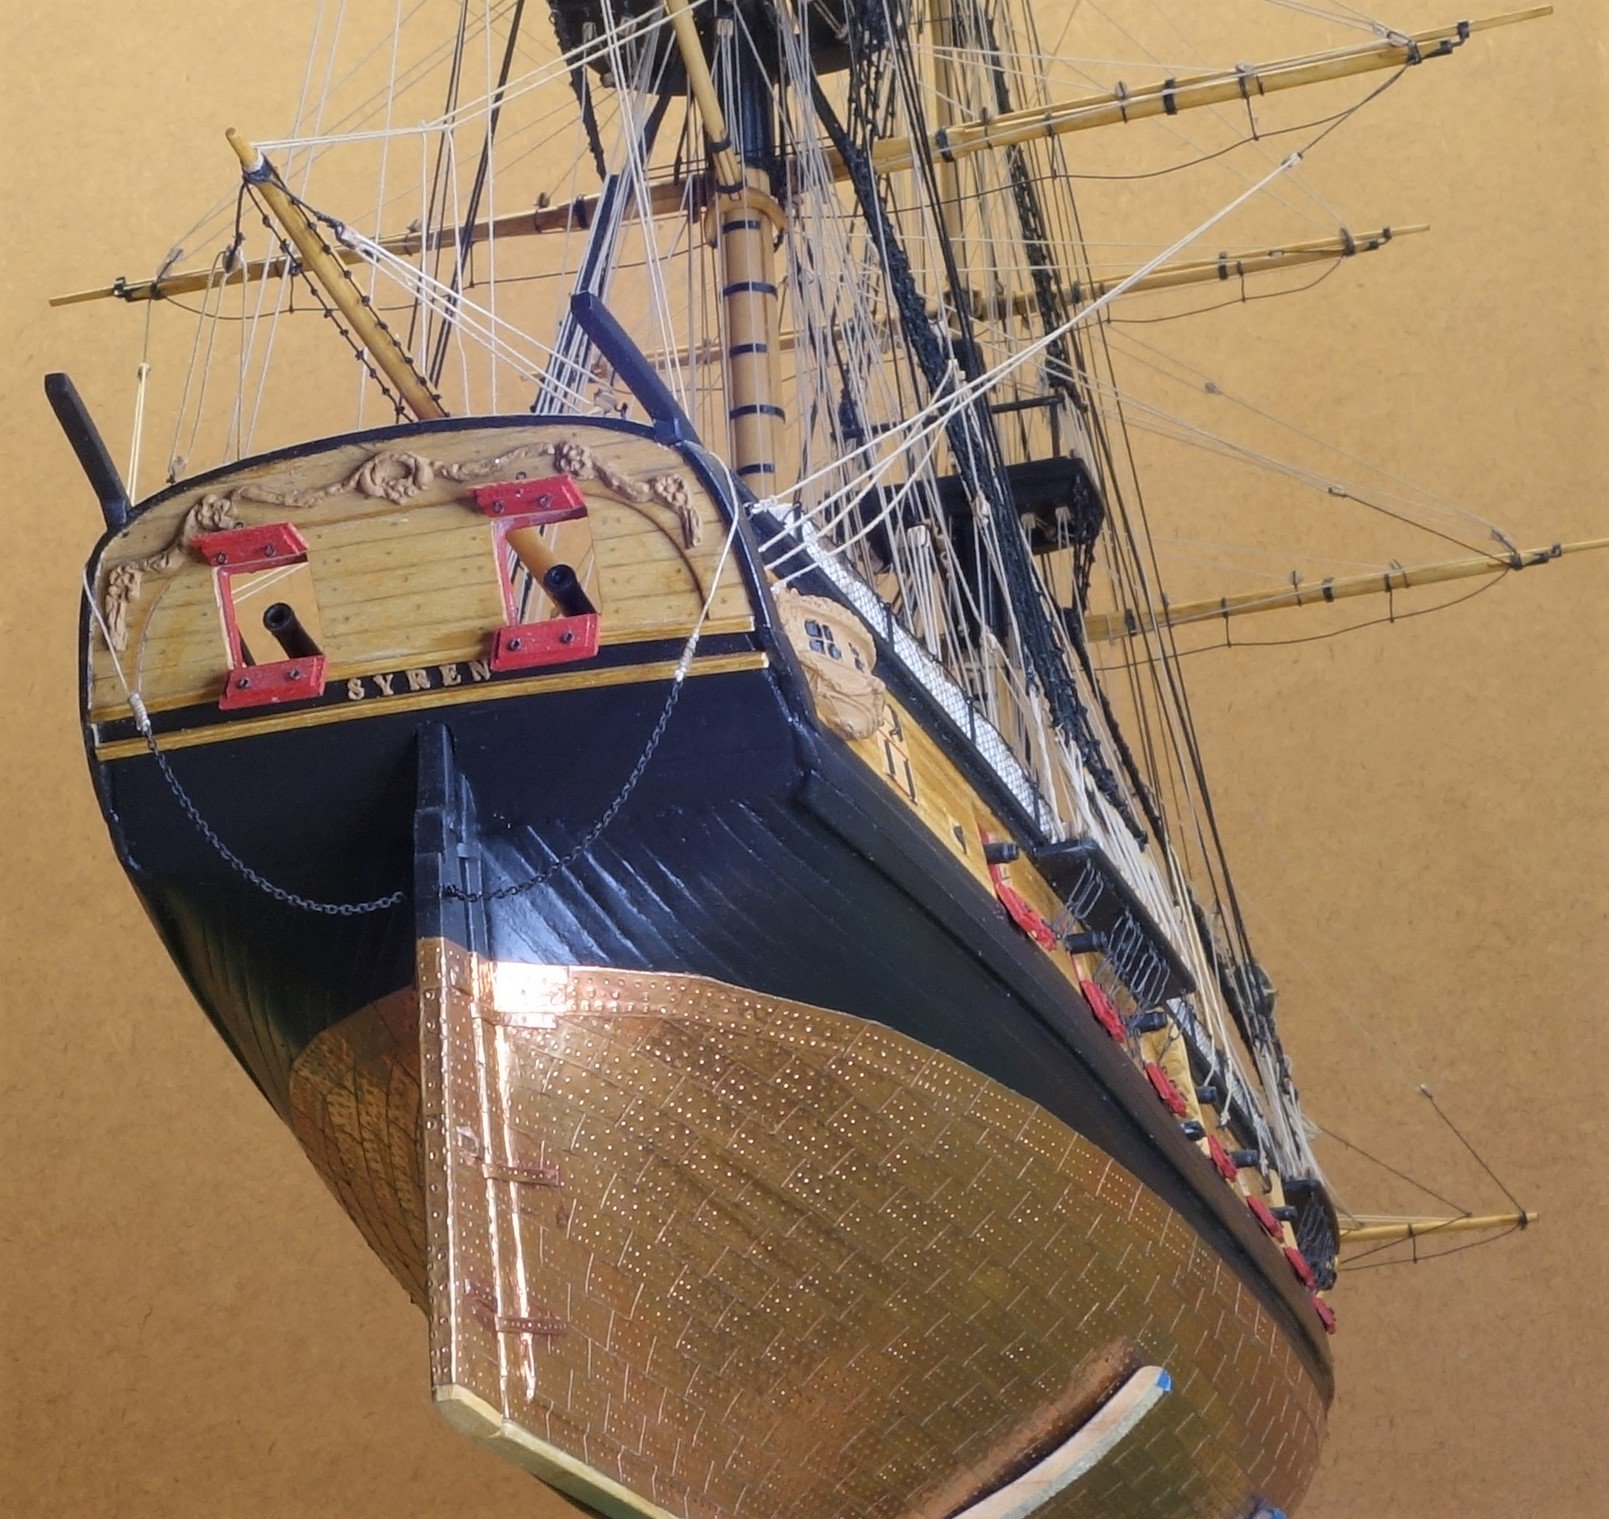
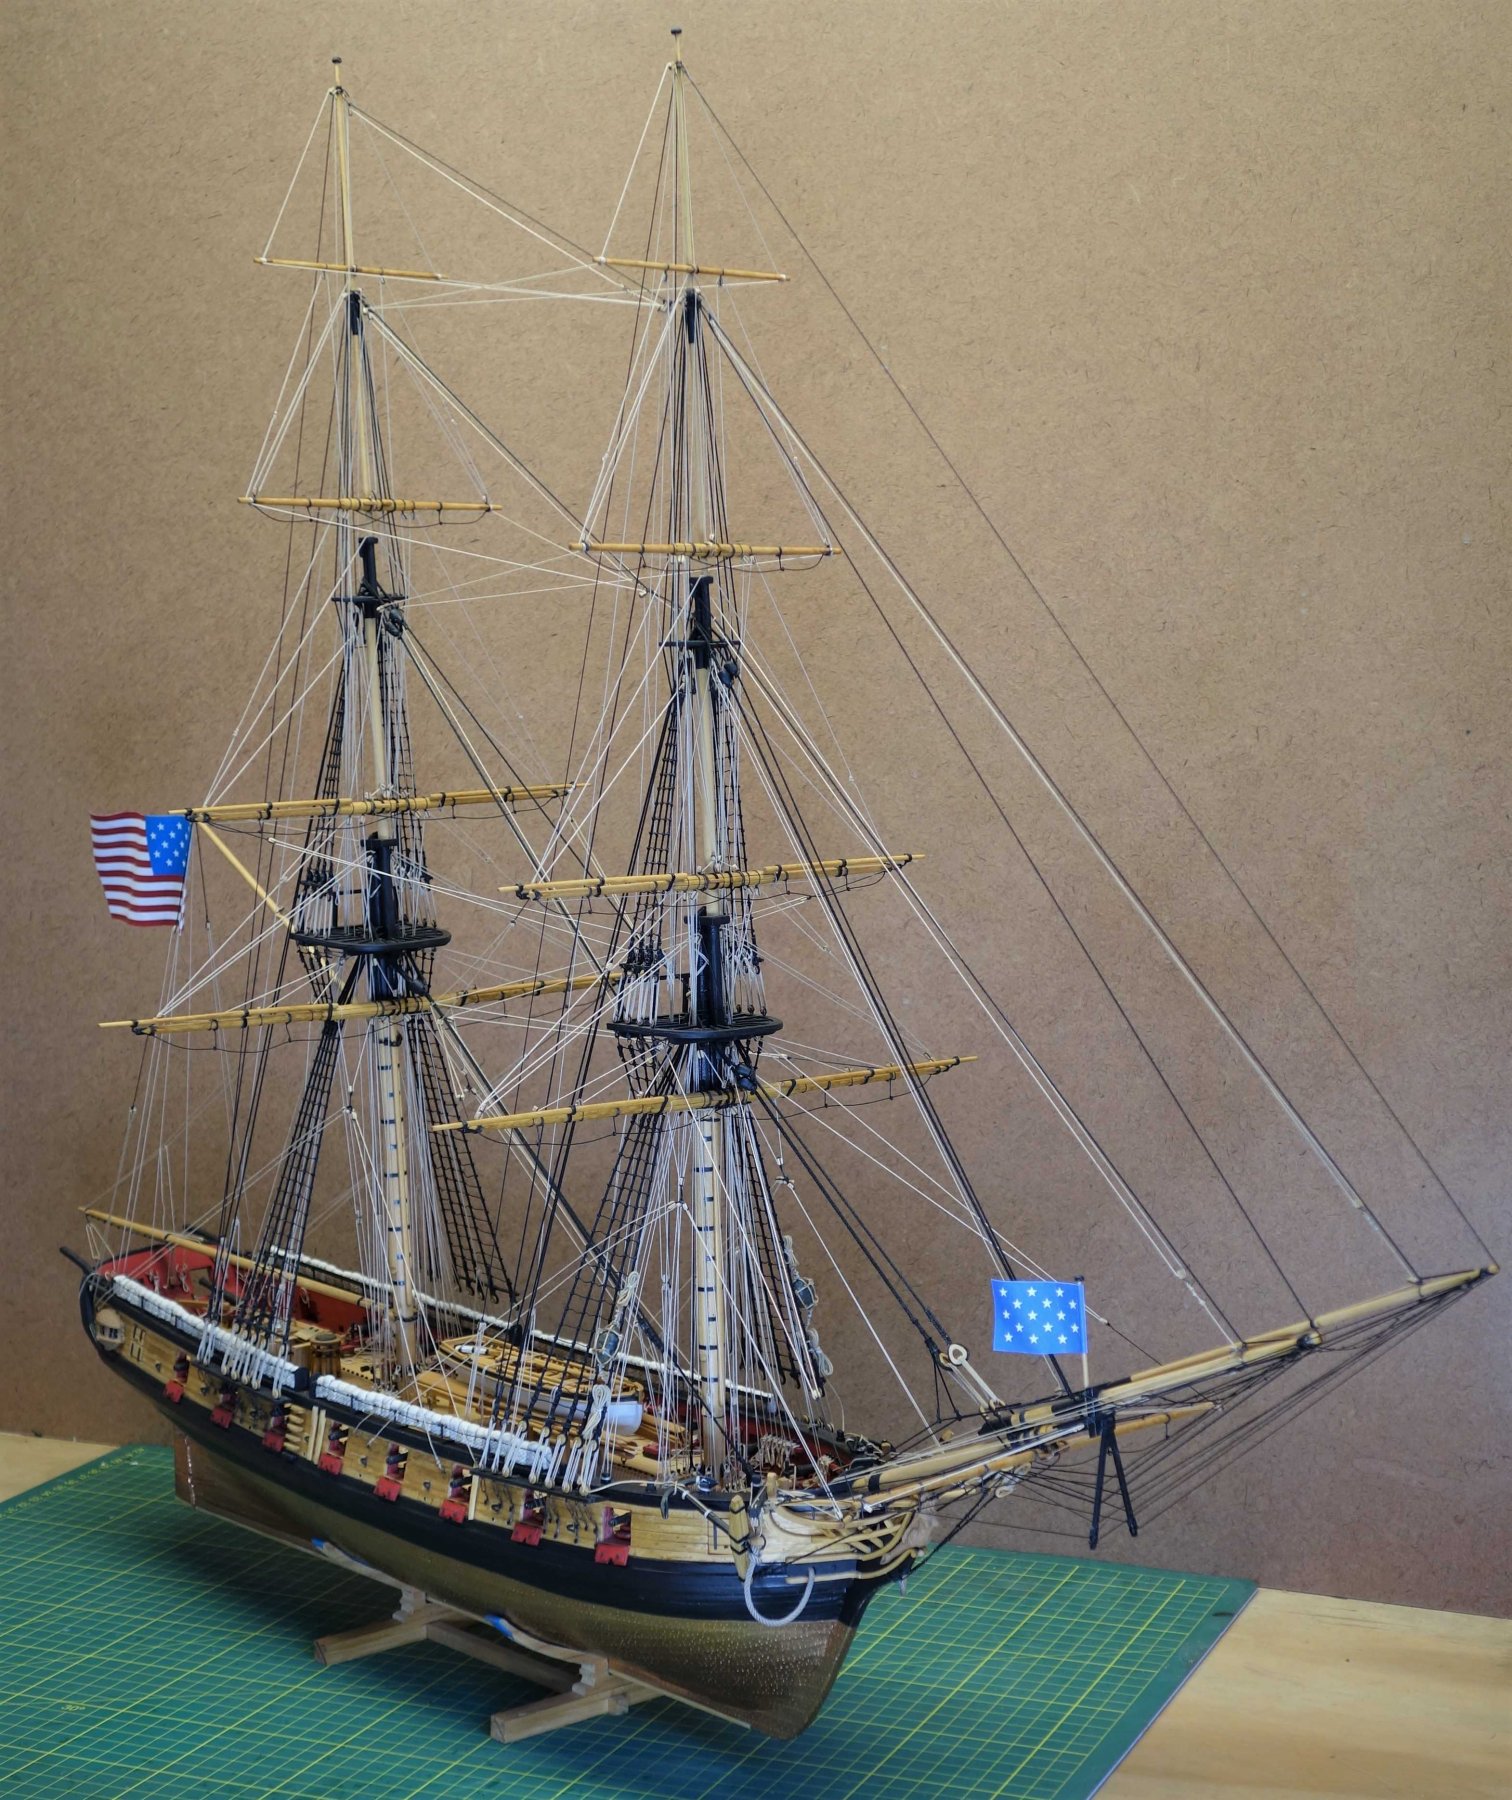
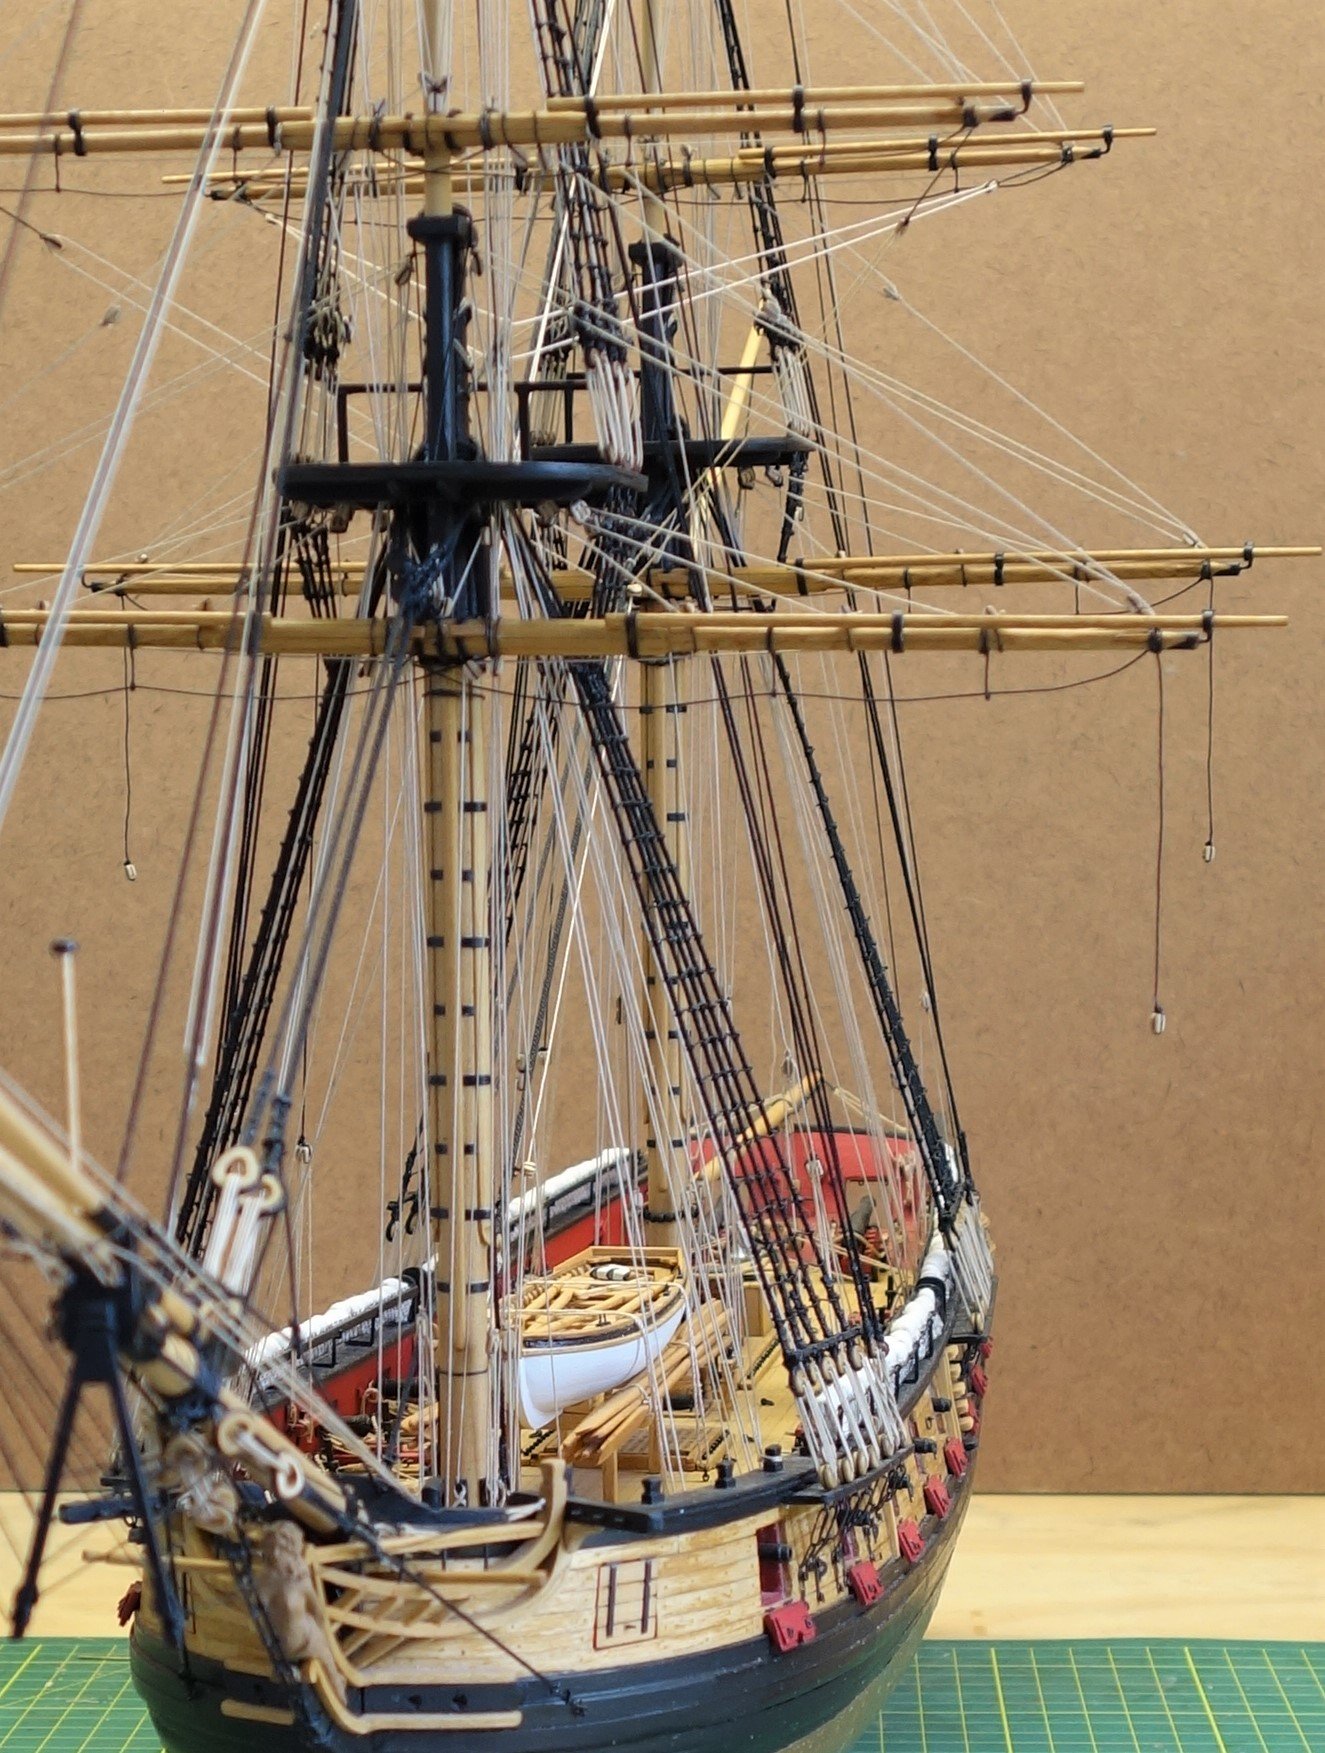
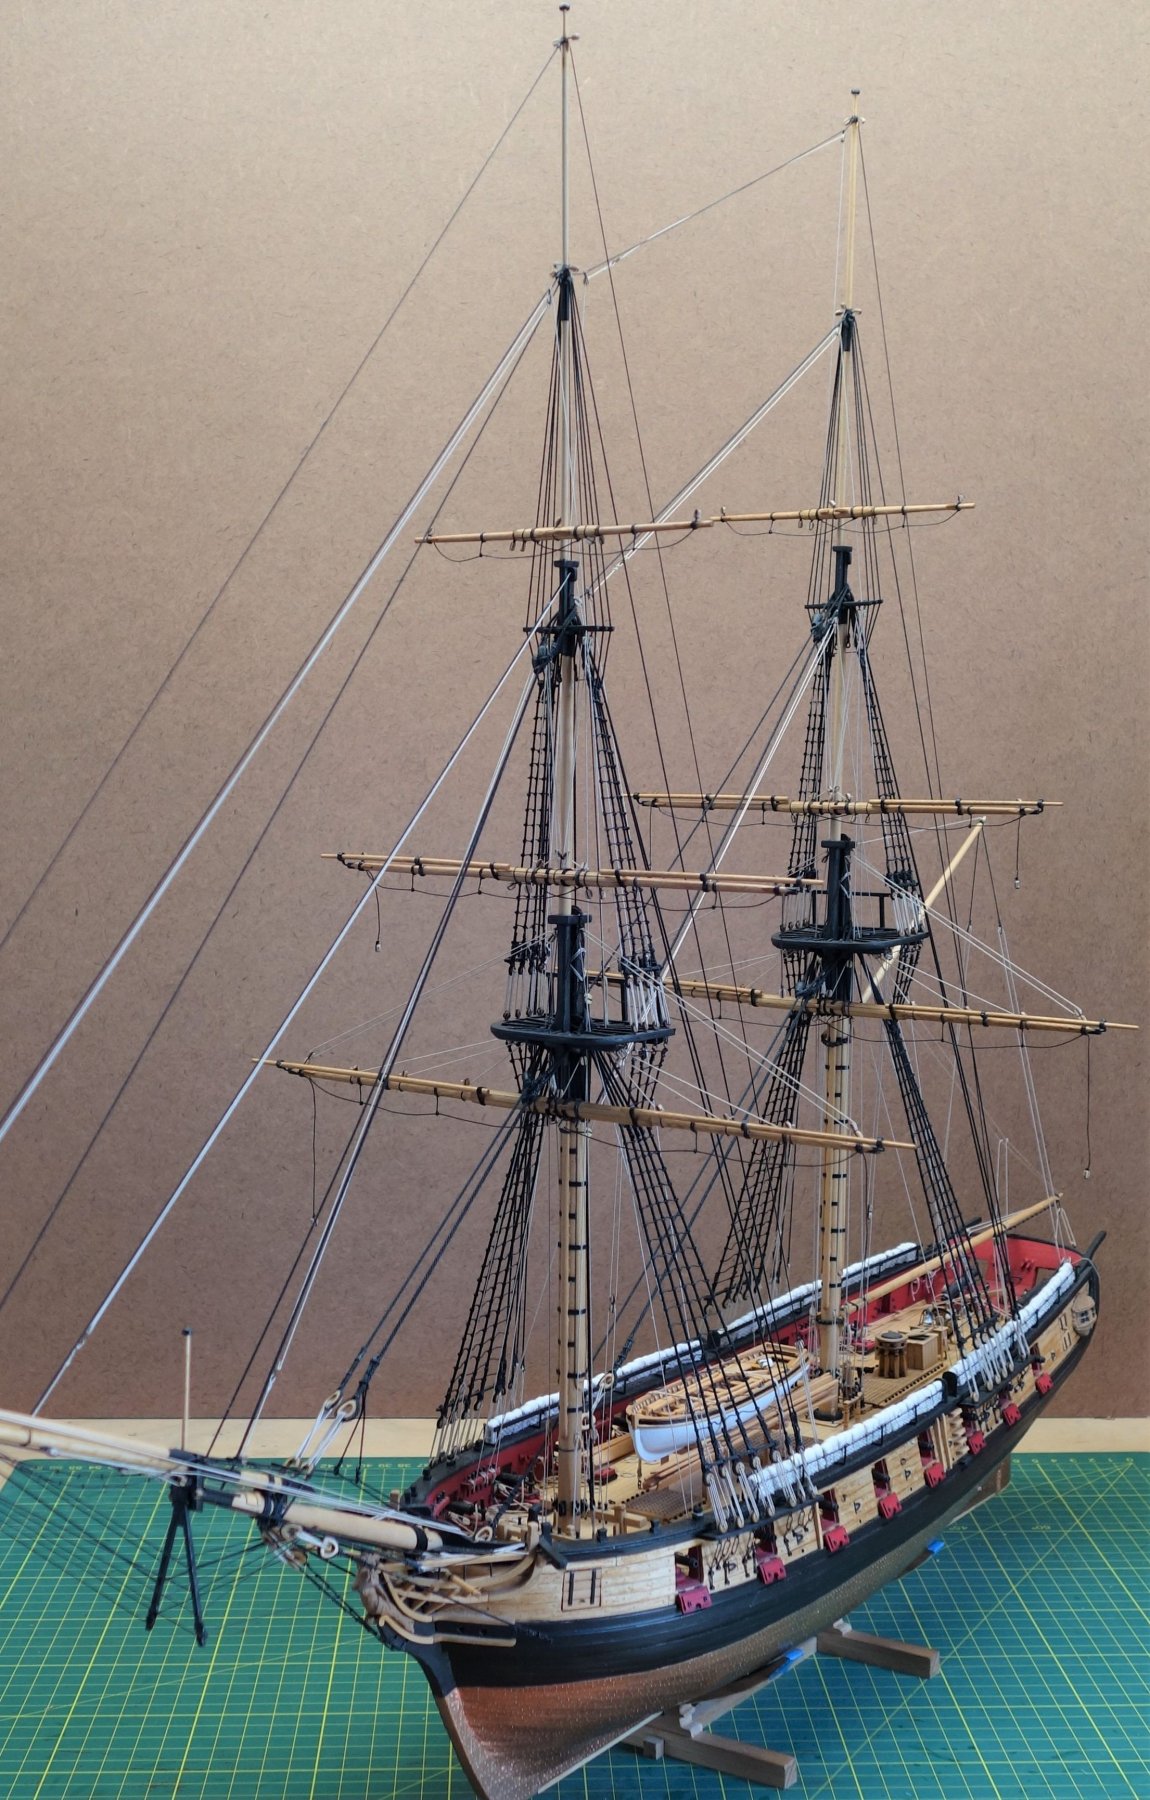
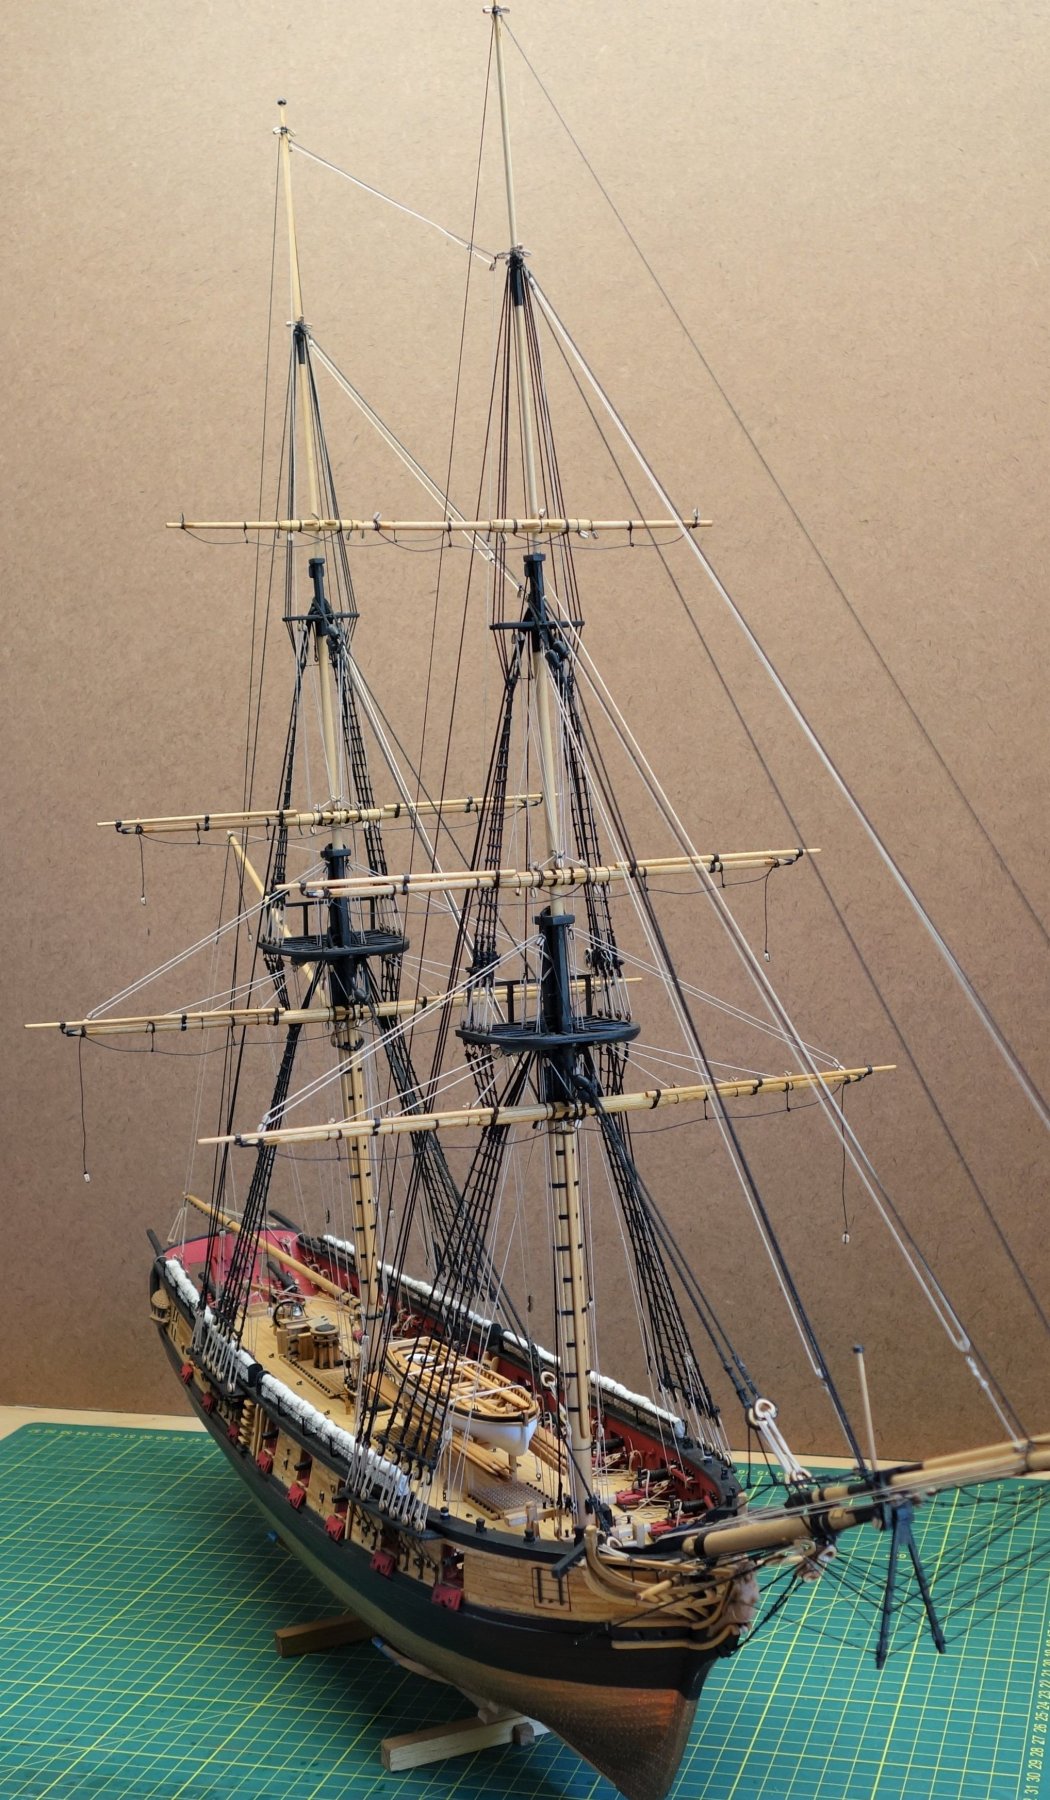
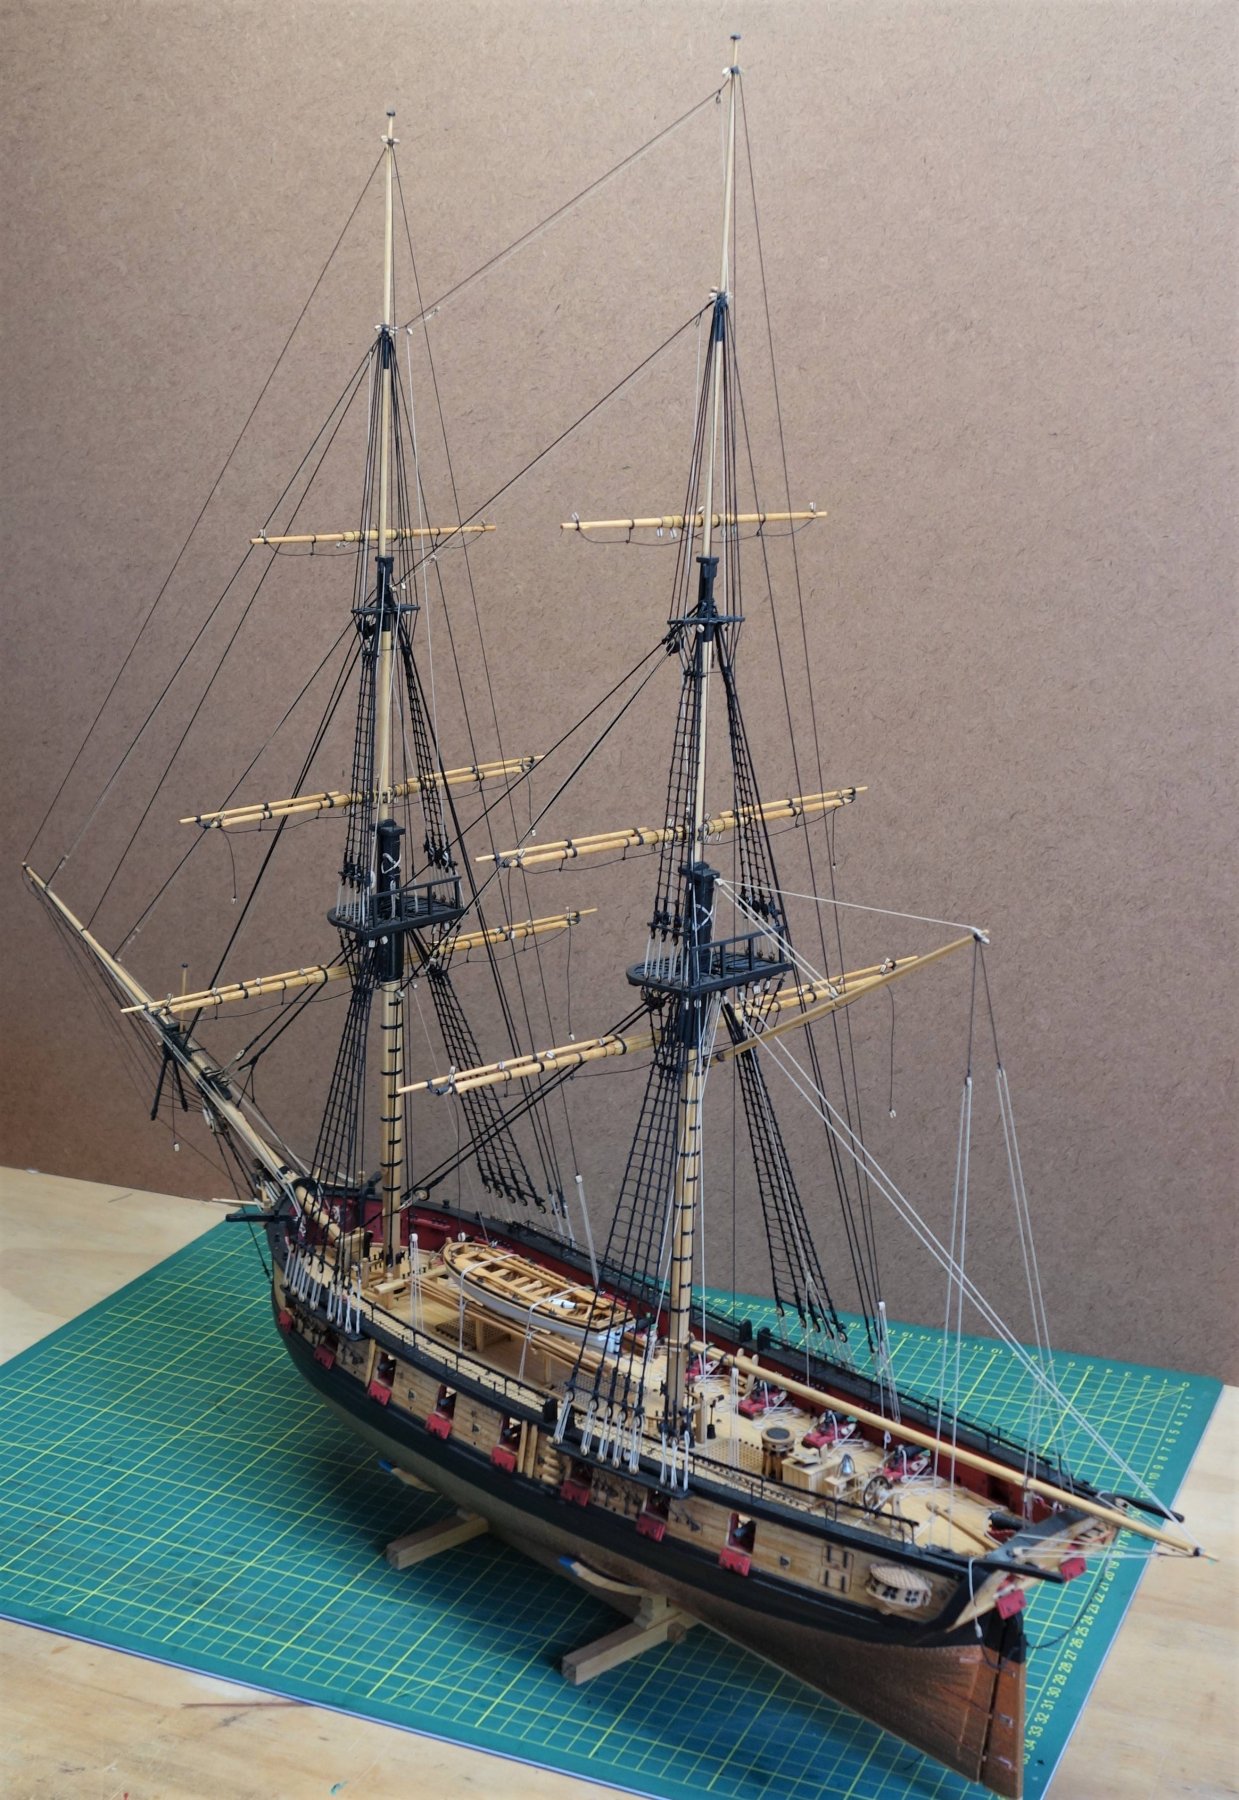
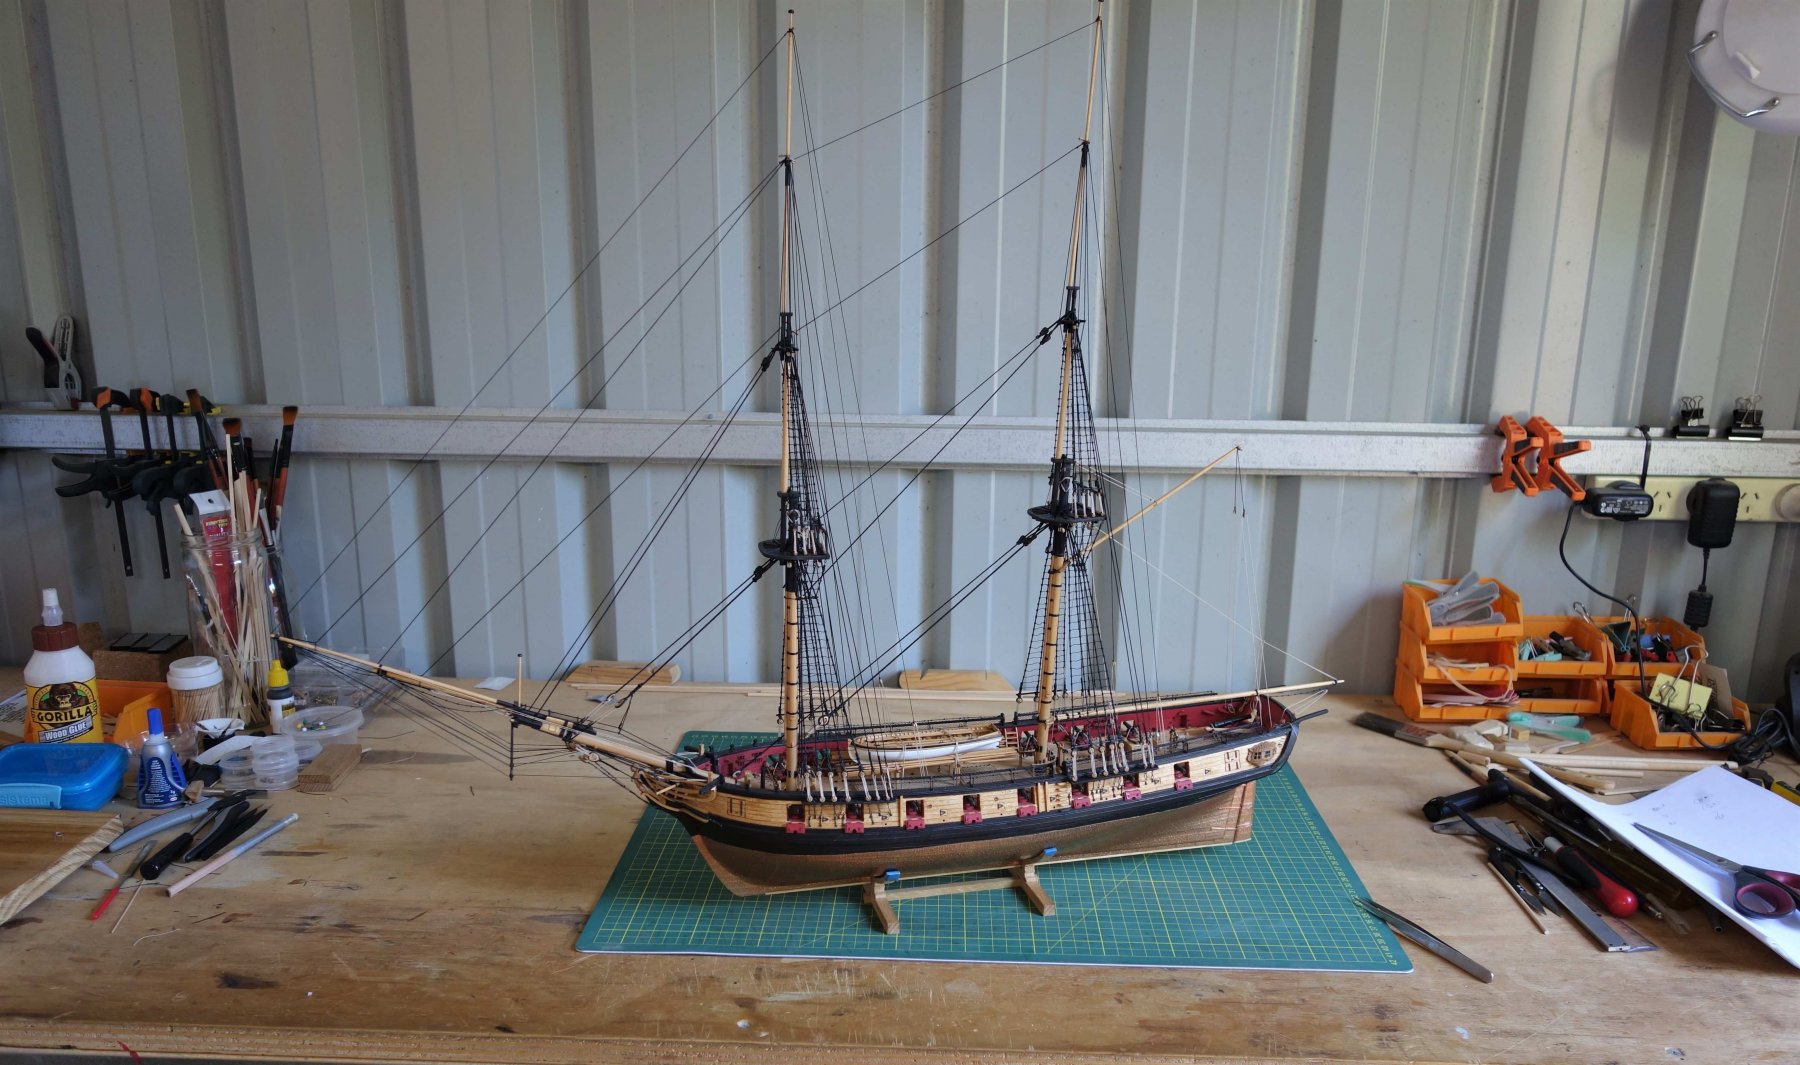
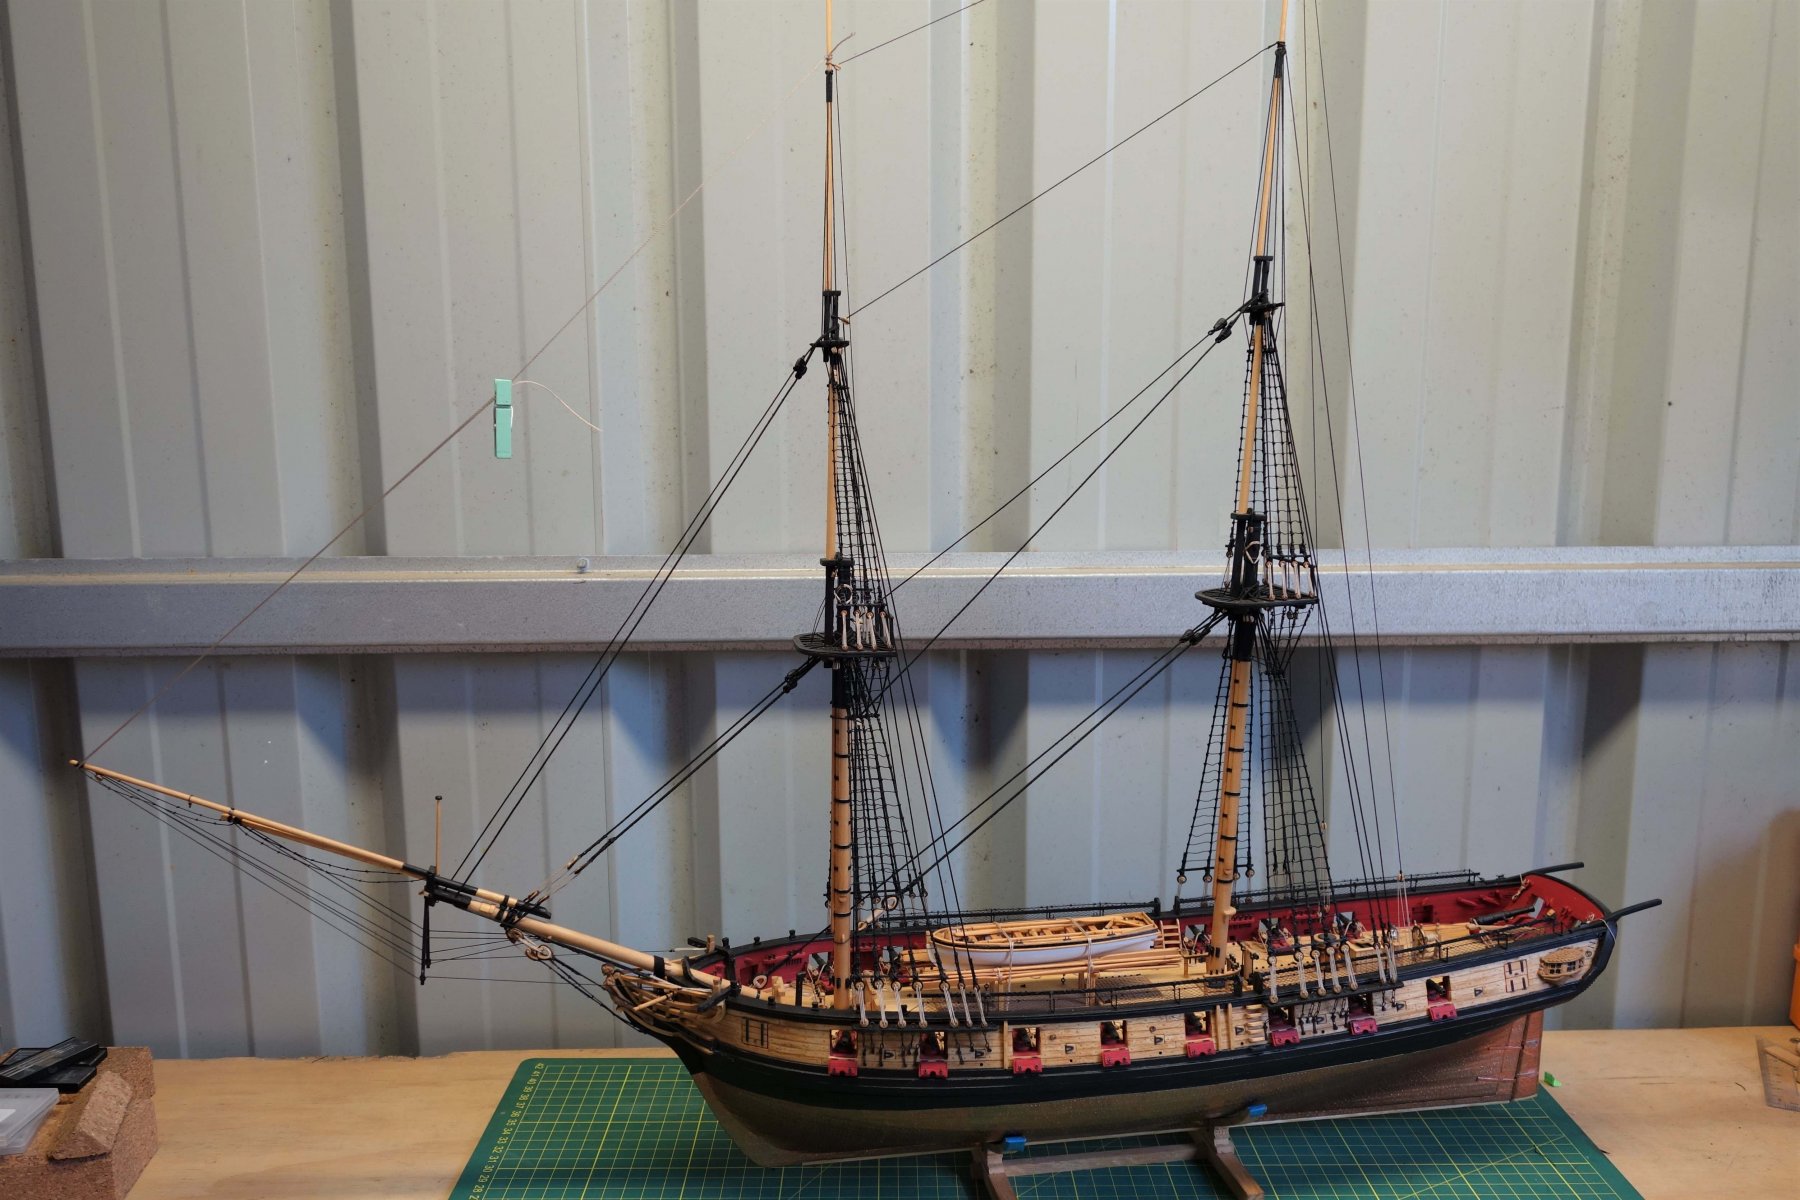
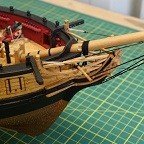
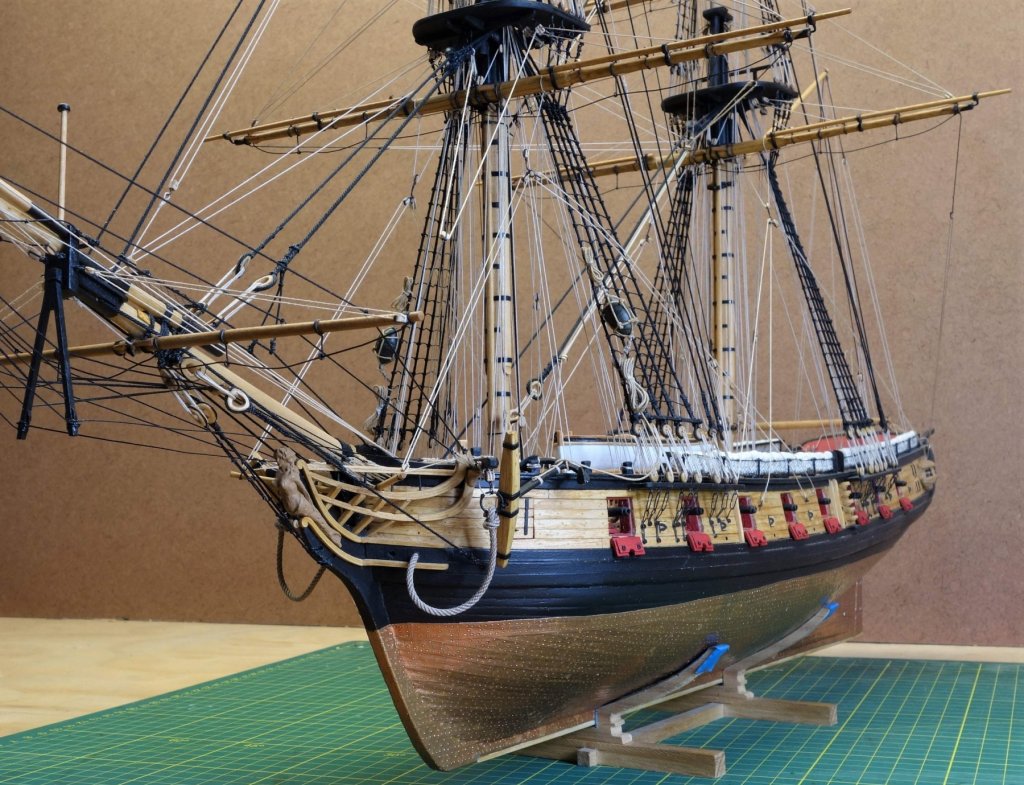
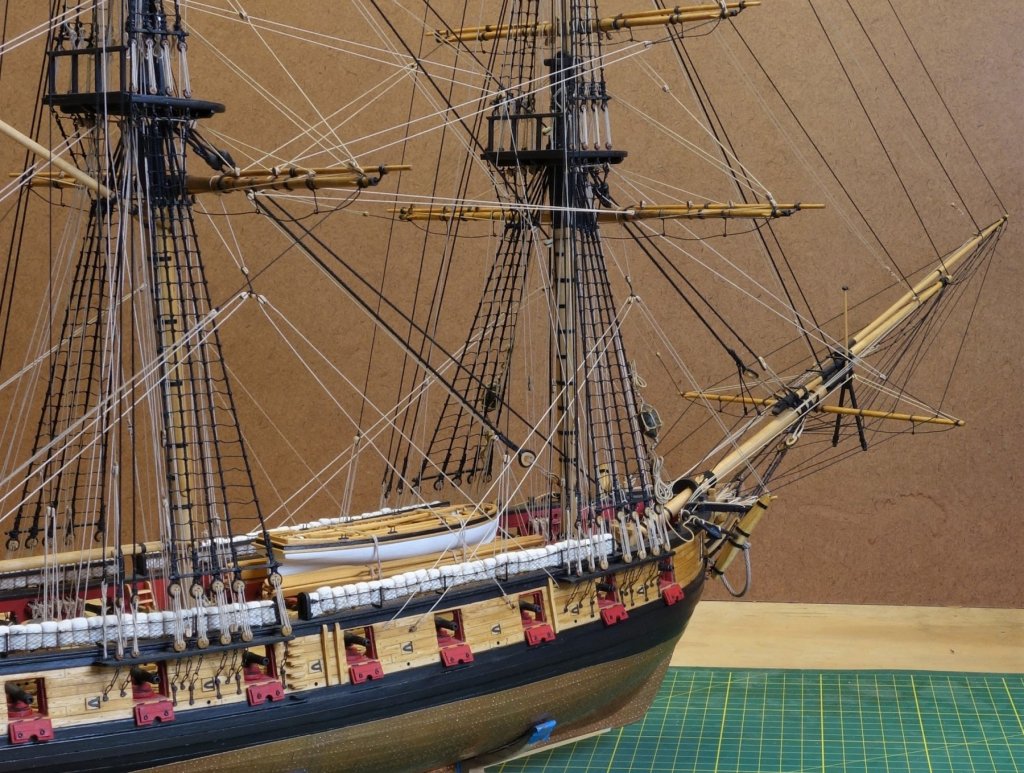
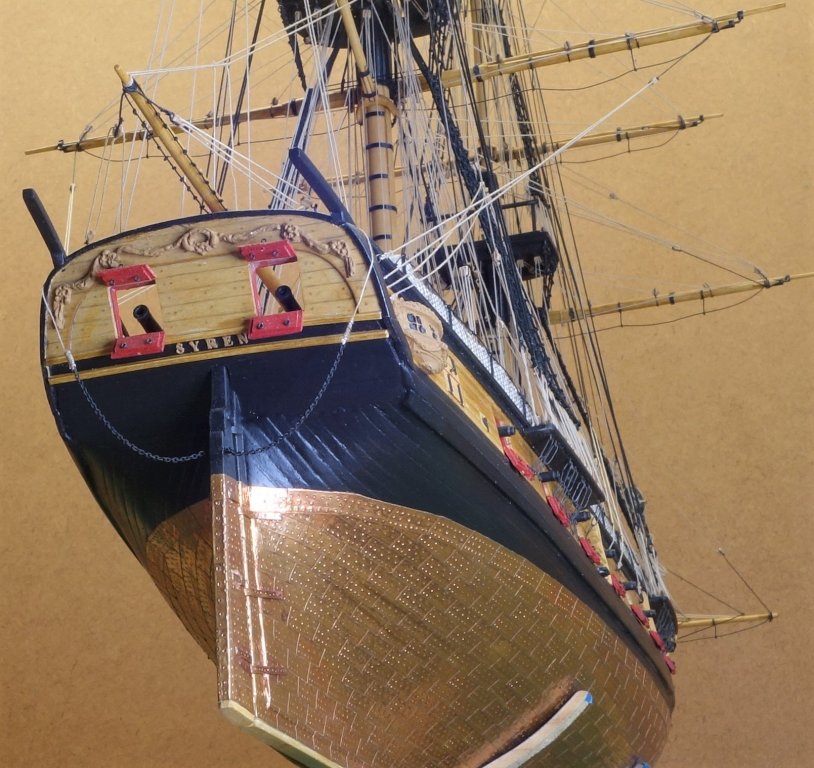
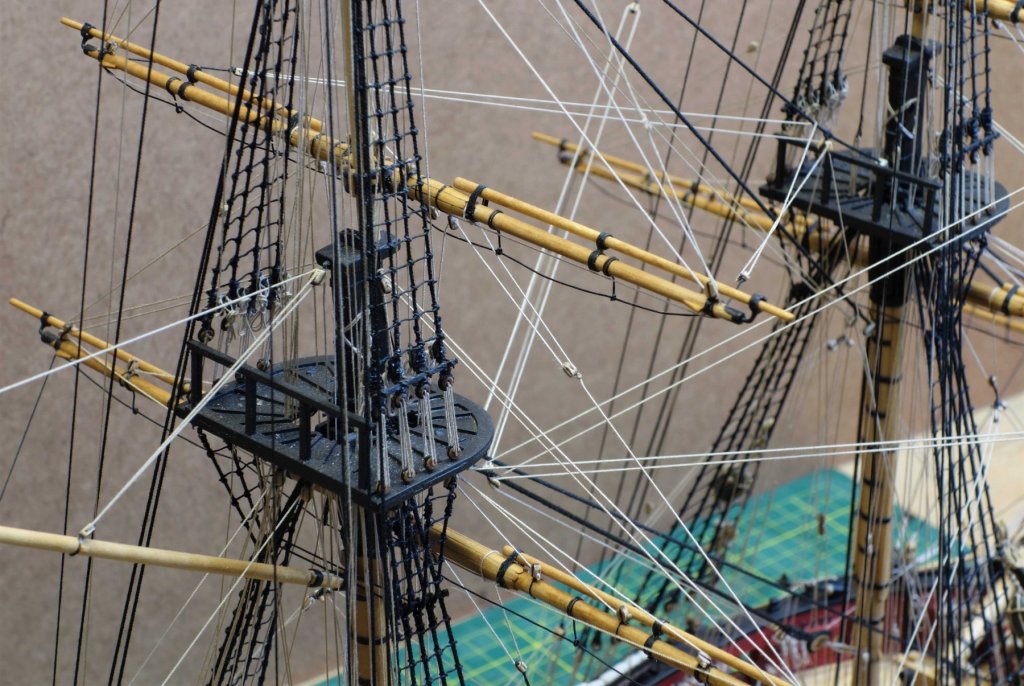
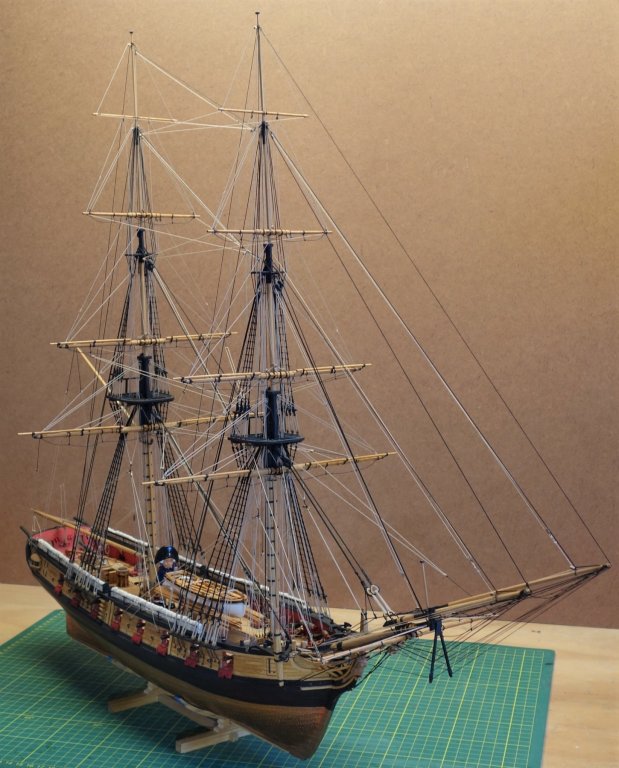
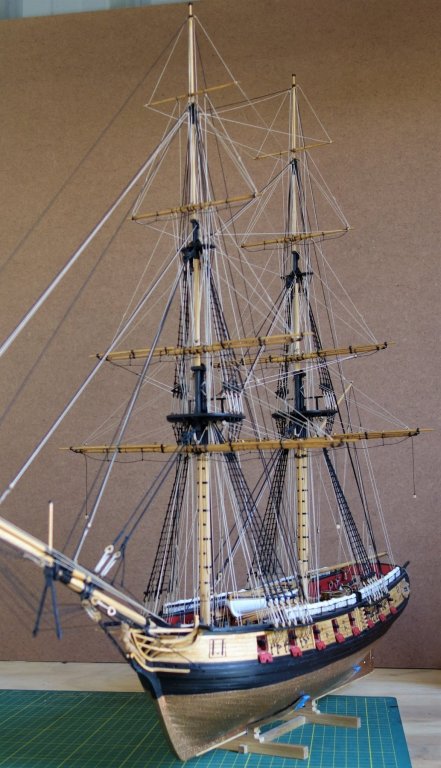
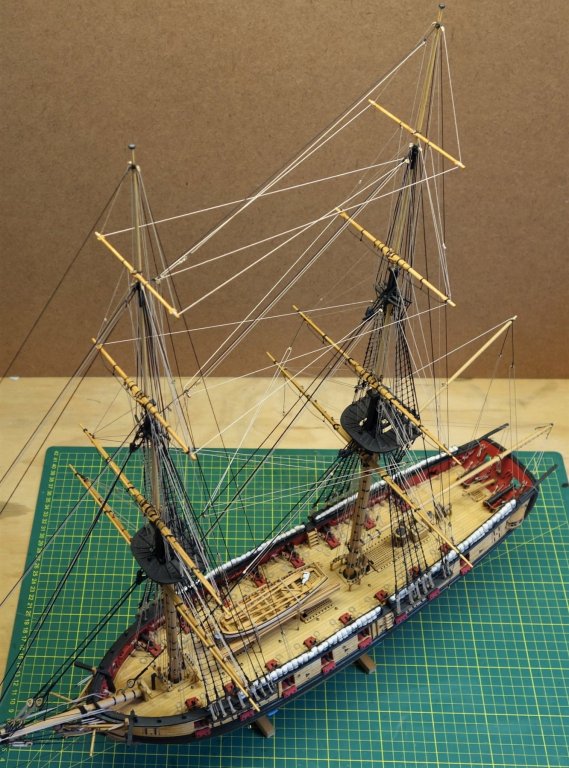
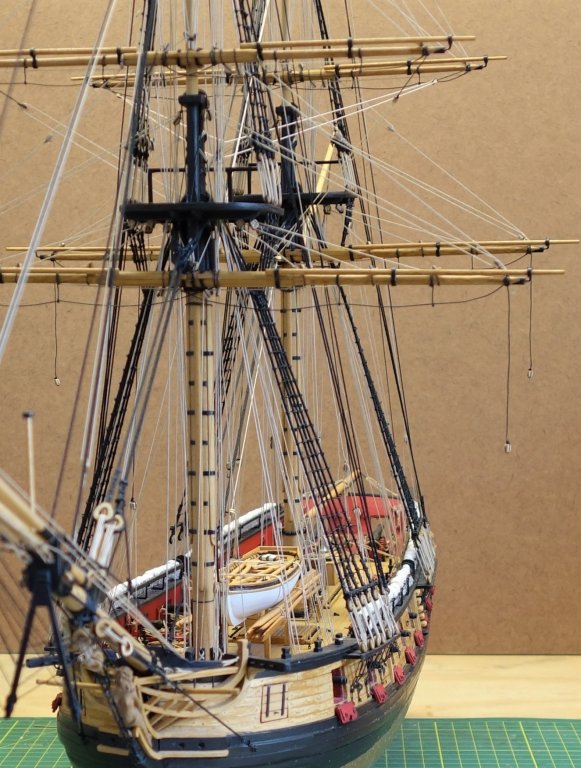
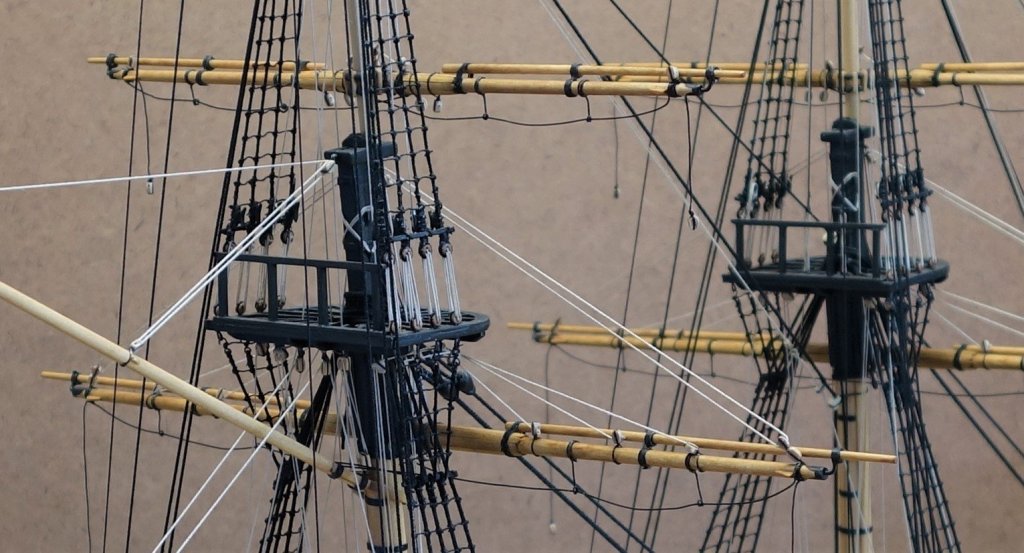
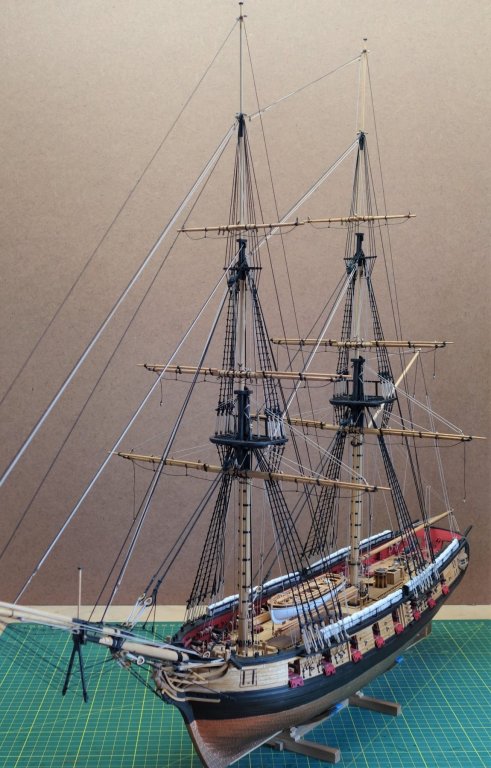
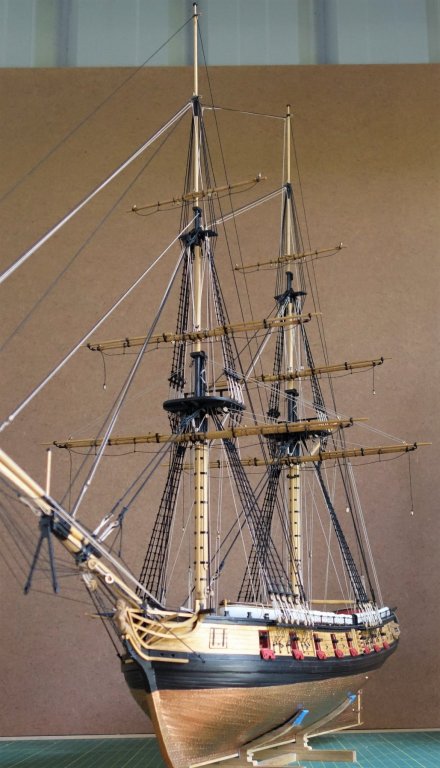
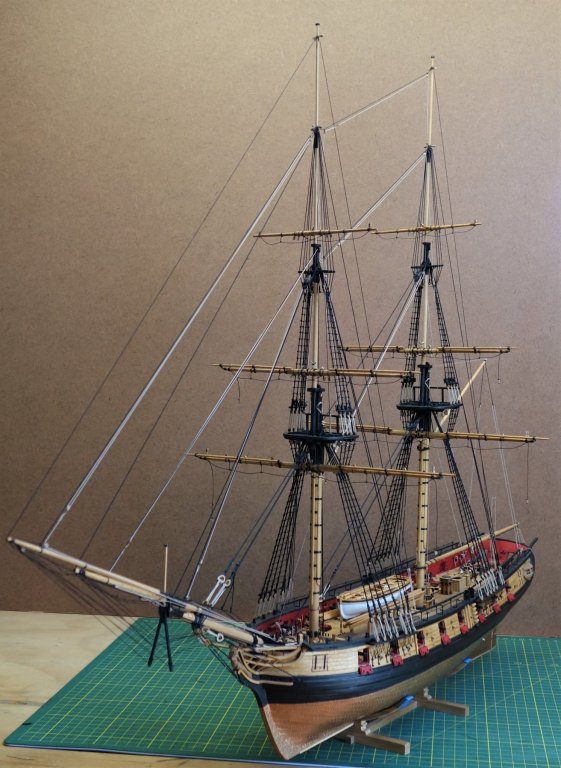
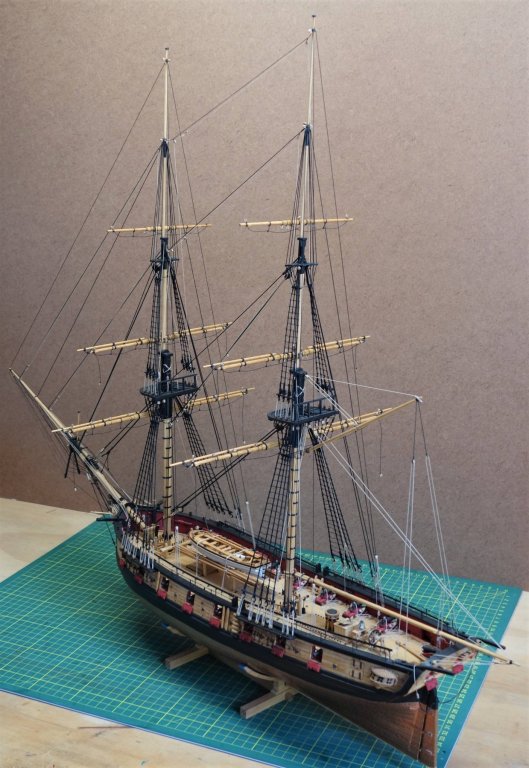
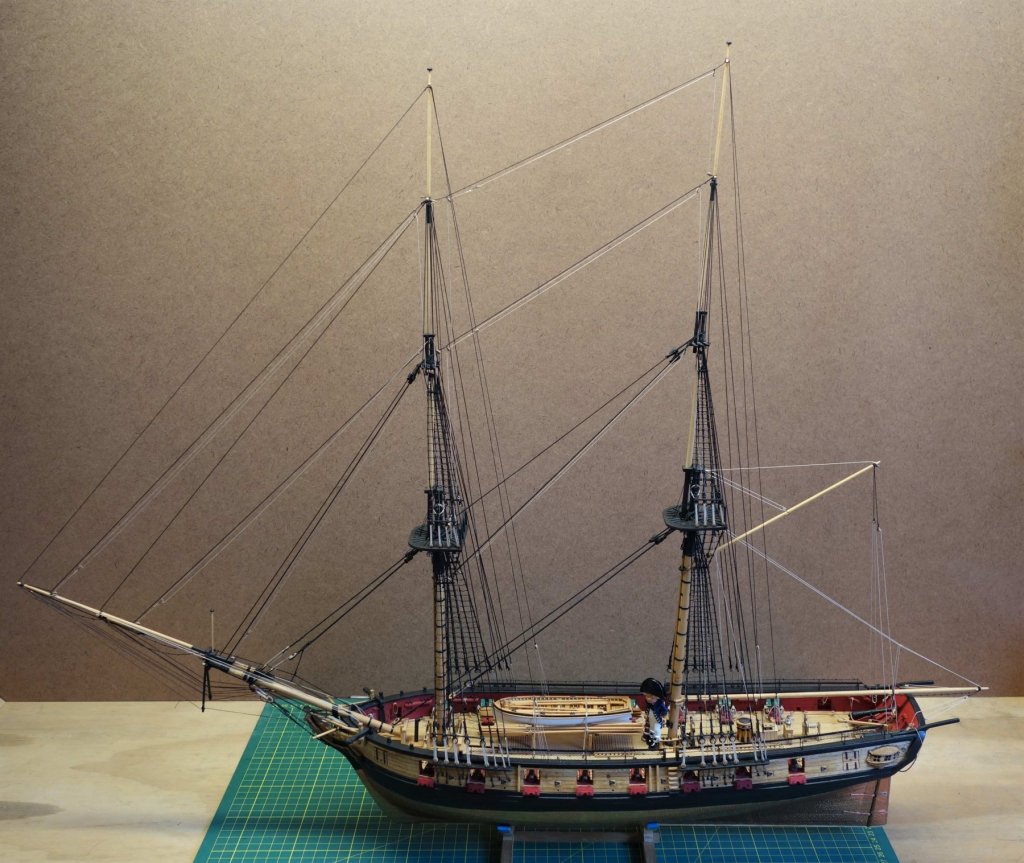
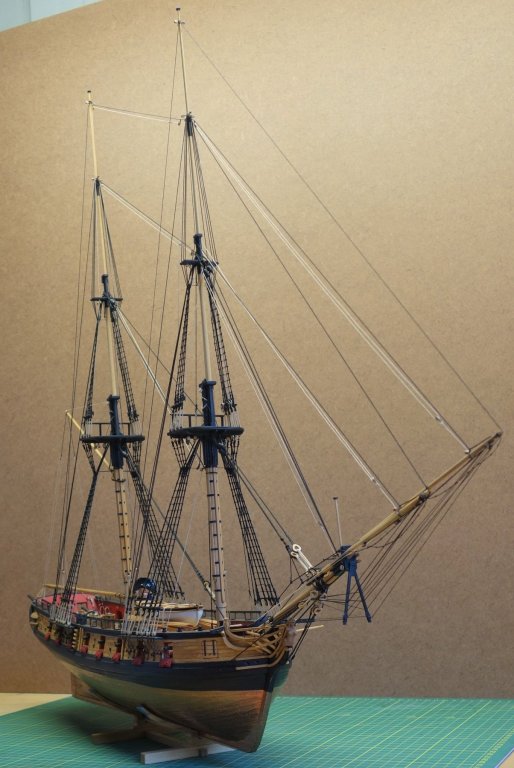
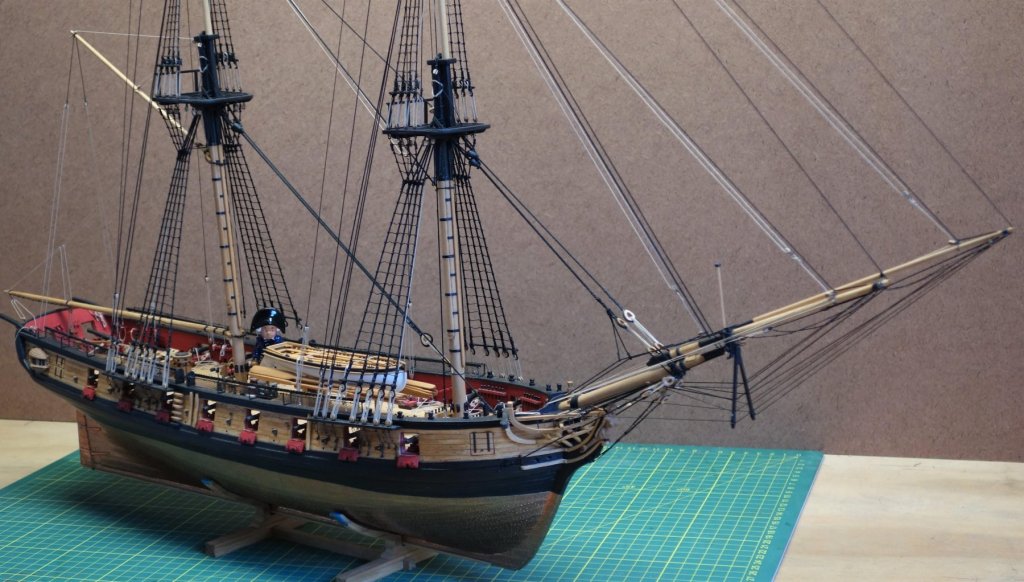
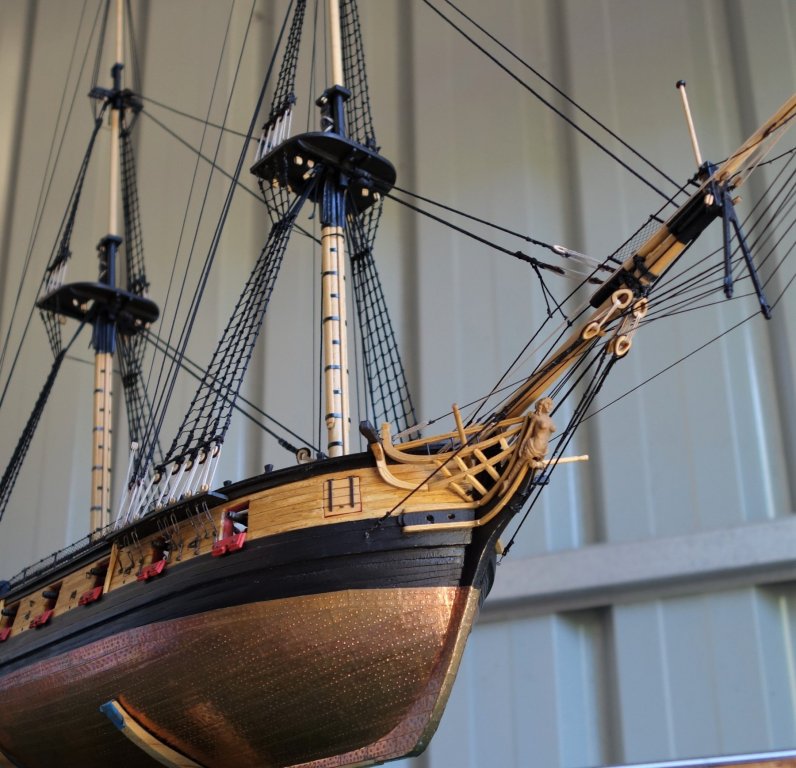
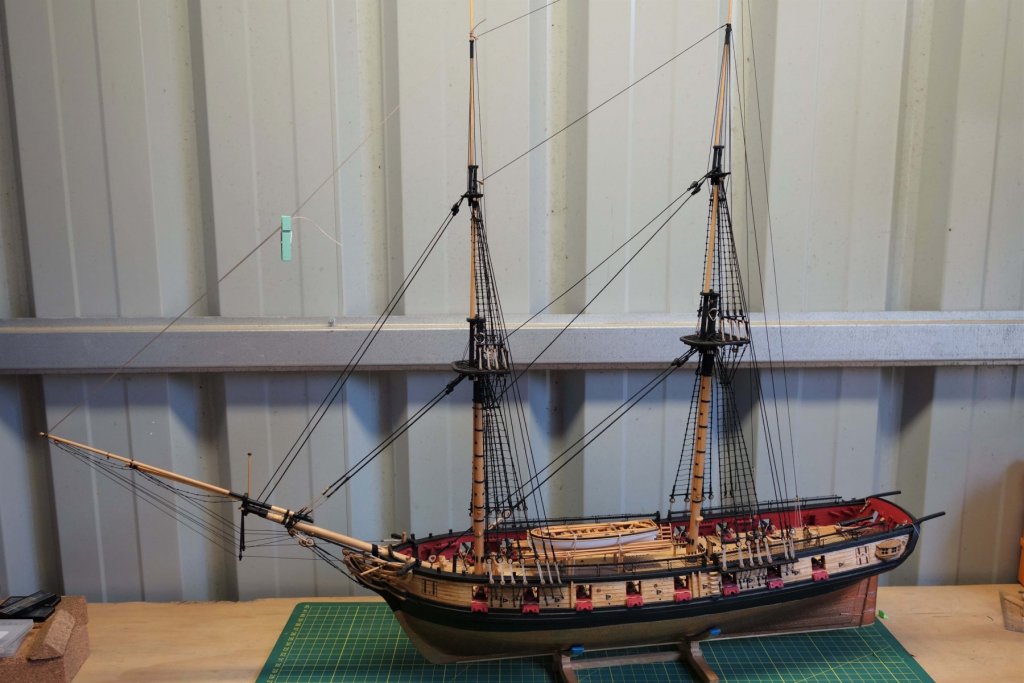
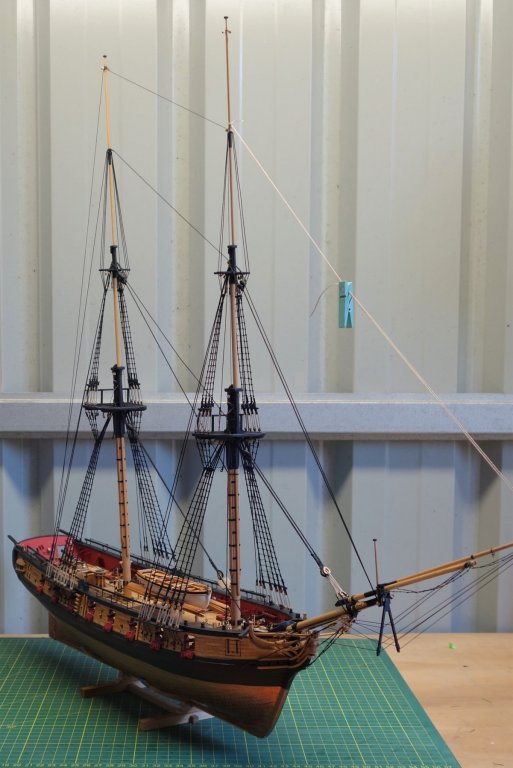
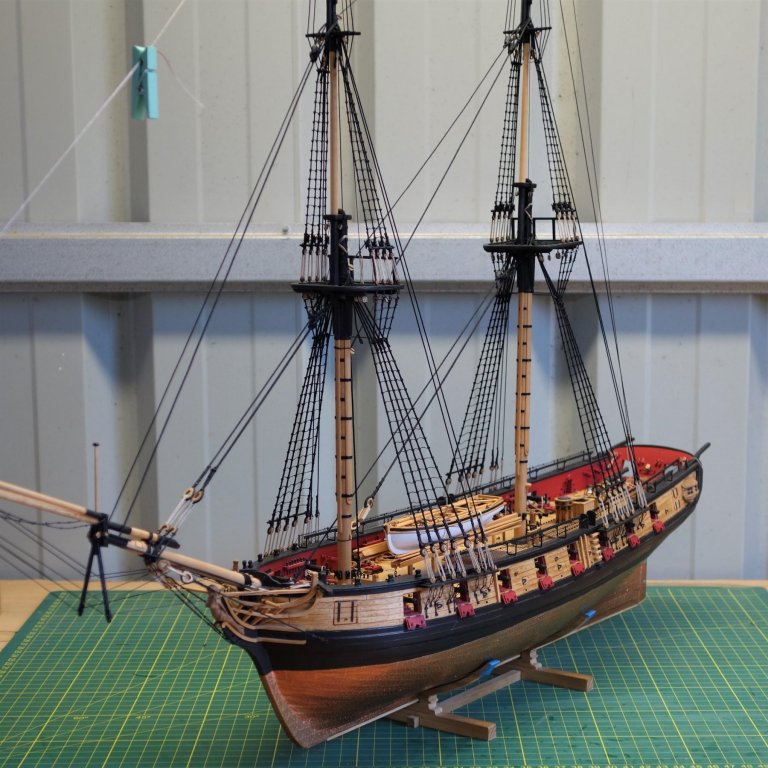
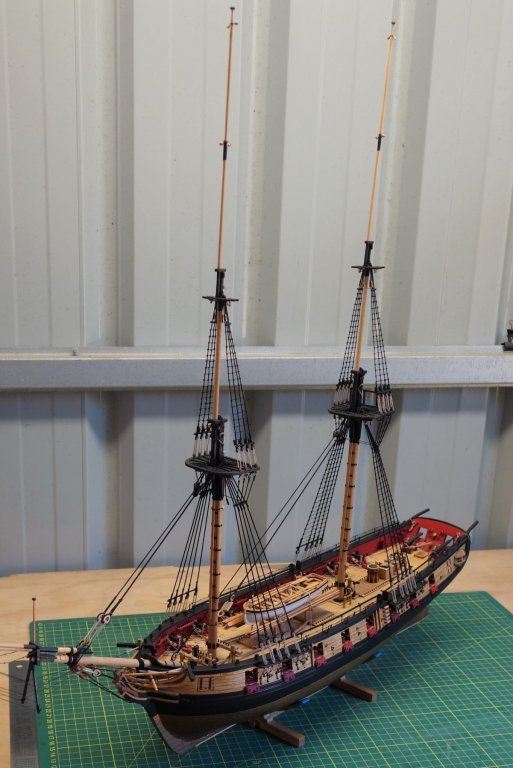
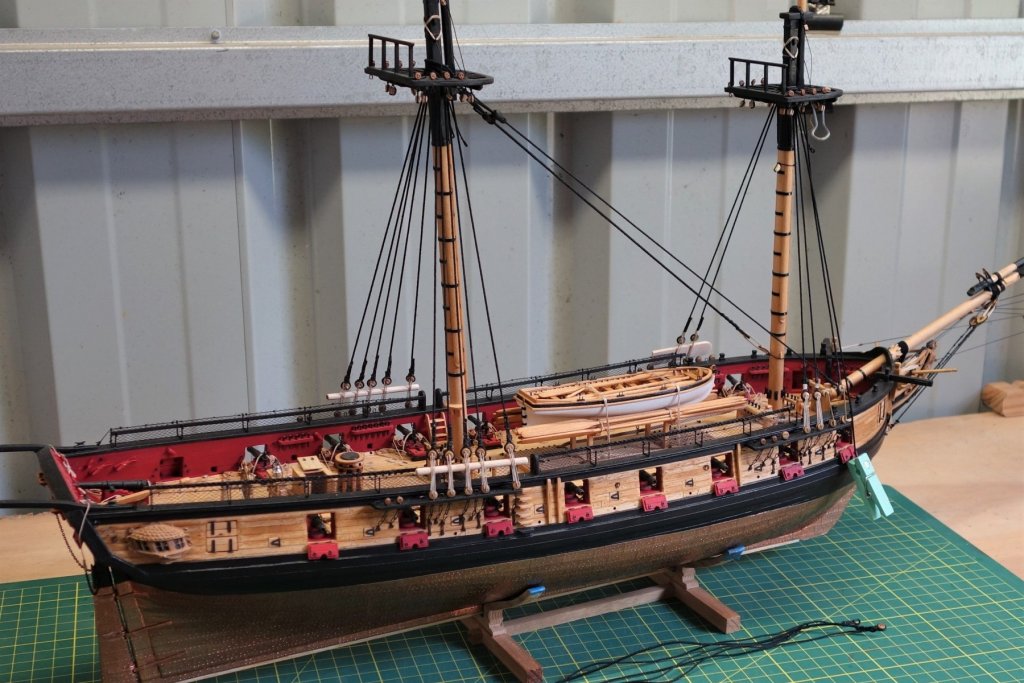
 Well, I finished the model. Not sure how to add "finished" to the title yet though....lol. Thanks for everyone who followed along and/or pushed the "like" button. It's been a absolute pleasure building this beautiful ship. I put a few extra photo's in for the final post.


- 242 replies
-
- 18
-

-
- syren
- model shipways
- (and 1 more)
-
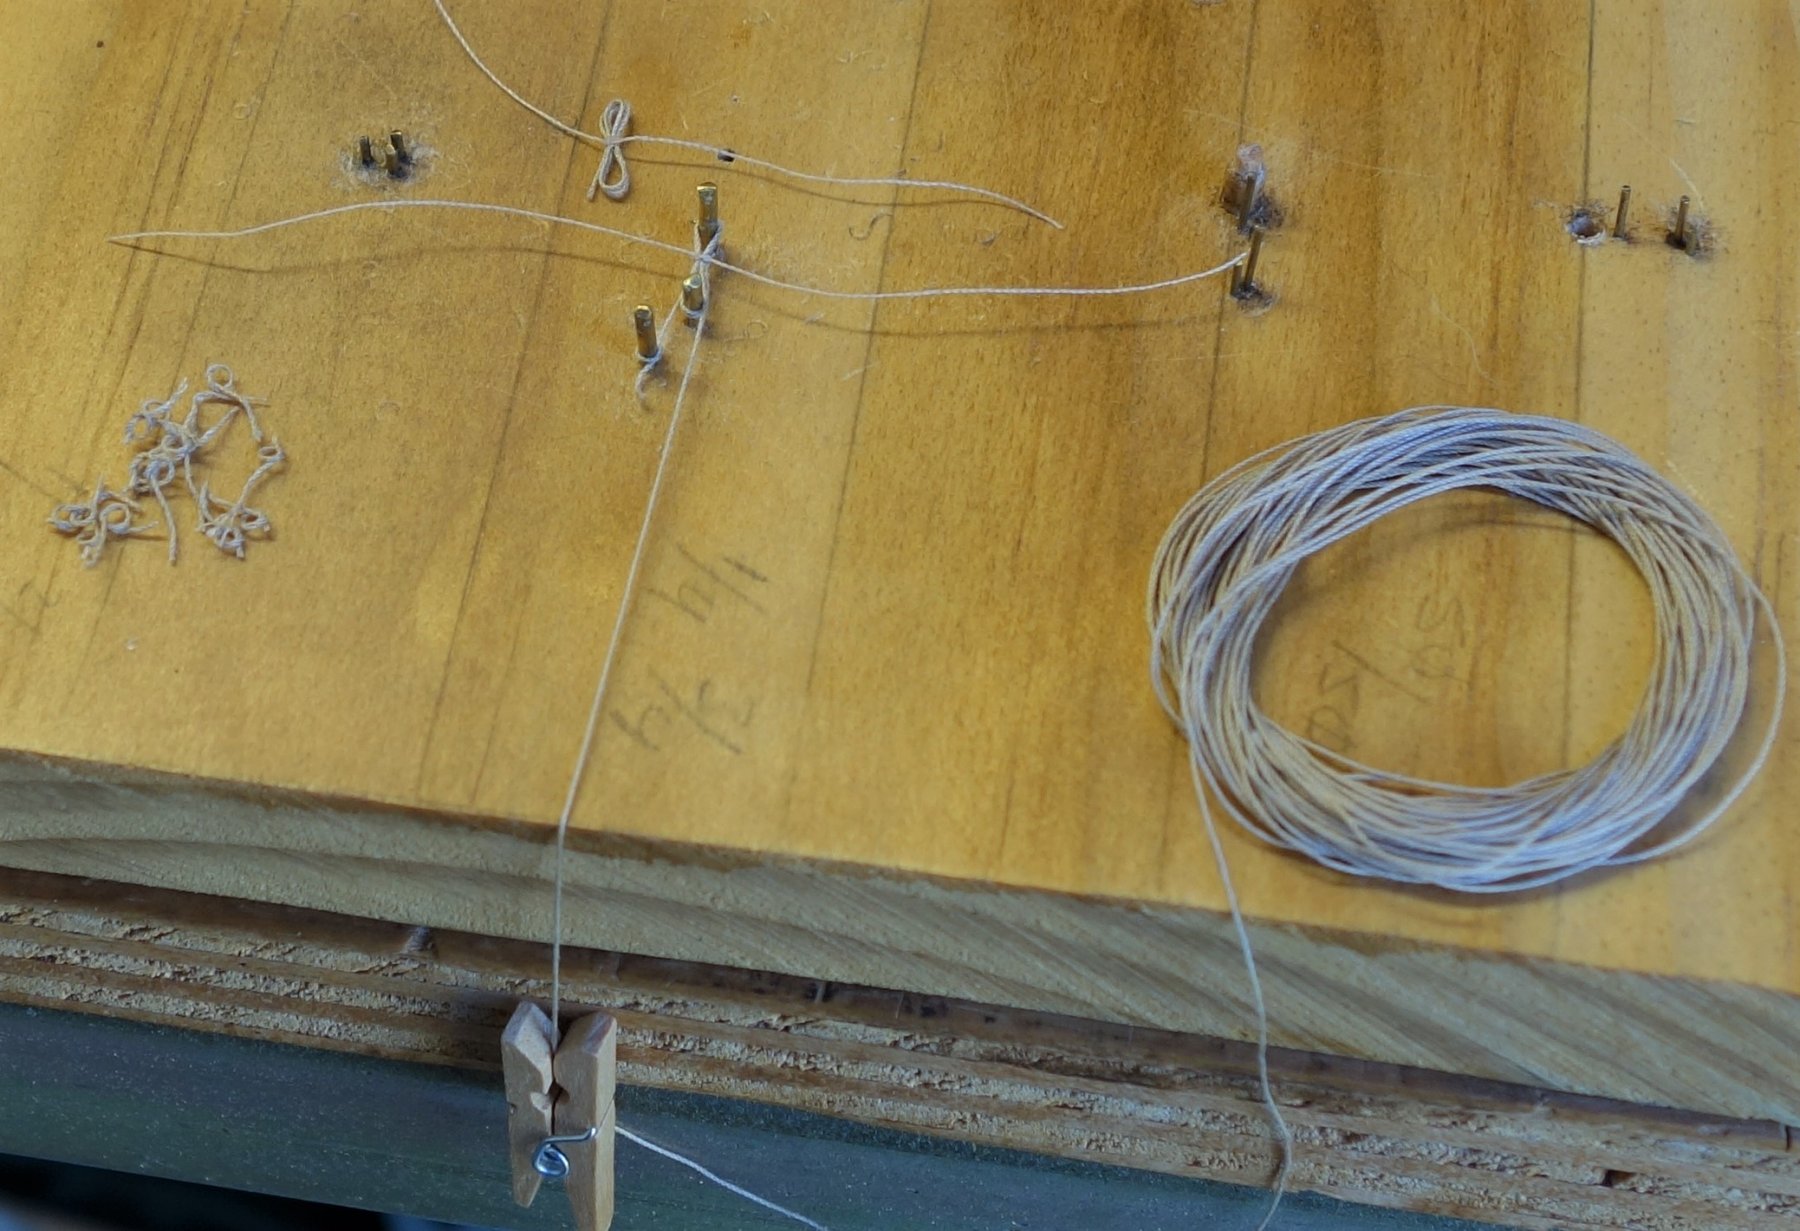
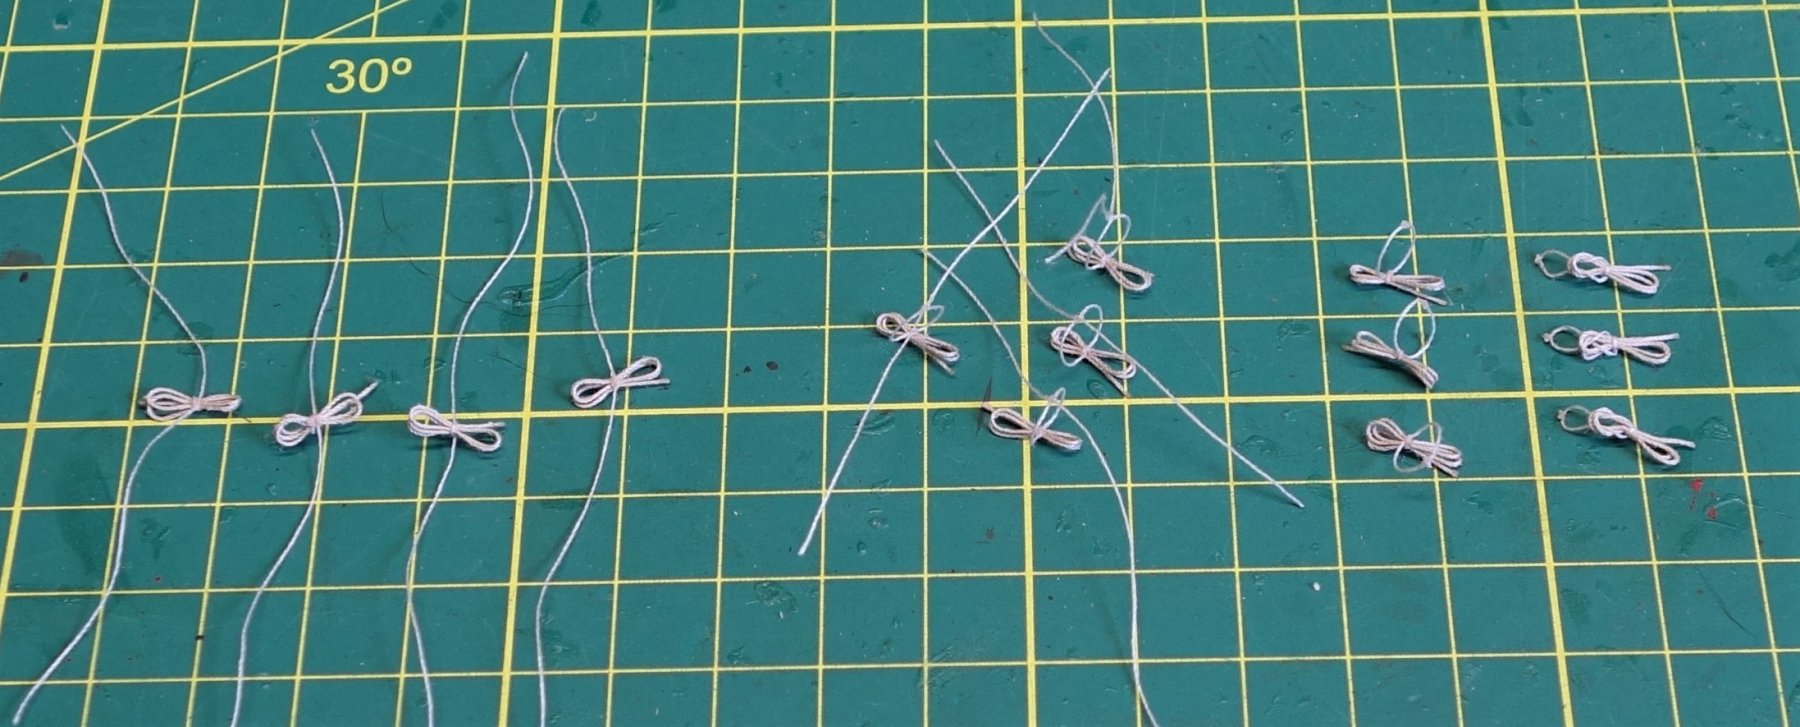
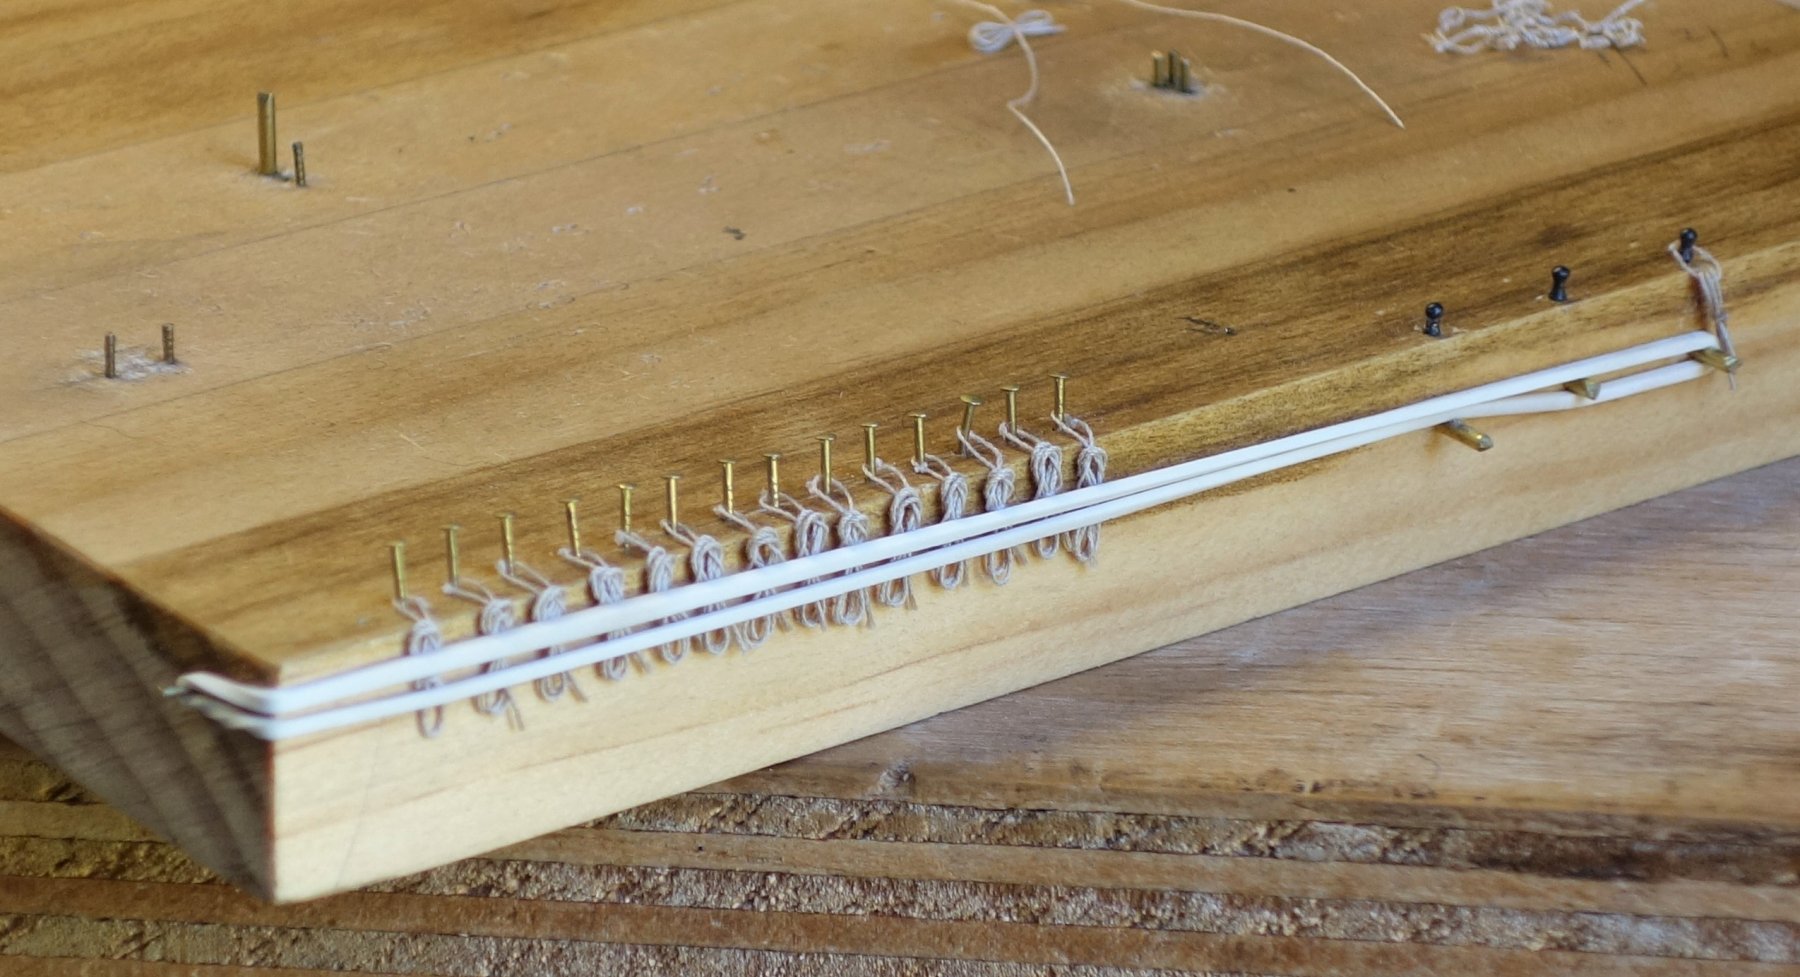
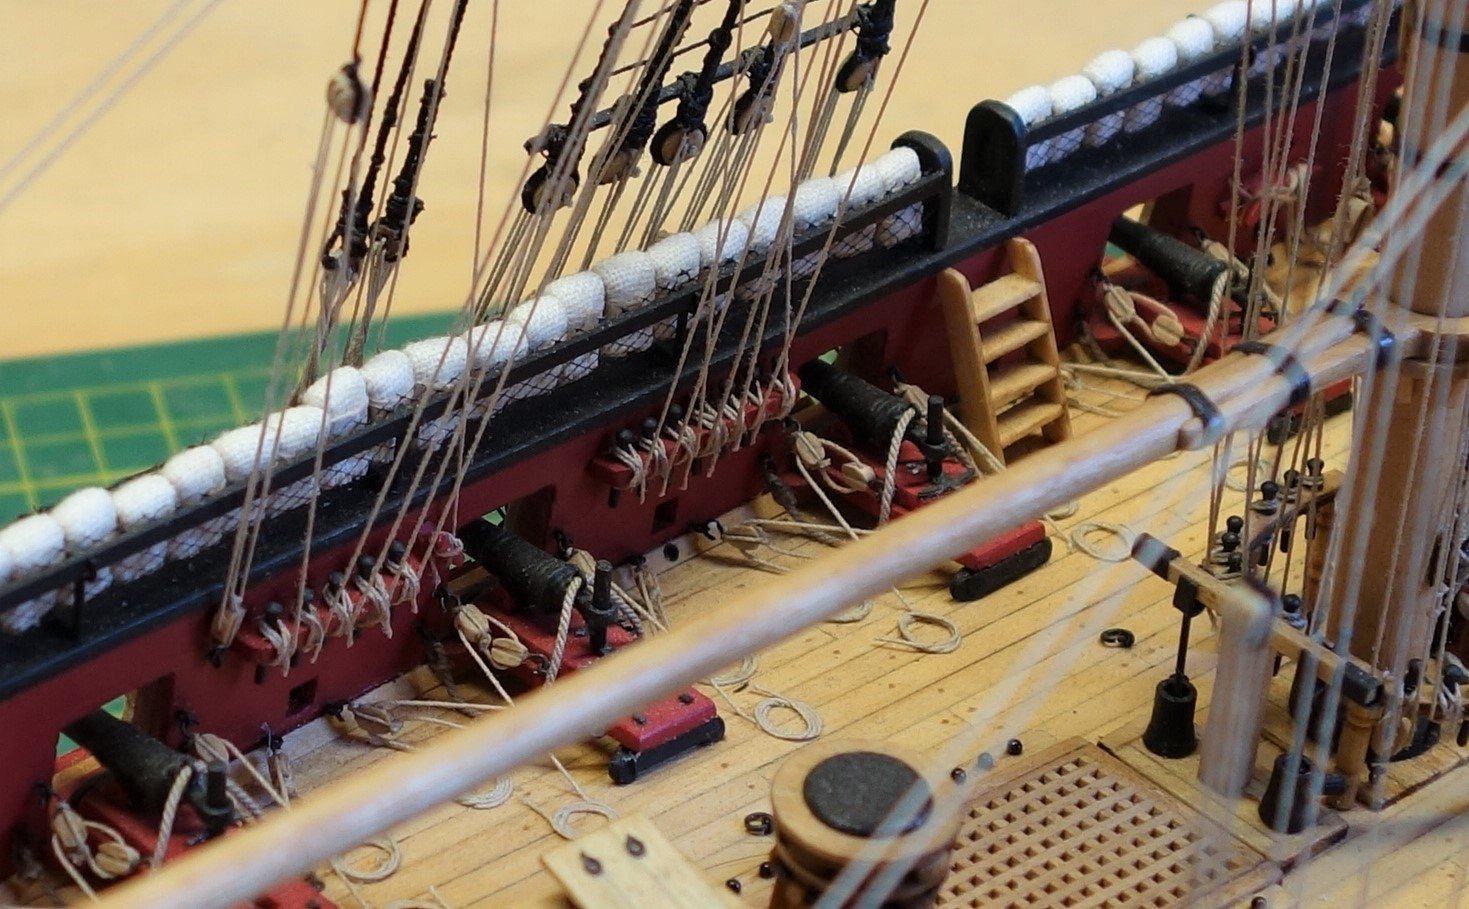
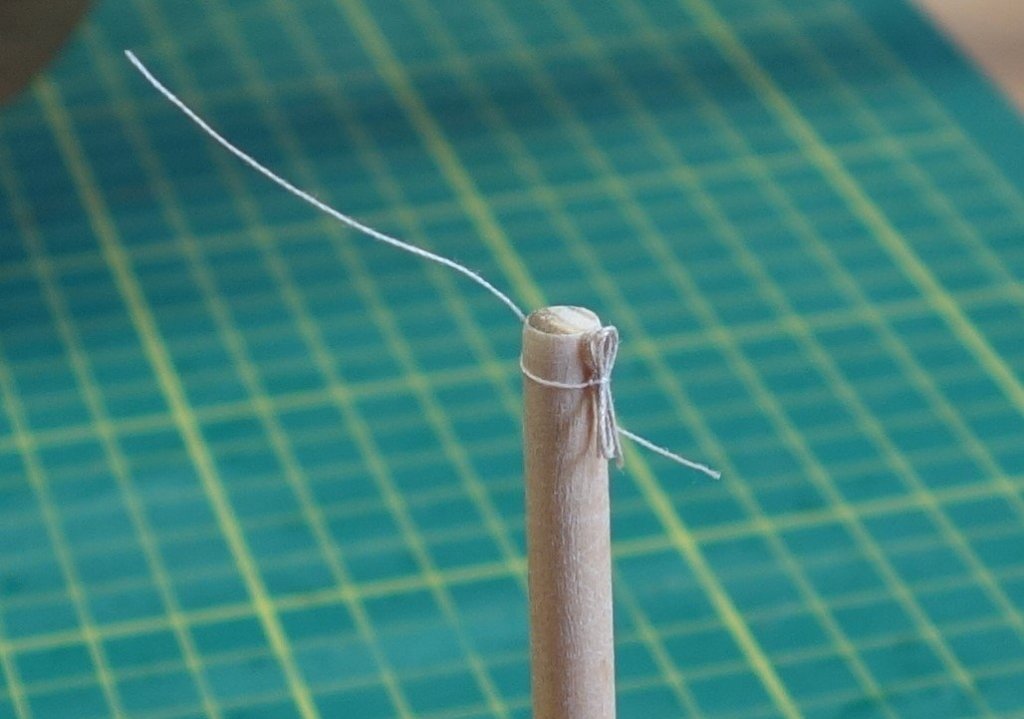
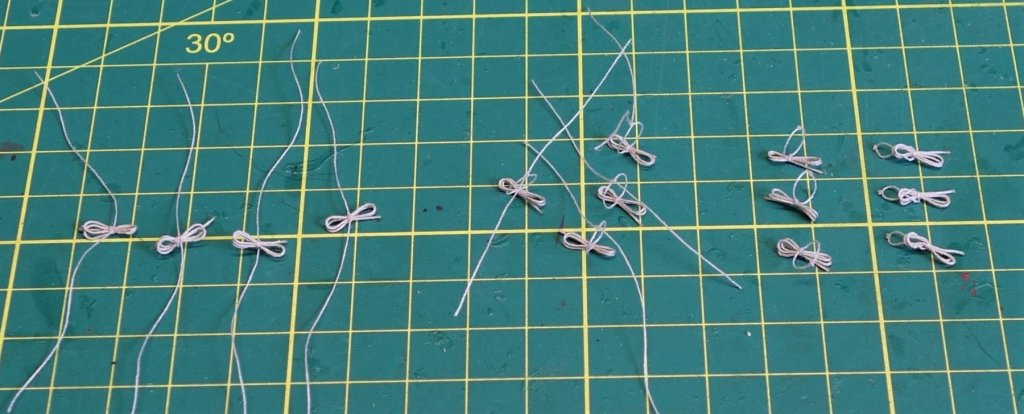
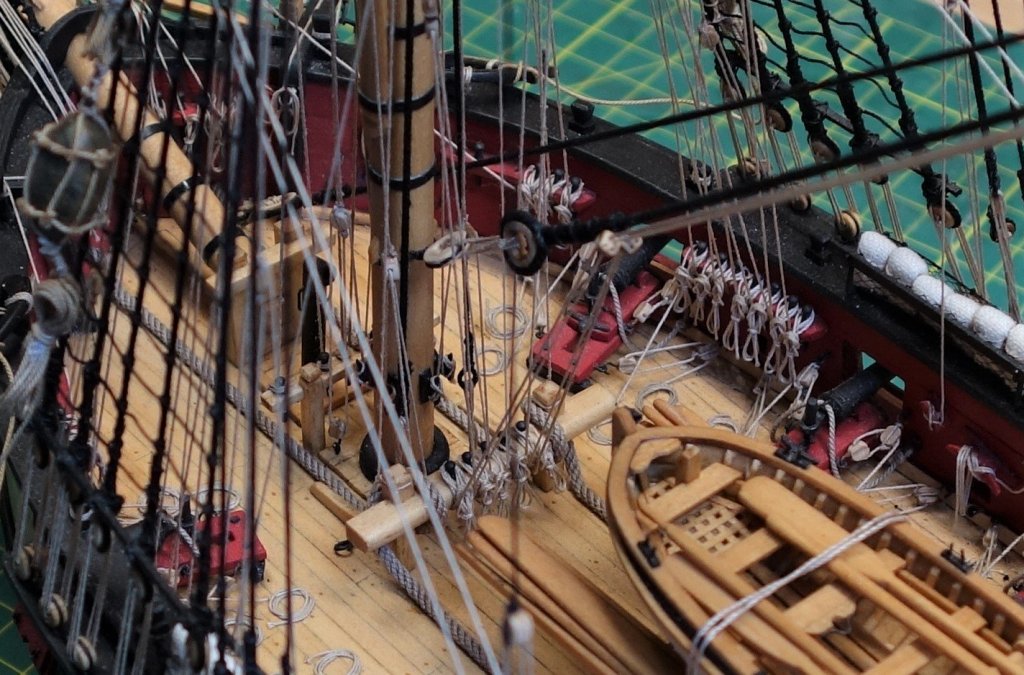
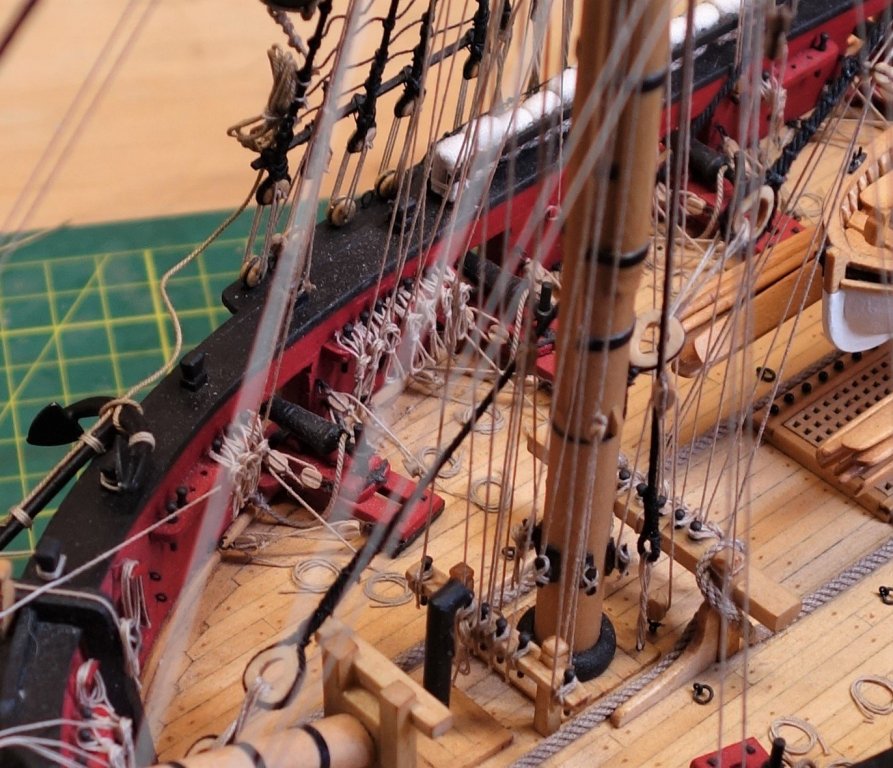
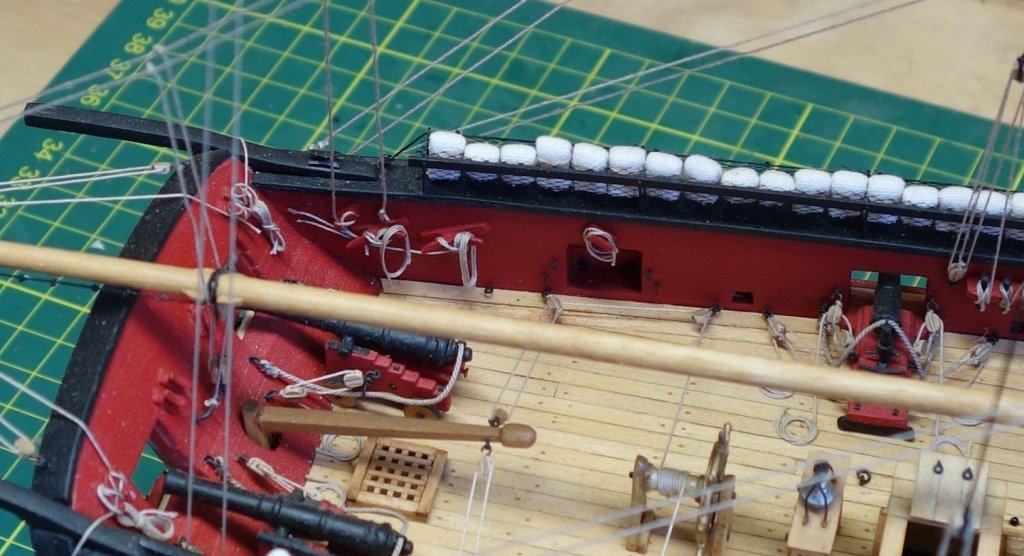
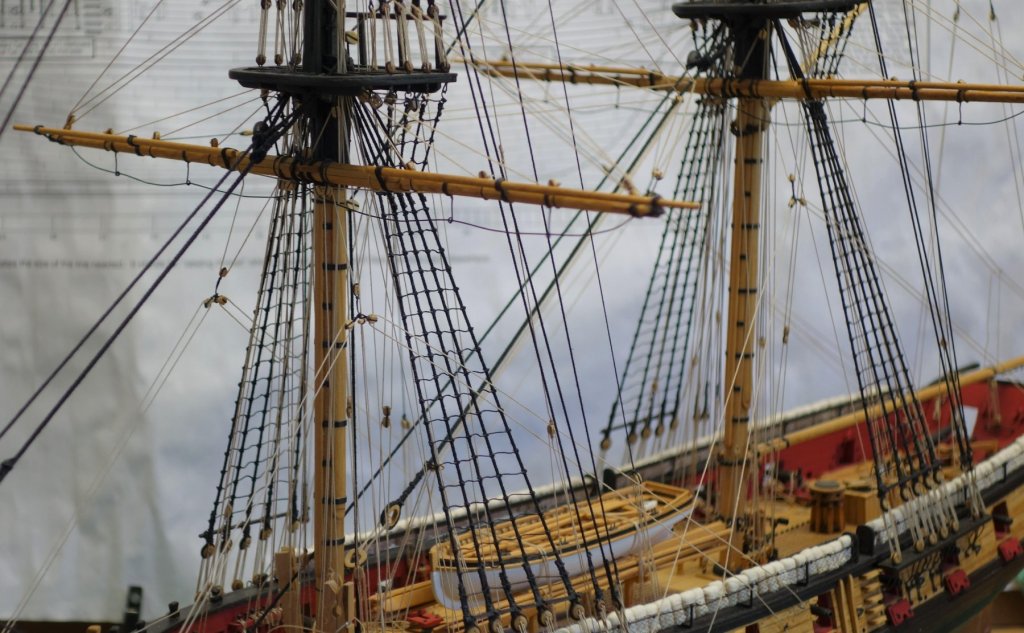
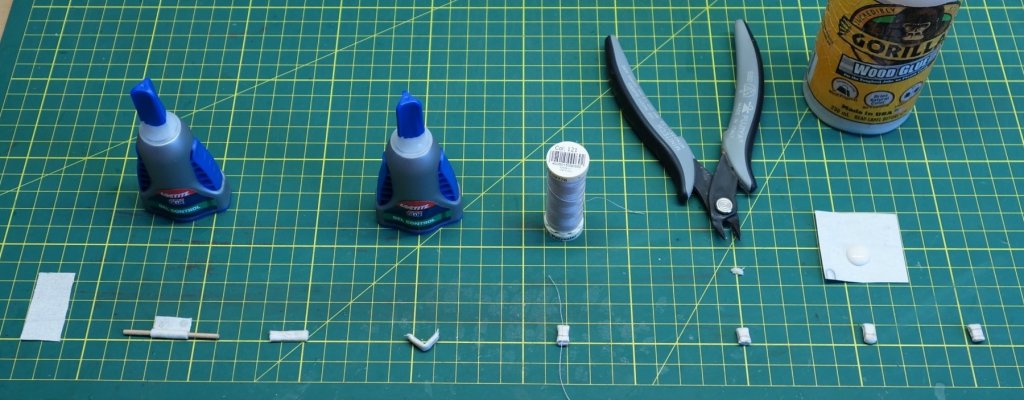
Well, time for another update. I have been getting stuck into doing the rope coils. I tried a few different approaches and settled on one that are shown on the attached photo's. I hope they come out in the correct order. Only some of the pin rails on the starboard side are done so far. After all the pin rails are finished I will need to adjust the size of the 'loop' to make the rope coil hang at the correct height for the other belaying styles. It' pretty much a trail and error approach and pretty time consuming. One thing to note is that the exact amount of glue is required for the knots. Too much and rope next to the knot soaks the glue in and becomes too stiff for it to look acceptable. Too little and the knot comes apart when fiddling with the assembly. So plenty of rejects, especially in the beginning. Another thing is that I didn't use any glue when placing them on the pin rails. I'm curious if anyone knows of a way to secure them. For example using a spray on glue with the airflow strength of a puffer...lol Anyway, enough dribble, here are some photo's...


- 242 replies
-
- 9
-
-
- syren
- model shipways
- (and 1 more)
-
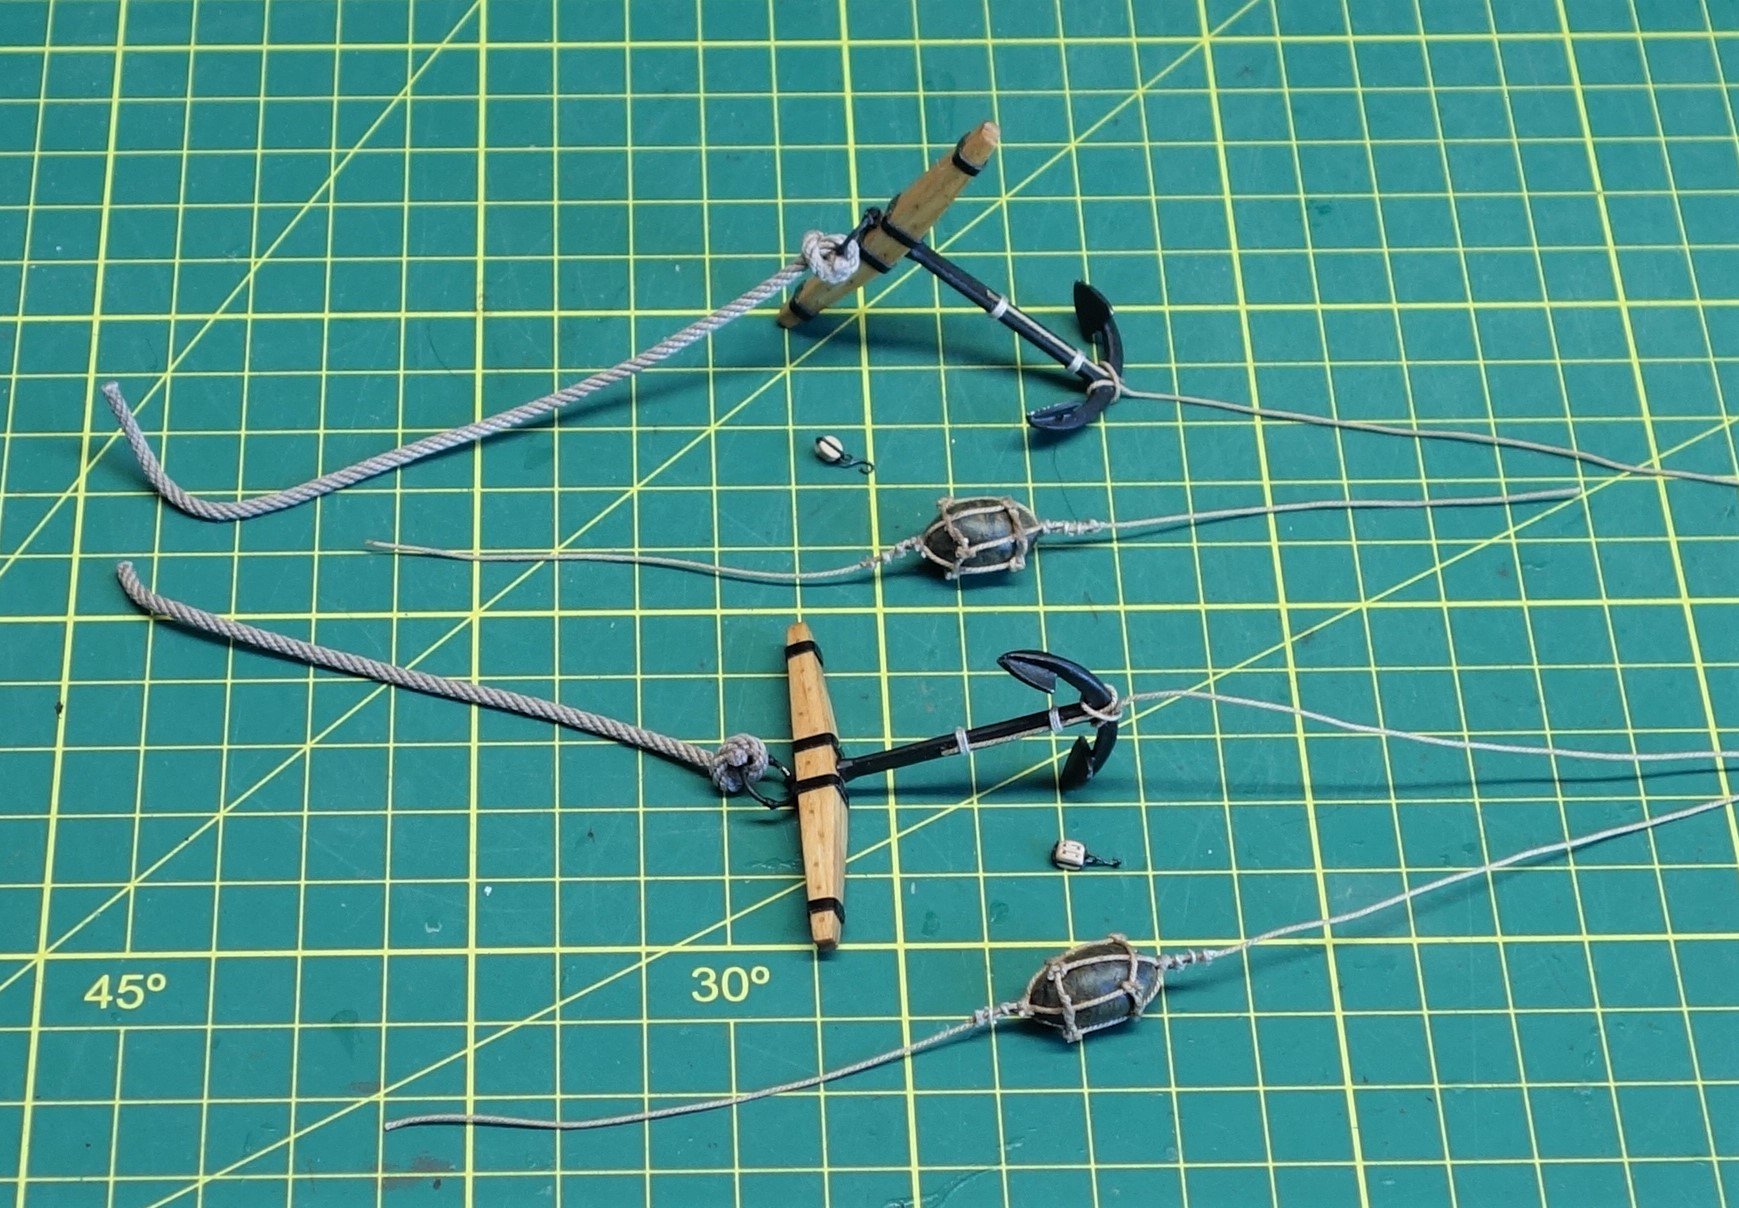
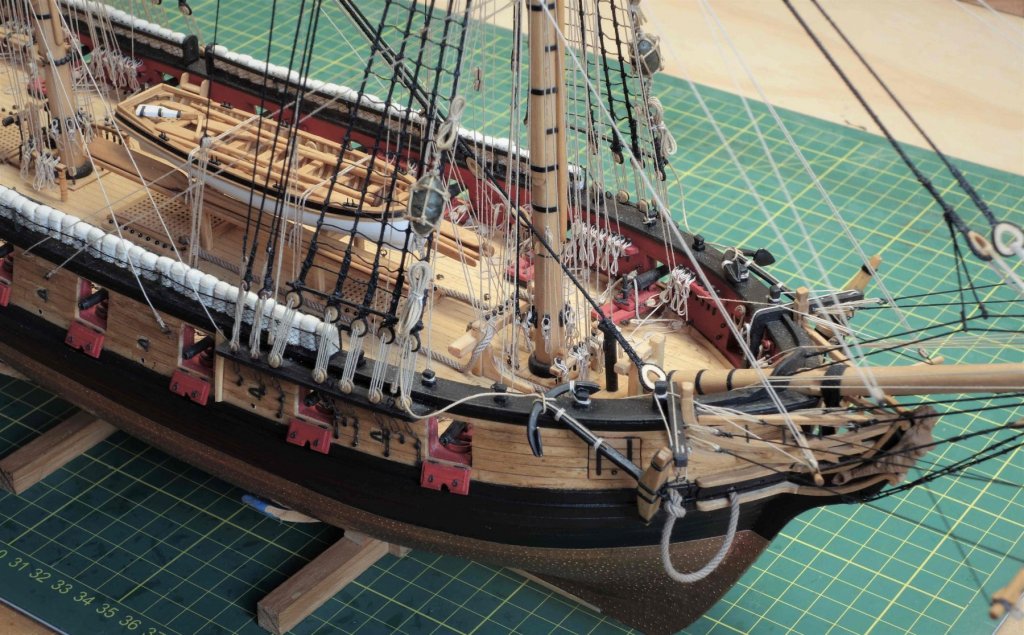
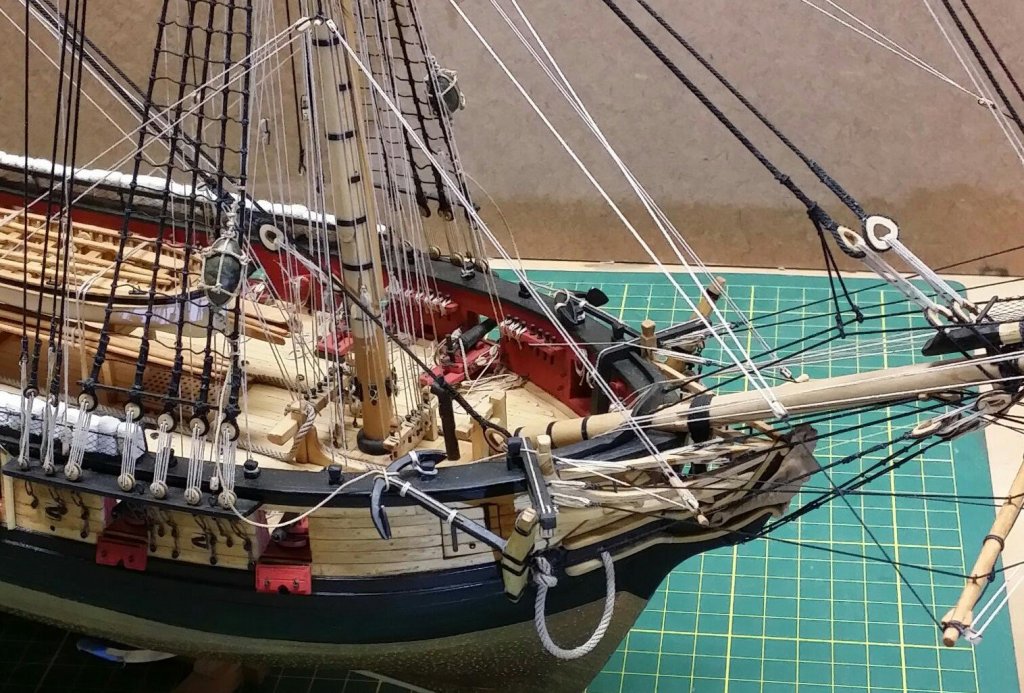
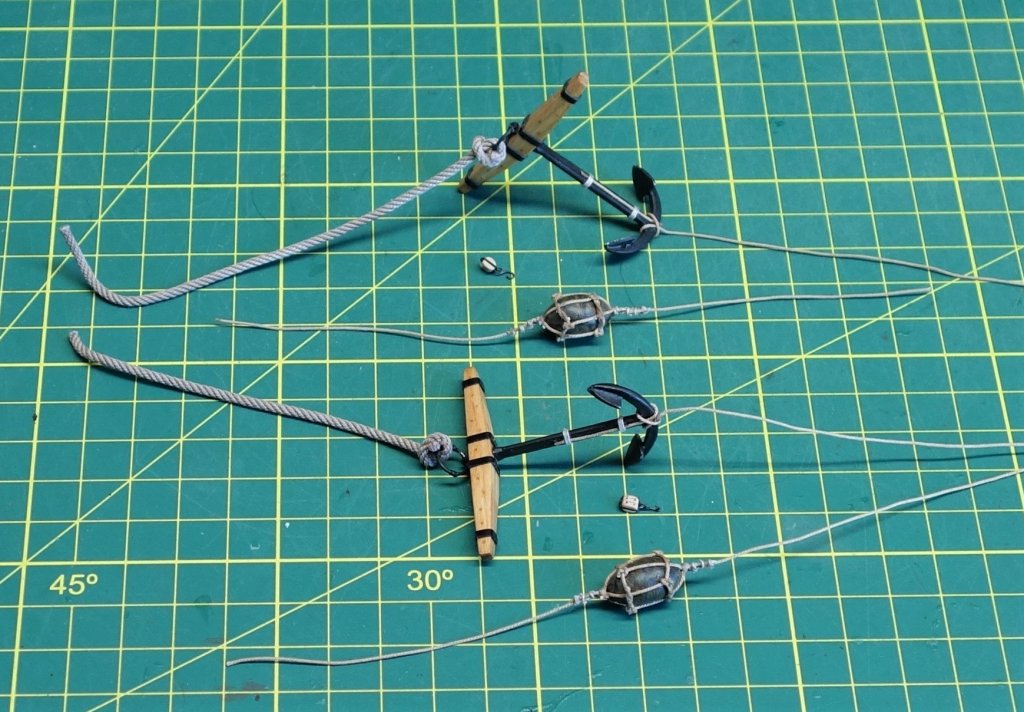
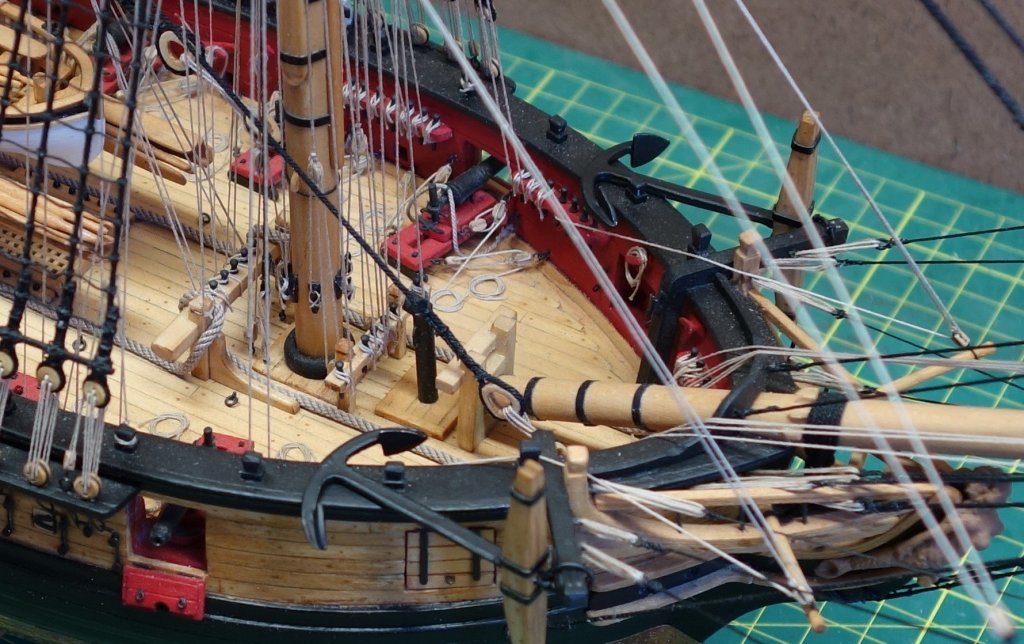
Thanks Dirk, No need to be jealous. You and Gahm were the inspirations for me to choose the Syren. And I'm not even close to the quality the two of you produce. (I won't disagree that my build is turning out pretty good though...lol). I'm glad to see that you have started working or you build again, I'm always looking forward to your progress. Thanks Frankie, I'm glad you are enjoying the photo's. Thanks again for all the likes as well. Here are just a few photo's showing the anchors and buoys fitted. The next items on the list will be adding some rope coils.

- 242 replies
-
- 14
-
-
- syren
- model shipways
- (and 1 more)
-
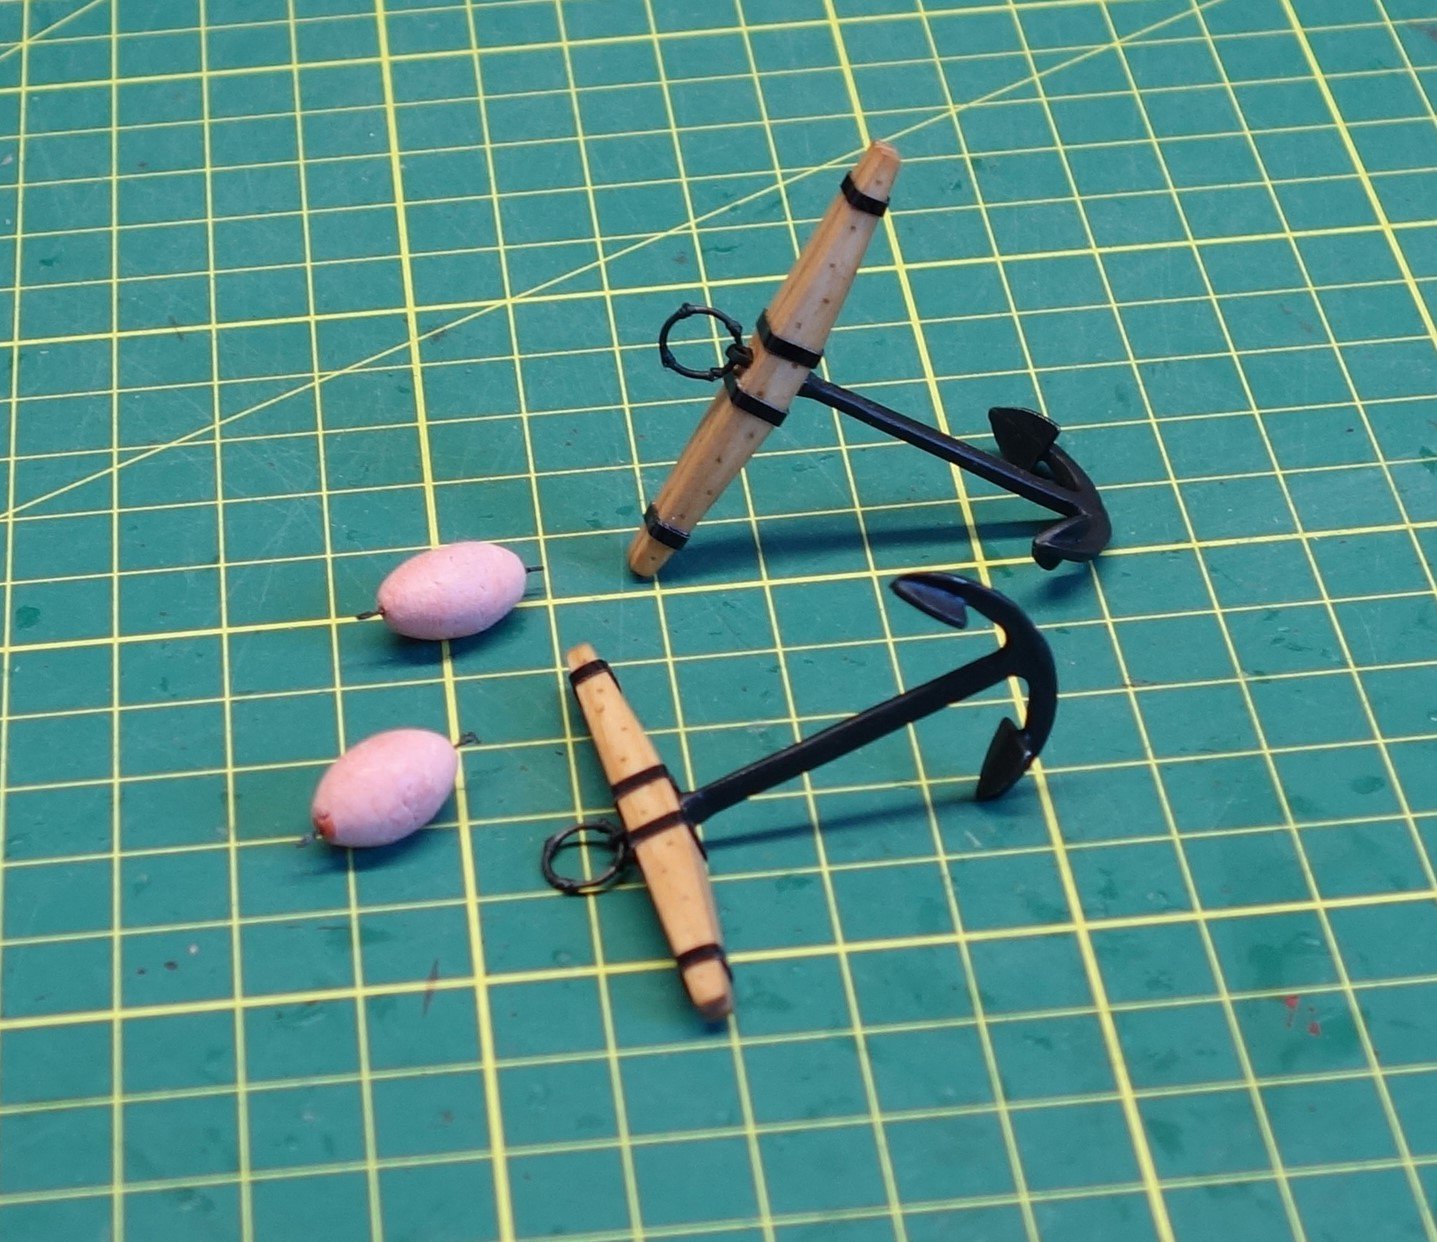
Hi Dirk, I'm afraid I'm not brave enough to re-arrange the anchor rope at this stage. I wrapped it around too tightly and it's lost its natural look, so I'm not even happy the way it looks now. But I glued it to the deck, around the riding bits and into the hawse hole and with the restricted access I'm afraid I'll make a mess of it when I try to pull it off. It will be a lesson learned for next time. Hi Jesse, Yes they are. They needed a bit of filing to clean them up, but they didn't have the pits and imperfections you experienced. Maybe you can ask for a replacement pair from the supplier. Peter
- 242 replies
-
- 2
-
-
- syren
- model shipways
- (and 1 more)
-
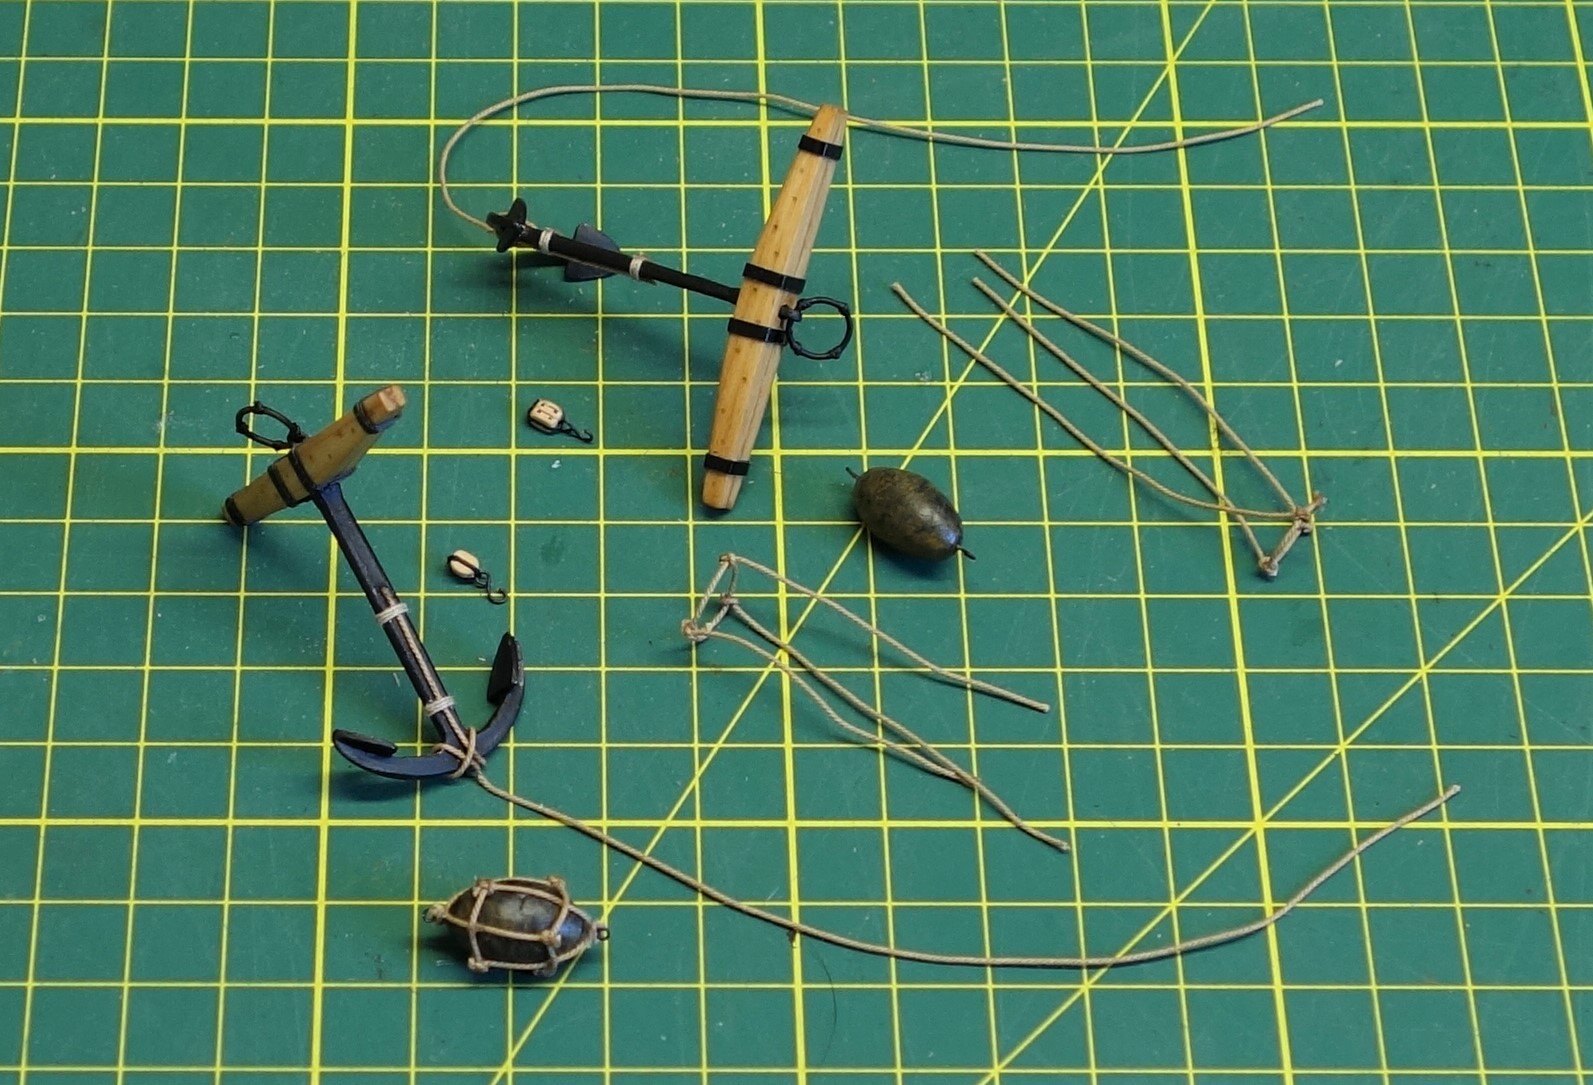
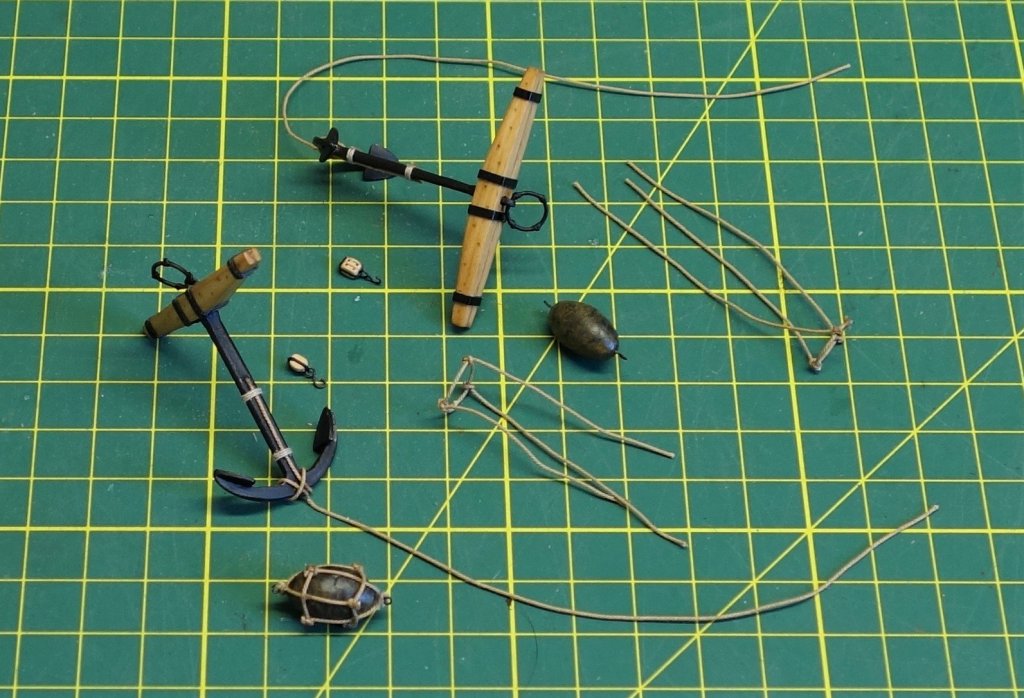
Well here is another Log entry. That's two entries in two days. We were supposed to go out this long weekend for our wedding anniversary but I ended up getting the flu instead. With clear instructions to stay out of everyone's way to make sure I didn't pass the flu on, what better place to go than in the shed working on the model. I'm very obedient following instructions like that....lol. I was (still am) not feeling too good, but I got quite a bit done. In this case I added some lines to the anchors, painted the buoys and added the buoy harnesses. Just 2 photo's this time.
- 242 replies
-
- 9
-
-
- syren
- model shipways
- (and 1 more)
-
WOW, Thanks very much Harley, That is quite a complement. Cheers, Peter
-
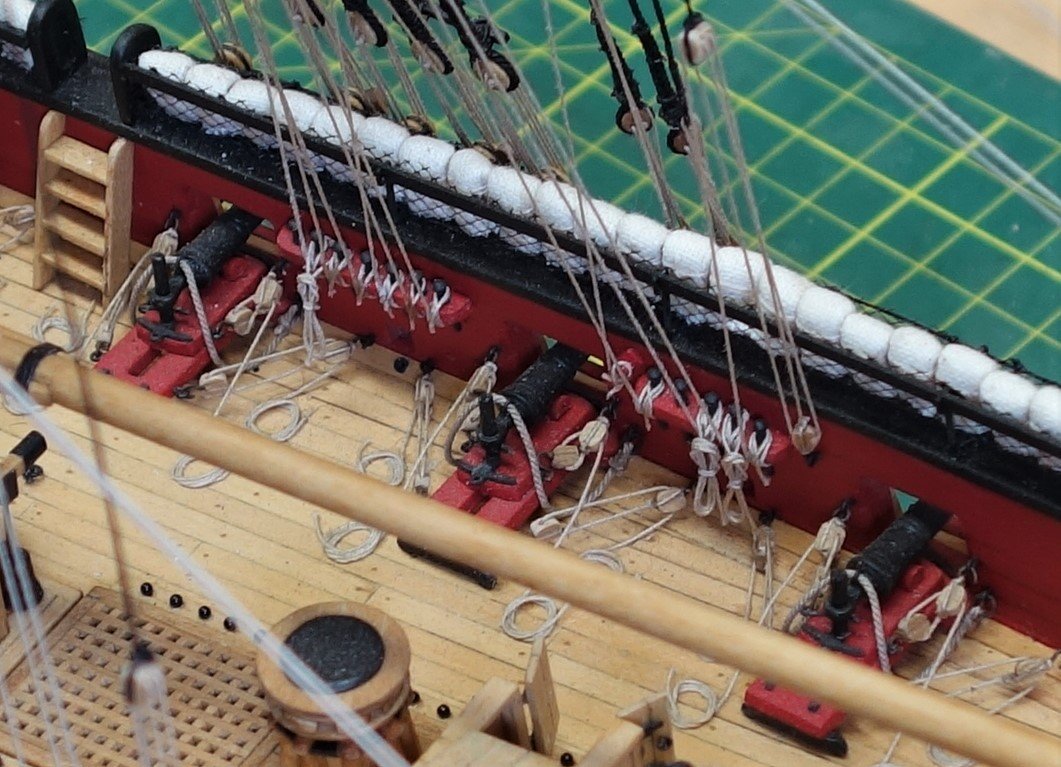
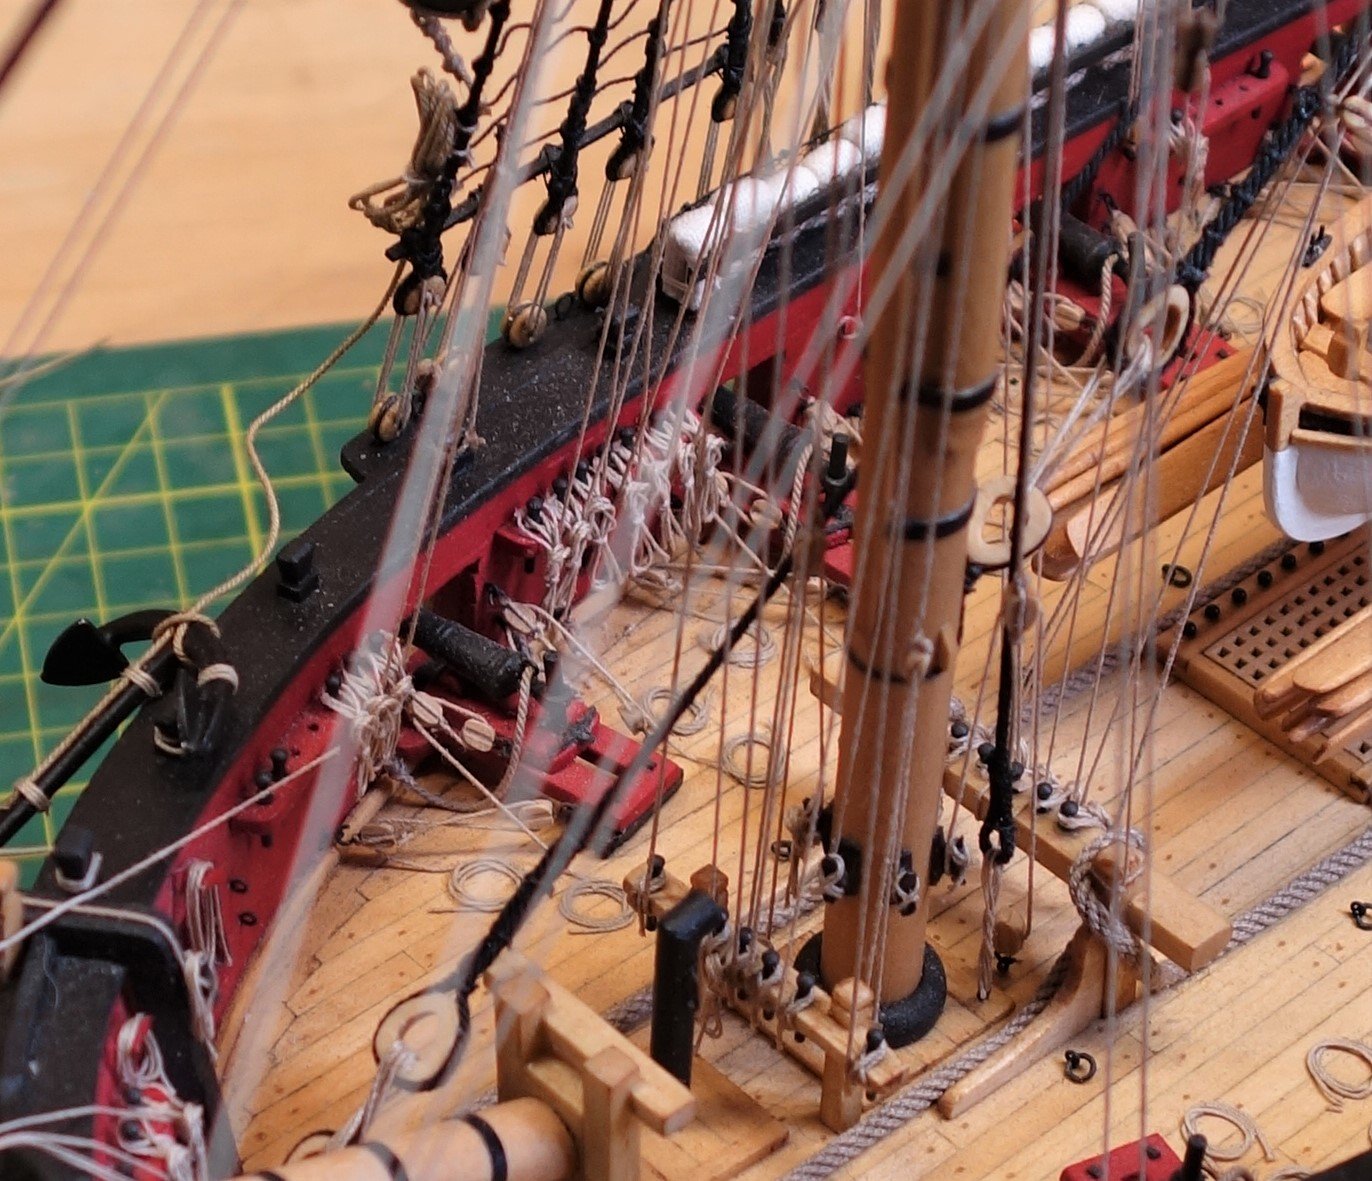
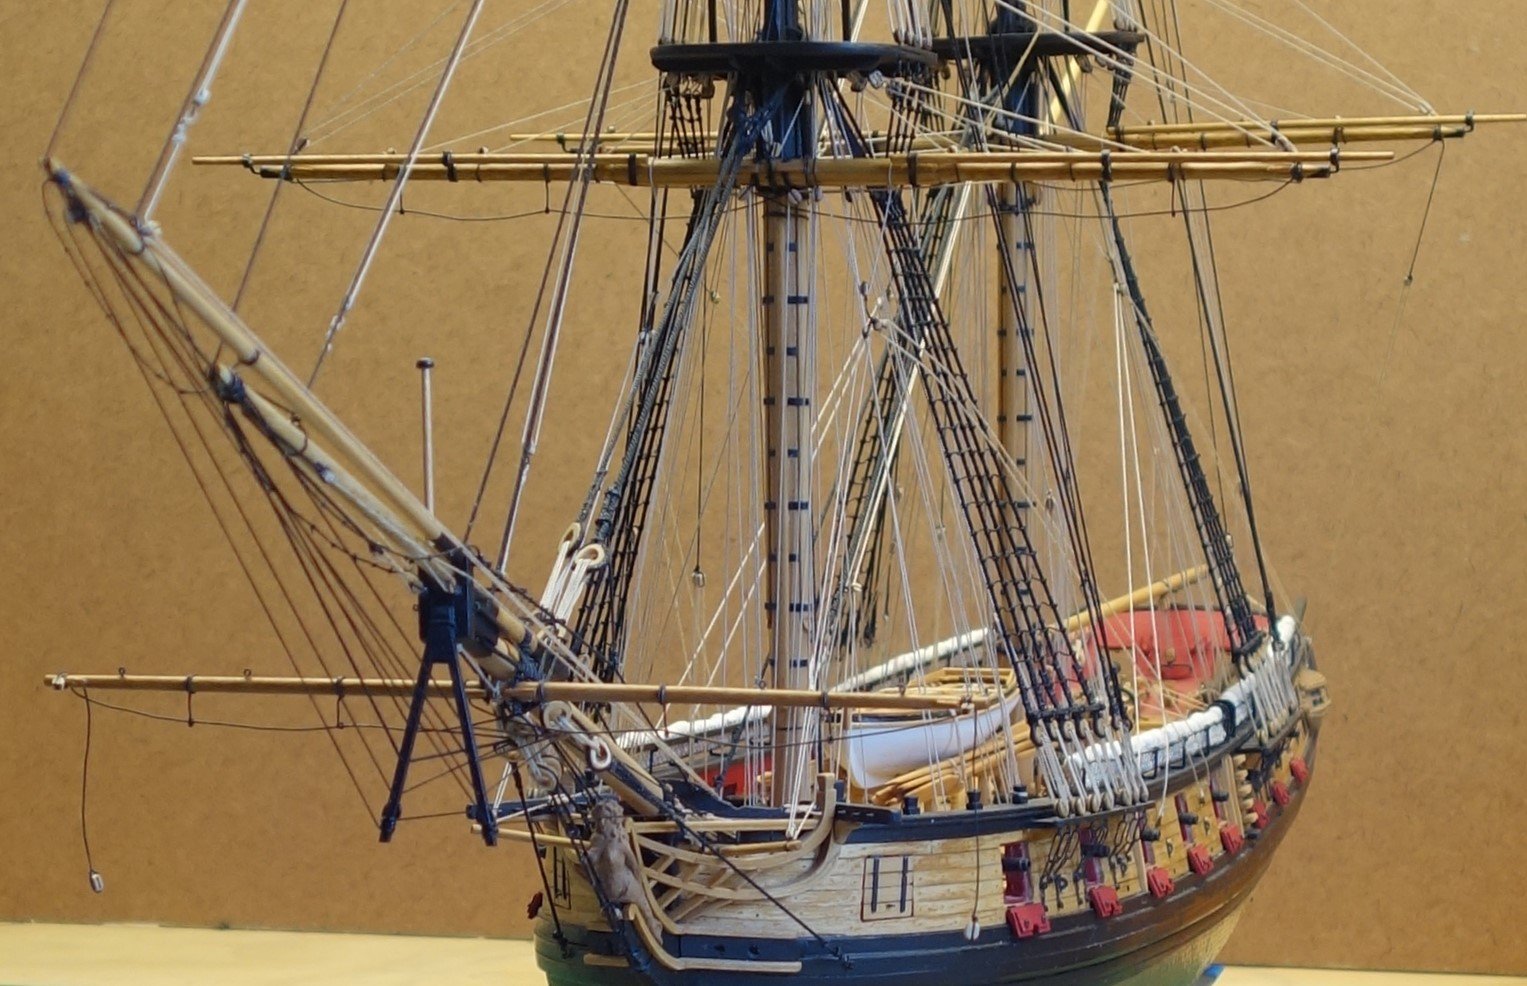
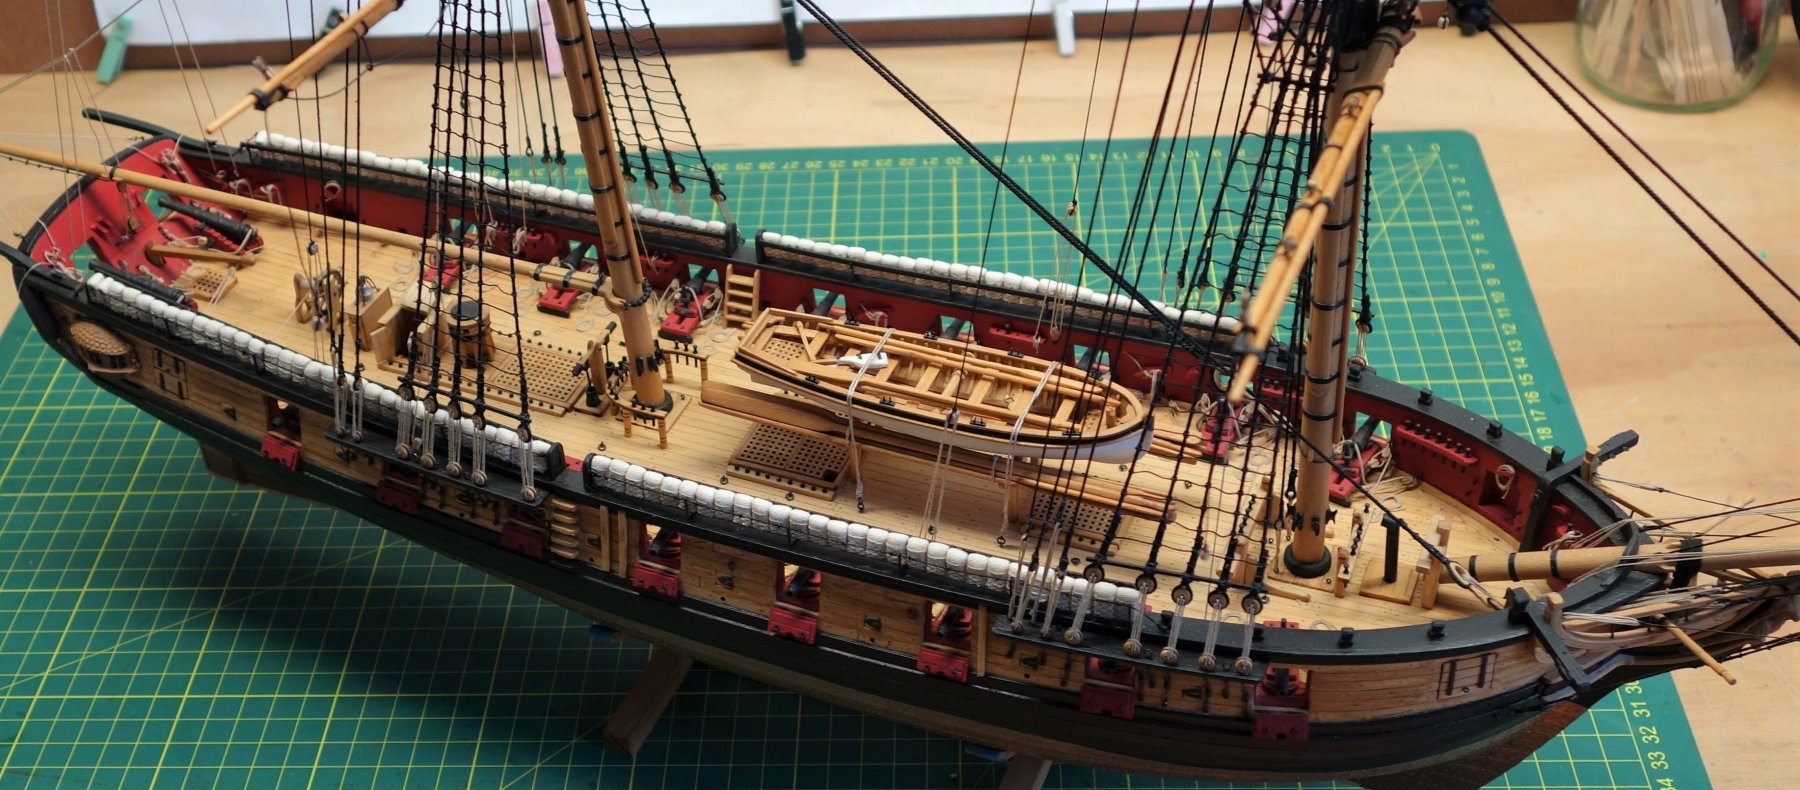
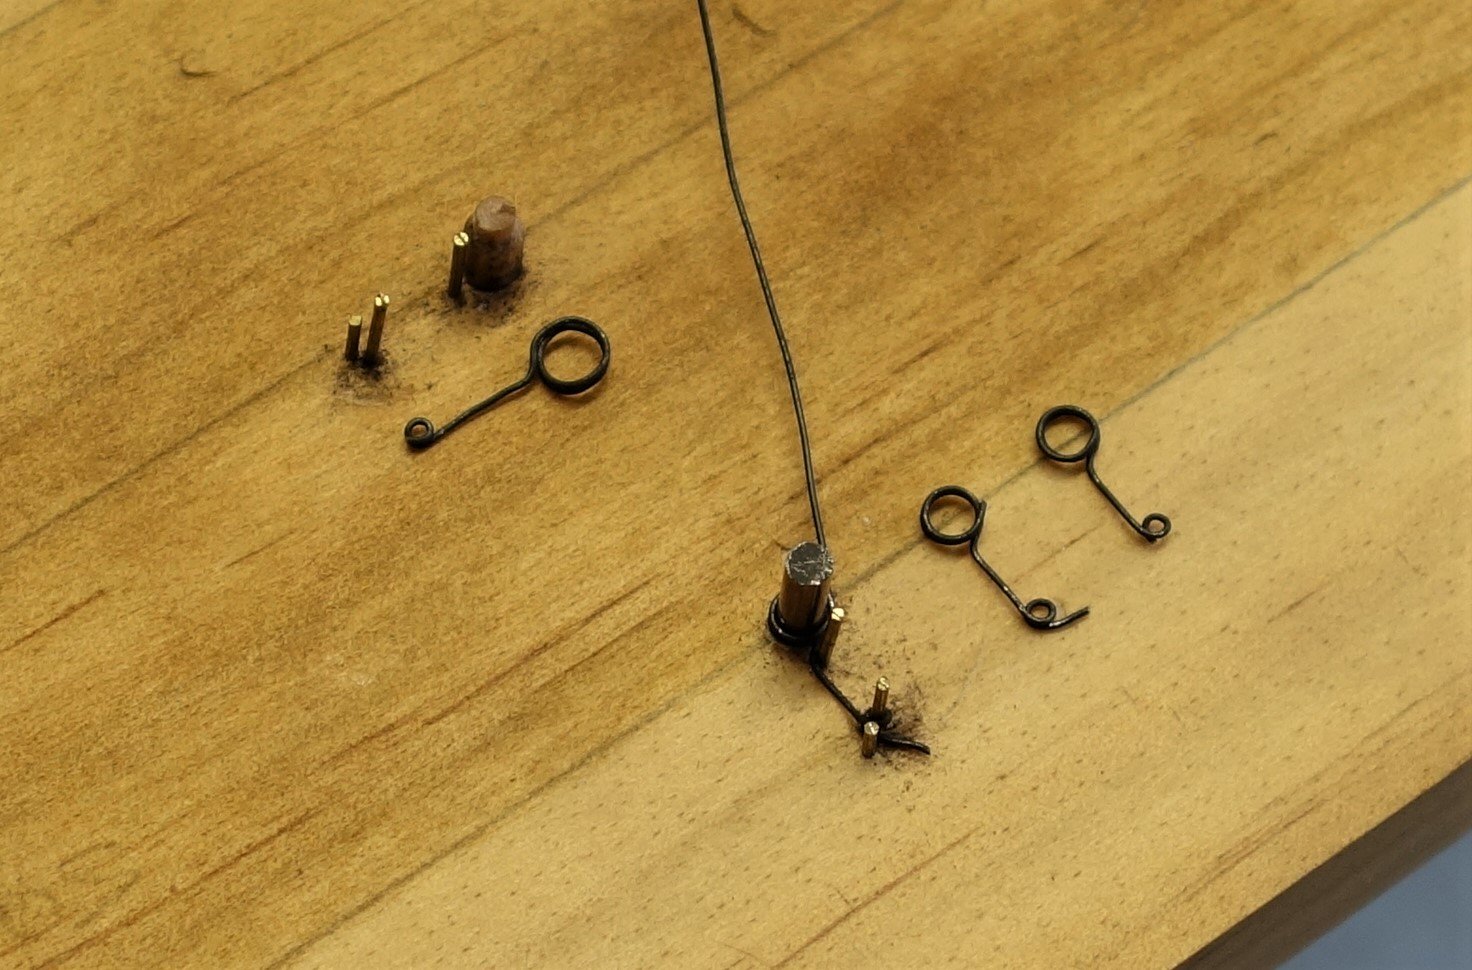
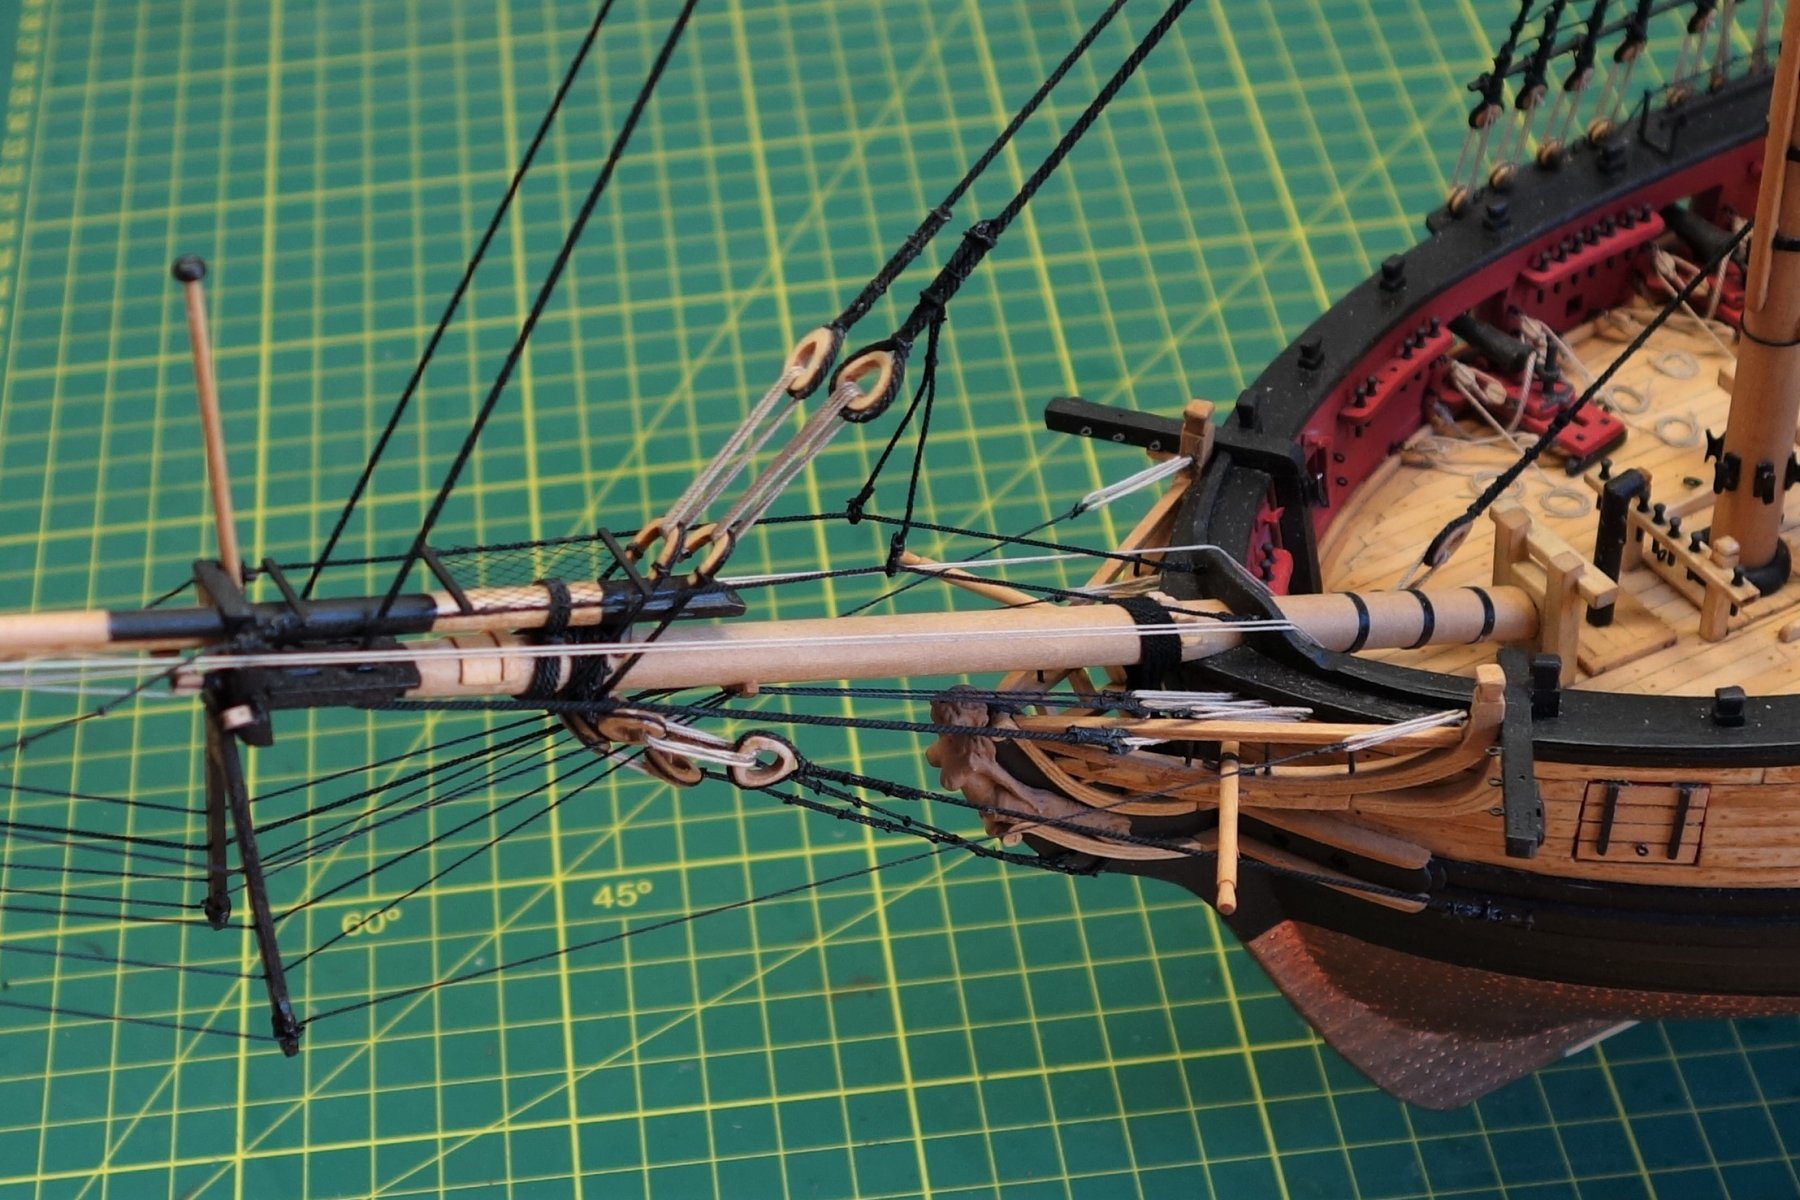
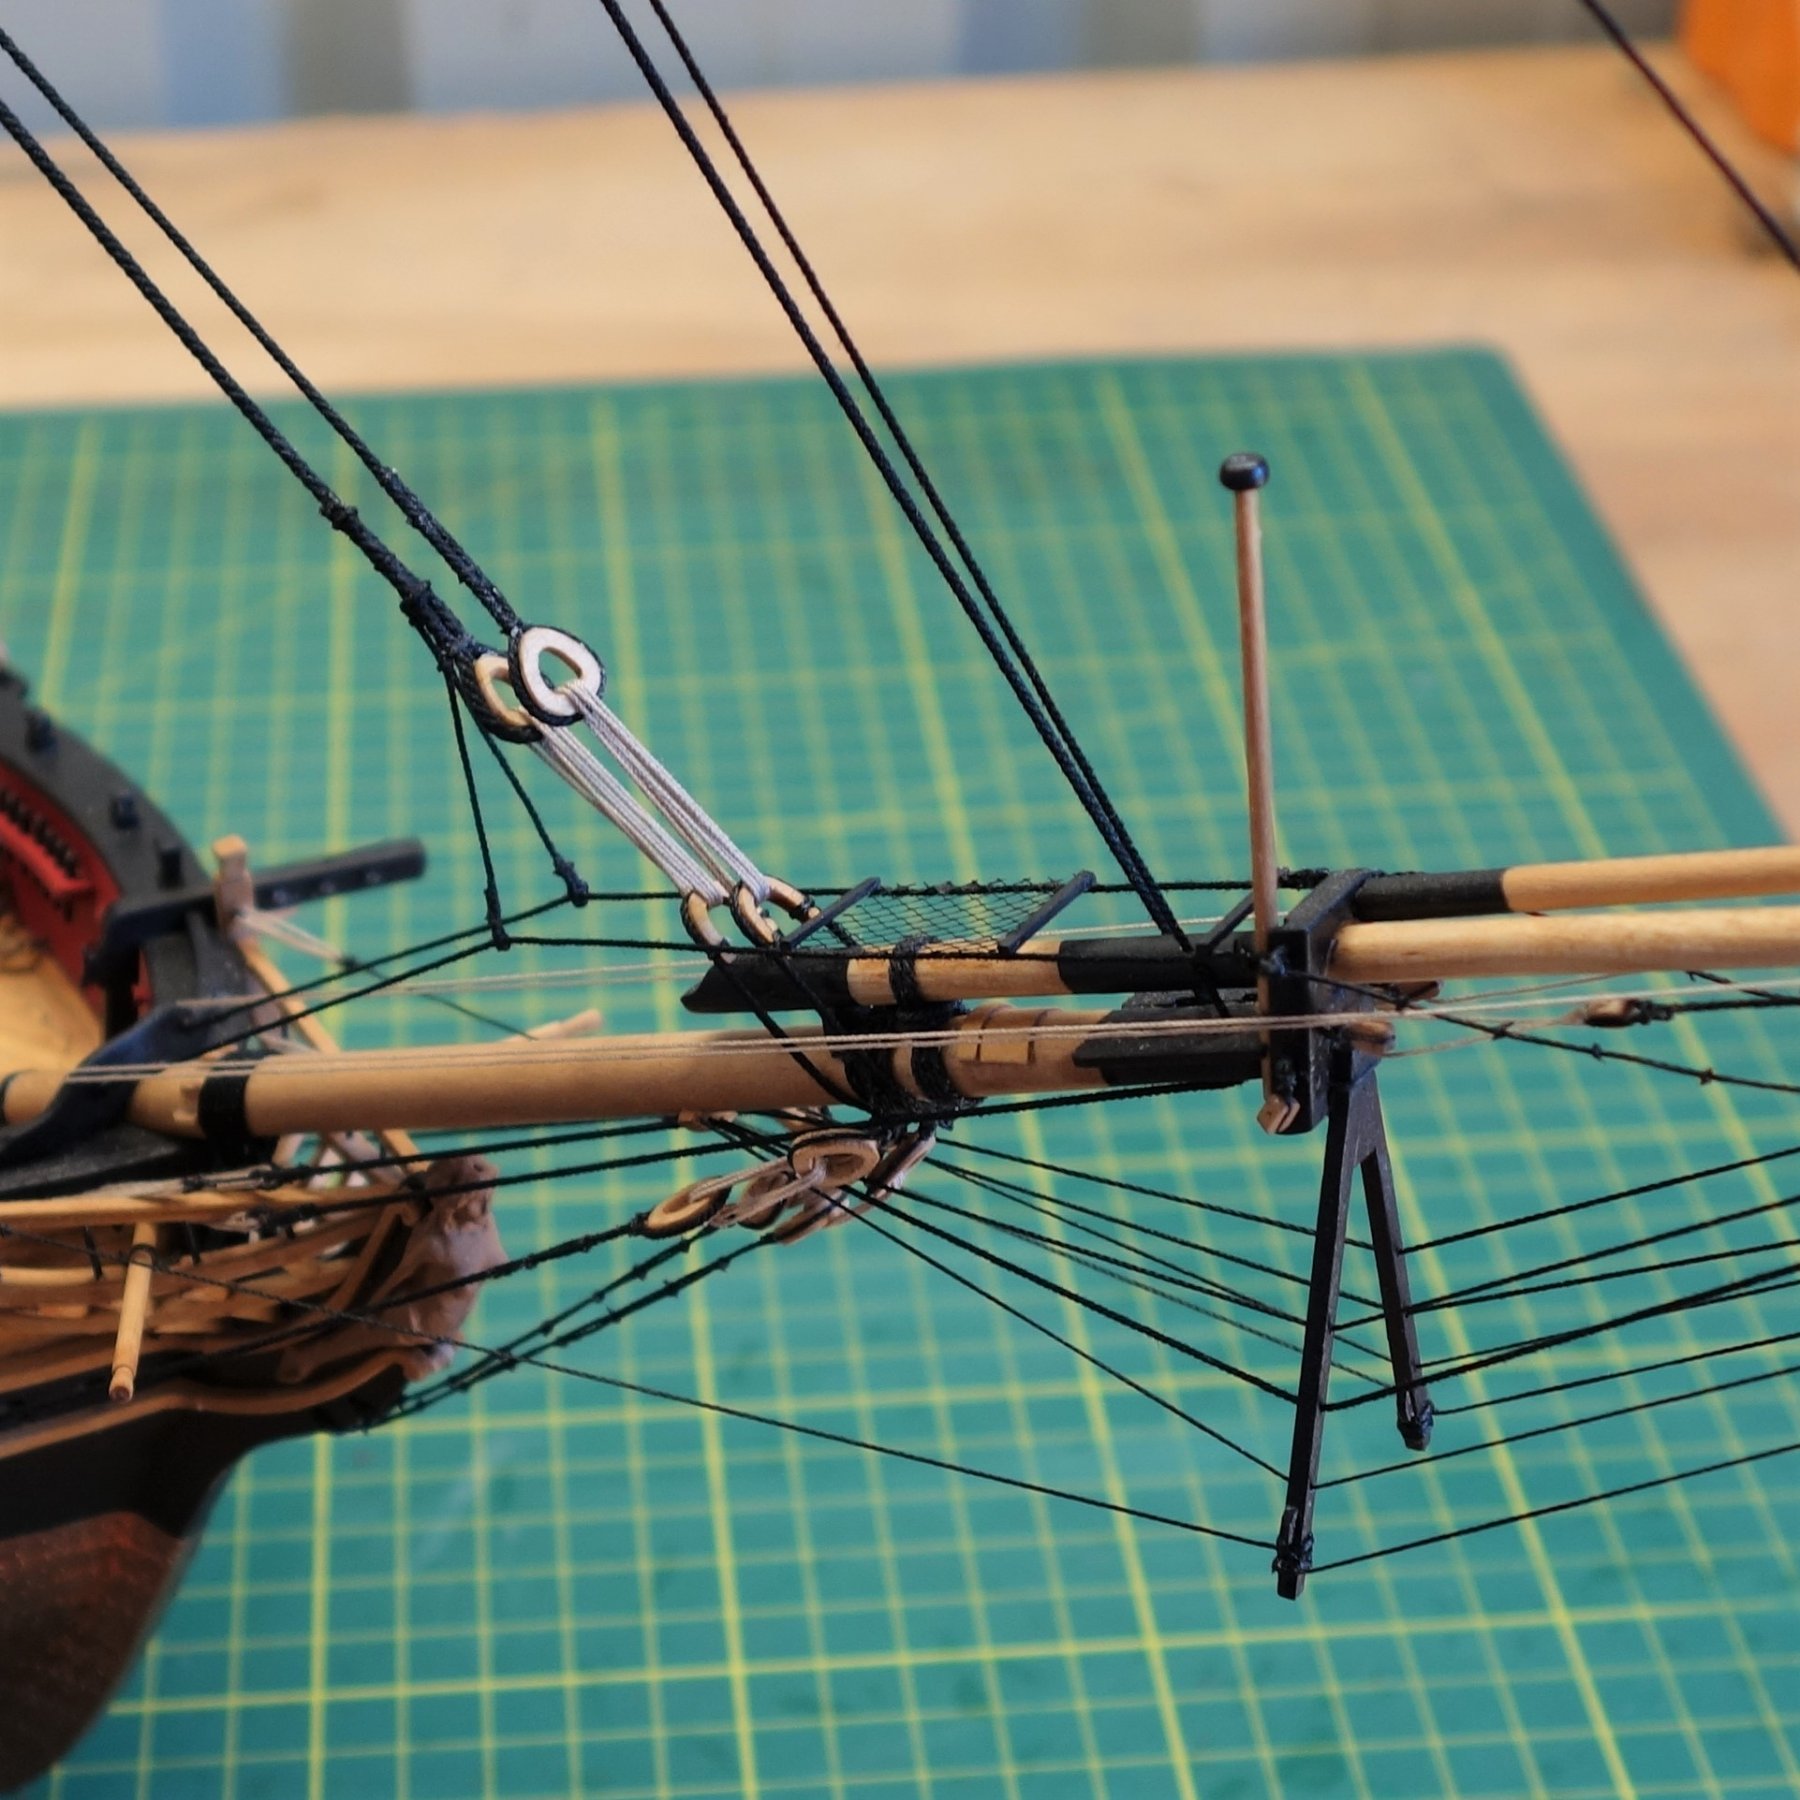
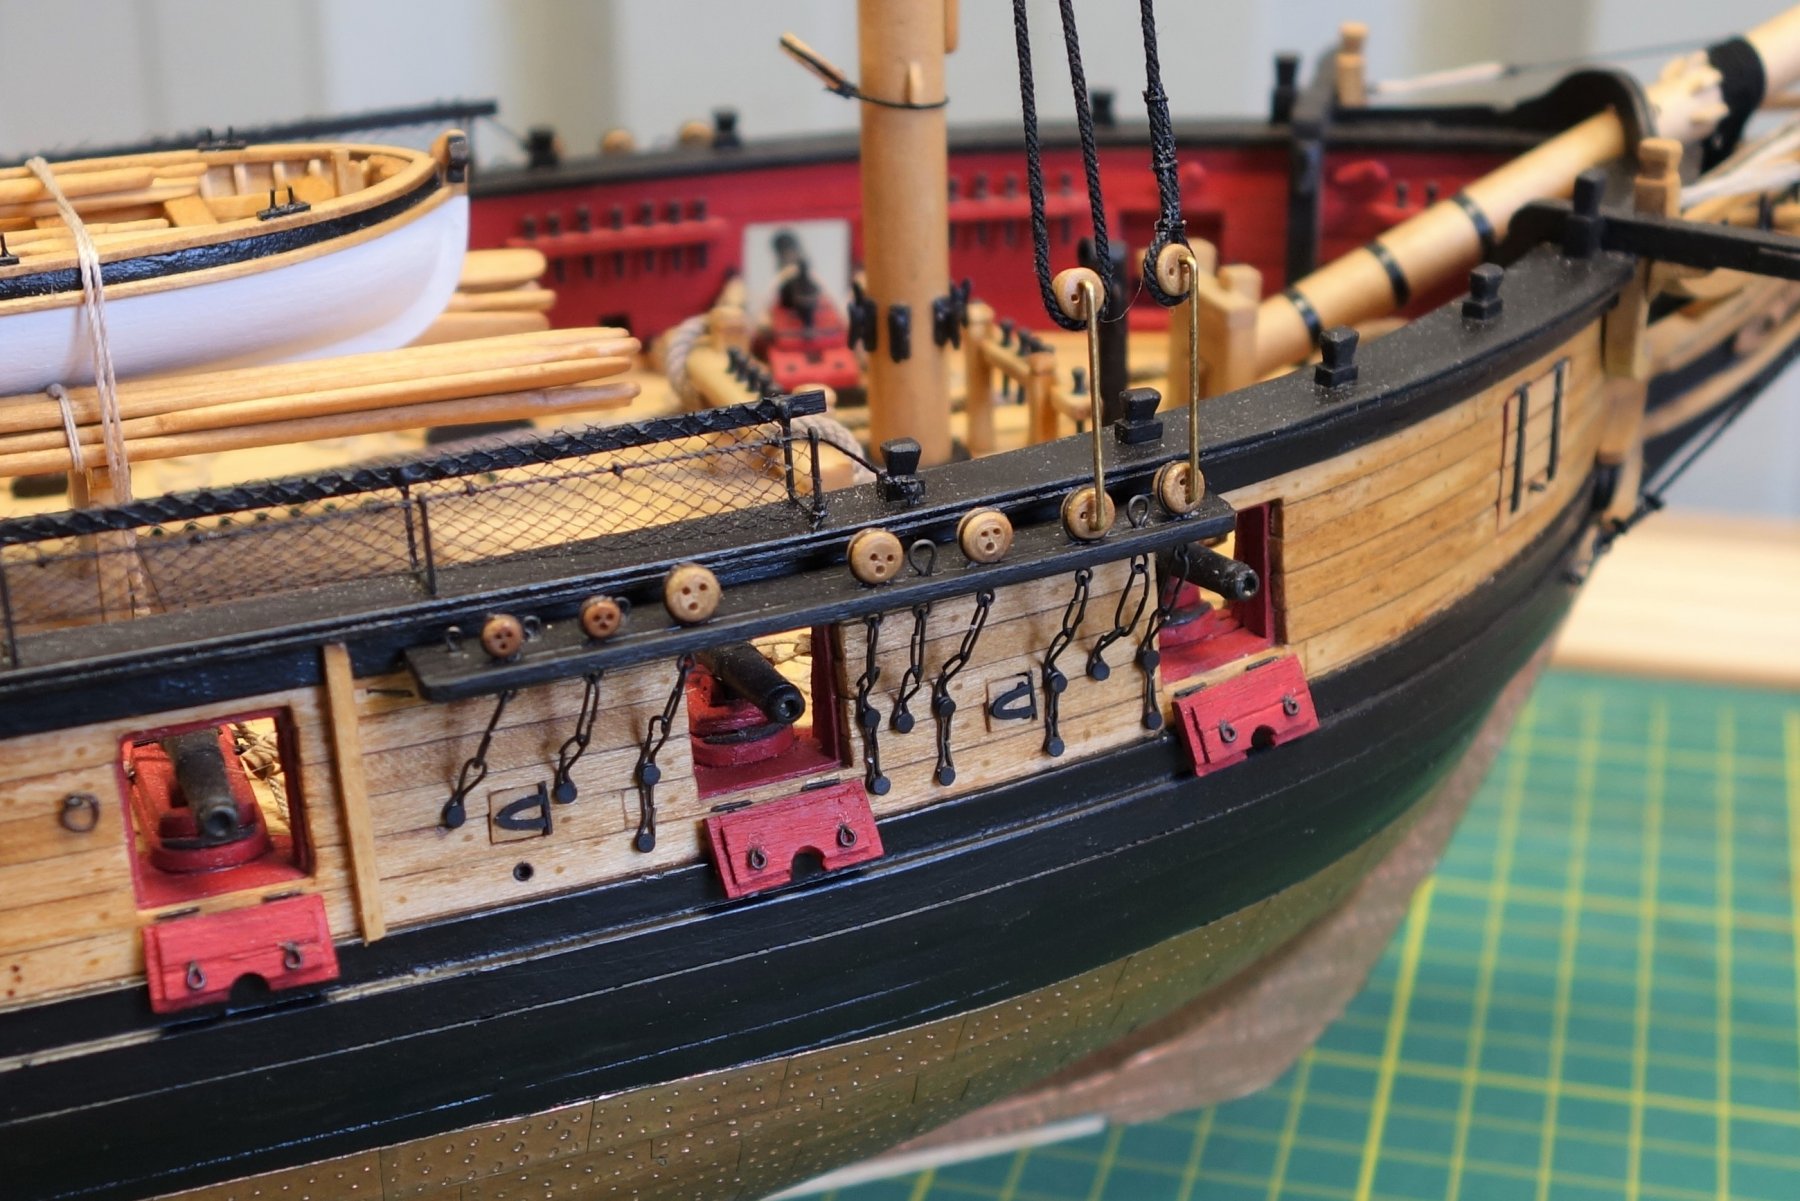
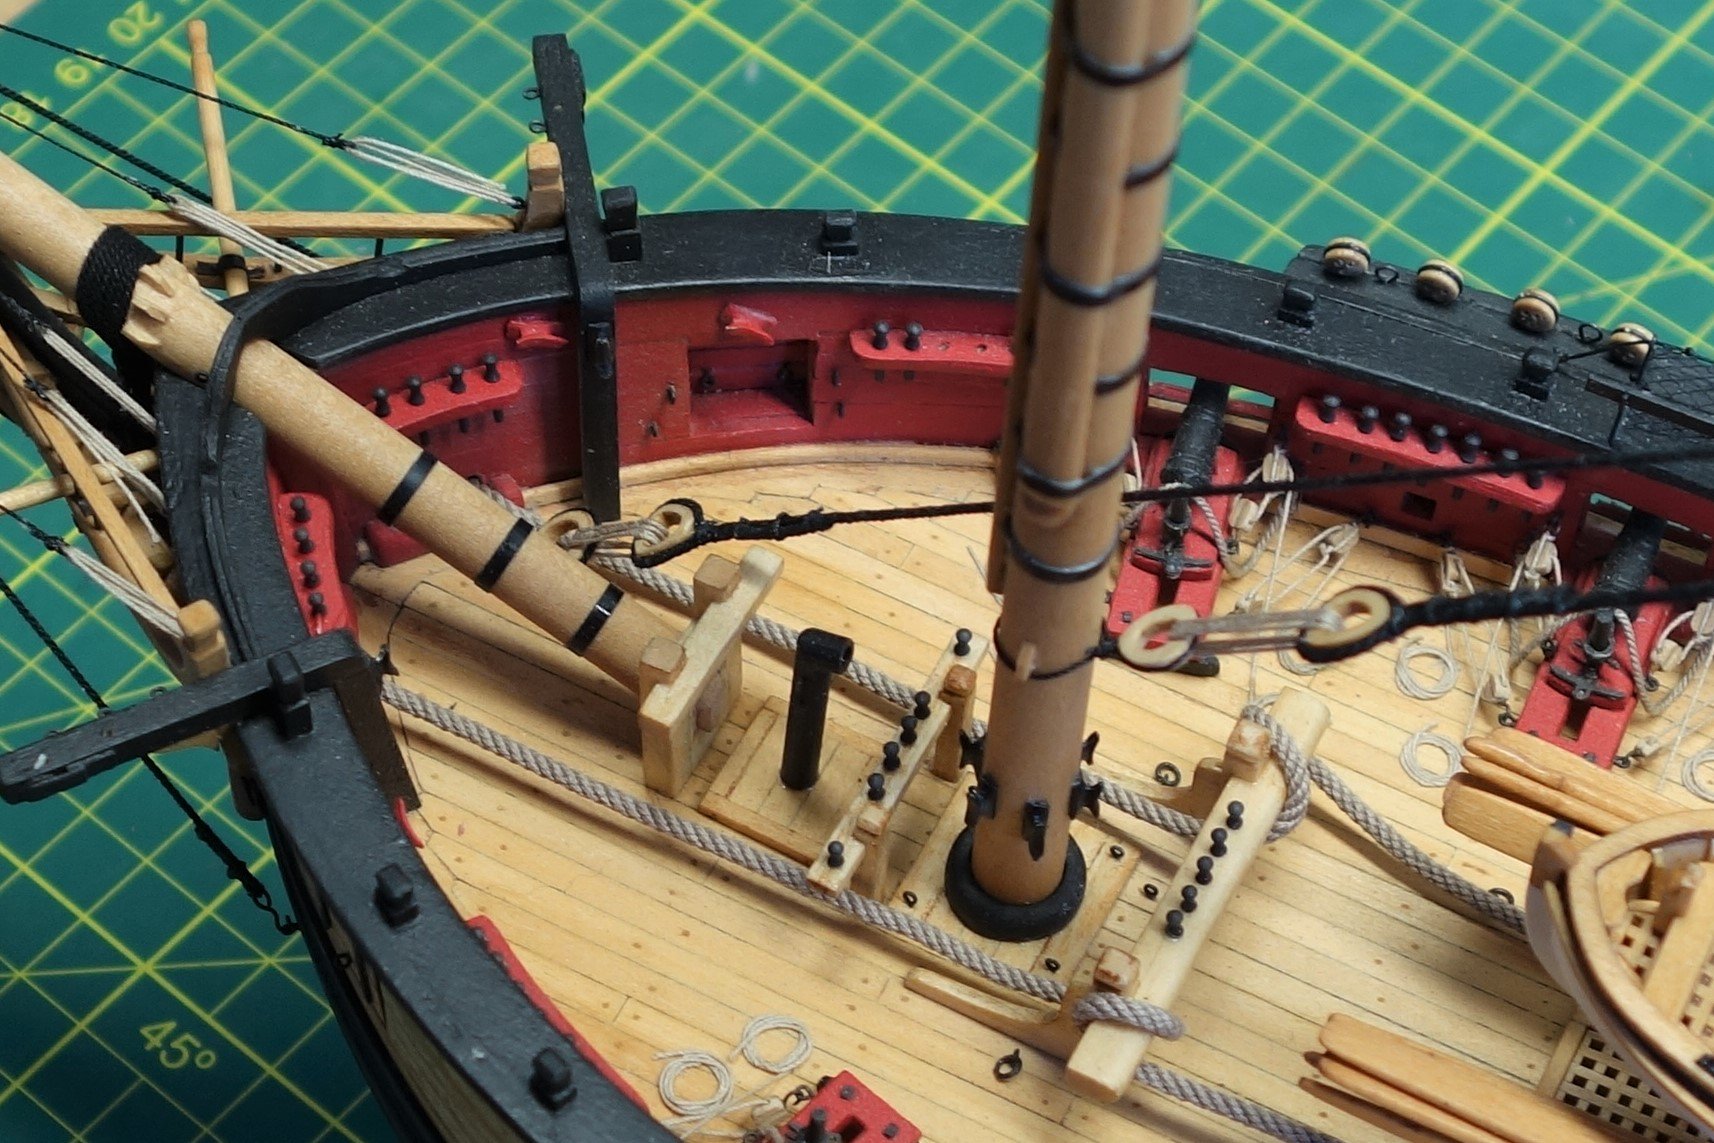
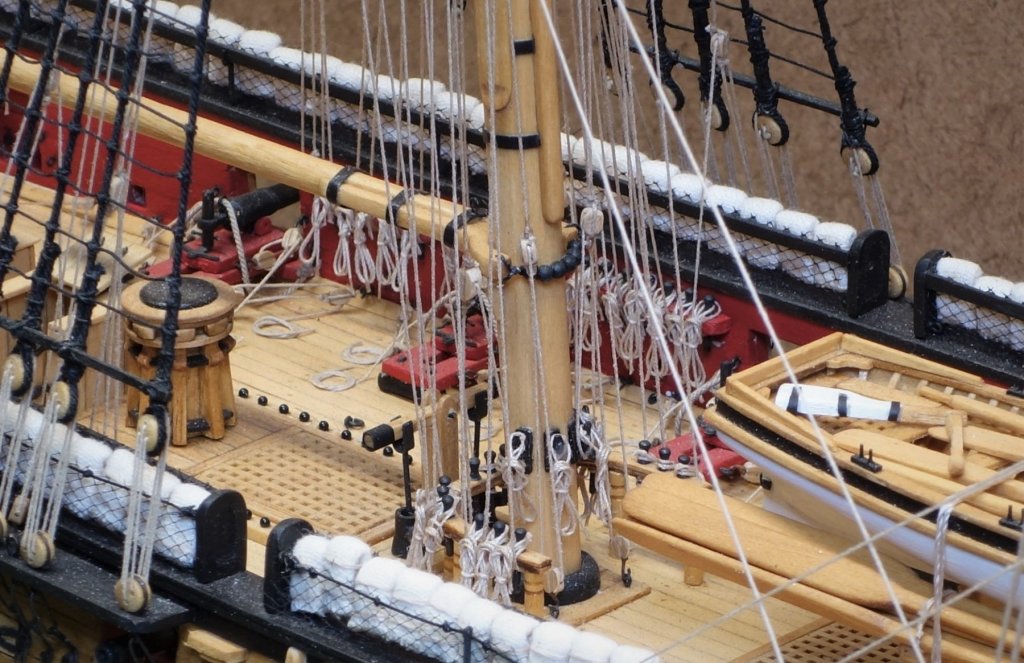
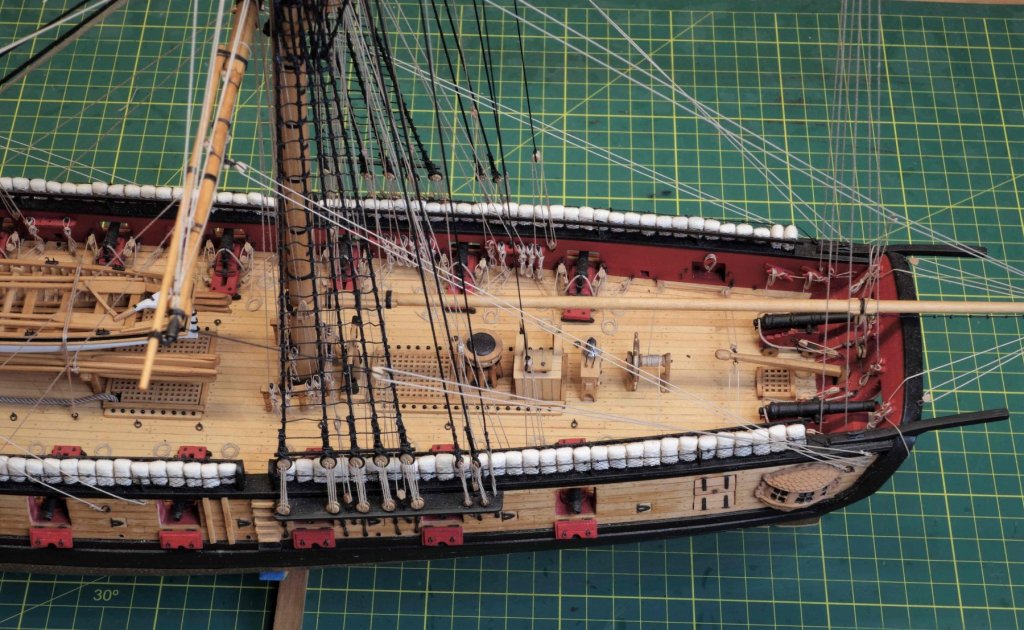
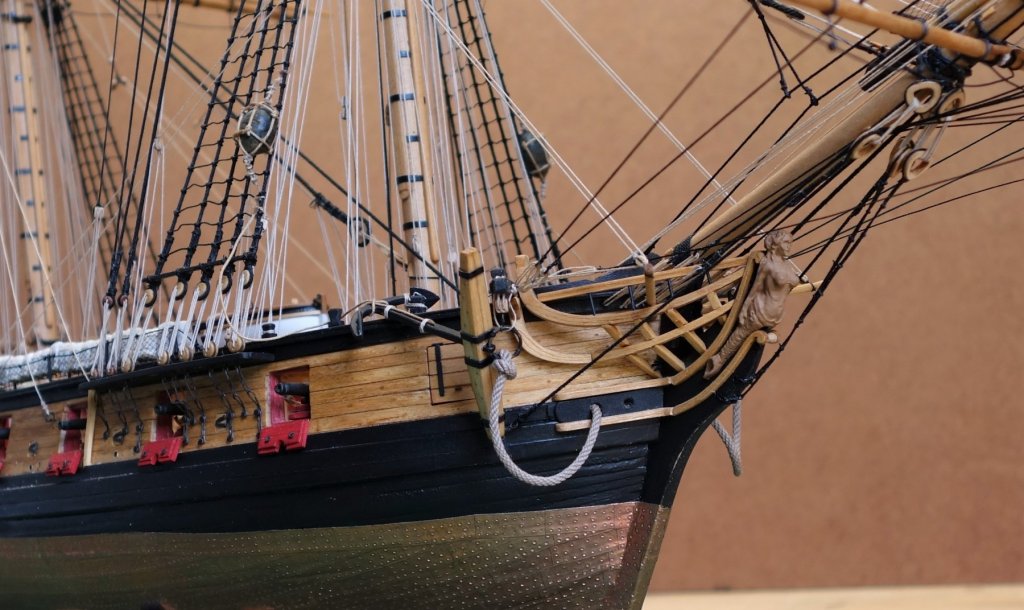
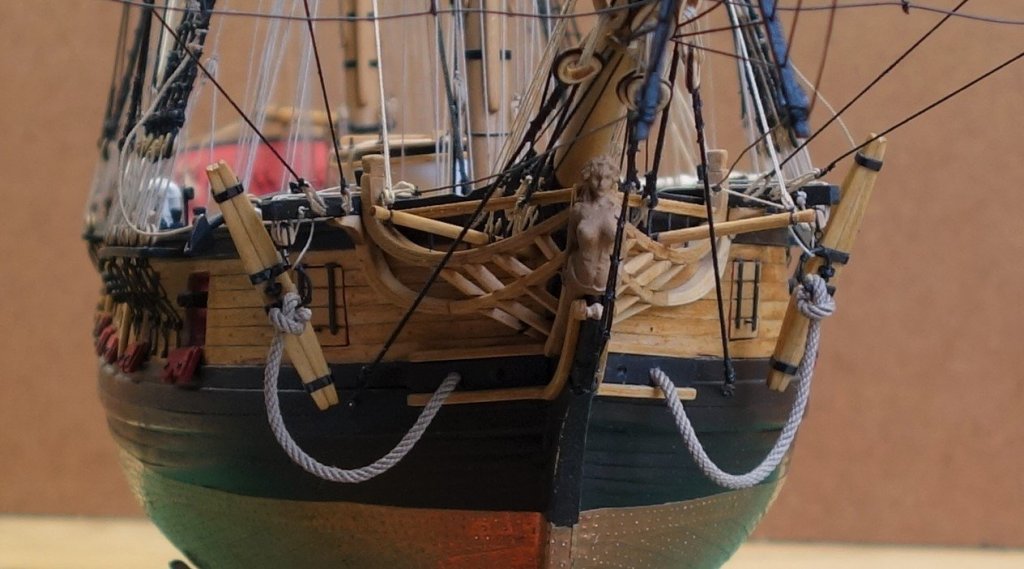
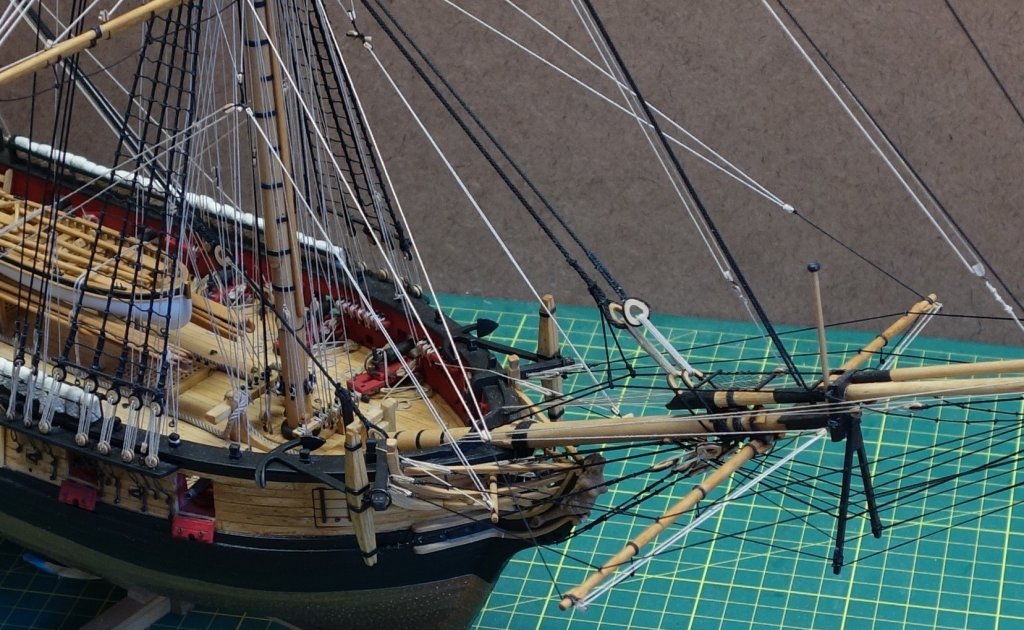
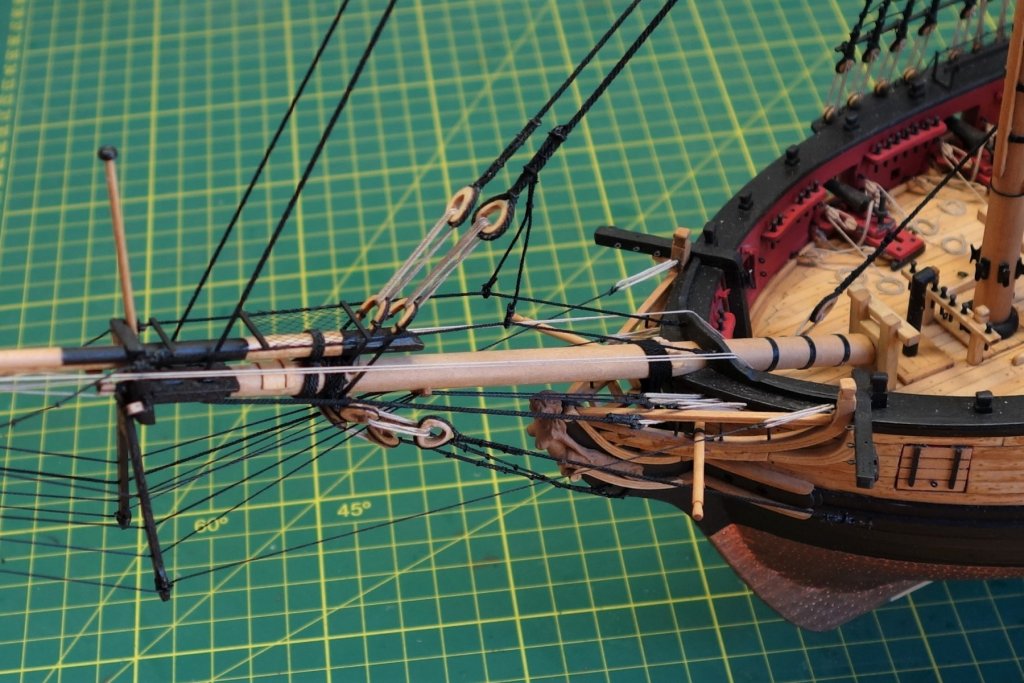
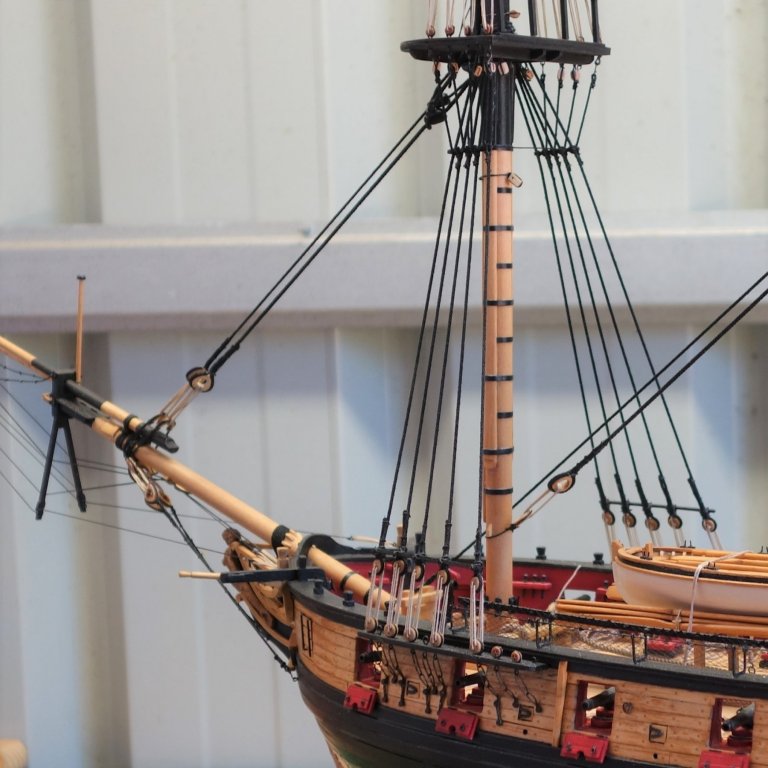
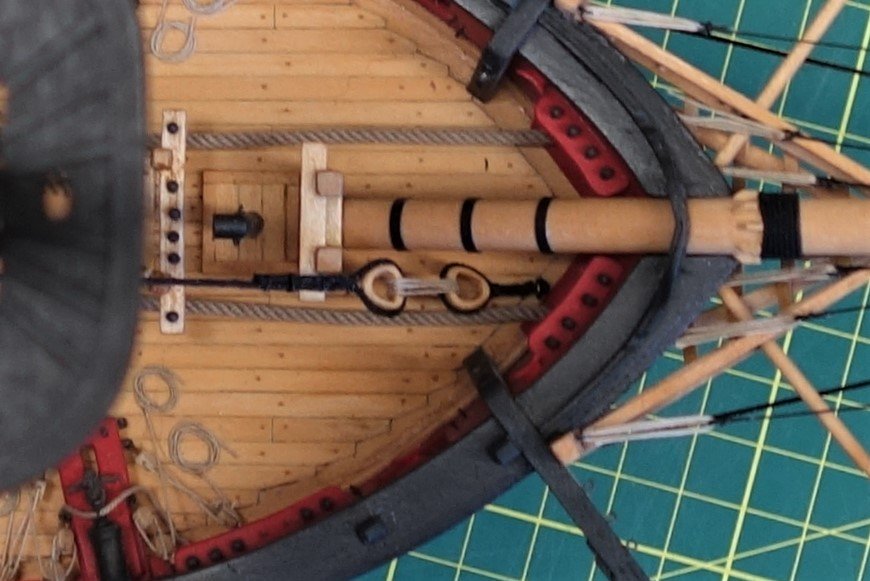
Thanks Chris, I am looking forward to seeing your log. Being a 'newby' and being able to finish the hull is a pretty good start in my book. The Syren is an enjoyable build but not an easy one....lol Thanks for all the 'likes' as well everyone. I have another update with a few photo's. I finished the Spritsail yard rigging and have made a start on the anchors and buoys. I just loosely placed the anchors for the photos' at this stage. I also added some close-ups of the various belaying points (which made me realise I still have about 100+ odd rope coils to do as well before I finish....sigh)... Peter.


- 242 replies
-
- 13
-
-
- syren
- model shipways
- (and 1 more)
-
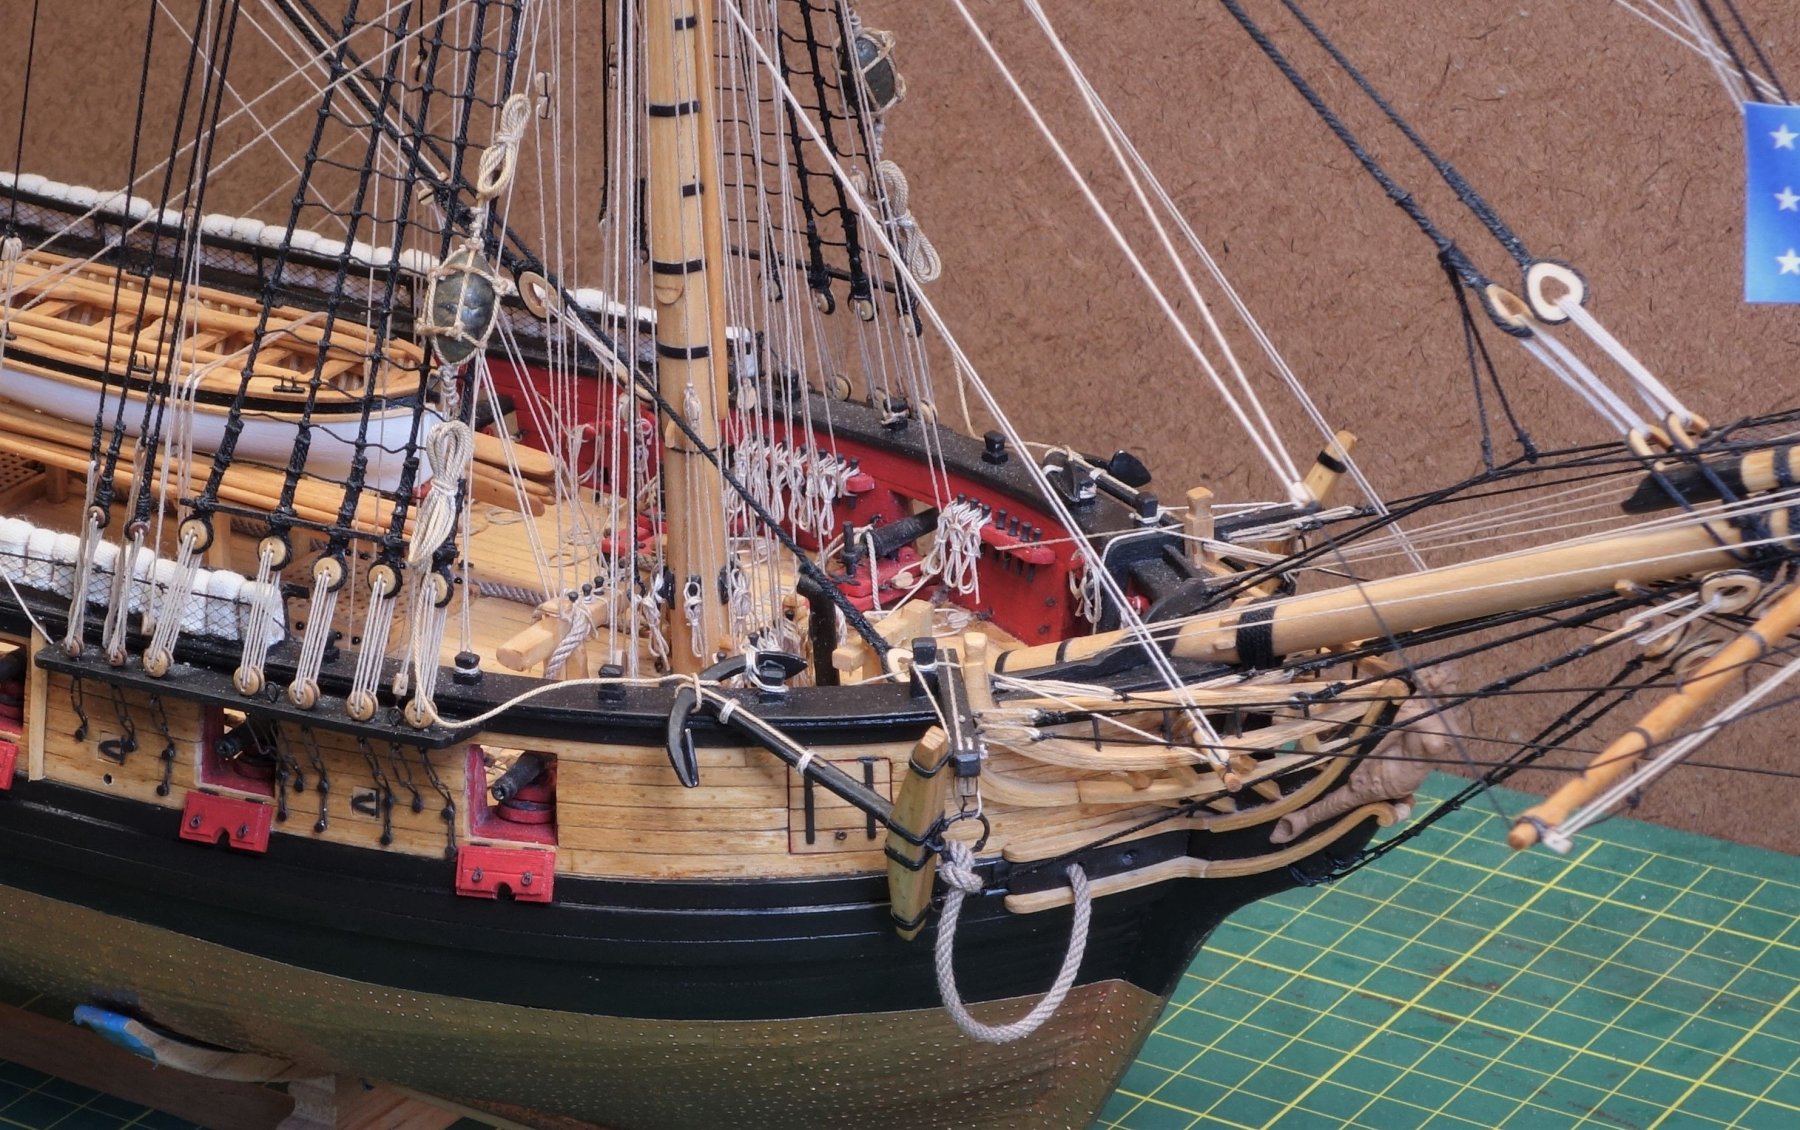
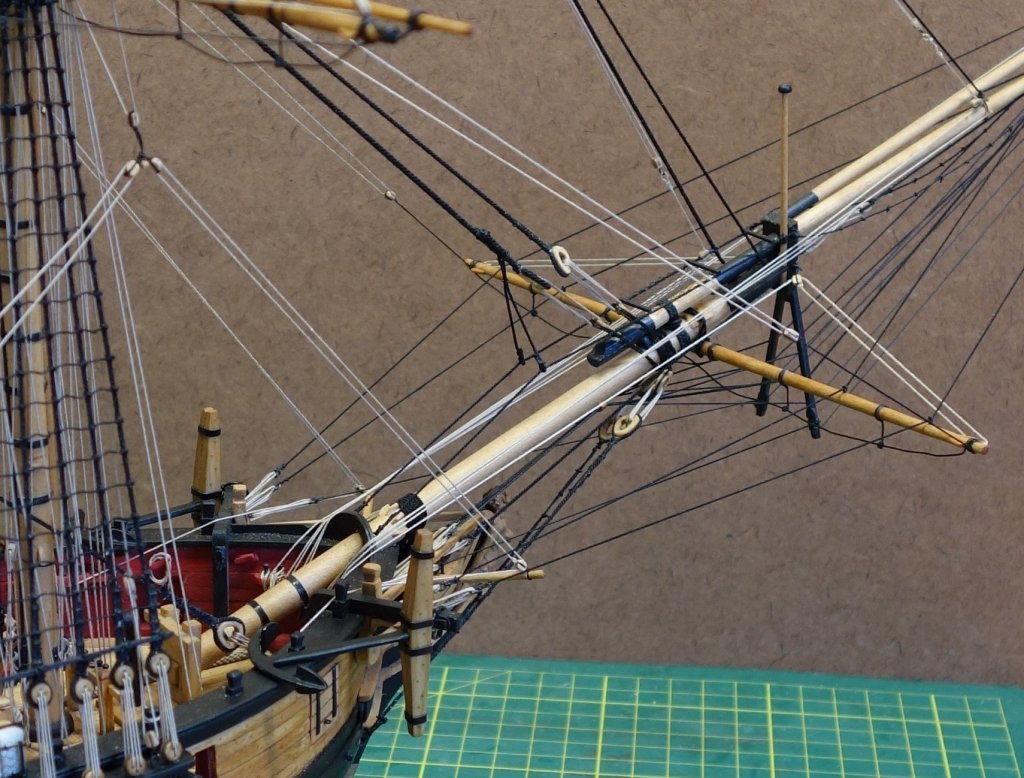
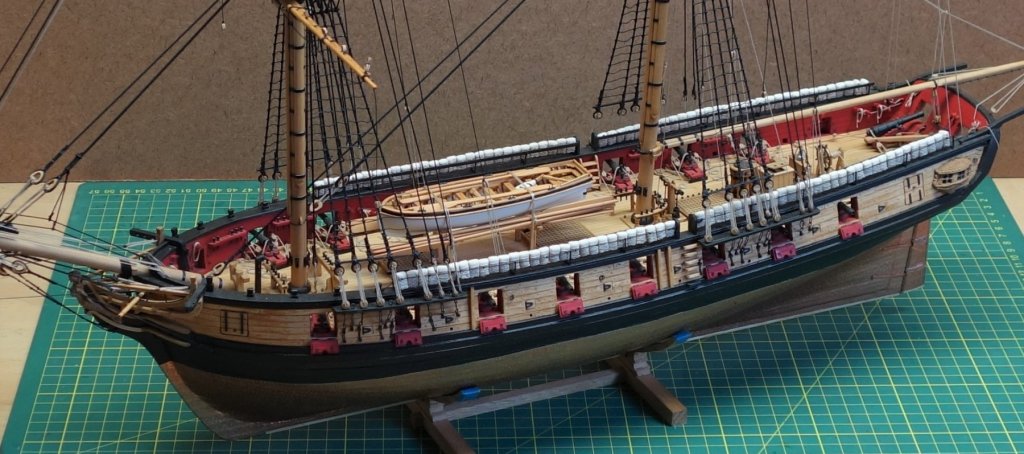
Thanks Thomas and thanks for all the likes. I'm slowly closing in towards the finish line. This time I have added the clew lines, sheets and tacks for the main and fore course yards. I have added a photo showing some pegs on the ends of the lines before I belay them. I have gotten into a habit of installing the lines with pegs on them and wait a day before belaying them. One reason is that the lines will settle a bit, but I also found a number of times that I made a mistake somewhere and It gave me an opportunity to move them around and fix them. At this stage I also fixed the Spritsail yard to the bowsprit. Here are some photo's again.

- 242 replies
-
- 17
-
-
- syren
- model shipways
- (and 1 more)
-
I know Jessie. I have been looking forward to updates from your build as I am slowly progressing through mine and have been taking advantage of some of your tips in the process. it's quite a journey isn't it...lol. Thanks Peta_V.
- 242 replies
-
- 2
-
-
- syren
- model shipways
- (and 1 more)
-
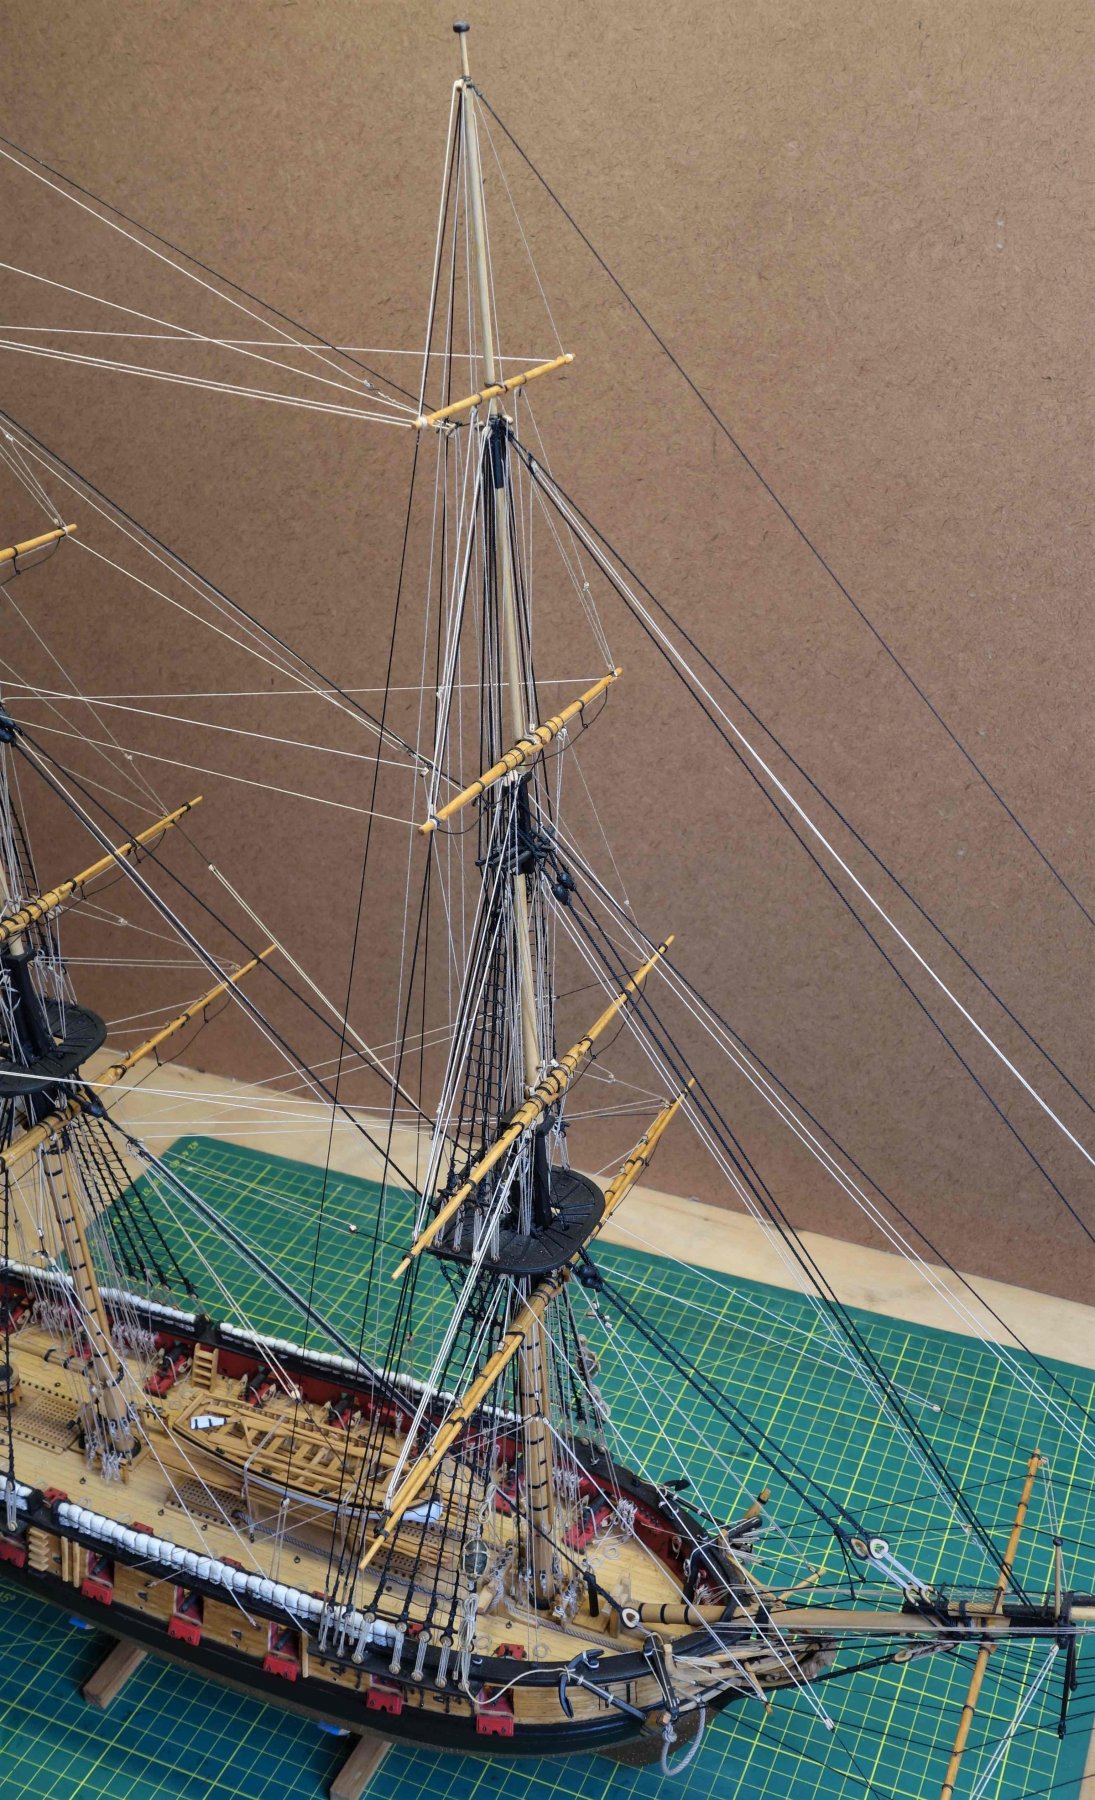
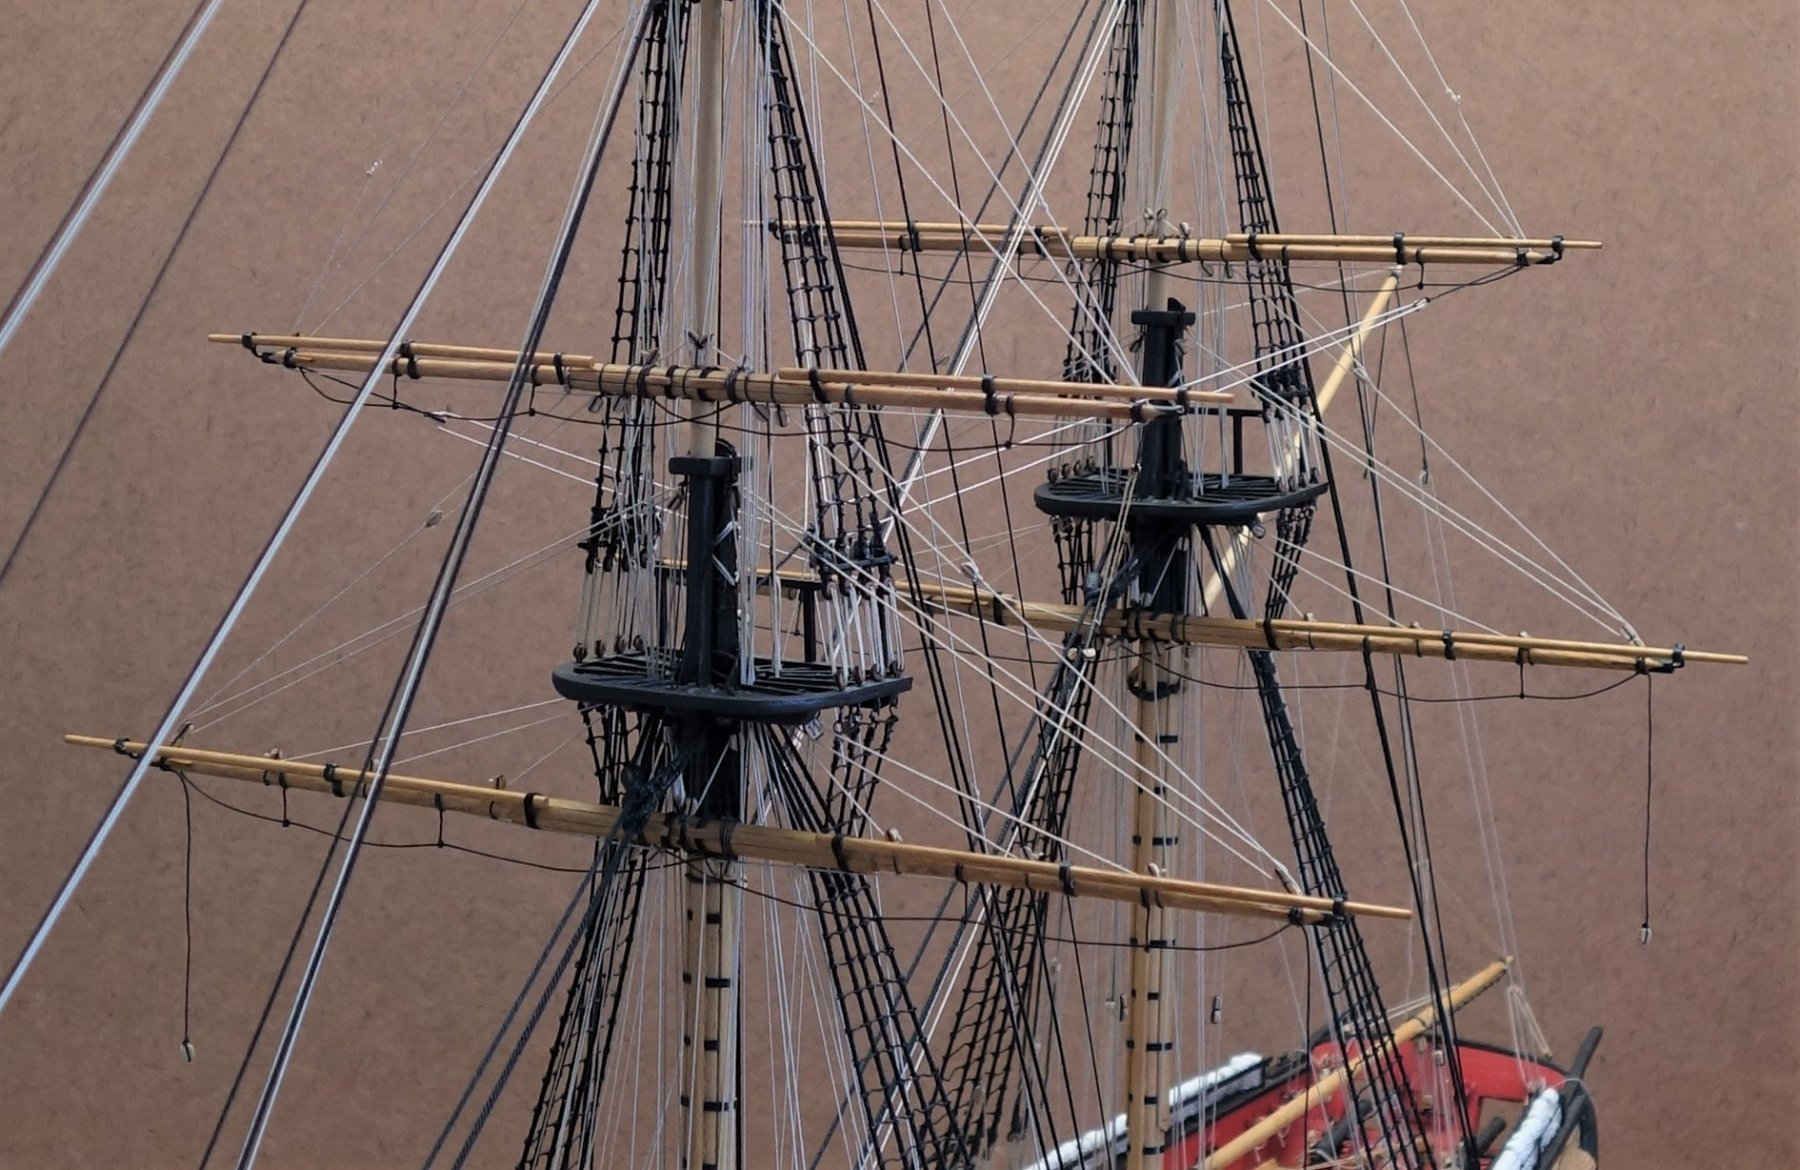
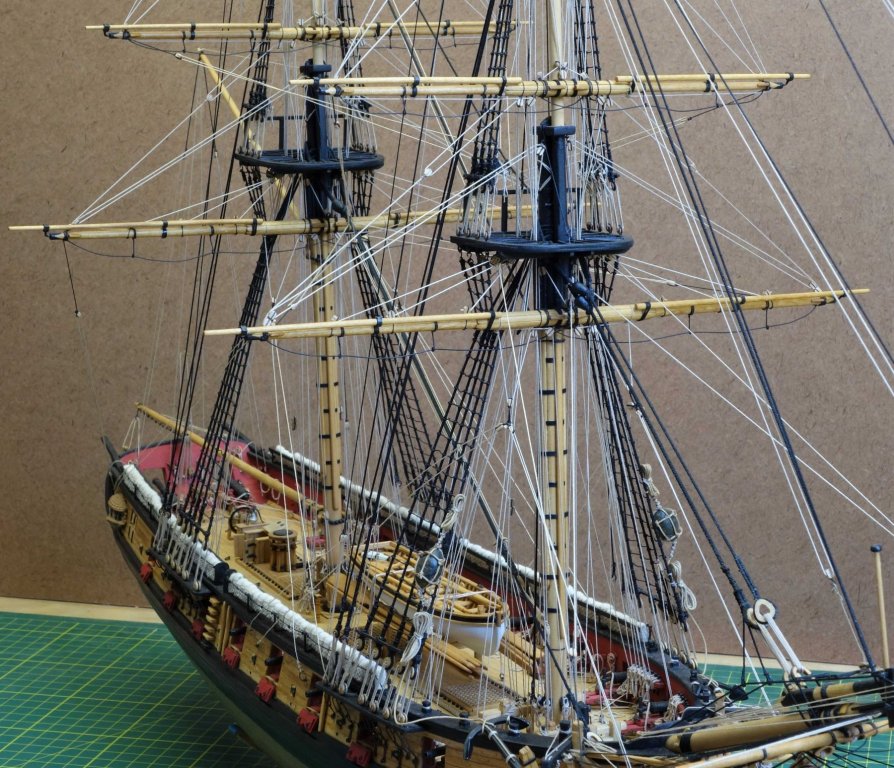
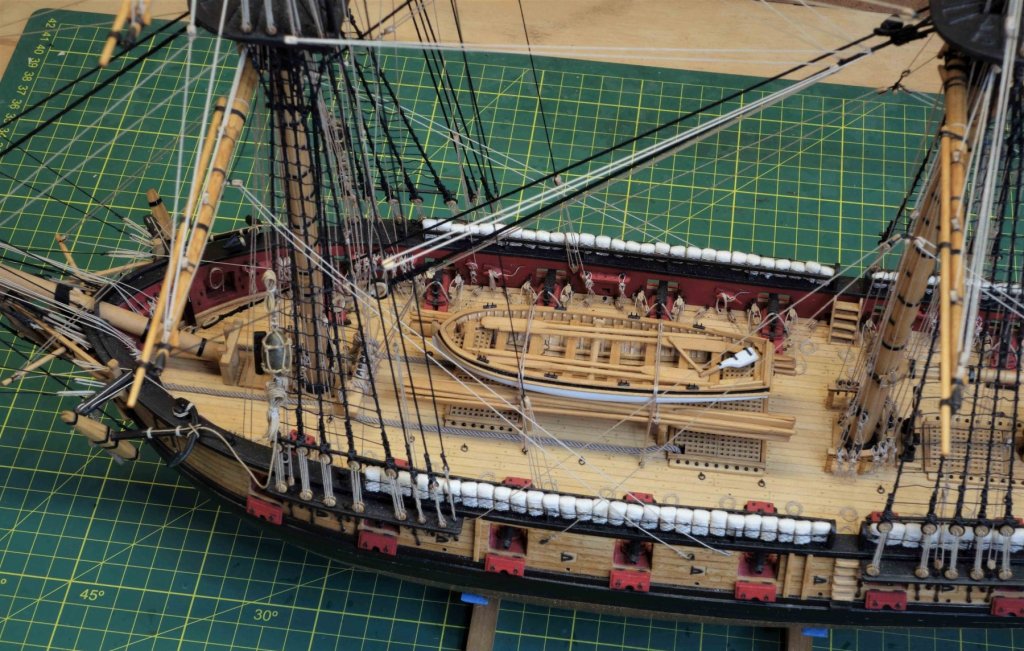
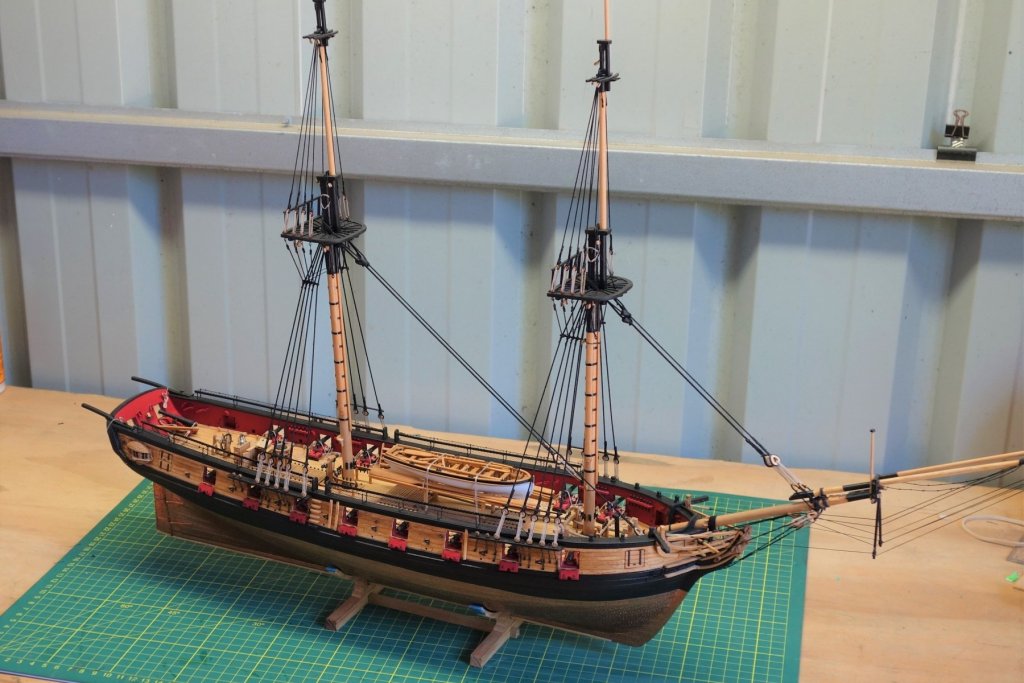
Thanks everyone. A bit more progress on the rigging. This ships seems to eat lines and blocks so I had to order some more from Chuck. The royal yards with their rigging are done as well. It's becoming quite a spiders web of lines and it's getting more difficult to show the complexity with clear photo's. At least it's covering up some of the mistakes I've made nicely...lol Some photo's...


- 242 replies
-
- 8
-
-
- syren
- model shipways
- (and 1 more)
-
Thanks Everyone for the comments and the likes. Just a quick update on my progress with the running rigging. At this point I am up to the Topsail Buntlines, just following the order of proceedings in the instructions. It's starting to get pretty busy. My slow motion mode seems to get slower and slower, trying not to get snagged as my hands move and trying to cut one line at the time (preferably the one I am aiming for). I had my in-laws over on the weekend and they are in their late seventies. Seeing their hands whizzing around the model pointing things out to each other made me break out in a cold sweat. Luckily the model and I survived their visit...lol A few photo's...


- 242 replies
-
- 11
-
-
- syren
- model shipways
- (and 1 more)
-
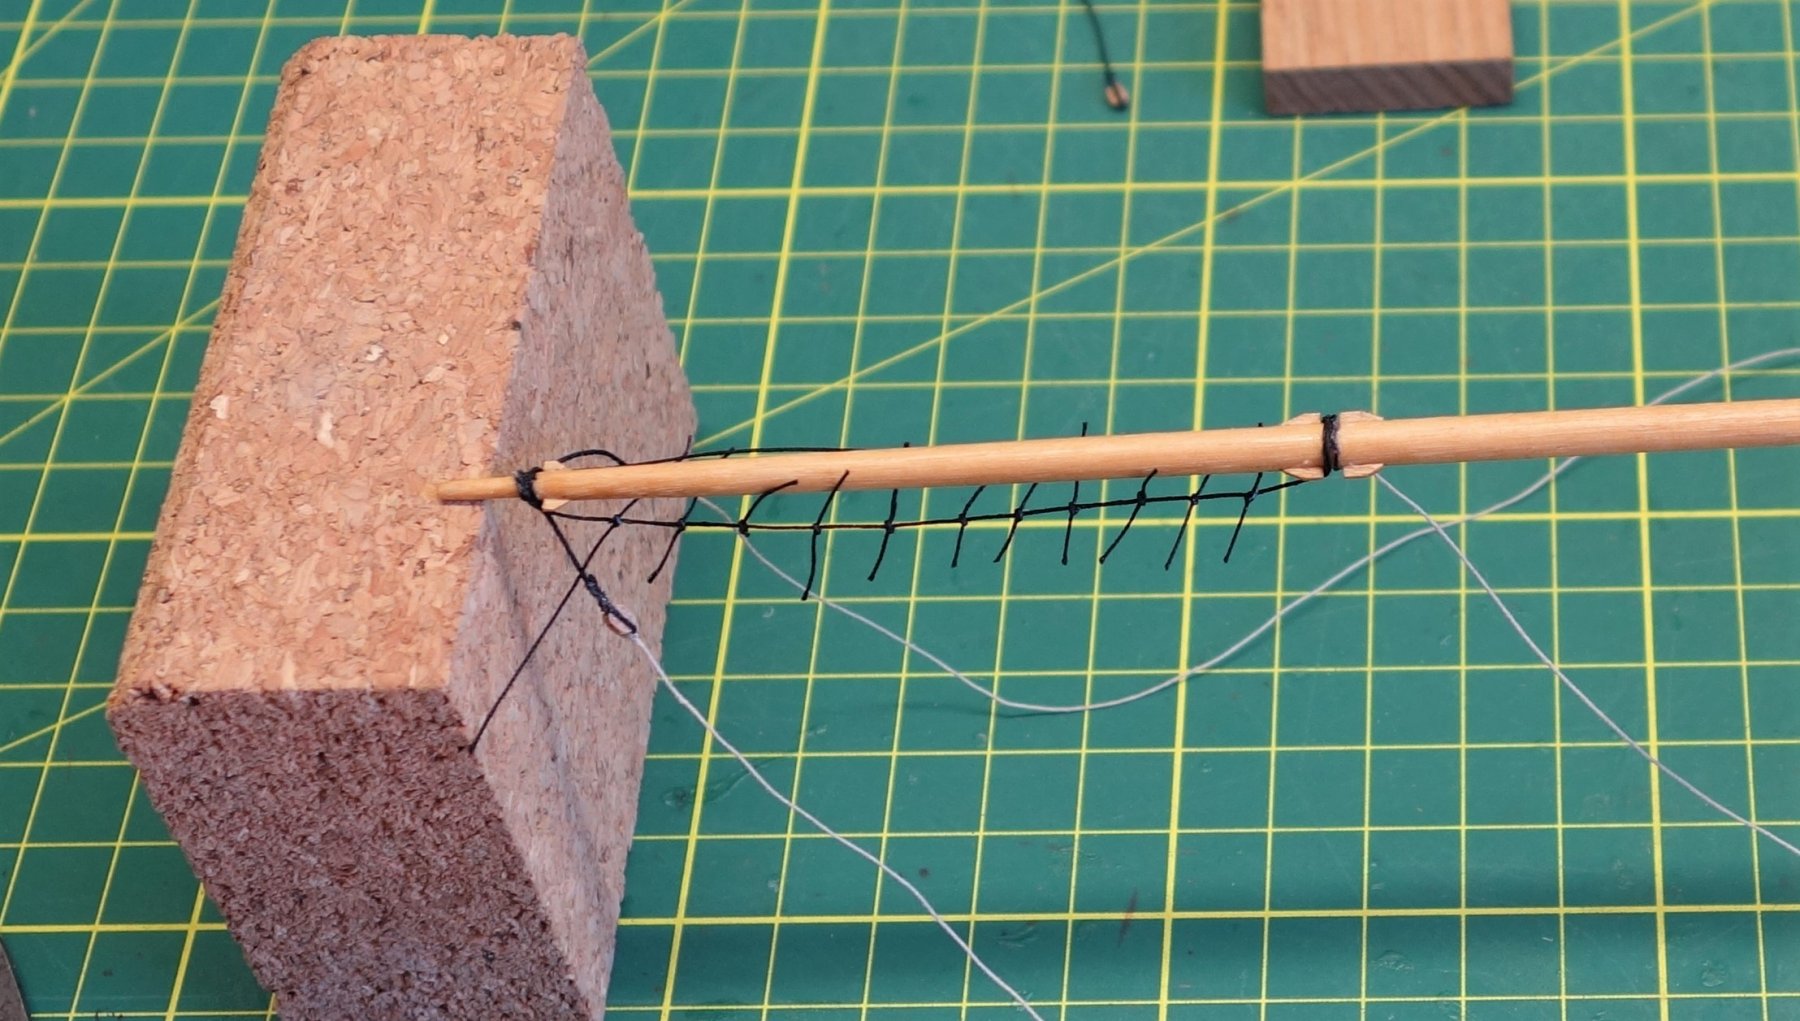
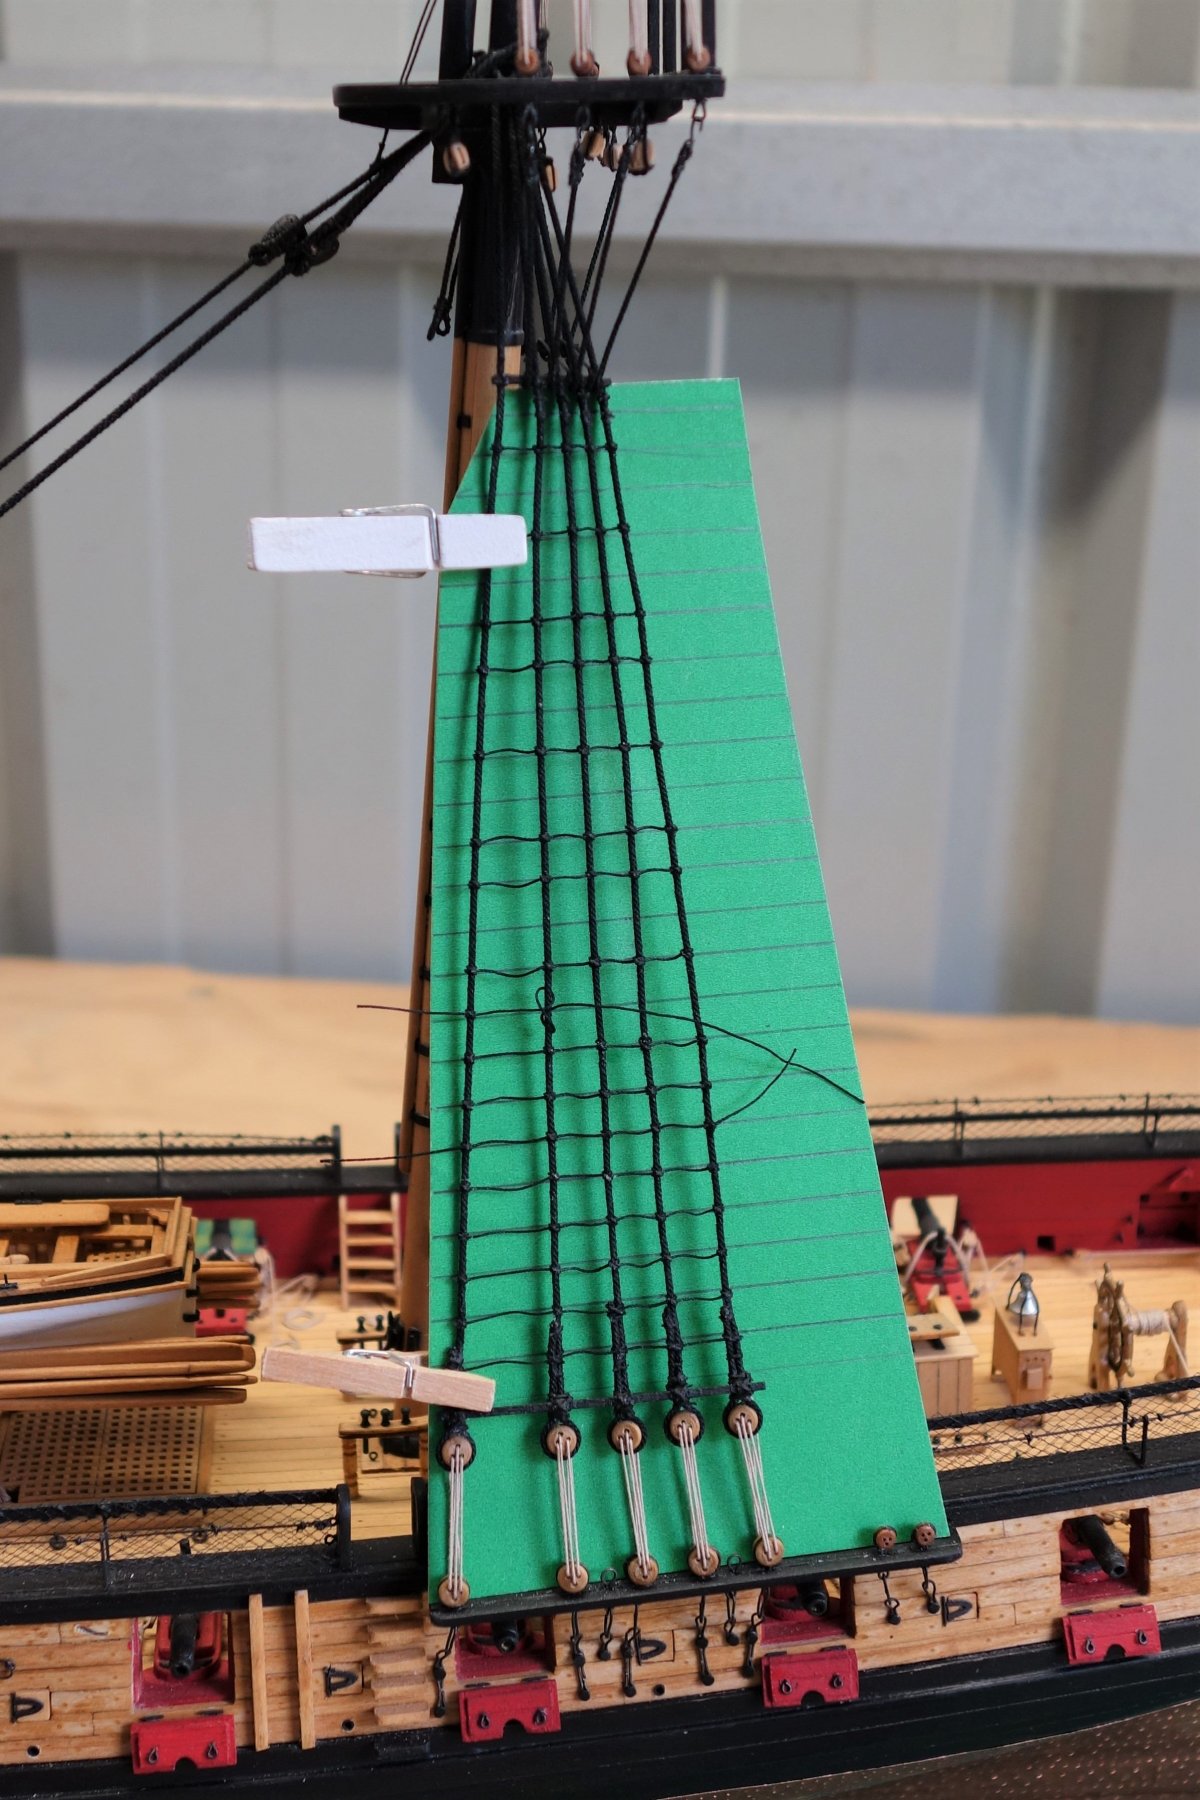
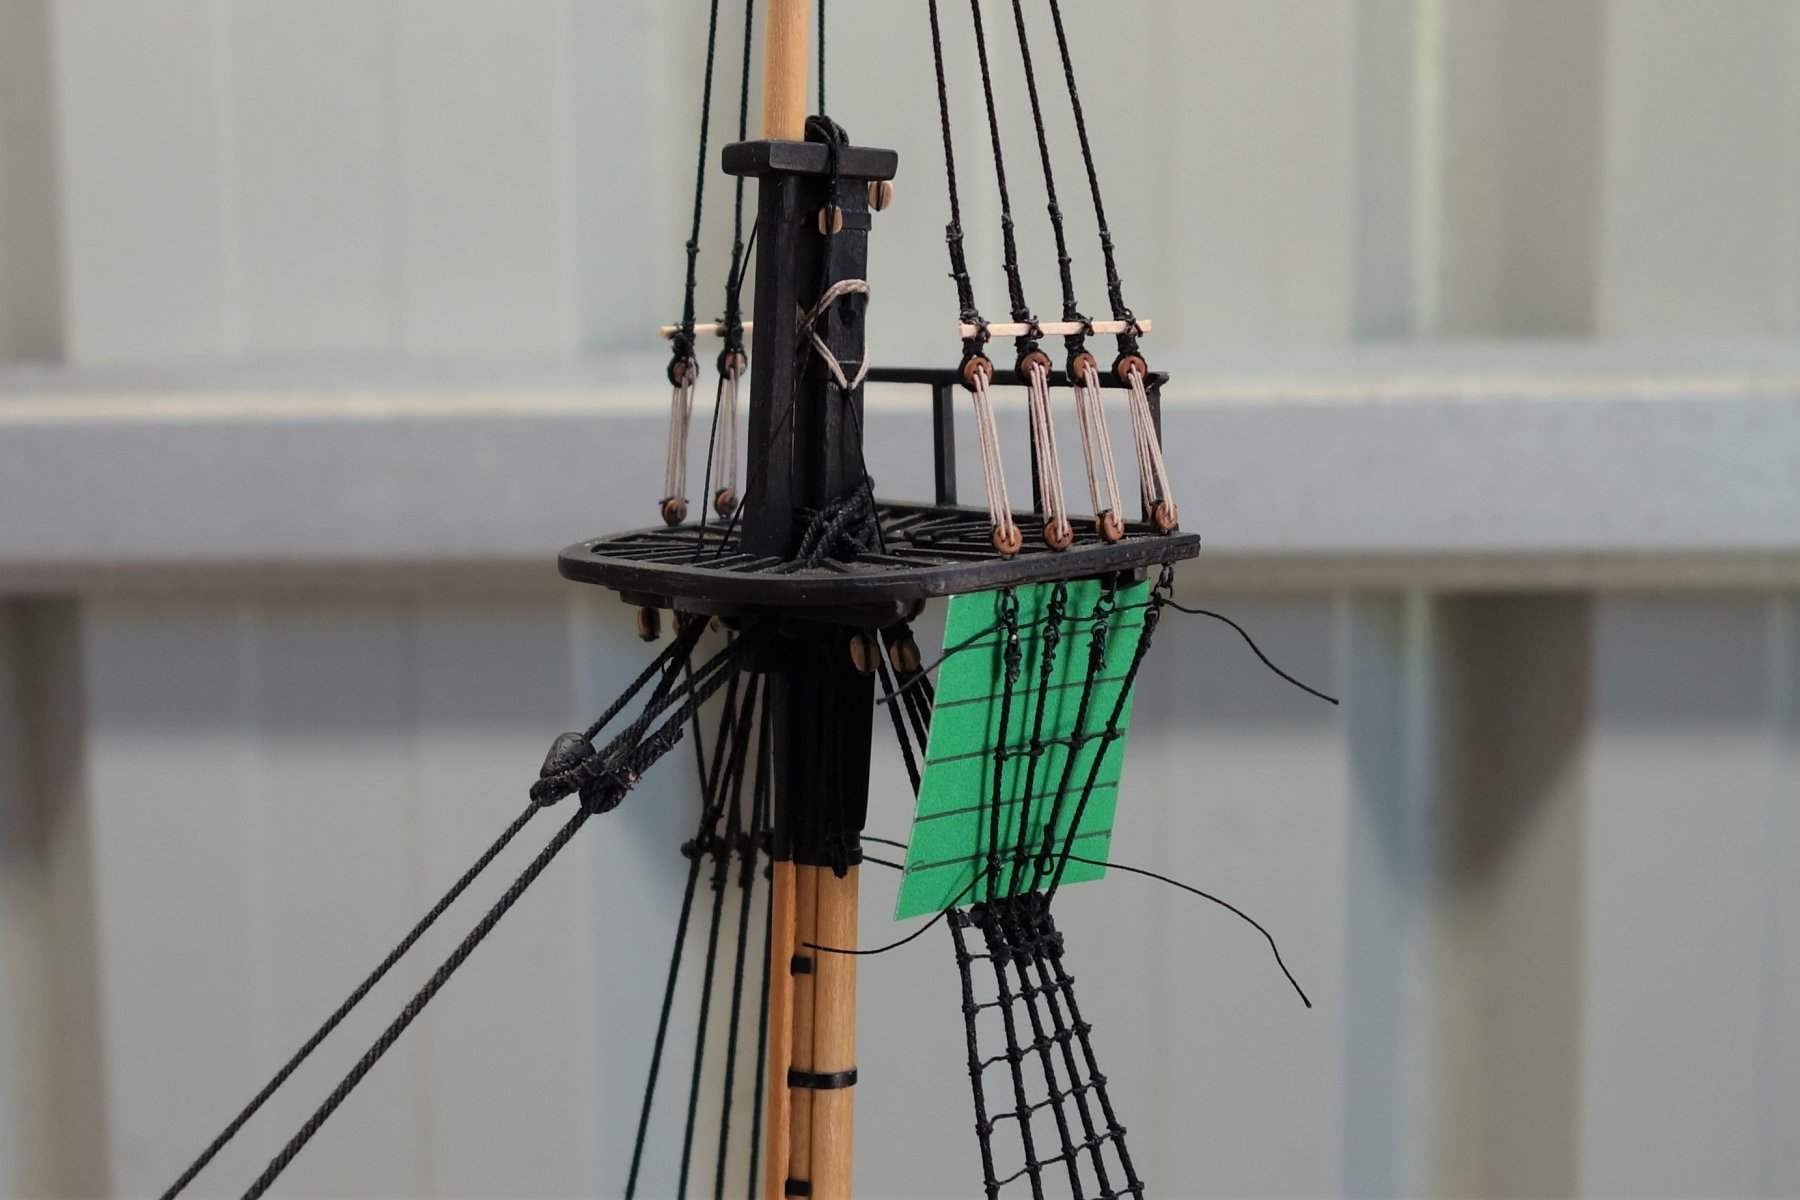
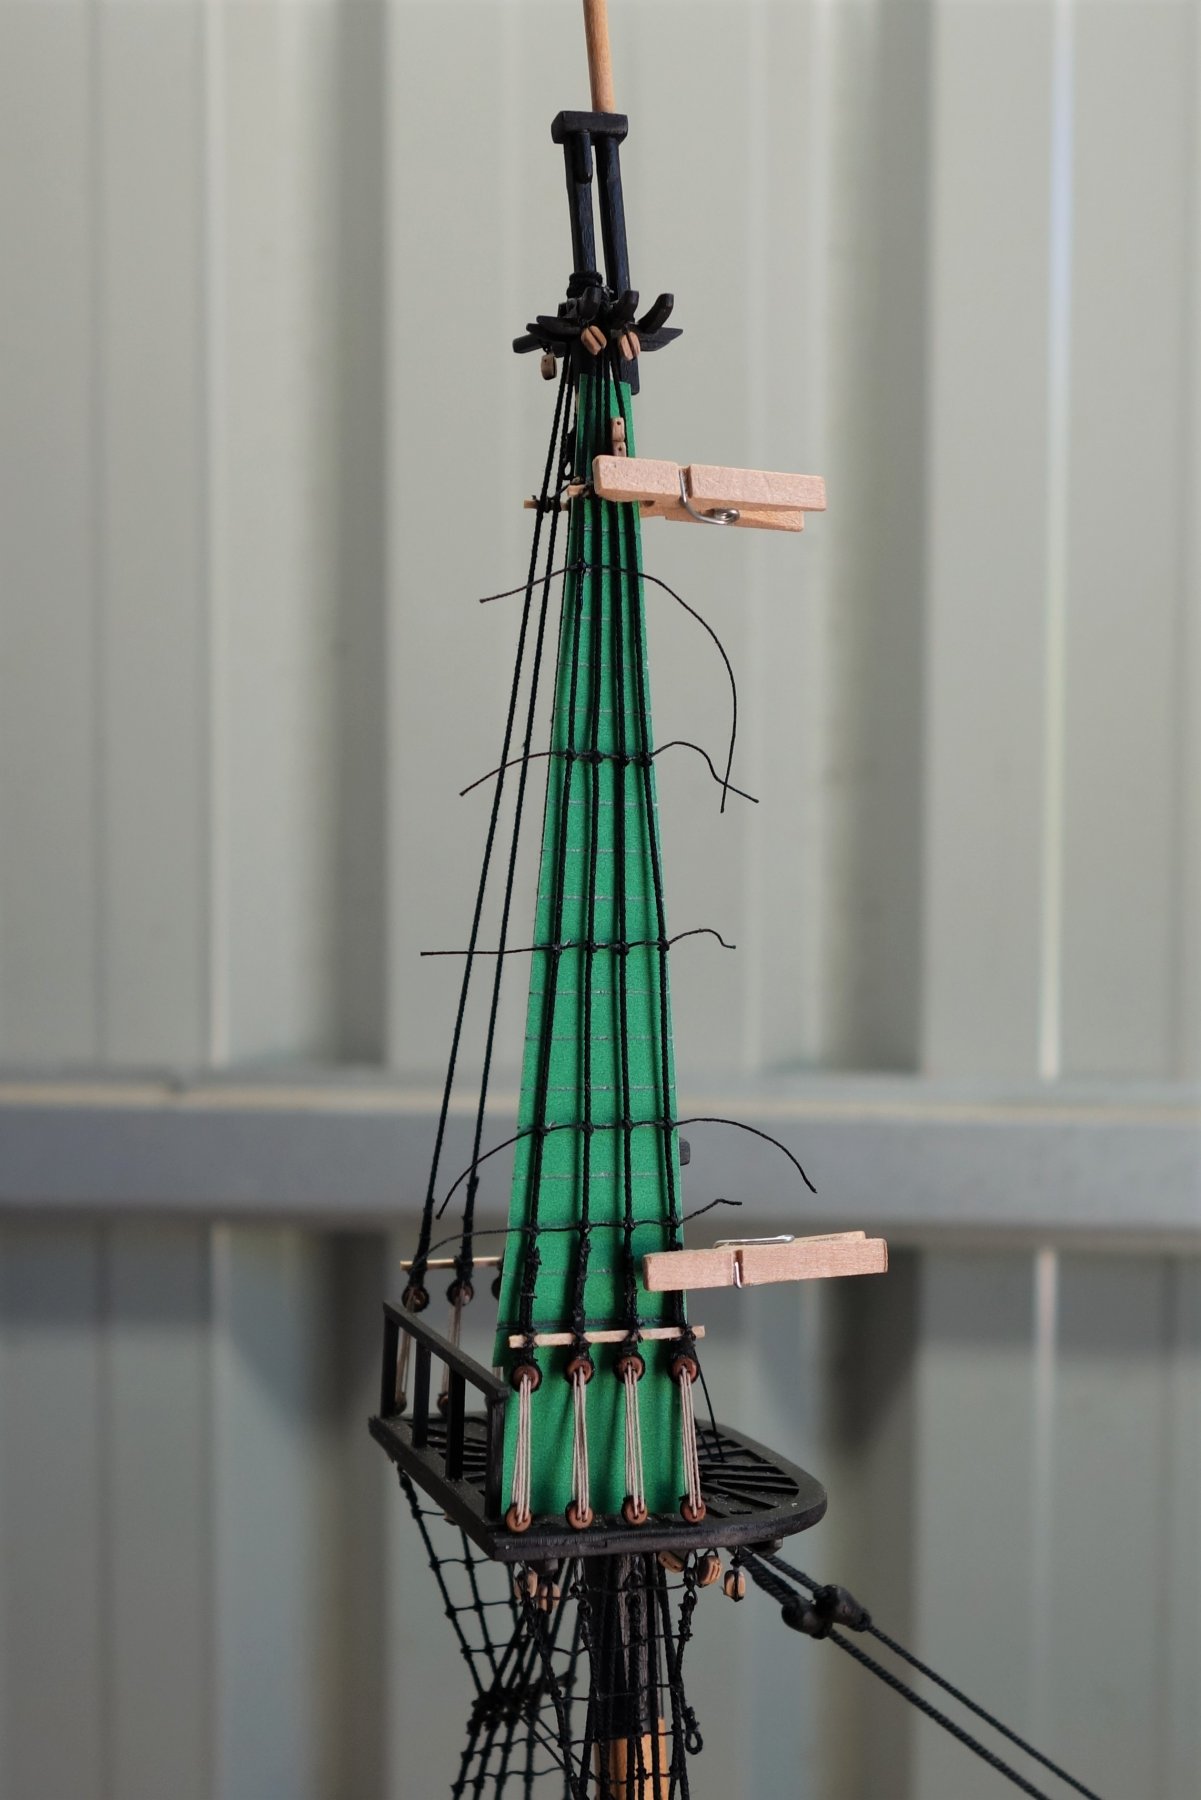
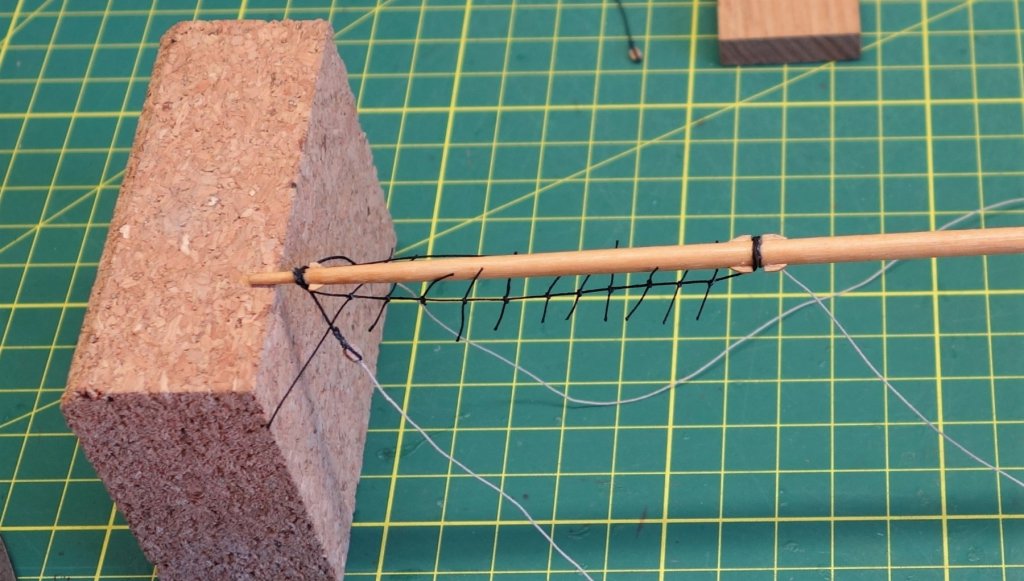
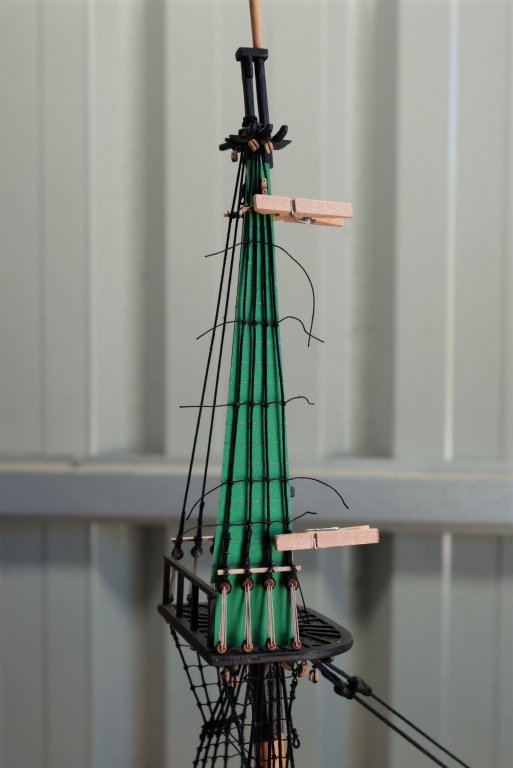
Time for another update. I mentioned earlier in my log that I wasn't happy with the hammock netting. I always thought that because the netting wasn't all the way down to the cap rail and had a bit of an inconsistent gap that adding hammocks probably wouldn't work. But I finally couldn't resist having a go at it to make sure. So I took a break from the rigging and spend a few weeks making the hammocks. I just used a sheet of calico and cut it into 17x35mm rectangles. I'm glad I did because I don't think it's come up too bad (looking from a safe distance....lol). A few photo's...


- 242 replies
-
- 10
-
-
- syren
- model shipways
- (and 1 more)
-
Hi Joe, Thanks for the compliment. Just had a look at your log and in spite of some early scares it's coming along nicely. I'm Looking forward to your progress. Peter
-
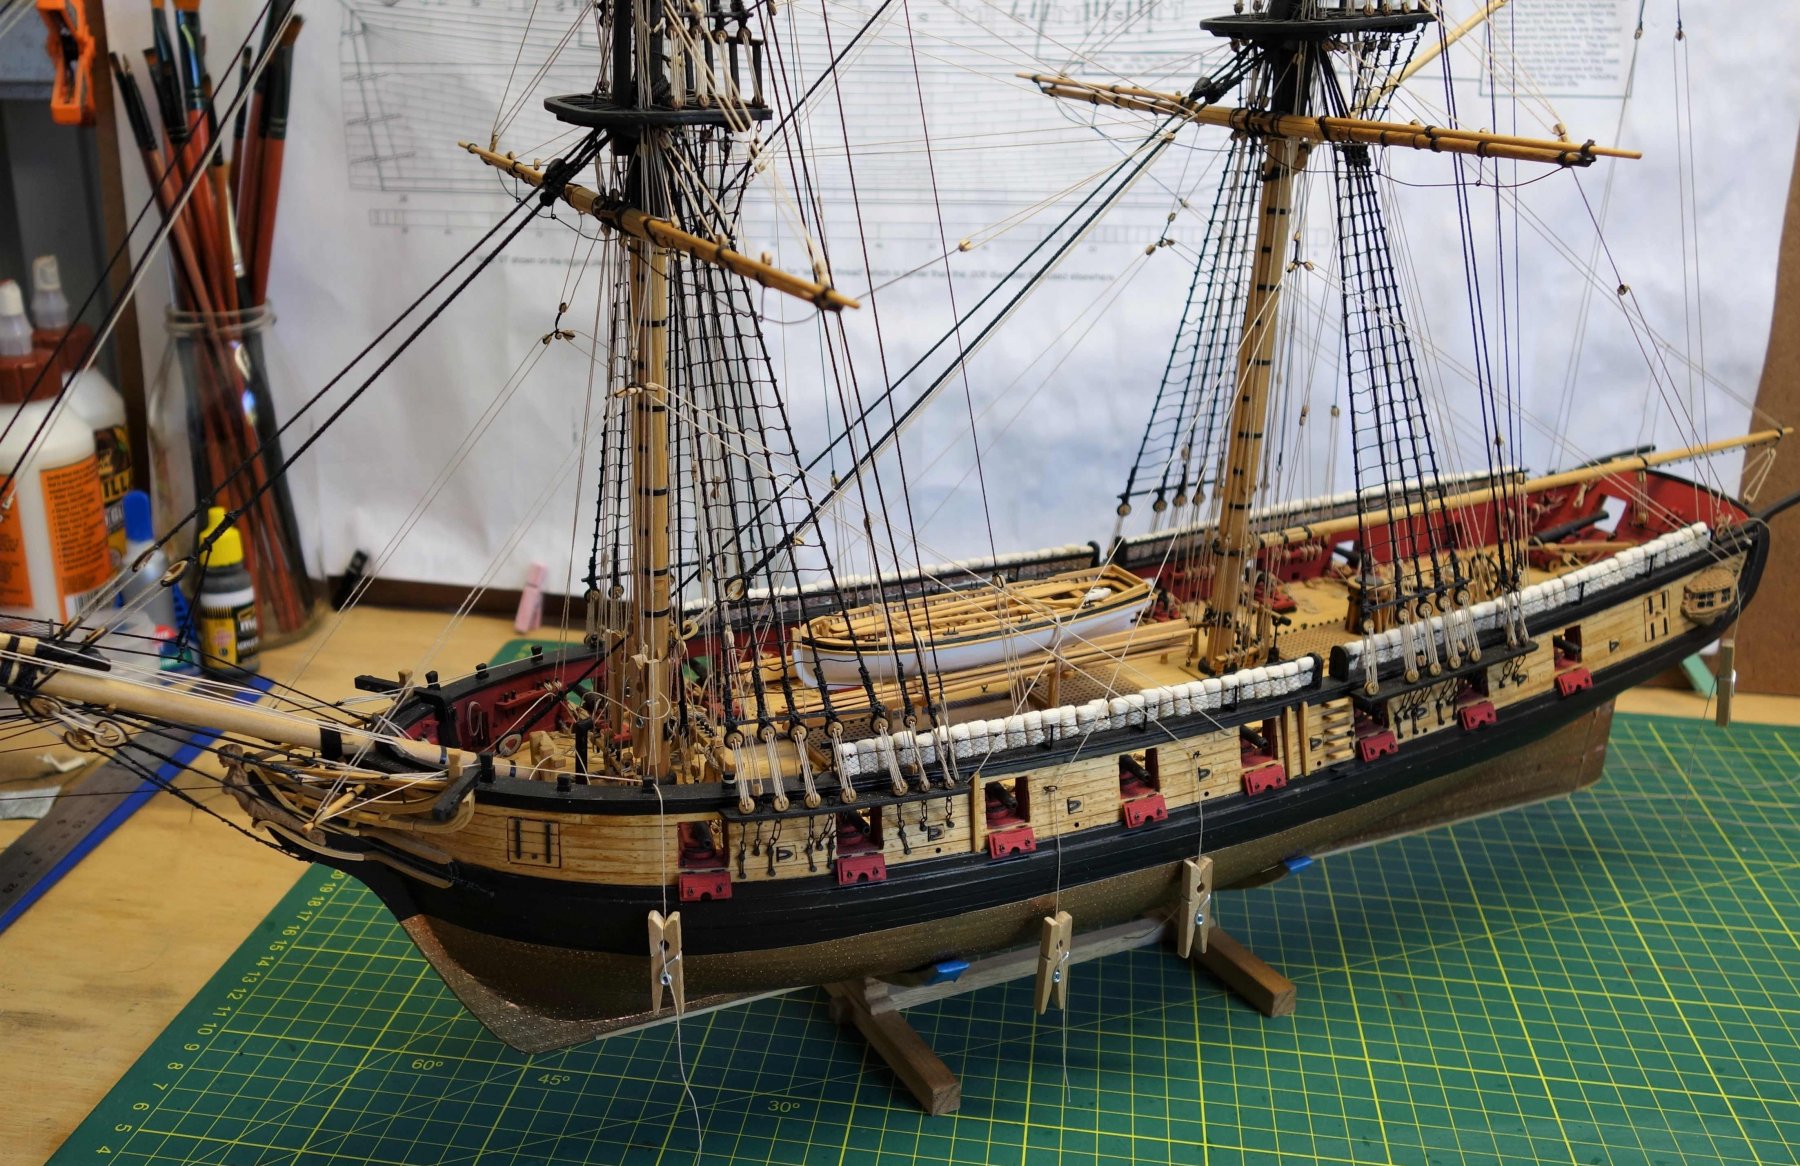
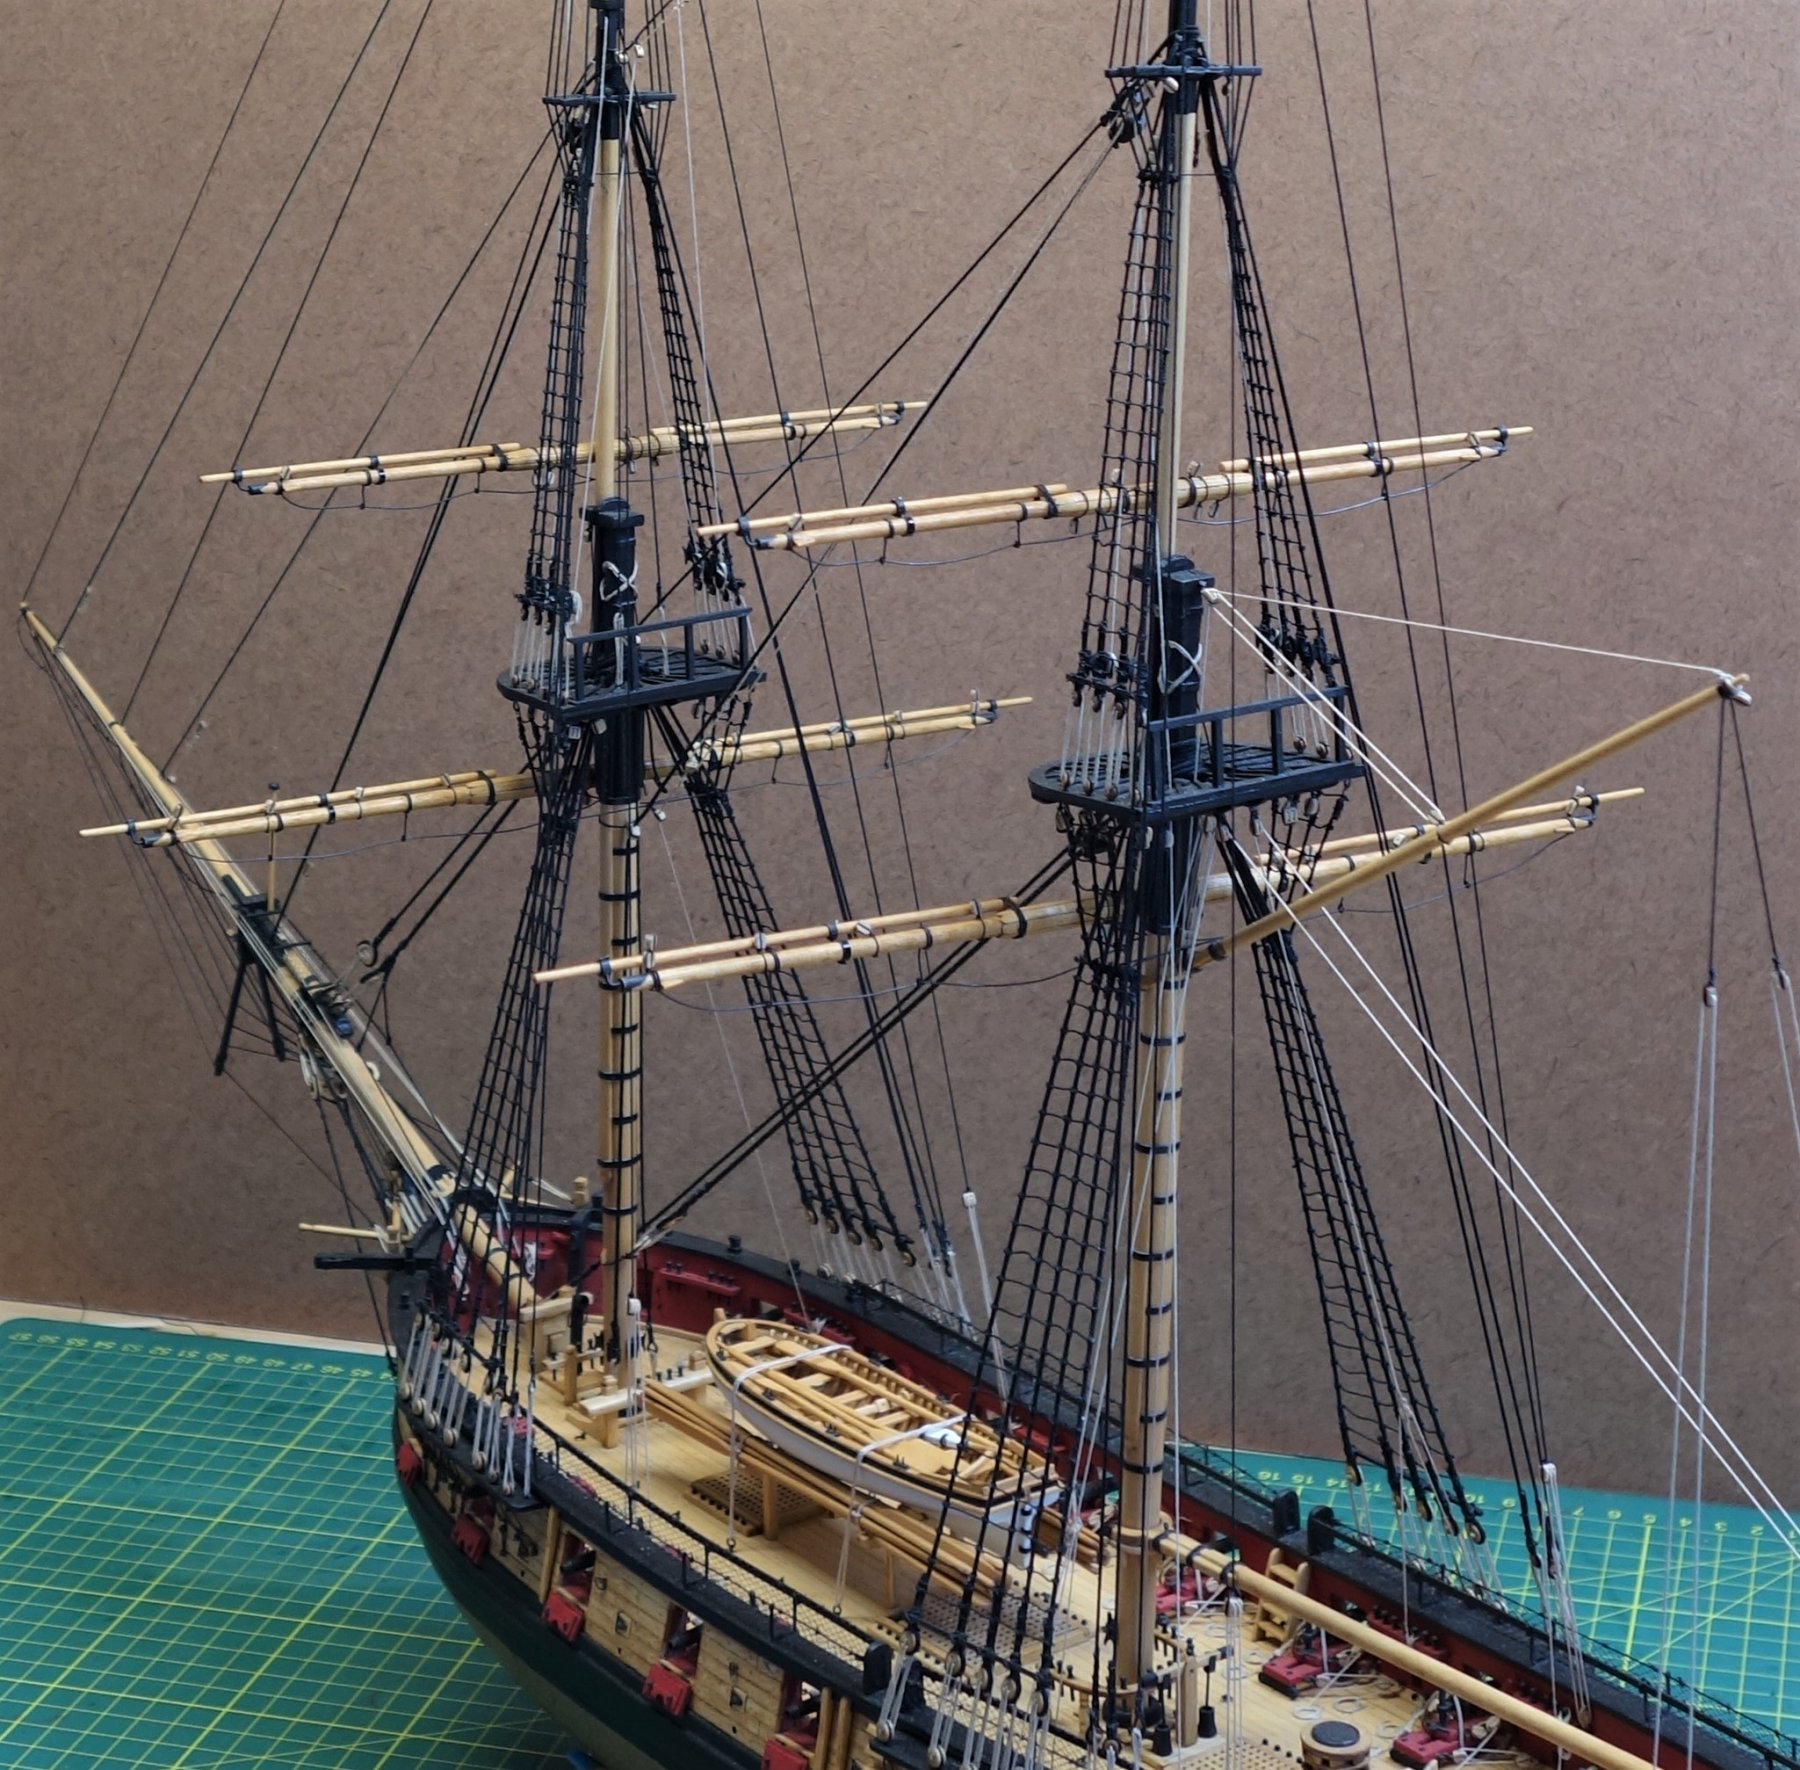
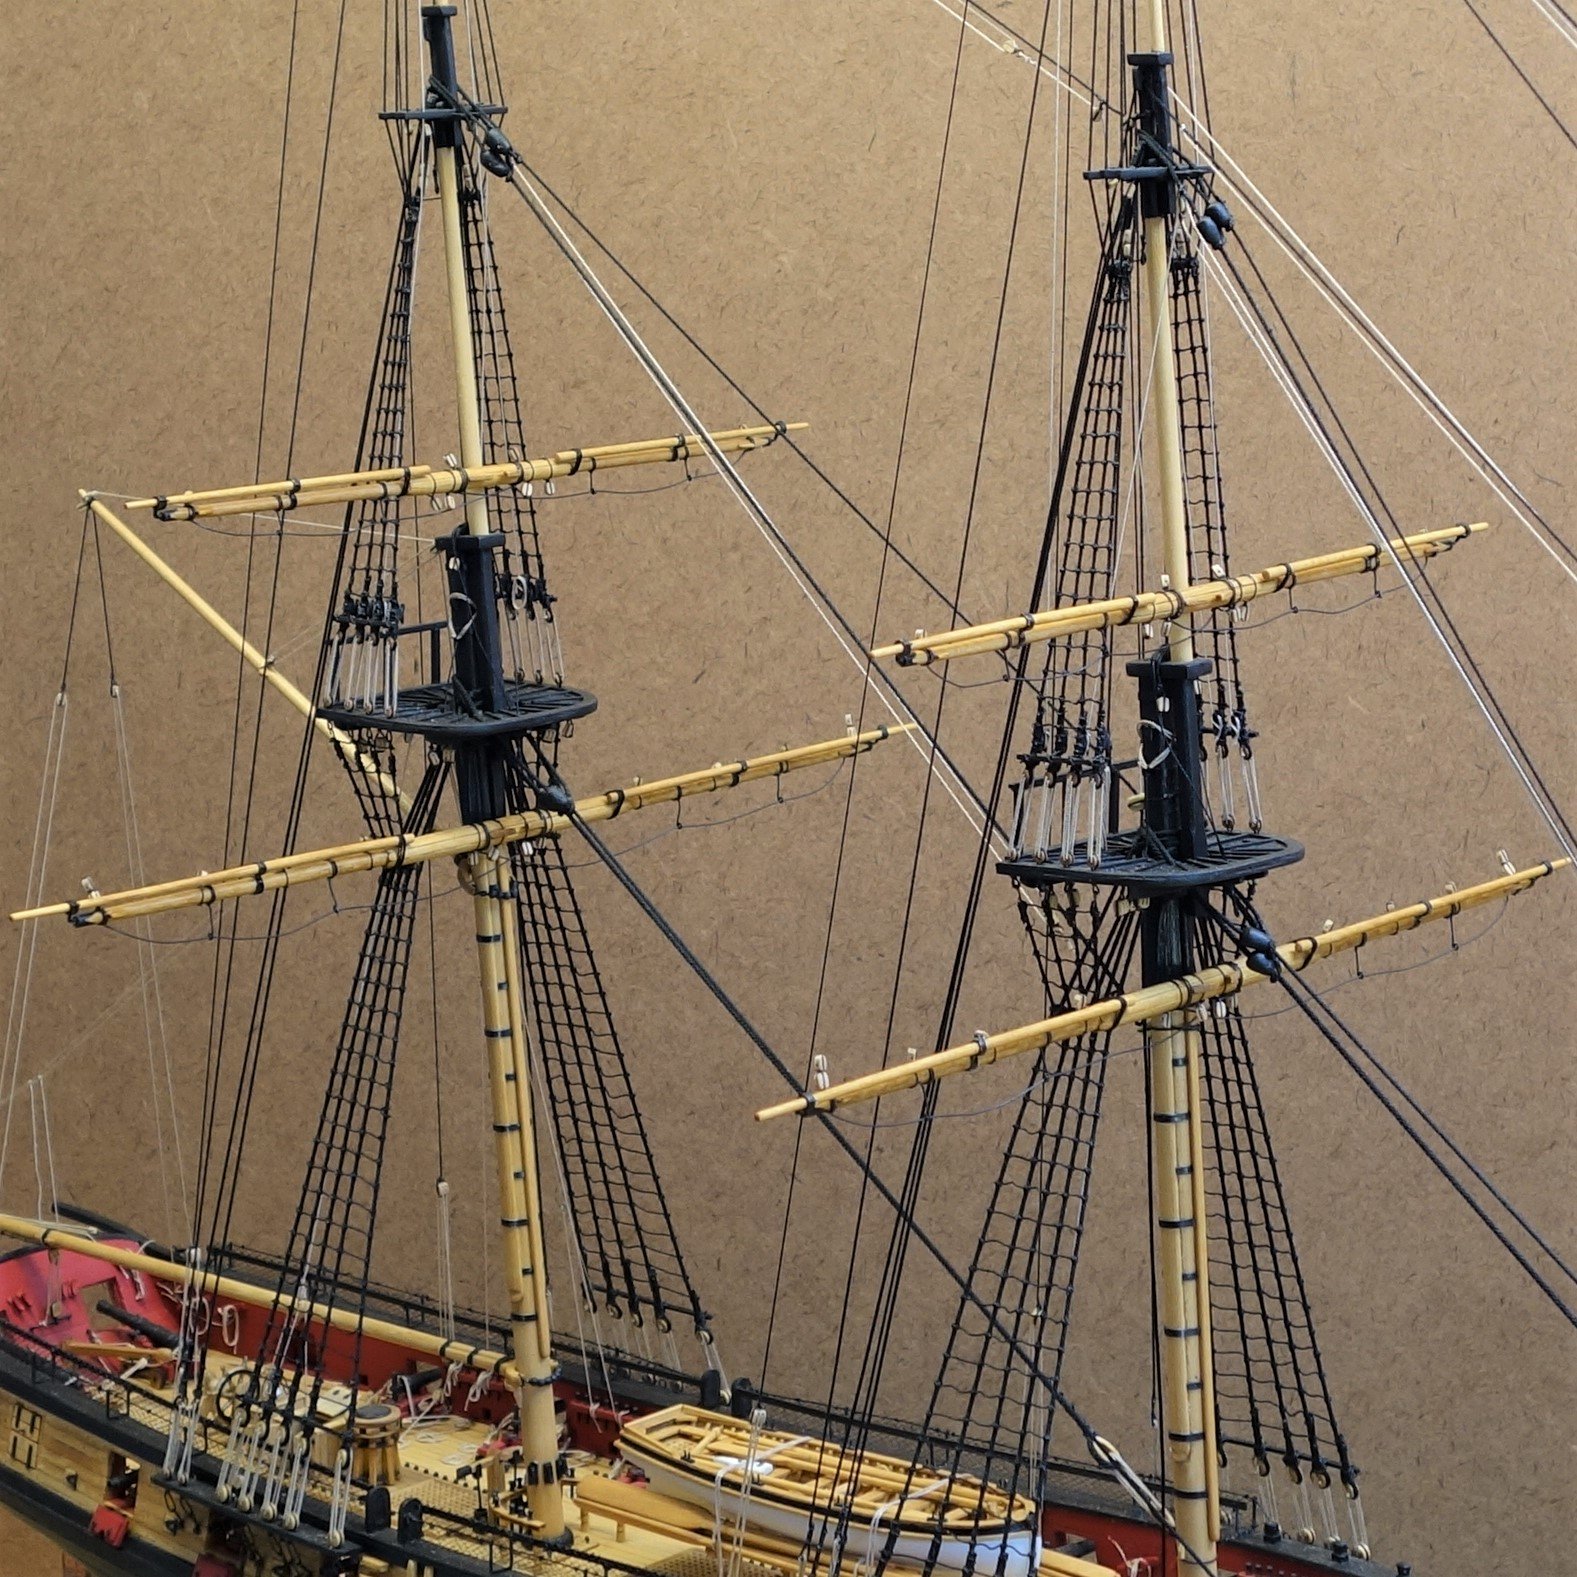
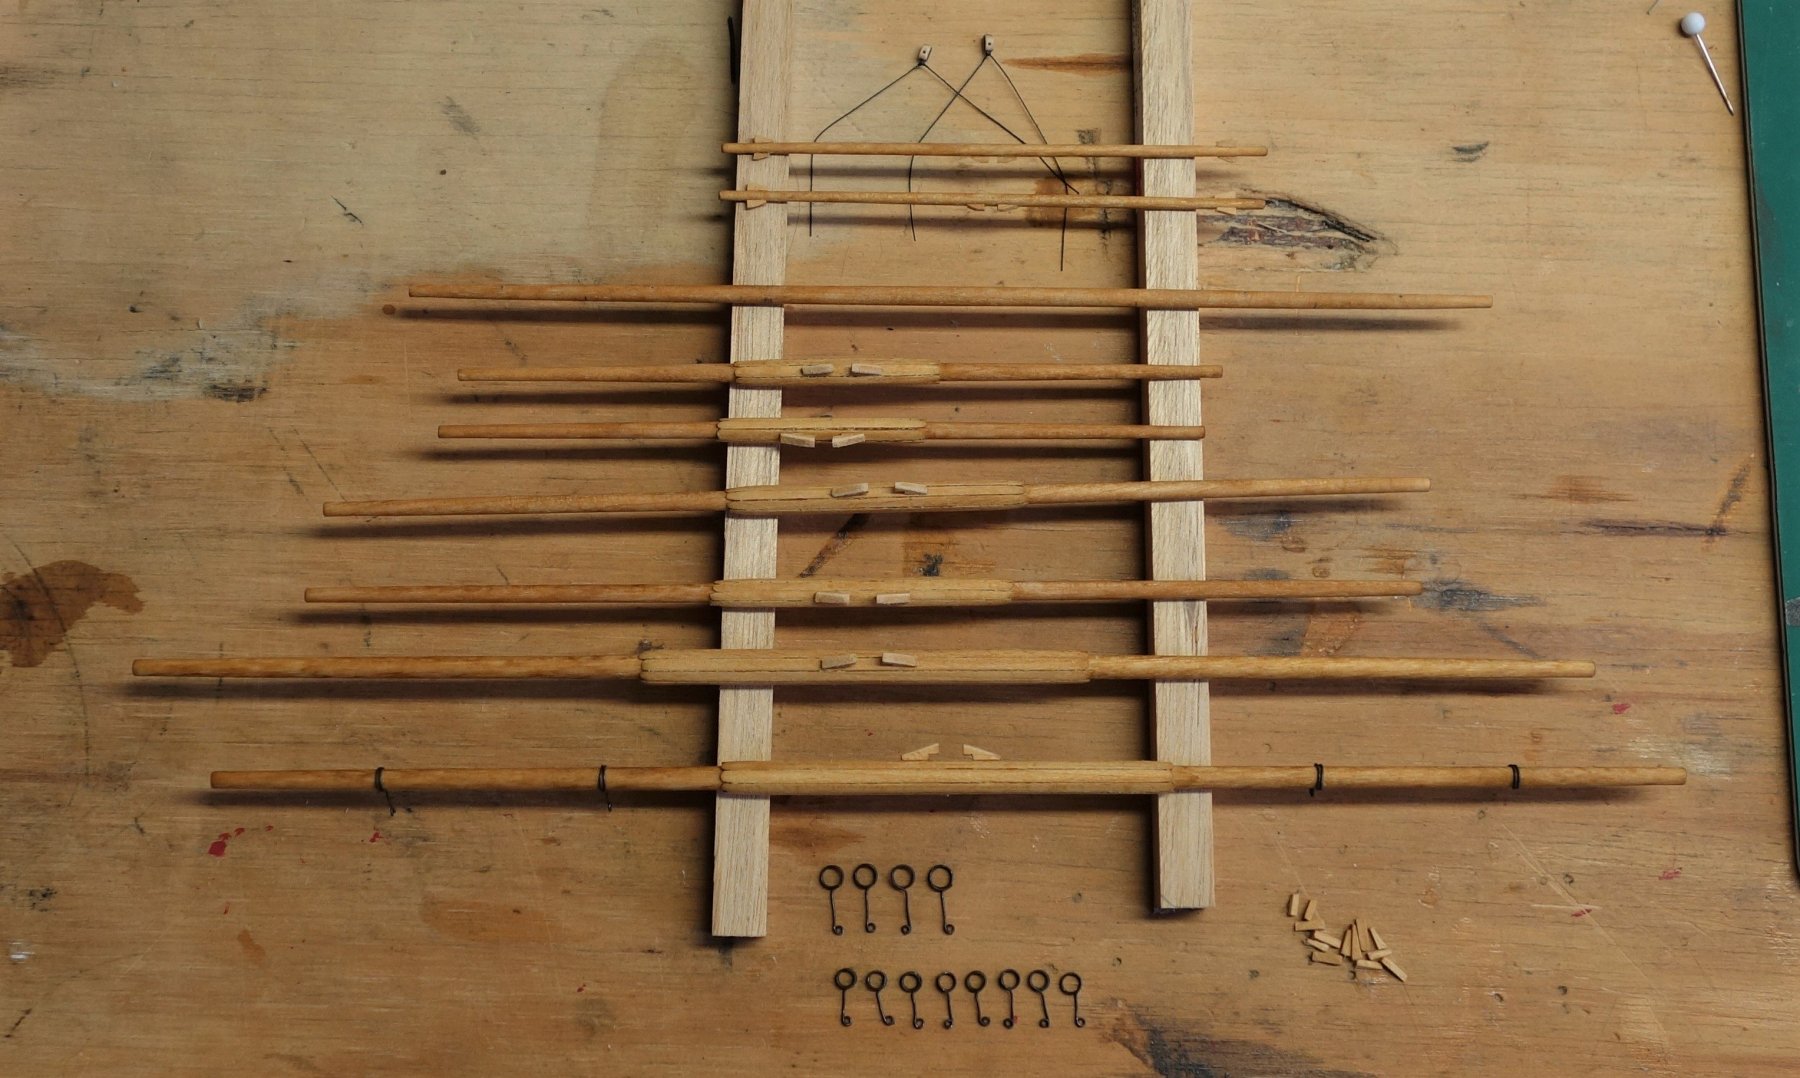
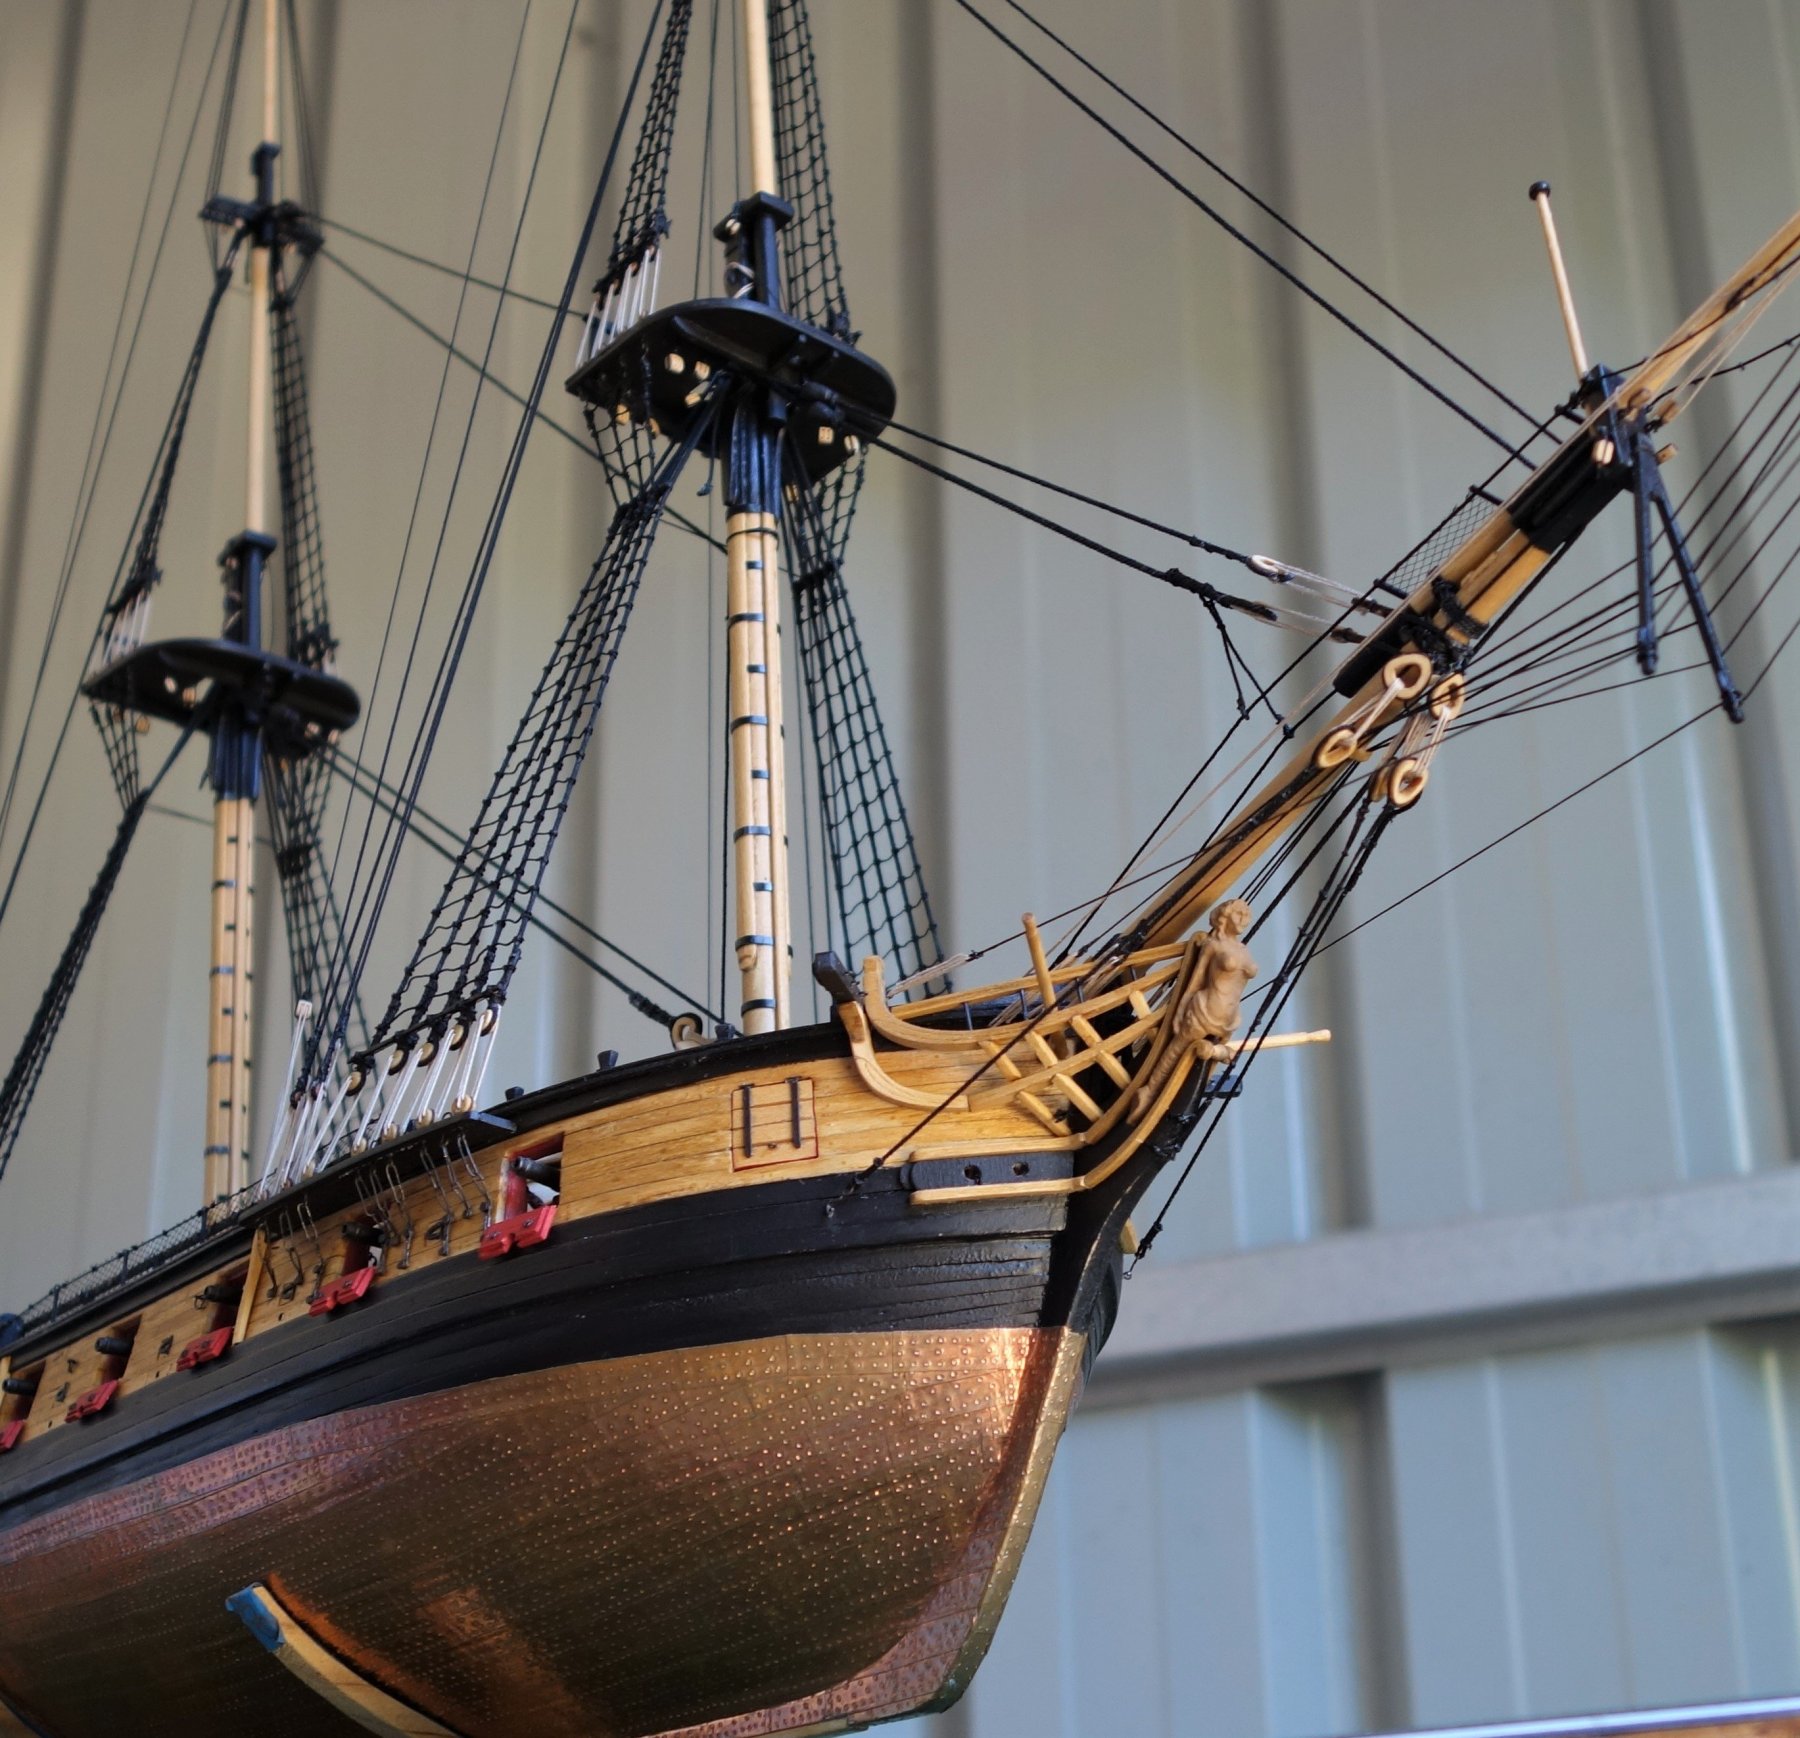
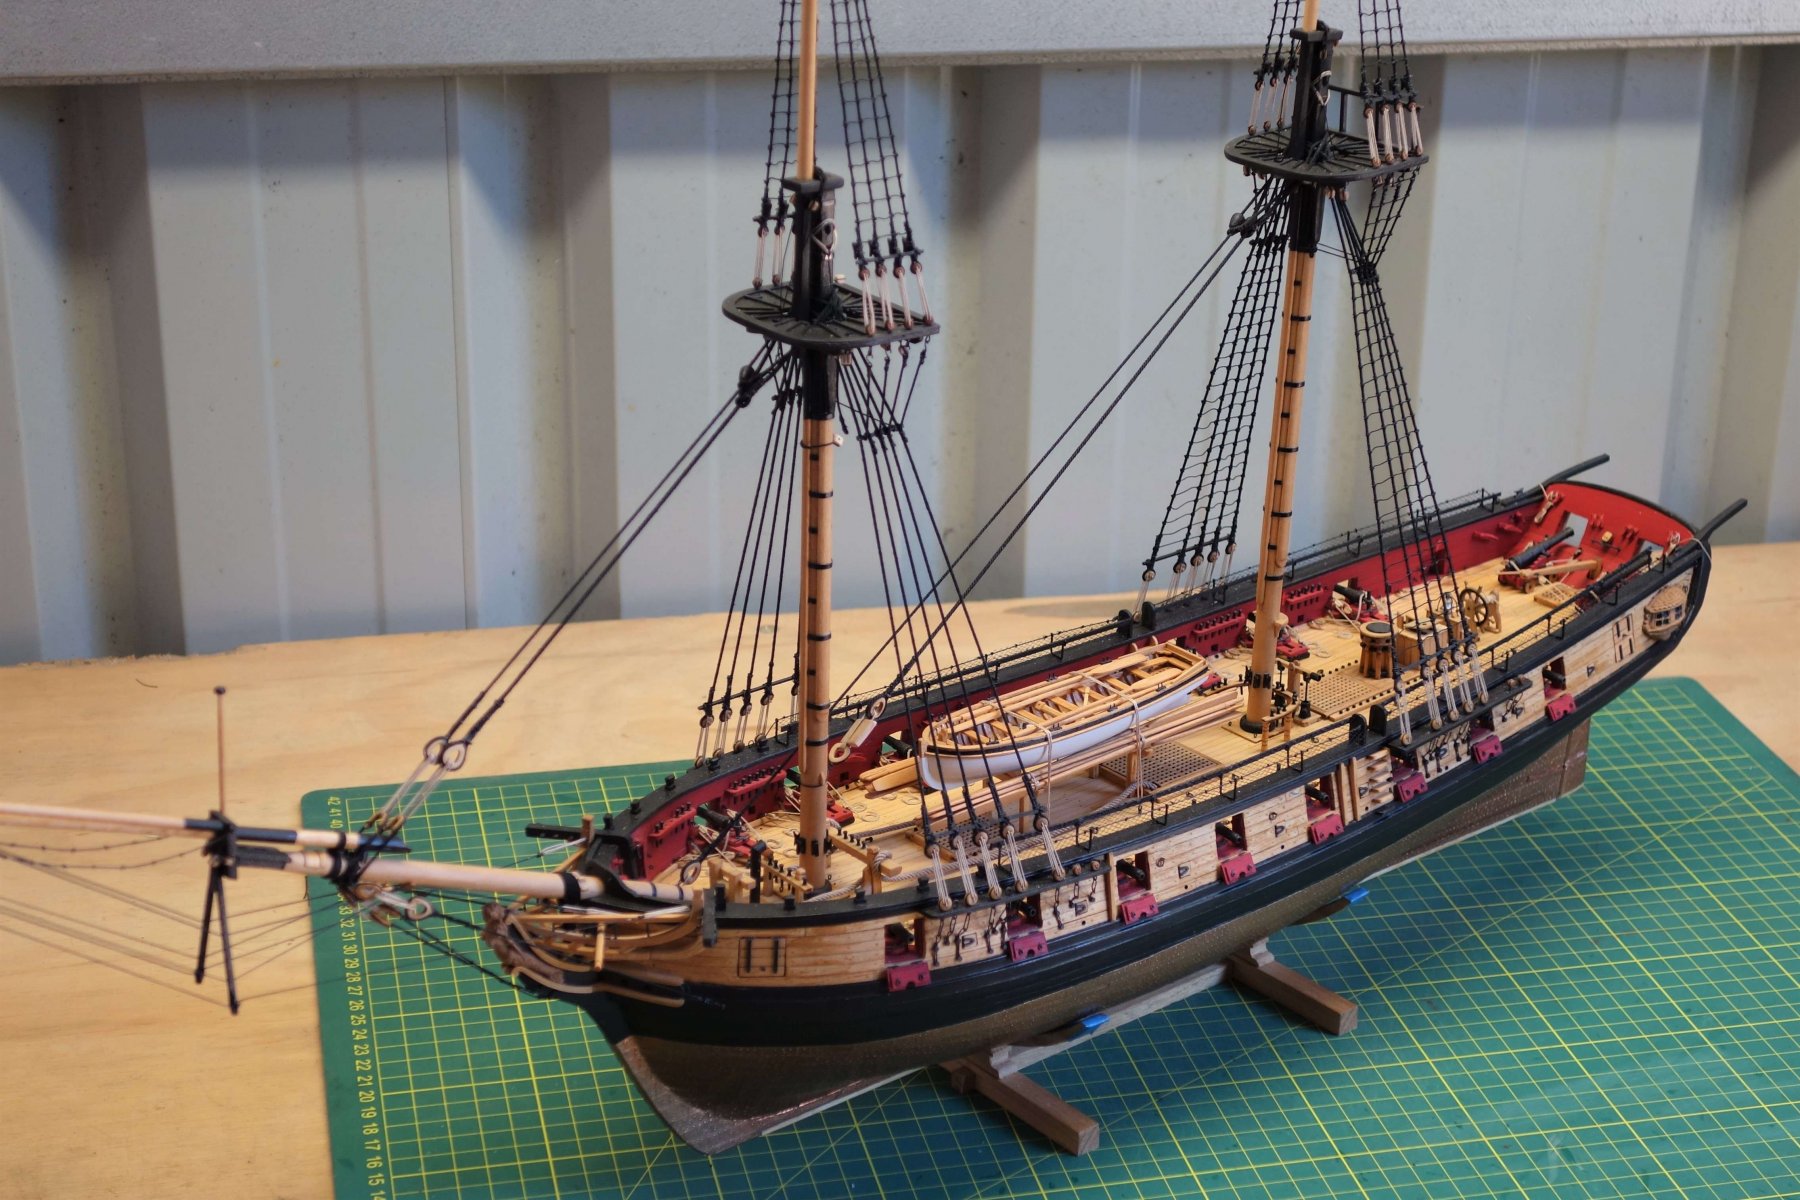
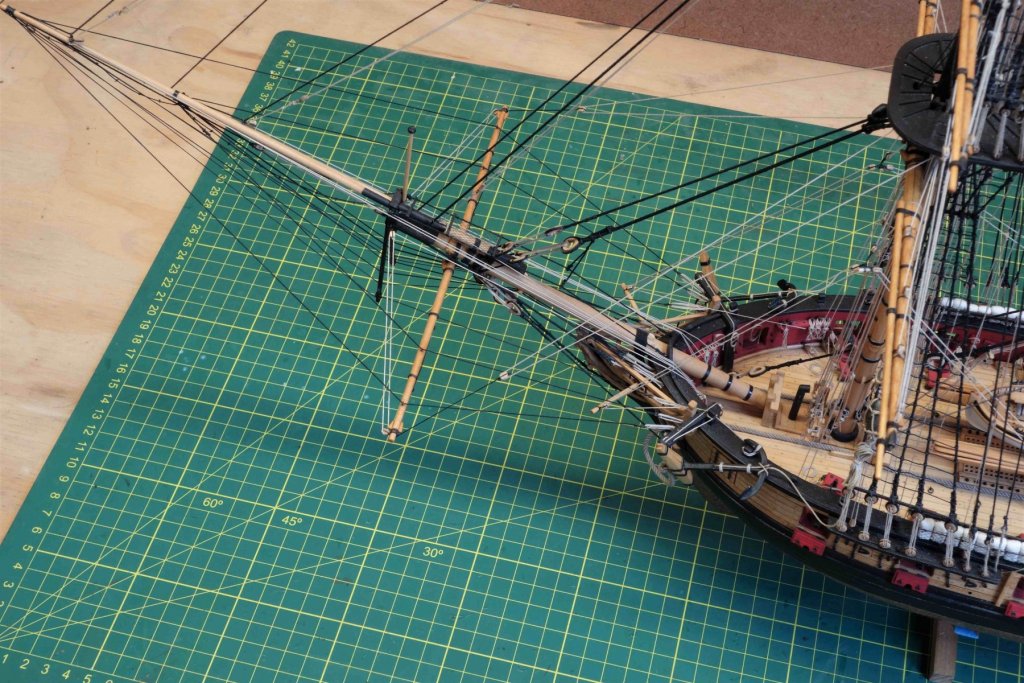
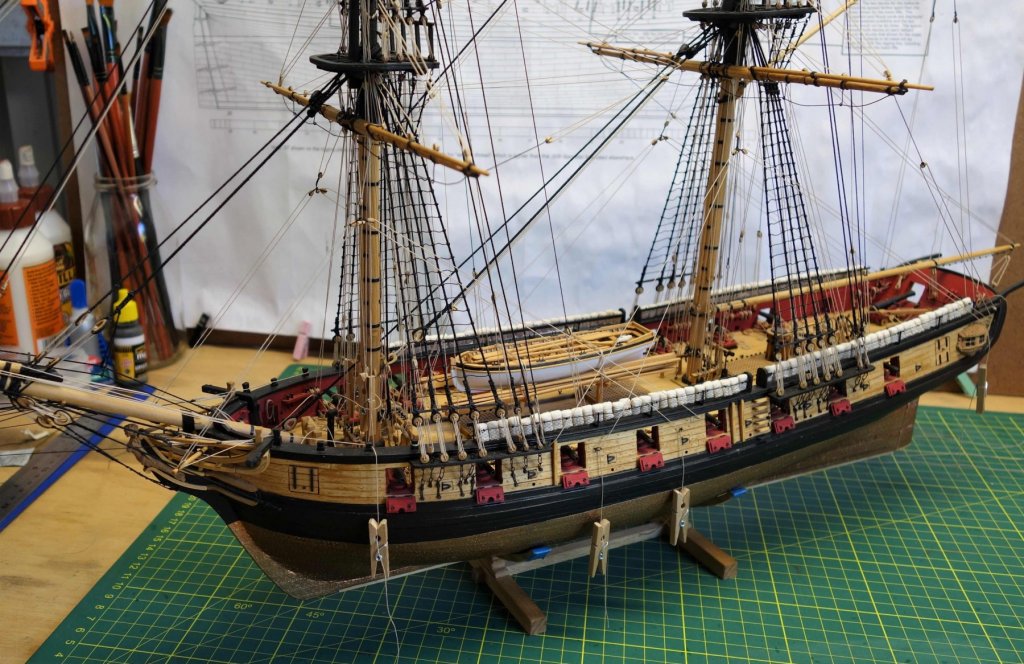
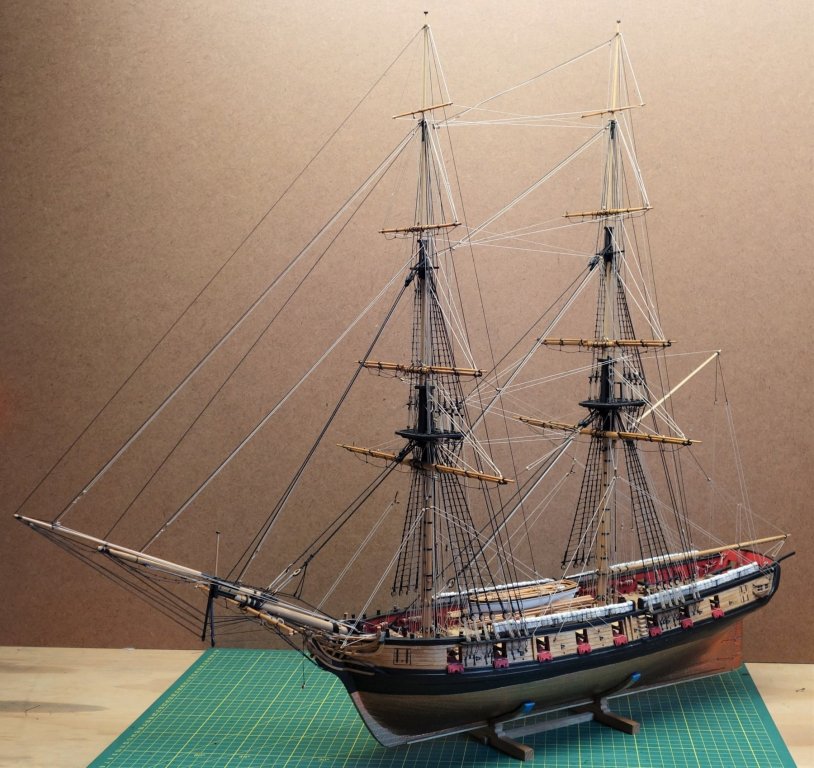
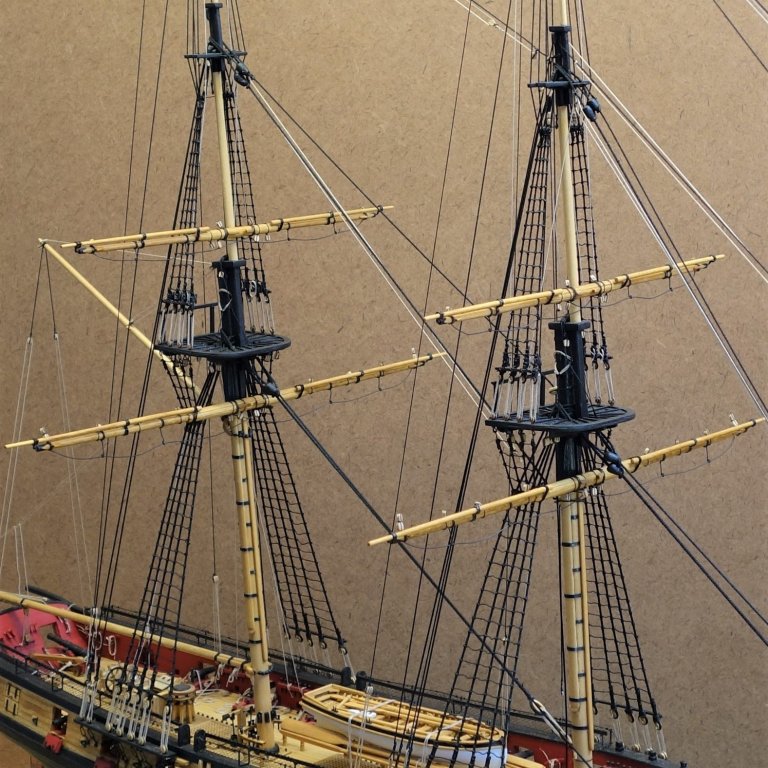
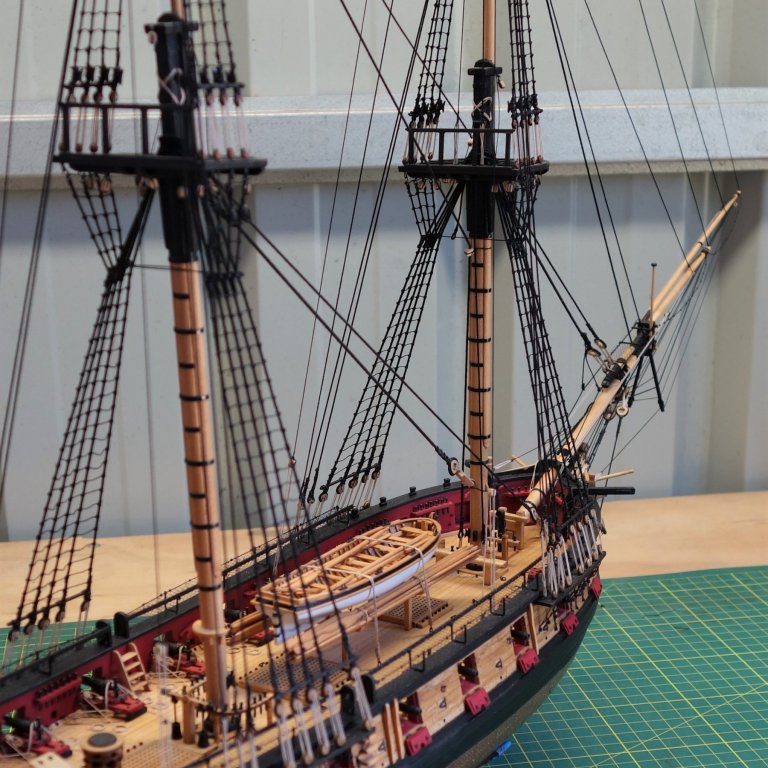
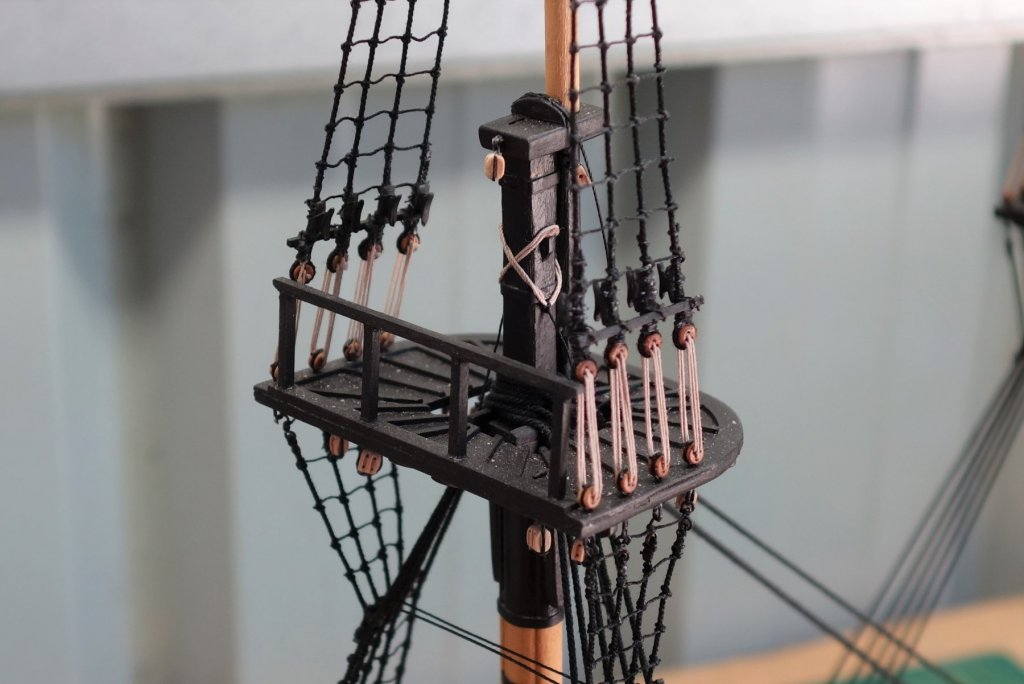
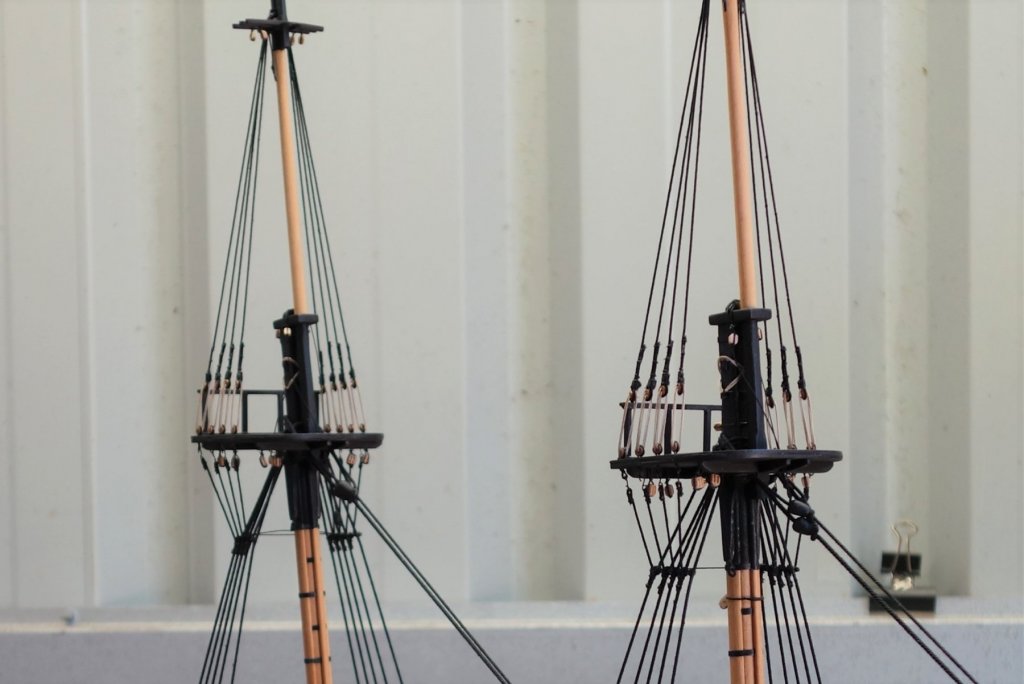
Thanks for the likes again everyone, I do appreciate them. I have added the remaining blocks and the brace pendants to the yards and fixed the lower and top sail yards to the masts permanently this time. I pinned the topgallant yards to the masts as well, although it was advised in the manual not to do that as it may weaken the mast too must. So don't copy that. I got a bit over confident...lol I probably said it before but I am glad I picked the Syren to challenge my skills. She is a truly beautiful ship and a joy to build. Hats off to Chuck again for putting it together. A few photo's to show my progress (in random order).
- 242 replies
-
- 14
-
-
- syren
- model shipways
- (and 1 more)
-
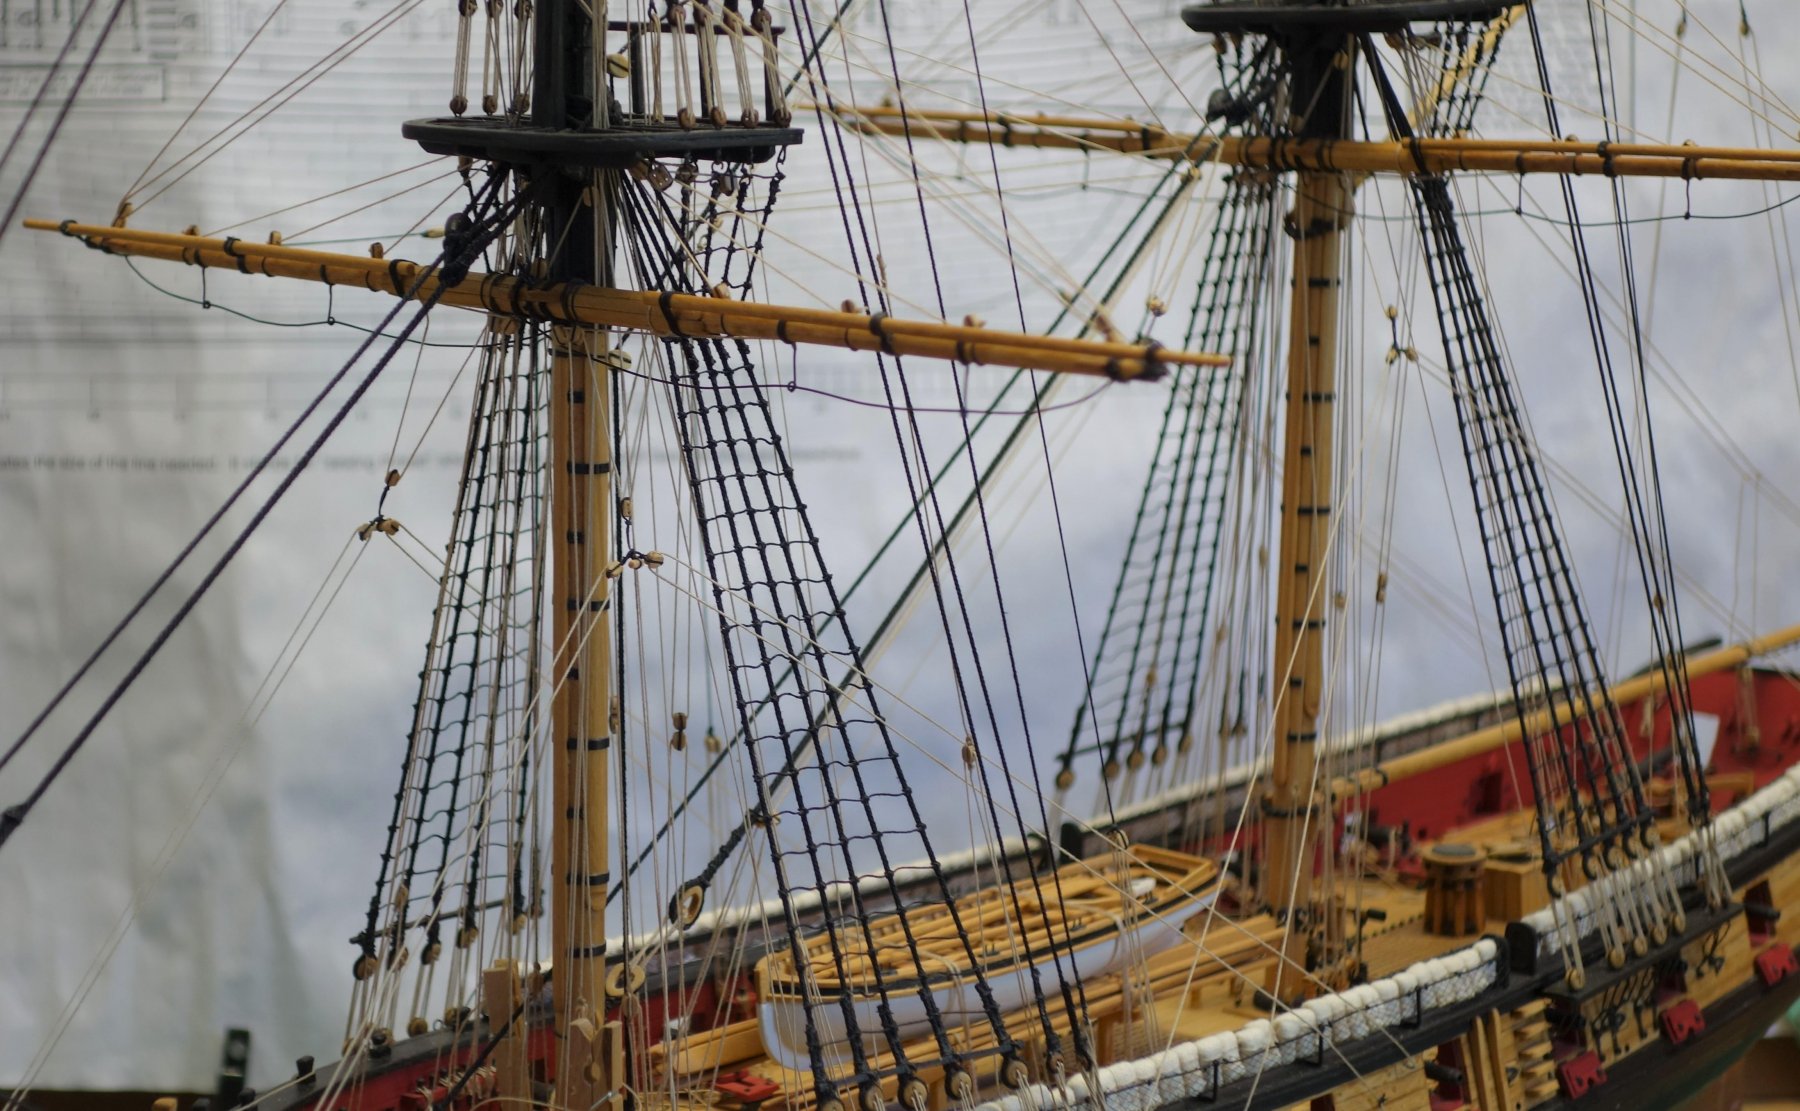
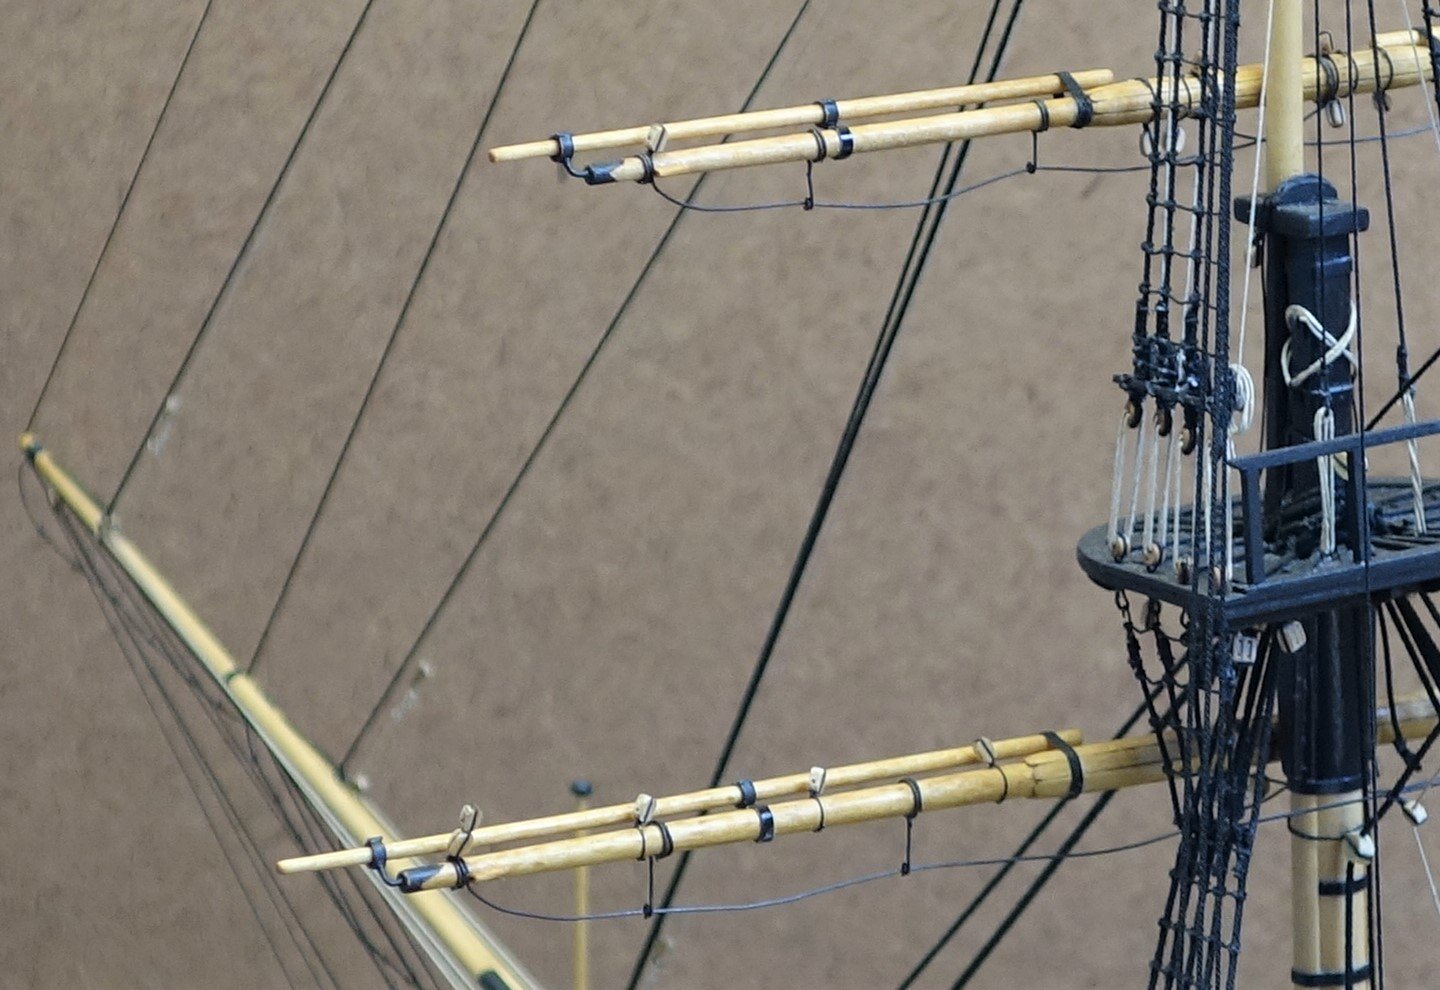
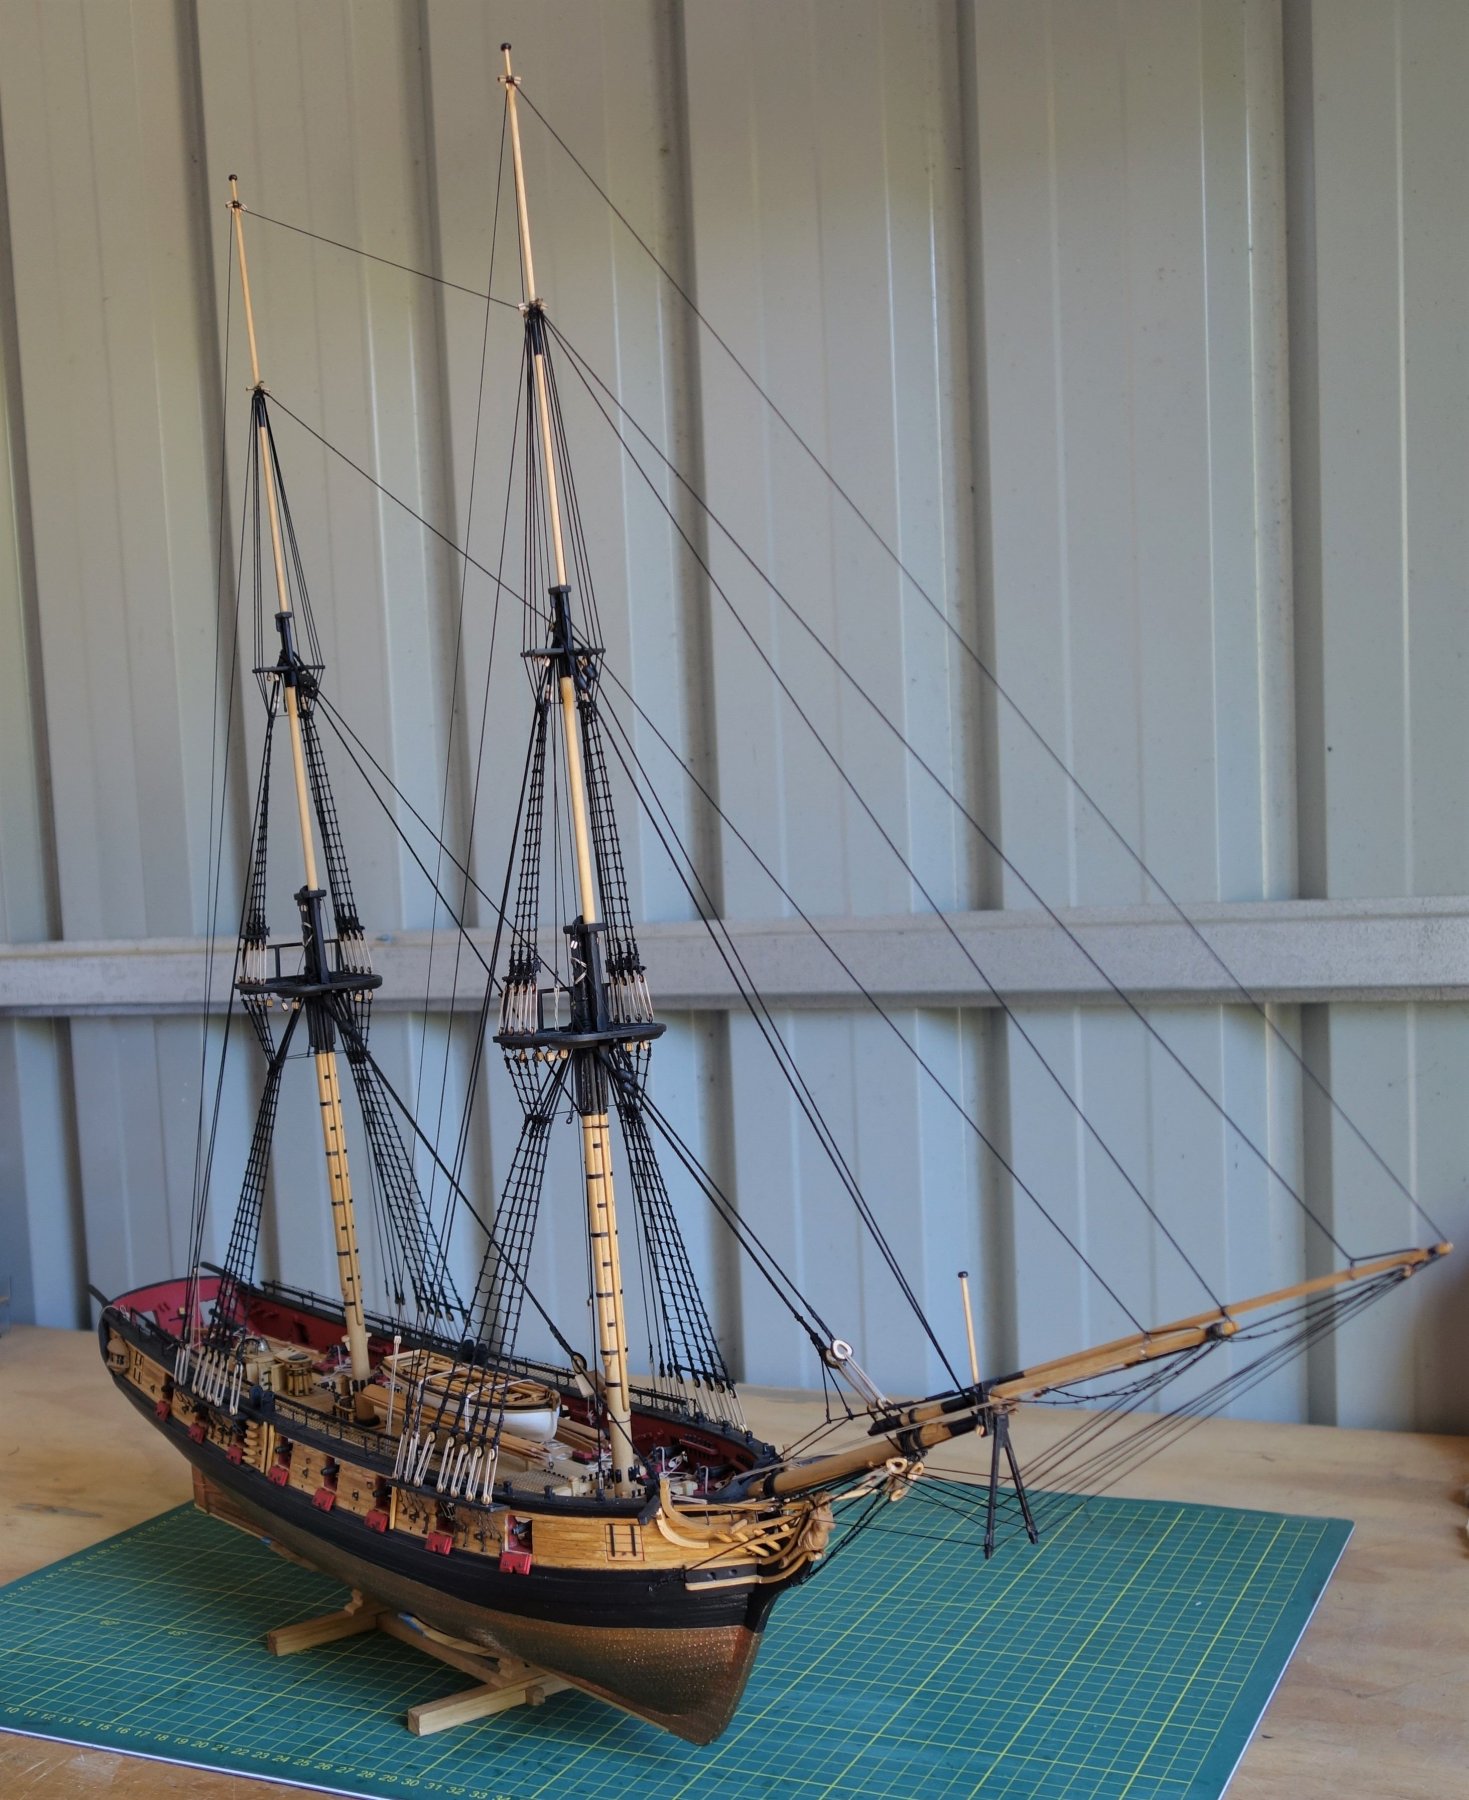
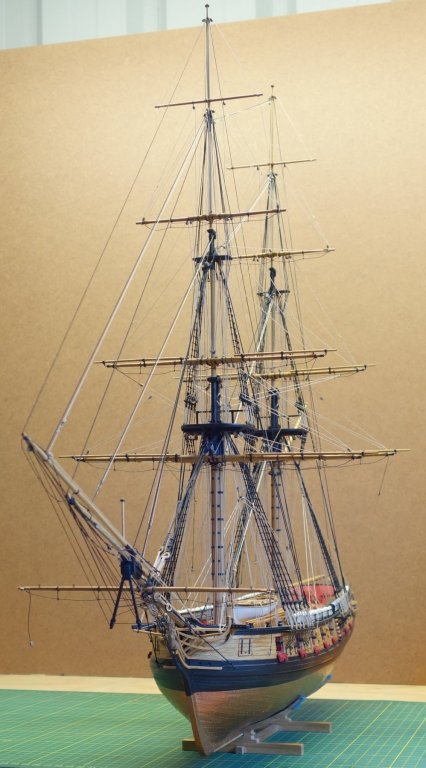
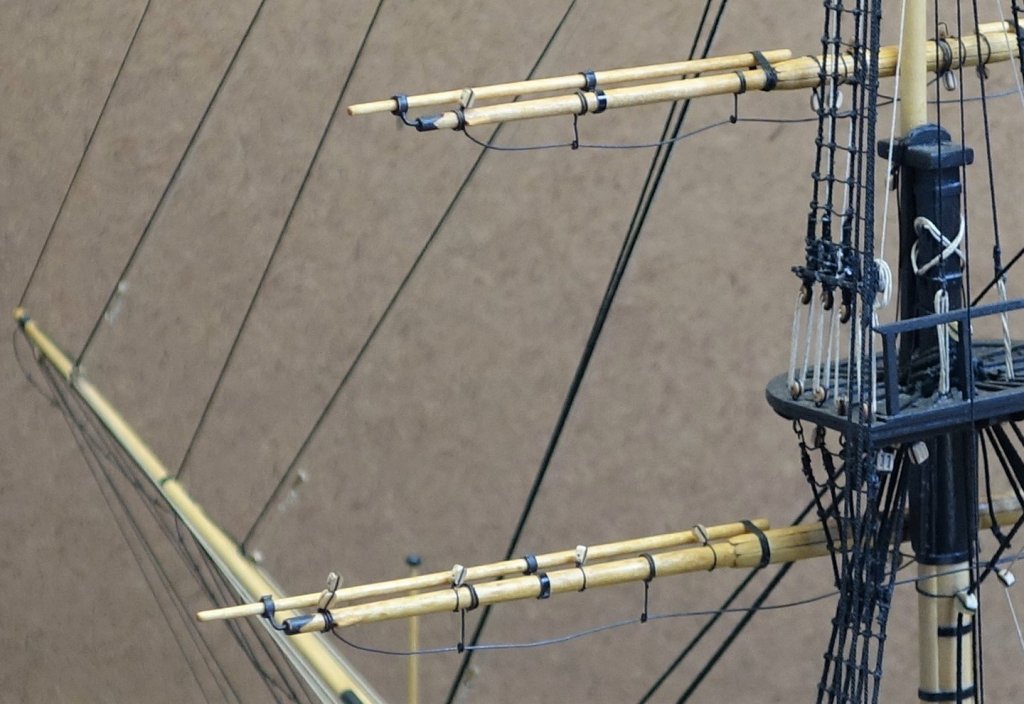
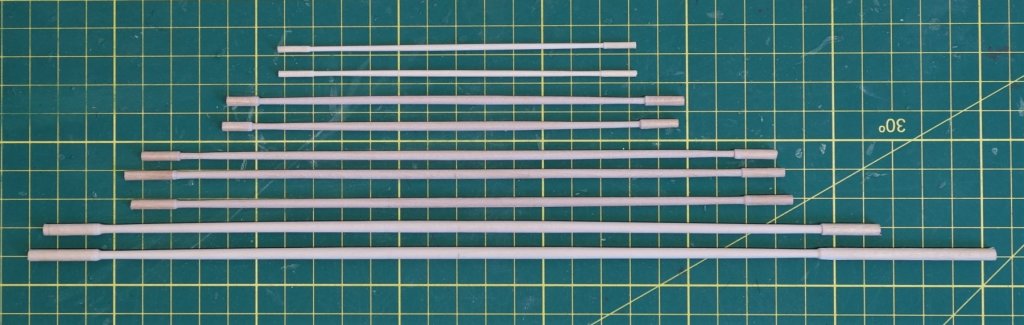
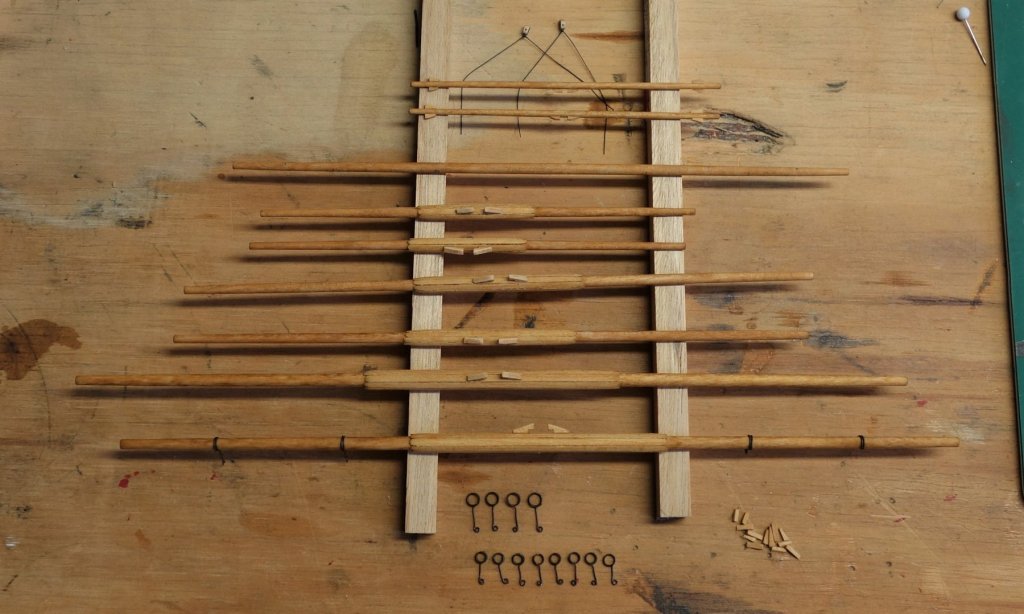
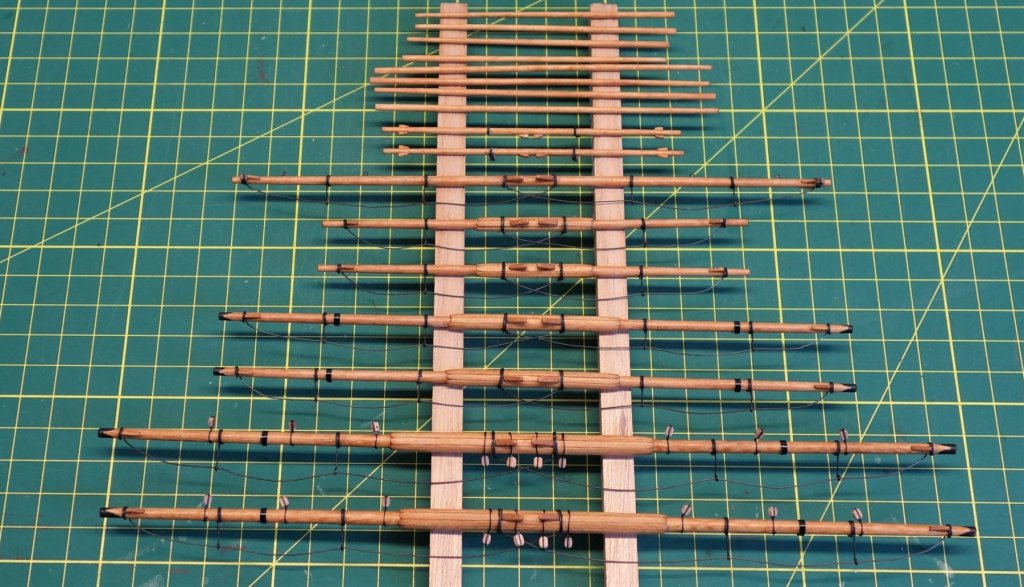
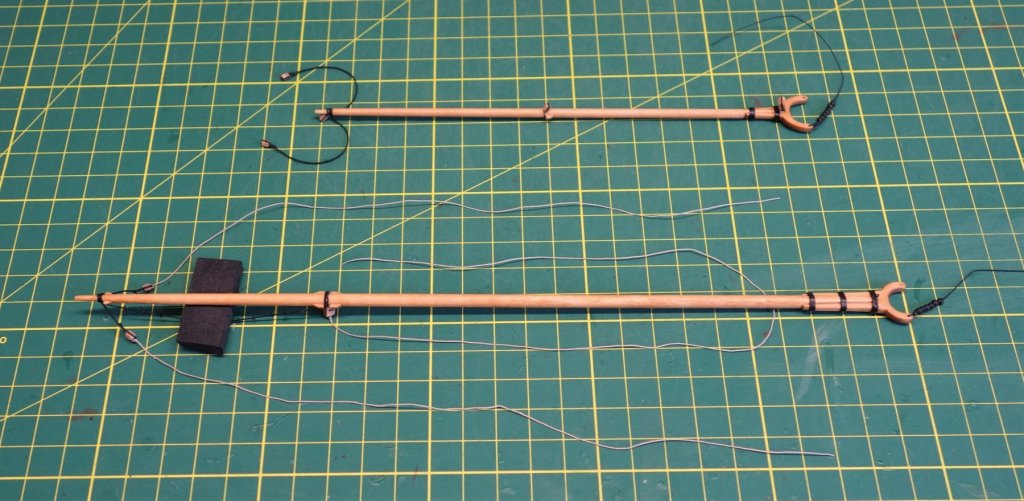
I added the stuns'l booms to the yards and pinned the Topsail and Lower yards onto the masts. They are just dry fitted and the yards assemblies are not completed yet. I have decided to keep them natural and not paint them black. Some photo's......


- 242 replies
-
- 16
-
-
- syren
- model shipways
- (and 1 more)
-
Thanks Chuck, Jim, Svein and Kevin. And thanks for all the likes as well. Just a few photo's on how I am travelling with the yard assemblies. They are not finished but are slowly getting there. At this point I am going for the natural look instead of painting them black. I didn't realise until after I finished the Boom & Gaff that Chuck changed his mind on his original ship and painted them black after assembling them on the ship unpainted (rigging and all). I'm not that brave (yet). I also don't mind the natural look as it highlights the details more. But... I still have a choice up until I pin them onto the masts... Here are a few photo's....(which got uploaded in reverse order....lol)


- 242 replies
-
- 6
-
-
- syren
- model shipways
- (and 1 more)
-
Hi Rich, To help you with your shopping list I copied and pasted some correspondence between Chuck and Dubz a while back with regards to the rope sizes and quantities. I followed their advise with regards to the upsizing. I hope they don't mind me passing the info on. Here it is: "Dirk....just found time to detail what needs to be changed as far as rope as you requested. I figured I would post here so other folks building her will also know. Expo has a very limited amount of sizes to choose from when designing kits. They use Nylon beading thread and its pretty rough to work with. Its essentially like plastic. They dont have the larger sizes so the stays and shrouds should be changed for historical accuracy. Most of the larger ropes were too small for the standing rigging. I had to unfortunately use what was available from them when designing the kit at that time. whenever you see .021 listed in the instructions this should be changed to .025 whenever you see .028 it should be bumped to .035 Changes are as follows and only with standing rigging. The running rigging is fine. I went through the instructions and found what needs to be changed so you can upgrade your rope. Breech line for guns - .025 tan Standing Rigging Changes Lower Shrouds .035 Topmast shrouds .025 lower pendants .025 Lower stays .045 lower preventer stays - .035 Futtock shrouds .025 Topmast stays .035 Topmast preventer stays .025 Here is what you would need to buy to rig your model if you decide to get it from Syren Ship Model Company. Black or Brown standing rigging .045 - 1 pack .035 - 2 packs .025 - 3 packs .018 - 3 packs .012 - 1 pack .008 - 7 packs Tan running rigging .062 anchor 1 pack .025 - 2 packs ,008 - 12 packs .018 - 2 packs .012 - 4 packs There you go... Chuck"
- 1,135 replies
-
- 2
-
-
- model shipways
- syren
- (and 2 more)
-
I have finished the staysail rigging. I am a bit behind on the rope coils, so before I make a start on the yards, I'll play around with making up a set of different type of rope coils to see how they fit and look. But that will be the subject of my next update. For now just a few photo's on how she is coming together. I'm genuinely still amazed I got this far and still loving the look of her every time I walk into the shed. Looking at the chapter where the yards are being rigged it ain't going to get any easier from here.....lol Here are some photo's...

- 242 replies
-
- 16
-
-
- syren
- model shipways
- (and 1 more)
-
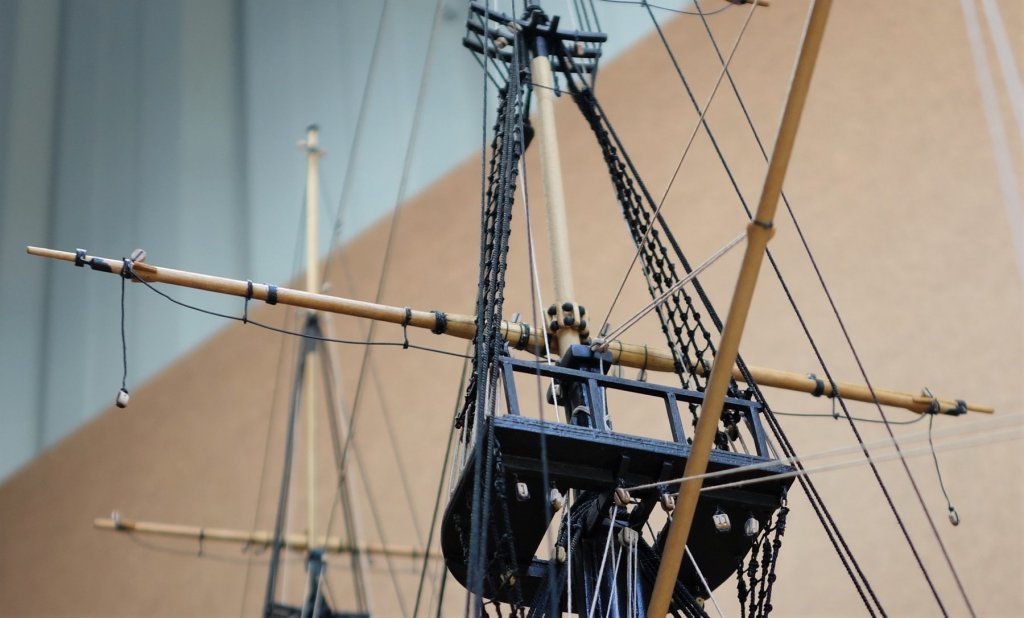
Thanks for all the likes again. Next is the gaff and boom addition. One of the instructions was to seize a length of line to the 1/8" double block under the main top. As I didn't allow for this when I put the block in place there wasn't anything to seize the line onto (maybe I am still missing something...) So I decided to cut the block off and re-install it with the additional line attached. I also realized (after a while scratching my head....) that I had forgotten the 2 blocks for the boom topping lifts. So they had to be fitted under the main top as well. Not the neatest job, but I do now fully appreciate the reason for adding all these blocks when the masts are build...lol. Hand drilling upwards under the top with the rigging in place was a bit of a challenge. Here are a few photo's... Cheers, Peter


- 242 replies
-
- 11
-
-
- syren
- model shipways
- (and 1 more)
-
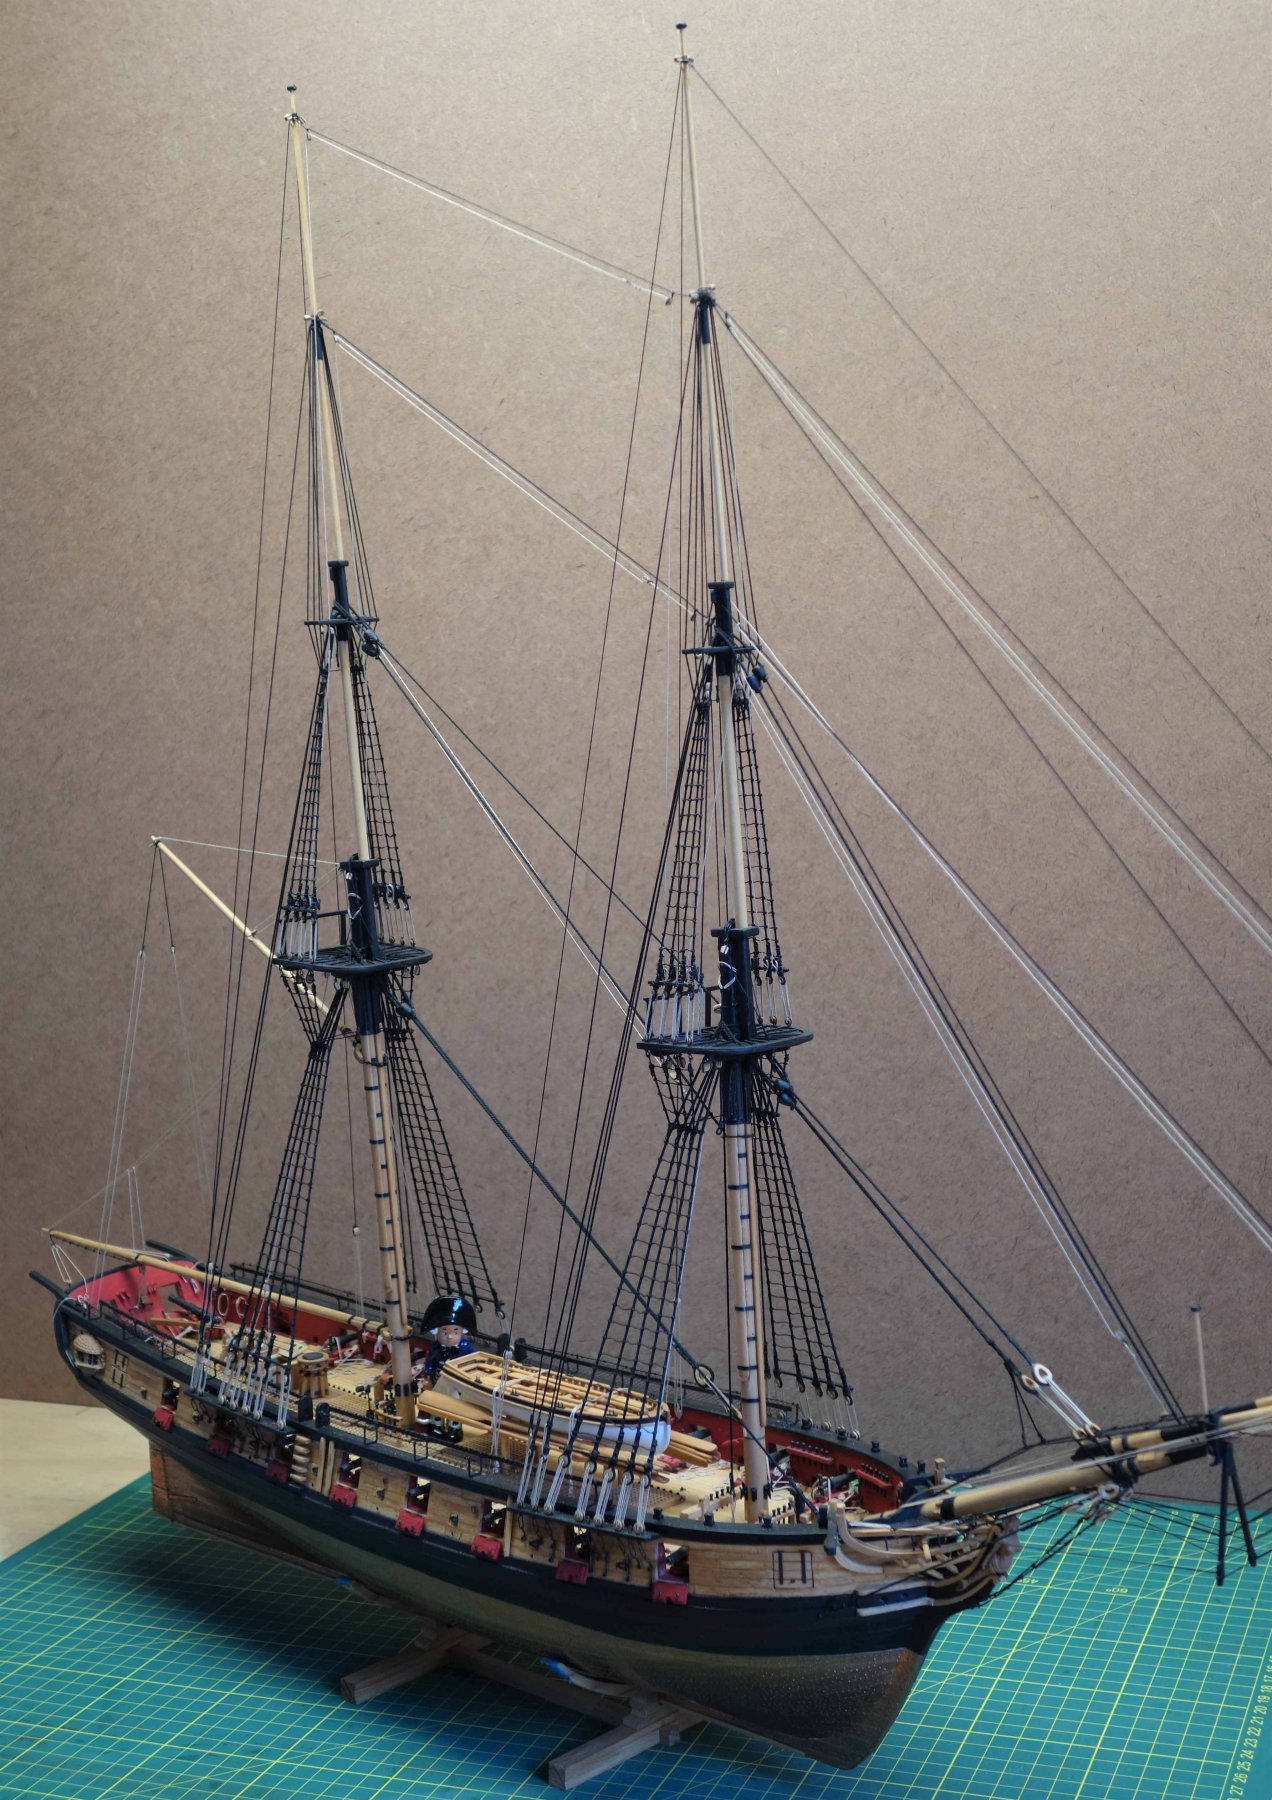
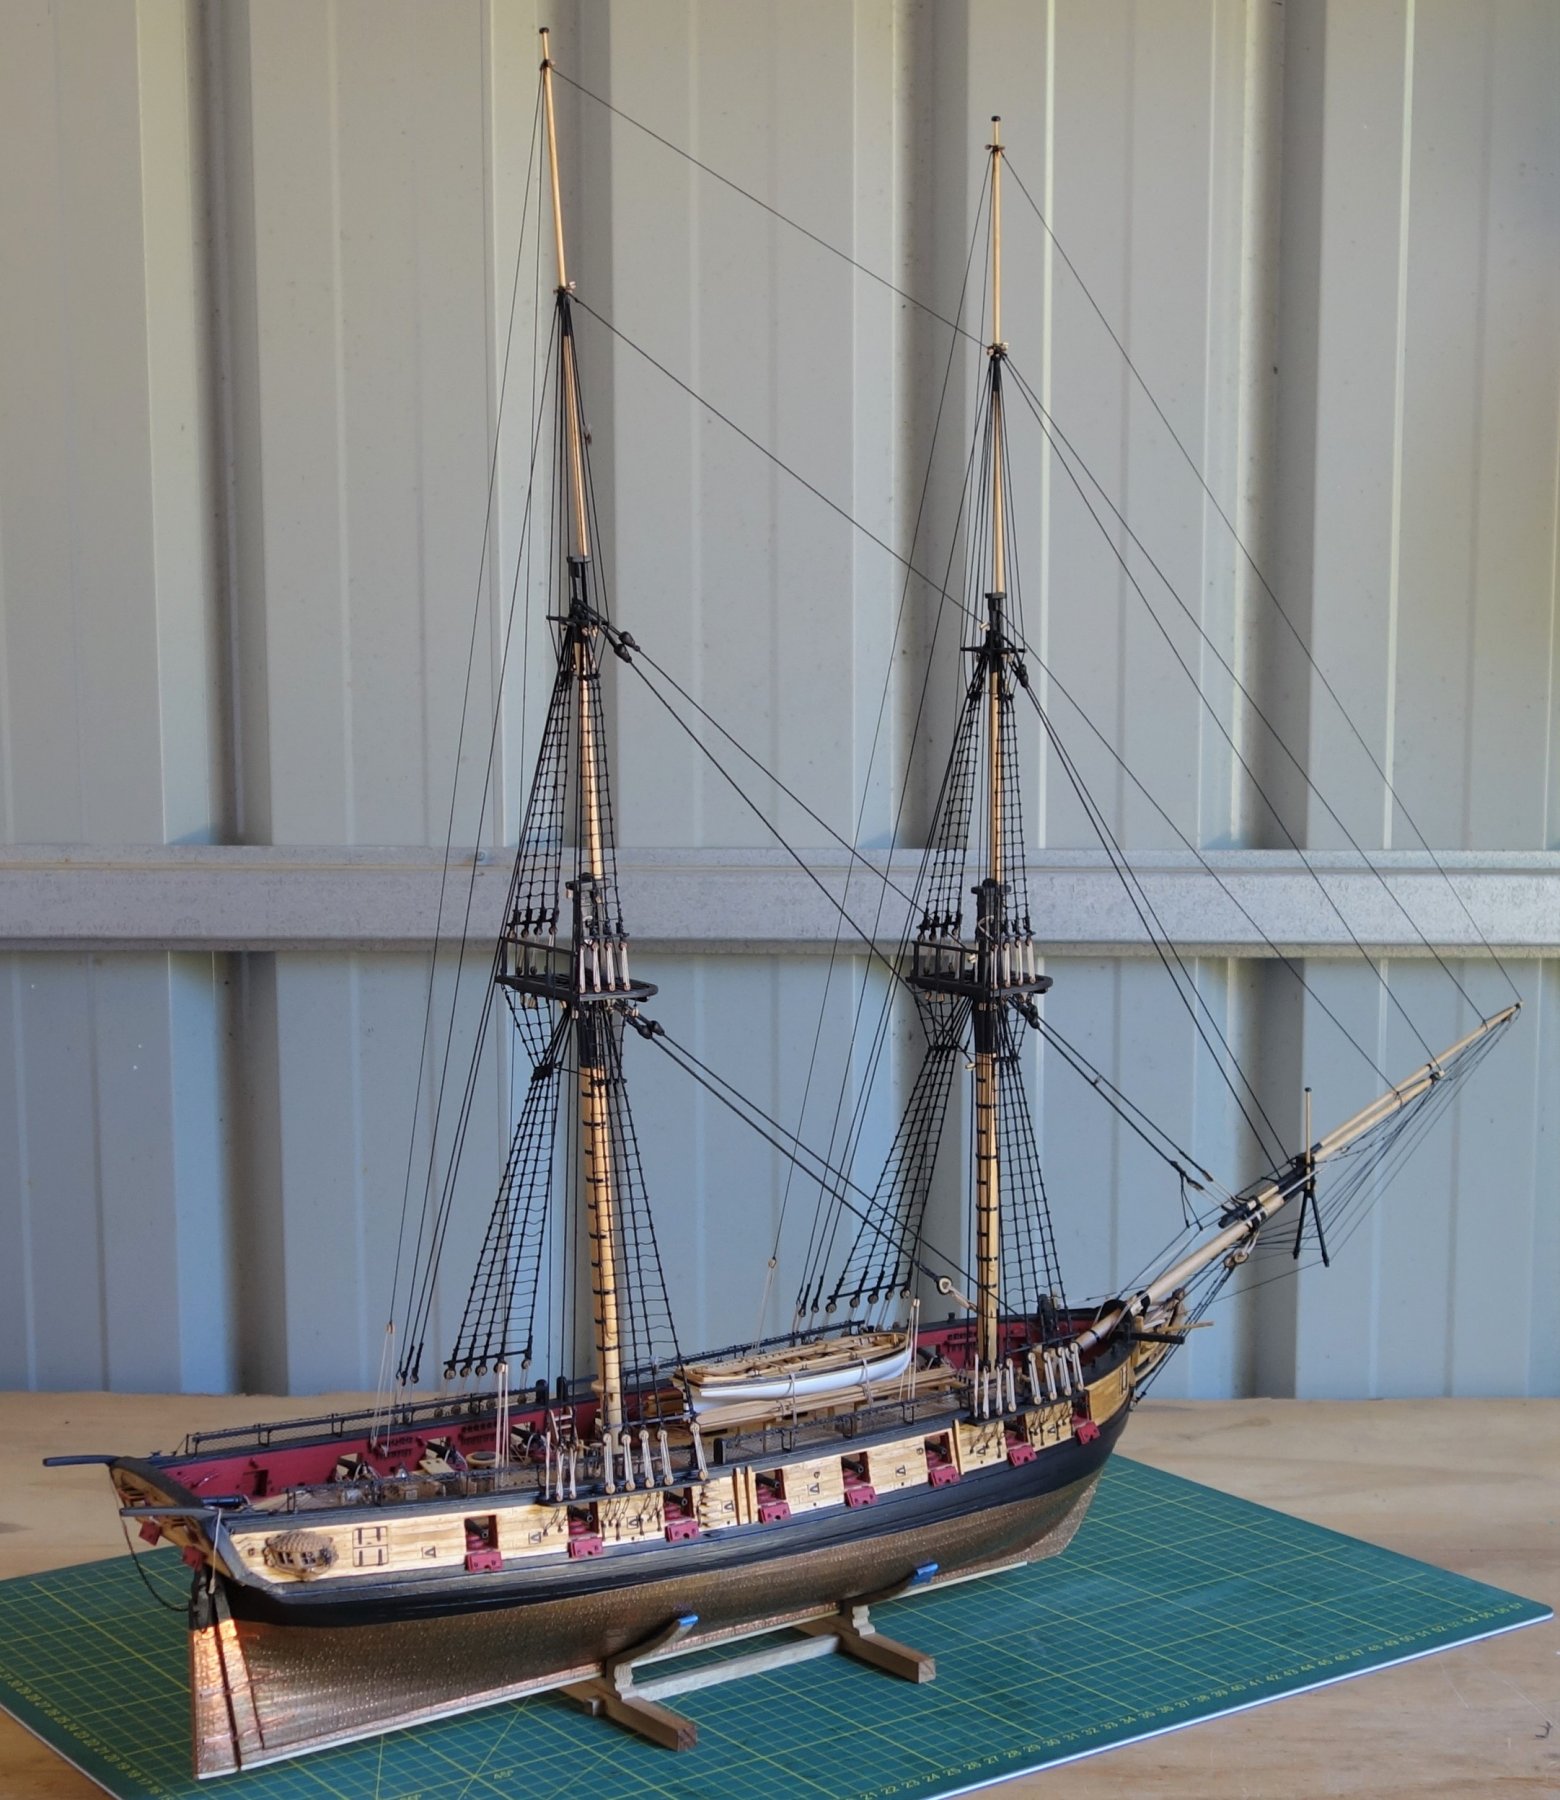
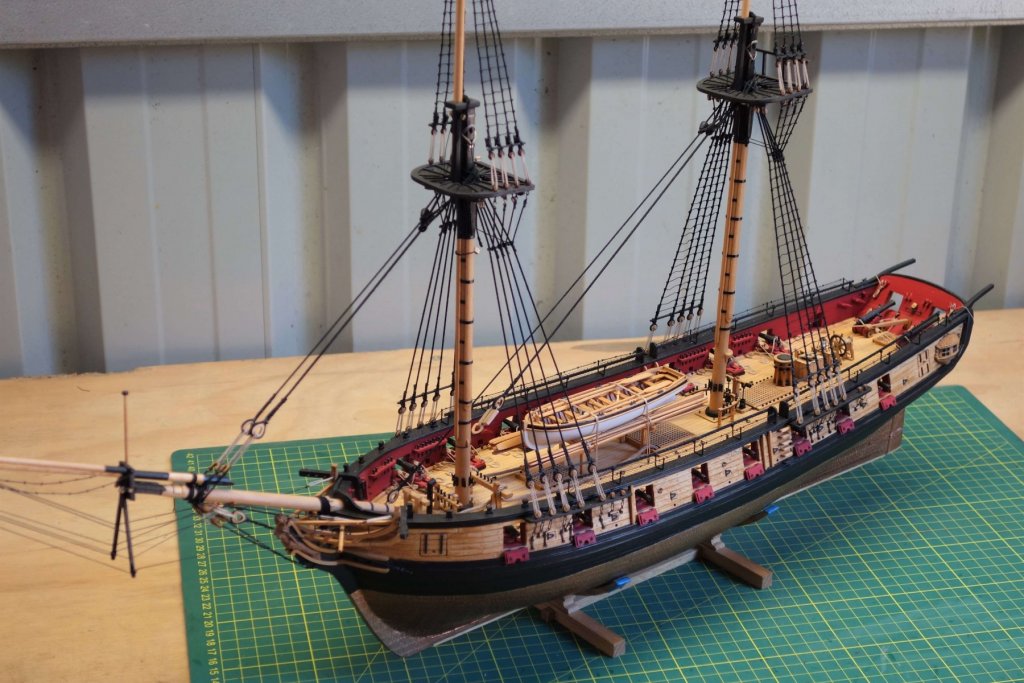
Thanks for all the likes again. Just an update with some photo's to mark the milestone of finishing the standing rigging. Onwards to Chapter 19 - the construction of the yards and the running rigging. Cheers, Peter


- 242 replies
-
- 15
-
-
- syren
- model shipways
- (and 1 more)
-
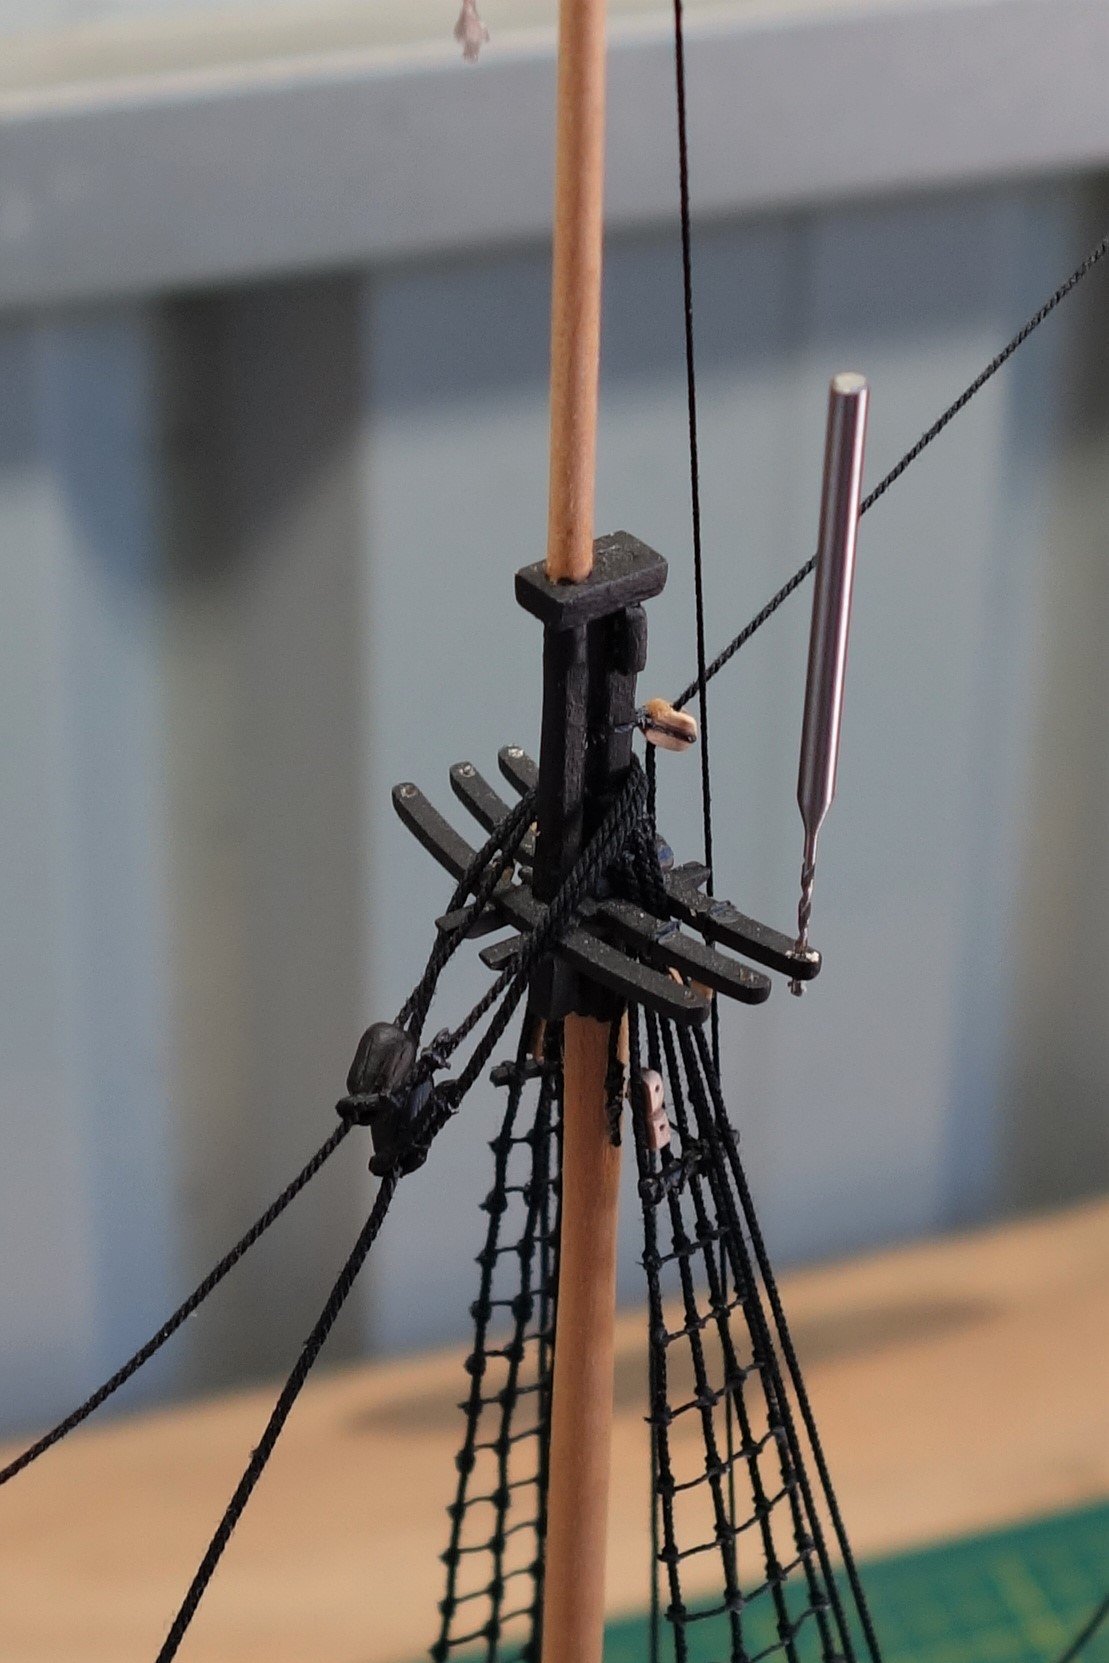
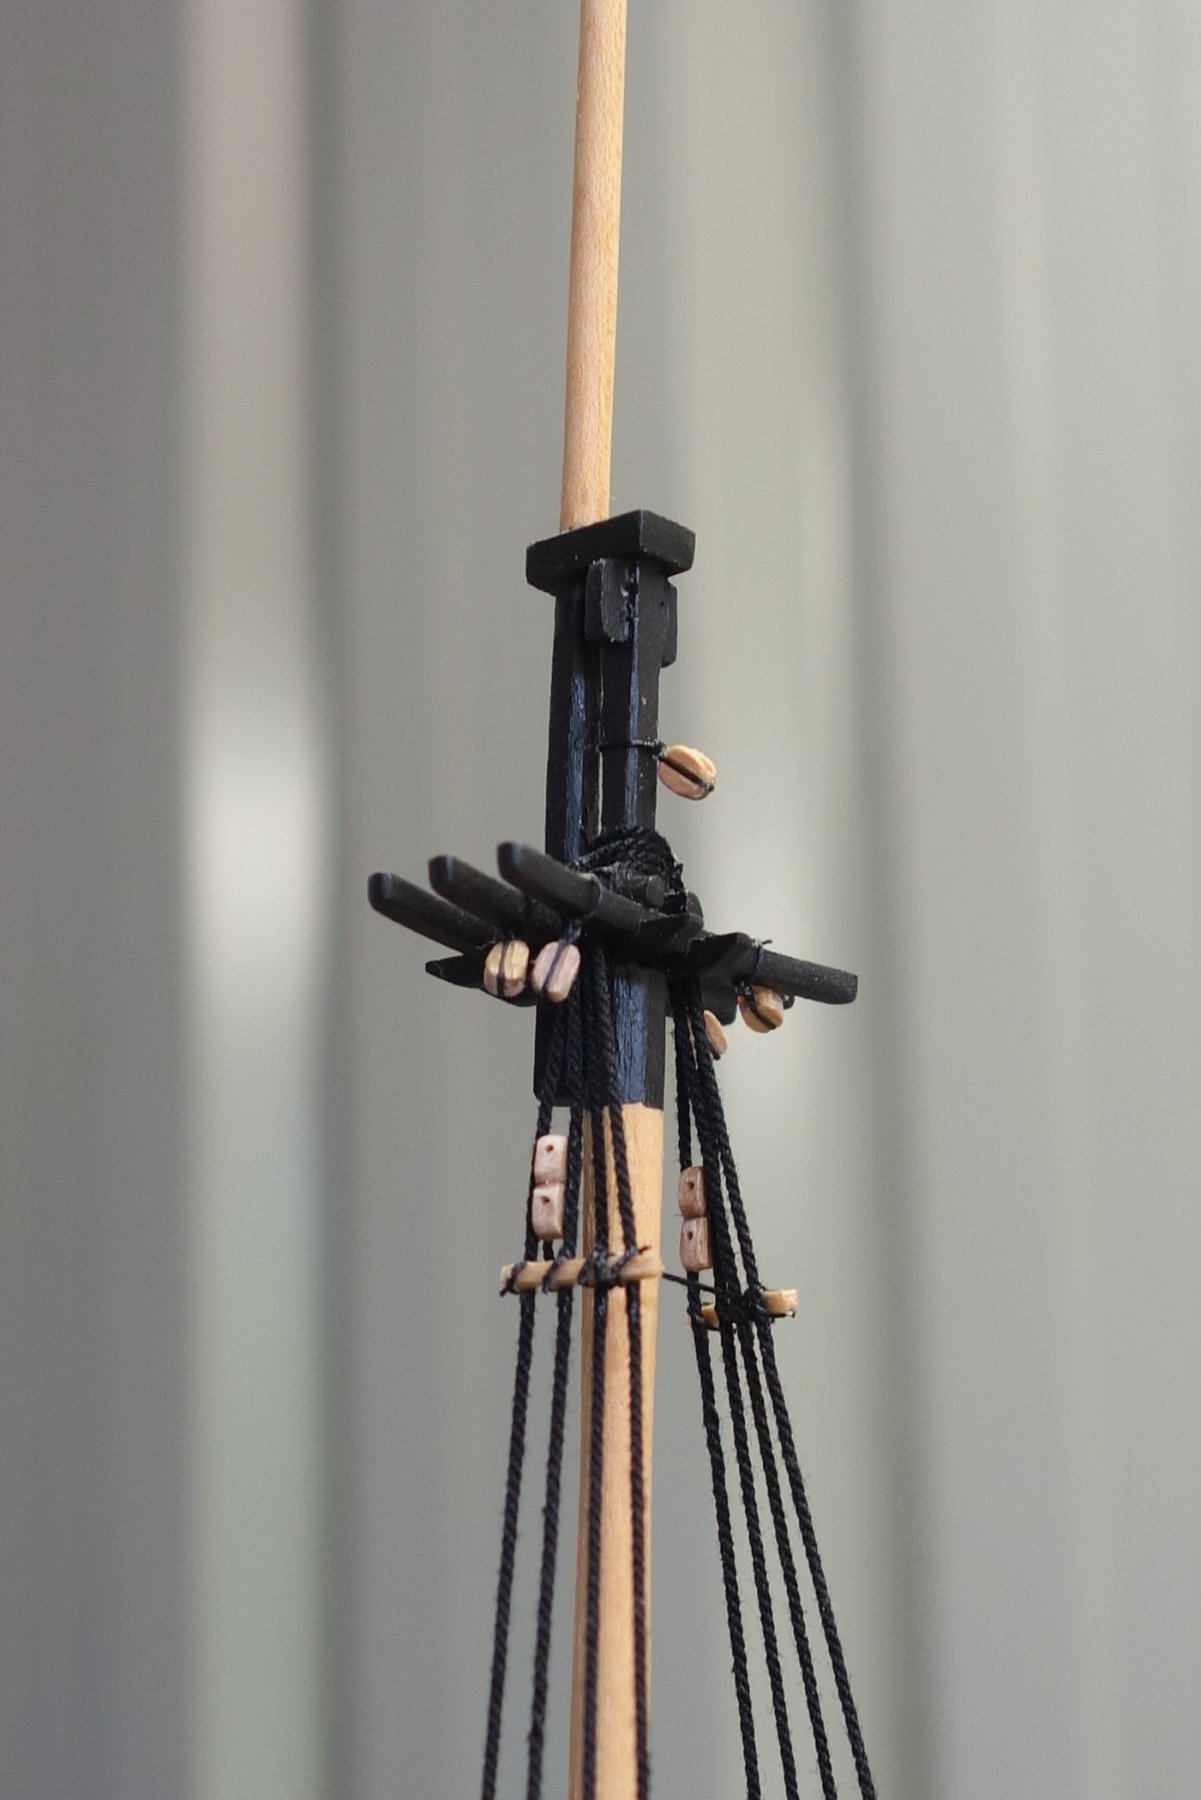
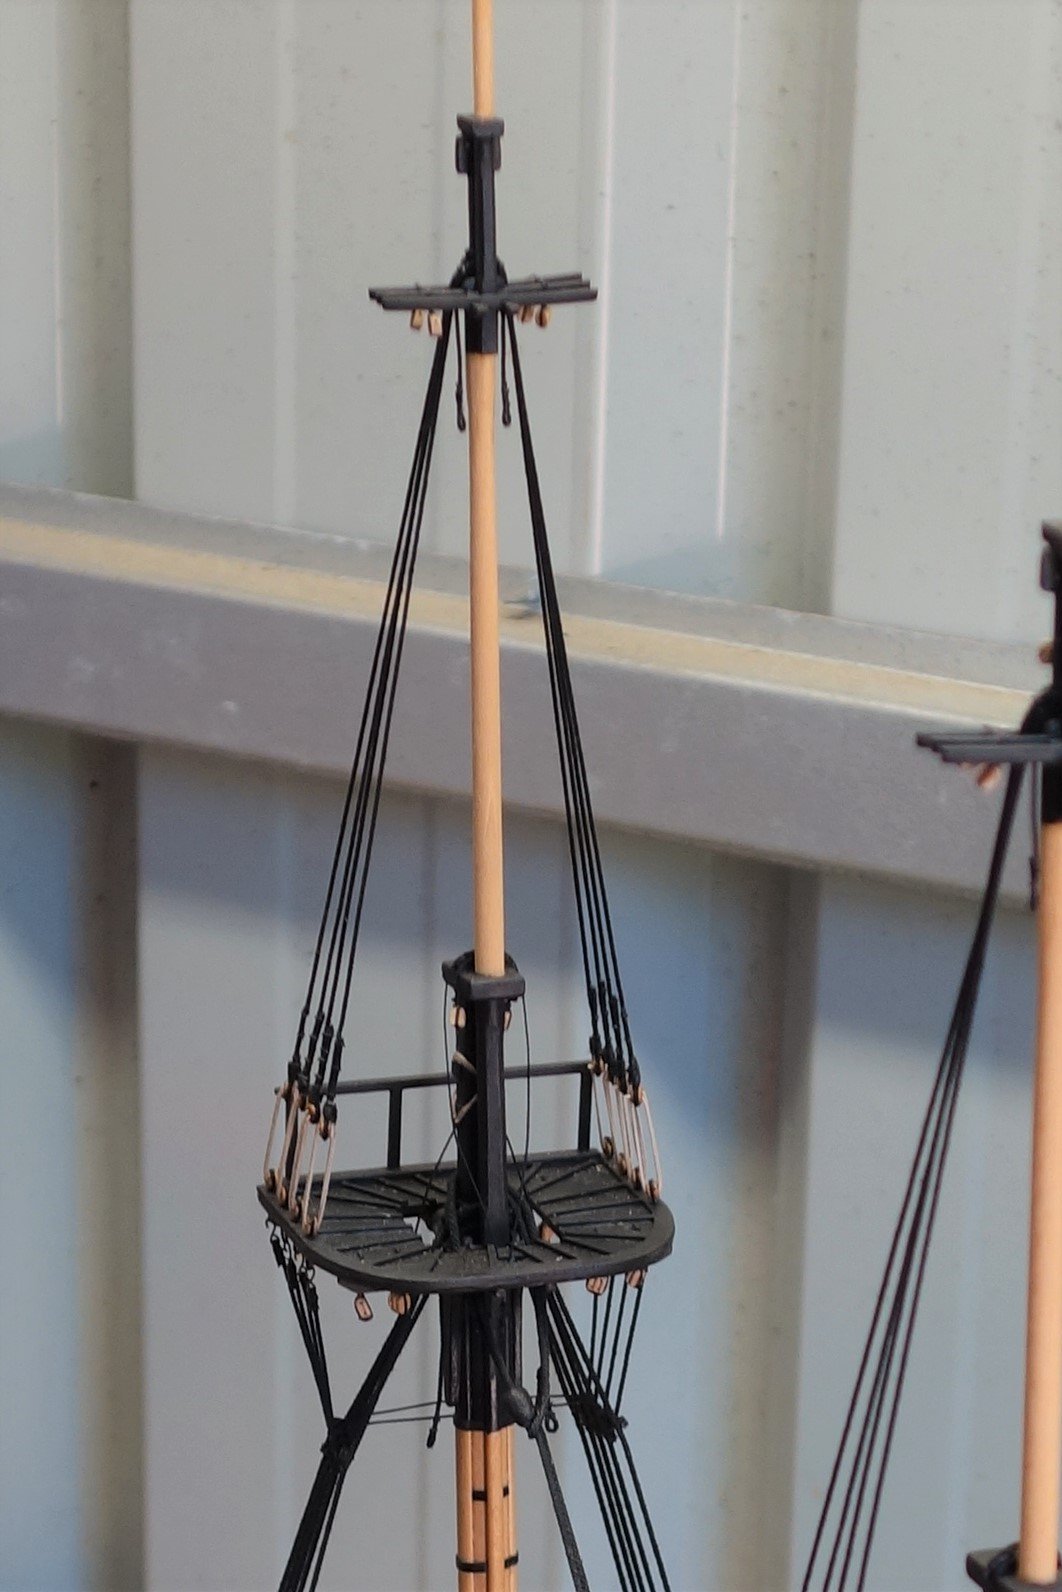
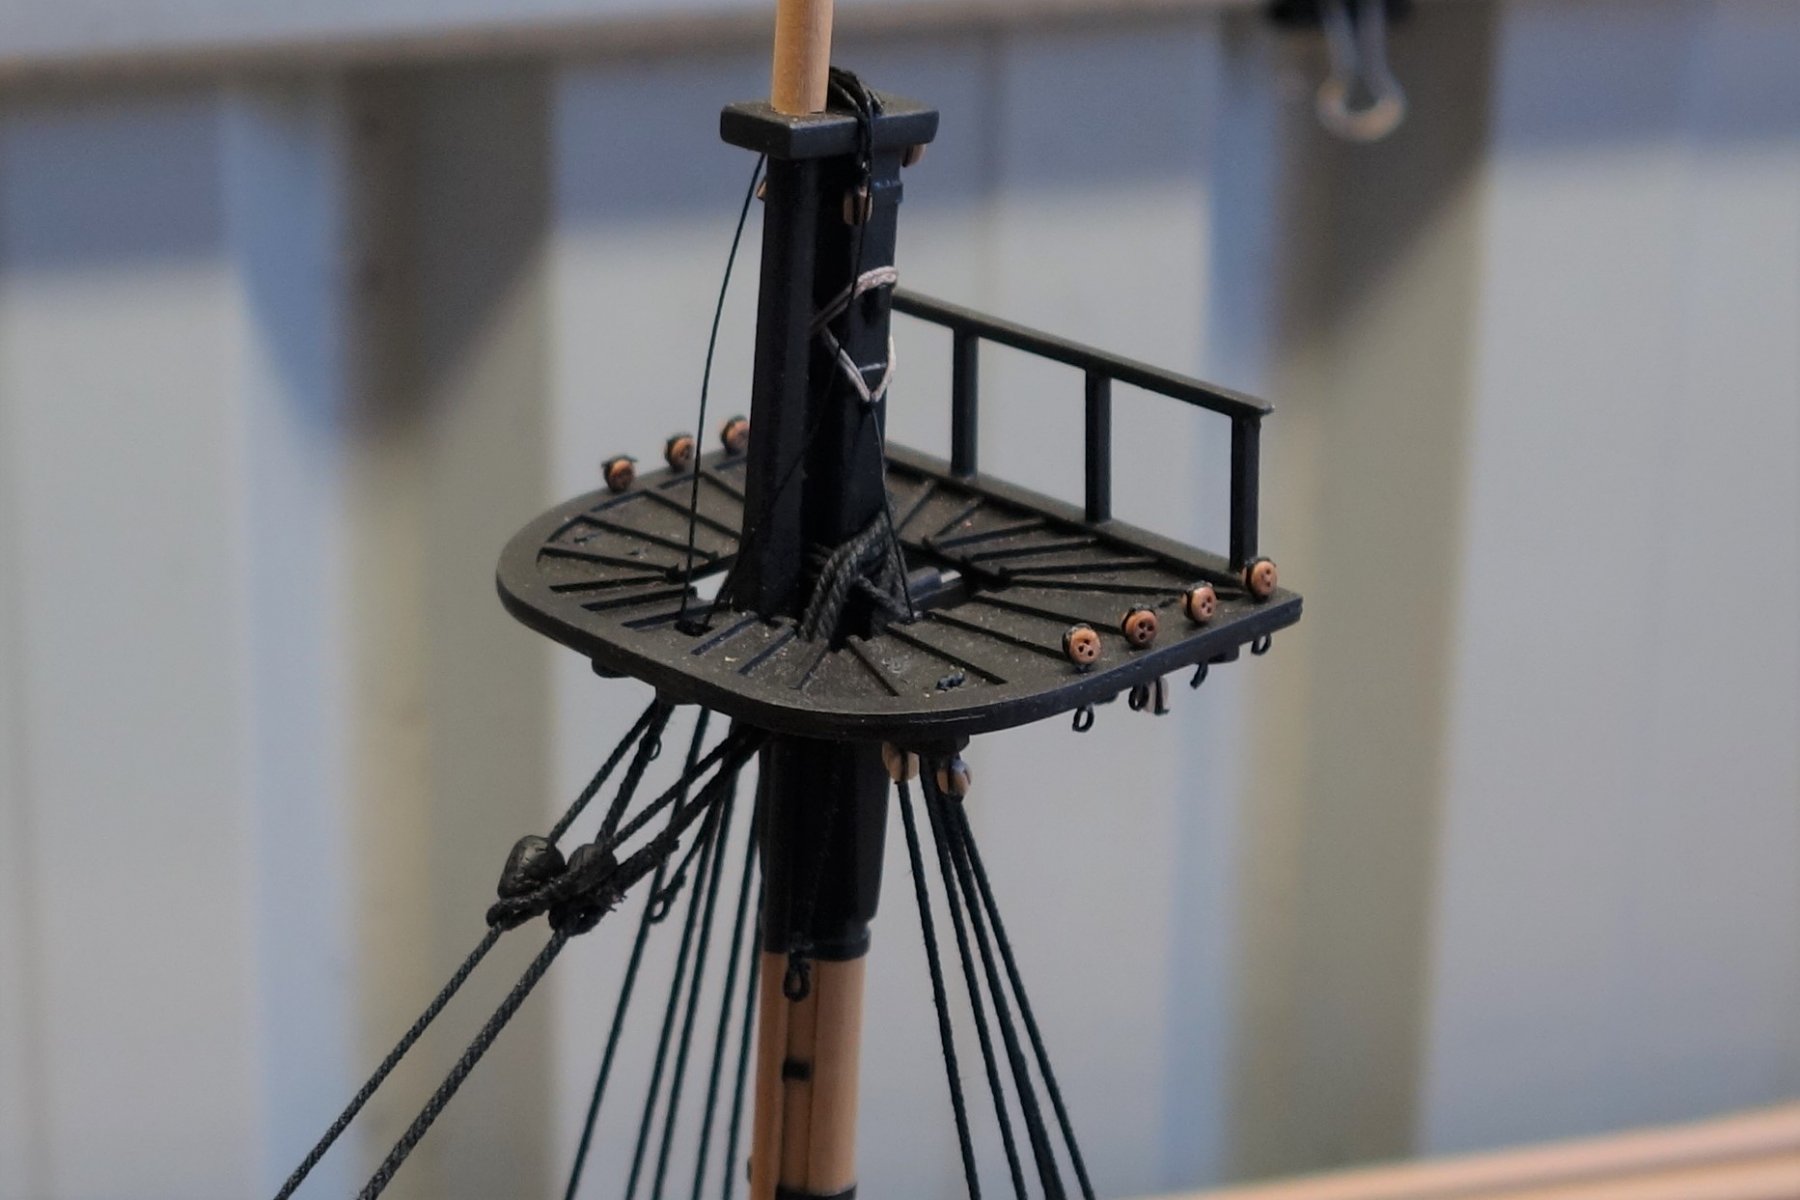
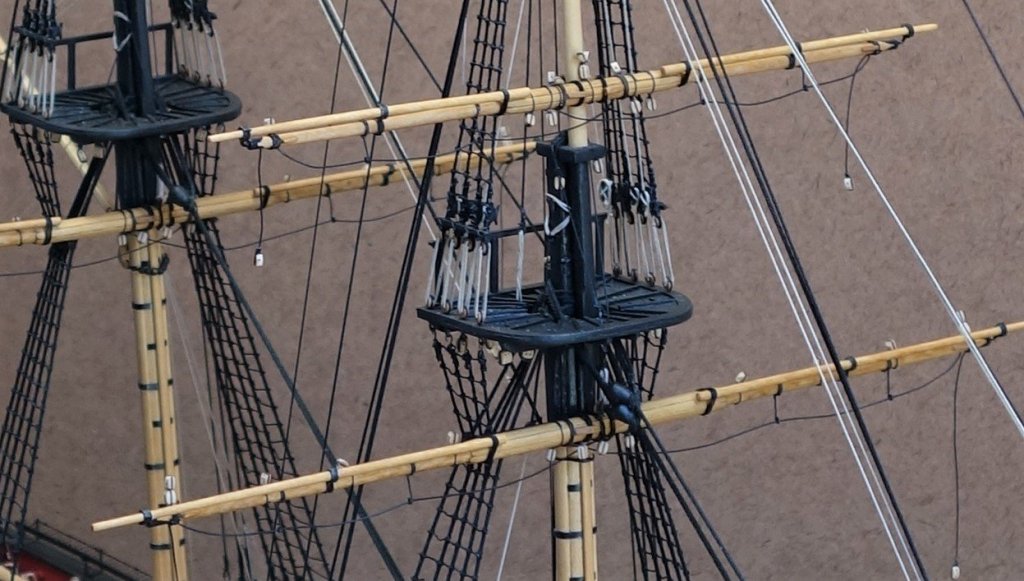
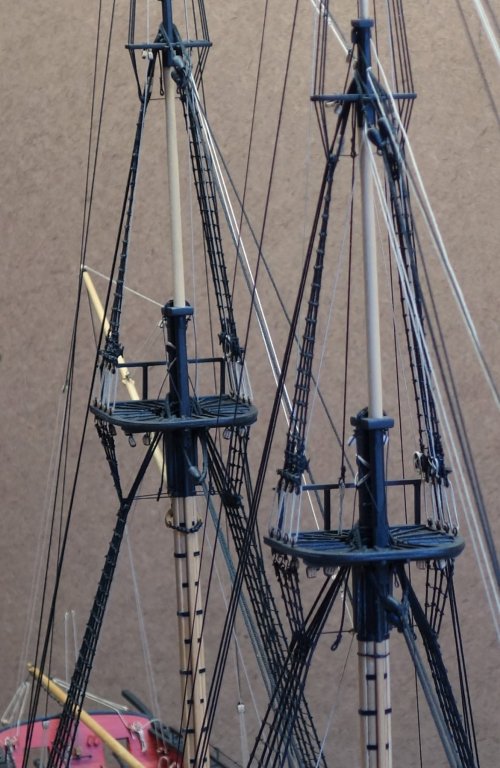
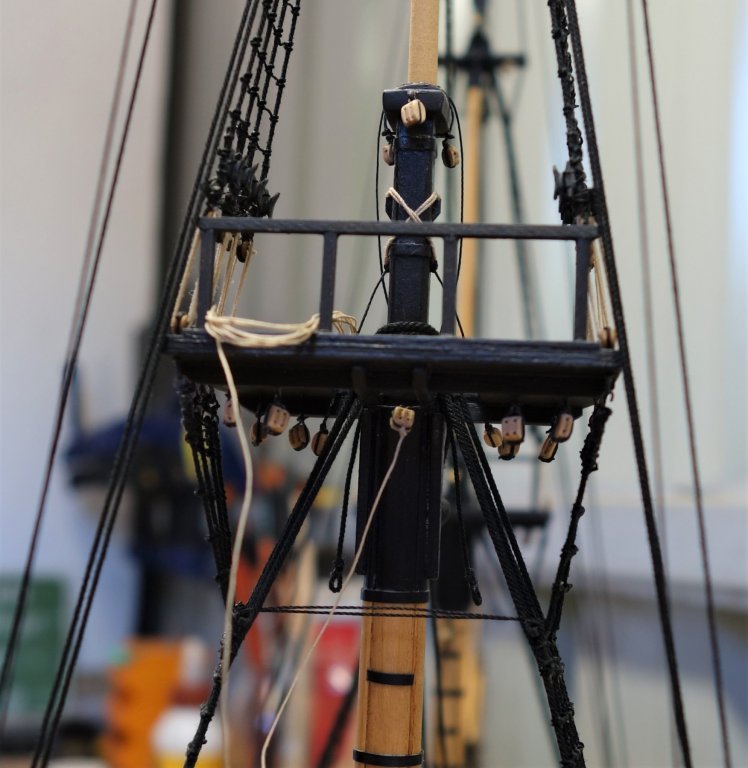
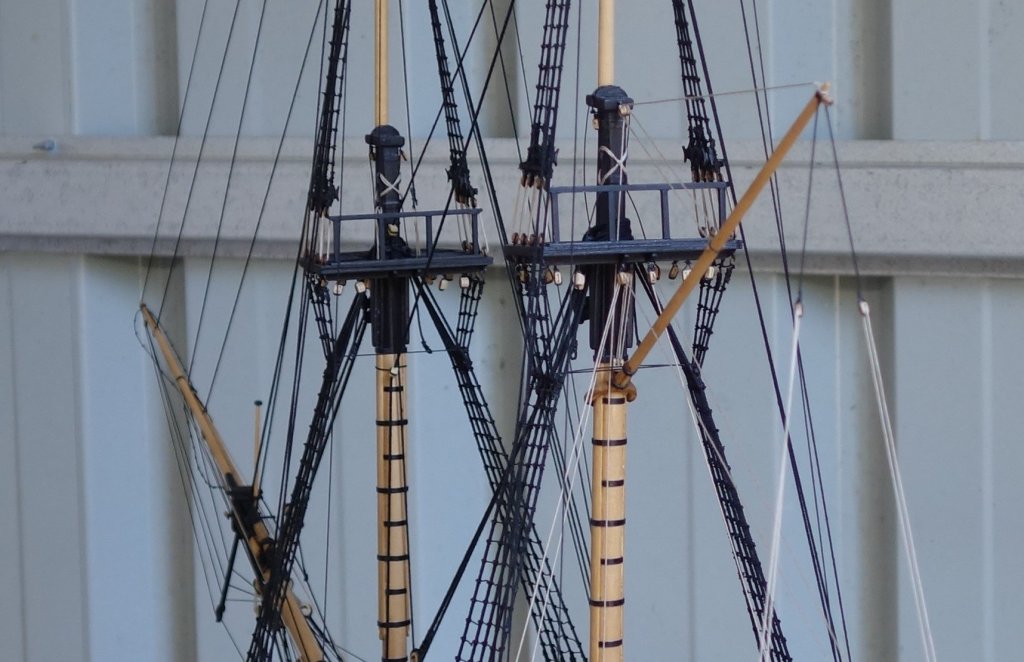
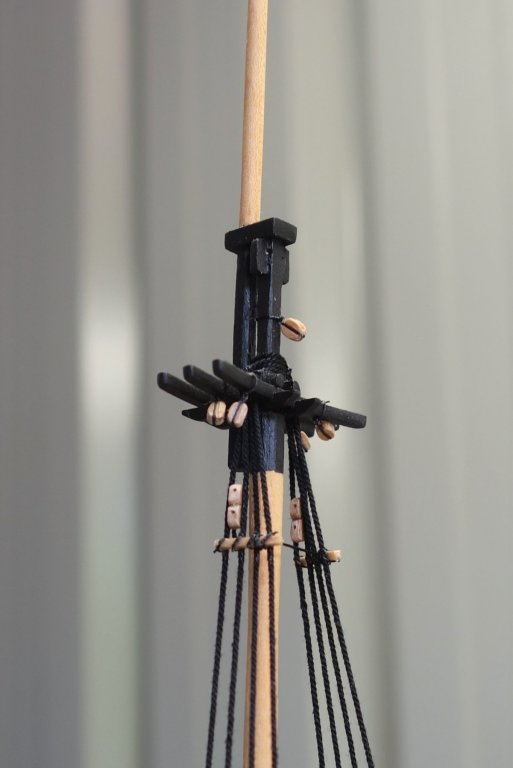
Thanks Harley and Christos and also the 'likes'. It's going well but I'm having a few hickups I like to share. First, as I am upsizing the size of the standing rigging as recommended by Chuck, I am finding that not all the blocks that were added to the mast assemblies can accommodate the larges sizes. I have had to replace a few. Also the blocks at the top of the masts (3 on the main, 4 on the foremast) I glued in the wrong position. I didn't allow for the gang of fixed rigging loops to go first. The drawing shows them where I assembled them but they should have been approx. 8-10mm higher. Due to my inexperience I didn't pick this up until now. I had to remove them all and tried to clean the mast up the best I could. I will add these block when needed. And finally I had to drill out the holes in the top mast cross trees from 0.5mm to 0.8mm to fit the rigging. Definitely got some sweaty hands doing this but I got away with it. Moral of the story. Check the blocks and hole sizes, etc. with the rigging lines before fitting them onto the various assemblies. Here are a few photo's of my progress. Cheers, Peter

- 242 replies
-
- 11
-
-
- syren
- model shipways
- (and 1 more)
-
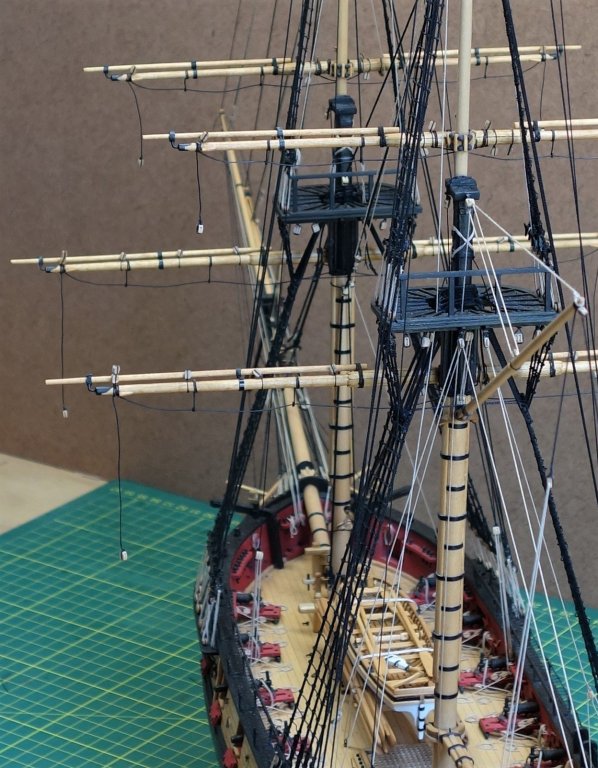
Thanks Nirvana & Dutchman, (and the likes). I have 4 sons, oldest is 30, youngest 20 so something tells me it won't be my last grandchild...lol. The other three don't seem to be in a hurry though. I must say it is a pretty special feeling holding someone so small again. His uncles can't wait for him to be able to hold a cricket bat. (Australia is in need of a good batsman...lol). Anyway, I digress. Back to modelling. Just some progress photo's of the standing rigging. The photo's speak for themselves. I always had a feeling that I wouldn't enjoy doing the rigging as much as I did the hull. I was wrong.....


- 242 replies
-
- 10
-
-
- syren
- model shipways
- (and 1 more)
-
Thanks Sven & Dutchman and thanks for all the likes. I have been a bit quiet for a little while. I noticed I dropped a bit in motivation so took a few weeks break from modelling. Luckily it didn't last long... I think I'm about halfway through the standing rigging so I thought it be a good time for a small update. I also would like to wish everyone a Happy and prosperous New Year (I got the happy bit sorted already because my first grandson was born yesterday 👍.) Cheers, Peter

- 242 replies
-
- 14
-
-
- syren
- model shipways
- (and 1 more)
-
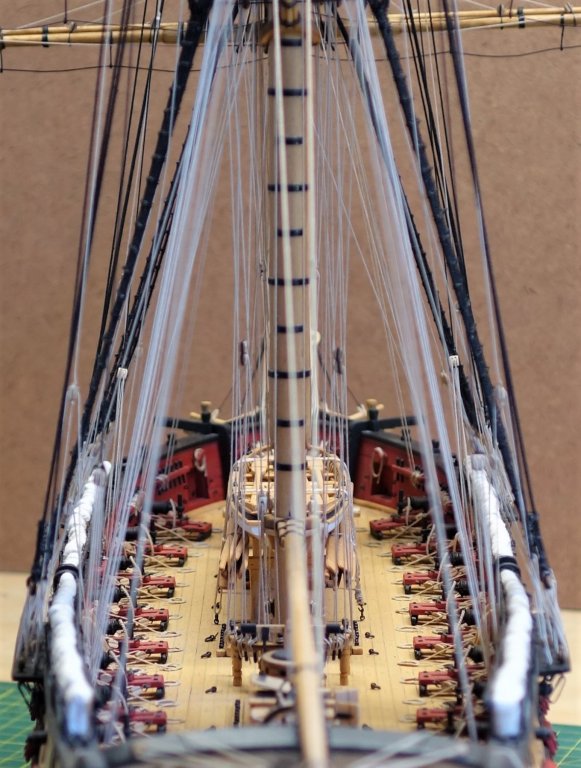
Thanks for the likes again everyone. The chain plates have been attached to the hull and the rigging is underway. I don't have a lot of problems, disasters or major successes to report. I just seem to plod along and follow the instructions to the letter. Sometimes I feel it makes for a bit of a boring log. Even the processes are mainly fingers, scalpel, scissors, glue and paint so no extra hand to make photo's while doing it....lol (and the Labradors aren't much of a help). I always admire the modellers that go off track and do their own thing, create new build processes or even scratch build, but that's not me I'm afraid....(yet). Enough dribble, here are some photo's to show my progress.


- 242 replies
-
- 14
-
-
- syren
- model shipways
- (and 1 more)
-
Hi Svein, I can't remember. I think i read about it on Dubz's log. He'll be the one to ask. Peter.