Peter Bloemendaal
-
Posts
236 -
Joined
-
Last visited
Content Type
Profiles
Forums
Gallery
Events
Everything posted by Peter Bloemendaal
-
 Thanks Richard, I have been quietly admiring your build too. I'm probably not in the same league, but I'm certainly enjoying the ride. Peter
 -
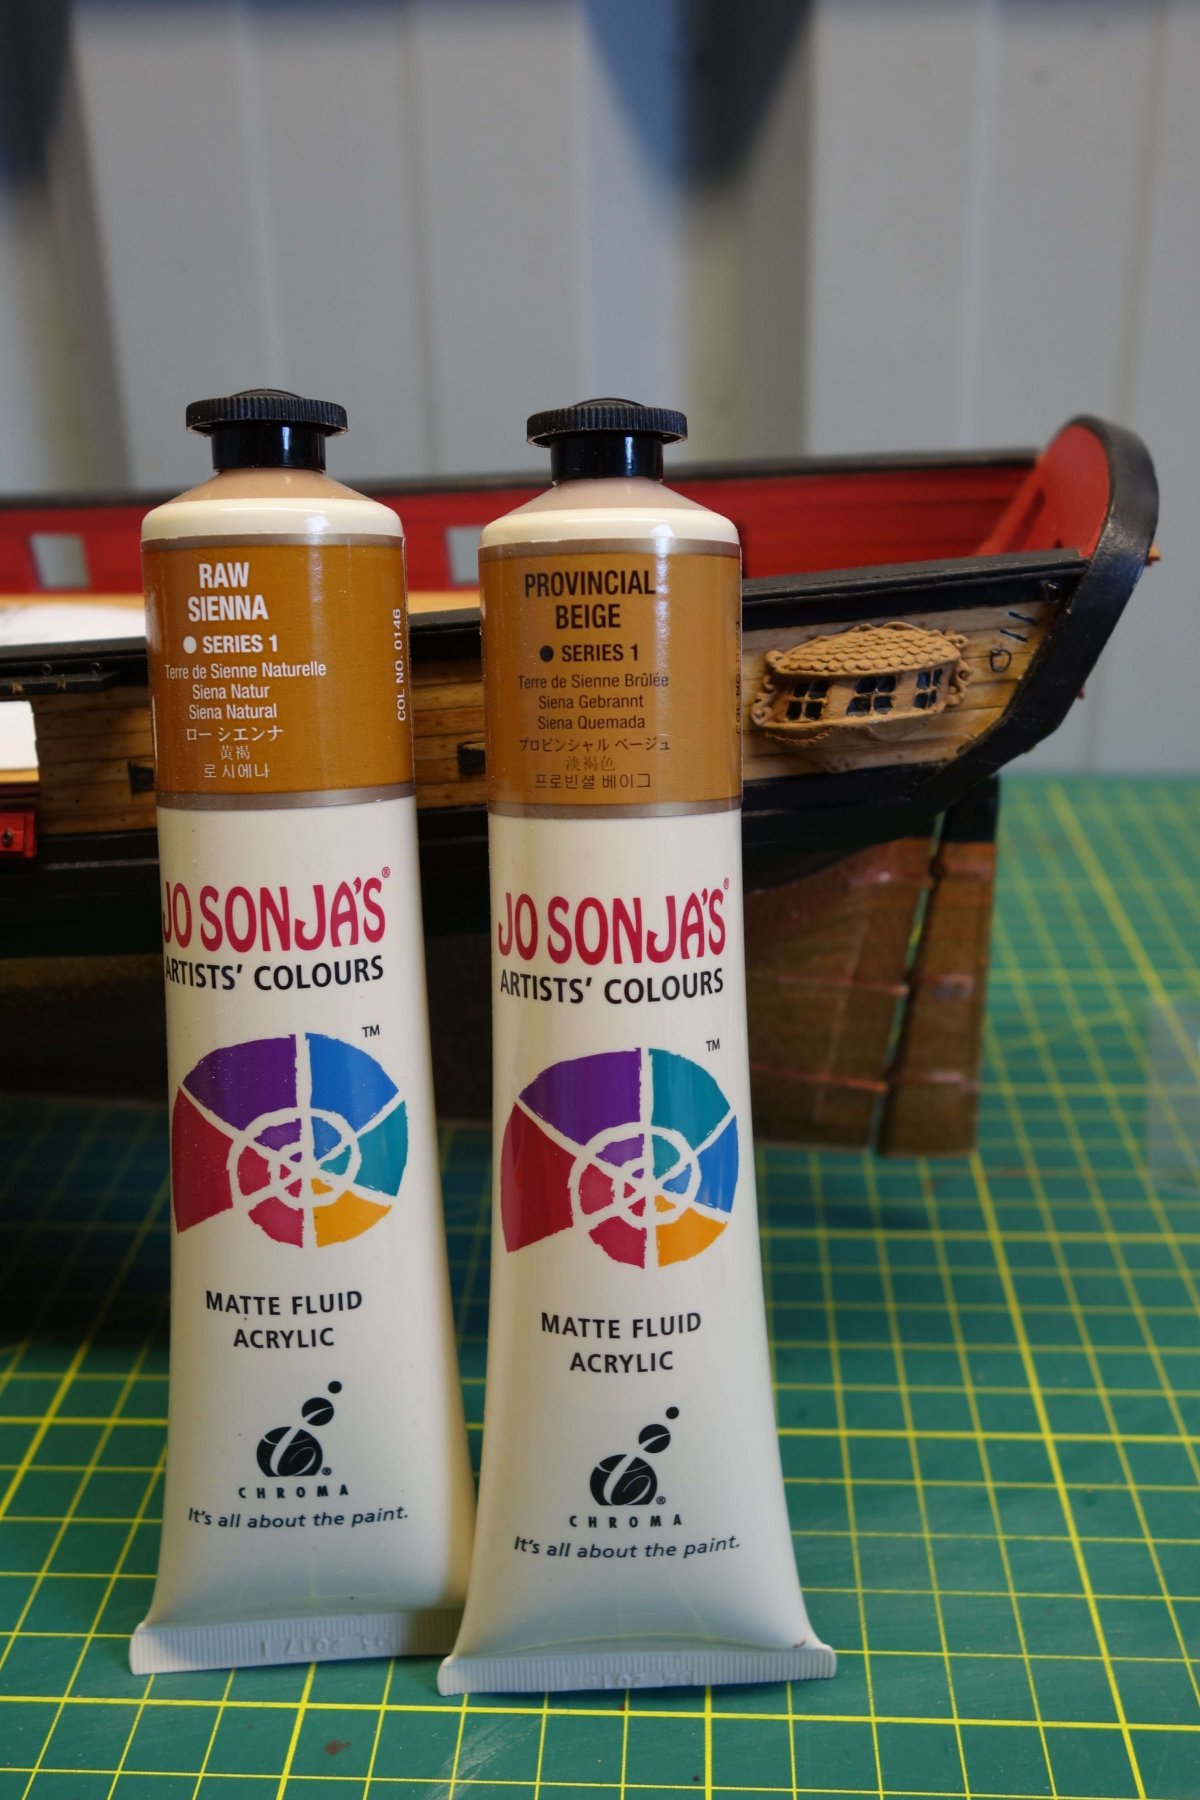
Hi Floyd, Here is a photo of the paints I used. Peter

- 242 replies
-
- 5
-

-
- syren
- model shipways
- (and 1 more)
-
Hi, I hope you don't mind if I join you in the journey as well. I have the Granado on the shelf as my next build. I intend to finish my current build the Syren first so I won't be starting for a while. (I can't do two or more at the same time, like some) Funny place Australia, as you were sweltering over east in one of the hottest summers ever, we in Perth had one of the coolest ones. Not a single day over 40C. Still hot enough at times to skip working out of the shed. I found myself more than once squatting a fly away from my face not realizing that I was still holding my scalpel. I wouldn't recommend doing it too often...lol. I think you planking looks great BTW. Cheers, Peter
- 421 replies
-
- 1
-
-
- caldercraft
- granado
- (and 1 more)
-
Hi Floyd, I used some acrylic paint tubes from an arts & craft shop. I got two colors and mixed them 1:1 to try to get a color match. I will upload a photo when I get home from work tonight. Cheers.
-
Wouldn't this be the ideal job for a 3d scanner??
-
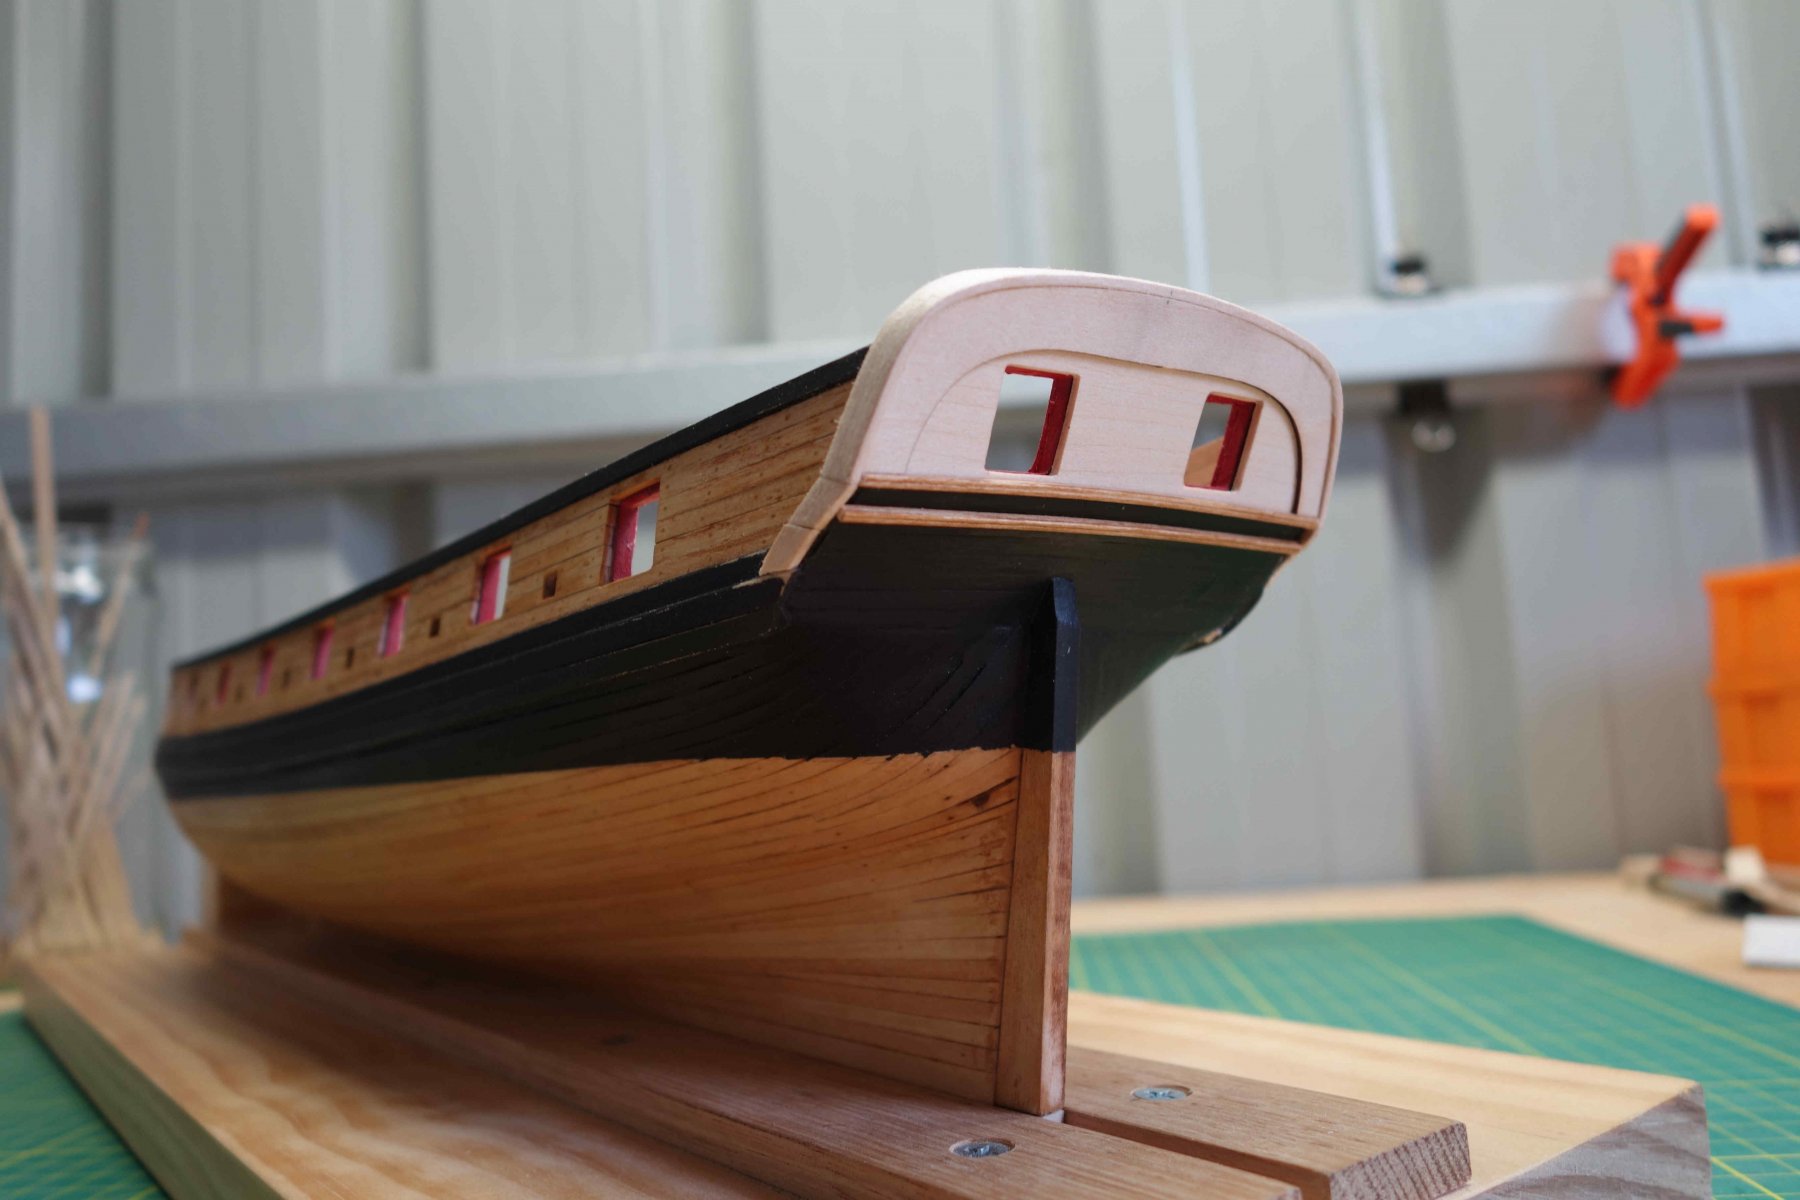
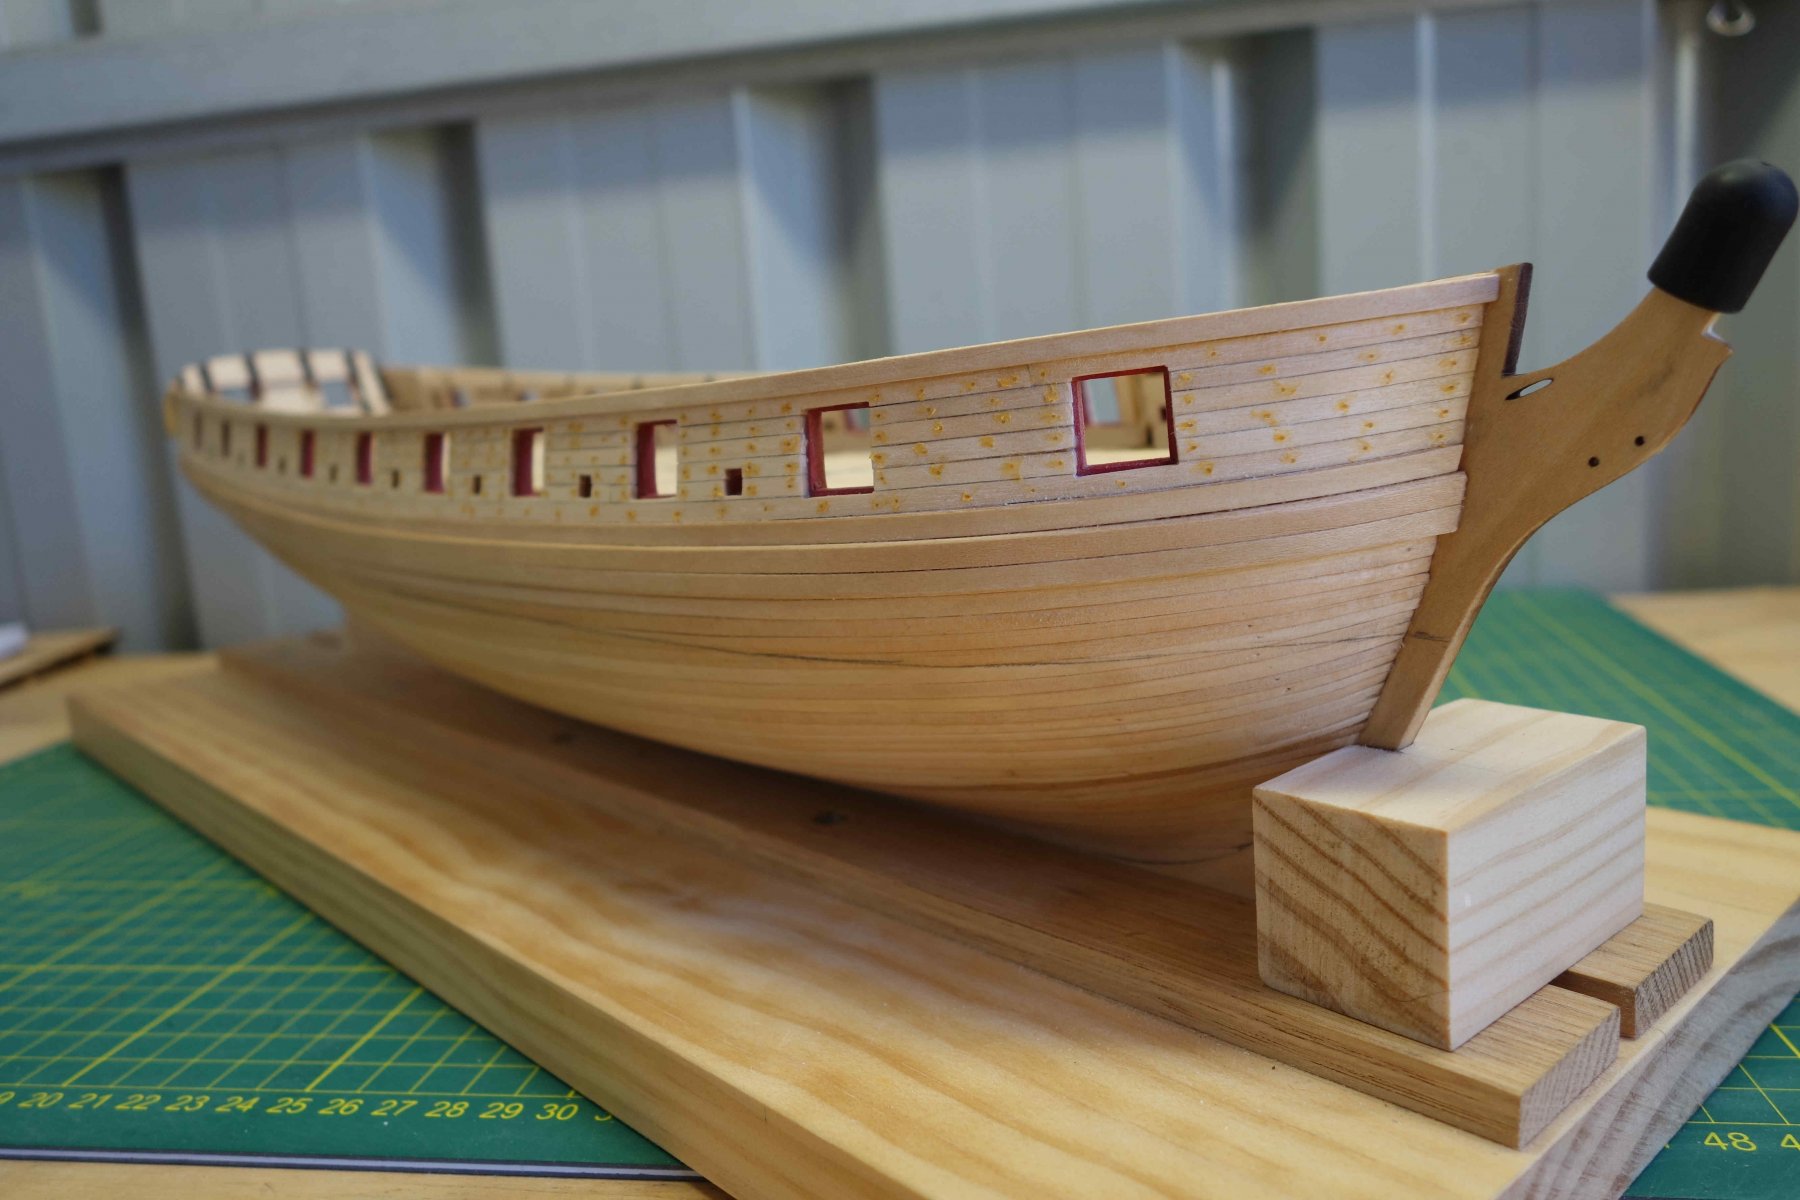
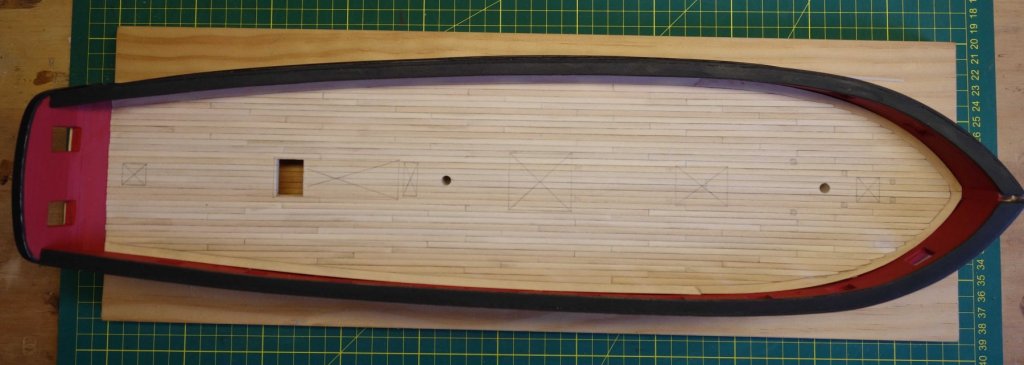
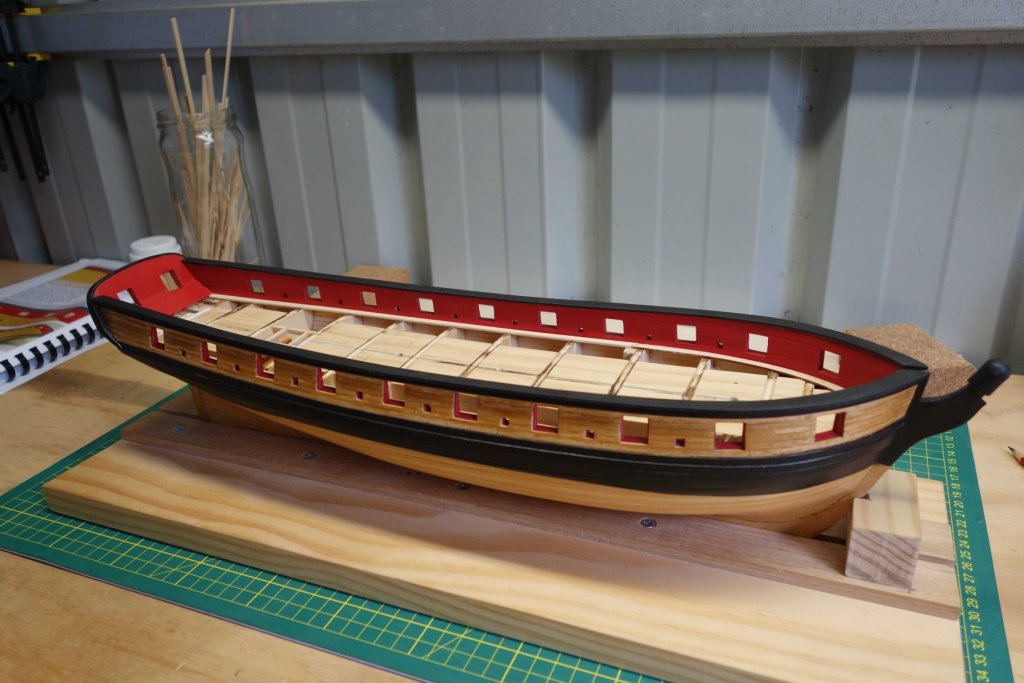
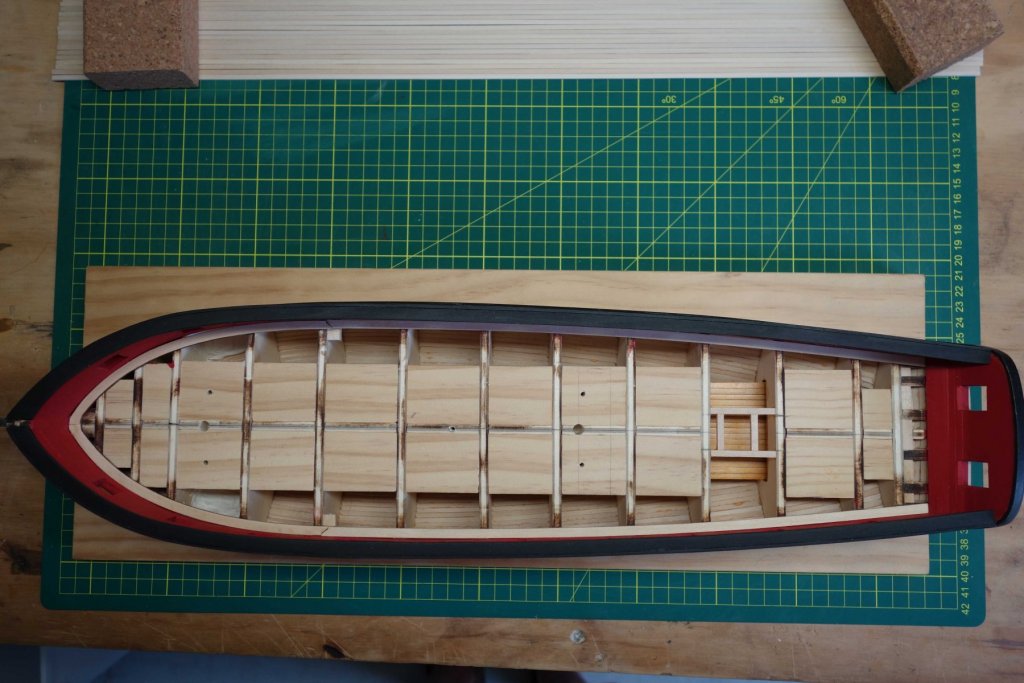
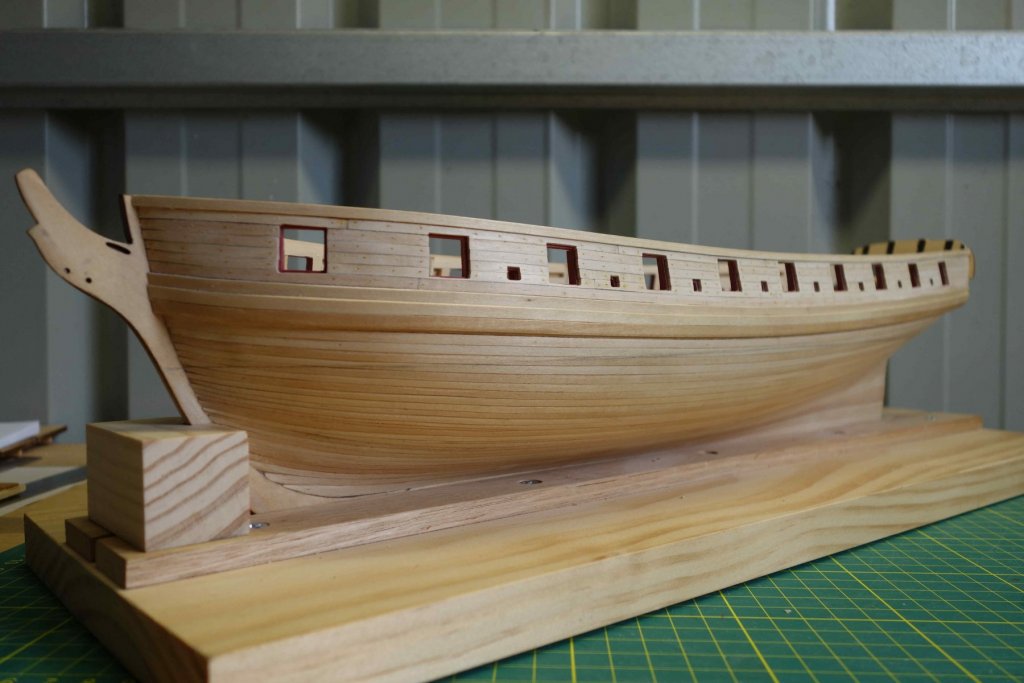
Another update with Chapter 9 almost finished. I haven't added the scuppers yet as the brass tube supplied in the kit was 1/8" in size and not 1/18" as listed in the parts list. Luckily I tried fitting one on a test piece and found the scale a bit 'odd', before going 'gung ho' drilling holes in the hull. I ordered a new tube on line. I chemically blackened the eyebolts before fitting them. The cut-offs are used to 'pin' the main and fore channels to the hull as shown on the first photo. they are also used as the port hinge pins. I have been a bit slack making progress photo's. I obviously am having too much fun. Next on the list are the head rails and figurehead. I will be doing some serious carving practice on test bits first before touching the laser cut ones. From when I bought the kit, I always feared the head rails would be the most challenging part. But then again, I wasn't even sure I would even get this far. So, onwards we go Cheers, Peter

- 242 replies
-
- 11
-
-
- syren
- model shipways
- (and 1 more)
-
Looks good Doug. Peter
-
Hi Chuck, How close you think the technology is to just get a commercial 3d printer and just print these components and add them to the kits. The printers are getting better all the time and are becoming more affordable. It will add a lot more flexibility to your design efforts. Cheers, Peter
-
Hi Chuck, Just a quick one. Does the cross section have mast details with some rigging as well or is it just the hull. Peter
-
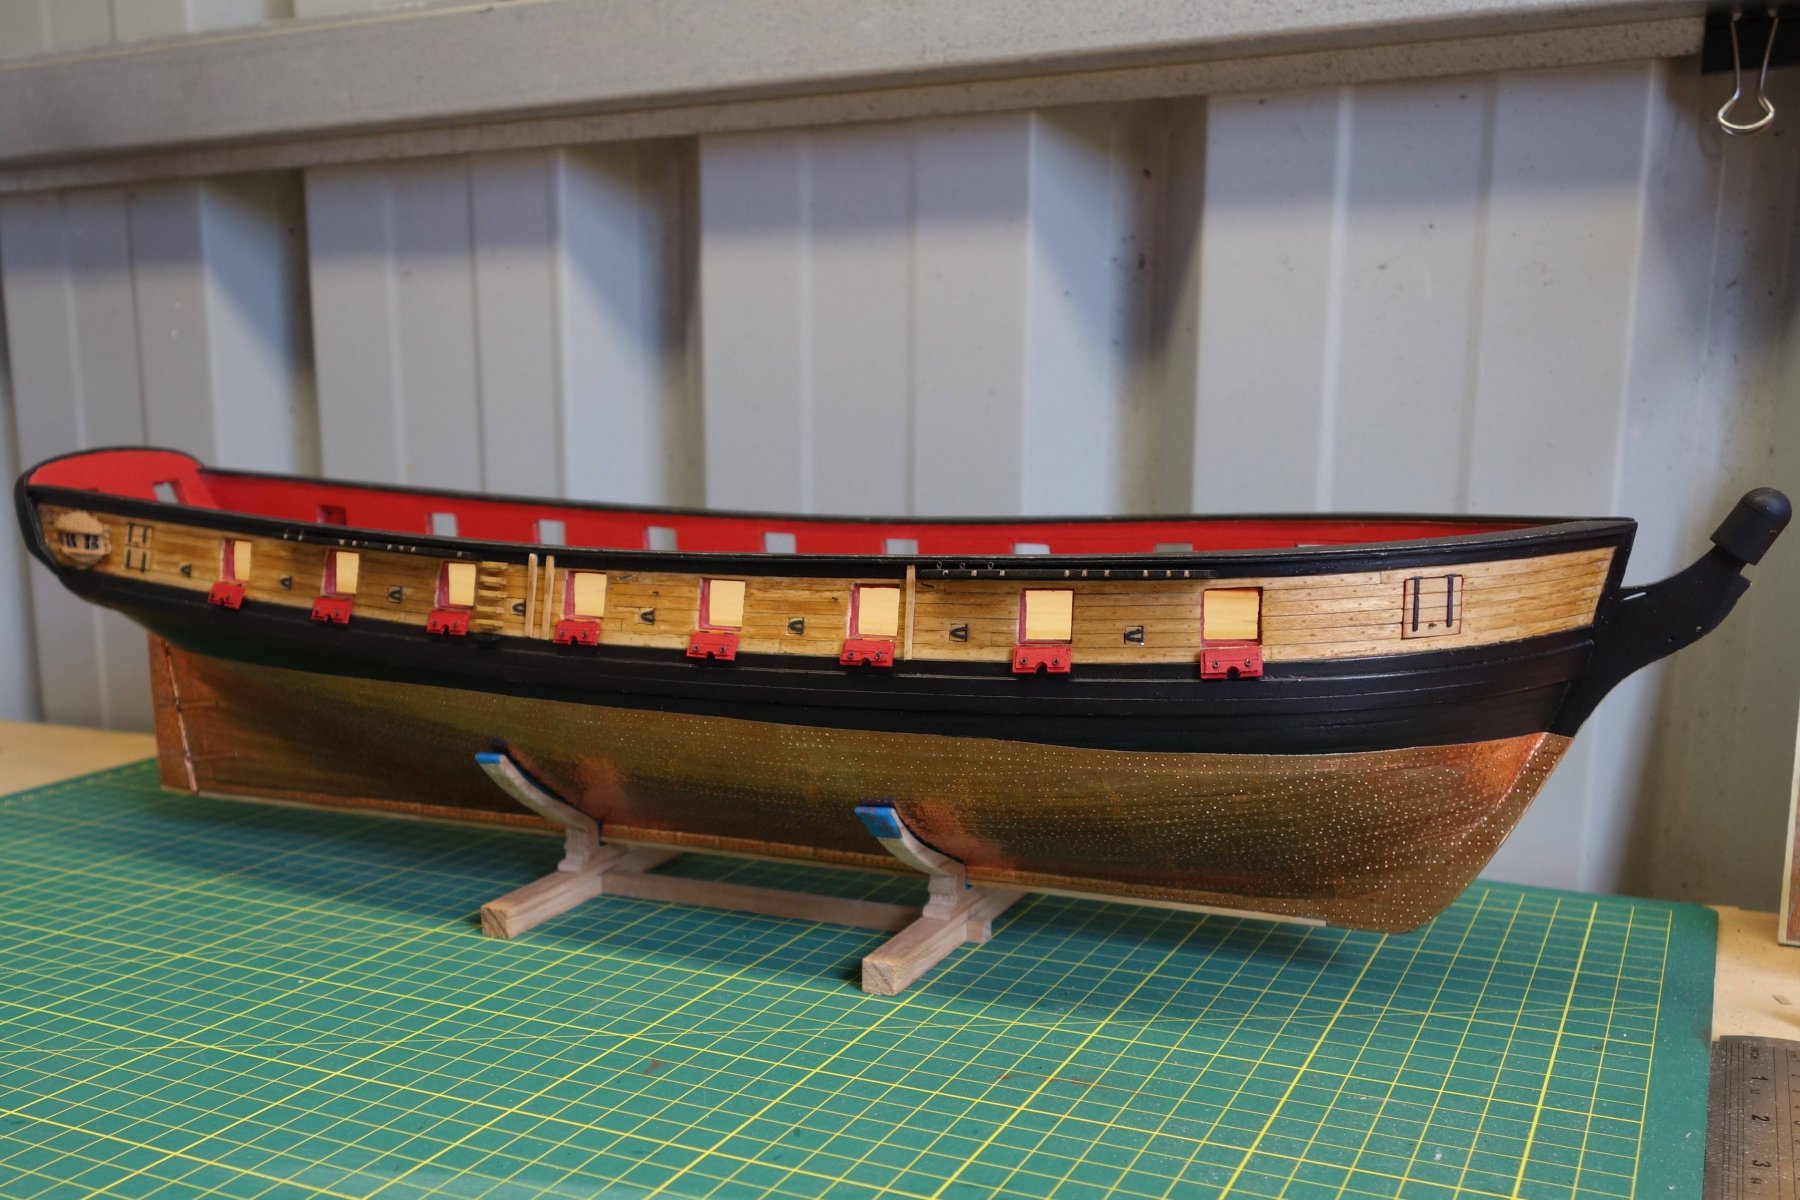
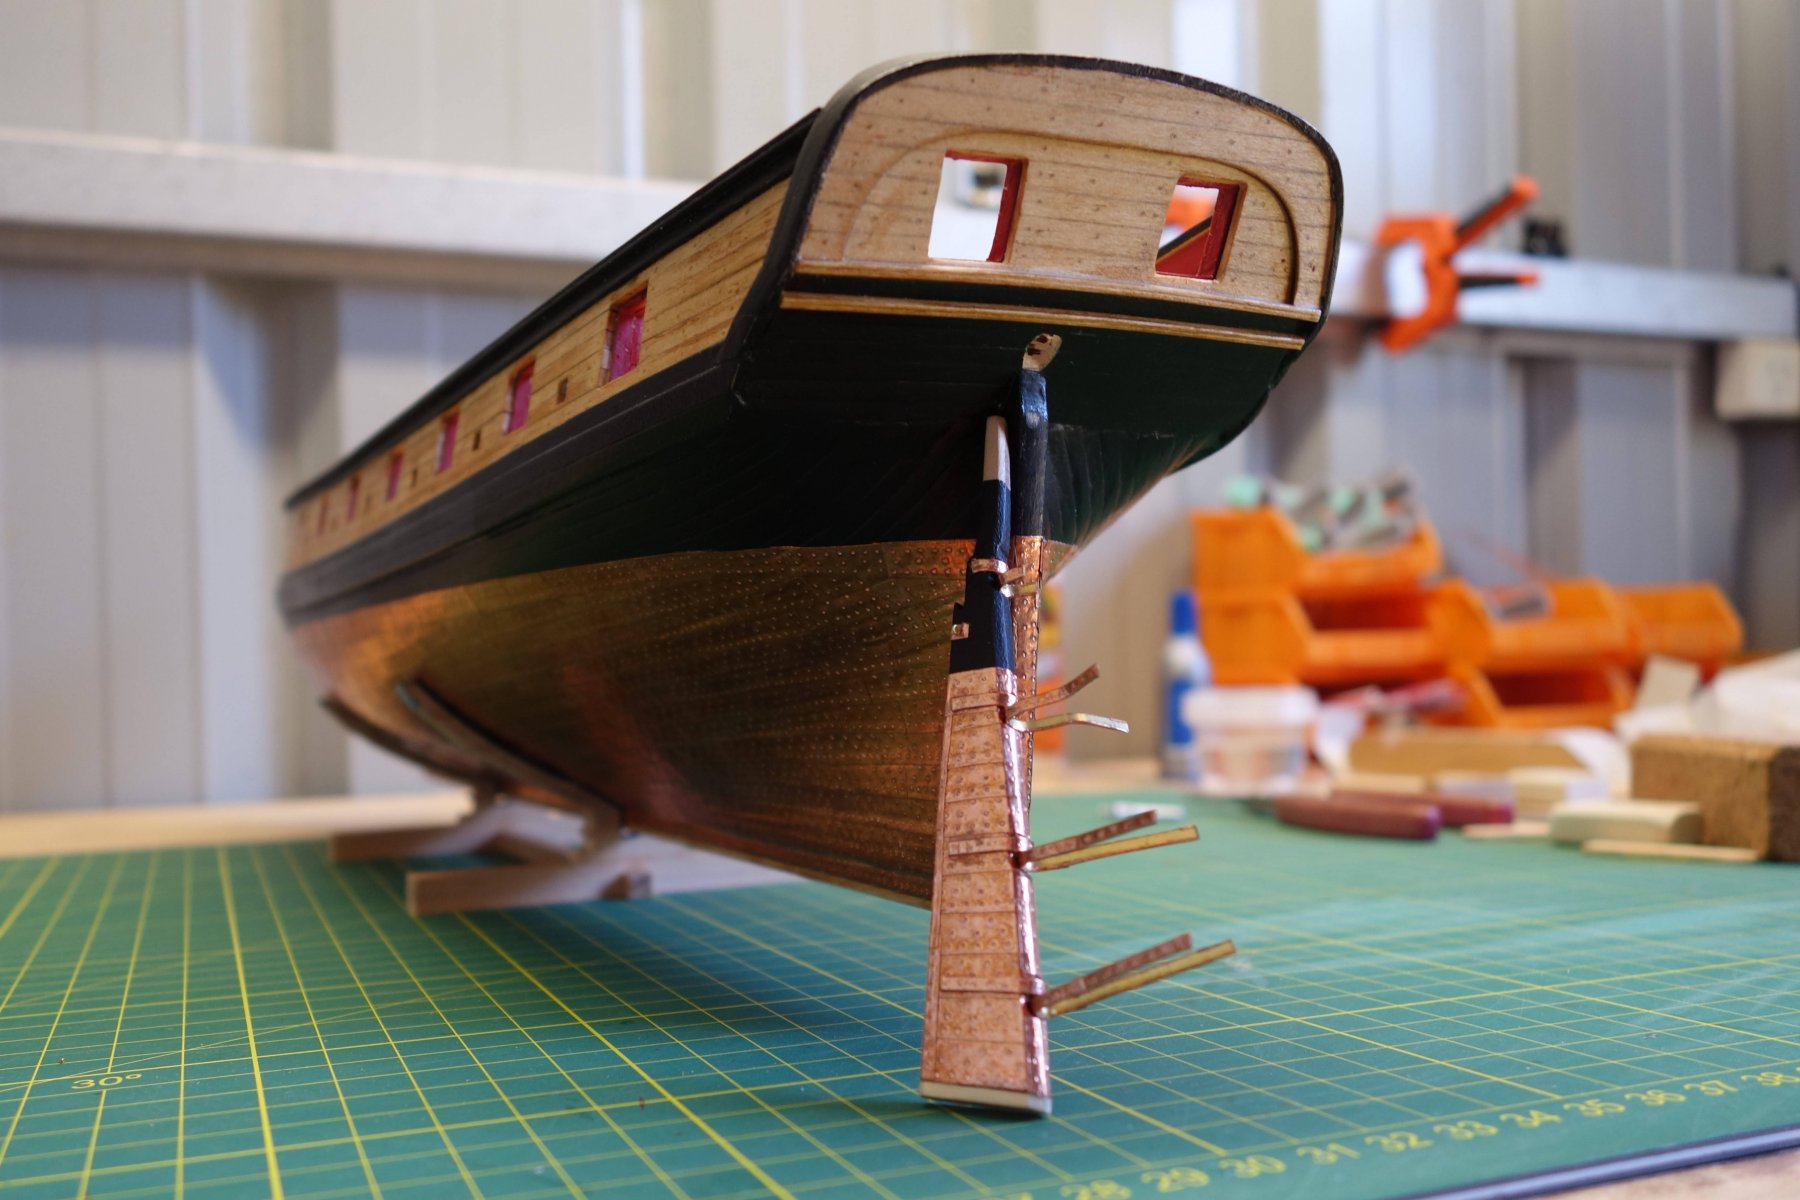
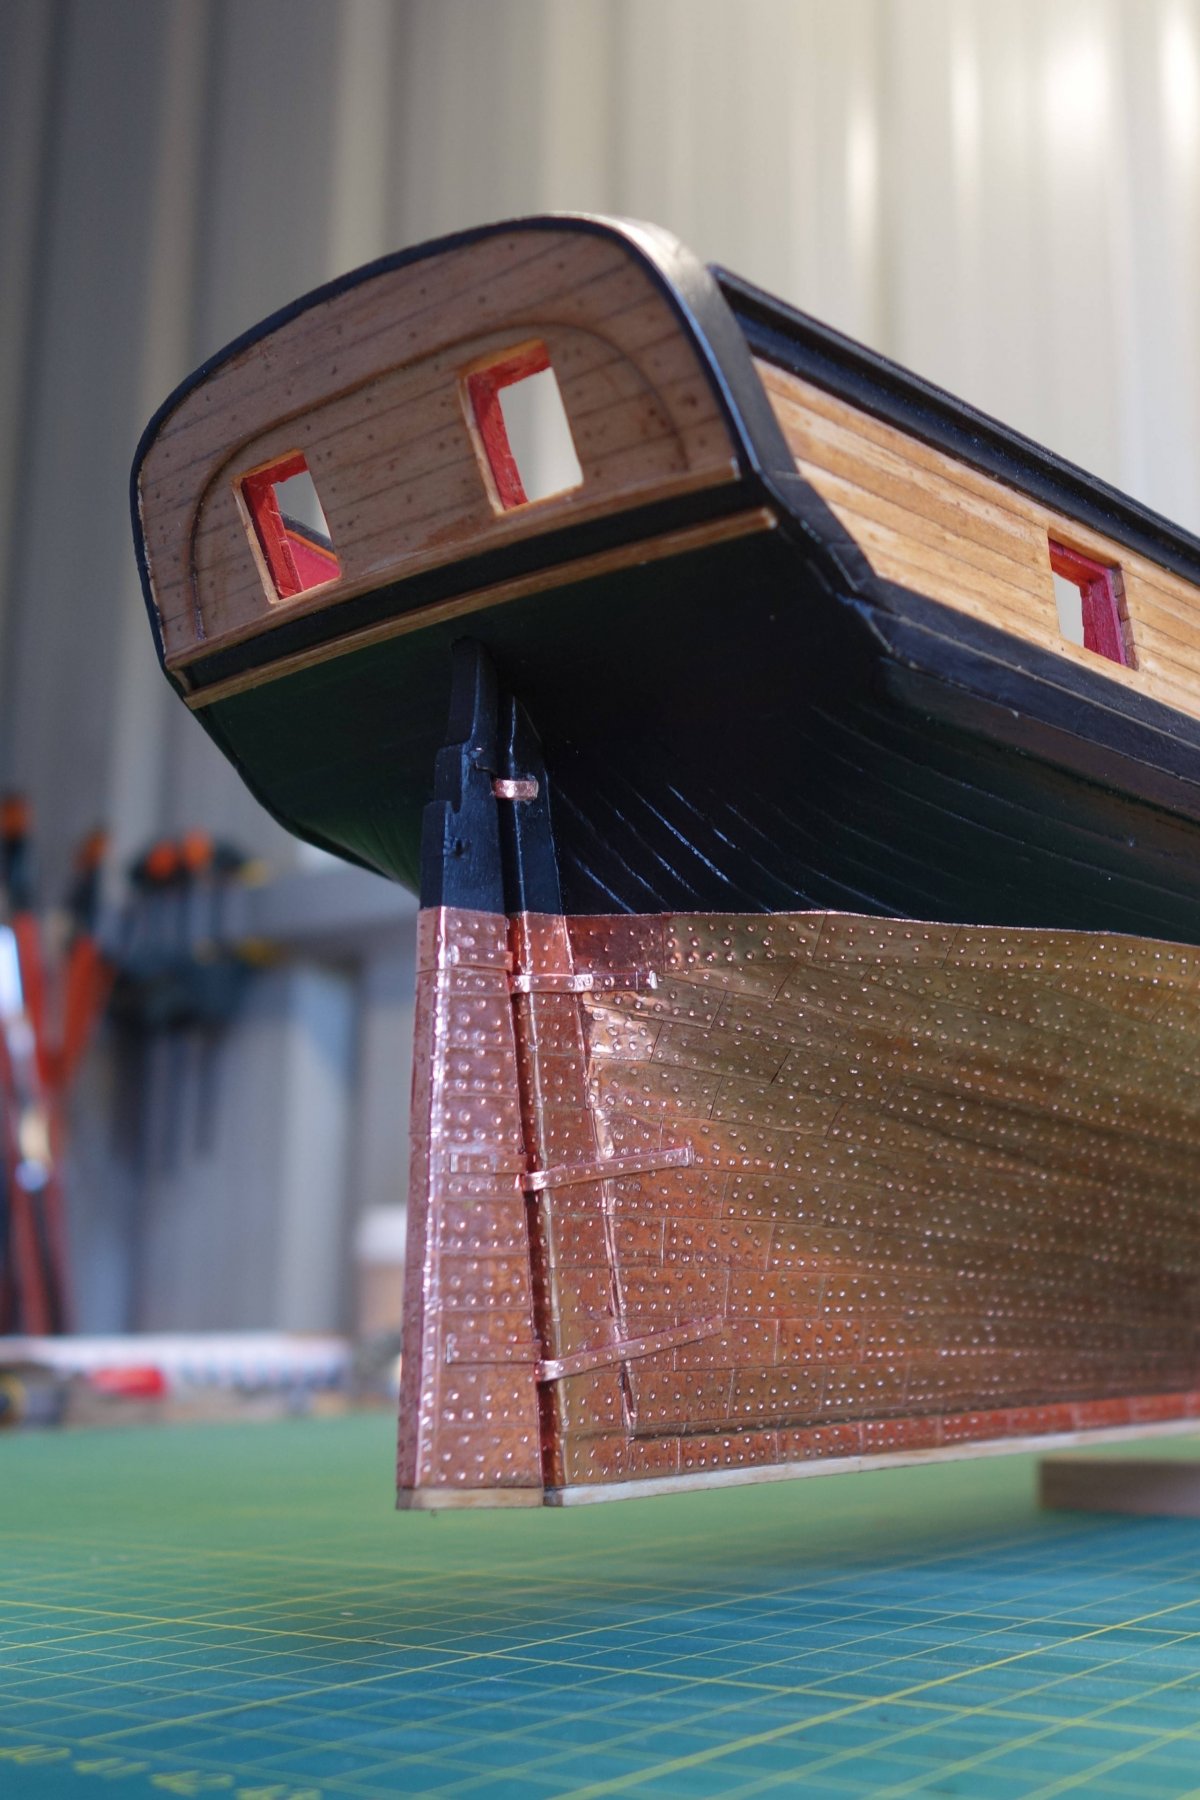
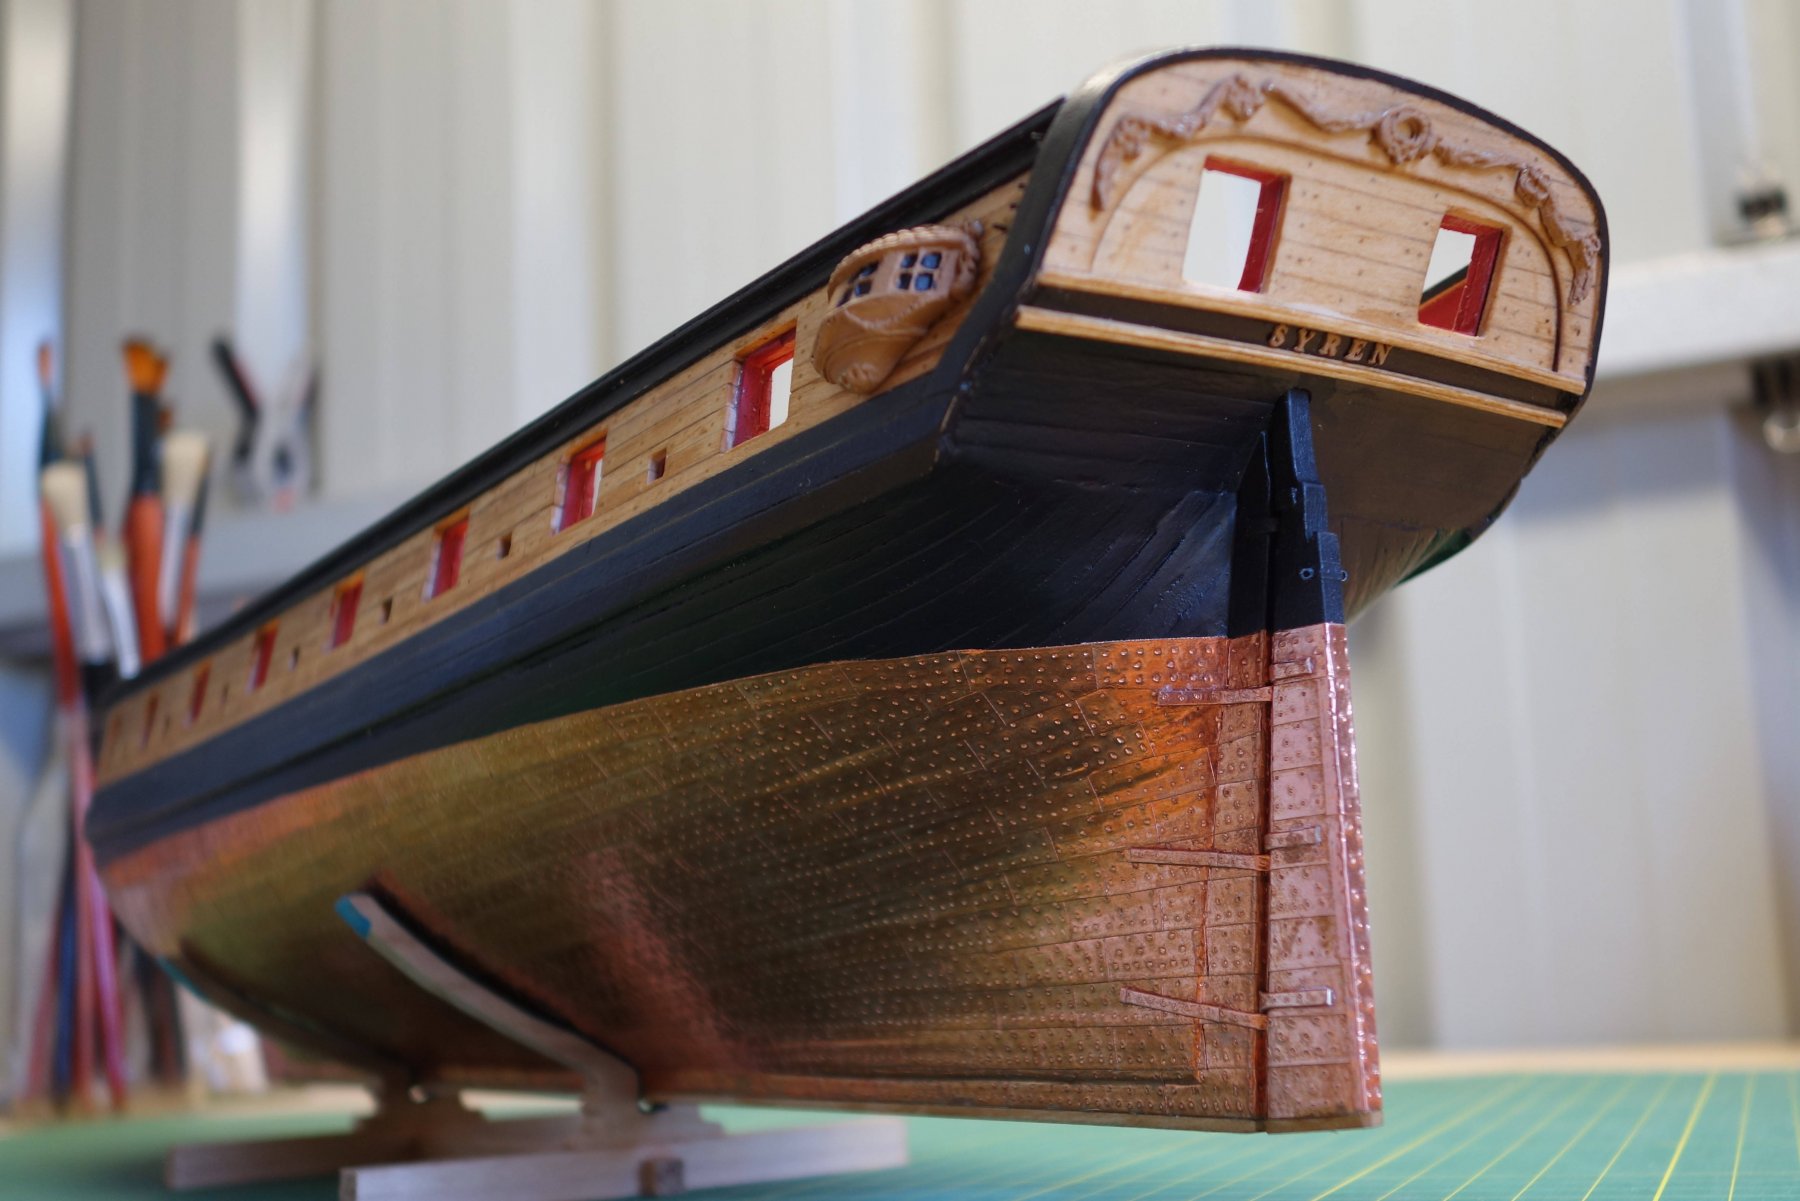
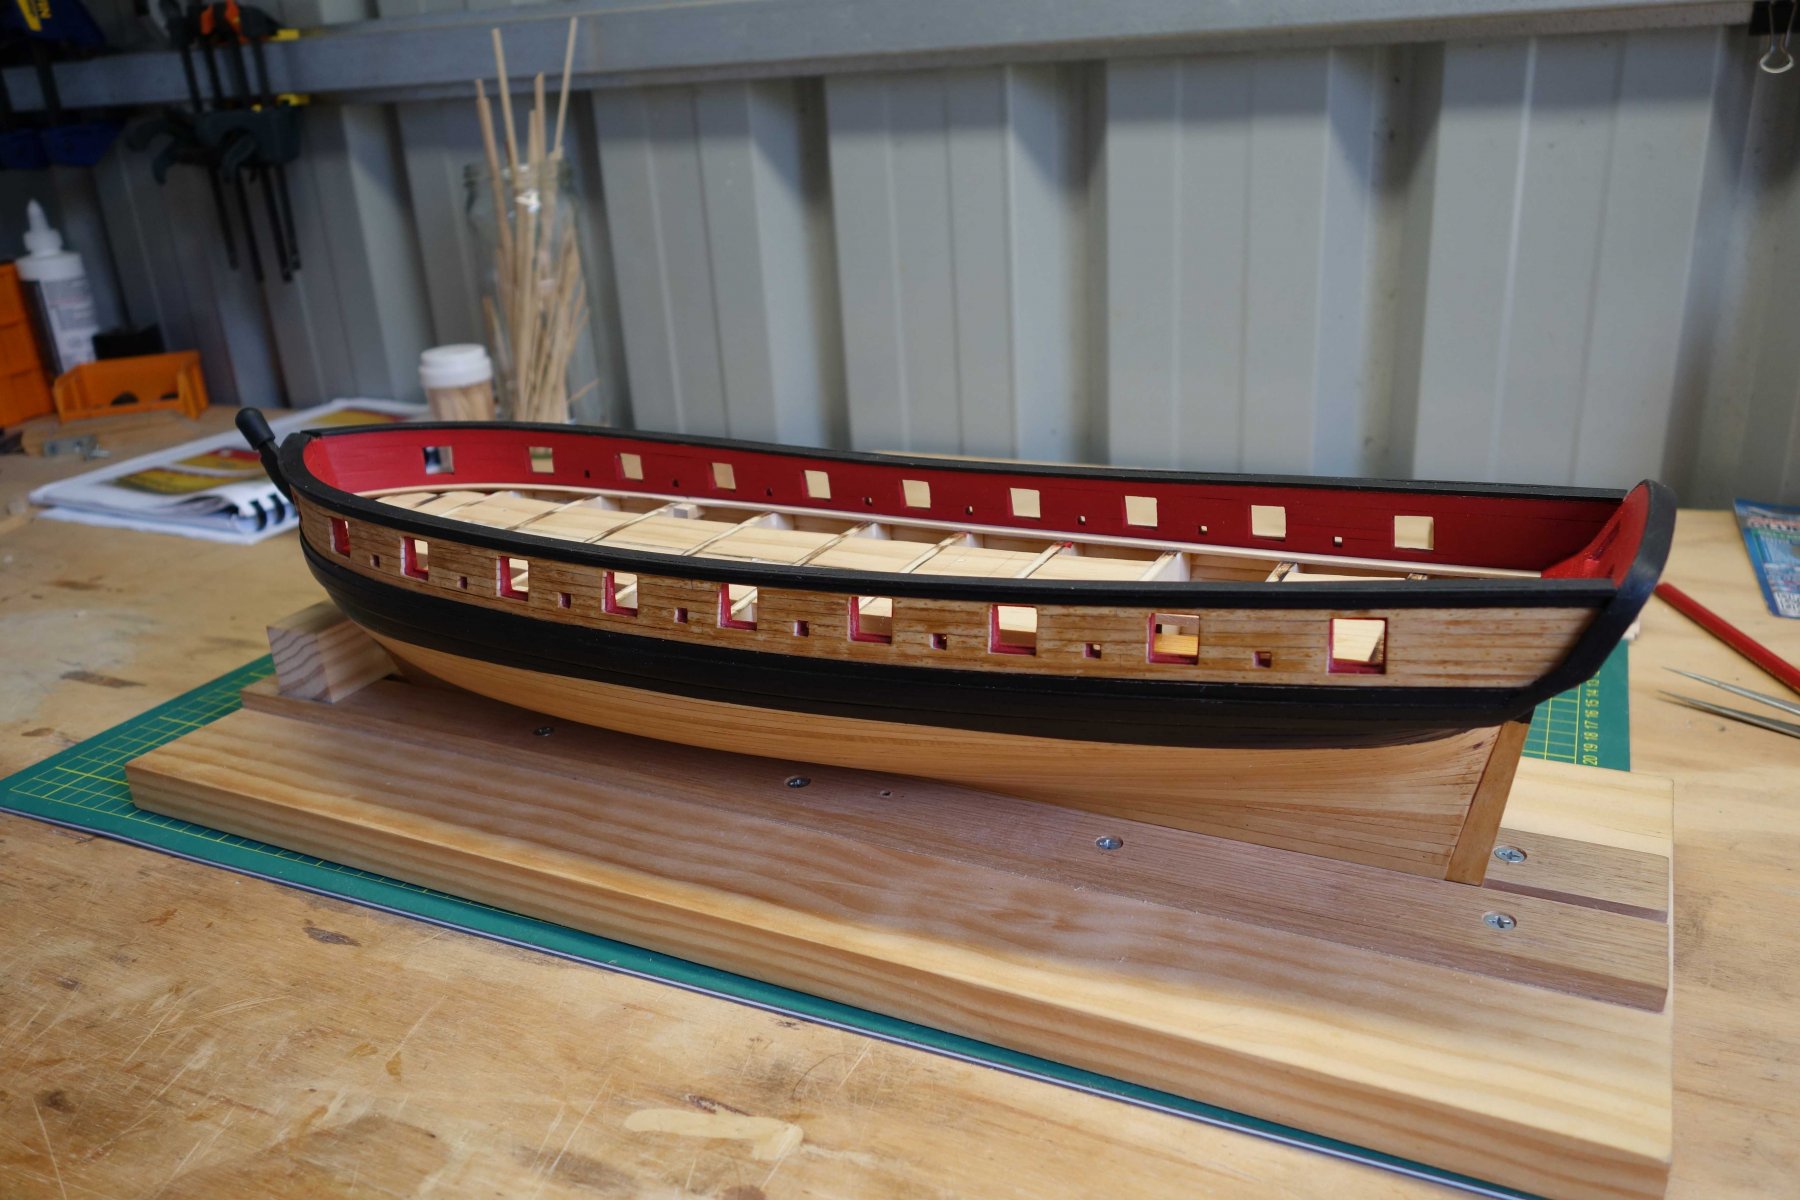
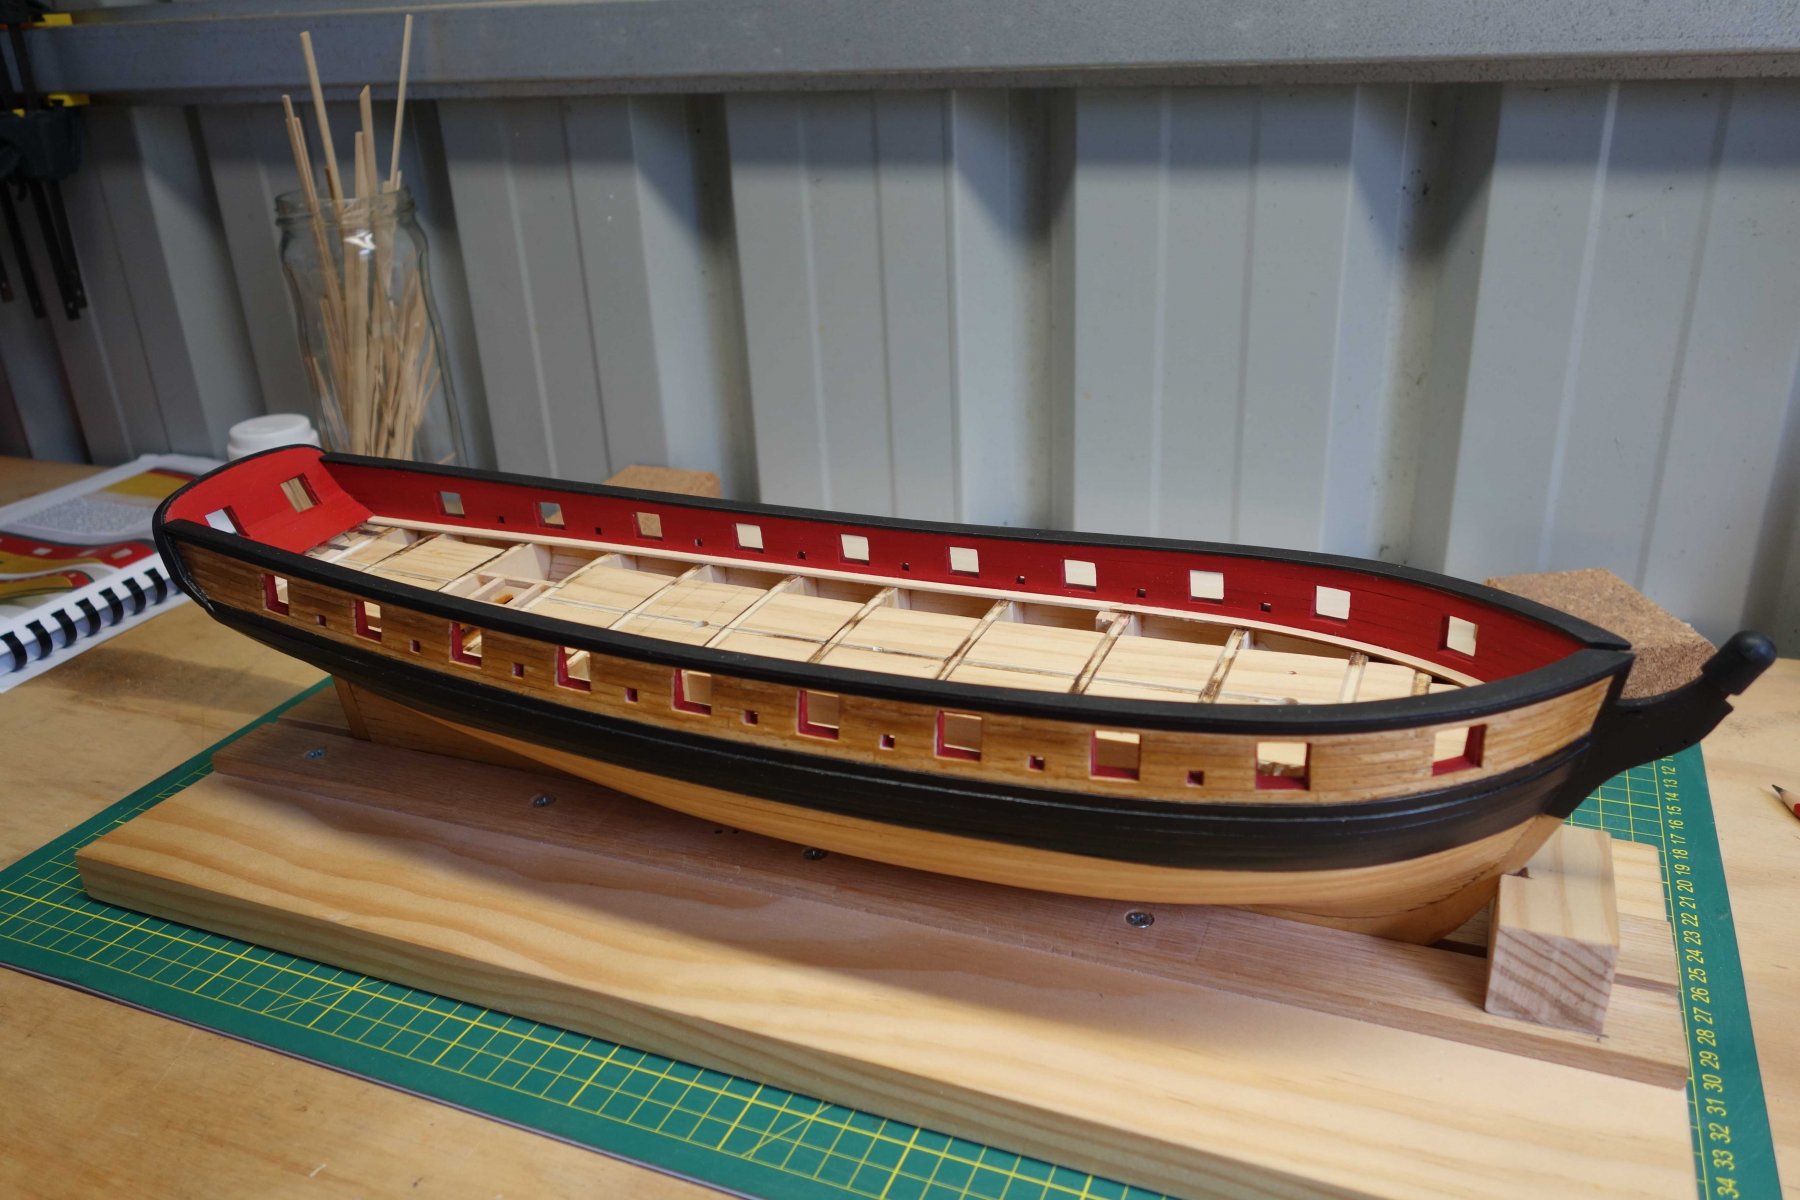
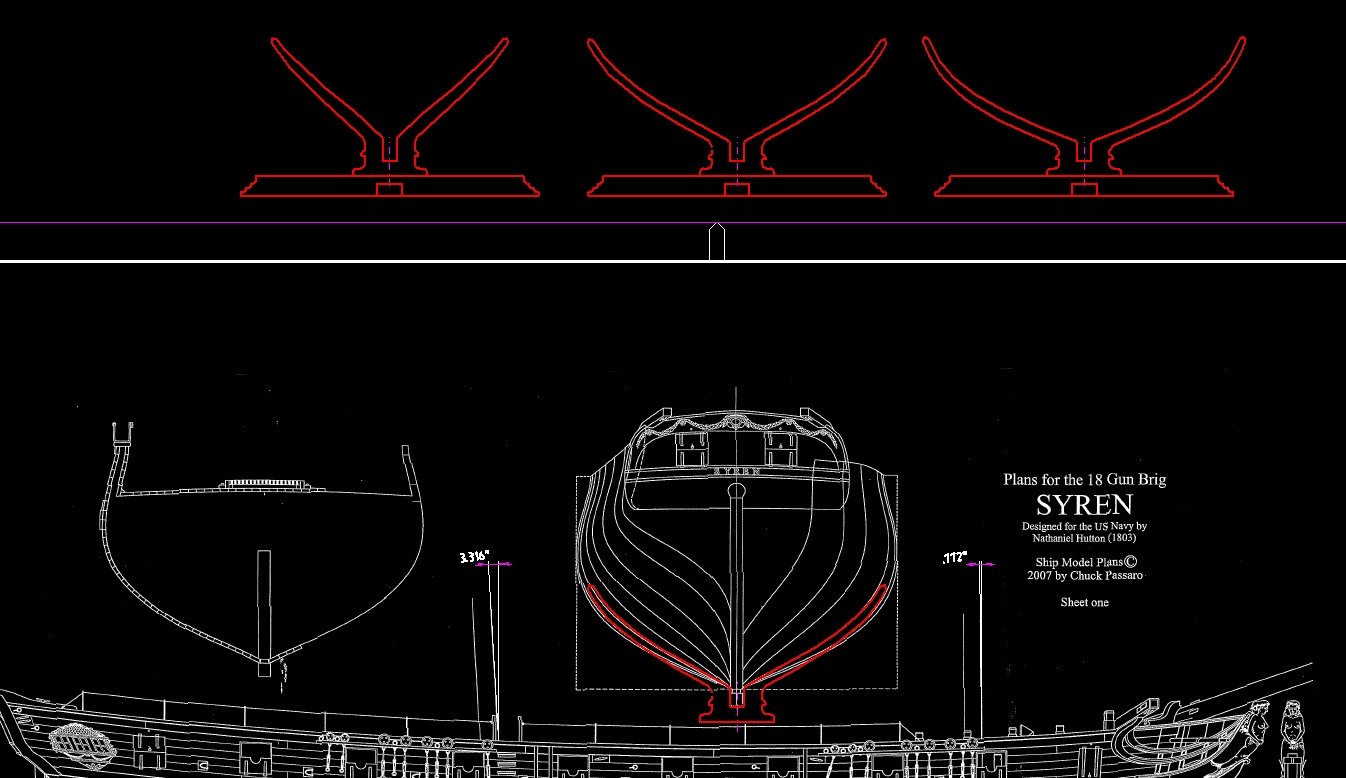
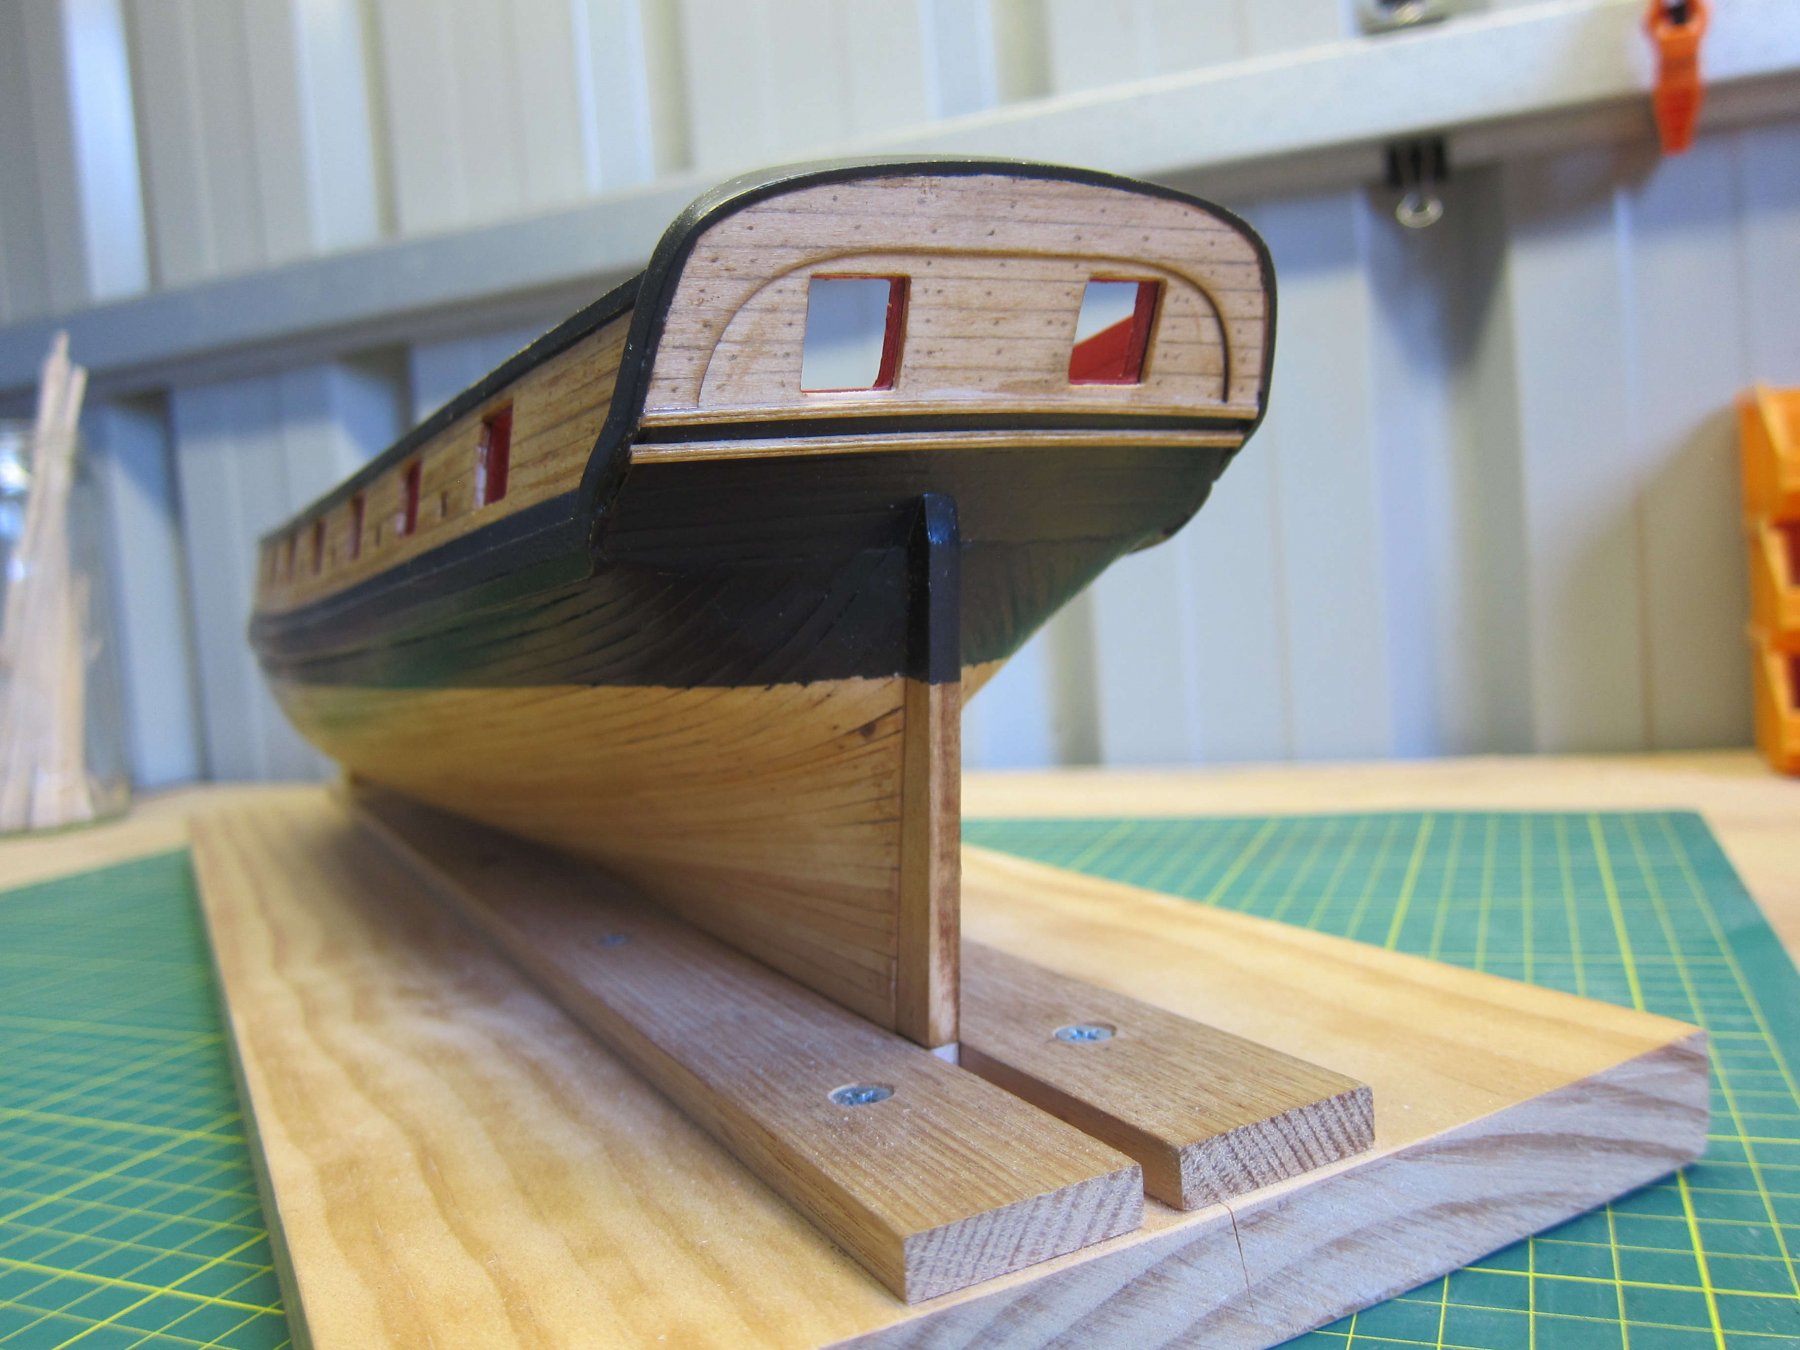
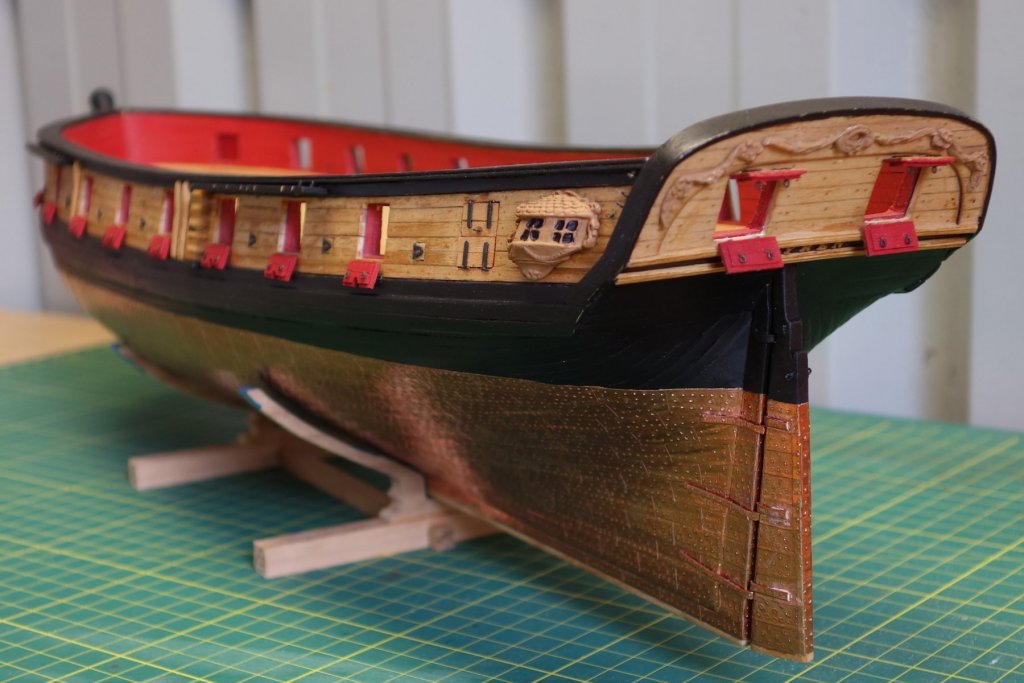
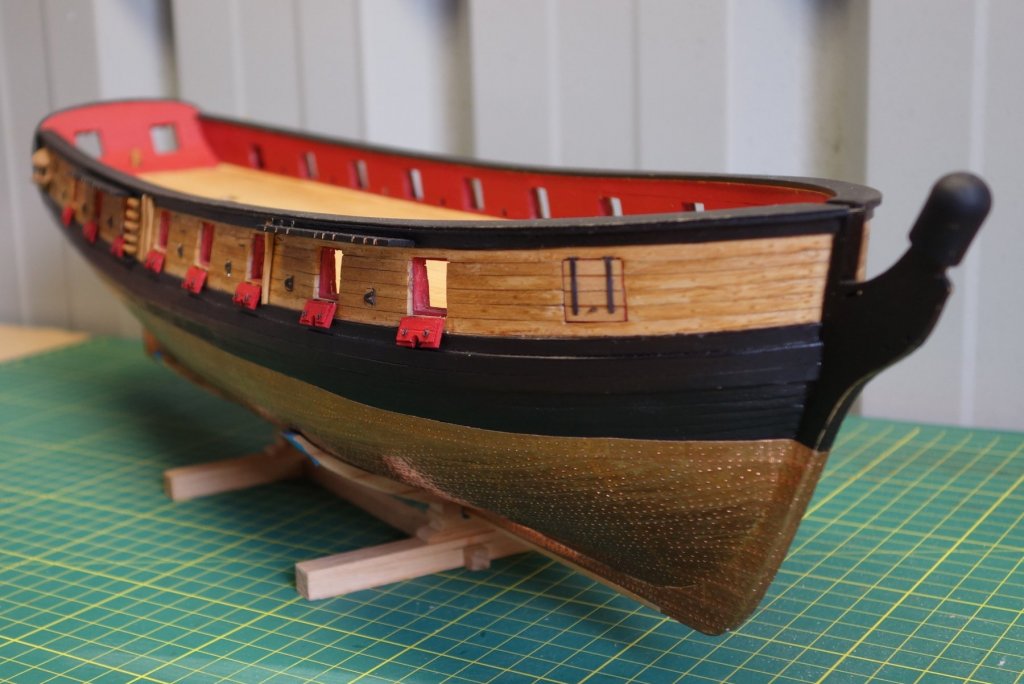
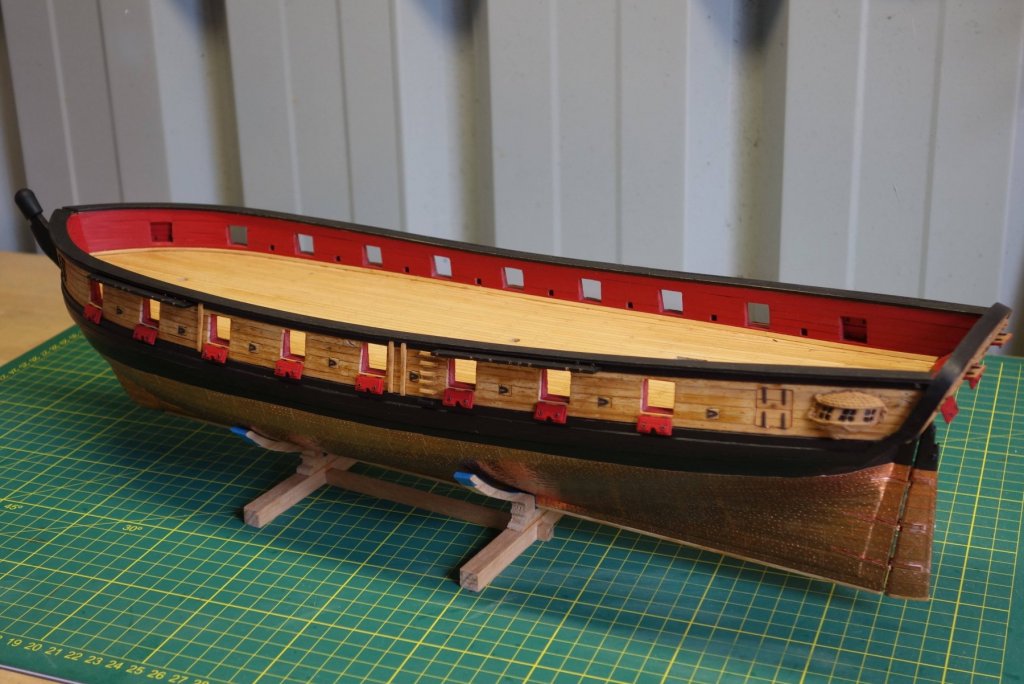
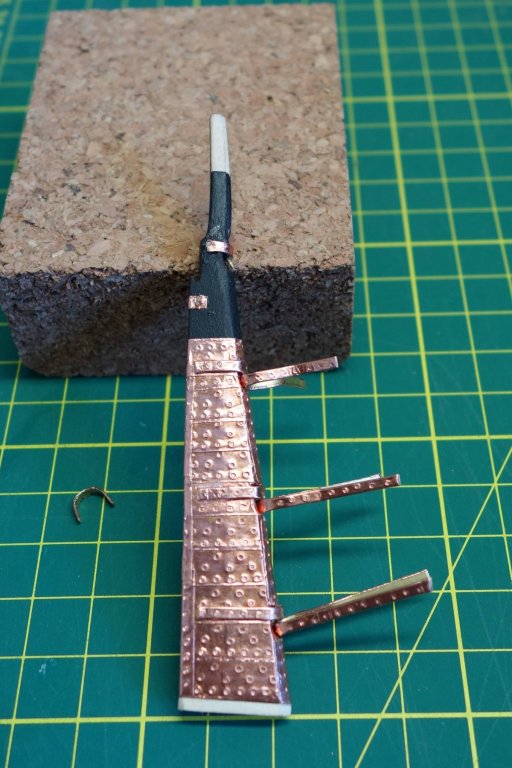
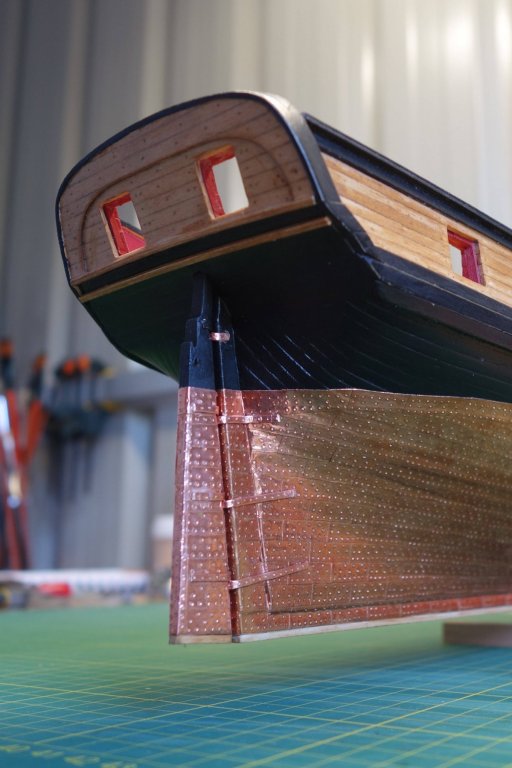
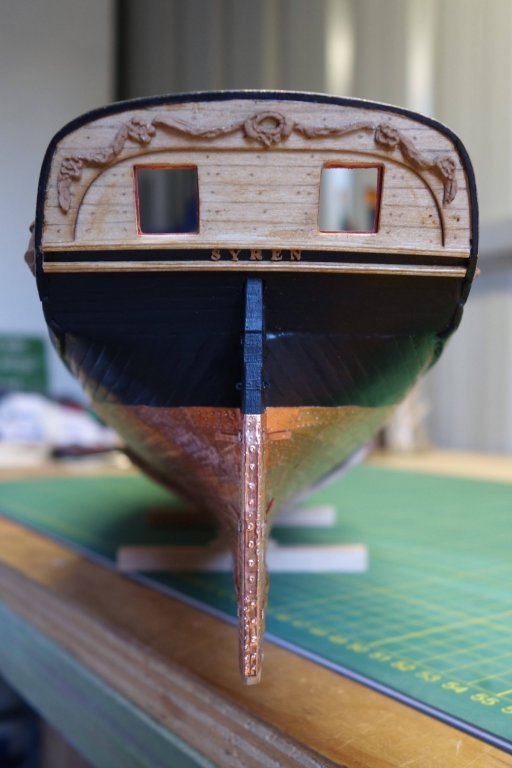
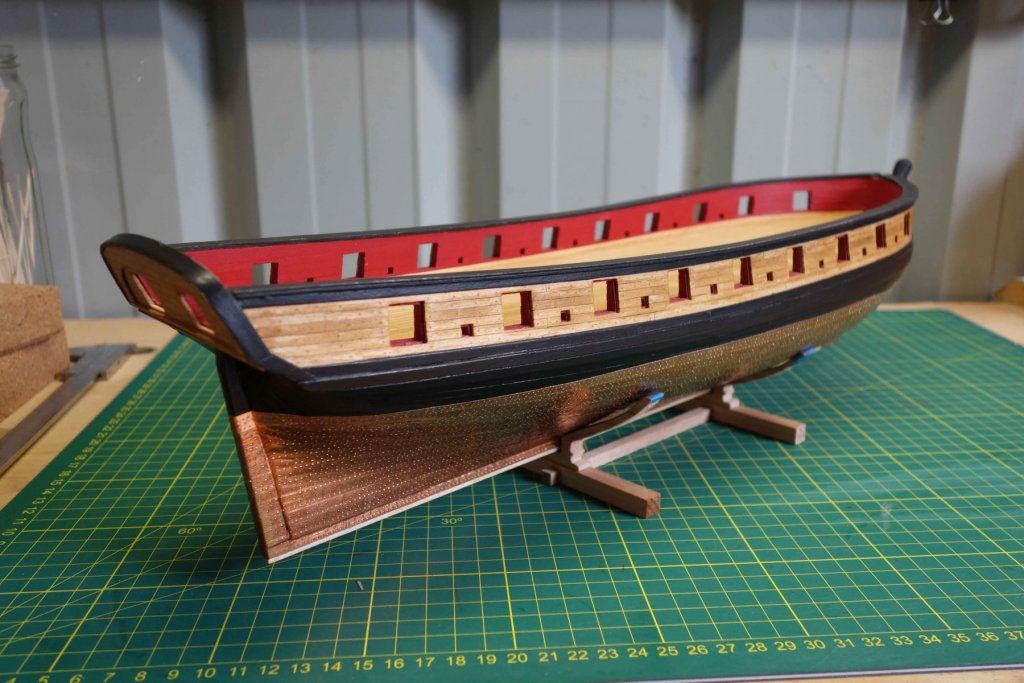
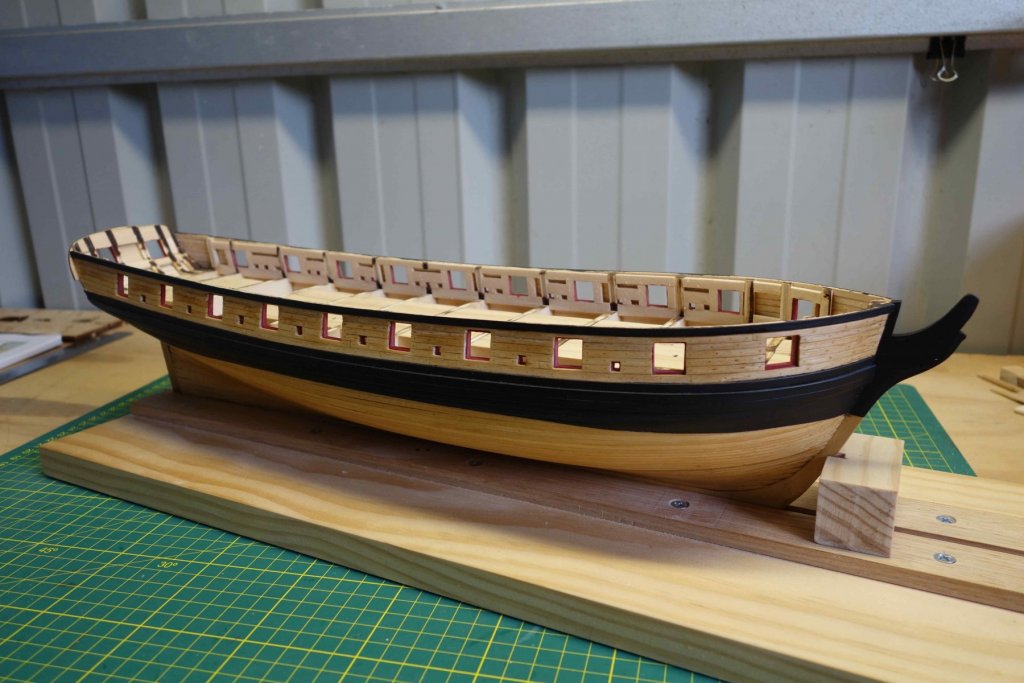
I have done some more work on the rudder and the stern section. You definitely have to take your time making the hole for the rudder. I have added the ships name, stern carvings and the quarter badges. The quality of the quarter badges are a bit disappointing but I tried the best I could with what was in the kit. I don't think it's too bad. When adding the letters and carvings I put the ship in a near vertical position to create a horizontal surface to work on and used the Gorilla wood glue, which gave me plenty of time to fiddle with the locations before the glue set. I avoid CA glue in these cases because of the speed it sets. I tried a few options ageing the copper but I am not happy with the results so far. I haven't included any photo's of the copper test plate yet. Here are the photo's.


- 242 replies
-
- 10
-
-
- syren
- model shipways
- (and 1 more)
-
Hi Eric, Welcome to the Syren club and enjoy the journey. Peter.
-
Hi Doug, Not sure if this is helpful but I cut a length, put it in a saucepan and put it on the boil for about a 30 seconds. Then I took it into the shed, got the strip out of the water and slowly rolled it with my thumb over both edges. It broke on the first attempt because I went too quick but managed to keep it together on my second go. Peter.
-
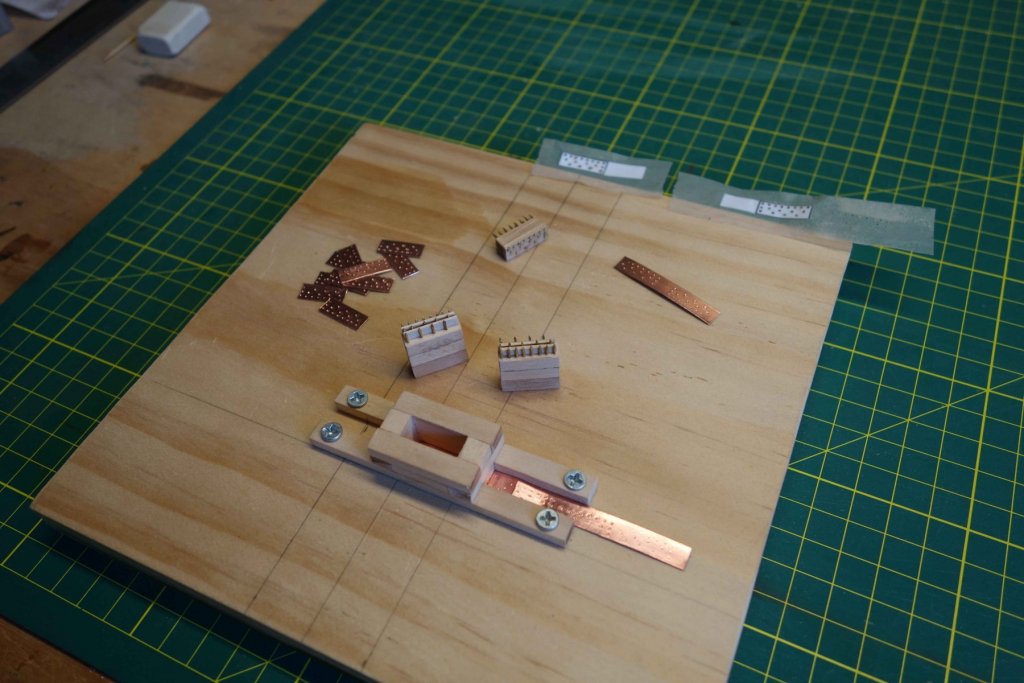
Thanks for all the likes everyone. Thanks Doug, No, the spacers were not used to control the depth of the nails into the copper. I drilled the hole pattern with a dremel, fitted on the stand. With a slight travel of the small drill bit (and the large variation of my eyesight lining it up...lol) the row alignment wasn't perfect. I pushed the spacers in to try to align them a little bit better and to prevent the nails bending during the whole process. I'm not sure if they made a difference. There was no advanced vertical process. Just a few taps with a small hammer, move the tape, look at the result, adjust the hammer taps with the next tape, move the tape, look at the result, etc. A very manual process with a variation of how the plates look. I also found I had to move the jig a few times. As I was hammering onto a soft pine base under the copper, I was slowly putting a pattern into the base affecting the look of the copper indents. Just on a side note, I am really enjoying this built (famous last words???) and I am glad I picked the Syren. The instruction are the best I have seen (thanks Chuck!) and the additional info from existing logs and feed back from other builders like you are inspirational. I probably don't say this enough, so here it is... Peter
- 242 replies
-
- 7
-
-
- syren
- model shipways
- (and 1 more)
-
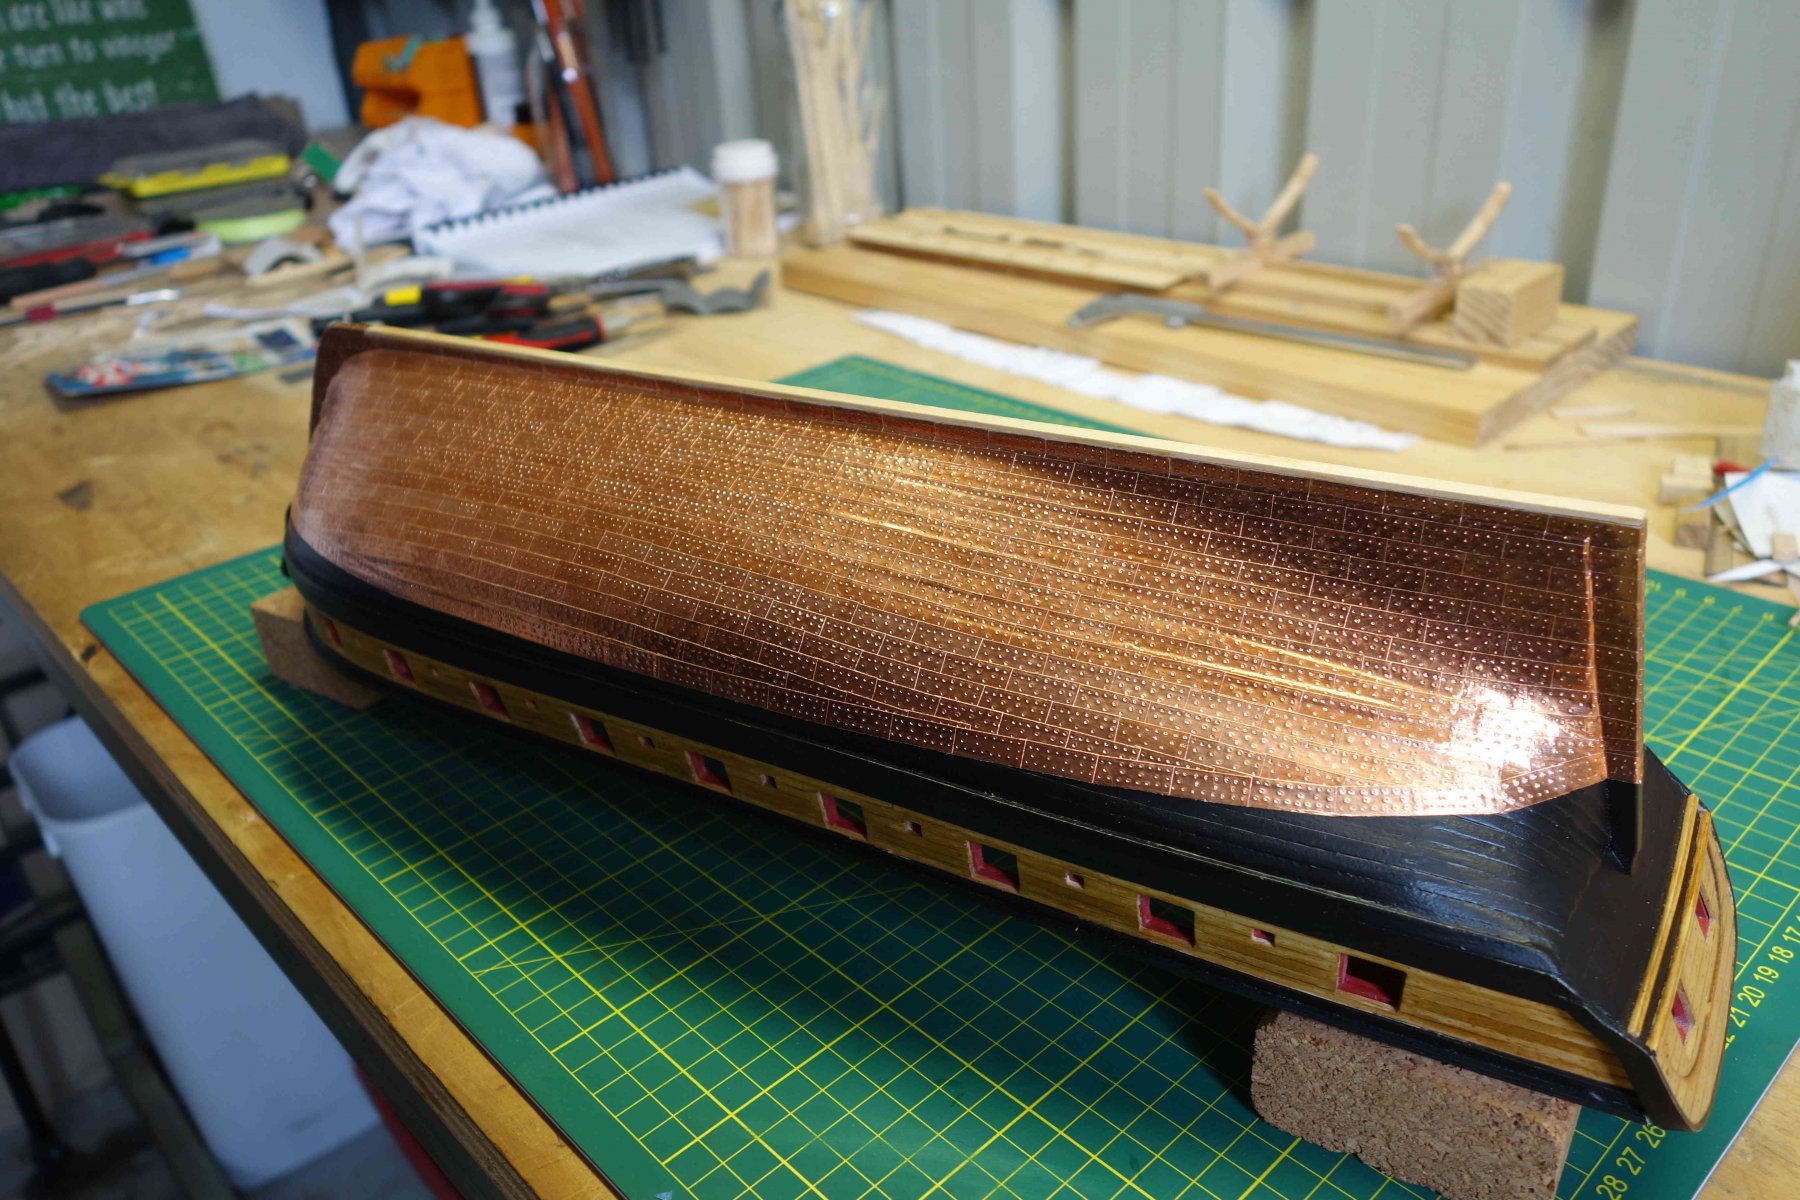
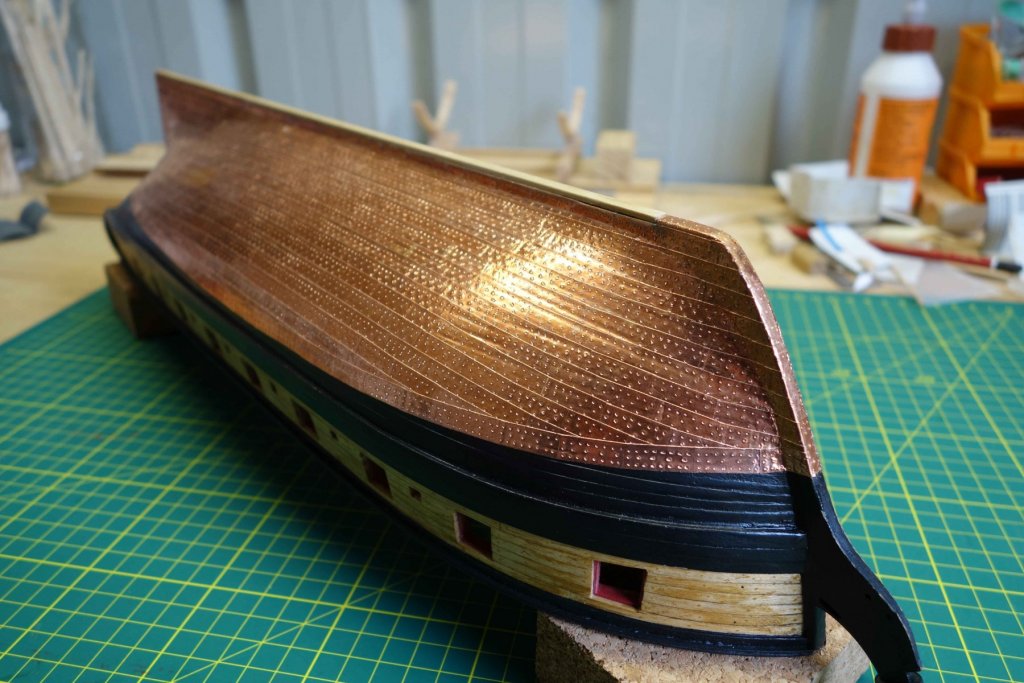
The Copper plating didn't turn out as difficult as I thought it would be. I kept the jig relatively simple and stuck to the instructions. The only difference is that I kept the nail heads on and didn't glue the nails in. I just glued the second tier of wood straight onto the nail heads (after filing them down a bit to create an even surface), using wood glue. Next I'll make up a few test boards (Luckily I made way too many plates...) and practice with ageing the copper to get it a bit darker. Cheers,


- 242 replies
-
- 19
-
-
- syren
- model shipways
- (and 1 more)
-
The Pegasus for me. If the instructions are as good as the Syren instructions, it would be a great opportunity to take my modeling to the next level and include building a fully framed cross section. A lot may also depend on the pricing of these models. What price range do you have in mind for these 3. Peter.
-
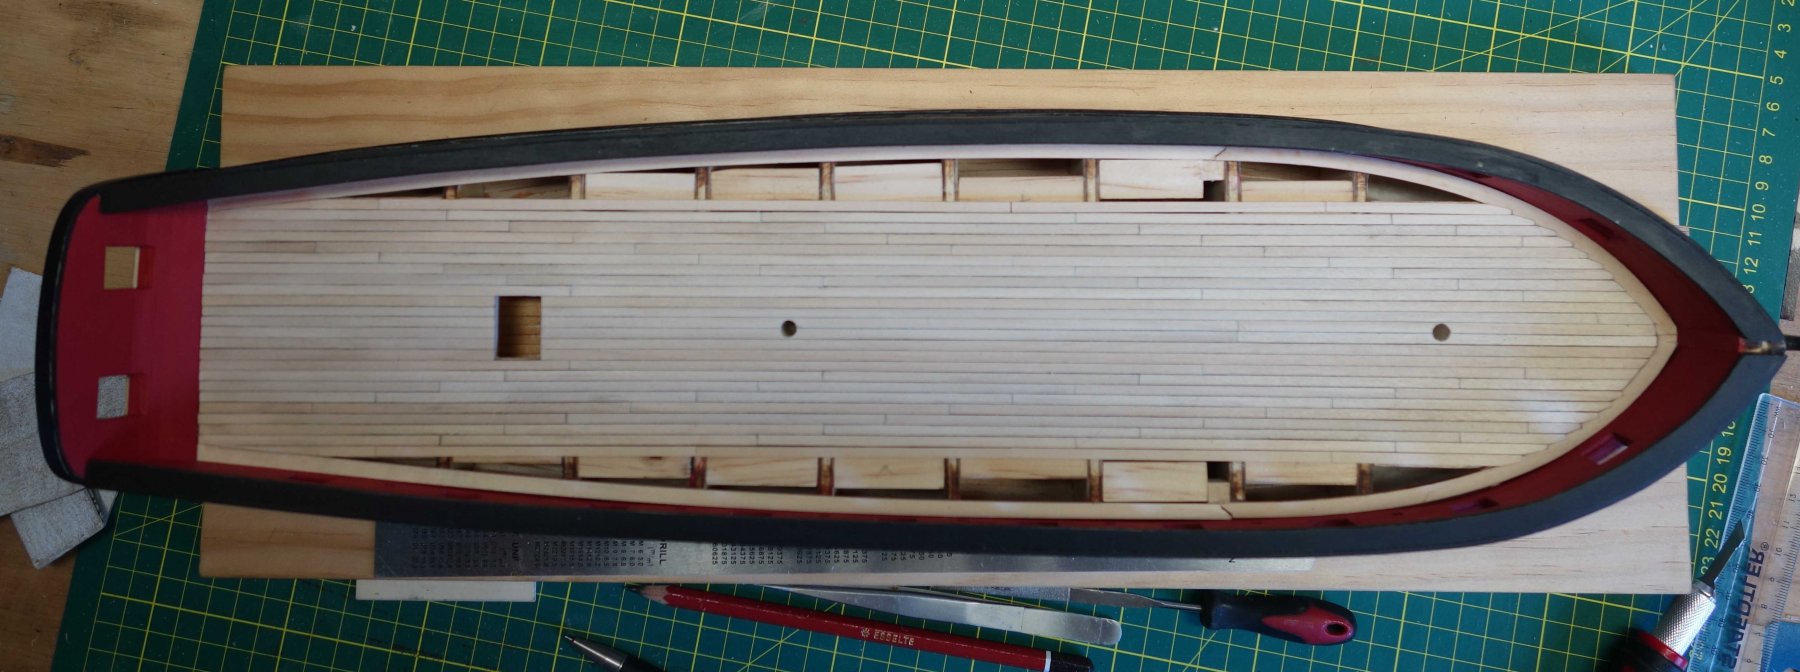
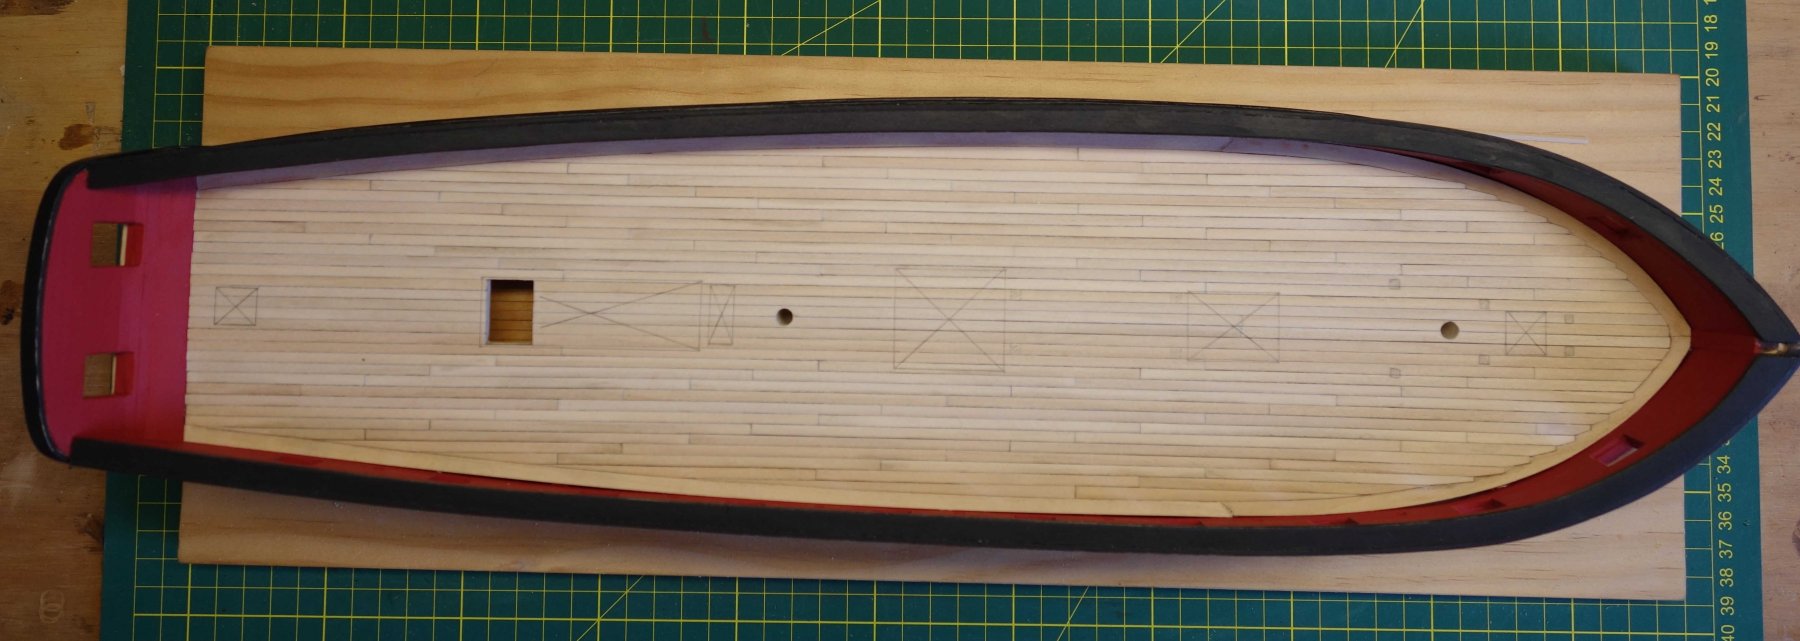
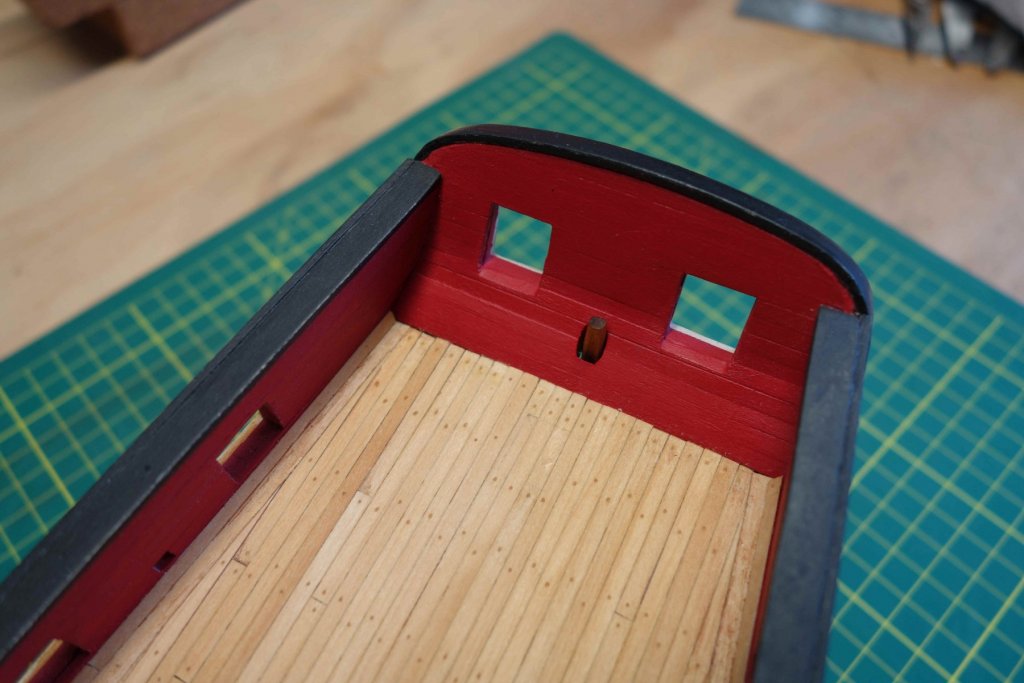
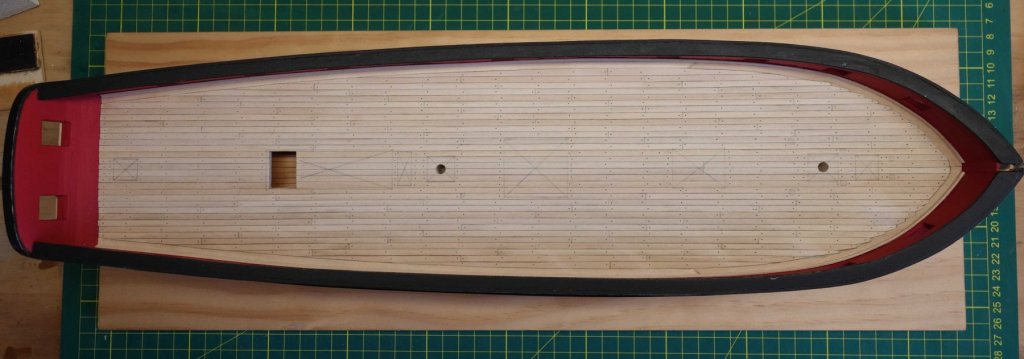
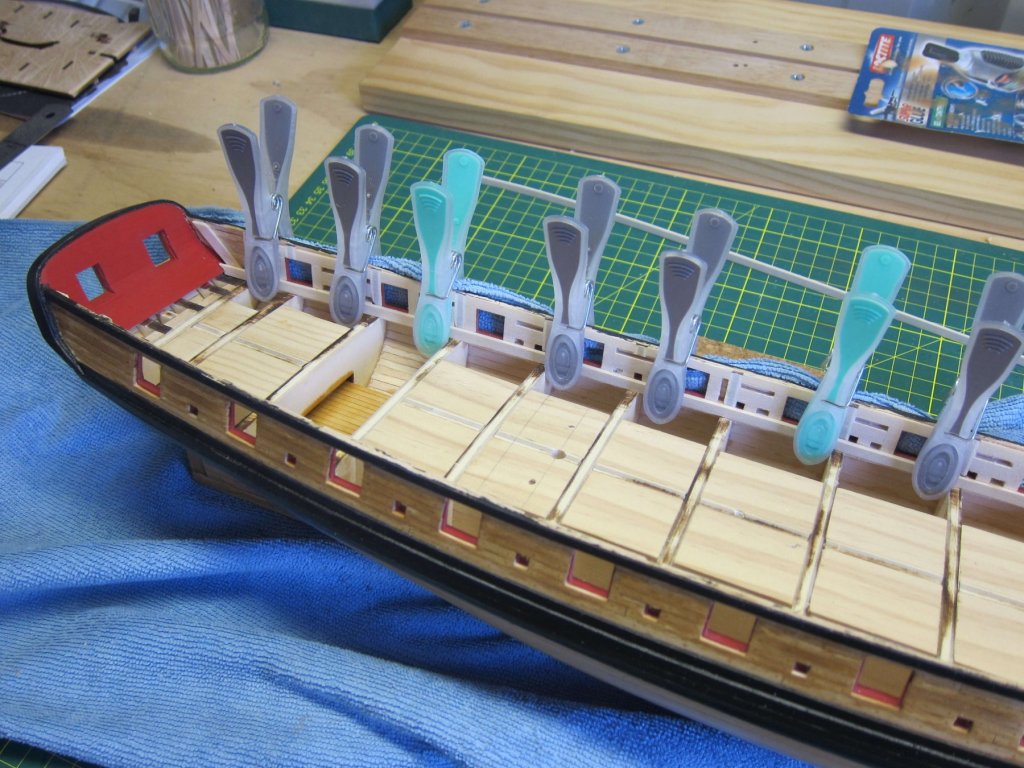
Thanks Dutchman, I hope you survived Christmas all right. Here is a "Gelukkig Nieuwjaar" back. (My Dutch has been a while so luckily I could check my spelling with your post just above...) My internet was out for more than a week (just came back on today). A real estate company decided to put in a rather large for sale sign and severed a main telco line. Apparently it happens more often. It's amazing how many nice discussions the admiral and I had with our sons once their gaming, facebook and internet movies/series options, etc. weren't available. We won't see them again for a while now. Anyway, I have finished the deck and have attached some photo's to show the progress. I ended up adding some filler blocks next to the centre ones so I had somewhere to glue the planks onto. Had a bit of a sore wrist after drilling 900 odd holes and filling them with wax. The result of the stain on the deck is much better than the hull. Still a little bit patchy in places but I'm very pleased with it. I haven't warmed up to doing the copper plating just yet. I'm not sure how I am going to go, but I will soon find out with some practice.

- 242 replies
-
- 12
-
-
- syren
- model shipways
- (and 1 more)
-
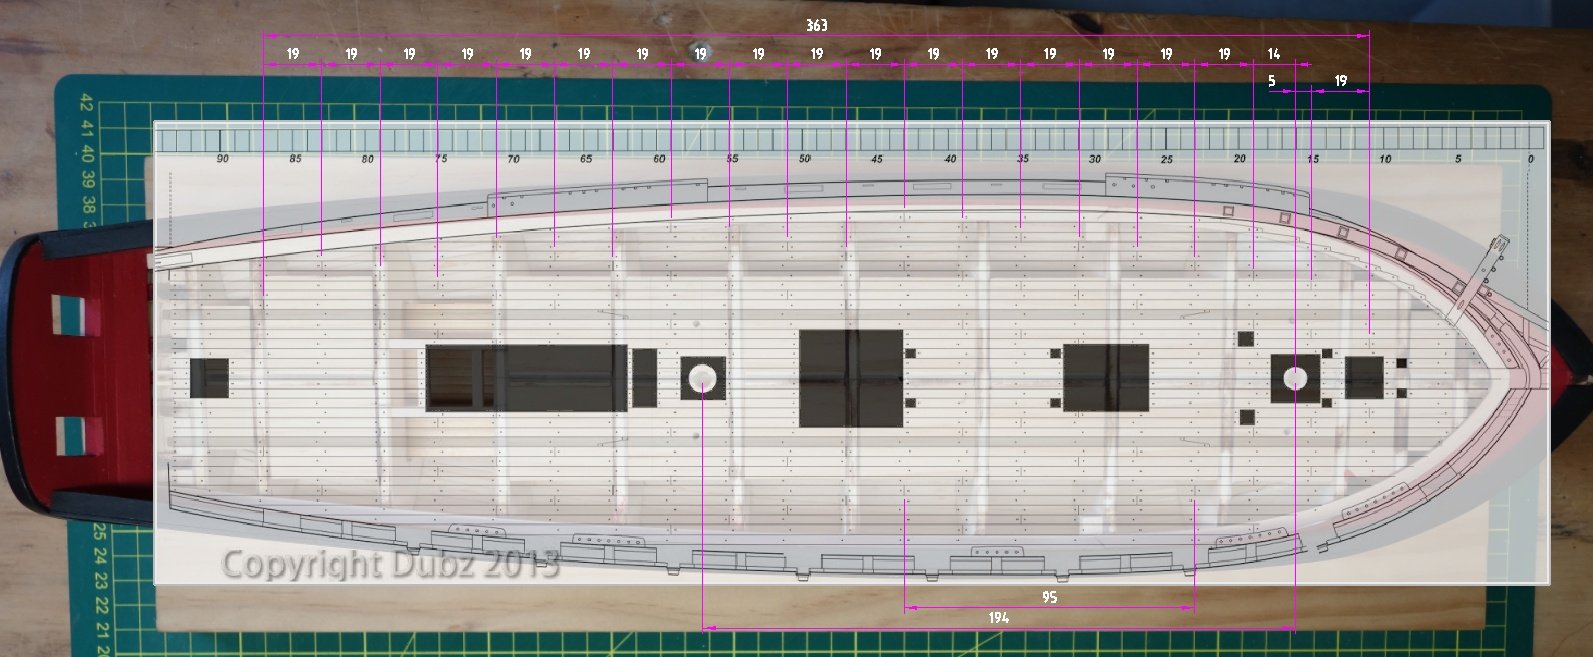
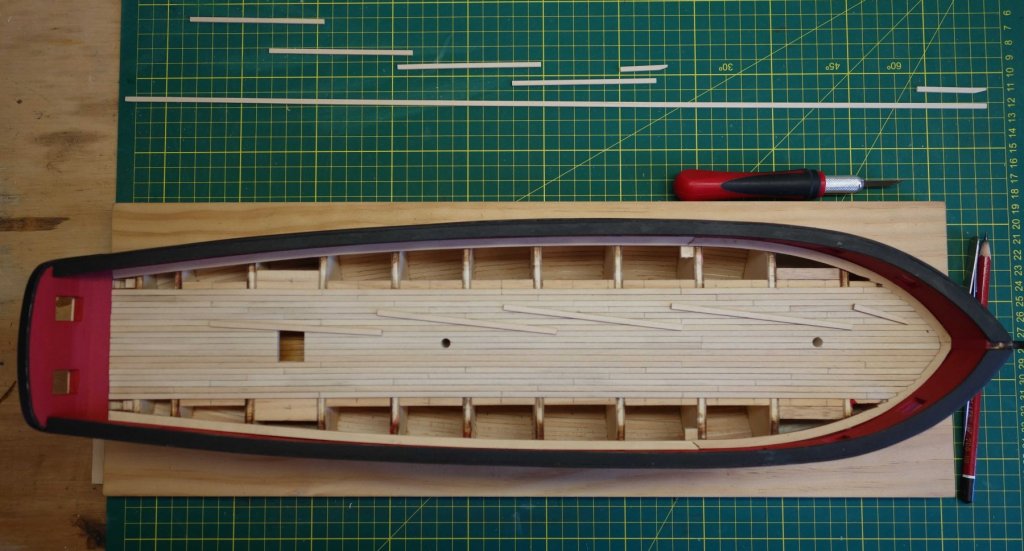
I decided to cut the cap rails out of plywood in one piece which worked out OK. They may be a little too wide but I don't think it's too bad. Next stage is the deck. I like the deck layout that Dirk used on his Syren, so to get a feel on how the treenails and the plank cut lengths would work out with the bulwarks and filler blocks I overlayed his drawing on top of one of my photo's (I hope you don't mind using your drawing Dirk...). No accuracy in the overlay because of the distortion of the photo, but I just wanted to have a look. I think I will go this way. I may need to add some supports next to the filler block where the planks are cut. I also started to play with the stand supports and drew up a few profile options. I like to get the stand sorted before the copper plates get added to avoid scratching them. This will be my last post before Christmas, so: Have a Great Christmas everyone.


- 242 replies
-
- 10
-
-
- syren
- model shipways
- (and 1 more)
-
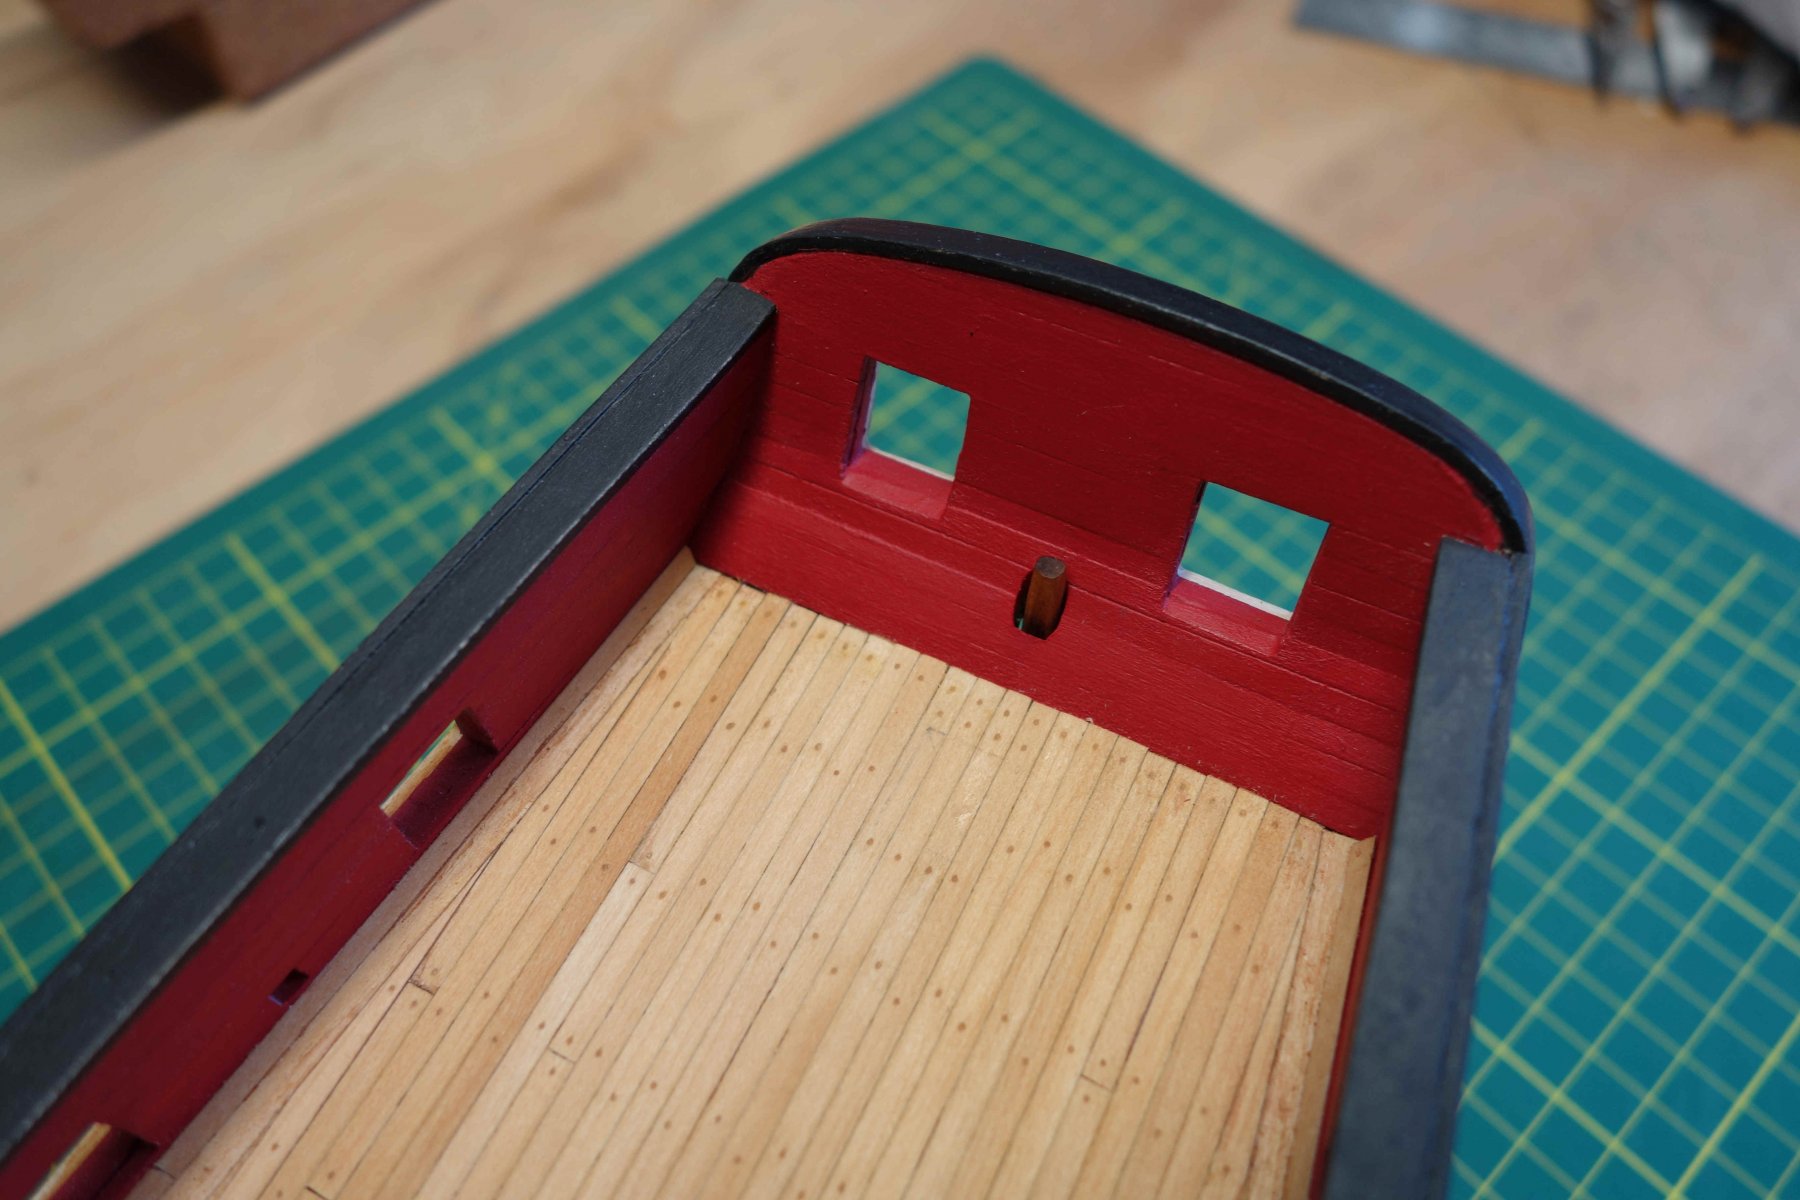
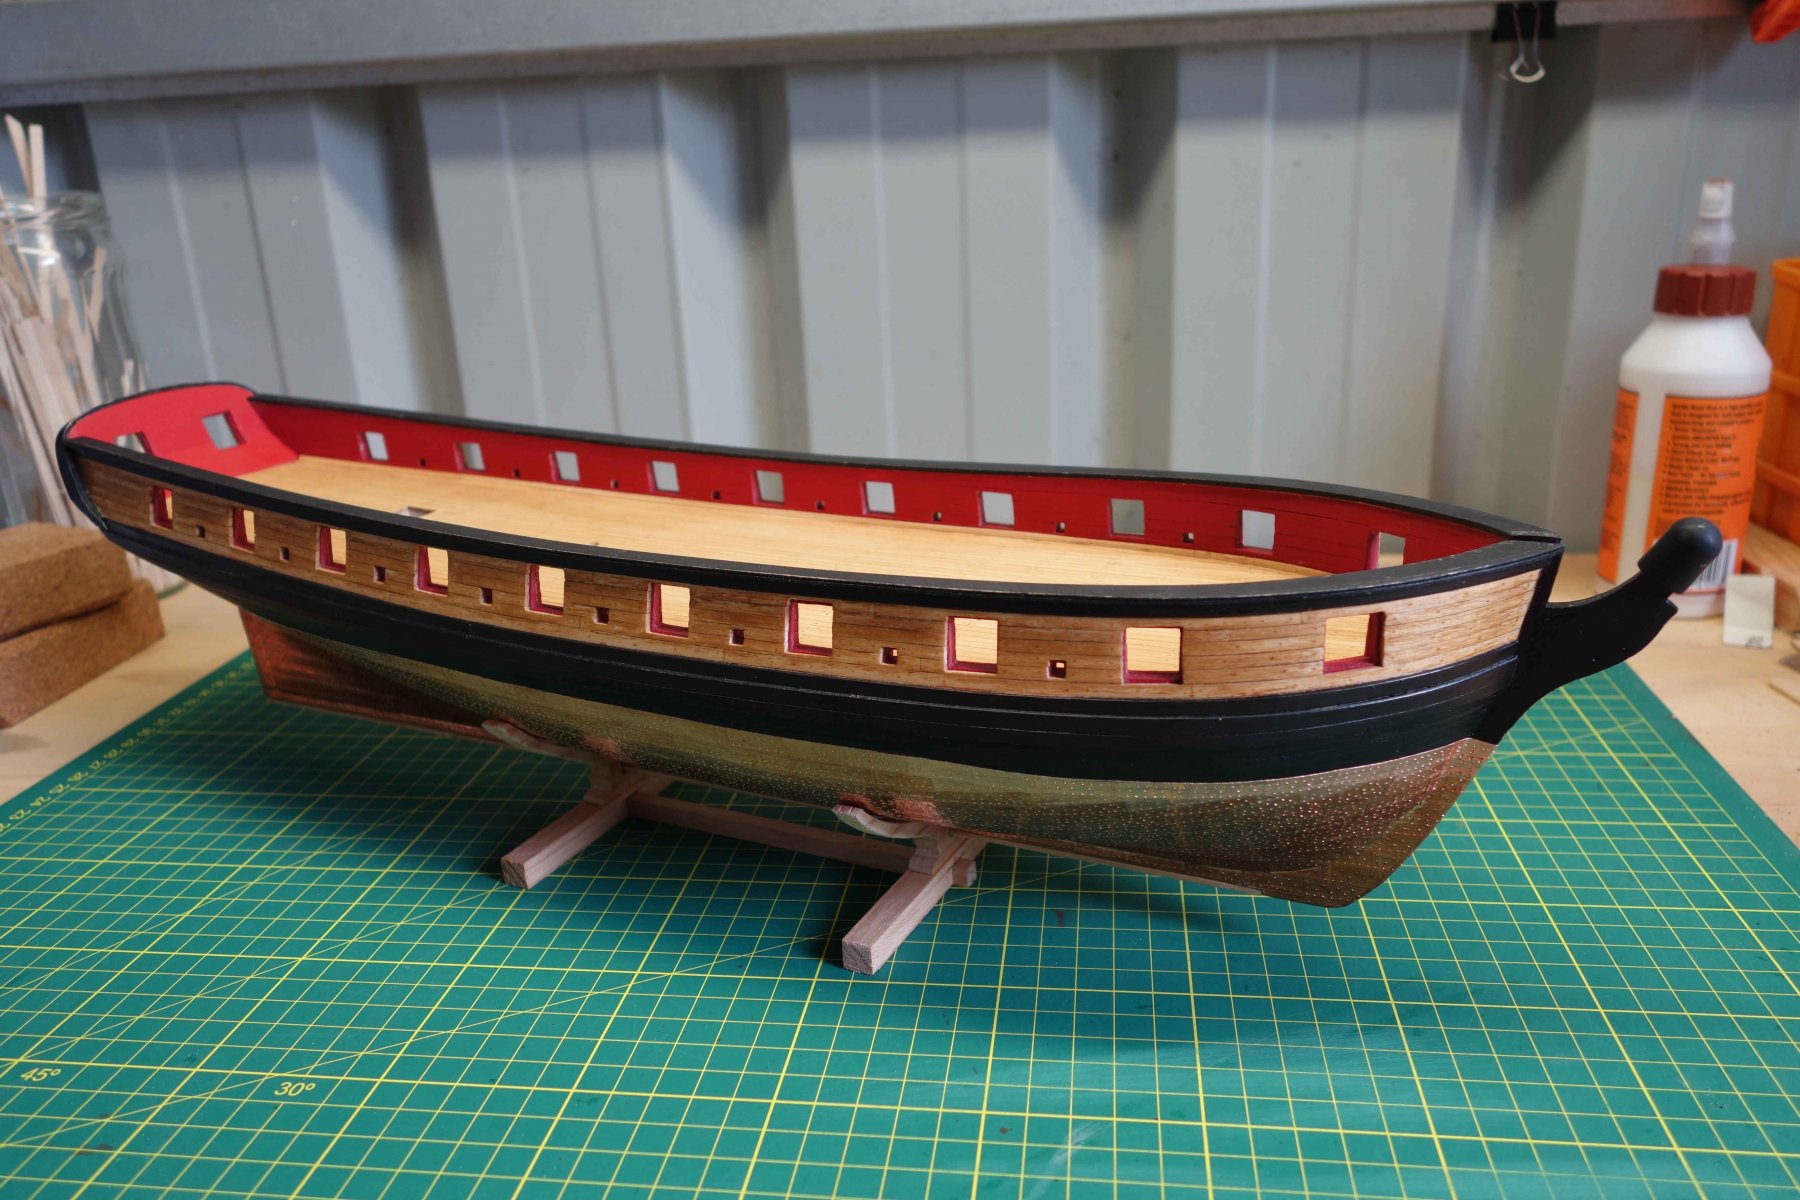
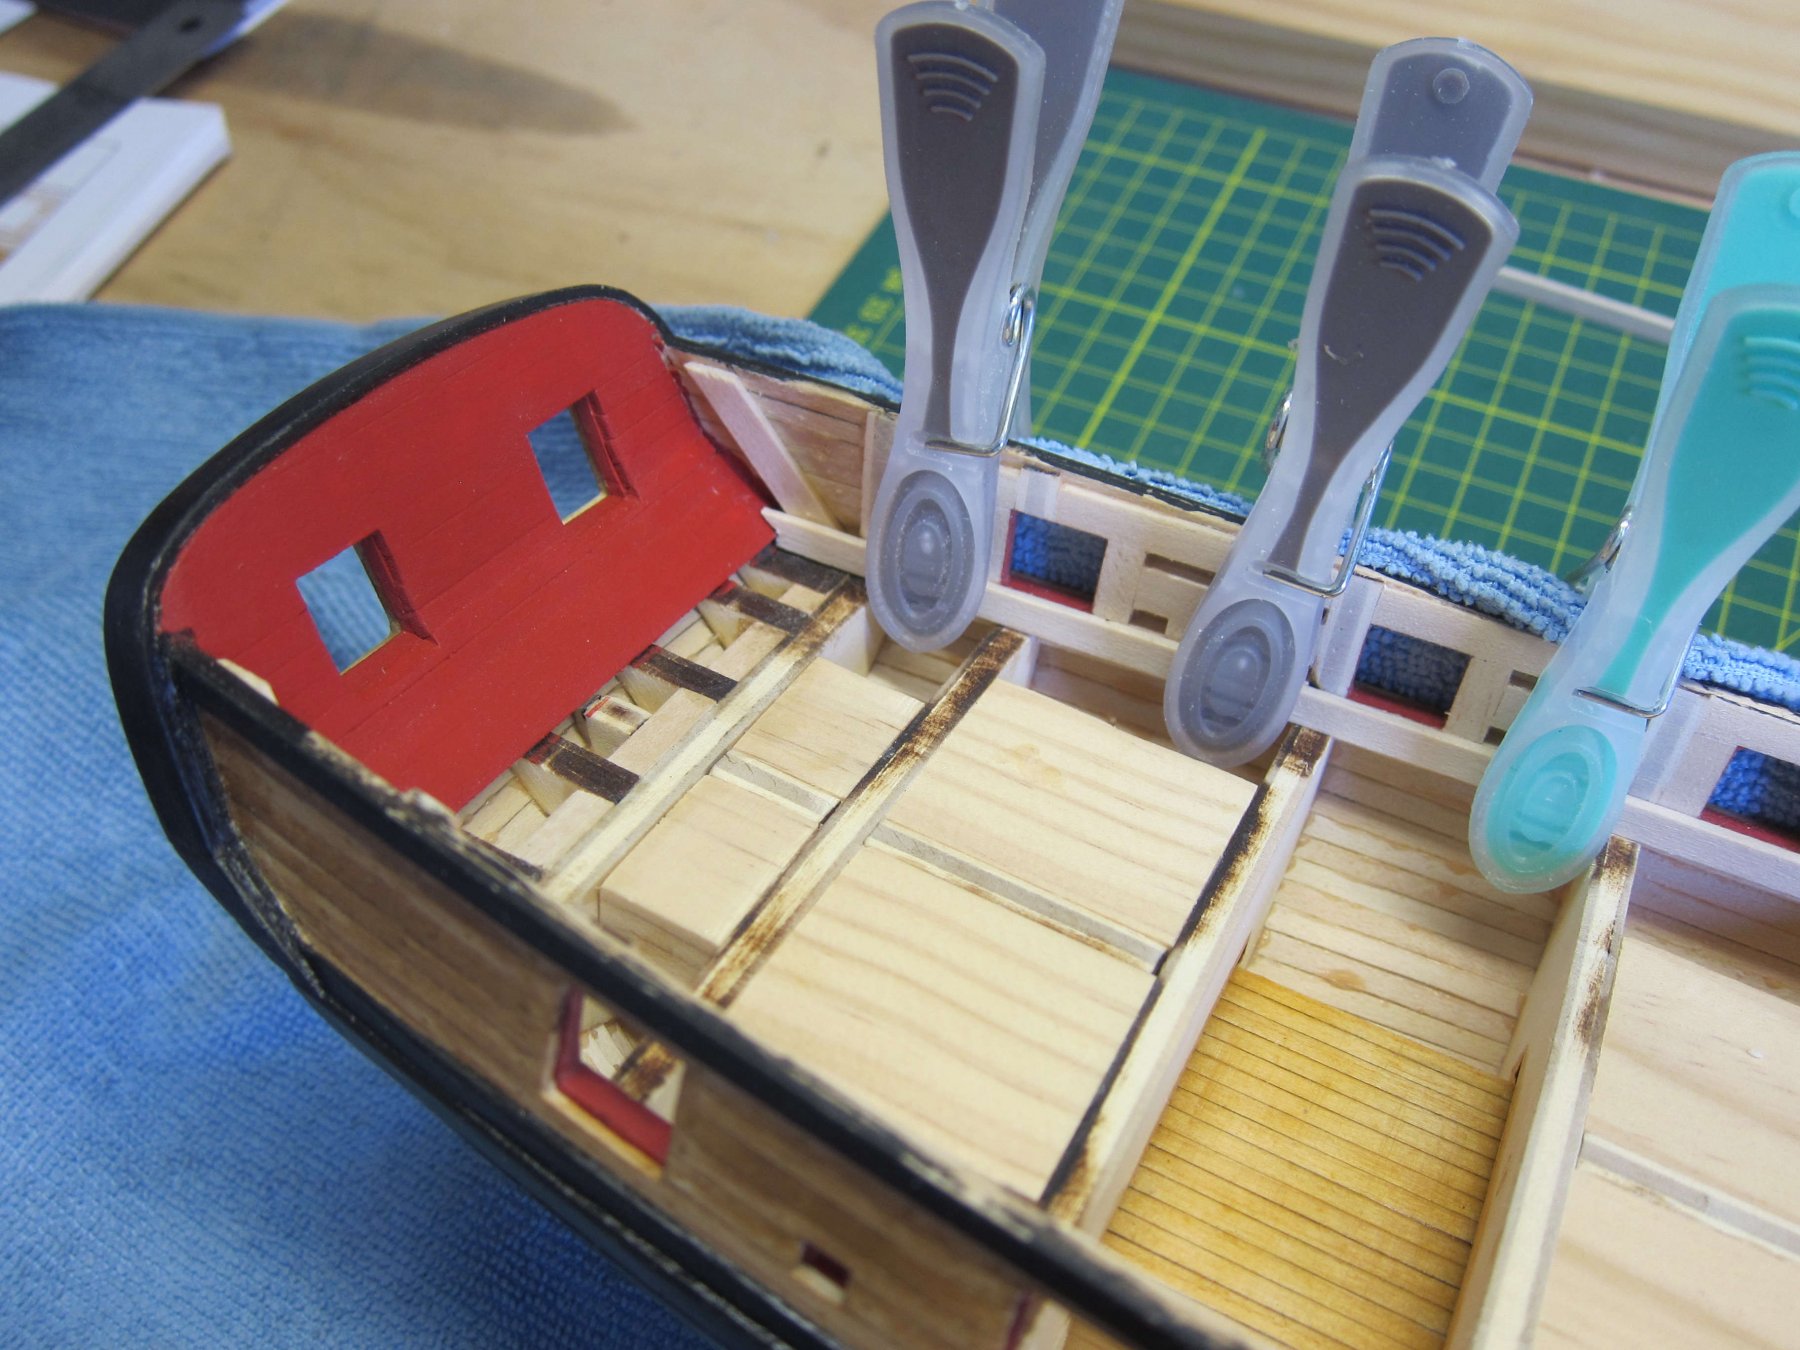
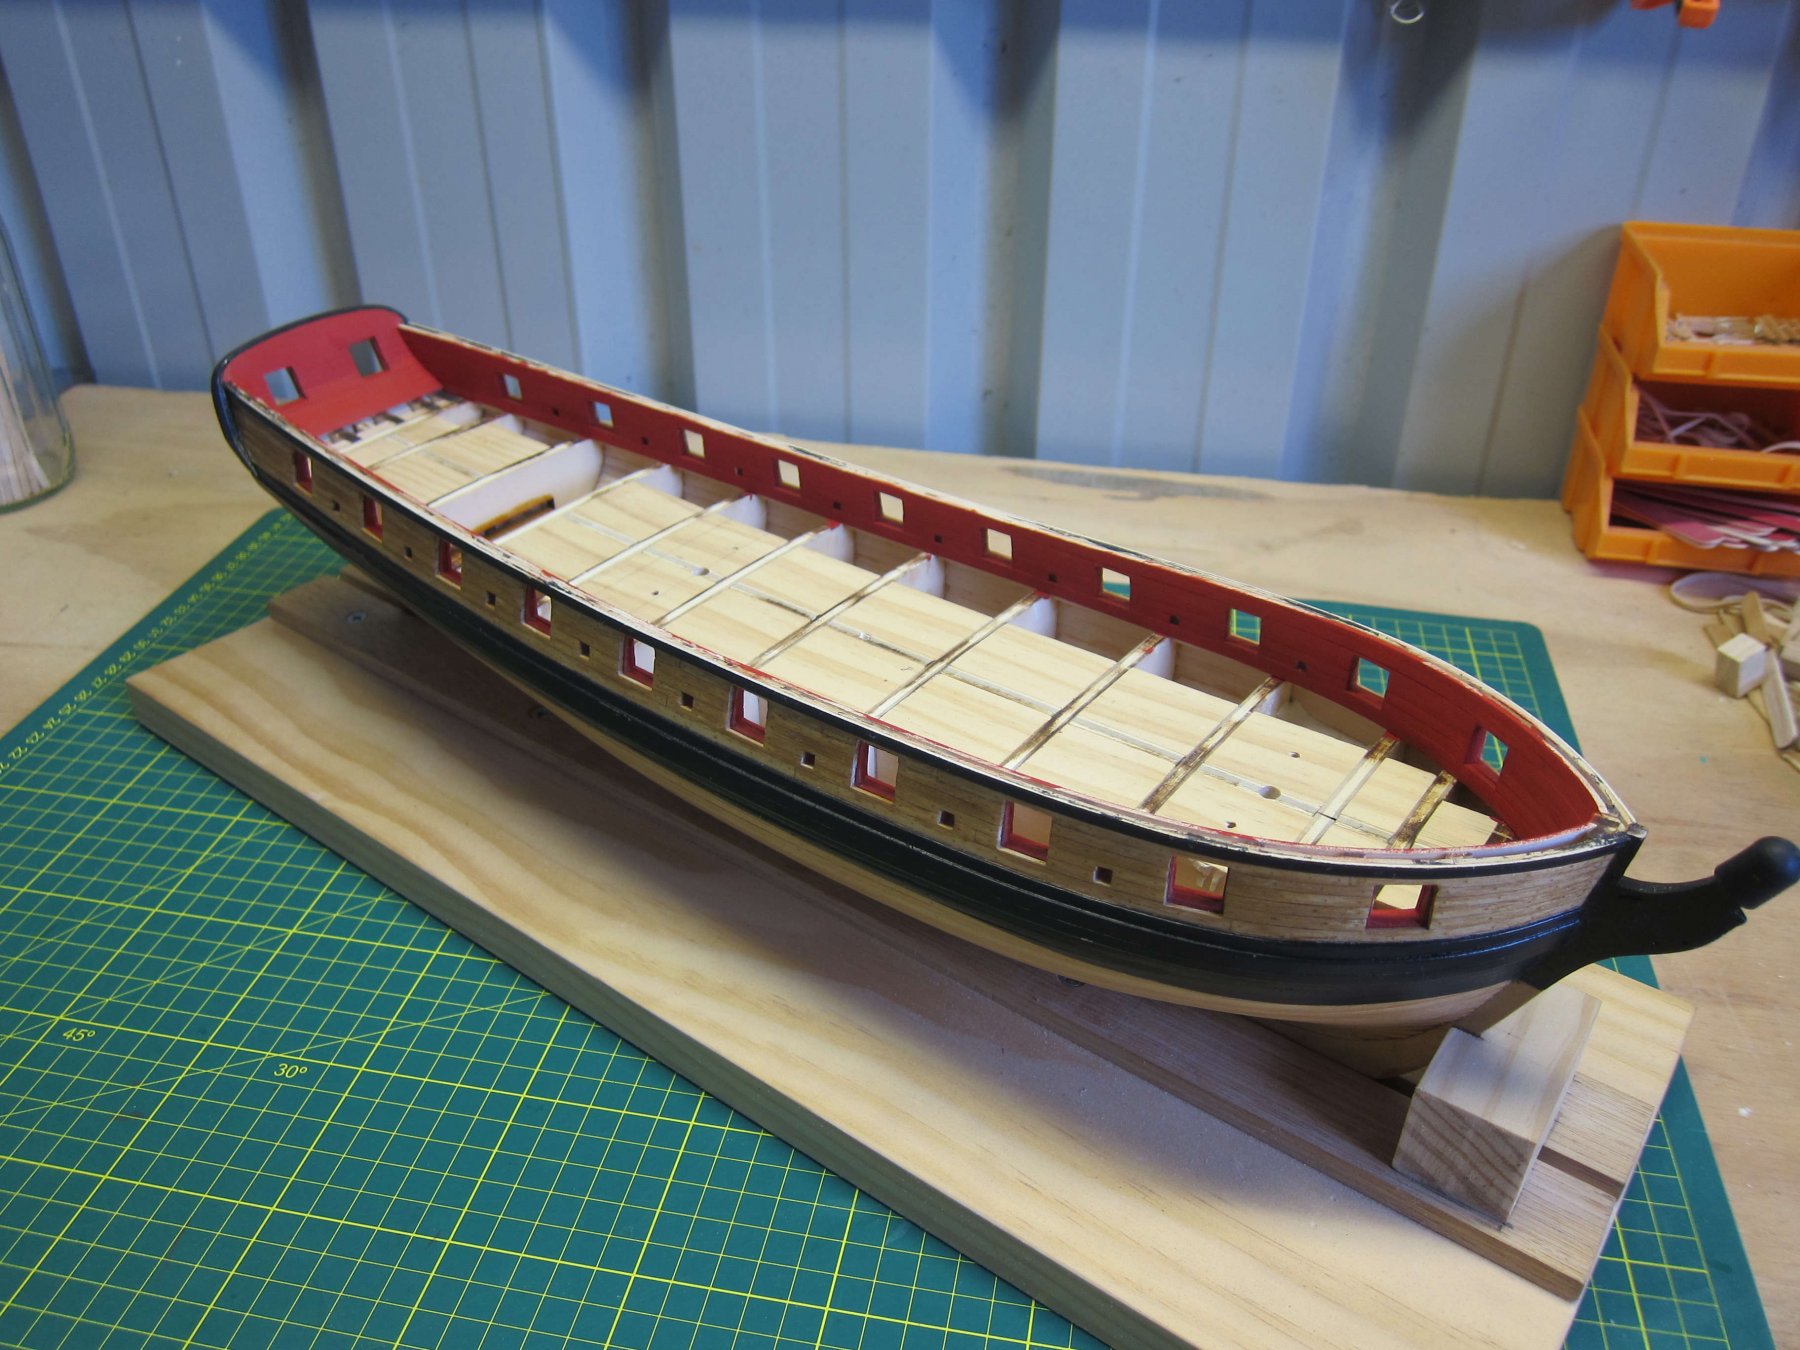
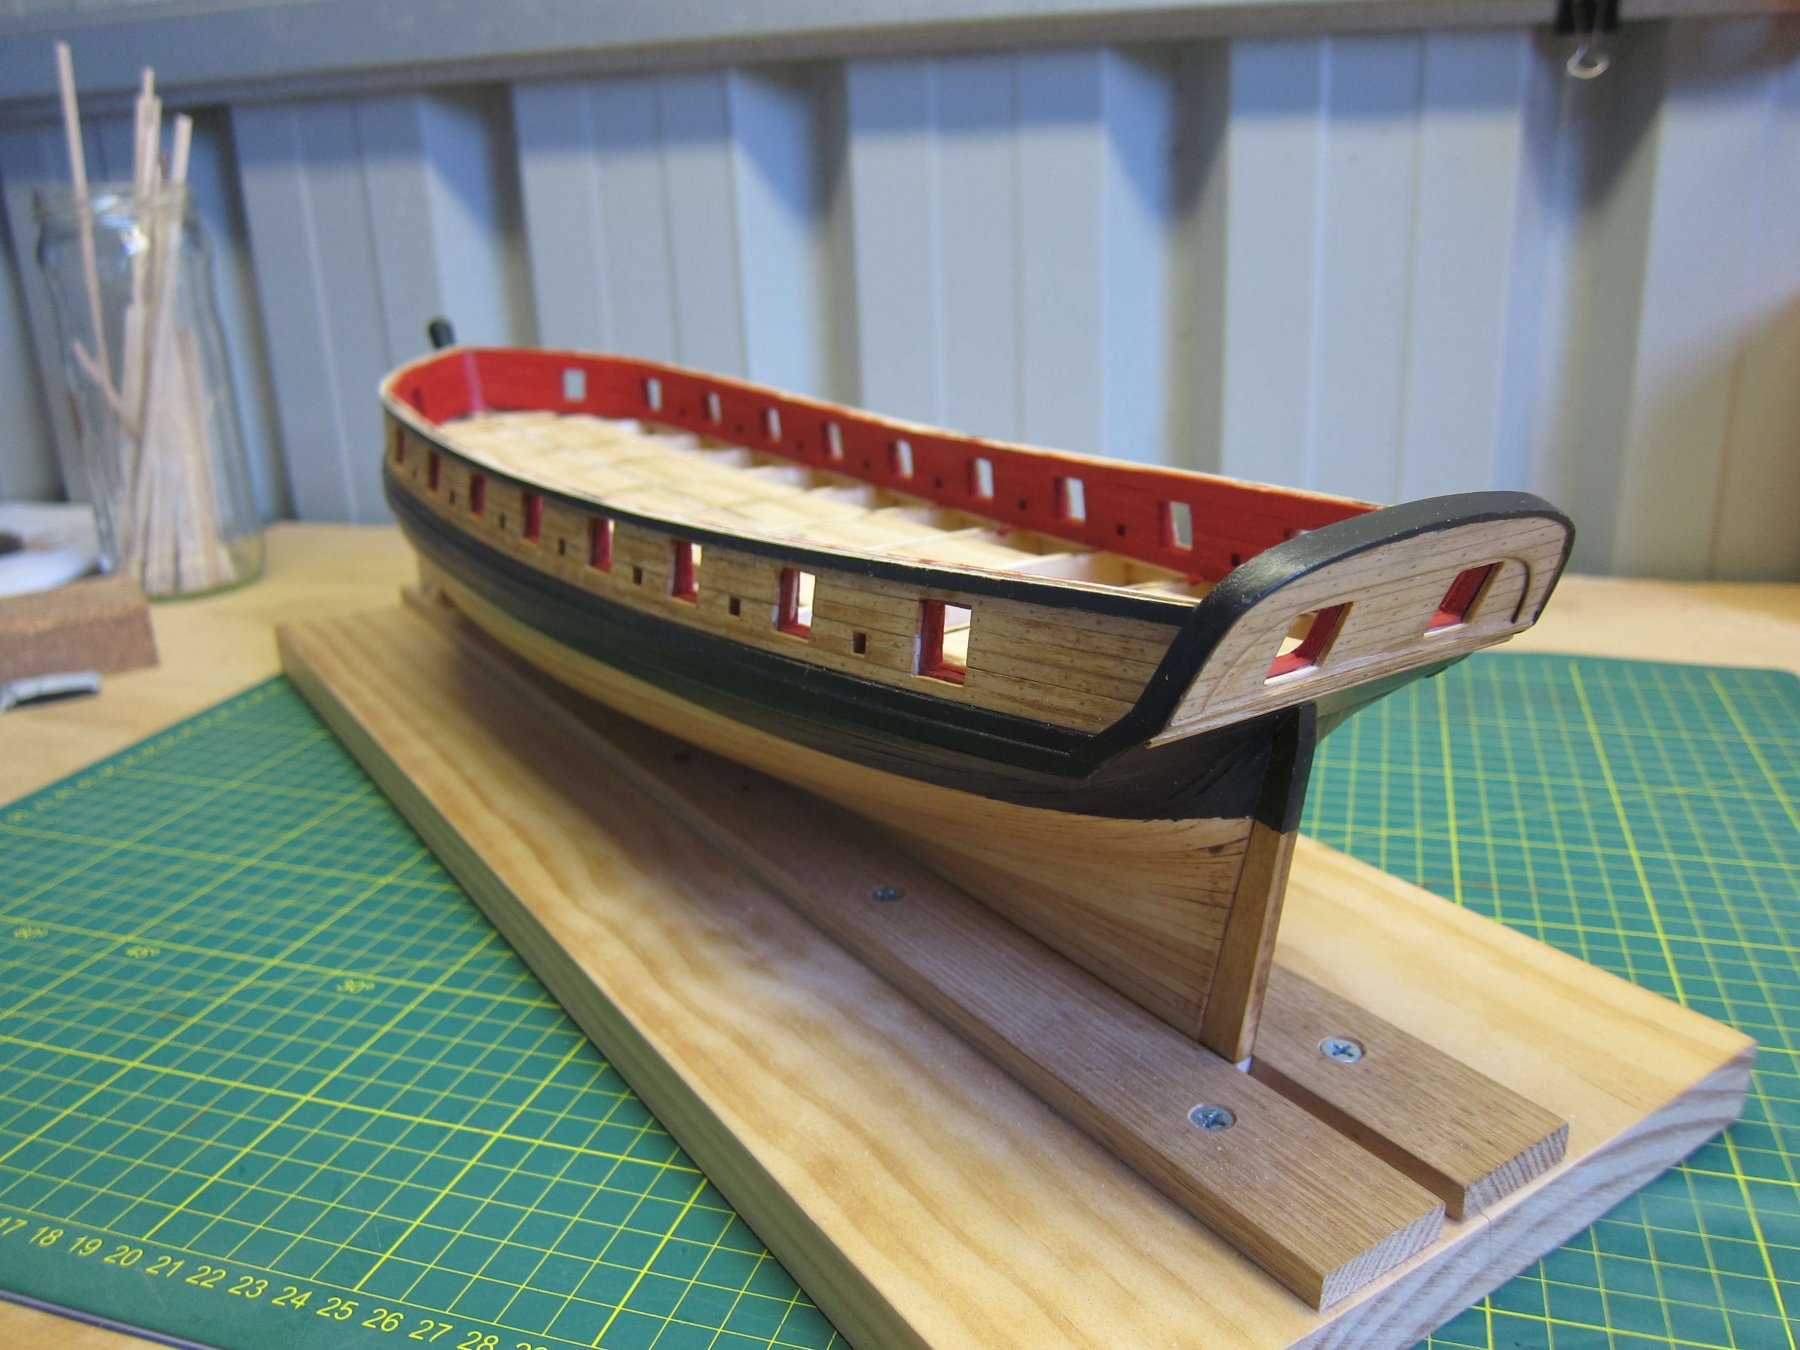
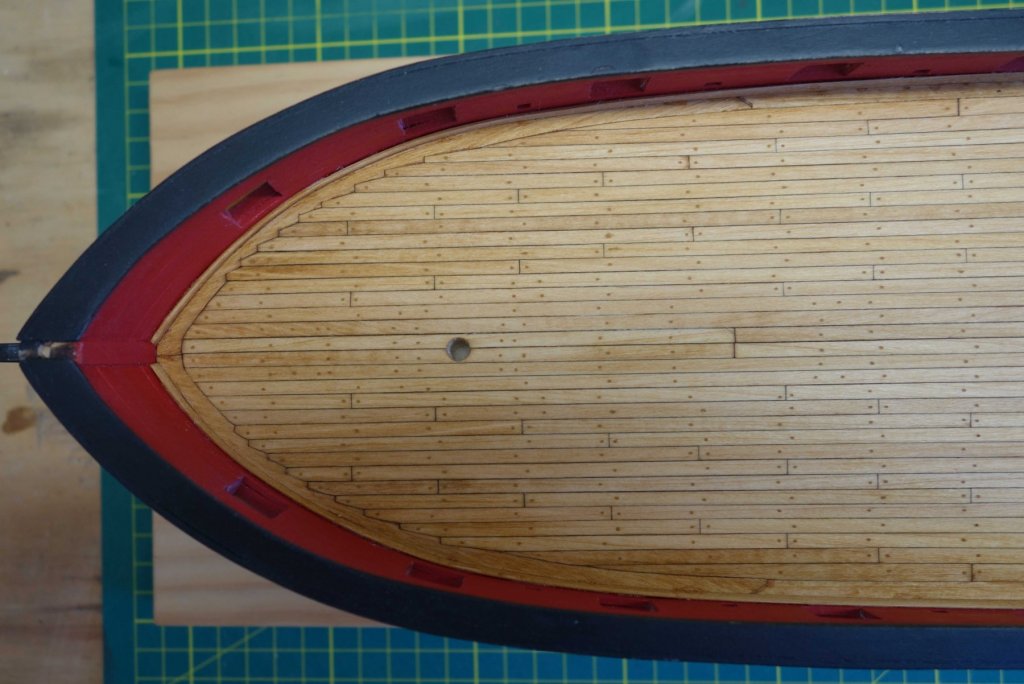
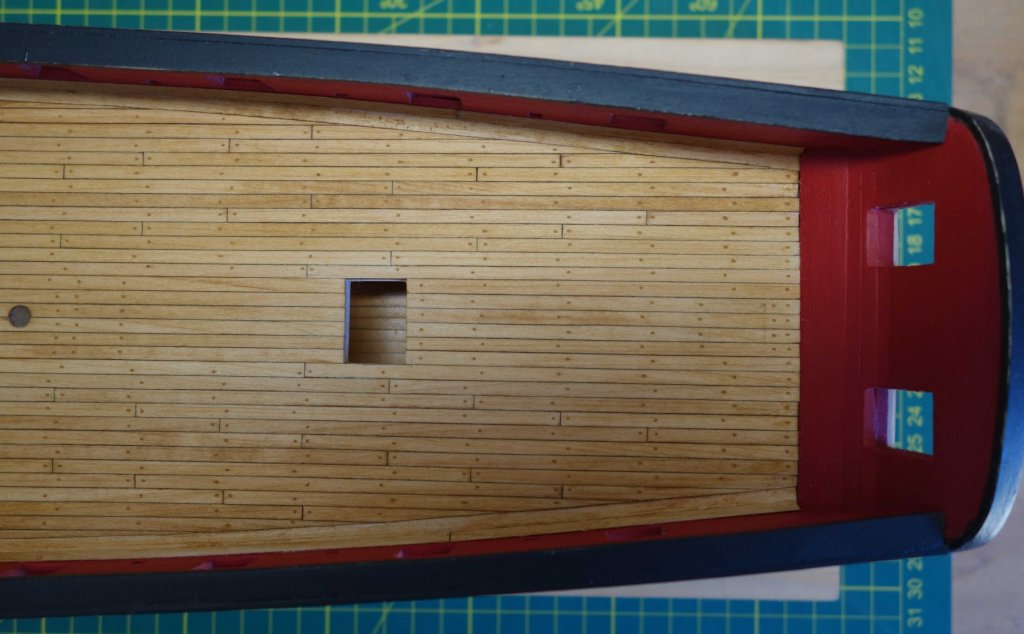
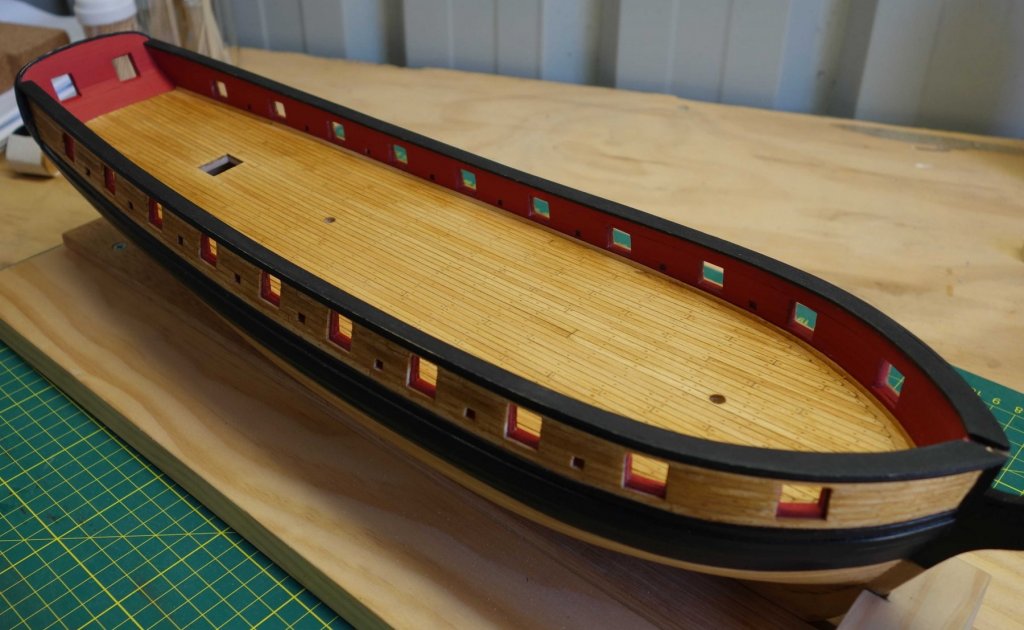
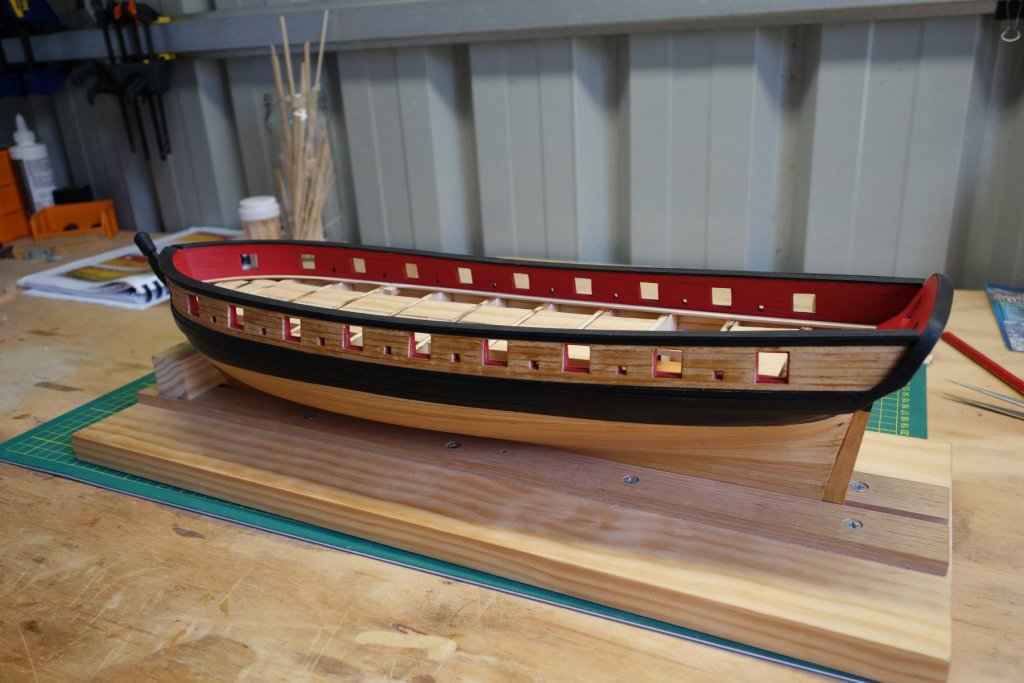
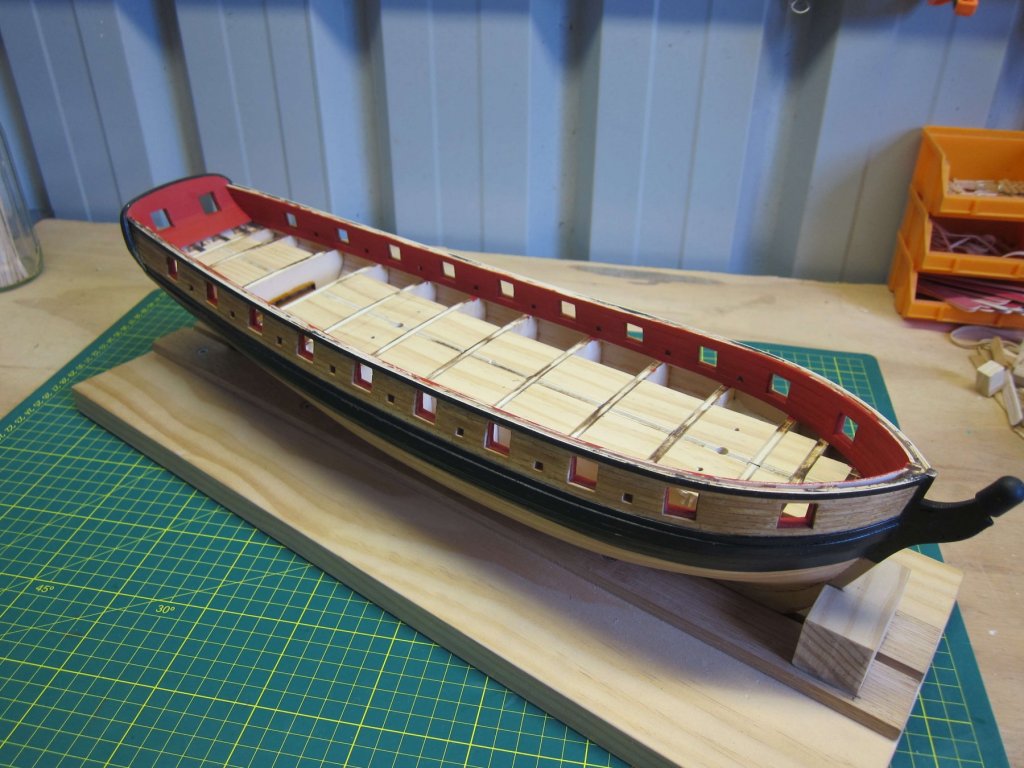
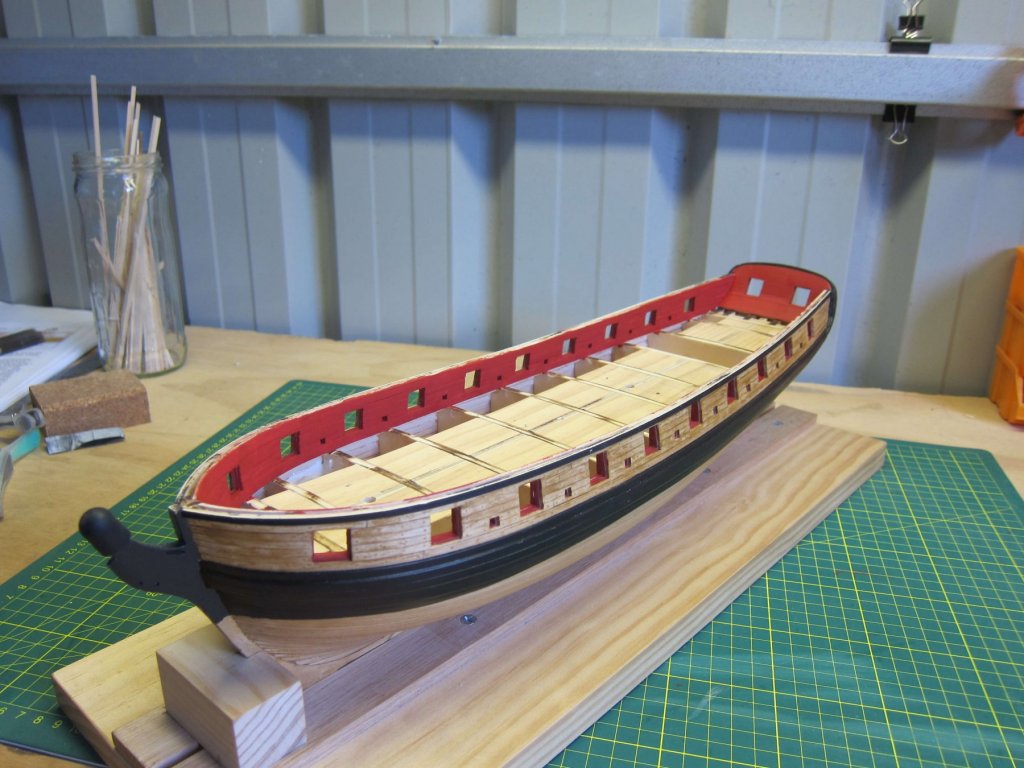
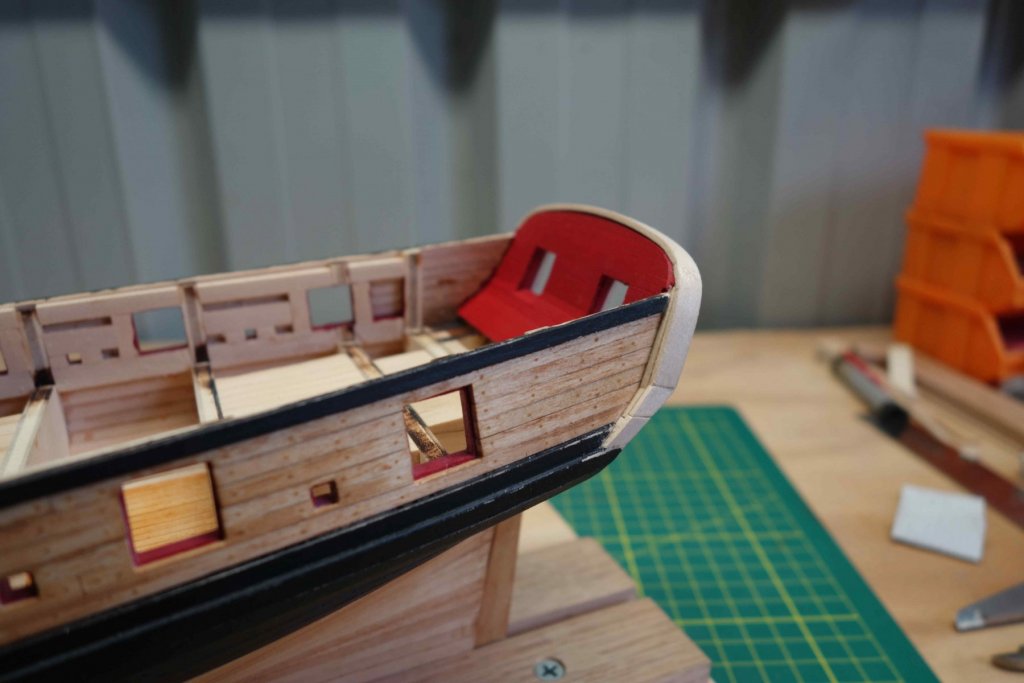
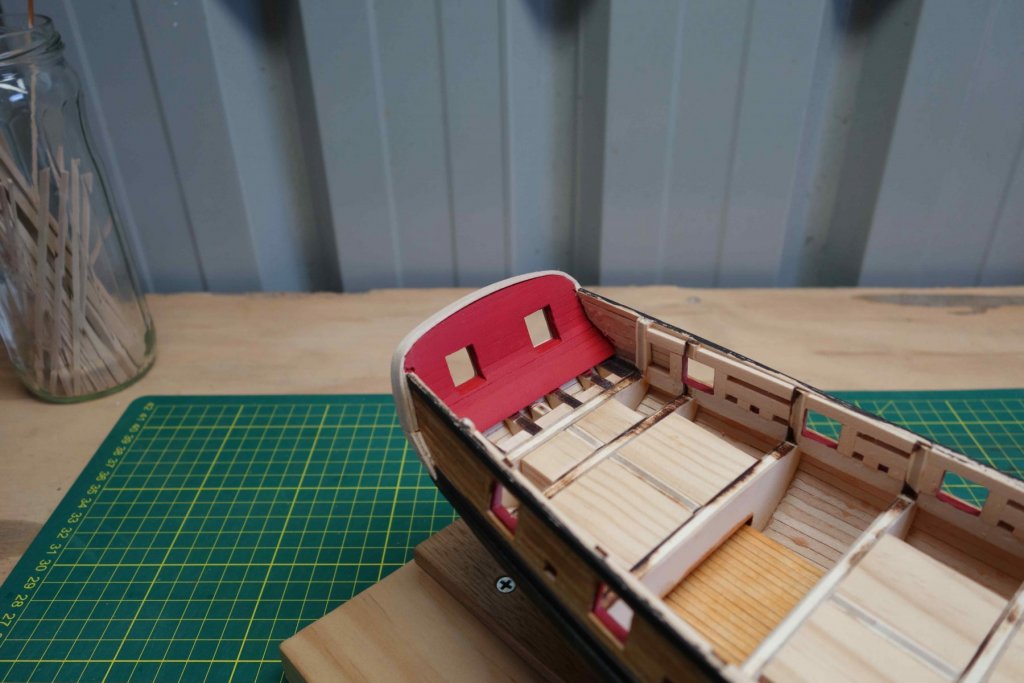
Just a few more progress photo's. I decided against fiddling with the outside stain colors for now and gave the whole outside a clear matt varnish for protection. Next I went on with the inboard planking and painted it red. The bulwark thickness ended up a little bit too thick for a 3/16" cap rail to create an inboard overhang, so I plan to use an 1/4" plank and make it a bit wider.


- 242 replies
-
- 11
-
-
- syren
- model shipways
- (and 1 more)
-
Hi Alan, Thanks for that info, you definitely got me thinking. I am a bit worried that by darkening the wood to even the colors my treenails might disappear. With some of the darkest planks they are already difficult to see. I will give it a try on a small test panel I still have. I had a quick look at your build log and I'm impressed with you work. Next time a might have a go as well making those treenails with a draw plate like you did.
-
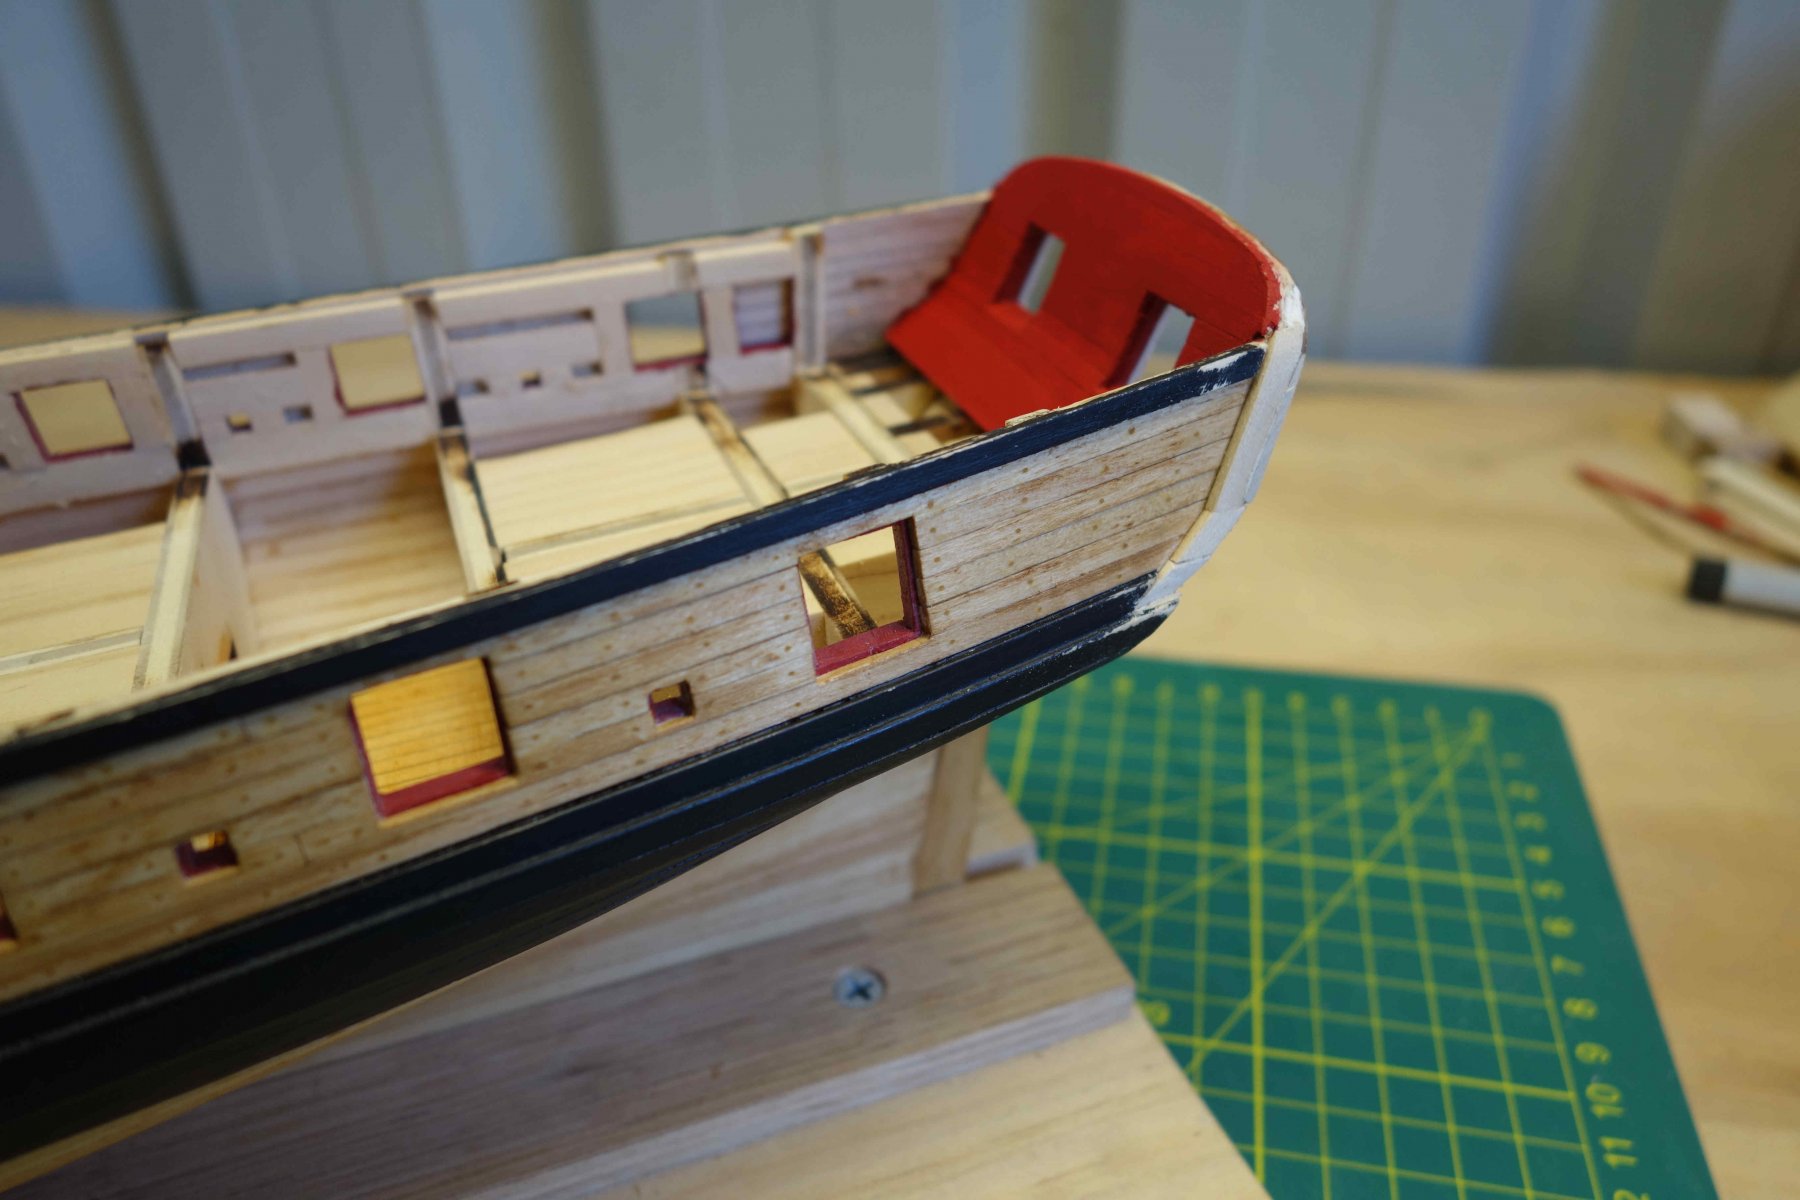
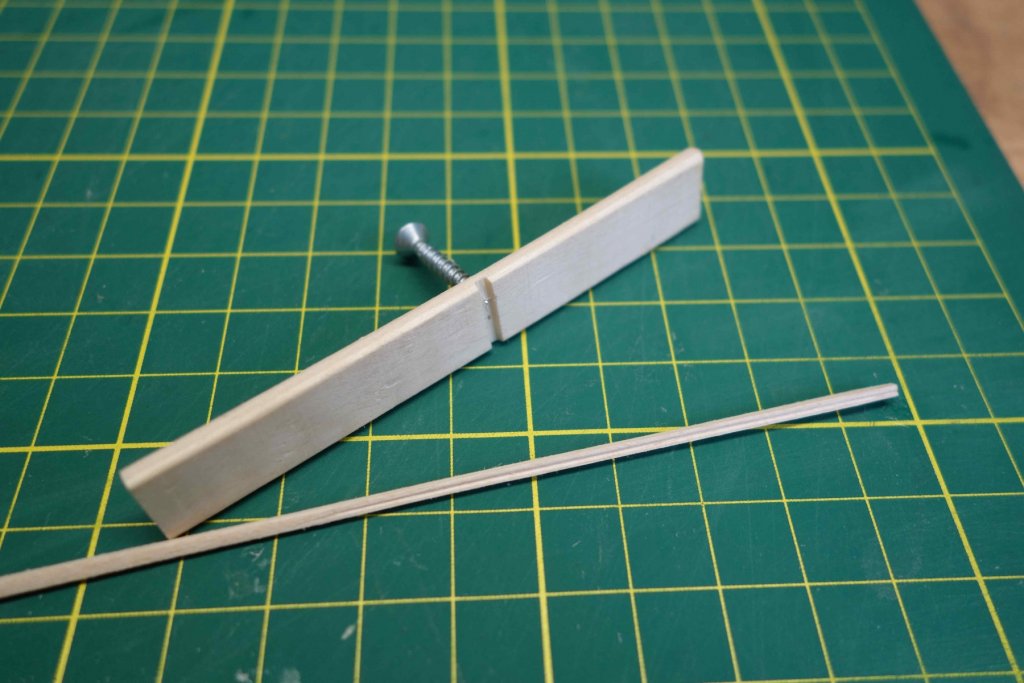
So I went on with the next chapter and put the disappointment of the stain finish behind me. Thanks for the compliment Jonathan. Hi Alan, I am not sure what you mean by applying many layers of acrylic washes. I can't picture in my head what it would look like. Here are some photo's on the progress on the stern. I used a (very) simple way of adding a profile to the stern molding strips, which I showed in the last photo. It took a few attempts to get the screw tip in the middle of the channel, but once that was sorted, it went surprisingly well.


- 242 replies
-
- 10
-
-
- syren
- model shipways
- (and 1 more)
-
Thanks All, The problem I have is that I become overly critical and start amplifying the "problem" in my head. The second problem is that in that state of mind I can't stop fiddling with the model to try to fix it. Straight after pressing 'send' on the keyboard last night I went to the shed and put a second coat on, which I don't think helped much. So I'm lucky I'm at work right now and can't touch it for a while...lol. In my message I stated that I varnished it, I didn't, I only used a stain. And you are all correct, it doesn't look that bad. I'll have another look tonight, maybe touch it up a little bit and then leave it to get on with the next chapter. Once the mind latches on to the next new challenges, this "issue" will get smaller and smaller. I'm still undecided when to put a clear varnish on, so I'll wait for now.... I'll probably wrap the outside up to protect the paint while sanding and working on the stern & the inside.
- 242 replies
-
- 2
-
-
- syren
- model shipways
- (and 1 more)
-
Thanks Doug & Jim. I was struggling a bit with the next stage, which is the finish. I decided to use wax for the treenails. I left the wax stick in the sun for a while to soften it up a bit. So far so good. Marking up the waterline and painting the various parts black also went well. However, I was dreading applying the varnish. The problem was that I forgot to pre-select the best 14 strips for that area. In my enthusiasm I just got on with it (after the penny dropped, I quickly put 30 good strips aside for the deck...). In the process I ended up with a few pretty average planks and some colour differences as well. There is only so much sanding you can do, so in the end there was only one way to find out. Just go for it. At the back of photo 51 you can see the variations. So I'm not sure yet if I should just leave it, or lightly sand and try a second coat with the risk of making it worse. Also what is the recommendation with regards to clear varnish. At which stages in the build would you apply that. Any feedback would be great.


- 242 replies
-
- 11
-
-
- syren
- model shipways
- (and 1 more)
-
Hi Floyd, Why don't you use wood glue to avoid the smudges. Peter
-
Hi John, The way I did it is to cut them about 0.5mm larger and to sand them down until a friction fit. At one stage I had them all sitting in position without glue. I had a slight curve as well. The filler blocks took care of that. The other choice to make is whether you position them level or slightly above the bulkheads and sand them down to create a fuller deck area (a lot of sanding...) or glue them below that level and glue the deck planks later on the bulkheads. I took the first road but it raised a few eyebrows from other builders. I am not saying that any of what I did is the correct way, just sharing my experience...
- 90 replies
-
- 1
-
-
- syren
- model shipways
- (and 1 more)