


AndyMech
-
Posts
363 -
Joined
-
Last visited
Content Type
Profiles
Forums
Gallery
Events
Posts posted by AndyMech
-
-
Thanks for the ideas on keeping the stanchions straight. I wish I had a laser line level, but it's hard to justify buying that, even the low-end stuff. I've seen other build logs use them to mark the water line. It would be cool though.
I used a mini-plumb bob to center the deck mast supports by just weighting a string over the keel line and letting it hang straight. I could easily do the same for the stanchions. Then it would just be a matter of sanding off just enough so they fit against the curved surfaces above and below.
Dave, the deck camber is part of the kit - they have a nice template of the curve that I copied and pinned the beam supports to and let them dry in place. The build is fun as you get to do essentially all the ship without having to do each part 16 times. The only thing it isn't really teaching me is full hull planking - there is no curve or taper at all to the hull strips as it's mid-ship. I did do some beveling, but that was trivial.
Andy.
-
As a fellow "mere mortal", I understand/applaud your approach - I try to enjoy what I do each modeling day and not lose sleep over any mistakes. If it looks good, well, that's a bonus. I have a Syren kit on the shelf, which I hope to start after my cross-section, so will be following your build closely too.
If you have any "aha!" moments (tips, tricks, etc.) I know I will be especially interesting in hearing them. Often I see beautiful work presented, but with minimal explanation of the techniques used to achieve it.
Andy.
-
Hi Ed,
Thanks for writing. Do you plan on creating a build log yourself for this kit? I hope you do - at the rate you're going, you'll be ahead of me in no time and then I can use yours as guide too.

I've created and bent the deck supports for the next two decks, but I want to finish the lower deck before putting them in. I glued mine when still wet and let them dry in the bent position - worked well for the first set, but I've not yet taken the next two sets out of their pinned position, and it's been 3 weeks. I'm guessing they're dry, but keeping them there allows me to keep them organized.
Andy.
-
I'll ask the novice question then: Can you give a description of how to apply a wash? The previous description of dry-brushing was terrific, but how would one apply a wash to get the effect in those pictures?
Andy.
-
You guys are right - it is somewhat satisfying to spend forever on a detail that may eventually be totally hidden. At least I know it was done with care, if a little inefficiently. No matter, at least it got done.
It helps me a lot to set realistic goals for the day. Sunday was good - I achieved installing the deck supports and the mast framing.
Next goal - cut and and properly the 4 support stanchions for the lower deck. This will be tricky (for me) as the neither end is square since both the bottom and top are curved surfaces, yet I want the stanchions to be perfectly vertical. If anyone has tips on ensuring a vertical stanchion, I'm all ears. Much less making 4 line up with each other in the vertices of a rectangle.
Andy
-
Today's update seems small, but took me all Sunday afternoon. I added the deck supports for the first deck:
Then, I added the mast support base and the framing through the deck rails, making sure all was straight and true.
I'll add ballast (probably small rocks) and barrels after more is complete. Next up very well might be planking the first deck! But at my pace, let's not get ahead of myself.
Thanks for watching.
Andy.
-
I planked the outside of my cross section this weekend. Since I plan on building the decks one by one, I can't plank the inside until after the deck supports for the top decks are in place. I can plank the outside, however, so that's what I did.
Starting at the top of the bulwarks, I wanted to make sure the highlight pieces (3rd plank down) were lined up:

Then I added the cap rail piece. In order to line up the initial planking, I had to place the shorter bulwark pieces up a little higher than the top of the internal, leaving a gap:

It looks a little sloppy, so I was thinking of filling the gap with a spare piece of wood or some wood filler. Any ideas?
Then, ran the planking down the outside, following the directions:
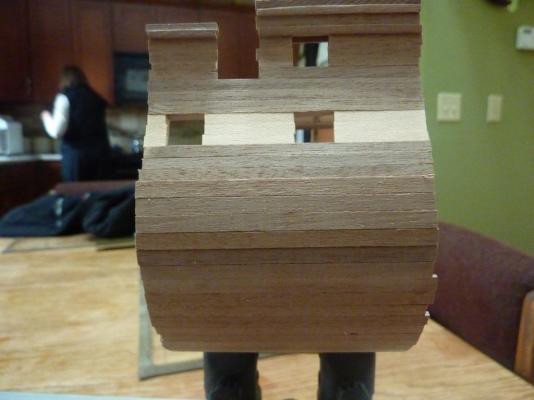
It's not been sanded yet, so looks a little rough. I plan on sanding, adding some wipe-on-poly and painting it black and white with a copper bottom.
Andy.
-
Please be aware, if you paint everything first, that using a plastic cement to glue them together later will require scraping the paint off where the cement needs to be applied.
If you don't use a plastic cement, then that scraping may not be necessary - but the plastic cement melts the plastic and when it dries it reforms. Paint gets in the way of that. I did just that when I built this model (or one just like it) years ago - painted everything, then glued. The paint melts into a goopy mess and the glue bond isn't nearly as strong.
For my Constitution, done later, much better results were had by making sure each bond was plastic-to-plastic. Also, use very little plastic cement, applied with a needle or pin. The prevents puddles of glue messing up your nice paint job.
Andy.
-
-
Hi,
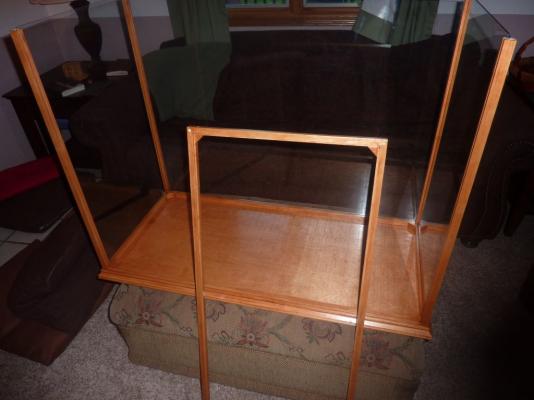
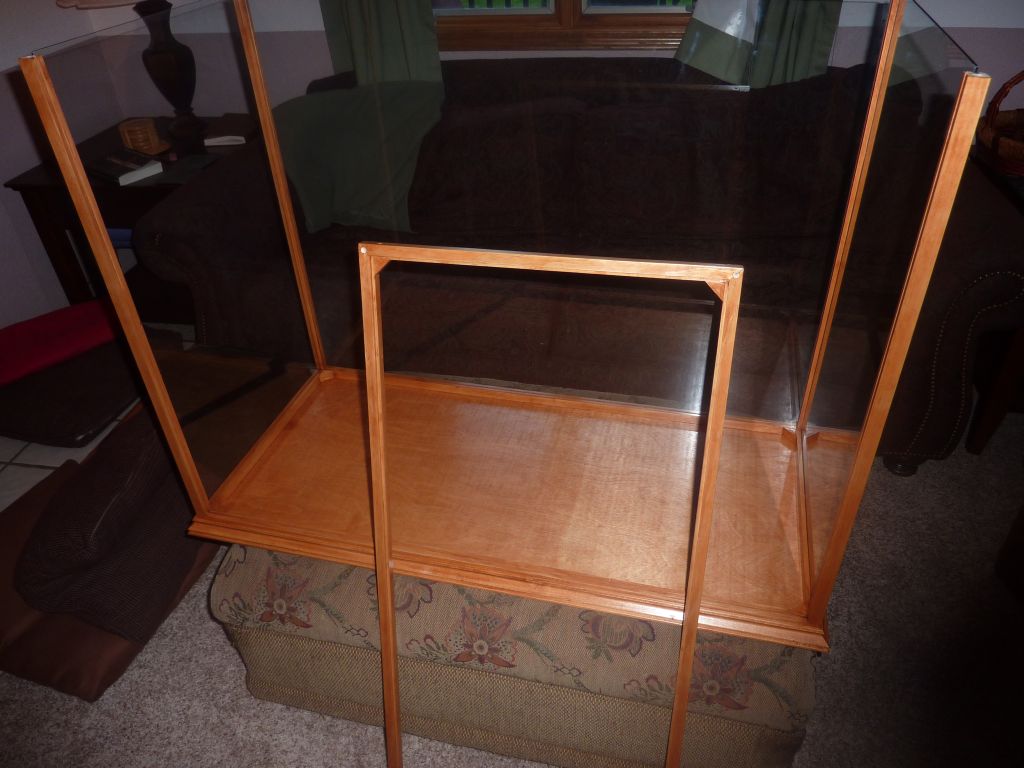
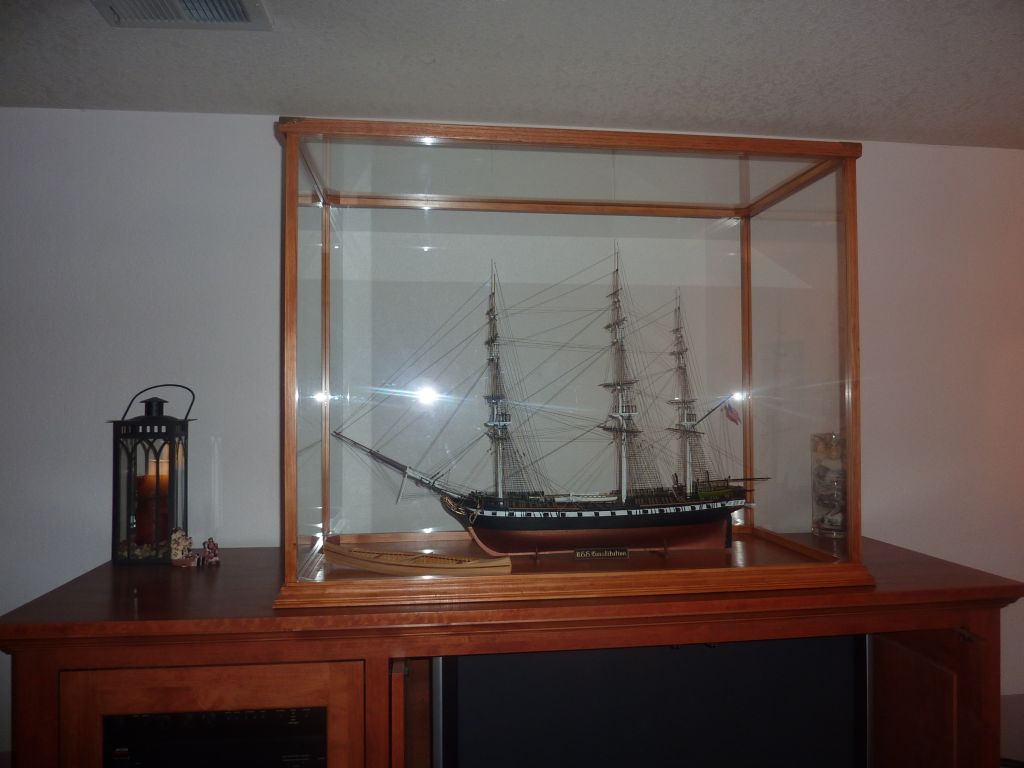
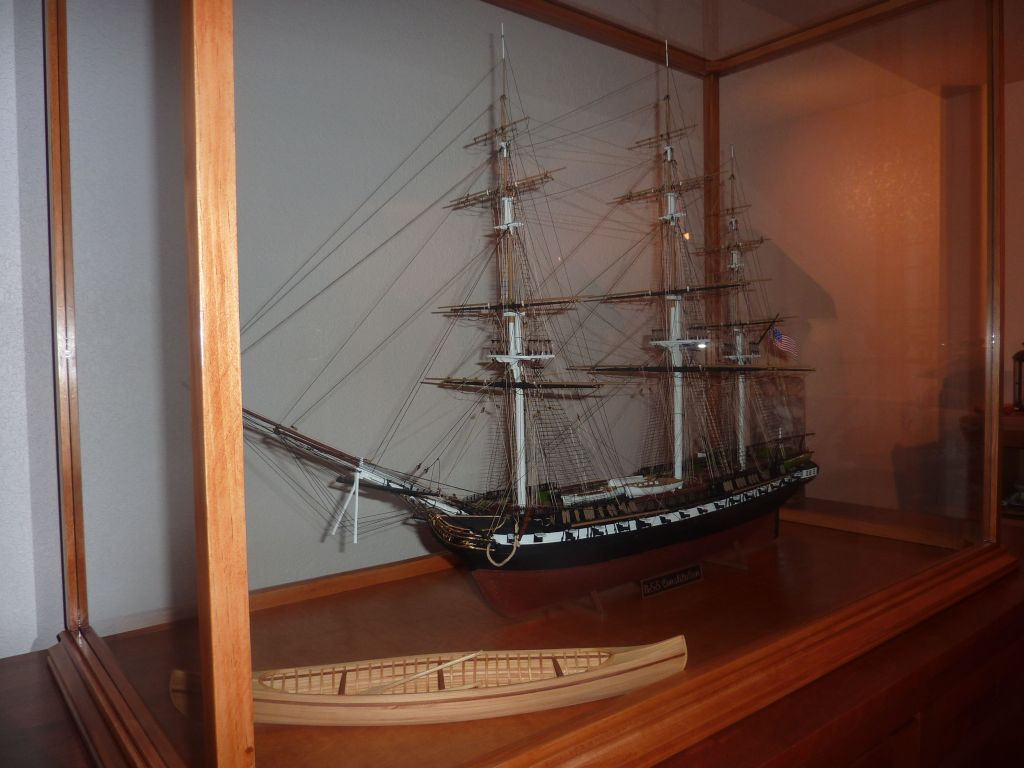
A few posts back, Kim generously offered to build a display case for this ship, now completed. I was really touched, but I had to turn him down as I had just started working with a friend of mine on building my own. My friend has a nicely equipped woodshop in his basement and offered to help me out if I bought the materials. I purchased an ebook with plans and started working on it about a month ago. Out of respect for the eBook author, I'll not show full construction, but just a few shots of the work.
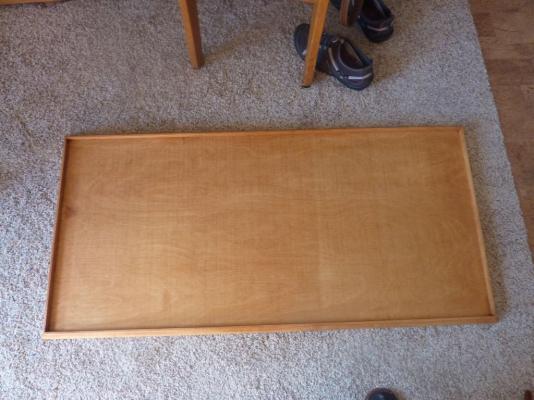
For a base, I used a half sheet of baltic birch plywood, 41" x 19":
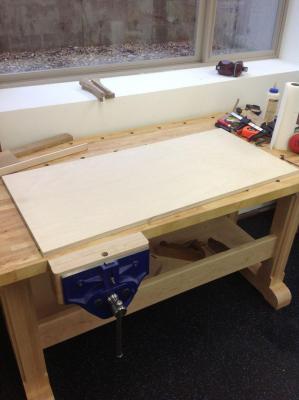
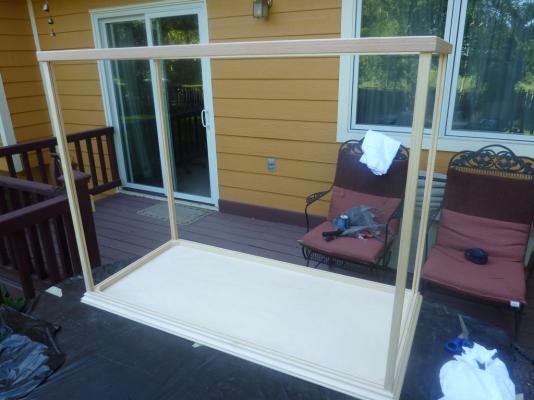
I bought a nice piece of clear pine, and we ripped 3/4" square rods from it. After they were done, we notched it 3/16" deep with a table saw. These form the frame, the notches for the glass. The supports are 30" high, which is maybe too tall, but better than too short!

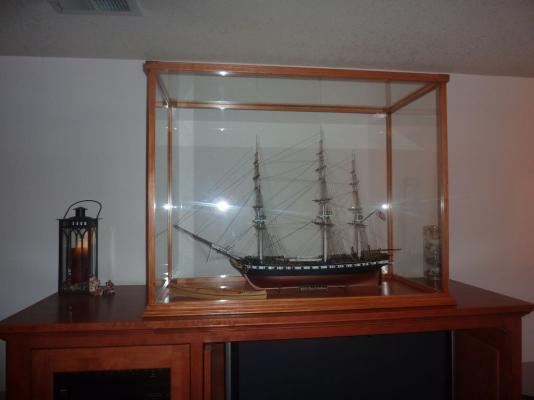
The completed case awaiting stain. I used General Finishes Prairie Wheat in gel form. Wipe on, wipe off.
Stained:
After staining, I applied two coats of polyurethane. Not the wipe on, but brushed and in semi-gloss.
Just today, glass arrived, and here the glass is being installed.
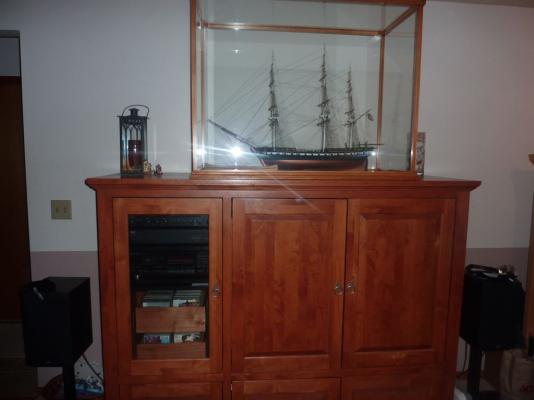
I put in the ship, but it's not secured yet. I'm going to wait until my cross section is done and I'll replace the canoe with the cross section - I hope it makes for a nice overall display. Then, I'll mount the Connie on a base and screw that base to the display base.

- JPett, HonuJaye, GrandpaPhil and 4 others
-
 7
7
-
Wow, it's been a long time since I've updated this log.
I've been spending much of my weekends building a display case for Revell Constitution - glass has been ordered, and I'm waiting for it to be ready. Pictures of that will show up in the Revell's build log.
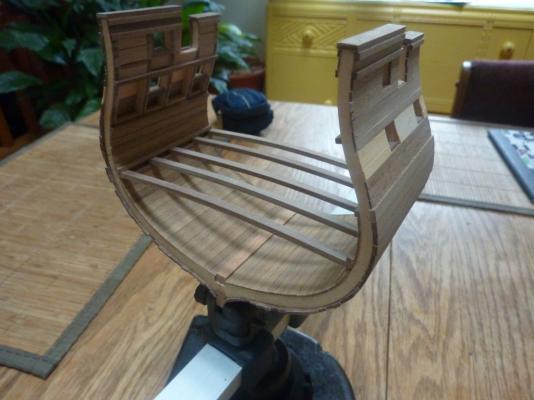
I did make some progress on the cross-section.
Planked the inner hull, below the first deck.

And added the supports for that deck.
I'm planning on doing it deck by deck, based on some of the other cross section logs, so I will plank what I can from the keep upwards.
Next up is to place the mast support and plank the first deck.
Andy.
-
Good luck and hope I answered your questions!
Absolutely. Thanks for such a detailed response, I appreciate the information as well as the explanation.
Much thanks,
Andy.
-
Thanks for the reply - I'm very new to wood so a lot of the finishing is still magic to me.
If I can ask, why put a wipe on poly on before painting? I'm thinking ahead to painting the outside of my Constitution cross section and was planning on just priming the wood before painting, probably acrylic paint, many coats. I saw your dyeing post and was intrigued - the results look great.
Andy.
-
Beginner question, if you don't mind: Do you use a water or oil based wipe on poly?
-
It depends on how well the mast holes line up. The bottom deck floats so you have some adjustment when inserting the masts.
Andy.
-
Sorry to repeate myself on the chopstick advice. I guess when I'm pretty happy with something I thought of myself, I can go on and on.
It worked so well for me, but there are probably other ways for other folks.Yes, I think you have it right about the pinrails. Hold the line taut as you wrap around the pin (that's what I used the self-closing tweezers for) and using the L-shaped pusher, you can easily extract the tool as it typically gets caught between the pin and line. I found tying to pins pretty straightforward, and easy to get just the right amount of tension to hold the whole line taut, but not too tight. Those plastic pins (which I did not replace) are pretty fragile.
I found tying off to eyebolts to be trickier, mainly getting the tension correct. I would use a double-hitch knot or clove hitch and it was way harder to get just the right amount of tension. Beeswax helped as the line would pull through easier.
Regarding tan thread - no I did not run out. I was pretty frugal with the line, and I used different sizes than the instructions called for. For example, I had lots of medium (I think), so I would use medium instead of small on some of the upper rigging to conserve the small. Stuff like that. I tried to keep the relative sizing correct (smaller thread the higher up the masts you go, and large thread for the lower yards, etc) and never ran out. I would challenge anyone to look at my ship now, behind the case, and tell the difference between the small and medium. Folks here probably could, I suppose, so it's a matter of adherence to the correct scaling,etc. Your ship, your decision.
I did run out of the medium size black thread - for the standing rigging and had to replace it. I bought some from Model Expo, and what I thought was 6 meters was more like 2, so I ran out again. I ended up going to a fabric shop and matched the size as best I could with what they had. It's much fuzzier than the kit's thread, but with enough beeswax, I made it look ok.
For future projects, I would seriously consider ordering all replacement thread from Chuck's Syren ship company store. That stuff looks terrific, and seems very reasonably priced.
Andy.
-
The best tool I made for tying to pinrails was a long-handled chopstick that I inserted and glued a pin into. The end 1/8" of the pin was then bent 90 degrees and I made slight indentation in the middle of that 1/8" section to hold the line. I can push with this and the thread won't slide off due to the small "v" nature of it. I also found self-closing tweezers invaluable. I also found just a straight pin in the end of a chopstick was also useful for getting the lines wrapped around pins. Sorry, but I didn't take a photo of it in my log.
Finally, I secured all those knots (pinrails) with dilute white glue. It holds them just fine, takes a few minutes to dry though, but can be removed if you make any mistakes. The main mistake I made, a couple of times, was when a line is being threaded down to the pinrail, it would wrap around other lines. Getting them "clear" with all the other lines in the way took a lot of patience and checking from all angles. Having the ability to undo a knot and re-thread it was super useful, and would be near impossible if secured with CA or fabric thread.
The last piece of advice I can give you is to not rush (sounds like you're already heeding that). I would be happy to tie of 3-5 lines in days work if they were good looking lines. I would tie a line to a pin, weight the end down with a penny, apply the dilute white glue and walk away for 15 minutes. Just walk away and not mess with it. Almost the hardest part. :-) After 15 minutes, it would be secure - remove the penny, trim the end and done.
I also bought a nice pair of fly fishing scissors (by Dr. Slick) - super sharp, get the longest you can. Better than using a razor as you don't want to cut other lines. Keep the scissors CLOSED as you move them into the line you want to cut - I had them open once, and they brushed a line and it cut instantly. Bummer.
Andy.
-
Hi,
This was one of the most confusing parts when I built my Revell Constitution. I must have read those instructions 10 times or more.
I'll try to answer your questions, but I did mine WITHOUT sails, so I'm not familiar with any sail-specific things.
1. Halyards - The two top yards (royal and topgallant yard): I just tied a knot around the yard and the plastic "U" shape on the yard that is glued to the mast. I didn't do anything special here except try to get the thread to look centered. Look at page 6, near the bottom, of my build log (link in my sig).
2. The halyard rigging for the lower two yards (topsail and main yards), goes through blocks that are attached to the yards. I think the idea is the upper two yards are light enough not to need pulley system to raise them, but the lower two are heavier and need pulleys.
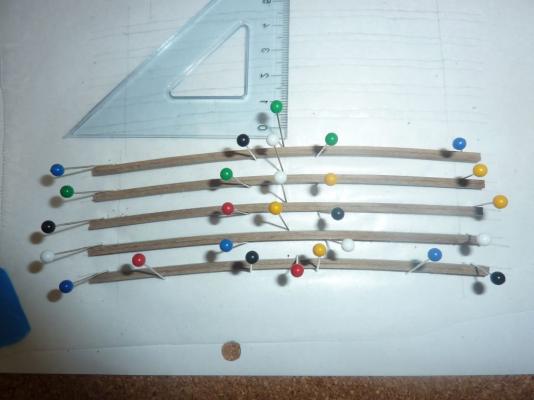
3. Rigging the yards with blocks ahead of time. I found that in the regular instructions, they let you know which block sizes to put on the yards. I went though the rigging instructions very carefully and found all the blocks used during rigging and made sure I tied those on the yards. Look in the middle and bottom of page 3 of my log for the results of those. I posted a photo of the diagram I made for the foremast, but I did the same diagram for the main mast and mizzen mast as well. It worked out pretty well, as I didn't have to add any blocks to the yards after they were mounted, which would have been difficult. It was tricky to identify all the blocks, but I labeled them in my yard diagram related to the rigging instruction step so I would be sure to use the right ones, and know if the blocks should be on top/bottom/side of the yard itself.
If I remember correctly, the main instructions were a little incorrect about block placement. The ultimate guide is the rigging instructions -- if you put in the blocks needed during rigging, you'll be ok. One thing I didn't do was to tie blocks to the mast tops and crosstrees ahead of time, mainly because I couldn't visualize where exactly they should go. Some of those got very difficult to add as the number of lines increased, so maybe think about adding those.
Hope this helps,
Andy.
-
You probably know this, but you can download the Connie instructions from the Revell website in PDF form if yours are too corrupt to use easily.
Andy.
-
I know you've got your answer, but here are some screen clips of the Revell instructions showing the placement of the studding sail booms. The instructions are in the running rigging, no sails, page 2.
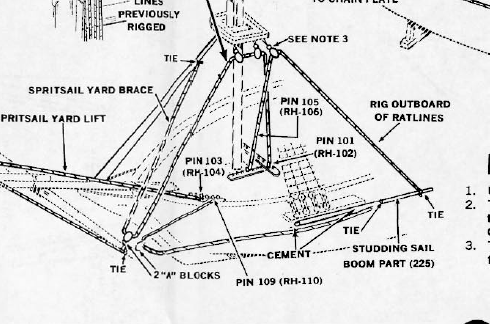

I painted them "Wood" color as well, because that's what I painted the other boom colors, up on the yards.
Andy.
-
Progress has been slow, as most of my free time has been taken up with making a display case. I'm working with a friend who has a nice woodshop to make a case for my Revell Constitution.
There has been some progress however:
I got the deck supports glued together and bent. I only did the lowest deck as I wanted to experiment a little with the technique. The instructions say to just glue two walnut strips together and hold them in the bent position until dry. I wasn't sure that would be enough to hold them in the curved position, so I soaked them in hot water for an hour, pinned them in place and let them sit for a few hours. Then I glued them together and put them back into the jig. When I took them out to glue them, they sprung back to almost straight, but their interior was still wet when I applied the glue.
After I let them dry for a few days, they held their shape just fine with no spring-back. I don't know if the initial soak was necessary, but since it worked, I'll do the same for the next two sets. I plan on doing the decks one at a time as some of the other builders of this kit have suggested, so there's no rush.
I also purchased a jewelers saw at Hobbytown and cut the notch in the bulkheads. It was tough getting a straight cut, but after some sanding it looks ok I think.

I've also done some measuring and re-cutting in preparation for adding the gunport frames in the lower deck. I had to extent the bulkhead notch by 1mm so the planking will fit properly (I hope).
Andy.
-
Awesome price - I hope it's intact inside when you get it.
As for ideas - I wouldn't have posted to a build log if I wanted to keep them to myself. Use them, extend them, combine with other people's ideas. Go for it.
Andy.
- texxn5, lambsbk and popeye the sailor
-
3
-
The chart is a very nice touch. I wish I'd thought of that.
Looking very nice.
Andy.
-
Do you plan on lighting the captains quarters? If not, it will be very hard to see in there. I spent a lot of time picking paint colors and detailing the furniture in there, and now it's completely invisible.
It's still worth doing, don't get me wrong, but do it for yourself mainly. Hardly anyone else will see it!
Andy


USS Constitution by AndyMech - FINISHED - Mamoli - Scale 1:93 - Cross-Section
in - Kit build logs for subjects built from 1751 - 1800
Posted
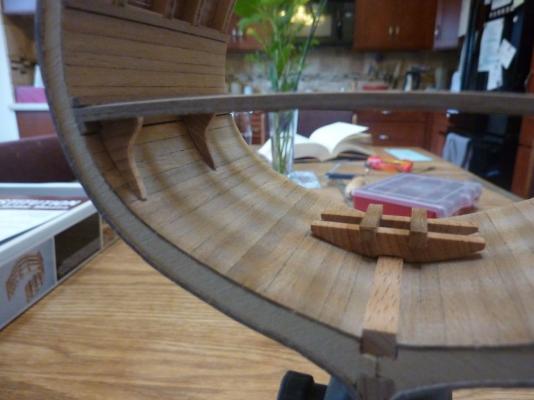
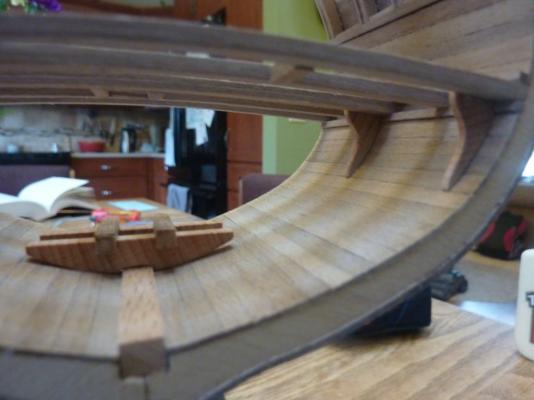
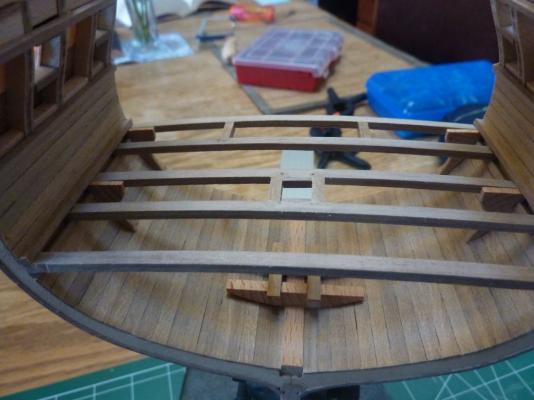
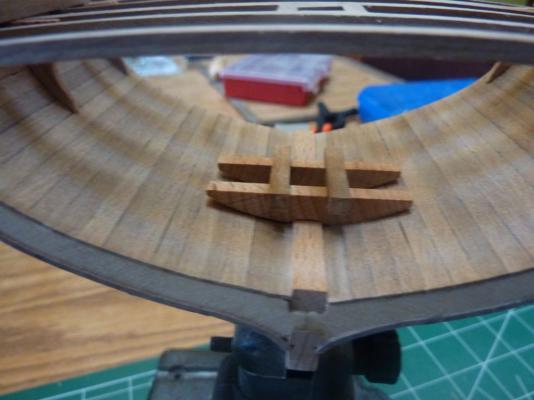
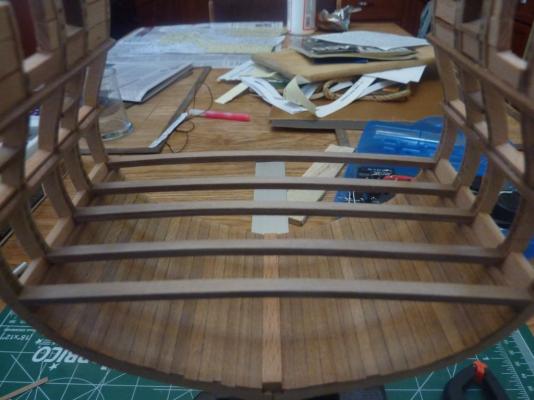
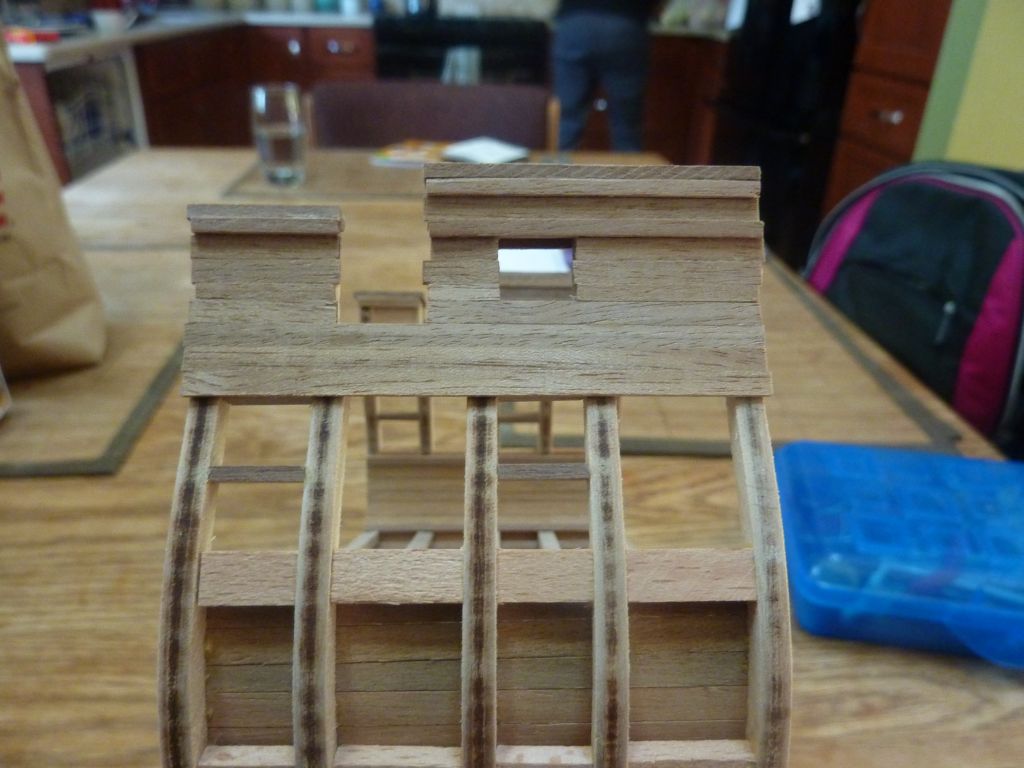
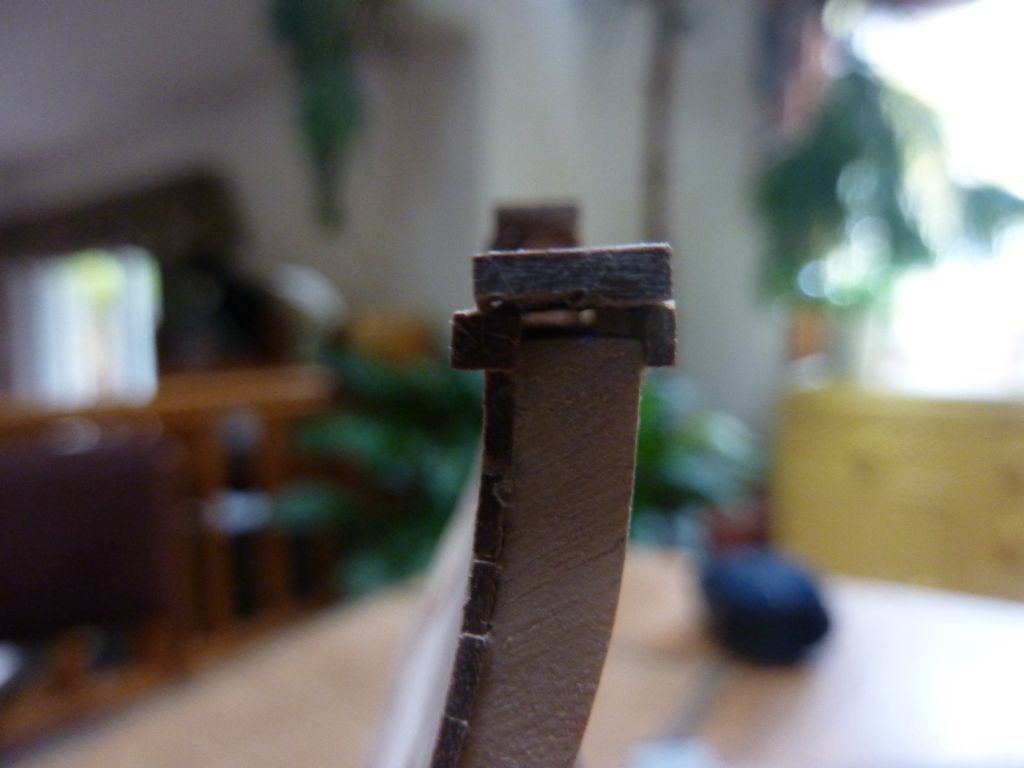
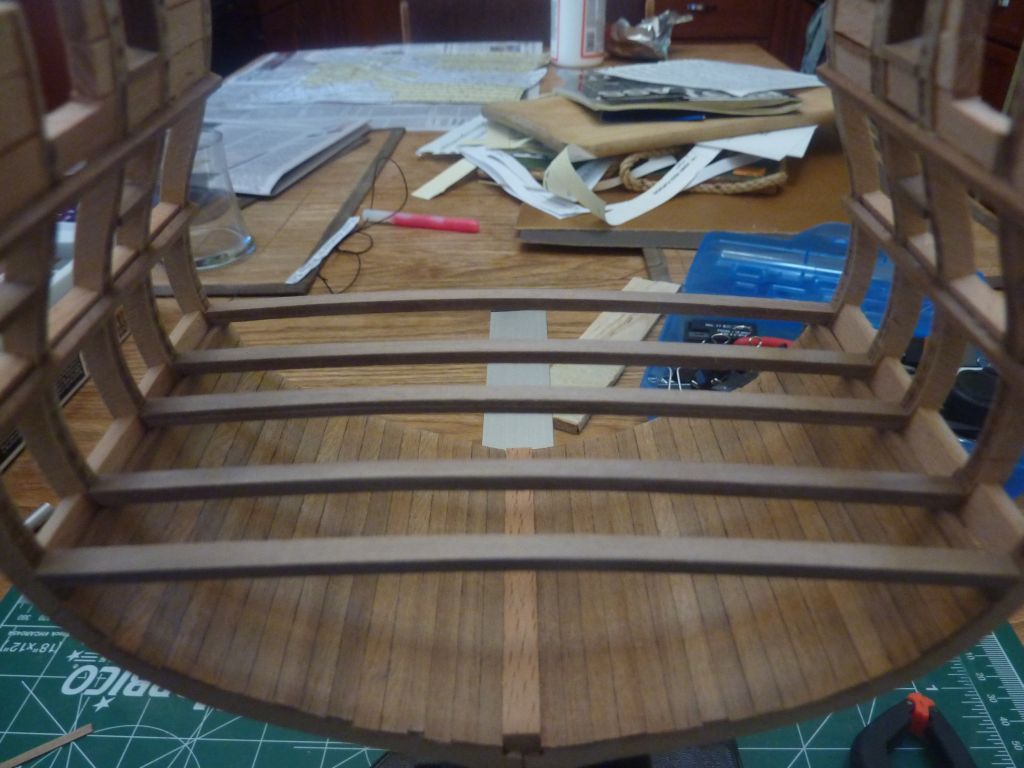
I spent the weekend working on the vertical stanchions and starting on the lower deck work.
Here are the stanchions - used a weighted bit of string to find the vertical lines, then just sanded to length and glued in.
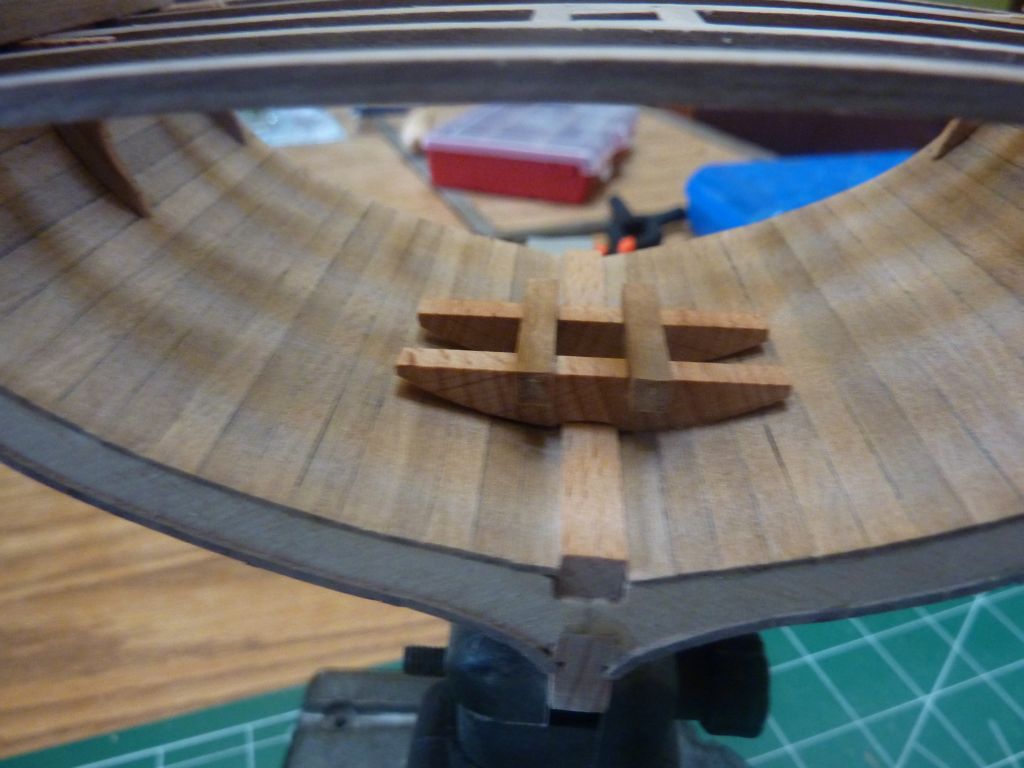
Next up was framing the hatch - the plans called for mitered joints, so I made cuts at 45-degree angle using a lego as a guide. I glued in the outside frame, then added the slats (I guess the hatch is closed, eventually a ladder is placed on it):
Finally, I started on the deck planking. I thought it would be very straightforward, but I have some questions. First, here's how it stands right now:
I used a #2 pencil to mark the ends of one plank for caulking, which I think is ok looking.
The questions I have are: I see in the plans that each plank doesn't run the full length - like most decks, the planks are staggered and should have butt-joints at periodic locations. How, generally, do folks do this? Do you cut the planks the lengths the joints demand, or can one simulate it by scoring a line? I hesitated to cut them to the shorter lengths as I wondered how folks get them to line up properly?
Finally, you can see in the last photo, there is small gap on the left of the hatch and an even smaller one on the right side. What's the best way to fill these? My approach to date has been to try to cut a length of planking so narrow that it fits in there, but the right side one is no more than a sliver! I really would appreciate some advice for fixing this, and I'm sure similar situations will come up on the next two decks - how do I avoid this for the future and how do I fix this now?
I found measuring the distance from the edge of the deck to the hatch should have left 3mm or so, and with a 4mm plank, I should have had a bigger gap. But after the planks are laid, they must take up more room, or the planks aren't exactly 4mm, so I've got a very small gap instead.
I also must not have centered the hatch properly, or the keel isn't dead center - either way something is off and I'd like to fix the deck planking.
Andy.