
ClipperFan
-
Posts
2,171 -
Joined
-
Last visited
Content Type
Profiles
Forums
Gallery
Events
Everything posted by ClipperFan
-
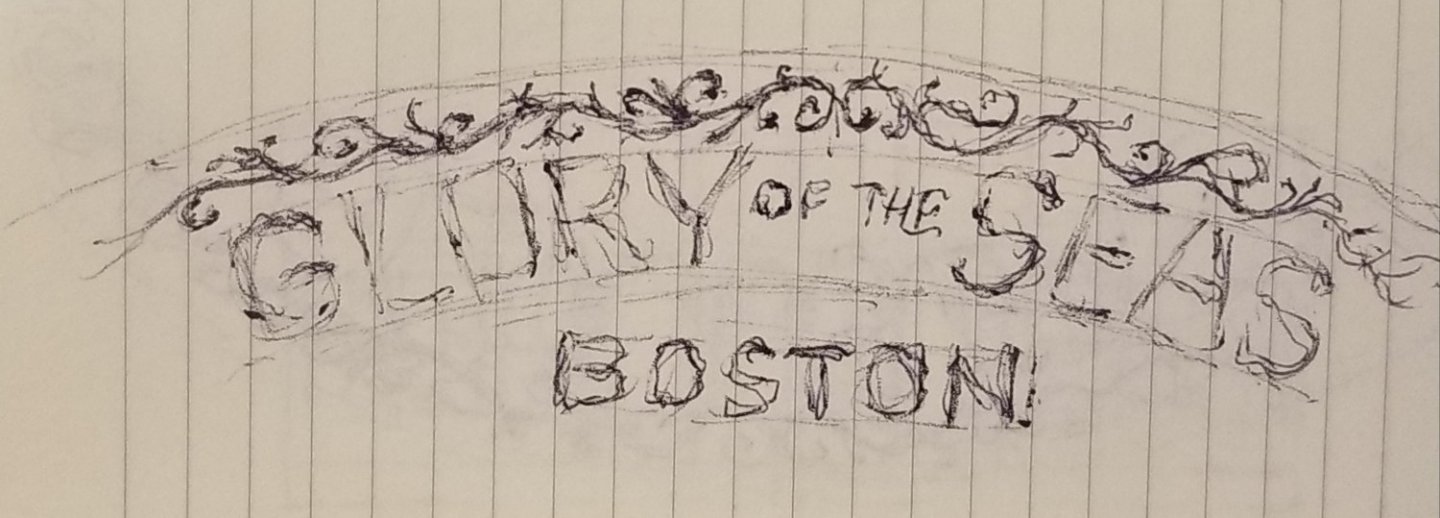
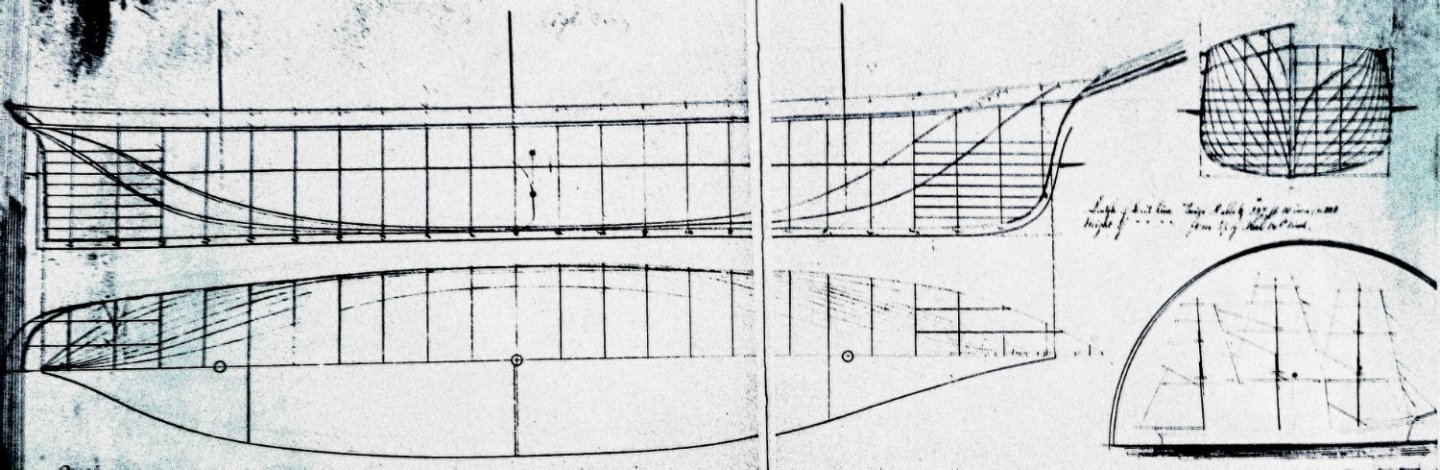
 Rob, Vladimir, I misread Mike's email today. He asked for two 1:96th scale drawings by the end of next week. Somehow I read it as the weekend. I committed to get it done by this weekend. Vlad, if you didn't see my message, I'm looking for your original print pictured on page 1, lower right side. I need to sketch it at 1:96th scale. Meanwhile, Rob thanks for sending the print you made with the compass arcs and inclination degrees. Not to sound dense but I'm still trying to reconcile two conflicting conclusions for the same angle of inclination for Glory's lower waterline hull profile. At one point you said it was 7 degrees. Then that was revised to 8.5 degrees. Your latest illustration appears to revert back to 7 degrees again. Please give me one specific number so I can work on Mike's drawing tomorrow. Thanks. Oh, by the way Vlad, I added a passage to the article with a description of the naval hood and cutwater carvings. Both of your digital illustrations and my sketch opposite them are included. Thanks for reminding me of those crucial elements. It ties together the entire prow description very neatly now. Guys, I made a suggestion to Mike to add his original 1970 sketch to the 1992 one, my 2021 hull sketch and Ron Haug's plan that Mike's now working on correcting. It would show an evolving comprehension of the true appearance of Glory of the Seas based upon additional information that's been developed. No matter what, it will be ready and submitted to meet this July 1st deadline.
 -
Rob, it occurs to me that since you've been model making so long, you're utilizing improvised construction jigs without even realizing you're doing it. Case in point, converting the front end of a drawer as an improvised construction source. Sheer brilliance.
- 3,560 replies
-
- 1
-

-
- clipper
- hull model
- (and 2 more)
-
Rick310 From Boston Daily Atlas, December 21, 1850: description of components which comprise the backbone of Stag Hound: (1) keel in 2 depths combined with the shoe moulds: 46" (3'10") (2) floor timbers on the keel mould: 14-16" (1'2"-1'4") (3) 3 depths of midship keelsons combined mould: 42" (3'6") (4) hold stanchions, form a rider across the keel are: 10" square Including their depth and the mouldings of the floor timbers, she is nine feet through "the back bone." Using the same methodology, the components for the back bone of Glory of the Seas come in at 11' consistent with Sovereign of the Seas.
- 602 replies
-
- 3
-
-

-
- Flying Fish
- Model Shipways
- (and 2 more)
-
I used the same specific component measurements to determine Glory's backbone, which came in 4' higher than published in the Clipper Ship Captain detailed ship's lines. This also moved the height of all three masts up 4'.
- 602 replies
-
- 1
-
-
- Flying Fish
- Model Shipways
- (and 2 more)
-
Rick310 one other important spec I pay attention to is the ship's 'backbone' usually being about 9' for McKay vessels this size. It's critical, since all three masts mount directly to this structure. We discovered that the masts of Glory of the Seas were 4' shorter than they should have been. Don't confuse this with the keel, since it's only a fraction of the components which comprise the backbone. Read the highly detailed description of Stag Hound for the most exhaustive description of each item which comprised her backbone.
- 602 replies
-
- 3
-
-
- Flying Fish
- Model Shipways
- (and 2 more)
-
George K, Yes, I'm sure it meant futtock shrouds. What appeals to me the most about the Boston Daily Atlas articles are the precise dimensions given for pretty much every major detail of each ship. For instance, in the case of Flying Fish heights are listed for her bulkheads: 16" fancy rail, 4 & 1/2' main bulkhead, etc as well as exact distance of each mast from each other. Since it's unlikely Duncan MacLean crawled all over each vessel to get these measurements, it's not hard to conclude these specs came from the shipyard itself.
- 602 replies
-
- 2
-
-
- Flying Fish
- Model Shipways
- (and 2 more)
-
http://www.bruzelius.info/Nautica/News/BDA/BDA(1851-11-04).html#:~:text=This is the fourth clipper,vessels%2C or to one another. Flying Fish construction details from Duncan MacLean's incredibly detailed description of her at launch. Included is a description of the exact diameter range of standing rigging on the ship herself. He also mentions that iron was used for the shrouds. Anyone wanting precise construction details of many of McKay's Clippers can find them in Lars Bruzelius's website.
- 602 replies
-
- 2
-
-
- Flying Fish
- Model Shipways
- (and 2 more)
-
Rick310 it always amazes me that great modeling talents like you are so critical of their own superlative work. From what I can tell, the anchor windlass handles you entirely scratch built and even soldered... are each a mere 1/2" long! Then again, your very realistic pump break device is much smaller then that! Take it from a person who can only dream of having such miniature building skills. Your work is consistently quite impressive. I have a question about the beautifully done Clipper forecastle pictured above. It's just below the one of your Flying Fish deck scene. Is that Snow Squall or Challenge depicted? Either way, can you share the link to pictures of these models?
-
Rob, Agreed. Seeing Lightning illustrated more than once with just a blank space where the cutwater and naval hood would be gives me the distinct impression that McKay intended to keep these features secret for as long as possible. His success in that endeavor is amazing too. Today, until you and Vladimir's meticulously accurate Glory of the Seas replicas, there hasn't been one single model that replicated those features. In fact, every single Stag Hound, Flying Cloud, Flying Fish, Lightning & Sovereign of the Seas model produced have only included the vessel's stem, both cutwater and naval hoods have been mysteriously left off. That's a major reason why I see Glory of the Seas as a type of nautical "Rosetta Stone" to finally reveal the true beauty of McKay's Clippers. After this project, now that the Nautical Research Journal article is in its editing stage I can concentrate on setting the visual record straight when it comes to the rest of Donald McKay's Clippers. Look for my future blog on this fascinating topic in "Research."
-
druxey, Good observation. At least it hasn't been enhanced like that completely bungled effort to restore a fresco of Christ the Redeemer in Italy! If I remember correctly, this impressive work of art still accurately captures a McKay Clipper's features. It's unfortunate it's been so unusually washed out, especially for a Samuel Walters piece. Since my preference is to share an entire image, I've attached it here. Not wanting to hijack his Glory of the Seas blog, I'm now dropping the issue in respect to Rob.

- 3,560 replies
-
- 2
-
-
- clipper
- hull model
- (and 2 more)
-
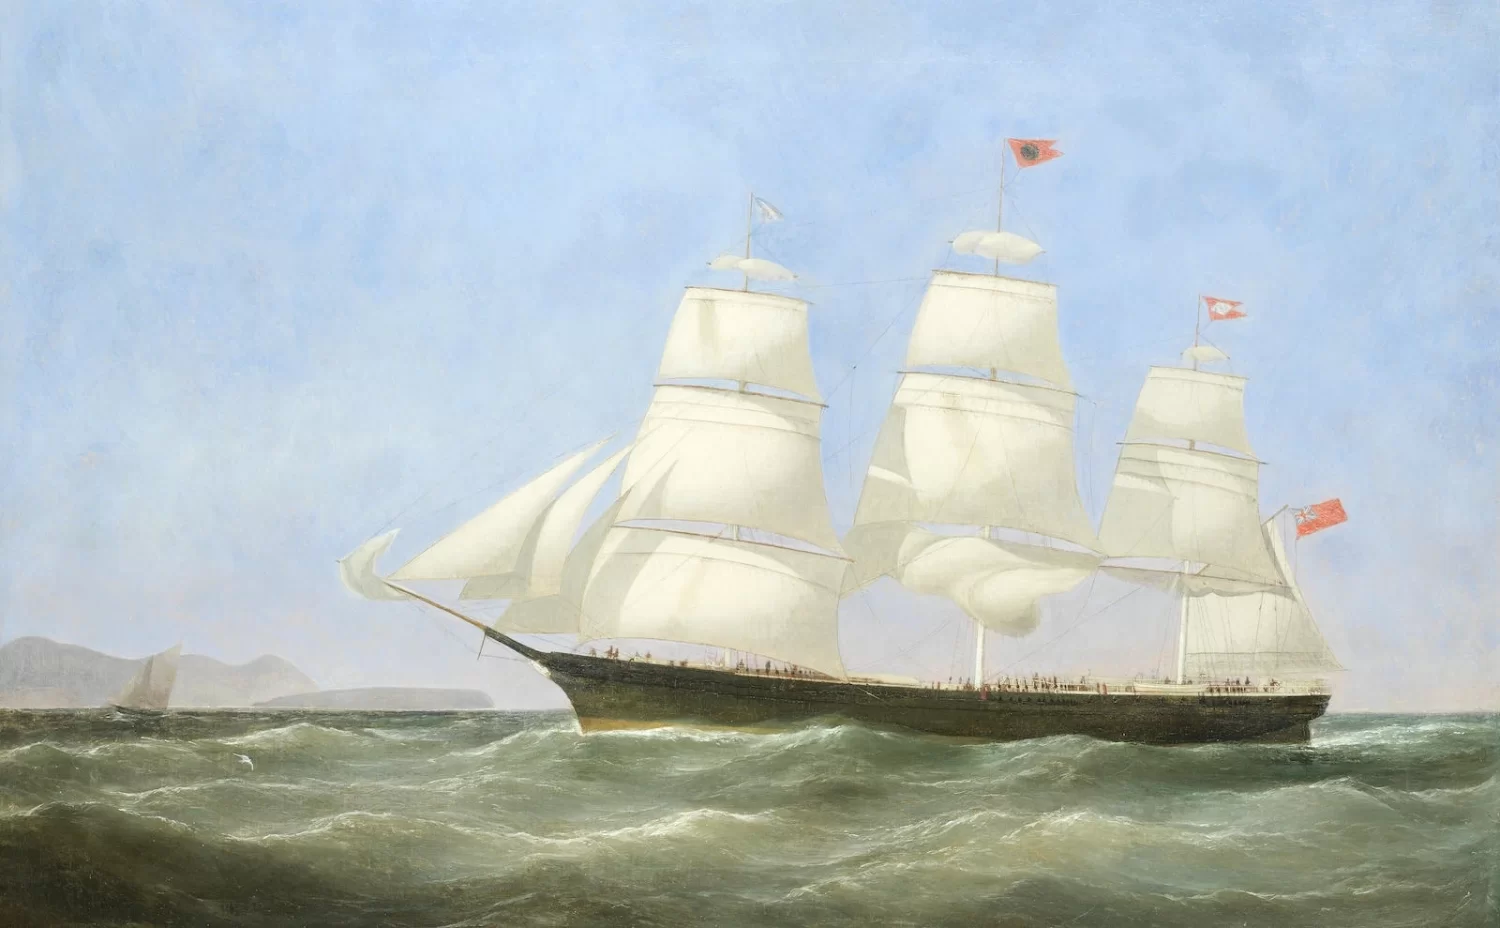
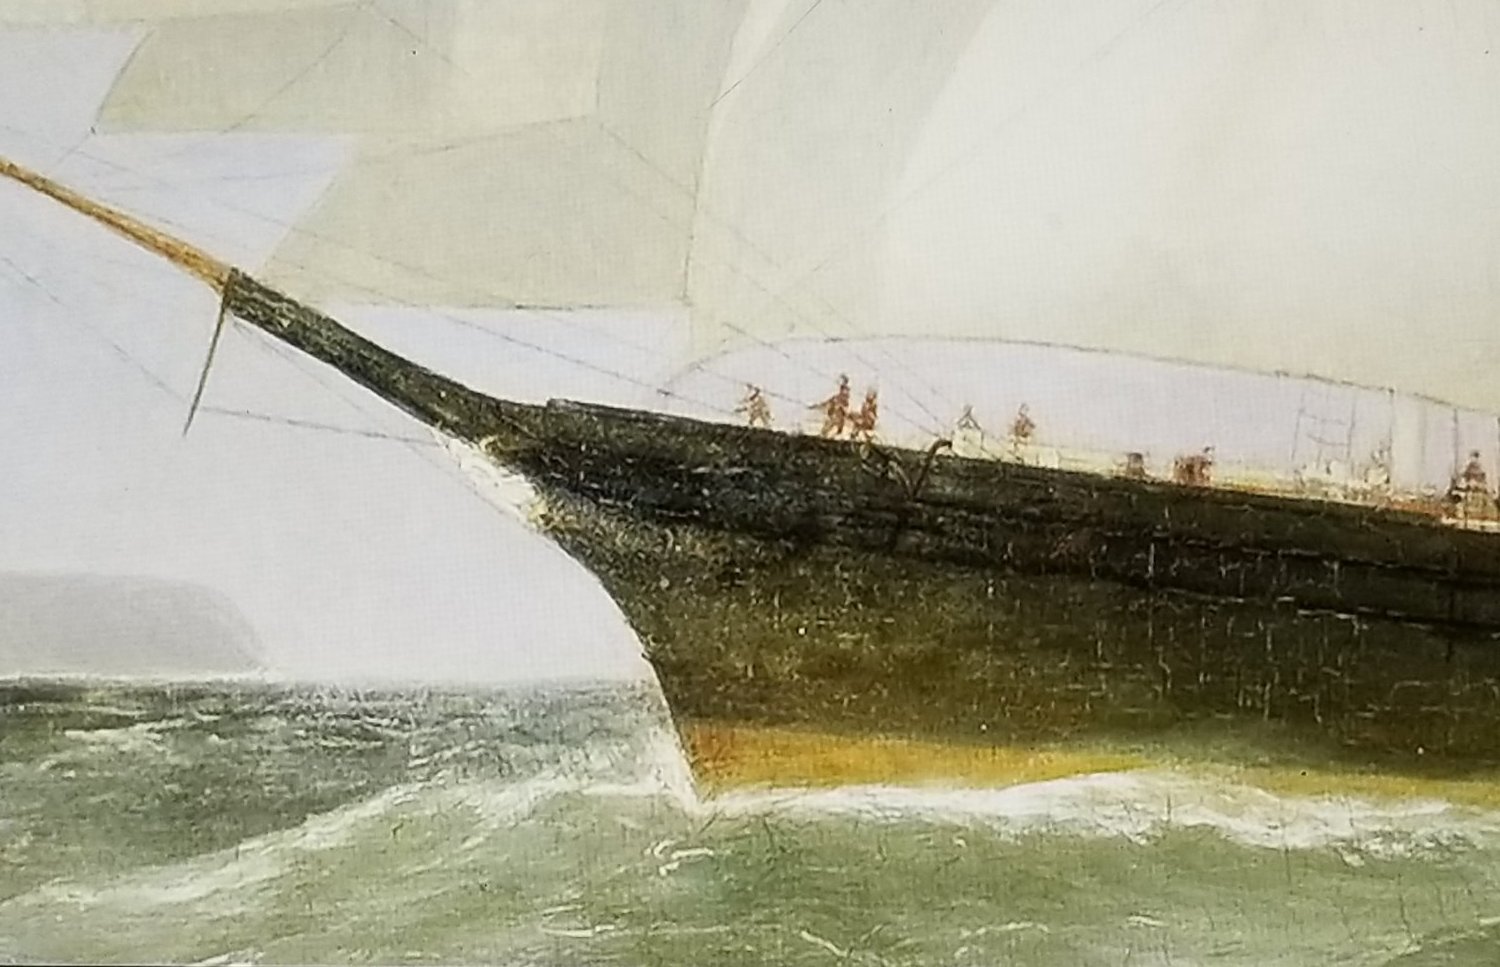
Hi Michael, I came across a rare painting attributed to Samuel Walters, who's renowned for the accuracy of his works. This is a close up of the bow and original figurehead of the McKay Clipper Lightning. What impressed me is that in this depiction, it appears that much like Glory of the Seas, the Lightning has similar naval hoods and gold leaf embellished carved cutwaters. Notice the sheer plan of Lightning. Pay particular attention to her bow. There's literally an open space where her cutwater, naval hoods and figurehead would be located. Donald McKay was famous for wanting to keep his nautical designs secret. I believe that's why even today, none of the contemporary McKay Clippers feature accurate bow treatments. For that reason, I see our group's accurate Glory of the Seas reconstruction as sort of a Rosetta Stone to revisit many of Donald McKay's other Clipper Ships.

- 3,560 replies
-
- 4
-
-
- clipper
- hull model
- (and 2 more)
-
Michael, by Lightning I figure you're referring to the famous McKay Clipper "Lightning" and not a lightning bolt?
-
George K, thanks for giving us your insight into the challenges you face and how you're successfully resolving them. Like Rob, you're consistently doing a masterful job in your build.
- 602 replies
-
- 1
-

-
- Flying Fish
- Model Shipways
- (and 2 more)
-
George K, thanks for the additional pics. Kudos to you and your group for continuing a fine history of maintaining such an interesting historical structure. It looks like from the outset, the designers wanted to provide their Lighthouse Keepers with an ability to view 360 degrees around their vicinity. That must be why those fascinating cupolas are in every wall of the building. Cool building overall.
-
George, I can't answer your question about Model Expo's replacement service, since I've never dealt with them. However, if your kit was new when purchased, I would let them know that. Reputable companies will supply some parts free of charge as long as they know you're not trying to rip them off. Thanks for the fun pics of your maintenance trip. That 1875 lighthouse structure is really neat. If you have more scenes of that, I'd like to see them. Out of pure curiosity, any idea how much of the original building is left?
-
Rob, I honestly can say I don't believe I've ever seen furled sails depicted on a model sailing ship before. This is such a convincing portrayal too that it's quite possible to imagine the crew climbing her ratlines and working all over this ship. Well done. Does anybody know if there's a way to share a 'Word' document? My NRJ article which is practically writing itself and being so image heavy is now 17 pages long. I'd love to share it here as it's still not finished yet....
-
Rob, knowing that the crossjack yard has the smallest dimension of the three lower yards (both main and fore yards are 90' each) it's amazing how large the crossjack looks on the mizzen. It must have been quite a sight to see these massive spars on Glory herself. It's no wonder this vessel was so popular at every port she docked at.
-
Rob, it's amazing how busy the base of your mizzenmast has become with so many lines being belayed just there alone! I can see why you found it necessary to add extra belaying pins in the rail. I'm curious, are you following the belaying chart from "Clipper Ship Captain" or developing your own pattern?
- 3,560 replies
-
- 1
-
-
- clipper
- hull model
- (and 2 more)
-
Rob, we will meet our objectives in our own unique ways!
-
Rob, if you review the 80 some odd pages of your blog alone, add in Vlad's dozen or more and there's more than enough images and discoveries to support multiple articles. I guess it depends on the level of interest the initial one generates. I will discuss the possibility of a series with Mike to see how he feels. Meanwhile, I don't want you or Vlad to feel any pressure to speed up your construction processes that might adversely impact your build qualities.
-
Rob, I wouldn't be concerned about the article's deadline. There's already plenty of photos being submitted. Once I finish writing it. I estimate it's about 75% done. I will share it with you unedited just for your response. At the same time, it will be emailed to Mike for his critique and I'm sure the inevitable editing. He's had many articles published so I'm sure he'll know how to proceed. Meanwhile, just proceed at a comfortable pace. If there's enough interest and with author Mike's "juice" I strongly suspect there will be, there probably will be a follow up article. What's really exciting is how this writing project is taking on a life of it's own. It will be fascinating to see Mike's reaction. That will be the true test of whether I've hit the mark or if it will need more work. Either way, July's deadline will be the one.
- 3,560 replies
-
- 1
-
-
- clipper
- hull model
- (and 2 more)
-
Rob, I have high confidence that the finished piece will actually get published. Since I'm including some images I took off of some museum websites, I imagine I'll need to get their ok to include their images. I don't expect to get compensation, so I don't anticipate any problem. Maybe they'll even supply better images too. What's surprising is how much volume there really is to cover. At this point it's also becoming image heavy but it feels like the photos being shared really contribute to the narrative. I'm sure once it's reviewed and edited by Mike, it will be pared down to a more reasonable size. Or, who knows? Maybe it will become a two part installment. One thing I'm sure of. I will not miss the July 1st deadline. This will be submitted long before then.
-
Rob, your masterclass on rigging is just deeply satisfying to observe. It also makes total sense to rig from aft to bow forward, as that's precisely how the stresses of sailing with stiff winds would be spread. I totally agree about the davit positions on both sides being identical. As I hope to include my revised 3' hull sketch with the Nautical Research Journal article, revised positioning of those davits is just one of a few corrections to be made. Mike's Ozzie friend Ron Haug has identified about a dozen minor errors. I've asked for his list in order to address them all. I want to meet his standards in order to have the most accurate, ultimate "Glory of the Seas" resource for everyone to be proud of. Finally I hope to darken all major lines in order to make it easier to scan. While I couldn't meet the April 1st deadline which is their Fall edition, I'm well positioned to meet July 1st, for Winter 2023. Vladimir, if you could possibly fix the rear gangway to the rear carriage house, I'd love to share that image. I know it's also a challenge but if you could also sculpt an "Athena" figurehead, I really want to show the impressive bow of your model too. It's my intention to give each of your creations as equal representation as possible. "Druxey" I haven't forgotten your lovely line drawing of Glory's figurehead. Let me know if your actual name is in your profile so I can give you the proper recognition you deserve. At this point, I've been using your full names. If anyone's not ok with that, just let me know. With the too many images included already, this is turning out to be a very long article. Once done, it will be submitted to Mike for his critique and editing. If anyone knows how to share a Word document, please let me know and I'll be happy to share it here.
- 3,560 replies
-
- 3
-
-
- clipper
- hull model
- (and 2 more)
-
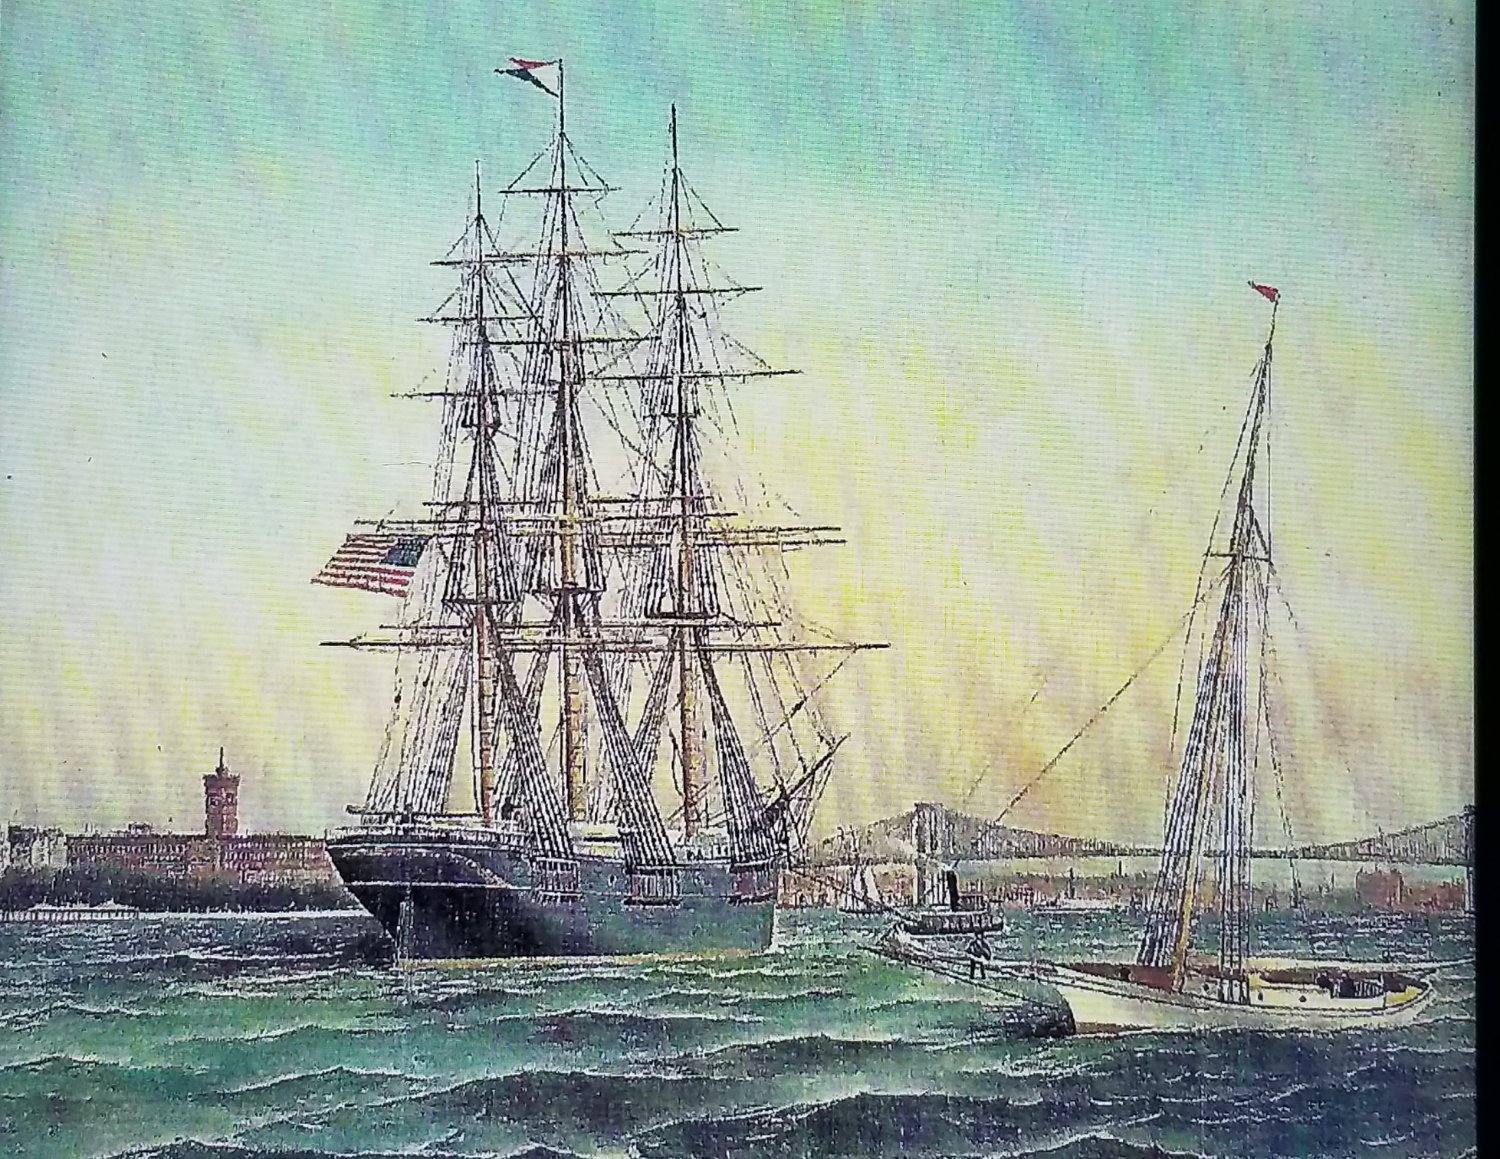
Rob, when I saw your incredibly realistic modeling of weathered, furled sails on your mizzen, spanker boom, it immediately reminded me of this scene from 1910. Your work practically matches that scene just about perfectly.

- 3,560 replies
-
- 3
-
-
- clipper
- hull model
- (and 2 more)
-
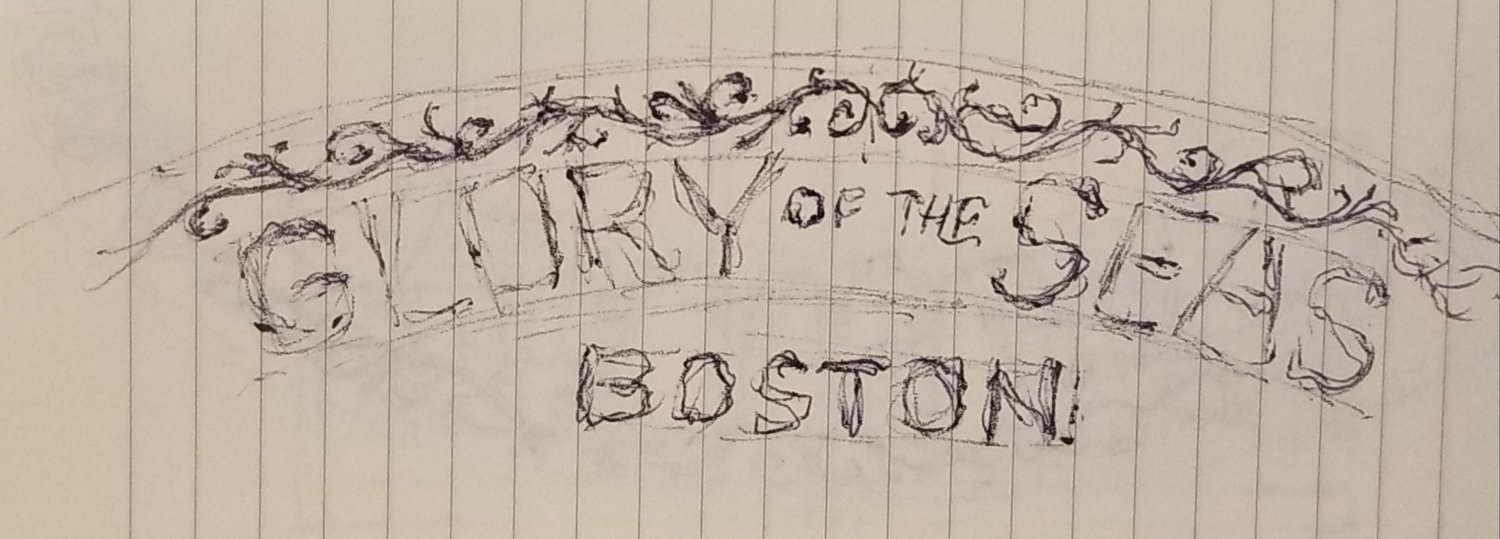
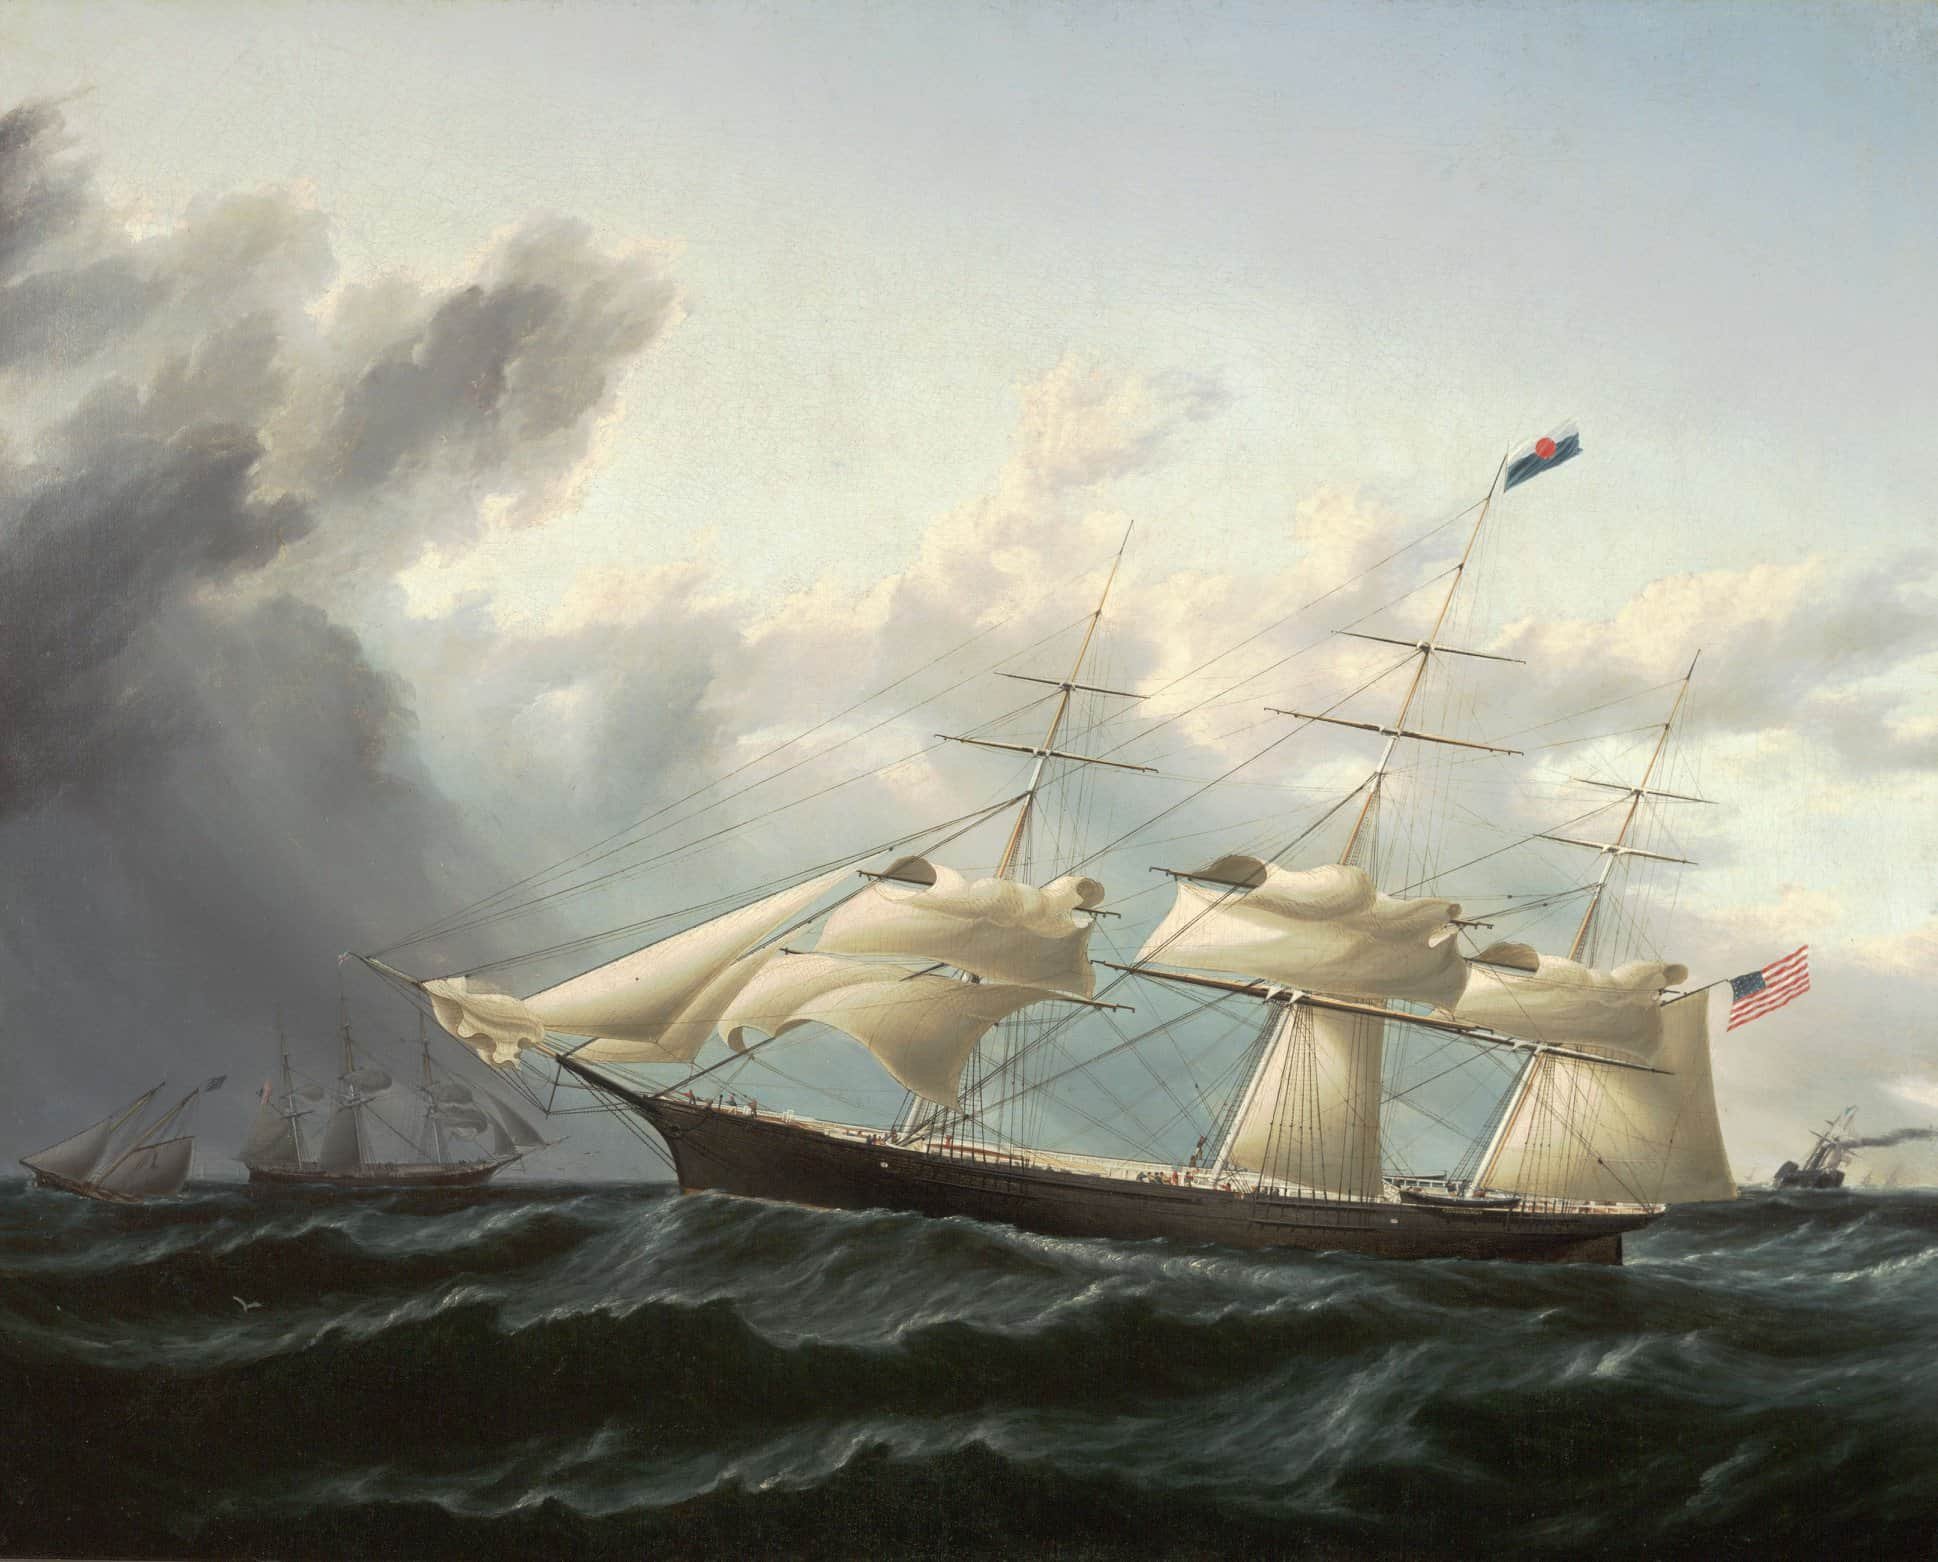
Rick310 I have a feeling you'd appreciate this. Mike Mjelde shared this lovely painting with me. He wanted me to see the elaborate stern carving on a large American Clipper Ship on left. It's an excerpt from the book "Antonio Jacobsen, Painted Ships on Painted Oceans" retrospective on the artist's works. As part of my ongoing efforts to reconstruct the beautiful, elaborate carvings on Glory's stern, I did this preliminary pen & ink sketch. When I get a chance, I'll revisit this with pencil to make it more workable. I think you did an excellent job, far better than rather hoky, awkward attachments provided with some kits.