.jpg.f14fd0b82ddc4970171089371a368a63.jpg)
Seamanpeter
-
Posts
68 -
Joined
-
Last visited
Content Type
Profiles
Forums
Gallery
Events
Everything posted by Seamanpeter
-
.thumb.jpg.01eb78ddd26fe9e56368b6bc83844e8c.jpg) Dear Jo, very clever solution found for the padlock! Looks great and not to worry, you can always change something for the better as we all do with out building. You did a great job my dear and can be proud of what came out of your hands. Have a great day there down under, Peter xxxxxxxxxxxxxx
Dear Jo, very clever solution found for the padlock! Looks great and not to worry, you can always change something for the better as we all do with out building. You did a great job my dear and can be proud of what came out of your hands. Have a great day there down under, Peter xxxxxxxxxxxxxx -
As always Jo, done a perfect job with the lashings of the heads, could not be better. Wonder the padlock will fit in there too! Must be a very tiny one. Well then have a nice cup of tea and enjoy the Sunday (what is left of it) As always Peter
-
Proud on you my dear with your first built! You have put in there all your life and forget the sorrows having! Must say as this is your first time you built something in WOOD that it cannot been seen from the work you have delivered. Keep on going until it's all done and when you rest in a chair with a nice glass of wine, looking at the built MADE by your hands only then you feel the relief and in the same time proudness of yourself that it was YOU that made it! I would say, up to the next one! I'm not so far yet as weather doesn't work good up here, raining, pouring rain and to cold to do anything outside like epoxy and painting! So it has to wait but did other small issues like fabricate the mast and railings in the vicinity of the mast itself, also the kim keels. Waiting for some spare parts from the Netherlands to arrive so I can do some more works to it until the weather outside clears up. Ok, have a great Sunday down there and looking forward to the finished ship! Peter
-
Amazing my lady, respect!! You will be a great sailer in your later life! Keep on going also now with the mast (sails etc) and some lights. Will look great, proud on you! Peter
-
Keep on going my dear, you will succeed and be proud on this built.
-
You doing well my dear Jo! Looking at it and reading what you go through with this first building, amazing you still have the patient to go further and find alternative ways to compromise. That is all what is about building a ship and not having the parts there. Keep on going and after all when all is done you can be proud on yourself. Waiting for the finals as it looks like. Don't forget the flag your lady is having. Peter
-
wow, great combination of colours and all done. You don't need to secure them though? Also "screws" on the hatch are missing but guess will come later. Overall, it is a nice "little" boat and you can be proud on it too. Peter xxxxxxx
-
Wow, very detailed Jo, the little lady has a great owner and you doing well! Sorry I put those pics here as looks like they don't appreciate that much but then again, they should read the whole contents and not just the pics. Anyway my dear Jo, we know now and next time we can send each other a PB and only you and me can see that. Keep up the good work and have a great rest of the weekend downunder, Peter
-
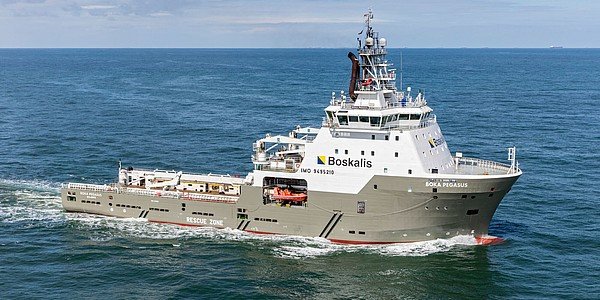
Well Jo, the reinforcement is not the epoxy but the vessel strength itself but for making sure after 3 x filler and sanding I don't want the risk my built blub blub sinks to the bottom of the bath!! No but seriously, this is for the imperfections I cannot see with my eyes if there is a tiny little hole somewhere on the line, afterall it is wood and you never know; beside it protects the surface as well for later any bumps with sailing in not deep waters or accidents. Gives overhaul the extra protection needed. But still waiting for the postman to come with the epoxy and then sanding again, maybe a second layer of this stuff. Colors are like all vessels from BosKalis (owner these days of the "real" vessel) but will put a pic here from one of them in the company colors. I had the privilege to visit the vessel in Rotterdam doing an inspection on her for the Bank, making an evaluation of the vessel's state and the value in money so yes I know nearly all corners on her. I will keep you posted on that. For sure she will have a white line as "waterline" too.

-
Respect my lady! You nearly finished all and it looks great, all in place and painted. Already tested in the bath? No leakage? Anyway, must say that you win as I'm not even that far! Let me know when she finally is going to sail! I'm just ordered the epoxy to have her watertight before painting the hull. But not much time as going to school (uni) for my BSc so only weekends free. I let you know when I have the colors in place and the waterline! Take care there now and good luck with the little lady! Peter

-
Well, in my younger years been travelling from Melbourne to Perth in a car we just bought in Melbourne! Was a great trip and see many things what we don't see here in Europe and was shaking my head seeing those ROAD trains, amazing! But did not see any animals like described above neither had the opportunity to go off this "road" as afraid I may get last there and don't want to end up as a skeleton in nobody's land. Had after all a splendid time there and also later when my ship was coming into an Australian port. Must admit, learned there to drink beer too. Have a great time there down under and not to worry, I don't run that quick away from animals!
-
Sure I'm scared now but bearing in mind that due to the fact she said <that's how bad my cooking is it puts holes in hulls > I'n not afraid to face that!! Have in my life time dealed with ladies that having bad cooking skills, so hopefully the little boat can stay on the surface as fire and wood don't go together. Either the boat goes in fire (what I don't wish) or she gets the hell out of my way so to speak. But let's see who has the first sea trails as she has to use the wind as I can go with charged batteries away. Jo, I was only joking as never ever I would run you over in that lovely little boat of yours. Take care and hopefully we can both sail before X mas.
-
Sure but first you have to come near me before doing that. Got a chopper now so can locate you very fast! Take care there my lady and let's see who finished first. Peter
-
Hi Steve, has been a while but back here.
Closed the hull and now sanding and filling until getting a smooth surface.
Did put some pics there too but apparently on a wrong page and no idea how to change that.
Anyway, going back to school to get my BSc in business so keeps me busy both ways.
https://modelshipworld.com/profile/32387-seamanpeter/?status=1004&type=status
Here you will find the latest.
Take care there now, greetings from here.
-
rpeteru, hope you did manage to get your mok so now you can drink coffee out of it.
Been away due to several problems but now back on my built an d closed the hull.
Sanding and filler is now the actions to be taken until I got a smooth surface for the paint to apply.
Have a great one there, cheers.
-
Changed my pic for a change as now a private man, "retired" but doing school and work at nights. At least not doing the same job as done in my previous life.
Take it easy you all.
-
Wow, must admit, not followed some time you did came far! Well done even not finished, far as I can see looks perfect this built. You can look into mine as well, just started again but having not much time in between school days will leave me with less time. Anyway, most of the hull done, now like you sanding and filler to be used. After this all done doing the accommodation and the rest like propulsion mounting the Schottels but you can follow that on my page here. https://modelshipworld.com/profile/32387-seamanpeter/?status=1004&type=status Take care now and will keep an eye on your boat not to run it over!
-
Good day all, did post some latest pics here but guess I mixed up the site where to put it, sorry about that. If you go here https://modelshipworld.com/profile/32387-seamanpeter/?status=1004&type=status you find the latest of my built. Have a great Sunday you all.
-
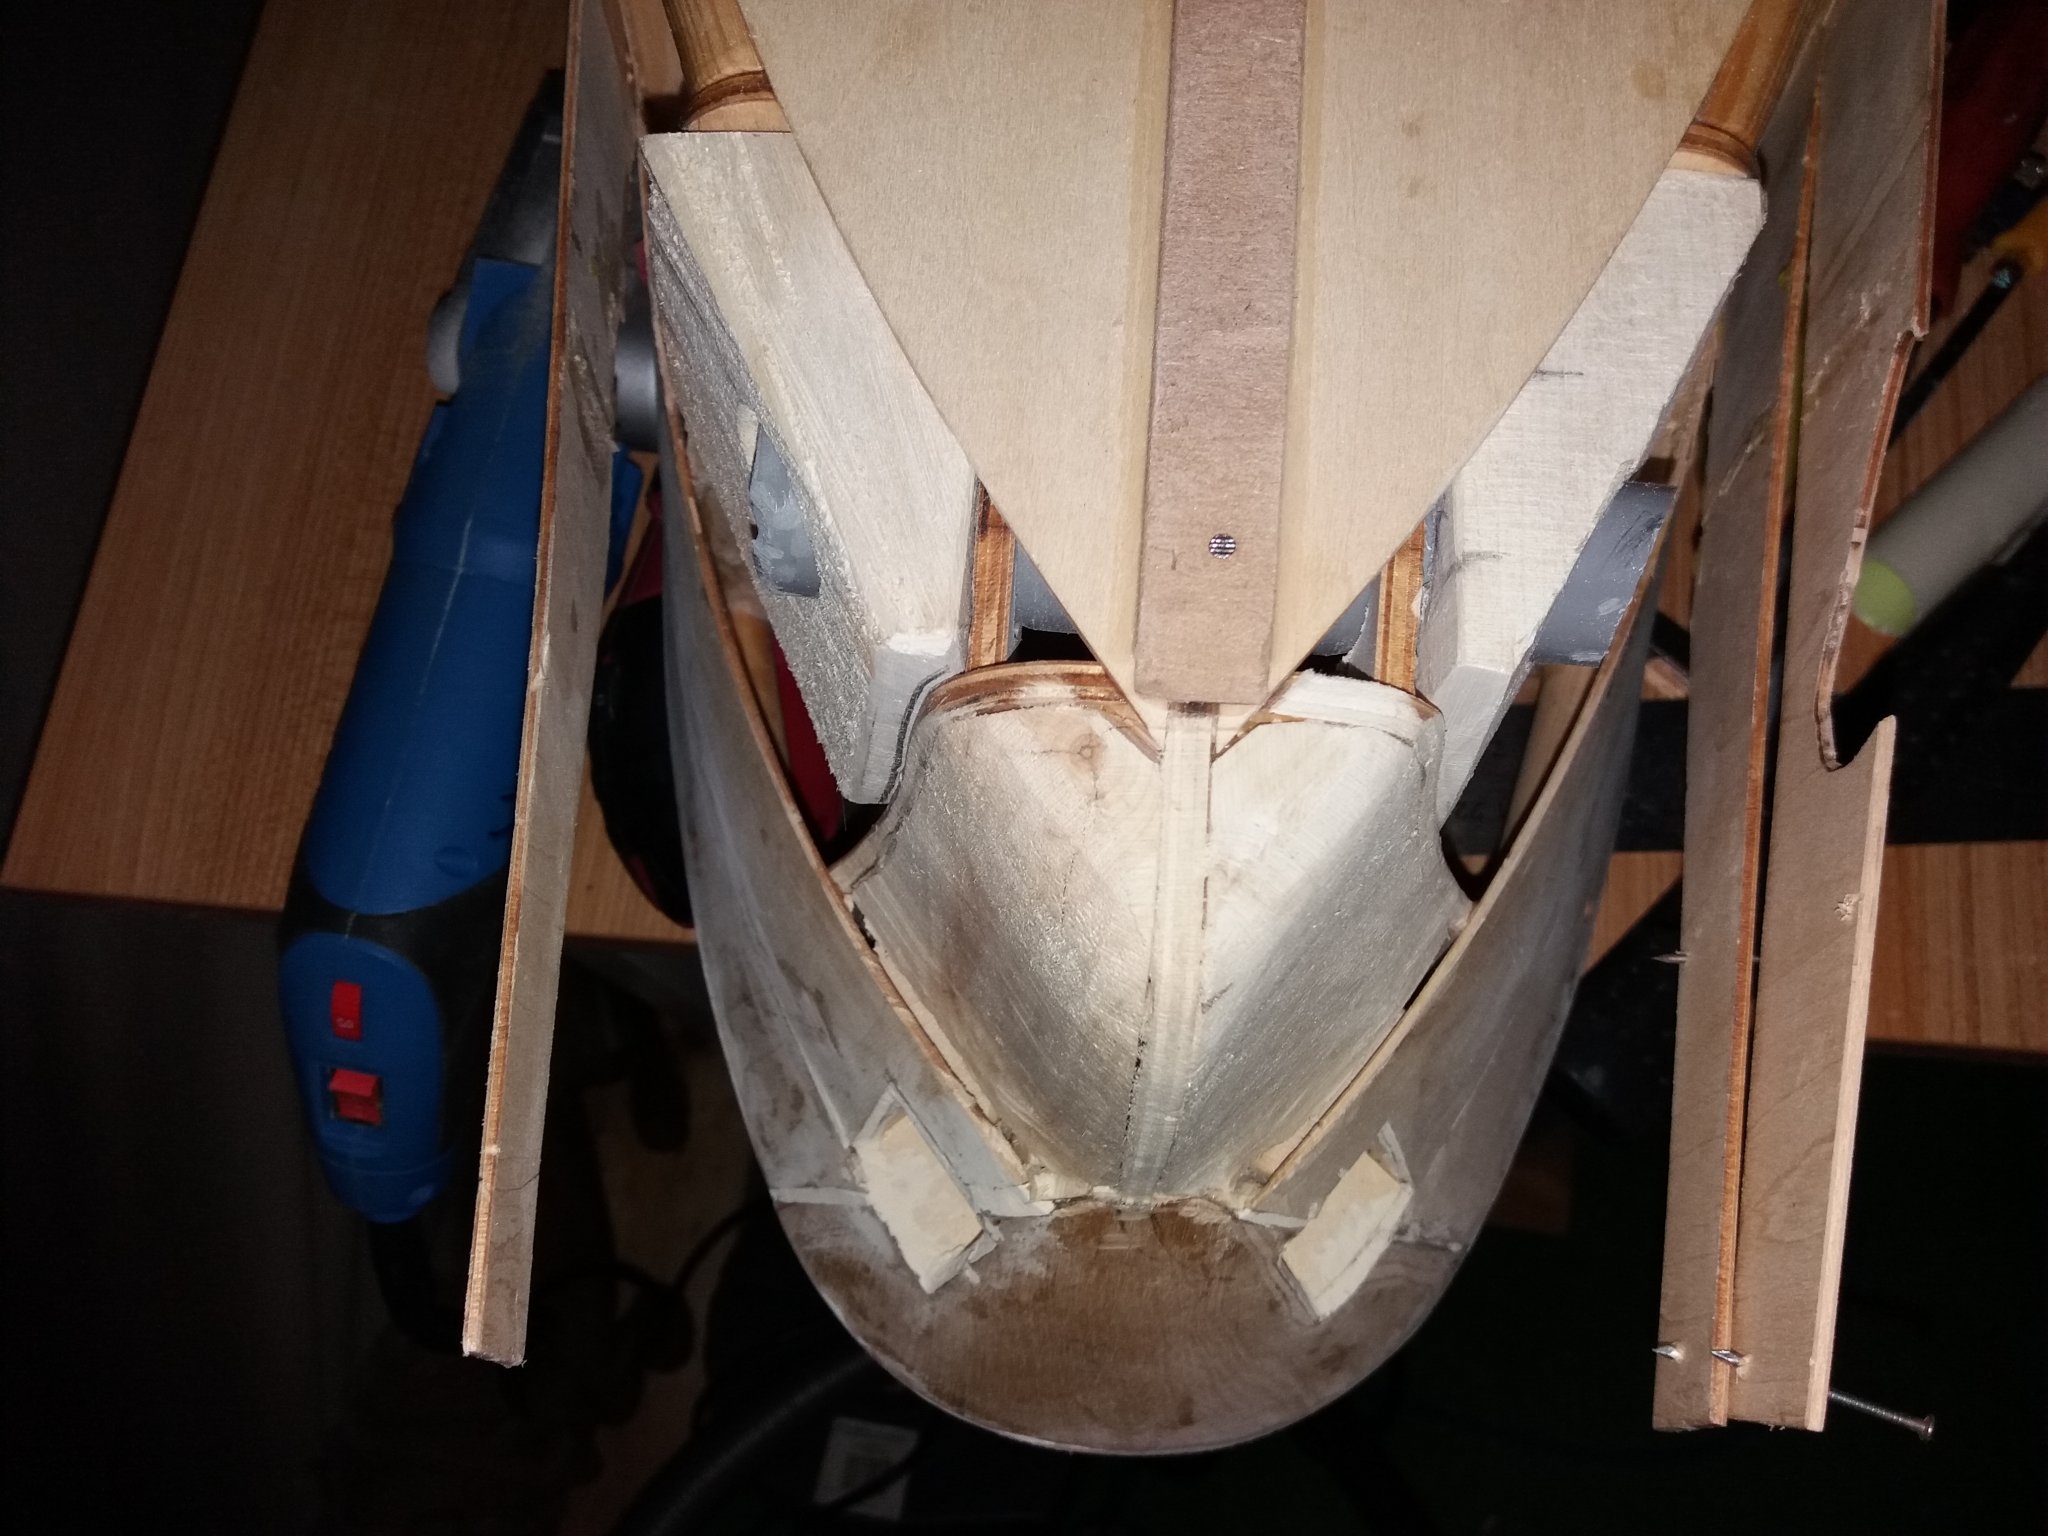
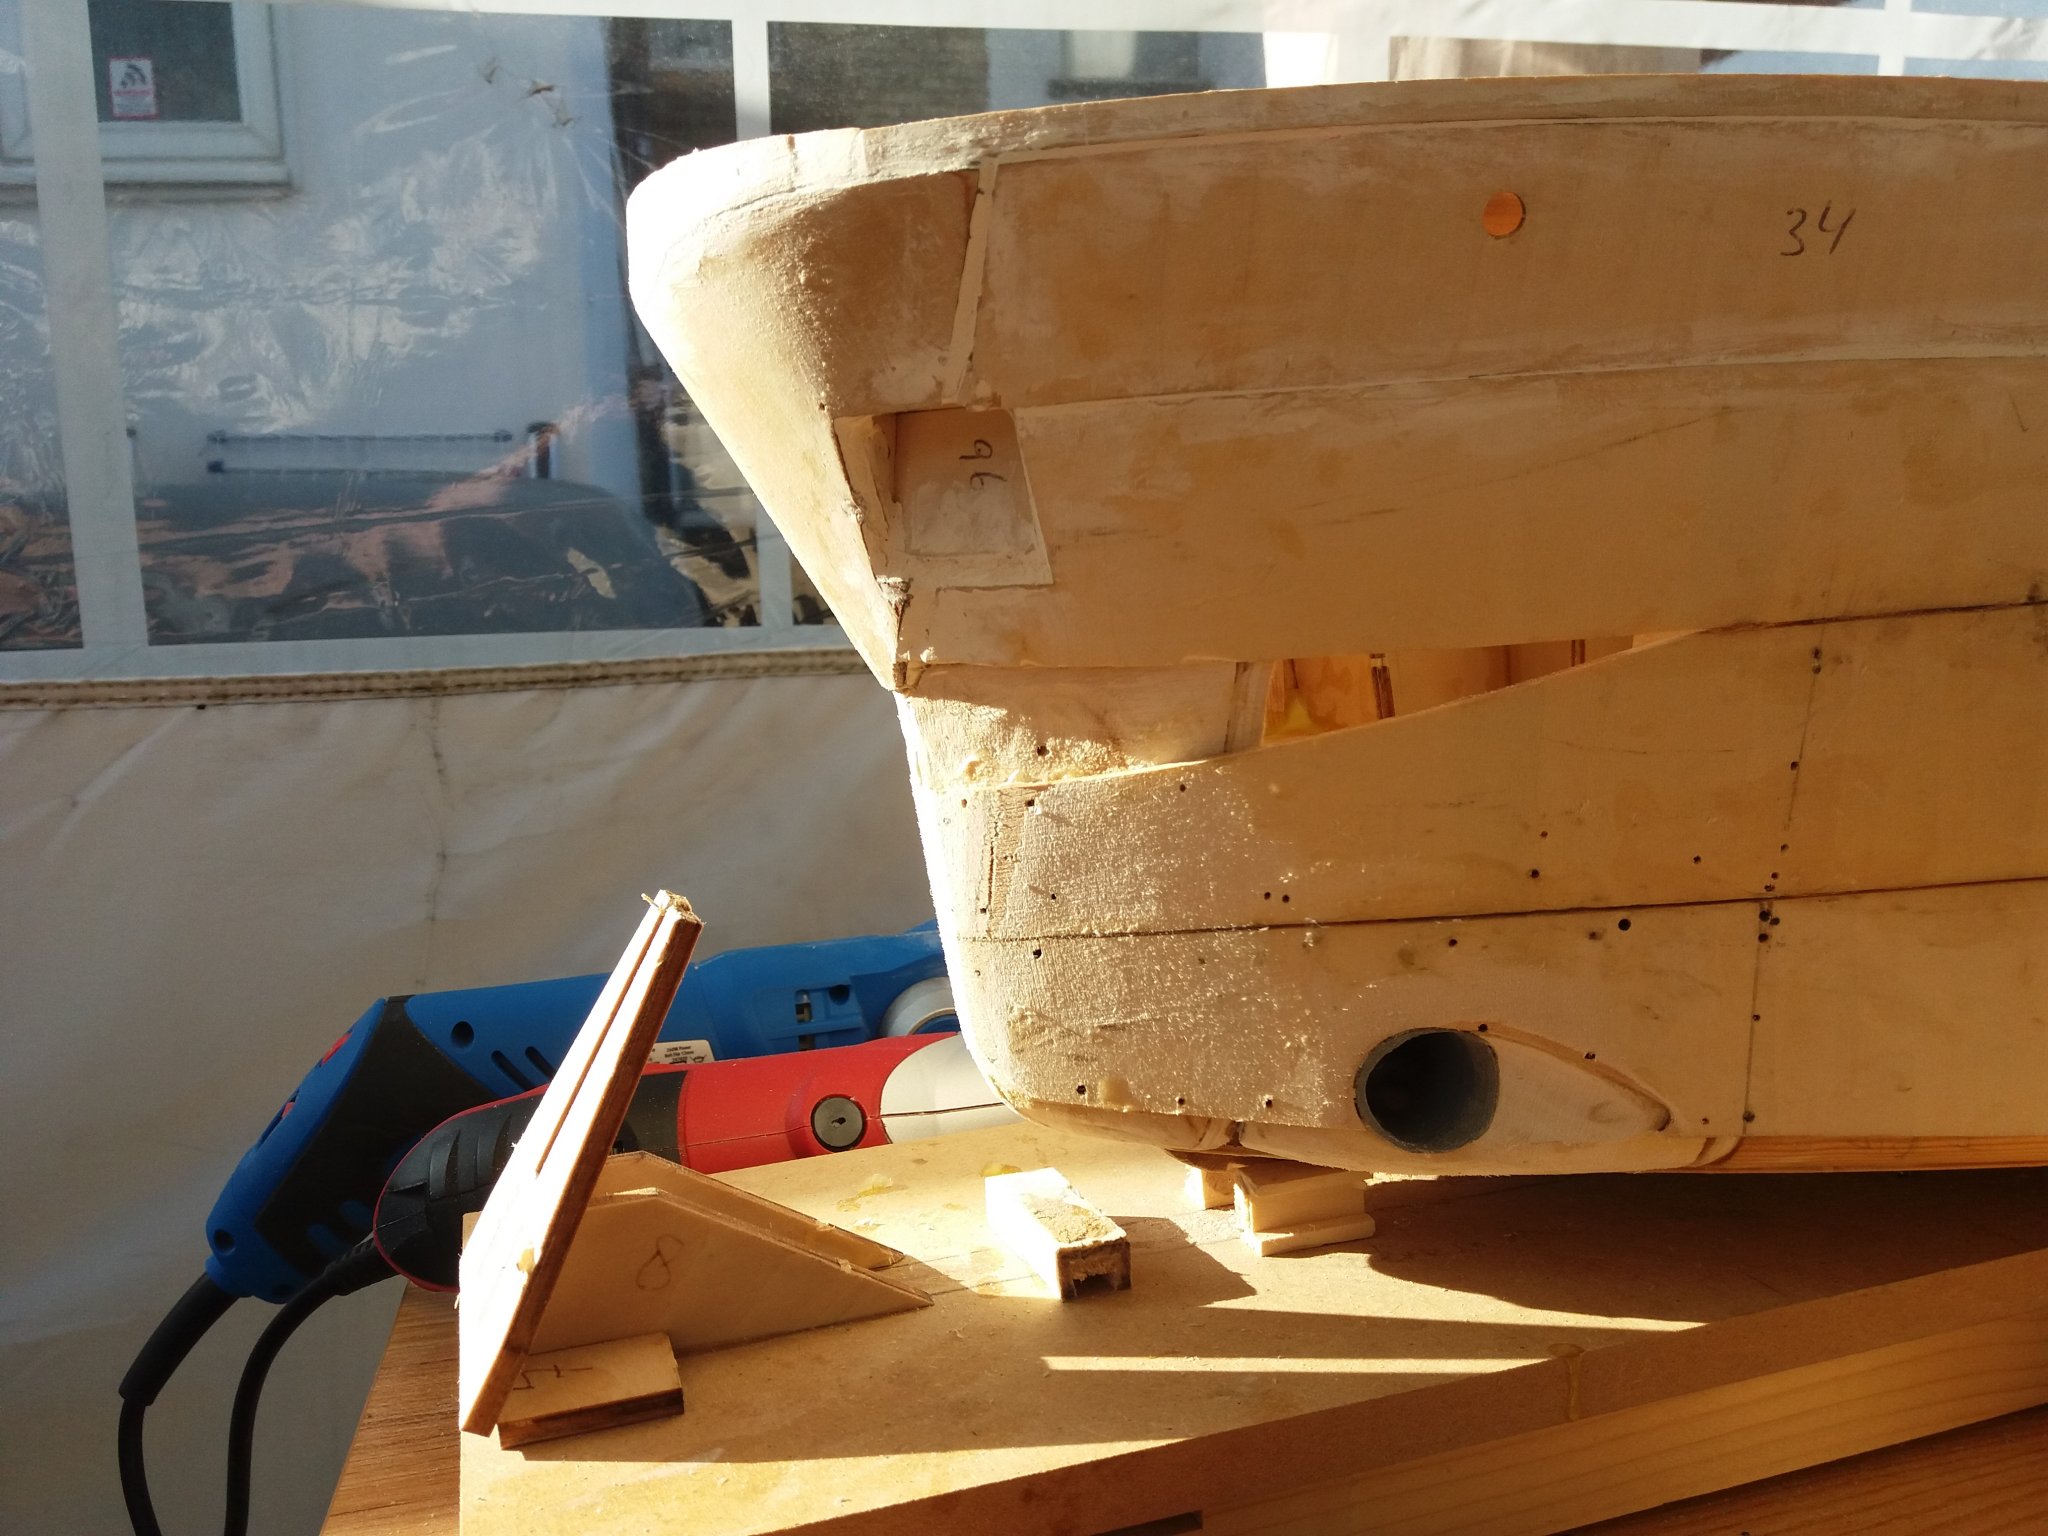
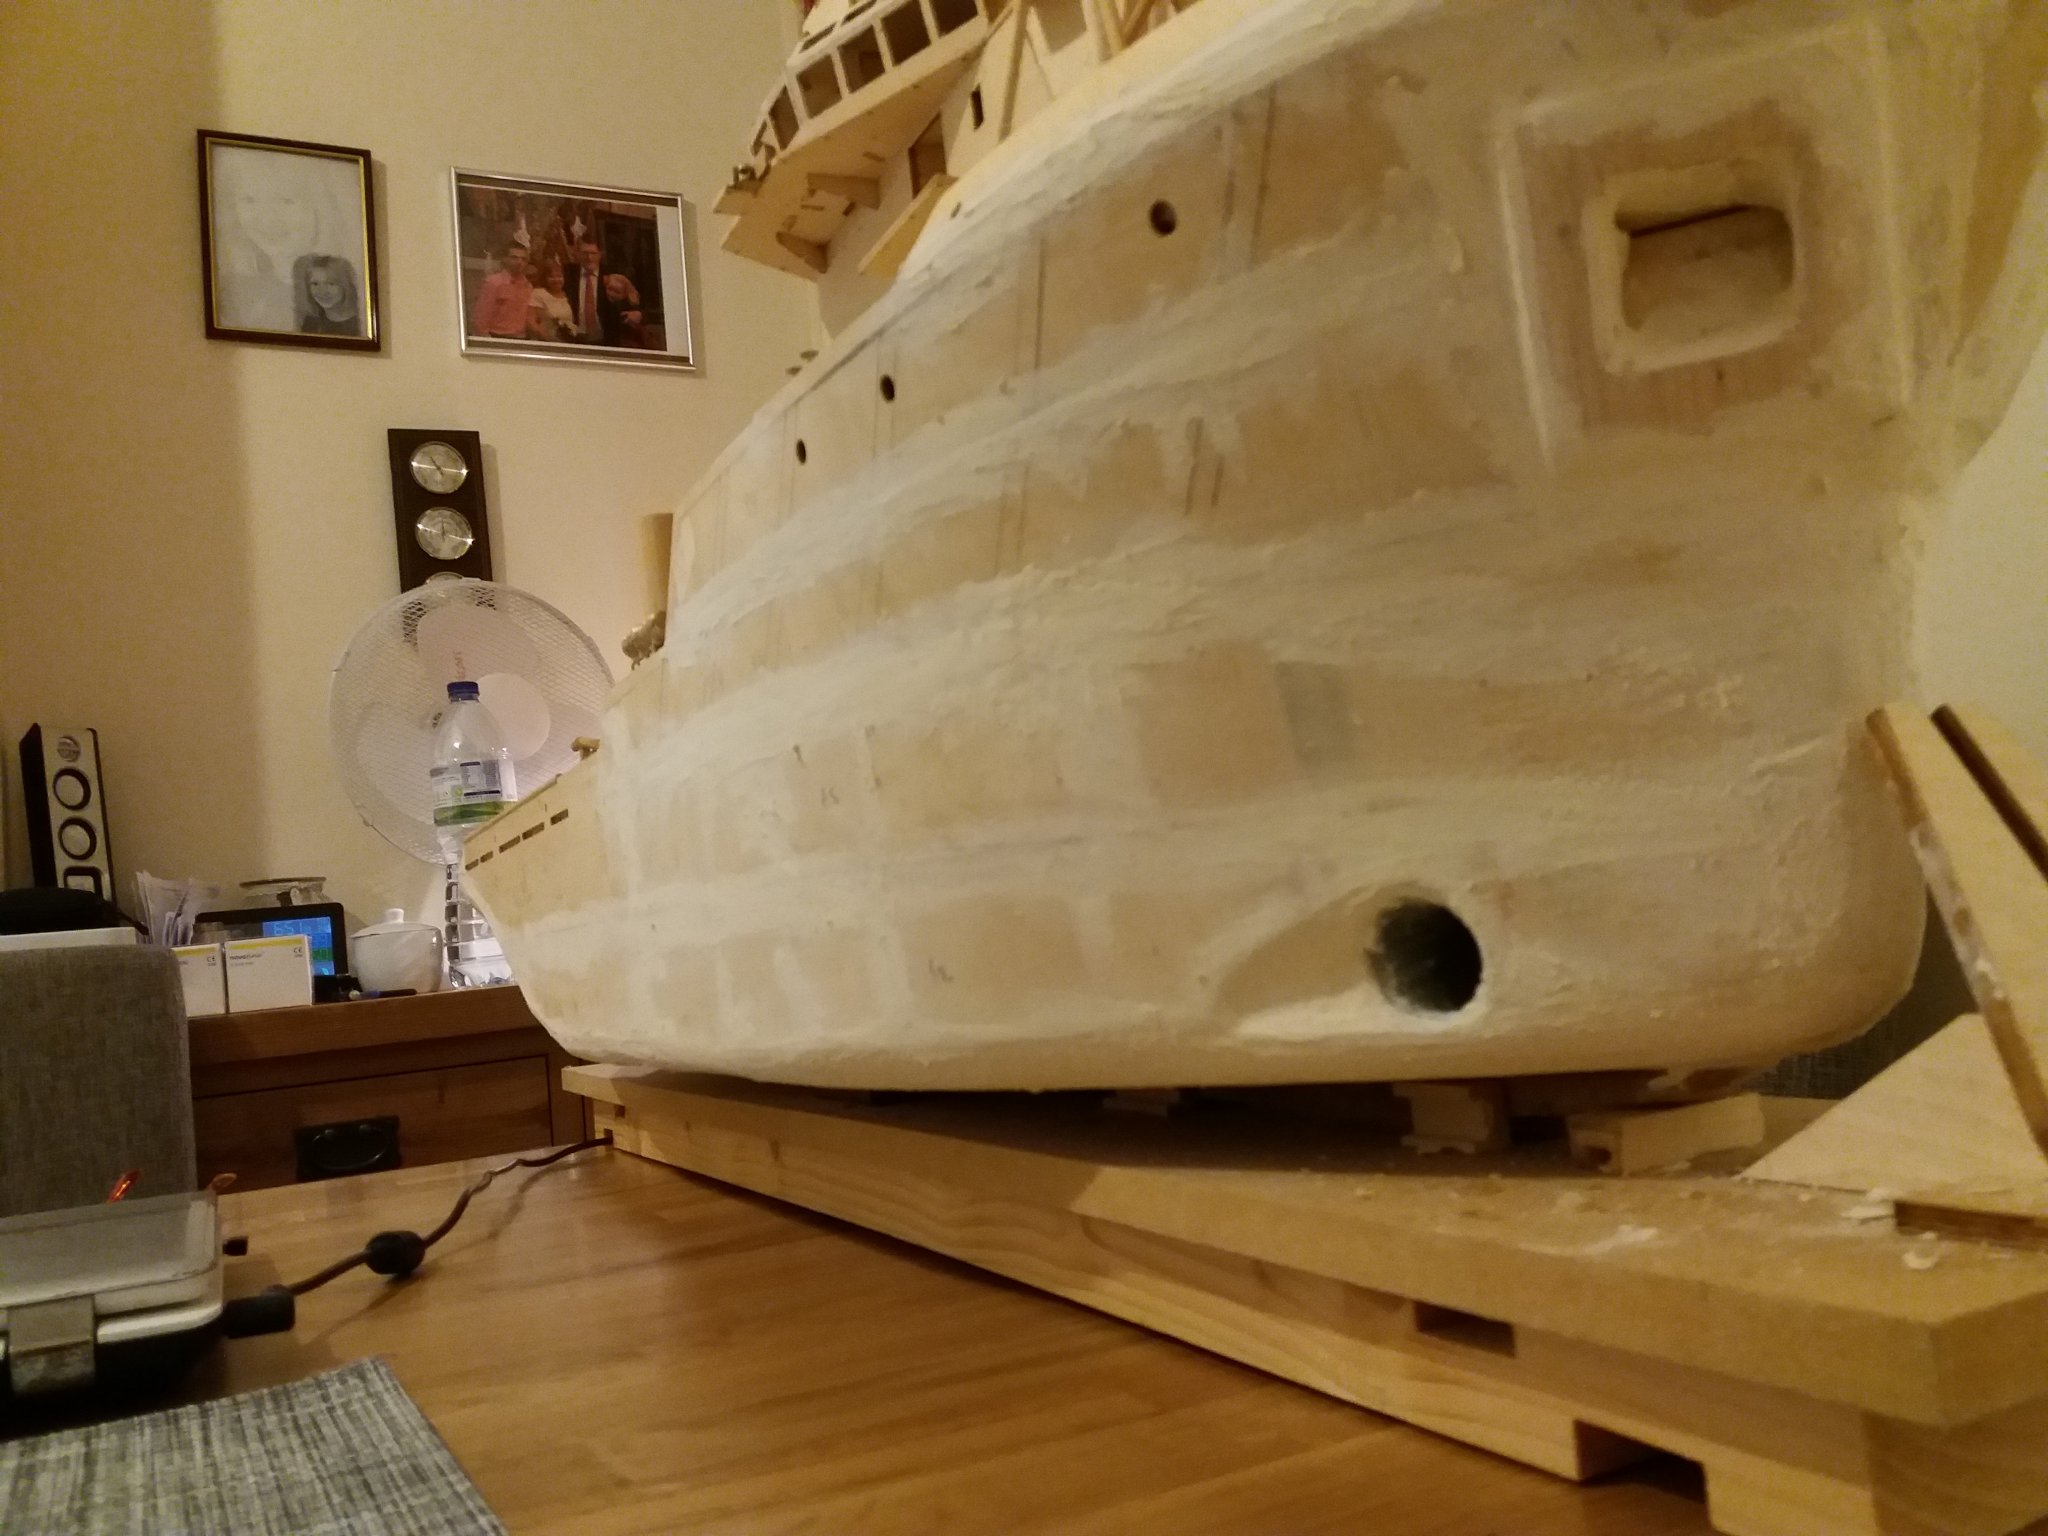
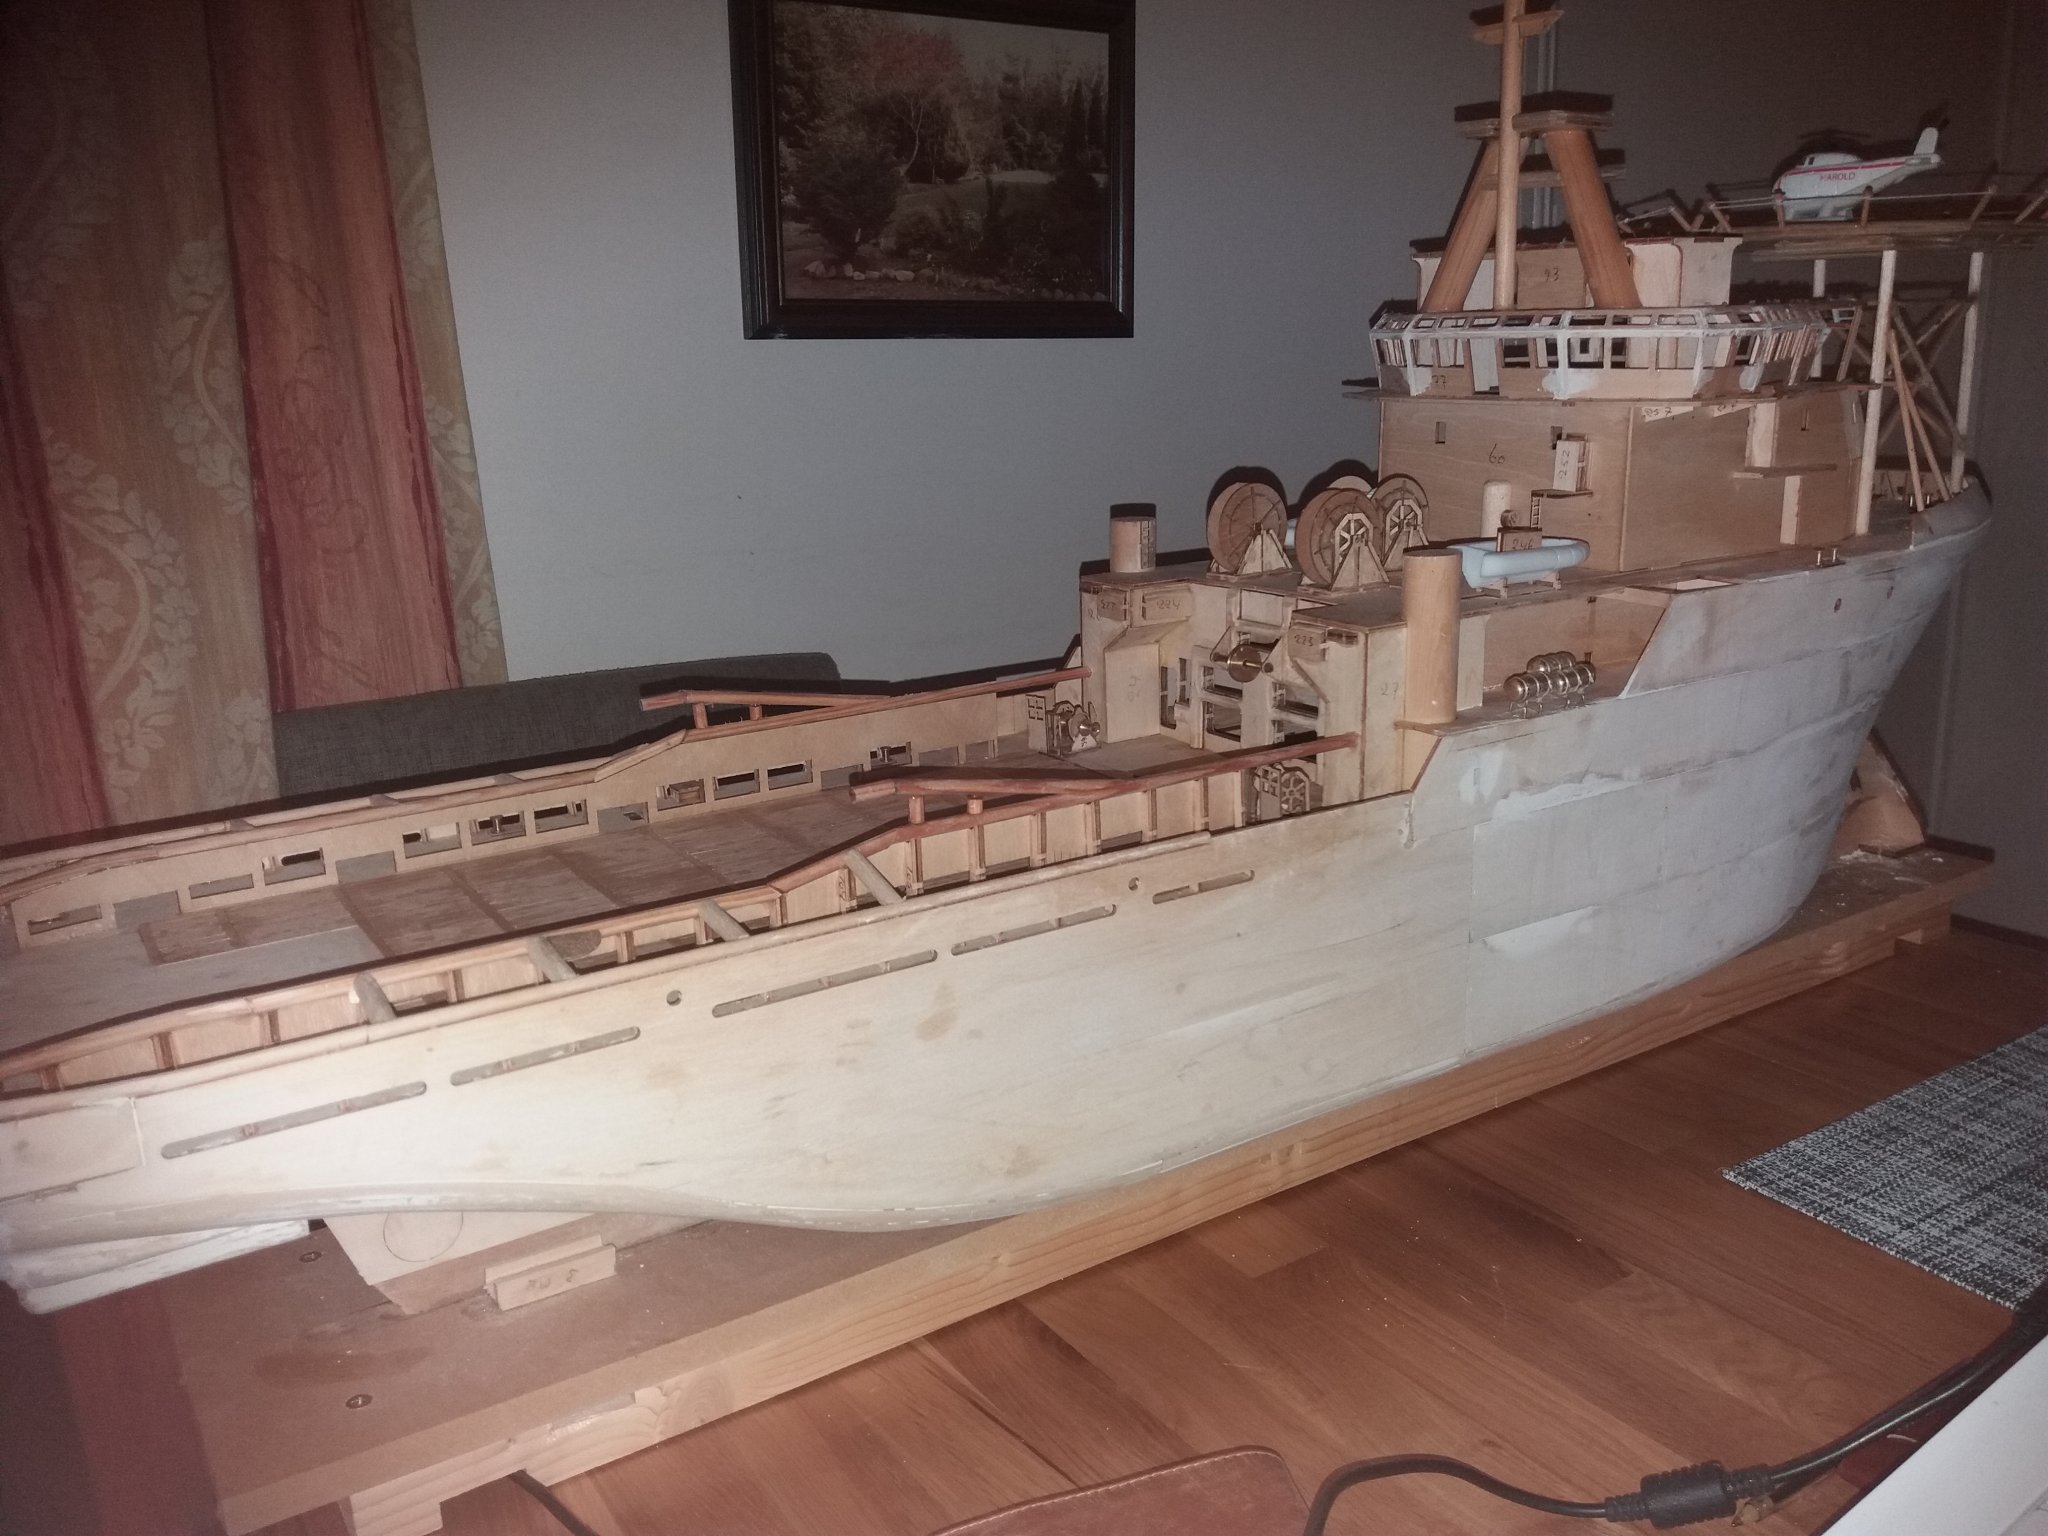
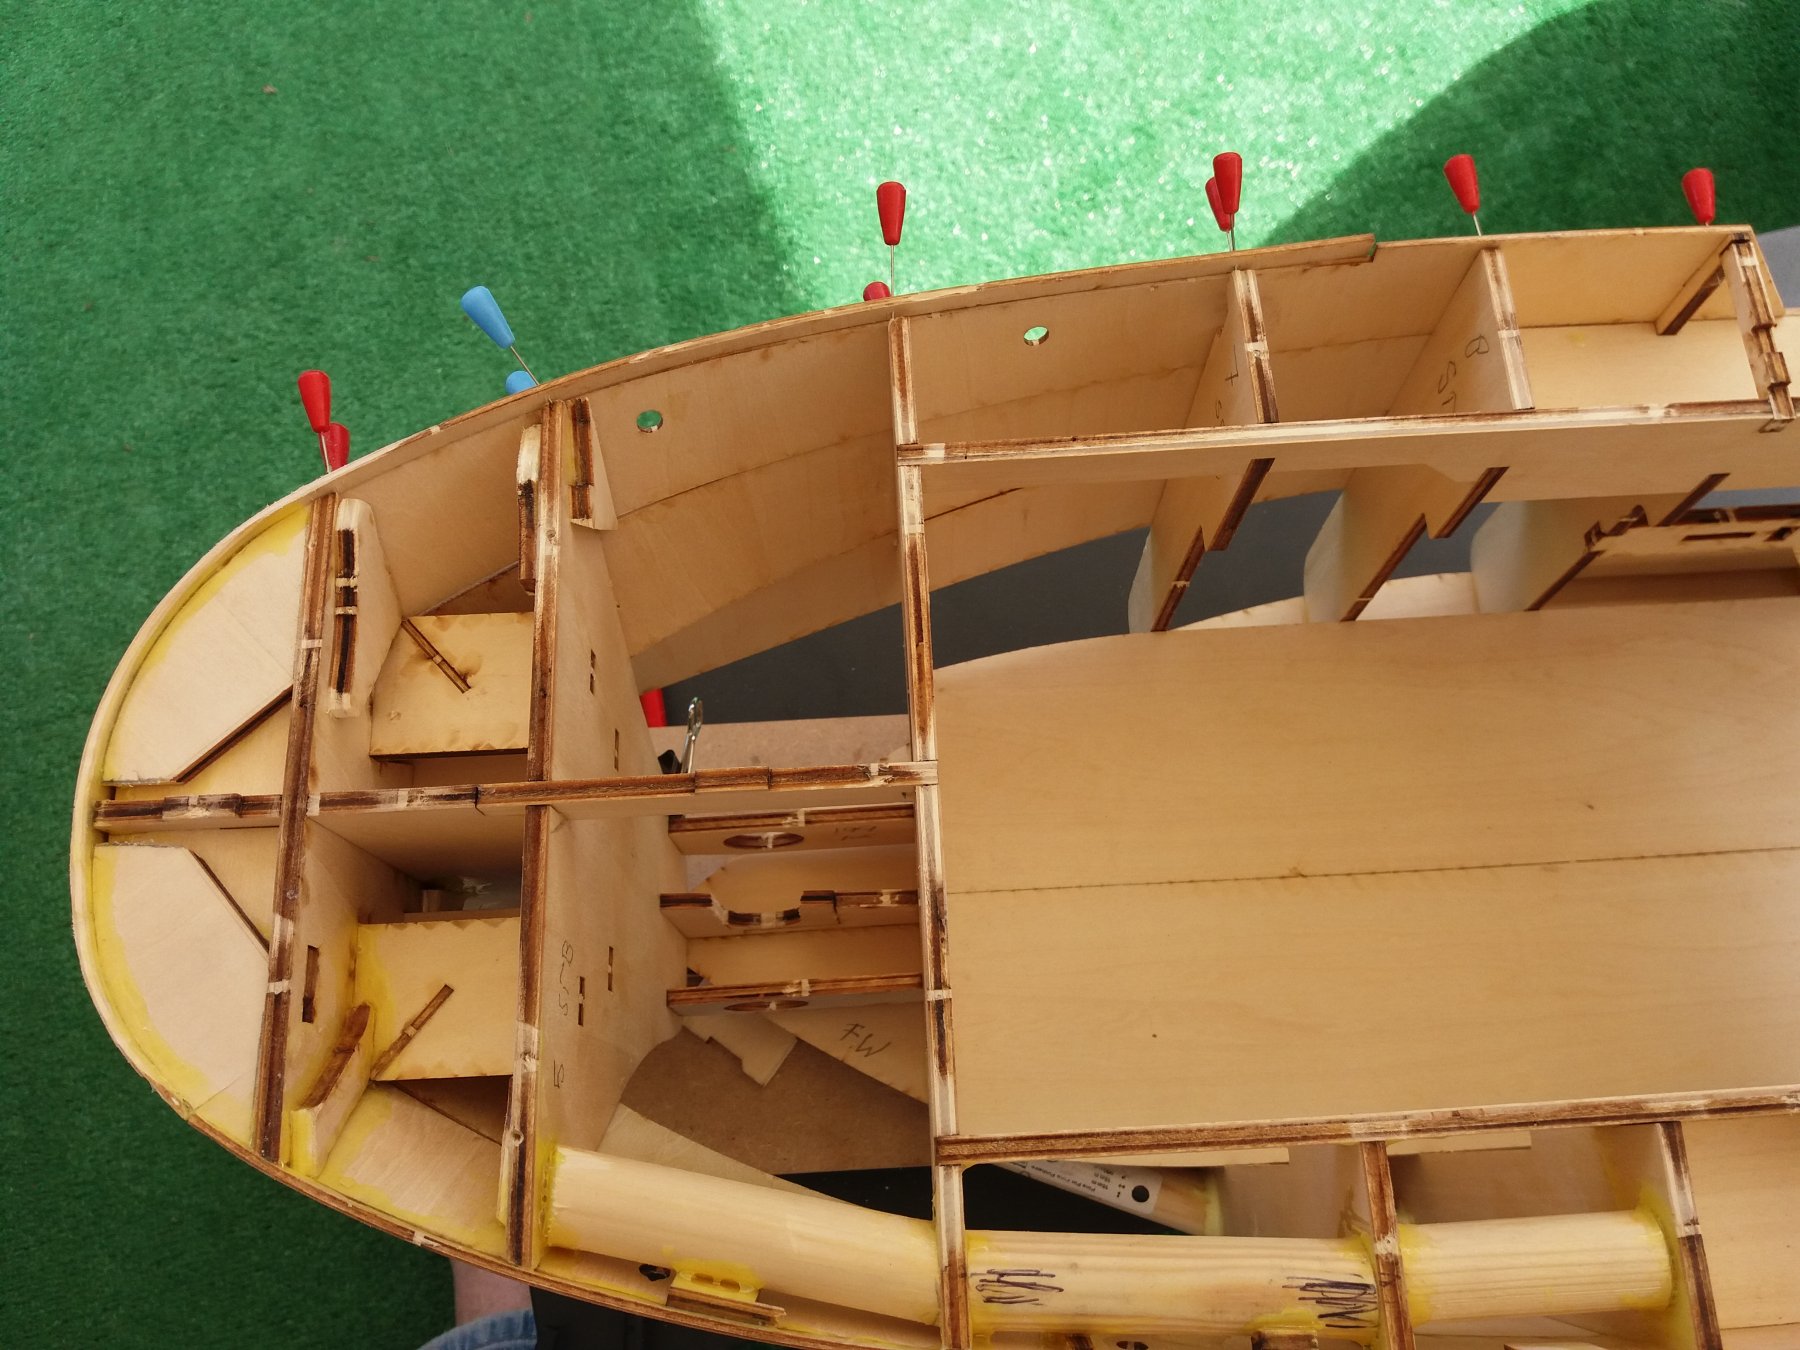
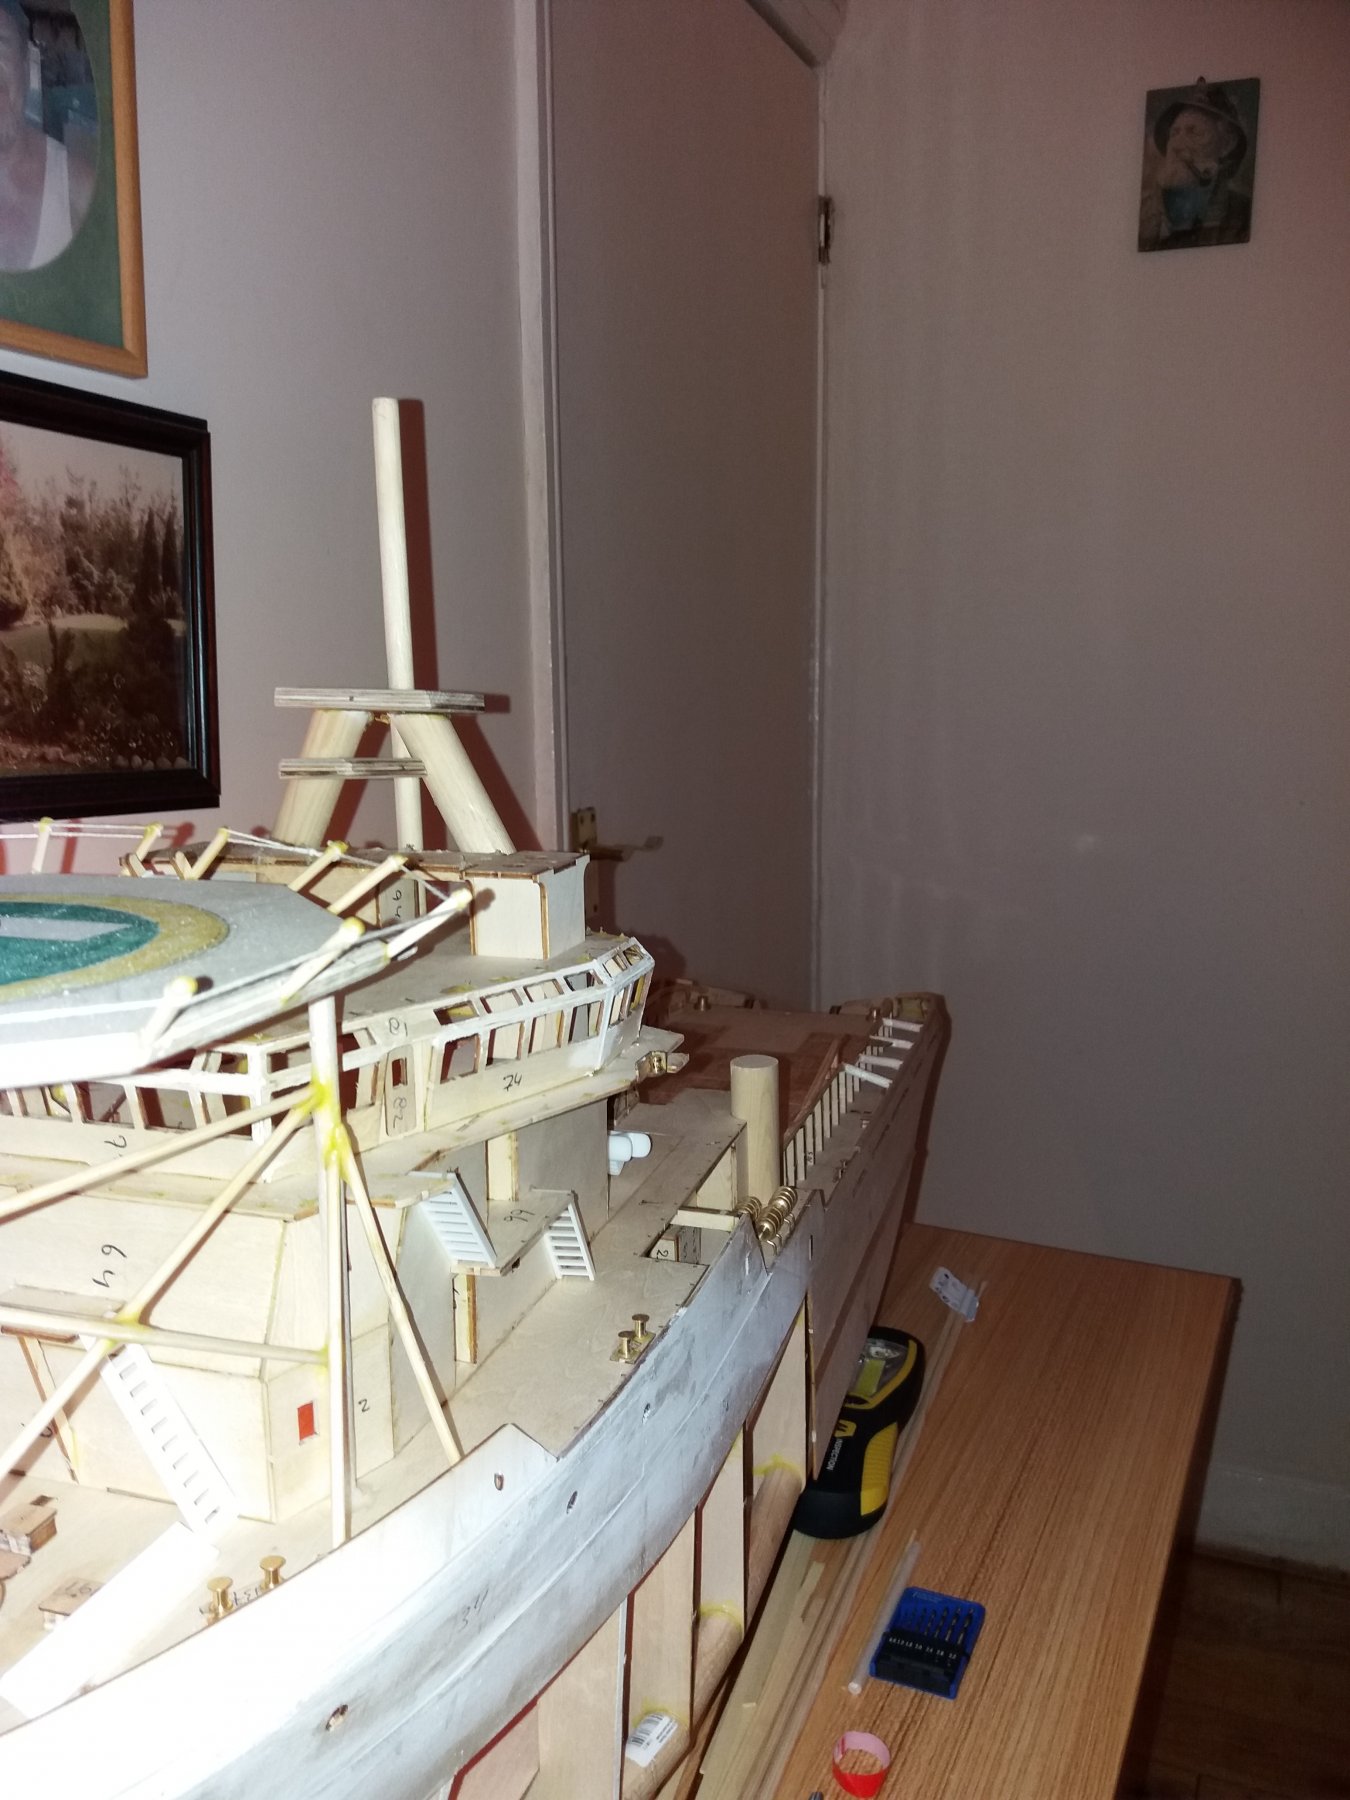
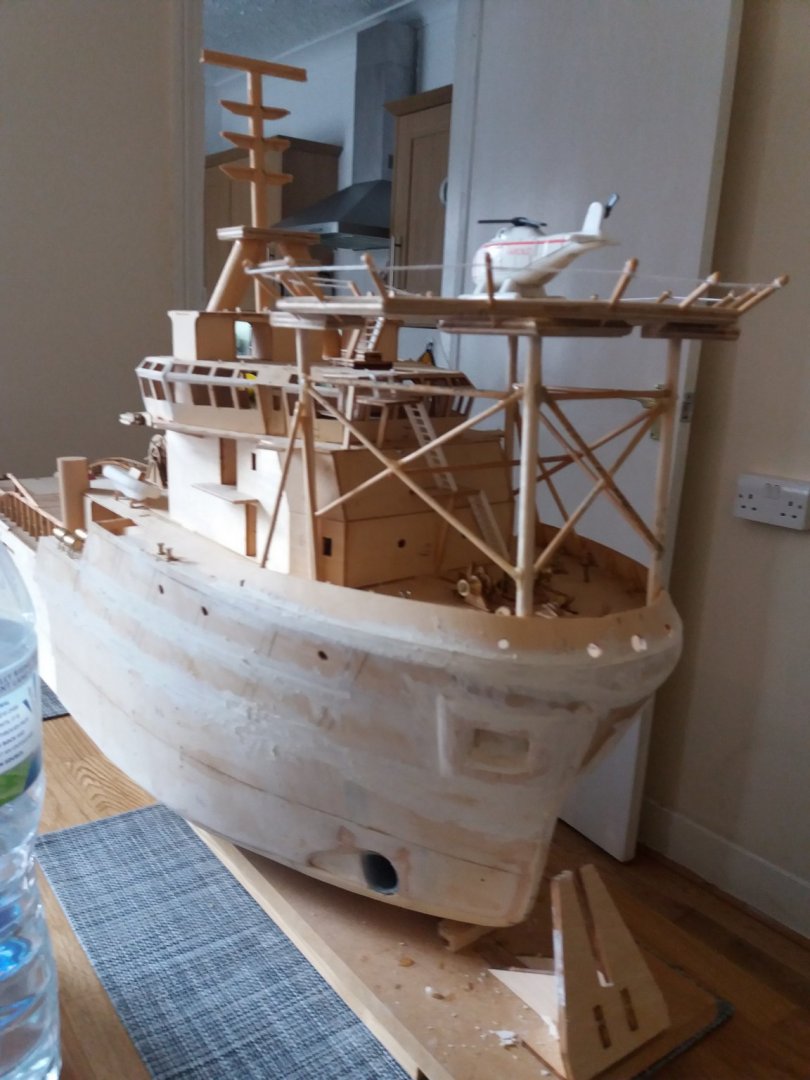
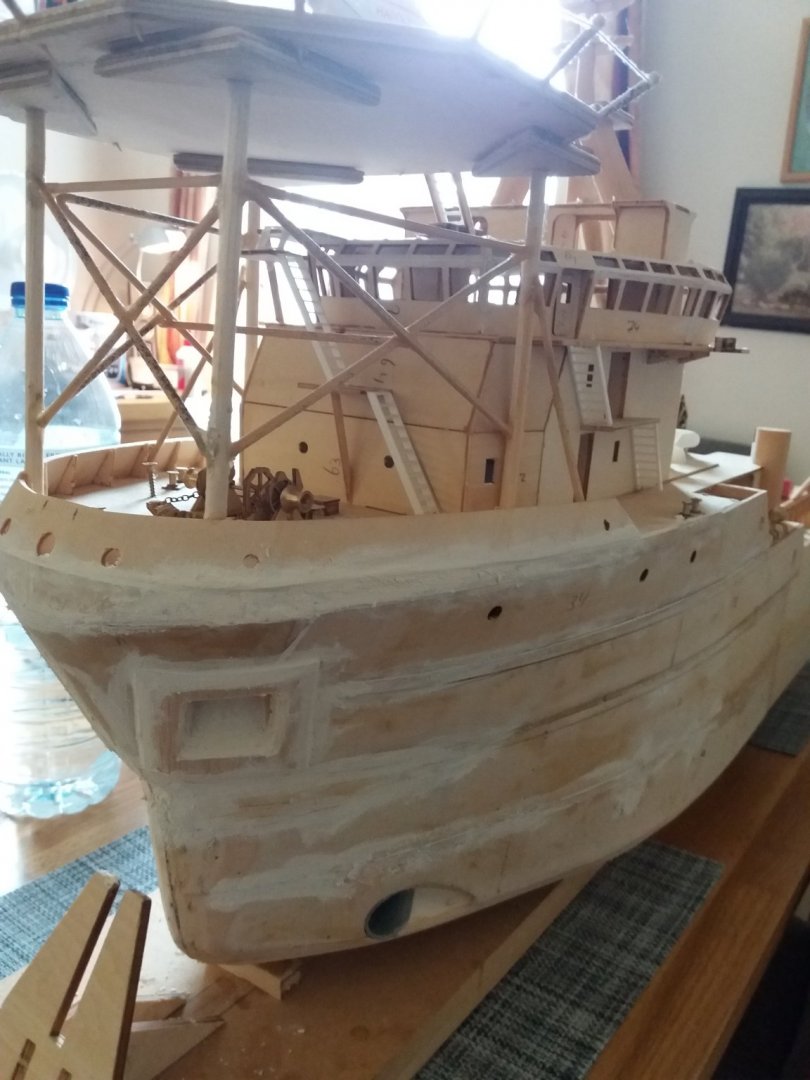
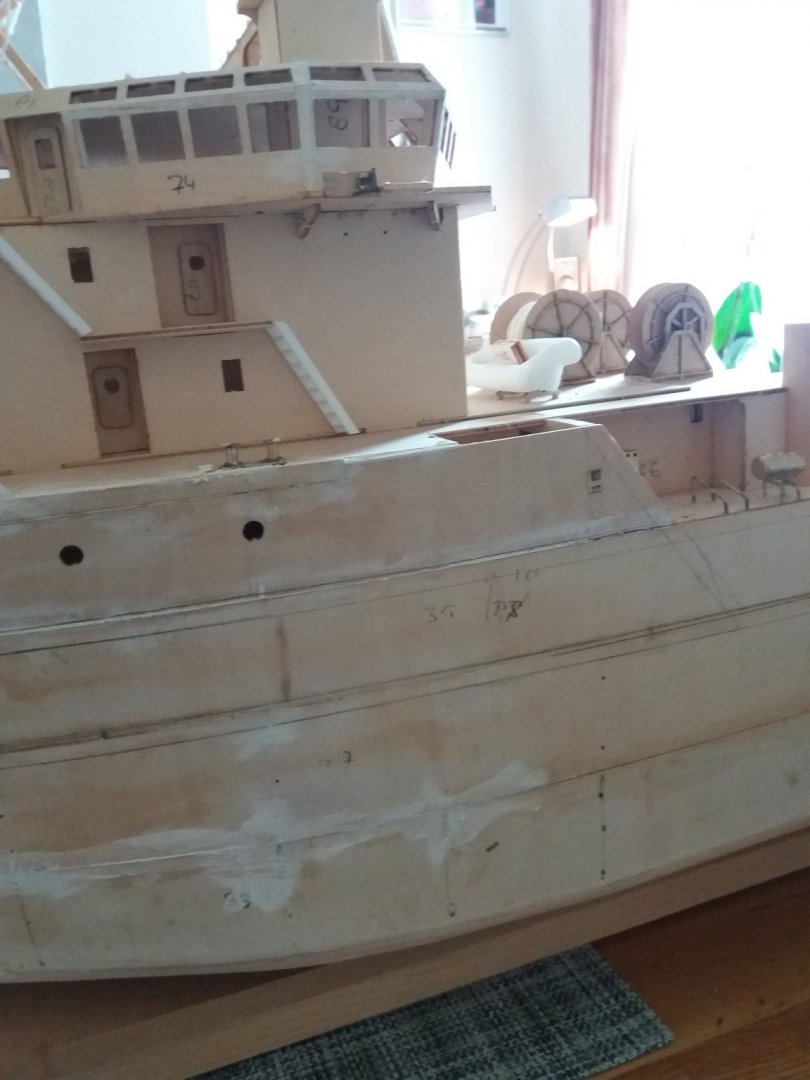
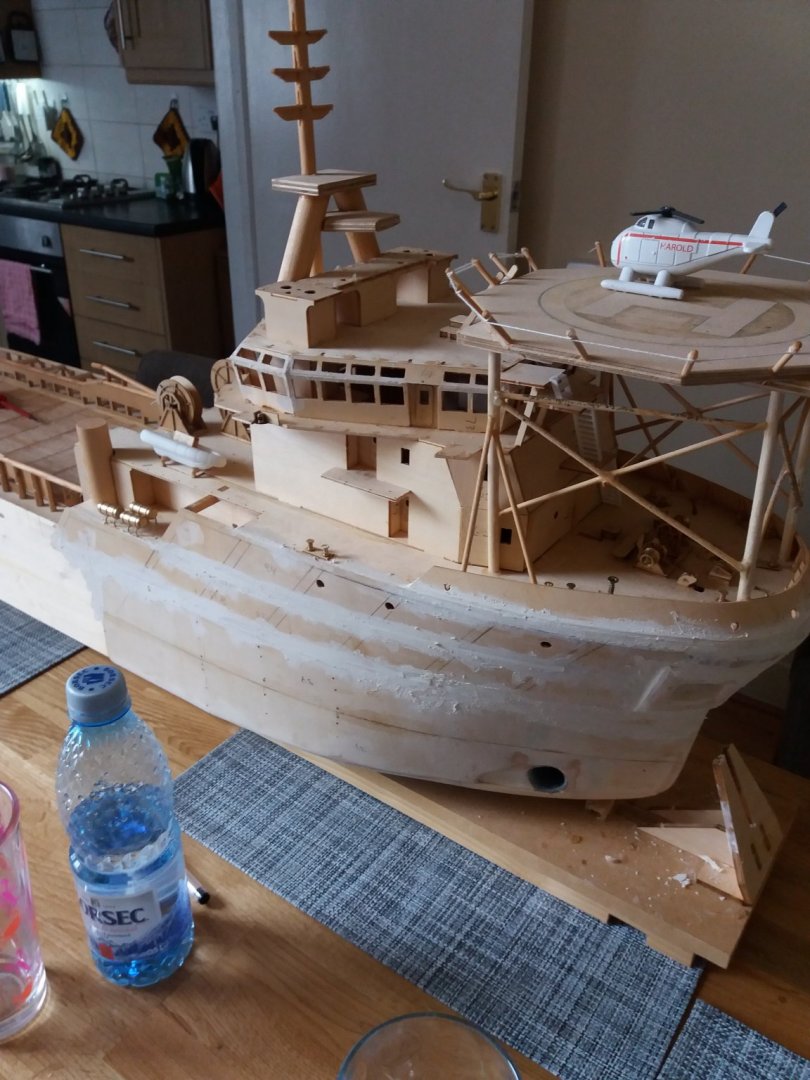
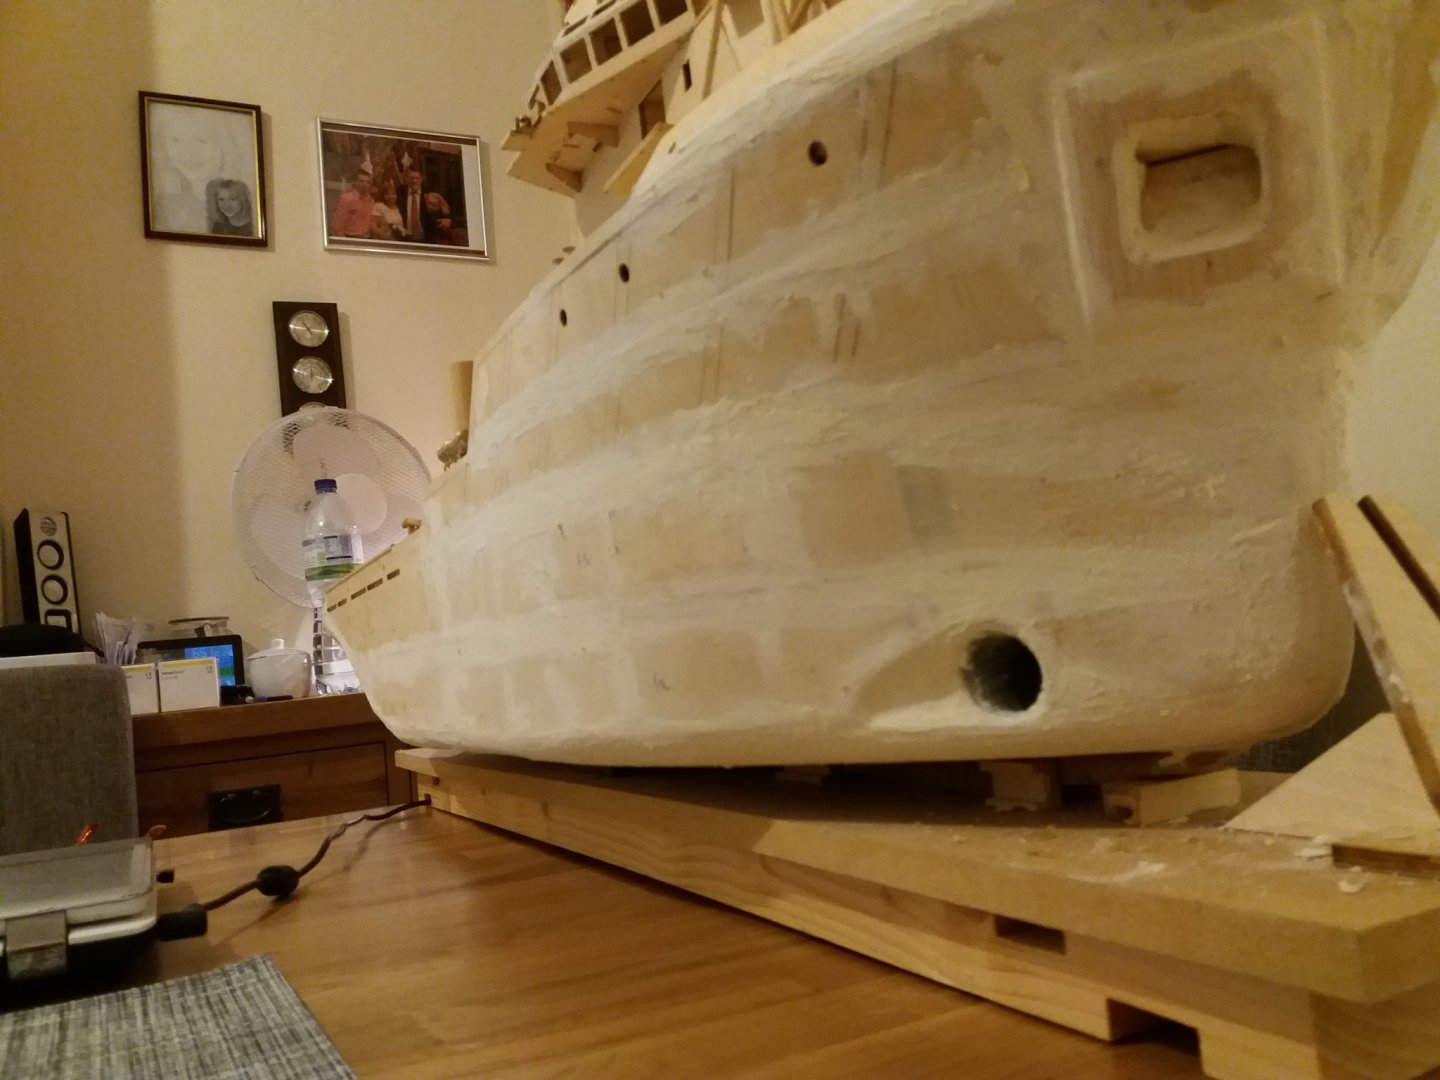
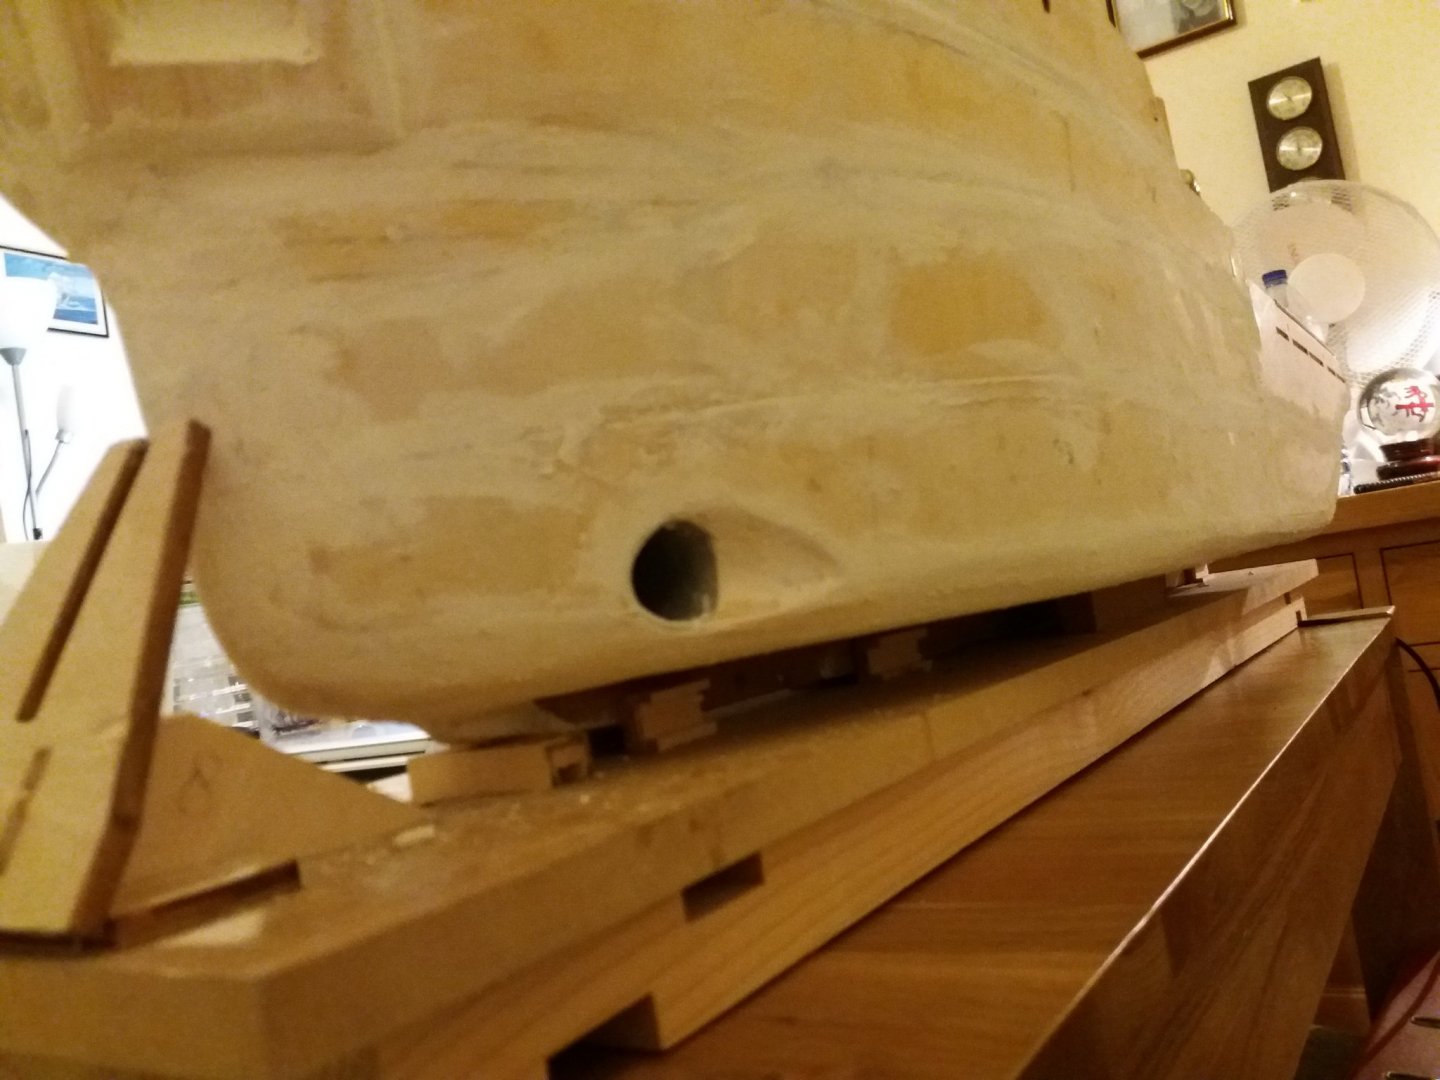
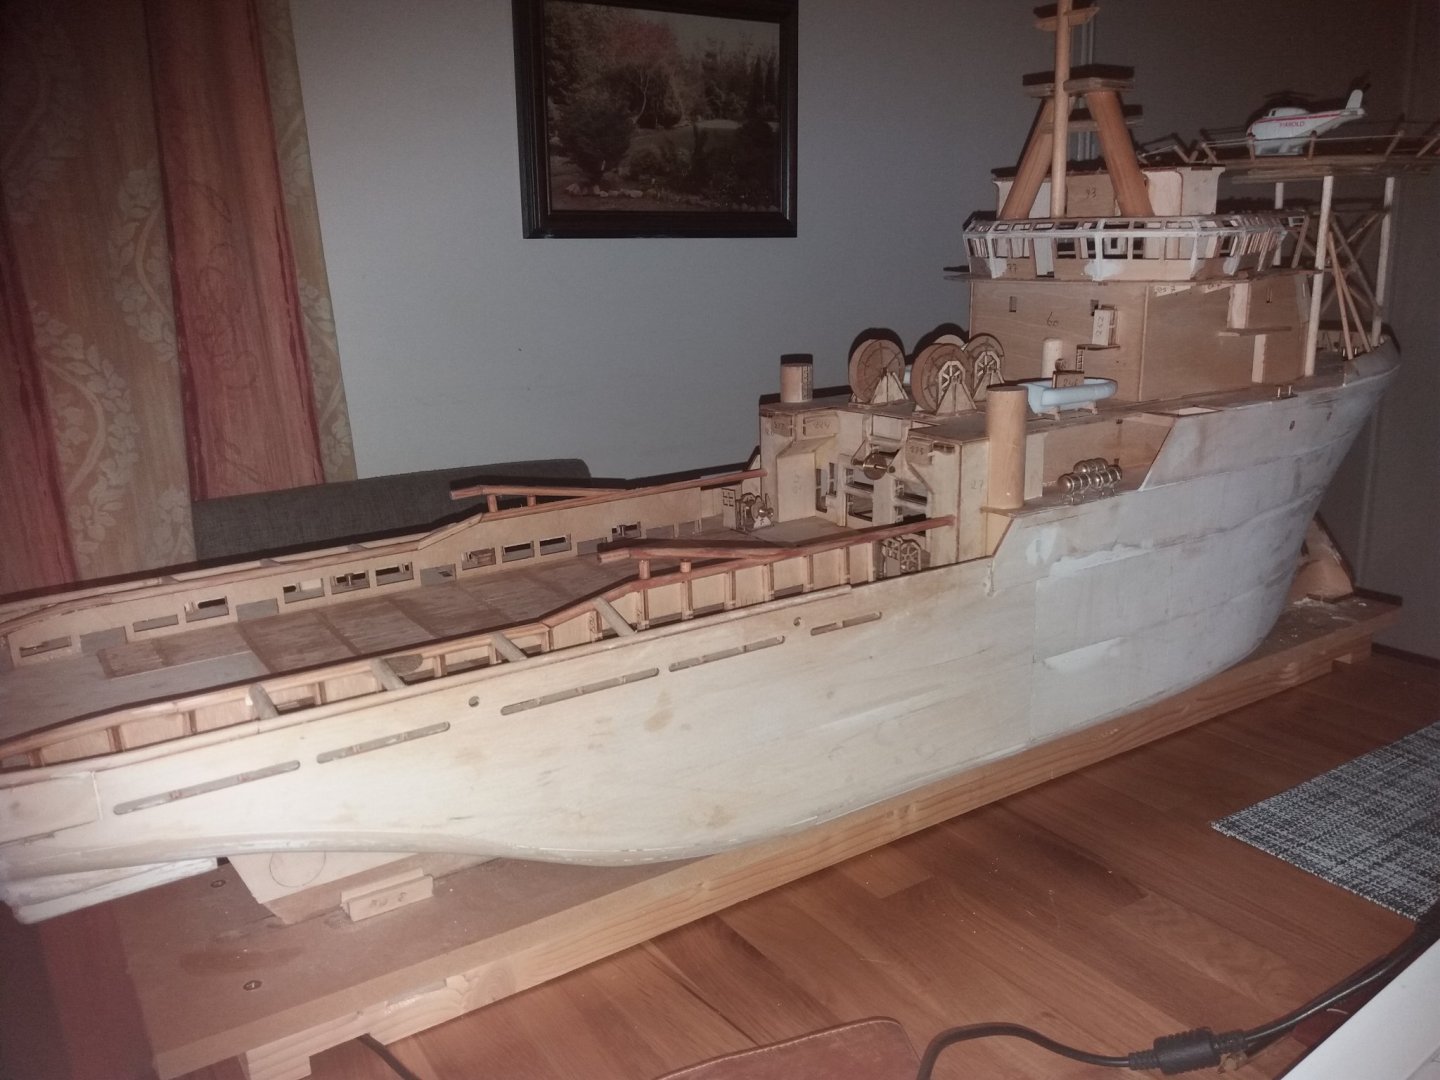
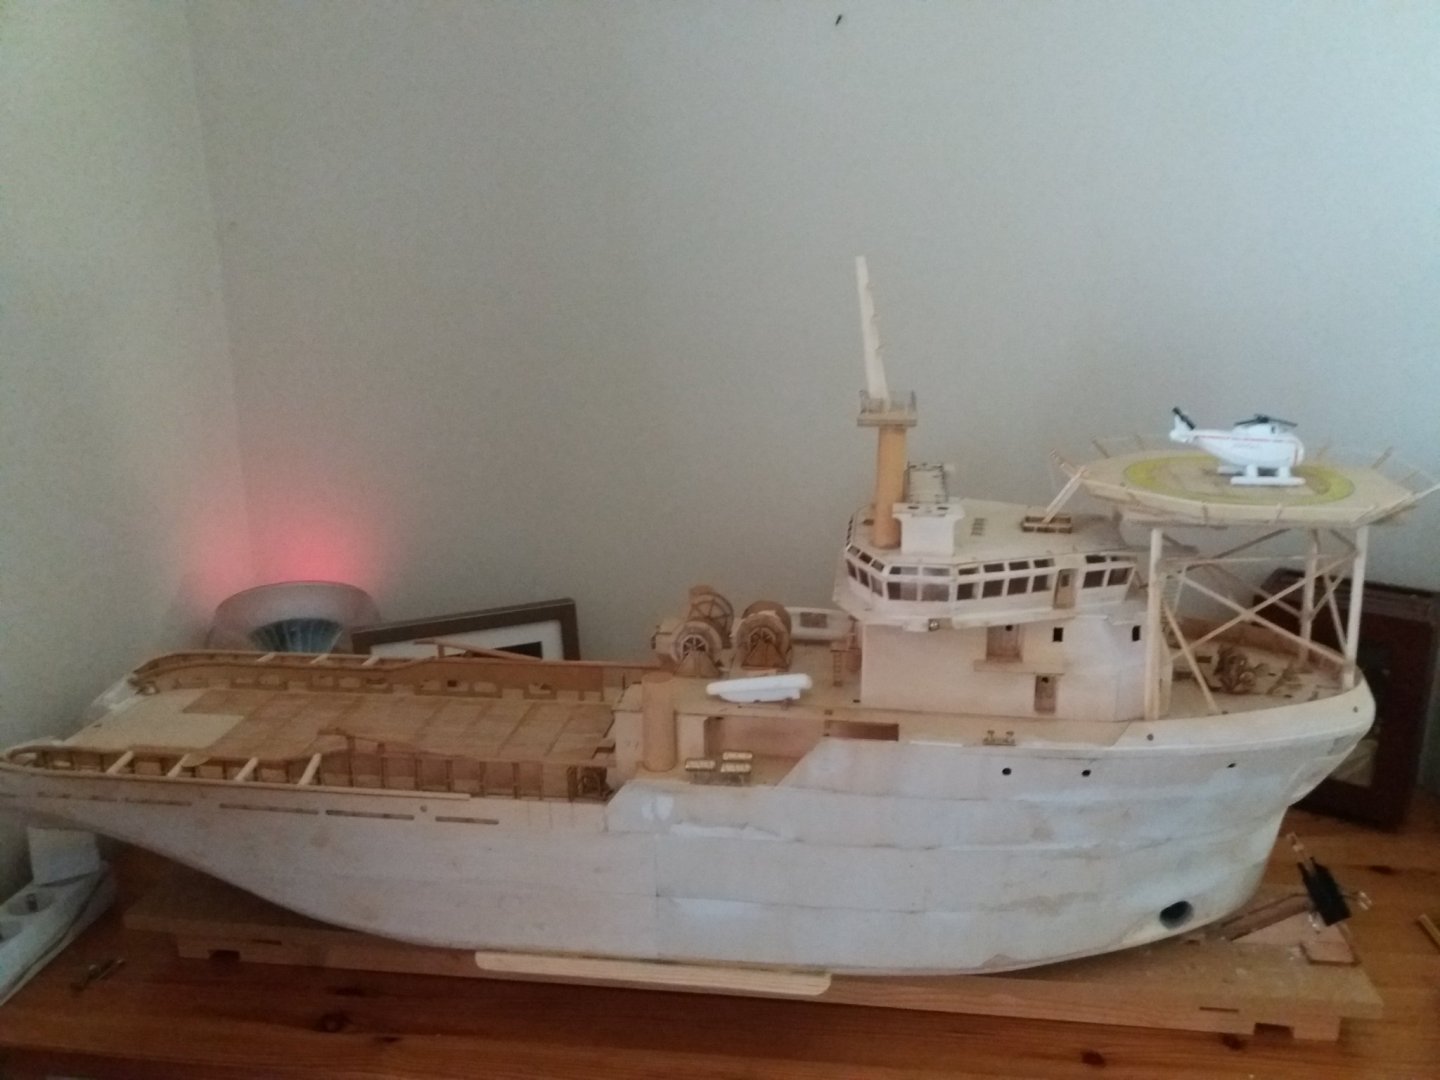
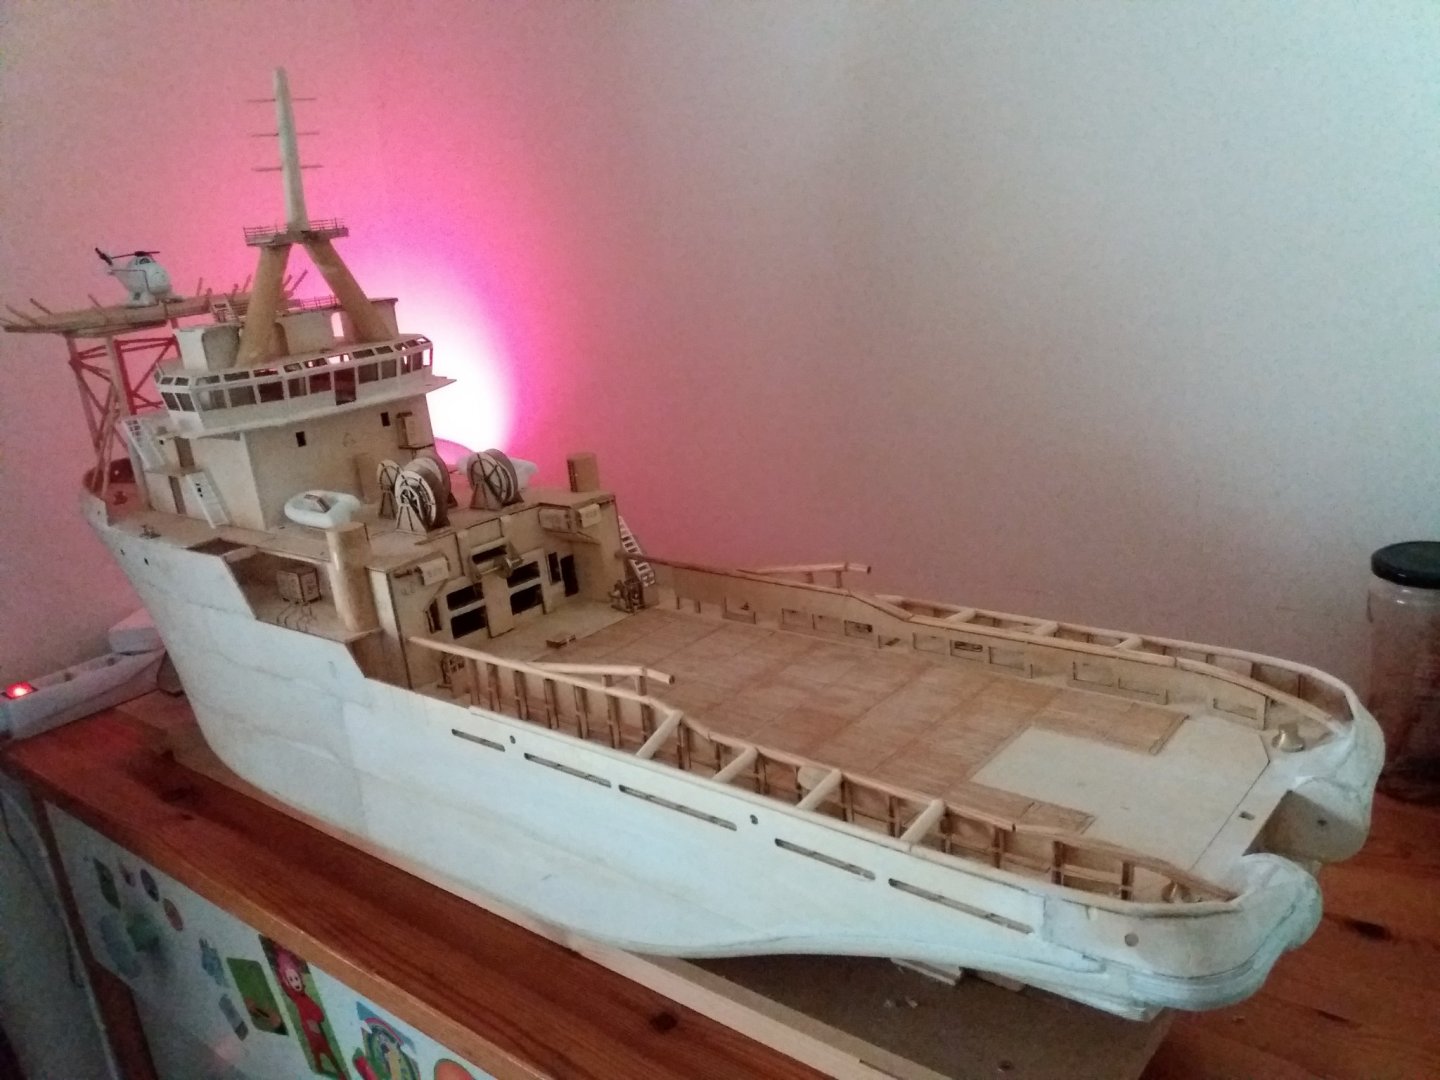
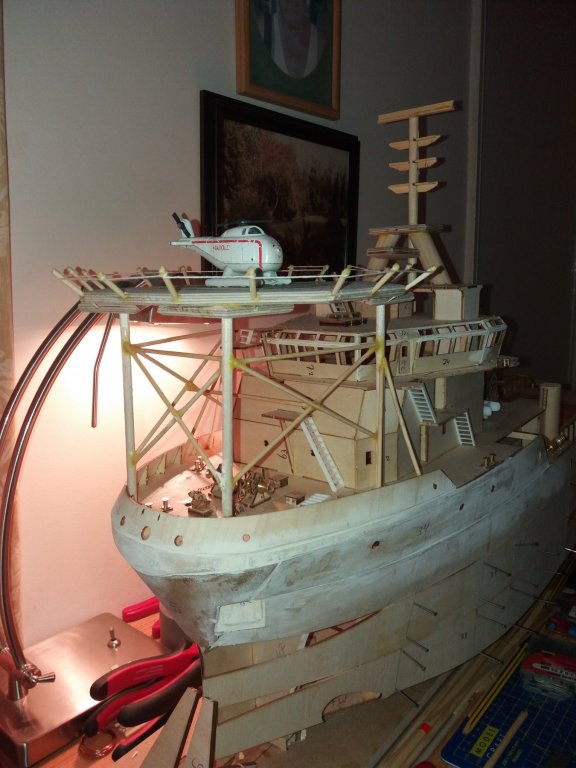
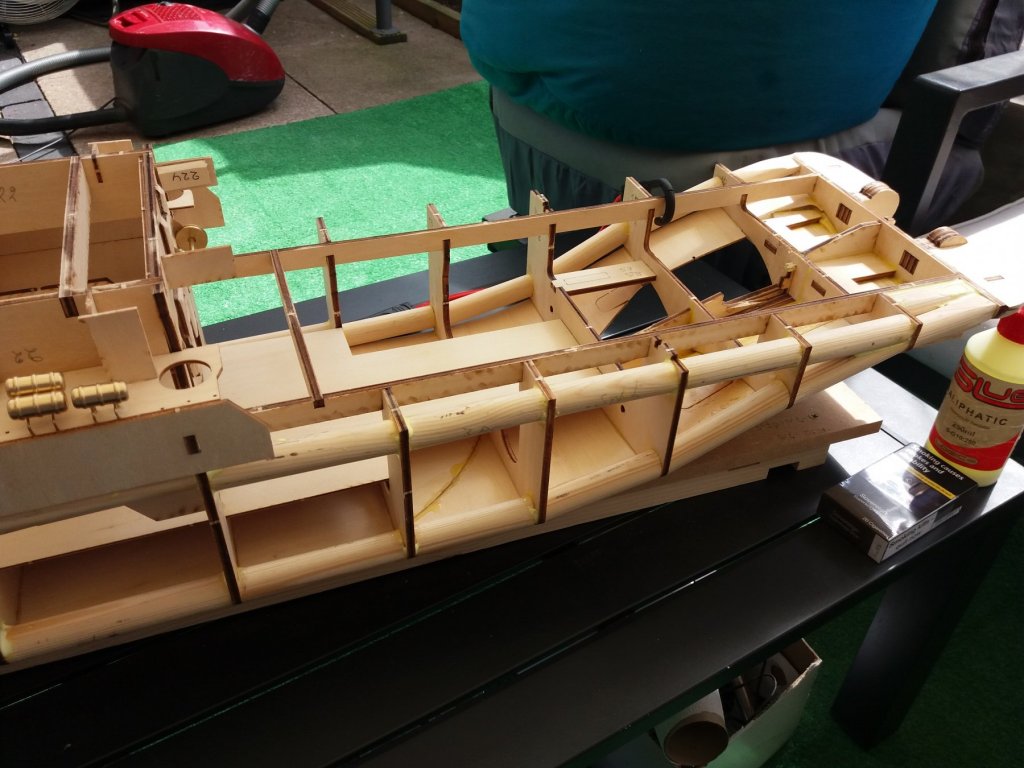
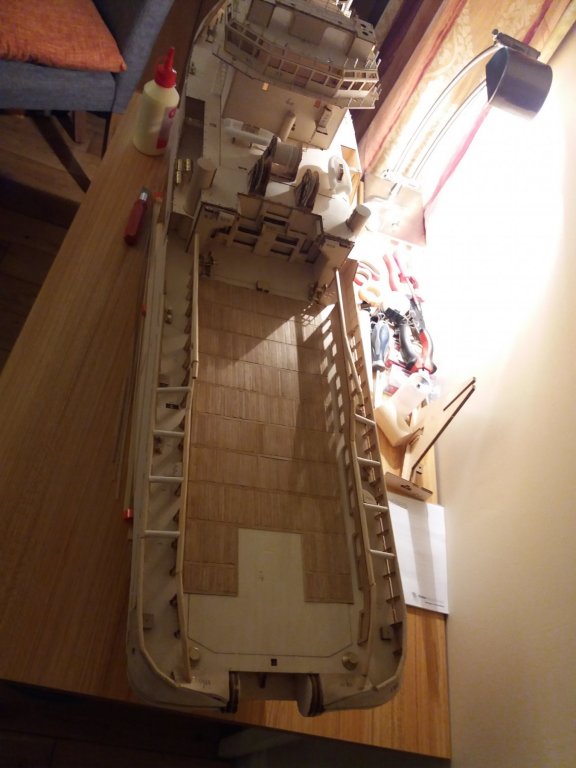
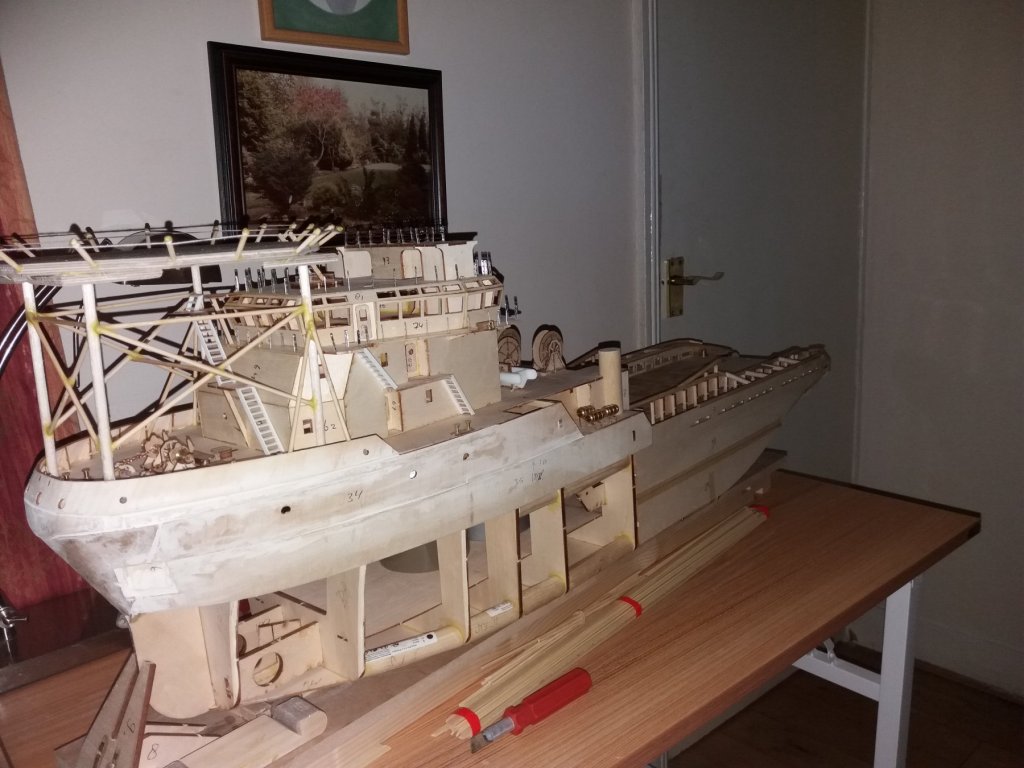
It has been a while due to domestic problems home and other issues but I'm back and want to finish the built.I did some other changes as well as you will see on the pics, made the bow nearly massive and also around the bow trust as to me looks like this is a weak point and I want to keep this built for years to come.
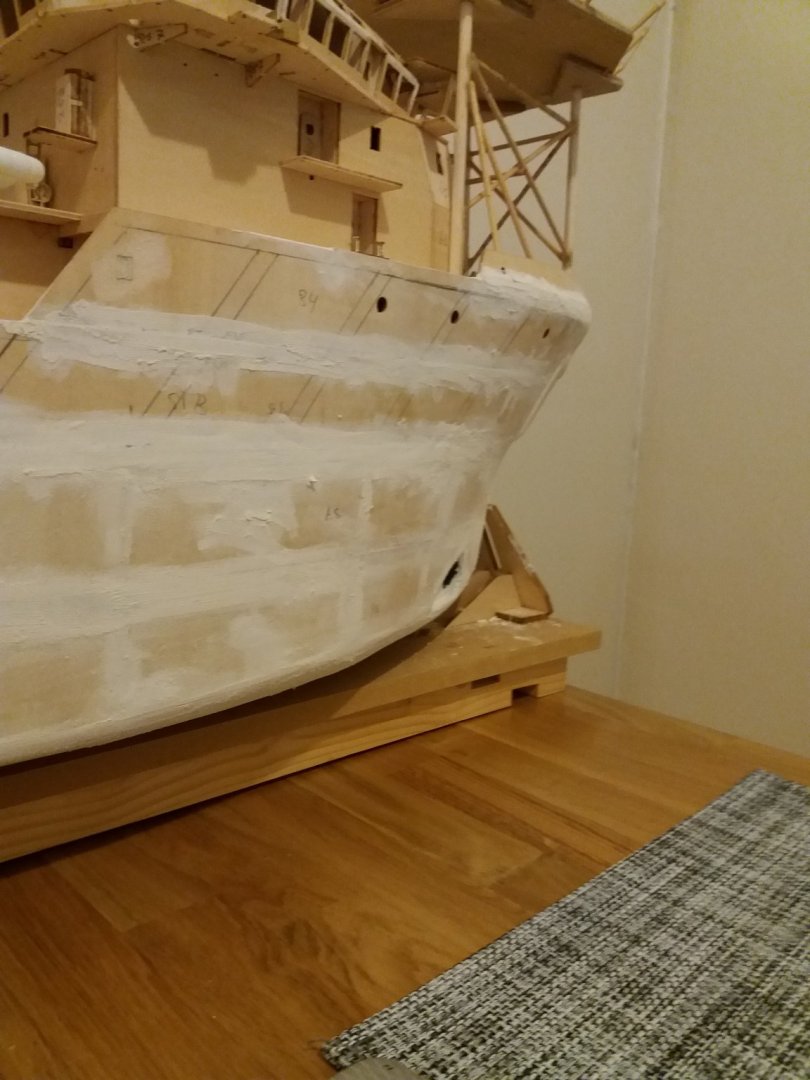
Anyway, presently I have done the hull, closed it up so no holes inside and now use filler, sanding, filler and again sanding until I have a smooth surface to apply the first paint on it.
The deck will be started afterwards like accommodation, mast (still not content with the mast present), Schottels propulsion back as bow trust already mounted.So completely sit still I haven't but not worked as frequently I want to be.
Going at the UNI now to get my BSc is another target I want to achieve, I know people say I'm crazy with 71 going back to school but I want to do something with myself and this is keeping me busy, no time getting Alzheimer too and having my Master already just want to have this done too in 4 years time incl the foundation.
Also having a night job so it will keep me going so to speak but still want to do my built and hopefully it will be done by next year.
I will put some pics here too with explanation what I have done and hope you enjoy it in the same way I did make.
 Last time I was here and upload this pic.
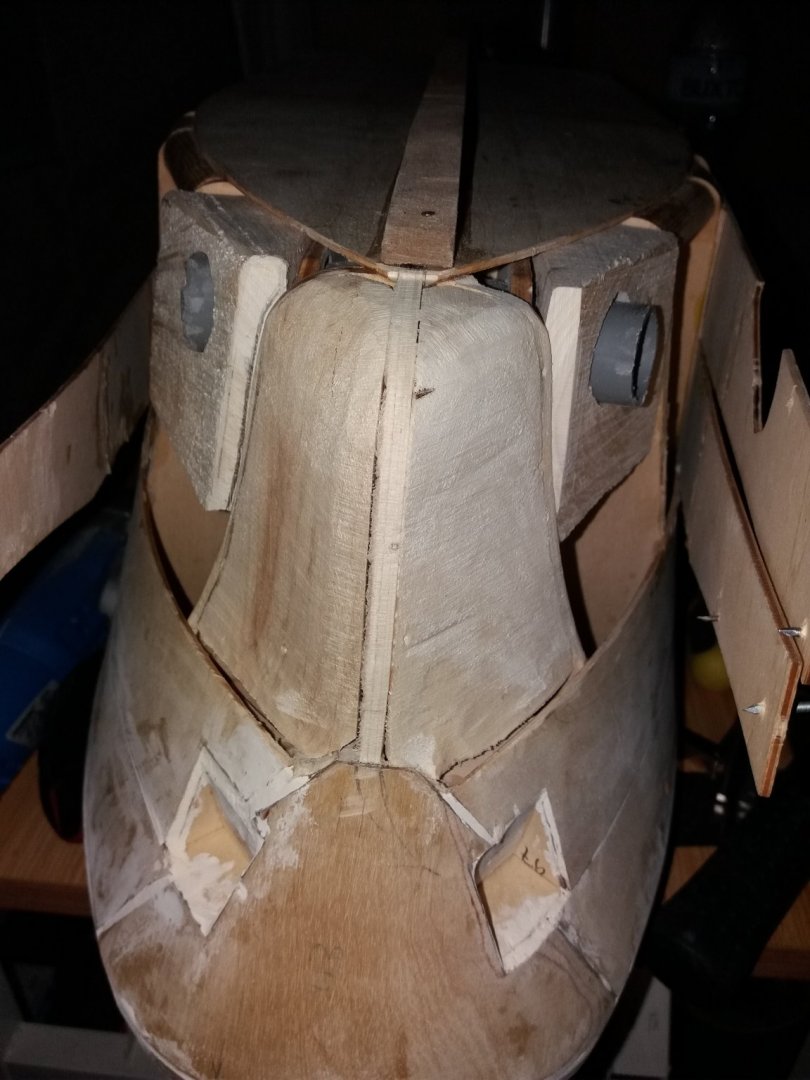
Made the bow itself out of a massive part to have more strength in there.

Raw shape of the bow to allow the hull plates glued on to it.
Also the bow trust surroundings with massive wood for strength and support.
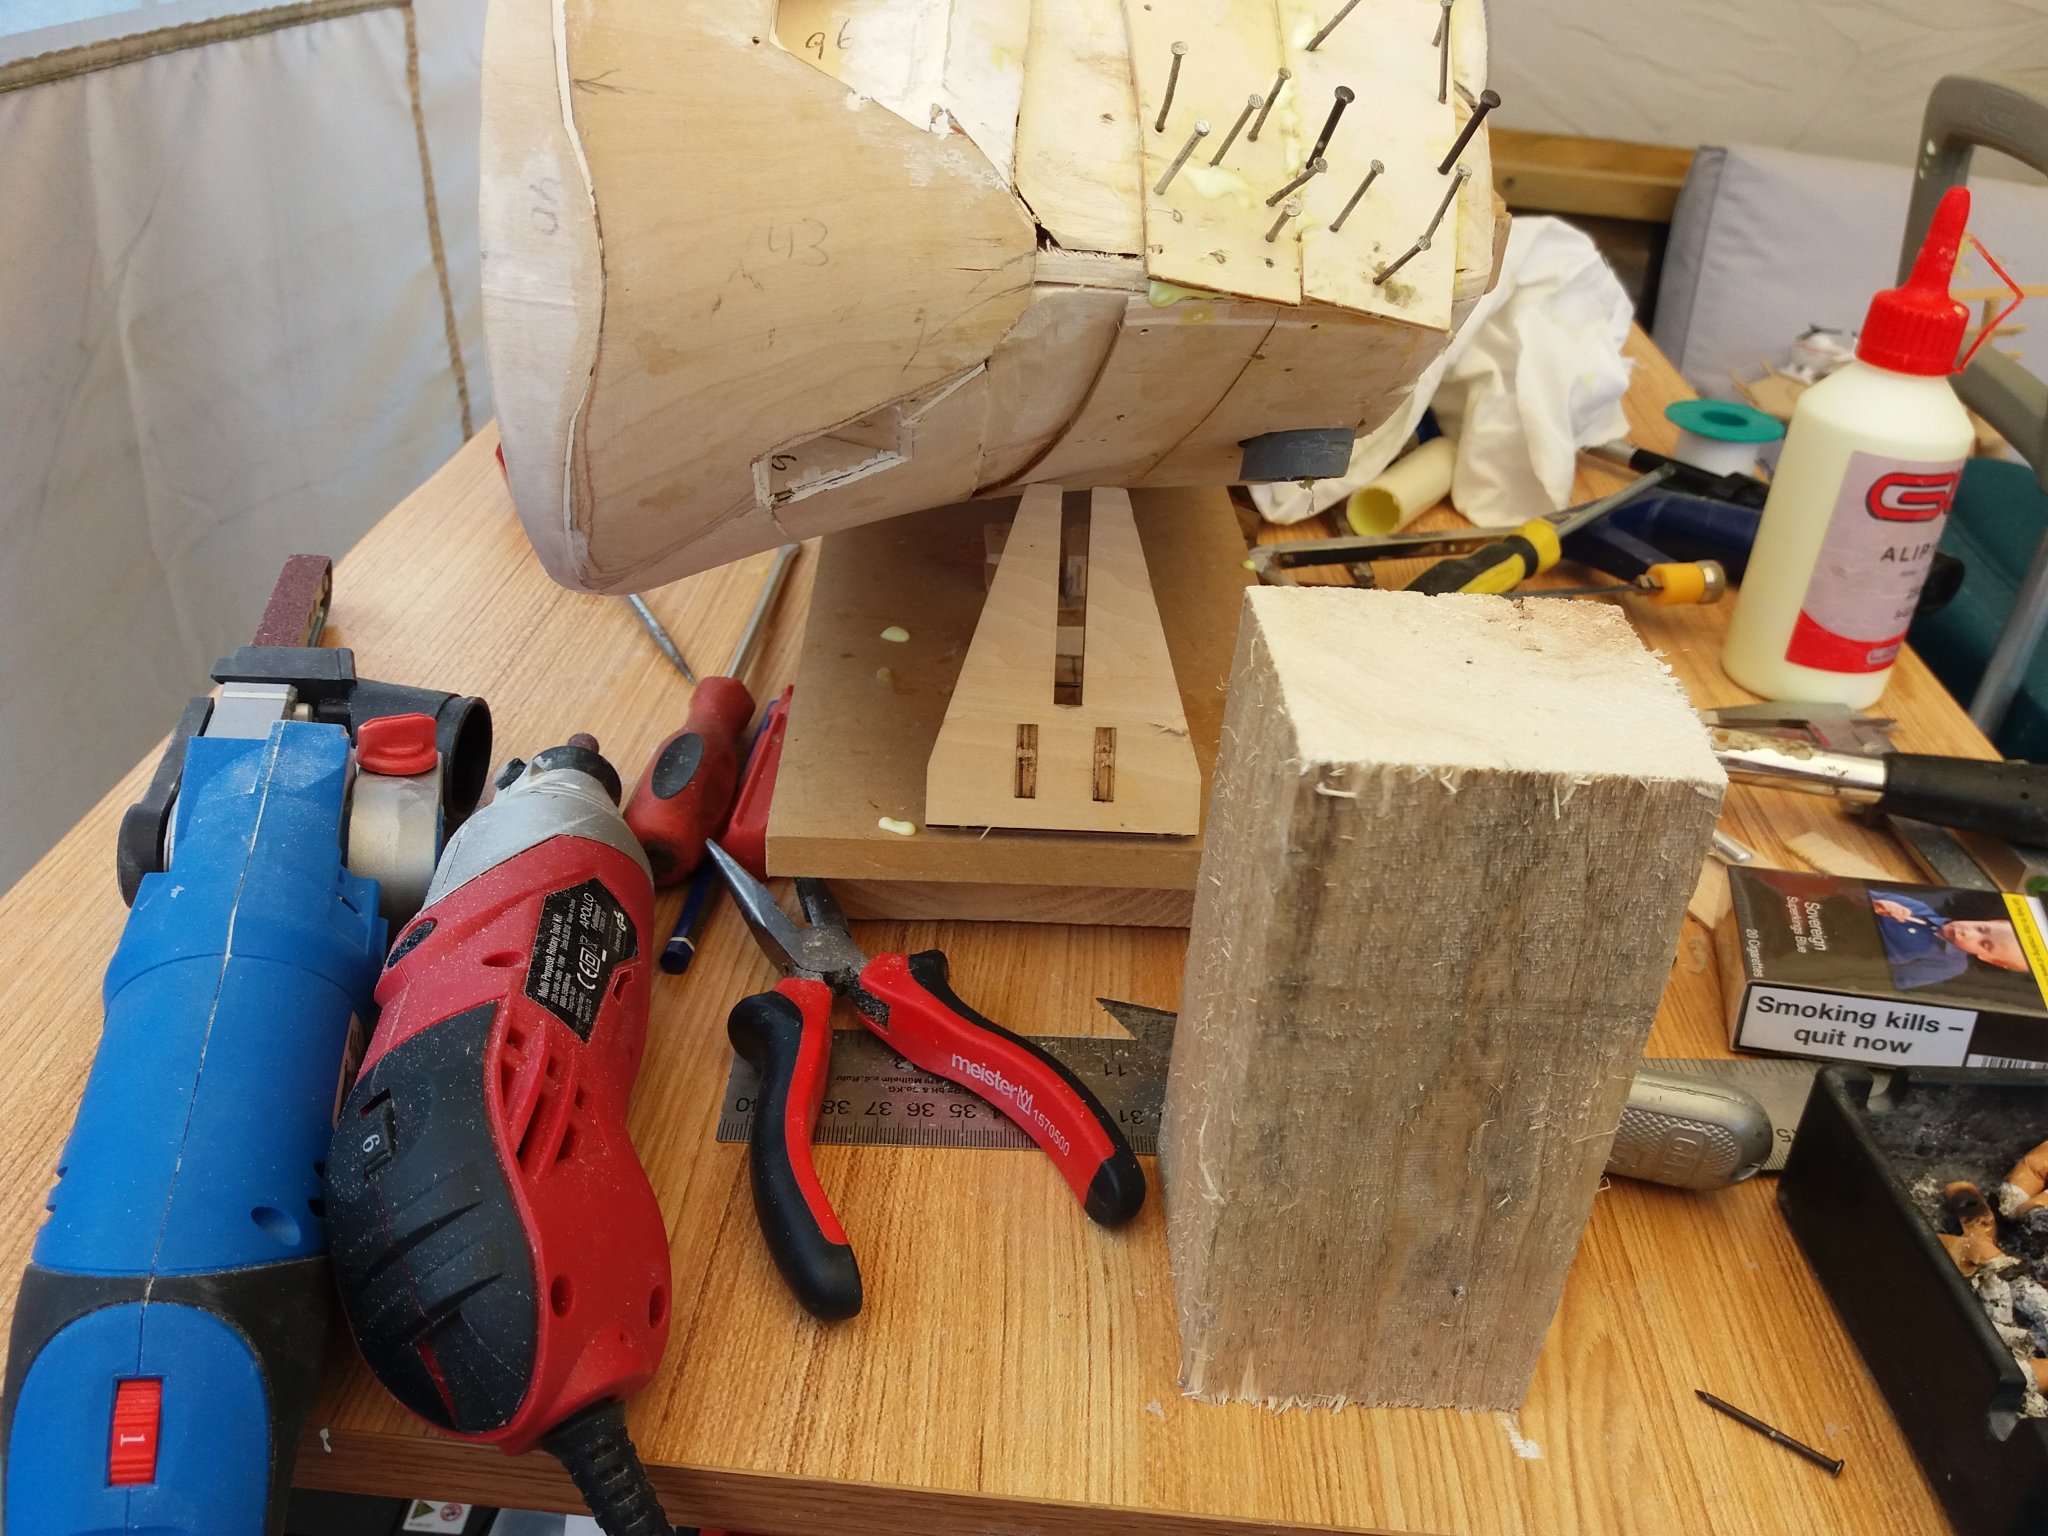
Applied glue on the wooden support blocks

Raw building port side and you see the block wood I made the massive parts out.
Coming there after works and glued parts there but still needs more work to be done

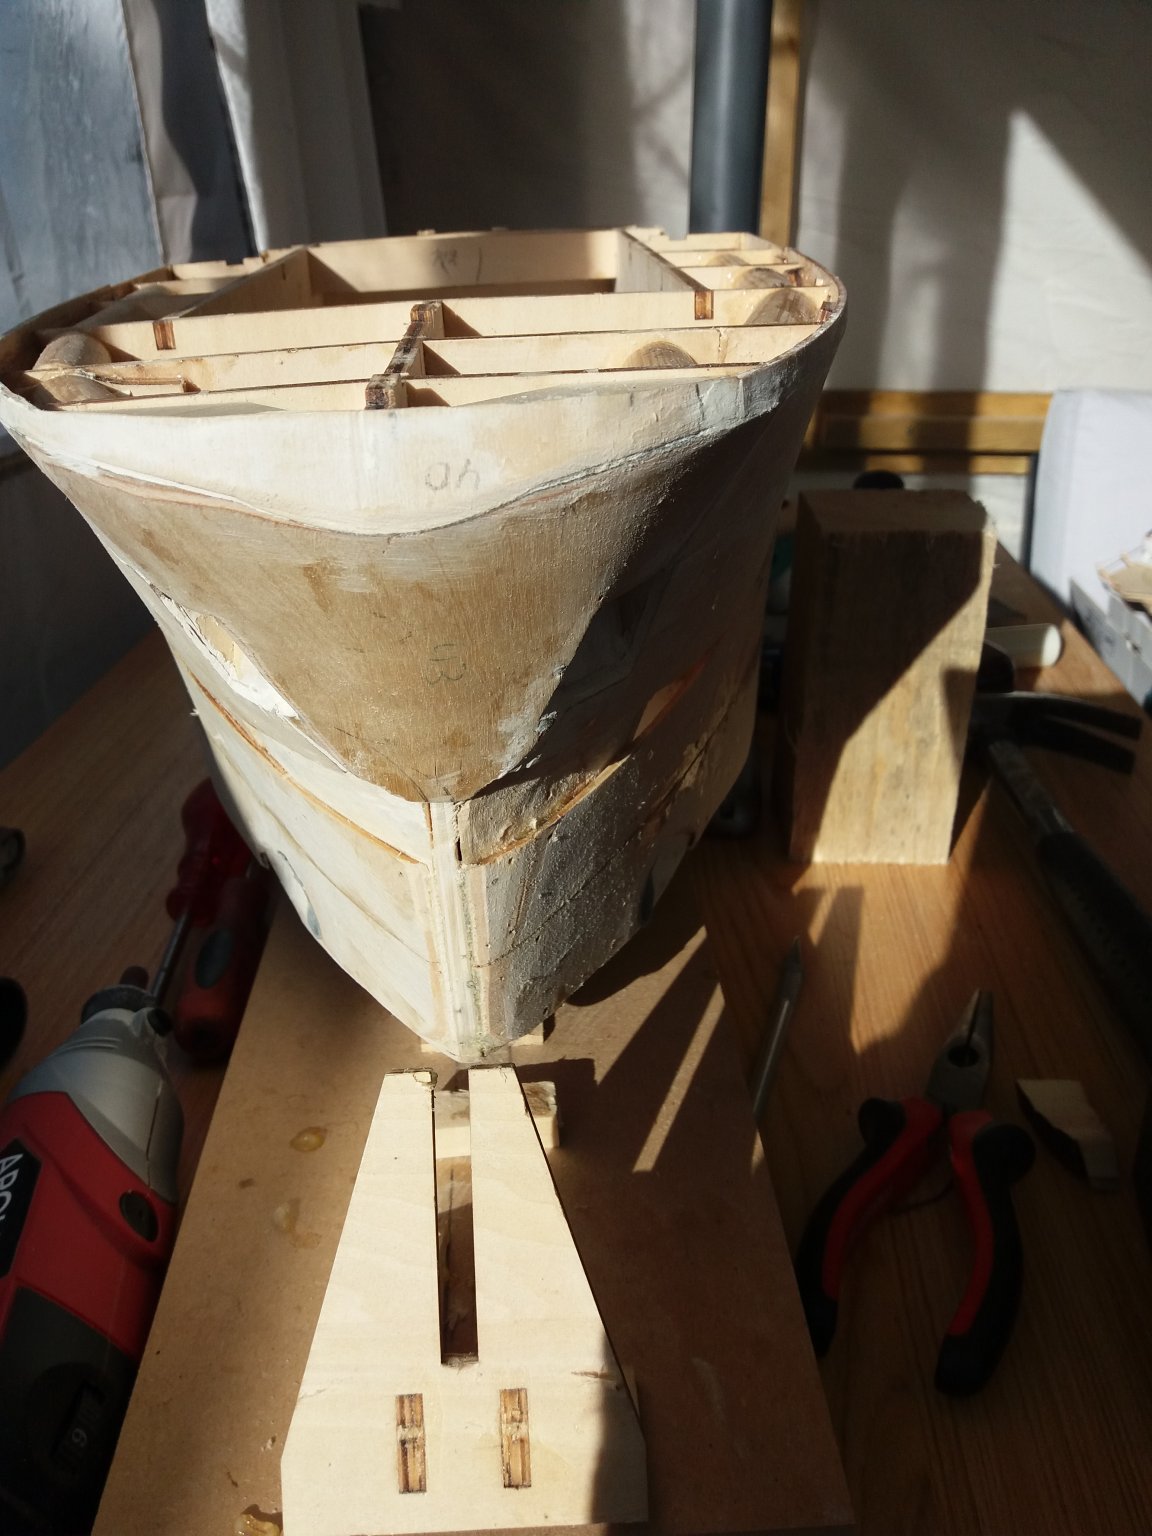
As she is still on the slip the bow comes to getting shape.

Also starboard side is coming to be in shape
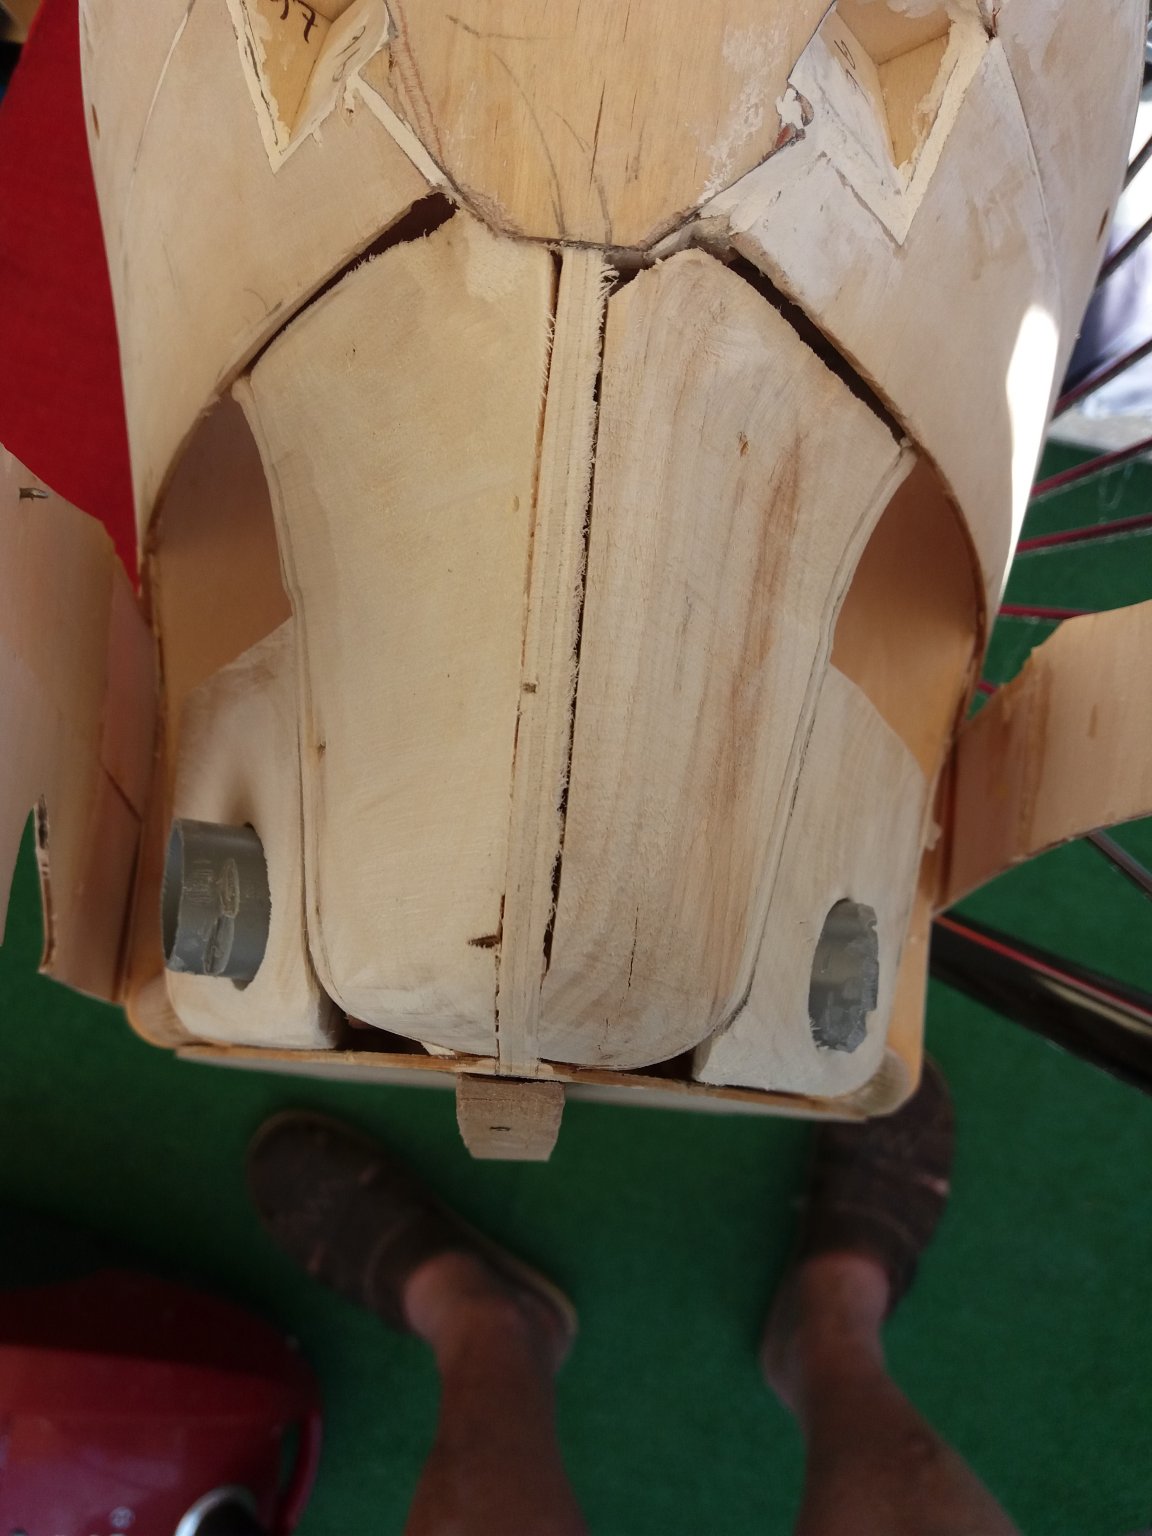
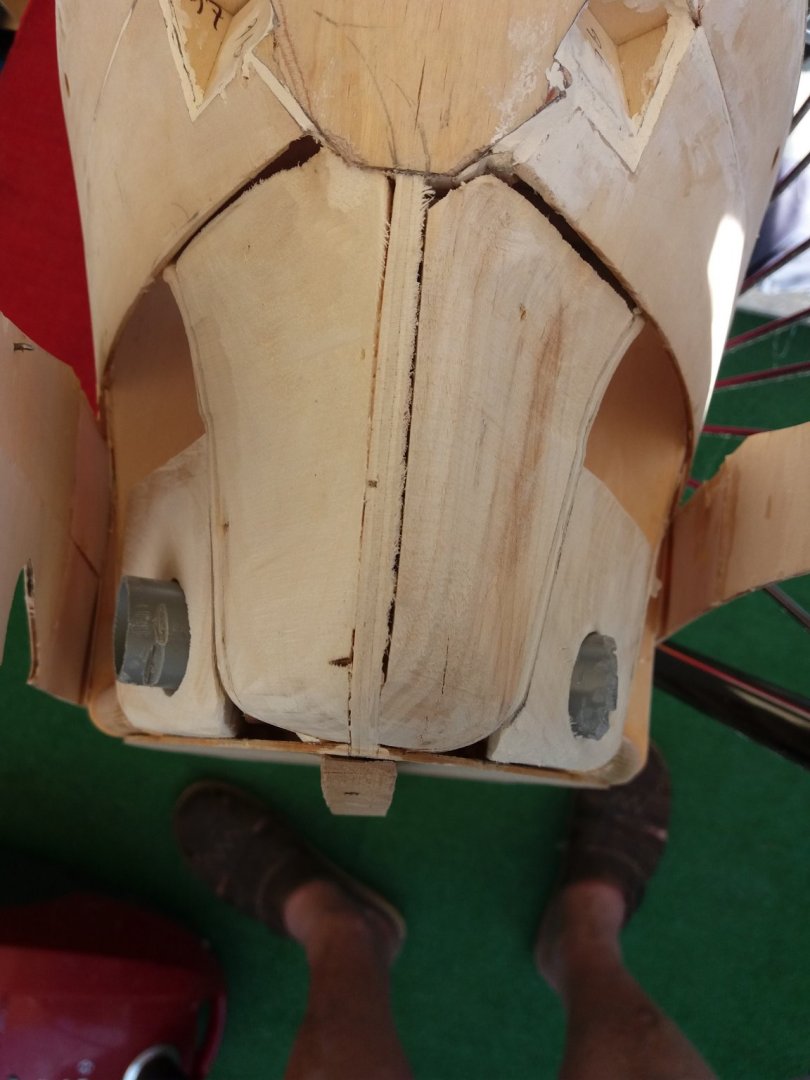
bow trust itself (without motor) in place and secured

Closing up the bow part
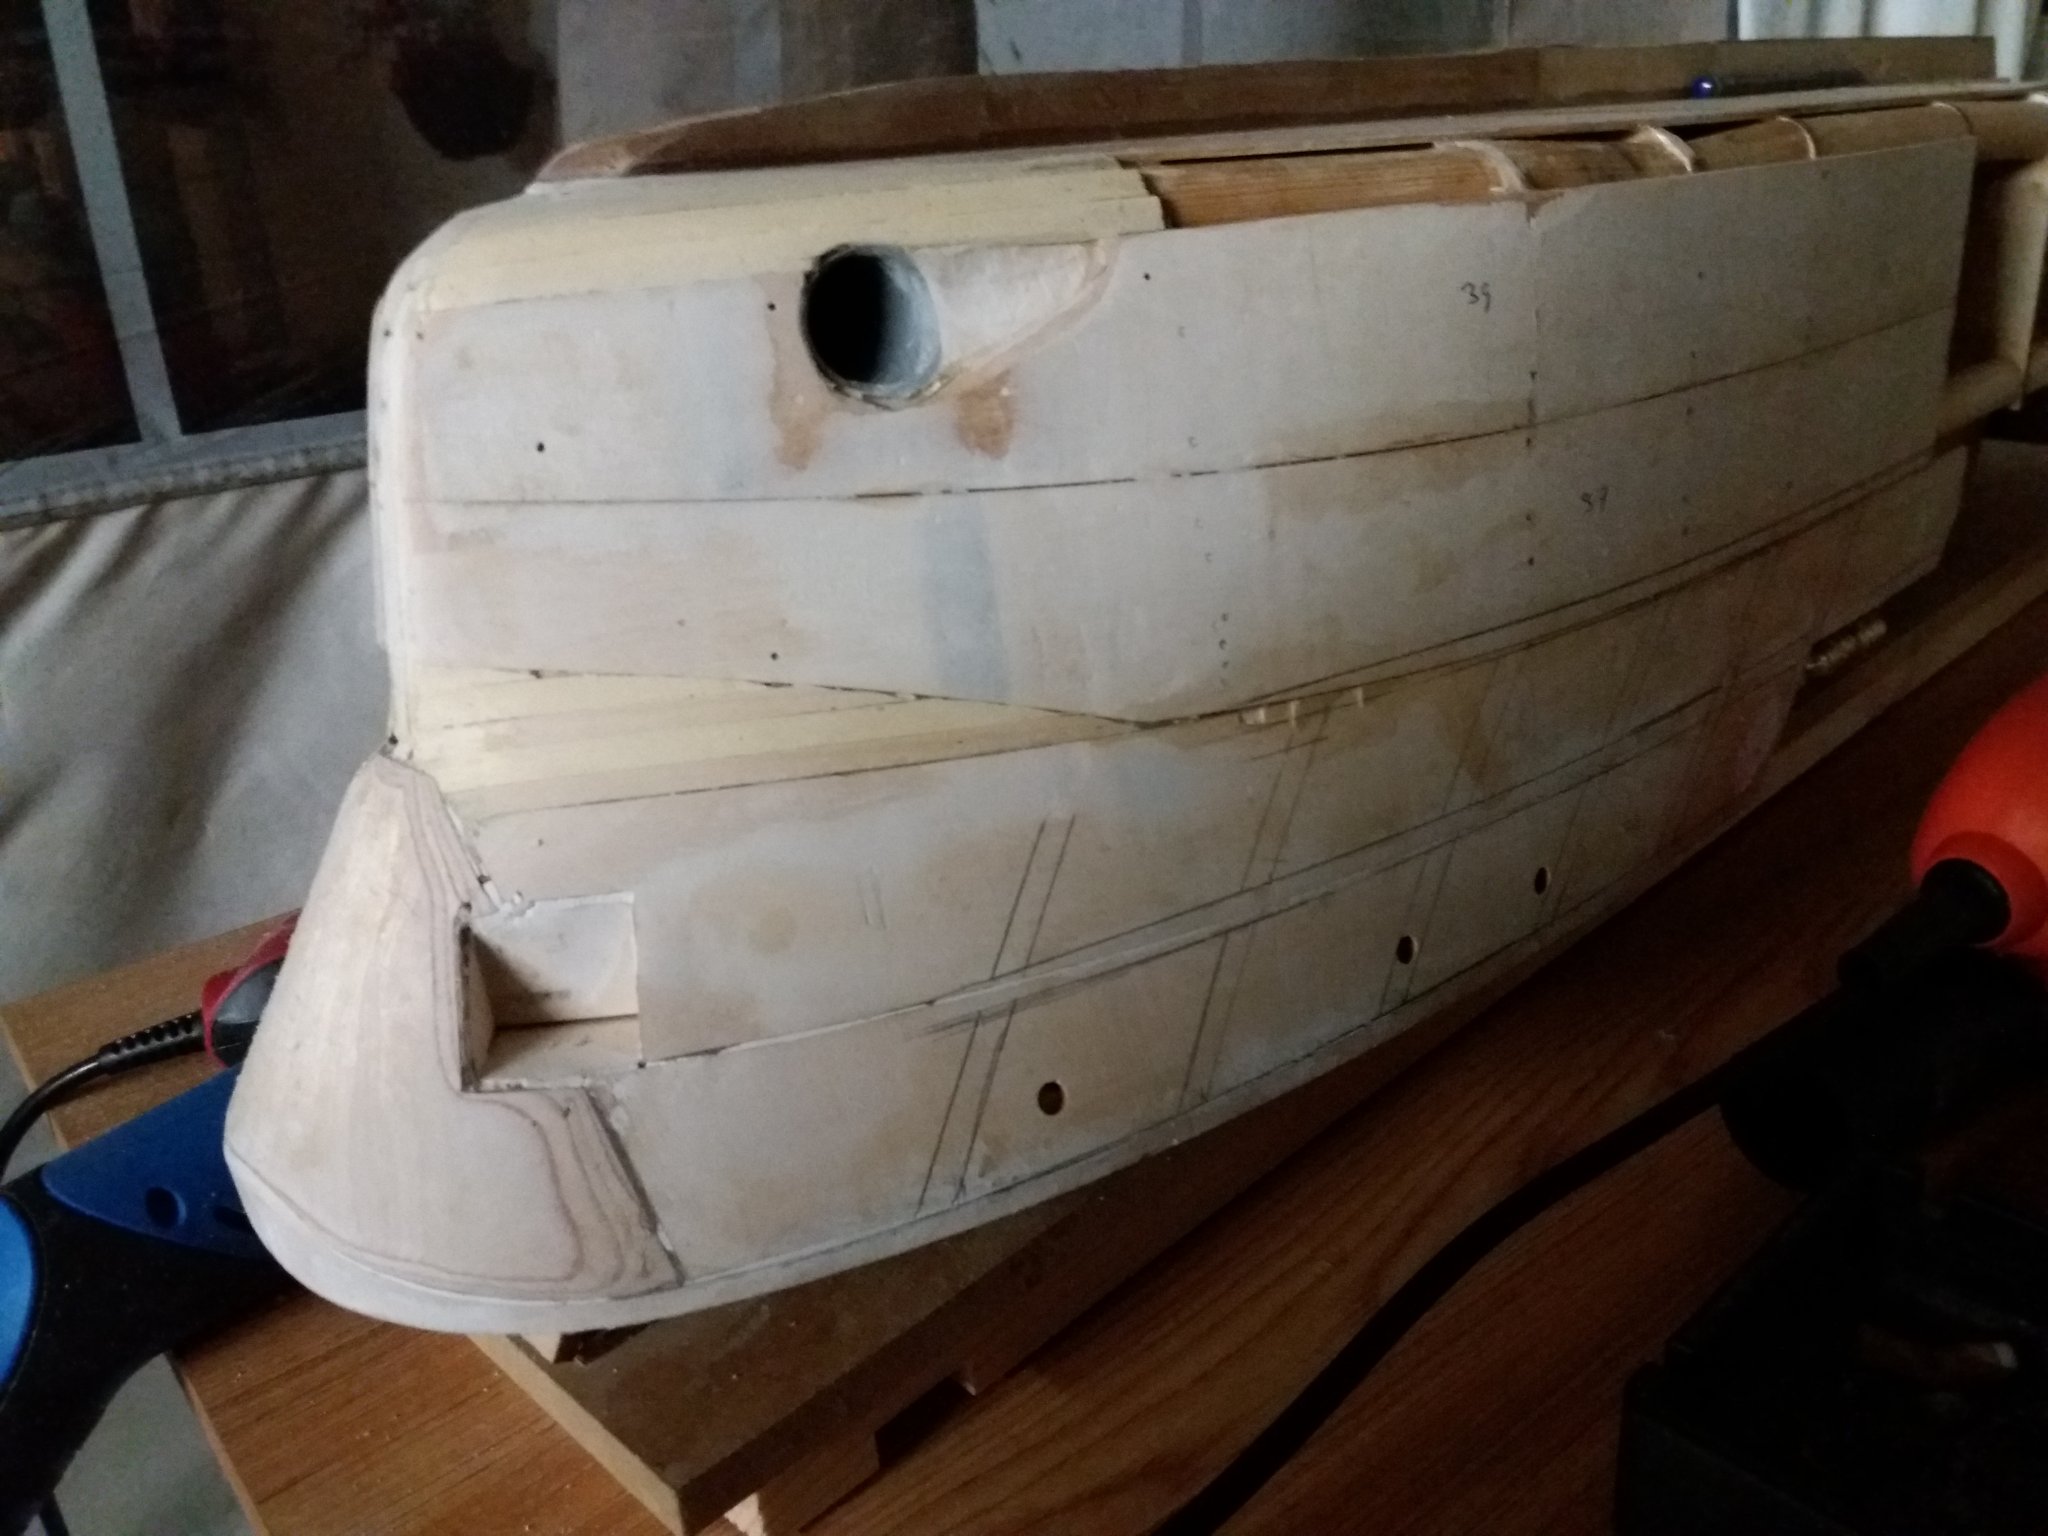
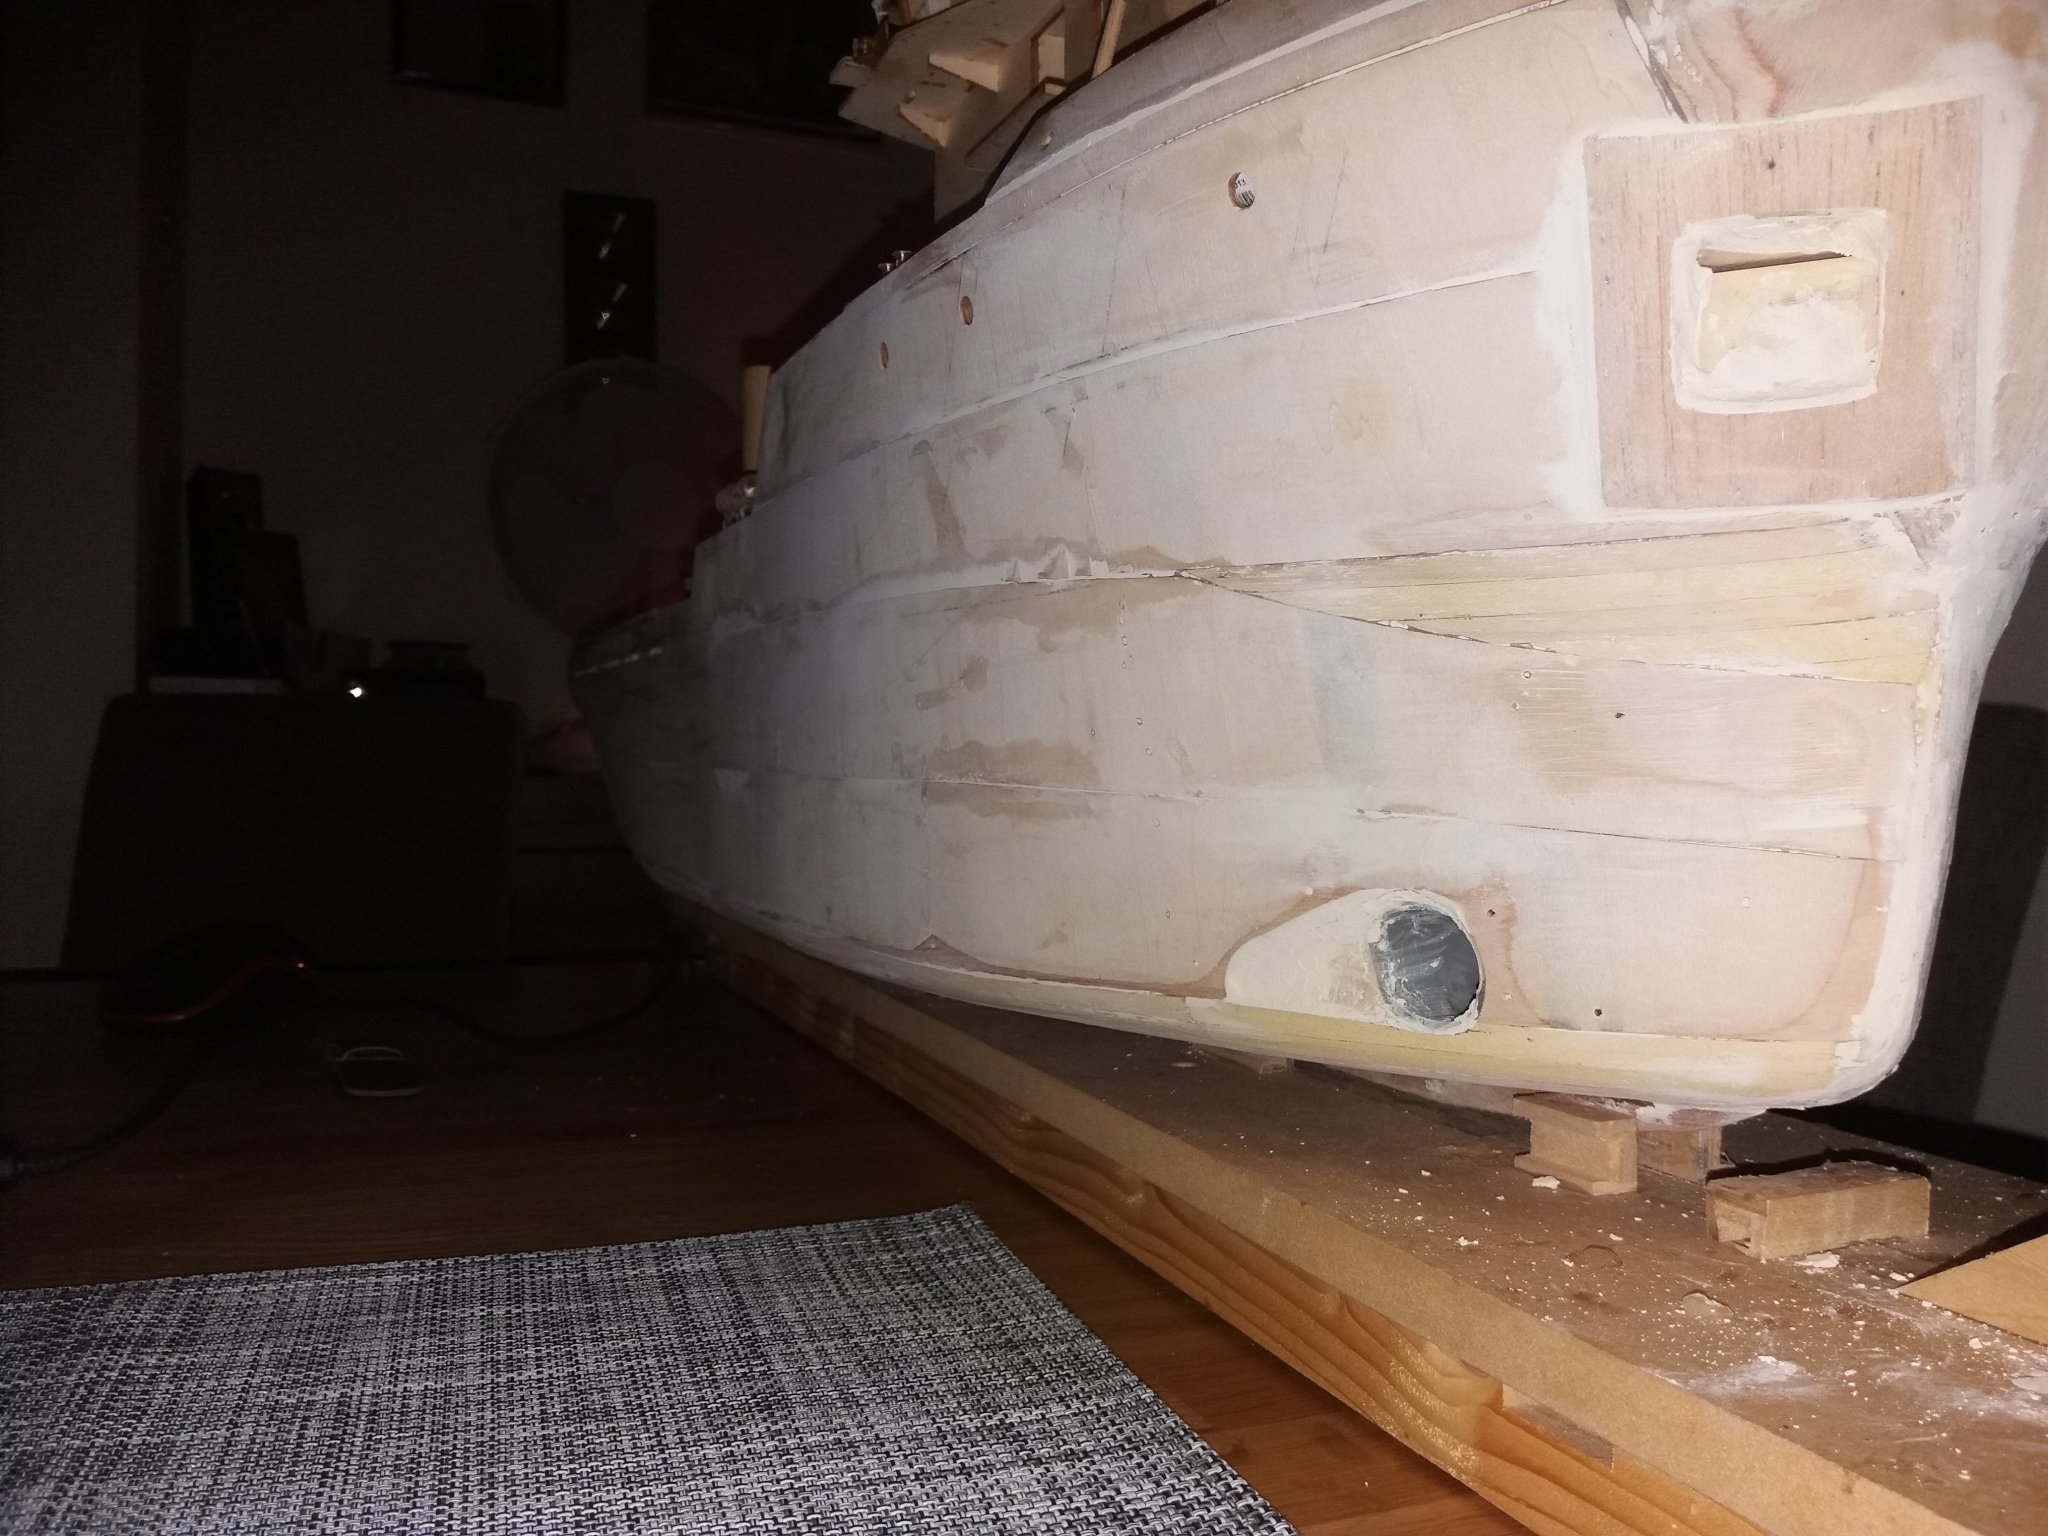
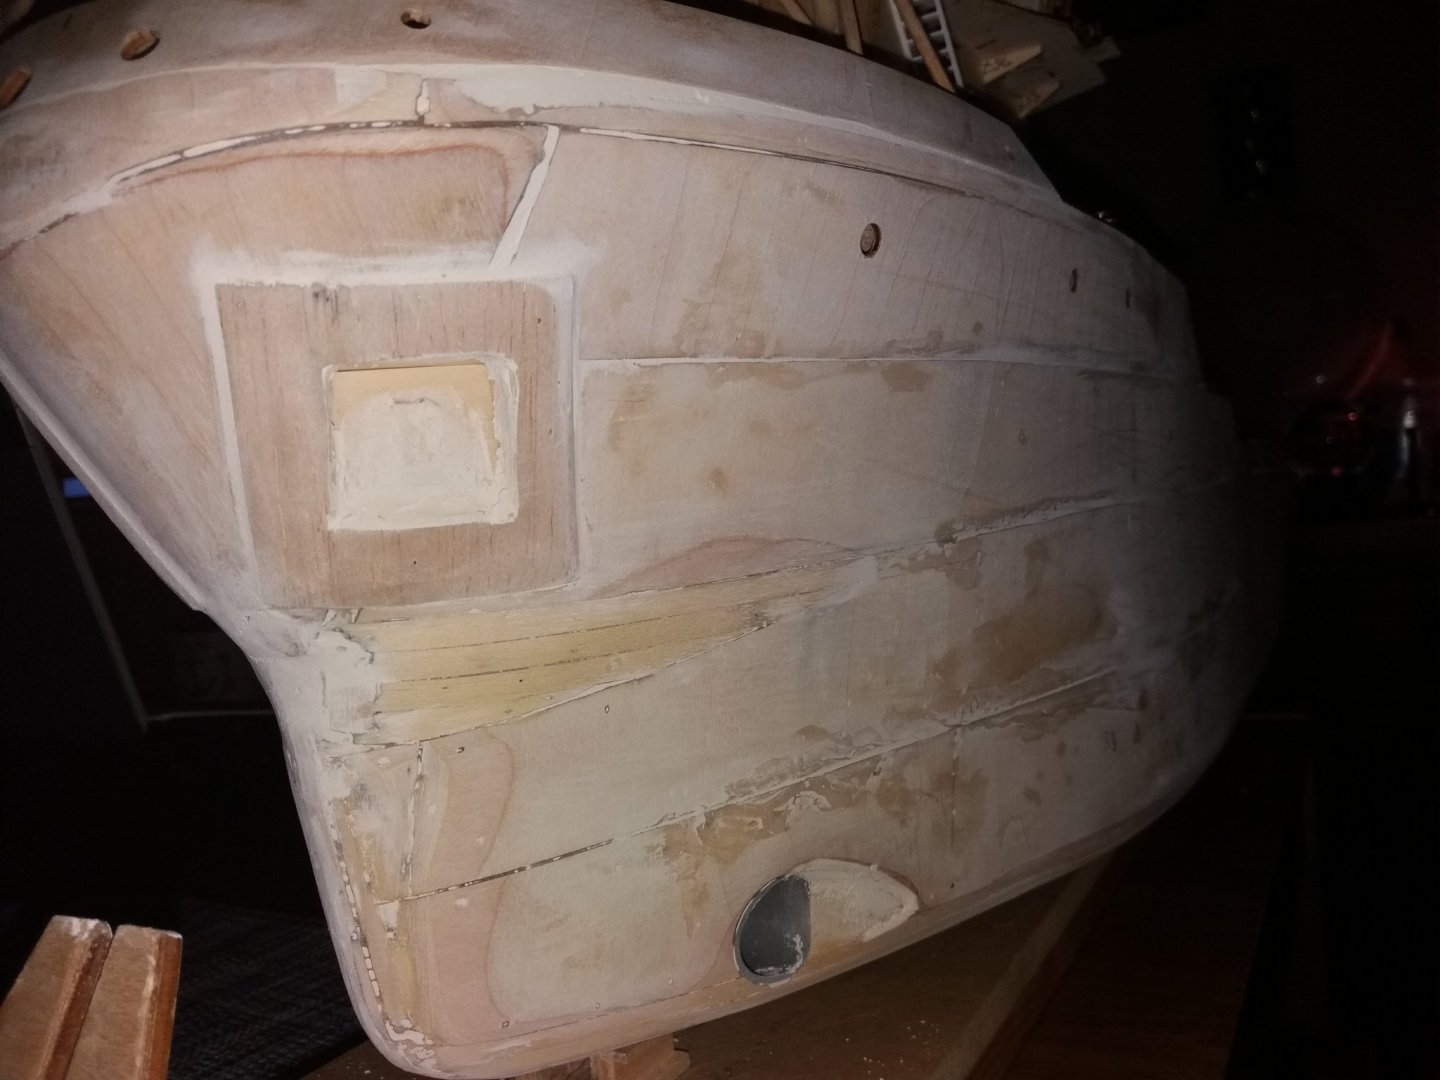
After both parts finalised and applied first time filler by finger to close all holes
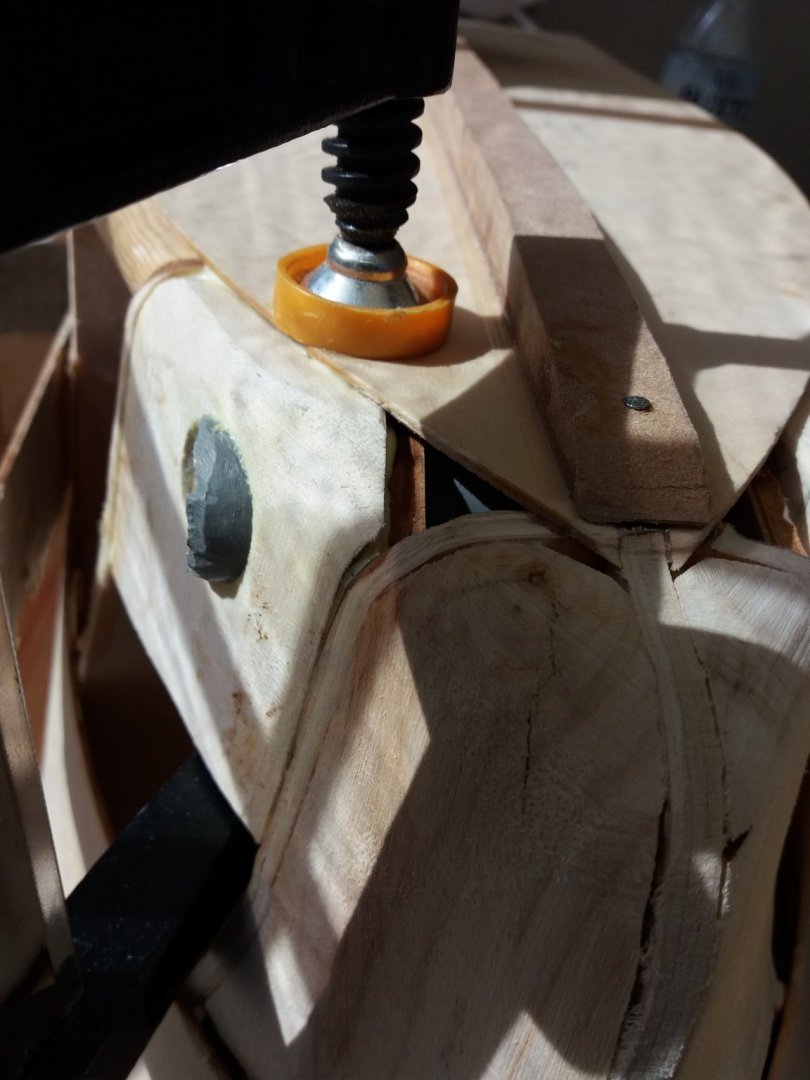
Also port side and did both sides anchor pockets protection and bow trust water line the flow of water afterwards

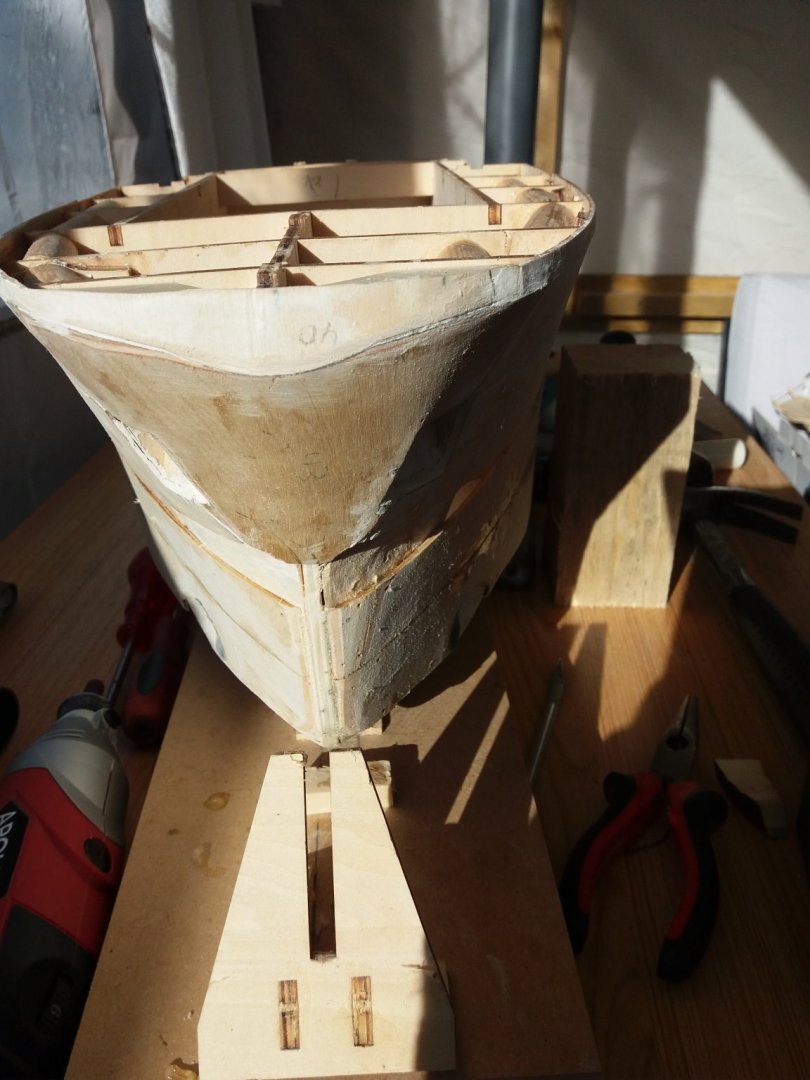
Bow is looking good but all in a raw stadium as need a lot more works to be done
Also the hull itself is going fine and connection to the kim is also done
same on the starboard side the filler just applied for the first time
 Hull and bottom plate applied filler also the kim plates
Not a direct sharp picture but you can see the hull and bottom connected by the kim
You can see the lines already of the bow part. Not sure if I want to make the protection on the sides but guess I will go for direct rubber covers.

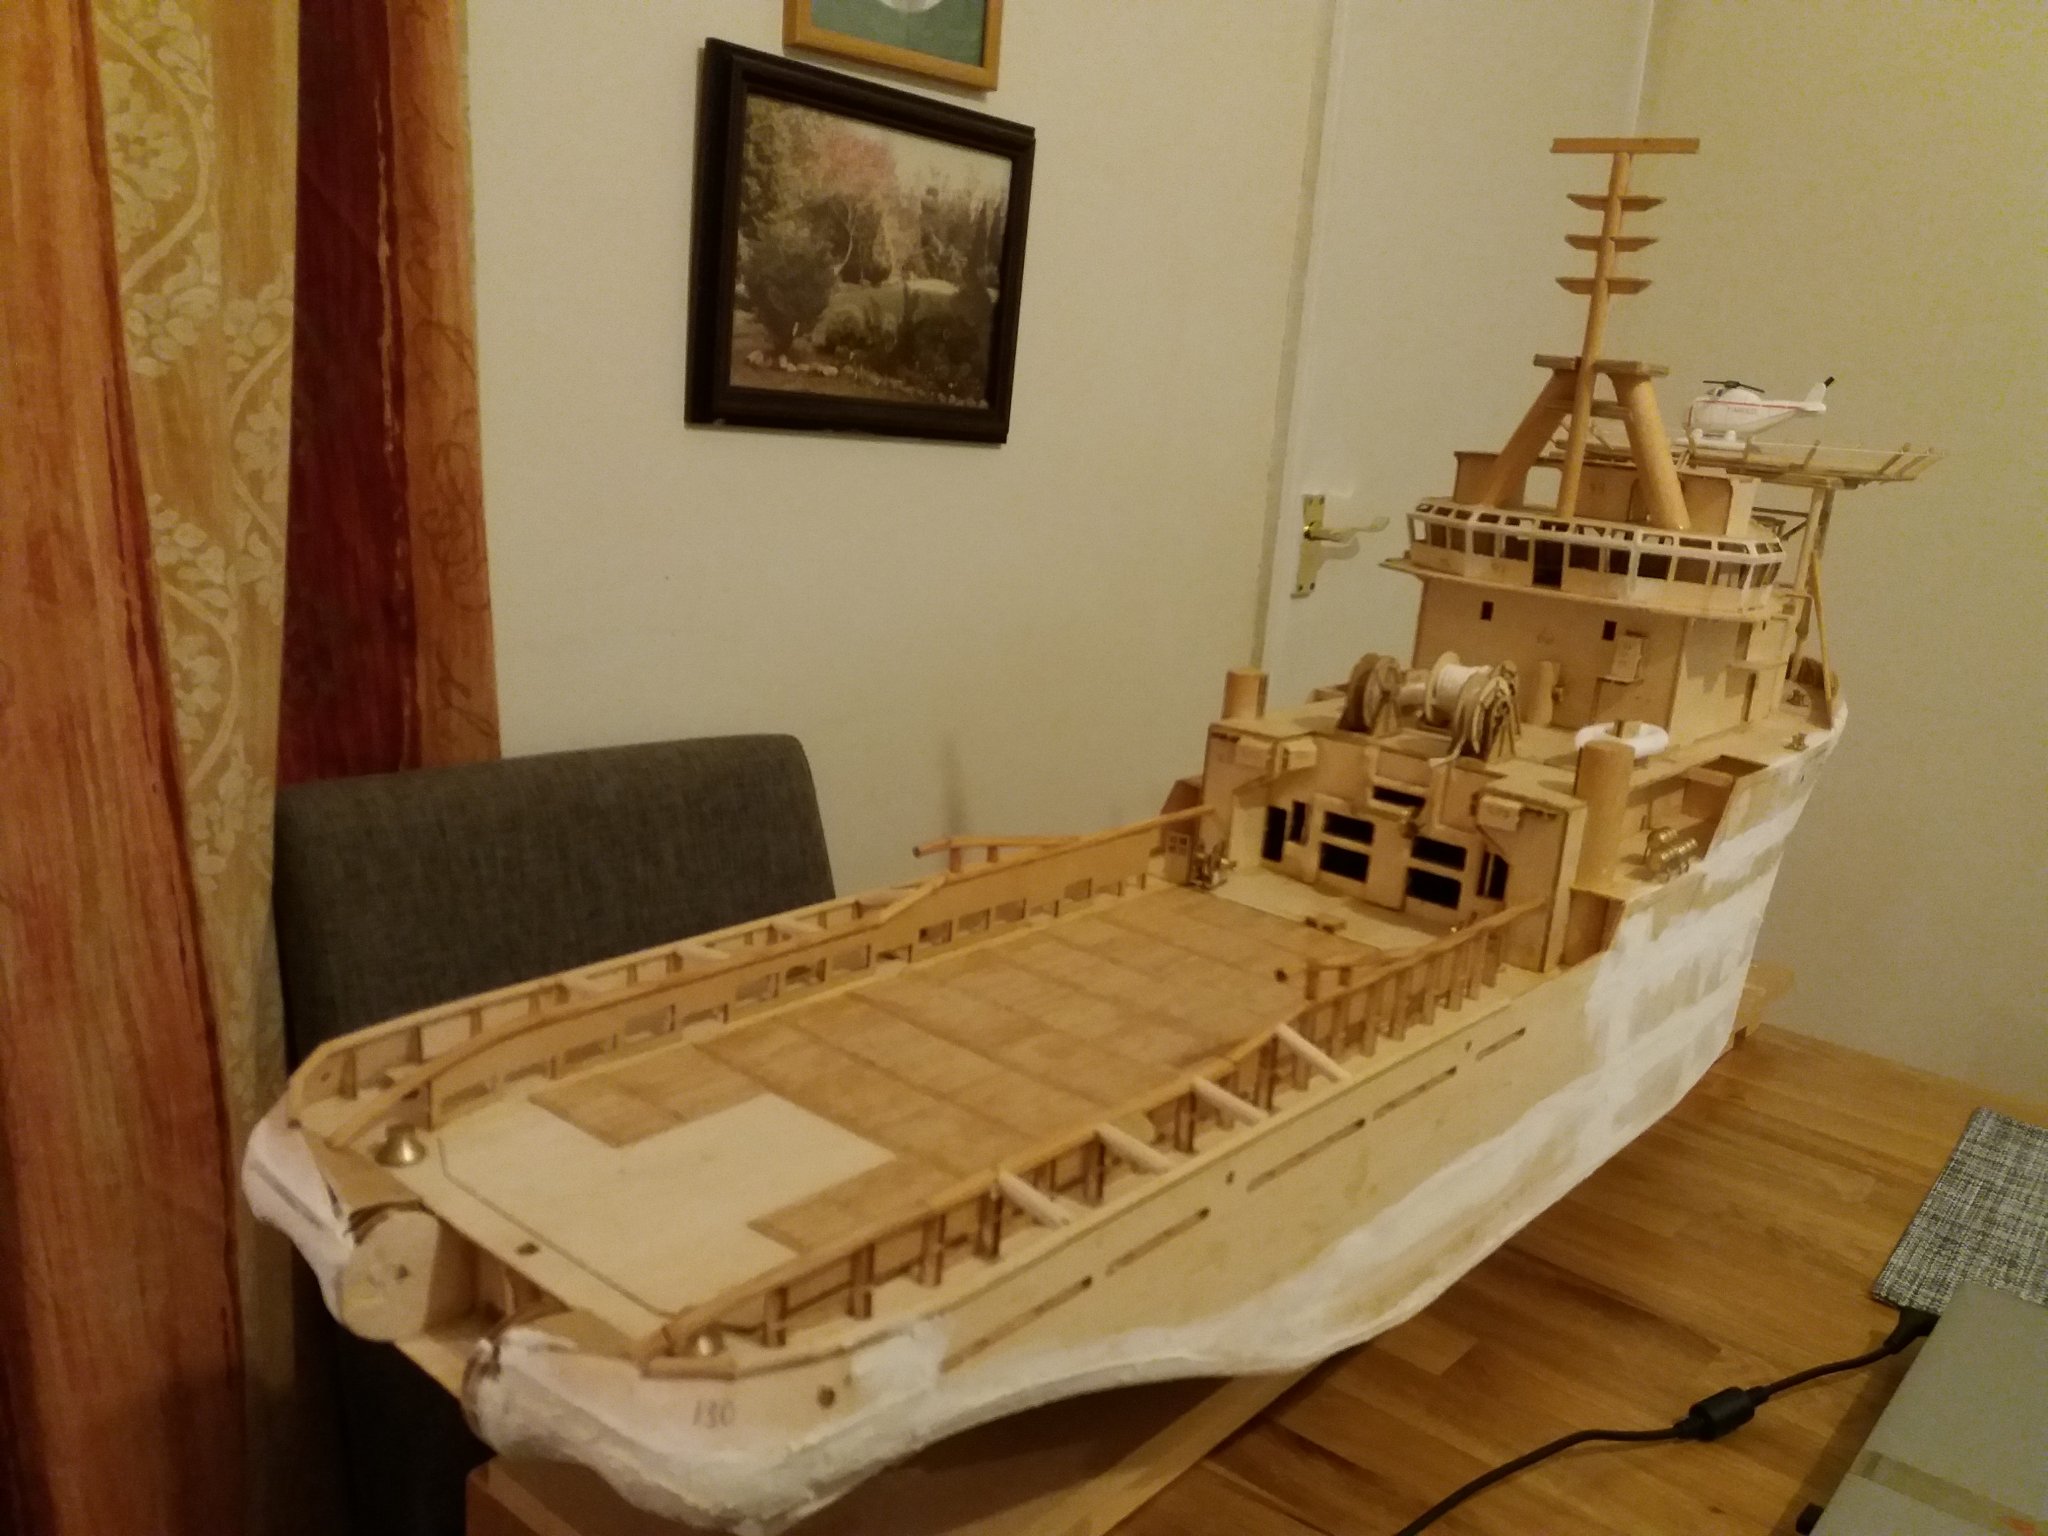
Aft part raw done but need more attention

Will have the roller in later and if having place under the deck built towing pins.

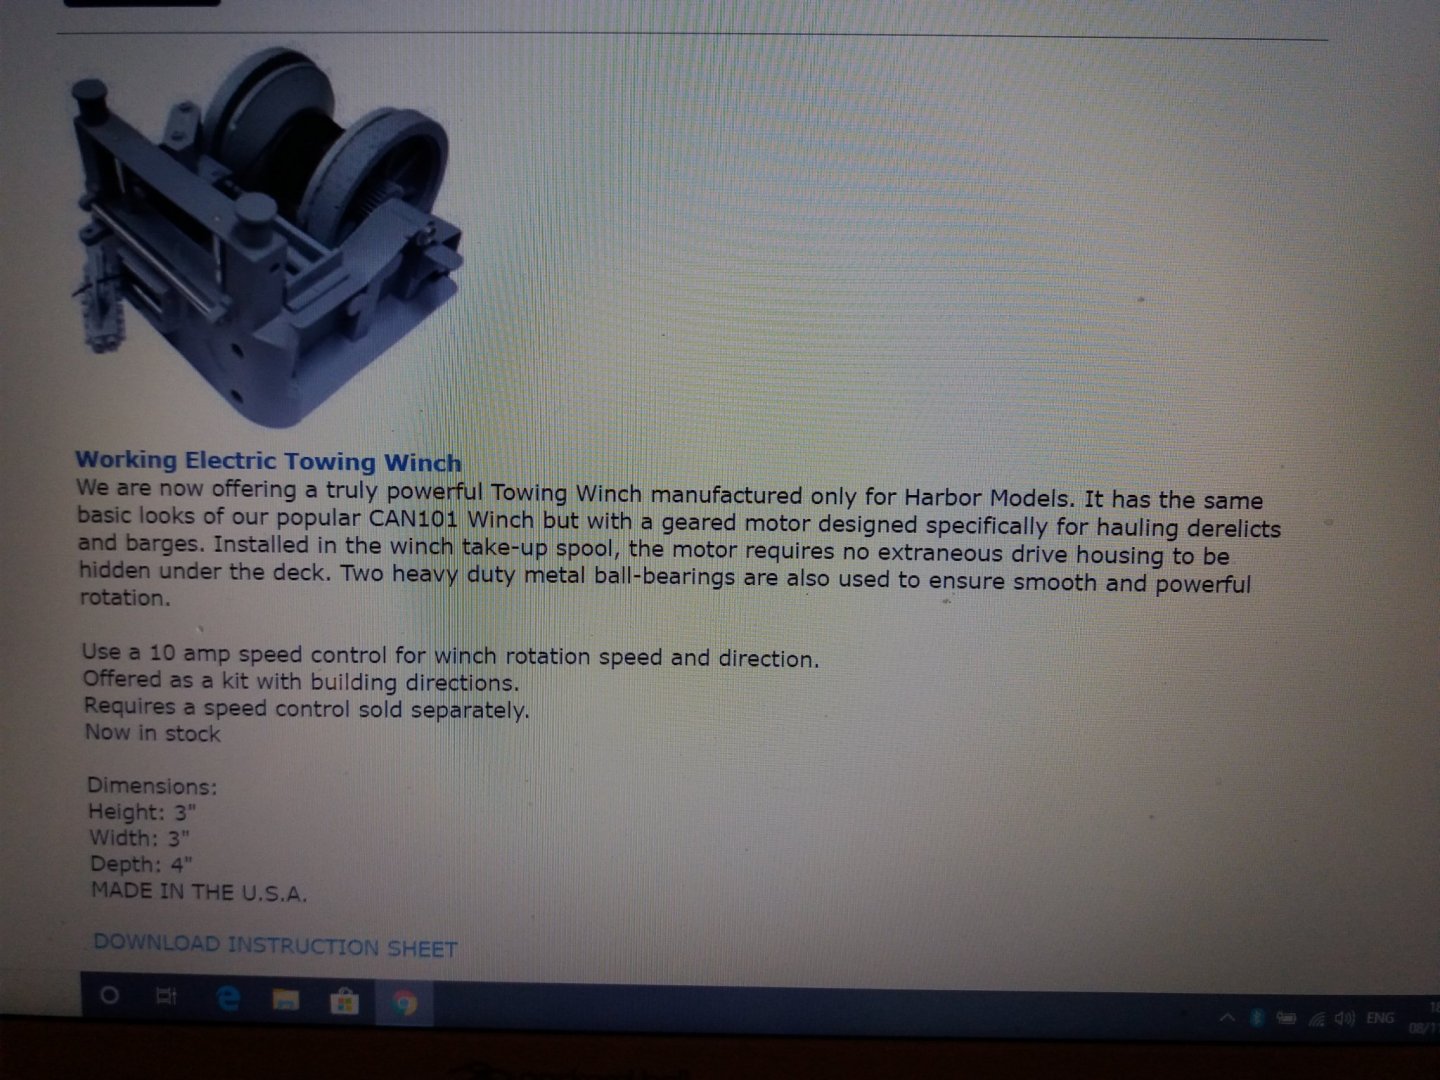
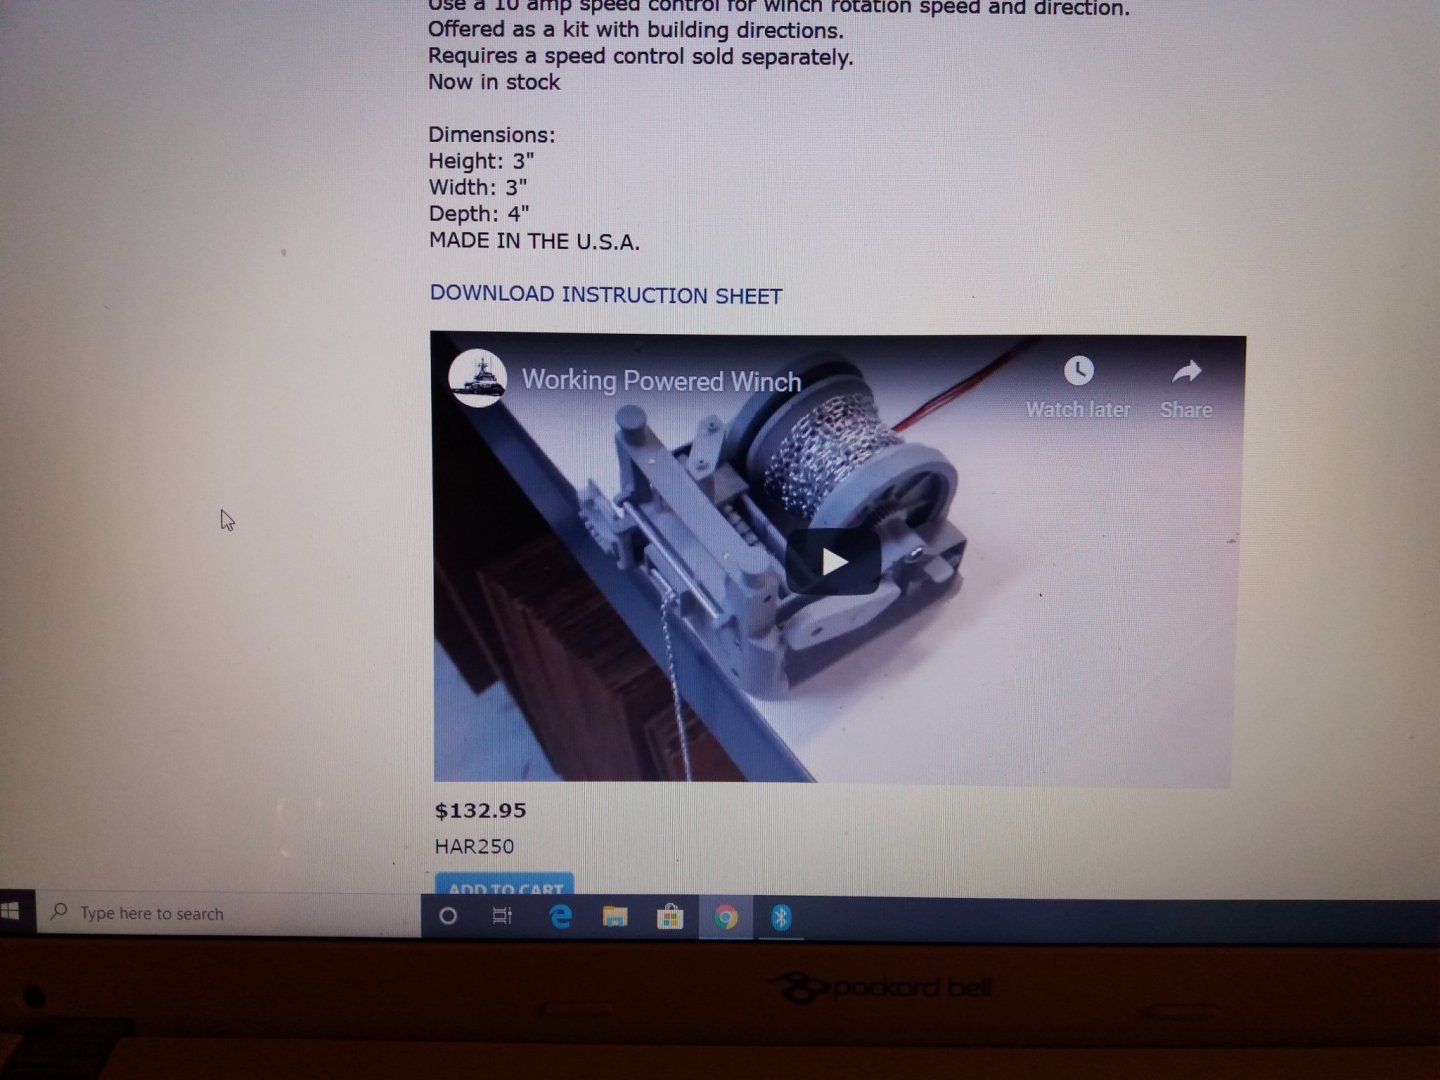
Also the towing winch will be built in later

Railing works will be done when hull finished and accommodation sanded
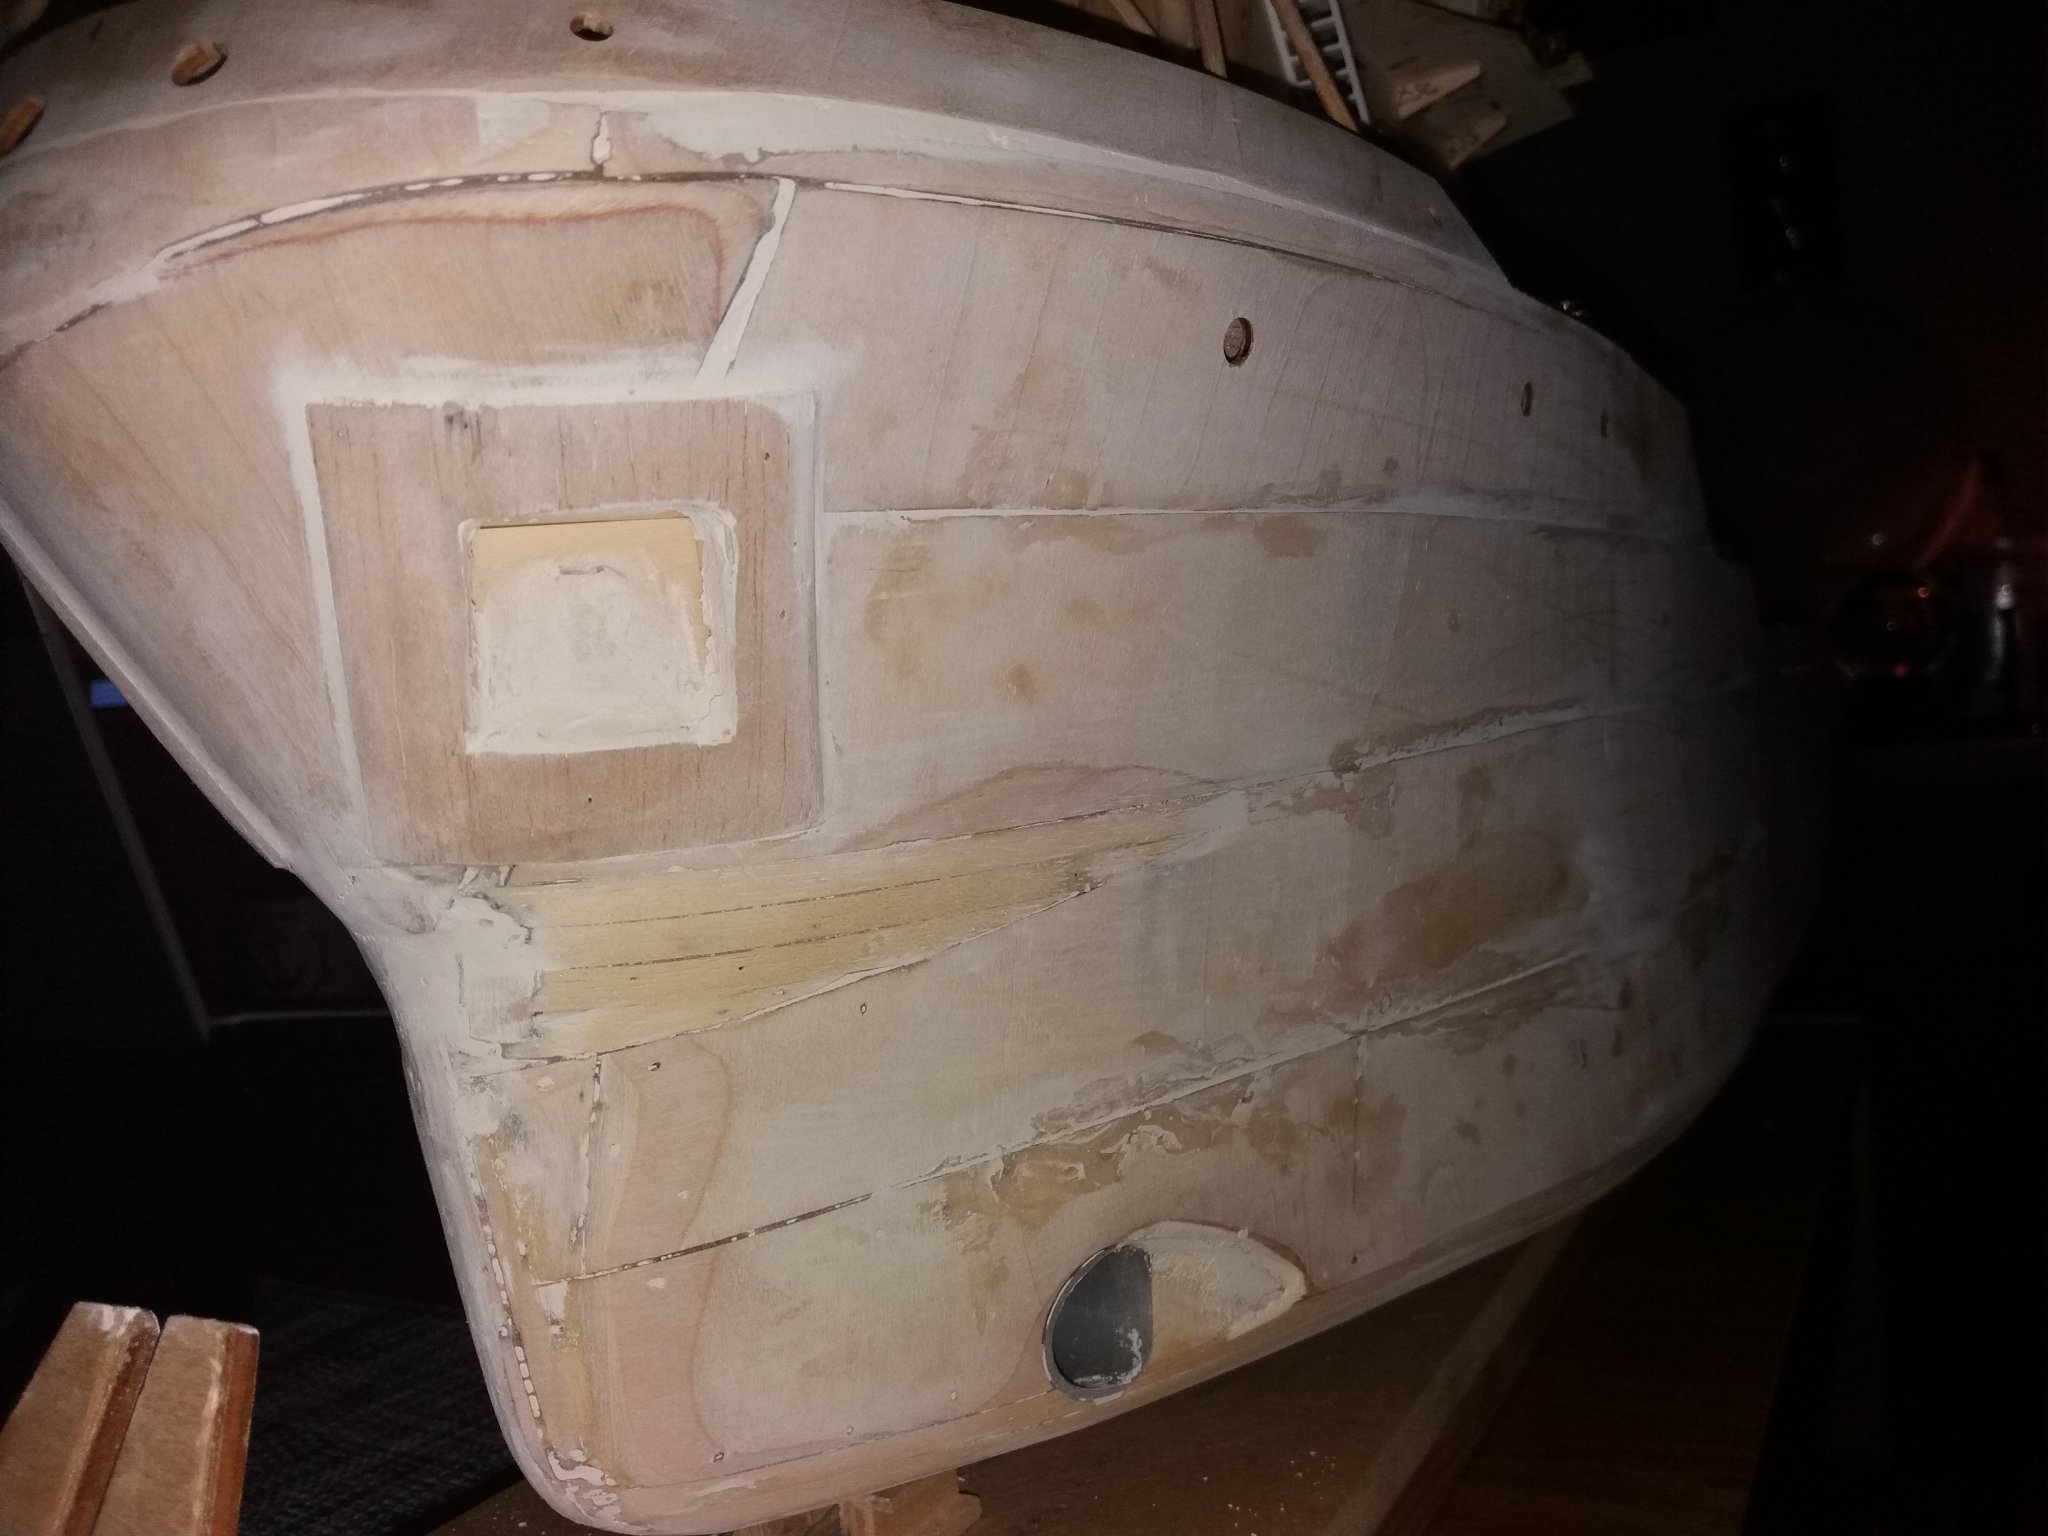
After first time sanded the hull and surroundings, looks good already

Also starboard side coming there
Included port side but still needs more filler and sanding
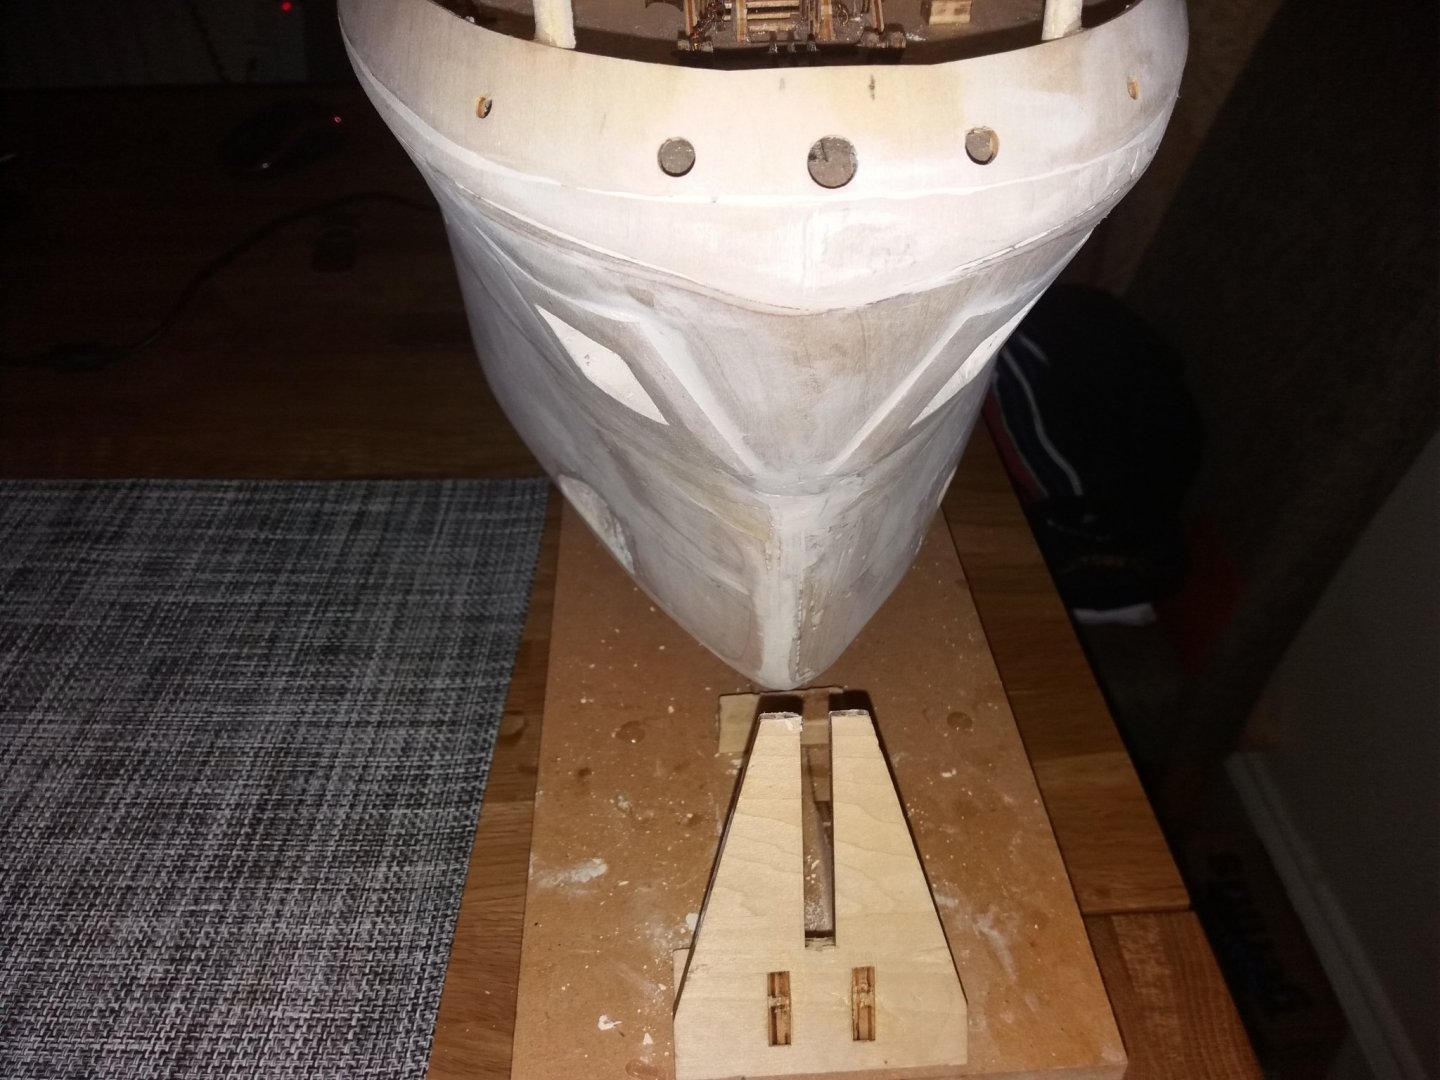
Even not standing and taking the picture direct in the center line of the vessel the bow looks good.

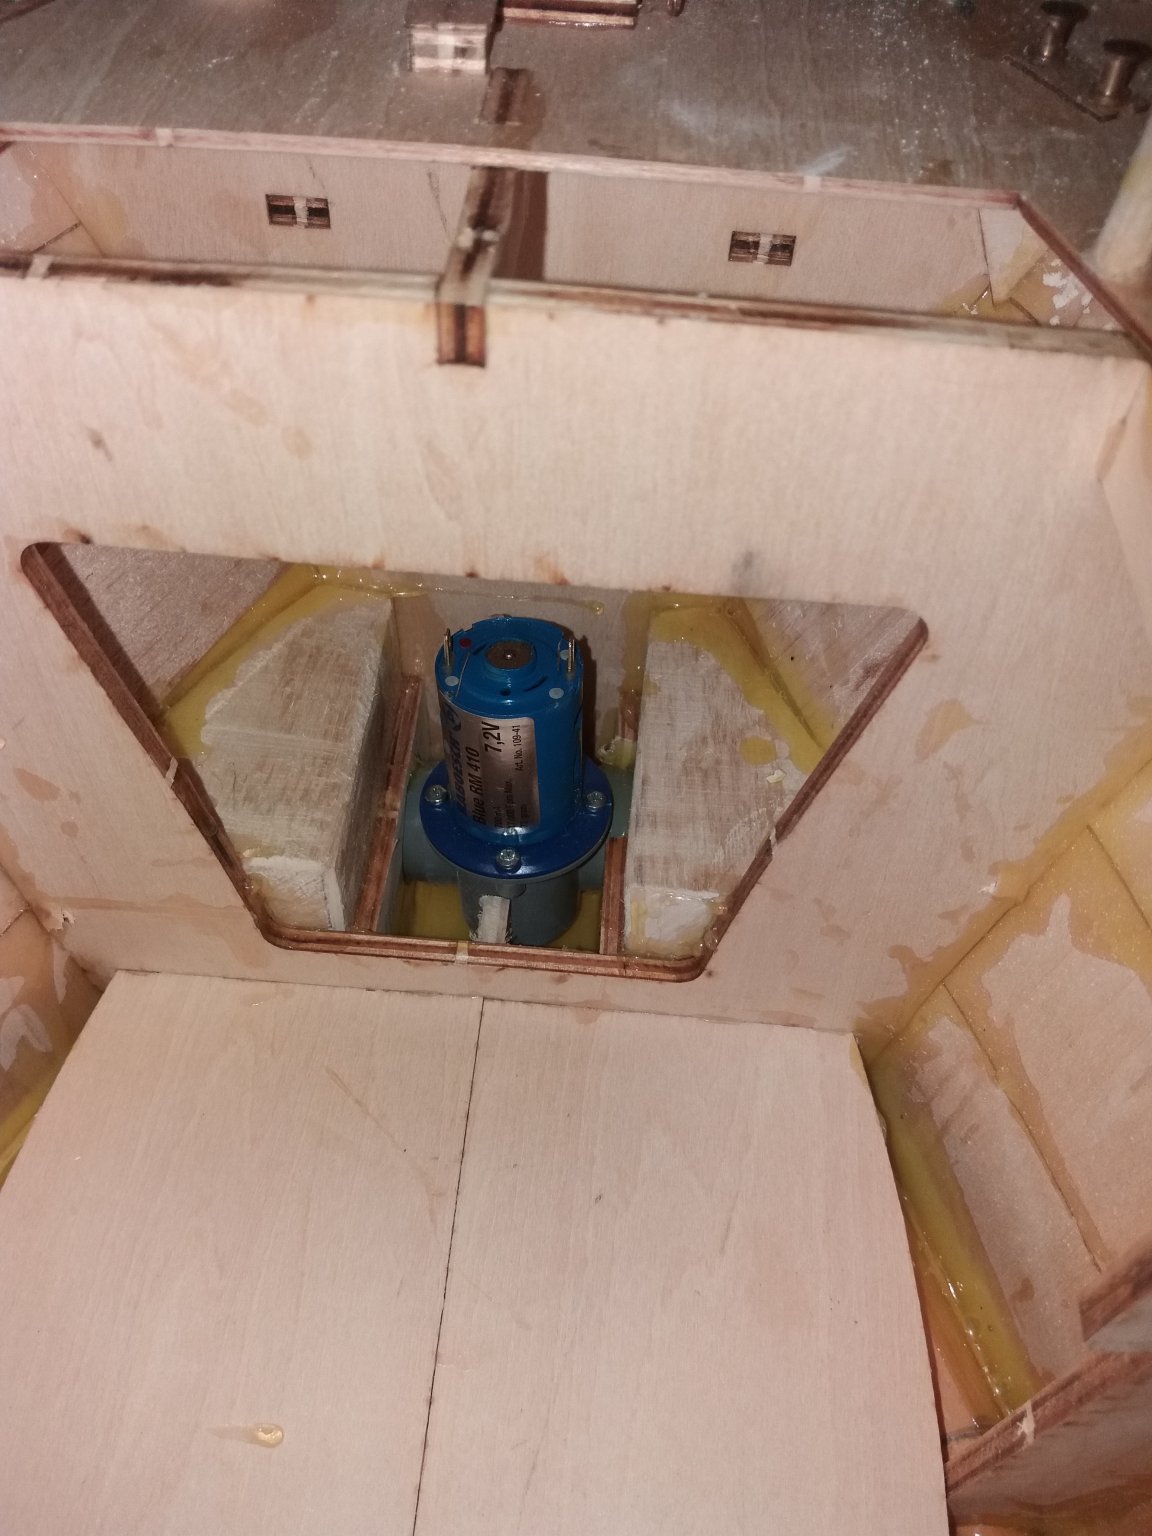
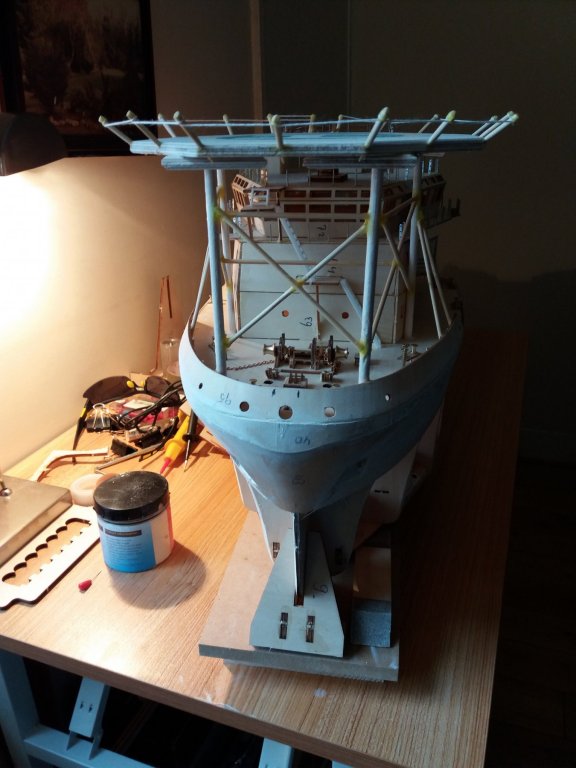
Bow trust engine mounted and secured waiting to connected
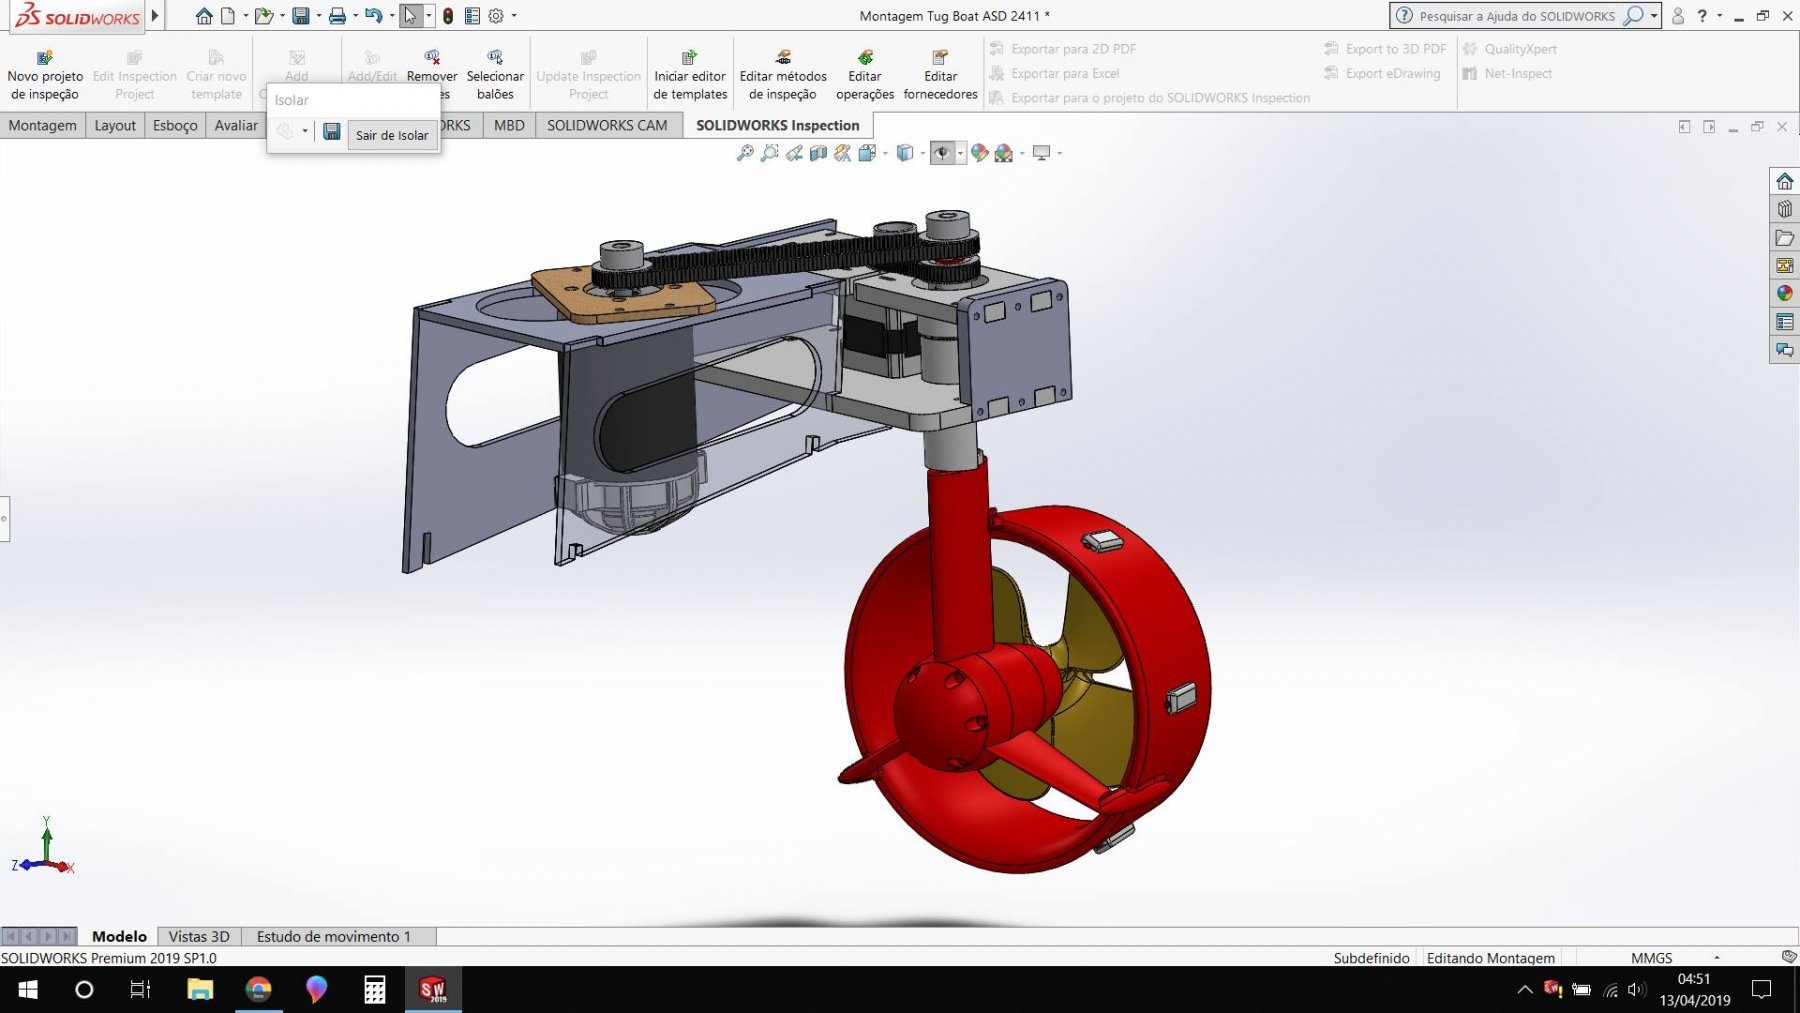
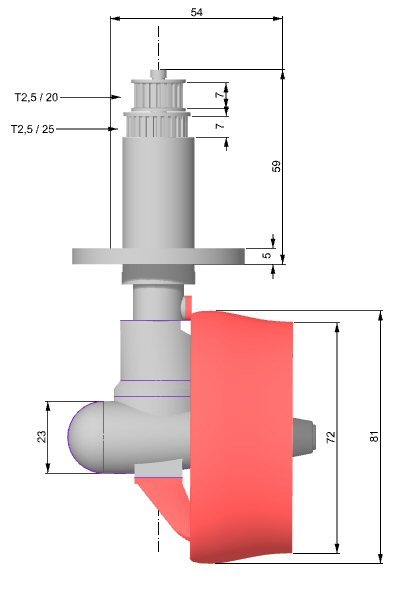
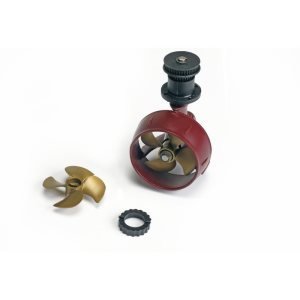 Schottels I'm going to use.
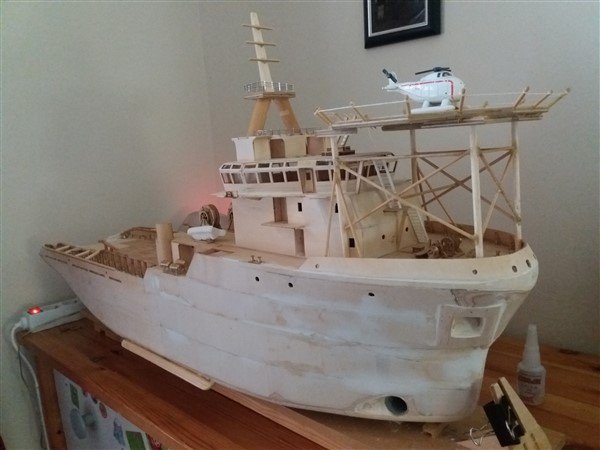
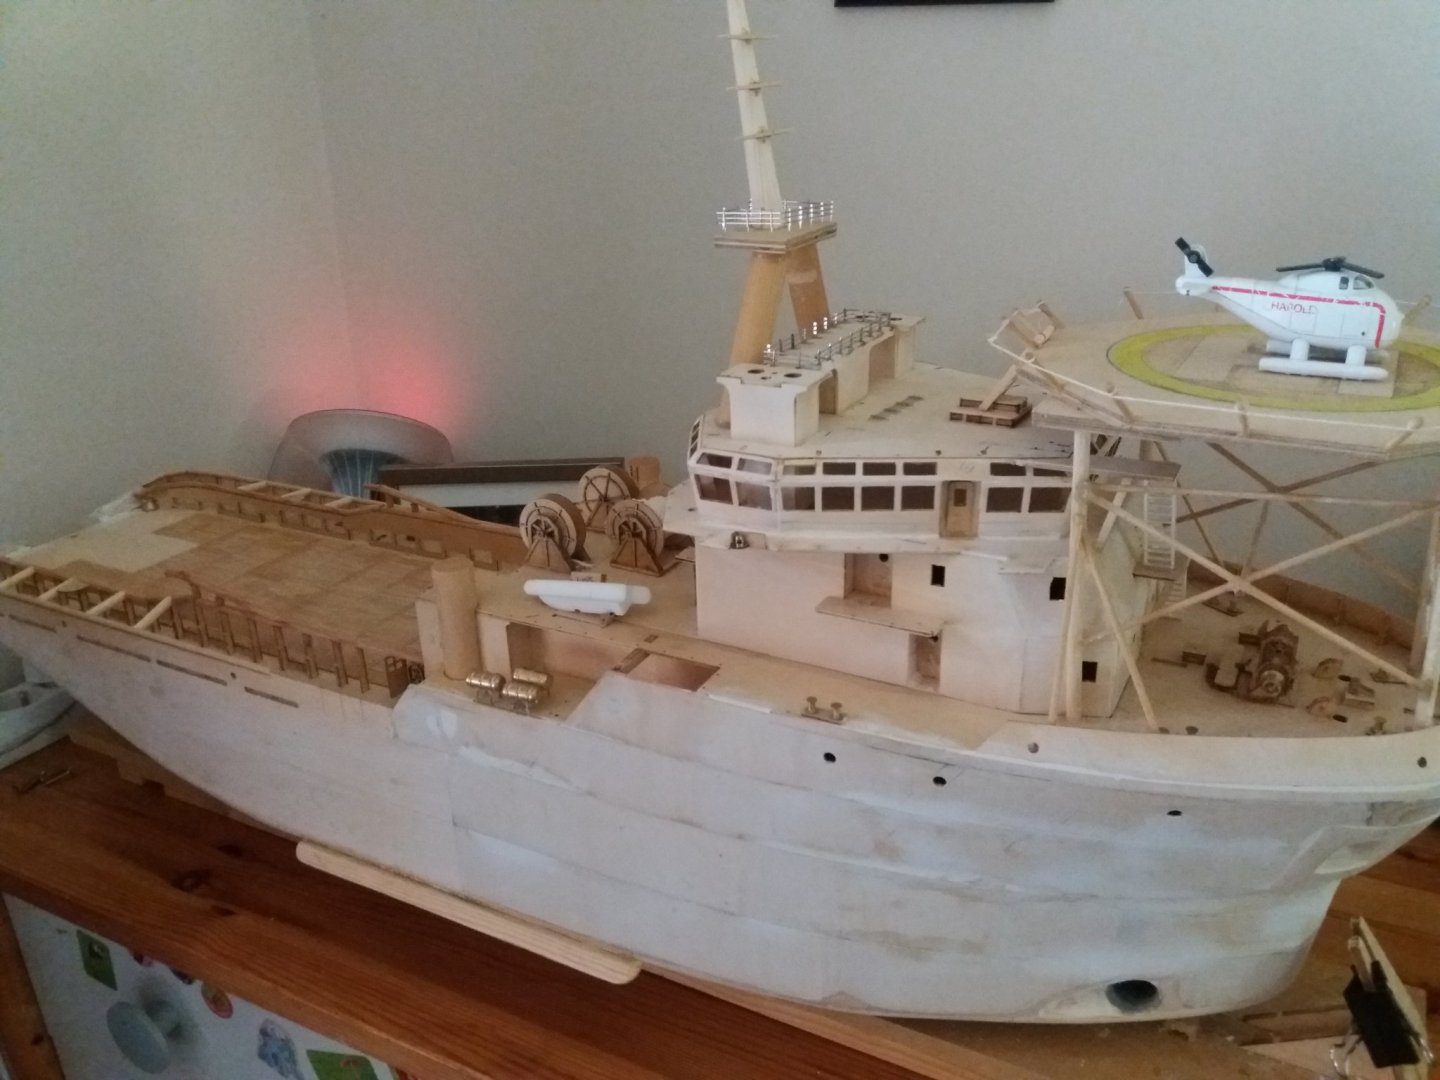
Just an update till now.
Already informed you that it will go slower as expected but still doing works to it.
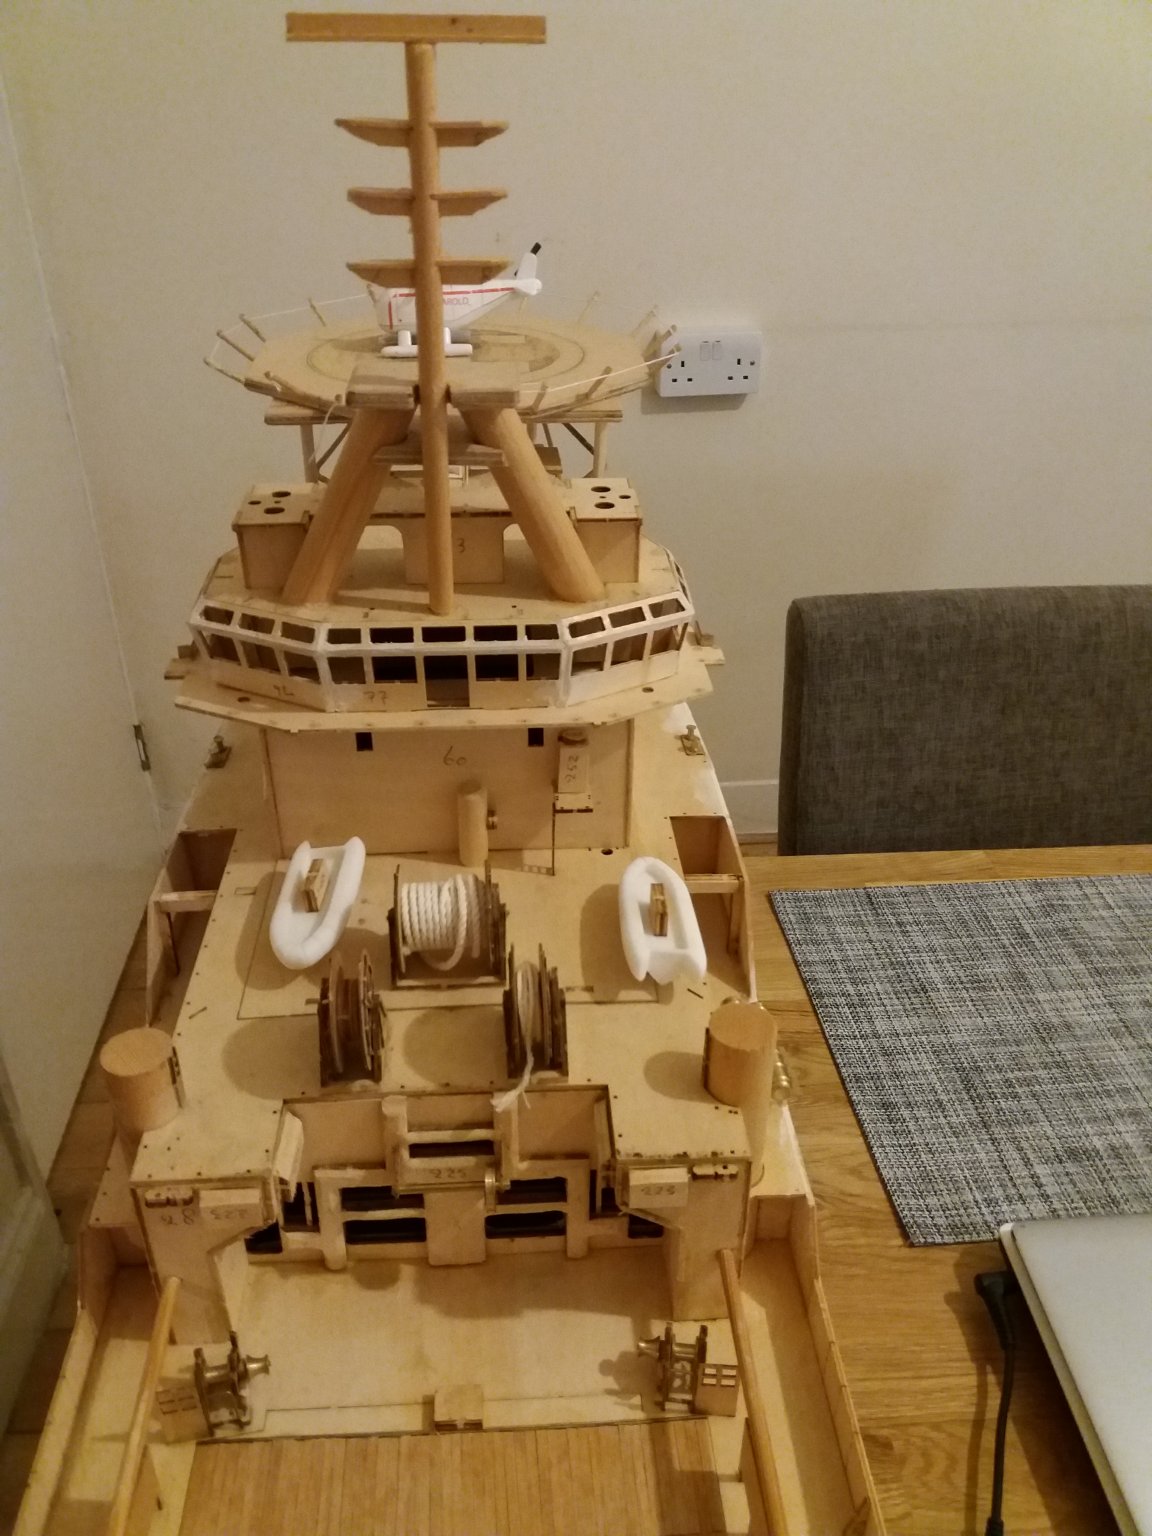
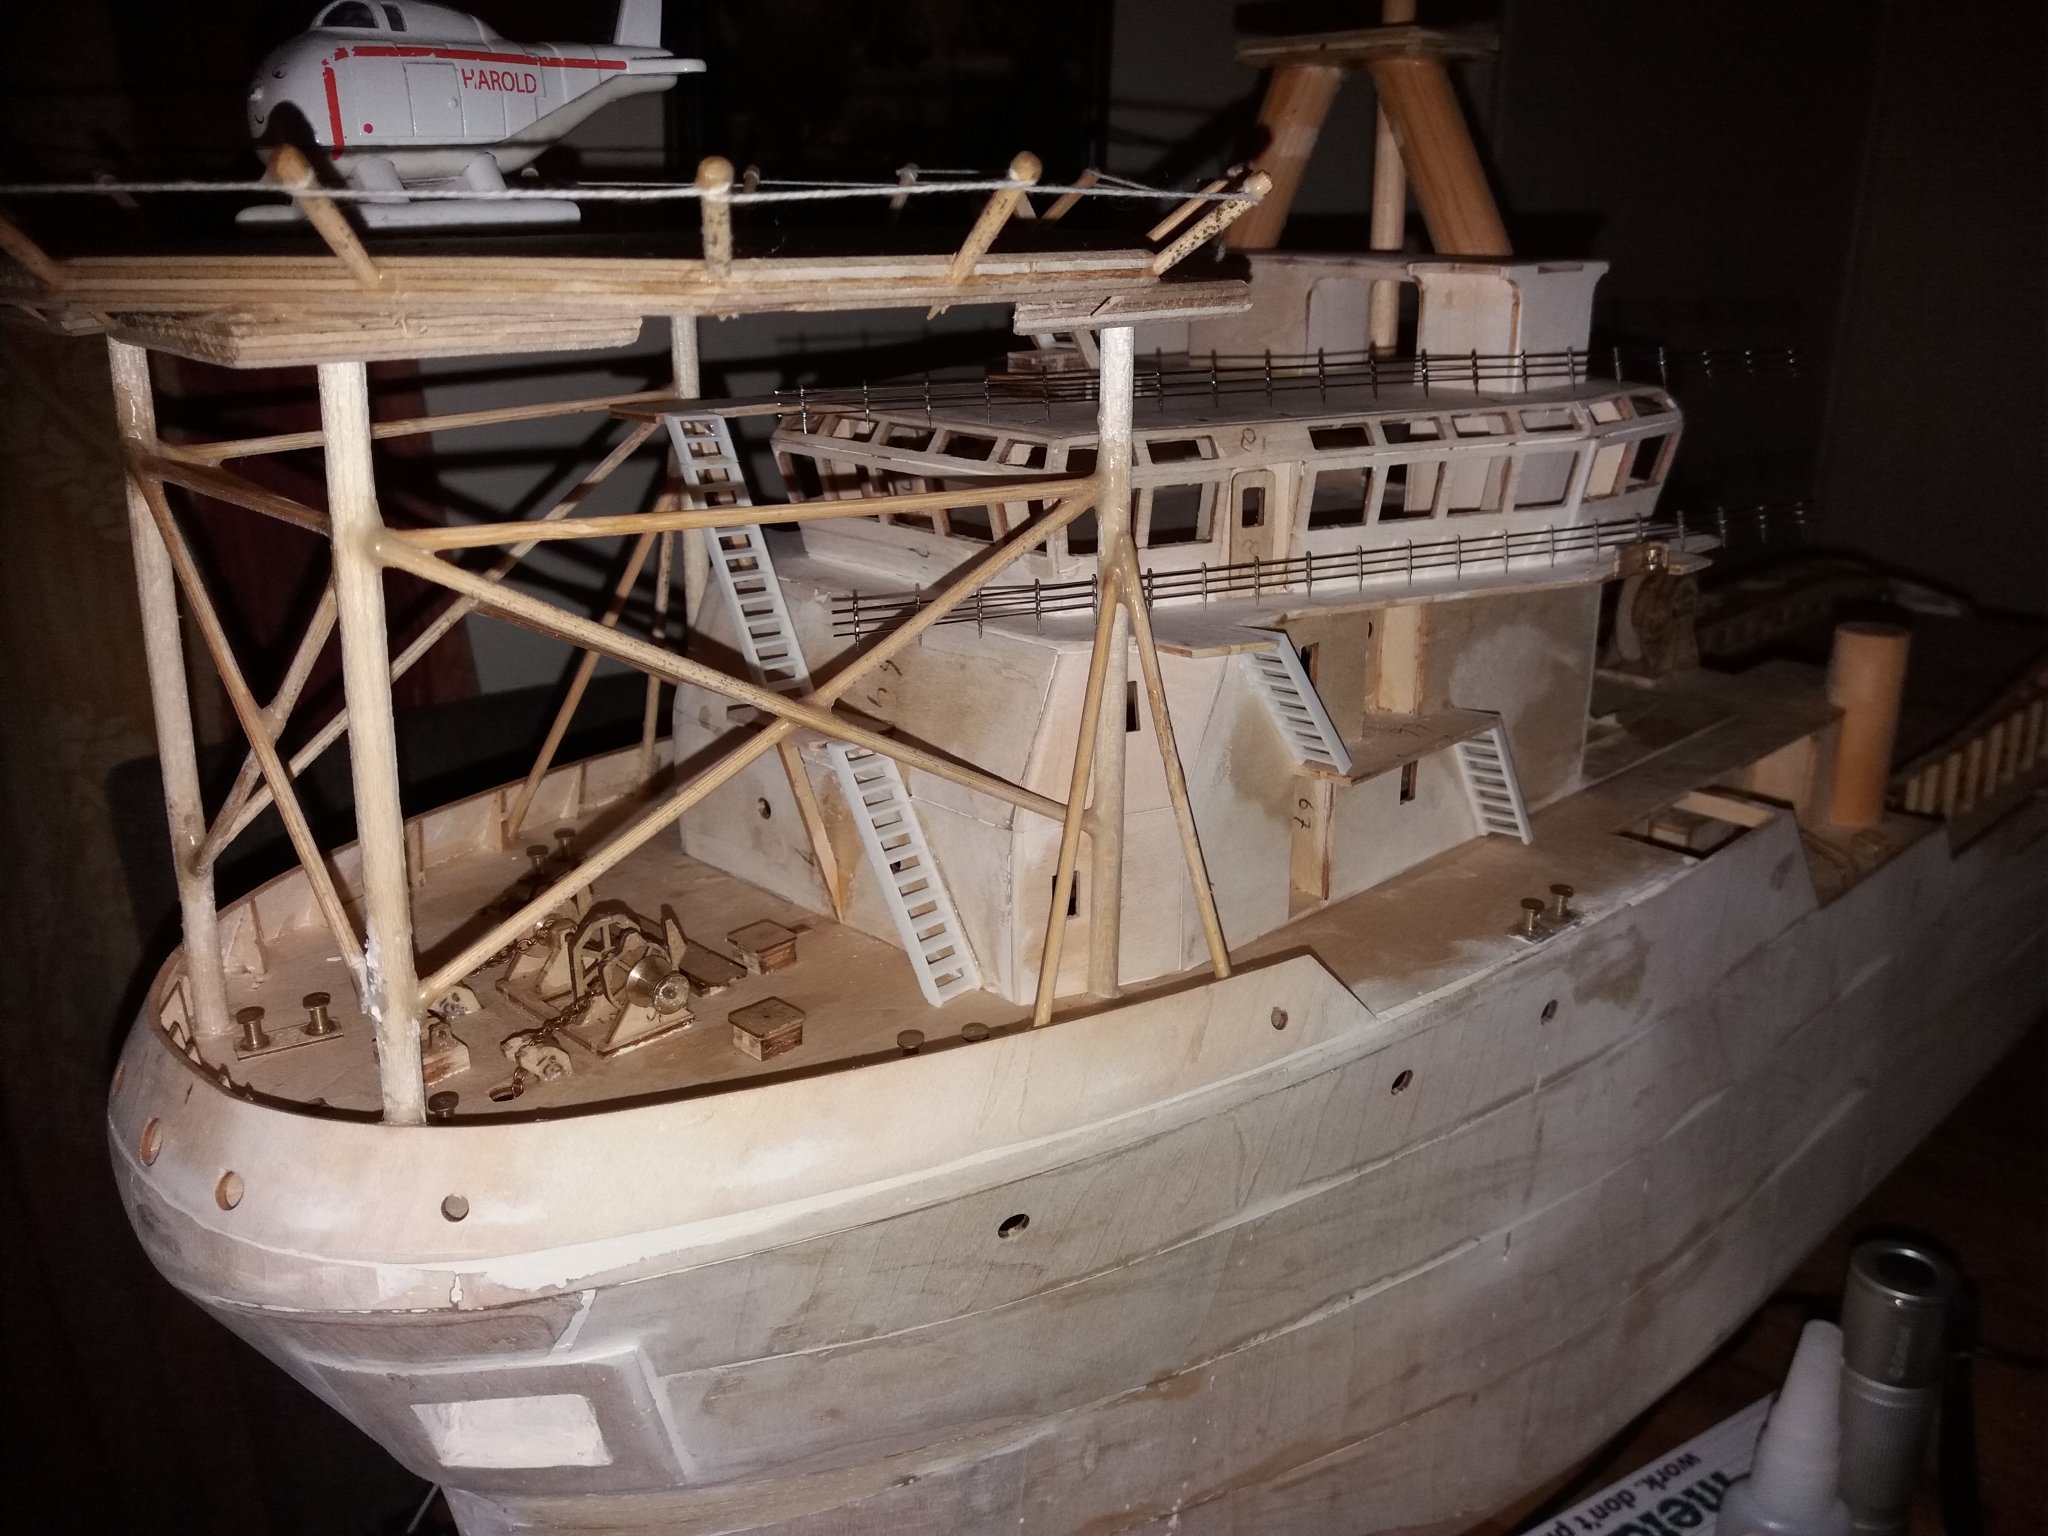
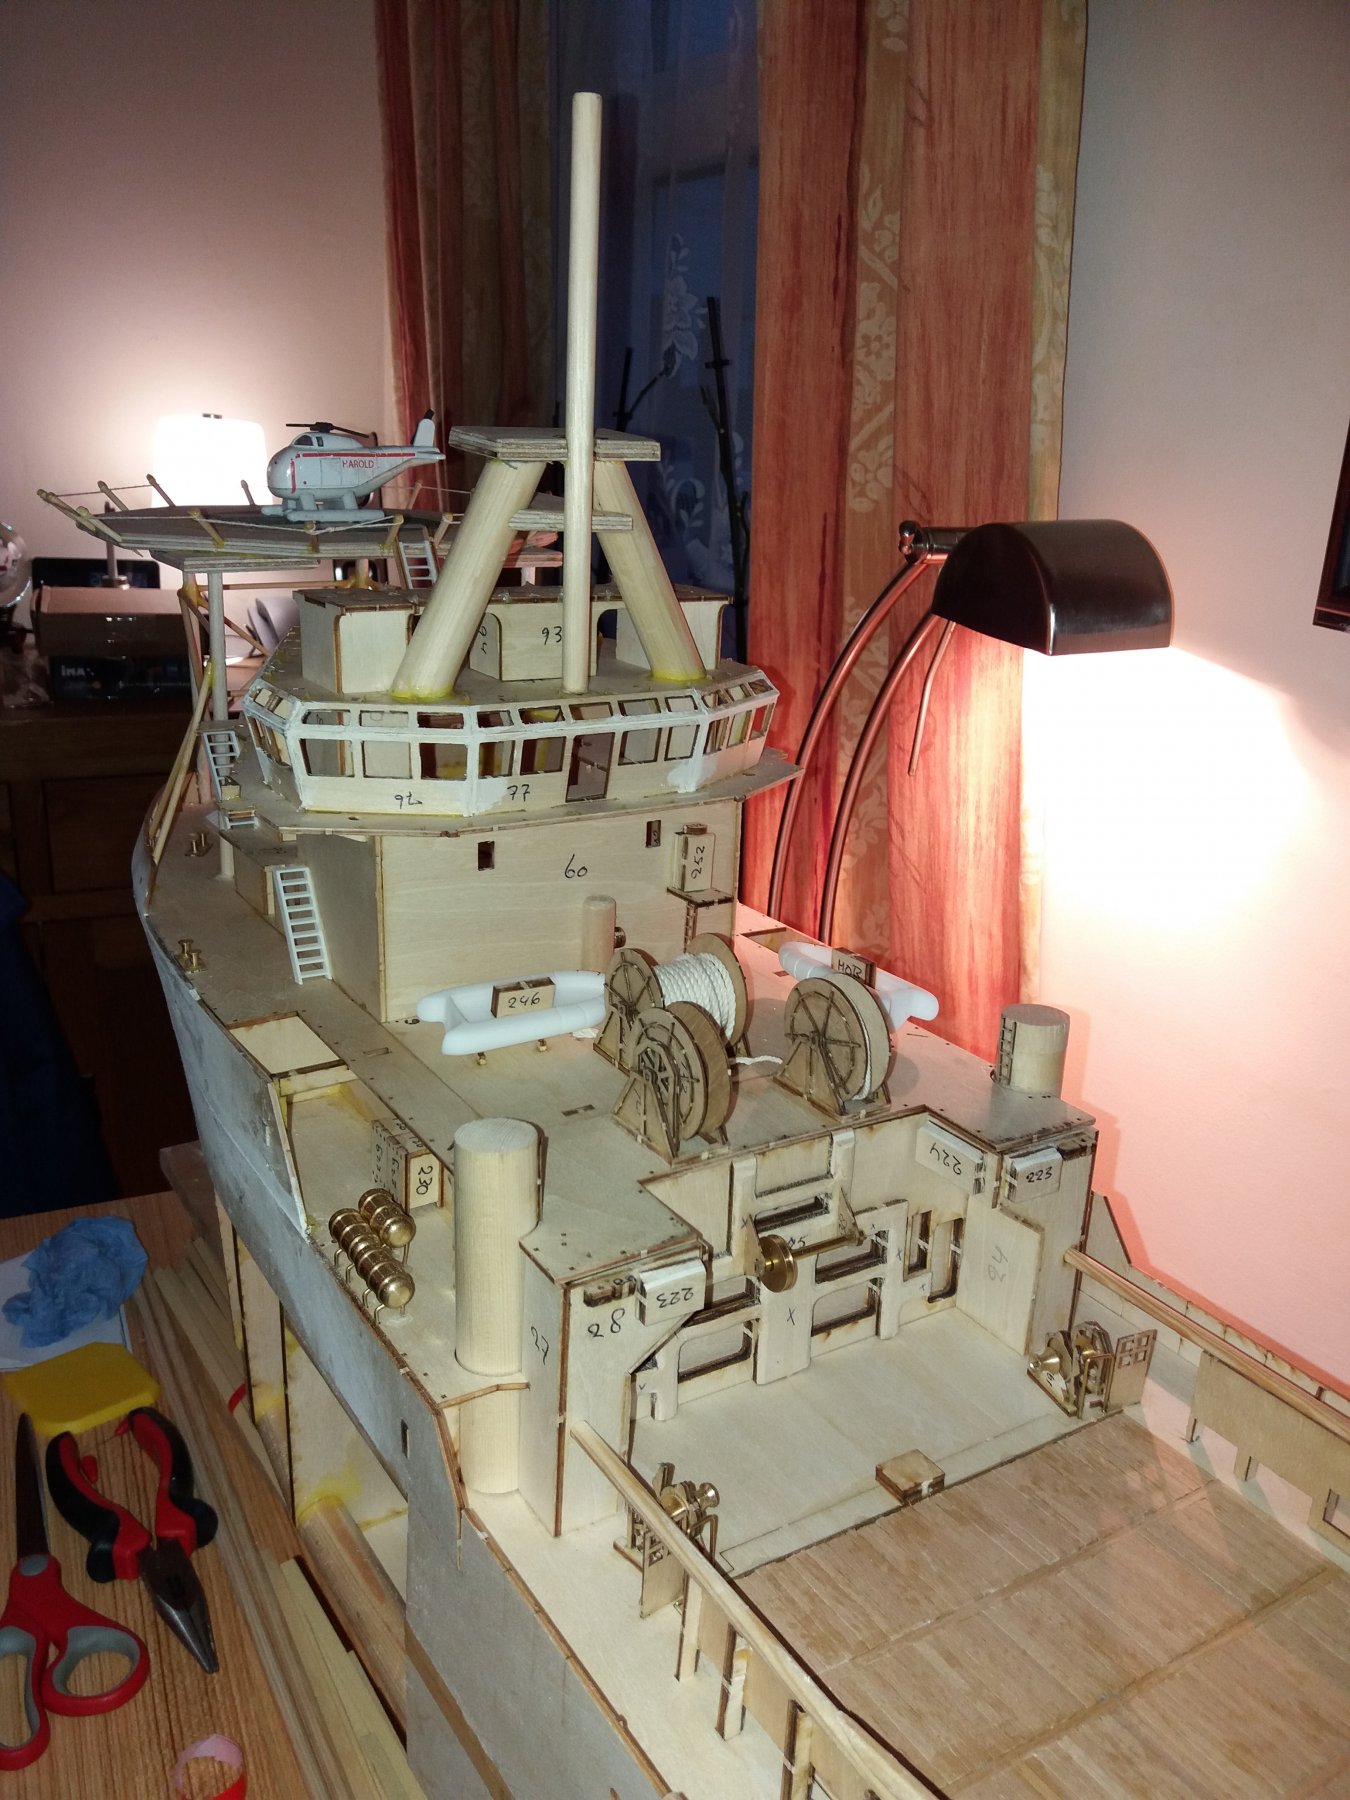
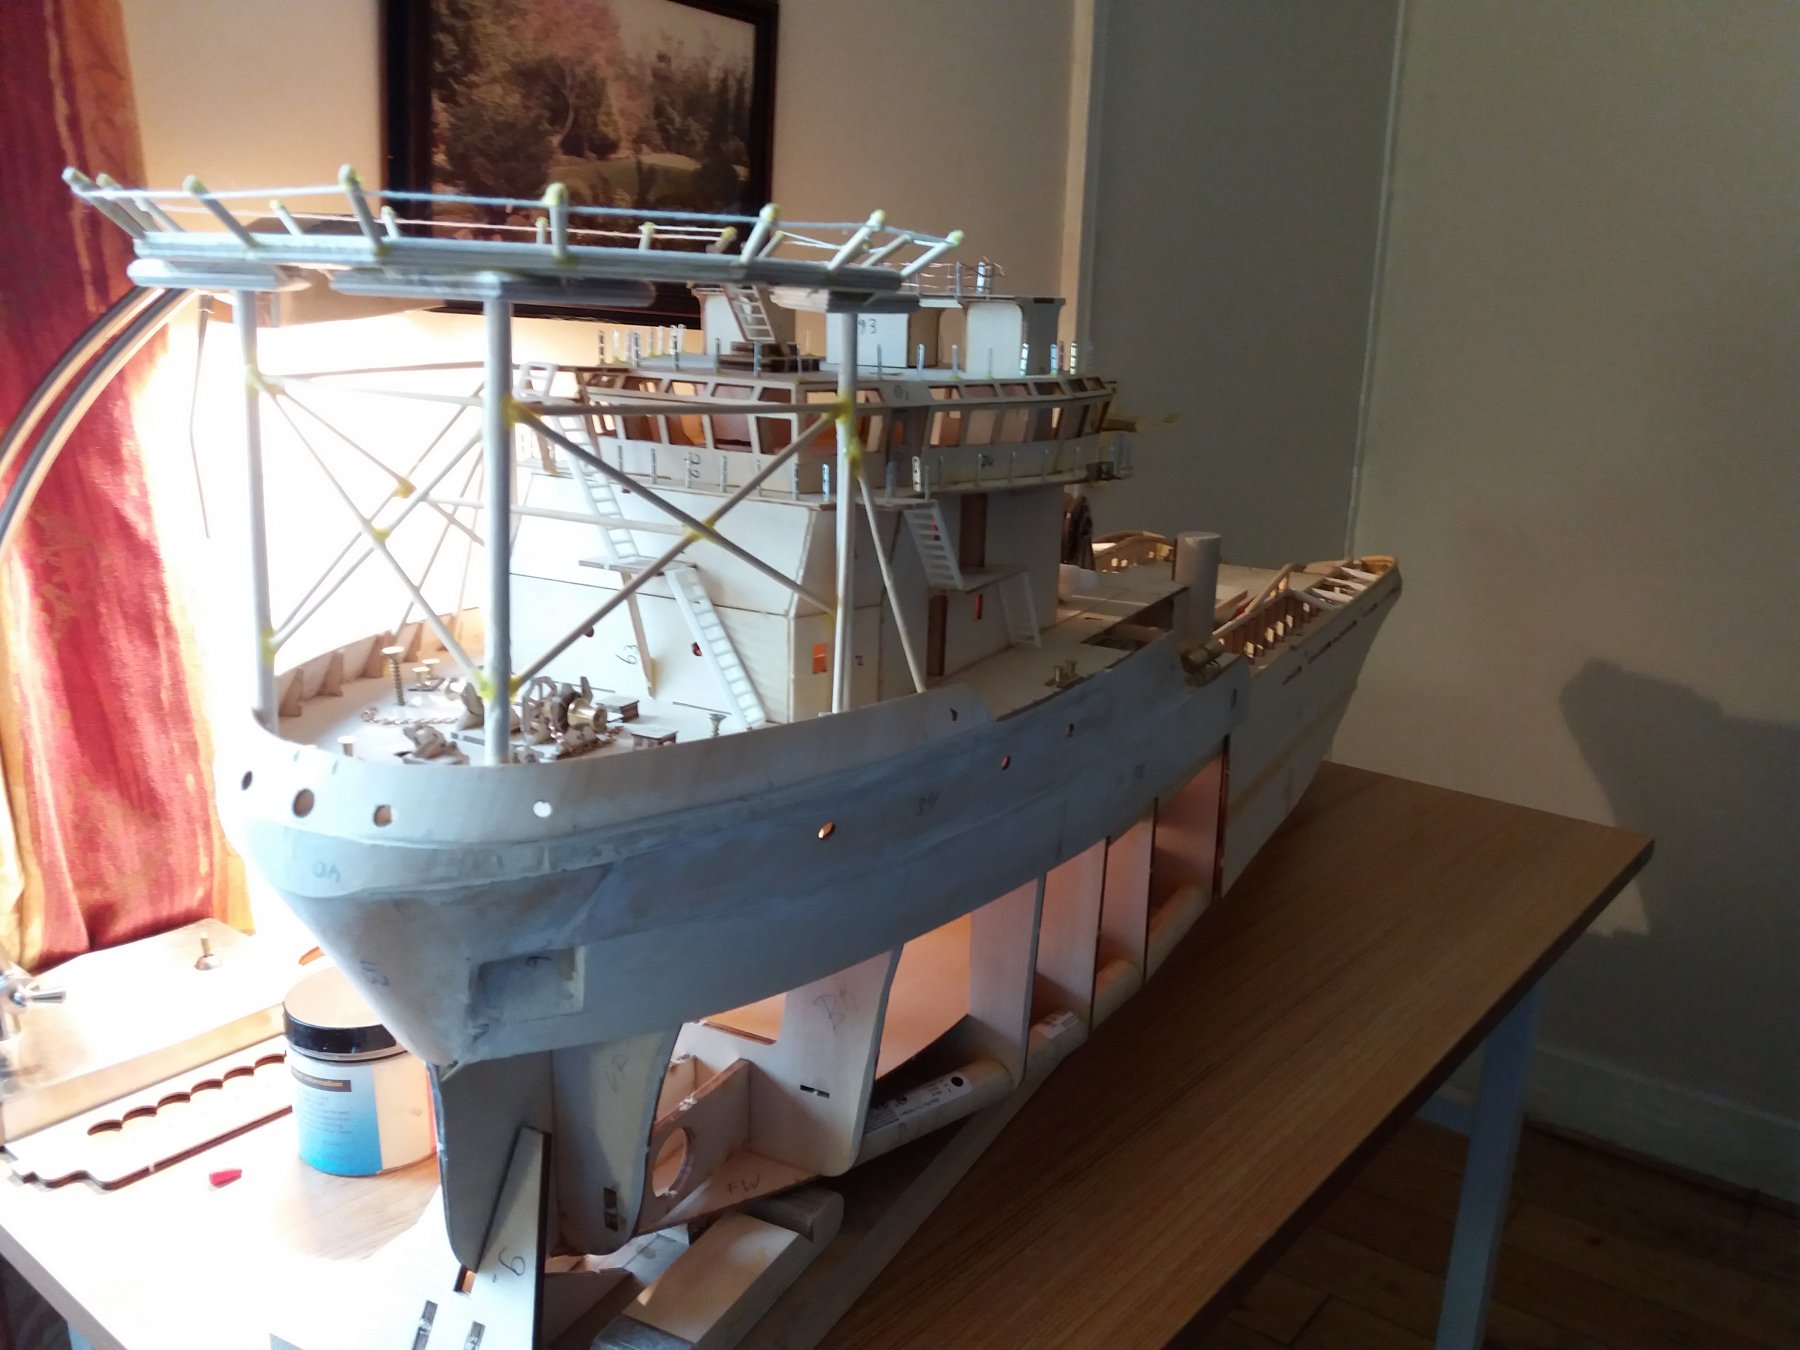
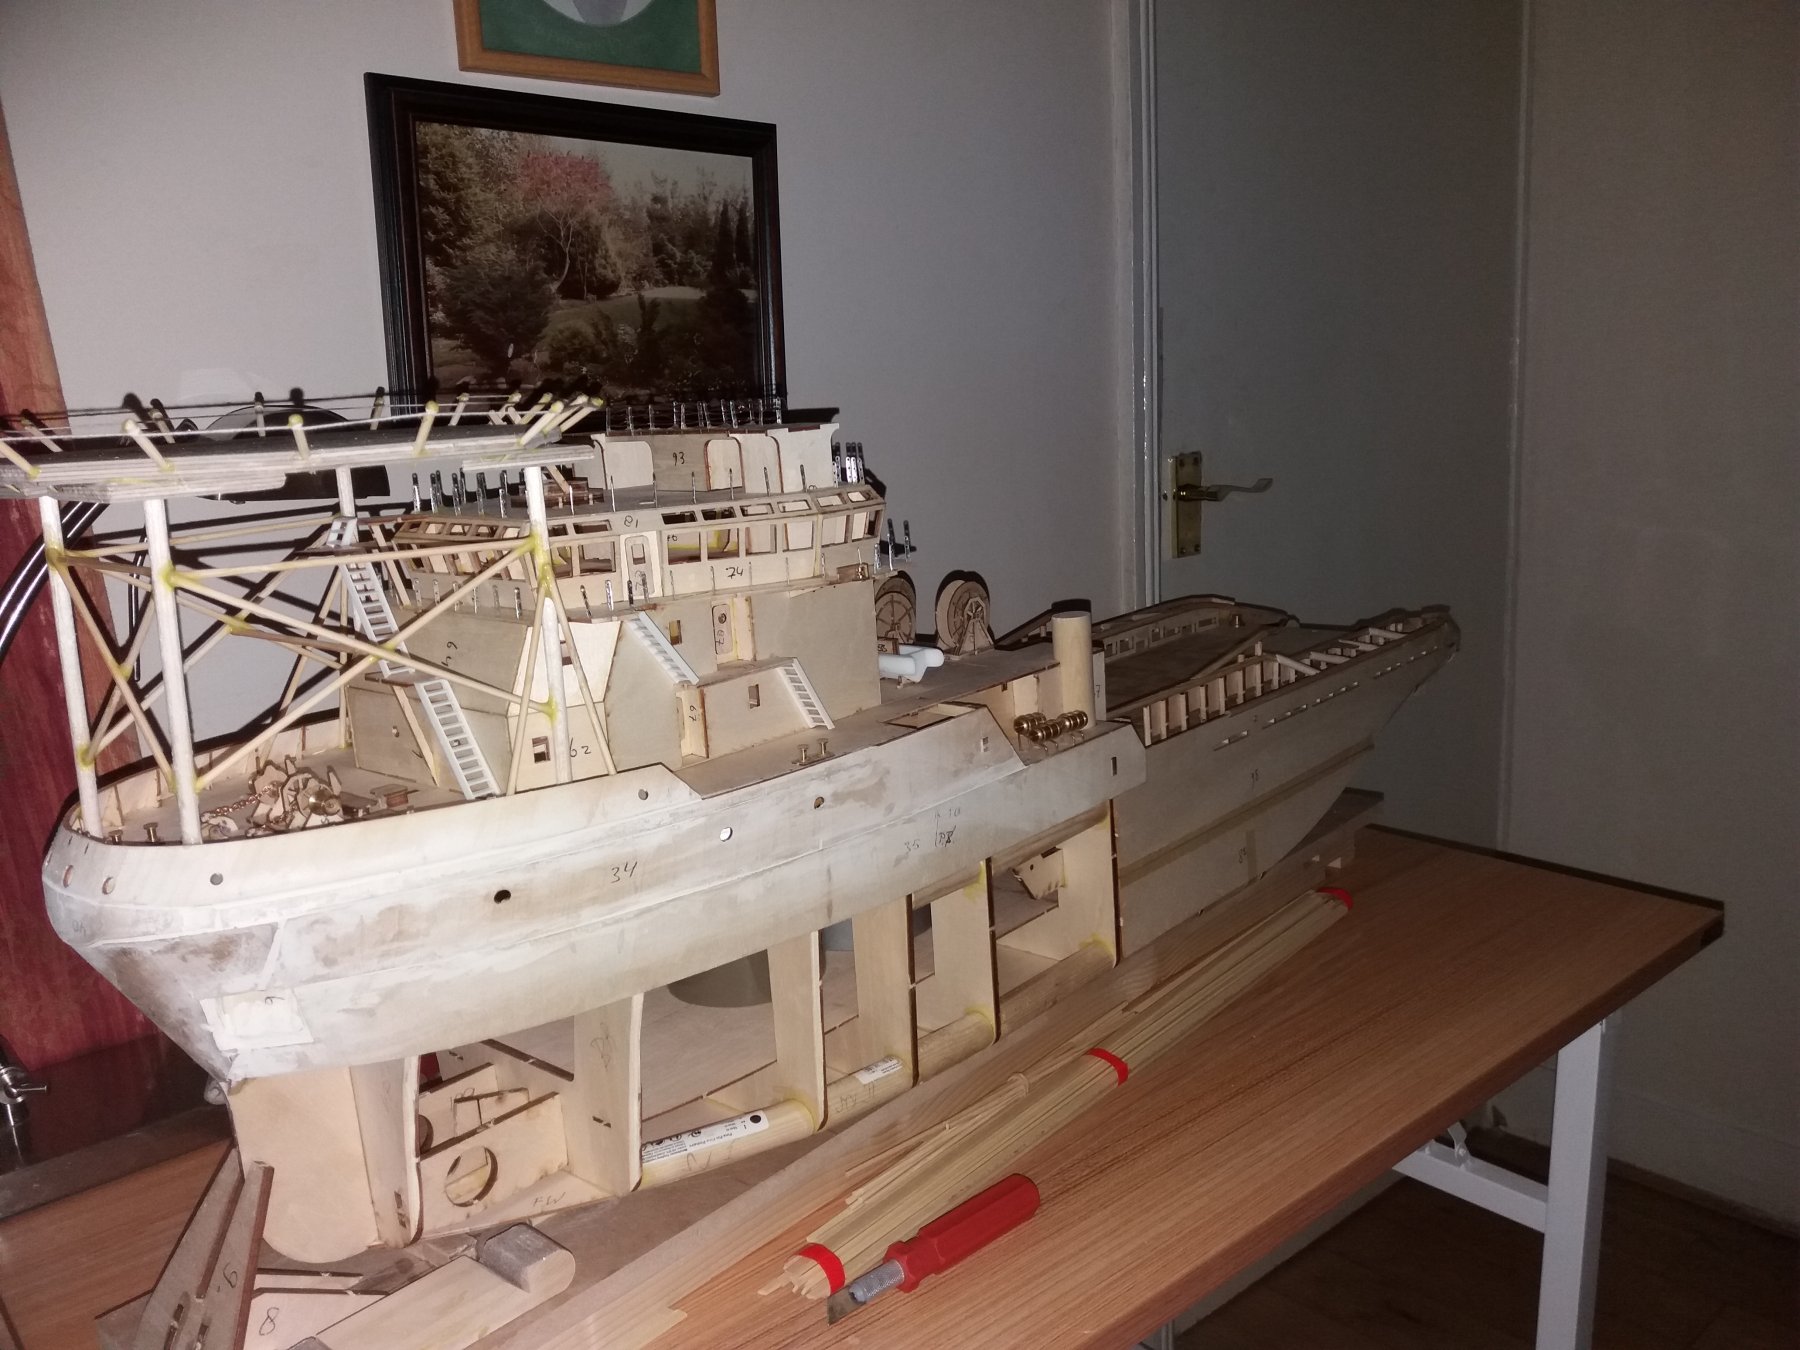
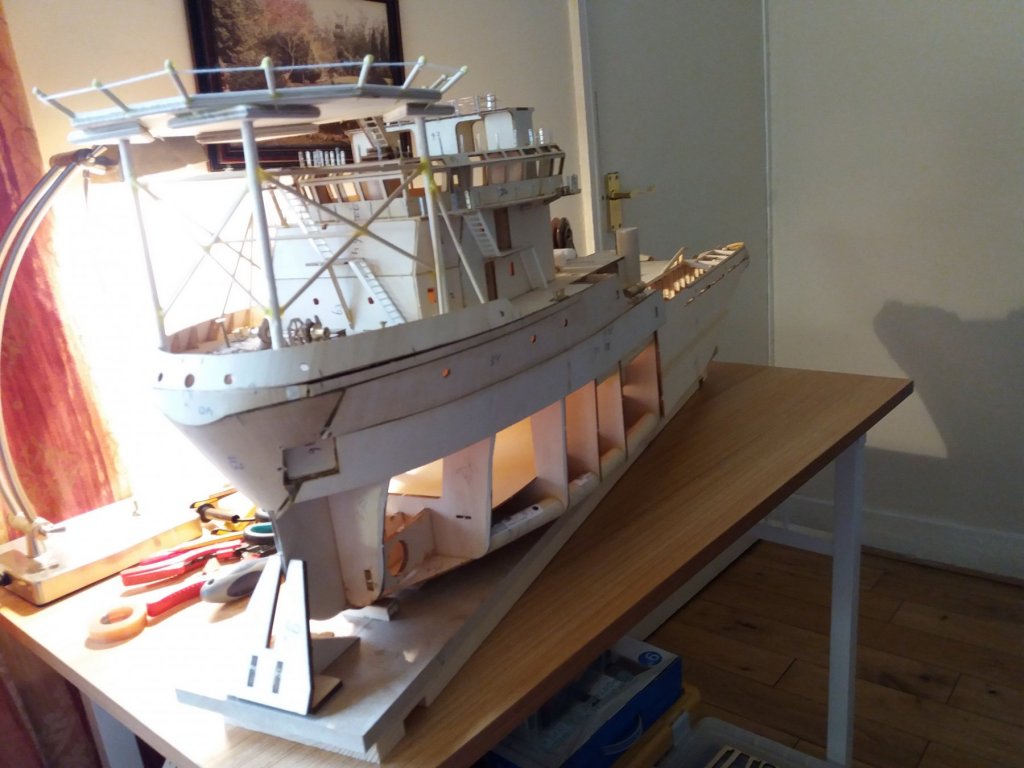
Did the sanding accommodation and bridge.
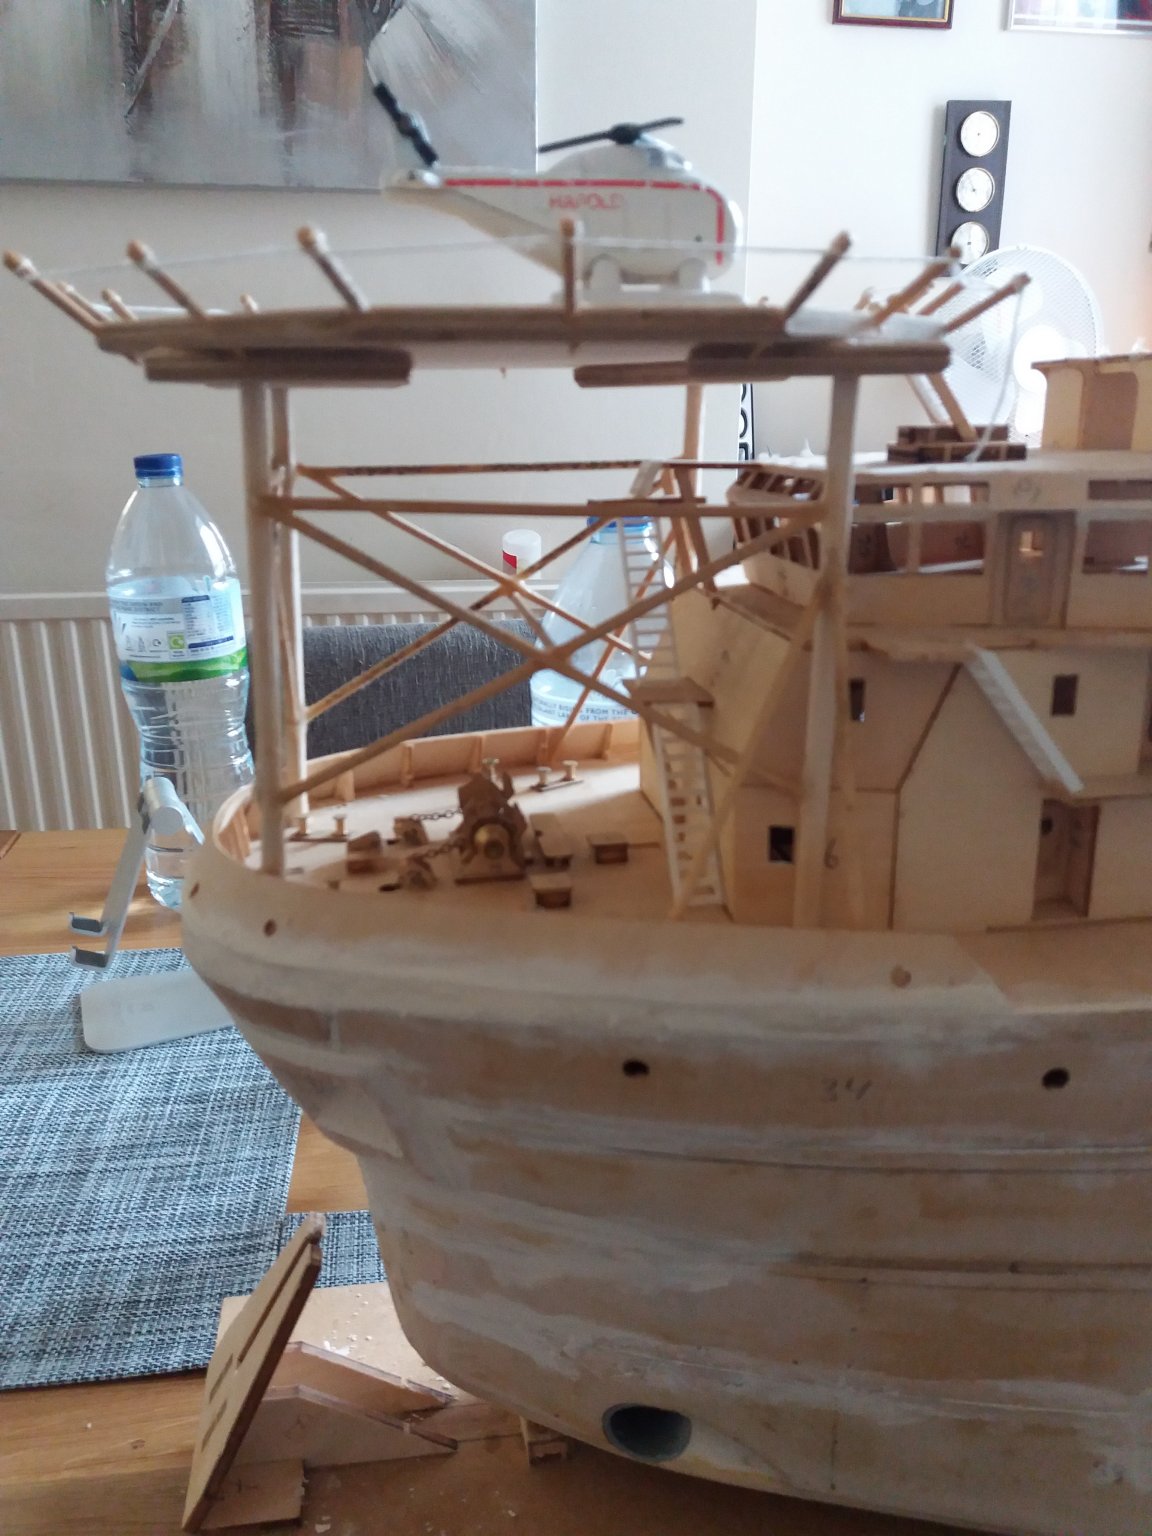
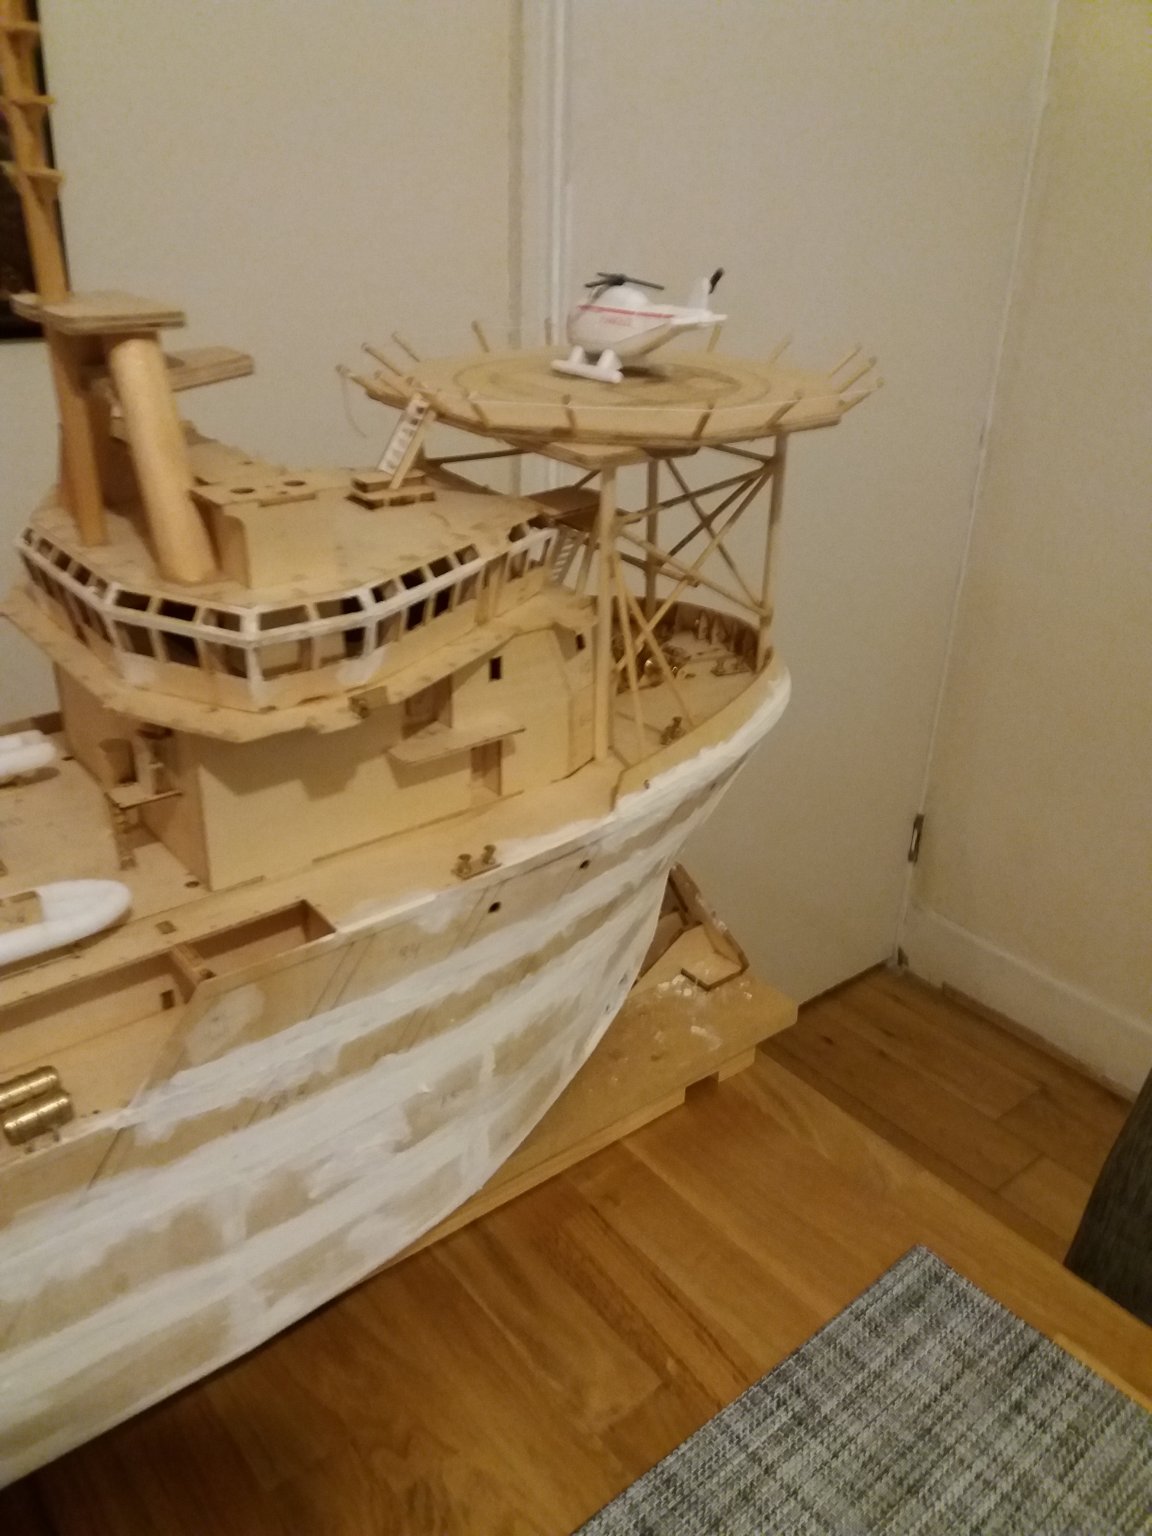
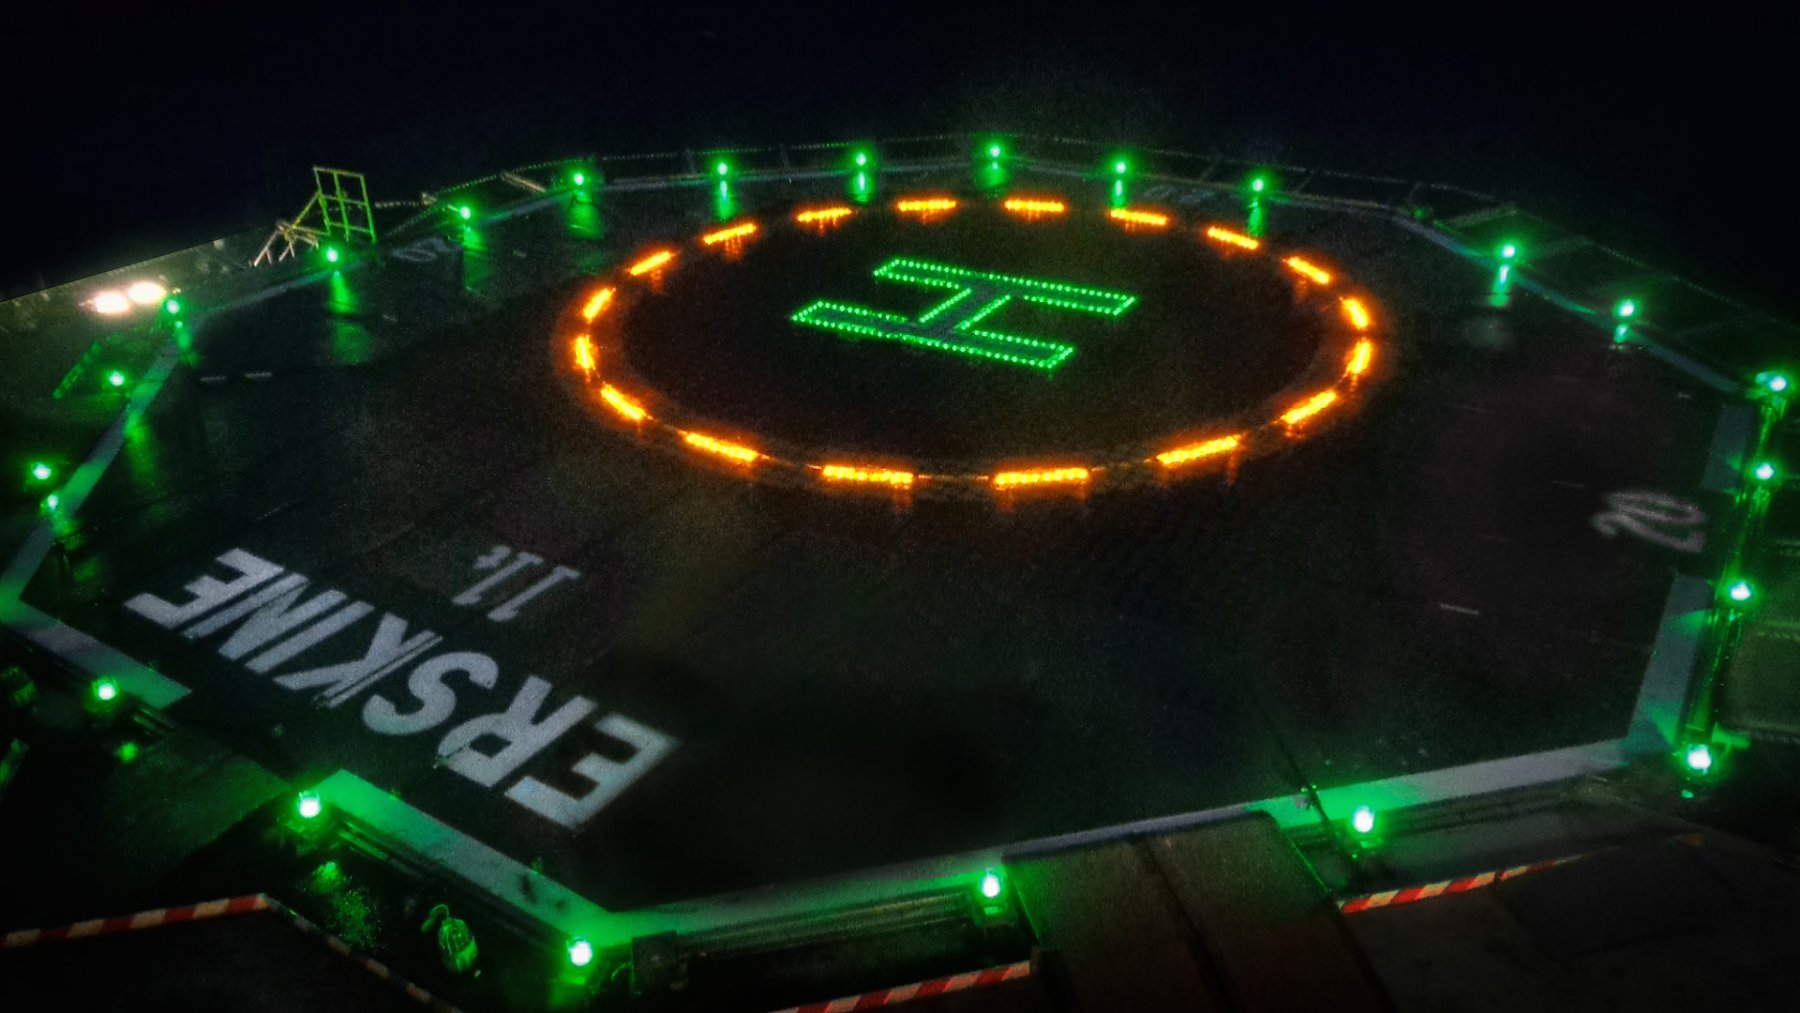
Changed also the uptake stairs / ladders to the helideck as was not content with it, now looks much better.
Also received the railing and can imagine how it looks wenn all mounted but will be something on both sides of the stairs to!
Having just 3 pics to go with this update.
But this all for the next weeks or so to start and finalise with that.
Wish all of you a great time, X-mas is just around the corner too.


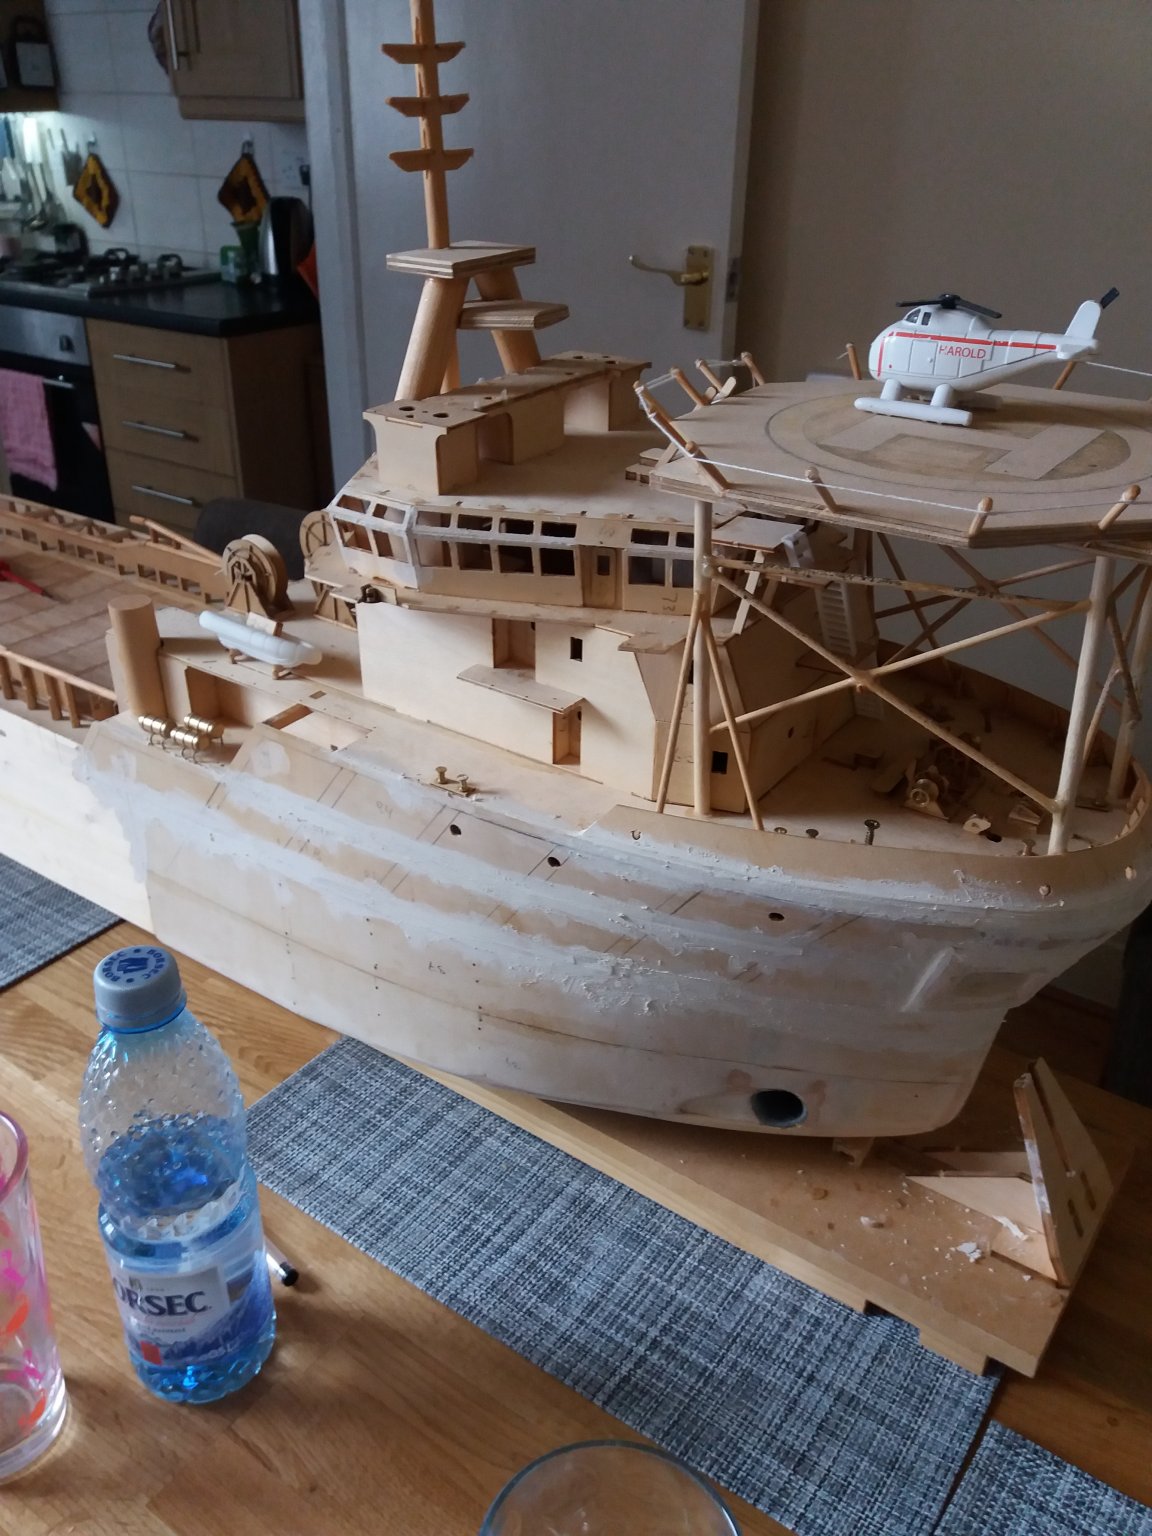
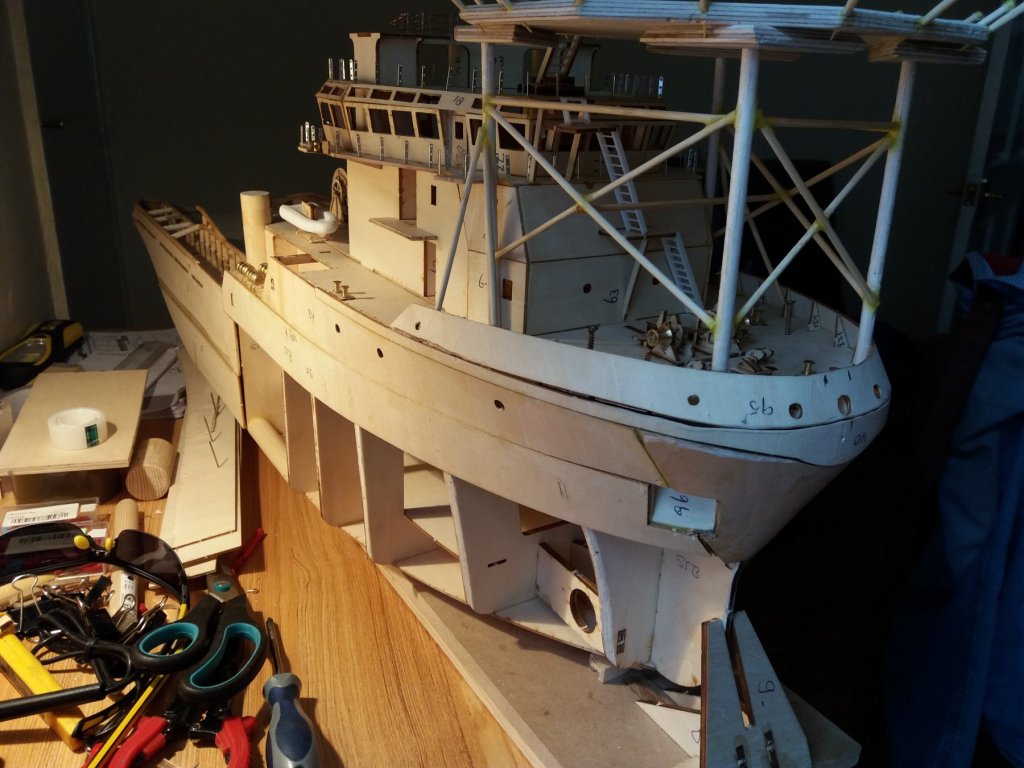
Having the last pics of the built.
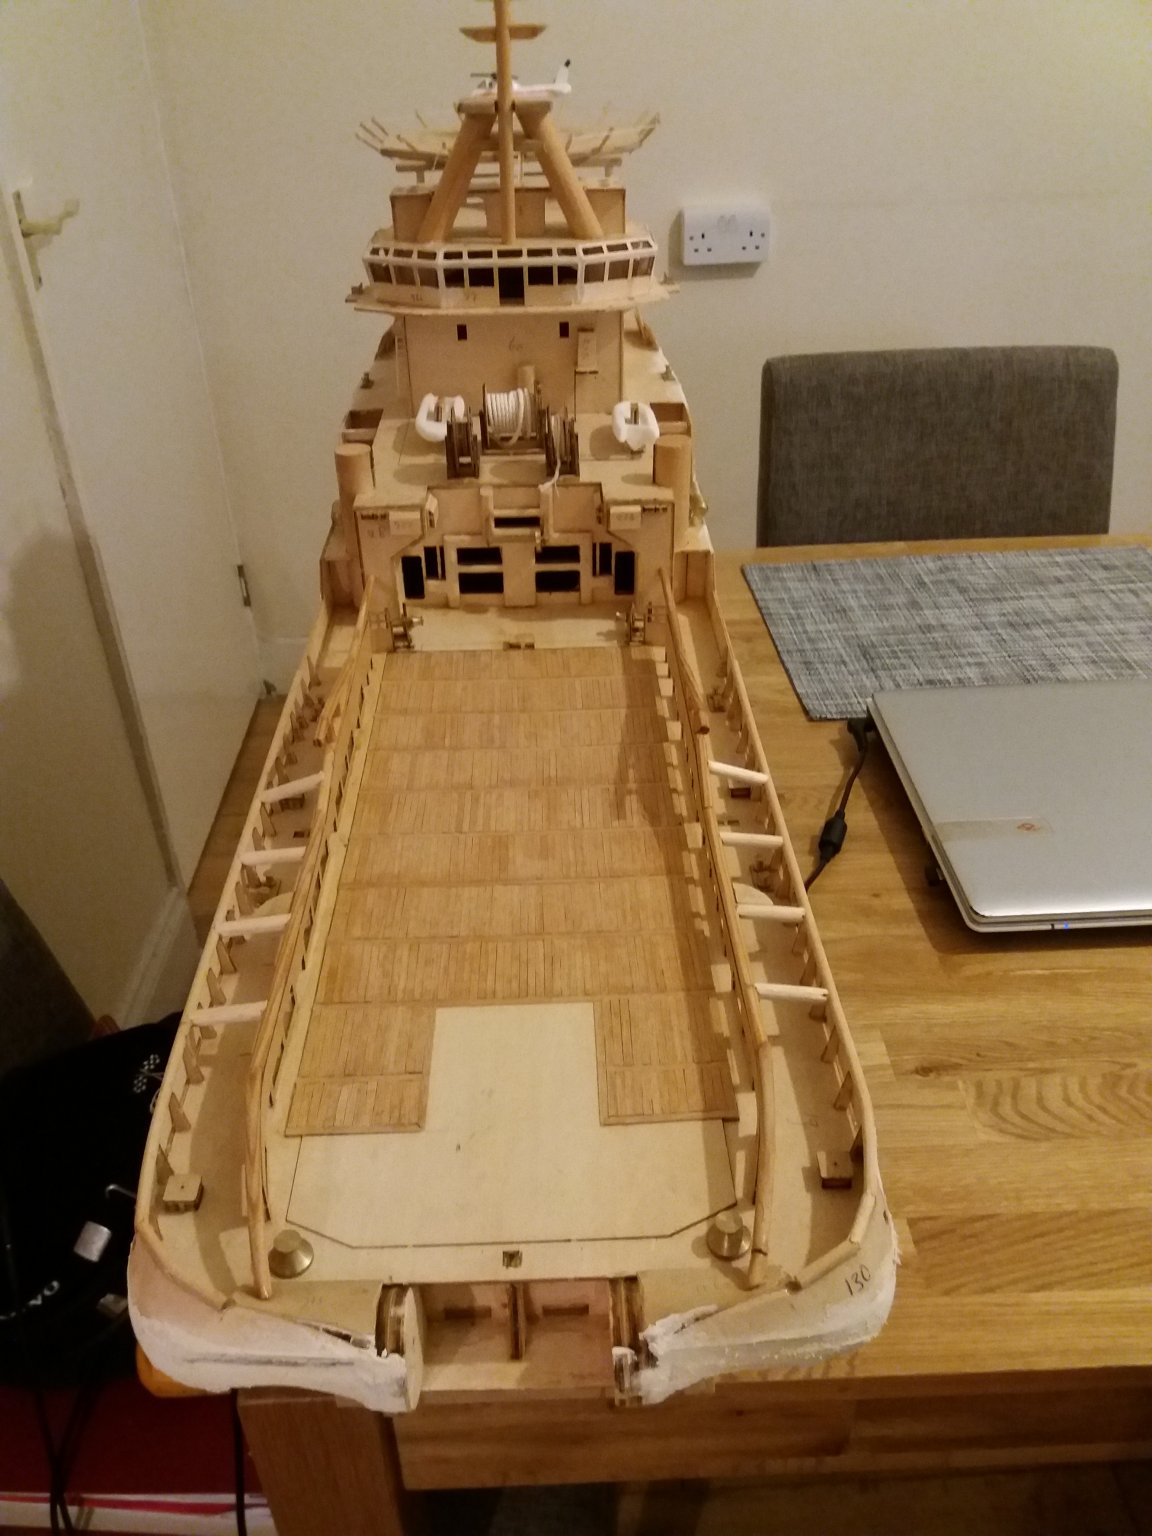
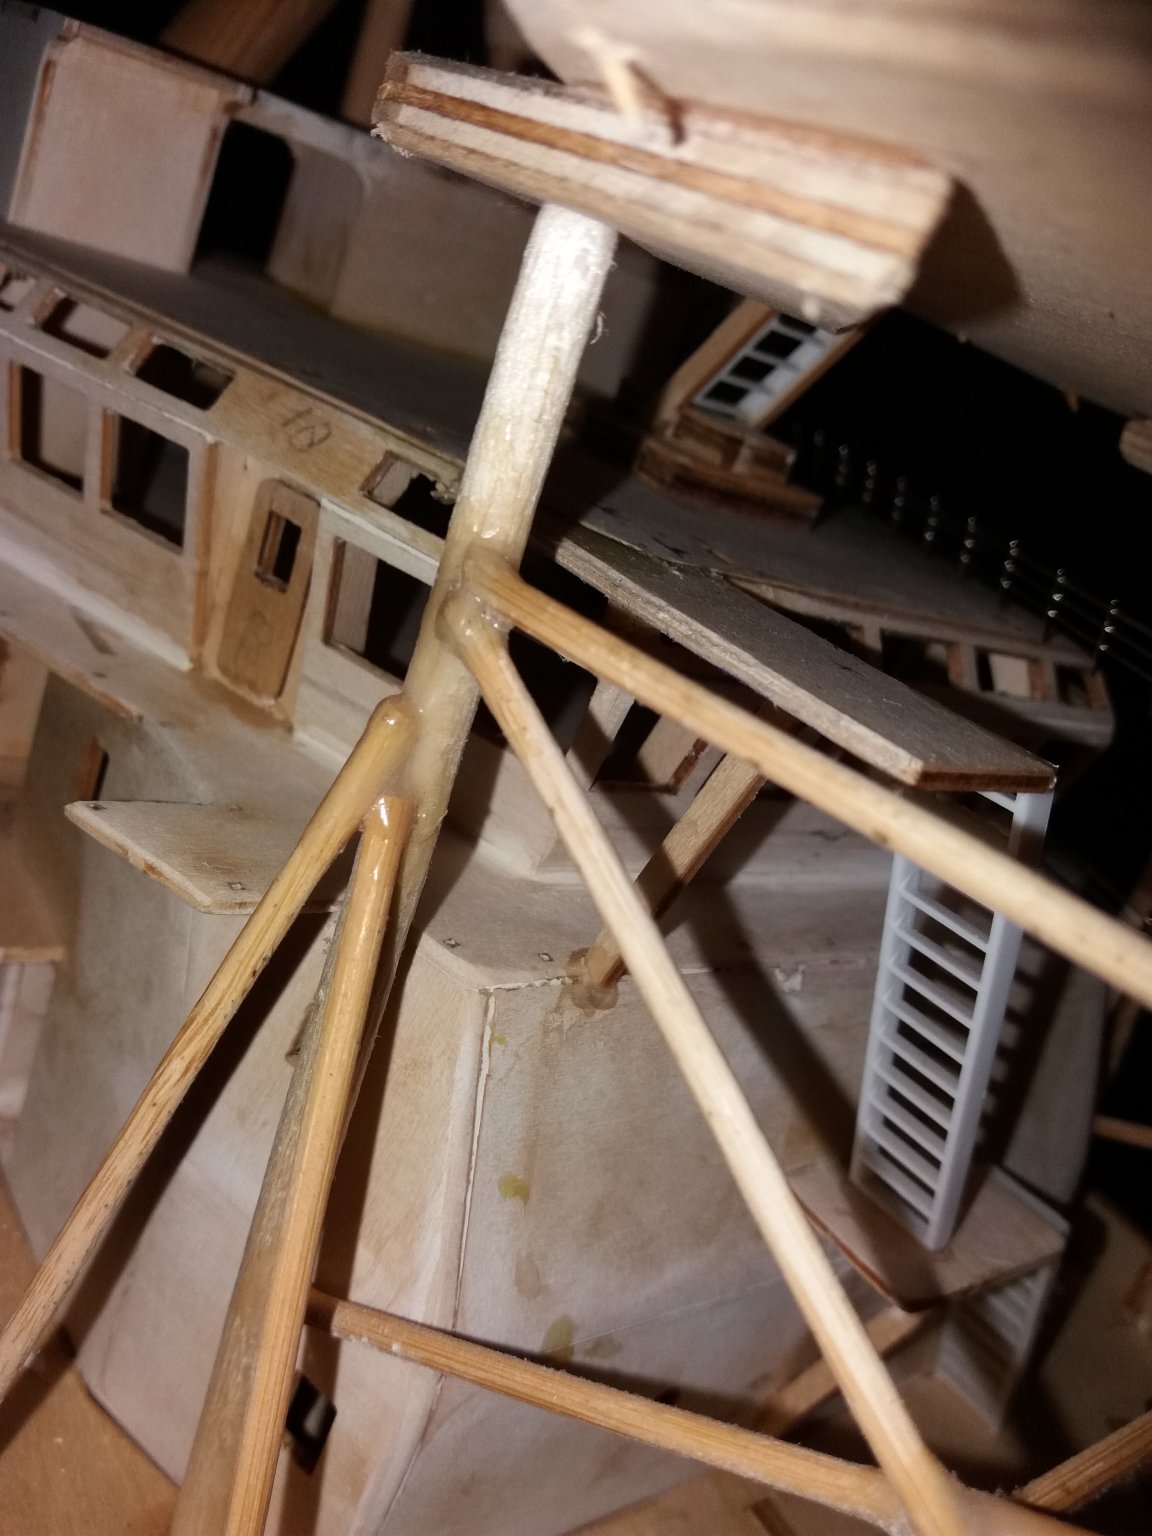
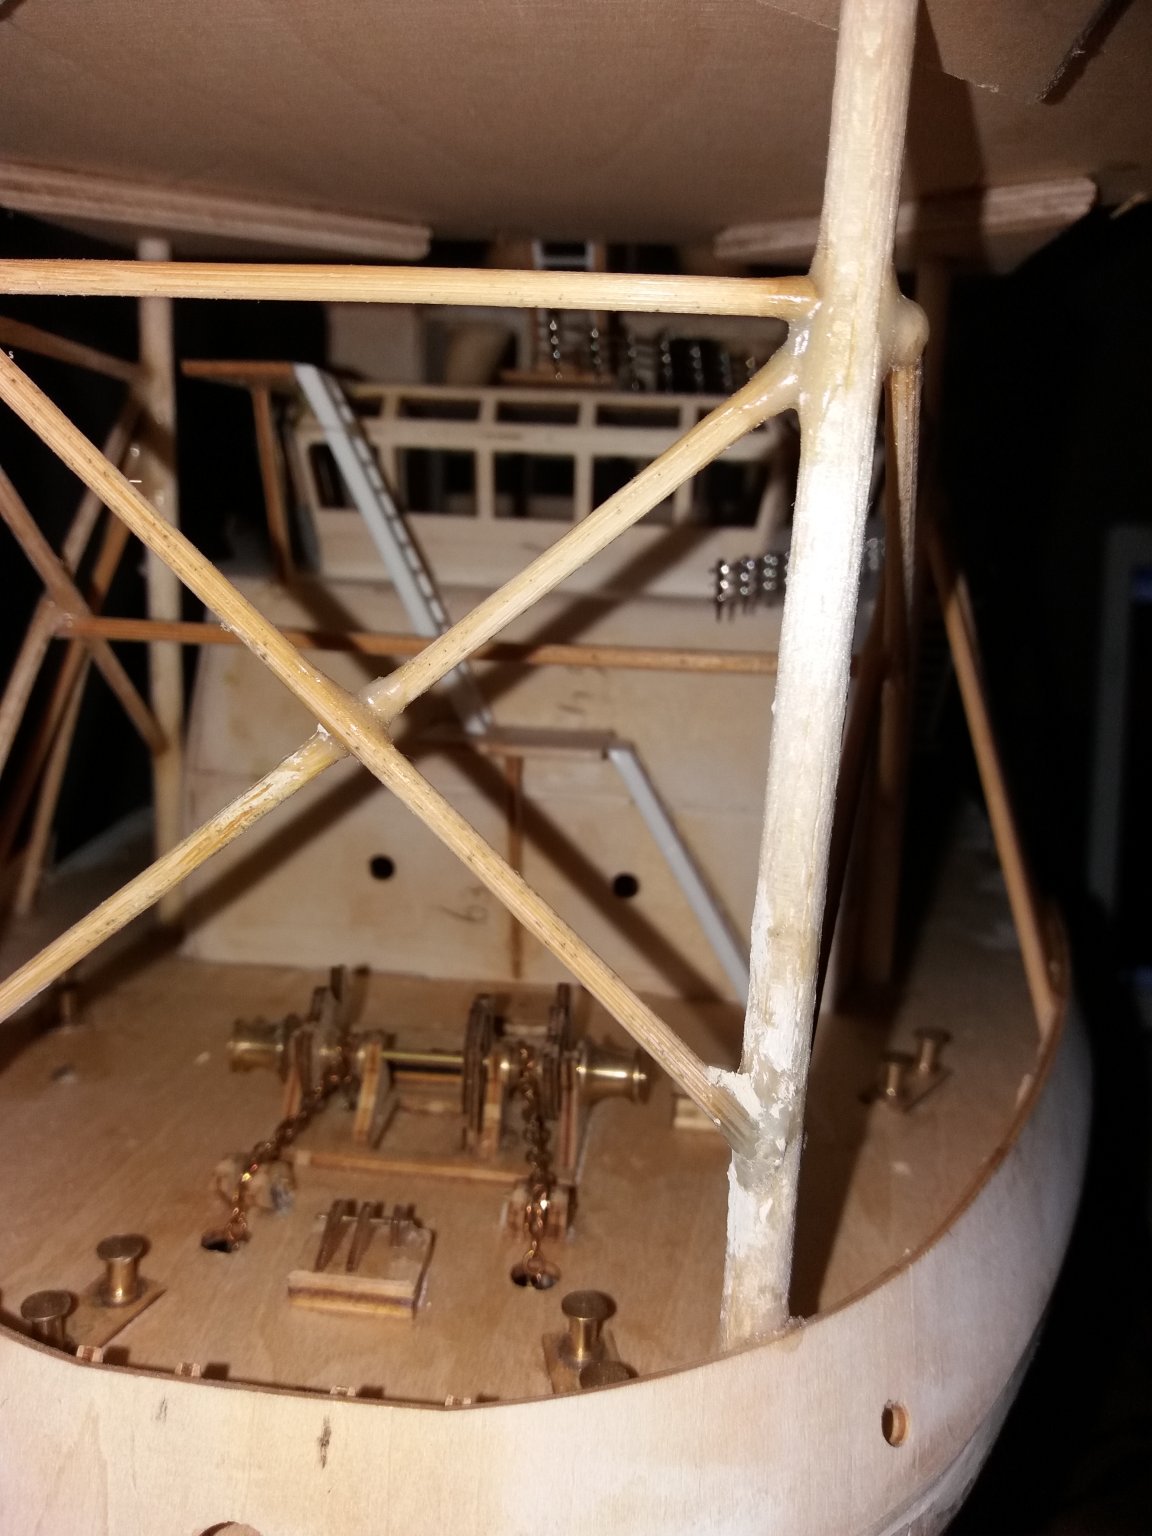
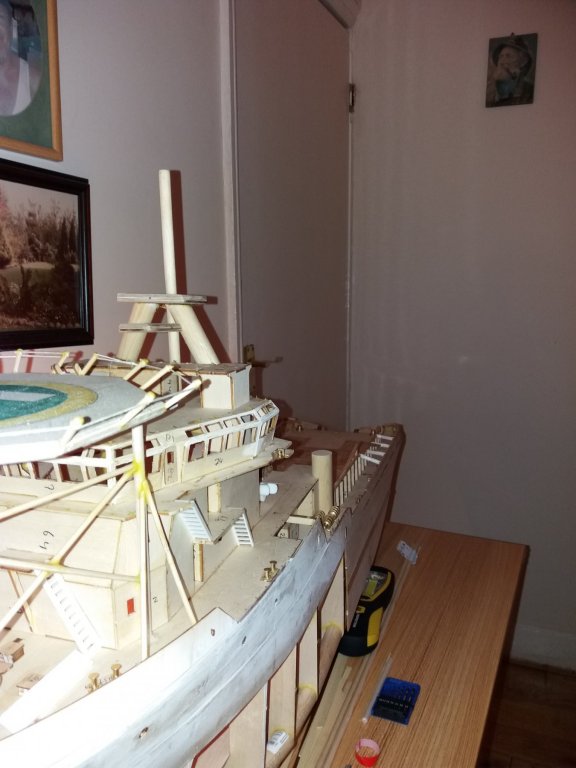
Made / altered the mast, made from a round piece of wood and by hand in the shape I like.
Also the railing on the border/platform made but need to drill the holes for it, it gives you an idea how it will be.
Then the kim keels made and permanent glued to the built.
Was not an easy job as could not get them in the side I want so had to be altered by hand but it looks good and hopefully it will work to not to have the Boka Alpine rolling that much in the water later.
Have a great day and weekend.
Peter.

-

Hello Peter
I have missed your posts but I am pleased you are back now in your shipyard.
I hope your domestic problems are not serious and you have overcome them.
You have done a lot of work on your ship she looks fabulous.
Jo.
-
 Hello all,
not much done then just the fore mast.
Still waiting for spares / parts to arrive but they already did inform me the delay as some are out of stock.
Made last week some more orders but they have to be made as those are mostly 3D and that takes its time and also all in scale 1:75.
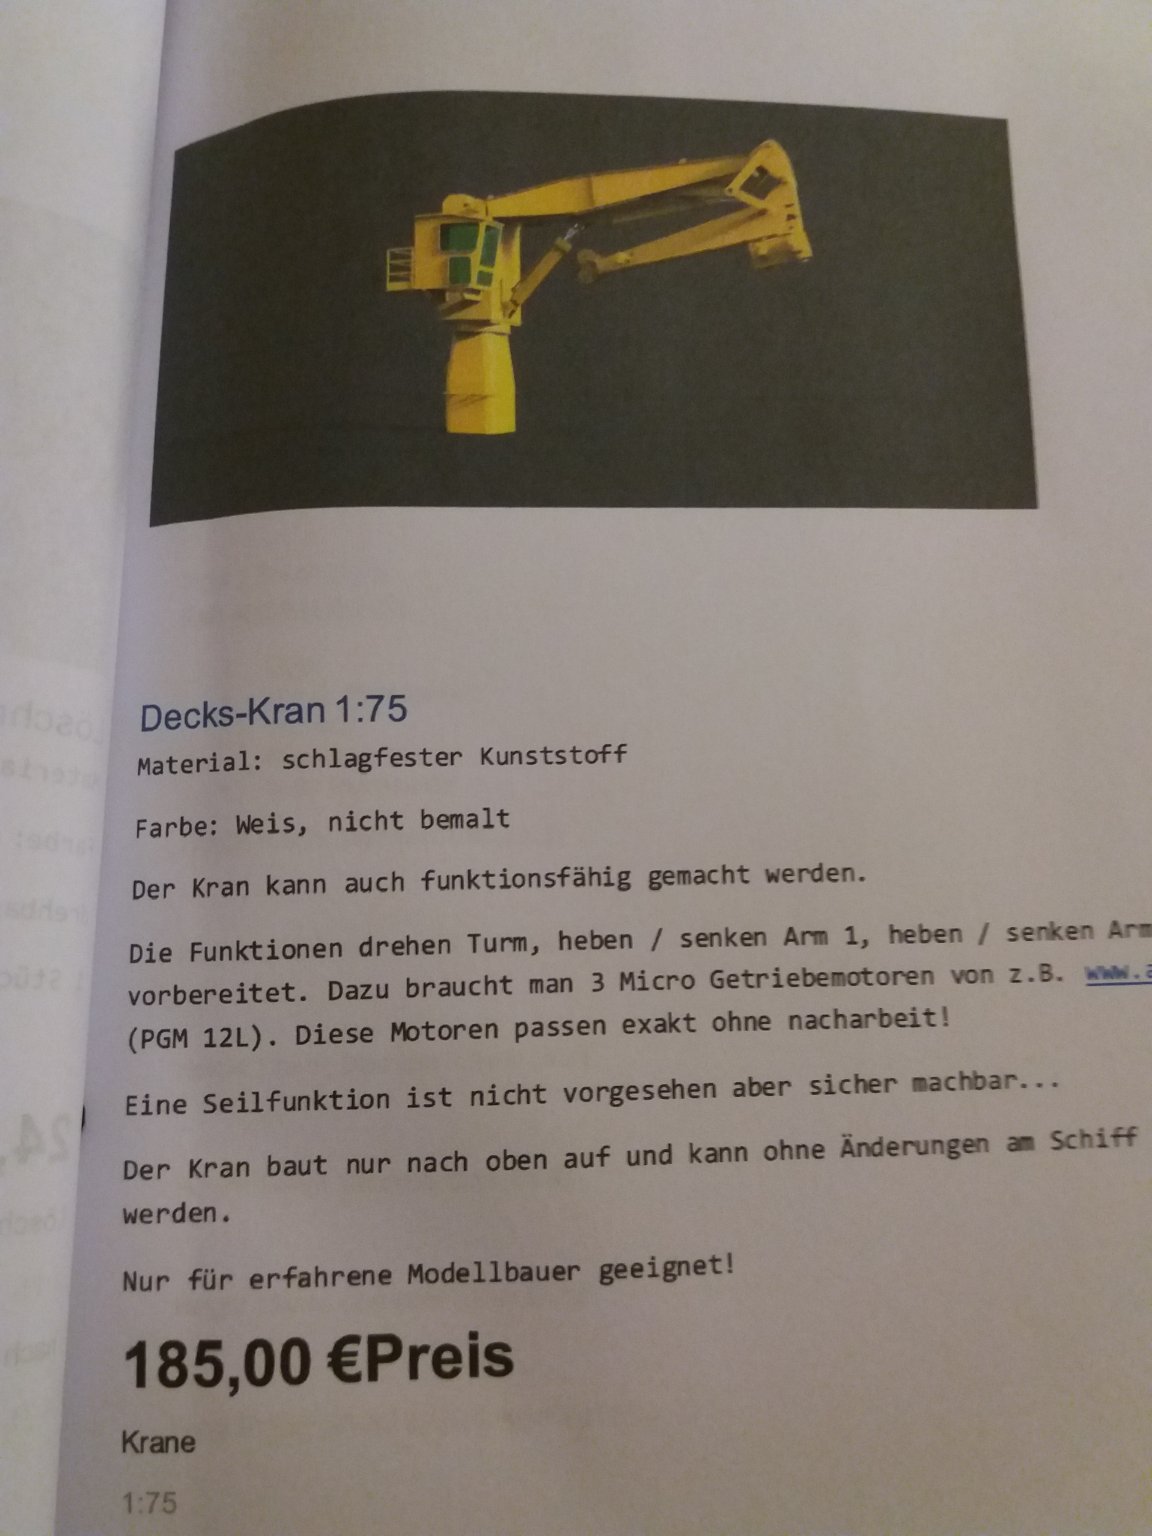
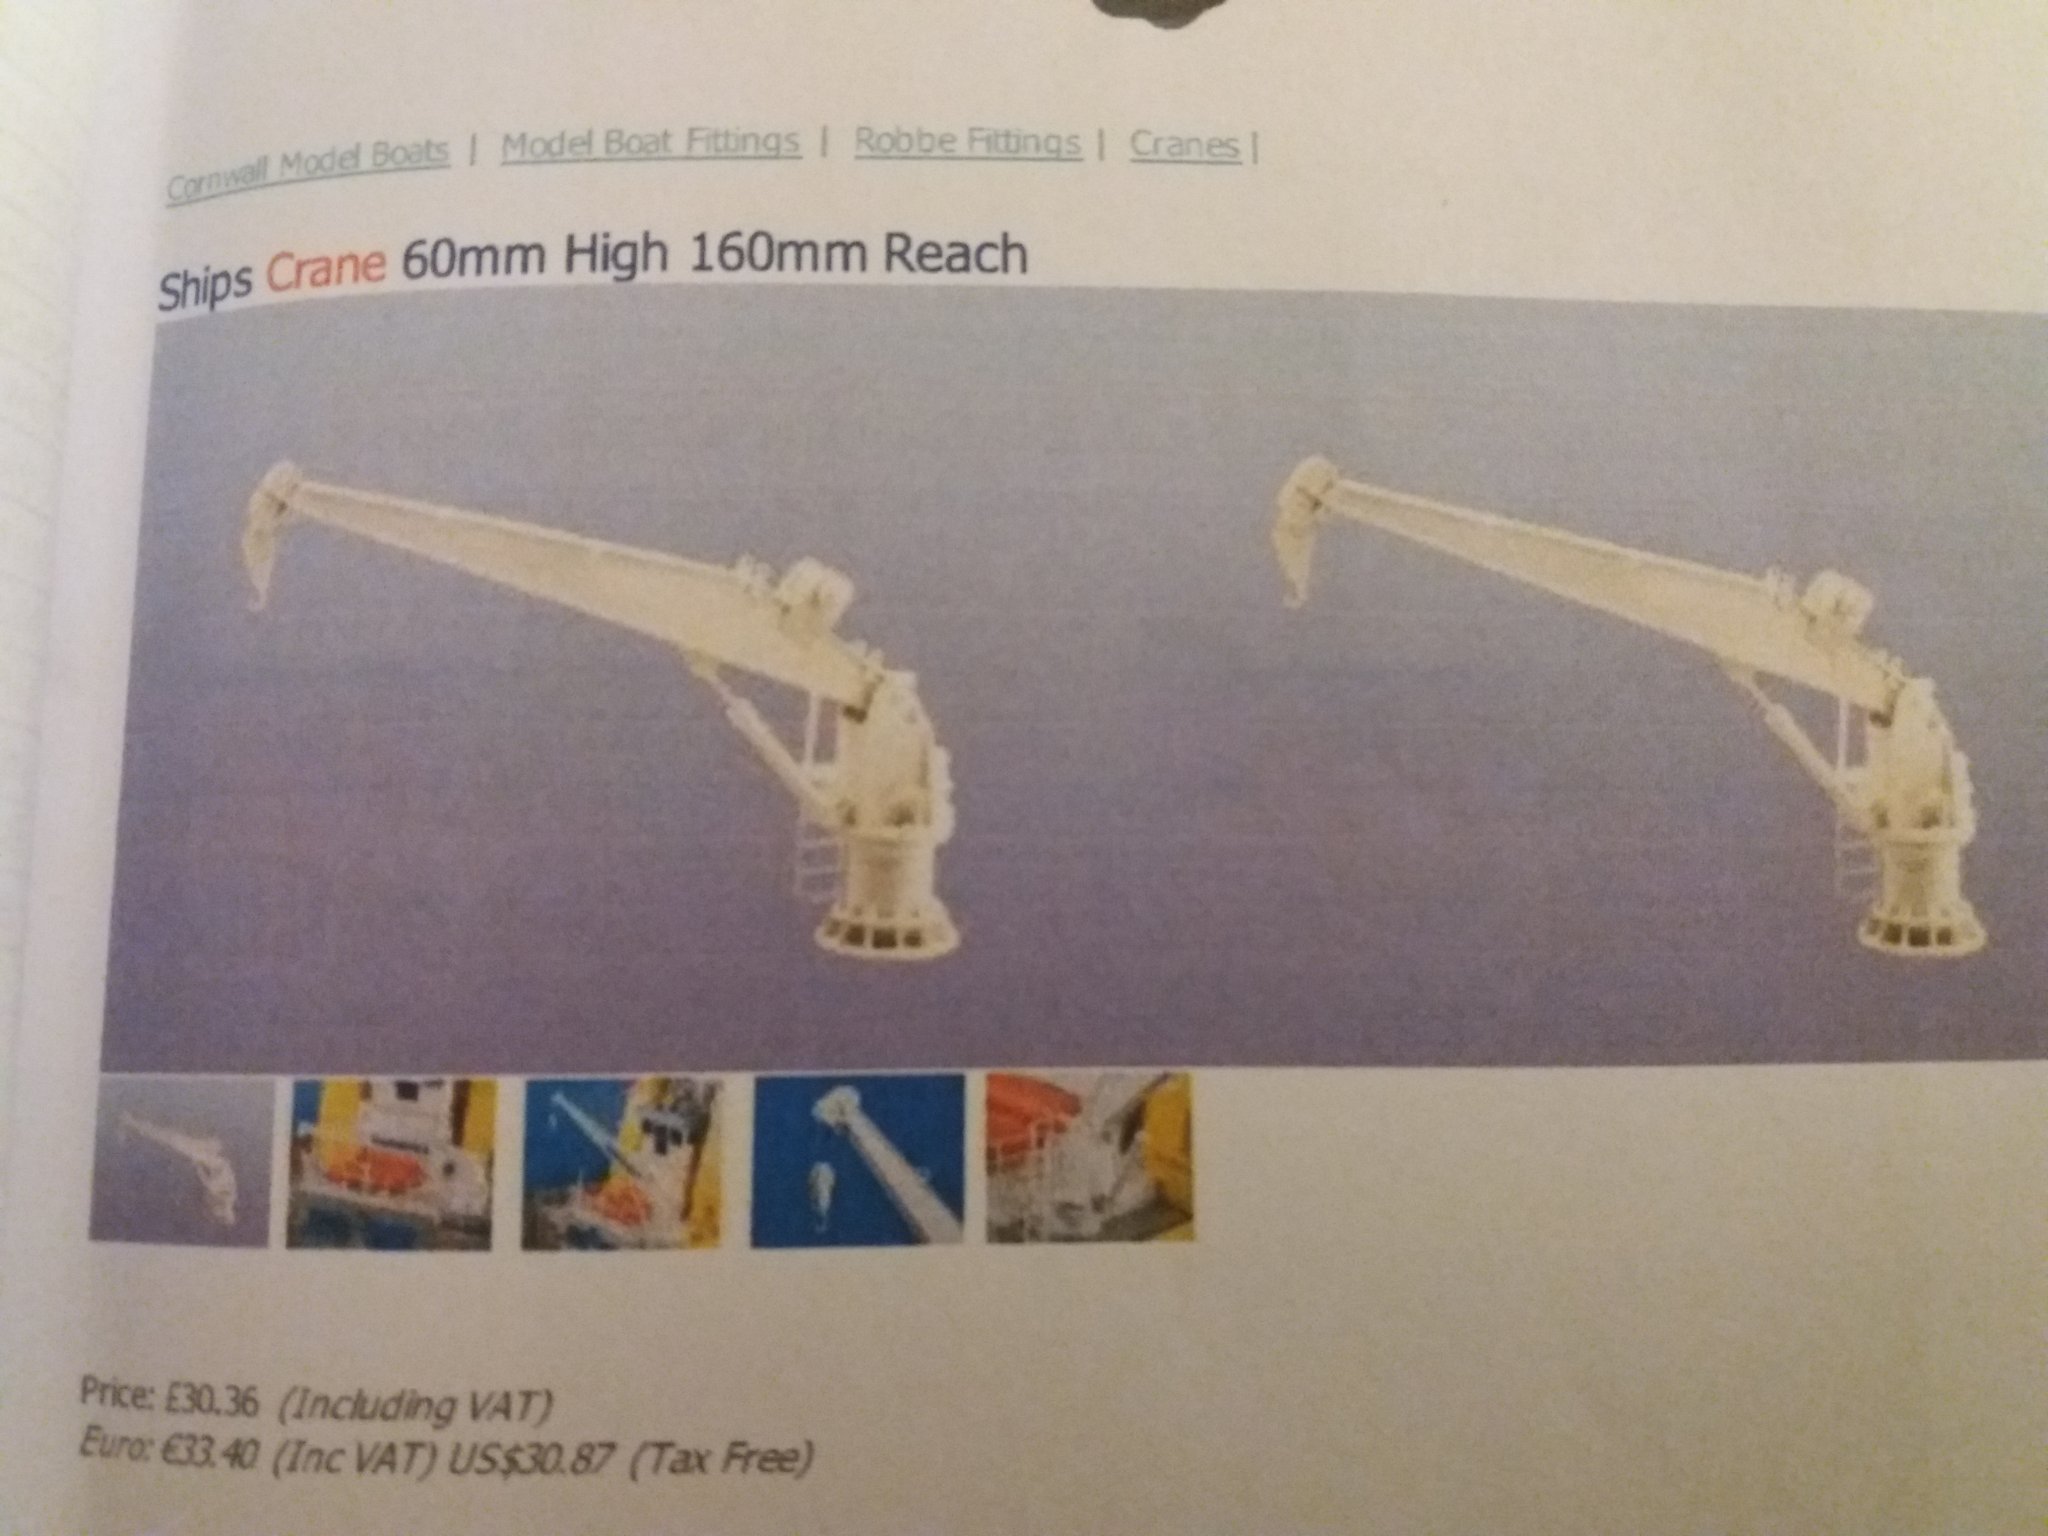
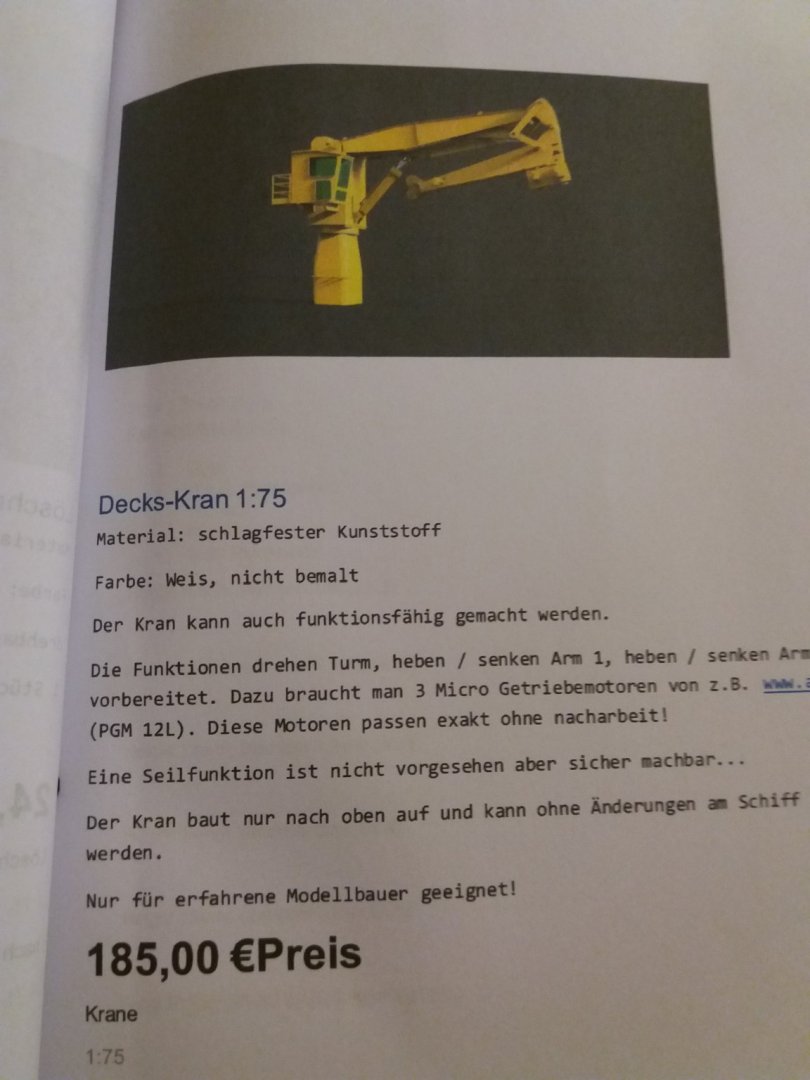
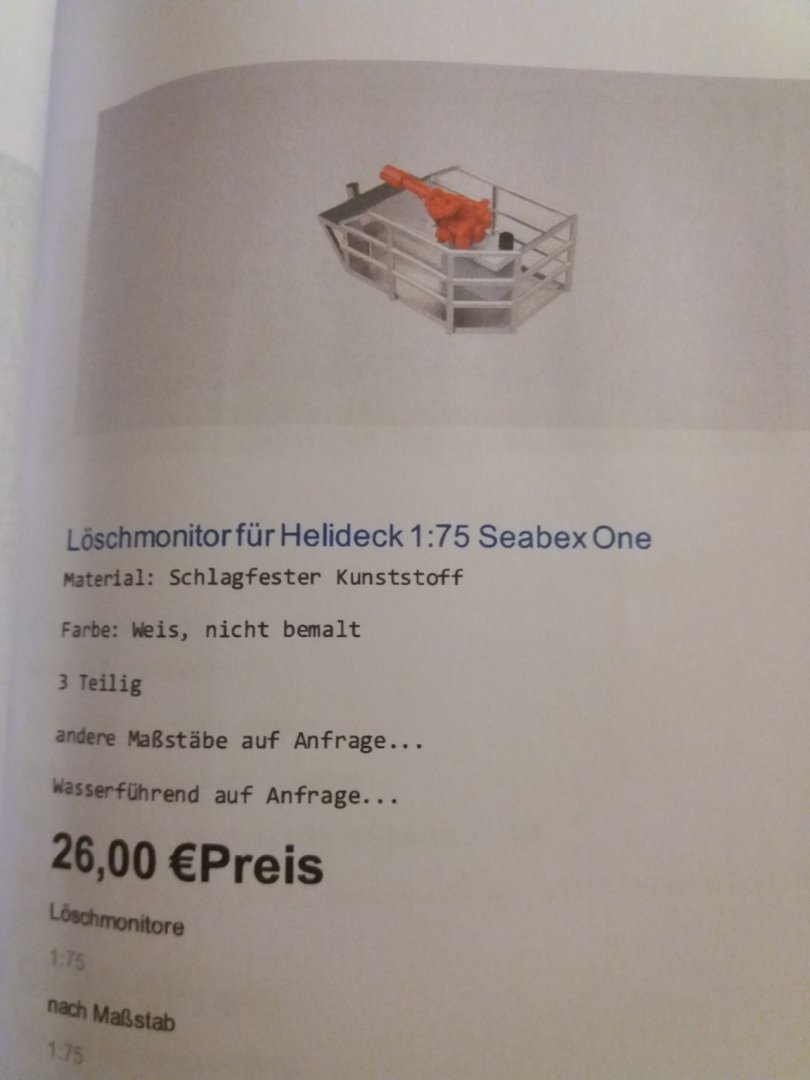
The deck cranes I have on order 2 x and will also make the "buckle" crane on ps aft deck for later the ROW and other equipment to handle. Those cranes (all 3) will be remote controlled.
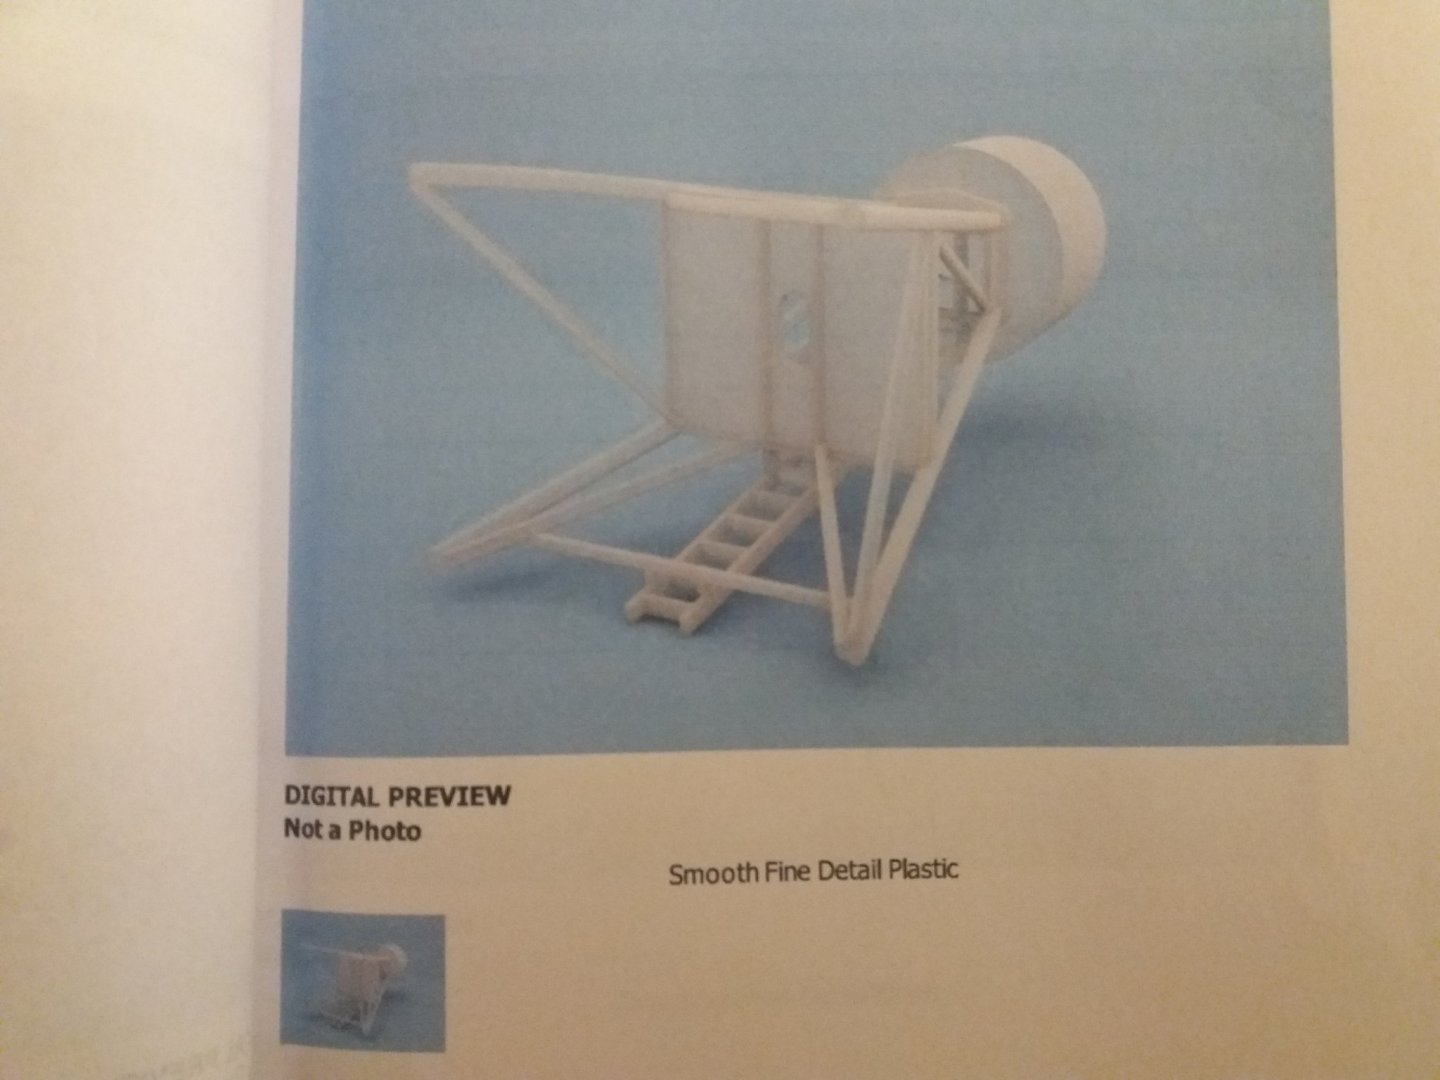
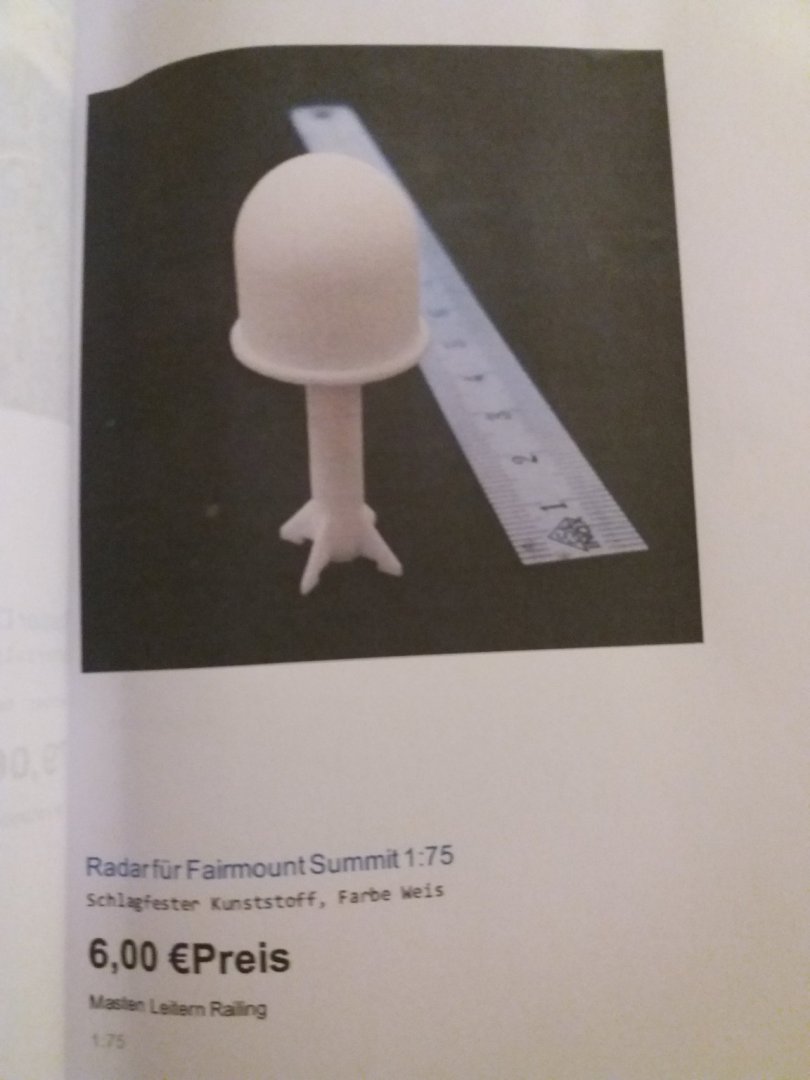
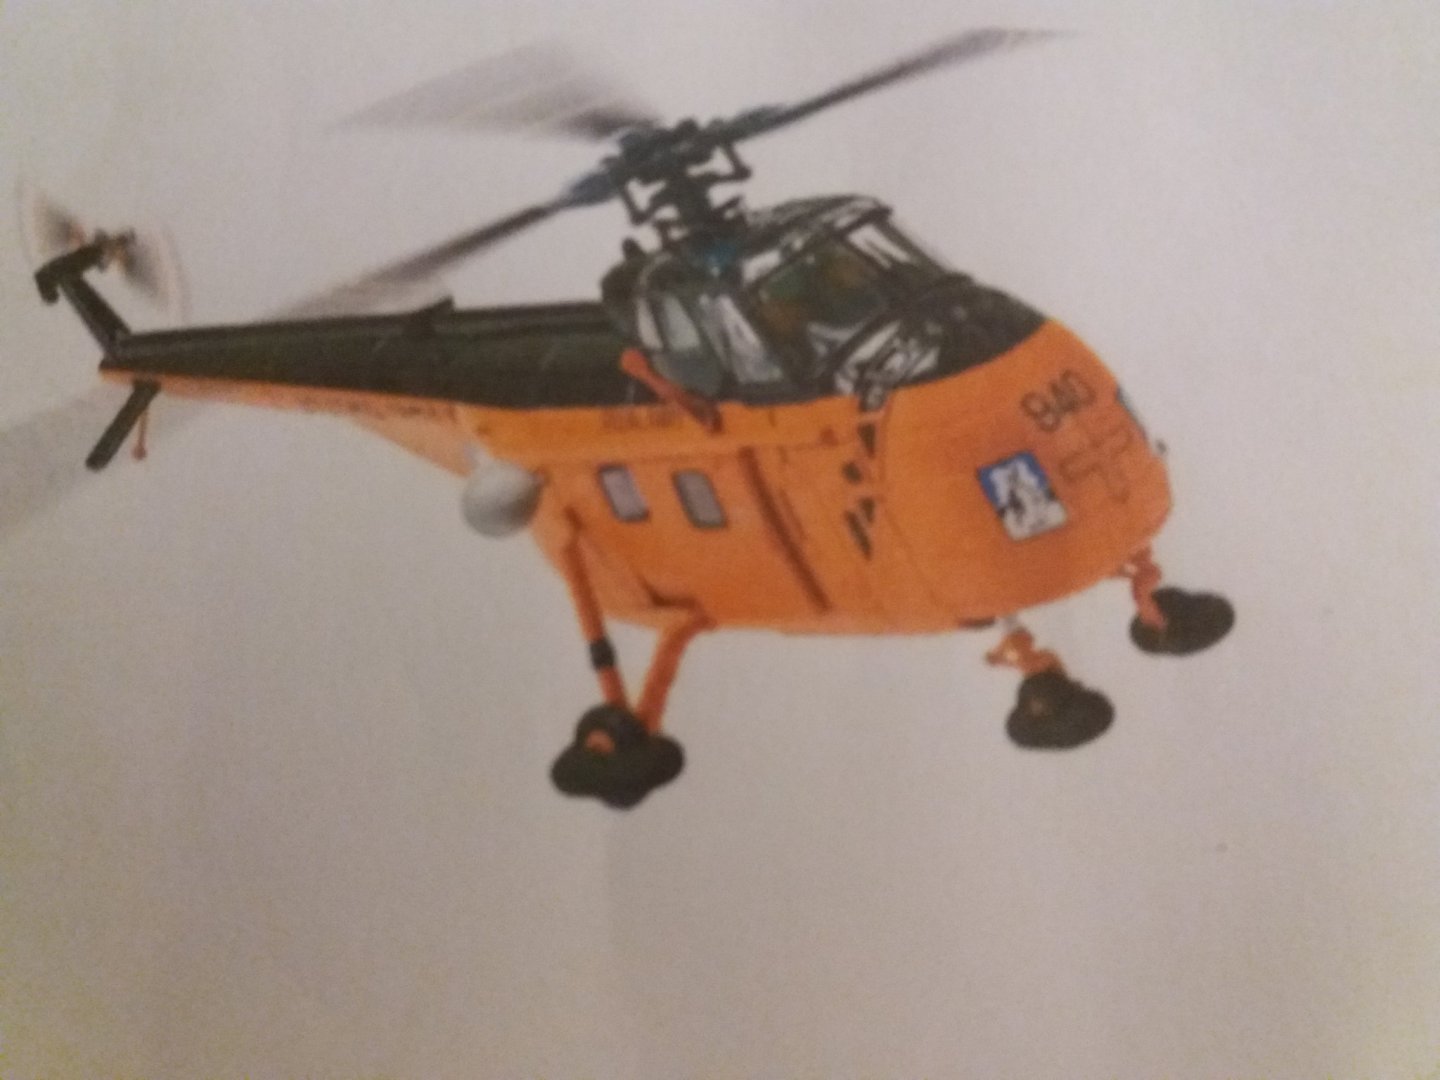
The helicopter on order and will be having it's own remote so it can land and take-off from the helideck.
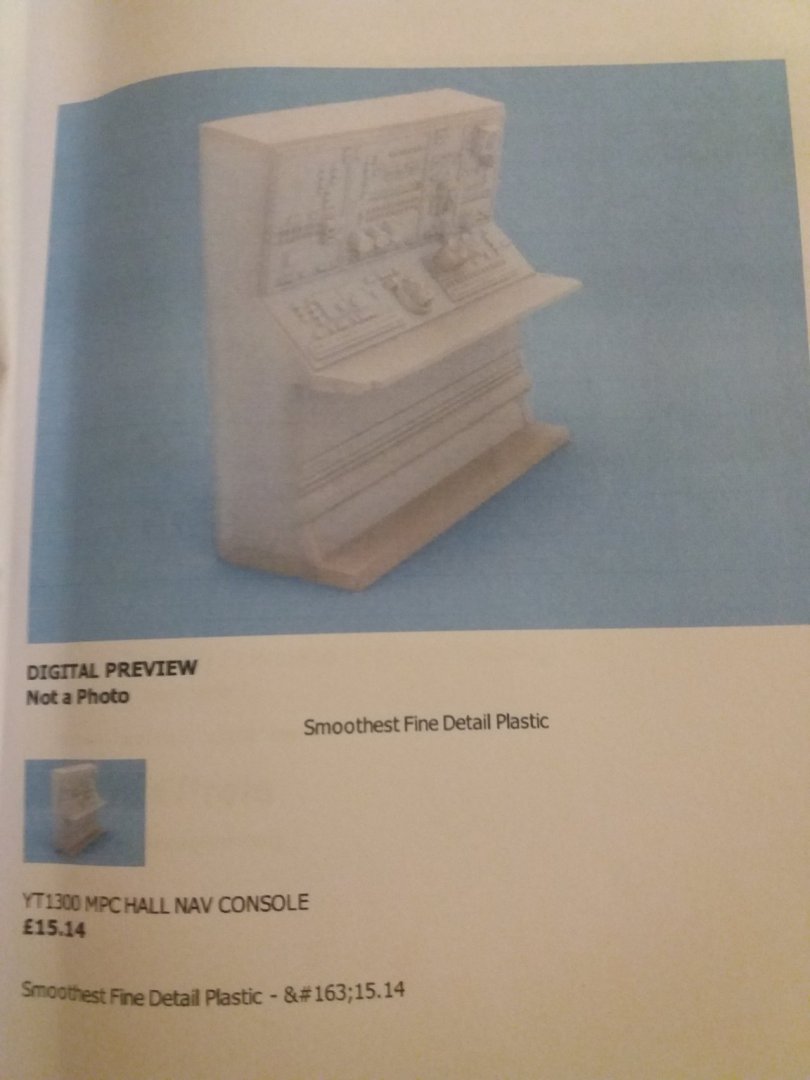
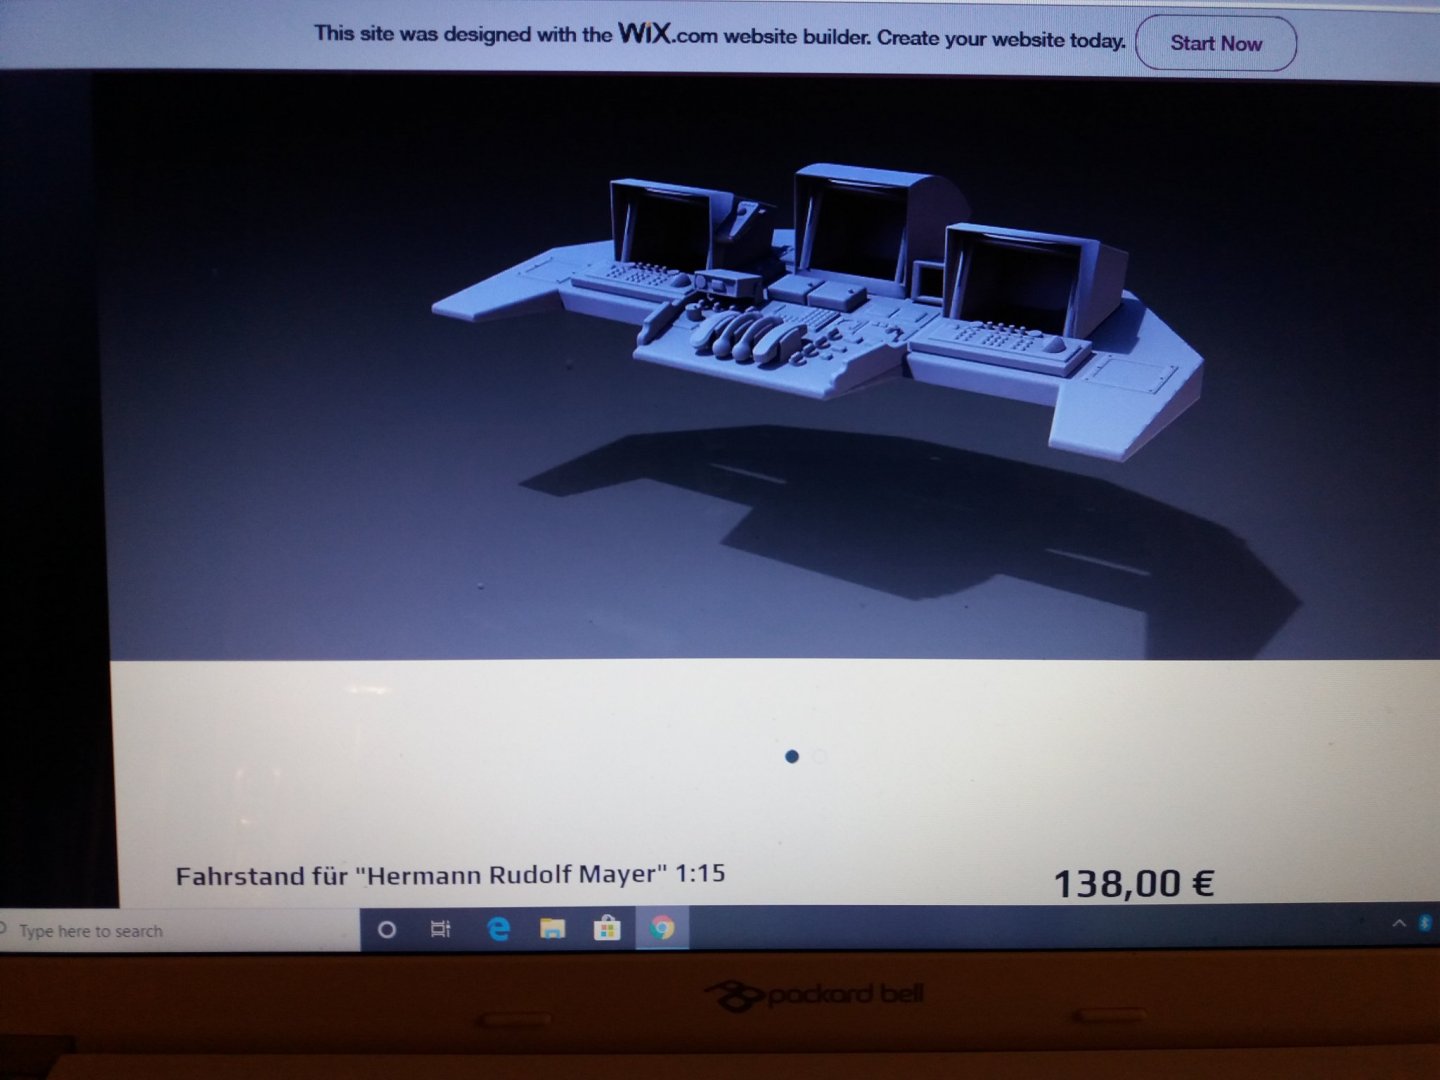
Mainly those are the inventaris on the bridge deck like chart table, consoles, chairs etc.
Also some equipment going on the Monkey Island and between the funnels.
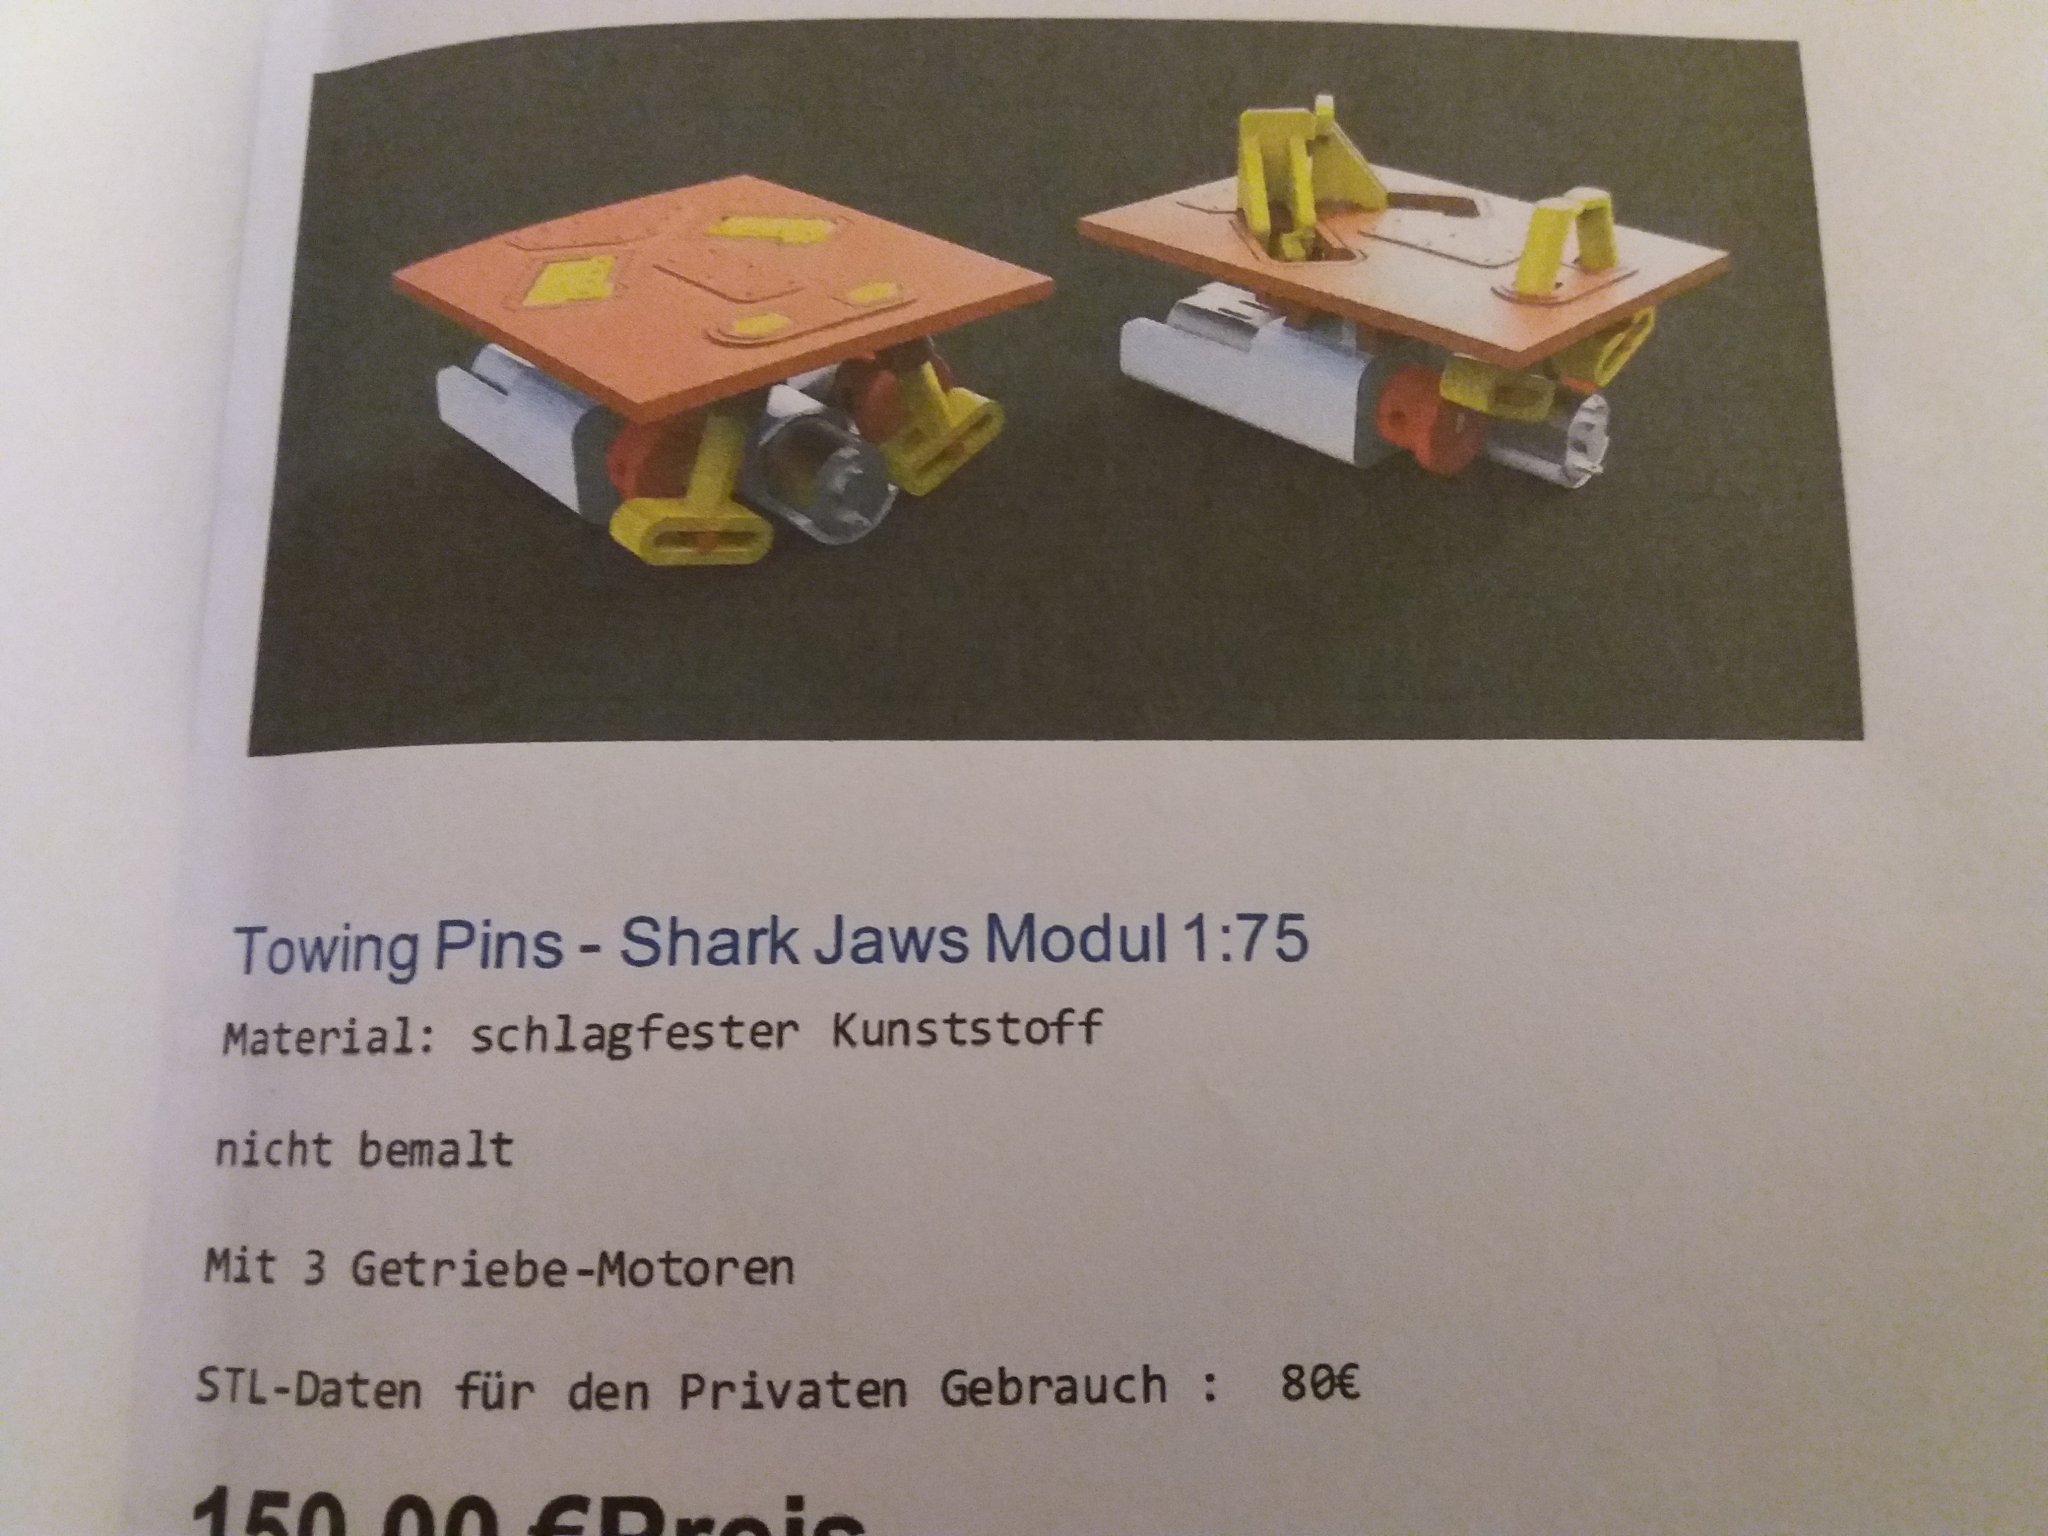
Also the towing winch what comes out USA will take its time.
Waiting for more info about the Schottels as already waiting 3 weeks and hopefully they will be here before X-Mas.
Anyway, as weather conditions are zero cannot do anything outside so just working slowly day by day in between "Home work" UNI and my work finding some time to make some small issues to my built.
Have a great day all and will revert.
(Just image some parts I have on order already)
Peter


-
-
https://teeherivar.com/product/once-an-engineer-always-an-engineer-no-matter-where-you-go-or-what-you-do/ Just go there and you can order on line, even shirts, hoodies and T shirts same design Succes brgds Peter
-
Thanks Steven. Yes I built it different then the original is doe as over the years working at sea as engineer and later as master on this kind of tugs I do have enough experience to made it in a way that I think it should be done. Nevertheless, this is my interpretation of a sea going tug and also these days in the Offshore working environment to assist where possible. At my age and been there long enough I made again my life work as hobby and with all respect, billing boats are great but you can make them stronger when you later want to use them so you will see that I have made supports to pick up the force and moments having a different kind of propulsion. Also seen some of the buildings as RC in the water they are not that stable so I made a keel under her and will make also "Kim keels" having her more quiet in the water during sailing. Yes I made also a helideck in the front as that what it's required giving service to the Offshore or any other project she may be involved in. It does not going fast but in a regular tempo as what you have said yourself, you have to think carefully what you doing during this built, perfect you cannot get it but will try to come as close possible. Sure afterwards will make the additional extra's to her like lighting, winches, towing pins, smoking exhaust, helideck lighting, working fire equipment and all what is on the market. By the end of the day it will be a realistic built with all the futures you can think off and as again, I was born on the water 71 years ago and still love it to get involved with ships, call it a passion. I will post pics during the development here and if comments, you welcome to give your input. Thanks Steven and take care there "down under".
- 35 replies
-
- 4
-

-
- fairmount alpine
- billing boats
- (and 1 more)
-
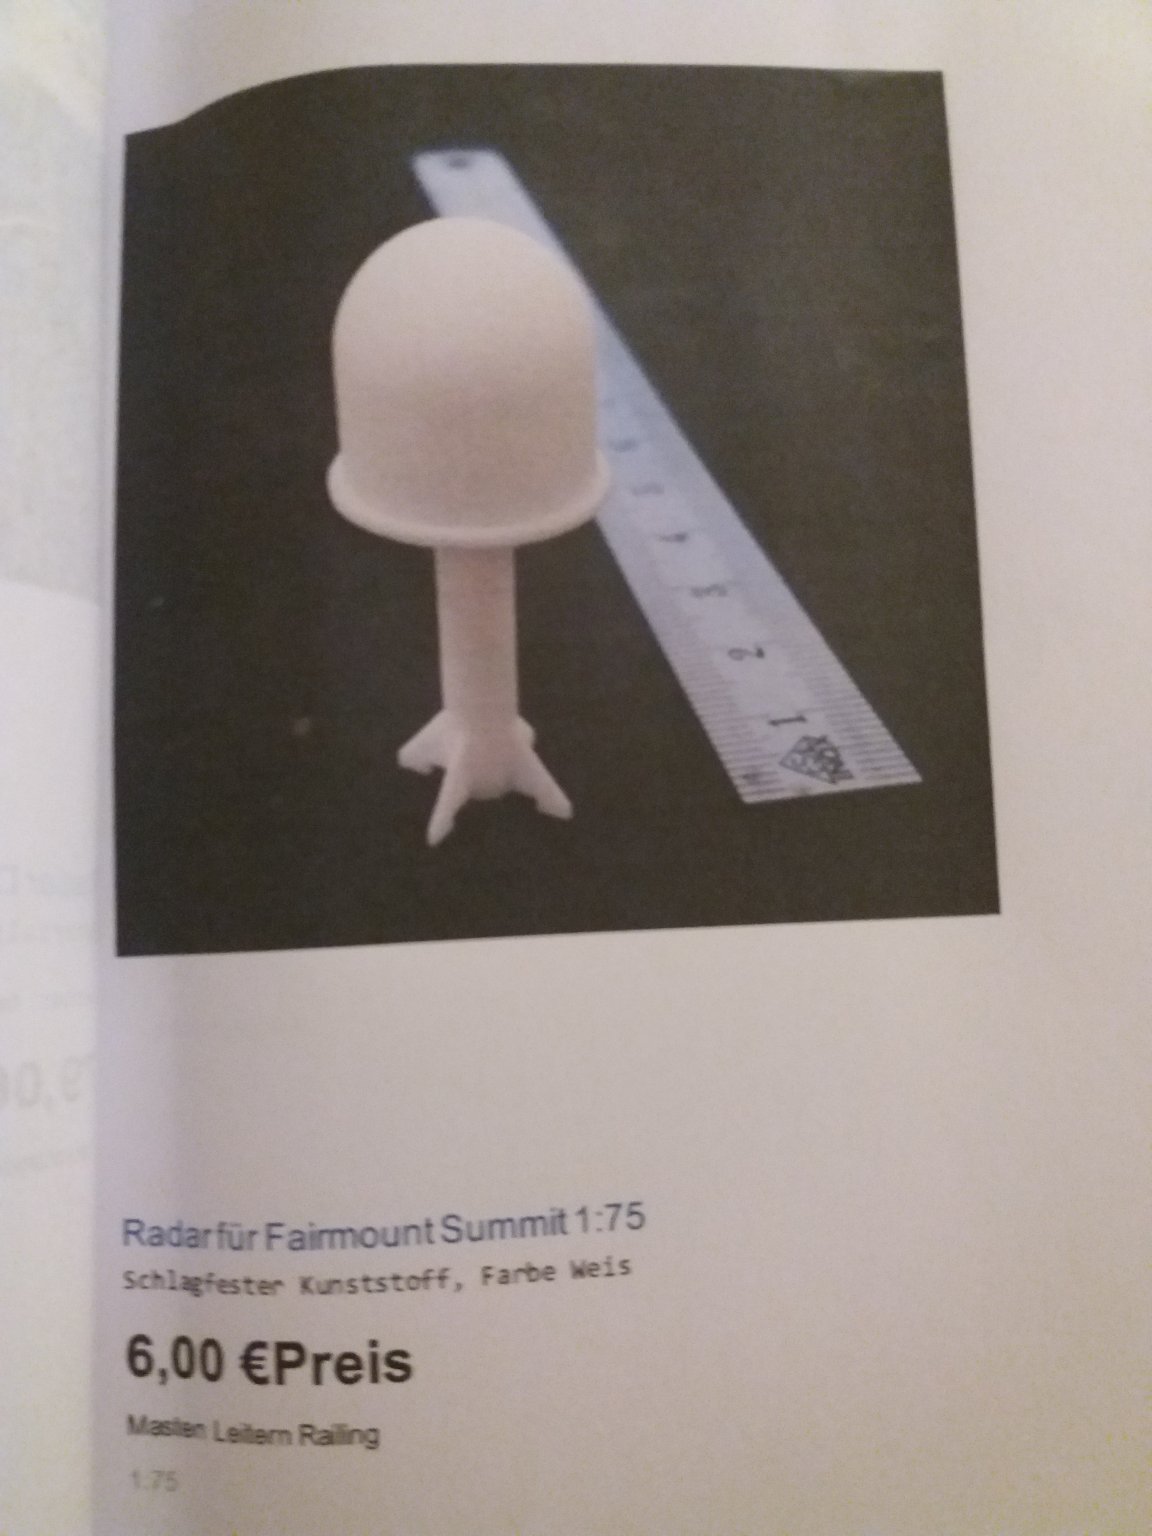
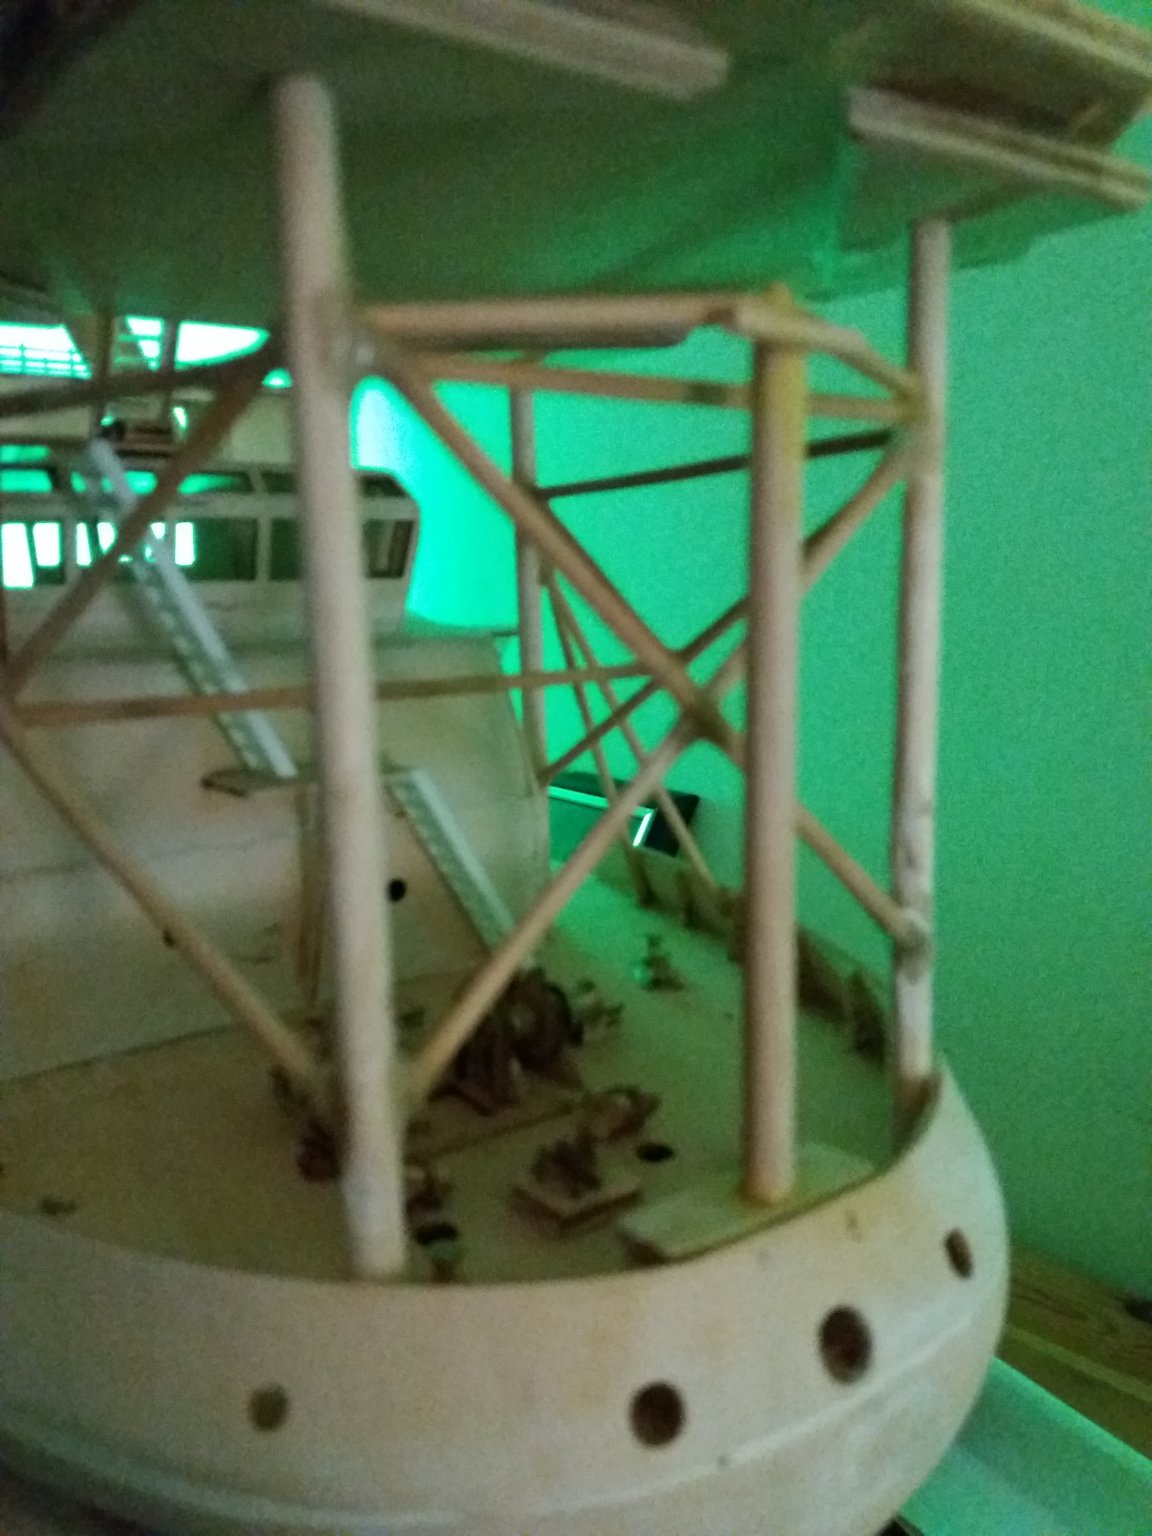
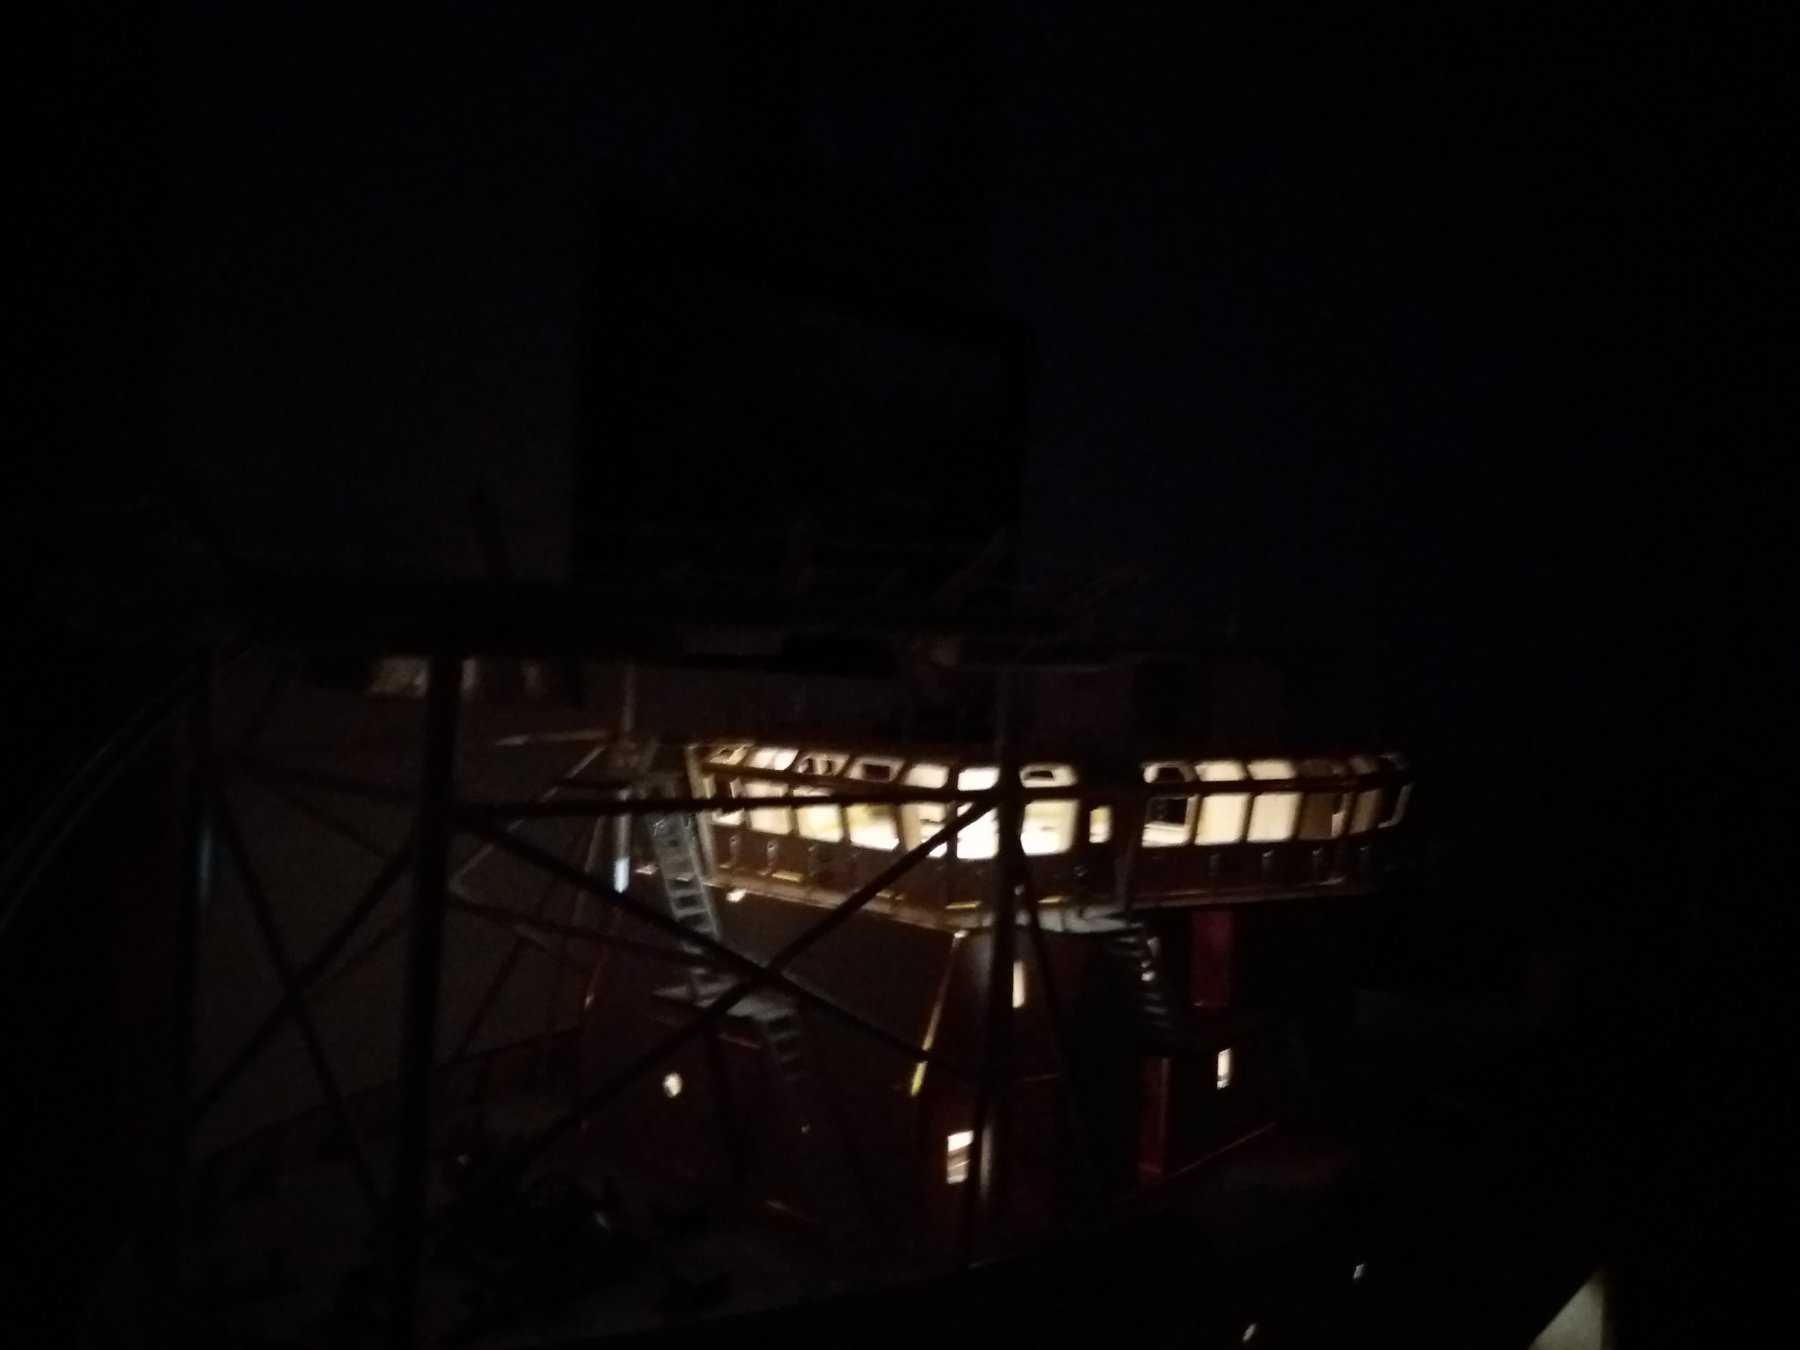
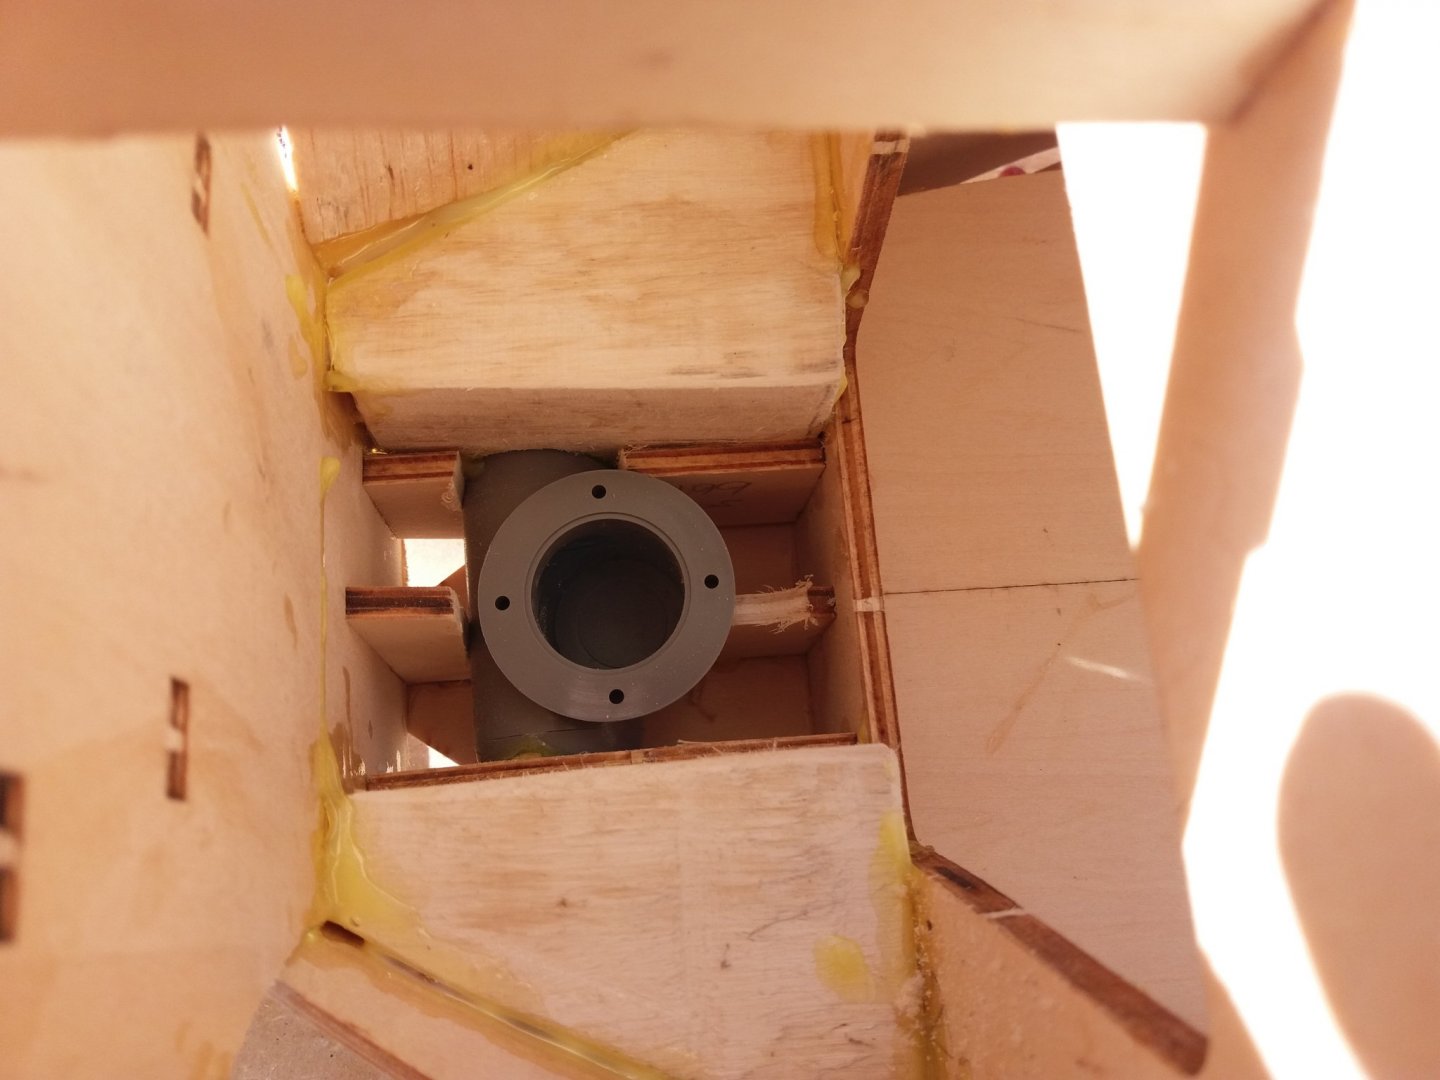
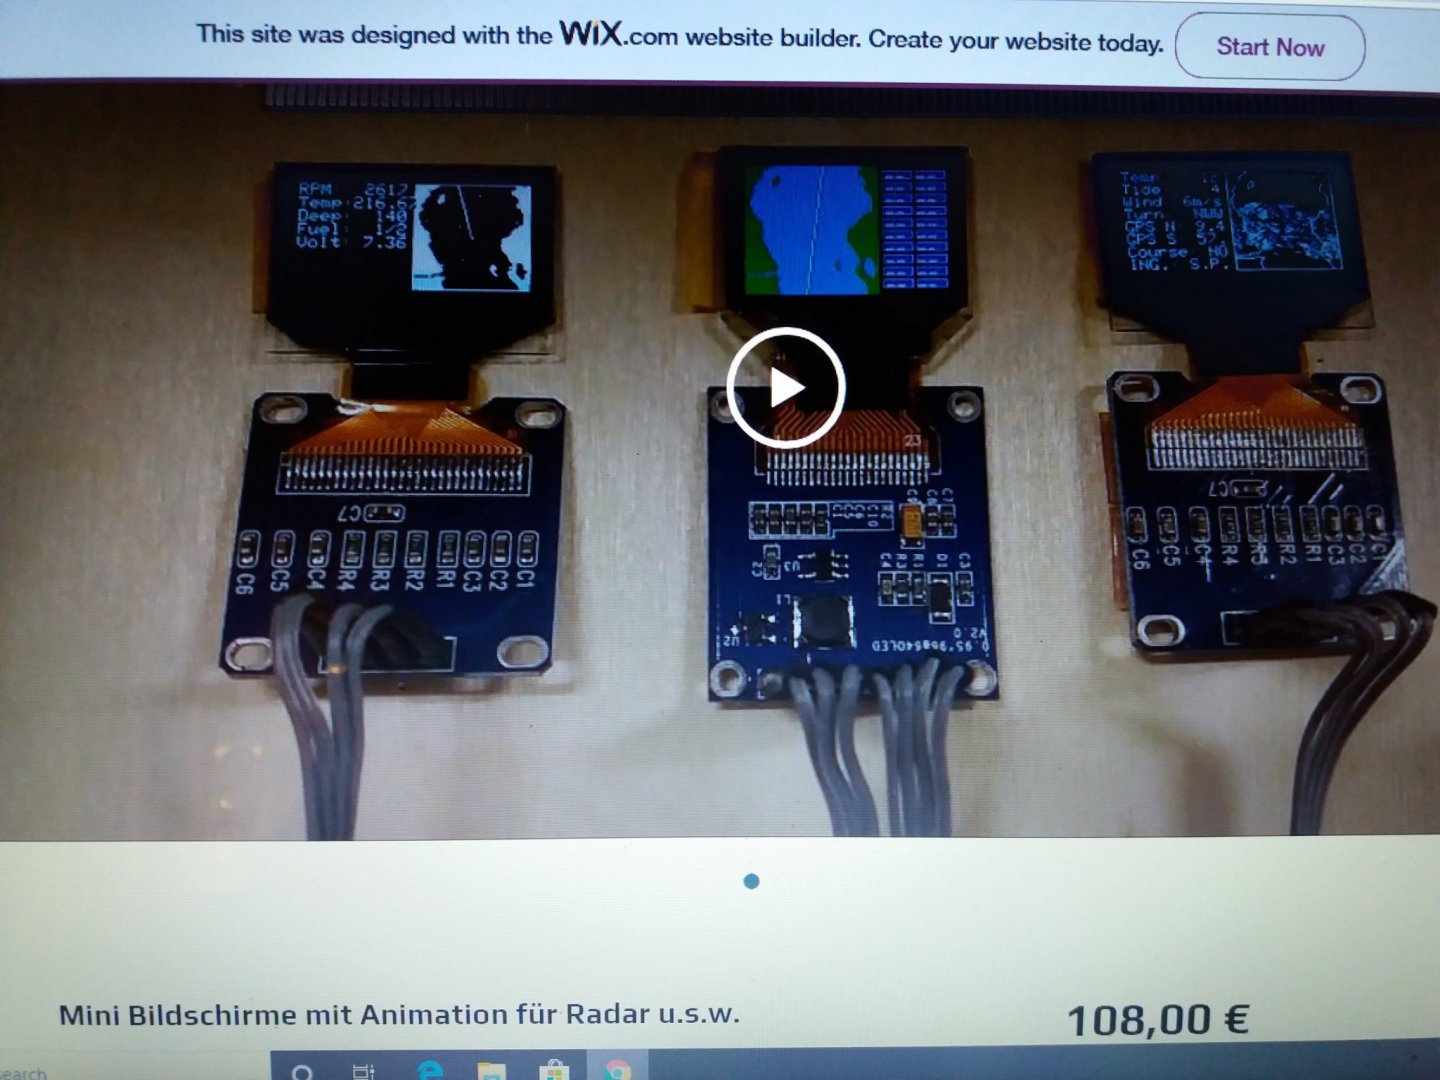
Right, being a bit slow this time as last my HD from laptop included most of the data so been busy to get this sorted out and after having a new HD mounted, now have to download all what I had before. Some of the data also from the Boka Alpine is last but did manage to retrieve some of it. Now then, did some work on the building but is still on the slip making little progress to the hull, bow and deck. The most difficult part was the mast, what shape, where to place it, as did not like the original one. Found a solution and that is what it will be, need some work to it like lights, radars etc, but that will be done later. Already did use filler on the bow and other parts as still waiting for Cornwall to come with an solution for the 2 x Schottel's in the back side as previous ones where to high above it as only have less then 25 mm but it will be sorted out with 2 x belt on each one, 1 for steering 360 degrees and another for the propulsion. Anyway, even the working space on deck is done with planking, my God what a work is that each plank cutting and glue. Cranes will be ordered and also the buckle crane on aft deck will be done. Railing works will be done by fixed ones and just bend / cut them where ever thy need to be. Helideck will be illuminated but all lights will be done afterwards when all rest is finalised. Still can take off most of it for later painting / lighting / epoxy etc. Still have some up to date pictures here and hope you enjoy them. Till next time with this building. nb. some pics of the layout mast and what will be the Azimut Schottels, only mine will have long belts both sides as only have limited space above ca 22 mm. Cornwall UK is making them and waiting for arriving here. Also the helideck will be illuminated as pic show and after with epoxy made smooth. need to get my image together to change mast Nope still don't like it Principe of the Schottels working and those should turn 360 degrees so propulsion goes only 1 way, to go astern you have to turn the Schottel 180 degrees so to speak (as in reality it works) I will make later similar lighting on the helideck


- 35 replies
-
- 8
-
-
- fairmount alpine
- billing boats
- (and 1 more)
-
Right, being a bit slow this time as last my HD from laptop included most of the data so been busy to get this sorted out and after having a new HD mounted, now have to download all what I had before. Some of the data also from the Boka Alpine is last but did manage to retrieve some of it. Now then, did some work on the building but is still on the slip making little progress to the hull, bow and deck. The most difficult part was the mast, what shape, where to place it, as did not like the original one. Found a solution and that is what it will be, need some work to it like lights, radars etc, but that will be done later. Already did use filler on the bow and other parts as still waiting for Cornwall to come with an solution for the 2 x Schottel's in the back side as previous ones where to high above it as only have less then 25 mm but it will be sorted out with 2 x belt on each one, 1 for steering 360 degrees and another for the propulsion. Anyway, even the working space on deck is done with planking, my God what a work is that each plank cutting and glue. Cranes will be ordered and also the buckle crane on aft deck will be done. Railing works will be done by fixed ones and just bend / cut them where ever thy need to be. Helideck will be illuminated but all lights will be done afterwards when all rest is finalised. Still can take off most of it for later painting / lighting / epoxy etc. Still have some up to date pictures here and hope you enjoy them. Till next time with this building. going further with making the re-enforcement in the tug as started before. I was still able to take of the complete superstructure incl the deck what now can see is an advantage as have works to do underneath. make the life rafts also both sides and you see the re-enforcement all the way around Also the top having this re-enforcement built in Slowly but getting there, waiting for the bow trust stb side re-enforcement also nearly done Just a view how it looks like and still on the slip first filler used without sanding until that time aft deck done with all the planking! Just a nice view of the tug Hahaha, night on board but still working on it made a mast but not content with it Nope, don't like the mast!


- 35 replies
-
- 9
-
-
- fairmount alpine
- billing boats
- (and 1 more)
-
Wow, so far so good. Came far my dear. Sanding is not so difficult, take care not to much as you cannot built it up again. Take a side plank and keep it against the frames on the outside and then you will see how much you have to take, is an easy job to be honest, just get used to it. Anyway, wish you luck and you come that far, the rest will also be great. One at the time and specially, give it time to dry!! Good luck and we talk again. Peter
-
Jo, thanks for follow this built, the total length is ca 1 Mtr, she will be ca 25 cm stb to ps, and the height is around 48 cm (top mast - bottom). How heavy she will be cannot tell you as no applicants built in yet and also no ballast so all depends. Hope she will not sunk to deep into the water but that's to find out afterwards in the bath!! Will take some time to have her all done with all I want to built in her with lights, propulsion, winch, batteries etc etc. Those are the heavy parts, the rest is hardly giving weight to her. But as time goes by I keep you all posted. Till next time, take care and hope your built will be finalised too.
- 35 replies
-
- 2
-
-
- fairmount alpine
- billing boats
- (and 1 more)