HOLIDAY DONATION DRIVE - SUPPORT MSW - DO YOUR PART TO KEEP THIS GREAT FORUM GOING! (Only 20 donations so far - C'mon guys!)
×


Binho
-
Posts
151 -
Joined
-
Last visited
Content Type
Profiles
Forums
Gallery
Events
Everything posted by Binho
-
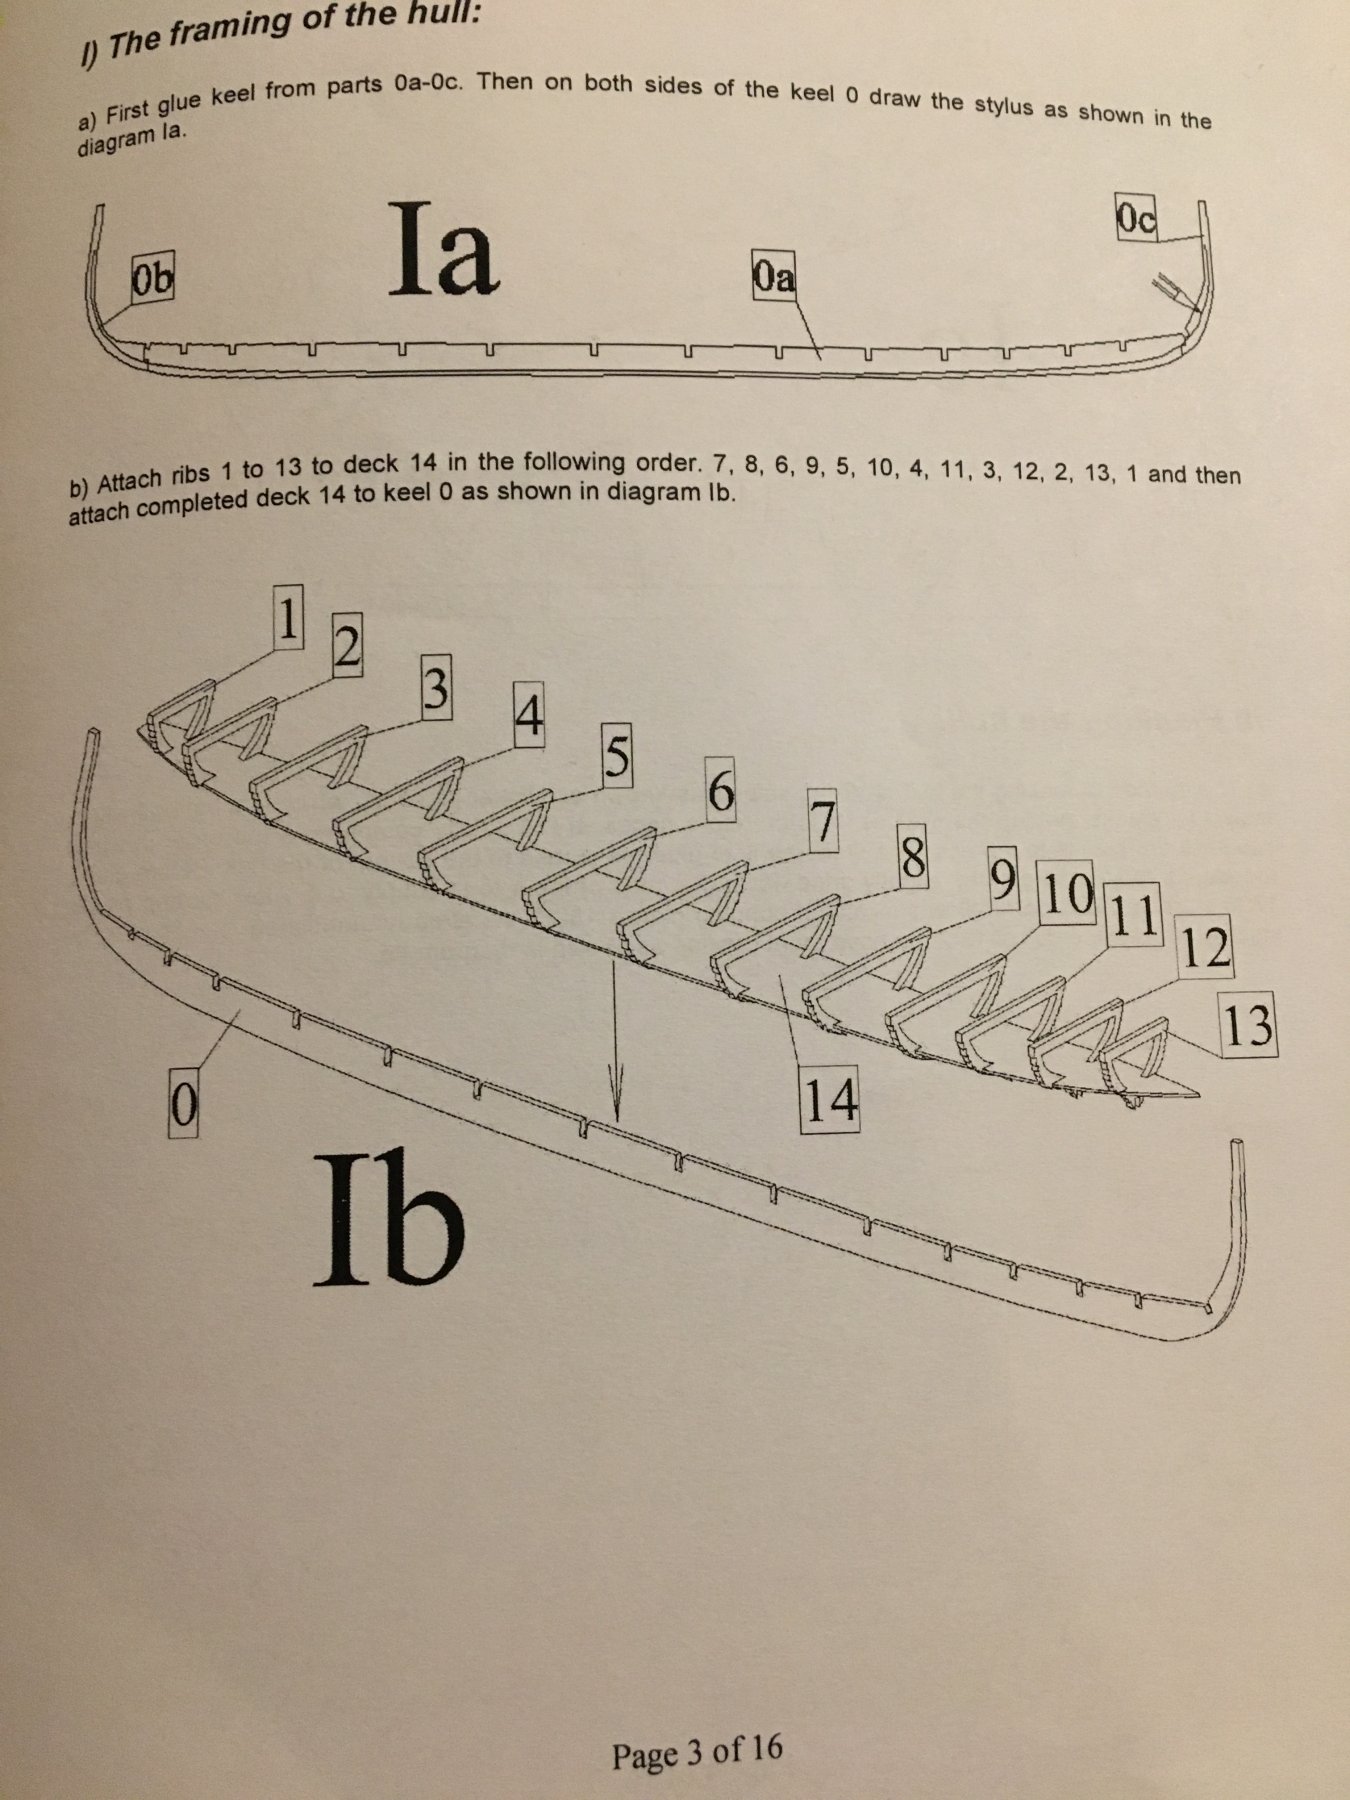
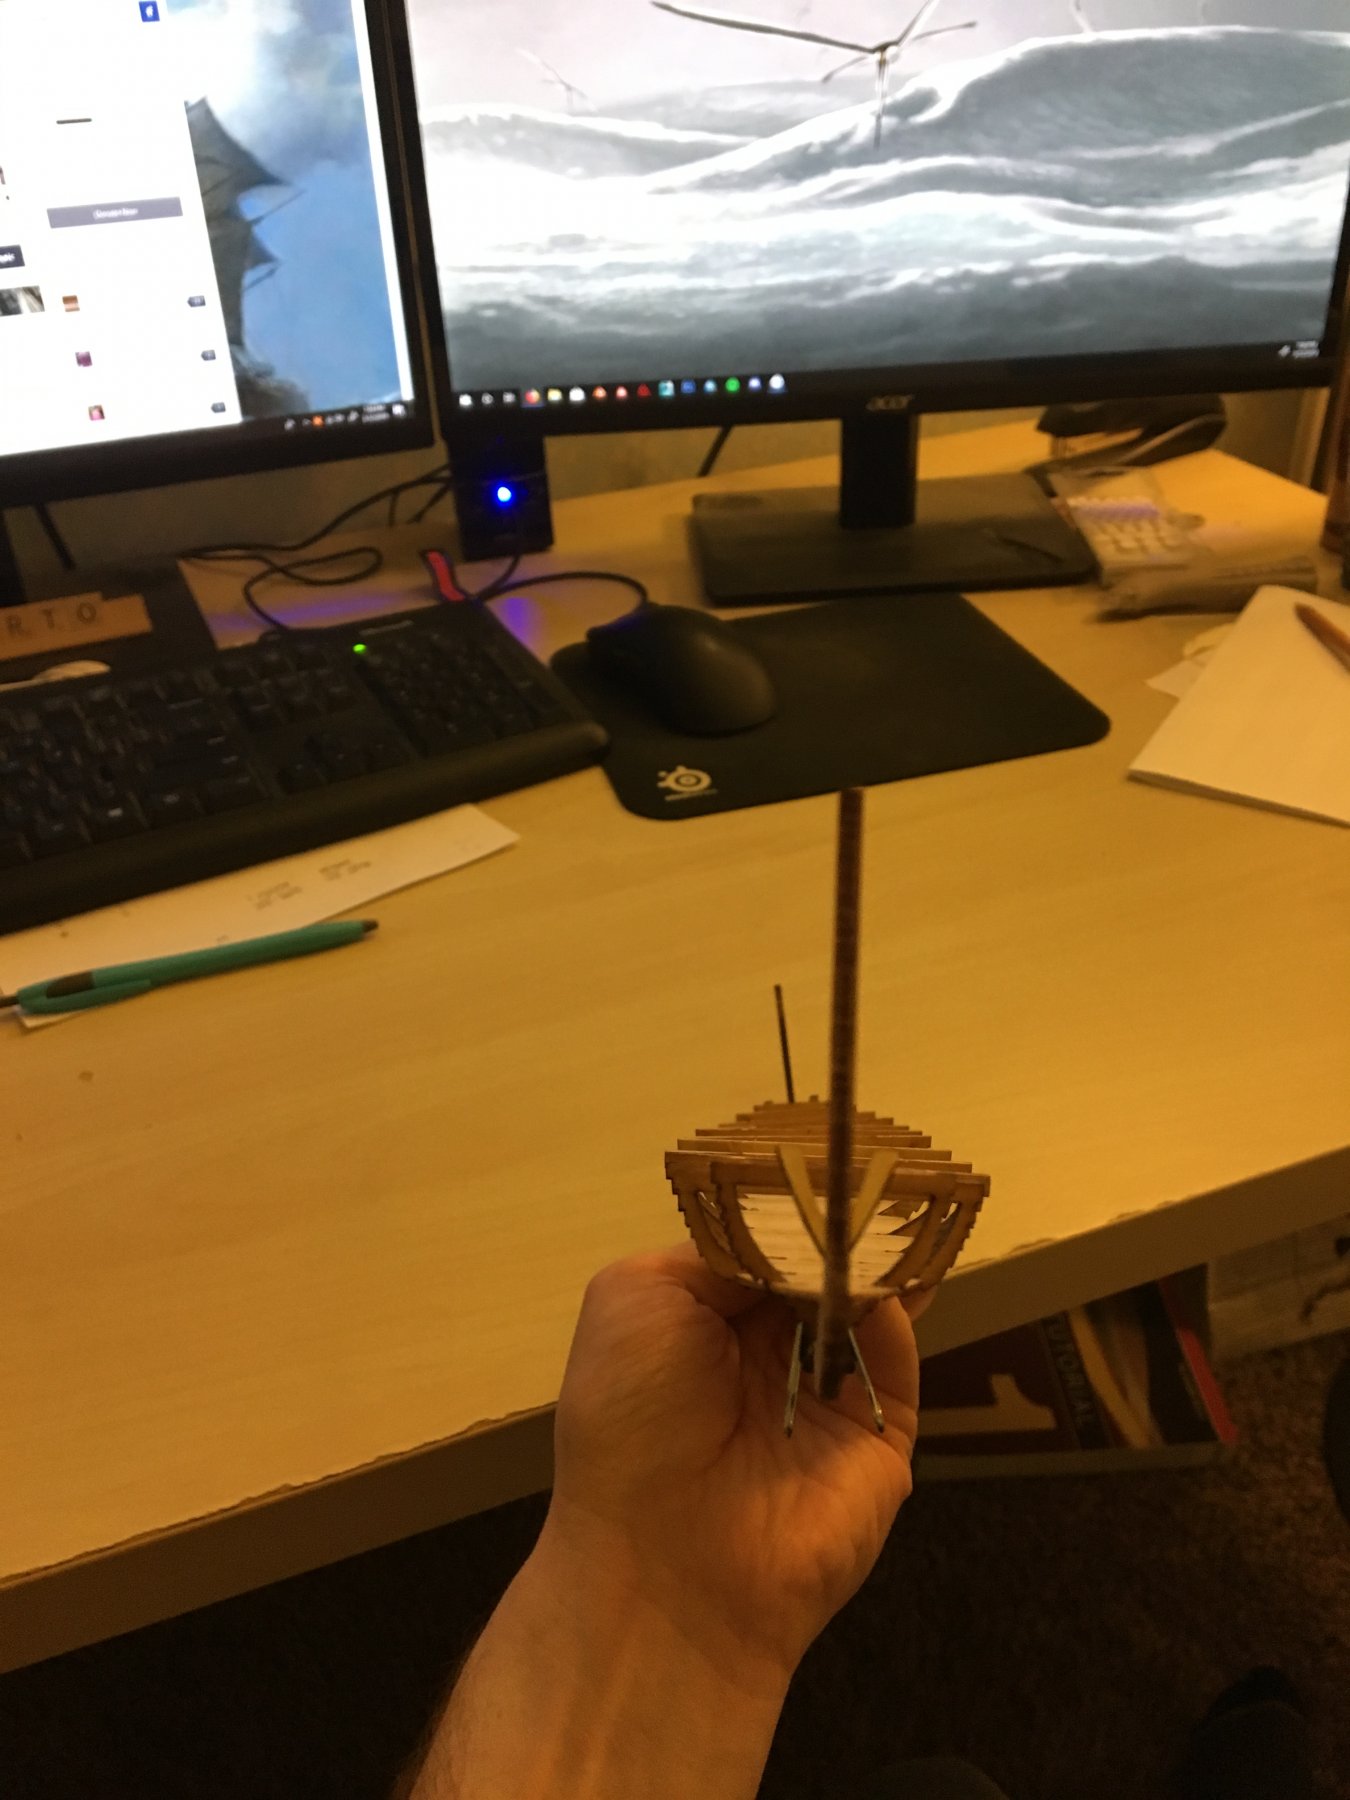
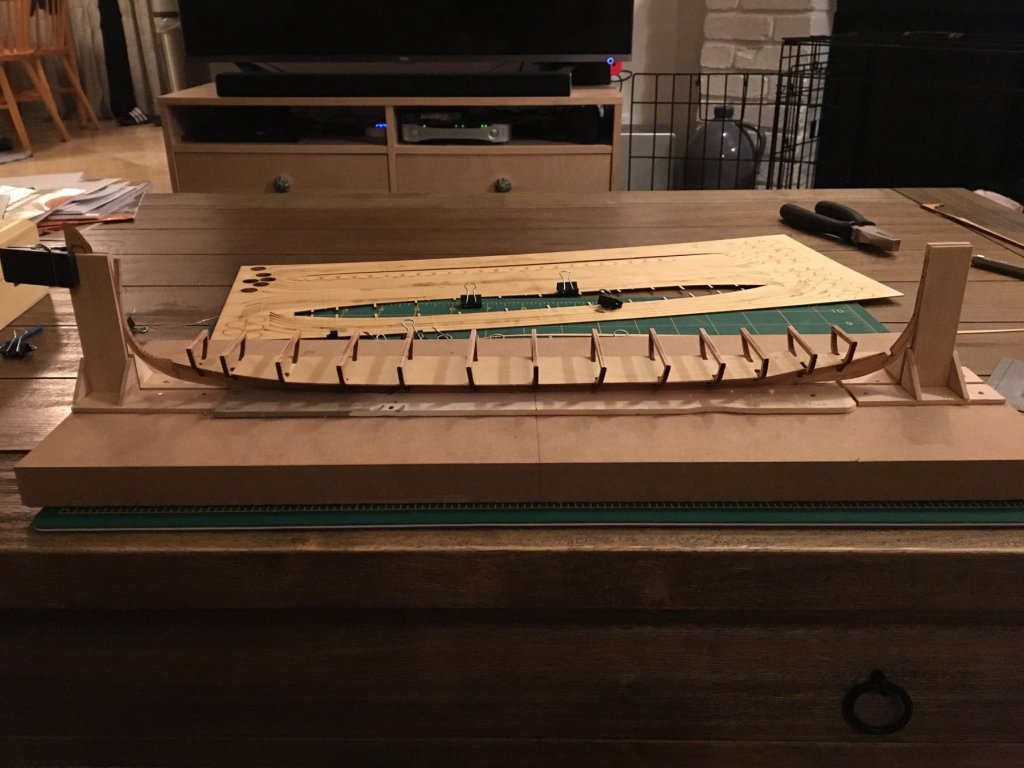
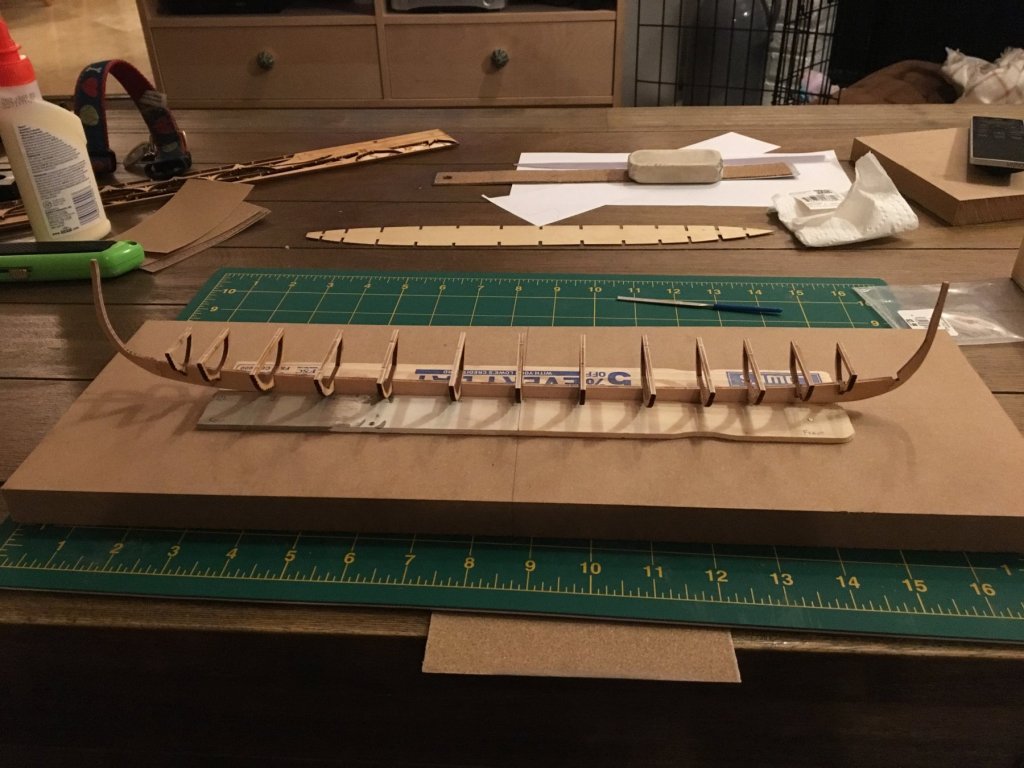
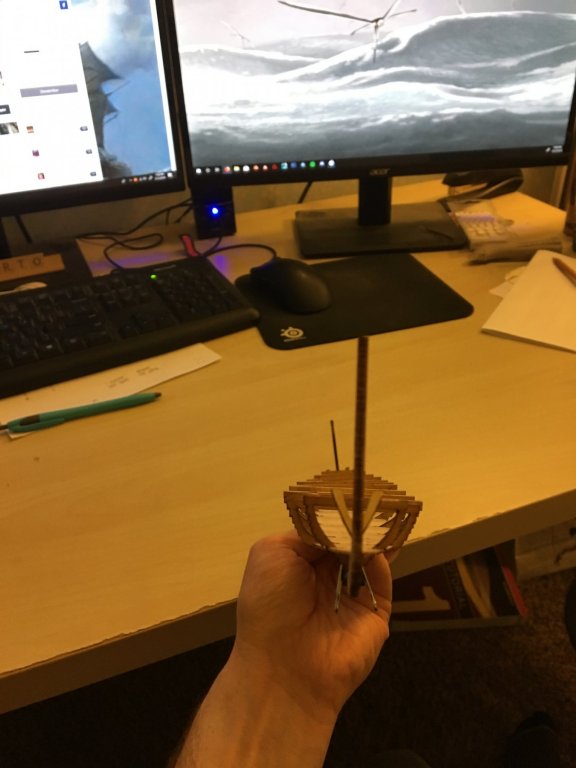
 Ok, so I’ve gone back a step and detached the deck from the frames again as I was not happy at how they were aligned. I’m having problems with this step in the instructions. It calls for the deck to be glued to the frames first, and then the whole assemblage to be glued to the keel: The problem is this deck assembly is flat, while the keel is rockered. So once the deck is curved to fit the keel profile the frames are no longer vertical and need to be more or less forced in to the keel slots, which is bad. I think this is one of the reasons the keel got so warped in my previous attempt. I dry fitted everything again and you can see how far out of vertical alignment the frames are being pushed by the deck. You can also see my new additions to the building jig to make sure the keel stays straight: My plan, unless anyone has a better approach, is to make the frame slots in the deck much wider so the frames fit nice and square. Then with the frames still in the keel I will glue the deck to them first, and once everything is dry will make sure everything is still aligned and finally glue it all to the keel. This step has been very frustrating so far. Hopefully then I can finally move on to planking!
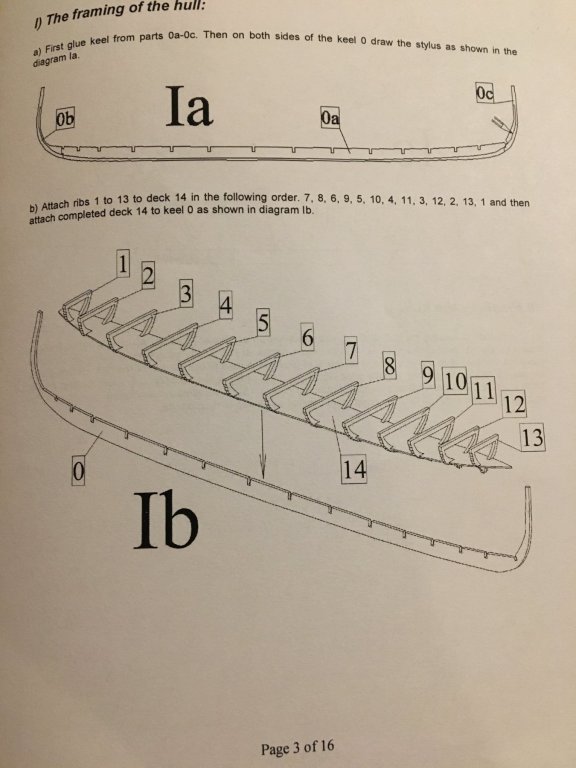
-
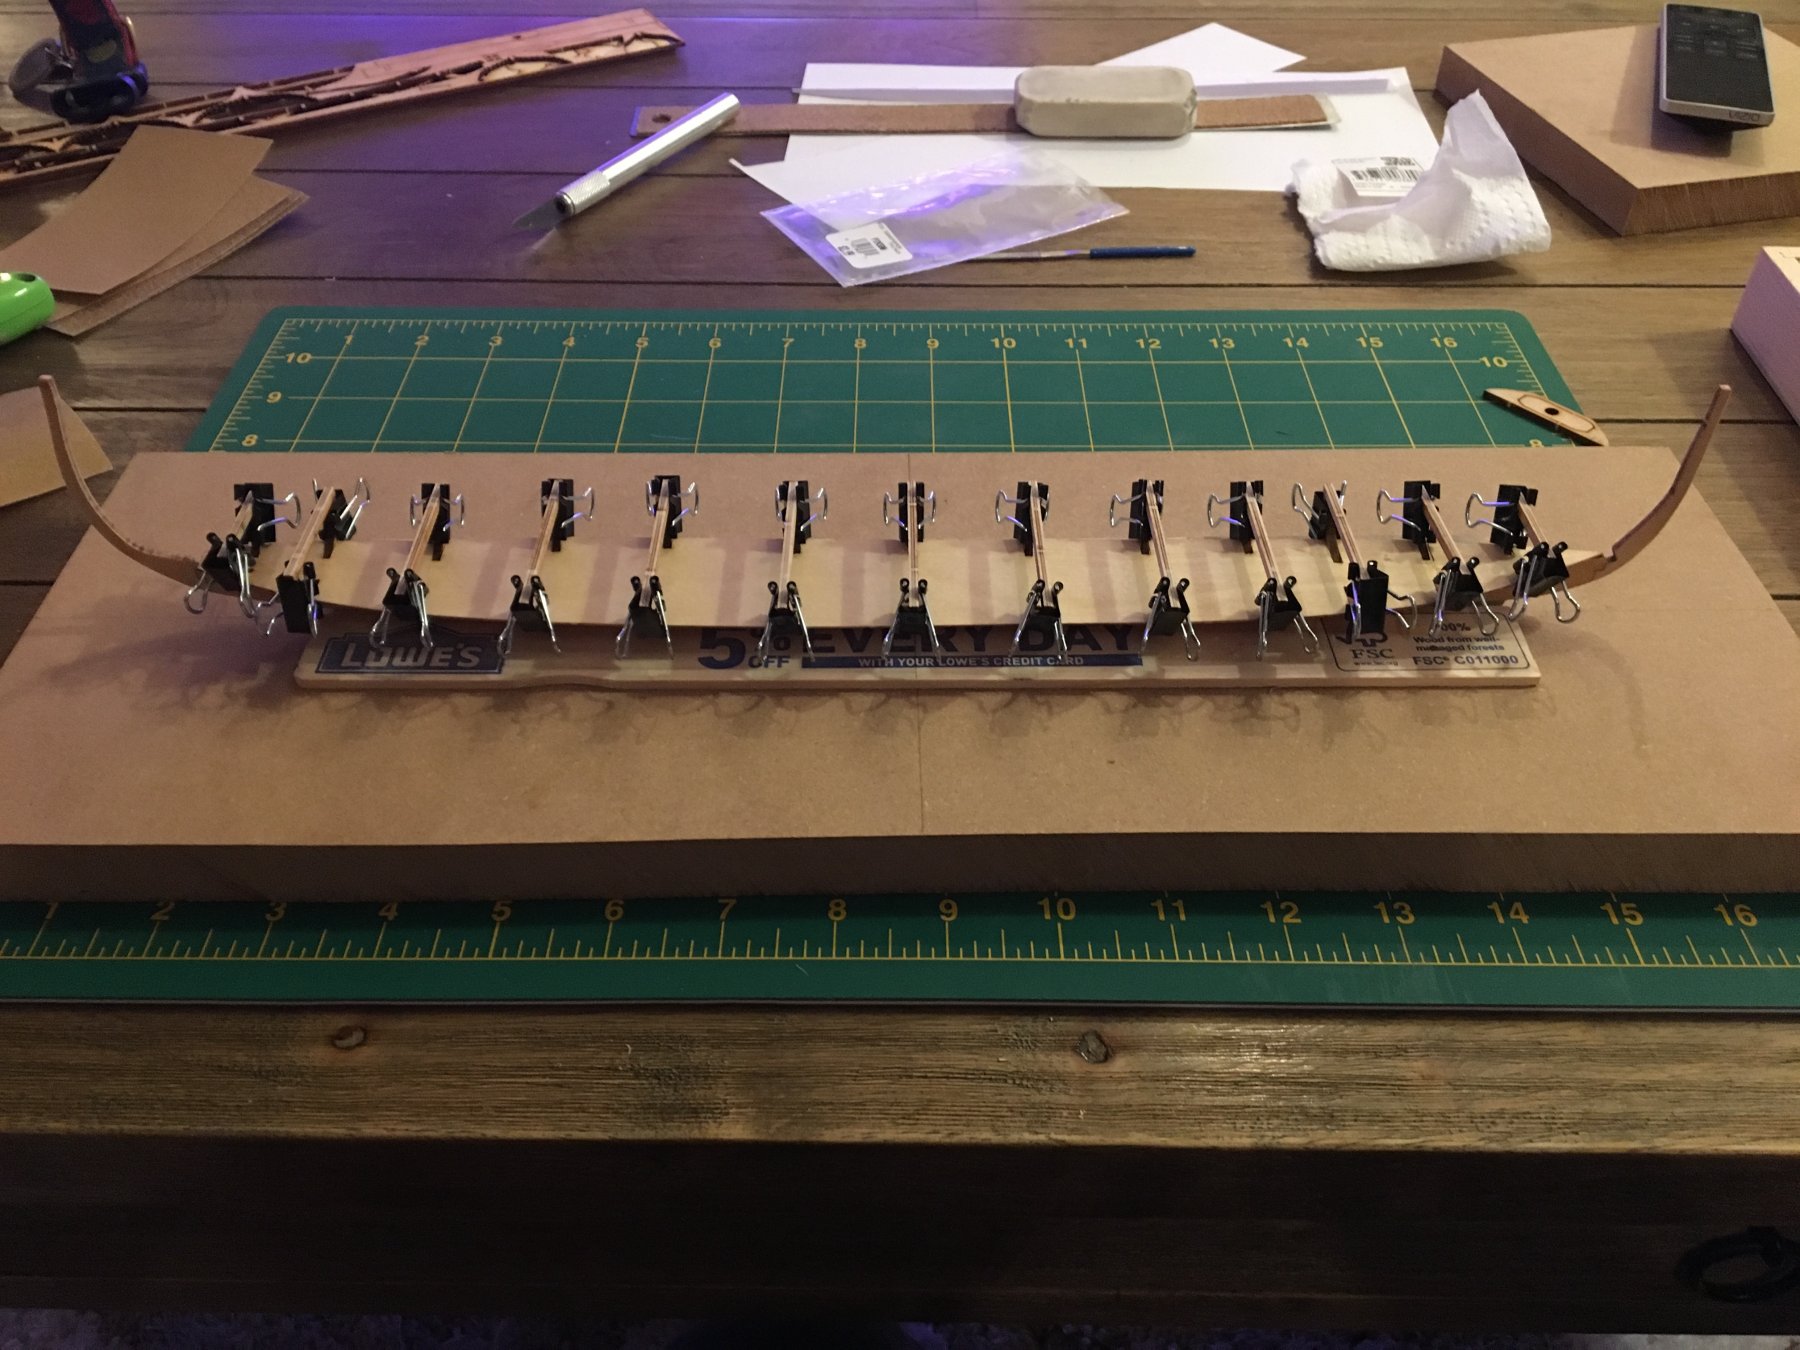
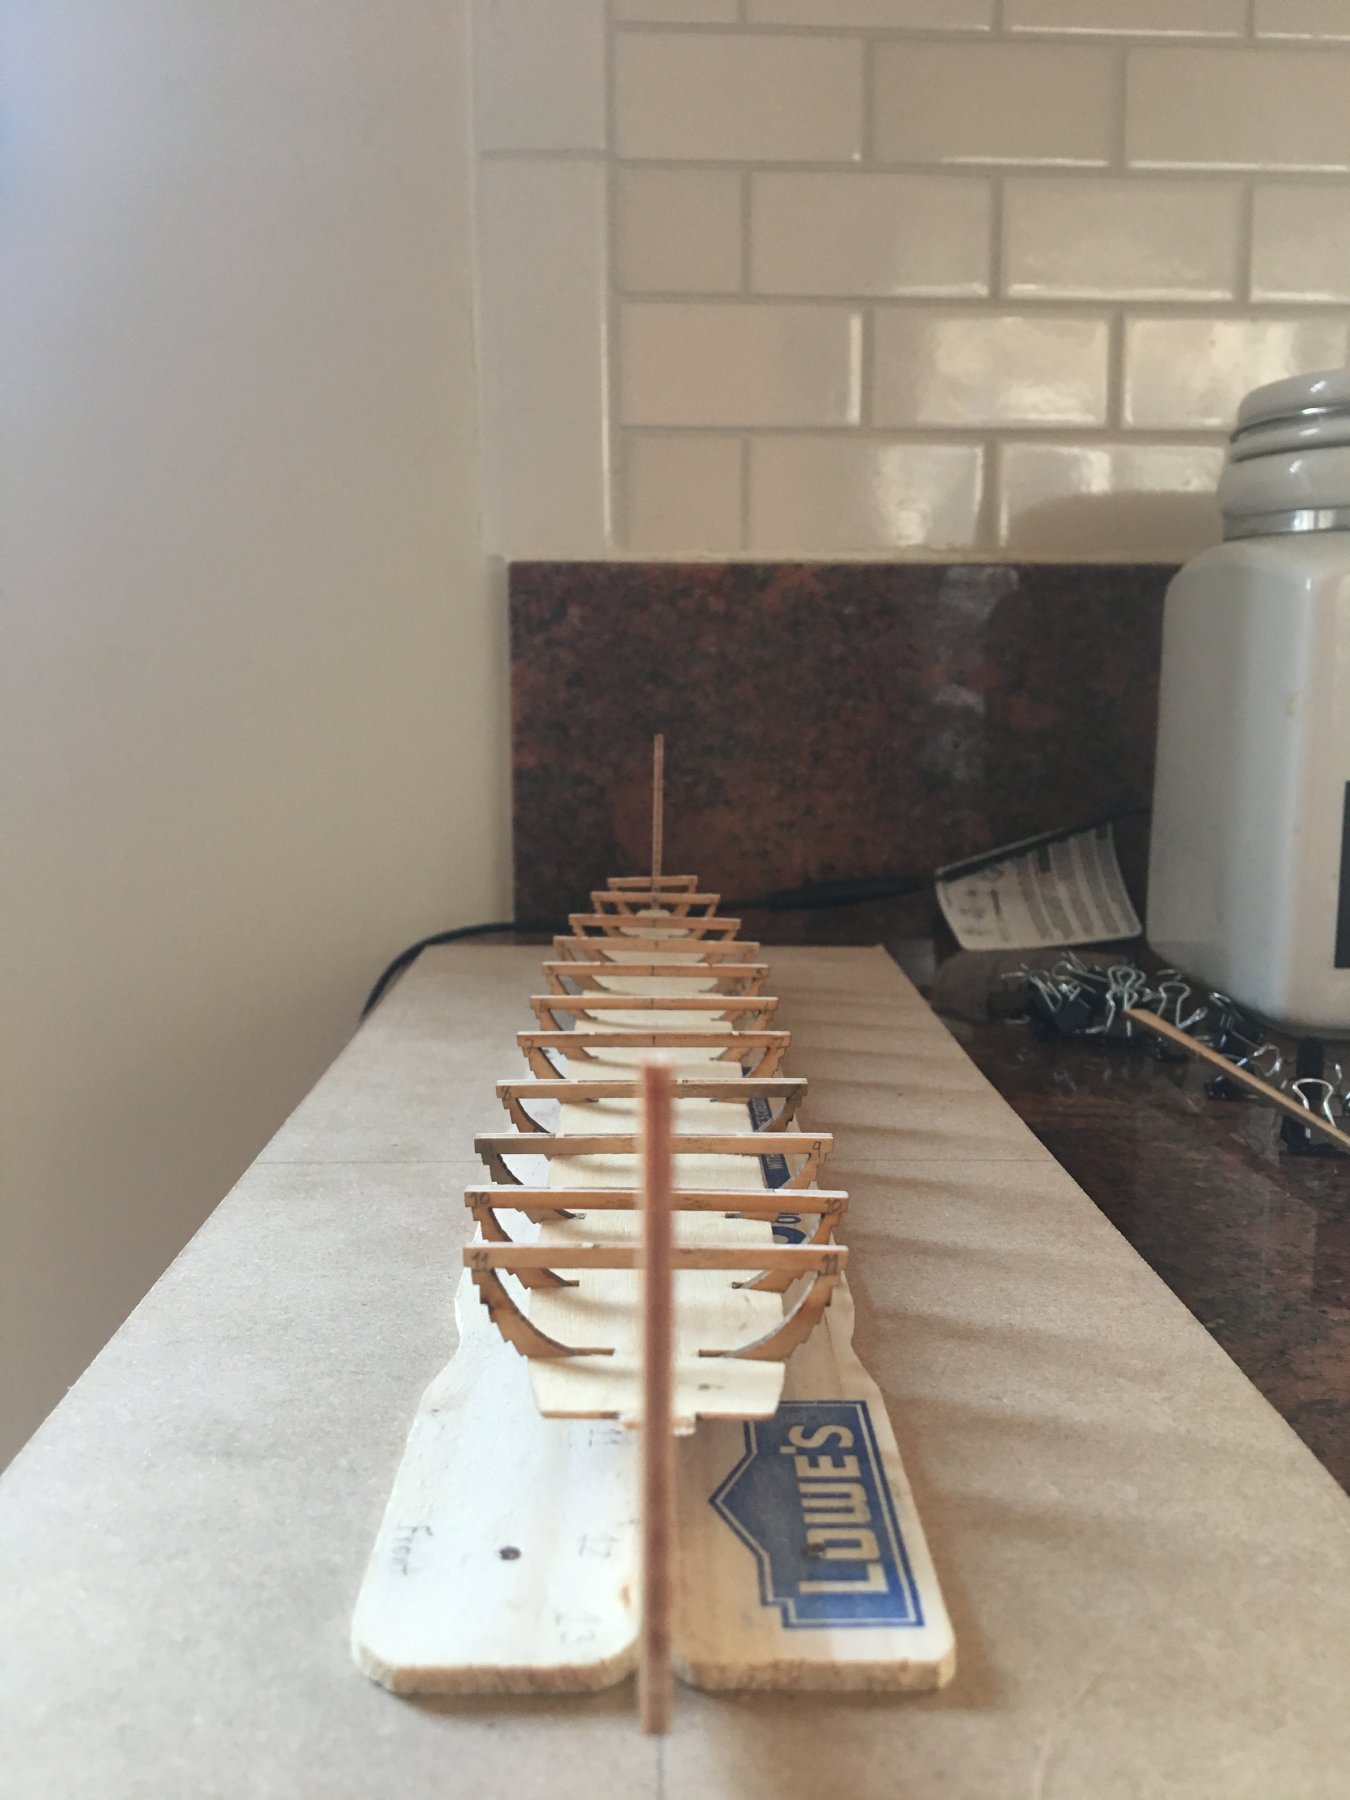
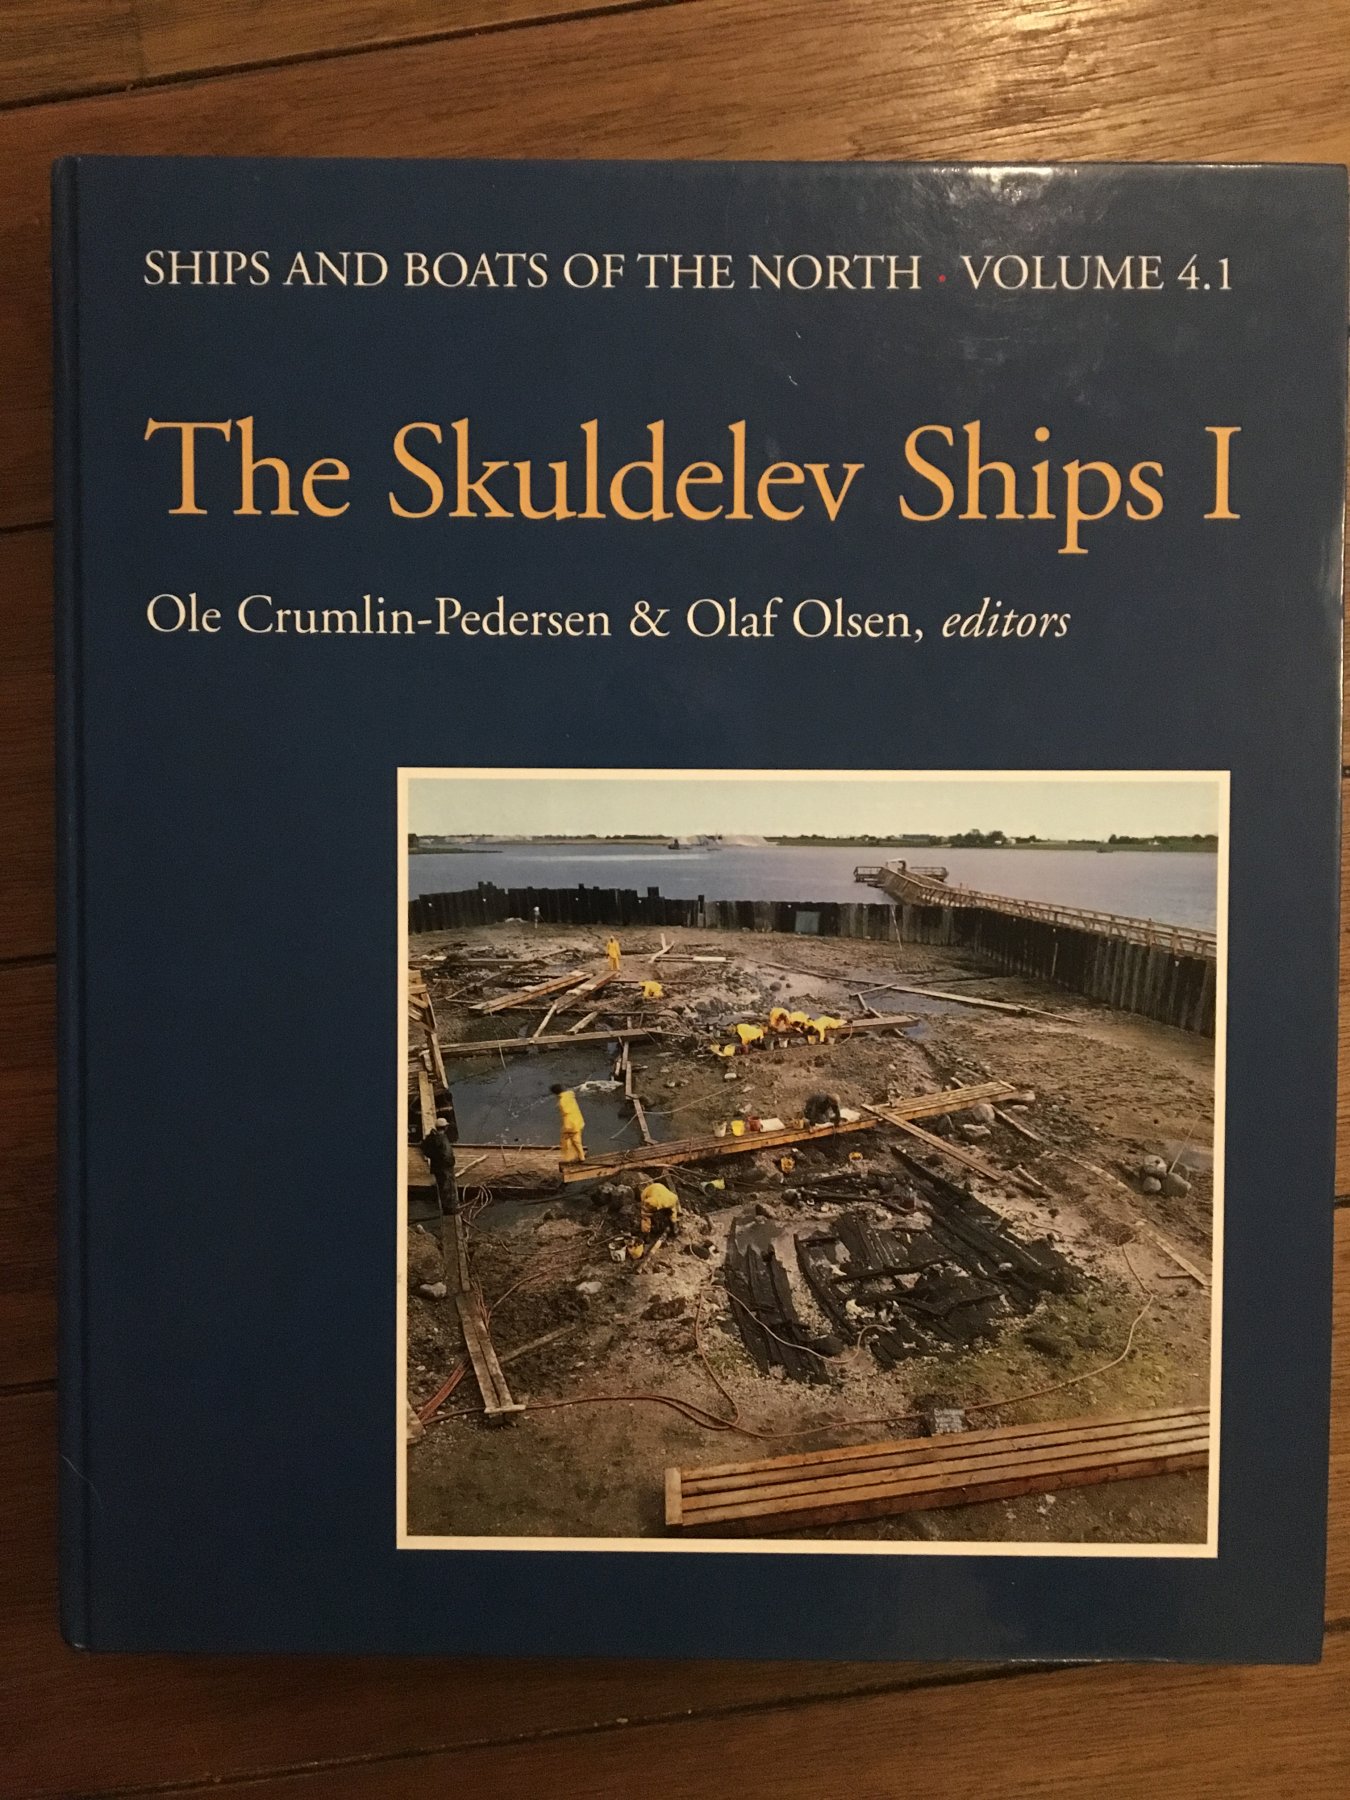
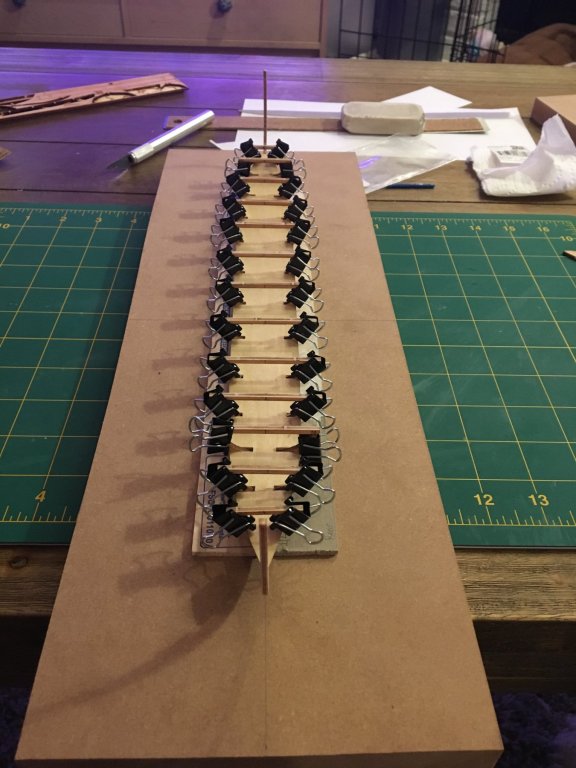
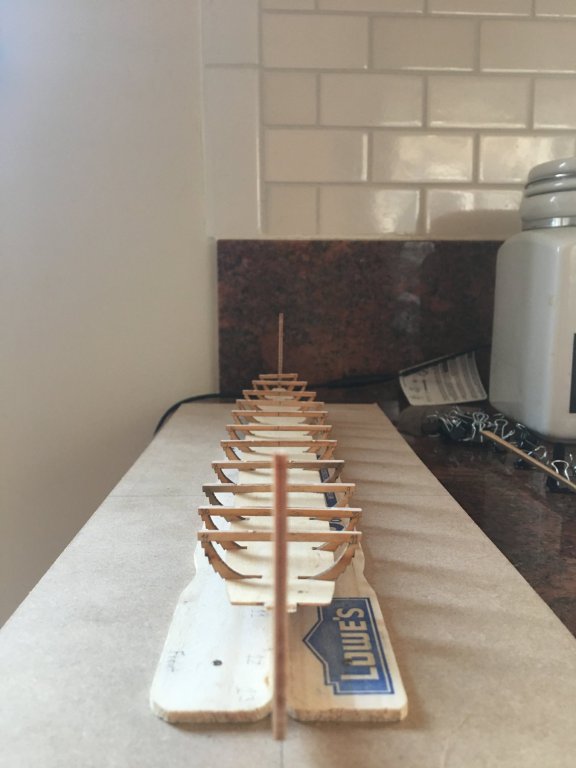
Update time! I dry fitted the frames and the deck, using clips to try and keep everything centered and aligned: I then glued the deck to the frames as per the instructions, and try fitted it again. The alignment of the rear to frames looks a little off, but that should be fixed when the deck gets glued down: it’s not perfect but it’s looking a lot straighter at least! I’ve glued some keel reinforcements on as well to further try and keep everything straight. Hopefully it works! I’ve been working on the oars as I go, 16/60 done. Made some shields too, 2/60. Also purchases a great book on the Skuldelev ships. It’s usually $80-$100 but I found a used one like new for $45 and couldn’t pass it up. Very interesting book with lots of good info (and plans for all the ships too).


-
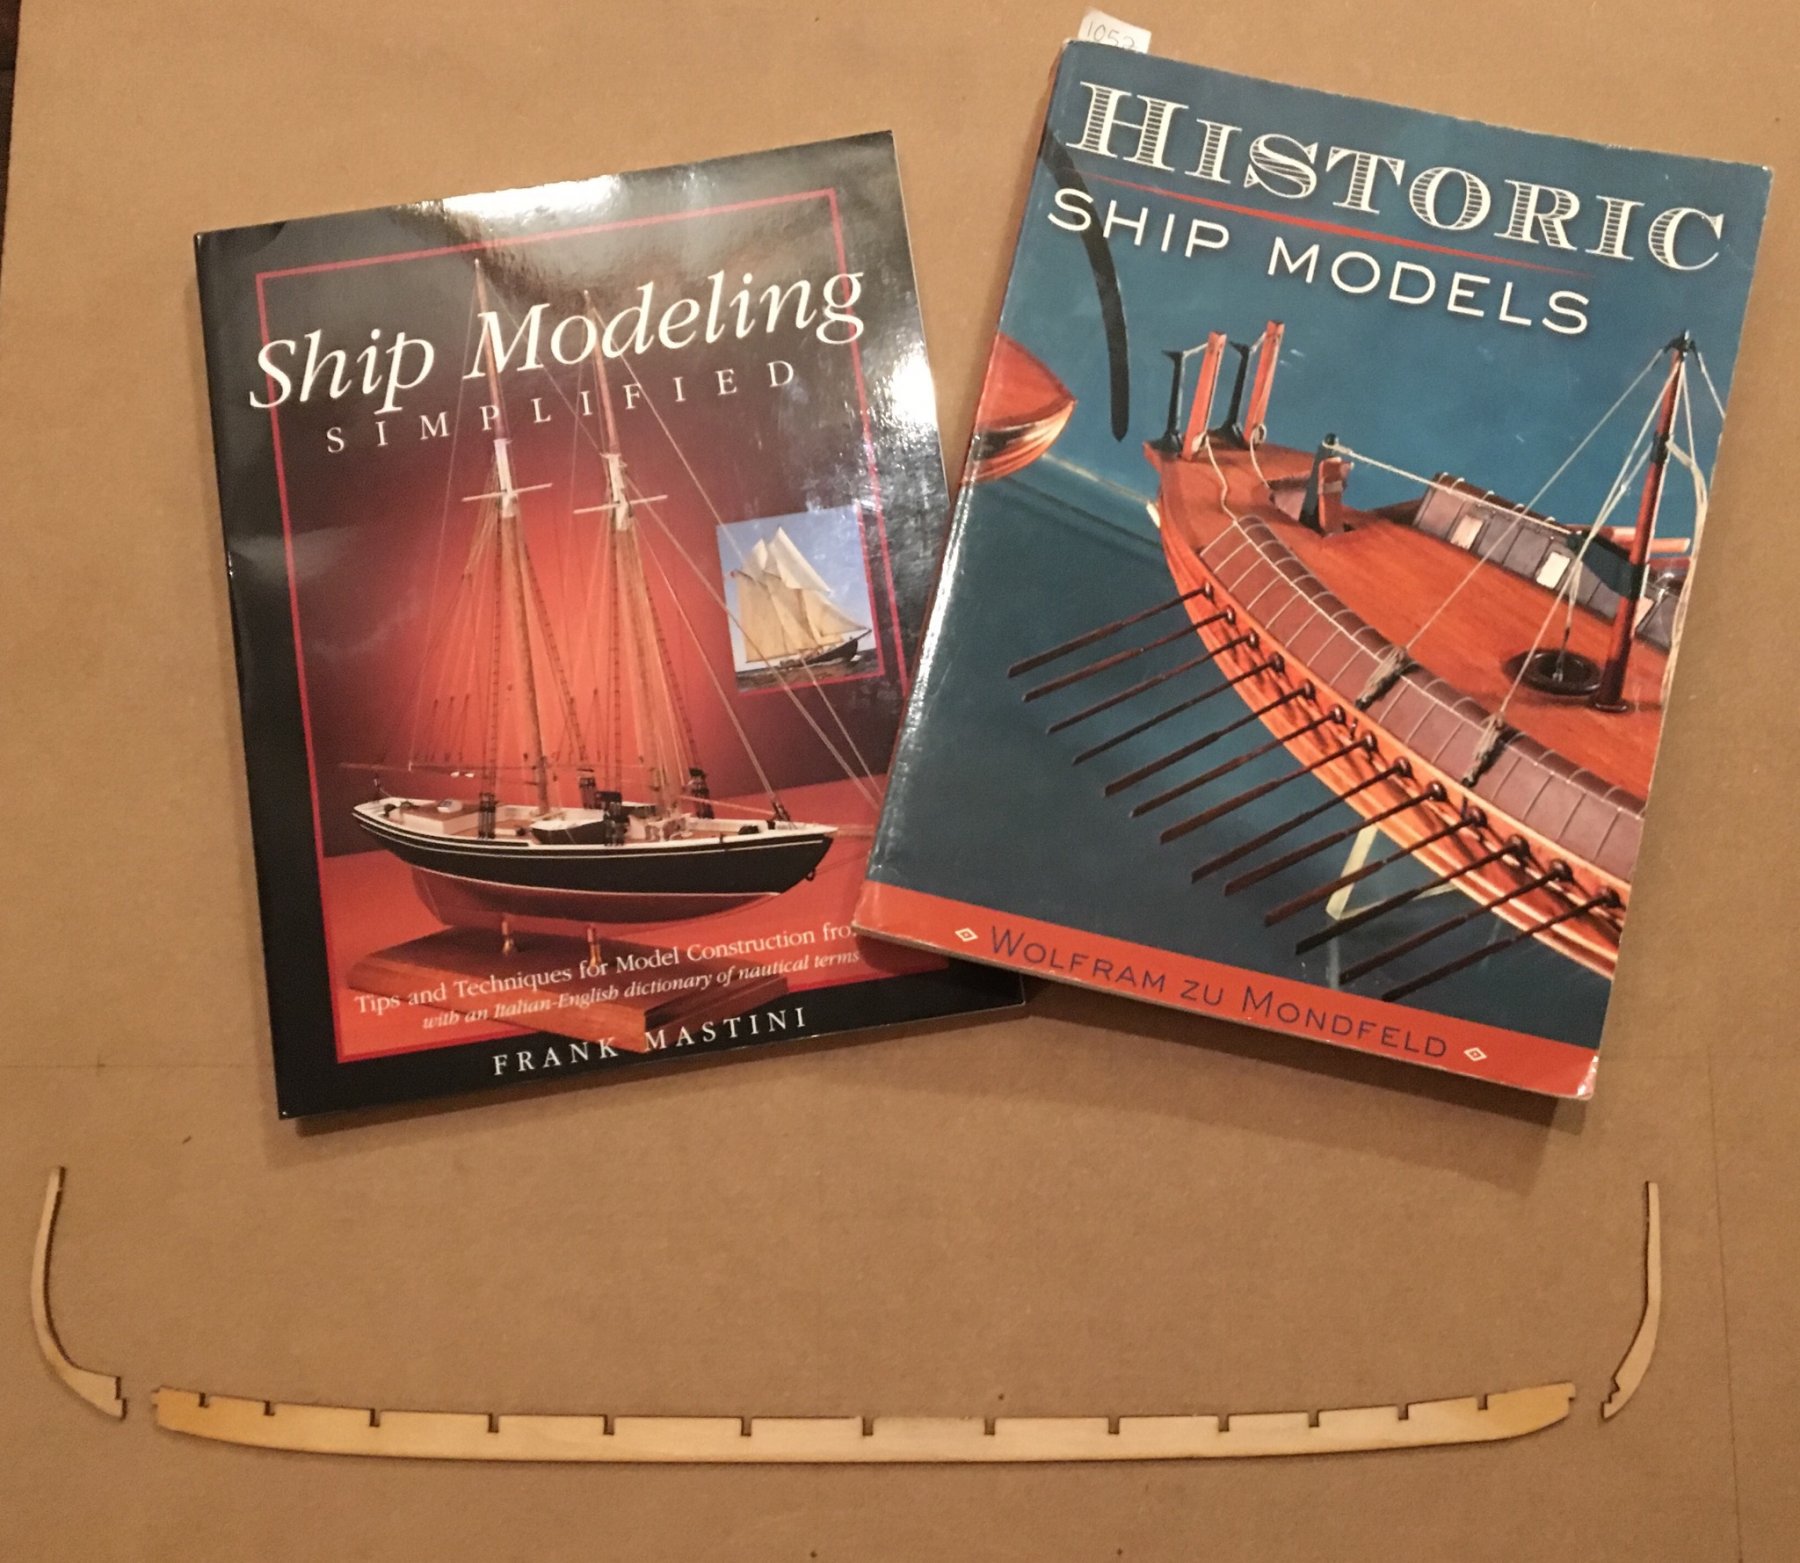
Quick update. The replacement keel arrived about two weeks ago. I also got some books: Mastini’s Ship Modeling Simplified and Wolfram zu Monfeld’s Historic Ship Models based on recommendations on other threads. So I’ve been doing some reading! Today I just glued the keel pieces together. I also bought a nice flat MDF board to make a building jig, as suggested in the books, to try and keep everything straight this time!

-
Thanks for the tips Doug and Mark. I contacted Daniel via e-mail, and he very kindly offered to send a replacement keel free of charge! Very much appreciated! So build is mostly on hold until then, might make some more oars and shields while I wait. Alberto
-
Unfortunately I haven't seen The Castle Glad the site might be useful! I've been procrastinating and looking through his Asia and Africa galleries, and found some dhows for you too. Appears to be the same concept as the Italian and Spanish ones, but slightly larger ships. Red Sea Sambuk calcet and truss: https://www.cherini.eu/etnografia/AF/slides/af_0077.html Dhow calcet and truss - interesting that it has a counterweight: https://www.cherini.eu/etnografia/AS/slides/As_0017.html Omani dhow, with interesting parrel: https://www.cherini.eu/etnografia/AS/slides/As_0018.html Persian Gulf two masted Baghla: https://www.cherini.eu/etnografia/AS/slides/As_0045.html Sambuk main mast rigging plan: https://www.cherini.eu/etnografia/AS/slides/As_0062.html Man, so much good stuff here! Should get back to doing what I should actually be doing, lol. Looking forward to your next dromon update! Alberto
-
+1 for the 'goosewing' sails, looks cool I was doing some unrelated research, and completely by accident I stumbled on an Italian website that may be of interest to your lateen sail/yard dilemma. This website has hundreds of drawings of traditional ships and boats, mainly from the 1800-1900's but some earlier. Unfortunately, the images can't be embedded so you'll have to click through. Here are some sail positions of a small Spanish lateen rigged vessel from the 19th century. Maybe this is common knowledge on here, but was new to me Drawings progress from close hauled, to full downwind. A bido describes when the sail is in front of the mast, don't know the english term. Yard was horizontal when wind is coming from behind - looks very much like what is going on in your paintings!: https://www.cherini.eu/etnografia/BEU/slides/BE_873.html He also has some detailed close ups of how the yard was fixed on to the mast on Catalan vessels: https://www.cherini.eu/etnografia/BEU/slides/BE_887.html And also on small-medium (~15m/30 tons) sized 19th century Ligurian trading vessels of the leudo type: https://www.cherini.eu/etnografia/Italia1/slides/023 Leudo.html EDIT: Even better, a simplified version of the above showing exactly what was going on: https://www.cherini.eu/etnografia/Italia1/slides/032 Liguria - leudo rivano - bozzelli - trozza.html I suggest looking through his galleries, might be a lot more useful info that I missed! Even just for fun, they are great drawings
-
Hmm, what would be the best way to go about making a new keel? I’ve found a model shop in town that sells wood for model airplanes. Would that be good enough quality? And what sort of saw should I use to cut it?
-
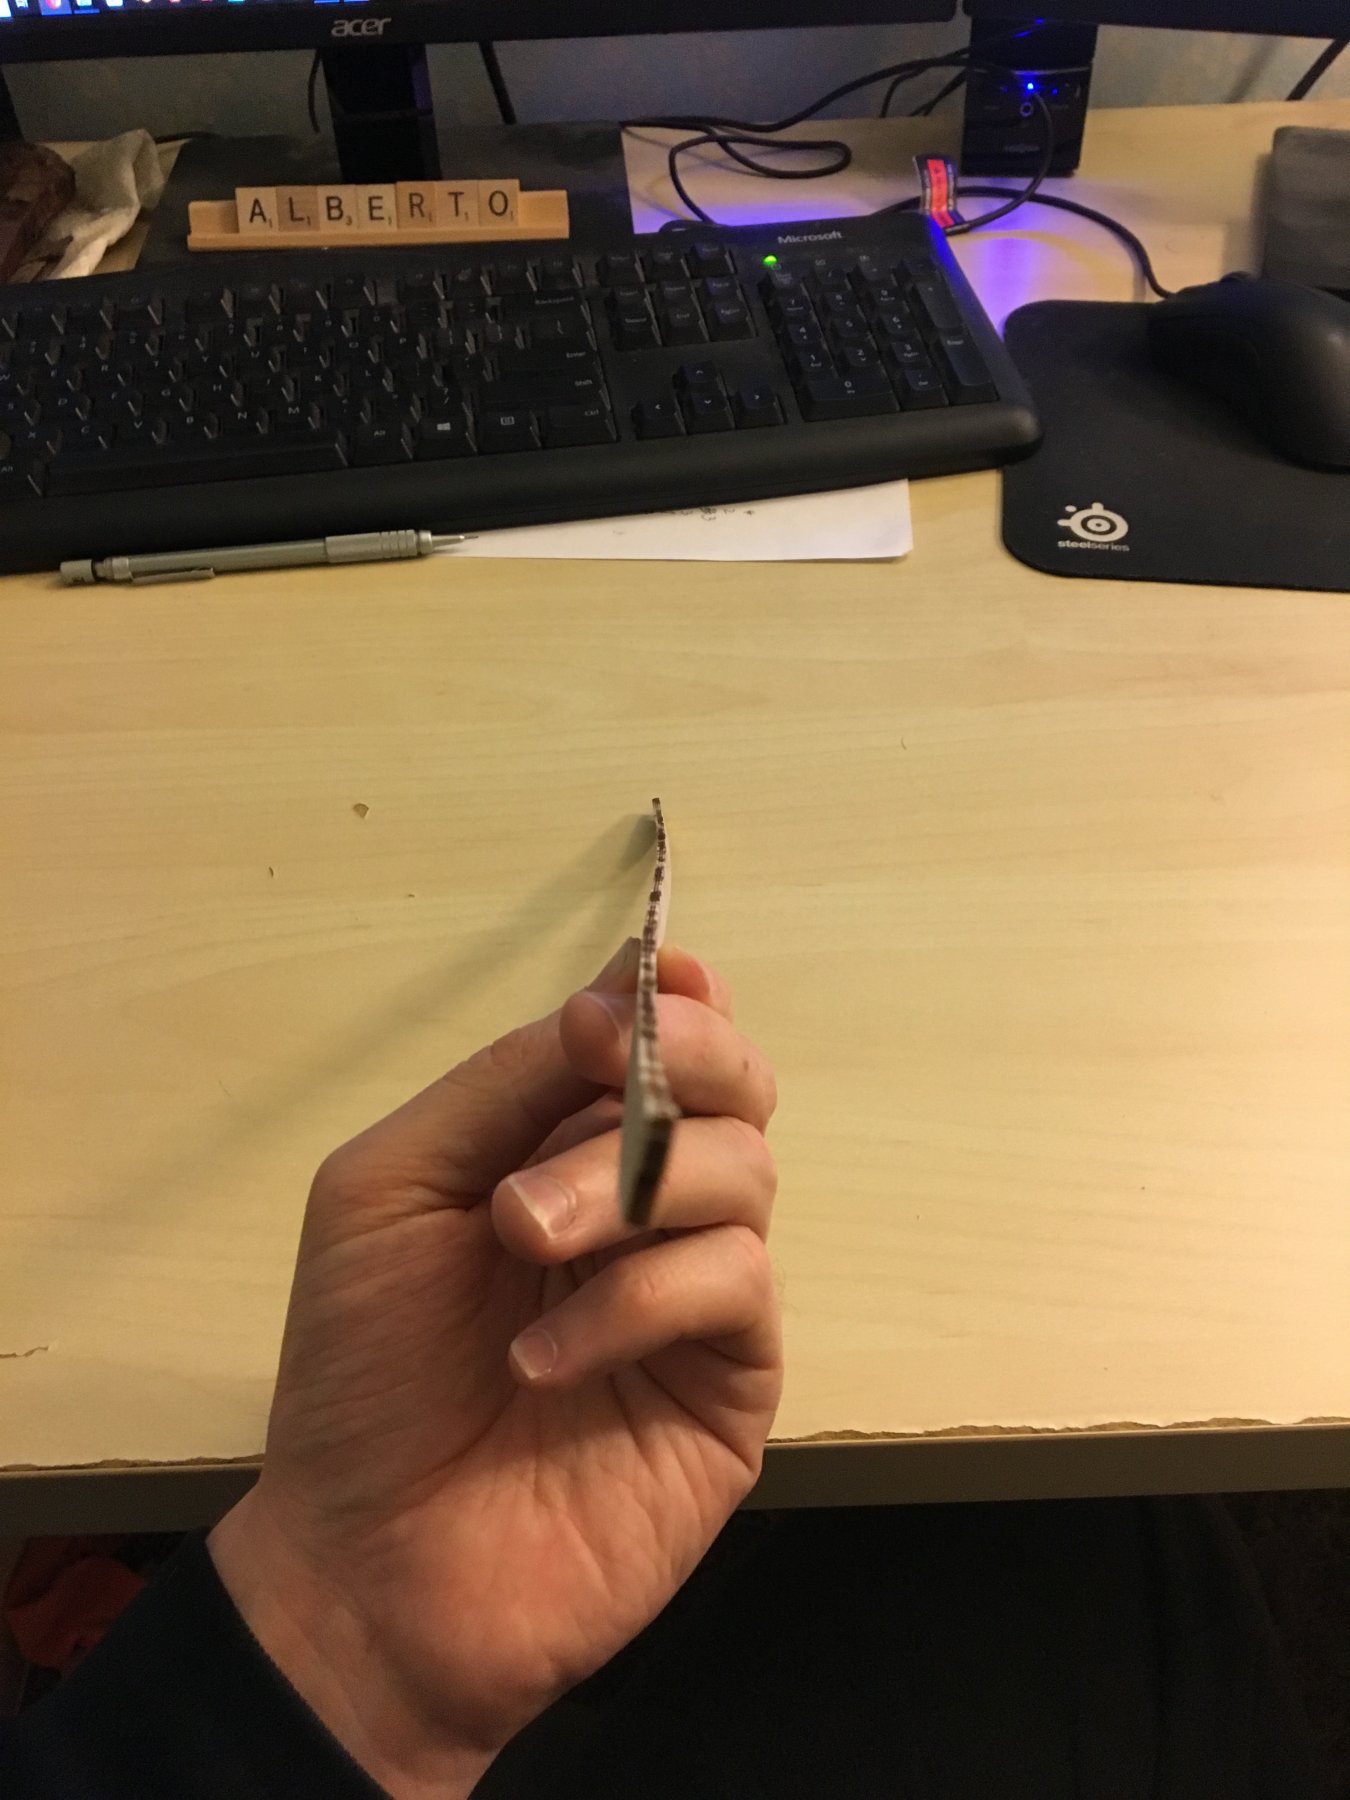
Thanks Steven! No, I won’t be doing a figurehead. Was aiming to keep everything as stock as possible for my first go. The figurehead I used on the CG model was based directly on the figurehead created for the Helge Ask, the reconstruction of the Skuldelev 5 wreck by the Viking Ship Museum: http://helgeask.dk Yeah, google searching Viking stuff can be difficult! They’ve been so heavily mythologized at this point, a lot of it is pure fantasy. I know they found some posts and some tent poles in the Oseberg and Gokstad ships with dragon decorations, but both of those ships are earlier than the Skuldelev ships. For the Skuldelev 2 reconstruction, the Sea Stallion, the only decoration they made was a weathervane based on the one found in Heggen, Norway, from the same period and in the Ringerike style. Apparently there is a carving from the 13th century showing those styles of vanes on the prow of ships (see the weathervane link) I pulled out the keel again and after sitting away for a week it’s even worse than before!

-
Thanks Steven! That's a really useful link, haven't decided what to do with the shields yet. Not much progress on the model. The books got most of the bend out, but it's still not great. I'm considering my next step now and doing more research on here if there are any other keel-straightening techniques. In the meantime, here is a CG model I teased in my introduction post that I finally finished and put online: (Unfortunately the embed code for Sketchfab doesn't seem to work here!) Viking Longship by Opus Poly on Sketchfab
-
Thanks for the links Steven! I am familiar with both of them from my previous research for my Skuldelev 5 3D model The Viking Ship Museum's website is really great for research, they put up a lot of info there. Hopefully my second attempt goes better! I already sanded down the slots in the frames so they fit better. Tomorrow morning I'll slip the soaked keel under some heavy books to try and flatten it out. My toe will take 2-4 weeks to heal, which sadly means no fieldwork for awhile and just a lot of office work. Oh well!
-
History Time's Development of the Viking Ship
Binho replied to vossiewulf's topic in Nautical/Naval History
Looks interesting! Bookmarked to watch later. Thanks!- 1 reply
-
- 3
-

-
Just a quick update - haven't made a lot of progress. Today I finally got some time to work on it, as I broke a toe and just stayed home from work after going to urgent care. A few days ago I was able to take everything apart using the alcohol, though unfortunately there was another breakage of the deck piece when one of the frames suddenly popped out. Fortunately the veneer should hide the breakages. I've managed to get all the glue off the pieces though, and I'm currently letting the keel soak overnight so I can try and straighten it tomorrow!
-
Right?? Yeah, that first fresco doesn't look too accurate. My assumption was that it was just a less detailed attempt to represent what was going on in the second picture. There aren't any thole pins depicted in the fresco, and those oars are a weird shape. The only text I have access to which talks about what galleys did with their oars is page 200 of The Age of the Galley (which I think you have too Steven?), in the chapter on "Oar Mechanics and Oar Power in Medieval and Later Galleys". The authors are summarizing texts from 17th-18th century French galley masters sailing a scaloccio galleys , so even further away chronologically from dromons unfortunately. The oars on those were left out while sailing and even in harbor, and were only brought inboard in harbor if the harbormaster said he needed more space. I think you had a picture of this on one of the earlier pages? These were 3-5 men oars though, so much bulkier than on dromons or alla sensile galleys. So yeah, really, who knows?? I do think it's an interesting topic for further research though! What I do know is your dromon is coming along well! I like all the deck structures especially. Alberto
-
Man, this is looking good! I really like the look of that stern structure. Interesting the rudders were covered in pitch, makes sense. Love all the research that goes in to your build.
- 263 replies
-
- 3
-
-
- nave tonda
- round ship
- (and 2 more)
-
Wow, looking really great with the sails on! I grew up around Den Haag, but I haven’t been back to NL in awhile. Haven’t really used my Dutch much since!
- 236 replies
-
- 1
-
-
- artesania latina
- kitbashing
- (and 2 more)
-
Hey Dick, my specialty is in Roman Frontiers! Day to day I work in California though, mainly with local Native American prehistory and some 19th-20th century european history. Been interested in nautical archaeology since I saw the Batavia as a kid growing up in the Netherlands. The interest was reignited a few years ago when I went to a series of talks at Oxford about the bronze naval rams from the Egadi battle site in Sicily.
-
I really like your Santa Maria, looking really good! My Dutch is rusty, but prachtig! Heel mooi gedaan Looking forward to see how it turns out with the sails on.
- 236 replies
-
- 1
-
-
- artesania latina
- kitbashing
- (and 2 more)
-
Thanks Steven! We just ran out of our isopropyl alcohol, so I'll need to get some more. I think I'll stick with wood glue for now. Used to use superglue when I made plastic models, and never liked how it stuck my fingers together. Alberto
-
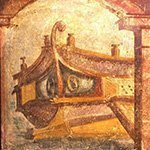
Hey Steven, I really love your dromon build so far! I went back and read it all from the start! Great research too! I do have some info that might be of interest you. Way back on the first page you were wondering on where the oars would go during battle. Well, in alla sensile galleys in the 15th Century they appear to have just hung loose over the side from their oar loops. Here's a fresco by Spinello Aretino of a battle between alla sensile biremes from Venice and the Holy Roman Empire, dating from 1407-1408 CE (Image from Wikipedia): There is also a more realistic painting by Carpaccio from 1497-98 CE, The Return of the Ambassadors, which shows an alla sensile trireme galley at port with her oars hanging loose. It's in the background on the left, quite high res if you click through to the image (Again, sourced from Wikipedia): and a detailed closeup of the galley (thumbnail from Getty images, but this is a public domain painting so I think it's ok?): It seems that pinning the oars up may have only been something done in a scaloccio type galleys with their much larger and heavier multi-man oars. I haven't seen any paintings of alla sensile galleys with their oars pinned up that I can recall. I'm surprised Age of the Galley doesn't discuss this, their section about alla sensile rowing mechanics. My observations may be wrong though! Perhaps letting oars hang by their oar loops was also common for dromons and earlier single-man-per-oar ships as well? I think this makes sense on some level. As the oars were longer than the ships were wide, part of the oar would always remain outboard if the oars were onboarded during battle. This could leave them vulnerable to being easily snapped by enemy ships making a pass, injuring the crew inside and destroying the oars. And it would impede movement on the decks with rowers, as you pointed out previously. Oars hanging loose would be moved around by an attacking ship, but be less likely to snap. And then the oarsman could just pick the oar up again to continue rowing. Plus, dropping an oar and ducking is much less involved than trying to maneuver an oar inside a cramped ship. Roman Wreck 1 (a later Roman cargo ship, 4th-5th Century CE) from the Black Sea finds might be of some interest to you as well, as it has a "wing" type support for it's rudders. It may just be a convergent design and not a direct ancestor to the later medieval "wings" in your manuscript drawing, but still might be useful for your build: https://twitter.com/sotonarch/status/1075035578096340994
-
Thanks for the encouragement and tips guys! I’m going to try dissassembling everything, straightening it all out, and then dry fitting before I re-glue everything. I’ve been using wood glue (Elmer’s brand). Would isopropyl alcohol work on that too? Taking a quick look online it says warm water with vinegar or denatured alcohol. Is PVA preferable for these types of kits?
-
Thanks for the warm welcome everyone!
-
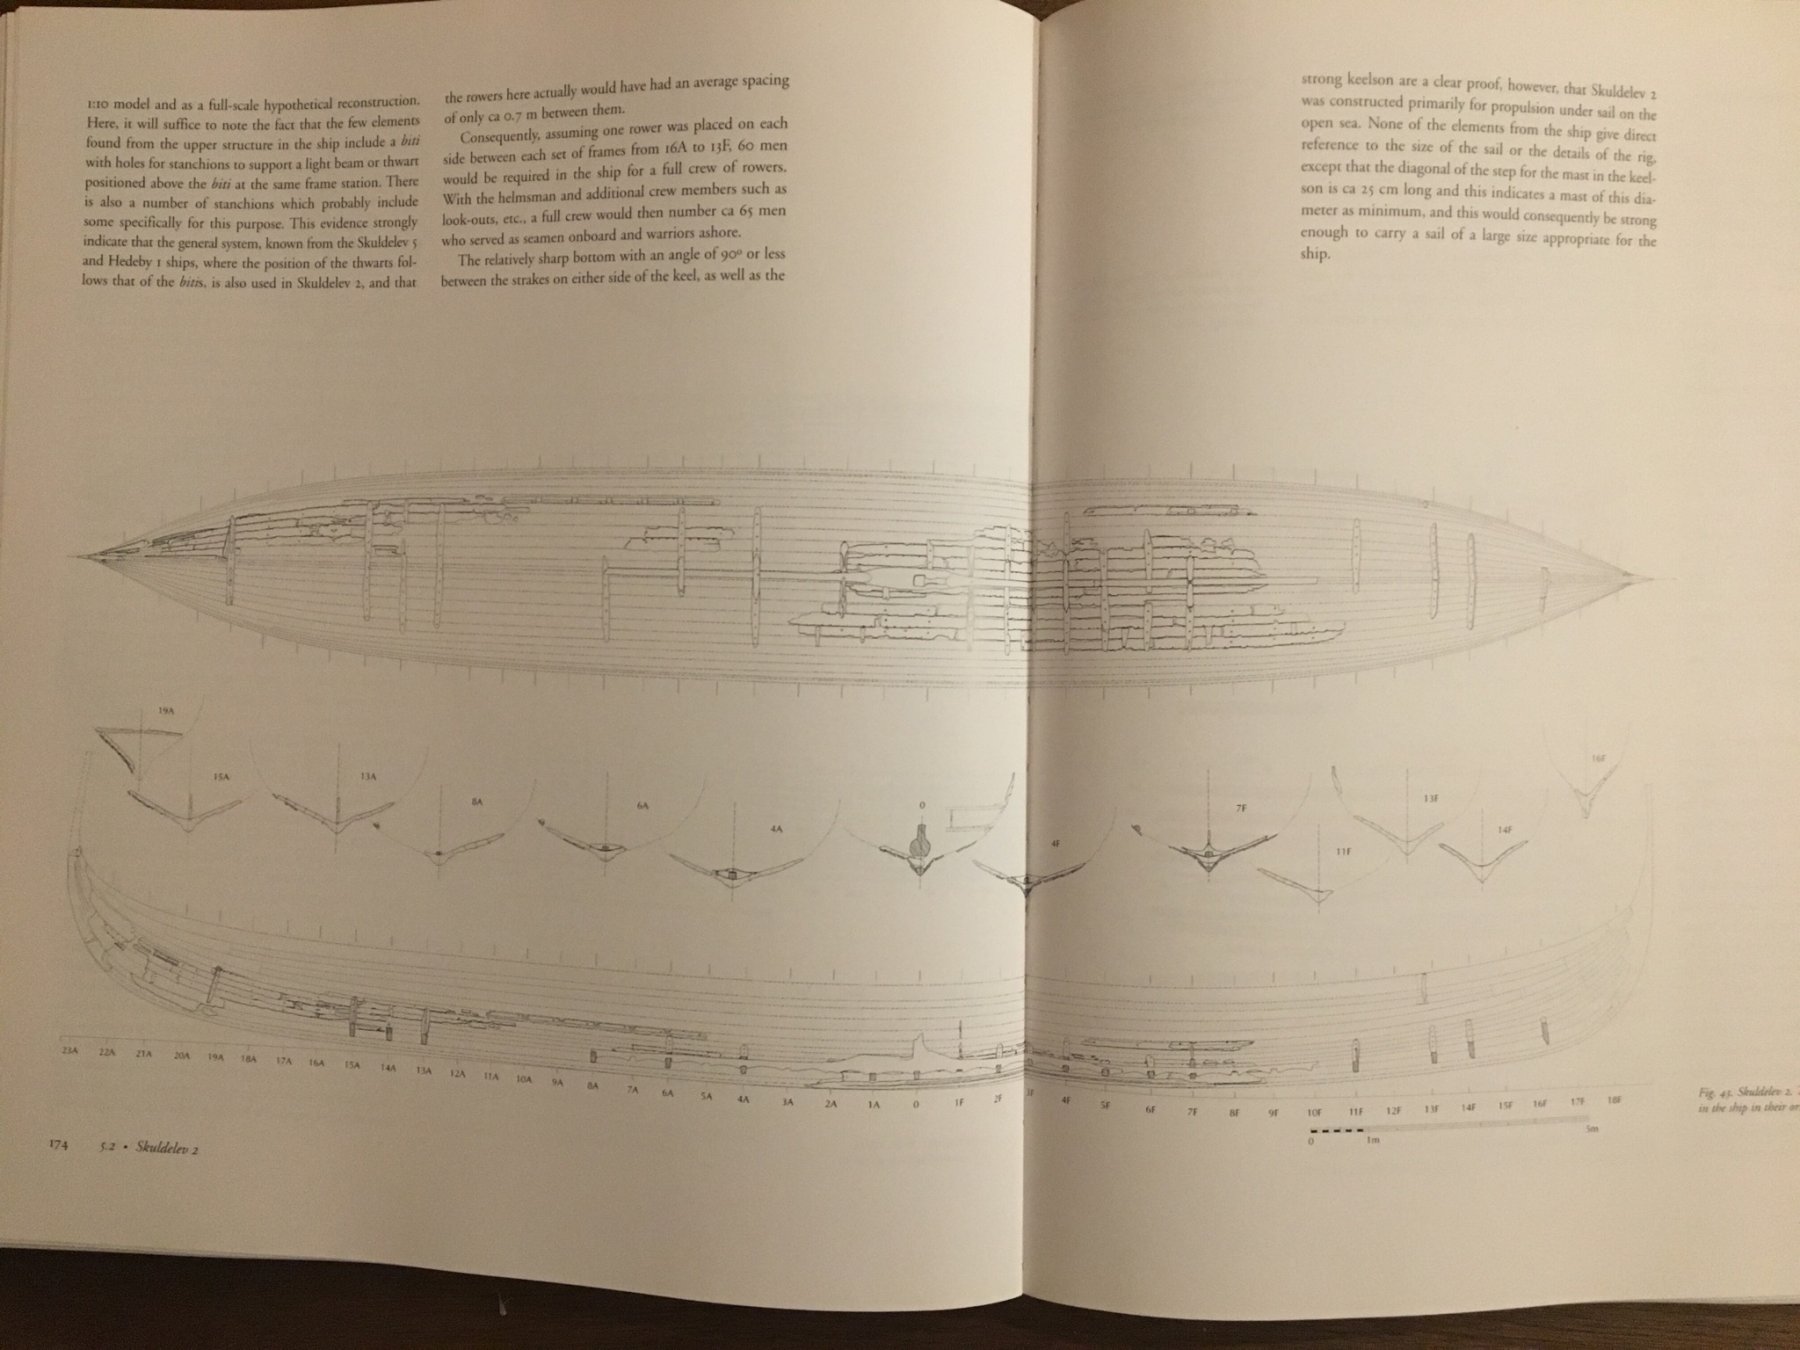
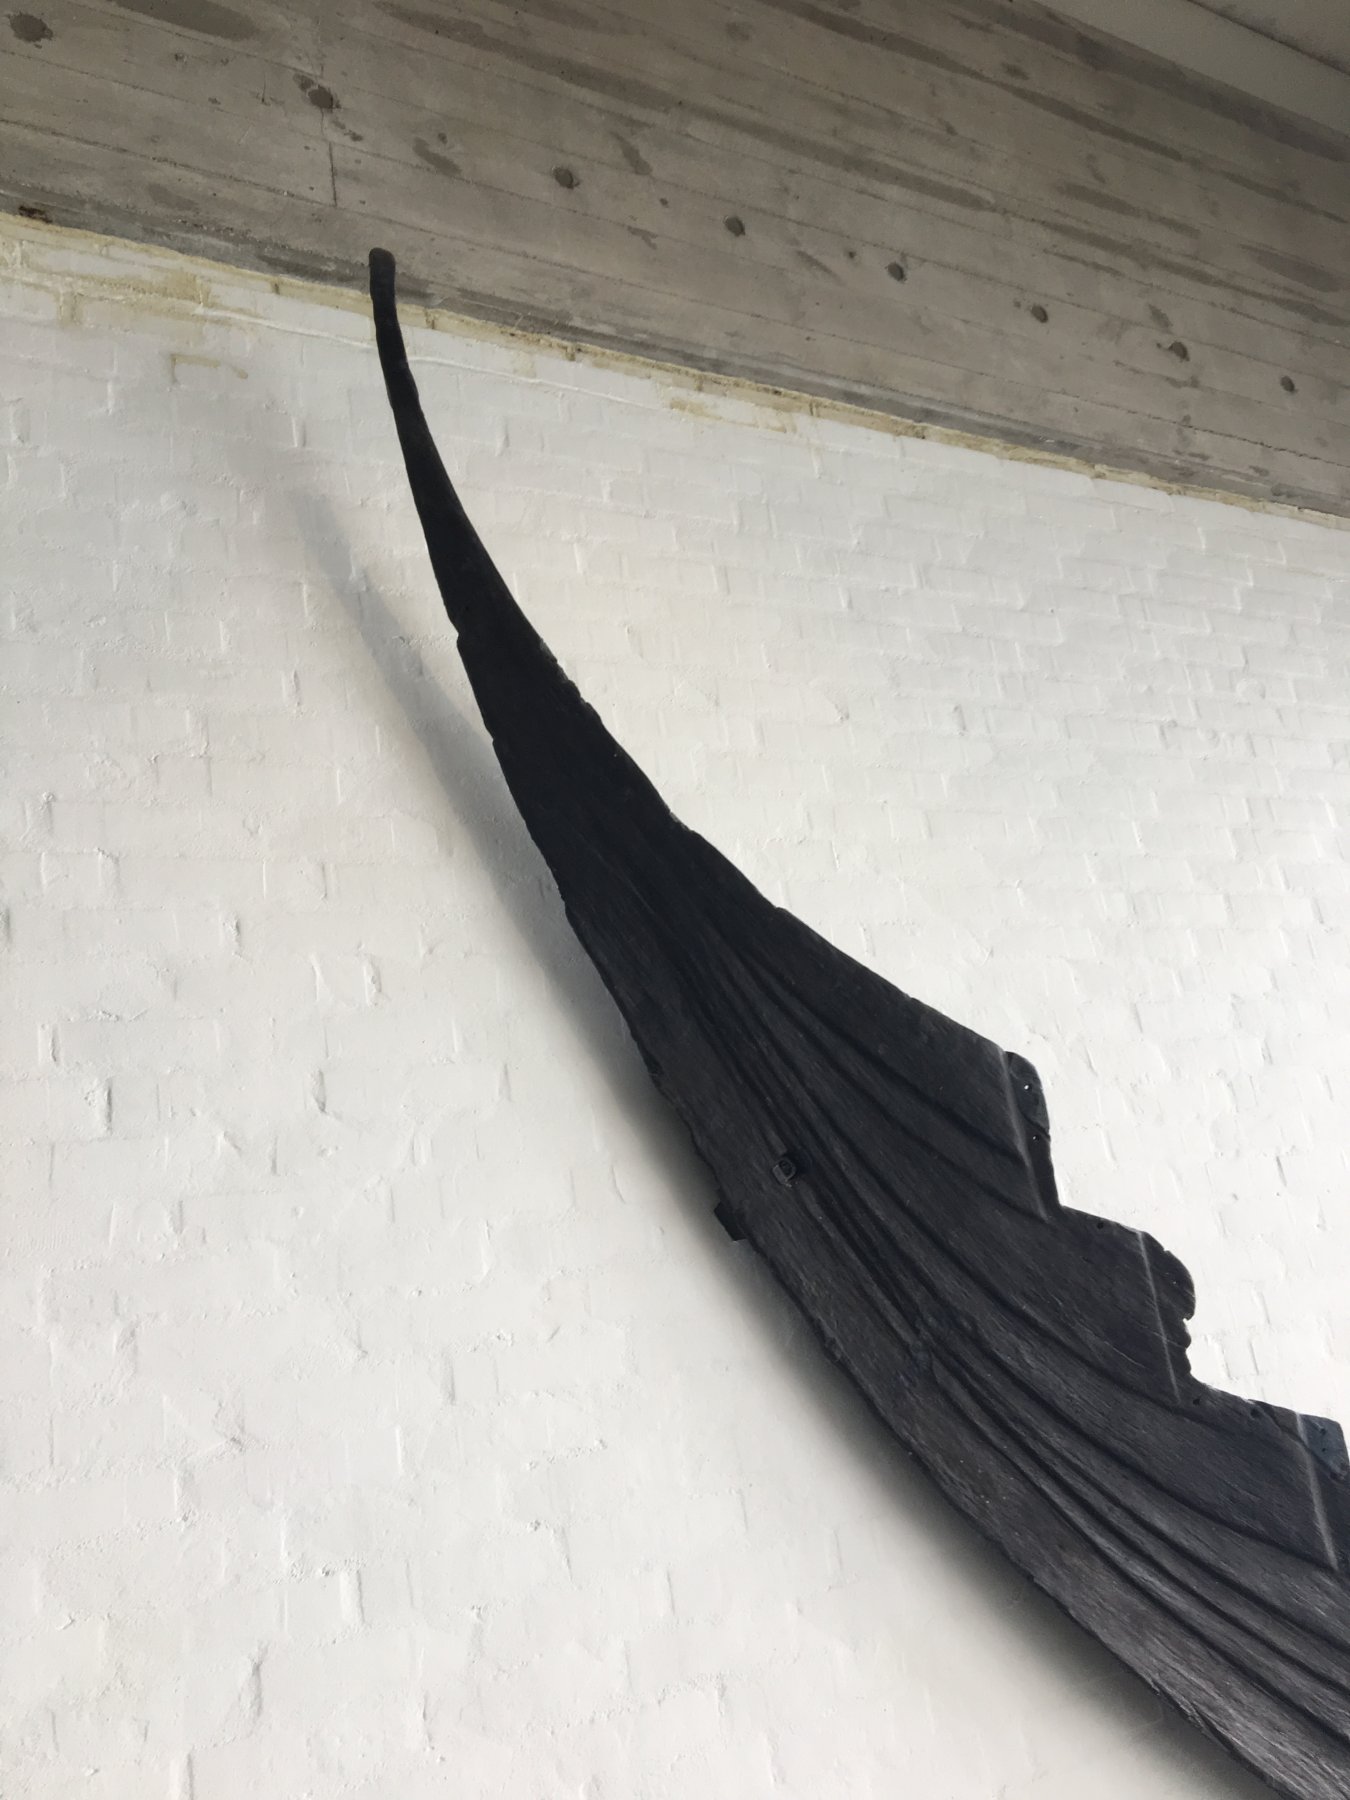
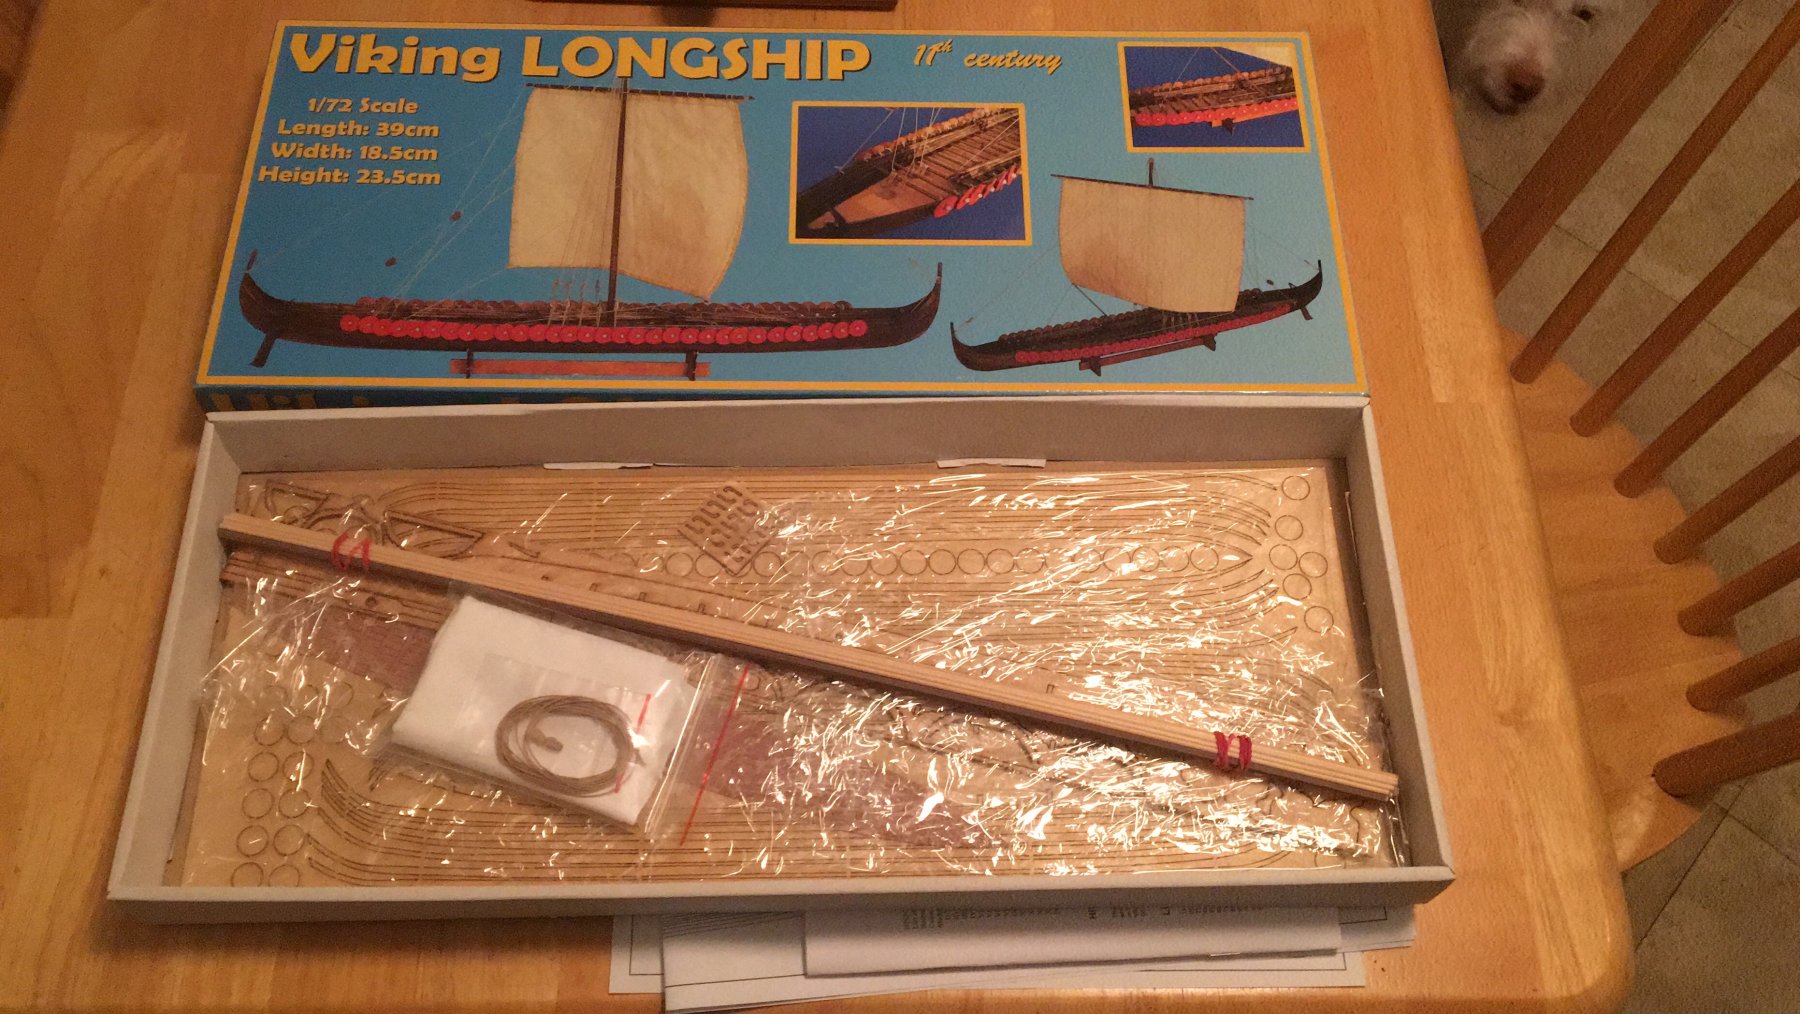
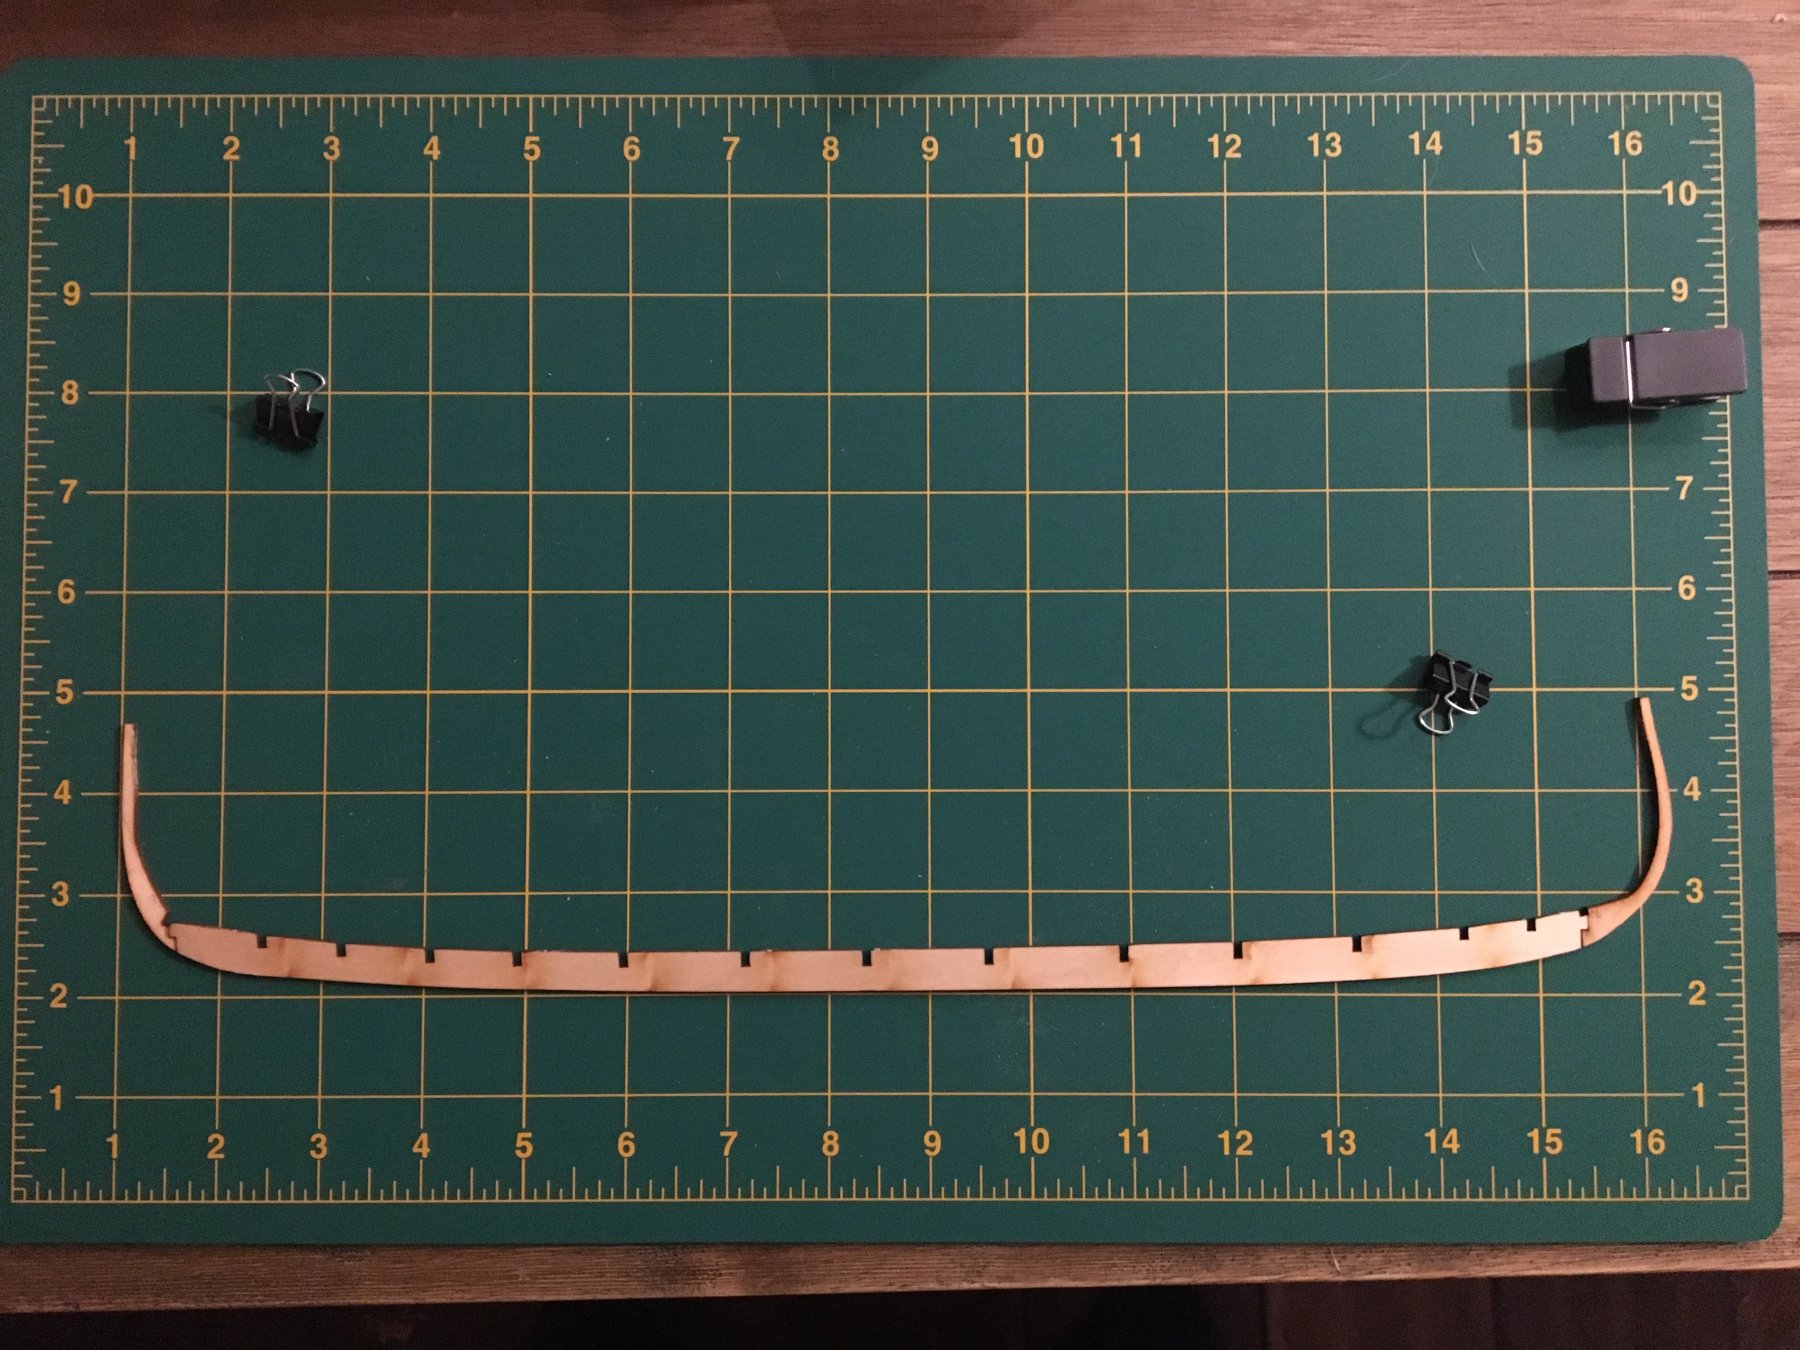
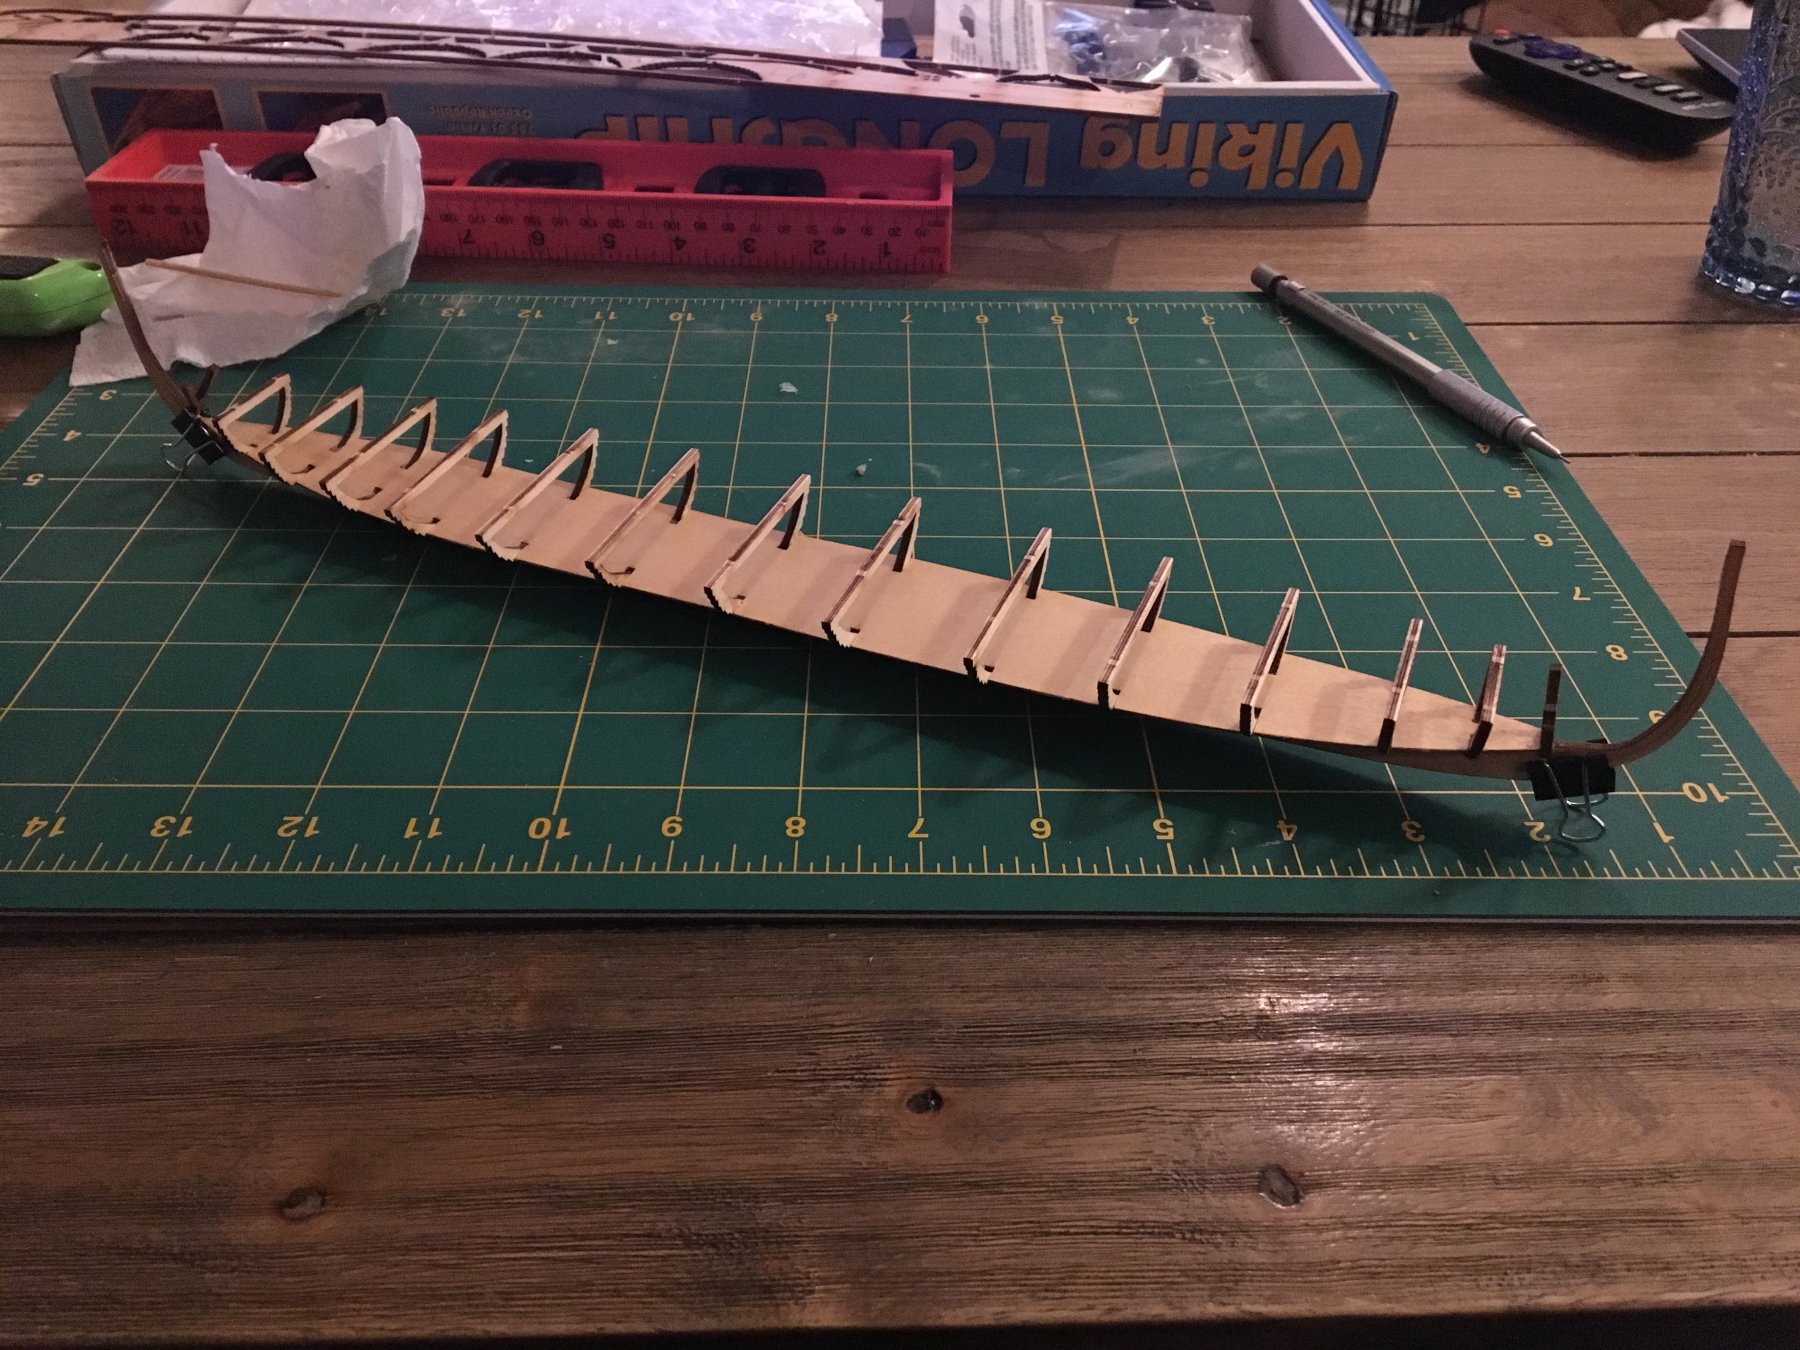
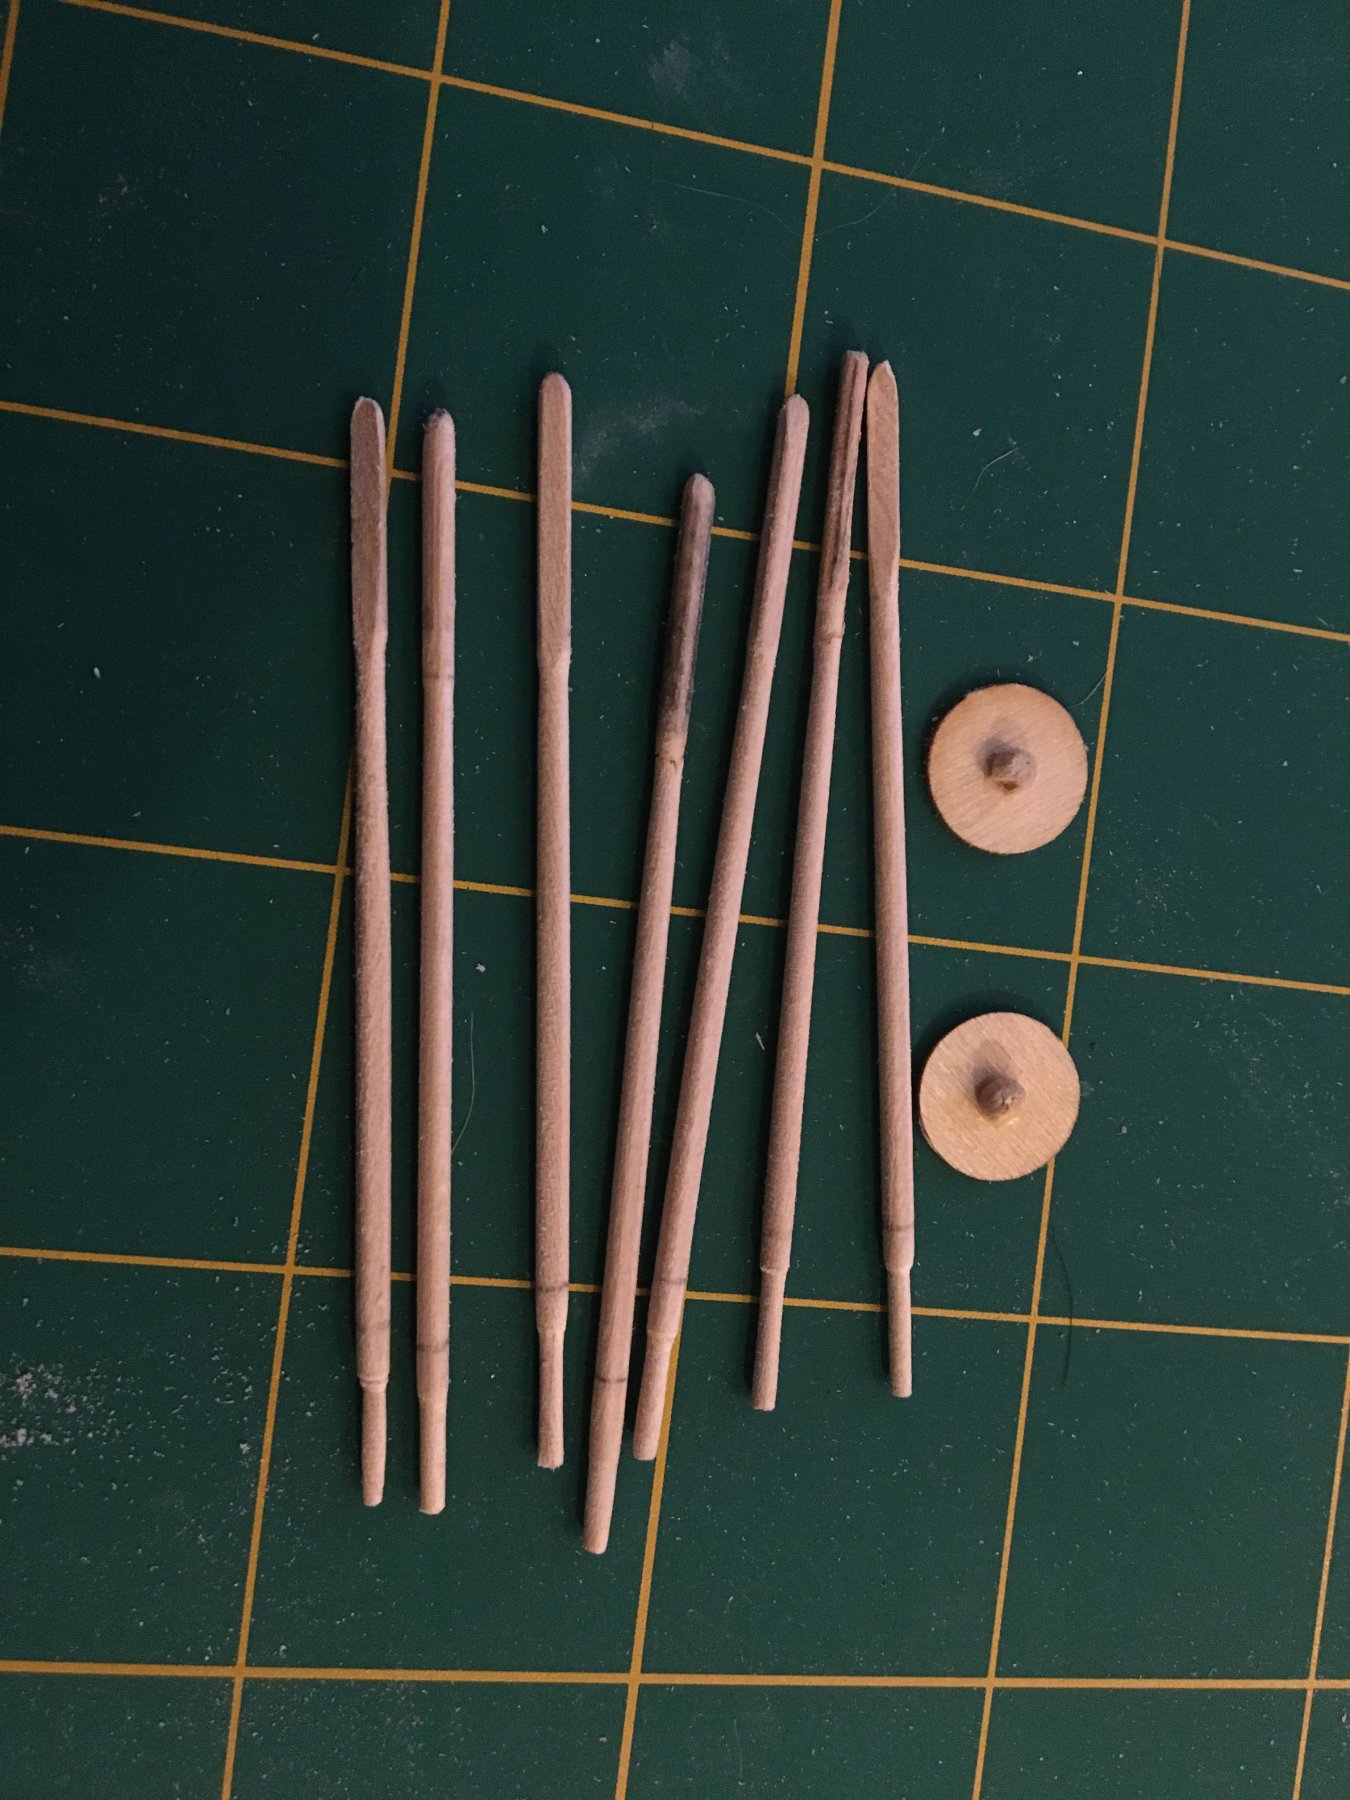
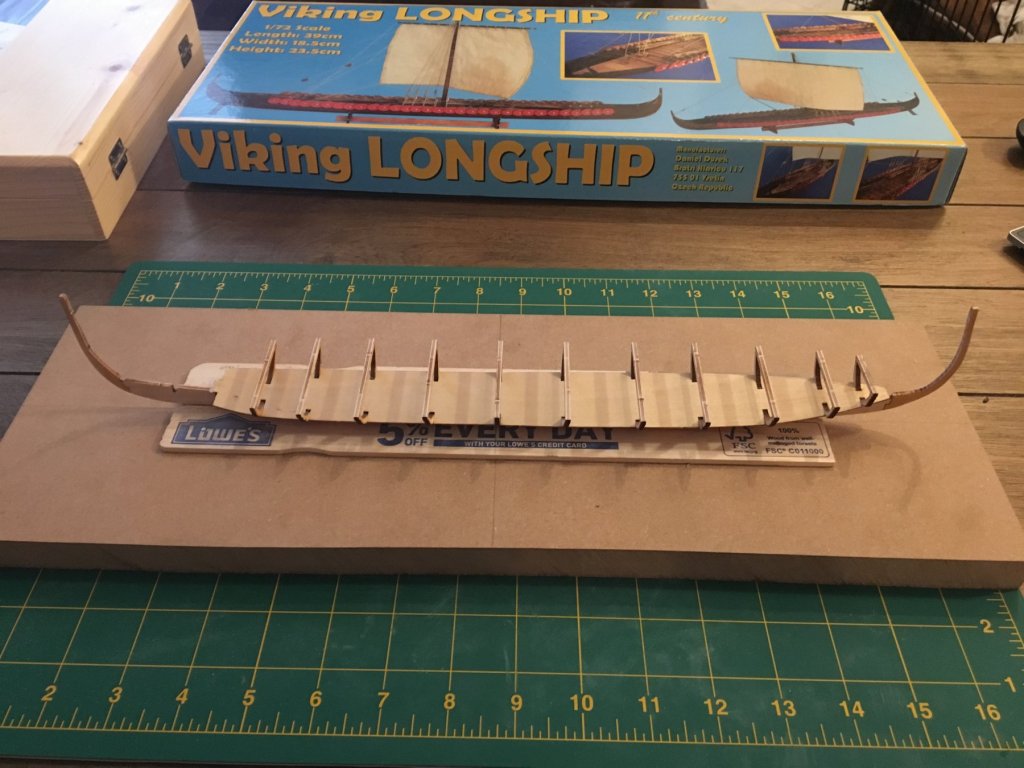
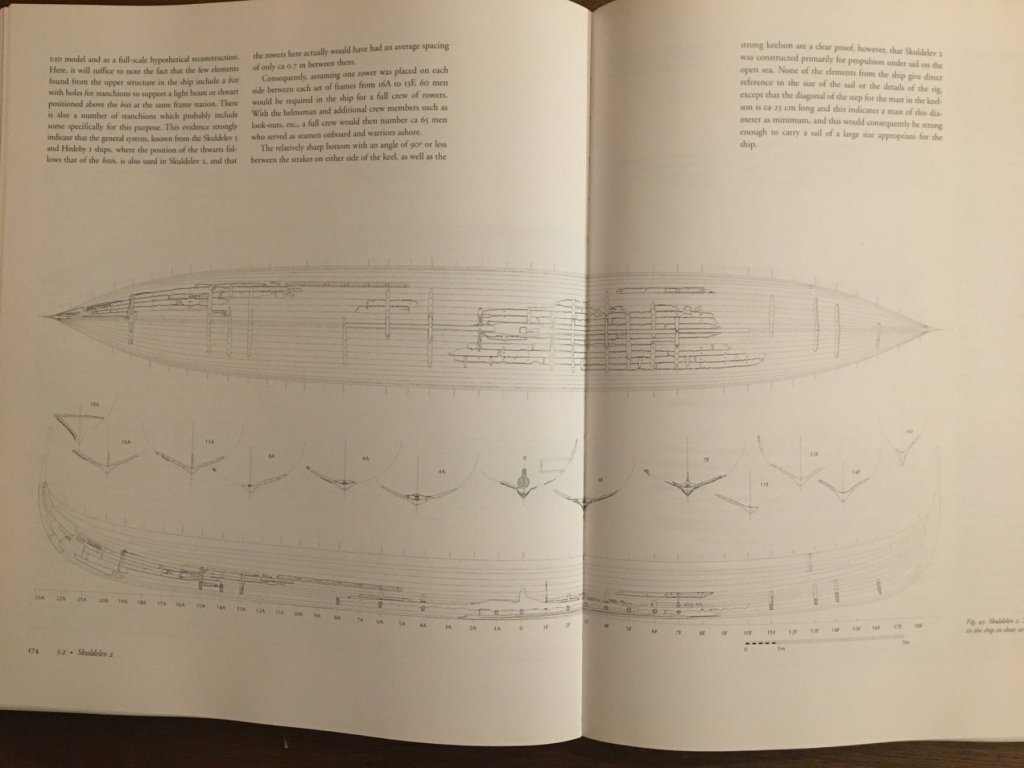
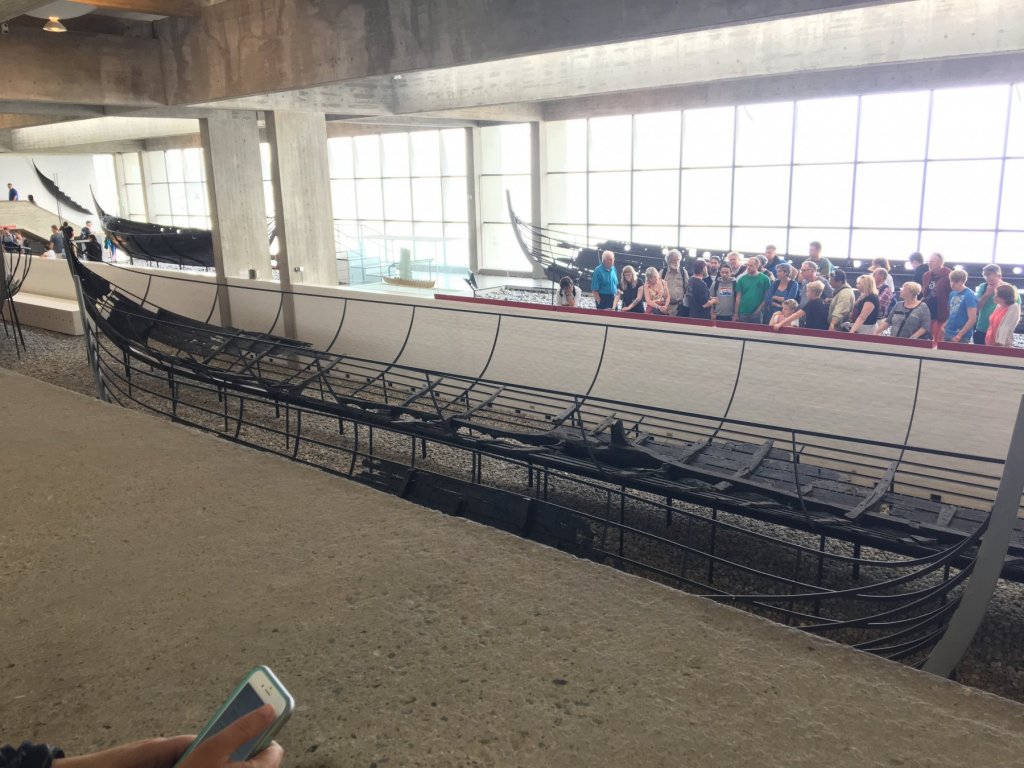
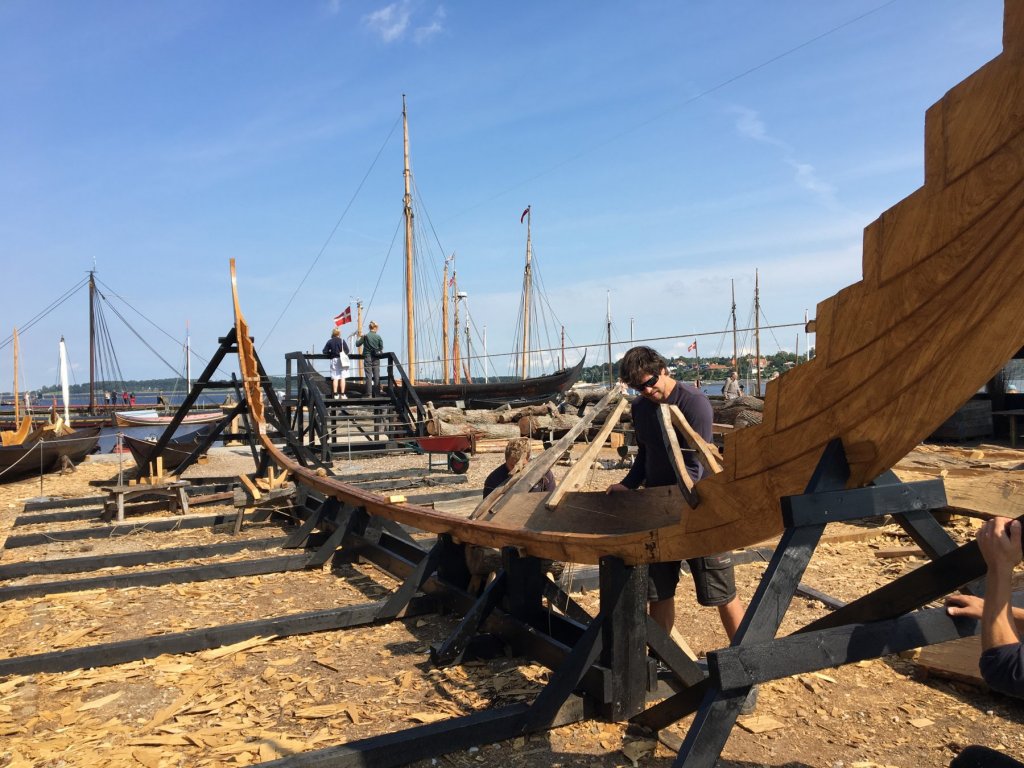
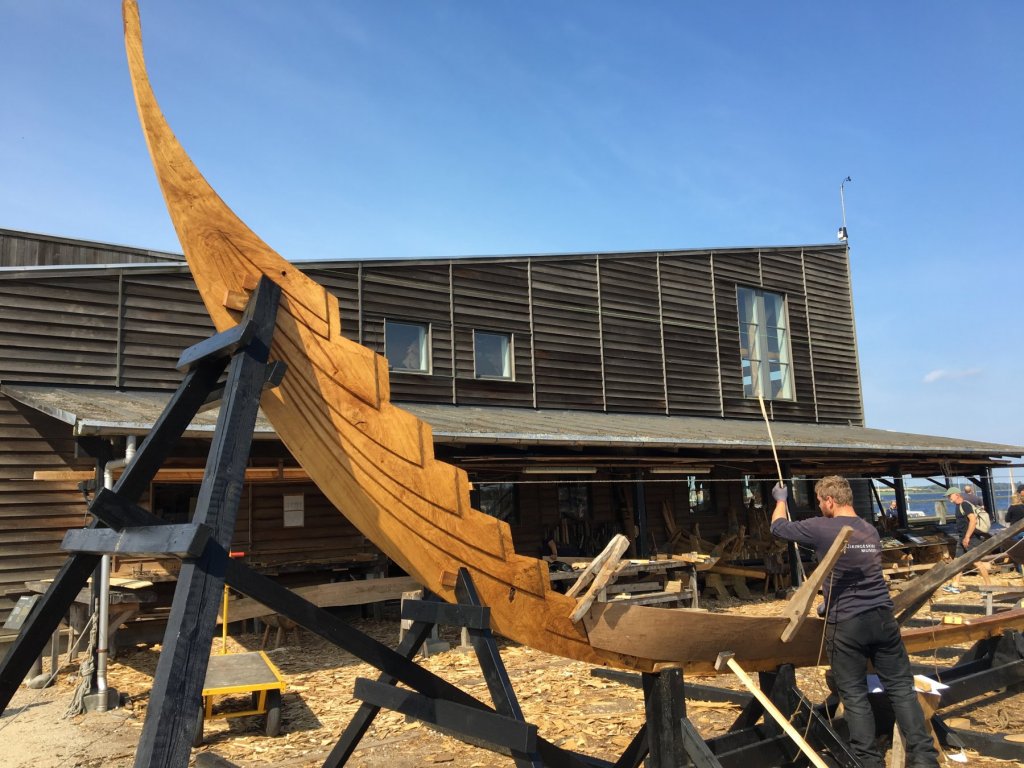
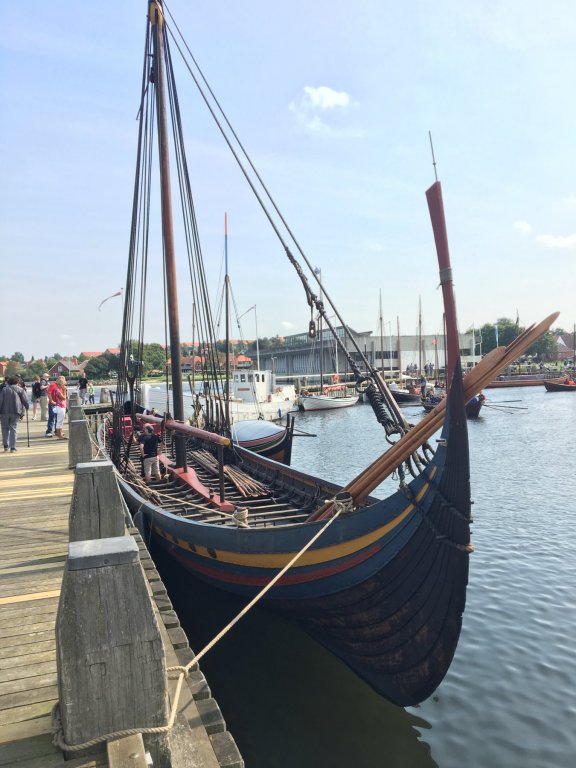
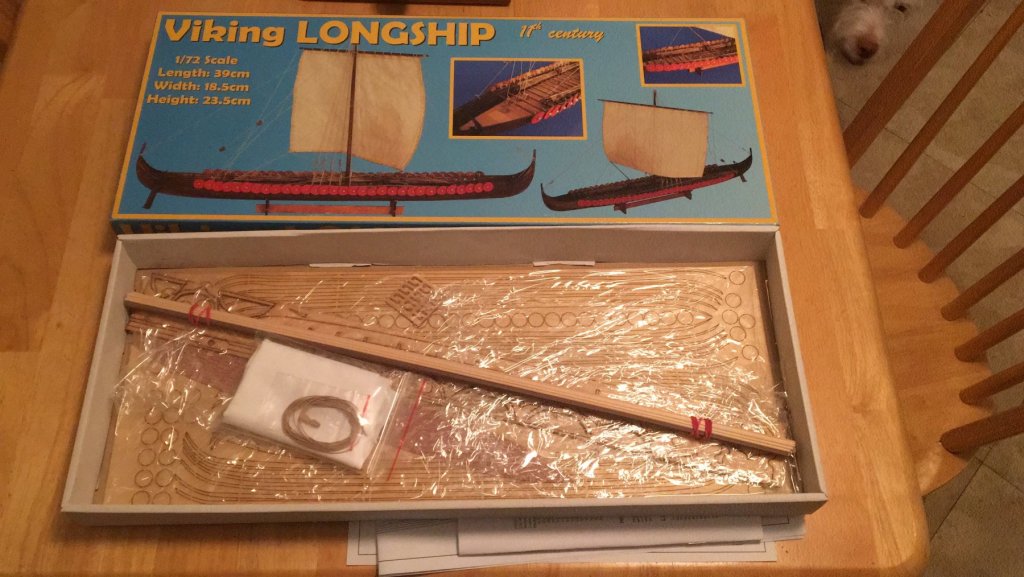
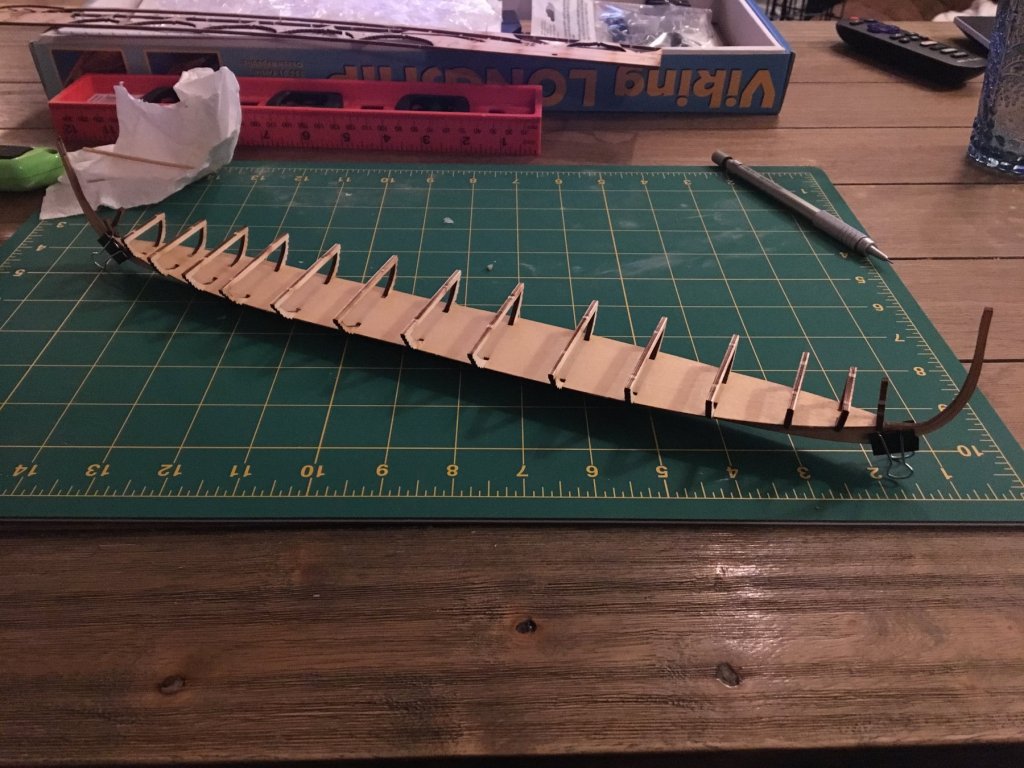
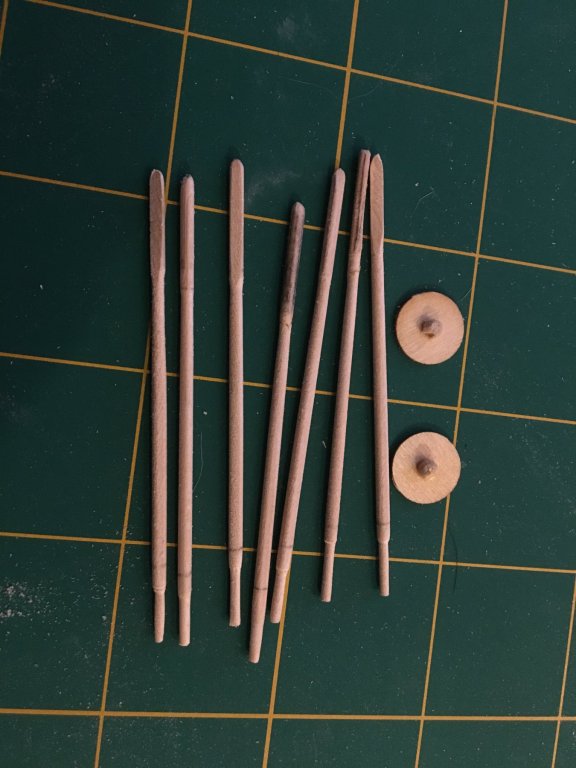
Hello everyone, this is my first build log and my first model of any kind in over a decade. I used to do plastic. My only experience with woodworking was shop in school, and helping build some sets for plays in University. This will be my first wooden ship build ever. I've chosen Dusek's 1:72 scale 11th Century Viking Longship kit. It seems relatively simple, with minimal planking and rigging. Hopefully it is a good starter ship! I'm a big fan of these later Viking ships since seeing them at the Viking Ship Museum in Roskilde, Denmark. It's really worth a visit if you are in Copenhagen and are looking to do a day trip. Roskilde is a nice town in general, with a beautiful Gothic cathedral. In the 1960's during the construction of a sea wall near the village of Skuldelev in the Roskilde Fjord, five well preserved Viking ships from the mid to late 11th Century CE were discovered. The archaeological excavation and investigation of the site determined that the ships were probably sunk intentionally with the aim of blocking the channel, as it was the most direct navigable route to Roskilde. At the time, Roskilde was one of the most important Royal and Ecclesiastical centers in Denmark - Roskilde cathedral is still the burial site of the Danish monarchy, in fact. The ships included an ocean going trader of the 'knarr' type (Skuldelev 1, which Dusek also sells a kit of), a large ocean going warship of the 'skeid' type (Skuldelev 2), a small coastal trade ship (Skuldelev 3), a smaller coastal warship of the 'snekkja' type (Skuldelev 5), and a fishing boat (Skuldelev 6). This Dusek model is based on Skuldelev 2: Skuldelev 2 measured approximately 30 m in length, with a breadth of 3.8 m, an estimated displacement of 26 tons fully loaded, and a shallow draught of about 1 meter. They estimate it had about 30 rowers on each side and that it could perhaps carry an additional 40 warriors, for a maximum complement of 100. This makes it one of the largest Viking warships found to date (I believe a larger one was found in Norway since then, but it's much less complete). It was built entirely of oak. Construction can be dated by tree rings from one of the oak timbers to about 1042 CE, and from analyzing the wood further they were able to tell it was built in Dublin, Ireland. Eventually it made its way to Denmark were it was sunk in the fjord around 1070 CE. These ships were clinker built, using shell first construction with relatively few frames which were inserted as the shell was built up. The overlapping planks were nailed together with iron nails, and were fixed to the frames with treenails. While we were at the Viking Ship Museum, they were working on a new replica of the coastal trader Skuldelev 3 using only traditional tools and techniques, as they've done with all their reconstructions: Skuldelev 2 is the least well preserved of the five ships. The bow and the lower midship area are the most intact, including the mast step and the stem post. The stem/stern posts of this era are very interesting and quite different from the ones on the earlier Oseberg and Gokstad ships found in Norway. As you can see above, they were one piece and carved with fake planking lines, with notches for accepting the actual strakes. Not sure exactly what the reasoning is for this development. Here is a closeup of the stem from the Skuldelev 3 wreck, and it's parallel in the Skuldelev 3 replica under construction: Both a replica and a model of Skuldelev 2 can also be seen at the Viking Ship Museum: The replica is called the Sea Stallion of Glendalough and I think she's a very sleek and attractive looking ship. She's fully sea worthy. In fact, they sailed her to Ireland and back in 2007-2008! There is even a BBC documentary about the trip, showing how dangerous open ocean voyages on these ships could be - they were initially delayed by storms in Norway, and when they eventually did set out they were caught in a different storm. One of the crew members got hypothermia, the rudder strap broke, and so did one of the shroud pins. They had to be towed by the support ship for awhile until the storm passed and they could fix everything! Looked pretty cramped (you sleep on your rowing bench), cold and miserable. Can't imagine sailing to Iceland in one of these. There's some videos on YouTube showing her in rough seas and under sail. In earlier sailing trials they were able to get her up to 11 knots, but they reckon she could do 15-20 - so she was a fast ship. The results of the rowing trials aren't available yet, but the replica of the smaller warship Skuldelev 5 managed about 3.5-5 knots, so I'd imagine it would be similar if not faster. The Dusek kit does not have the complex stem/sterm post of the actual ship, but that's fine since it's a small model! Most of the parts are laser cut in plywood. Dowels are supplied for the masts, spars, oars, and shield bosses. There's some long pieces with square or rectangular sections for the benches and some internal longitudinal supports. I think it's a very good quality kit, but it's my first one so I don't have much to compare it to Here's when I first opened the box, showing how it was packaged: The manual is well illustrated with good instructions, and some nice full scale plans are provided too. My only small quibble with the manual is there are some grammar issues, but nothing that makes the instructions unintelligible. Last weekend I had the house to myself, so I eagerly got started...but it's been rough! I got too excited and did too much without thinking things through, despite reading the warnings on this board beforehand. You live and learn, I guess! So I started by laying out and gluing on the stem and stern pieces (front is on the left). I noticed there was a bend in the keel, and using an iron with a steam function I was able to iron it out, mostly. I only saw the trick of soaking it and weighting it much afterwards, unfortunately. Here's where things started going really bad. Before gluing the frames to the fake deck as per the instructions, I tested out how a few of them fit in to the keel. The keel slots were too narrow however, and one of the frames got stuck and snapped. Luckily I was able to glue it back together without much trouble. I then preceded to widen the keel slots and tested the fit with a scrap piece of wood of the same thickness as the frames. I didn't test the frames again because I got too afraid of snapping another one. I did not consider that the slot in the frames might need widening as well... so I glued the frames to the fake deck, and the next day after it all dried I started popping the frames in to the keel. Of course, popping means the fit is too tight. So I tried to get the frames out, but they wouldn't budge, and when some of the rear frames did come out they came out fast and partially snapped the fake deck. Gah! Since these frames are only to guide the planks and have to be cut out afterwards anyways, and since the fake deck will be covered with veneer, I decided to just glue everything down as is and get on with it...and that's when the bend in the keel came back with a vengeance! As you can see, it's pretty nasty! Does anyone have any advice on what I should do? Should I try disassembling it and starting over? maybe with a scalpel I can loosen the frames. I was thinking I could also the clamp the keel so it's straight and then do the planking only on one side first, to pull the bend outwards and straighten it out. Then do the planking on the other side later? I've started on the oars and shields too, since there are 60 of each of them. I'm on a budget, so I've been using a power drill, a small file, and sandpaper instead of a lathe. I had two oars snap in this first set of fice, but I was able to glue them back together. They are going to be bundled on deck like on the picture on the front of the kit, so I'm not too worried if they don't look nice - I'll put the ugly ones at the bottom. I'm more just trying to get a handle on turning wood in general. For the shields, I've had trouble with the bosses. The razor saw I have is not fine toothed enough, and the 3 mm dowel has been falling apart when I try to cut out a small piece for the boss. This weekend I'm going to search for a better saw! So yeah, this is where I'm at. Not a good start at all! Haha. This is a learning experience though, so I figured I was going to make a lot of mistakes to start off with. Can only improve from here, right? - Alberto


-
Hey Dick, really cool ship you have so far! Really liked your Cocha model as well! Maybe you have seen this already, but the Southampton University Archaeology Twitter feed has recently been posting more info on the Black Sea Mediterranean round ship wreck you posted a screenshot of. The ship has been carbon dated to 1160-1260 AD, so it's a bit earlier than yours. One of the tweets has four nice high resolution closeups of the stern structures though, including the rudders and their mounts. I've tried embedding the tweet thread below - hopefully it works! If you click through, it's the third tweet in the thread that has the photos. There's a fly around of the model as well, and a top-down Digital Elevation Model (DEM). Southampton University also has an article about that ship, explaining the differences between Italian ships of the time and Northern European Cogs. Most of the info is pretty basic, but there is a nice reconstruction of the wreck by Prof. Jon Adams, one of the lead archaeologists on the Black Sea project. Here's the article link, and the reconstruction drawing: And lastly, this wreck makes an appearance in the documentary about the Black Sea project that was released last month (Ghosts of the Deep: Black Sea Shipwrecks), starting at around 00:28:00. You get another nice shot of the stern structure, as well as those interesting timberhead/bitts right behind the foremast, and the stem post. Here in the US the documentary is available for $3.00 in HD on Amazon Prime: https://www.amazon.com/gp/product/B07NV92WF8?pf_rd_p=1cac67ce-697a-47be-b2f5-9ae91aab54f2&pf_rd_r=V91XKZBP85AN559R7D17 Sadly, none of the Black Sea wrecks have been properly published yet. I'm assuming it will be a few years, knowing how these things go! All the best, Alberto
- 263 replies
-
- 6
-
-
- nave tonda
- round ship
- (and 2 more)
-
Hello all! I'm an Italian archaeologist living and working in San Diego, California. In school I used to love to build plastic WWII ship and airplane models, and I also used to make Warhammer figurines and vehicles. I stopped in University though as I couldn't bring my tools and kits with me easily. Then I started working and got married - so it's been about 12 years since I made a physical model! About 1.5 years ago I was in Denmark visiting my brother, and me and the Admiral (also an archaeologist) went to the Roskilde Viking Ship Museum. Seeing all those ship reconstructions and models inspired me. I decided to get back in to modeling, but I felt like trying wood this time as I've always admired wooden ship models. I really wanted to do one of the Skuldelev ships on display at the Viking Ship Museum. Looking online I saw that Dusek does a 1/72 scale model inspired by Skuldelev 2, the large 11th century Viking longship wreck. Last week I finally pulled the trigger and bought it - I will be starting a log for it, very excited! I'm afraid it's going to be a steep learning curve though, since I'm quite rusty! I've also been browsing these forums for the past week, and I've been super impressed by the models on display. You guys have some crazy good skills! I didn't completely stop modeling however - I've just been doing it in 3D. For those interested, here's a model of Skuldelev 5 I've been working on, the smaller of the Skuldelev Viking longship wrecks: