HOLIDAY DONATION DRIVE - SUPPORT MSW - DO YOUR PART TO KEEP THIS GREAT FORUM GOING! (89 donations so far out of 49,000 members - C'mon guys!)
×


dunnock
-
Posts
524 -
Joined
-
Last visited
Content Type
Profiles
Forums
Gallery
Events
Everything posted by dunnock
-
Thanks very much Andrew
-
Thank you Maurice. That's good of you to say so. David
-
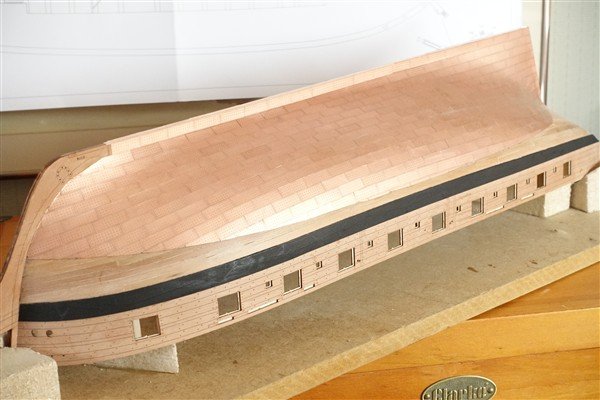
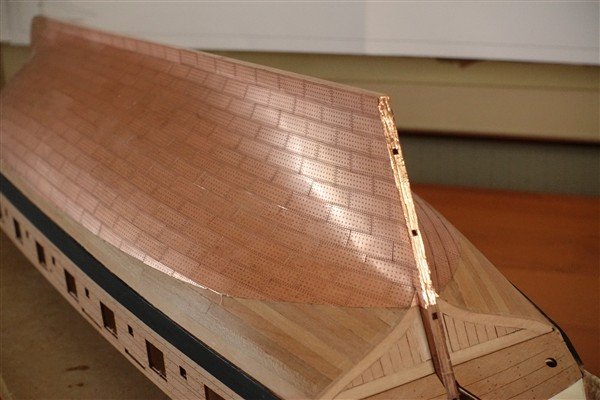
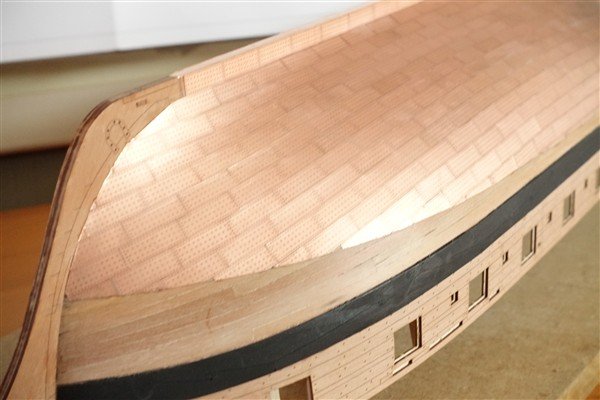
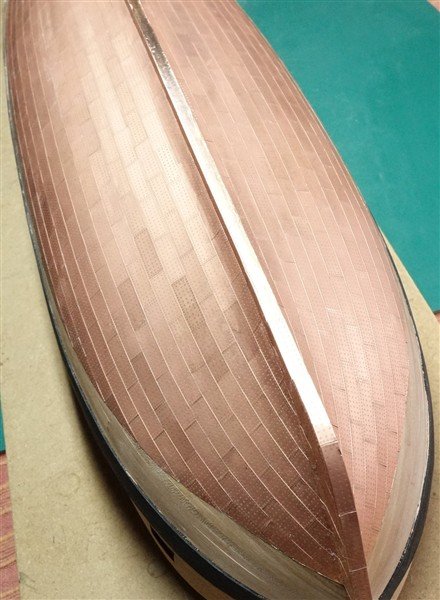
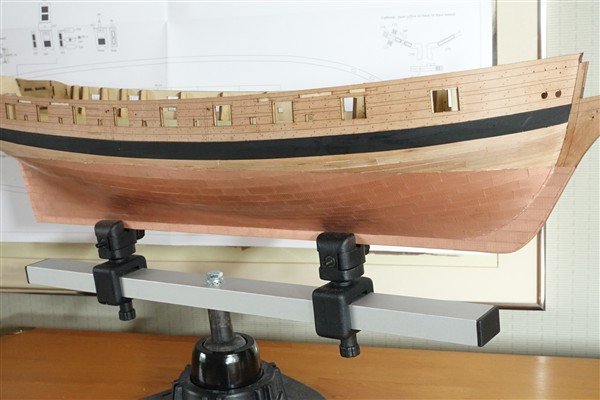
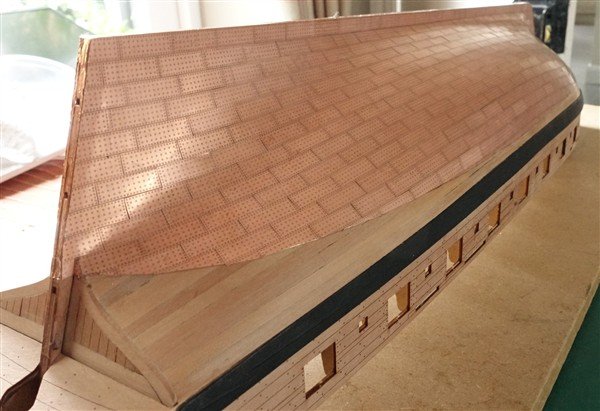
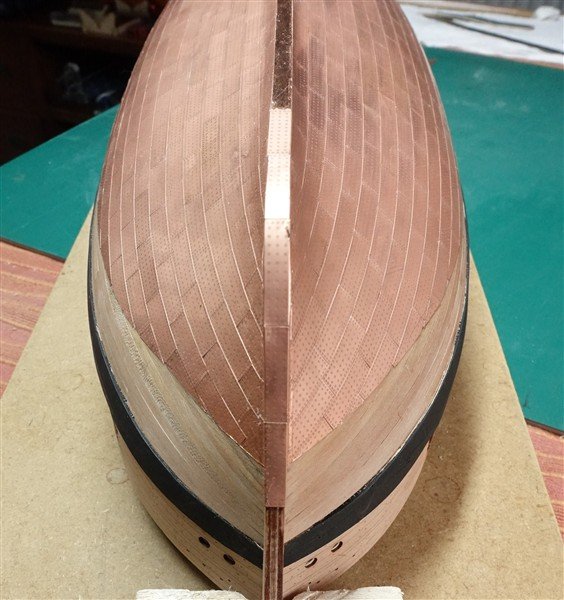
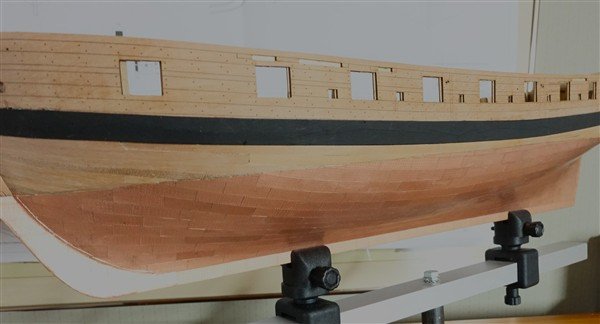
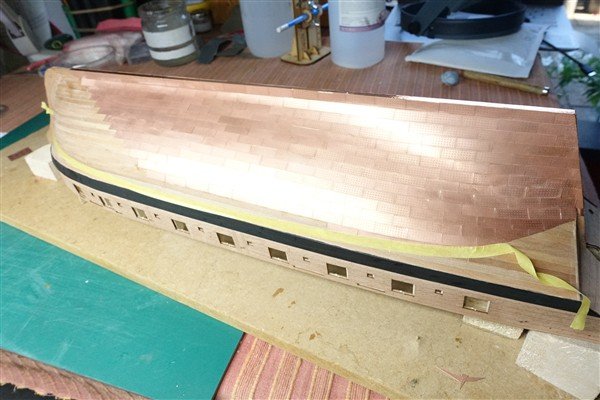
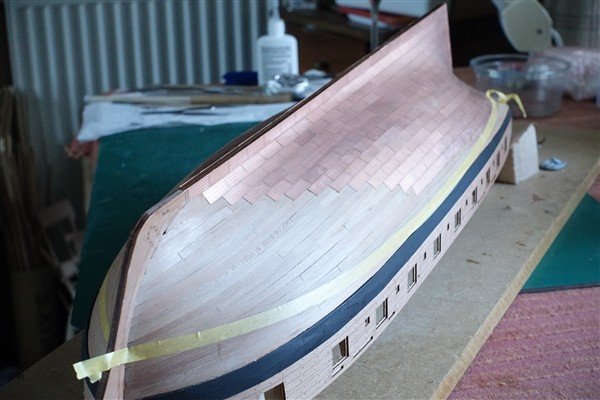
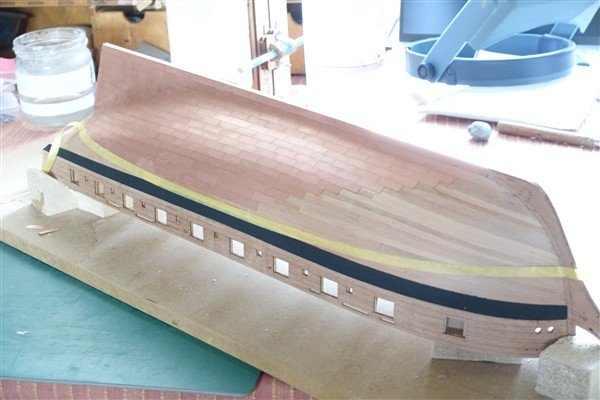
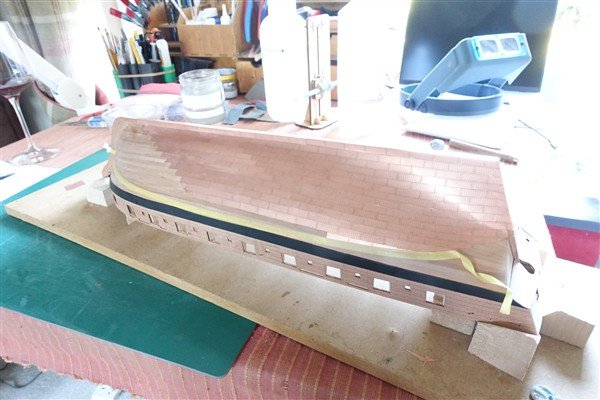
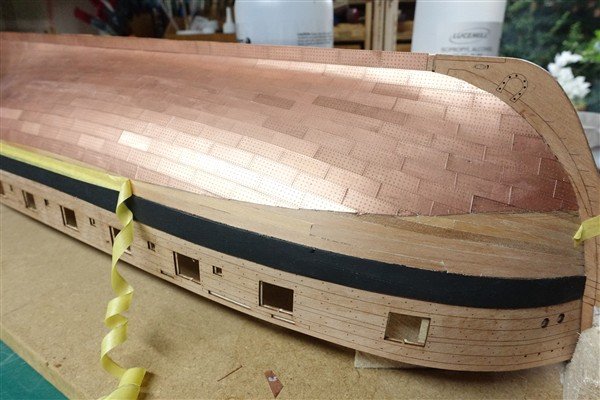
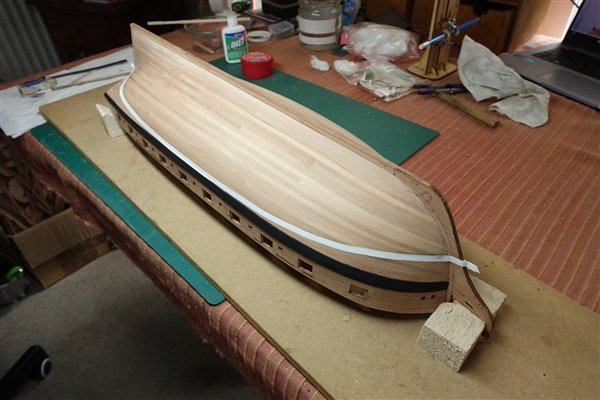
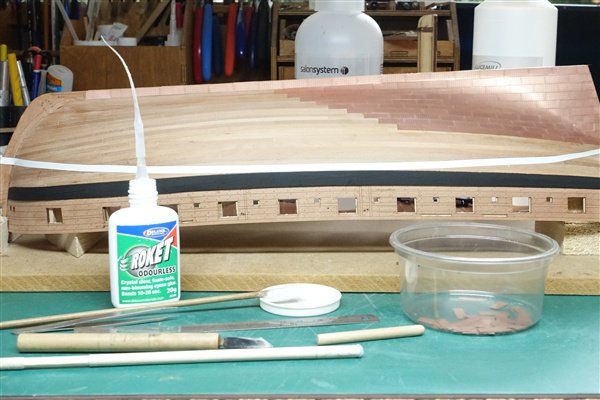
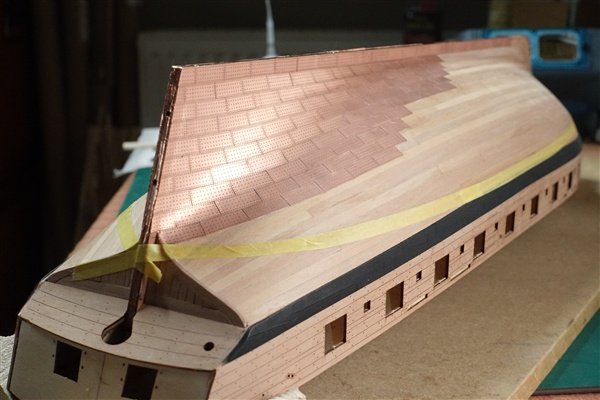
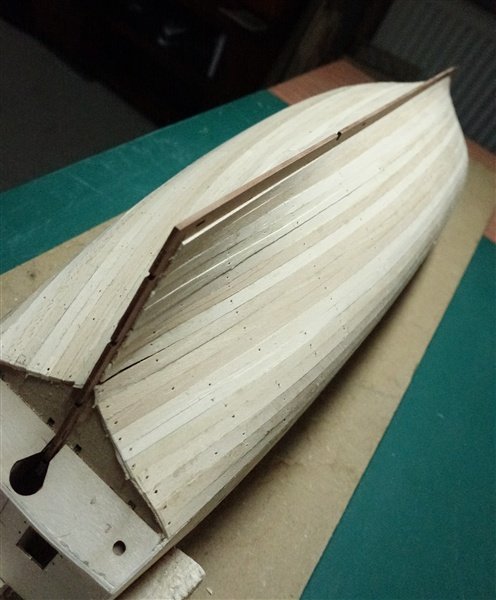
Coppering Completed After10 days, I have finished coppering the hull. Diana it isn’t but even so there are over 800 plates to glue in place. The final row to the waterline involved a lot of small pieces which took some time. Any ragged edges will be covered by a boxwood strip. The final piece of this 3D jigsaw is the prow. I ran the side pieces first, continuing down from the keel to the waterline. I overlapped the plates by about 1mm onto the hull and then finished with the vertical plates down the cutwater, again overlapping onto the horizontal plates by 1mm each side. While looking over my work, I noticed that some plates had lifted at the corners so I have been checking and re-glueing those that weren’t firmly stuck down. Thanks for looking in, the likes and comments. David


-
Thanks Theodosius that's very kind of you. I've just looked in on your Speedy and your making a great job of it - don't believe it can be your first wooden model David
-
Coppering Continued Just an update on progress. I’m about 2/3 of the way along and beginning to reach the waterline and the need to cut plates. I mark the line with a pencil, score several times and then bend it until it breaks along the line. Minor adjustments and smoothing the edge is done with a fine file. I continue plating towards the stem. I'll get to the same stage on the other side before going back to finishing plating at the waterline. I also have some small pieces to add at the stern David
-
Thank you Jeff and Bob, that's very kind of you David
-
I like to finish the edge with stripwood (it covers a multitude of poor cutting). On previous builds I have edged with 1mm square section boxwood. I now also have some 1.5x1mm strip so I will decide when the coppering is complete which to use. David
-
Many thanks Ron and Mort for your very kind comments. It's much appreciated David
- 310 replies
-
- 1
-

-
- Diana
- Caldercraft
- (and 1 more)
-
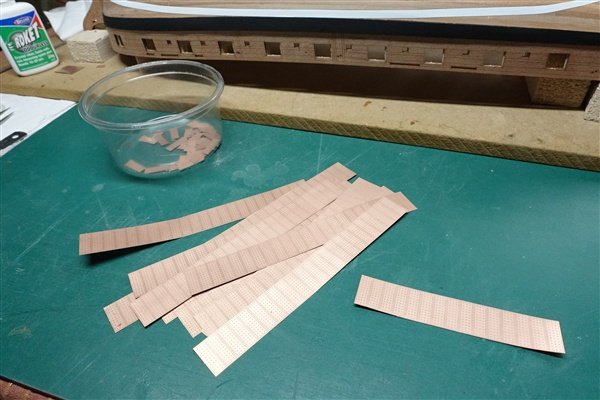
Coppering the Hull The waterline is marked up based on measurements taken from the plans at stem and stern post and from lower edge the wale directly below the centre of each gunport. To begin with I marked the edge using white pvc graphing tape but it’s not very sticky so I’ve redone it using masking tape. This is my set of tools for coppering. A scrap of dowel with Bluetac to hold and place the plates. Itried’Tacky Wax’ but couldn’t get on with it. Bluetac holds better and I’ve yet to replace it. A burnishing stick; again from scrap dowel, a tool for scoring plates and a cotton wool swab dipped in acetone for cleaning up excess CA. I’m using Rocket Odourless CA glue. The sheets of copper are easily split into individual plates by flexing. I found that the separated horizontal strips can be split into individual plates by flexing 3 strips at a time. Individual plates are cut to shape at the sternpost by scoring and then flexing to split it along the score line. I applied copper tape to the bottom of the keel and sternpost before staring to apply plates from the sternpost at the keel. It's probably overkill but I apply a spot of CA at each corner and a few spots across the rest of the surface to be sure of good adhesion. A rub with the burnishing stick and then every 3 or 4 plates I clean up excess CA with acetone. I have used nearly a complete sheet thus far. There are three sheets in the kit so should be some spares. David


-
A different presentation that adds new interest and I really like it. I think you may have begun a new trend . David
- 332 replies
-
- 1
-

-
- Harpy
- Vanguard Models
- (and 1 more)
-
Thank you Daniel; the finish did look pretty shabby David
-
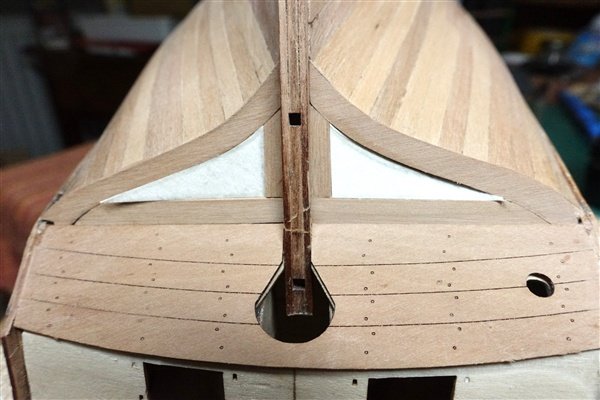
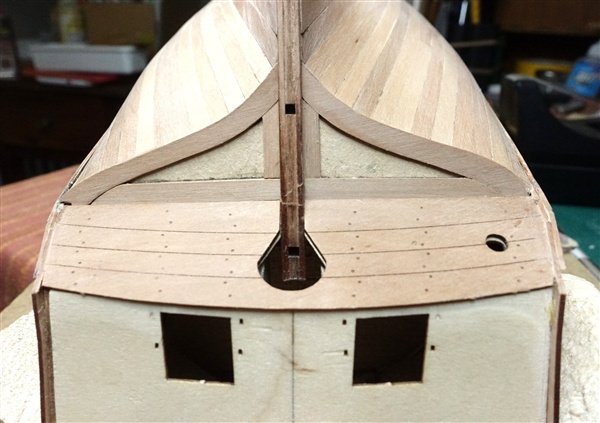
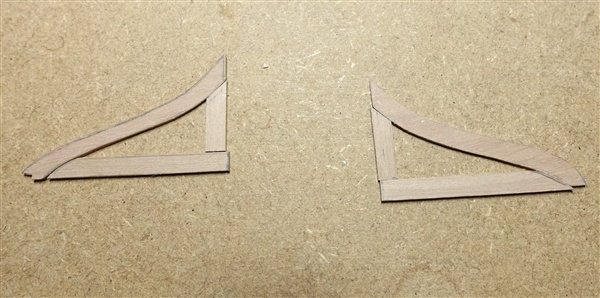
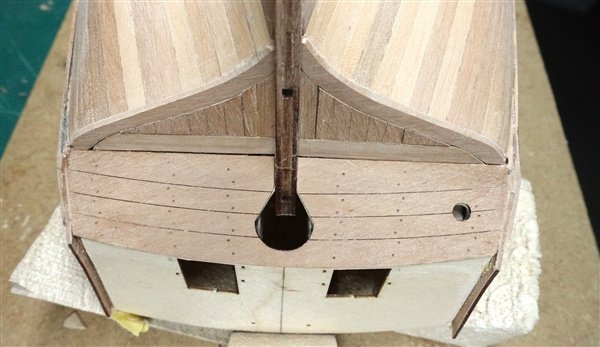
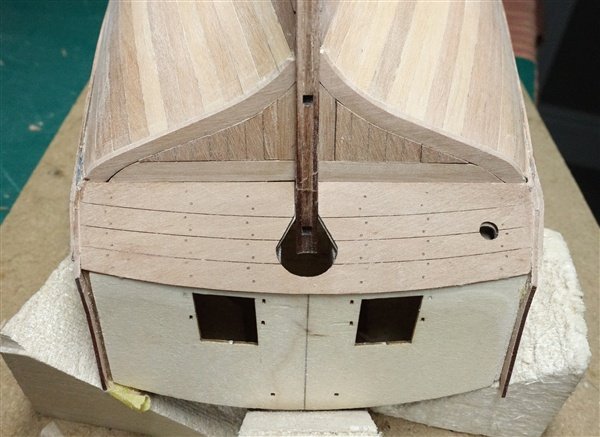
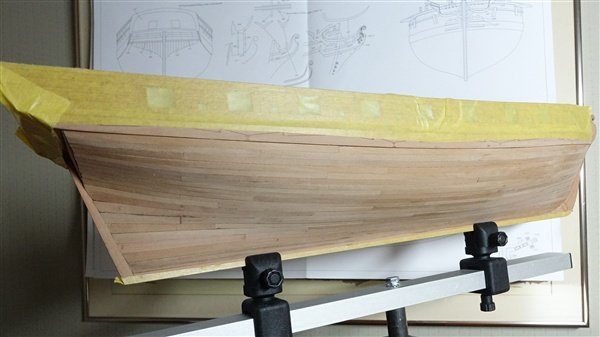
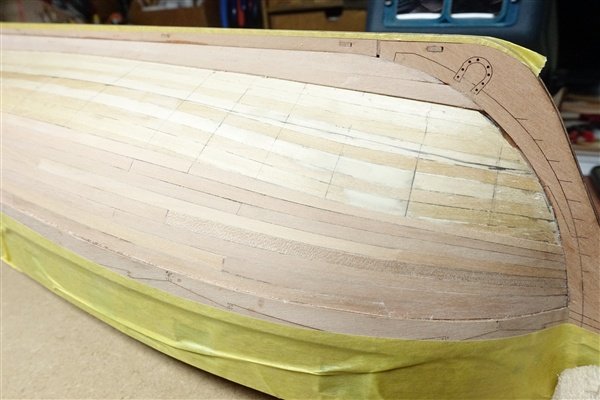
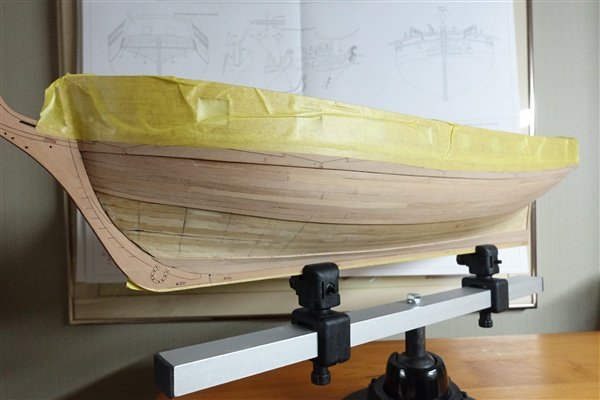
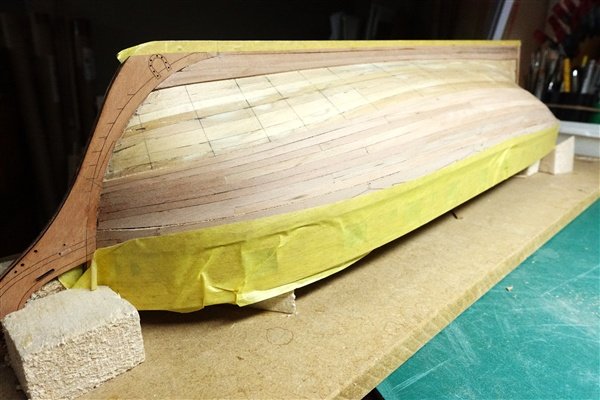
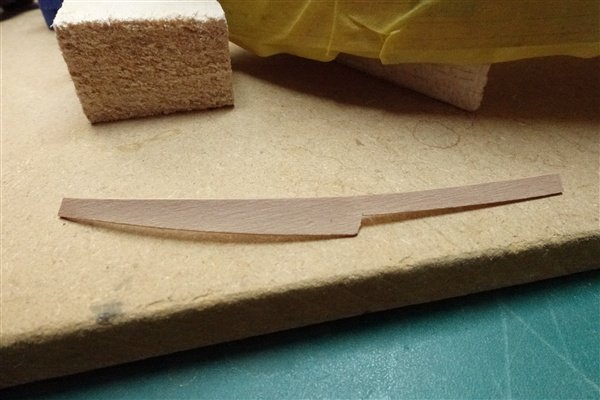
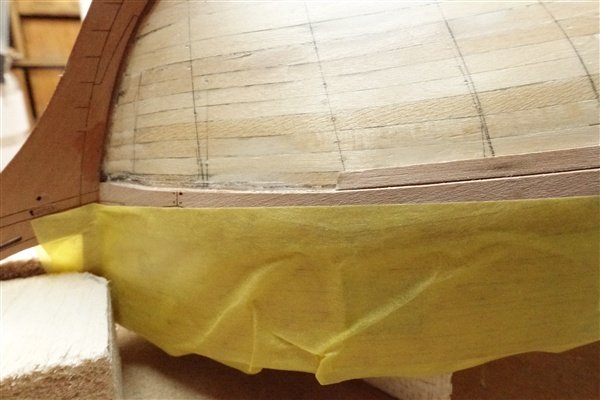
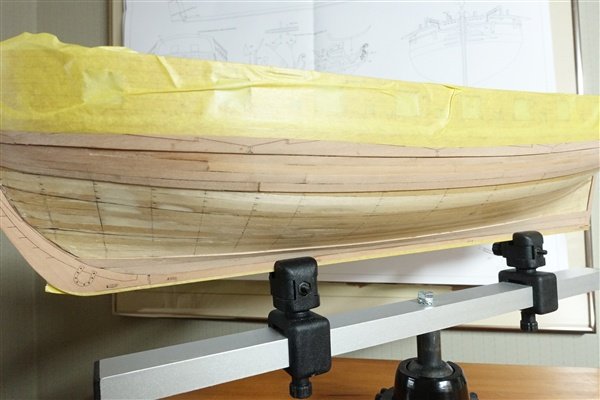
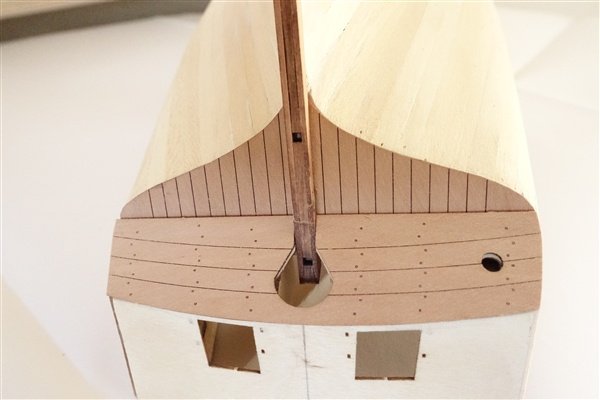
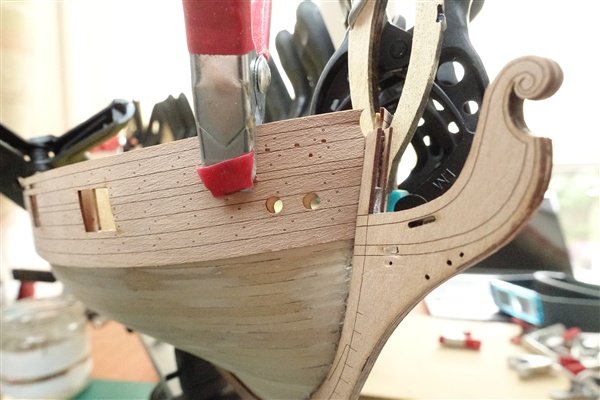
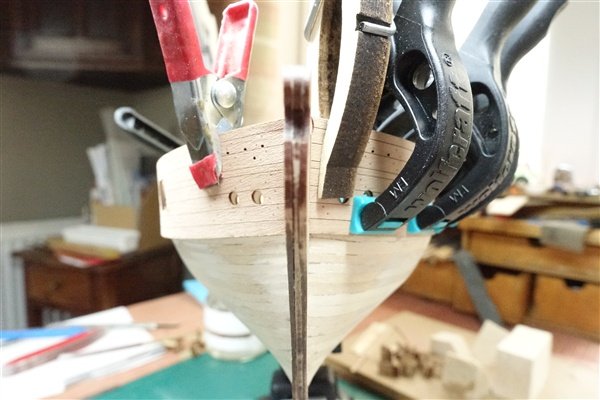
Thanks everyone for following and the likes Framing The Tuck I spent most of an afternoon scraping and sanding the hull until I was satisfied. I needed a bit of a think about how to frame the tuck. I had left the etched pattern slightly proud of the hull but some of the planks didn’t finish as tight up as I would have liked. I decided to remove the pattern entirely and try reuse it to fill the frame. With help from IPA and some careful work with a fine chisel, I managed to remove them, though each in a couple of pieces. I had made the frame pieces that follow the hull earlier and now completed framing with more 1mm fret. I made templates from stiff paper (1000g wallpaper lining paper works well) and used these to cut out the shapes from the original pear etch. The etching is quite deep so the pieces are delicate but with care I was able to make them fit. Only dry fitted at the moment. David
-
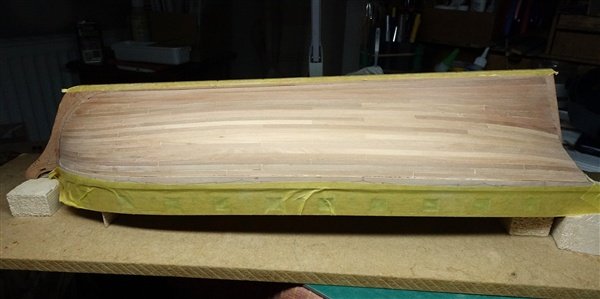
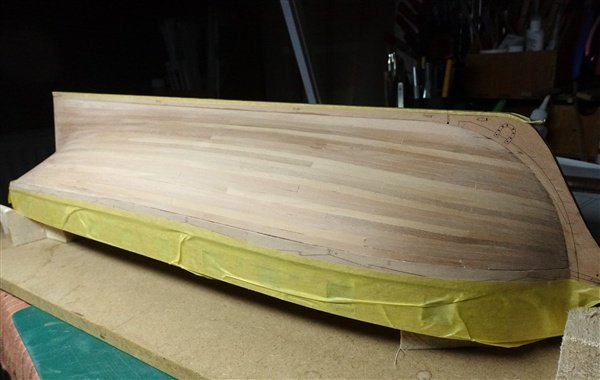
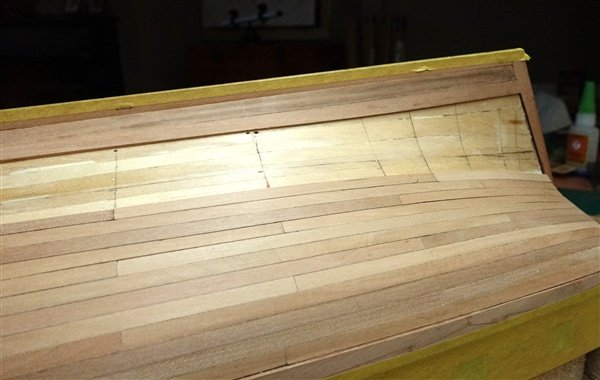
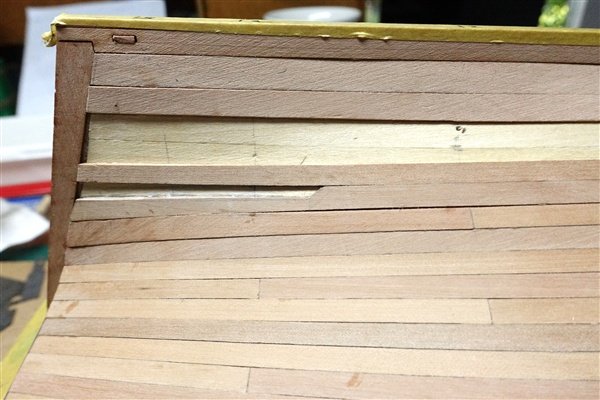
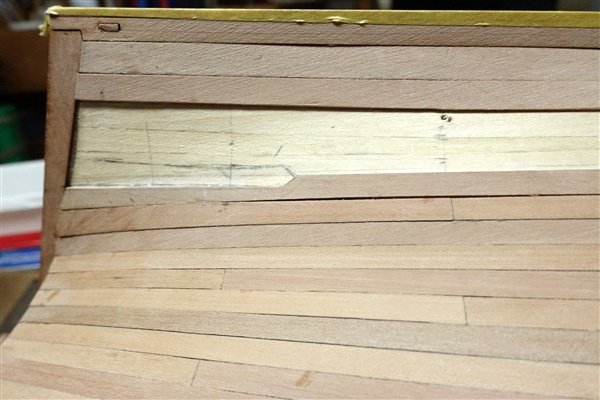
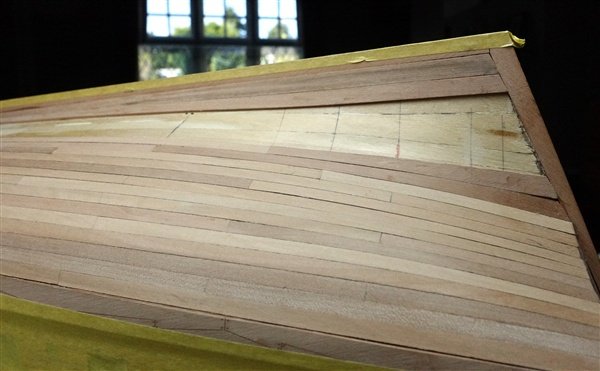
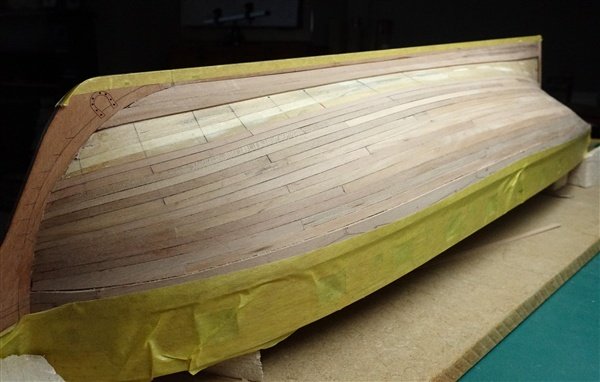
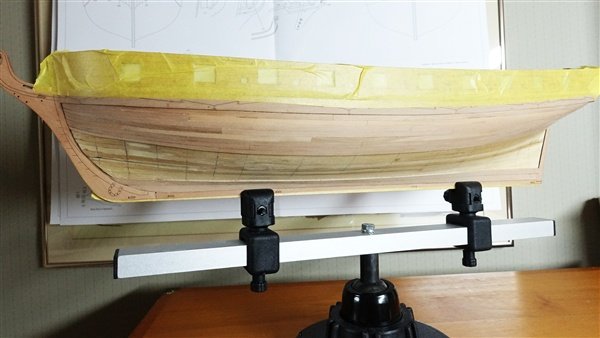
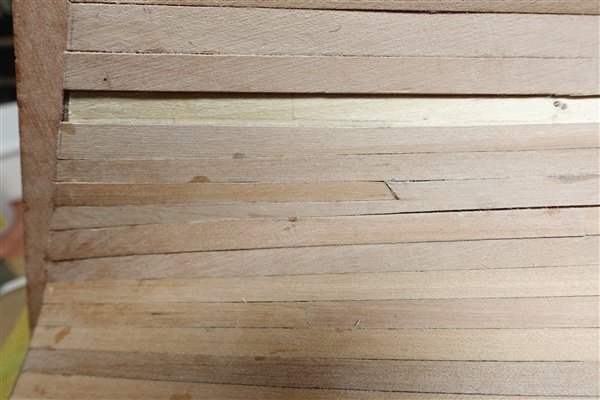
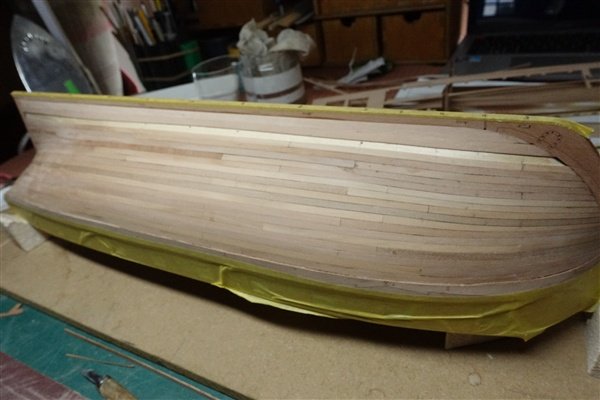
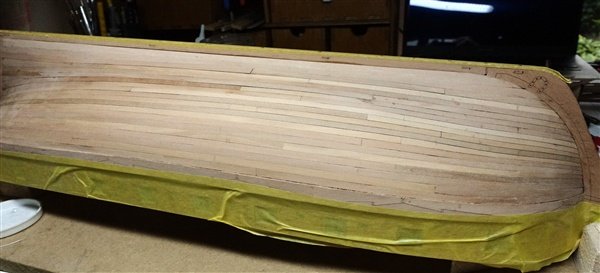
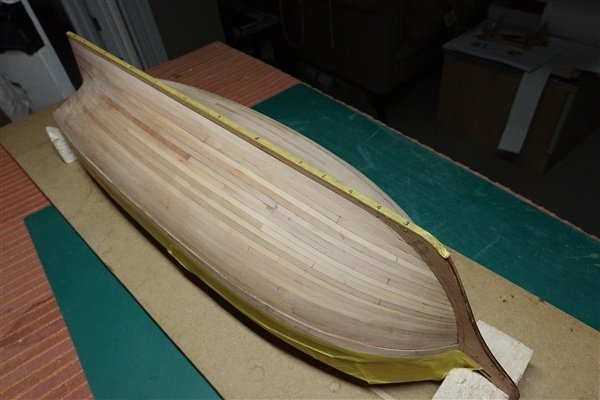
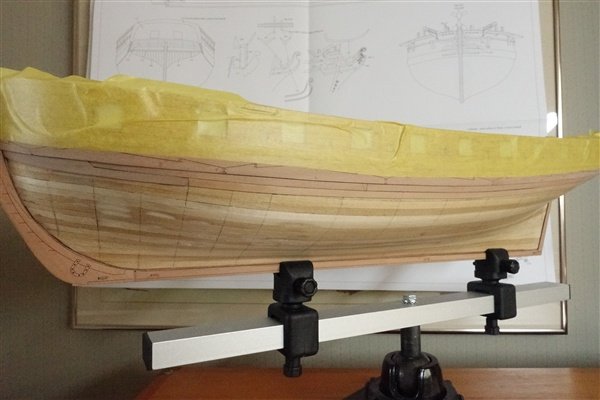
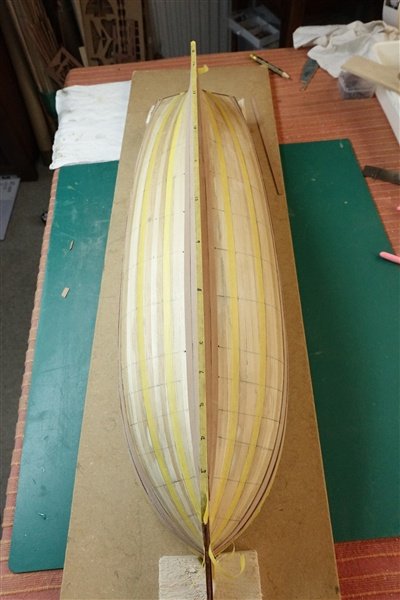
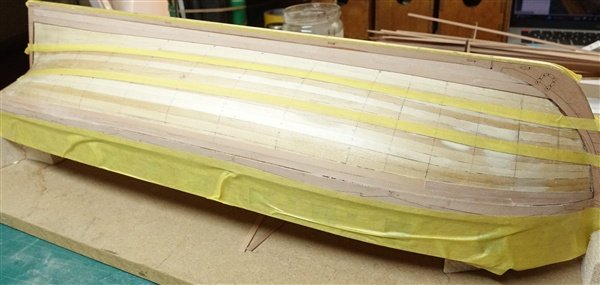
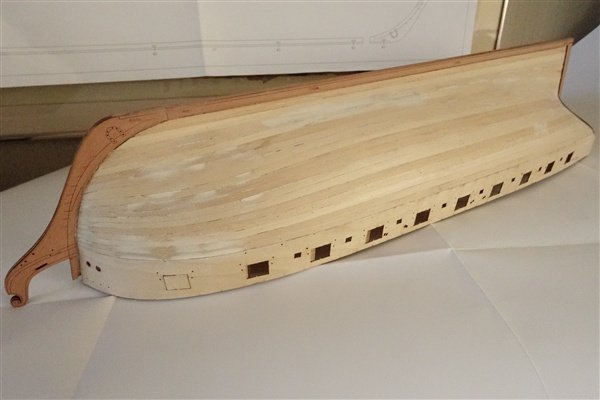
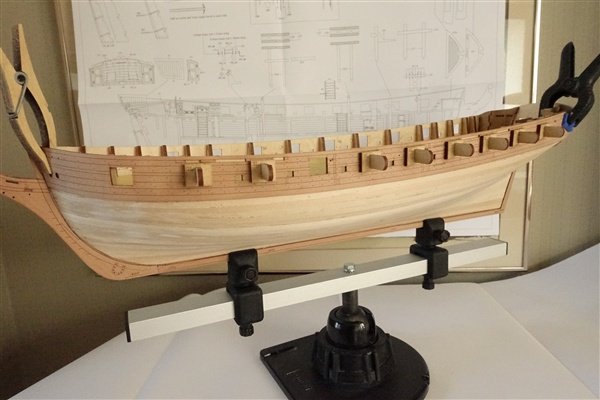
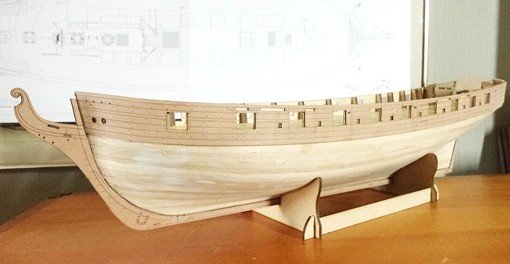
Thanks to Ron Andrew and Daniel for their kind comments and for others' likes and encouragement. Completion of the Second Planking I’ve been away for a few days in Northumberland but I did manage to finish the planking before leaving on Monday, just didn’t have time to write the log. All is straightforward to the end of the square tuck at the sternpost with a whole number of planks completing that section. As planking moves towards the keel, stealers or ever widening planks are required at the stern. It is very useful that there is plenty of raw material in the form of 1mm pear fret in this kit. I could say that it was an exercise in the two forms of planking that I have used a stealer on the port side and only spiled planks on the starboard. In reality there was a difference in the degree of flare required and I thought an 8mm wide plank at the stern looked too much so I added a stealer. Maybe I could have made a more gradual increase on the port side but as I am going to be coppering the hull, it won’t be seen. Nevertheless it’s is an annoyance to not have both sides looking the same. Marking and cutting for the portside stealer. In the end a half stealer was enough. I never know which way to cut the angle of the stealer and you may notice that I changed it in the final piece. As planking progressed towards the keel it was obvious (in fact I suspected that I would have to do something like this from first measurements) that I would need either a very thin plank amidships to finish or a slightly wider plank. I opted for the latter. And a few shots of the finished planking Now if the weather holds and we don’t get the forecast thunderstorms, I will be outside scraping and sanding the hull to get a suitable base for coppering. Thanks for looking in David

-
Thanks Ron
-
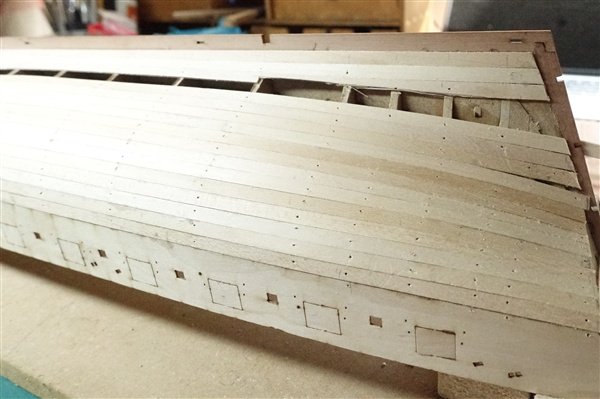
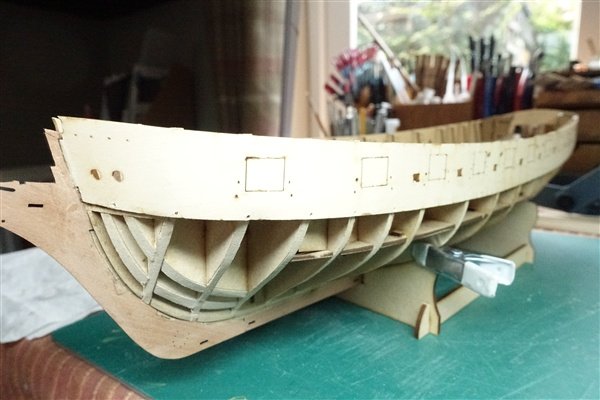
Planking the First Band The first 6 strakes have been added below the drop plank to complete the first band of planks. Tapering and edge-bending from the bow to bulkhead 7 is necessary and then planks are full width back to the stern. The only difficulty has been where the following strake runs above the join between two planks and I have been finding the transition is not smooth enough and leaves a small gap between strakes. I have improved the joint by scraping the top edges of the two planks into a smoother curve to but I must pay more attention to this area. I have scraped this first band to get an impression of the finished appearance but further work will be required once all is finished. I haven't yet measured off the next band of planks in case it needed some adjustment but so far it all looks in line and I casn continue to mark off the plank widths at each bulkhead. David

-
Thanks very much for the likes Planking Below the Wale I began with a drop plank at the bow, running forward from bulkhead 5 tapering to 3mm at the rabbet. I gave the drop plank a quick dip in water and then formed the curve around a jar to make fitting easier. I am making my plank length around 140mm although I will not be using a strict 4 plank shift, I will make sure that there is separation between joints. I’m using CA gel to glue planks. After installing the first two strakes, I moved to fitting the garboard plank. I made the garboard 50% wider than the rest of the planks at 6mm. The garboard meets the rabbet at slightly beyond bulkhead 3. I followed this with a 5mm plank which runs forward to midway between bulkheads 3 and 2. I lined off the hull in three sections: two of 6 strakes and one of 4 but I expect that some adjustments will be need as planking progresses. Tick strips are used to mark the width of the plank at each bulkhead. I’ve now added four strakes below the wale on each side and so far, so good. Onwards... David

-
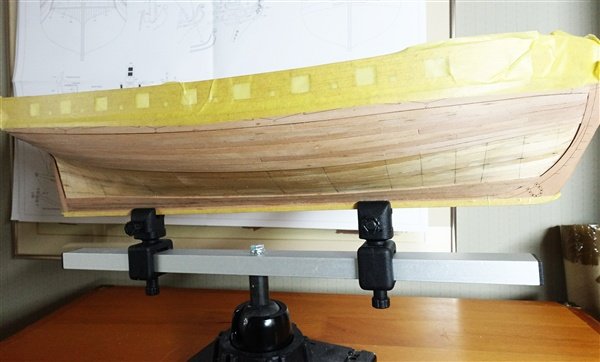
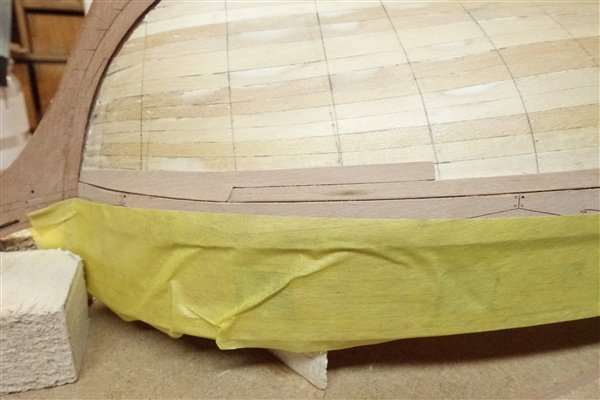
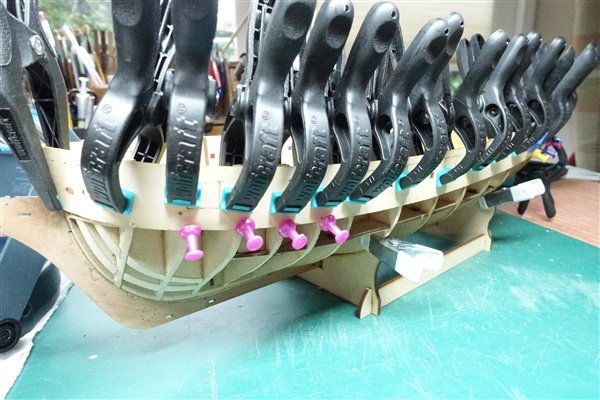
The Wales I marked up the bottom line of the wales and intended to fit and trim two runs of pear planks to the line. In the end I tapered the fore and aft ends of the planks to the the line of the lower edge of the wales but left the midsection, where I thought it would be easier to trim back the planks. The forward end of each wale was sanded back as far as I dared to appear that it tapered into the rabbet at the prow when glued in place. To achieve the required curve at the bow, the patterns were soaked and clamped to the hull and left to dry overnight. I used CA gel to fix both the under-planking and the wales, applying a few sections at time. In this way the need for awkward clamping was largely avoided. I had to redo the centre section on both sides where it misaligned with the etching on the bulwark pattern. Once I was happy with the fit, it was time to cut back the excess planking. I was nervous of cutting into the wales as I went, so as some protection from accidental damage, I used a length of fret that formed the top line of wales held in place with rubber bands and clamps and worked my way slowly along. Completed without mishap, I finished off by scraping along the line and a light sand. A bit of staining on the prow which needs some attention. Thanks for the likes and on to the pear layer of planking David

-
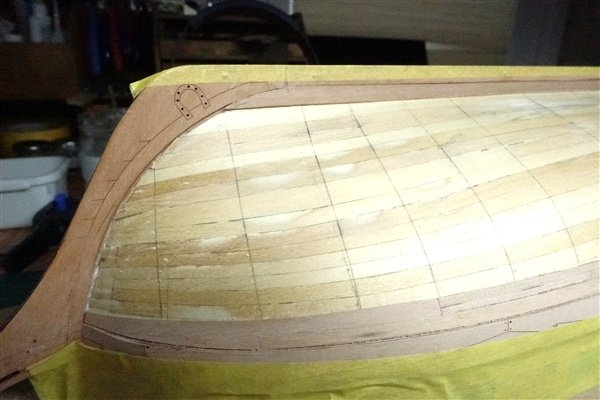
Thanks once again for the likes and comments. In Preparation for Second Planking I spent a couple of afternoons sanding the hull. Some filler was necessary at the bow and in odd places along the length but I’m now happy with the look and can move on to second planking. I forgot to take photos at each stage so the pictures that follow show the relevant parts at the end of this stage. But first some more parts need to be added. I started with the square tuck. According to the instructions, these parts should sit slightly proud of the first planking so a little more sanding at the stern was needed. I liked Maurice's @Blue Ensign treatment of this area with the addition of the framing and have decided to follow suit. I’ve roughly cut the outer edge pieces from some 0.8mm pear using the kit parts as a template and will finish them later. I'll make the other parts of the frame when I’m ready to fit them all. I plan to glue the frame to the kit parts and then infill. As with the core pieces of prow and keel, there was a 1mm gap between the two etched pieces which I filled with a scrap piece of pear. A little sanding around the rudder port was needed for the sternpost to fit snugly. I soaked the counter and clamped it in place to achieve the curve. It was probably unnecessary since the curve is only slight but as I had to soak and leave the outer bulwark patterns to dry overnight, it was no extra hardship. The port bulwark pattern fitted almost perfectly with only a little bit needing to be taken off at the bow. However the starboard bulwark needed about 1.5mm to be removed before I was satisfied and the gunport jigs fitted. I think this was due to the problems I had getting both of the plywood patterns to fit into the rabbet. They looked to be symmetrical at the time but clearly something was out. I will now apply a thin coat of shellac to the planking as a sanding sealer. I also plan to follow Maurice's @Blue Ensign lead with the pear planking and align it with the wales but I need to decide whether to follow his method or perhaps take the less risky route of Richard @Richard44 Something to ponder. David
-
Thanks Ron
-
First Planking Cont. A bit of a break in work on Harpy. I've been visiting a friend in Preston with the most incredible model railway based on Preston station in 1938 and followed by a week staying with friends on the Isle of Man. A couple of afternoons and evenings and the first layer of lime planks is complete. There is some work to do, especially around the bow on the port side where I think I made a mistake early on. It meant that some of the edge-bends were a bit extreme and I had to add a wide spiled plank. The final strake was a bit of a mess with a wide plank required at the bow and stern and a thin piece in the middle. Overall though, I’m happy enough. Some lighting angles are not very kind; a lot of sanding and some filling follows. Thanks for following and support. David
-
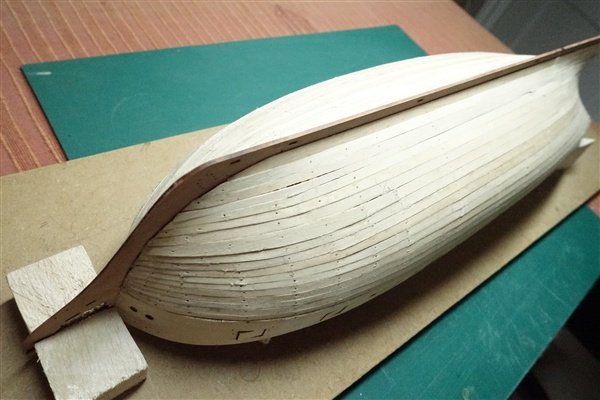
First Planking The first layer of planking with 5x1mm lime is going steadily. I used tick strips to measure the width of the plank at each bulkhead. Each plank is tapered to 2.5 or 3mm at the bow and gradually runs to full width between bulkheads 6 & 7. The planks are bevelled before glueing and pinning. After five runs down from the gunport patterns I fitted the garboard strake and the one above. With eight runs completed, I’m nearing halfway. Some edge-bending is needed at the bow but I’ve not needed to use any spiled planks yet. Onwards and upwards (and downwards) David
-
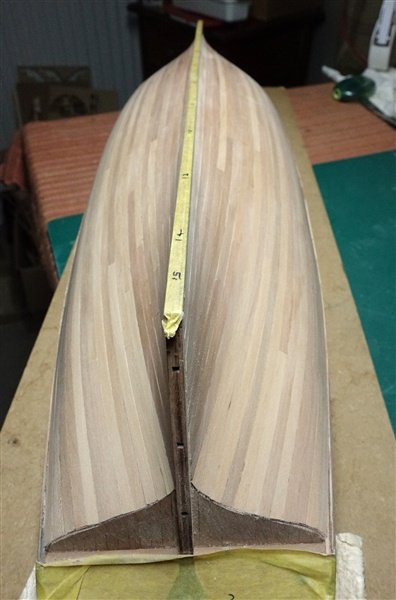
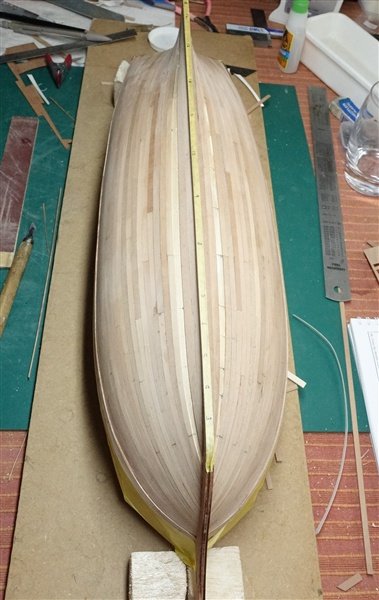
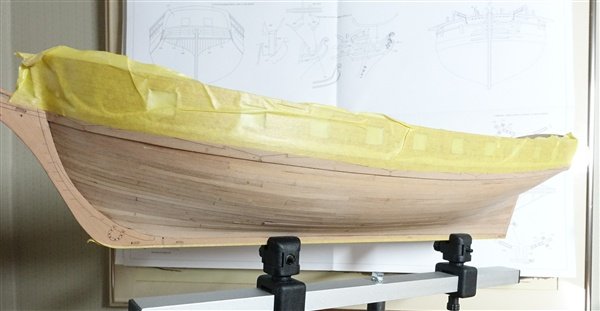
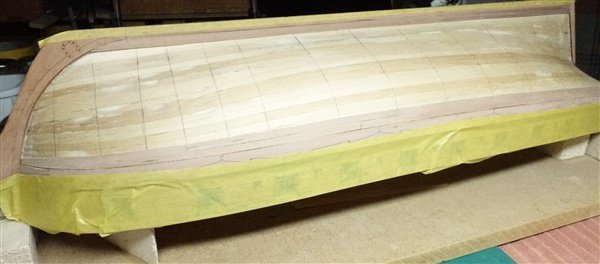
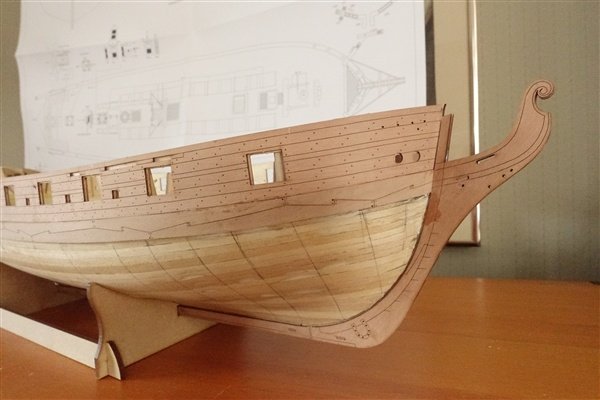
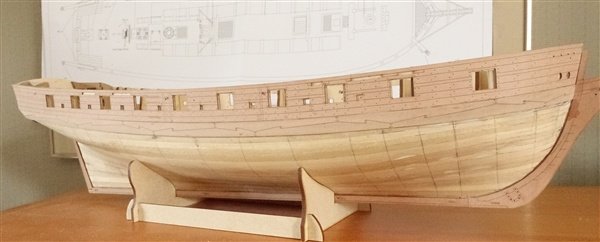
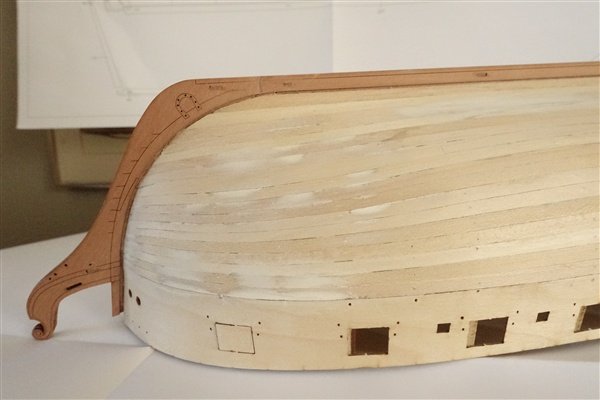
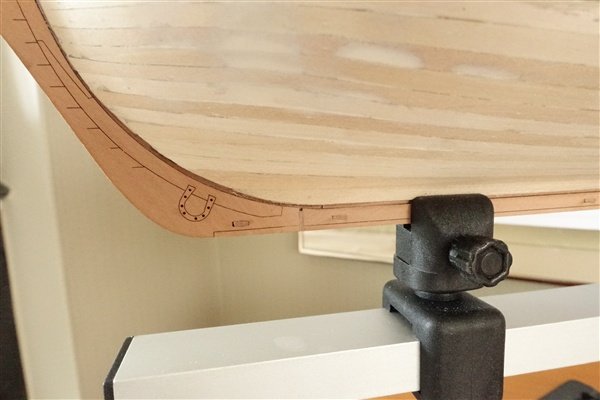
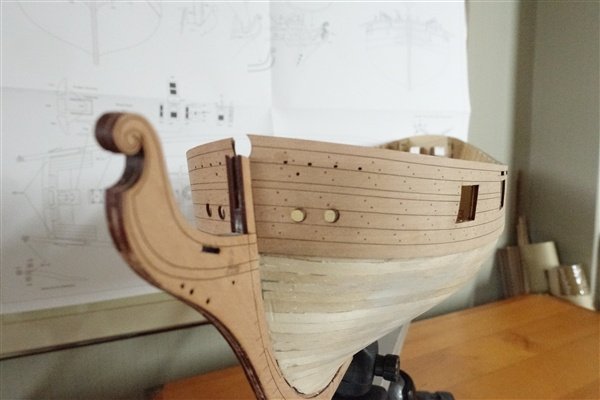
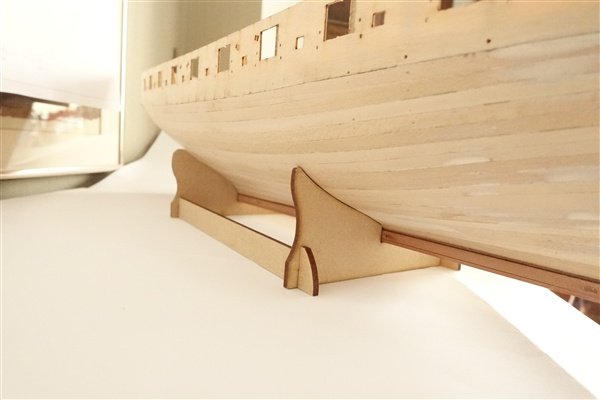
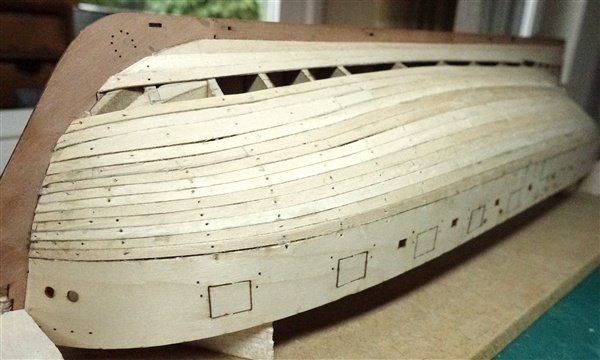
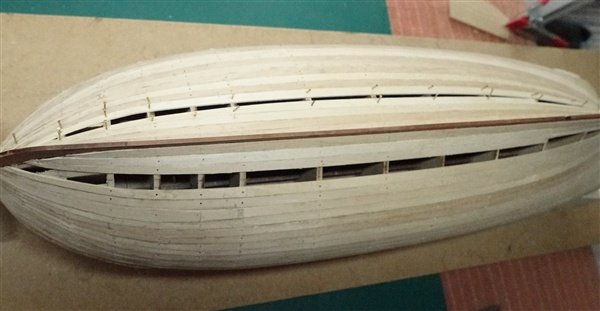
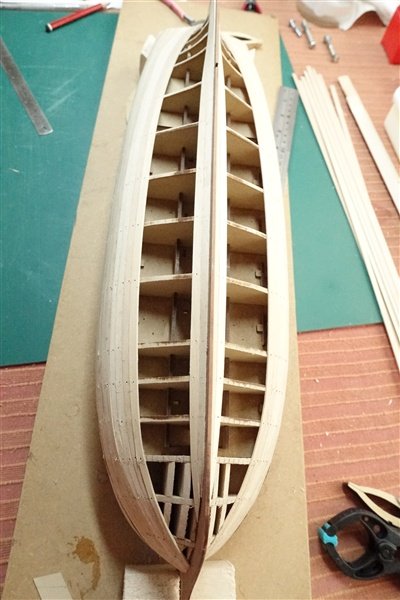
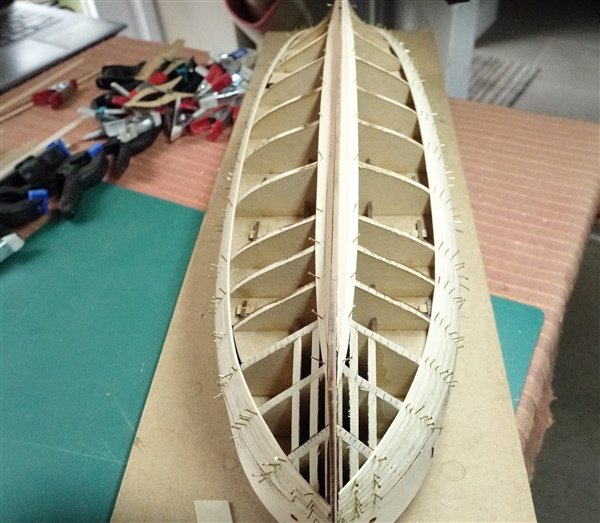
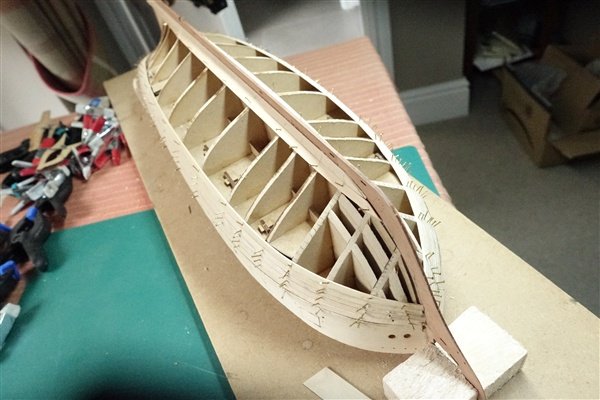
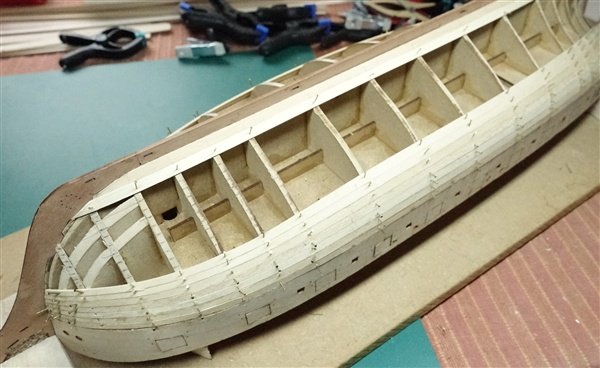
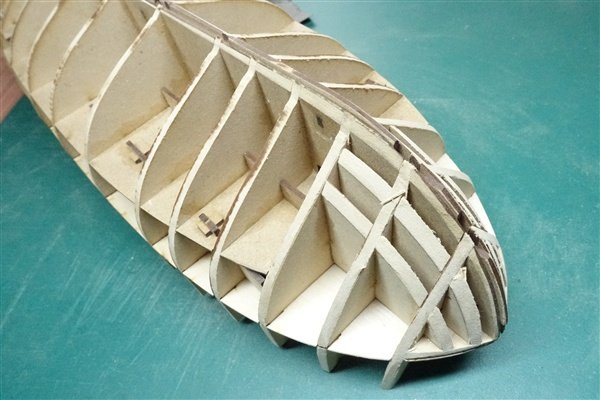
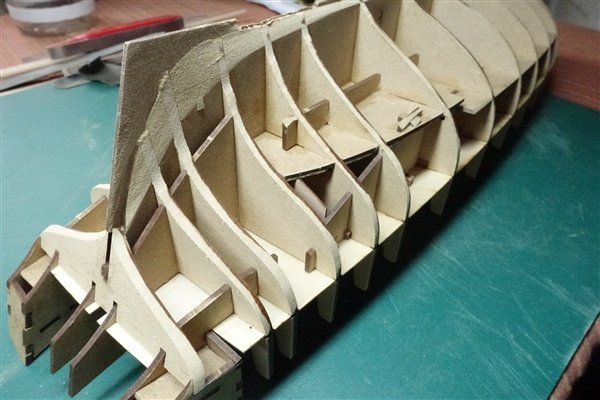
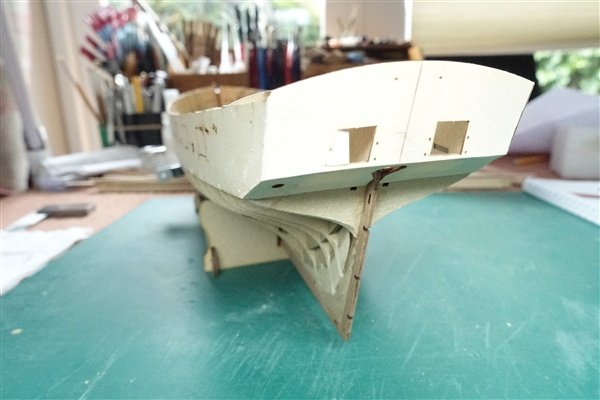
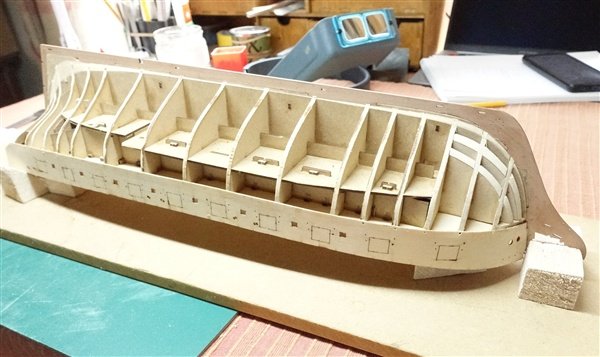
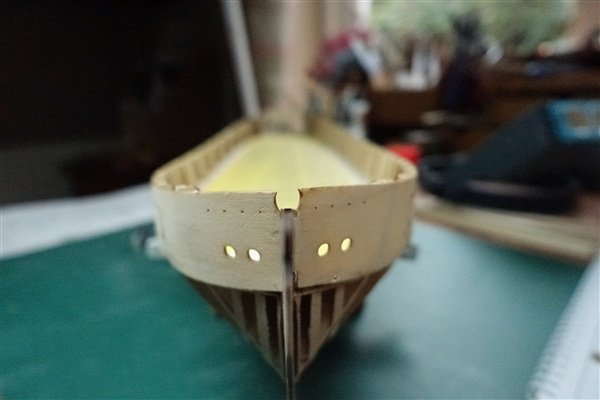
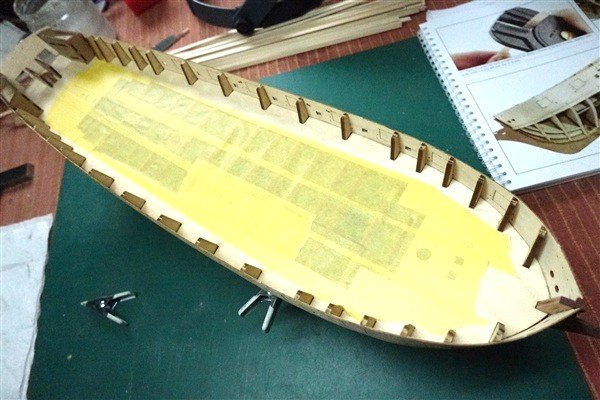
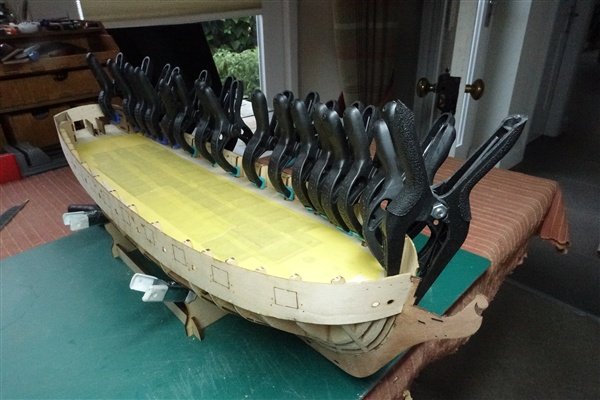
Thanks to all for the likes and comments Preparation for First Planking I spent a happy couple of hours in the sunshine fairing the hull . There was even sufficient breeze to keep the dust down. The inner patterns for prow, stern post and keel are added next. The prow needed some sanding to make it fully seat into the slots between frames. Before glueing in place, I tapered the leading edge of the knee of the head. I don’t have exact measurements of the taper but drawings in Longridge and AoS Diana show a reduction of about 1/3. To achieve this would mean sanding away the leading edge of the pattern completely when the two 1mm thick outer pieces are taken into account. I thought that too extreme for this modeller and reduced it to 1mm; sufficient to see a taper. The stern post and keel also needed a slight touch of sanding to achieve a tight fit. There was a 1mm gap between prow and keel which I filled with a sliver of pear. Sorry, I forgot to take pictures of a lot of this stage. I gave the gunport patterns a short soak to accommodate the curve around the bow. I couldn’t get the two patterns to fit in the slot at the prow so enlarged it to give more space. I also tapered the leading edge of the two support pieces that are glued to the prow. Even so it was a tight fit and I didn’t entirely succeed in getting both parts to meet. The first patten went on easily, glueing along the false deck every three or four bulkheads clamping and pinning the lower edge to each frame. The fit was perfect at the stern and required only a light sand. The starboard side had to be refitted because the forward end slipped out of the slot and there was about a 1.5mm overhang at the stern. A second attempt was a great improvement but still required some sanding to bring it flush with the counter and transom pieces. As a final step before planking, I made a support for the upturned hull from a piece of mdf and scraps of balsa. David


-
Hi François, I use a Pigma Brush to blacken one edge of each plank. David
-
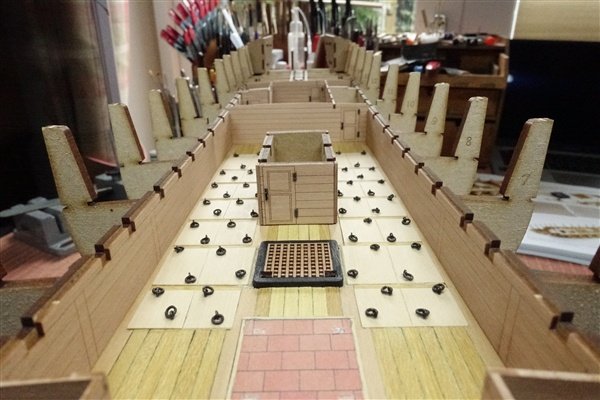
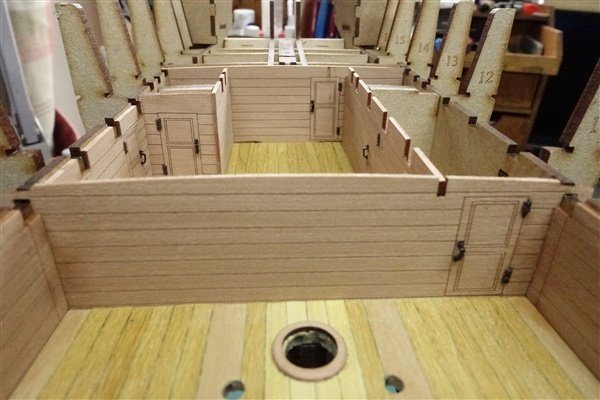
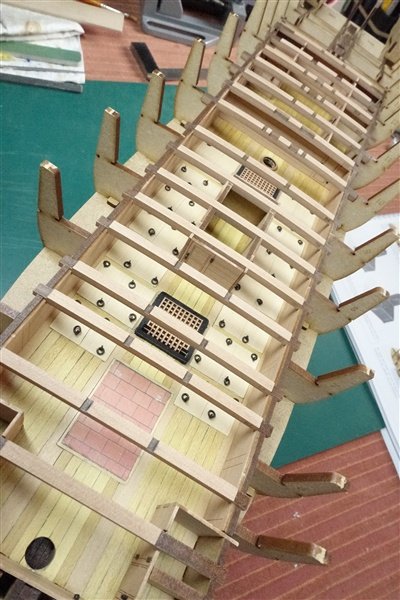
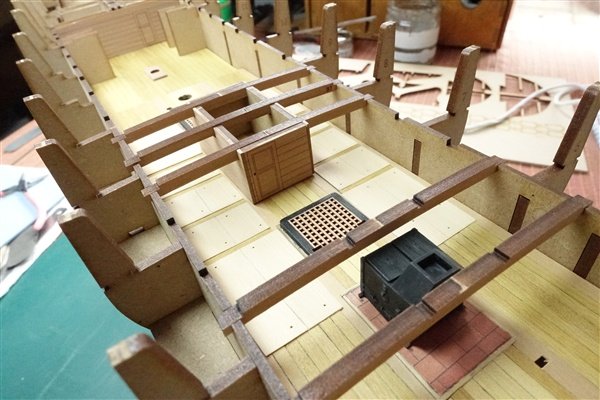
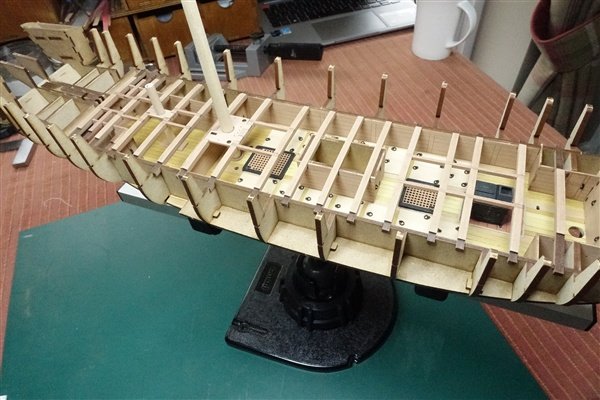
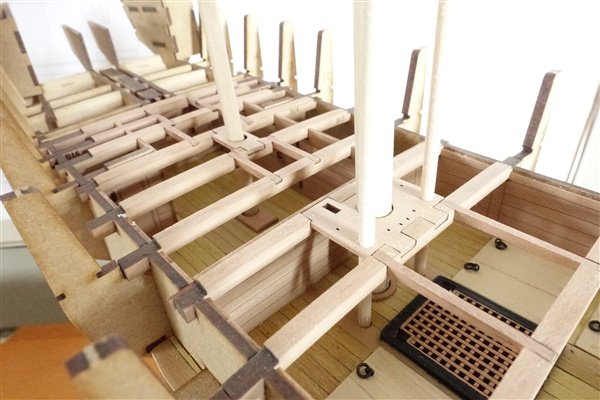
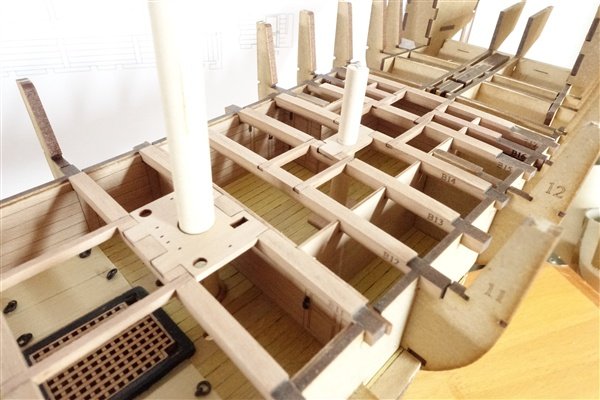
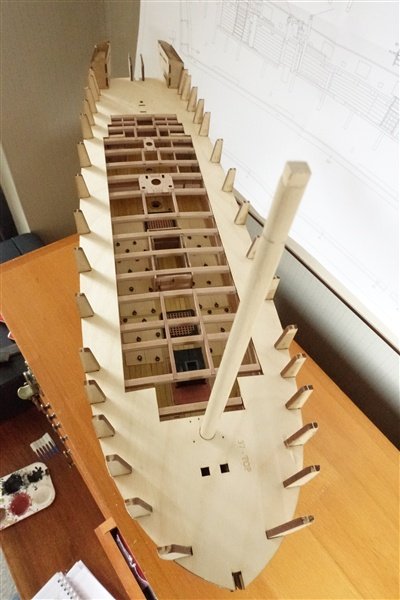
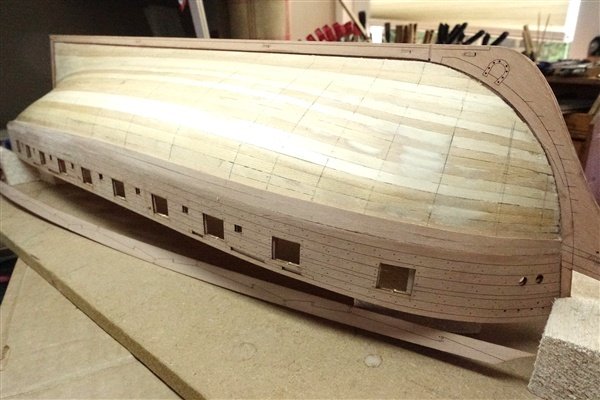
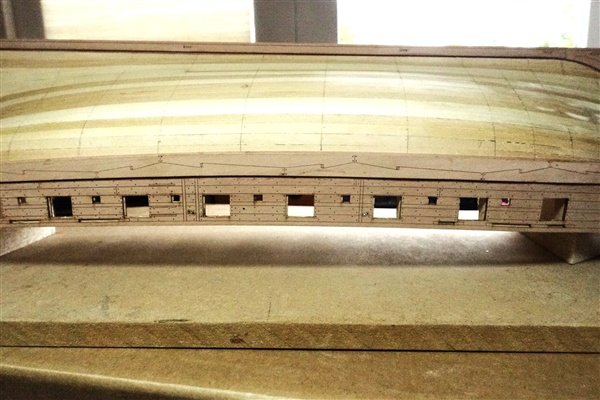
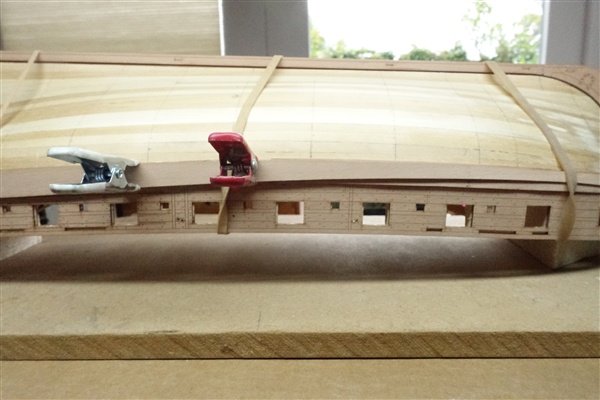
Completing The Lower Deck I have made some of the gun deck centre line fittings but I'll save that for a more appropriate point in the log The hinges and handles that I was waiting for have arrived from Syren and I can continue with fitting out the lower deck. The small Syren handles are added to the pear cabin fronts using small dots of CA gel and the paper hinges with PVA. They all slot together easily but the side walls need clamping to stop any risking of warping. Once in place, I gave them a couple of coats of diluted matt varnish. The beams are all sanded to remove the char and dry fitted. There was only one slot that needed a bit of attention but only because of a slight overlap from one of the cabin pieces. Carlings, mast partners and capstan base are added and alignment checked with scraps of dowel. The ship’s stove is 3D printed and nicely detailed. I painted it iron black and dry-brushed it with pale grey to bring out some highlights. It’s quite subtle. I glued it in place on the hearth with CA before the final carling pieces are added. The ply sub-deck clips in place after a bit of fiddling and lies nicely flat. Next up is to complete fairing the hull. The deck is covered in wide masking tape to keep the majority of dust out. Time to make some more dust... David