
bolin
-
Posts
482 -
Joined
-
Last visited
Content Type
Profiles
Forums
Gallery
Events
Everything posted by bolin
-
 It looks very nice! I did not pay attention when you started your build log, but now I realize that this will be a rather big model.
 -
I don’t have Monfelds book, so I can’t judge how it compares to my go to book, Harold Underhills Plank-on-frame models. It is a bit dated, and he does not describe the latest material or techniques. That is actually the books strength. He describe how to build a model using simple tools, many of which are home made. He wrote it just after the war when he had few tools available. This means that you learn the fundamentals, which can be simplified with access to better tools and materials. Such as modern glues.
-
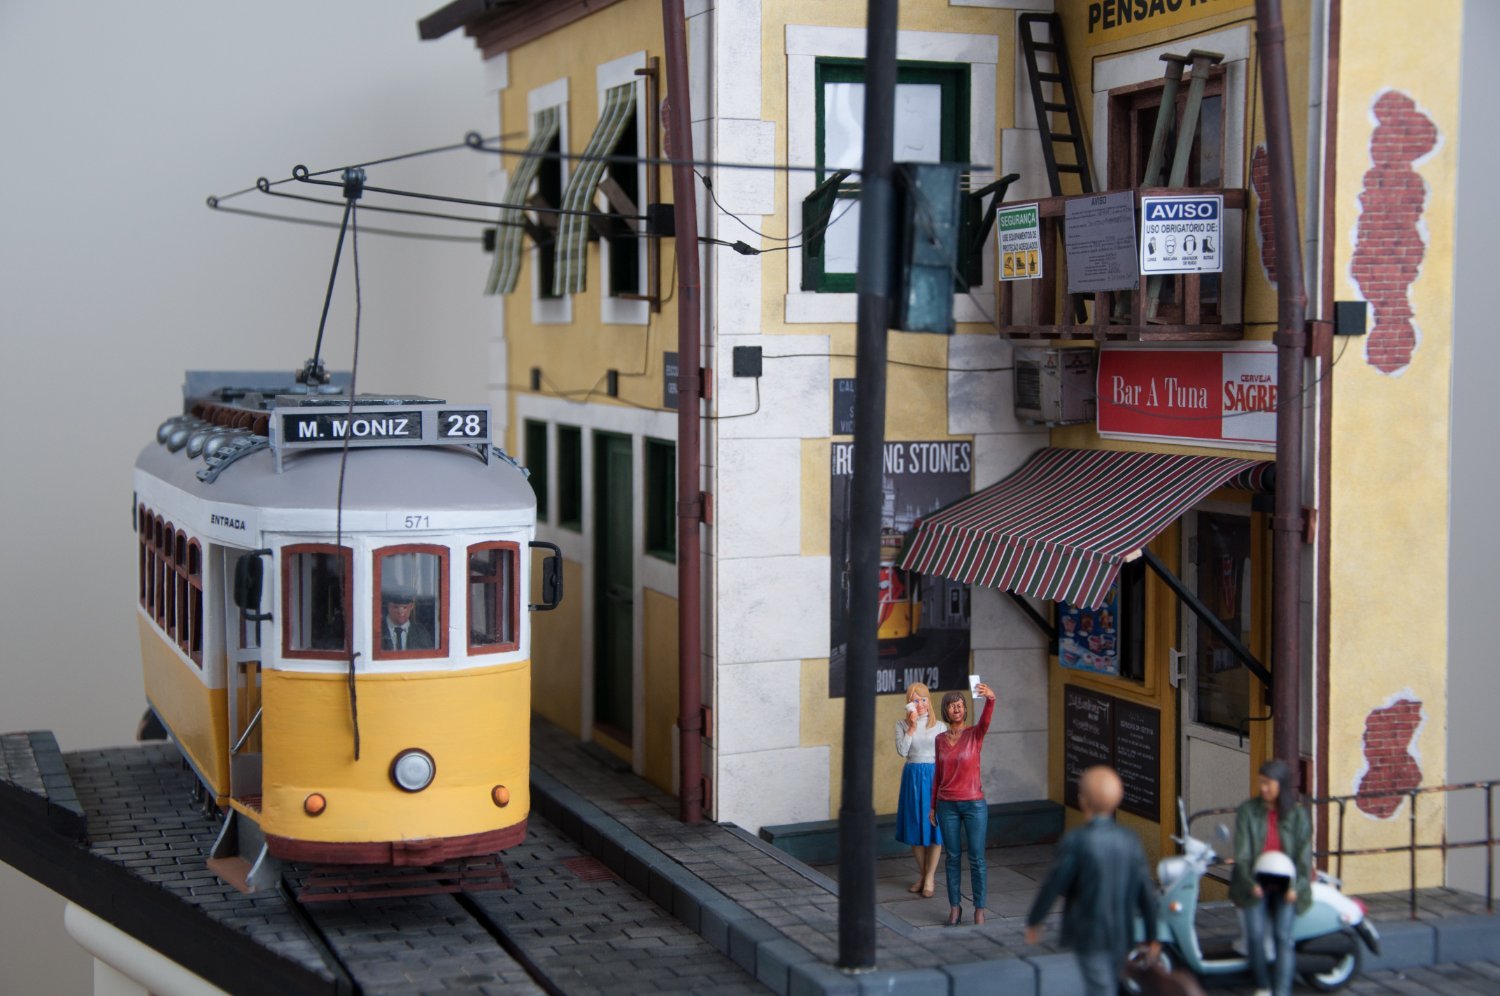
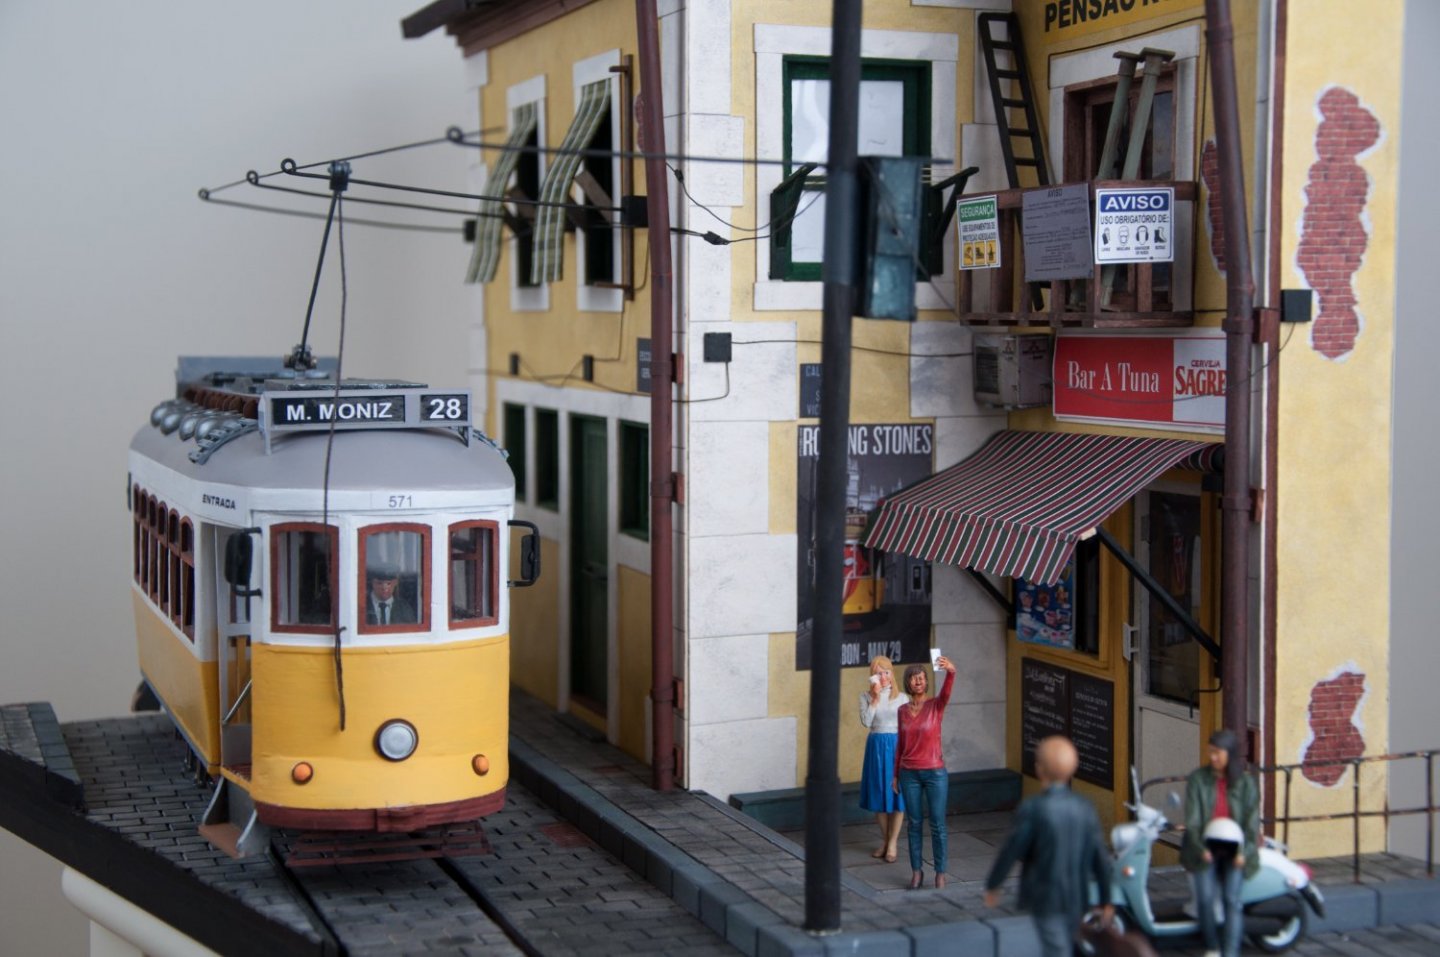
Thanks 😊 Yves The tram and diorama kits are by Spanish Occre. They have a line of different trams in scale 1:24. This one from Lisbon also had the diorama as an option. The figures are by Tamiya. I think it was called “Collage friends 2” or something similar.
- 118 replies
-
- 1
-

-
- billing boats
- meta 484
- (and 1 more)
-
Falconet sells a Slavic warship kit. It looks very much like a Viking longship. Is this the kit you are inquiring about? I have also been curious if there are any archeological or other sources behind that kit.
-
How many kits do you have on the go at the moment?
bolin replied to CaptnBirdseye's topic in Wood ship model kits
Eight months ago I had four builds ongoing. Two scratch builds and two kits. Since then I have finished all but one. I found that I actually got a bit stressed of having several projects going in parallel. I do have a couple of kits in the stash, and several ideas for scratch builds I want to do. Maybe I’ll be distracted by one of them, but as many as four in parallel is too many for me. My work space is also quite small, so it is easier to have a single build active at a time. -
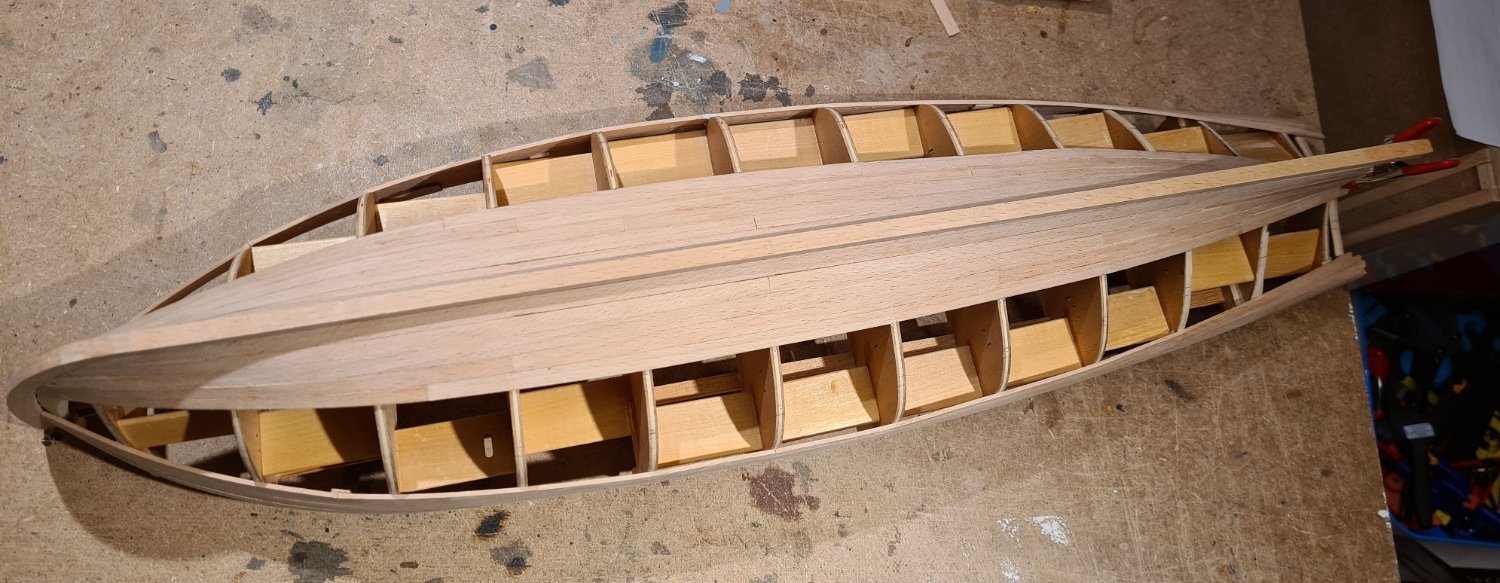
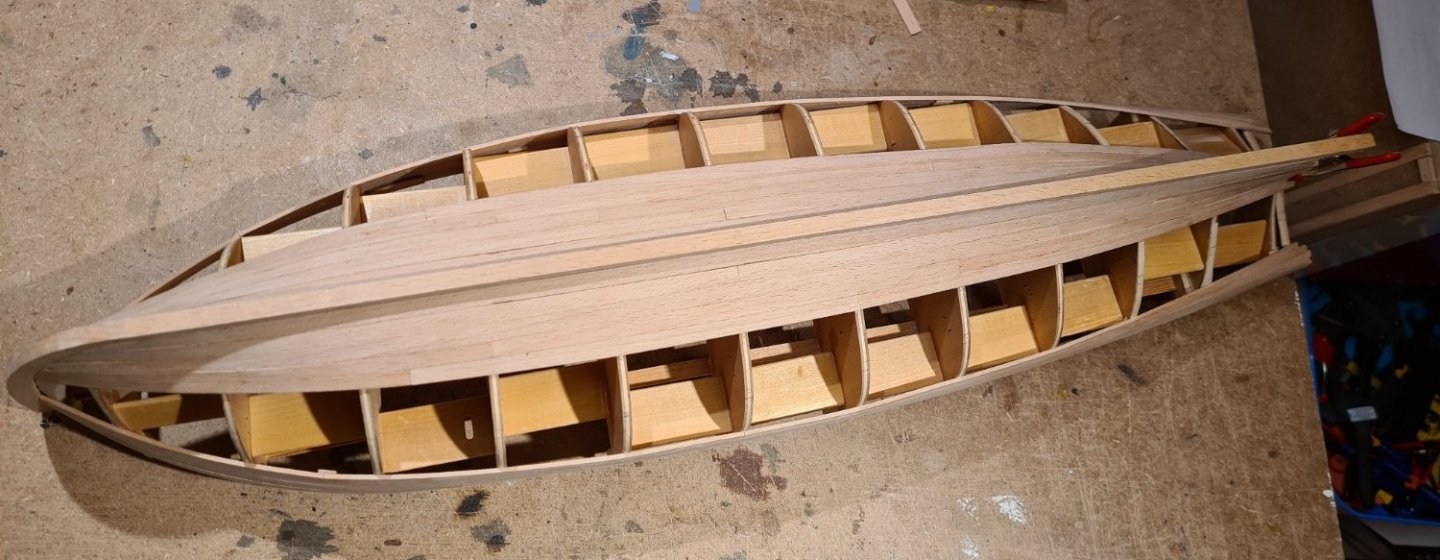
I have had a fair bit of time to spend on the model, so the progress has been good. I'm now halfway on both sides. I'm quite happy with the result. There is a small gap between the garboard strake and the next one on each side. I obviously missed clamping it tight enough. I will need to add some filler from the inside to fill it in.
- 118 replies
-
- 2
-
-
- billing boats
- meta 484
- (and 1 more)
-
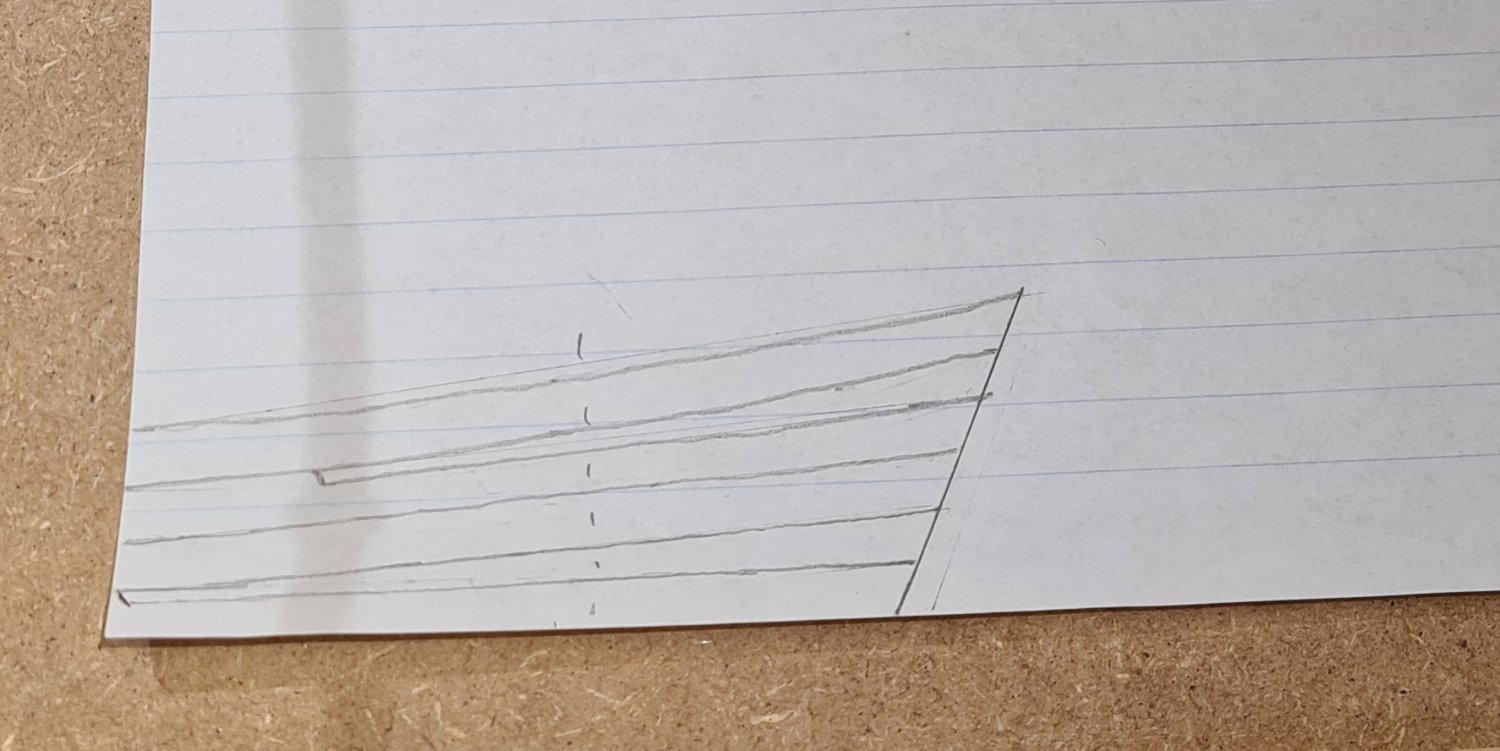
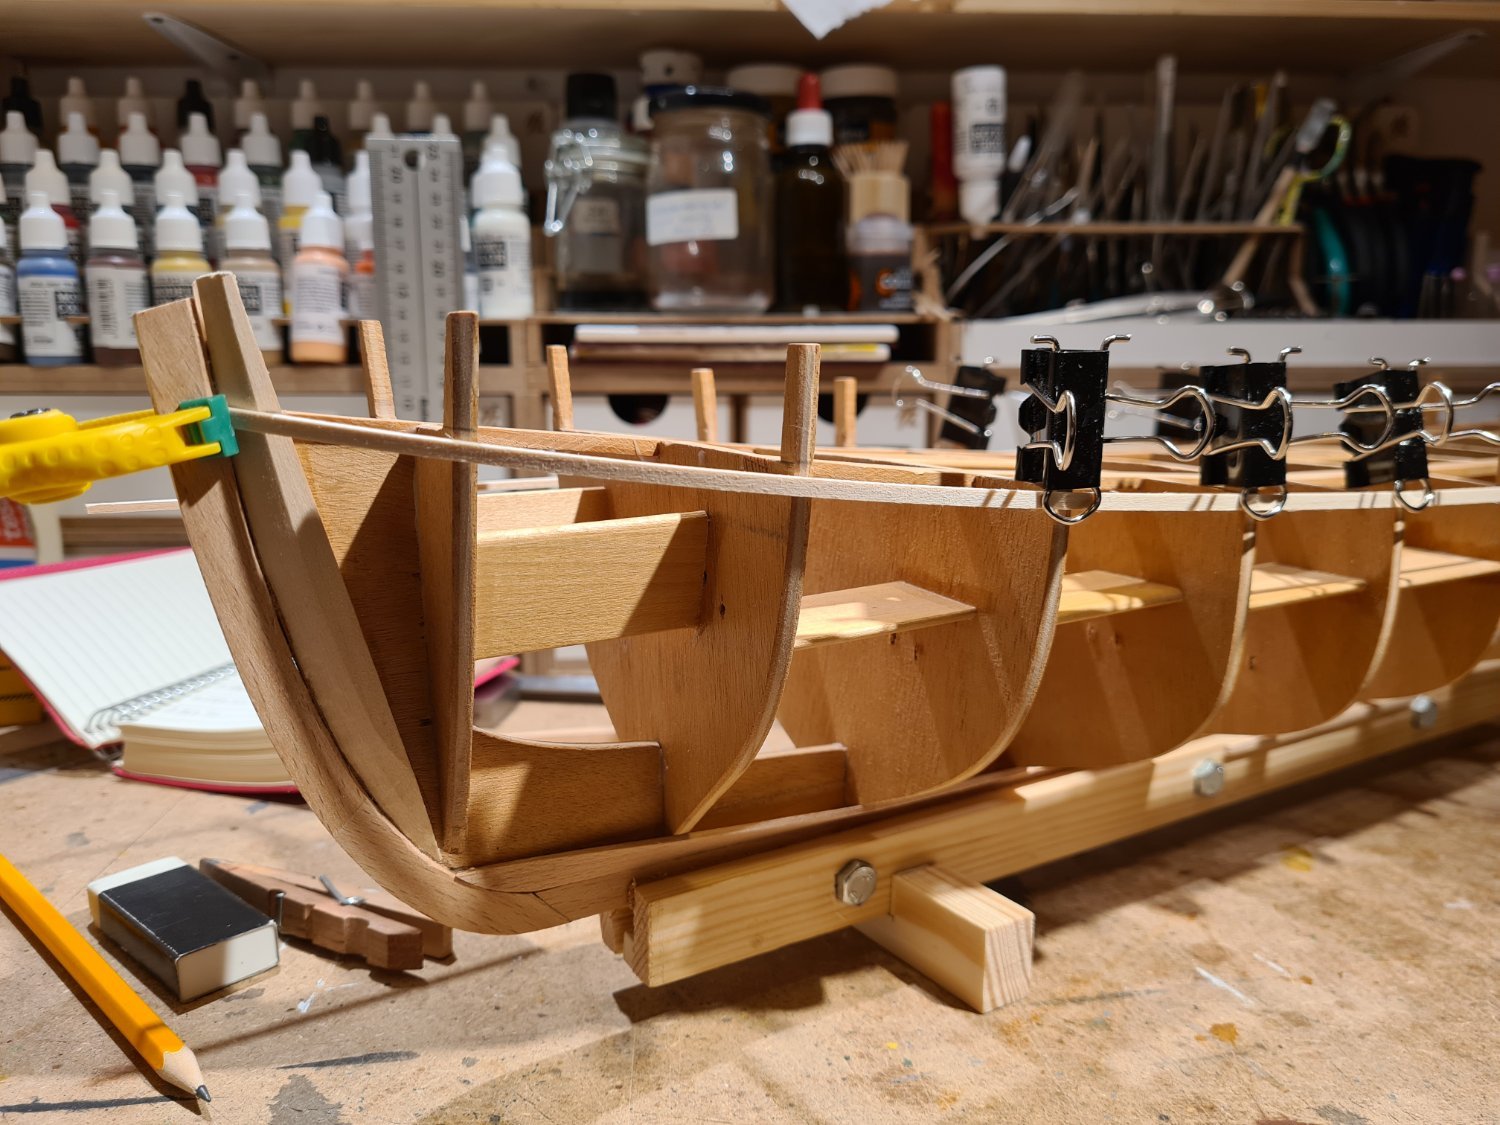
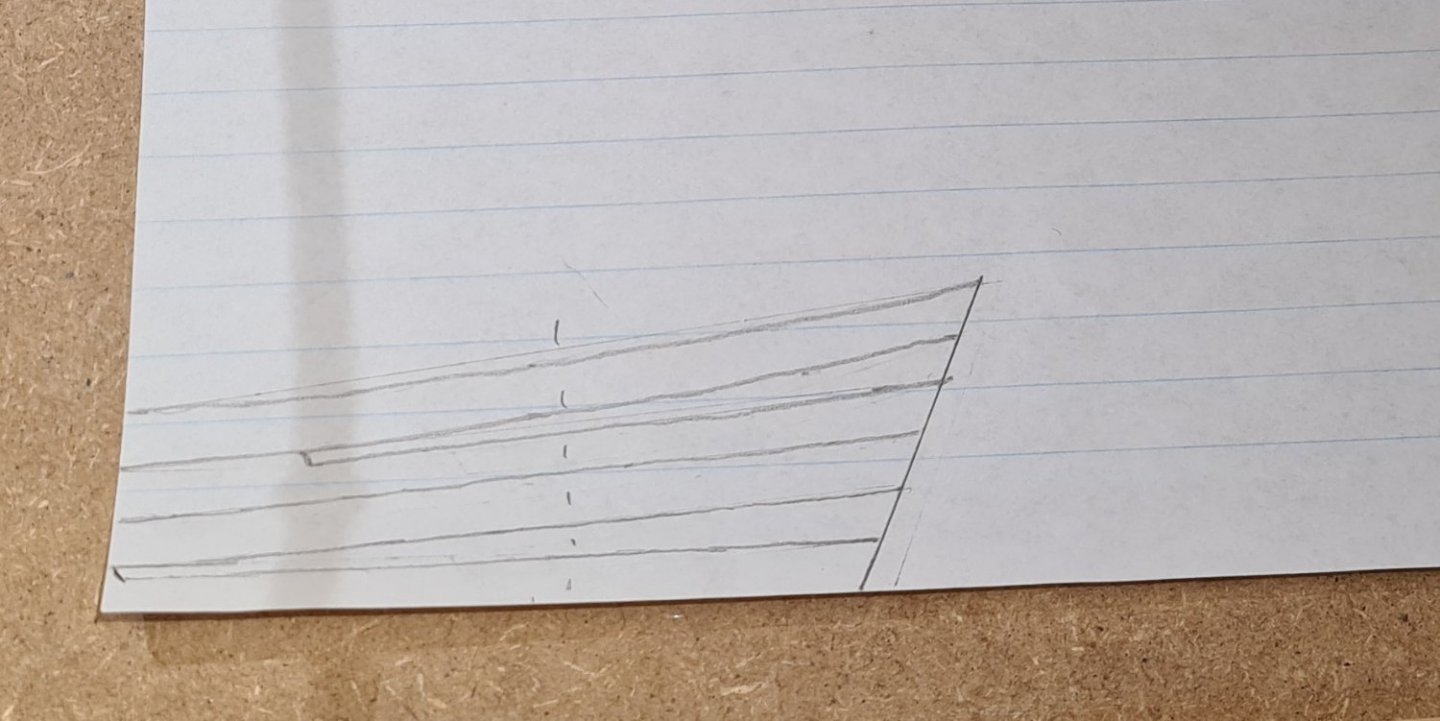
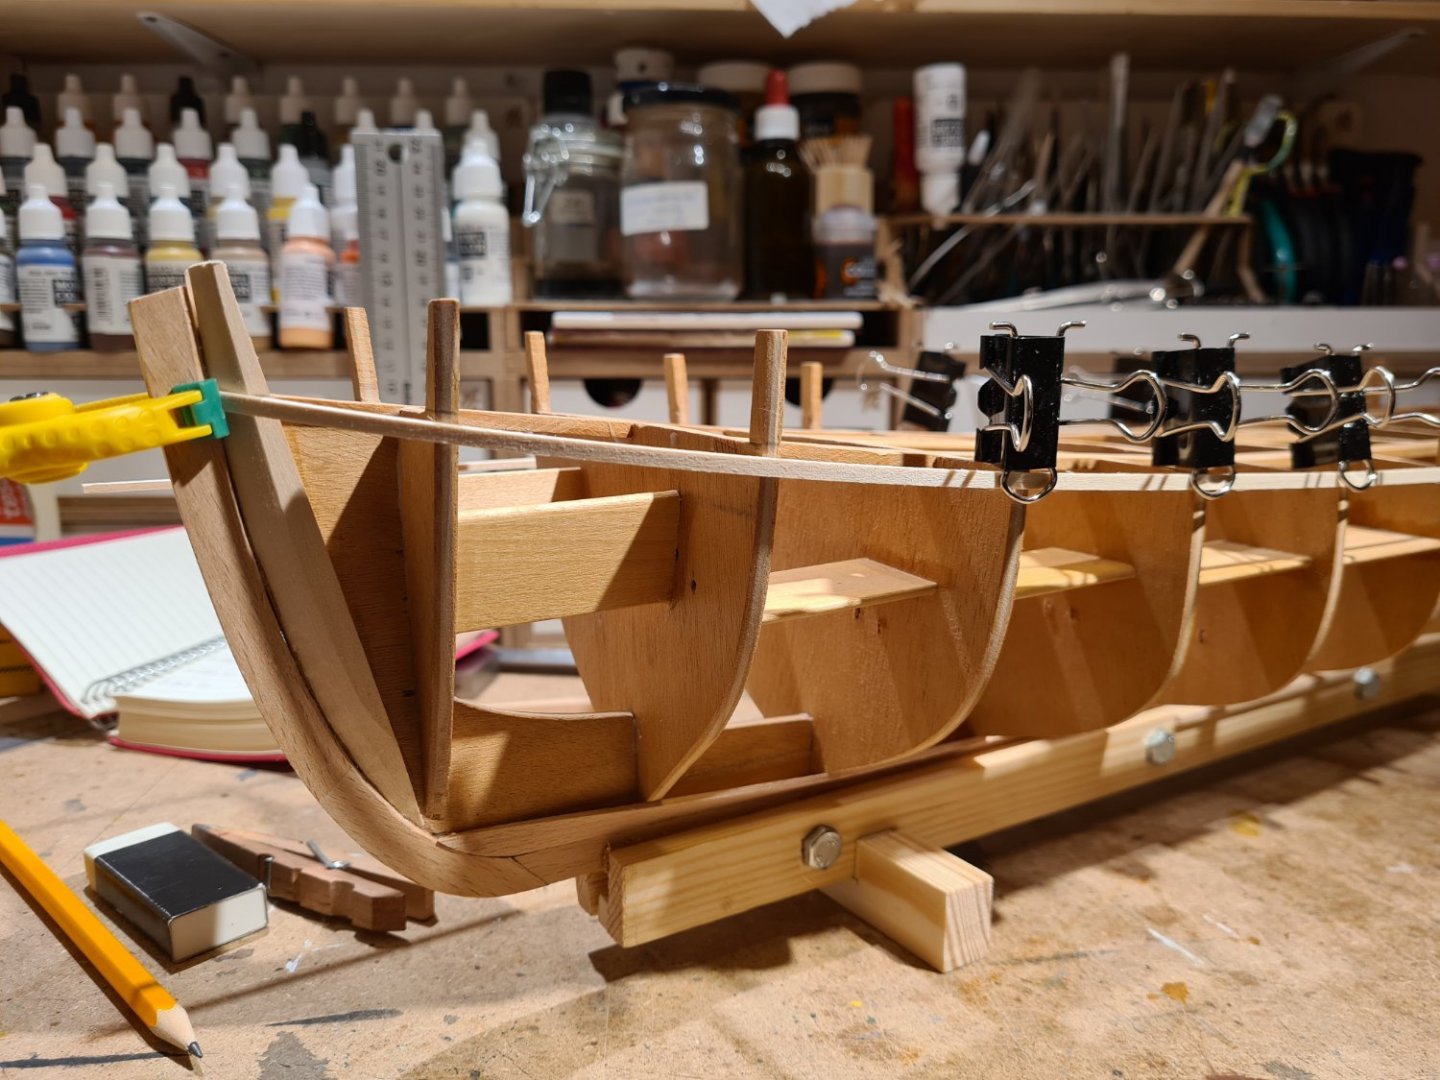
When lining off the hull, I saw that it would need a couple of stealers in the deadwood area. I made a simple sketch on paper to see how they could be arranged. Then when I laid the next stake I edge bent it so that the gap at the stern post is just wide enough for one plank (7mm). ... and with the stealer fitted.

- 118 replies
-
- 4
-
-

-
- billing boats
- meta 484
- (and 1 more)
-
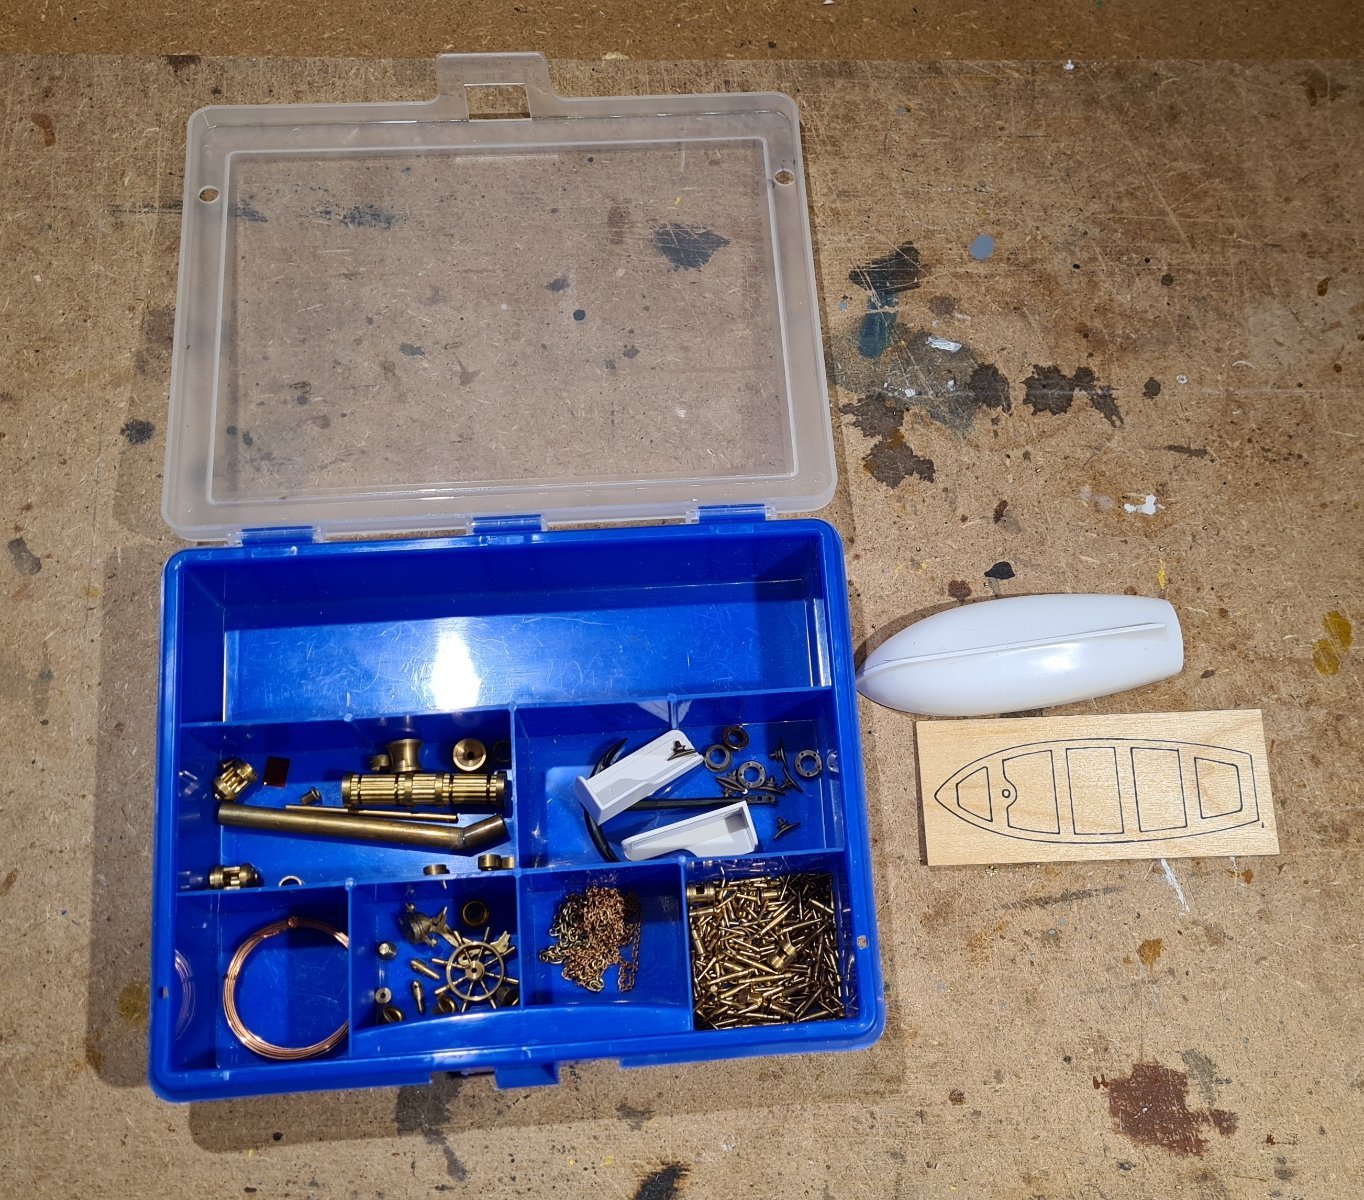
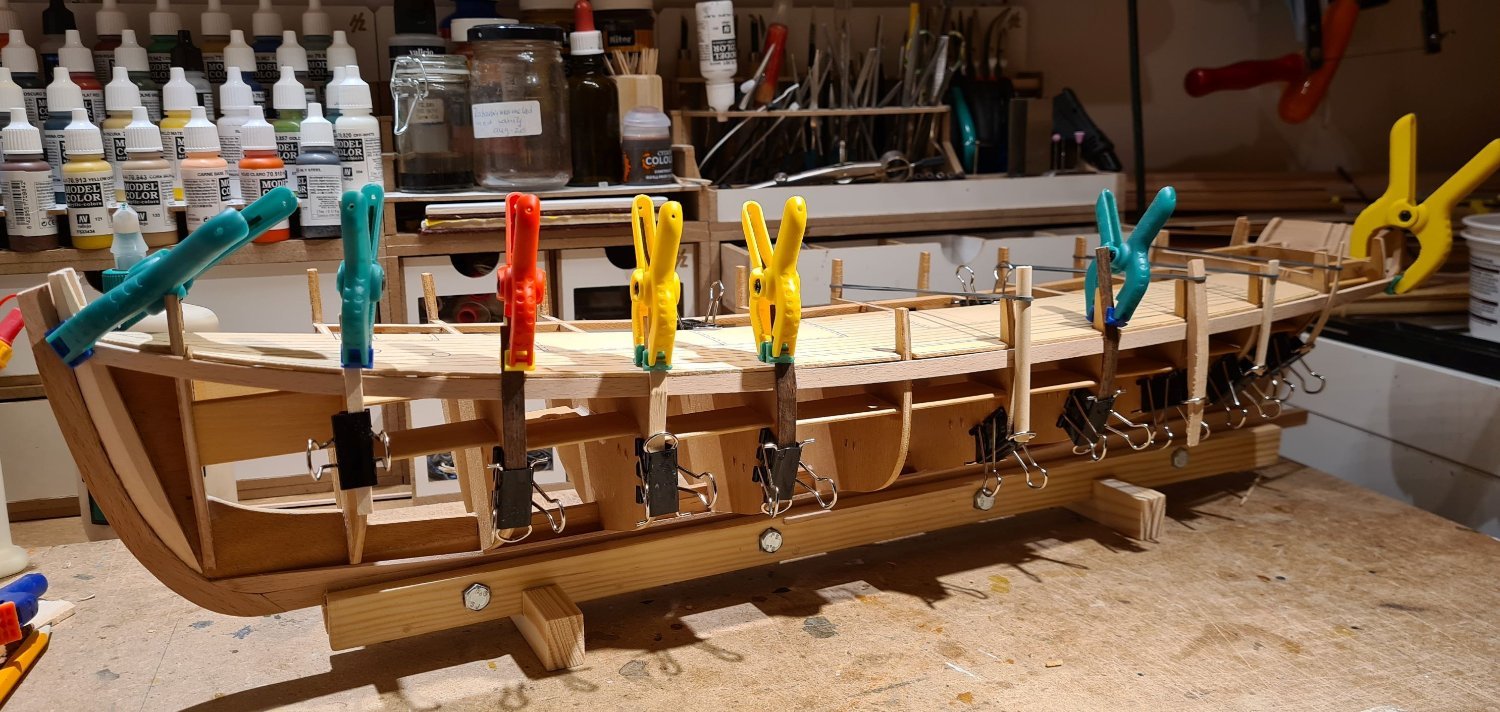
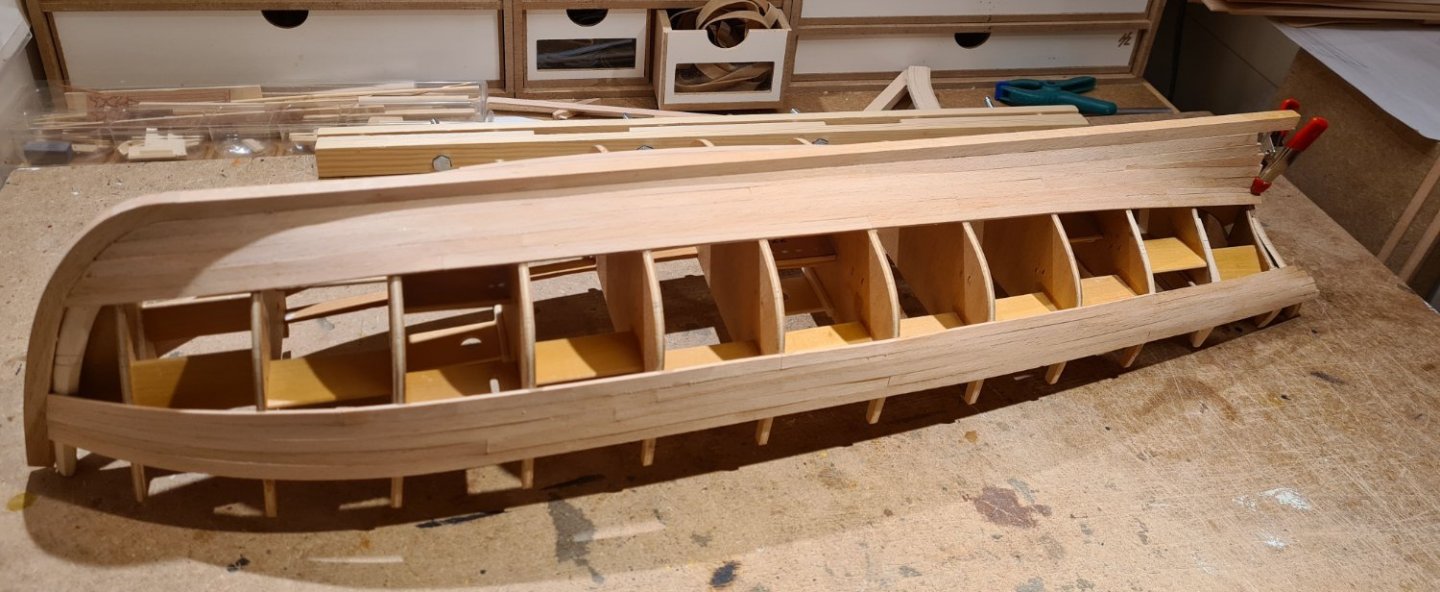
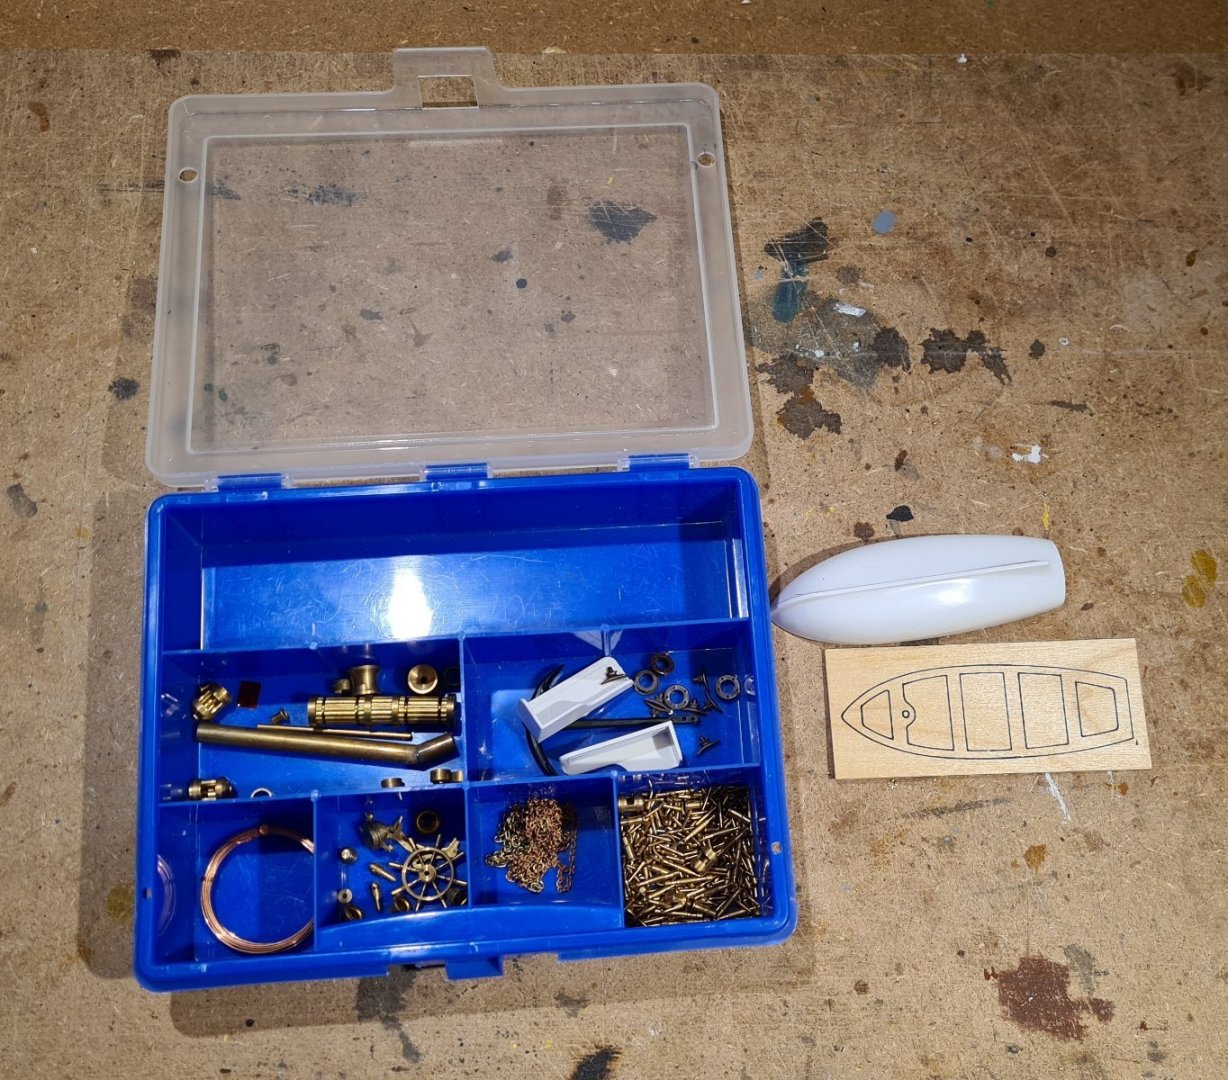
A quick update on the progress of the planking. Not too much to show, actually. The planking will take some time as I try to do it properly and as good as a can. The picture shows the second strake at the keel on the port side. Starboard side has already gotten this far. I will plank downwards from the wales and upwards from the keel on each side in rotation. In this way, I can let the glue set one one strake while I start to work on the next one. This will at least be possible until the planking meets in the middle. I use 7 mm wide and 2 mm thick strips of beech. It is much better than the kit supplied obechi strips, which are practically unusable. Something that is not unusable is surprisingly some of the fittings. I went through what was provided and found for example nice belaying pins of turned brass. The wheel, lanterns, chimney and some other parts also looks nice. The picture blow shows the parts that I have not discarded outright, like the plastic blocks and dead eyes. I will not use the boat as such, but I consider using it as a mold when I build a new one.

- 118 replies
-
- 3
-
-
- billing boats
- meta 484
- (and 1 more)
-
Well done! A nice little boat, it has been a pleasure to follow your build. I have learned a thing our two from your work, thanks for sharing.
-
It probably fits well with when the kit was constructed 😃
-
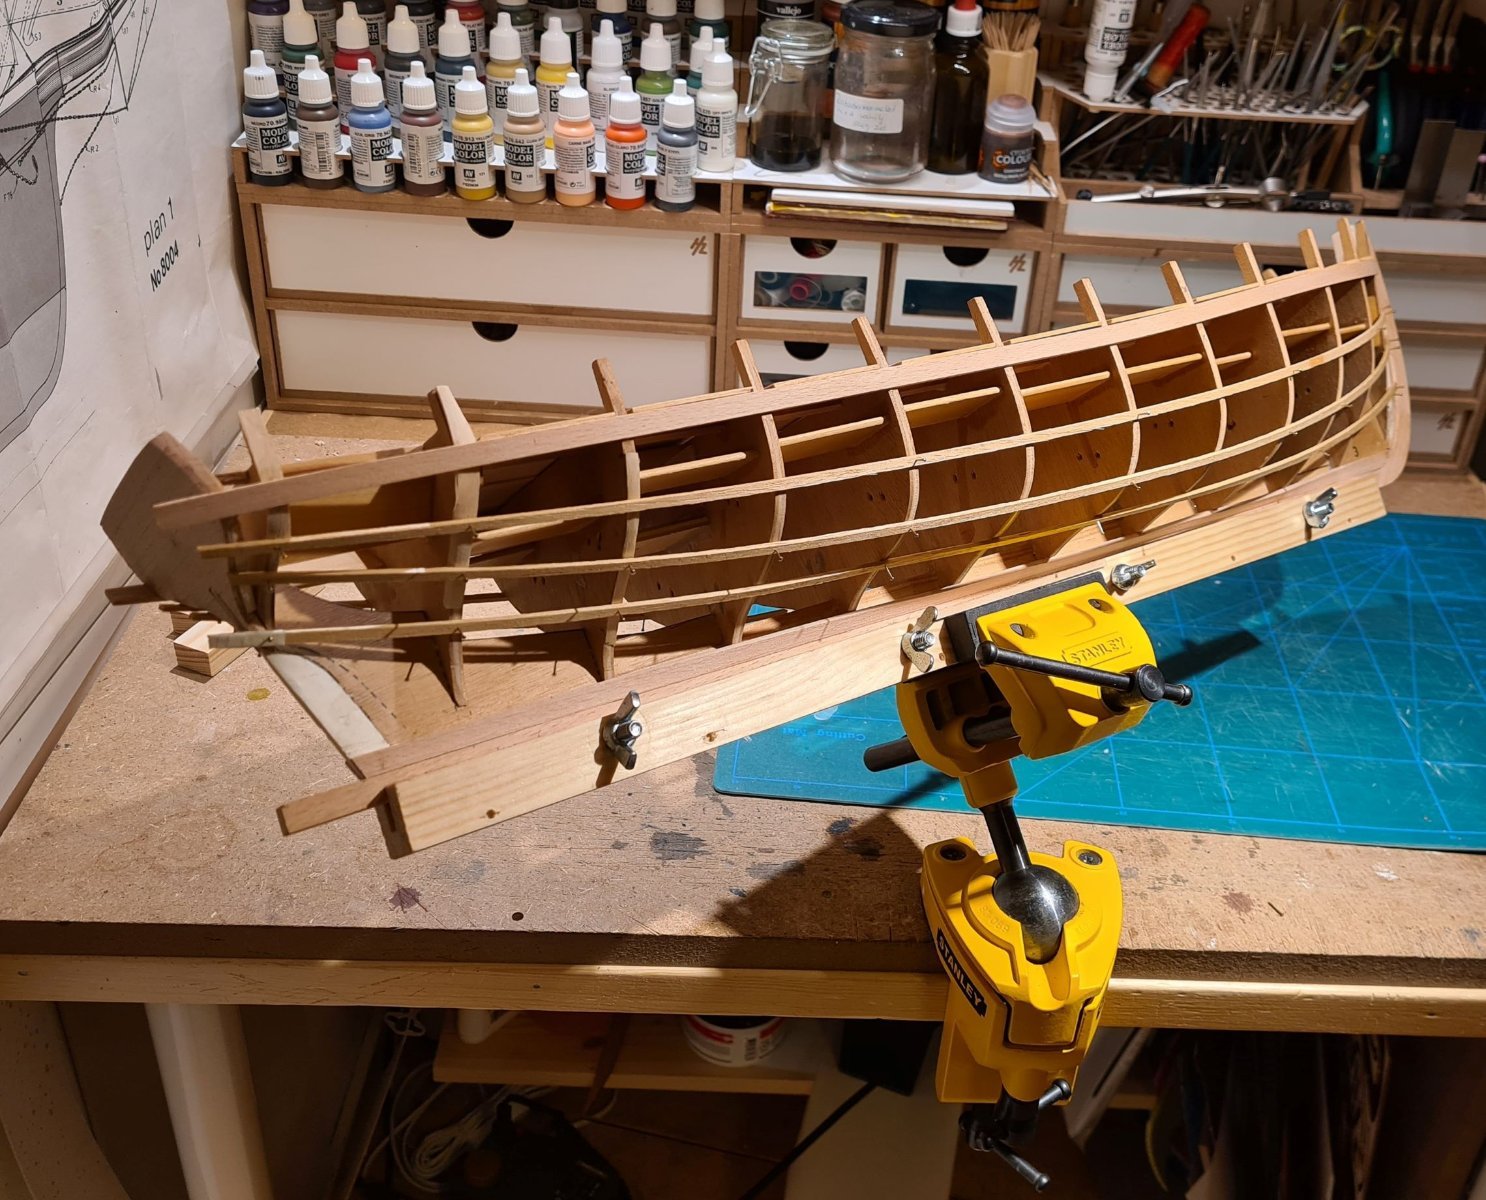
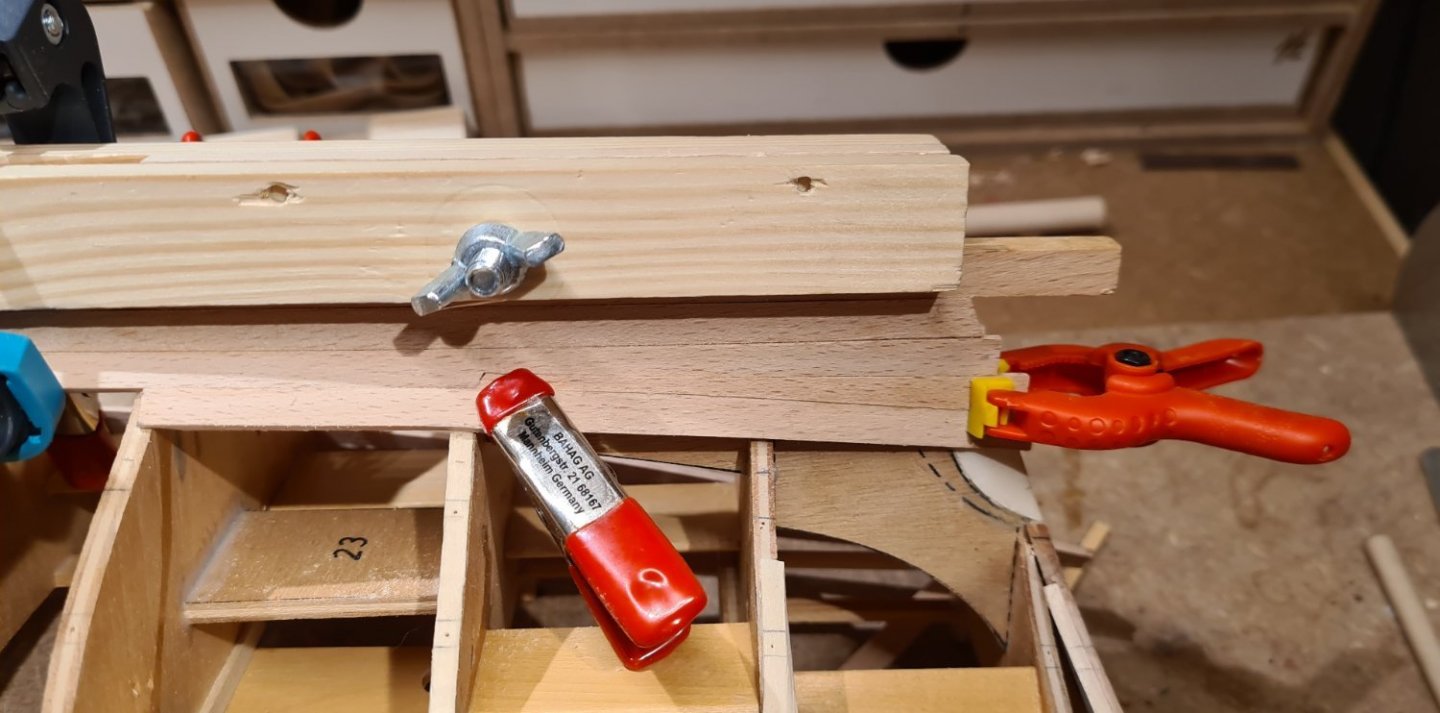
I only used the HobbyZone building slip to try to get the hull to straighten itself. I took over the model from a man that had had it in his basement for 40 years, so it was a bit twisted when I got it. I later abandoned the building slip, when the hull is stable enough it is impractical. I prefer my home made keel clamp with feet attachments. It is much more versatile. The drawers etc from HobbyZone on the other hand are great. It is so nice to have Avery tool I need within closes reach. And with my small work space it is essential that every tool can be easily stored in its right place to avoid clutter.
-
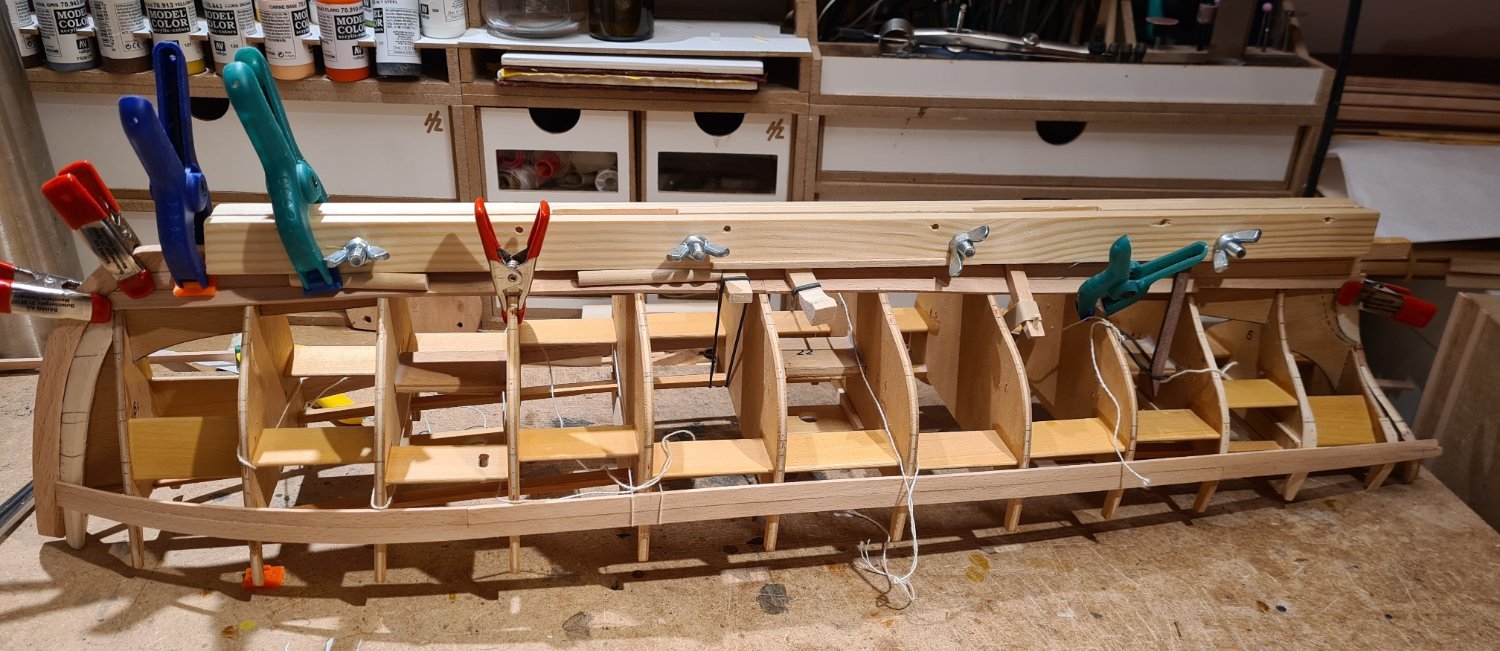
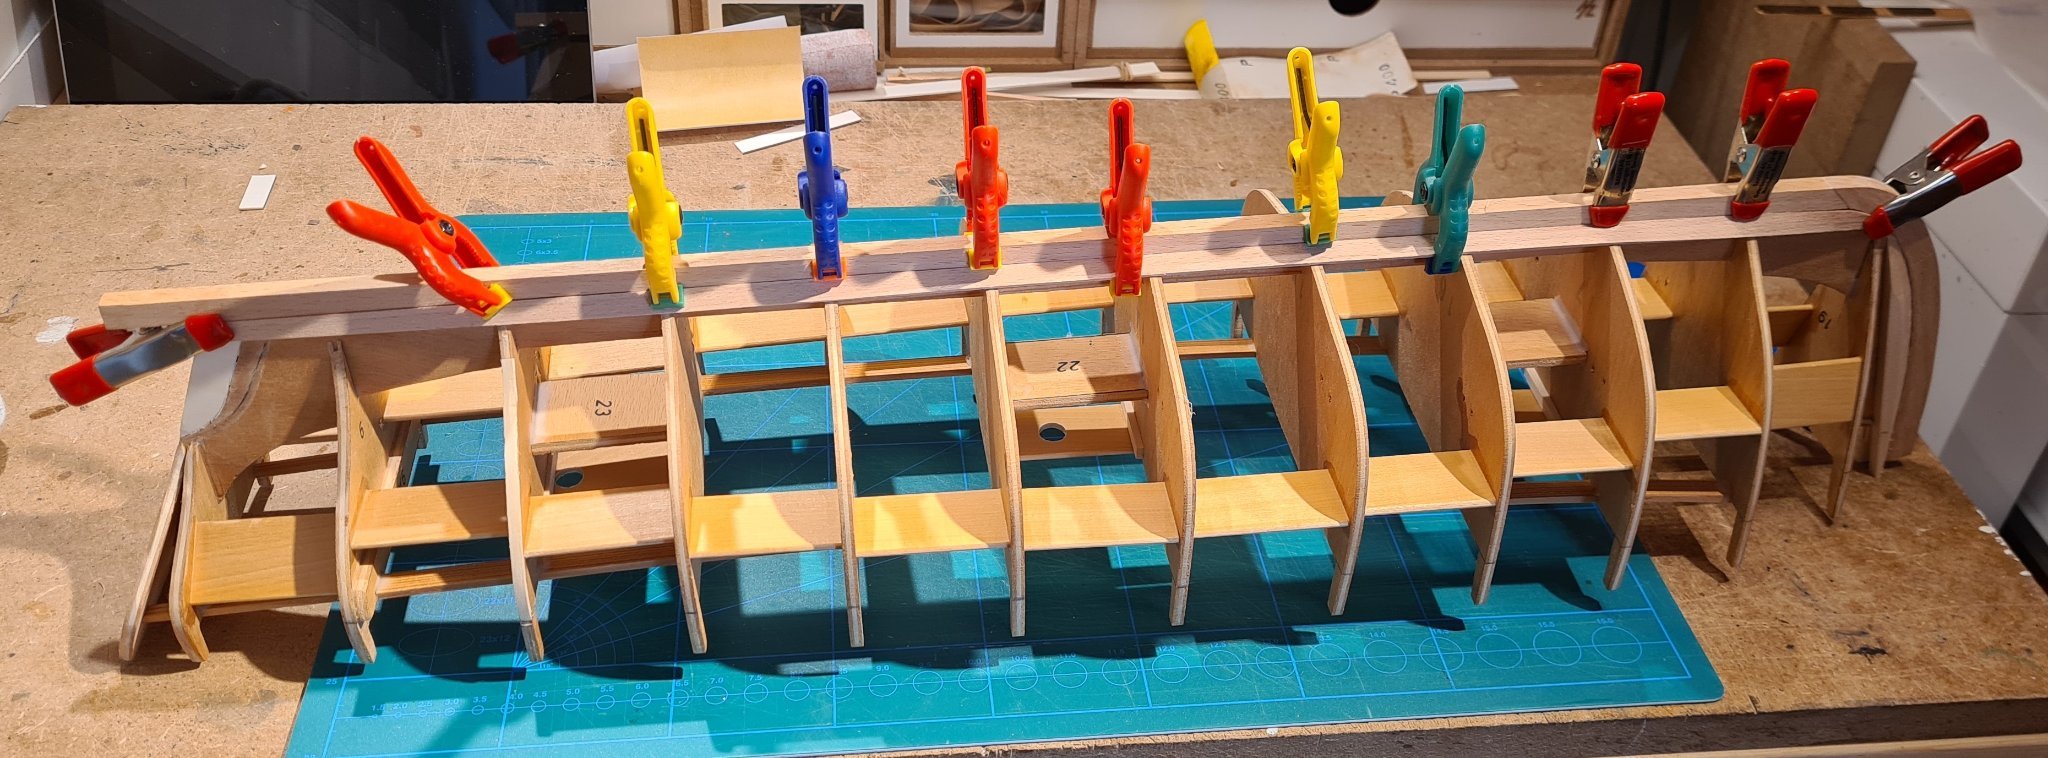
After the transom has been replaced, I could finalize the fairing of the hull. It turned out that some shims were needed on two bulkheads. With that fixed, I installed the topmost strakes on each side. I opted to make them full length and full width, to have a fair curve to base the rest of the planking against. In the picture I have temporarily installed the false deck from the kit to have a reference for the strake. With two strakes on each side, I went on to divide the hull into bands. At the widest, bulkhead 5, there is room for 15.7 planks. With four bands, that gives about 4 strakes per band. I used the obechi wood from the kit for the battens. The old wood was very soft and brittle, it is barely usable for this task. In the deadwood area the lowest band widens so that more than 4 planks are needed. My widest beech strip is 7 mm wide. I will need to use stealers there to cover it. At least two will be needed.


- 118 replies
-
- 3
-
-
- billing boats
- meta 484
- (and 1 more)
-
Hi Marcus Polaris should be an excellent choice as a beginners model. Even better if you got a good deal on the kit. Good luck
-
Welcome to MSW! What kit did you get?
-
Cute kitten 🐱 … and very interesting tutorial on medieval rope making. …the plow is also nice …and the planking looks great! You have been busy 🔨
-
Looking good, it comes together nicely. My best well wishes and hope for a quick recovery. By the way, I found the "Kågen" book on an on-line bookseller today. I could not resist it, and ordered it. Maybe I will follow in your footsteps 😃
-
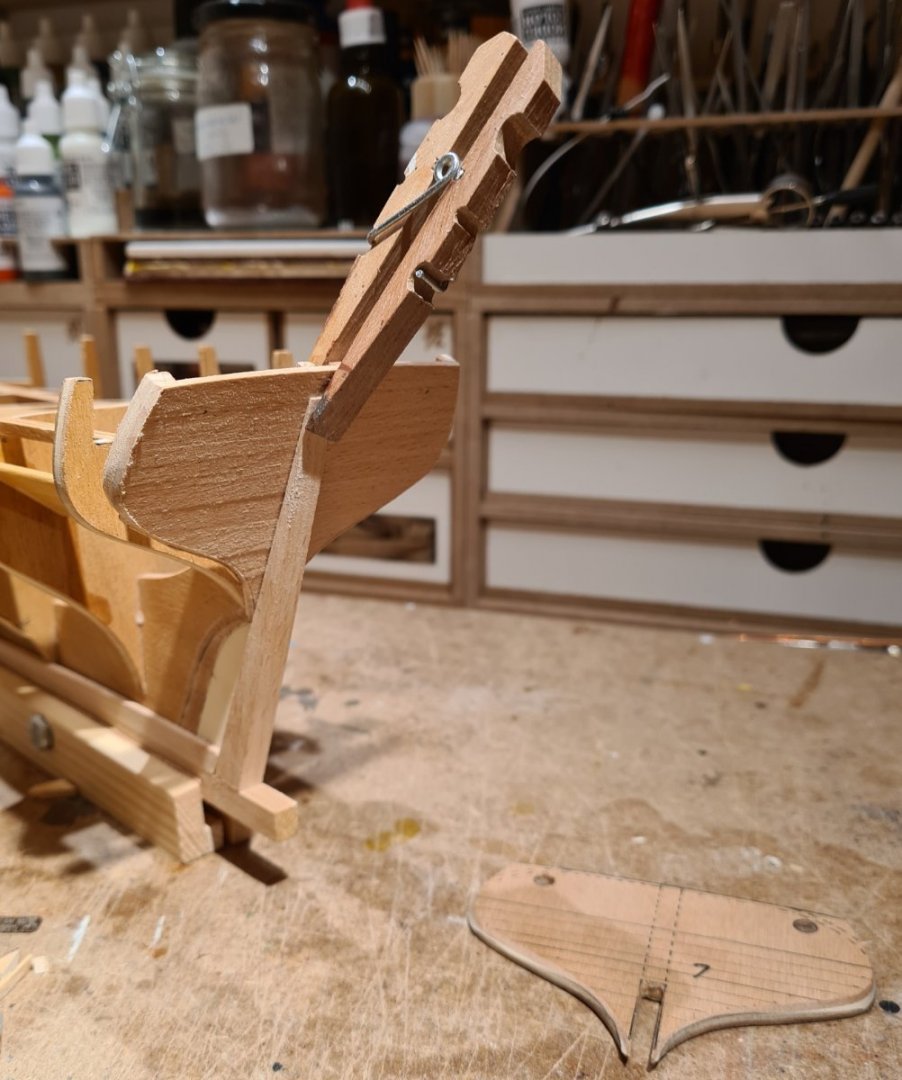
Thanks Chris 😀 Before I can start planking, I also want to replace the transom. When I got the started model the kit transom was already mounted. I first considered planking it with thin strips. However, since I'm considering to leave the hull unpainted, I would need thin beech strips. I don't have that, so I built a new transom. In the picture below, I have also test fitted the external stern piece. Now back to beveling the bulkhead edges and fairing the hull.

- 118 replies
-
- 3
-
-
- billing boats
- meta 484
- (and 1 more)
-
Welcome to MSW! It looks like a nice little model you have found for your first build.
- 7 replies
-
- 1
-
-
- Wendameen
- BlueJacket Shipcrafters
- (and 1 more)
-
Congratulations to a very nice model. It has been a pleasure and very interesting to follow your progress. Thanks for sharing.
-
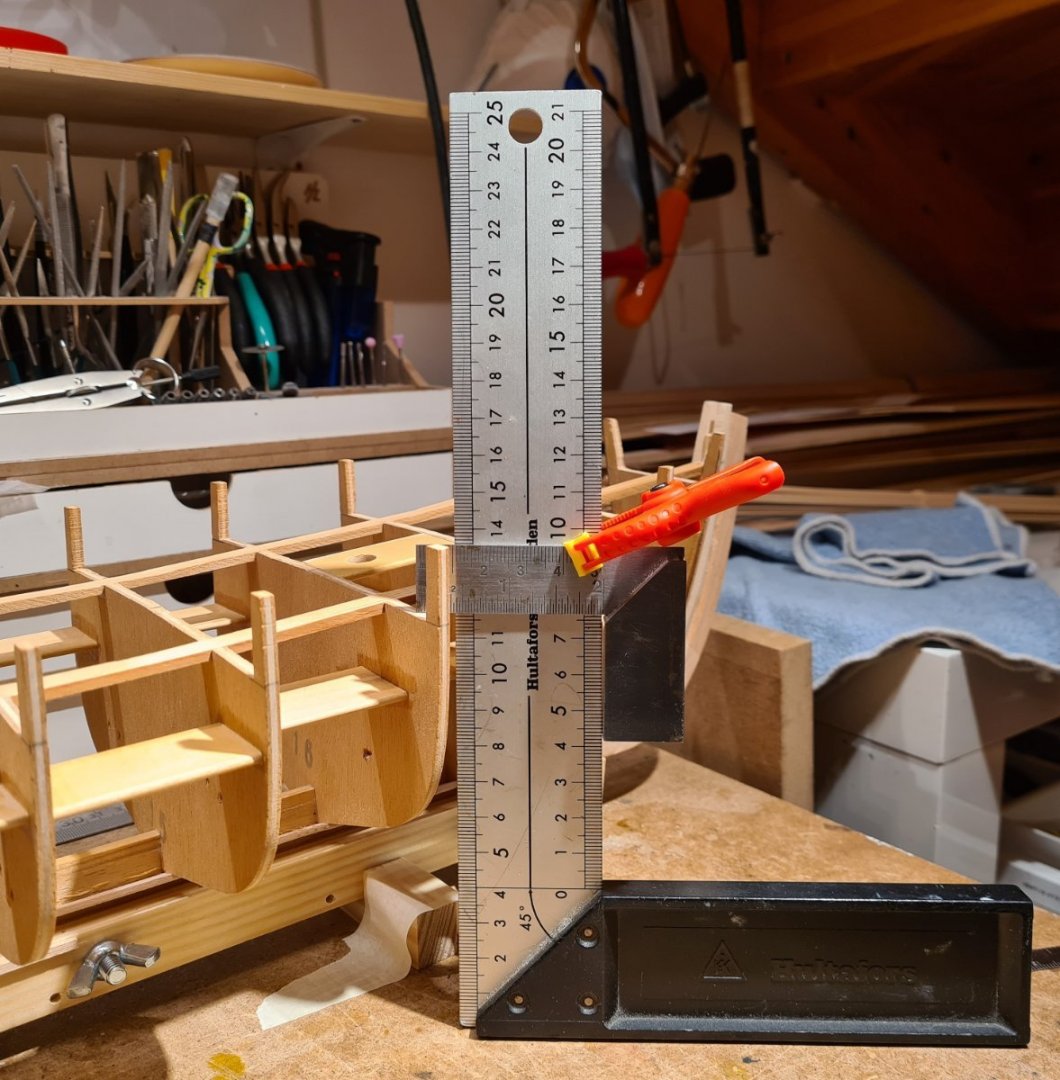
This build has been gathering dust for a couple of months. I ran into some problems, took a break with another model, and got distracted by it. Now the other model is finished, and I can get back to this one. This is the result of my distractions... So back to the difficulties I encountered. When I started to prepare the topmost strake by edge bending, I didn't seem to get it to run fair along the deck level. I thought that it was an issue with my edge bending technique, something that I have not done too much earlier. So I was considering if I should spile the planks from a sheet instead. And while I was considering ordering more wood, or try once more with edge bending, I got distracted... Before coming back to this model, I read some other build logs, that discussed problems with edge bending. I started thinking, maybe I was trying to fit a strake to a curve (the deck level) that wasn't fair to begin with. First I checked with a batten to see how it wanted to run. It indicated that bulkhead 1 and 2 could be a bit high. I then measured the height of each bulkhead at deck level and plotted it on the plans. Sure enough, bulkhead 1 and 2 are indeed mounted too high by 2 to 3 mm. Since I have already installed the garboard strake I think I will need to modify the bulkheads in place. Otherwise, I could have tried to debond the glue and reinstalled them lower.
- 118 replies
-
- 8
-
-
- billing boats
- meta 484
- (and 1 more)
-
Nice start! The Swampscott Dory was my first kit as well, I found it to be an excellent introduction to the hobby. Good luck with the rest.
-
The garboard strake is cut and fitted. I used a 2 by 7 mm beech strips. Beech seem to be as good as advertised when bending. I put boiling water in a thermos, and dip the strips in that for a few seconds before bending to shape. I will let it dry and then glue it using wood glue.

- 118 replies
-
- 5
-
-
- billing boats
- meta 484
- (and 1 more)
-
The first thing I have done with the new wood is to cut and fit a new stem piece. After gluing, it will be tree nailed to the inner stem piece for extra strength. I have also added an extra piece on the inside of the stem to have a landing for the planks.

- 118 replies
-
- 5
-
-
- billing boats
- meta 484
- (and 1 more)
-
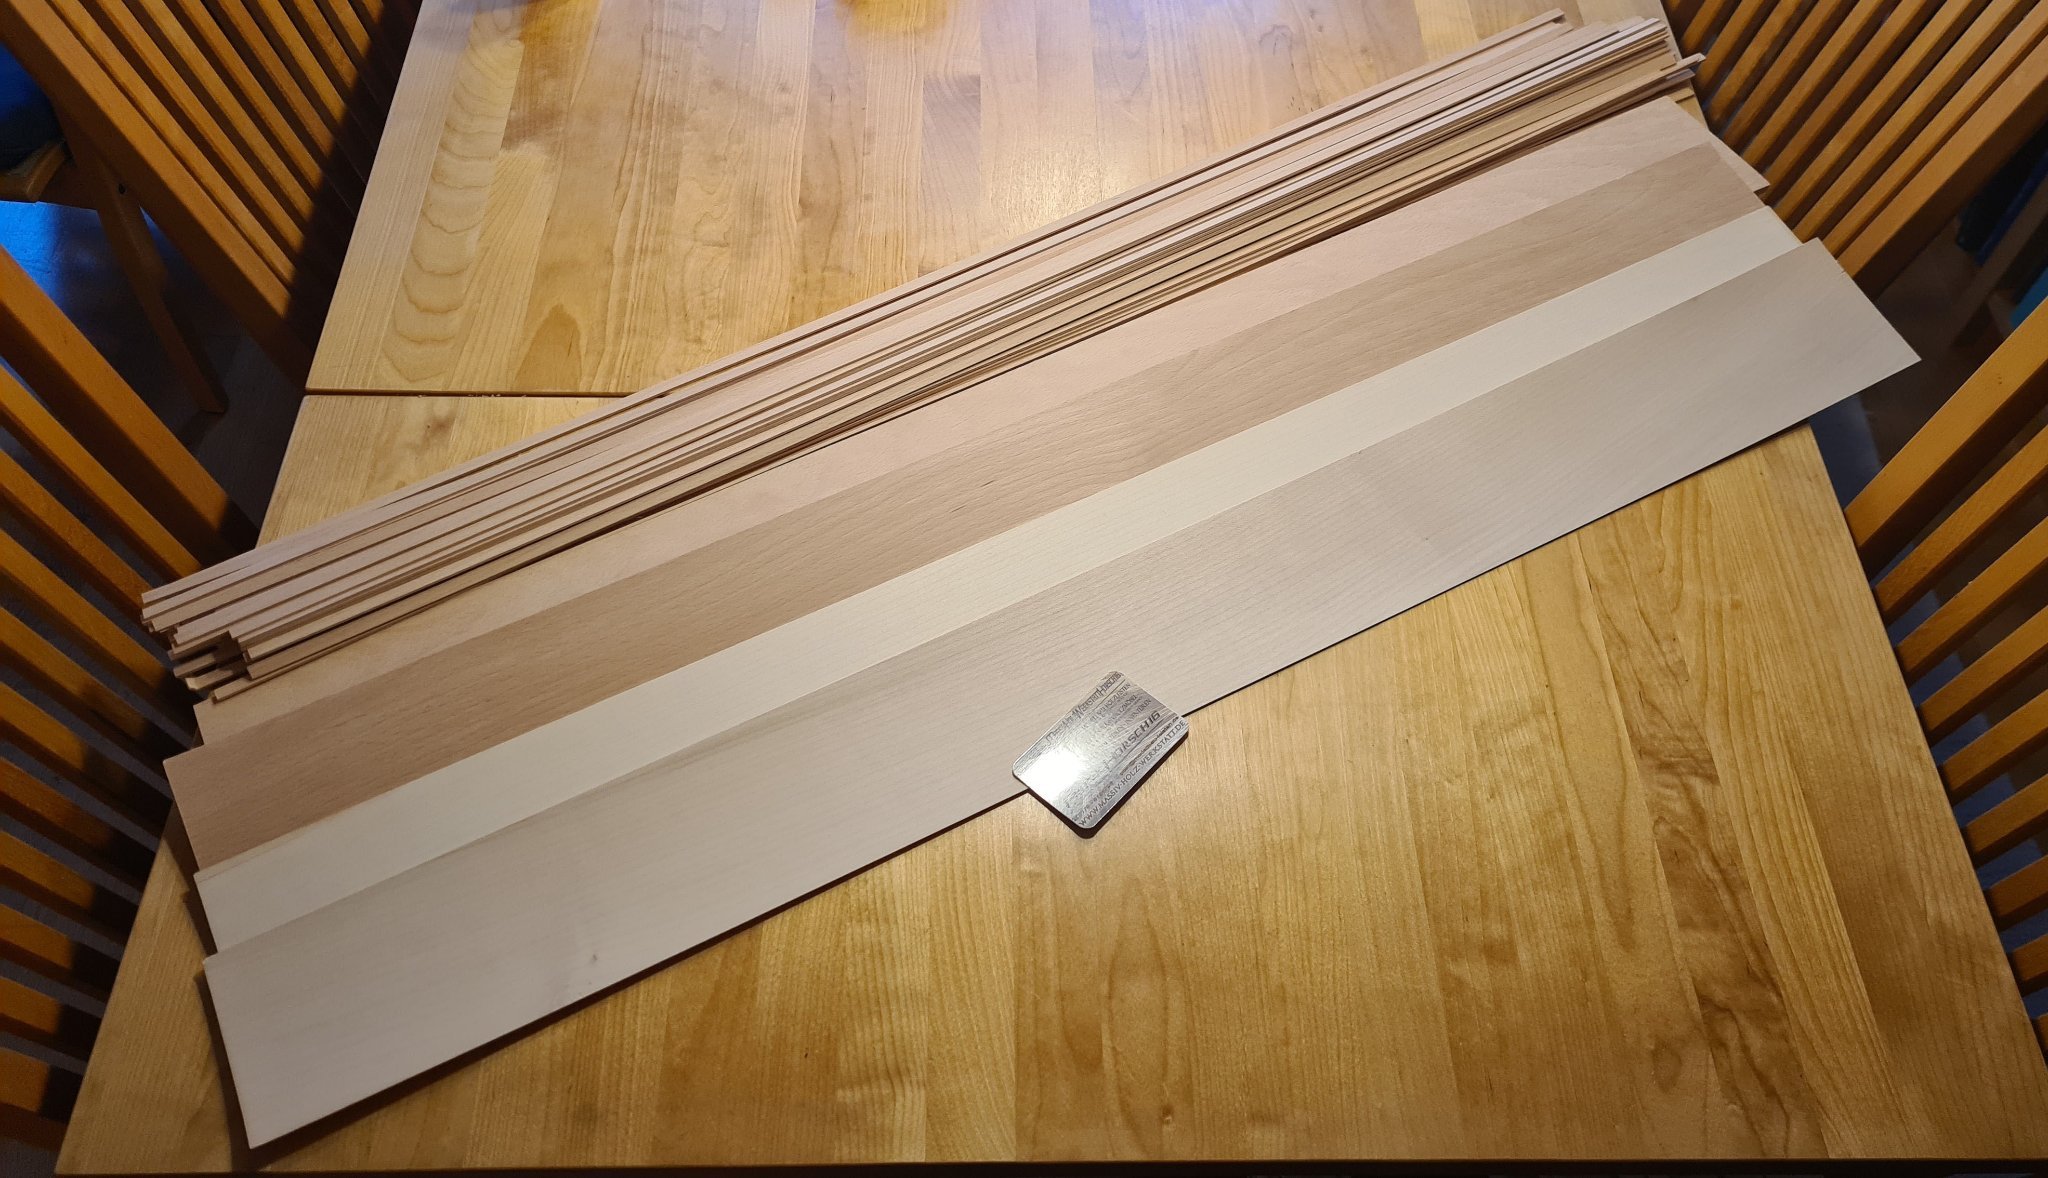
Today I got a package from MassivHolzWerkstatt in Germany with replacement wood. Beech strips for hull planking and a piece of thicker (7 mm) beech for keel, stern and stem. Maple for deck planking and for hull planks for the lifeboat that I will need to scratch build. I have no experience with either type earlier, but with the good quality I got I look forward to learn how they work.
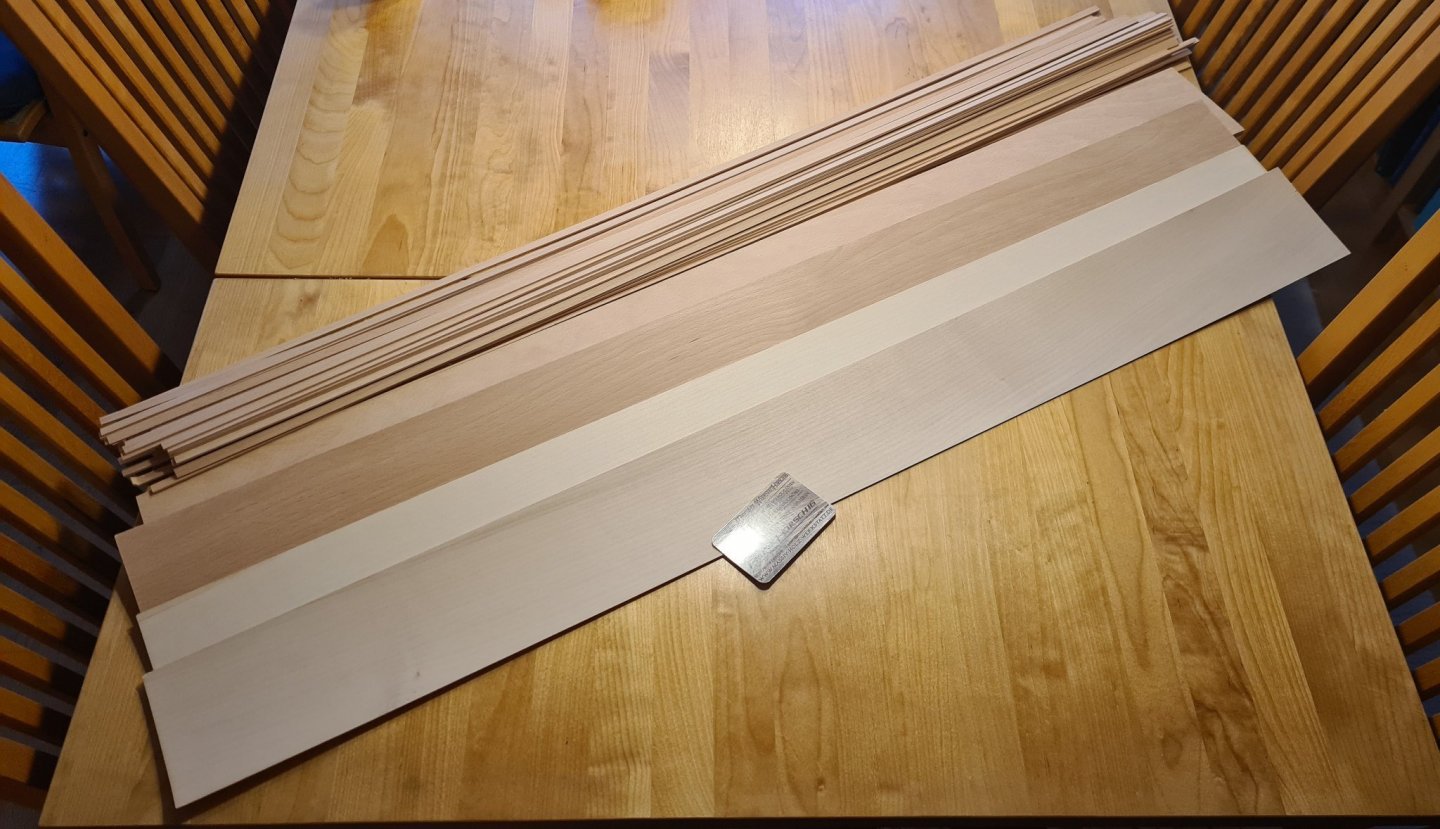
- 118 replies
-
- 3
-
-
- billing boats
- meta 484
- (and 1 more)