Brewerpaul
-
Posts
190 -
Joined
-
Last visited
-
 phebe reacted to a post in a topic:
Albatros by Dr PR - FINISHED - Mantua - Scale 1:48 - Revenue Cutter kitbash about 1815
phebe reacted to a post in a topic:
Albatros by Dr PR - FINISHED - Mantua - Scale 1:48 - Revenue Cutter kitbash about 1815
-
phebe reacted to a post in a topic:
Albatros by Dr PR - FINISHED - Mantua - Scale 1:48 - Revenue Cutter kitbash about 1815
-
Archi reacted to a post in a topic:
How to sail a square rigger?
-
GrandpaPhil reacted to a post in a topic:
Pride of Baltimore II by Brewerpaul - Model Shipways - 1/64
-
Canute reacted to a post in a topic:
Gluing tiny parts-- metal to wood?
-
mtaylor reacted to a post in a topic:
Tips on prepping masts, spars, etc for tapering
-
Tips on prepping masts, spars, etc for tapering
Brewerpaul replied to Capella's topic in Masting, rigging and sails
FWIW-- I have a metal working (machine) lathe. On my only (previous) build, I chucked the spar in the chuck and lightly gripped the dowel with a piece of folded over sandpaper. Started sanding near the center of the spar, moving the folded sandpaper to the outboard end. As the diameter shrank, I started my strokes further out, leaving the center parts alone. I worked very gradually, with frequent diameter checks. When I got one end of the spar the way I liked it, I flipped it in the lathe and repeated the process, with frequent checks for diameter symmetry. I made my final sanding by hand, lengthwise to the spar to remove the sanding marks extending around the spar. A small wood lathe would work too. The advantage over the dowel in the drill method is that you can pass a long spar into the headstock of the lathe which gives a lot more stability than a couple inches in a drill chuck. -
mtaylor reacted to a post in a topic:
Gluing tiny parts-- metal to wood?
-
Is this the right forum for glue questions? If not, moderators please feel free to move this to the right place. I need to glue some TINY, thin wire eyebolts into wood. This particular time, they're going on a masthead, but there are plenty of others on the Pride of Baltimore II! I'd like to do it neatly, but the joint needs to be fairly strong as rigging blocks will be attached to them. So far I've tried CA, both thick and thin with varying results. The tail of the bolt is too thin to pick up enough glue from a "puddle" of glue, and putting a droplet of glue on the masthead is messy. How do you folks tackle (pun intended) glue jobs like this? Type of glue? Technique? Thanks.
-
Untangling and rerigging or start from scratch?
Brewerpaul replied to Rgpracer's topic in Masting, rigging and sails
I have one totally different thought. Why not put this model in storage for a while and build a simpler, different ship to learn to use the tools, learn terminology, get a feel for rigging, and then tackle the repair job? The ship you have is pretty complicated and learning how to do it right will not be easy. Having another build under your belt might make that task a LOT easier. Something like a two mast topsail schooner for example. -
Less costly rigging rope for Pride of Baltimore II?
Brewerpaul replied to Brewerpaul's topic in Masting, rigging and sails
I've looked at lots of rope making info, and I simply don't want to go that route. -
I want to replace the supplied rigging rope from my Pride of Baltimore II with something better looking, but I can't spend a fortune. I used some Syren rope for my Constitution cross section and it was truly first rate so that was the first place I looked. If I calculated correctly, rope to rig my Pride would cost upwards of $50, assuming I bought the same lengths as the cord from the kit*. This is 'way out of my budget. I know, you get what you pay for, etc and I agree, but I have to be somewhat frugal. Anyone know of alternative replacement ropes at a lower price? * The kit comes with 0.008 Black 30 yards 0.021 Black 10 yards 0.008 Manila hemp 50 yards 0.021 Manilla hemp 10 yards Do these lengths sound reasonable or too much? If any of those are 'way too long, I might be able to pare down the list and afford Syren.
-
Although I've loved tall square rigged ships for most of my life, I really didn't have any idea how they were sailed. All I knew was that it HAD to be a lot more complicated than my old Sunfish 😁 Any of you who are in the same boat (pun intended) check out this videos which I got wind of (pun also intended). It's amazing and gave me a great appreciation about how complicated and sophisticated these magnificent ships were/are; https://www.youtube.com/results?search_query=star+of+india+ship YouTube has a lot more related videos.
-
FWIW-- I sailed on the Pride of Baltimore II this summer as guest crew. The port anchor is on chain, the starboard is on un-tarred rope. Both do go around the winch (not windlass).
-
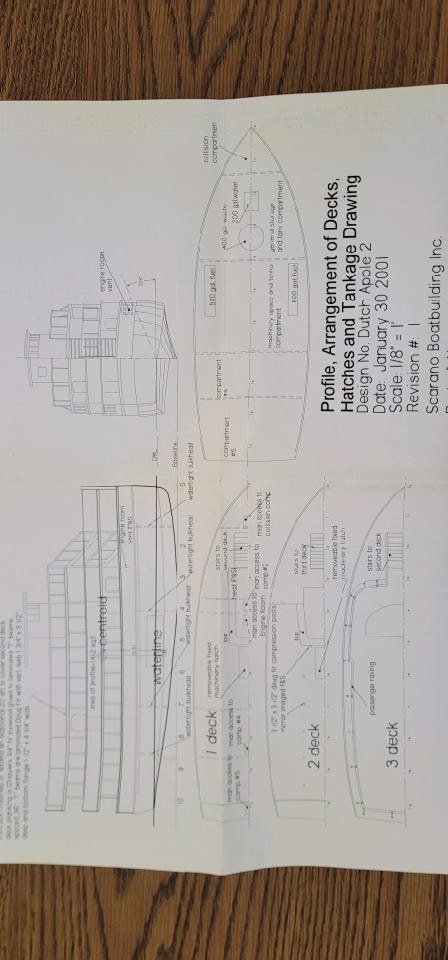
Come June, it'll be my wife's and my 20th anniversary. Our reception was held on the Dutch Apple cruise ship from Albany NY. As a gift, I'd like to build a model of the ship and naturally there is no kit remotely similar. The nice people at Dutch Apple have sent me a drawing of the ship to work from , plus some photos of the ship out of water to show the hull design. I've never done a scratch build and have no idea how to proceed. I'm thinking that a solid hull would be easiest, maybe balsa for ease of working,otherwise basswood. Probably a foot long or so. I'm concerned mainly about getting the hull pretty close. I can pretty easily enlarge the drawing to size, paste the side view of the hull onto my block, and bandsaw that profile. It's the fore and aft contours I'm not sure how to translate.I am NOT looking to produce a museum quality reproduction, just something that looks pretty much like the Dutch Apple. I'm thinking that the parts of the ship above the main deck ought to be fairly straight forward to build from sheet stock. Any and all suggestions welcomed.
-
Sometimes the materials supplied in a kit are not easy to use for one purpose or another. On my current build of the Pride of Baltimore II (modified into a more generic War of 1812 era Baltimore clipper) I was having a heck of a time cutting the 1/32" stock neatly for the trim around the transom and the "fancy pieces" on the sides of the stern. My blades are surgically sharp. In fact, they're actually real surgical blades, brand new. The wood kept splitting while I cut the pieces and trying to bend the fancy pieces on the sides of the stern also split them. Eventually I came up with the idea of using file folder material for these pieces. I don't know if the thickness is to scale, but the card stock cut neatly and easily, and didn't crack when I bent it. The cut edges had a bit of paper "fuzz" which was easily handled by using sanding sealer and then sanding it off. Now I'm at the stage of building the bowsprit. There are some metal bands at the base of the jib boom but I can foresee that bending them neatly wouldn't be easy, and getting the required holes drilled in the brass without having the drill bit wander off, even with a pilot dimple, would be tough. I'm going to resort to my card stock again. It should bend and glue easily and I think the drill bit will stay in place better than in brass. Once painted I think they'll look just fine. Anyone else here use alternative materials to make life easier?
-
That's a really nice build! I hope mine comes out as nice.
- 21 replies
-
- 1
-
-
- model shipways
- Finished
- (and 1 more)
-
The text and pictures are out of order, but you get the idea. One item of news-- my wife and I will be sailing on a 2 night cruise aboard the real Pride of Baltimore II as guest crew at the end of June. Excited much? You betcha!
- 1 reply
-
- 2
-
-
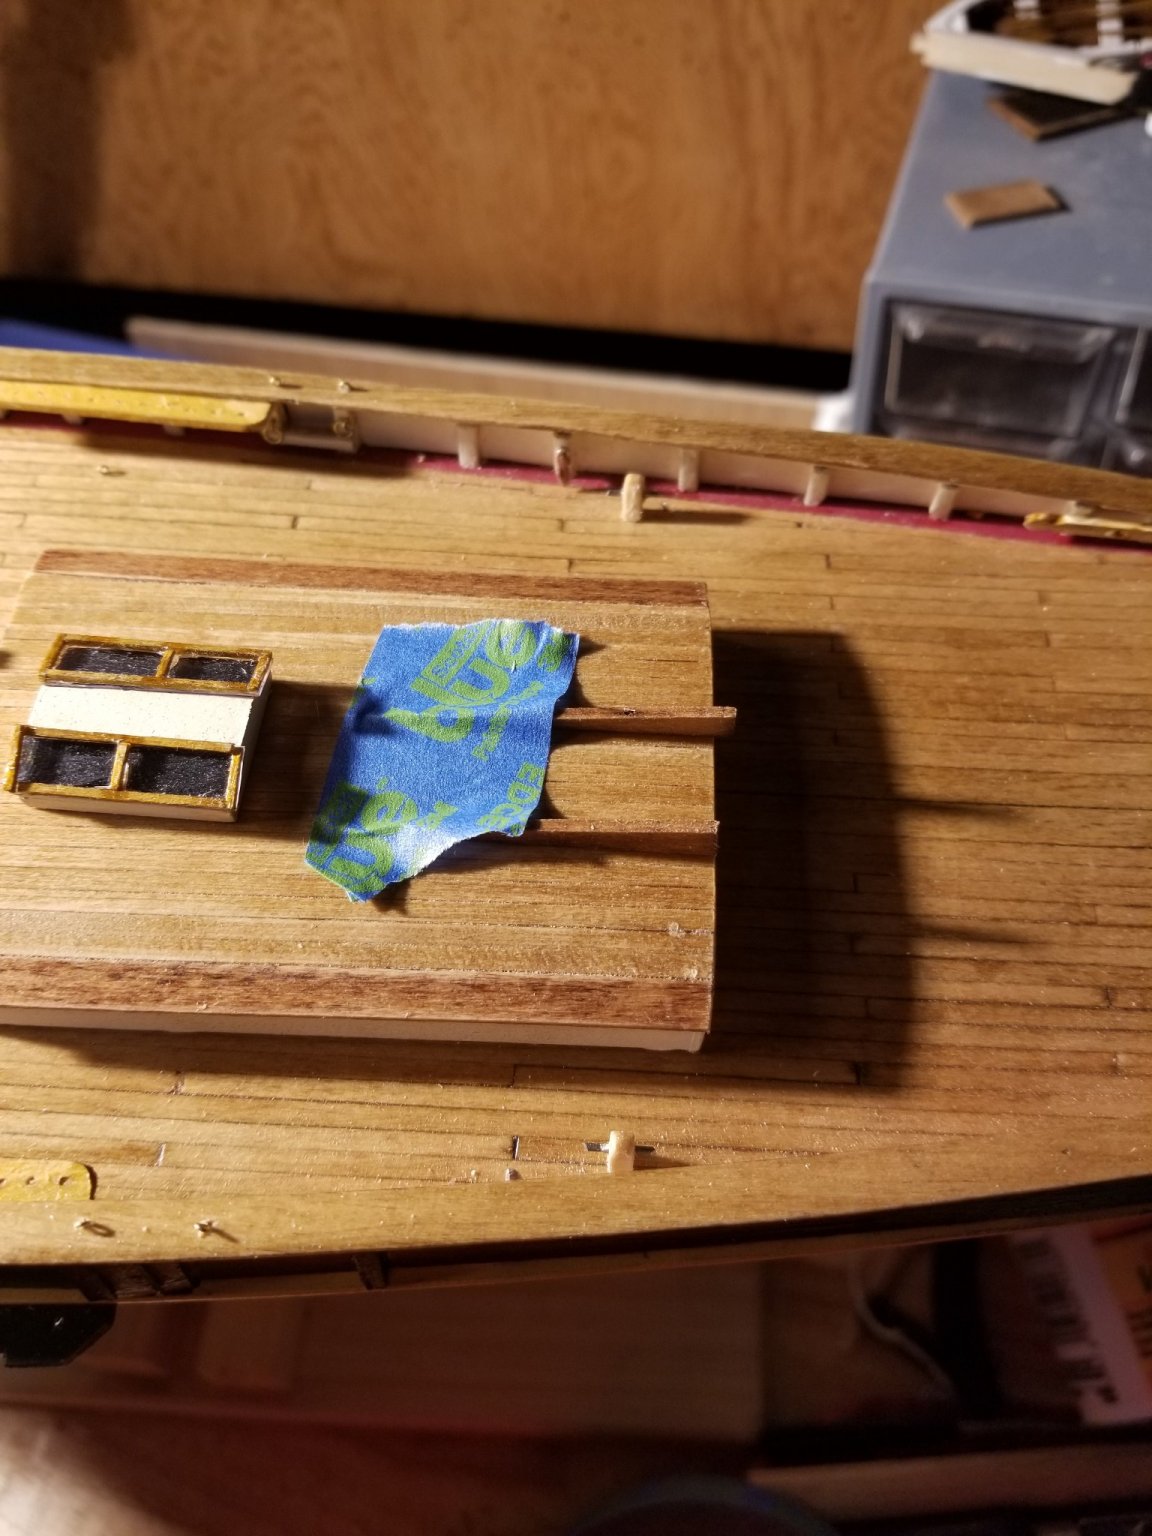
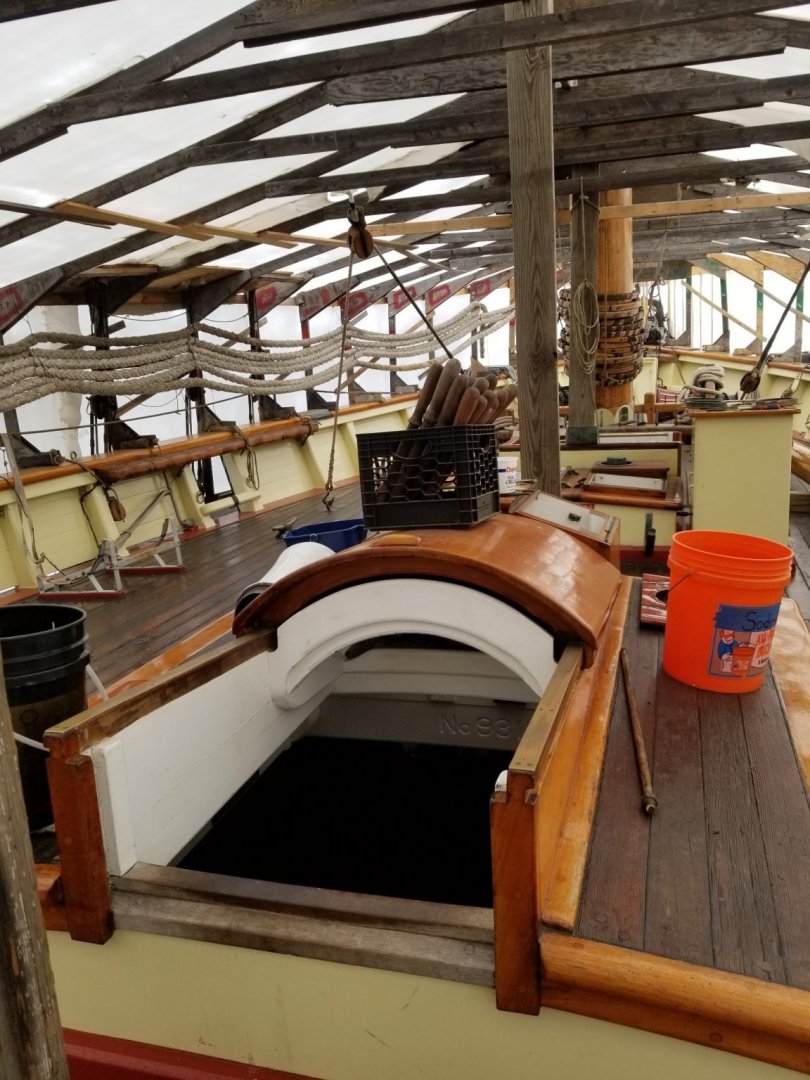
I'm still plodding along with my Baltimore clipper build. It's from the Model Shipways kit of the Pride of Baltimore II. I decided to de-modernize it,eliminating some of the not so beautiful things like radar, props etc. It has slowly morphed into a generic Baltimore Clipper called Fair Charlene, after the admiral. Right now I'm working on the aft cabin. On the real Pride, the hatch/entry looks like this; The hatch is slid forward so you can see down into the cabin, although you don't see much since it's dark in there. My cabin thus far looks like this; Those rails are just taped,obviously, to show where they'll be. I'm thinking putting the hatch in the slid forward position, then cutting a square hole in the cabin roof between the rails.There is deck below that, so I'd paint that area black to simulate the dark cabin, then add a couple of rungs worth of ladder going down. What do you think?`

- 1 reply
-
- 2
-
-
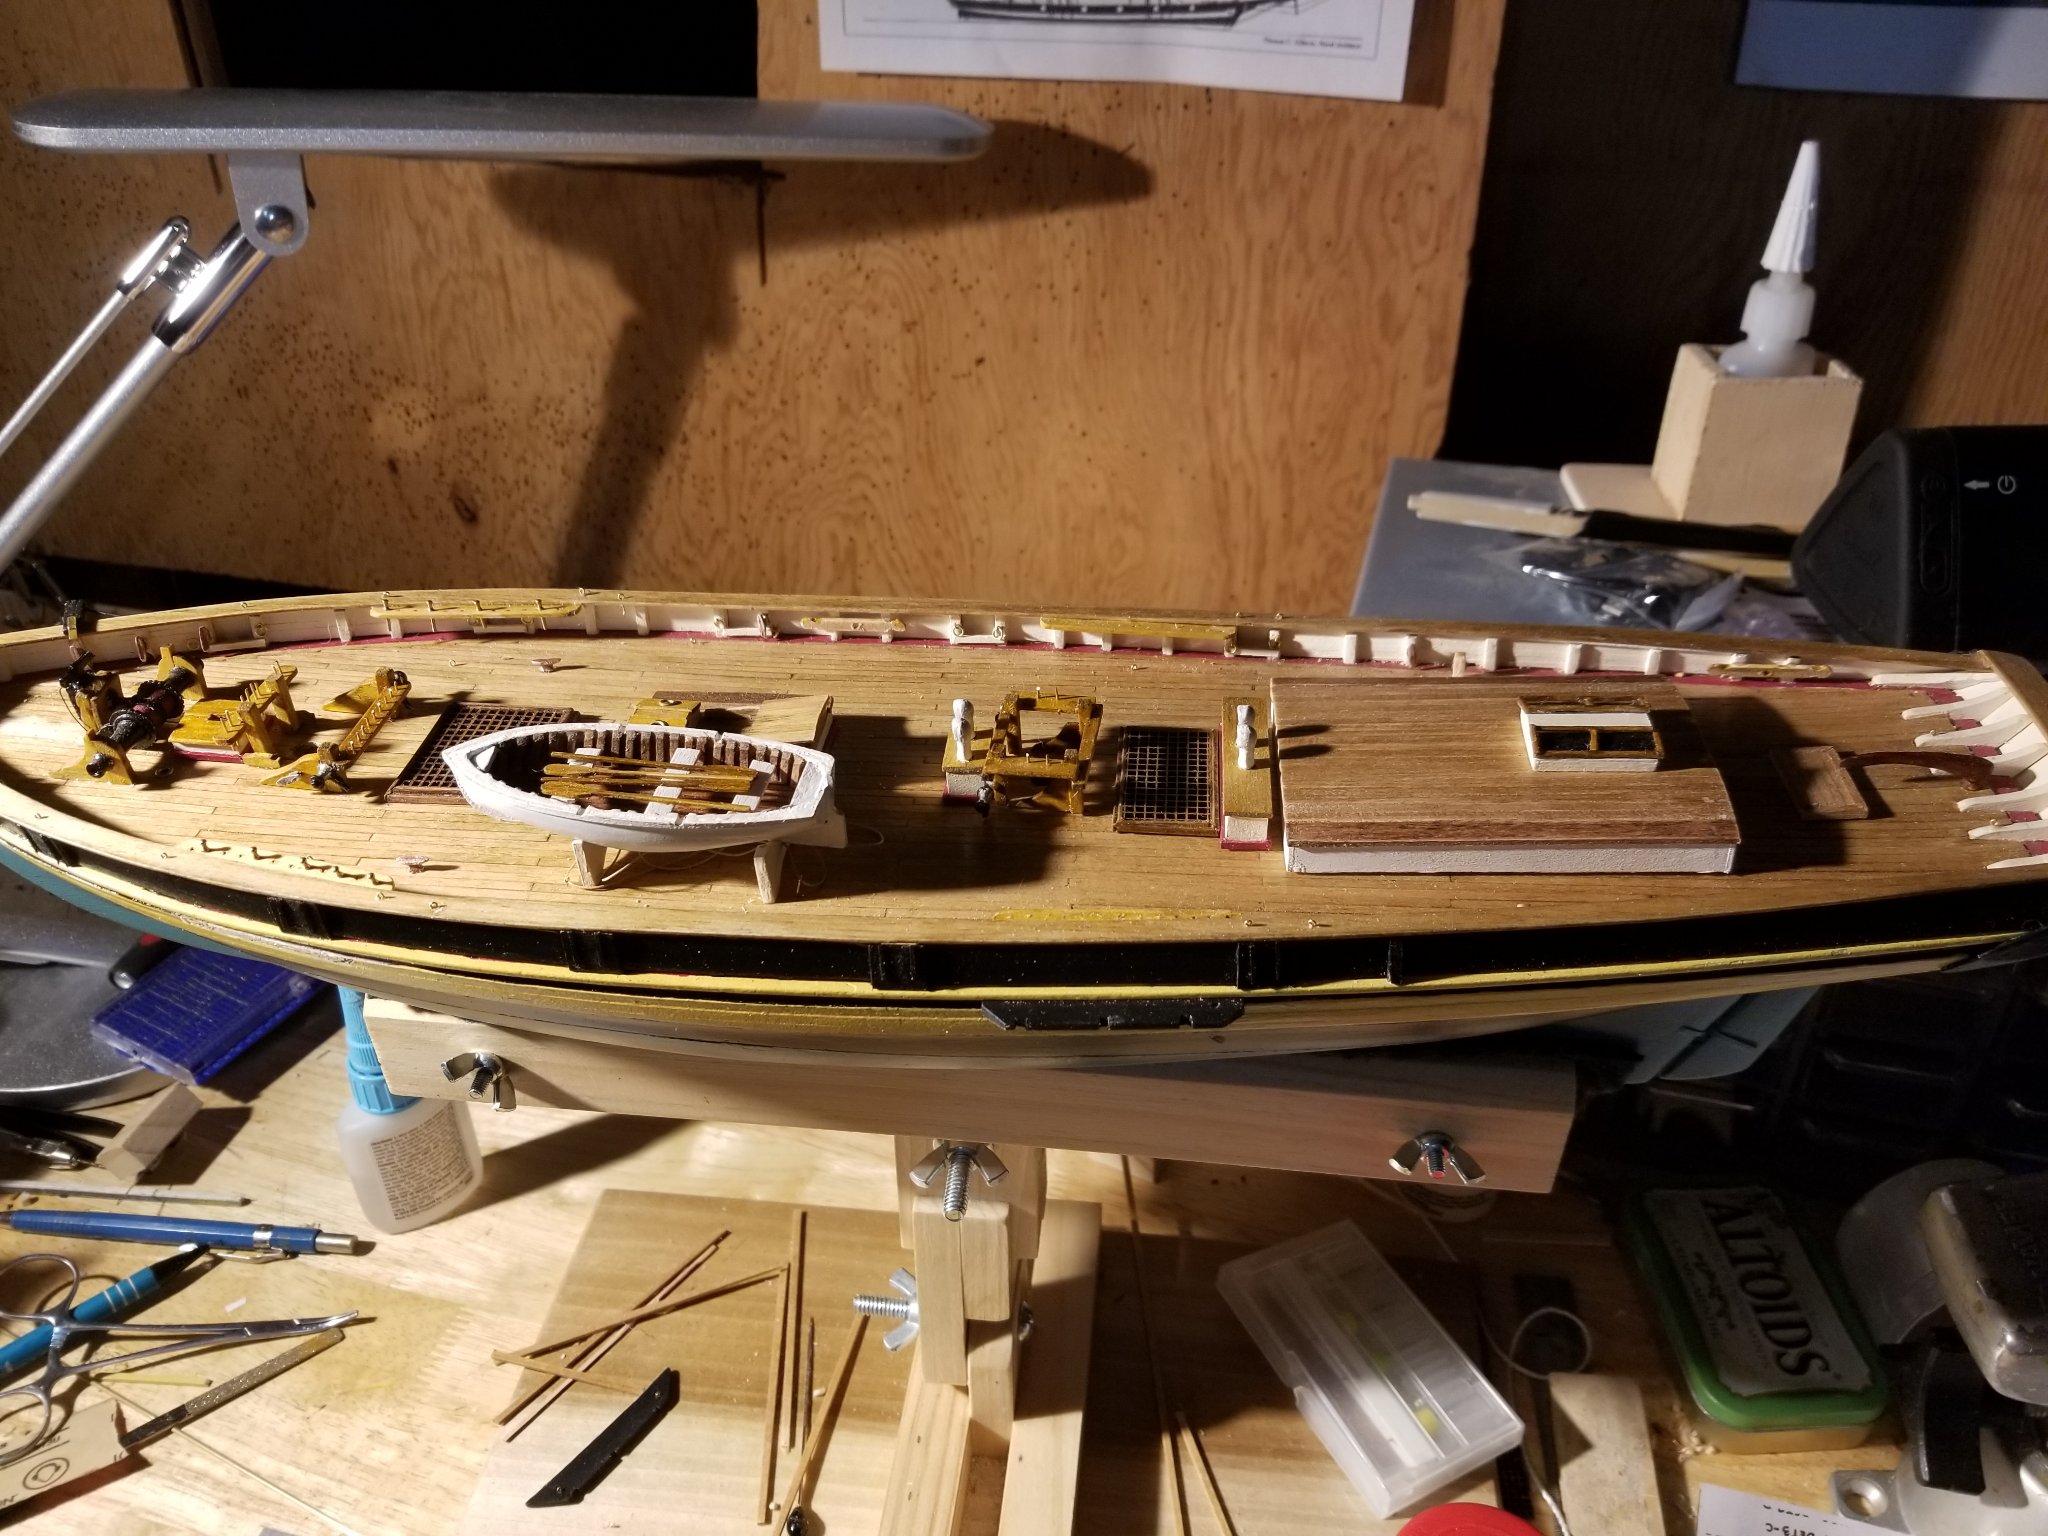
Update. My progress has been slow,but although my work isn't up to the level of some other builds, I'm pretty happy with my ship. The picture shows her as of last night. Some things are glued down, others such as the rails around the masts, ships boat etc which might get in the way of future work are not. That the aft cabin is unattached and has more things to be added. You'll note that the foremast channels are not in place. I only recently noted that the port channel was not parallel to the mainmast channel, too much to tolerate. I broke it loose and it's a good thing I did for another reason. I had installed it backwards with the aft end forward and vice versa. This meant that the deadeye spacing would not match that of the starboard channel and would have been VERY obvious once I started adding shrouds 🥶. I ended up taking both channels off and reworking them so they're both correct (I think). I reinstalled them after I took this picture. Other Pride of Baltimore II news-- my wife and I will be sailing on her as guest crew for a two overnight cruise!! It's been a lifelong dream of mine to sail on a tall ship, and I'm more eager than you can imagine. I'll take many pictures, so if anyone wants views of any particular parts of the ship, let me know. This will be at the end of June,starting on my birthday.

-
I'm glad to see this topic. I wouldn't mind some figures for my modified 1/63 Pride of Baltimore II model
-
I haven't used it for model making, but I make Irish Penny Whistles from exotic woods, and I've used the Minwax hardener to strengthen some spalted woods. It works really well. Note that it does discolor the wood, which may or may not be an issue on a pin rail. Actually, I think I have a bit left in the can so I may give it a try.