
HOLIDAY DONATION DRIVE - SUPPORT MSW - DO YOUR PART TO KEEP THIS GREAT FORUM GOING! (Only 13 donations so far - C'mon guys!)
×


mcb
-
Posts
150 -
Joined
-
Last visited
Content Type
Profiles
Forums
Gallery
Events
Everything posted by mcb
-
More great work and ingenuity here. I will have to try rolling wire flat the next time I need small flat brass/copper as it seems to be getting scarce in the hobby shops. There is a lot to be learned from this thread. Thanks for posting it. Merry Christmas, MCB
-
Hi Again All, Thanks mtaylor and thanks again all for the likes. Everything is just sitting on poster board for the photo, the lines will come off after a little spray of water. The booms are vulnerable and swing in the breeze as they hang loosely on pins at the top and are really supported by the rigging, however I didn't have too much trouble repairing the one that I damaged sanding the bottom. The marine legs are rigid up and down but will move slightly in and out at the bottom. If I ever get to use these models on new modules they would have to travel about 4 hours each way once a year and 45 minutes each way 2-3 times a year. I haven't had much damage over the years but this one is a little bit delicate. Anyway it's all part of the game, the fun part on this one is over. You never know more NYC harbor items (in 1:160) may appear here some time in the future. Thanks again everyone, MCB
-
Hello Again, Thanks mbp521, Keith Black and ccoyle for the comments and thanks again everyone for the likes. At last, this grain elevator is essentially finished. Way back in this thread I mentioned I might post a re-cap at the end, well here it is. As I mentioned somewhere before I come from a model railroad background (N scale 1:160) and have built many scratch-built items, mostly in styrene. I cannot remember using plans at the beginning of a build but work from photographs found in various books, magazines or an occasional field trip. I enjoy the task of reconstructing a model from sometimes scant information and I am prepared to have to spend time to correct mistakes or live with them (see below). I expected that it would be finished this past spring, however quite a few revisions and repairs had to be made. The first problem was that the commercial windows that I wished to use in the engine house appeared to be slightly larger than what appeared in my photos. This caused me to build a new engine house and the hull as well in order to keep the proportion reasonable. Next the marine legs (the movable conveyors that are lowered into the grain barge to remove the grain from the barge) did not fit well in the side of the opening in the elevator. This was an opportunity to improve the fit and the dimensions as well as to incorporate what was learned from some additional photos that I found. Finally, I had to sand the bottom of the hull to get it to sit flat, I suppose that attaching the superstructure introduced a bow. This is something I should have corrected immediately when noticed, it would have avoided damage and delay. I have made a lot of assumptions building this model, inserting things that must have been there such as coal /ash hatches, cleats, water plugs, and omitting things that I cannot make sense of, at least at the time I am working on the particular item. I used some commercially available parts such as metal blocks, chocks, capstans, cowl ventilators and eyebolts from Blue Jacket. Model Shipways eyebolts and cleats. Sylvan lifeboat. Tichy N scale windows. Micro scale alphabet decals. Gold Medal n scale lift rings (really small eyebolts). The engine house cyclone ventilators, chains and wooden barrel - unknown from my detail parts drawer. Rope and hoist lines are from EZ line, Model Shipways, Walmart and the mooring lines (which I have recently received) are from Ropes of Scale. I wish I used RoS for the rest of the lines, it is very nice looking. FloQuil (RIP) and tru color paint. The rest was predominantly styrene (mostly Evergreen). The bell on the pilot house, pilot house stairs and railing, the 2 whistles, the stack and relief valve vent are fabricated from brass. All the doors and half doors as well as the pilot house windows and skylights are built up from styrene as well as bitts, bollards, top ventilator etc. etc.. I should feel guilty for using commercial n scale windows but I don’t, I have made (and discarded) plenty of them in model railroad projects and I won’t miss it. In case anyone might be interested the inspiration for this model came mainly through browsing ‘ New York Harbor Railroads in Color’ vols. 1&2 Thomas R. Flagg, Morning sun Books. There are many nice color pics of interesting harbor equipment mostly railroad related as well as text explaining operations in the harbor. Also useful was an article, also by Thomas Flagg, in the back issue of ‘Transfer’ no. 40, Jan-May 2004 the newsletter/magazine of The Rail Marine Information Group. There is also one photo and some info on railroad marine operations in ‘The Delaware, Lackawanna and Western Railroad in the 20th Century’ Thomas Tabor and Thomas Tabor III. For the most part however I used the 3 photos which were shown throughout this thread. This model was intended for inclusion on a set of N scale modules which I hope will start building in the upcoming year. I will have to devise a way to transport it since it is fragile, as expected. The module with this model will have a few grain barges and a freighter next to the grain pier as shown in the pictures in the opening posts of this thread. I am just about certain that the pier is the DLW’s grain pier in Jersey City. The freighter happens to be there in this case, though usually the grain elevator and barges would meet the freighter at any pier in the harbor. Following are a few pics of the grain elevator in action with a couple of previously built grain barges and a not quite finished small freighter model from Sylvan Models. Note the crooked front ‘bumper’ under the name on ‘Amy Mack’, I have been not seeing that for months, I see it now when I post it on this forum! Finally, thanks again for all the comments and all the likes from everyone during this build. It is certainly a great place to be a part of and the place to go for info on model building and anything nautical. MCB
edit1.jpg.98b8203b29cf2c6081c9b95081cea994.jpg)
edit1.jpg.815c51b574072357e8df81c83ac575cf.jpg)
edit1.jpg.656aeb43f02a70b5ad7faef127290c39.jpg)
edit2.jpg.f3587ffd6aaf10b15a2e51b4d3a6169f.jpg)
- 87 replies
-
- 16
-

-

-

-
Hello again, Thanks for the comments mtaylor, wefalck, Keith Aug, and Roger Pellett and thanks to everyone for the likes. I have finished up the rigging of the discharge booms. I decided to obtain some nicer line for mooring lines so I ordered a few packs from Ropes of Scale, now I wish I had used it for the lines installed earlier, it it's so nice looking. While I was waiting for my order I made some brooms and a shovel which must have been in constant use on this boat. I also made a (very) crude representation of a 'power shovel or scoop' which were used in the hold of the grain barge by the crews which were hired on for the purpose. These scoops were guided by hand and apparently pulled along by a continuous loop arrangement of pulleys. I assume that some of the lines on the marine leg were for this. There are a couple of photos of this in "Transfer" mentioned above but it is difficult to make out exactly how it is rigged as everything is covered in grain including the workers, up to their knees. Therefore I omitted the blocks and lines on the foot of the marine legs (wouldn't be visible anyway). So the model is finished and in the next few days I will try to put up some pics of it, in its working environment, if I can finally get the dust off. Thanks, MCB
edit1.jpg.b3c46371a4032e0a24223ea7778f2989.jpg)
- 87 replies
-
- 12
-
-
Hello All, Thanks Canute and Keith for the comments and thanks everyone for the likes. Well last night I managed to get the marine legs installed in the tower, not perfect but I am going to take it as it is. The EZ line started to fray a little but it remains intact. I can still see a lot of clinging styrene dust that needs to be cleaned. All that is left to be done is to rig the final discharge tube, tighten the one that was upset when I had to sand the bottom, some clean up-touch up and perhaps add a few details. The end is in sight. I need to get a better camera (or operator). Thanks, MCB
edit1.thumb.jpg.623741338a614411fbab377ca7e32589.jpg)
edit1.thumb.jpg.8ff5ba0694f4a5562d44fcdfeeec48d8.jpg)
- 87 replies
-
- 11
-
-
-
Hello Again, Thanks mtaylor and Canute for the comments, and thanks to all for the likes. Well the marine legs for this thing are ready to be installed with simplified rigging. I can no longer put it off, the 'moment of truth', installing the marine legs into their openings, is next. I made hooks to attach their inboard ends to a beam in the center of the tower, I have to find a way of fixing them in place against the pull of the EZ line elastic rigging. (I have a few ideas). Wish me luck. 🤔 Thanks, MCB
edit1.thumb.jpg.e6310b9272c7cf0b1349cdb37e610601.jpg)
edit1.thumb.jpg.d5fc1160e166c6cdc7de292090cd02ea.jpg)
edit1.thumb.jpg.fc58db73c4401b255b3dbd93ef44bbeb.jpg)
-
Hello CDW, I like the coloring of the engine, especially the starter. Very nice. MCB
-
Hello Again everyone, Thanks Keith Black, mtaylor and Canute. Thanks everyone for the likes. Work on 'Isis' slowed down recently due to a busy August. After a little clean-up the marine legs will be ready to paint. Then perhaps final clean-up and assembly at last. I thought that this would have been finished a long time ago, but I seem to always underestimate the time required. Thanks Again, MCB
edit1.thumb.jpg.47832dd860eb0138a974f0066c34960f.jpg)
edit1.thumb.jpg.a9e26892fb6245bf596e6733cbe3d727.jpg)
-
Hello Again, Thanks Keith, G. L., Kevin and Canute and thanks everyone for the likes. Well I thought that this project would be finished by now but I found a couple of things to correct. I discovered that the bottom of the hull had developed a significant bow a while ago and put it out of my mind, to be remedied later (mistake). I should have taken care of this before I put a lot of details on, especially the discharge tubes. So now the bottom of the hull has been sanded, I only have to clean up some clinging styrene dust and re-rig the extended discharge tube. I think that the styrene bowed when I glued on the superstructure. The other problem was I was never happy with the previously assembled marine legs. They did not hang right from their support arms and since they were built I have seen some photos suggesting how the bottom of a marine leg really appeared. Some slight adjustment of the proportions seemed necessary as well. The pic below shows the old version and new under construction. Anyway I had hoped to show the completed model by now but I suppose now it might be a few more weeks. Thanks, MCB
edit1.thumb.jpg.5818b4f9c9a1c30b1c9d0ef604d1d79d.jpg)
-
Hello Eurus, As Roger said above you should be able to find something to use for the wheel such as N scale model Railroad brake wheels (see below) in photo etched metal. I thought I had something that could work in plastic but I didn't find it in a quick search of my inventory. If I recall Gold Metal Models may have offered water tight type doors (USN), but don't hold me to that. Good Luck, MCB
edit1.thumb.jpg.94105c74d644e68dbe7828aa15552206.jpg)
-
Looks good. At first I would have voted for red but I think this is the best choice. MCB
-
Hello Wefalck, Those blocks look great. I cannot imagine making them any smaller. So you must have a jeweler's apron. I should have gotten one of those years ago. Well done. MCB
-
Hello everyone, I thought I should report in as it has been a while since my last post. I have installed three of the discharge tubes with somewhat simplified rigging. They were not as difficult as I was expecting. I will leave the last one until after the marine legs are in place to avoid interference. After the marine legs: clean up/ touch up and perhaps add some details, then finished, I hope. Thanks for looking, MCB
edit1.jpg.c0886f117f5b804c539b15d962631c15.jpg)
edit1.jpg.e66fab0ee64eeb0c668d5a90577817f5.jpg)
- 87 replies
-
- 13
-
-
Very nice. I especially like the masonry . I never thought white metal could look that good. Did it stand up over time? MCB
-
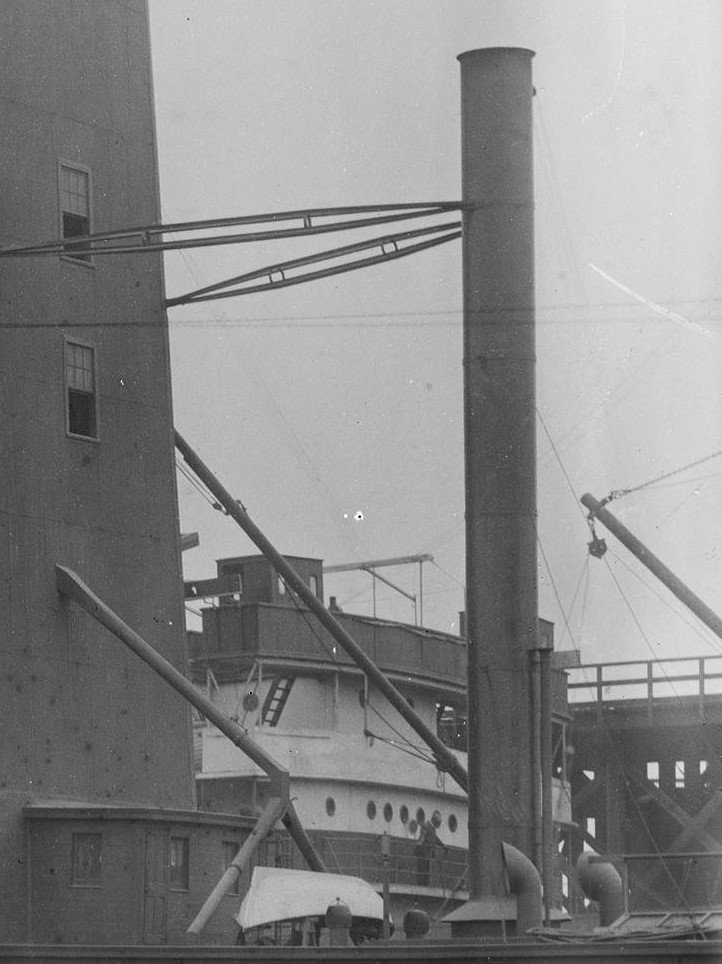
Hello Again, Thanks Mark, Wefalck, Kevin and Keith. Thanks everyone for the likes. The aft compartment that must be shallow to allow for the top of the boiler appears to contain extensions for the discharge tubes. Some of these tubes must be rubber or similar since they are flexible. Here attached is a crop from the same photo shown above. The opening in the forward part of the elevator is a mystery since it is blocked by grain barges in all of this series of (5) photos. Perhaps gear is stored in there? You can see that most of the windows and doors are open for ventilation though it does not appear to be summer. Next up should be the discharge tubes. Have to go to work now. Thanks Again, MCB
.jpg.fb4f72c4a851aafc12a6410c8a056db4.jpg)
-
Hello Again, Thanks for the likes. I put on the support brackets for the top of the stack, they don't look as bad as I thought they might. I will probably keep them. There is not a lot left to do on this I think. Only the discharge tubes, door handles, marine legs and then a lot of touch-up/ clean-up. This thing is starting to get fragile. Not everything is glued. Four posts in 2 days, I am not usually this talkative. Thanks Again MCB
edit1.thumb.jpg.5233a3f916d12c681b16645903cc15be.jpg)
-
Yes Wefalck, I could not see any stays forward, only the bracket at the top. There are other lines faintly visible in the photo above but I am reluctant to add them when I am not sure. For instance there appears to be a block at the top of the stack. What could its purpose be? Flag or anchor light? We already have a mast for that I think. I may need to fatten those turnbuckles more. Thanks, MCB
-
Hello again, The upper support bracket for the stack is unusual (see pic above) at least to me. I was unable to find suitable brass stock at a few local hobby shops so I am trying to make do with 3/64th styrene tee (Plastruct). I built a fixture to taper the ends and I thinned it down somewhat as well. The hoops were made with some flat brass wire. These will be mounted with brass wire pins and not permanently attached in case I can come up with something better. If these look to bad on the model I may simply use smaller flat styrene or brass and give up some of the 3 dimensional 'texture'. Thanks Again, MCB
edit1.jpg.8c5fcaf5b3354c28070cc0a88db042e5.jpg)
edit1.thumb.jpg.ecf14e625df39c4dbb6ff2398e63f29b.jpg)
-
Hello Everyone, Thanks for the comment Brian and thanks everyone for the likes. I have been working on the stack for 'Isis'. On the first version of the stays for the stack I made some turnbuckles but they were grossly oversized (probably ~42") so I removed them and tried to represent them with blobs of paint. I used fine Easy Line for the stay wires. I also hung the boat hook over the door. I will make another post to show how the top bracket support is working out. Thanks for looking, MCB
edit1.thumb.jpg.04ed4db6bef8a5e49bb0e387aa196084.jpg)
edit1.jpg.bb6b76c2380491080194d4c8bad256d3.jpg)
-
Hello again everyone, Thanks Keith and Canute for the comments and everyone for the likes. There is a little bit of progress to report on the grain elevator. I have added and rigged the ladders to the sides of the elevator. I couldn't think of their purpose until I saw a picture of one leaning against a freighter that was being loaded, it should have been obvious to me. I have also made up the flag pole (never saw a flag or lantern in any of my pics) but did not yet glue it in, as well as some other miscellaneous details. The last week I have been building the stack and vent for the relief valve in brass which in the pic are placed in position not glued. Remaining to do on the stack are turnbuckles and guy wires for the stack and the support bracket for the top of the stack. After the stack will be rigging the discharge tubes and the marine leg. Clean-up and then finished? The last pic included here should be a detail shot of the stack cropped from another William W. Barry jr. photo in the series as noted in the first post. It shows an odd lenticular sort of arrangement of structural steel joined at the ends with 2 hoops for spreaders. Most or all of the other (few) pictures of 'Isis' and the other grain elevators I have show a simple set of 3 pipes or rods (p&s) which would have been easy. But I said to myself when I started this that I would stick to these photos and a deal is a deal. Thanks for looking, MCB
edit1.thumb.jpg.77c07efa61fce51baed9efaa0f4ac2bf.jpg)
edit1.thumb.jpg.d2c6958940193b3d1e3965b6118bdf41.jpg)
- 87 replies
-
- 10
-
-
-
Hello again all. Thanks Roger and Canute for the comments and everyone for the likes. Three weeks and more seem to have gone by since my last update. I must post some progress. A lot of the small detail parts have been added and of course some things that were good when dry fitted have had to be re-made. I have added ventilators, skylight, boat and whistle to the 'boat deck', whistle, bell, awning and blocks for the ladders forward. One thing that I cannot see on these photos is a smoke jack for the galley stove which I assume to be in the rear of the engine house. I will omit it for now. Remaining to do: Rigging the ladders, rigging the discharge chutes, aft bitt and flagpole, various deck litter (ropes , barrels, boat hook etc.), fabricate rooftop ventilator, (dreading this) rig the marine legs and lots of touch-up and adjustment. When I am finished with this project I will list the materials and commercial parts I used and perhaps some thoughts on my reasoning involved. I think it might be necessary to get a new camera so that I can get good images when this grain elevator is done. The pics I have been posting look the thing just rolled of the show room floor. Thanks, MCB
edit1.thumb.jpg.c2d2f0800b5e2b2d51ac0a7d5cd225e7.jpg)
edit1.jpg.ba59cbdcb73fc7e90fef06cc7752c344.jpg)
edit1.jpg.aa54053daad5daa7d854aa0022c59aed.jpg)
edit1.thumb.jpg.0f27c537c7fcaaa427109ea389fd6f4a.jpg)
edit1.thumb.jpg.6d26b007e4e8a5192b232a03da474f84.jpg)
- 87 replies
-
- 13
-
-
Thanks Keith Aug and Canute. And thanks all for the likes. Yes I am glad I got that issue of 'Transfer', thanks for the heads up Canute. I do have Flagg's books with three color pics. They were barn red over a black hull in those pics and probably for most of their career. A small update: I now have the tower sheathed and some of the deckhouses on. The model is a little bit more heavily weathered than I usually like, I am having difficulty touching up since I have no more of the Floquil paint in that color. The pics show the red paint brighter and the weathering a little more subdued than it actually is. Thanks Again, MCB
edit1.thumb.jpg.2fa305adceee55ecd6691e50fbefafbb.jpg)
edit1.thumb.jpg.3f2a97c6bc379fba1d7169dc0a0be499.jpg)
edit1.jpg.10b2f3e5f018f445f20e2f64af7475e3.jpg)
edit1.jpg.cd50e32abb8e6d3ffffe32b3411fdcca.jpg)
edit1.jpg.160dbef8c6c437af340ddb00e273a6df.jpg)
edit1.jpg.a8fae58693bacca3db8787c00d960a7e.jpg)
edit1.jpg.3a8487f336f7255799e818c53bb9e606.jpg)
edit1.jpg.1e8d34a4d3a2b5243a320e8991106d1c.jpg)
edit1.jpg.8f334c36d667f989b98ddba2c625f40e.jpg)
edit1.jpg.f2917775352a60c2f520f6eaf525d20c.jpg)
edit1.jpg.fa5d7349570243ba8e78e33968b8f870.jpg)
edit1.jpg.4e73bddaeca18661ad95962cc3908512.jpg)
edit1.jpg.09452bc060357989193852dba622b362.jpg)
edit1.jpg.bacfebe9ed124debdeb2e4b607bc2f83.jpg)
edit1.jpg.d40f2f92ef0da8c09c47930483d6af38.jpg)
edit1.jpg.c80d0d797e56814bd32d3ea9691164e0.jpg)
edit1.jpg.01d26df30fa1ab31e9c2fb80d355f861.jpg)
edit1.jpg.1d7100c845ee15b1122e7655d2105927.jpg)
edit1.jpg.33627bfe0b61c8452e73df82cff4e209.jpg)
edit1.jpg.b69091817c7d14827b692978b660fe82.jpg)
edit1.jpg.1753586fb91e951068fb3827cd273019.jpg)