
HOLIDAY DONATION DRIVE - SUPPORT MSW - DO YOUR PART TO KEEP THIS GREAT FORUM GOING! (Only 13 donations so far - C'mon guys!)
×


mcb
-
Posts
150 -
Joined
-
Last visited
Content Type
Profiles
Forums
Gallery
Events
Everything posted by mcb
-
Well, the fairlead turned out well. Is that 1/4" x1/16" stock? I'm sure you'll get the boat figured out. Good Luck, mcb
-
Nicely done.
-
Hello again everyone, Thanks Keith Black, and thanks to all for the likes. I am sorry that I took so long to answer you Keith. I don't know how those stacks look so clean, I suppose the ferry especially could have just had maintenance, but I doubt it. Anyway, here are some pics showing recent progress. I am currently installing rubbing strakes. I hope to be a little more careful with the hull on this one. Unfortunately, it will look much the same as 'Isis' until the superstructure is well along. I promise that the next one will look much different although still 1:160. Thanks for looking, mcb
edit4.thumb.jpg.9ace8ed1756a87bf9d4a64411590aa92.jpg)
edit1.jpg.c8b120f5ee5dd824485add68fc6b26f9.jpg)
edit1.jpg.b48a6519bf2d9cebb83fef18f8c2bd7c.jpg)
edit1.jpg.17f2bbb09de746e20b7aea4c9f427f66.jpg)
-
Hi, Nice anchor and the railing turned out well too. Good Luck, mcb
-
I think the cover and boat look very good as well. You really were able to get a nice on the edge. I have used tissue paper like that, but I don't think I could get a clean-cut edge in place like that. I usually just cut out squares as tarps and drenched them in thin paint. The gig looks quite delicate. Excellent, mcb
-
Hello Again, Thanks to Keith Black, mtaylor, von_bednar, Jim Lad, and Canute. And thanks to all for the likes. I had to start this thread since I was mired in indecision about which subject to start next. Once I start the thread I am committed and motivated. Below is a photo of the progress so far, roughing in the bulkheads. I hope to improve a few things compared to the last one. Also, below is a picture (NPS/ Watson B Bunnell) of another, older and smaller steam derrick lighter, 'Bangor' so that you can get another view of these steam lighters. This is a crop of larger photo. As Canute said above these glass plate negative images can show a lot of detail of the subject and the background as well. Note the laundry drying on the clothesline! Believe it or not that is a common sight in these images. I was surprised to see the clean appearance of the inside of the funnel of the 'Bangor' as well as the almost white funnel of a (paddle wheel) ferry at the bottom edge of the pic. There is an interesting thing in the background of the first pic in the first post too Thanks again, I will be back after the hull is faired and skinned I hope. mcb
edit2.jpg.a2e10e85bec465cd65b977a82e129584.jpg)
edit1.jpg.f0fba391e06c891ffe05d81eceff6ea9.jpg)
-
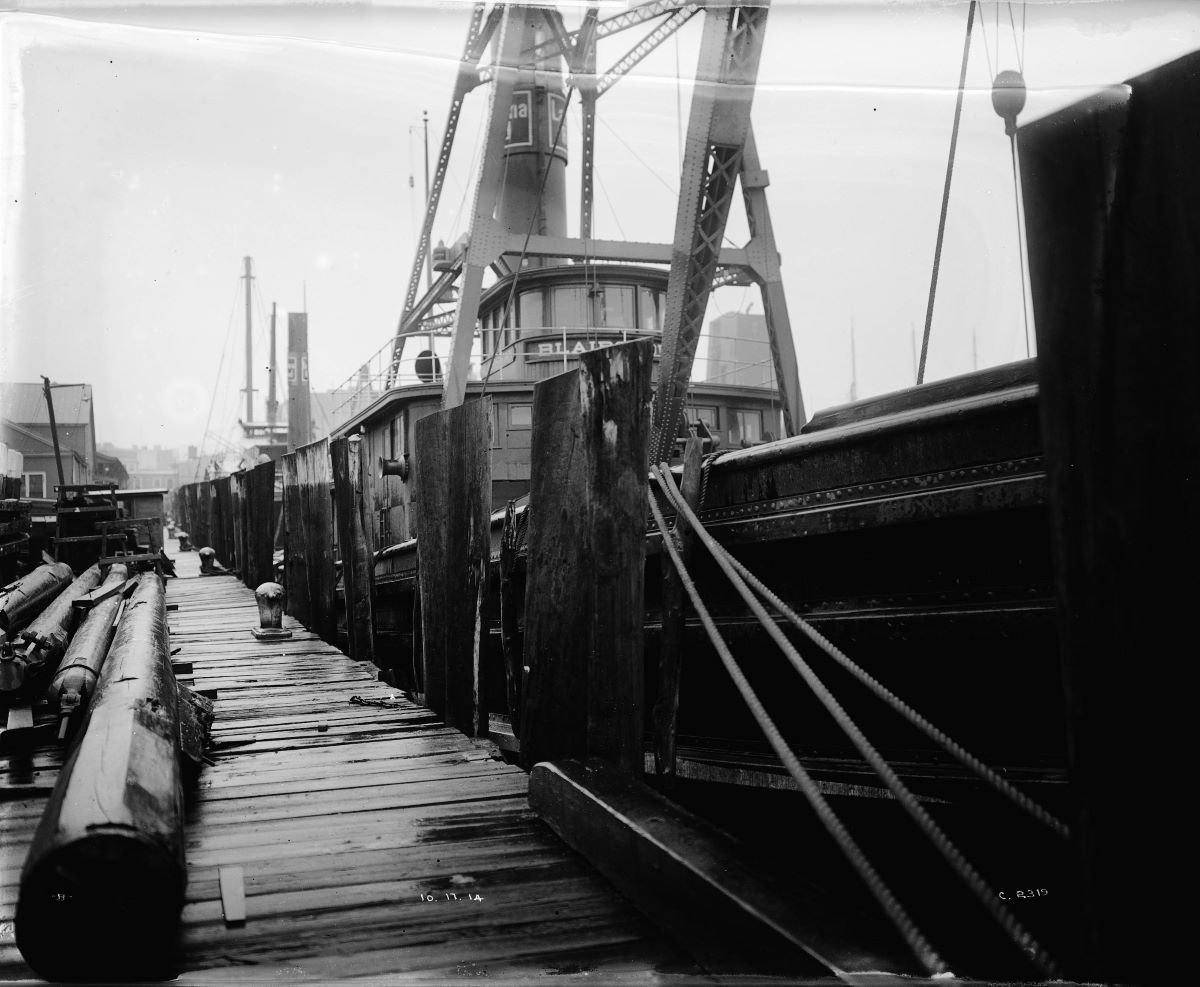
Hello everyone, Here is the start of another NY Harbor waterline model. 'Blairstown' was operated by the Delaware, Lackawanna and Western Railroad in New York Harbor from approximately 1914 to the early 50's when it was sold. She was an open decked, self-propelled, vessel equipped with a derrick boom rated for 35 tons. These lighters, being self-propelled as opposed to ordinary 'stick' lighters, were used to transfer important cargo from the railroad piers to ships around the harbor. 'Blairstown' will be built from photographs for the most part as was my previous model 'Isis'. I am preparing a crude drawing to work from using a good broadside photograph. I may paint this model as she was after she was sold to a non-railroad lighterage firm (and still working in NY harbor at least into the 1960's). The sources I am using are the same ones I used to build 'Isis' which I will list at the end of this project. Unfortunately, I only have a couple of photos that I am able to post which are of the 'Blairstown' soon after being built. My model will have among other things a pilothouse added above its former location, a narrower engine house etc. Photos below are from National Park Service, Steamtown DL&W glass plate negative collection, Watson B Bunnell Thanks, mcb

-
"this is the challenge and,...the fun of it." Well said Ras. Scratch building, it seems to me that one must build the kit but also build the instructions. Very nice work. Good Luck mcb
-
Its really starting to come together now. The 'gun pit 'is beautiful. I hope some of it will be visible in the end. Excellent work. mcb
-
Good to see this project back. That bulkhead looks indestructible. Nice ladder fixture. mcb
-
Bluenose II now sprit color.....
mcb replied to CPDDET's topic in Painting, finishing and weathering products and techniques
Hi Dave, I think you may be looking for the original Bluenose so this may not apply. I am knocking together an old AL Bluenose II right now. I made my bowsprit match the hull in a very dark blue very similar to the color on hof00's nice Bluenose II build log. I believe someone posted a pic here of the real Bluenose II like that. Inside the bullworks I made it white. Gammoning strap and chainplates I made flat black, but I am doing this to please myself rather than for accuracy. I looked through some of your log again. Very nice work, now I think I want to make my own ship's wheel. Good Luck, mcb -
Hello Again All, Thanks Keith Black, Canute, KeithAug, Roger and Grandpa Phil, I will be building 'Blairstown' soon, but I just might put up a build log of my Bluenose while I am getting ready for 'Blairstown'. I will probably make a crude drawing of 'Blairstown' as I don't think I have any pics of her that should be posted. Roger, I appreciate the info on the 'Lakers', I thought you would know. It lets me feel better about using it. I was originally going to use it as a place holder until I could build a more suitable larger ship, but I doubt that I would ever get to it. One of the pics in the above mentioned Flagg book shows what appears to be a Liberty Ship dominating the floating grain elevator that is loading it. Thanks Again Everyone, MCB
-
Hi Keith, No log for Bluenose yet, it is pretty far along, hull almost done. I am not sure if you folks need another Bluenose II build here.🙂 There are many nice ones already. Canute I guess it will be Blairstown next then. I have some pics (Taber, Flagg etc.) and a couple of different #s for length. Thanks Guys, MCB
-
Hello again all, Keith, I had intended to start another harbor model before this, but I couldn't decide on the subject. While I am procrastinating, I am working on yet another...you guessed it ..."Bluenose II". I saw an old (80's?), very reduced price, AL kit at a train show a while back and could not keep walking. When I get to the masting and rigging stage, I will probably have decided on the next project and come back to NYC harbor. There are about six models I would like to do all in the same vein and 1:160. I may try the steam derrick lighter "Blairstown" using the hull I abandoned for "Isis". The length is very close, the breadth is maybe close enough. I have also acquired plans for a larger project that would require much more time. Roger, thanks for the info about the 'Laker' class. Do you suppose that any worked the east coast, perhaps down to Cuba? Thats what I was telling myself. The small size is convenient for my purpose of fitting in a module, in fact I have a carfloat model that is bigger than it and the two should probably not be in the same scene. Since it is a 'Laker' I named it Avon Lake as my sister-in -law lives there. Out of Miami (only 5 letters). Thanks, everyone, for your interest, MCB
-
Hi wefalck, Another excellent simulation of wood. I had never given much thought to attempting it as I thought such results were not possible, especially in this scale. It is not overstated as well, which seems to happen frequently with effects like this. MCB
-
Hi Keith, Wouldn't it be nice to have a 1:120 figure to visualize it, but I think the practice shrouds are a great idea, it should make your decision for you. At least you won't have to rig the deadeyes on it. Good Luck, MCB
-
Hi Keith, If they don't appear in the photos that would be good enough for me! Everything looks fine, symmetrical and taut. mcb
-
Hello Again Wefalck, Amazing work here. I wouldn't think it possible to produce such small belaying pins. You really have simulating wood solved. I will have to save this info for future projects. Thanks for presenting this, MCB
-
Outstanding. I meant to mention a few posts back that the mahogany hull planking really looks good. It looks lively (right word?) MCB
-
Hello Wefalck, The wood effect turned out well, I like the hinges. Well done as usual. MCB
-
Realistic Water
mcb replied to taylormade's topic in Painting, finishing and weathering products and techniques
Hi taylormade, I had good results with Magic Water (in model railroad applications) if you can find it. It is a two-part mixture that can be tinted and has minimal curl at the edges. It had good shelf life. unrealdetails.com I think was the website. Good Luck, MCB

edit4.jpg.2e96c701e646f0ba2e29fdc50b991ffa.jpg)
