HOLIDAY DONATION DRIVE - SUPPORT MSW - DO YOUR PART TO KEEP THIS GREAT FORUM GOING! (89 donations so far out of 49,000 members - C'mon guys!)
×


Egilman
-
Posts
4,377 -
Joined
-
Last visited
Content Type
Profiles
Forums
Gallery
Events
Everything posted by Egilman
-
 yep... B-17 44-6302 / Shoo Shoo Baby II; B-17G-50-DL: 44-6251 to 44-6500 Was battle damaged over Merseburg 11/30/44 and force landed at Melsbroek, Belgium; Salvaged 12/21/44. According to the B-17 Database, there were 9 different B-17's that carried some form of Shoo Shoo Baby as a nickname..... Here is an image of Shoo shoo Shoo Baby as a Swedish Airliner..... Correction: this image of her is in her Danish airline livery after the swedes sold it to Denmark. (I completely missed the "Danske" in the caption below the image)
.jpg.d160b0f42d92245b9220b2e5893f5dac.jpg)
-
Yes, The "Swoose", B-17 40-3097 flew combat missions Over Rabaul and New Guinea and was damaged several times in air combat and in bombing attacks eventually being consolidated with a second "D" model B-17 40-3091 to become a personal aircraft of a General.... (amongst her notable passengers was one Commander Lyndon Baines Johnson) It is the oldest B-17 in existance and the only one to be in service for the entire war.... And The "Memphis Belle", B-17F 41-24485 whose combat record is widely known.... They also used to have "Shoo Shoo Shoo Baby", B-17G 42-32076 who is the most complete and original B-17 in existence... also with a well known combat record was shot up by flak and forced down at Bulltofta Airfield, near Malmo, Sweden, recovered by the Swedish government and used an an airliner reg. SE-BAP then sold to Denmark for $1 and called the STIG VIKING, later renamed STORE BJORN for the African routes; bought by IGNF (Institut National de l'Information Géographique et Forestière) as F-BGSH for geographical survey work before retiring at Creuil, France; sold to the USAF for 20 cents and fully restored at Wright-Patterson AFB and displayed at the USAF museum until she was transferred to the Smithsonian in exchange for the "Swoose" which is considered the more historically important aircraft.
-
1931 Cadillac by CDW - FINISHED - JoHan - 1:25 Scale - PLASTIC
Egilman replied to CDW's topic in Non-ship/categorised builds
Yes they were marvels of engineering, and Caddie's engine color was black in those days.... (packard's was green) but the original finish is hard to discern from a polished lacquered museum display piece. I know they were not that shiney during production.... That is black lacquer on those engines...... Polished aluminium on the rocker covers and chromed accessories. Standard restoration finish on a collectors piece. I'm sure you will do it justice..... -
It always amazed me the intricacies of Olive Drab camo. it can run from a greenish brown to a deep green depending on when it was painted and how long it had been on the surface... and the sun would fade it proportional to the thickness of the paint application.... Most of the B-17's went overseas in BMF and were painted in the field by either the maintenance facilities or the crews themselves by hand.... wipe brushing is a good way to replicate the look and spongeing is another..... I believe there is even fade powders that can replicate the look if used sparingly.... Me, I'm looking for a "D" model to model the "Swoose" There are very few combat used B-17's left most of them were sent to the scrappers immediately after the war..... Almost all the B-17's on display are post war manufacture.....
-
I better get busy, your battalion would kick mine's butt in any engagement... Very Very nice......
-
That pic shows two things, first the BMF on the turret and fairing, and second the ability of the aircrews to follow the regs handed down by the upper echelons.... :-)
-
1931 Cadillac by CDW - FINISHED - JoHan - 1:25 Scale - PLASTIC
Egilman replied to CDW's topic in Non-ship/categorised builds
Yep nothing about that engine was chrome....... I wonder why the model companies always chose to chrome the darn engines? -
I do believe that the nose turret and it's fairing were bare metal. I believe the reason was that the paint interfered with the operation of the turret, (but I've lost that link, looking for it) It was this way on all B-17G's....
-
There was actually four of them brother, three "F"'s and a "G" that carried the Little or Lil Audrey name.... 41-24560 B-17F one of the first Fortresses in England 368th BS - 306th BG code: BO-D carried the "Little Audrey" name her entire service life she was eventually scrapped in Texas during '44 42-29477 B-17F Assigned to the 369th BS - 306th BG code: WW-H. Also carried the name "Little Audrey" until she was transferred into the same squadron as 41-24560, she then became "Joan of Arc" she was on the second Schweinfurt mission 10/14/43 when she was lost over Bamburg to a Messerschmitt antiaircraft rocket. 41-24523 B-17F Assigned to the 323rd BS - 91st BG, code: OR-N, you covered her naming history and loss... 42-32008 B-17G Assigned to the 551st BS - 385th BG code: HR-T her name "Li'l Audrey" she also survived the war eventually being scrapped in New Mexico 02/07/46. You can find any B-17's in the B-17 Database... Also for many, their service life and final disposition.... I find it an invaluable resource brother when researching B-17's... It was hard to find a color and marking reference for it though, there is only a few decal sets made for the 551st squadron and the best one is for a silver bird or the one I posted above... and her scheme changed after she arrived in Europe going from an unpainted NMF to a drab over grey scheme that most of them wore....
-
1931 Cadillac by CDW - FINISHED - JoHan - 1:25 Scale - PLASTIC
Egilman replied to CDW's topic in Non-ship/categorised builds
I forgot, we can cast our own parts now, that definitely a better option.... -
SBD-3 Dauntless 1:48 Hasegawa - Edwardkenway-FINISHED
Egilman replied to Edwardkenway's topic in Non-ship/categorised builds
The wife may have to wait on her floaty thingy..... -
1931 Cadillac by CDW - FINISHED - JoHan - 1:25 Scale - PLASTIC
Egilman replied to CDW's topic in Non-ship/categorised builds
You can easily make them with a bit of trial and error, it is just a flat ring of plastic with a slot taken out of it so they will cone shape to fit the tire.... might take a couple of tries to get it right but it's not hard... -
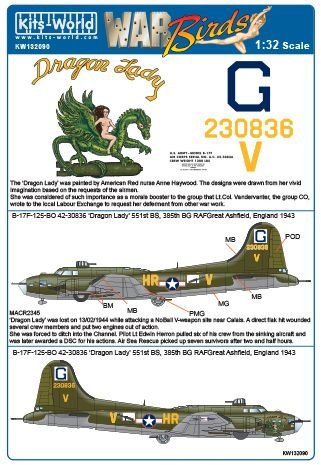
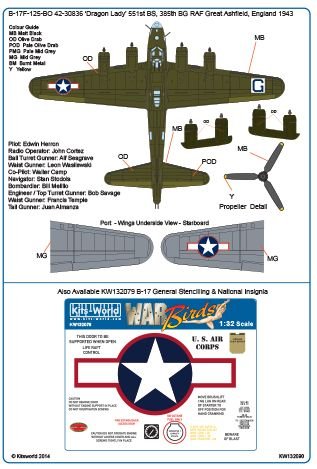
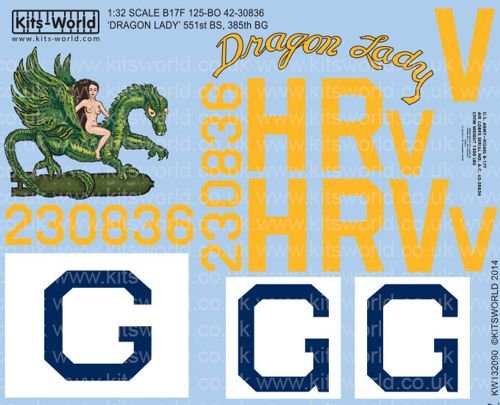
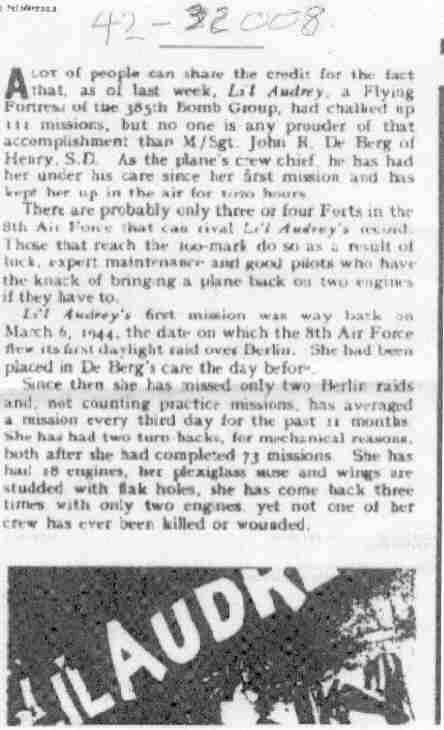
One last note: she was in the 551st Bomb Squadron/385th Bomb Group stationed at Great Ashfield. Her aircraft designation was HR-T and the unit designation was the Square "G" Color scheme: Standard Olive Drab over Neutral Grey, Yellow Lettering/numbering Red outlined stars & bars. Tail: Insignia blue "G" on a white square background, yellow serial "232008" and below that a yello "T". Left Fuse would be the yellow "HR" and Star&Bar ahead of the waist gun position and a yellow "T" following. Right Fuse would be the same markings positioned as shown in the images below... of course this is late war, early on she appeared like in the photo above with the vertical stabilizer in bare metal, blue square with white "G" and black lettering on the tail. The rest, Olive over Grey with yellow lettering ws standard Unit emblem.... And a period write up of the planes history. She flew 111 missions over Germany.....

-
That's cause it was a partial number mate... in the post above this one I've identified her... 42-32008 and she was named Li'l Audrey the apostrophe was actually in the name.... Here is another image of her...
-
B-17 42-32006... B-17G-35-BO: 42-31932 to 42-32116 This was Duration Plus which was forced down in France 03/03/44 eventually salvaged 10/15/45. I found her.... B-17 42-32008... B-17G-35-BO: 42-31932 to 42-32116 Delivered Denver 01/15/44; Kearney 01/29/44; Assigned: 551BS/385BG Gt Ashfield [HR-T] 02/21/44; Returned to US: 121 BU Bradley 06/24/45; 4168 BU Sth Plains 07/05/45; 237 BU Kirtland 12/10/45; Scrapped: Albuquerque 02/07/46. LI’L AUDREY.
-
That's not a B-17 code number, all B-17 code numbers were 4 digits up to the model "F" and from there, their code numbers start at 240000...... (although there were some "F" models with 4 digit numbers, assembly line modification to earlier airframes) And that is a "G" model with twin cheek guns, believe it or not that helps.... The airfix kit is a "G" model also.... so none of the Little or Lil' Audreys we have posted will work as they are "F" models.... I'll do some more looking around....
-
Yeah it's the pic, the same image is posted to the B-17 DB.... And looking through the DB, I find that there were two "Little Audrey's" 41-24560... B-17F-25-BO: 41-24540 to 41-24584 33 of the 44 aircraft in this production block were lost to enemy action. (only 4 of them returned to the USA after they were worn out) 42-29477... B-17F-55-BO: 42-29467 to 42-29531 When 24560 was transferred into the 369th BS she was the earlier aircraft named "Little Audrey" and 29477 was renamed "Joan of Arc" (lost 10/14/43 over Schweinfurt) Update: I found a third... 41-24523... B-17F-20-BO: 41-24504 to 41-24539 Originally called "Golly" was renamed "Lil Audrey" and then renamed again to "Snooks" She was lost 08/31/43 after a mid-air collision with.... 42-29816... B-17F-70-BO: 42-29732 to 42-29831 "The Eager Beaver" over the english channel with only one survivor from the two crews.
-
If you mean this Lil Audrey, I'll be sittin in.... Aircraft # 41-24560
-
1931 Cadillac by CDW - FINISHED - JoHan - 1:25 Scale - PLASTIC
Egilman replied to CDW's topic in Non-ship/categorised builds
I built one of these as a gift for my father-in-law about 30 years ago.... If memory serves they built into wonderful representations with few real defects... A real blast from the past..... Sitting in on this one.... -
Figured while I'm on a bit of a short hiatus on this I would clean up my artwork and get it scaled correctly and submit for a printing quote..... Scale for 1/25th measures 116mm high and 573mm long.... The quote back was for $98.00 to print two of them, of course they will be two piece overlapping decals..... The image is hi-res in case anyone wants to save it. (or it was when I uploaded it, you can access it by clicking on it and expanding it then copying it into your favorite software or to your HD. It measures 2048x415 pixels)

-
Ahh... late to the party, but, I see the main attraction hasn't arrived yet, just being introduced.... Grabbin a seat......
-
That's not the cannon mounted in fighter aircraft, (well a modified M-61) with the Navy's Phalanx system adapted to 20mm rounds, mounted on a mobile chassis.... Limited to 1,000RPM in burst mode The Israelis are the only ones that actually used it to shoot down an enemy aircraft in combat.... and they did it only three times. It was mostly used in the same manner as the M-16 modeled above, as infantry support. It's no longer in use by the US military being finally phased out in 1994. (replaced with the M-6 stinger equipped Bradley AFV. Currently the US Army uses the actual Phalanx system (known as the Centurion C-RAM Scroll down for it) mounted to trailers for DIVAD. (can also be mounted on a HEMTT) and I understand that they are phasing that out as well.... Guns for DIVAD have been rated as ineffectual for several decades.
-
Try again.... M-163 M-113 -w- Vulcan Divad...... From Amazon.....
-
SBD-3 Dauntless 1:48 Hasegawa - Edwardkenway-FINISHED
Egilman replied to Edwardkenway's topic in Non-ship/categorised builds
But I already promised SWMBO a floaty thingy. After this current build.... (but I think that the guns and motive power is not going to be what she expected) And SWMBO is much more powerful than the Borg..... -
Artillery/mortarman Huh? that's ok, I like artillery. The only thing I don't have in the stash is what isn't being molded at this time... (and a 8" howitzer) based on the long tom gun which is still easily available. (including their standard or substitute standard prime movers) Beautiful work...... nice collection....