
HOLIDAY DONATION DRIVE - SUPPORT MSW - DO YOUR PART TO KEEP THIS GREAT FORUM GOING! (89 donations so far out of 49,000 members - C'mon guys!)
×


Egilman
-
Posts
4,377 -
Joined
-
Last visited
Content Type
Profiles
Forums
Gallery
Events
Everything posted by Egilman
-
 Nice CAG Hornet.... I like the color definition on it.... I'll be sitting in on this one, I particularly like the USAAF birds of British ancestry.... It's just something about seeing Mossy's and Spit's with the star and bar just does it for me.....
 -
No doubt, the Shillegah was a 152 mm wire guided missile.... (just keep the crosshairs on the target) They could fire that and a low velocity standard heat round, ask him if such held true when firing that..... (no it didn't) The main dish about the Sheridan was it didn't carry a lot of ammo compared to a real tank, and it was very lightly armored, but it was light and air-transportable and that 152 mm missile would make scrap iron out of anything it hit. Tow missiles rendered it obsolescent. They also mounted the Shillelagh missile system in the M-60A2 which was nicknamed the "Starship" The troops in Germany, (where most of them were deployed) were real happy when they traded in their Starships for M-60A3's The Shillelagh was not considered a successful weapon system, when it worked, it worked well, but that was it's main problem, keeping it working in the field...
-
Why thank you sir.... I must say, that's some darned fine layer work I'm seeing.... (some of the best I've ever seen) Gonna be downright gorgeous when the bead board sides go up....
-
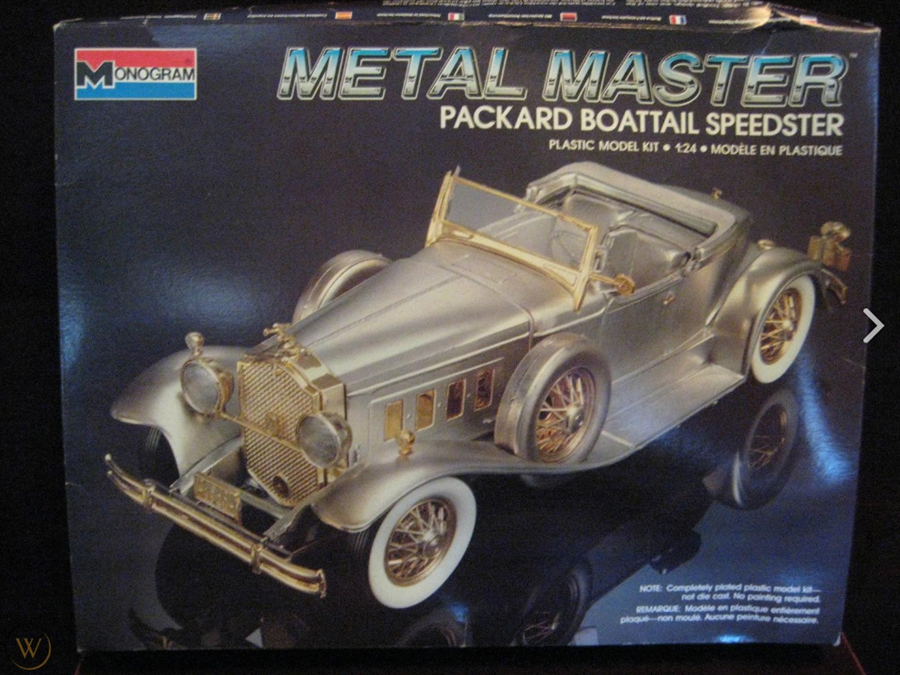
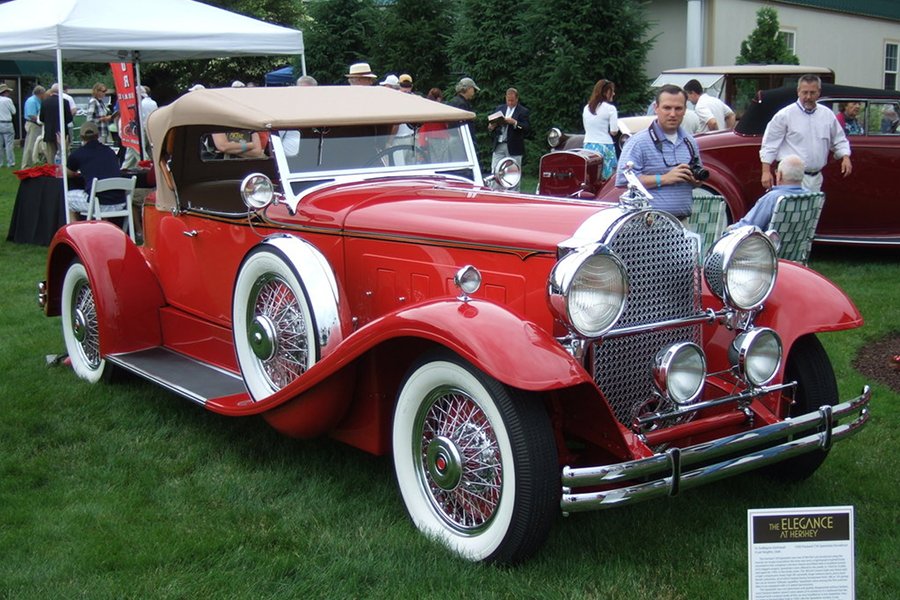
Yeah Cord bought Auburn to try and rescue the brand, he then set about revamping the lineup by creating the Auburn 8 in '24 and built a few cars to fit it.... He knew about the Packard speedster and tried to compete by creating the Auburn Speedster (the boattail was a direct response to the Packard) then redesigned the eight to produce the speed and power. But it was the depression, and not a lot of car companies made it thru... Auburn didn't....... It's a darn shame I believe the Auburn speedsters were also very fine automobiles.... There are a bunch of pics of Packards online some of them absolutely beautiful and the resto work is above excellent.... This was a fun kit to build back then, didn't take too long and I did a few tricks with it.... going to replicate them here.... the kit falls together amazingly well and good detail..... they still show up on evilbay as there is usually a couple of them for sale... they did a whole series of the metal master kits mostly of the antique cars. they didn't sell well cause back then most didn't know how to deal with the chrome very well... the whole metal masters thing was viewed as a gimmick so they didn't go over well with the modelers.... I have the V-16 Caddie metal master in my stash also.
-
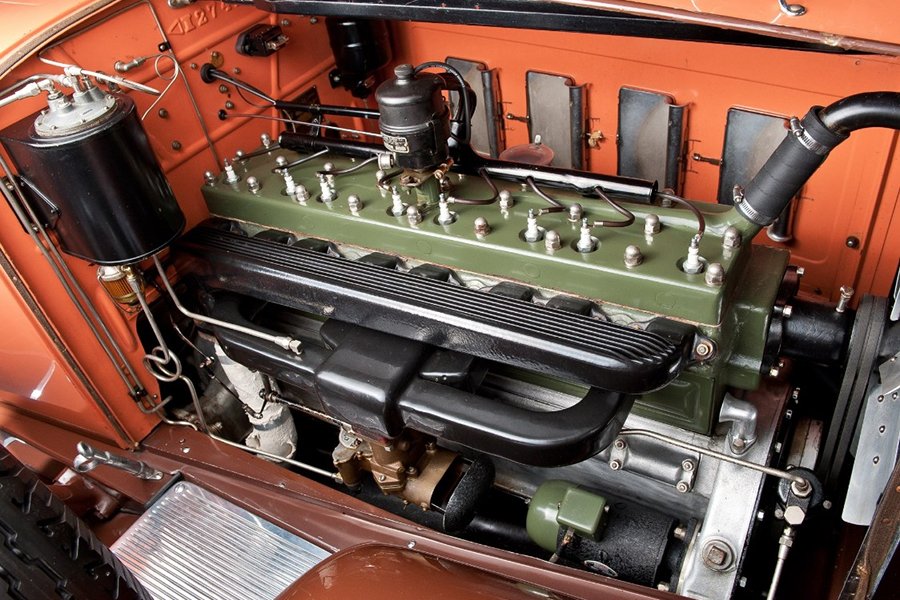
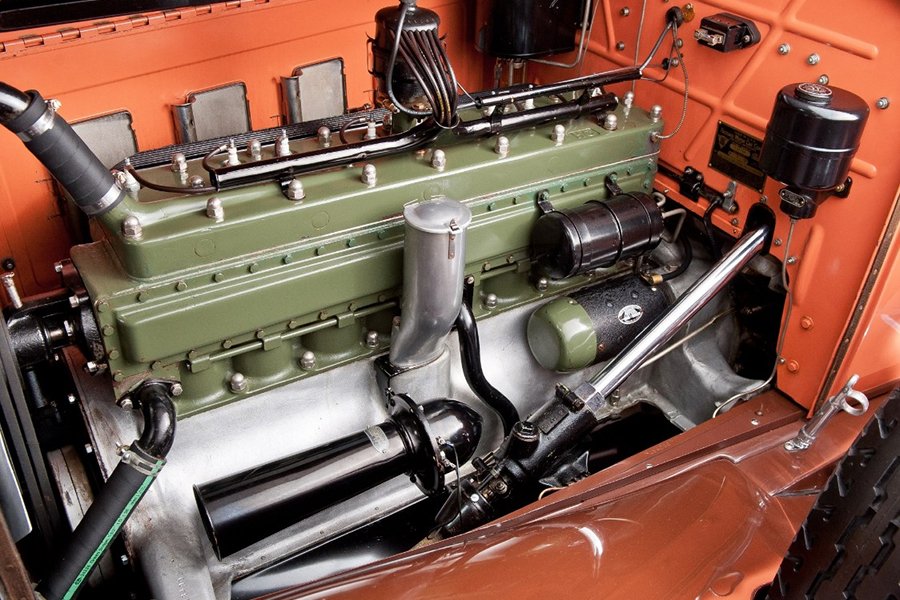
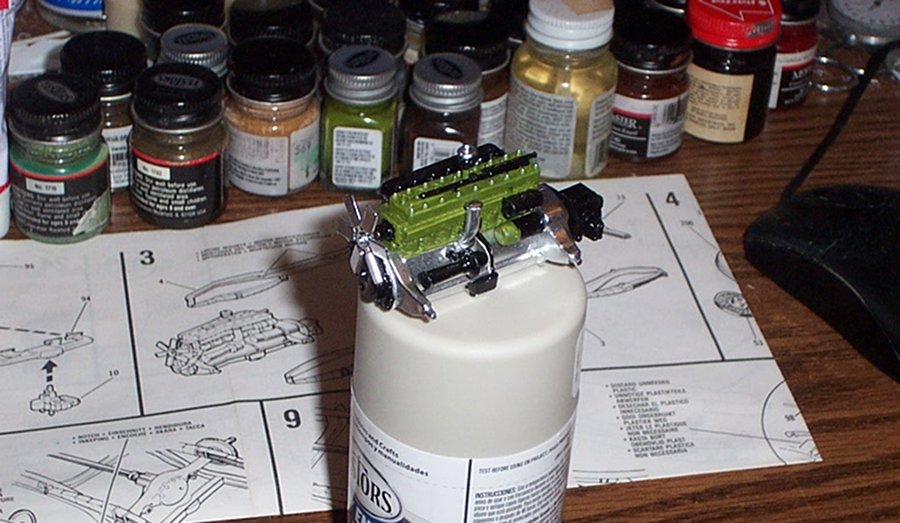
Ok this will be OOB, and with only what I have on hand for supplies. I built one of these 30+ years ago and the wife took one look at it and claimed it... It sat on her shelf in the living room for 10+ years with a halogen spotlight shining on it.... And she was proud as punch when she was telling people that I built it for her...... Unfortunately, it didn't survive the trip to the new digs 20 years ago, and since I'm at a place I can't finish the truck till parts get here, I'm going to occupy my time re-creating something she loved..... I'm starting with the Monogram # 2311 The Metal Master kit.... And yes, that is exactly the way Monogram thought we should build it... Soft Chrome & Gold.... The instruction have no painting suggestions or table of colors... I am on my own... {chuckle} You know it doesn't look all that bad in reality, it's not real of course and saudi sheiks weren't buying cars with sterling silver bodies and solid gold trim yet..... This was the 1930's, the middle of the great depression Ford Model "A"'s were selling for just over $250.00 Henry Ford was paying his workers unheard of money so not only would they stay but be able to buy his cars... this Packard was selling for $5,200.00 decidedly a car for the well heeled... But one must understand what one was buying when they bought one of these, THIS, is the original muscle car.... Two generations before Carrol Shelby started the ponycar/musclecar rage, this was the car to get if you wanted to go fast in style...... It has an up-tuned Packard Straight Eight that boasted a whopping 109hp, it was sold as a car that would do 109 mph when everyone else was barely getting to 80.... (road tests easily demonstrated that it would peg the speedo at 120 and eventually break the cable) Yep, 120 mph stock....... some 120 Packard speedsters were built, in five different body styles, of course the most popular was the runabout, but they had a phaeton, a coupe, a sedan and a touring car as well, all built on the speedster chassis. (some 50 or so were runabouts of which 30-35 still exist, the sedan is the rarest of them all, 15 were built and only two known vehicles remain) They can sell for up to 2 million dollars for a particularly well documented showroom car, or 50-60,000 for a decdntly maintained driver. Anyway... as with all vehicle kits, they start you out with the engine...... First lets take a look at the real deal..... Packard Green and a nice polished aluminum crankcase trimmed in black..... And my feeble effort to replicate it.... Frame coming up next....... EG

- 123 replies
-
- 19
-

-
Nice work.... Usually I just close mine up cause I'm not that good at cockpits. Impressive work....
-
SBD-3 Dauntless 1:48 Hasegawa - Edwardkenway-FINISHED
Egilman replied to Edwardkenway's topic in Non-ship/categorised builds
May 1942.. SBD-3 as flown off the USS Lexington. Aircraft #12 of Scouting Two, just prior to the loss of the ship, they were using SBD's as low level plane guard protecting against torpedo attack, The pilot is almost an ace. A little known fact of history, the US navy had several SBD aces. Doesn't get widely reported in many books but it is true.... Shortly afterwards, they dropped the squadron numbers and switched to black lettering with huge full chord insignias on the wings.... I think this is the prettiest scheme they had..... Beautiful job my friend.... it a shame she's going to be a hangar queen, but I guess you have to follow the admiral's orders... :-) -
Yeah I know, the last time I heard anything was this morning and that's what they were saying then, I kind got burned at them and refused to listen to them for the remainder of the day.... So they actually went and did it.... And our dedicated teachers, some of the highest paid teachers in the nation, have to get their inservice days don't you know? Besides, the whole online schooling thing was only so they could get paid.... The teachers didn't lose a thing..... but then they are a protected special class of worker in this state. Anyway we probably shouldn't be hijacking this build thread anymore... or Jack will have to fire up that bird and come rescue us.....
-
Oh I hear ya! but then they belong to the club, the rest of us don't.... The Gov and the Super are talking about that exact subject right now... I suspect that school is over for the year.... Cause this is easily going to run into June so they can get the most benefit out of it they can...... (while the state of emergency is still in existence which gives them virtually unlimited power to order anything they want in the name of protecting the people)
-
ours was extended a couple of days ago to May 4th, and we are expecting another one into June.... Especially since he and the SAG are chatting up enforcement.... (he isn't happy that the peons are still trying to get on with their lives)
-
It doesn't look like they left much in the way of shaft based upon those pics. They probably intended to either glue it or let it float. I would definitely let it float at this point, best way to go..... The instructions are a bit sparse on directions.... You would think they would be clear.... Nice work....
-
Yeah, they were talking about that here, but I think the panic is passing. the talking heads are desperate to get back on the trash the president campaign.... (and use this emergency situation to their political benefit) Listening to it is is absolutely hilarious how they want to make the president responsible......... But it allows me to build more models..... (there is always a silver lining to every disaster although it may not be apparent to those buried in it at the time)
-
Probably the best that can be done at this point.... just have to remember not to pick it up by the rotor hub.....
-
Here, Wally World has changed it's operating hours, open from 6:00am to 1:00am now, they deleted my favorite time to shop..... supposedly as a virus measure.... I suspect it is because they received too many complaints about only one register open as far away from the exit as possible.... I hate going to WW during the day.....
-
Generally when I have had one of these, I do not glue in the insert until after the shaft has been placed thru it and a disc like a washer is placed over the shaft allowing the inset to spin on the shaft, then I install the insert along with the rotor... Even if there is no ring and the hole in the insert doesn't go thru or the shaft isn't long enough, I make it so it does.... and the rotor can spin freely.... Have you glued in the insert already?
-
Actually you look closely every single aircraft on that deck is turning prop... the other thing you notice, there are no flight personnel in the scene, aircraft captains and assistants are warming up the engines for the days operations... The TBD's usually did not unfold their wings until they reached pre-launch position as the second or third aircraft in the procession, they were the largest birds on the deck. They are angle parked on the deck edges to facilitate aircraft handling making it easier to advance to launch position.... That is a deck that was pre-spotted in the early morning for launch operations... They have been sitting there for over 6 hours, they needed to be run up before launch. I have official US Navy image examples, (like the one above) of this from all aircraft carrier classes used during WWII, even the smaller escort carriers used this procedure.... Yes flight ops on a carrier deck is one of the most dangerous occupations anyone could work in.... In the wrong spot at the wrong time, they would be promoting your replacement.....
-
Depends upon the class of ship and the era... As designed the Lex & Sara carried 90+ but that was back in the biplane days, in the 30's they carried over 100, but only 90 or so were flyable, they had the capability to store aircraft in the beams and girders near the roof of the Hanger Deck. The Yorktown class as designed carried 85-90 but operationally limited to 80 or so. The Essex class could also carry 90+ as designed but later in the war as the aircraft became progressively larger and larger, they reached about 80-85 operational aircraft also.... as capnmac says flightdeck size was the limiter as to how may aircraft could be launched on a single flight op. WWII saw the addition of catapults which allowed more aircraft to be carried and launched in one flight op... But in general, 80-85 aircraft for a WWII aircraft carrier.... 75-85 for a Korean war carrier group. The angled flight deck did two things, it allowed both flight and recovery operations at the same time, and, with enlarged hanger decks, increased aircraft complement..... back up to the 80-85 they enjoyed during WWII... Long about 1944, a design decision was made, the most efficient aircraft complement for an aircraft carrier for efficient air combat operations, it was settled at 75-85 aircraft, after than it was the aircraft carrier that adjusted in size to fit the aircraft complement it was going to carry.... The Midway class was designed on that basis, as was the supercarriers.... Everything on an aircraft carrier today is designed to serve the aircraft aboard.... everything else is secondary......
-
Must be Wally World, it's where I get mine... 1500 for just a few bucks, they also make excellent paint shaking balls....
-
I beg to differ.... In the foreground, Grumman F4F-3 Wildcats of VF-3 “Felix the Cat” are parked on the flight deck of the USS Saratoga. In the background, Douglas SBD-3 Dauntless and Douglas TBD-1 Devastator aircraft are pictured. (U.S. Navy Photograph.) Sometime mid to late '42 I take it based upon the aircraft on board and their insignias.... Circle star with red center dot on the dauntless's and Circle star without the center dot on the wildcats.... Looks like angled parking, lashed down to me....
-
Hey denis.... Yeah, when I first decided I was going to do this I thought it was going to be easy, just grab a couple of models, a few simple bashes and some paint majic I'll be in like flint.... (so much for that thought) There is a LOT that can be done with detail painting and weathering and god knows there are trucks that have weathering... but I've stuck myself to a very specific truck/trailer combination..... with loads of visual information to show what it was... And if I'm going to be true to that then there isn't much I can do on the detail side as far as painting, the scheme and course is set.... The truck in the movie was typical road material nothing special, they all went through dealer sales and were typical assembly line items nothing custom at all . (except what they added for the movie which wasn't much aside from paint and a fake reefer) I've been debating on washing it down with a dirt wash but not much else, the only place I see rust was on Trailer #1 (7 months old) and it was very light spotty stuff Trailer #2 which I'm modeling was fresh off a dealer lot less than two months old, no rust at all.... And the making of shots showed cans the same color as the axles which means they were new enough to not have been replaced yet, Trailer #1 had three different cans on it... two originals (from the grey paint, one blue and one black with bare metal edges... I may do another truck at some point which I can play with effects on, but this one has a specific look and details which have to be there...... (otherwise the rivet counters, or, more specifically for the truck modeling world, the bolt counters are going to be all over it) But I'm going to be laying ambush for them, with every detail added I have movie caps with indexed time and frame #'s showing the detail I'm adding actually on film..... I"ve already had a few comments over the engine from guys that say they just KNOW what engine it had by the sound of it..... (engine is never seen in the movie, in fact I have it from the property masters that the hoods were never raised in the entire production of the movie. even they do not know, nor did they care) so yeah I'm sure being a movie accurate rig, all the "experts" are going to come out of the woodwork on this one, it's also why I'm not doing it in the truck forums.... (although there are some of them, good guys, that know) I've set a fairly high bar on this one.... I've had a couple of occasions to wish I hadn't.... (but solutions eventually come forward to the problems) Besides, it caused the wife to pay attention and suggest we get a glass case to put it in when it's done... A small price to pay for perfect storage for my hobby.... And I'm having fun, the wife occasionally asks how's the truck coming and comments that it's going to be beautiful when it's done and such things... Right now all's right with the world.... Thank you for following and all the comments.... EG
-
Thank you very much OC, I've got parts that have come in from all over the world, Czechoslovakian photo etch, Austrian resin and PE, Australian resin, plastic and metal castings, (in fact my missing parts for the TBS arrived today YAY!) England, 1/25th scale expanded metal and all 18 tires and wheels are aftermarket out of Ohio.... Still waiting on some of the wheels and tires and the resin air horns from Austria. Most of these parts are from one-man specialty shops, so they take your order and you go on the production list and when they are done they are shipped..... could easily take a month to get them and when the occasional mistake happens like with my TBS it can take three months to get what you need... Almost like the aftermarket ship model industry in the beginnings... It's a whole lot different today than it was the last time a built a truck model.... Thank you for asking... (and yes I'm sure there are a lot of kits being built at this time of forced inactivity) EG
-
North American P-51D Mustang by Asat - Airfix - 1/48
Egilman replied to ASAT's topic in Non-ship/categorised builds
Nice quick start..... Nice work as well... -
Ok there it is, finished cleaned and repaired.... I hope someone can use it.... EG Update: With the hidden lines removed.... Now I'm done with it, looks better in my opinion not as busy and cluttered...
- 154 replies
-
- 15
-
-
It's already about half done Andy, it doesn't take long, I regularly clean up and correct BoGP's for my private collection.... It's really not that difficult... (a bit tedious but easy) And I'm glad that someone understands the importance of archives of design references, if anything the museums could use the help.... When I get it done, I'll post the finished work a second time in case anyone else is interested....
-
I can clean it up and remove all the call-out numbers, from there it can be scaled and reference sizes taken.... There really isn't much available it's sad to say and if the loss was intentional, then those stuffed shirts without brains that did it really shouldn't be in charge... The history of what came before is as important as the vision for the future.... Sad...