Egilman
-
Posts
4,385 -
Joined
-
Last visited
Content Type
Profiles
Forums
Gallery
Events
Everything posted by Egilman
-

Porsche flat 6 boxer engine by kpnuts 1/4 machine works
Egilman replied to kpnuts's topic in Non-ship/categorised builds
The original Renwal Visible V-8 called in the instructions to sand the pistons smooth and use clear cooking oil as a lubricant for all moveable surfaces... looked good when first finished, but that didn't age well turning yellow and eventually brown as the oil aged and dried out..... But I loved my Visible V-8.... For a 10 year old it was an adventure... -
Thank you everyone for the opinions and thumbs up's... I've decided on the F-86F pretty much out of the box probably McConnell's Beautious Butch II, after his last mission when he has all 16 Mig 15 outlines on the side of the fuselage...... The only other decal set worth a damn is Mig Mad Marine, John Glenn's F-86 with only three kill markings... Will start a new test thread for this when I get started... Thanks everyone for your patience....
- 139 replies
-
- 10
-

-
Well it's a P-38L, essentially a "J" model with revised, more efficient radiators, better superchargers, "dive" flaps and stronger hard points on the outer wing to support the christmas tree rocket launchers... so you can model either "J" or an "L" model lightning with it... The decals that come with it are for Maj. George Lavin's "Itsy Bitsy II" 54th FS; 343rd FG '45... All BMF with black stabilizer tips and huge black anti glare panels, it would be a striking study in contrasts... Decals of course are available for either McGuire's Pudgy II or Bong's Marge or Olds Scat II, (which went from Olive over Grey to BMF with red tips during it's lifetime) which would make the markings easier as they were all BMF with red tips... Being from the same fighter group and all... (except for Olds that is) Probably going to go with the F-86F to establish the technique, it's a more straightforward build and would represent the actual finish I want for the F-104... My idea being to get at least one RnB technique down before trying something else.... Thanks for the opinion my friend, they both are fighter pilots airplanes... Thank you Ken...
-
I agree Ed, doing the 86 would be straight and to the point, the same finish as the F-104 would have in that period... No need for complicated figuring and perfect the technique... Thanks my friend...
-
Yeah that is either titanium or stainless steel I haven't researched what it is yet... What you see in these planes today is the high polished look, but it should do very well in a clean reflective finish.. I will probably have to white base the yellow identification stripes, so they stay to true color as well, a good exercise in a needed skill... Thank you my friend...
-
Very logical Lou, and of course your right, all the F-86's in American service were BMF... And fairly well maintained... The decals represent Beautious Butch II... (could be altered as well to represent Butch I as well) Joe McConnell's aircraft the leading ace out of Korea... It would be fitting.... And as you say I'll have to do the BMF anyway when I get to it... And it will be the exact same finish on the 104 as well... A good tune up... Thanks my friend..
-
There were two types of coaches, the eastern road coaches, and the western trail coaches... They were both built in the same manner on similar plans but the western coach was built much, much more stoutly... The eastern coaches were usually hauled by two horses occasionally four, (much shorter distances on improved roads) and the Western coaches pulled by four occasionally six horses over wagon trails.... Think GMC inter-city bus compared to a Greyhound or Trailways super liner... The thin wheels were usually found on the short haul coaches as were the large leather sided luggage compartments in the rear... The western coach had rear wheels that would be about 3-3.5 inches across and fronts 2.5 to 3 inches wide with half inch thick steel rims... and the rear luggage compartment was usually a simple framework supported by chains at the corners and a leather cover that rolled down from the top and unfolded over the sides in bad weather...
-
Porsche flat 6 boxer engine by kpnuts 1/4 machine works
Egilman replied to kpnuts's topic in Non-ship/categorised builds
MAY? Might have to add a couple of sleeves as well.... {chuckle} Heck of a compression ratio, -10/1 Love what you did with the crankshaft... Masterful piece of sculpting work... -
Thanks dennis, yeah that kit has been redone many times over the years and remains a popular kit for those on a lower budget... Thank you for the compliment... One of the points of using RnB is that it never loses it's reflectiveness, according to Paul, his birds retained their shine and reflectiveness for 25 years on his first one and his B-29 looks the same as it did when he finished it... (20 years ago) if anything they seem to age the same way the metal ages when protected, the color will just darken slightly according to him...... I don't know, it's going on my shelf right now and if it's still around in ten or so years I guess we will see... Next one will be a smooth skinned bird...
-
Thanks Ken, I obtained a Tamiya P-51D, I'm gonna do a Red Tail scheme for her... but I also want to do it justice... so it might be a bit....
-
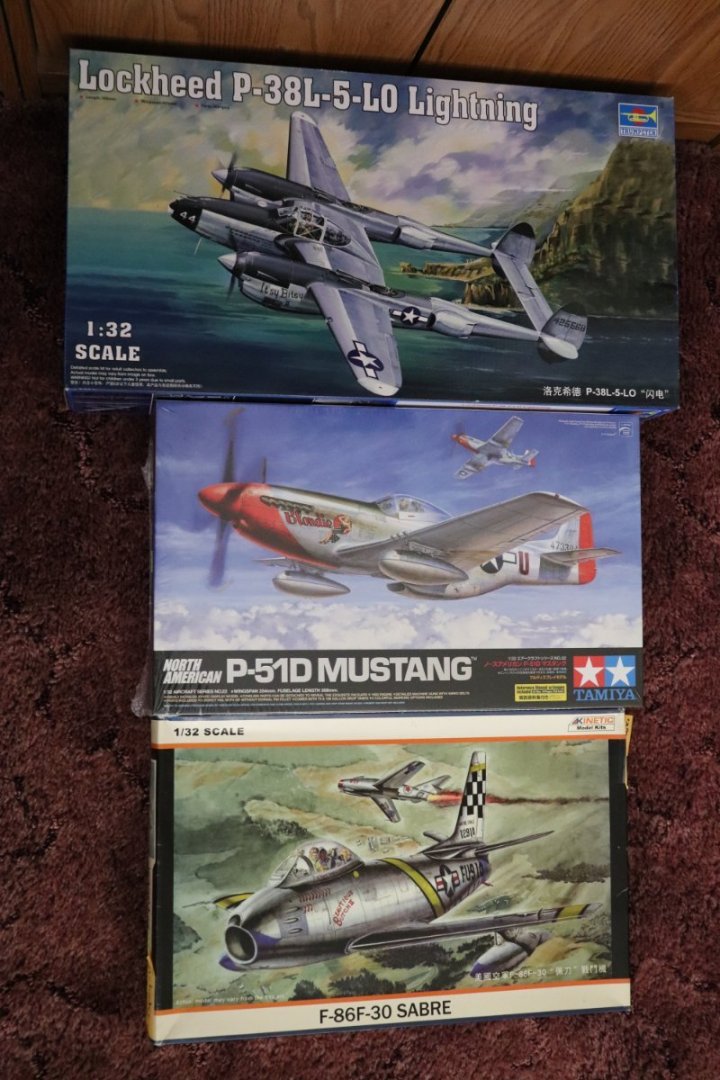
Now, with the P-51 experiment done... I feel it's time to do another experiment, I've confirmed a few basic things... #1 Rub N Buff is easy to apply... (use rubber gloves, it comes off the fingers with IPA, but it will transfer to whatever you touch so gloves can be removed before handling anything) #2 Apply it thin, very thin, rubbed in with a fingertip... #3 It can be applied over anything... #4 If you want a smooth shiny reflective surface apply it over a smooth glossy surface... The higher the smoothness/gloss the higher the shine/reflectiveness... #5 It can be sealed with Future without damaging the reflectiveness and only a very slight change in color.. (not really noticeable) #6 It can be decaled over directly, Micro Sol/Set doesn't effect it... (but I would personally over coat with future first before decaling) Pretty much everything else about building a model remains the same.. No change... The deficiencies of the kit I chose made for some issues in the finishing of the P-51.. Of course it was chosen on a cost basis in case the experiment failed.. But it didn't fail, In fact it came out much much better than expected... But before I go to town on my F-104 Blue Jay 4, I really want to be confident in the process... so I'm going to do another test build... This time a complete BMF bird... The only paint will be details... Two days ago I had a chance to visit the only local Model Shop local to me... Skyway Models in Skyway WA... I grabbed about ten varied models that I need for my collection... Five of them will easily lend themselves to a complete BMF... The other two are the HK models B-25J glass nose and the B-17F... (I didn't include the pics of these cause I probably won't be using them as an experiment) So I've narrowed down to the three above, and as much as I'm familiar with the P-51 now, I probably won't be doing that one either... So I'm left with the F-86 and the P-38... Both are favorite aircraft of mine... I'm leaning towards the P-38 at this moment but the F-86 is a draw... I have nothing in extras for the 38, I have a cockpit and instrument panel and masks for the 86... Enough to do a decent build on her... Anyway, out of those two, which would you like to see in Rub n Buff? EG
- 139 replies
-
- 12
-
-

-
That looks good, excellent in fact, like a newly minted Patton just issued to the troops.. it hasn't had time to fade out yet... if you want to give it a couple of months in country, throw some brown dust on it, that's all you really need... And the tracks? throw a brown and rust wash on them, they were rubber cleated so there wouldn't be a lot of shine to them anyway... Really, really nice job in my opinion... Not all armor has to be mud gooped up to look good... (and this looks very good my friend)
-
Porsche flat 6 boxer engine by kpnuts 1/4 machine works
Egilman replied to kpnuts's topic in Non-ship/categorised builds
I always put them on a new line brother, put the text above and below if that is what you mean... I like your stippling brush, well used is good for some very special effects... Stiff and scrubby but not so stiff as to scratch.... Gives that chipped area of paint effect and layering gives the surface, undercoat, primer, bare metal effect of prolonged wear... Old technique but still the best technique... And you use it like a master of it... The pics prove that.... Nicely done... -
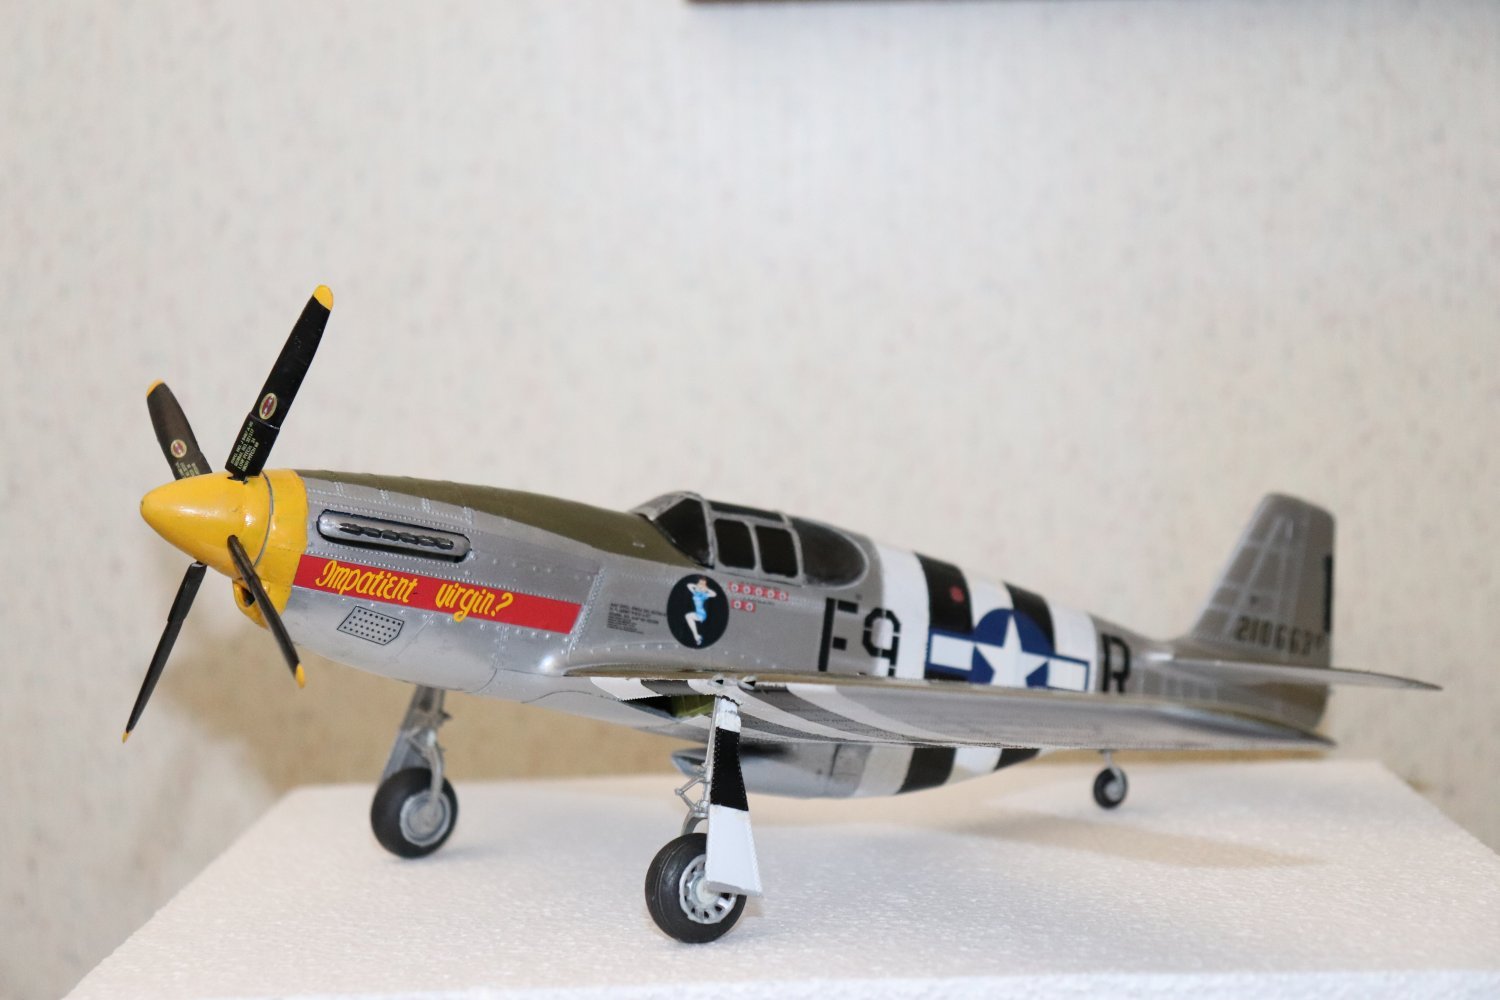
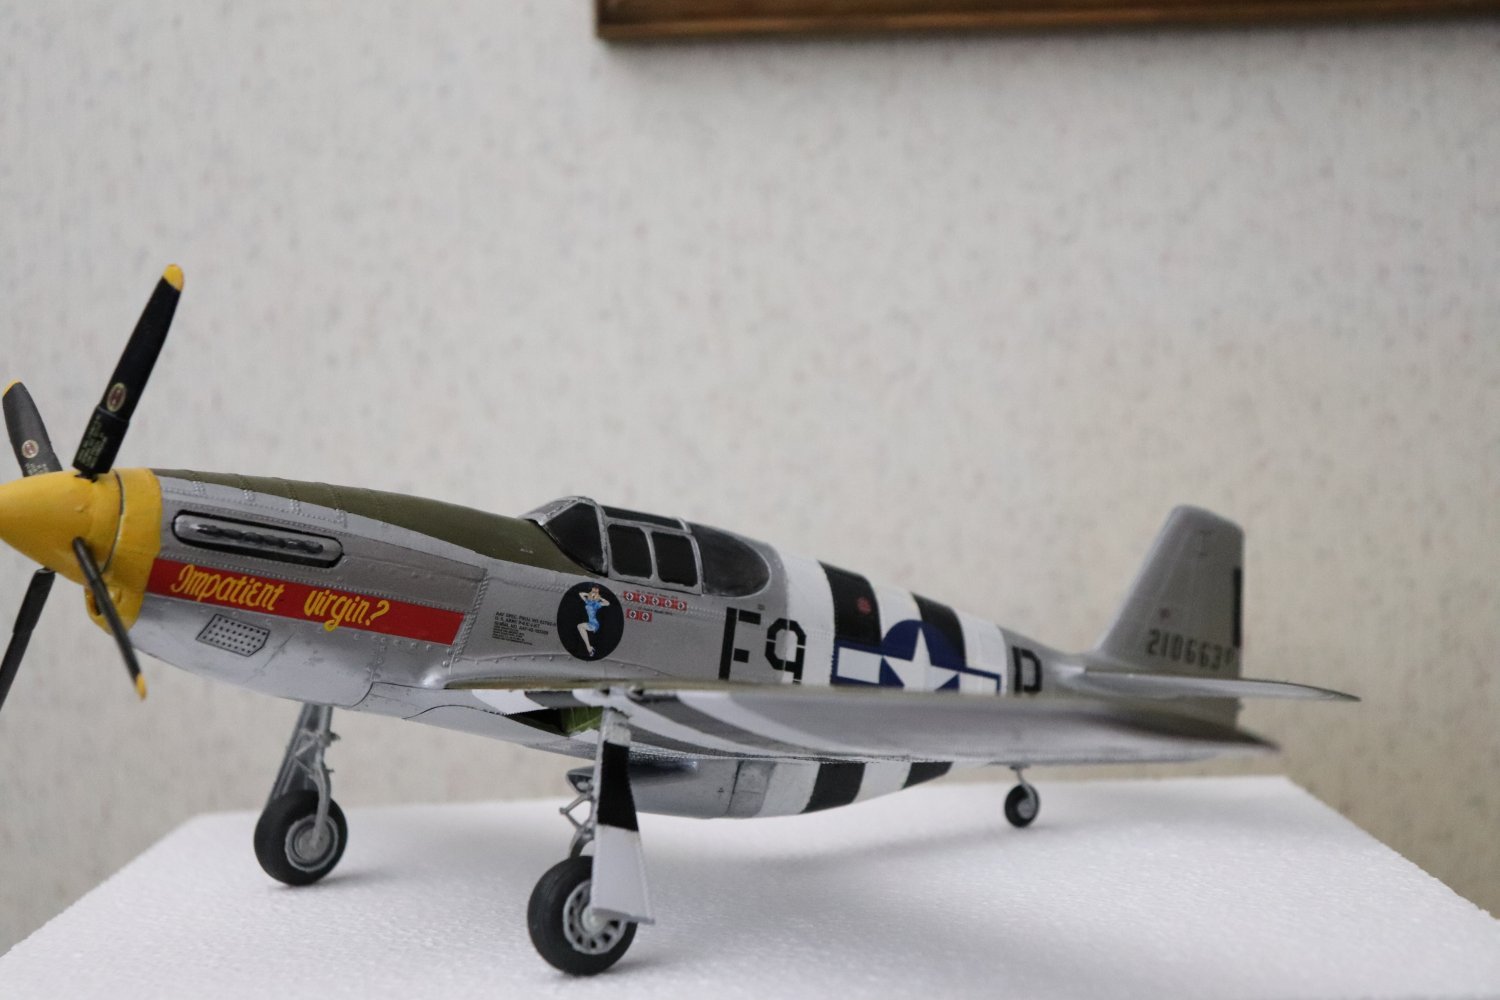
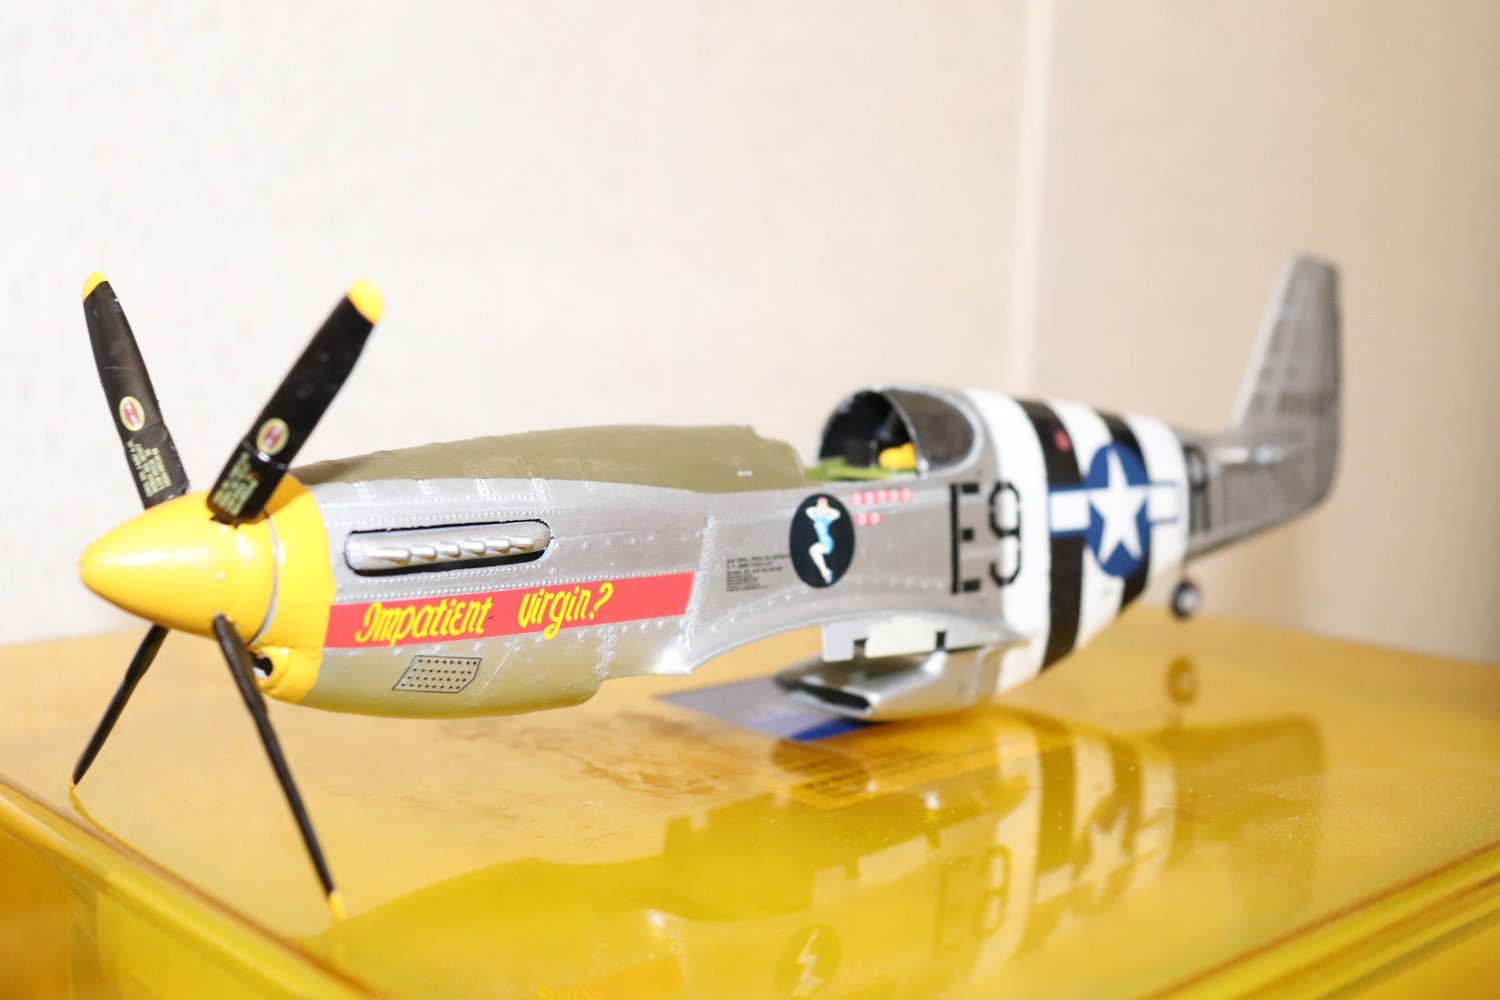
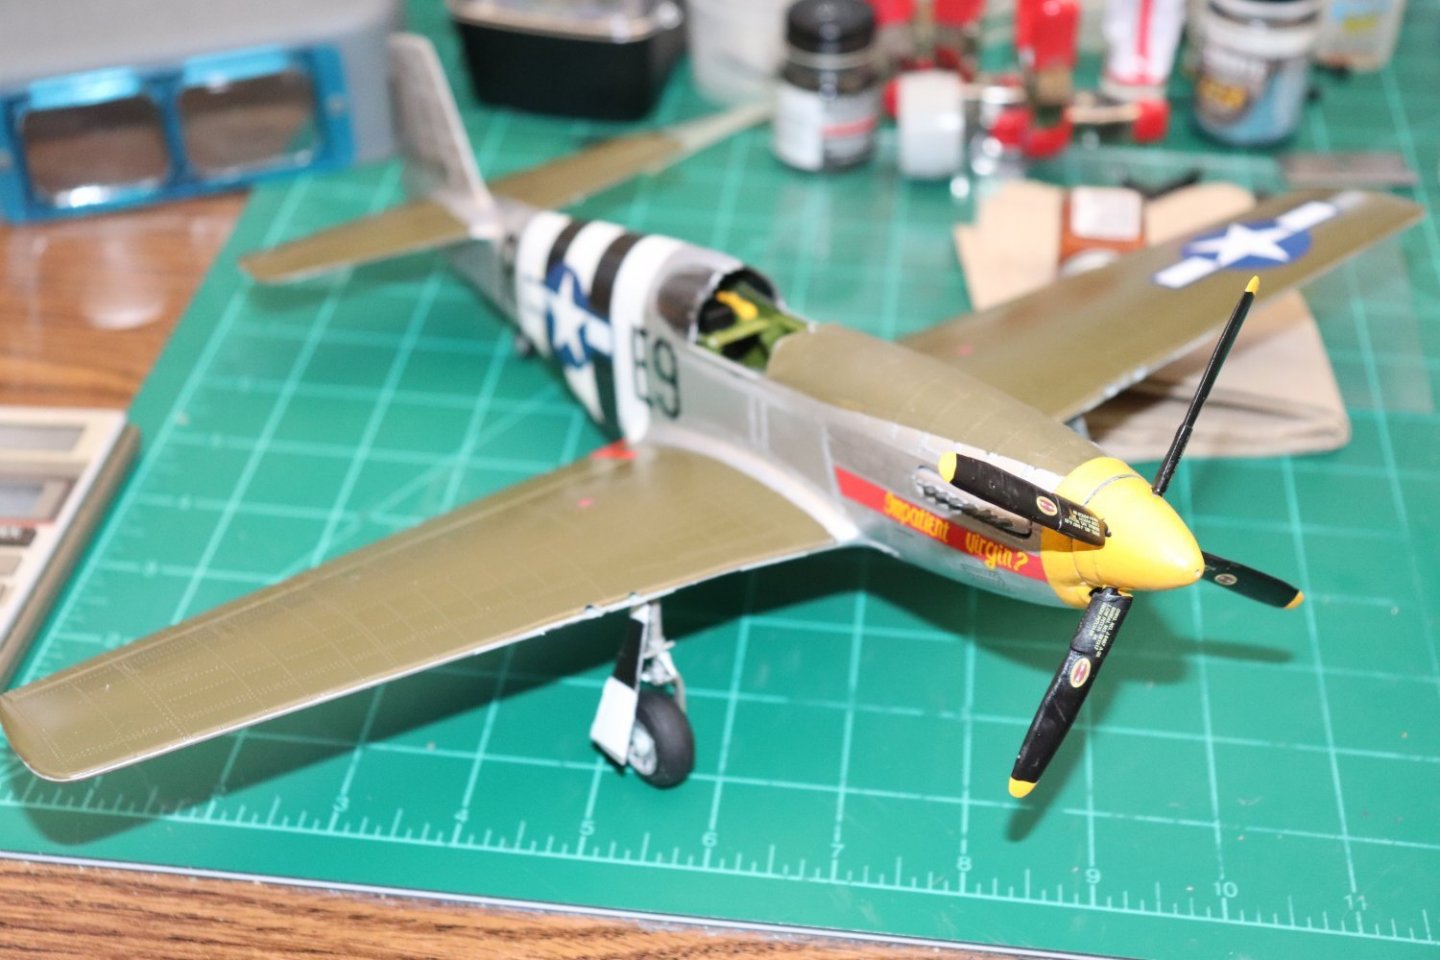
Ok Jav, Just to let you know I really mucked up the canopy, that liquid cement, aluminum paint, glue fingerprint thing... So I'm going to show the best side if it and call it done... High flash on a white base.... And one in natural light.... I already have acquired a Tamiya P-51D to do a display bird in this finish, I won't have to deal with the rivets anymore... I think it came out ok for what it is, my first decent BMF... EG


- 63 replies
-
- 11
-
-
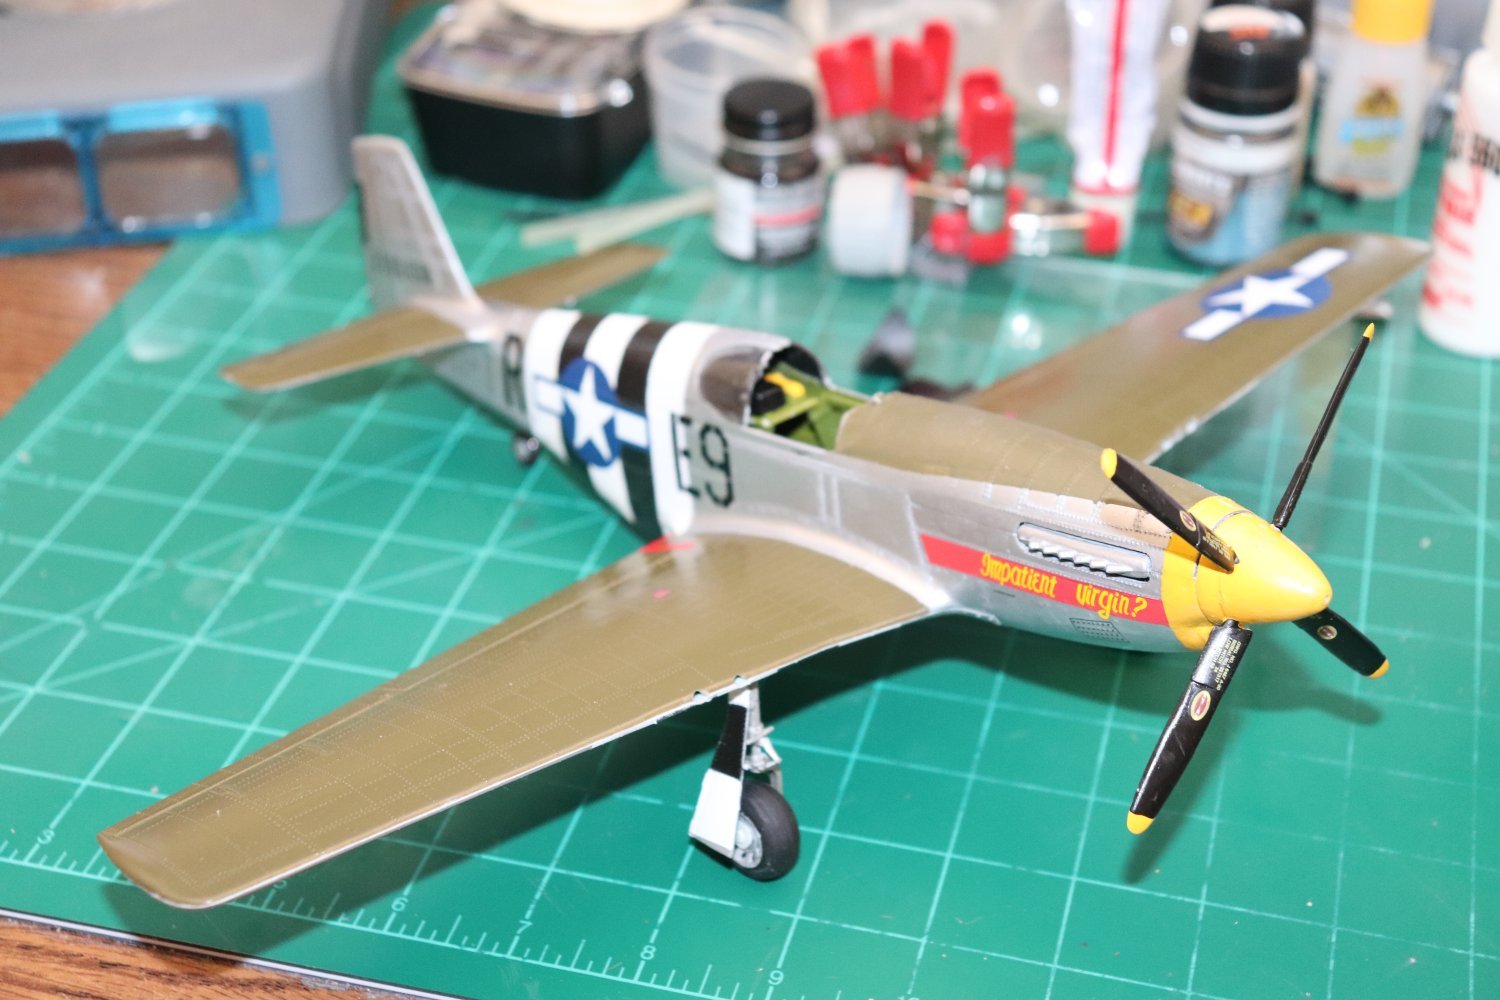
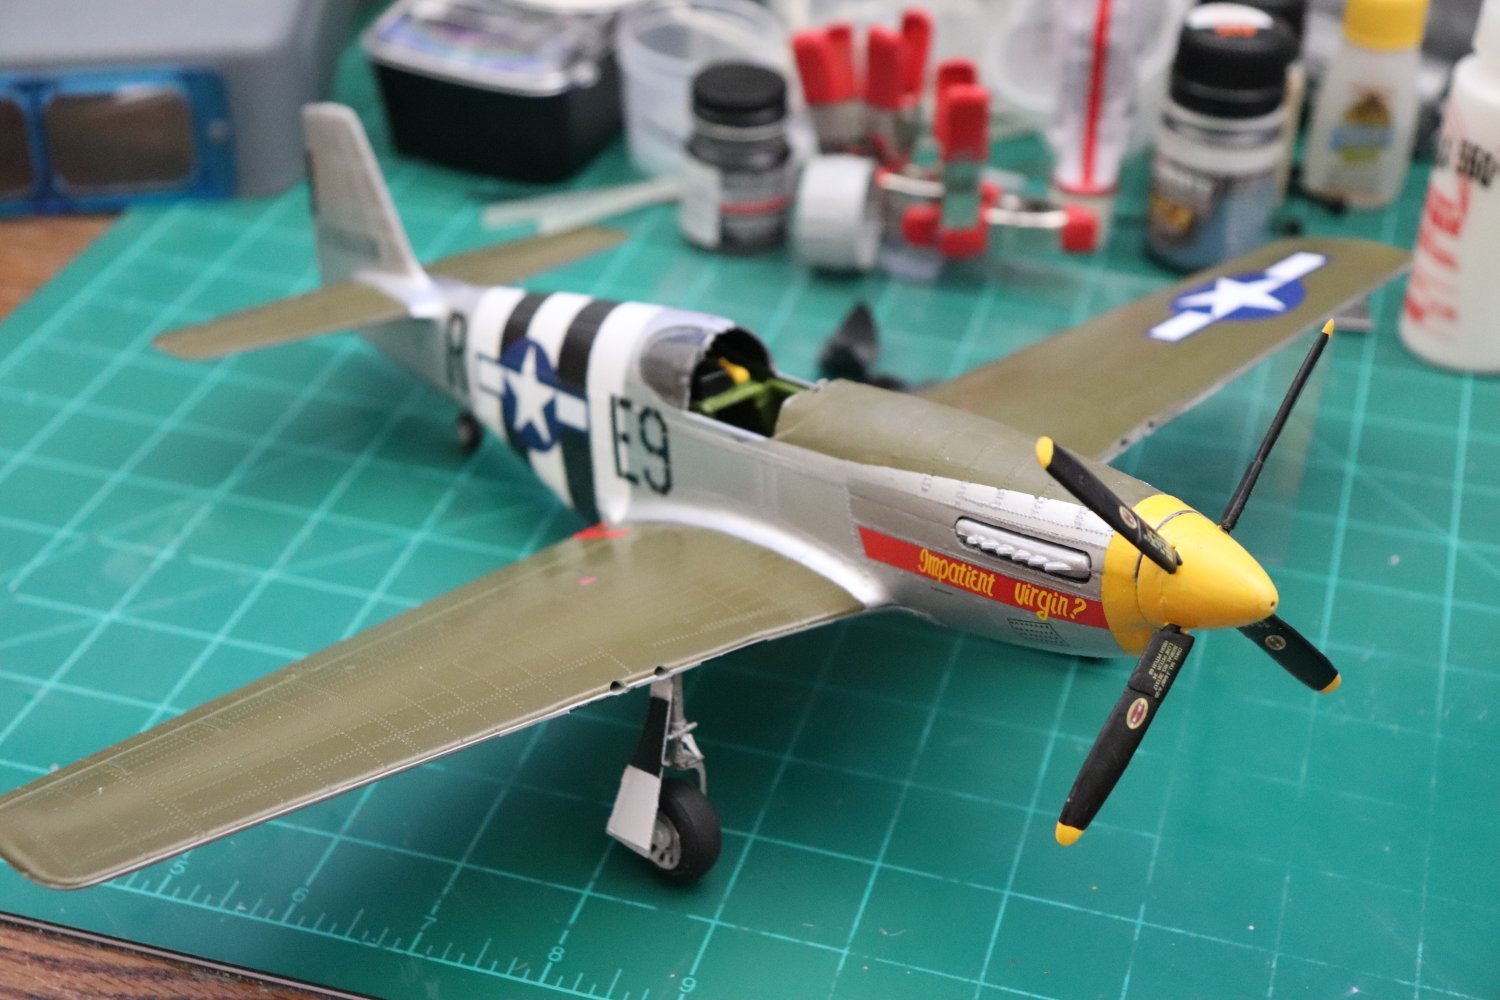
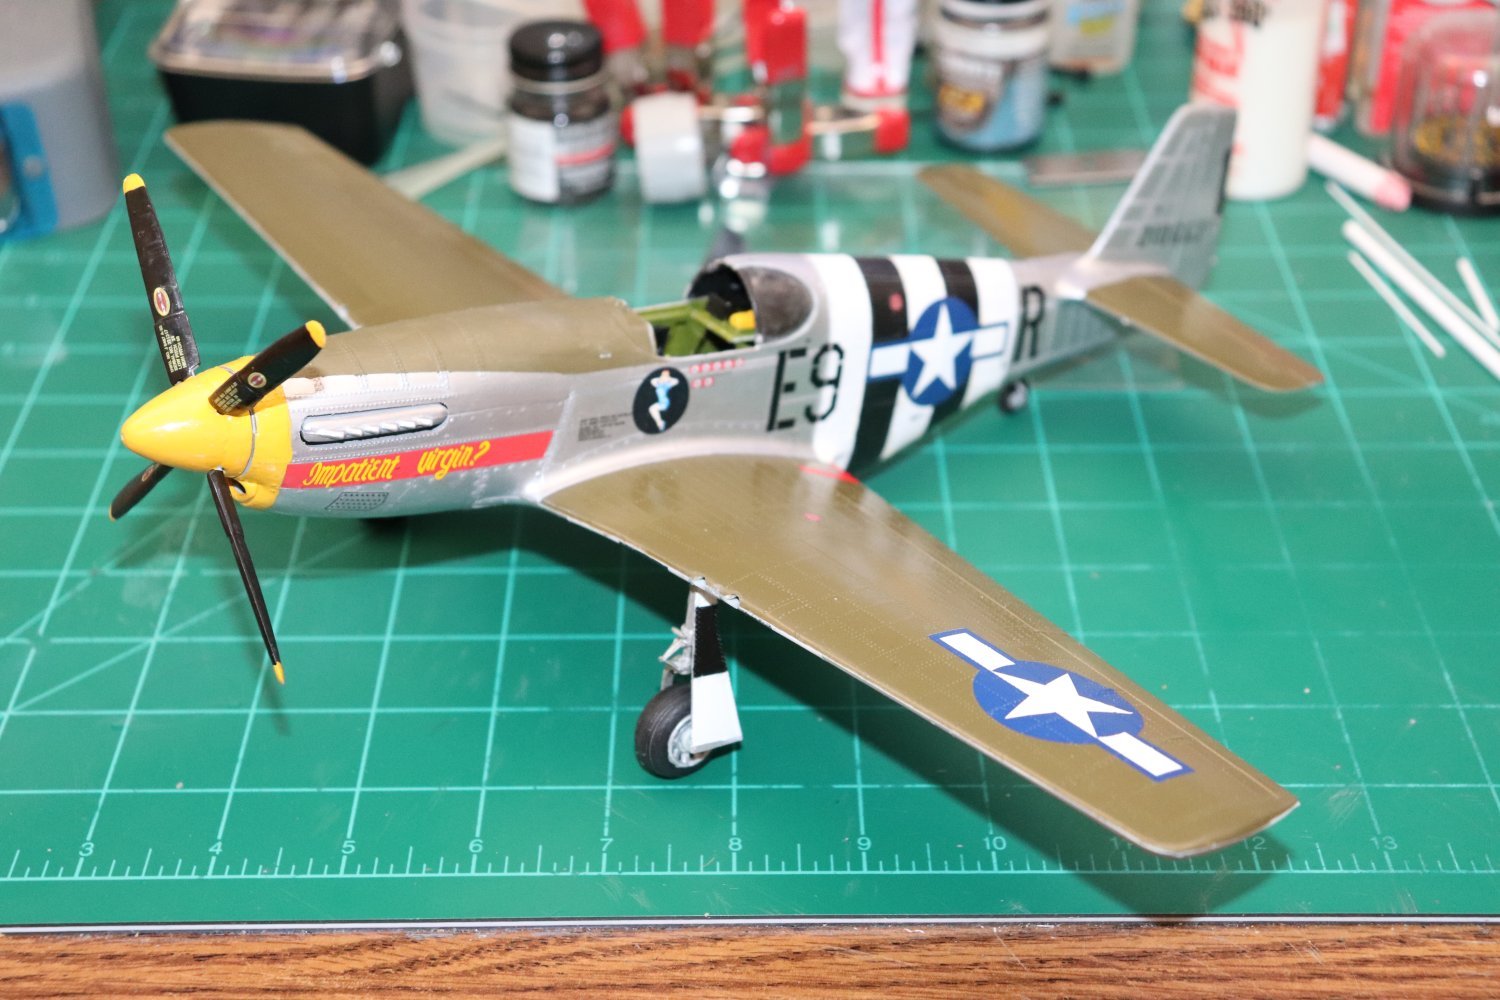
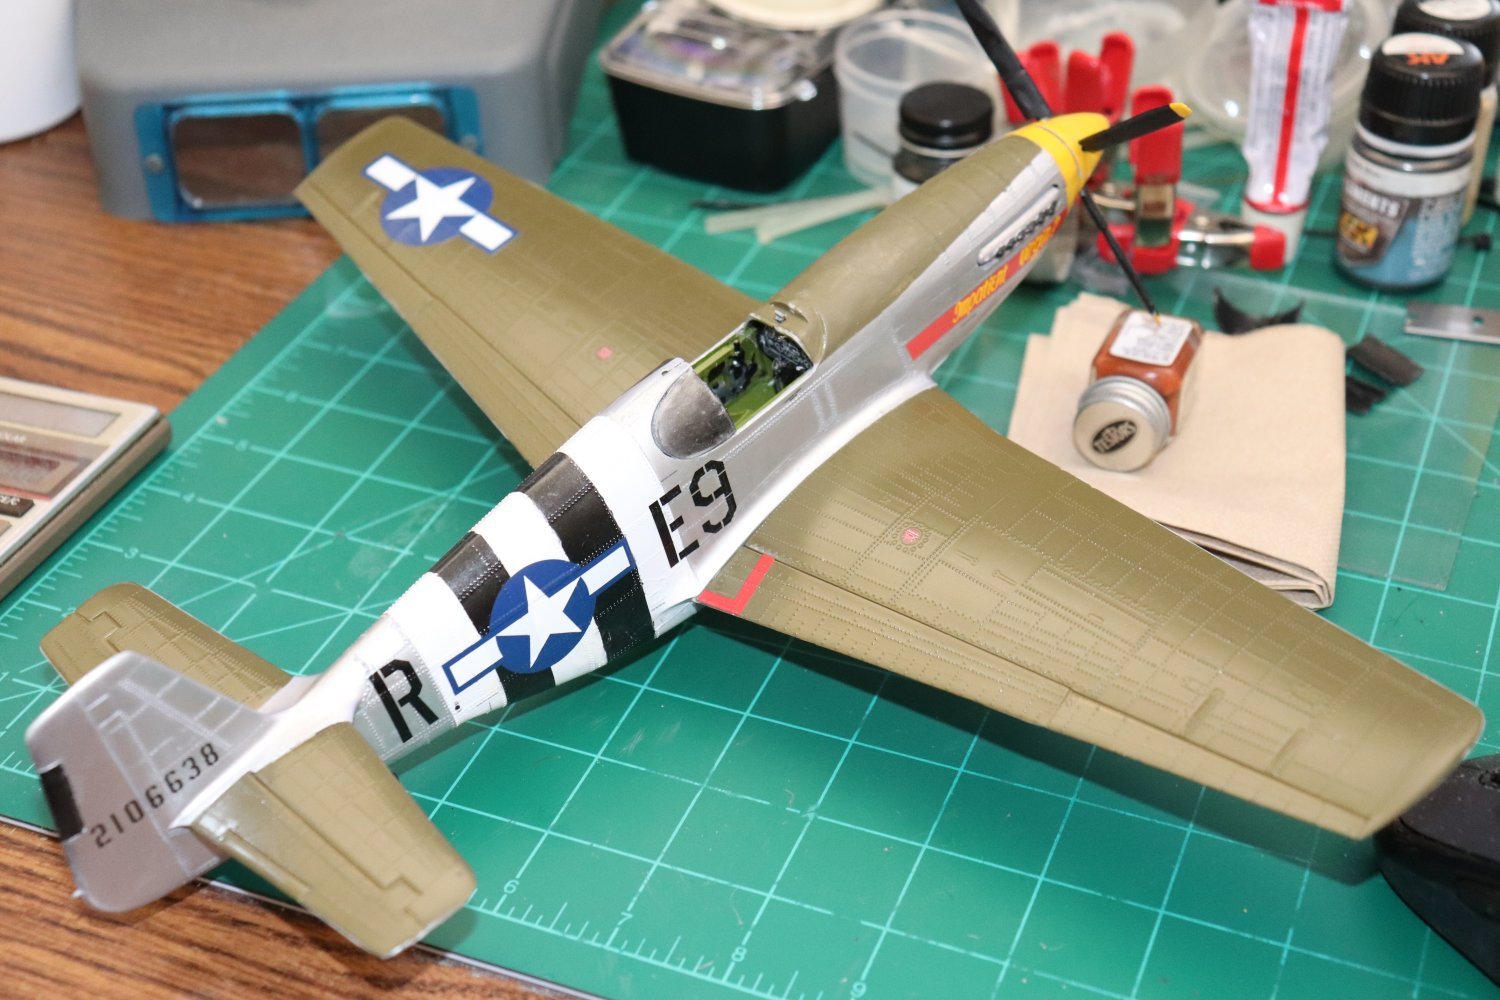
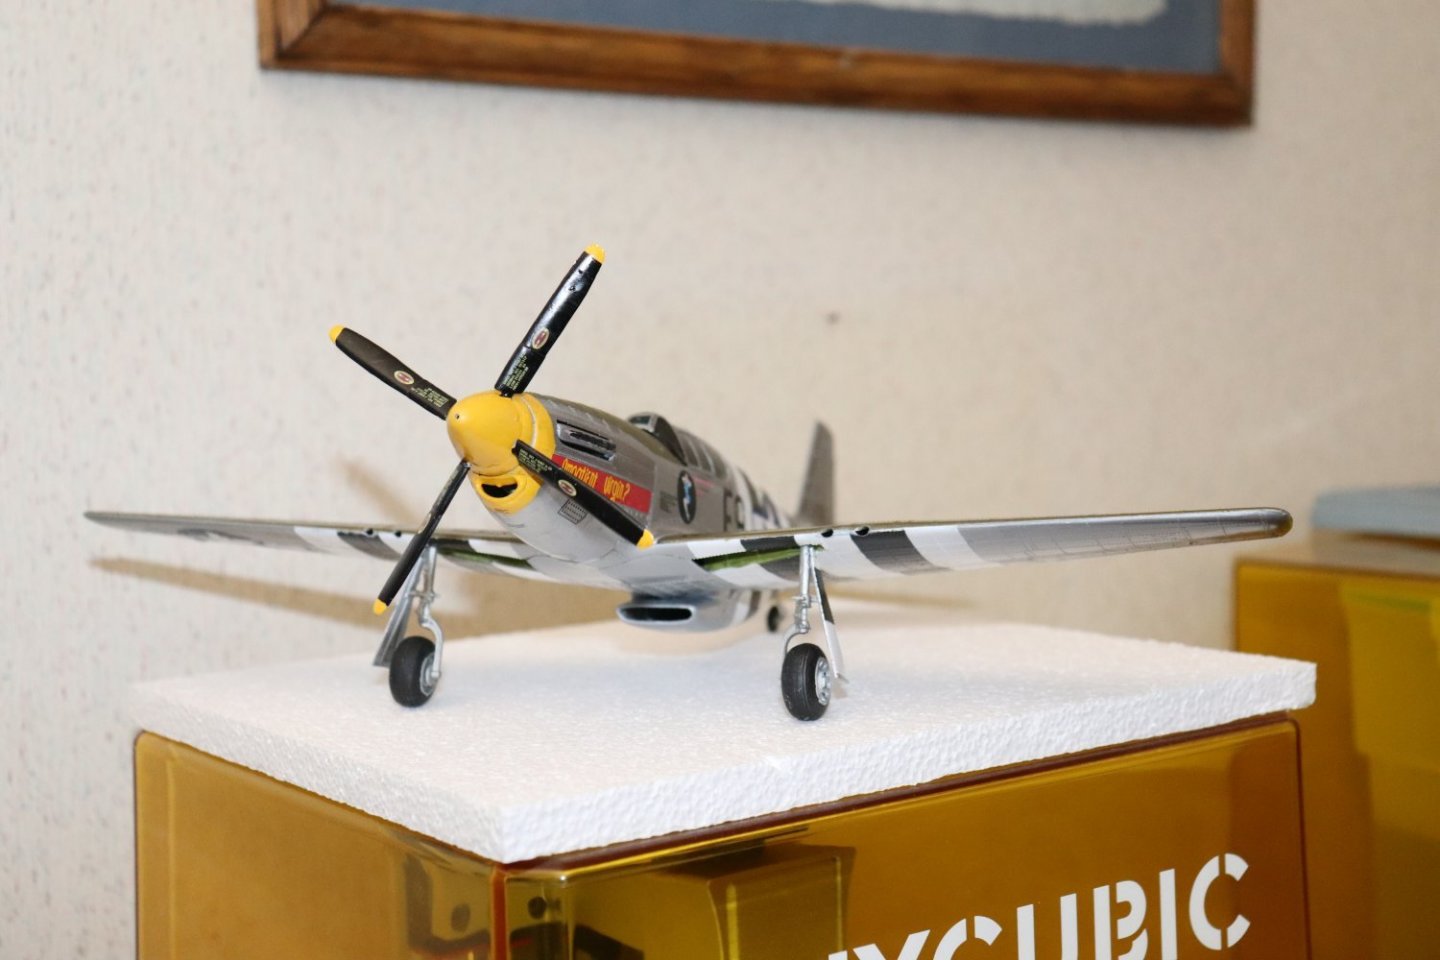
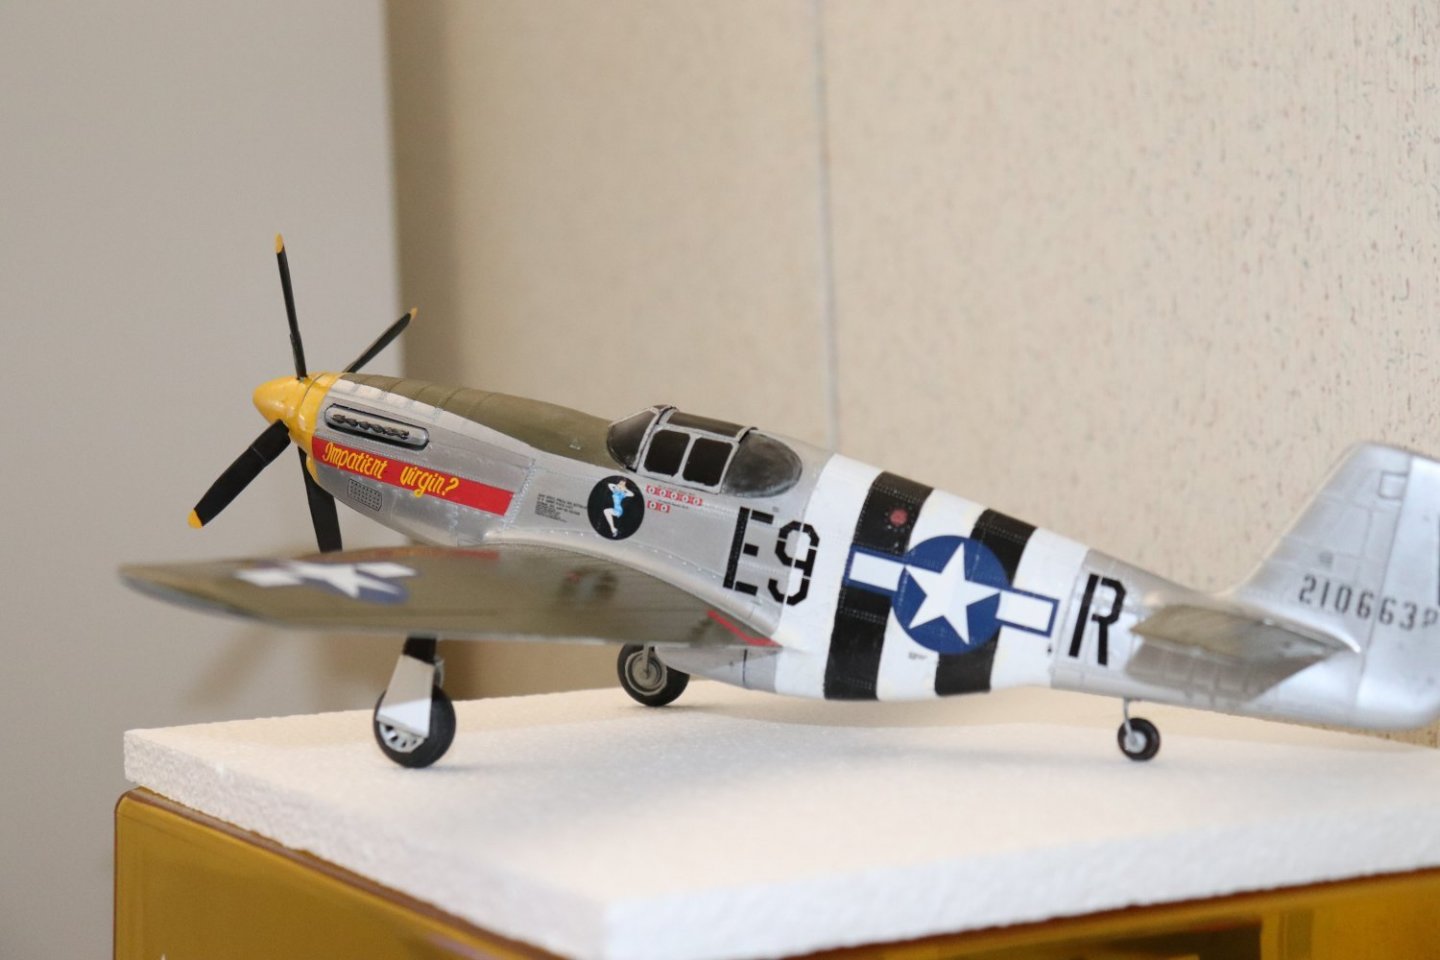
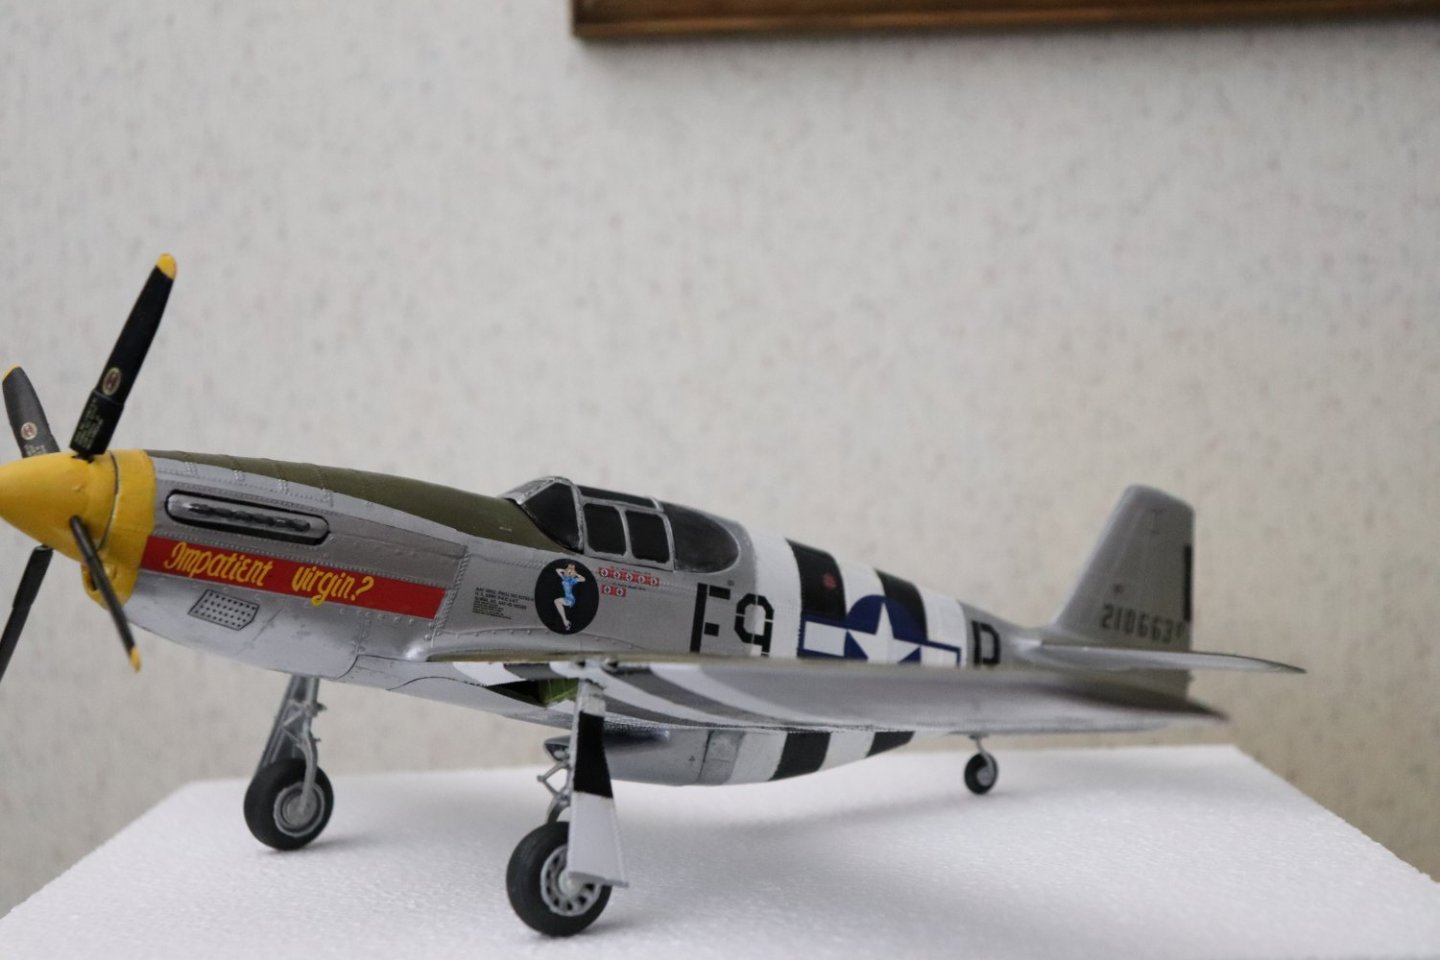
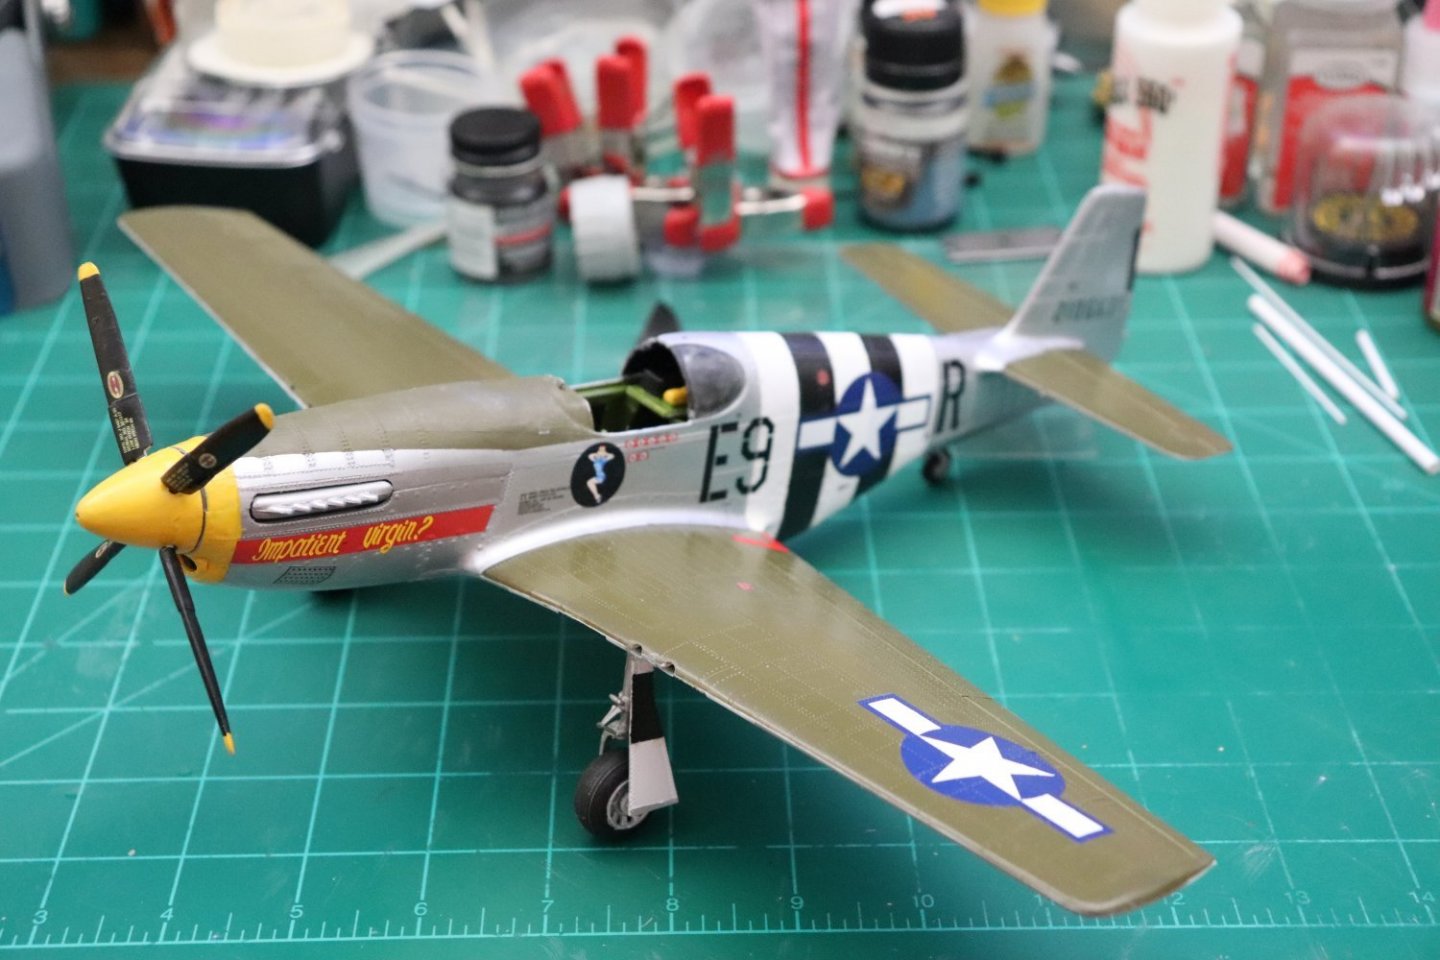
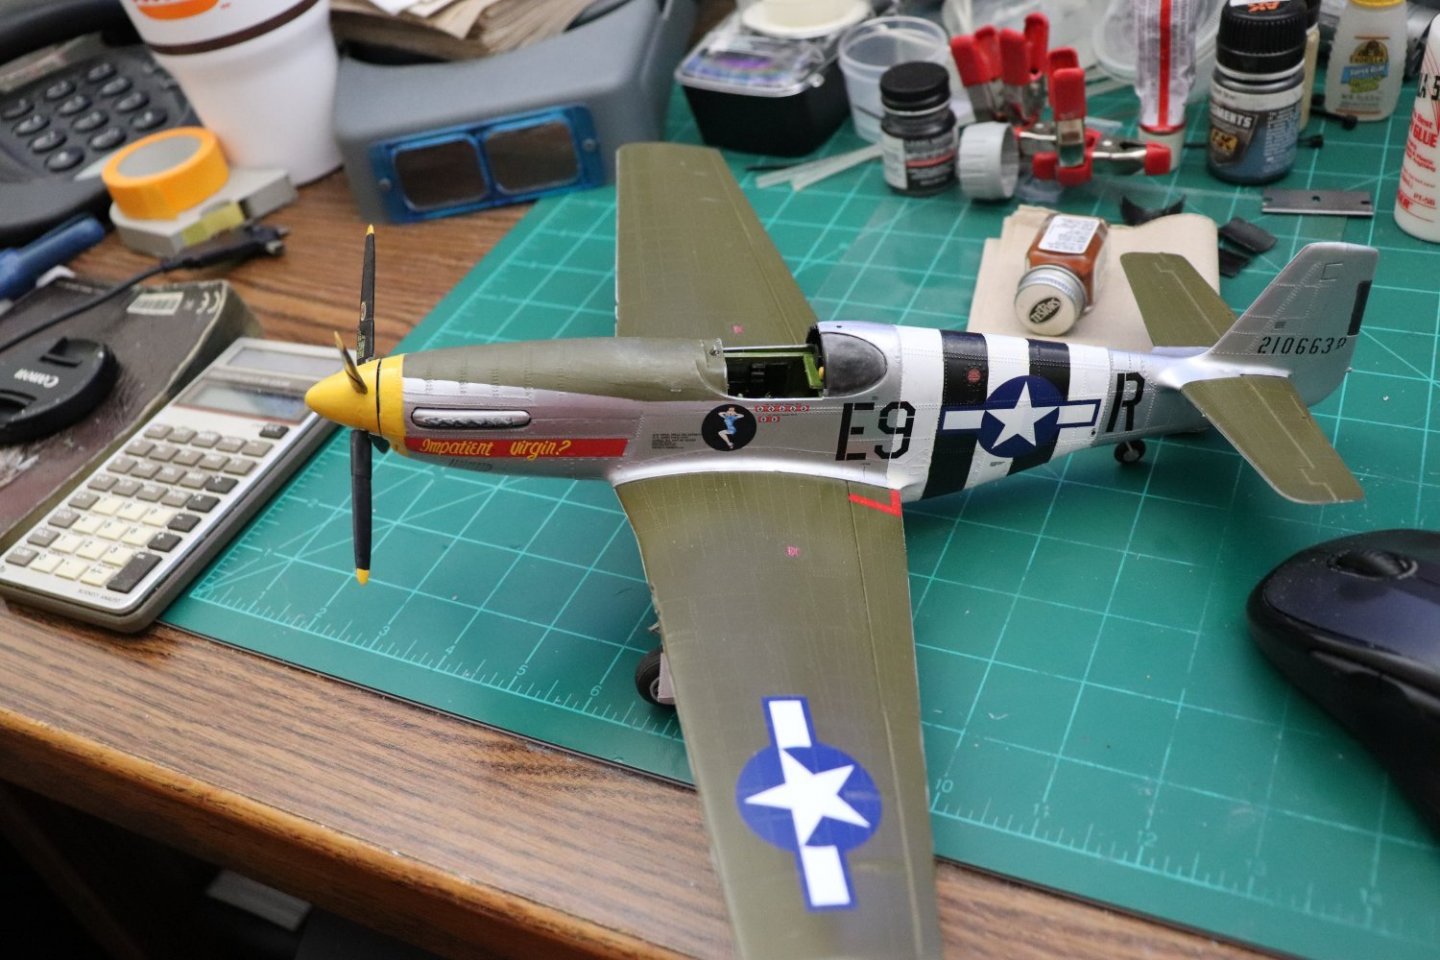
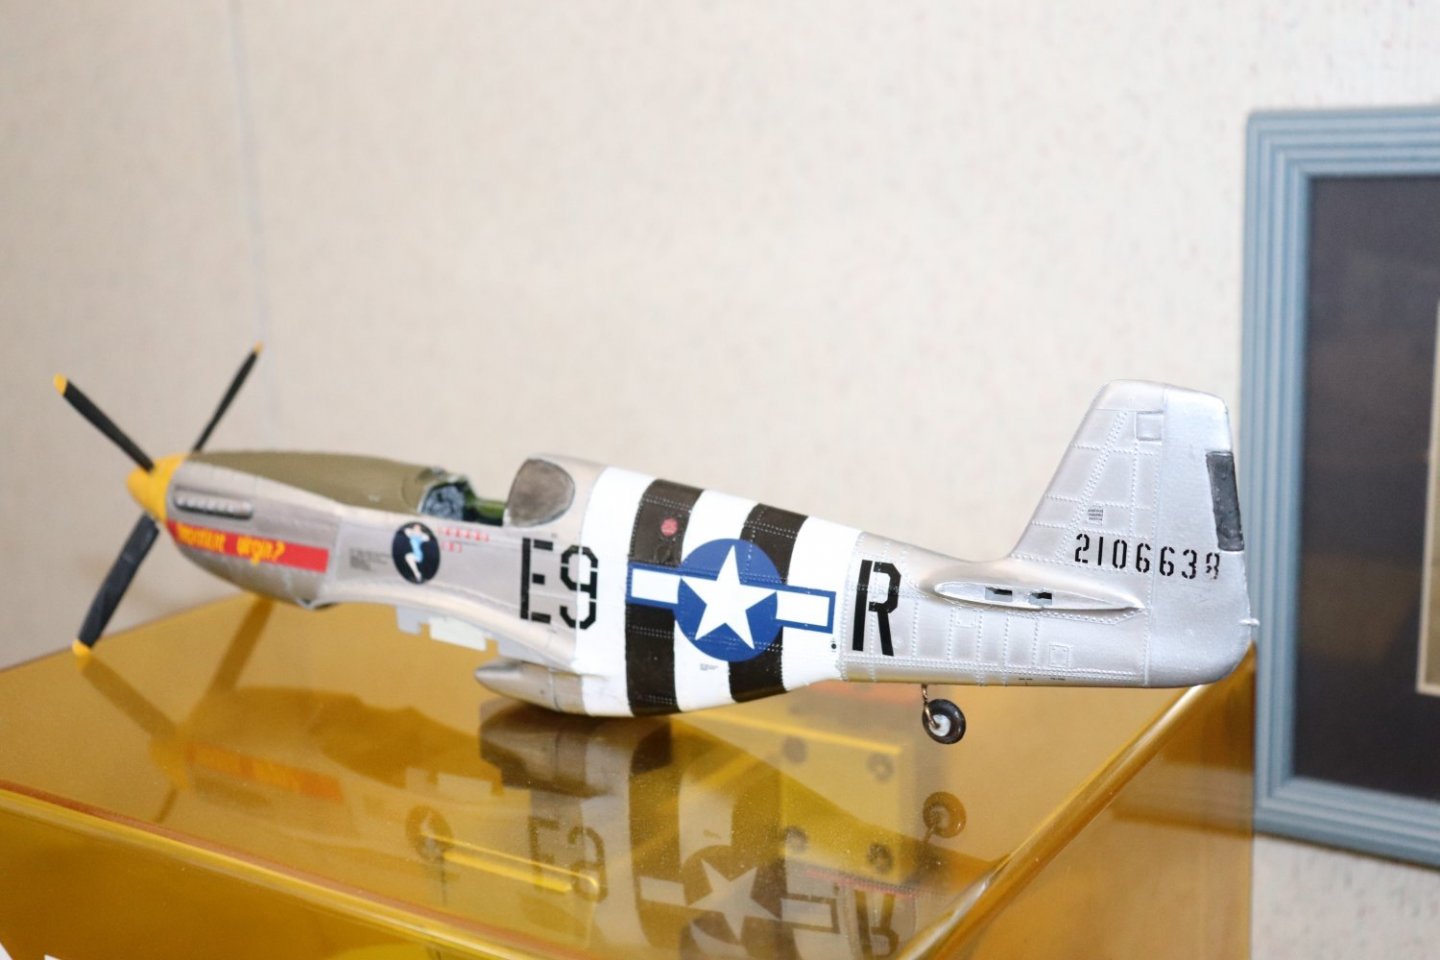
I certainly appreciate that Mike... Thank you... But unfortunately this one is a hack job, a cheap test to see if I could get a decent BMF on a plastic model... For this the himalayan mountains sized rivets all over this thing actually served to show what is possible when I thought at first is was going to ruin the experiment... The wing is painted Testors Aluminum Plate rattlecan over Tamiya Fine Grey Primer rattlecan, then overcoated with Testors wet look automotive gloss rattlecan The upper surfaces of the wings and horizontal stabilizers is Testors Olive Drab rattlecan paint in the same manner as the bottom surfaces substituting OD for the AP The Fuselage and vertical surfaces are Rub n Buff, rubbed on very lightly with a rubber gloved finger, a very small amount is critical, too much and it doesn't buff up... It went over Tamiya Fine Grey Primer rattlecan the same as the wings, which was then wet coated with future before the Rub n Buff was applied... Once the Rub N Buff was applied, it was then wet coated in Future again to protect the surface and give you something to decal on... Details were painted as normal... The secret is using very thin coats the thinner the better as long as you have complete smooth coverage... And that is it.... No massive surface prep, no mixing paints, no non-curing lacquer primer coats, no multiple airbrush coatings.. All by hand in the simplest manner possible... You might want to check out my Rub N Buff testing in the Blue Jay 4 article it where I try to show what is possible... I still need to get it out in the sun for a good natural light look at it, but I think it will be fine... This stuff is simply amazing on what it can do.... (and it's been around for over 60 years) amazing that very few have tried it and experimented with it... In my opinion, it beats everything else hands down for a scale, direct application, BMF finish... I believe I'm going to do a full aluminum modern model bird to see what it will really do, I understand that it can be tinted to produce some spectacular effects... As much as I want to finish Blue Jay 4, I want to know what I'm doing with this first...
-
THANKS Gary!!! I'm glad I'm not the only person that sees it! I tried to get pics that highlighted this exact effect which is what got me excited about it in the first place... And, when exposed to the weather and starts oxidizing, the gran of the sheet oxidizes at different rates making the effect splotchy, which is one of the very hard effects of real life aluminum sheet to model... This stuff duplicates it with ease... You have to see it in real life to get the full effect... In my humble opinion I've found my realistic BMF finish... And the best thing, it's a LOT easier that anyone would think... (and FAST as well) I need to test this on a smooth surface airplane model A more modern kit... (an F-86, or F-84, which when originally used weren't painted when in BMF, no aluminum paint {chuckle})
-
I think so Dan, I think it came out a lot better than I expected it to for the type of surface I put it on.... Final pics coming in a few... Thank you...
-
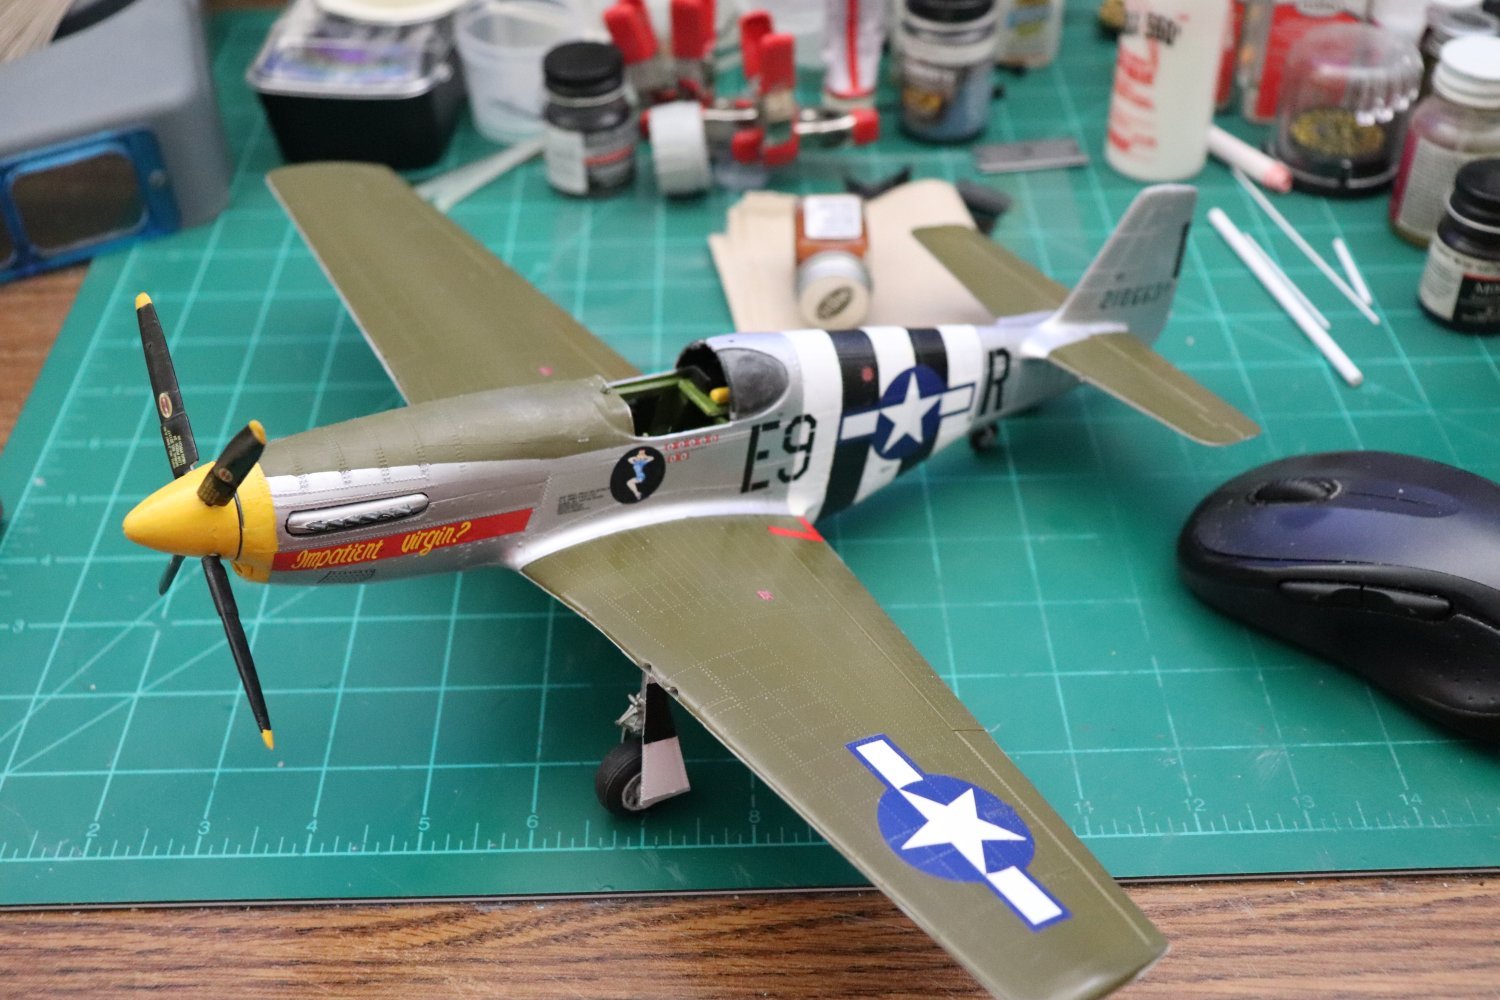
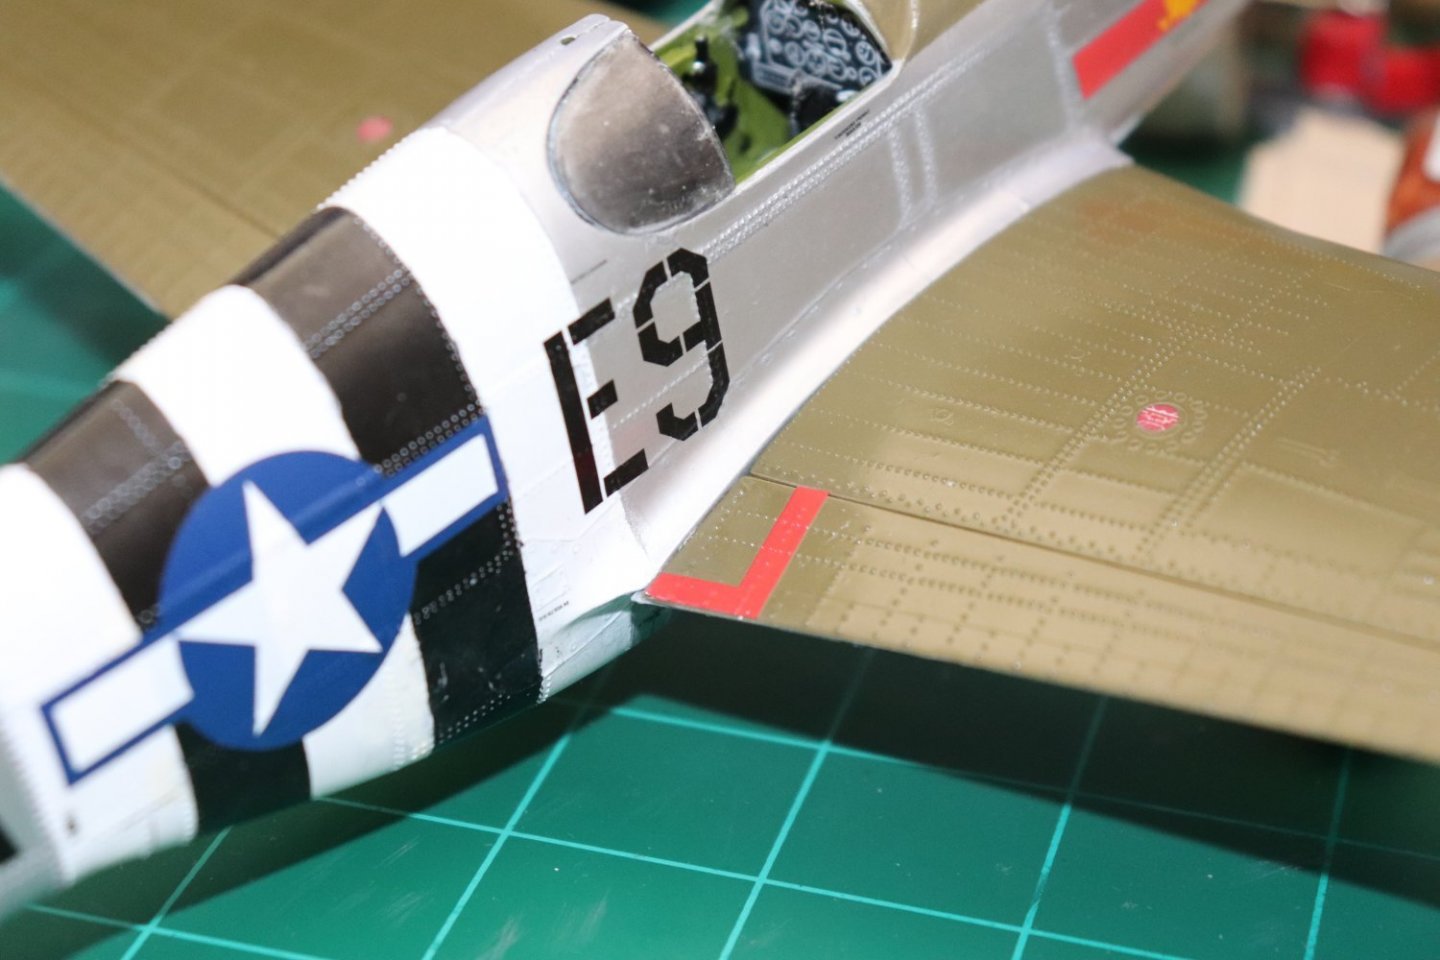
Thanks Ken, The differences in sheen are what you would expect with RnB when you have a smooth surface from a rough one... The nose has long panels which allows you to rub it more than the after sections... The effect works for a riveted skin cause if the differences not in spite of it... The noses of P-51's were usually shinier than the rest of the fuselage anyways, that is where the most handling was done and hence the most cleaning... I didn't plan for it that way, it just happened... (a bonus in this application if you ask me)
-
Thanks Mark, the pics don't really do it justice is all I'm going to say, the effect on this is stunning to say the least... I might need another experiment on a smooth bird before I go forth with Bluejay 4, that's the one I don't want no issues with.... (going to be center stage in my case) I want to be sure before I rely on it...
-
Possibly, I remember it in 1/48th along with Ding Hao! (Major James Howards P-51B) Revell did the 'Shangri La' in all three scales.... H295 1/32 P-51B Mustang, Don Gentiles P-51B is certainly a possibility.... In fact pretty much all the manufacturers at one time or another did Capt. Gentile's P-51...
-
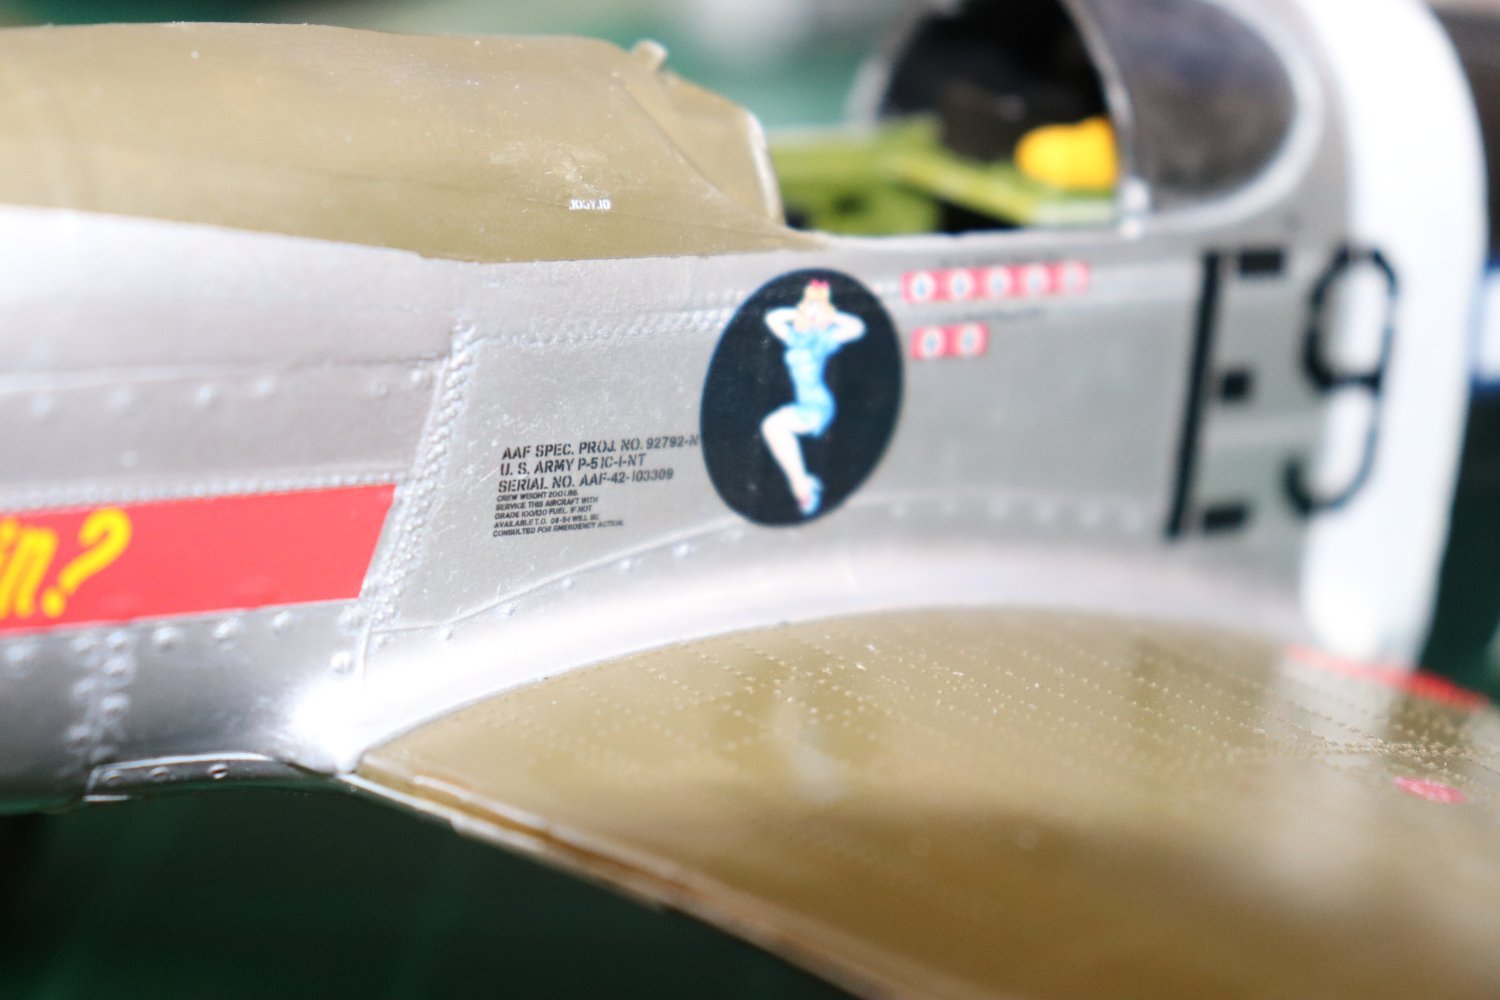
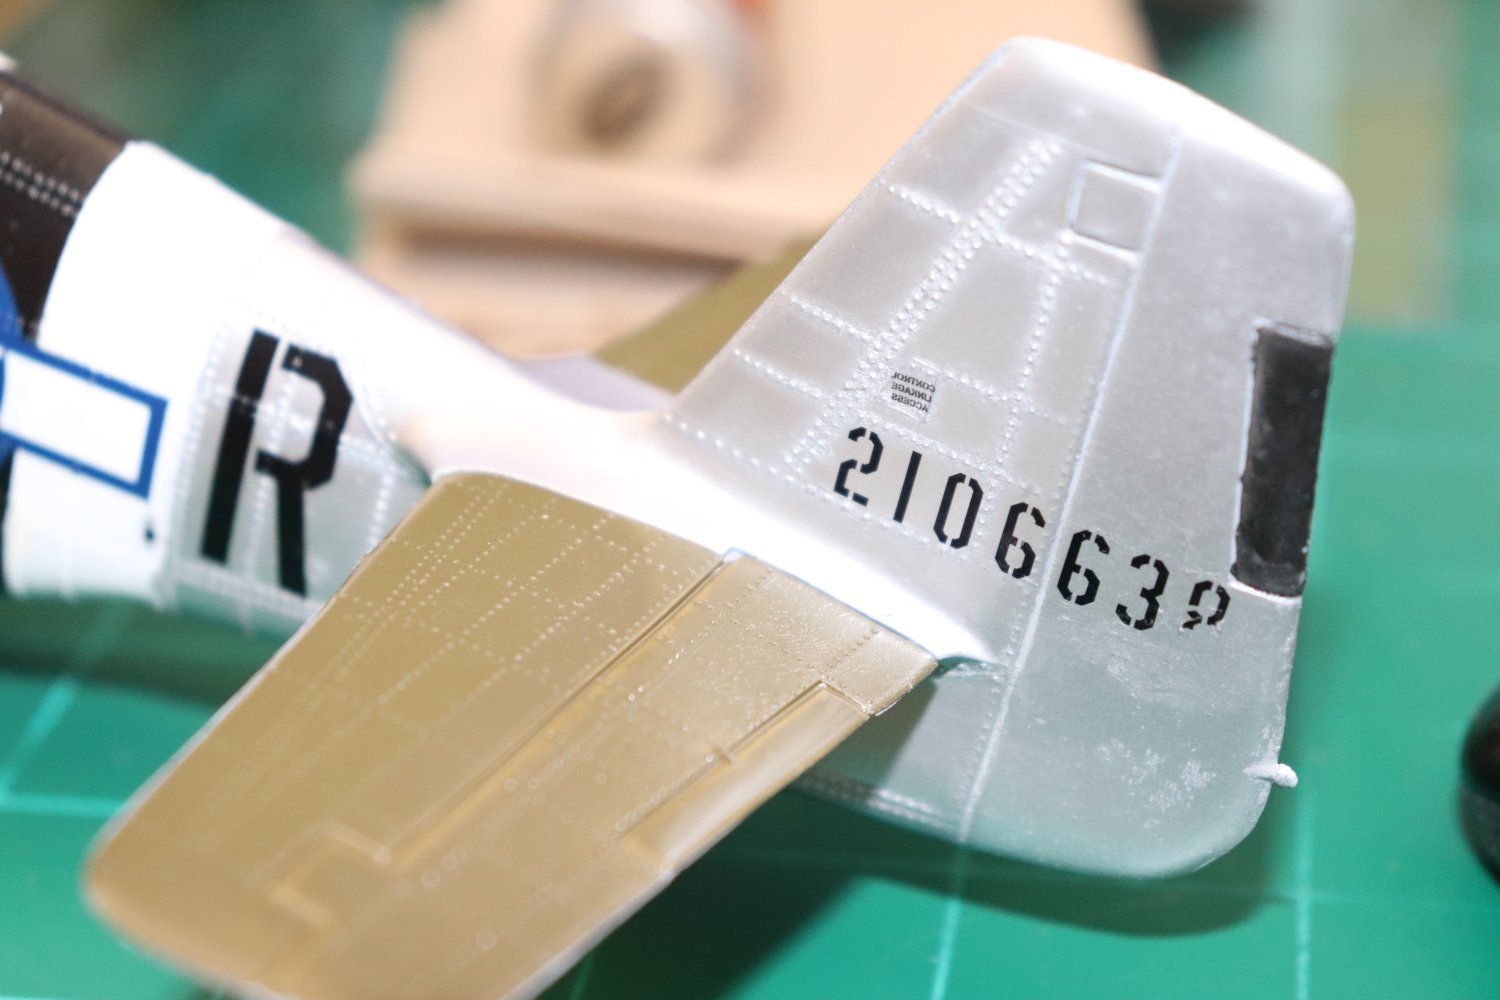
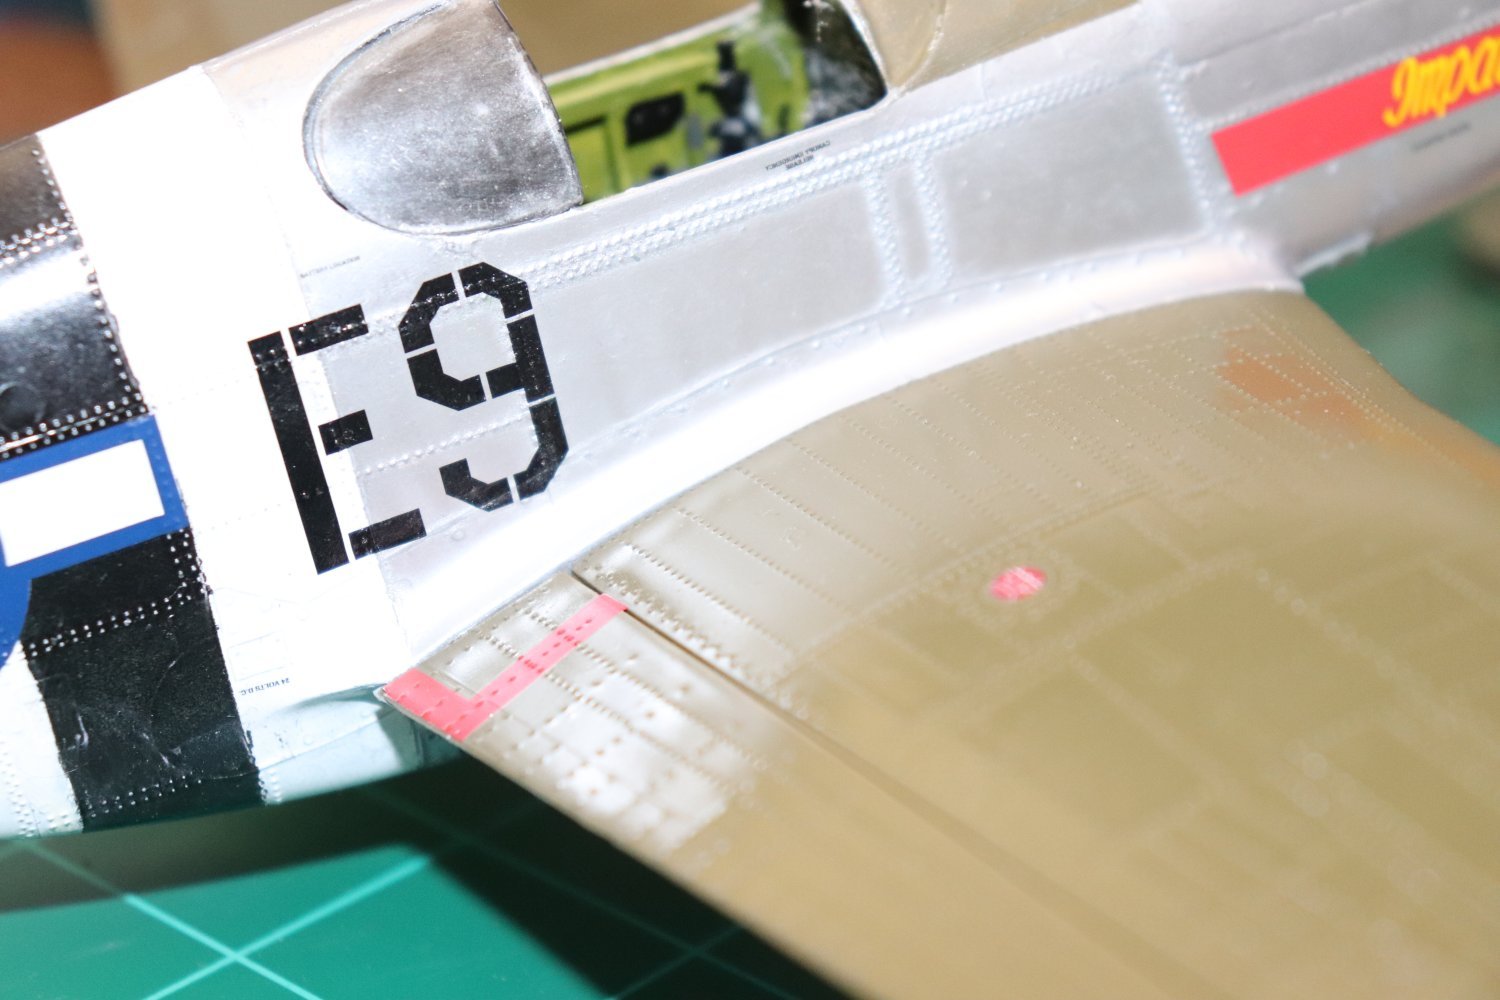
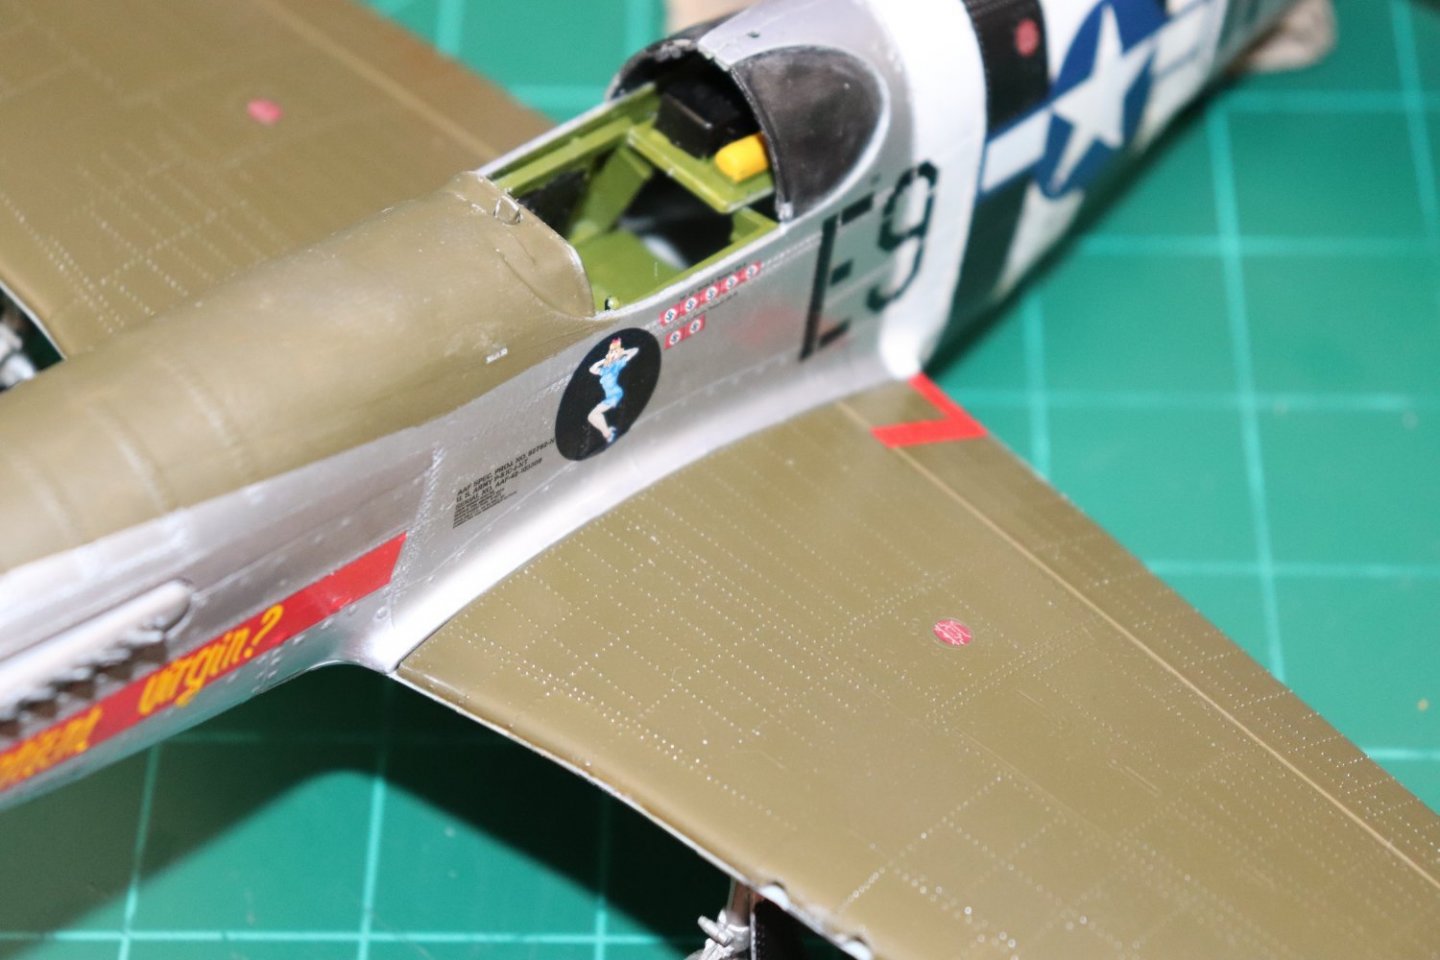
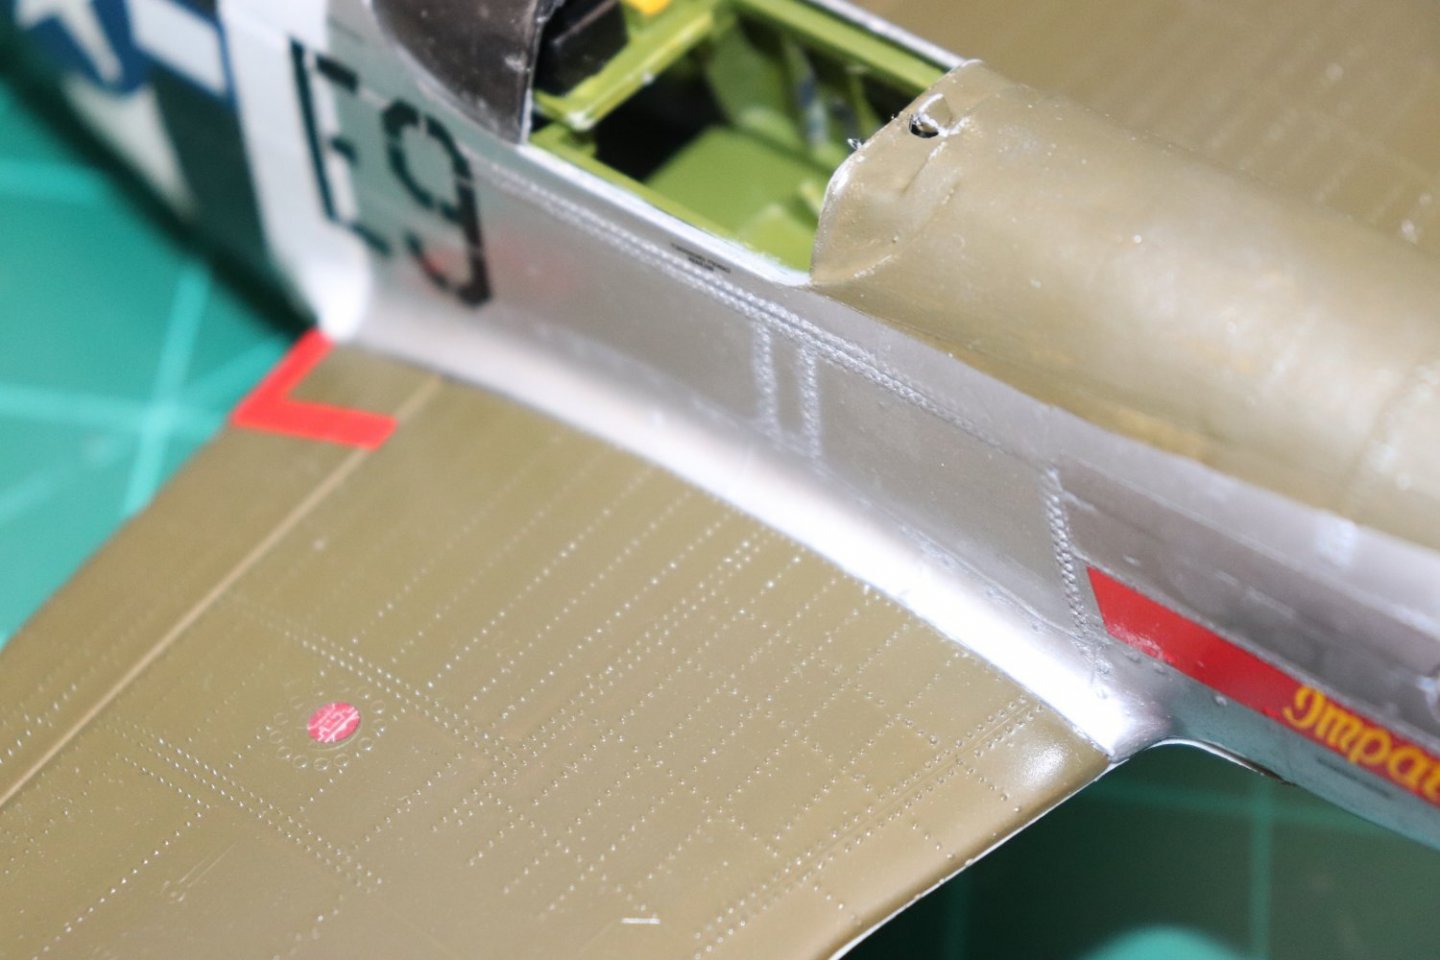
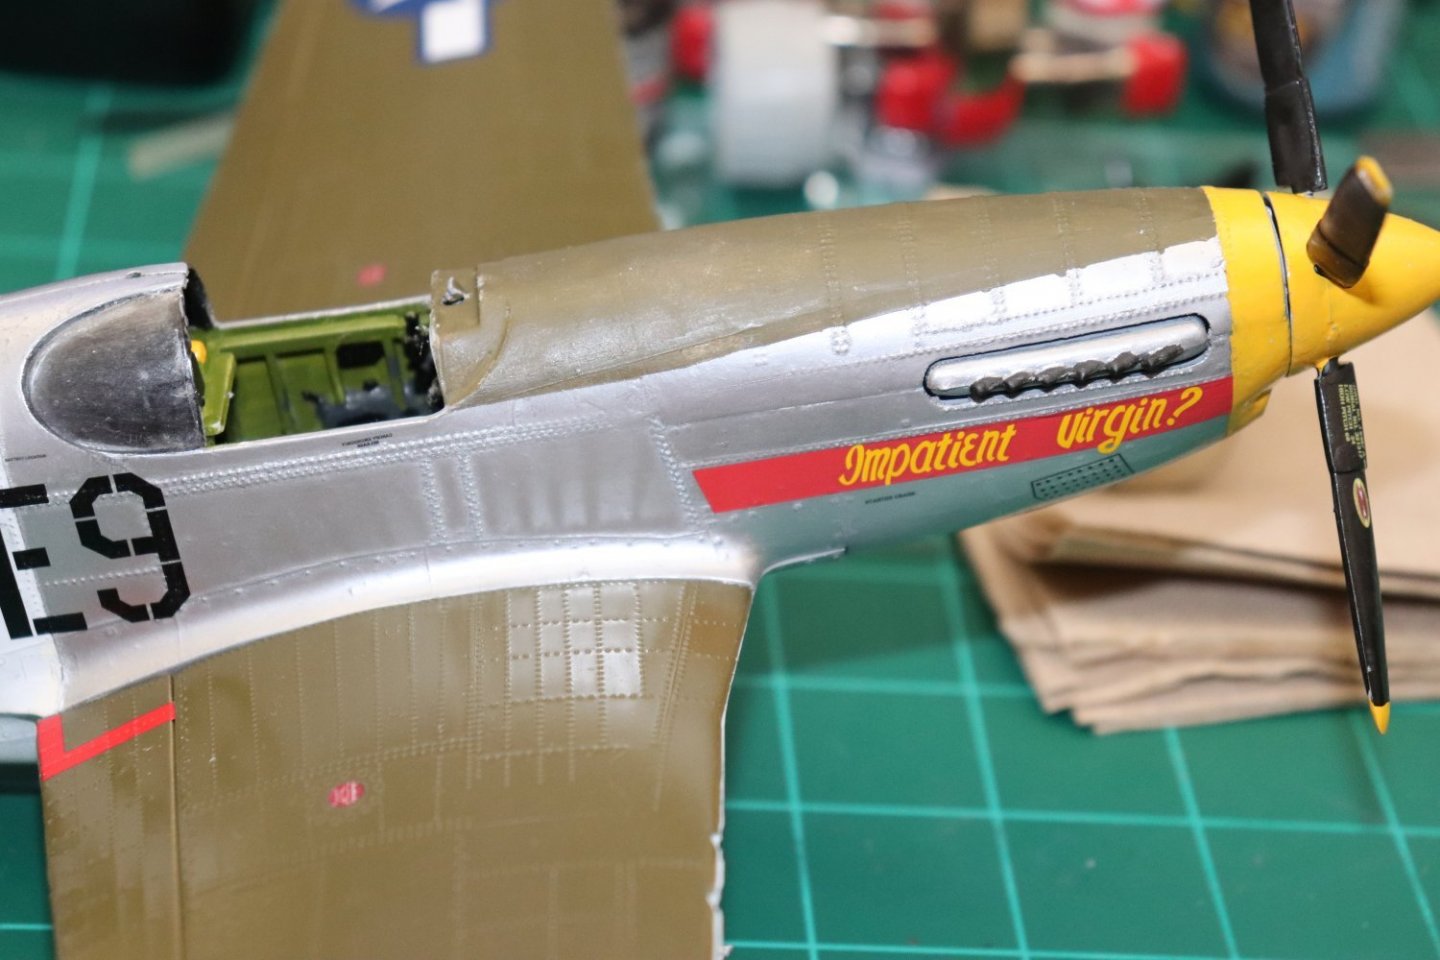
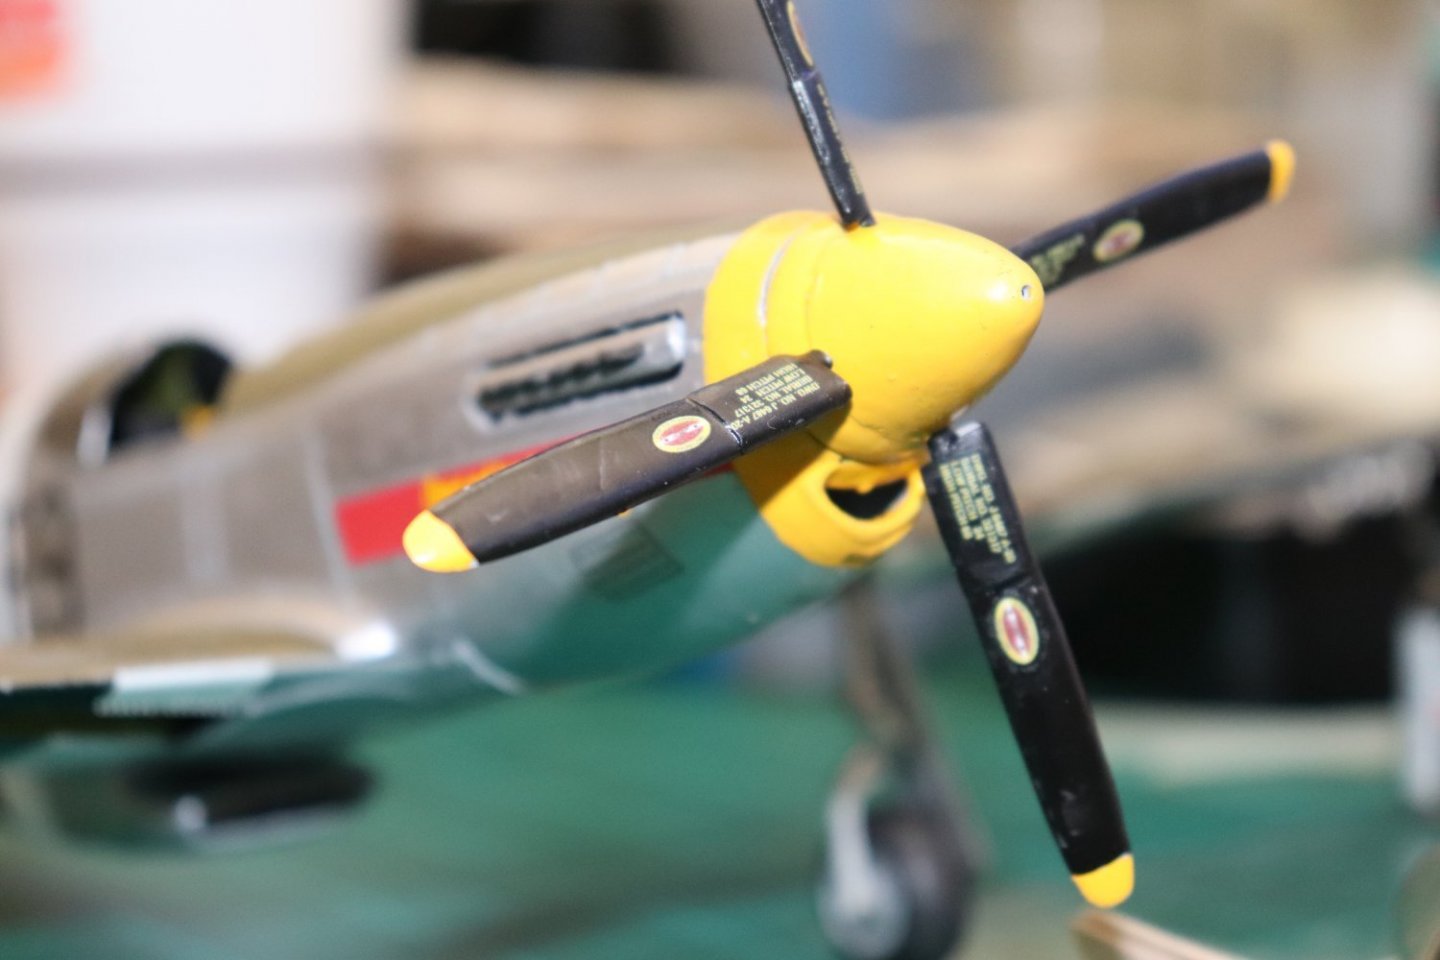
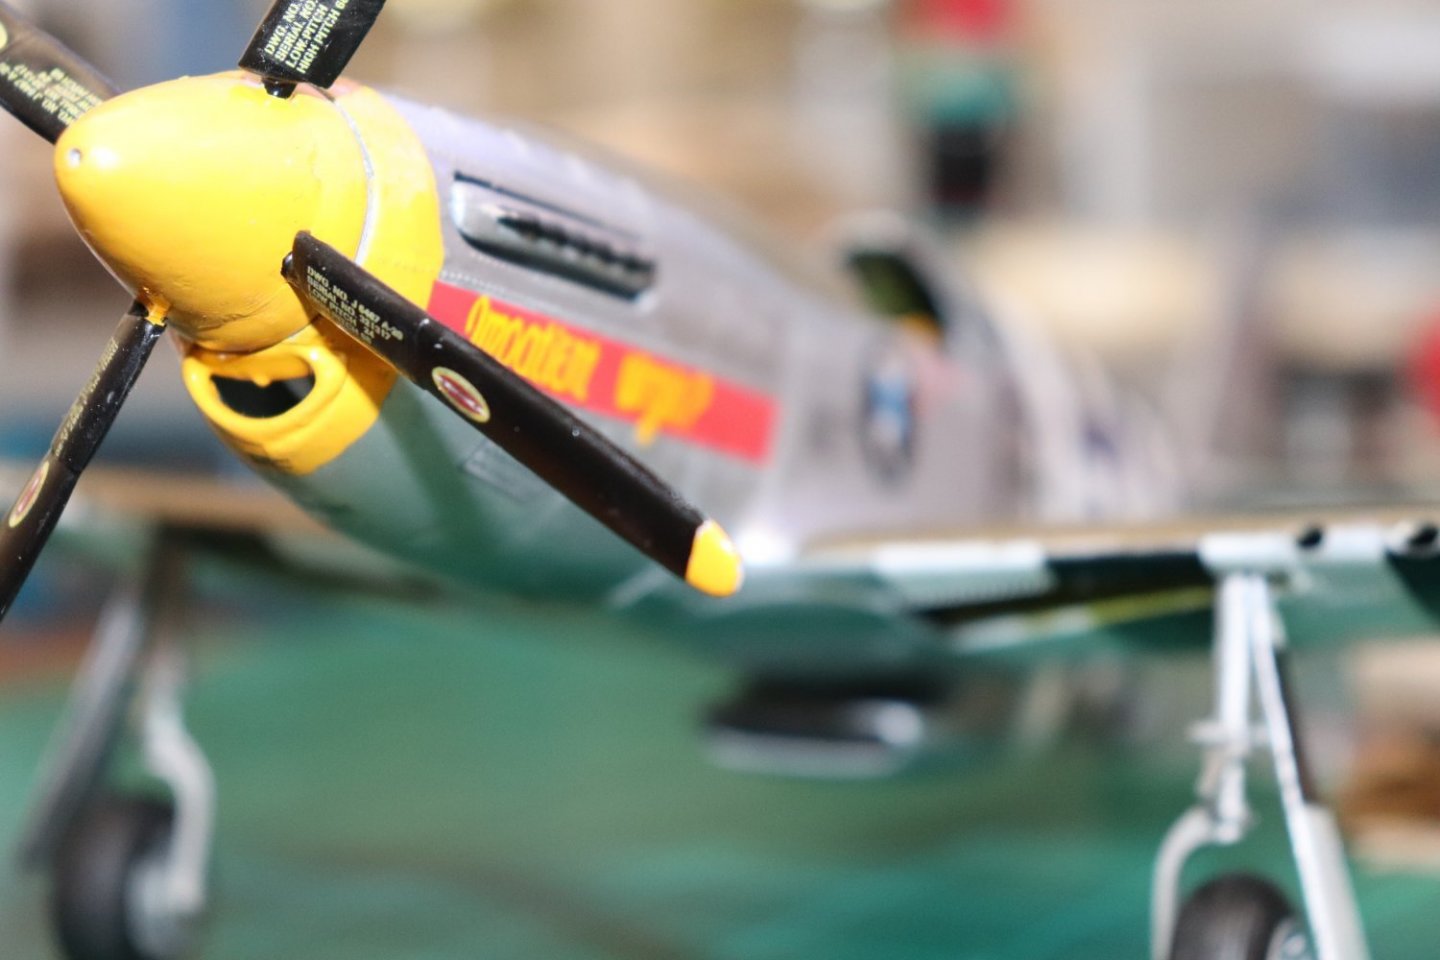
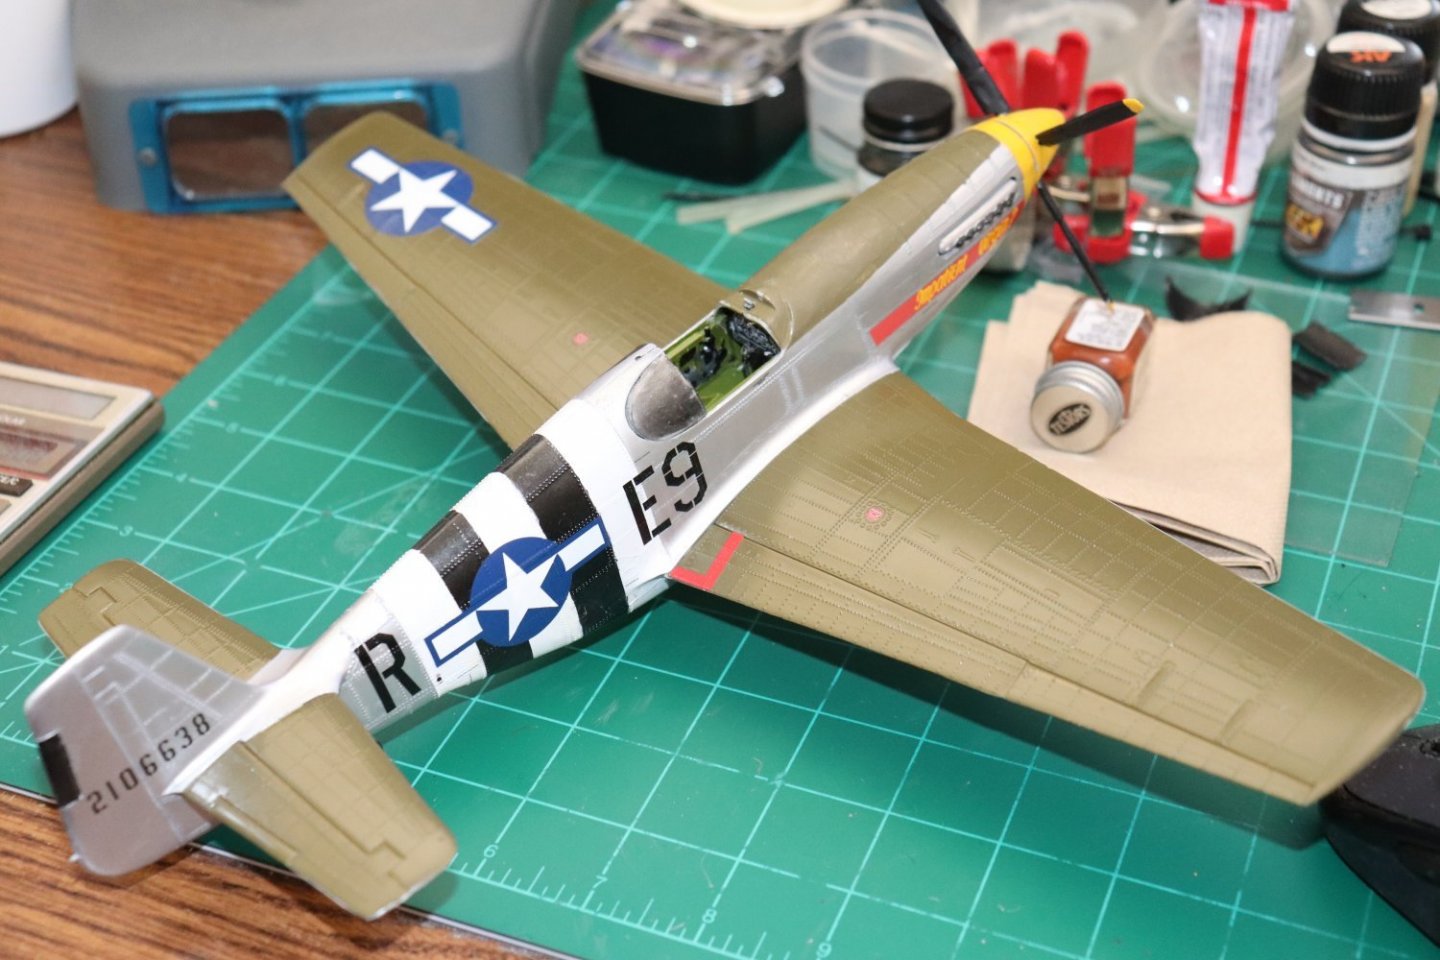
Update: As far as completeness, all that is left is to glue on the propeller and canopy.... This is a series of shots under natural light and heavy flash that will hopefully show what I was driving at as far as this finish surpassing anything I've ever seen done before... Aluminum when new has a reflectiveness, but it is muted by the whitish grey pasty oxidation that is always present on bare aluminum... Aluminum can be polished into a mirror but for working warplanes, this is seldom done so we are stuck trying to replicate that innate reflectiveness and dulling oxidation that such materials represent... We can paint aluminum and put a gloss coat on top of it and get a reflection from the gloss surface, but the surface has no reflection at all... You are going to see that here... Overall status now in natural light.... In these shots you get muted hints... Overall status in heavy flash... Your beginning to see the olive drab color reflection in the fuselage sides and the green surface on the underside of the fuselage... You can clearly see the fuselage reflection in the wings from the gloss coat... Closeups... (under heavy flash) On this one I'm going to point something out... Notice the red reflection on the olive drab wing? then look along the wing to the fuselage side.... the first square vertical panel back from the leading wing root? That's a reflection of a reflection... You see a diffuse secondary red reflection of the red reflection coming off the gloss surface of the wing from the red name label on the nose... Note the reflection between the E and the 9..... THAT's the reflection I'm talking about, REAL aluminum sheet does that, PAINTED aluminum does not... And two final shots under natural light... Ok you see the red tint behind the exhaust and above the name label? that is my red shirt from two feet away... Look between the E and the 9 (on the fuselage side) in the lower half you see the warning strips from the wing flap reflected... Look at the tail in front of the 2 of the registration number... You see the reflection of the olive drab horizontal stabilizer... That is what I was seeing on Paul's airplanes and what I was seeing on real BMF non-polished airplanes... Can't get any more scale that that in my humble opinion... I'm going to call this one finished at this point, I'm sure you all know how to glue up multipart canopies so there is no need to illustrate that... I will post a couple of finish shots in a few days, real life is coming on hard at the moment and the next few days are going to be hectic... Thanks for following this experiment in BMF and I hope you all don't think I'm crazy.... EG


- 63 replies
-
- 13
-
-

-
-
Thank you very much brother, after the next photo update we will see if everyone sees the same thing I was seeing... It's kinda difficult to describe with words...
-
Thanks Gary I think so as well, and am about to do an 18 pic closeup update under high camera flash to show what I mean... It looks real and in scale... (scale being the part paint and foil can't replicate in a typical BMF)
-
Thanks my friend... Yep the riveting was an issue, nothing like a Himalaya's worth of peaks to prevent a smooth coat... but we got it done, I couldn't apply it with a smooth circular pattern, I had to go with the rivet lines and cross them to get in between them... A lot more work... The mostly smooth skin to the Starfighter should take this beautifully...
-
Minor update... Fuselage decaling done..... Working on finishing the wings now, Then a final once over for missing stuff... Finish coming soon now... EG

- 63 replies
-
- 12
-