Egilman
-
Posts
4,385 -
Joined
-
Last visited
Content Type
Profiles
Forums
Gallery
Events
Everything posted by Egilman
-

F-86F-30 Sabre by Egilman - Kinetic - 1/32nd scale
Egilman replied to Egilman's topic in Non-ship/categorised builds
Well the idea is similar to black basing, since the base is pure black like the real aircraft, that's what you use.. Then take some dirtifying stuff, (Mig streaking grime for example) and wash it without sealing it, you want the flat black and grime to really adhere to each other... Once dry using clear clean thinner, wash it again, yes it's going to knock down the paint on the high spots, but it will move the rest around making it dull and splotchy, but still discernably black... Then you go back over it sealing it with future before dry brushing gloss black enamel over the high spots you washed the paint off of before... Then pick out the details with your colors and overcoat it with flat clear... Pictures soon... -
Martini Porsche 935 by kpnuts - FINISHED - Tamiya - 1/12
Egilman replied to kpnuts's topic in Non-ship/categorised builds
I'll be here brother, got a '66 Mk 4 in the stash in the same scale... Get yourself well my friend, it's no fun being sick... -
F-86F-30 Sabre by Egilman - Kinetic - 1/32nd scale
Egilman replied to Egilman's topic in Non-ship/categorised builds
Agreed on the not being seen not being done as well.... My skills are what they are no need to hone them on useless endeavors... Yep the F-84F Thunderstreak, completely different aircraft from the F-84 Thunderjet it was derived from... It's is also a BMF bird in USAF livery... (the 3 color SEA scheme looks good as well) You should do a build thread on it... -
F-86F-30 Sabre by Egilman - Kinetic - 1/32nd scale
Egilman replied to Egilman's topic in Non-ship/categorised builds
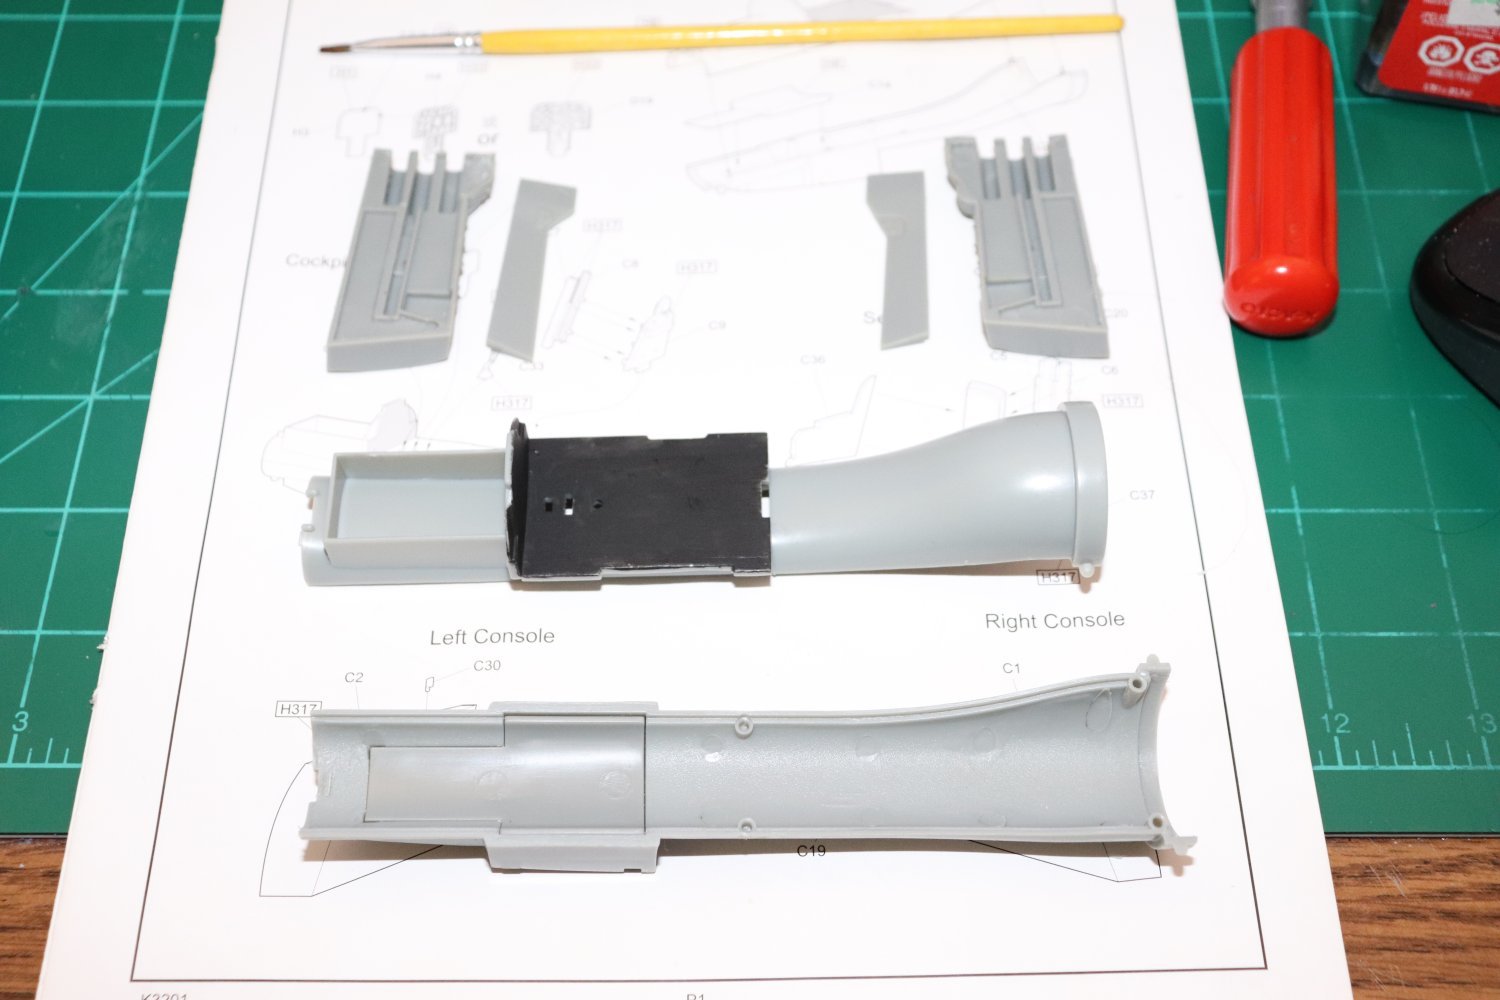
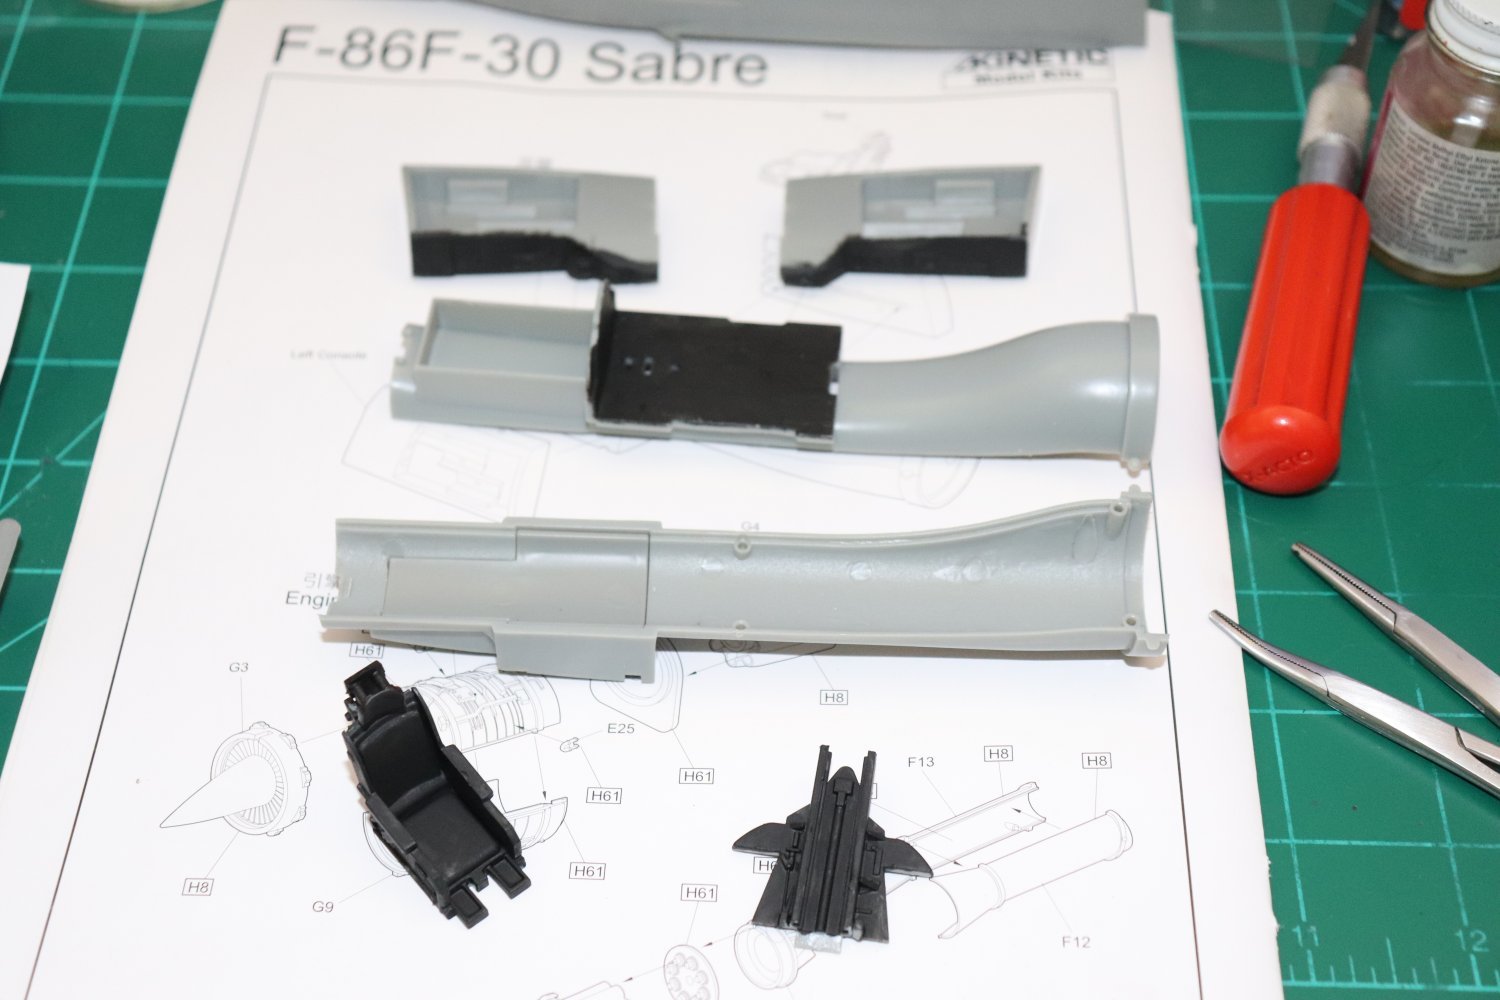
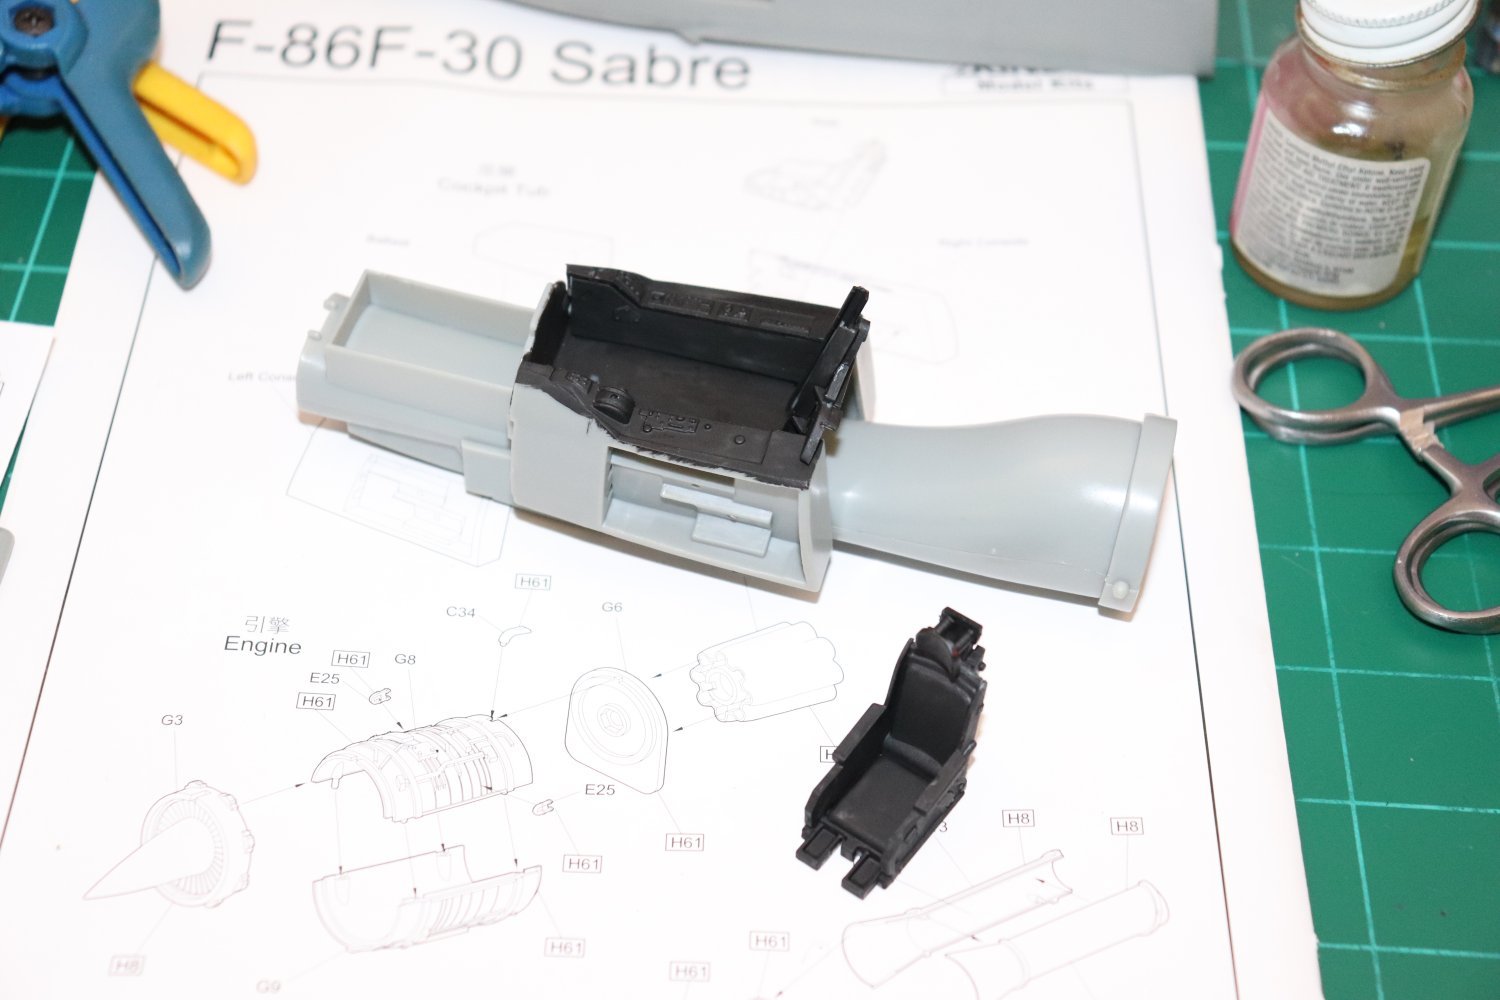
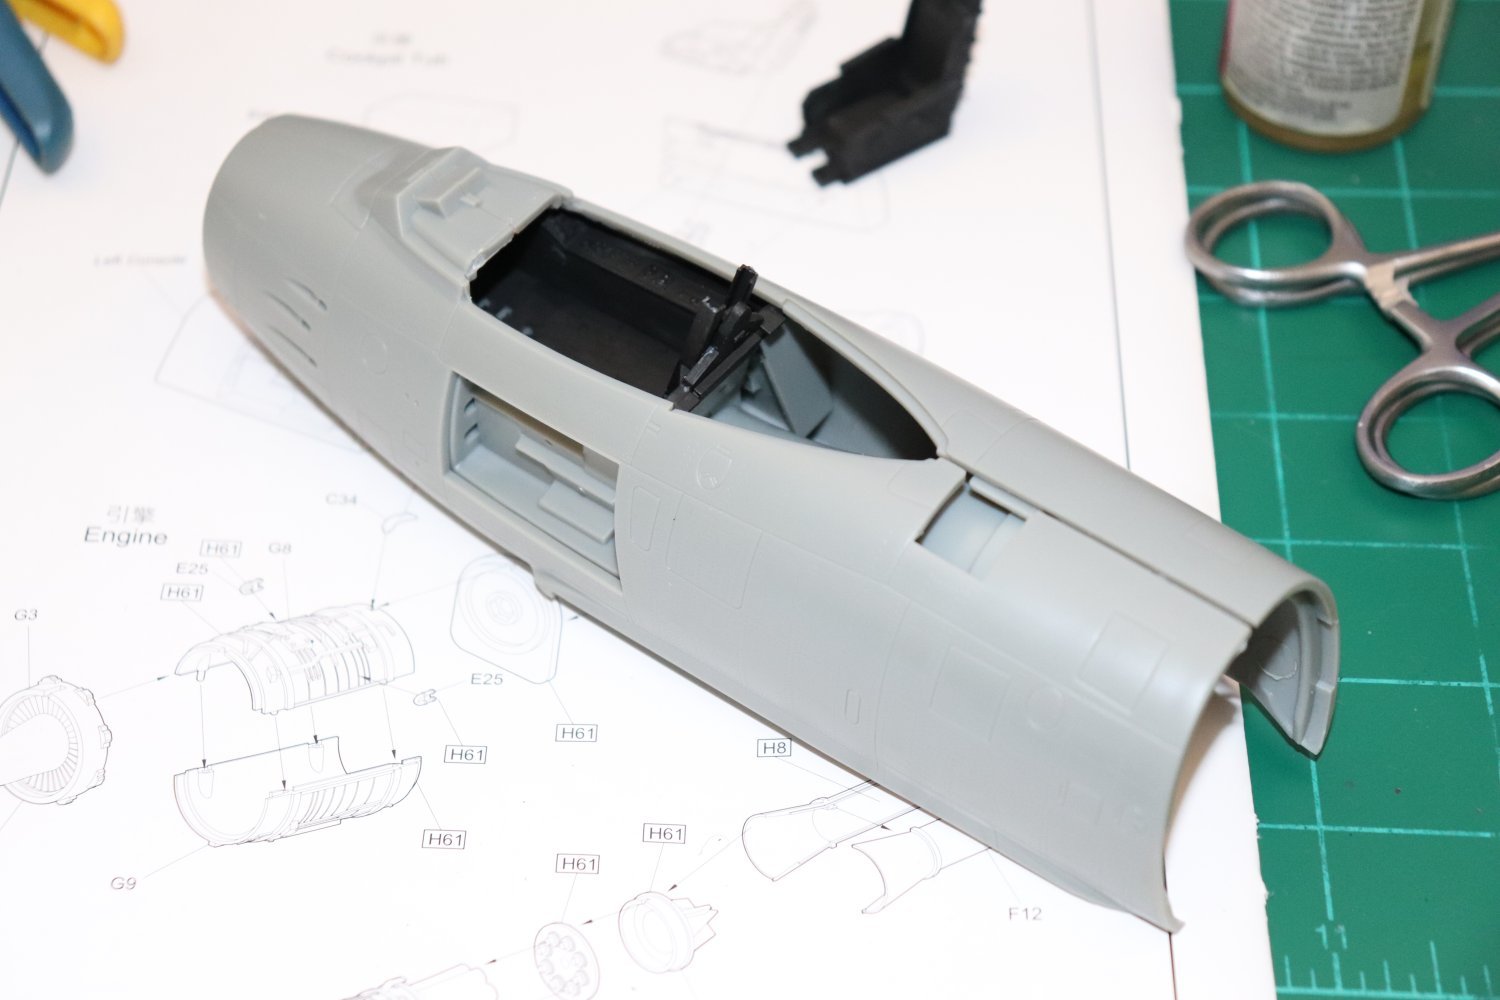
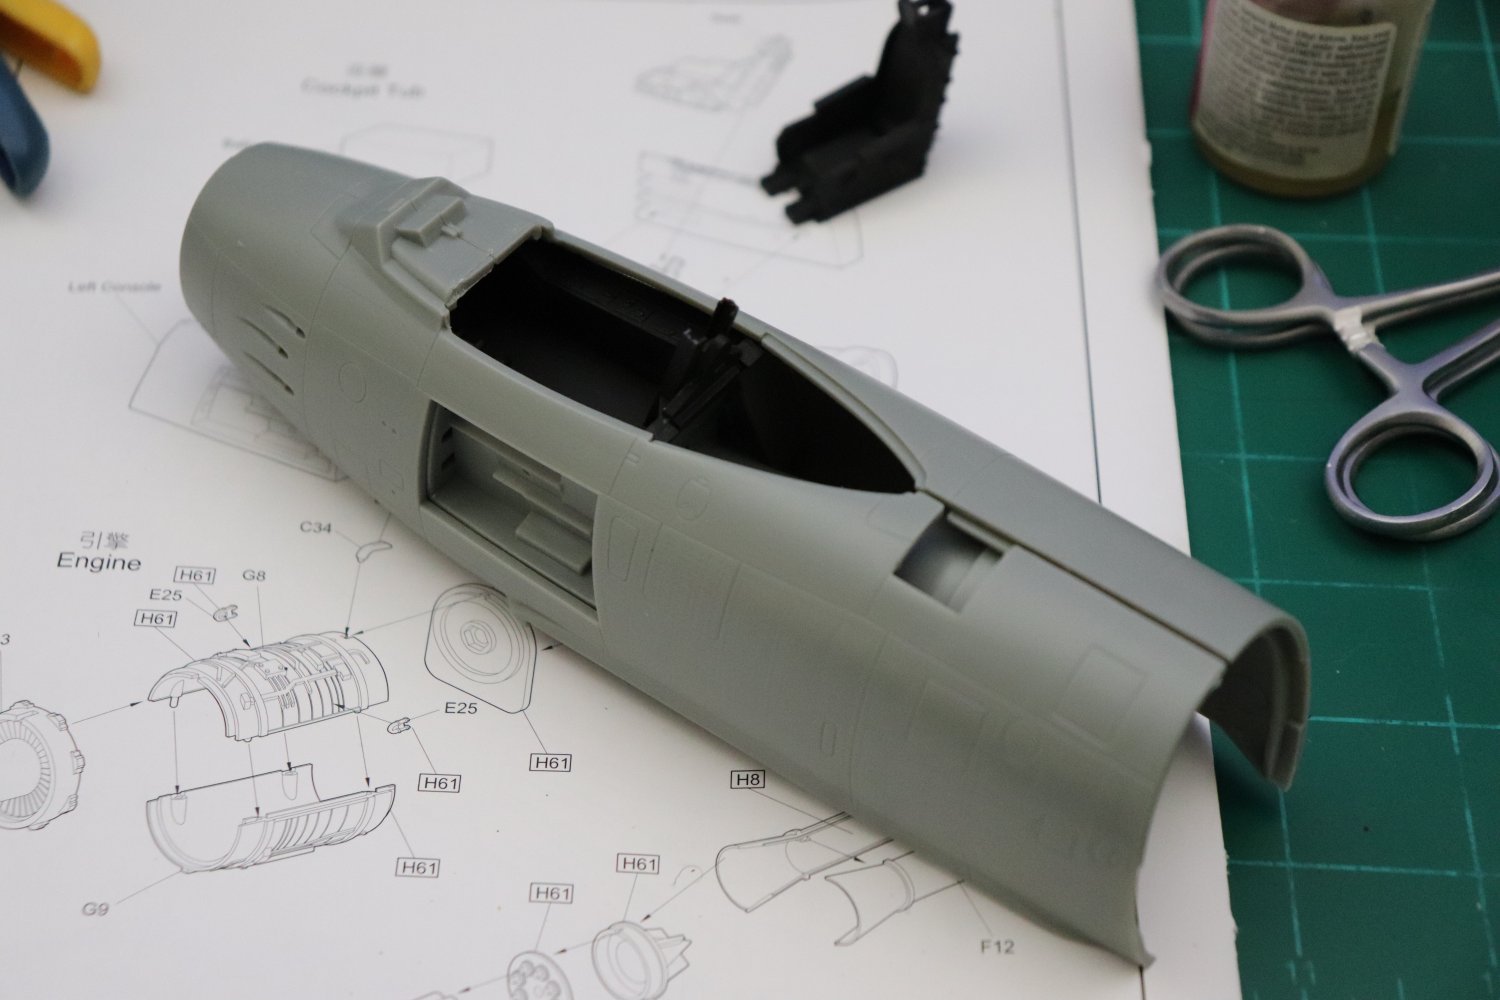
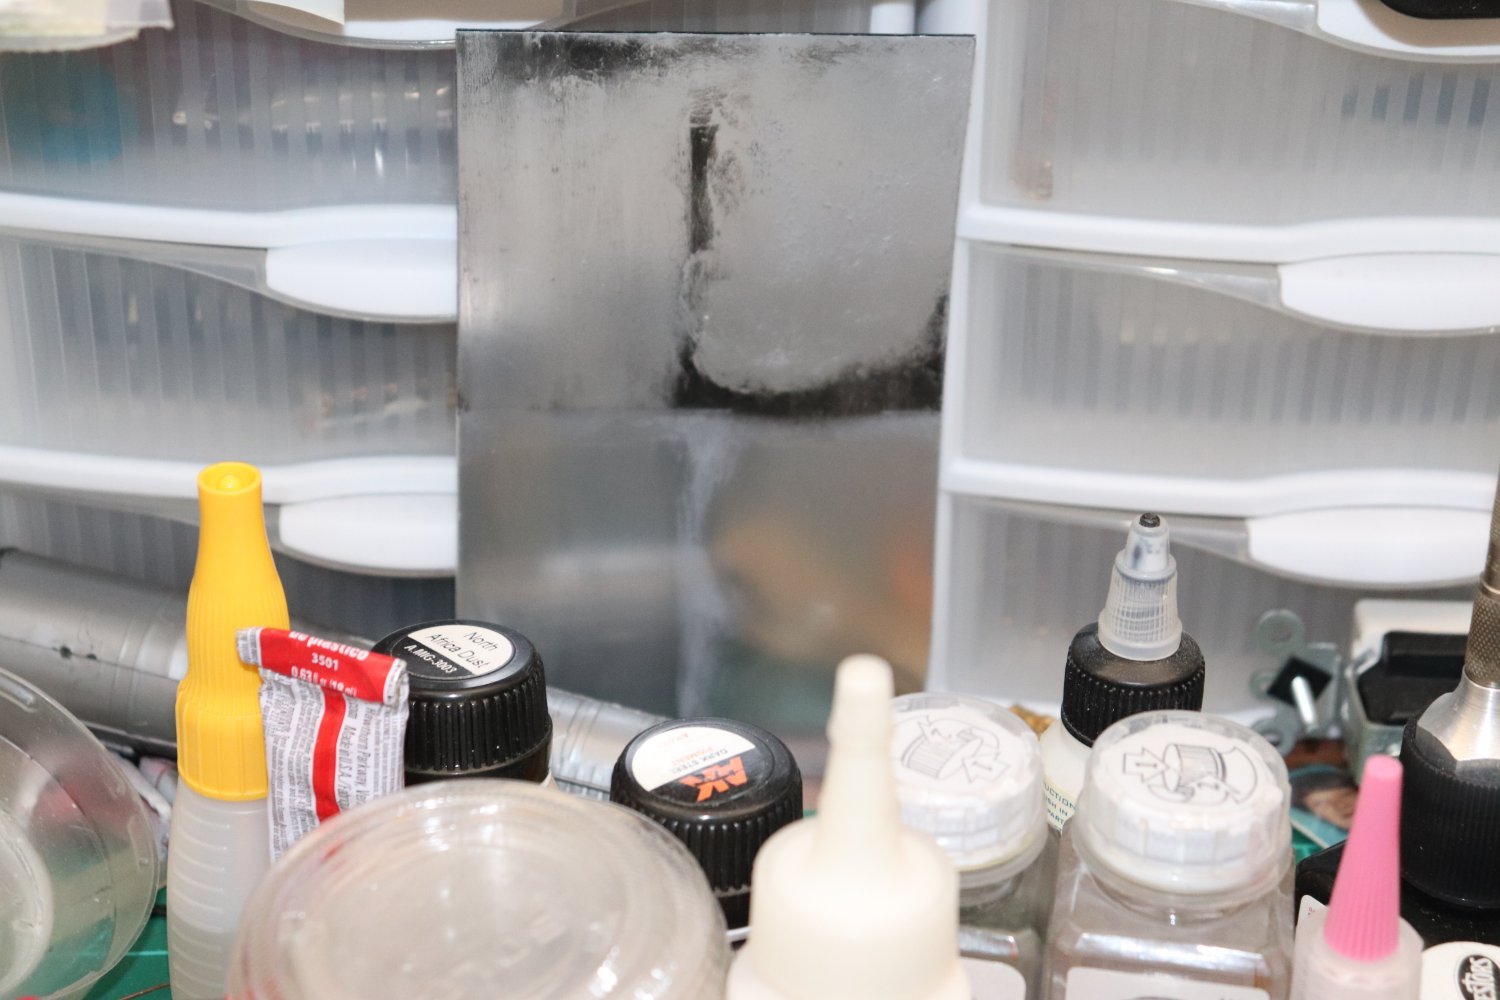
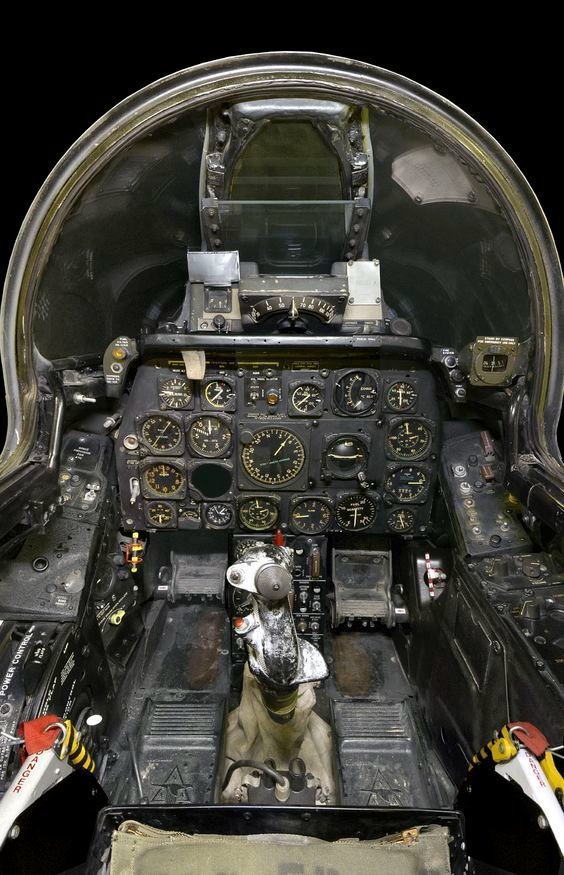
Ok small update... Cockpit assembly... The kit gives you full intake ducting, no I'm not going to be cleaning up and metalizing the insides of the intake like some have tried, I don't mind a little self abuse, but torture, especially for something your never going to see? nah... Basic black, you can already see the details fading to nothing... I actually went and looked for everything I could find on this specific aircraft to see if there was ANY variation of color... Nope McConnell's aircraft was an almost new F-86F-1-NA and yeah the cockpit was black as night... (even the headrest and seat pad) so I'm forced to give it the shadowbox treatment. (slightly off shade washes in the hope of highlighting shapes) Maybe a very light dusting of pastels to highlight the nooks and crannies.... As you can see it's pretty bland, would be much prettier in black over grey, but it just wouldn't be accurate... Below a sample of it in the fuselage under flash and natural light for an idea of what I'm describing... Detail just disappears in a black hole.... Oh Well.... Next up the instruments and side panels, hopefully the colored PE will add some pizzazz to it I will be picking out some switches and lights as well, there just isn't much you can do with an all black cockpit... Onwards....


-
So do I definitely needs color there... Good Job!
-
F-86F-30 Sabre by Egilman - Kinetic - 1/32nd scale
Egilman replied to Egilman's topic in Non-ship/categorised builds
No Kidding, can you imagine sitting in a black tub in the Korean summer sun, under glass for four to five hours at a time? Sweltering... An oven on slow cook... It was reported that occasionally a pilot would pass out from dehydration once they climbed out of the cockpit... Amazing men every single one of you.. -
F-86F-30 Sabre by Egilman - Kinetic - 1/32nd scale
Egilman replied to Egilman's topic in Non-ship/categorised builds
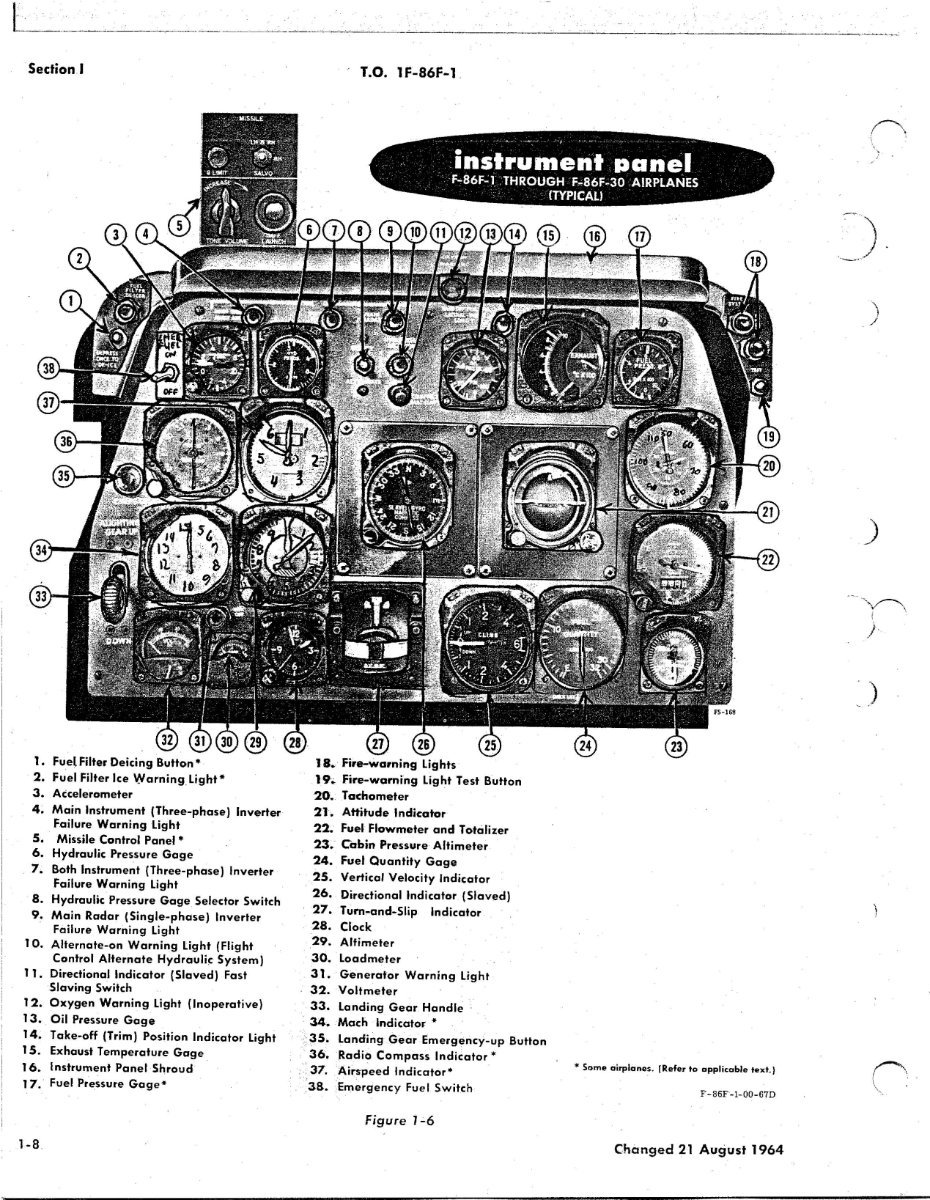
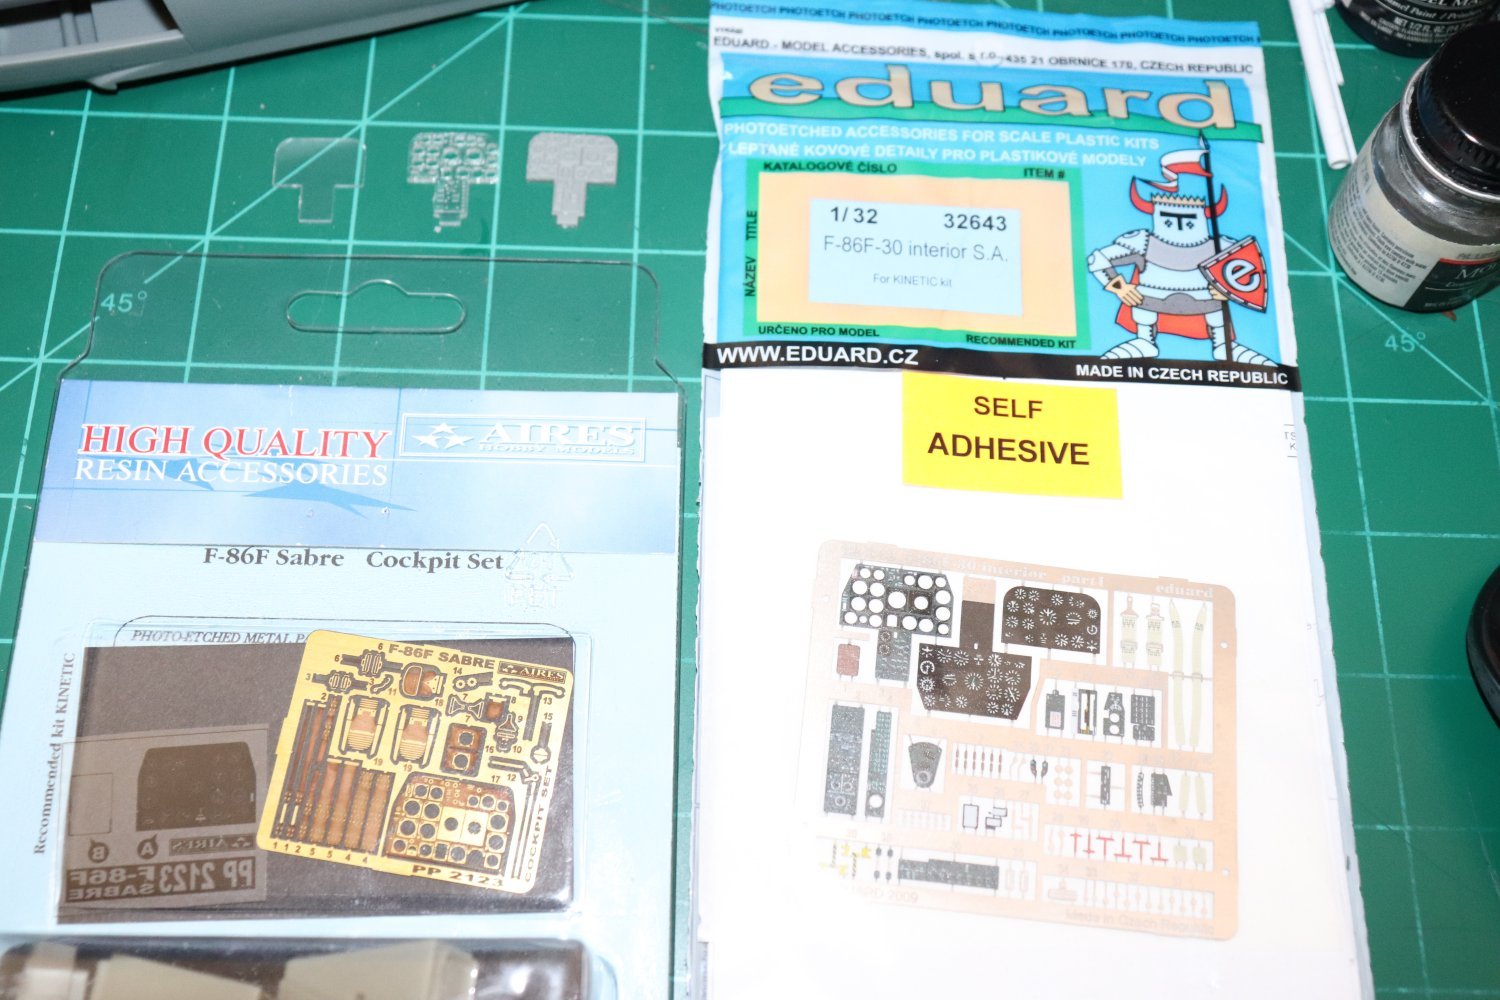
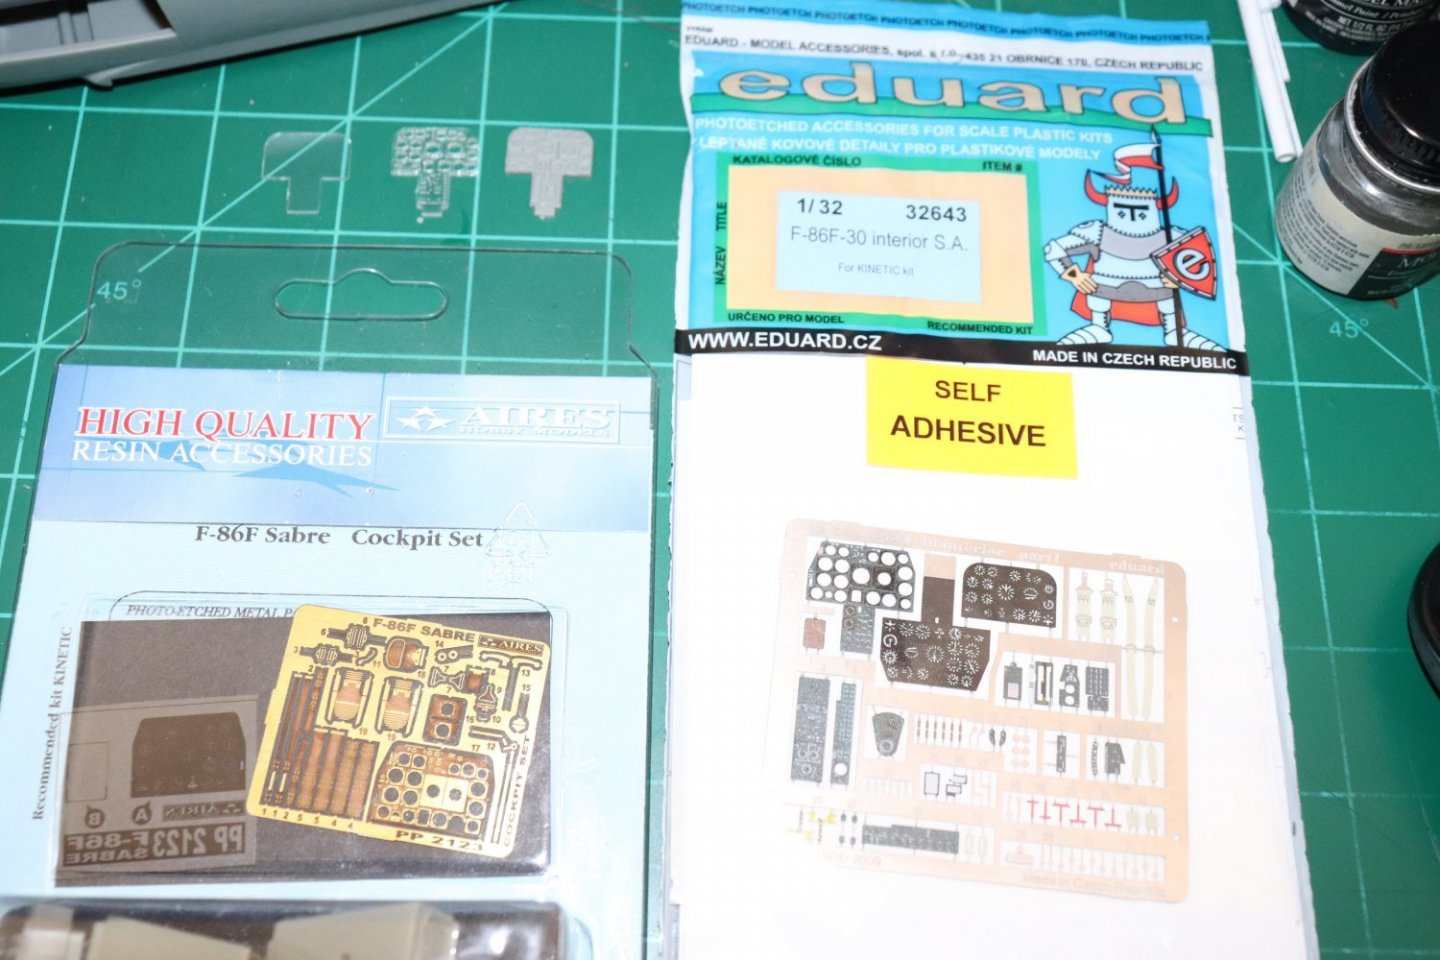
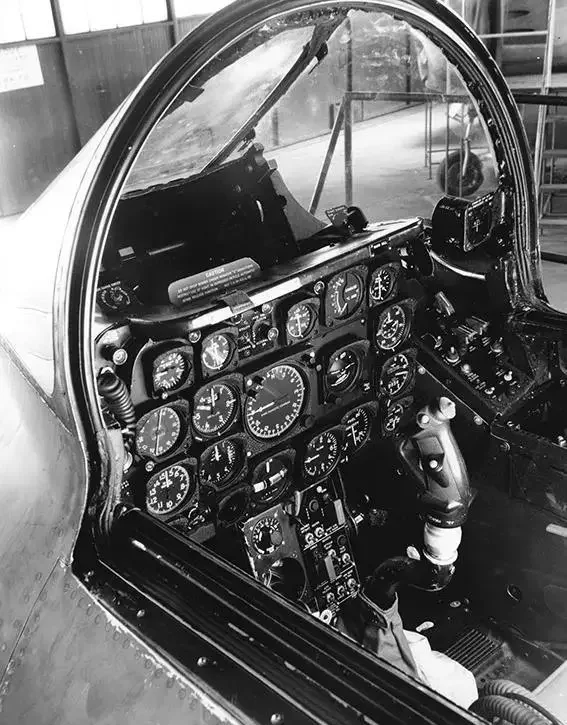
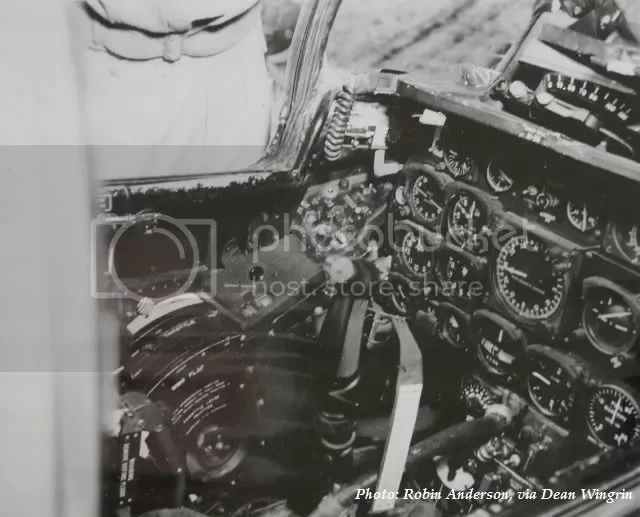
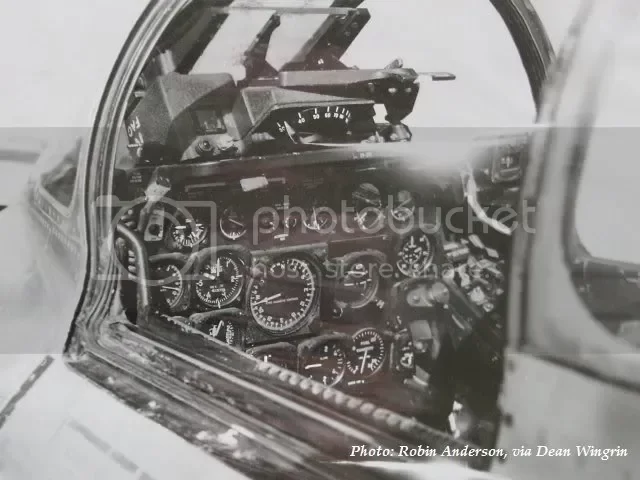
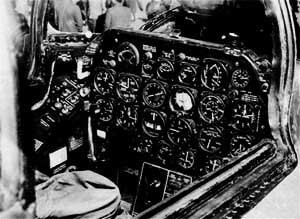
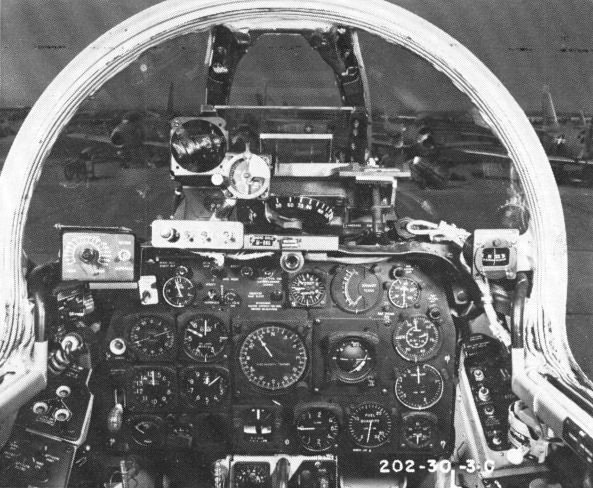
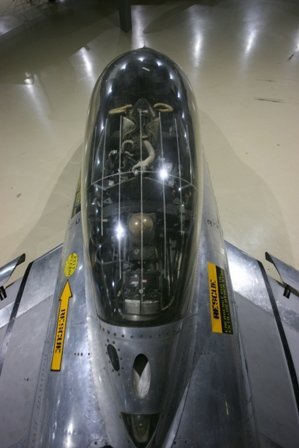
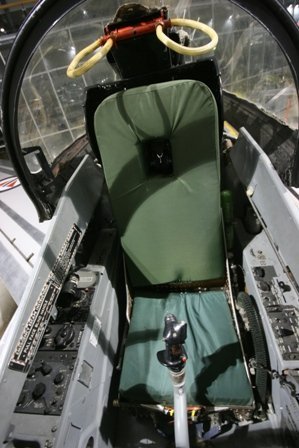
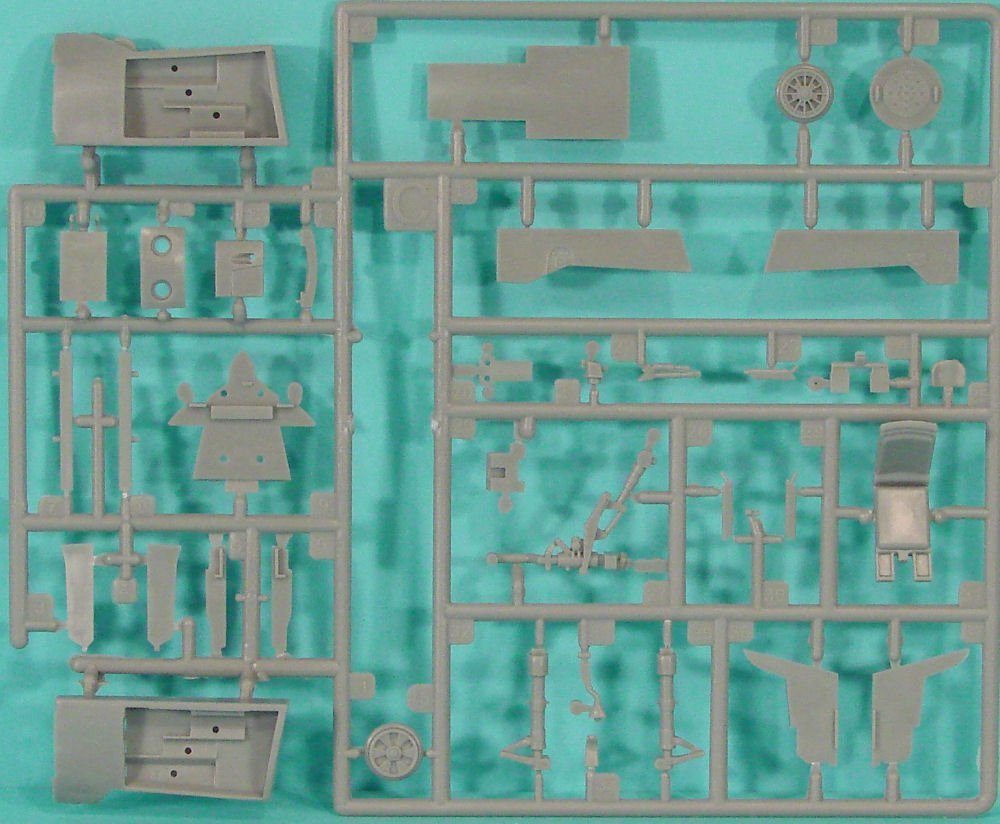
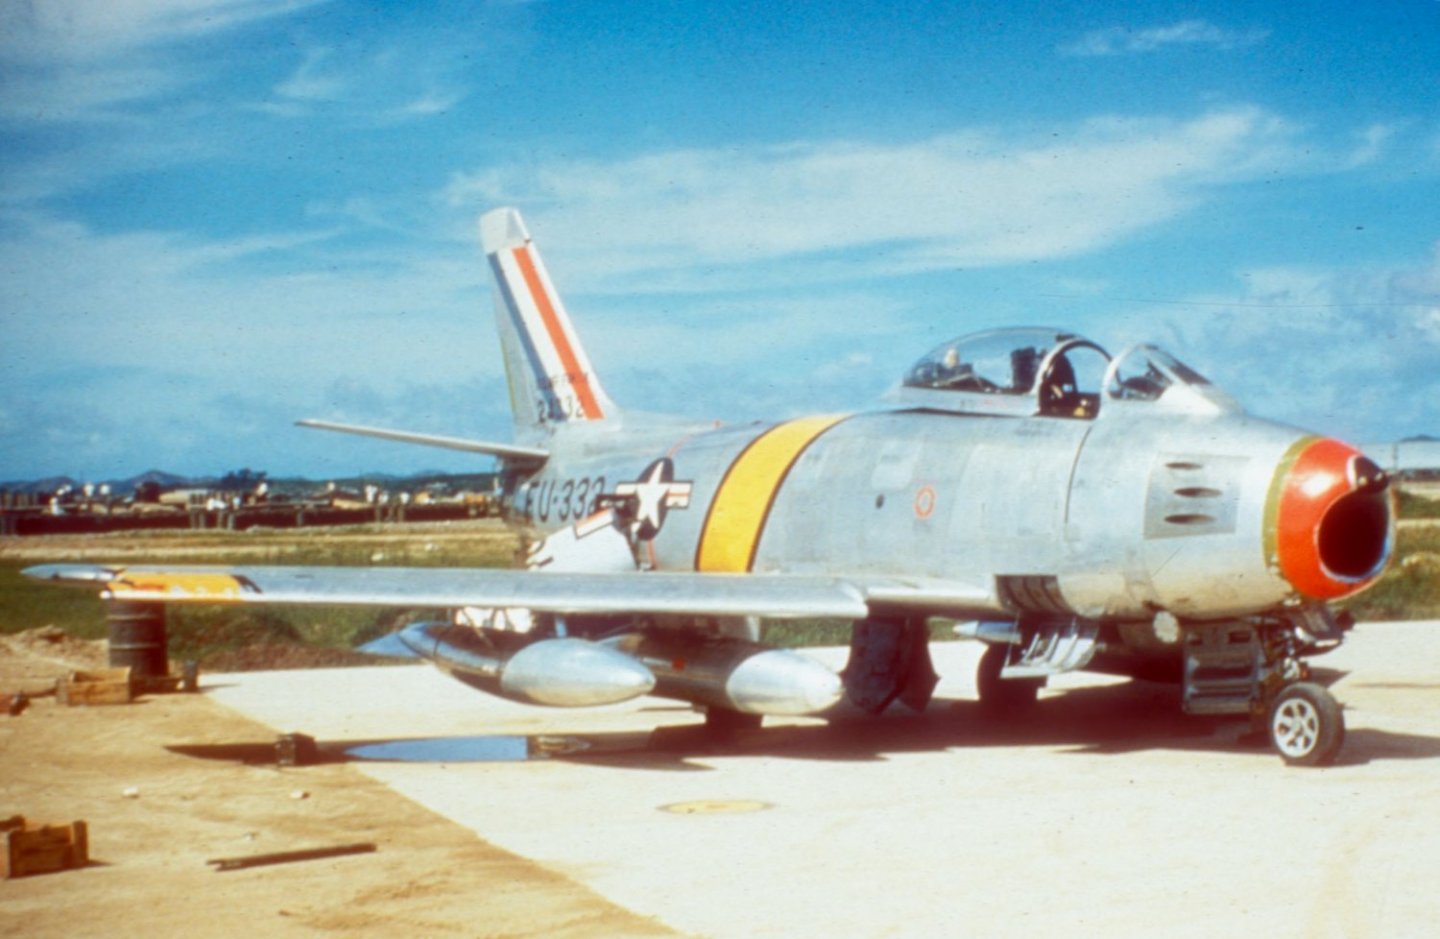
Ok first step on most model aircraft is the cockpit.... (usually the instrument panel) On this model, I'm blessed, (or cursed) with options... Two from the kit and two aftermarket.... The upper left corner shows the two kit options, A decal sandwiched between clear plastic panels, or a raised plastic panel... they are close to the actual instrument panel layout as shown from the flight manual page but not exact... The next option on the lower left is the Aires cockpit set for this model the instrument panel is a lot more accurate compared to the picture but not quite perfect... the last option on the right is the eduard set of which I only have the instrument panel portion... It is perfectly laid out matching the flight manual image... of course with all the switched levers and buttons you need a microscope to see much less install... the Aires set gives you seatbelts and harnesses that need to be assembled as well where the eduard set gives you simpler ones much easier to install... (the eduard set also gives you a brass panel to replace the kits decal with, you can see the detail differences between the kits representation and the eduard representation clearly there) Before making this decision we also have to realize another situation.... Somewhere in the time after the end of WWII and the start of the Korean War, the Airforce decided to go to an all black cockpit... F-86A F-86F The last image is a Palmdale (North American Aviation) built Sabre Mk 5 that is still in it's wartime configuration... This illustrates the black cockpit better than anything I could describe... Postwar, the Airforce decided that they were going to the aircraft grey cockpit with black panels (November '53) and all aircraft were to be switched to the new scheme upon the first IRAN (Inspect and Repair As Needed) so you will be very hard pressed to find any sabre aircraft with a black cockpit today, all of the currently flying refurbished/restored aircraft have a grey/black cockpit... Given this fact, I'm loath to do a ton of mods and AM upgrades to a cockpit you aren't even going be able to see... Non-updated Sabre Mk 5 cockpit... Even the grey cockpit doesn't show up that well from above... I'm probably going to do the Eduard instrument panel and pick out the rest of what kit details there are and call it good... There is just, in my humble opinion, no point to hacking and slashing a cockpit that no one can appreciate..., the eduard set has the most accurate IP and I'll leave it at that, I may dip into the Aires set and update the cockpit aft panel and canopy frame as the detail on those parts is better than the kit and it will be seen so that is a plus.... But other than that, I think I'm going with the basics..... A wartime aircraft Next up, paint and glue to plastic.... EG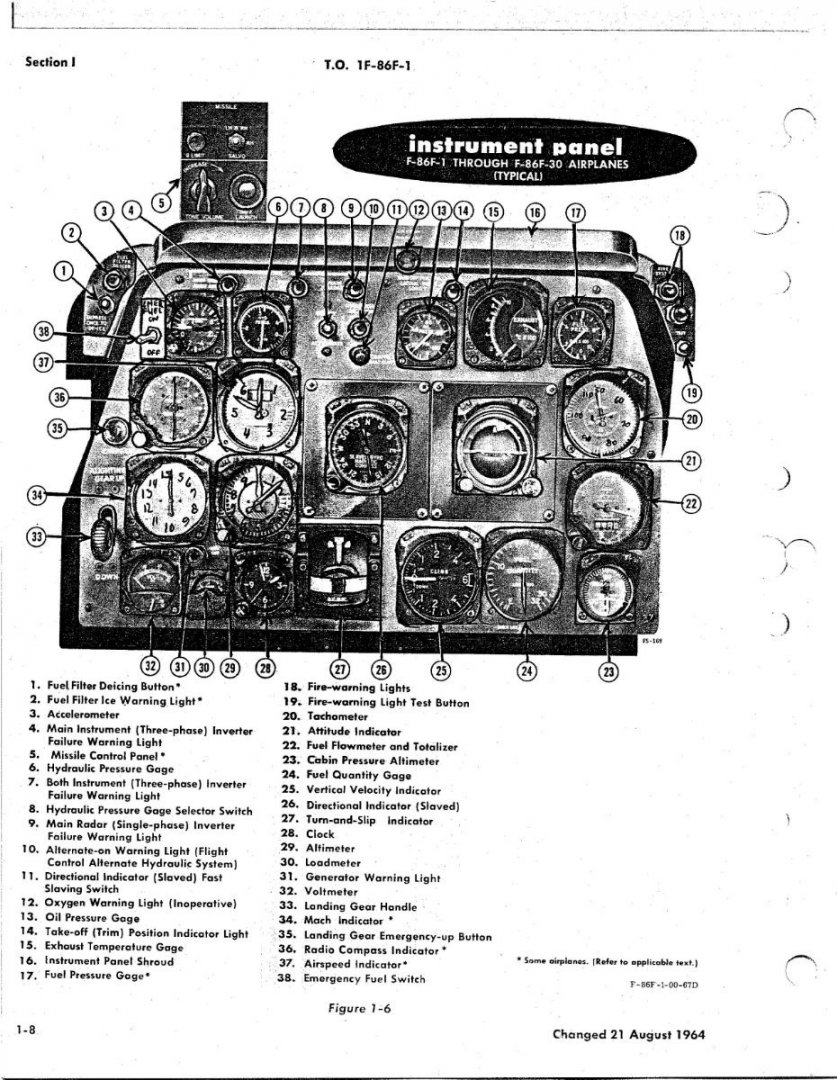
- 585 replies
-
- 13
-

-
F-86F-30 Sabre by Egilman - Kinetic - 1/32nd scale
Egilman replied to Egilman's topic in Non-ship/categorised builds
Welcome aboard Ed, good to see you... Enjoy the journey... -
F-86F-30 Sabre by Egilman - Kinetic - 1/32nd scale
Egilman replied to Egilman's topic in Non-ship/categorised builds
Thank you Yves, I'm going the full tilt route with this one, accuracy is a priority so I will be taking my time trying my best... At least everyone knows what the kit actually is, and that's a good thing... -
F-86F-30 Sabre by Egilman - Kinetic - 1/32nd scale
Egilman replied to Egilman's topic in Non-ship/categorised builds
I think it's a very presentable kit, it does have some challenges, (don't they all, chuckle) some modification surgery is going to be needed, to present it in a real world situation... Thankfully there is aftermarket to correct the relatively minor issues.... I will present those additions as I come to them.... Wish me luck my friend.. Welcome aboard Mark, glad to have you here... the popcorn smells great nice and buttery...... -
F-86F-30 Sabre by Egilman - Kinetic - 1/32nd scale
Egilman replied to Egilman's topic in Non-ship/categorised builds
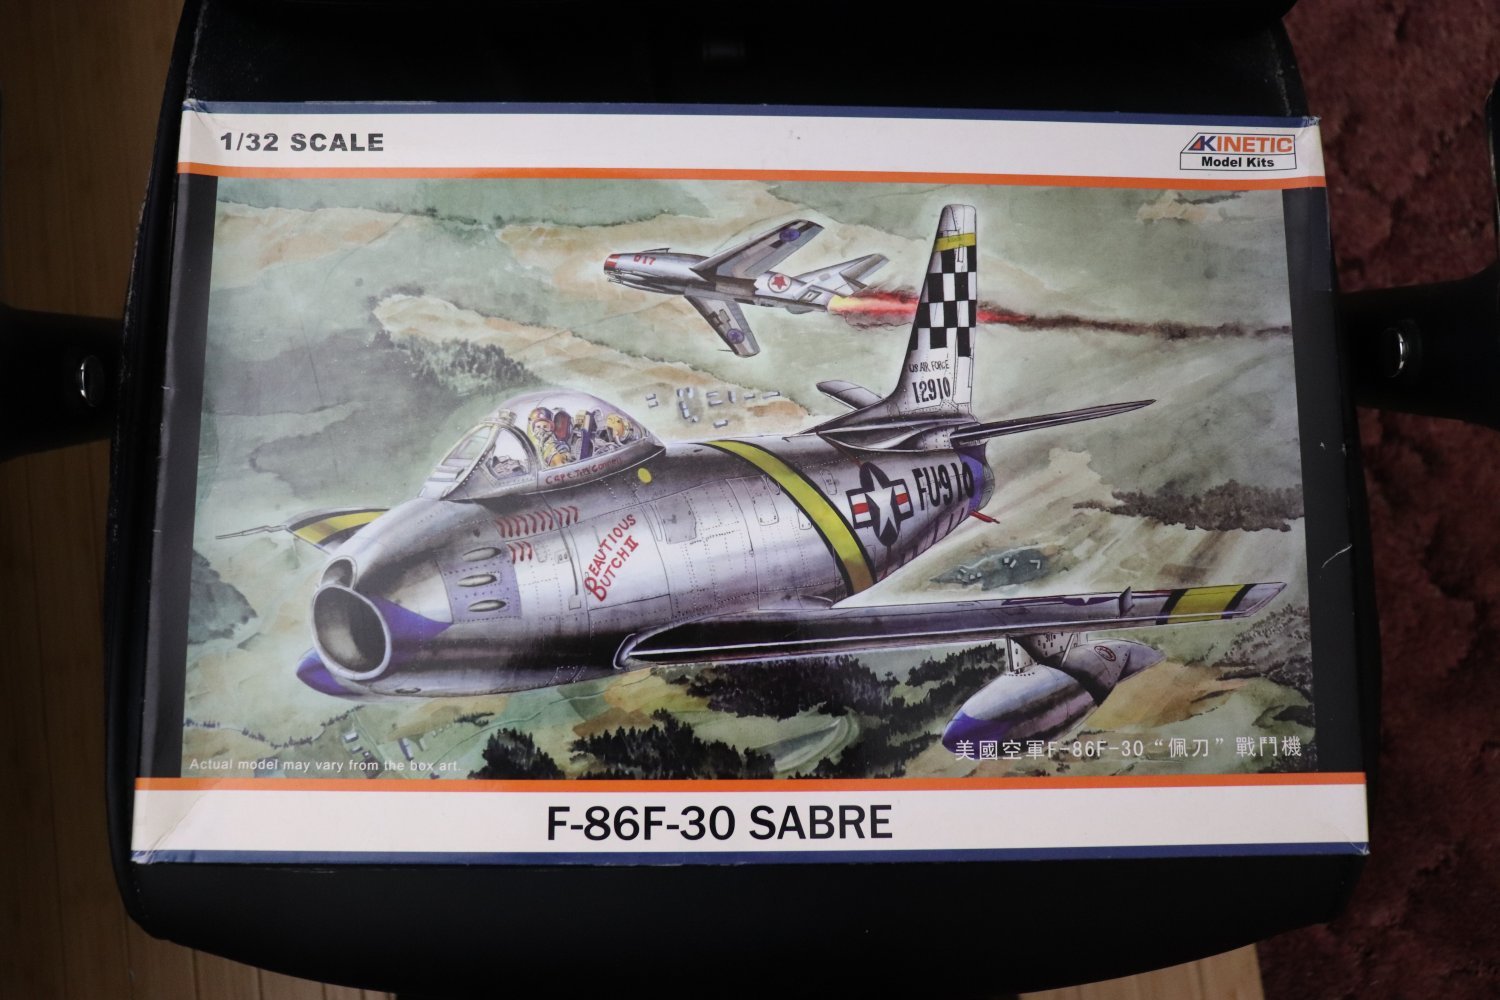
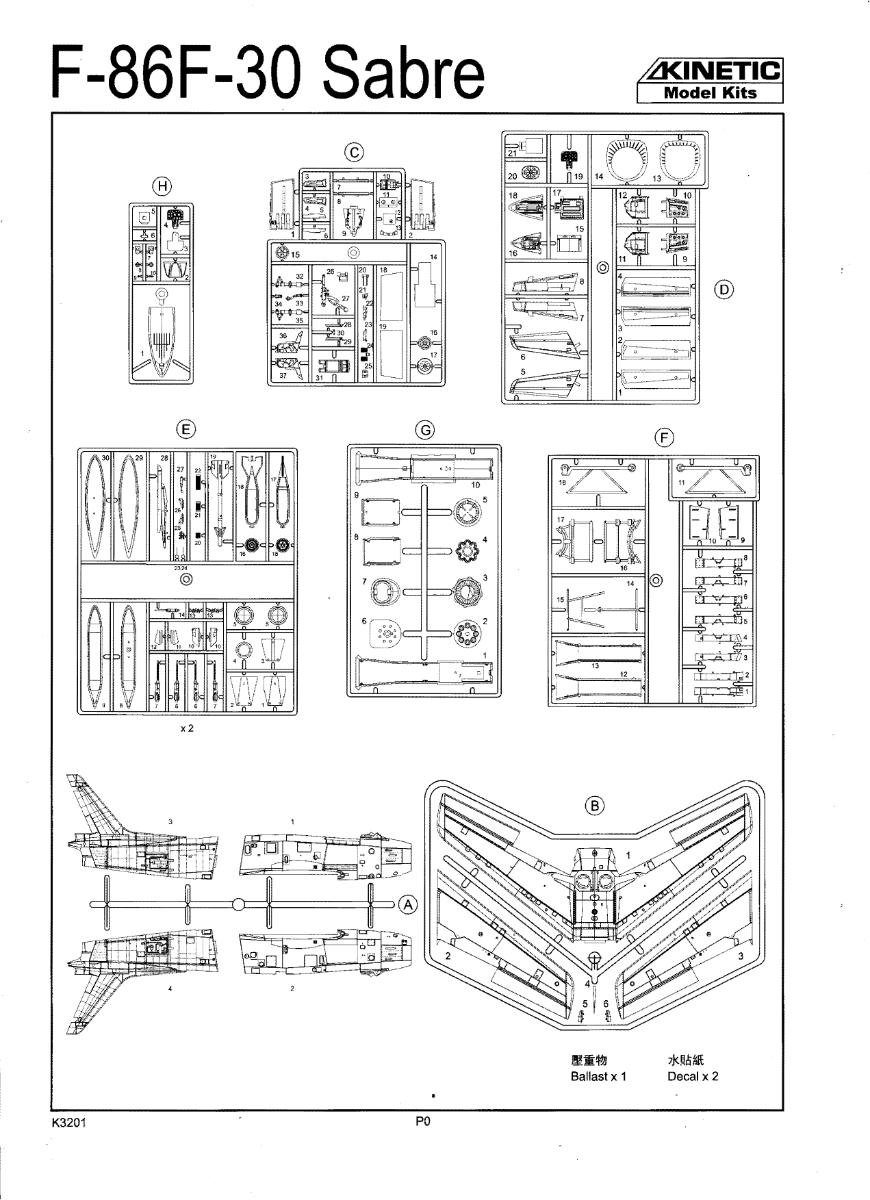
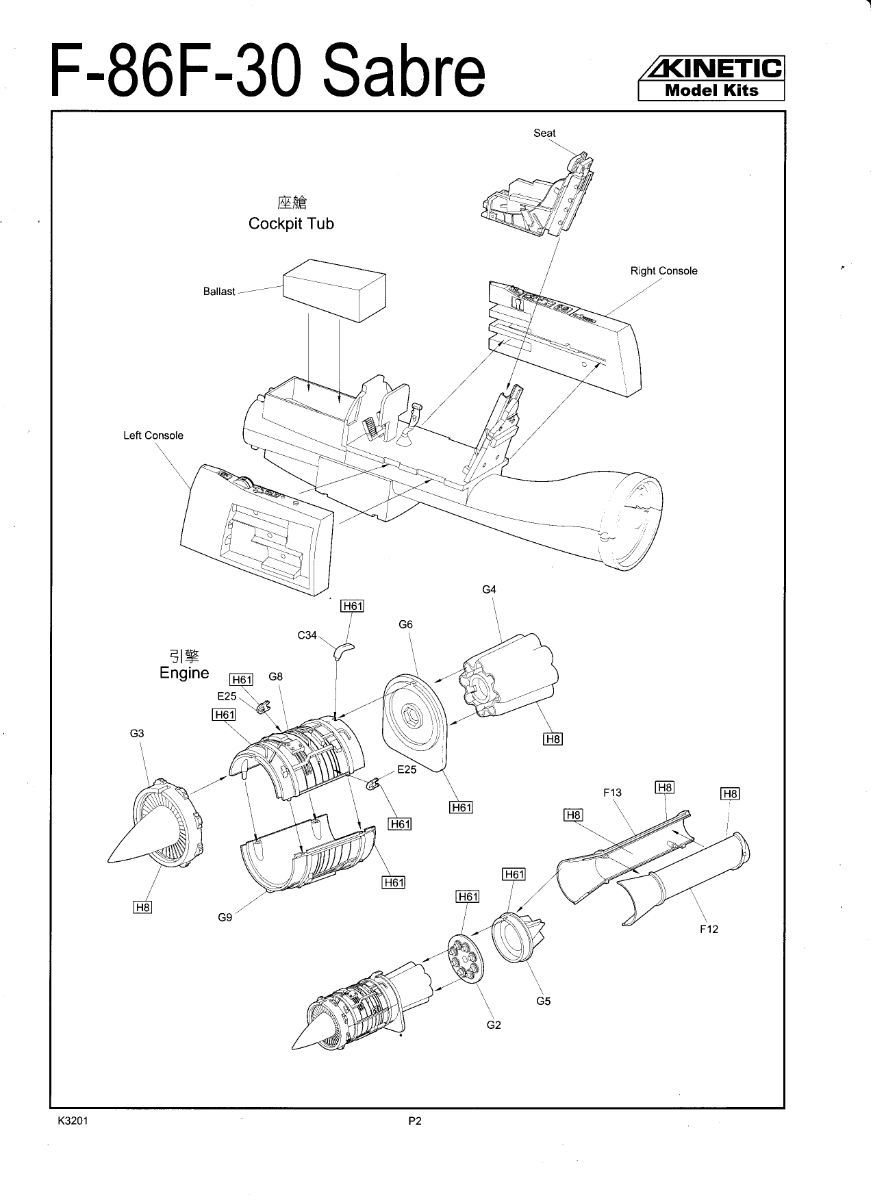
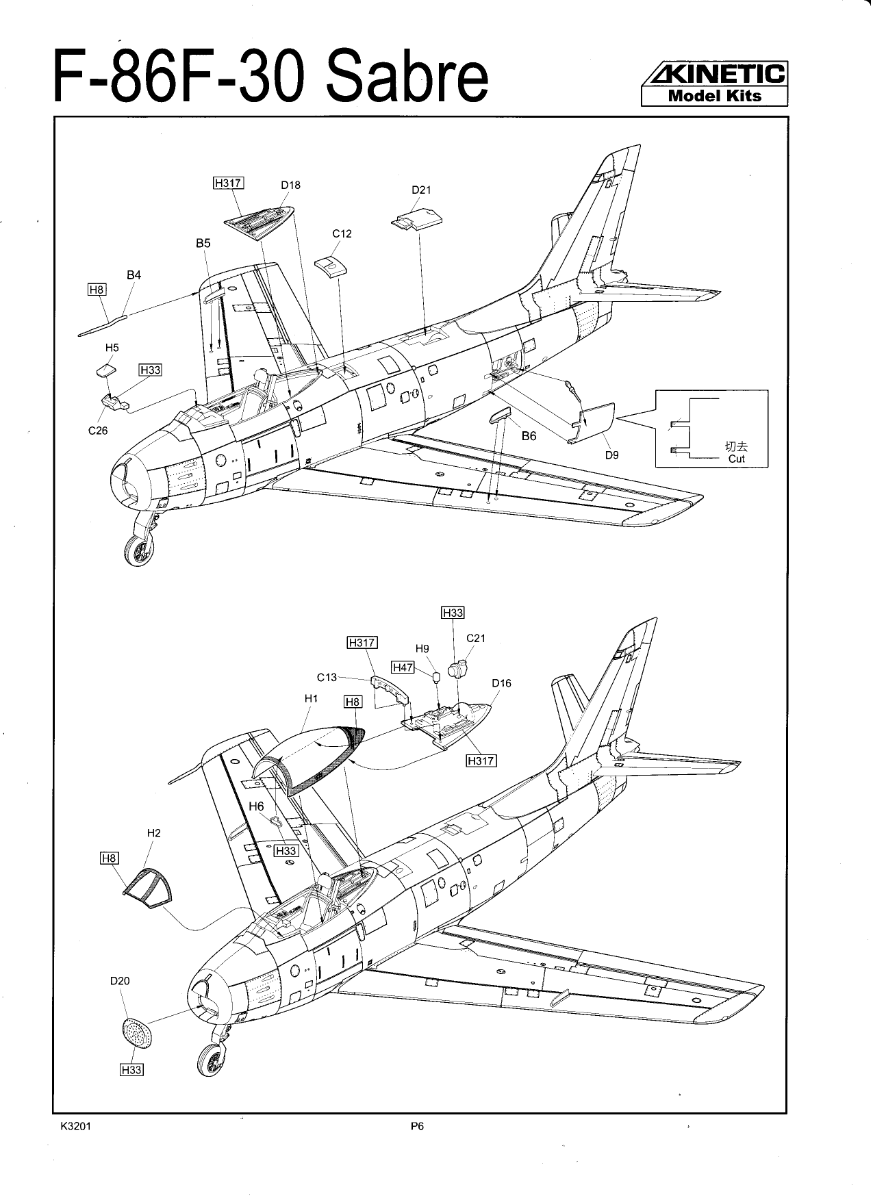
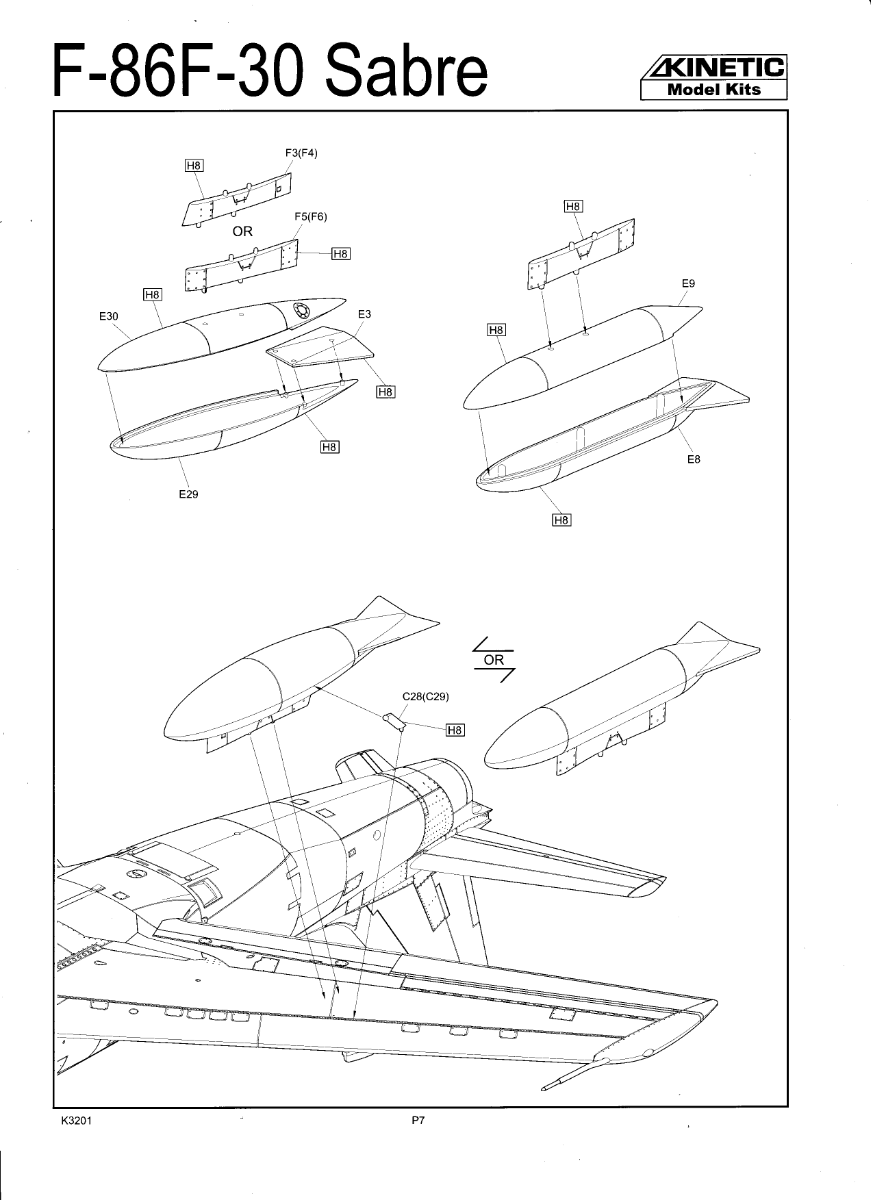
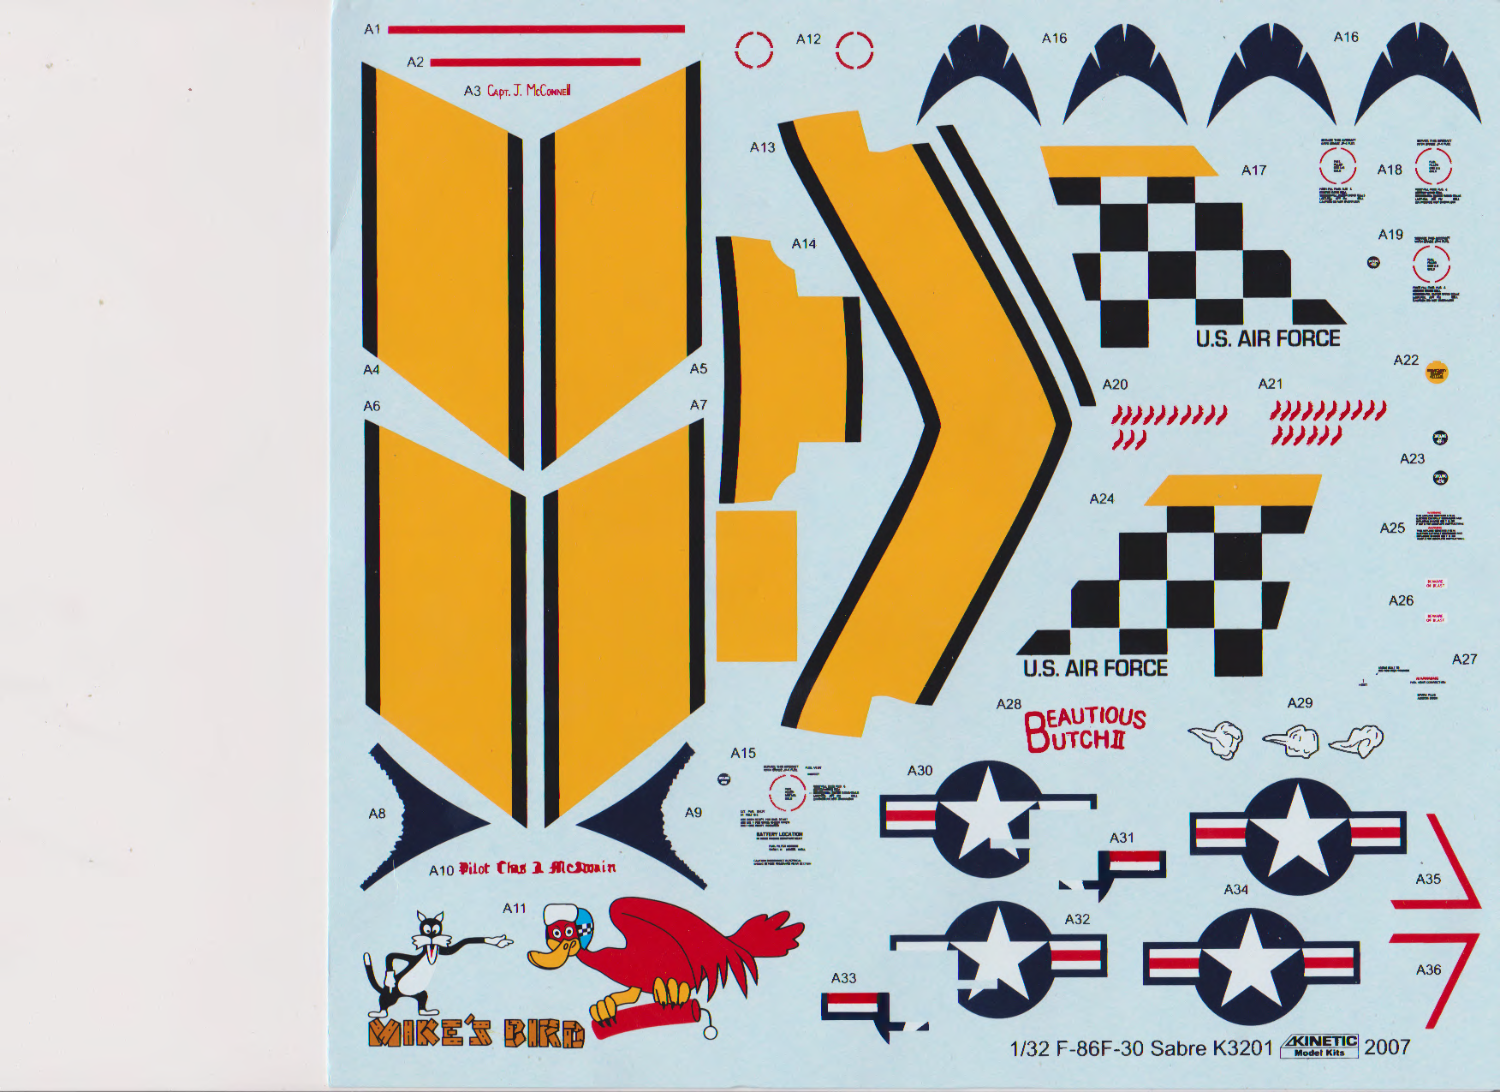
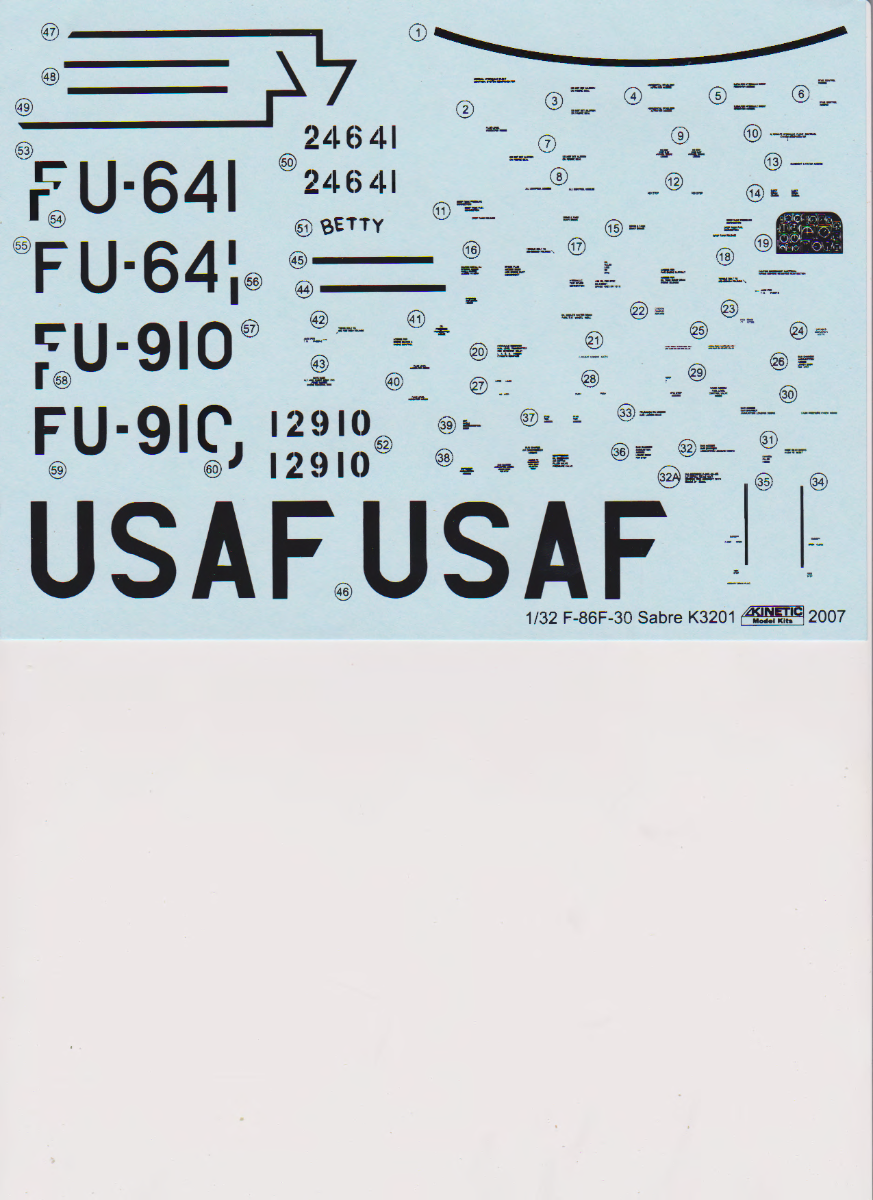
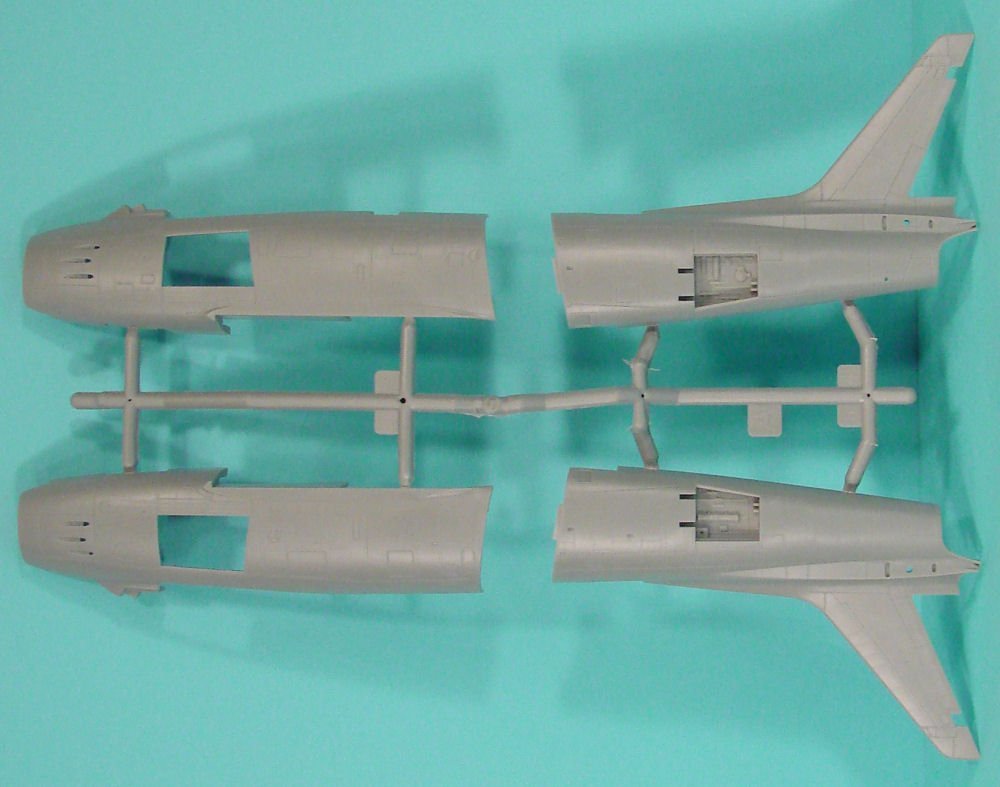
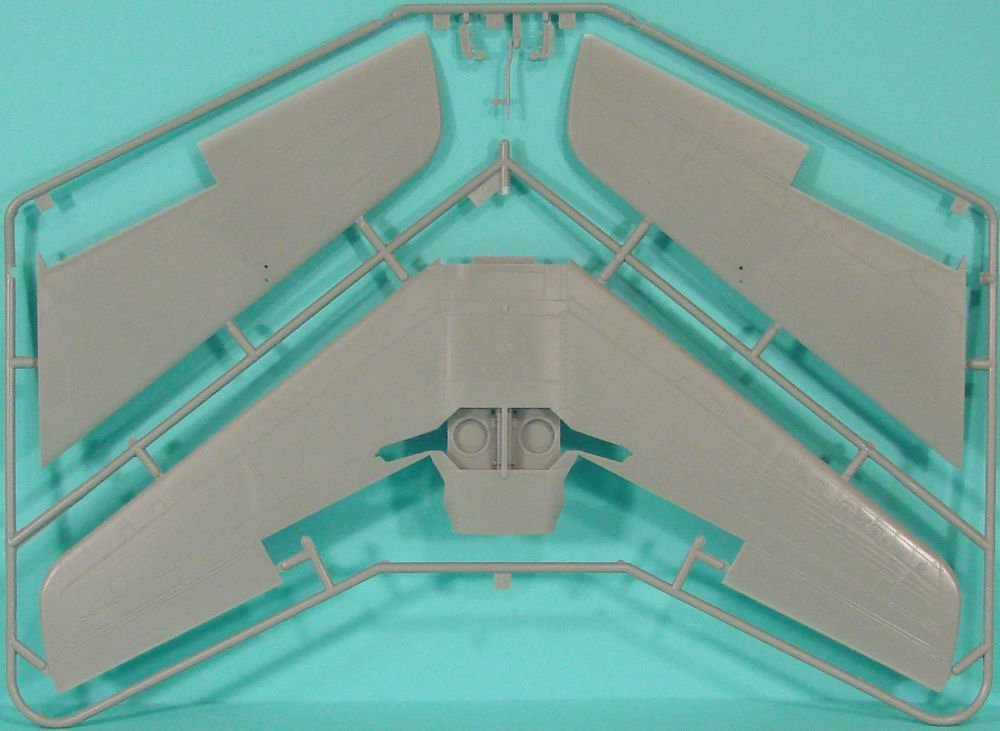
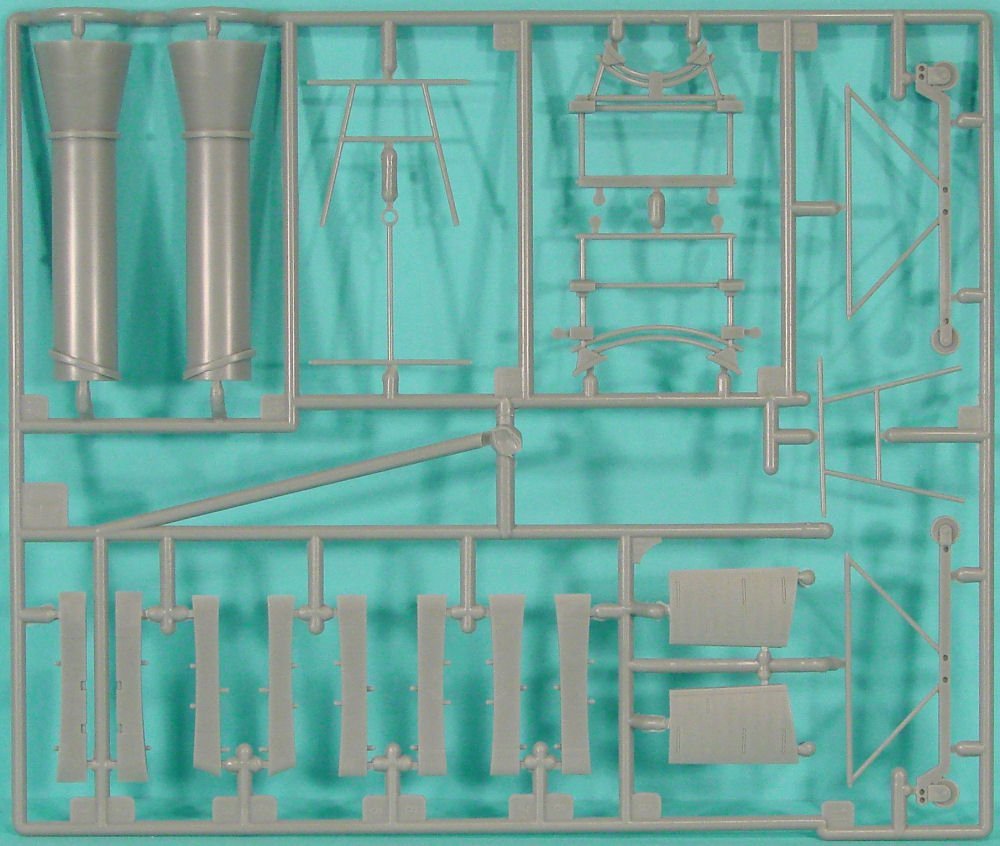
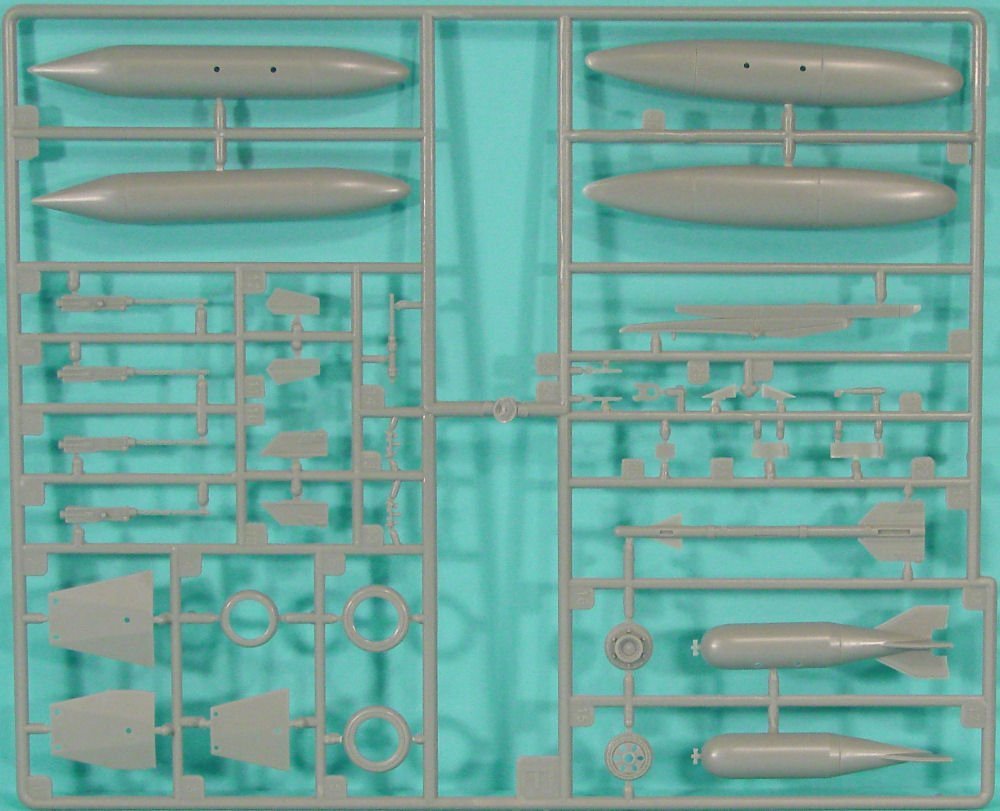
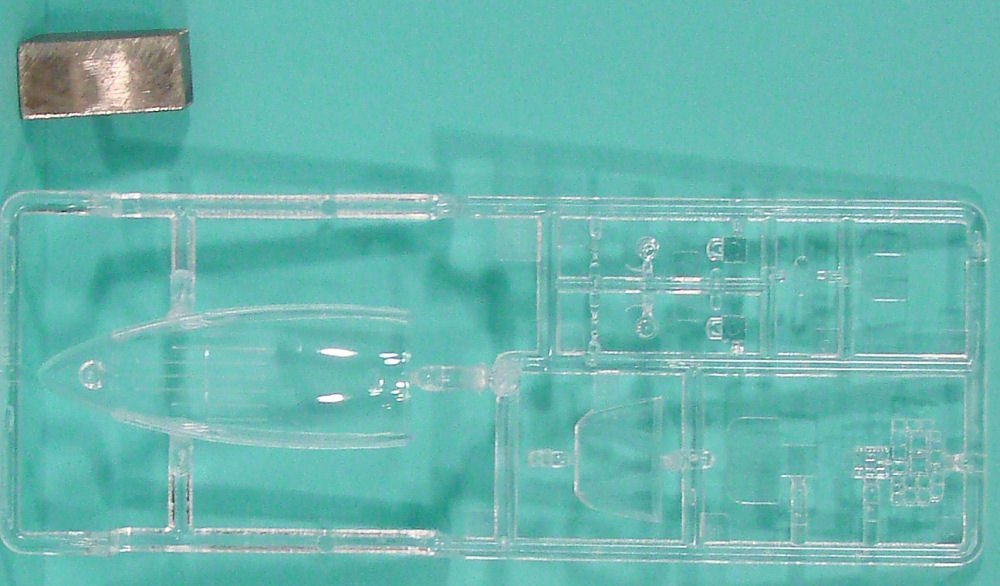
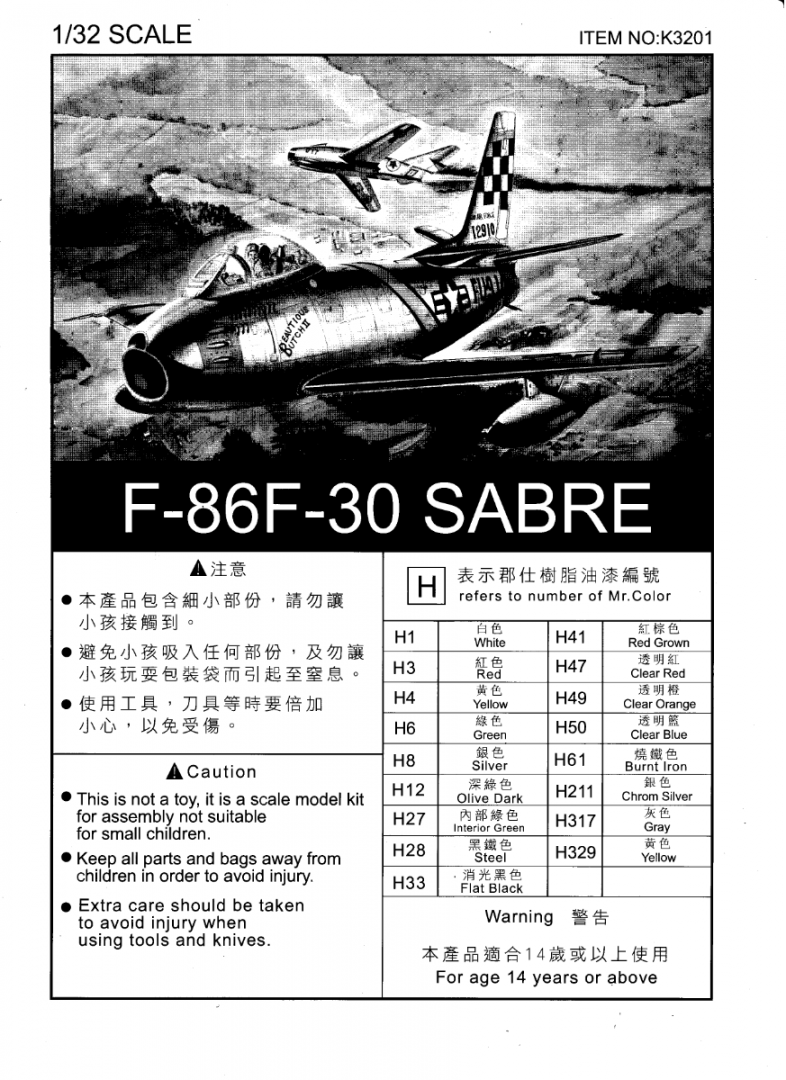
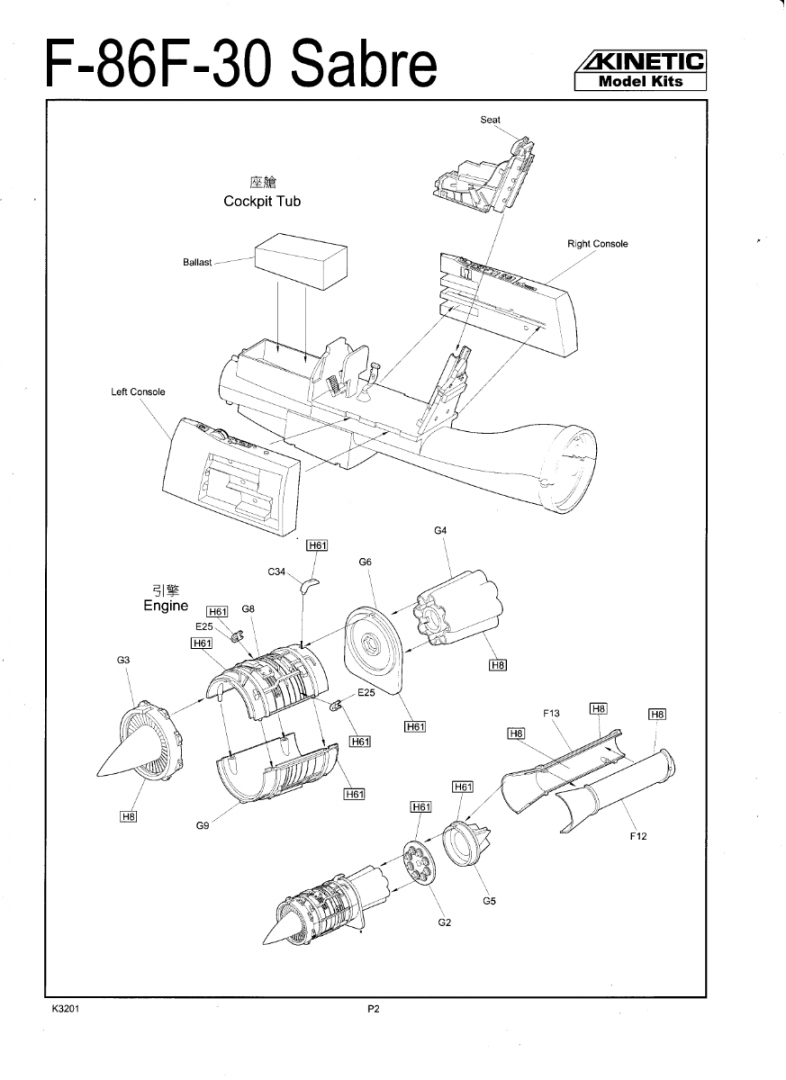
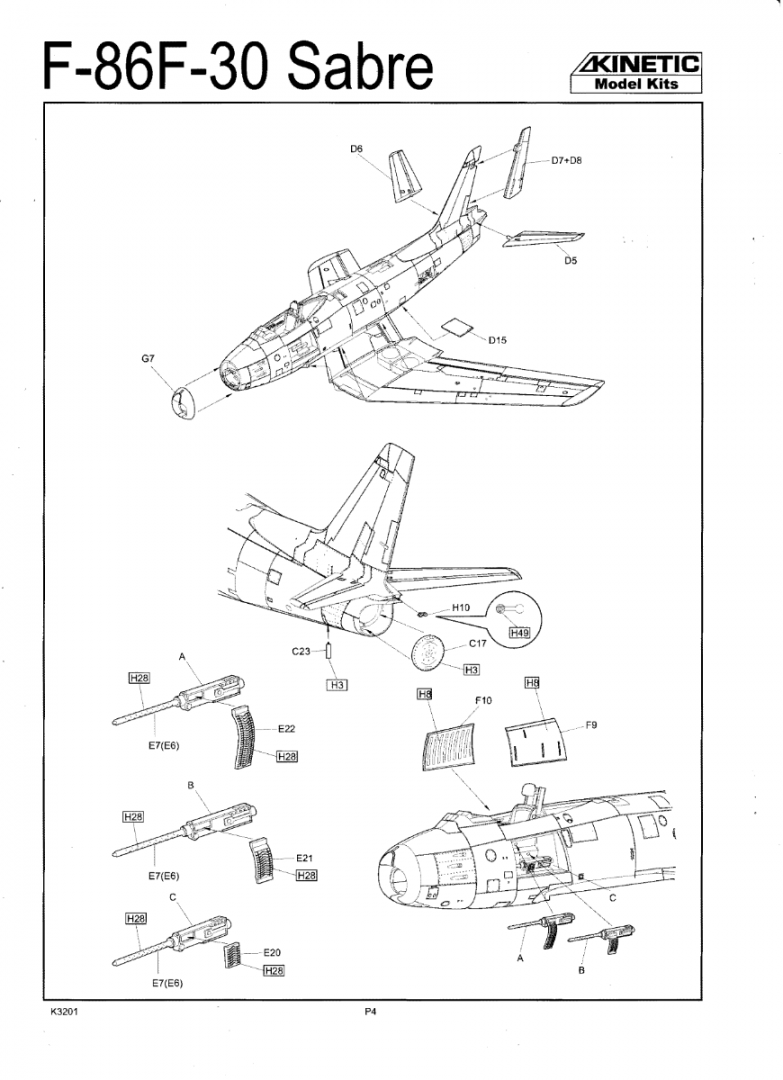
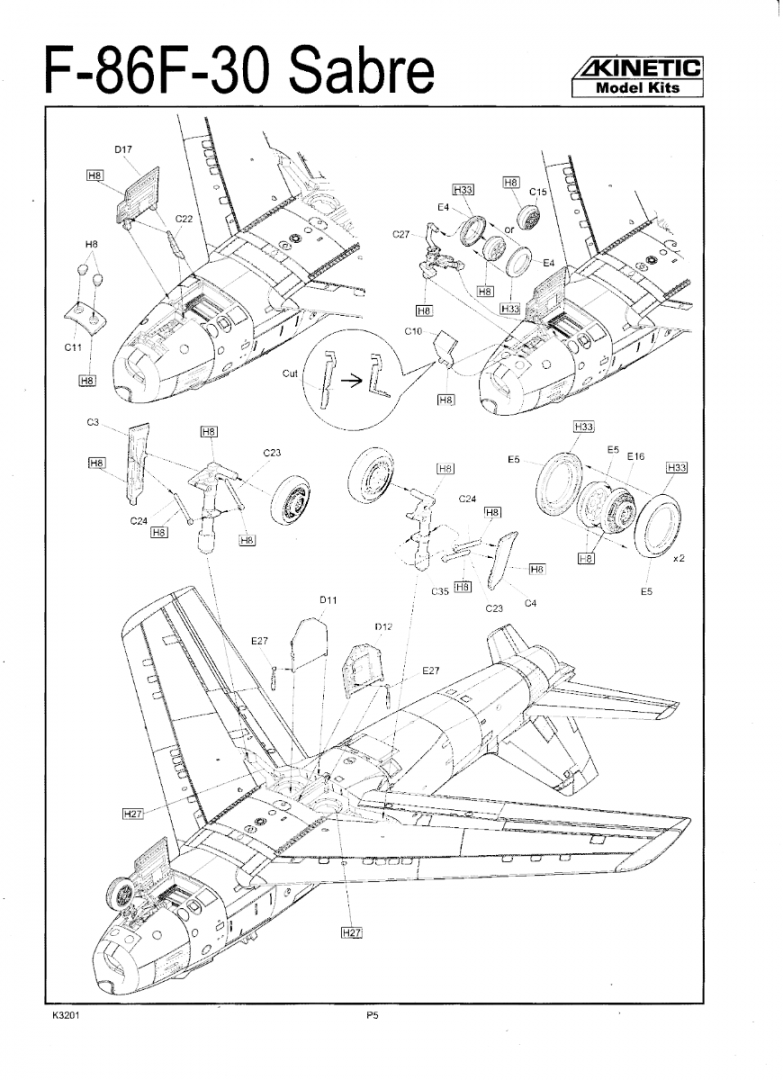
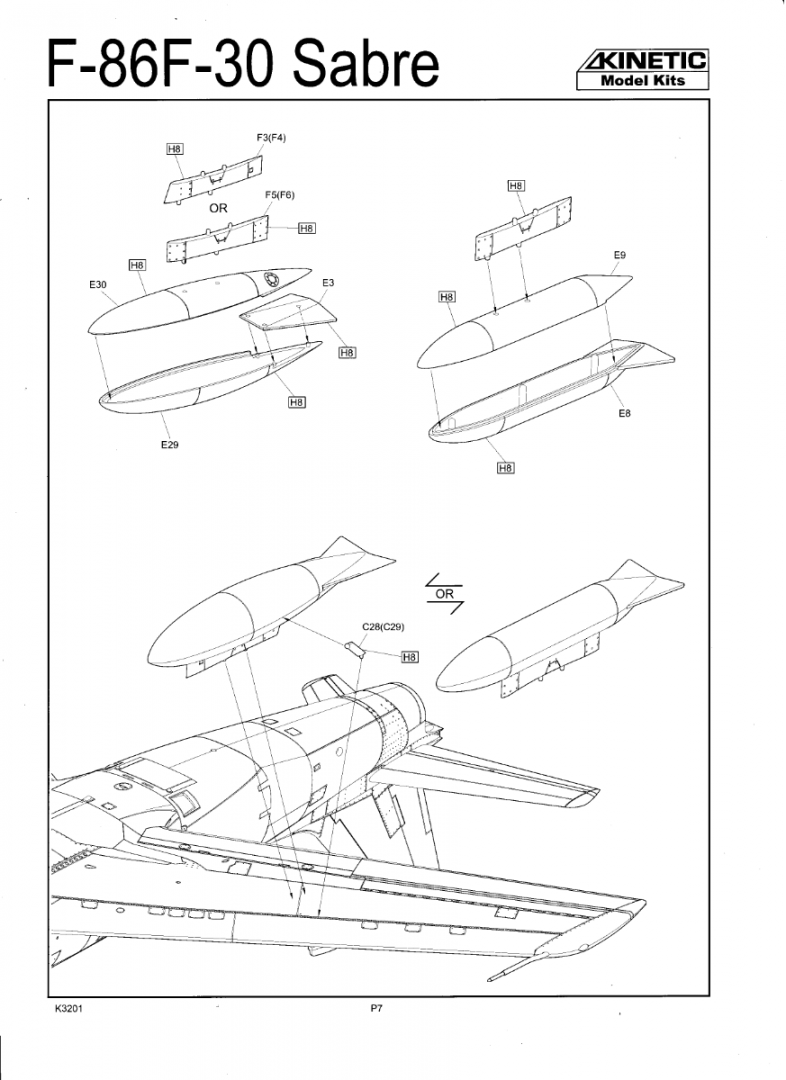
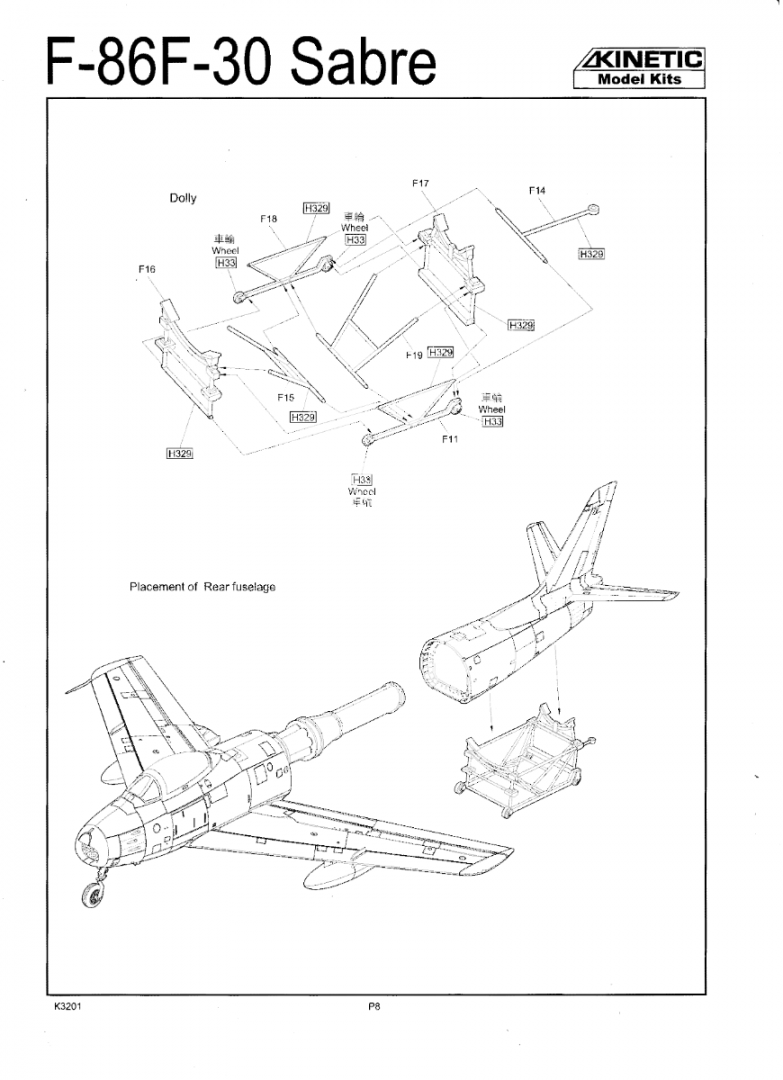
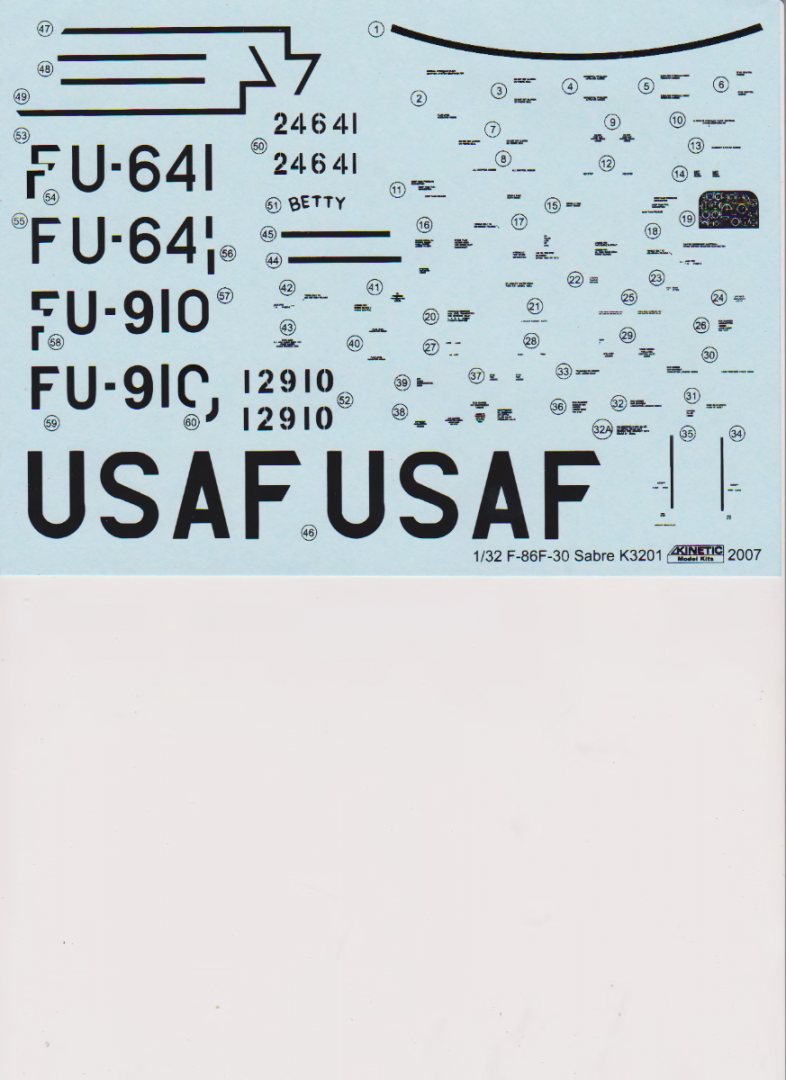
Ok the Kit.... Kinetic # K3201, 2007 issue, the first kit from a brand new company at the time... When first released it was going for around $25-30.00, 15 years later, your lucky if you can find one for 5 times that... F-86F-30 Sabre There are plenty of first impressions open box reviews and several decent build reports... Although this kit is rather hard to find, there have been two releases under another brand... Italeri's 2009 #2501 is a straight rebox of this kit and their #2503 is a rebox in Skyblazers decals.... also Kinetic themselves re-released it in 2009 in RCAF Golden Hawks Sabre Mk 5 livery, (Kinetic # K3202) They then released it with reconfigured wings for an F-86F 40 NATO-Sabre 6-3 Extended Wing, post Korean War version, (different wing shape, Kinetic # K3202 in German livery) and Wolfpack (#WP13201) released the F-86F-40 Sabre as a Korean Airforce fighter bomber livery... So the kit still lives in the modeling world if you care to acquire one... The Kit accurately represents an F-86F-30-NA right down the the instrument panel.. (correct instrument layout for a -1 to a -30 model) so you can model pretty much any late Korean War F-86F with non-slatted "6/3" wings installed... (wing configuration is an issue with this kit as there were several variations of wings employed on Sabre's and to model a specific aircraft requires a little education in Sabre version history) Not applicable here cause I'm directly modeling a sabre in this configuration, F-86F-1-NA #51-2910. In the box comes nine Sprues of parts, one clear, two decal sheets, a steel nose weight and a twelve page instruction booklet.... Parts.... Instructions... Decals.. (for two versions) The kit to me looks like it will build well, it does have a separate J-47-27 engine which can be left out of the airplane but it will need an engine dolly scratch built to sit on.... Next up the first step, figuring out what to do with the cockpit.... And the journey starts.... EG


- 585 replies
-
- 12
-
-
F-86F-30 Sabre by Egilman - Kinetic - 1/32nd scale
Egilman replied to Egilman's topic in Non-ship/categorised builds
Your most welcome Kevin, happy to have you here... Yeah Airframe silver is as close to true BMF you can get with a spray paint I feel... Very Very close... We are gonna see here if it CAN be done.... the results of my testing so far have me very optimistic for a good result... This piece of plastic from my first test a few month back is my inspiration.... That is some reflectivity there...
-
Thank you Alan... So far it has worked well, I'm currently doing a second experiment in Rub n Buff... F-86F-30 You can follow it there.... Full BMF overall going for that '50's semi polished look... Haven't quite started the build yet, still collecting background info, but very very close.... Gonna go step by step on it as confirmation of the process...
-
F-86F-30 Sabre by Egilman - Kinetic - 1/32nd scale
Egilman replied to Egilman's topic in Non-ship/categorised builds
Yep it's why the Airforce created the Test Pilots School at Muroc in the early '50's they found that there were two types of pilots the Jimmy Doolittle type seat of the pants flyer, and the Orville Wright types who needed to understand everything in a methodical engineering approach to flying.... Both could make good test pilots if they have what Yeager called the "gift".... Sometimes like in the case of McConnell, the pilot could do everything right and still get killed.... (McConnell's loss was directly attributable to bad maintenance procedures and sloppy manufacturing quality control and several AF heads rolled cause of it) Yeager was actually given the task of replicating the fault that caused McConnell's loss, but he did it at 32,000 feet.... (and had to eject from the aircraft when it occurred) There are several hundred Aces that became test pilots, most had uneventful careers as test pilots... But there are a few that just stick into your memory... Dick Bong & Donald Umphres testing the P-80 Shooting Star, Jack Bade testing the F-105, George Welch, (yes, THAT George Welch) testing the F-100 Super Sabre.... Great pilots all.... Of course when most are asked who they consider the greatest test pilot many will answer Chuck Yeager, and I can't fault them for that.. But when Chuck is asked that question, his answer is Neil Armstrong... Neil was from the engineering school of test pilots, Chuck was from the Doolittle school of test piloting.... That says a lot...- 585 replies
-
- 10
-

-
-
F-86F-30 Sabre by Egilman - Kinetic - 1/32nd scale
Egilman replied to Egilman's topic in Non-ship/categorised builds
Welcome aboard My Friends... Although this is another RnB test, I'm going to do this one as a stand alone display piece trying for the best result possible... One of the things I'll be trying to accomplish is this... Blue to white.... Fuzzy reflectiveness on closeup Sky Blue... Bright White... And dark bluish steel gray.... All in the same finish.... and I will complete it even if I don't get all the variations.... This is the real test can a good polished BMF be done... We are going to find out.... (I believe for a high flying aircraft the only way to describe the finish is chameleon like, it changes with the surroundings) I don't know if it can be done, but I'm going to give it one heck of a college try... Thanks for following along...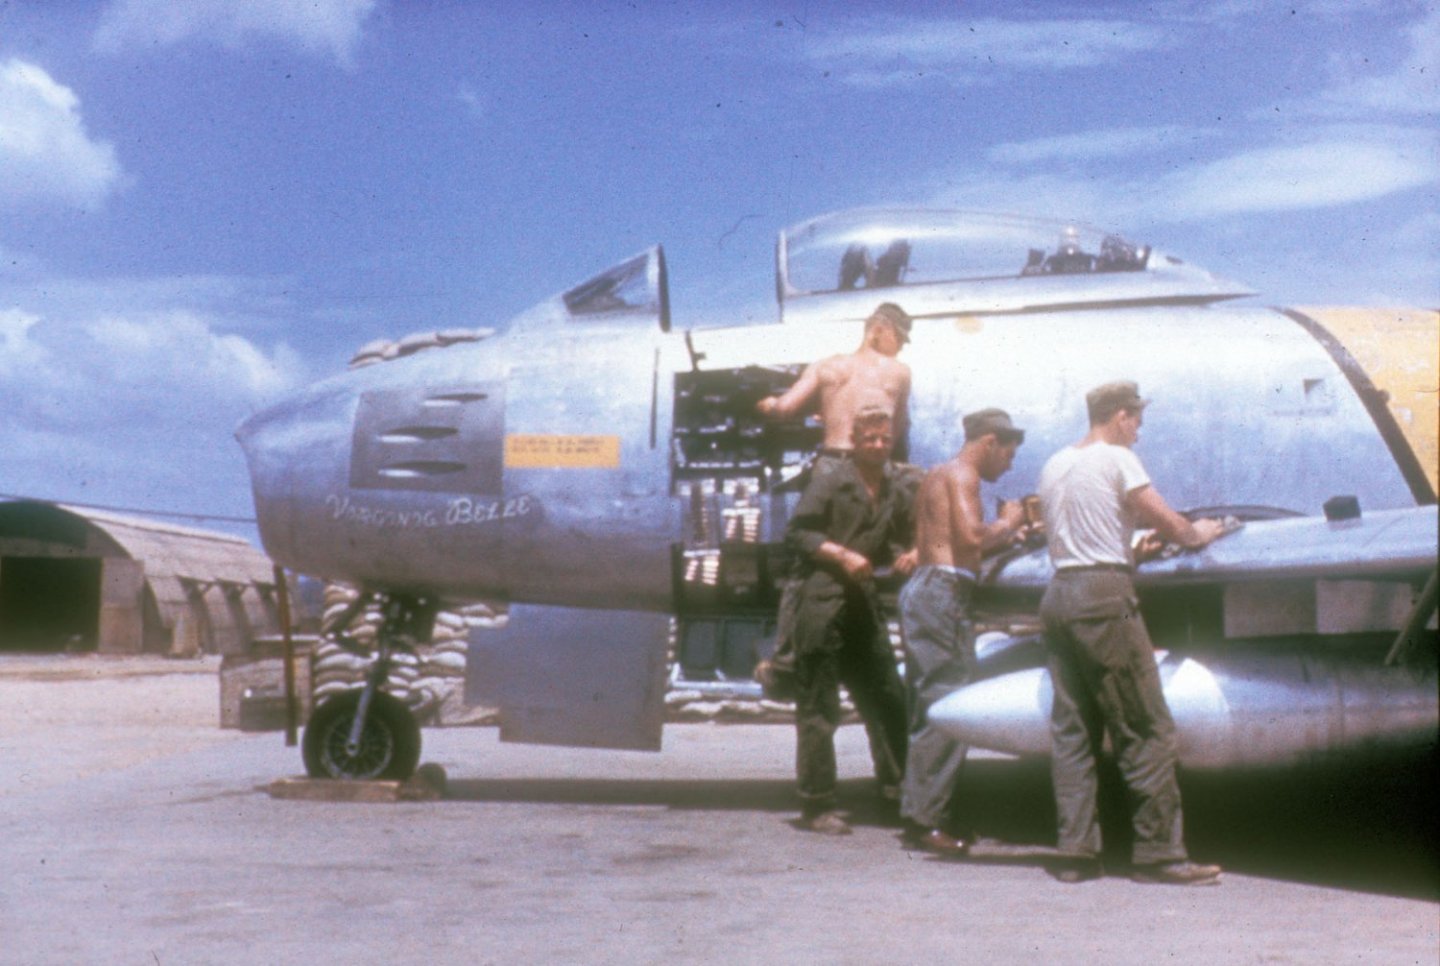
-
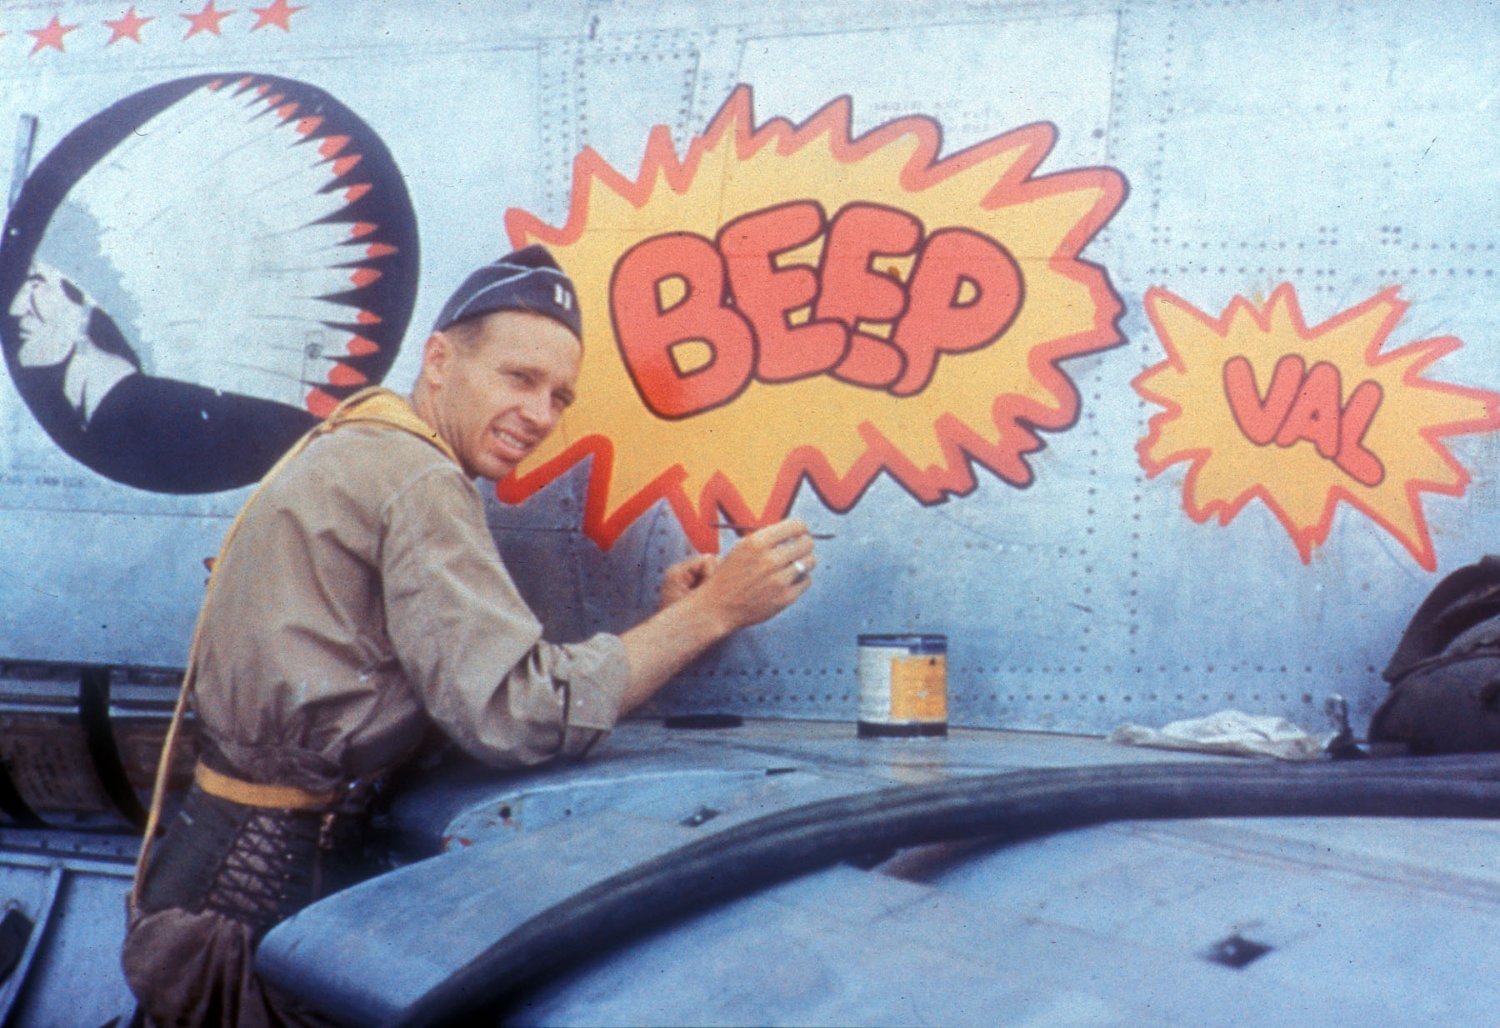
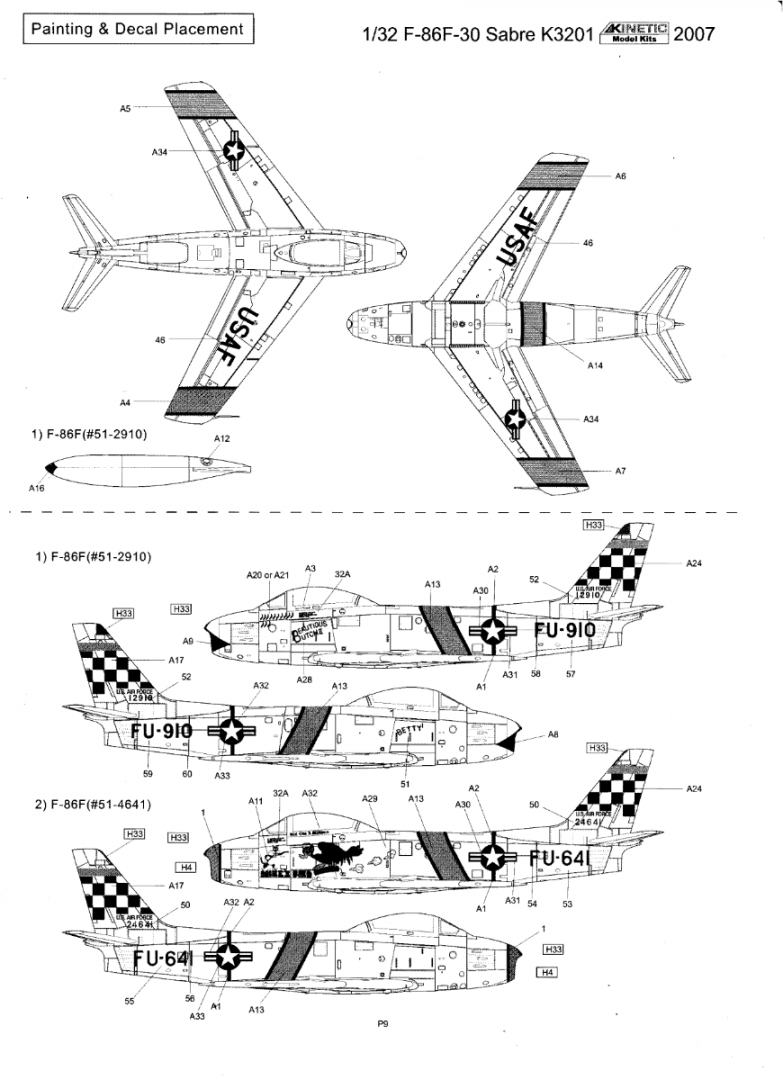
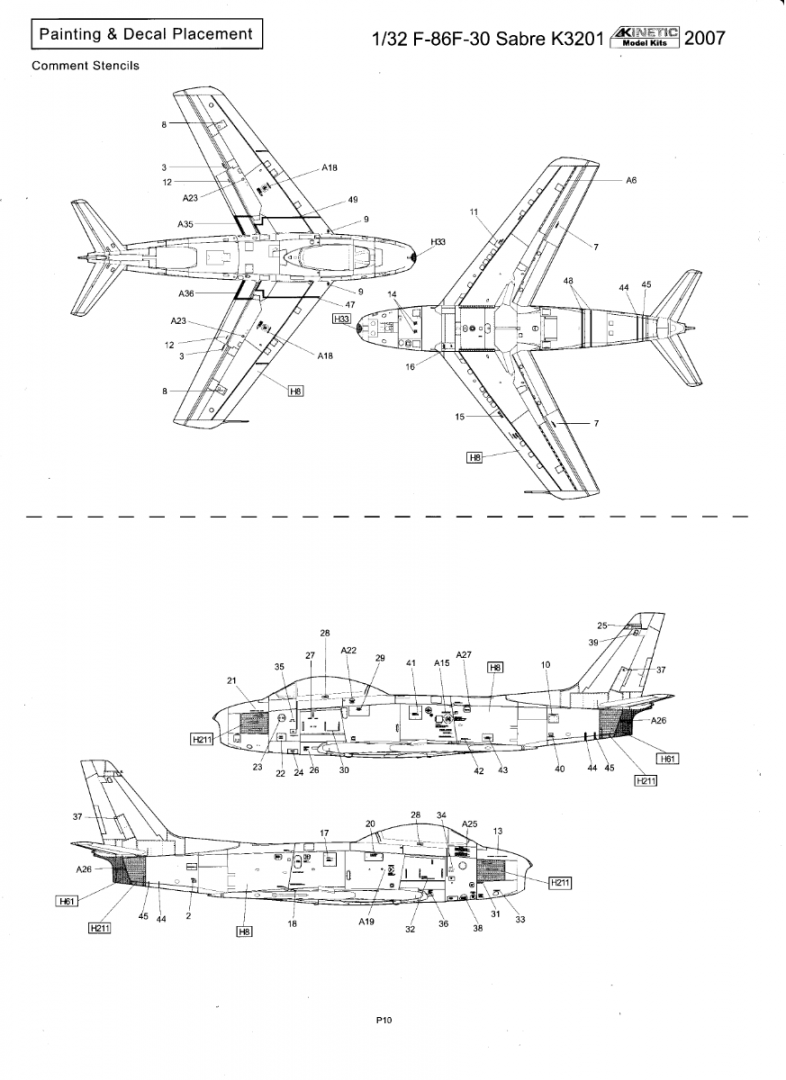
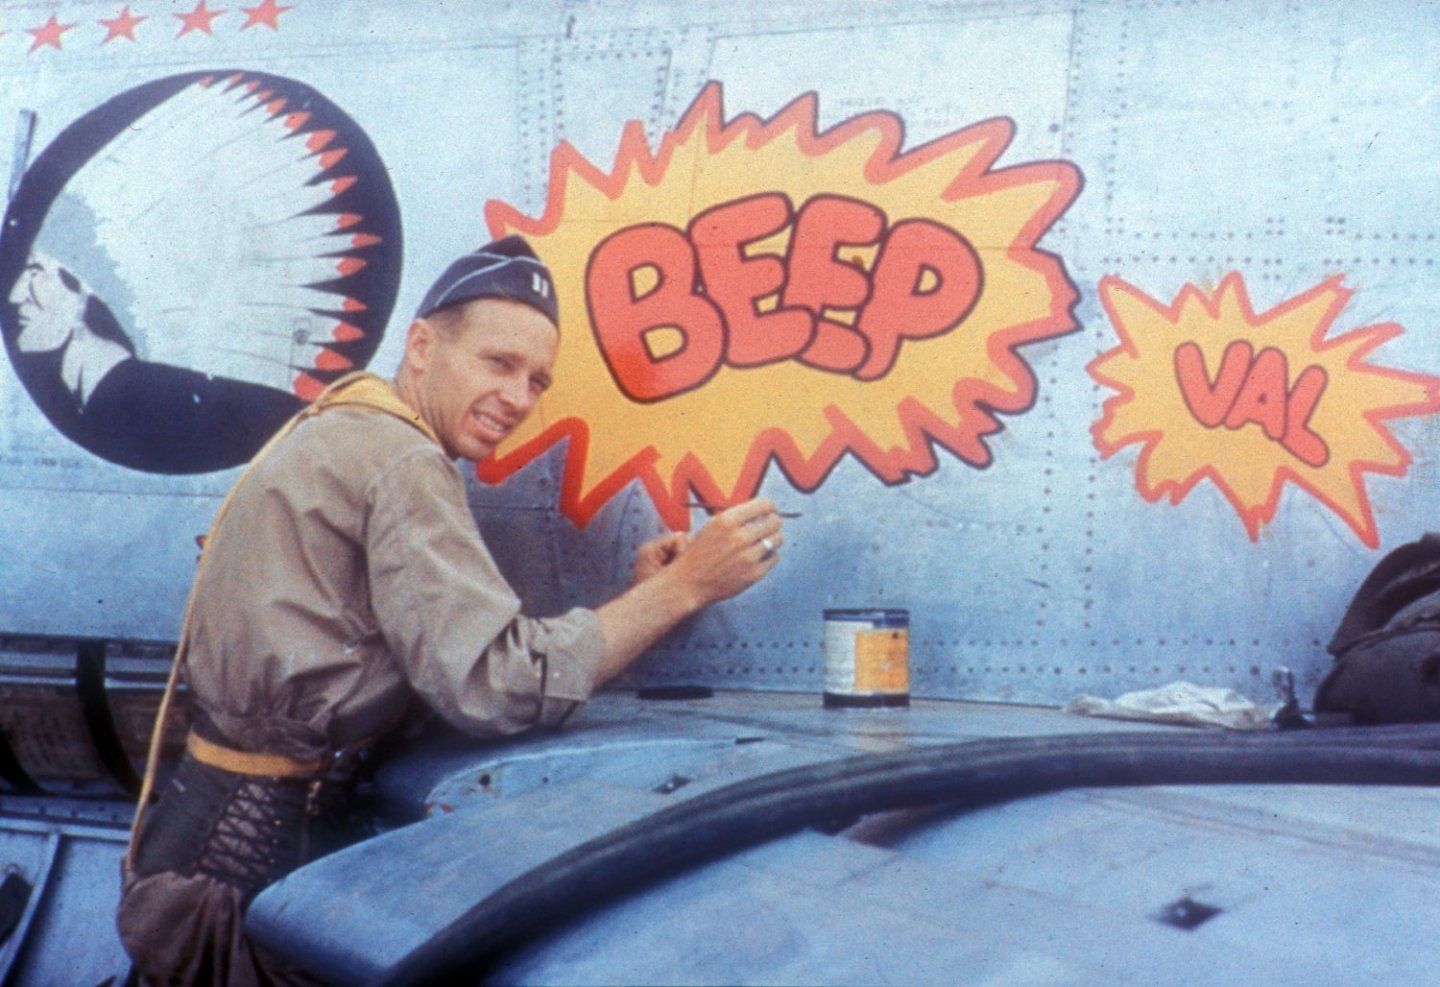
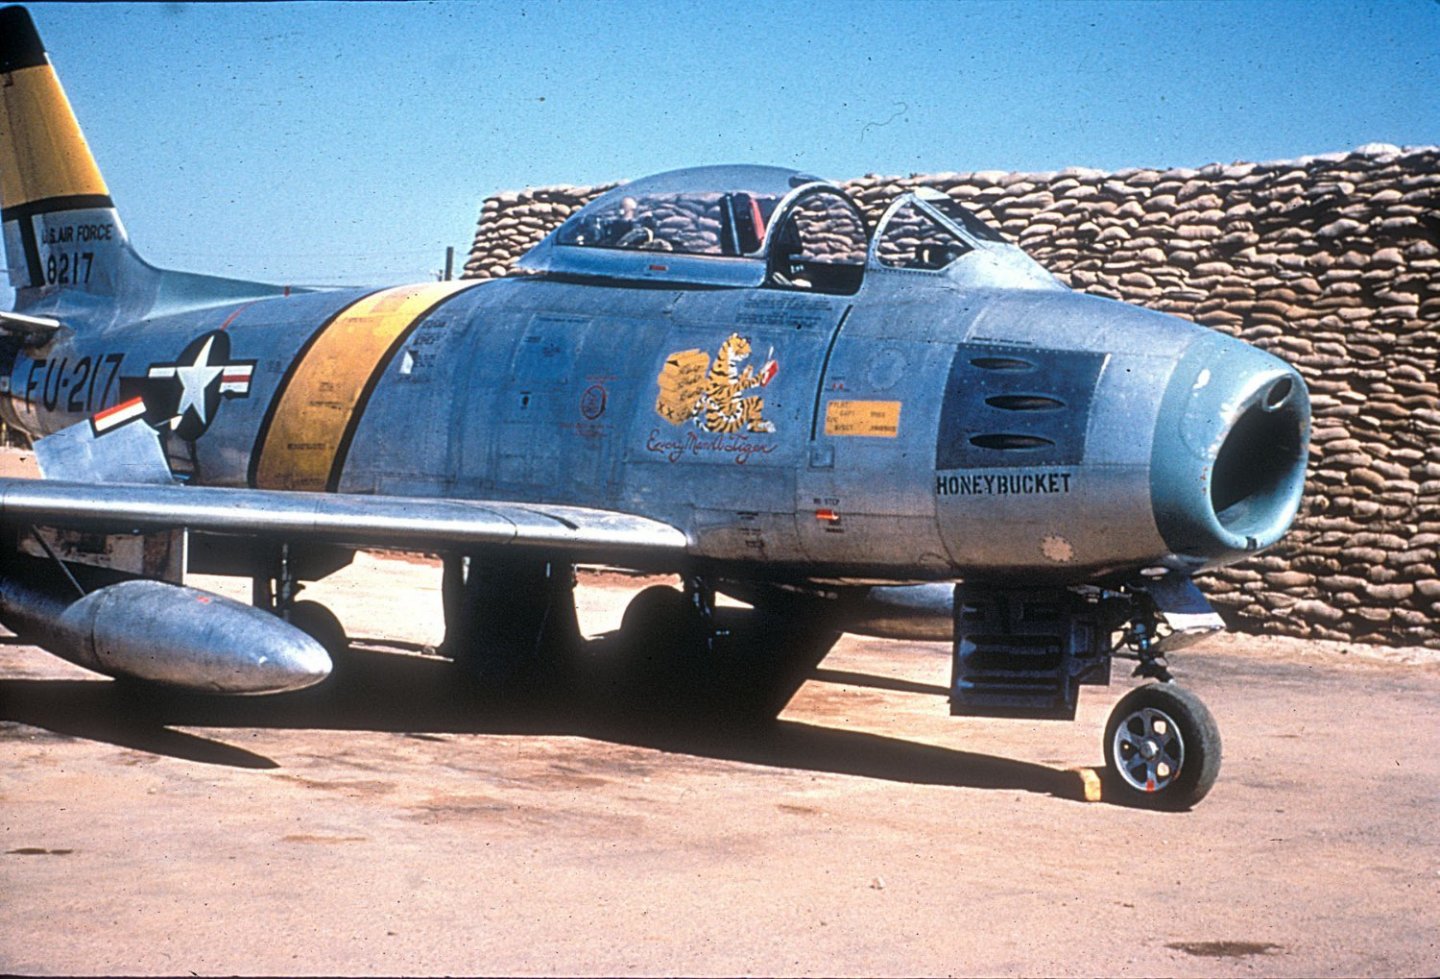
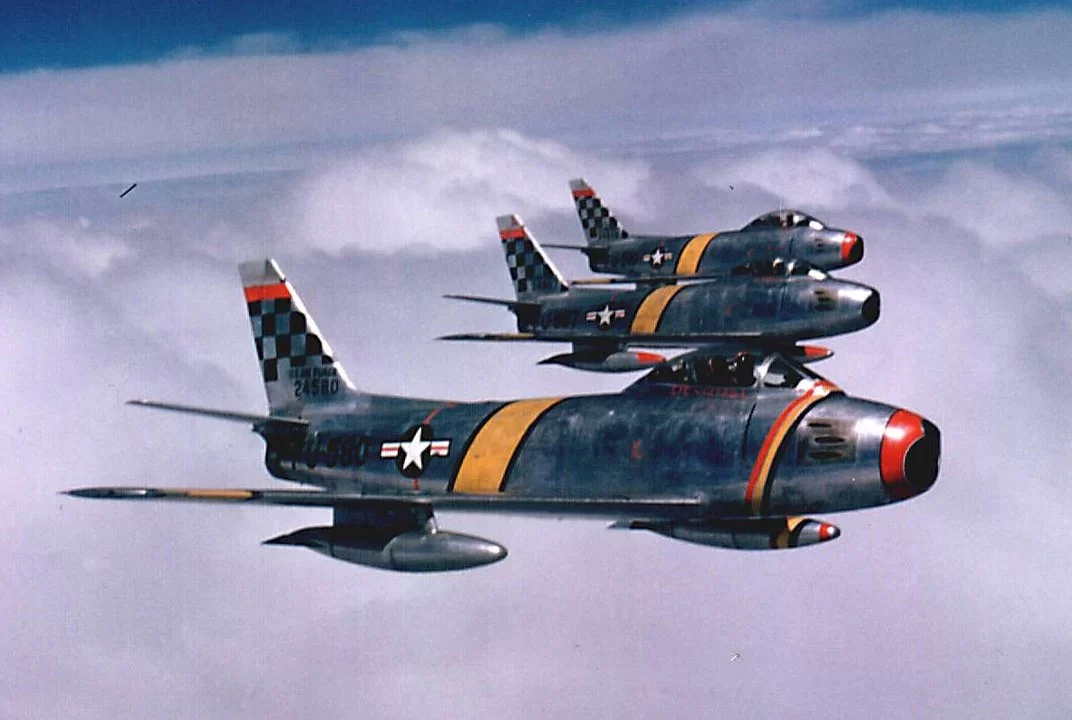
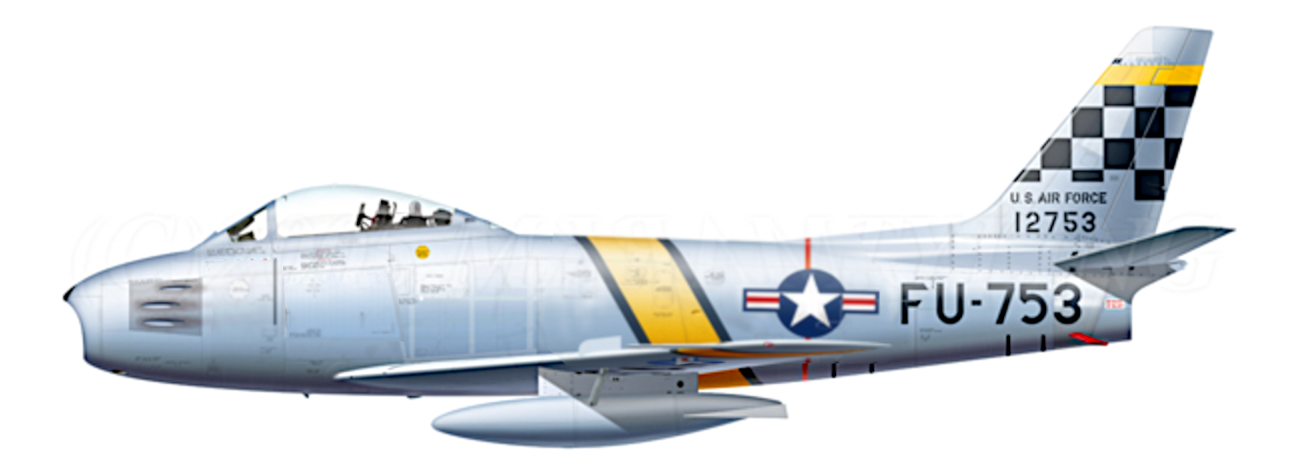
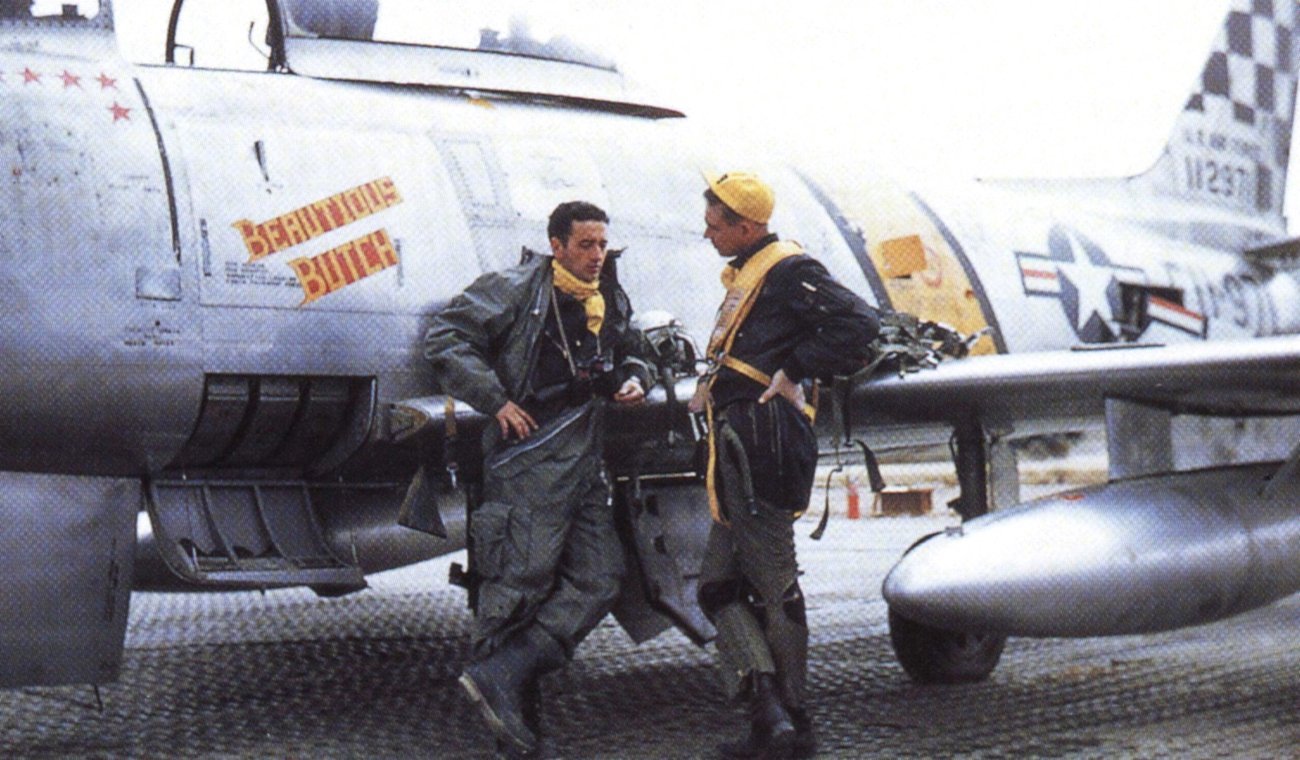
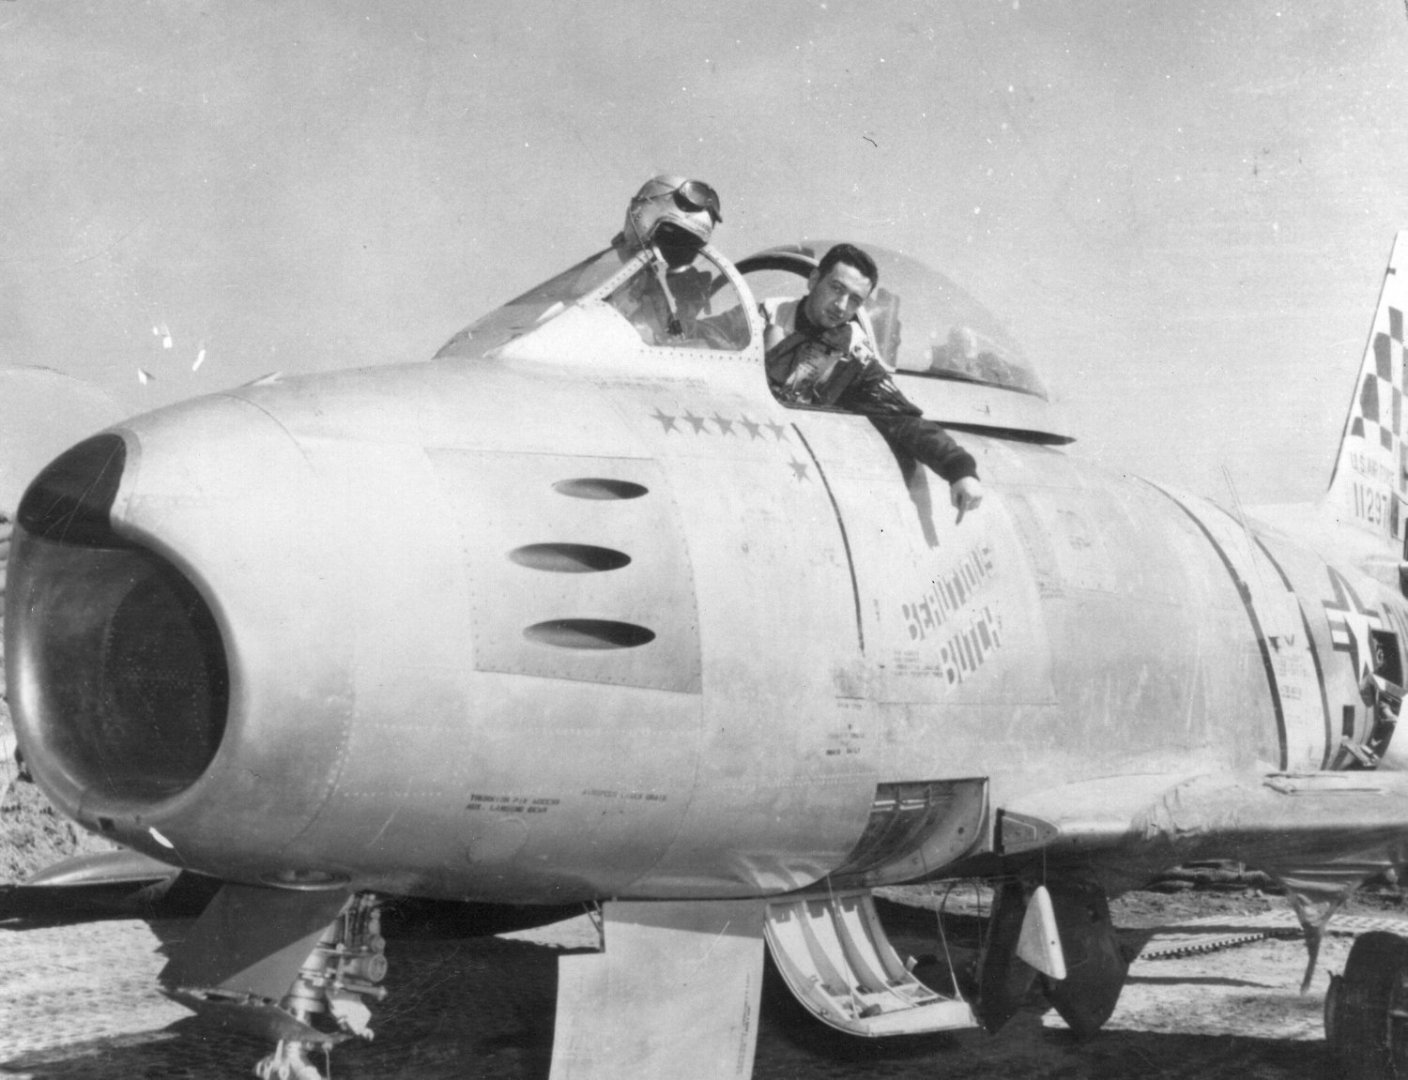
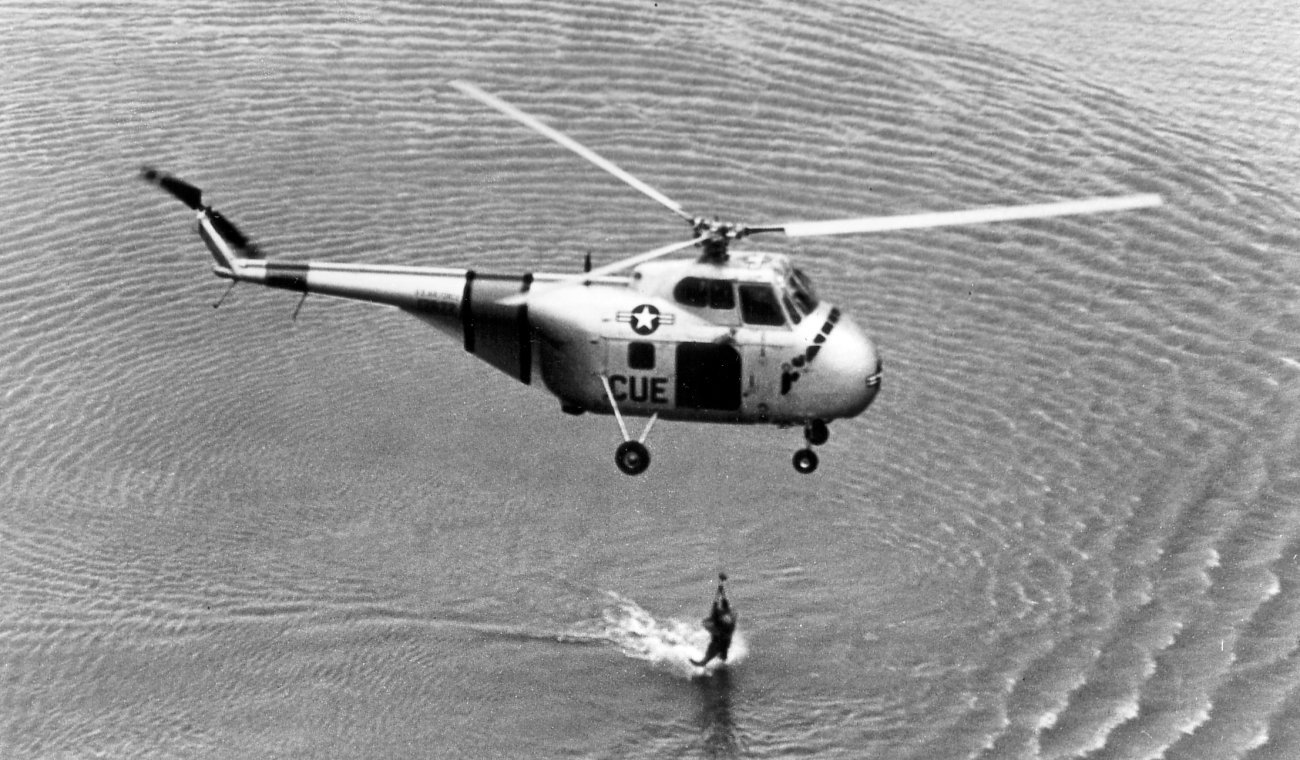
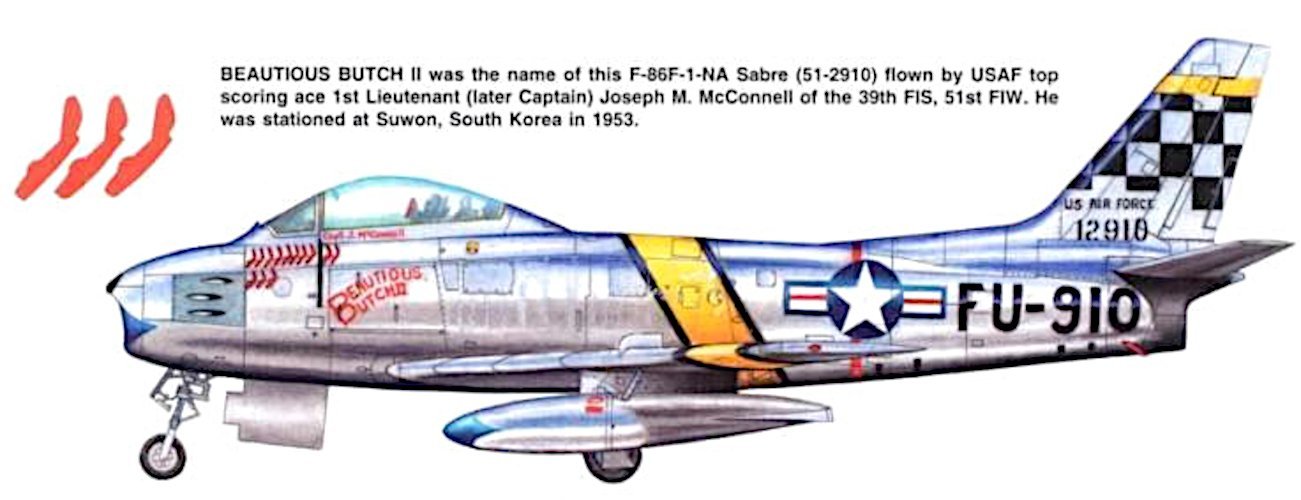
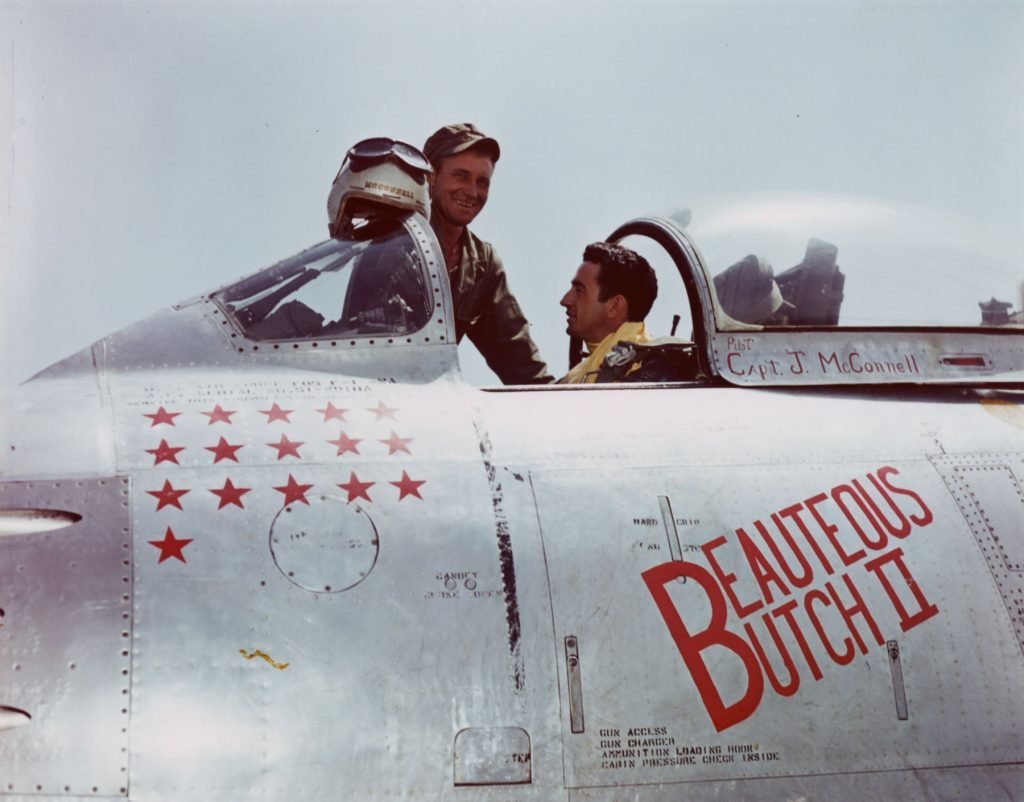
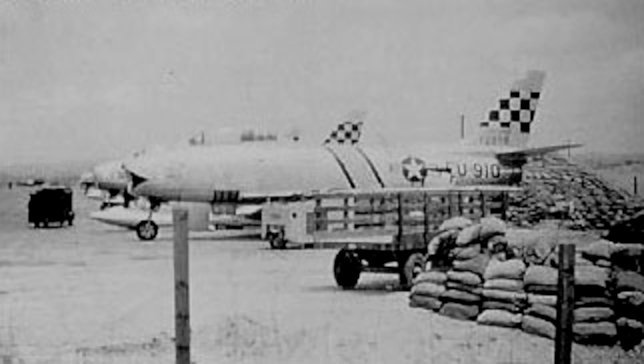
Hello Brothers... Continuing on with my exploration of Rub N Buff as a Bare Metal Finish for model airplanes.... Today, I'm doing the official start of my second attempt... The North American F-86 Sabre The F-86 Sabre was a revolutionary aircraft when it first entered the scene in 1947; the first American production fighter with a swept wing. It met with success in battle too, ending the Russian MiG-15’s dominance during the Korean War in the early 1950s. The type saw widespread use in nearly every Western-aligned nation, with factories set up outside the United States in Italy, Japan, Australia and Canada. The production run, with numerous different variants, eventually developed into a transonic aircraft, ("F" models) and reached almost ten thousand airframes, making it the most produced, Western-designed jet fighter in history. The type lived on long after its days as a front-line fighter were over, serving ultimately as a remotely-controlled live target drone for pilots to hone their skills in the use of air-to-air missiles. A healthy number of Sabres have made it into civilian hands, with a number flying on the air show circuit, and several more under restoration to fly... I am going to present a specific aircraft, Captain Joseph McConnell's mount 'Beautious Butch' I hope you all enjoy the journey.... F-86F-1-NA sn. 51-2910 is the last Sabre which jet-ace Captain Joseph McConnell flew from Suwon Air Base during the Korean War with the 39th Fighter Interceptor Squadron, 51st Fighter Interceptor Wing, 5th Air Force... While stationed there he is credited with shooting down sixteen MiG-15 jet fighters during the conflict, while damaging an additional five others... Captain McConnell is America’s highest-scoring jet ace, but interestingly, he started out as a navigator on B-24 Liberator bombers during WWII, flying on sixty combat missions. He stayed in the military following the war though, and pursued his dream of becoming a fighter pilot; earning his wings at Williams AFB, Arizona in February, 1948. He joined the Korean conflict, quite late, arriving for service in September, 1952. his first aircraft was F-86E-10-NA, sn. 51-2753... McConnell had the last two of his fighters painted with the name, 'Beautious Butch' on the cockpit left side in honor of his wife Pearl, whose nickname was “Butch”... All of his victories came between January and May, 1953, in aircraft named for his wife, with the first eight being scored in his second assigned Sabre, F-86F-15-NA, sn. 51-12971... On April 14th, McConnell was attacked by a MiG-15 piloted by Soviet ace Semyon Fedorets, McConnell's F-86 was severely damaged but McConnell was able to reverse the fight and shoot down Fedorets. (watching Fedorets eject from his destroyed Mig-15) Too damaged to land, (barely flying), fortunately, he was able to reach the Yellow Sea and managed to eject from his stricken fighter, and a rescue helicopter plucked him from the water and brought him home. (both Fedorets and McConnell were credited with victories for the action) He was back flying in combat the following day though, and shot down another MiG-15. The third Sabre which McConnell flew in combat was F-86F-1-NA, sn. 51-2910. He shot down his final three MiG’s on May 18th, 1953... He and his wingman took on a flight of 30 MiG 15's by themselves... His fellow pilots were listening to the combat radio calls on the base radio when he loudly proclaimed to his worried wingman "Don't Worry, we have them all to ourselves!" (he shot down two of them, his wingman got one) Then went up again later in the day and shot down a third... (his 16th) He was awarded the Distinguished Flying Cross for this action... McConnell was immediately ordered home to the USA, (Gen. Barcus, head of Far East Air Force, didn't want to risk his top ace to any further combat, and is reported to have said, "I want that man on his way back home to the U.S.A. before you hear the period at the end of this sentence.") His F-86 was quickly repainted to remove the Russian Mig symbols he was using for victory markers in exchange for N Korean/Chinese red stars and a very famous, obviously staged, photo was taken of him and his crew chief for publication, they even re-spelled his aircraft's nickname to how the public affairs section thought it should be spelled... (shooting Russian MiG's down over Red China was still a military secret at the time) A few days later his aircraft was photographed on the ramp at Suwon clean of any personal markings... On arrival home, he served with the Sabre-equipped 445th FS at George AFB in California. Shortly afterwards, he was assigned as a test pilot at Edwards Air Force Base to evaluate the then new F-86H variant. While conducting a test flight in the 5th production example, F-86H-1-NA, sn.52-1981, on August 25th, 1954, the aircraft experienced a horizontal control surface failure at low altitude and crashed. McConnell tried to ride it out and land the plane, (dead-stick landings were a specialty of his in Korea) but a gust of wind off the desert floor lifted a wing as he was settling to the ground, too close to recover... He ejected from the aircraft, but it was too late, He was found next to his seat, his unopened parachute separated and came to rest a half mile away.... His 16 aerial victories made him the leading American Ace of the Korean War. He remains the highest-scoring American jet ace in history. This is going to be my attempt to render a decent model of his last combat aircraft.... Lets take a walk..... EG
- 585 replies
-
- 18
-
-
I know that brother, but there are those that would never talk to me again for making such a suggestion... Even when I tell them that most plastics are derived from plant matter in the first place... {chuckle} We all have our purists.... What you do in that medium, it's amazing, and I will always doff my hat to you and your skills with paper and glue.... EG
-
Personally I would replace them with appropriately scaled wire... Probably wouldn't satisfy the paper only crowd, but would be much much easier to fabricate...
-
EXACTLY the way they are supposed to look brother! a kaleidoscope of colors depending on the angle of light reflecting from the surface... Beautiful well done, well worth it...
-
Yep they have that polarized look the real thing has and can't be replicated with paint... Nice Work!
-
Thank you brothers, Still researching this, and patiently waiting on Kevin to finish his, I don't want to take anything away from his spectacular build of the same kit....
-
F-86F-30 Sabre by Javlin - FINISHED - Kinetic - 1/32
Egilman replied to Javlin's topic in Non-ship/categorised builds
That looks Good Kevin, scale BMF can be achieved with an airbrush of that there is no doubt... And this was a very nice job... I think airframe aluminum was the right choice... (and I believe stainless would be the correct choice for the gun port panel which yes has a slightly blueish cast so it should be laid thinly over white primer to lighten it up a bit) Nice work figuring out the airbrush technique... -
Yep, it stands for Break Out Another Thousand... (my '68 14' Starcraft Arrow absolutely supports this ideal)
-
Porsche flat 6 boxer engine by kpnuts 1/4 machine works
Egilman replied to kpnuts's topic in Non-ship/categorised builds
Beautiful work as well my friend... Question, you going to do the timing housing/covers half and half as well? Or leave it clear, that would be a lot of moving parts to catch the eye... A visually stunning display....