HOLIDAY DONATION DRIVE - SUPPORT MSW - DO YOUR PART TO KEEP THIS GREAT FORUM GOING! (Only 53 donations so far out of 49,000 members - C'mon guys!)
×


drjeckl
-
Posts
196 -
Joined
-
Last visited
Content Type
Profiles
Forums
Gallery
Events
Everything posted by drjeckl
-
 This is probably going to sound a little cynical and I hope that I don't get blackballed from this site. But I have been spectacularly impressed with the wealth of experience and knowledge of the veterans that log into, maintain this site and comment/assist on build logs and other topics, all on their own time. Bravo to all of you!!! Couldn't live without this site. However, (yeah there is a however), if one of the missions of this vehicle is to help the new-to-the-hobby, which I think it is, and which I am one of them, then I think there is could be some improvement needed on the part of the Moderators and/or some other group of veteran experts, in order reduce the elapsed time between submitting a request for help in a build log and getting a response. Based on my count today, there are 210 x build logs that have not been responded to as far back as 5/2120 just in where I have posted my specific build log, updated on 09-Oct=20, here Build logs for SHIP MODEL KITS - by era - launch date Kit build logs for subjects built from 1751 - 1800 I have not looked in other topics or forums, but my guess is the situation somewhat exists in those different timeframe forums as well. Bottom Line: What I'm hoping for is that management could put into place an official mentoring process for the Noobies; I joined in April, 2020. This could take several forms and it's likely that this issue has been brought up in the past, so I won't throw out suggestions on how to to this. If you want me to, I will. Not sure how many members out there who are sympathetic to my proposition. However, I'm sure I speak for others that are waiting fore a response, in their build logs, to their 'plea' for help from the wizards at this site. on how to proceed. I have gotten valuable responses when I have posted questions in specific forums, such as furniture fittings. But I have not received any comments in two weeks on my build log. Just trying to make this a more useful site and give you my feedback...John
 -
Searcher, I'm in the same (no pun intended) boat, the Lady Nelson. And I had the same issues you had with the first planking. I was pointed to the definitive site videos here: https://modelshipworld.com/forum/98-planking-downloads-and-tutorials-and-videos/ . The key one is the 3rd I think, where Chuck shows how to edge-bend the planks. It puts a curve into the plank that when bent in the normal sense, it lays right on top of the forward bulkheads. Yeah, I also followed Leon, but after 5 x planks, I reached for help from the wizards around here. They convinced me to start over, which I did. I left the 1st plank on and edge-bent the rest of them. And we will likely need to do the same for the 2nd planking. I would also recommend that you go through Chuck's build of the Cheerful, which is close to the LN. You can find that here: https://syrenshipmodelcompany.com/revenue-cutter-cheerful-1806.php. There is a PDF for each chapter. I'm just a little bit ahead of you in the build and you can check out my log. I would recommend that you create your own log so you can post your own questions and not be lumped in with whadozer's log. Good luck...John
-
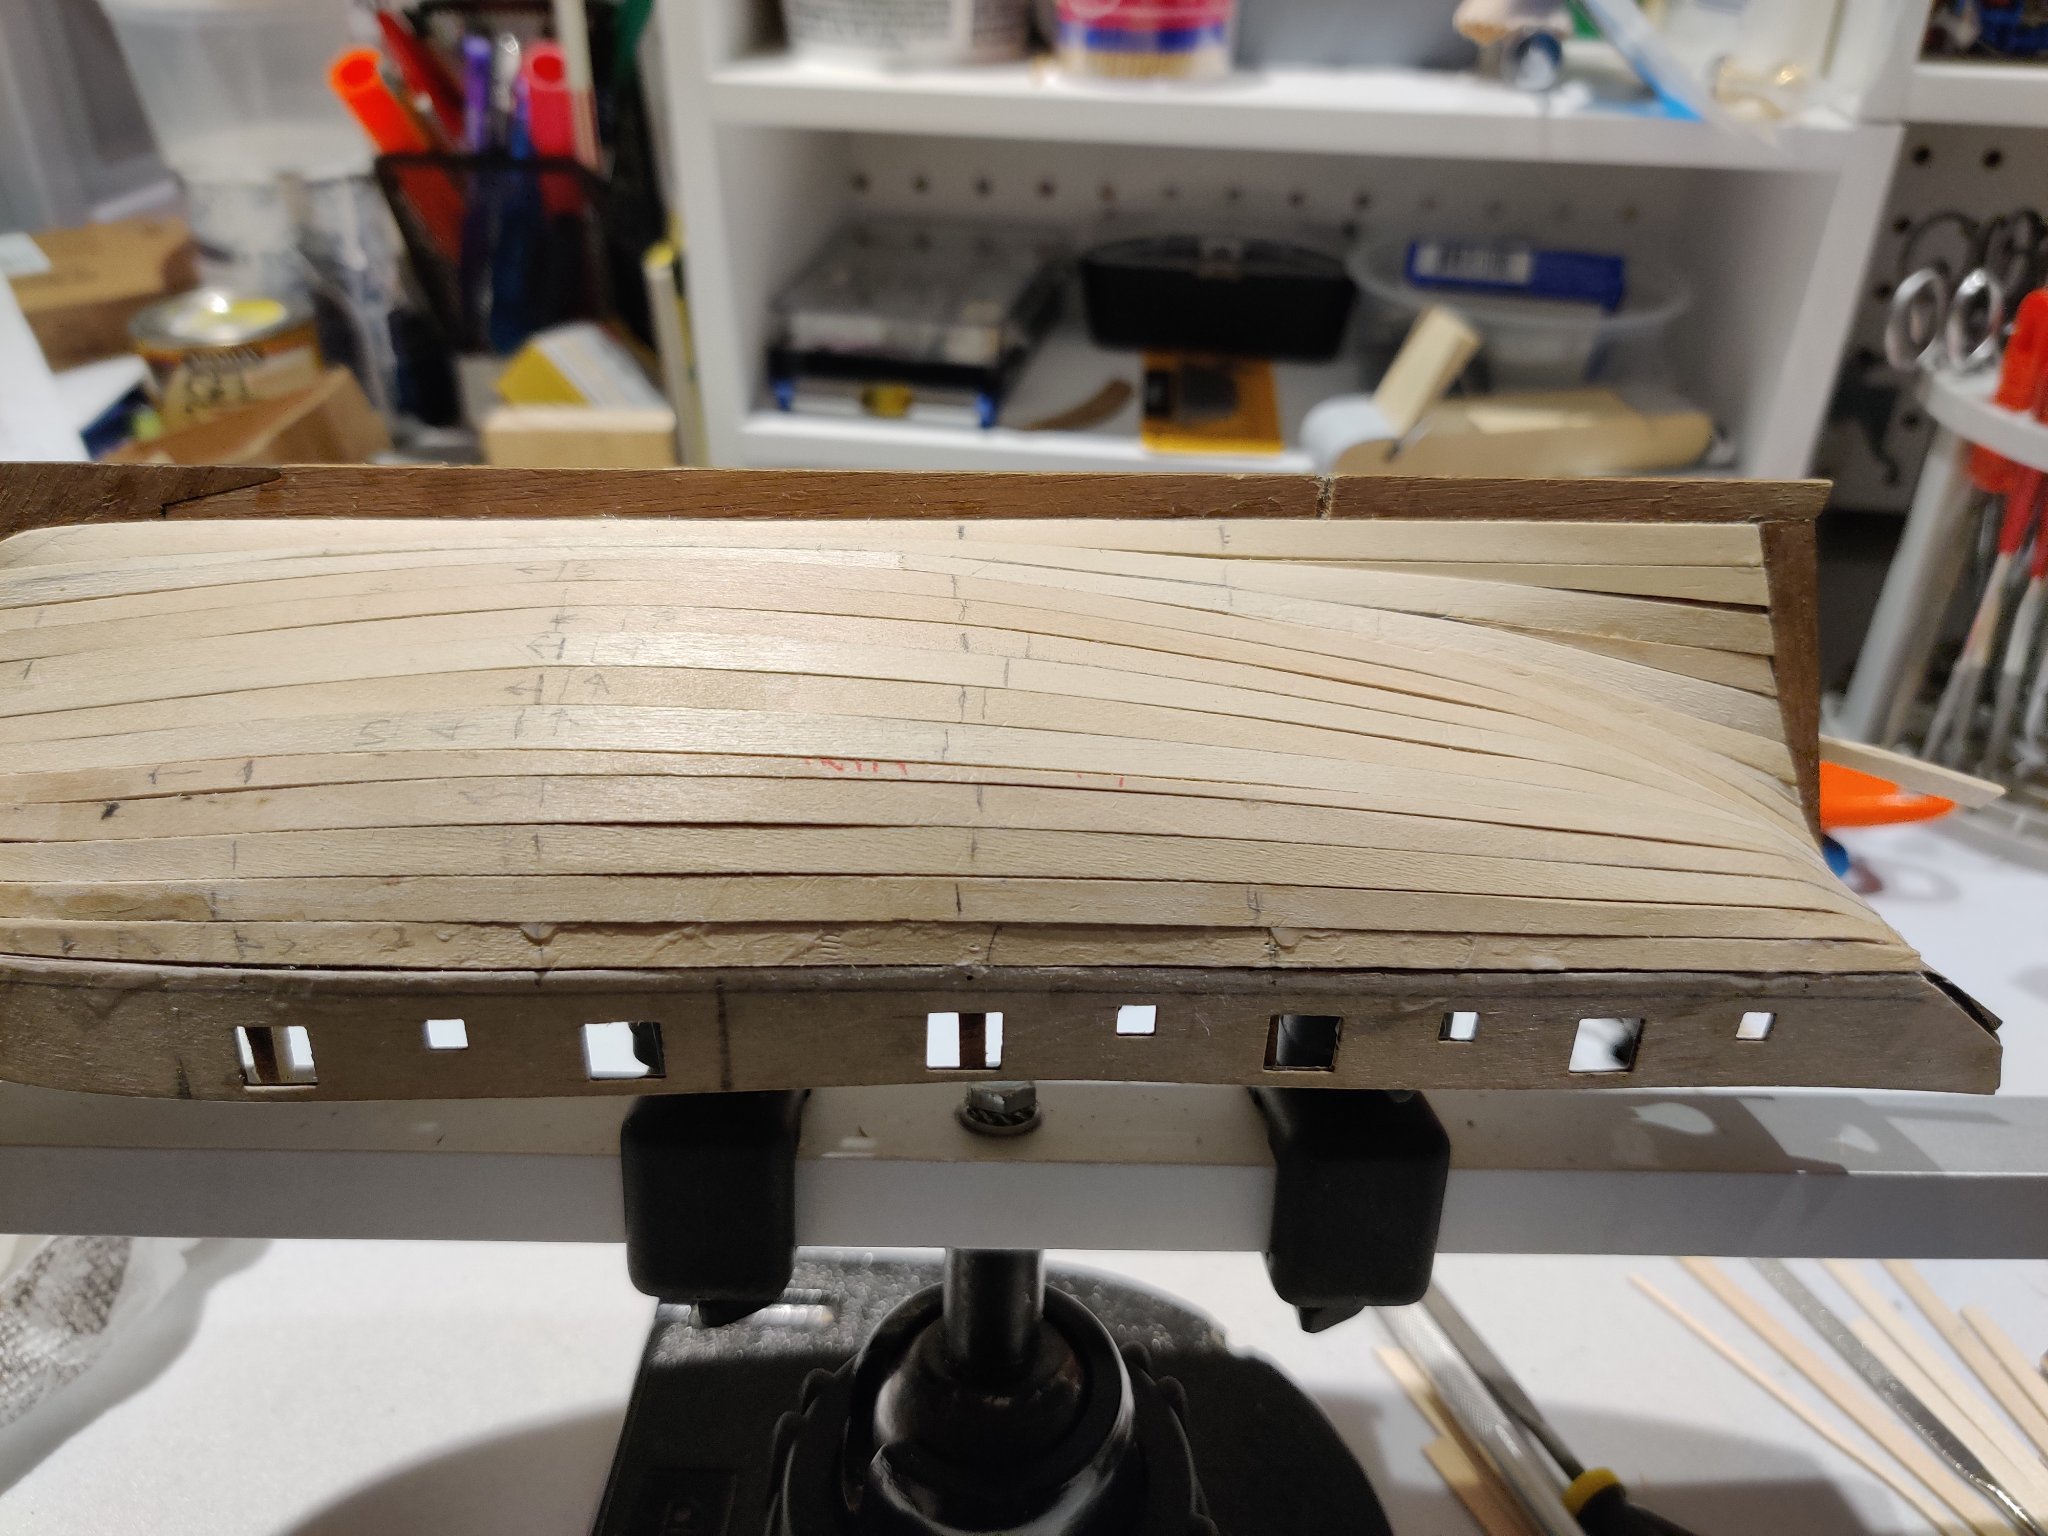
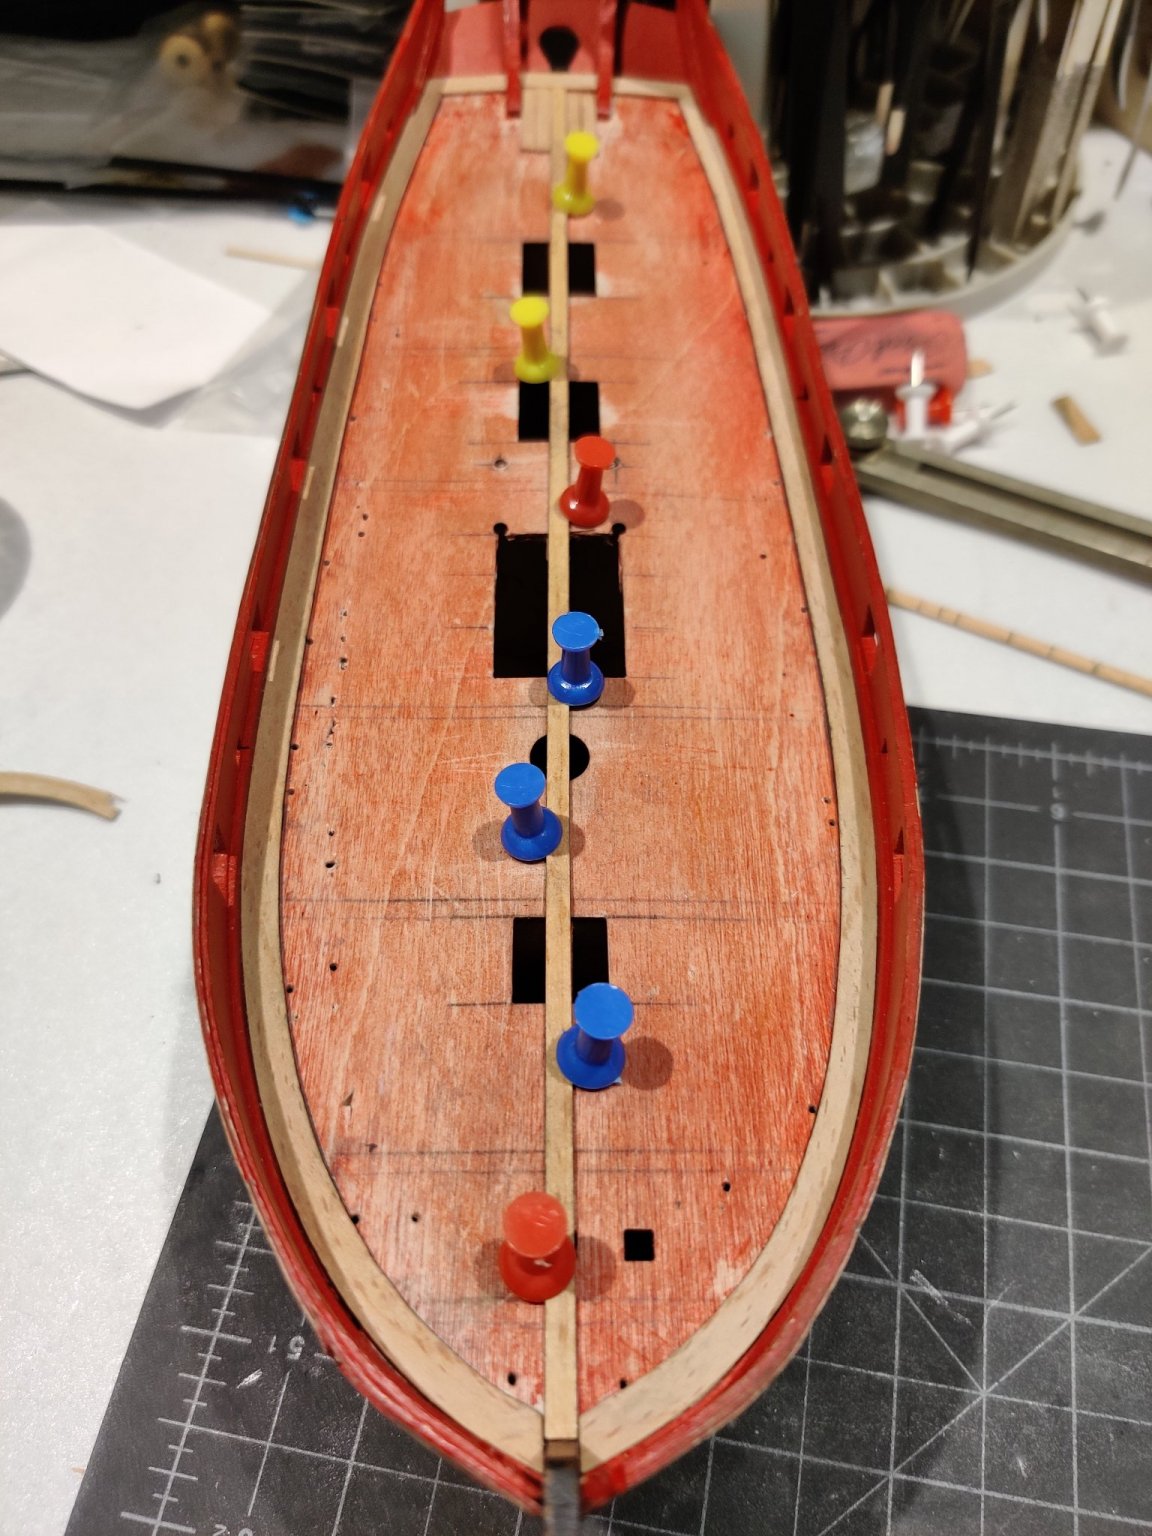
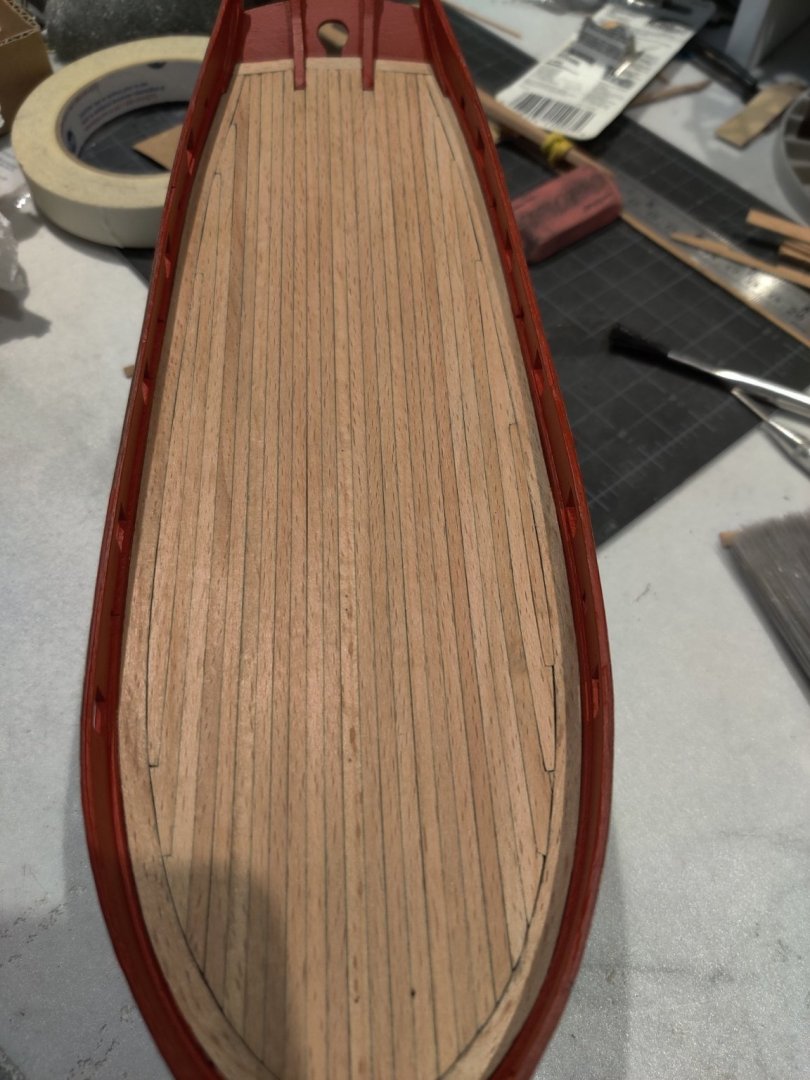
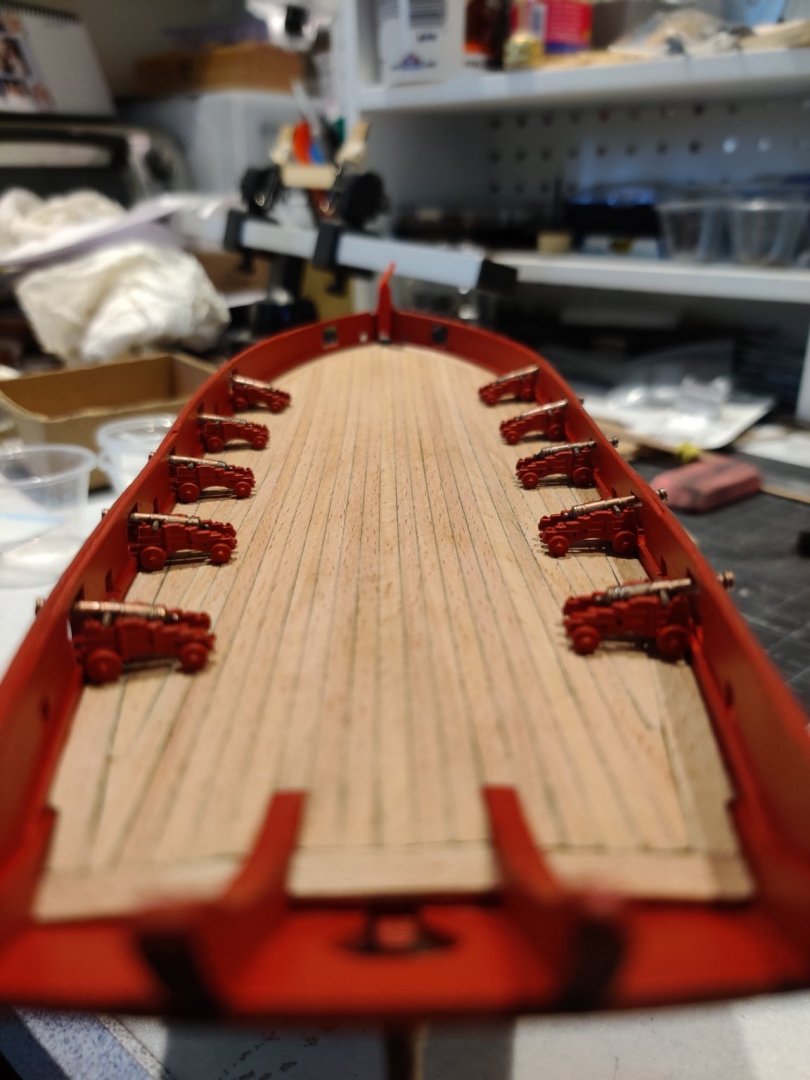
Wow, it's been exactly 5 months since my first and only log post. Since then, I've posted in a couple of specific forums for certain issues that I probably could have posted here; either/or! Anyway, I think I've made decent progress: After laying 5 x planks with fairly miserable results, I sought advice and was convinced to restart. From this: To successfully completed first planking: The secret technique I was missing was Chuck Passaro's plank edge-bending process. What a difference! Check out his videos on this. I haven't yet migrated to his technique of lining up yet, but I may for the 2nd planking; not yet sure. Challenged myself to follow Chuck's plan with laying down a margin plank on the border of the deck. Rather than piecing together several shorter planks with scarph joints (I forget now why I couldn't do that with the material I was able to put my hands on (3mm beechwood kit planks and max width of 5mm planks available online), short-term memory is the first to go!), I tried and was able to edge-bend a single 5mm plank for each side. Here's the result and adding the king plank: I laid down deck planks until the end points of the plank got too sharp and started to hook them as per Chuck's process, found on page 10 here: http://modelshipworldforum.com/resources/Confed/Chapter10.pdf . I cut out 2mm chunk out of the 5mm planks, leaving a 3mm plank in the middle of it and hooked the ends for the blanks at the ends. The cutting out technique I used was captainbob's, found here (scroll down a little): Due to some careless fit cutting, I had to follow one of Chuck's rules: If it doesn't fit, toss it aside and make another one. I used a jumbo graphic stick to coat each edge of every plank with lead to simulate the caulking. Couldn't keep from getting the lead on my fingers and while gluing the planks to the false deck, got sticky lead on the surfaces. After every two or three planks laid, I used a single edge blade to scrape the surface lead off (NO SANDING!!!). Here's how the final deck turned out: I marked the center of the deck cutouts with a pin hole so I know where they go. I'm pretty happy with how this turned out. You might be able to see that there is a spirketting plank between the lowest bulwark plank and the margin plank. The deck edge layout was a topic of discussion I raised here: I had to adjust my final layout of the spirketting plank to rest it on the false desk so it wouldn't cover the oar ports. But it works as intended, keeping the cannon carriages nicely away from the bulwarks planks. Did not try laying in a waterway; didn't want to stretch my luck. After the deck was completed, I needed to clean up the bulwark planks from the scrape marks. So I masked the deck and gave the bulwark a couple of second airbrush coverings using Vallero Air Red 71.269. The planks were previously primed with Vallero Surface Primer Pure Red 70.624. So now I'm ready to move on and have some questions on the sequence I should take. I'm planning to etch plank butts according to a 5-butt scheme. After testing a couple of plans on some off-ship planks, I'm planning to do the following: Cover the deck planks with one coat of MinWax Wipe-On Poly followed by some smoothing out method (?) Transpose the 5-butt scheme, in pencil, to the deck. I did a layout in Visio (there is also an Excel spreadsheet by AEW one can use at http://modelshipworldforum.com/ship-model-framing-and-planking-articles.php). Use an milled down Excel blade #17A exactly to the width of the 3mm plank to etch the butt lines. Use a Staedtler Pigment Liner 0.05mm pen to make the lines. Cover the deck planks with a 2nd and maybe a 3rd coat of WOP with the same smoothing out method in between coats. Mask over the deck to protect it and start the final hull planking. During my testing of the pen, without a coat of WOP on the plank, as soon I touch it with the pen, the ink absorbs in a circle and I don't get a clean line. With a coat of WOP on the planks, I do. So here are some of the obvious questions: What type of smoothing method would be best? Sanding is out to avoid spreading the graphite. Steel wood (0000 grit) could be an option. What about stray, stuck steel threads? Use a magnet to pull them off? I also have a softback sanding sponge, 2500 grit. Too fine? What's best? I probably should cutout and mask the edges of the deck hatch and mast cutouts so the deck furniture, et al, glue will adhere good to the deck. I will likely use PVA for this. I have read in some posts that PVA will adhere well over WOP. Should I risk not masking out the cutouts before applying the WOP? If it doesn't stick, I would likely be left with scraping the edge of the cutouts. I'll also need to deal with gluing (CA or PVA?) the cannon trucks to the deck. Mask that area with a rectangle piece of tape under the entire carriage? What about the water-based WOP? Anybody use that and glue over it? Not so obvious questions: Any issue with the 5-step plan above? Recommendations? Alternates to the Staedtler pen? Because I don't know: Would a coat of WOP over the bulwark planks be any help? Any and all recommendations will be appreciated. I just have to say that this site is fabulous for learning this hobby. The wealth of experience here is amazing! I have gained so much knowledge in the last 5 months and well before I started my log. Oh, and the 2021 calendar is great! Thanks...John


- 26 replies
-
- 8
-

-
- First Build
- lady nelson
- (and 2 more)
-
Thanks for the tips guys. I guess I wasn't very specific when posting this (I'll learn, I promise). My scale is 1/64, 1800 British cutter, and I'm planning on using one full length kit plank per strake and simulate the butts (I've already laid out a 5-butt pattern) with one of the numerous techniques posted on MSW (not sure which one will work for me; this is my first ship model)! So with the sheer of the deck, the issue is how to hold the plank tight to the false deck while the PVA sets. The best I can come up with is push pins and like I said, I need 7 pins to hold it tight. I will try to see if I can find heavy things to hold it down. Thanks...John
-
I'm planning on using PVA glue to install the deck planks over the false deck; just want the extra time to lay them in tight. With the slight curved bow in the false deck, from stem to stern, with the low point at midships, the question is how to hold the deck planks tight to the false deck while the glue sets? I used push pins to hold the edge of the margin planks down tight when they went in. For the king plank I need 7 x pins to hold it down. If I use push pins for every deck plank, the false deck becomes Swiss cheese, But who really cares; it's covered by the deck planks. Just wondering if there is another technique out there. Don't really what to bend the deck planks either. Thanks...John
-
Thank you to everyone who contributed to this topic. I know it helped me and I'm sure other first time builders as well. .John
-
Here's a pix of Vossiewulf's finished deck: If you look at the middle hatch, he suggested moving it closer to the stern to allow the the eyebolts and rings to be moved closer to the center, stretching out the training tackle. So that's what I am going to do. Now go back and read my dilemma from above. VTHokiEE: Thanks for your comments; yeah I will paint one with black wheels. I this it will look better than all red. .John
-
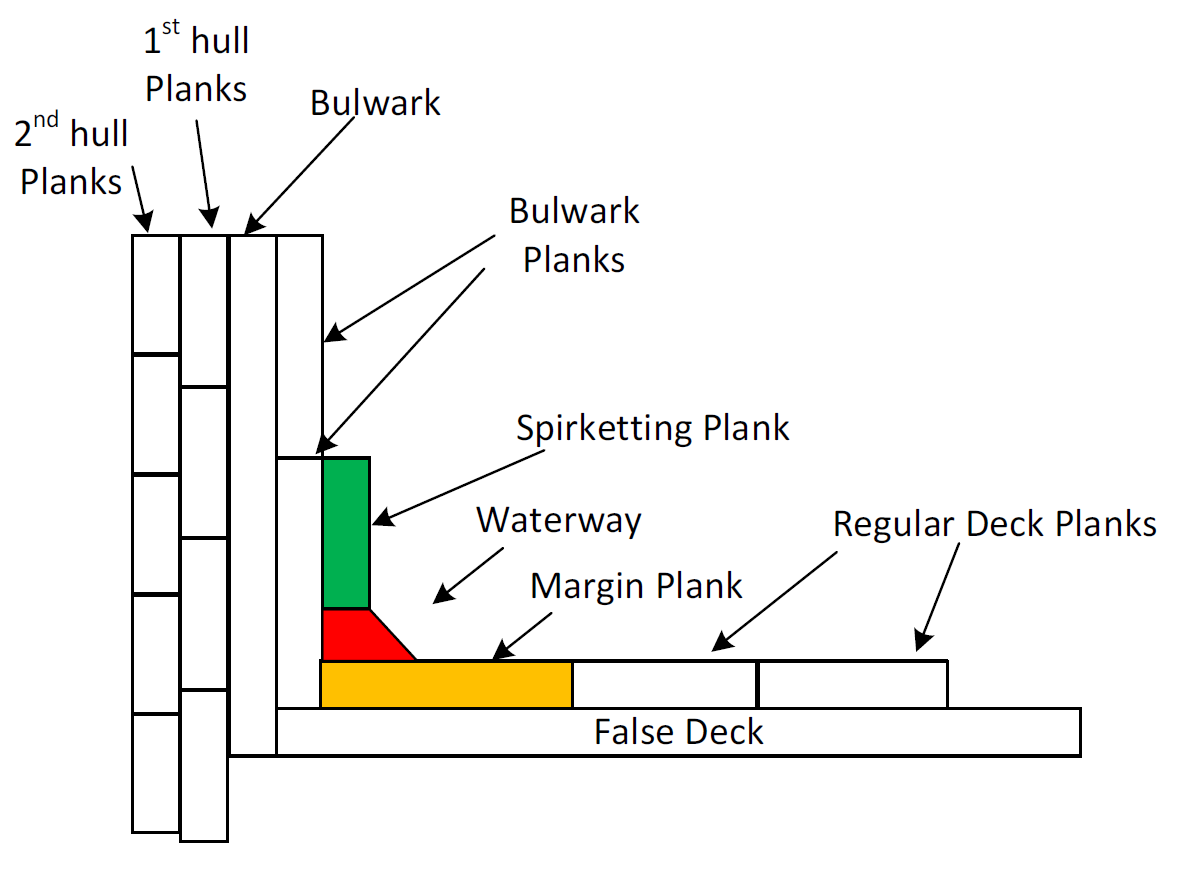
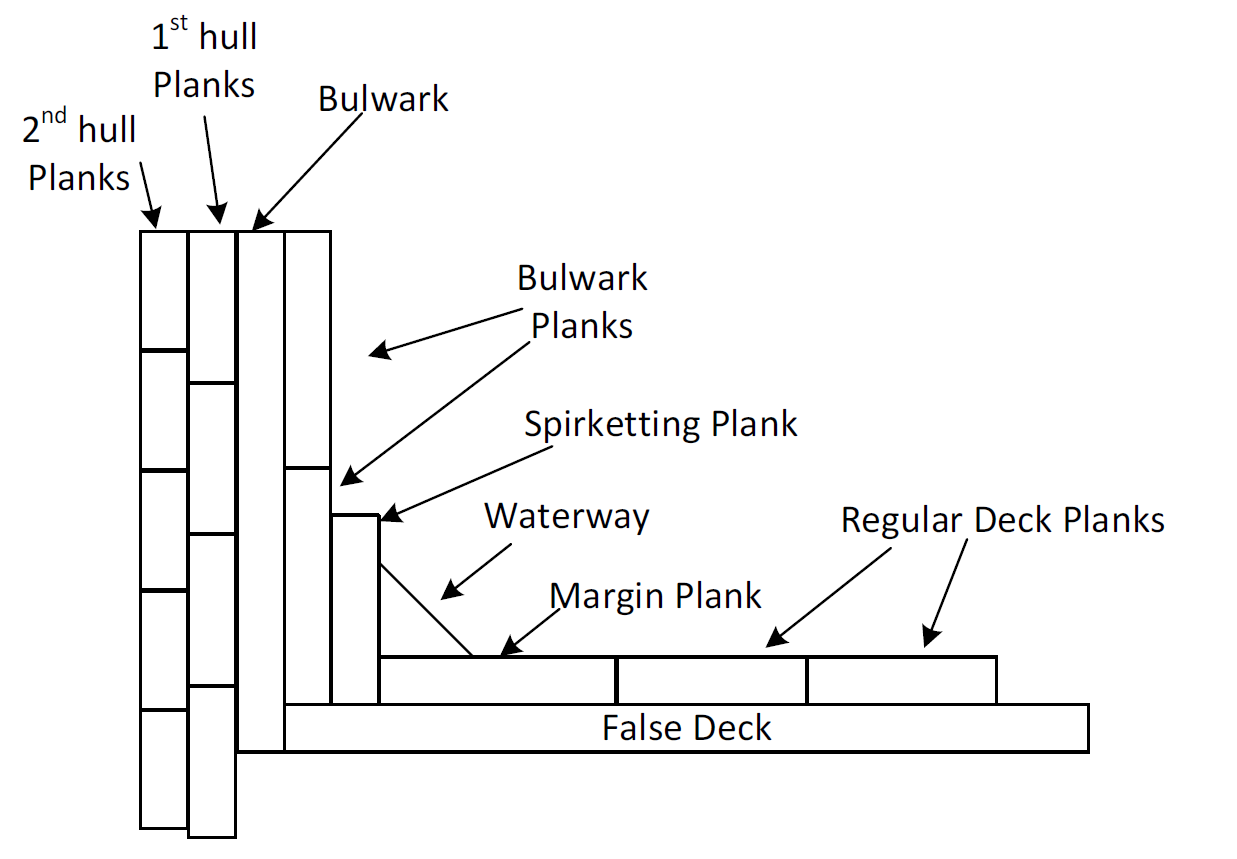
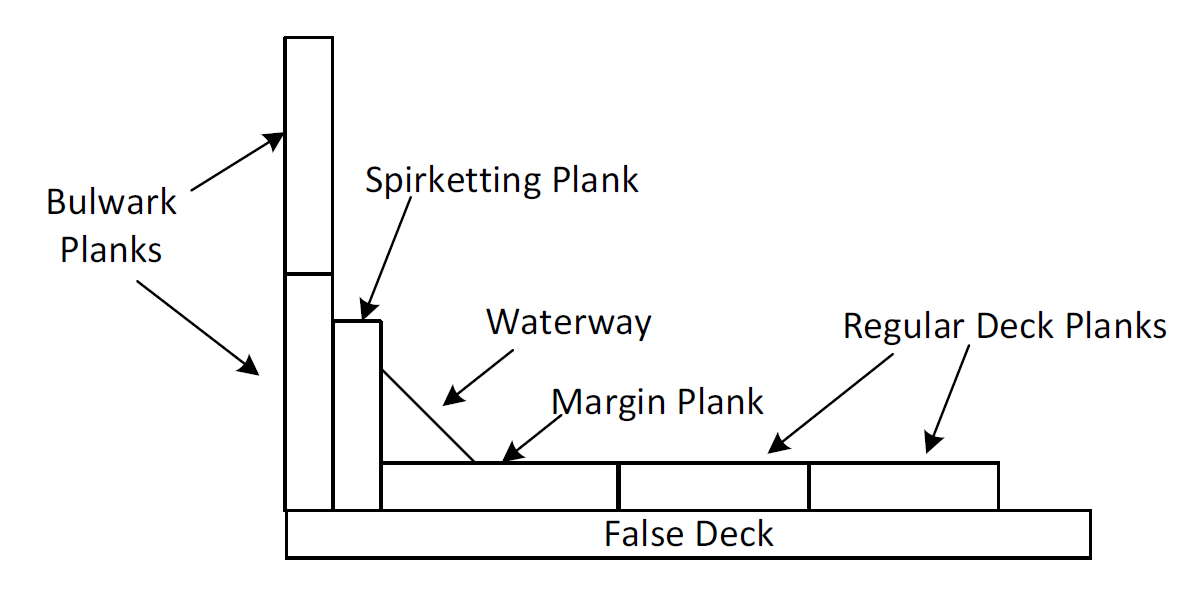
Wefalck: The LN was never a ship. It is Amati's version of a typical HM Cutter, circa 1803 and based on the Sherbourne class of cutters and yes, very small. Druxey: Yes, exactly. Not can I duplicate how it was built in the real world but how can I, as a modeler, replicate what was built. And based on the drawings in this thread, I think I would tweak my original sketch, by raising the spirketting plank, and moving the waterway (now a trapizoid instead of a triangle) and the margin plank against the bulwark planks, under the spirketting plank. See below: Feedback on this appreciated and thanks for your help...John
-
Mark, not sure of what you mean. do you mean that the triangle I'm showing as a triangle is actually adjacent to the bulwark planks? Where does the spirketting plank(s) go? Hear is an adjusted drawing: Gary, what you're showing in Figure 1 is basically that what I'm showing as the Margin Plank and the Waterway is one piece. That may have been the case back then but most of the MSW build logs I've reviewed have it as two separate planks. How have you dealt with this? ...John
-
I'm getting ready to install the deck for my Lady Nelson (1803, 1:64) and I've been looking throughout MSW for a concise layout for what's at the edges of the deck. All I've found are historical drawings and there are no instructions in the kit. From the historical drawings, I drew what I think I should build, shown below. Would appreciate any comments...John
-
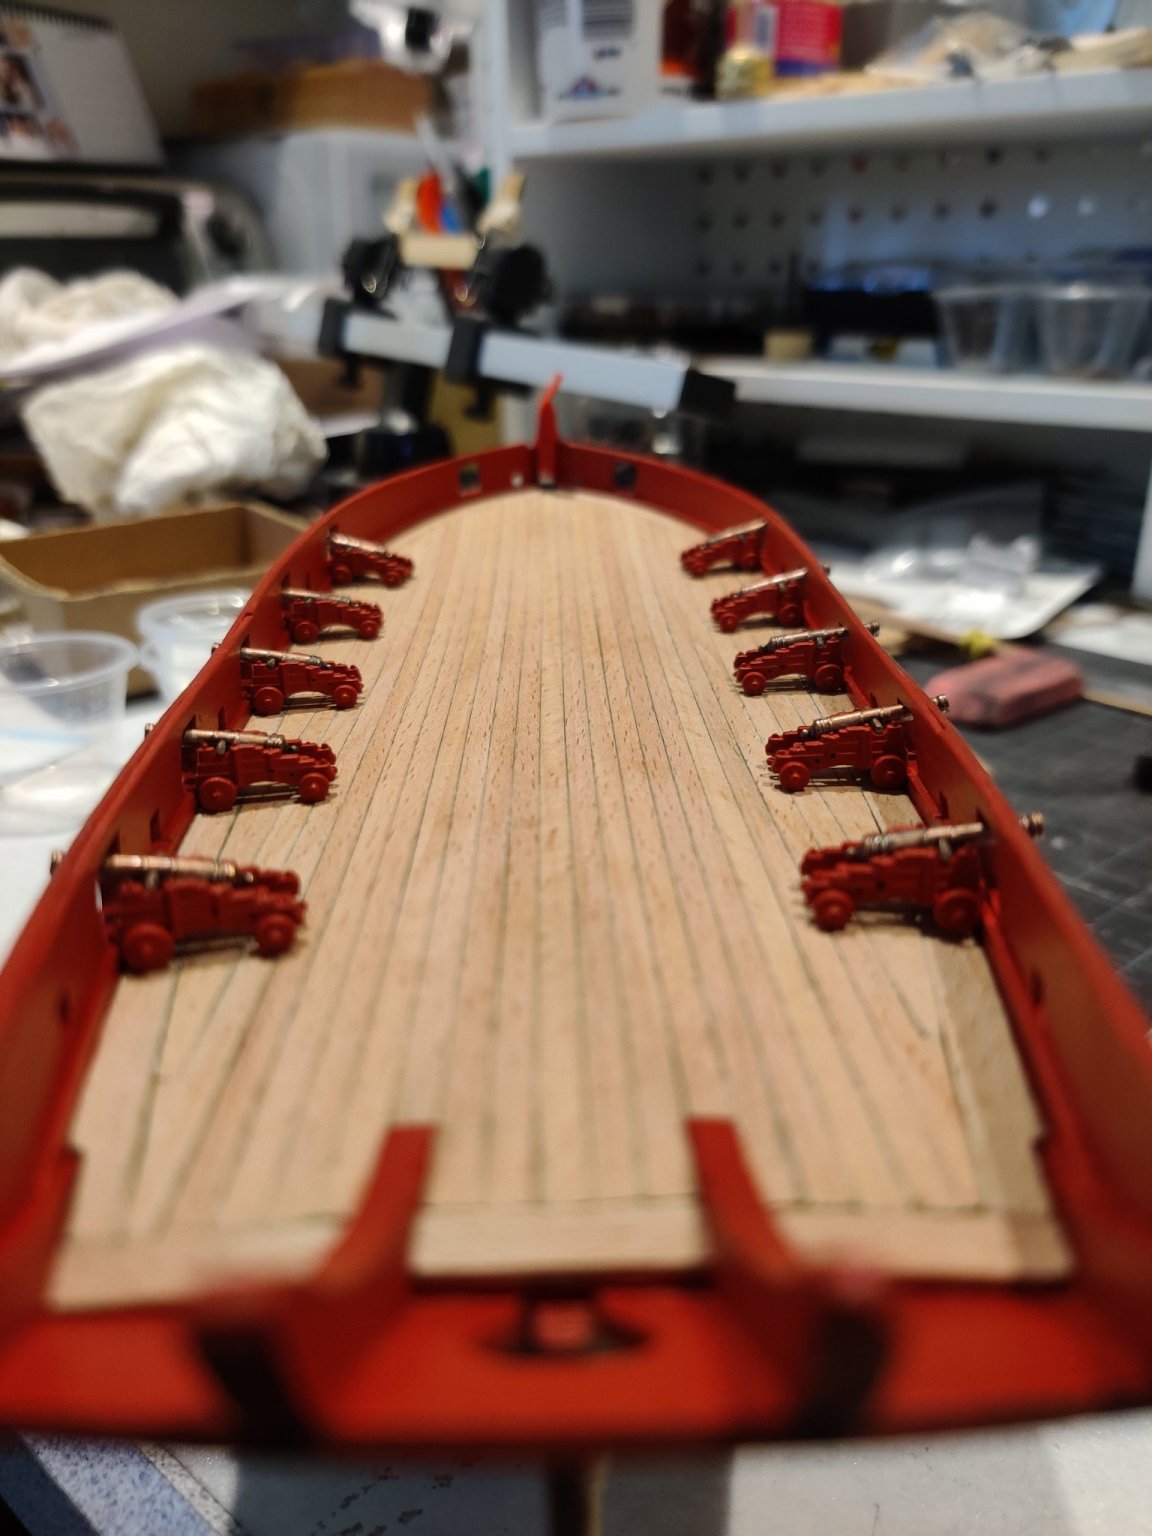
Two questions for my Lady Nelson (1803) build: 1. Are Deck Cutouts Actually Needed? The LN is a single deck build. Other than the hole for the mast, the deck layout has 4 x square cutouts; 3 x for hatches and 1 for a companionway. Taking Vossiewulf's suggestion on moving one of the hatches to make room to relocate a deck cannon training tackle eyebolt, and in fact move all of those eyebolts closer to the center of the deck, I extended that deck cutout without planning ahead on how to support the deck planks (8) that would extend over the portion of the cutout that I was abandoning (8mm). And after thinking about it, my question is why can't I just plank over that entire enlarged cutout and in fact all of the cutouts, obviously except the hole for the mast? What's to see though the hatch? A black hole? What actually is the purpose of cutouts in a single deck build? If it's for a hatch, and there's a concern that one could see the deck through the hatch, I could paint that portion of the deck black. Anybody got a good answer? 2. Cannon Trucks (Wheels) Color The LN plans suggest red for interior bulwark planking and the cannon carriages. The carriages with the wheels are one piece metal. Other builds show the wheels painted the same red as the carriages. I wouldn't mind painting the wheels a different color; black or brown and I will probably paint two units with those colors to see how they look. Just wanted to get some opinions on this. John
-
Priming Metal Fixtures
drjeckl replied to drjeckl's topic in Painting, finishing and weathering products and techniques
Wefalck and Roger, Thanks for your input. My Amati Lady Nelson kit came with metal gun carriages as well as the guns (alloy not specified). Wasn't sure if I needed to apply a primer before the final color acrylic paint. Assuming I prep these parts with some acetone with a water rinse, sounds like I could skip the primer paint to avoid an extra coat. Thanks...John -
Haven't seen this topic yet here. So, is it necessary/advisable to prime metal gun carriages, anchors or any other metal pieces, other than any brass or copper parts (I'm planning to Brass Black all those (eyelets, rings, deadeye straps, chain plates, rigging hooks, rudder hinge straps))? John
-
Thomas, Got it. Your explanation and the sketch nailed it. The light bulb is lit! Thank you so much. .John
-
Thomas, Thanks for your writeup. I have and been using most of all the tools you mentioned, except the proportional dividers. Based on the topics I've seen here on this tool, I think I get how they are used. The post by mikiek gave me the insight to these. Question: Are the less expensive plastic PDs, which just let you do proportions in whole numbers, good enough for their use in planking? Would hate to spring for the more expensive metal PDs if planking would be their only use. Also, for the edge bending, would a set of french curves be useful? Barkeater: Thanks on which edge you use to go against the previous plank. That's what I thought and where I made my mistake that got me in trouble. I put the non-tapered edge against the the previous plank. David: Thanks for pitching in.
-
Jan, that's what I did, put the tapered edge next to the previous plank, so the non-tapered edge was at the bottom. Oh well, I thought I had something there. I will probably dry fit a couple of planks both ways and see if there is any difference. Diadeczek, The reason I put the math up there is that from all the planking docs read/videos seen over the past 3 weeks, there was nothing that concisely, put everything together about how to determine how much to taper and where to do it. There was always something like "divide by 1/8 inc.....", not divide by the width of the plank. Or use the planking fan template to line up the tick marks. There has to be some math about that, so what is it? Also, after reading vossie's build log again, I learned that cutting a rabbet, if you don't already have one, is kinda important for each planking so there is a tight place for the planks to land. I never saw that in any of Chuck's tutorials or any of the videos from Amati. And I'm with you, I don't have enough good practice; this is my first build. And I scoured all the documentation I could find on planking (MSW's docs, Modeller Central's docs, YouTube vids) way before I attempted my first first planking. I couldn't find enough of the math. So I went with what was the easiest to follow, the Amati video build logs on Amati's Facebook page, https://www.facebook.com/search/videos/?q=Amati Modellismo lady nelson . I'm rambling, so I'll stop here. Thanks for helping...John
-
I think I see what the main problem I had, other than letting the planks go where they wanted to go. When I installed each plank, I put the tapered edge to the top and the non-tapered, straight edge at the bottom. From all the drawings I've looked at in the past three days, it appears that the non-taped edge went to the top. So did I have that wrong? And that's why I got what I got? I never saw anything written about that issue. I specifically checked on the videos from the Amati build logs to confirm that and I could have sworn I saw the non-tapered edge at the bottom. Maybe I missed that. Please tell me that's the main reason for what happened to me. Please...John
-
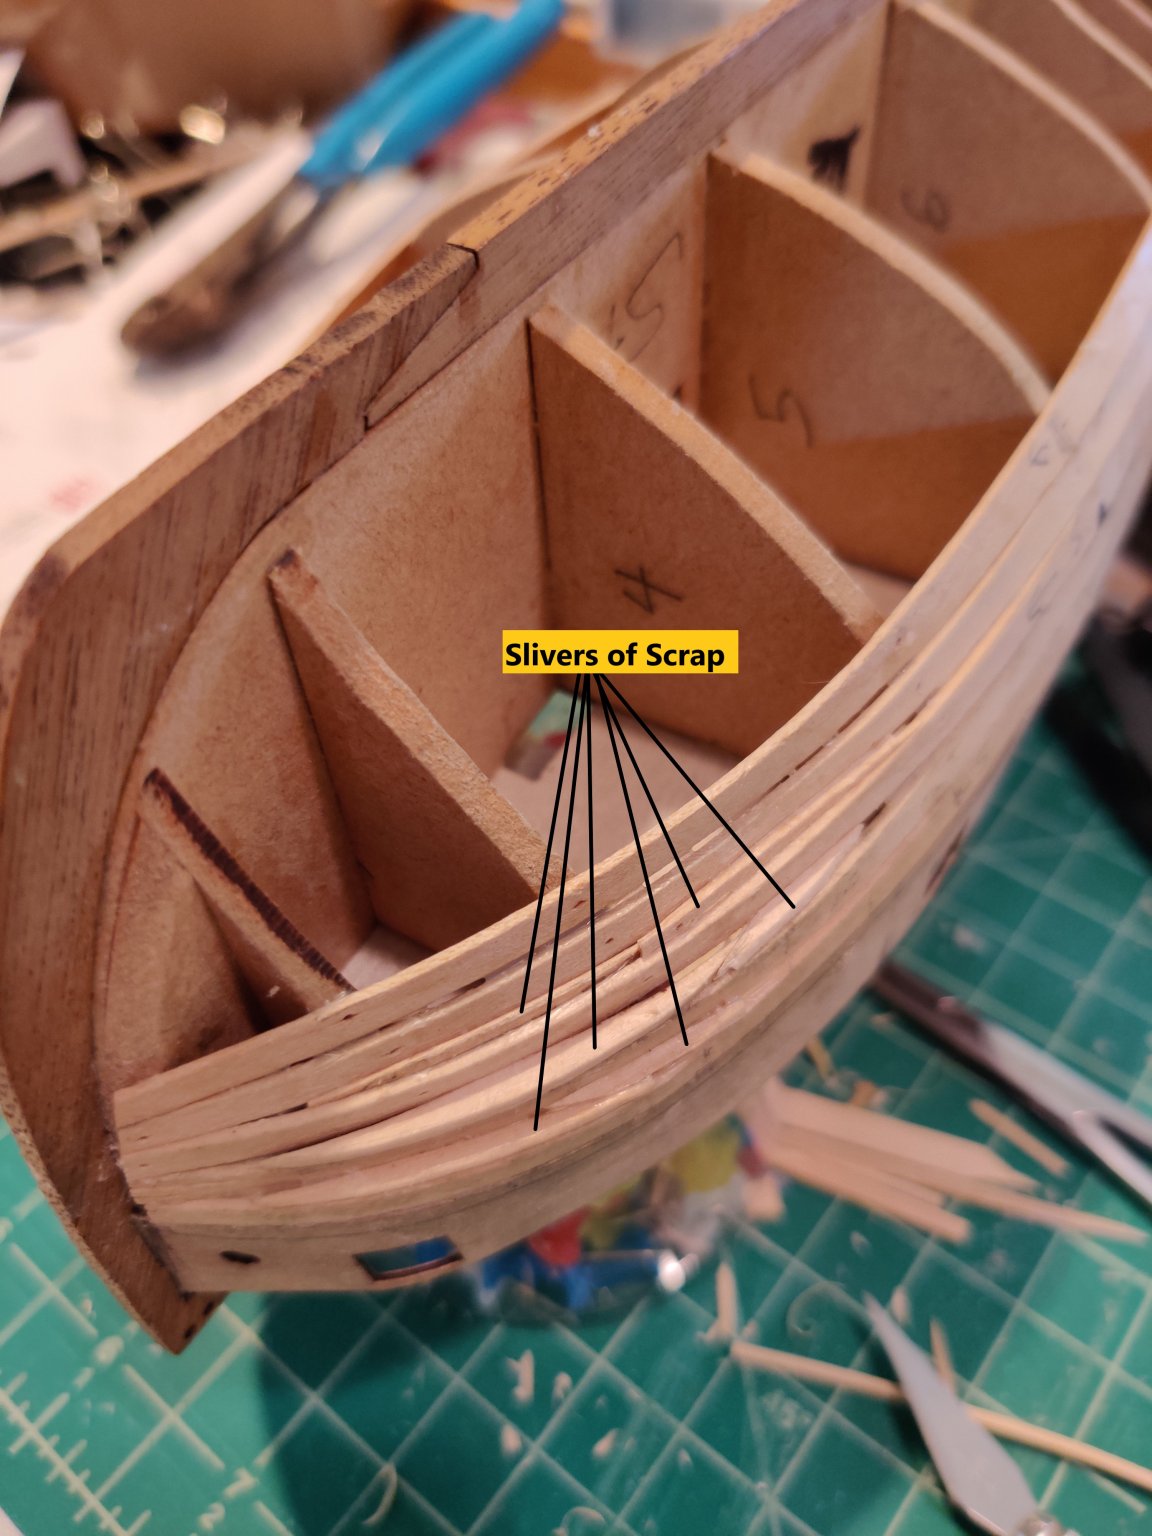
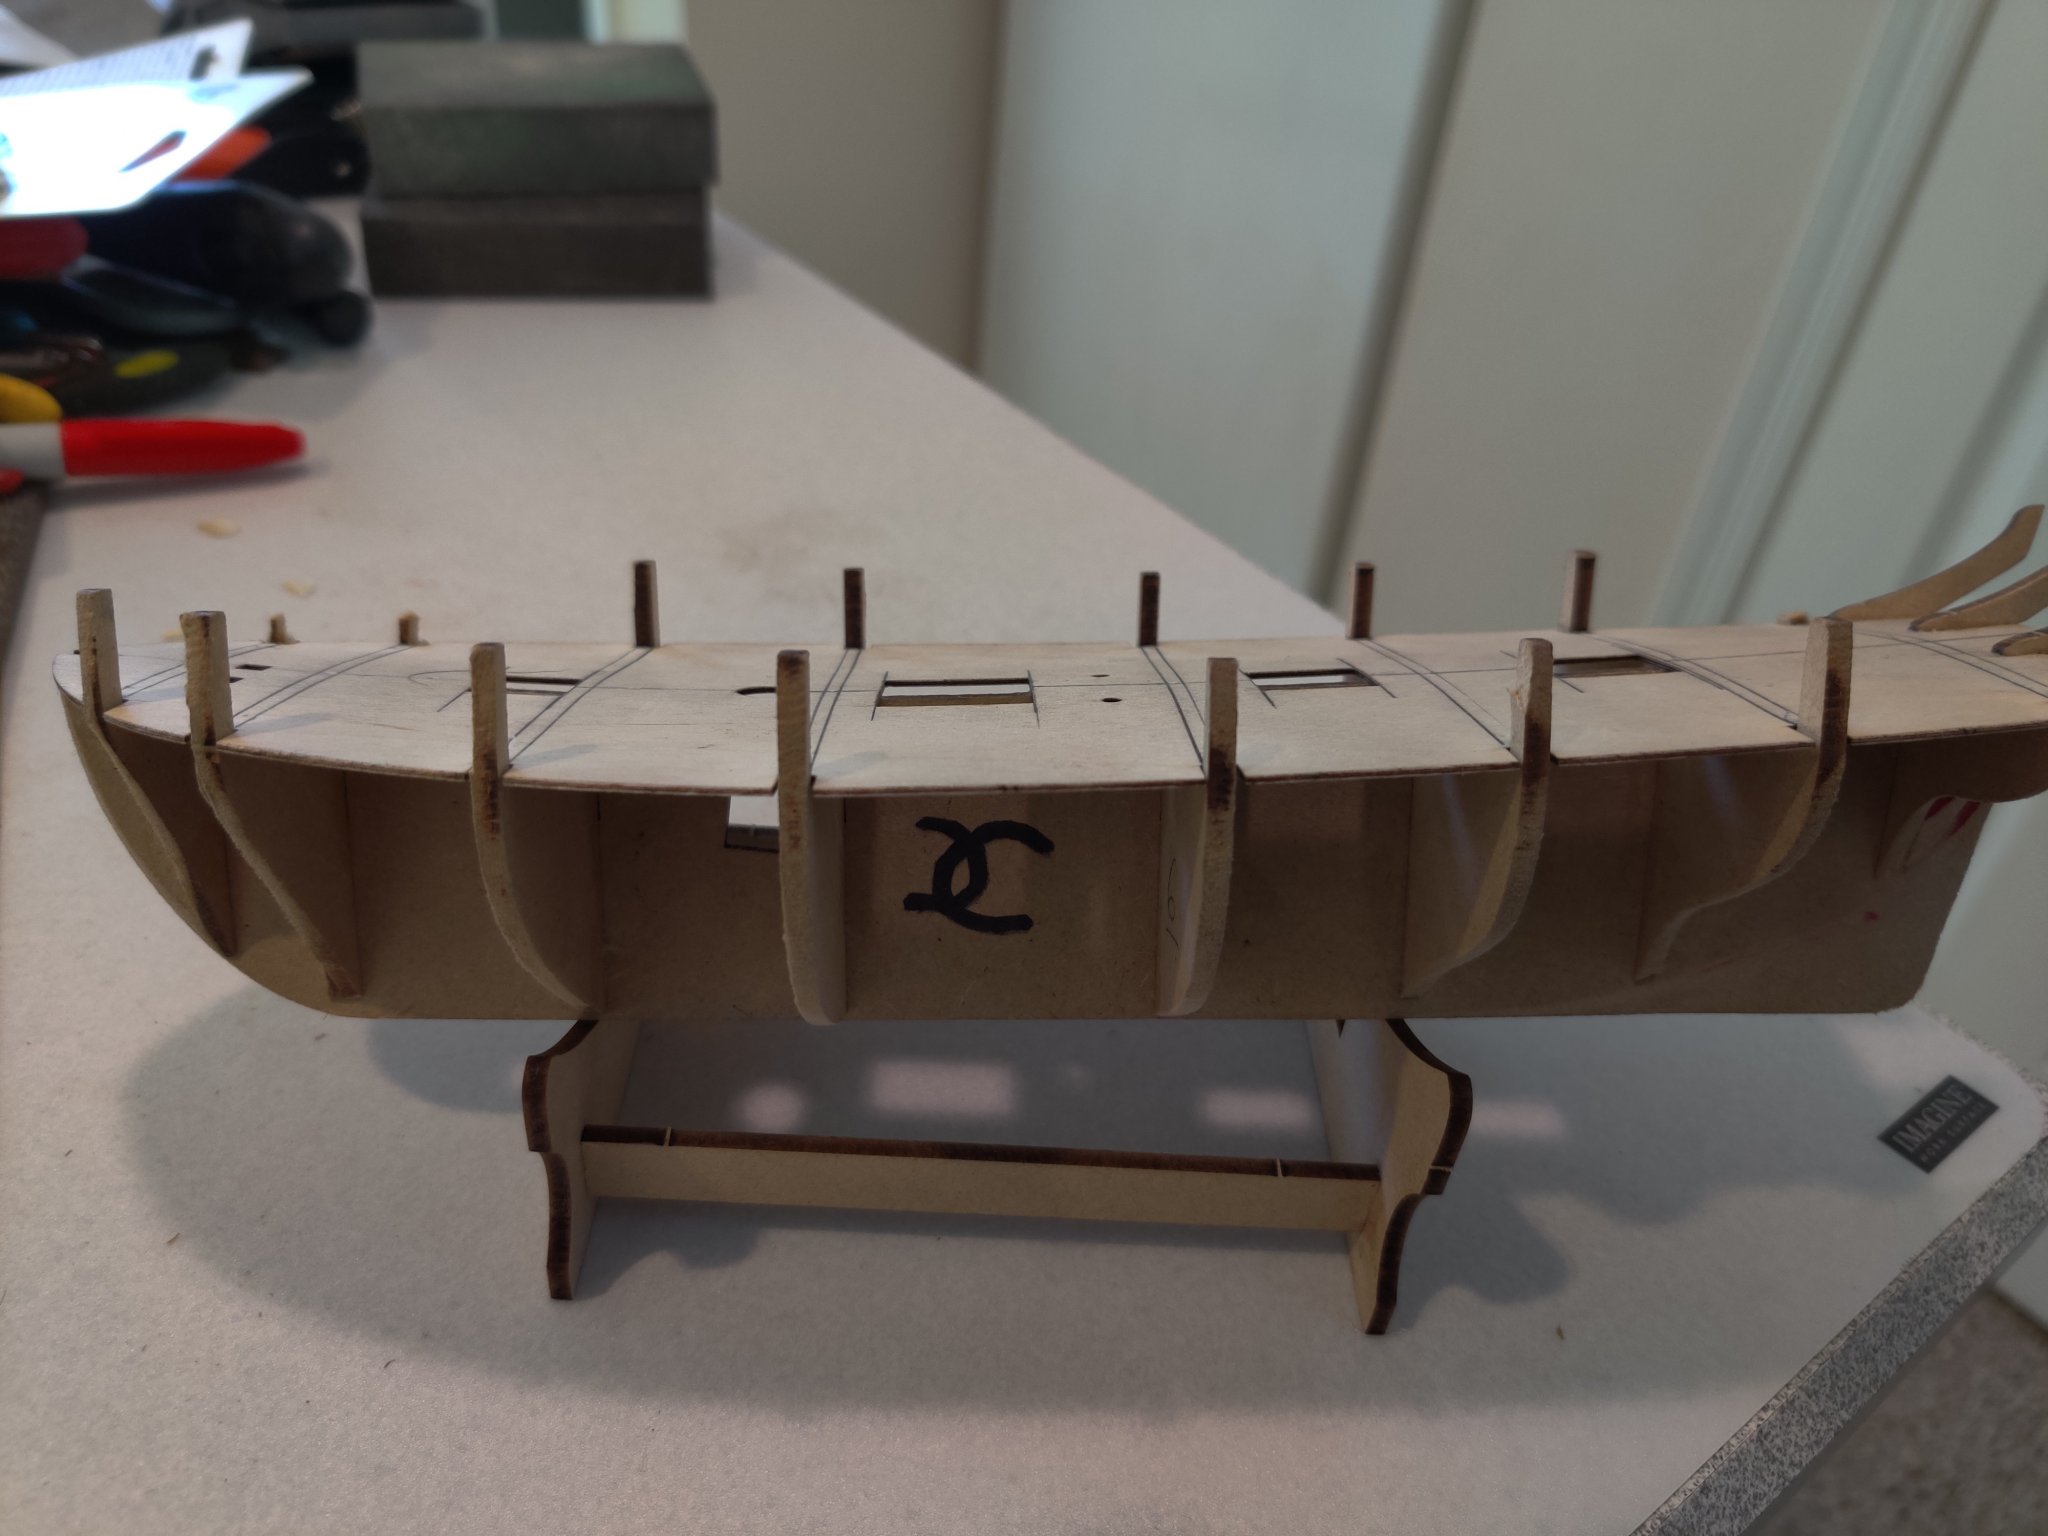
Being a math major, I needed to layout the math behind what you all have advised, what I've read in the planking tutorials and the Lady Nelson build log by vossiewulf, which I read for the 3rd time last night, this time in full detail. So here goes: Comments appreciated...John
-
Gents, Thanks for your advice. My mentor on the build was Leon Griffiths from The Modellers Shipyard with his videos up on the Amati Facebook site. I followed his planking technique, which is different that what's up on the MSW tutorials. I've been reading these again and going through, for the 2nd time, the LN build log by vossiewulf, which IMO is an exceptional tutorial (curious why he didn't finish). I am going to start over, with probably the exception being the first plank, which was pretty tough to get in. Fortunately, I do have enough spare planks. Thanks...John
-
Jan, I will try that technique going forward. How do you think I should resolve my current situation with the first 5 planks in position? Pull them off and start over? Keep filling in the gaps? This is my first build so I don't know the ramifications of filling in the gaps. Thanks for your advice...John
-
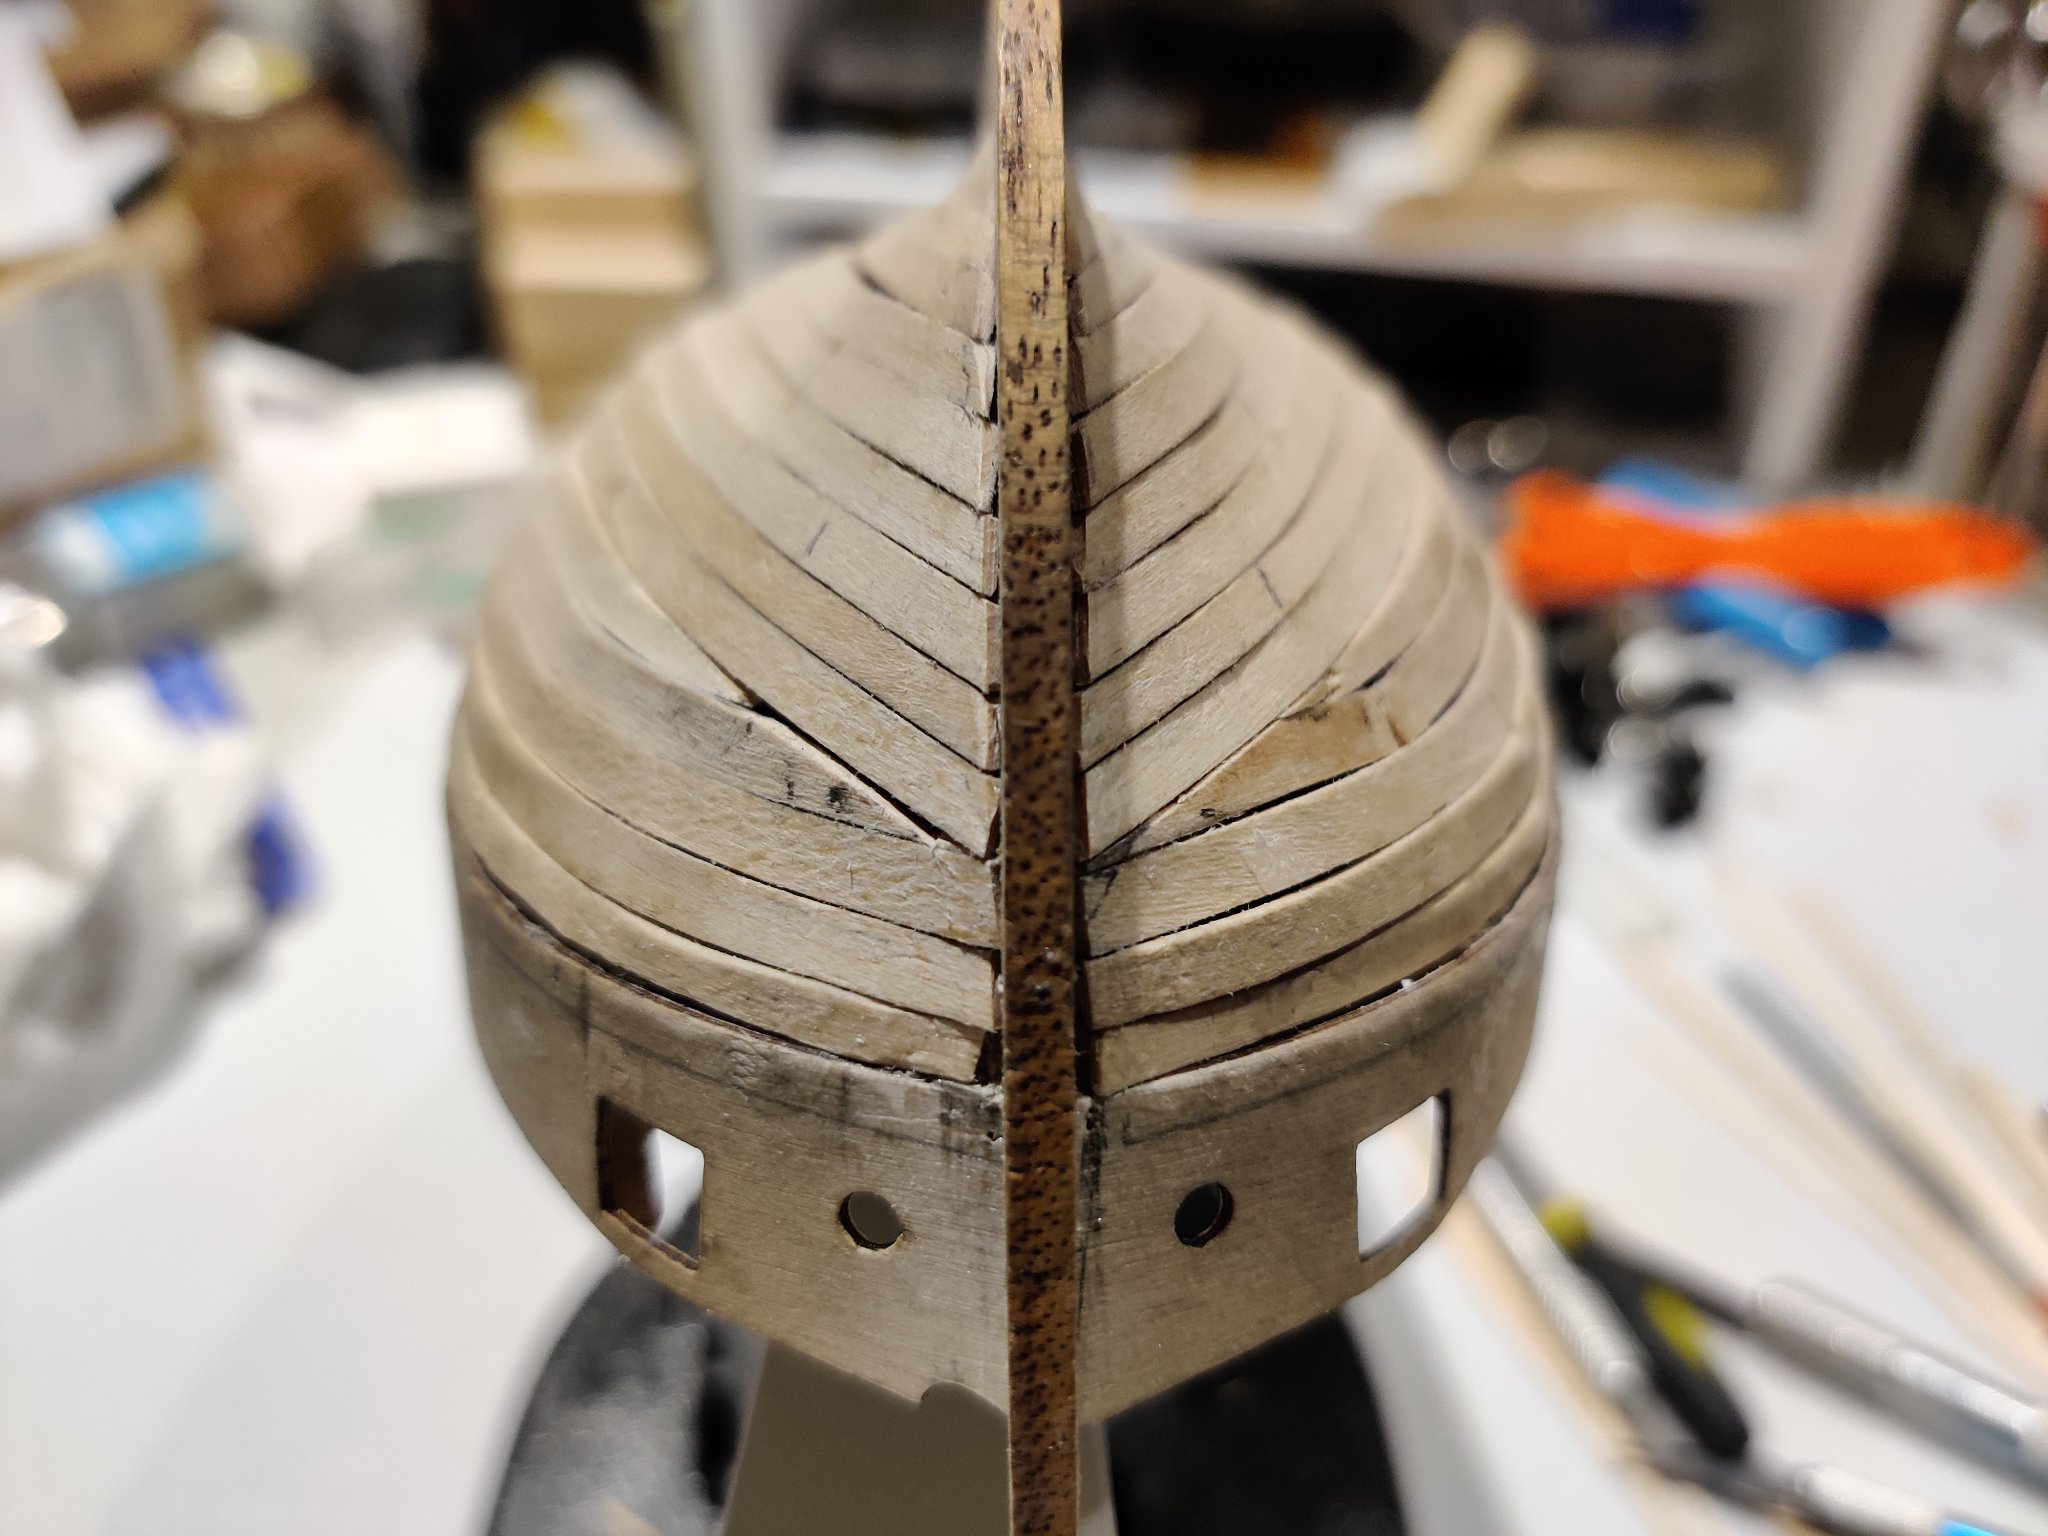
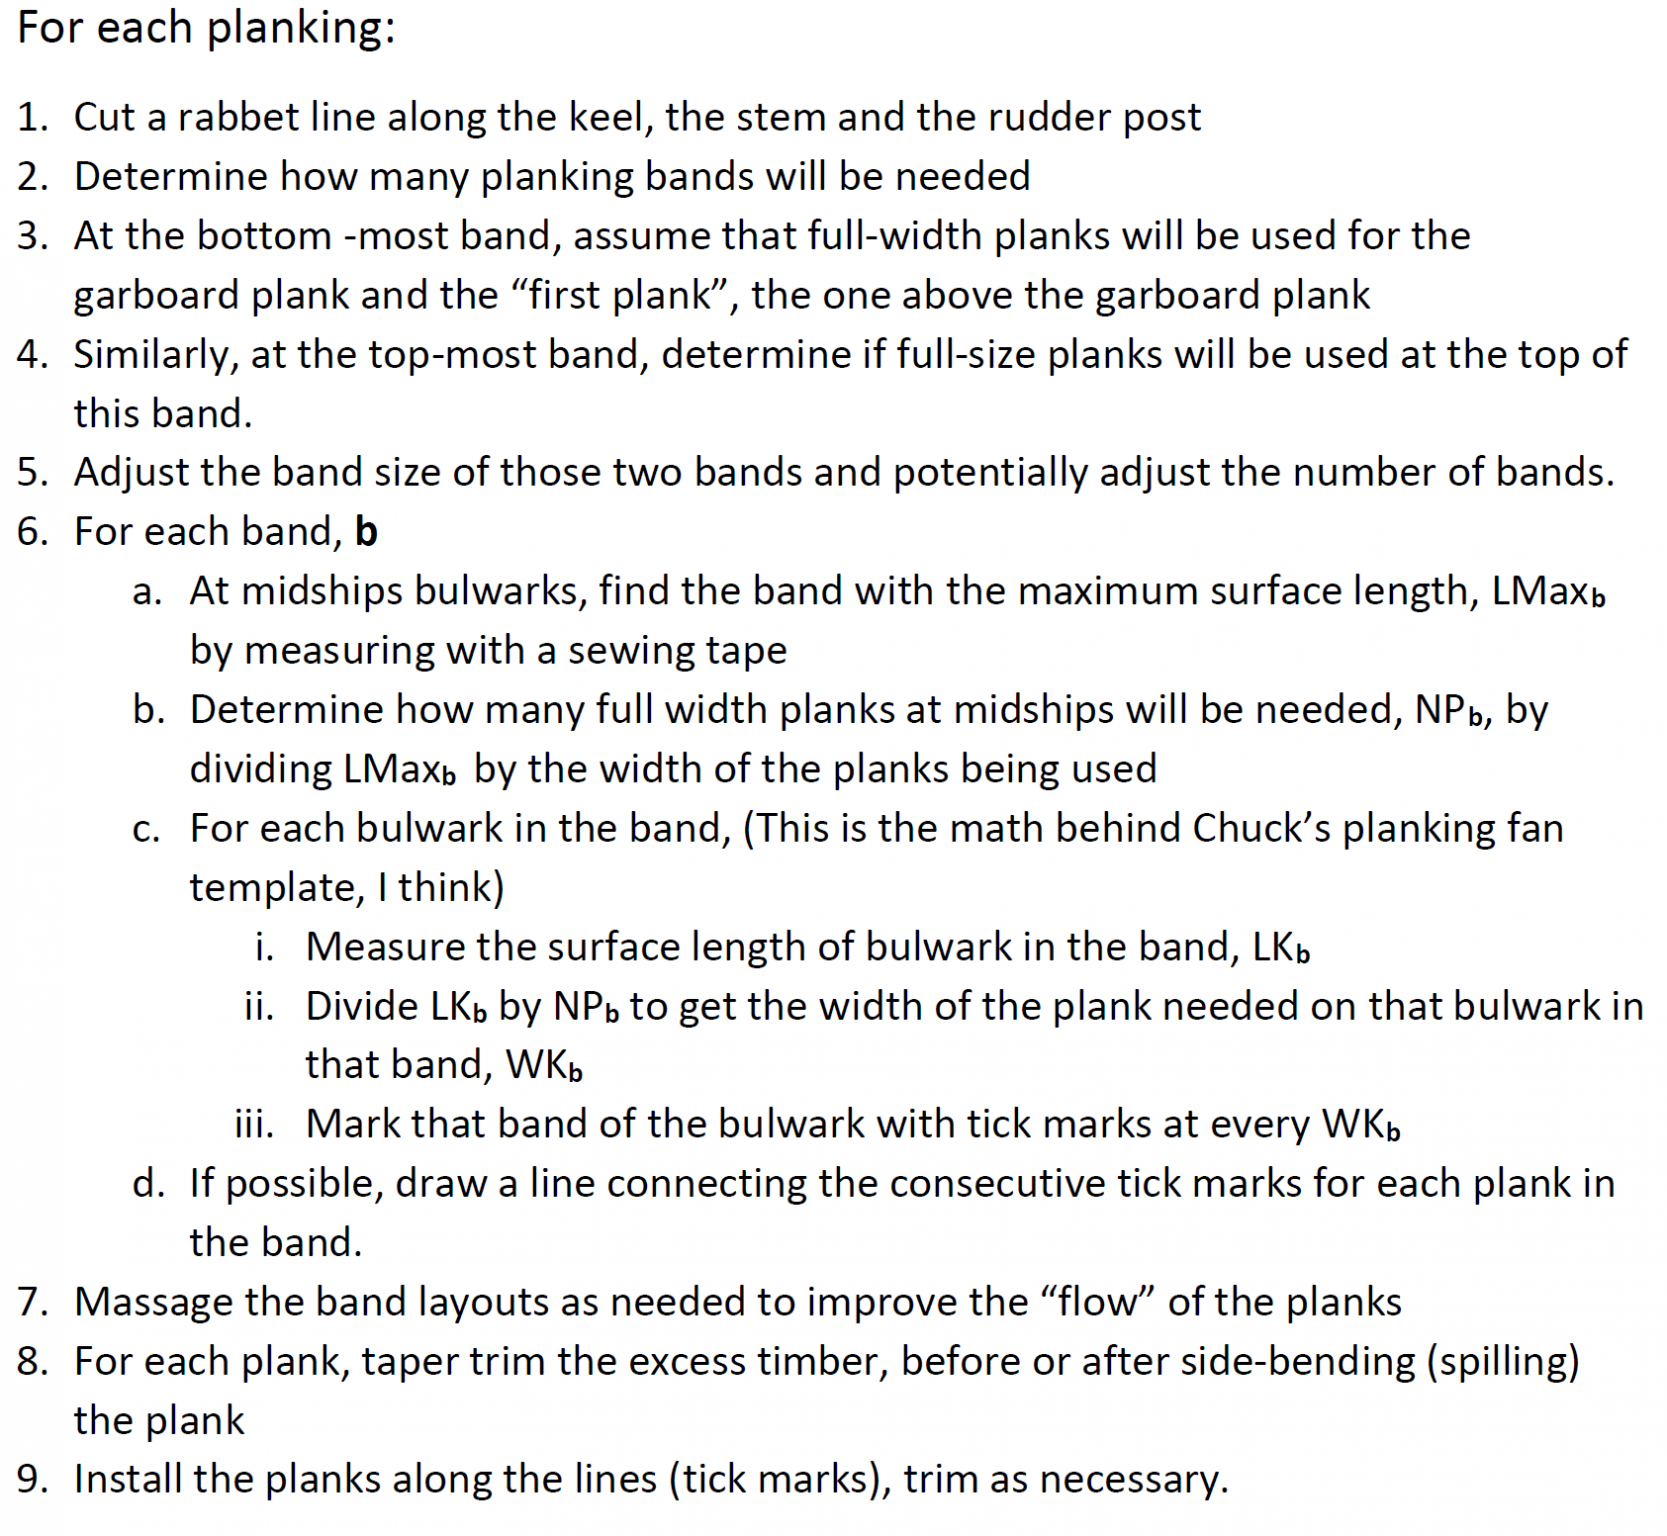
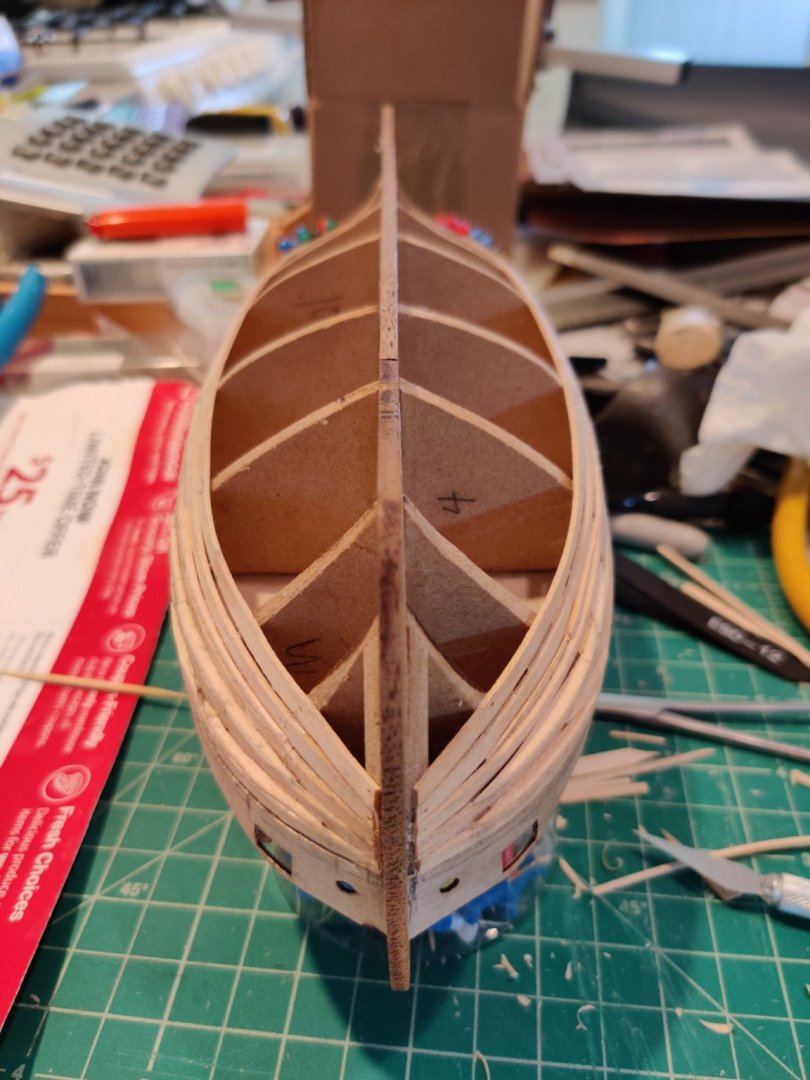
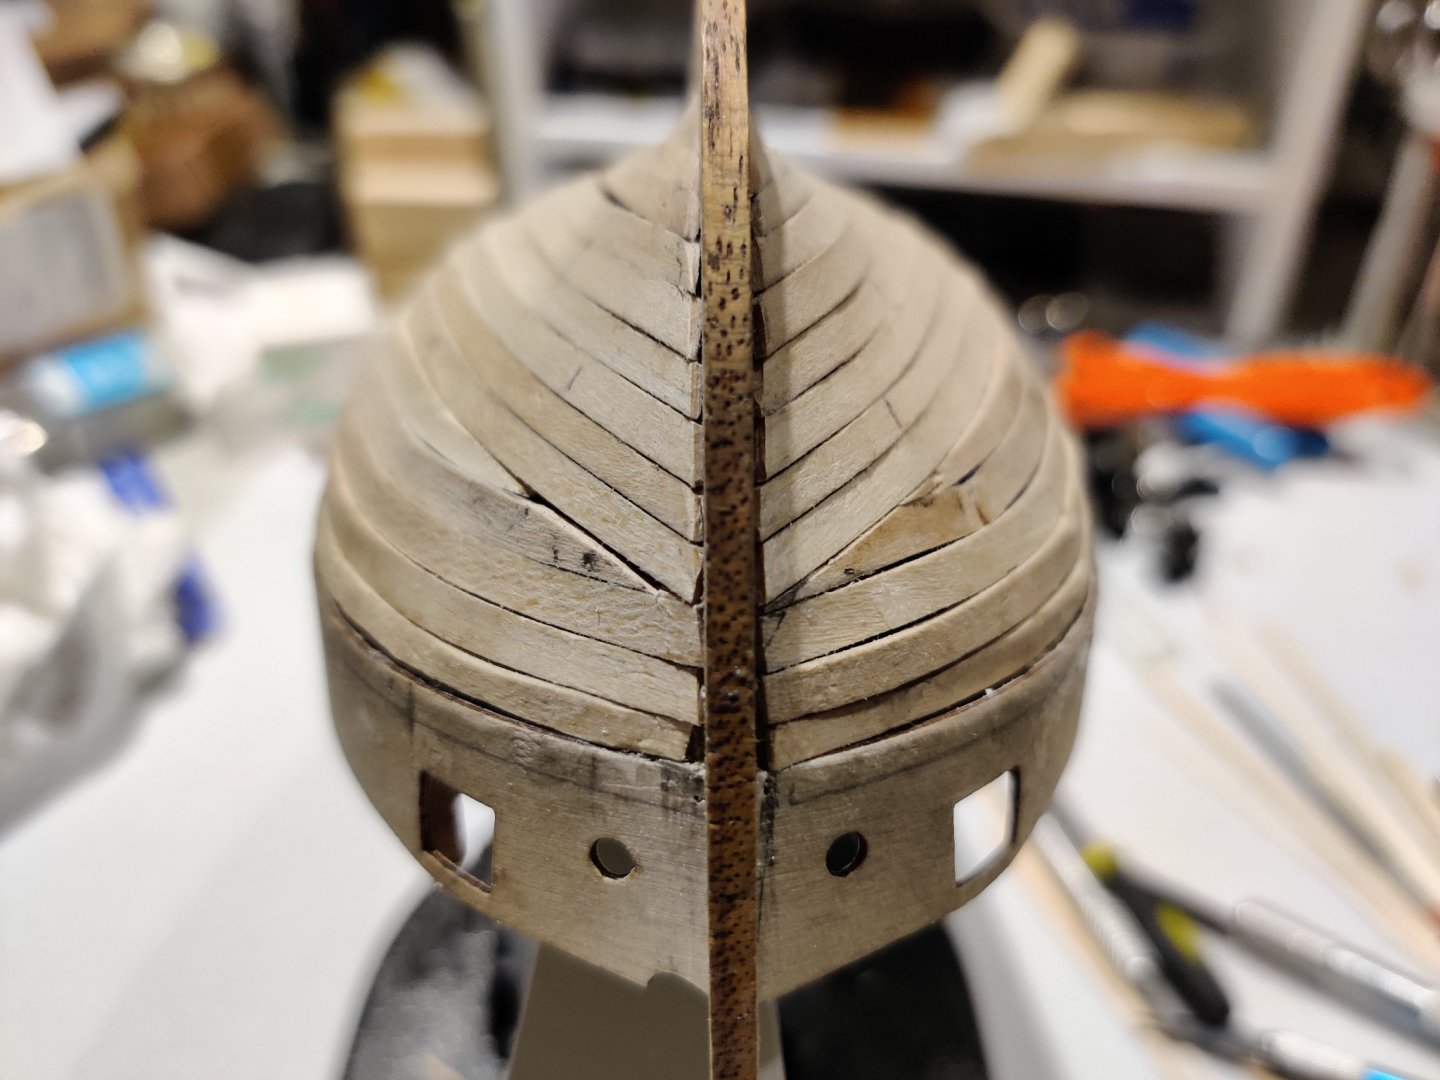
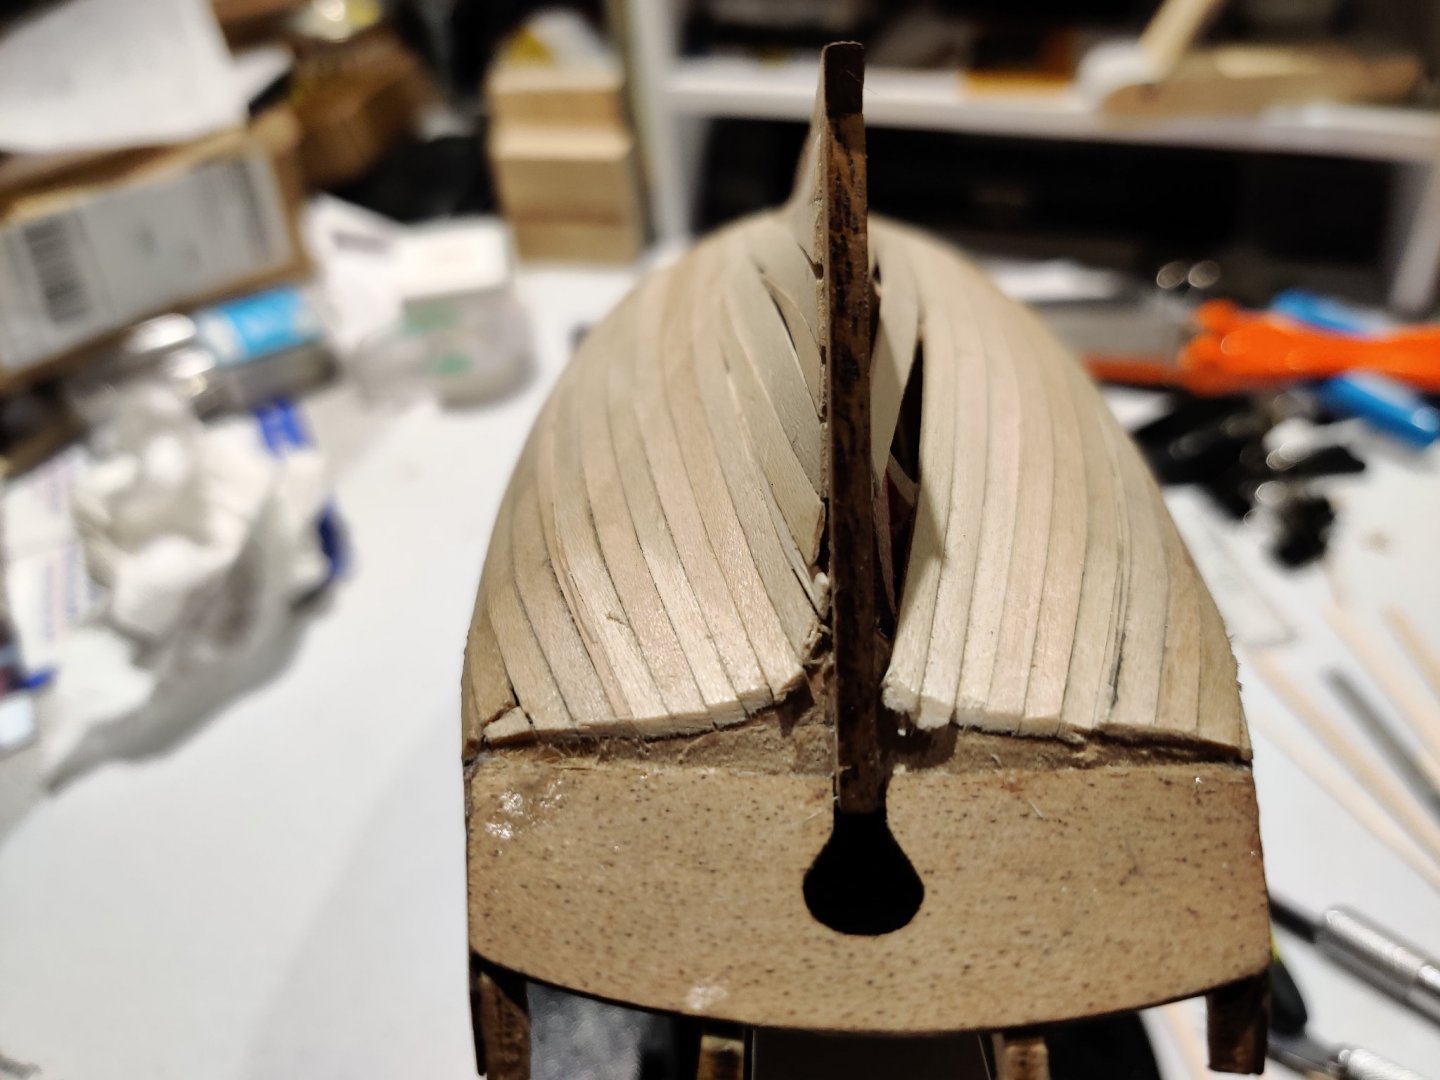
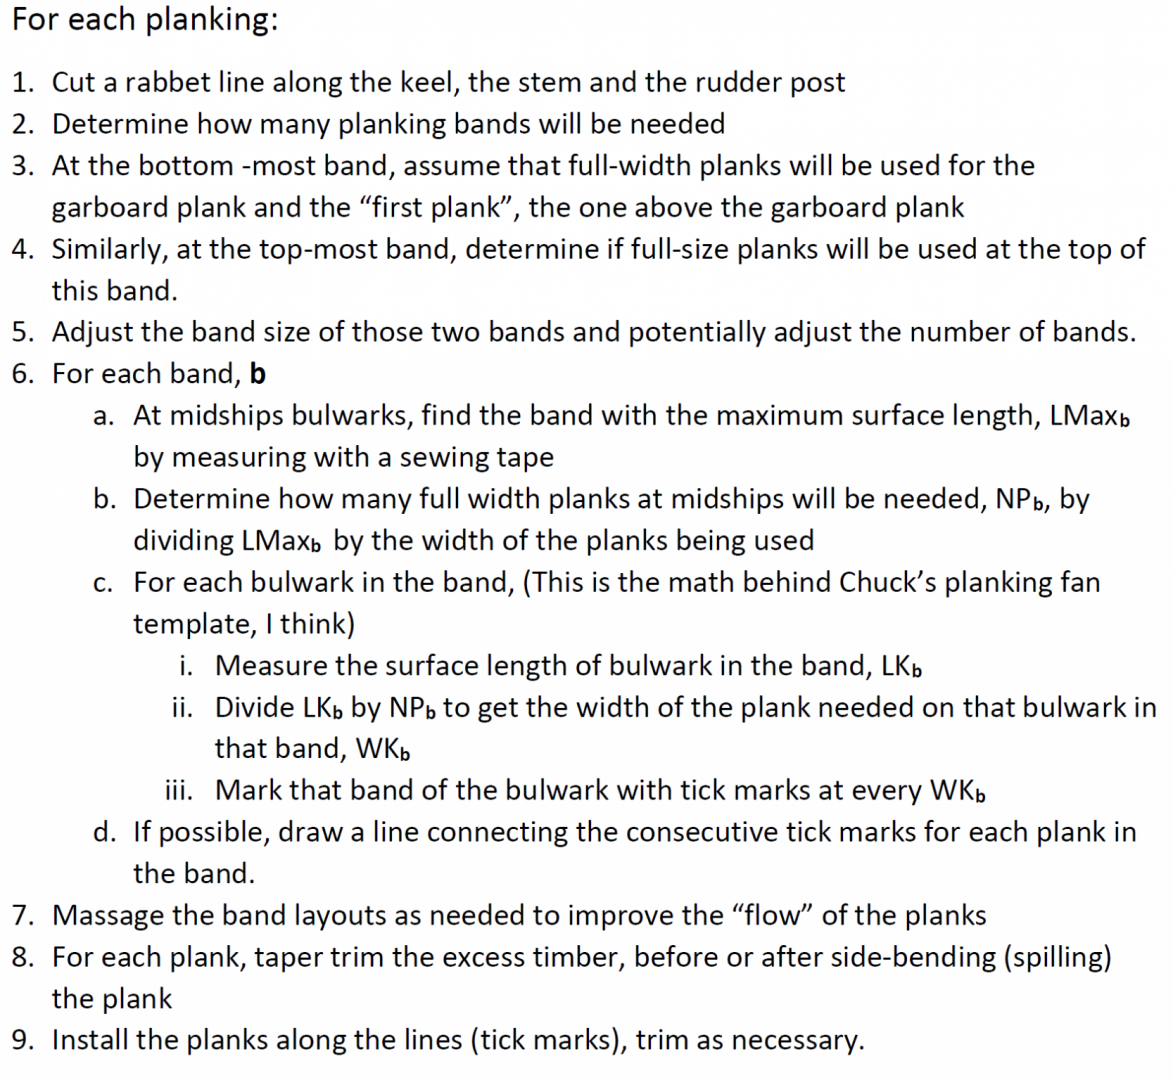
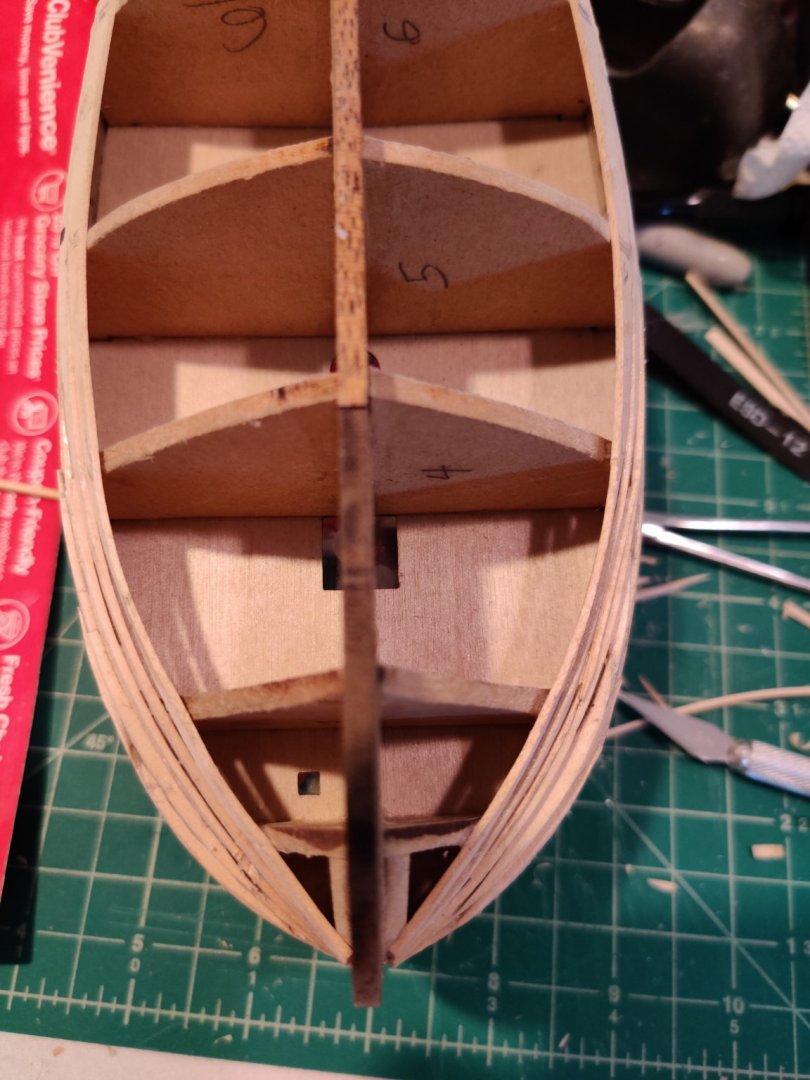
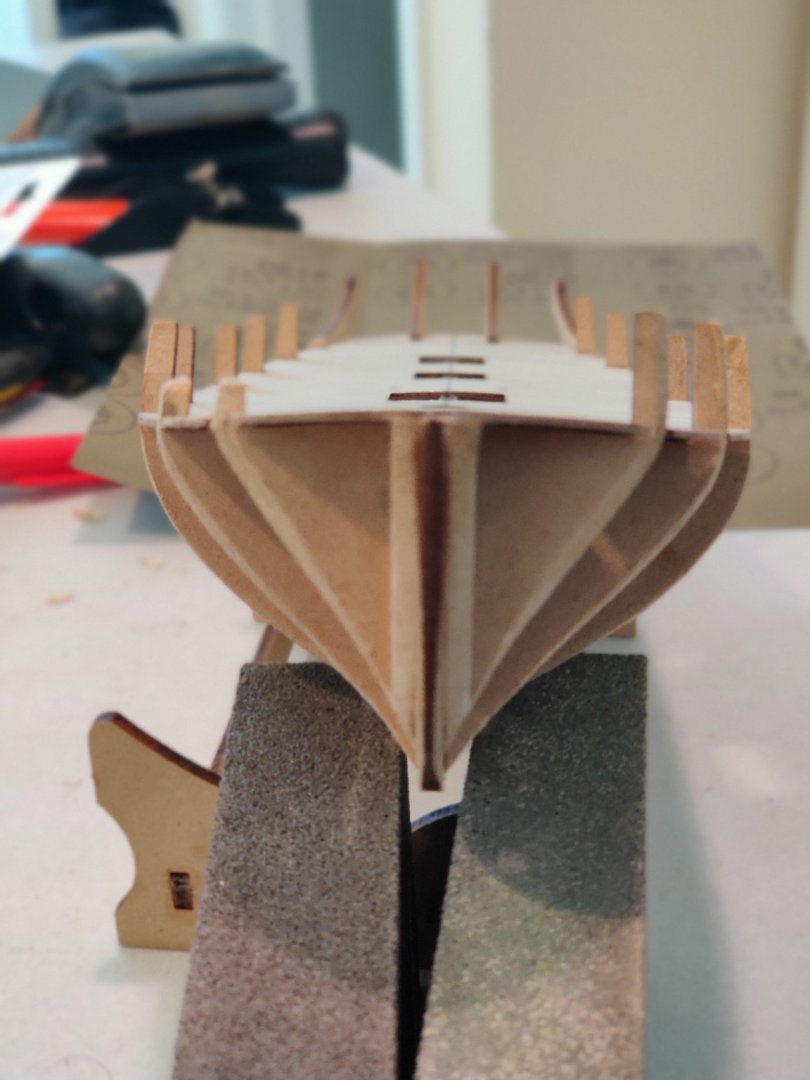
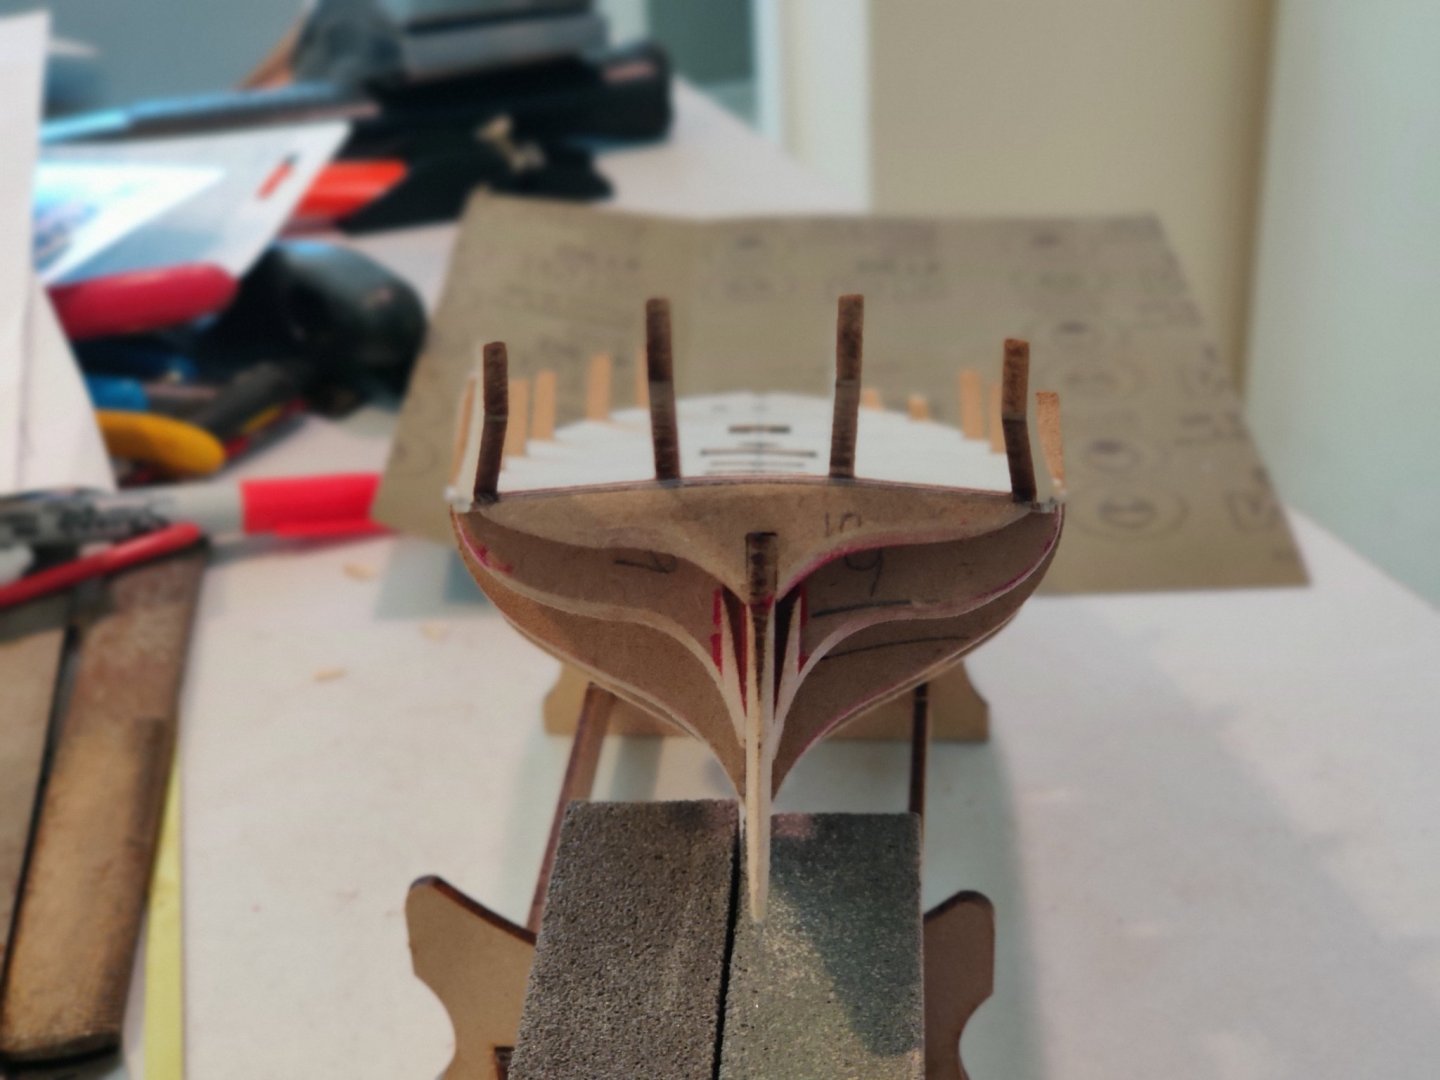
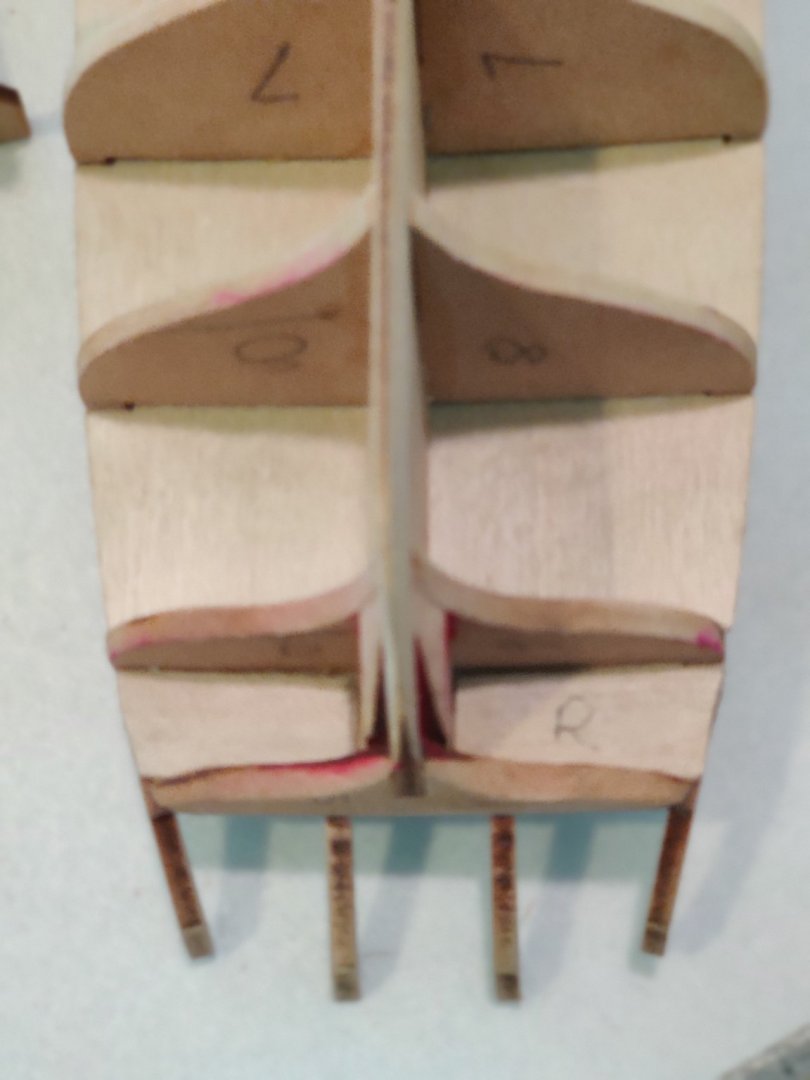
It appears that during the beveling of the bulkheads for the first planking of the Lady Nelson, I've removed too much material. I think that, because I have significant gaps between consecutive planks. This issue is only in the bow, as the planks at midships and the stern lay in tight. It's not as prominent in the pictures because I already plugged some of the big gaps with slivers of scraps. See below. Top View: Front view: Side View: It's somewhat hard to see but the planks are laying flat on the bulkheads. I figured I could resolve the gap issue with filler after the first planking was complete and sand it down to bevel it out. But I thought that I should at least plug the gaps so the filler didn't see seep through. Then I thought laying in a skinny, second plank in those areas would build that section up. I could see some issues with that solution. Finally, I thought, wait a minute, what am I crazy? Why am I not engaging the wealth of experience and knowledge at MSW? I'm from the tech business and have learned that when I have a problem that I can't solve in 30 minutes by myself, I call the help line. So, I'm calling the MSW help line. Help!!! John


-
Kevin, I went through all the logs for that build and didn't find anything specific. I searched this forum and found nothing. I googled this topic's text and found one with CA. The MS builder in the Amati video logs recommended epoxy. I got nutin'. John
-
Newbe here. I'm building the Amati Lady Nelson and I'm ready to attach the 3 x pieces that make up the real keel to the "false keel" that the bulwark frames are attached to. My question is what type of glue should I use to attach them? I've seen articles/discussions that include epoxy, CA and PVA. Amati Instructions don't specify. Also, I have not seen any discussion on the application of epoxy or PVA. If it's CA, that's fairly obvious. Also, if there is a gap between the rudder post part of the real keel and the stern edge of the false keel as a result of beveling the deadwood at the stern, do I need to fill that gap before gluing the rudder post? I would think so. See the photo., the gap Help greatly appreciated...John

-
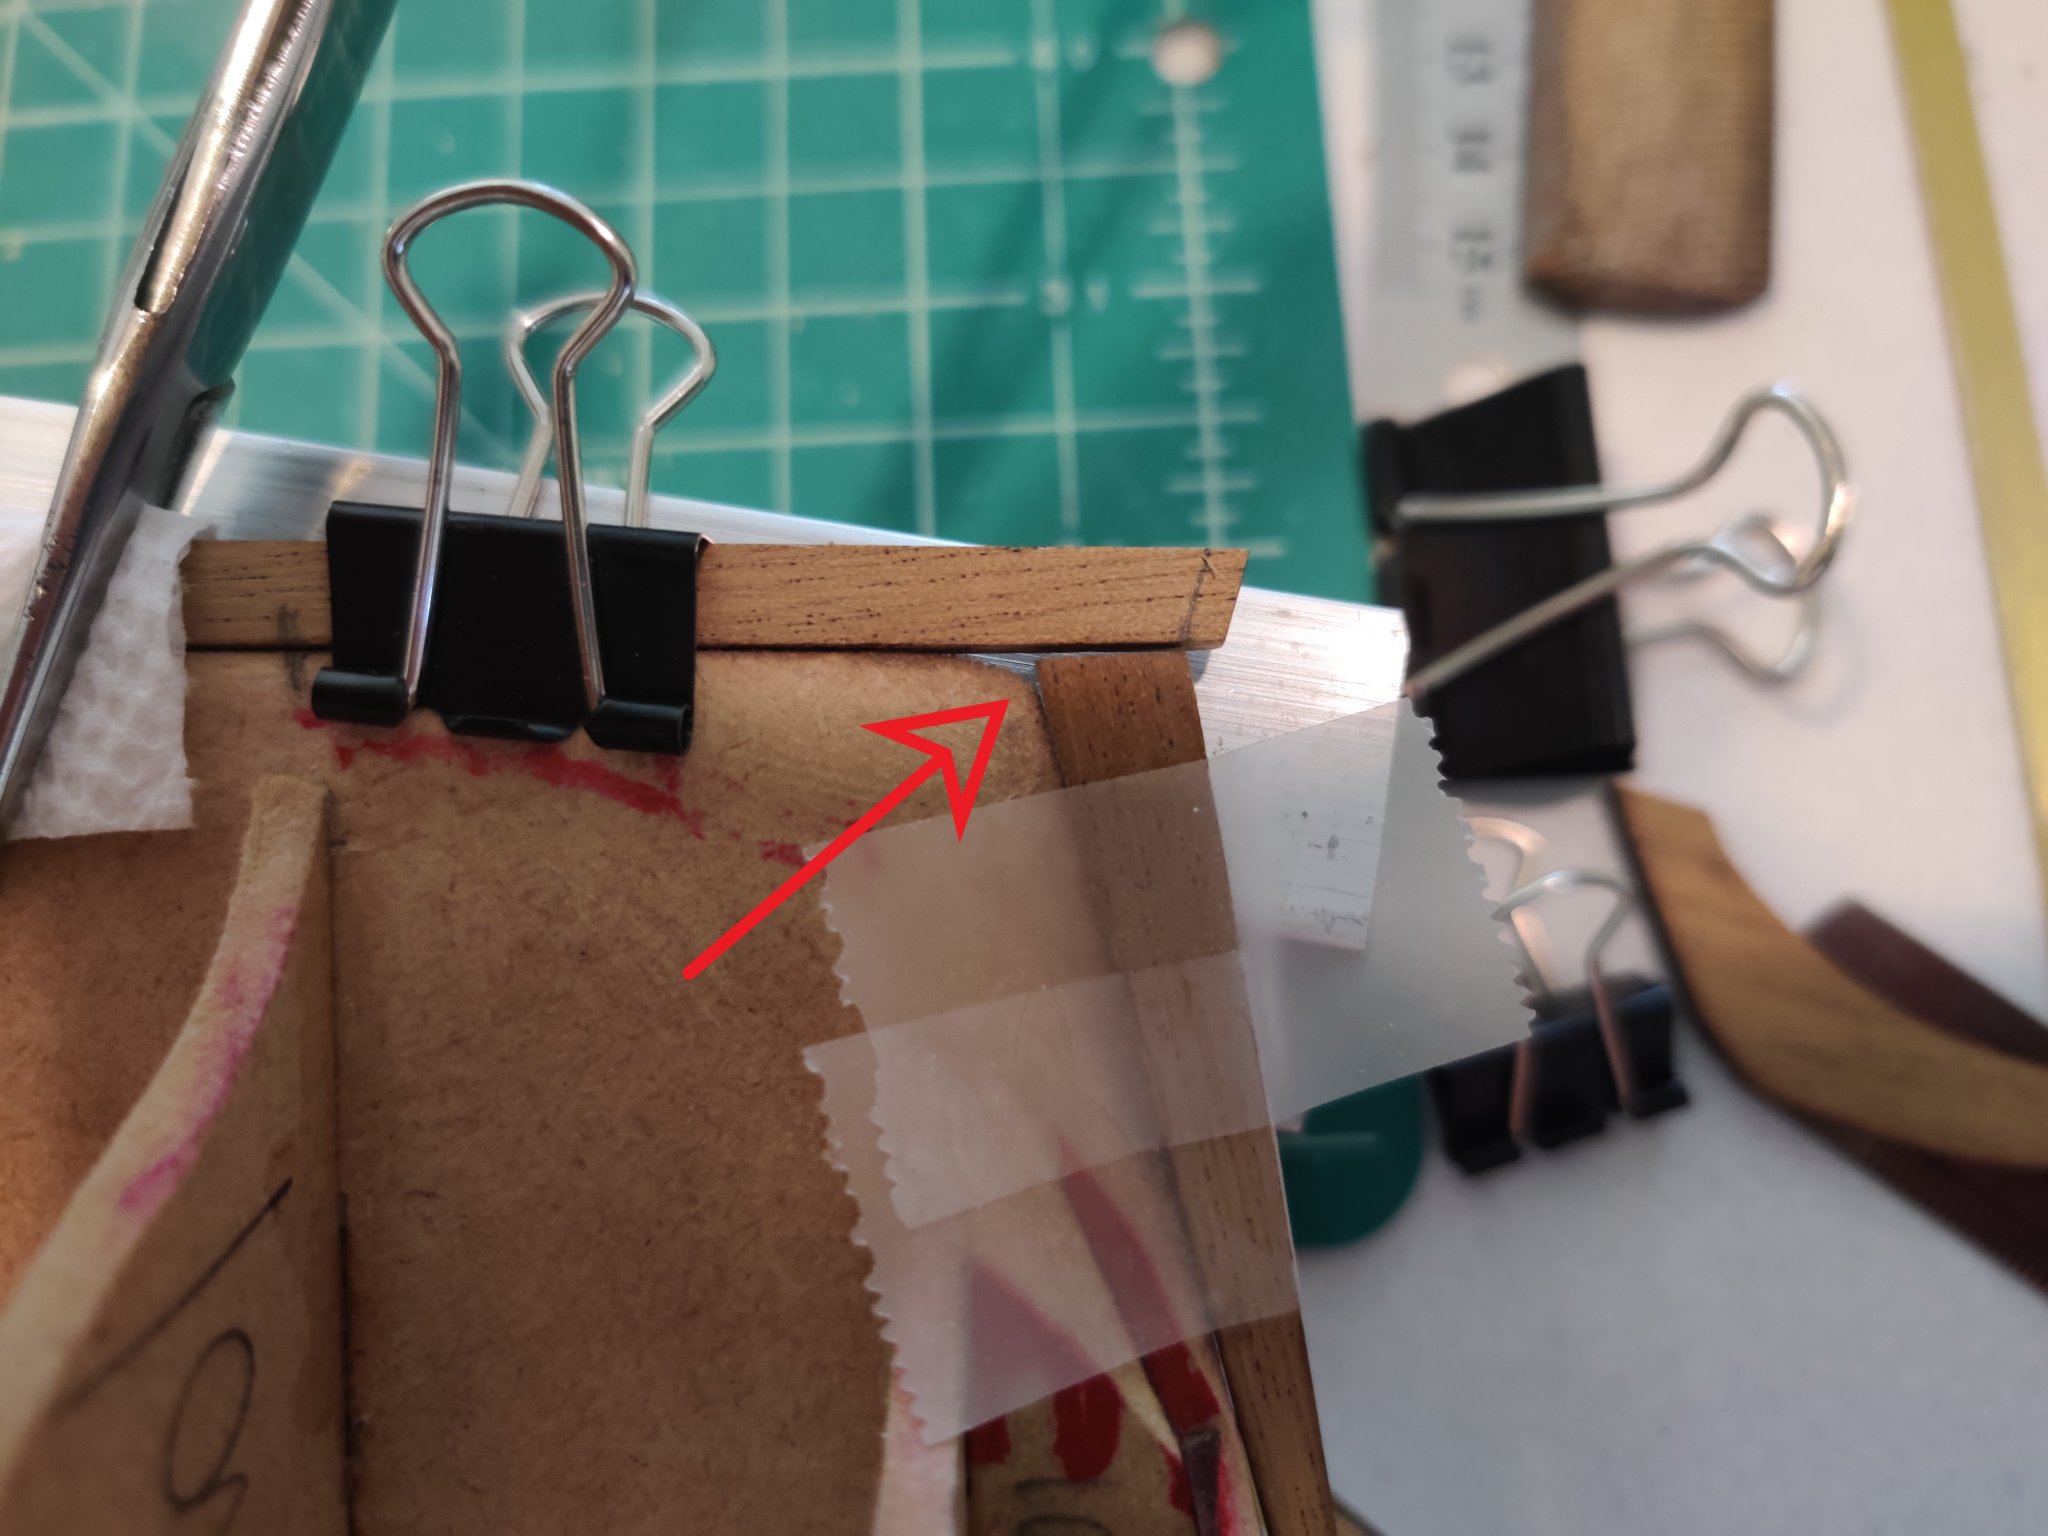
So the journey begins. I'd been planning on getting into building model ships and what better excuse than the quarantine to start? After some online research, I picked the Amati Lady Nelson. Then I needed tools. I basically had nothing since I had downsized into a small cottage from a 4-bedroom house and had to sell/giveaway most every tool I had accumulated over 30 years. Boy, it wasn't cheap to restock and I included a starter airbrushing kit from Master Airbrush and a spray booth. Was not willing to brush paint all what needed to be painted. Also, it was a scramble to get tools; most of the modeling sites had a lot of out-of-stock for items. Guess a lot of folks are doing the same as me. Then it was looking for help. This site was fairly easy to find and has a lot of good stuff, especially the Build Logs. I also looked for build video logs. Those on Modelers Central were way too expensive. But I did find that Amati released free video build logs of the their Lady Nelson by Models Shipyard. There are 20 of them on Facebook, starting here: https://www.facebook.com/search/top/?q=Amati Modellismo lady nelson&epa=SEARCH_BOX . The builder takes some different paths from the Amati instructions, such as beveling the bulkheads AFTER adding them to the false keel. After comparing his approach to what I found in the build logs and other tutorials here, I decided to follow his process, supplemented with tips from the MSW logs. The most comprehensive MSW log I found for this ship was by vossiewulf. Wow, he is one master builder! Anybody know why he didn't finish it? Too bad; I would have loved to see the final product. Anyway, as to my build. Below is where I am. One issue I ran into was while beveling the bulkheads: the false deck popped up at the edges, not by much, but it did flatten the deck somewhat. When I first glued the deck, it had a bigger curve to it, port to starboard. I didn't see a problem with that. After it popped up, I decided to leave it. It still had the curve, just not as pronounced. I looked at the the MS logs and he had the same gaps at the edges that I had, so I don't seem too worried. Here's the bow: And the stern: The MS builder used a marker to highlight the filler blocks and the deadwood before beveling to show what had to be taken off. I also had to take some of the deck off here since it overhung the last bulkhead. I guessed that was needed based from what I saw from the MS logs. The only issue I had at this point was supporting the gluing of the outside stern counter frames into their slots. With the bulkhead beveling, I had removed most of what those frames would stick to. So I glued 2 x pieces of the 1mm plywood sheet underneath the deck between the last two bulkheads. See below. Those frames are not going to move. So I'm off to attach the 3 x keel pieces and then move onto the first planking. Some observations: The MS builder avoided using balsa bulkhead filler blocks between the bow and stern bulwarks. When I saw that technique in the MSW logs, I did think that was a bit overkill for this small ship. I figured two sets of hull planking would eliminate having to deal with the thick filler blocks. Surprised vossiewulf went there. Also, he and others had the tools to easily make those blocks; I don't. Comments anybody? The MS builder's plan for tapering the planks involves calculating how much to take off on either end based on mathematical formulae which I found easy to comprehend. When I looked at planking guidelines here, it appeared to involve drawing lines on the bulwark edges or lines, bow to stern, on a fully filler-block loaded hulls and then taking measurements. That seemed a little tedious so I'm planning on following the MS builder's plan. Also, he planes off what needs to go . Some of the MSW log techniques appear to draw a line on the planks and then utilize a craft knife to remove the excess. I'm going with planing the edge off a plank held in a vise. Final painting scheme is still fluid. My current thinking is (comments welcome): Hull: White paint from the bottom to the waterline. (Maybe tinged with a little green or maybe grey.) Walnut paint from the waterline to the main whale (maybe walnut stain) Black paint main wale Walnut paint from top of main wale to the top of the hull, including the upper wale (Again, maybe walnut stain) Black paint for capping rail. (Any reason I shouldn't paint the rails before attaching them? Obliviously need to deal with the pin holes, but not a big deal compared to painting the rails in place.) Deck: Carriage red for the bulwark side planks. Same for hatches and the frames walnut (flipped from what I see on the MSW logs, but the Italian version of MSW showed that and I thought it had a better look.) Red for the gun carriage, flat black for the guns. As for the rigging of these, I see vossiewulf tried but then abandoned to rig with them with 2 x side tackles and 2 x train tackles and went with just 1 x centered train tackle because there was no room on the deck for all that rigging. I will follow his lead on that. Natural for the deck, no paint. The MS builder used, as a deck scraper, a piece of thick glass and that gave it a nice look. I'm trying to find a piece of glass; may break a window! Off I go; wish me luck...John

- 26 replies
-
- 11
-
-
- First Build
- lady nelson
- (and 2 more)
-
All, I have not heard back from the manufacturer regarding the chemical composition of their product. But isn't likely that all painting of our models, or at least airbrush painting them, will be completed before rigging, and therefore before using this thread conditioner, whatever it contains, starts? I'm taking Kurt's endorsement of Thread Magic ("I have used the Thread Magic product for several years") and running with it. 😀 Thanks...jce