
HOLIDAY DONATION DRIVE - SUPPORT MSW - DO YOUR PART TO KEEP THIS GREAT FORUM GOING! (Only 53 donations so far out of 49,000 members - C'mon guys!)
×


drjeckl
-
Posts
196 -
Joined
-
Last visited
Content Type
Profiles
Forums
Gallery
Events
Everything posted by drjeckl
-
 Great job Derek; she's a beauty! And a great build log. And yes, you showed us, in detail, in text (a lot) and photos (really exquisite at the Finishing Line), how you did it. It will be my go-to when I start my Speedy. Thank you for sharing.
- 725 replies
-
- 3
-

-

-
- vanguard models
- speedy
- (and 1 more)
-
Bill, Blackening is a replacement to painting; do one or the other. If you go for blackening, you do have to prepare the items prior to the blackening step. Based on my readings of the blackening processes, probably the best prep step is pickling which can be viewed as sterilizing the items; there are others. Then you blacken the items, which basically dips them in the blackening agent, rinse and repeat until satisfied. The two popular agents are Liver of Sulfur and Birchwood Casey's Brass Black. I prefer blackening to painting, especially if you have a lot of small items; eyebolts, rings, even cannons. Can't even imagine painting eyebolts. I have used the Brass Black product; works great. Don't think I have seen blackening as a prep for painting. Either prep for blackening or prep for painting. But definitely check out the topics on MSW. That's what led me to blackening.
-
Not only did she turn out great, I think your build log is even better. You provided a lot of details that will help the next round of Alert builders as well as beginners in general, like me. Great job Glenn!!! Can't wait to see what you do with the Sphinx. Don't forget to change your signature. Alert is done.
- 160 replies
-
- 2
-
-
-
- Alert
- vanguard models
- (and 1 more)
-
That division could work. I made my bands after I installed the garboard plank and the one above (the "first plank"?). Those will likely be full sized, like the the bulwark planks. Your band planks will be tapered. Then once you have your bands, figure out how many planks in each band. I don't think you want a wide spread in that. An equal number of planks per band, or a one plank difference is probably best. Mike, I have not really seen any consideration of band size. I'm just basing this on some common sense. I did that on my LN, 8 and 7) and the it turned out ok. Maybe Glen has some better insight..
.thumb.jpg.e7ff307f9c9893a6184c8a1c3aedf972.jpg)
- 114 replies
-
- 1
-
-
- Lady Nelson
- amati
- (and 1 more)
-
Looks like you got the stem better than it was. My question is why did you let your dog chew on the bulkhead former (part 16), where the first first hatch is supposed to go? What's with that?😁 What, did you buy the ZHL LN knockoff? Just kidding.😛
-
Take a look at Vossie's LN build log in that section. He agonizes over various looks of where he does the division so that may help give you an idea. Me, I just tried to divide the gap into 2 equal sizes or at least one band having only one more plank than the other. Do the tic strips after you create the bands.
- 114 replies
-
- 1
-
-
- Lady Nelson
- amati
- (and 1 more)
-
Paul, great looking Cheerful. Been following you through your quick build of the LN (my first build), and I wanted to see what you would do with a model a couple of levels above the LN. My sense is that you have been modeling before, maybe in a different form, and you just wanted to try out wooden ships. And I've picked up some techniques from your log, including the masking of the gun ports with packing foam. Nice idea. Questions: what is the thickness of that foam? 1/2 inch or higher? And do you have a source, or is just what you have saved from incoming packages? Can't wait to see how your Cheerful turns out!
- 274 replies
-
- 1
-
-
- Cheerful
- Syren Ship Model Company
- (and 1 more)
-
Derek, what a great tutorial on building and then cabling a buoy. Doesn't look that difficult, now that I have a roadmap.😁 I also have the Proxxon lathe so I'll be following along from step one when I get to my Speedy. Great job!
- 725 replies
-
- 1
-
-
- vanguard models
- speedy
- (and 1 more)
-
For some reason this didn't get posted this morning and it's on the companionway. Here's one on the companion way installations which gives some different reasons for doing it either way. Tony is a great builder. The Sherbourne is in the same class as the LN. So there was a lot of cross-pollinating going between the two sets of builders back in the day of this build. I only know cause I read most of them. I highly recommend you look at his build. Still haven't figured out how to link a post, cross-post cleanly. Here's the link and it's on page six, about in the middle, search for the title: Captain’s companionway I’d been looking at the plans and decided I’d scrap my long companionway, build a captain’s companionway to the height it is in the plans and place it aft, by the tiller. This left me with a dilemma. If I placed the doors of this companionway facing forward, it would leave small room for people moving in and out since the next hatchway is only 2 feet in front. If I had the doors opening to the rear, they would be getting in the way of the tiller. I didn’t think of making them open sideways – partly because the plans show a line on the companionway going side to side, which seemed to me to indicate the roof opening in the fore/aft direction. In the end I decided I’d have the doors opening forwards. I reckoned 2ft was still room to get in and out, and the doors certainly opened comfortably into that space. Interesting reading and we'll have to take some measurements on our deck layouts. From the plans, it looks like we have room either way. This, I think is possibly the clearest way to make you decision. Kirby, are you planning to install the hatches and this before you plank the deck? If you do, you'd better make your decision on the orientation of this beforehand. If you don't, Yikes!!
- 114 replies
-
- 1
-
-
- Lady Nelson
- amati
- (and 1 more)
-
I think I got a capsquare tip from from Glenn; seems like he found a better one, but I think he suggested black card stock. I got some stiff stock from Amazon and a black permanent marker. Seems he has moved on to his black tape method. Haven't got there yet. A little tip I picked up from Vossie was to paint the heads on the carriage bolts black. That made it really look realistic.
- 114 replies
-
- 1
-
-
- Lady Nelson
- amati
- (and 1 more)
-
Here's one on the companion installation ways which gives some different reasons for doing it either way. Tony is a great builder. The Sherbourne is in the same class as the LN. So there was a lost of cross-pollinating going between the two sets of builders back in the day of this build. I only know cause I read most of them. I highly recommend you look at his build. Still haven't figured out how to link a post, cross-post cleanly. Here's the link and it's on page six, about in the middle, search for the title: Captain’s companionway I’d been looking at the plans and decided I’d scrap my long companionway, build a captain’s companionway to the height it is in the plans and place it aft, by the tiller. This left me with a dilemma. If I placed the doors of this companionway facing forward, it would leave small room for people moving in and out since the next hatchway is only 2 feet in front. If I had the doors opening to the rear, they would be getting in the way of the tiller. I didn’t think of making them open sideways – partly because the plans show a line on the companionway going side to side, which seemed to me to indicate the roof opening in the fore/aft direction. In the end I decided I’d have the doors opening forwards. I reckoned 2ft was still room to get in and out, and the doors certainly opened comfortably into that space. Interesting reading and we'll have to take some measurements on our deck layouts. From the plans, it looks like we have room either way. This, I think is possibly the clearest way to make you decision. Kirby, are you planning to install the hatches and this before you plank the deck? If you do, you'd better make your decision on the orientation of this beforehand. If you don't, Yikes!!
- 139 replies
-
- 2
-
-
- Lady Nelson
- Amati
- (and 2 more)
-
I've read some comments on that using the same reasoning for the companionway. I'm flipping mine 180 degrees. I'll try to find some comments.
- 139 replies
-
- 1
-
-
- Lady Nelson
- Amati
- (and 2 more)
-
That's how it worked out for me; 4 full planks then start tapering. Although I wound up putting in 6, but then seeing what the tapering would be in the first band at the bow, it would be too small. So I ripped of the last two planks. I wound up having 7 x planks in the top band and 8 x planks in the bottom band; which did not include the garboard blank nor the the one above it. But your mileage may vary. Take a look at how the planking on the stern counter worked out. The the part that goes above that, the stern facia, I'm not planking that, just painting it black. One other issue you may run into, is without the facia in, how are you going to terminate those 4 top planks that end there? And realize that the facia is going to need to be bent slightly. It may be tougher to get the facia on to the counter with those planks there. I put the facia on before those upper planks went it. I had a bear of a problem with that as well. Hope you plan goes better.
-
Great build. Looks very authentic.
-
I believe that VTHokiEE is correct. You should probably end planking when it hits the bearding line. And it should be easy to shorten the planks you have already laid over the line. I wasn't advised about a bearding line before I got here but I appreciate the concept now that I've completed the 2nd planking on my LN. Mike, don't wait; cut out those sections now.
-
OK, error detected and rectified. Bravo! Gold star accepted. Not sure it matters, just be consistent: I chamfer the top inside edge of each plank I lay down, which gets a tighter fit to the plank above. Also, every new plank mates with a straight edge. I'm thinking that's what you're saying, just that we're saying the same thing with different words. Probably not a big deal but I found the smaller hatches were the same size; 6 x holes by 6 x holes. I measured the big hatch at 10 x holes by 10 x holes. Don't be going off the rails on us, brother; we're invested in you. As you found out, details matter! I could be wrong but you're going up against a math major (BS, Applied Math, SUNY at Stony Brook, 1973, cum laude) not bragging 😎 but... Look at the plans my friend (maybe you got different plans than I got). Nice work on the anchors, the wood makes them look more realistic. I haven't gotten to my carriages yet, but are you going to cut off the quoins and replace with wood ones, as per the recommendations by Chuck Seller (Modifying Gun Angles) ? That's how I'm going to go; just not there yet. I guess you need to have a final deck to check out the display angles. I'm working on the coamings for the hatches; will advise on how I made out.
-
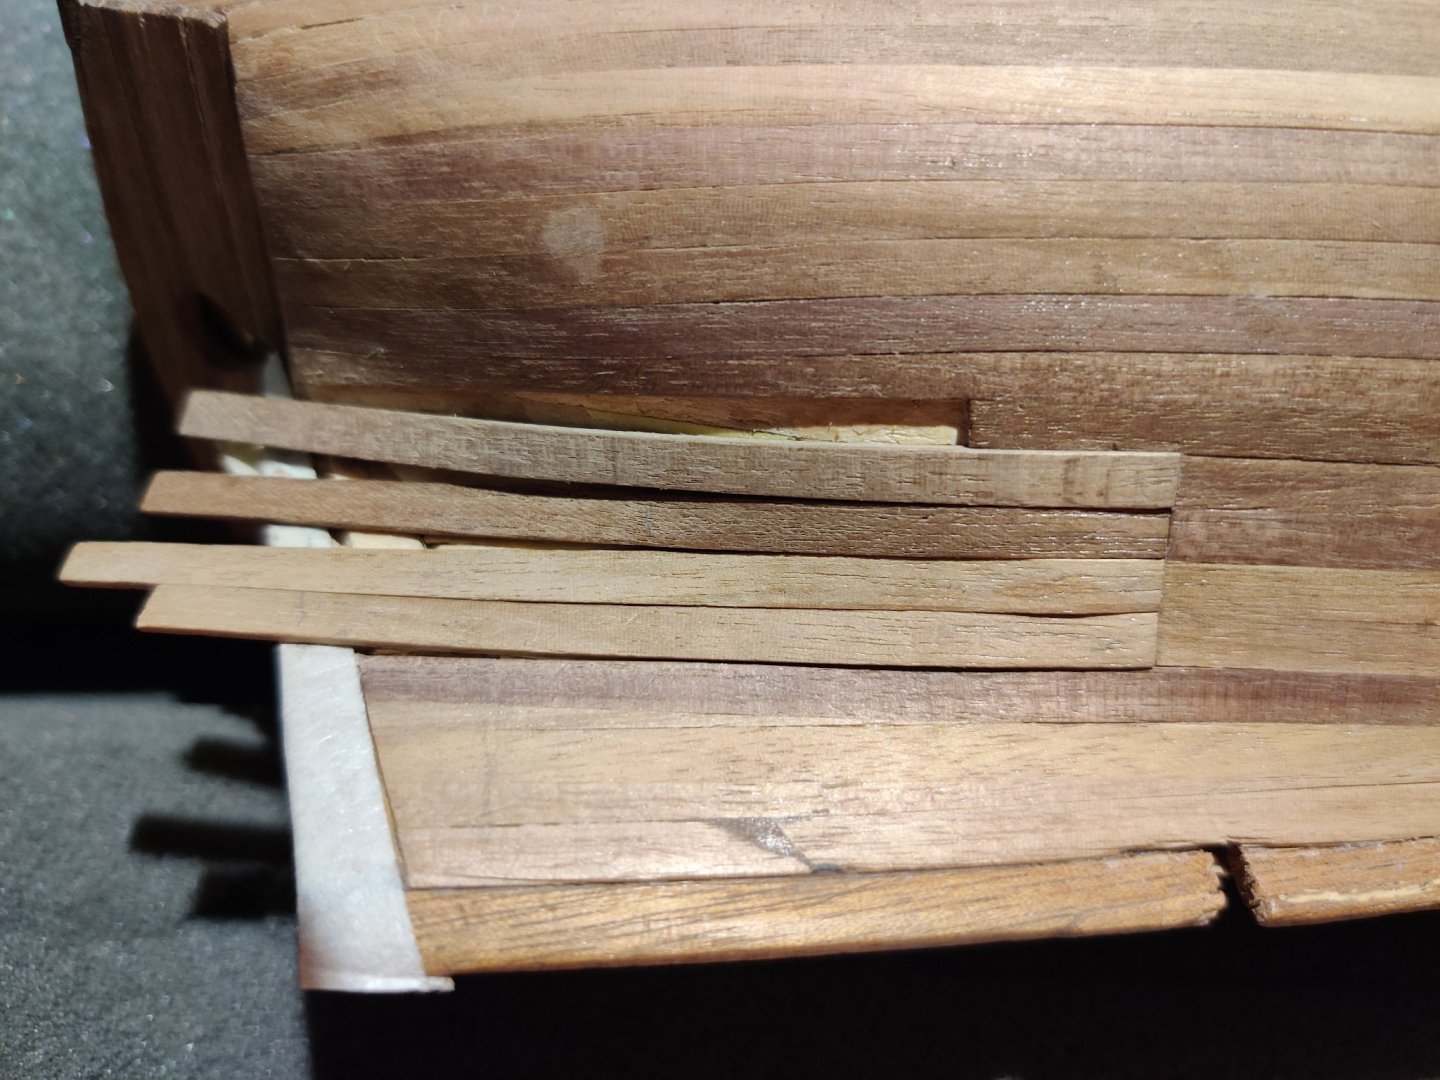
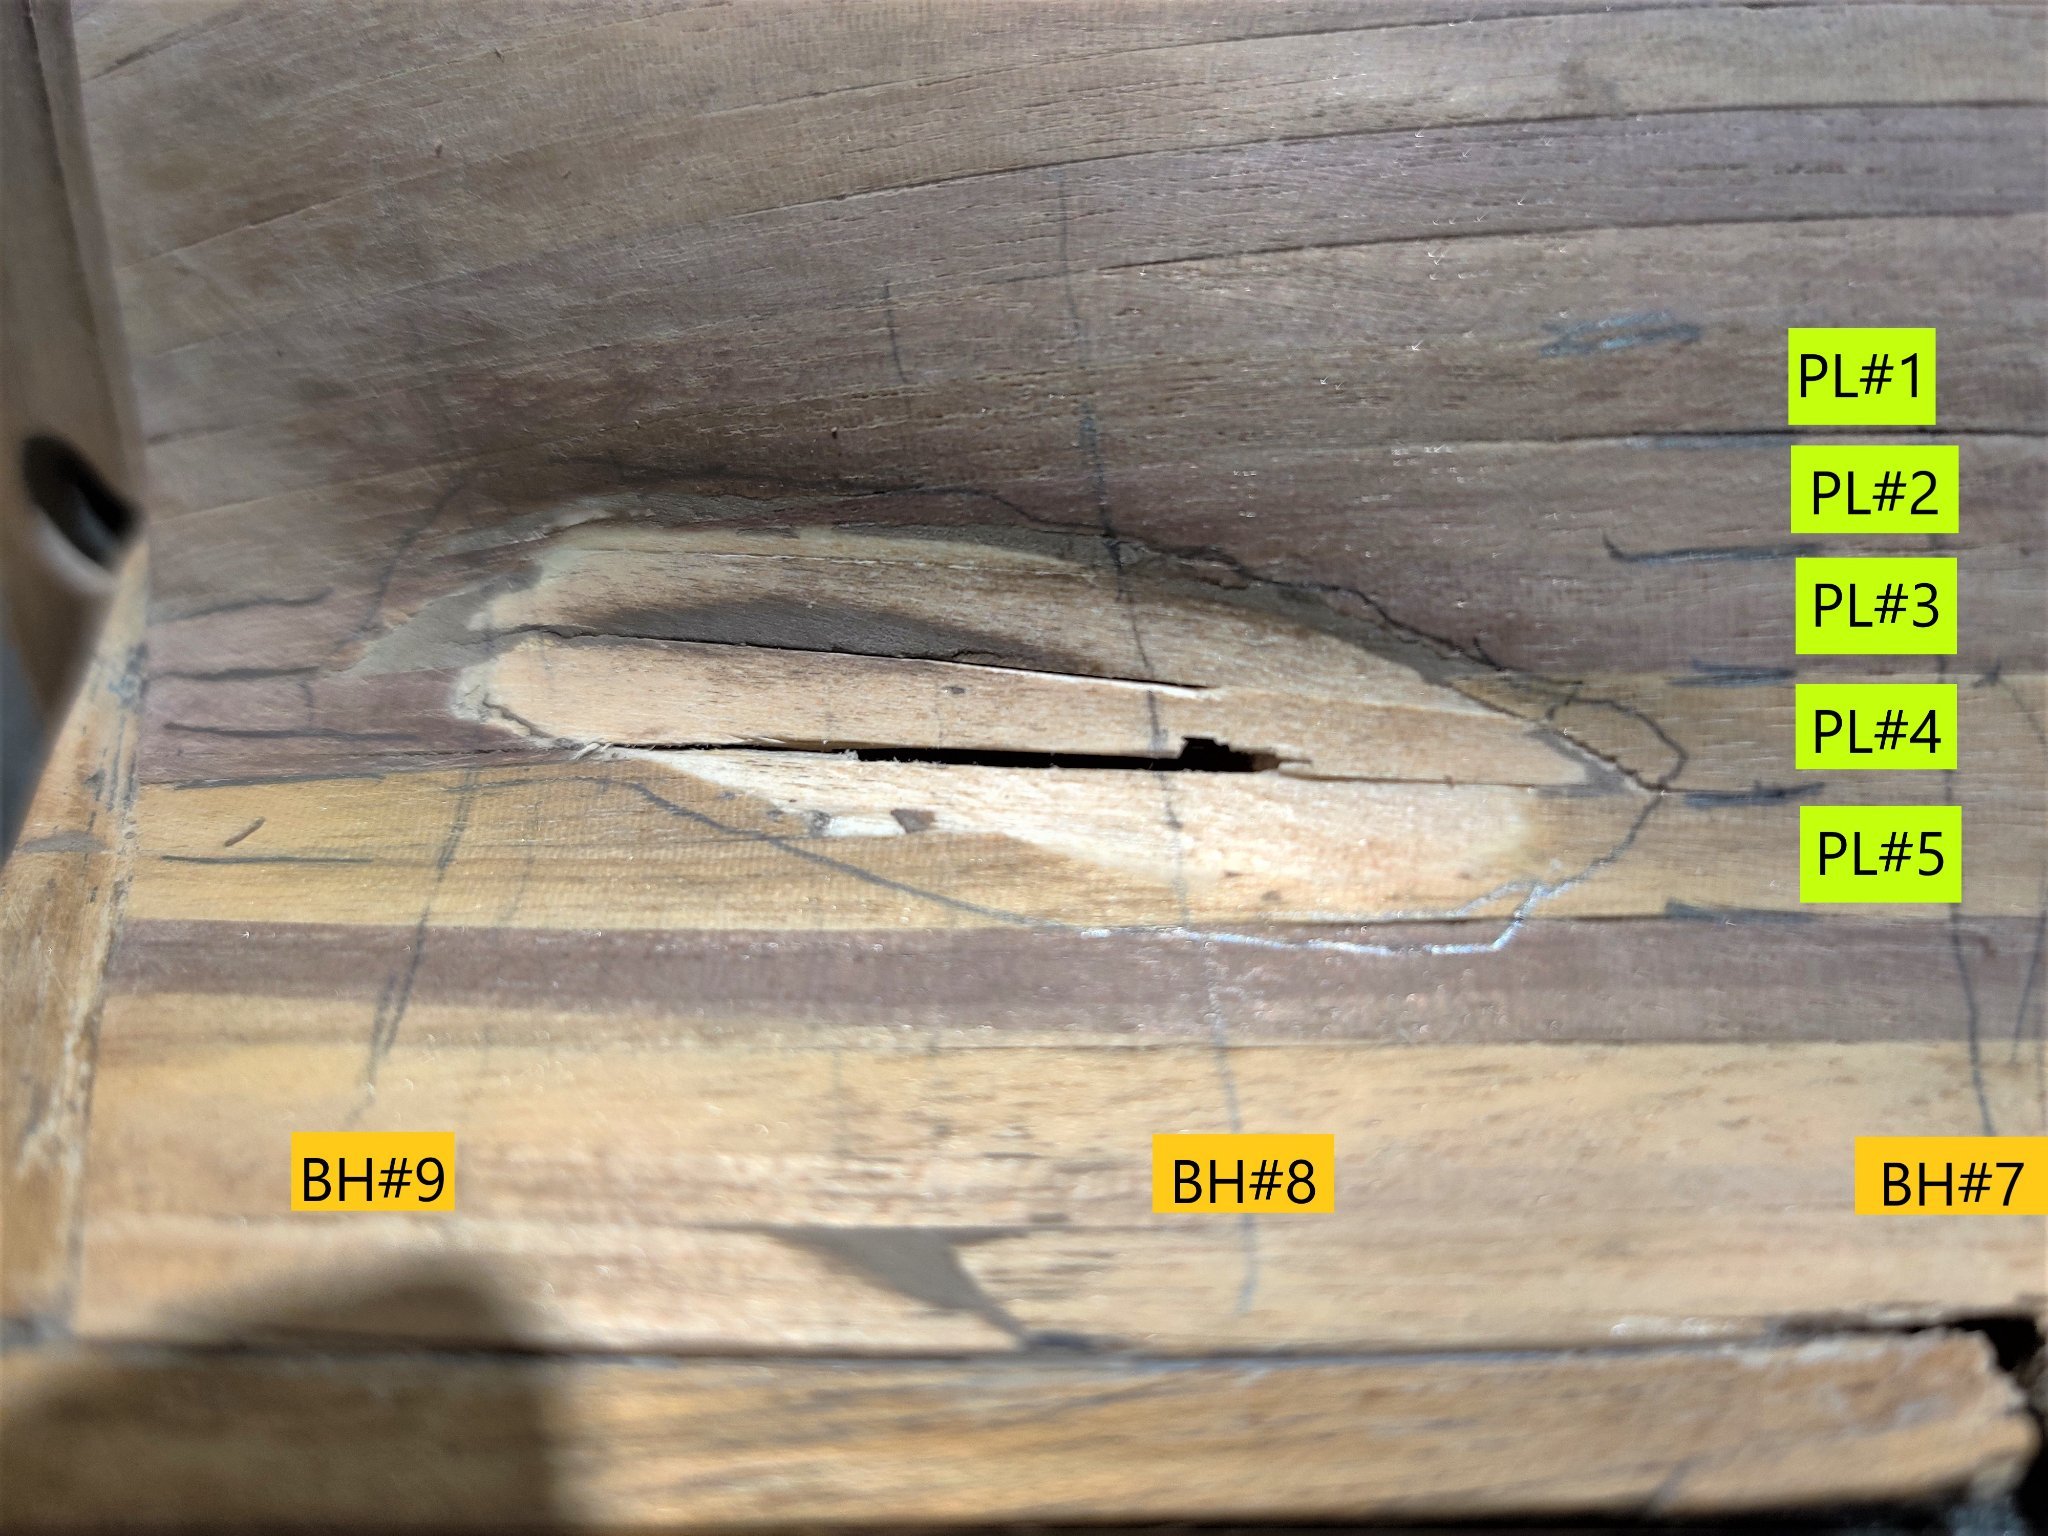
In all my calculations, bulkhead 5 had the peak plank width for the number of planks in that band. Meaning that if band one had 6 x planks, the plank width would start low at BH1, say 2.00mm, increase in width from BH2 through BH4 and max at BH5, say 4.11mm, and then decrease from BH6 through BH8. Typically, BH9 and BH10 were full width since even at full width, stealers were needed to fill in the gap. I have a mathematical background so instead of using the planking fan, I just created a spreadsheet that calculated the width of the plank at each BH based on the 'height' of the band divided by the number of planks in the band. The height of the band was the distance from the top of the first plank in the band to the bottom of the last plank in the band. I didn't bother with tick mark strips. The spreadsheet told me how much I had to take off at each bulkhead for each plank in the band and I marked it on the strip, or a pair of strips, then took off that much with a block plane and sand sticks. Here's what the spreadsheet looked like (this was for the 2nd planking): I think you have something wrong with your marks on the BHs. You shouldn't have a multiple wavy line for the band division, or a up, down, up, then down. It should be a wave, with one peak; no more than that. Let me know if you have any questions on this. Taper is really the key here.
-
This is the iron I have and I think Glenn has the same one: Small enough and it heats up real fast. You'll also need the standard plank bending heat iron but I'm sure you already have one. I haven't painted my cannons yet; I planning on blackening them in a diluted solution of Birchwood Casey Brass Black. It's fairly popular on MSW. I'm waiting until I have identified all the eyelets, rings and any other metal that needs to be black and then treat them all at once. They need to be treated before the blackening. Various methods described on MSW.

- 114 replies
-
- 3
-
-
- Lady Nelson
- amati
- (and 1 more)
-
Paint one carriage red or look at my post on Modifying Gun Angles to see how they look red.
-
I didn't put anything in; going to use, as per Glenn, a small nail at the end of the mast to plunge in to the MDF. There's a discussion of some support in Kirby's LN build log at post #49:
- 114 replies
-
- 2
-
-
- Lady Nelson
- amati
- (and 1 more)
-
Fairing looks good. I suggest mask taping of the keel parts for protection. I would also recommend planning on how your going to support mounting the hull to any display base and possibly take some action before you start planking. There are some good ideas here:
-
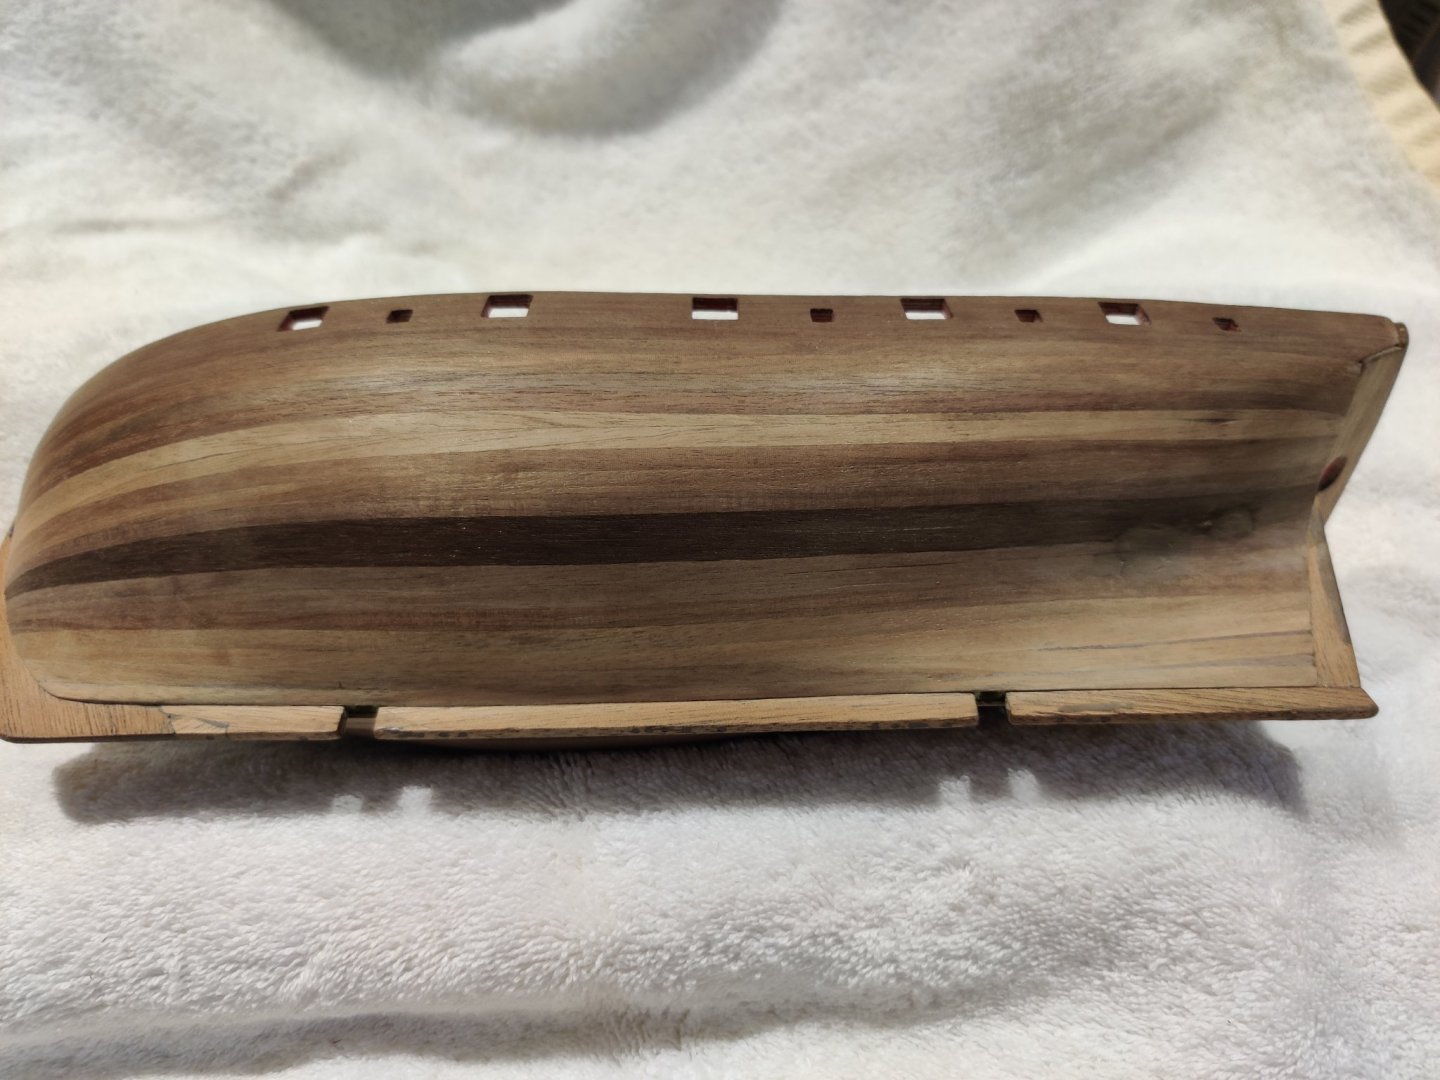
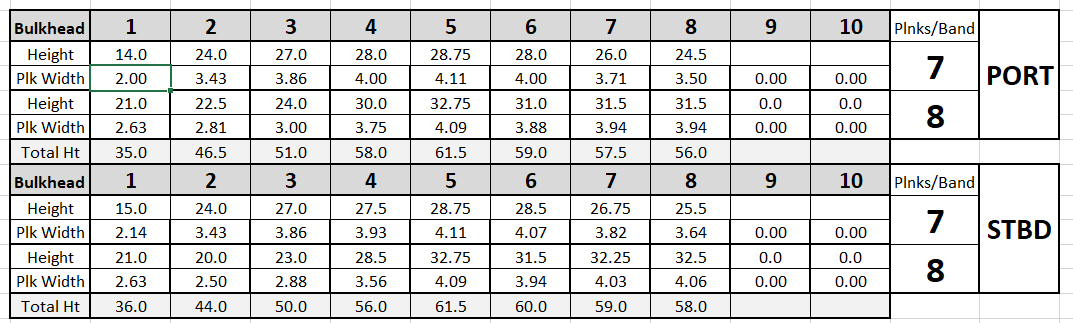
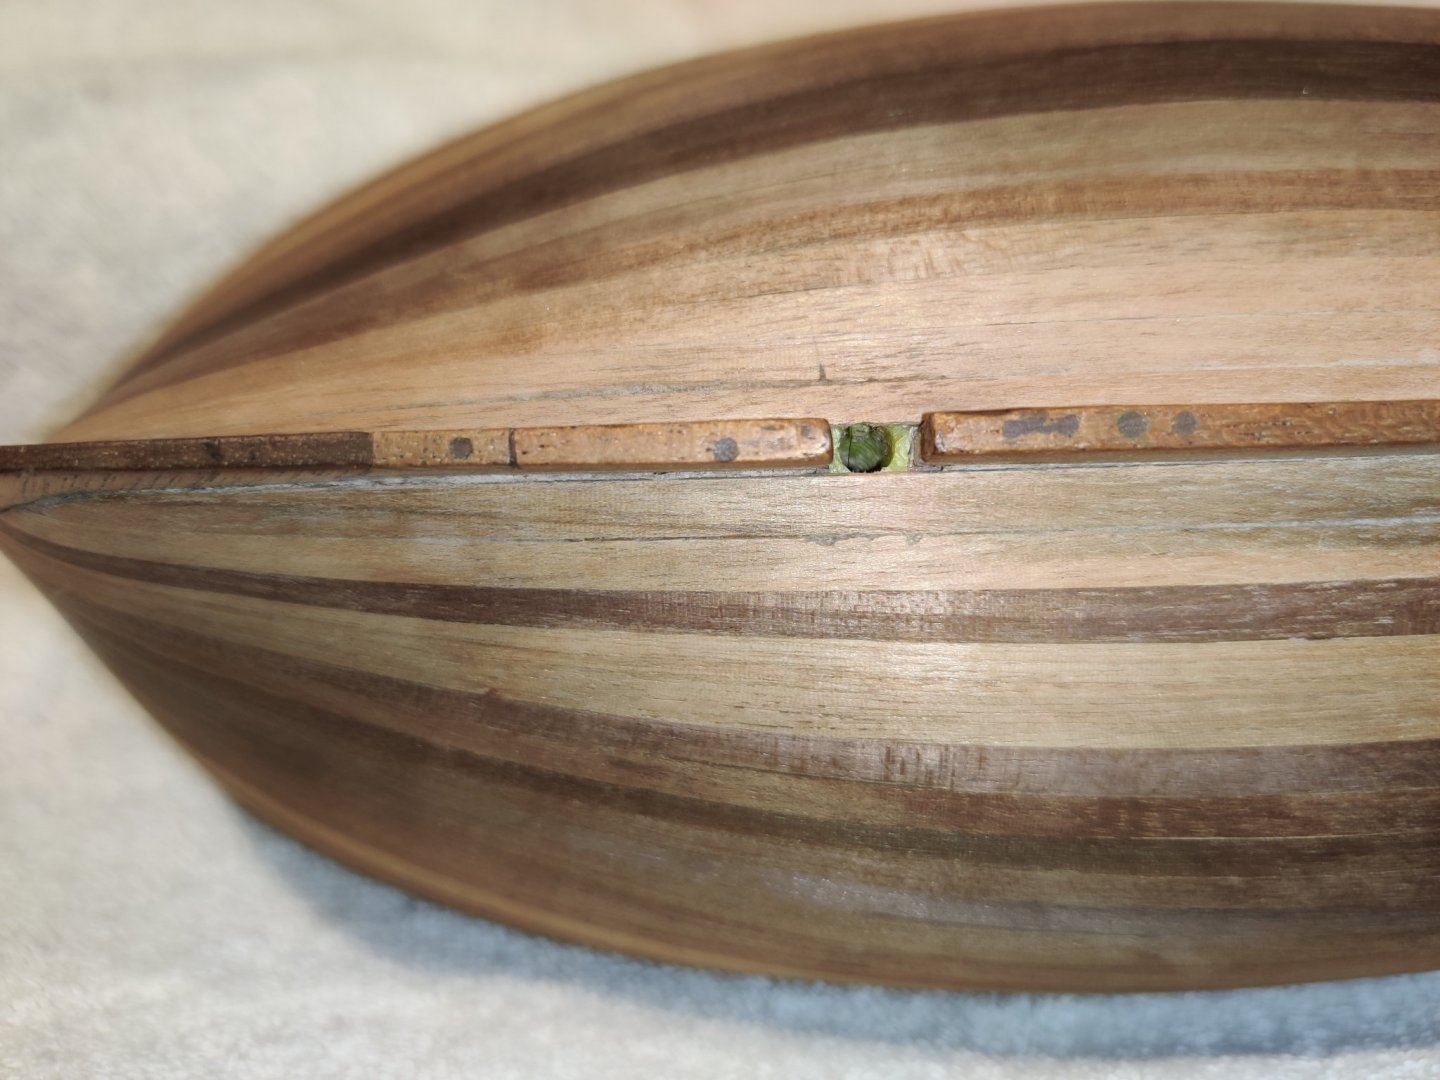
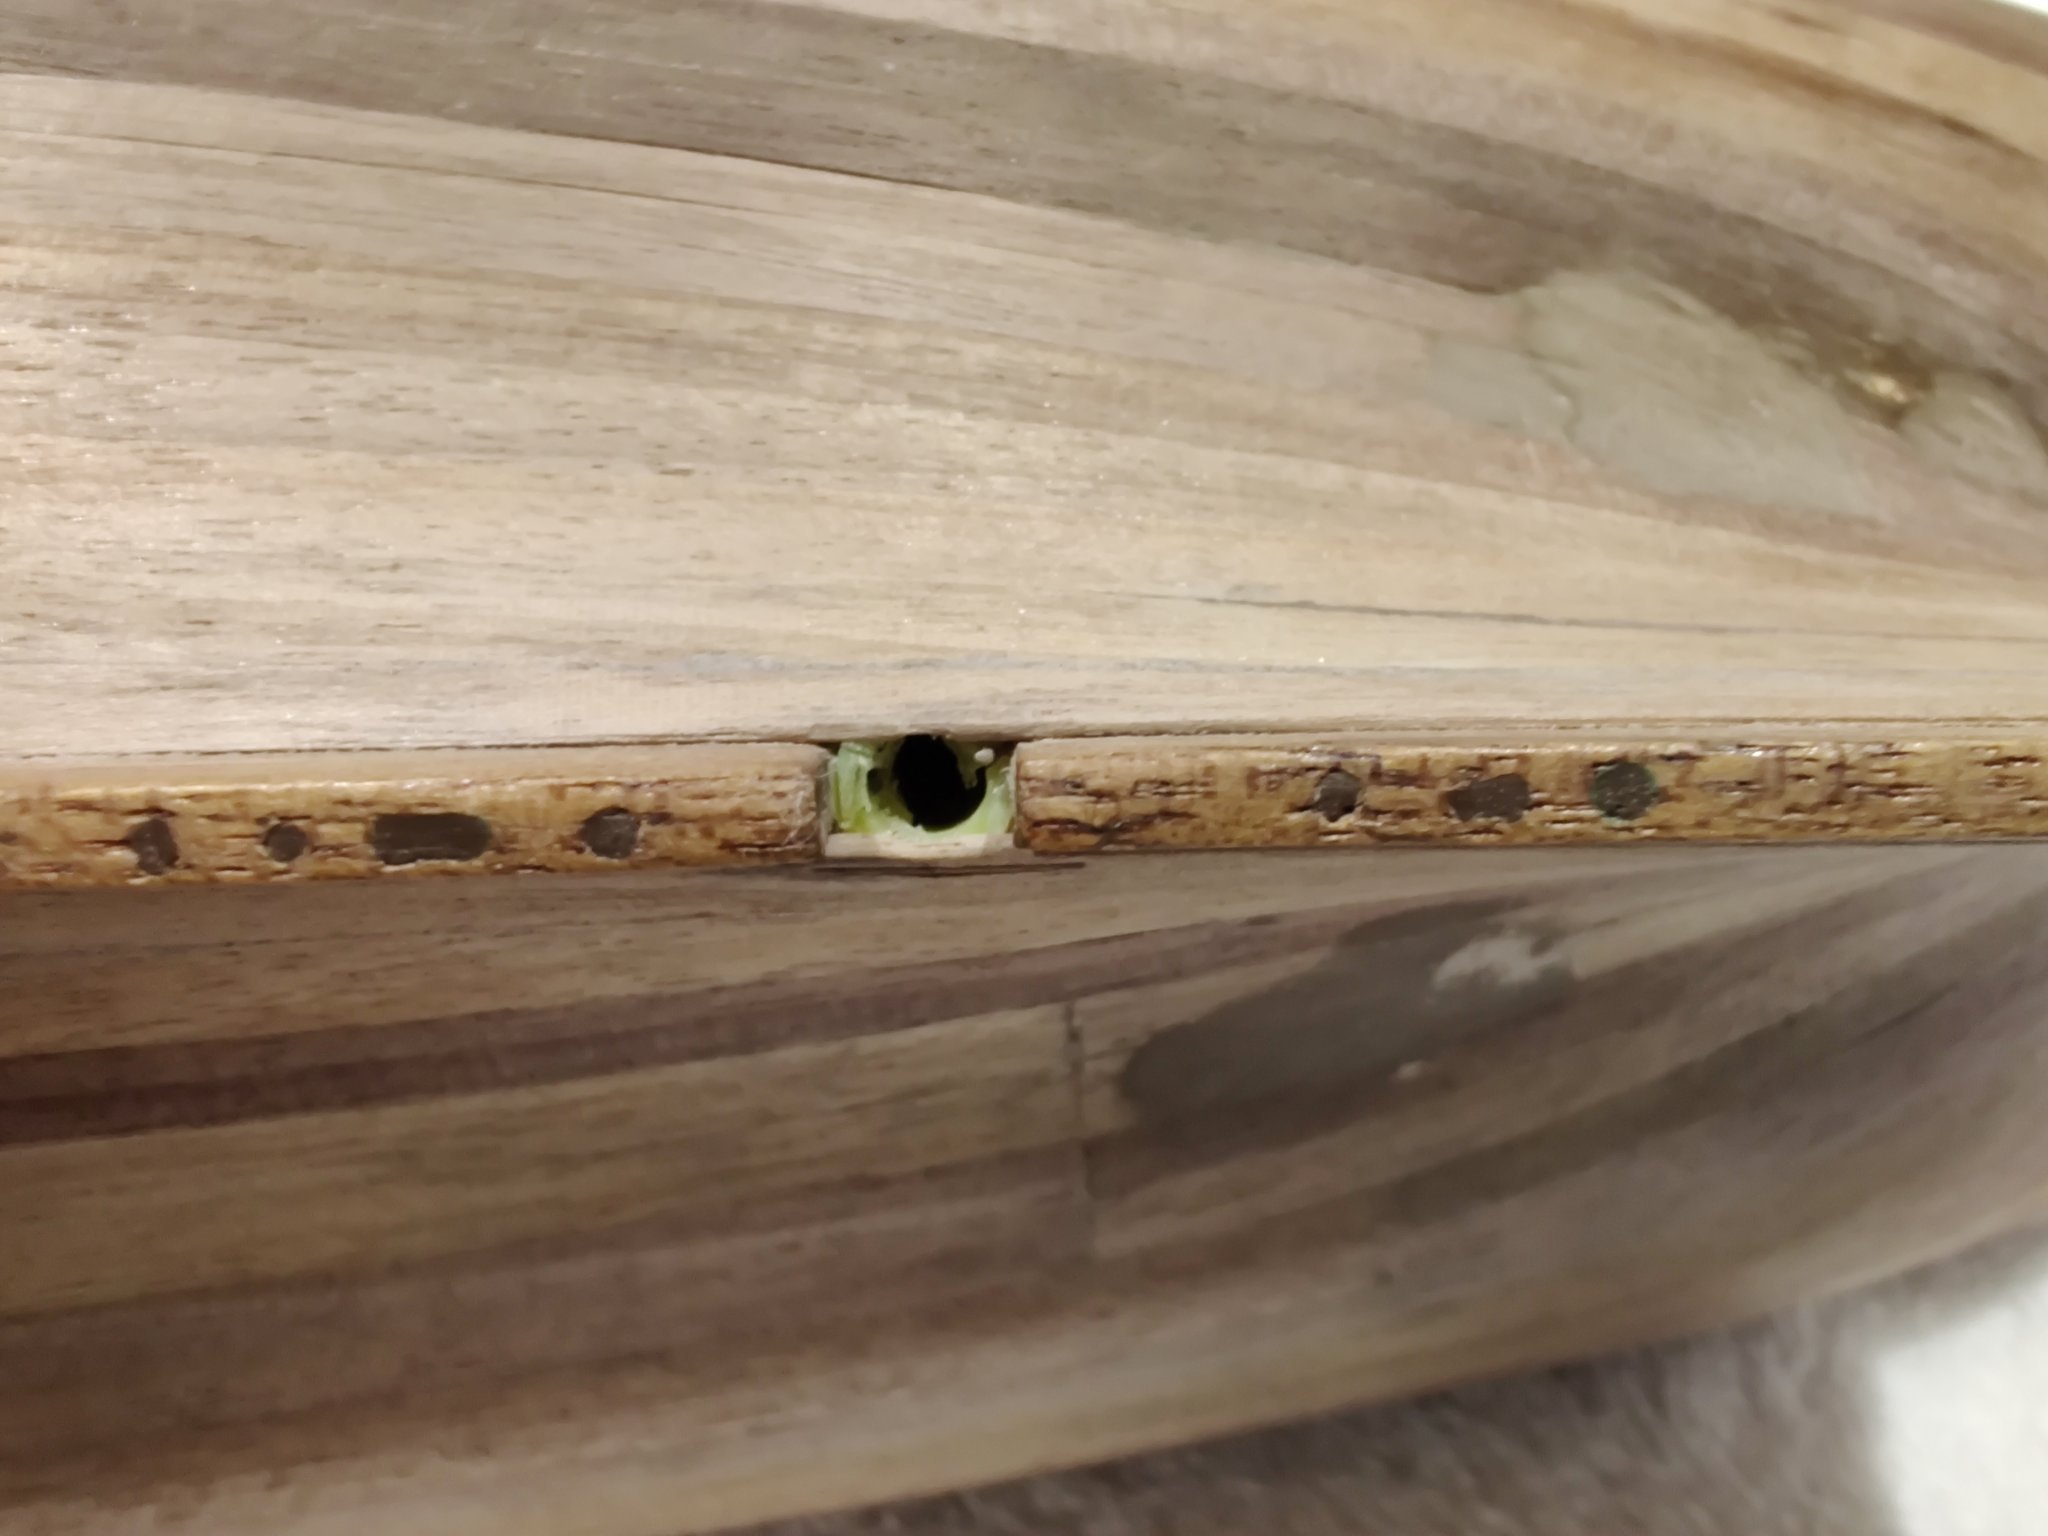
Been 2 months since I last posted to this log, but I’ve posted in other forums about some issues that I’ve come up with while finishing the hull build. I’ll post my work-arounds that are below, in the appropriate forum for completeness where you can find my posts. Getting a 90 degree Fit: Keel to Display Base Pedestals I was advised to use some brass rods instead of long wood screws in the holes I had made in the keel. Well, that didn’t work because the rods had nothing to grab onto once they went through the holes. What worked for me was old-fashion plastic, ribbed anchors used to hang pictures on a sheetrock wall. I epoxied the two anchors to the false keel (below). To have them sit flush to the false keel, I had to remove the garboard planks and the three sections of the real keel (broken earlier in the build). I made sure that each anchor went in at the correct angle. To get the garboard planks and the keel pieces to sit flush, I trimmed the anchors on the edges, making the circle into a square. Here’s how she sits now: I also took the opportunity to replace the sections of the keel and the rudder post that I really abused during the hull build. I made them out of the spare areas of the 3mm walnut sheet; (don’t throw out any of the sheets until absolutely finished). Took a 24-lb Shot Below Waterline on Starboard Side I had a bad experience with a little too much pressure on a mouse sander that left this damage. After getting advice to build up the 1st planking first and then I patched in to the rudder post pieces of the walnut planks. It went like this: This walnut is very soft, so, even with 220 grit sandpaper, I still wound up needing some Elmer’s Carpenter’s Walnut Wood Filler. And I needed the same treatment for a portion of the starboard side. Fortunately, my painting plan is white below the waterline and it will cover both sections. So, here’s how she looks now: Note that I planked up the Stern counter: And I’m going to paint the stern fascia black. Looking down the bow. I was conscious of lining the planks up on each side at the bow, trying to match the plank taper on each side. I was also trying to keep the shade of the planks alike for the strakes that will not be painted. On the display base, not with the right pedestals yet: I had a bear of a time with the outer stern counter frames staying attached to the stern counter. I wound up adding some MDF ply between the top tips of the frames and the counter. That whole section is going to be painted red anyway along with another coat for the inner bulwarks. I also started asking question on how to fabricate some of the deck fittings, here: For how to do lap joints for hatch coamings and head ledges: Starting at post #34 For adjusting gun angles in the carriages: Before I put a couple of coats of Wipe-on-Poly on the hull and the deck, I’ve been checking on where the main wale will end up at the stern and how the stern side finishing pieces, now with new brass decorations, should meet together. The plans show the wale starting at 15mm below the upper part of the bulwarks. Glen made his own pieces from scratch and I don’t get a real good look how Vossie did it. What I can show is how Tom Grigat did it in the marvelous 9-minute video of how he built his LN (see it on YouTube). And these are the only good shots I got from the Amati videos of the Modelling Class with the Lady Nelson: My questions are: Does the main wale end before hitting the stern counter as shown in Tom’s video? The finishing piece doesn’t lay against the counter. Or is it the Amati video that’s correct in that it looks like the finishing piece goes on top of the wale but it lays against the counter? The builder here was Leon Griffiths from Model Shipyard. Any help will be greatly appreciated. Thanks (and I will try to make my build log posts more timely and shorter.)
.thumb.jpg.b4a1f427a6fbd674c1b55d03a97b1e6b.jpg)

.thumb.jpg.d5e7992749507cfbeb0ce2fee482ba63.jpg)
.thumb.jpg.14f1d0f5bfcc6ec6a60bb3d29f876c29.jpg)

.thumb.jpg.efe04c84d4704adaf1131497ced57af9.jpg)
.thumb.jpg.6ac74492b489f410d6de867e32827bb9.jpg)
.thumb.jpg.63e7a47bbc8f9cdb740061366b65ae04.jpg)
.thumb.jpg.7cf978587a55c4b665e3f5bc4a01345a.jpg)
.thumb.jpg.108a01954f77d1b72e8503e549cdfed8.jpg)
.thumb.jpg.218df10dd02c94711490324c3cdd0cc9.jpg)
.thumb.jpg.2194e2bddb6580bb5c26b38f7b733f3a.jpg)
.thumb.jpg.a01086ff481dac593698fd0d0df65e03.jpg)
.thumb.jpg.3b5fc3ed4b565b4c0cc9c9da73420ecf.jpg)
.thumb.jpg.13349aaa596102fc69c46ff86c65a831.jpg)
.jpg.8114a5fdb2b6da0ce083ebe774656414.jpg)
.jpg.368a0ccf387d66b1e0aee1502e78980d.jpg)
.jpg.e7c9afc5972f8dfddf1909be4b25c69e.jpg)
.jpg.4ca324169bd8ac5f6ab2f76ffa718bde.jpg)
.jpg.c92fda48e66fe06d88be1338e91f536c.jpg)
.jpg.1698ca482ac2db30b42019828959281f.jpg)
.jpg.2b50afc2c4cd9e81c7575577d702e151.jpg)
.jpg.b2a21be982342212d96e6ade89173465.jpg)
- 26 replies
-
- 6
-
-
- First Build
- lady nelson
- (and 2 more)
.jpg.3ac288cc5fb3d1ee2ba513c200ec5c39.jpg)


.jpg.7b91926039bd1f6a05260488d975678b.jpg)

.jpg.4fb0ff46e0c446ae853ea37a96b8a822.jpg)
.jpg.2aaaefe4e5737ecb3fa3d99d0c03c8e0.jpg)
.jpg.e963b20ad1769bdf90ca9e093a22256a.jpg)
.jpg.425242d880d3651659e0dc6262bf20cc.jpg)

.jpg.24979c41e8de8fea98401b133d6aa409.jpg)
.jpg.8ca0be4509d0449e900537318e9b4088.jpg)
.jpg.f213eea183b9c7381ee09fa4a65416cc.jpg)
.jpg.f1a446e5f6facd1432339b77421a517a.jpg)
.jpg.12559206b49218c9dab1b6189930b8a2.jpg)
.jpg.6ec347db79f054f719596972439d6dcd.jpg)
.jpg.2021dd2f0ab114d9751bcd4392b946ef.jpg)
.jpg.344d32f223cd031cd969c9e1ee8f6286.jpg)