
HOLIDAY DONATION DRIVE - SUPPORT MSW - DO YOUR PART TO KEEP THIS GREAT FORUM GOING! (Only 53 donations so far out of 49,000 members - C'mon guys!)
×


drjeckl
-
Posts
196 -
Joined
-
Last visited
Content Type
Profiles
Forums
Gallery
Events
Everything posted by drjeckl
-
 Welcome FP to MSW and the LN build club. A few of us are active, some never heard from again. I'm a first-time builder so it's been an exploration for me. I have just finished the 2nd planking and about to publish an update to my build log. I did a lot of researching on this site before I got too far along. There are two build logs that I highly recommend. The first is: Vossie is a very experienced carpenter who sometimes goes off on way off tangents but I learned a lot about this hobby and how he built the LN from this guy. Unfortunately, he fell off the map before completing the build. But it's worth going through his entire log. The other log is: Glenn is an experienced builder who got back into the hobby with the LN. Same here: I learned a lot about this hobby and how he built the LN from this guy too. His log is shorter but very informative. Also, I highly recommend looking at Chuck Passaro's videos on edge-bending of hull planks. Using his technique made a world of difference to my work. Good luck and welcome aboard...jce
 -
Eberhard and Allan, Thank you for taking the time to offer advice to a newbie. I am trying to address the issue I have, otherwise I wouldn't have posted it; I could just say Go F**k It. I'm just trying to assess the cost/reward metric vis-a-vis my first build. It's not that it's my first build; it just happens to be first. I think everyone needs to assess that cost/reward metric when faced with a fork-in-the-road decision, however small or large the fork is, whether it's their first or 100th build. Nobody has unlimited resources. I'm looking forward to building more models, with this site's help and your help, after the Lady Nelson. Thanks.
-
Tony, Just caught up here. She's stunning, yet casual. I think the sails look very realistic. Nice work.
-
How to install pedestal stands
drjeckl replied to LMDAVE's topic in Modeling tools and Workshop Equipment
Gents, I asked basically asked the same questions in a recent topic over in the Model Tips and Tricks and Making Jigs forum. Bottom line, that topic helped me but I was forced to go another route. I am planning to update that topic with what I went with very shortly, but the skinny is that I epoxied standard wall anchors (size 4-6-8 x 7/8") into the false keel, split the real keel into three sections (around the two anchors) and used flat head phillips wood screws (size #6 x 2 1/4") to come up from the bottom of the display board, through brass pedestals and get secured into the wall anchors. I may have gotten lucky, but I got a 90 degree secured fit. Keep an I out for my follow-up post in that forum. -
Derek, Nice recovery on the new fore topgallant stay. Yeah, reverse engineering; what a concept. 👀
- 725 replies
-
- 1
-

-
- vanguard models
- speedy
- (and 1 more)
-
Chris, Best of luck on your business decision. You can see that everyone here is elated that you will be dedicating your efforts to Vanguard Models. Keep it going! Looks like your wife did indeed have a Speedy recovery.
-
Gents, Thank you for all advice; great as usual. I do not want to invest any more in my first ship's build. If the proportions are not of scale, so be it. This is what Amati gave me and I will live with . I'll work to build up the quoins. I'll probably have to customize a solution for each gunport. Fortunately, it's only 10. 😀 ...John
-
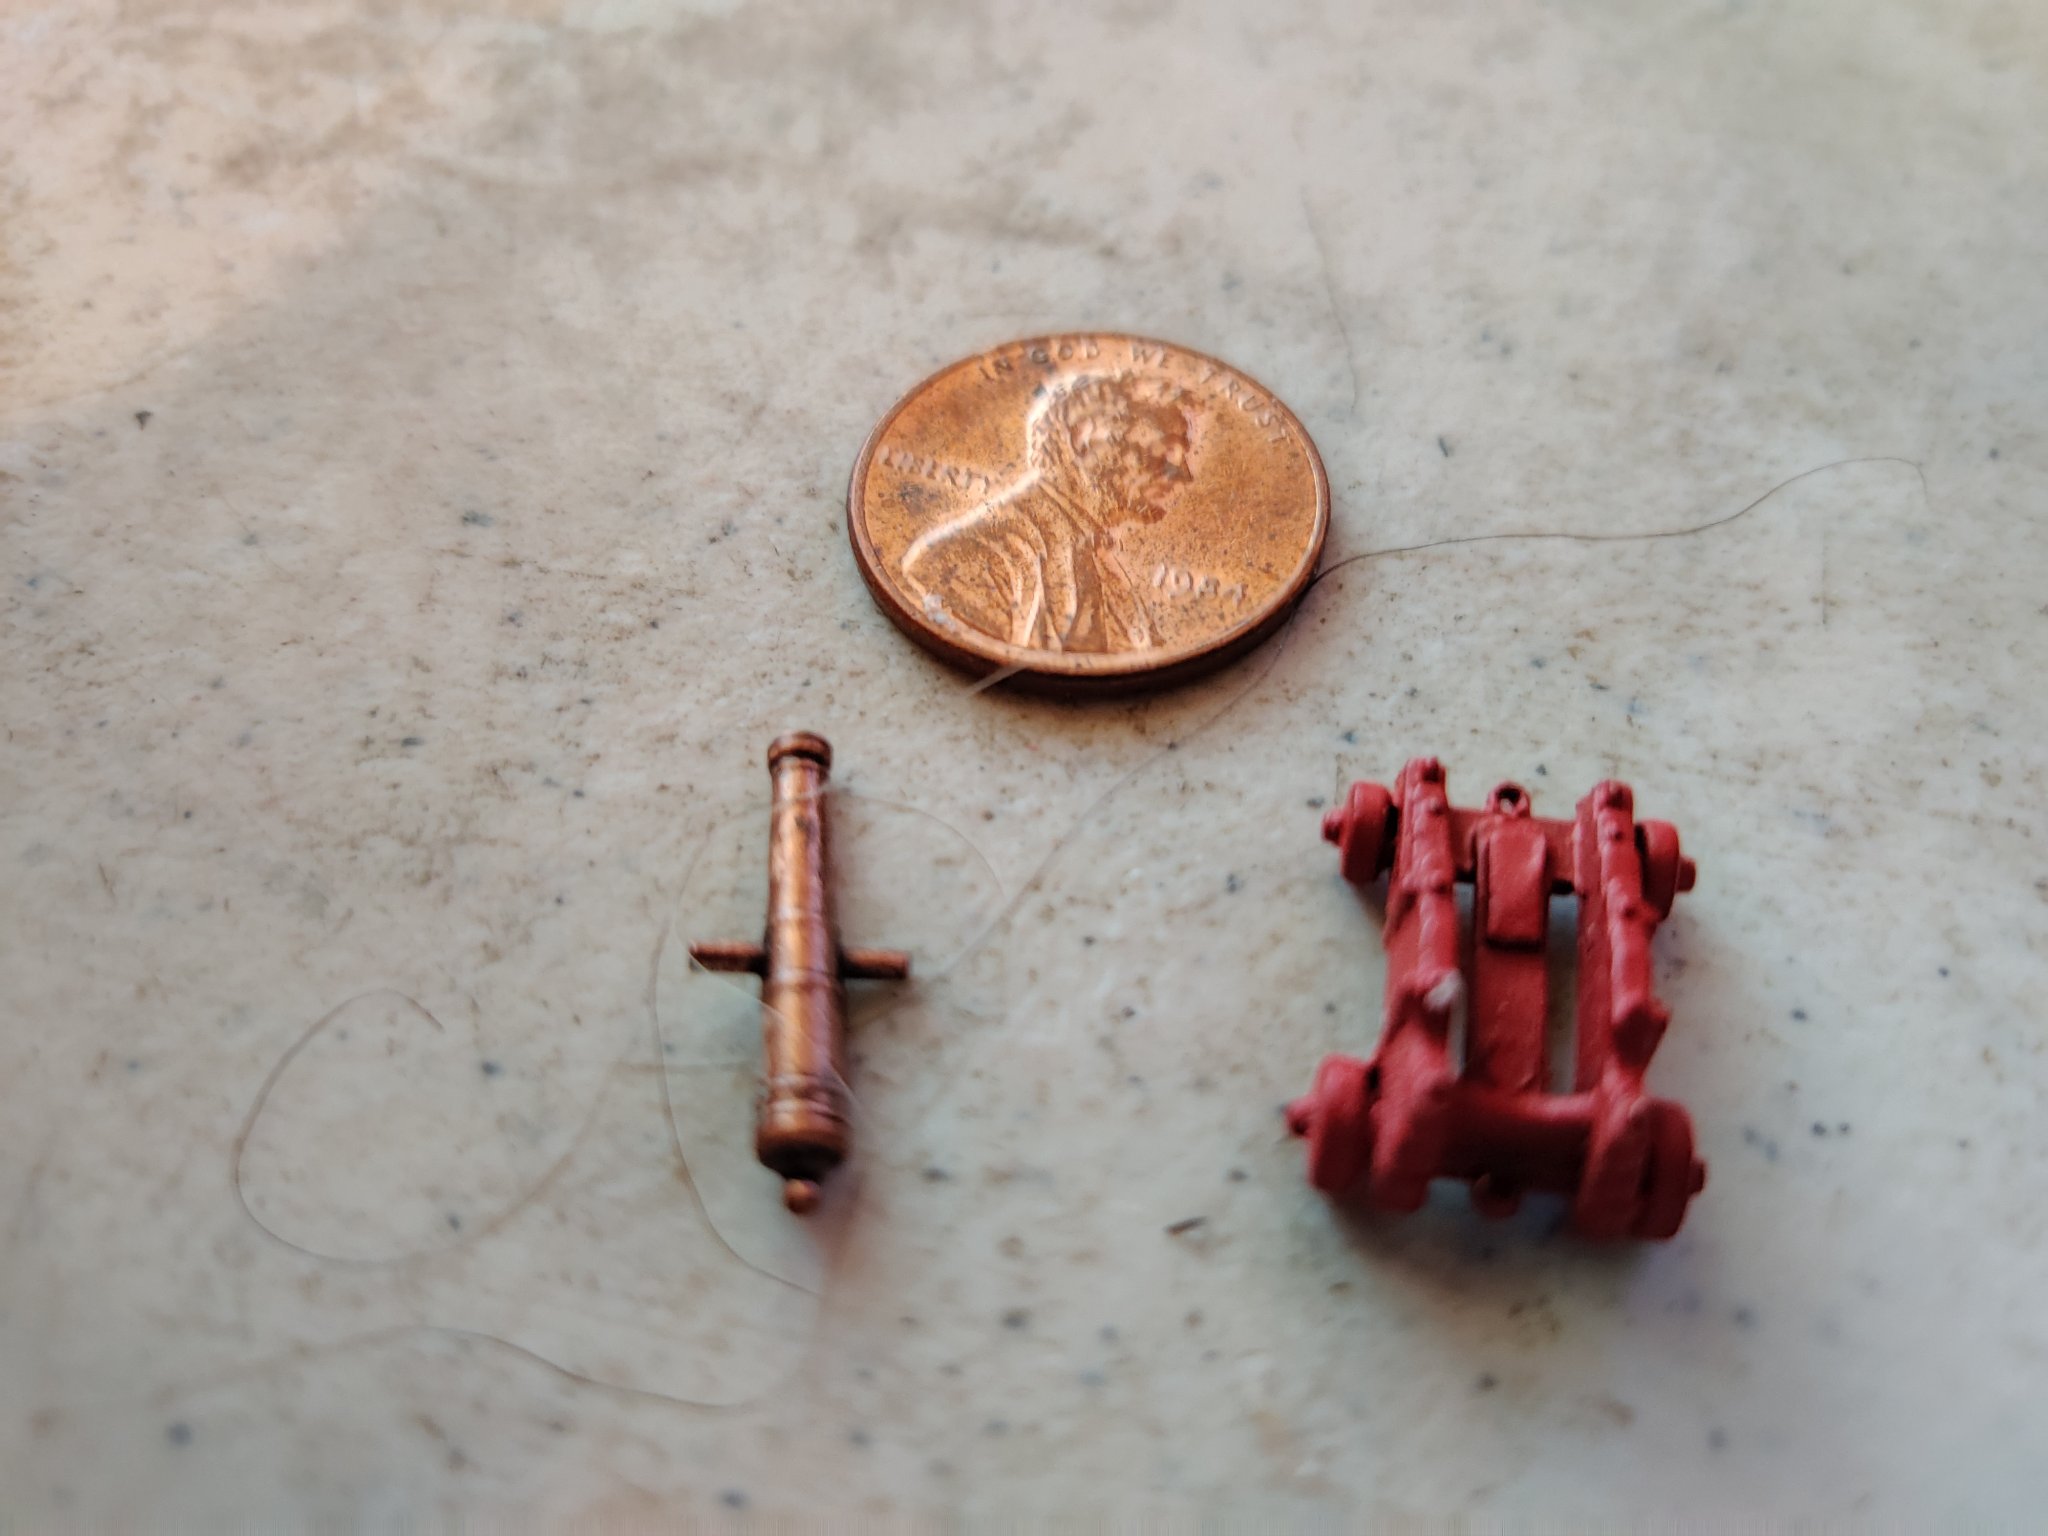
Here you go: The gun goes in the opposite direction, WRT the carriage.

-
Chuck, Thanks for the quick response, being on the left side of the States, you're probably the one one here up at this time.. That solution would probably require a lot of grinding out of the quoin, which I would see as a problematic situation. I have the tools to do that but not so sure how that would turn out. Yeah, the wooden quoins would let me customize each cannon. Look at that I'm talking myself into your suggestion.. Good job...jce
-
I've completed the hull of my LN (Yeah!!! Updates in my build log soon) and took some pix with the guns and carriages and as you can see, most of the guns are at the top of the gunports. The one at the far left looks like it's OK It's clear to me that for presentation purposes, the guns should be dead-center in the gunports (maybe I'm wrong here; someone set me straight). These are metal carriages and cannons, so I think I have three options to lower the gun aims: Bulk up the quion portion of the metal part on each carriage (how to do this?; what material?) Gouge out more of the slot where the trunnion sits Hike up the back trucks of each carriage Are there any options out there? Which is preferable? If there, are, I don't see any that would modify the deck. I think I will have to do whatever modification is the most appropriate to each gun and gunport. Didn't find any appropriate topic on MSW that resolve this issue. And if I have the need to raise up the angle, presumably the way to do that would be file off some the quion, Yes? . Thanks...John
.thumb.jpg.904198b725d08893fdd33d45ffa92daa.jpg)
-
Add that one to the list for Chris. He's such an honest guy, I'm sure he will have the correct answer for both of your adjustments. Either he'll be 2 for 2, 1 for 2, or 0 for 2. Not making any bets here.🤐
-
Nice. Thanks...John
-
Spyglass, thanks, just what I was looking for; how to make the joints. Similar to the SOS technique, but this looks easier. Phot #3, with the file looks like a nice way to get them all lined up. Fortunately my hatches are square so I can use that technique on all four pieces at once. Thanks...John
-
Allan, I'm going to try this as you suggested; chisel, knife and back saw; pretty much follow how it was done in the SOS post. I'll post a shot when I complete the first one. Thanks...John
-
Derek, I'll be waiting for Chris's reply on what happened here. You solution was pretty innovating. Speedy is next for me and I hope I won't have to make a decision like you did. Good job! .John
-
Mike & Allan: Thanks for the info. My issue is specifically about fabricating the lap joints for the coamings. And I have the additional burden of the only power tool in my possession that could may be of assistance is a Dremel knockoff. This topic here does not really come to a conclusion: https://modelshipworld.com/topic/7949-cutting-lap-joints-for-deck-furniture-etc/?tab=comments#comment-235440 I do have that Dremel Router attachment, but I could not figure out how to use it to notch out the edge of the coaming stock. Also, forget about Googling hatch coamings; the predominate hit is about installing a hatch with coamings in a kayak, ugh. I did find one hit that had a decent how-to description. Unfortunately (well maybe not), it is found on a post from that 'other site'. Here's the link: https://shipsofscale.com/sosforums/threads/hatch-coamings.7491/page-2#post-171358 . Not sure I will go for the outside beveling of each side because I will be placing them directly on the deck (plus I don't have a power table sander). If you know of anything anywhere else, I'm all ears (and eyes). Thanks...John
-
Mike, I'm starting to make my hatch coamings and saw this. Did you ever post what your repeatable process was? Would appreciate any help on this. Thanks. .John
-
Exquisite work! And great photos. Wow! John
-
Not knowing the strength of my sanding pressure, this is the 2nd case where I have sanded through the thickness (1.0mm) of the 2nd planking. This area of the hull will be painted. Here you can see that there is a speck of the first planking showing through the walnut. Any quick hints on repairing this other than multiple passes of filler/sanding/filler? Also, any hints at preventing this from happening in the first place, other than not leaning hard on the sandpaper? The last sanding pass at this used 320 grit. Thanks...John
.thumb.jpg.60b41a5cae8cb00db14d96591970ba1e.jpg)
-
Oh, I was on that one also, just keeping quiet. John
- 160 replies
-
- 1
-

-
- Alert
- vanguard models
- (and 1 more)
-
Glenn - Glad I found this. Pulling up a chair to watch and read. Looks beautiful so far. And I love to read your great descriptions of how to each task. Keep it up.... John
- 160 replies
-
- 1
-
-
- Alert
- vanguard models
- (and 1 more)
-
Beautiful deadeyes!!!
-
Right, it was not you. Assumed there was only one person here on MSW known as Chuck. Exception noted and apologies given. John
-
I've used Chucks recommended site, Drill Bits Unlimited https://drillbitsunlimited.com/Default.aspx. Great prices and service. Every drill bit size is delivered on a 1/8' shank, packaged in a 10-count plastic case. John
.jpg.c4a97a3c70e3b1857d55fa82c457c274.jpg)
.jpg.8e14e1cadbc60a57e60fa0d561c98724.jpg)
