
HOLIDAY DONATION DRIVE - SUPPORT MSW - DO YOUR PART TO KEEP THIS GREAT FORUM GOING! (Only 53 donations so far out of 49,000 members - C'mon guys!)
×


drjeckl
-
Posts
196 -
Joined
-
Last visited
Content Type
Profiles
Forums
Gallery
Events
Everything posted by drjeckl
-
These look beautiful. Welcome to MSW. Looks like there are some blocks just hanging out in the last pix. Still working on it? John
-
 Congrats Glenn. Beautiful looking model. Although I caught up late, it's been a pleasure following along with the finish. Great job on the build log; a lot of detail for others to follow. John
- 382 replies
-
- 1
-

-
- Vanguard Models
- Duchess of Kingston
- (and 1 more)
-
Sounds like a good business plan for a start-up. Speedy (my next build) recovery for your wife. John
-
Enjoying the journey is all that matters. And I also pushed myself to try different things, especially the deck. And I feel sorry that you feel like you were being scolded. That wasn't my intentions and I'm sure it wasn't Glenn's either. I was giving you my experience as a first time builder, like you and progressing through the same kit as you. Take the advice or don't. It's that easy! It's your journey! John
- 139 replies
-
- 1
-
-
- Lady Nelson
- Amati
- (and 2 more)
-
What Glenn said. John
-
If you want to get the same timber that's in the kit, I have found two places that supply Amati-brand timber: Wooden Model Ship Kit (in California) and Cornwall Model Boats (in the UK). I have bought other accessories from both of these. They both have pretty good turnaround, obviously higher shipping from the UK but do shop at both sites to compare. If you stay with the Beechwood for the deck note that the parts list has it at 0.6 x 3mm. Check yours but mine was 1x3.25mm. (I didn't measure mine so if you need some at 0.6mm thick, do have a deal for you.) Model Expo has a good selection of everything also. Get an account there and you can get a daily email on what they are currently discounting, something different at least every week. I would think twice about doing this. It is not that obvious of the kit's deficiencies in this area. Remember, this is a beginners kit. Do you really want to scratch-build on this? Surprised you needed to cut it off. Using the appropriate dissolving solution for the glue you used should have made it easy to just pull it off. Check out this thread: https://modelshipworld.com/topic/28203-a-spot-of-glue/?tab=comments#comment-807736 I like your gun port mockup. What's missing I think is a margin plank, which is typically wider than the other planks. The widest I was able to get was 5mm from WMSK. And you should go through my first post to you on April 17 for planning the deck layout. You will put in a lot of effort into the deck. I wouldn't add to that by the re-working the gun ports. Just saying... John
-
The eyes are the second thing to go, after short term memory. John
-
Michael, I want to setup this link in my signature. This works if you are replying to a post. But in the signature setting page, the "chain" icon does not appear. Follow you instructions to see where I'm screwing up. I'm disappointed that I keep failing to get this figured out. I spent 45 years it IT and know how to work around operating systems and mainstream apps. Help me out here, buddy. John
-
Still trying to do this but still confused on Mark's post. This is from post #2: What does "proceed as normal to link the specific page" mean? One member posted this and all I see is that James posted this? Is there something that James flipped in his profile? I use Chrome. I see MS has shown that there is a "Link" option for Edge, Is that related to the solution? Thanks...John
-
Beautiful looking model! Great job. Gonna be my go-to log when I get to my Speedy. John
-
What I found very useful was a couple of chapters (in reality, I read the entire set) of Chuck's build instructions for his cutter Cheerful, here: https://syrenshipmodelcompany.com/revenue-cutter-cheerful-1806.php , particularly Chapter 7. Give it a look. .j
- 139 replies
-
- 1
-
-
- Lady Nelson
- Amati
- (and 2 more)
-
Been following since the beginning, Glenn. Really outstanding work and the detail in your posts is at the highest level. Well done! John
- 382 replies
-
- 2
-
-

-
- Vanguard Models
- Duchess of Kingston
- (and 1 more)
-
You will find that the 1st 4 x planks, covering the bulwarks, will not need any tapering, either at the bow or the stern. After that yes. How's your deck planning coming? Or are you still sanding?😁 .j
-
I believe the MinWax product will work without a problem. But you certainly don't need a stainable filler. However, I'm thinking that it is oil-based, whereas the Elmer's is water based. If you use the MinWax product, you may be introducing an oil-based product into your build which could change the dynamic between oil-based and water-based products which I think you currently have just water-based. I could be way wrong on this, but I'm sure Glenn will correct me since he has more experience than me. His recommendation is the same as mine and they are both water-based. What glue are you using to attach the planks? .John
-
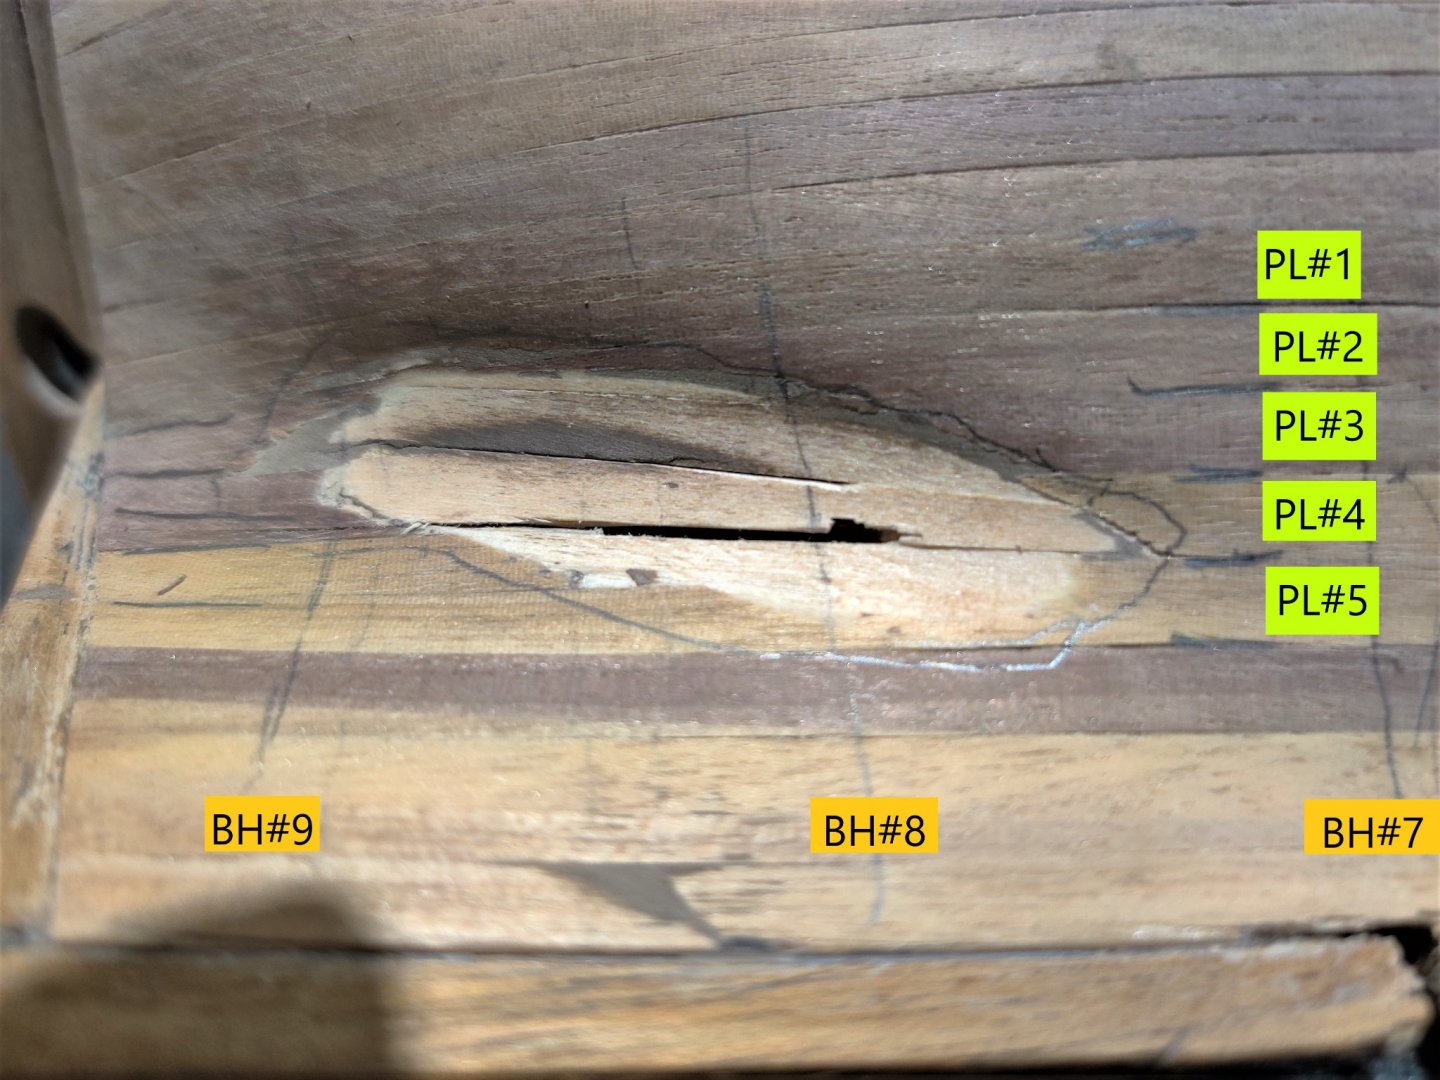
OK, Just to recall, this was the damage: So I cleared out to the rudder post and squared off the 2nd planking that took the brunt of the hit (PL#1 through PL#5). Then I removed the damaged 1st planking planks that were between BH #9 and BH #8 which was a little right of the marking in the above picture: Then I installed 3 x 1st planks and 1 x stealer: My mentor, whose videos on the LN build were on Facebook, advised to plank over the deadwood with the 1st planking. As I now know, doing that causes the 2nd planks there will be proud to the rudder post. So to avoid that here, I'm thinking to remove the 1st planks in the deadwood are as shown behind the arc in red above. To balance the appearance between starboard and port sides, I'll sand down the 2nd planks on the port side to match. Advice/Comments appreciated. Also, as shown in the 2nd photo, any advice on straightening the edges on the 2nd planks that remain and border the edges of the visible 1st planks. Really tough to get in there with a file or a very thin sanding stick. Or just re-cut until I get a straight edge? Thanks...John

.thumb.jpg.83289a4218c31bbd588b5238c4f0f2d8.jpg)
.thumb.jpg.3f963cc6d11f8ff96e82be6ad68cae86.jpg)
-
Looked there but couldn't find it, oh well. Thanks Derek. John
-
Best practice is to have the 1st planking as smooth as a baby's butt. So yes, fill and sand. And I use Elmer's Carpenter Color Change Wood Filler, here: https://www.amazon.com/Elmers-E914-Carpenters-16-Ounce-Natural/dp/B00K25F1UW/ref=sr_1_17?crid=3TEOEM5LL2HA5&dchild=1&keywords=elmers+carpenters+wood+filler&qid=1618691773&sprefix=elmers+carpenter%2Caps%2C182&sr=8-17 I feel the 16-ounce is worth it, not the smaller sizes. I notice you have the beaded version of the multi-hands tool. I've shopped for something similar. Obviously, the Quad-Hands looks to be the best, but the most expensive. Have you used it on this project and does it do the job? John
-
Glenn, could you provide the US Amazon link to these cutters? Dereck's link is to the UK Amazon. And I can't find where/if Ryland posted a link. Thanks...John
-
Beautiful execution, James, of a beautiful kit, Chris. Will be added to my list of kits to get. John
- 355 replies
-
- 7
-
-
- vanguard models
- Sphinx
- (and 1 more)
-
Very nice work for your first time. One tip: put masking tape on the prowl, keel and stem post, some heavy stuff. Will prevent some dings and sandpaper scraps. Question now is do you go with 2nd hull planking or tackle the deck? I went with the deck to prevent me getting frustrated/bored with more hull planking. Needed something different! Deck planking has some 'look' decisions you will have to make: What will the edge of the deck look like? Check out the thread I started on this here: I eventually went with the Spirketting and a Margin plank. If you go with a margin plank you will need some wider deck planks. I bought some 5mm planks and instead of going with scarf joints, I edge bended an entire blank. Then you need to decide how the rest of the planks will terminate on the margin planks: straight, pointy cut, or nubbed, or hooked. My research found that during the time of this ship, the practice was hooked. It's not a trivial exercise. You'll also need the wider planks for nubbed or hooked. A lot of people have gone with nubbed and it looks nice. With hooked, you don't have to cut into the margin plank. Check out the October 10, 2020 post in my build log where I get into the details of all of this and check out MSW for other posts on these topics. Note that if you go with the deck now, you will get some experience with the 4mm walnut planks before you use these planks for the 2nd hull planking, since these also go over the inside of the bulwarks. I'm very happy I went going with the deck instead of going straight to the 2nd hull planking. It got me more experienced working with wood before the 2nd hull planking. I'm finished with it and am just cleaning up before I post on that. Good luck...John
-
Sorry, I like my story better. More relevant.
-
It was a small sheet to begin with and I had used some it already so there isn't enough to try to make it myself. I already sent an email to the reseller, so we'll see. The only material I have would require gluing a three 2mm x 4mm beech strips together and then a lot of sanding and shaping. What about build up those pieces with wood filler in situ and then sand and shape? Will that survive? Most of those pieces will be painted. .John
-
Thanks for the many ideas. I'll report back on what technique I used. Yes, most, if not all of this area will be painted white (should have said that in the first post). I have another question for you: I've pretty much made a mess of the keel and stern post. These were in a 3mm walnut laser-cut sheet 60mm x 300mm that came with the kit. How successful do you think I will be in asking the reseller (Wooden Model Ship Kit) or the manufacturer (Amati) to sending me a replacement sheet? Not sure I want to do the stern post yet, but the keel piece is easy for me to replace. Is there any site that would stock model laser-cut sheets? Thanks...John
-
Unbeknownst to the captain, who was below deck asleep, the Lady Nelson, overnight, took a direct hit below the waterline on the starboard side. Fortunately, she was in dry dock, undertaking commissioning work on the entire hull and didn't sink. Here's what the damage looked like in the light of day: No one could determine how this damage was sustained but the authorities were reportedly investigating the dry dock ship to the starboard side of the LN. The architect was summoned to the dock to give his plan for repairing this portion of the hull. Nope, I'm too embarrassed to say how this happened. Trust the reporting. So I thought that wood filler would be the solution, but after sanding it down, I was left with less material than what I started with, even thinning the 1st planking. As painful as it is, the only and worse case solution I can come up with is to cutout both layers of planking between Bulkheads #7 and #9 and Planks #1 through #5, leaving a open rectangle and room on each bulkhead to lay in 1st and 2nd planking planks. I'm hoping the experts on this site have some better ideas to dig me out of the hole! .John


.jpg.f55af1e4257cfe1b2e21d2f4faed17a0.jpg)
.jpg.572cd286c13de7d9ab72696f183f6d34.jpg)

