Jonathan_219
-
Posts
176 -
Joined
-
Last visited
Content Type
Profiles
Forums
Gallery
Events
Everything posted by Jonathan_219
-
I am finally starting the work on the rigging on my San Felipe and in observing other build logs I really like the look of served rigging where it's appropriate. I bought a Syren Servo-Matic and starting doing some practice serving to see how it goes. All in all it's quite good but I'm not very happy with the thread I'm using for the serving as it gets pretty fuzzy after it's wound on the rope. I've tried using a candle flame and some beeswax to try and tame the fuzz after winding, but neither are giving me the nice clean results I'm looking for. The instructions mention to use as fuzz free thread as possible and I'm using some that looks pretty good on the thimble but once it's wound the fuzz really comes out. The thread I used is SewOlogy all purpose 100% cotton that I purchased at my local hobby store. I'm looking for recommendations for a specific manufacturer and/or type of thread to use, black of course, that has produced good serving results for others. I have a Hobby Lobby, Michaels and a Joann near me plus several other fabric stores and it would be nice it was something I could go pick up but if I need to order online to get the right thing that's ok. Appreciate any thoughts or ideas.
-
Did DeAgostini leave the model ship business? I have a kit that's been back ordered for almost two years now so I check their website every once in a while to see if they're selling it again and when I checked in today their site has completely changed, all the model ship kits are gone and the only thing they seem to be selling is some collectable cars? I had already give up hope on ever receiving the kit so not a big deal, just curious if they've decided to go in a different direction.
-
 Chainplates: I have really struggled with the chainplates, from the positioning, the soldering and assembly it's been a serious challenge. I've had to just spend days looking at the instructions and ship trying to figure out what to do, try things and fail and come up with different approaches, but I think I've finally got something that works. The first issue was the positioning, I thought I had placed the side boards that hold the deadeyes in the correct place according to the plans and instructions but several of the holes for the chainplates were right above the center of a gunport requiring the chainplate to come out a a very ugly (to me of course) angle to not block the cannon. The plans show several of the chainplates coming out at very odd angles and mine would have been even more awkward and I just didn't like the way it would look so I made a decision to eliminate the chainplate on deadeyes that were directly over a gunport. If the hole was more to the side then I'd install a chainplace and angle it away from a straight line with where the shroud will be as little as possible. For these deadeyes with no chainplate I wrapped the copper wire around it and then just bent both legs back on the underside of the board hole to hold it in place. Not ideal but better to me than having a chainplate at a wonky angle. My next issue was soldering the loops. I tried several methods and while I could sometimes get a solder that seemed good as soon as I put any pressure on the link installing the wire loops they almost always broke. I watched several silver soldering videos in the metal forum here and on YouTube but decided that was more than I wanted to get into for this one small part of the project. I went to the local hardware store and found some metal epoxy and it seems to be working pretty well. It hardens in a very short time, only a couple of minutes, so I mix up a very tiny amount and do 6 at a time and let them cure overnight before installing. It seems like the epoxy has a slight bit of flex where my solder joints pop the second any sideways force get put on them, which is pretty inevitable when installing. I also had a minor issue where the supplied nails for the bottom of the chainplate had heads that were smaller than the holes in the bottom section so they just fell off. Another trip to the hardware store found me some small brass nails but the diameter of the shaft was slightly bigger than the hole so I had to do a small bit of filing on each lower chainplate piece to allow the nail to pass through. The last issue was just the installation of the plate, getting the wire that wraps around the deadeye to have the U-turn in the right place to get some tension on the chainplate but not be so tight as to pull down the side board with the deadeyes was very trickey, a very small difference in the position of the U-turn makes a huge difference in how tight or loose the chainplate would be. I would wrap the wire around the deadeye with one long leg and place it in position. I would then install the lower part of the chainplate, nail and all and then use tweezers to hold it in place and then mark the wire where it needed to bend, pull the lower part of the chainplate off and test install and if it was good then finish putting the nail in and if not then take the lower piece off, adjust and try again till it fit. I got better at guessing were to put the U-turn in the wire and by the end was getting most of them first time. I painted the wires and chainplates before installation but of course of bending and grabbing with pliars some will come off so just touched up the paint after it was all in. This has been by far the most difficult part of this ship so far and I'm just glad I have something that is semi-decent. One side of the ship is done and it's time to work on the other side now.
-
Things have been a bit slow lately, just working on the gunport lids and the structure on the lower deadeye assemblies with the chains etc. so decided to take a break and do the lifeboats. Not thrilled about the plastic hulls but decided to just go ahead with them and see if I could get a decent looking finished product. Planned ahead and put the tie down ropes in place along with the hardware so it was easy to tie in place on the boat was finished. Almost done with the second one and will tie it in when I'm done.
-
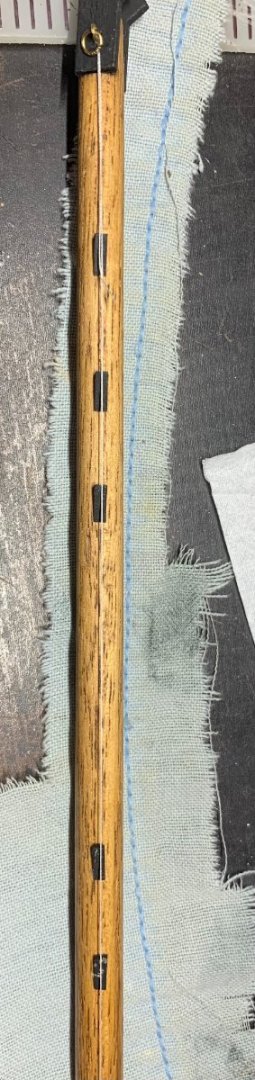
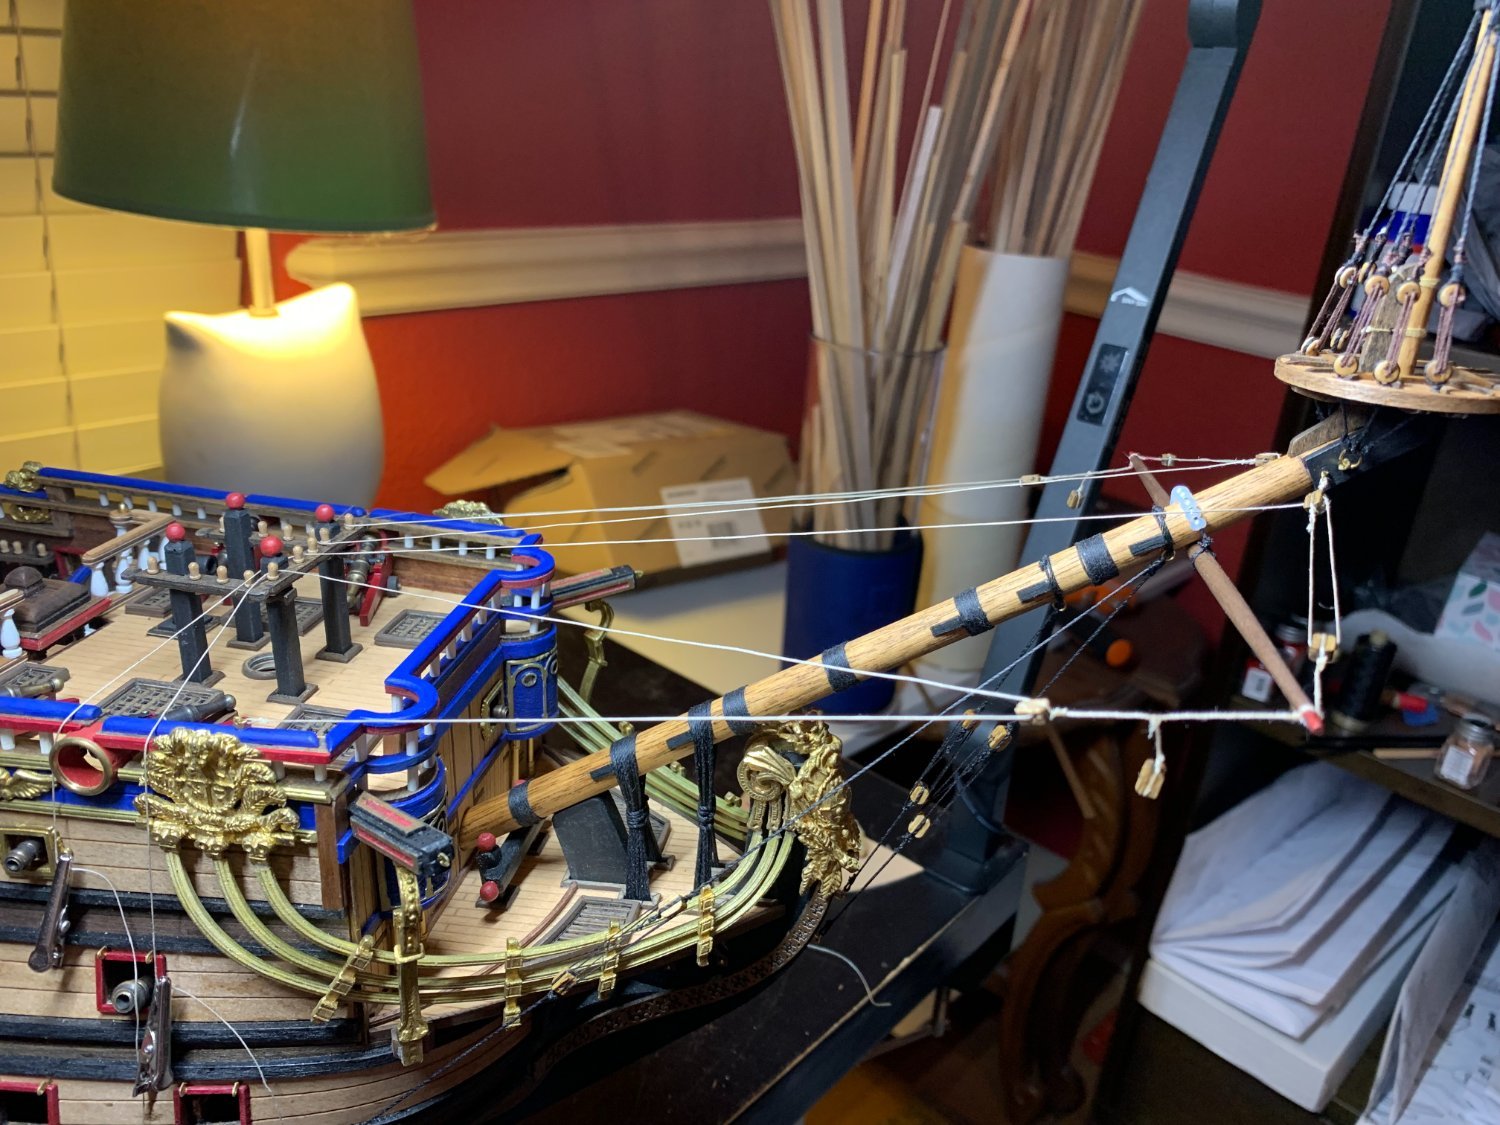
Bowsprit and rigging: I've finally been able to start on the rigging, for some reason I really enjoy the look and work on the bowsprit. I've made some very minor changes like adding rings to give an anchor point for ropes attached to the bowsprit and using some small beads from the local hobby store as parrel beads. The are several things that the instructions and plans don't agree on so I'm just trying to find what will work best. The first set of deadeyes is in and I decided to use a dark brown thread for the deadeye rigging. I've seen that somewhere, don't remember where, and really like the look and since it's decorative anyway just went with it. Bowsprit yard is loose on the bowsprit and I'm hoping I can position it and hold it in place with the rigging, I've used a pin previously. I'm working with the threads now to see at what point I want to tie things down. I'm hoping I can leave it where I would have the ability to adjust as things get further down the line but I'm not sure how that will work out yet.

-
Allan, the cross piece for the bit pins did seem very high to me as well, I've just gone ahead with what the kit instructs. So many things on the deck look completely off scale to my eyes. I'm still at the point in my learning that I don't catch a lot of these things until after it's all together and looks wrong. I especially appreciate the plans resource as I need to learn how to dig into details like that as I progress though builds.
-
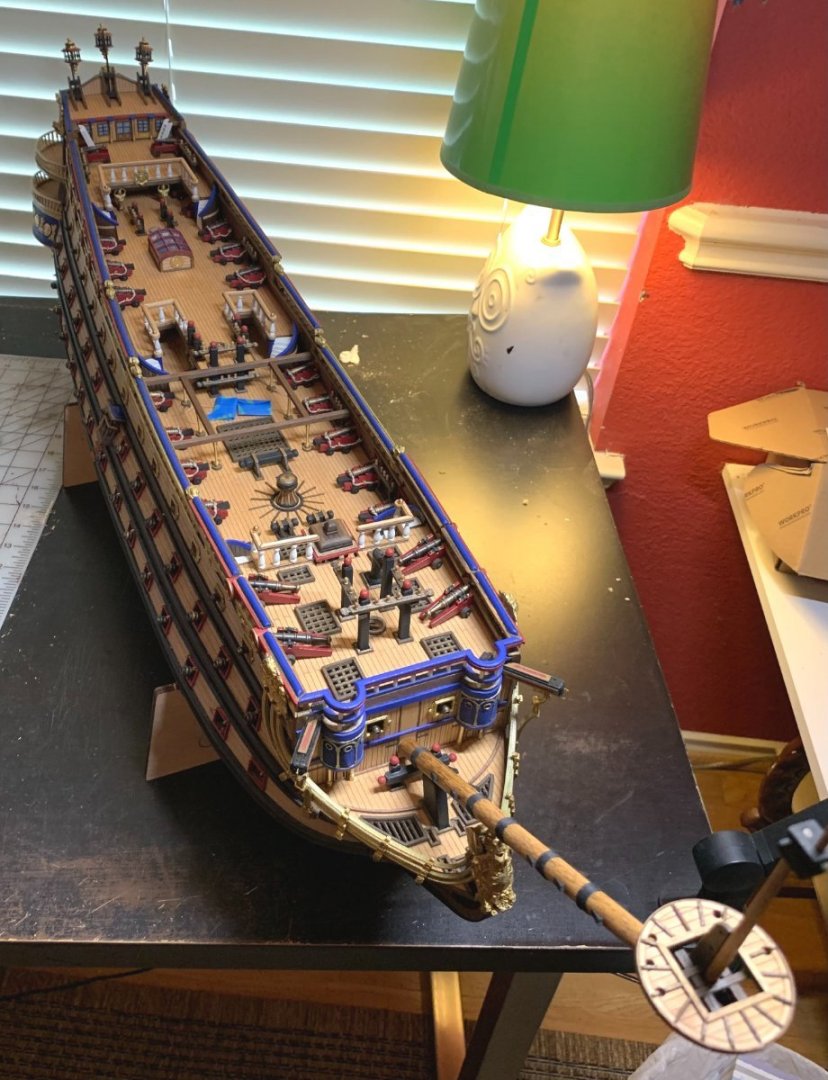
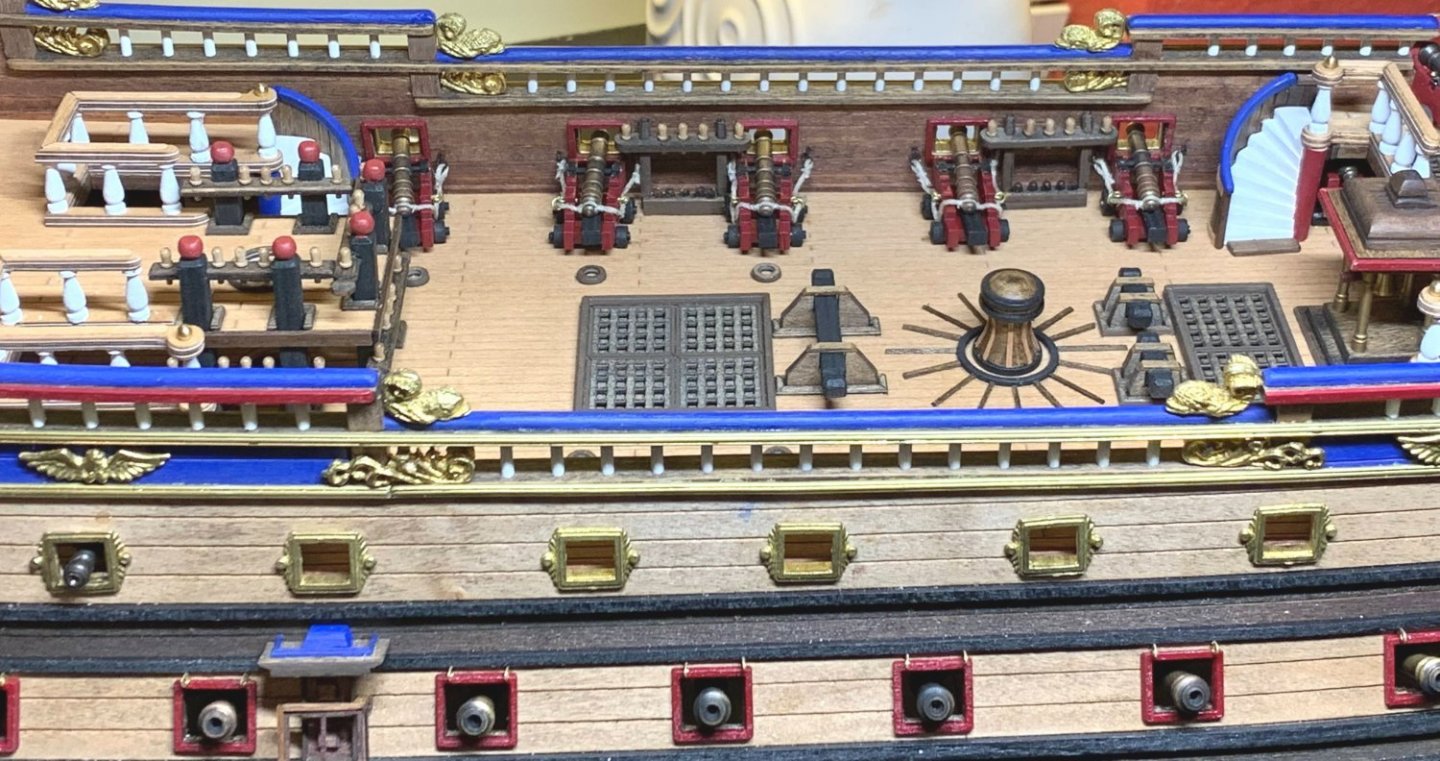
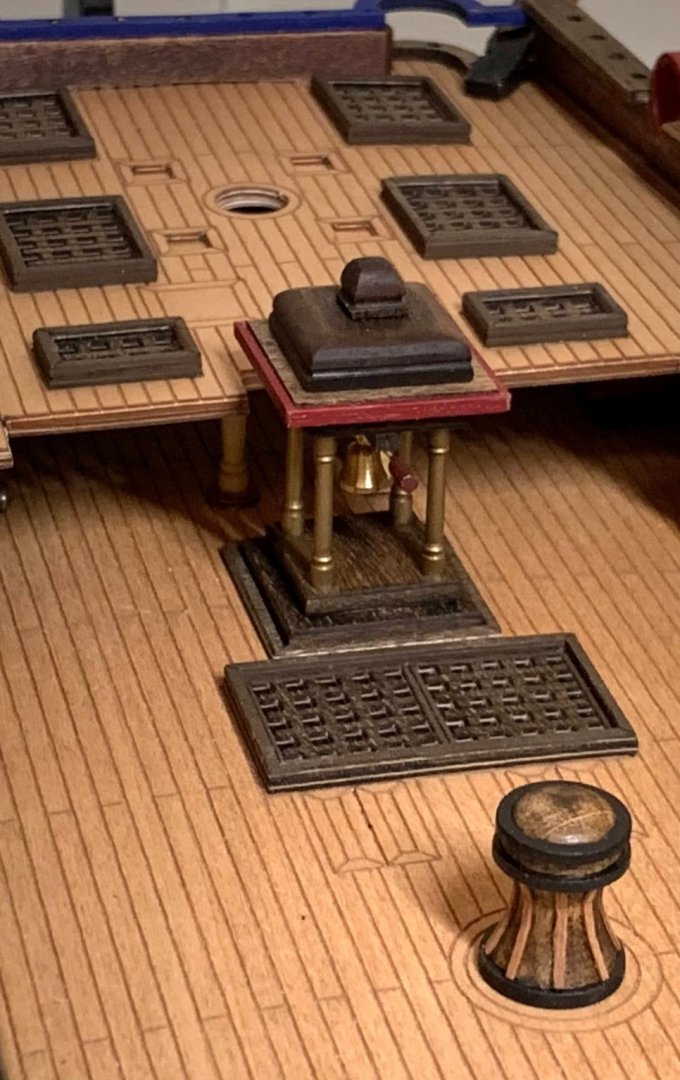
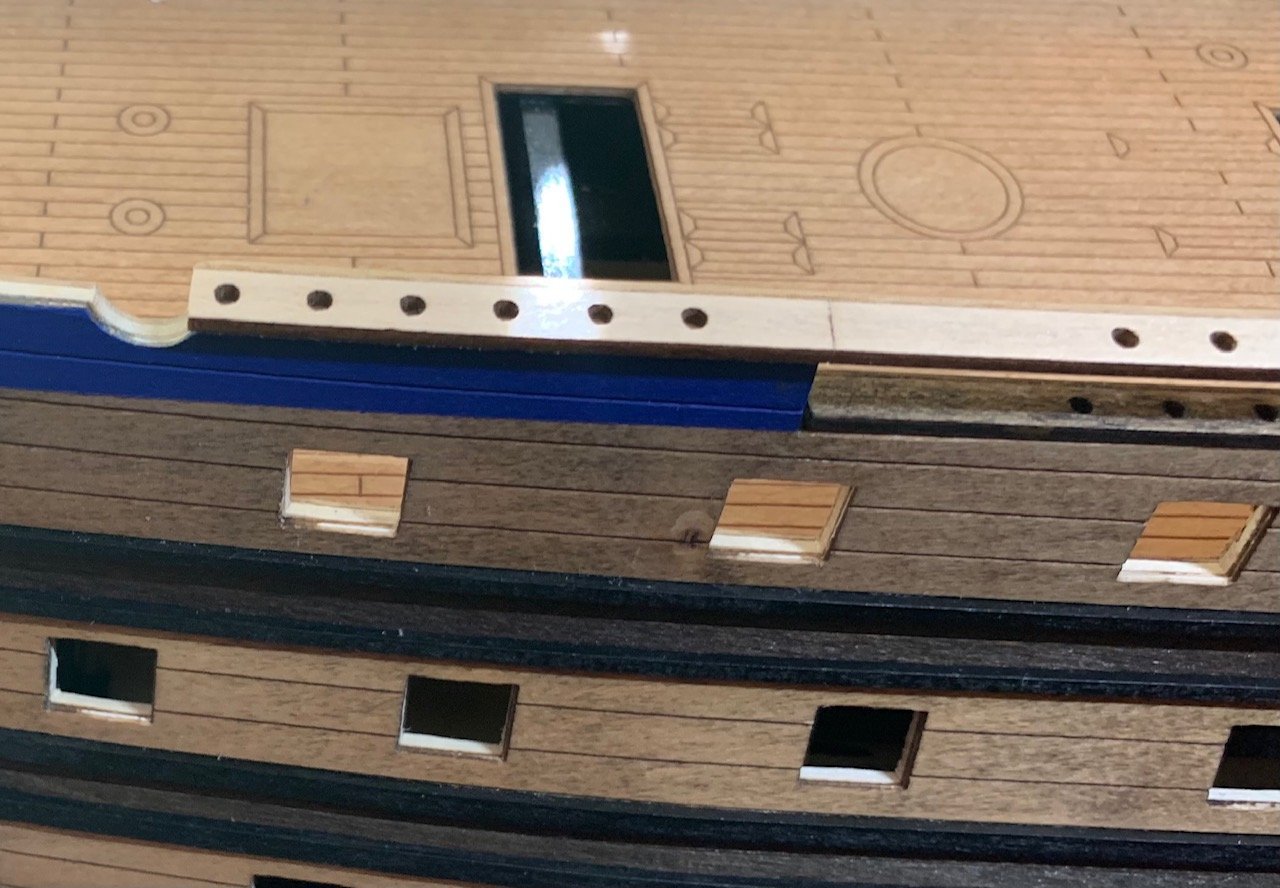
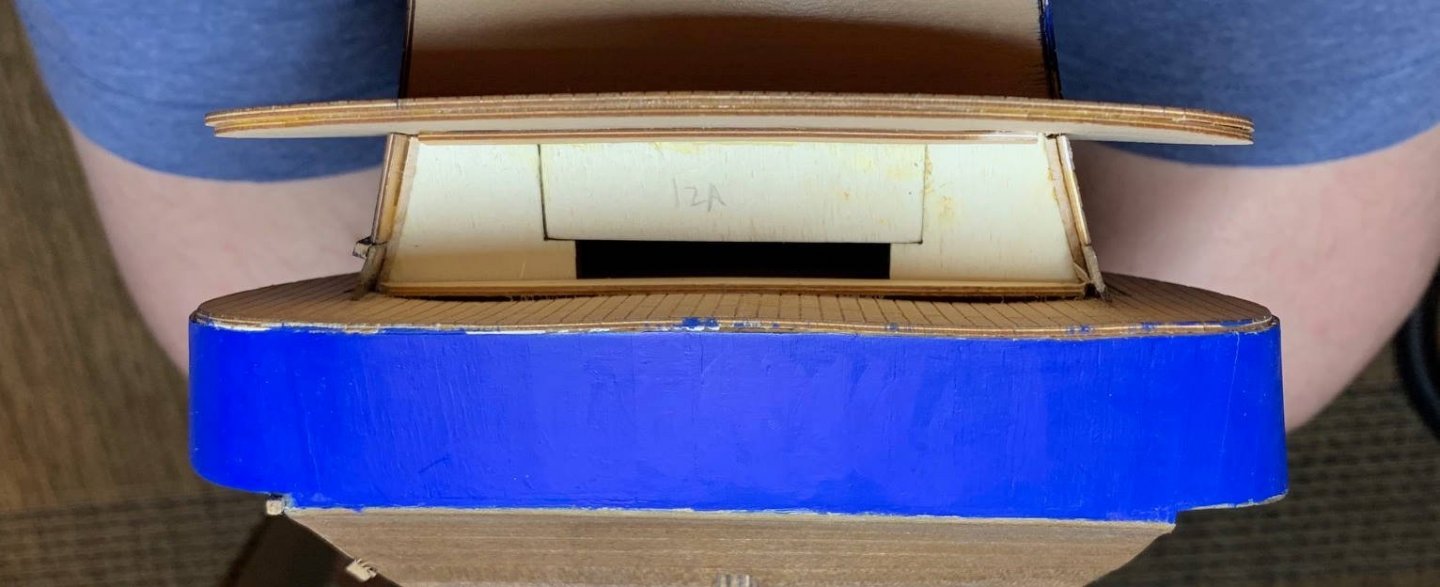
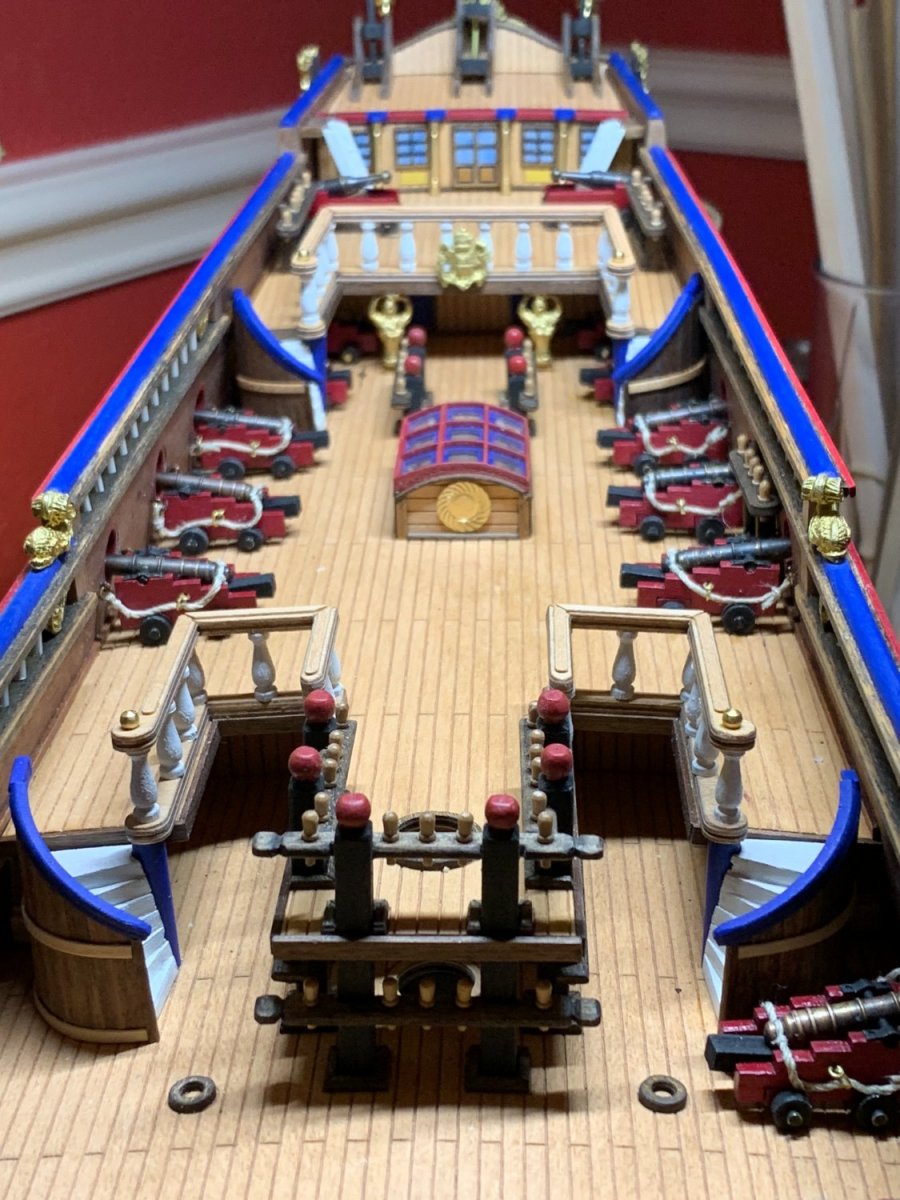
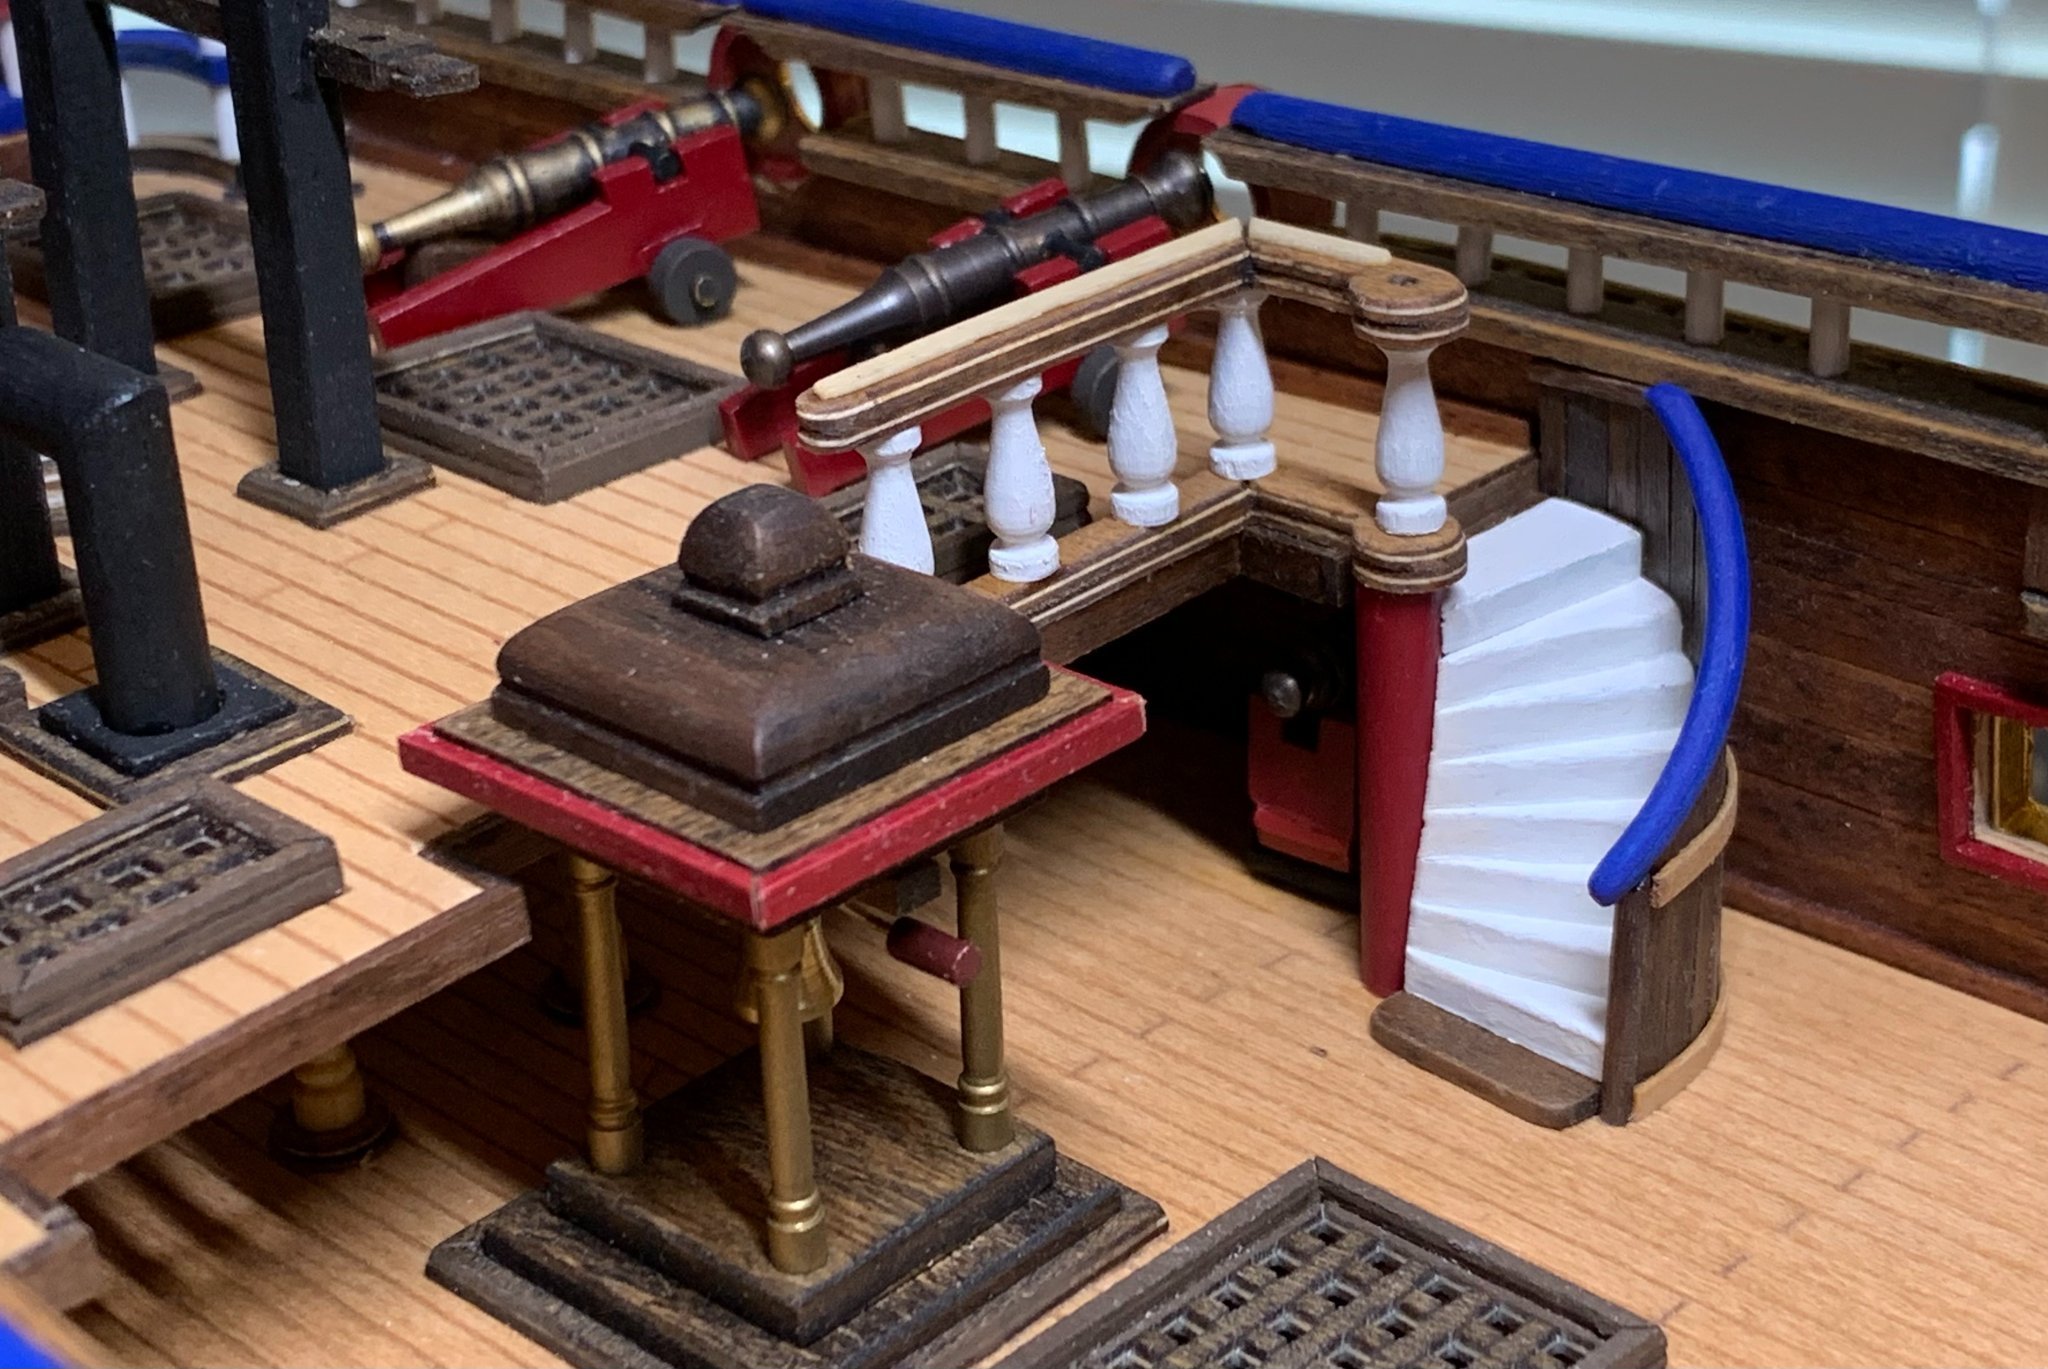
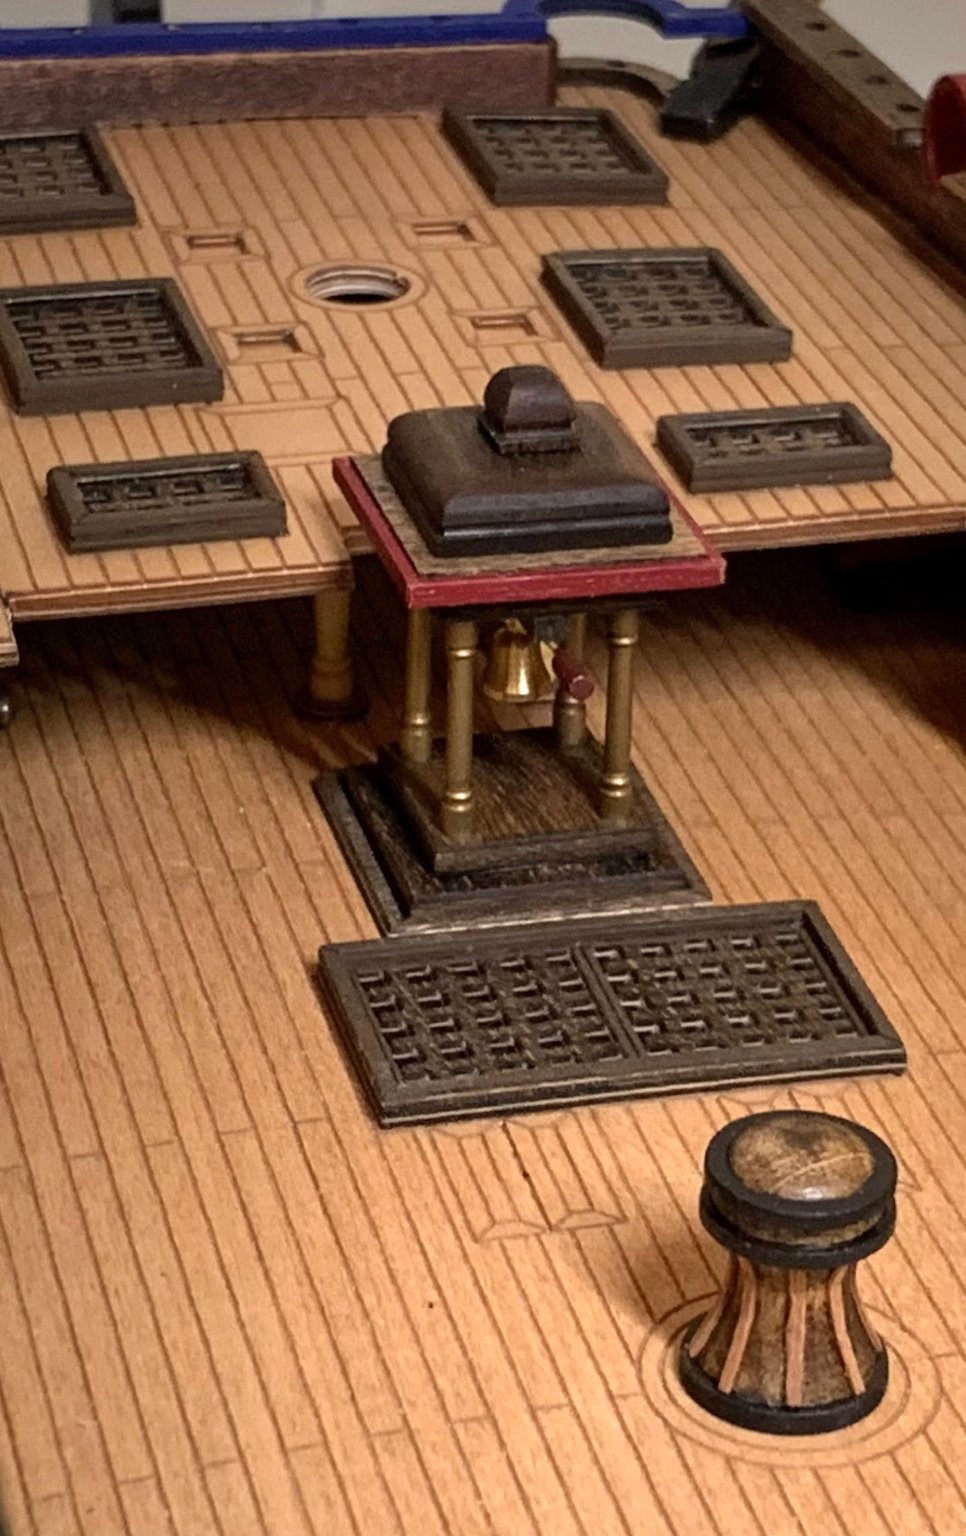
Deck Details Finished: Finished up the last of the deck cannons and the other assorted deck details. One thing stuck out to me which is the instructions don't seem to show any tie downs for the lifeboats which just would make them look really odd to me so I added four eyebolts for each boat, two near each of the end columns so they wouldn't interfere with passage in that deck area and I've already added the roap to one of those which I'll put in basically an X shape across each boat then back through the starting eyebolt and tied off on one of the pins on the lower main mast rack. I looked through the instructions and I couldn't find any other ropes that tie off on that lower rack so I'm hoping that I don't find something later that I missed that will need that pin. I just rolled up the two ropes for that and put some painters tape on them so hopefully they'll stay out of the way while I'm doing the other rigging. I felt that if I put the boats on the rack now that they would be very much in the way as I rig so I will hold off on including those for as long as possible. The bowsprit isn't permanently attached yet but I'm hoping that I don't need to remove it again but don't see any point to making it permanent till I have to. Really looking forward to getting to the masting and rigging, seems like that's a part that many of us really enjoy and it feels like a bit of a milestone to get to this point.
-
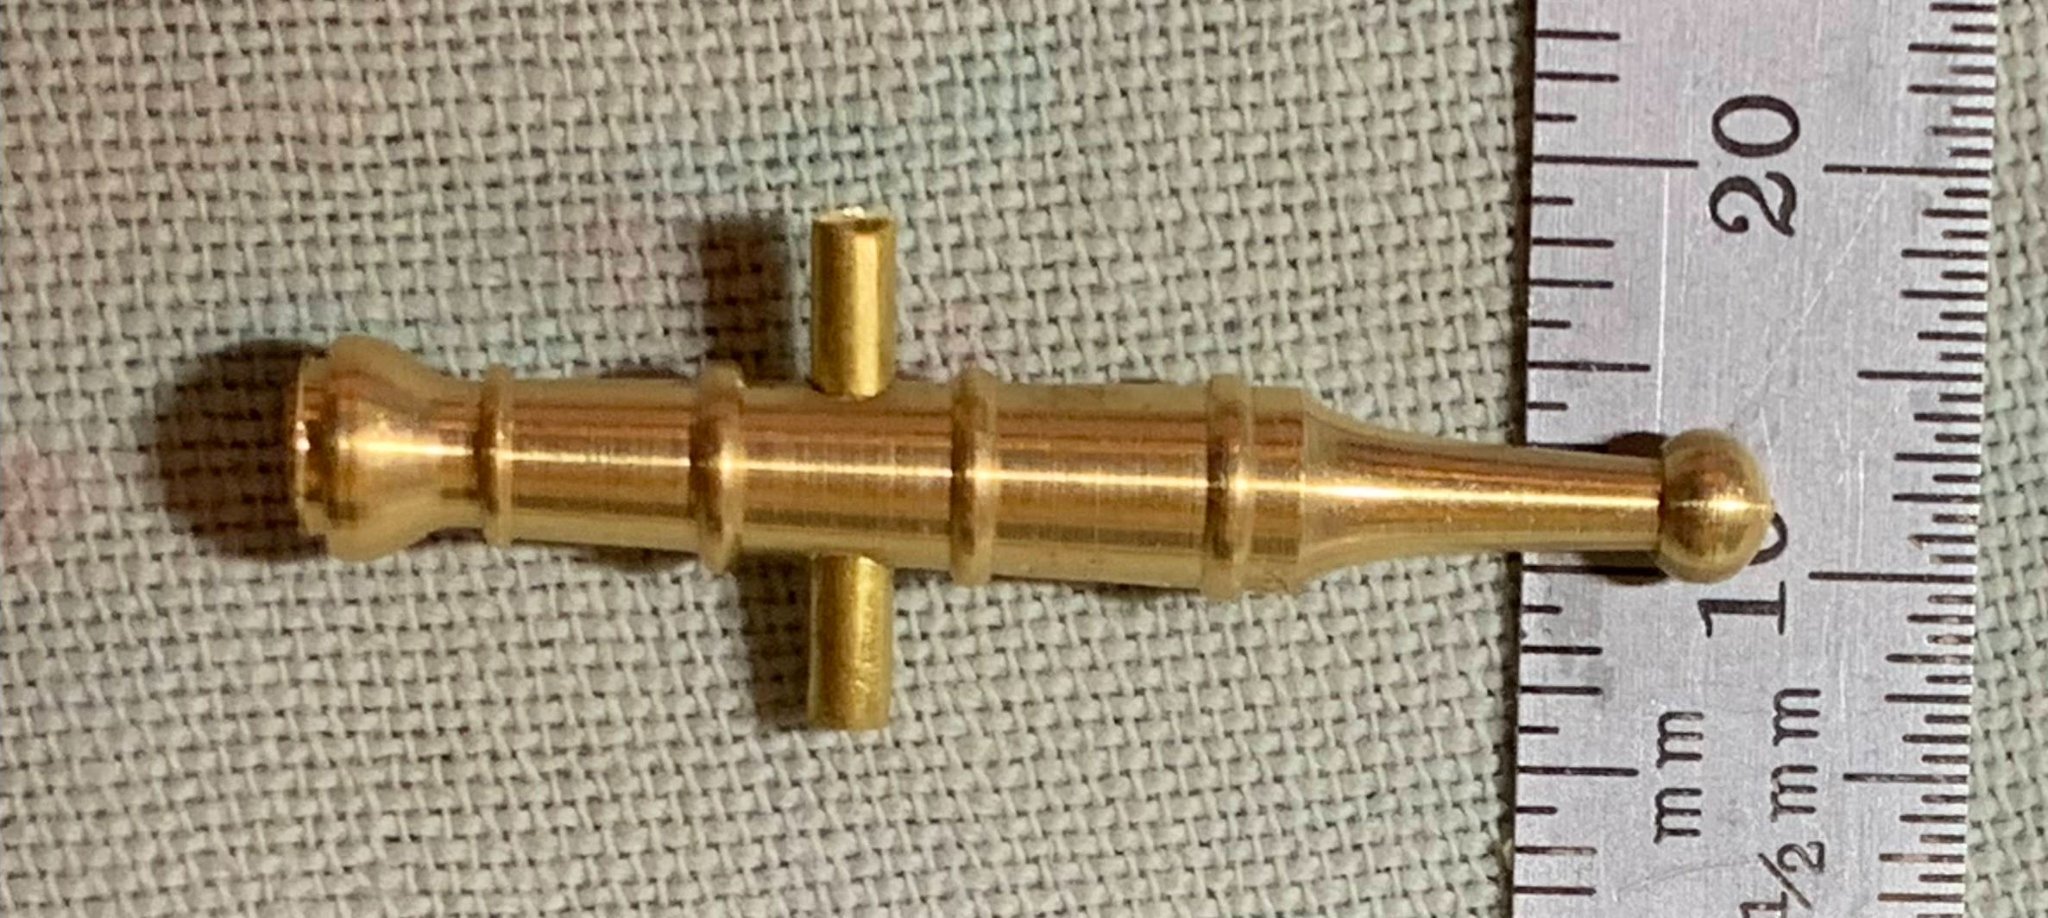
Eureka! I haven't posted a lot of my actual work process in this log because most of the time I'm just trying to figure out things and have no idea if they're the best way to do things but I had a bit of an aha moment today with a problem that's plagued me on both my builds. This problem is when attaching multiple pieces of hardware on a mast or spar that should be in a line on one side getting them positioned correctly. I've honestly tried to do this by eye and the results have not been as good as I would have liked them but I thought of just stretching a thread down the side of the spar or mast where the objects would be centered and using that as a position and straight line guide. I've started on the bowsprit and there's a line of 5 chocks (I think they're chocks) on each side so I tried this technique and it seems to have worked pretty well, certainly much better than just eyeballing things. I used hardware on one end of the thread and painters tape on the other to attach the thread. I used it as a center guide but it could also be edge guide if everything is the same width. Putting the thread on gave me a chance to eyeball where things would be and adjust the thread till I was satisfied and then glue pieces in place. This may be a common technique but I don't remember running across it in any of the build logs I've been through so thought I'd share.
.thumb.jpg.c75fb314efc1c618b3e9329395e92cec.jpg)
-
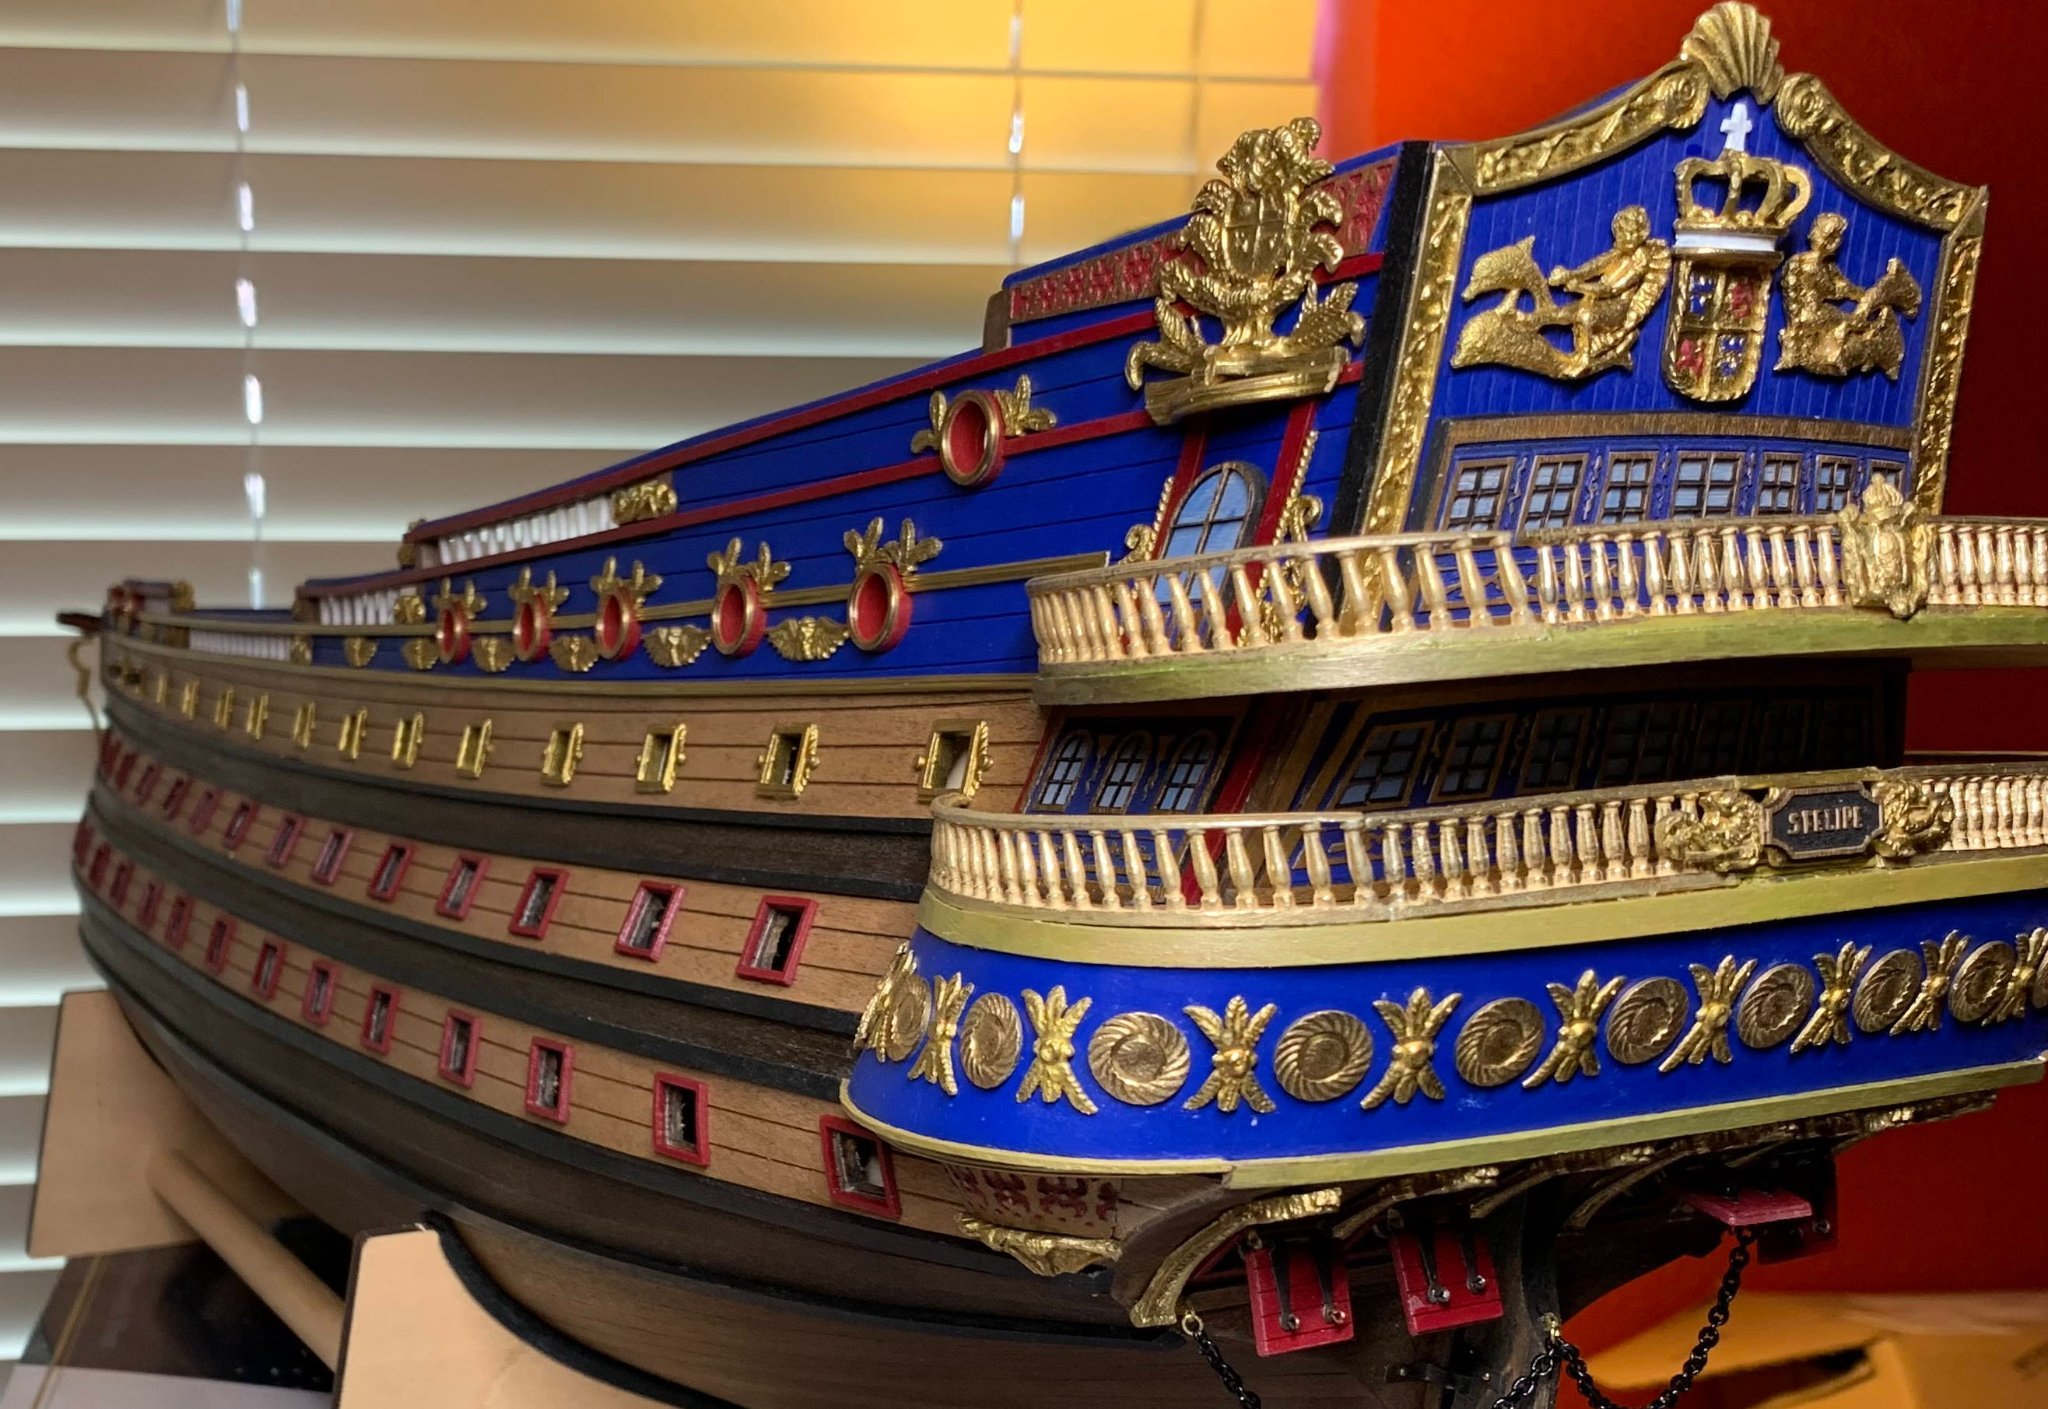
Allan, interesting point on the belaying pins, I was not aware of the timeframe of their introduction and that's great to know, what you see is exactly the parts and position of the kit. I was aware that the San Felipe in this kit was pretty much fantasy and had seen that link before I purchased and I've made some build decisions (mostly colors) based on this being a decorative build and I was ok with that when I started and will finish this out with that in mind, but I have decided to go historical accuracy with my next build. I don't think there's anything wrong with either approach, I built this for myself after all, but it's a different type of "fun" with one being "what color would look good here" and the other "this is how it looked, how can I make it like that" and I'm interested to give the accuracy approach a try so I have the Caldercraft Victory waiting for me when this is finished. This is the only Mantua kit I've built and it's a mess IMHO, looking around on the web before purchasing that seems to be well known but I plowed ahead anyway.
-
More deck details: Just working through all the cannons and deck details. Finished the last of the spiral staircases, I had to scratch build the banister for all of them I just couldn't make the included ones look right. Just have 5 more cannons to go and the last of the detail is done I think. Everything has gone pretty smoothly for these details. Will be able to start the rigging fairly soon now, looking forward to it.

-
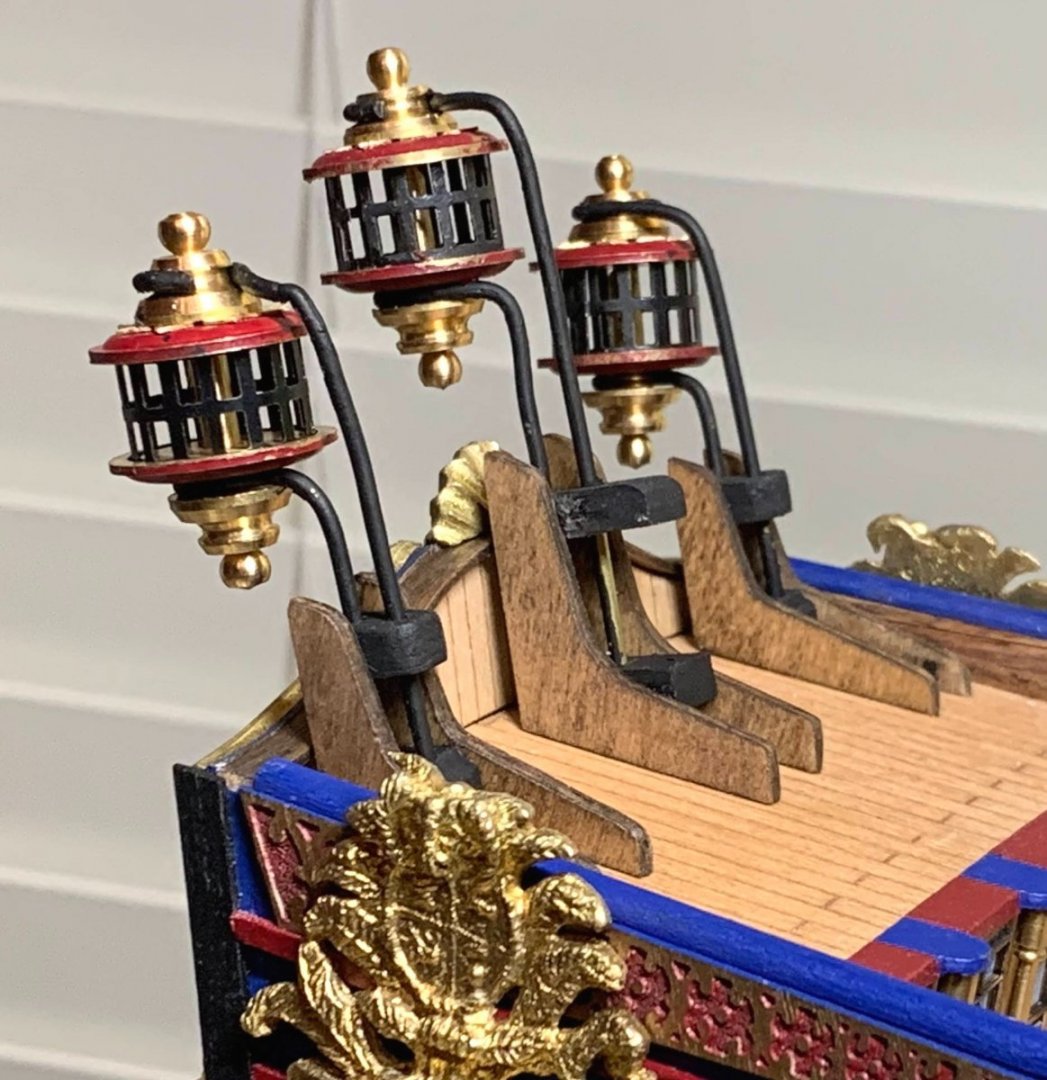
Deck Details and Cannons: Just continuing to work on the decks, and cannons, both the deck cannons and the false cannons. The instructions don't have any rigging on the cannons and that just makes them look funny to me. I had to decide between doing a full rig or just installing the restraining ropes and decided to just do the restraining ropes. The way pieces are positioned on the deck I just though that a full rigging would make things look too crowded. I still have the second side deck cannons to go and a few dummy cannons but soon they will all be done. The lanterns were a bit of a problem because they're supposed to have two end caps which screw down on a central shaft to hold the grate in place but even when the two end caps are screwed completely down it still left the lamp grating loose in the grooves so I decided to put a couple of spare brass 3mm o-rings on the shaft before installing the lower end cap. That pushed the lower end cap up enough that everything screwed down night and tight. I then filled that gap with the mounting wire so that all worked out ok. I'm also debating on whether I should install the gunport lids now or wait till the rigging is done. On my last build I had a tendency to catch my hand on the lids and accidentally tear them up. I'll just have to weigh the extra work adding them later vs. the risk of tearing a couple up.

-
I think I've posted everything I've taken. I feel a little bit bad about disparaging this kit all the time but it's just terrible. In addition to the bad instructions several pieces are just the wrong size to even fit, I'm continually frustrated and having to scratch build some pieces. The weird thing is that it eventually makes a nice looking model. My advice is read through the entire instructions several times and them spend some time with the drawings that show details on the large plan sheets. Sometimes either the instructions or details just won't work but between the two I'd figure out something to make things fit. I've been bouncing all over the instructions not really doing things in the order they're presented in the book. I'm a little afraid when I get to rigging as that's less intuitive to me to figure out what will work and in what order to do things. There are several build logs here much better than mine and I've learned much about the pitfalls that are up ahead by studying them. Good luck, it seems like so far I've been about to find a solution for everything that's popped up.
-
Brass Blackening questions
Jonathan_219 replied to stevenmh's topic in Metal Work, Soldering and Metal Fittings
Just finished another attempt at getting consistent blackening on my cannons and found that using my Dremmel with a polishing pad on the cannon after cleaning greatly improved the result. I've only been cleaning with rubbing alcohol since my workspace is in the house and just don't want acetone or similar solvents in the house. My process was clean with alcohol and a rag, rub dry, polish with the Dremel pretty vigorously and then wipe clean one last time to remove any dust from the polishing process. I used a small container with about 50/50 Casey Brass Black and distilled water and tie a thread around the cannon and keep the cannon off the bottom of the container and move the cannon about fairly frequently. I do two at a time and it takes a couple minutes for the process. Before I started polishing the process took almost 10 minutes and the finish was splotchy. The finished product still has a bit of a matte finish and a slightly powdery look but much less powder than before I started polishing. I finish the cannons out by rubbing a very small amount of clear candle wax over them with a rag, tried beeswax but the candle wax worked better. This gives the cannon a much more realistic finish and texture to my eyes. I'm hoping in the future I can continue to get a fairly consistent result by polishing since personally I like the look of blackened over paint. These were my last cannons on this ship so it will be a while before I get to try this process again. I've been following this thread as I've tried to improve my process and wanted to share some positive results, it wasn't as easy as I thought when I started but once I got a process it went pretty quickly. -
First Spiral Staircase and Railings: Slowly adding some deck details , started with the small cannons and after a discussion and some very helpful advice in the Metal Work forum decided not to force things and continue to try and bend these small cannon tails up like the instructions indicated. My first attempts didn't budge anything and with the info from the forum decided it would be best not to keep attempting to bend it and end up ruining them. I think they look fine straight so will have to stay with that. I did have better luck with blackening them as I tried a different method of using about 50% blackening solution and 50% distilled water. I hooked a small thread around the barrel and then made sure to keep the cannon constantly in motion in the solution and that does seem to give me a more uniform appearance. I used a very small amount of candle wax, tried beeswax but candlewax was softer, and polished the cannons with a cloth to remove any powdery look. This lightens the color some but still give a nice look, anything is better than the bright untreated brass. Couldn't stand the look of the deck edges so I found some 1x3mm walnut strip left over from another build and finished out the edges, I'll need to do that on every deck edge but it looks so much better than the raw ply edge. The railings were pretty straightforward except I wondered what to do with the edges of them since they're made out of multi-ply stock so when staining they're going to be striped no matter what I do. After a test stain I decided the stripes were a feature not a bug and that they looked ok, or at least better than painting them a wood color. Considered briefly painting them blue or red as part of the color scheme but decided that I'm in danger of, or maybe past the point of having too much accent color and wanted them as natural as possible. The finished spiral staircase in the instructions was just ugly. The other two positions have covering pieces but these two were left bare with some railings added and just didn't like the look of it. So I took some inspiration from the Testazyk build log and added my own outside covering and details. I'm happy with the way it turned out. Now on to making 5 more! Thanks Testazyk for the idea. The deck details are one of my favorite parts of this build so far, since it's a decorative build and there's not a definitive right or wrong with the details I'm able to just do whatever I think will look good without worrying too much. It looks a bit gaudy to me but I'm hoping all the rigging and hardware will tone that down a bit in the final product. Don't want to veer from what might have been possible but I don't have to be a stickler for accuracy either. I plan to go opposite way with my next build and try the historical accuracy route to see how I like that approach.

-
Bending Brass Cannon Tail
Jonathan_219 replied to Jonathan_219's topic in Metal Work, Soldering and Metal Fittings
Thanks everyone, I had been mulling over the visual effect of just leaving it like it is and not trying to do anything and with the information provided I feel a lot better about doing that. If I'm not mistaken this is pretty old kit so it seems very likely that this particular cannon included has changed from the original design of the kit. I feel like a broken record on my build log but this kit is a mess. Just FYI there are only 6 of these cannons included with the kit and they're all placed on a top deck and are aimed through the circular gunports in the railings so the anti-personnel intent would match that placement. Thanks again for the great information. -
Bending Brass Cannon Tail
Jonathan_219 replied to Jonathan_219's topic in Metal Work, Soldering and Metal Fittings
Excellent idea, had not thought of that. Not sure what I would use for the tube that would be sturdy enough but some additional leverage seems like a good thing, Thanks. -
In my San Felipe build there are 6 smaller cannons (picture included) that the instructions show to bend the tail up slightly with a picture of pliers next to the cannon. I'm assuming they are implying that I should use pliers to bend the part but I grabbed the tail with my largest pliers protected by some cloth and pulled with all my might and nothing happened. I don't have a vise and really don't want to get one for just one task but I don't think there's any way I'll bend it by hand this way. I also tried laying it across a metal screwdriver shaft and hitting it pretty vigorously with a hammer and again nothing happened. I'm afraid if I grabbed it tight enough with some vice grips or something similar tight enough to hold it firmly enough that it would end up deforming the cannon and I don't want that. I checked with calipers and the very narrowest part of the tail is 2.3mm and it enlarges from there pretty quickly and it appears to be solid as a rock. Just looking for ideas for a simple way to get this tail to bend a bit upwards. I've considered trying to heat it over a gas stove but I'm worried about trying to hold the barrel steady while trying to bend and not burning the heck out of myself and haven't done that yet. Everything I've needed to bend in the past has been pretty easy but these are just not budging.

-
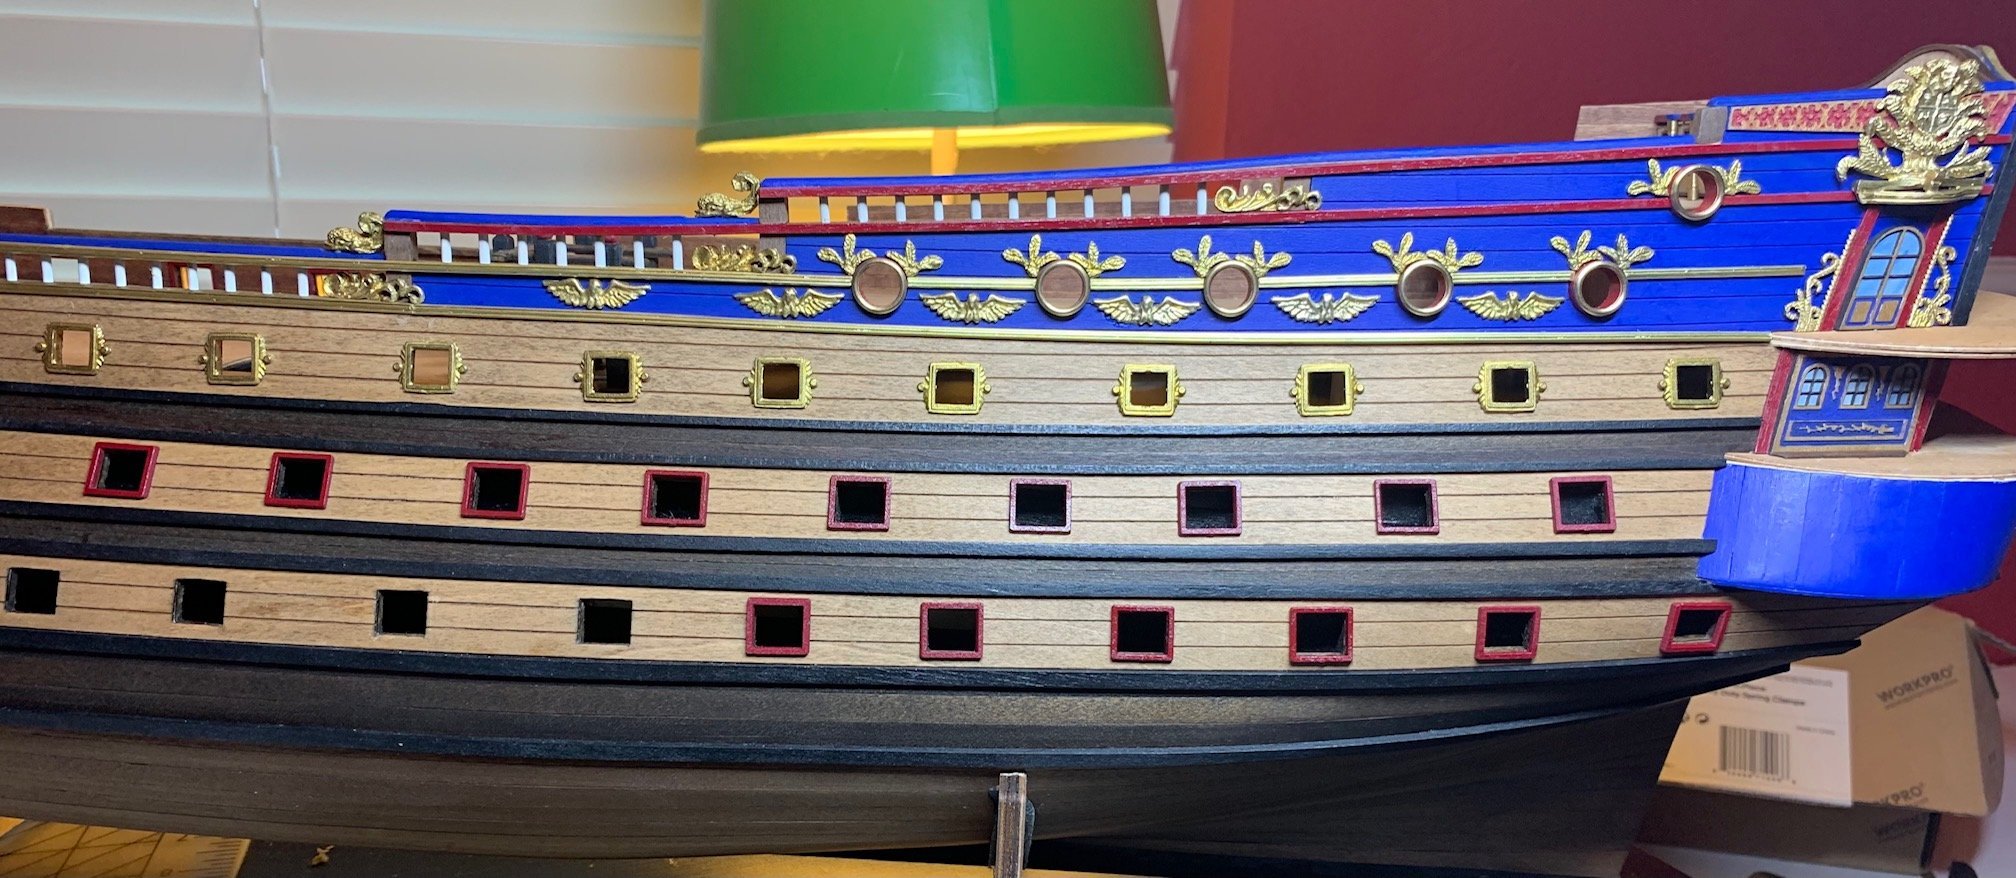
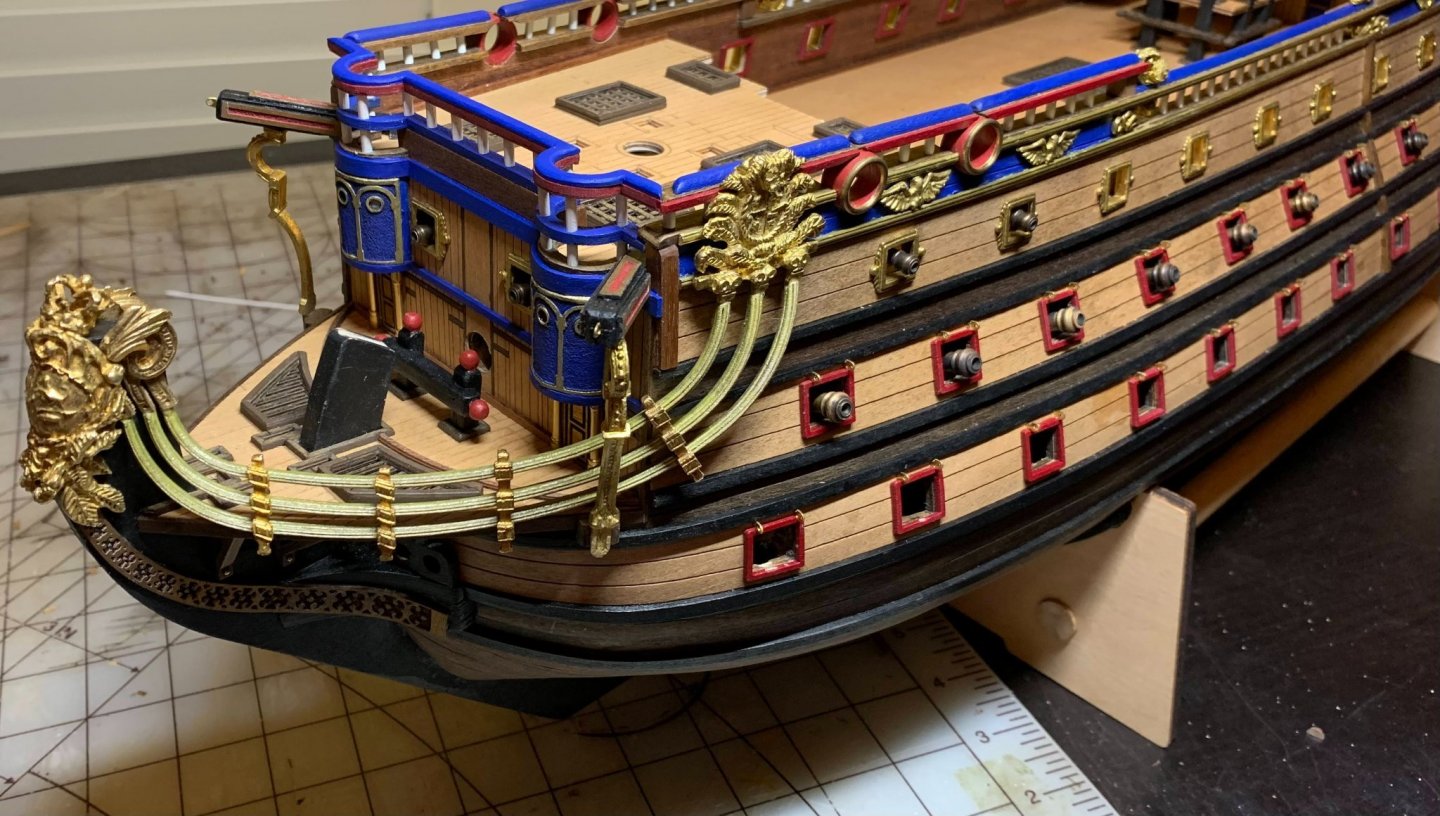
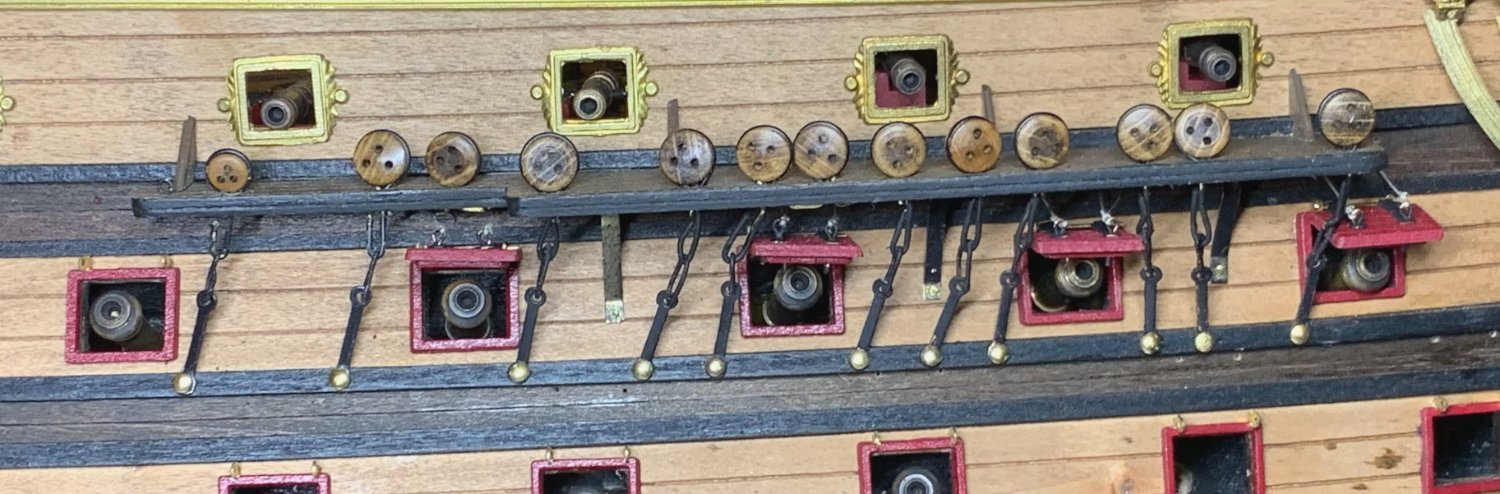
Bow Railings and Dummy Cannons: Installing the dummy cannons turned out to be a bit more involved than I anticipated. The blocks that hold the cannons aren't really at the proper distance from the gunports to give me the amount of cannon I wanted sticking out and I'm not sure if that would ever be possible even if I had planned it better since the blocks are straight and the hull is curved. The only solution I could come up with was to drill a hole big enough to let the entire cannon barrel go through and not just the finger that seems is designed to be inserted into the hole and that turned out to be nearly exactly a 1/4" hole which gives just a little play for the cannon to be adjusted to a chosen position. I wanted to use the Dremel to drill but my 1/4" drill bit won't fit in the Dremel but I did find a Dremel drill set with a 1/4" drill and a smaller bit that would fit in the Dremel which allowed me to drill 1/4" holes with the Dremel. Using a heavier hand drill would have been possible but that seemed a lot more unwieldly to me so I was happy the Dremel bit existed. Went outside to do the drilling as my work space has enough sawdust and dirt already. I've also had a bit of an issue blackening the cannons, I'm using Brass Black and cleaning each cannon before I blacken it as best I can with alcohol and rubbing with a clean rag but I'm still getting mottled and uneven results. I don't know if it's the material, my cleaning or what but the result is not exactly what I was looking for but it did get a worn used effect so it's something I can live with. You can see in the picture how much variance there is. I was timing how long I left them in the solution and then add some if they were lighter but still couldn't get a consistent result. I then made a small jig to fit into a gunport and drilled a 1/8" hole in it at the position and angle I wanted to drill a pilot hole for each cannon and then with back with the 1/4" to finish out the hole. There are some places where the block didn't go far down enough to encompass the entire 1/4" hole but I think I have enough to glue the cannon on, I just have to fix it in place while the glue dries. So far I have one row down and nothing to difficult so far putting the cannons in and adjusting as the glue dries. Also finished the front railings, I had to scratch build several of the pieces for this, the included pieces just weren't long enough and left a significant gap in the railings which I just couldn't have. Not hard just time consuming, but enjoyable. Will continue to finish the cannons and gunport covers on this side and then it's on to repeat everything on the other side.
-
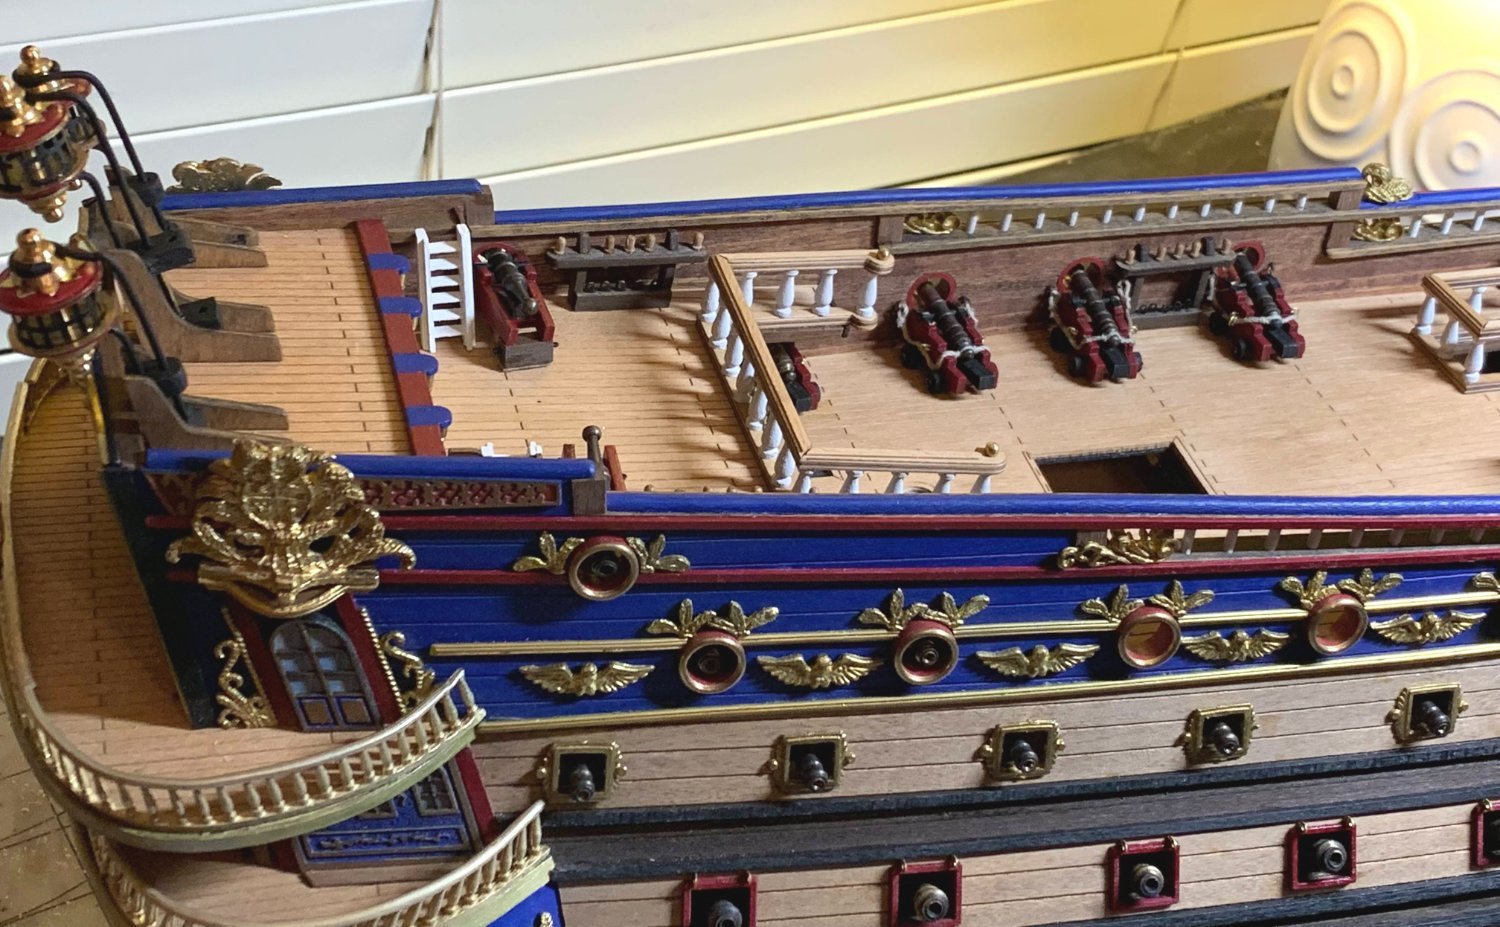
Stern and some deck fixtures: I've been mostly working on the stern and breaking that up with some deck fixtures that don't need to be glued in place for a change of pace. Things have been going pretty slowly as it seems that almost every piece of the stern has to be worked and in some places completely remade to fit properly. Since several of the pieces are brass that has meant a lot of hand filing and shaping. Fitting the cannons in the four gunports proved especially challenging since there wasn't a convenient piece to attach them to, I suspect that I placed those gunports lower than planned but any higher and the opening would have been almost completely facing down horizontal which didn't seem like a very likely arrangement for cannons unless they wanted to shoot fish. This required me to file away some of the nearest bulkhead to the stern and do it through the gunport without damaging the gunport, tricky for clumsy me. I have also added the back gunport lids and worked out a system for the eyebolts included in each lid. The instruction call for eyebolts to be pushed through and then bent into another eyebolt on the back side but I didn't think that I could make that look good and I also felt like the included eyebolts were too big, for my eye at least, so I ordered 400 eyebolts (62 lids X 4 each with some spare I hope) and I'm using those. I've tried using the Brass Black on the eyebolts and lid hinges but the result isn't that great. It seem very powdery and easy to come off and I'm assuming that's due to the material used to make those components since it seems to work pretty well on cannons. My only other alternative is to paint them but I wanted to try the Brass Black and see how it worked on smaller pieces, jury is still out on that. I'm going to take a deep breath soon and start working on the cannons. I expect this to be a fairly big job but I don't want to start full bore on the deck details until they're all in place so I don't have to work around anything that I don't have to.

-
Been a while since I posted, just working on a lot of fiddley bits, mostly the bow and stern along with completing the second side. Lots of small pieces and especially on the bow front bulkhead a lot of having to adjust pieces to all fit together correctly to my eye. The most difficult bit, and probably the most difficult area I've ever done was the curved sections in the front bulkhead. I've heard these called "seats of ease" but I have to wonder if they'd put the seat of ease directly over a door, that seems like it wouldn't work in practice at all but I'm going with where things are shown on the plans and only making minor changes in that area. The difficult part was getting the face plus the top and bottom strips to curve to the semicircular base piece without cracking and coming apart. The top and bottom strips could be soaked but even after 24 hours of soaking they tended to come apart at the grain when curved that much. I tried soaking and then wrapping around a small bottle with painters tape tightly wound around it to start the curve and then seemed to help a bit but didn't eliminate the issue. My solution was to pre-curve first as described, let dry and then soak again right before gluing but the wood still came apart in some places and then I'd slowly glue the cowlicks back in place with CA glue after the bulk of the strip was glued in place. Luckily the piece was painted and not stained so I could be a bit free with the glue and then sand into a reasonable resemblance of a curved strip after everything dried. Couple issues with the stern, one of which I'm still trying to figure out, which is how to glue the dummy cannons in place. There's nothing really in the right place for a simple solution so I'll probably have to make something that will attach somewhere to the frame to hold those stern cannons in place. I did get some Casey Brass Black for the cannons and other smallish brass pieces so they wouldn't lose detail by painting black and I'm happy with the results so far, I've been experimenting with different concentrations and timings so once I get to the main cannons I can hopefully get a consistent result. I don't really want totally black but something with a little of the brass color coming through, I just like that look better, helps the eye see the detail on the cannons better I think. Should be finishing up the sides, stern and bow fairly soon and am looking forward to doing the deck details like the staircases, etc.
.thumb.jpg.4a2ac059be68d5f721be36ebfe036dcb.jpg)

-
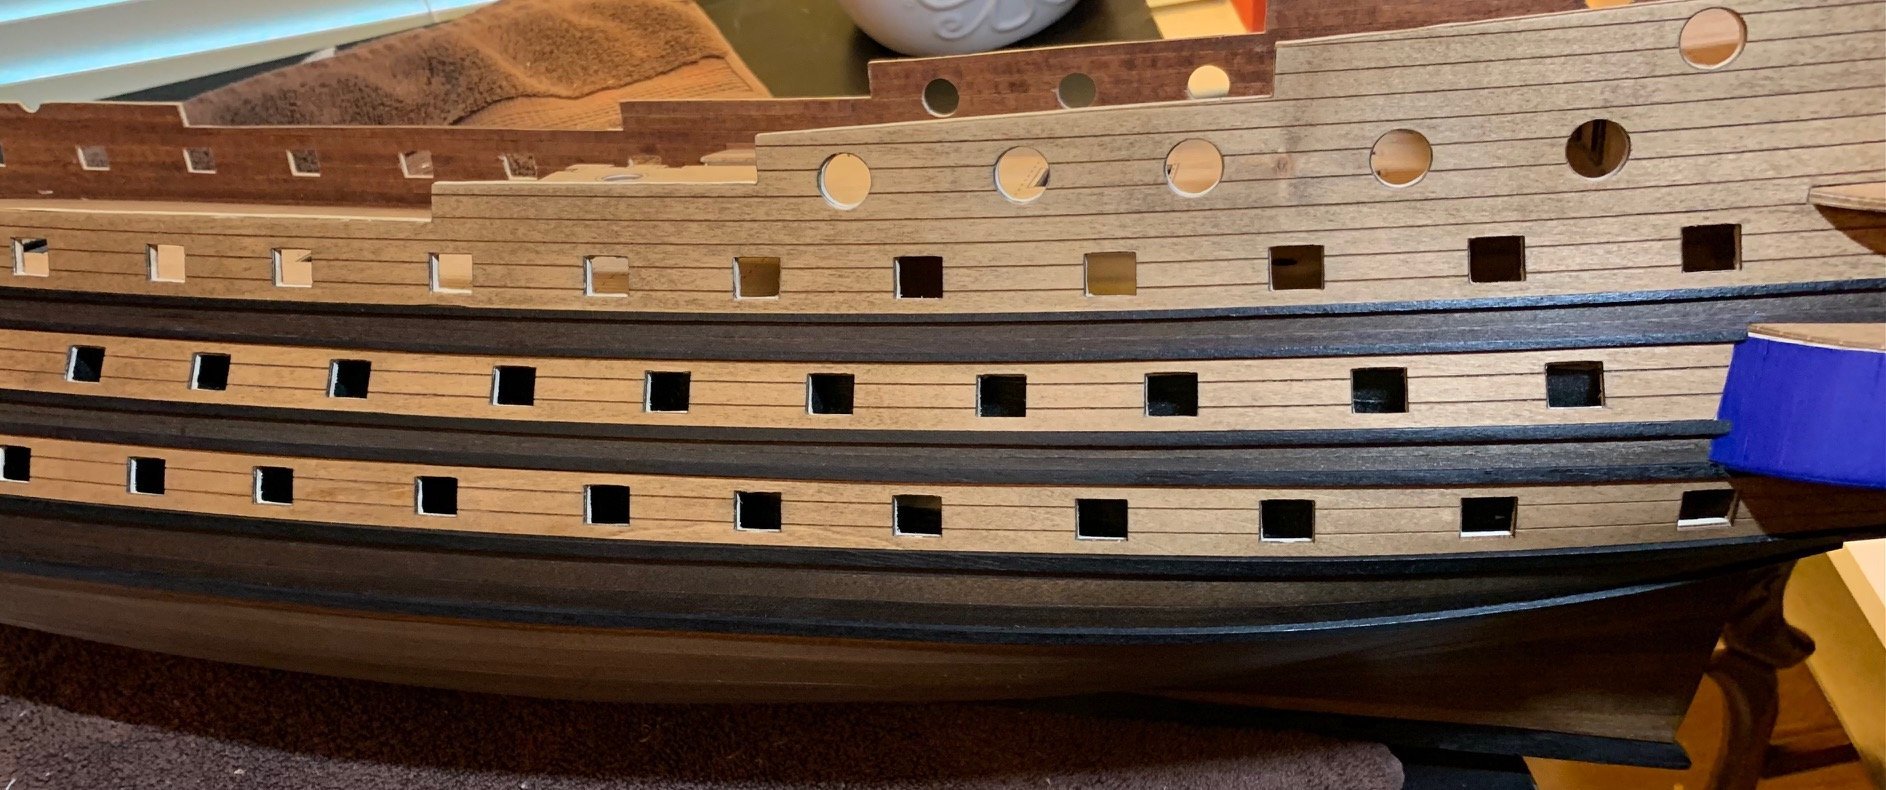
Hull Side Details: I'm working on the side details trying to get one side done and then move on to either the stern or other side, haven't decided which yet. I've changed up the color scheme in several places but I've decided to embrace decorative on this build, I think my next build will focus on historical accuracy so I'm not getting to hung up in that for now. Using wood and painting it red for the top two molding strips came about because I didn't believe I had enough of the bronze/gold molding and even if I could squeeze it out, several of the bronze molding pieces looked pretty ragged so this allowed me to pick the best ones and use them and avoid the bad ones. Also both of the stern window assemblies should have bronze columns in front of the red side pieces but no matter how I tried to mount them I just never liked the look so I'm going without them for now. If I have a change of heart then they'll be pretty easy to add later. I still have a little more work on the bow area and at some point pretty soon I'm going to have to start building and installing cannons. I want to get as many in a possible before adding the last deck and any deck details that would get in the way of placing them. I have a feeling a couple of them are going to be challenging anyway. I should probably get the other side details done first so I can continue to lay it on it's side without dislodging cannons while working on it. I have to say even though at times I've gotten frustrated with this kit, if you're willing to work through the issues it looks like this is going to be a very nice looking ship when done. I'm enjoying it and getting experience with every piece I consider gluing as I go through the instructions and think through "what piece does this need to have in place first and what is it going to close off when glued" which is probably good practice for any build. I think will have worn out the instruction manual and plans by the time I'm done.

-
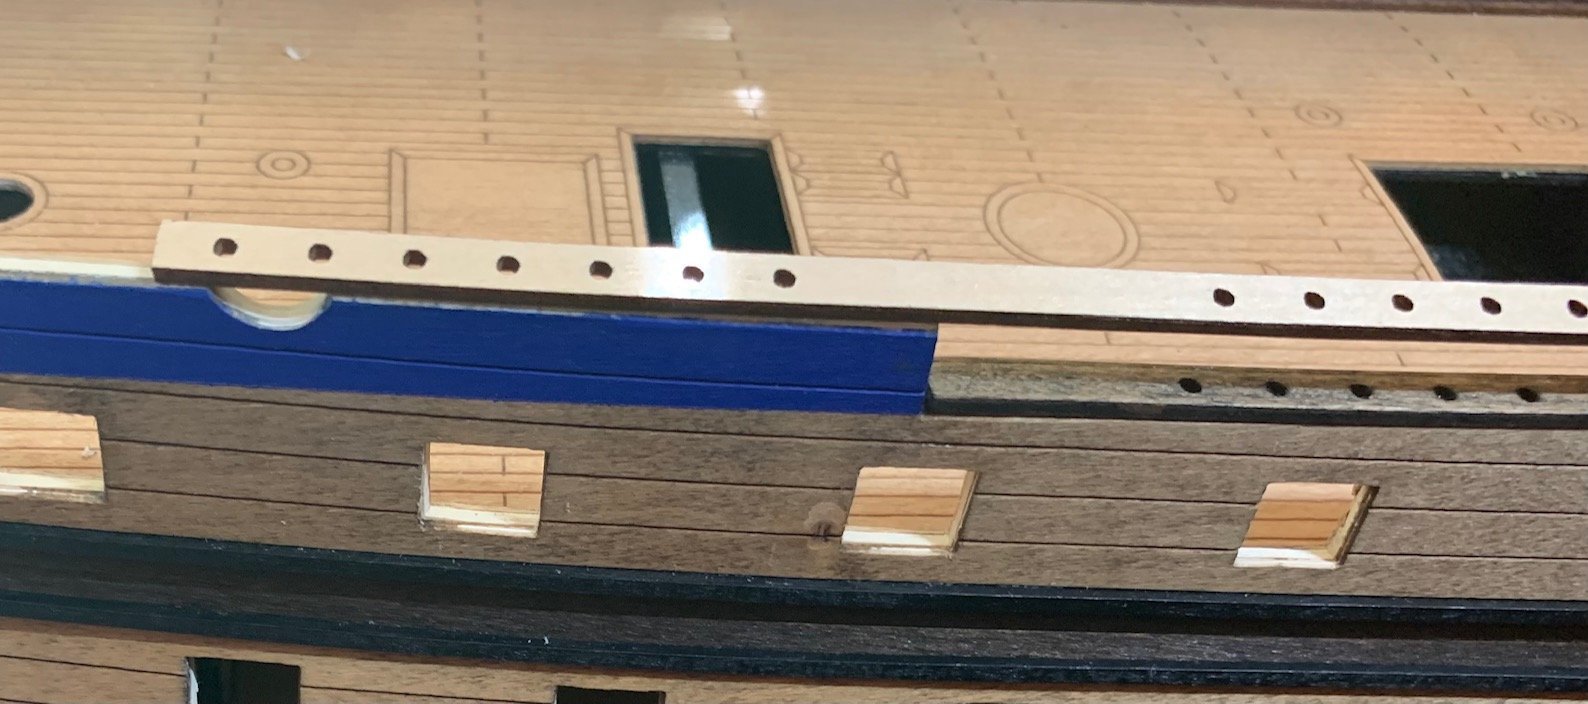
Bouncing around and another ? moment: I've been working on the hull details and picking and choosing where I'm working next and everything has been good. Focusing mostly on the stern of the ship and spend a lot of time just working out which pieces need to go in first and hoping I get that right. Had a bit of confusion as I worked on the railings as one of the railings just doesn't fit the space where it should go. I'm positive I have the right pieces (port and starboard) and I'm including a picture of how the length of the railing is too long and goes over the place where the circular gunport would be. I've been placing a 1x2mm strip on the inboard edge of the railings because the railings are ply and I don't like the look of ply stained. I've gotten around that on the hatch coverings by painting the edges brown and the railings look find with the added strip. I'm not sure how the railing piece can be so wrong, I'm pretty sure I didn't do anything wrong as the area it fits against is an unaltered side panel with the locations for the gunports already cut out. To remedy the issue I had to shorten the railing piece in two places, first removing a section to make the holes for the railings move to the correct place and then trim the end to stop at the correct place. I left it slightly long so I could shape it for the circular gunport later. Adding the strip helped add some strength back to the piece and I've included a picture of an original and altered one. It wasn't a really difficult fix but I just don't know how this could happen. Continuing to just work on the hull details. I'm waiting for some Birchwood Casey Brass Black to take some of the shine off the cannons and I want to place the two forward facing cannons before placing the deck above them. The instructions have you place the deck first and then use string to pull the cannons in place with glue on the base but I'm going to avoid that as much as possible and get cannons in place while I can still reach their positions. Once I'm able to start placing cannons I can start adding some more details that would be blocking their placement.


-
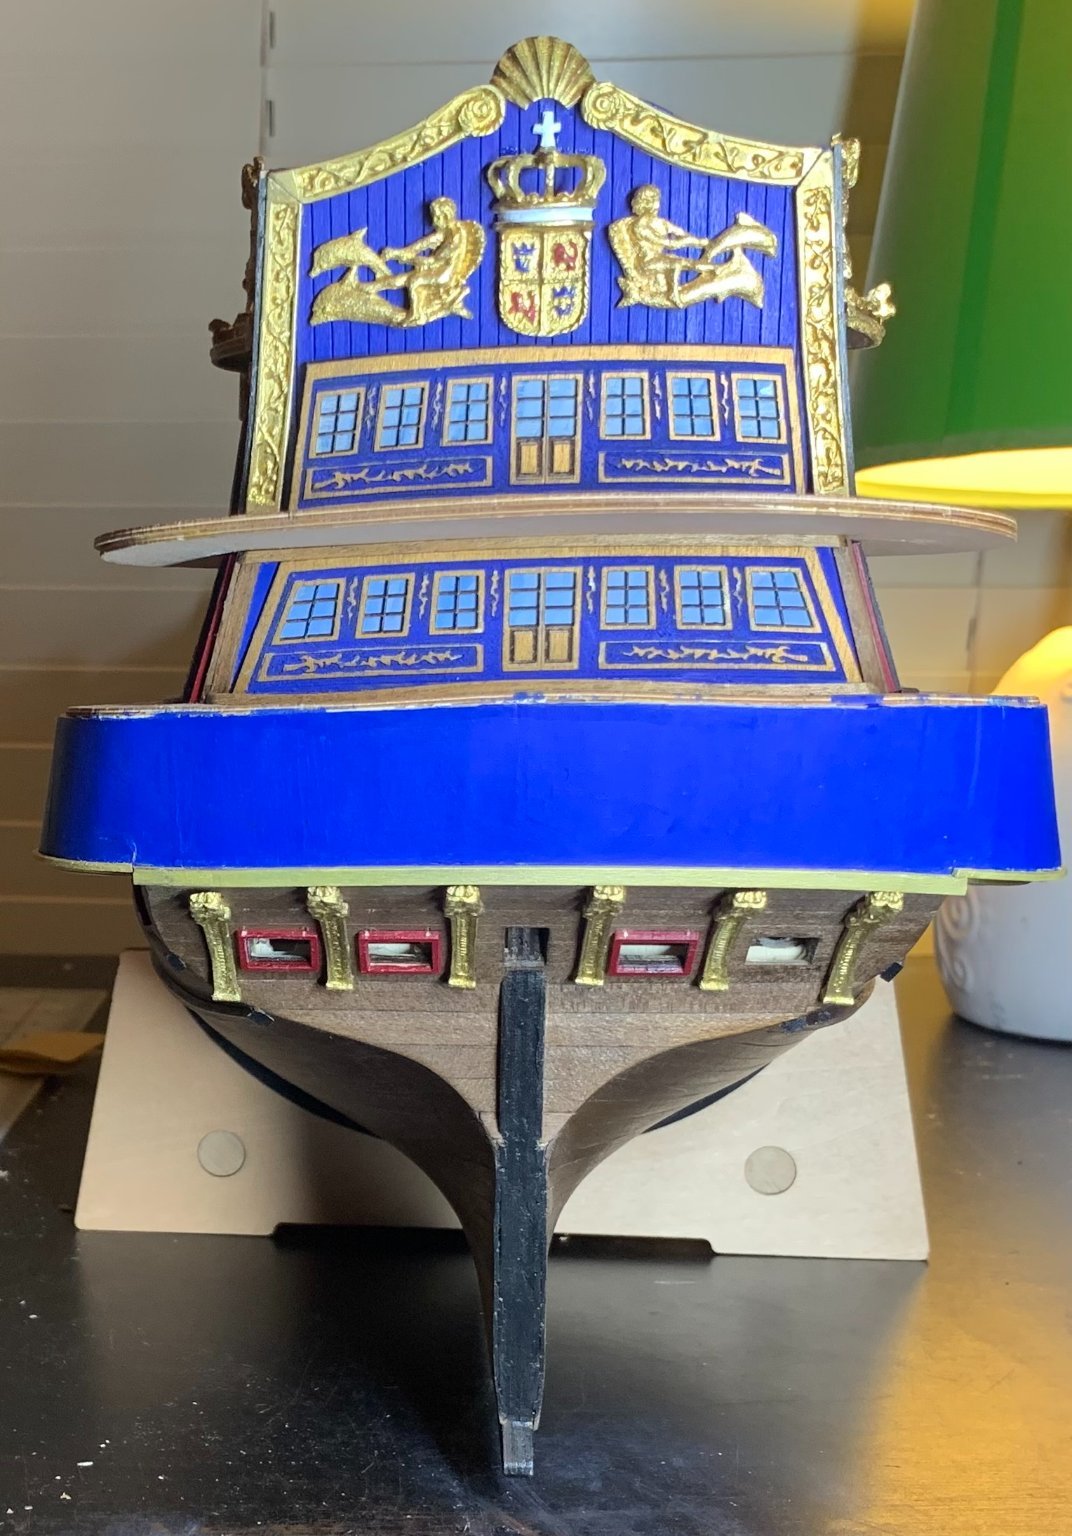
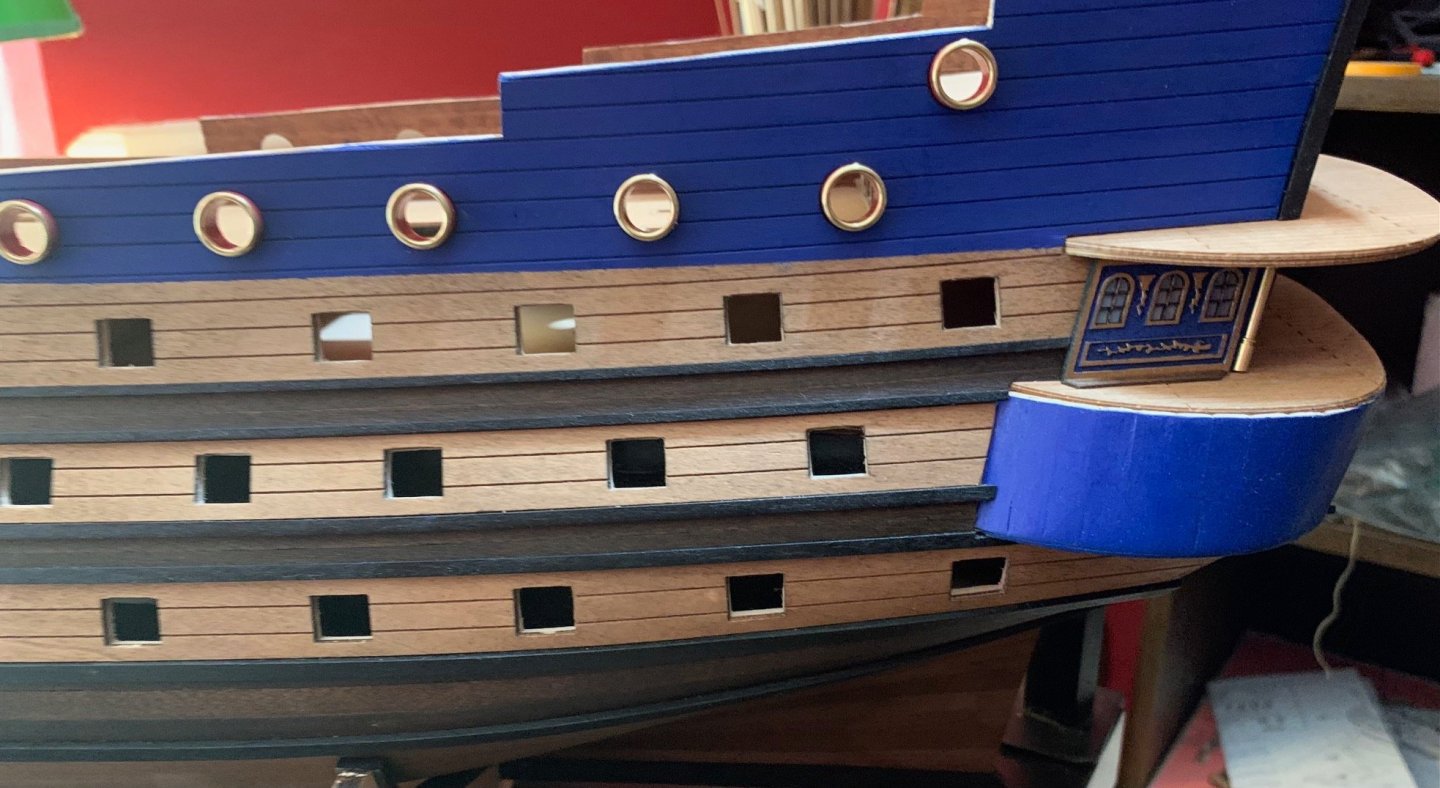
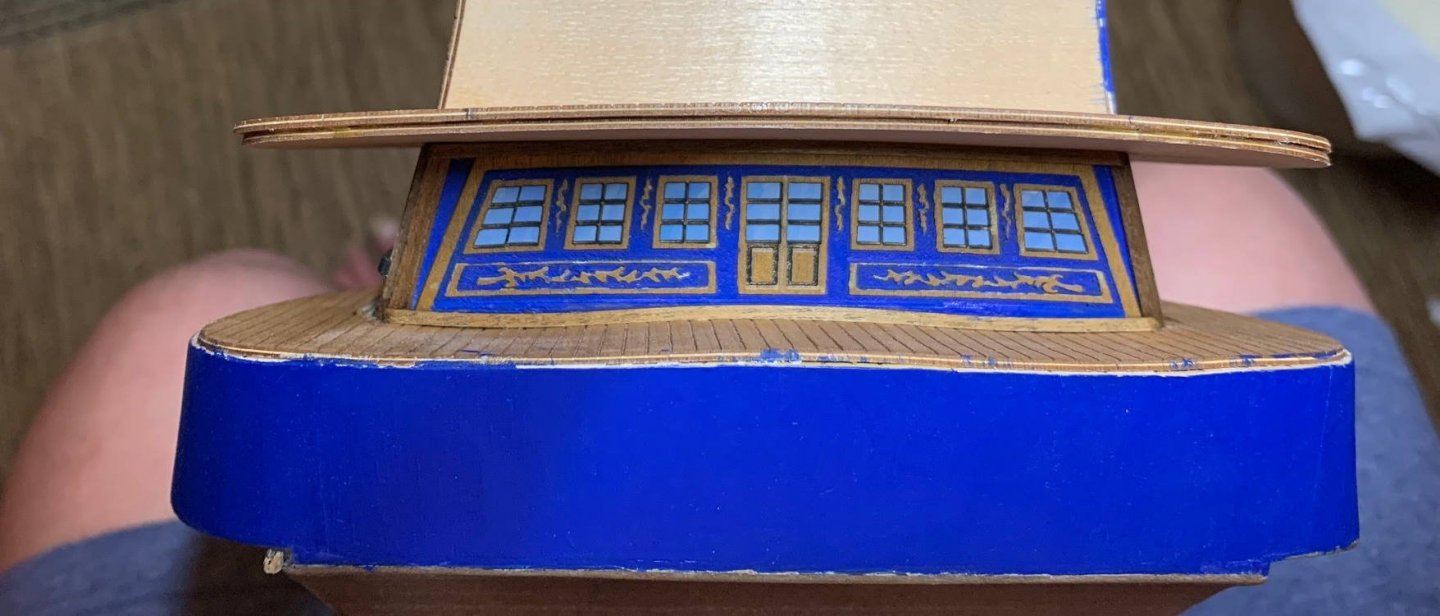
Wales and Stern Balcony Bulkhead: As I mentioned earlier I painted the wales black, I think the dark strips down the sides with black wales will contrast nicely with all the brass and blue that will be going on the ship later. Took me several tries of black paint to find one I liked, I didn't want too flat and didn't want too glossy so I was just trying to find that perfect satin finish. Ended up using the Admiralty Dull Black, it's a bit thick but I put on a coat and then went over it with a 6000 grit sanding pad and then put another thin coat on top and I like the look. All the wales except the bottom one went against the slight difference in height between the side panels and the planking so placing them was quite easy, I had considered trying to even out that height difference but decided that since the wale would hide it there was no need and I'm glad I went that way. The very bottom wale just went along the edge of the darker stain area, it's hard to see that in the picture below but it's obvious in the picture in the previous post. I didn't follow it exactly near the bow to allow the wale to take a more natural flow. For the stern balcony bulkhead I had several challenges to deal with. First was that the side panels didn't come quite far enough back to completely cover the space where the bulkhead should go, I knew that, but when placing them I had to decide between that issue and having the gunports alignment look completely wonky and I went with lining the gunports where I liked figuring I could find something to fill that space. I ended up filling that space with a piece of leftover 4mm walnut planking cut to fit. The gap was wider on the top than on the bottom so cut it to match the space. The instructions say to use planking cut to short lengths similar to the bulkhead below for the main bulkhead, but I decided to use a piece of flat scrap and started with the door and window overlay as a template and then cut the bulkhead larger and just gradually fit it in place. Gluing this piece was a challenge as there's enough curve in the piece that every corner really wants to pop up and I couldn't find a good place to clamp everything at once. Ended up gluing the center in place and then gluing each corner down one at a time and holding it in place while it dried with clamps and painters tape. I added walnut strips on each edge to try and get a neater join. I also decided to paint the door and window overlay black areas blue. The black was very badly mottled and was going to have to be touched up, black would have been easier but I think the blue accent color matches the rest of the stern blue nicely so I just bit the bullet and slowly painted the black areas blue. Had to touch up a few gold lines with some gold but my gold doesn't match perfectly so I did that as little as possible. One skill I really need to work on is mixing paints to get good matches and the colors I want. Still have the second side wales to finish and then I'm not sure where I'll go next.


-
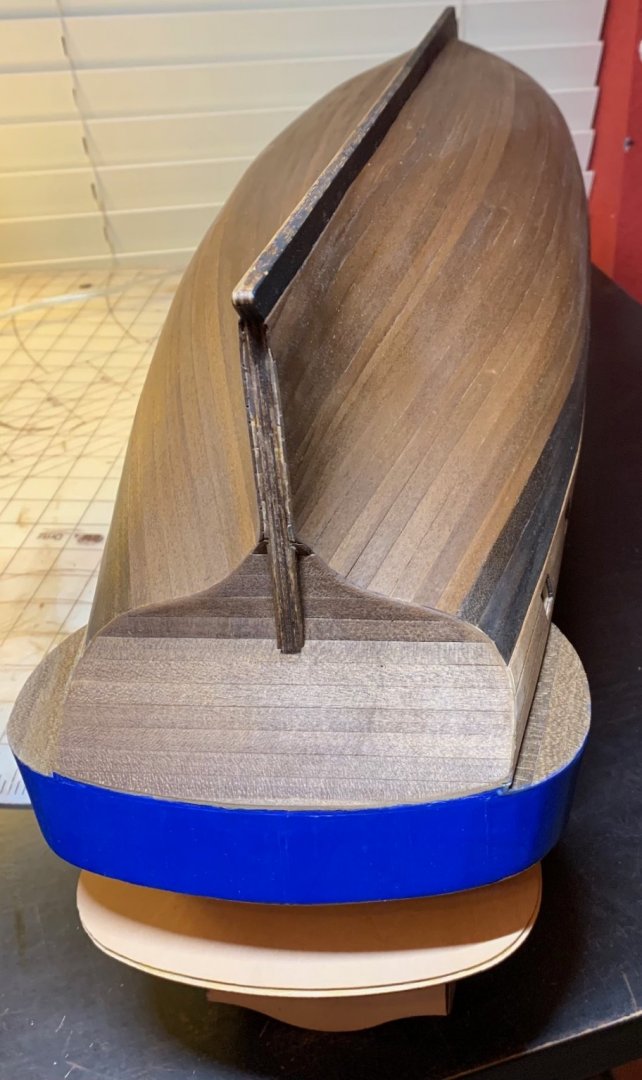
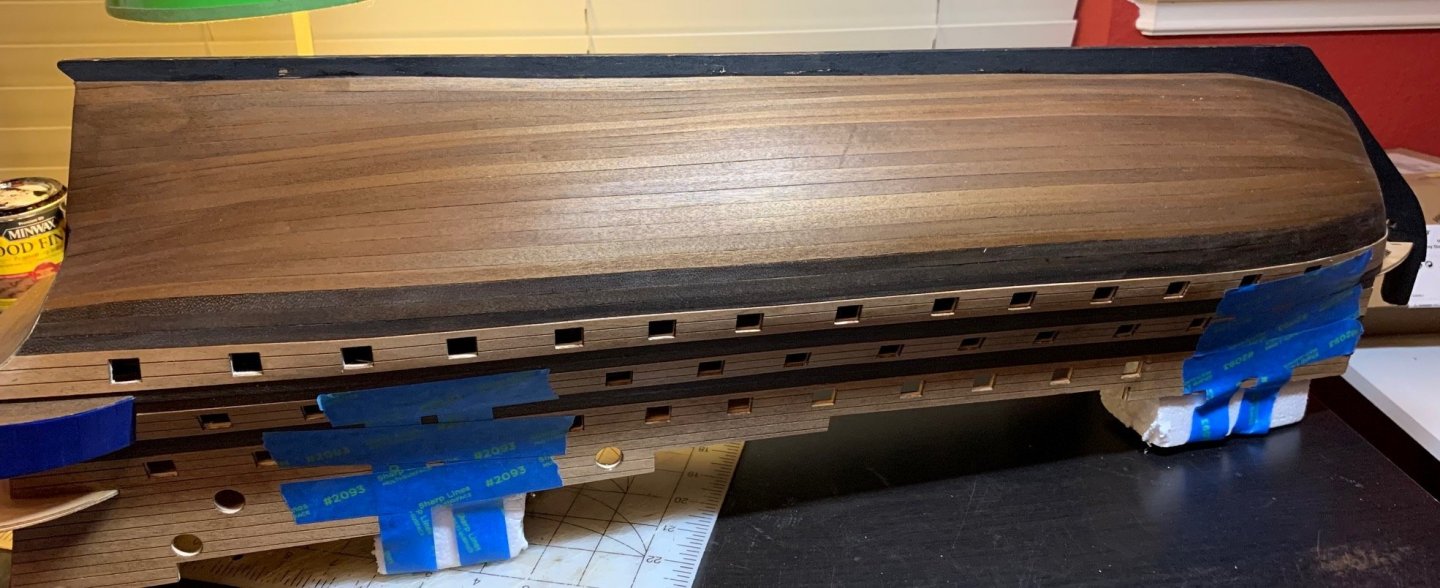
Second Planking Done: Finished the second planking which I feel like is a big milestone in construction of a model ship. I still haven't figured out how to get the planking done without breaking every rule but thankfully it's still going to look decent I hope. The plywood keel looked awful stained so I painted it, considered a brown to sort of match the hull but decided on black to match the rest of the keel. I've also decided to paint the wales black to give more contrast against the darker wood as the wales run the length of the ship against the dark wood background. Still have some touch up to do in a few places but my normal handling during the rest of the construction always seems to add a few dings so I'll fix all of those together when I'm closer to finished. I had to do my first complete tear off of several planks when I just got crazy and put them down in an obviously terrible place. I didn't like removing the planks but couldn't see any other way to repair the damage so I just bit the bullet and used my knife and plane to slowly remove the bad planks. I purchased the smallest Ibex finger plane (8mm blade 25mm body) a couple weeks ago and now I don't know how I ever got along without it. It was more expensive than I would have thought for something so small but it seems really high quality and is really handy in places where a knife is awkward. If I'm not careful I'm going to develop a hand tool fixation. As always photos seem to bring out every imperfection.
-
For Fusion 360 all I could find was a 30 day free trial and then $60/month or $347/year after that. Is there something I'm missing for hobbyist use? Tinkercad looks like it might be a good option to just start learning the basics to be able to move to more advanced programs and have some background.


.jpg.1c532e0a7be6237730d62f5f3c52ec55.jpg)


.jpg.8bbfa227442518a2914fc512d3e20270.jpg)