HOLIDAY DONATION DRIVE - SUPPORT MSW - DO YOUR PART TO KEEP THIS GREAT FORUM GOING! (Only 75 donations so far out of 49,000 members - C'mon guys!)
×

Jonathan_219
-
Posts
176 -
Joined
-
Last visited
Content Type
Profiles
Forums
Gallery
Events
Everything posted by Jonathan_219
-
 I've purchased an acrylic display case and I'm hoping to fit the nameplate on that but need to see how it all fits before I know for sure. For some reason I just can't bring myself to use the included pedestals, it just looks too dangerous and I'm not crazy about screws in the keel so I'm considering just painting the work pedestal and trying to make it look nicer. Once I get the case and finalize the display I'll post another picture.
 -
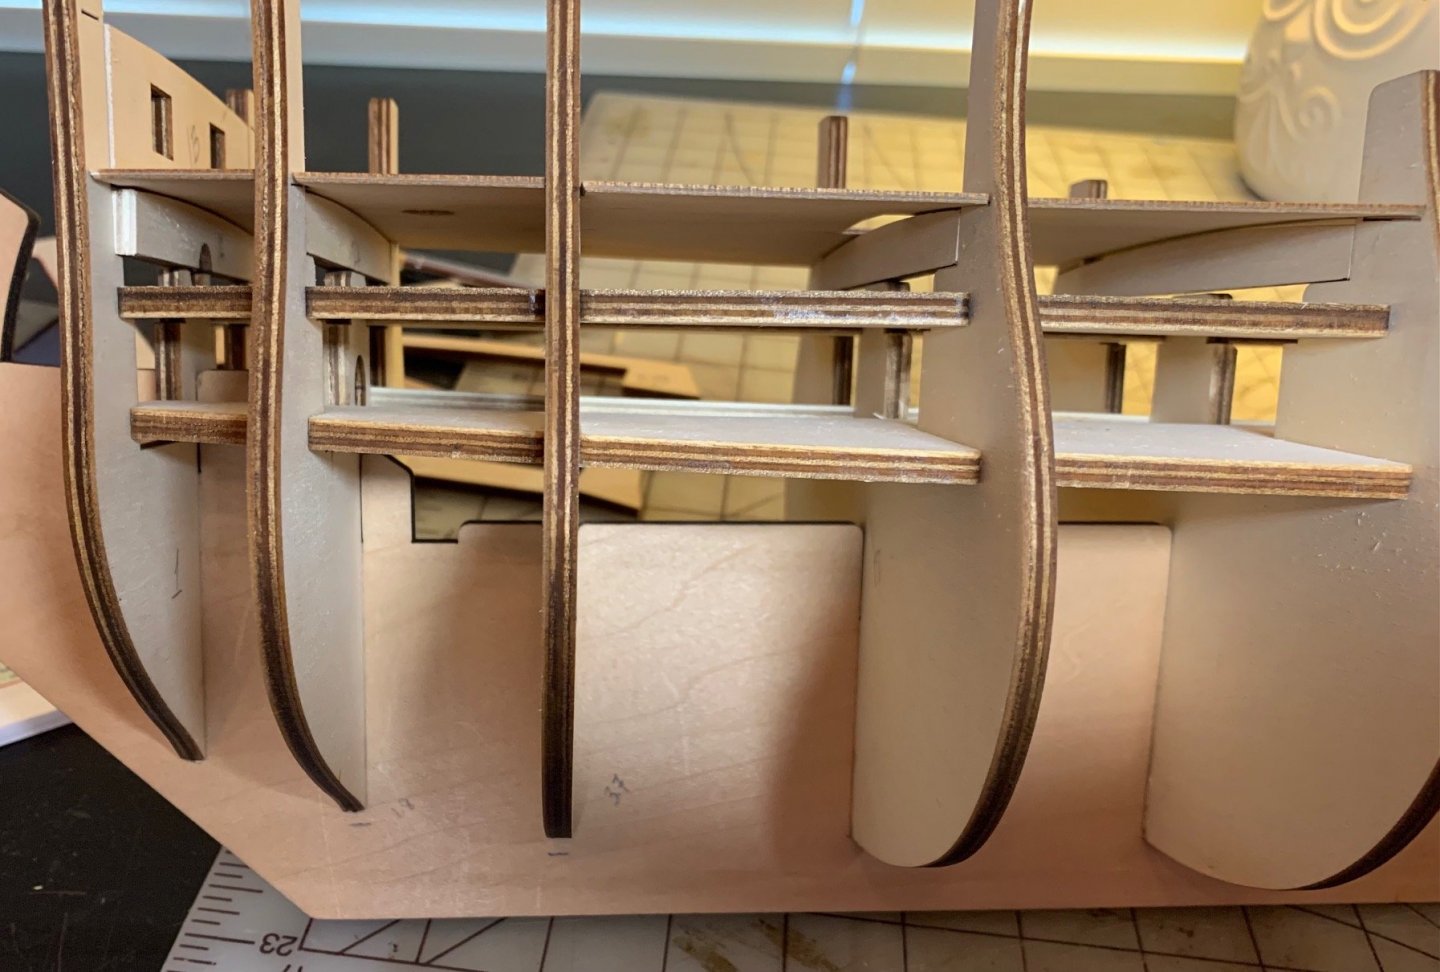
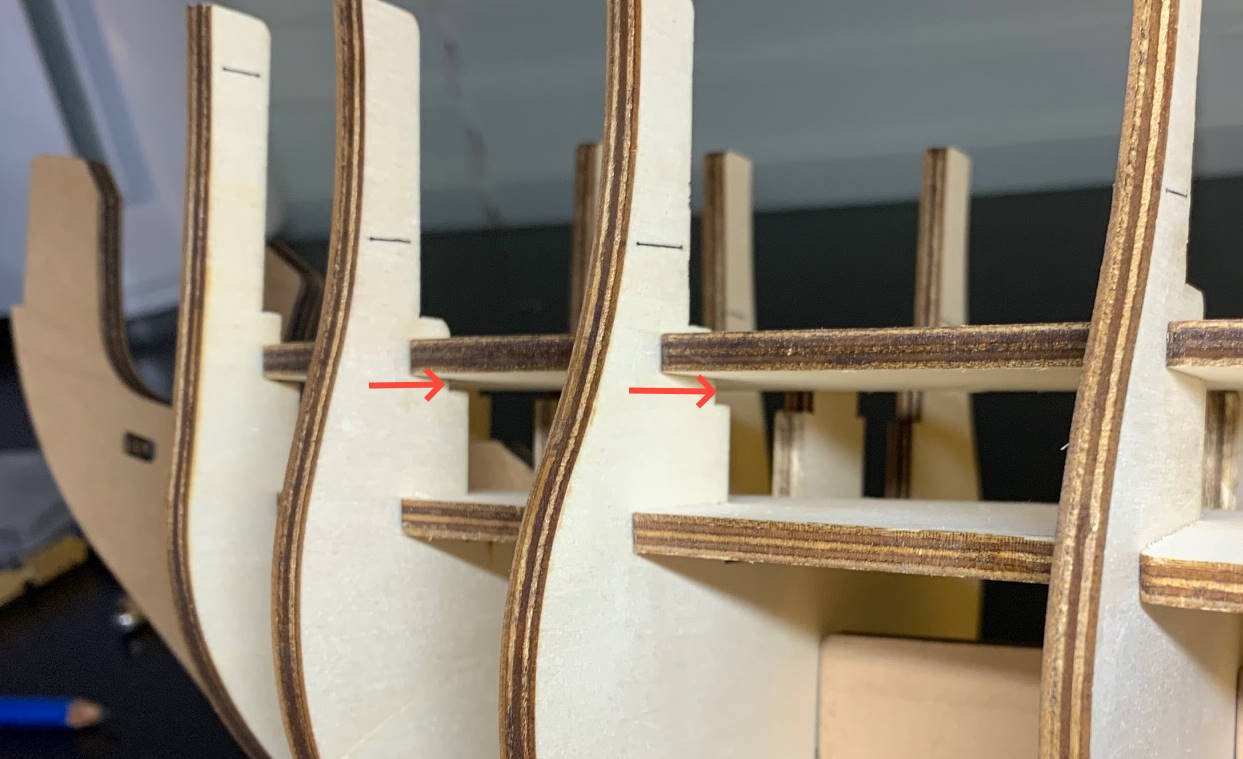
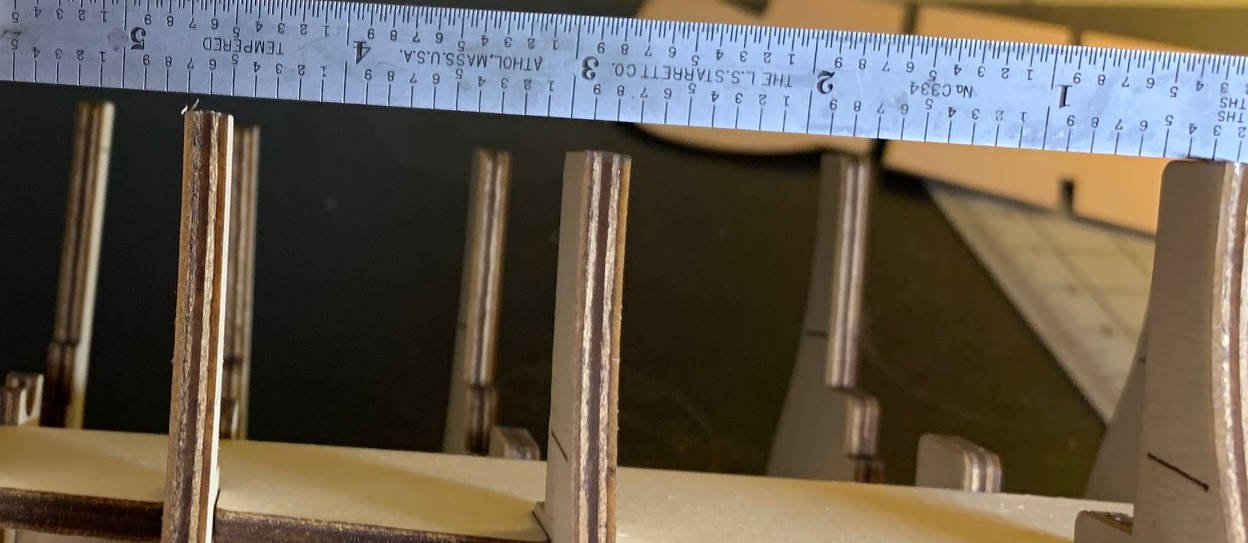
I believe that raising the two bulkheads in question will solve the problem. I'm including a picture and you can see a pencil tic below bulkheads 2 and 3 which is where they sit if pushed all the way in. Raising them allows the main deck that sits on the bulkheads to be almost completely straight across that section, if I push them completely down then there would be a dip there. Had to raise bulkhead 2 about 3mm and #3 almost 5mm but with that everything above them seems to lay flat and straight. Everything is just dry fit now as I just check the fit and try to be sure everything is correct before I start gluing things down.
-
First Challenge: I'm hand fitting the bulkheads and lower false decks and it seems like there's an alignment issue. The false keep and bulkheads came out of the sections very easily with an exacto knife and the keel lay perfectly flat on my table so no issues there. The bulkheads were extremely tight when test fitting so I took a small file and worked the inside edges of the bulkhead slots to achieve a fit that I'd describe as very snug instead of pinched. I feel pretty confident that even though they're very tight that I got all the bulkhead all the way down in the slots for the test fitting. When putting in the first false deck (piece 16) I noticed that theres a gap between the deck and bulkhead on bulkheads #2 and 3. number 1 and 4 seem to be correctly placed and when I look at the tops of the bulkheads they're low by the same amount as the gap. This would lead me to believe that bulkheads 2 and 3 need to be raised slightly to align with 1 and 4 but nothing in the instructions or drawings seem to give definitive proof of this. I'm still in the process of opening up the slots enough on the false decks to be able to slide them in without having to resort to extreme force but I'll try to see how much much I can test fit to make sure that this is the correct approach. I'm including pictures of the gap between the deck and bulkheads 2 and 3 and the top with a straight edge that shows the same distance lower for those two bulkheads.
-
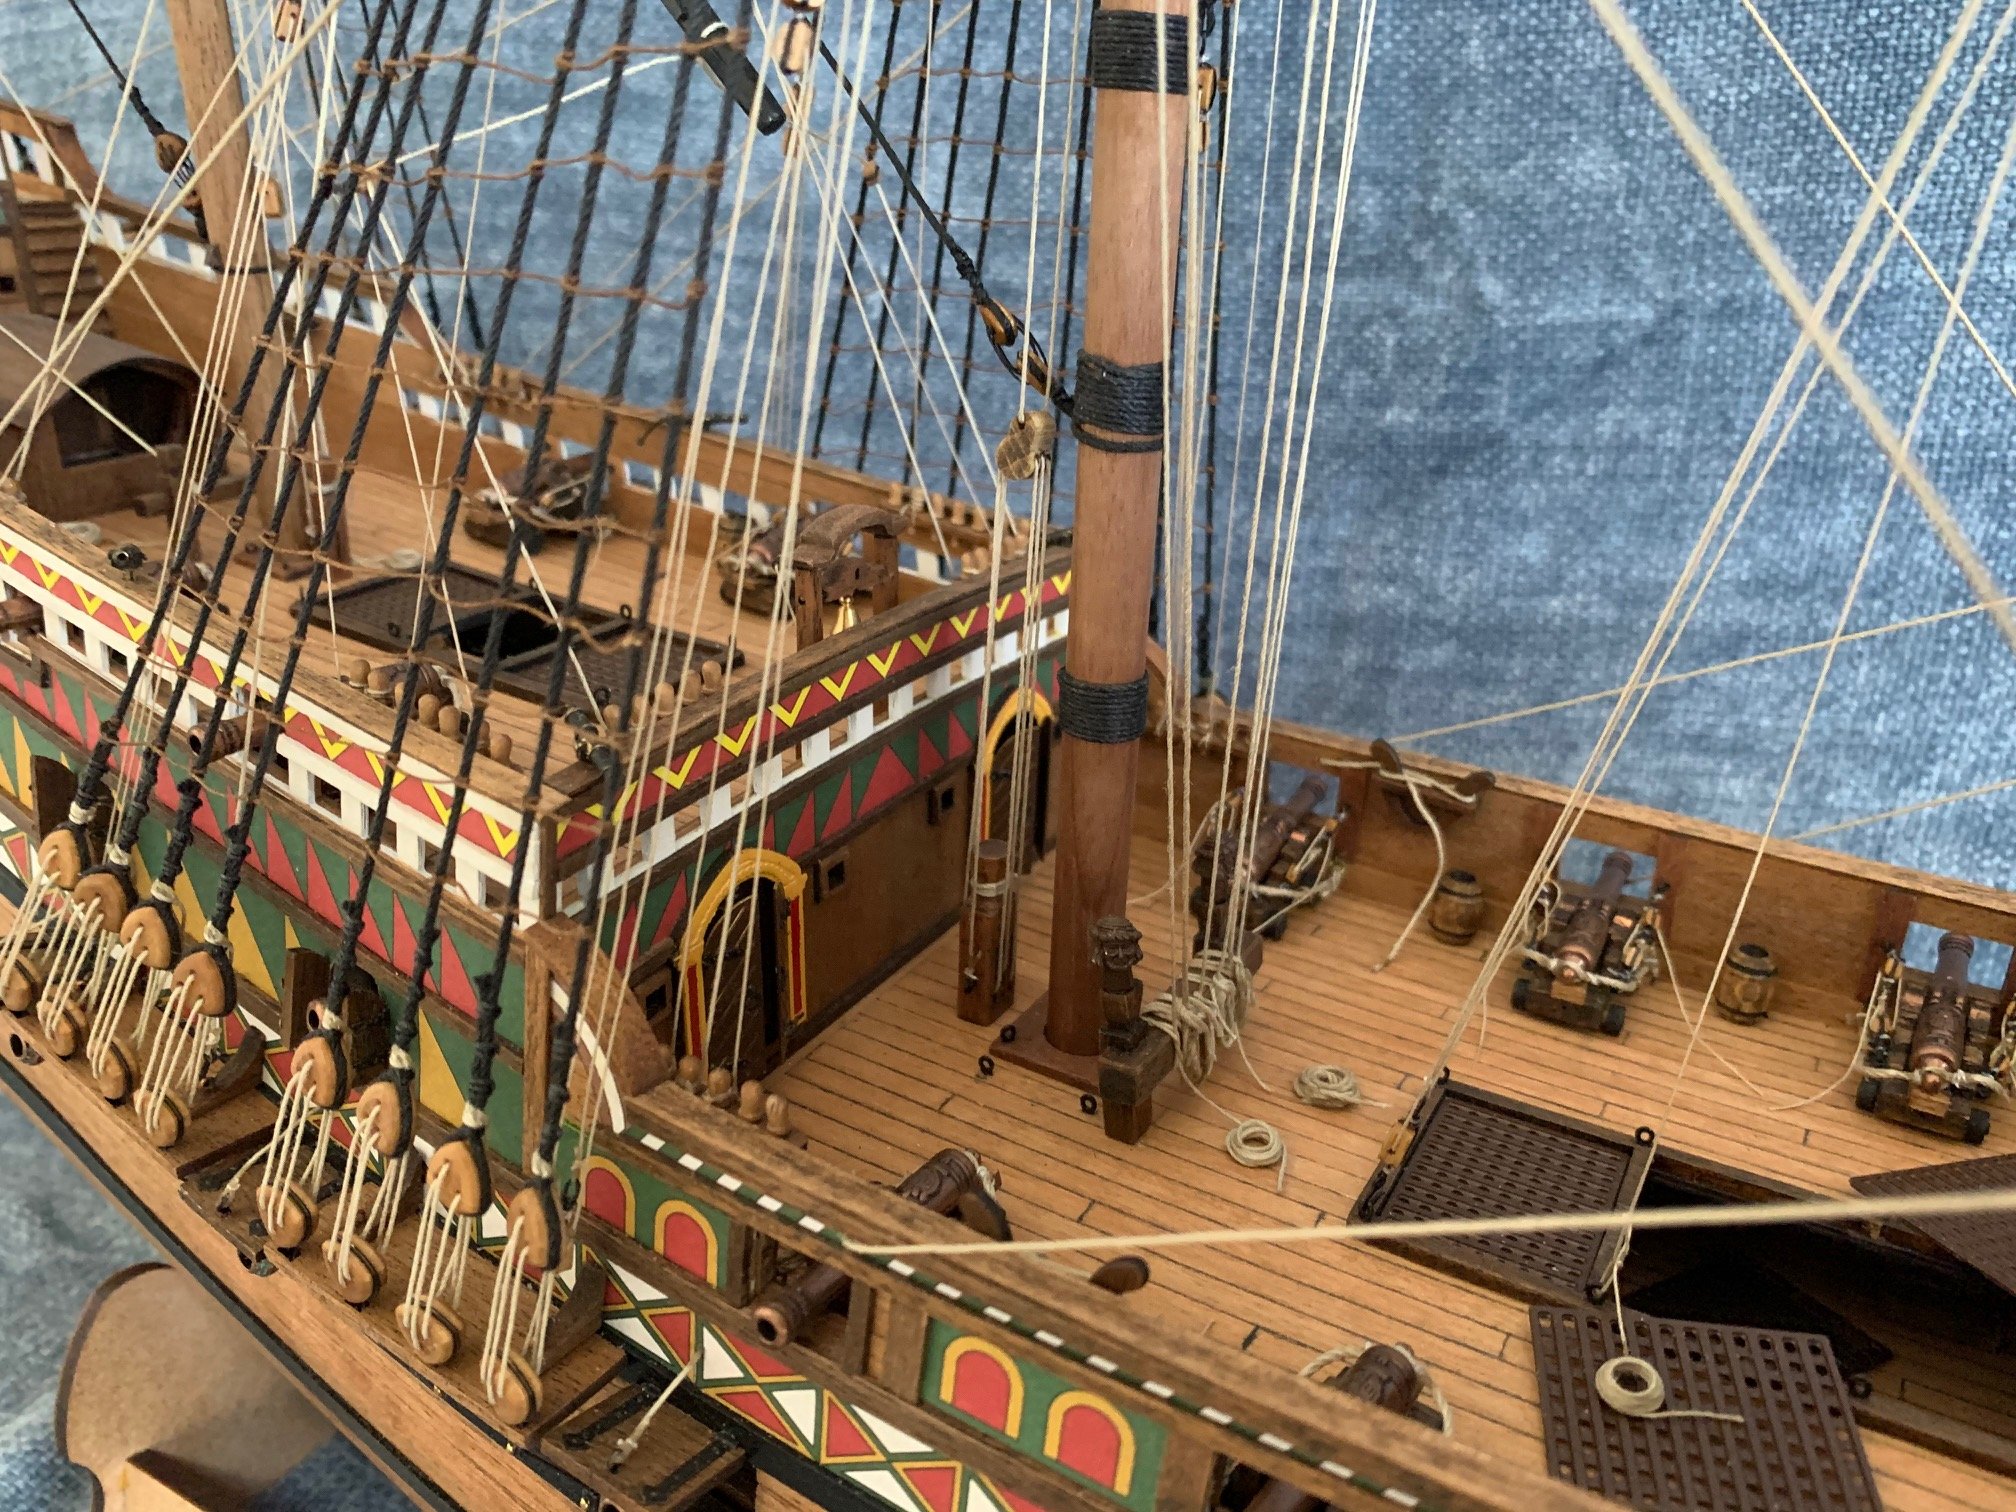
I have just finished my Amati Revenge and I'm going to jump right in and start on this kit. I've read about this kit and know its reputation so hopefully I'm prepared for the issues that will pop up and with the assistance of the existing logs will be able to work through them. Despite the issues I'm very impressed with the look of the finished kits I've seen, it can be a very beautiful ship and I'm hoping I'll be able to make it look good. Some of the issues I expect to face will be the hull planking as I don't plan on painting the hull so the sections of pre cut and laser etched hull probably won't match each other when stained. I'm keeping open the idea of replacing those pre-cut and etched areas with planking and just purchasing enough wood to be able to plank the entire hull with the same wood. I'm sure I'll have to get a little further into it to figure out what I'm going to do. I've also seen multiple comments about the alignment of the decks and cannon ports so I'll try to be extra careful as I assemble that area and make sure I get all that aligned correctly without having to take things apart. I haven't been able to find a log of this kit that's less than several years old so I'll try and note things that are different from the logs I've seen. I'm hoping some of the instructions will have been corrected over the years, I did check the book that came with the kit and as far as I can tell it matches the PDF on the Mantua website. Initial inspection of the parts seem to show that everything seems to be of good quality, some of the brass looks a little less than completely sharp in definition but nothing that really bothers me from what I've seen so far. I'm not crazy about the pre-etched decks, I really enjoyed doing the decking on the Revenge but I suspect that if I try to deck over the provided deck here it's be way too thick but we'll see as I get there. I consider myself more of a kit nudger than a basher so I'm not looking to do a total rework of how the kit does things, just make slight improvements where I can. All in all I'm ready to get started and see where this goes, I feel like it's a completely different type of kit than the Revenge, not good or bad, just different.
-
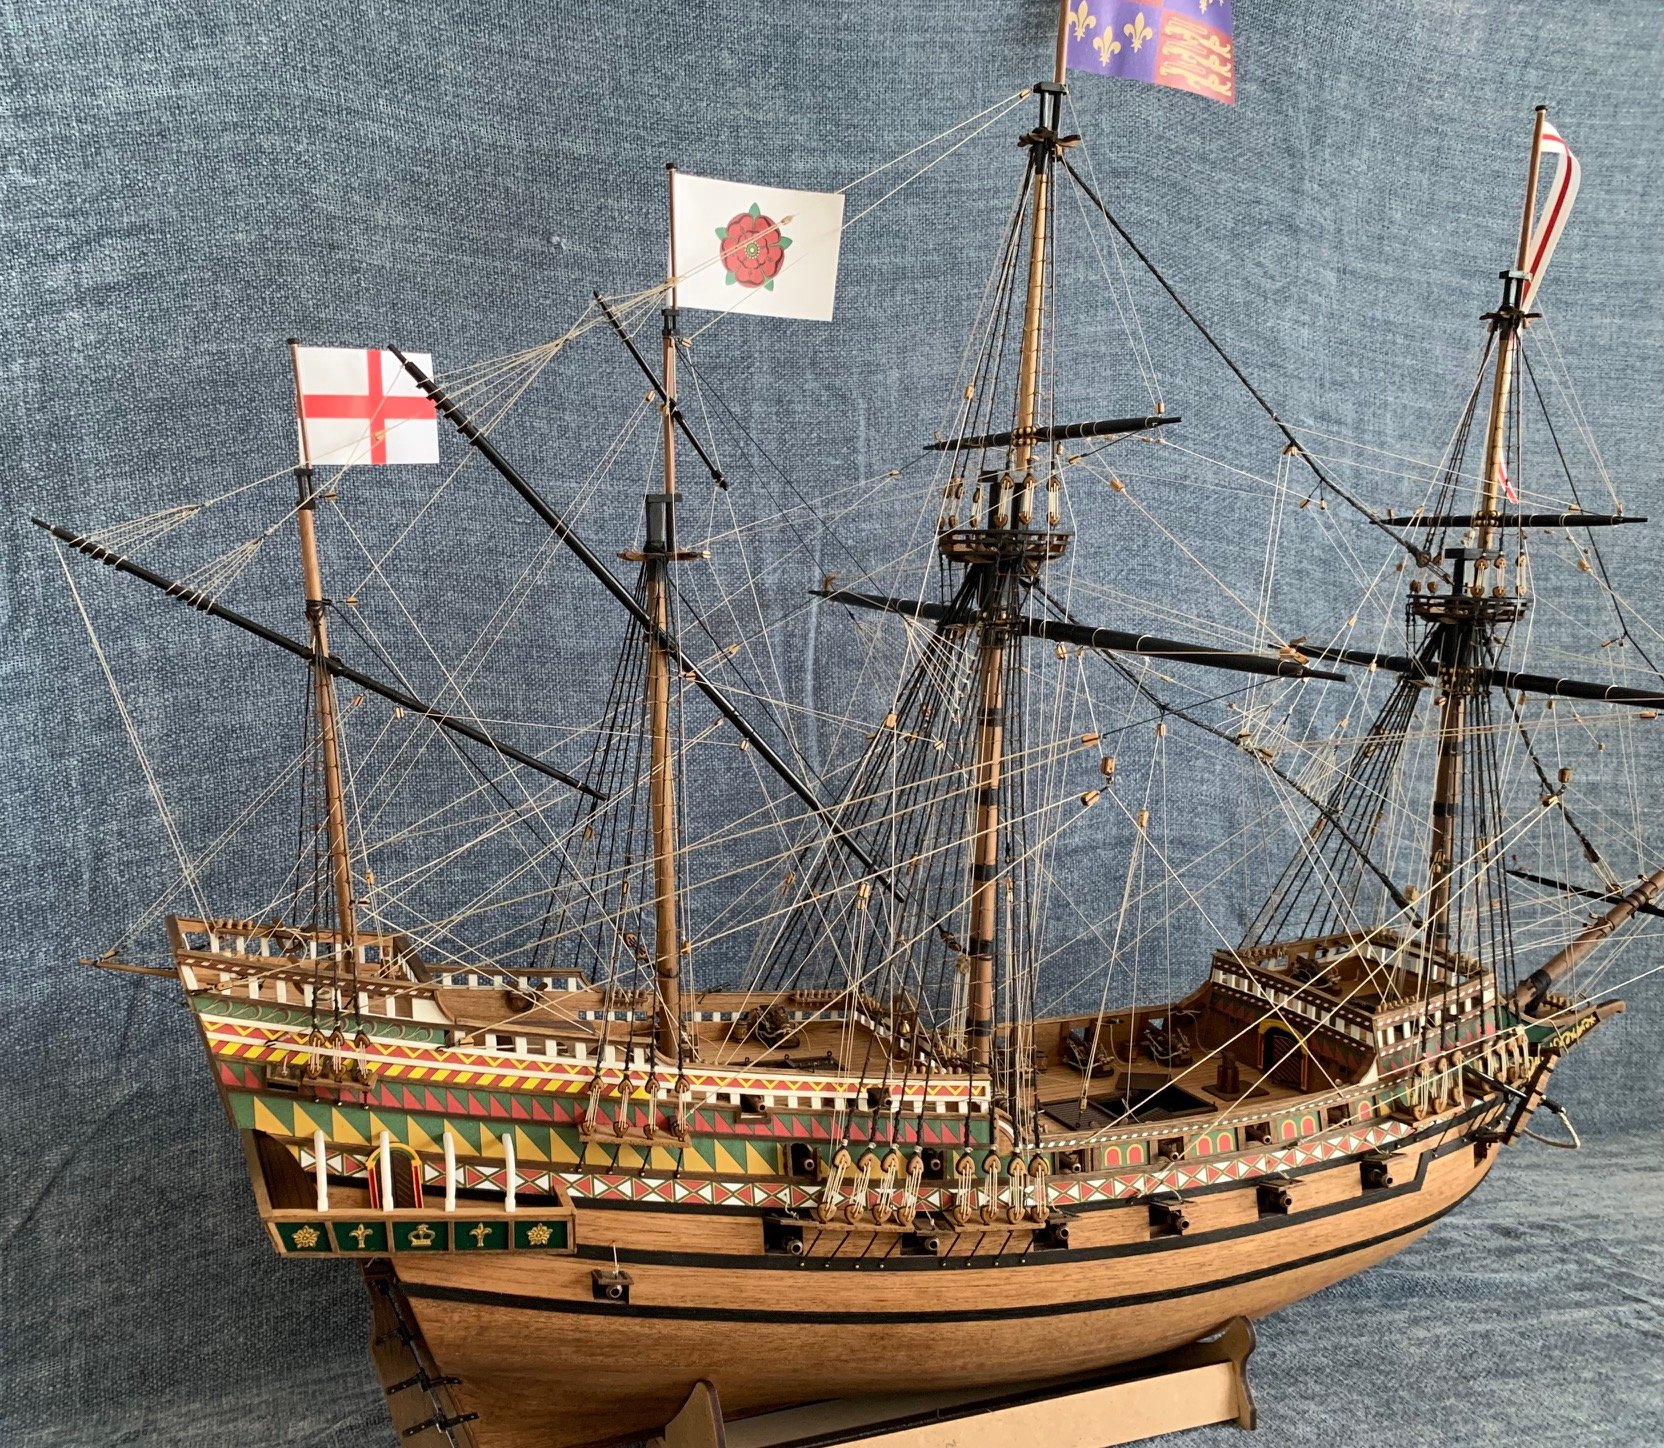
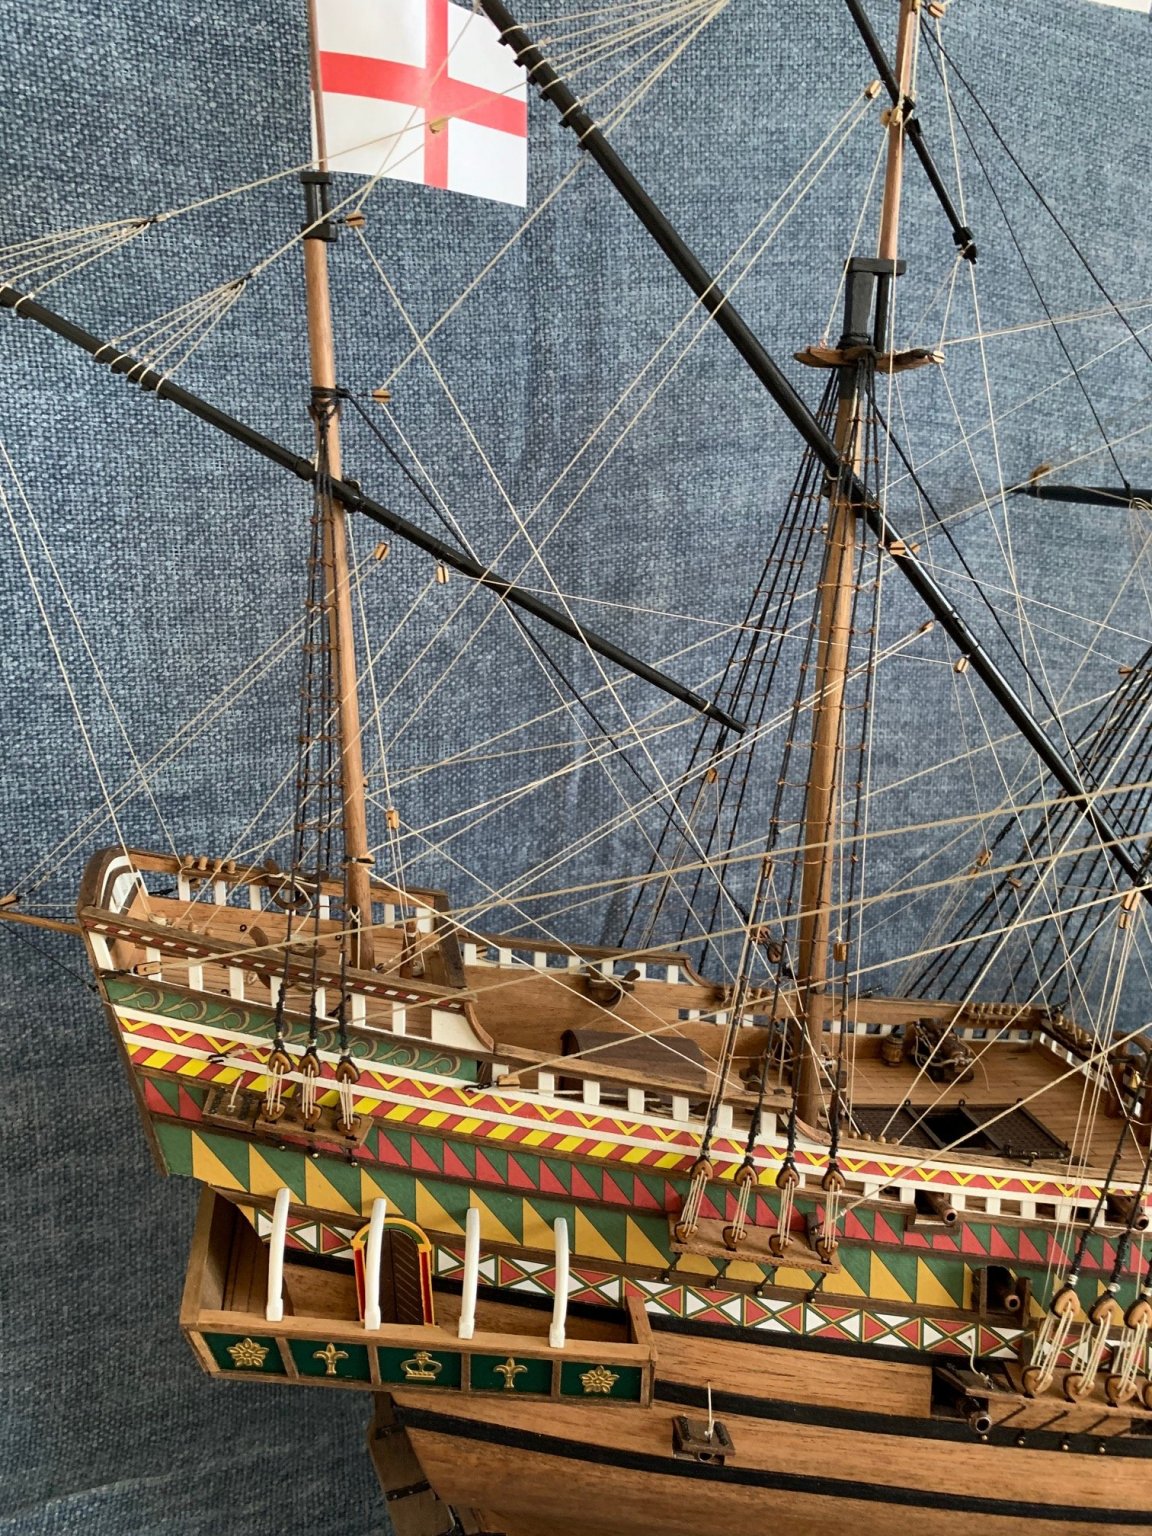
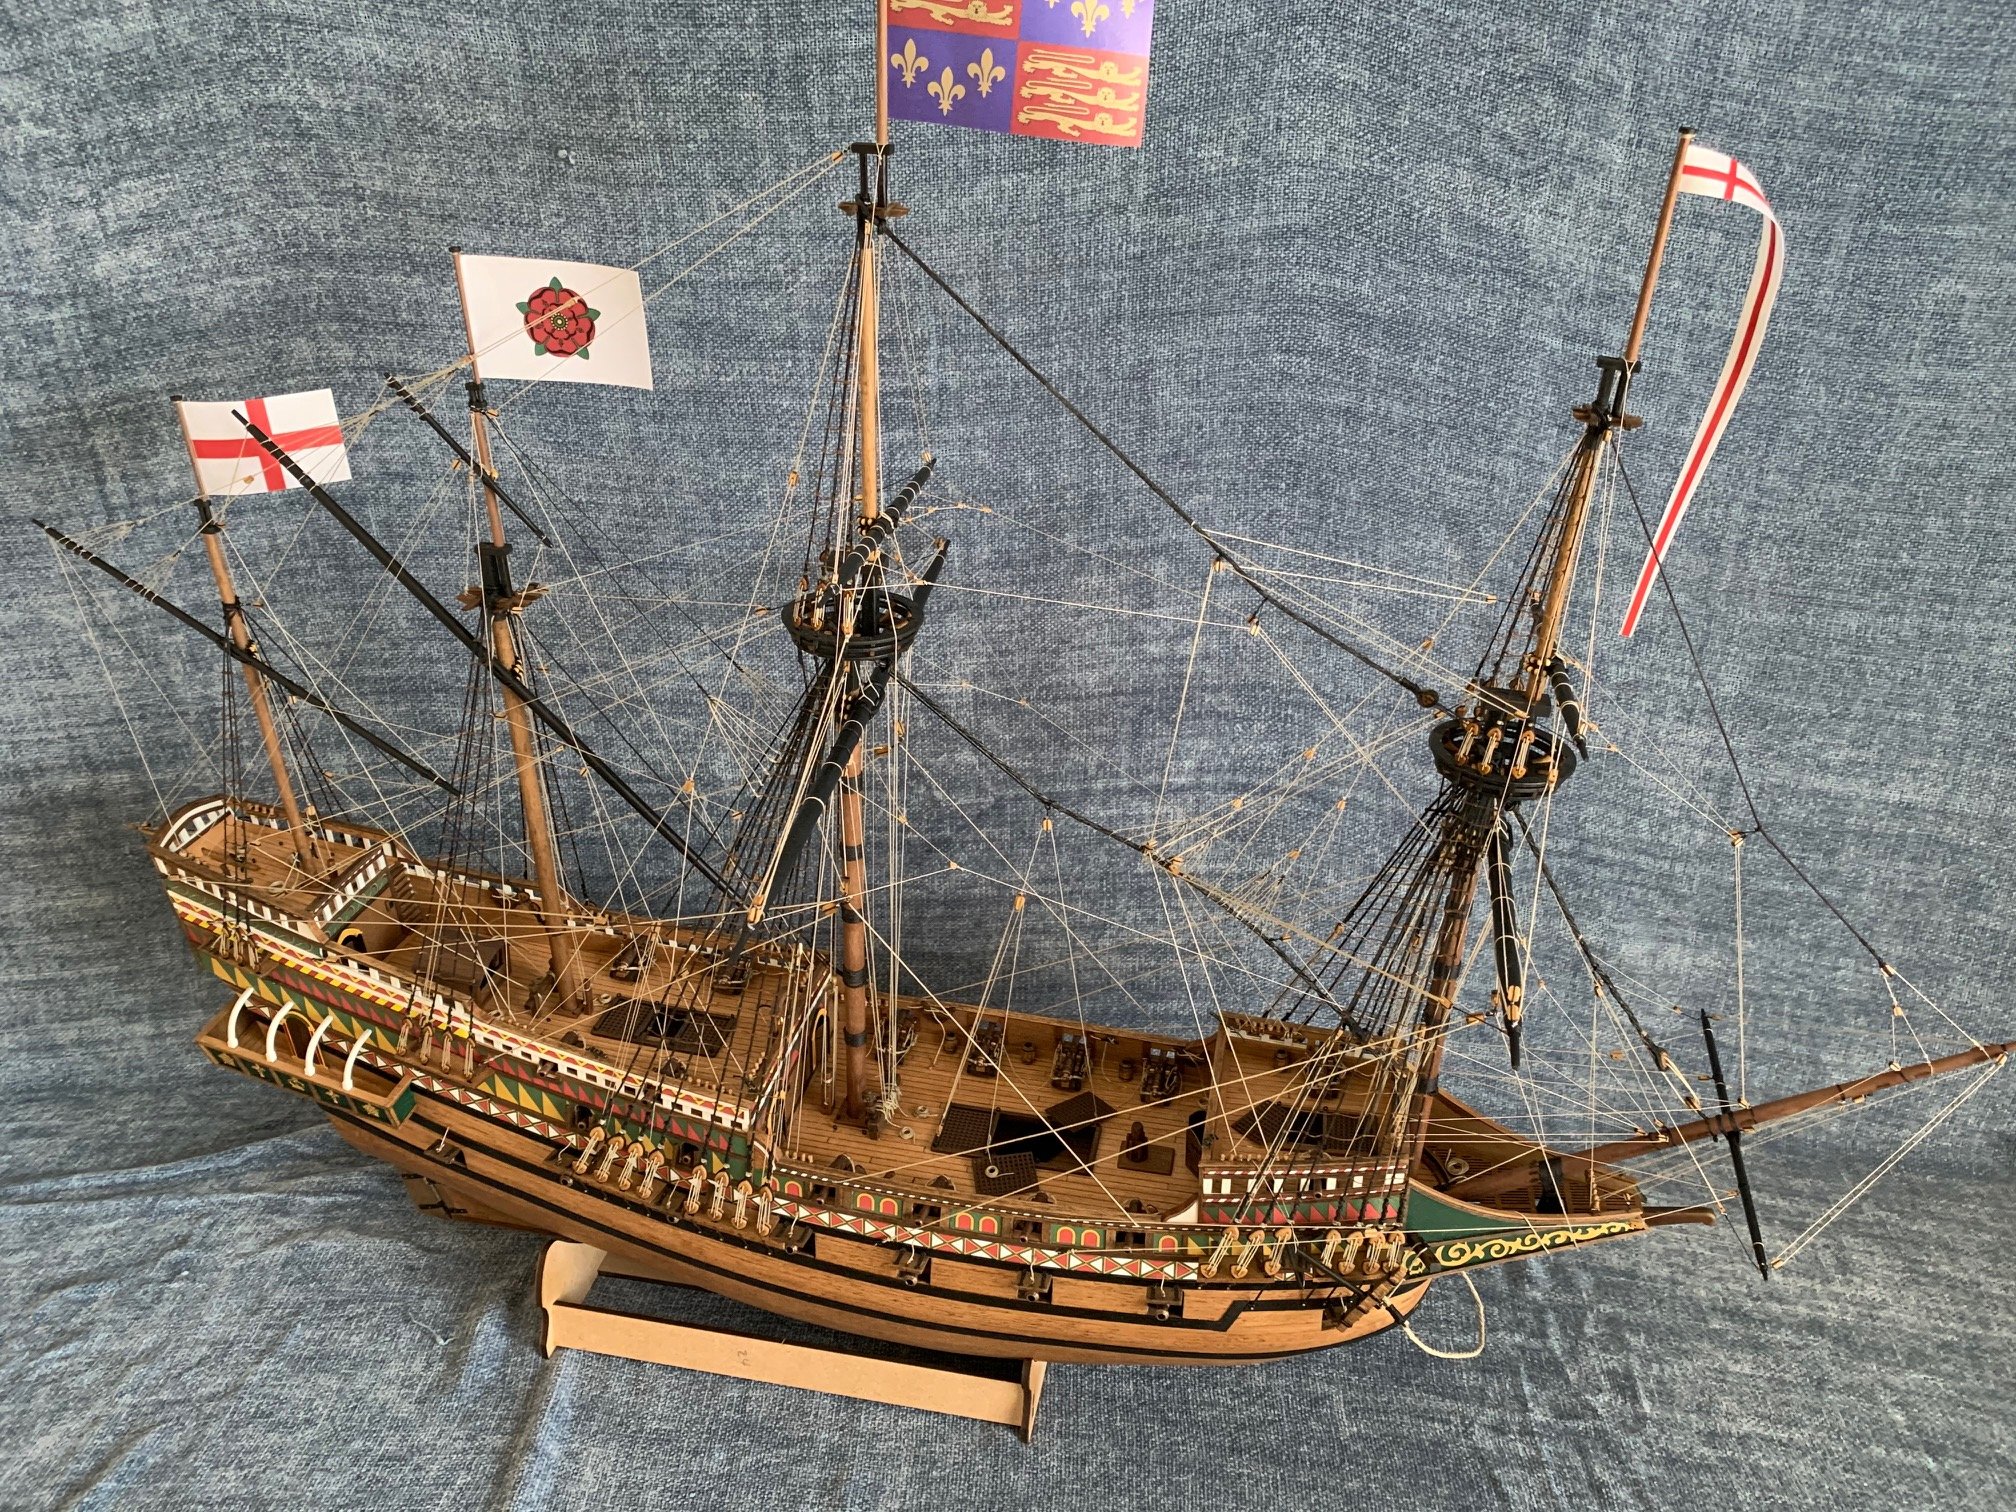
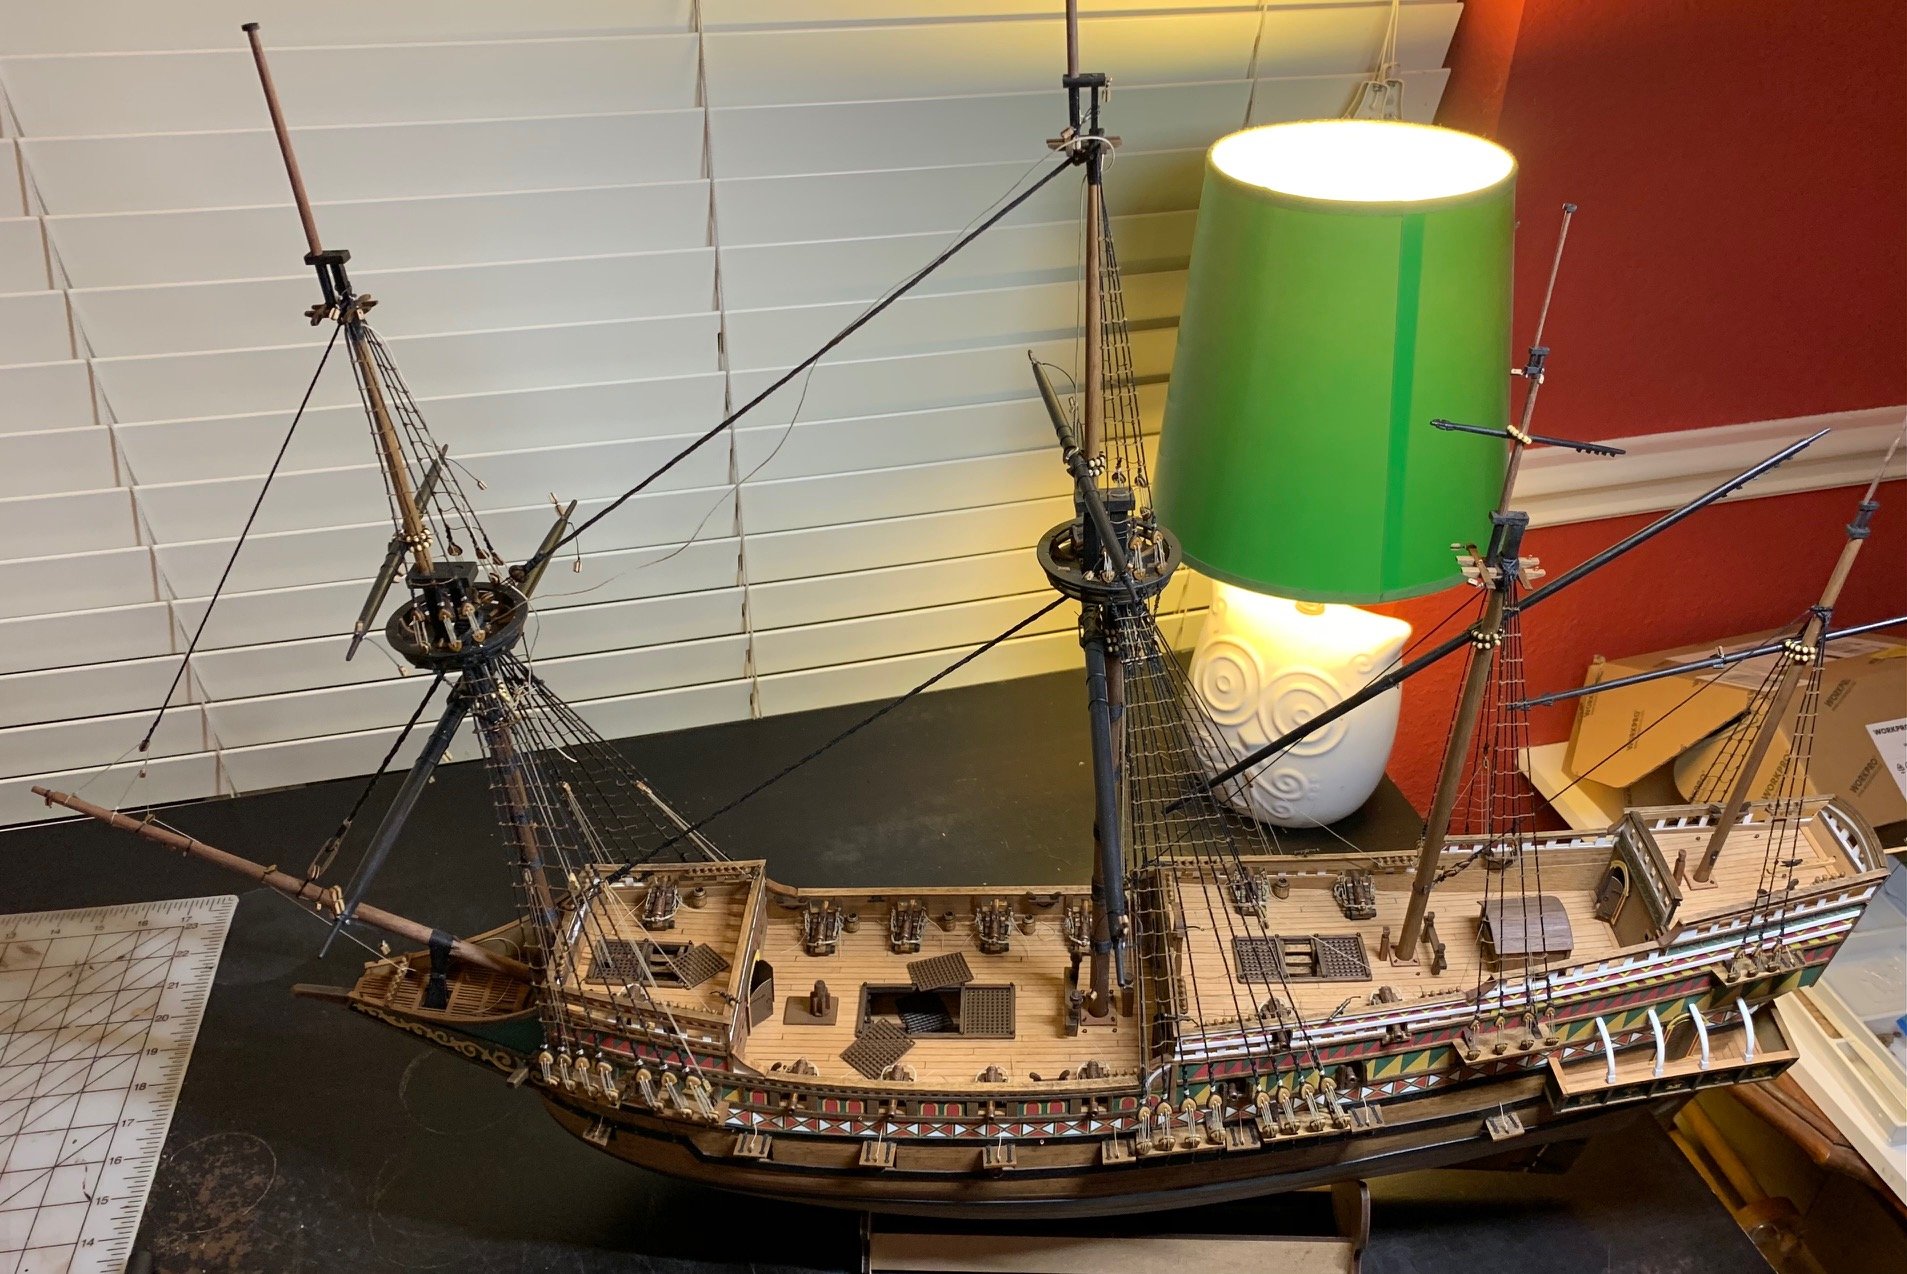
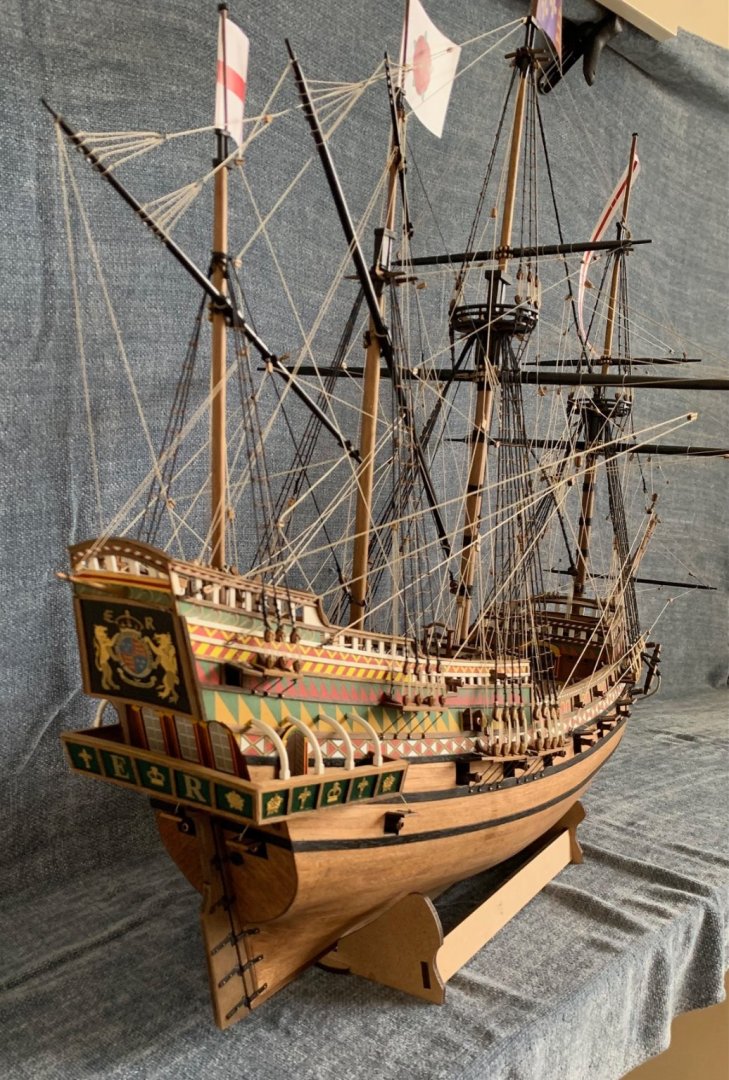
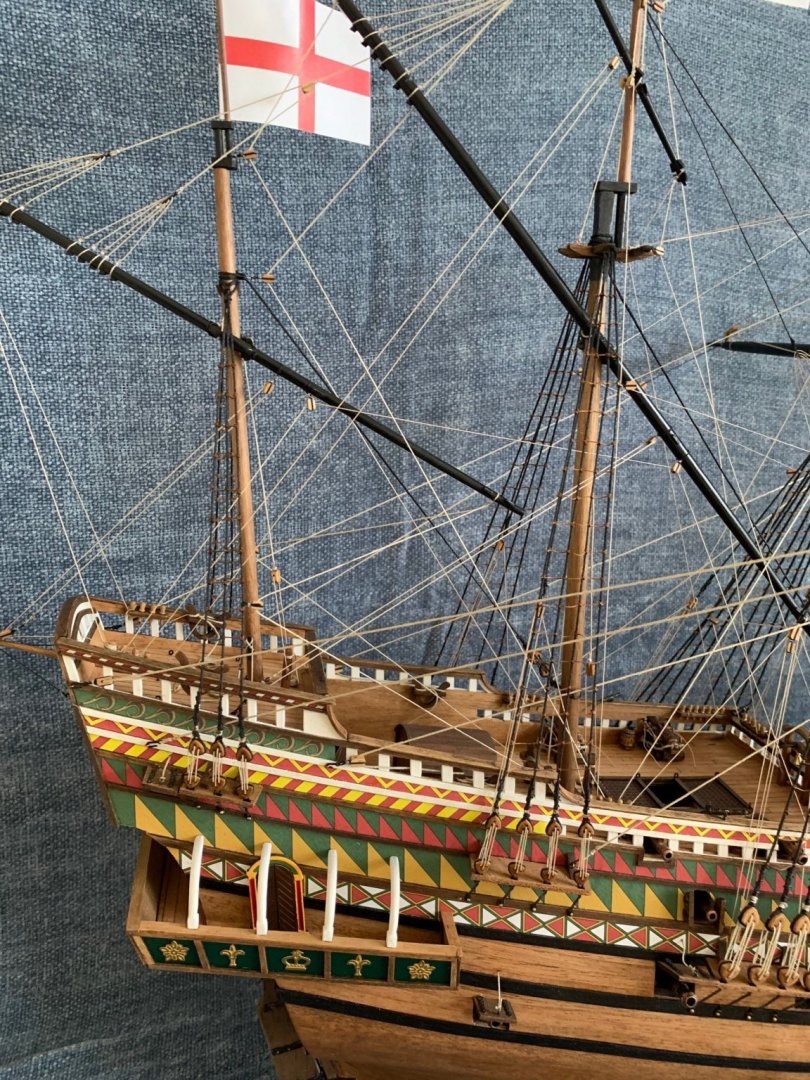
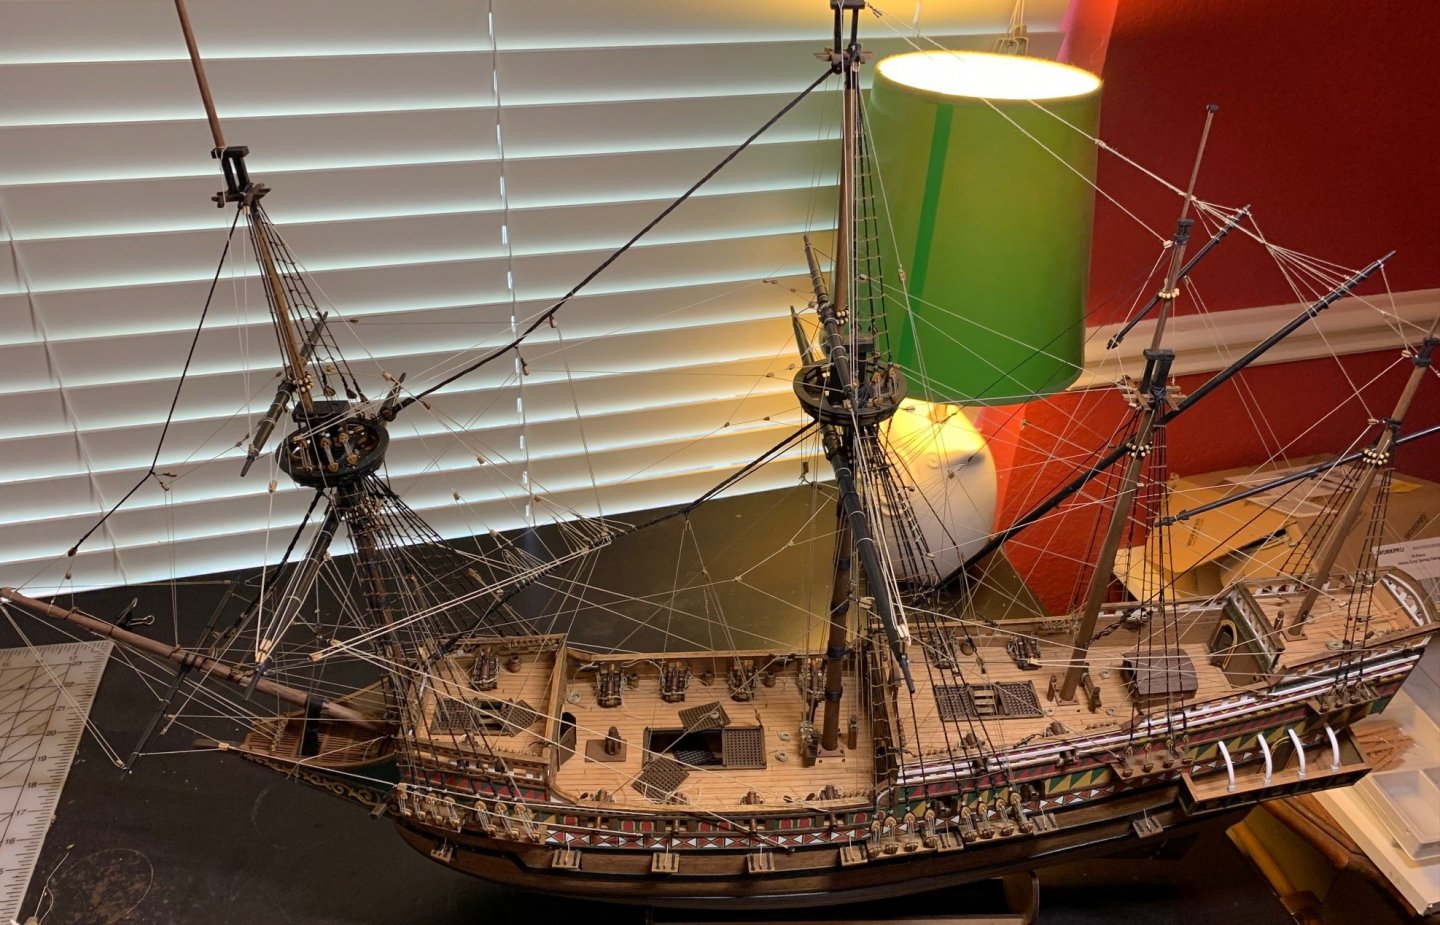
Finished ! I've added the anchors and flags and believe I'm going to call it finished. There is some minor detail work that I may come back to later but right now I think I'm going to leave it be and see how I like the way it looks. I've ordered a display case and will post one more set of pictures when I have it placed in that. Couple comments looking back on this build. Firstly the quality of the kit and honestly I don't think you could ask for more. The quality of the materials and instructions is first rate and is something that someone who hadn't completed a build previously can tackle and get great results, so I'm going to rate that a 10/10. As for my build there is some good, some bad and probably hundreds of mistakes that experienced builder will spot immediately but I'm ok with that and am just considering it part of the learning experience which will be applied to my next build (already out of the closet and the box is sitting on my table staring at me) so I'll rate my build as a 6/10, I'm happy with the final product but it could be made even more beautiful if one desired. Speaking of mistakes I'd really like to thank the people that have been so helpful with information, I may not have gone back and corrected all of them but at least I know now what I did wrong and can improve in the future. This has been an incredibly enjoyable process and I'm excited to start the next kit. One of the things I really enjoy about the hobby is that it's so varied, just when it seems like you've done a ton of something then something completely different will come along and you'll be doing that for a while. It's also given me even more appreciation of the amazing work I see here on the build logs and I'm so thankful that people share their experiences and help beginners like me tackle the more challenging part without having to invent the wheel from scratch.


- 166 replies
-
- 17
-

-

-

-
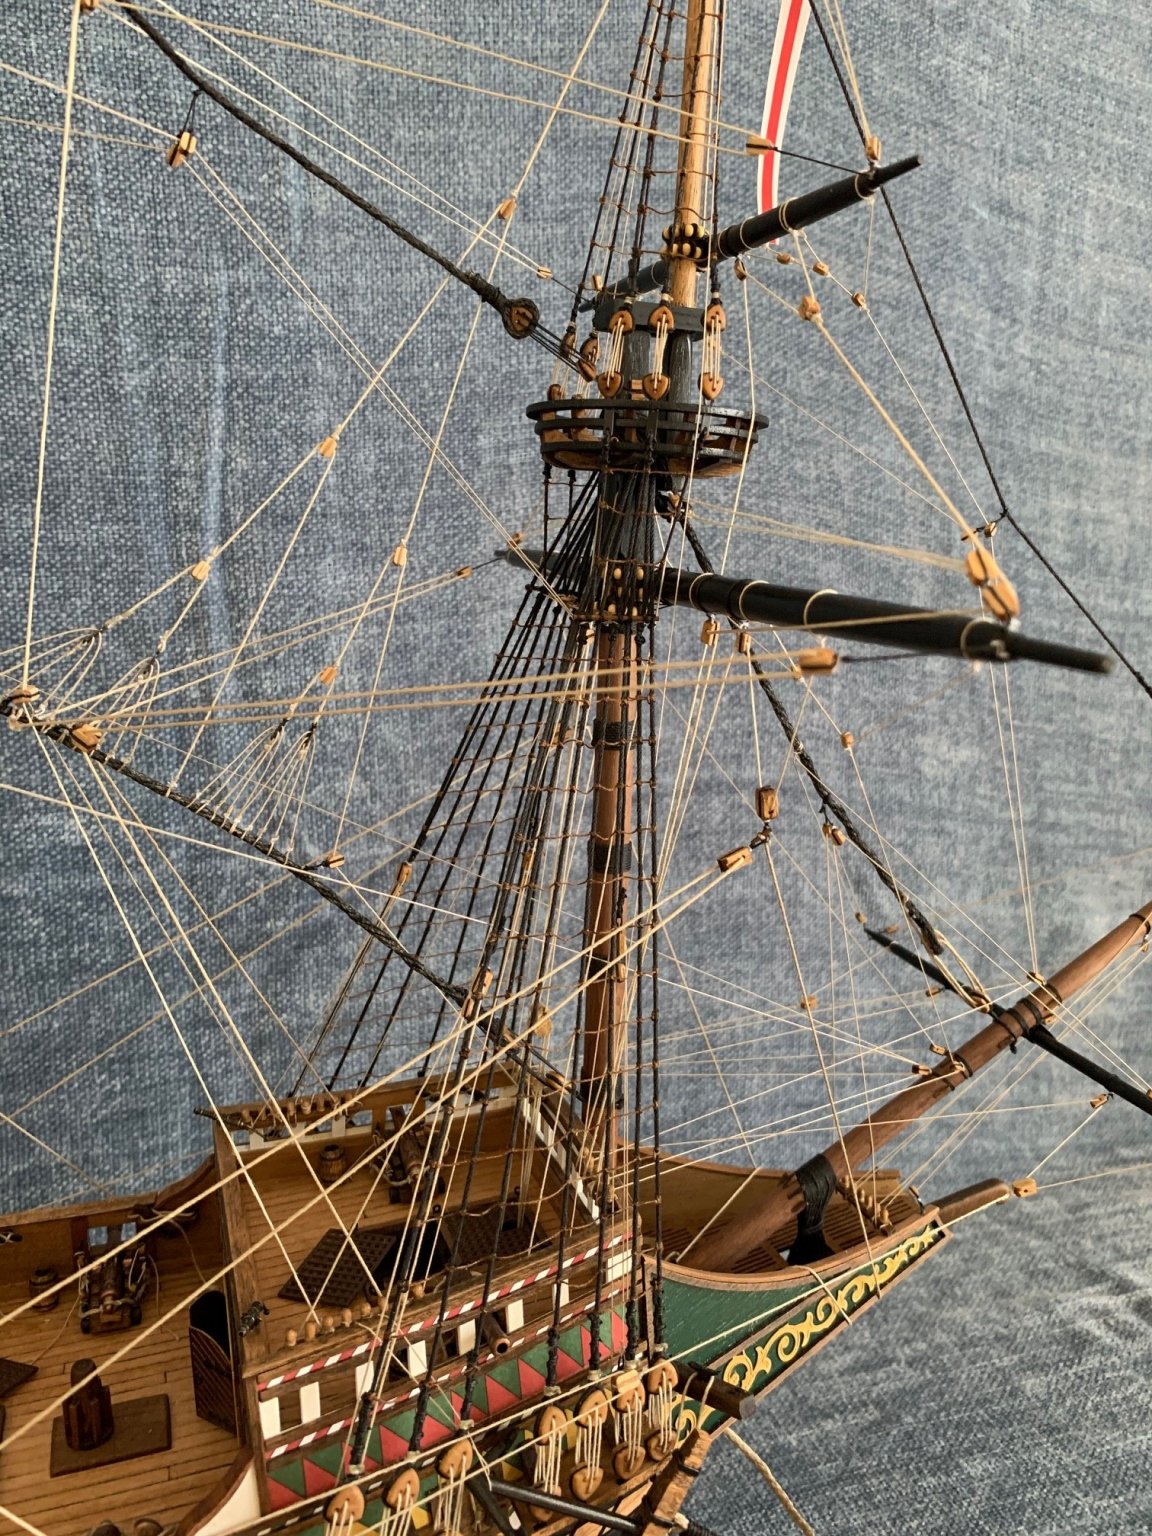
Rigging Finished: All the ropes are in, just need to finish up some details and some final clean-up and touch-up work and I'll be finished. The anchors are made just need to put them on as part of the final details. Still debating the flags, comtemplating attaching them to a rope and then threading that in place, seems like it would look better and give some flexibility.
-
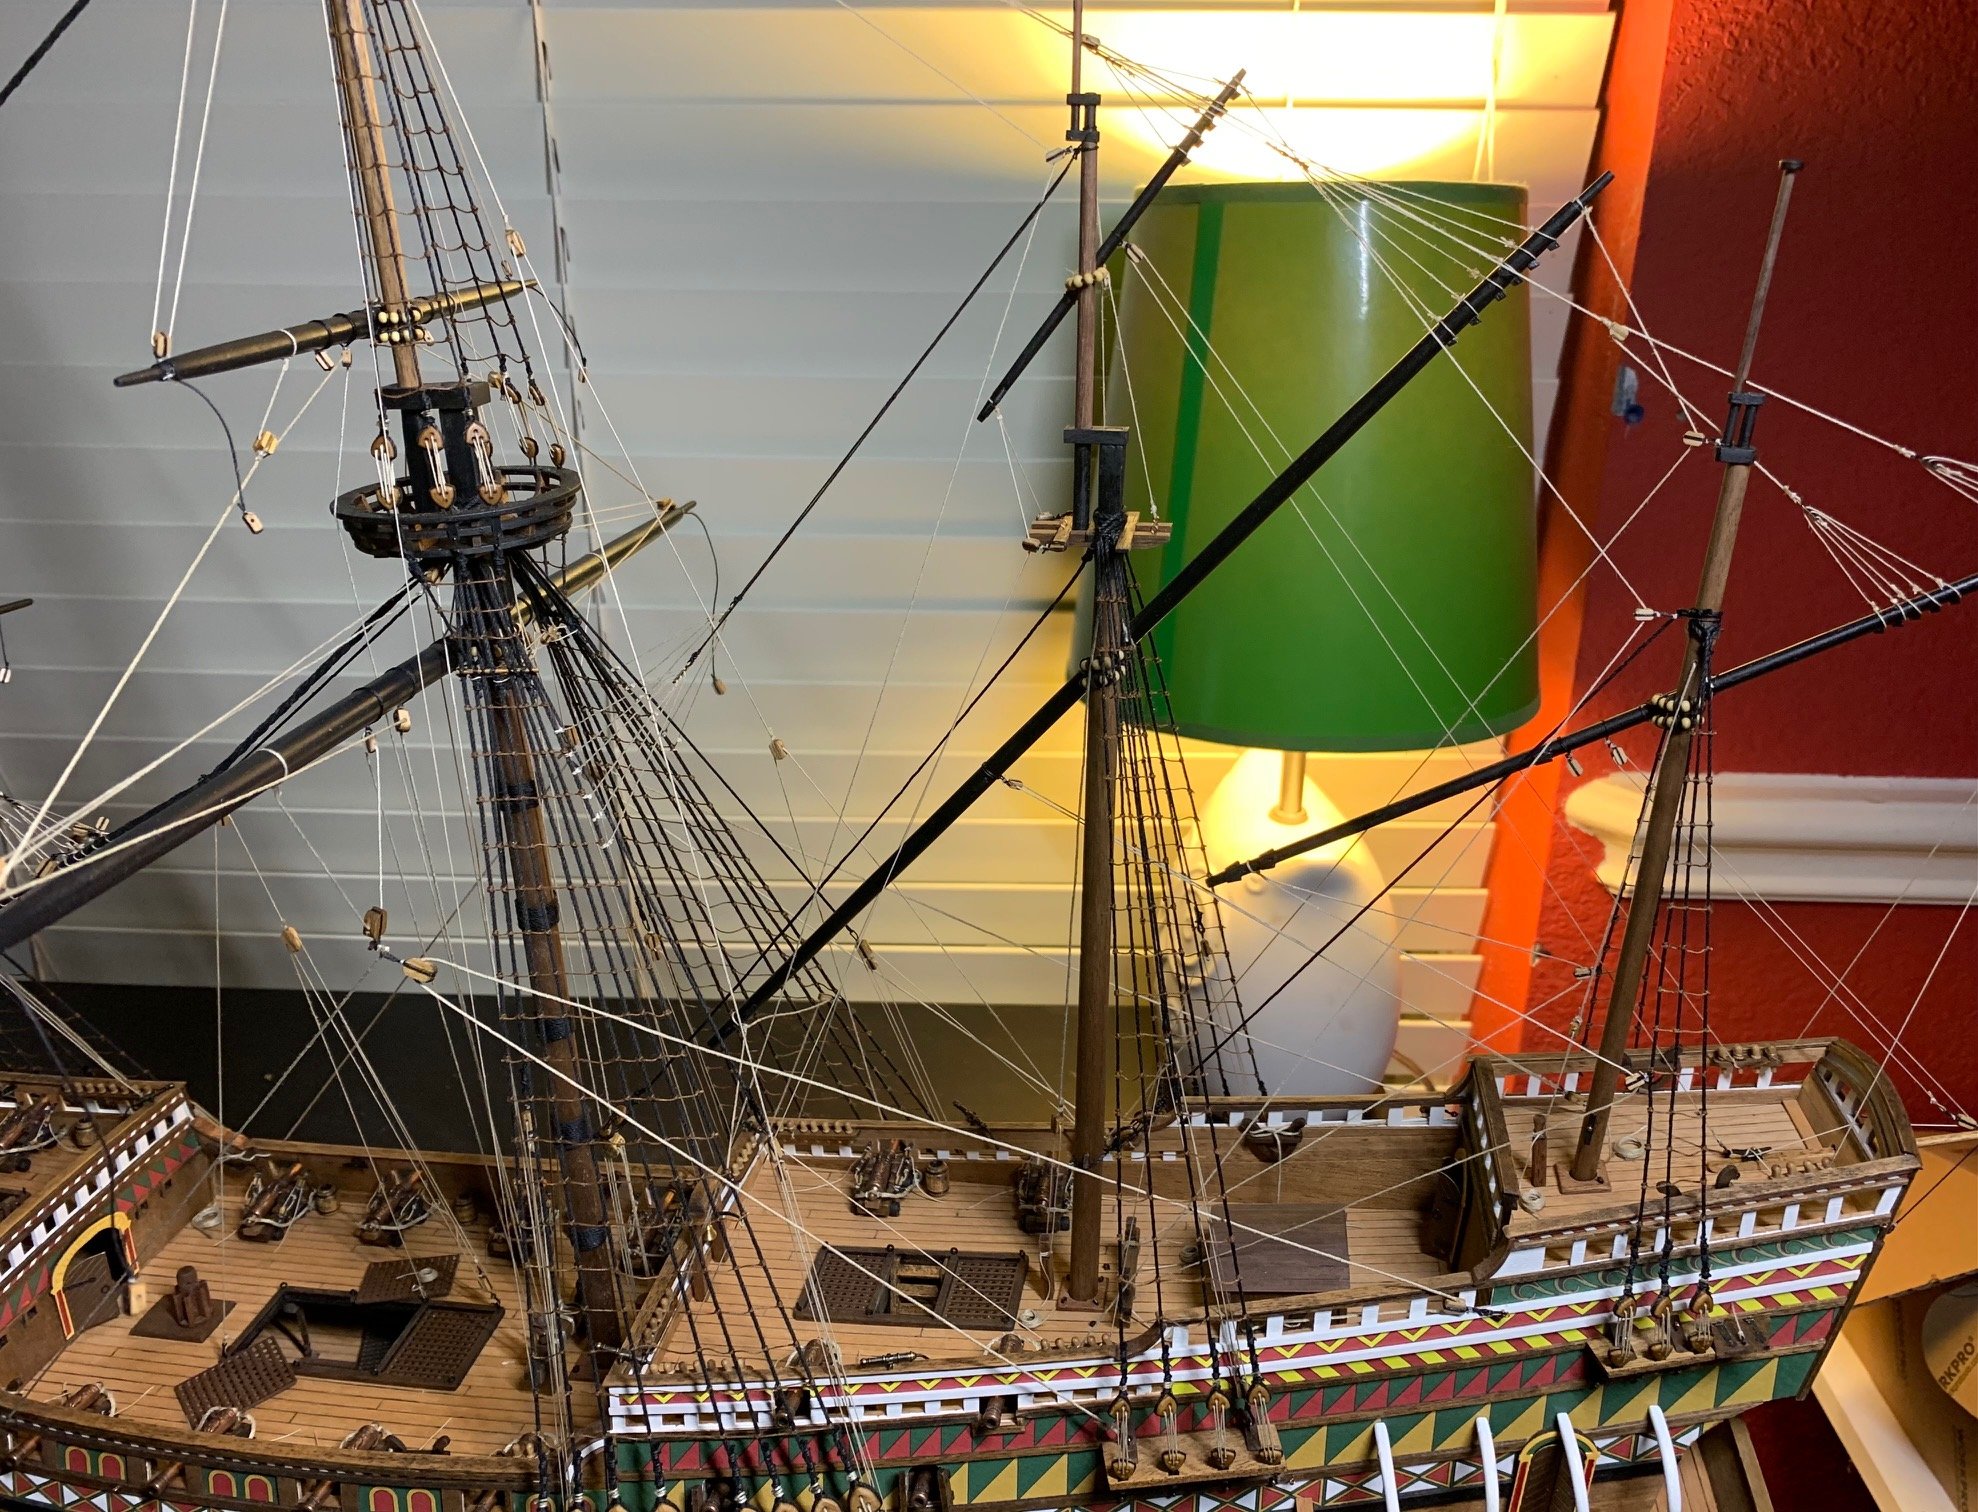
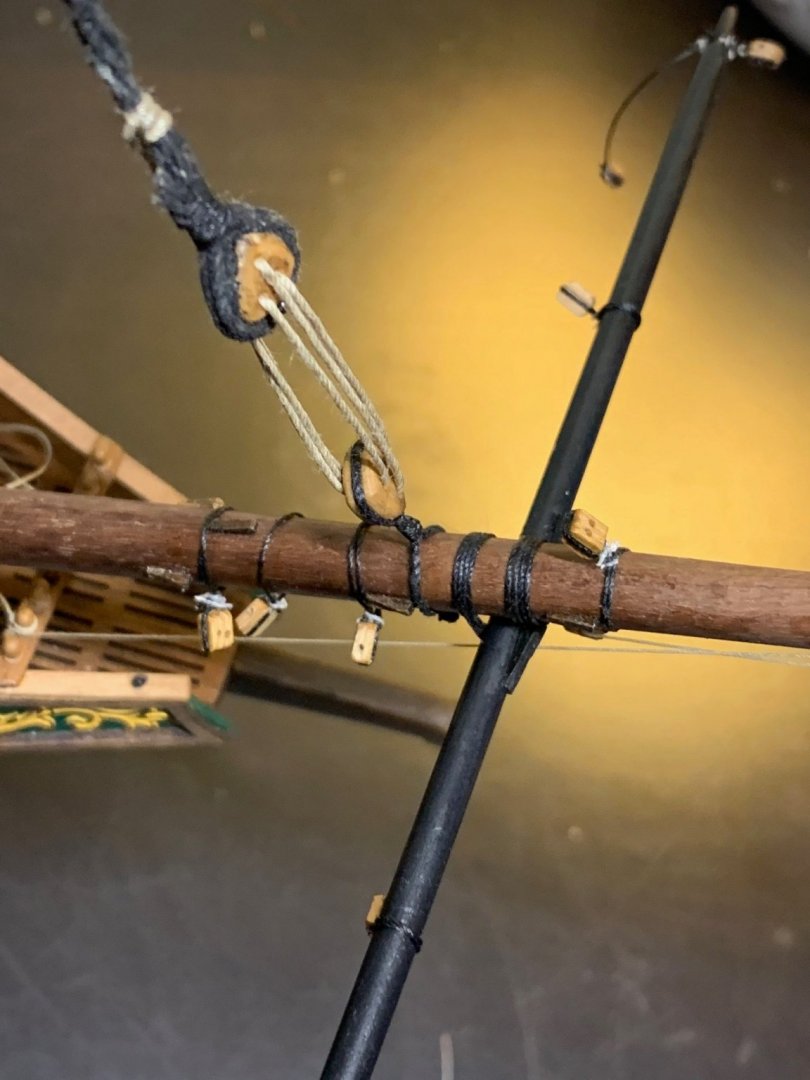
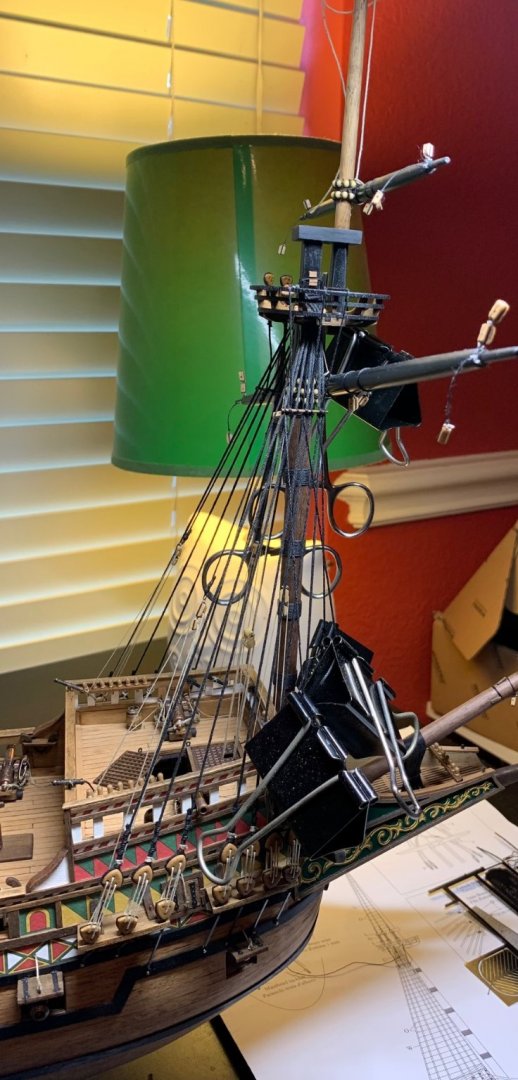
Plugging along on the rigging: Lots of rigging going in, it's hard to describe what's happening. Almost everything seems to be going by the book and plans with a few exceptions. I'm almost through page 17 of the plans which I believe is the next to last rigging plan when you're not adding sails. I had to add something to counteract the pull of the mainmast stays on the mizzen and bonadventure yards. There was just no way to get any tension to pull all the threads somewhat straight so I added backstays on those yards. I believe I've seen at least one other log where that was done. I've been using a jig which is just a flat piece of scrap with some different size dowels glued to it to make rope coils and falls and that's working out pretty well. I just coil the thread around the dowel and then use some 50% white glue/50% water solution to wet it down and then when dry just slowly work the coil up and off the dowel. Then I'll use some CA glue on the bottom if it needs a little holding together and trim and glue in place on the ship. Rigging is both easier and harder than I expected. Understanding what I need to do and getting thread and blocks in place is easier than I expected, helped immensely by the quality of the instructions. Tying ropes off is where it's extremely challenging. Getting the thread over and around pins and getting the correct twists in is something I'm having to learn. I'm trying different techniques but I suspect that no one technique will work in every situation and sometimes it's just a matter of getting lucky and pulling it in place as quickly as possible. Looking forward to getting the last bits of rigging done and then putting on the finishing touches.


- 166 replies
-
- 11
-
-
Kirill4, thanks for the great information as always. I've seen the needle technique before but I like the look of the seized threads to the shroud, again the picture makes it look much bigger than it is in real life and it's pretty subtle when you view the real model, it works for me at least. For the bowsprit spar I just decided to lash it to the bowsprit. I can see from the picture you included that it's probably not historically accurate and something I'll improve on the next model I do. For this kit I'm not going to go too far away from the plans.
-
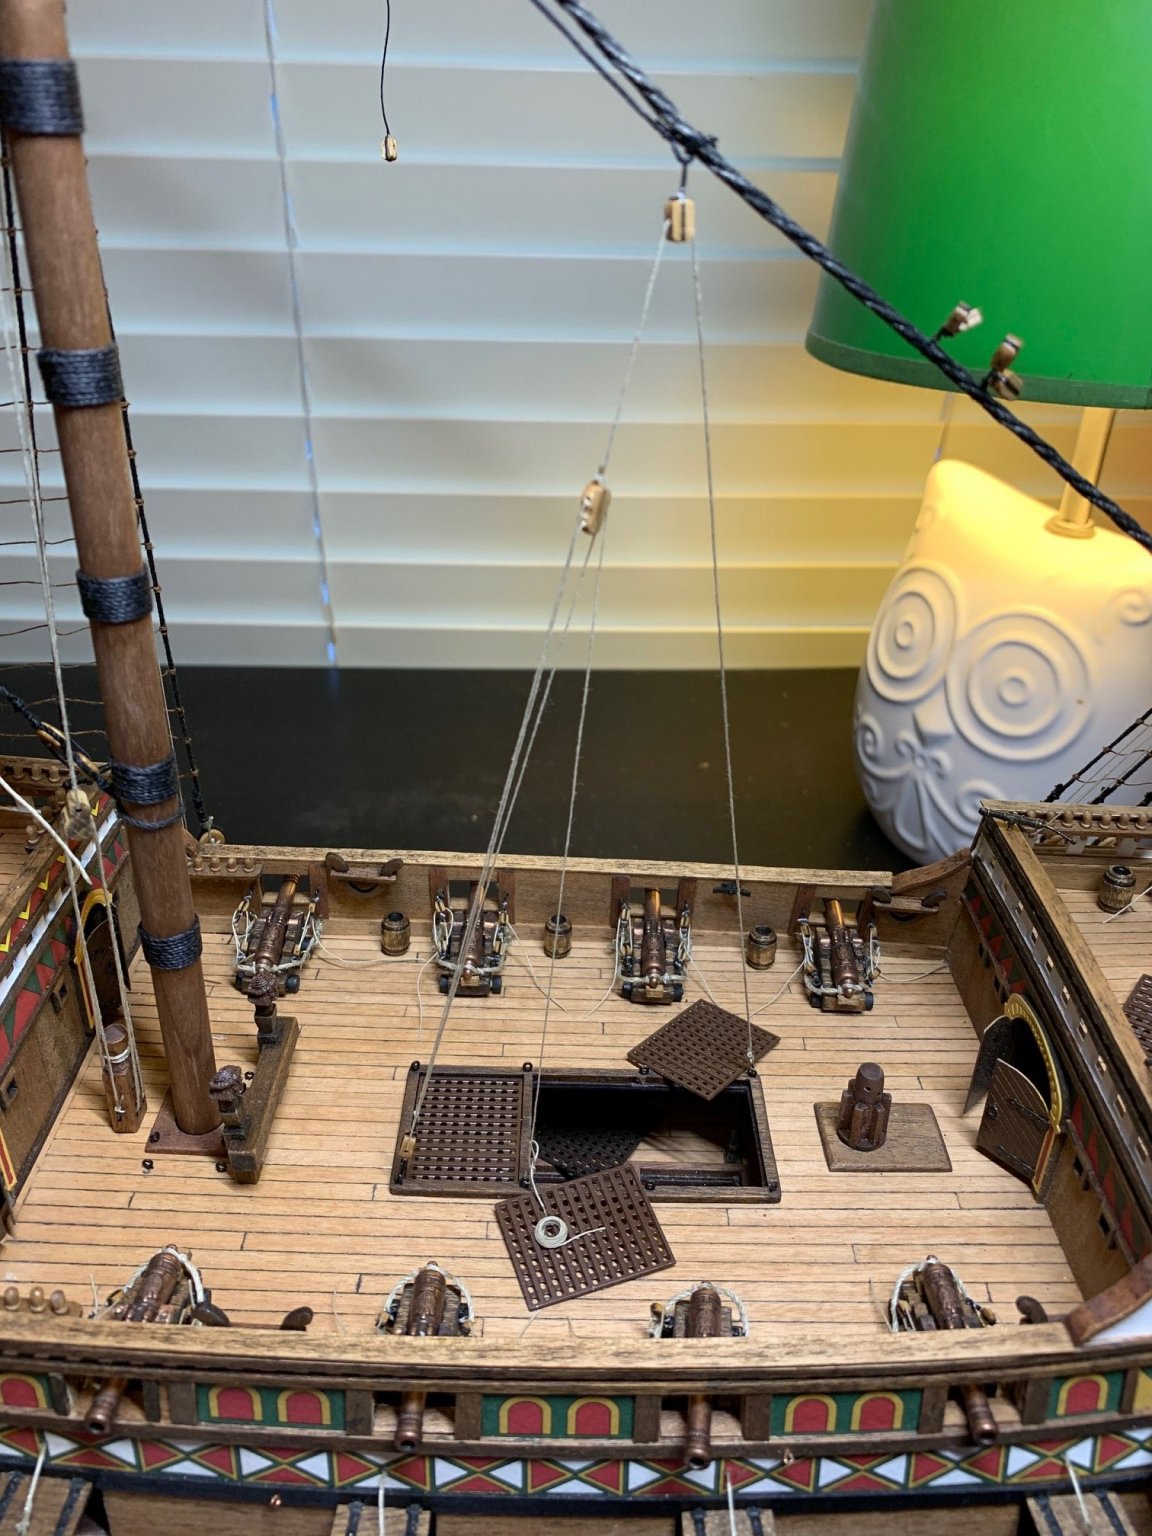
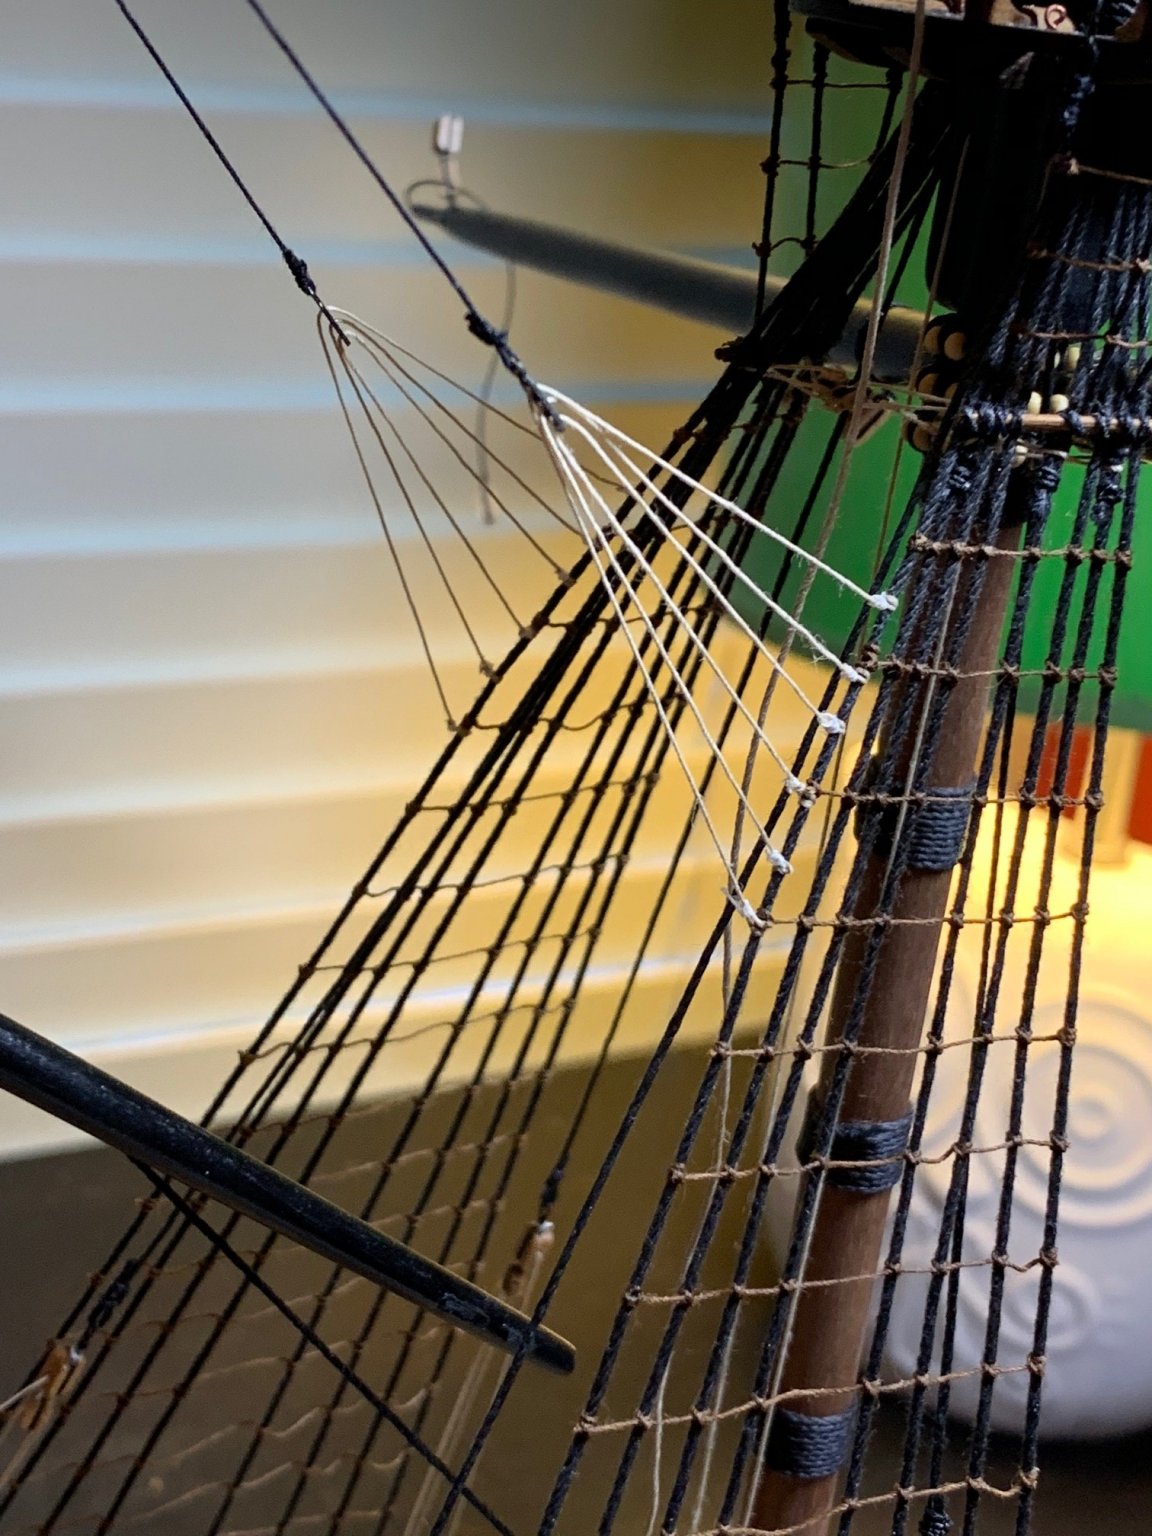
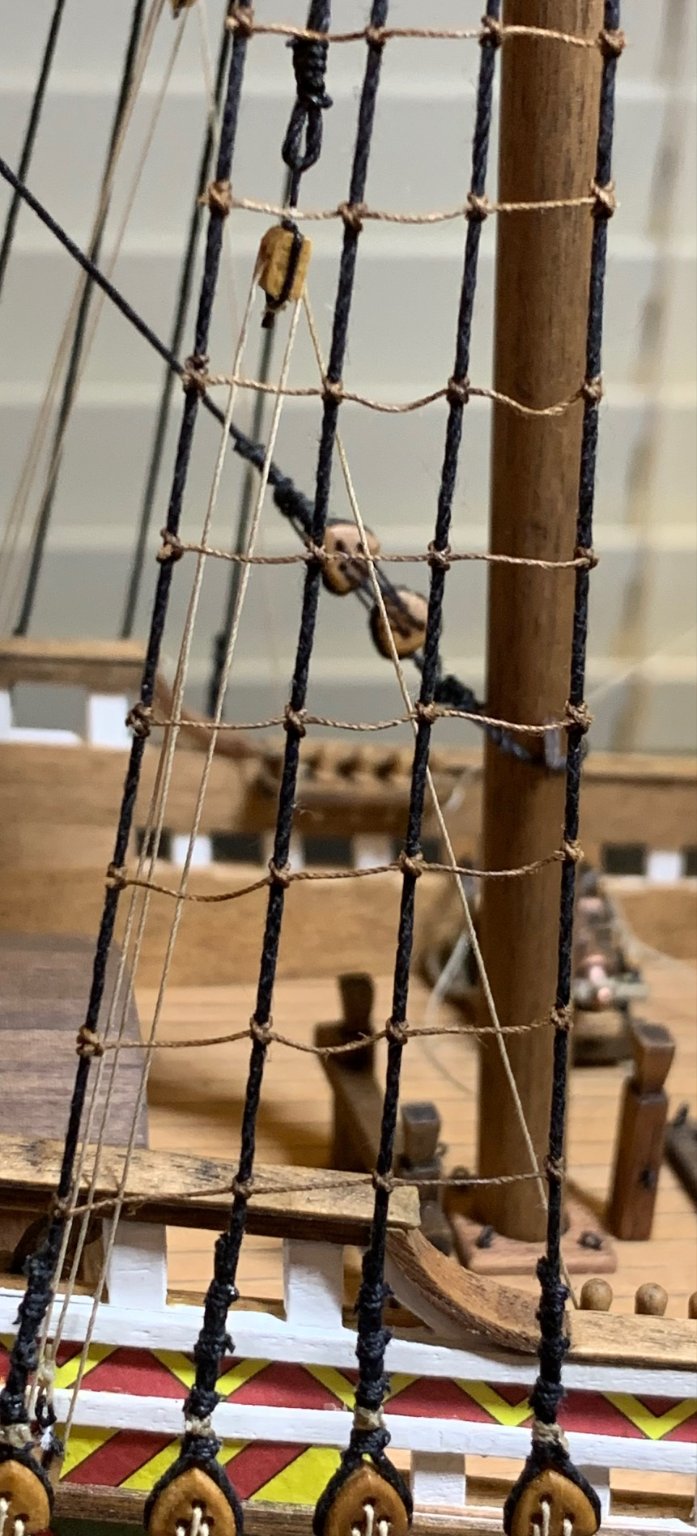
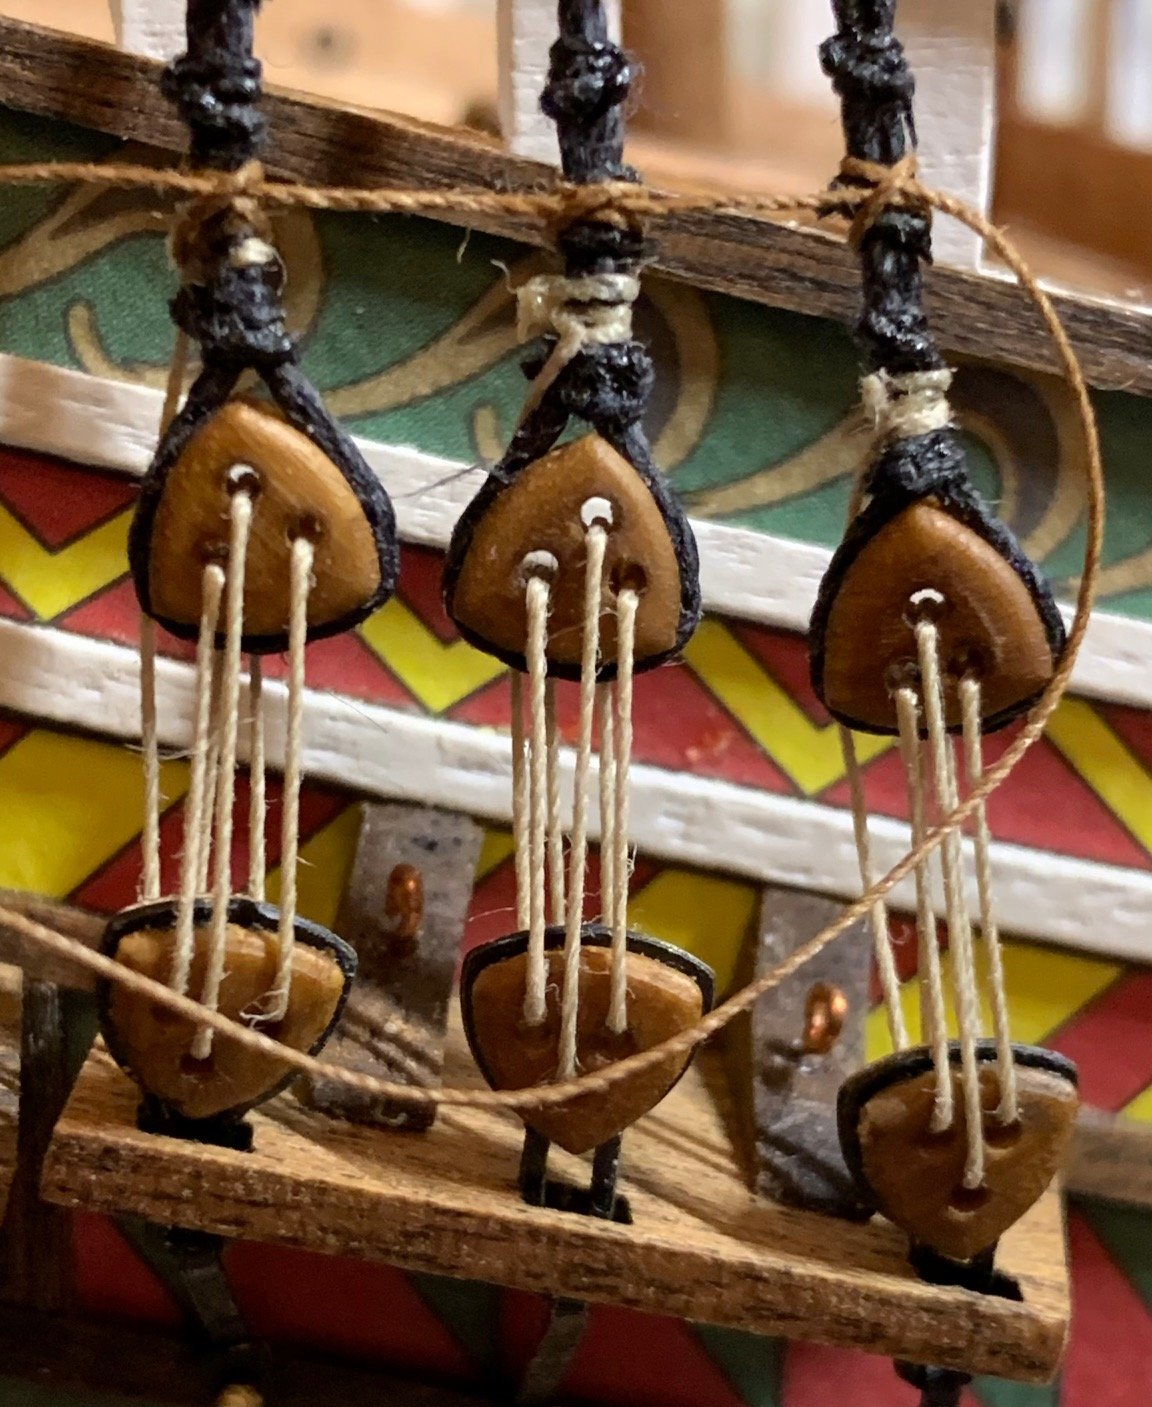
Finishing Mast Stays and Mast Stays Tackle: Finished up the rest of the mast stays, the mizzen mast stay has the rope fans that attach to the shrouds which I wasn't sure how I would do but they turned out to be fairly straightforward. I just seized three lines on the shroud and then working from inside to outside threaded the threads through the piece that holds them and then seized them in place on the shroud. Tying the seizings less than full tightness let me adjust the tension on each one to try and get that as even as possible. I would have liked to put a little more tension on them but that would have pulled the shroud out of place, there's a tiny bit not but not bad. The mast stays tackle was easy and I did my first rope coil expiriment which can be seen in the pictures below. I'll have to do a bunch of these as I continue. As I look forward to the next steps it calls for installing the yard ties for all the spars including the bowsprit and I can't seem to find anything that shows how the bowsprit spar should be attached, I'll start doing some research and if I'm still not sure I may have to start another thread in the rigging forum.


-
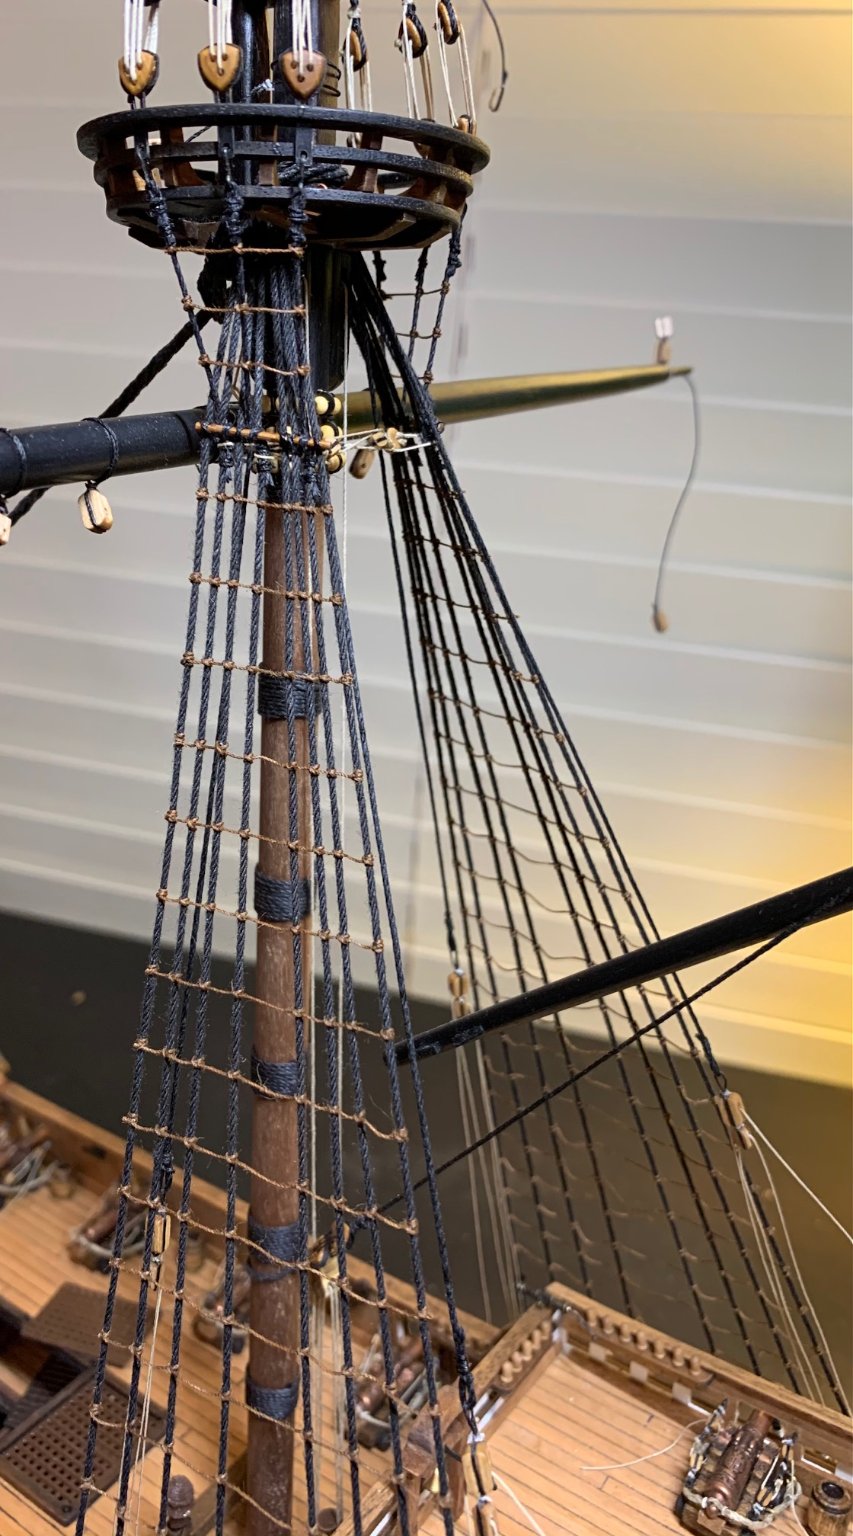
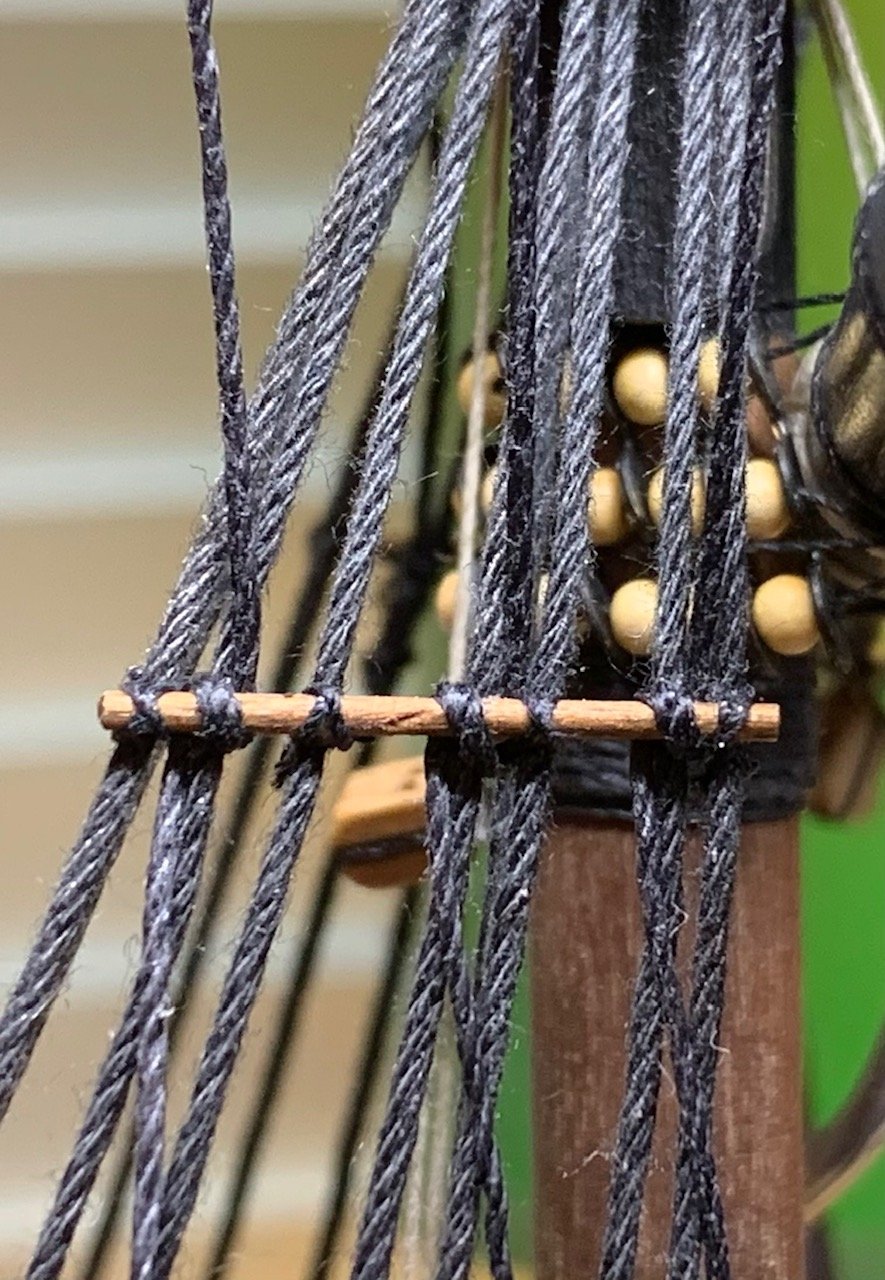
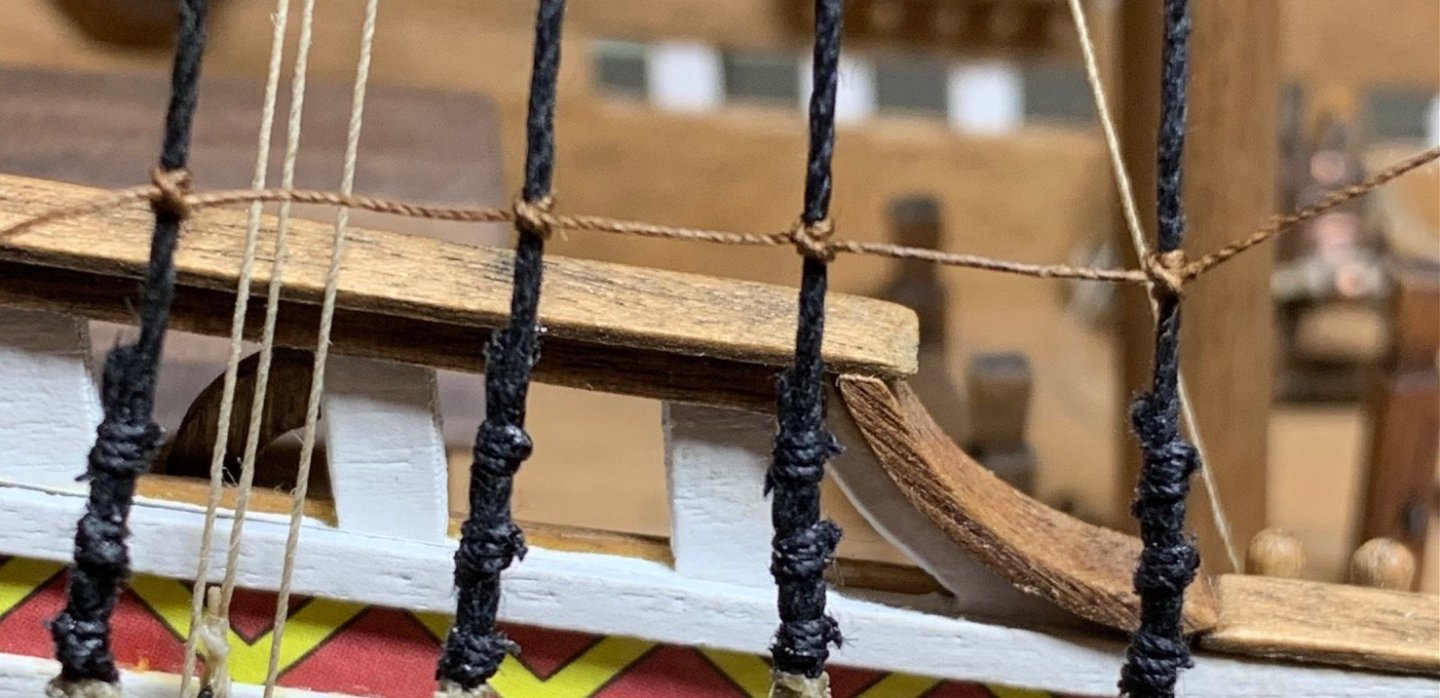
Update As I progressed on doing the ratlines I realized that I think I was tying the taught line hitches incorrectly. If done correctly the last loop or hitch around the shroud would reverse direction and come out going back to the center of the shrouds. So I switched to what I believe was a correct taught line hitch but the knots often came loose very quickly and I found I was relying on the glue to keep the knot taught, which I didn't like. So I then switched back to the first knot I had used which is basically a clove hitch with a double loop around the shroud on the first loop, I'm not sure if there's a name for this knot or it's just a clove hitch with an extra loop. I'm not sure why the correct taught line hitch had trouble staying tight after tied, it could have been the thread or possibly something to do with the what I stained the thread with a marker. A few of my ratlines have the correct taught line hitch with the end pointing in and the majority have the modified clove hitch with the threads pointing out. If the thread is trimmed properly it's pretty hard to tell which way it's facing so I'm just writing the minor difference up to experience. I'm including a picture with the shrouds facing the camera all done with the modified clove hitch.

-
Ratlines are done! Finished up the ratlines. I had stated earlier that I was using a taught line hitch on the end shrouds but as I was going and looking at the diagram of a taught line hitch I realized that I wasn't tying it properly, at least I don't think I was. Done correctly the last part reverses direction and the end of the line would come out pointing back to the center of the shrouds so I started doing it that was thinking it would be better to have the last bit of line coming out inside instead of outside. As I progressed on the ratlines using the correct taught line hitch I felt like the knot just didn't work well, it didn't stay tight well and I found I was relying on the glue to keep the knot held tight which I didn't think was good in the long run so I went back to my original knot which I think is just a modified clove hitch with a doubling of the first loop around the shroud. This puts the end of the line pointing out but I felt that this was better than having the knots come undone. It may have had something to do with the thread I was using or how I stained it with a marker, it's just what worked best for me. Other than that the ratlines went pretty well, don't know if they're the hardest part of the rigging but probably one of the most time consuming parts and I felt a bit sad as I was tying the last one, I sort of enjoyed this part once I settled on the knot and staining procedure. The tricky part is getting consistency with the placement and tension, or lack of, between each know and sometimes I'd be really good at it and sometimes it just seemed like I was all thumbs. I've also started putting in some of the next steps of the rigging when I just needed a break from ratlines for a while.


-
Thanks, I think the first picture was so close up that I think it may have made the ratlines look bigger than they really are, and the knots did look like they were going to come apart which led to my looking for another way to do that and came up with the taught line hitch for the ends.
-
After posting a thread on the Rigging forum and getting some ideas for the knots on the ends of the ratlines I decided to use a taught line hitch on the ends and of course the clove hitch on the middle shrouds. I think I'll continue to use the thread supplied in the kit for the ratlines even though it might not be the perfect size. Just working through and getting all of them done now.

-
Thanks for all the information and ideas. I've decided to put a taught line hitch on each end and the clove hitch on the shrouds in the middle. Here are my results so far.

-
Tied a test with the taught line hitch and it seems much better, like that a lot, thank you. I believe I have the taught line hitch correct.
-
I also wondered about that, the instruction diagrams very specifically show them starting right above the deadeyes, in the seizing so for the trial at least I did it that way. It would certainly be easier to start above the seizings as one of the clove hitches fell right on the edge of a seizing knot and really tended to go up or down.
-
Starting the ratlines on my 1577 Revenge and I've found a lot of information on how to tie the clove hitches on the interior shrouds but almost nothing on how the ratline would be attached at the first and last shroud other than just more clove hitches. For testing I've put a clove hitch on the first and last rope but for some reason it just doesn't look right to me (not that I'd know) and the pictures I've found of period reconstruction ships just don't show enough detail for me to see how it was done. It seems to me that a clove hitch on the end would come loose pretty easily so I feel that has to be more to it than that. Some information seems to show the ratline seized in a loop around the first and last shroud and that makes some sense to me but I though I'd ask before plowing ahead. Any ideas/information would be greatly appreciated. Picture of my test ratline included.

-
Starting Ratlines: All my shrouds are in and I added some of the mast stays just to be sure everything was firmly in place and I'm ready to start the ratlines. I read several forum threads about the color of the ratlines trying to decide between the natural and black and finely decided that neither was what I wanted and that I needed to color the natural thread a bit darker and see how that looked. I tried several things to stain the thread but nothing really worked like I wanted it to until I tried using a Prismacolor marker. I took a Light Umber marker and the best method I found was to take the broad tip and place it against the top of my table with the thread in between the marker tip and the table and slowly pull the thread through. I've taken that thread and tied one ratline with no glue to see how it looks and I think I'm happy with it. Now I need to decide what glue I'll use to fix the knots, I don't think I want to use CA glue as it leaves a shine and the wood glue I use is too thick so will have to do some experimenting to see what will work there. Hopefully the picture will show the color of the black, natural and my stained thread.

-
The bowsprit is off center. Since it passes by the foremast my assumption is that it had to be. Thought that was an interesting detail as well.
-
That's good to know and makes perfect sense. Thanks.
-
I have considered that and when I start my next kit I will probably get one. I'd also like to get some clamps specifically for the hull planking but will need to look into what's available and which ones would work best for me.
-
kirill4, your english has been fine, no problem there. I did what you suggested and the pictures are below. I think it looks very good, now I'm not even sure what I saw that made me do it the other way. I will probably just tie the futtock shrouds off where they are, it really doesn't look that different from the other side since I made a similar loop around the staff just with smaller thread. I will probably be able to live with the difference and just use this method going forward. Many thanks to you and xodar in helping me understand what is going on here.

-
kirill4, I will try to get pictures like you've requested when I start on the other side of the foremast, right now I'm just trying to soak up all this new information and see how I'm going to move forward. Currently I use CA glue on the rigging and have a medium thickness with an extra fine dispenser and I try to get glue where it won't be seen as much as possible as it does make a slight change in the look of the thread. As for magnifier glasses, I am blessed/cursed with extreme nearsightedness and when I take my glasses off I can see tiny things really well. I've been meaning to say something but keep forgetting but possibly the best upgrade I've made to my building area was an adjustable bright LED lamp, the difference a well lit area makes is incredible. Not enough can be said about good lighting. xodar461, great information as always. I had seen some mention of the thickness of the rope based on the mast in some of the things I've been through as I try to absorb as much as I can building and learning at the same time. My initial plan was to just go ahead and follow the instructions in the kit as much as I could and get at least one full rigging done and try to build on that for the future. I do think that what is completely accurate and what works best on a scale model aren't always the same thing and how those decisions are made just depend on the personal preference of the builder. I confess that I lean a little to the look good over total accuracy camp a bit. As I've been learning and seeing more models, pictures and paintings what I see as best for a certain situation has been changing. Again, I really appreciate you taking the time to share this information, sometimes I find so much on the web it can be hard to separate the important pieces but specific details like the ones you've pointed out are a great help and really help focus on the practice for a ship of this period.
-
It was the size of the futtock shroud wrapping around the staff that bothered me. My eyes are admittedly very untrained and new to this so they could have been perfect and just looked wrong to me. I'm still mulling over what I'm going to do for the second side. I could also try and fake the loop around the staff on this one but haven't come up with a good plan to do that yet. It's a challenge for me on my first go through rigging as I'm learning so much as I go along that several of the things I did earlier I now know aren't correct or don't look right but I'm not sure how much I could correct without just tearing down and starting over which I don't really want to do. I really appreciate you taking the time to show me how you've done things and the knowledge will be applied. BTW, your ship looks amazing.
-
Kirill4, thanks very much for the information and pictures. From looking at the instructions I was pretty sure that I was probably doing it wrong and that the futtock shrouds did need to make a loop around the futtock staff but when I tried to do that it just looked wrong or bad, at least to my eyes. I think it might have something to do with the scale of the rope used for the futtock shrouds, maybe I should have tried to go down one more size for that rope and things would have looked better. I could probably fake the loop by using some thread and gluing it in place like it was looped around the staff, I'll have to think about that. Every step of the rigging is such a learning process for me. Sometimes it's hard to know when to move forward and when to just go ahead with the best you can do at the time. I think that I'll probably consider this side a learning process and see if I can improve the result on the other side and then decide how to match things up.