Jonathan_219
-
Posts
176 -
Joined
-
Last visited
Content Type
Profiles
Forums
Gallery
Events
Everything posted by Jonathan_219
-
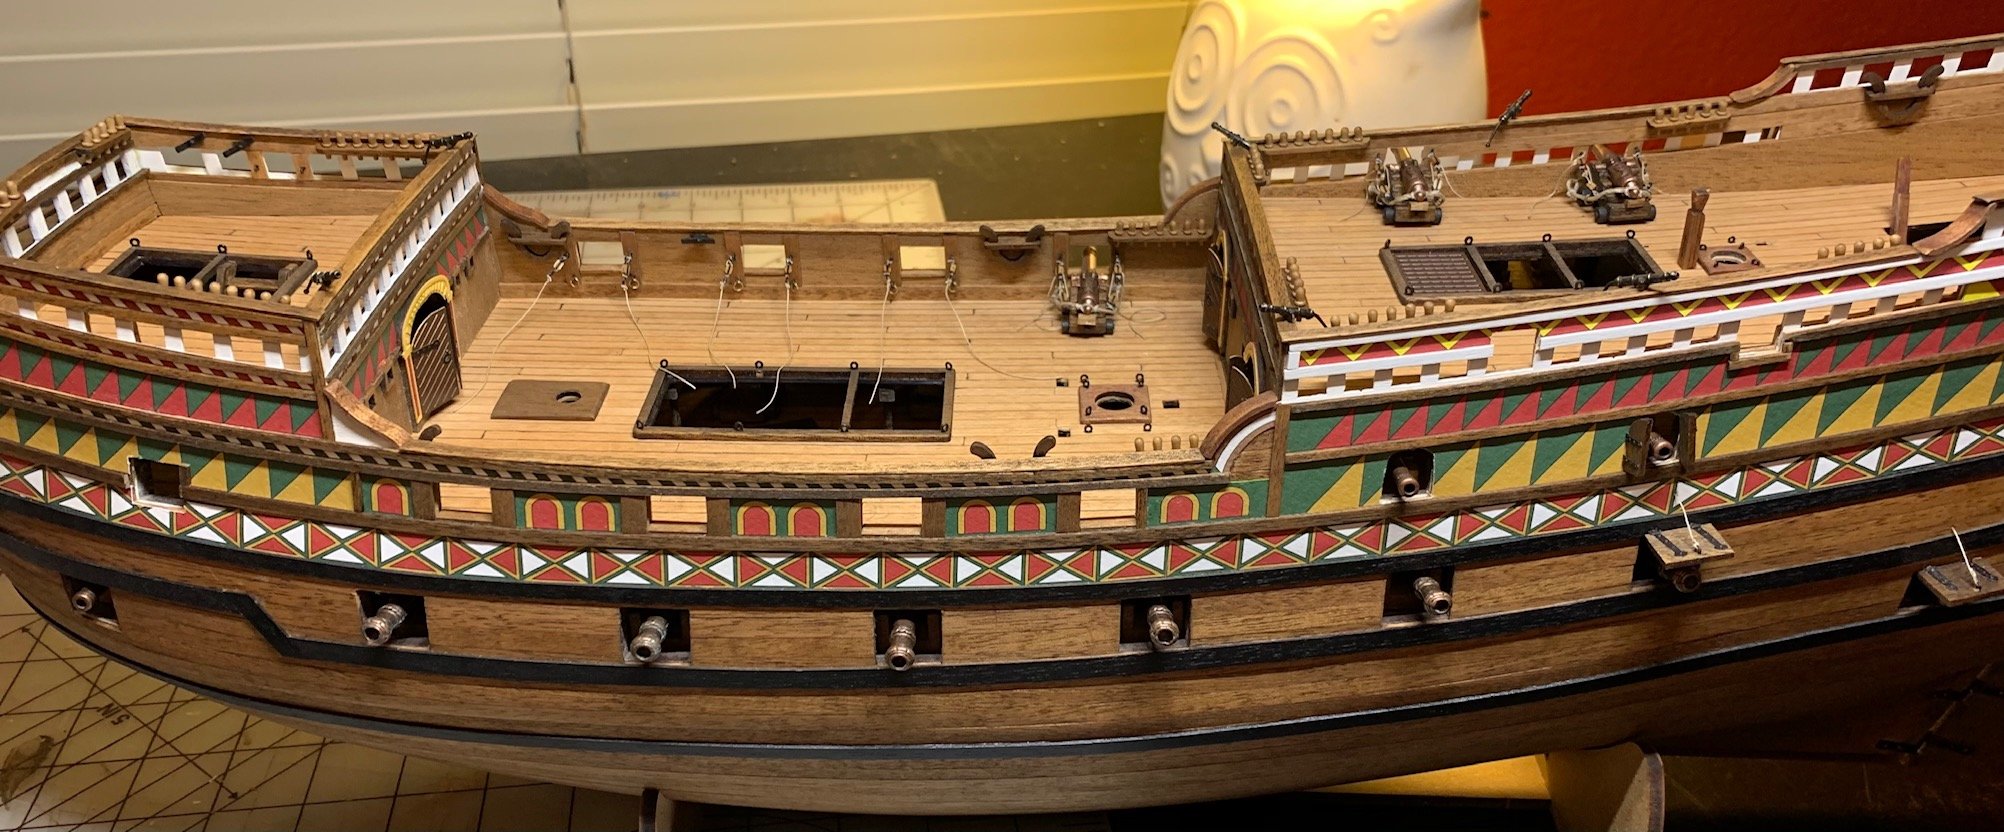
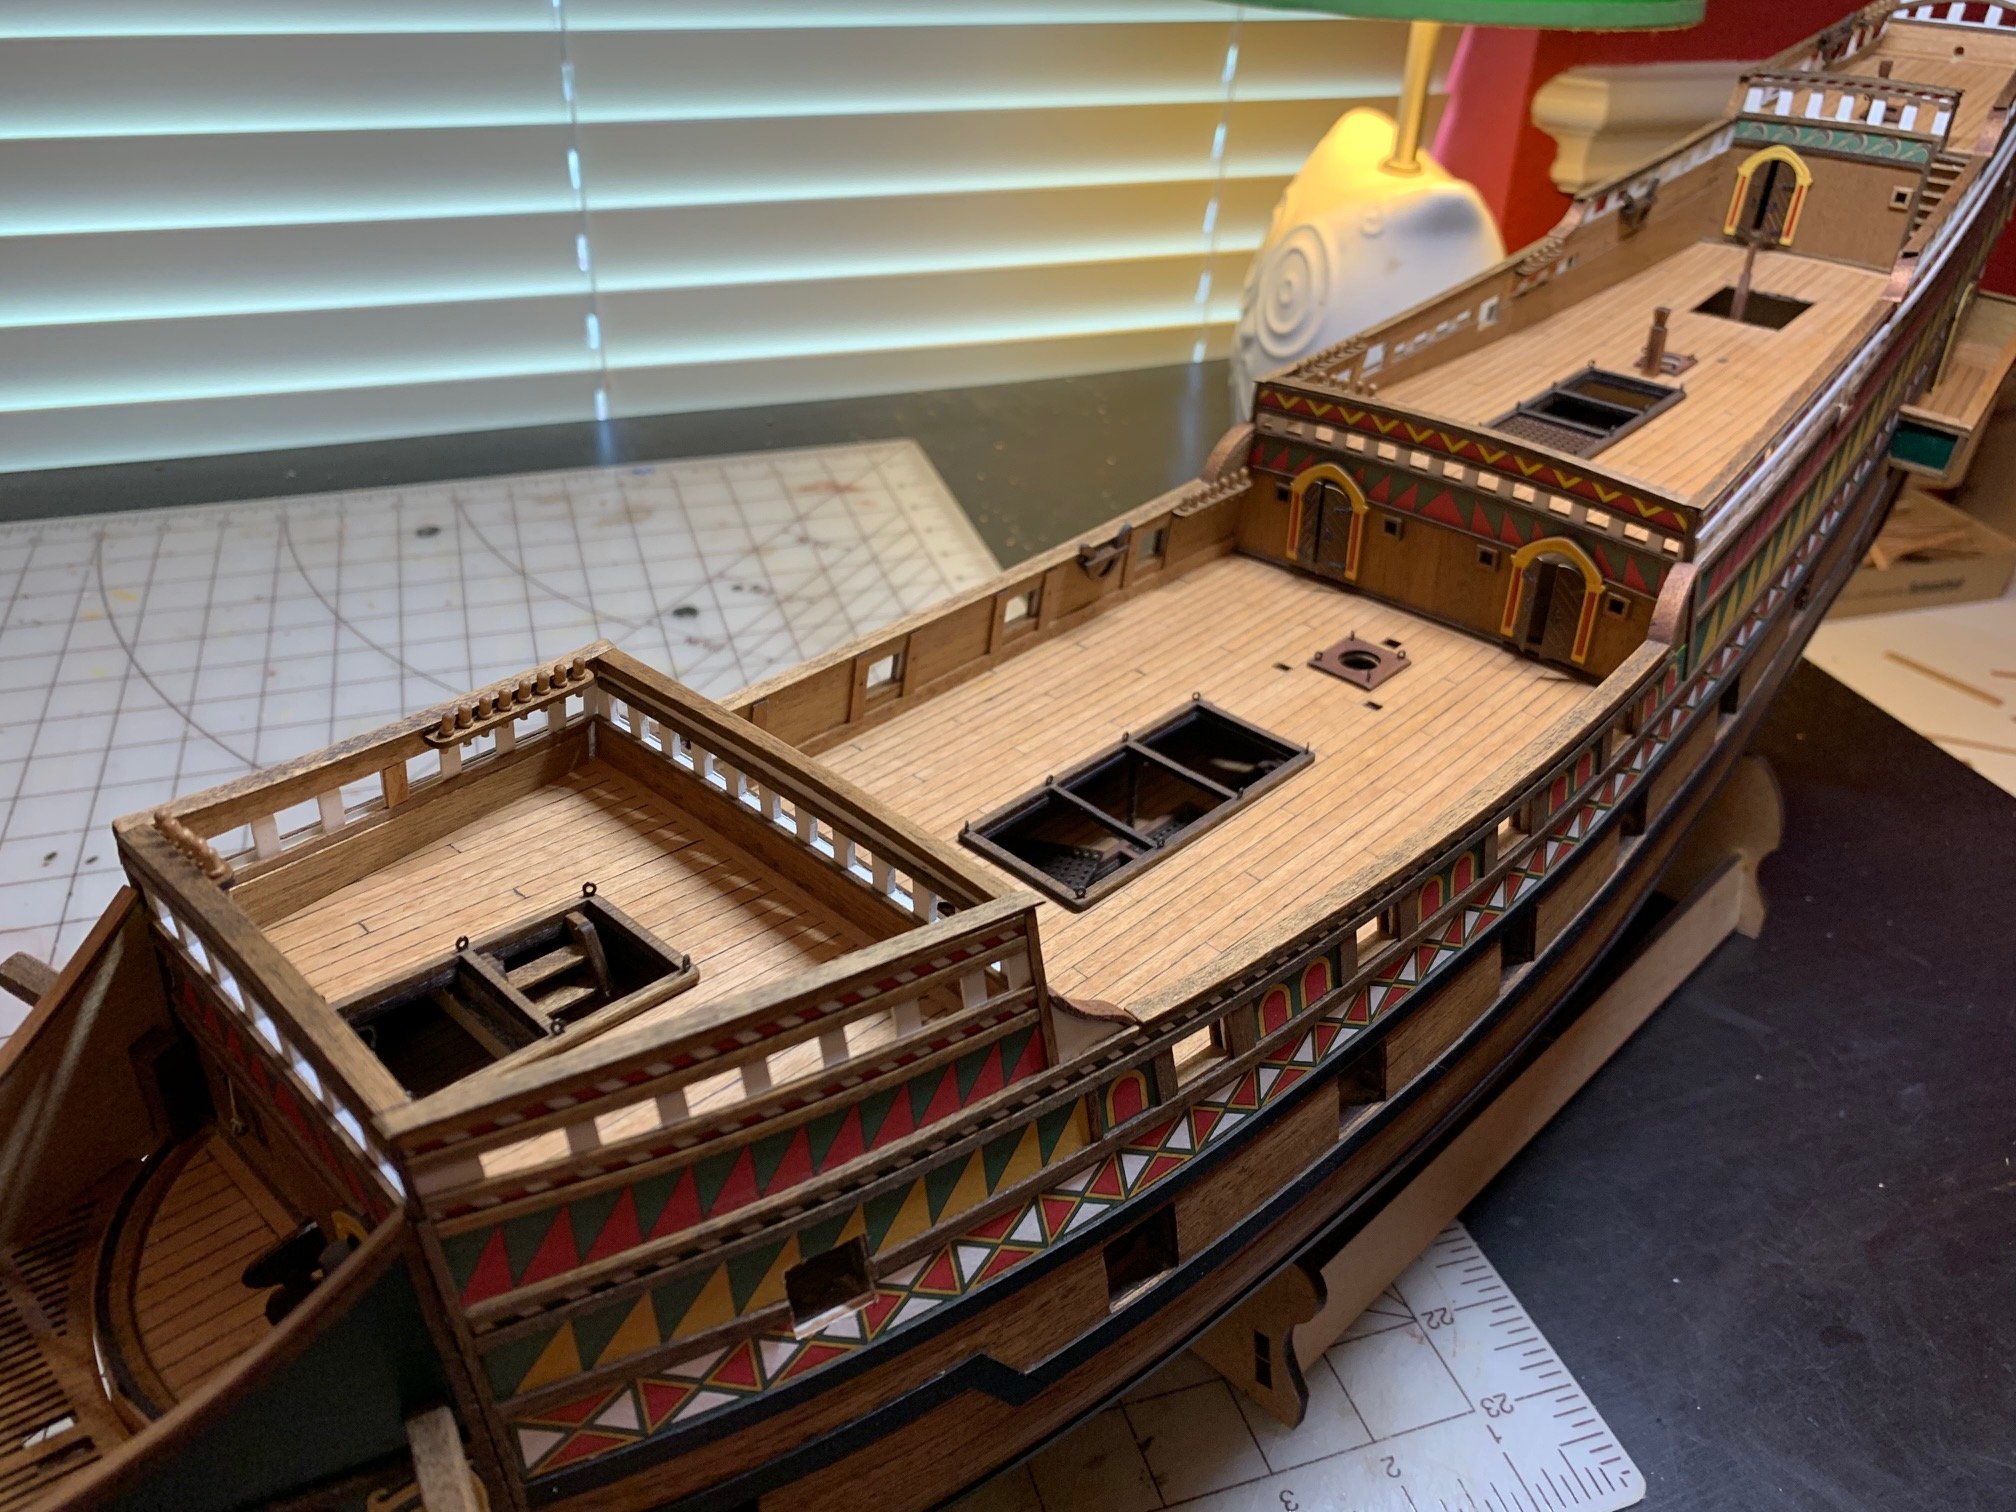
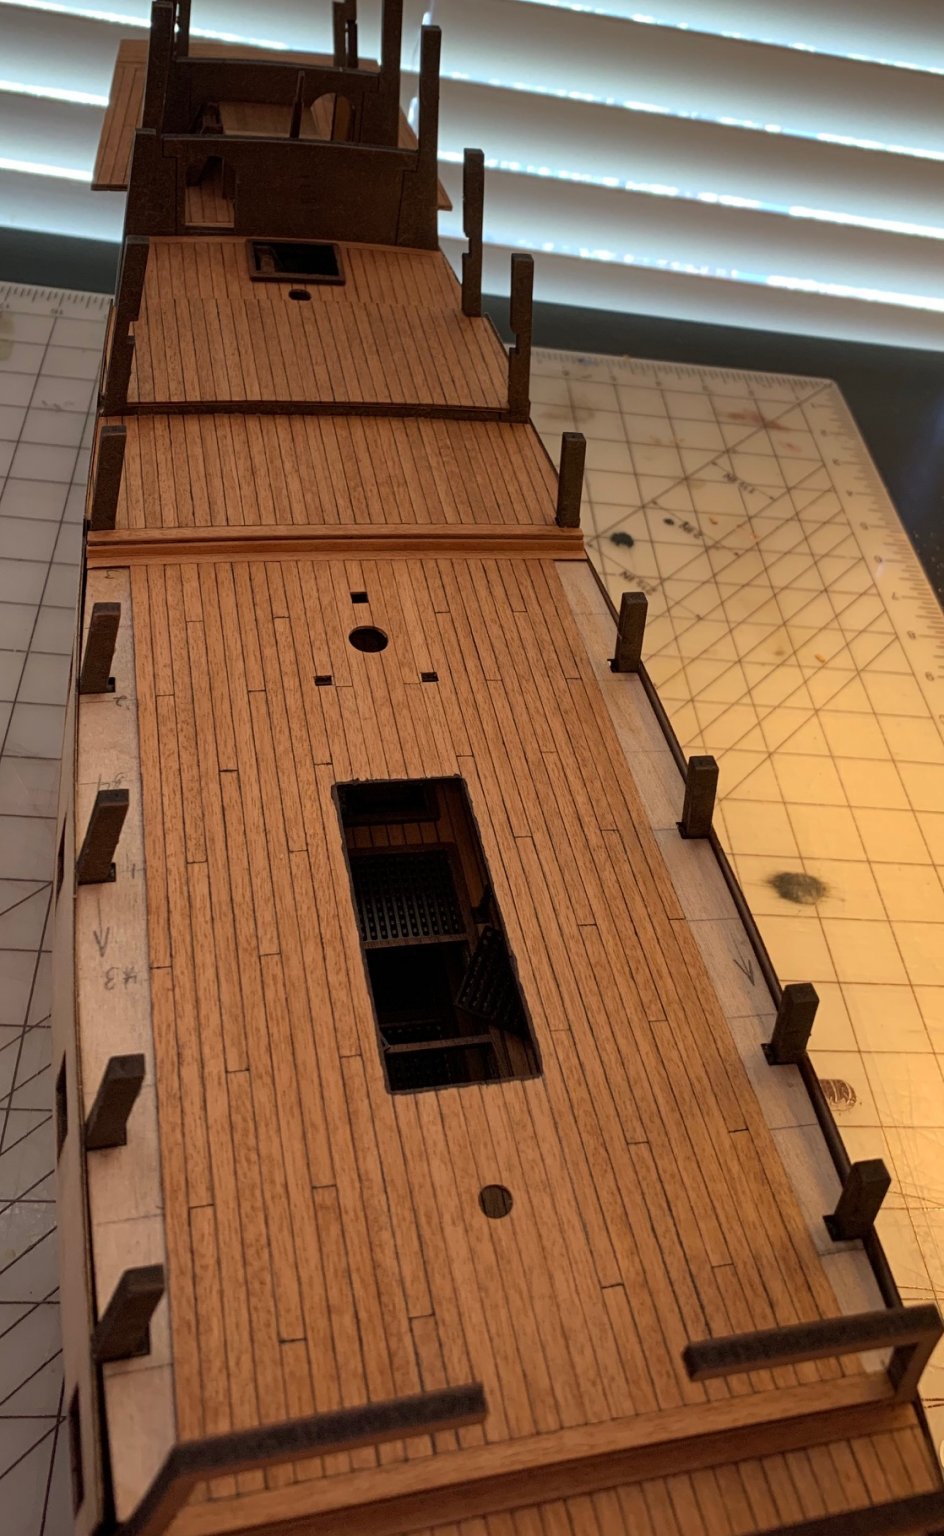
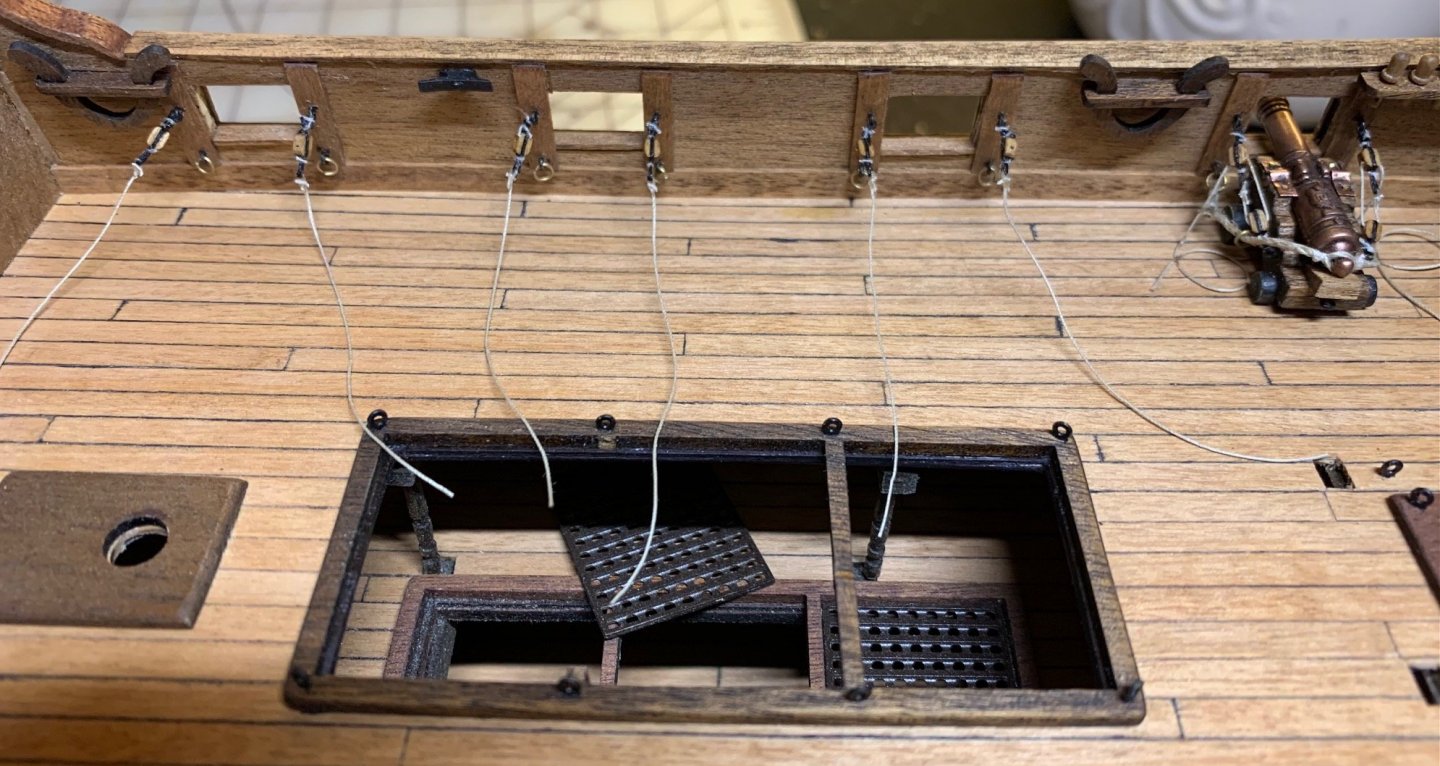
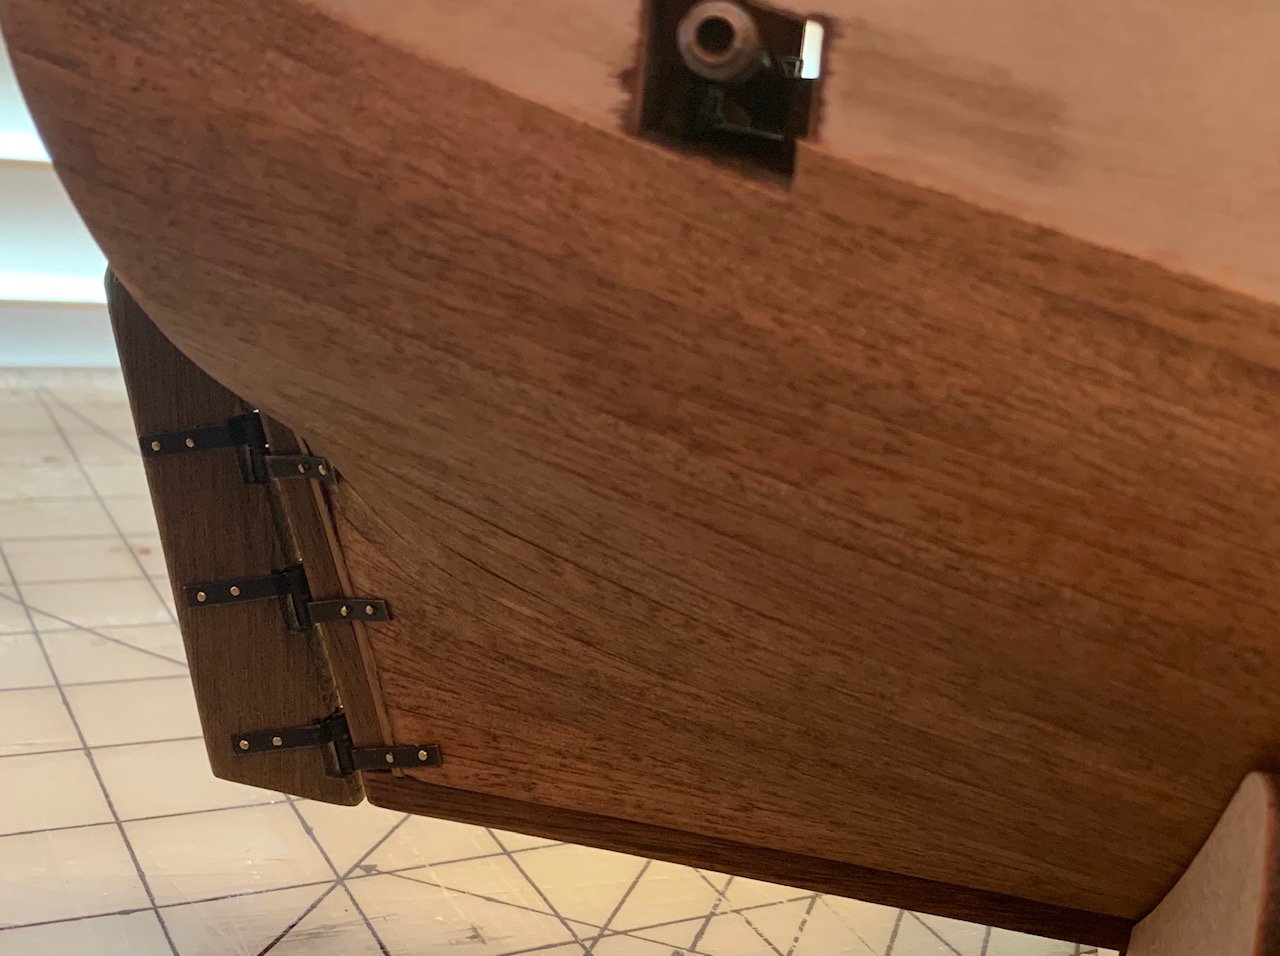
 I'm continuing to work on the cannons and gunport lids. Slow going for me as there's a lot of seizing for each cannon and that takes me a while to get each bit in there. I counted and I have 14 seizings on each cannon but I really like the look of each rope connection seized even though it's pretty tiny. I've added a few other deck details like the hand guns which I gave a light wash with black enamel thinned with thinner to give them a more weathered less shiny look. I thought about trying to build a rig for the gunport lid hinges both for the placement on the lid and drilling the holes but realized that many of the lids are different sizes so to get the right look each one was going to be a little different. The way I ended up drilling the holes in the right place for the hinges was to take the lid with the hinges already attached and put a little white glue on the tip of each hinge and then hold the lid where I wanted it to go and press against the hull. This would leave a tiny bit of glue on the hull and I could then use one of my dental tools to mark the hole and wipe the glue away. Sometimes I had to adjust the up and down a bit to be sure the lid would sit right but that didn't affect the difference. So far that has worked well. I'll just continue to work the cannons and lids and when I finish them I'll be ready to move to the channels, deadeyes and chainplates. I've included a picture of the main deck with the blocks and rings installed ready for the cannons.
-
Even though I'm deep in my current build I've really enjoyed looking at kits and thinking about what my next project will be and I'm intrigued by the Soleil Royal. I really like ships of this era and am hoping to be able to move up to something this complex after finishing my current build. I've been looking at these two different kits and other than the scale are there any major differences that might make one or the other a better kit? There are a ton of videos of deAgostini builds but I haven't found nearly as much on the Mantua kit and the build logs I've found are doing pretty extensive rebuilds for accuracy which isn't something I'm probably ready to do yet. Builds of both that I've seen look fantastic so I'm just interested in any feedback on these two kits that anyone would be willing to share.
-
- 4
-

-
Thanks for all the great information. I'm realizing that understanding how a specific ship rigged their cannons is a dang complex question, which could have several different answers depending on which time period you choose over the course of the ships life. It also seems that the information gets murkier as we go further back into the history of these ships and 1577 is a pretty long way back. I find that researching the practices is pretty interesting but at some point you're probably going to have to make your best educated guess and go with it also considering what will work on a model of the scale you're working with. I'm also learning that ship kits (by necessity) use standard parts for cannons and carriages that might not be completely accurate for a specific ship and it's up to the modeler to decide if they're going with that or they want to do research and construction to try and be more historically accurate. I'm really not sure where I fall in that spectrum of build the stock kit/painstaking historical accuracy right now. I've seen research on some builds that boggles my mind coupled with amazing construction techniques that I'm not sure I could match so I have to find what works for me. I'd like to make things as accurate as possible but not bog down the build for an extended period of time deciding how to rig the cannons. This applies to more than cannons, of course, but that is what initiated this investigation and awareness of the possibilities. For now I think I will forego inhaul tackle on the cannons and concentrate on doing a decent job on the outhaul and stays.
-
Sorry I posted in the wrong forum thread, got confused where I was.
-
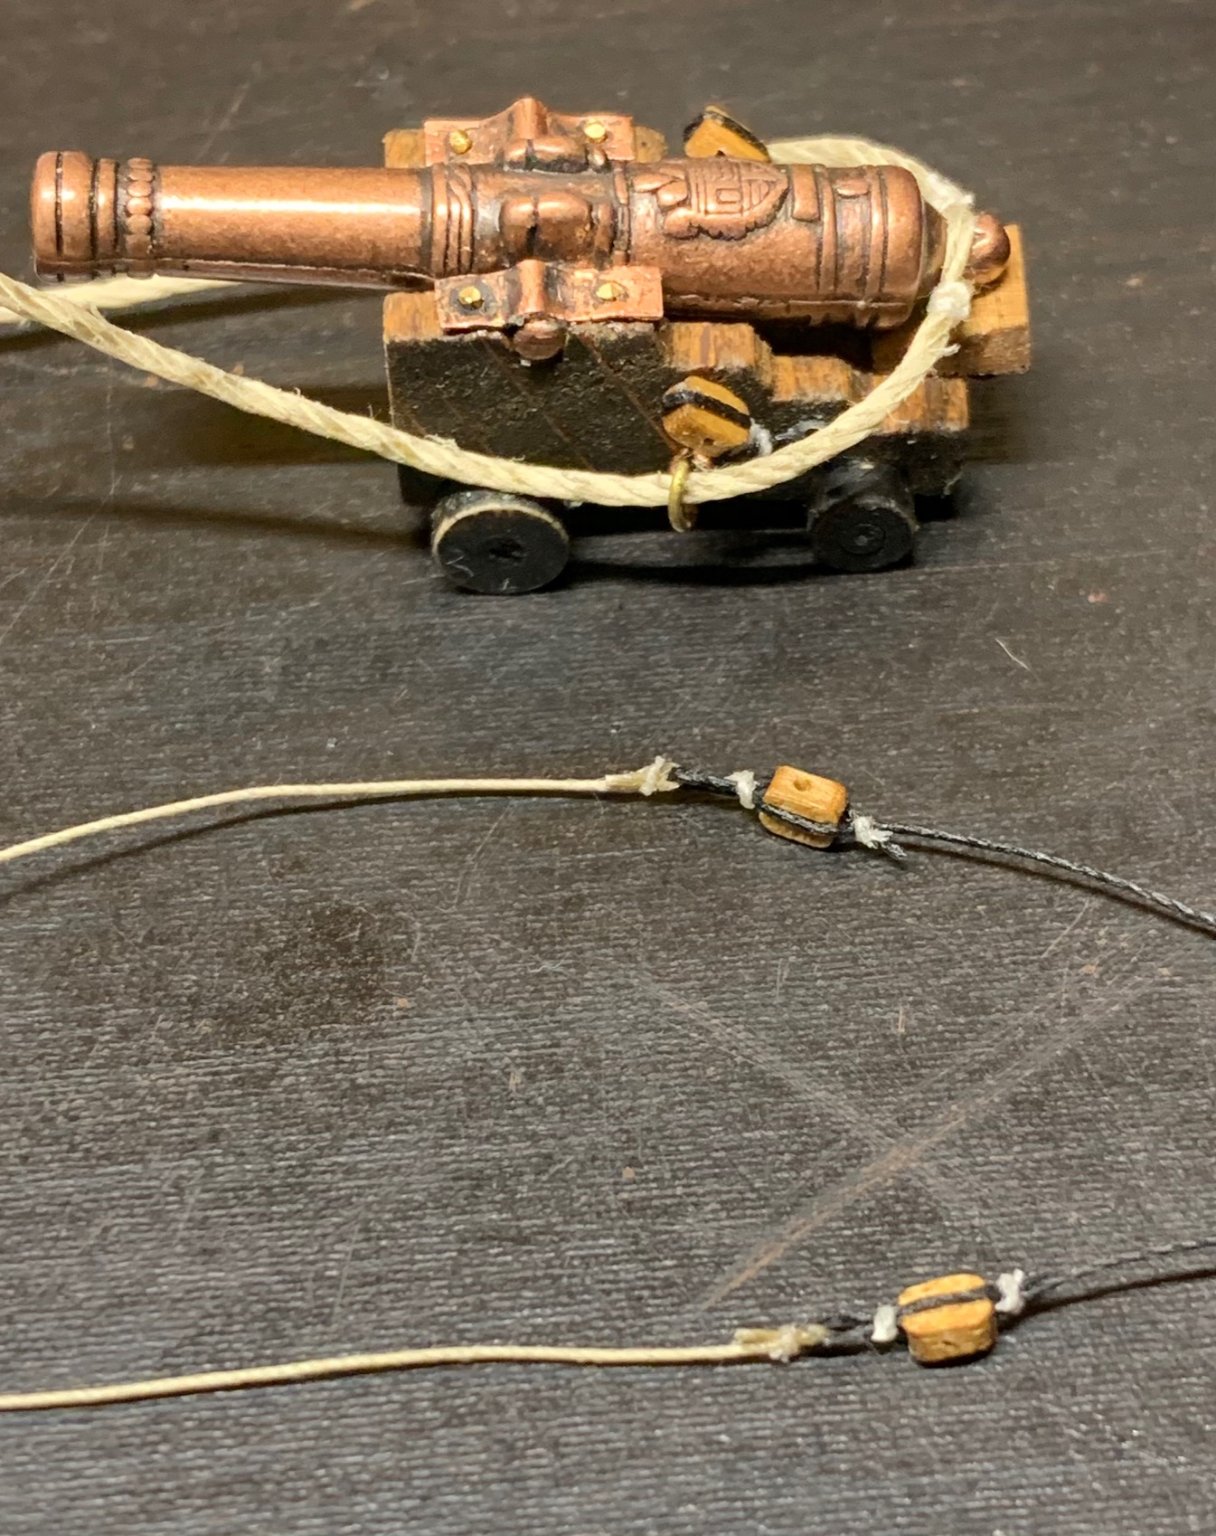
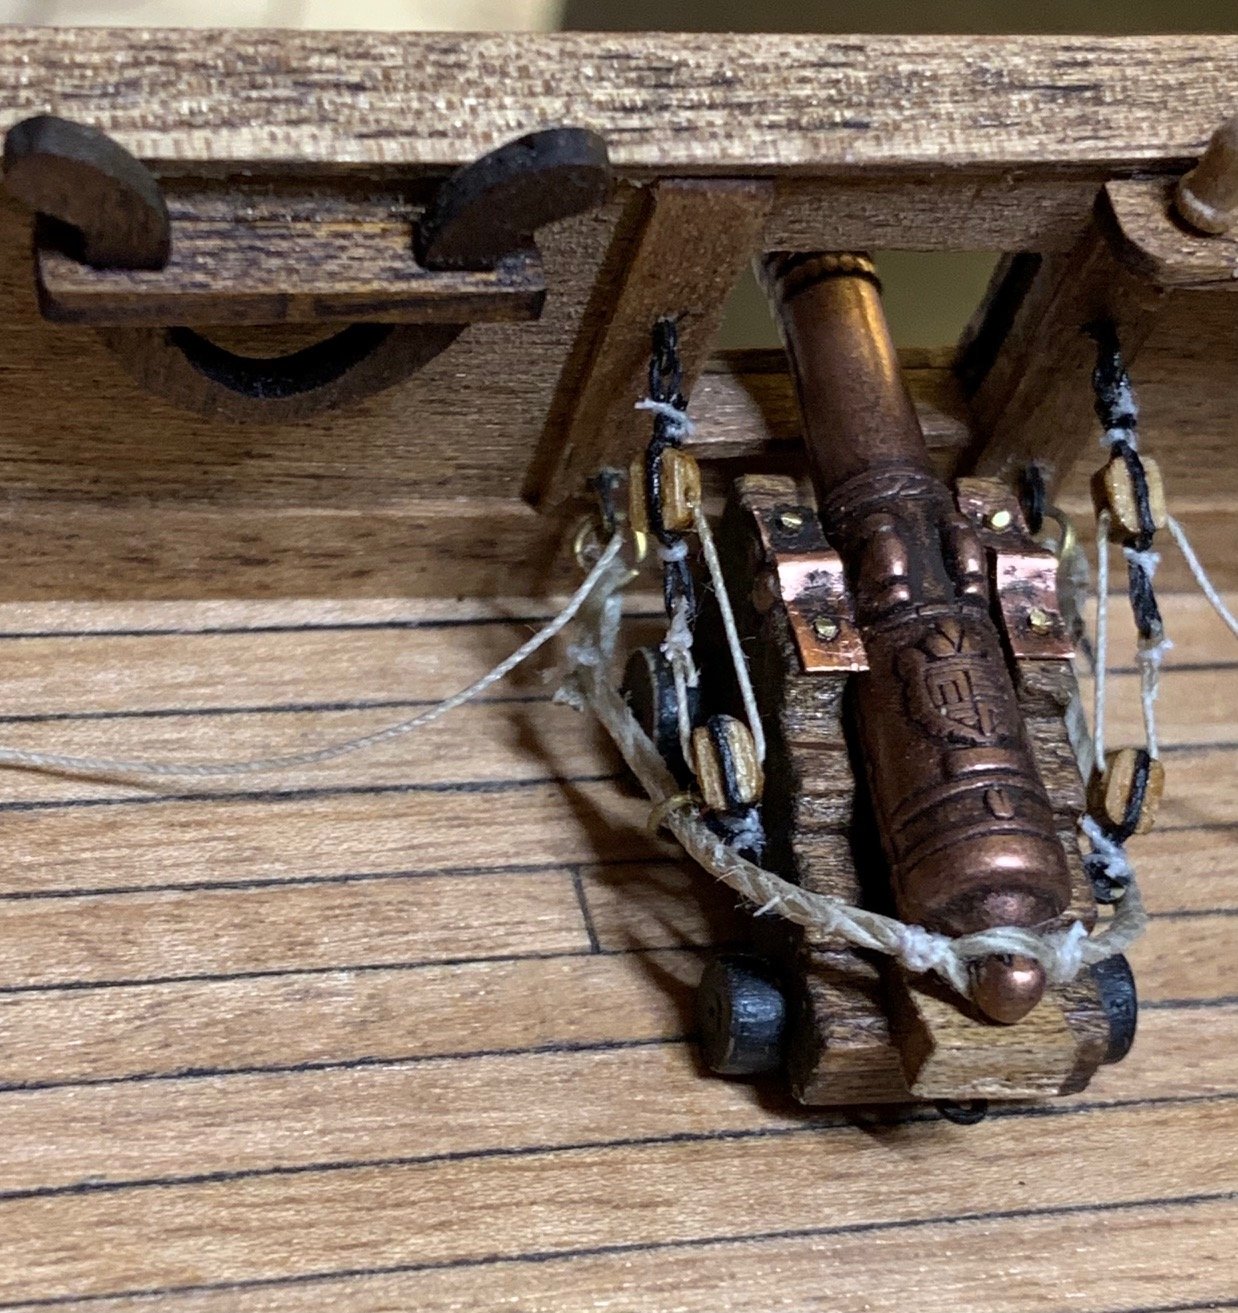
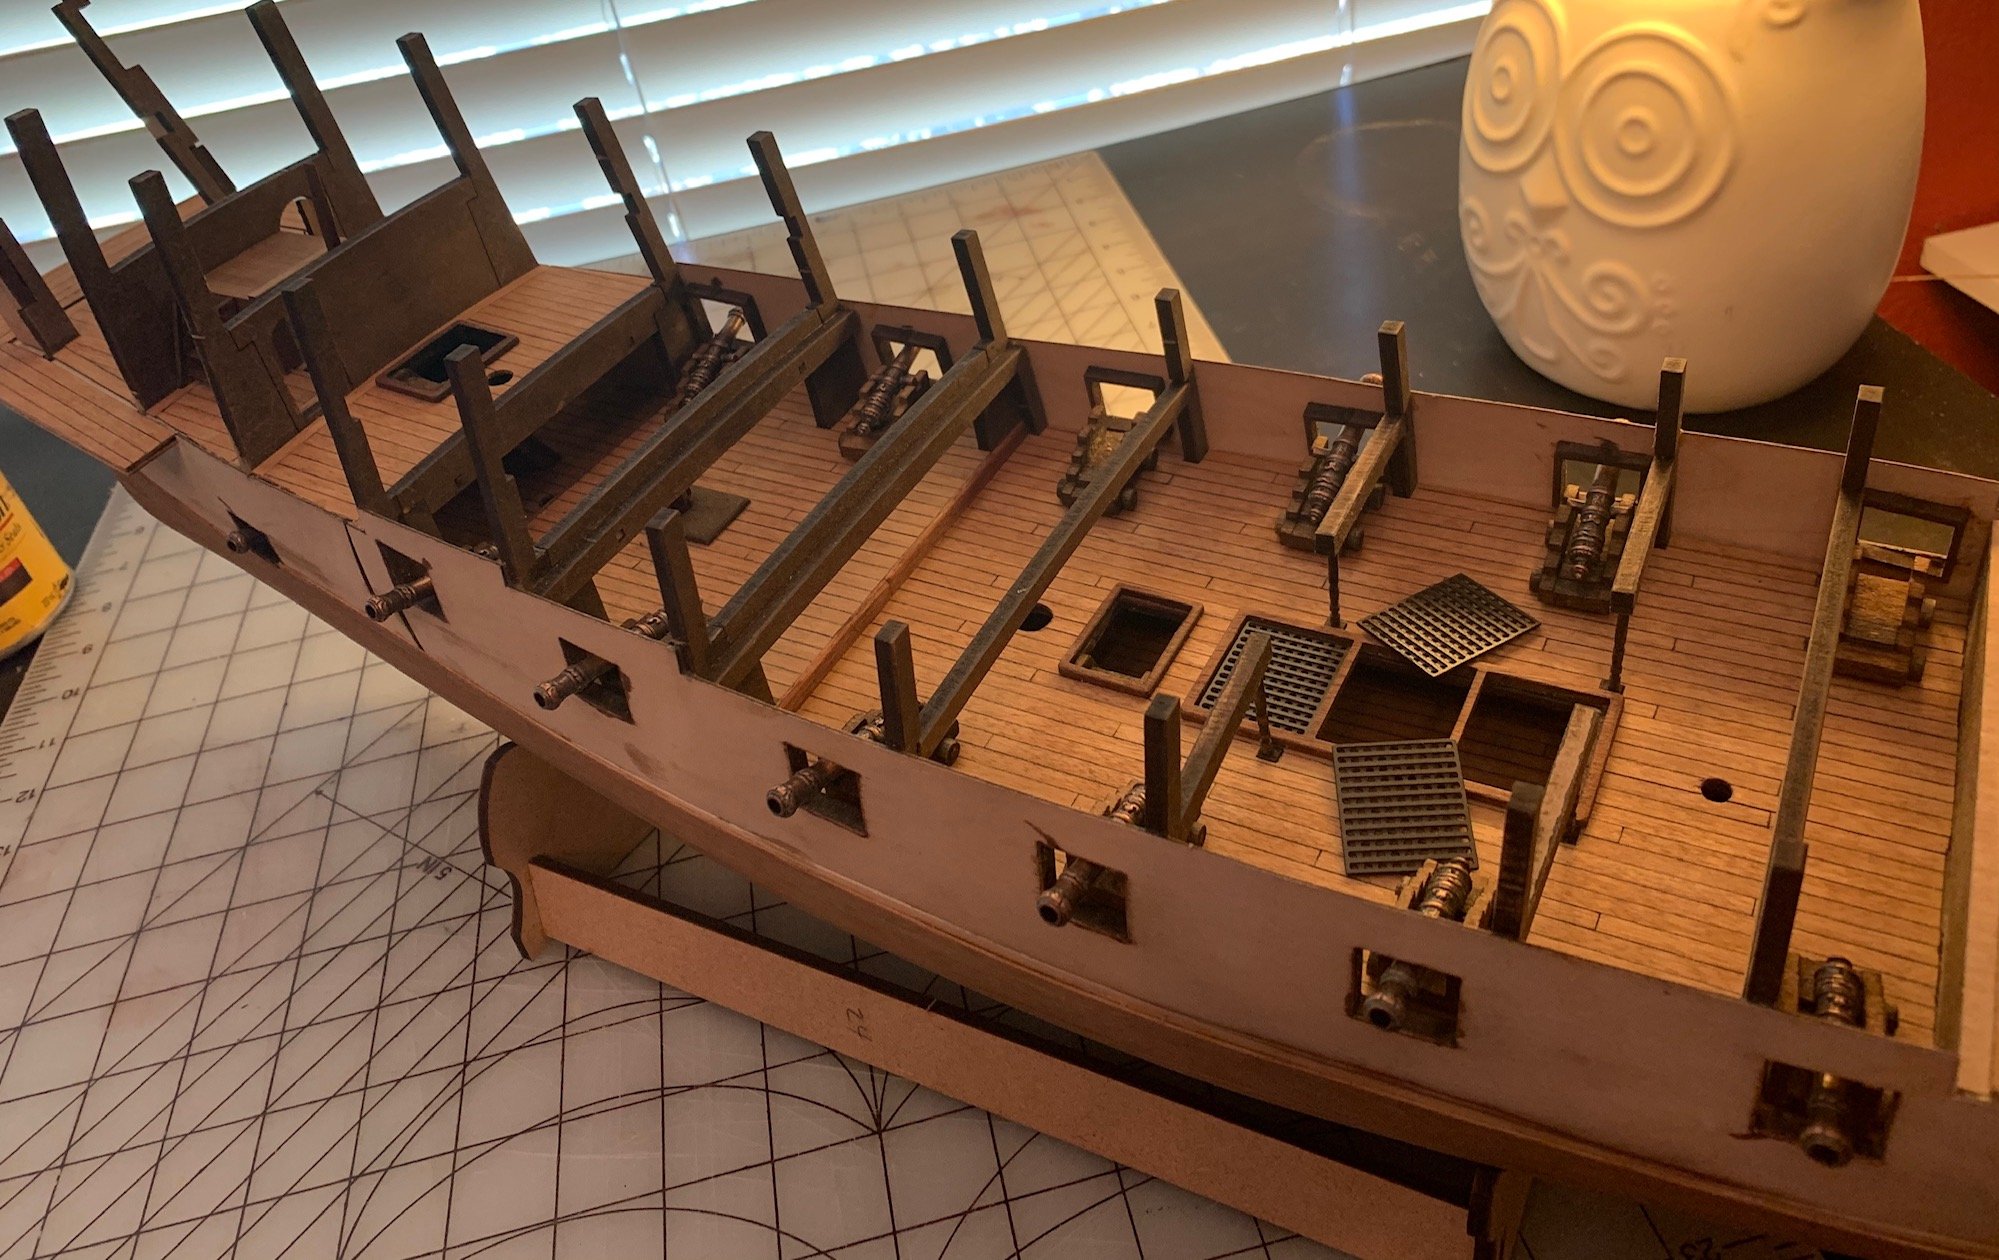
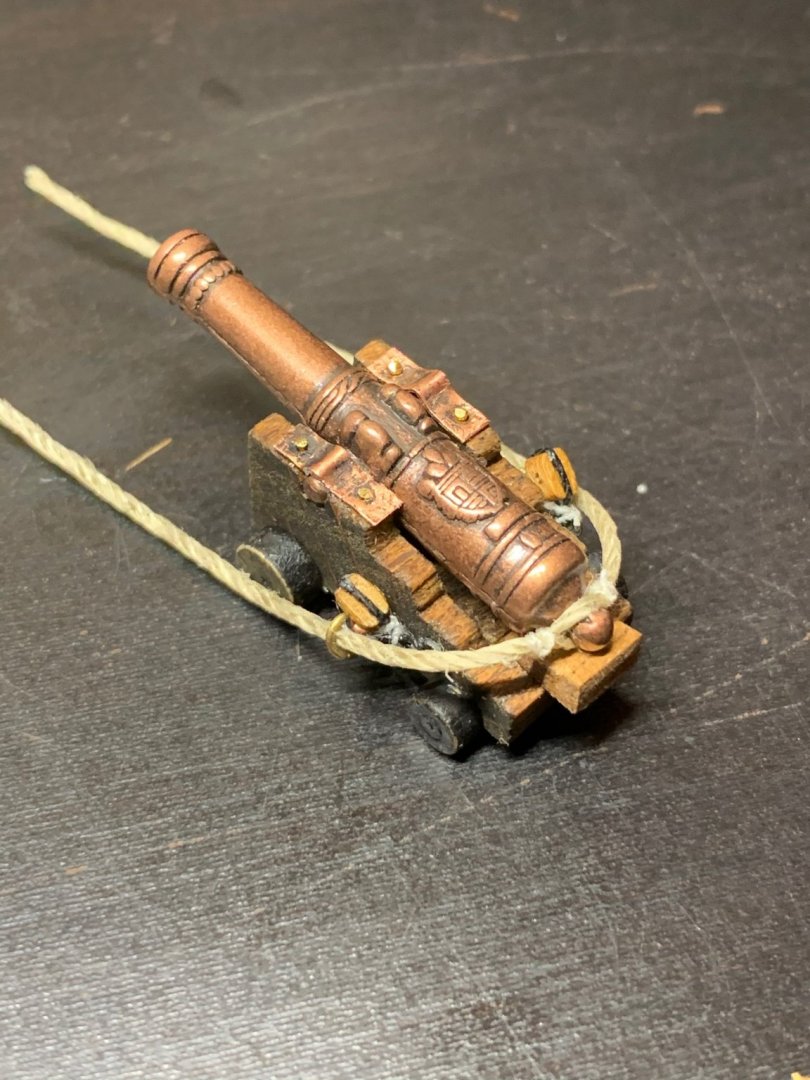
I've been working on the deck details and also did the two rear cannons and gunport lids. All going well. I had been thinking about how I was going to do the cannons so got to working on the first one to get a look and process down. Couple of things I had to decide about the look, first I have been considering the lack of cannon inhaul tackle, there's an eye on the back of the carriage assembly for one but nothing in the instructions or pictures so I've been thinking about whether to include those or not, I still haven't decided but I'm leaning towards not putting them in right now. Thought I'd get one or two in and I would have a better idea how things are looking and if it would just make clutter. Secondly I wanted to add a wedge to the back of the cannon, most of the pictures I've seen of ship cannons have these and it makes sense that they'd want to be able to adjust the angle some so I cut some scrap and made a wedge to place under the back edge of the barrel. I have to be careful not to push the front of the cannon barrel down since their almost resting on the gunports already so they're cosmetic only. I'll probably check each cannon to see what angle I can put the barrel at. The brass strips on the pivot arms looked to shiny for me so I gave it a wash of very diluted black paint to give it a bit more weathered look. I tried to cut very short lengths of shaft under tack head and use those to pin the brass to the top but wasn't able to make that work so I ended up putting a pin in through the hole in the brass and then clipping it off as close as I could to the plate and then roughing up the tiny but of shaft sticking up to simulate a head. It's not perfect but will do. Rigging took some getting used to, I had to get my rigging thinking back and remember how to work with tiny knots and thread. Including the outhaul tackle was a no brainer for me so I had to carefully count the hardware it would require to add a second eye on each side of every gunport and brass rings on the sides on the cannon and lower eyes for the main cannon rope. It looks like I have enough of everything so I'm moving forward. First cannon is in and I've included some pictures of some of the steps along the way. I will continue to work on the deck details, gunport lids and cannons in a round robin as it really help me to switch tasks after a while. Can't imagine some of the cannon rigging on the bigger ships, 14 cannons seems like a lot right now.


-
I'm still very new at this so I'm trying to understand why the kit doesn't show adding the cannon inhaul tackle on the main deck cannons. There is an eye added on the back of the cannon carriage where it would attach but it's left empty. Would it make things look too cluttered maybe? It would require adding an eye to the deck for each cannon and then two blocks similar to the outhaul tackle but as I imagine it, it seems like it would look good. The blocks to accomplish this aren't included but that's a minor issue, easily resolved so it boils down more to a matter to me of how it would look. I'm going to try and mock one up without drilling any holes and see if I can get a better idea but even then one will look different than 14 and there might be other issues that I haven't thought of to consider. I'd think that the scale of the ship could influence this decision quite a bit, there's a lot more room at 1:64 than there is at 1:90 or 1:100. Thought I'd see what the thinking is on these. Maybe it's just something you can add if you feel like it.
-
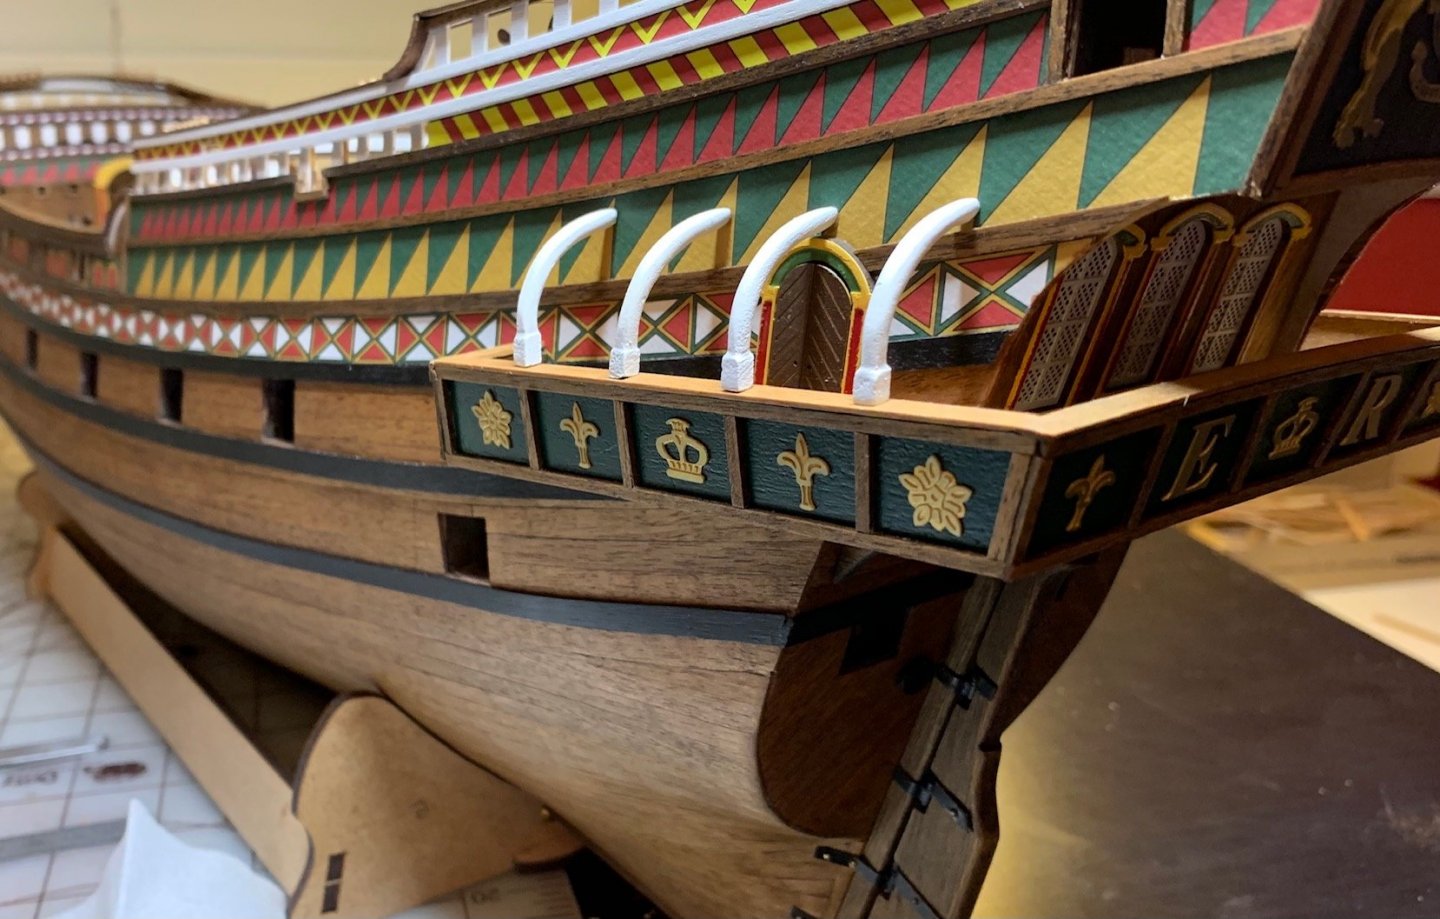
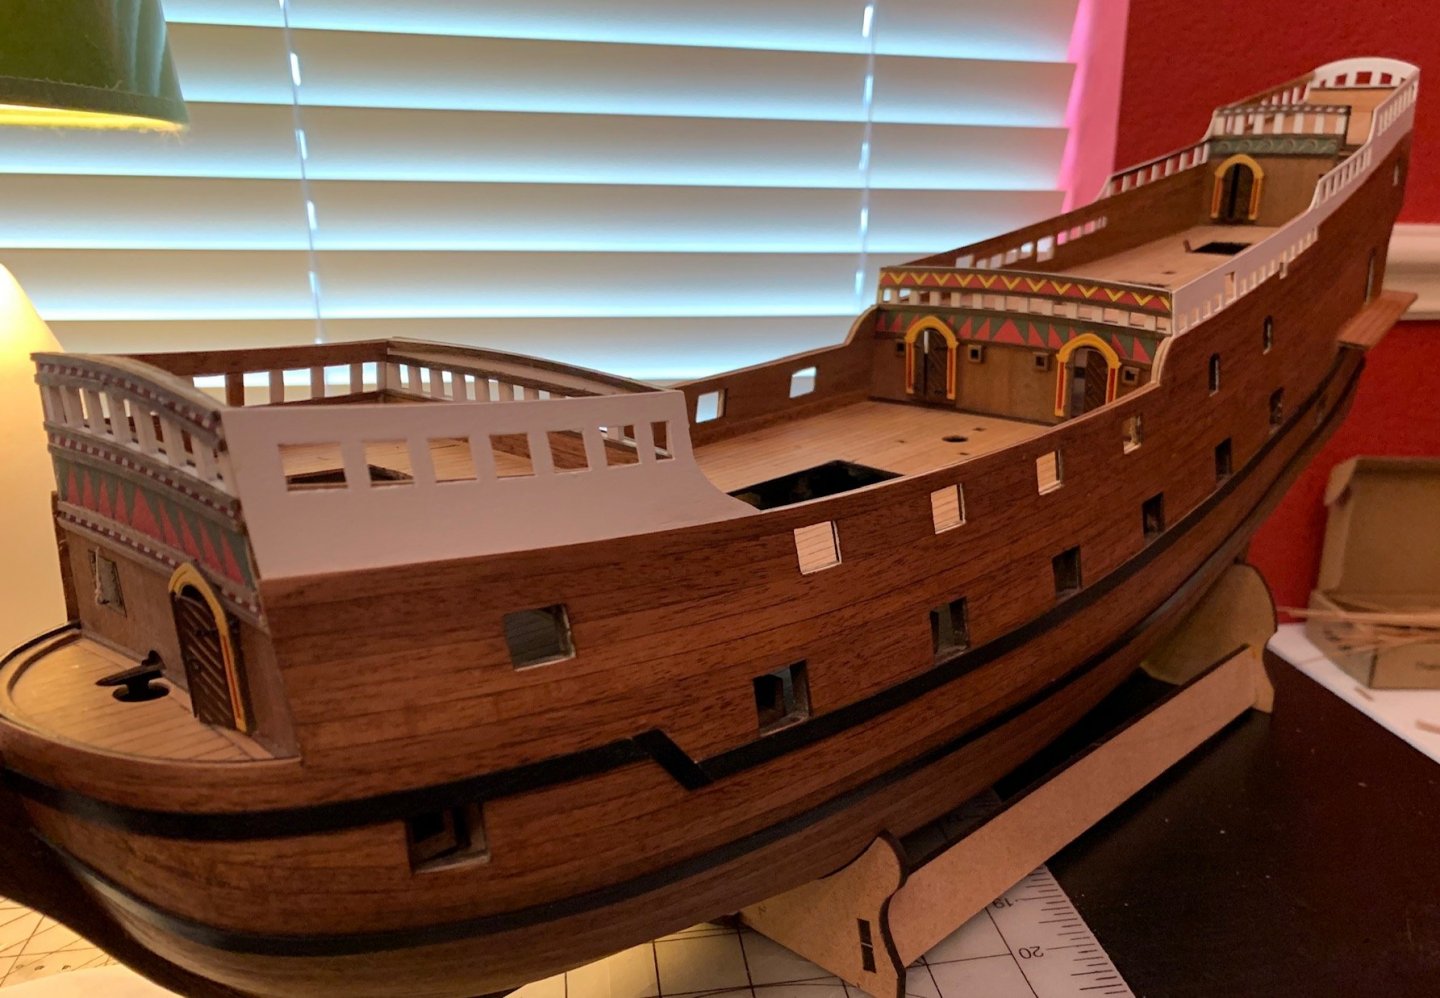
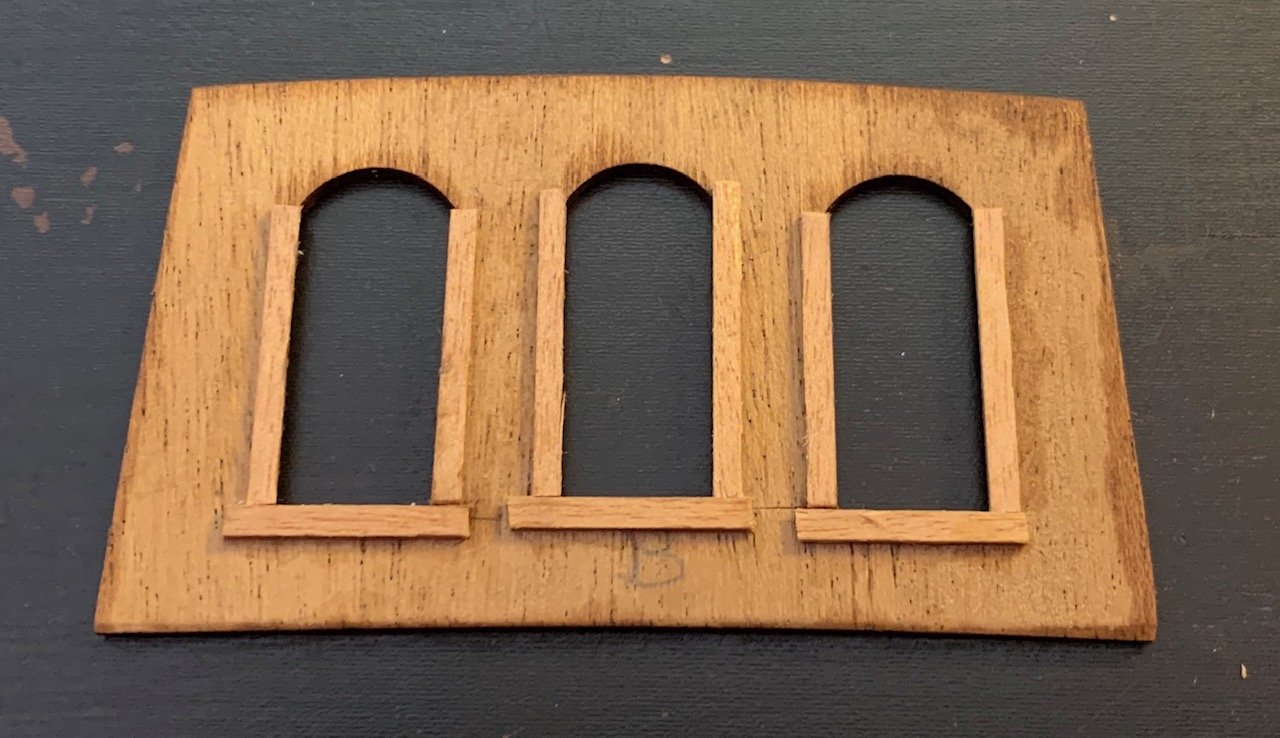
Gallery Arches: For some reason the supplied gallery arches just didn't look right to me, just clunky so I decided to see what I could do. After experimenting with some similar pieces cut from scrap I thought I could leave them square for a bit and then round everything out to make them look like a curved column. Wasn't as time consuming as I thought it might be, I just trimmed the edges with the knife and then worked them with rough and then fine sandpaper till they were fairly round. I was also convinced that staining them wouldn't look that good due to the way the grain is one way at one end and then at 90 degrees to that at the other end so I decided to paint them. Went back and forth between the green that's on the outside of the balcony and white and finally went with white since it seems that columns are usually while. I also thought it would make a good contrast against the colors of the hull. I still have the other side to shape, paint and glue.
-
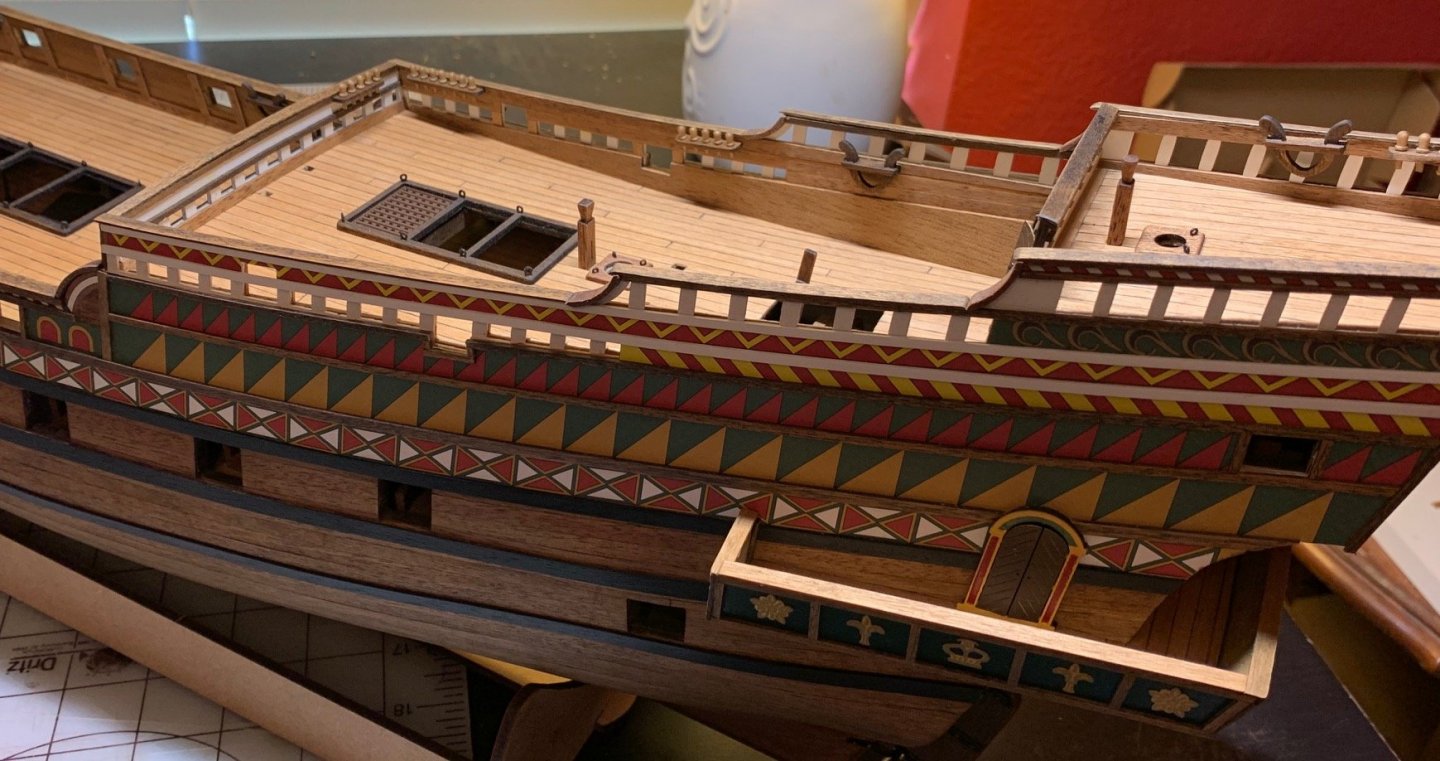
The gratings are brass that I spray painted brown. They're supplied with the kit.
-
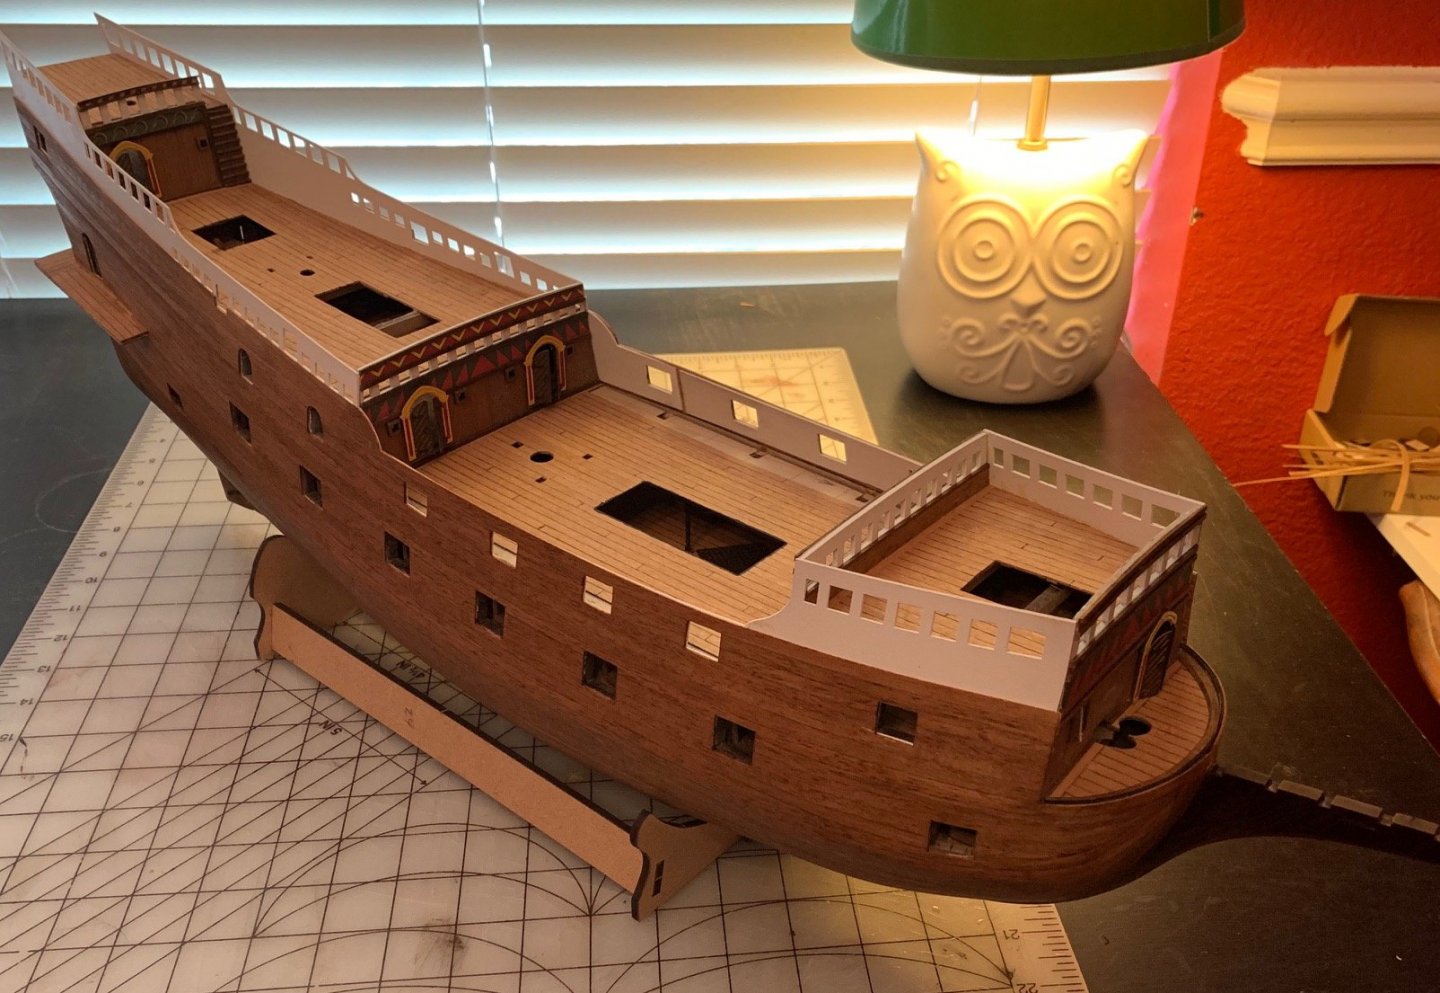
Just working on adding all the exterior and deck details after getting the 1x2mm wood I ordered. Interestingly enough the 1x2 Walnut I received was a slightly different size than the 1x2 that came with the ship. It seemed more like 1.1x2.1 but that was easy to sand down if I needed to match existing work and I'd much rather have it slightly big than slightly small. Everything has gone pretty much as expected and per the instructions, I've made some very minor changes in the interest of making things look better to me. I think I'm going to finish the deck details, maybe not gluing them in place but at least getting everything done and ready to go before tackling the gunport lid assemblies, that looks like it's going to be a bit tedious just keeping them all sorted out and not mixed up so I'd like to have a clean mind and workspace as I start that. As things start to come together I'm amazed and how good it's looking, it just goes to show that even an inexperienced modeler like me can get good results with a good kit and just taking time to figure things out. I think I saw somewhere that the kit should take 250 hours and I'm well past that already, but I'm slow plus I'm taking my time and trying to make sure I have a plan before starting something. My lack of experience shows up sometimes when I don't plan ahead enough on how things will come together at junctions and making sure that the last piece covers up any slight misfitting that might have occurred with previous pieces but overall it's looking better than I had dared hope when I started. A lot of thanks for being as prepared as I could be goes to the previous build logs not only of Revenge but other ships as well as it seems like every one I've read has given me something to learn or think about as it applies to this craft. I really appreciate this resource and the effort people put into documenting their work.

-
Jeff, that is great advice. Thank you very much. FYI, your build looks great and has been an inspiration to me.
-
I have a bit of confusion and a question I'm hoping someone can give me direction or an answer. On the diagram showing the top down view of the ship and where components should be located it shows at least 56 locations for the larger eyebolt, part 228, but there are only 36 in the kit. There are lots of smaller eyebolts, piece 227, so I'm guessing that some of the ones marked 228 will have to be 227's but which ones? Looking at it from a rigging standpoint none of them stand out at needing the bigger eyebolt, probably to someone with more experience it's obvious but I have no clue. If anyone has an idea which eyebolts should be large and which should be small or guidance on how to choose it'd be appreciated. I searched through the current build logs but couldn't find where anyone had mentioned this issue. I also considered posting the diagram but after reading a thread in the "Using the MSW forum" thread I don't think I'm sure enough that it's not a violation of copyright that I'll pass on that.
-
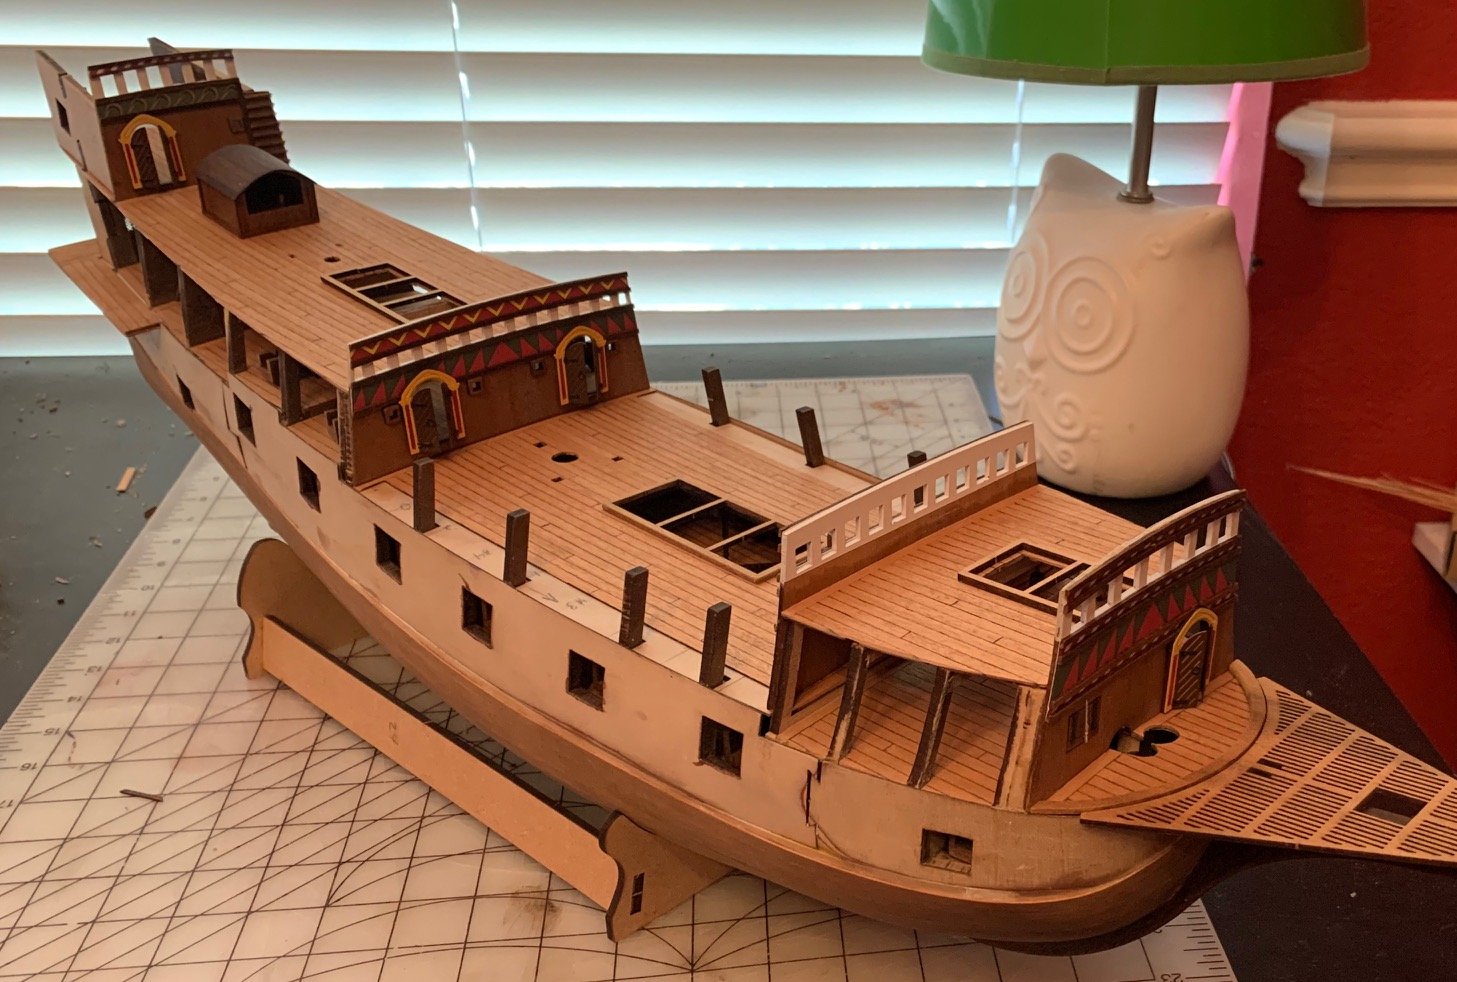
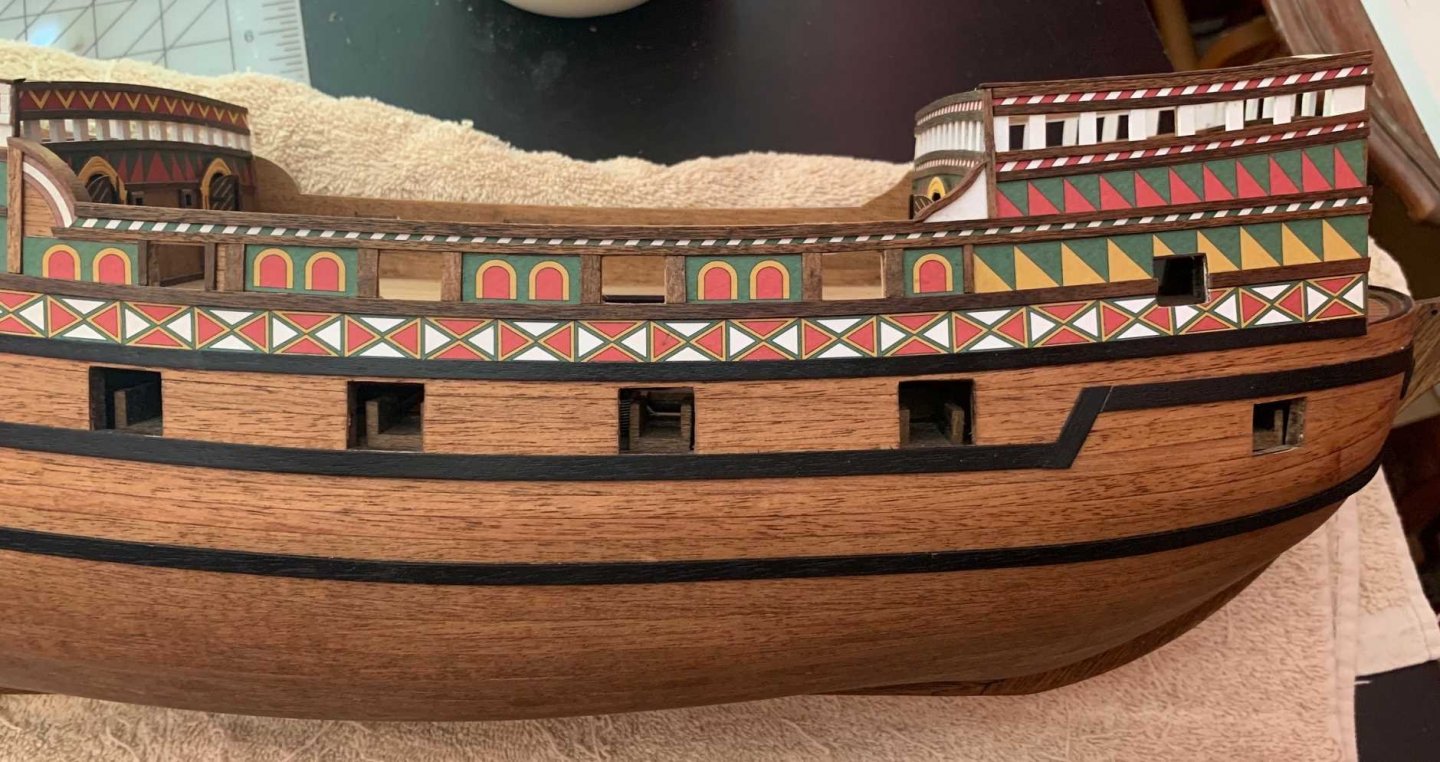
Just plugging along working on the details of the sides plus I've started on the bow and stern pieces. Everything is pretty much going according to plans, I just have lots of clean up on the gunports, railings etc. I decided not to paint the scroll work on the bow pieces just like I didn't on the stern badge, it just seemed like I'd lose too much detail. One place where I had to really fix things up was the main deck gunports. Since I had a gap in the side pieces to make everything fit at the bow and stern the windows didn't line up with the side paneling that goes on the deck sides so I had to make some covers for the internal sides of the gunports to cover up the gaps. I also put in a piece on the bottom of the gunport opening, there were three pieces there and the edges didn't always line up exactly. I decided to have the piece go from the lower 4mm plank that goes against the deck up to the railing, that just looked better to me in the dry fittings I tried. I drilled holes for the cannon eyes before gluing them in place. Hopefully the 1x2mm wood I ordered will arrive soon, the only place I could find it in stock was overseas so it's taking a while, understandable with the current situation. It's landed in the states so I'm hoping the slowest part is over but not holding my breath. I'm a bit blocked on some things that I can do till I get that so I've been working around doing other things. There's no shortage of things to do.

- 166 replies
-
- 13
-
-
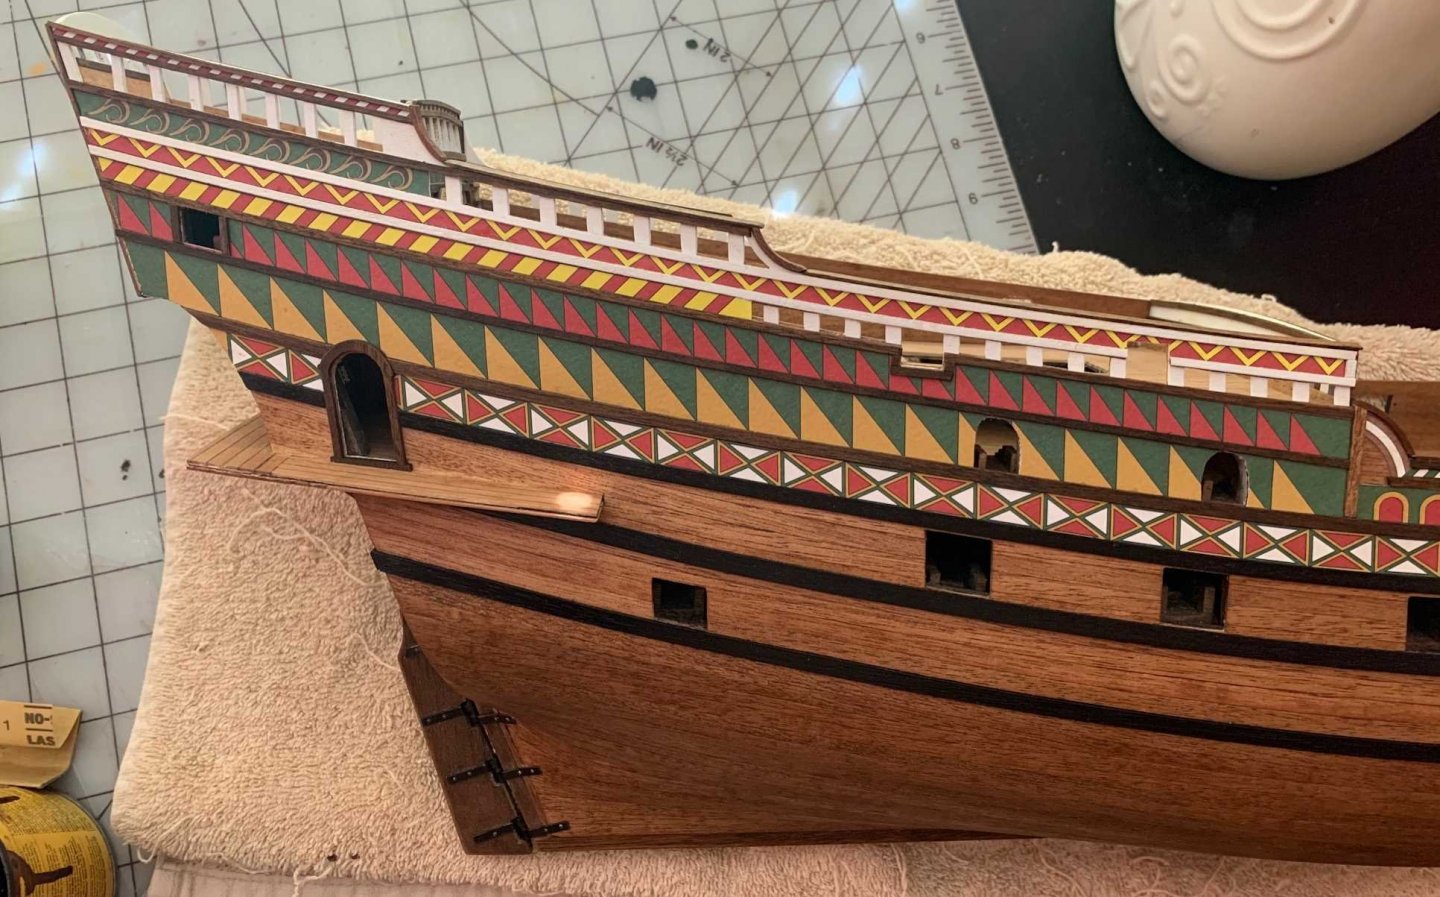
Side Details and Decoration: I've been working on one side, I haven't touched the other side yet and everything is going pretty much as planned. The paper patterns add an incredible touch of detail to the kit and look amazing. I am running low on 1x2mm walnut but that's my fault. I've added some in places where the instructions don't call for it and if I have two pieces that don't fit together as well as I'd like then I just slap some 1x2 in there to cover the fault. I still have some more work to do on the first side but thought I'd post progress. I've ordered some more 1x2 and hopefully it will be close to a match for my existing pieces. Xodar, I'll give the soaking another try before I try and bend those last couple of pieces, so far I haven't had much luck but noticed you said soak till they sink and I may not have been soaking them long enough. I've been getting some significant splintering when I (slowly) work the pieces into the desired curve, I'll make sure I let them soak till they sink before trying again. Reading your experience with breaking the bow piece was my inspiration for trying to be careful and I made it for a little while. I'm just too clumsy to make it last.
-
Deck Sides, Lower Wales and breaking things: I've almost finished the interior sides of the decks and pieces that go inside. Everything has been straightforward except I don't have a way to bend the 1x2mm strips to the curves on the final stern bulkhead yet. I've experimented with some things like soaking in hot water and just gluing and forcing and nothing has worked yet, I may try the soldering iron method next. The curves on this piece are significantly greater than the others and I'll just have to keep experimenting till I find something that works for me. Painted and installed the lower two wales on each side. I tried using black stain for the wale but it wasn't nearly dark enough, I felt the look required a solid black wale to contrast with the hull so I spray pained the wales. My original plan for the wale that has the change and angle was to cut close to a 45° angle matching the angles in the plans but when one angle is greater than 45 and one less then the width, or distance from edge to edge across the angle is different and therefore it doesn't match up width so it looked poor. I had to just use a straight piece and then cut the bottom off to match the bottom (and top) of the wale coming across. Wasn't exactly what I wanted but it worked. Other than that the first two wales were pretty simple, I did use my longer 5mm strips or the included strips would have been maybe 8-10mm short. I'm sure that's due to some poor fitting of the basic structure when constructing that part. Working on the details near the bow I broke the bow piece of the keel that is in front, it was just moving my hand and my forearm caught it and pop. At first I thought since it was a clean break it would be really simple to glue back in place but I had a really hard time with it but finally got it glued in place and it was difficult to tell that it had been broken. Next morning I started working in the same area and broke it again exactly the same way. This time I decided I wasn't going to try and glue it back in place till the other pieces in that area all get put in place, I felt that every time I broke it it would just get weaker and after the second time I didn't trust myself not to do it again. I had been so happy that I hadn't broken that piece and then did it twice in less than 24 hours. Oh well. The installation of the wales really makes the model pop. I'm really looking forward to starting to add some of the detailing that's coming up.
-
Sides Installation and planking: After getting the 4 bulkheads in place I started working on the sides. There was a lot of small adjustments to be made to get the best fit I could and there's about a 1.5-2mm gap horizontally between the two side pieces in what seems like the correct positions for them to me but I've decided to go with that. I suspect that this is at least part of the reason why the provided 5mm strips weren't long enough to cover bow to stern without splicing, in several places it's just the tiniest bit short so the extra length and possibly a bit of extra width where I didn't get things tight could explain it. I did decided to order some longer 5mm strips from the same place I bought my ship hoping that they'd be close enough to match once stained and I ended up needed those for several planks if I didn't want to splice. Since the other planks would be continuous it seemed to me that just having a couple with splices would look out of place, it's also hard to keep the curves of the planking even with a break in the plank so I'm glad I ordered those longer planks. Once I had the longer planks the planking itself was pretty straightforward. For some reason when I started I thought I'd just use pieces between the gunports but it was immediately obvious that the preferred solution for me was to run a single plank across the length of the gunports and then trim away. A lot of that has to do with keeping the consistency of the curve and just being smooth. Since I had all the extra planks that made the decision simple. Once the planking was done and the gunports trimmed out I gave the new planks their first coat of stain. I'm pretty sure it'll get at least one more and immediately after staining it I can see a little difference between the lower areas I stained earlier and the new areas. I'm hoping that will be fixed as the new coat dries and going over everything with another coat. Lots of detailing in the deck and railings areas coming up and I really enjoy that part so looking forward to it.
-
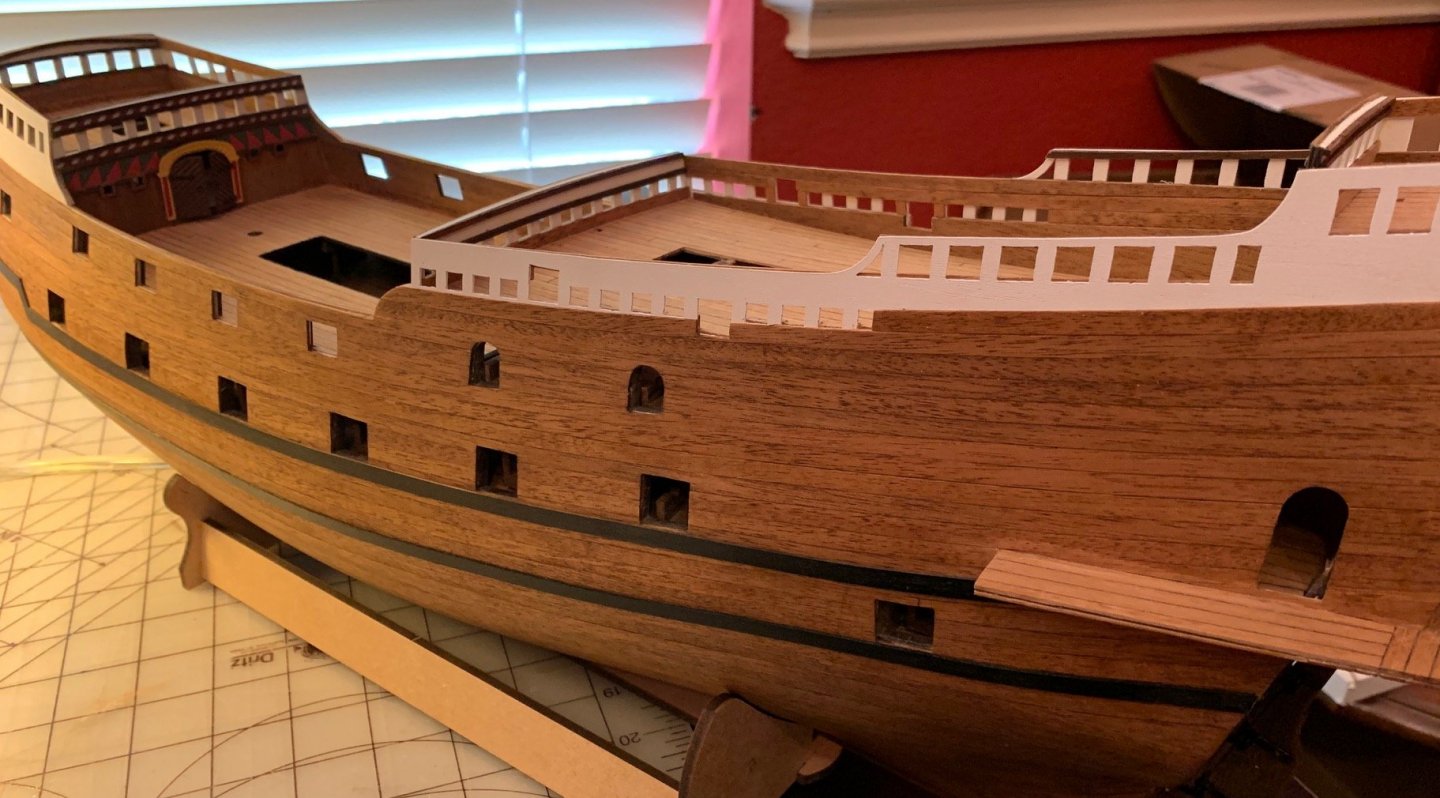
Attaching Bulkheads: I've glued on the 4 bulkheads, started working on the pieces that attach to the sides of the bulkheads and started test fitting the sides and making the adjustments that I'll have to do for them to fit properly. Everything is going pretty much to plan and I'm really enjoying this part of the build as things start to come together. As I've been test fitting the sides I have wanted to see how the last stern bulkhead will fit together with the sides so I've started working on it and as I do more test fittings I'll decide if I want to glue it in place before the sides. The instructions put the sides on first and then the stern bulkhead but for some reason it seems like it's working better for me if the bulkhead is in place first so I'll see as everything comes together. The rather large gap on the sides between the frame and side pieces is one of the things I'm correcting as I'm test fitting the sides and I've managed to pull it into place with some regluing and careful trimming. Hopefully it will all work into place. The picture includes some test fitted parts as it really helps me to visualize everything a couple steps ahead plus it's nice to see how it's starting to look.


-
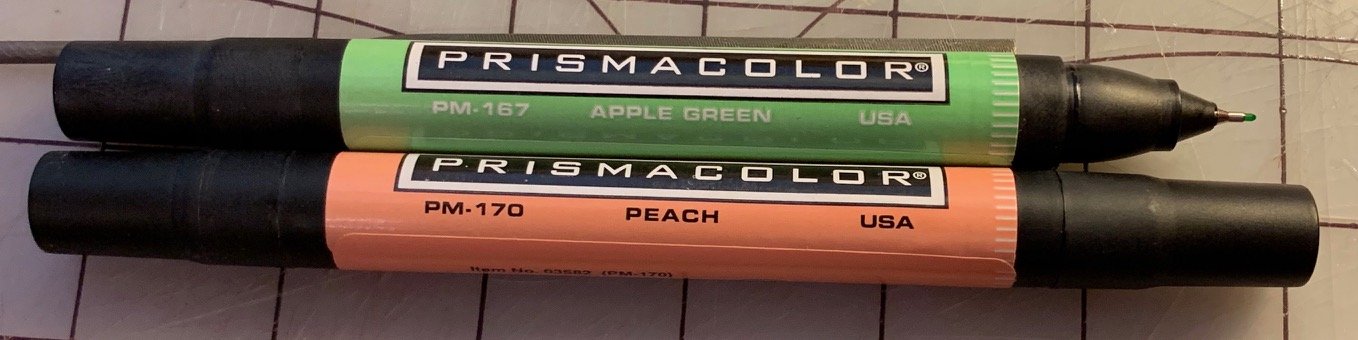
Second bulkhead and paper touch up: Finished the second bulkhead just like the first but one thing I did discover that might be useful to others is a way to touch up the paper patterns if you get a slight flaw, which was always a white or lighter spot than the rest. I have had a couple of very small white spots show up in the patterns where I tried to remove some glue that had dried too much. The only colors I've had to do that in were the red and the green but I had the advantage of a full set of color Prismacolor pens so I thought I'd see if I could touch them up, they were very tiny but if a flaw can be fixed why not? For the red I found that Peach PM-170 worked perfectly and for the green Apple Green PM-167 also worked perfectly. These colors look much lighter than the colors in the patterns but they work. A tiny touch of the fine marker on a white spot and it disappeared, couldn't even tell where it was. Pretty sure these can be ordered individually but looking online I'm not sure the fine tip is still like the one in the picture, my pen set is probably 10 years old, I was a little surprised that they still worked but they seem to be fine. Anyway if you ever need to touch up the paper it can be done and won't show.

-
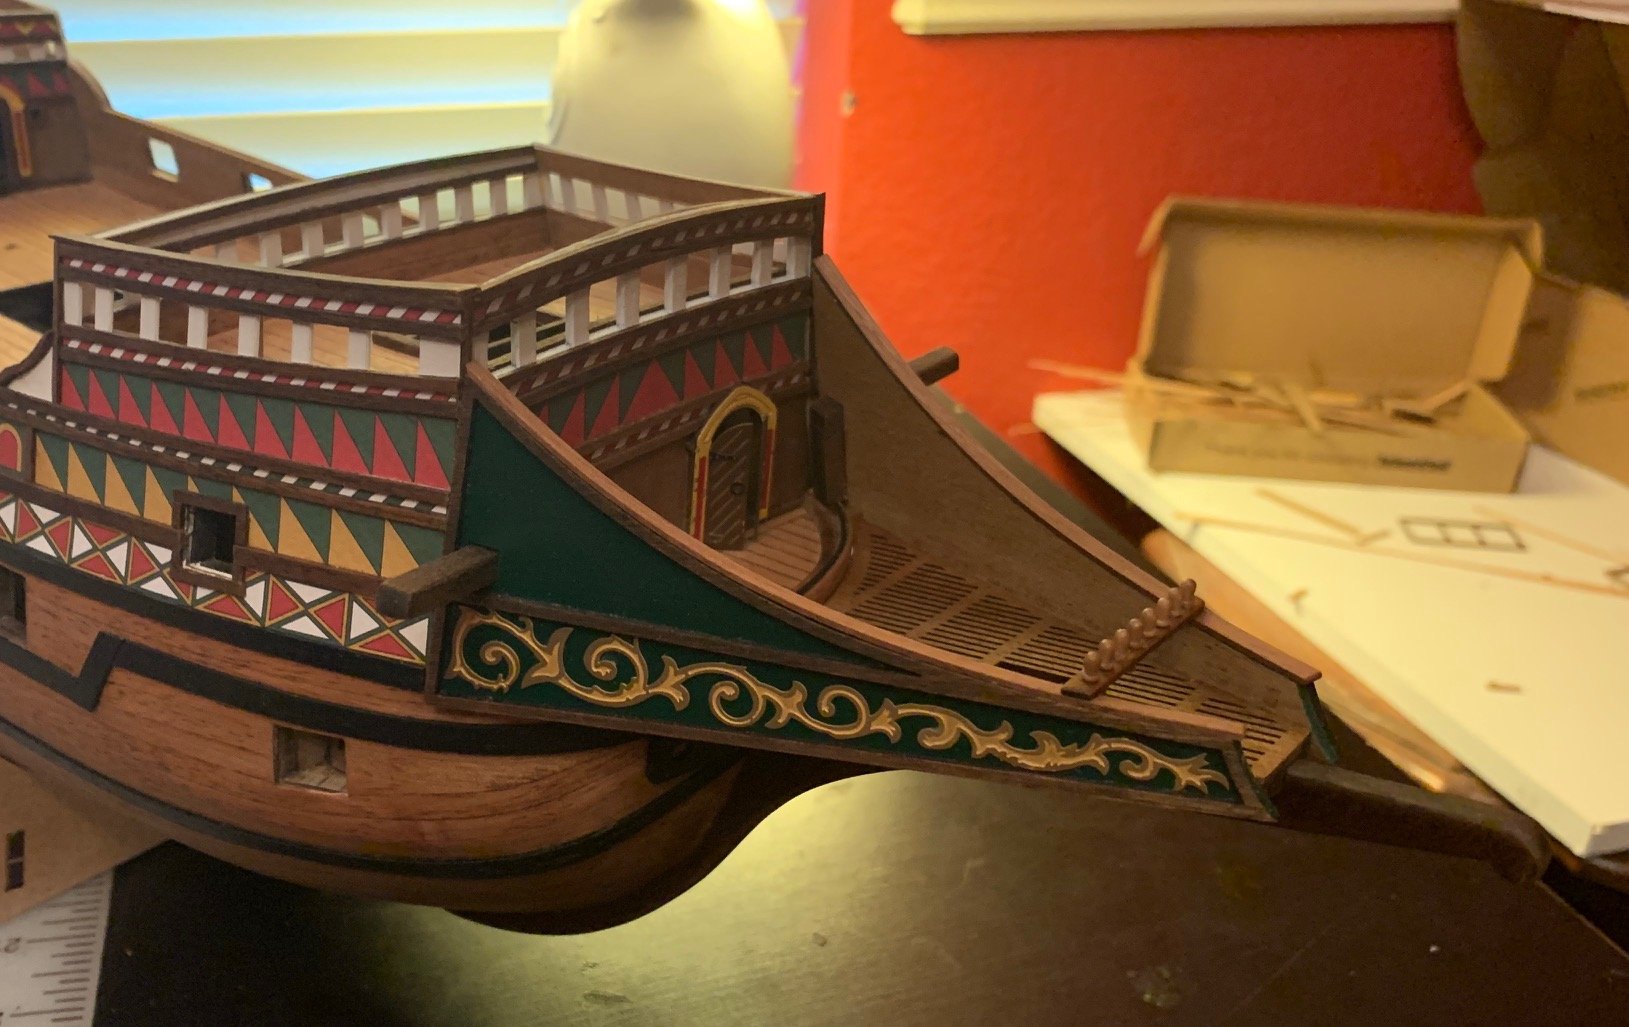
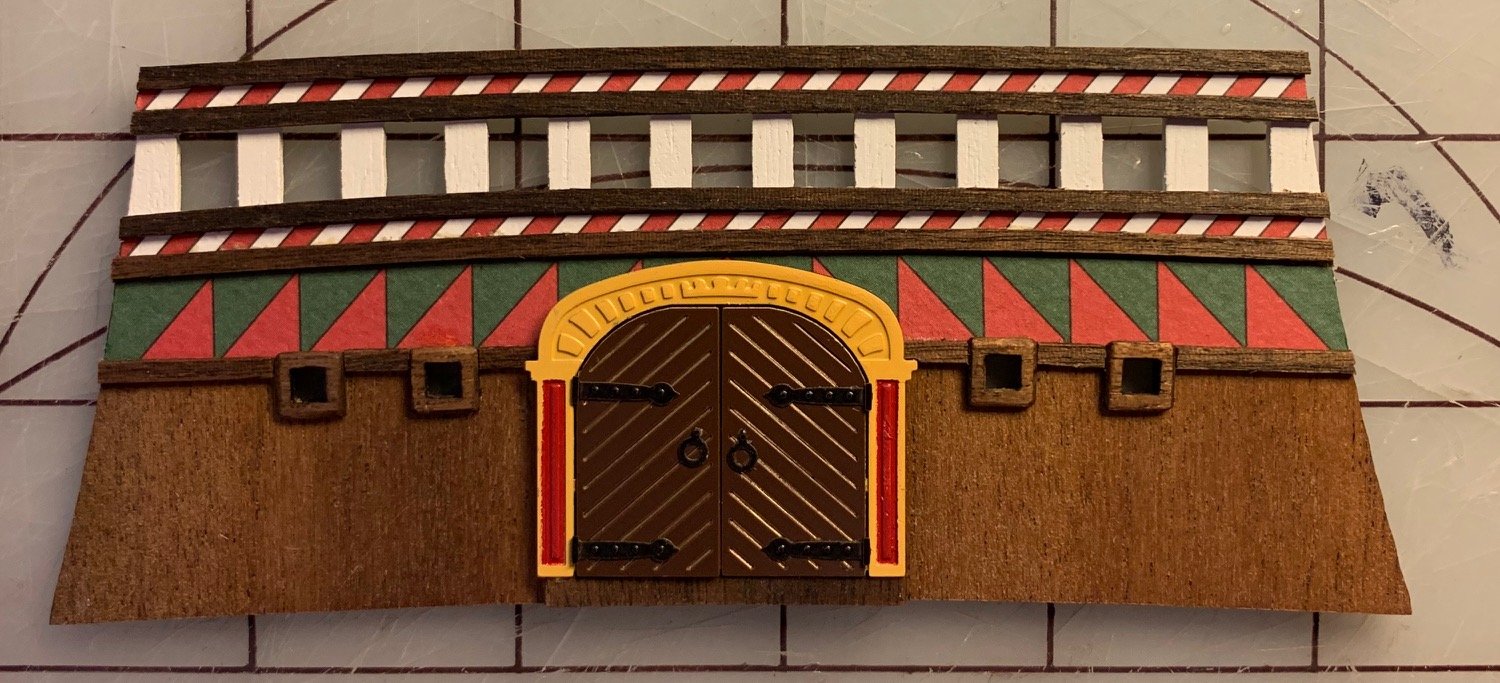
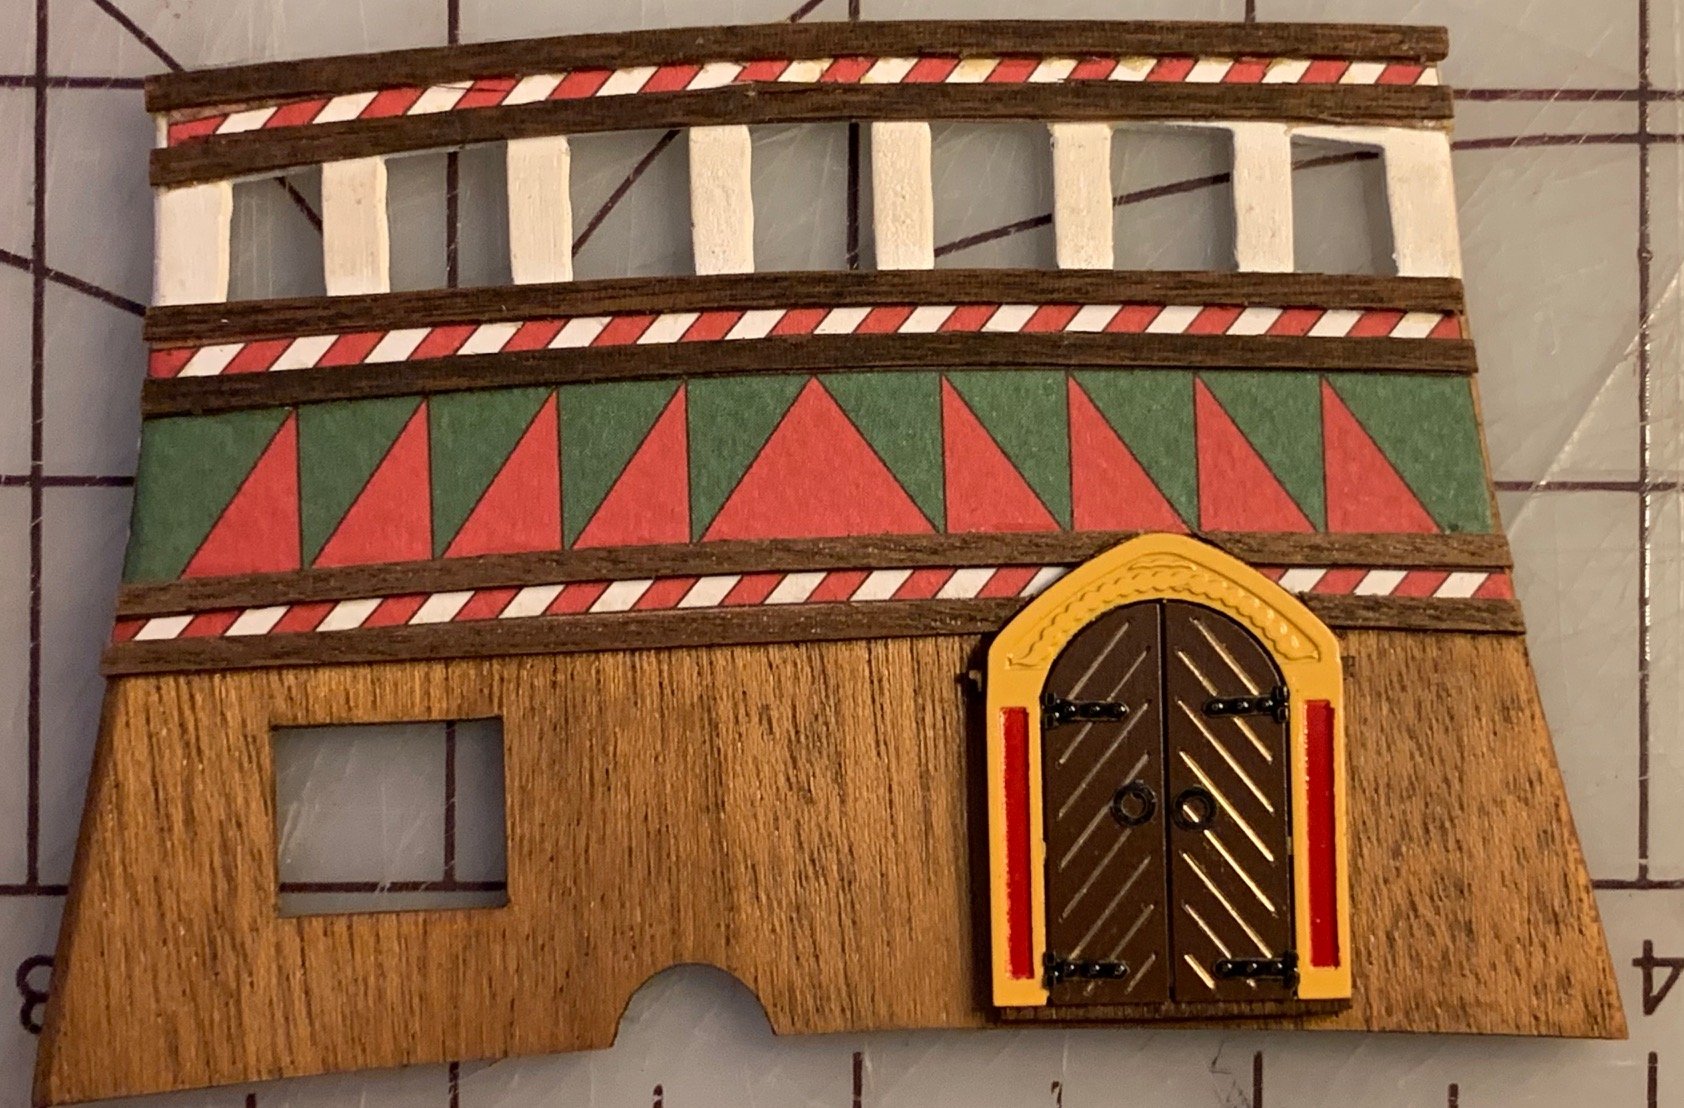
Bow Bulkhead decoration and door: The bulkhead was a challenge, mostly gluing the wood strips across the face. The curve required, especially in the top two, made getting them in place and holding them while the glue dried tough. I tried wood and CA glue but the CA glue attempt popped off with just a touch after I had it on so I went with wood glue, it gives more time to get things in the proper place but have to balance getting enough glue to hold it in place without getting so much that it oozes out everywhere on the sides causing cosmetic issues. I did find that any small blobs of glue that popped out the side didn't have to be removed immediately but I could get them with one of my dental tools and the glue would just roll off the paper as long as it wasn't completely dry. That gave me some time to hold them in place long enough for the glue to set but not so long I couldn't get the glue excess off. I tried getting clamps on but moving my fingers off let the wood move and break whatever bond had been forming setting everything back so I became the human clamp for a while. It looks like the other three pieces to do now all have less arc than this one so I'm hoping I will be able to get in place easier. The stern bulkhead look like it has a lot of curve and I'll have to think about that, I had even tried pre-bending the pieces but that didn't seem to work with the wood it has for this (Walnut). The door is all spray painted, I used my dental tool again to remove the paint from the ribs in the doors. I added the touch of red on the sides as that area seemed to want some more detail and I wish I could have figured out how to do something with the detailing on the top arch but it seemed like it would take some freehand and I'm strictly a tape and spray painter at this point. Now that I've figured out a process I'll probably batch the rest of the doors. One note for anyone not to this point on this kit yet, I made a mistake trimming the brass door frame, there's a two level decoration that's also in the wood frame and I thought the second level part was part of the excess connecting material so I trimmed that off. It left me with either cutting the whole thing off or leaving half of it missing, I decided to take the whole thing off but will be careful not to maim the door frame on the next one I remove from the brass assembly. I thought about trying to paint the front of the wood frame in that area the same color I painted the brass and I'll see about that, I may still do it.

-
Thanks for the heads up on the metal, if I decide I want something there I'll probably do a plastic sheet which I've done before. The holes are tiny enough on this window that I don't thing having something there is a big deal although maybe I'll think differently as more of it comes together.
-
Thanks for the idea on the windows, no idea something like that existed. The frames are metal but I think it would work the same way. I'm not sure I could even get to those windows without tearing some things apart but I'll give it some consideration.
-
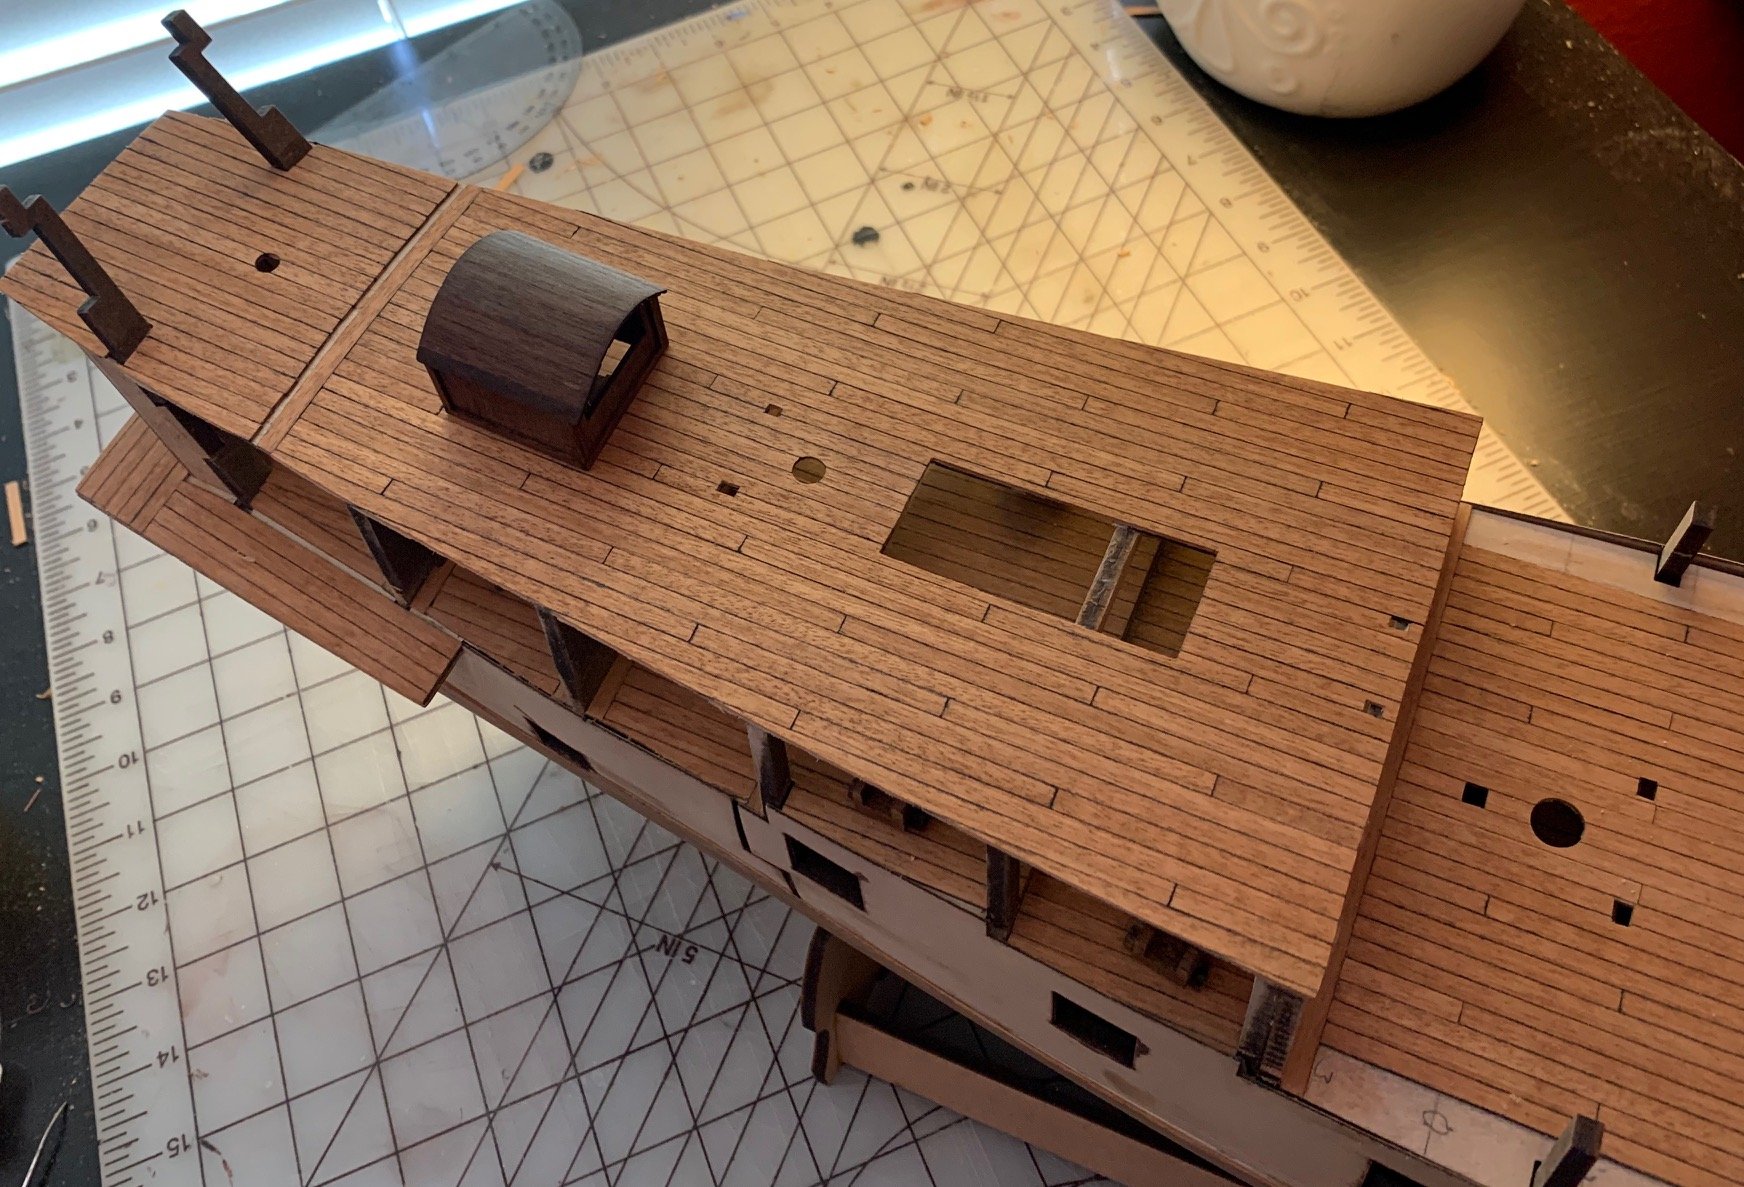
Quarterdeck and forecastle deck planking and Helmsman Canopy: Finished planking the forecastle and quarterdeck and glued the forecastle deck to the ship, All went as planned. Can't say the same for the Helmsman Canopy all of which was due to my clumsiness and bad decisions. When I was gluing the four sides together I was having trouble getting them to stay square while the glue set enough to hold things in place so I decided I'd put a clamp to hold it steady. As soon as I released the clamp (spring loaded) the pressure broke the front side with pieces sproinging everywhere. I looked and looked but never found the upper arch which holds up the roof so I had to make a new one, I did find the piece that came out of the hole in the front section so it had the right curve and all I needed to do was cut a piece the right width and glue it in place. The piece broke as I was cutting it out but it was a clean break that could be glued back together so I proceeded to move forward. I think I broke that piece at least three more times but I finally got enough roof structure to give it some strength and surprisingly if I didn't know what had happened I don't think I'd be able to tell. The instruction say to use 1x2mm wood strips to do the corners and roof but in the pictures they look suspiciously like 1x3mm stripe, at least on the roof so I decided to use 1x2 on the corners and 1x3 on the roof. The 1x3 in the kit is Walnut and it's much harder than anything I've worked with before but it seemed to go OK and when I stained the roof it looks really good, not sure if you'll be able to tell in the picture but there is a lot of nice coloring in the wood now and I like the look. I haven't decided whether I'm going to put a base around it or just glue it straight to the deck, it's another one of those things I'll consider before pulling the trigger and there's a lot to do before it matters. I also went back and did the bases for the two small swivel cannons on the quarterdeck and they went in with no issues.

- 166 replies
-
- 10
-
-
Quarterdeck planking and Lanterns: I decided to put the center deck plank on the quarterdeck before gluing it in place, that piece is so critical to my deck planking and I didn't think it would cause any issues putting it in place first. Now I wish I had planked out from the center over the hatch openings before gluing in place it would have been so much easier to trim everything up nice and neat and I don't think it would have affected getting the quarterdeck in place. The quarterdeck is a tricky one with the last bulkhead at an angle, getting everything in place to drop down requires some pushing and pulling. I did fewer dry tests just because I didn't want to have it snap while moving it in and out so I did a couple and then went with it. The lanterns are pretty tiny but thanks to being extremely nearsighted I could work on them without any real issues. I've put four of them in place above the gun deck (can see a couple in the picture) and I'm holding on to the other as I figure out where I want to put them. The quarterdeck is about half planked and I should be able to finish that pretty quickly.
-
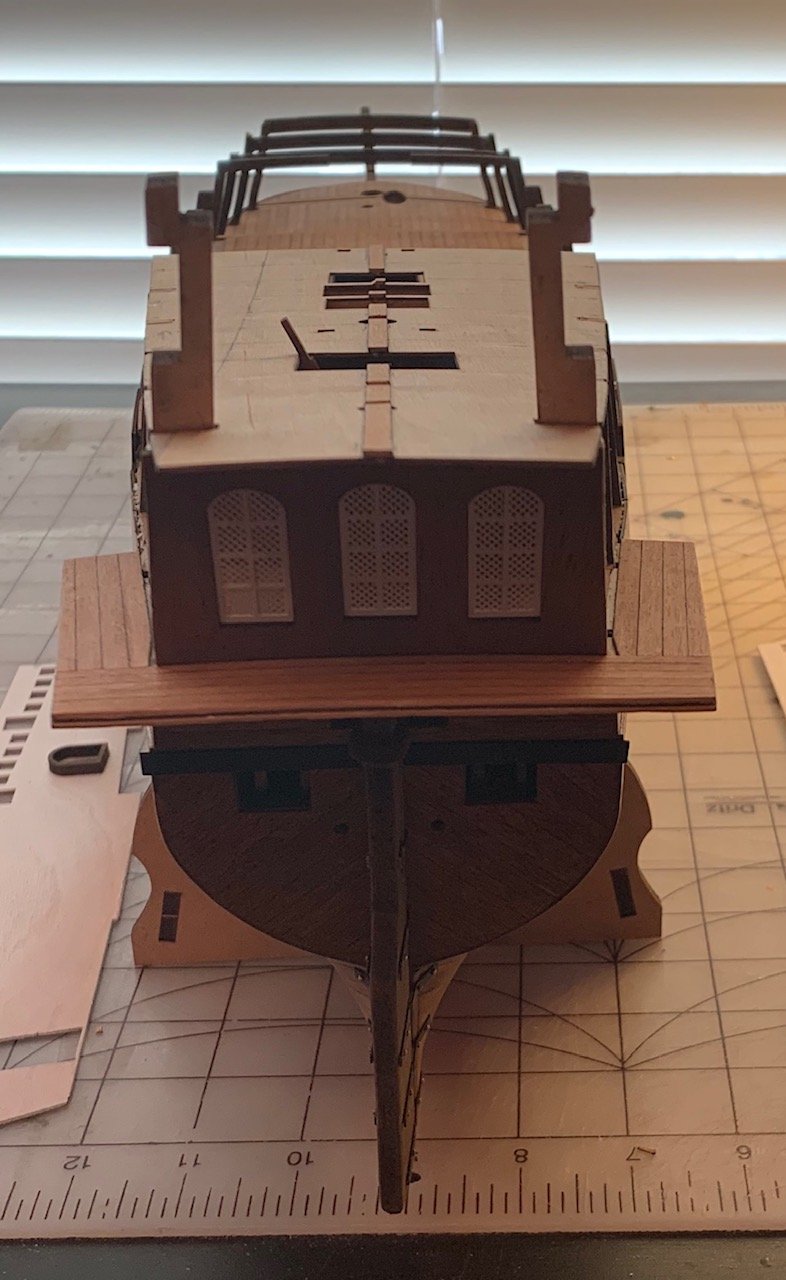
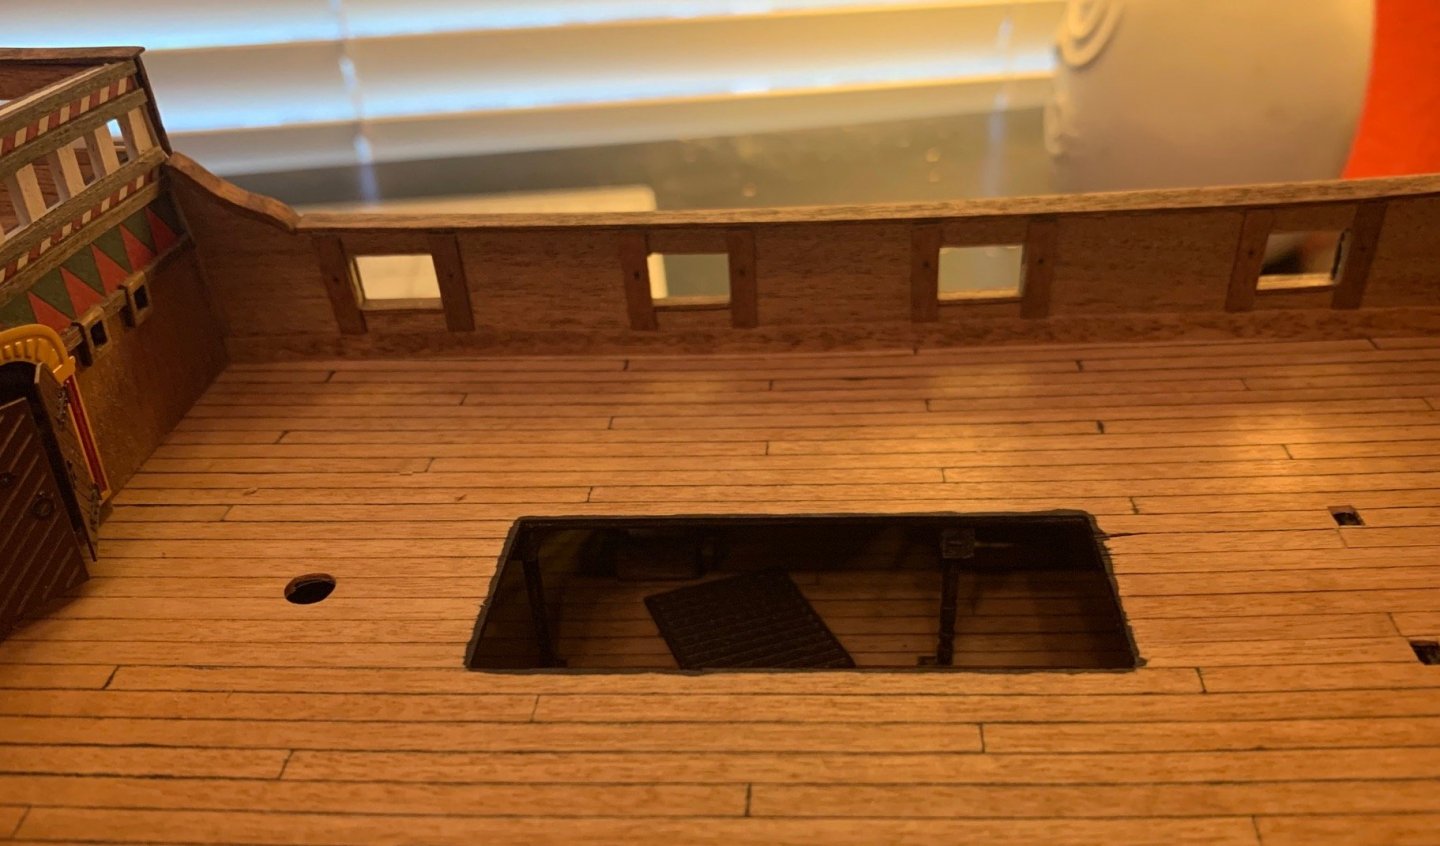
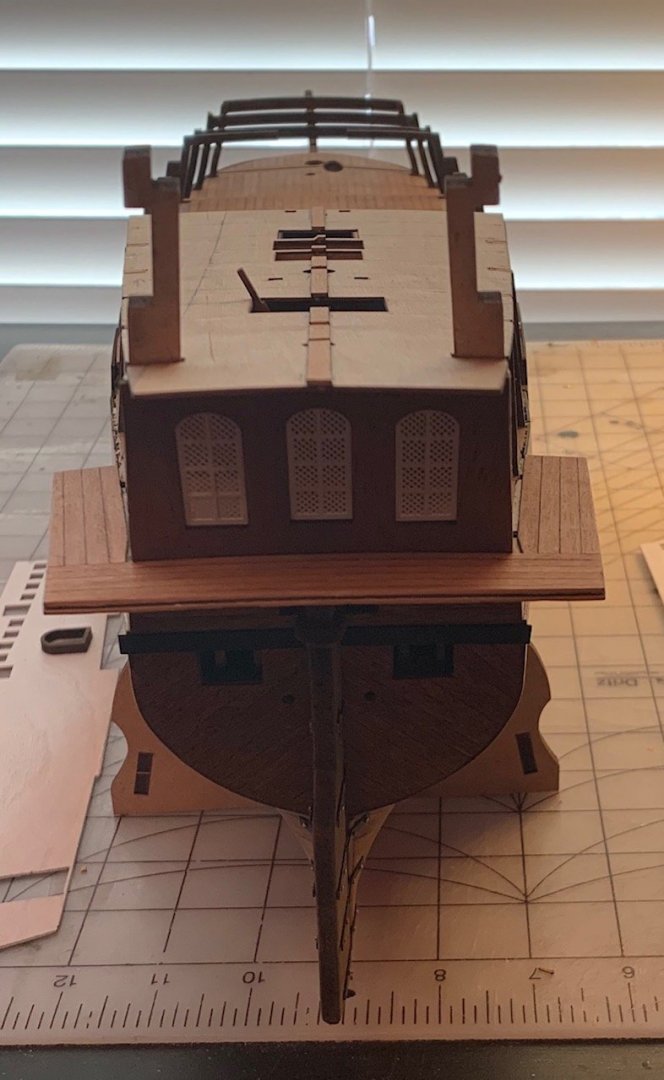
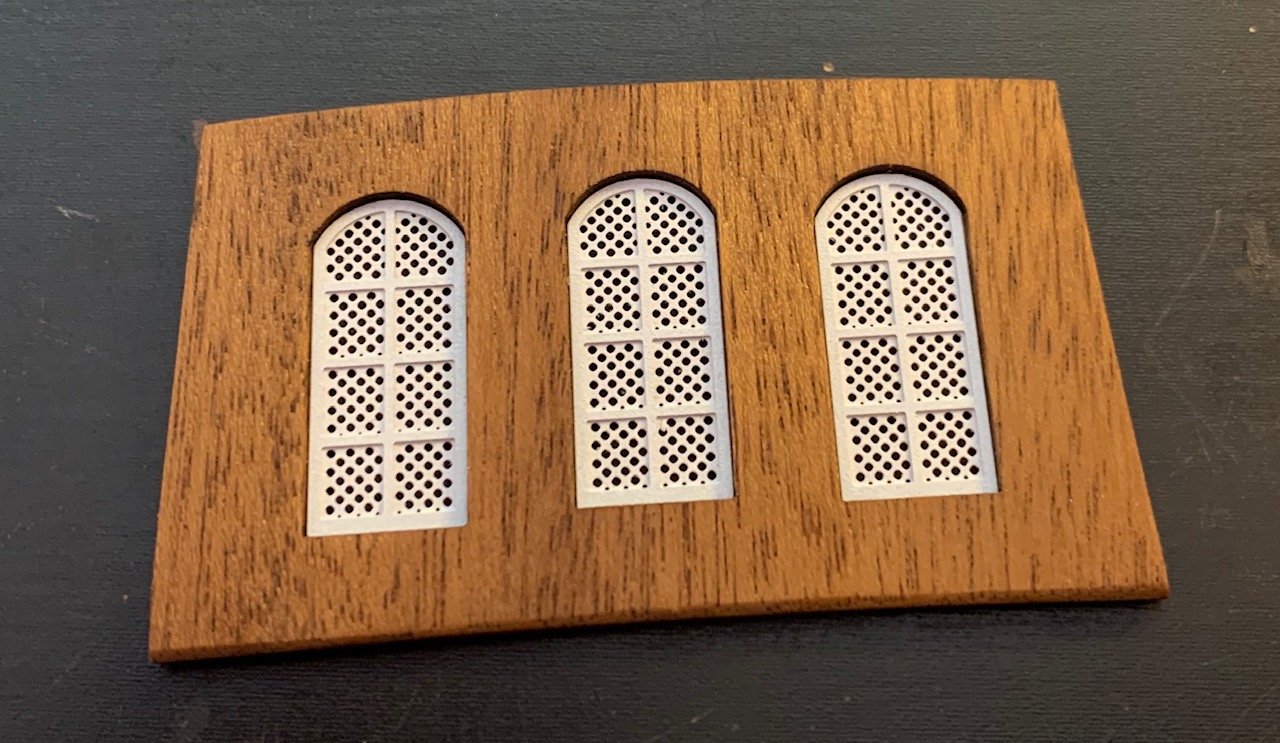
Main Deck, Stern Bulkhead Windows: Planked the main deck just like the others and glued the three deck pieces in place. Dry fitting the quarterdeck and realized I needed to get the stern window piece in place to check the fit so I went ahead and completed the windows and glued them in. I placed small strips on the back side of the bulkhead to give the windows something to rest against and that also eliminated any light coming through the tiny spaces between the window grates and the frame so two birds with one stone. On the main deck I decided to cut the cross pieces in the hatch opening and just place the cover piece on it later, at this point I thought I'd stay consistent with that. I also realized that the hole in the quarterdeck for the whipstaff will prevent it from going so far to one side that it could slip out so I don't need to create anything to make sure that doesn't happen. One time when dry fitting the quarterdeck every time I'd try to get one side down the other side would pop up and I finally saw that I didn't have the whipstaff in the hole and it was pivoting on it, it's a lucky turn that I didn't break it because I was pushing it pretty hard. Everything seems pretty straightforward after fighting with the hull planking for so long, deck planking is a breeze. Looking forward to getting the quarterdeck on and planking it.

-
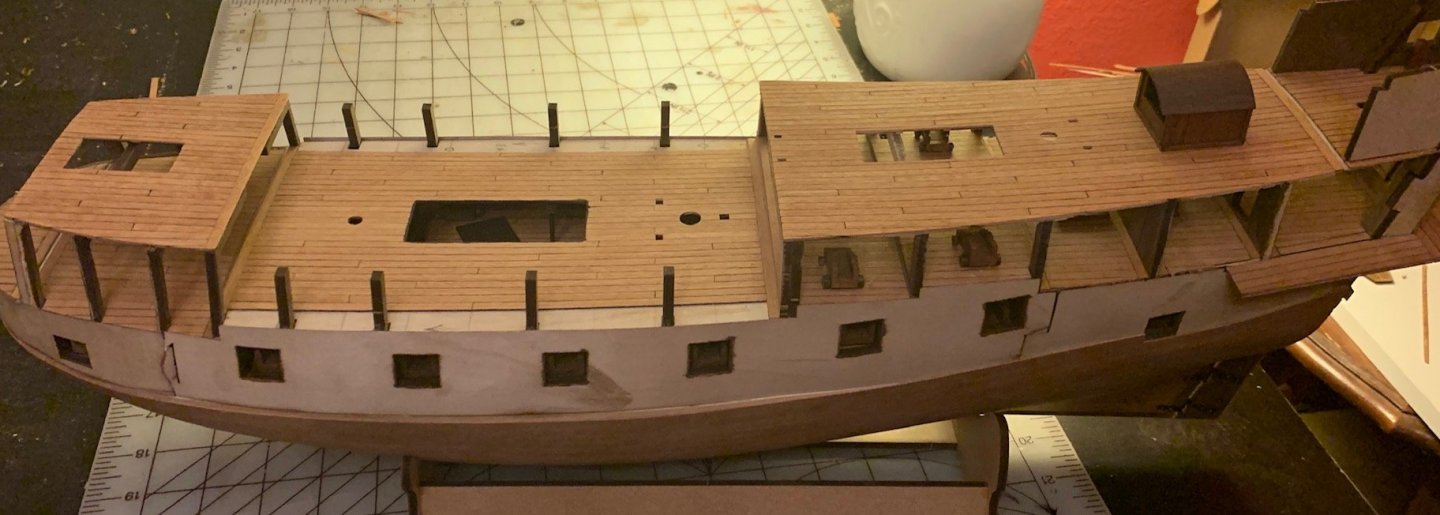
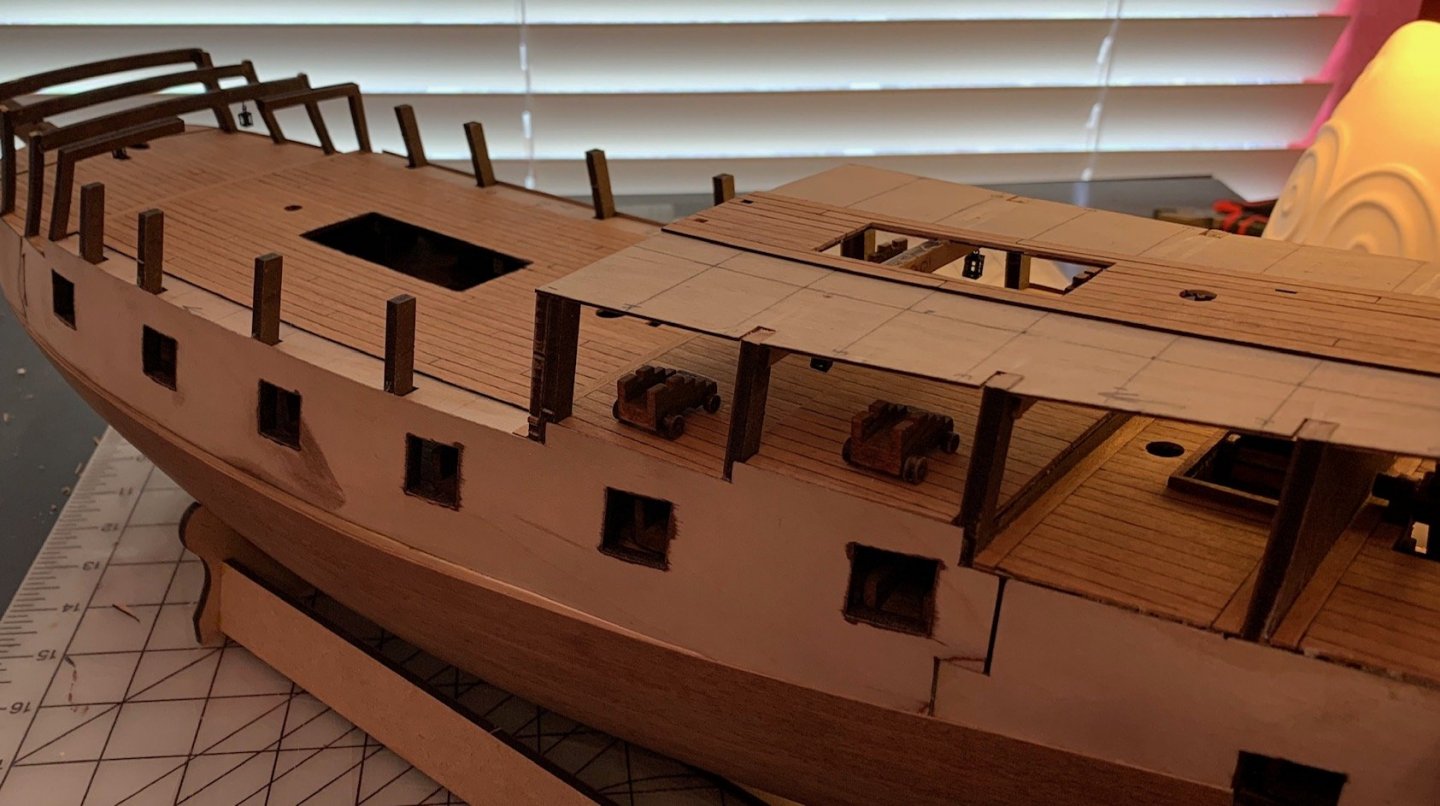
Gun Deck Finishing and Rudder: I finished installing the rudder and it was just like the instructions stated, no issues. I have found out since that if the Whipstaff goes all the way to one side or the other that the tiller arm can come out from it but it's easy to put back in by just going all the way to one side again. I may try to see if there's a way to put a stop in place to prevent that from happening once that deck is covered up as it could be a real pain to put back in if I couldn't grab the Whipstaff securely. I did have to cut a piece out of scrap to bring the end of the keel to the same level as the back of the stern deck so the rudderpost could sit flush against the back but I'm pretty sure that was just a relic of me not being precise enough earlier on. Just glued it on and sanded it back to fit flush with the planking. In the pictures the pins I used to attach the hinges to the rudder are still brass and I think I'll probably end up touching those up with black paint but I thought I look at it for a while before deciding. The cannons and deck coverings for the gun deck were straightforward with one exception. When doing test fits of the cannons in the default build the cannon pointed so high up that it often was touching the top of the gunport and I didn't like that so I cut short pieces of some old lime wood that was 4x1.5mm and placed that in the carriage where the butt of the gun rests to push the back up 1.5mm and the front down a bit. That gave, to my eyes at least, a much more pleasing angle for the cannons to poke out of the gunports. I scotch taped a cannon to each carriage and then was able to eyeball the position as I glued each carriage in place. I just placed most of the cannons to get a look at things and to take a picture before removing the cannons and starting on the next deck.

-
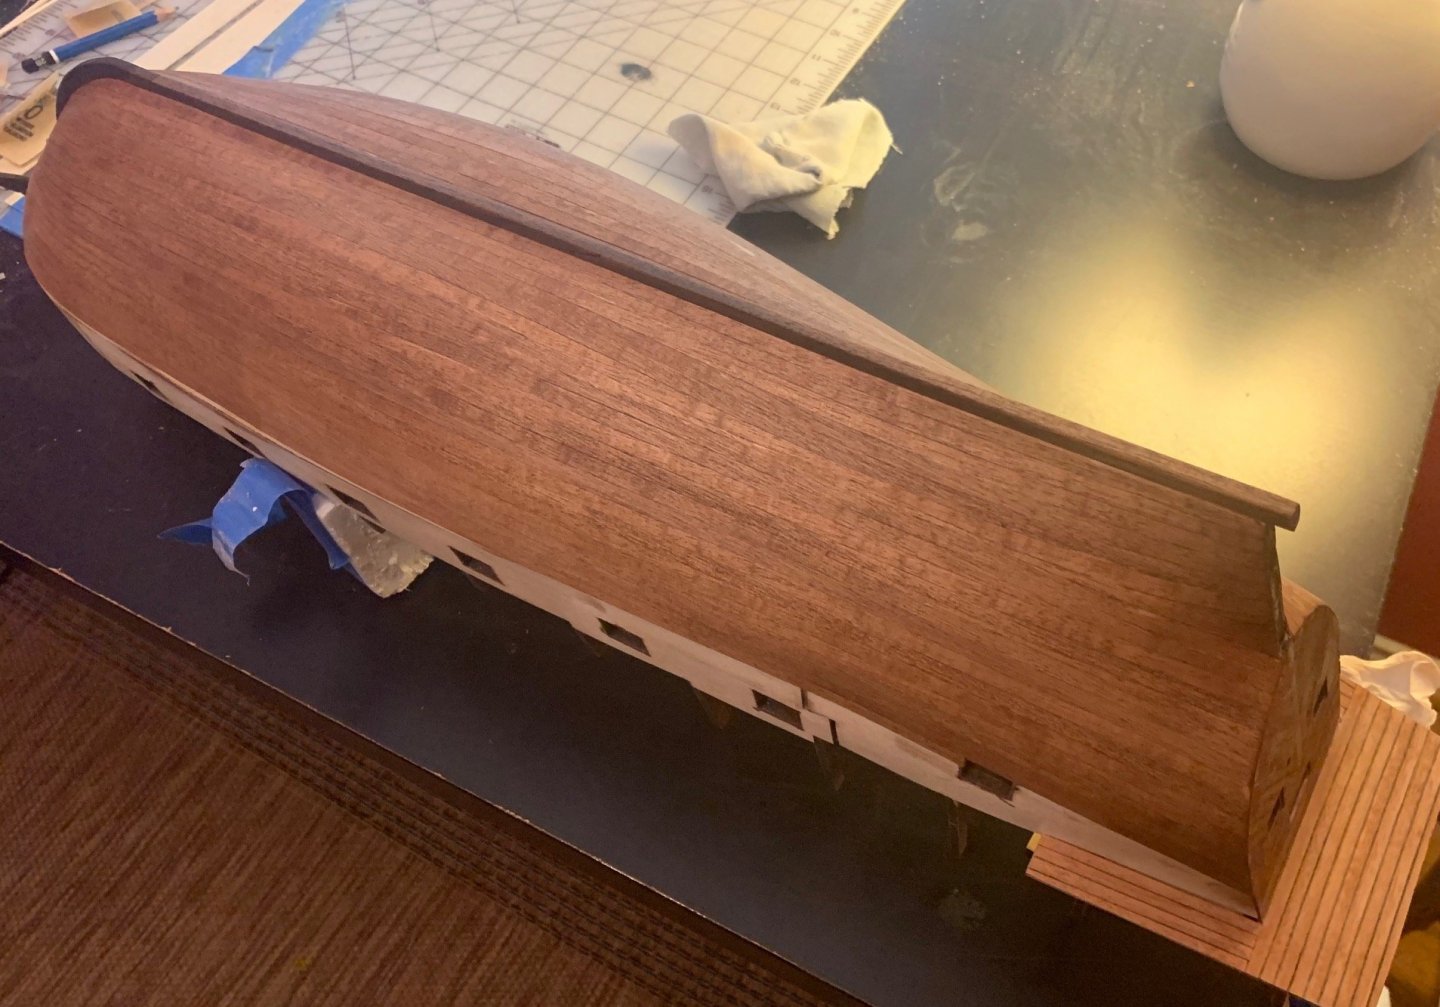
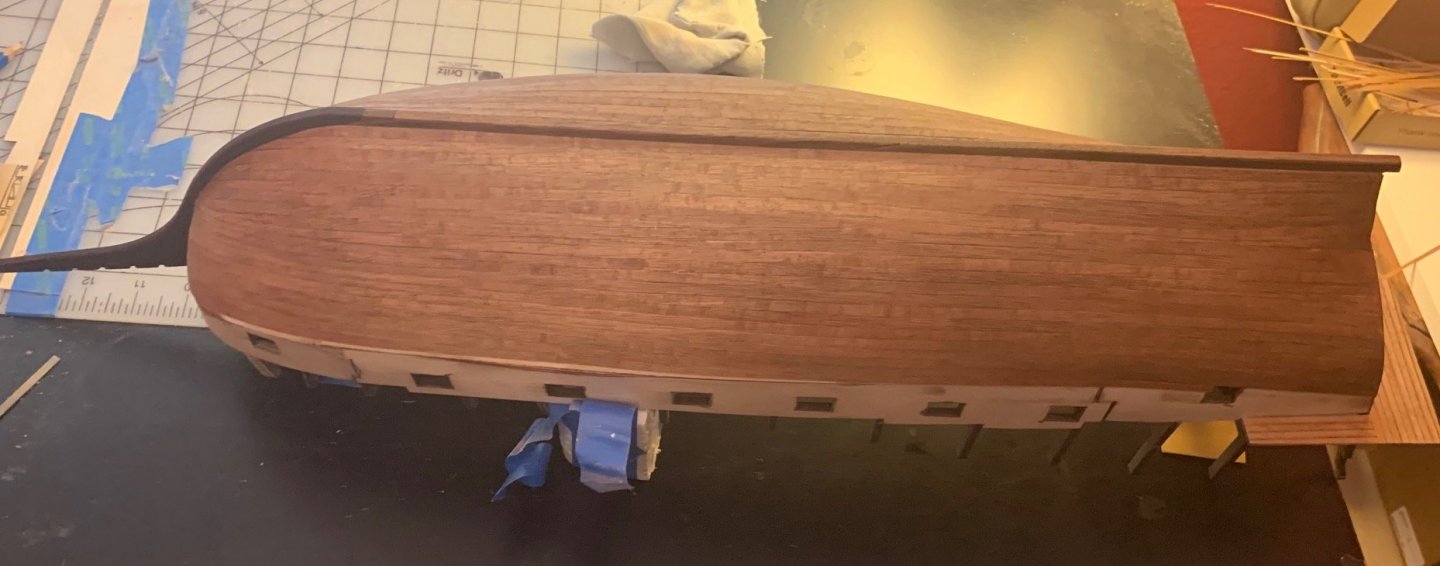
Hull Planking Bottom done: I've been working through all the issues I've had planking, especially near the bow and I'm sure that most of the issues have been caused my my lack of experience with hull planking. Everything else so far has been something that I feel that with a few tools, patience and attention to detail I can complete without knowing too much going in. That's certainly not true with hull planking, every plank you position and shape affects every plank that comes after that and I just can't visualize what's going to happen so I have gone astray several times. I've broken pretty much every rule getting finished but kept hoping that as long as I had fairly tight fits it would all work out in the end. There were a couple planks in particular where they got narrow and then wide and then narrow again before going back to full size that I'm sure would never be on a real ship, but it is what it is and I was able to finish. I sanded a lot as I was planking just to make sure that I wasn't completely off so once I got the last plank in final sanding wasn't bad. I need to continue the planking up a bit higher but I wanted to stain what I had so I'd know if it was all going to work out and so I added the stain, Special Walnut. The keel is a dark walnut so there's a nice contrast and since I'm not planning to paint below the waterline I'll have to decide what color I'll stain the rudder and rudderpost. Since the rudderpost looks like an extension of the keel I'll probably stain it to match the keel, but I haven't decided what to do with the rudder yet. I'm really looking forward to doing something that isn't planking for a bit.