Jonathan_219
-
Posts
176 -
Joined
-
Last visited
Content Type
Profiles
Forums
Gallery
Events
Everything posted by Jonathan_219
-
 This is the kind of thinking that could really push things forward. I'm sure some people would enjoy researching and creating the files necessary for something like this but I'd prefer to use existing files to make more accurate pieces for my models if they were available. I have the DeAgostini SotS on order (backordered forever) so this is something that I'd probably eventually use if it were available. I wonder if the forum would be able to host files like that so people would have a logical place to look if they need something, just thinking out loud.
 -
I did intend to say Blender instead of Bender, I blame Futurama. I will check out Fusion 360. I've done a couple of the Blender tutorials and am more lost than when I started.
-
I've been poking around, downloaded and installed Bender and have been looking at free and cheap sites for 3D patterns that would apply to shipbuilding. One of my biggest concerns is what resources are 100% legal to use as a basis for creating a 3D model. Let's say I learned Bender well enough to model a specific 16th century cannon and I found a picture of one on the net. Would it be legal to use that picture as a basis for creating a model? I don't want to use something without knowing that it's legal but I'm just a hobbyist that would make something with no intention of selling either the plan or product but I'd like to be able to make and share it with the community without worry. Copyright laws and just plain Intellectual Property common courtesy seem like a very deep subject. The free and nearly free sites are tough to search, but there are useful things out there. I tried searching for barrels and found lots of patterns and could almost surely find one that fit my needs (purely hypothetical right now) either as is or with a little tweaking in Bender. Some of the more specific things like hull decorations or figureheads seem like they'd have to be made since they're more specific to a single ship. Learning Bender seems like a pretty monumental task and that's not something I'm sure I want to tackle right now. I'm still trying to think this through and see if it's worth digging deeper. The possibilities are pretty amazing but if it's just one off pieces I'm not sure it'd ever be worth it.
-
I've been thinking (a dangerous pastime I know) and it seems that there ought to be a way to 3D resin print parts that either aren't right or aren't included to finish out the deck details of kits. I really know nothing about 3D printing but I've been doing some research and there are some companies that are selling some items like that and I think that's great but what if they don't have the item or scale you need then what are you to do? As resin printers come down in price, I've seen some under $300, it seems like that should be an option but I don't know where I'd get the 3D plans to print the correct part, I don't really want to learn how to create those plans needed to print accurate parts but maybe that's what I need to do. I'd like to think that there could be a repository of plans that have been created by hobbyists that we could all share and use or adjust if needed and scale then to the right proportions for whatever ship we're working on and just print out the right cannon, for instance. I'm assuming that once a 3D plan has been created it could be scaled to whatever size it needed to be to fit the ship you're working on. It seems like pretty much anything needed from cannons to buckets to lanterns could be printed and added to kits with a fairly inexpensive printer and the right plans. Even figures for the crew should be within the realm of possibility. It seems like a new world of detail and accuracy is in our reach if we just had the right plans and a printer. If someone has been down this road and knows why this would or wouldn't work then it would be interesting to hear. It's an emerging technology, resin printers seem to be able to produce the detail and size necessary, but it seems like the biggest barrier right now is the lack of public plans to create these pieces. I have no idea how hard it would be to create a 3D bucket or cannon in a format that would translate to whatever printer someone decided to use and if people would be willing to share their work after creating something like that where anyone that wanted to print a new one for their ship would be able to access. Possibly some companies will fill this void and there won't be a need for most people to print their own items but it seems that there are so many different possibilities that something like this would work in a lot of cases.
-
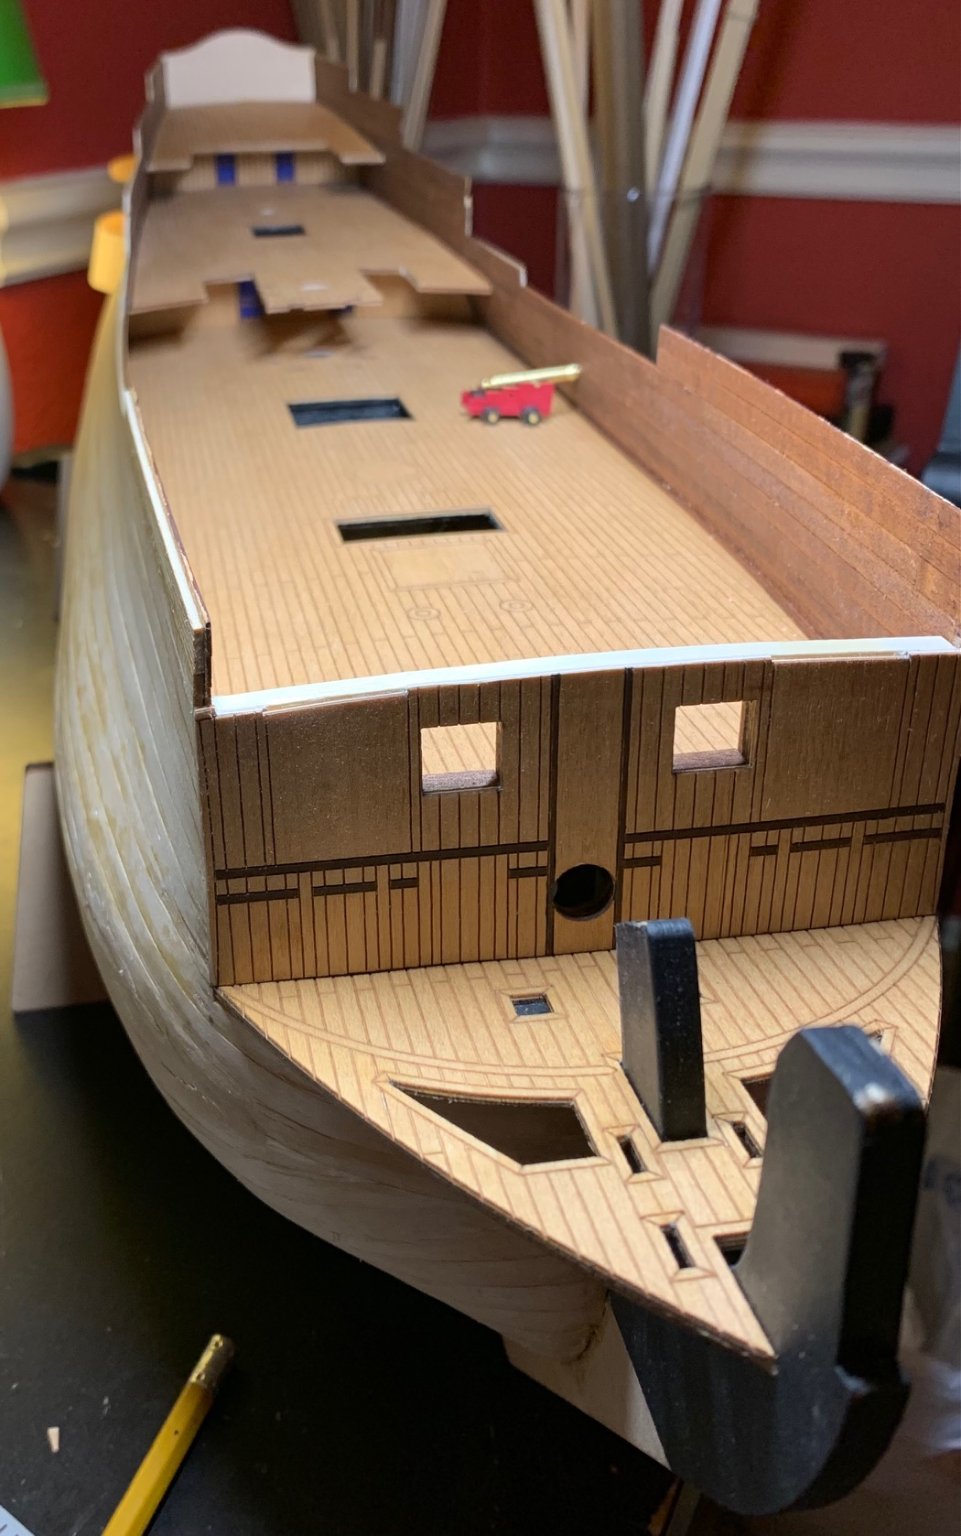
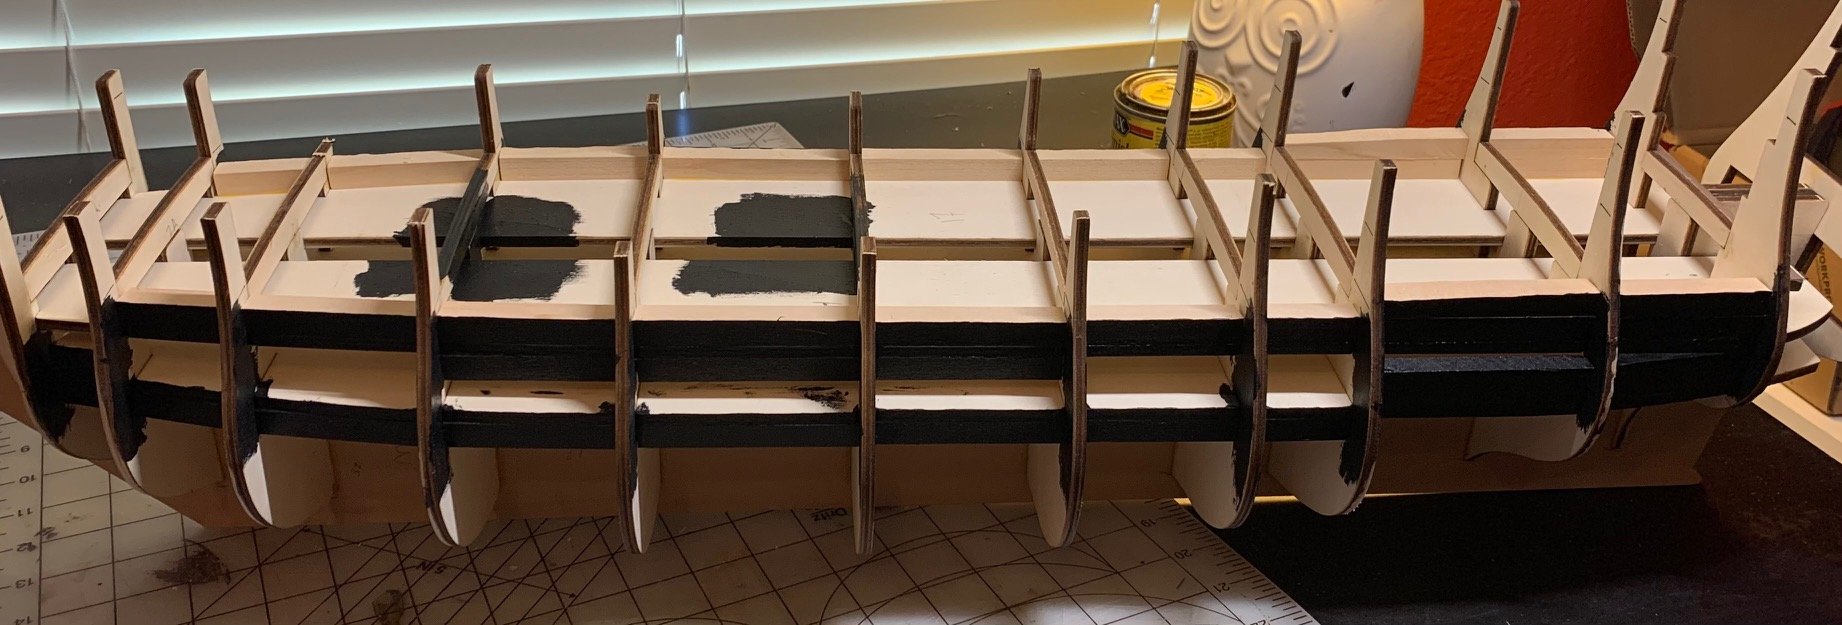
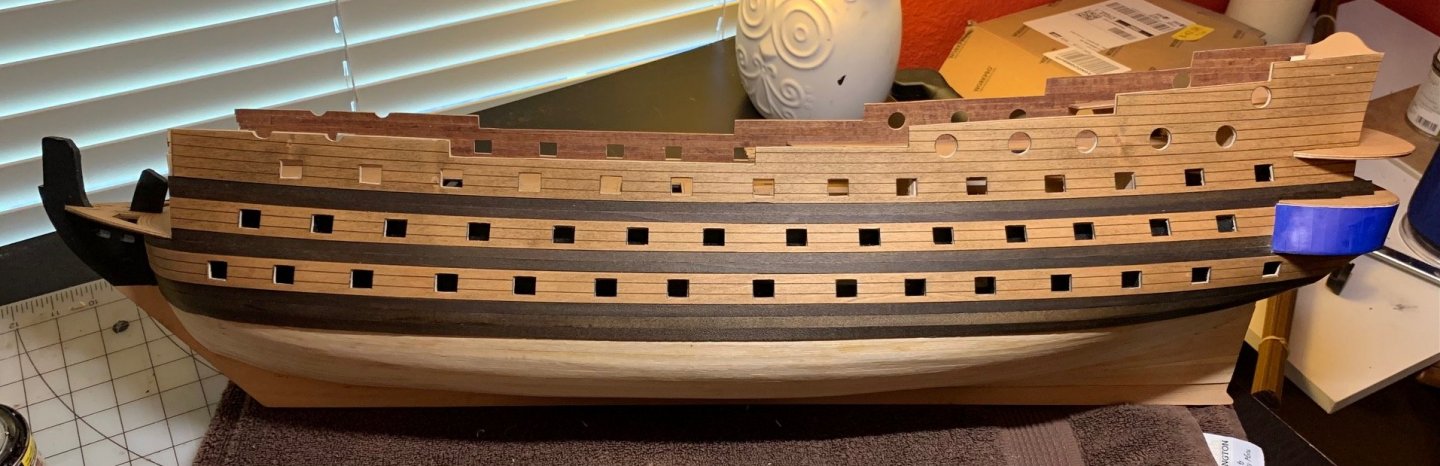
Sides and Gunports: I've finished attaching the side fake planking pieces and cutting the gunports. I spent so much time double and triple checking the height of the top piece to make the cannons hit the center of the gunport and even with all that when I put the cannon in place it's a bit too low. I did my measurements with the gunport cut and the height of the center of the cannon that I measured was right at the center of the gunport but when you set it in place it's a bit different. It's not so much that I won't be able to make some minor adjustments on the cannons and get it correct but it's weird to have the measurement and actual cannon not exactly line up. I think it's due to the angle of the cannon so every bit of the barrel is lower than the tip and when it sticks through then the lower part is what you see at the port. Lesson learned I hope. After getting all the side pieces on I needed to cut all the gunports, the only real challenging part was with the ones that had the covering for the inside decks that was visible. Cutting the port without damaging the inner planking was tricky, I covered the inside planking with 4 layers of painters tape to try and keep splintering to a minimum and cut slowly and carefully on those and for the most part was successful but a couple spots still splintered and I'll need to do some minor repairs to that planking. I decided early on that I wasn't going to paint the hull so instead of the painted black strip below the bottom row of gunports I stained the walnut planking dark to simulate that. I also stained the strips between the side pieces the same dark walnut stain so it's has three rows of the dark wood. I'll be staining the lower planks a lighter color. I still have the wales to put in place on the dark strips and I'll probably stain that the same color. It's starting to come together and I'll finish the hull planking next so I can get the ship on the cradle for stability and then work on the upper areas.
-
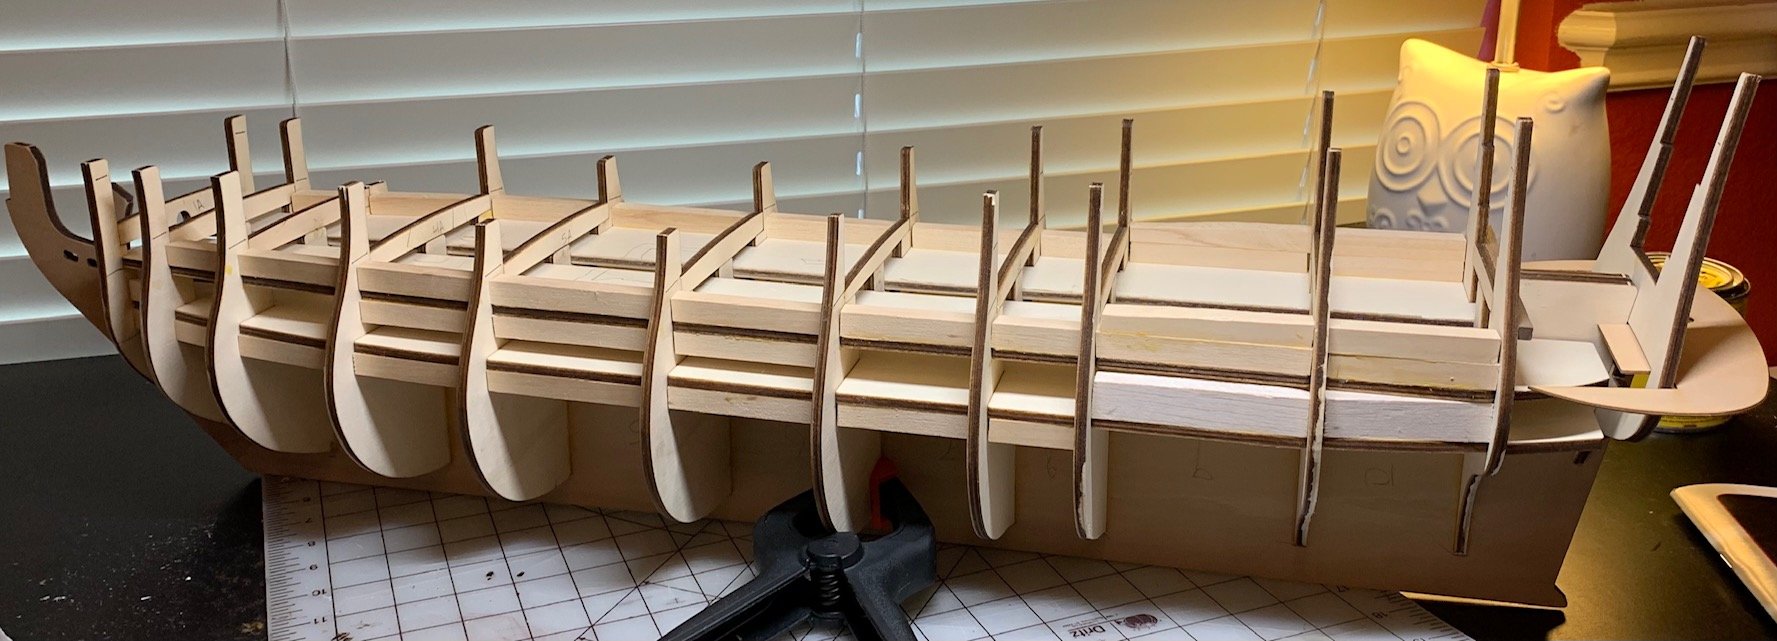
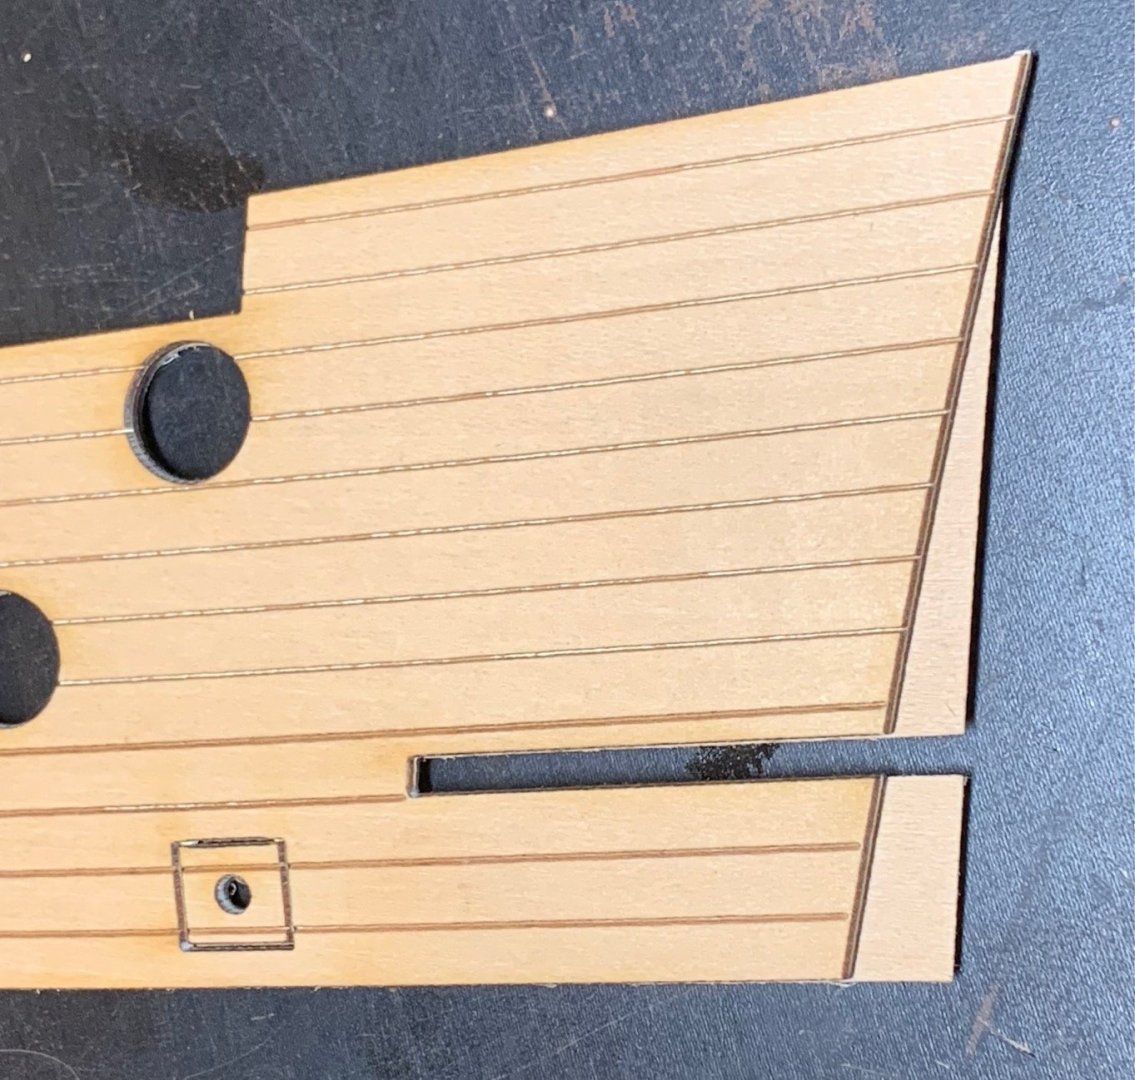
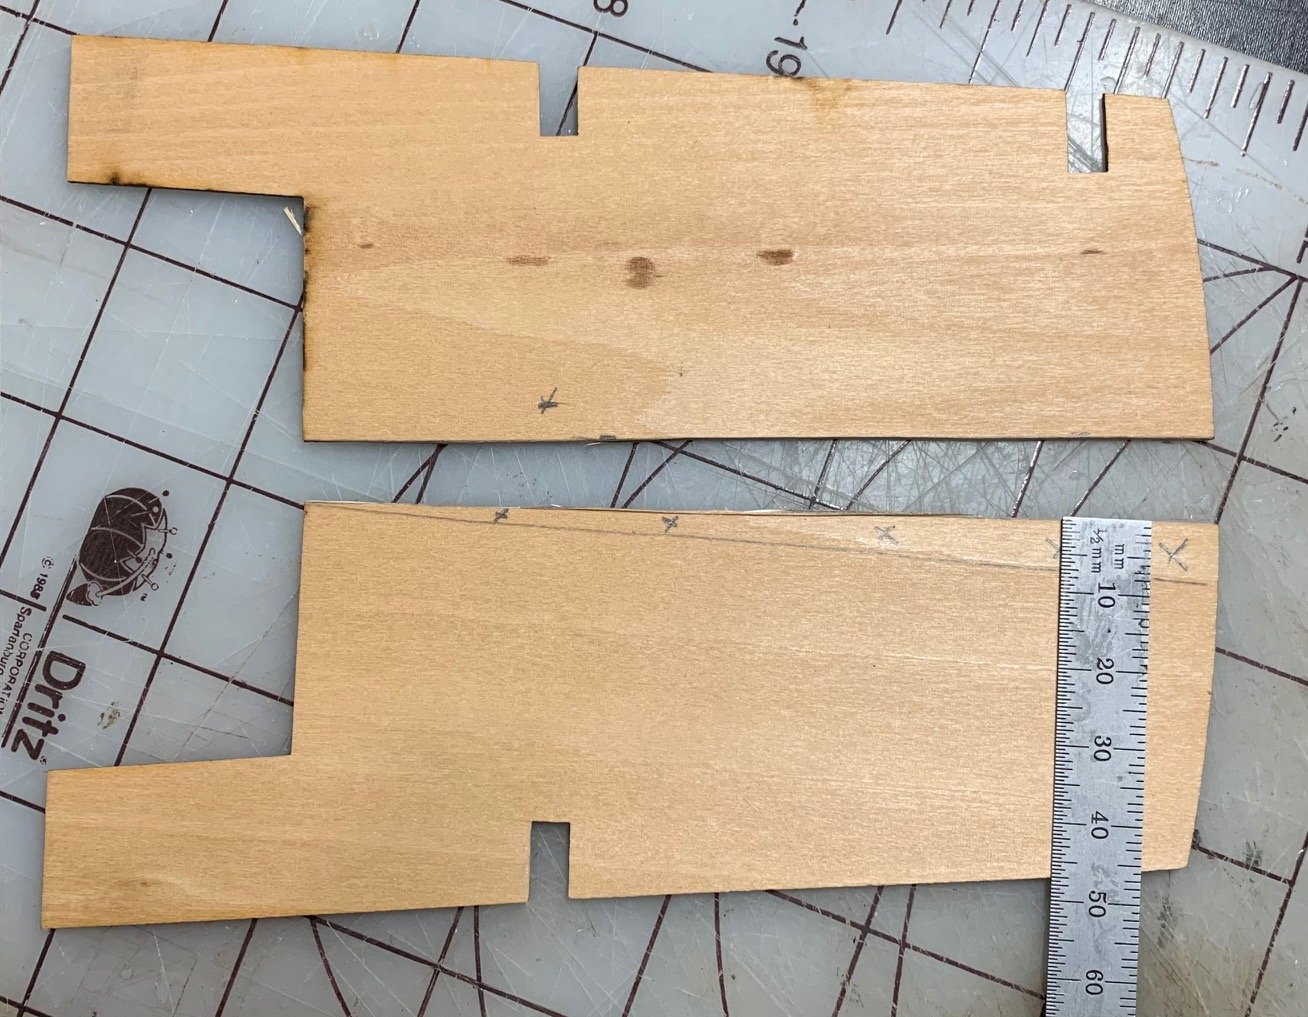
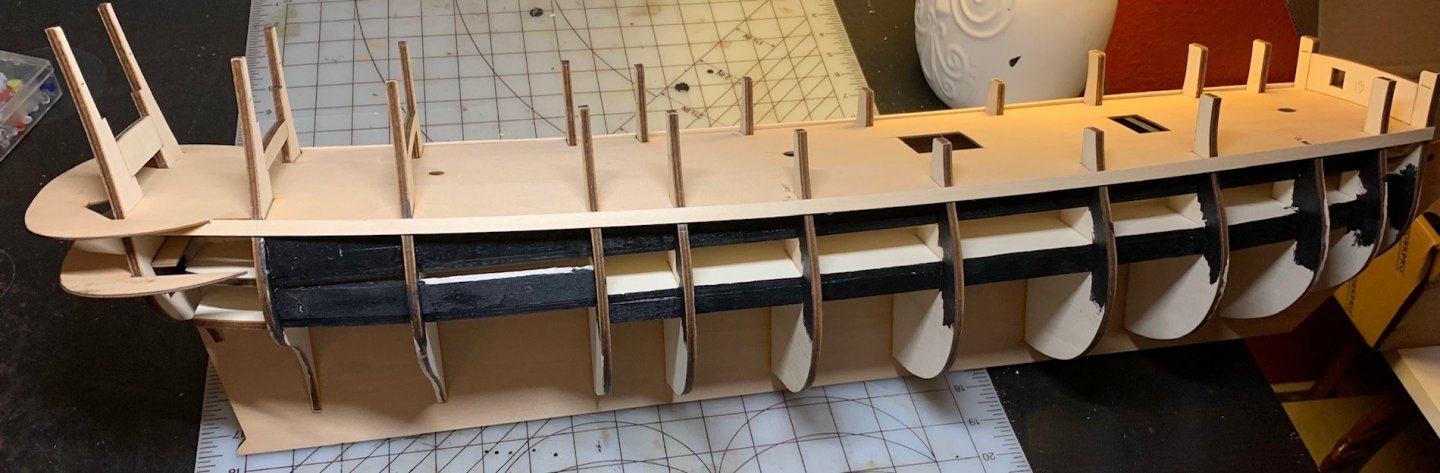
Upper Hull, Decks and What? Having finished the first planking my goal is to get the etched hull planking pieces in place on the sides so I can do the second planking. I want to finish the second planking because I push and pull a lot as I'm planking and even with some styrofoam blocks on the decks as I turn it upside down it's still easy to damage the upper decks so I though get the planking done and then work up from there. I've worked through the instructions and plans building up the hull planking where it will rise above the etched planking pieces and can be trimmed down to be flush and lined the hull on the inside. I've also been trying to make sure that anything that needed to be in place before the etched sides were added was done. I've been paying very close attention to the position on the side etched planking pieces since there's quite a bit of play at the bow while the stern position is pretty locked in with the slot fitting around the stern balcony deck. The instructions seem very vague about the exact position of these pieces, it's up to the builder to check and make sure it's all going to work with the gunport locations and cannons. I made up a cannon so I could measure and test the gunport positions and it seems that the center part of the first planking piece needs to be biased up a bit (2-3mm) and from there to the bow bias it down a bit (1-2mm). I've testing this by measuring and by sitting a cannon on the deck and drilling a very tiny hole in the hull and seeing where the bit hits the cannon and I've marked these positions on the hull. What I haven't figured out yet is how I'm going to glue this fairly large piece down getting it firmly against the hull and biasing things in the correct positions, I may try to do it in sections but that has issues as well. I was having trouble making the very back end of the starboard piece fit with the hull assembly already in place and decided to put the two etched hull pieces against each other, the port piece fit perfectly. They should be a mirror image of each other as far as I can tell but they're not even close. I'm not sure how this could happen. It would be one thing if one was just too large as it could be trimmed back fairly easily but the very top area is short. Any type of filling or patch is going to be near impossible to paint to match with the wood grain etc. I knew the instruction in this kit were suspect but this is frustrating. Maybe this will be an area that gets covered up or I can fudge it enough to cover up easily, it's only about 1-2mm short, I hope so. I don't remember seeing this in any of the logs I read but I could have easily missed it. I've included a picture of the two etched pieces, port (correct) on top and starboard (wrong) underneath to show the difference in shapes. Every other bit of these two pieces is an exact match for the other. This will require some thought.
-
Cleaning Brass Casting Residue
Jonathan_219 replied to Jonathan_219's topic in Metal Work, Soldering and Metal Fittings
I haven't tried soaking it in water but I did spend quite a bit of time under very hot tap water with an old toothbrush and toothpaste. This did help quite a bit and now it seems that where the residue was before that the surface texture is different than the "good" areas. I'm calling a good area one where the surface is smooth and shiny. It's hard to tell if there's still a slight bit of residue left or if it's completely gone and the surface of the brass where it was previously just has a different texture than the other surfaces. I'm still debating if I'll try soaking in Sparex, on one hand I'd like to try it and see what it gets me for learning but on the other hand if the texture of the surface is just different in these areas now (which I believe to be the case) I don't see how it could do much for that. Luckily I have a lot of time before I have to attach any brass to the kit so I can keep thinking about it and make a decision. Either way I'll report back whatever I decide and the results. -
Building the San Felipe and many of the brass castings have a hard whitish, almost crystalline substance in many of the crevices. A gentle probing with a dental tool seems to do almost nothing to remove it and it really degrades the look of the piece. I'm looking for ideas to clean the pieces with this residue up some, the casting is already of fairly poor quality and I'm hoping I can do something to improve the look before attaching them to my kit. I've thought of trying an old toothbrush with some toothpaste and seeing that if does anything but if a dental tool doesn't dent it I doubt a soft brush will either. Removing this material from the crevices would help restore some of the definition and it would be nice if it was brass color everywhere without the whitish crystal look in the crevices. A side question is this really brass or some brass like alloy? Some of the pieces have the color and brightness of brass and these pieces are much better cast with good definition. The pieces with the residue have a more tarnished and dingy look with softer edges. I tried taking a picture and it doesn't show it very well. The piece also doesn't look as bad as the picture makes it look, it's not great though.

-
Scrubbyj427, thanks. Honestly I wish they didn't have the etched decks and planking now. I'm not thrilled with the way they look but decided to just go with it and see how it works out. Part of the learning process but I suspect I'll avoid any more kits with it. I will be doing a second layer with the provided walnut and will check out Chucks tutorials, I need all the help I can get with planking, I'm getting a little better but it's a skill that benefits from practice.
-
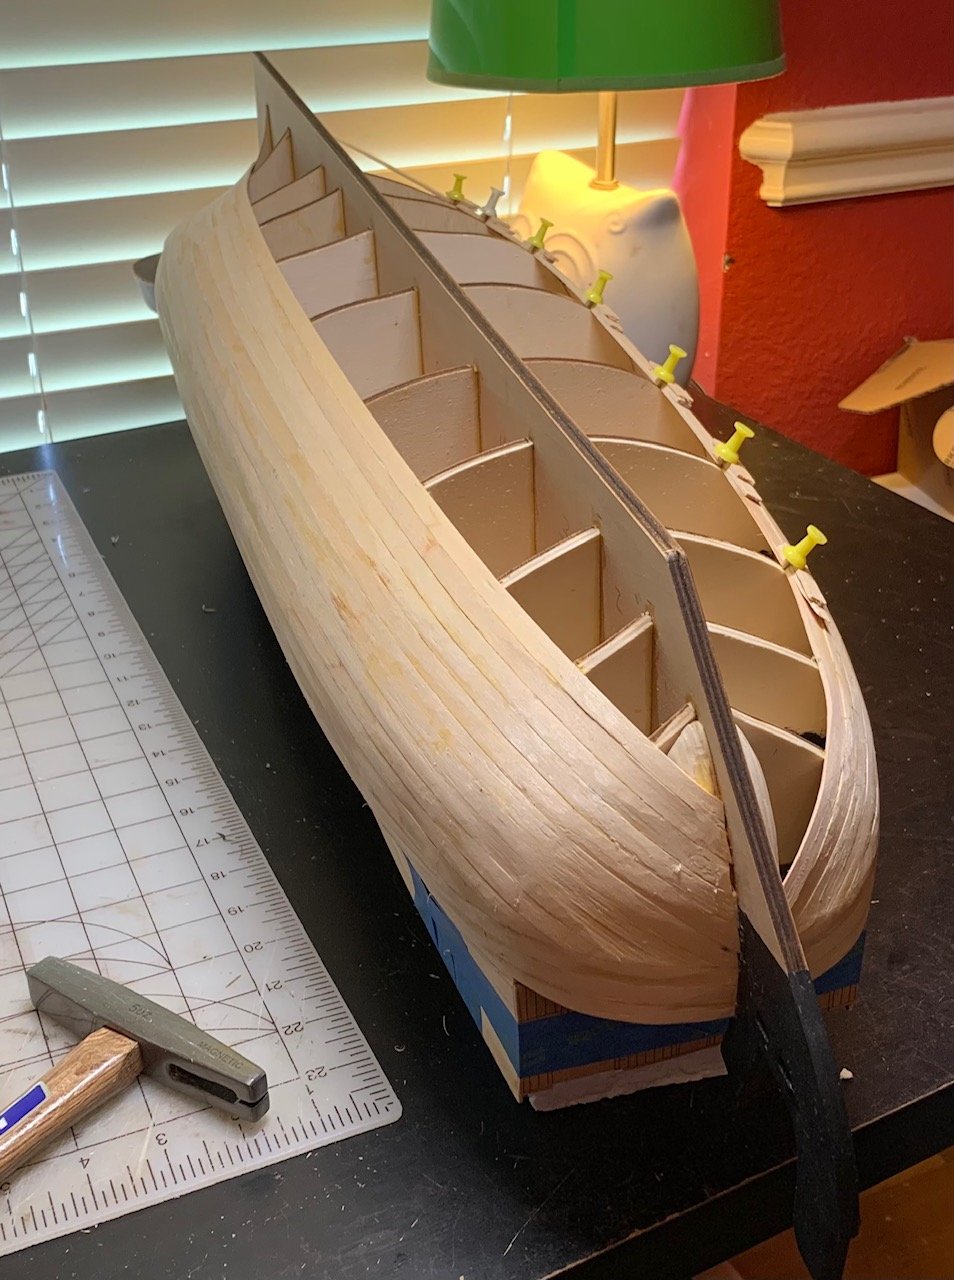
First Planking Continued, Stern: I've been continuing the first planking, trying to get that done to be able to return to the topside of the ship and so far still going well. Finished one side and nearly done with the other and finished roughing out the stern. No major sanding or filling yet but trimmed with exacto and some light sanding to be sure everything was in line as much as possible. The stern was pretty interesting with all the different things coming together and trying to understand what was going to end up on top in each area. Everything but the lower deck will get another planking and that gets painted so that will need to be very smooth. I've bought some new filler as the last type I tried seemed too dry and hard to work with. Tried a little of this new filler (Famowood) as a test, and the initial results were very good, I'll be doing a few other spots soon.
-
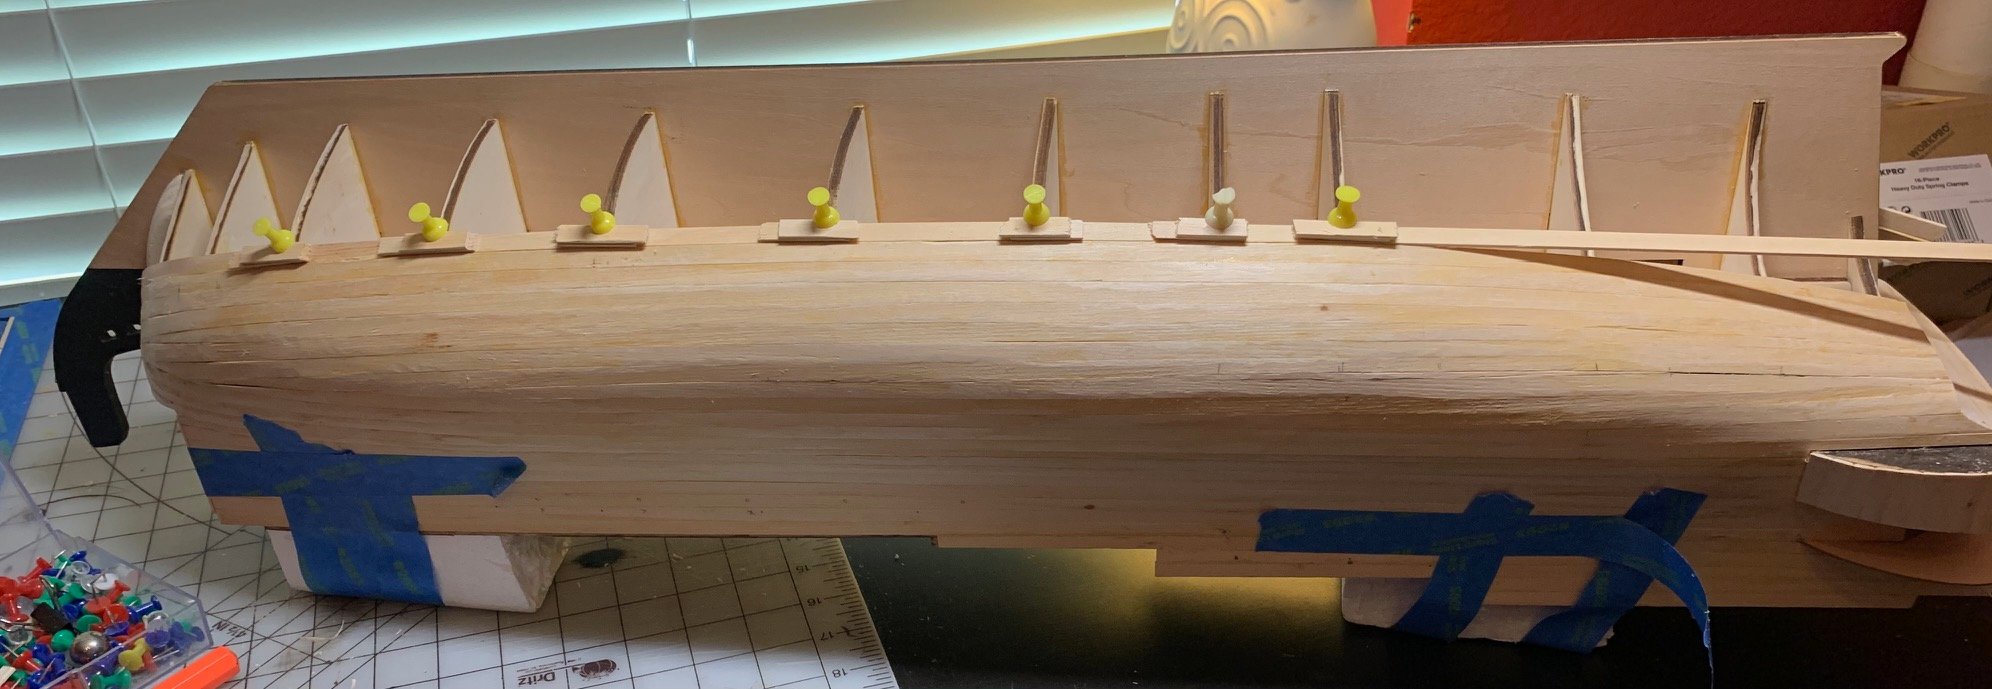
First Planking Progress: As I was trying to work out the position of some of the top decks and gunports it sent me into a deeper and deeper rabbit hold as I realized that this position affects that and so on. Trying to work all of that out really helped me understand and visualize where things are going but I also realized that I needed to get as much work on the hull done as possible since flipping the ship upside down and pushing and pulling planks would damage more fragile upper deck work. So I went ahead and decided to get at least the first planking done. It's a slow process as I glue the plank to the first three bulkheads and then wait for the glue to dry enough to glue the plank up to the last three bulkheads and then after that dries enough to work on the last three bulkheads. I can work on both sides at once but I'm only getting 2 or 3 planks done a day but I'm not in a hurry so that's all right. I have discovered that I can use a knife like a plane and smooth off the plank edges that stick up on the bigger curves. It seems to be much quicker and more precise that sanding although I'll still use some sandpaper to finish off the smoothing process but it should be very close just using the knife. I've also done some work that I can while waiting on the hull planks to dry so I've gotten some of the stern work done but there's some that I can't do till the hull planking is finished.


-
I've been looking around at lots of companies and kits and have become interested in understanding who designed the kit. Sometimes this is very easy to find out and sometimes there's just nothing in the companies description of the kit or anywhere else that i can find. I would also assume that in some cases there's not a single person but a team working on the project but I'd still be interested in the names or leader of the project. Personally I think this is a really interesting process and it would add more interest in the kit for me if I knew more about it. For example, I tried to see if I could find a complete listing of the ships that Chris Watton had designed, the ones for Vanguard and Amati Victory seem obvious but what about kits for any other companies he might have worked for in the past, and I didn't find anything, those might be the only ones but it would be nice to know for sure. I also wonder if there are any other designers with a name that stands out that have made really good kits. I'm just wondering what type of information is out there, I haven't been able to come up with much Googling things.
- 1 reply
-
- 1
-

-
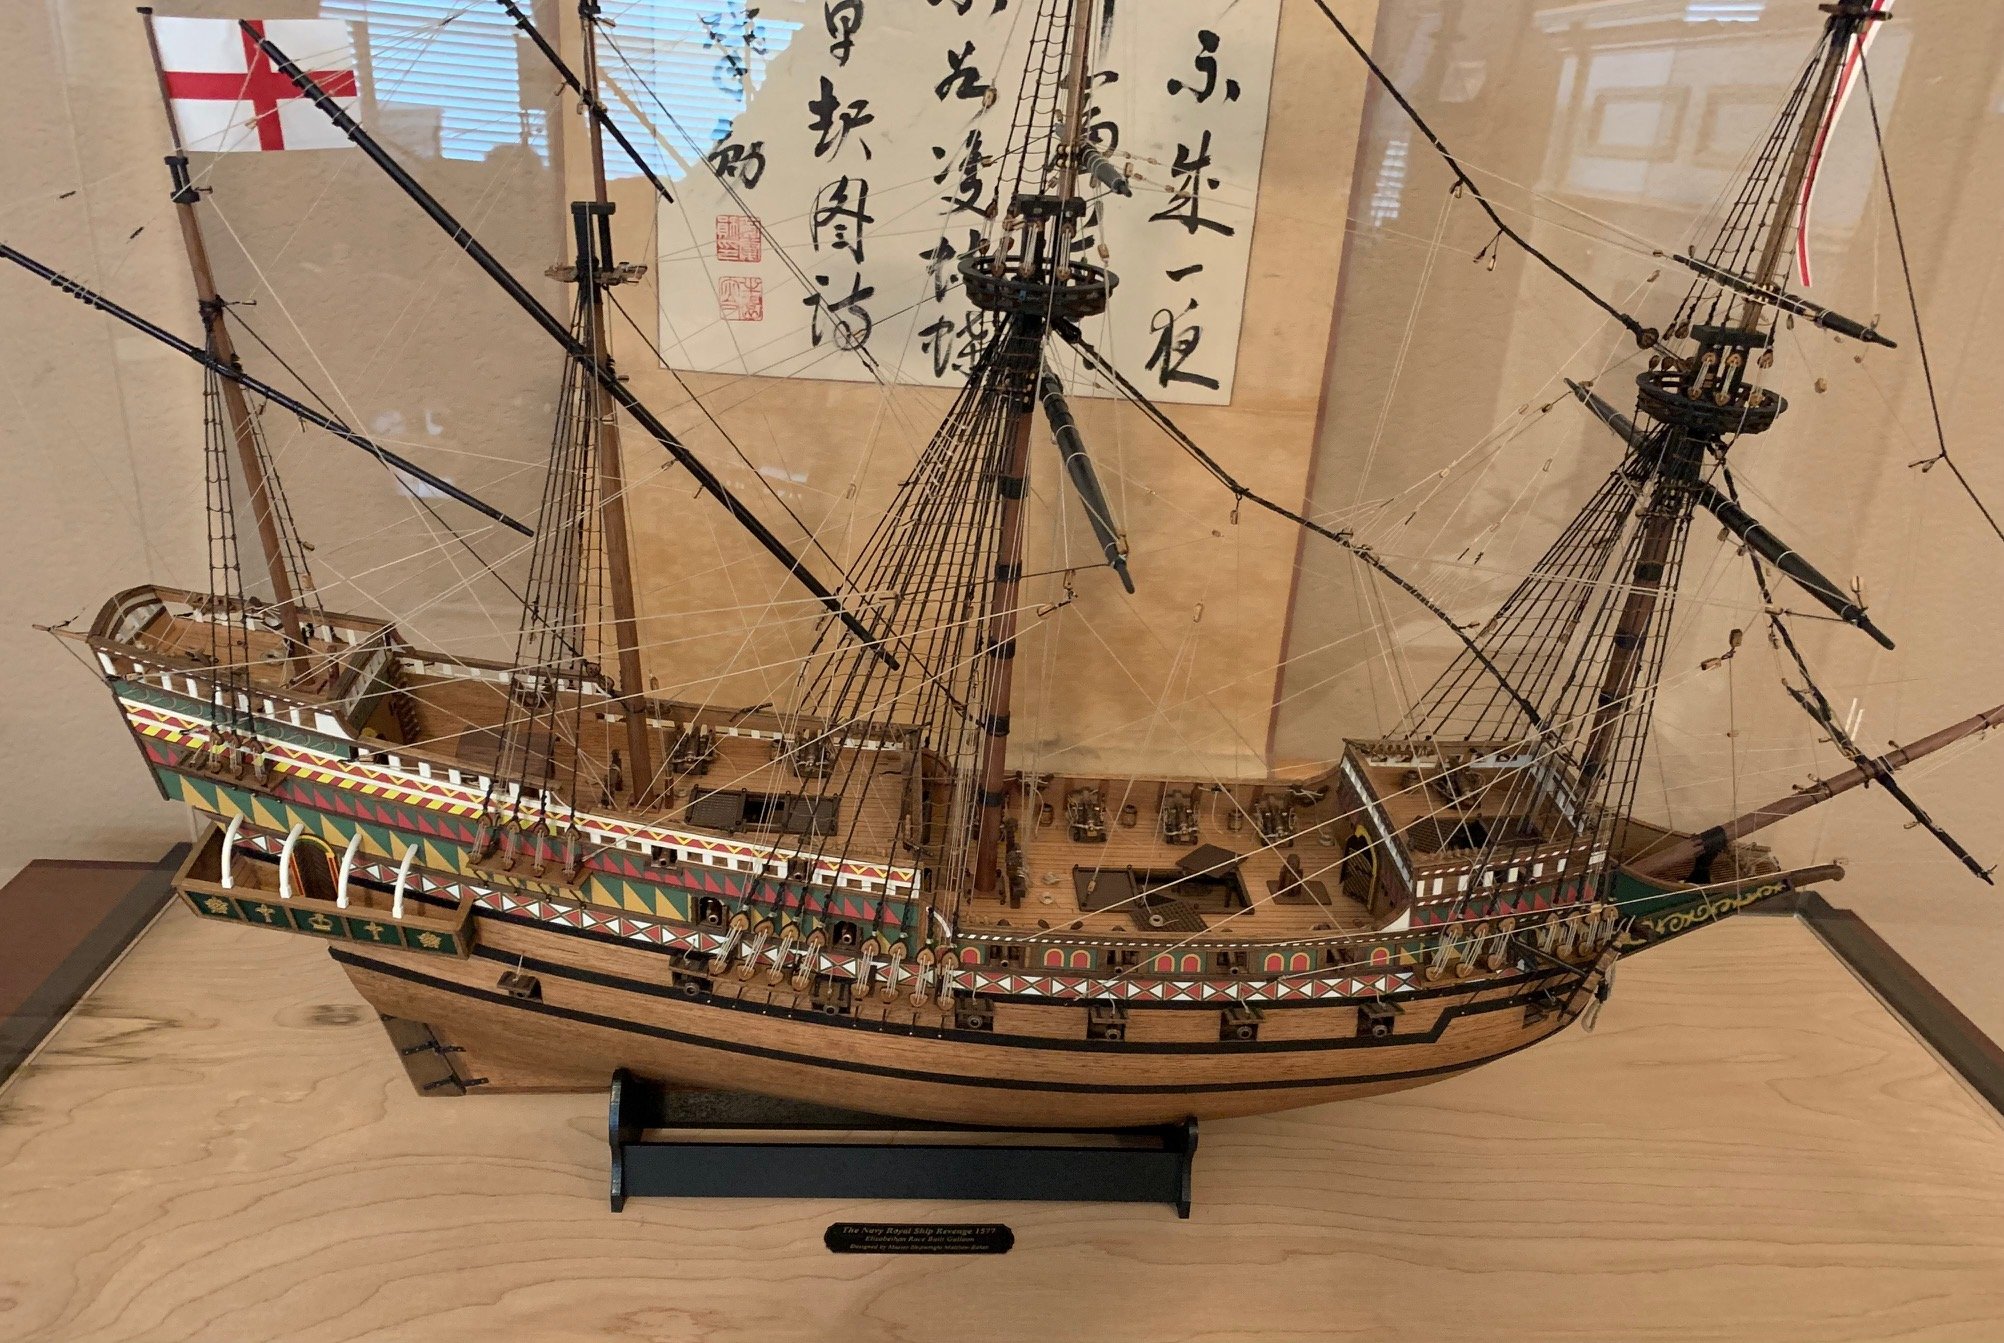
Amazing work and a beautiful ship, the detail is incredible. Congratulations on a great work.
- 228 replies
-
- 3
-
-
- spanish galleon
- lee
- (and 1 more)
-
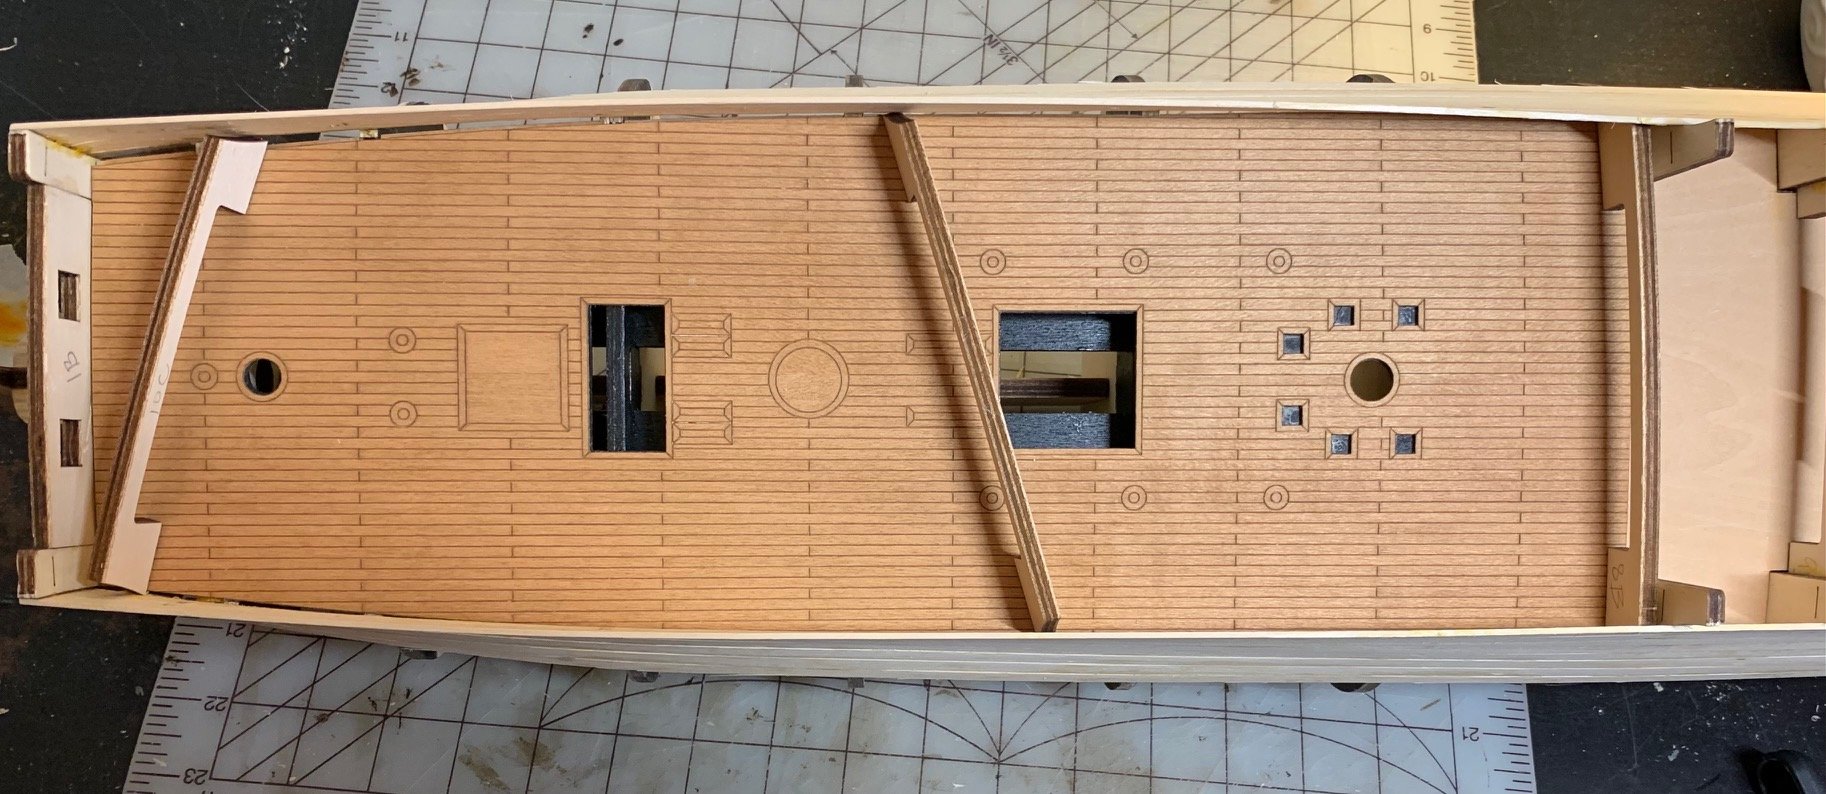
Next deck challenge: As I was waiting for some paint to dry on the next bulkhead I decided to go ahead and start test fitting the next aft deck. No matter how I tried I could not get the false deck to move into place, it just seemed too big. Looking at it for a while I went ahead an cut it in half so I could figure out what was going on and make it fit. When I placed the two halves on the bulkhead supports the fore part is pretty much spot on for the width but the aft area is at least 8mm too wide. I'm completely confused by this as the space it's trying to fit into is determined by the bulkheads and there's really no way I could have changed that dimension. I pushed them in place as much as I could and drew a line where one side overlaps the other when they're snug against the planking. My first impulse was to just cut that off and then they'd sit flat on the bulkhead supports but then I believe that the real deck wouldn't fit properly against the false deck. I'm going to have to cut something off somewhere but I'm inclined not to remove it from the sides as that will make the two tongues much narrower as I'd have to cut off something like 4mm off the width each one. I don't really want to cut the real deck in the middle and splice it either as I'm sure it'd be visible as a splice with the way the decks are cut. Maybe I can glue the false deck back together with it reformed to be the correct shape and then use that as a template to trim the real deck in the least destructive way possible. I'll just take this opportunity to say that I'm really not a fan of the pre-scored decks for planking. It doesn't look horrible but I missed doing the deck planking and it looks a bit cheap to me but I've decided to go ahead and live with it. I'll almost certainly never get another kit that uses the pre-scored decks. Plus if I was doing the planking on the deck fixing this problem would be much easier, just adjust the false deck and then plank whatever shape results. Including a picture of the deck, cut in half and with a line drawn where the sides overlap.
-
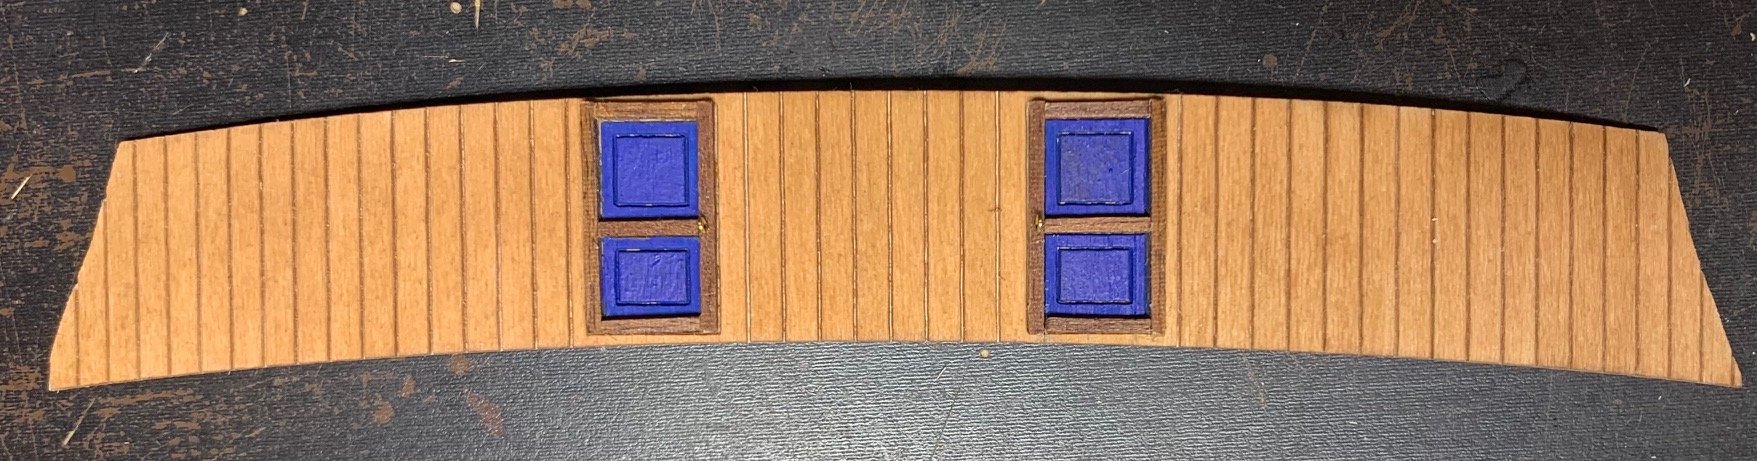
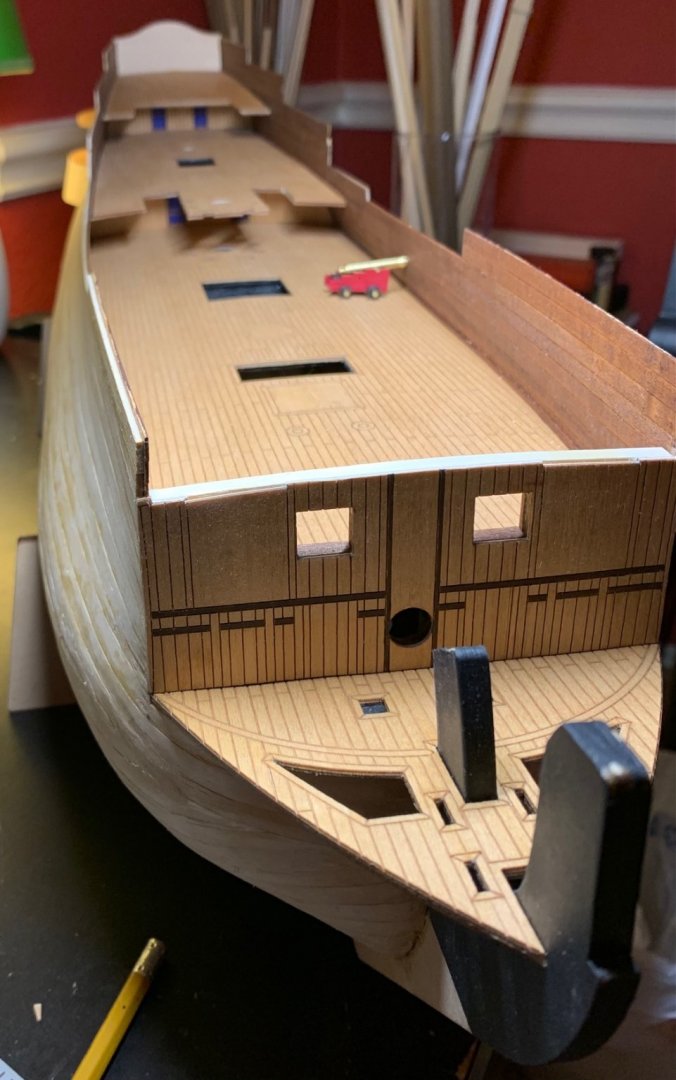
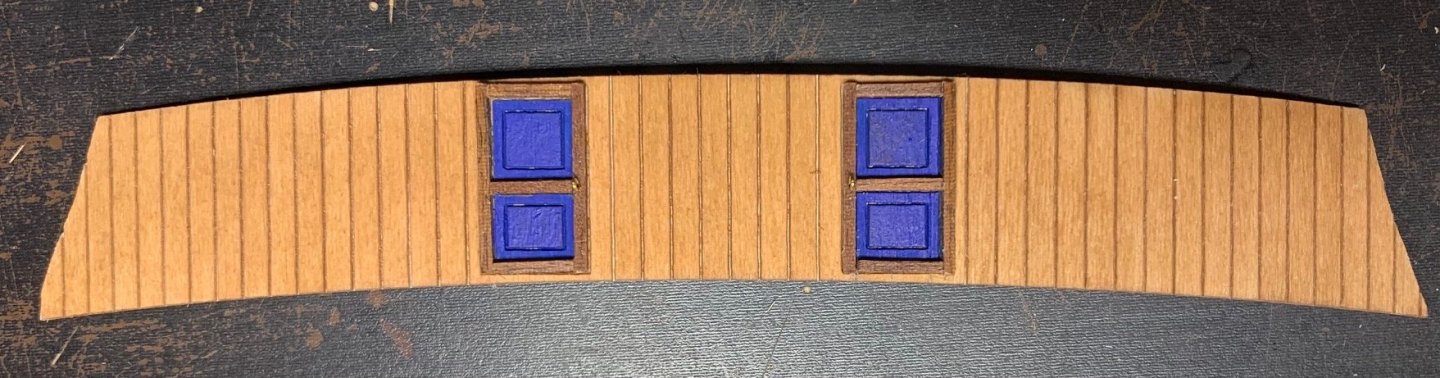
Main Deck Walls and Doors: While planking the interior walls of the main deck I noticed that there was no wall at the end of the deck, just an open spot where you could see all the bulkheads. Even though that space where the wall would be is pretty far under the deck overhanging above it just didn't seem right that it would be completely open. I looked and looked through the instructions and could not find anything where something was added so I looked through the pieces and found what I believed the walls with a couple of doors etched in it. Finally on the drawings I found something that showed piece 8C going in that spot. I feel like this should have been installed before the false deck went in above it to cleanly get a good fit but there's noting in the instructions that I can find that ever shows installing it. I also found another piece 11D that goes in a similar spot on the deck above and again with nothing in the instructions to ever install it. Luckily I caught it before it was really hard to install and if I hadn't removed the tongue from the deck above I'm not sure if I'd have been able to get it. I really have to get used to the way both the instructions and drawings have to be gone over carefully to make sure you have everything in the right order. The door etchings didn't look very convincing so I tried painting them blue and it helped but still seemed flat so I constructed and glued a frame on using some 1x1mm trim that was laying around. I also added a brass eyelet for the door handle just to give it a little depth. These pieces are pretty far under things in the model but I'd still like them to look decent. This also gave me a chance to test the blue (Vallejo Blue) I plan to use on the stern and I think it's going to be good, I'll look at it for a bit before deciding though.
-
Two problems, one solution: As I continued to plank up the side and prepare to put the next deck on top of the false deck which I have already glued in place I noticed two things that were going to be issues. First, I needed to plank the inside of the hull above the main deck and the tongue of the second deck was going to make it really hard to get the planks under the overhang of the second deck in place securely. Secondly, and much more problematic, was when I glued the second false deck into place I didn't check the alignment with the mast holes in the main deck and I was either going to have to enlarge the holes for the mast or trim the mast exactly right to get it to sit straight. My solution was to cut off the tongue on the false deck and then glue it to the real second deck, that way I could carefully align it when gluing, and it got the tongue out of the way to install the inside planking. I've dry fitted using the mast blank through both decks and I'll use that when I'm gluing to make sure I have the alignment where the mast will align properly. The instructions say to use the included walnut for the inside planking but I decided to use to leftover wood from my Revenge build for that and save the walnut for the final hull planking, I've seen logs where people run low on the walnut so I'm hoping not using it here will prevent that issue later, I'll see. The wood I had for the inside decks was Tanganyika 1x5mm and I tested several different stains on that and finally decided to go bold and use the Mahogany stain. I also added a 1x2mm footer on the places where the plank connects to the deck. That helps the look and helps cover any gaps between the deck and the hull. The color will fade a bit and I think will give a nice contrast to the lighter color of the deck. Just continuing with the planking and getting the aft decks installed.
-
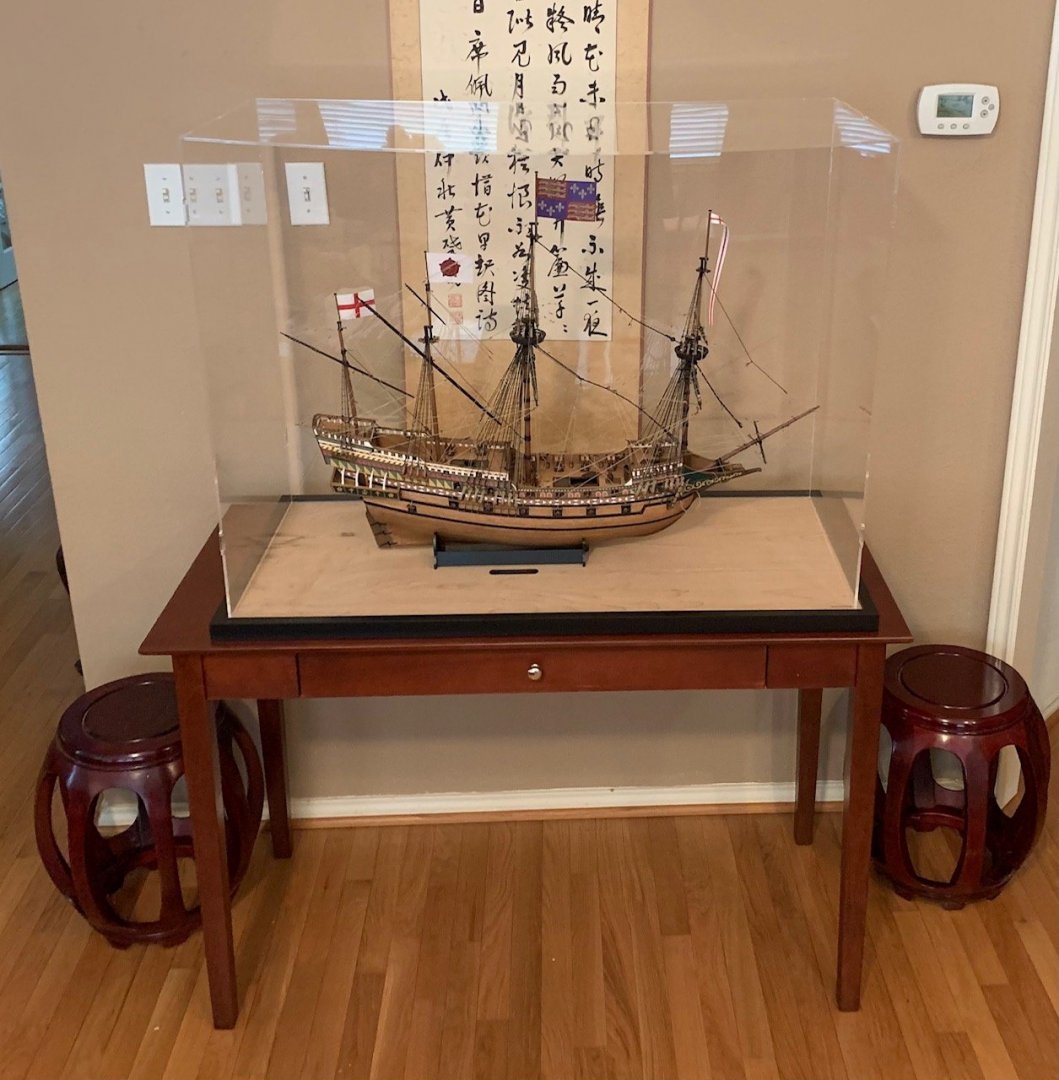
Final Presentation: This is a story I'm sure many of you are familiar with. Ship needs case, now case needs table, now table needs space so rearrange furniture. Whew! Overall though I'm really happy with the way the case and table turned out. The picture is missing the front acrylic panel to cut down on reflections therefore the top curves a bit where it's not supported. Thanks again for all the wonderful support, help and information.

- 166 replies
-
- 18
-
-

-
Thanks for the ideas, I always struggle with how much glue is too much or not enough. I tried to spread a thin layer over the entire surface with just enough to be there everywhere as I didn't want any loose spots. I'm not sure if that was right and I think my issue was more of a result of not being able to clamp properly while the glue dried but it's always good to consider everything. I tried to work some CA glue down on the edges while I was having a problem but with only the top available there wasn't much room to get any in where it might have helped. That's very different from what you're describing but it was way too late at that point. I will be mulling over how to glue for the next one.
-
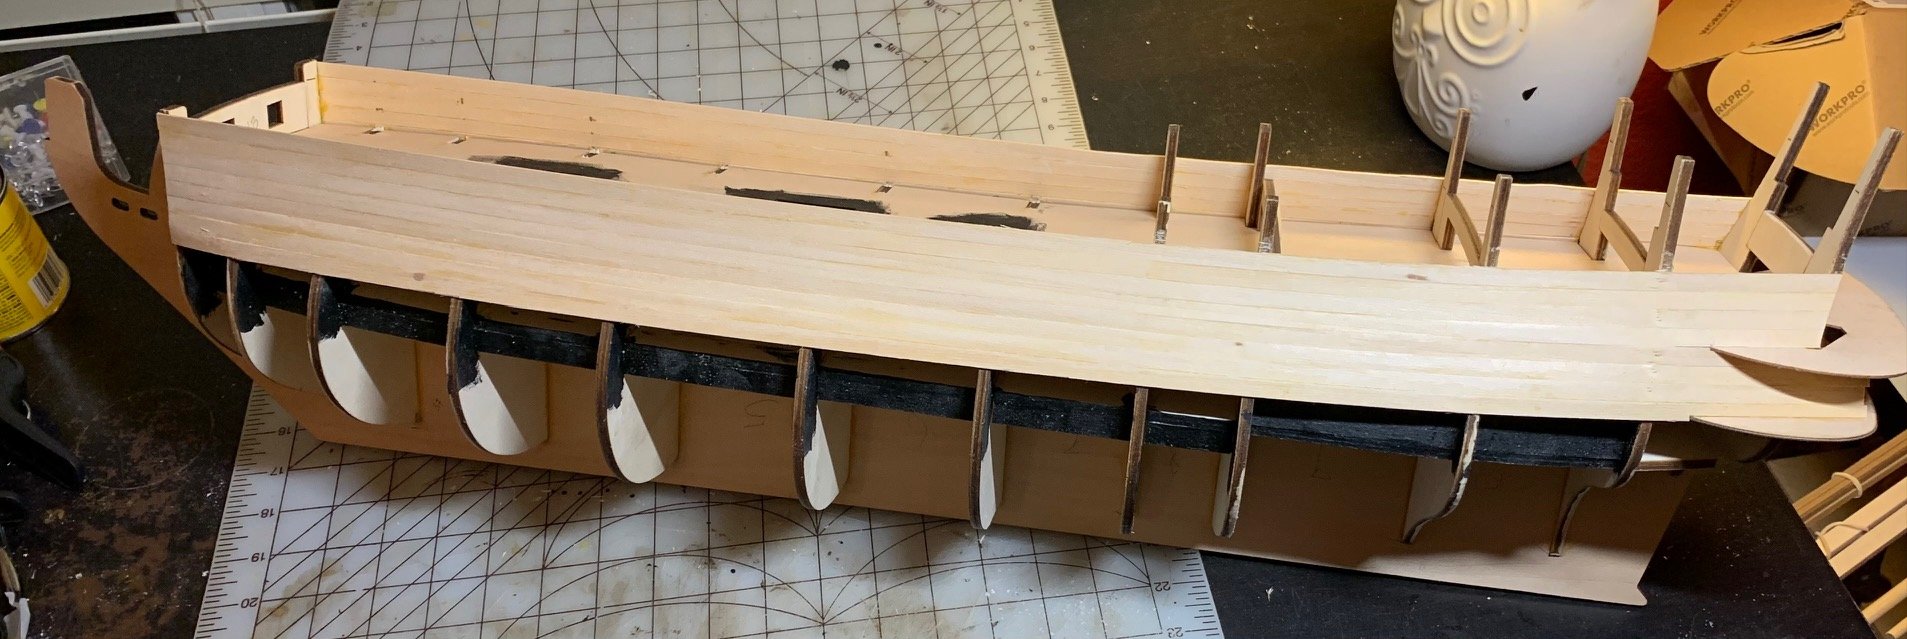
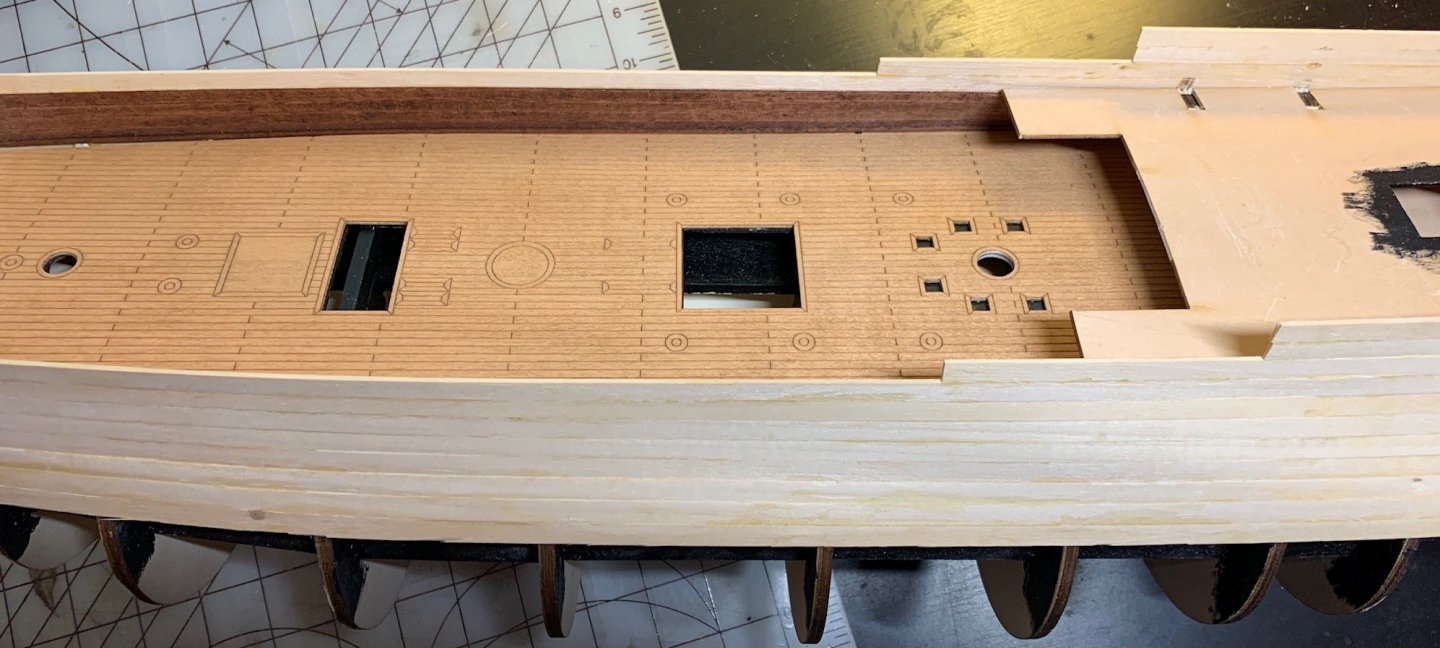
Gluing first deck with issues: I needed to glue the first two decks in place in order to plank the upper sections of the hull. I test fitted and removed some from the sides of the main deck so it would line up exactly with the holes for the hatches and masts and finally had a good fit and it lay down on the false deck evenly and smoothly. I didn't see an easy way to clamp so I though I would be able to just hold it in place long enough for the glue to start to set and leave it to set, so I put a healthy coat of wood glue on the false deck and around the edges of the main deck underside and put it in place. I held it in place for about five minutes and as I moved my hands back the deck immediately popped up on both sides. I held it down again, this time longer but the edges still popped up as soon as I removed the pressure. At this point I'm thinking do I need to remove it and start over but parts of it, mostly in the center had a really good grip and wouldn't have come out easily. I tried weighting the deck down to hold it in place but since i hadn't planned on this didn't have a solid base that would keep the hull from tipping over when weights were applied. Finally I hit on the idea to use the deck supports and just wedge them in between the sides of the hull to keep them in place. The aftmost part was easy as there's a support that goes on top of the deck there and I had already dry fitted it so I used that there and just used a couple of the others that weren't installed to push the deck edges down while the glue set. I almost think that the moisture from the glue caused the deck to curl because it sat flat with no problems dry, the edges only tried to rise when I added glue to the mix. I'm including a picture of how I used the deck supports to hold down the deck and I'll be prepared for this issue with any subsequent decks that I glue down. When I removed the supports this morning everything had gotten glued down and in place. I was a little worried that the glue might have dried out too much while I was messing with it but everything seems to be good and tight.

-
Starting first hull planking and lessons learned: I've been continuing planking the hull working up and down from the first plank. These planks have been pretty easy so far there's not a lot of curves to them and I've been focusing on making sure that the sides are glued well in addition to at the bulkheads. One thing I learned on my Revenge is that if the first planking has places where the sides aren't glued well they will bounce and it becomes very hard to sand things out evenly so I'm double checking each plank edge as it's finished and if it's not glued to the plank next to it I'm putting some glue using a q-tip on the back side. This seems to have gotten everything tight so far. I'm going to try and make the first planking as good as possible it does seem to be harder than I anticipated to cover up imperfections with the second planking. Had my first real issue with the instructions. Bulkhead 1B is clearly shown glued in place in the instructions but if you do that, and I did, then the true deck will not fit in later since it has a section that goes under 1B. As soon as I realized this I remembered reading about it in one of the logs I searched but I still made the mistake. I looked at what it would take to remove the bulkhead and decided I didn't want to do that, I glued it in very well. The alternative was just to cut off the tab that would have gone under 1B and that's what I did and now the real deck fits. The only thing I can see that it might affect is the height of the top of 1B and I'll just keep an eye on that when I lay the deck on top of it and if it's too low then I can either use the piece I cut off the deck or just add some shim to level the next deck. I don't think there's any real damage here, it's all hidden in the end. In my test fitting of the main deck I noticed that I may not be able to line up the holes with the false deck exactly, it's less than a millimeter off, but I went ahead and painted those areas around the hatches black just in case they show a bit and can't be trimmed to fit exactly. Will continue with planking and fitting the decks, it looks like the two decks will need to be installed before the planking up the sides can be completed.

-
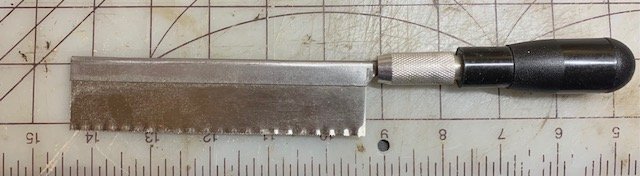
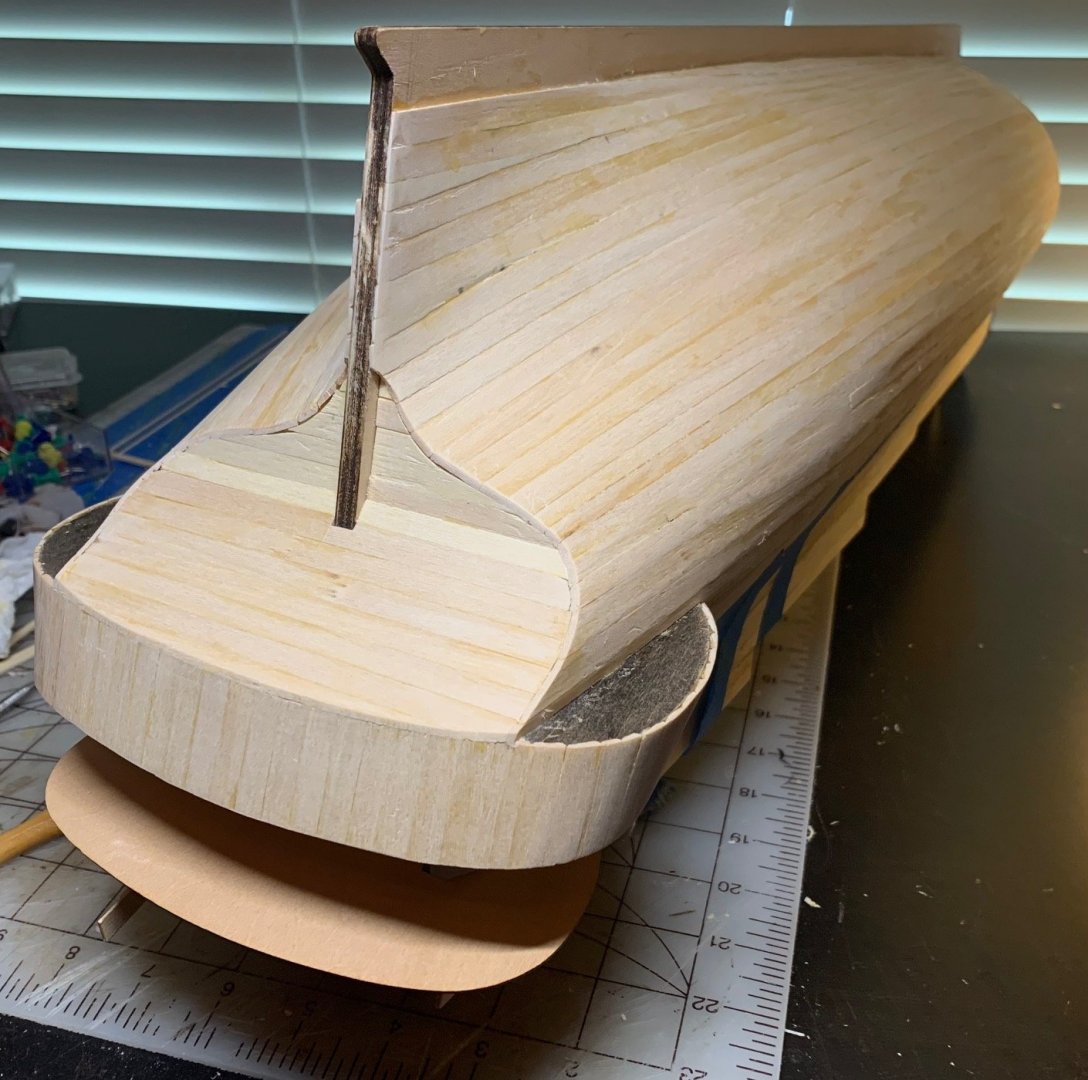
First Hull Plank: The first hull plank seems like it's pretty important on this model, as I'm sure it is on most. The instructions and plans differ a little on where to start and I picked a slightly different plank than either of them. I chose the topmost plank that is glued to all the bulkheads, if I'm reading everything correctly the planks above will have the bulkheads 2-7 behind them broken off later and are only there to help shape the planks so gluing the planks to them would be a problem when it comes time to break those parts of the bulkheads off. With this plank solidly glued to all the bulkheads I'm hoping it gives me a solid foundation to glue the higher plans where half of the length will only be edge glued. This plank also establishes the shape of the stern deck immediately above it since it's only supported in the middle section so this plank provides the outer support for the deck and by raising or lowering the support edge you change the shape of the deck. Since the center foundation for this deck has a very slight curve I tried to set this plank where it would continue the very slight curve. Then I had to replicate that position on the other side but by visual checking and measuring the distance of the deck surface to the top of the bulkhead I believe I have a very nearly symmetrical deck with a pleasing shape. I did cut out the top of the plank the width of the deck plank where the deck sits on it since it seems that this is what the plans and instruction have with the plank immediately above straight across the deck. One note here, before I bought a Japanese saw to cut the cannon supports I always trimmed excess planks and the like using a knife but tried it using the new saw and it was so much easier. I think I will be using this saw a lot more than I thought initially, it seems to be a relatively cheap investment that will make things a lot easier. Good tools are such a boon. Here's the discussion on the hand saw from the tools forum, big thanks to the helpful folks there. https://modelshipworld.com/topic/28294-hand-saw-recommendations/
-
I painted the dummy cannon holders black as well as a couple of the areas under the hatches in the main deck. I painted the bulkheads a little to the side of where the cannon holders were painted just to be sure that I didn't get any visible areas that were unpainted.

-
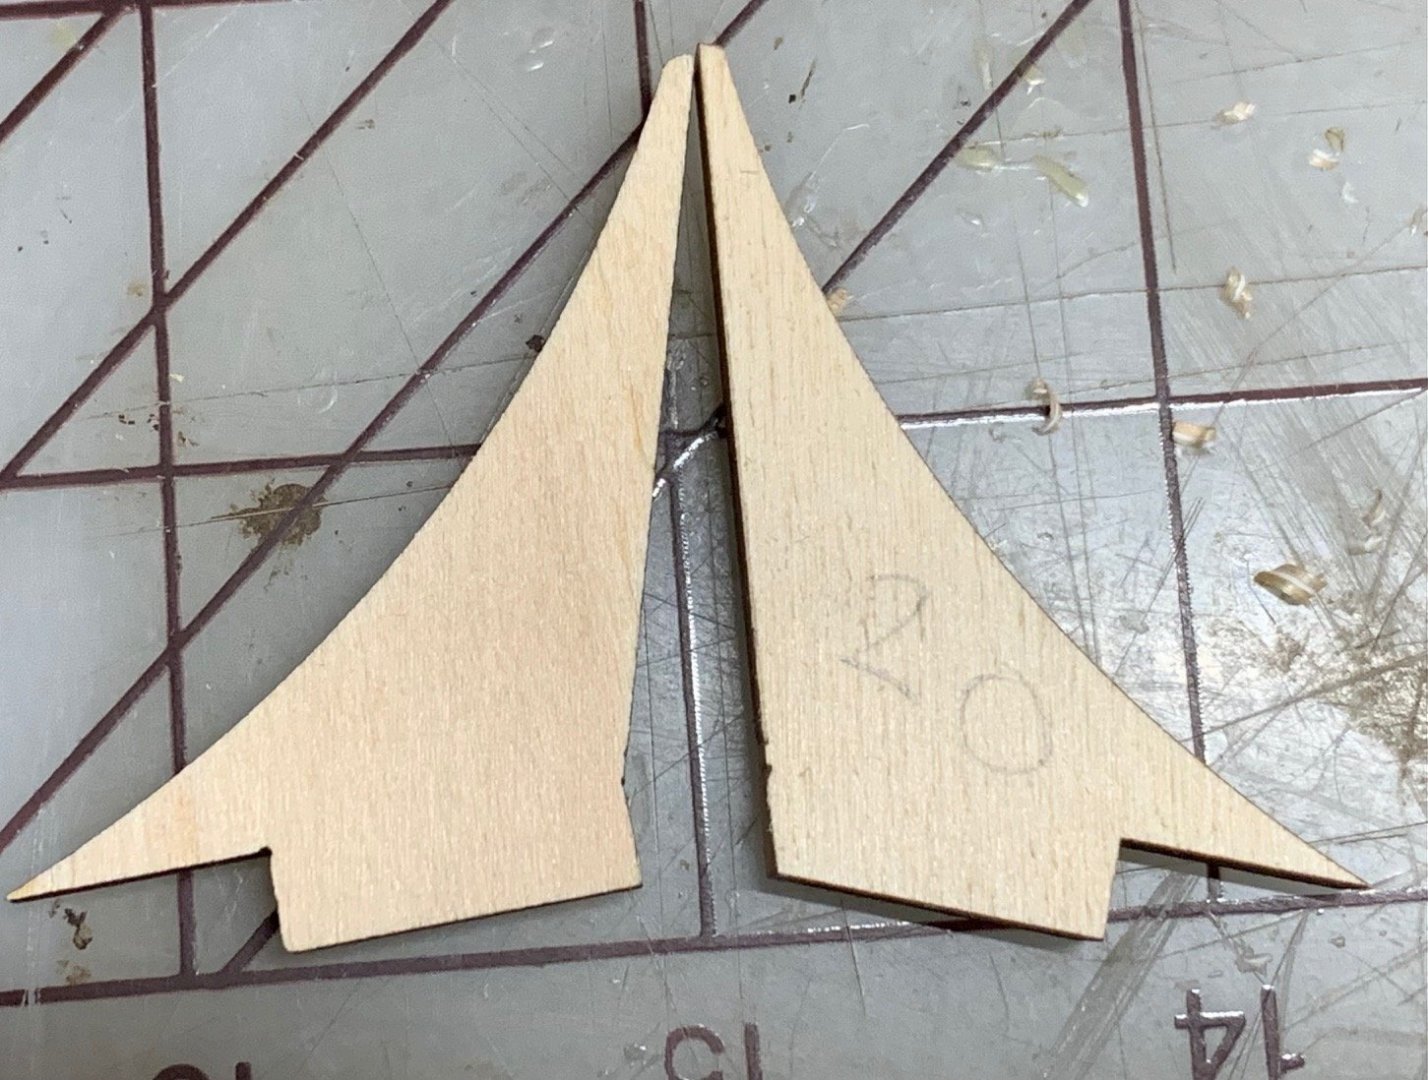
Resolved the bulkhead height issue by checking the height of the main deck support against the other supports and adjusting them to where the supports were in a line with no sudden dips. This didn't change the adjustment of the bulkheads much, only changing about .5mm on bulkhead 3 from about 3mm up to about 2.5mm up. Now when I lay a straightedge across the supports they're all in a line or a gentle curve. The deck supports seemed to be the best indicator or where things should end up. Continuing on with the cannon supports, ran into an issue that was mentioned in one of the logs I read where one set of the supports sticks up above where the main deck should sit, very obvious from a test fitting of the deck and looking at the break lines on the bulkheads that indicate deck position. Easily solved by taking a knife and removing the excess material. Even though the instructions don't mention this it's easily found. One place that the instructions might have led me astray without forewarning from other logs was the lower outer stern deck and supports. The instructions have you glue pieces 20x2 and 21x2 onto the stern to support the lower stern deck but if you didn't bias the supports all the way down and leave a place for the deck to slide between them and the last bulkhead you'd be forced to take them out and redo it. Luckily I didn't glue anything until I test fit the deck and supports together and the problem was obvious. It seems a good idea to me not to glue anything in place until you need to and have test fitted everything that touches it and I'm trying to remember to do this and not get ahead of myself. In addition to this location of the supports issue they also have an angle where the support the deck and the deck doesn't flex there so I'm not sure how they would go in with this angle still there so I had to remove a small bit of wood to get everything to fit together. I've included a picture of two of the supports, one original and one modified showing the area that I removed to achieve a good fit. I hope this is good, I really don't see any way for it to have worked with the extra wood on there. Other than that I'll paint the cannon supports black next and also a couple areas under openings in the main deck even though I don't think they'll be seen.

-
Hand Saw Recommendations
Jonathan_219 replied to Jonathan_219's topic in Modeling tools and Workshop Equipment
I had my eye on the Japanese two sided saw that CPDDET said he uses so I went ahead and ordered one. One day later I have it and have been able to do some cutting with it and the difference is huge. It seems like it cuts at least ten times faster than the hobby razor saw I was using. Took a little patience to learn to use it but the results are impressive. I hadn't needed a saw much before this but I recommend this to anyone who needs something to cut wood cleanly and quickly. Thanks for all the great information everyone. I had no idea of the world of hand tools that is out there. A rabbit hole I'll have to be careful not to get too deep into as working with hand tools is one of my favorite parts of the building process. -
I have a lot of 10x10mm wood to cut and I tried cutting it with the saw pictured below but it took a long time to make it through the first cut, IMHO it's not worth a darn. I got it with a basic tool kit and I believe it's a razor saw of unknown quality. I know it's hard to say without having used it but is this specific model just poor or is a razor saw (or whatever this is) just not what I want? The instructions say the 10x10 wood is balsa but it's the toughest balsa I've ever seen. If a quality razor saw is significantly better than what I'm using that might work or possibly a different type of saw, I'm looking for ideas. Every review says the saw cuts great so real word experience is needed. Have anyone tried the Japanese hand saws, they look like they would fit the bill but never having used one I'm hesitant to spend the money without knowing if they're really better. I need a hand saw, with my workspace situation power tools just won't work. Any ideas or recommendations to cut through this wood would be greatly appreciated, I probably have around 100 cuts to make. I don't need a super clean cut as these pieces will be hidden once the model is finished, but I'm working in a fairly small space so smaller would be better.