


Balclutha75
-
Posts
168 -
Joined
-
Last visited
About Balclutha75

-
 mtaylor reacted to a post in a topic:
Bending small (approx 5x15 mm) plywood pieces?
mtaylor reacted to a post in a topic:
Bending small (approx 5x15 mm) plywood pieces?
-
mtaylor reacted to a post in a topic:
Bending small (approx 5x15 mm) plywood pieces?
-
Knocklouder reacted to a post in a topic:
Bending small (approx 5x15 mm) plywood pieces?
-
barkeater reacted to a post in a topic:
Bending small (approx 5x15 mm) plywood pieces?
-
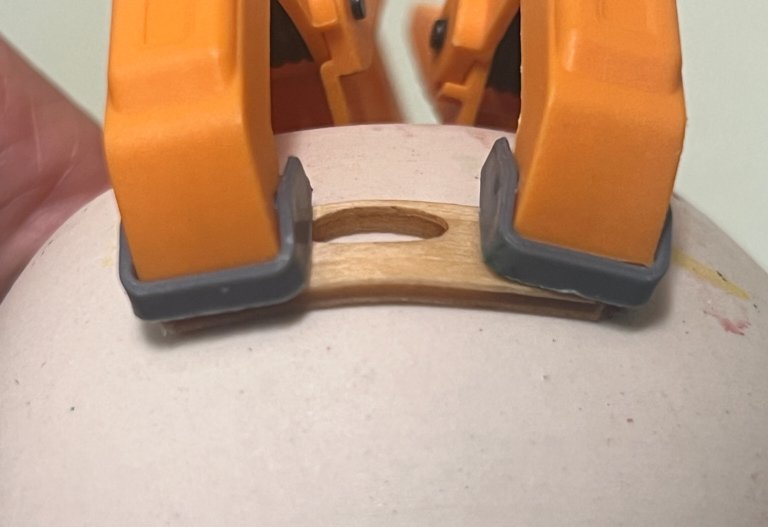
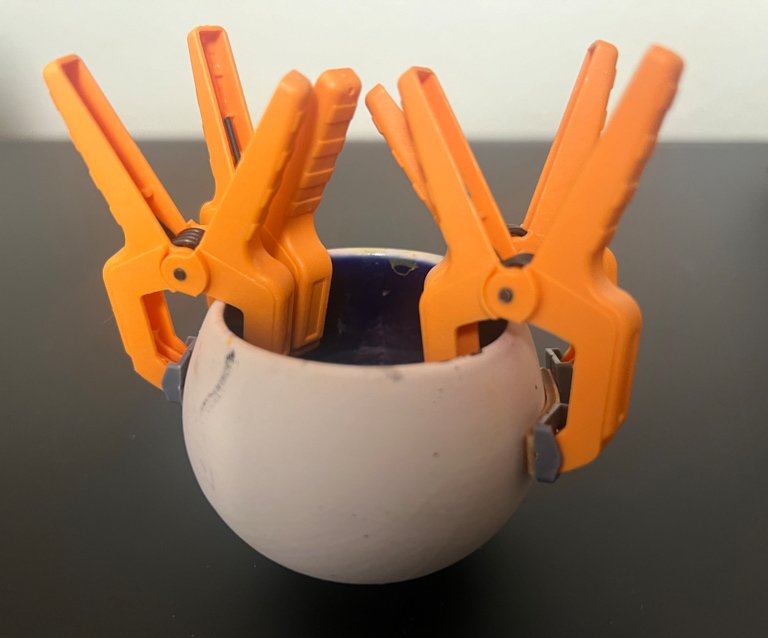
 Well, it's not perfect but it looks like this will work. It certainly worked better than some of the other ideas I had before settling on this one. I guess if I had the proper tools and skill set, neither of which I possess, I could come up with a jig that has the precise curve. But this will do nicely. Onward!
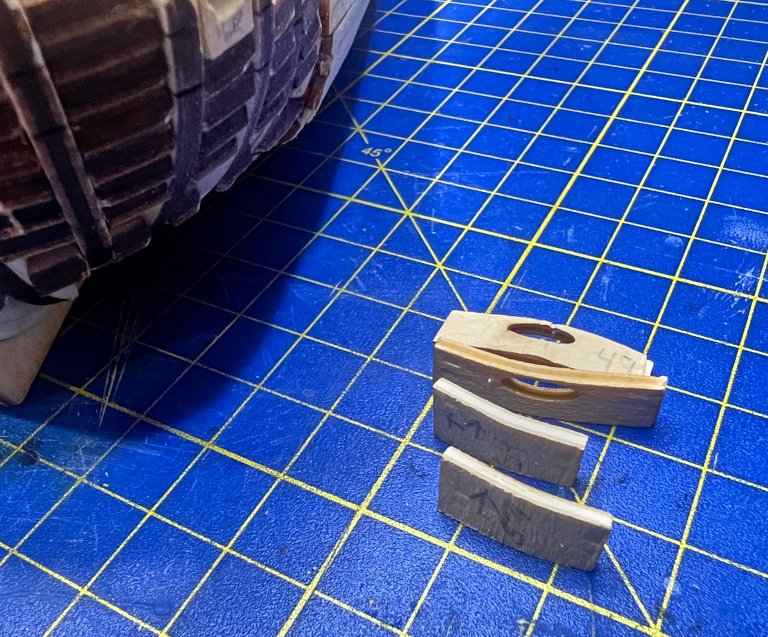
- 1 reply
-
- 3
-
-
Knocklouder reacted to a post in a topic:
Bending small (approx 5x15 mm) plywood pieces?
-
thibaultron reacted to a post in a topic:
Bending small (approx 5x15 mm) plywood pieces?
-
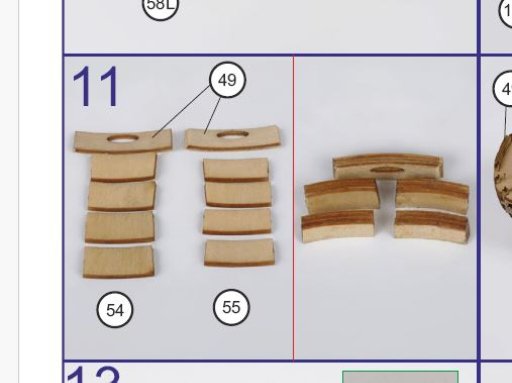
I'm working on the Master Korabel St. Gabriel and need to put a small bend in some plywood pieces. The instructions are ambiguous to me, saying, "Control the degree of bending by applying the inserts to the places of their installation". But there is nothing to clamp them to while the wood dries. Here is the photo instruction, showing the pieces already bent. This is what I came up with, after soaking the pieces in nearly boiling water for a few minutes. I used a ceramic tequila shot glass, a gift from a local liquor store. The shape of the curve is close if not precise. The wood is still wet so I don't have results yet, but wondering if you experts have better ideas? Thanks.
- 1 reply
-
- 3
-
-
Balclutha75 reacted to a post in a topic:
Viking Drakkar by Balclutha75 - FINISHED - Amati - 1:50 - TAKE II, First Ever Model
-
Snug Harbor Johnny reacted to a post in a topic:
Viking Drakkar by Balclutha75 - FINISHED - Amati - 1:50 - TAKE II, First Ever Model
-
Cathead reacted to a post in a topic:
Viking Drakkar by Balclutha75 - FINISHED - Amati - 1:50 - TAKE II, First Ever Model
-
Balclutha75 reacted to a post in a topic:
Viking Drakkar by Balclutha75 - FINISHED - Amati - 1:50 - TAKE II, First Ever Model
-
Balclutha75 reacted to a post in a topic:
Viking Drakkar by Balclutha75 - FINISHED - Amati - 1:50 - TAKE II, First Ever Model
-
Knocklouder reacted to a post in a topic:
Viking Drakkar by Balclutha75 - FINISHED - Amati - 1:50 - TAKE II, First Ever Model
-
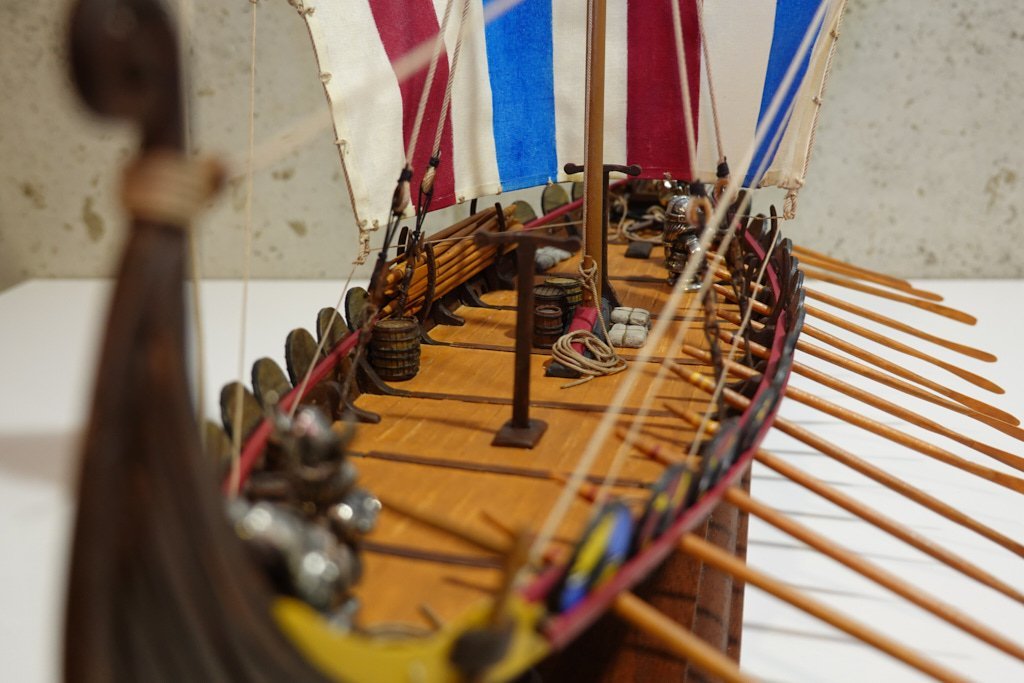
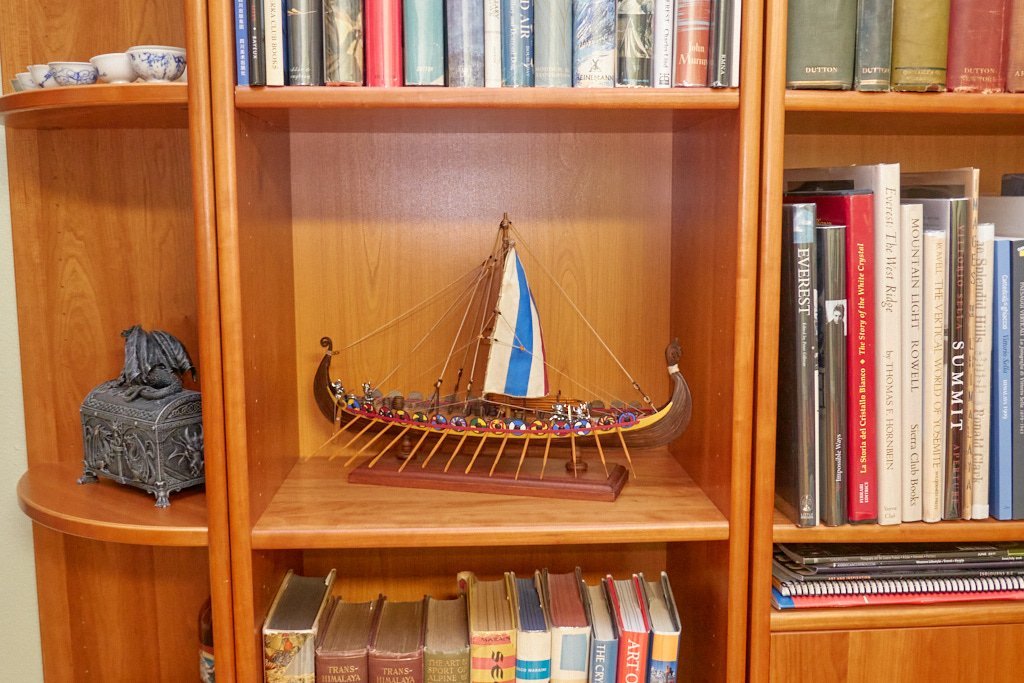
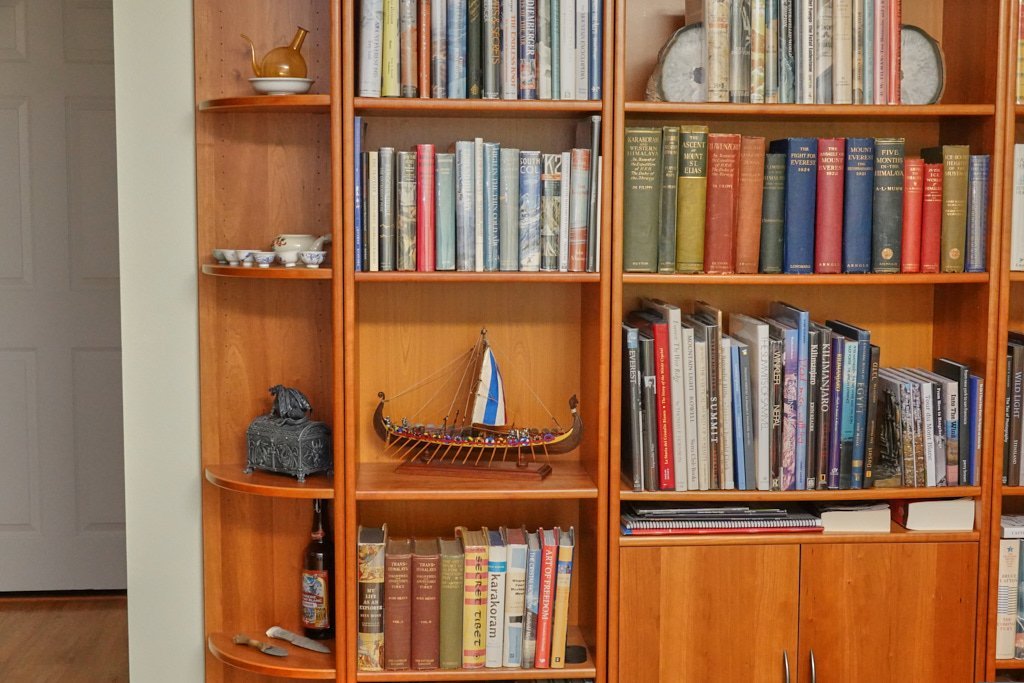
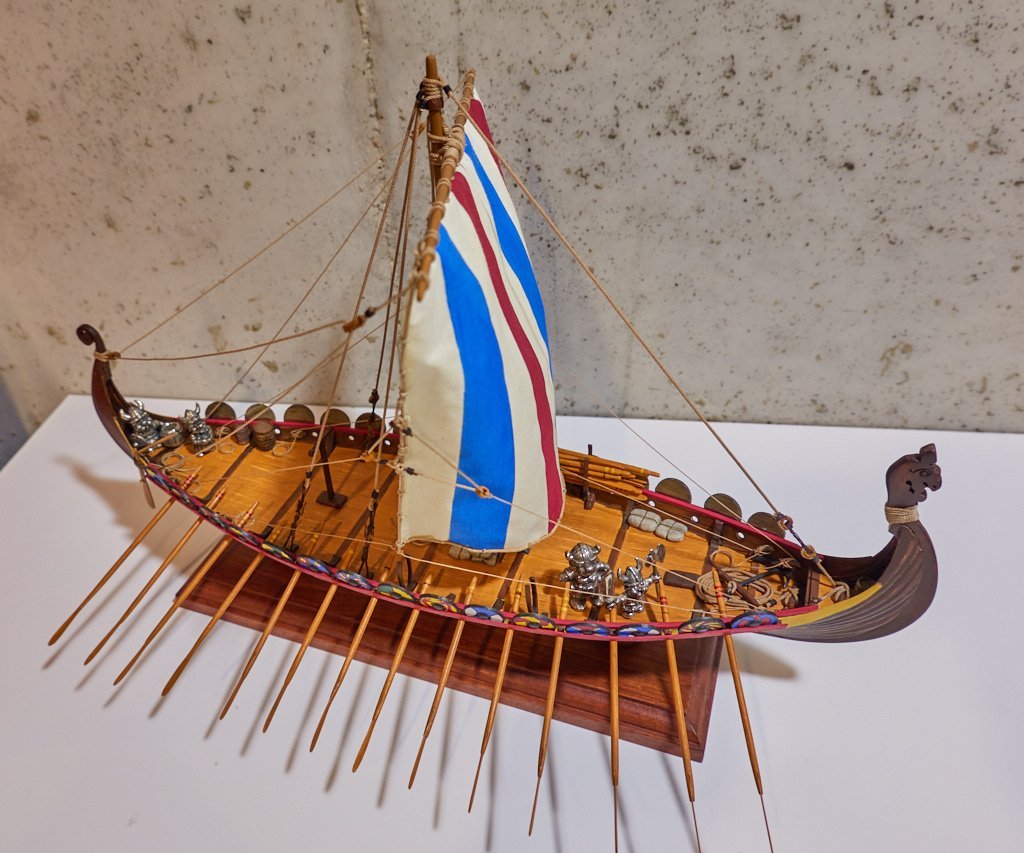
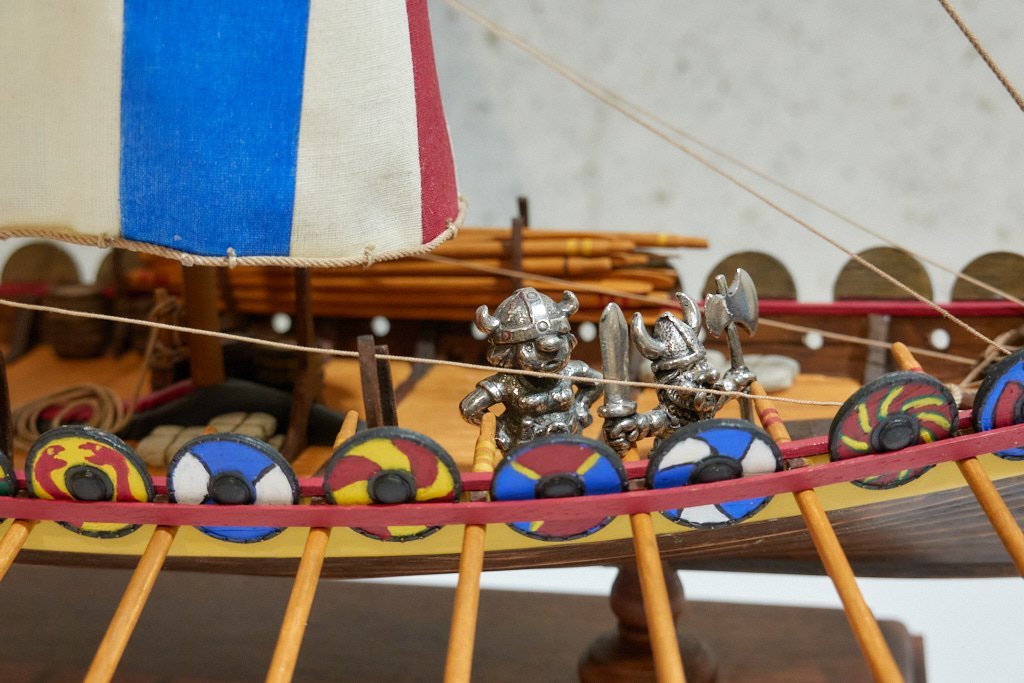
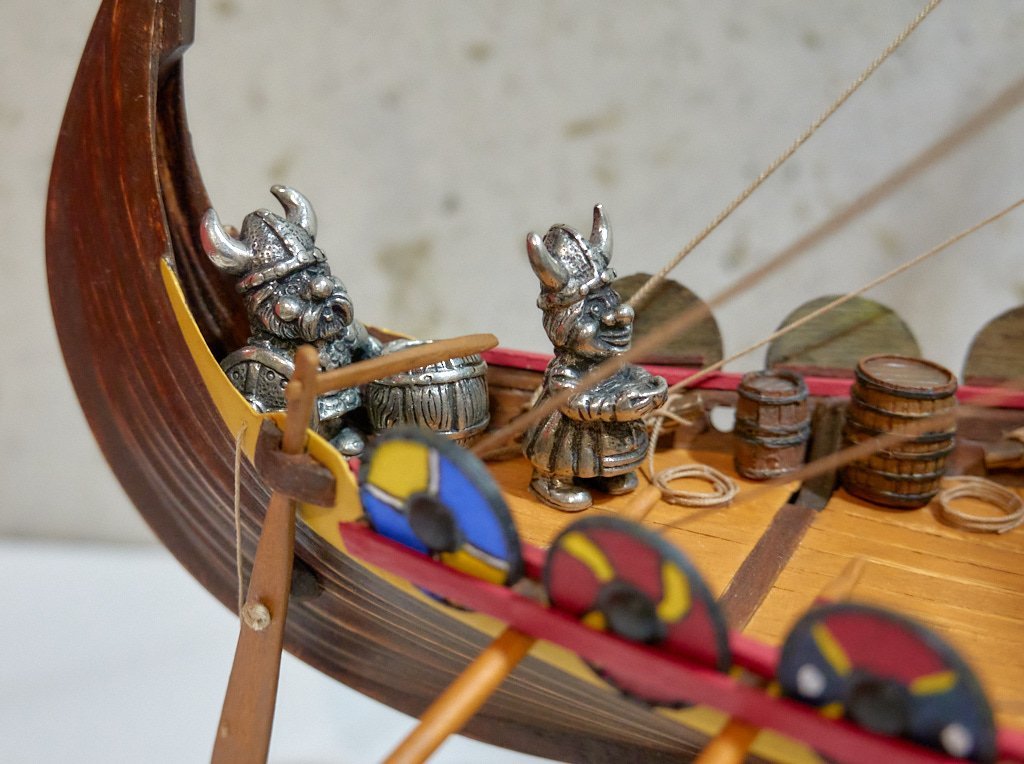
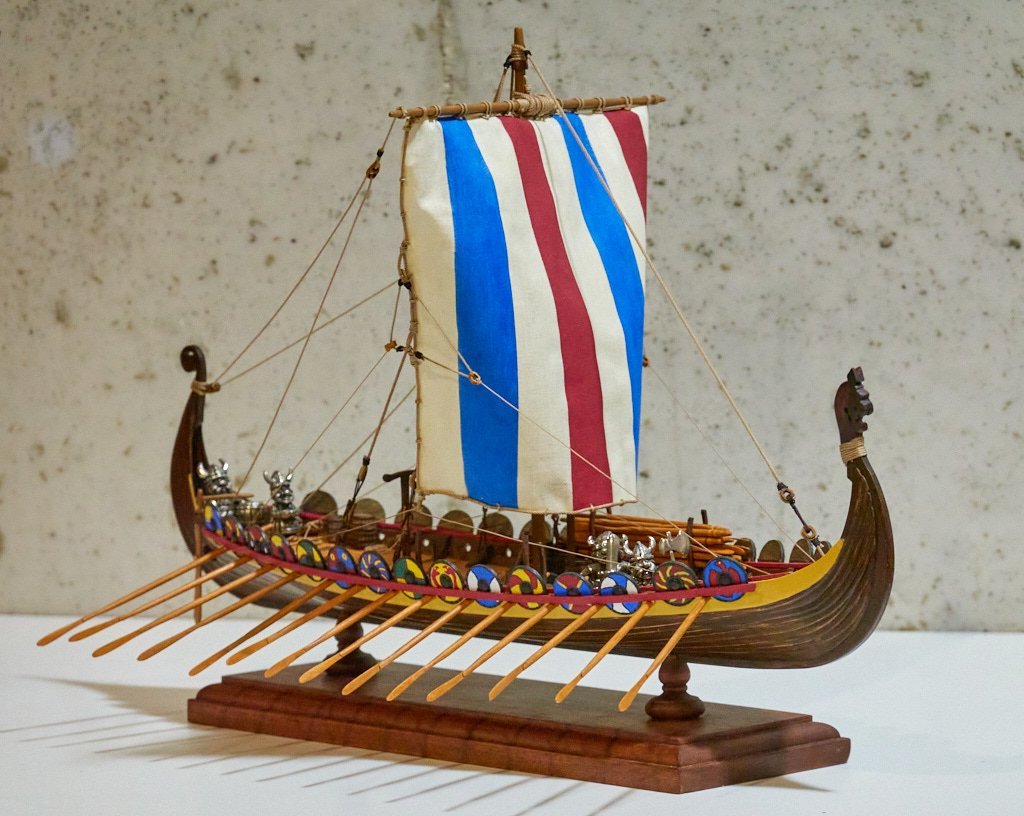
Greetings! After putting this aside for some time, I finally returned to it last week, did a small amount of work, and have deemed it FINISHED! I had optimistic thoughts of adding a bunch of benches, deck furniture and other items, but soon realized that since I had already rigged the sail, the odds of breaking something while working with tweezers through the rigging was very high. In fact it became 100% when I broke one of the oar racks and a trestle. I decided that continuing down this road was a a bad idea, and there is another kit in the queue that it's time to start on. Some time ago I had purchased a few resin barrels and bales from Artitec. This item is no longer offered by them, and I don't have a picture of it. But I painted the pieces in an attempt to make them look weathered, scattered a few on deck, added the crew members (a gift from my wife) and the ship has set sail! The crew has been patiently waiting for this day and are excited to see some action. Lindisfarne or bust. Captain Aegir at the helm. This is where the ship is displayed at home on my bookshelf. This explains why I only put the oars out on one side as it just fits nicely on the shelf, part of the original plan, going back to why this particular size kit was purchased. I'm pleased with how it looks. I'd like to thank all the folks here on MSW who have encouraged and inspired me along the way. It's been a real pleasure. I plan to be spending more time here this year and will start a new kit - Master Korabel St. Gabriel - in the next few months. Thank you!
-
 Balclutha75 reacted to a post in a topic:
NINA by Knocklouder - FINISHED- Amati - 1:65
Balclutha75 reacted to a post in a topic:
NINA by Knocklouder - FINISHED- Amati - 1:65
-
Balclutha75 reacted to a post in a topic:
NINA by Knocklouder - FINISHED- Amati - 1:65
-
 Balclutha75 reacted to a post in a topic:
NINA by Knocklouder - FINISHED- Amati - 1:65
Balclutha75 reacted to a post in a topic:
NINA by Knocklouder - FINISHED- Amati - 1:65
-
Balclutha75 reacted to a post in a topic:
NINA by Knocklouder - FINISHED- Amati - 1:65
-
Balclutha75 reacted to a post in a topic:
Peerless 1893 by Cathead - 1:87 - sternwheel Missouri River steamboat
-
Balclutha75 reacted to a post in a topic:
Peerless 1893 by Cathead - 1:87 - sternwheel Missouri River steamboat
-
Balclutha75 reacted to a post in a topic:
Peerless 1893 by Cathead - 1:87 - sternwheel Missouri River steamboat
-
Pin Vise vs. Hand Vise?
Balclutha75 replied to Balclutha75's topic in Modeling tools and Workshop Equipment
Thanks for all this detailed information, really appreciated! Overnight in thinking about how I was using this, I realized I was often going back and forth between 2 or 3 different sized bits and having to constantly change. Therefore, the set if four vises actually makes good sense. So for the price, I'll probably just order both of the items Ryland linked in post #2. This is still around 6x cheaper than the Starrett 4-piece set, which I'm sure is fabulous, but I don't think my skill level and usage warrants it. Thanks again. -
Thanks Steven. Yes it is addictive, kind of fun to see things take shape. I remember your fantastic crewmen. Getting decent wood as you guys suggested above made a huge difference. Also, I might have crossed a right of passage and sliced my thumb once when the blade slipped. Fortunately it was minor and healed in a couple of days. Lesson learned we hope.
-
Pin Vise vs. Hand Vise?
Balclutha75 replied to Balclutha75's topic in Modeling tools and Workshop Equipment
True enough. I looked at the four set and decided I didn't need it at this stage. I'm going to order the one Ryland posted, I think that will be ideal. Thanks. -
Pin Vise vs. Hand Vise?
Balclutha75 replied to Balclutha75's topic in Modeling tools and Workshop Equipment
Thanks Ryland. The first one you linked looks perfect, somehow I had missed it on their site. -
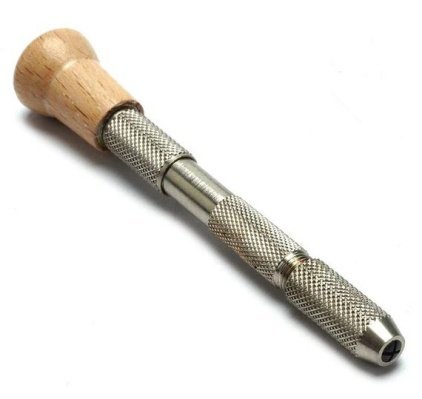
Greetings experts, I have one of these basic pin vises, that I have been using on a first little carving project: It has two issues: 1) I can't always tighten it completely, so the bit slides. (I don't necessarily fault the tool, my hands are getting extremely weak with age. I have trouble flipping open a beer can, for example. 😝) 2) It only accepts shafts up to 2.5mm, so it does not accommodate a 3.1 mm dremel bit. Looking on the Otto Frei website, it split vises into "Pin" and "Hand" categories. For example: https://www.ottofrei.com/products/square-chuck-pin-vise-with-2-collets vs. https://www.ottofrei.com/products/whaley-hand-vise I see the hole going through the latter, which I don't necessarily see a need for at this point, but opinions on which I should perhaps order are welcome. Or something else? Planning to get some Vallorbe files, so I could add one to the order. Thanks!
-
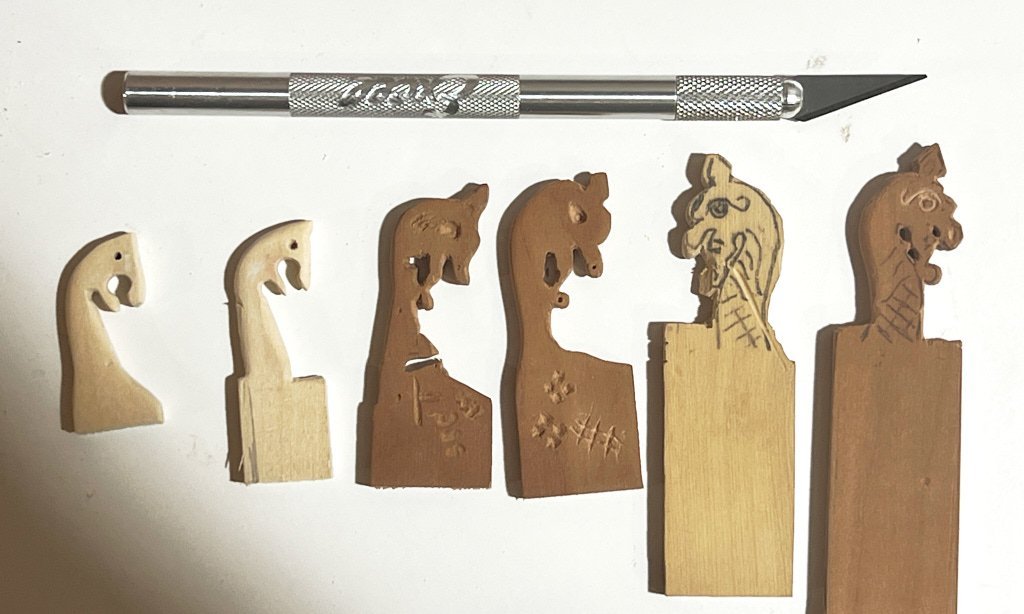
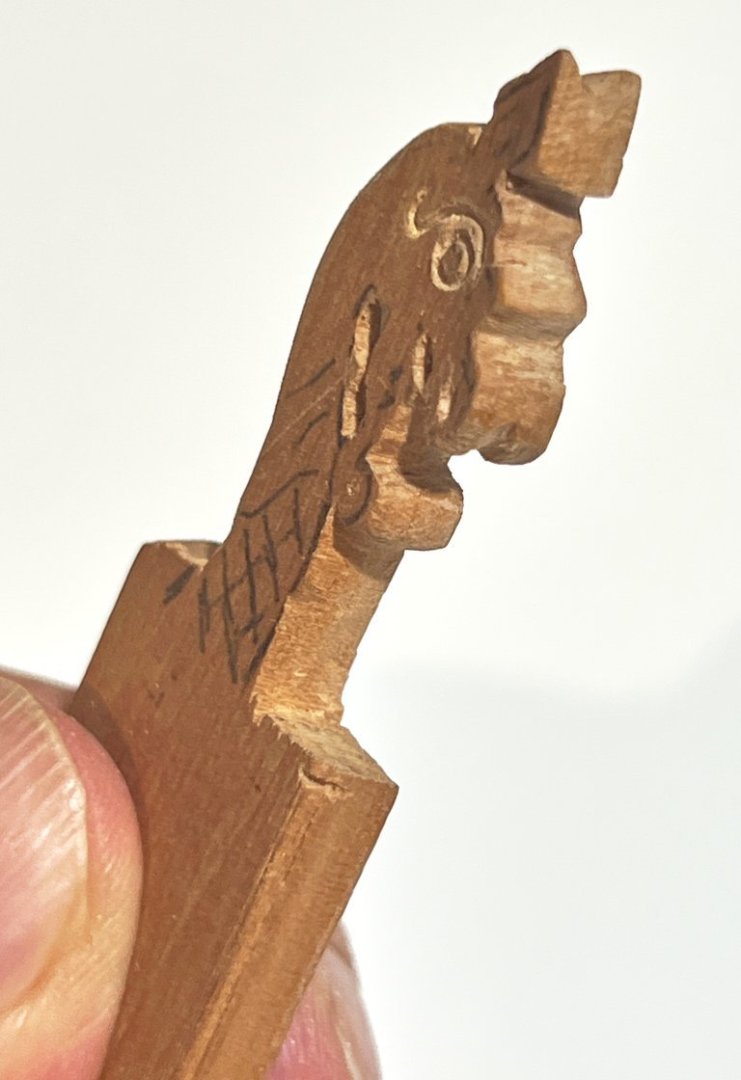
Evolution of a dragon head. These were all done with the pictures #11 blade, some files and drills in a pin vise. Note the oops on the second from right. From L to R: Basswood, basswood, pear, pear, boxwood, pear. The two in the middle have been turned into practice pieces. I'm kind of thinking the one on the far right in is a keeper. I might do a bit more carving, and of course some sanding, but getting satisfied with where I'm at. I'll need to figure out a stain or finish and also decide what to do, if anything, about the scales. Might just leave them penciled in? Also, will probably put a dab of red paint on the eye. Progress!
-
I’ll silently follow along if you don’t mind. We were in Missouri last month and spent 3 days in Rocheport, 4 in St. Charles, a week in St. Louis and a too short visit to Hermann. While there it’s easy to get an interest in steamboats, something I know nothing about. I read a Sultana book during the trip. Your build will be interesting!
-
Hah, yes I can imagine that. I have a new pack of #11 blades and will give that a go, on scrap pieces as you suggest. Thanks!
-
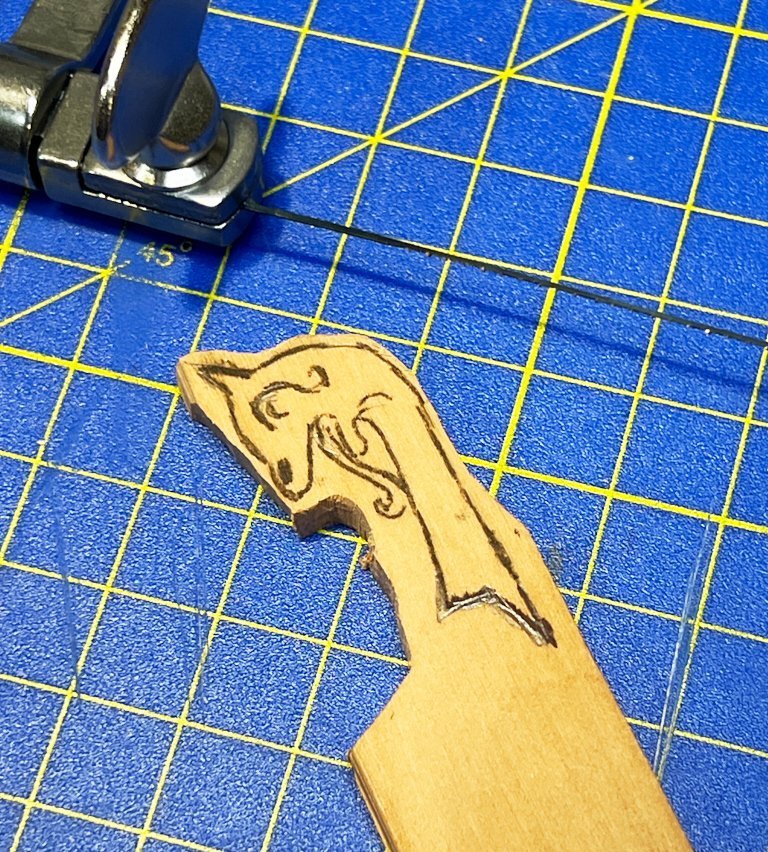
Thanks very much! Here is where it is so far, in between working on a big patio project. I drew a pattern on to a piece of the pear, and have hacked away at it with a jewelers saw. Next I wonder if I should go at it with a dremel, which I already have, or spring for a decent carving tool like a Flexcut 1.5 mm blade? Maybe both?! Thanks again.
-
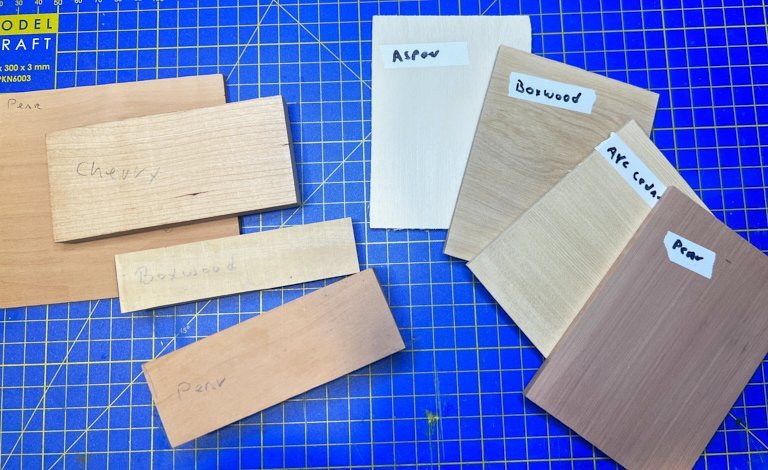
Following the appreciated above advice from Chuck and Steven, I contacted Joe at Modeler's Sawmill and ordered one each 4 x 4 x 3/16" pieces of pear, boxwood, Alaskan yellow cedar and aspen. He sent those promptly and at an extremely reasonable cost. He also threw in a few freebee blocks. Wow! Great recommendation. Very exciting to have some real wood in hand. Now the ball is back in my court.
-
Truly beautiful model, and such an exciting race to the finish line! Thanks for sharing. Enjoy your road trip.
- 56 replies
-
- 3
-
-
- Sea of Galilee Boat
- SE Miller
- (and 1 more)
-
He is their mythological inspiration. But the guy on the left is their Captain Aegir, who is "associated with brewing ale" in old Norse records, according to Wikipedia. Thanks Chuck and Steven for your guidance on the wood. I will take it to heart and look at MSW sponsors and see what I can come up with, and now plan to place a small order. I see at least a couple there. I'll dive into that tomorrow. And for the tip about scarphing. I would have omitted that, but now will do. I've seen pictures of that astounding Academician head in reading about the Oseberg ship. It is a thing of complex beauty. In looking online, and here at MSW build logs, I read about Viking styles, such as Ringerike and Jelling. To be honest it was hard for me to pin down differences. I chose the head I did because the shape resonated, and I thought there is a remote possibility that I could carve it. Thanks again.
