


ScottRC
-
Posts
548 -
Joined
-
Last visited
Reputation Activity
-

 ScottRC reacted to VitusBering in Cutty Sark by VitusBering - Revell - 1:96 - PLASTIC - Redux
I have been MIA for a couple of months due to a health crisis. I am back in the wheelhouse part time and feeling pretty good.
Before the unfortunate events I made some progress but not enough to post pics quite yet so you all will have to take my word that I've got most of the foremast yards rigged up with Flemish horses, footropes, jackstays, pulleys, and blocks. All but the top two spars are done and ready to hang but they will have to wait until all of the mast's yards are ready.
The other two mast's yards don't have jackstays yet and are not yet painted. I have a lot of work to do before I can post pics but now that I am ambulatory again I think I can make tangible progress in a relatively short time.
-
ScottRC reacted to Marter1229 in Cutty Sark by Marter1229 - FINISHED - Constructo - old kit revived
I think this is as good as i can get it. Really learned a lot of what should and should not have been done first.
It is a pretty good "stand-off scale"
Also i ran out of 3mm and 6mm blocks.
-
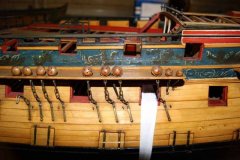 ScottRC got a reaction from prutser in CUTTY SARK by Hostez - Sergal - 1:78
Very nice job with the planking.
-
 ScottRC got a reaction from Hostez in CUTTY SARK by Hostez - Sergal - 1:78
Very nice job with the planking.
-
 ScottRC got a reaction from gak1965 in Flying Fish by gak1965 - FINISHED - Model Shipways - 1:96
Thanks George for putting out such a great build log. I am just starting rigging a clipper and your photos and details help a lot. Especially with motivation.
Great job!
-
ScottRC reacted to Bruma in Cutty Sark by Bruma - Revell - 1:96 - PLASTIC
Hello! Here I am again with some updates:
Mizzen mast has been stepped up, crojack and mizzen lower topsail in place.
Stepping the mizzen is the same business as the main and fore mast. The only thing I changed is that the mizzen is not glued, but held in place just by the shrouds. No real reasons for this; I just wanted to try something slightly different. In the end, the glue is not needed, and I’m happy with this choice.
Shrouds in place, ratlines, fairleads, all as usual.
Here is a close up of the fairleads:
Since these are the last ratlines on my Cutty Sark, I took the opportunity to make a small video of the process.
No audio, slow and not so steady hands due to the uncomfortable position, with the smartphone in the middle, but just to share a long and repetitive process that I ended up liking.
If you struggle to get a sleep, here it is:
Once the mast was stepped, I installed and rigged the crojack and the lower topsail.
Once again, the process is similar to the other sails and other masts. Sails are prepared before installation, and rigged as much as possible before being installed on the mast.
Here are some images:
A small mention for the stays: It would have been better to pre-install them starting from the main mast. I thought I was smart pre-installing them on the mizzen mast before stepping it, but it is better to do the opposite in my opinion. I ended up removing them from the mizzen and starting all over again to be fitted on the main mast. Here is a close-up of the topmast and topgallant stay on the aft of the main mast:
As you can see it’s quite crowded, not an ideal place to work with knots and tweezers.
And, at last, the Cutty as she is now:
Thank you all for passing by!
-
ScottRC reacted to petervisser in Cutty Sark by petervisser - Billing Boats - Scale 1:75
Hi All,
Well, with the fall weather and rain arriving (yay...) it's high time to get back to model building! It's been March since I last posted any progress and to be honest, not much has happened. But with more free time and crappy weather I am really looking forward to getting all the standing rigging set up. I am using a combination of Nepean's book and Underhill's excellent text regarding the rigging of ocean clippers as well as Campbell's plans. Together they have helped immensely. I had started with the lower mast stays and lower shrouds on each mast as they held the masts to the desired rakes. A short blurb in Nepean's book which I thought makes sense is to set up the shrouds and backstays first before tying off the stays. This is due to the fact that the former are set at smaller angles relative to the mast and therefore have less tendency to pull the mast out of the desired plumb. So I shifted gears and have therefore continued with the mizzen standing rigging (shrouds, backstays and stays) for the lower mast first, then the topmast (shrouds, backstay, stay), and will continue that process for the main mast and foremast. Of course creating a "cage" of standing rigging will make the running rigging more interesting and challenging.
Here are a few pic's of the progress...
-
ScottRC reacted to petervisser in Cutty Sark by petervisser - Billing Boats - Scale 1:75
Hi Guys,
I just got some new eyes! After a recent dental appointment, I was intrigued by the eye glasses my dentist was using. I asked about them and was told that professional dental loupes are in the range of $3K-5K. But she told me that they are also available on line for much less than that. So after a brief amount of searching I found these on Amazon. Where else...
These are the BoNew 3.5X binoculsar loupes with a 5W headlamp. I was doing some intricate rigging using my usual magnifiers when I thought maybe the loupes would be more suitable. Were they ever! The work was made much easier with them as the headlamp really comes into its own. So if you have $100 CAD kicking around I would definately consider them. They do have a finite range of vision, but I find it an optimal distance. Here's some pic's...
-
ScottRC reacted to gak1965 in Flying Fish by gak1965 - FINISHED - Model Shipways - 1:96
Well, I still need to buy some transfer letters to make the name, but I've removed the Saran wrap covering the base and I'm calling this one FINISHED. 2 years, 355 days after starting. I don't have a lot of great photos (I'll take them during the day and in a better setting), but I've got a couple of the now completed ship.
First, couple of snaps of the last steps. The preventers on the rudder:
The forward bell:
The lower, fore stuns'l boom mounts (I lost one of the ones shown and had to remake it), and the mounts+booms in place. The mount was made from sheet brass, the boom iron from copper venture tape painted black, and boom rest from 1/16 by 1/32 brass, with the lower support made from annealed steel wire.
Finally, please take a journey with me, having a look at the ship at approximately 6 month intervals.
NOVEMBER 2020:
MAY 2021 (6 months)
NOVEMBER 2021 (1 year)
MAY 2022 (1.5 years)
NOVEMBER 2022: (2 years)
MAY 2023: (2.5 years)
And finally, completed, November 4, 2023: (3 years)
Thank you all for your suggestions, assistance, and for following along so that I didn't give up somewhere along the way. As I said, I'll post more, better pictures in a couple of days. Now I need to figure out what is going to be next.
Regards,
George
-
ScottRC reacted to gak1965 in Flying Fish by gak1965 - FINISHED - Model Shipways - 1:96
Okay, well, I have mounted the starboard side davits. Here is a photo:
The photo isn't great, but here are the basics. Fore davit on a small platform I built at the planksheer. Aft between shrouds 3 and 4. I put the guy in, but simplified the rigging. The plans show a bolt at the after end, and a tackle, belayed to a pin on the main rail forwardl. I just ran it to a eyebolt on the main rail. I looked at rigging the boat tackles in an X pattern but didn't like the look, so they are rigged vertically, with the hooks attached to the lower channel or the platform directly beneath the davit. It doesn't look vertical (it's an artifact of the photo), but it is.
The list:
Stuns'l booms on hull: 2
Davits: 4 2
Boat tackle: 4 2
Guy wires on davits 2 1
Gilded balls on mast trucks: 3
Decals: 3
Total = 13
Regards,
George
-
ScottRC reacted to gak1965 in Flying Fish by gak1965 - FINISHED - Model Shipways - 1:96
Well, the yard mounted stuns'l booms are done. They are shown as per the plans, which is to say tied to various convenient halyards. Here are a couple of photos of the ship and the booms:
In the first photo you can see the boat davits drying after being painted black. I ultimately drilled the hole for the aft davit between the 3rd and 4th shroud as in the Buttersworth painting rather than the plans (between shroud 1 and 2) or the China Trade painting (between the shrouds and backstays). They are drilled on both sides, ready to be mounted once the paint dries.
The list:
Stuns'l booms on yards: 12
Stuns'l booms on hull: 2
Davits: 4
Boat tackle: 4
Guy wires on davits 2 (maybe)
Gilded balls on mast trucks: 3
Decals: 3
Total = 18
We will see if I ultimately put the guy wires on the davits. They would need to be run behind the shrouds and backstays and that area is really inaccessible right now. I'll probably try, but there is a limit to how much damage I'm willing to do at this late stage to add two lines. FWIW, for those that are working on the Fish, it might be worth installing these before the course and top braces so that you can access things a little easier.
Anyway, the end does appear to be approaching. I'll probably do the davits, then the two hull stuns'l booms, and see if my wife has any beads of the right size to make the gilded balls for the mast trucks. The decals will be the last step. Not sure if I'm going to apply the name directly or whether I'll put it on a very thin piece of black painted wood. It needs to be discreet, there were no head or trailboards.
I have a case that my father bought for the Revell USS Constitution* I made for my parents, but which he dispensed with when they moved into his current apartment. The case was way too tall for the Constitution, and it's too tall for the Fish at the same scale, so I'm going to cut the wooden corner elements shorter and have a glazier cut the glass down to appropriate size, but it's already available.
Hopefully I will finish her by the end of this weekend, as November 14 will mark 3 years of work on this project. I'm really looking forward to closing this one out and working on something new. I appreciate everyone who has looked in and helped me along.
Regards,
George
* PS: There is a bit of a story as to why I gave my parents a Revell USS Constitution. My maternal grandfather (who died in January 1969) built plastic models while he was living with us from 1967-1969. He built two Revell Cutty Sarks (and the Nichimo 1:200 Yamato, the notorious flat bottom Revell USS Midway, etc.) which were displayed in our house. Why two of them - I don't know; I assume he wanted to do better on the second try, although they both looked great to me. He was working on the Constitution when he died. I tried to pick it up when I was about 12 years old, but it was beyond my skills, had been sitting in the house for 8 years and was probably missing pieces, and I ultimately gave it up. In the interim, my brother, sister, and I had pretty much destroyed both of the Cutty Sarks playing with them. When I took up modeling again as an adult, I decided to build the Constitution that my grandfather never finished, and to give it to my parents to replace the ships we destroyed as kids. I think that they appreciated it, particularly my dad, as my maternal grandfather had been so kind to him after his own parents more or less disowned him for marrying my mother.
-
ScottRC reacted to Jared in Flying Fish by gak1965 - FINISHED - Model Shipways - 1:96
I'm with Rick on this. Your log has been exceptionally helpful George and I am most thankful to you. Sorry I can't help on your davits question.
-
ScottRC reacted to gak1965 in Flying Fish by gak1965 - FINISHED - Model Shipways - 1:96
Well, the Fish is rigged. I still have some things to do, but we are definitely on the home stretch.
The list:
Stuns'l booms on yards: 12
Stuns'l booms on hull: 2
Davits: 4
Boat tackle: 4
Gilded balls on mast trucks: 3
Decals: 3
Total = 28
As always thanks for looking in,
George
-
ScottRC reacted to gak1965 in Flying Fish by gak1965 - FINISHED - Model Shipways - 1:96
Well, we got back from vacation on Monday, a day late. Unfortunately, United downchecked the aircraft after we had boarded, so we waited for 5 hours before they cancelled the flight. Given that it was avionics, I don't know why they didn't just cancel it right away - we would have found something more interesting to do in Lisbon than just sit around the plane (at least they let us walk onto the gate area). Anyway, Portugal was very nice - we took a boat trip up the Duoro River from Porto, ate great and had lots of delightful wine and Port, so, can't really complain. One shot of the Duoro in Porto itself, taken from the Mosteiro da Serra do Pilar (which is technically in Vila Nova de Gaia (Porto is on the north side of the river) where all of the Port houses are. You can see some of the boats used to transport the wine - unfortunately I forgot to take a photo of a rabelo boat, the old school shipping sailboats. The bridge in the foreground is the Ponte Luiz I which was designed by a student of Gustav Eiffel, hence why the arch may remind you of some other structure....
So, back to the ship. Since I've been back I've been working on the braces. I have now completed all but the fore course and top, main course and top, and mizzen course, which is to say, I've been attaching main and mizzen braces. Here are some photos of the work to date:
And here is the ship in its current state:
I also wound up repairing a previously mounted brace that was interfering with the spanker.
So, the reduced list:
Spencer gaff: 2 Braces: 30 10
topping lifts: 2 Stun'sl booms on hull: 2
vangs: 4 2 Stun'sl booms on yards: 12
Spanker boom: 1 Davits: 4
sheets: 2 Boat tackle: 4
Topping lifts: 2 Decals: 3
Spanker gaff: 1 Gilded balls on mast trucks: 3
peak halyard: 1
Throat halyard: 1
vangs: 2
ensign halyard: 1
Change:
0 Additions
-12 (12 braces)
Net = -12
Remaining items: 45
Finally dropped below 50. Of course, the remaining 10 braces are the complicated ones, each probably worth 2 normal braces. But, I'm sticking to the 45 items number. I'm also probably going to start fabricating the stun'sl booms. The kit only provides 5/32 dowels for them, but I bought some 1/16 dowels and am going to try to make them scale appropriately to the yards.
Main course: 3/32
Main top: 1/16
Main topgallant: 1/16 (not sure - going to see what it looks like, may sand it down)
Fore course: 1/16
Fore top: 1/16 (not sure - going to see what it looks like, may sand down a bit)
Fore topgallant: 3/64 (ish) - basically going to sand the 1/16 dowels
Those 5/32 dowels are 9 inches at scale. Except for the main - that's way too big. I can try to lift the diameters by measuring the plans, but I'm probably just going to eyeball it.
As always, thanks for looking in!
Regards,
George
-
ScottRC reacted to gak1965 in Flying Fish by gak1965 - FINISHED - Model Shipways - 1:96
Thanks - appreciate the compliment. I tend to find that my hands start to shake after a certain amount of very fine work even without COVID, although it is annoying that I am still testing positive.
With that said, a short update. I finished the remaining sheets and clews on the mizzen royal and skysail yards.
And, I've started dealing with the spanker.
I've mounted the spanker gaff and boom. The gaff has both the throat and the peak halyards fully mounted. I've also put in the topping lifts, but I'm not going to mark them as done because I have to put in the tackles that connect to the live ends.
So, the list:
mizzen yards: 5 Jib halyards: 4
lifts: 10 Jib downhauls: 4
sheets: 8 Staysail halyards: 2
clews: 8 Staysail downhauls: 2
halyards: 4
Spencer gaff: 2 1 Braces: 30 24
topping lifts: 2 1 Stun'sl booms on hull: 2
vangs: 4 2 Stun'sl booms on yards: 12
Spanker boom: 1 Davits: 4
sheets: 2 Boat tackle: 4
Topping lifts: 2 Decals: 3
Spanker gaff: 1 Gilded balls on mast trucks: 3
peak halyard: 1 Fairleads on shrouds: 8
Throat halyard: 1
vangs: 2
ensign halyard: 1
Change:
-3 (only 1 throat halyard, not doing 2 outhaul sheets) - also adjusted topping lift to spanker boom, and throat halyard to gaff)
-8 (spanker gaff, Spanker boom, peak halyard, throat halyard, 2 clews, 2 sheets)
Net = -11
Remaining items: 63
As always, thanks for looking in, and for the likes and comments.
Regards,
George
-
ScottRC reacted to Snug Harbor Johnny in CUTTY SARK by Hostez - Sergal - 1:78
You've got something good going there. The use of small wood blocks for clamping the second planking (with the wood clamps temporarily nailed into the 1st planking below) is novel ... I'll have to remember that in future. Your re-do at the bow and stern of the 1st planking was well thought-out and resourceful. No doubt you'll have a great model in the end, however long that might take.
-
ScottRC reacted to Hostez in CUTTY SARK by Hostez - Sergal - 1:78
SO! Now the ship is ready for the second planking:
-
ScottRC reacted to Hostez in CUTTY SARK by Hostez - Sergal - 1:78
I had to redo this process several times, applying putty, drying, sanding, reapplying putty, drying sanding... untill i was happy with the results.
-
ScottRC reacted to Kevin-the-lubber in Cutty Sark by Kevin-the-lubber - Revell - 1:96 - PLASTIC
Hello all, checking the log, it looks like I've been working on the mast assemblies for around 9 months now (started at post #352), though a fair chunk of that time has gone on other, non-modelling things. No wonder I'm beginning to feel bored, though not yet to the extent that I'd park the model. I ran into difficulties with version 1 of the mast assemblies: some of the more delicate parts proved too fragile and I needed to find better solutions. To cut a long story short that's led to redesigning the way a mast assembly fits together and I'll post on all of that eventually. Meanwhile, redesigning has sometimes led to an incidental improvement, one of which I'll post on today, just because I feel more like writing than thinking!
Tops
While re-working these to accept a square carbon fibre mast stiffener, rather than round CF rod (hence the square holes in the white frames), I realised I would get cleaner prints and sharper paint lines if I made these as a two-part sub-assembly. Once the parts are painted, the white 'iron frame' sits snugly within the wooden platform and, with a few dots of glue, the whole has fairly good rigidly.
Why so many when I only need two? Because these are extremely thin and a small lapse in concentration or even just a bit of bad luck can see them break at any point. I dislike having to stop and make a new item from scratch so I often make extras to begin with. It takes the same time to print 6 as 2, the cost is relatively insignificant and I also tend to do each operation ( cleaning up, painting, glueing) a little better as I work through the collection. It's a shame the spares end up in the spares bin but that's the nature of the beast.
-
ScottRC reacted to Canute in Charles W. Morgan Whaling Bark Kit
Different mix of the plastic used. Was the kit a later reissue? Their later plastic blend may have been different than the original Revell plastic. That rubbery plastic seems to me that you should use substitutes for those parts.
-
ScottRC reacted to Frank Burroughs in Charles W. Morgan Whaling Bark Kit
On old, worn molds, why do the parts come out rubbery?
-
ScottRC reacted to Canute in Charles W. Morgan Whaling Bark Kit
The molds for the injection molding machine were newer and fit better. Worn molds can lead to excess flash on the parts.
-
ScottRC reacted to Frank Burroughs in Charles W. Morgan Whaling Bark Kit
I had one missing part. A minor piece that won't be missed. And the skylight was broken. Still, as a first model kit, it was worth the money.
why are the older molds better?
-
ScottRC reacted to Snug Harbor Johnny in Charles W. Morgan Whaling Bark Kit
Most definitely - so one does not have to deal with excess flash or more 'rubbery' plastic to boot.
-
ScottRC reacted to VitusBering in Cutty Sark by VitusBering - Revell - 1:96 - PLASTIC - Redux
The standing rigging is as done as it can get for now.
The ship is balanced on the stands, they're not glued to the hull nor are standoffs permanently attached, this is just a test to see if I like the color.
Yard sling chains are installed, will be trimmed to length when the yards are attached.
Now I'll start work on the yards. They need lots of stuff like jackstays, Flemish horses, footropes, a variety of blocks and pulleys, etc.