HOLIDAY DONATION DRIVE - SUPPORT MSW - DO YOUR PART TO KEEP THIS GREAT FORUM GOING! (89 donations so far out of 49,000 members - C'mon guys!)
×

Sooty
-
Posts
76 -
Joined
-
Last visited
Content Type
Profiles
Forums
Gallery
Events
Everything posted by Sooty
-
Thanks Eagle-Eyed Tim! I can't believe I missed them 😂 To make it even funnier, I just finished them, with walnut strip 😂
-
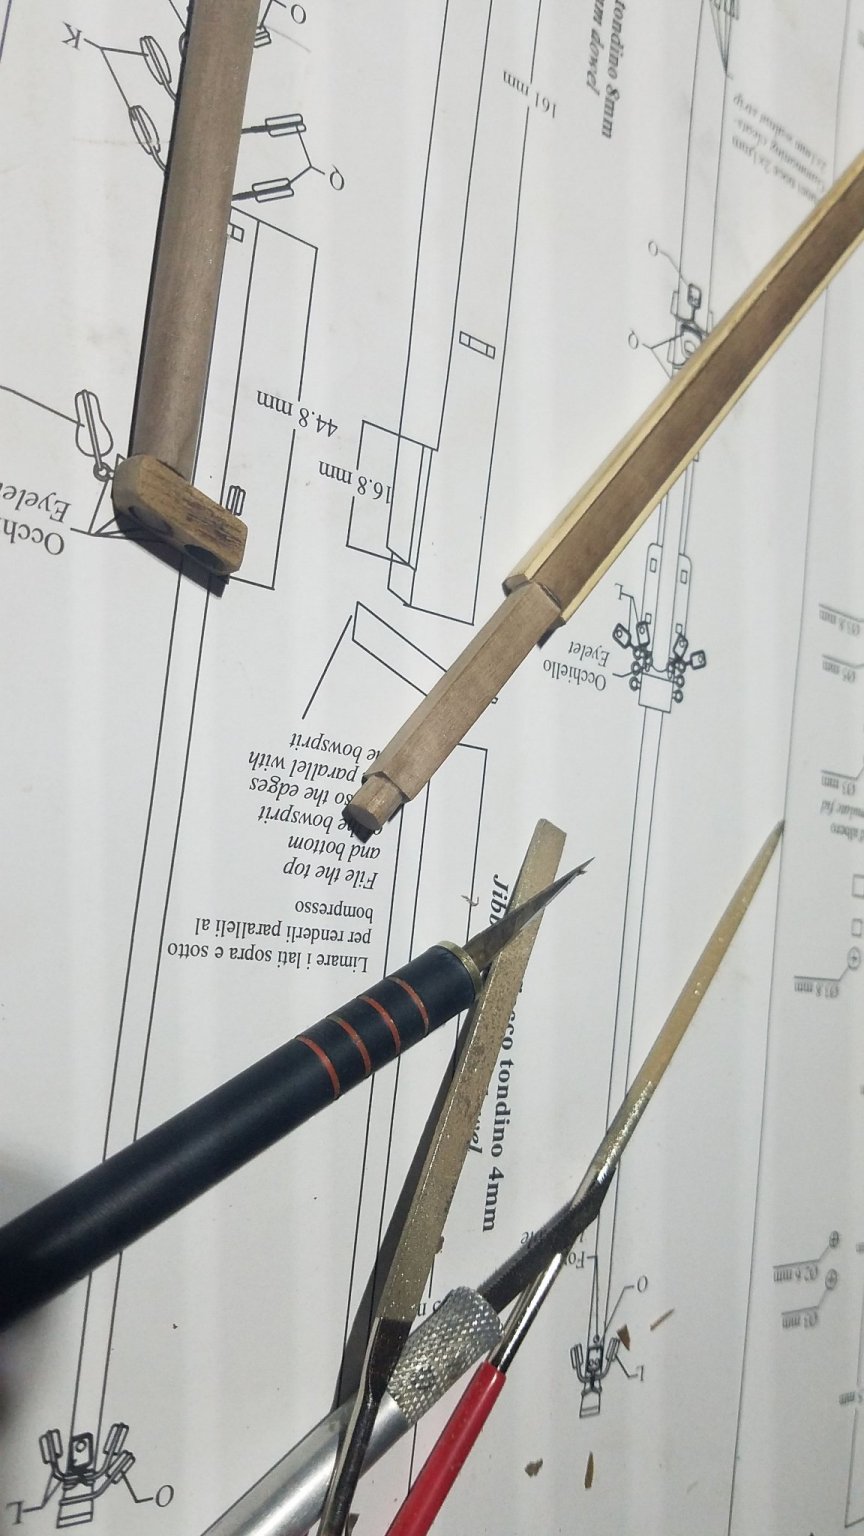
Question; Just trying to make the hull fenders along the sides, parts 129 and 130, from the '1.5mm walnut ply' sheet according to the instructions. However, I cannot locate those parts anywhere, on either the actual laser cut sheets or their paper drawings. I take it that is just a glitch with the model, and that 2mm walnut strip will do just fine?
-
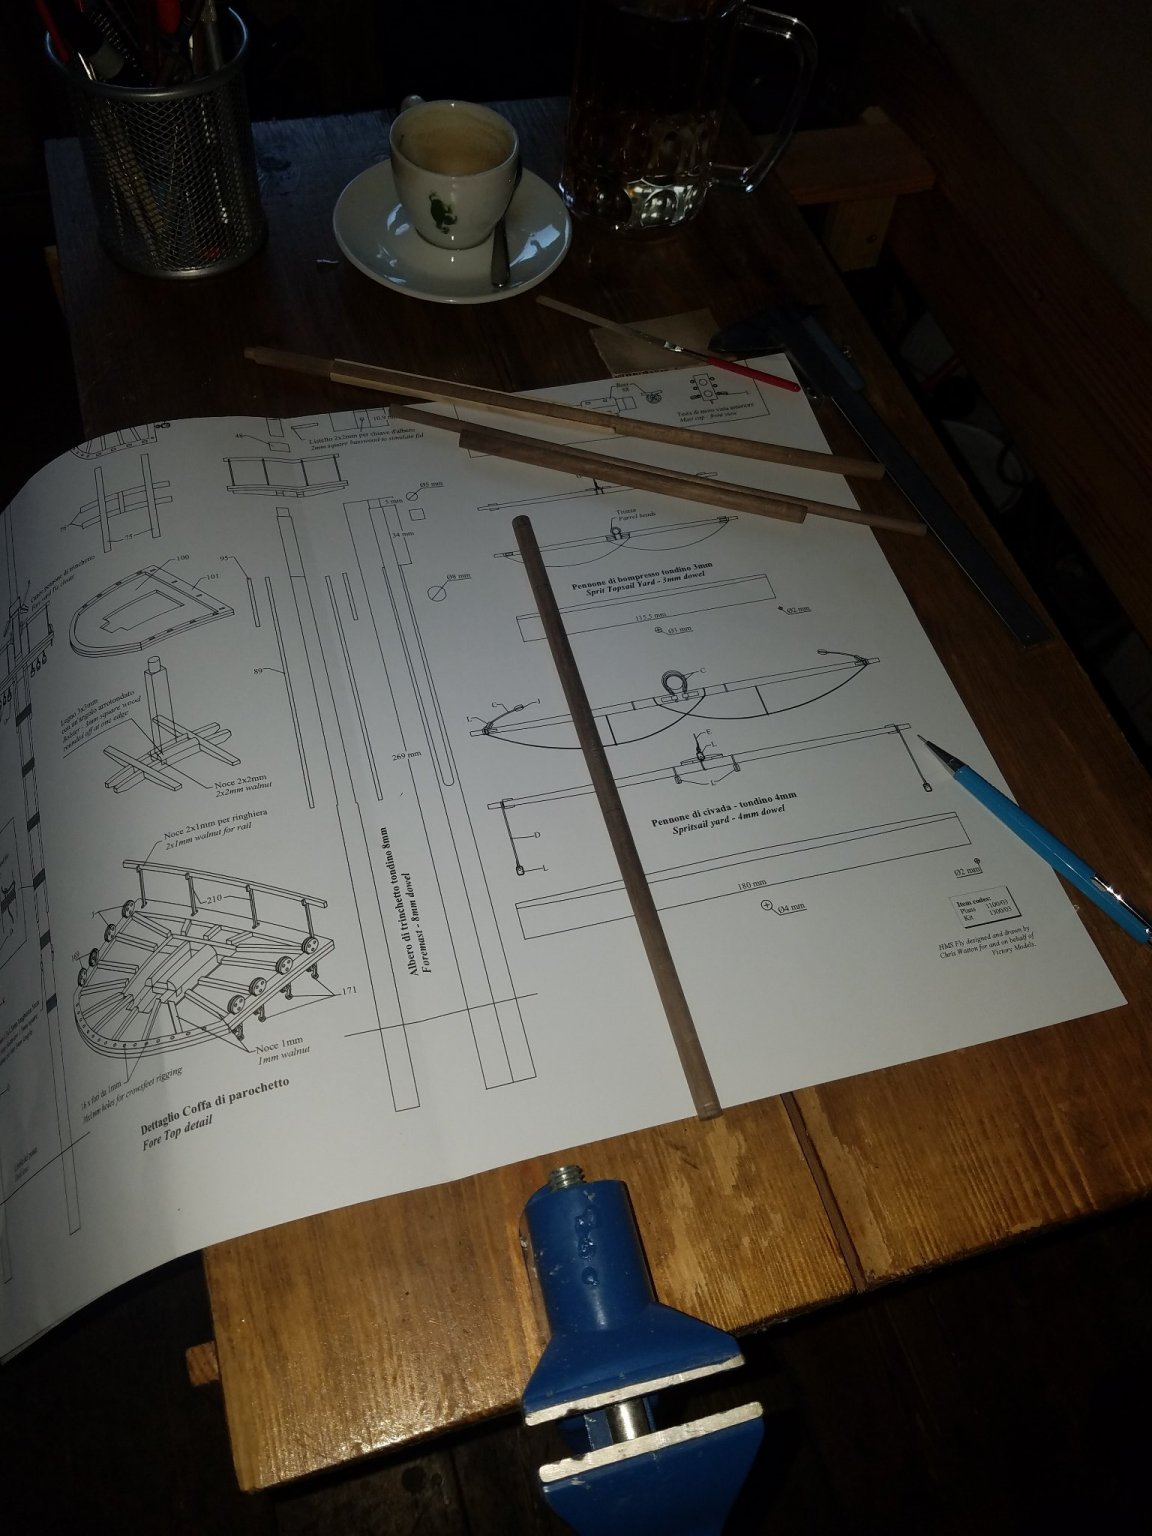
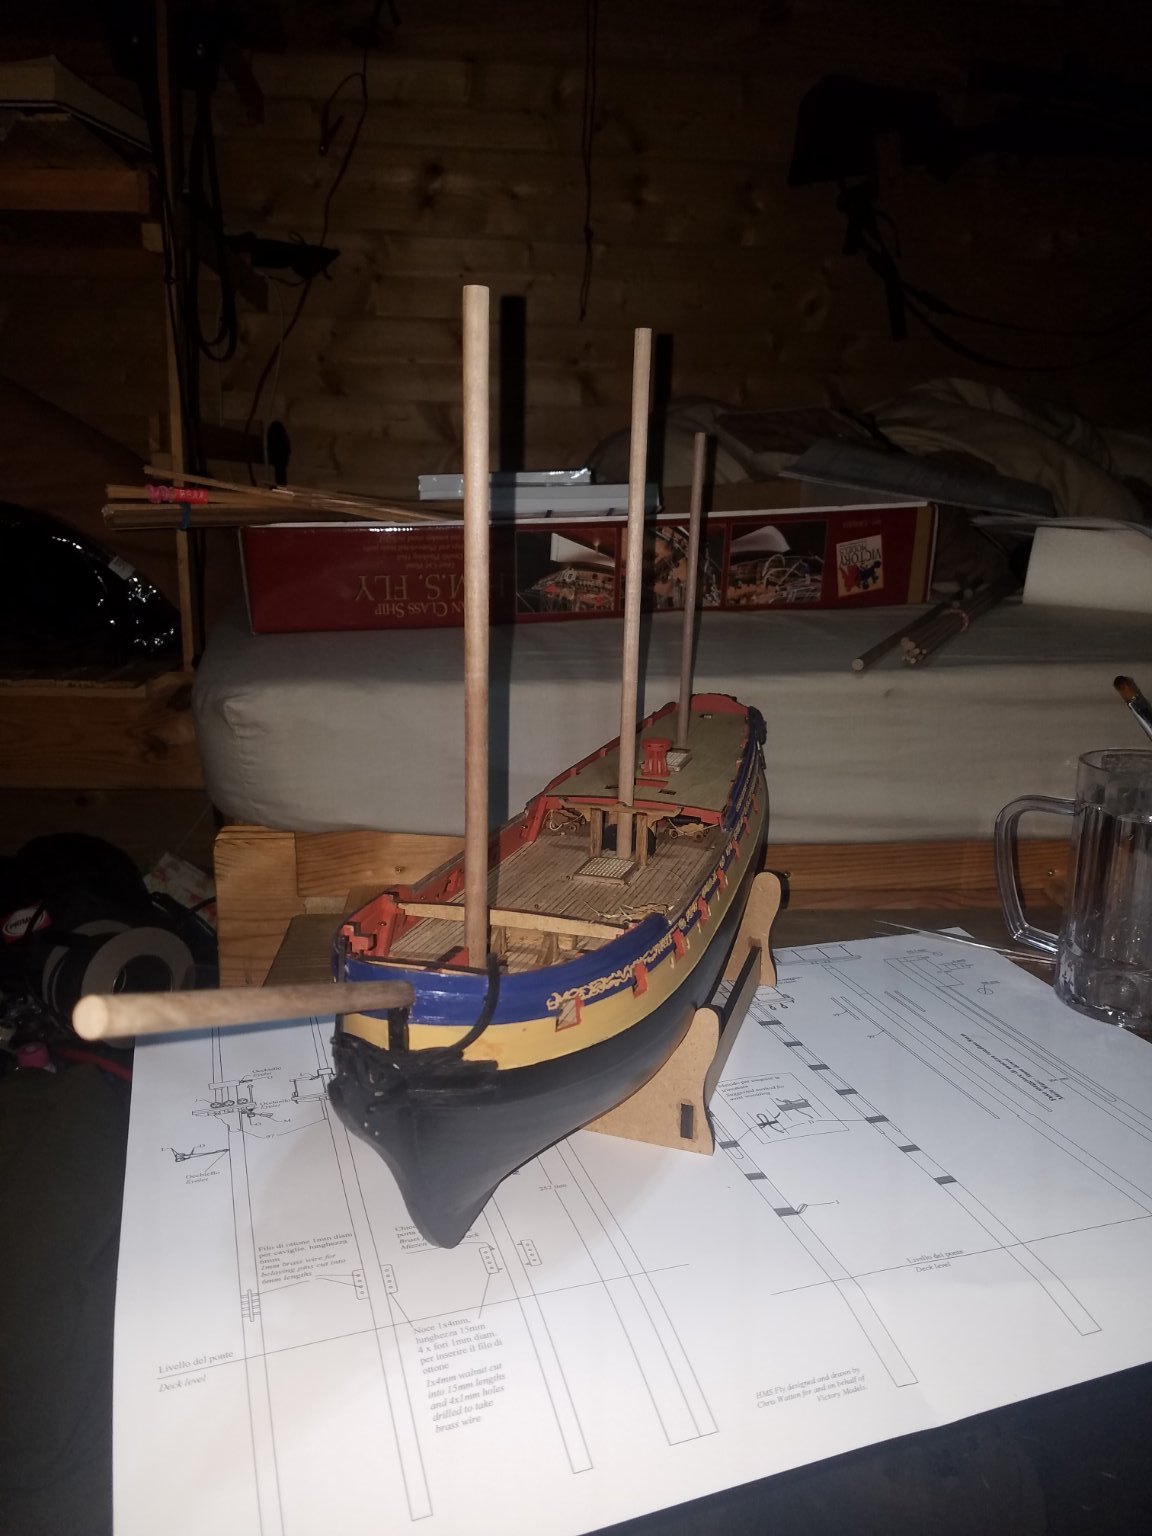
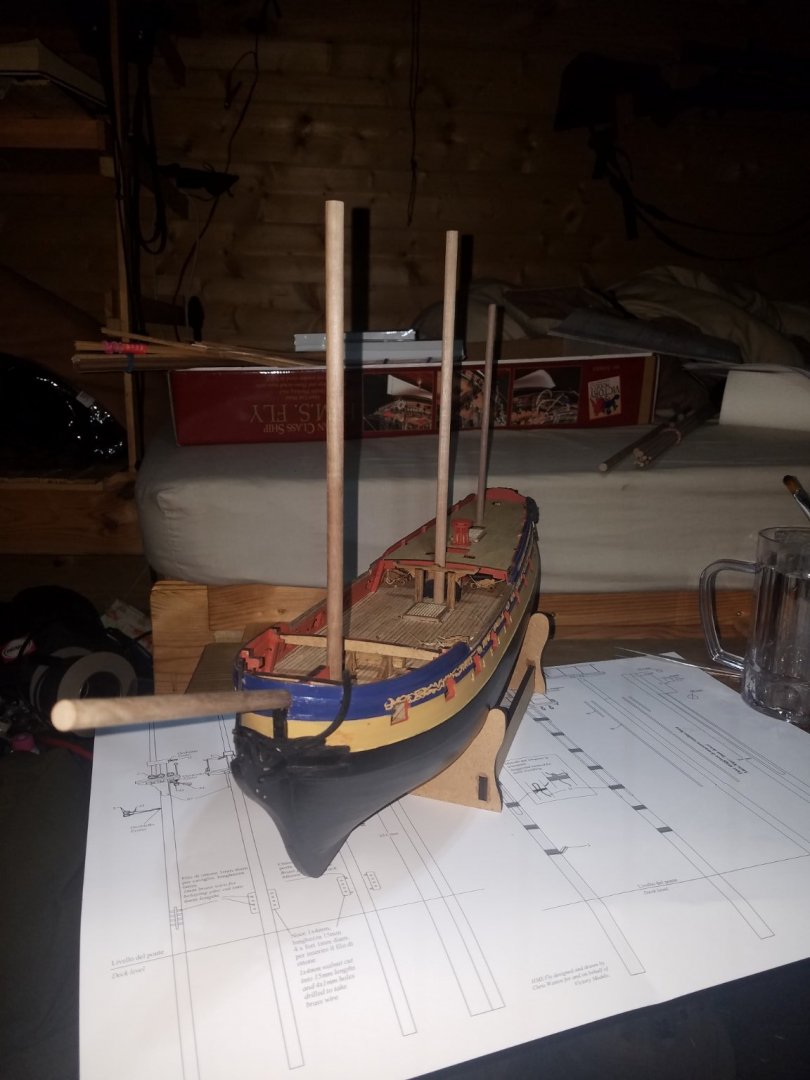
Masts started, trying to get the bowsprit and the lower masts sorted first. I placed them on the model, looks brilliant. I just realised how big this is going to be, and I am starting to worry about moving it 😂😂


- 59 replies
-
- 3
-

-
- Fly
- Victory Models
- (and 1 more)
-
I got a little bored of hull work and needed something a bit more 'linear', so I made a start on the masts! Lower main wooden parts all done, I will prepare the fore and mizzen too, put them on and see how she looks!
-
Your work is pretty impressive for a first model Tim, you have an eye for detail! Very well done, and you did a much better job than I did with the PE (I ended up stripping mine off and going for the 'operational' rough-and-ready look, to cover up the mess I made 😂) Wishing all a happy 2021!
- 164 replies
-
- 1
-

-
- fly
- Victory Models
- (and 4 more)
-
Thanks for the pointer to that post! I will likely have just a couple of sails up, after deciding how she would be while launching one of the boats (which I will try to recreate). Likely the mizzen and a foresail or two, or whichever setup a ship like that would have in a 'hove-to' situation. The rest would be shown furled. Anyone has any ideas? A looong way from that though 😂 Garage may be better for ventilation and keeping tools? Mine is basically a shed in the woods on my land. Off-grid, so I am working with LED worklamps, solar panels and a 12v system for charging, a small inverter for running tools, and a woodburner for keeping warm! All squeezed among forestry kit and the work is usually done after I am finished with the actual jobs I'm here for. Pity I only have pine and spruce here, as I would absolutely love to build an actual small boat from these trees one day! Maybe... till then, models it is 😊
-
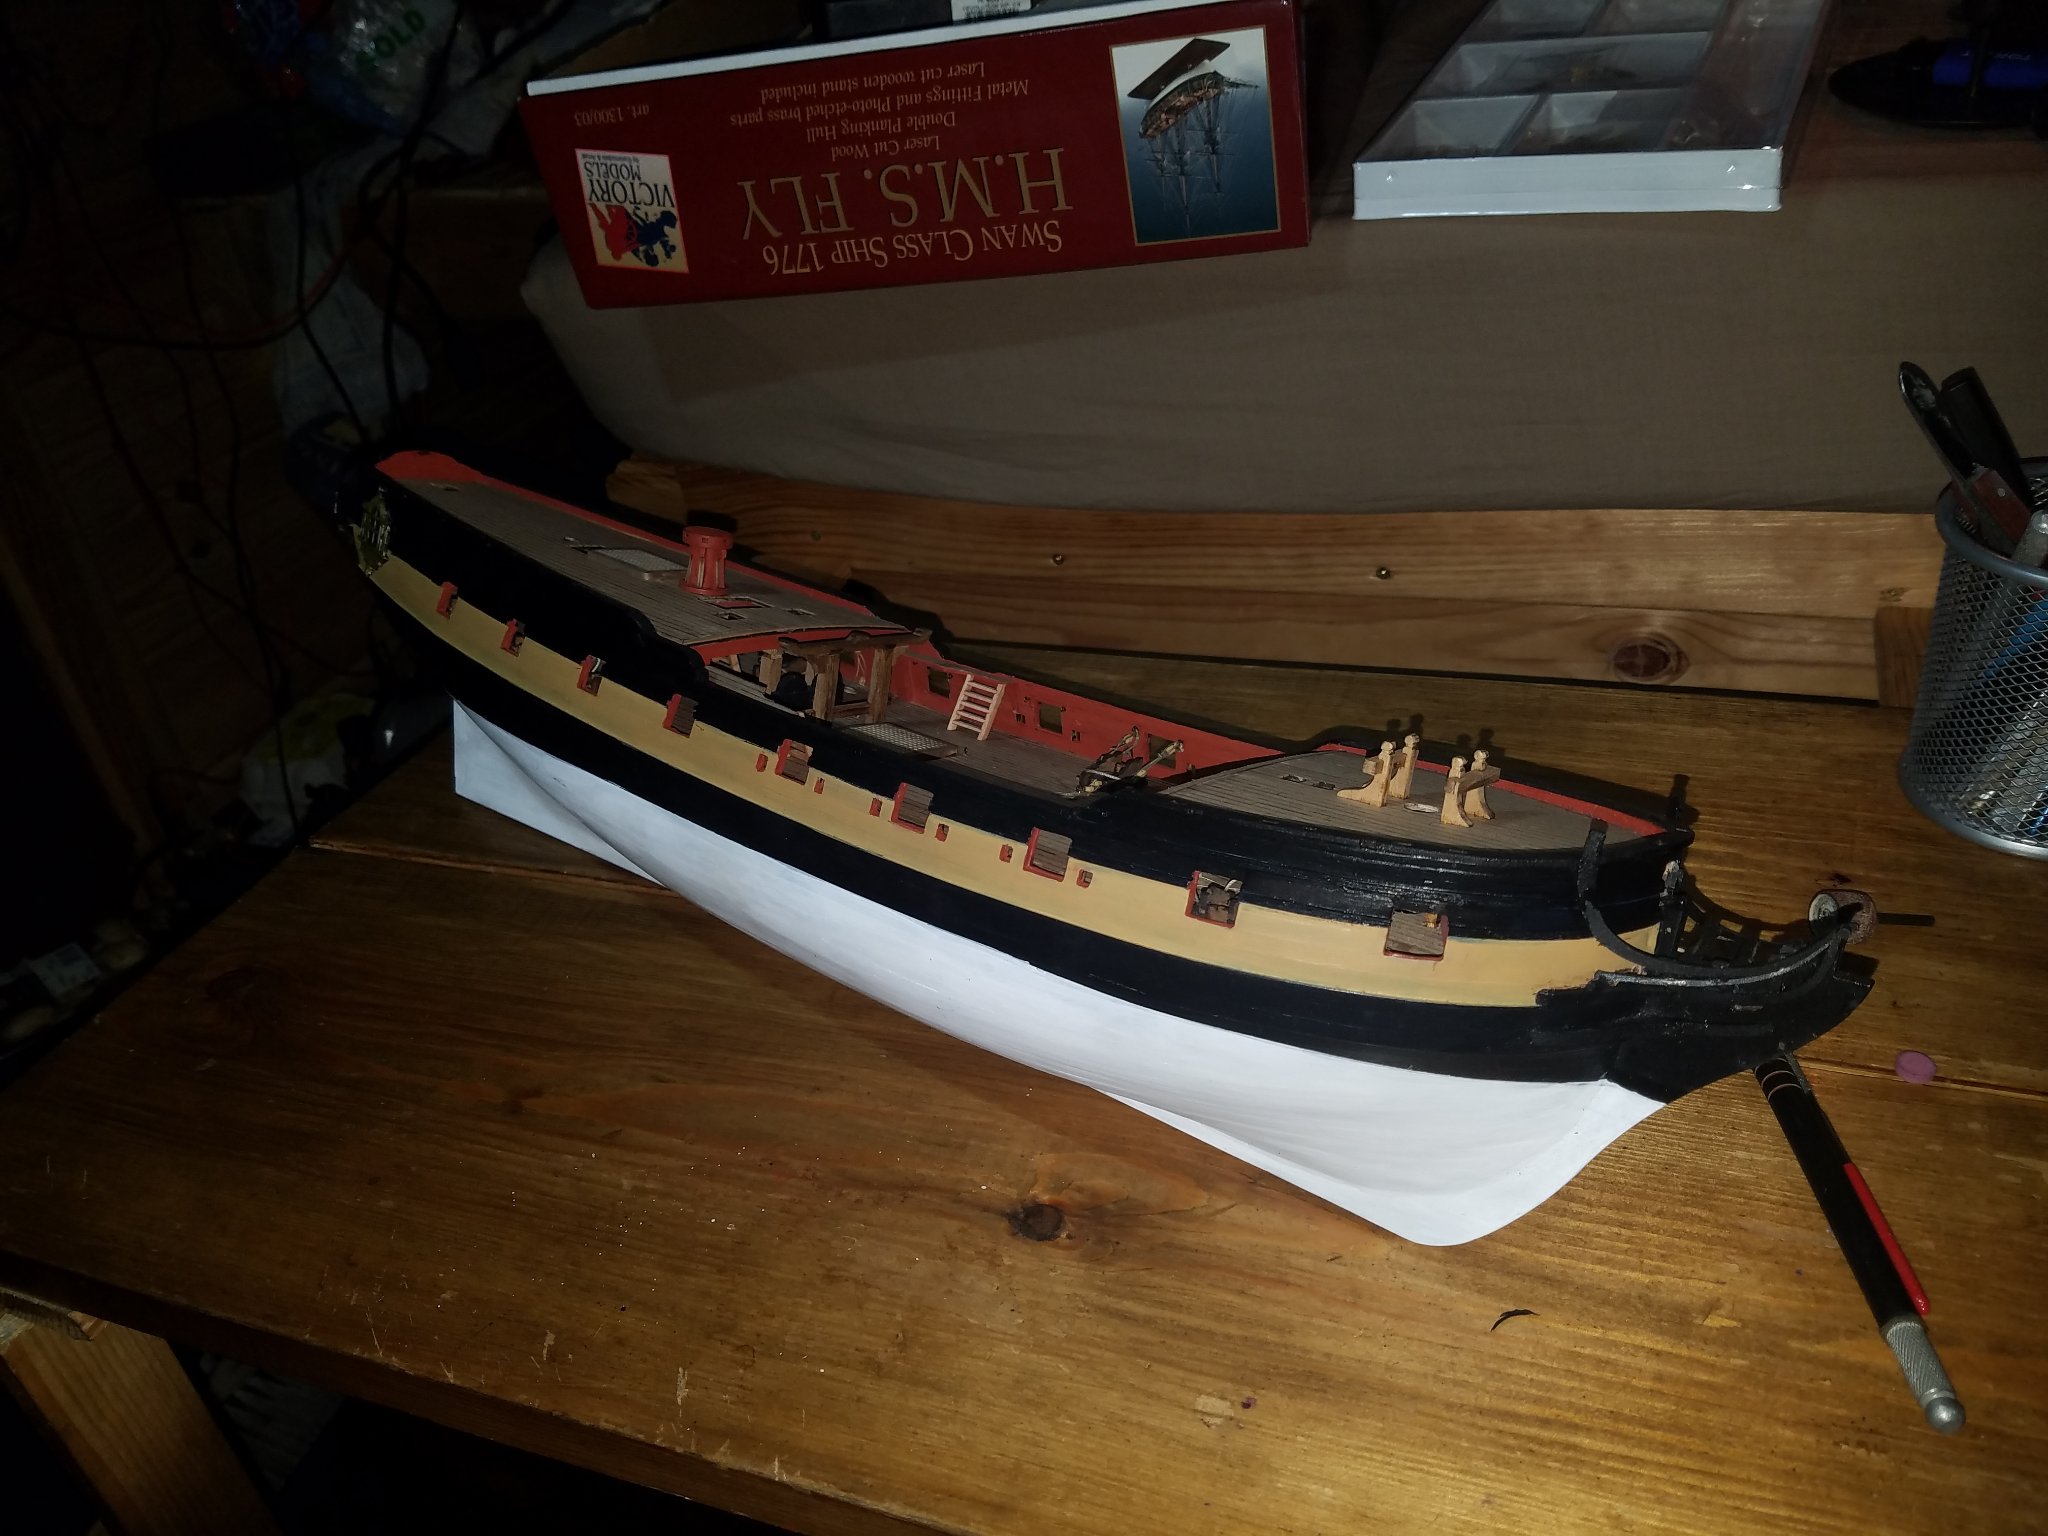
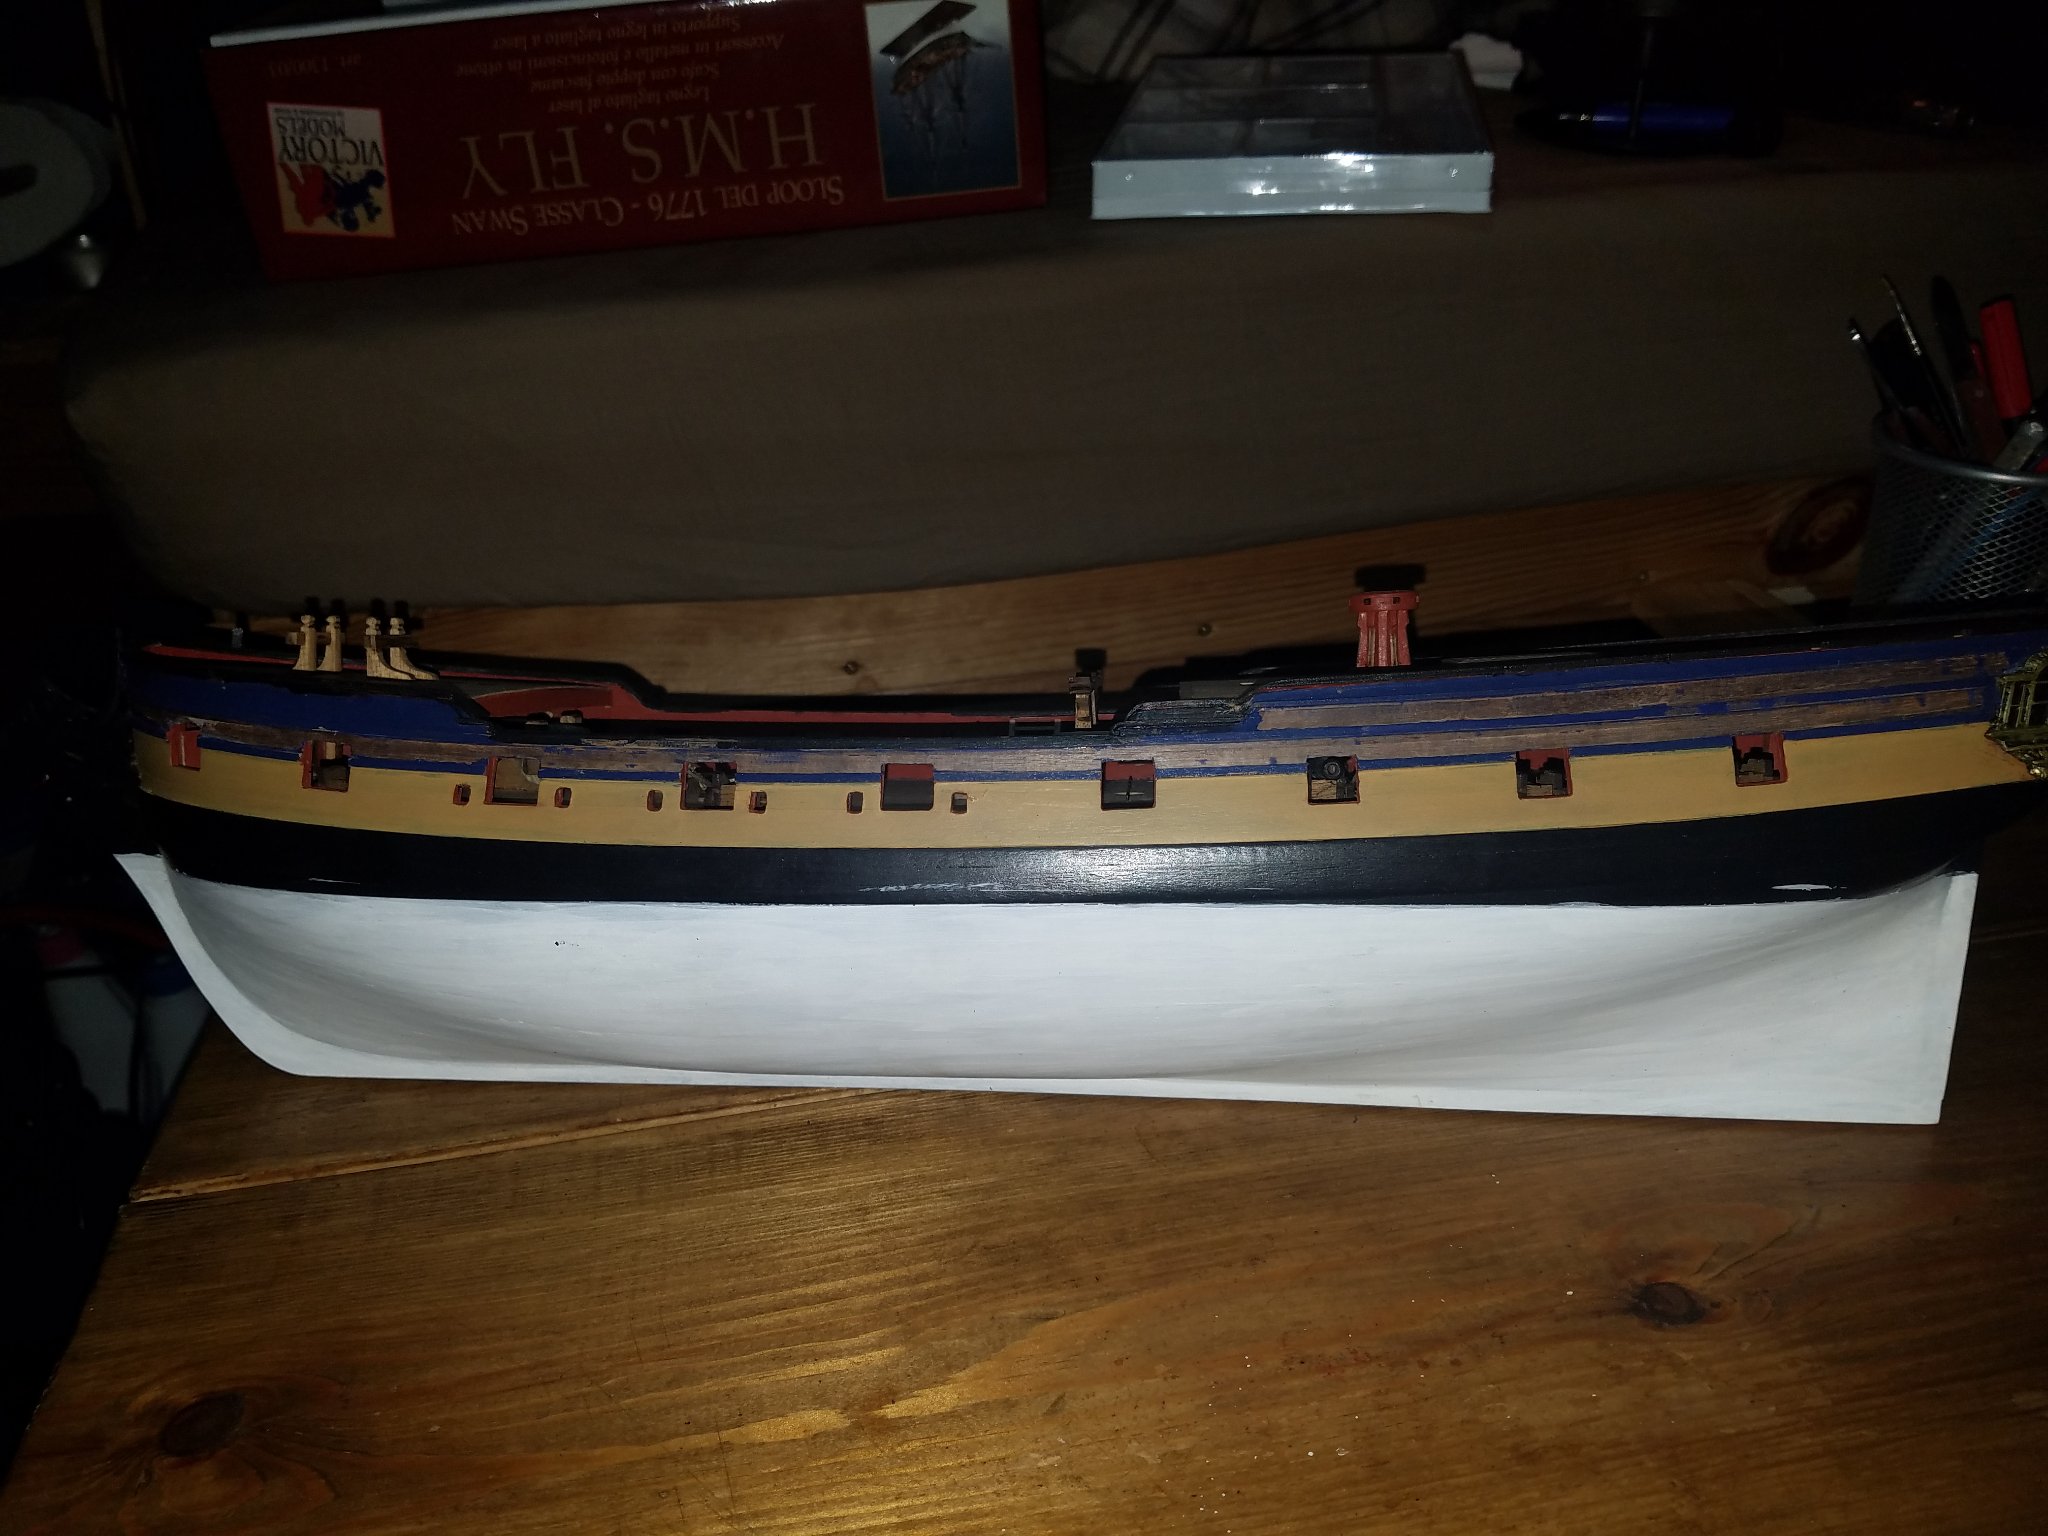
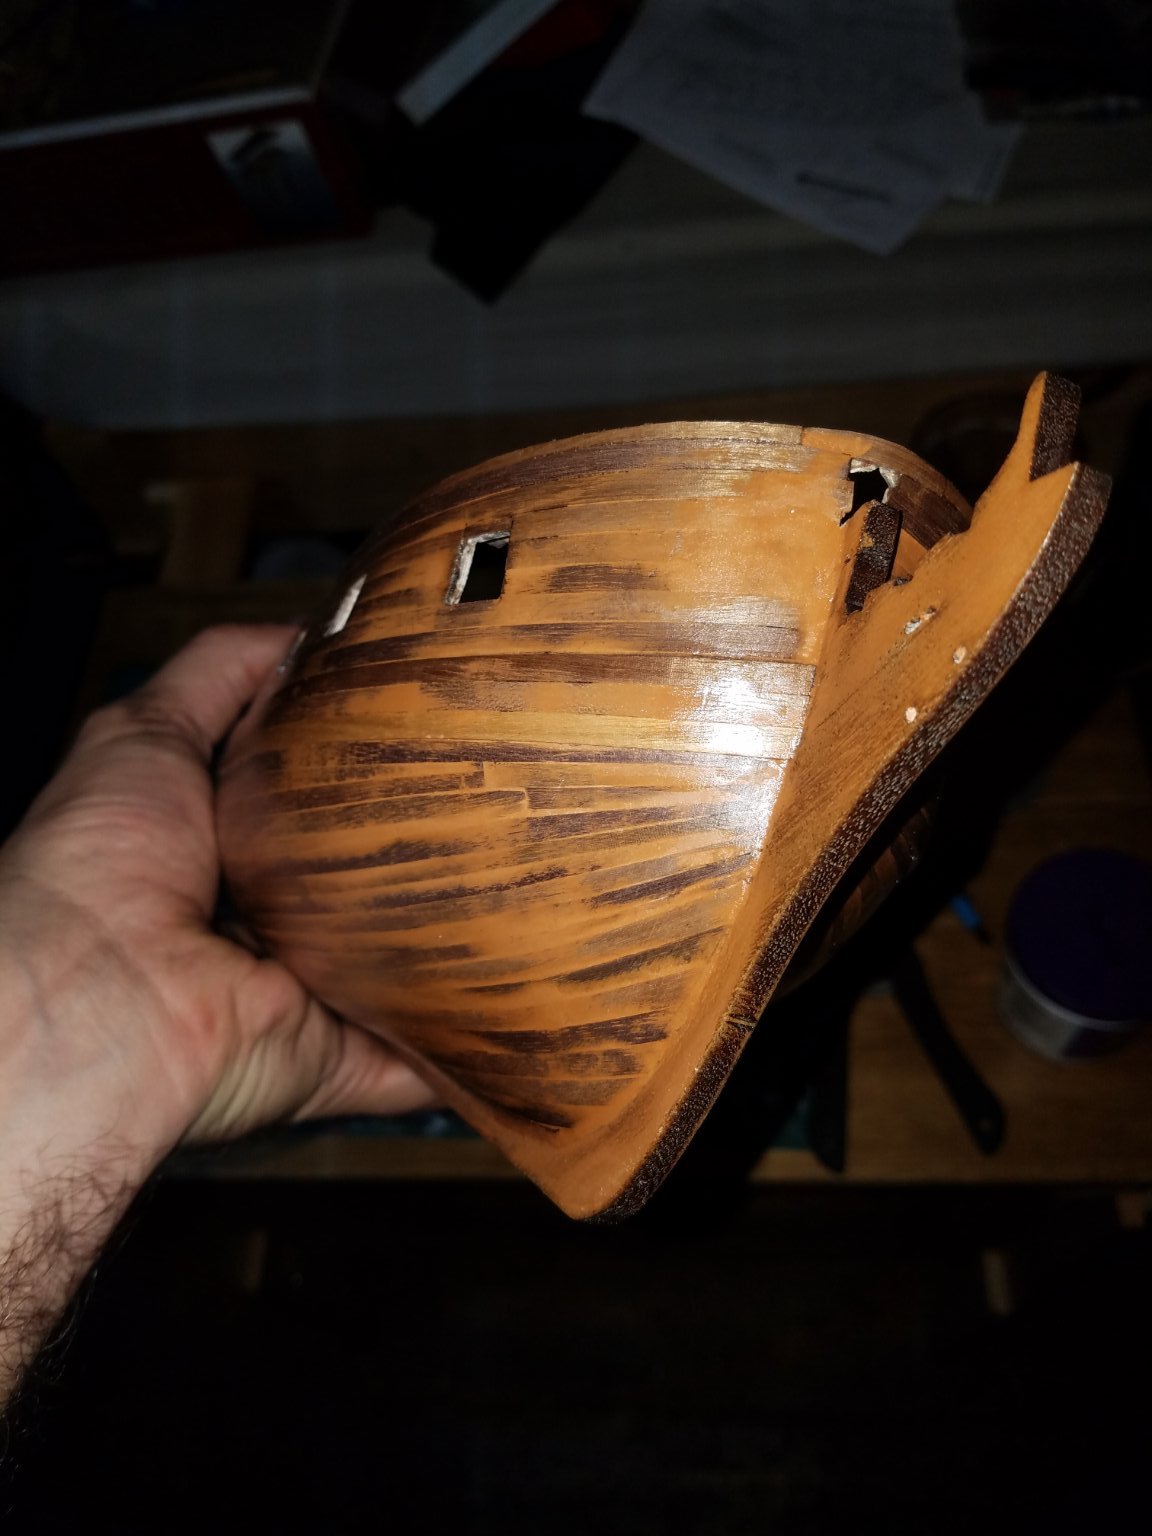
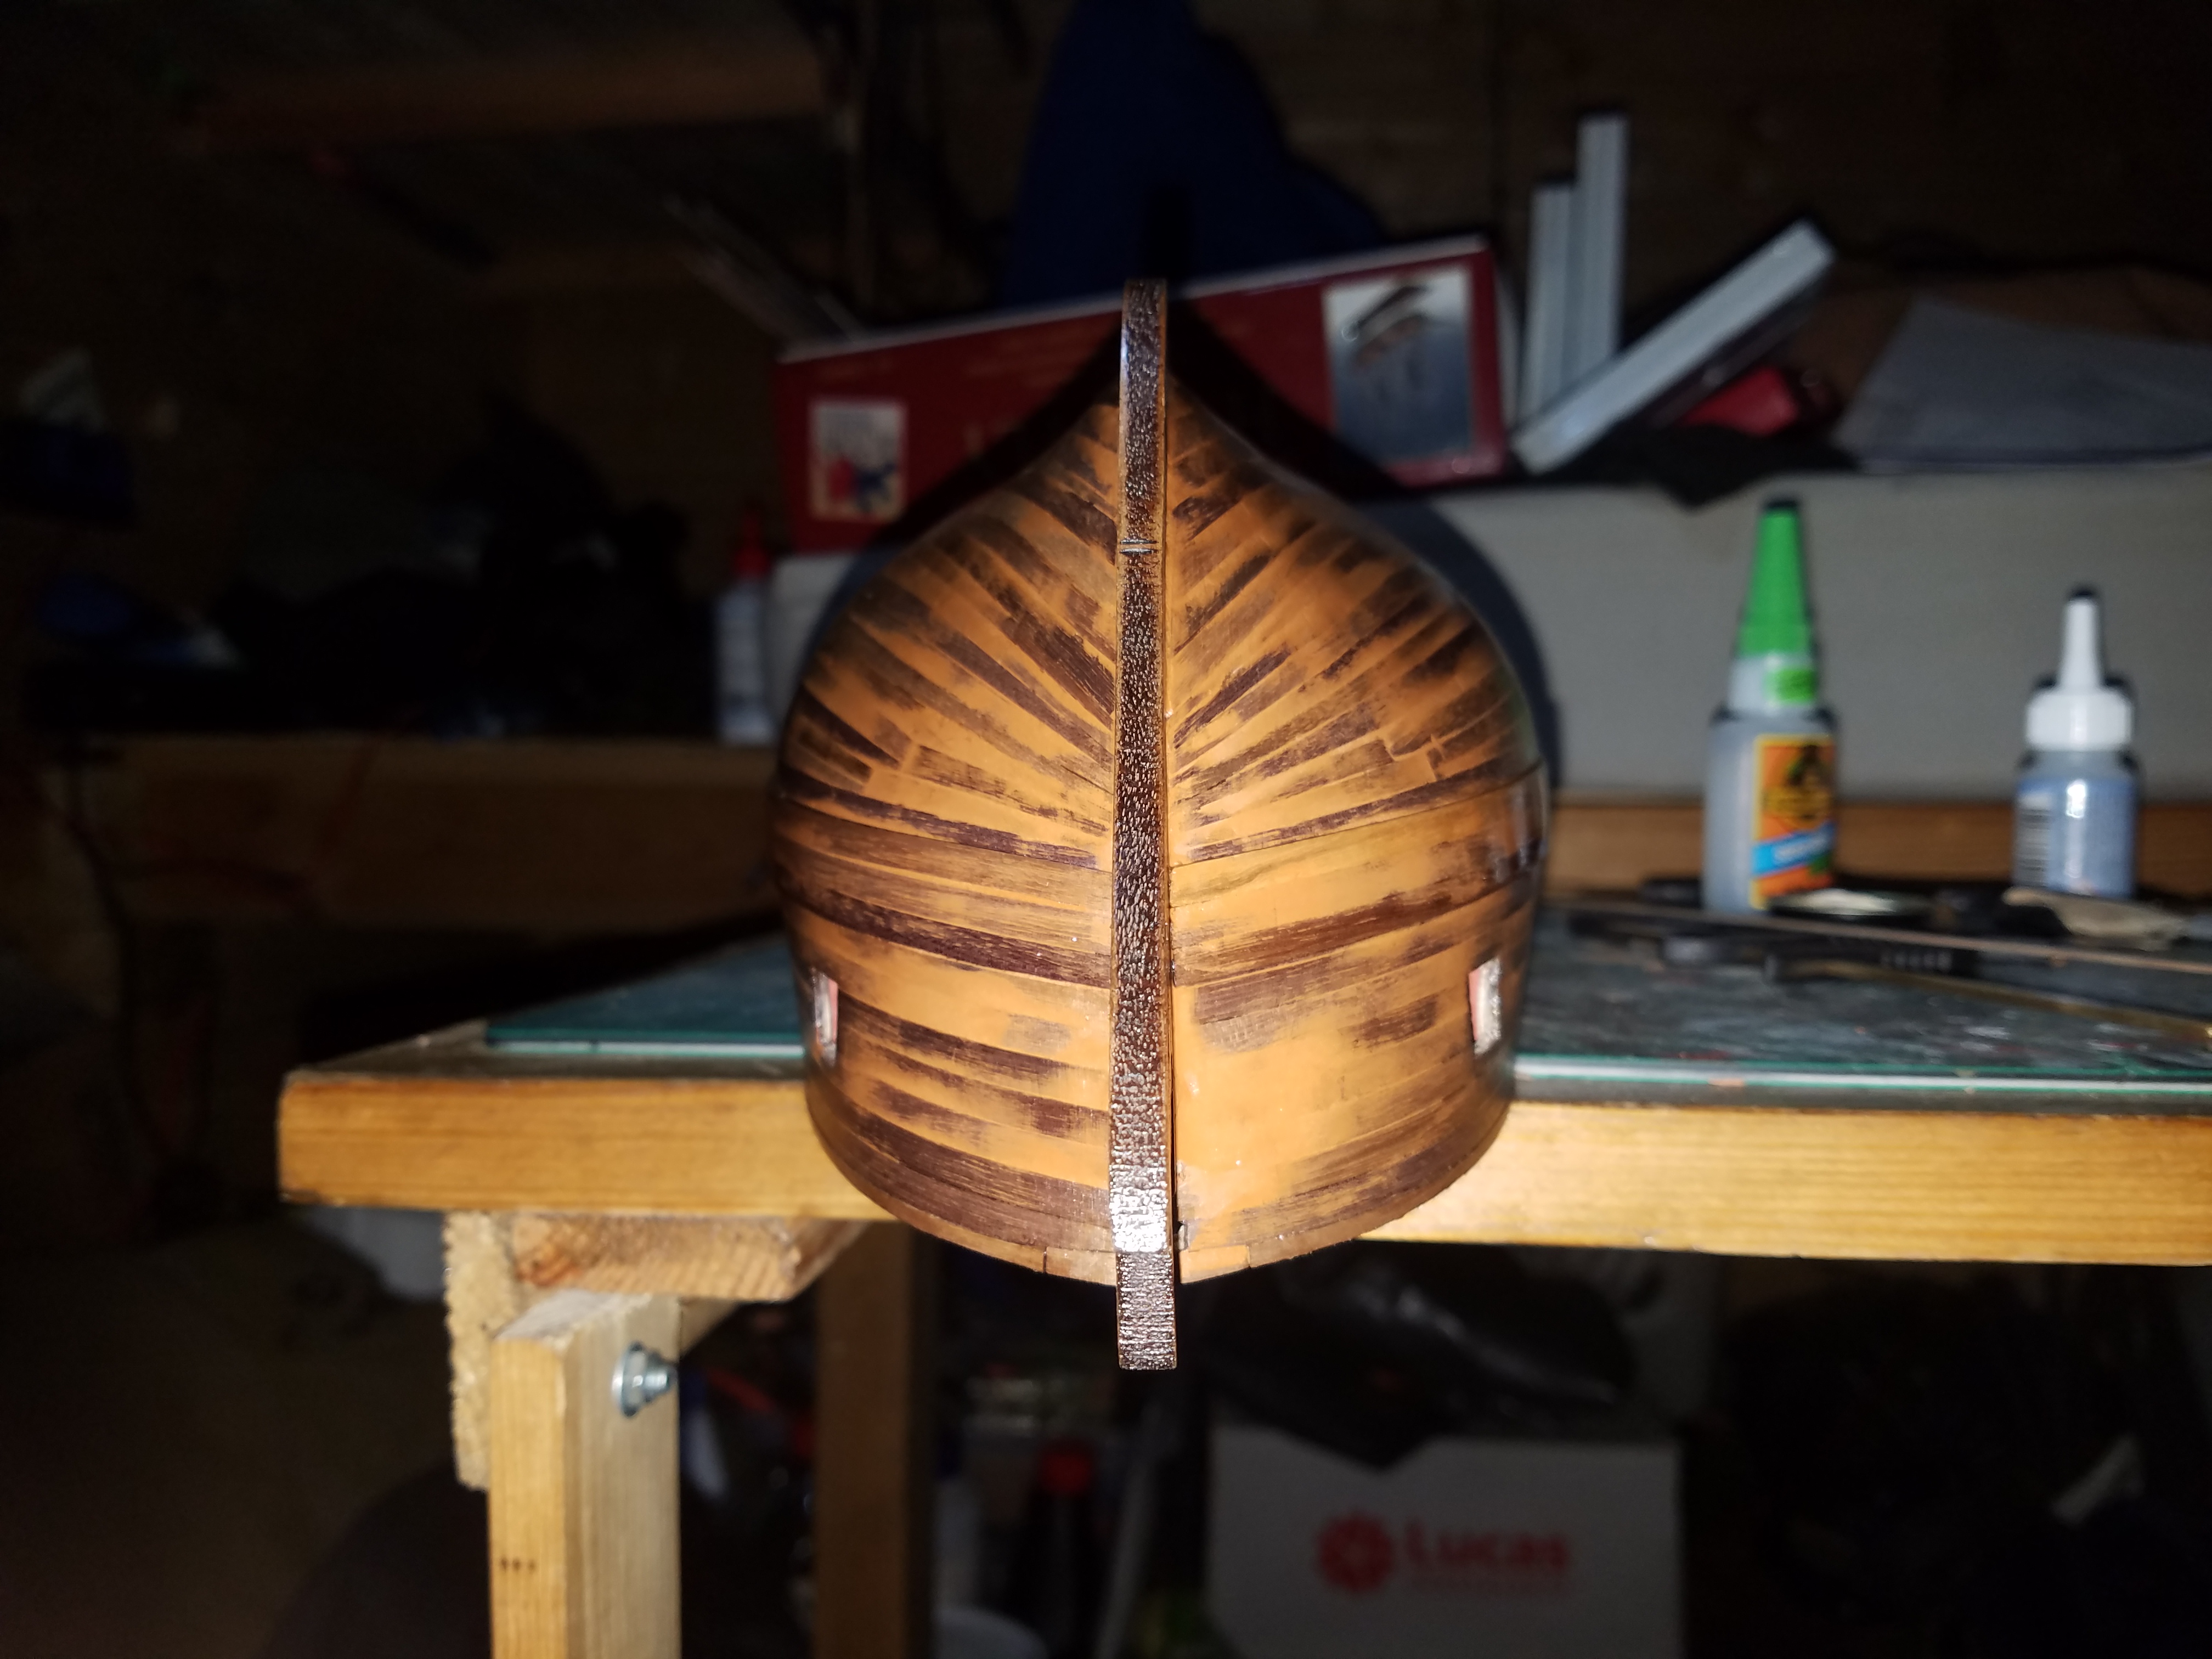
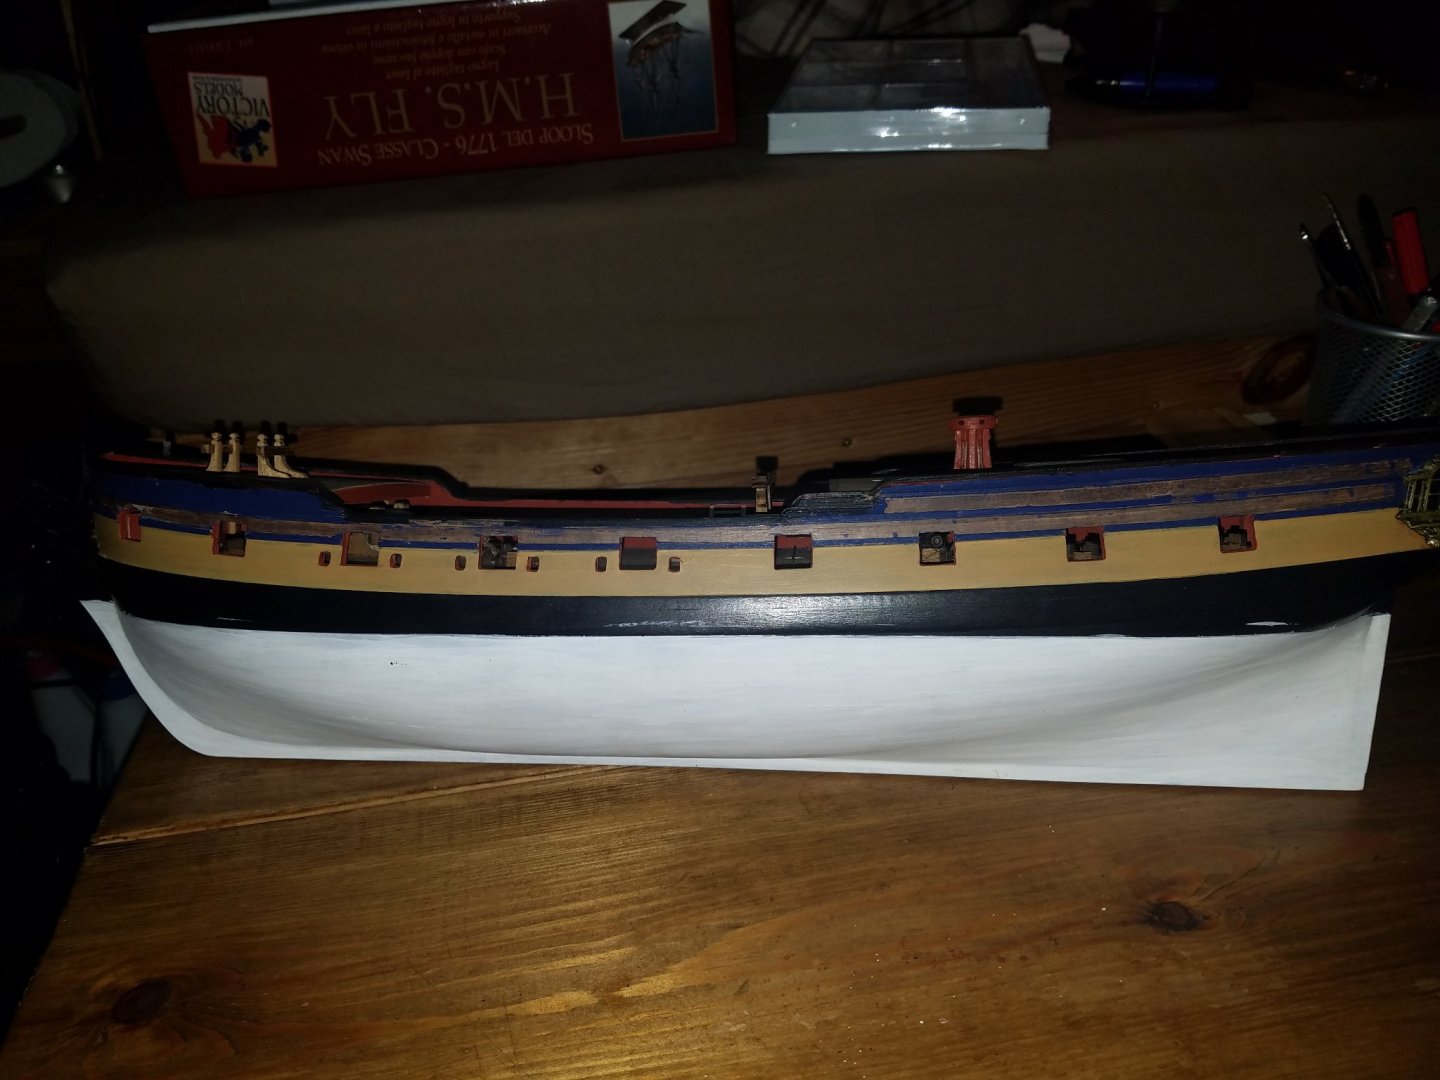
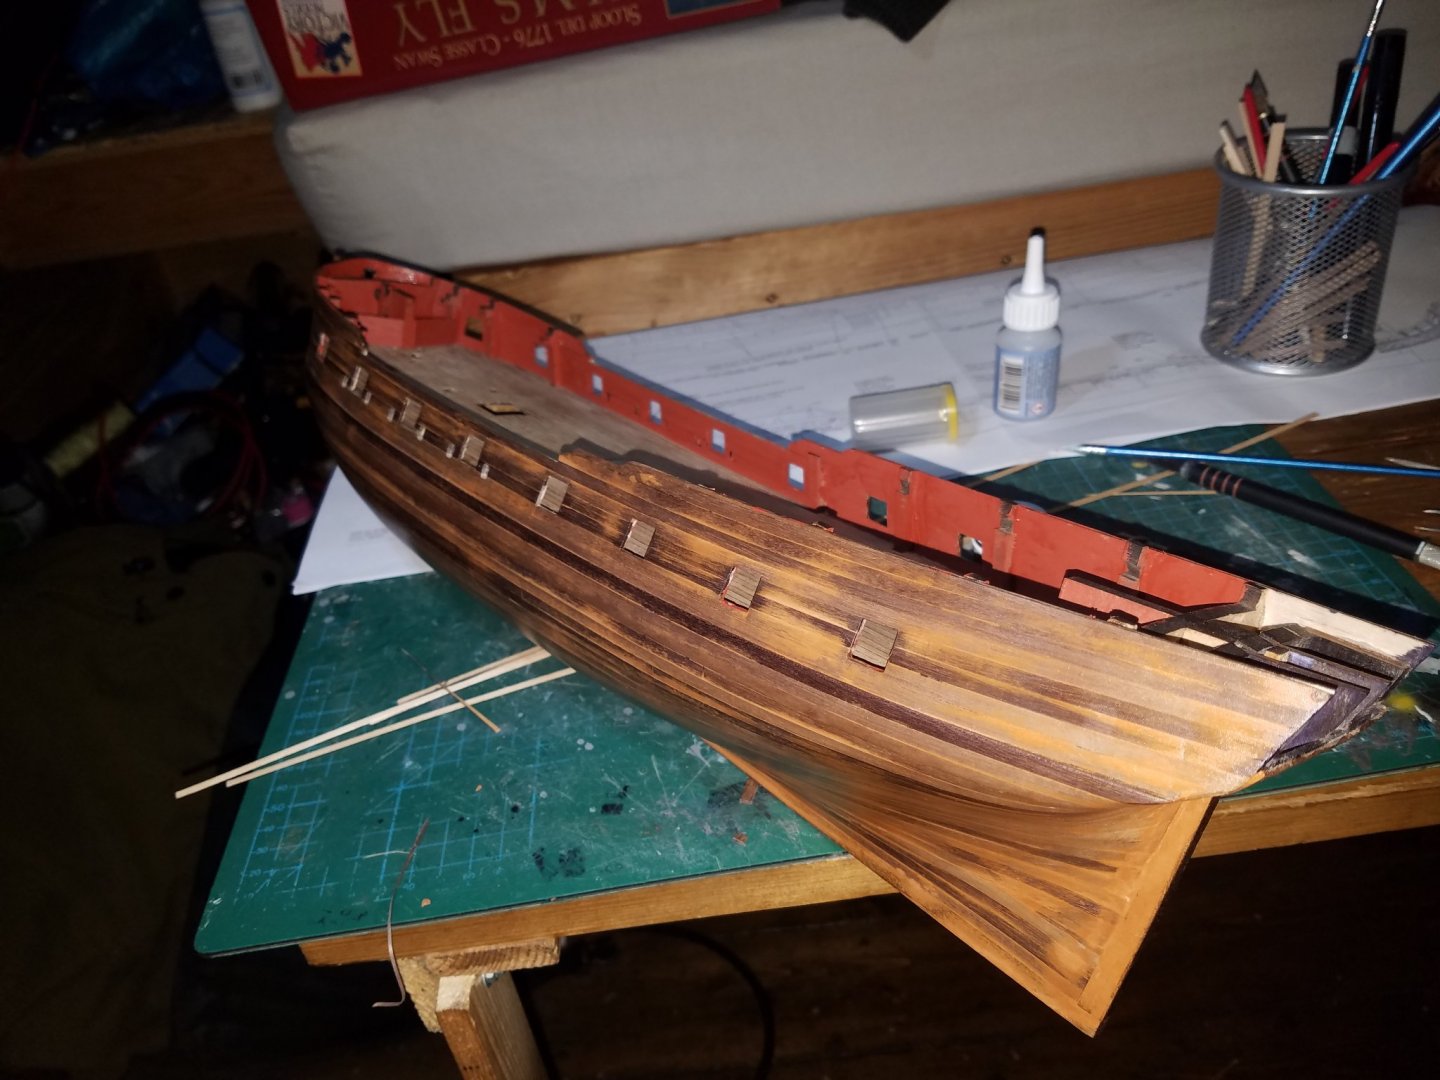
Thank you, and happy holidays! A combination of lockdowns, losing some of my modeling mojo as well as really not liking the job I did with the photo-etch stopped me for a few weeks. However, I am back with my model and tools and I decided to strip the side decorations. That left some ghastly marks from the CA, so I had to spend some time with my dremel tool and a grinding bit. Finally managed to strip the areas the PE run over down to bare wood, then paint it black. I will highlight some of the strakes with yellow ochre, but it now looks gorgeous and we will finally starting to move again 😊
- 59 replies
-
- 3
-
-
- Fly
- Victory Models
- (and 1 more)
-
That looks GORGEOUS, and the margin plank is simply superb. Though the grain/shade continuity kind of gives it away. Perhaps a couple of shades of very diluted stain over random planks would break it up? Then again, usually things like that show up a lot more prominently on photos and it may be hardly noticeable to the naked eye.
-
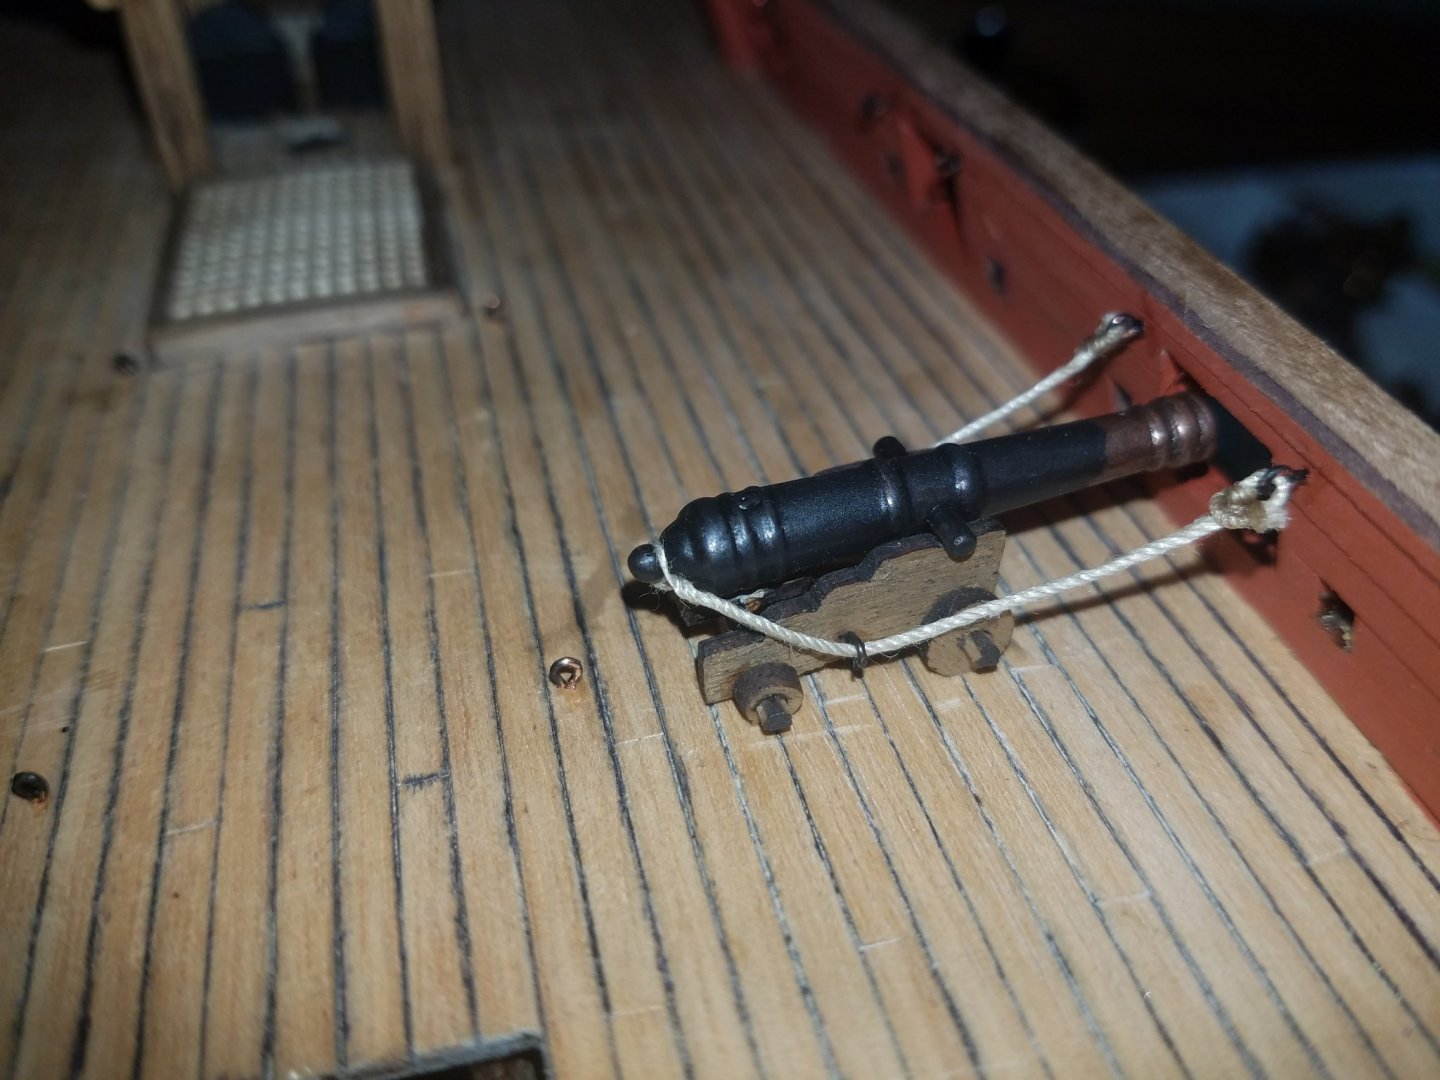
Keep in mind, the 200m/s muzzle velocity was just a guess, and that affects the calculation considerably. So does the friction coefficient I assumed on the wheels. It's great to see the cannon fire from the Bofors test centre! I was looking for such a video and all I could find was field guns firing actual shot, with everything else firing blanks. Cheers for that!
-
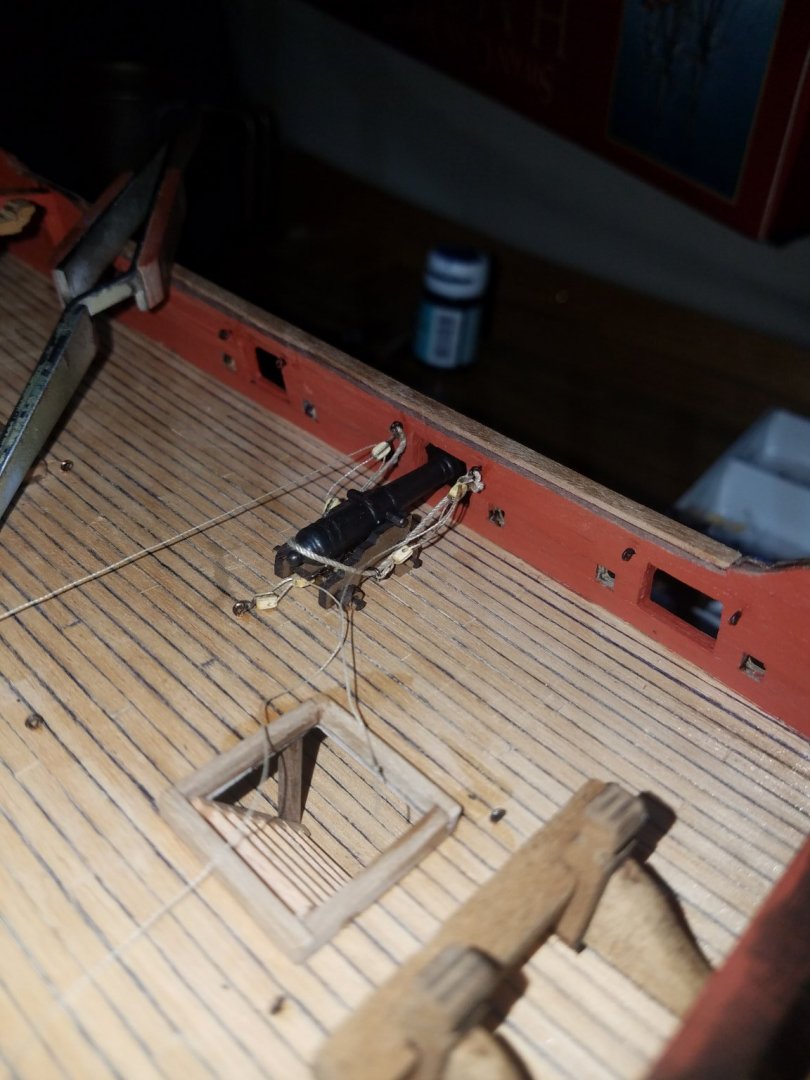
A bit of Engineering geekiness... 32 pounder, weighing 5500lb, firing at say 200m/s (guesstimate), would cause the gun to recoil at ca. 1.16m/s. That translates to a kinetic energy of 1,682Joule. To absorb that energy over a 1.5m recoil (just over 5ft), a constant force of ca. 1100N would be required, i.e. ca. 110kg force. Now, those guns were ca. 2.5te and the carriages had small diameter wooden wheels on wooden axles with fairly primitive bearings. I make the friction factor 0.1 or so, for a friction force of 250kg. Which means the gun would be very unlikely to ever recoil enough to get the breeching line violently taut, as the wheel friction alone would have stopped it a couple of feet before that. My guess is the breeching lines were probably an assurance.
-
Thanks for the background info on coppering! I remember a couple of drydocks in Norway, and totally get what you mean about asking for desertion 😂 White stuff it is then! I think it definitely looks better than the copper anyway, which is one of the reasons I got the Fly & upgrade set rather than the Pegasus. On the historical accuracy note; I was reading on the instruction sheets the bit about the decorations, and how the ship would have been very unlikely to have fought with the painted friezes. As I like the 'rough and ready' look she would have had in ops, I am now regretting applying the photo-etch 😂. I will use some spare PE on some spare wood and see how much mess is left behind if peeled off, and I might go for it and pull it.
- 59 replies
-
- 1
-
-
- Fly
- Victory Models
- (and 1 more)
-
I had to go down to the Big Smoke for work, and I became separated from my model for a few days, so no updates for a while. However, I got my hands on white paint, and I am taking my airbrush and compressor up with me on my return, so the waterline will be marked and the wetted parts will be sprayed a few nice thick coats of white! I am wondering whether it would be more appropriate for the era to copper-sheath, or leave it white. I think the white stuff will look lovely though.
- 59 replies
-
- 1
-
-
- Fly
- Victory Models
- (and 1 more)
-
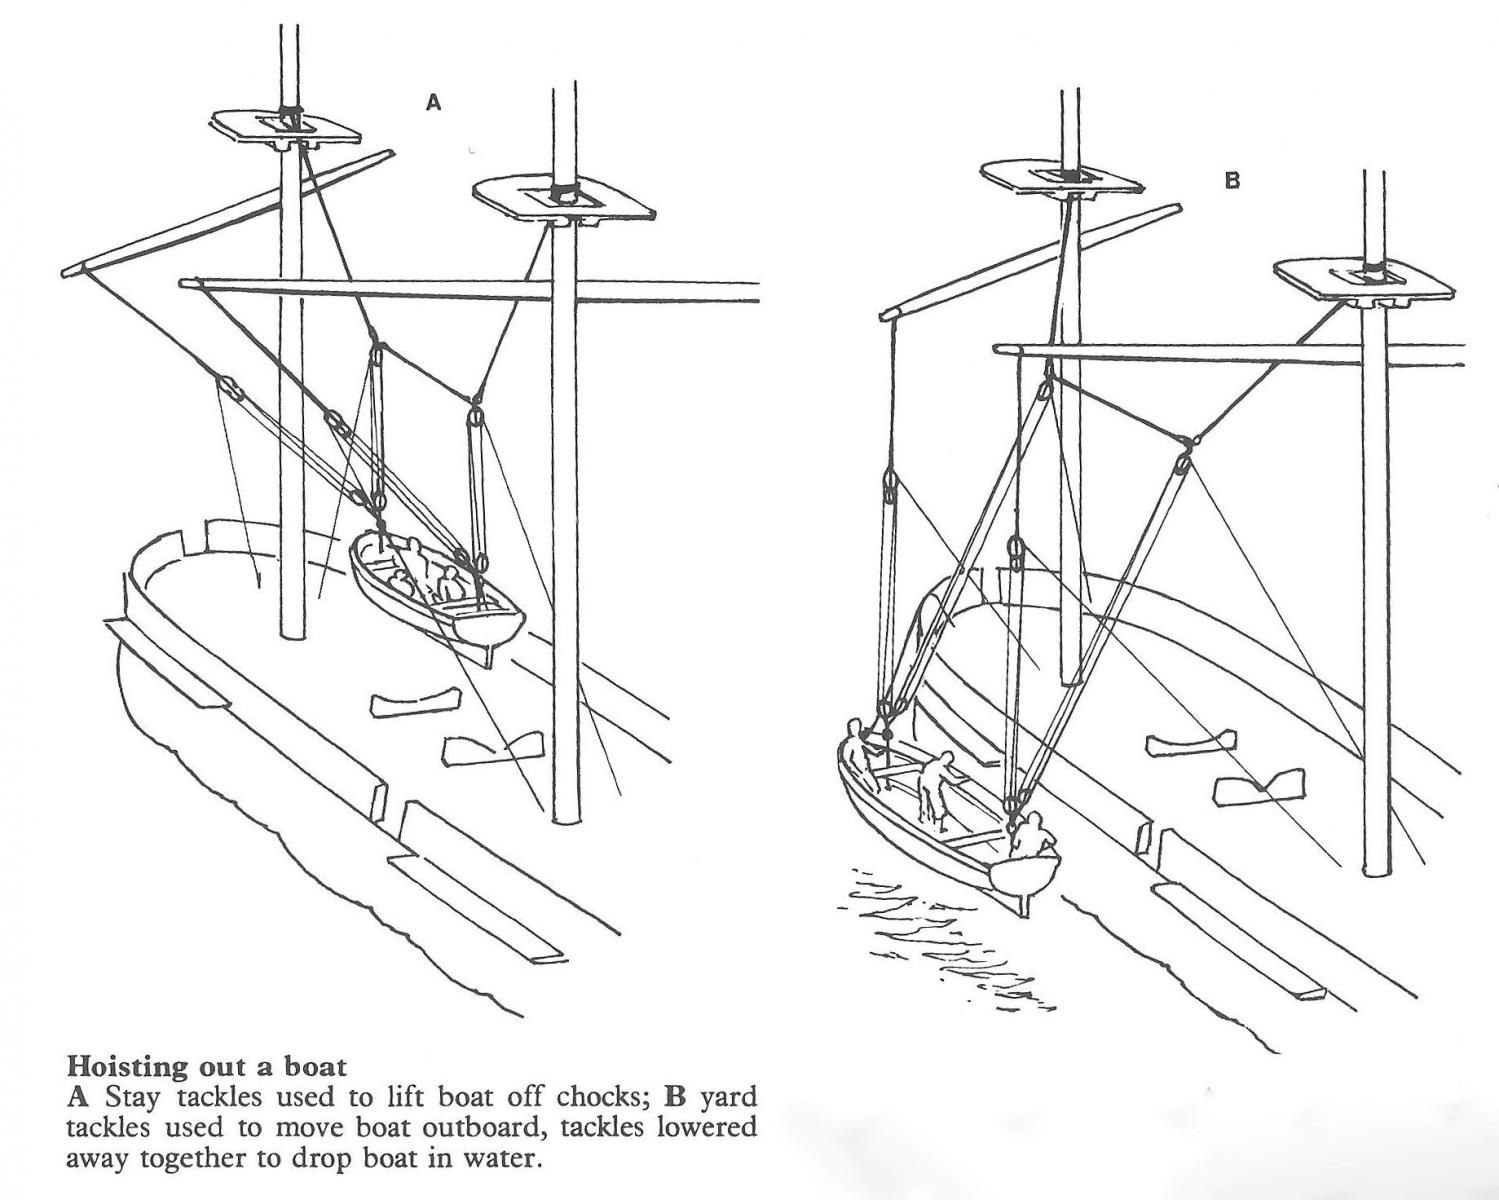
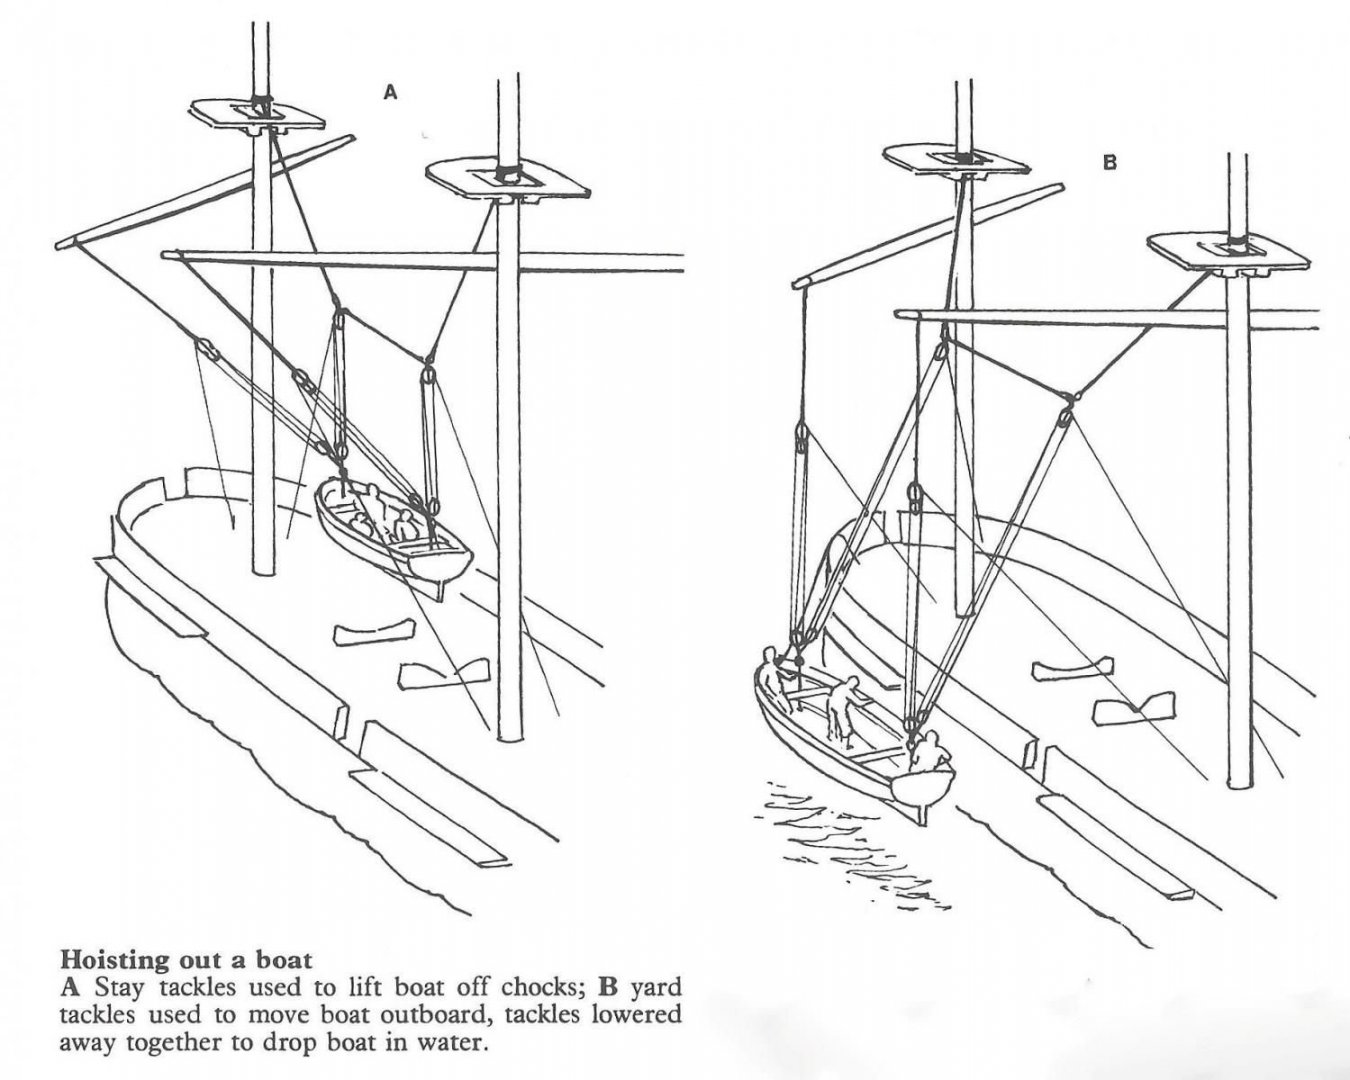
Yip, it looks legit! I would love to show the boat being deployed that way on my build. Though that causes a slight problem: the boat's length is much shorter than the spacing of the rubbing strakes that run up the sides of the hull. Judging from the spacing of those strakes, I would need a ca. 50% longer ship's boat. Or maybe one more strake in between what is already there.
-
Ok, I think I found the answer to my own question. Googling it was a tough one, as I had to scroll through hundreds of photos of boat launches at shipyards. They used the yards as crane booms: (I don't know the original source, so I cannot credit it. I found this on 'pinterest'.)
- 59 replies
-
- 6
-
-
- Fly
- Victory Models
- (and 1 more)
-
I have another question; The capstan bars would likely be stowed away under the quarterdeck, probably along deck beams, just like the gun ramrods etc. But how about the oars? They would be massive. The only place I can think of them going would be along the top of the bulwark, by the hammock cranes. What would they have looked like? Another question, not so much for including in the model, but more for information; how were the ship's boats launched, from the spot on the centreline to over the side? Using the yards as crane booms?
- 59 replies
-
- 1
-
-
- Fly
- Victory Models
- (and 1 more)
-
Should I weather the bows then, just below the bowsprit rails, with a dark brown shade? 😂 Thanks for that tip though; I had never thought of it! I knew they had sitting arrangements on the bows of larger vessels, but I guess one just squatted on the rails on a vessel the size of the Fly. I will just put some kind of handrail then!
- 59 replies
-
- 1
-
-
- Fly
- Victory Models
- (and 1 more)
-
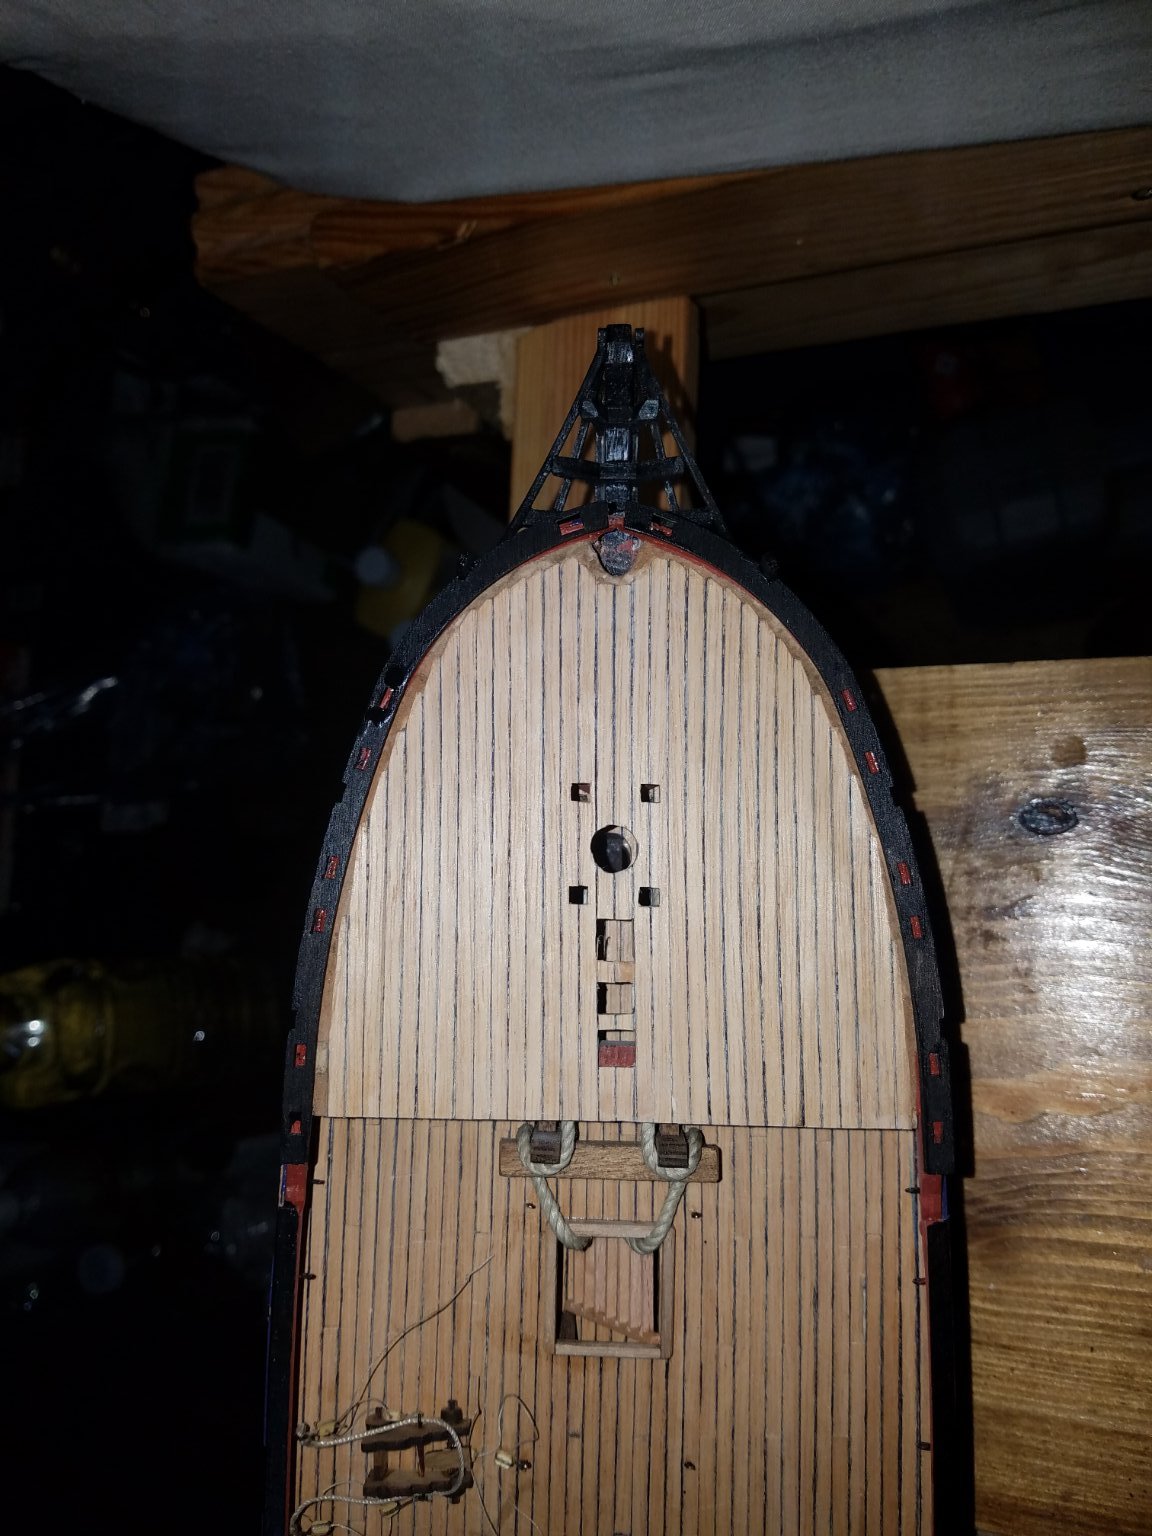
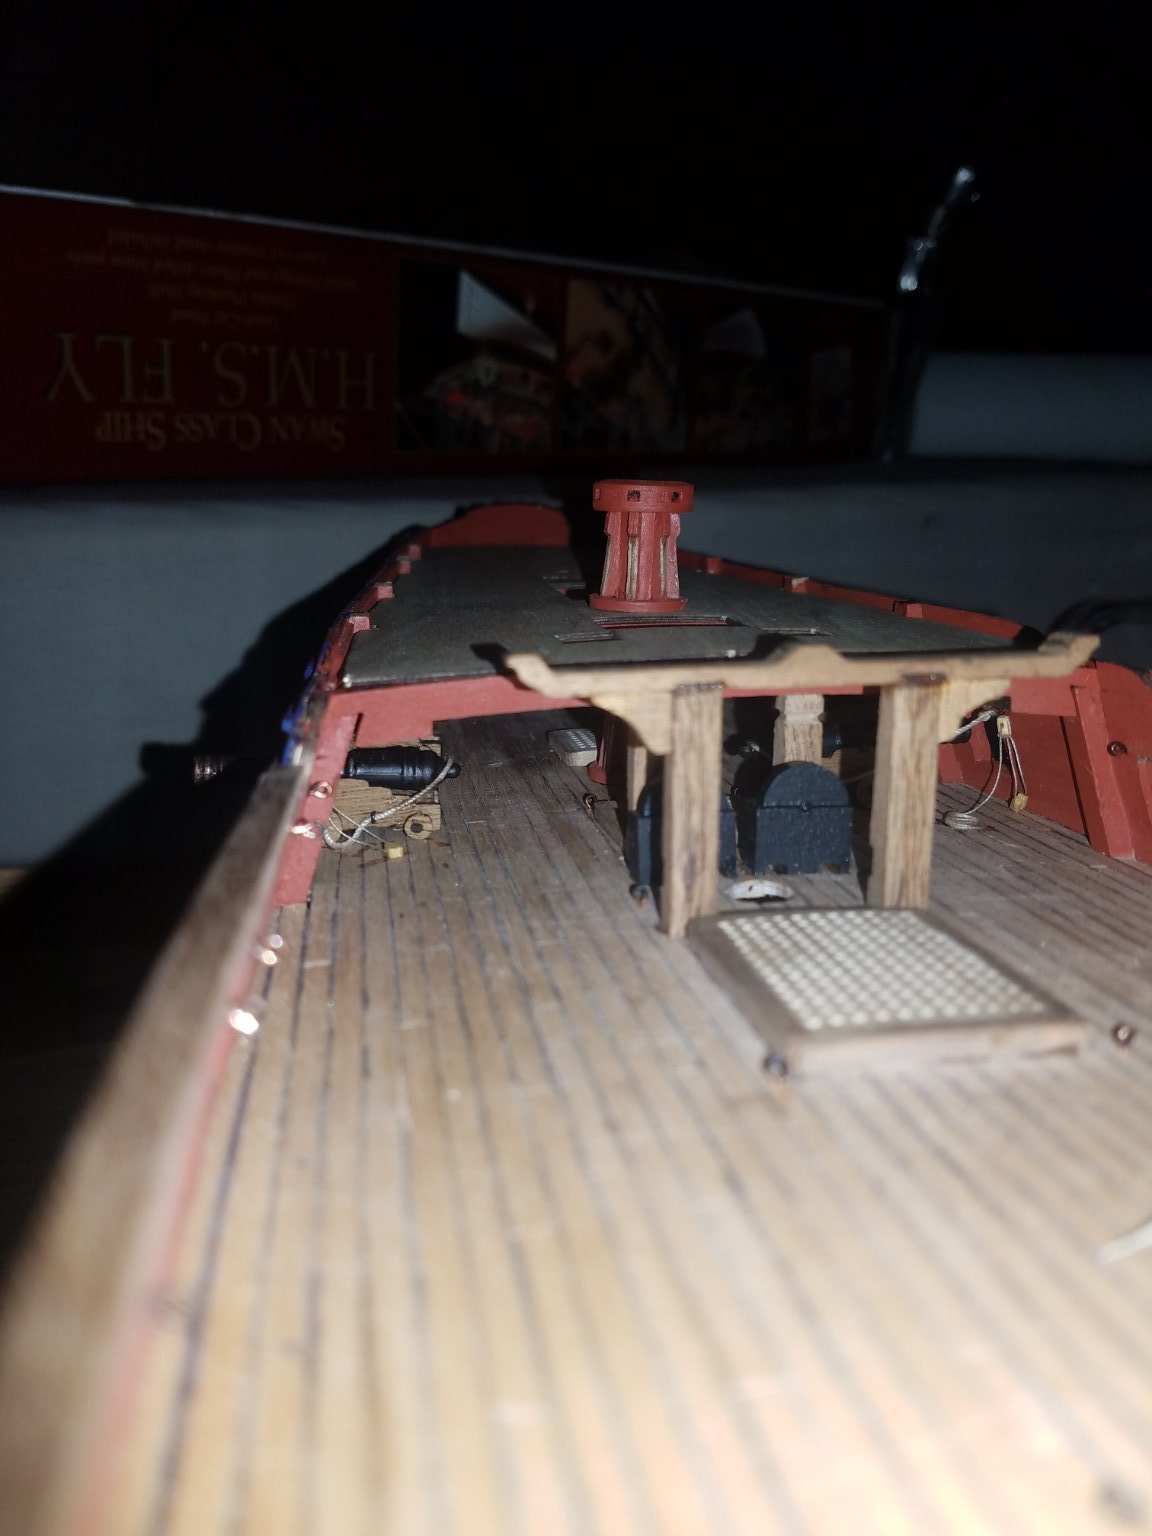
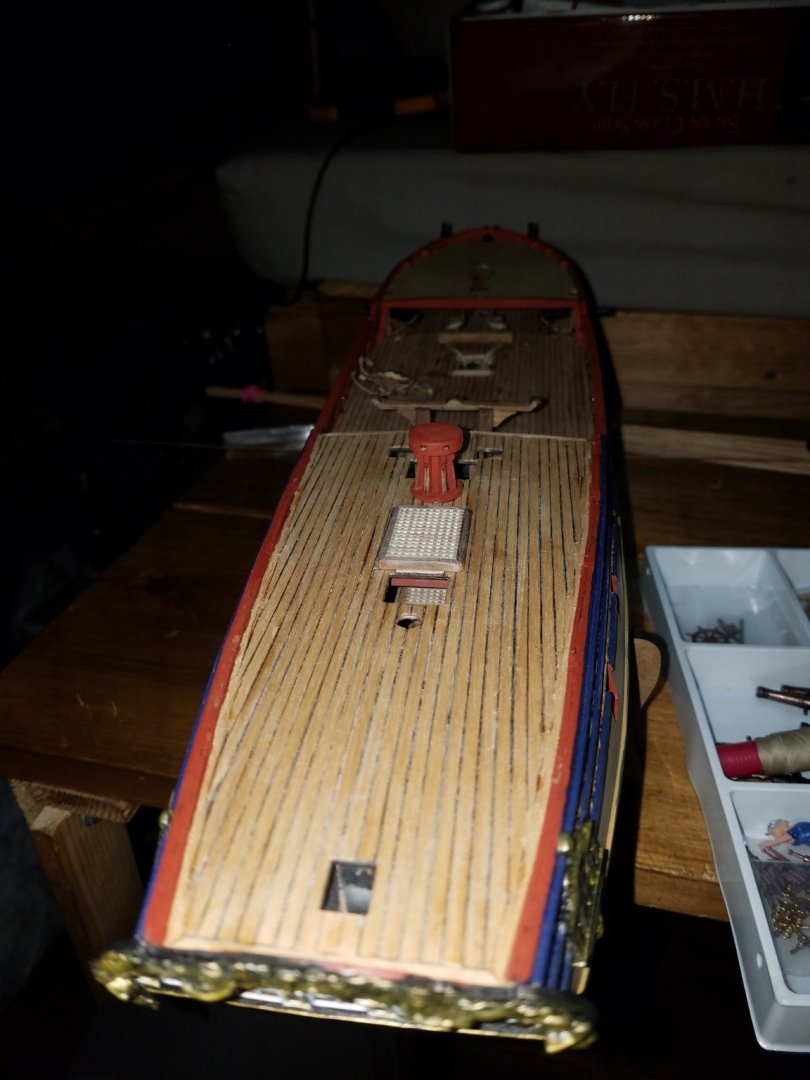
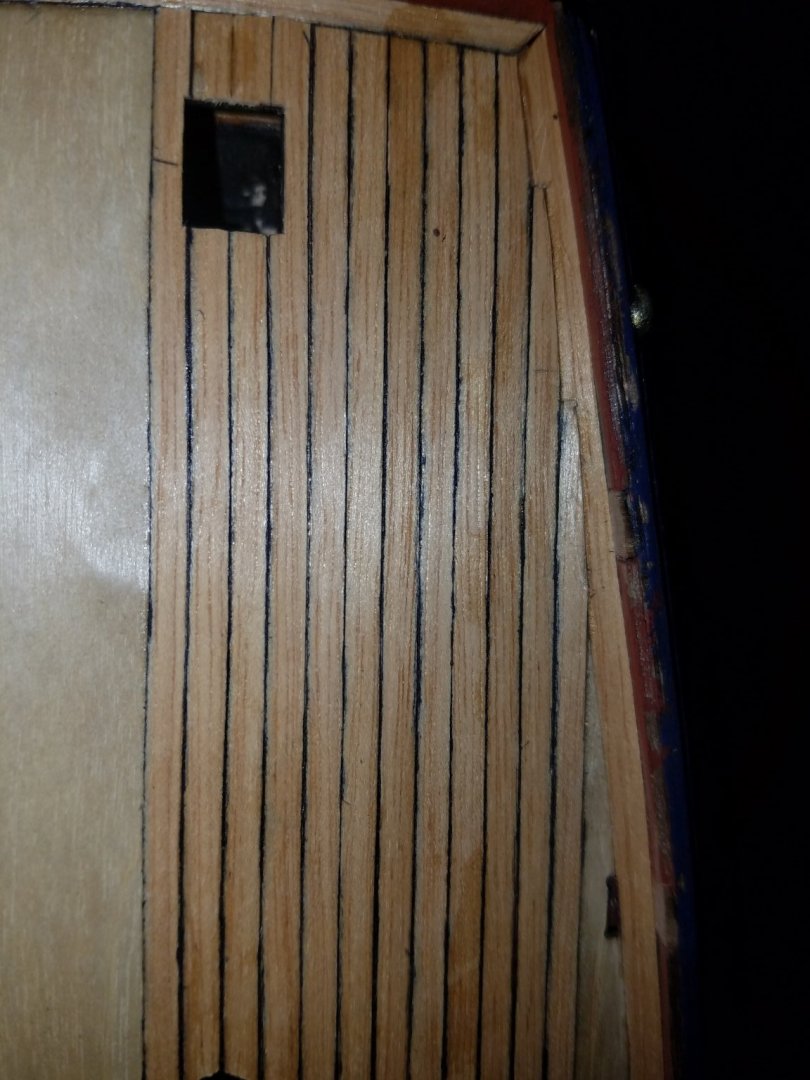
And that is all the decks finished (apart from the aft end of the forecastle, which needs the margin plank and the supportint beam and brackets below it). I must admit to something that may make the purists barrel-roll in their beds tonight 😂 I did not have any suitable wide and thin planks to use as a margin plank on the rounded section, so I cut the planks as if they were butted against a margin plank, then used filler and sanded it to look level. Looks decent enough to fool most inspections, but best to own up 😂 What do you do with grating the rails above the bowsprit? Would they have been grated-over, or just left as they are?

- 59 replies
-
- 3
-
-
- Fly
- Victory Models
- (and 1 more)
-
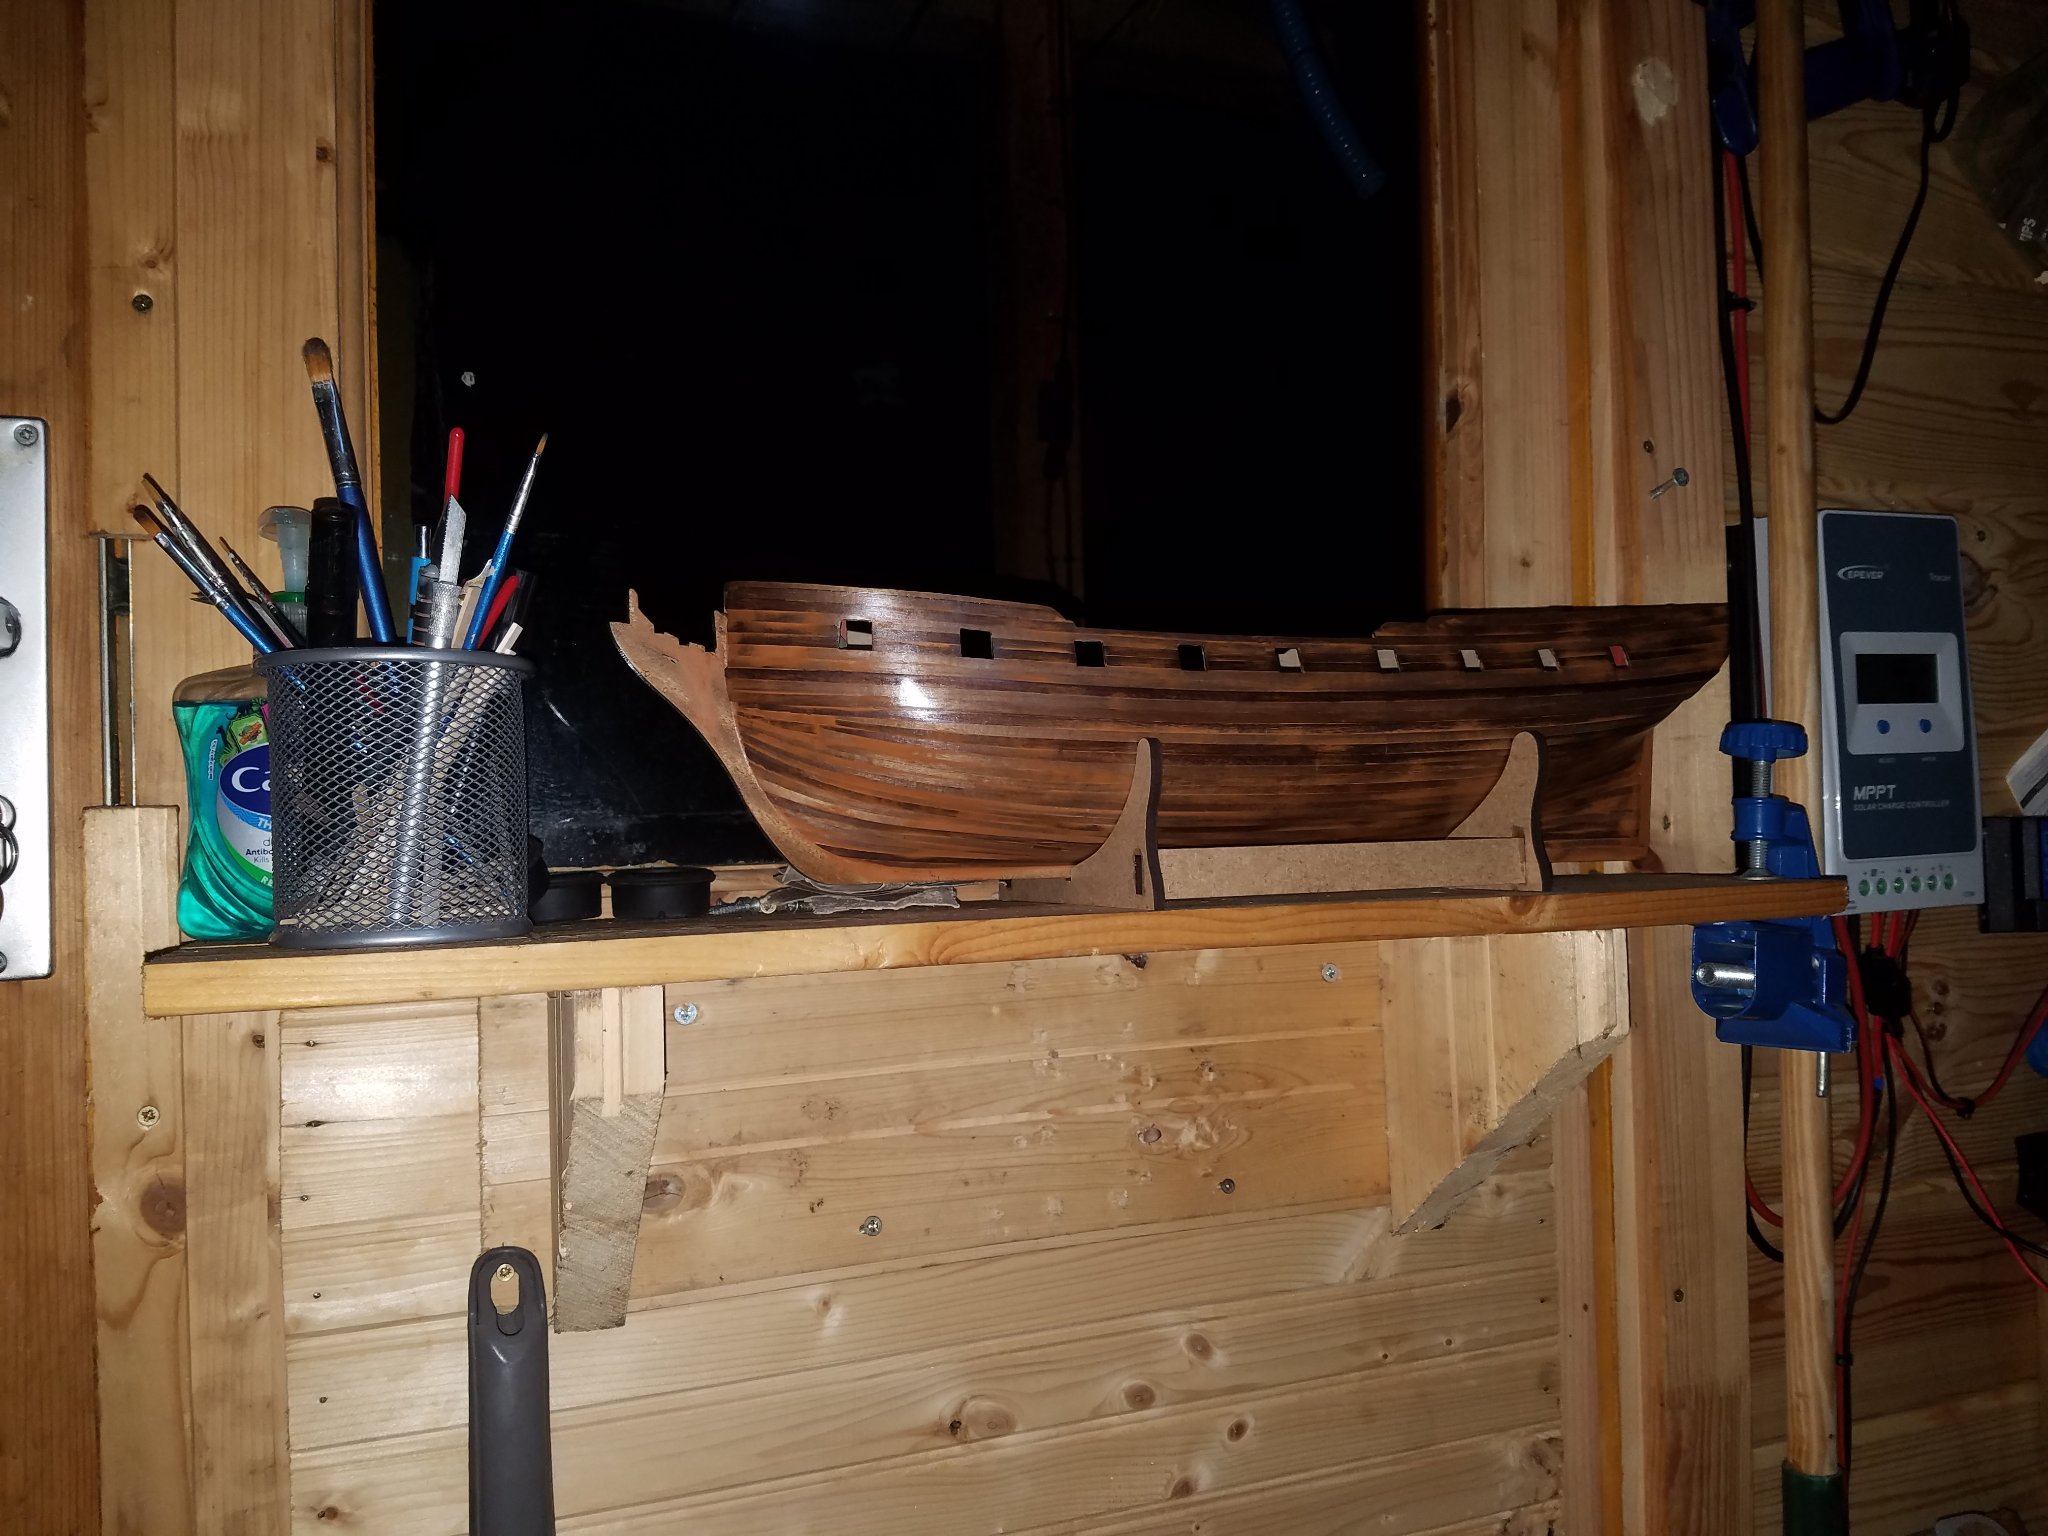
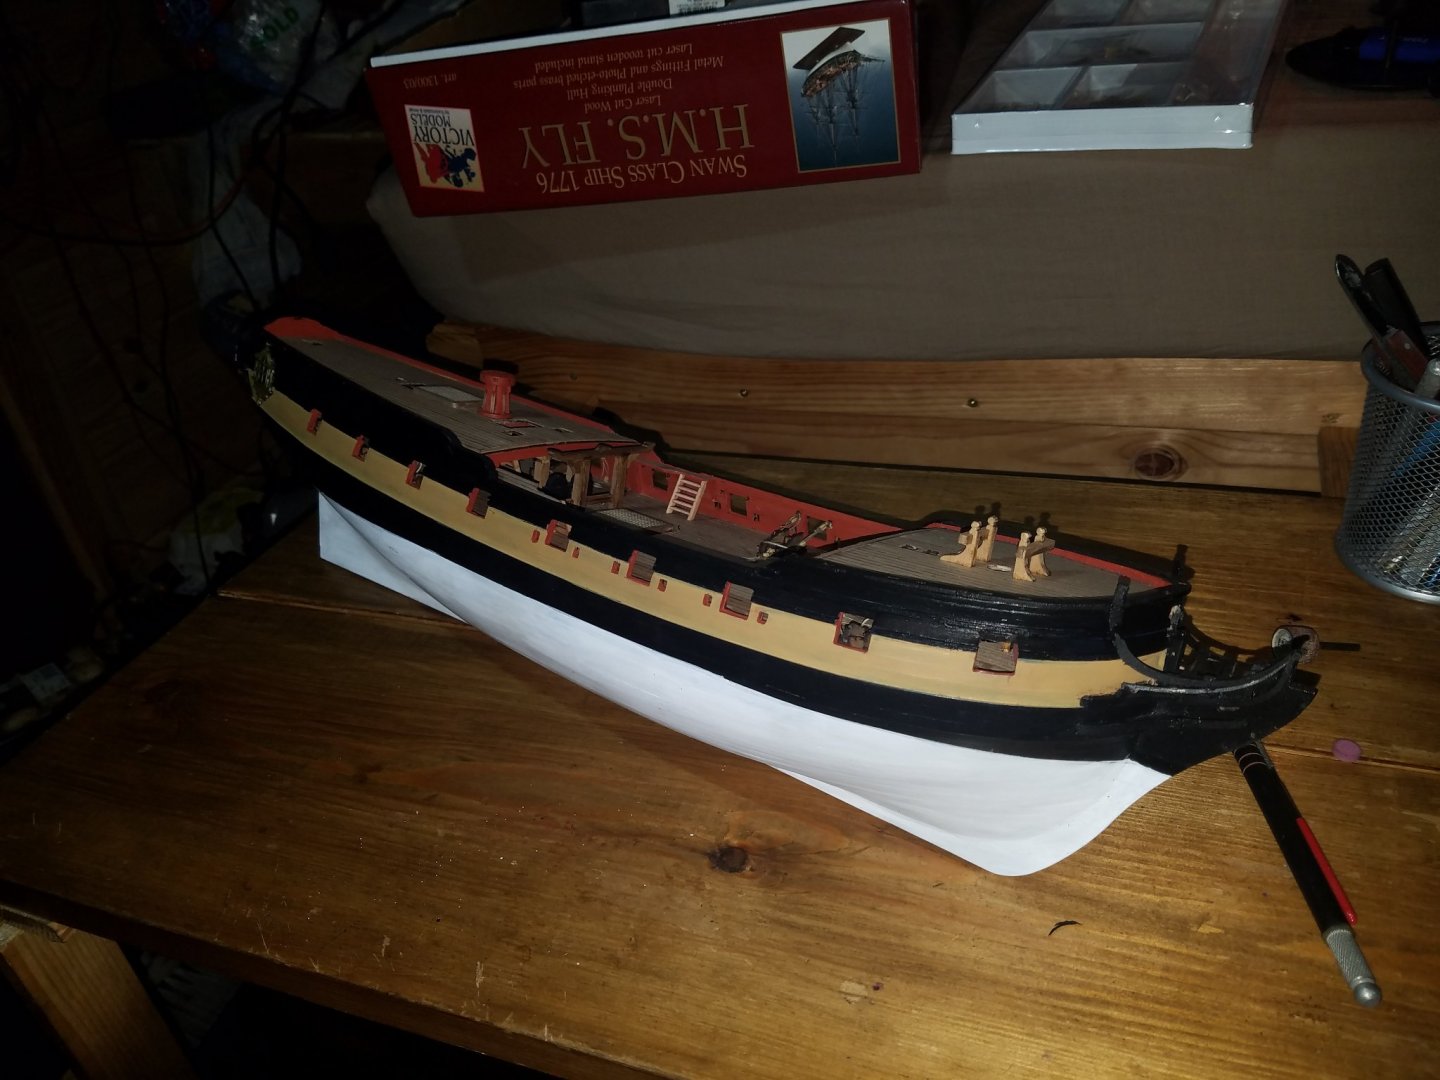
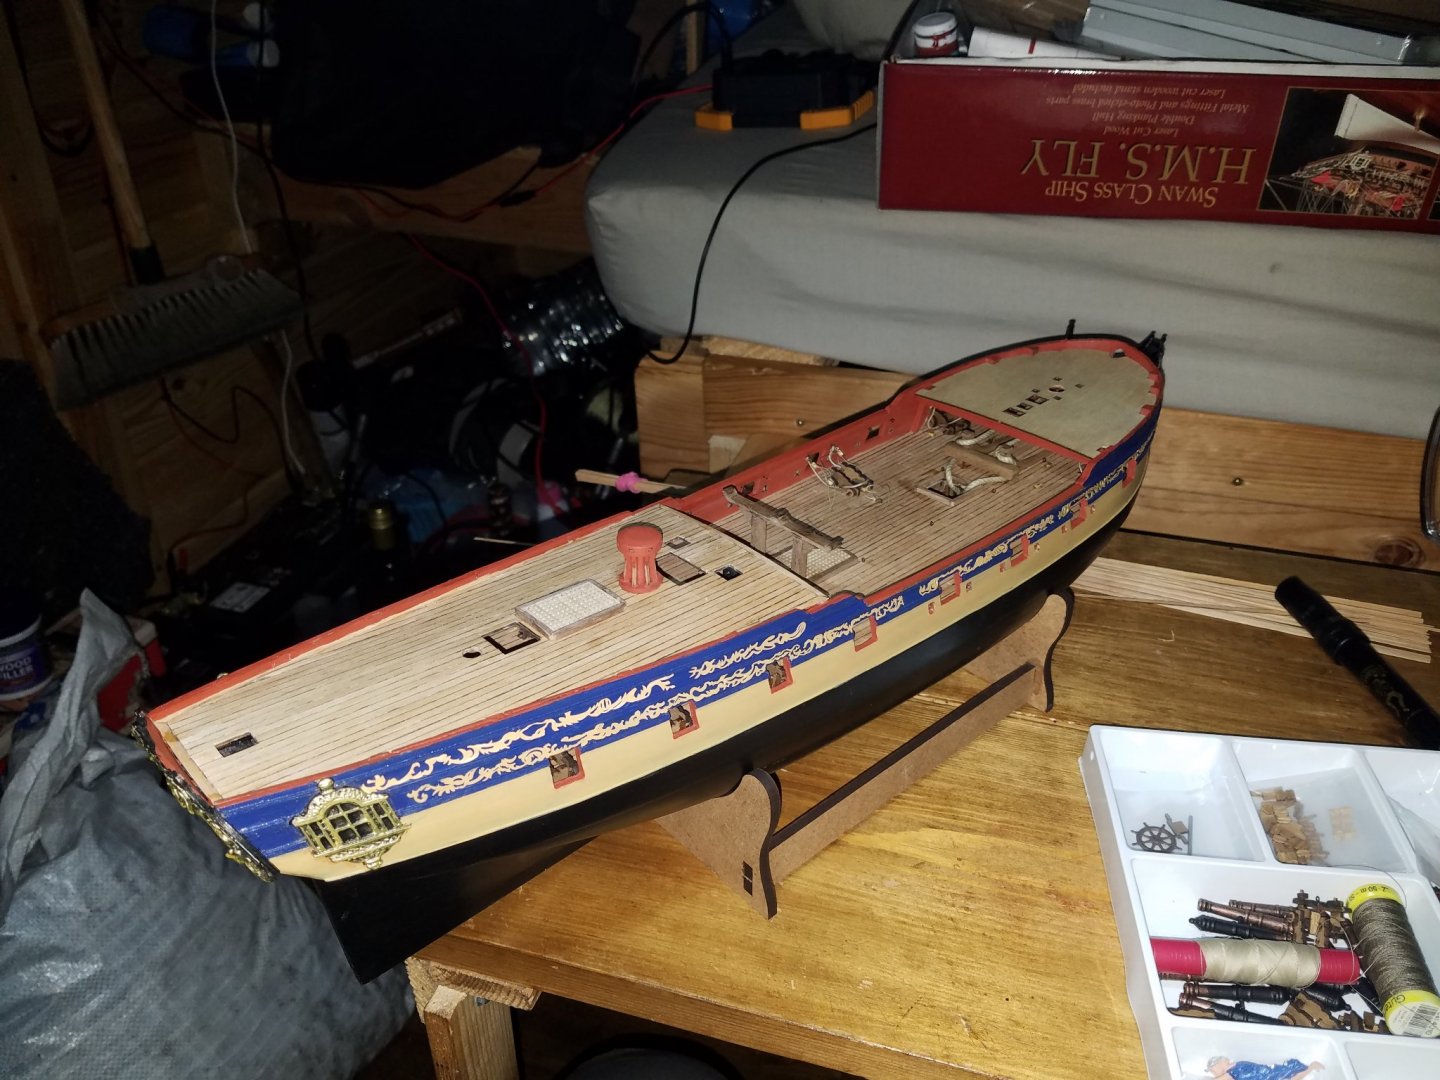
Quarter deck done, maybe a light sanding needed. Made a start with the foredeck. The guns are not glued, but the carriages are, and rigged ready for firing (thus the run-out and haul-in tackle is disconnected). A few superglue marks 🙄 At least they do not show without the flash. I am not the best at following build manuals and made a couple of mistakes, but she is looking good. Once I get my compressor sorted, I will spray the bottom white and likely paint the hull between the whale and waterline in yellow ochre. The hull curves are just too beautiful to bury them in that black, so the variation in colours will help bring them out more.

- 59 replies
-
- 5
-
-
- Fly
- Victory Models
- (and 1 more)
-
Has anybody done a Pegasus or Fly with a full set of sails rigged? I would love to build it with at least some of the sails up, trimmed for reaching and filled with wind, but not sure of a) their size and b) how to make them 'full of wind'. If you know of a log showing how to do that, please fire away! I've done sails before, in my 20s, but they looked limp and the stitching grossly out of scale.
- 59 replies
-
- 1
-
-
- Fly
- Victory Models
- (and 1 more)
-
The margin plank on the quarterdeck. Doing the same around the curves of the forecastle will be... interesting 😂
- 59 replies
-
- 2
-
-
- Fly
- Victory Models
- (and 1 more)
-
I love your 2nd planking, and you did a very cool tapering job, with the planks following the natural curves of the hull. Well done! I coated my hull with cellulose dope. It ended up looking pretty good and it really brought out the wood tones, so maybe you can make up a small piece of plywood planked with the 2nd planking strips and try it, to see if you are happy. Note that I painted my hull and only used the dope to seal it, but I personally would have left it on the dope had I decided not to paint it. Here are a couple of pics to show you what it looked like when doped (I used a lot of filler, as I was going to paint it and didn't care much about making the 2nd planking super-neat). I guess a glossy varnish would have the same effect; the other guys here will be a lot more experienced with varnishes and should be able to suggest the best stuff!


-
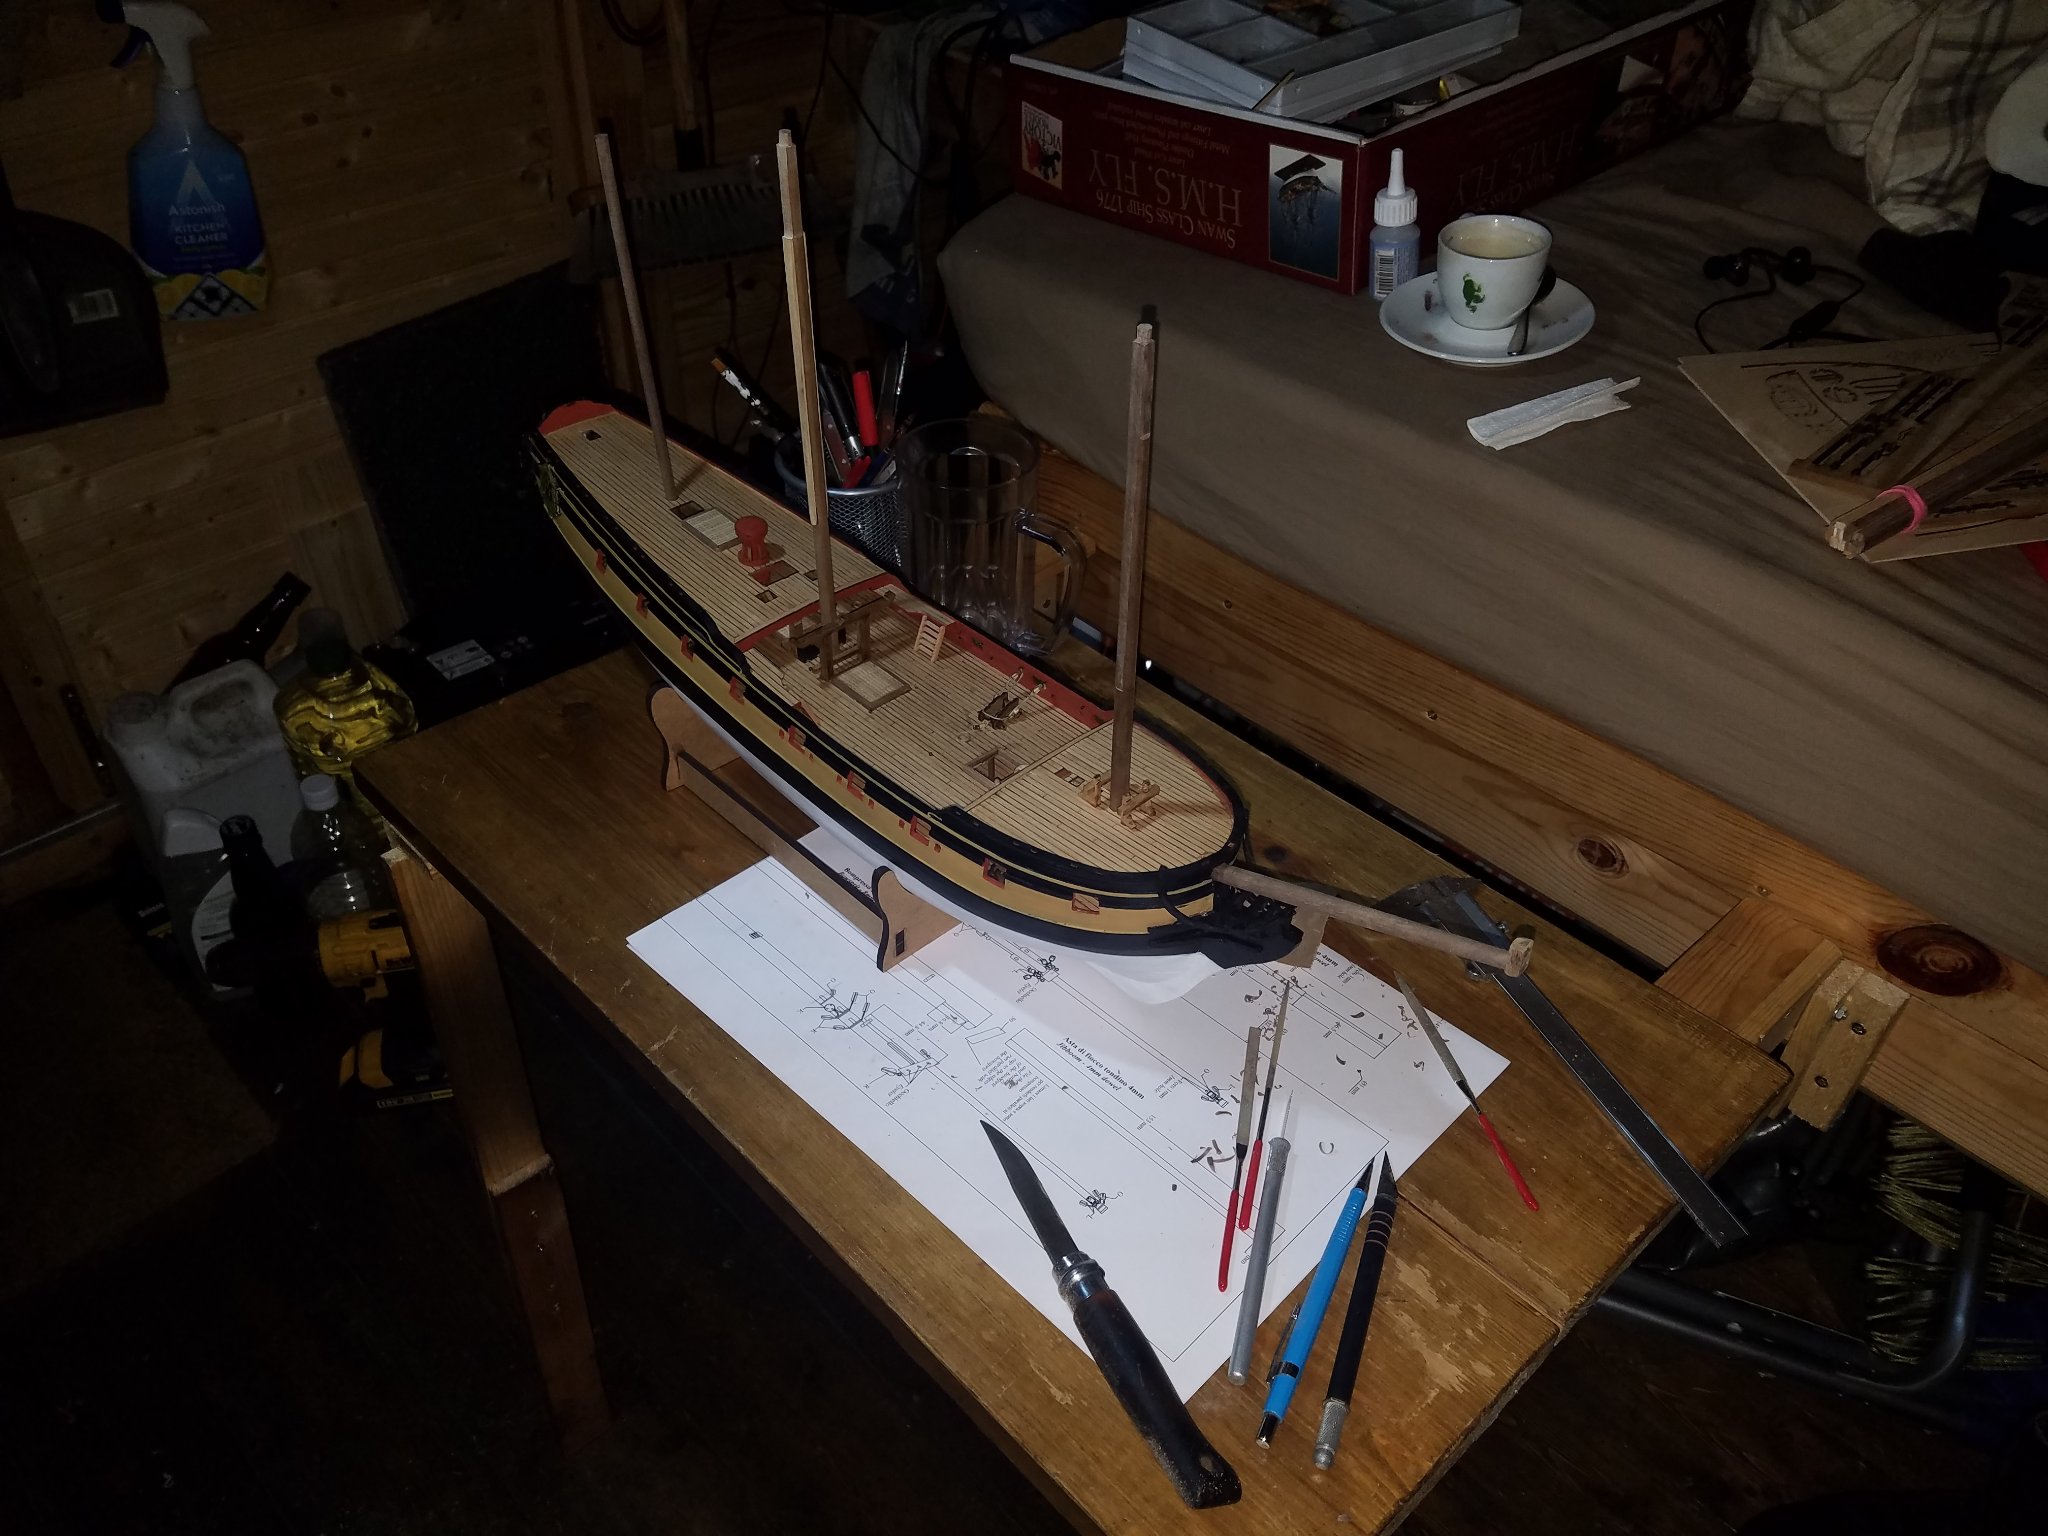
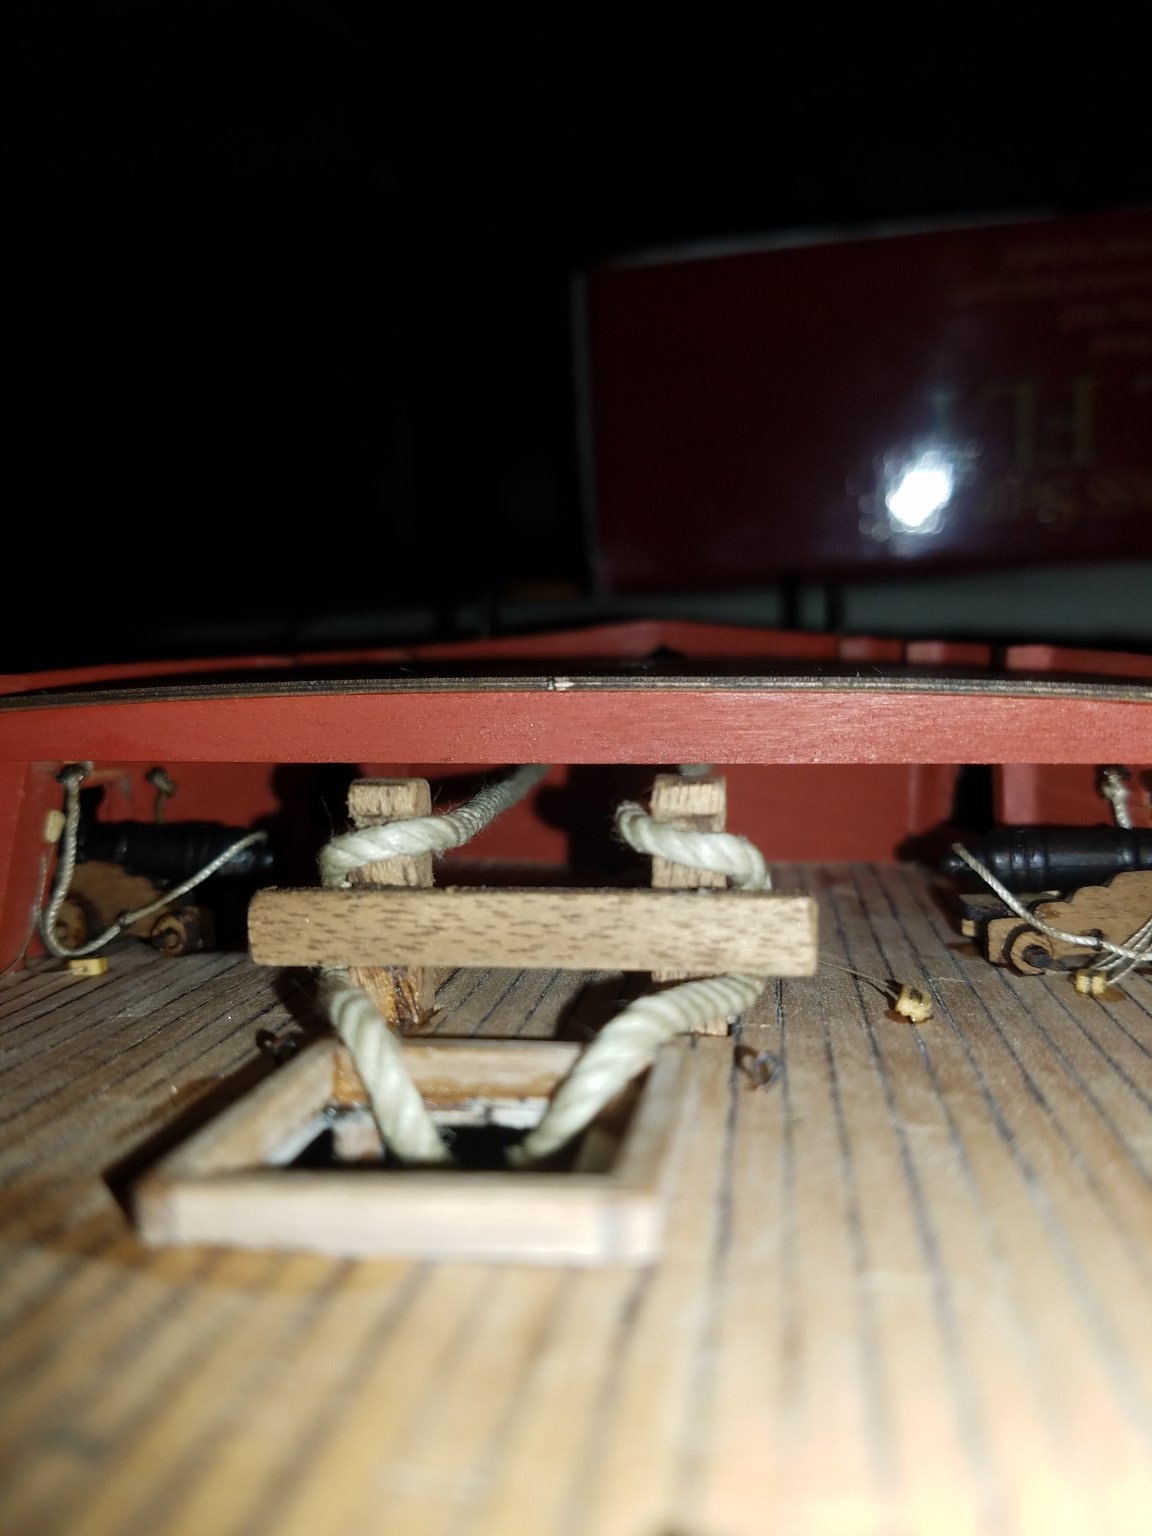
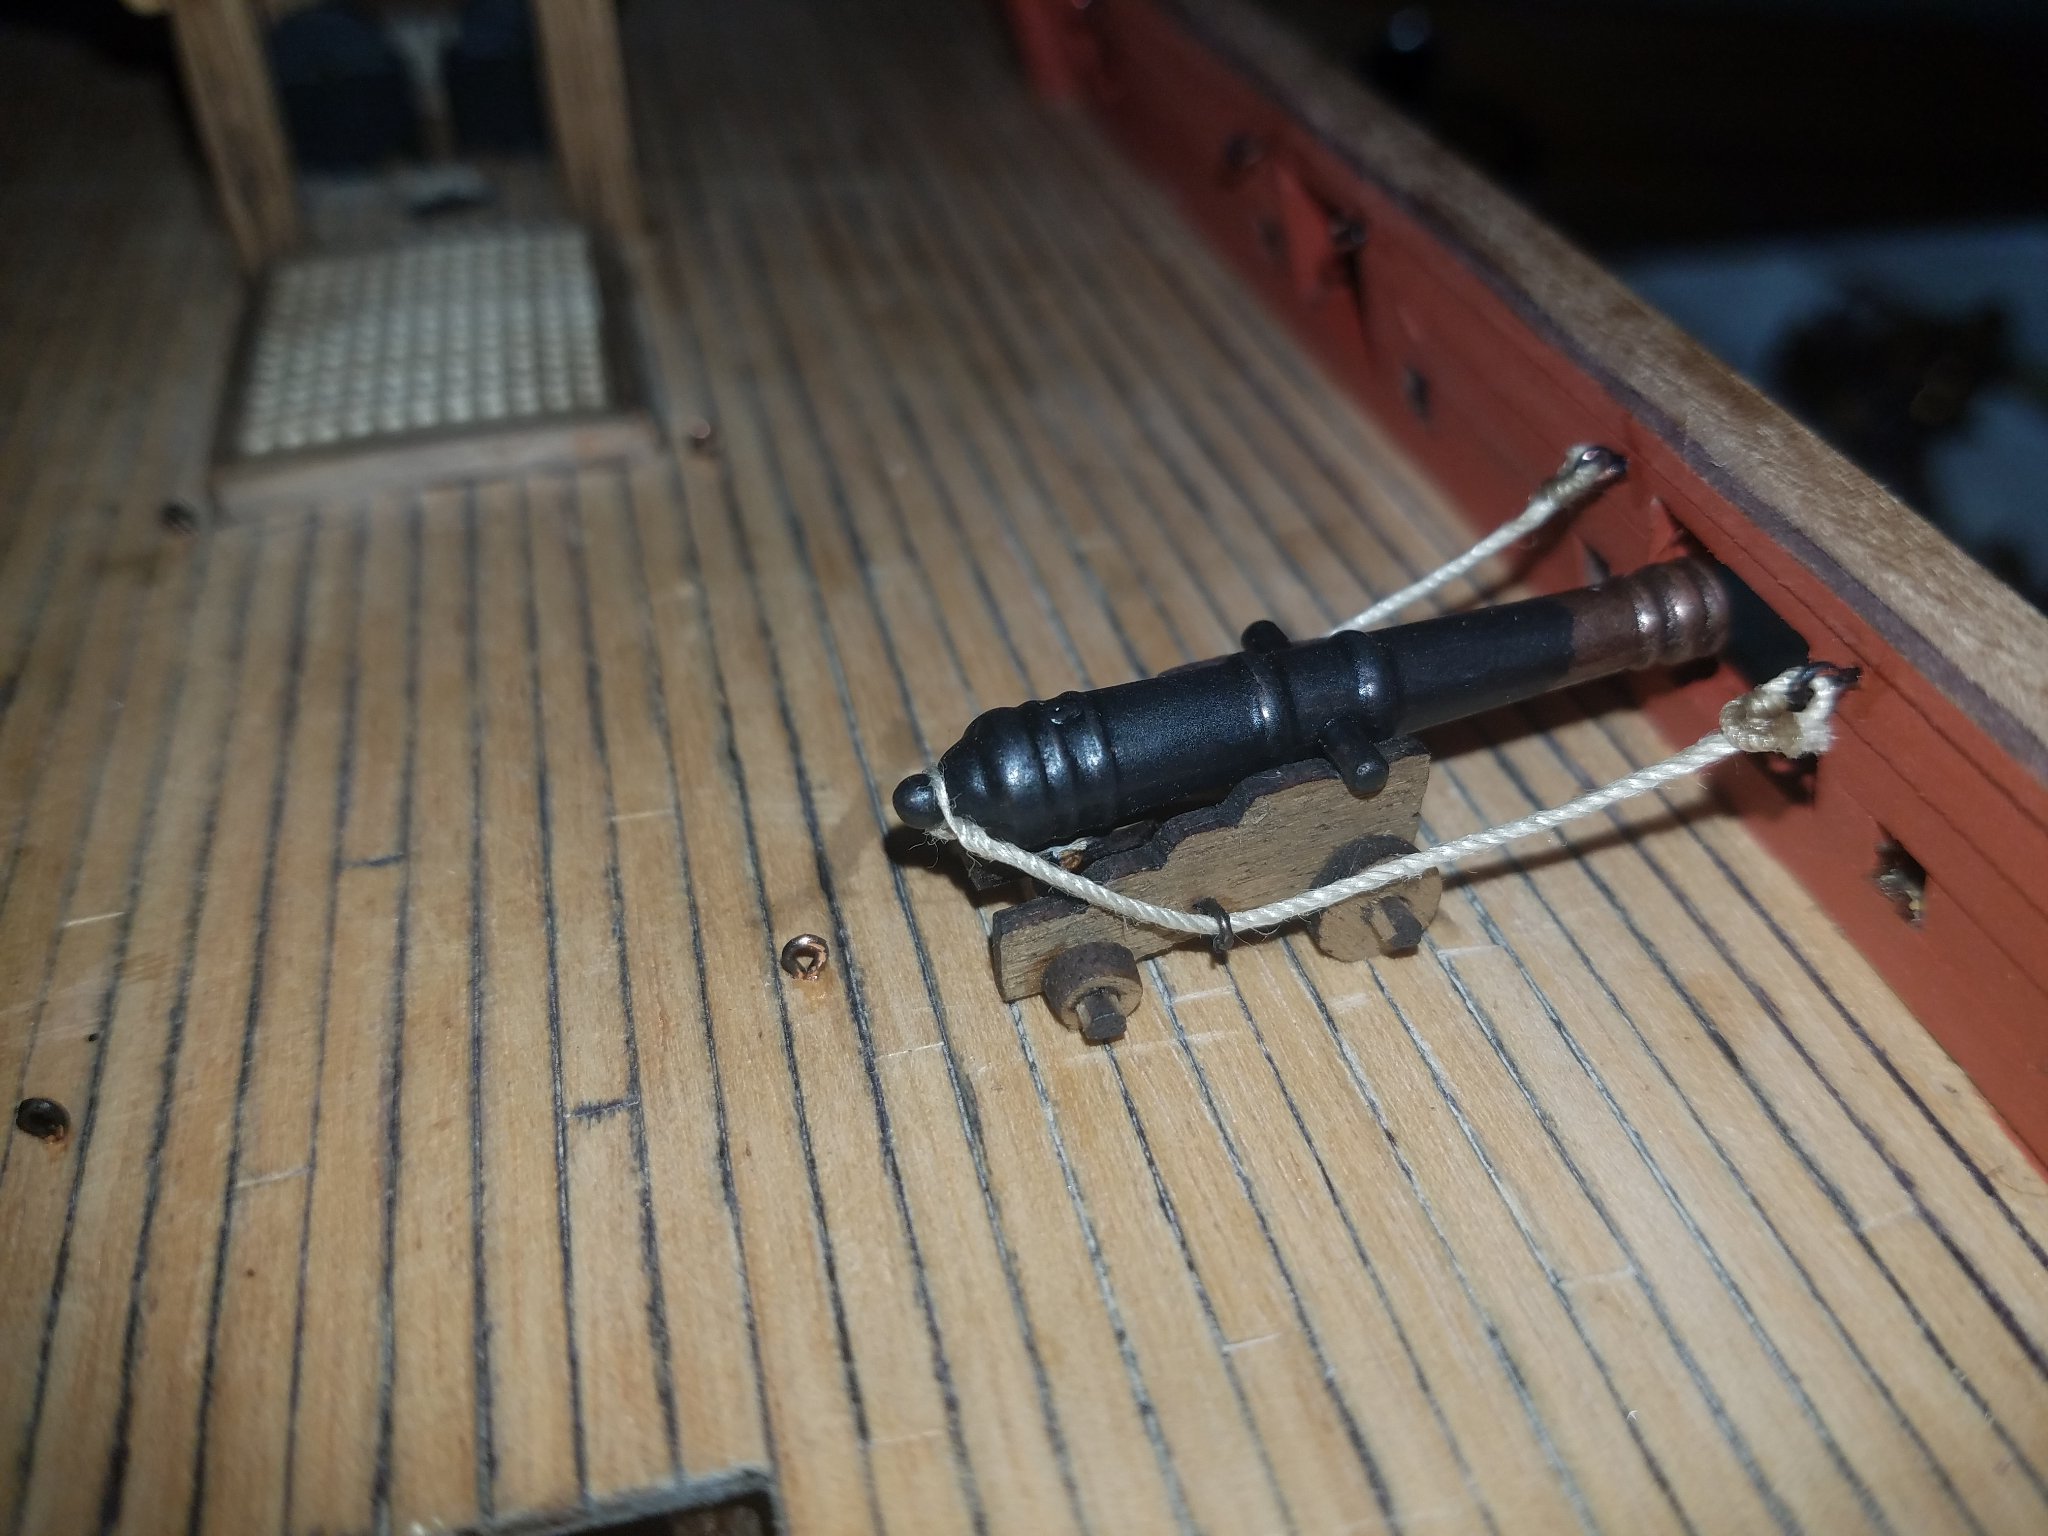
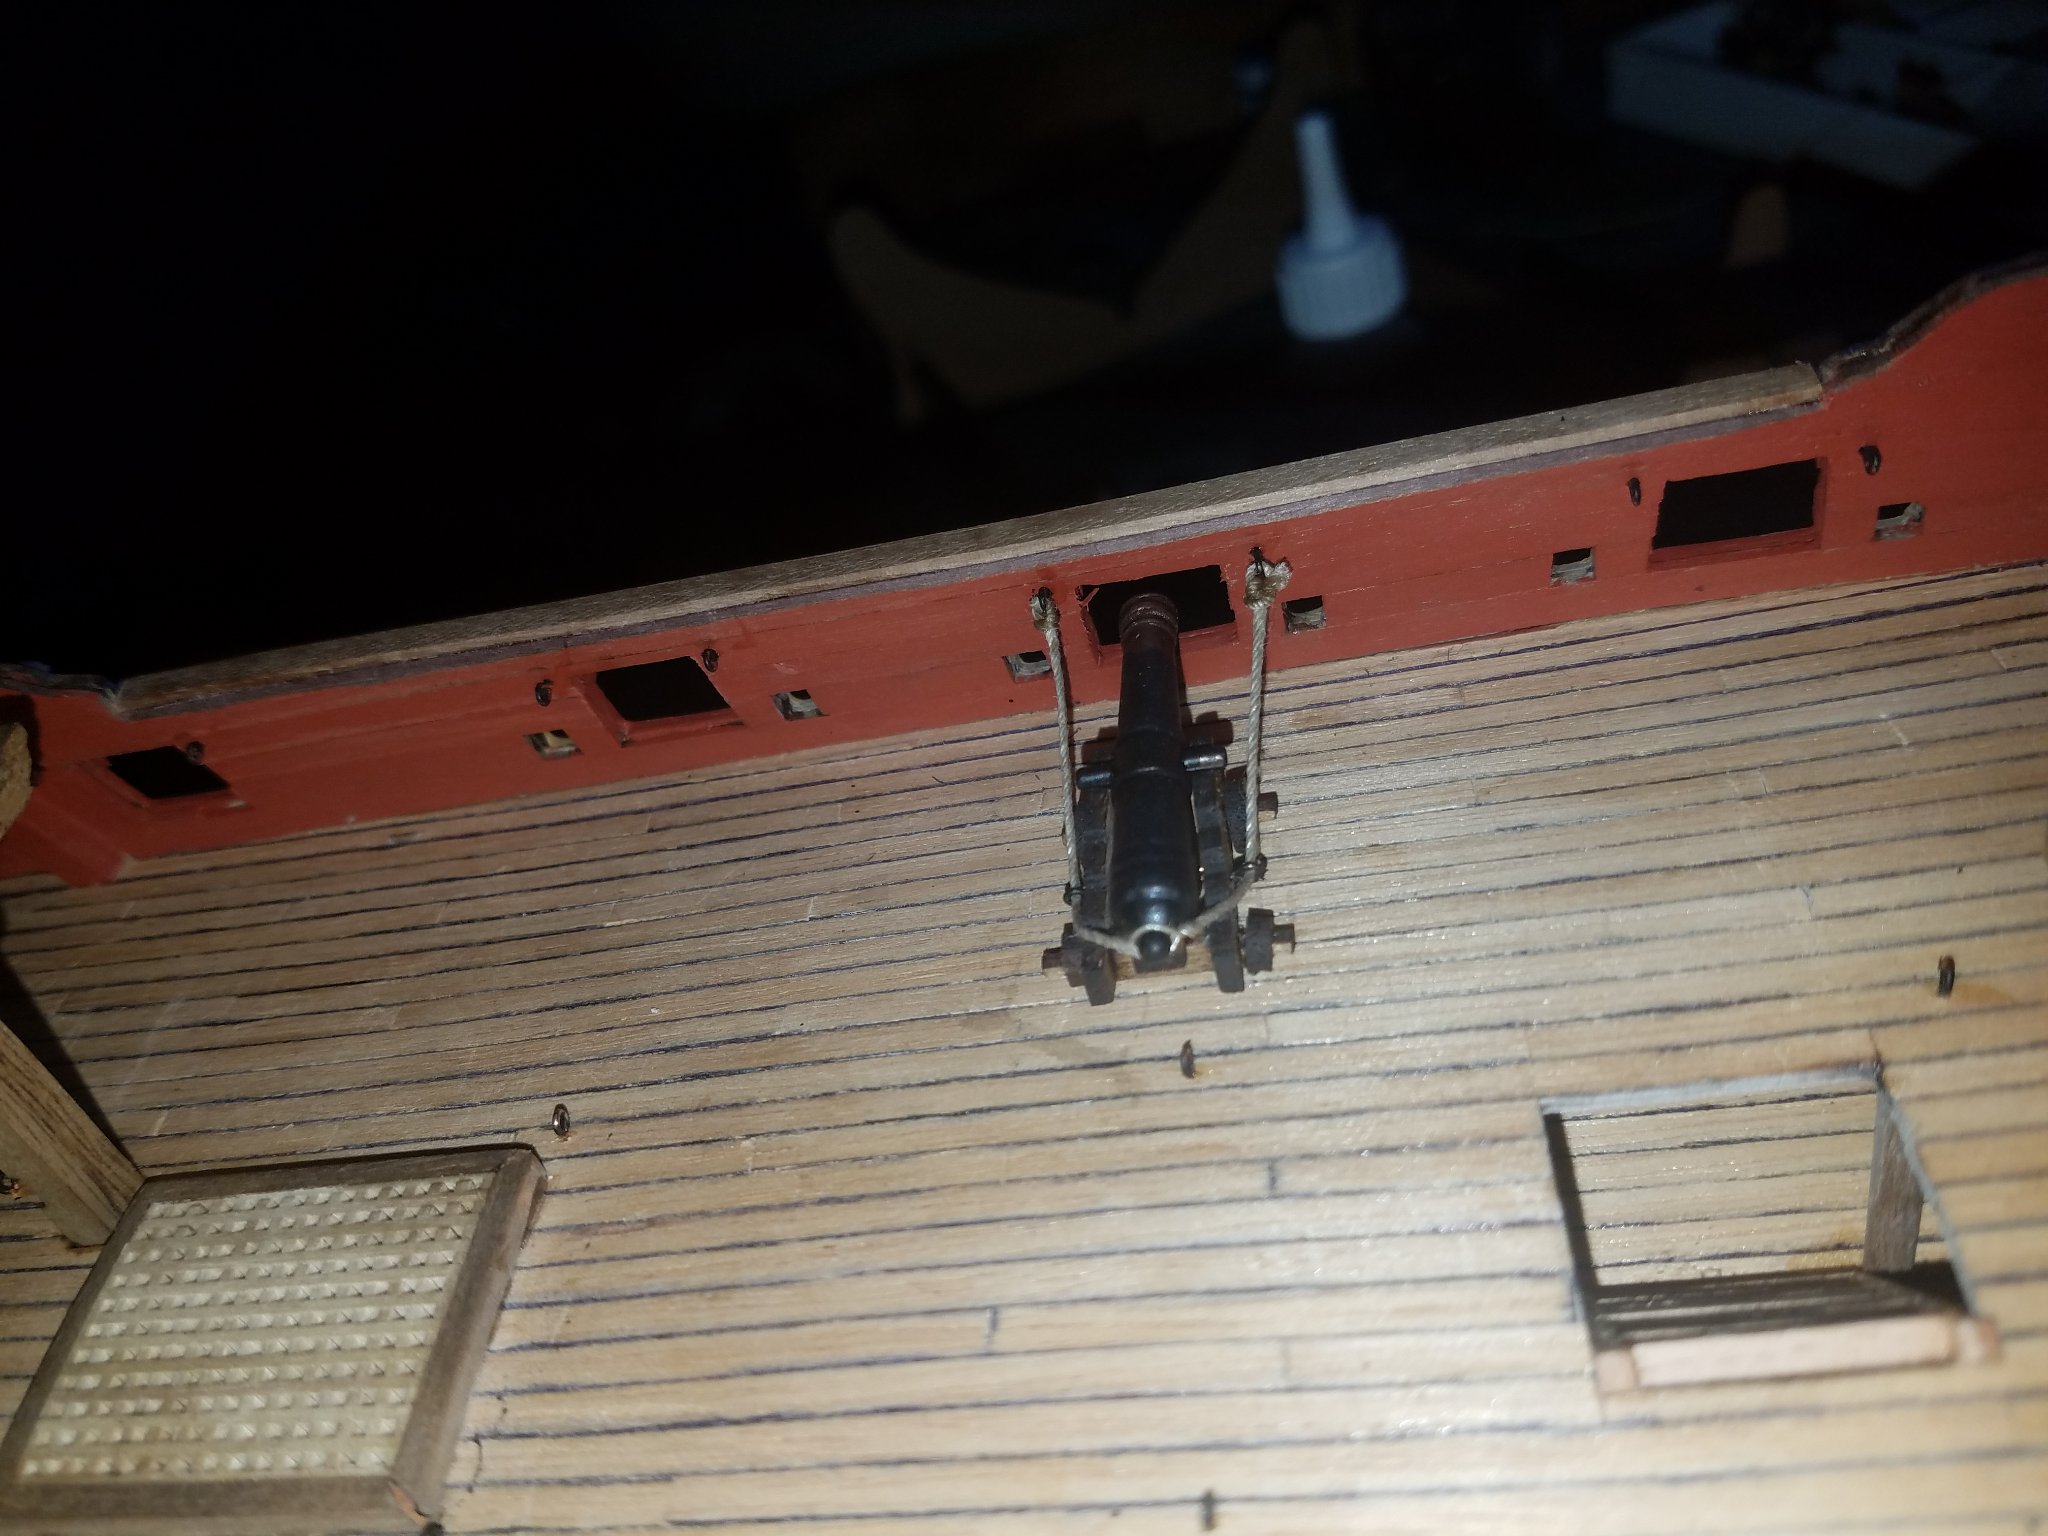
A bit more progress. I worked out how to rig the guns 😊 It's not perfect and I cheated on a couple of points (I glued one of the haul-in blocks to the carriage, and the run-out rigging connects to the same rings as the recoil rope, but I wasn't going to put 5 rings on something the size of my pinky's nail 😂) but it will look convincing enough! The first mistake! I installed the main mast bits facing the wrong way. I tried to pull them out and it won't happen, but I'll work something out. (Those two columns are facing the wrong way) Quarter deck is now glued in place. The masts & bowsprit are the correct lengths, but not profiled; just installed to see what she looks like! Further to that, I have also removed the tops of the 'frames' that stick above deck level and made a start with planking it. The foredeck and quarterdeck will have margin planks, although I might come to regret that decision once I hit the highly curved section on the foredeck! More in a few days, have a great weekend everyone!

- 59 replies
-
- 3
-
-
- Fly
- Victory Models
- (and 1 more)
-
I will be following your build keenly, and it will likely be my next build! I was looking at the Vanguard range just yesterday!
-
Ok, I had a look for a few videos and a bit of reading up on wikipedia. This is a good one; It turns out the ring positions are spot on by Amati. The muzzle would not come inside the hull, but recoil just about flush with the bulwark. The gun crew would sit on the gun port and swab, ram etc from the outside.
- 59 replies
-
- 2
-
-
- Fly
- Victory Models
- (and 1 more)
-
I've made a bit of progress with the deck and fittings. I can see this is going to take me a while, which was the whole point of starting HMS Fly (aka HMS Lockdown)! Thinking about the guns. I will be going for a few of them shown in the 'ready' position, some stowed for sailing and a couple in the fired/reloading position. This is a 'fired' one (haul in/out tackle still to be added). Does this look about right in terms of recoil? Would it be possible to reload there, or would the gun need to be pulled further back? I am starting to think the haul-in rigging's deck rings should be further inboard!

- 59 replies
-
- 2
-
-
- Fly
- Victory Models
- (and 1 more)