
Sooty
-
Posts
76 -
Joined
-
Last visited
Content Type
Profiles
Forums
Gallery
Events
Everything posted by Sooty
-
Hey, nice work! We are both at similar stages, I just finished my second planking on the Fly last week and I have moved on to decorations and the deck details. Pay a bit of attention to getting the whale and the various strakes symmetric between port and starboard, and you'll be fine with that hull! For when you are putting the strakes on (the small 1mm and 2mm walnut strips running along the hull, dividing the decorations), I noticed that the decorations are exactly one 1st planking strip wide, so you can use one of those as a spacer for the strakes to get them real neat.
- 164 replies
-
- 1
-

-
- fly
- Victory Models
- (and 4 more)
-
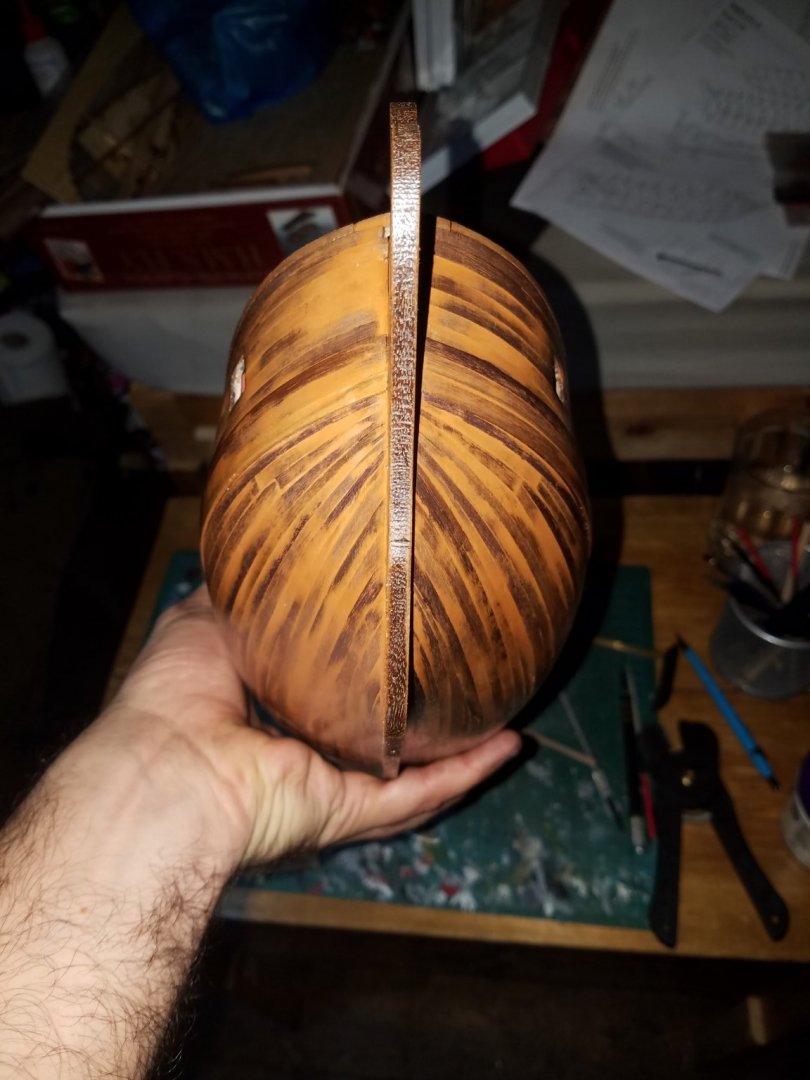
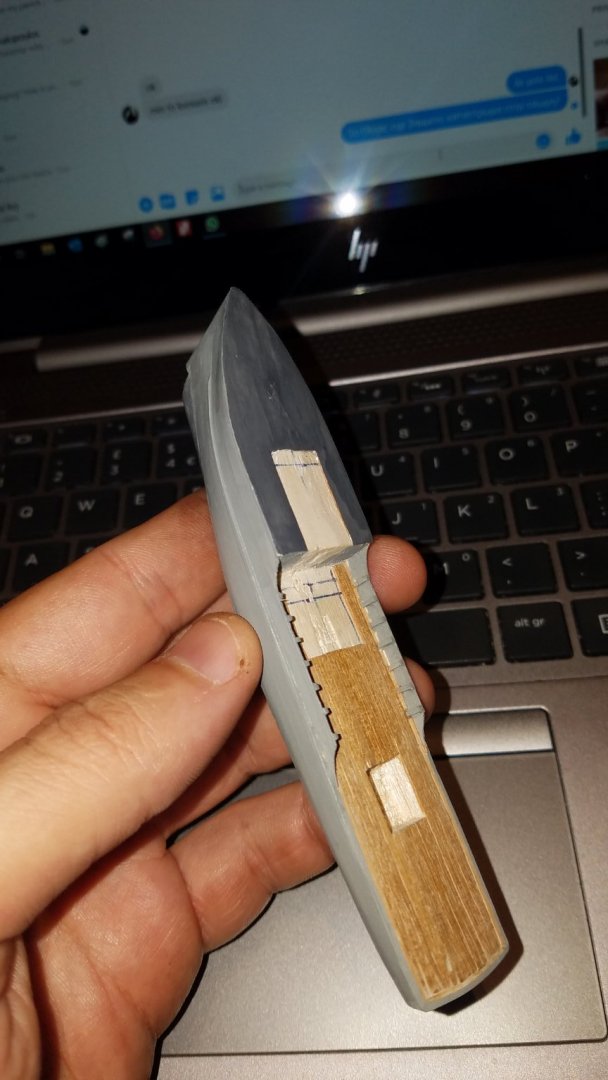
I can't find any particular part number on the drawings, so I take it the bulwark capping rail on the section between the fore- and quarter decks is to be made from a spare plank from the 1st planking?

- 59 replies
-
- 2
-
-
- Fly
- Victory Models
- (and 1 more)
-
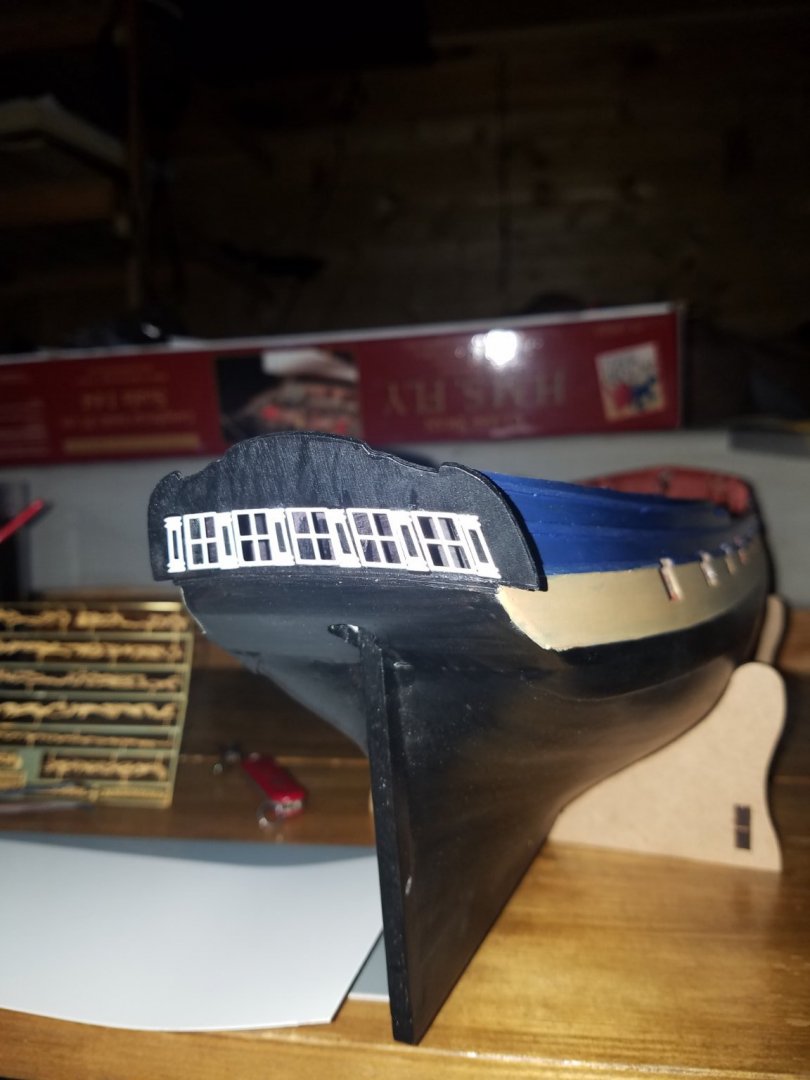
Thanks guys, your advice/comments are really helpful! I will stick to just painting the 'windows' black then! I just spent a few hours sorting out the bow rail structure, major pain 😂 But it looks OK now. Waiting on some putty to dry, then a little knife/file work and then painting it!
- 59 replies
-
- 2
-
-
- Fly
- Victory Models
- (and 1 more)
-
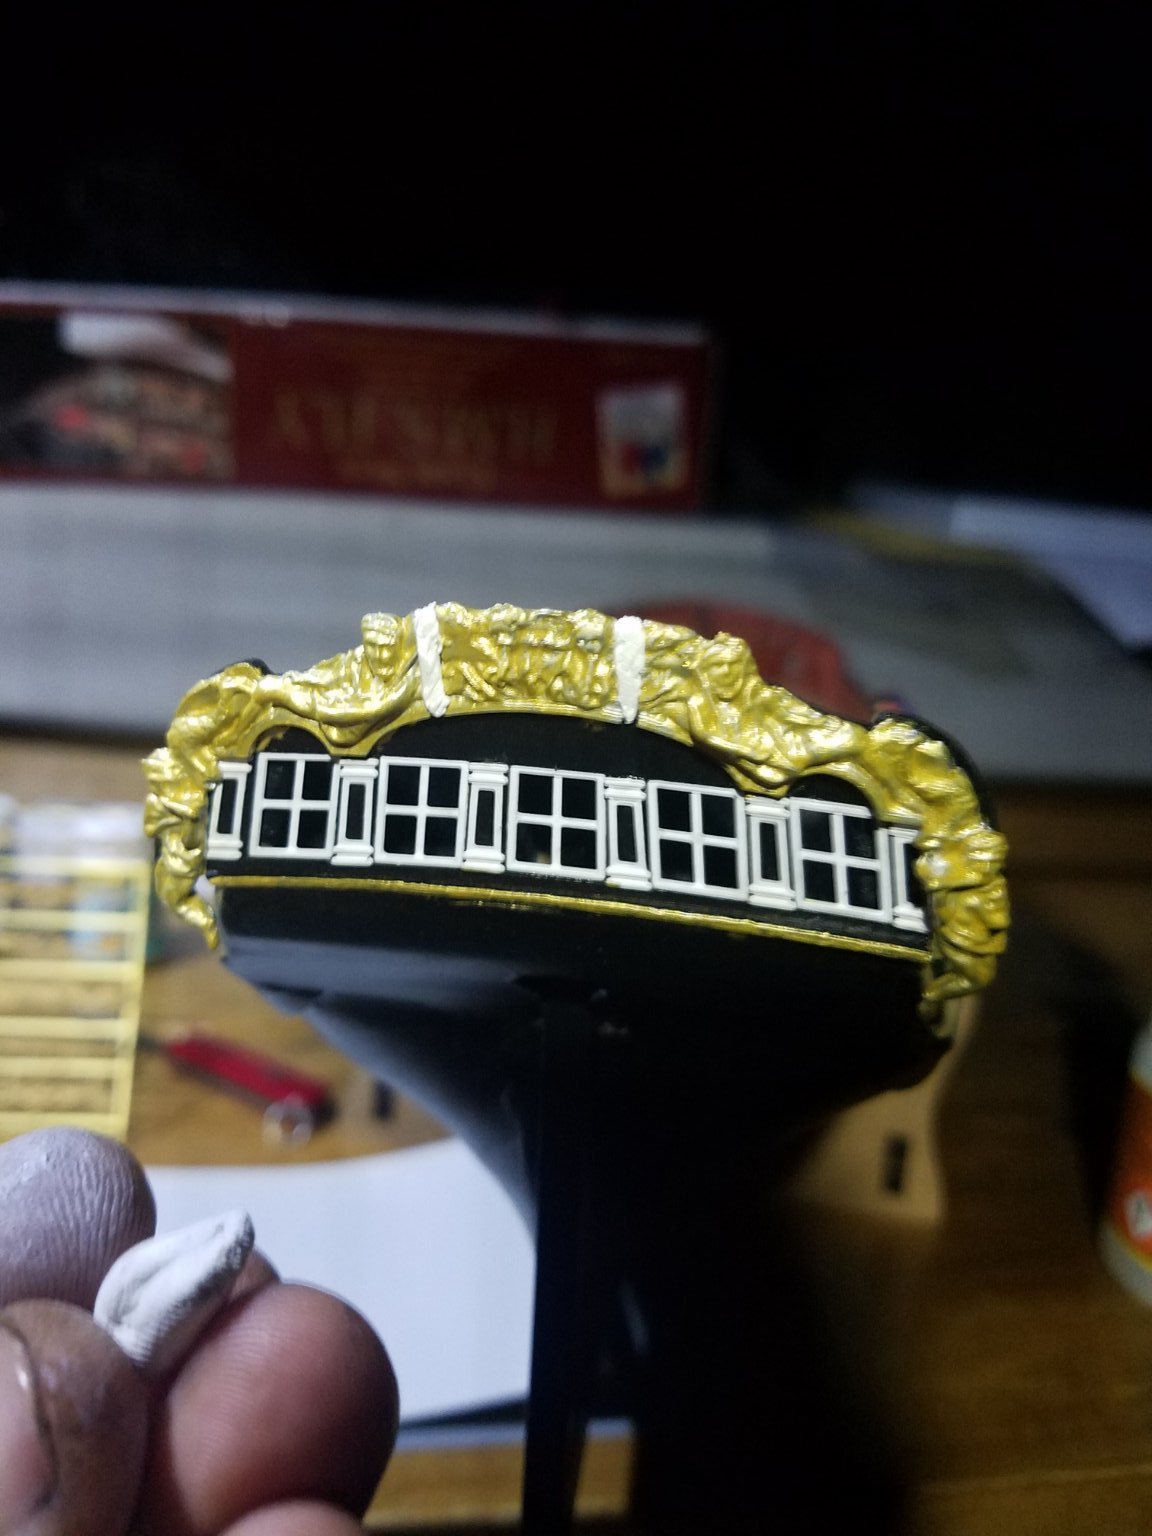
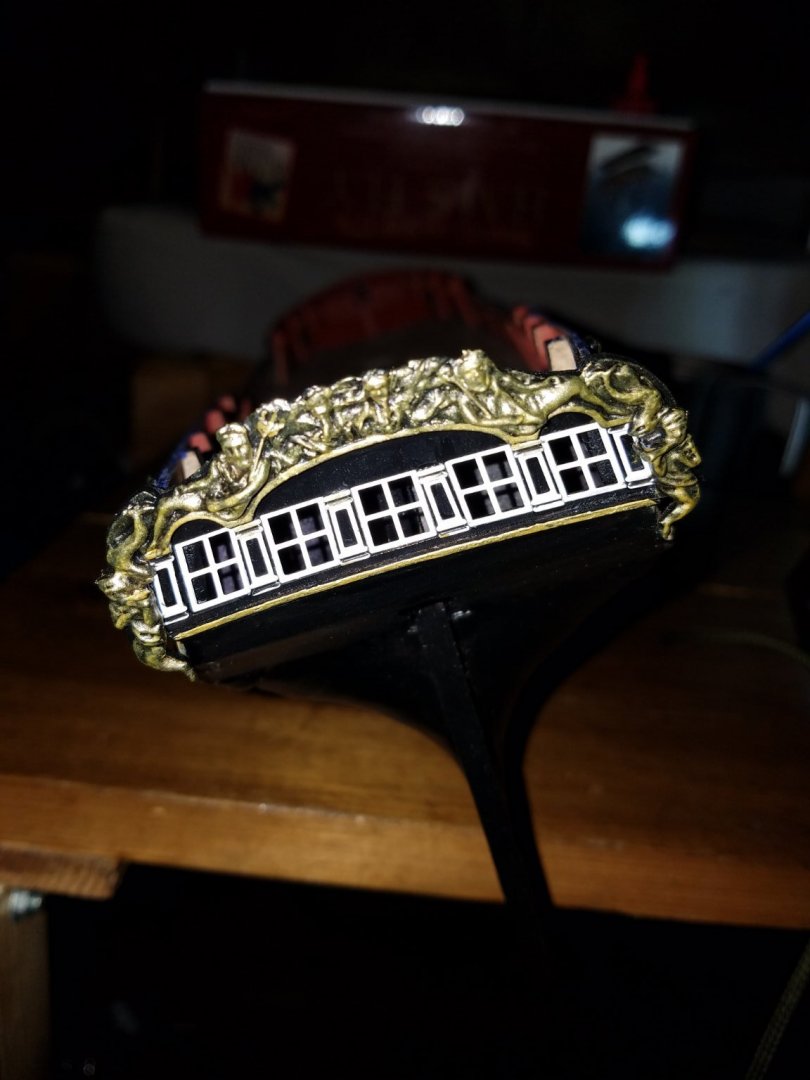
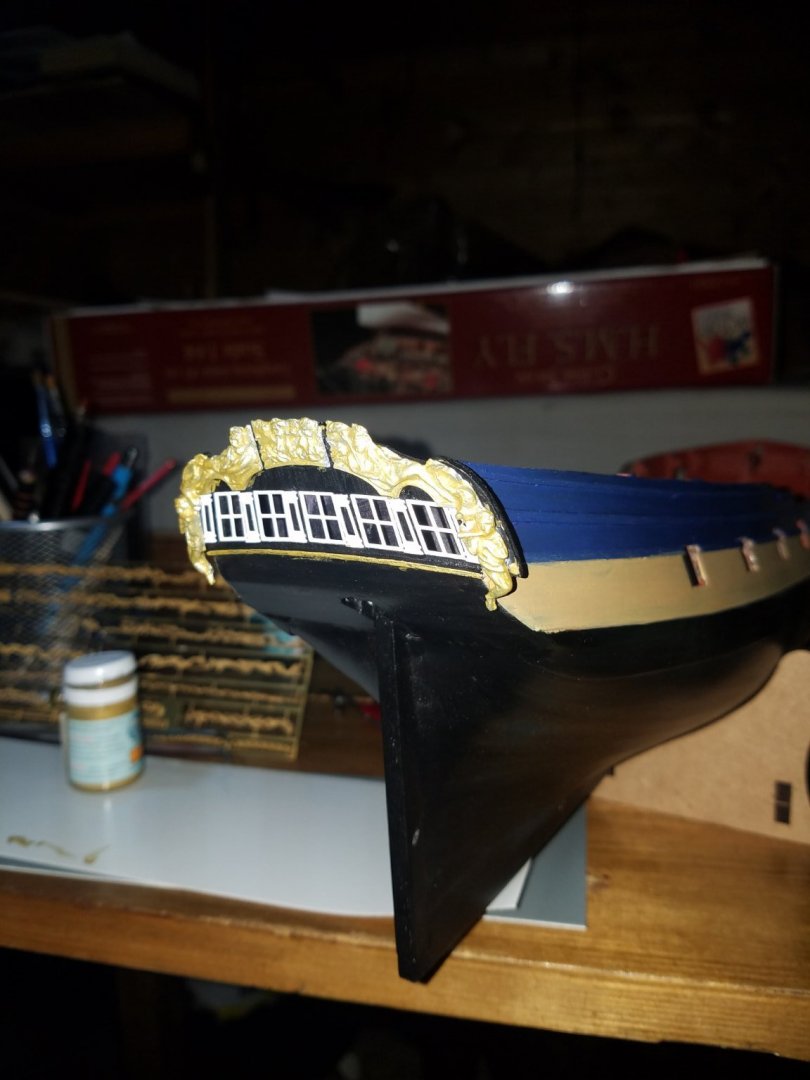
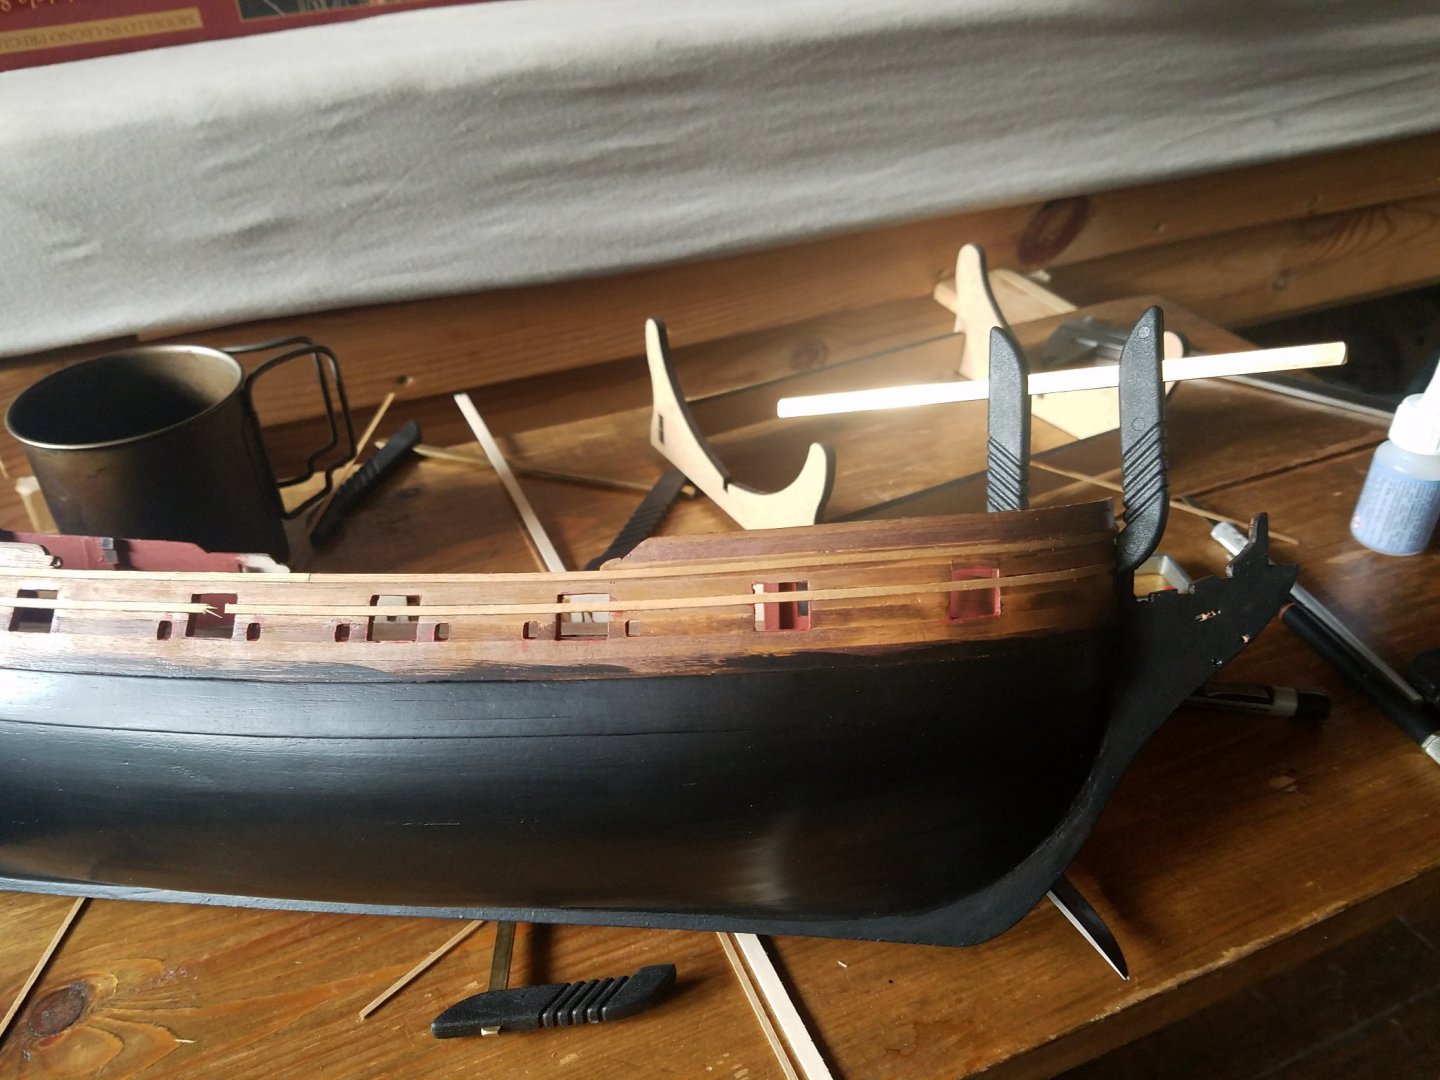
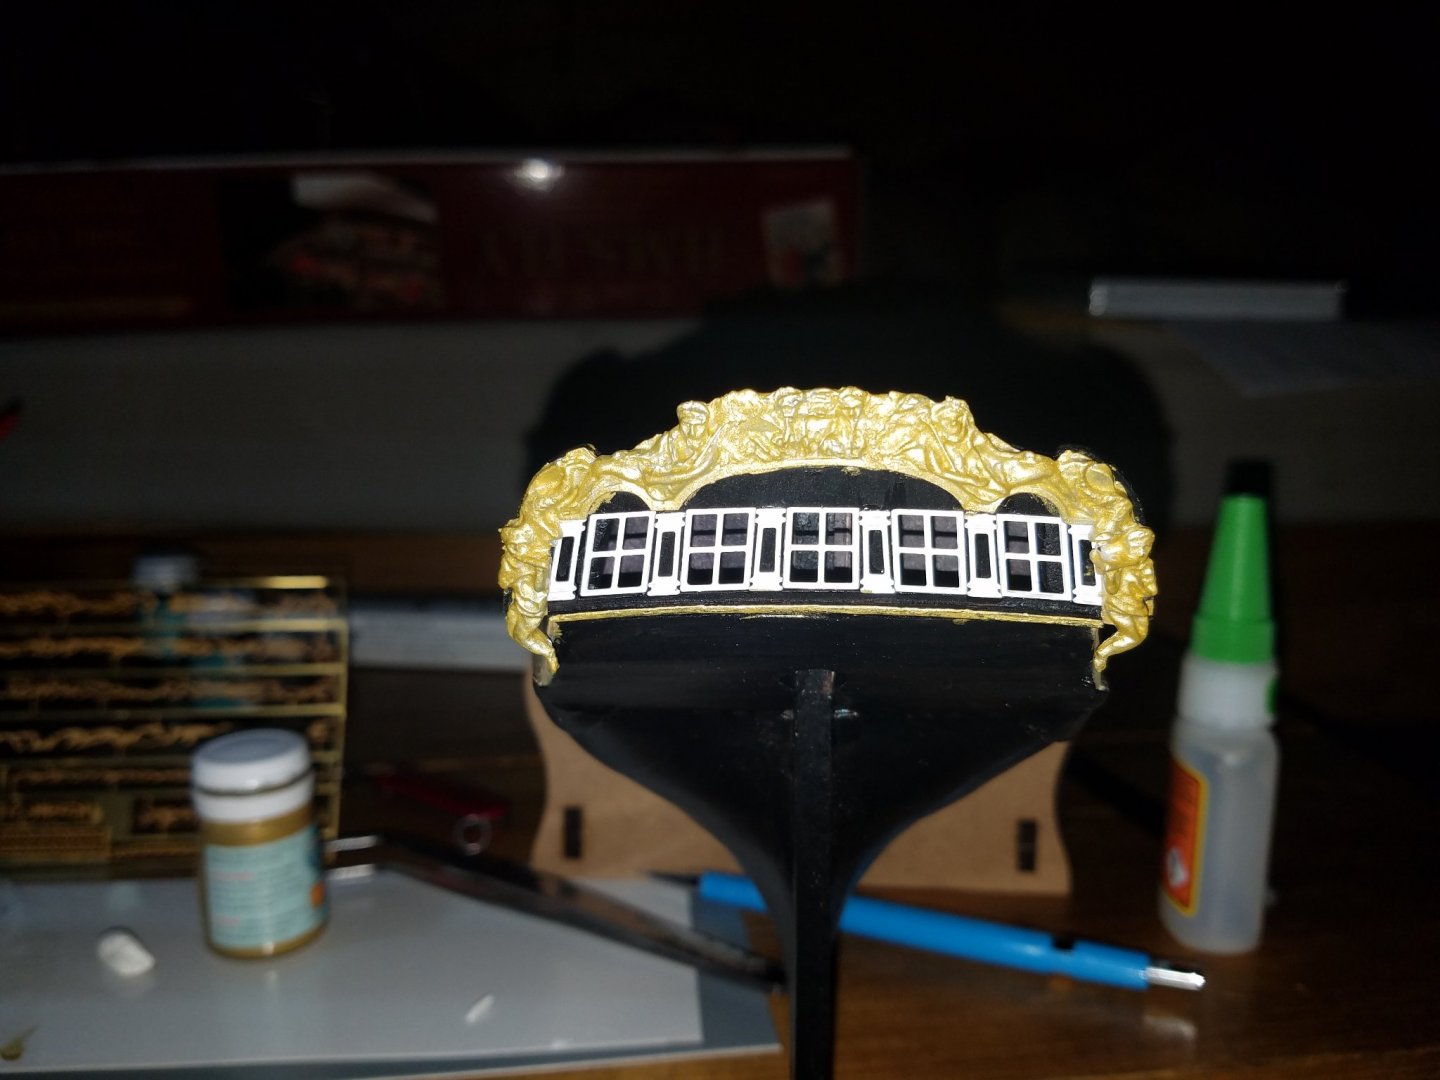
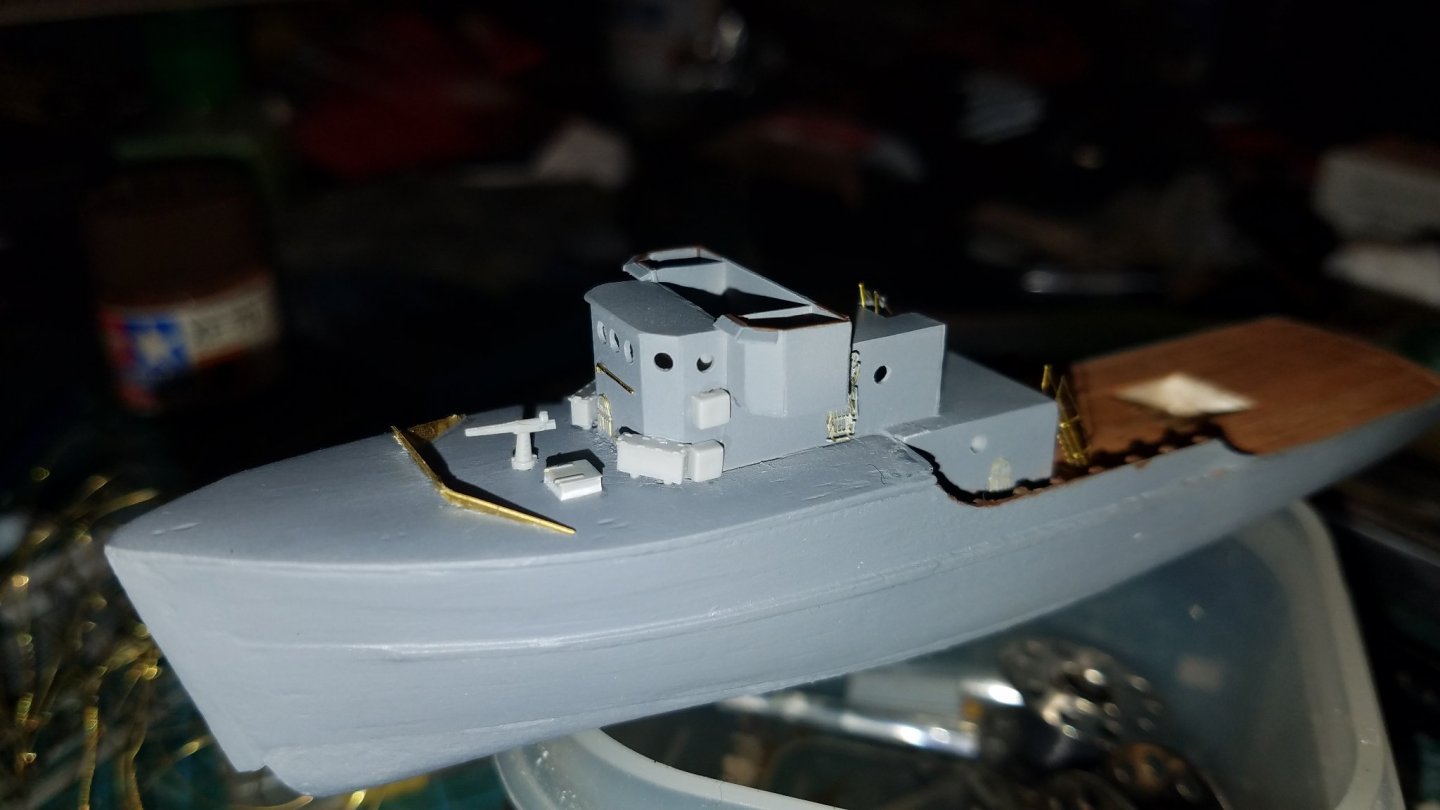
Stern gallery looking a little better now. I decided against a solid gold colour, and instead painted it black, then dry-brushed the gold to get more relief/shadows. Still scope for improvement, but looking good. However, I am not too happy with the bay window castings. They look too flat/crude. I will try a bit more with the paint, and will look around for ideas on how to make them stand out a bit more, but any comments/ideas very welcome!
- 59 replies
-
- 3
-
-
- Fly
- Victory Models
- (and 1 more)
-
Chipping effect on wood?
Sooty replied to Keithbrad80's topic in Painting, finishing and weathering products and techniques
On plastic models, where I want to simulate paint having flaked off, I will use a number of techniques based on how big an area I want to flake off. Usually, it will be a small piece of masking tape for larger flakes, and then grains of thick-grain demerara sugar stuck on the model around the larger spot, to simulate smaller spots of flaking. You spray paint your paint, wait for it to dry, then peel off the tape and remove the sugar grains with your x-acto. Works a treat on plastic models, and I am sure the sugar would work well on wood too. I would seal the wood first with a cellulose dope or similar. -
Ok, I found who I copied the technique from; it's Chris Flodberg, and he has a few tutorials. Here is a great one: http://www.shipmodels.info/mws_forum/viewtopic.php?f=4&t=157503&p=637868#p637868
-
Interesting historical background and a very nice build! Keep up the good work, and enjoy some tsipouro for me! Sotiris
-
So are most glues, paints and solvents we use, so just take reasonable precautions such as ventillation or doing it outside. One other hazard to note is some styrofoam can go up in flames, so best use the fire-retardant variety used for buildings' insulation.
-
I forgot to add the final steps; -LOTS of coats of artist's acrylic medium till you are happy it is smooth and everything blends in. This is applied with a brush, and you need to be careful not to leave bubbles as these will show up quite bad and are hard to get rid of. -Finally, a few coats of VERY glossy varnish. -This is a dust-magnet and pretty hard to clean. You want it in a case straight after you are finished with it, so it will look its best for years to come.
-
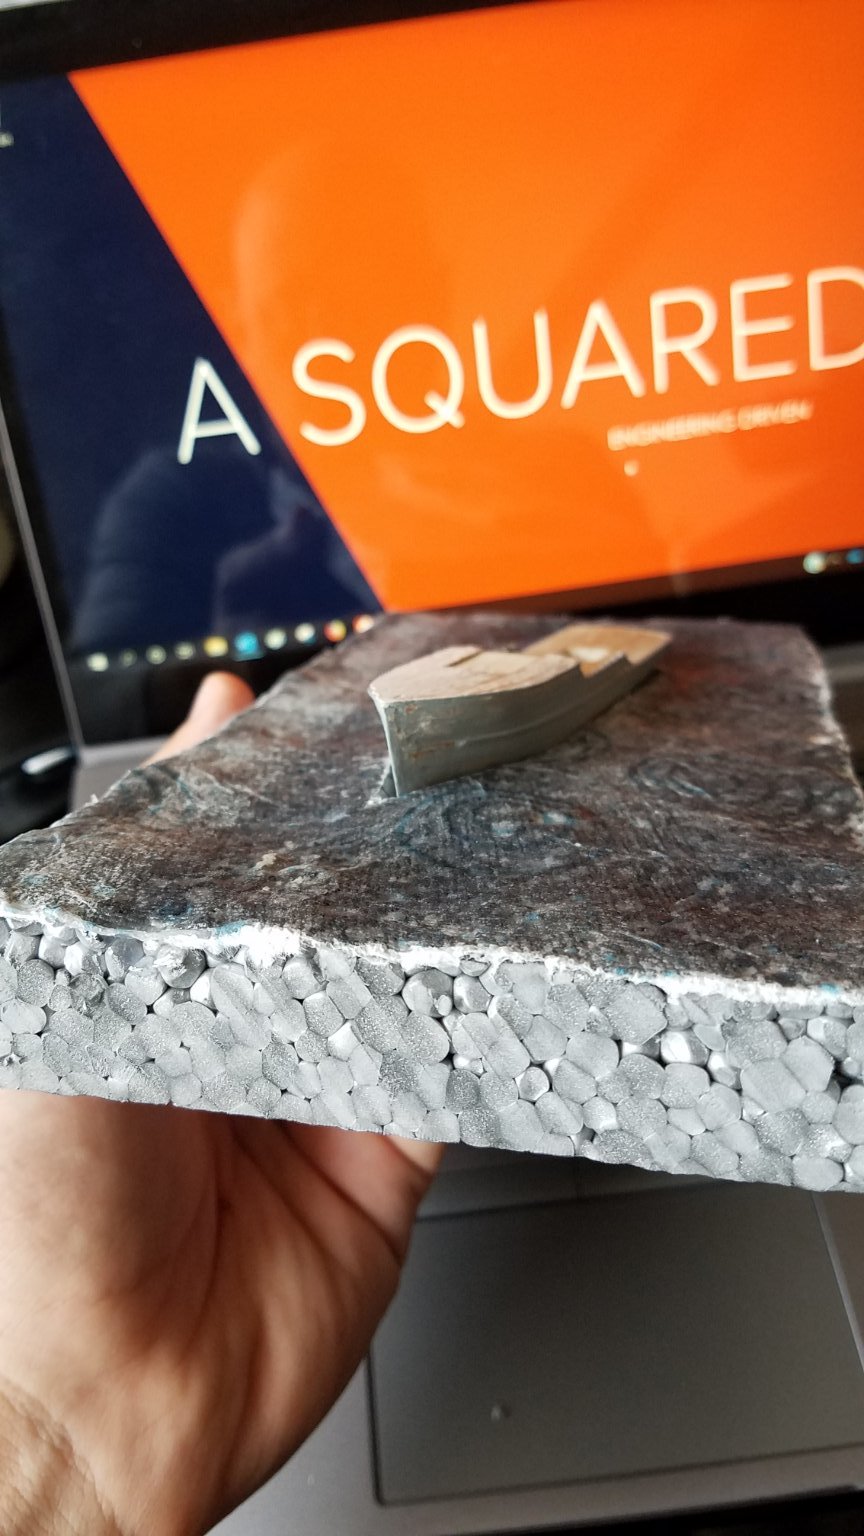
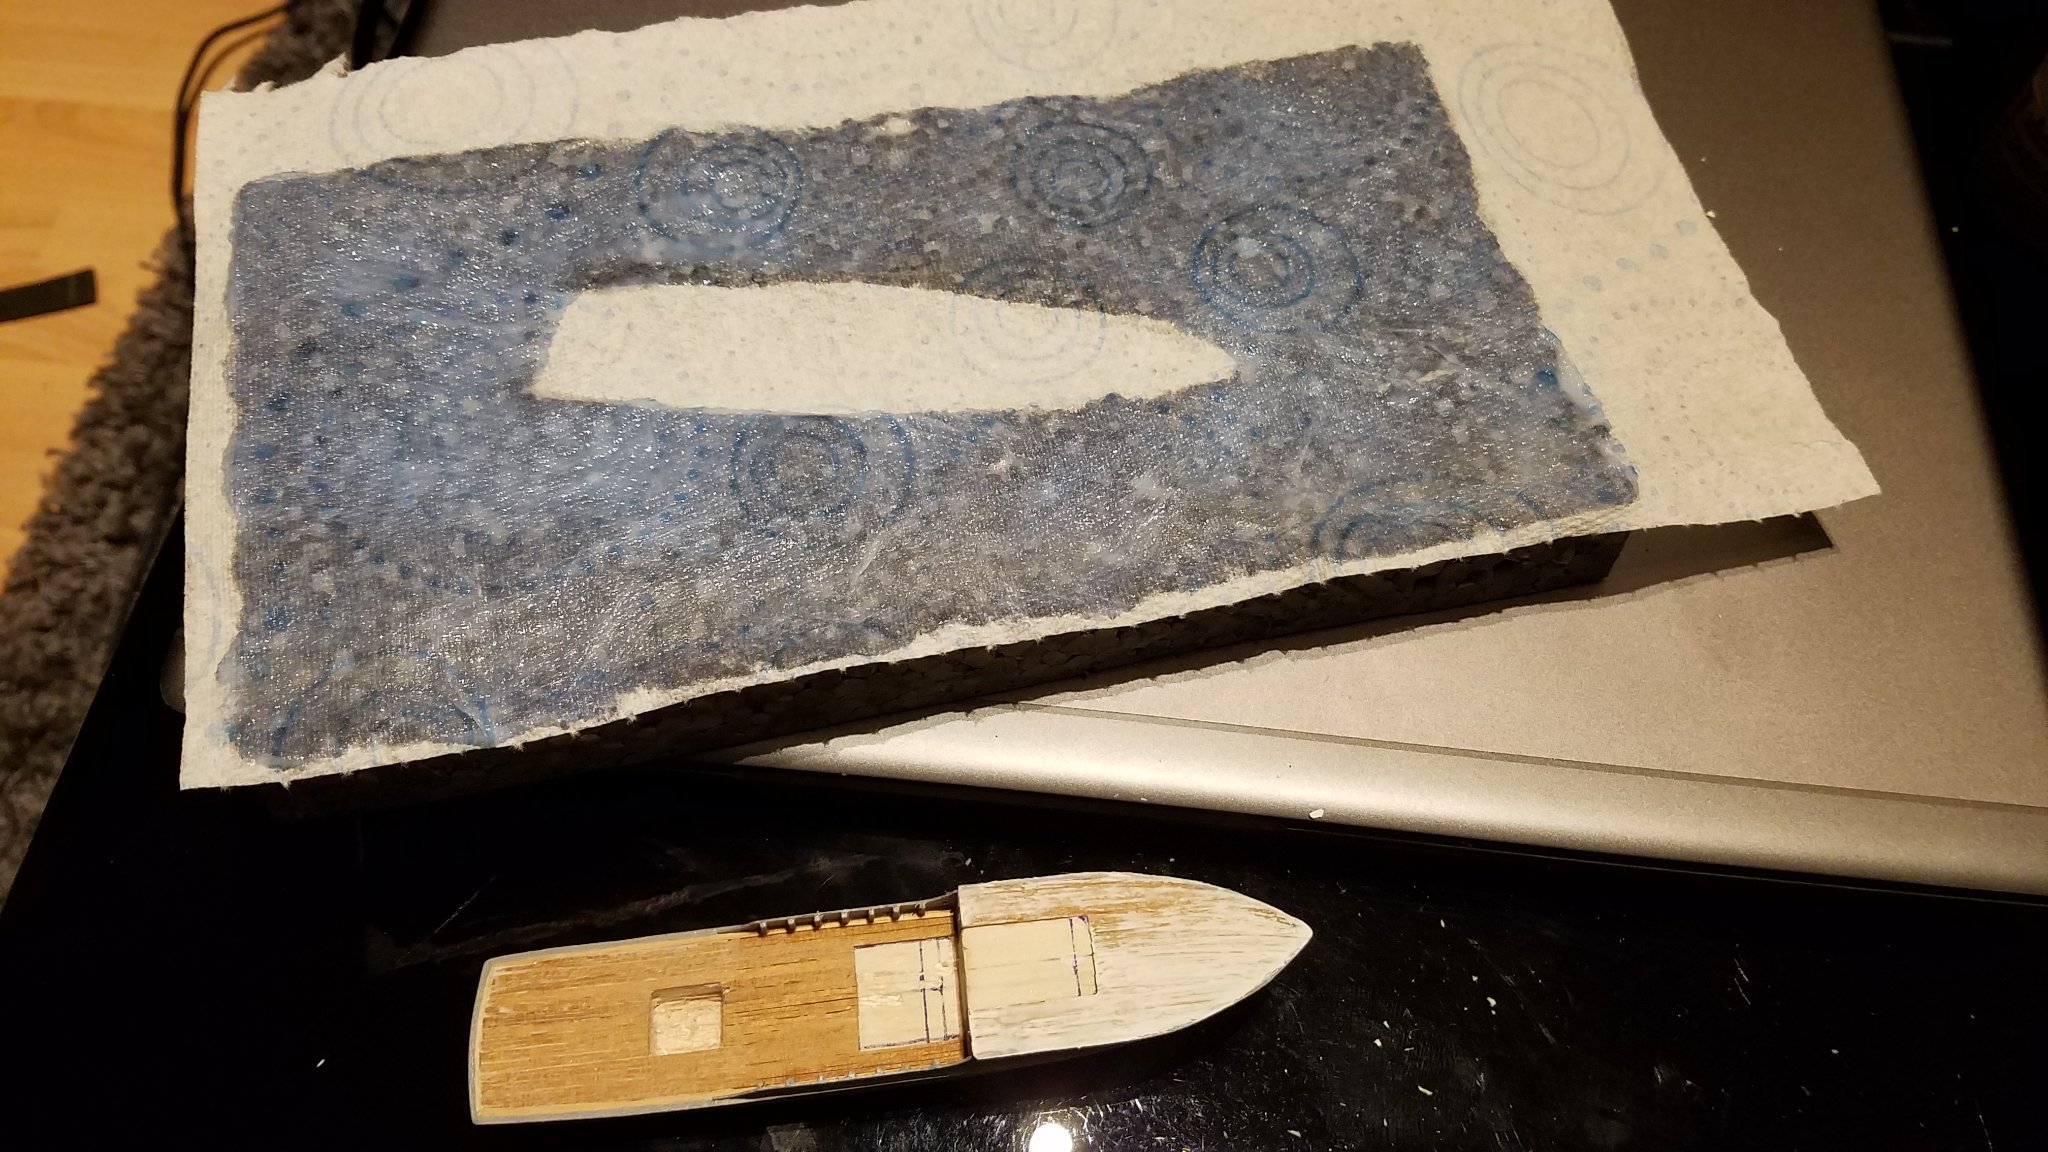
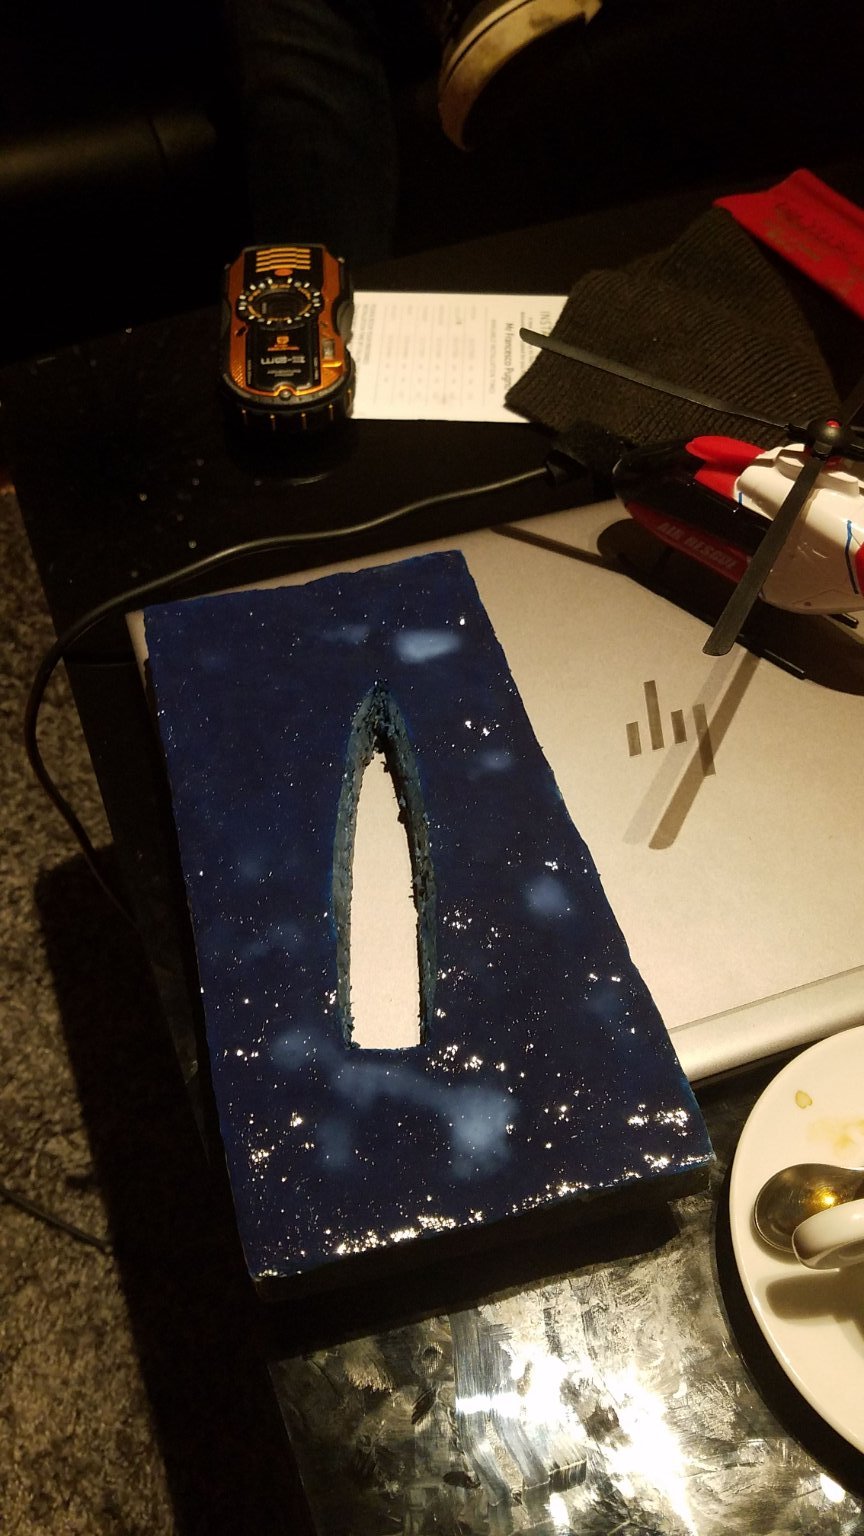
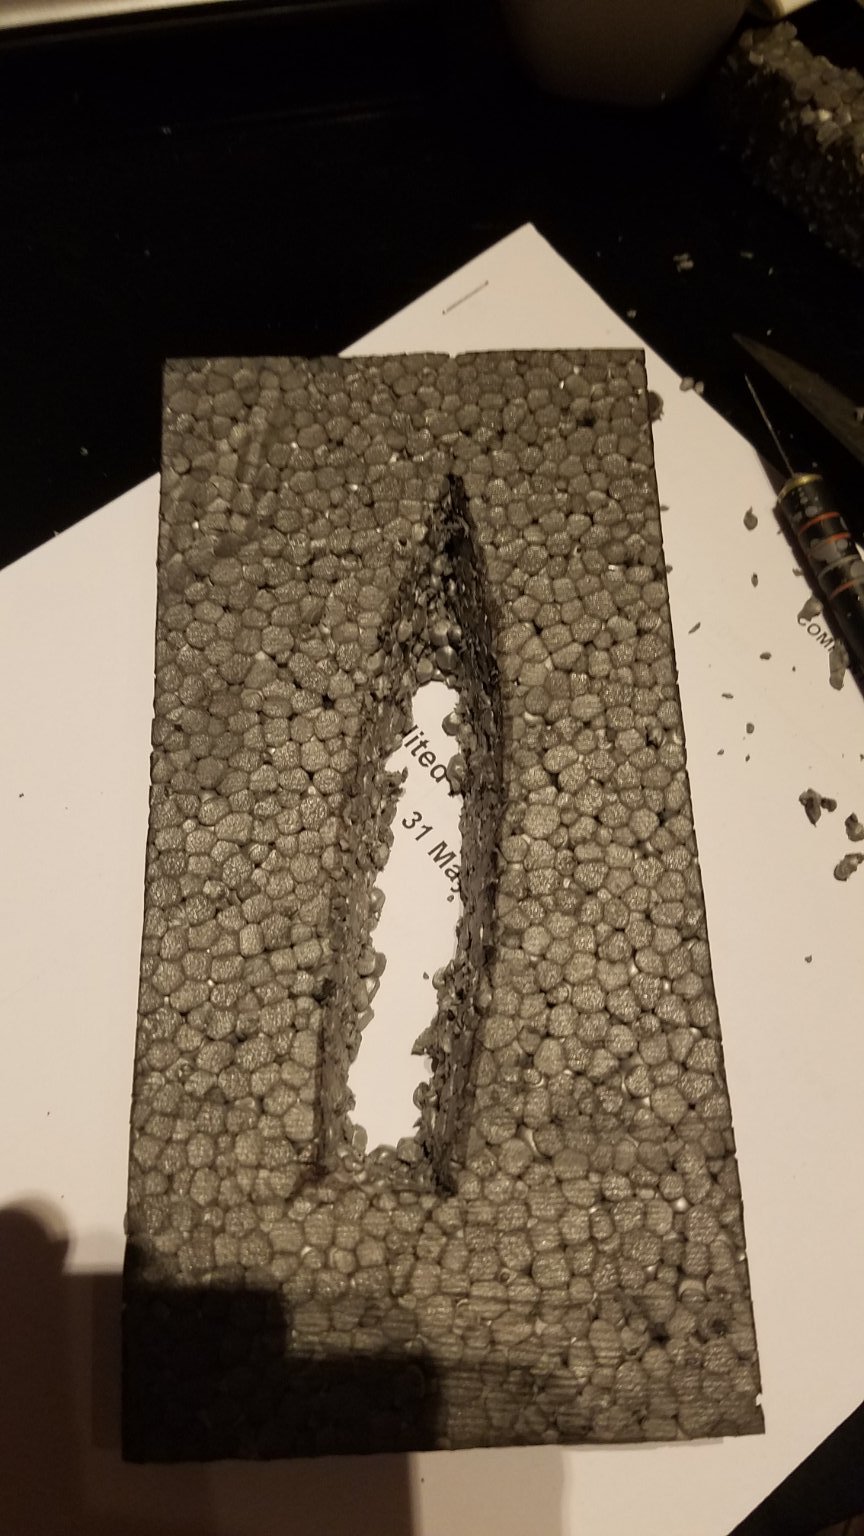
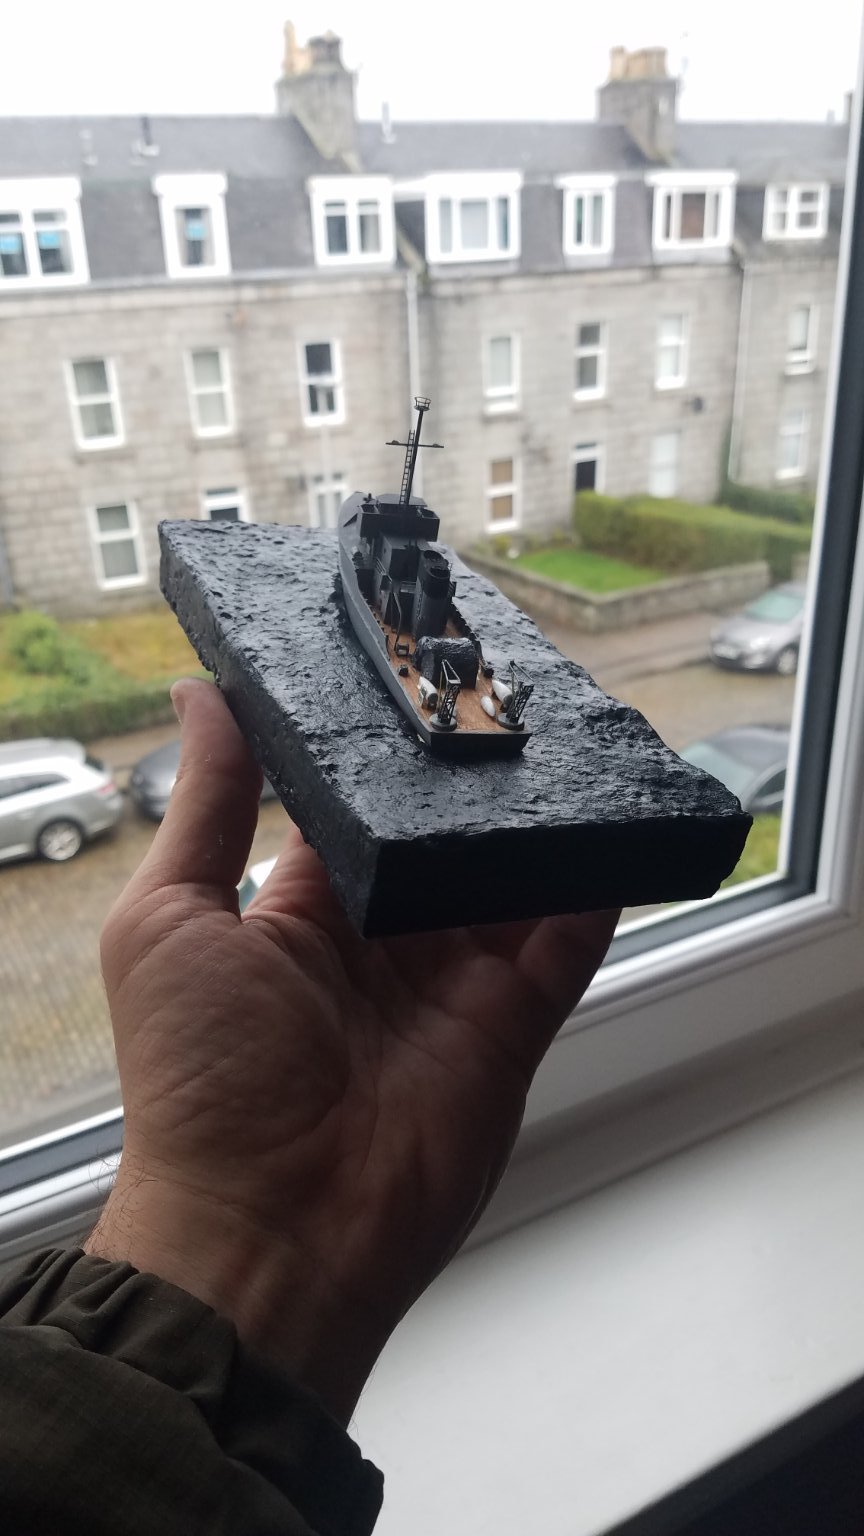
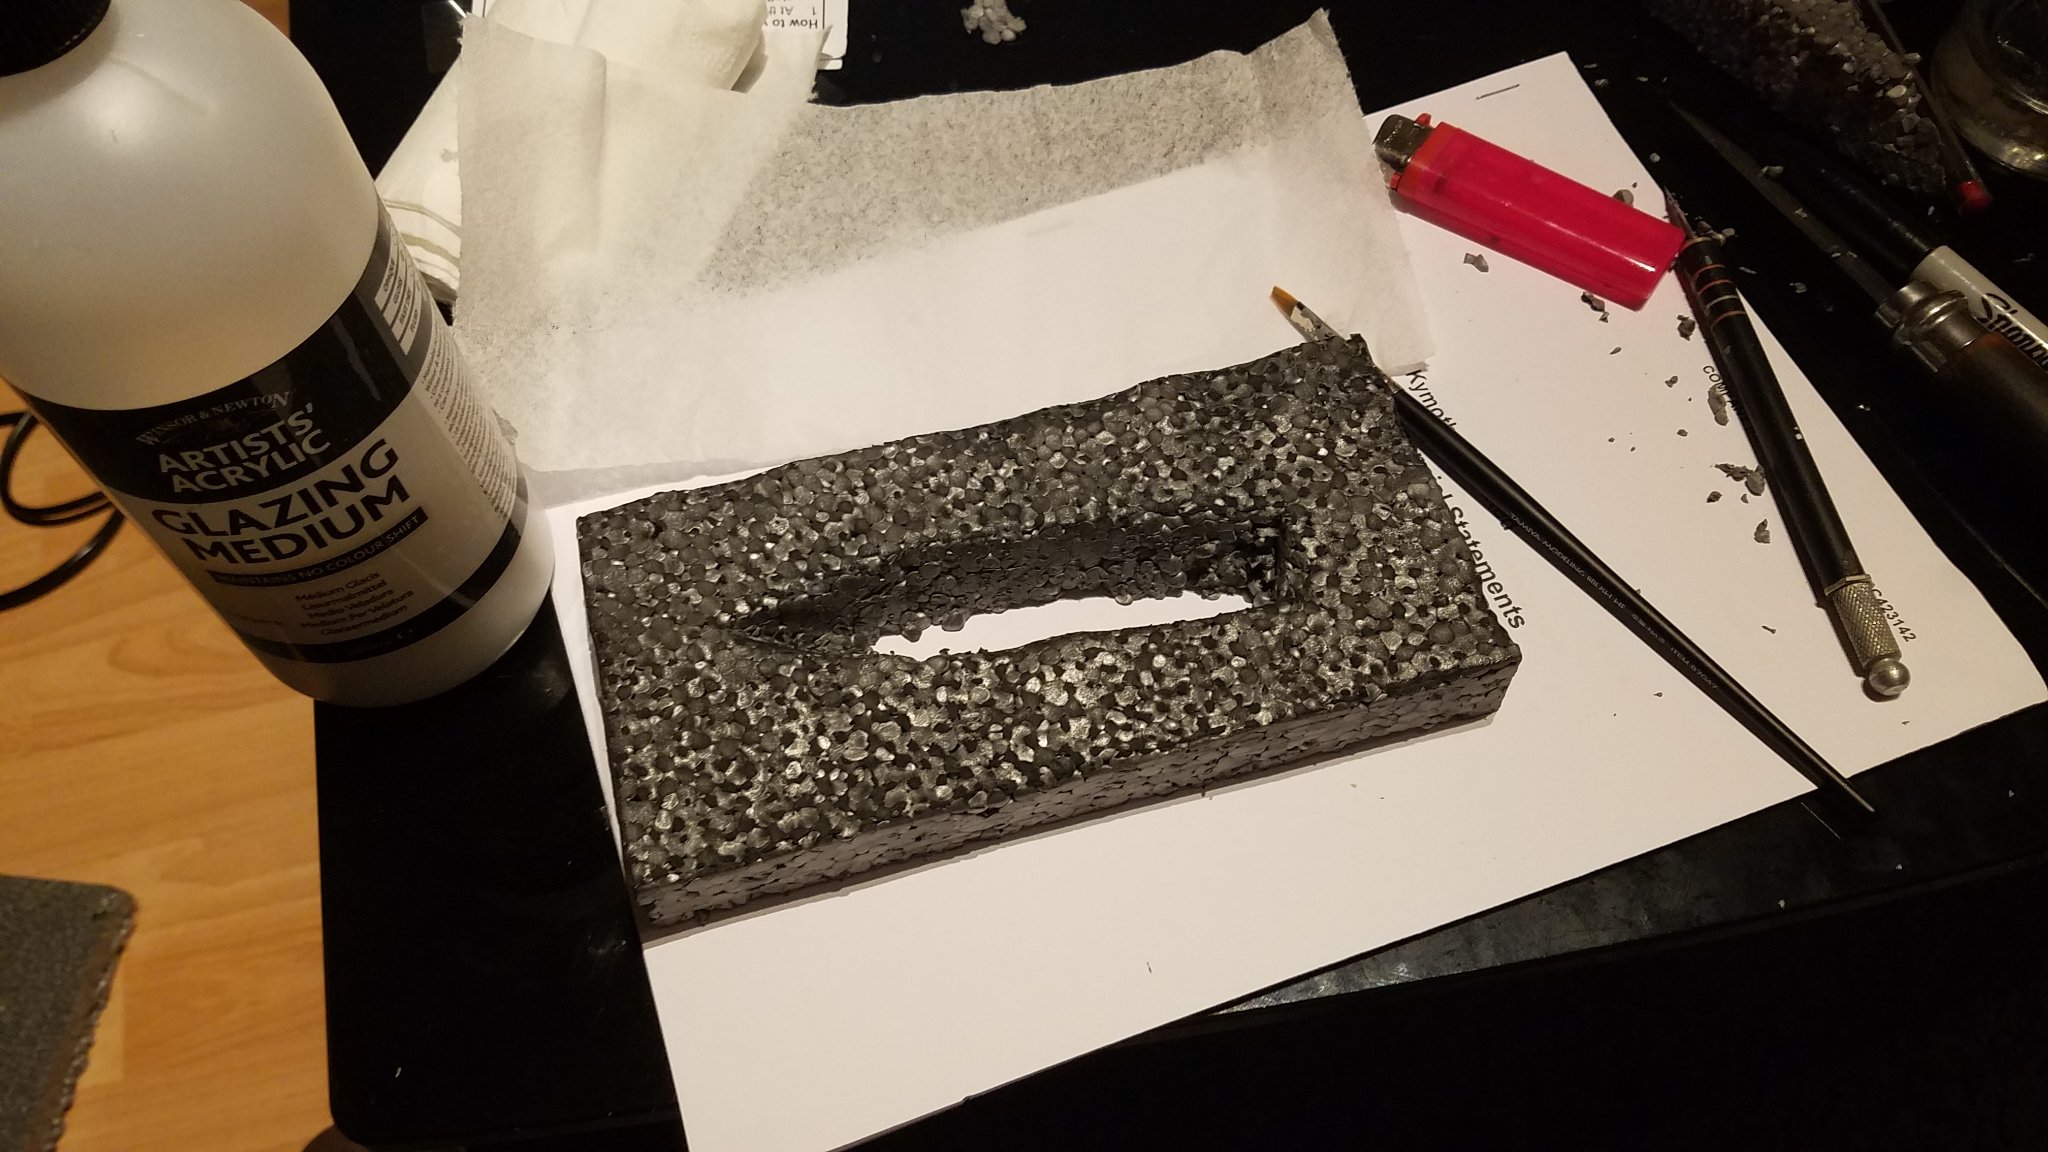
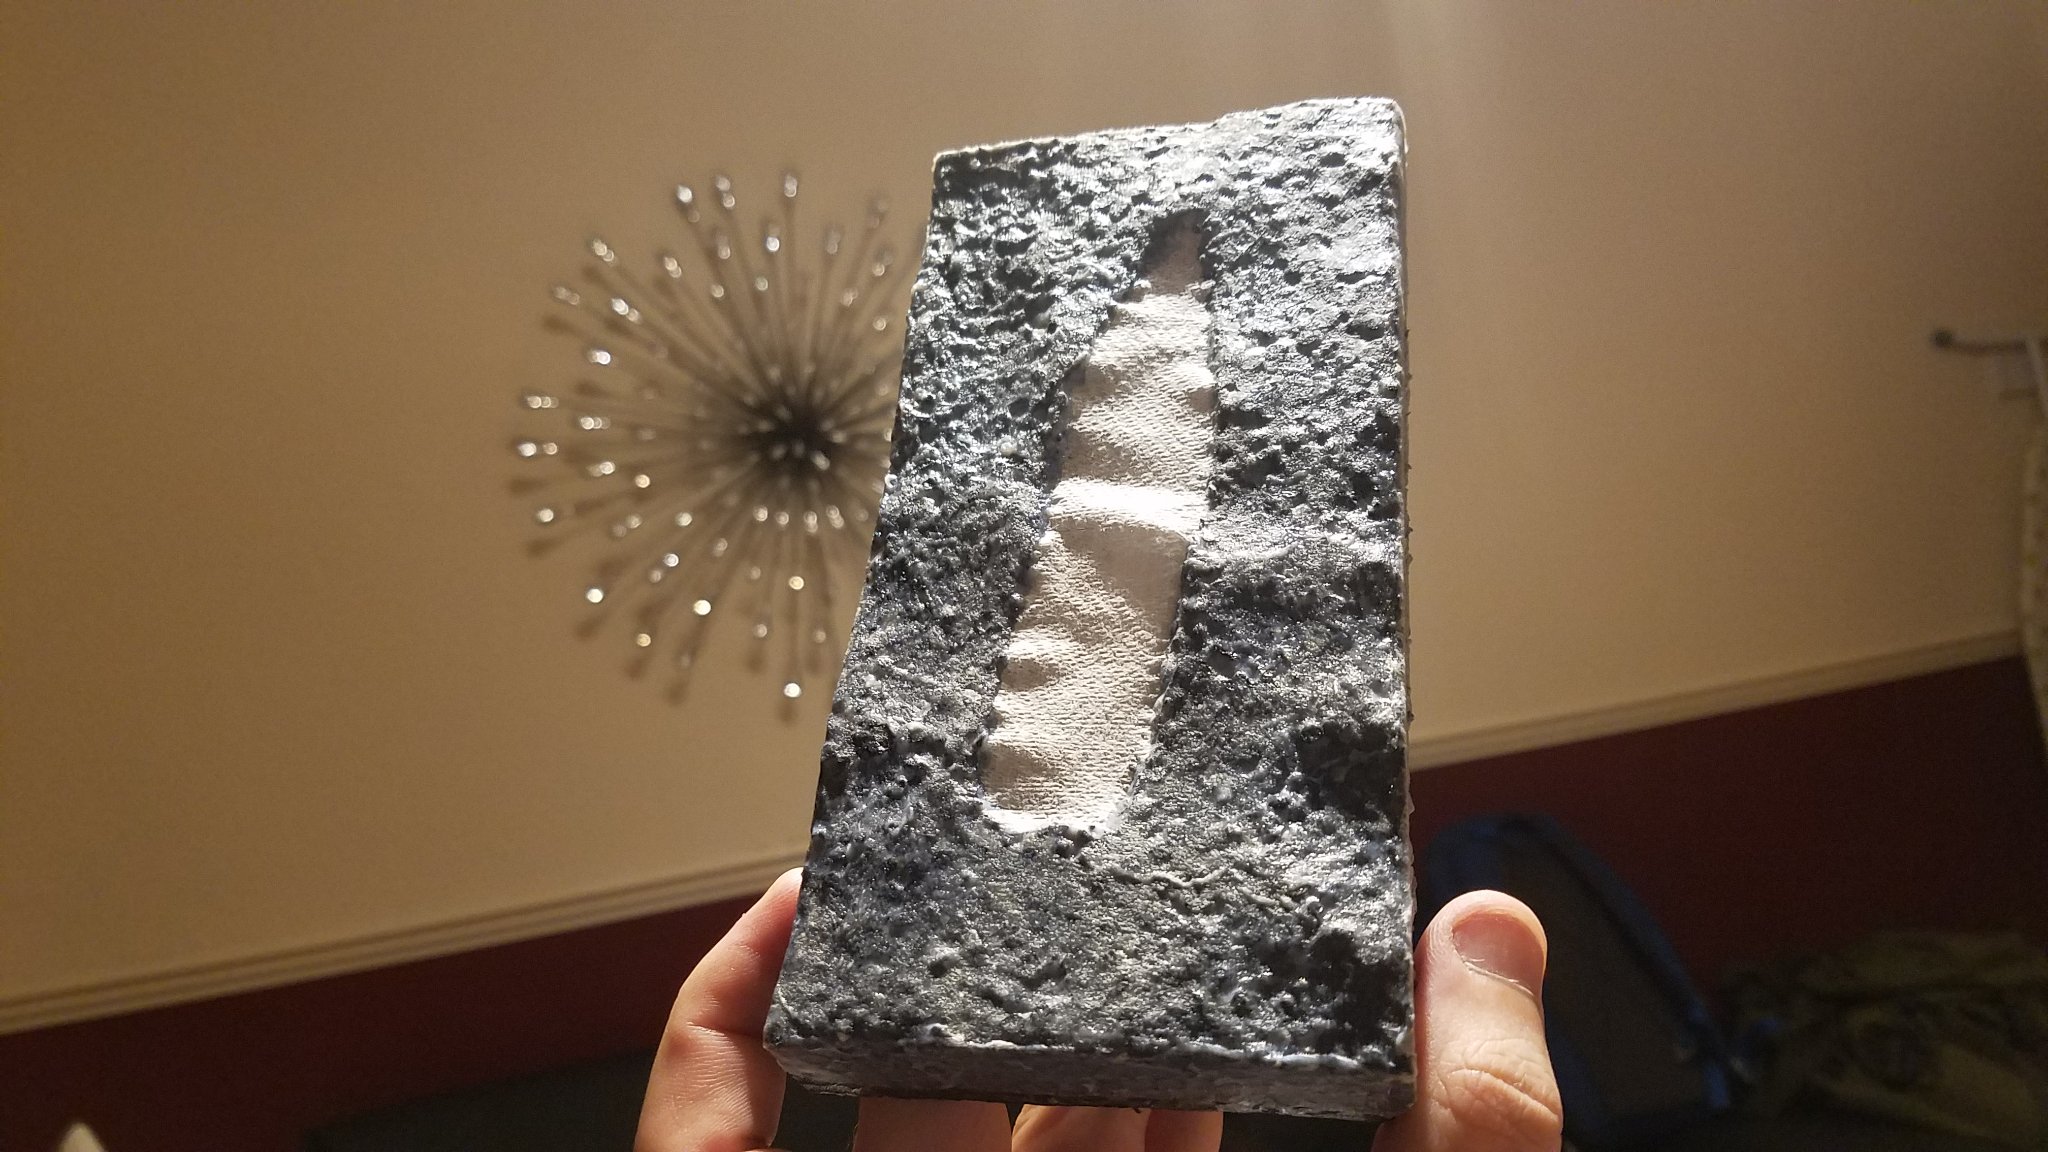
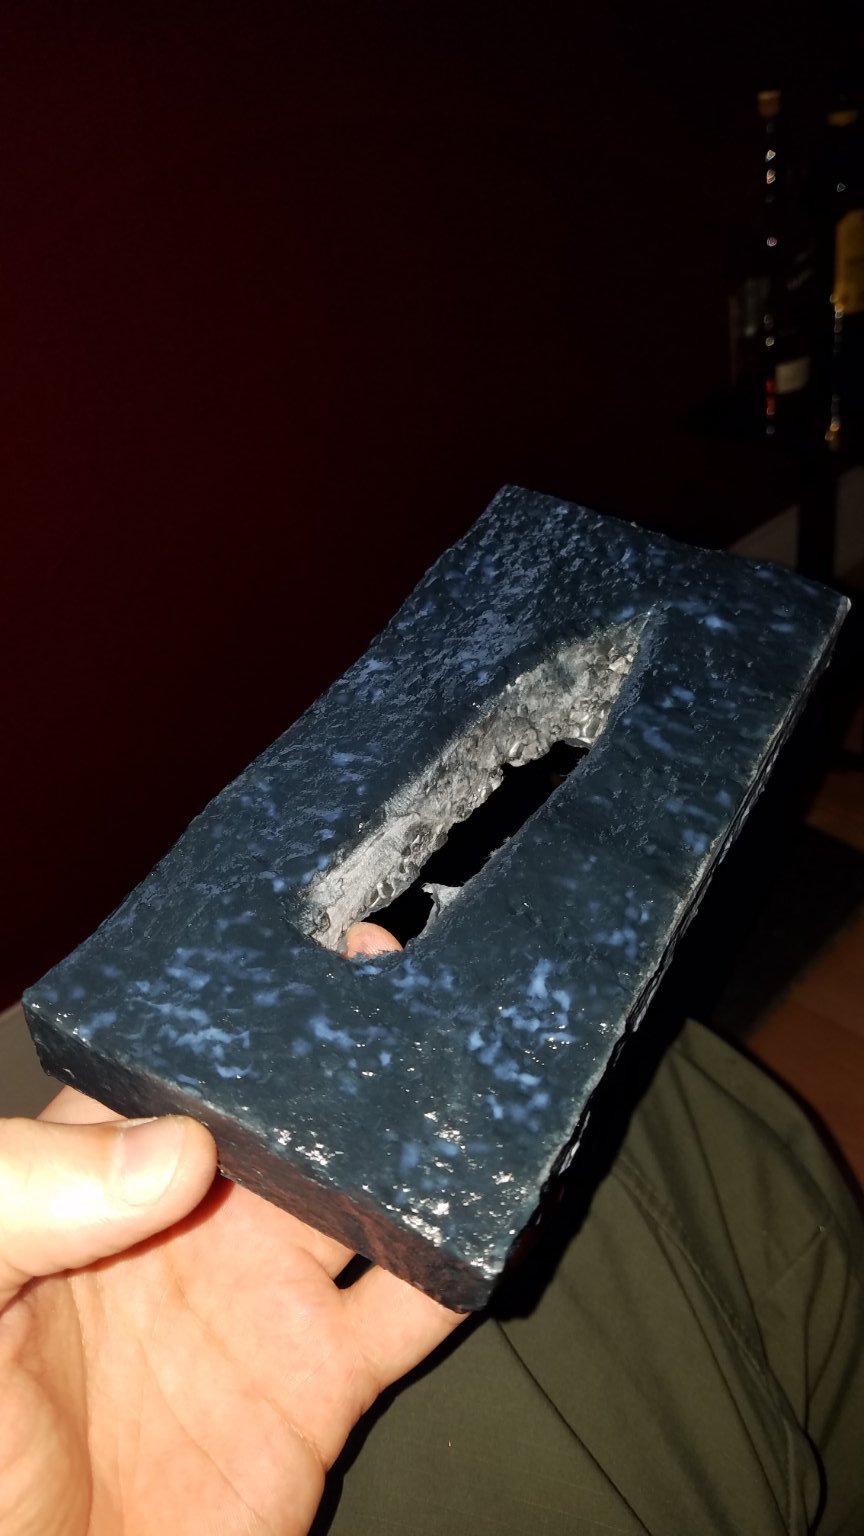
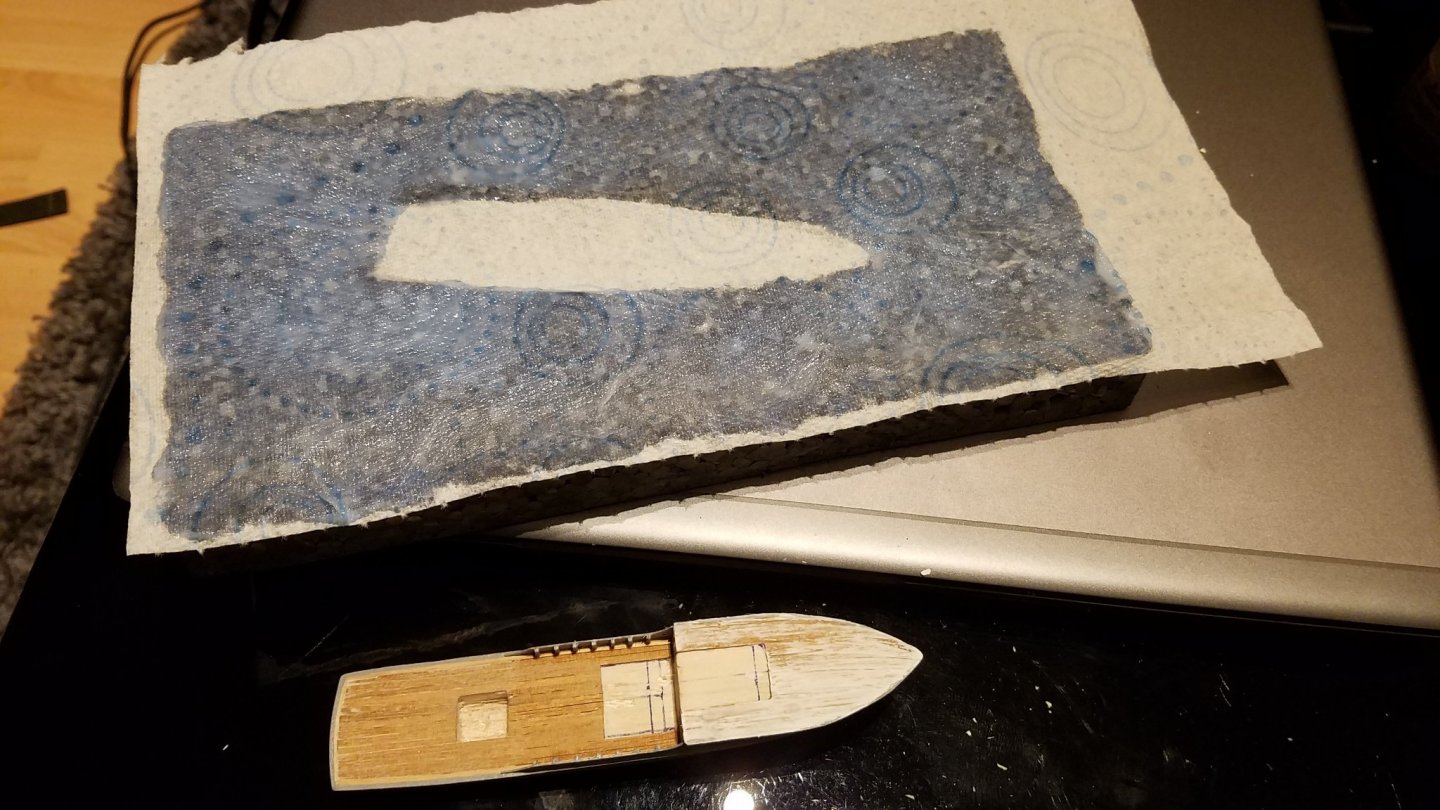
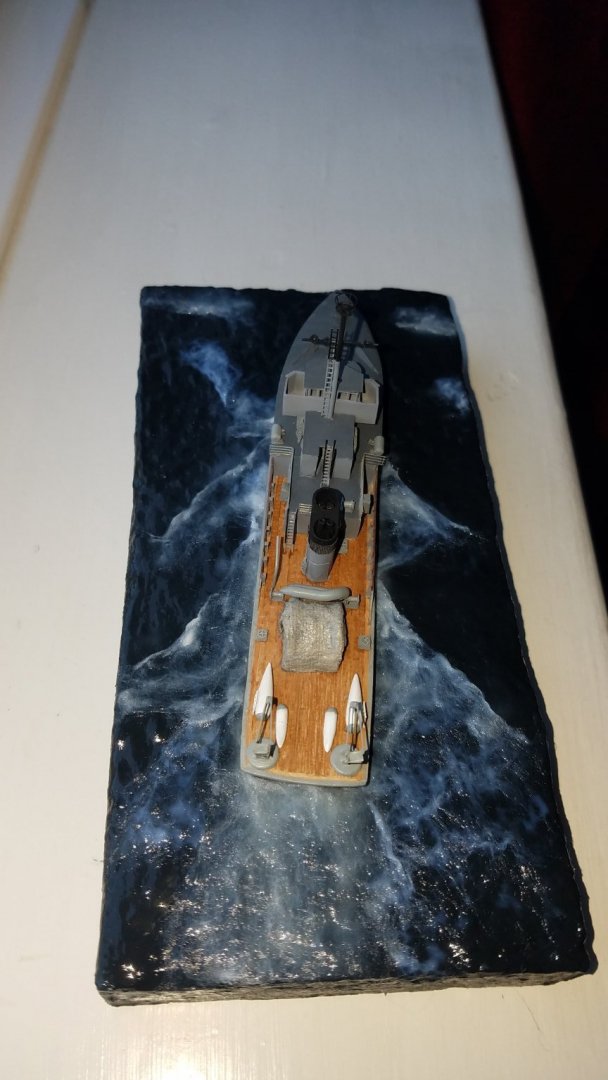
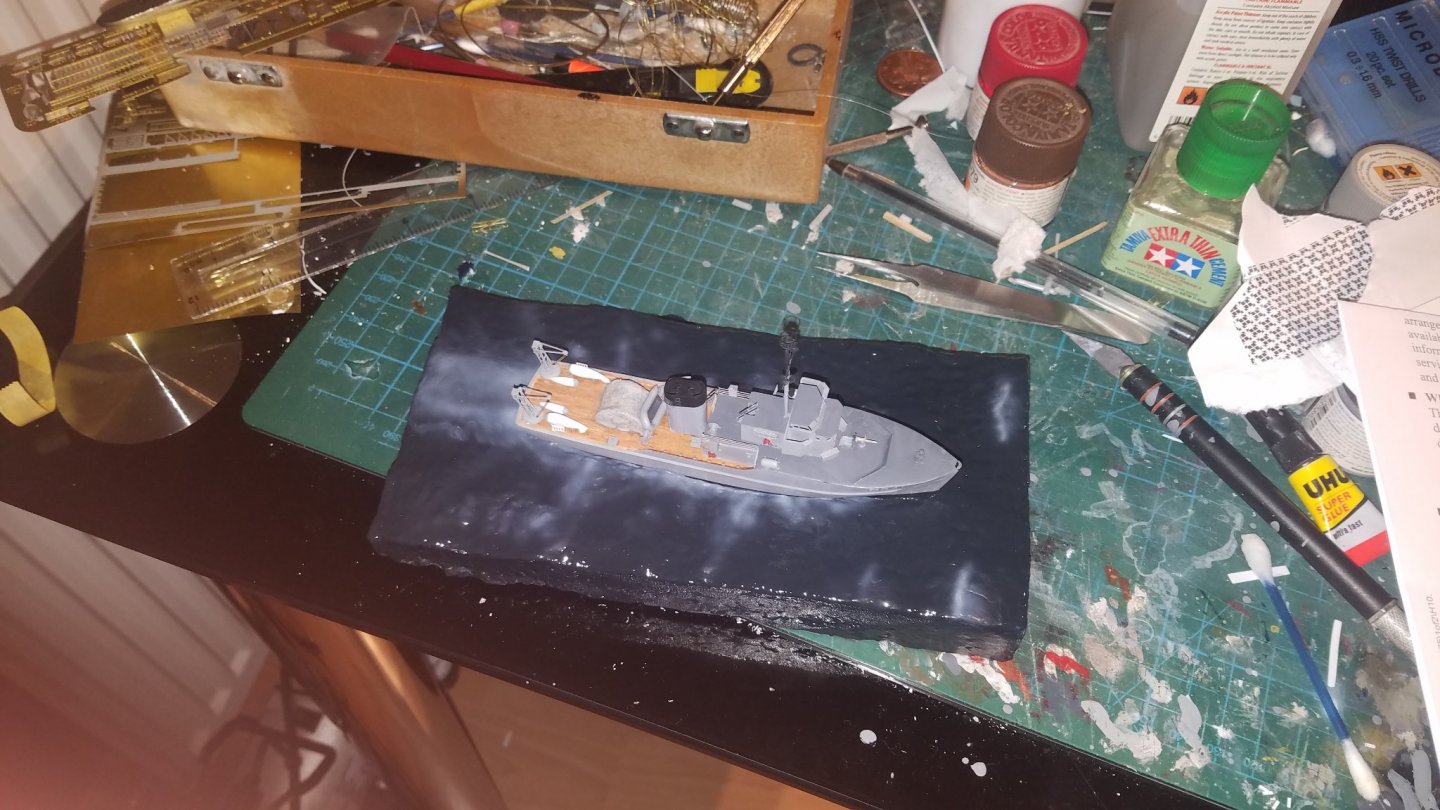
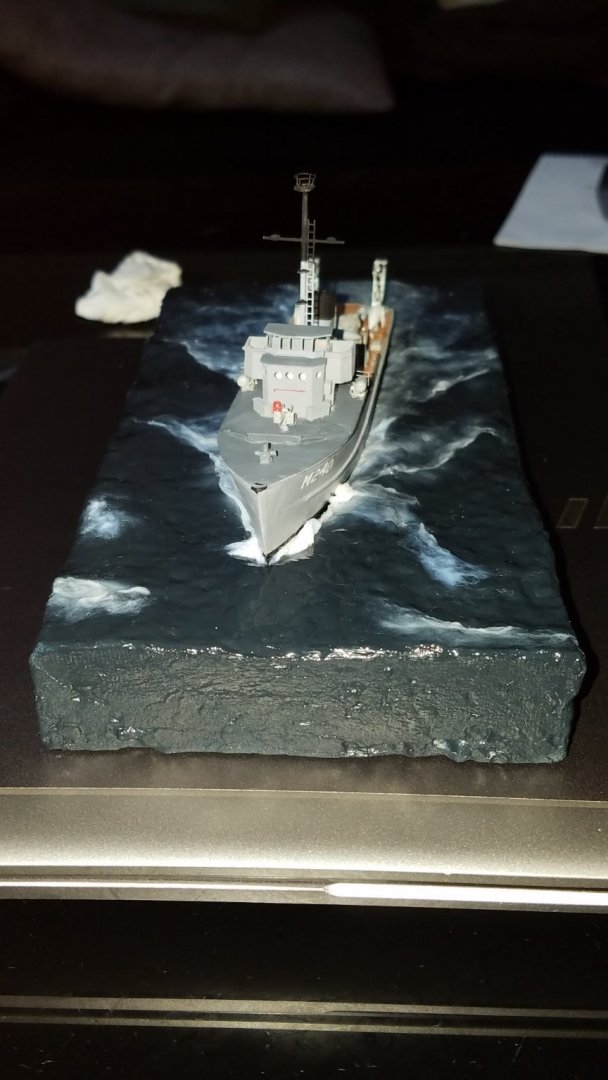
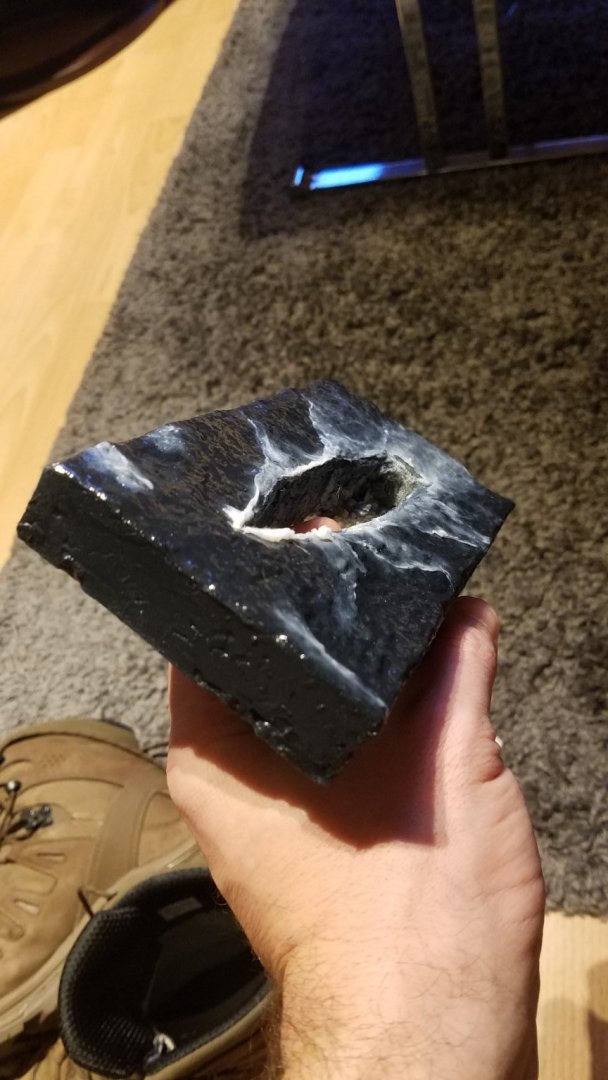
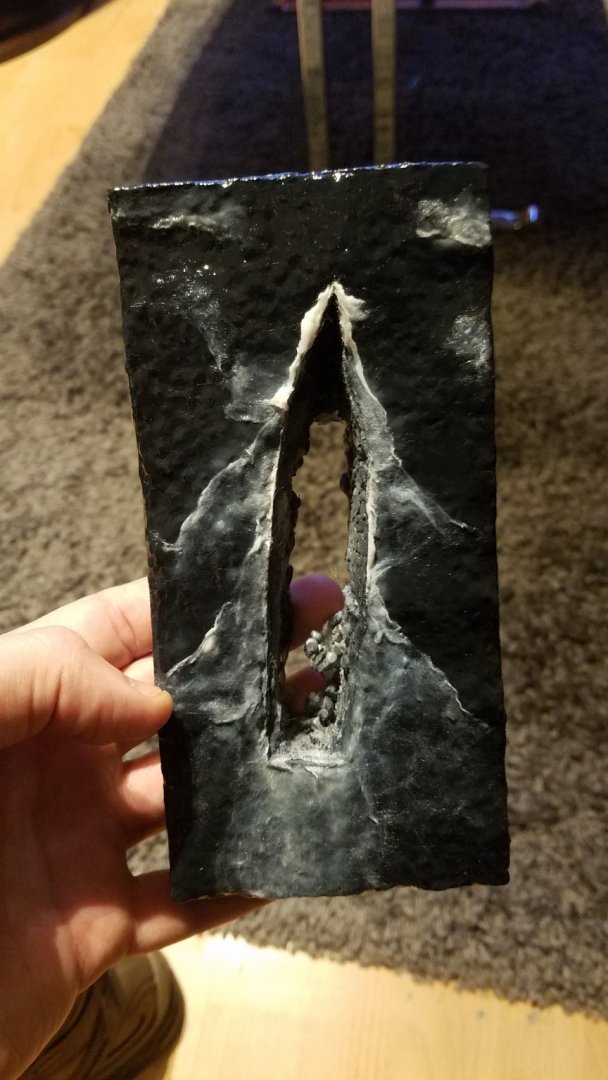
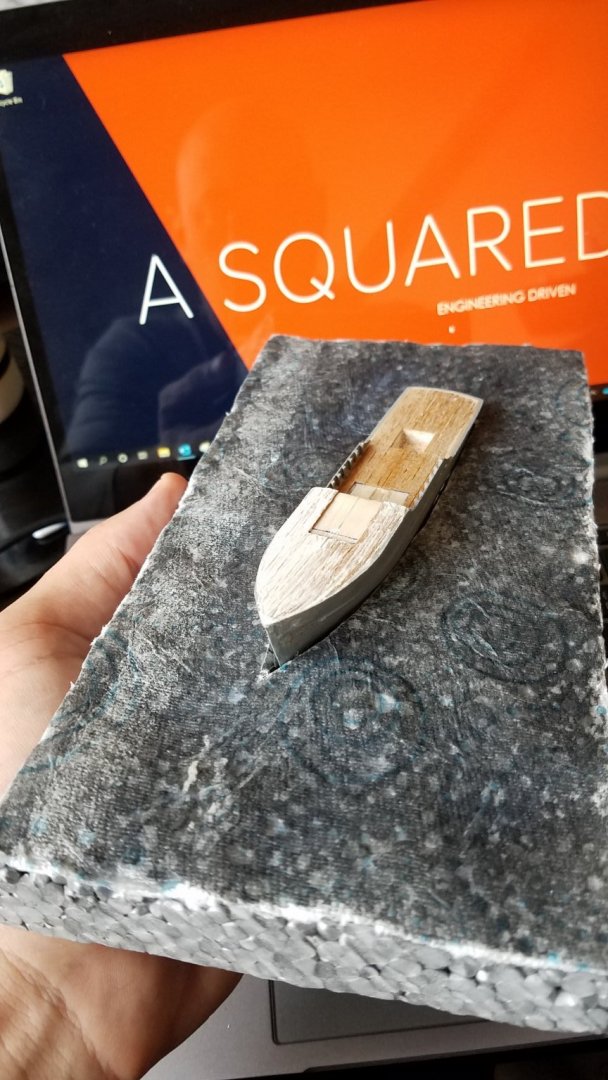
Hey, thanks! The sea is actually my favourite part! It starts life as styrofoam: put the boat on it and mark a rough waterline where you want it. Then, cut the hole for the hull. Then, mark the wave pattern you want with a felt tip marker, turn the sheet upside down and carefully run a lighter at low power and from around 3-4" away, to get you the waves you want. If it is too much, throw it away and try a new piece. This one takes practice, so spend some time on smaller pieces before you try a bigger one! Fut the ship on and check that you are happy with the arrangement. There is a VERY specific set of angles to follow for the wake pattern, check 'Froude Pattern' on google, it never ever changes. The styrofoam and lighter can give you larger waves, as well as wavelets from the foam's individual pellets, which is what makes this convincing. As the styrofoam is now too rough, you need to smoothen it; use tissue paper which you glue with woodglue on the foam, and dope it with some extra glue. You should now have something that looks like this; It still has a bit too much texture, so you can use a very thick medium called 'acrylic artists medium' to smoothen things up a little. Make sure you buy the transparent version. It is best to paint the surface after you dope the tissue, as that shows you how much you need to smoothen it. Painted and with a few coats of artist's medium: You want to use a very dark blue. I find the dark blue the USN used for overall-painting their aircraft in WW2 to be spot-on for deep sea. You should now have something like this; Once you are happy you have a good / smooth surface to continue with, then you put the boat on and spray a white / very light blue where you want to create foam and the wake pattern (remember the 'Froude pattern' angles); Don't go to town with the waves, just a light contrast. Now the really tricky bit; You take cotton, pull it out, lay it on where you want the 'foam' and wet it with more acrylic medium. This takes a lot of practice, but it is very satisfying to get right. Manipulate it to the right shape with a wet brush, cocktail sticks, the handle of your brush, anything that suits. If it looks bad, take it off and try another piece. This is done wave by wave. Here is one side done; At first it will look too white, but it becomes more transparent as you wet it. Keep doing it till you get it right. You might have to dump the whole base and try again, but the materials are dirt cheap. It should end up looking like this; It works much better for bigger models, but this turned out fine. Top tips; -Use artificial cotton that has no seed. I got mine off a surgeon mate, it is rayon cotton. You can also get it from vaping supply places, but they might sting you. This is essential, as the seed shows real bad and will ruin your work. -Take it easy on the waves and don't go to town with them. -Froude wake pattern angles are very fixed and the same for all displacement hulls. The distance between waves and their size changes, but the angle is ALWAYS the same; you need to get that right. Hope this helps! Finally, I cannot remember who I got this technique from, but I remember it was a Canadian ship modeller. He had tutorials online, and a few videos; worth trying to google it.


-
Cheers John, good to be here!
-
I think Pleias was one of the very last MSCs to be built. She started life with a bridge that was closed on the front and the sides, but the rear was indeed open to the elements in the 70s, I guess to facilitate communication with the back deck and probably to also keep the place cooler! Closing off the back of the bridge was a later greek addition. Also the several A/C units. Other than that, she was probably not different at all to what you were on! As far as I know, the last of the woodies were broken up around 5 years ago. I dug up some pretty sad photos of a JCB at work, never showed those to my dad!
-
Indeed, although mine was initially an accident; I was trying to work out how pliable the casting was, to see if I could make it conform to the stern gallery's curve. Turned out that it was pretty hard and brittle 😂
- 59 replies
-
- 1
-
-
- Fly
- Victory Models
- (and 1 more)
-
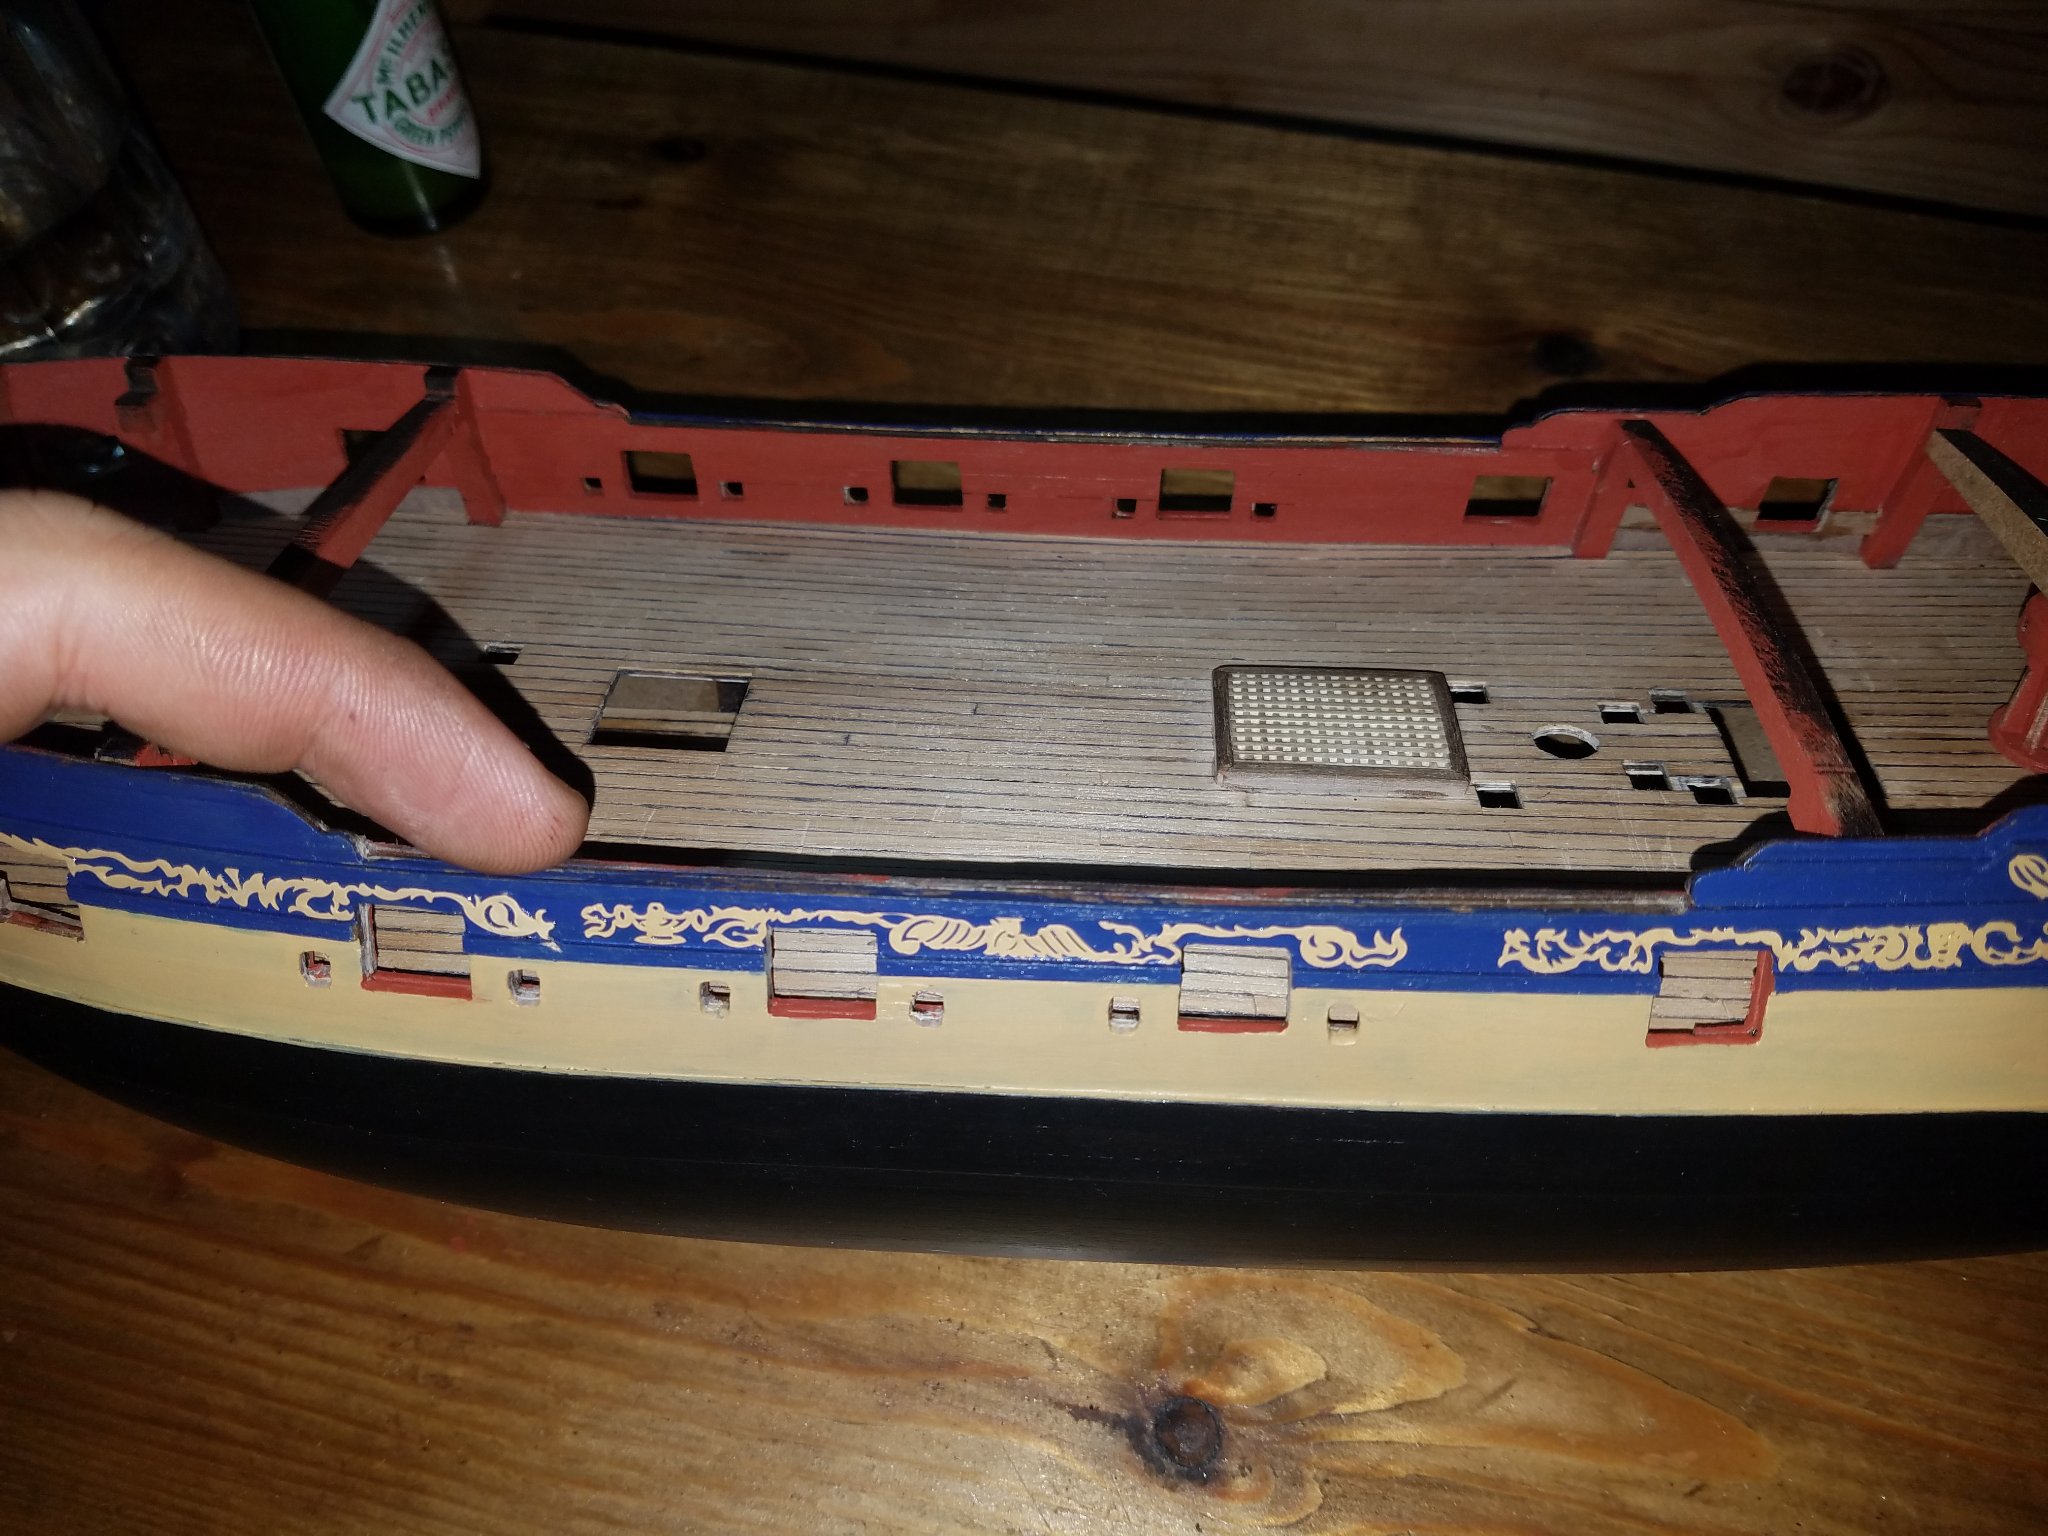
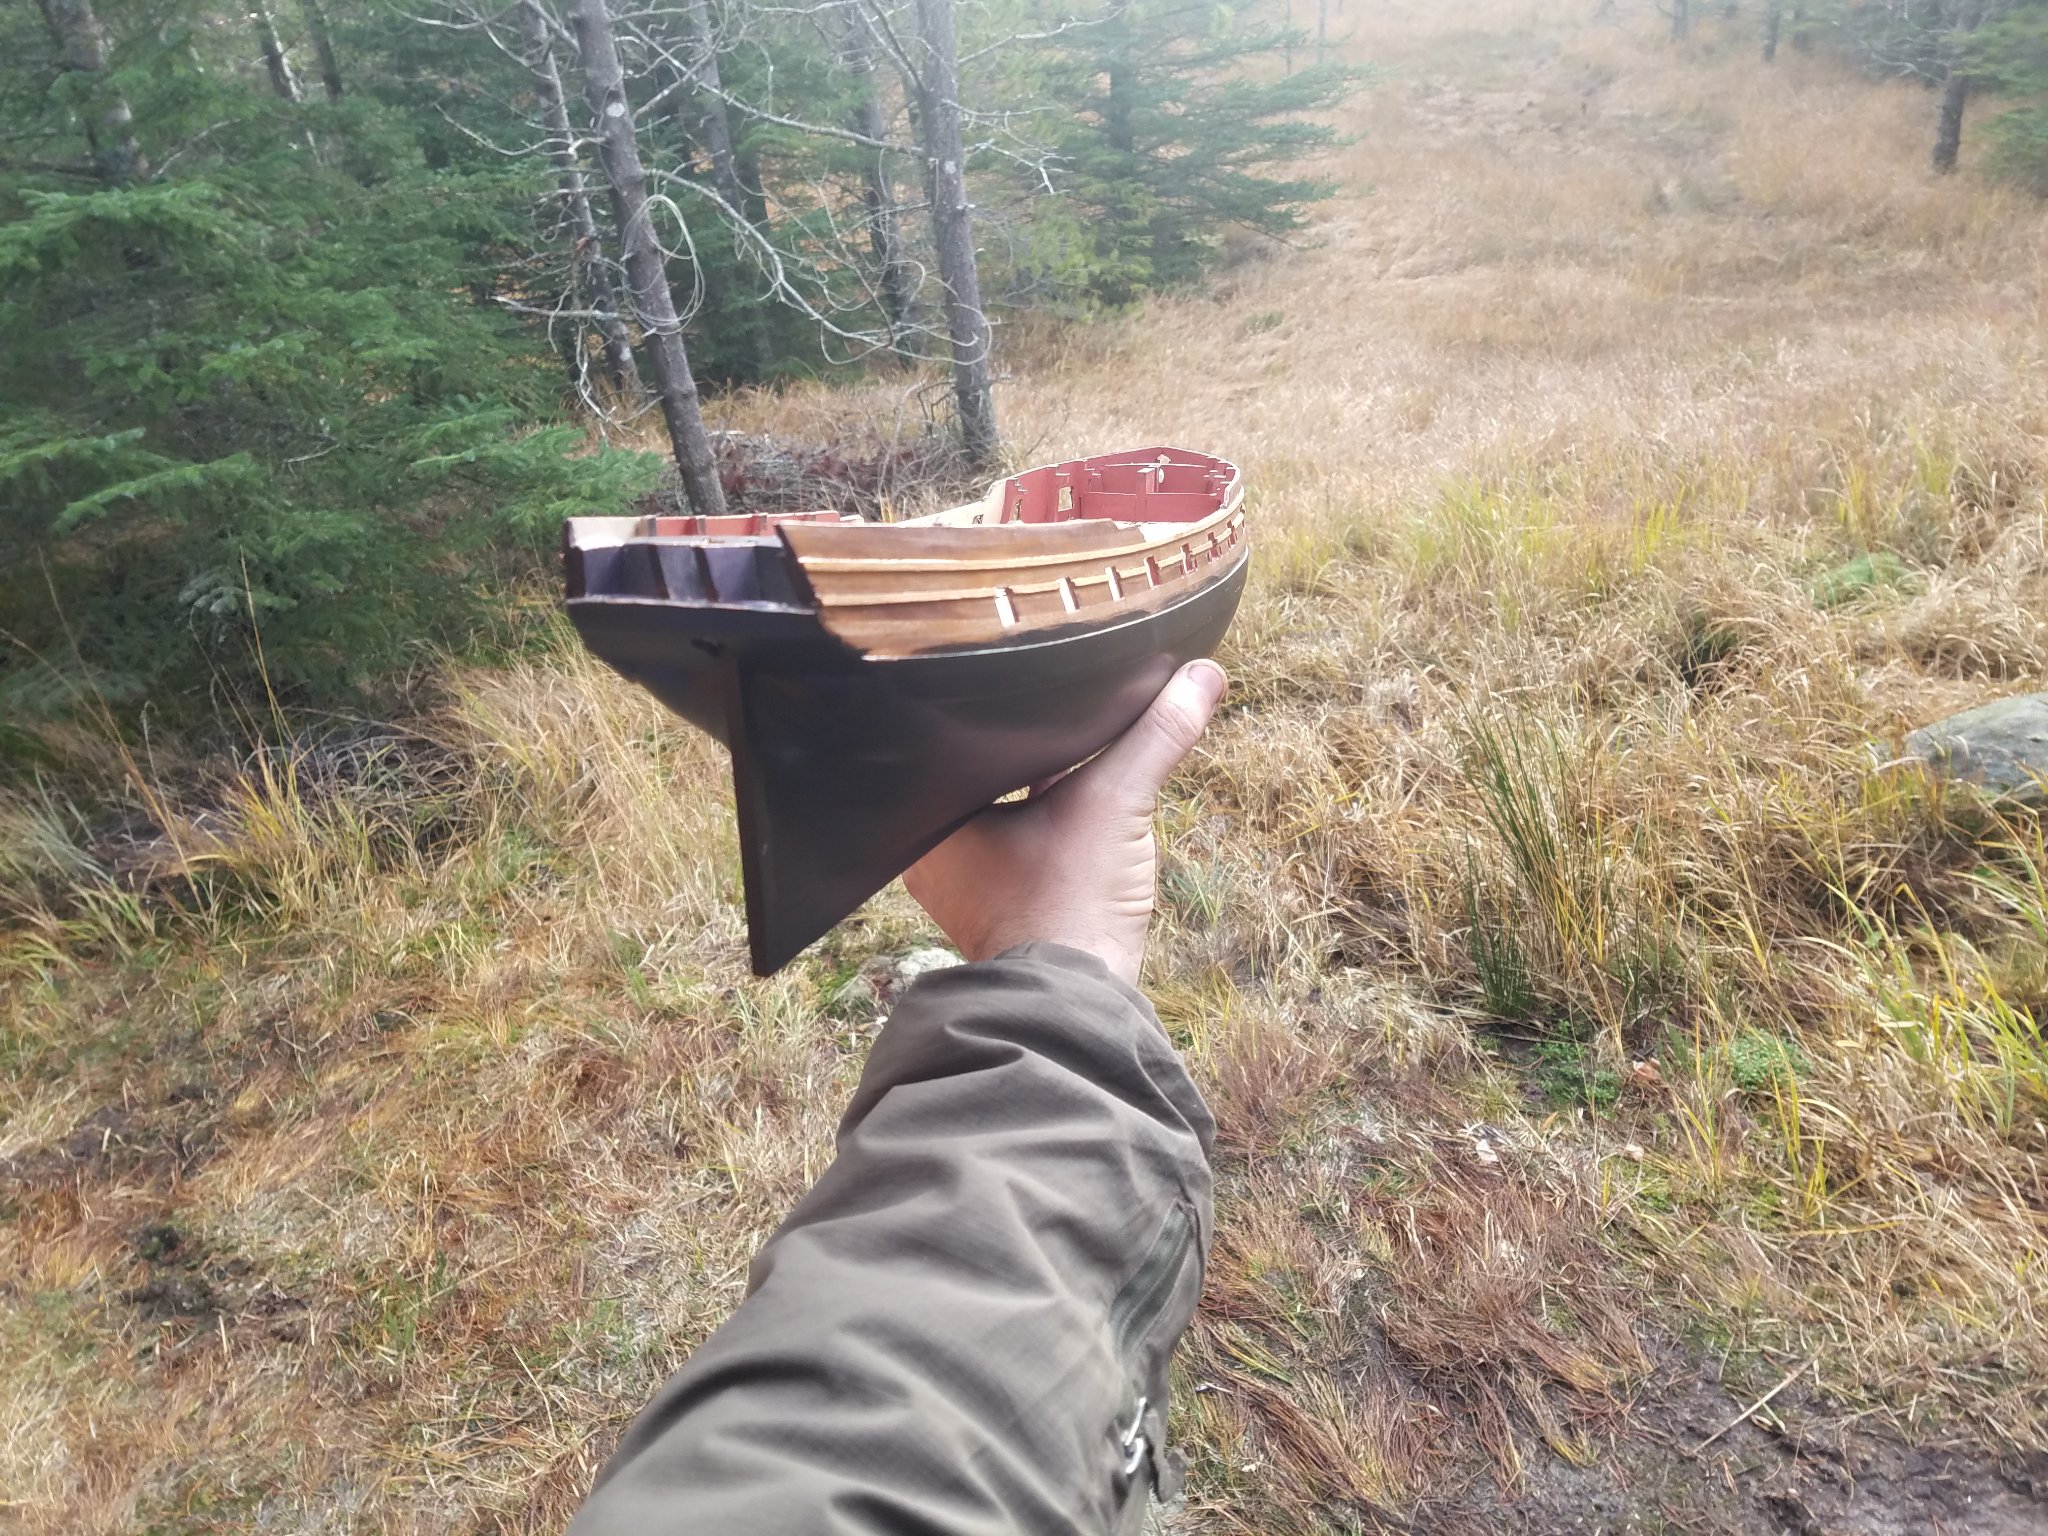
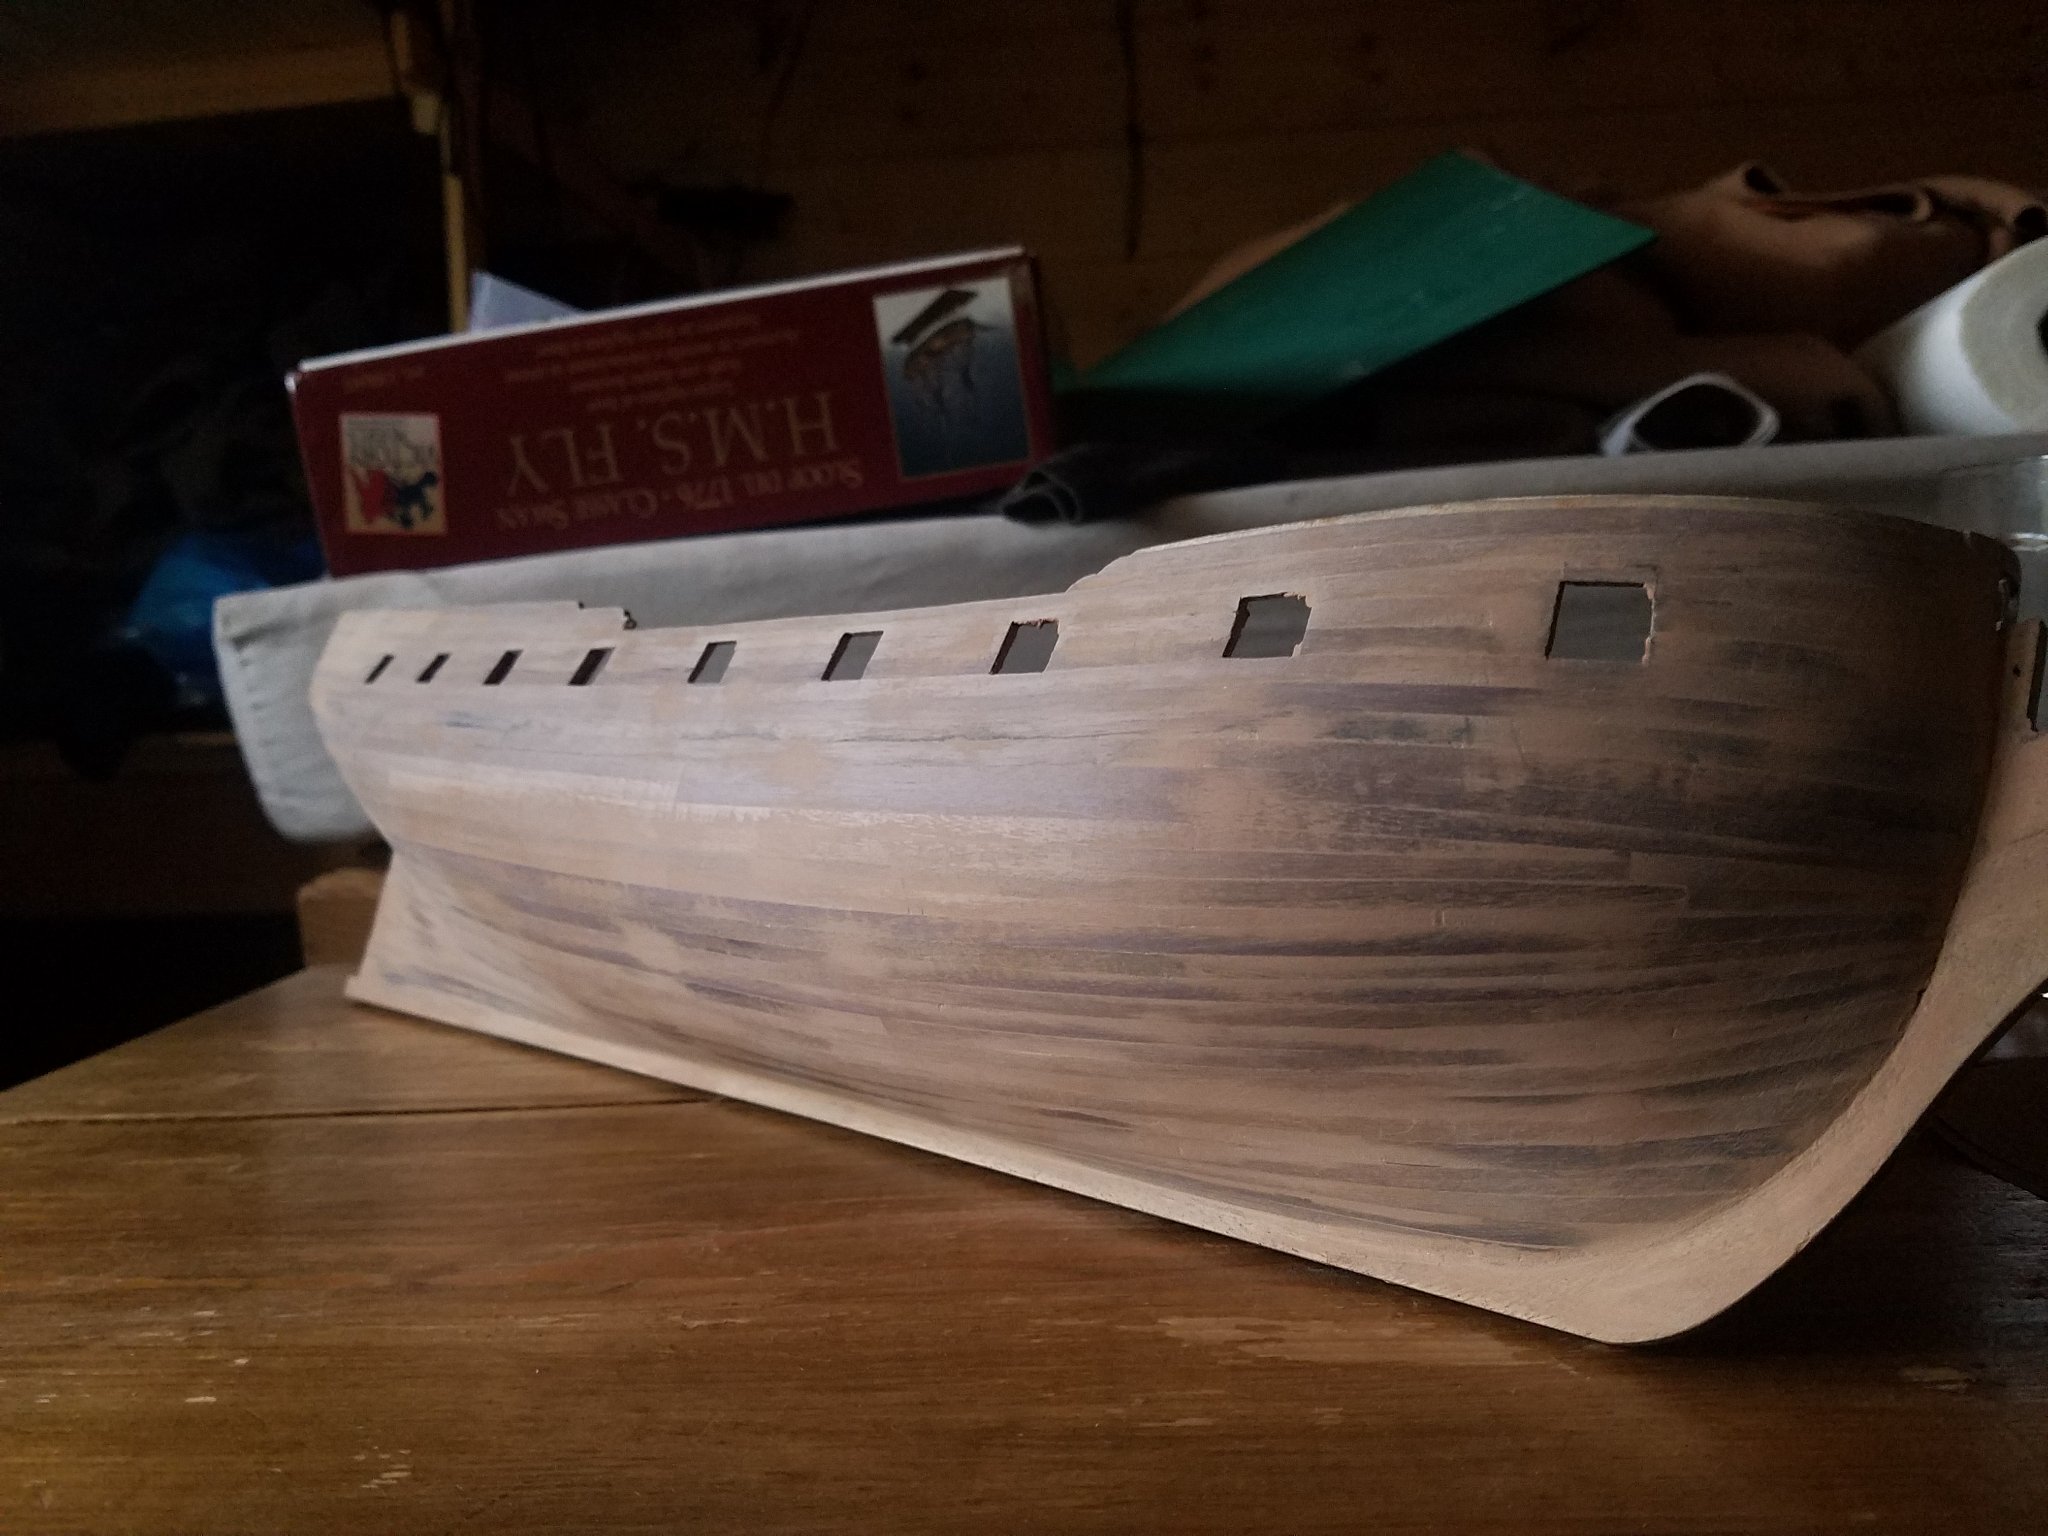
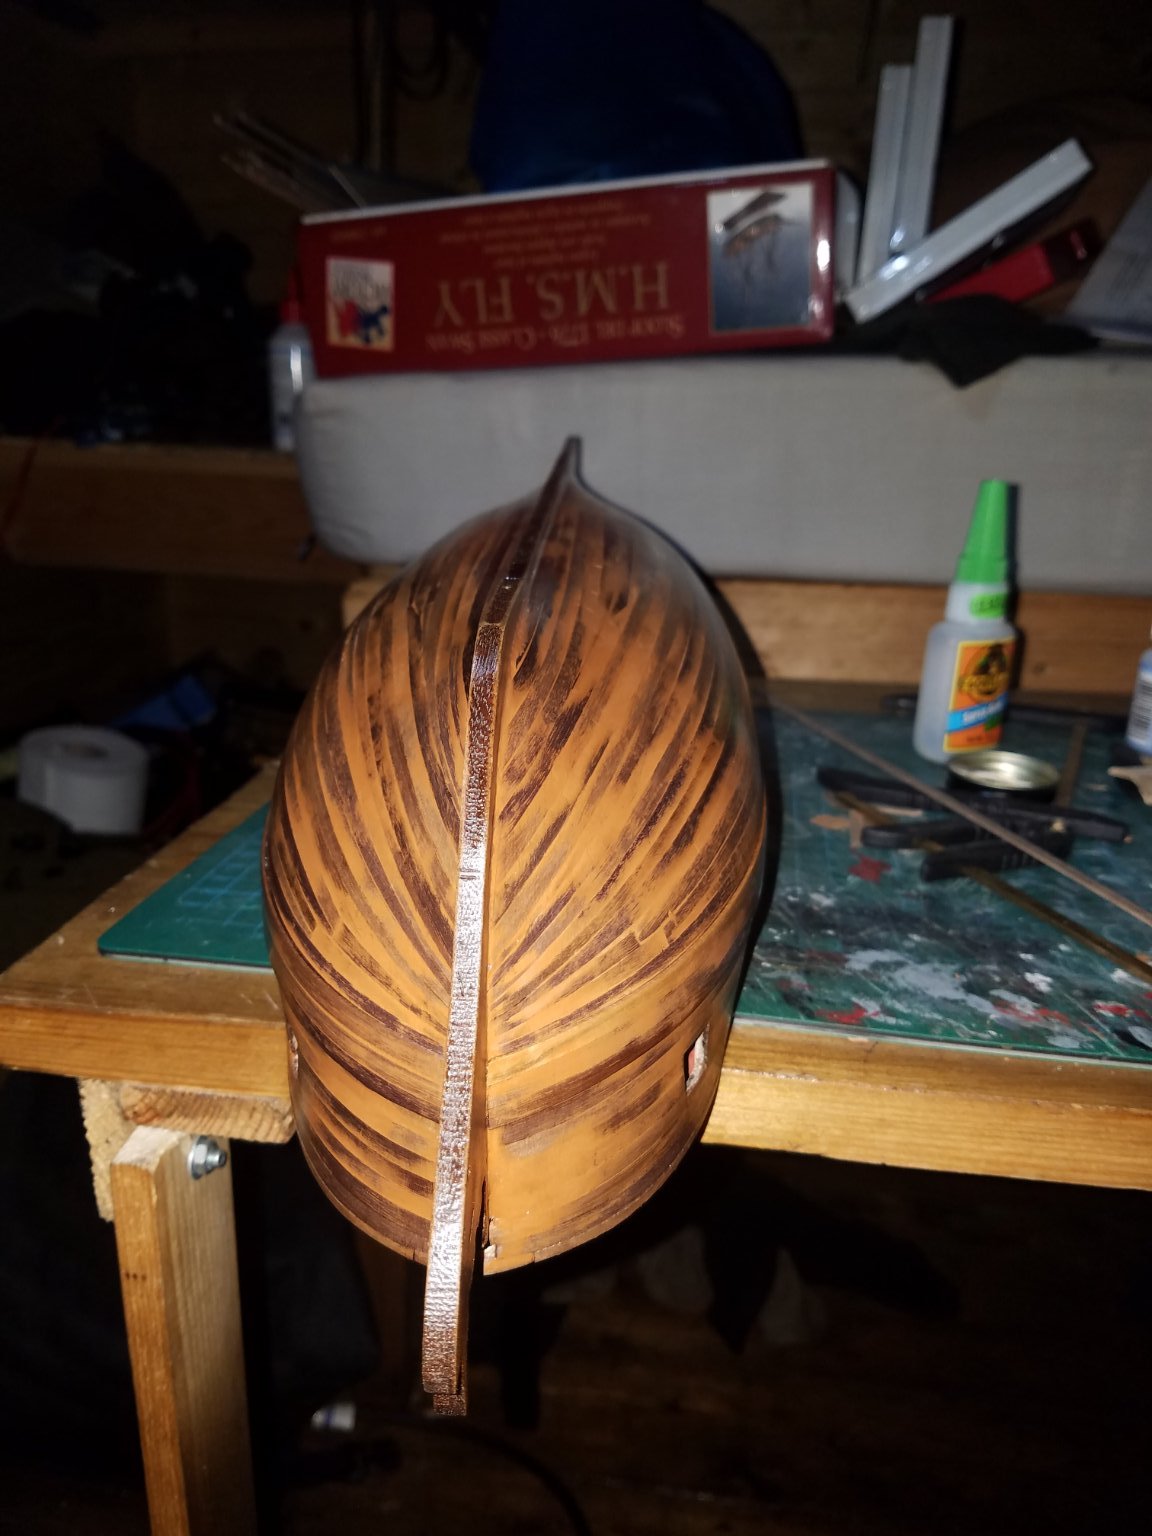
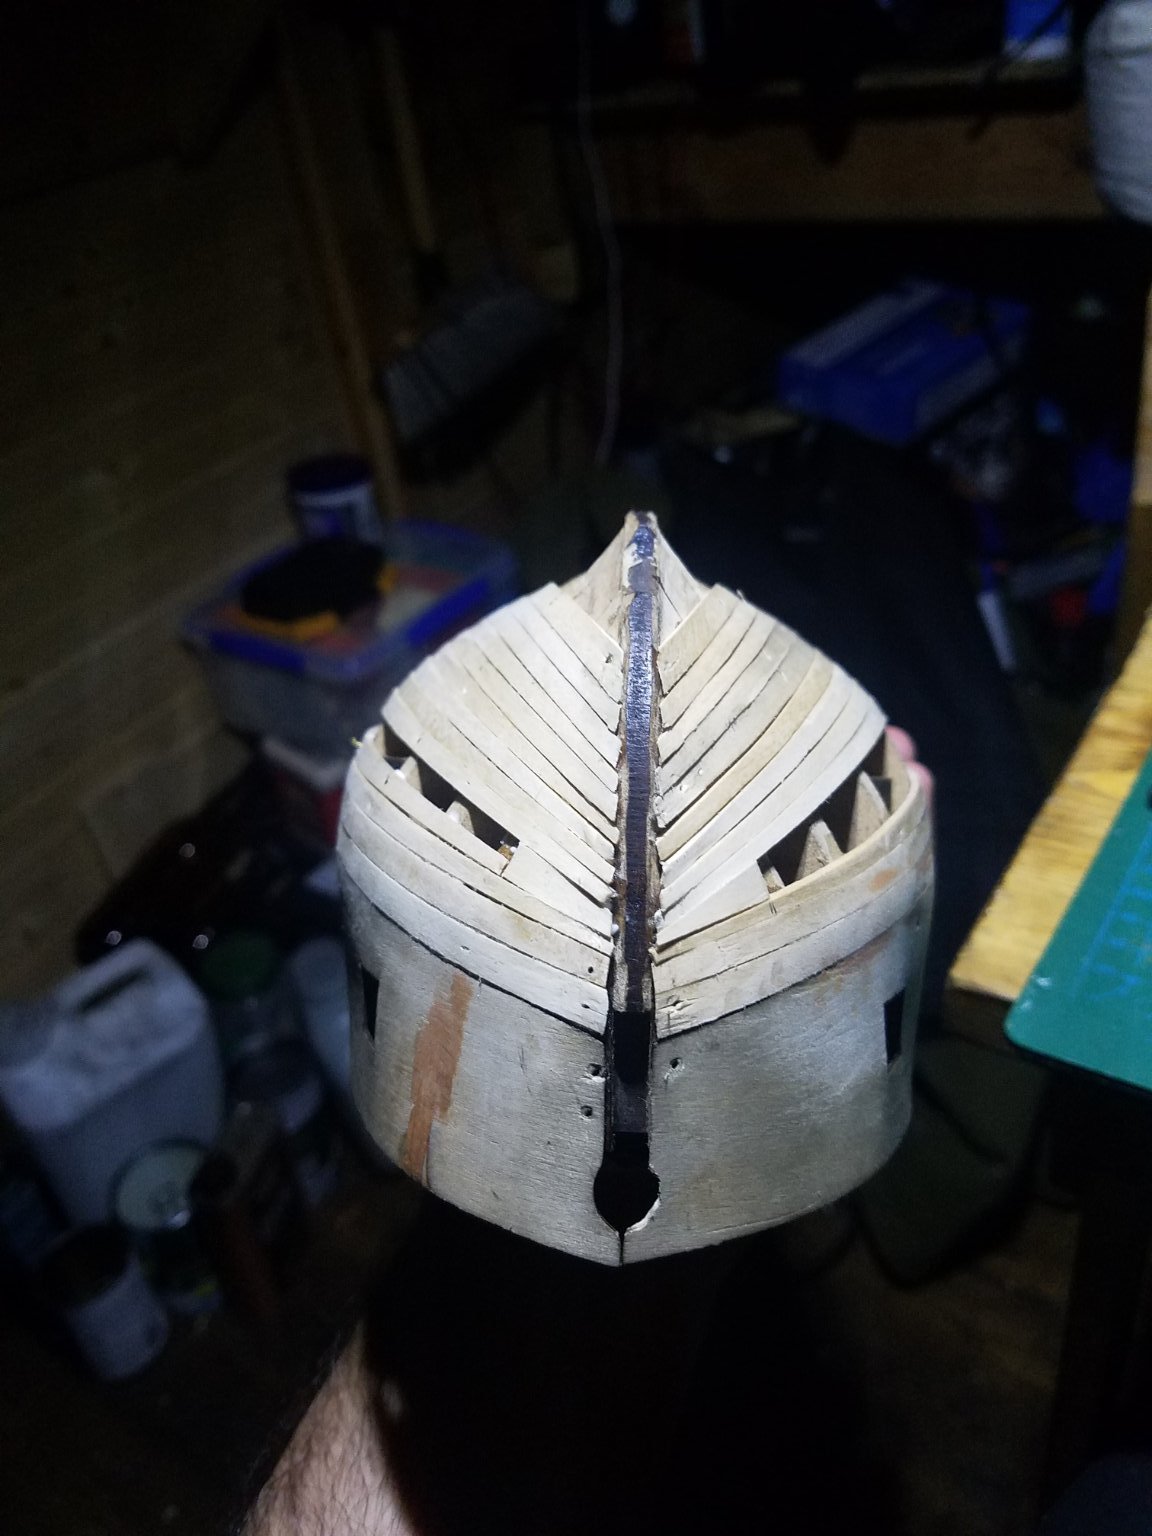
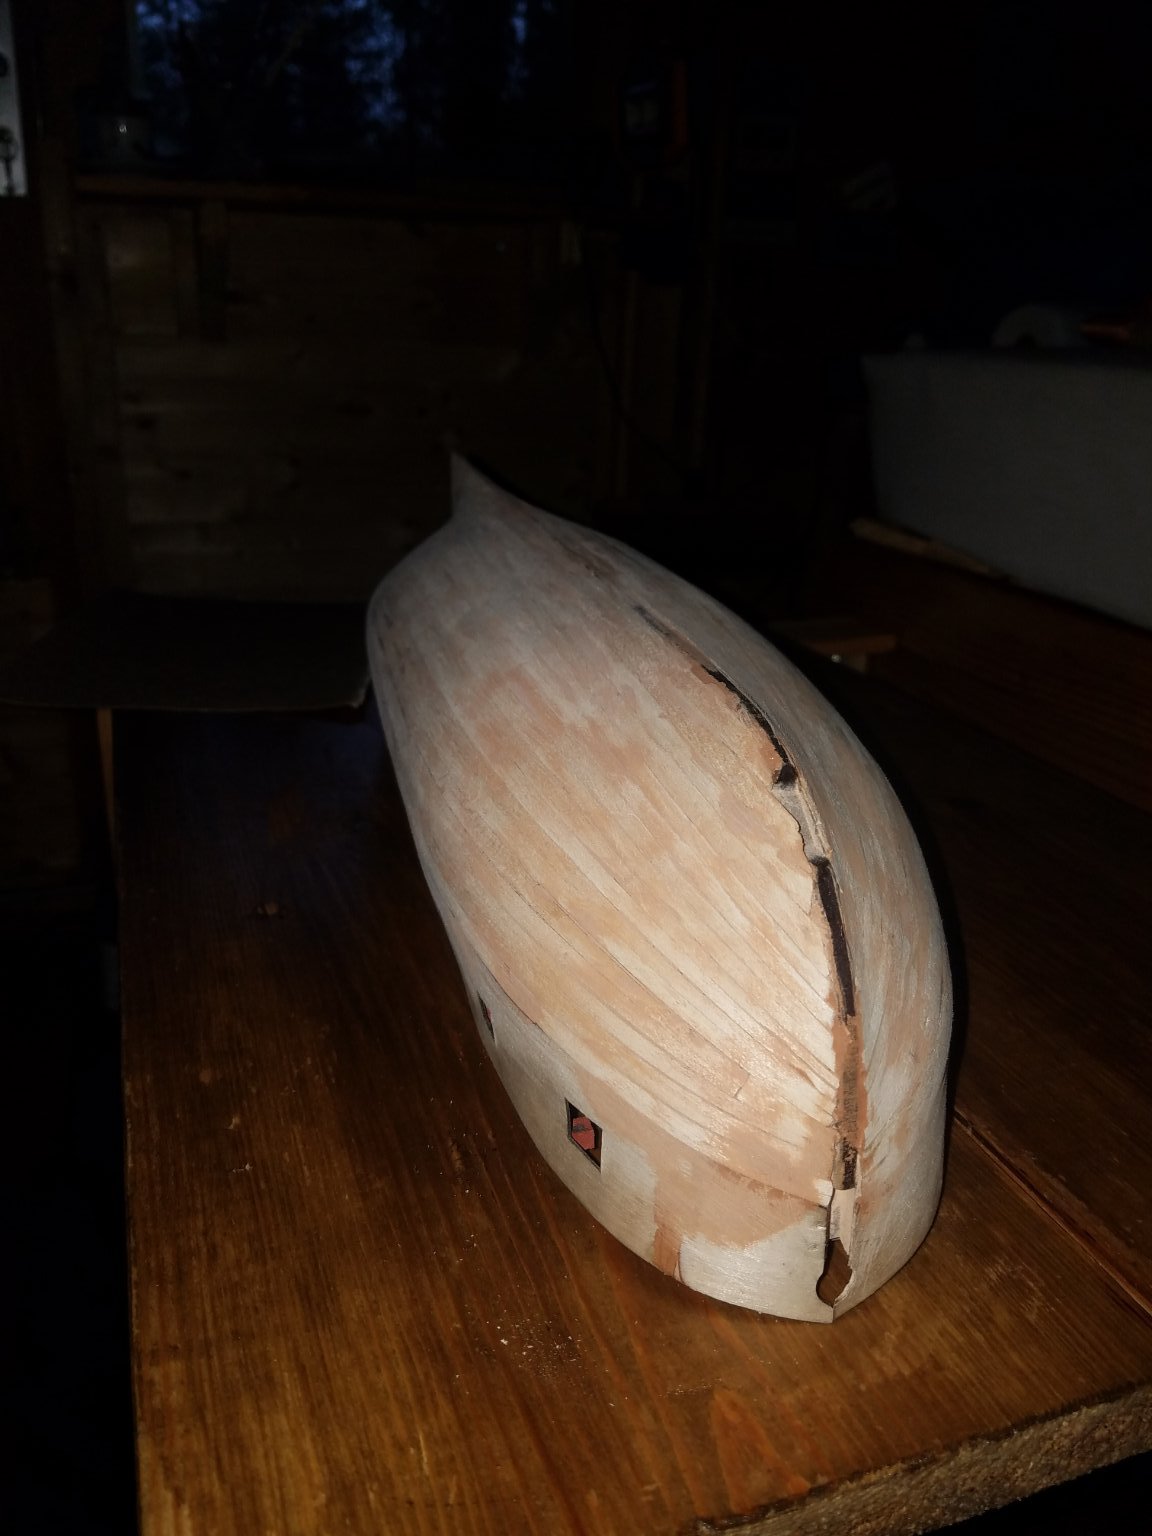
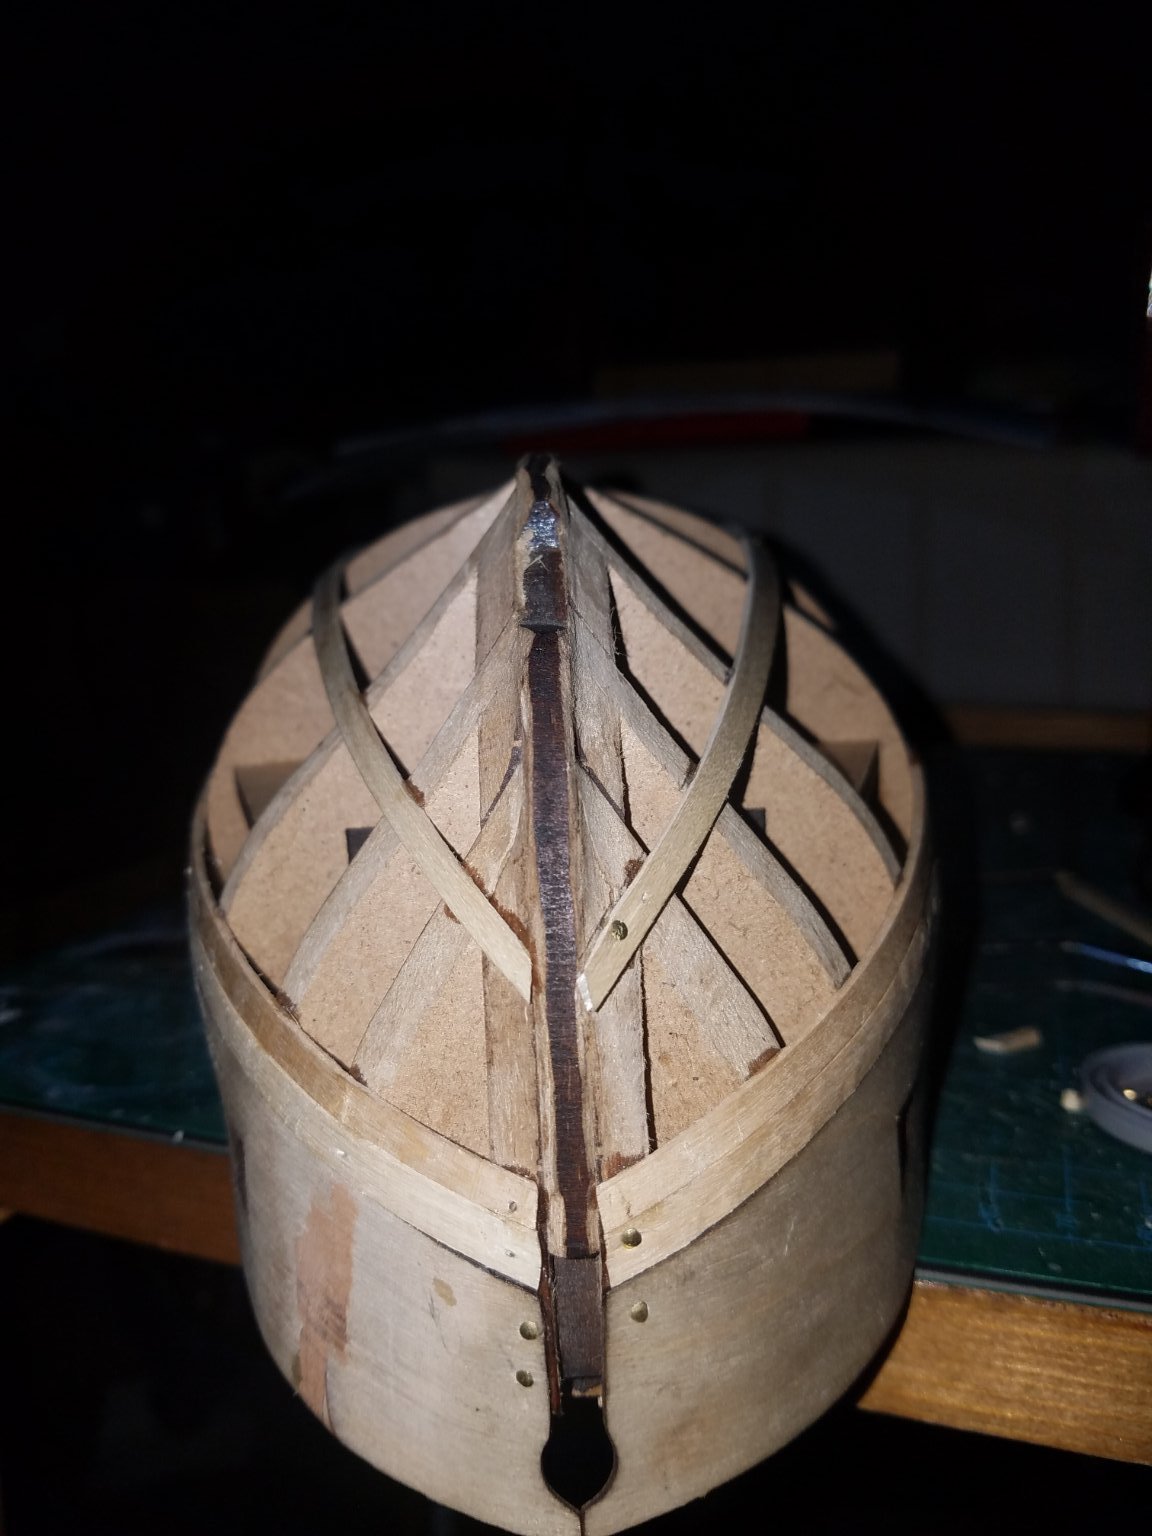
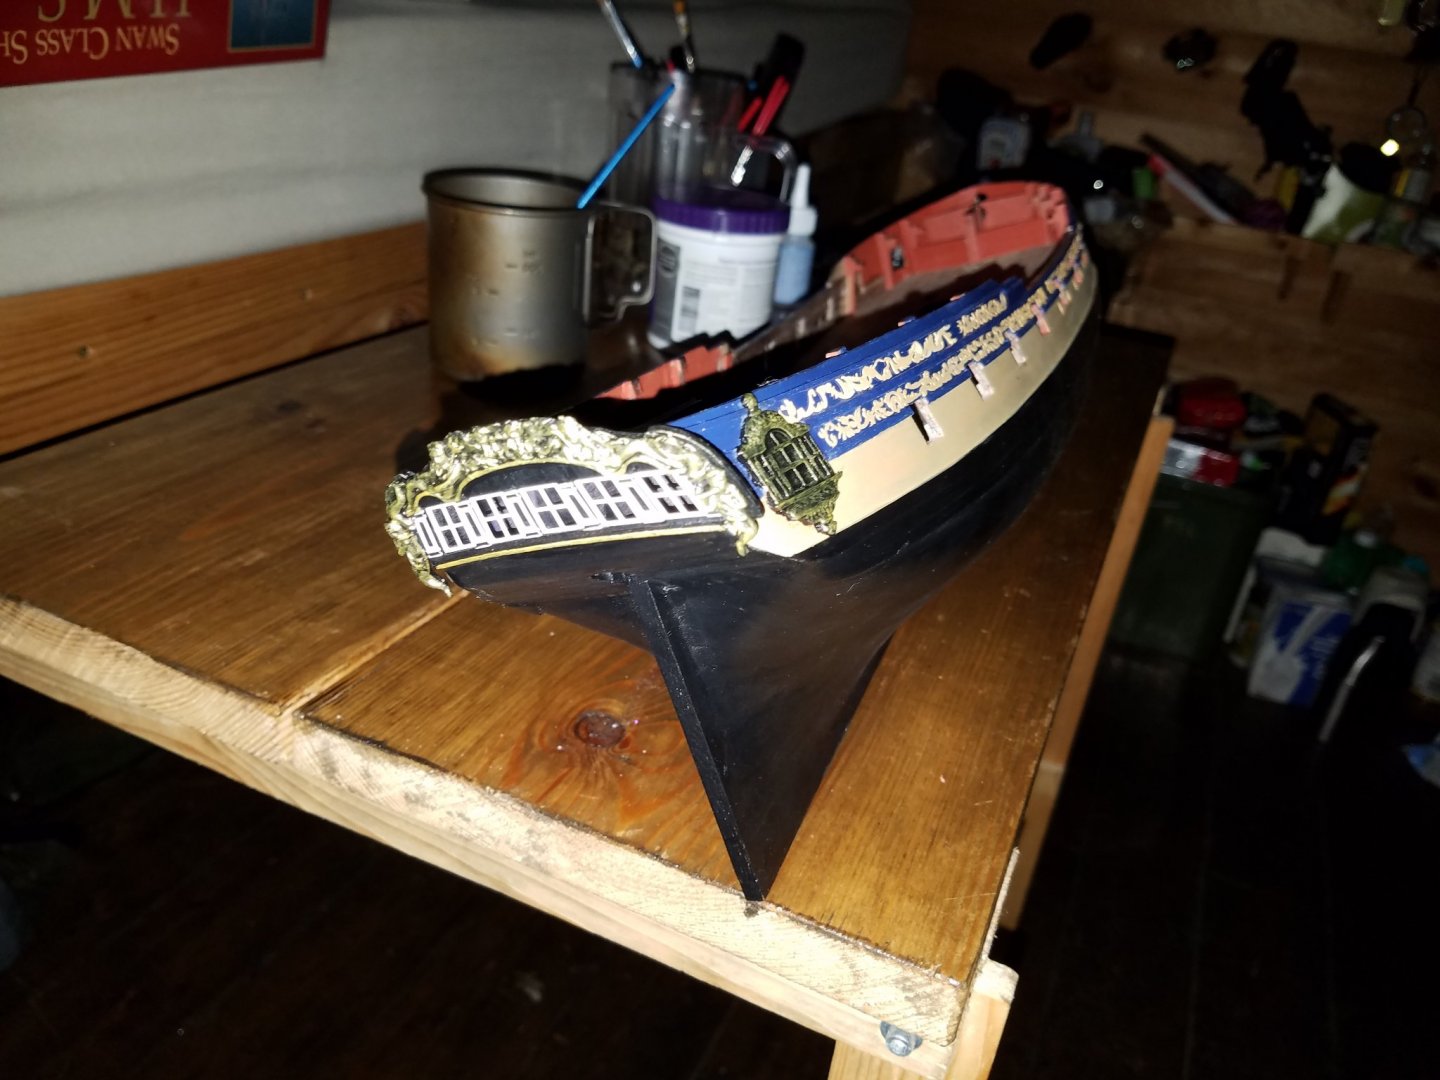
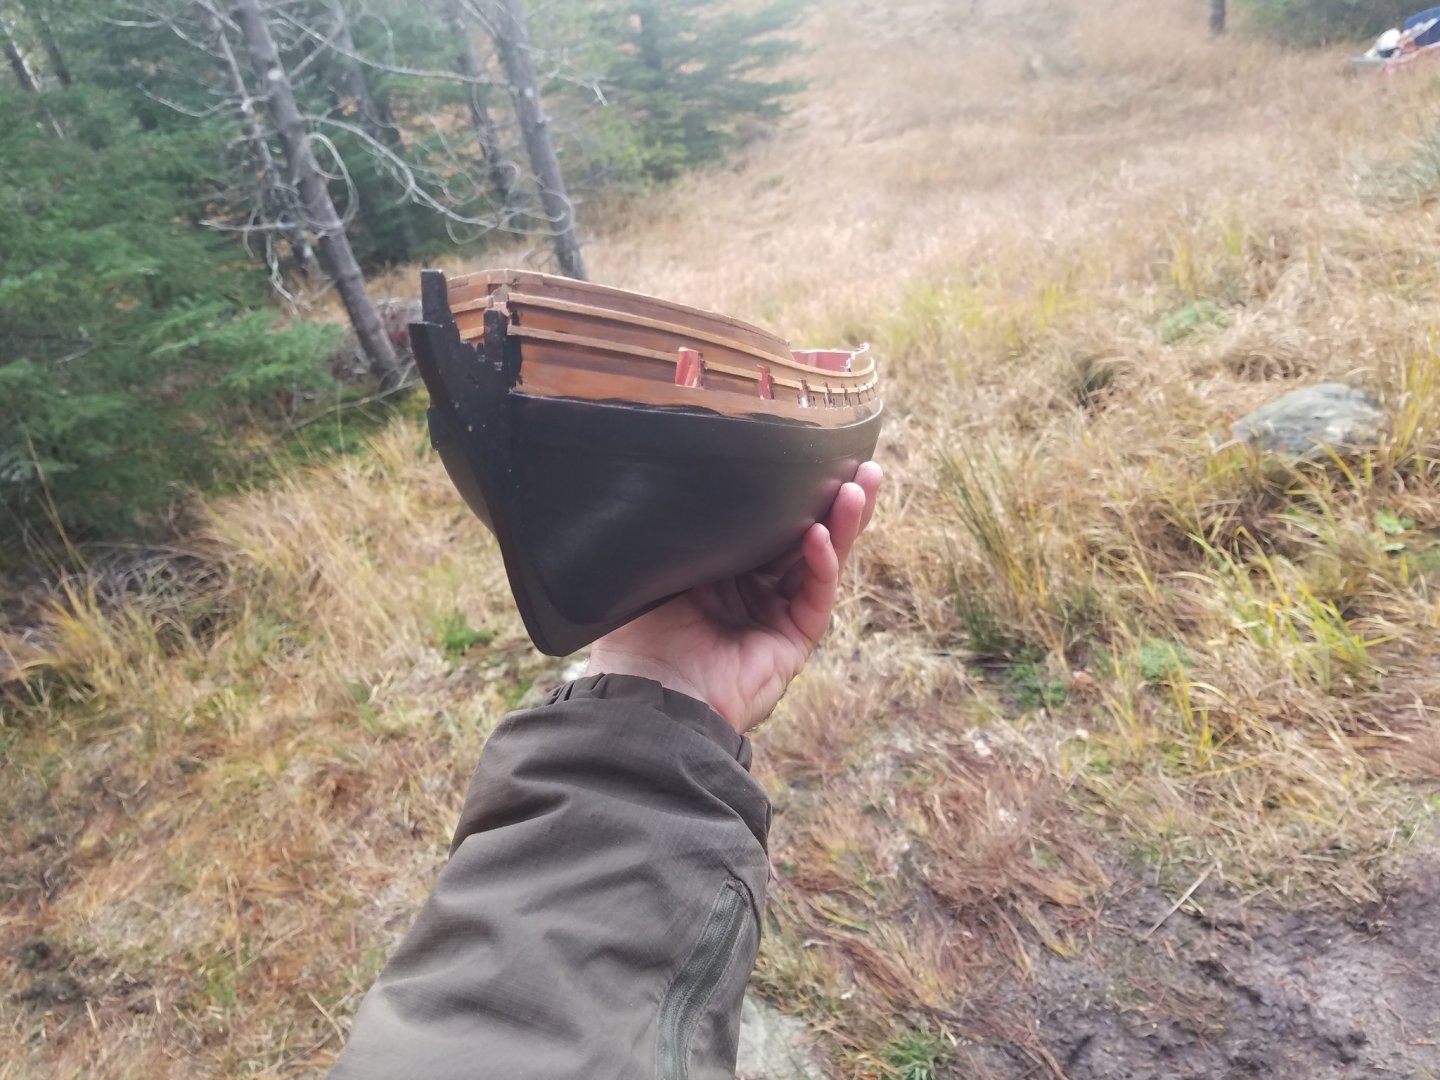
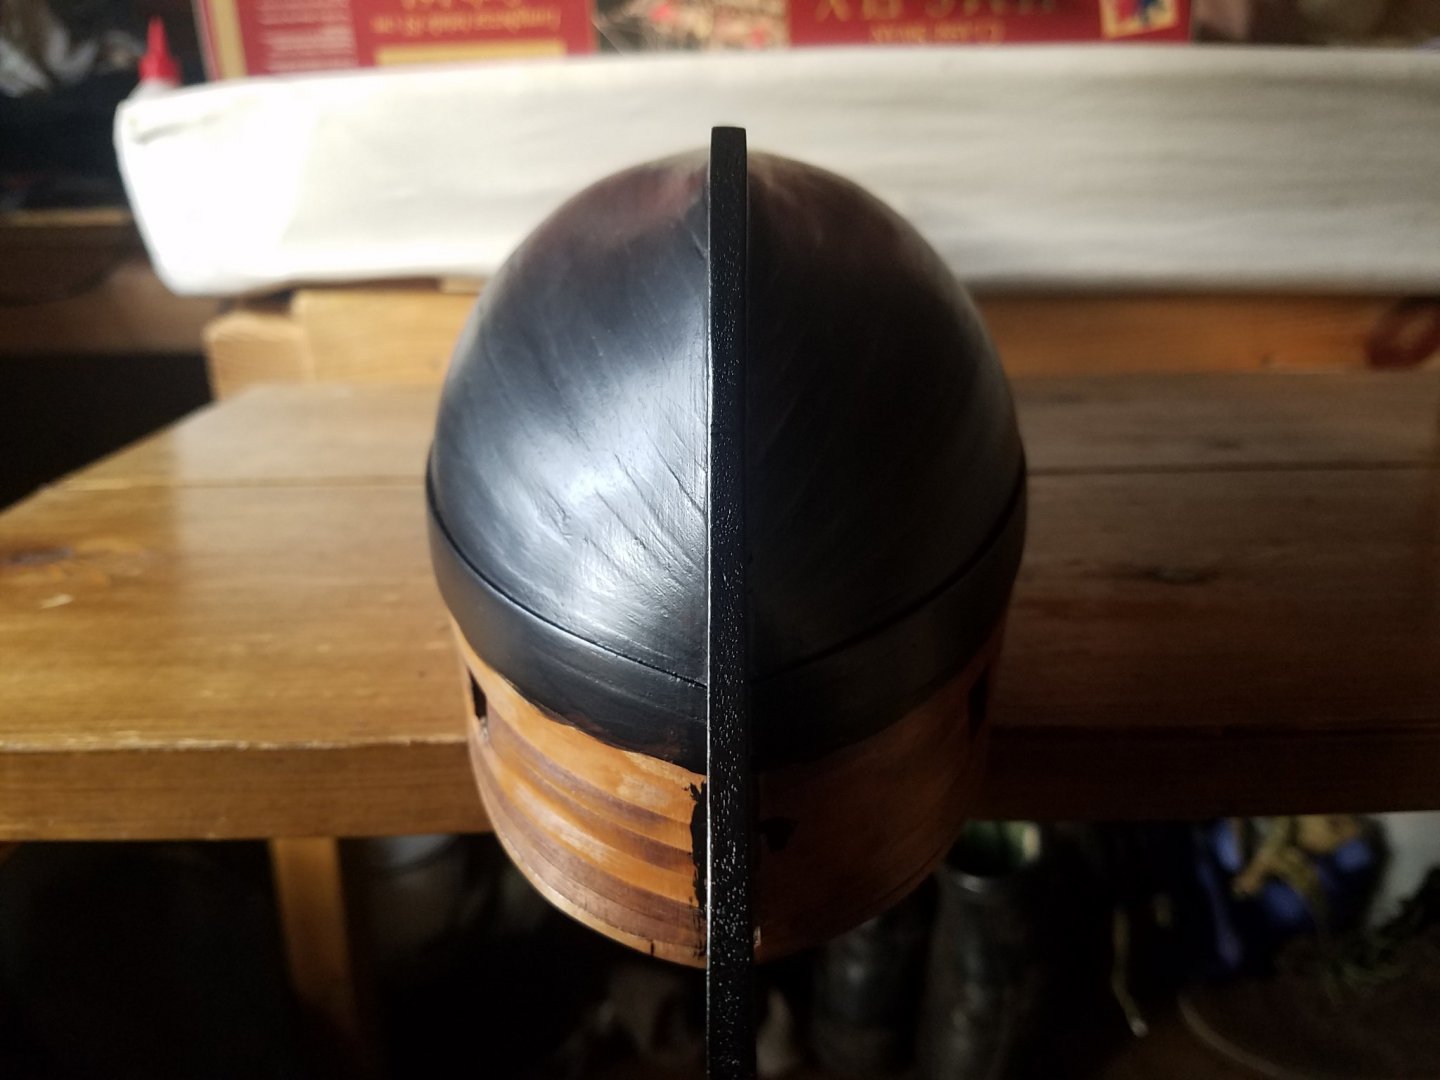
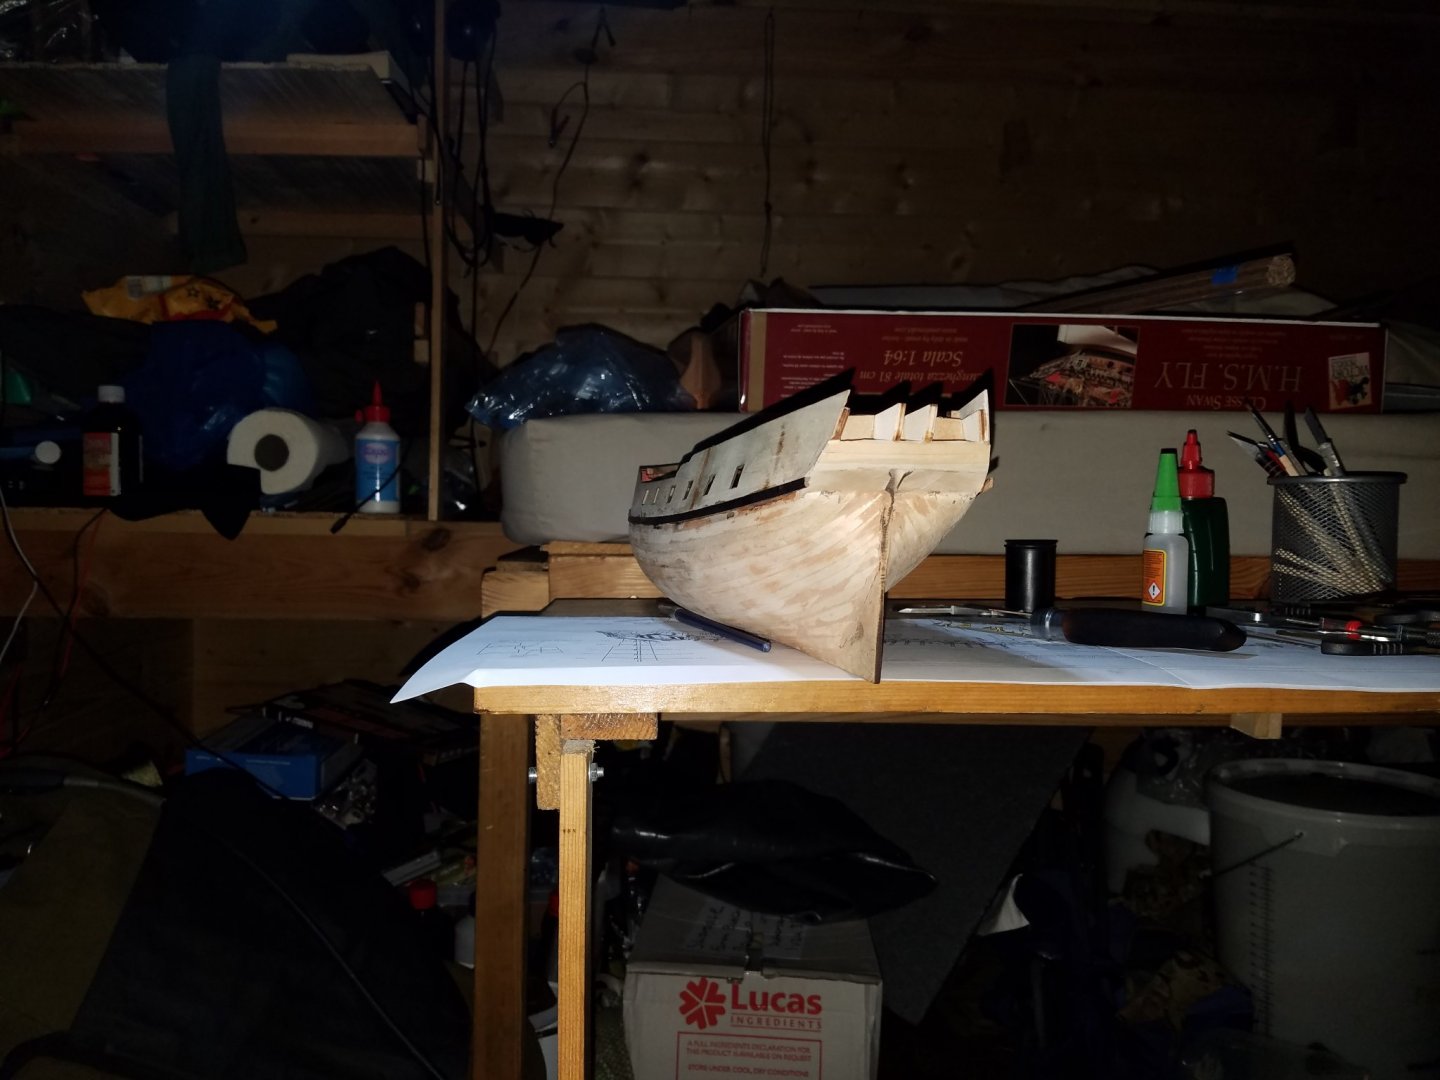
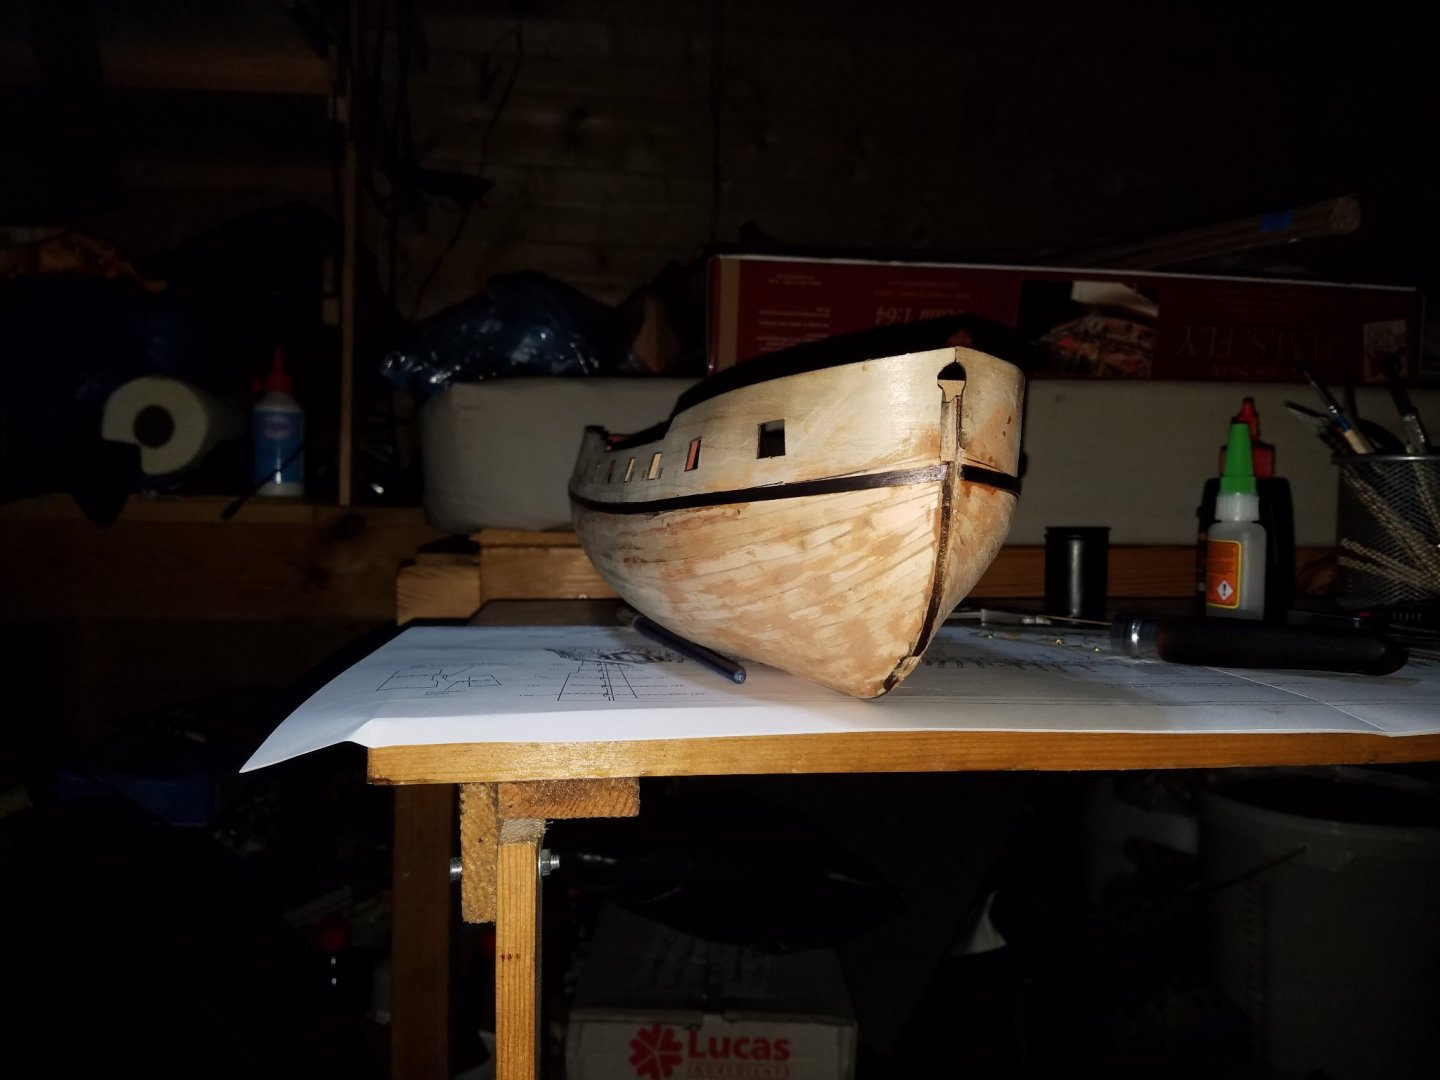
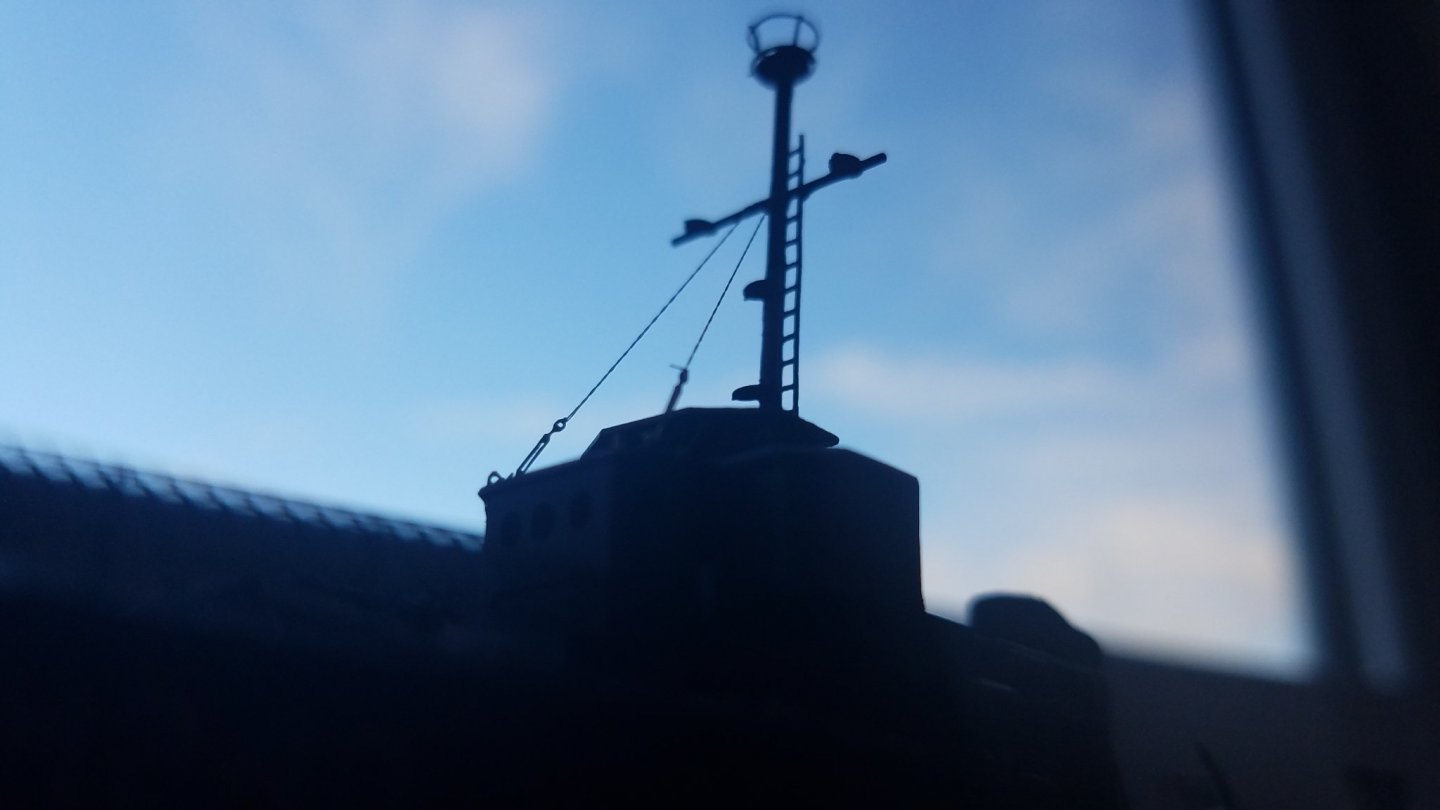
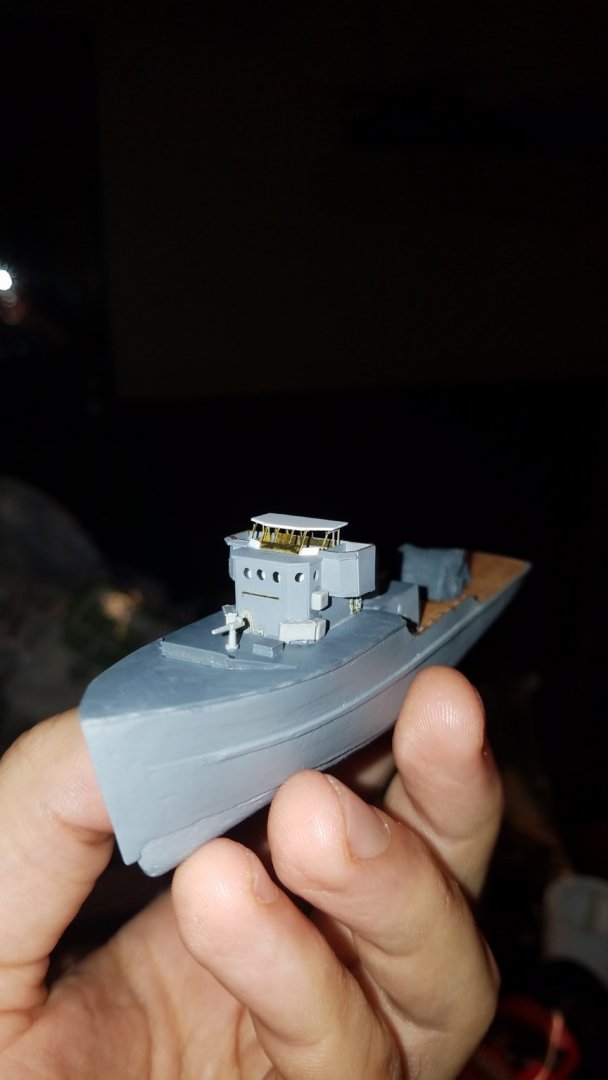
So, final post for today, taking us to how the model is standing as of yesterday. Will likely pick her back up tomorrow evening; I gave myself the weekend off 😁 Second planking progressing well, looking pretty symmetrical and followoing the lines it would roughly follow on the real thing. I need to improve my tapering a bit, though the intention was to paint it, so I did not pay much attention. The darker lines are the sheer strake marked (or do we call it the 'whale'?) Second planking finished, sheer strake / whale not on yet. Good sanding for a smooth surface to work on further. It will be painted, so I wanted a little grain and joints to show, or you won't be able to tell there is actual wood underneath. Looking good. Whale added, sanded, then a couple of layers of cellulose dope applied. I also treated the model with a light coat of antifungal/rot treatment first, as I am in a forest and wood gets attacked pretty badly around here. Bottoms and sheer strake painted, now adding a few more strakes for the decoration strips. Pretty satisfied with the curves. Stern gallery started! The stern casting was a) too small and b) too flat, so it would not fit over the windows properly, or follow the curve. So I just snapped it in a couple of places. Bit of milliput and some scalpel work. Painted, and a perfect match. I'll repaint the stern of course, this was just to see what it looks like and decide on how to paint it. I've seen a brilliantly done stern in here, with the casting's background done in blacl, then the highlights in gold and with and detail in red/blue. I will try and go for that look! And this pic takes us to how HMS Lockdown / HMS Fly stands just now! The next posts will be actual progress, as all the previous pics were from my work over the last couple of weeks. Looking forward to advice and comments!


- 59 replies
-
- 5
-
-
- Fly
- Victory Models
- (and 1 more)
-
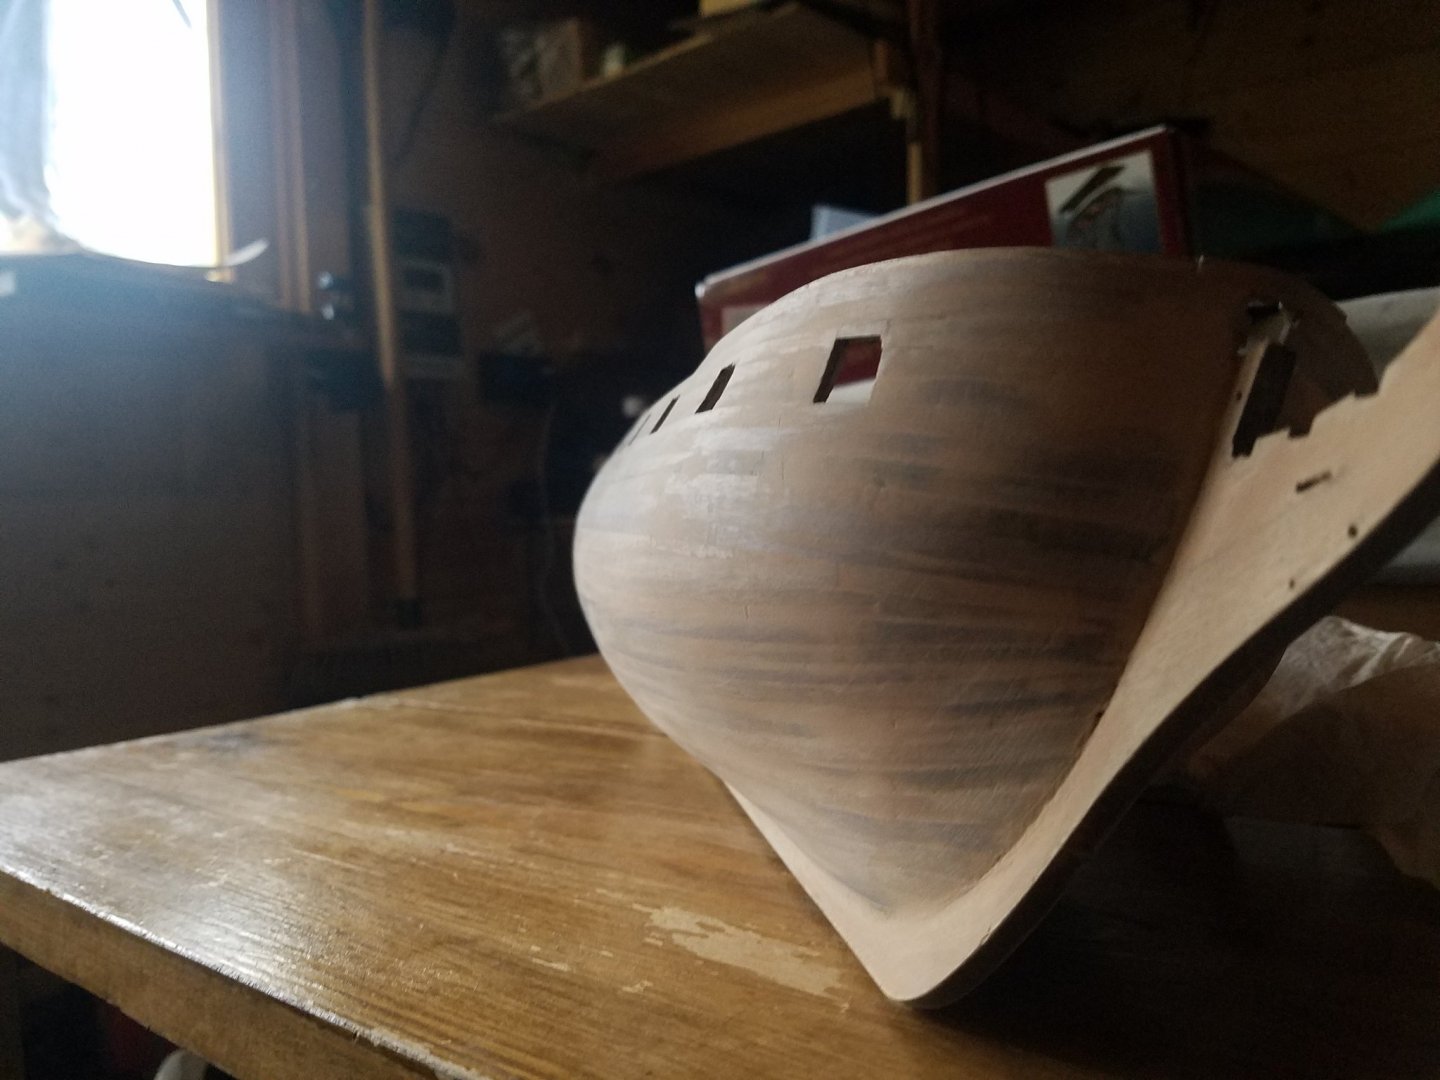
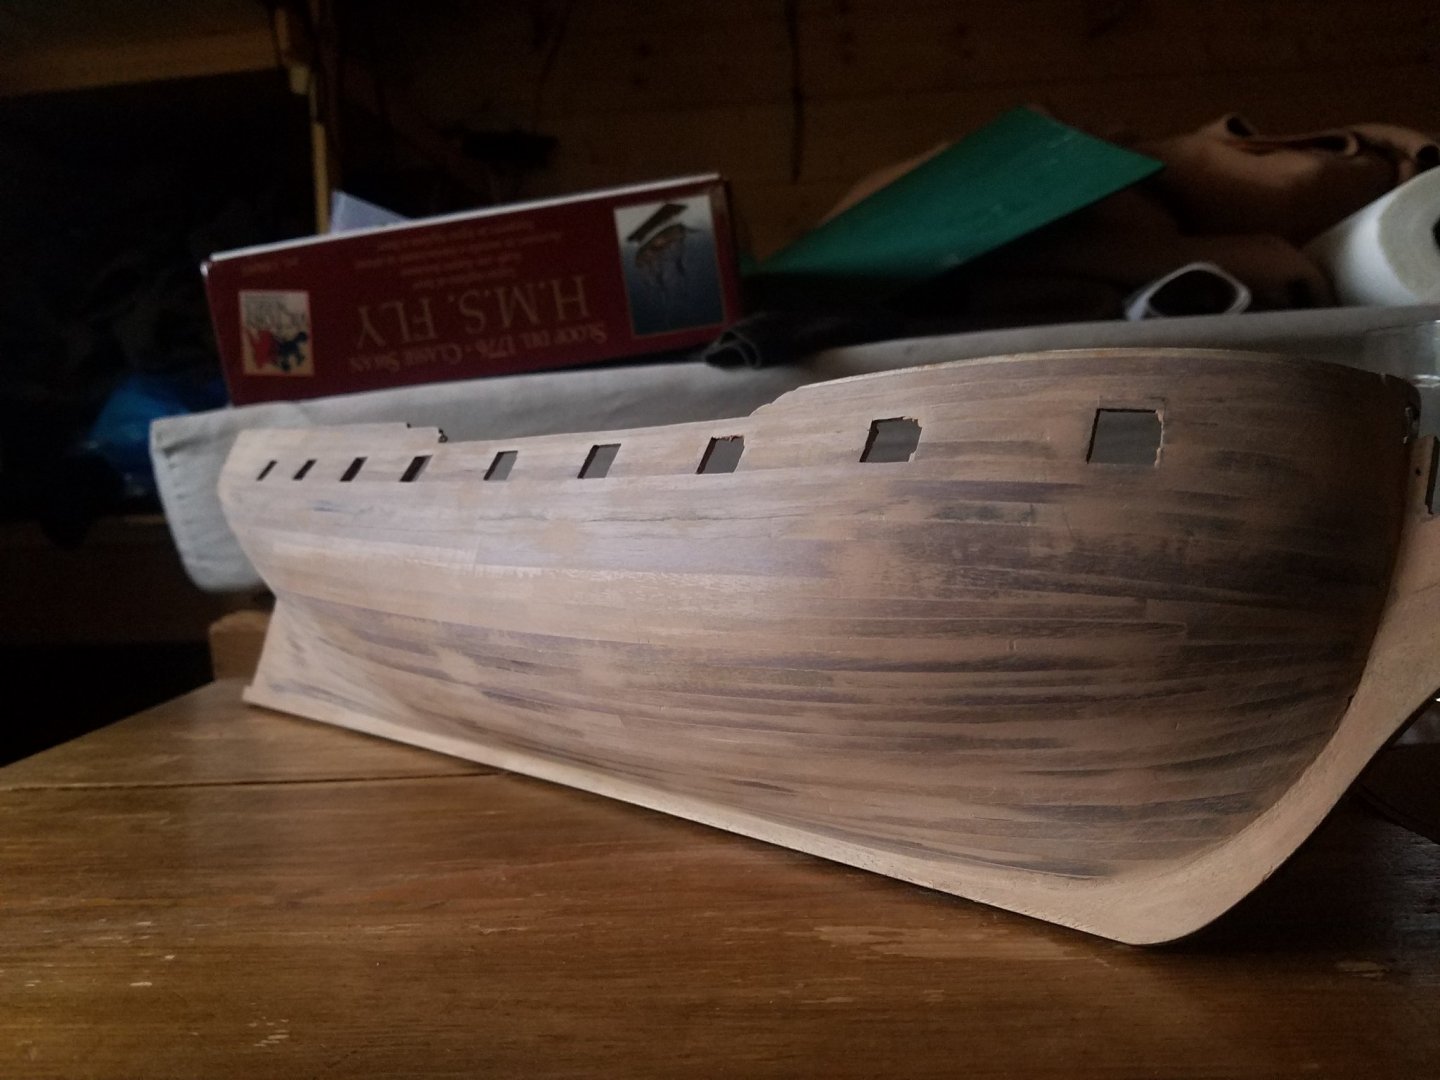
First planking well-progressed. First planking now all closed and sanded. Bow view, with the first planking finished and sanded, and the top plank of the main whale installed. Stern view.


- 59 replies
-
- 2
-
-
- Fly
- Victory Models
- (and 1 more)
-
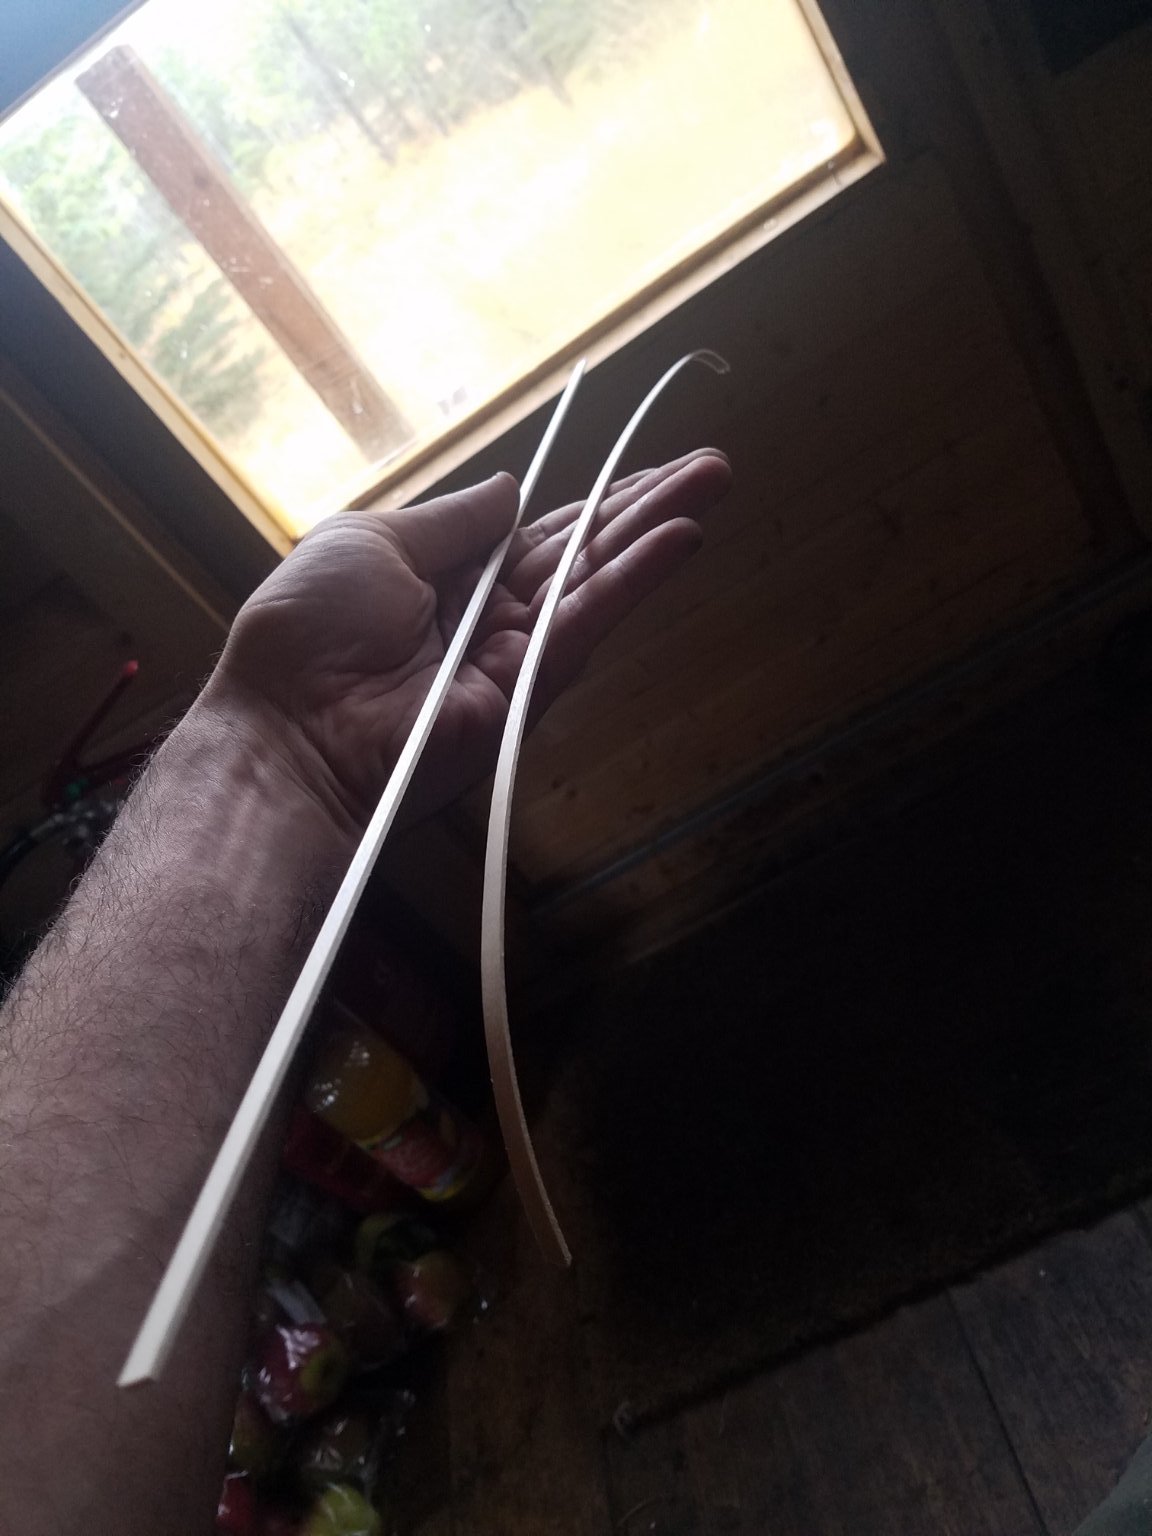
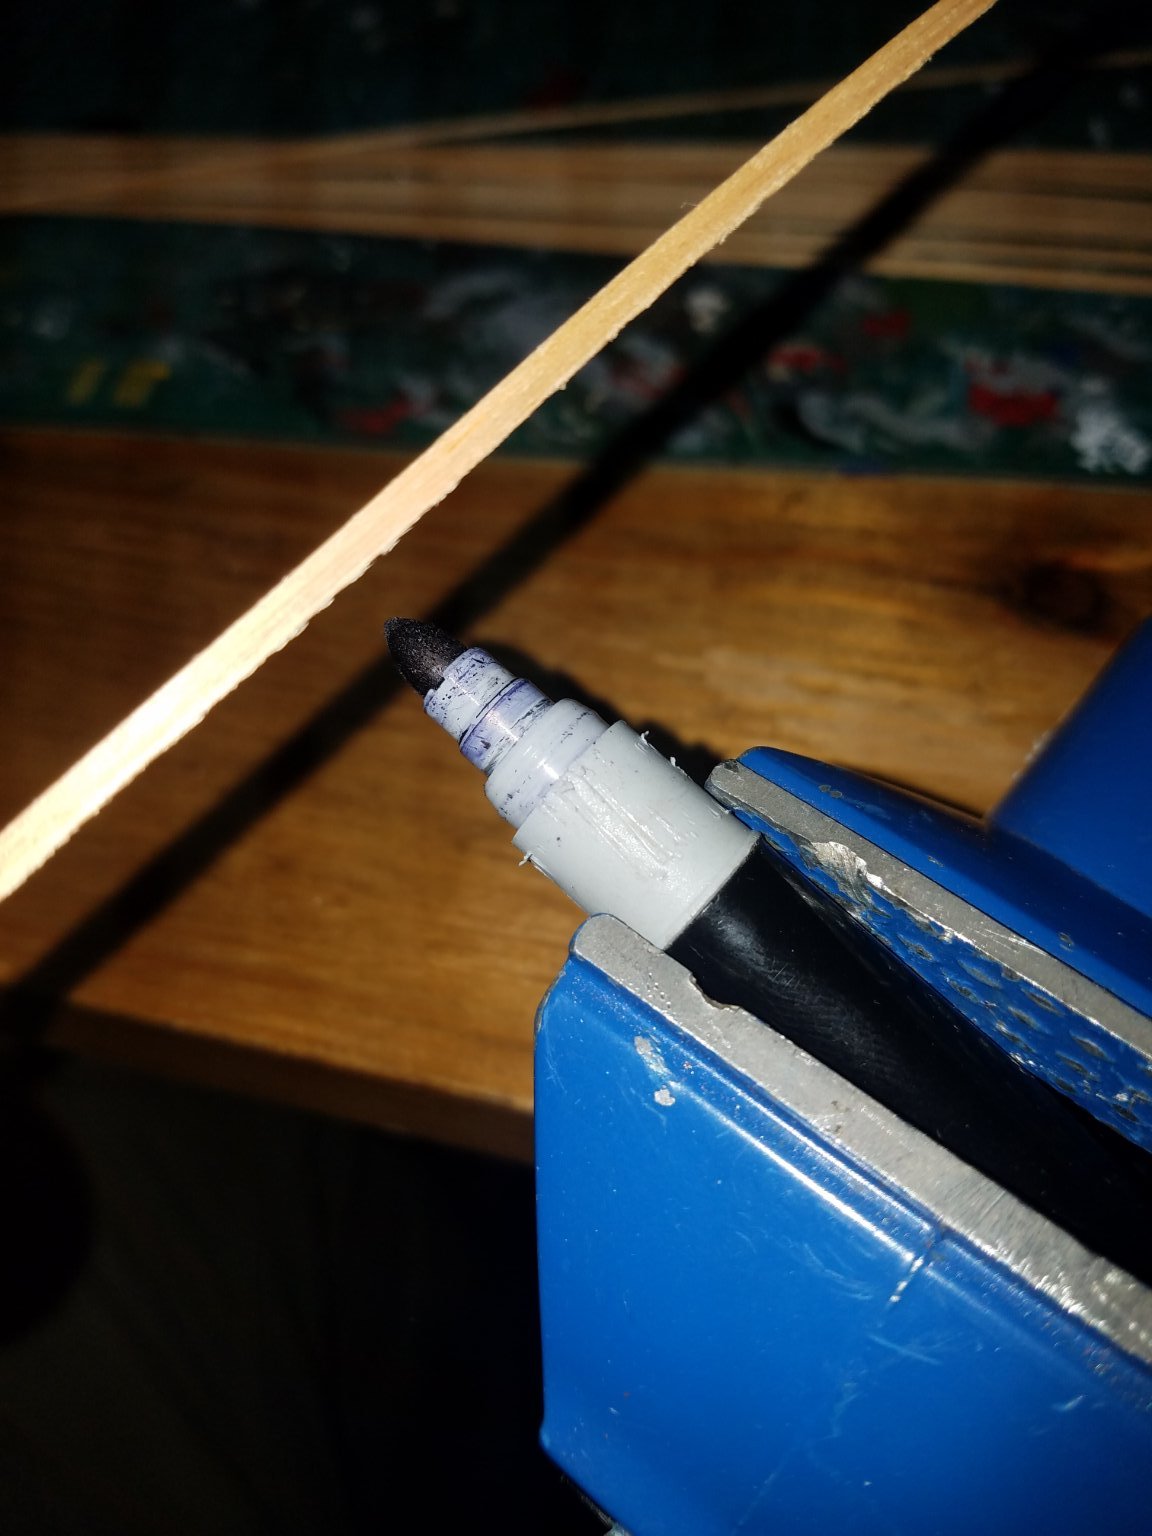
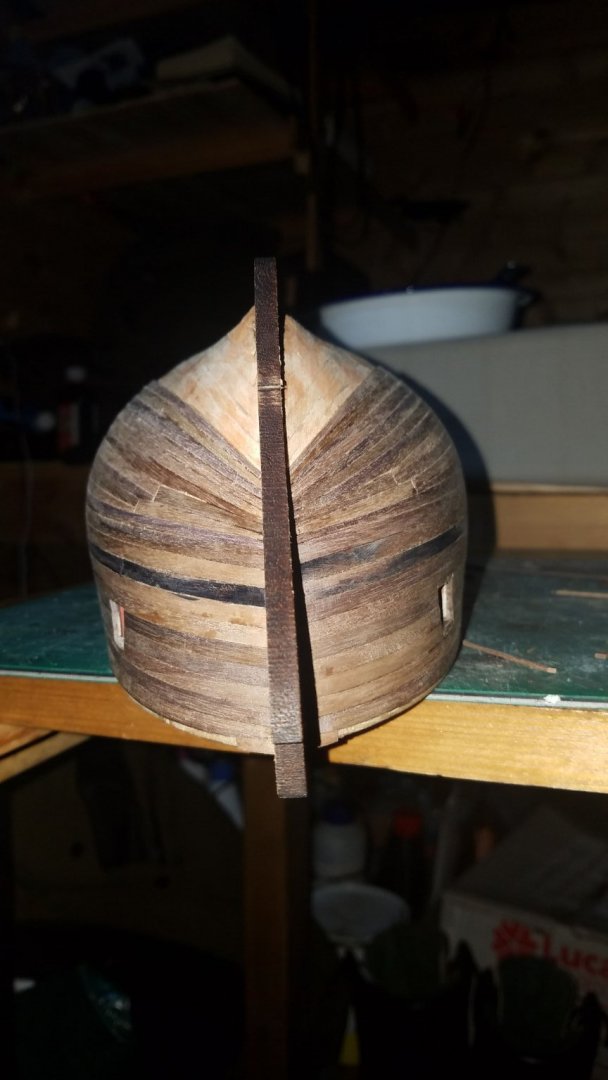
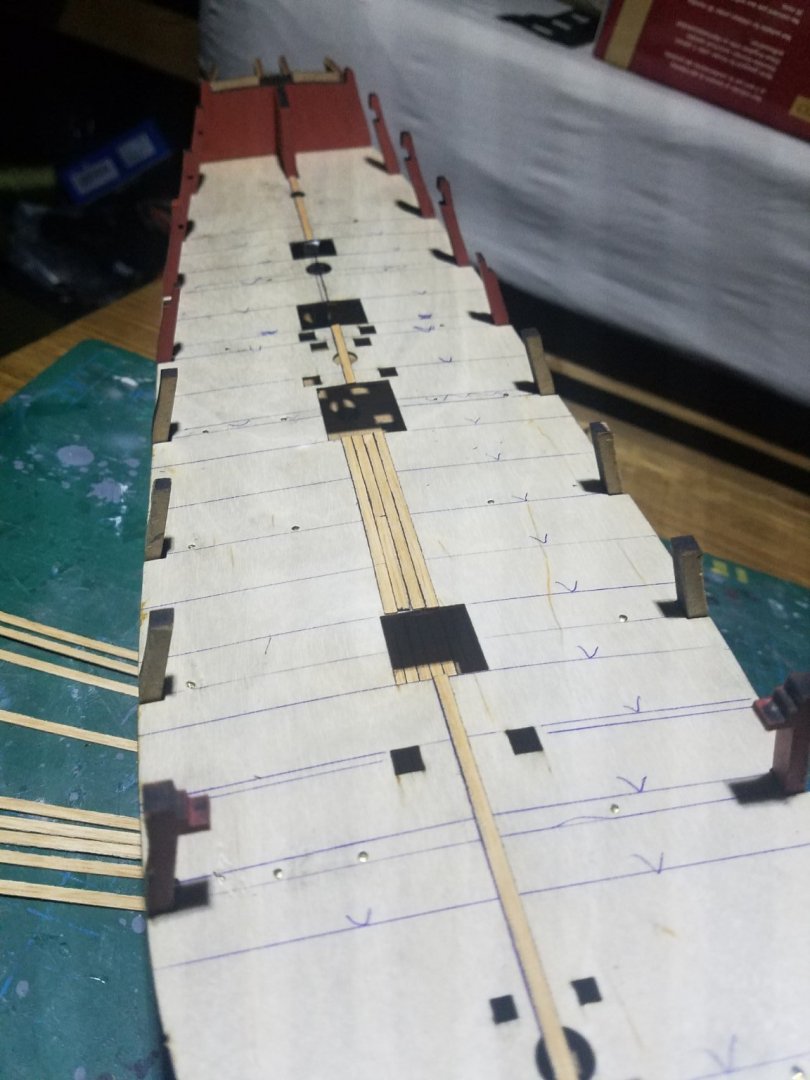
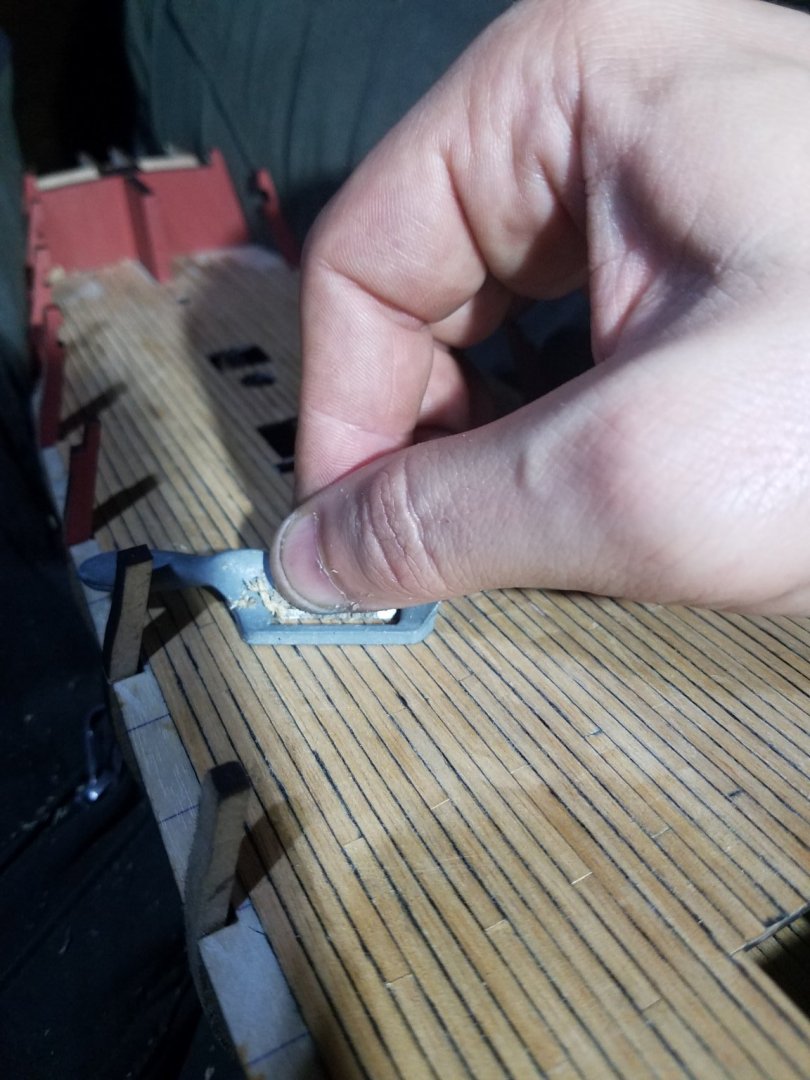
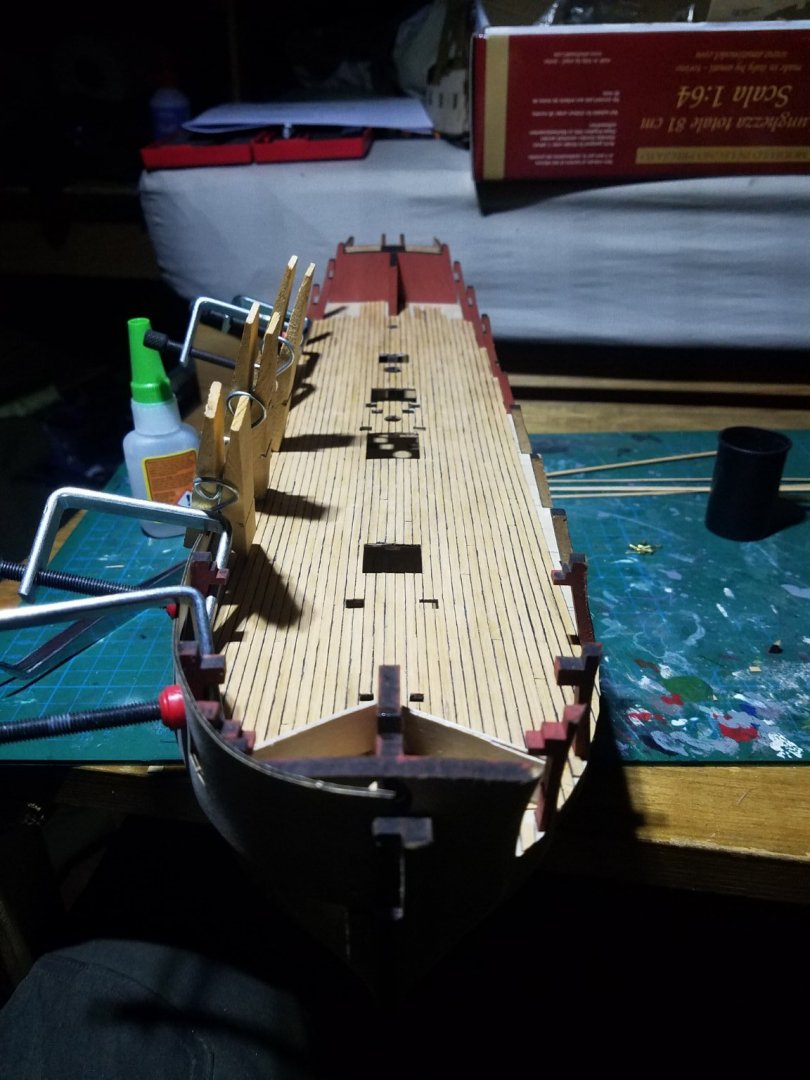
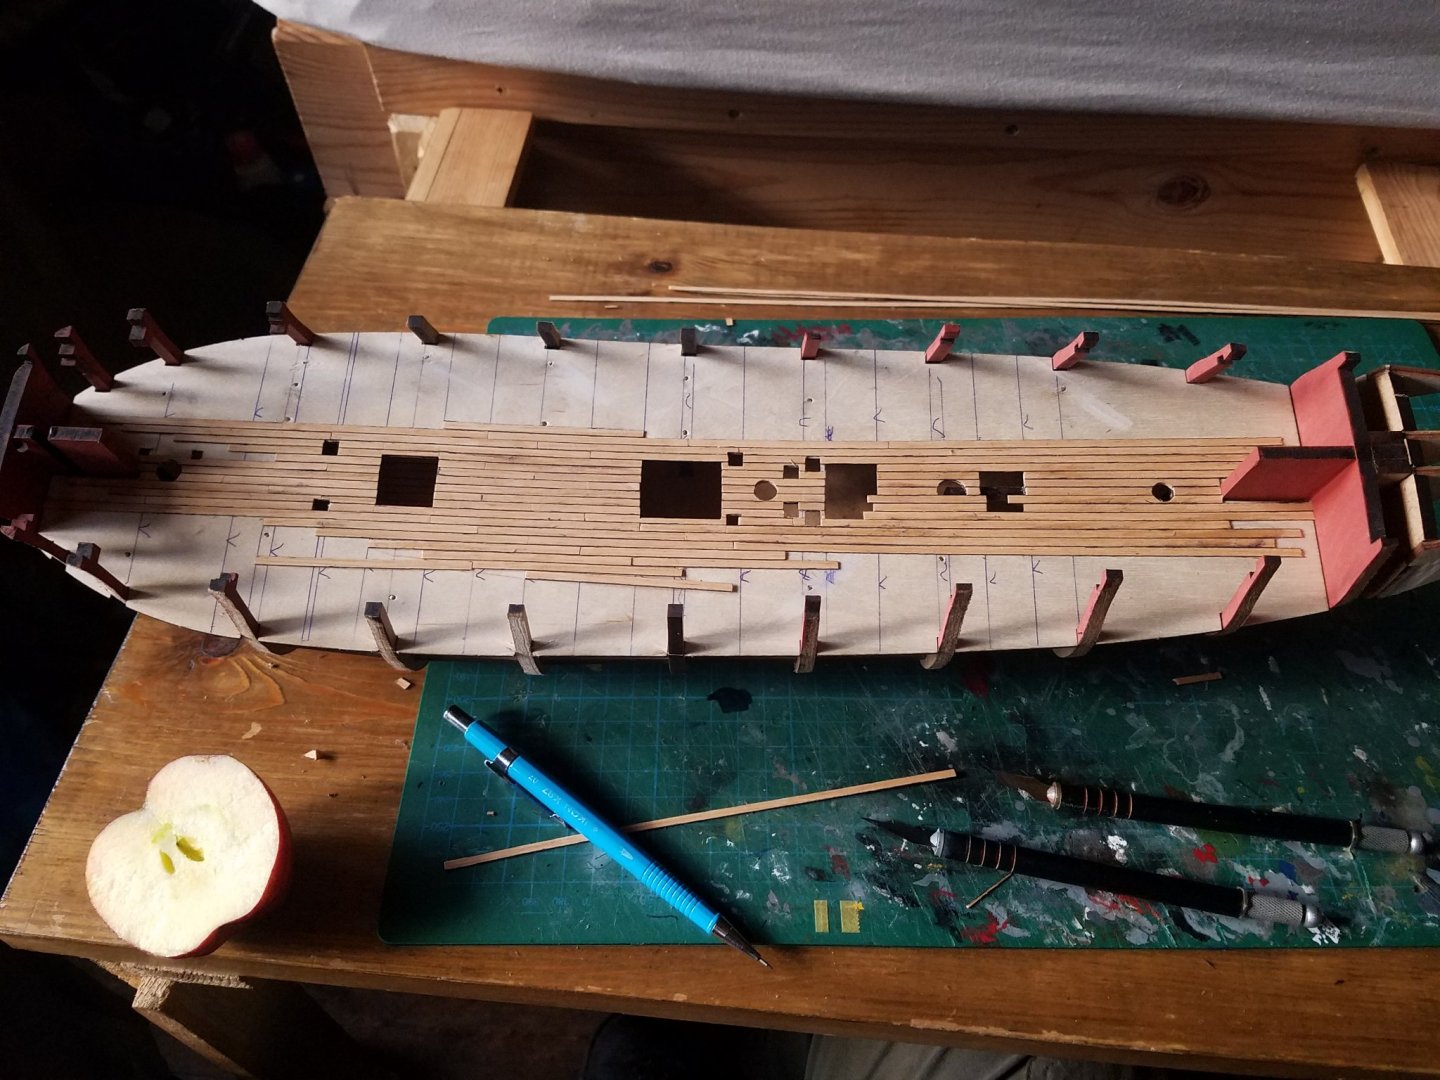
Started the planking. Marked what I think would have been deck beam locations, for my planking joints. Just using a black felt tip marker for the 'caulking'. Planking progressing well on the main deck. Sharpened the plane blade and planed the rough stuff off the deck, then a light sanding with a medium grain sandpaper. On to the plywood sides. I have a lot of time for working on the model, and I wanted to get on with it, so no long soaks etc. Just got the sides wet, then rolled them on top of the woodburner, wet again, a little careful mini-blowtorch work and they turned out spot-on. I used to bend planks with water and a candle, using my fingers. This time I decided to give the amati plank-bender (the one that looks like pliers) a go. Absolutely brilliant tool! (If you are not bothered about the looks of the inside surface. On with the first planking.


- 59 replies
-
- 2
-
-
- Fly
- Victory Models
- (and 1 more)
-
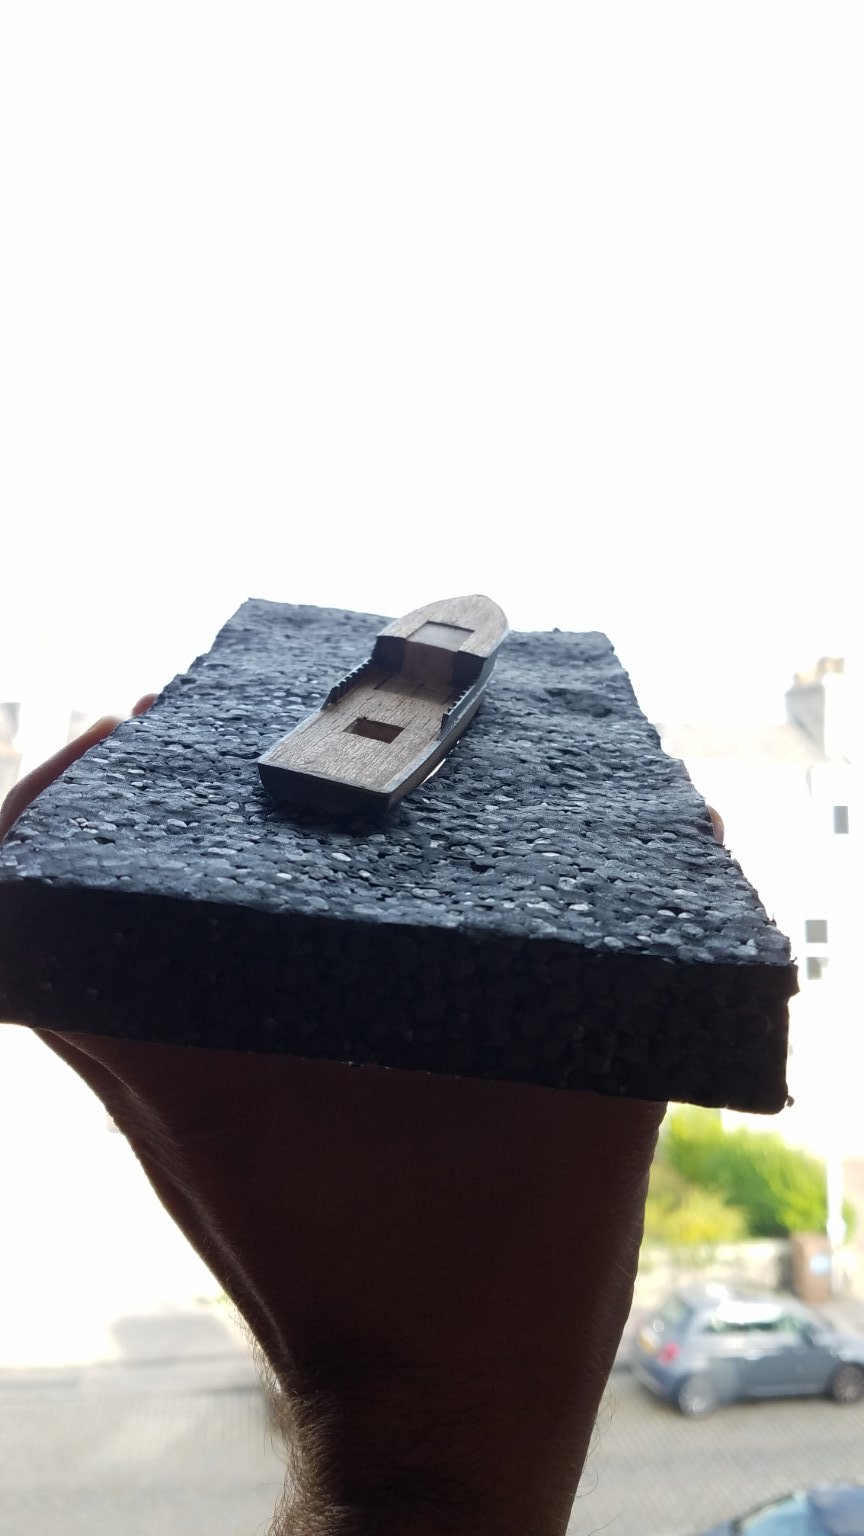
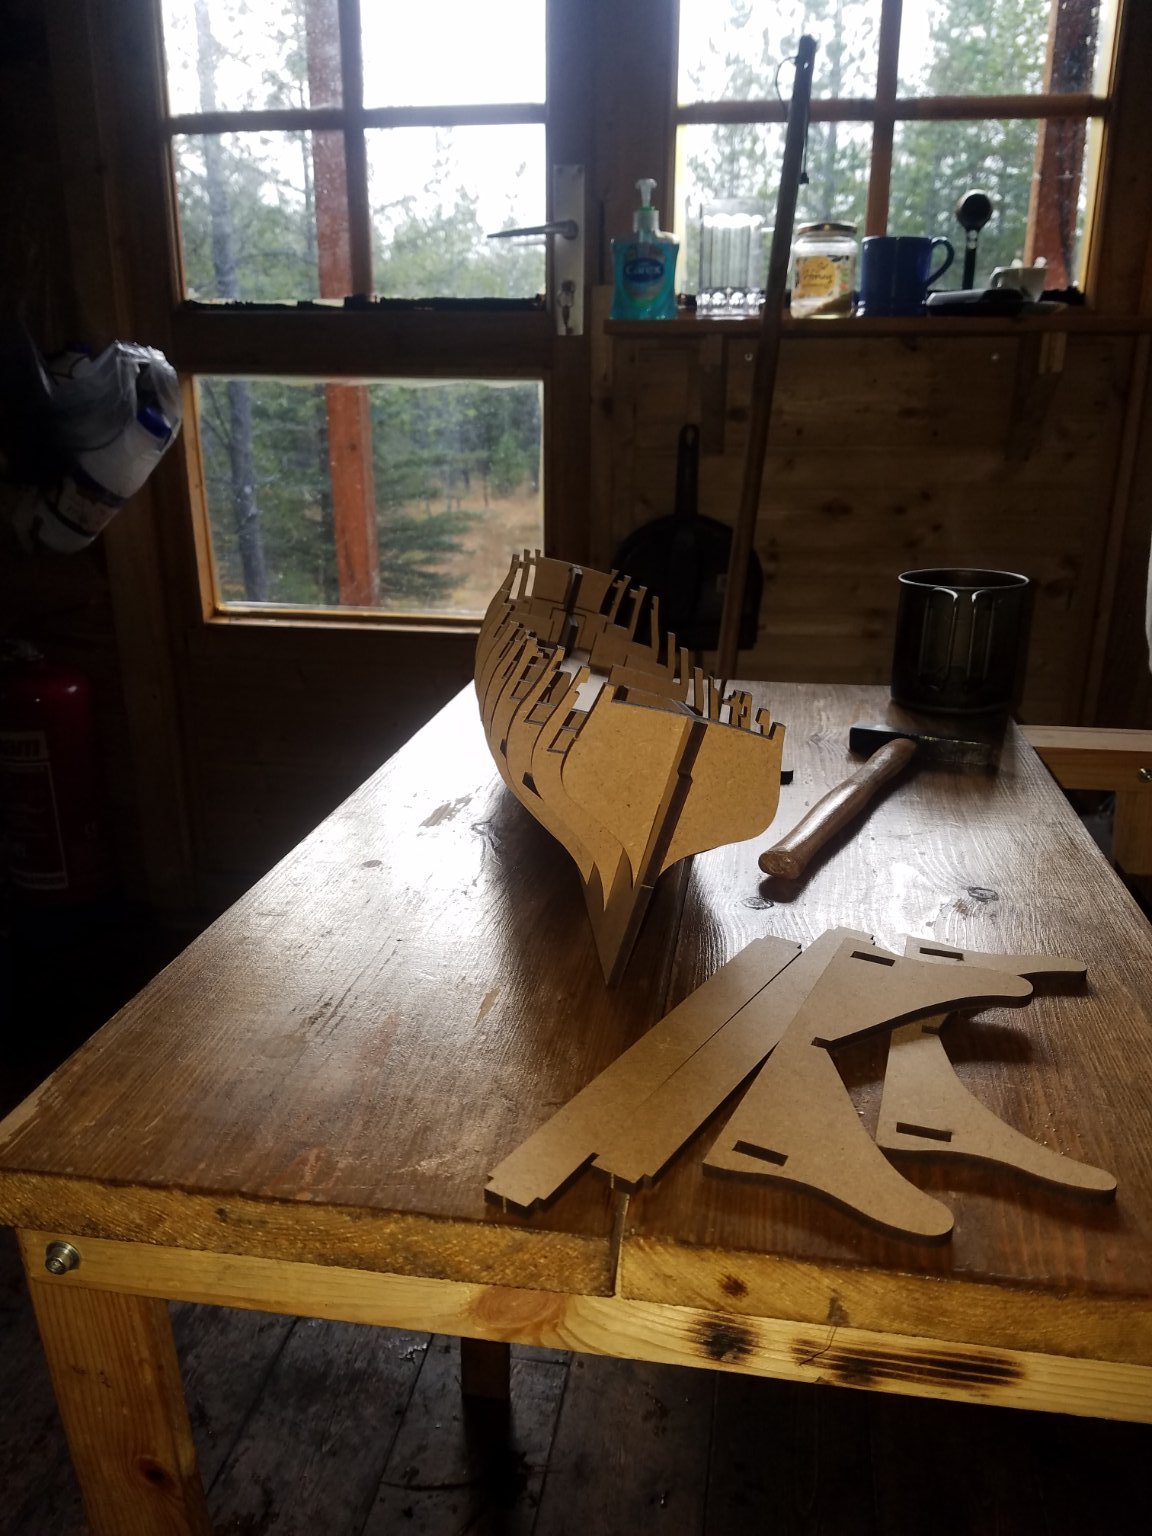
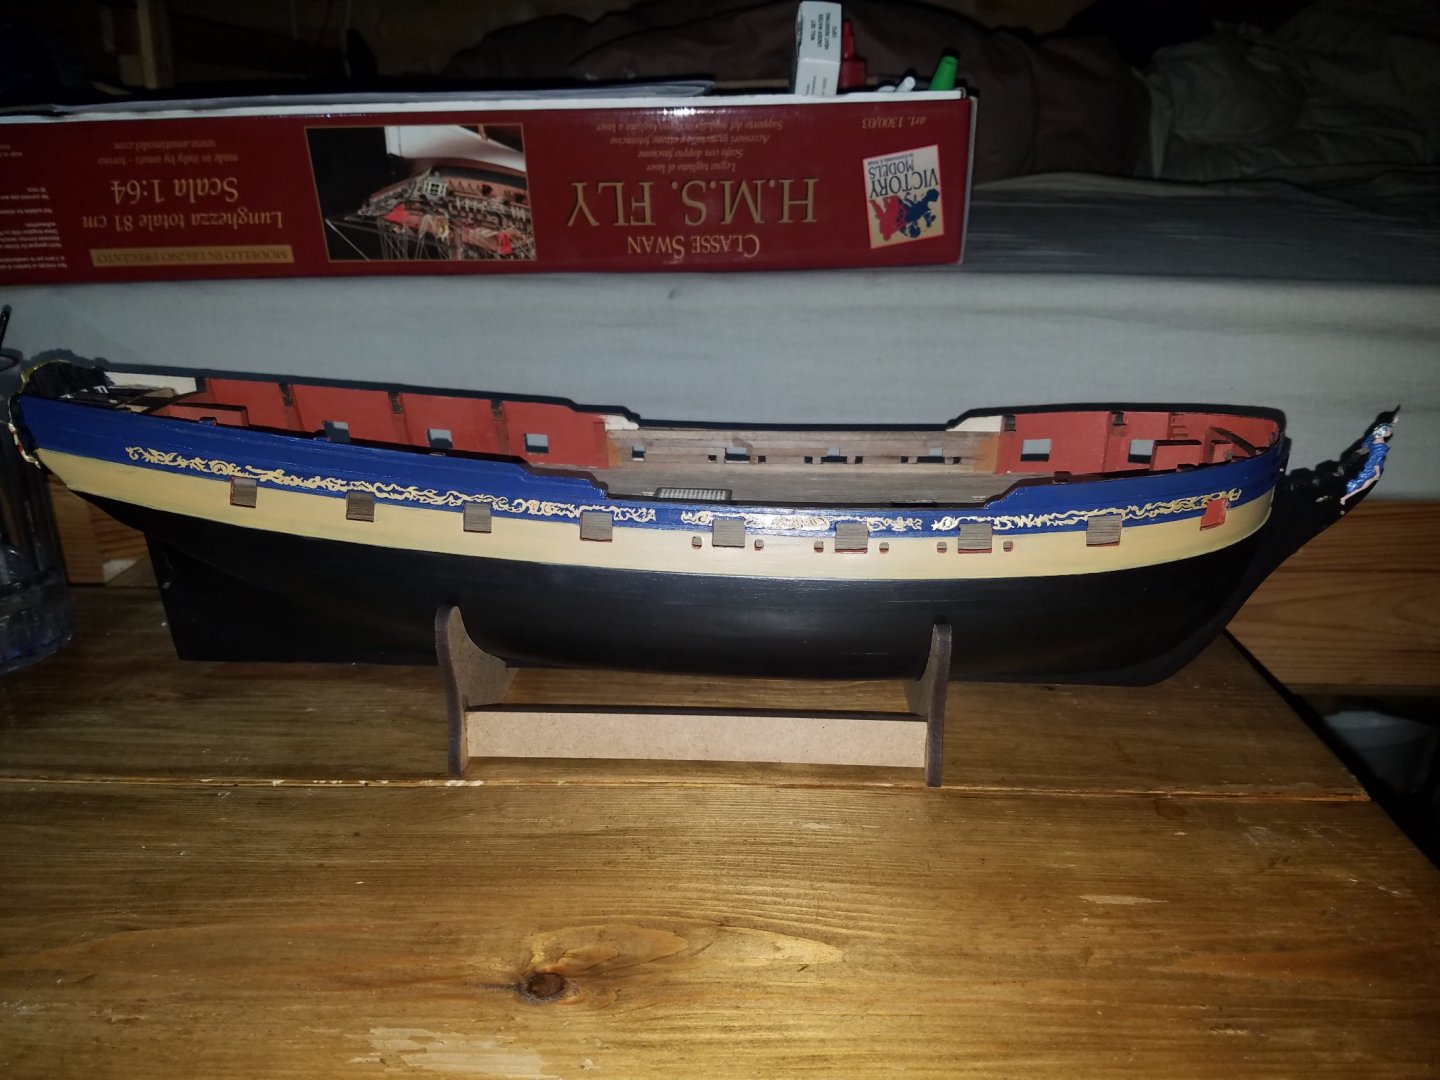
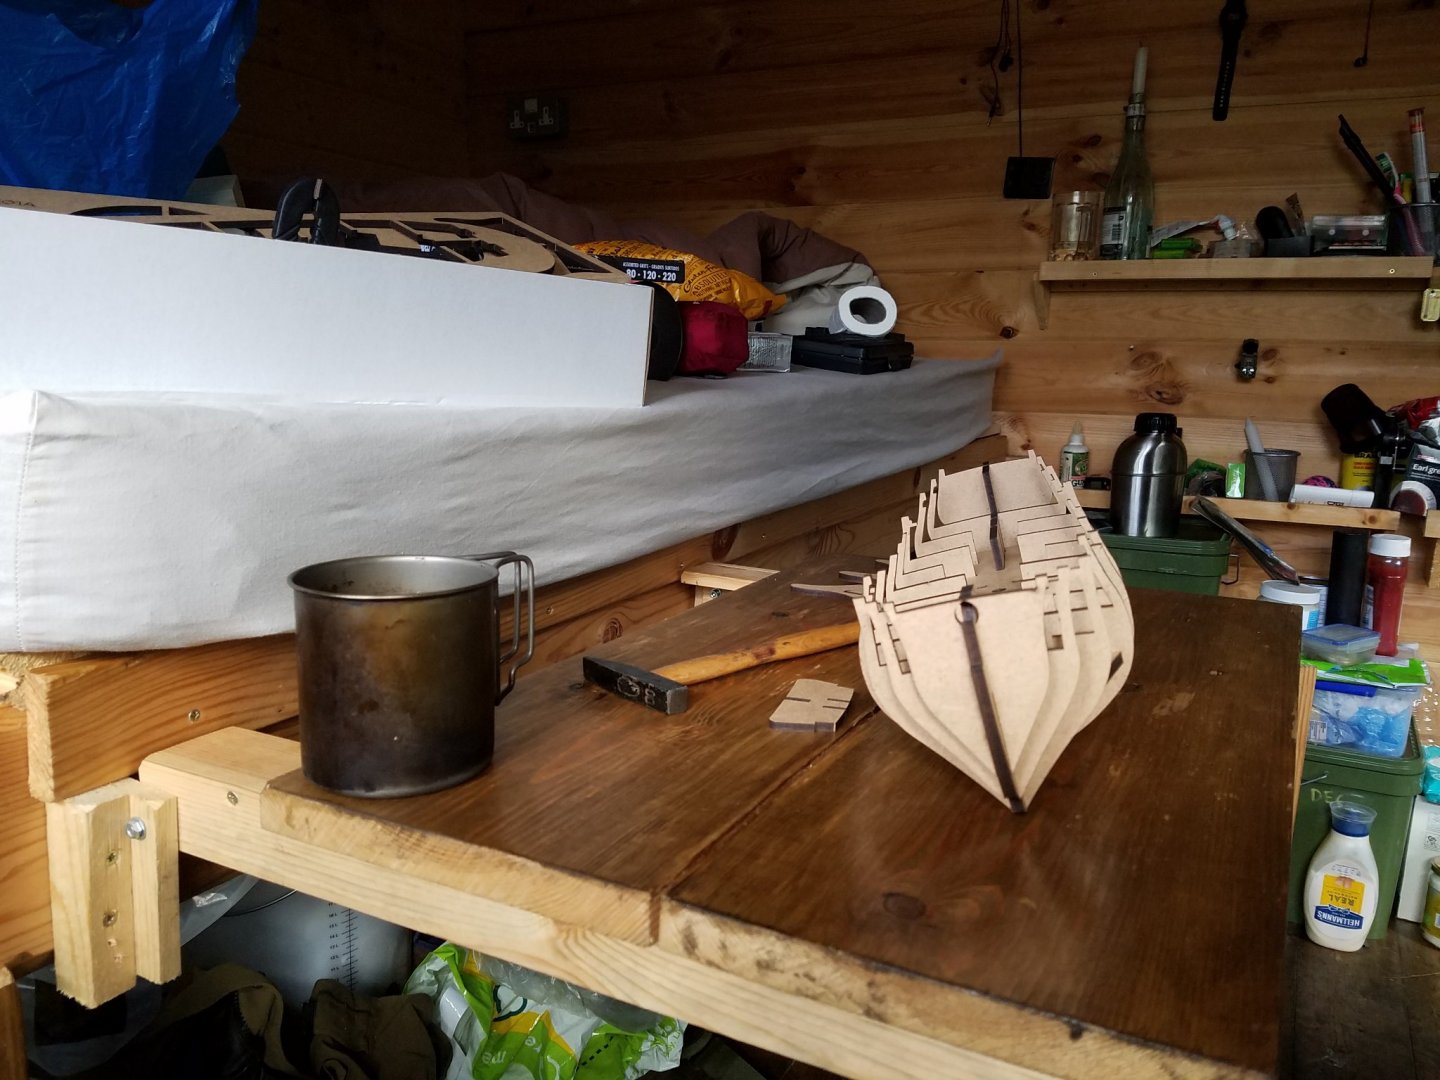
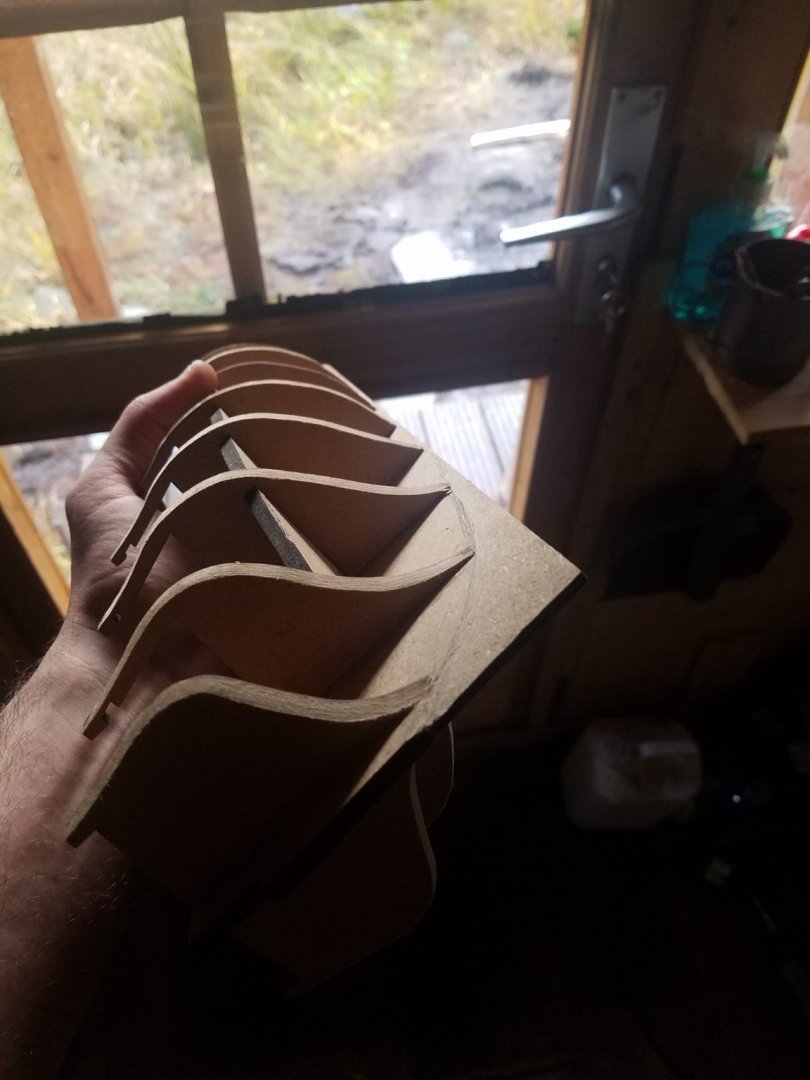
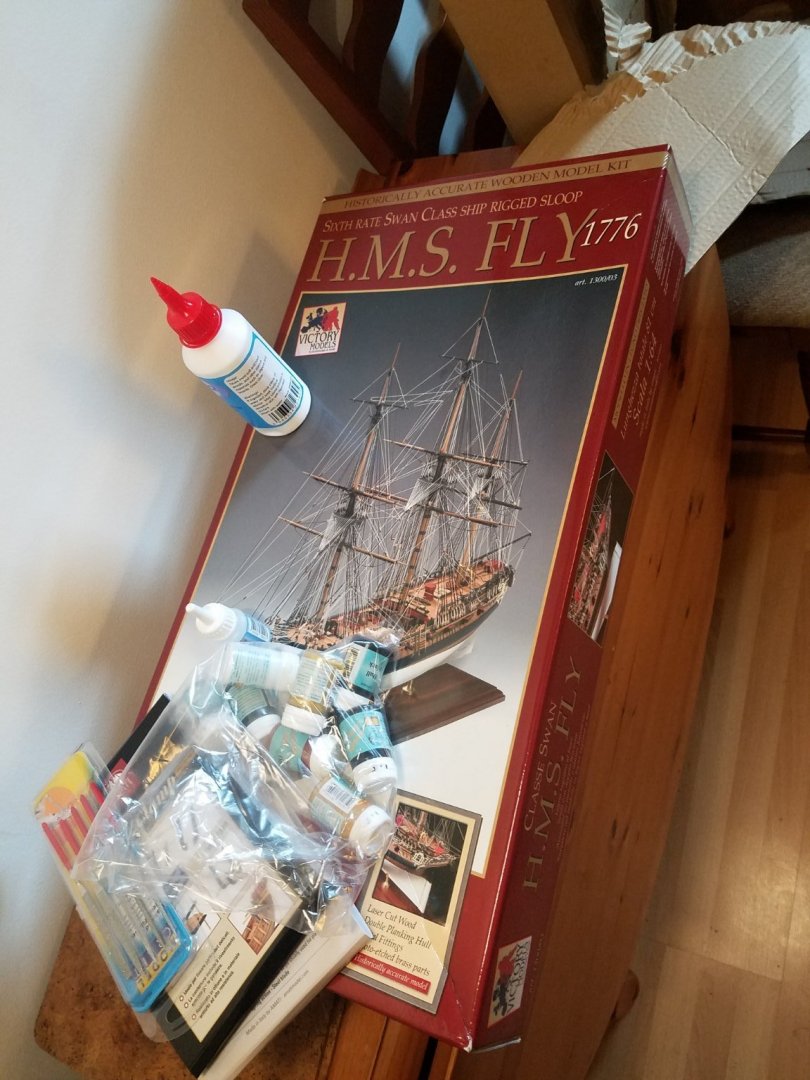
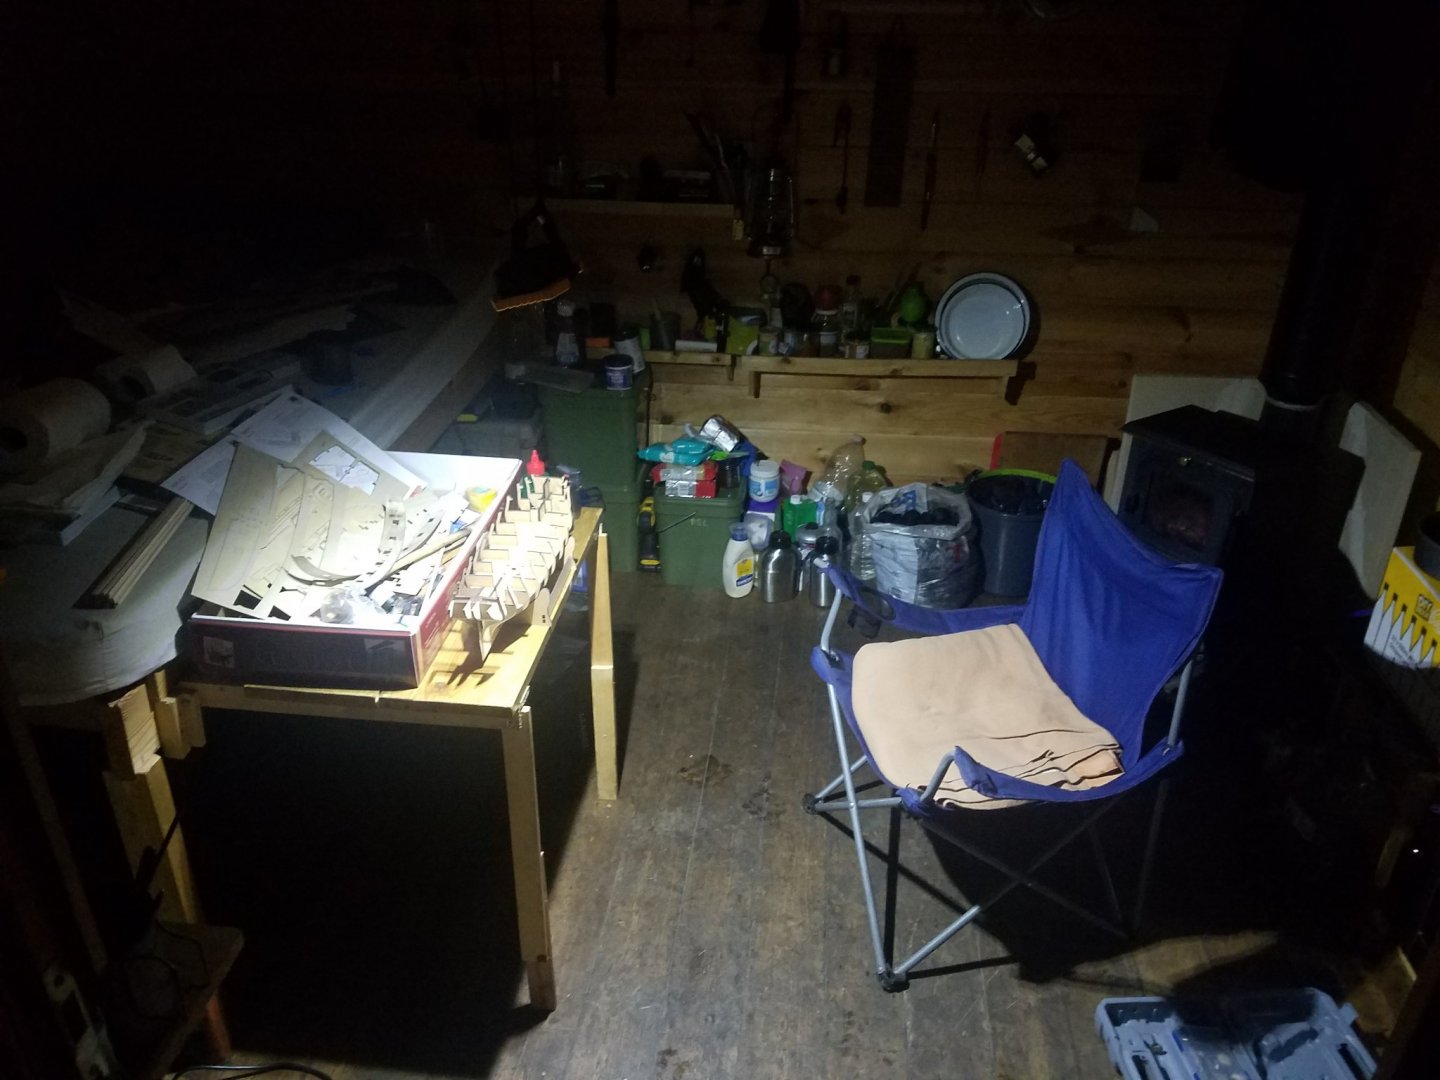
Hello, and welcome to my second topic! This one will be a proper log, as I am still pretty early in the build. Another HMS Fly by Amati/Euromodels, which I must say is a brilliant kit and a pleasure to build! So far, I've painted the hull and made a start with the decorations and stern. I went for a fully-painted hull, so I kind of blasted through the planking without spending too much time on the second planking. I think there is very little chance any parts of the hull were left in natural wood, and I prefer realism, so I went for a full pain-job. Pleased with the strakes and main whale, they came out pretty symmetric. Still to add a waterline and paint the bottoms white, but the paint kit came with a 'whitewash' that is very watery (actually more like a wash than a paint), so I don't have white to use and the nearest source of any paint is a 140 mile roundtrip for me 😂, so it will have to wait. The box and some materials and tools I was missing. Pretty exciting moment, when you open a box, isn't it? Frames on the keel, looking good. Started with fairing the frames to match the hull curvature. I did not add any fillers; I prefer taking more time to bend the planks to the right curve before I put them on, so they don't need too much support underneath. So that the final thickness on the skeg is not much more than the keel, I had to file off a lot of MDF in that area. My workshop. I am lucky enough to have the man-cave I always wanted as a kid 😂

- 59 replies
-
- 2
-
-
- Fly
- Victory Models
- (and 1 more)
-
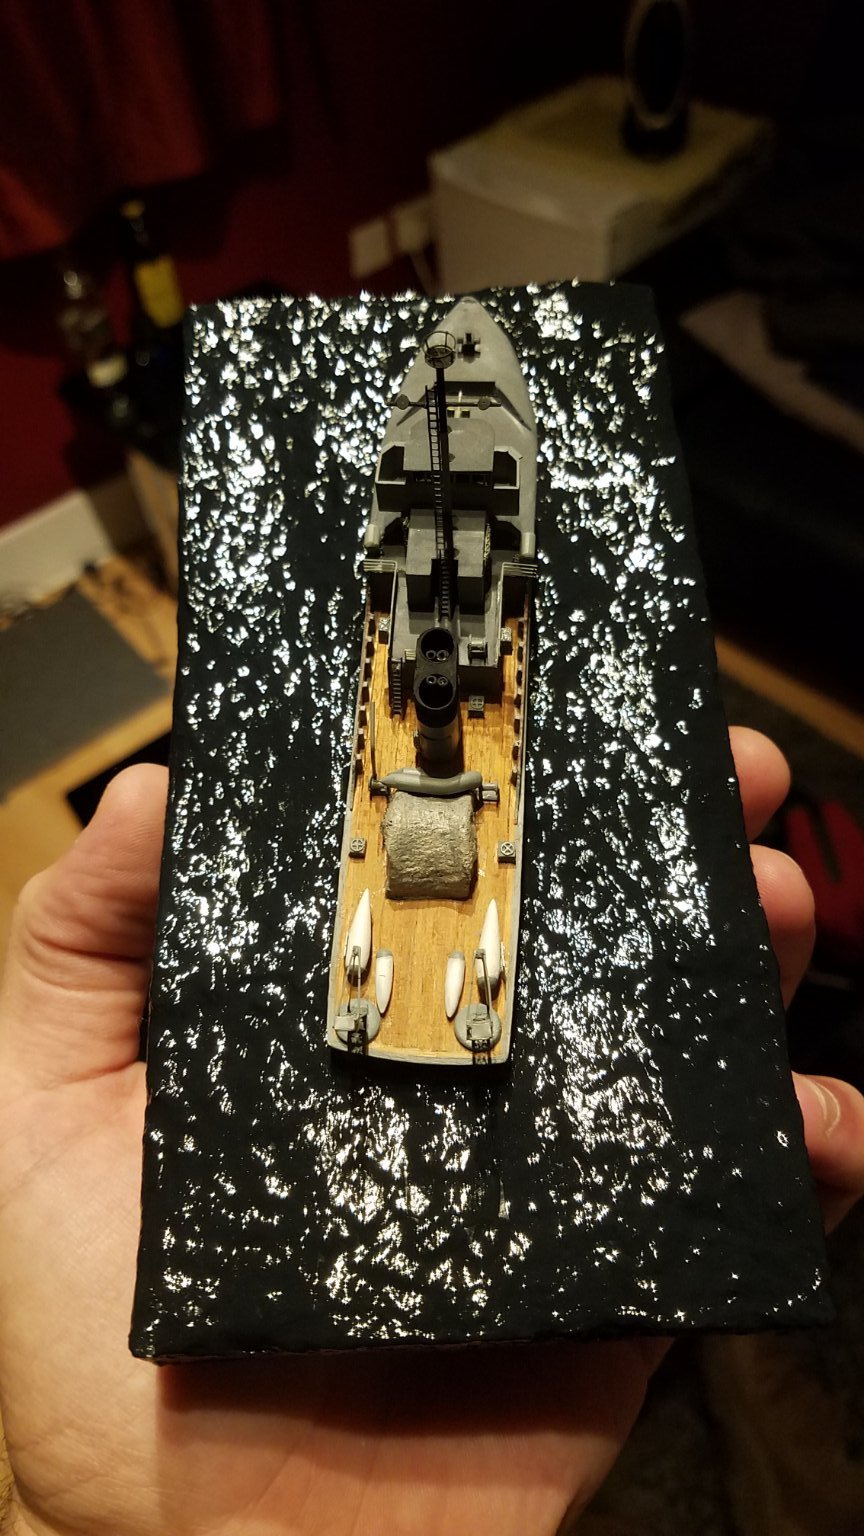
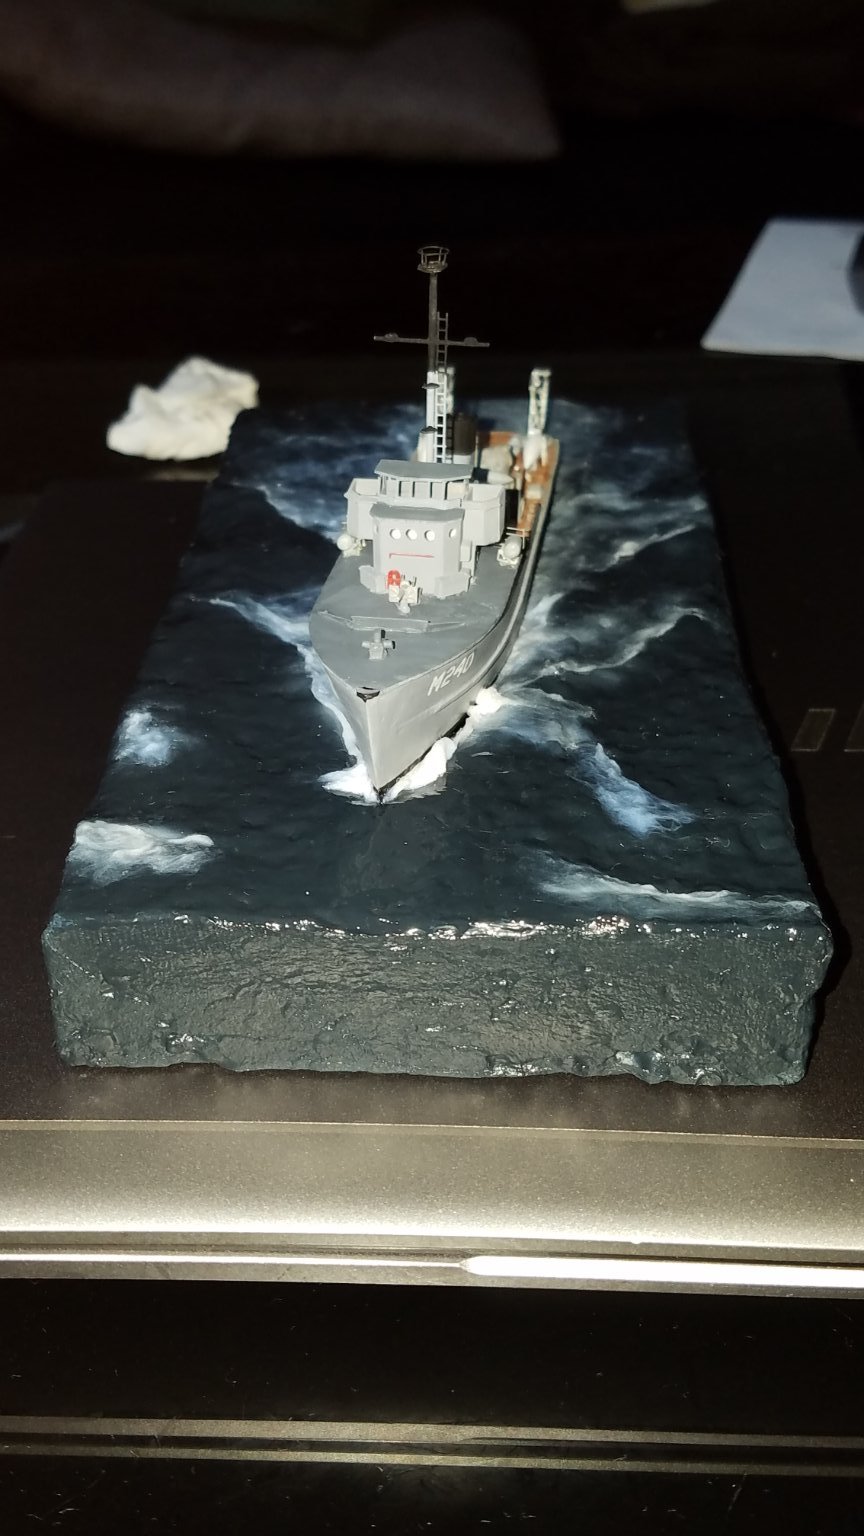
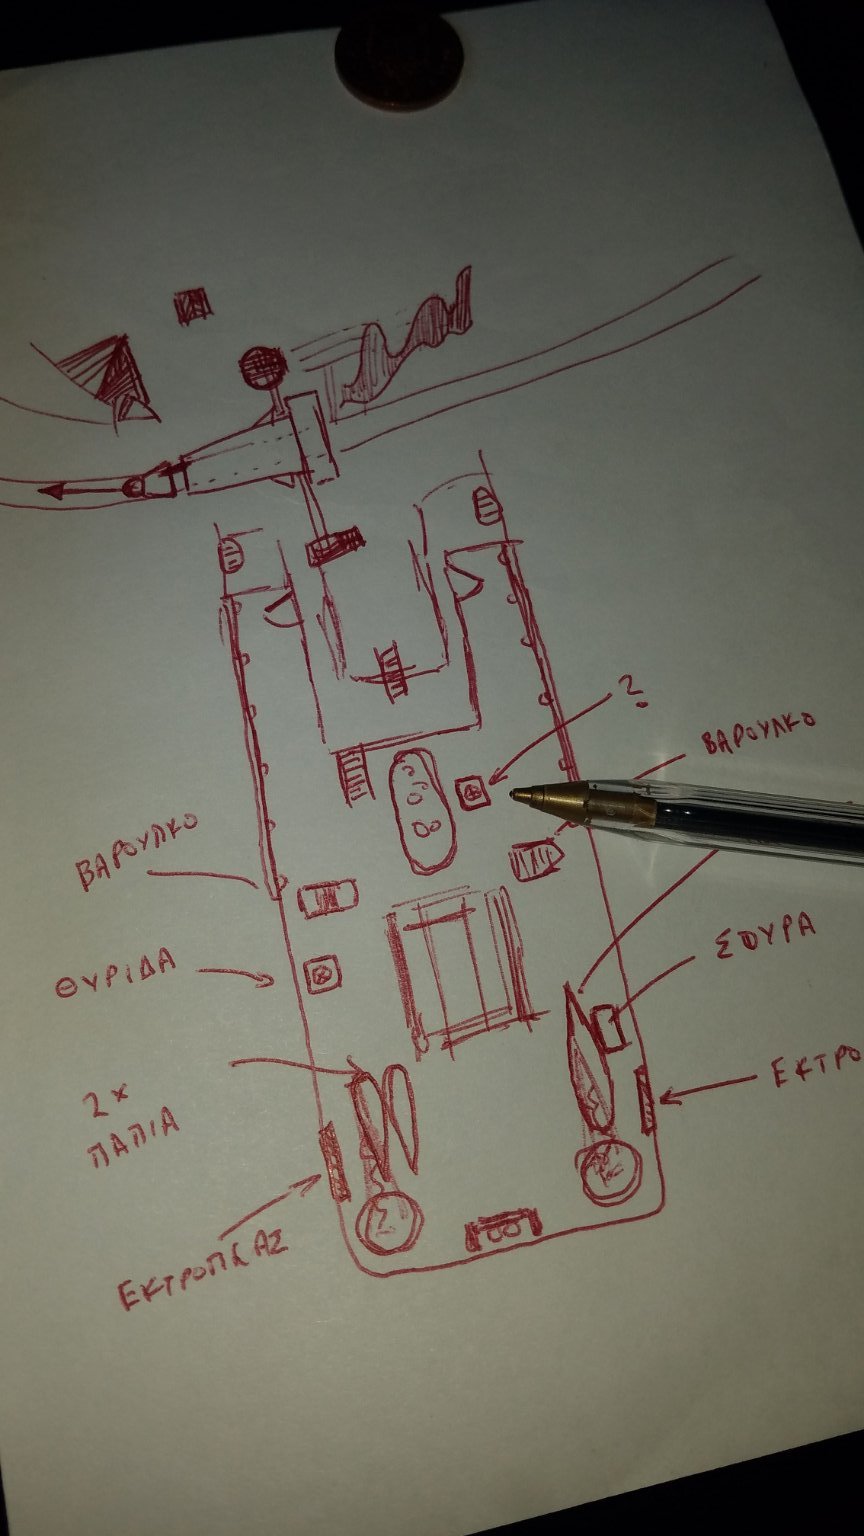
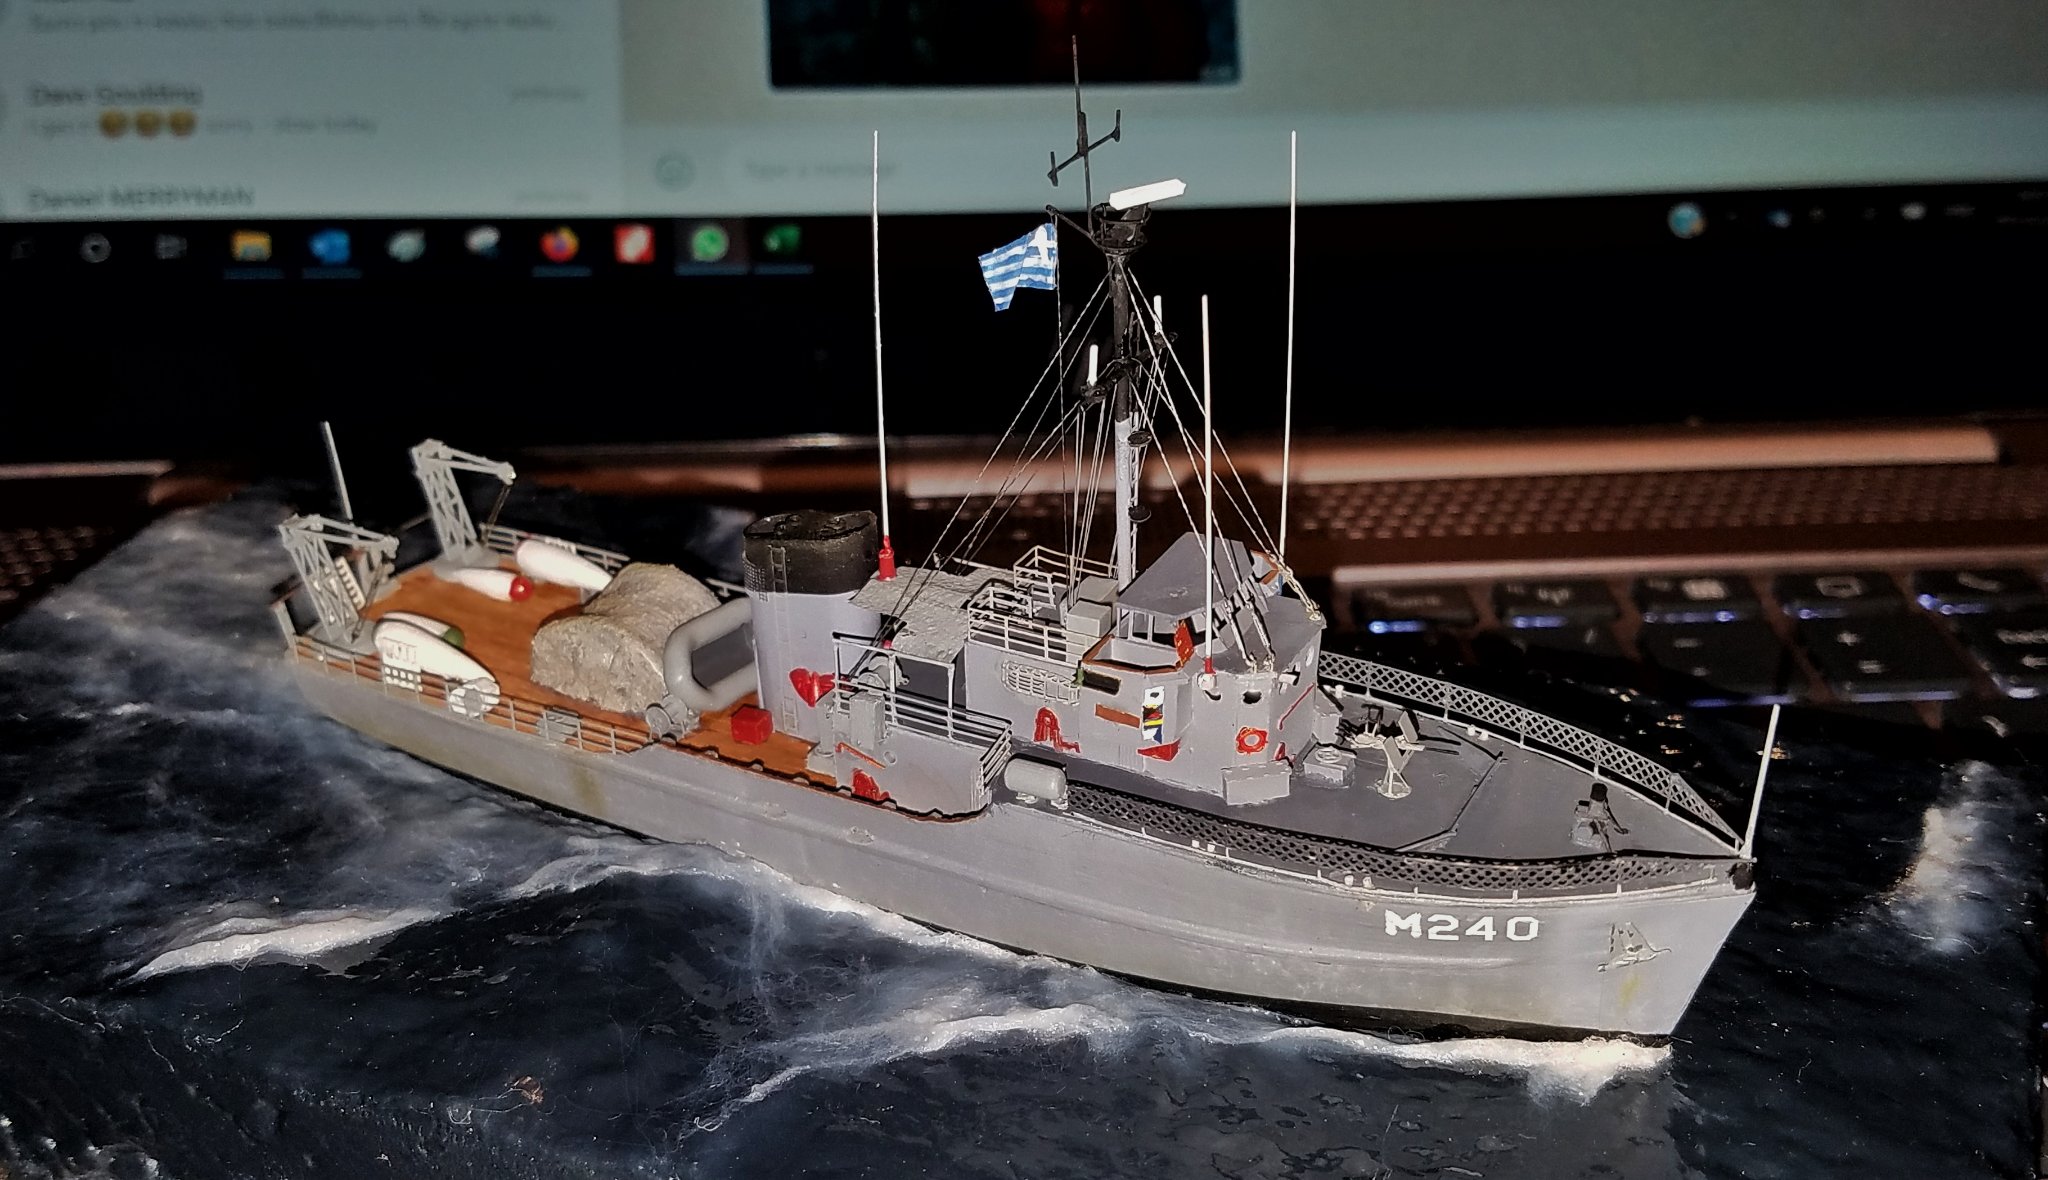
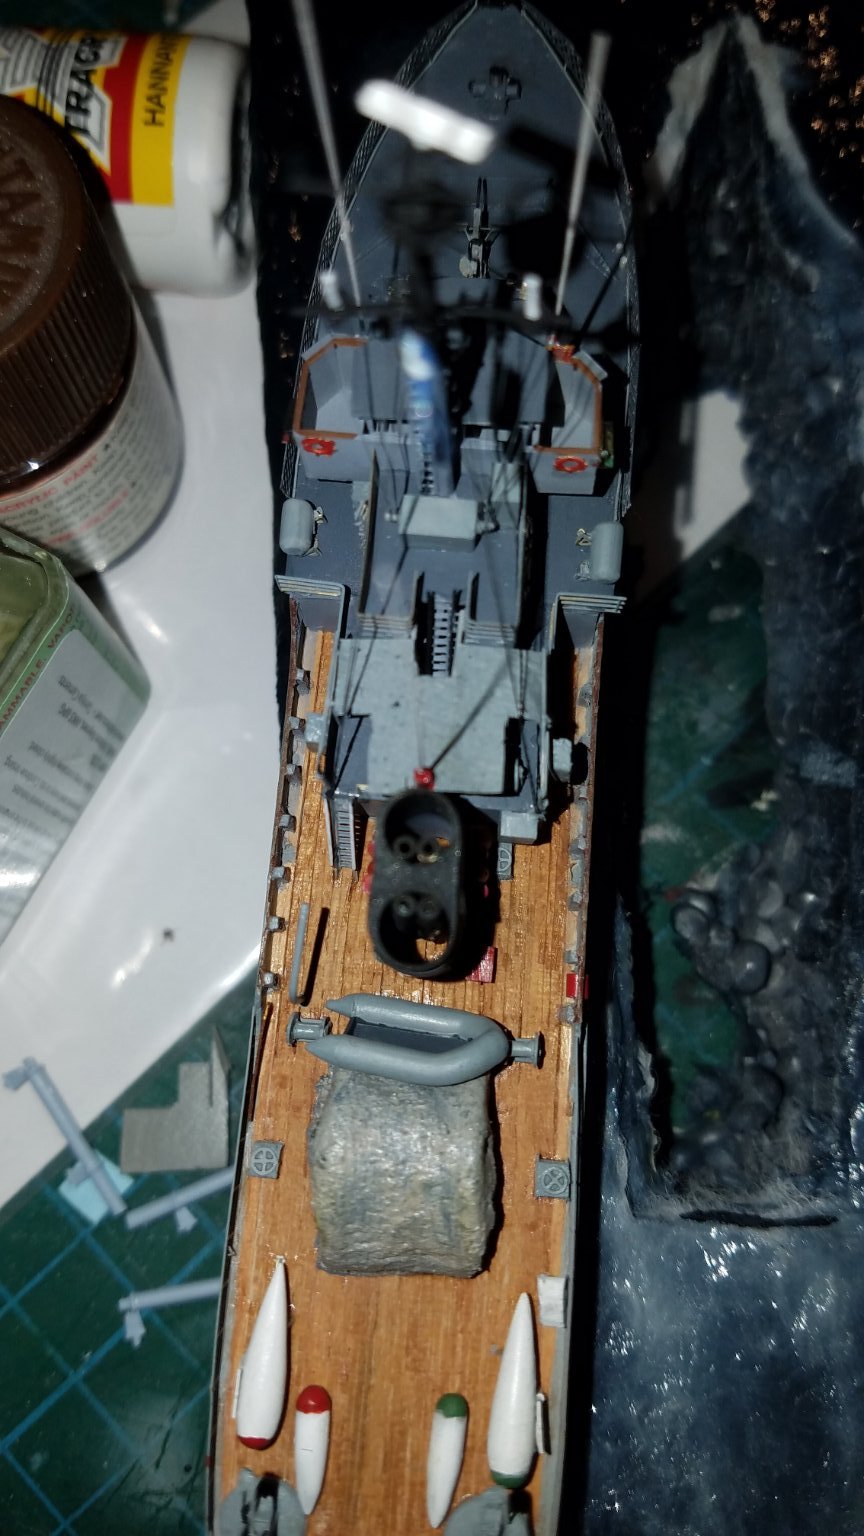
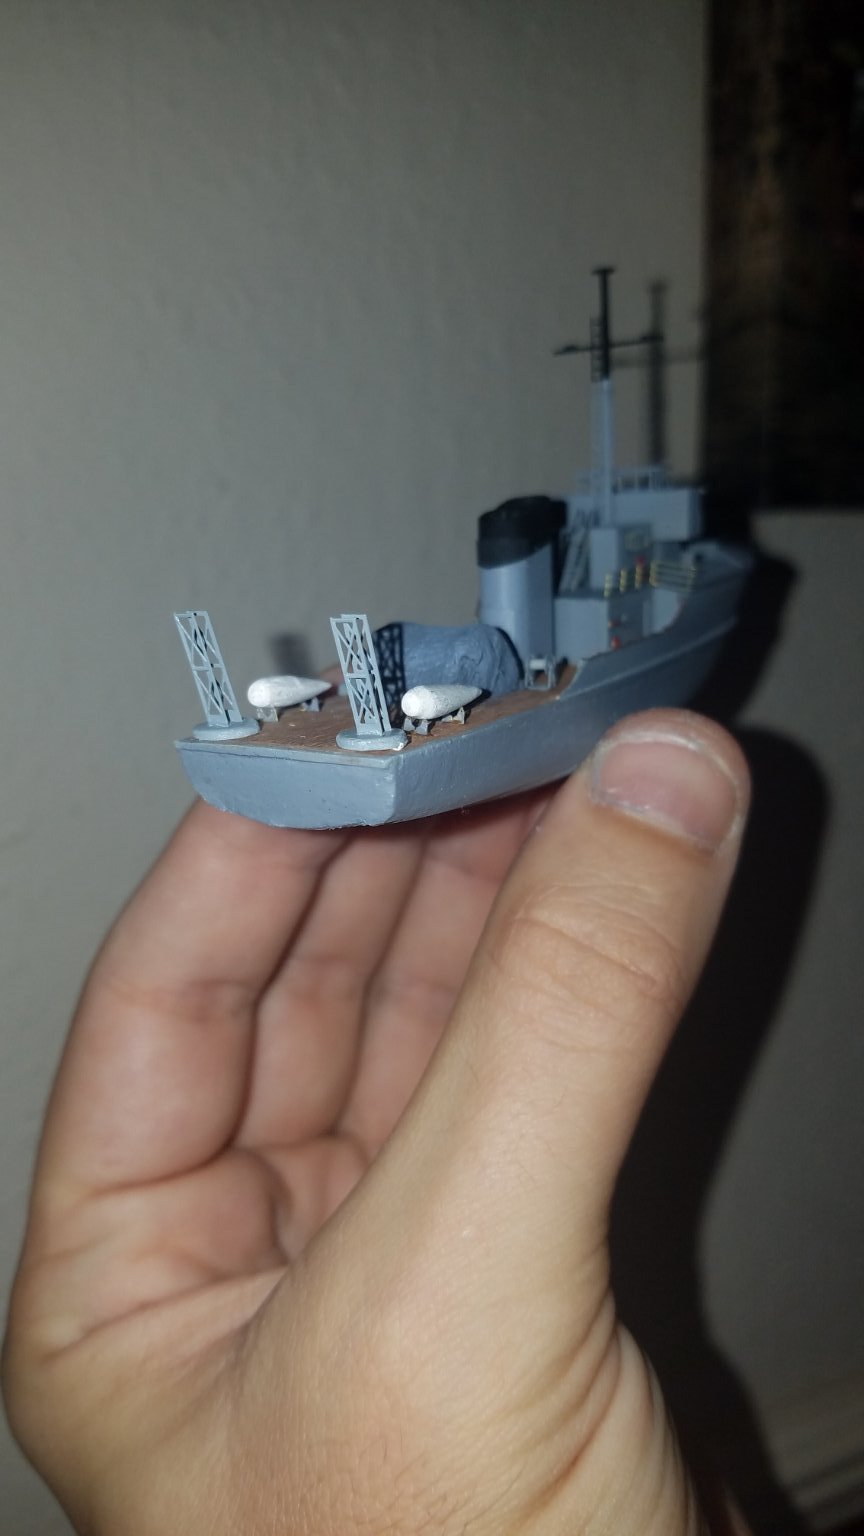
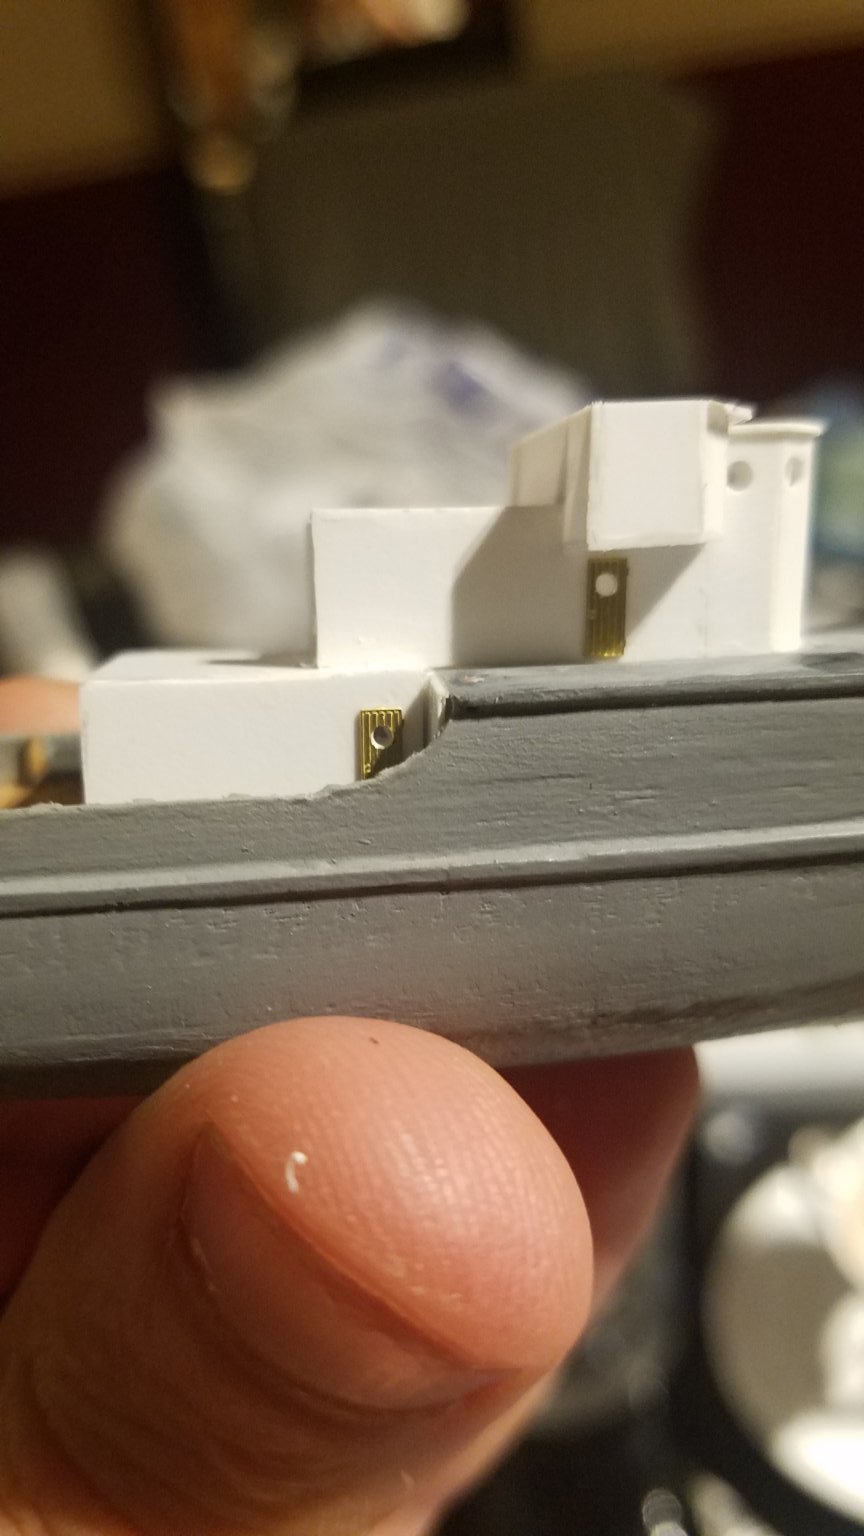
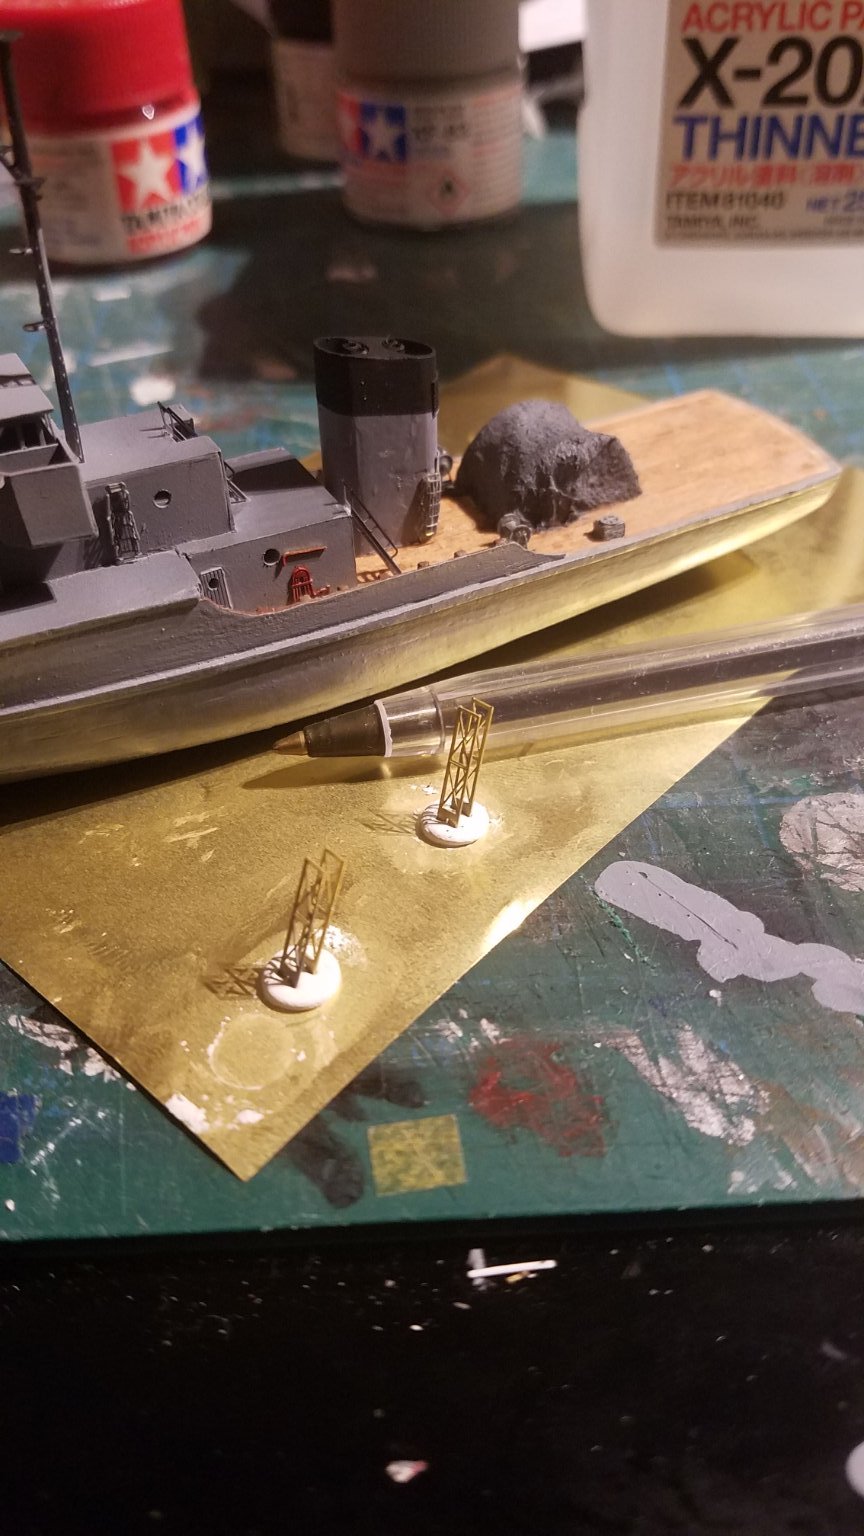
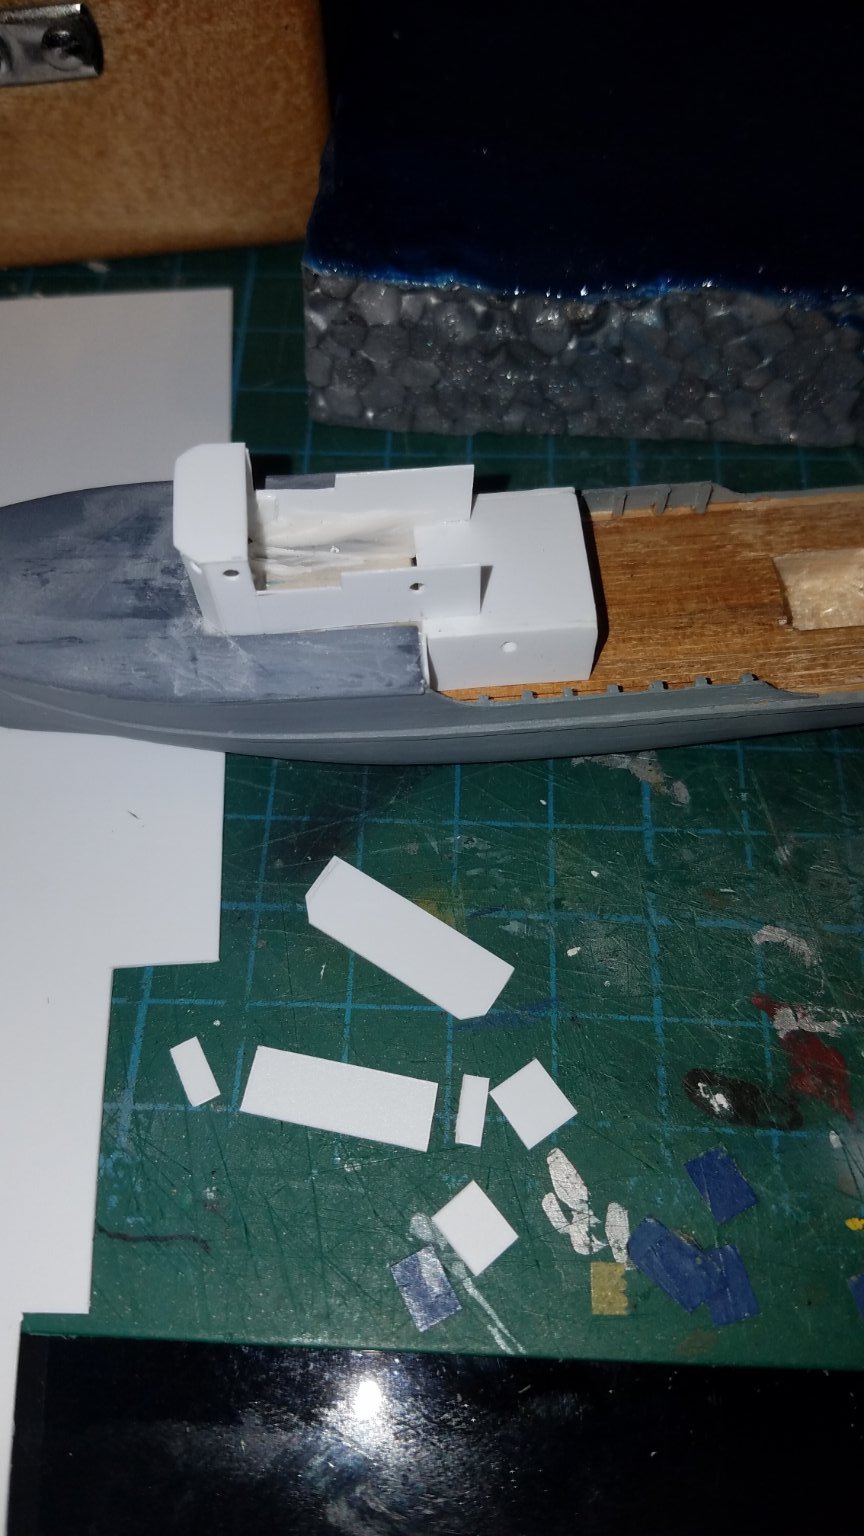
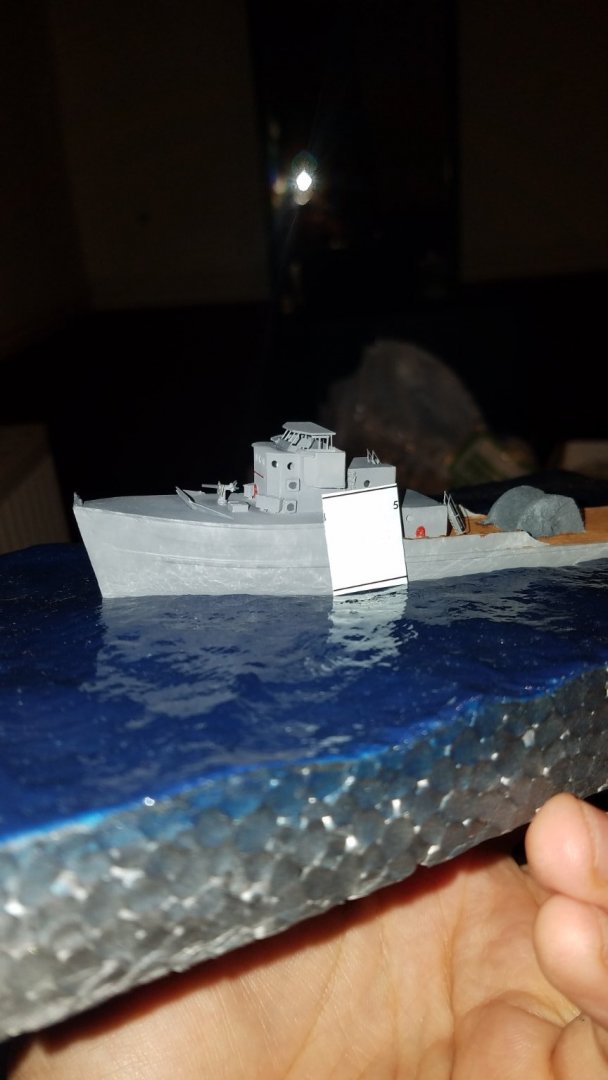
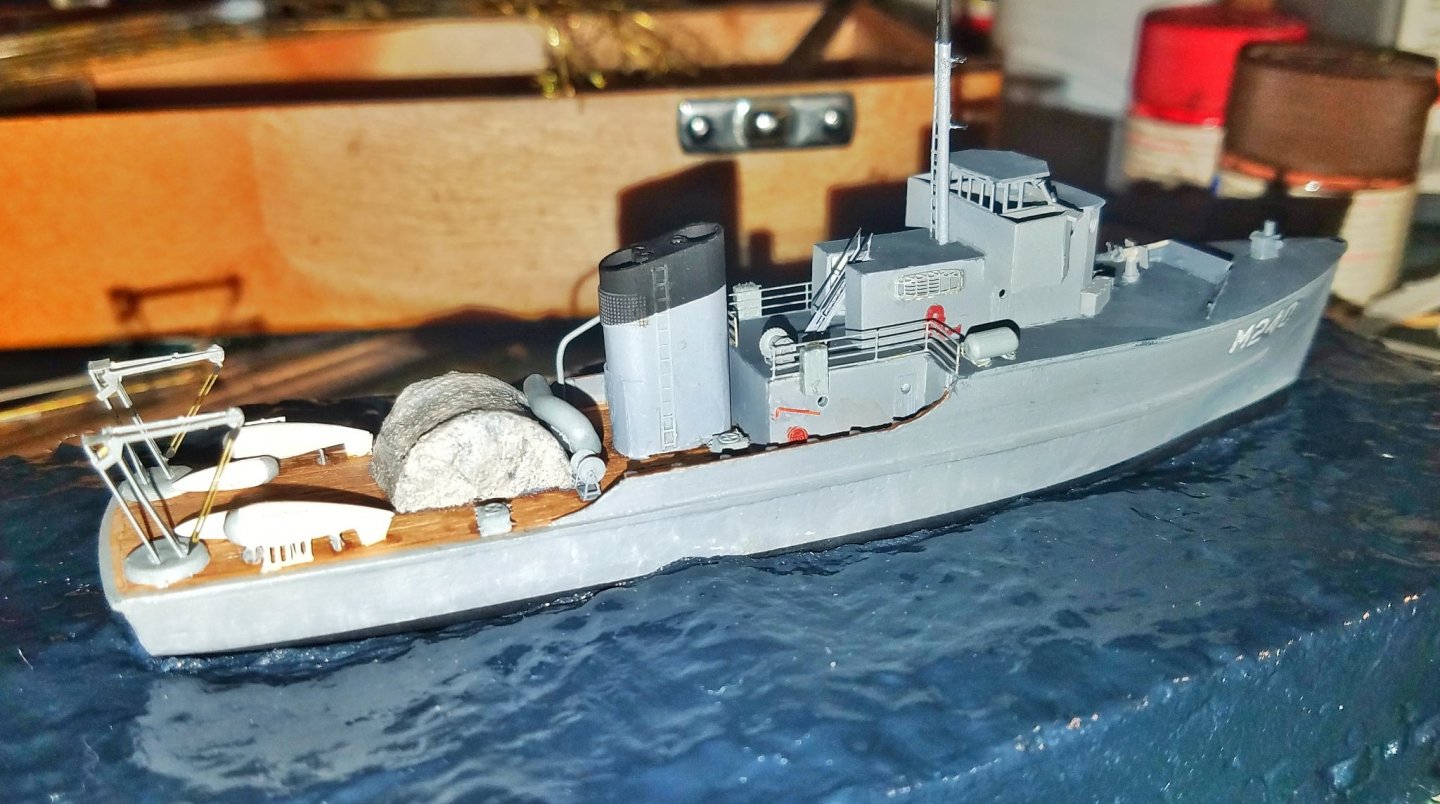
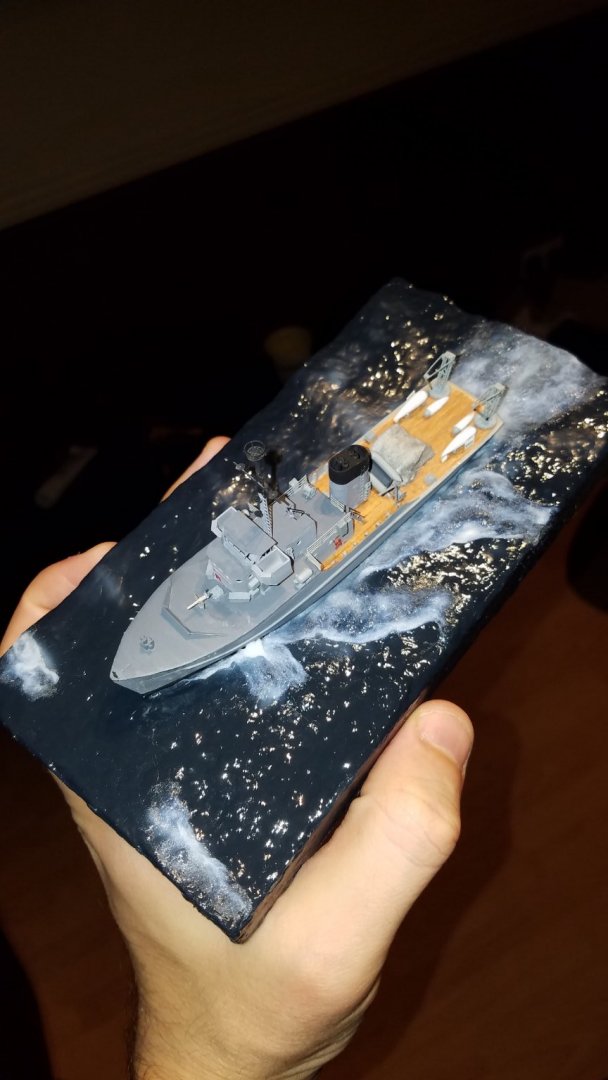
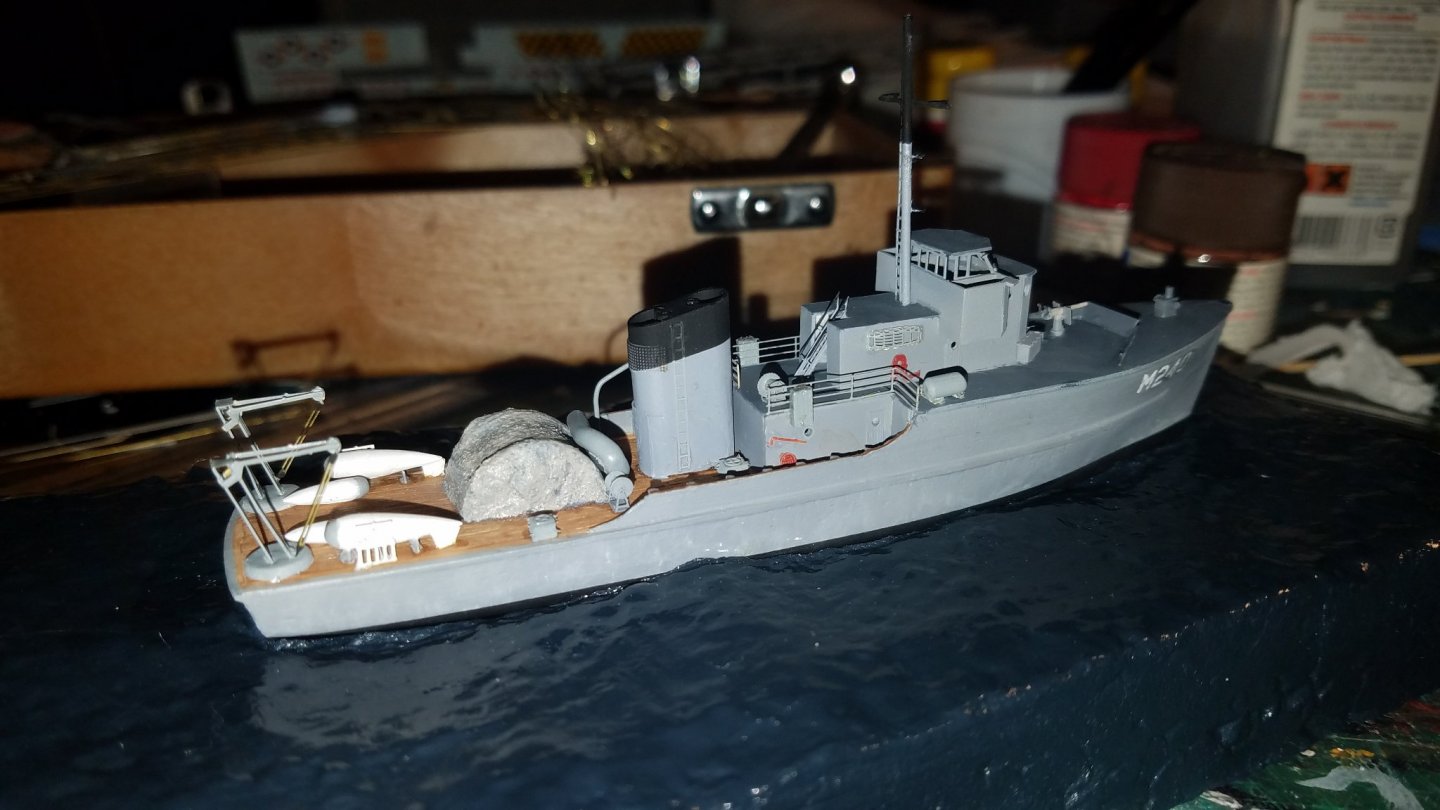
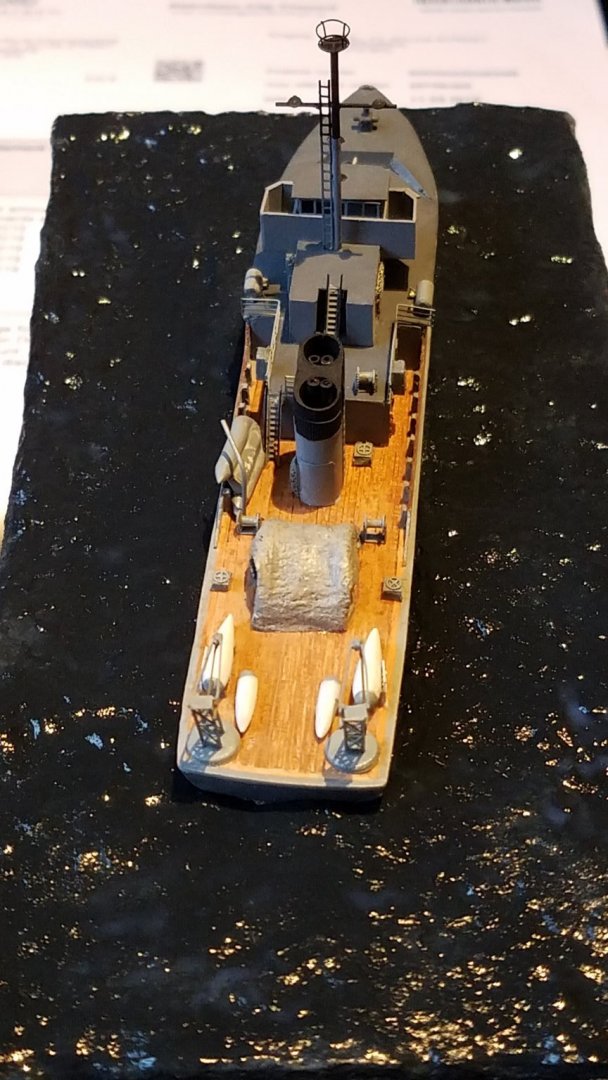
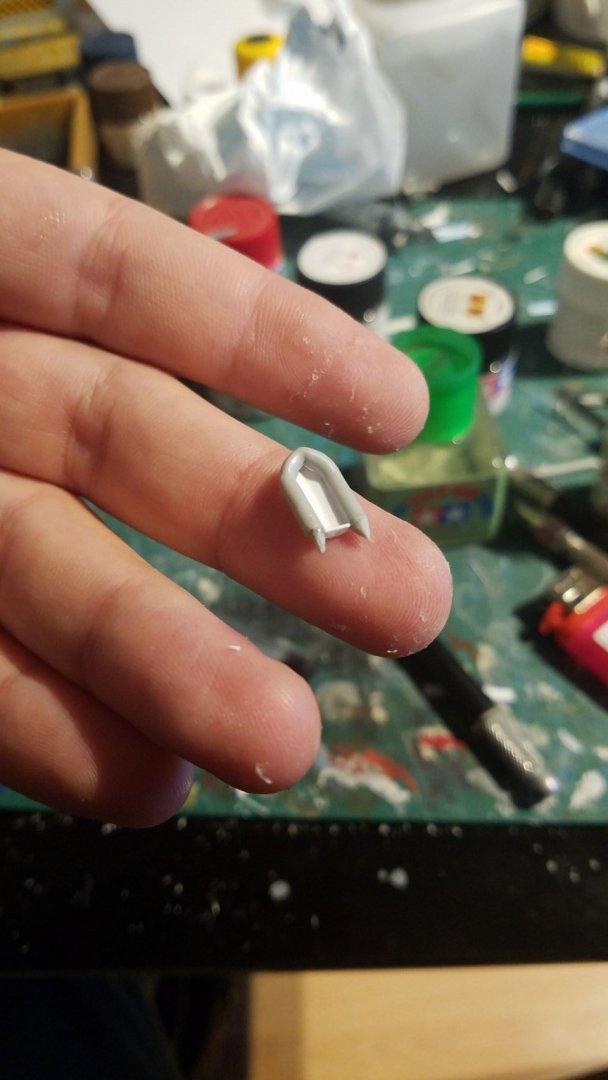
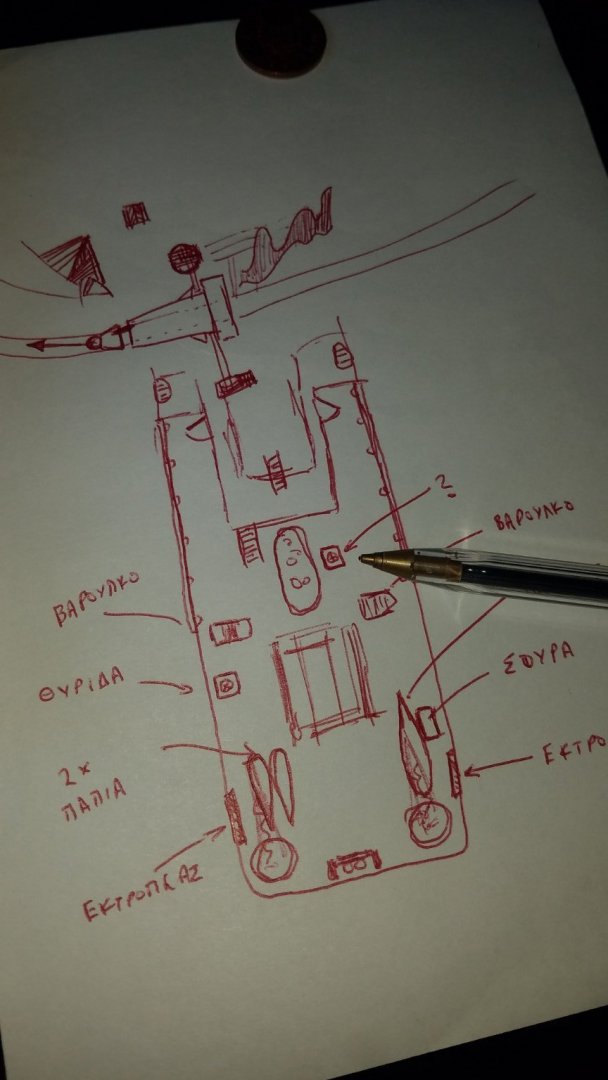
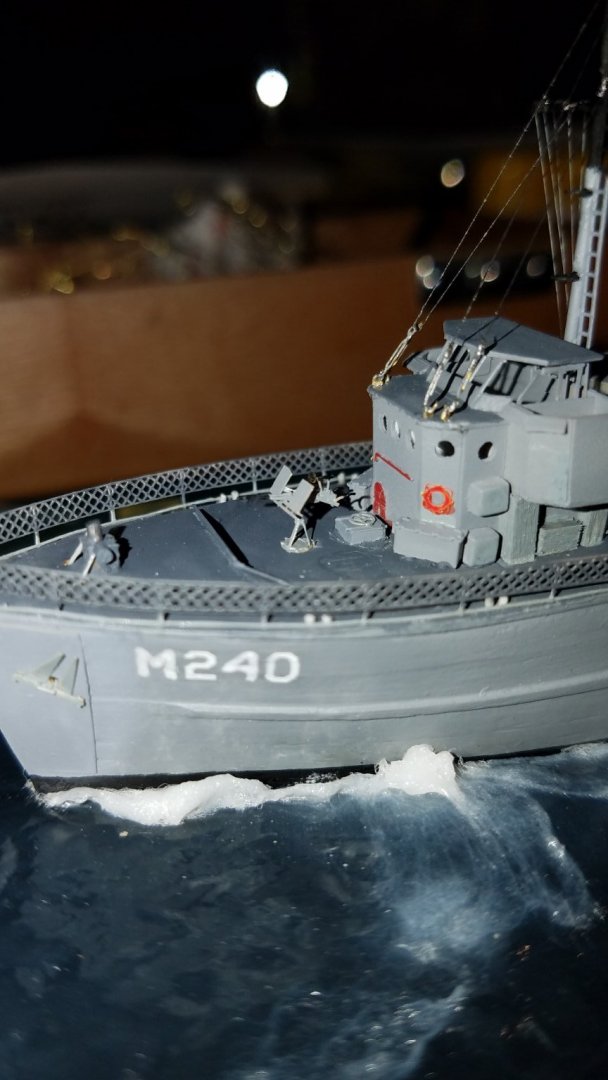
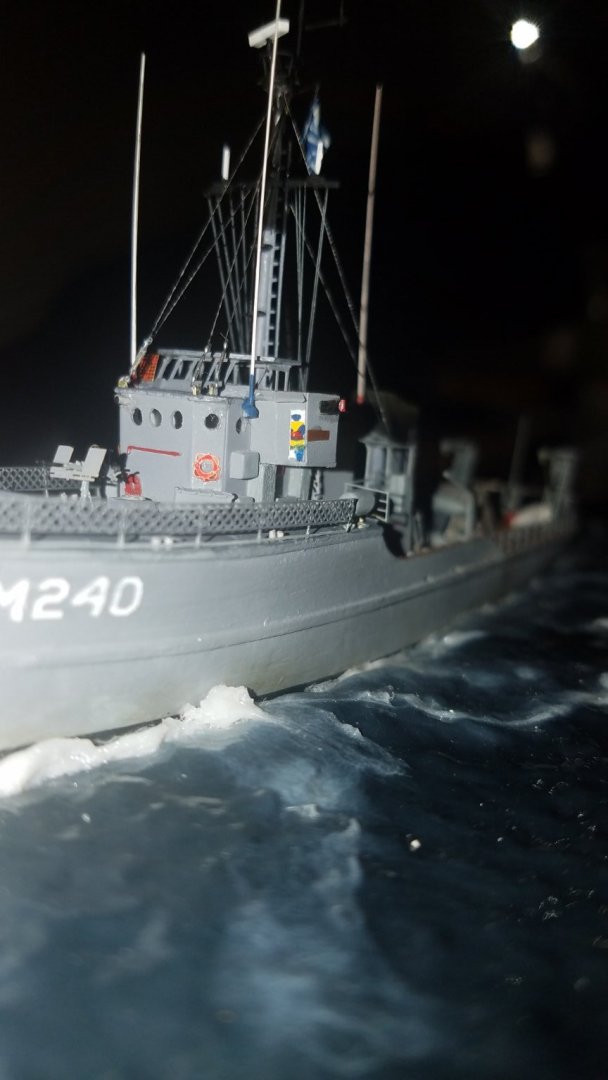
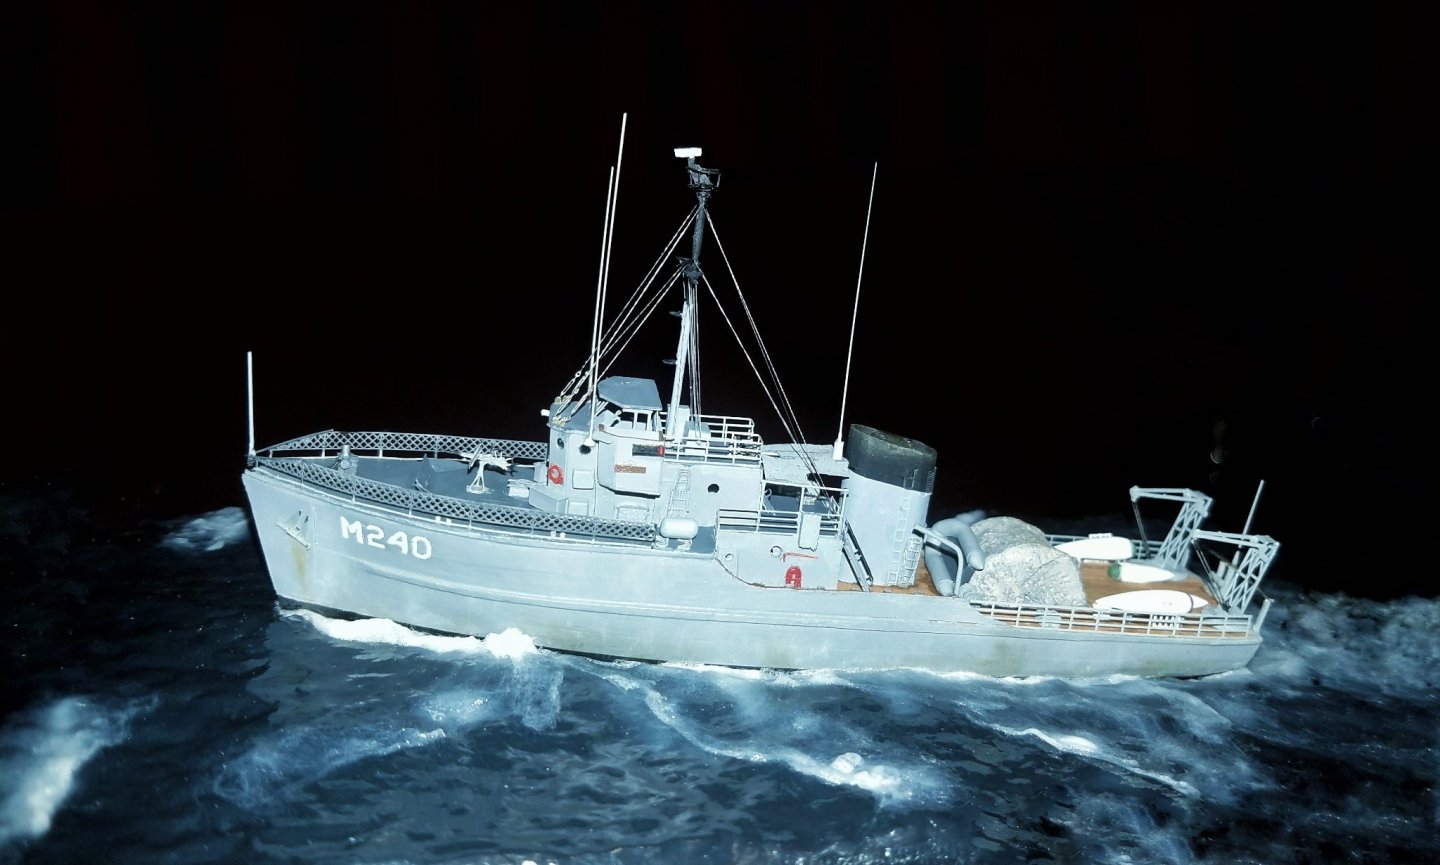
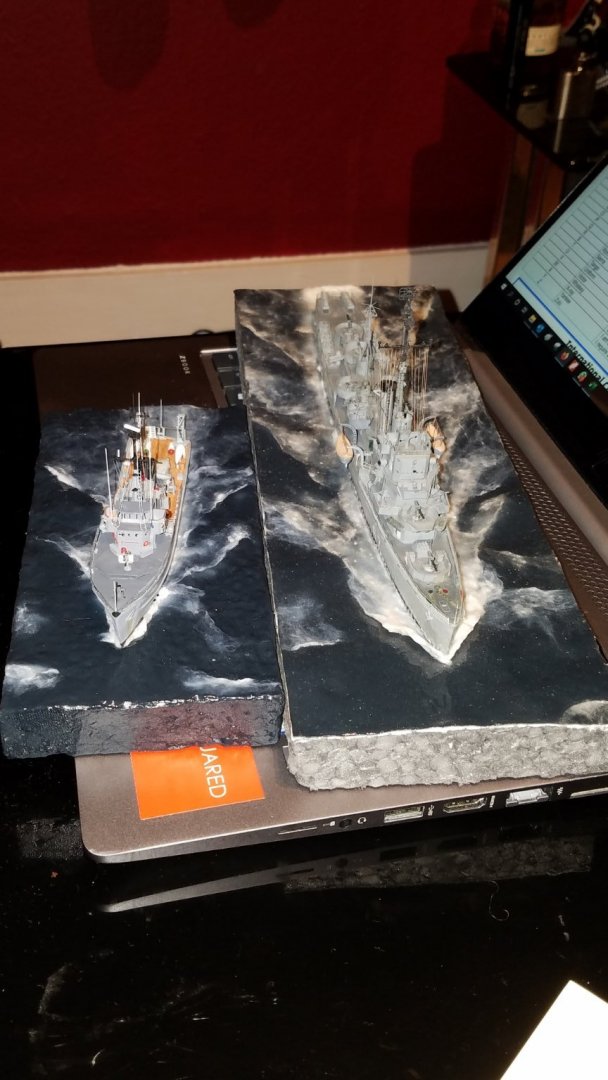
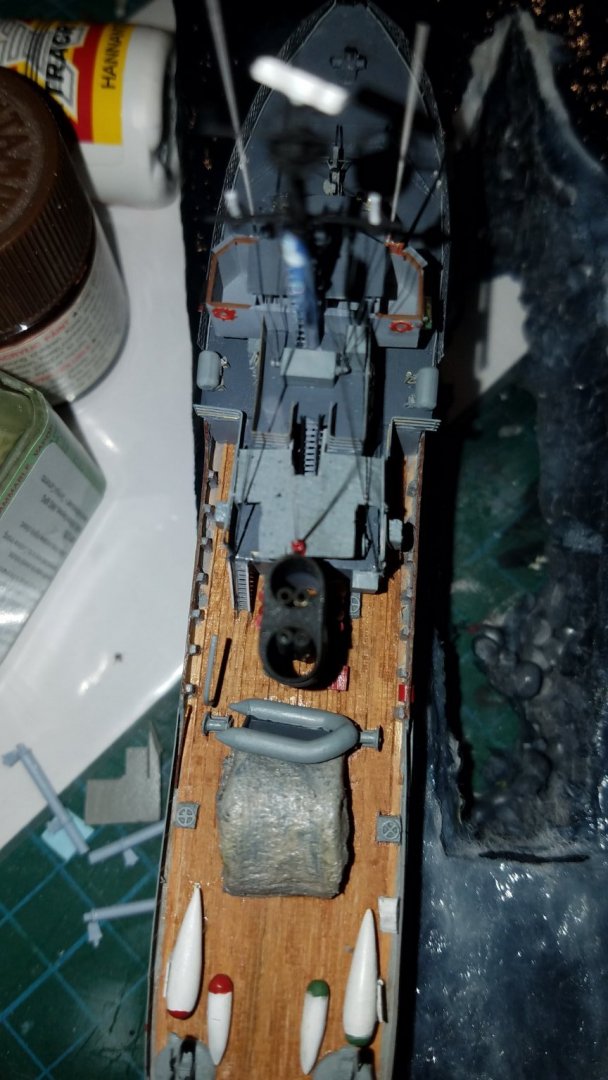
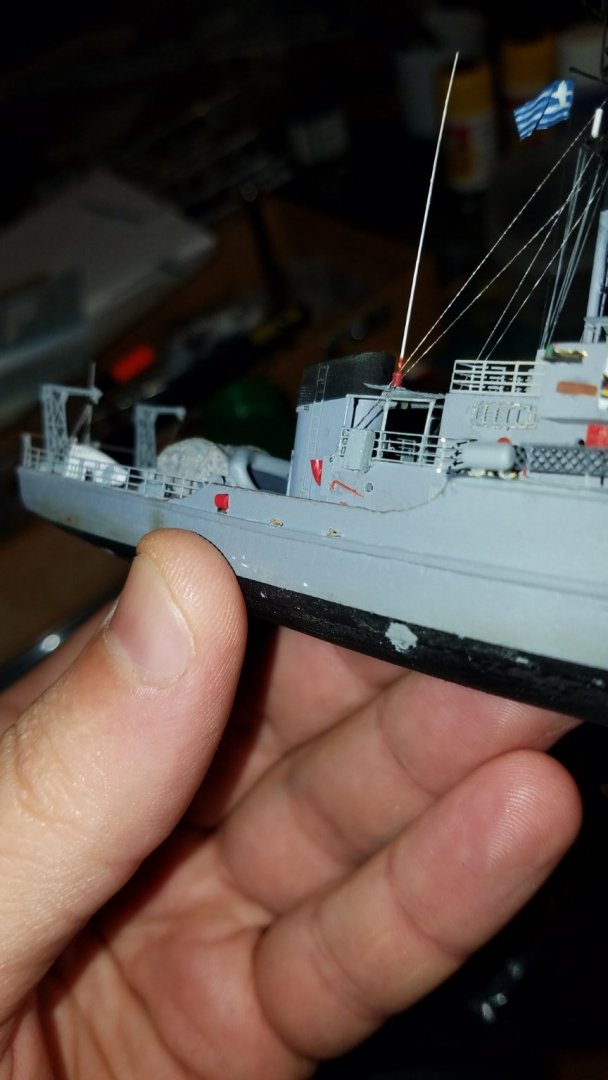
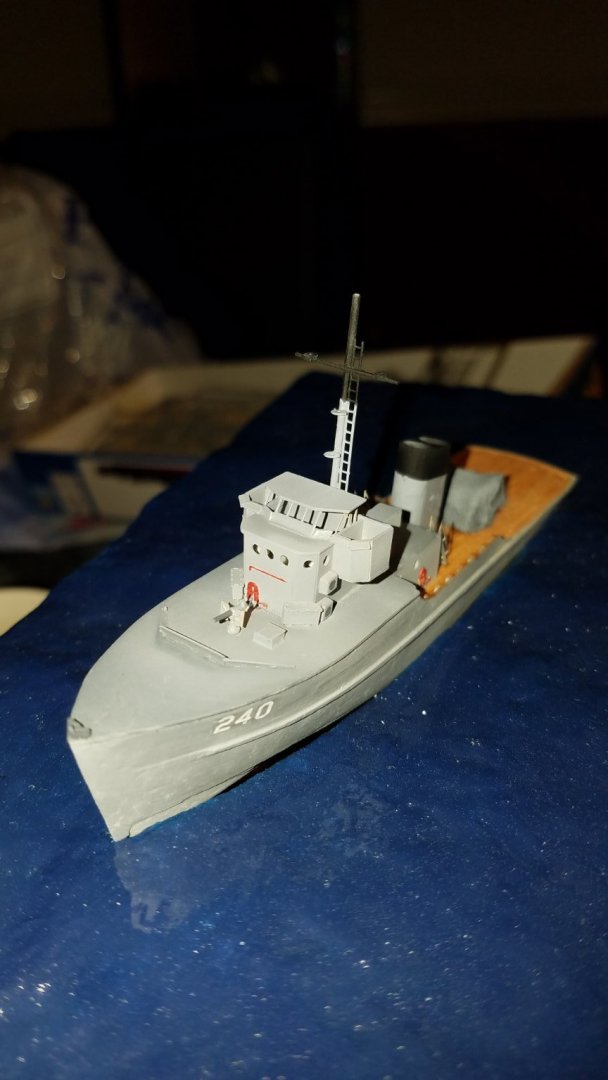
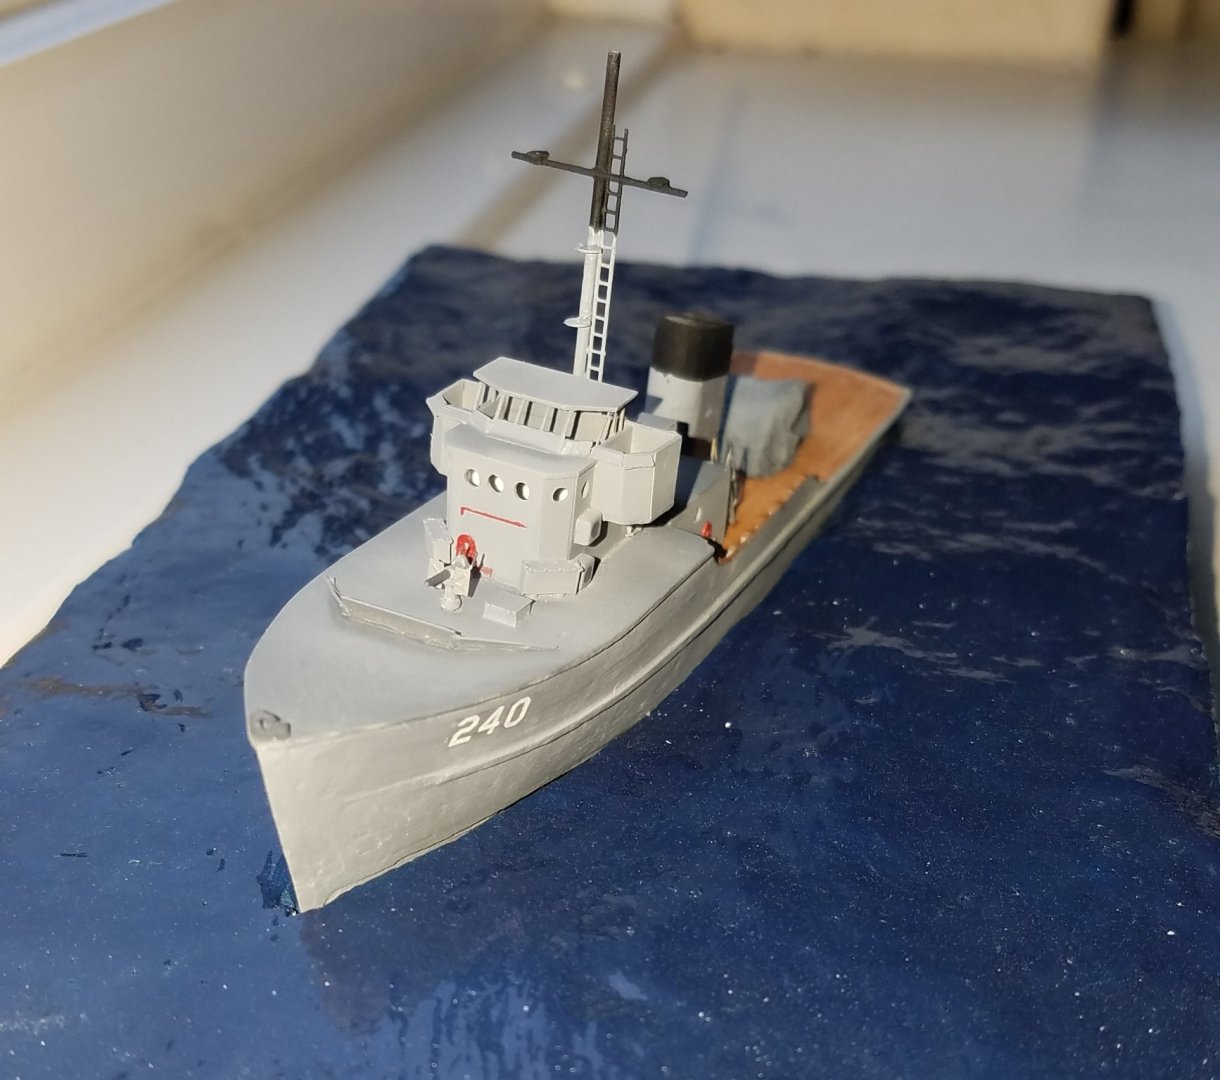
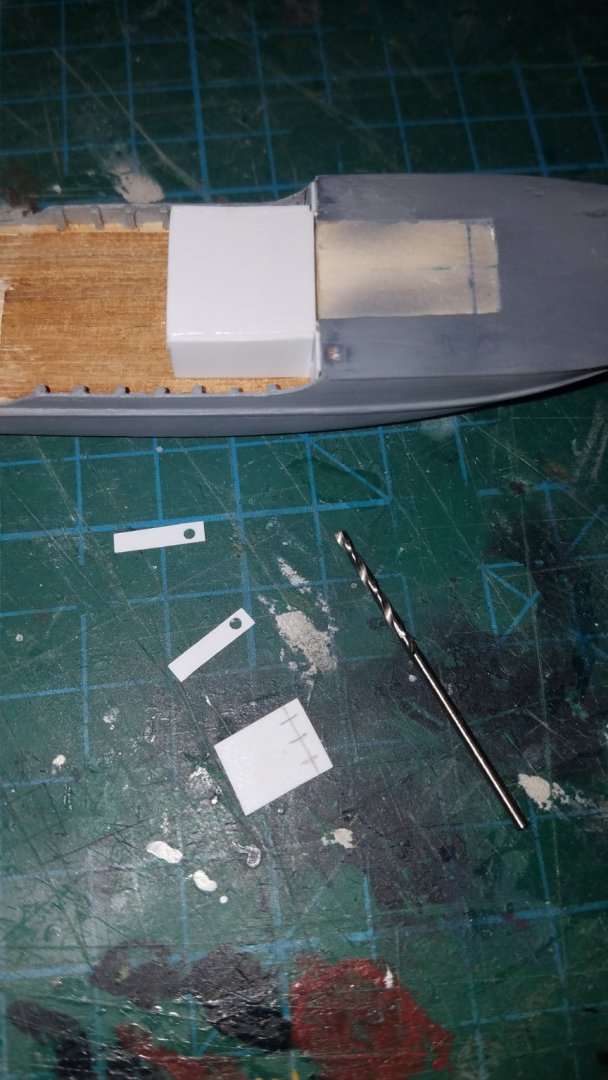
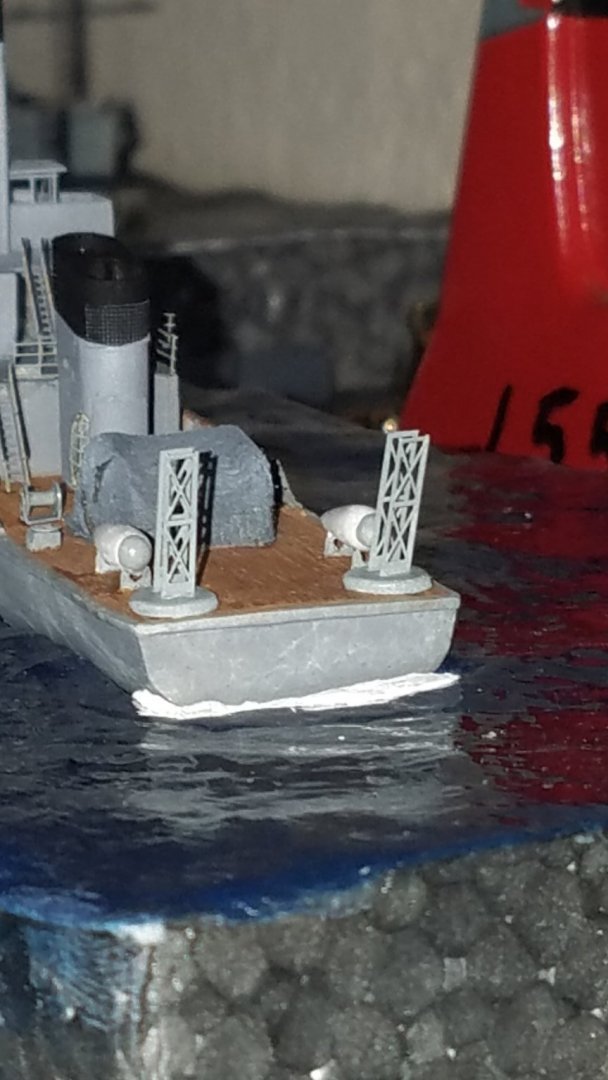
A few more shots of the build. Deck equipment slowly being added, the mast has been started, and the sea is already looking pretty good. The small zodiac. Bent sprue, xacto and a bit of plastic card! All the sweeping gear was also made that way, plus milliput and bits of spare PE and brass wire. With no vessel drawings, I just made a sketch and got my dad to fill in the gaps (here come the "It's all greek to me!" jokes... 😂) Most of the sweeping gear is on, though I ended up moving things around a bit, based on more photos I found. Also made a start on the railings and sorted out ladders. Started rigging up the mast, with the fore stays going on first. A lot more detail is on now. More railings, and the rigging is more or less all done. I usually finish the rigging and then add all the finer details on the masts, as they tend to interfere with the rigging if they go on first. Sorted out a decent Oerlikon gun from spare PE from previous models. Pretty much finished, with the last job I did being hand-painting the callsign flags on the bridge wings. Some more pics of the finished model. (The 'lights' are photoshopped in, but the rest is all real) Here is a photo taken from a 'helicopter' at 'night' and under 'searchlights' 😂 Next to a small Destroyer Escort, also at 1:350. I totally overdid the wake on the destroyer, but kept it much more subtle on the Minesweeper. And the final addition; the little red 'thing' just above my thumbnail. Apparently, a petrol tank for refuelling petrol-driven kit. On a quick-release fitting on a bulwark cut-out, so it could be jetissoned quickly if there was a fire. I think I am kind of working out how to add pics in bits of the text that I want, so I hope this post comes out OK!


-
NICE! Actually, I found loads of reference photos of the sweeping gear from vet groups that sailed them around those waters! Some pretty good shots of the underwater parts from drydocks in Sasebo. I think the MSC289 class was very much like the earlier ones, so I see where you are coming from. My dad said they were very good boats, pretty seaworthy, very manoeuvreable, the crew were more like a tight family and he preferred them over destroyers.
-
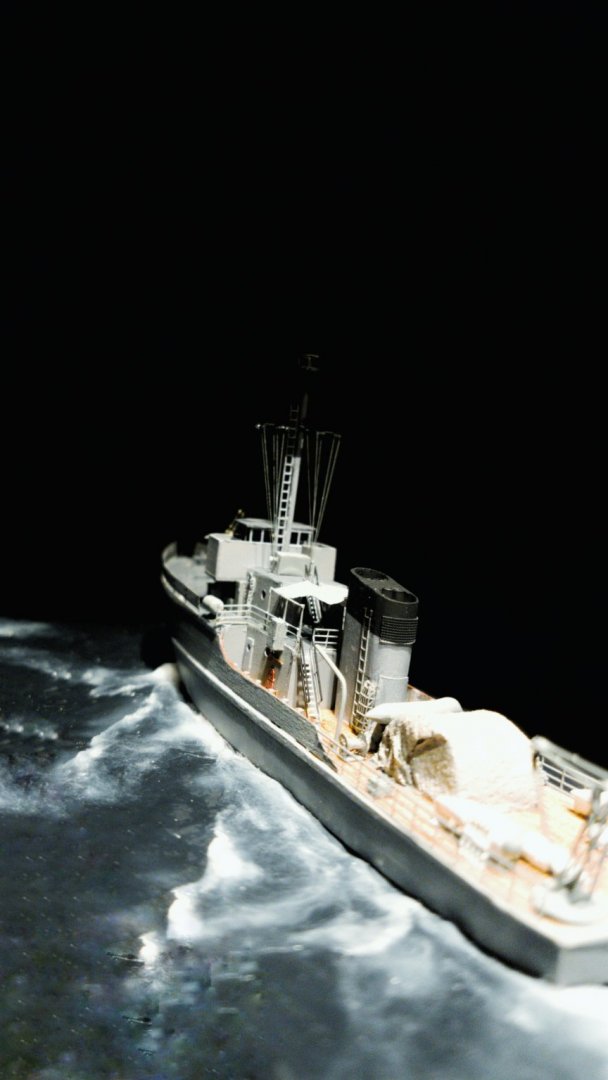
Some more pics of the build. I could not find any decent-looking propellers, and it would have been a massive pain to try and make them in the 350th scale. 5-blade propellers, ca. 6ft diameter and funny-looking, probably to reduce noise? So I decided I am putting the model on a 'sea' diorama, and concentrated above the waterline.


-
Thank you Bruce! I am just digging through my photos now and will be posting more!
-
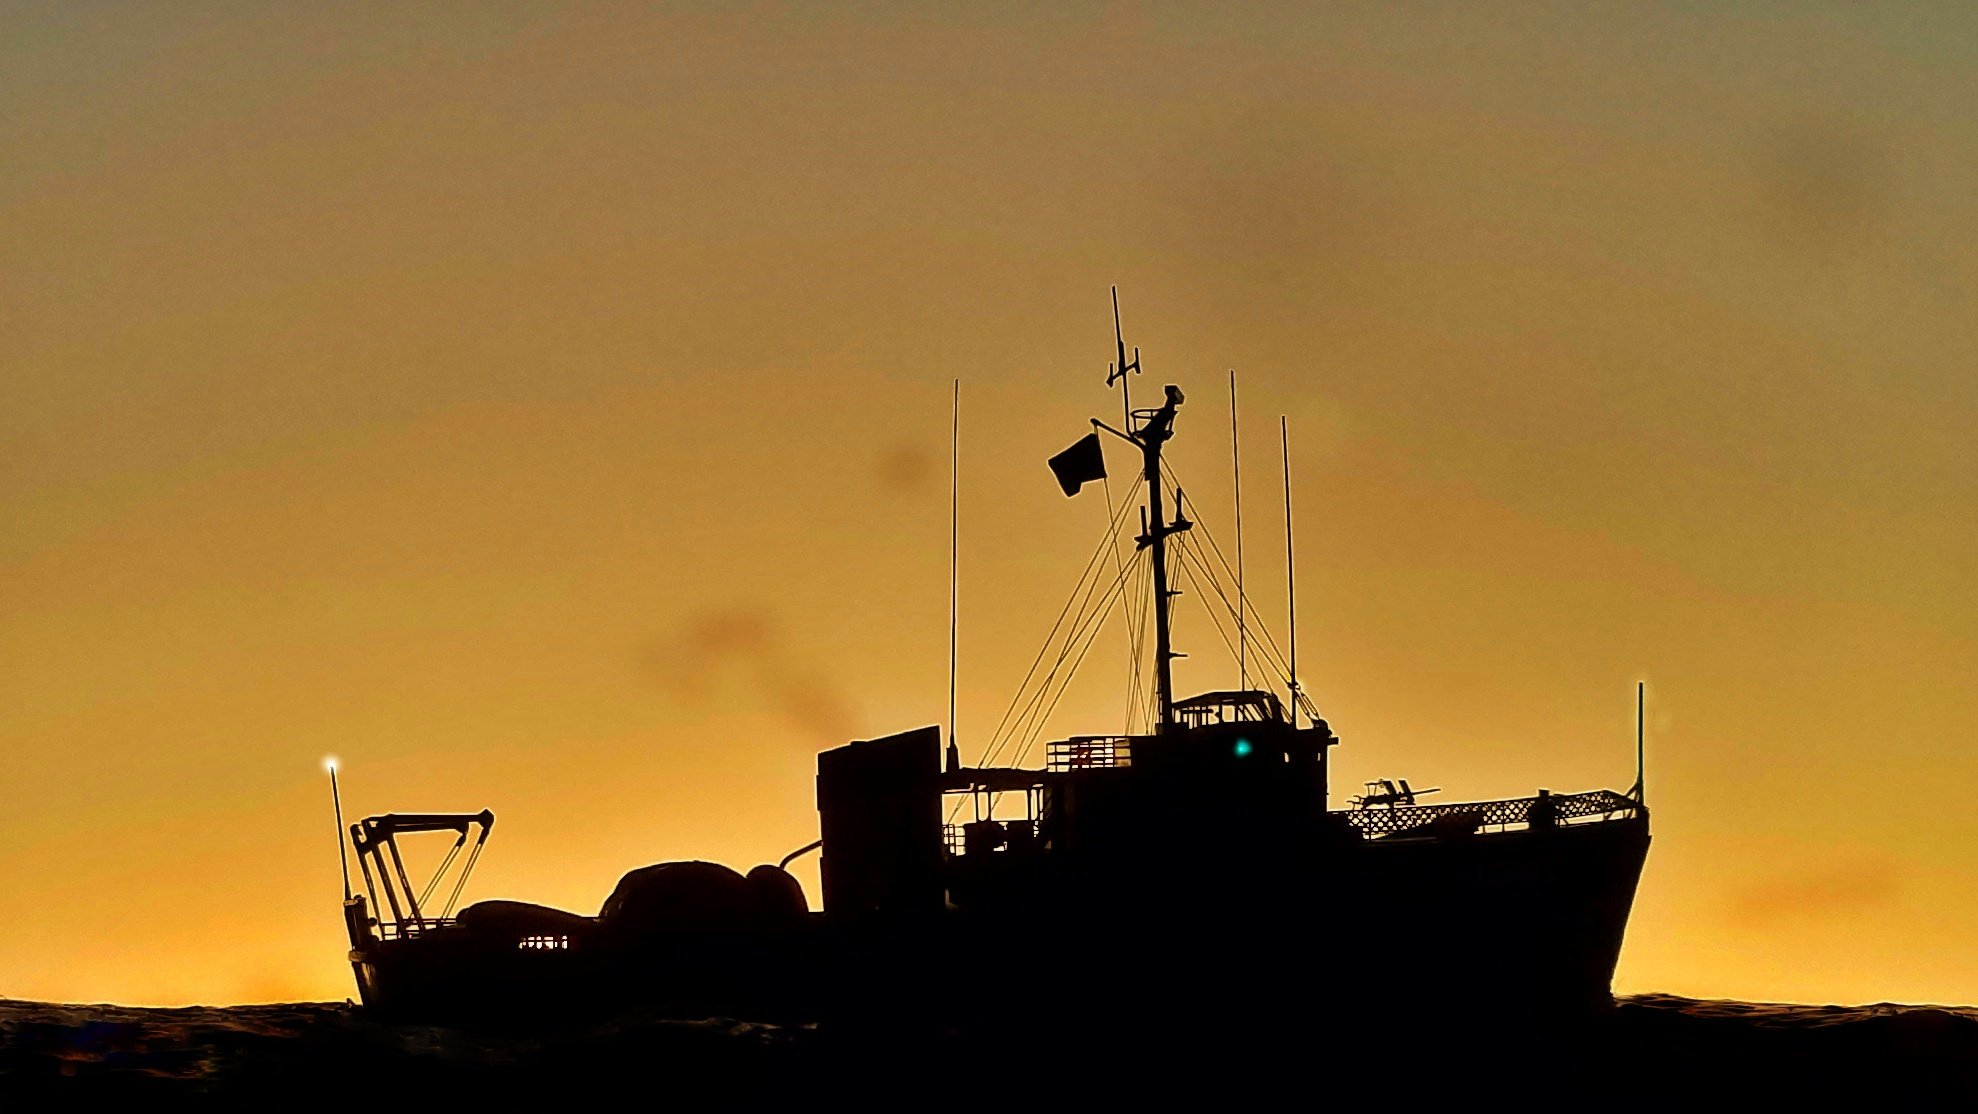
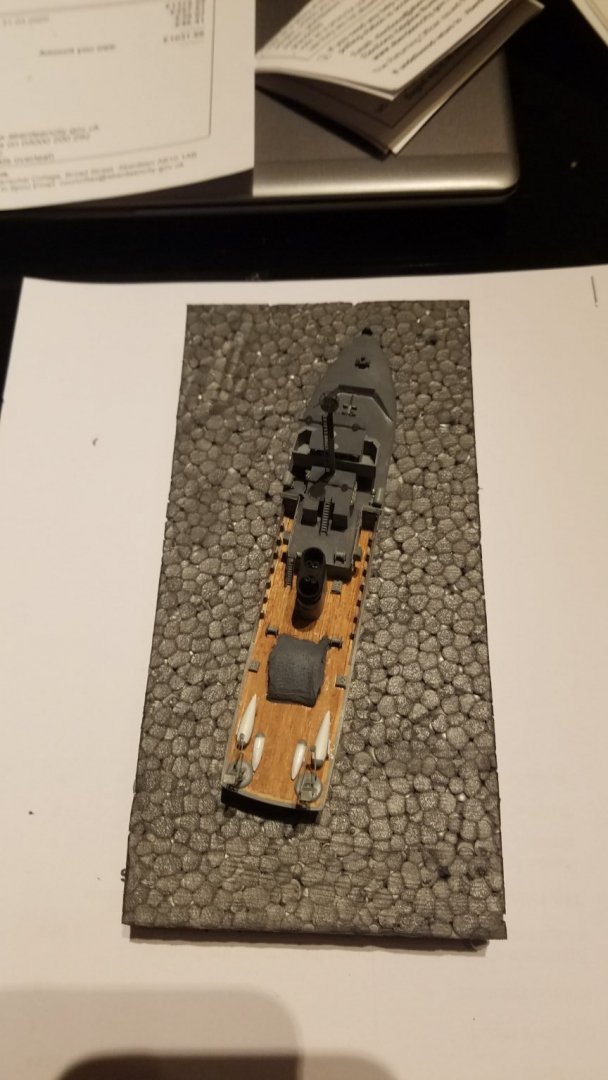
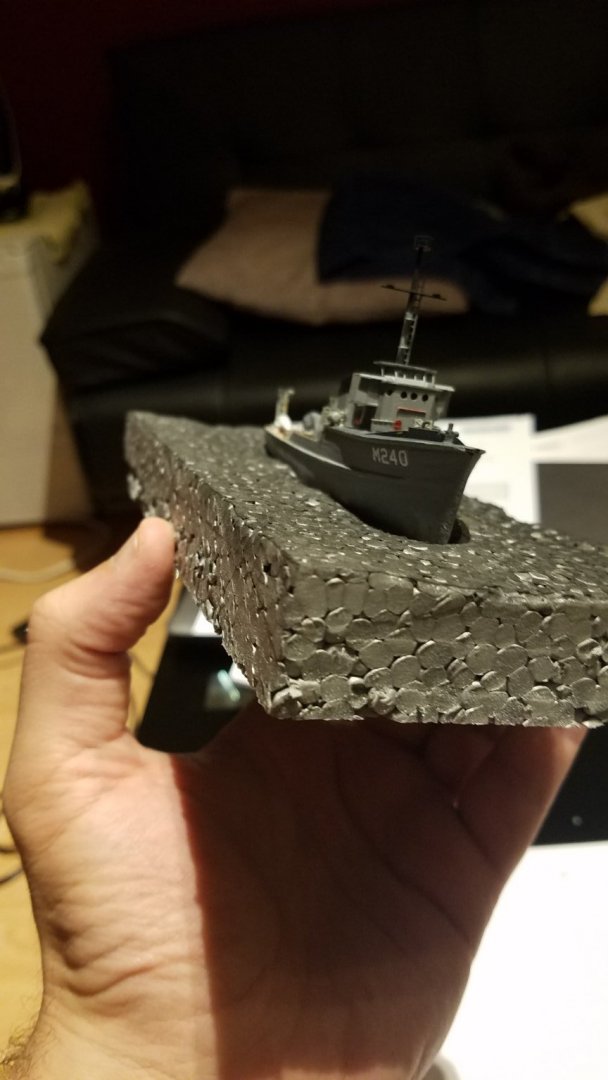
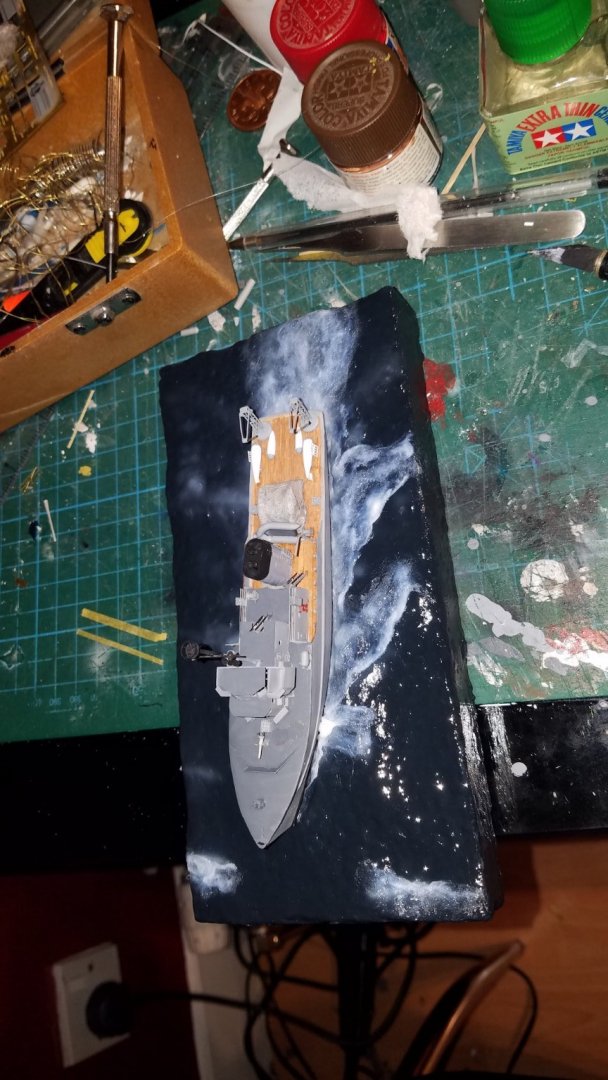
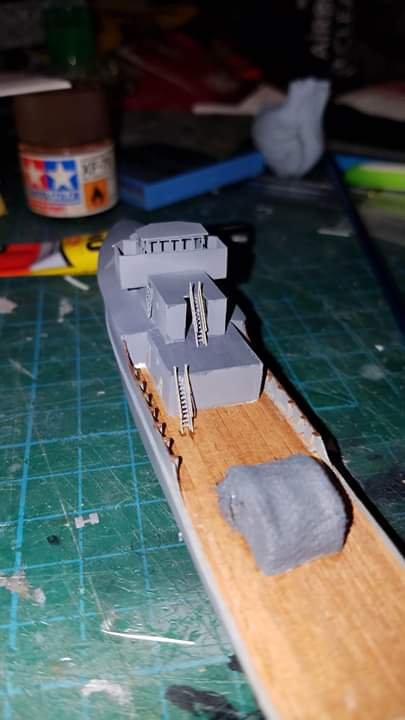
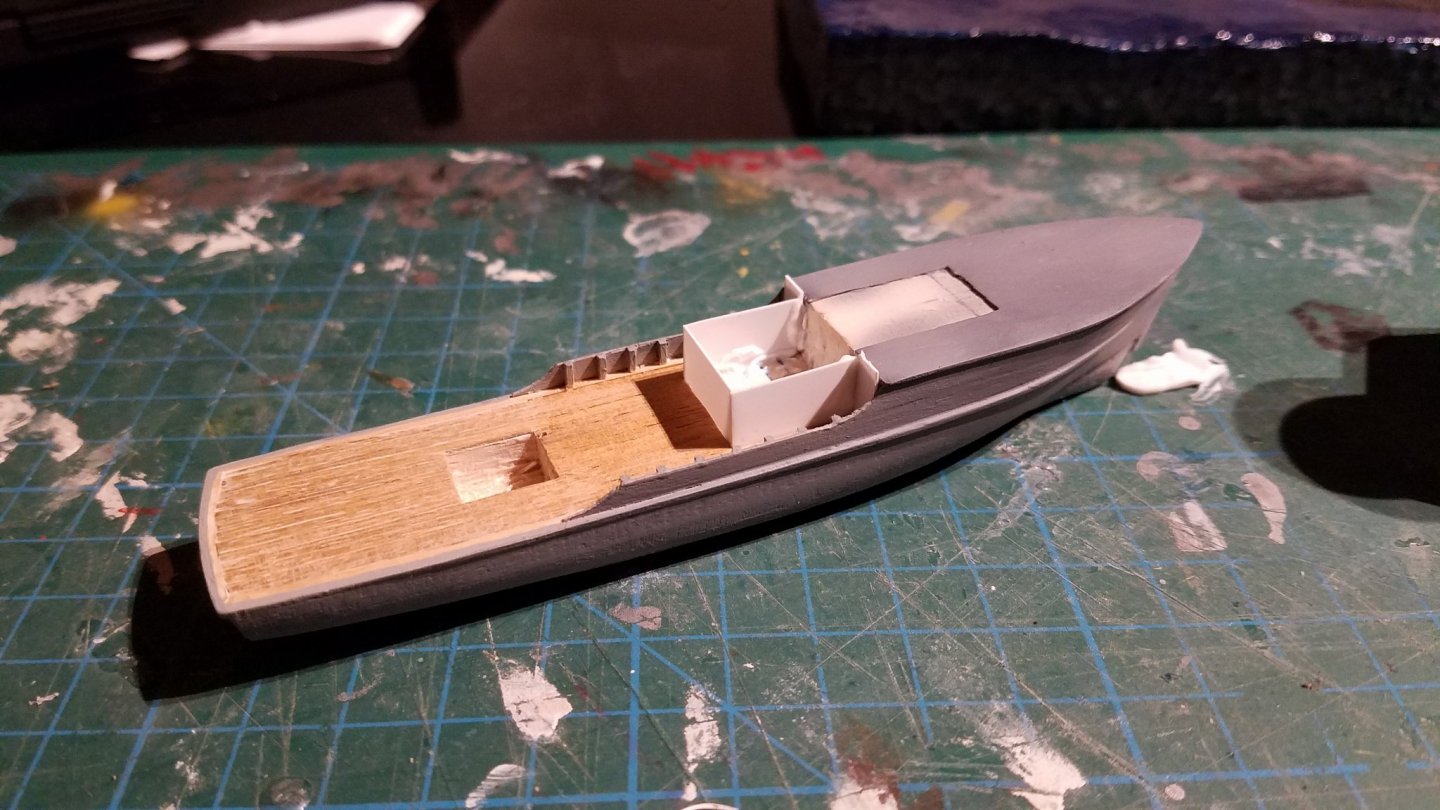
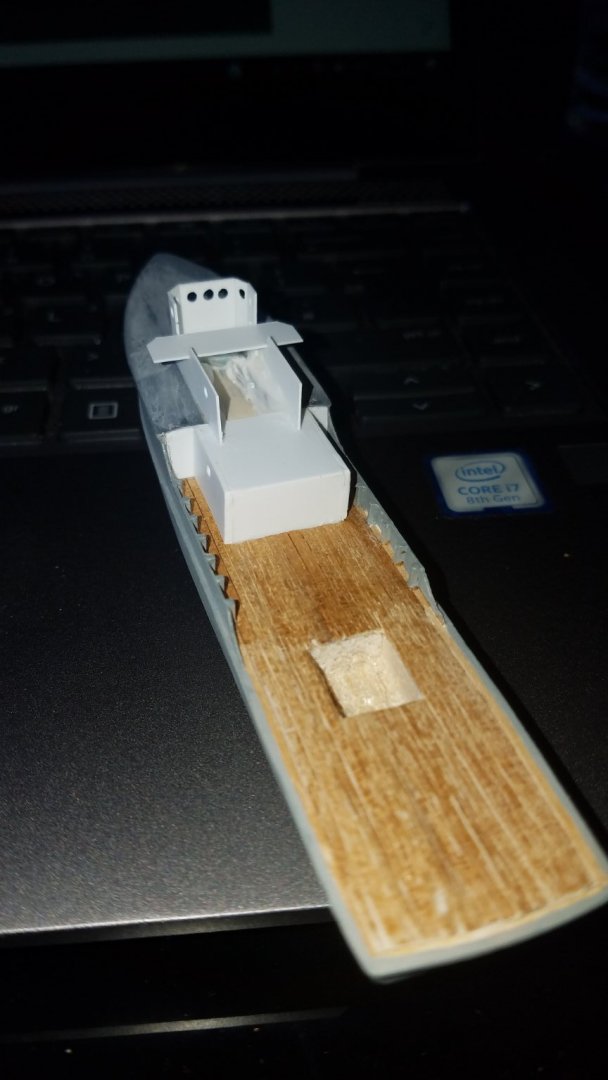
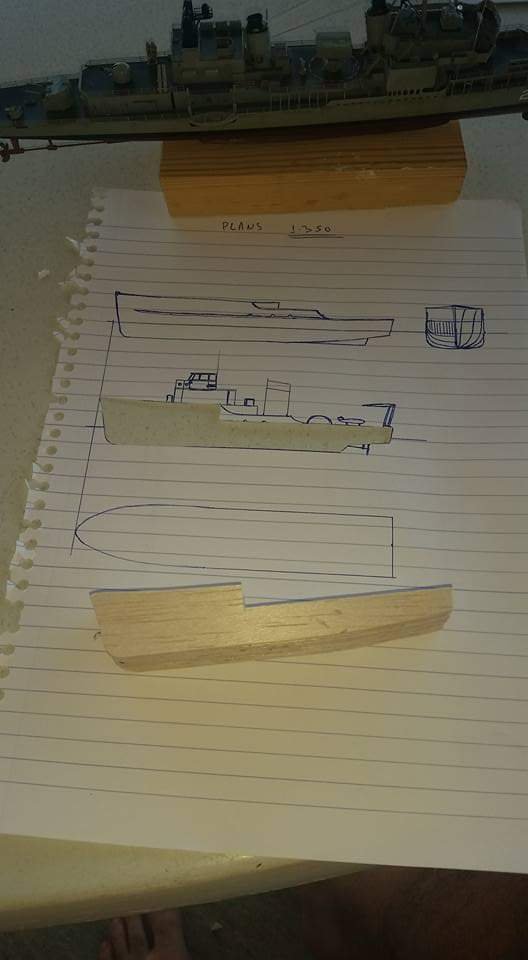
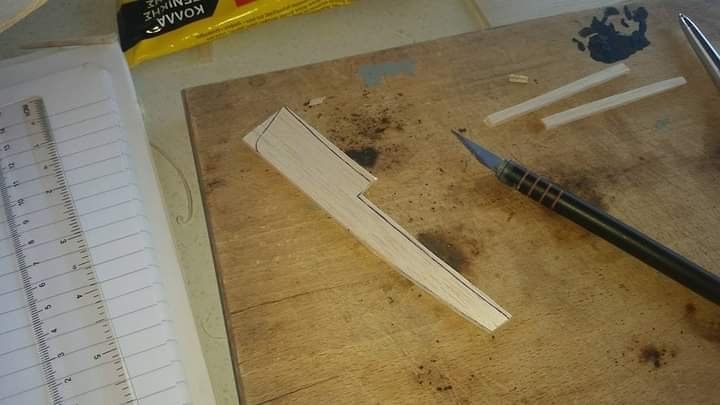
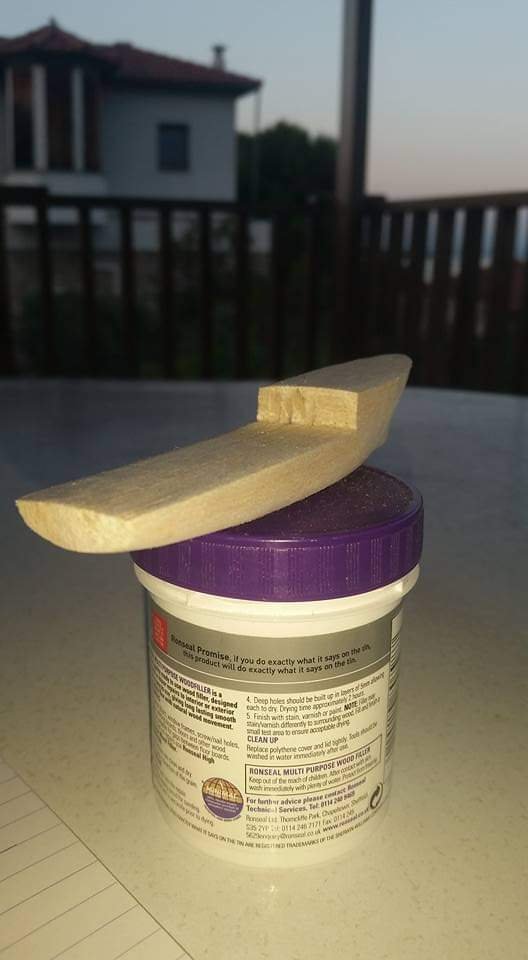
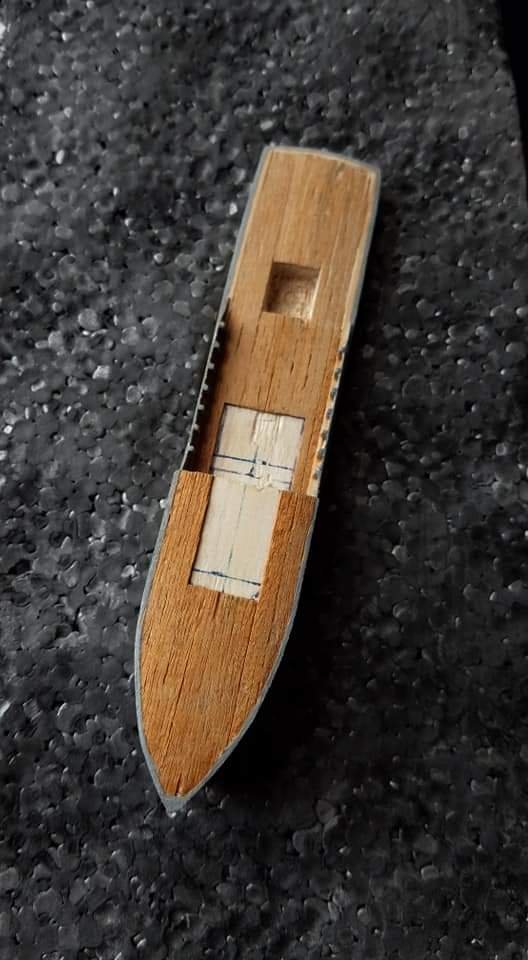
A bit of background on M240. She was built sometime in the late 60s / early 70s as part of the 'MSC289' class of coastal minesweepers for the USN. She was transferred to Greece as M240 'Pleias'. She was my dad's first command sometime in the early 80s and I had a few photos to work from, plus a lot of info from my dad. I started this without have any grand plans of building it into a decent model a few years back; I was on holiday im Greece, the weather was too poor for sailing, I had some spare bits of balsa and a sharp blade, a few photos and my dad, so I shaped up the hull and put it aside at the summerhouse, where it sat collecting dust till late last year. Then, one evening in the Scottish Highlands, I was watching the stars and noticed again that little group of stars I've been looking at for years, wondering if they are called something. Not being a complete caveman, I downloaded a 'stargazing' app and quickly realised they are a constellation, called Pleiades. 'Pleias' came to mind again; as it turned out, Pleiades is the plural of Pleias. Then memories came back of me walking on her deck as a 5yo, my then young dad in a navy uniform... that was it, the hull was posted to me from Greece and I set about building a fairly good model! Here are some pics of the very early stages, apologies if the quality is not great, the rest of the build is in high resolution and will be posting more!

-
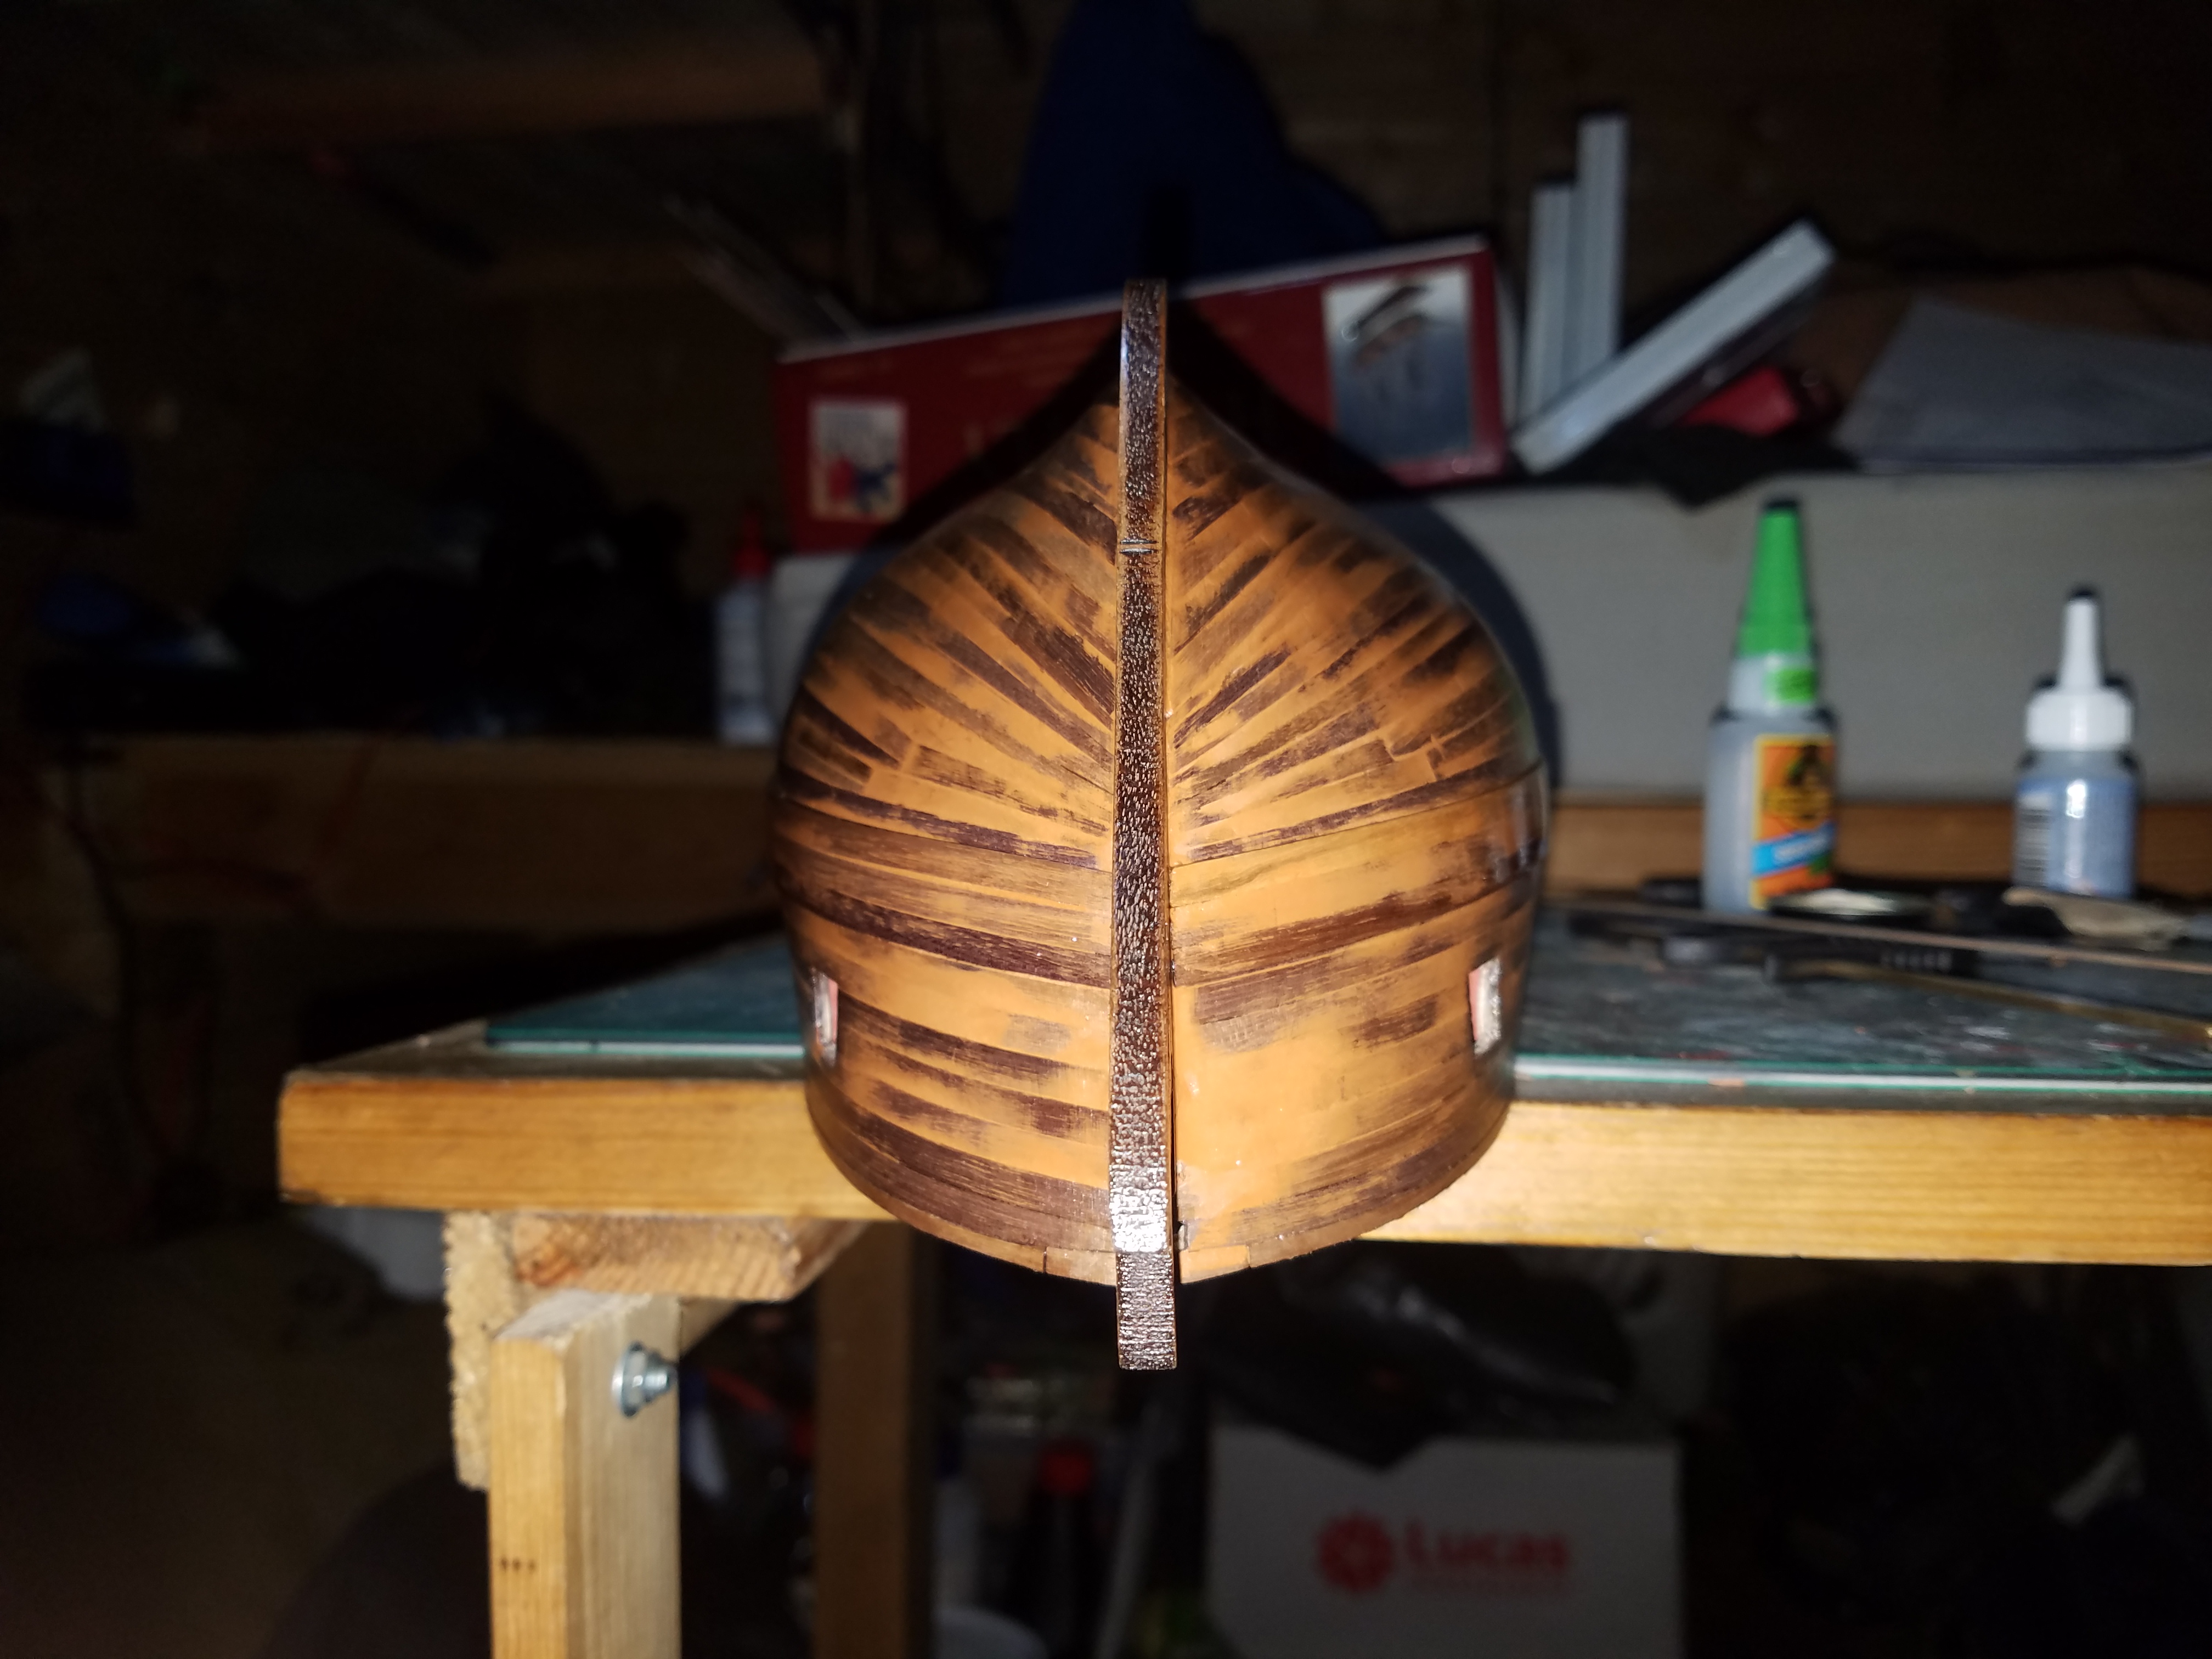
Hello and welcome to my first post! This is intended to be a build log of my first modern ship built from scratch. I made the hull and some of the superstructure out of balsa and birch, with detailing made out of everything I could find, some milliput and spare PE bits from previous builds. The sea is made of polystyrene foam, tissue paper, thick acrylic artist's medium and cotton. Here is a pic of the finished model, I am just trying this one first pic to see how things work, then I will be building up the log! There were no plans for her at all. It's all scaled from photos and known dimensions, and the deck and equipment was all sketched up with my dad's help (who was her skipper back in the early 80s). I made my own lines plan from drydock photos and looking at similar designs, then cut sections in balsa, glued them into a rough hull and sanded them smooth. Sealed with dope, painted, then added all the details.