Dan Vadas
-
Posts
3,261 -
Joined
-
Last visited
Content Type
Profiles
Forums
Gallery
Events
Everything posted by Dan Vadas
-
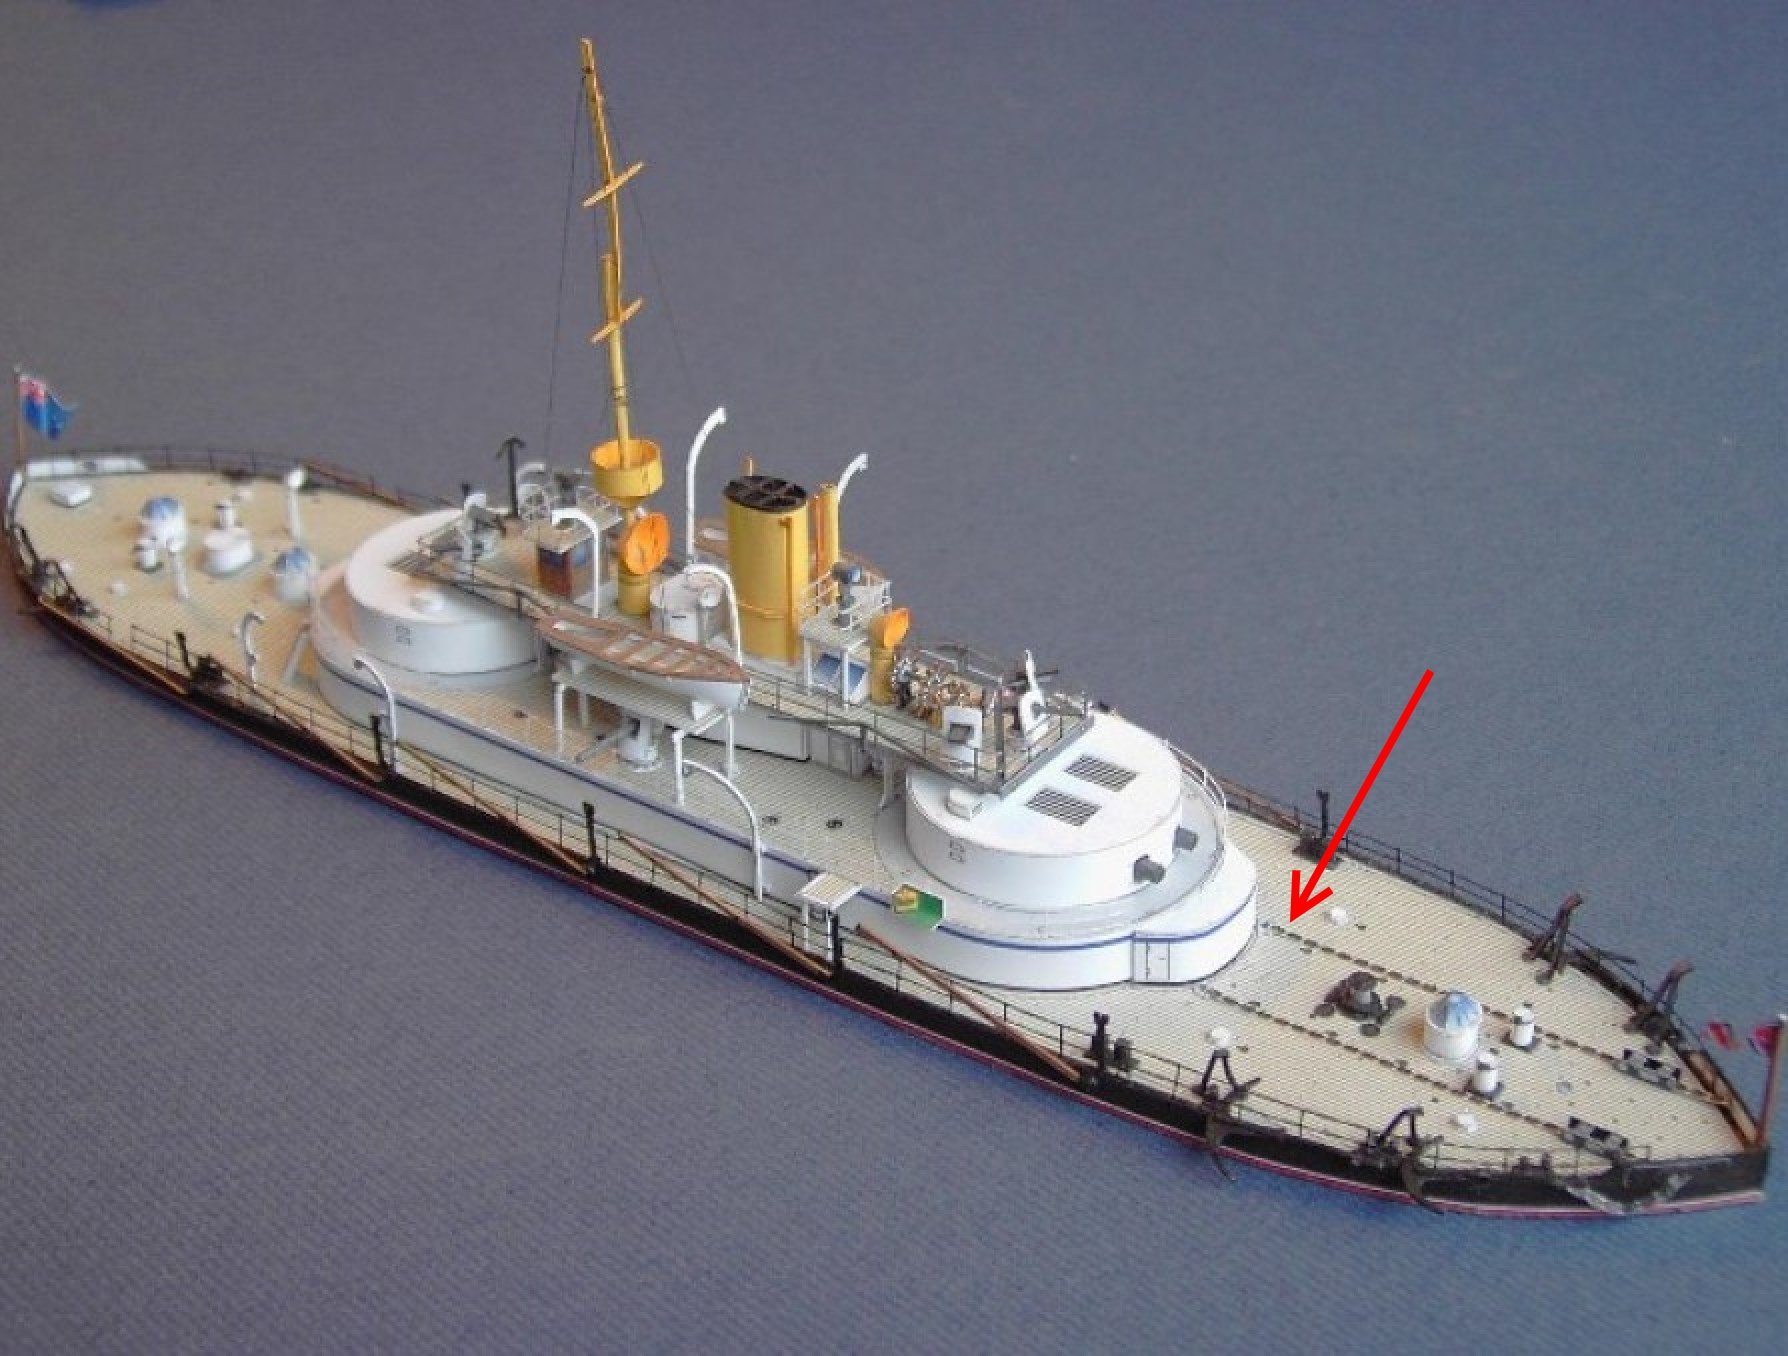
Jan, they are from different time periods in the ship's history. Perhaps she had a different pumping system on the one in the 2nd pic? The 2nd one is the more recent version. Well, using CA on the backs of the pieces before cutting was a success. It was a lot easier (relatively speaking ) to cut the wheel legs. Only two more to do . It looks like I've glued the wheel in crooked - not so. There is a Crank system similar to the Chain Pumps on older ships to be made and fitted, the wheel is at an angle to clear the other deck fittings. All will be revealed later on : I've also made and fitted four Bollards : Danny
.JPG.18225adaa5f67d6776214cd56ccec435.JPG)
.JPG.2063d5c0a73d78cf3415bc6d54319519.JPG)
- 193 replies
-
- 12
-

-
- cerberus
- paper shipwright
- (and 1 more)
-
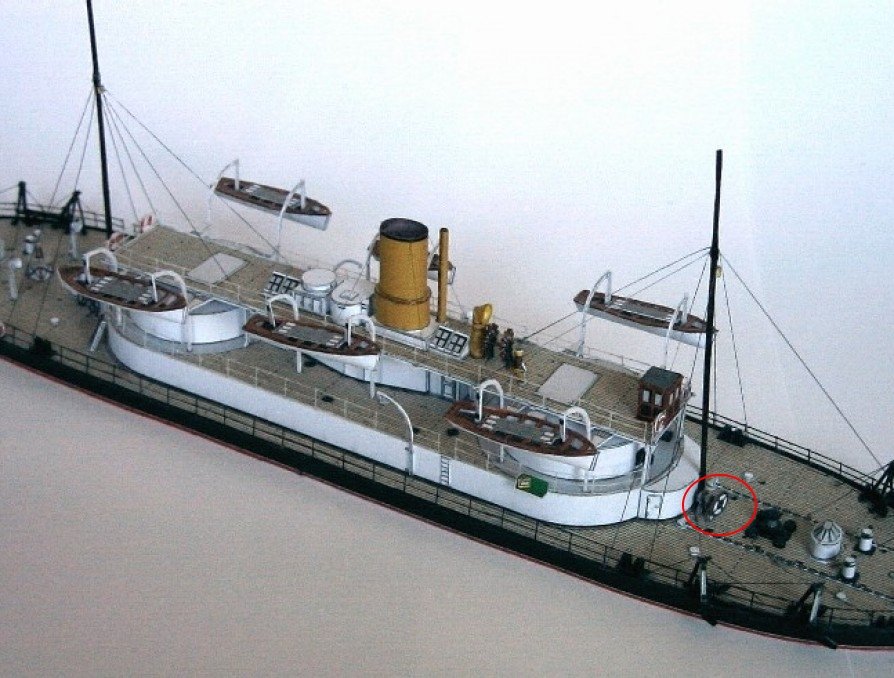
Isn't it just . In fact, I had at look at the completed demonstration models on the Paper Shipwrights site - one has the wheel with a solid centre, the other leaves it off altogether : Remember, this is a practice ship for improving my paper modelling skills. I may as well try a few things out now before the real thing starts. Although I doubt there will be paper details this small on Bismarck - I'd guess they'd be replaced with PE. Danny

- 193 replies
-
- 12
-
-
- cerberus
- paper shipwright
- (and 1 more)
-
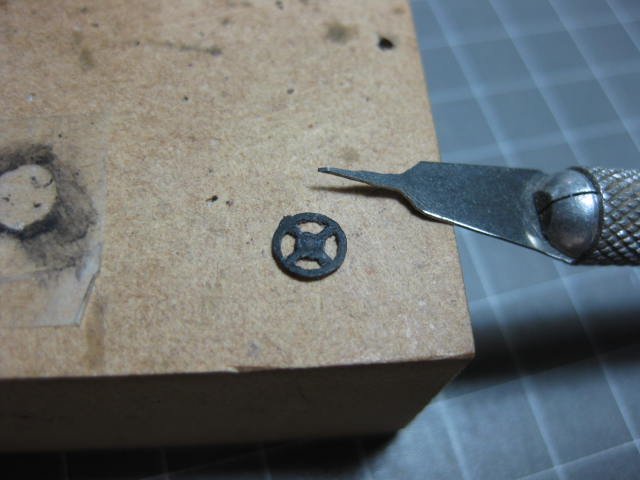
Now I'm really starting to go beyond the contract - this is the wheel for one of the three Pumps. It's 5mm in diameter, and double thickness 160gsm paper. I don't know if they expected the builder to cut out the inside pieces but I had a go at it anyway - successfully . Being double thickness and printed on the reverse side as well I couldn't use CA to stiffen the paper as it took all the print off on a test piece, so it was all cut in the "raw" state. I used the tiny chisel in the pic to cut the inside of the rim - it's not much wider than a sheet of paper . After I cut it out I dipped it in CA to strengthen it in preparation for what I thought was going to me a fairly major clean-up. All it needed was a light sand on both sides with extra-fine wet-and-dry - YAY. Then I dry-brushed it Matt Black : EDIT - After thinking about it a bit more I realised that I COULD stiffen the paper with CA before cutting it out, as long as I applied it on the BACK of the piece. I'm painting them anyway, so it doesn't matter if the print comes off the back. A test piece proved that as long as I was careful it didn't affect the printing on the front side, so I still had lines I could follow . Danny

- 193 replies
-
- 11
-
-
- cerberus
- paper shipwright
- (and 1 more)
-
I guess you mean THIS ONE ? I hope so, because I just ordered it . $31.81 with FREE SHIPPING from the UK - gotta love that, it's cheaper than the AOTS book . Danny
- 193 replies
-
- 4
-
-
- cerberus
- paper shipwright
- (and 1 more)
-
The Stoppers, or Anchor Chain Guides if you like, are next. Some delicate cutting and folding required : I kept looking at the Steam Vent (?) pipe and decided to attempt a re-do. You decide if it's an improvement : Danny
.JPG.a78c0b866897df88dcfefb587aa41fea.JPG)
.JPG.5afa0da711c2dce432afab5f1c6fe860.JPG)
.JPG.24219c50242ed50bbb9c54fe97a84f70.JPG)
- 193 replies
-
- 13
-
-
- cerberus
- paper shipwright
- (and 1 more)
-
Thanks John . Question for Slog - is the AOTS book of Bismarck worth buying? I've seen a few negative Reviews regarding accuracy. Danny
- 193 replies
-
- 2
-
-
- cerberus
- paper shipwright
- (and 1 more)
-
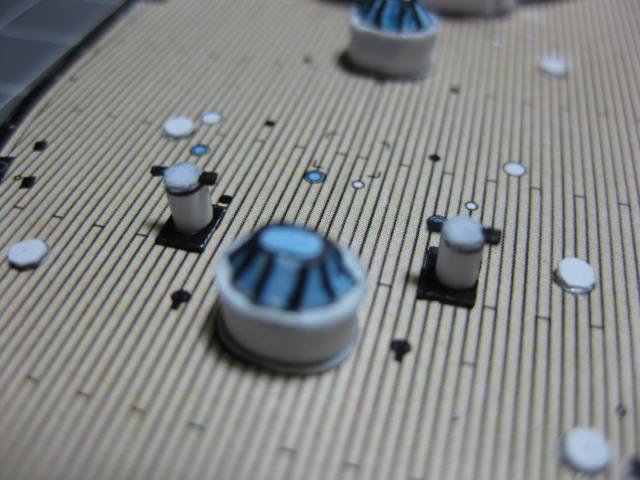
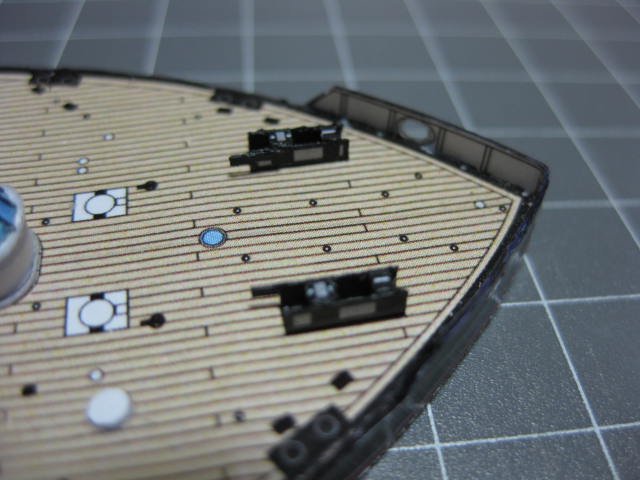
Thanks for looking in John and Rick. The finished Rollers. The one on the right has had the CA/sanding treatment and been dry-brushed with black acrylic. It looks 100% better than before : All four fitted to the deck : Danny
.JPG.c0837b307ab72dc045fc98d5b72ff260.JPG)
.JPG.2eff14d6f87b2ee3f0fdced14d10c707.JPG)
- 193 replies
-
- 14
-
-
- cerberus
- paper shipwright
- (and 1 more)
-
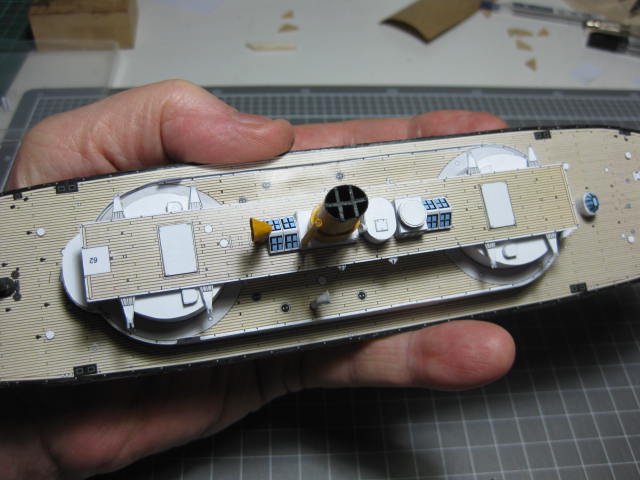
Yeah, you're probably right John. There are a LOT of things I'm not completely happy with, but I'm using this model as a training exercise for my next one . I thought I'd take a pic with my giant oversize fake hand : Danny
- 193 replies
-
- 15
-
-
- cerberus
- paper shipwright
- (and 1 more)
-
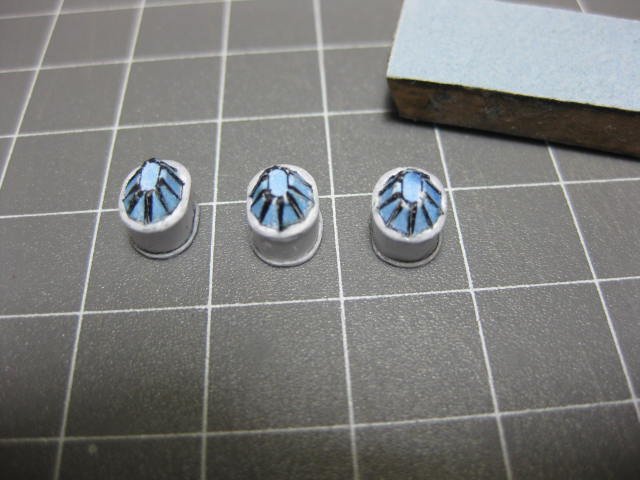
The Capstan has been made and fitted. I'm not totally satisfied with it, and I may pull it back off and do a bit more work to it : I came up with an idea to improve the round edges of the skylights to make them completely round. I wiped some CA around the edge and sanded it to shape - MUCH better . This is what I'm thinking of doing with the Capstan, although I'm in two minds. Maybe I should leave it "warts and all" to show the gradual improvement in my card modelling skills? BTW - I touched up the paintwork on the skylights after I took this pic : Some Progress Pics with the recent additions fitted : The Capstan Rollers. There are 10 layers of paper in each one. They will be getting the CA/sanding trick when they dry : Danny
.JPG.00f4baaad0428948274a038264812158.JPG)
.JPG.d7ac383a632a358383a8c2daf97f20f6.JPG)
.JPG.e1513119f8e0b2e079601f3f416629fd.JPG)
.JPG.9b7c249c041b7d36e281b4457eeba6c1.JPG)
.JPG.3547ece4467e1cca8efe2480a3fb6f29.JPG)
- 193 replies
-
- 13
-
-
- cerberus
- paper shipwright
- (and 1 more)
-
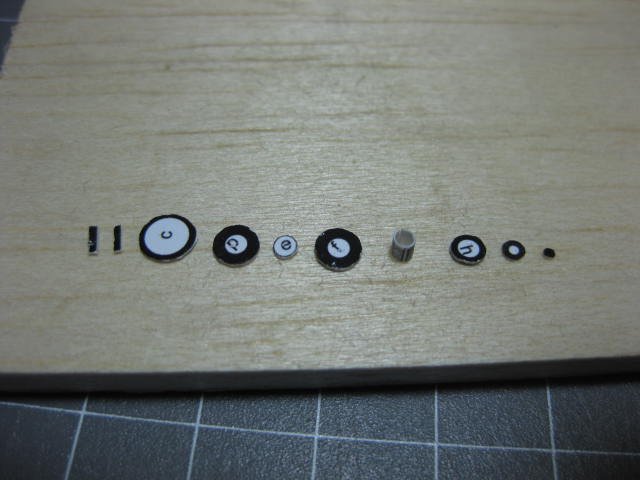
Thanks for the extra info vossiewulf, much appreciated. I intend to spray all the sheets of my next model as soon as I get them, so they'll have plenty of time to dry before sanding while I start on the hull framing (or spend a week looking at the plans ). I've rolled and glued all six Air Ventilators. I'm reasonably happy with the results, considering their size. They look pretty good without magnification . I tried my hand at dry-brushing the yellow one, using Artist's Acrylic straight from the tube. The Yellow Ochre is a pretty good match for the printed colour. I'll give it another coat or two before fitting : The Skylights were a step up from anything I've made so far. They haven't turned out perfect, but acceptable. I learned a few new techniques while constructing these which will come in handy later on : These are the parts for the Capstan. I'm getting rather good at cutting tiny circles, if I say so myself . The one on the right is only 1mm in diameter: Danny
.JPG.83b7ba807dcd7d3ab50efbf8c9c0a359.JPG)
.JPG.e140f5aedd44cc3223bb517f3e0963f7.JPG)
- 193 replies
-
- 13
-
-
- cerberus
- paper shipwright
- (and 1 more)
-
I assume you are referring to applying by brush? This one comes in a 400gm spray can with a very fine spray nozzle for even application. Thanks for the info on the number of coats - that was going to be my next question . BTW - warm weather is not going to be a problem in the near future. We're heading into winter down here, and it can drop below freezing. I have reverse-cycle aircon though . Danny
- 193 replies
-
- 3
-
-
- cerberus
- paper shipwright
- (and 1 more)
-
I found Nitro Matt Finish in Australia HERE. Vossiewulf, you were right - it's from a luthier supplies site. A bit pricey, but at least Shipping is free . I've bought their last can . Danny
- 193 replies
-
- 3
-
-
- cerberus
- paper shipwright
- (and 1 more)
-
Thanks Slog. I've done that on the last few tubes I've rolled, even though it may not look like it . Yep, Pav. I did that too . And that too . I roll them on my fingertip using drill bits of diminishing size. I don't know, I didn't print them myself. I had them done at a photocopy shop. I'll be using Matt Lacquer on the parts sheets of my next model before I cut anything out, and this one will be getting a coat when it's finished. I had a look at the Nitrocellulose Lacquer in your link, but I'm a bit worried about this bit : I'd prefer a coating that stays clear with age. Polyurethane would do that, but I don't know how it would affect other things in the build like glue adhesion. Danny
- 193 replies
-
- 5
-
-
- cerberus
- paper shipwright
- (and 1 more)
-
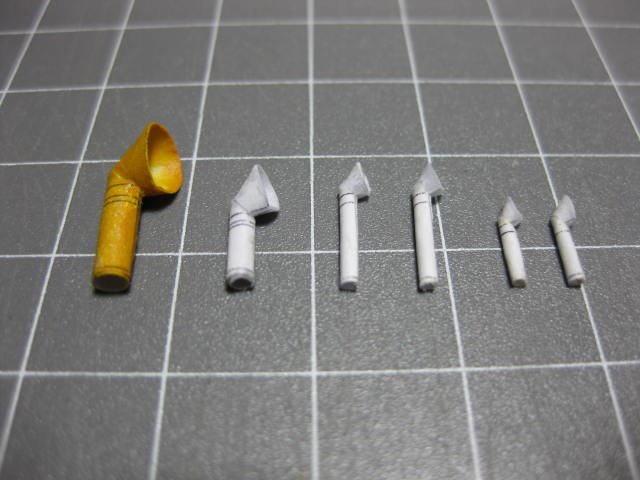
More tiny rolling. These Ventilators are the smallest ones on the ship - 8mm high by 0.8mm diameter. I was particularly happy with the way the cone turned out, especially as I used the 160gsm paper : Danny
.JPG.f93531a2f83c85b4eac0636e4e2fc60e.JPG)
.JPG.d1c004f07ba85332ab6d6444724254fa.JPG)
- 193 replies
-
- 14
-
-
- cerberus
- paper shipwright
- (and 1 more)
-
An exercise in tube rolling. This tube is only 1mm in diameter. The Kit has the part on 160gsm card. I tried rolling that and the yellow ink came straight off, and it finished up at 1.8mm diameter. So I used the part from the 80gsm paper that I'd printed the Instructions etc on. Much better, although it has a small bulge in the middle. This can't be picked up with the naked eye . The drill bit is 0.5mm : Danny
.JPG.9bdf1b64bc35e9dda3b513daa90726c1.JPG)
.JPG.10fed89e15701a3f650a78e2108b9820.JPG)
- 193 replies
-
- 12
-
-
- cerberus
- paper shipwright
- (and 1 more)
-
Now I understand. Yes a very useful tool, but I guess one would only need a couple of sizes of them. Hah, that's the technique I used to cut out the inside of the Flange in the bottom of this pic. This sub-assembly is the Boiler Intake : I've been experimenting with using Acrylics. The Funnel in the pics below needed some touching up after rolling. I'm not at all happy with the way the printed parts have come out. The ink they used is very fragile when rolled or bent. It's all good Pav. We are ALL foreigners if you think about it - whether we believe we came from the Garden of Eden, Atlantis or Olduvai Gorge . Thank you Pav, I'll take all the help I can get . Danny
.JPG.25644eee6efa899984162a80738b2f1d.JPG)
.JPG.4d9672273107e122da18425eb69cb364.JPG)
.JPG.25fb6fb37a60e5dad6e65fda3c6a2102.JPG)
.JPG.77d8922748b7114bb5bfa392e53b7195.JPG)
.JPG.3639eaf868d6fd2a973e11456b69dbf3.JPG)
- 193 replies
-
- 10
-
-
- cerberus
- paper shipwright
- (and 1 more)
-
Hi Pav, thanks for these tips. There is indeed a small difference in the scaling on at least one of the sheets. I discovered this early on when I was gluing the ribs to the base, which were on different sheets. The longitudinal centre rib was a touch over 2mm too long, and all the athwartship rib positions were also out. Anything else on this sheet would also be a bit too big, but the rest of the parts on it are all fairly small so won't make much difference. Unfortunately there are no scaling rules on the sheets which could be used to check this. The problem is with the Kit sheets, not the Printer. I printed out all the pages on normal printer paper with one Printer, and the actual Parts Pages as well on another Printer. Both lots came out with the same error. That wasn't a problem with the balsa inserts I glued in because of where they are. I used the PVA very sparingly - it was dry almost immediately, before the paper had a chance to get wet. Yep, that's the way I did it . I bought one years ago and agree it's a good tool for cutting perfect circles, but I seem to have lost it in my last house move . I ordered a new one on-line just two days ago . I may not live long enough to do another easier model (hopefully I will). A Bismarck might see me out - she'll take a few years. Is there a video of the technique? Or some more information perhaps. Danny
- 193 replies
-
- 4
-
-
- cerberus
- paper shipwright
- (and 1 more)
-
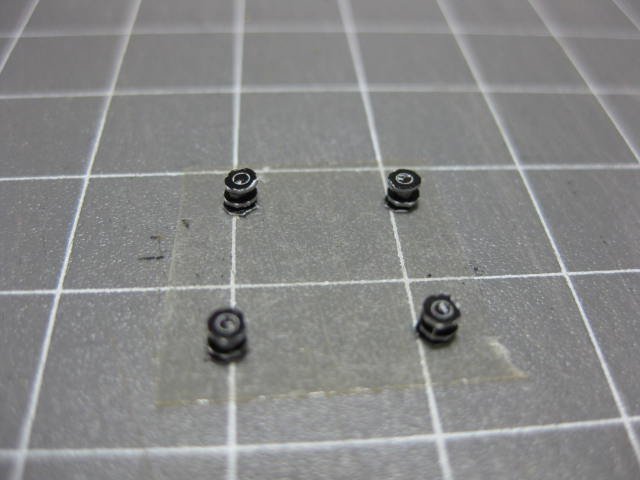
I also remade the Support Posts and Davit Brackets. The tiny "fingers" on the brackets were a bit of a pain to cut, as they are only 0.4mm wide in 0.4mm thick card. I dipped the ends in CA glue to harden them before cutting, all worked well : Danny
.JPG.da1eff3ec64d9ae66b08ac45b56bb8db.JPG)
.JPG.0f9c4d695b69291b8b5d129a845834cf.JPG)
- 193 replies
-
- 11
-
-
- cerberus
- paper shipwright
- (and 1 more)
-
Hi Slog, I've finally had time to read your Log to this point - wow, there's some stuff to learn. Thanks very much for the in-depth tutorials on each step, particularly the way you solved potential problems and also for showing the mistakes that can be made. This log is an excellent learning tool . I can't wait to get my Bismarck, but of course I'm still going ahead with my "practice ship" . Danny
- 244 replies
-
- 2
-
-
- borodino
- dom bumagi
- (and 1 more)
-
Learning from mistakes, part 2 (or is it 14 ). The major error earlier was the alignment of the Flying Deck. I came up with this solution to ensure it didn't happen again. One problem I found was that the black printing didn't like Tamiya Masking Tape - it came right off when I did a test on my spare main deck. So I made up two pieces of scrap paper which I folded to match the main deck just behind the fore and aft bulwarks to keep the tape away from the printed surface. Then I taped the ship to my cutting board to ensure it couldn't move. I taped a piece of balsa in the exact position of the rear of the flying deck as a "stopper", with another piece of tape on it to mark the side of the deck : Next I added some balsa scraps to the inside of the structures to which the deck is glued to give a much larger gluing area. I made sure that all the pieces were flush with the tops of the little structures with a steel rule. Some of them were a little high, some a touch low, so these were adjusted by either a bit more sanding or by filling the gap with another piece of paper : When I was satisfied that all was correct I glued the deck down and placed a small block of MDF on top to hold it down while the glue dried : Danny
.JPG.7c74987de2e945fc7f66cc493307bb8b.JPG)
.JPG.f9ede5ca78935abb44fa661b448667b1.JPG)
.JPG.92983f1281734323eb9c27fa0ee17f8c.JPG)
- 193 replies
-
- 17
-
-
- cerberus
- paper shipwright
- (and 1 more)
-
I've redone all the Superstructure. I'm MUCH, MUCH happier with the way it turned out. Well worth the effort . After looking through Chris's and Slog's Logs I've picked up a lot of tips, most of which were used in the redo : 1. I used an awl instead of a light score with an Xacto blade to score the fold lines. The scores don't have an open cut on them now. 2. I laminated extra card to build up larger gluing surfaces when edge gluing (pic 1). 3. I glued down extra card on the back side of vertical pieces so I could remove the gluing tabs (on the left in pic 1). Previously I had some trouble getting the walls to sit down at the correct height and in the right line. 4. I cut inside the lines to remove the black edges that I had before (most of the time anyway). 5. I used Slog's method to cut circles and curves. Much neater now. 6. My tube rolling is vastly improved thanks to tips from both logs (pic 2). 7. I now dry-fit EVERY part before applying any glue, and no longer assume it's going to fit properly. 8. For some tricky pieces that like to spring a bit (like the walls) I'll glue one end first, let it dry, and then work my way around the piece. Previously I'd try to fit the whole thing in one go, with some poor results. I'll glue the deck on in the morning. I may have to remake some of the Deck Support posts that got knocked around a bit, I'll see how they come up first. Danny
.JPG.2e4abe4980ed6690fabb1174b3b6de57.JPG)
.JPG.fe7daf4479702c63e7e231817d6e57ad.JPG)
.JPG.a21e905b3bbe0ac175df46ef9a61e390.JPG)
- 193 replies
-
- 16
-
-
- cerberus
- paper shipwright
- (and 1 more)
-
Never heard of Gundam Eddie. My last Plastic was a Tamiya USS Missouri, about 13 years ago. Favourite Plastic kits would be Hasegawa. At the time they had the best detailing and parts fit. Danny
- 193 replies
-
- 2
-
-
- cerberus
- paper shipwright
- (and 1 more)
-
Sure is Chris . And if I'd read a few Card Logs like yours and Slug's before starting this model I probably wouldn't be re-doing a major Oopsie now either . When I get my next Card model (hopefully in a couple of weeks ) I'm thinking I might scan the sheets before I put knife to paper. That way I could get a second go at any of the blunders I'm pretty sure to make with it. Purely for my own use of course . I'm not into piracy. And thanks for the kind words Andy . Don't forget the hundreds of plastic cars, planes, ships etc I built before getting into wood . Danny
- 193 replies
-
- 3
-
-
- cerberus
- paper shipwright
- (and 1 more)
-
Go easy on the congratulations for this Milestone guys. That was how she looked last night - this is how she looks NOW : When I went to glue on the last two Supports I found they were a massive 2mm out of position - their tops would have been out in fresh air . In real life that translates to about 500mm. To make it worse they were also 1mm out athwartships. Only one thing to do to fix the problem : The only way to remove the deck was by using Isopropyl Alcohol. I'd earlier established that it had no effect on the printed surfaces, so I was confident I'd be able to get it off again. I unglued the tops of the supports first, placed two scraps of balsa on the turrets to put some tension on the outer ends, and slowly brushed the alcohol on from each end until it was all free. So far, so good. I'd never been 100% happy with my first attempts at making the Superstructure, so I thought "what the heck" I'll re-do all of it as well. Luckily I'd had two sets of sheets printed out initially . So I pulled it all off again : Now to start again . Danny
.JPG.263b1bcafe08c5b3c9f63799e2def444.JPG)
.JPG.64eba2a218b2c7e87838a1539f659cb1.JPG)
.JPG.9773e14e46ade22d55471cedcf1044e3.JPG)
.JPG.9896e33359ca44e138fe3815ebfc99ab.JPG)
.JPG.b5a2bdc1cca7c782be95e3e9c7dd4ed1.JPG)
.JPG.3d33b978f971222bdb591f403f0c1922.JPG)
- 193 replies
-
- 11
-
-
- cerberus
- paper shipwright
- (and 1 more)
-
Cheers Slog, that worked . Thanks B.E., welcome to the show. There are 12 Davit Brackets to fit under the Flying Deck before it gets glued on. They have a 0.4mm slot in their ends into which the Davits will fit - to trim out the inside portion of the slot I used a scalpel blade with a broken tip (I have quite a collection of them by now ) the end of which I sharpened with a wetstone into a tiny chisel point. Worked fine : Next I glued the Flying Deck on : Then I glued in the Deck Supports : Danny
.JPG.9427e039ccc97bf88eb6f182e03ca6e2.JPG)
.JPG.e07c842ecceda68940d2eb8f9d47fe20.JPG)
.JPG.0fb324e4108cb256fb914132ab9df13b.JPG)
.JPG.06c8d607d4232d65ec2bfa8ac4b23dd8.JPG)
- 193 replies
-
- 15
-
-
- cerberus
- paper shipwright
- (and 1 more)