


Dan Vadas
-
Posts
3,261 -
Joined
-
Last visited
Content Type
Profiles
Forums
Gallery
Events
Everything posted by Dan Vadas
-
Thank you Popeye. NOW she's FINISHED . The base and Nameplate were the last things to do : Danny
.JPG.c0c79fe75c8e4764759dfd6c7fff6254.JPG)
.JPG.c3c76f4a21c86396f3d70ad30187a78f.JPG)
.JPG.526fb7f9f1811be817a6ecde97baa801.JPG)
.JPG.b5ae8dfa7049cb6c8c02e7ab52337cca.JPG)
- 193 replies
-
- 17
-

-
- cerberus
- paper shipwright
- (and 1 more)
-
Thanks CDW, but I've already got enough models coming to do me for the next 4 or 5 years (at least ). Thanks for the kind words. Thank you John. Maybe if it was modelled on how she looks TODAY, but this is modelled in 1870 . Danny
- 193 replies
-
- 5
-
-
- cerberus
- paper shipwright
- (and 1 more)
-
Thanks Vossie and Slog . My excuse is that she's only doing 5 knots - or whatever speed it takes to make the water look like that . Yeah, that's been my problem all week - and I've run out of things to do . Me either - it's my first real go at making a sea . Danny
- 193 replies
-
- 7
-
-
- cerberus
- paper shipwright
- (and 1 more)
-
That should do the job . Danny
-
New member from North Sydney Australia
Dan Vadas replied to Fernando E's topic in New member Introductions
G'day Fernando, The "Norfolk" turns into a nice little model straight from the box. I kit-bashed mine, but that's just me - I can't help myself . Have fun building her. Danny -
I think you have put the Bowsprit on way too early, it'll get in the way of fitting out the hull. Or is it just sitting there without glue? Danny
-
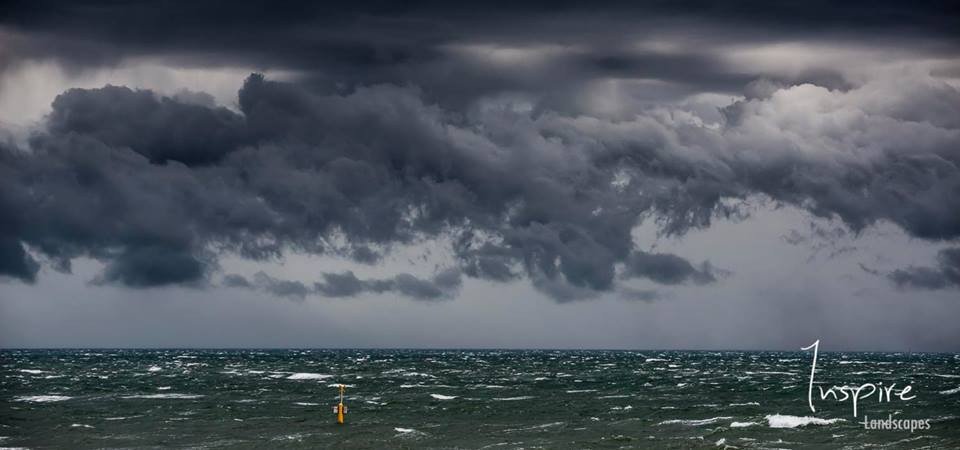
To paint the sea I used Acrylics, colours of Black,White, Sage and Warm Blue. Here's a pic of Port Phillip Bay with a storm approaching. I tried to finish up with a similar coloured water : As a base colour I mixed the blue, a touch of black and some sage and brushed on two coats : Next I used blue + sage and painted the wash and highlighted the swell, leaving some of the darker base coat in the "forward" areas of each swell. When this coat dried I used just sage to highlight it even more : I slipped my awl under the paper in a few places to raise the wash and swell where it hits the hull, and injected some PVA under the paper to make it keep it's shape : Finally I added white froth and bubbles : What do you all think of it? I'd like some opinions before I go any further. I will be painting it all with clear gloss before fitting the ship to the base. Danny
.JPG.fa4615d1a02960403875517e44388d9e.JPG)
.JPG.2bfe6b97e3229cdf62131f0e8bb50f6f.JPG)
.JPG.4eff488a9ef697527c0c312ae9c96e1e.JPG)
.JPG.c3245e430a9c678cfef5b96ef4231763.JPG)
.JPG.db93f4875ccf21f8bb609c650bd03279.JPG)
.JPG.c0ab49fdef4786eff5501263b279a952.JPG)
.JPG.e91884ec023577157e5bbef875eb2b8d.JPG)
.JPG.c069d2fd0c3f94a7b693d11c33d7956e.JPG)
- 193 replies
-
- 12
-
-
- cerberus
- paper shipwright
- (and 1 more)
-
Thanks Grant, me too . It's a lot easier than rigging a 3-master Pav . I'm constructing the Base. I used some thick scrap card for the sea, and glued pine strips around the edge to support it. These will be covered with strips of Tasmanian Oak when I've finished the sea : Next I glued some paper to the card and pushed toothpicks under them to simulate a swell and the bow wash. I pulled the toothpicks out before the glue set, and painted the whole sea with 3 coats of diluted PVA : When the PVA dried I used a spare Hull Base to mark and cut out the shape of the hull. Then I tested the ship in the cutout and did a bit of final trimming : Next job will be the painting of the sea. Danny
.JPG.26c9e9666ac943e0a72ea2a6606e0528.JPG)
.JPG.100e3cd6b11e15c54c36d103f457191e.JPG)
.JPG.b87ac80f14b793bdbdde35ad183324cd.JPG)
.JPG.5b5b1547d72f5a988b35da4abcf2bcae.JPG)
.JPG.439877c95e5c0135f4f0e4766f45e206.JPG)
.JPG.f0e1a7a6f3c7001830c3180f7cb79289.JPG)
- 193 replies
-
- 11
-
-
- cerberus
- paper shipwright
- (and 1 more)
-
Excellent work Jeff, I'm glad it all turned out OK . That looks like pretty good Isopropyl - 70%. My usual one is only 50% but it still does the job. For really stubborn glue I have a bottle of 100% which I bought from a Pharmacy ($15.00 for 100ml ). Danny
-
Thanks Vossie, but not in this lifetime . Well, I don't have much else to do at the moment Michael . Thanks Slog, I pretty much owe it to you that I actually STARTED this model. Thanks for all your help. I can't wait to start Amatsukaze . Thank you for your help too Chris. I'll try not to let the side down . Danny
- 193 replies
-
- 5
-
-
- cerberus
- paper shipwright
- (and 1 more)
-
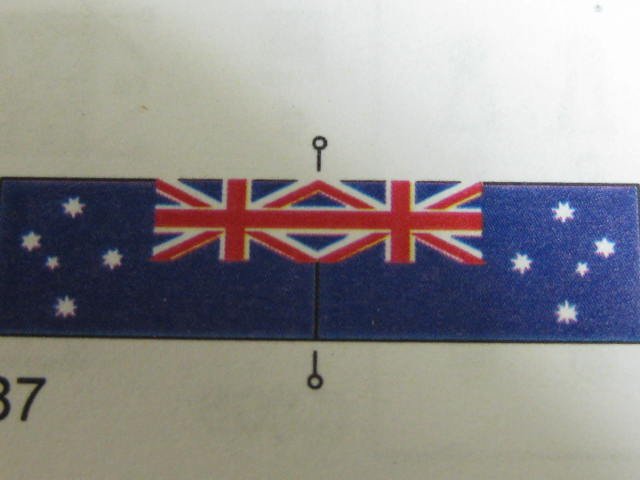
The Masts are rigged : The Flags and Flagpoles have been made and fitted. I had some concerns about the "Australian" flag (which wasn't formally adopted until 1954) until I looked a little closer and did a little research. It's actually the VICTORIAN flag of 1870, and it seems that it was created because of THIS VERY SHIP , as mentioned in the article (Cerberus being Victoria's first warship). Kudos for some excellent research by Paper Shipwright, it even has the correct amounts of points on the stars and they face the right direction : And ...... she's FINISHED . The only thing left to do is make the Base for the model : Danny
.JPG.b778c6abfec68d61ca26a1caaa33a84c.JPG)
.JPG.7fb95a07cbb289ab07fcbe7921826985.JPG)
.JPG.5351acfed4a5e9d35b02dd5913c6d62d.JPG)
.JPG.dabd1162aa8c44af11176cdf89624b26.JPG)
.JPG.25e62c3c9aa958076350931a151c8818.JPG)
.JPG.514d864261bafca8e899620f03c8a5ad.JPG)
.JPG.5ec2c3ab7b3070dc977c44a13fbb410a.JPG)
.JPG.074aea09088674eb447edc6399611d7e.JPG)
- 193 replies
-
- 19
-
-
- cerberus
- paper shipwright
- (and 1 more)
-
New member from North Sydney Australia
Dan Vadas replied to Fernando E's topic in New member Introductions
Another Welcome from up the M1 . Danny -
Thanks Paul, John and Pat. Third-last job before she's finished - Rigging the Masts (a bit easier than doing a "Victory" ). I taped the first mast to a board to keep it stable while I glued the rigging lines to it : Then I taped the lines to the mast and glued the lines to it in their correct positions : After trimming the excess off above where the paper Band will go I rolled the band : Then I glued it around the mast, holding all the lines to it. None should become detached now. The join in the band is at the top in this pic - almost invisible : The mast glued to the ship ready to tie off the lines at the previously fitted eyebolts : Danny
.JPG.9d97757df516ab64f3b026eed6508720.JPG)
.JPG.c4919dc33b905bafac1cf75759707e6f.JPG)
.JPG.25f4df1ee1bdbd7f1730f87ce0836e47.JPG)
.JPG.68d4e369dd0400ce36d589fec63141eb.JPG)
.JPG.610288cdc335ea0831af7ee1714c1723.JPG)
.JPG.070045a119c02bfe8847ed4de8bcca79.JPG)
- 193 replies
-
- 12
-
-
- cerberus
- paper shipwright
- (and 1 more)
-
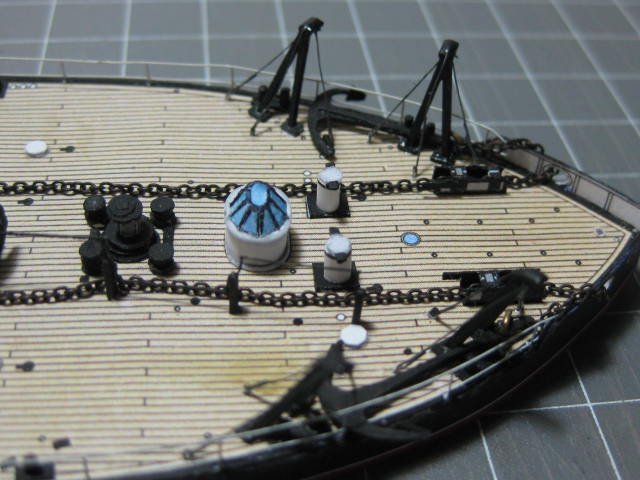
All the Anchor Cranes are now rigged : So are all the Boats. It took me a few days, but they've turned out OK : Danny
.JPG.4d8c64b4d17c4323a54e4273656a115d.JPG)
.JPG.59c34ab7c113c5d6212aca1cdbfca2b4.JPG)
.JPG.d0cbdcc45ee6b564813edc4b92b904ea.JPG)
.JPG.228bcbc4f5a7b0cb93979eb69203fc1e.JPG)
- 193 replies
-
- 14
-
-
- cerberus
- paper shipwright
- (and 1 more)
-
G'day mate . Have you seen THIS thread? I agree with what you said above . The second post in the thread applies particularly to your own problem with the bulkhead. Danny
-
No way Slog - I'll have enough trouble keeping track of all the parts for ONE kit, let alone two . Though I will be using (I think it was your idea, maybe Chris's) of using a clear plastic Folder to keep the parts in. I see. My apologies to GPM then . That makes sense, as I don't think Paypal would reimburse the difference. Danny
- 193 replies
-
- 5
-
-
- cerberus
- paper shipwright
- (and 1 more)
-
Lucky you living in the US. The postage to Australia for a GPM Bismarck with accessories would have been $AU97.00 for a $AU180.00 model if I'd have bought from GPM in Poland. I got lucky and bought one (with the same accessories or more) from maaaslo that he didn't think he'd ever get around to starting. He worked out the postage from UK to Australia at around GBP18.00, or about $AU30.00. That's a lot more realistic. Methinks some of the Card Model manufacturers are boosting their profits by pocketing most of the shipping cost . Danny
- 193 replies
-
- 7
-
-
- cerberus
- paper shipwright
- (and 1 more)
-
Been there, done that Greg. I STARTED in plastic when I was 10 years old. I made hundreds of ships, planes, cars and trains . My first model was a tiny Sopwith Camel that cost all of 5 cents and only had about 10 parts . Danny
- 193 replies
-
- 7
-
-
- cerberus
- paper shipwright
- (and 1 more)
-
That's it exactly. The last 5 or 6 pages are printed in 3D, you need the glasses to see the effect otherwise they just look like blurry pictures. The rest of the book is normal 2D - the whole lot are rendered CAD, amazingly life-like. Danny
- 193 replies
-
- 4
-
-
- cerberus
- paper shipwright
- (and 1 more)
-
I've already bought a 1:200 GPM Bismarck off maaaslo (Pav). It'll be coming in a few weeks, along with a heap of PE, turned Gun Barrels and Laser cut stuff that he's getting for me from GPM. I've also got the IJN Amatsukaze winging it's way here from Halinski as we speak . Thanks anyway Christian. Danny
- 193 replies
-
- 6
-
-
- cerberus
- paper shipwright
- (and 1 more)
-
You probably get different brands to the ones we have in Australia. I use Fuller's MaxBond which is fairly thick and dries a bit faster than some others, but any other brand would probably work just as well. What brands have you seen in your hardware store? Danny
-
Wowser, you weren't wrong about the 3D book - it's amazing . It's like being on the actual ship, or at the least on a brilliant 1:4 scale model of Bismarck . It arrived today . Danny
.JPG.97680f25fb9a217115ad7e4960084f35.JPG)
.JPG.5351bcabfb84ac50eedd1664ea18861b.JPG)
- 193 replies
-
- 7
-
-
- cerberus
- paper shipwright
- (and 1 more)
-
Here's the trial of the first of my brass eyebolts. It was easier to get through the hole than the fishing line one. It's in a cow of a spot, right next to a Deck Support : I trimmed off most of the tails, spread them flat and wiped on a bit of Roket from underneath : Final bit of the trial was to make sure I could still get the line through it easily enough - no worries . This means that I can now finish the line at the eyebolt rather than on the mast, which would have been more difficult as there are either 6 or 7 lines all finishing under a paper band (later). My thinking is that the brass ones will be the way to go, especially if I find my roll of 0.15mm wire instead of using 0.15mm square railing scraps : Danny
.JPG.469023e148e3b55a559b3dd213f3845d.JPG)
.JPG.2bdc5eb1fa0595f71115a4f65bc00cfd.JPG)
.JPG.22454091d9ed5a26fa8e15af3f5a012c.JPG)
.JPG.237c6e2aa68b25da812abcb36008d8e8.JPG)
- 193 replies
-
- 14
-
-
- cerberus
- paper shipwright
- (and 1 more)
-
Only up to a point Pat, but it takes acrylic paint a lot better than larger line (maybe because it's braided?). It doesn't take too well to a lot of handling, especially if you have to bend it. I touch-up the line when I've finished fitting it, and there's no more problems . Danny
- 193 replies
-
- 3
-
-
- cerberus
- paper shipwright
- (and 1 more)