


Dan Vadas
-
Posts
3,261 -
Joined
-
Last visited
Content Type
Profiles
Forums
Gallery
Events
Everything posted by Dan Vadas
-
Recommendations For A Good Milling Machine
Dan Vadas replied to Thistle17's topic in Modeling tools and Workshop Equipment
I agree. I have both and use them rather than tilting the head. Danny -
I'd decided to get all the under-water bits done before starting on the decks, as they would have been very difficult to do later on. I started with the Propellor Shafts and Housings. The shafts themselves are rolled around 0.8mm wire, which I left in for extra strength : Next came the Bearing Housings. These are made of three parts. I cut a slight bevel into the adjoining edges so they meet with no (or very little ) gap. To get a really strong join I glued a piece of thin paper to the inside and rolled the piece around the appropriate size drill bit. Not only is the join stronger, it also dries a lot quicker too. Masking tape holds it together while it dries. I'll be doing all my tubes in similar fashion wherever possible : To make the cone on the forward end I sanded a dowel to the correct angle and taped the piece to it. This made handling the tiny piece easier, if not actually possible. Once again there is a piece of paper on the inside of the join : On the aft end is a small disc. I punched out the 2mm centre hole with my new "toy" : The forward housings took the longest to make as they had to follow the shape of the hull plates in both directions. I cut them slightly over-size and, after gluing together complete with reinforcing strips, sanded them down to match the hull : The completed assemblies. The support legs are at the top of the pic : Danny
.thumb.JPG.2a9dfe972e466bdcf6b60e395dcbec91.JPG)
.thumb.JPG.8f4ef7d573465bf282112496136d0317.JPG)
.thumb.JPG.d9b2d6e177550613a9b5cbd63e92473e.JPG)
.thumb.JPG.7e1a1d474f25d9e485cf205e4f8de063.JPG)
.thumb.JPG.8a8678ce7654c71c5146e9381407fdf2.JPG)
.thumb.JPG.d00ce8dcf85943190933fe32ebf079e6.JPG)
.thumb.JPG.d5083cf58f5d380a5d052f0228f79b0c.JPG)
.thumb.JPG.f93c78ef4b114246060081af2bcb5a87.JPG)
.thumb.JPG.9675709eef37266a93950f44846f7f3a.JPG)
- 295 replies
-
- 14
-

-
- amatsukaze
- halinski
- (and 2 more)
-
Recommendations For A Good Milling Machine
Dan Vadas replied to Thistle17's topic in Modeling tools and Workshop Equipment
I have the Sherline 8-axis mill and wouldn't buy one again - I'm talking about the "8-axis" part. Since buying the Mill 10 years ago I've never used the extra axes. Save your money and buy the standard Sherline 3-axis one. It'll do anything you will need, and if you REALLY need to go to the 8th Dimension you can buy all the parts needed to convert it at a later date (although it will cost more of course). Otherwise, I love my Sherline . Danny -
That looks a whole lot better Toni. I was rather concerned that you were going to leave them the way they were - the angle they were on would have spoilt the whole look of the bow. Neat trick on laminating the extra timber, even the camera doesn't pick it up . Danny
-
Don't beat yourself up about the slightly peckish bovines Slog - they'll be forgotten by the time all the deck furniture goes on . She's looking really good, and I'm sure the standard will continue. For future reference, here's a LINK to a build on Paper Modellers in case you haven't seen it before. It's a lot of work, but virtually foolproof to avoid the "cows". You can see the whole build by clicking the Link in the upper-right corner. Their Software is hopelessly out-dated I'm afraid . Danny
- 244 replies
-
- 4
-
-
- borodino
- dom bumagi
- (and 1 more)
-
Carl, you don't need a jig if you have four hands and can sit perfectly still for 10 minutes while the glue sets . Danny
- 295 replies
-
- 9
-
-
- amatsukaze
- halinski
- (and 2 more)
-
Great, Jeff . One last tip with using the pen - always use it from the BOTTOM edge of the plank (before you glue it on) in case you slip and leave a black mark on the top. It dries almost instantly and is a little difficult to remove although any small slip-ups will disappear when you sand the whole deck. You only need to do ONE edge of each plank, that saves using too much of the pen which isn't cheap - about twice the price of "normal" felt-tip pens. Oh yeah, and don't forget to do the Butt Joins as well . Danny
-
Hah, that's nearly exactly what I did , and I also used a Q-tip dipped in Acetone to go over each one when the paint was almost dry. This took a little of the paint off, allowing some of the original to show through, and taking all the shine off it as well. I've finished the red touch-up, masked the grey (which I haven't touched up yet) and gave the hull two coats of Testor's Dullcote. The difference is extraordinary - you really have to look hard to see any of the touch-ups. The only ones that stand out a little bit are a couple that I'd done with a slightly darker shade of red near the stern. I'm more than happy with the result . I've fitted the Bilge Keels. I had to think a bit on a way of holding them in position and came up with the following. There is a thin printed line to follow, so I used some Tamiya tape to make it easier to see as it would have been hidden once the keel went on : Next I shaped a strip of balsa to follow the curvature and taped it to the hull : I taped and clamped the keel to the balsa strip and ran a bead of glue on the edge closest to the centre of the ship so it won't be seen when the ship is the right way up : The finished job. You can see the touch-ups on the gaps (or not ) : Danny
.thumb.JPG.11ca2fe50d99f4fa91cb72d1705489ac.JPG)
.thumb.JPG.24c771c27375c6ef372c58c6c4a9a07f.JPG)
.thumb.JPG.d3c866c2a90e1b0529547ec1a5e7e5a7.JPG)
.thumb.JPG.28e9d68d0840241ea92e63ec8a0ba54d.JPG)
.thumb.JPG.c611476fa4deb884b5ebd07107d11af3.JPG)
.thumb.JPG.61ee3cd8ea8380685215864d6beb43cc.JPG)
- 295 replies
-
- 22
-
-
- amatsukaze
- halinski
- (and 2 more)
-
Ah, found you at last John . An interesting little ship, and with a significant history to you as well. I look forward to an update when you're ready. Danny
-
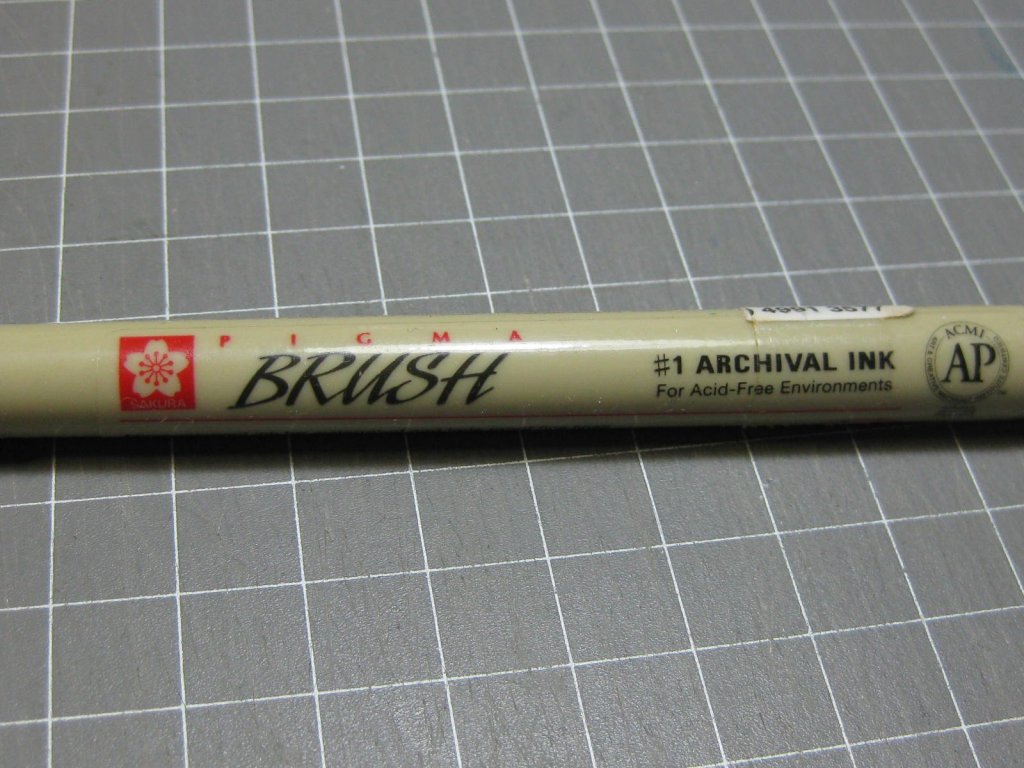
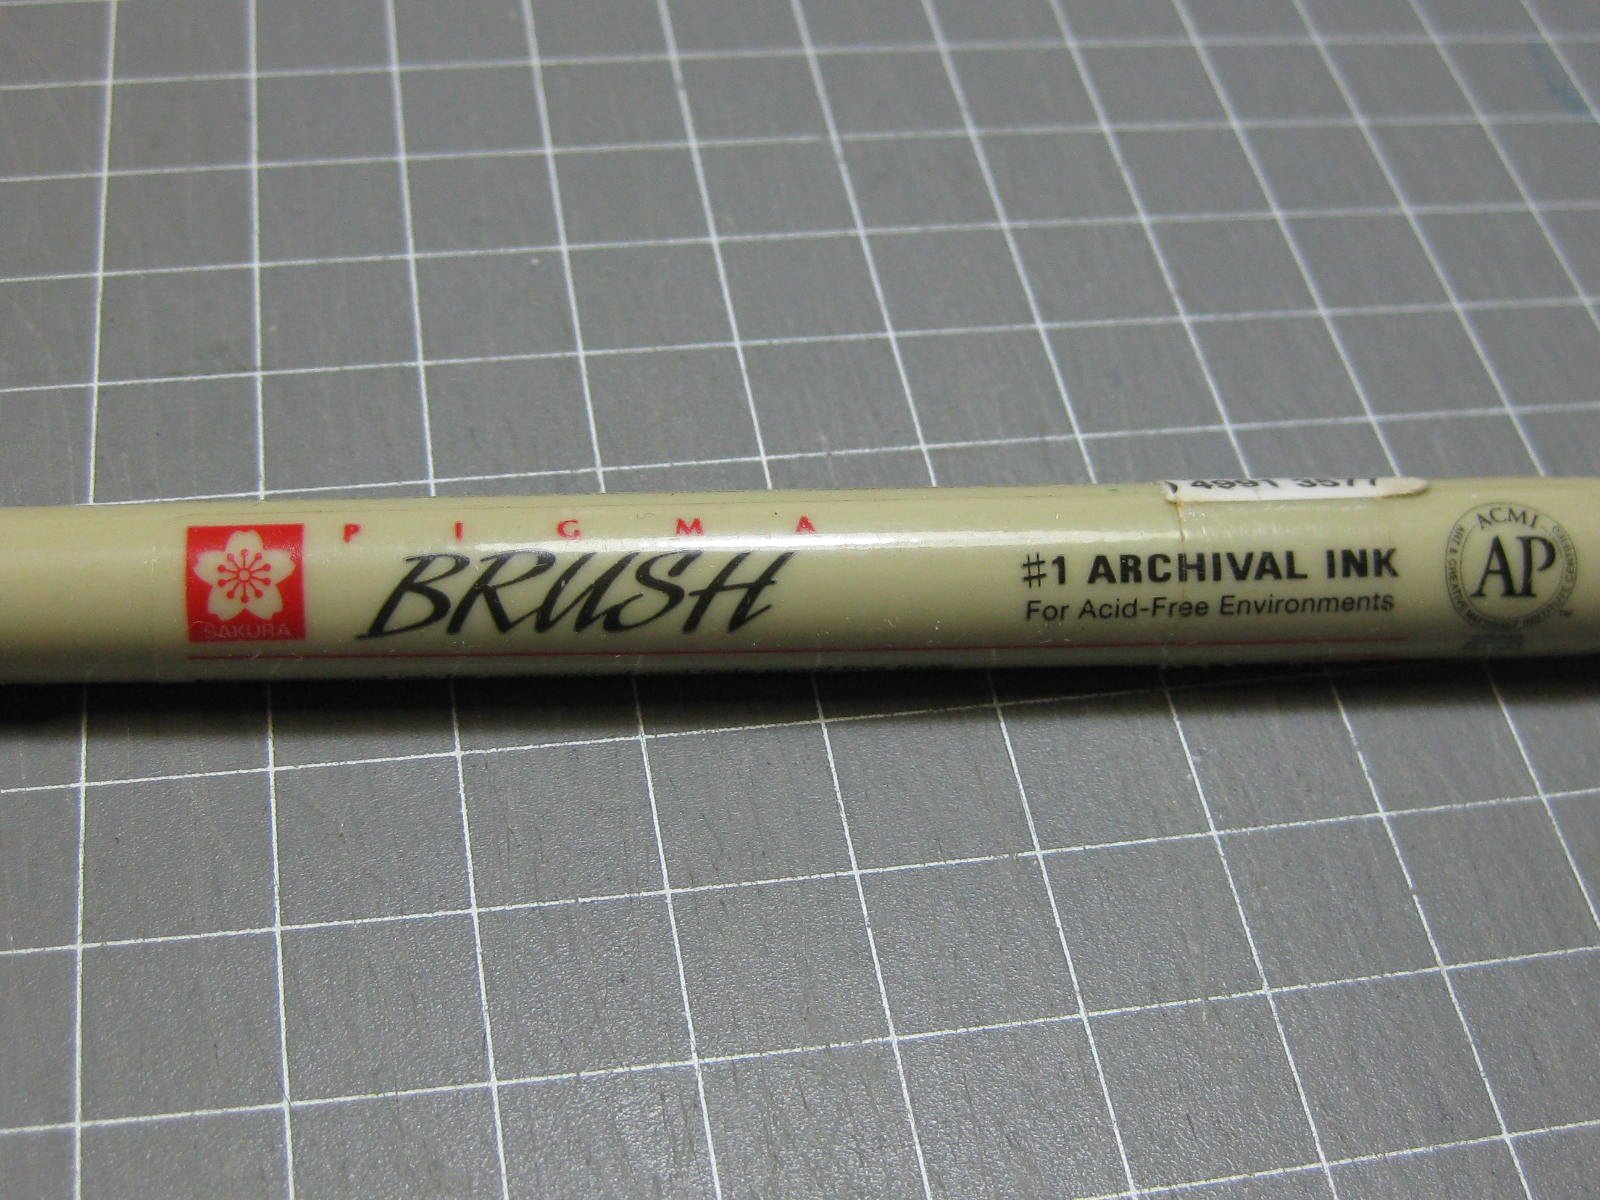
Jeff, there's a better way that comes out the same as using the black paper, but with the ease of using the pencil. I use one of these pens - note the "Archival Ink" - they don't bleed into timber like a normal felt pen and are acid free. They are made by Pigma and are available from Art Supplies stores or on-line. A tip - get the "Brush" type and use the SIDE of the tip to apply the ink : Check out the deck planking on one of my models done with the pen. Danny
-
Thanks Popeye and John. It's just the same as a wooden model John ..... no it's not . BTW - I haven't noticed if you are currently building anything. Anything happening? I haven't gone back to the gray yet Popeye. I'll finish off all the red first and then have another go at it. I think it needs a bit more white, I added 35% white and a touch of Yellow Ochre to the red and it's very close now . Close enough for me to be happy with it anyway . Danny
- 295 replies
-
- 5
-
-
- amatsukaze
- halinski
- (and 2 more)
-
And thank you for dropping in again CDW . Chris, I realise all that about the "perceived" colours in the printing - I've been staring at them through a 3.5x magnifier for nearly a week now . The printed pixel colours actually change as they approach the edge of a sheet, ending in an almost black which was the cut line that I had to cut outside of to make sure I wasn't short . It was a case of "damned if I do or damned if I don't" - either leave the gaps, or fill them and touch-up. I chose the latter, so we'll have to wait and see if I made a good choice . Danny
- 295 replies
-
- 7
-
-
- amatsukaze
- halinski
- (and 2 more)
-
Thank you Pat, Pav and Carl . Pav, I spent a full day Fairing the hull - it was spot-on according to the laser-cut frames. Most of the gaps were the result of a slight miscalculation of the placement of the very first skins. They should have been 1mm further aft. The gaps between the grey and red sheets came from some sloppy cutting on the first few skins . I improved the cutting later on. I've filled all the gaps, they have turned out rather well. The pics below show the sequence of my method. Because the putty dried so quickly I needed to thin it with Acetone to make it workable. I did some testing to see if the acetone would damage the printing - I found that if I worked quickly enough it would flash off before it could get to the print. I applied the putty with a toothpick, pushing it into the gap rather than trying to spread it to minimise the width of the filling. It looks lumpy and bumpy because it is : Next I carefully scraped off the majority of it with a narrow chisel : Then I used a Q-tip dipped in Acetone to remove the rest of the excess. Here's a finished gap : There were quite a few to fill. I probably could have gotten away with doing about half as many, but they were easy enough to do once I started : And the hull all filled and ready for touch-up paint : Danny
.thumb.JPG.ac53afa325904c48bd7c405f593acef2.JPG)
.thumb.JPG.6badc50e95fe73d57b7720bd7f5c03a2.JPG)
.thumb.JPG.62f94daaecb408d34a14a03947dcd2c0.JPG)
.thumb.JPG.c5ab5c49dc5cb20f82e7f78e5e768892.JPG)
.thumb.JPG.8a6ae6cca0a1d0f863703e170421ba58.JPG)
- 295 replies
-
- 18
-
-
- amatsukaze
- halinski
- (and 2 more)
-
Thanks Pav. I did indeed experience a few more gaps, but I think I have worked out the cause of every one of them and it will stand me in good stead for when I do Bismarck's hull . Speaking of hulls - I've finished skinning this one . It isn't the best job I've seen, but it's by no means the worst either . A bit of "Starving Cow" overall, but at least it's reasonably even in that regard. Halinski give you absolutely NO margin for error in the fit of the sheets - I cut each one EXACTLY as printed, but still managed to get a few small gaps. It was a good lesson for future card builds. Here are some pics of the completed hull : The starving cow is not as pronounced as the pics indicate. I used a rounded piece of Castello on each join to press the cut edges down after the glue dried. This leaves a shiny mark which brings up the effect of a ridge where in fact the join is flat. The shininess will disappear later when I spray the hull with matte nitrocellulose lacquer. According to the instructions sheet #29, the last to be fitted in the mid-section, should have been a touch long and would need trimming to fit. Guess what - it was a touch SHORT and will need a bit of filler : I bought a tube of Testors Plastic Filler (the model shop didn't carry Tamiya filler ) and tried it out on a test piece to see how hard it would be to use. Not too bad, although it dries VERY quickly and will need to be done in very small lengths at a time : Here's a bit I tried on the hull. It takes watercolour very well and shouldn't be a problem to paint : Danny
.thumb.JPG.d3eaaf3ca3228f28571c9224eeac3d20.JPG)
.thumb.JPG.1a2f35b71eb682d7f719b477143111a3.JPG)
.thumb.JPG.2b6bf5e90f7a71f96a07e4b7d3583731.JPG)
.thumb.JPG.2282462d58a730b3c2e4bf9de62b54aa.JPG)
.thumb.JPG.ea7898b9e94a183616d9da325ad3b092.JPG)
.thumb.JPG.ed5a1dde2a9eb1c00ae17309acc78391.JPG)
.thumb.JPG.5378890072006e9131a8b75aa72c153e.JPG)
.thumb.JPG.1bbd1a73f65104f9453e03582db2c1f8.JPG)
- 295 replies
-
- 21
-
-
- amatsukaze
- halinski
- (and 2 more)
-
Congratulations on a great looking runabout Grant. Your skills have definitely hit a new high - the steering wheel blew me away, among many other things . Danny
- 339 replies
-
- 6
-
-
- dumas
- Chris-Craft
- (and 3 more)
-
Lower Hull skins continued. No major problems, the stern ones were actually quite easy. The thin strip between the two forward ones actually took me longer to do than the two with the wild curves : The "gaps between the sheets are actually invisible - it's just a trick of the lights coupled with the macro lens that make them appear rather large . I still have a little bit of work to do on the "peak", once the glue dries properly. Danny
.thumb.JPG.da65c388a2287e99513a5b260f84ed01.JPG)
.thumb.JPG.65055a6deffc159982a74dee57778cd0.JPG)
.thumb.JPG.d1f92318181edb1371c860b924da0440.JPG)
- 295 replies
-
- 18
-
-
- amatsukaze
- halinski
- (and 2 more)
-
Thanks Slog . I do have a little bit of "Starving Cow" on the grey panels, probably due to over-handling. I have to get used to not handling a Card model like I could a wooden one . A lighter grip is needed. I'll only be using the Tamiya Putty to fill a few little gaps between skins on 90 degree corners, not on any flat areas. Sanding that will be easy enough, if I even need to at all. I've used Tamiya putty in the past, it's quite easy to sand. I have no problem with the Tamiya tape - I use a blunt awl to get under the end of the tape where the serrated edge is left from the dispenser (it doesn't stick down hard on the end). I gave the printed sheets two coats of Nitrocellulose Lacquer before I started any cutting. The surface of the paper is as hard as concrete (I exaggerate a little ) and doesn't mark or tear at all. The tape always lifts off with no damage (I did some testing before I started using it). I highly recommend using the lacquer on any Card model - I didn't on Cerberus and had a lot of problems with the tape pulling off the black printing. In past years I painted quite a few (real) cars, so I've had a lot of experience with removing masking tape , but thanks for the advice anyway. Danny
- 295 replies
-
- 8
-
-
- amatsukaze
- halinski
- (and 2 more)
-
I've started fitting the lower Hull Skins, beginning at the bow. The first one was a little tricky, but it finished up fairly good with only a slight bulge on each where I had to make a small cut (as per instructions). The second one was easy, I only had to sand 0.3mm off the front of the keel end to get it to fit perfectly . No touchup has been done yet. I'll get a tube of Tamiya Putty tomorrow : Notice the pattern printed into the red underwater skins. I guess it is supposed to represent barnacles and rust, I think it looks a lot better than plain red . I've taped some thin foam to the decks to protect them while I'm working upside-down. Danny
.thumb.JPG.72fd86b2cc20ea6ce42cf94a65257f3c.JPG)
.thumb.JPG.955aab969366f46b8fe7cee214bebabc.JPG)
.thumb.JPG.7d367443e52661ca963272bb6d29d7aa.JPG)
- 295 replies
-
- 19
-
-
- amatsukaze
- halinski
- (and 2 more)
-
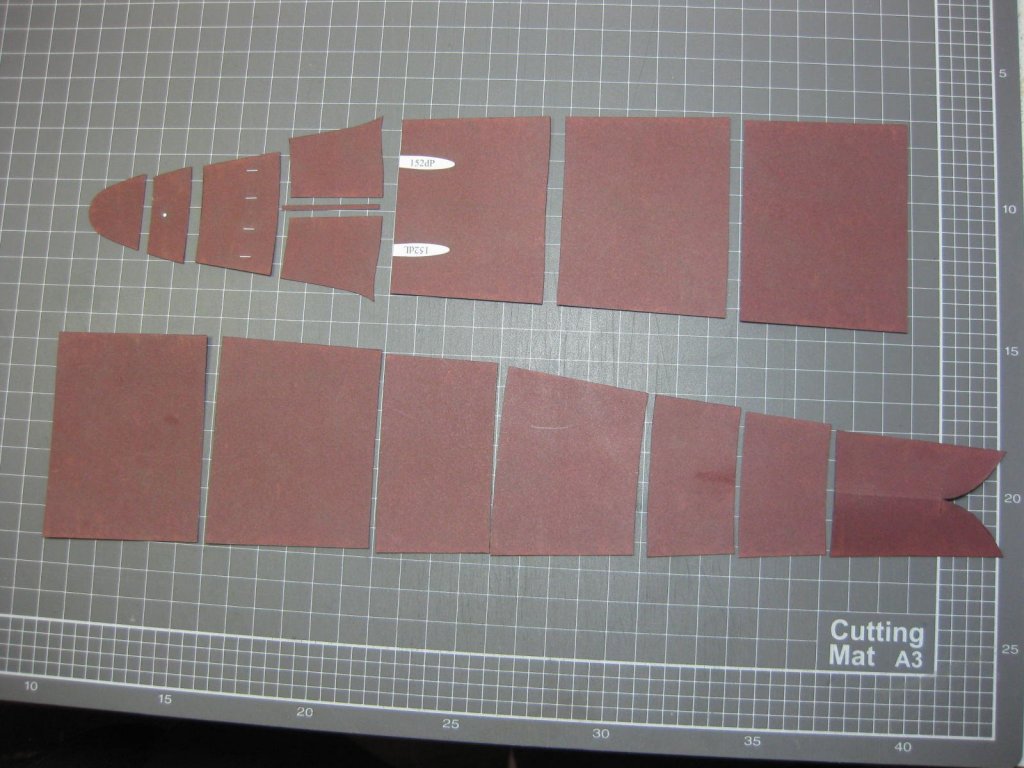
I've spent most of today cutting and edge painting all the lower hull panels. 10 of the sheets are straight on the port/starboard edges, but every other edge has a curve of some description which takes a while to cut accurately. None of the fore/aft edges are perfectly straight. To paint the edges I used a 50/50 mix of Crimson and Burnt Umber, which is as close to perfect as anyone could wish . Next job is fitting them, starting from the bow and stern and working toward the middle from both ends. If there is a slight anomaly in their lengths I can adjust it on the last sheet : Danny
- 295 replies
-
- 16
-
-
- amatsukaze
- halinski
- (and 2 more)
-
Slog, it cuts so cleanly that you can actually make 0.5mm discs from the plugs, not just holes. The first pic is a closeup of the 0.6mm holes in the 0.27mm thick deck - it's the largest one : Here are two 0.5mm holes in 80gsm copier paper. A disc is on the right : I can highly recommend the punch set. About the only drawback would be the width of paper you can put in it, but it'll probably do any part in a 1:200 ship. Here's the Link to the place in Melbourne I got it from. And a Link to the manufacturer. Danny
.thumb.JPG.2f3d995a6c1dceff248c9c60f7548ae0.JPG)
.thumb.JPG.c92d1562684d5426f3084c7d9994875d.JPG)
- 295 replies
-
- 11
-
-
- amatsukaze
- halinski
- (and 2 more)
-
Thanks John and Pat. Some new tools came yesterday, including a precision hole punch set. The set can make perfect holes from 0.5mm to 2.0mm in 0.1mm increments. Here's a pic of the set, using the punch and the results in one of the decks (the view is from the back side) : I could only use the set for 3 of the holes, the largest ones at 0.6mm. The others are 3 x 0.4mm done with a micro-drill, and 4 x 0.2mm done with a sharp needle. Danny
.thumb.JPG.6cde77ee585574c0e6075fbaf4103e90.JPG)
.thumb.JPG.6135a07fb8fc253e0c6991a6b4a3aab1.JPG)
.thumb.JPG.7044389c4a092ca74387cd92a6bd2f0b.JPG)
- 295 replies
-
- 15
-
-
- amatsukaze
- halinski
- (and 2 more)
-
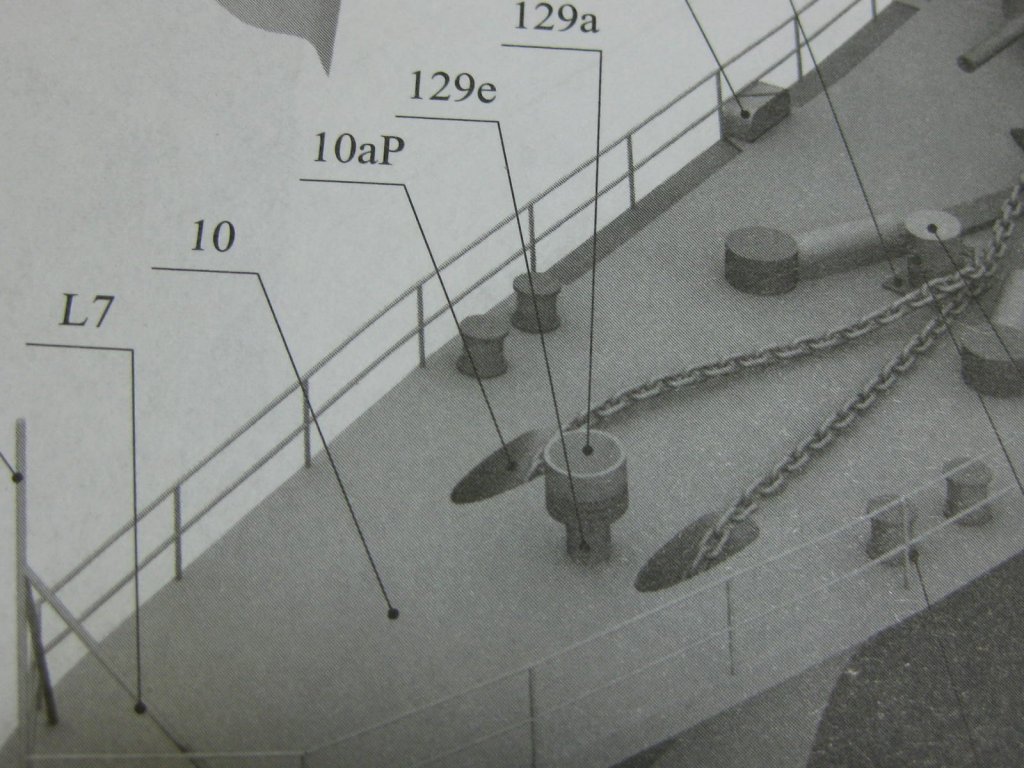
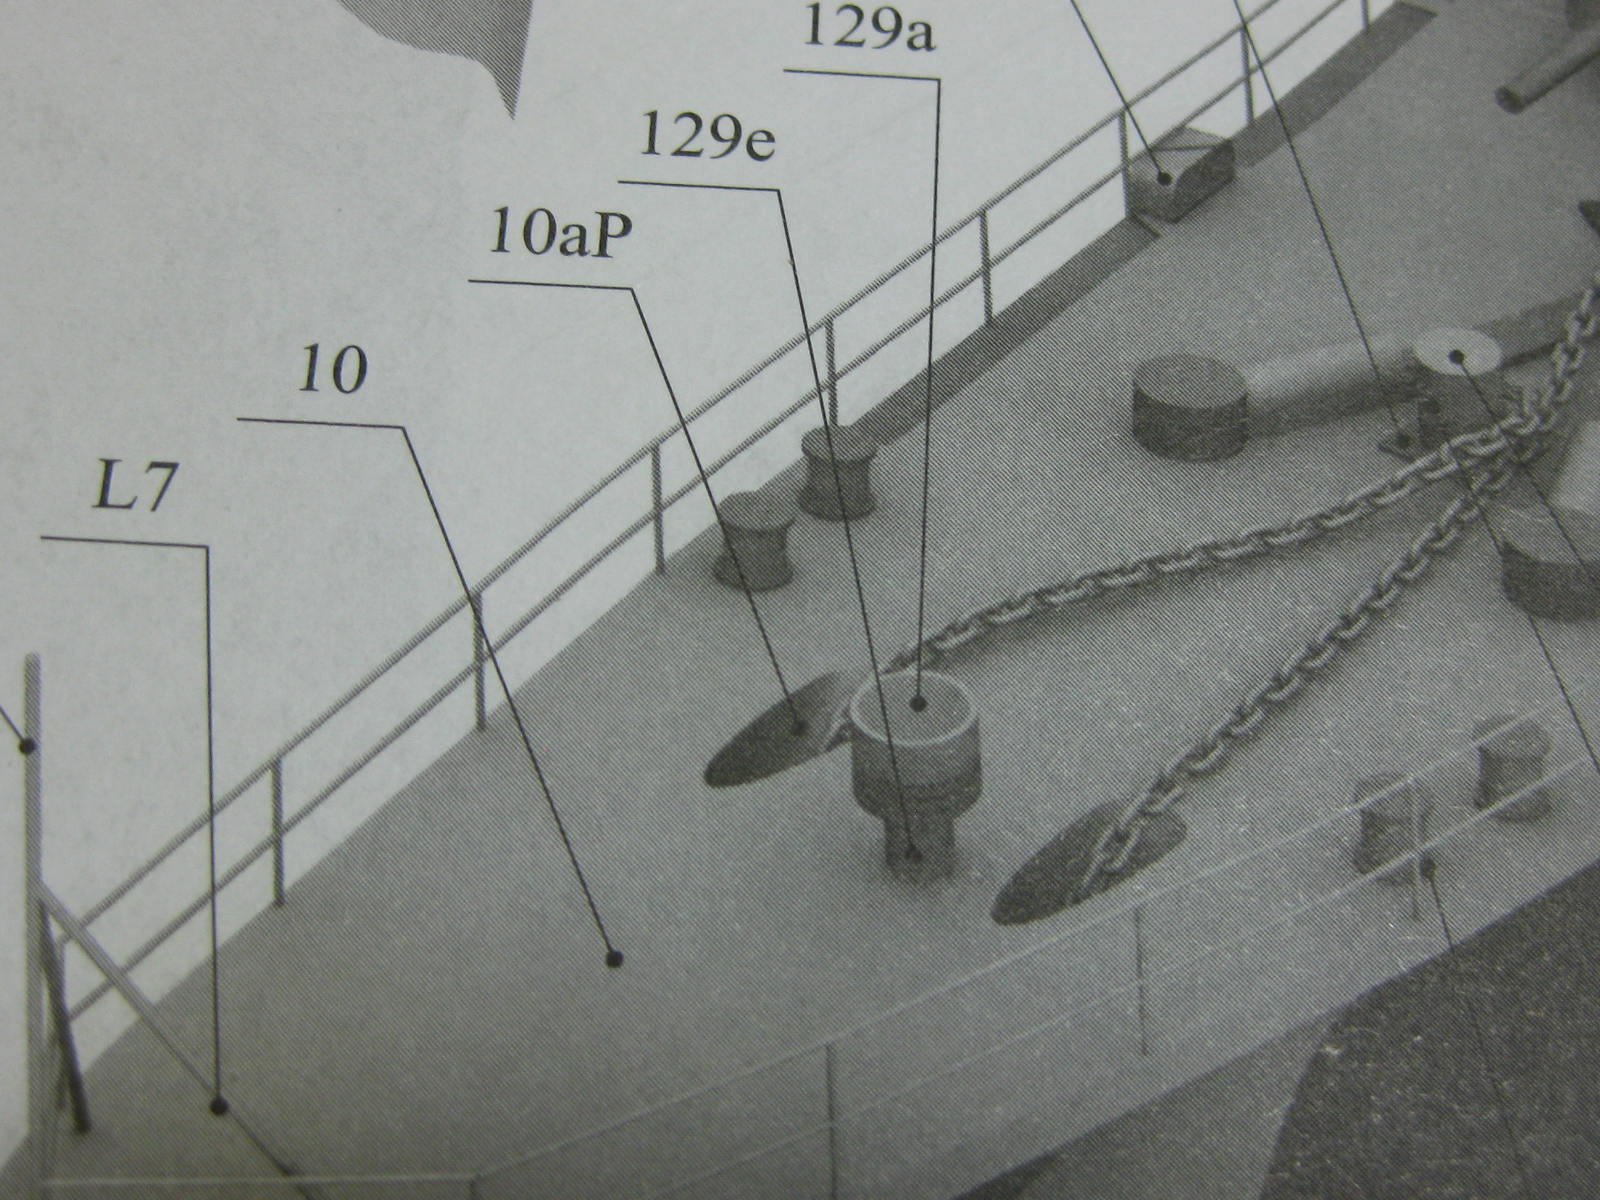
Moving on from that debacle . Part numbers 10aP and 10aL were a weird shape. All I had to go on were a rendered photo of the forecastle deck and the instructions were a little vague (to put it mildly ) : Here's part 10aP (the letters "L" and "P" are "Left" and Right"). Part 10aL is the rolled cone to it's left : And here they are fitted to the false deck. I found it much easier to glue the pieces into this deck than to try gluing it under the proper deck, though it was a bit scary - if I'd have dropped one into the hull it would have been there to stay : The Forecastle Deck glued in with the Hawse "Funnels" in place : Danny
.thumb.JPG.db0e6342c70be745dcf639da1e639e24.JPG)
.thumb.JPG.e3ac677cd0b160ae9b2471d96d3f8cdb.JPG)
.thumb.JPG.40cbd70869e2b5abdbdbbb66a3560352.JPG)
.thumb.JPG.de43245c17a746c3633209338a0a5fea.JPG)
.thumb.JPG.67c0d42e9f40704e682da21cfc6eb3b7.JPG)
- 295 replies
-
- 21
-
-
- amatsukaze
- halinski
- (and 2 more)
-
Thanks Popeye and CDW. Thanks Slog . In regard to that botched job on the bow I've come up with a cunning plan : I'll change the date that I'm presenting Amatsukaze and claim the fault lies with the dockyard workers . They did, and I followed instructions. That's what I'm whining about . I've been doing that wherever possible. There was a fair bit of printing damaged in the bow section which needed touching up, I can probably tidy up the (watercolour) painting before the final coat of matte clear. It's nowhere near as obvious to the naked eye . Danny
- 295 replies
-
- 8
-
-
- amatsukaze
- halinski
- (and 2 more)
-
Apart from the re-do on the small bow piece I've skinned the upper part of the hull. It all fitted well, apart from ........ ....... where the sides met the already fitted front skins on both sides : I cut a couple of thin strips of spare card and glued them into the gaps. Pretty good, if I say so myself : I had a feeling I was going to have a problem with this. The point of the bow was a bit long and needed trimming back about the same amount as the width of the gaps. If the instructions would have said to skin from the stern to the bow instead of vice-versa this would have been avoided. It was a bit difficult working out exactly where to align the first two skins I fitted, and apparently I got it wrong. Danny
.thumb.JPG.aa3b561e071cec7358d4bedf436a7f65.JPG)
.thumb.JPG.e1ae65f1d33e5f30ee5c29b70cc3e916.JPG)
.thumb.JPG.647c9d65cc212337d9190848547f3d05.JPG)
.thumb.JPG.9418e8ee48d1c92d5c5be71436b38895.JPG)
.thumb.JPG.562d94668378204abd8616fdd2b62f16.JPG)
.thumb.JPG.861b45ed0062f4db3e900ec679601722.JPG)
- 295 replies
-
- 20
-
-
- amatsukaze
- halinski
- (and 2 more)
-
Vossie, I'm trying NOT to paint the hull if at all possible apart from the inevitable little touch-ups on the white edges. I'm still using this ship as a Learning Curve before starting Bismarck. I will however be using a substantial amount of PE for Railings, Stairs, Gratings, Radar Antennae etc as I regard that as a legitimate alternative which looks better than paper on those applications, and I'll be doing the same on Bismarck. The printed colours actually look fine to the naked eye - it's just the extreme close-up of the macro lens that brings up the pattern in it. Even with a 3.5x magnifier you can just barely make it out. They have printed a subtle amount of "weathering" and rust stains which looks quite good . The problem with that upper piece at the bow came from the extra filling I'd used underneath it - I guess I sanded a touch too much off it and didn't pick up on that until I actually glued the piece in and pressed it into place. The Craft Glue I'm using dries very quickly so I couldn't pull the piece back out to fix the problem until it was too late. I've decided to remove the small piece and make a new one. I'd thought of using something like Tamiya Putty to fill it, but I doubt it would do the job to my satisfaction (besides, I don't have any and can't get any until next week ). Danny
- 295 replies
-
- 9
-
-
- amatsukaze
- halinski
- (and 2 more)
.JPG.1940f537574d1333f7622b56bf93f1a1.JPG)
.JPG.fab26b827b70d29c8ec39998010d7198.JPG)
.JPG.3a3d02eab0a2b5956bc07a86ca9da649.JPG)
.JPG.90353932a206bc6625f5f74be92ae7f3.JPG)
.JPG.7c878caef552f31df97fcb3e969a97ef.JPG)
.JPG.7ab56d6b1a571cf59c16f92fdc04deb0.JPG)
.JPG.832597a3bb37d44e905fa0e5453a5ea0.JPG)
.JPG.938dcb910d01662d9355b99e6b0d4e35.JPG)
.JPG.3f4ef5745913d9d3d397eac71f81ab4f.JPG)
.JPG.3c345f09b0f91b7e925287e69c8a76ed.JPG)
.JPG.f1aec79d1dc0c83e2859ed27c38eb267.JPG)
.JPG.a63234c9608d14268dca59b33adb2a07.JPG)
.JPG.a35c95a3e130266869063379f8c04c30.JPG)
.JPG.3829e3996fd3d4245eef3d101ca14dcf.JPG)
.JPG.9edcad442a863a2f5f8c9ddd54fc43dd.JPG)
.JPG.7862c1a3d4bf80e5a78030f62a4475ab.JPG)
.JPG.ef4fc220a4c536e032d4f35d4b3e0155.JPG)
.JPG.5111bcb2bafa566cdbcd39a60bd5c0ff.JPG)
.JPG.c06a25f14cba40993d90b4dbc7e15802.JPG)
.JPG.58b4e55522f0dcc2b42b309306d80fbb.JPG)
.JPG.cb64acd1b68bd0cbda215d9c93ec4d76.JPG)
.JPG.5c67aaf14d9ca749dfa372952c31c4d4.JPG)
.JPG.d2925e8ca72b9b14f4c869d6792f8c07.JPG)
.JPG.ca352fcdc525c308a7a603bc690a1f85.JPG)
.JPG.03749392820e8ac5734fa7f15b4e931b.JPG)
.JPG.62ce76f29eda68e54d320d8468058f5e.JPG)
.JPG.9db9ac80aaba2270811e283d7f2d1a88.JPG)
.JPG.953a227479346a4c541bb76a0022d4cc.JPG)
.JPG.cde573fe6de752736984901c36c9fa04.JPG)
.JPG.0bbc37aab258928ca62497fc06426894.JPG)
.JPG.27237d1a7a0c28b94f789c6ac321780e.JPG)
.JPG.75053b597f68470b450d8042656b016d.JPG)
.JPG.0fe7e07e4922e5b1ab49d85ad4f39c46.JPG)
.JPG.cf29e898a479b92acfb0495e6425c879.JPG)

.JPG.f106be57b5ec95e266e4839281d37547.JPG)
.JPG.4f557d31abb4fd64c1ae487ff1e1a017.JPG)
.JPG.f2341ecefc63911b0691098371f02c21.JPG)
.JPG.d97776fd8891dc7abf38e05d74cffd4f.JPG)
.JPG.4300fdf04c23581a022f45797175c930.JPG)
.JPG.e3ea6817be51e1e8cd0445ddd5a483ff.JPG)
.JPG.51a83b3b8b67e052269292367510a551.JPG)
.JPG.08de9c17dd032f128283189ea6b2388c.JPG)
.JPG.908ede37bcdfef630f97d9a59379565a.JPG)
.JPG.537422d763afba871211b9e38ad22038.JPG)
.JPG.e31aa583bb7039a829d1a796a69f5fc1.JPG)
.JPG.05d8941410a12a33cd2123d45dfbd219.JPG)
.JPG.069faa2571c22d43a2a8d92e025b4720.JPG)
.JPG.d1a0fe7e2138678babad029c0107e8c5.JPG)
.JPG.70963a5d6b2d52f927b23c009fd04eaf.JPG)
.JPG.900518c24237f67afe2f5faa2f4920c3.JPG)