


Dan Vadas
-
Posts
3,261 -
Joined
-
Last visited
Content Type
Profiles
Forums
Gallery
Events
Everything posted by Dan Vadas
-
Harpin
Dan Vadas replied to piratepete007's topic in Building, Framing, Planking and plating a ships hull and deck
Hi Pete. Would THIS help? Scroll down to the following post as well for a look at Harpins and Ribands fitted to my model. Danny -
Fitting the Davits. After all my work earlier remaking the Davit Brackets to get the "fingers" on their ends right I finished up having to cut them off, because my Mk2 Davits were a fair bit wider and would no longer fit in the slots : The first 4 davits fitted to the starboard side. I think they will be a success . As you can see in the pics below I've also fitted the Breast Deck Railings : Danny
.JPG.41273f8cbf9e85faf09dda98b954a3d1.JPG)
.JPG.78aaeb513f29a297aea0385e9f5ea820.JPG)
.JPG.df7ac02e17c74333b3ca4411fa8a0b36.JPG)
- 193 replies
-
- 9
-

-
- cerberus
- paper shipwright
- (and 1 more)
-
Thank you Eddie . I bought a sheet of generic Railings in 1:250 scale which I painted before cutting anything off. These replace the awful printed kit railings : These are the smallest PE I've used to date, 0.15mm thick, and the railings are the same width. The piece of wire next to the offcut is 0.5mm, which looks huge in comparison : The railings have 3 bars, so I cut off the lower one. Then I marked and drilled 0.35mm (#80 which is my smallest drill bit) holes for the legs to go into. I've drilled all 3 decks, a job which would have been MUCH easier while the decks were off the ship but I only got the railings a couple of days ago. All the holes so far have lined up perfectly, which was a bit of a nice surprise . Another surprise was that the spacings for the posts nearly ALL fit each deck with a post right in the corner - what were the odds of THAT happening ? I'm quite happy with the way they've turned out so far, the job while fiddly is a bit easier than I was expecting. The hardest part is actually finding the holes : One deck down, two to go. Danny
.JPG.d068994bb4f82df93aab60e431d77591.JPG)
.JPG.5bbf5f38125b29771fda1762aae39fb3.JPG)
.JPG.764f94c17a7adc536b71e2bbfde48f8a.JPG)
.JPG.9827cc929f70ce42d4205d1b18bf2696.JPG)
.JPG.3fb50e621b487b3ec6be52ae93b0ca3d.JPG)
- 193 replies
-
- 13
-
-
- cerberus
- paper shipwright
- (and 1 more)
-
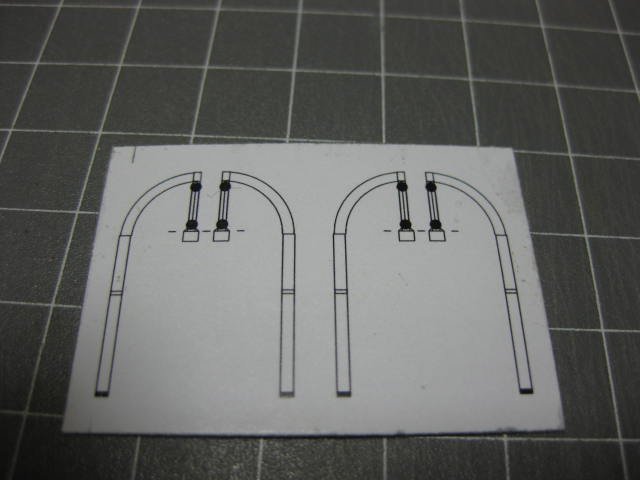
I've finished all the davits. They were a lot easier and turned out much better than trying to cut out the kit ones : I wasn't overly impressed with the kit's simple davit block and tackle arrangement, it looks a bit tacky. I'm going to rig the tackle "properly", so I've made "impressions" of blocks for the davits and also the boats. Here are the kit ones : And these are mine, complete with the "blocks". The holes in the blocks are #80 (0.35mm) : The "blocks" on one of the boats : Danny
.JPG.65cc8976695e9b2364eaf95cbe2c4517.JPG)
.JPG.4589790e69b71be5f2e8f80e3259023d.JPG)
- 193 replies
-
- 9
-
-
- cerberus
- paper shipwright
- (and 1 more)
-
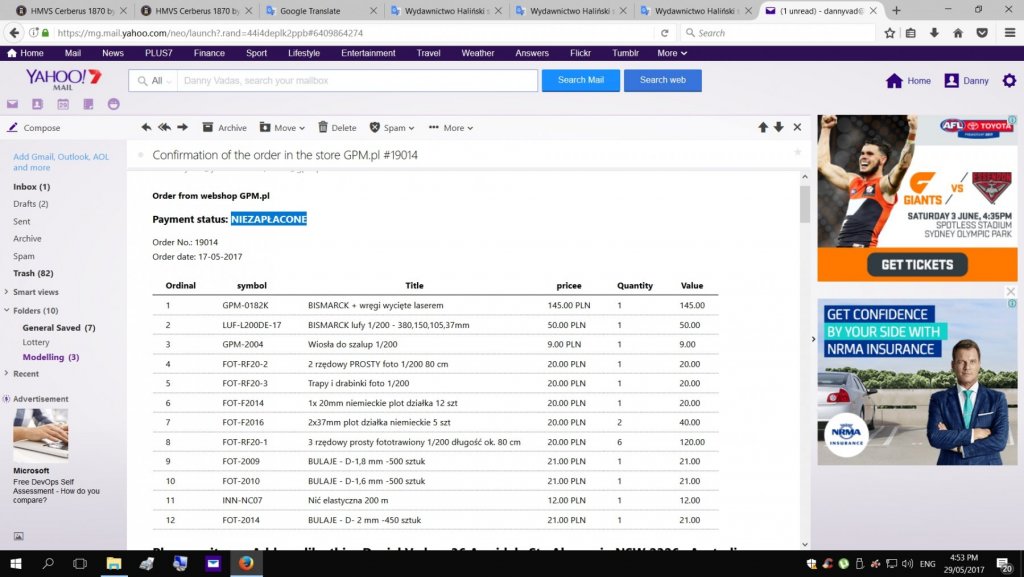
So was I Slog . I will shortly, but as you say I'm not going to hold my breath waiting for a reply. They sent an Order Confirmation. Where it says "Payment Status" (highlighted) it translates to "Not Paid", even though I did send the payment via Credit Card with the order : Danny
- 193 replies
-
- 2
-
-
- cerberus
- paper shipwright
- (and 1 more)
-
Well I've about had enough of trying to deal with GPM about my up-coming Bismarck. I put my order in for it on the 17th, checked my bank account and the transaction was marked as "Pending" for about 10 days, and then it disappeared altogether. The money never left my account, so I can only presume that the order won't be filled I've sent an Email to Halinski to see if they can do any better. On their Site the Bismarck is marked as "Out of Print" in one version, but on another page under "Wrapped Kits with Laser" it shows as being available. We'll see . Danny
- 193 replies
-
- 3
-
-
- cerberus
- paper shipwright
- (and 1 more)
-
John, it's mainly for letting the PVA dry which takes about half an hour before the piece no longer springs back. Once dry it holds it's shape beautifully. Danny
- 193 replies
-
- 2
-
-
- cerberus
- paper shipwright
- (and 1 more)
-
. You had me confused as well John. My Stagecoach didn't have the iron bands on the hubs. The idea of using Heat Shrink tubing on the wheel RIMS is still a valid one though . Well fancy that Mike. Small world . BTW John - don't throw away the scraps of the grey gasket material. If your kit was similar to mine you won't have enough of the square "nuts" to finish the job. I had to make about 20 or so by first drilling then cutting them out with a sharp blade. Danny
-
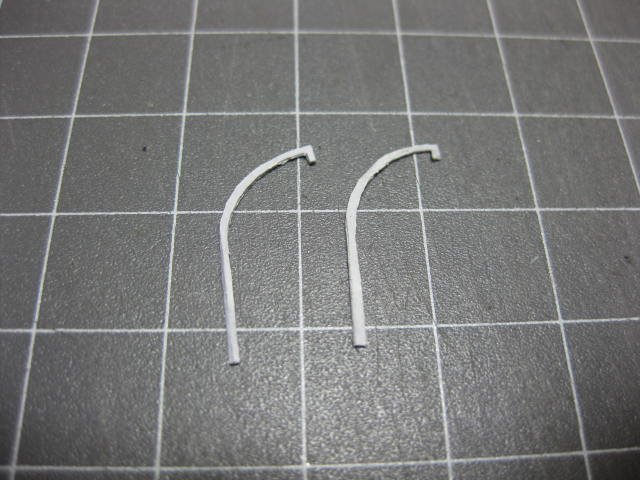
Thanks John. Cutting the seats out took a while, but well worth the effort. The flat printed interior looked very ordinary : All the boats completed and touched up with acrylic : I made the two Cranes as per the instructions, stiffening the doubled paper with CA and cutting them out. This operation took about 1.5 hours for the two. Despite my best efforts they didn't turn out perfectly but they are acceptable : I have 12 Davits to make which are similar to the cranes. I came up with a better idea of making them but still using paper. I laminated 3 strips together with PVA and placed them into a jig to dry. I'll trim them to size later. It only takes a couple of minutes to make one now : Danny
.JPG.1e4611102d5aa1b0b87ed8936095e92c.JPG)
.JPG.e99447343c3b197689b82c1f2bc9b9d3.JPG)
.JPG.e4546696c2e7ba81f1b9d111f56506cd.JPG)
.JPG.60a0f6d6313ee9d45c79a47bb15b7853.JPG)
- 193 replies
-
- 14
-
-
- cerberus
- paper shipwright
- (and 1 more)
-
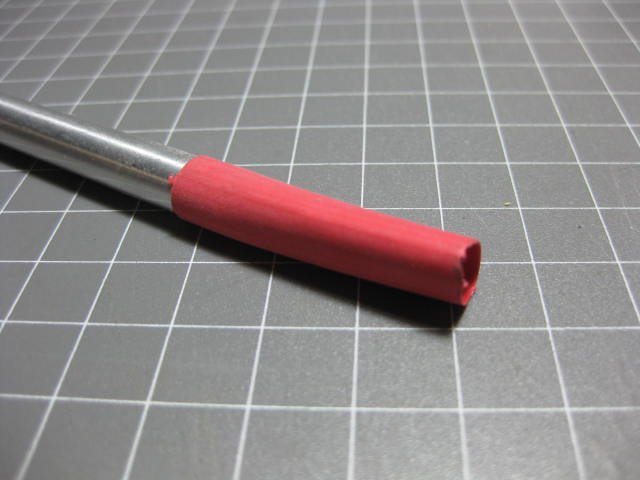
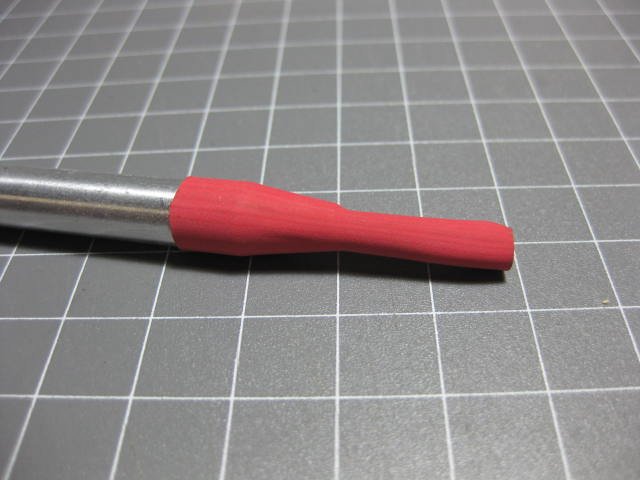
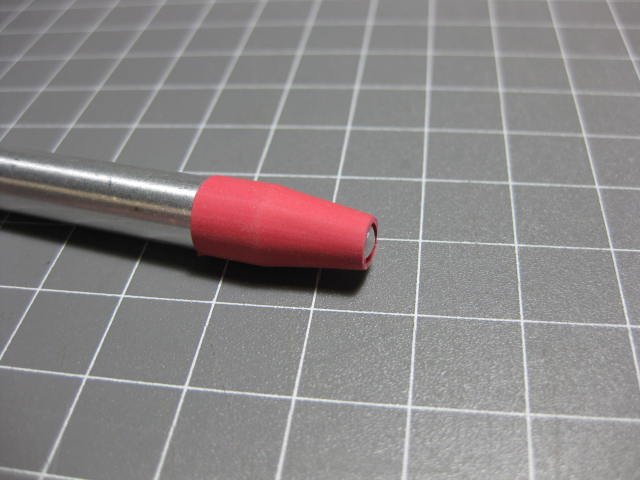
Mike, it's not Shrink WRAP, but HEAT Shrink. It's a special plastic tubing that shrinks when it's heated, usually by using a heat gun. Electricians (among others) use it for insulating soldered wires instead of using tape. Check out the pics where I used some on the tapered end of an Xacto handle : After using the heat gun : Trimmed off : John's tubing would have started out at about 4" diameter. A tube that size would shrink down to nearly 2". Danny

-
Hi John, great build so far . Top idea using Heat- Shrink for the axle rims. The stuff supplied worked well, but I had to be careful to cut the joins properly - you only get one go if it's too short . Couple of points : 1. You don't need to use CA for the gasket "nuts" - PVA holds them just fine, which is good if you need to remove them again for any reason (I did). A wipe with alcohol loosens them again. 2. Good move not fitting the wheels yet - they will probably be in the way when it comes to fitting the wagon body to the chassis. The Stagecoach body would have been near impossible to fit if the wheels were on. Danny
-
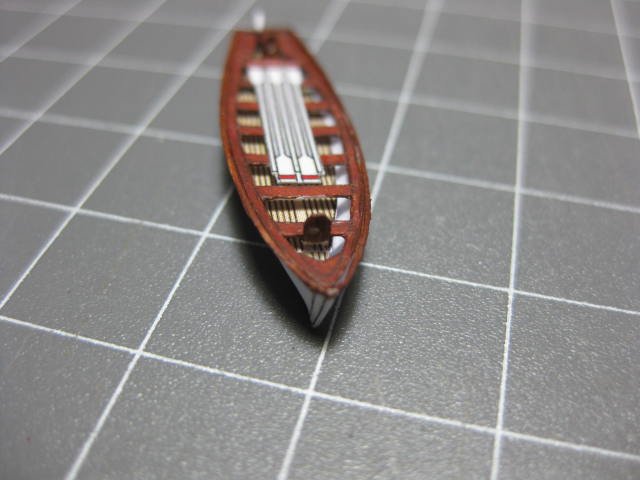
My first attempt at building a Ship's Boat turned out rather well. I had no idea how it would have to fold as the instructions told me NOTHING . I cut out the hull from a spare thin sheet and soon got the idea - very simple and a fairly good design . I made a work platform by carving out a piece of balsa to hold the very slippery customer : The completed boat. Only 5 more to go : Danny
.JPG.2cb17933b9928607eb16398e1ece944f.JPG)
.JPG.784481ed92e820dc9ab00423f55e6162.JPG)
.JPG.8131cf25222c3eb37db70621ef0e9c93.JPG)
.JPG.73ecceb9142572cc4ad661a0488b9c28.JPG)
.JPG.2e42eb39b0b21a32bb3766400e027cd1.JPG)

- 193 replies
-
- 17
-
-
- cerberus
- paper shipwright
- (and 1 more)
-
Don't stress about that gap Jeff. My guess is that the front part of the keel (called the "Knee of the Head") will go OVER the planking - the planking will bring the line further forward, closing the gap down. Everything will still need fairing, so the shape is going to change dramatically . Check which piece (if any) matches the plans and sand one or the other or both to match the plans. The Knee is thinner because the "false" keel and bulkheads are not to scale. They are only there as a support for the planking and aren't visible later on. Is the knee plywood or a solid piece of timber, because it tapers slightly in various directions which can be hard to do with ply as you may cut through the upper layers. See the post in THIS LINK for an explanation of the above. It depends on your level of expertise with planking. Experienced builders will cut a "Rabbet" into the keel in which to lay the ends of the planks. Novice plankers may find it easier to plank first and then attach the keel as it hides a "multitude of sins" .
-
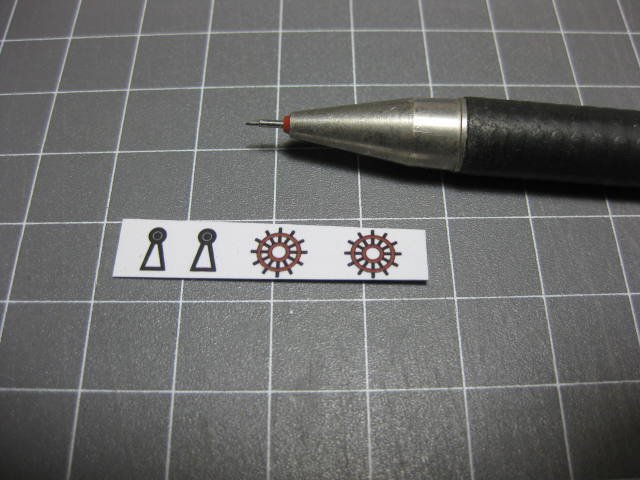
The madness continues . I've finished and fitted the Ship's Wheel. I did a "cheat" on the cutouts in the spokes by drilling them. To the eye they look fine, giving the "impression" of spokes. I could have spent more time rounding the ends of the spokes, but where do you stop? : What are the odds? Just as I was chopping out the waste between two of the spokes a fly flew up my nose. Arrrrgh . I cut a longer spoke for easier handling and CA'd it back on : The paper tube shaft is the smallest I've done so far, wrapped around a 0.4mm drill bit : Fitted to the ship : Danny
.JPG.31858e2297193091972581e9abe1548c.JPG)
.JPG.aac26f265ab8ad89956dc47a76a45a1c.JPG)
.JPG.87cad1e9714180a91ae95c37511198de.JPG)
.JPG.281e6bd430d464013f48ebdf4bf2c26b.JPG)
.JPG.50819f8a34523ba2f91e97f39d7aada4.JPG)

.JPG.aa470d926da4f6477e05a7c34a7e6ed2.JPG)
.JPG.a86f7b2c3f6ad5543e35a1fdf5f77d40.JPG)
.JPG.4c591bdc7e3d25344a950ab62f3aec0c.JPG)
.JPG.f064e221aea7351ac5328c0541dc860f.JPG)
- 193 replies
-
- 13
-
-
- cerberus
- paper shipwright
- (and 1 more)
-
Tools You Can't Live Without
Dan Vadas replied to Justin P.'s topic in Modeling tools and Workshop Equipment
I've bought one of them on Ebay, $AU20.83 with free postage . Eddie, I'll check the screws . Danny -
I think so, perhaps, but I won't be starting Bismarck until she's done. One at a time, and I always finish my models . Danny
- 193 replies
-
- 3
-
-
- cerberus
- paper shipwright
- (and 1 more)
-
Tools You Can't Live Without
Dan Vadas replied to Justin P.'s topic in Modeling tools and Workshop Equipment
Thanks Michael. The 3.5x @ 80-120mm is about half the distance from the job that my current ones work at. How easy is it to swap the lenses over? That's one good thing about my current one - you simply flip down the 2nd lens to double the magnification . I also found THIS ONE, a Chinese knock-off of the Donegan magnifier. Anyone else use it, and what do you think of it? Danny -
Tools You Can't Live Without
Dan Vadas replied to Justin P.'s topic in Modeling tools and Workshop Equipment
Xacto knife or scalpel, diamond tweezers and ........ number 1 - Headband Magnifier. It's the first thing I reach for when I sit down. I'm looking for a good one to replace my 10-year-old one - the lenses are getting past it, too many scratches. I'd prefer one with a 3rd lens that goes to 6x or 8x magnification - not that useless drop-down round one but an actual rectangular lens. It also doesn't need those equally useless lights - they don't do anything a good movable worklight can't do, and they get rather heavy after an hour or so. Any recommendations? Danny -
I think you're right John. Fortunately, I haven't had a drink in weeks - hundreds of cups of tea though . I reckon I might go through half a dozen blades - the CA has turned the paper into plastic . Danny
- 193 replies
-
- 6
-
-
- cerberus
- paper shipwright
- (and 1 more)
-
Good stuff, it's a ton of fun . We'll see just HOW MUCH fun after I've successfully (or not ) cut out the next part - the Ship's Wheel. Apart from the round centre, all the white sections will need to be cut out. The paper is doubled-over 160gsm. See you this evening with an update : Danny
- 193 replies
-
- 8
-
-
- cerberus
- paper shipwright
- (and 1 more)
-
Hi Pav, the GPM Bismarck (with all the extra PE sets etc) has already been ordered and paid for and is hopefully in transit somewhere between Poland and Australia . According to Slog it usually takes around two weeks for orders to arrive, so by the end of next week ....... Danny
- 193 replies
-
- 4
-
-
- cerberus
- paper shipwright
- (and 1 more)
-
That's odd, perhaps you need to look at your Notification settings in your Profile. I really don't know . Danny
-
Might be time to update my magnifying visor . Danny
- 193 replies
-
- 3
-
-
- cerberus
- paper shipwright
- (and 1 more)
-
Hi Martin, and welcome from Down Under . If you're looking specifically for Small Craft you can use the Search facility to bring up all those that the Builder has labelled in their Titles (a recommendation for the various types of either construction or type) by going to either the Kit Build Log page or the Scratchbuild Log page, typing "small" in the Search Bar, and then selecting the "Search only in Titles" option. This will bring up every Small Craft Log. Here's the LINK to the Scratchbuilt Small Craft Logs to save you the trouble. There are currently 66 Small Craft Logs in the Scratchbuilt Forum, and another 90 in the Kit Built Forum. Danny
-
Impressive Pav, but I won't be going there as my eyes and hands aren't what they used to be. Although, considering thickness, my Pumps weren't much bigger than those bits . THESE are the replacement Photo-Etch guns, courtesy of Captain Slog , the same as I'll be making. Danny
- 193 replies
-
- 3
-
-
- cerberus
- paper shipwright
- (and 1 more)
