MORE HANDBOOKS ARE ON THEIR WAY! We will let you know when they get here.
×
Richard Dunn
-
Posts
528 -
Joined
-
Last visited
Content Type
Profiles
Forums
Gallery
Events
Everything posted by Richard Dunn
-
 Progress Smokeroom area Glueblocks on joints Lid longitudinals ready

- 454 replies
-
- 6
-

-
- Union Steamship Company
- Stepcraft 840
- (and 3 more)
-
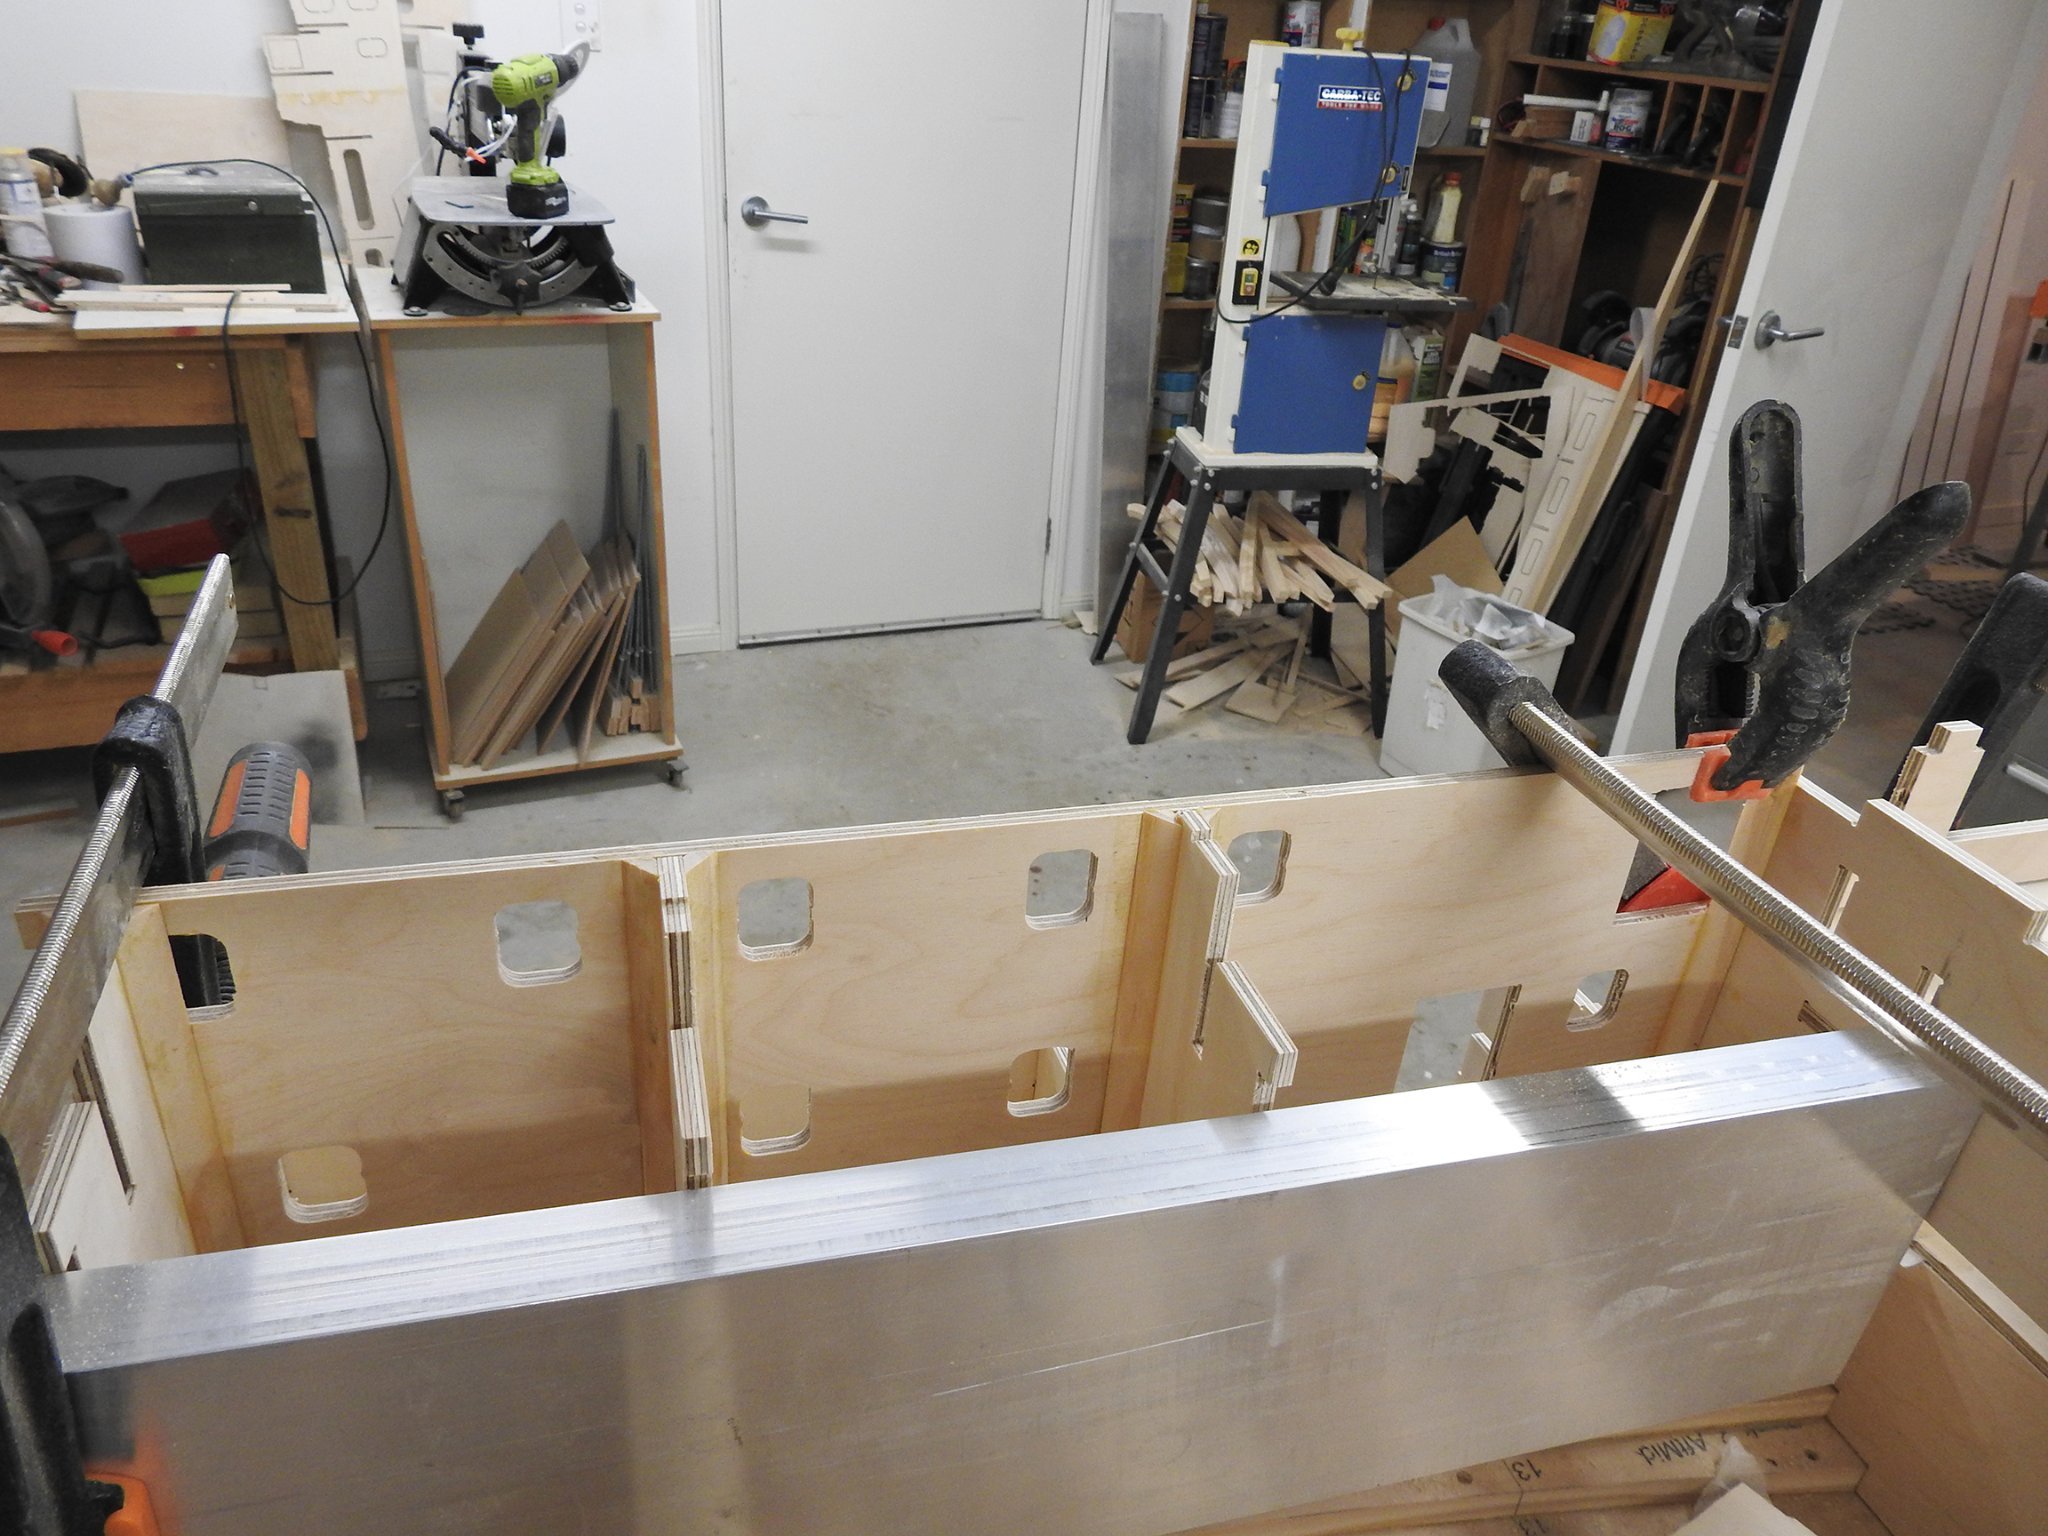
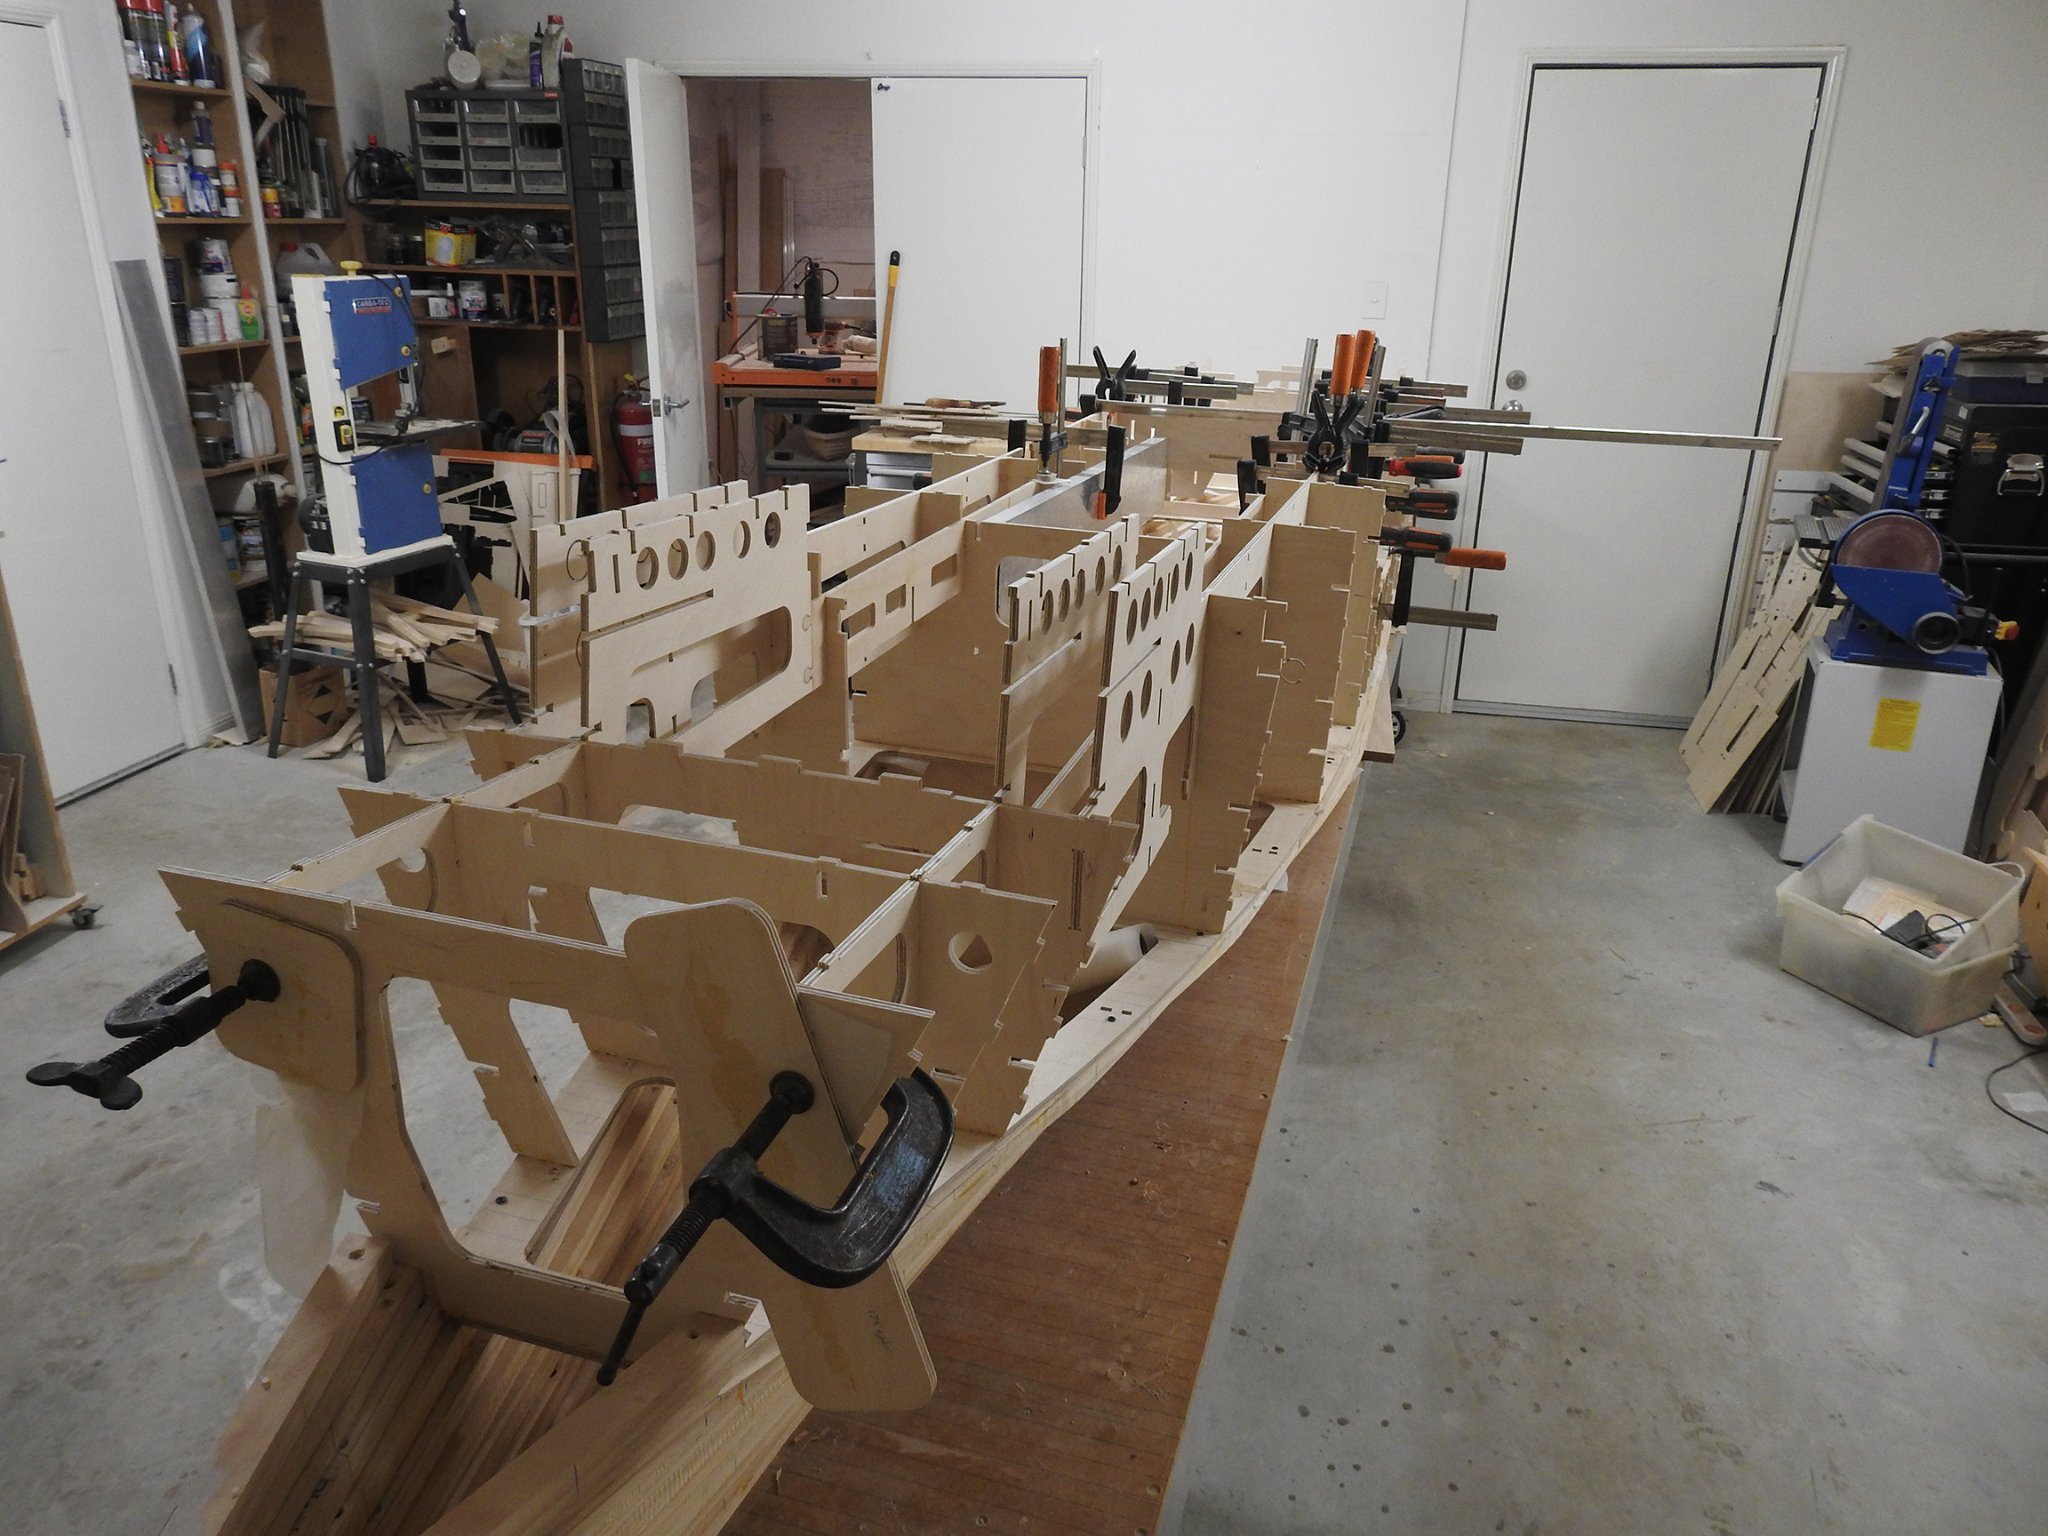
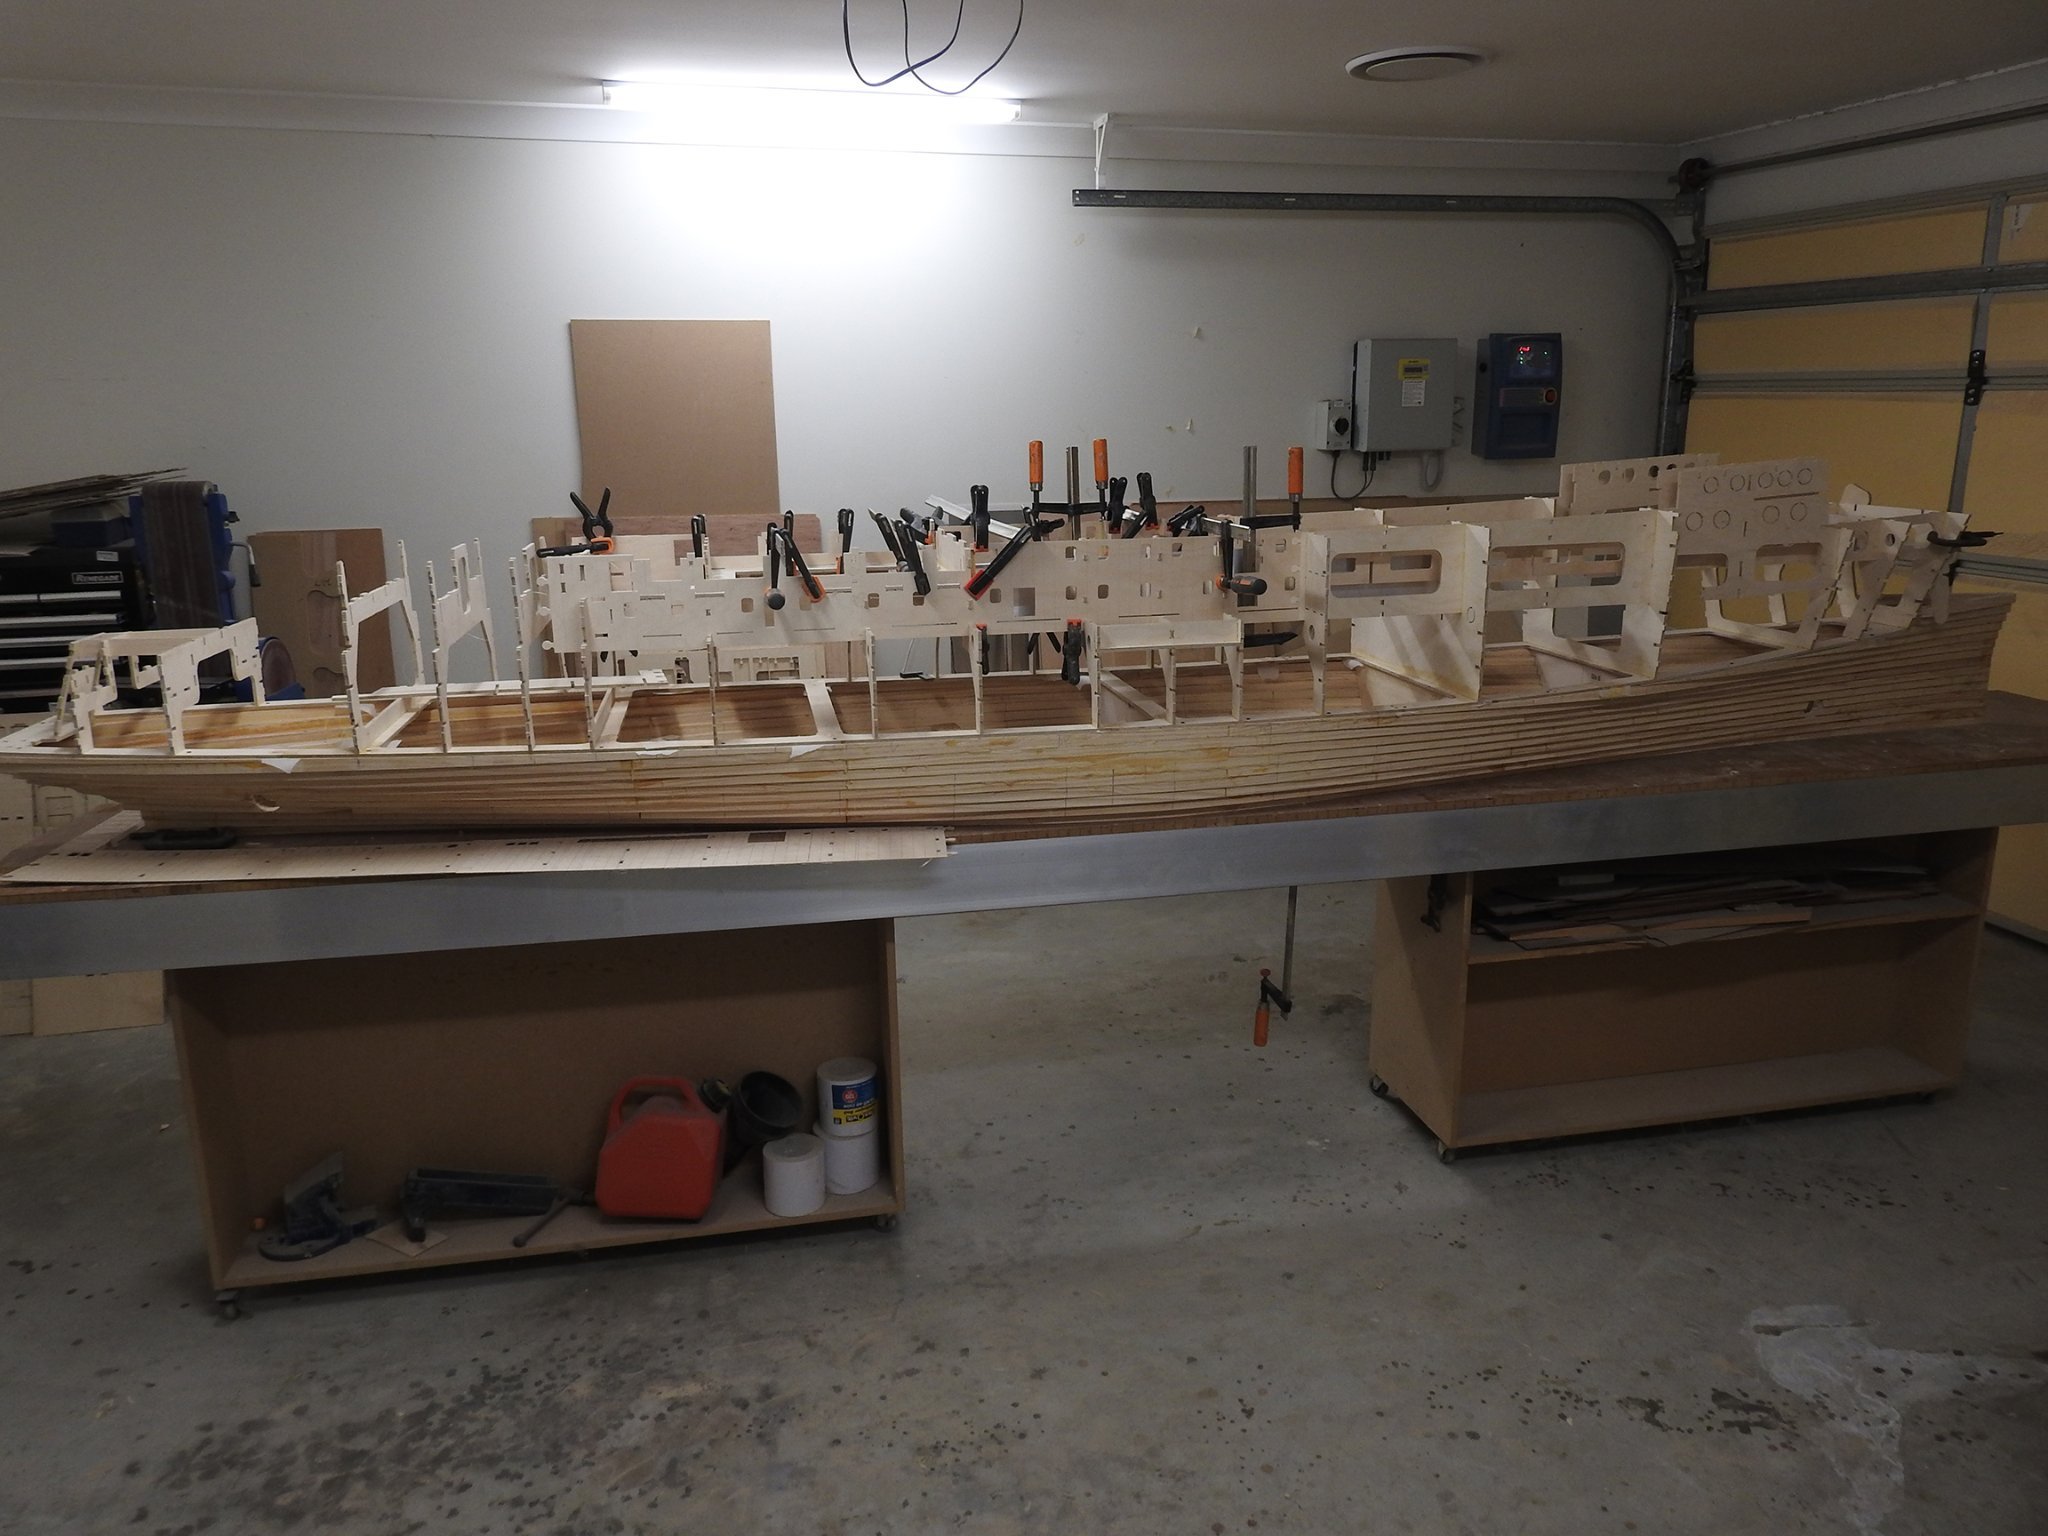
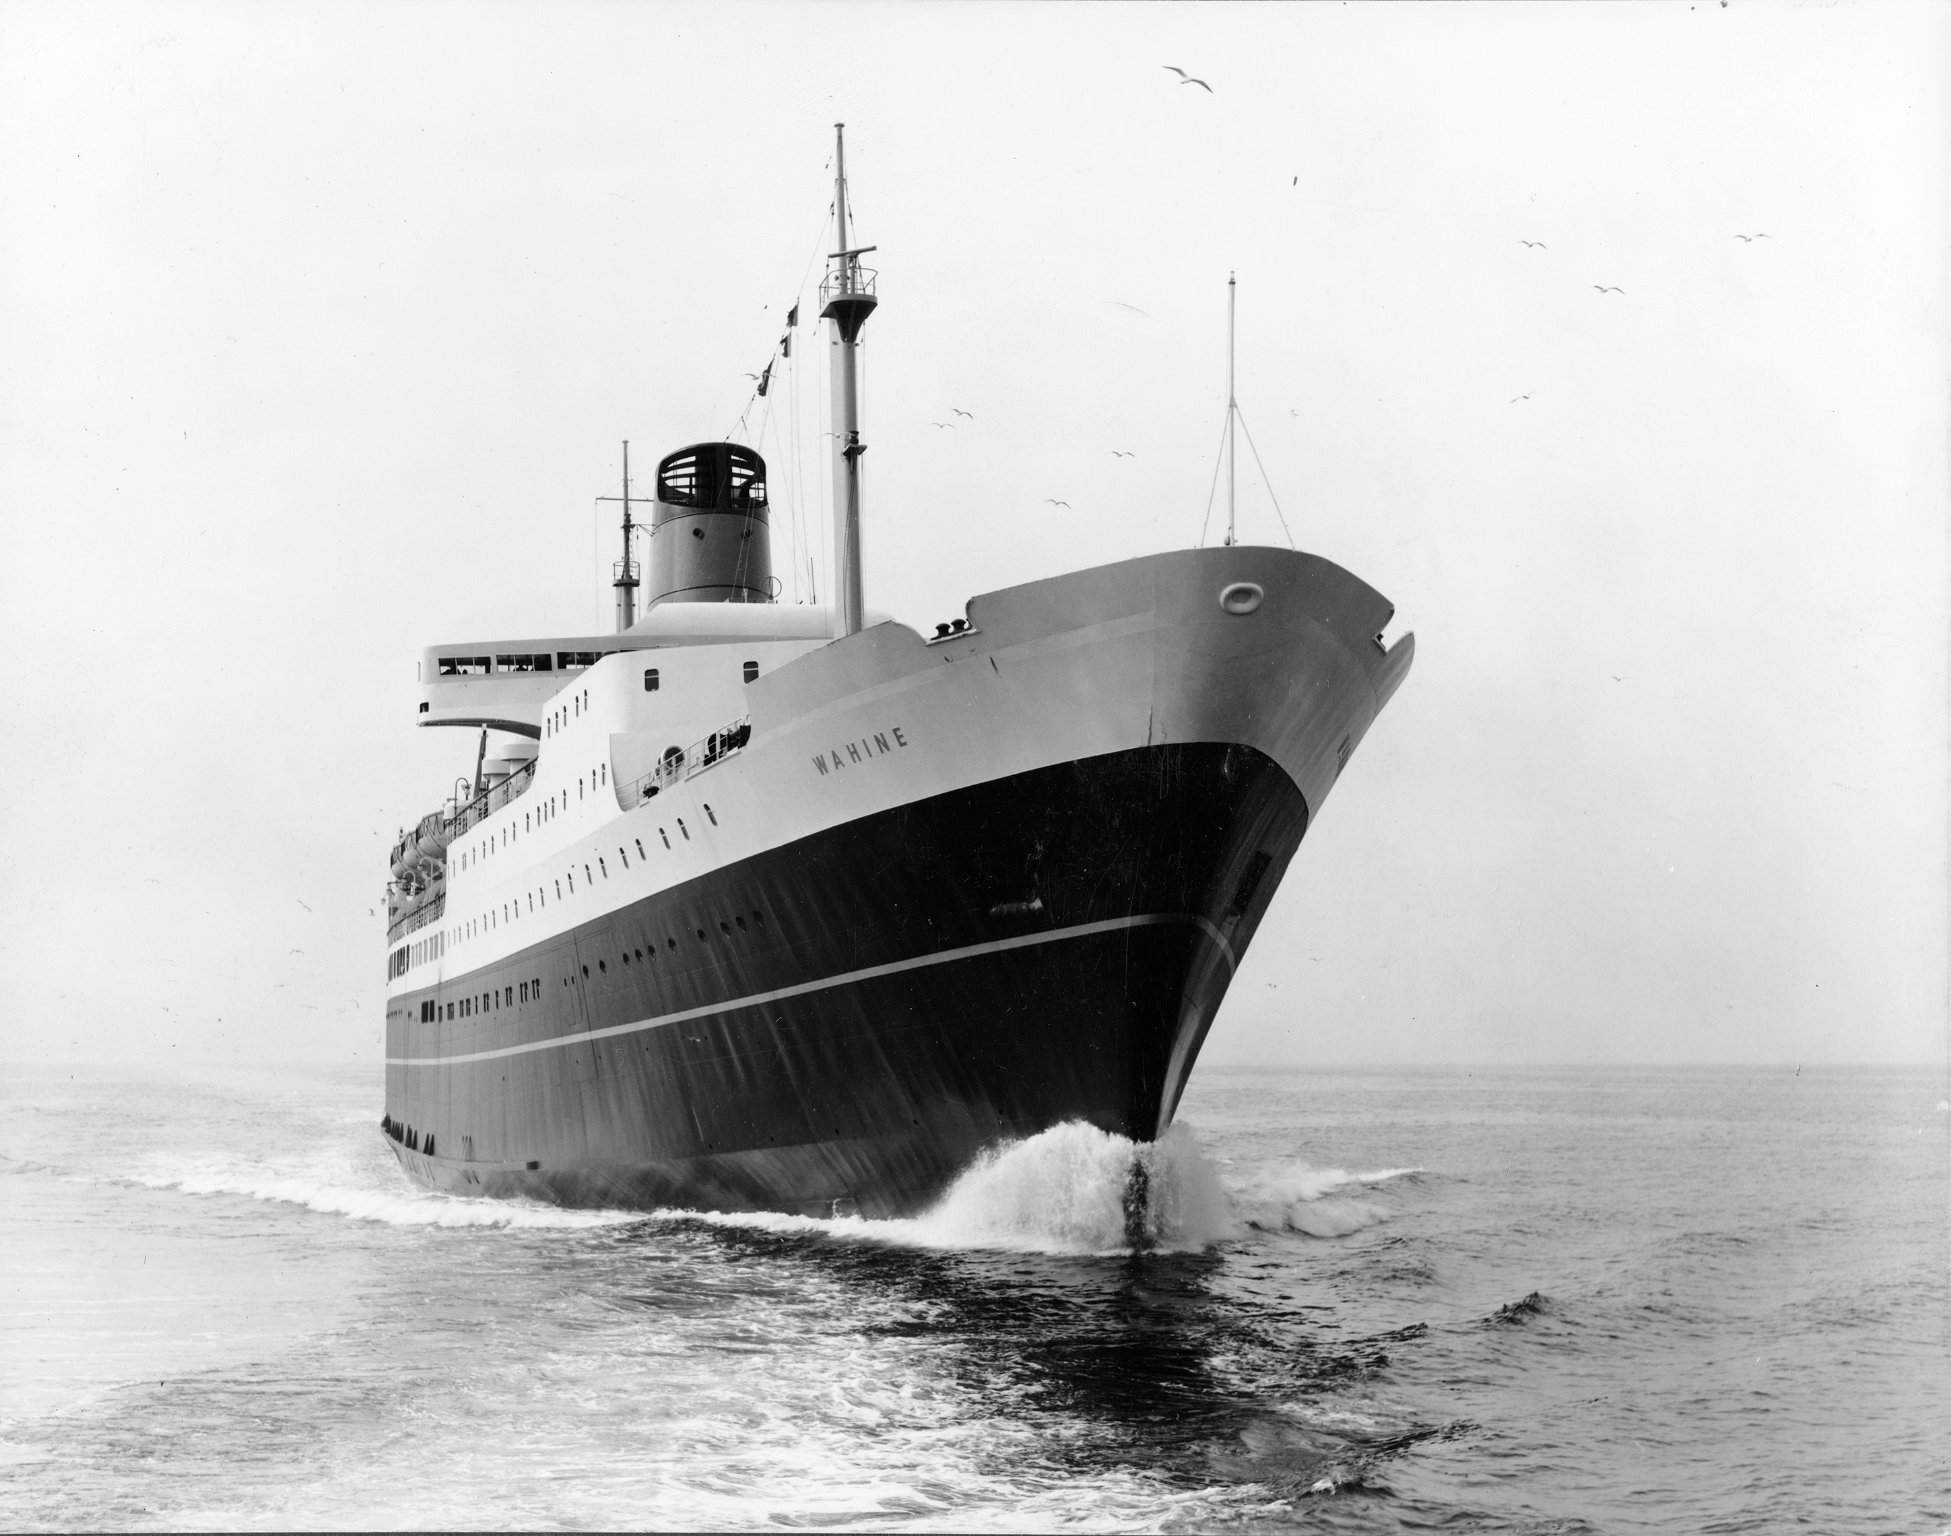
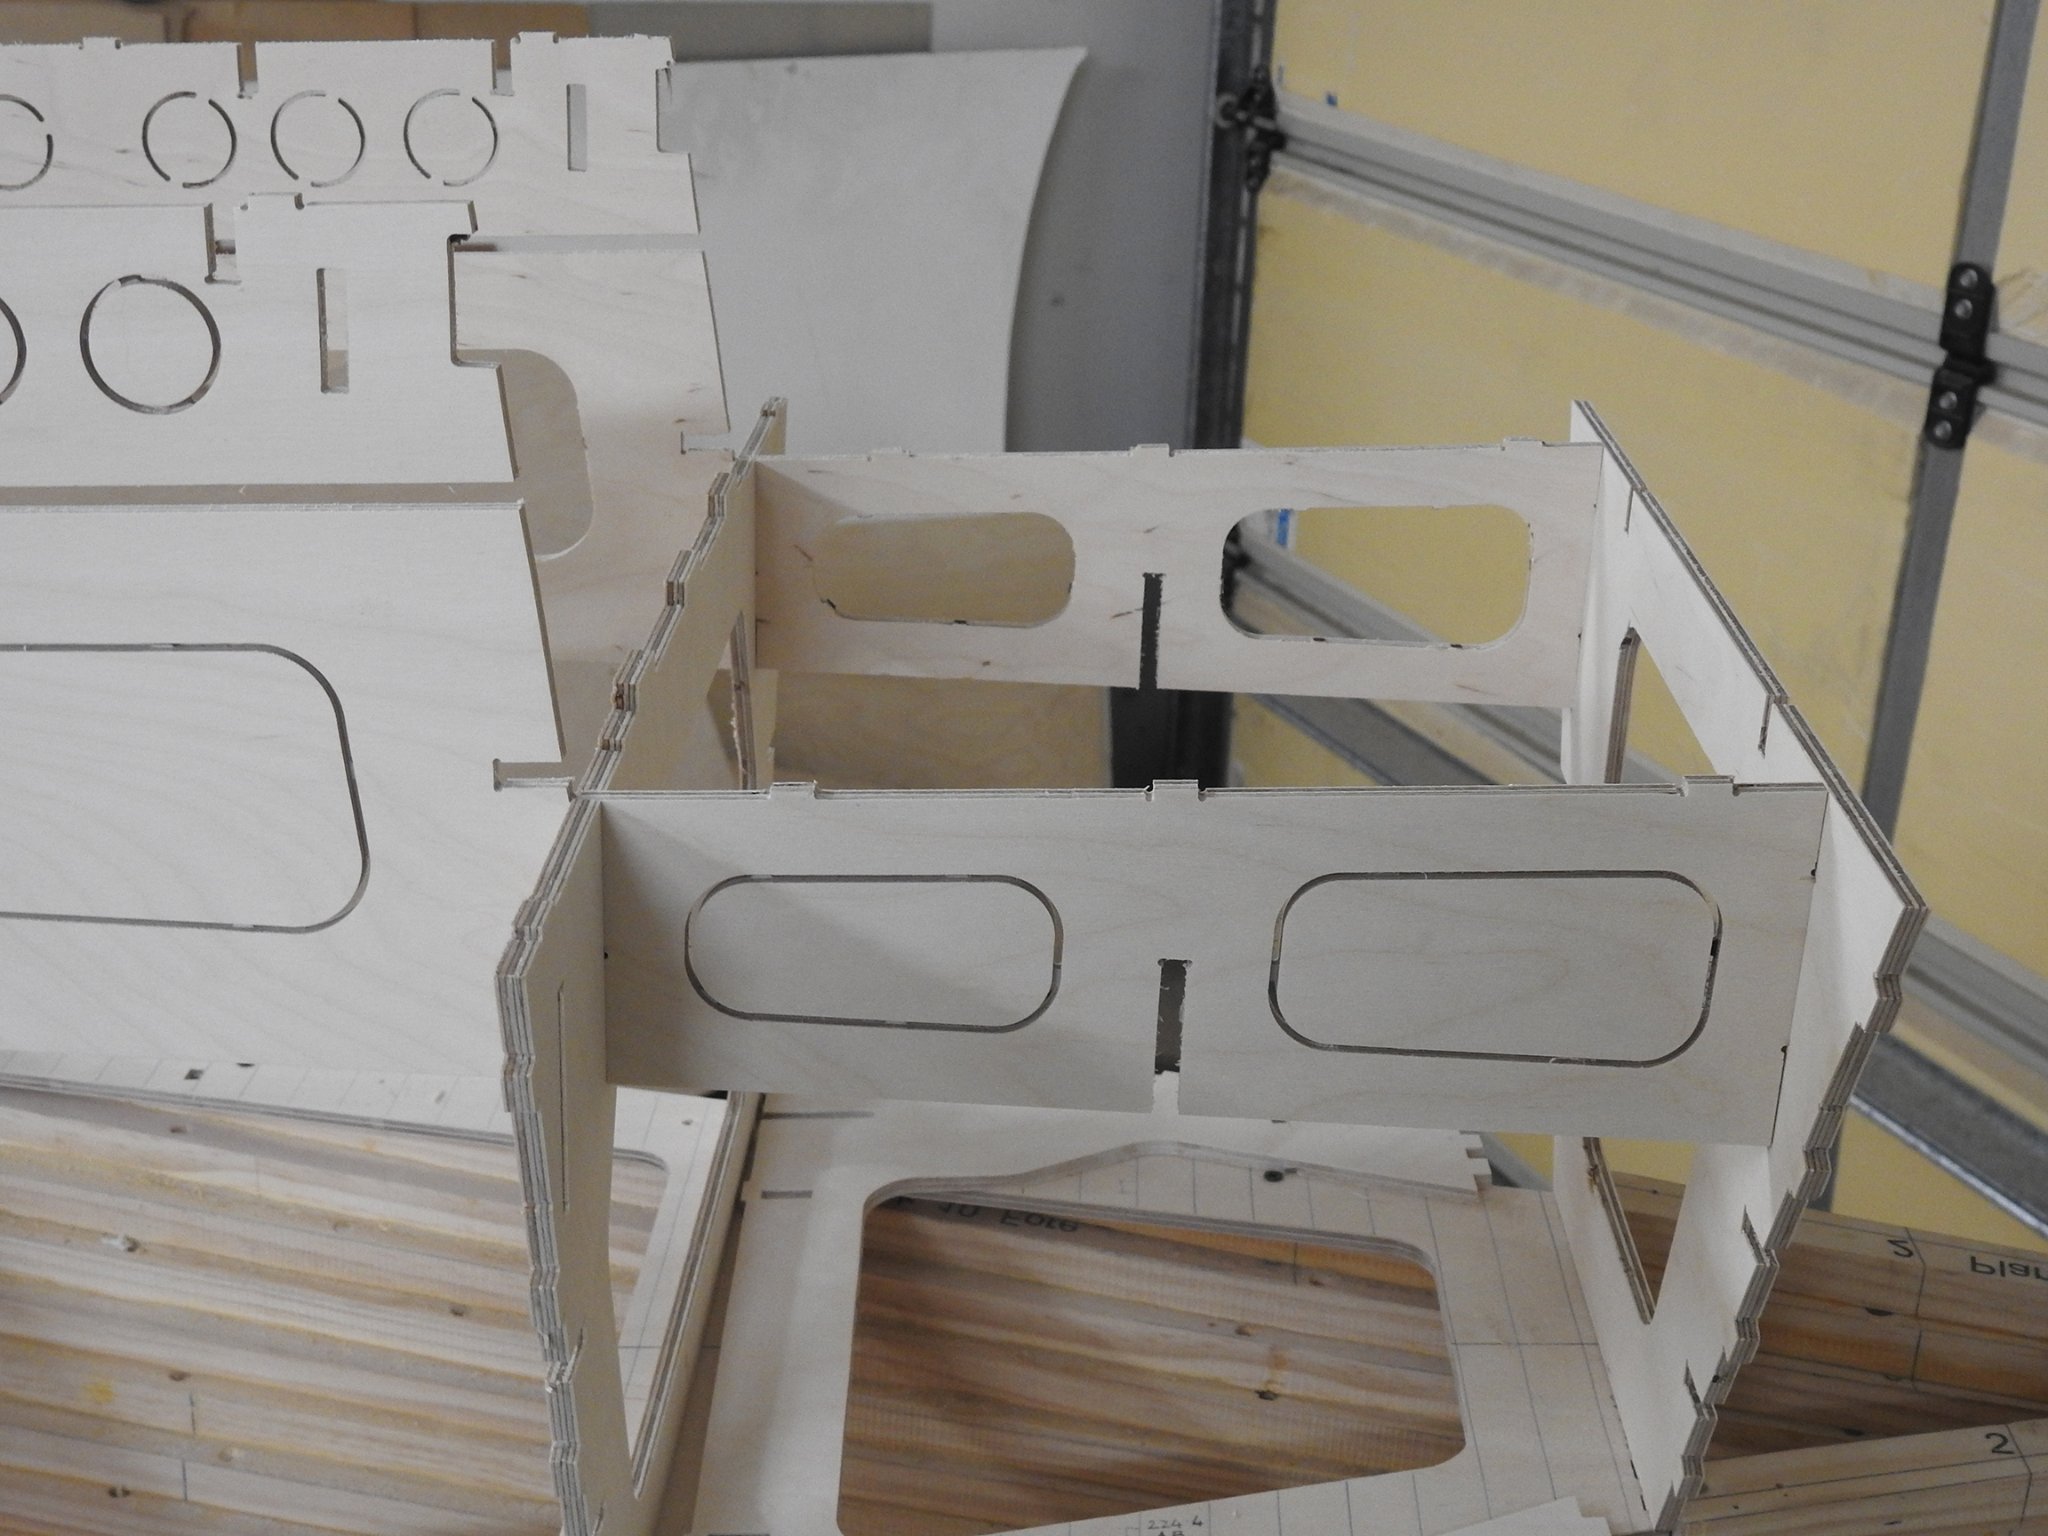
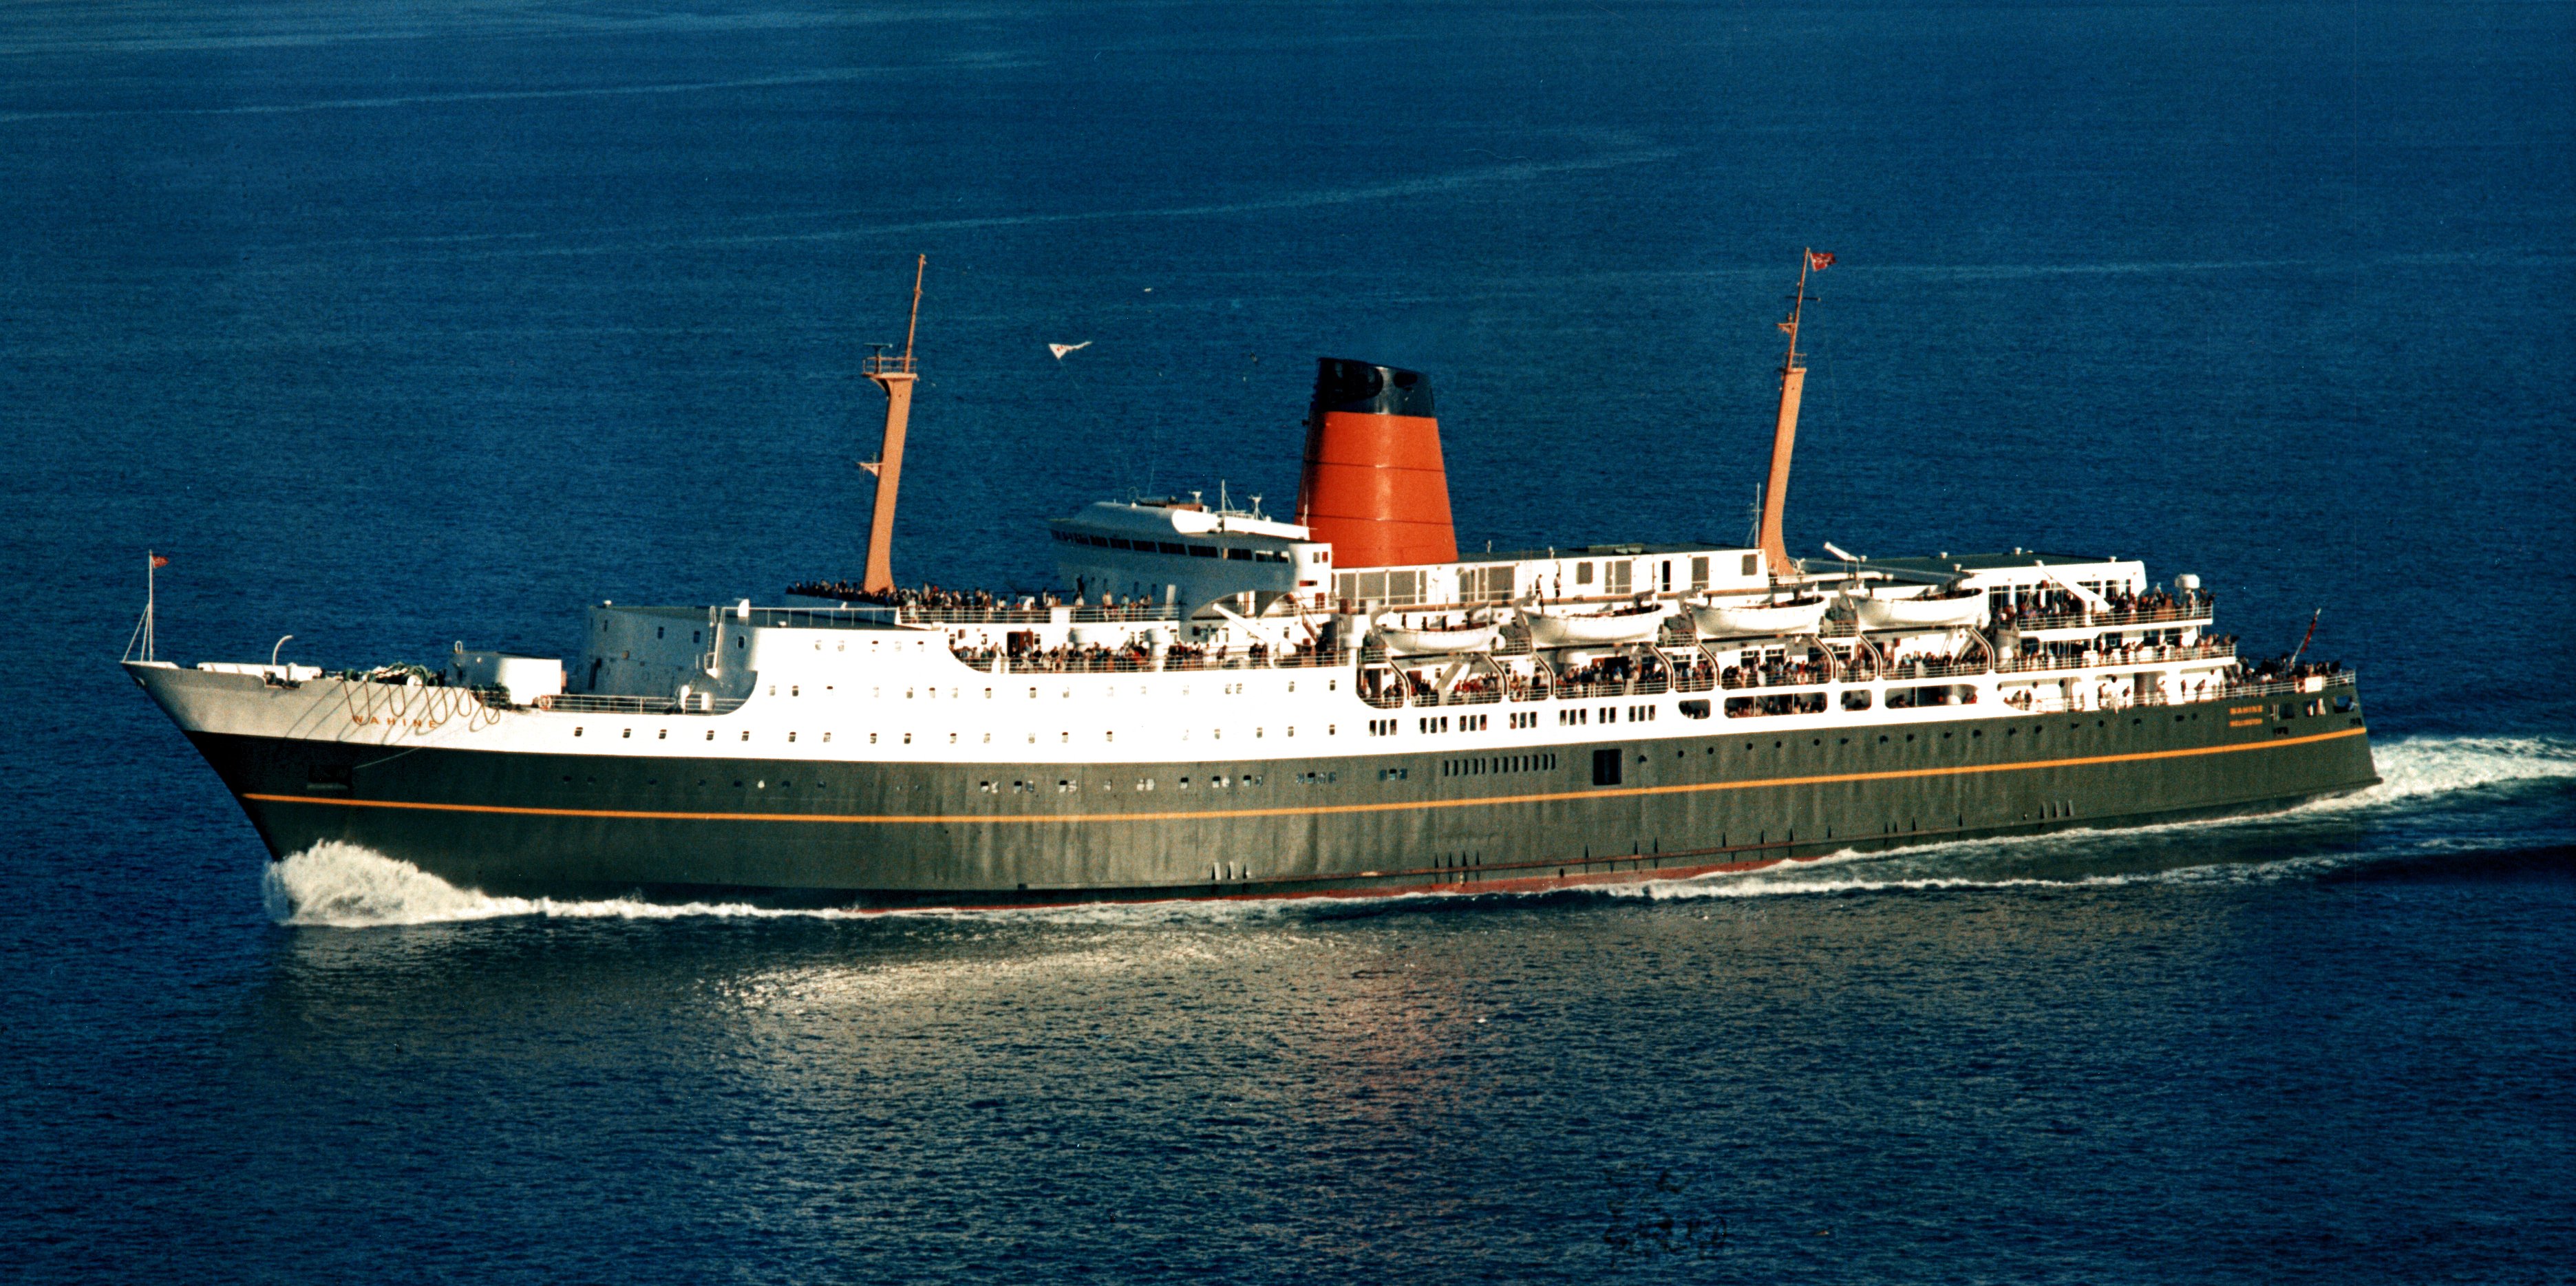
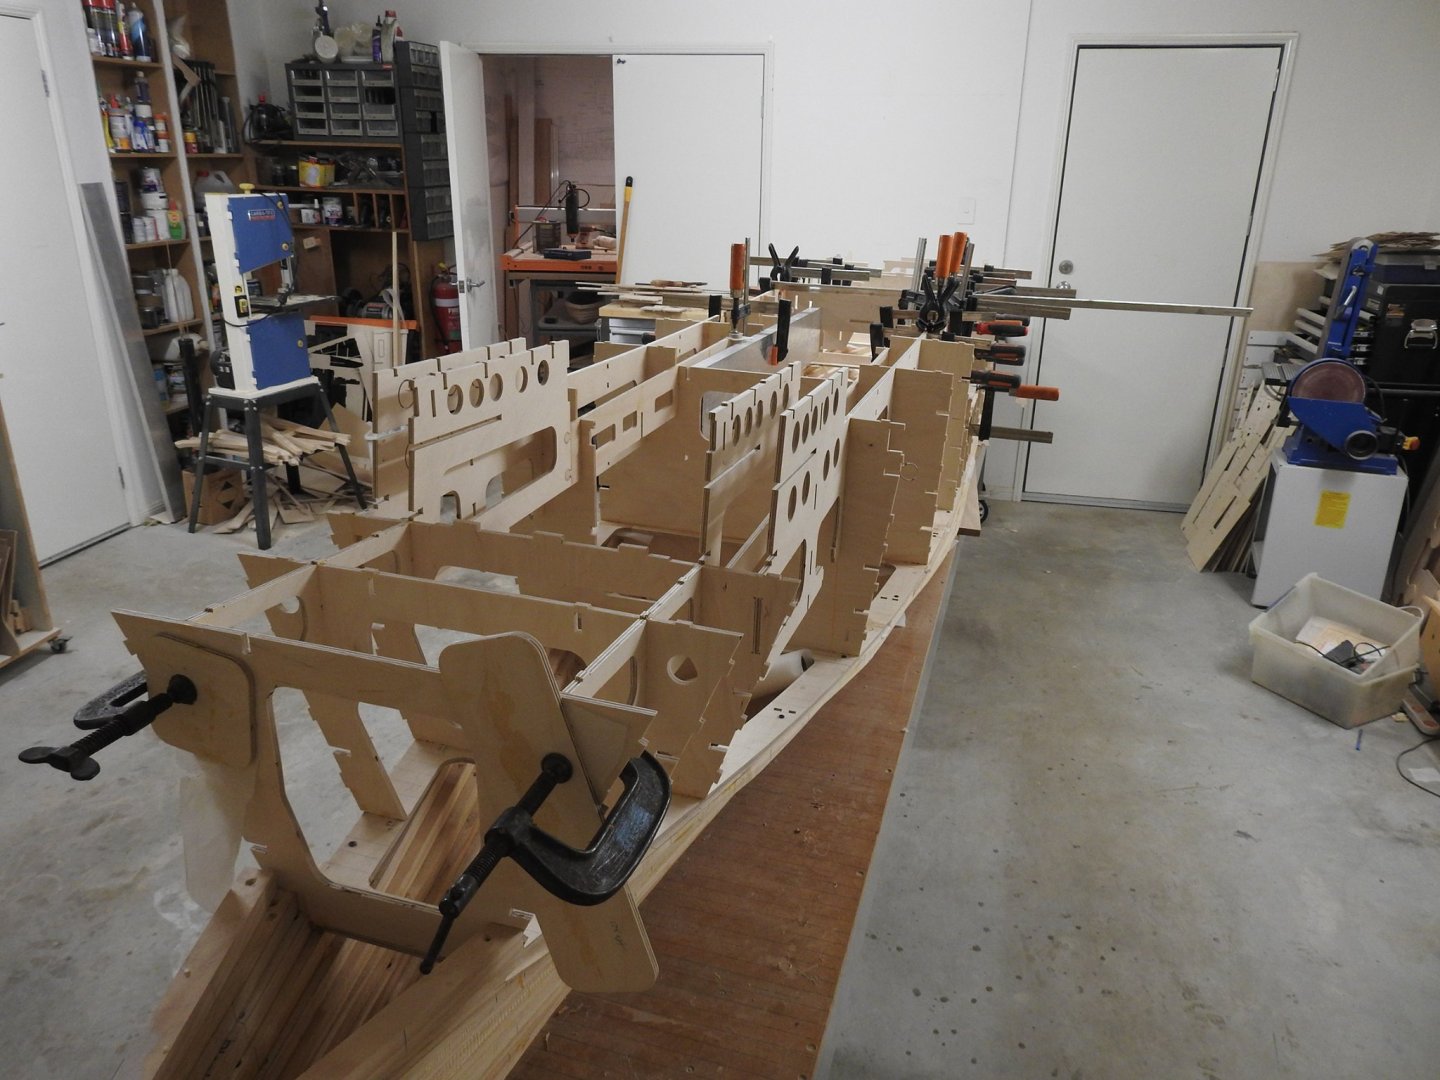
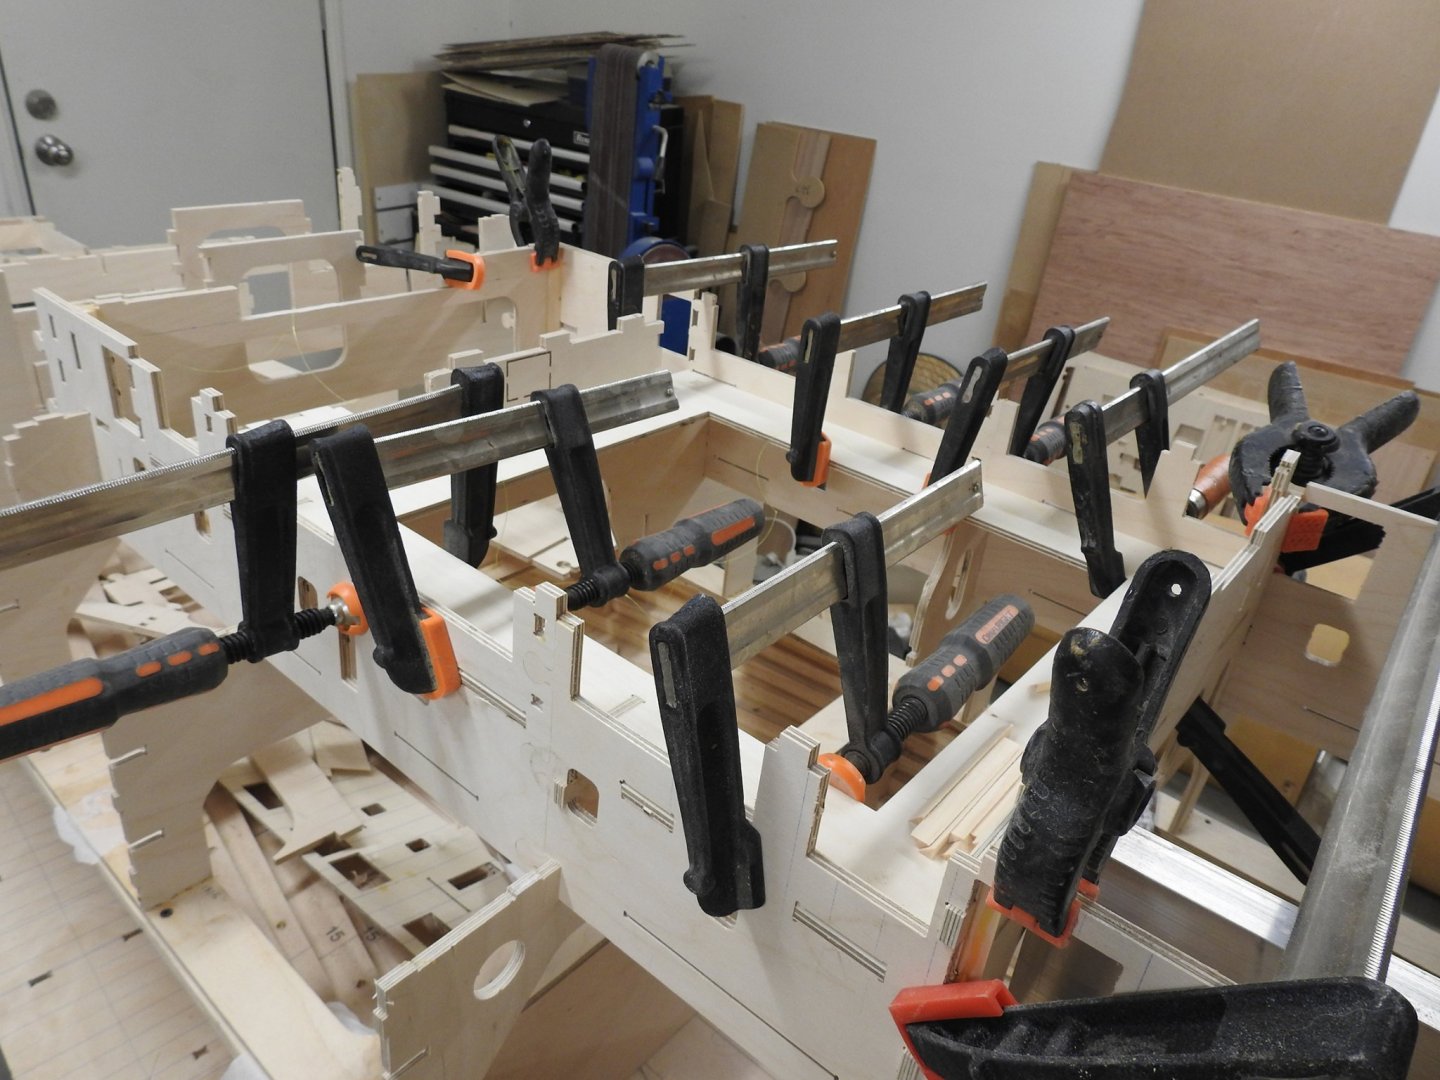
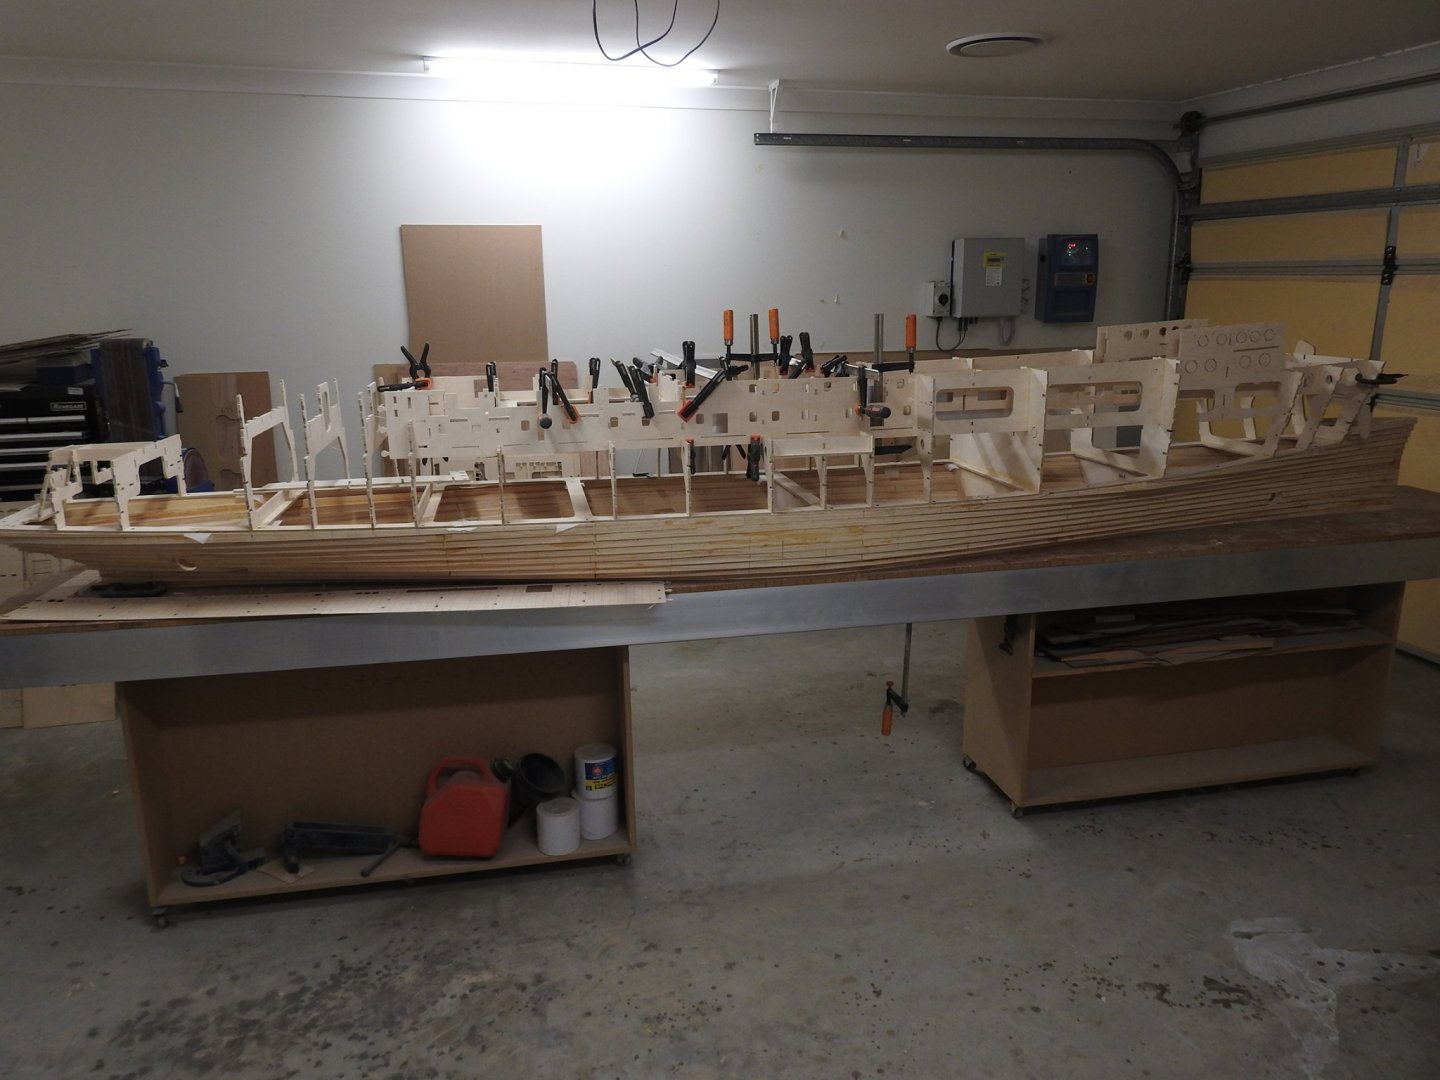
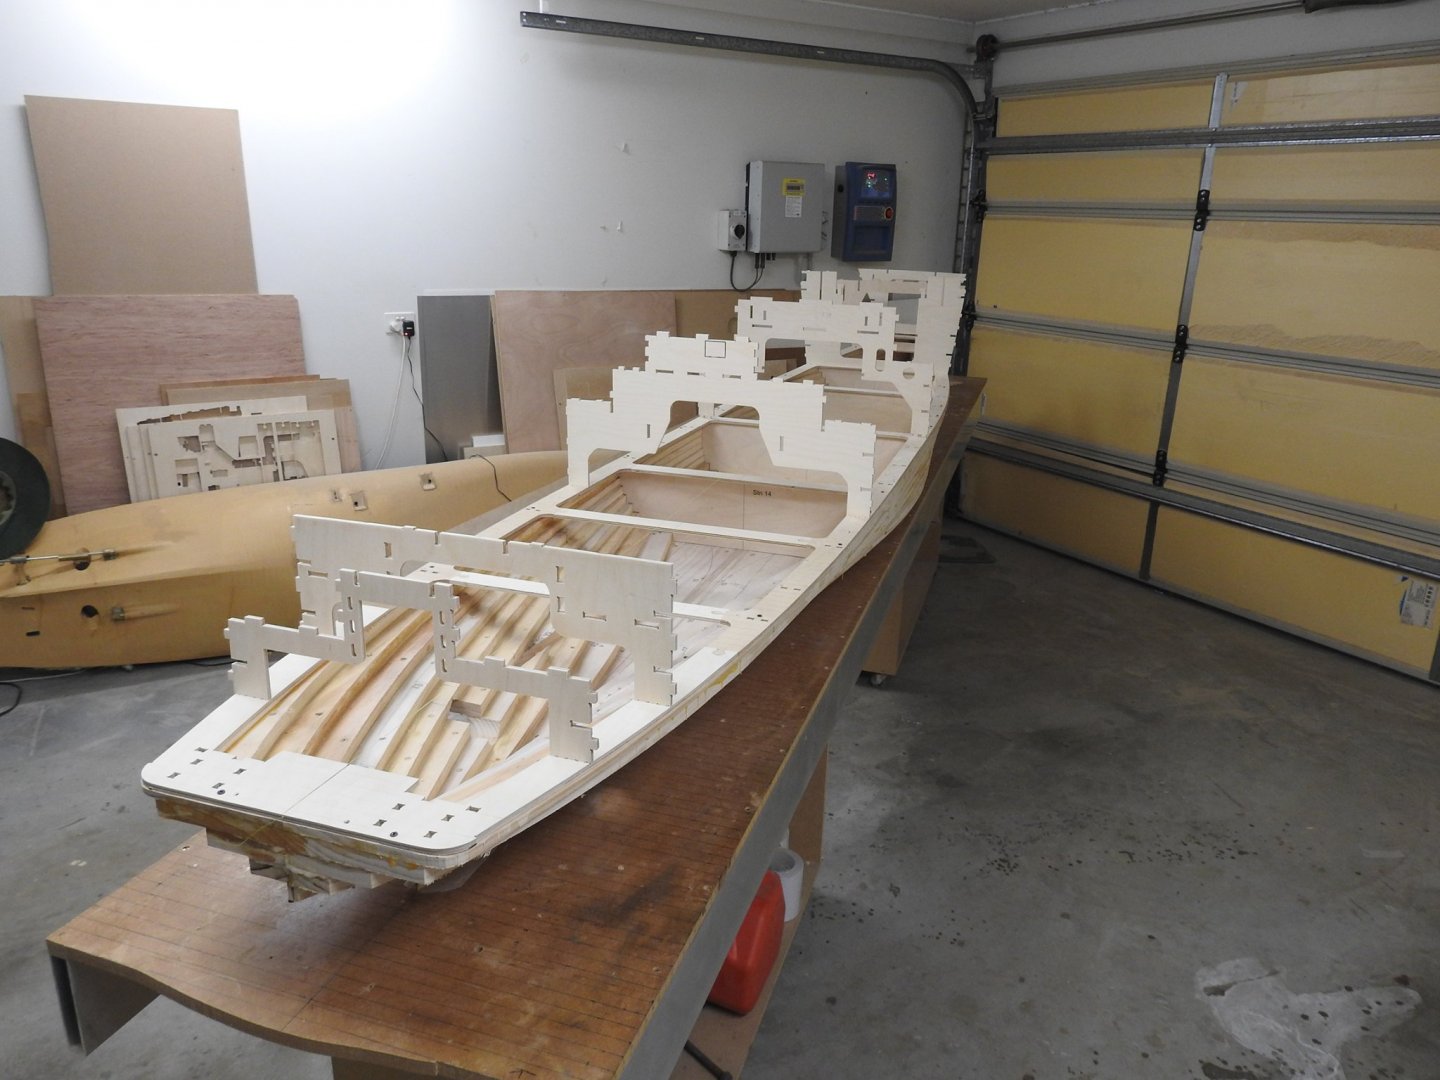
Thanks Keith Well this weekend I glued all the frames in and got the main longitudinal installed into the hull as well. they were a mission to get in so I opted to install dry and use glue blocks to fix in position, they are plenty strong enough and remember them from my furniture days when making staircases, a good glue block will not leg you down. So well on the way, I have also assembled and glued all the other longitudinal bulkheads that make up the lid section as well, so will have that main frame done in another day work. the hull is getting very rigid now and just have to make sure I install any remining stringers and such with an aluminium section clamped on so I keep everything straight. I think another 3-4 full days work I will be cladding hull sides and decks. I am interested in hearing from anyone who has done full on detail of model surfaces before or if someone knows of a post. I have said this before but I plan on having the weld seam, tin canning and steel texture on the mode, most is done with paint. basically you apply a suitable primer to the plates which are .4mm ply sand with fingers between the frame lines to create subtle depressions, doing this on each plate before it goes on means it should vary per plate and look natural, then apply another coat and stipple it roughly. after its dry, sand it flat but leave the lowest points to give the pitted effect, I got this from military modeller who uses the effect on tanks, then glue on the plate and one a few are on glue the .5mm round styrene weld bead in place. the bead is softened with glue and run over with a fine serrated roller to give the bead effect, then all that requires to be done is primer touch-up along weld beads. and painted. Here is the effect this guys work in suberb!. I am interested in people thoughts with this, I have never done it but really keen to see what people think. Its a bit of work to prep each plate, probably 10mins per plate to paint and sand twice, but I think at 1/35 it will look good, I am not a fan of nice smooth hulls on larger scales, Wahine had a very distinct tin canning effect and I think it needs to be there if only subtle. I have attached a hi res shot that shows the effect on her hull.

- 454 replies
-
- 7
-
-
- Union Steamship Company
- Stepcraft 840
- (and 3 more)
-
Oh Kevin I have sorted out the Cutty Sark image library to, 1300 images. I just need an email from whoever wants them so I can give permission and access in Dropbox to those people. Mojofilter if you are watching I am still waiting for your email to.
- 454 replies
-
- 1
-
-
- Union Steamship Company
- Stepcraft 840
- (and 3 more)
-
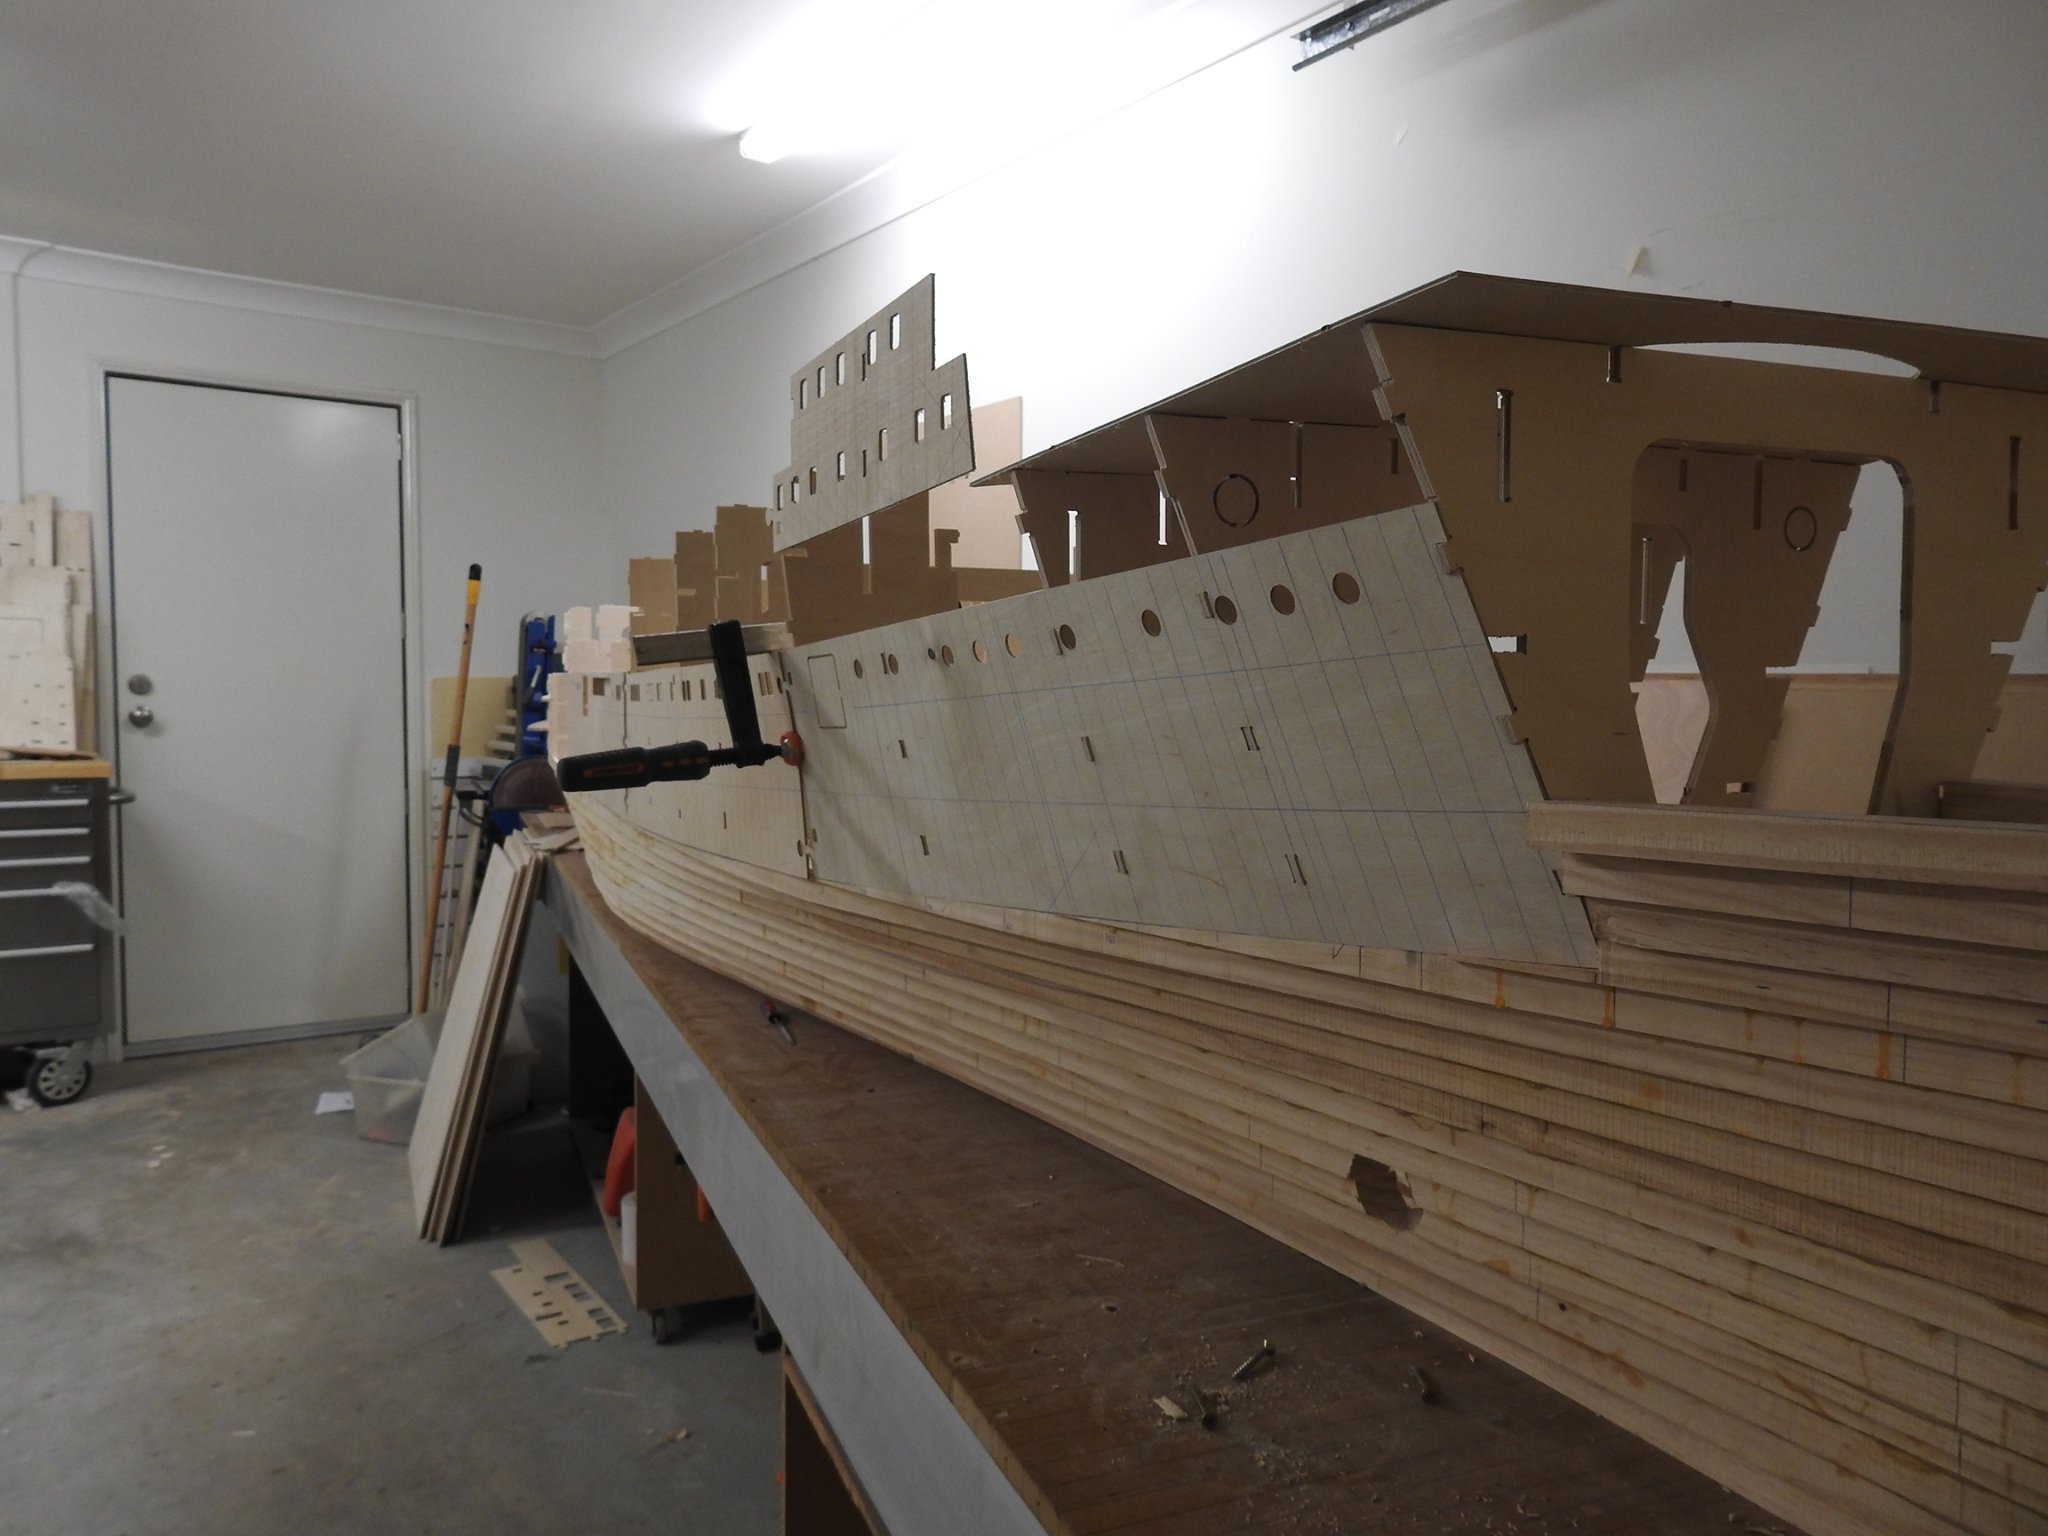
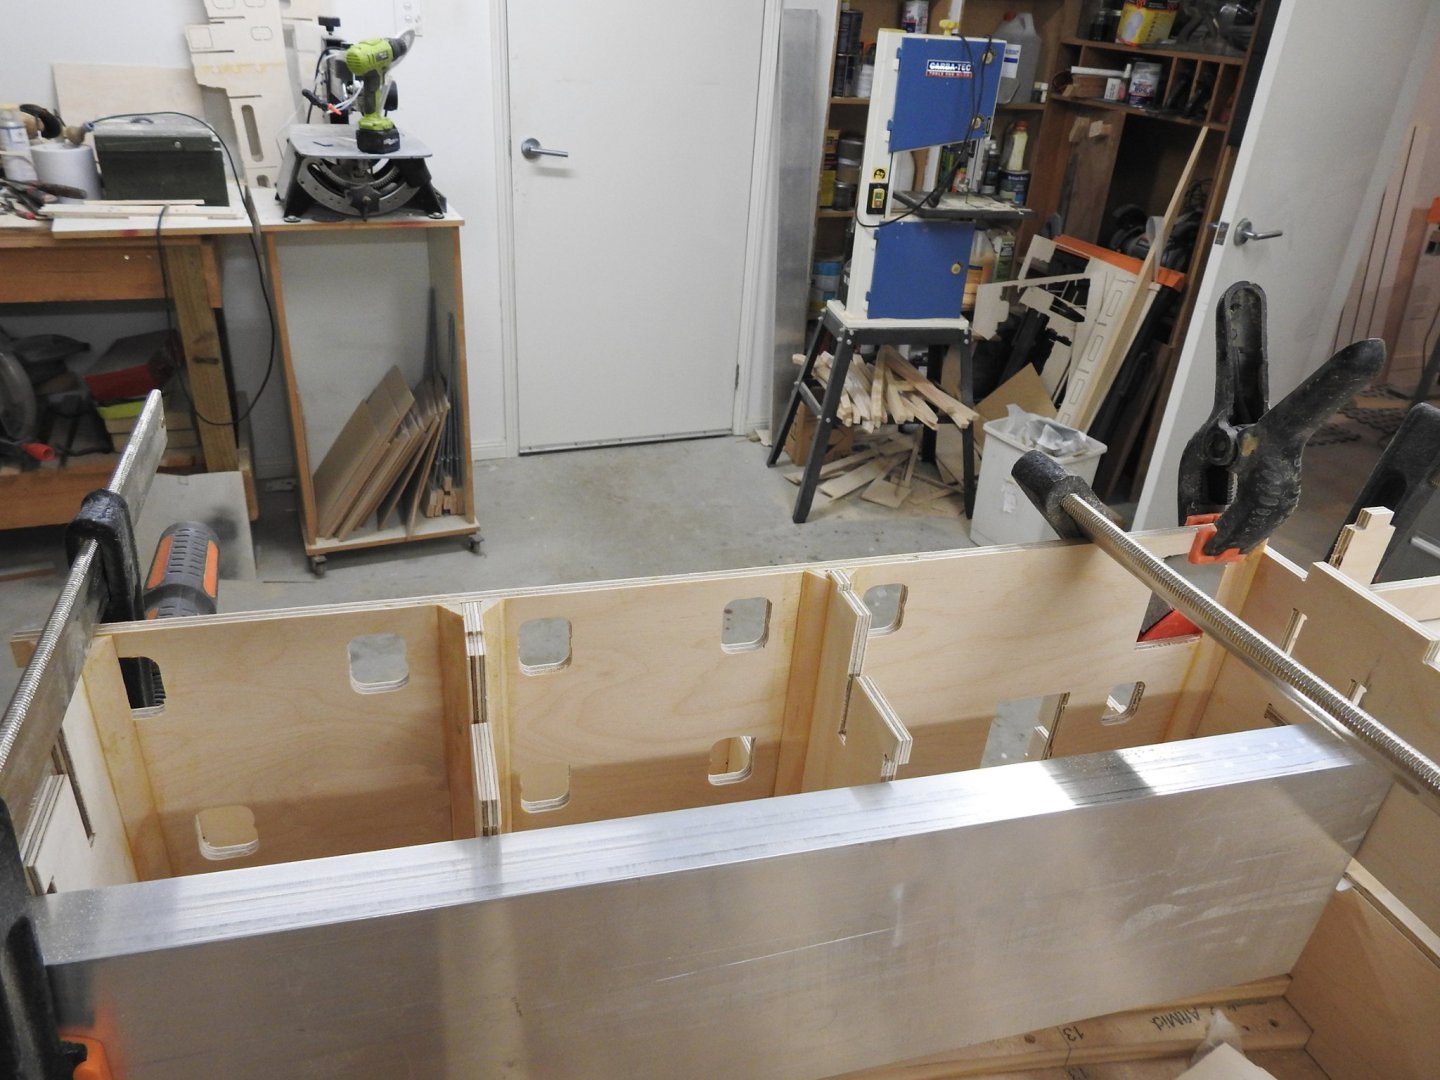
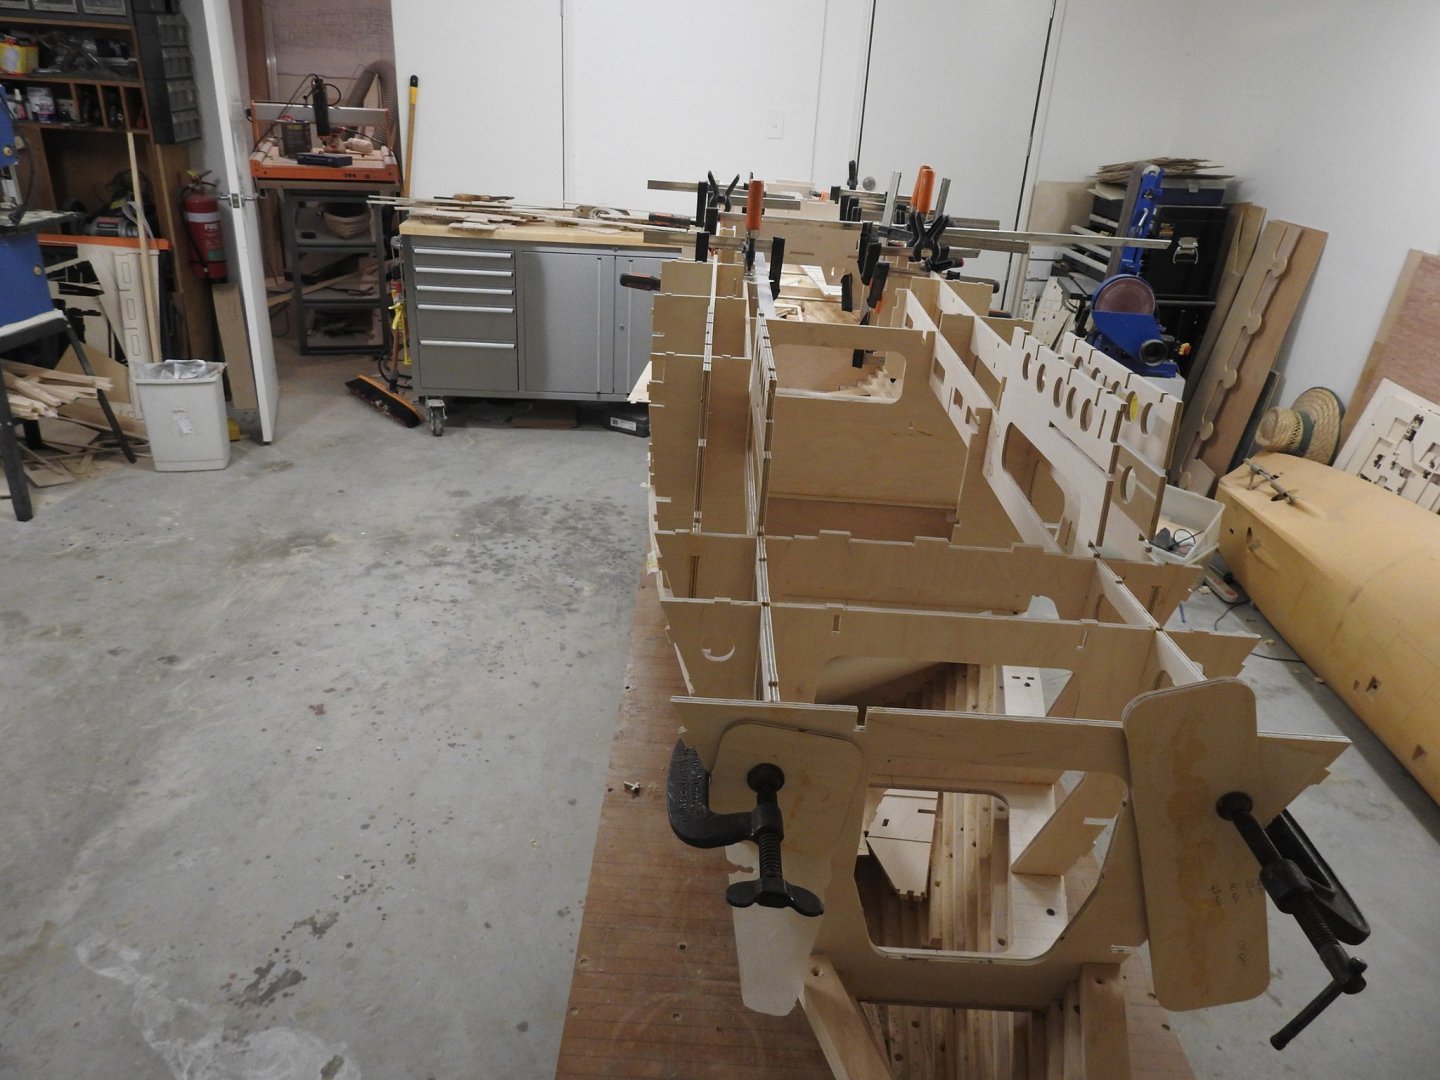
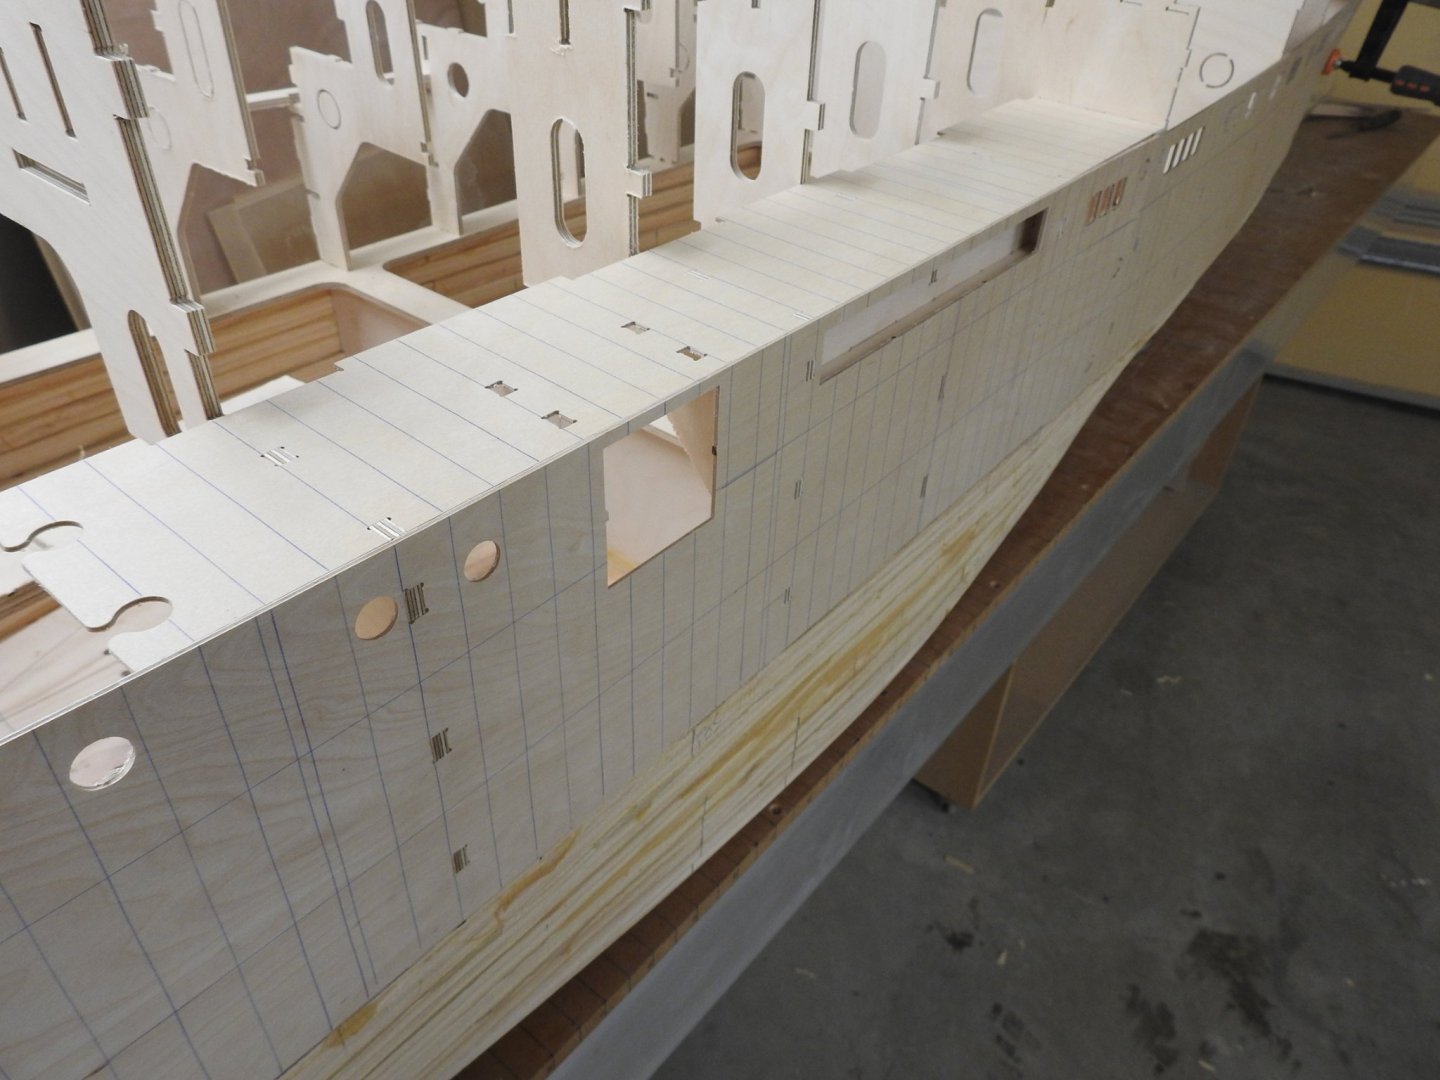
I am one happy son of a you know what. I test fitted a hull panel today ,actually 3 consecutive panels and an adjacent deck panel and it fitted better than I could have hoped for. I also glued the first pair of longitudinal bulkheads together against a straight edge, this weekend will be a big one with main structure probably done. Look at that fit!! Notice the fit of the bottom edge against the B&B part. Rhino's True shape development tools really do work thank god. Part of Forecastle deck also test fitted First Longitudinal BHD's glued Now I am getting excited!!

- 454 replies
-
- 12
-
-
- Union Steamship Company
- Stepcraft 840
- (and 3 more)
-
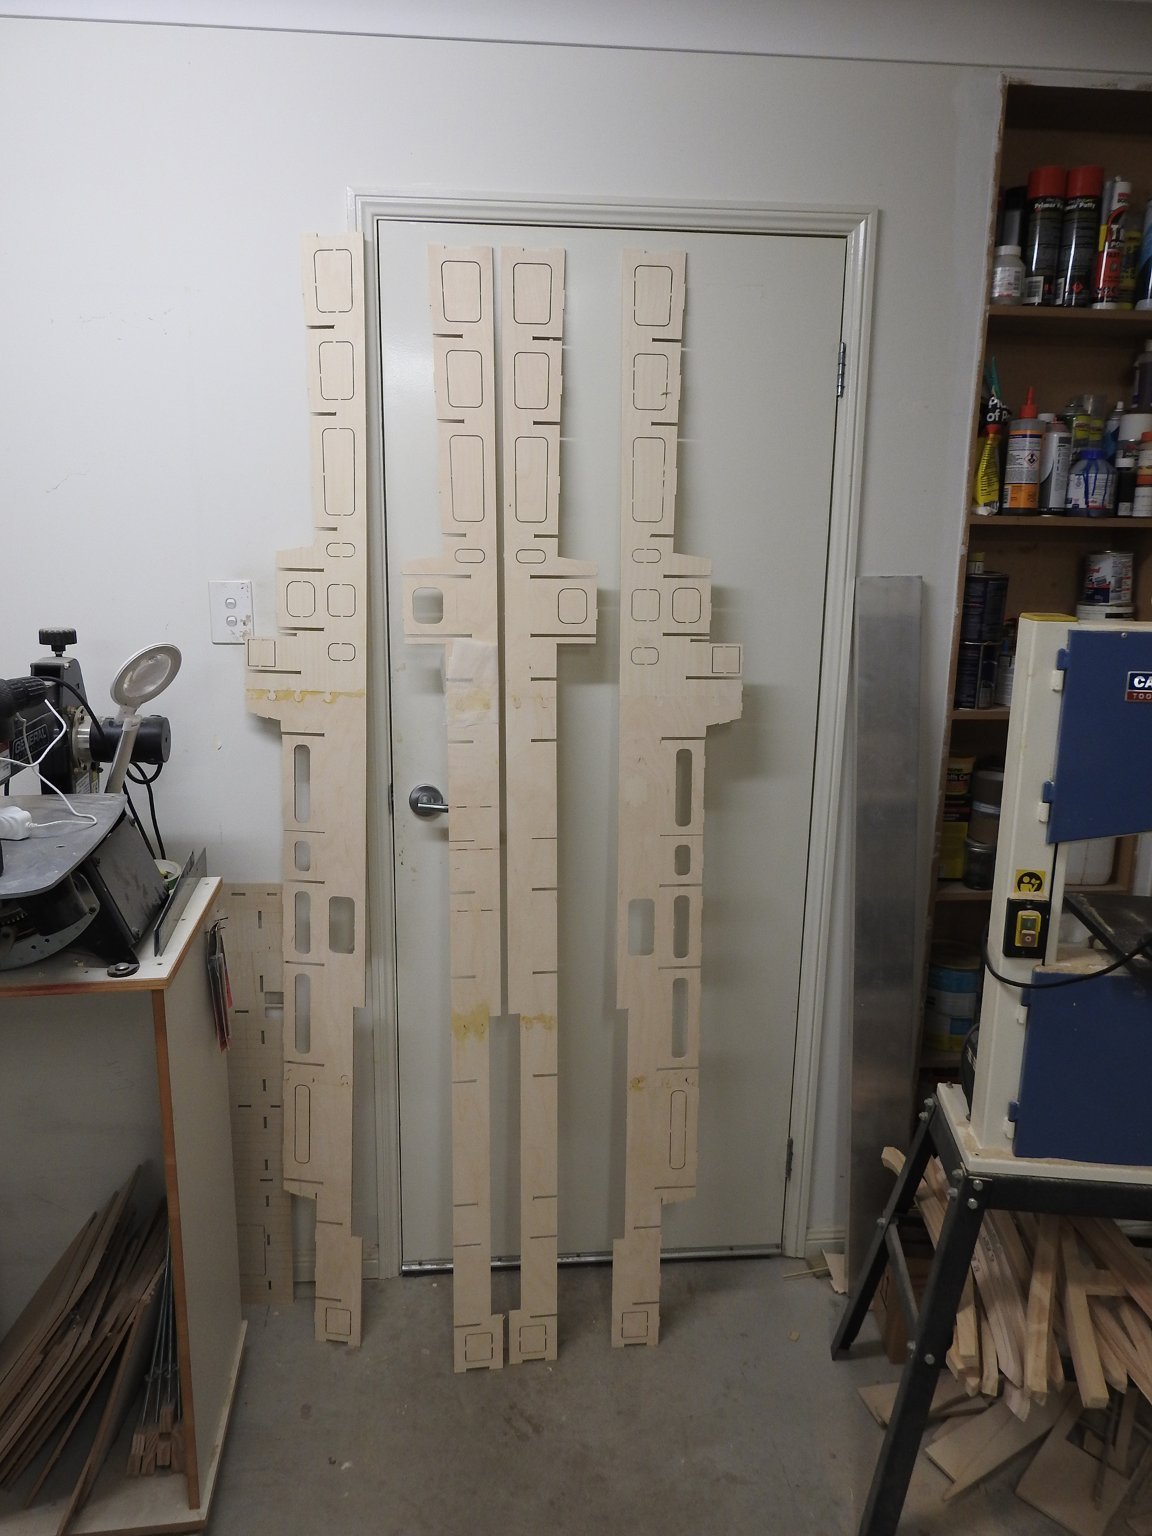
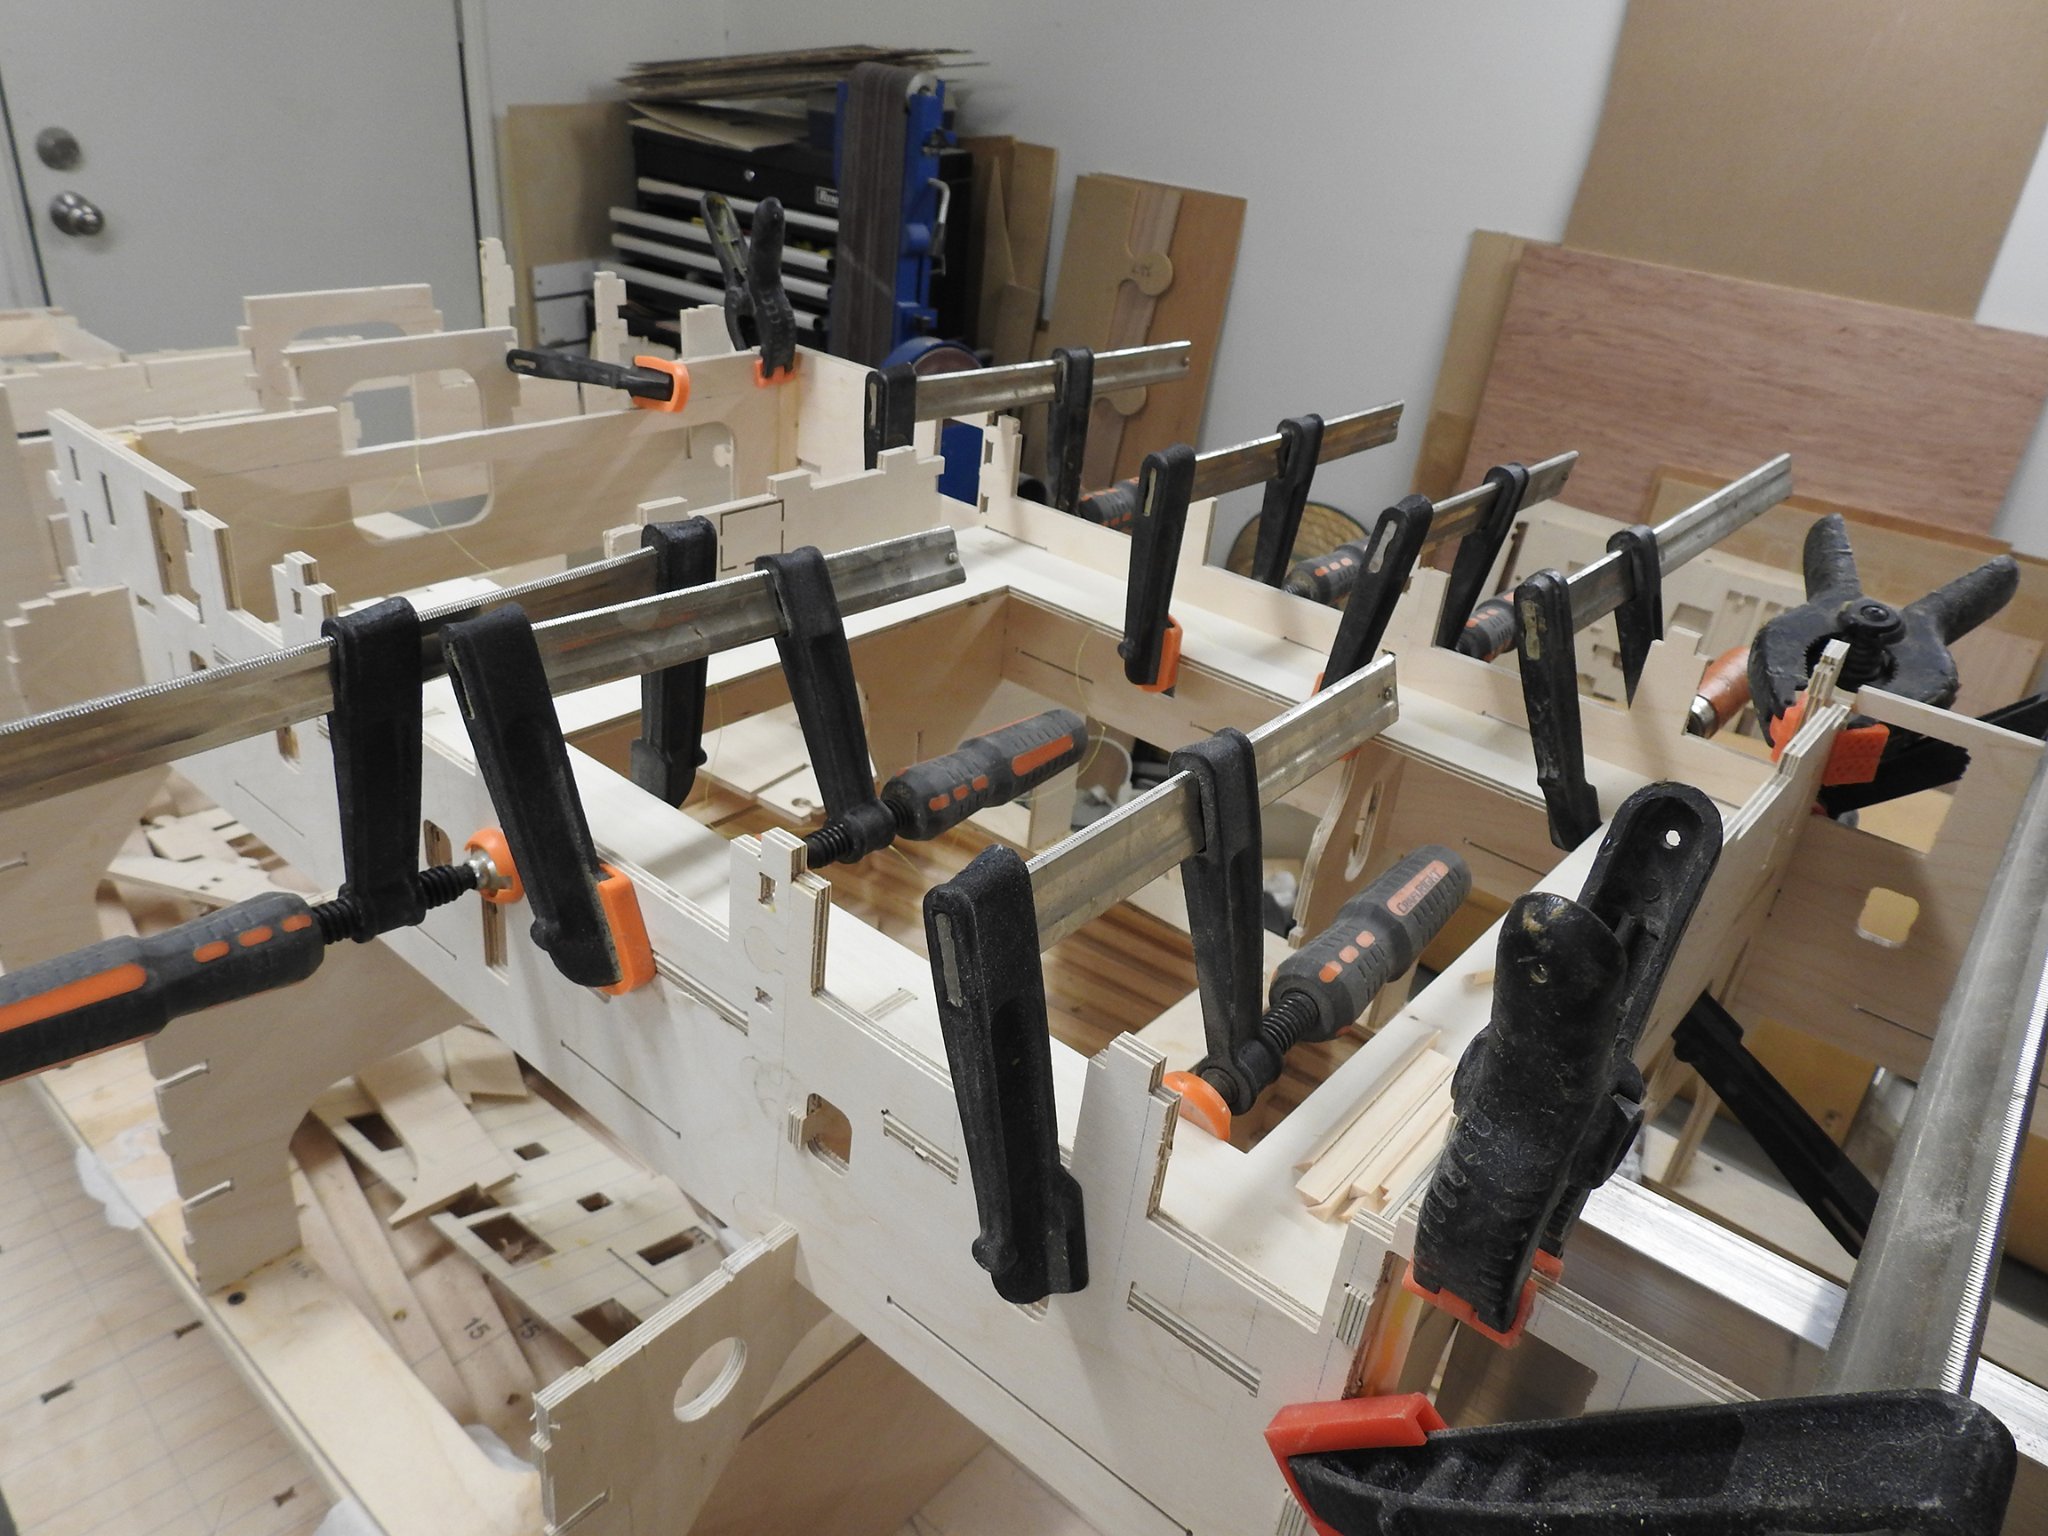
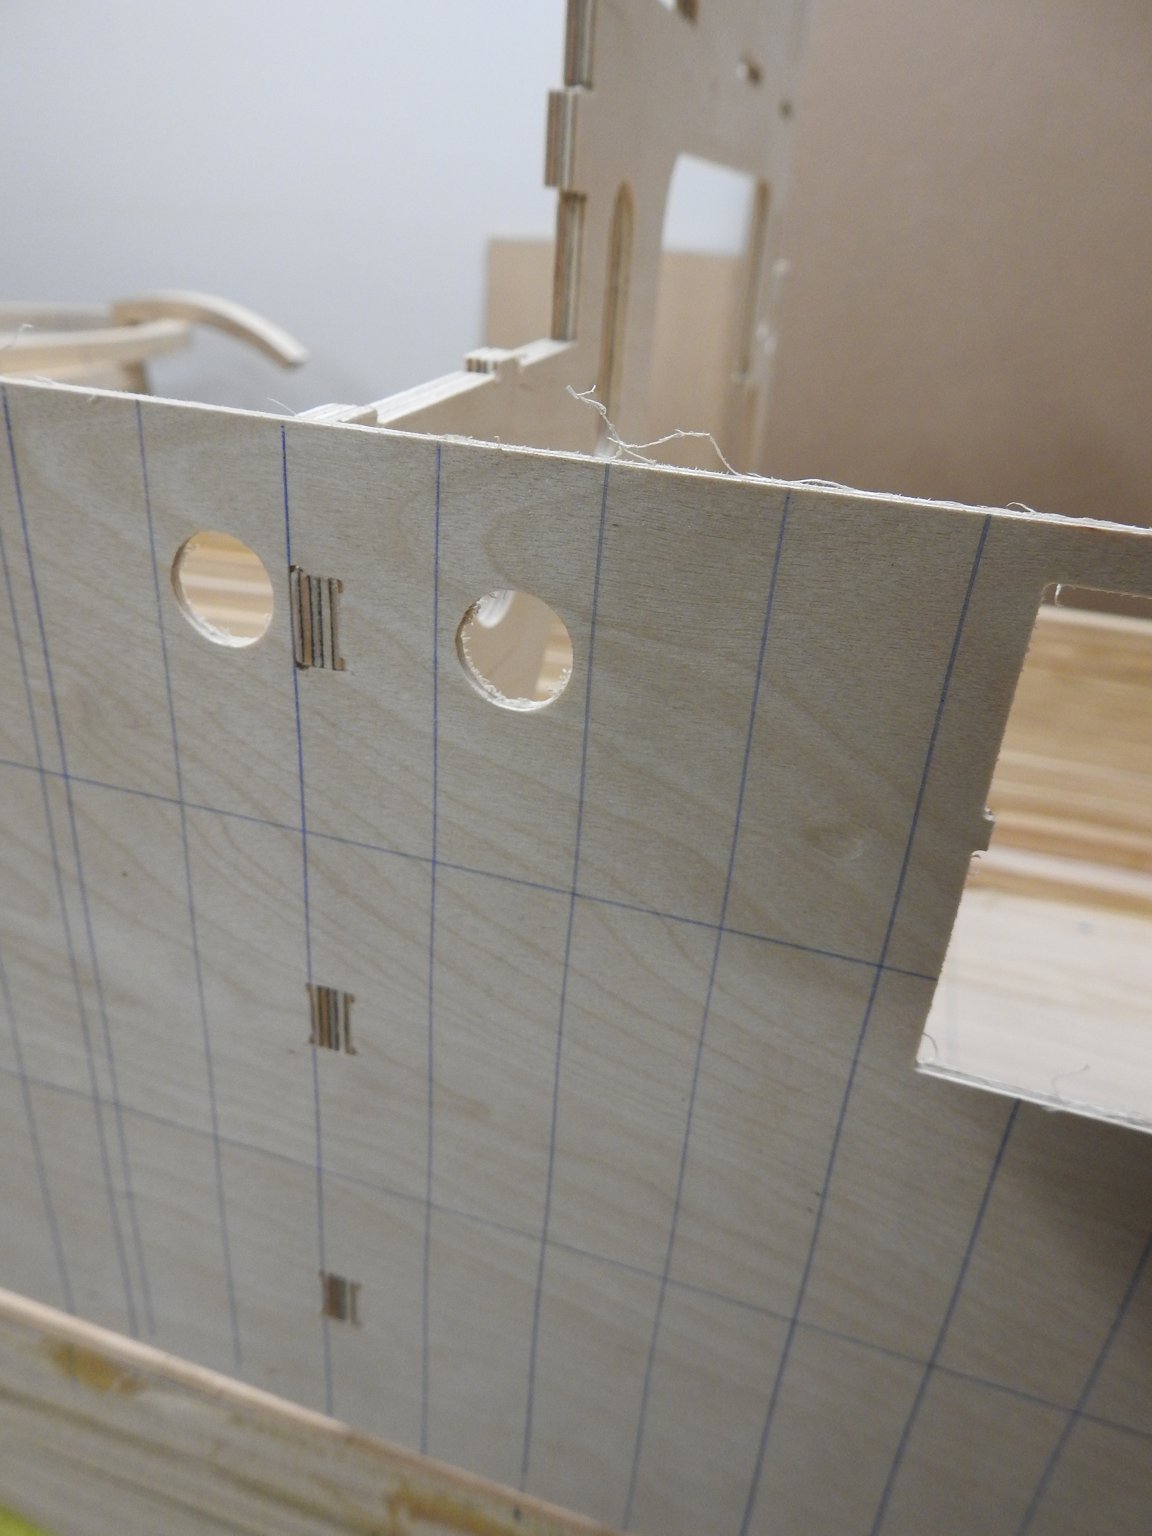
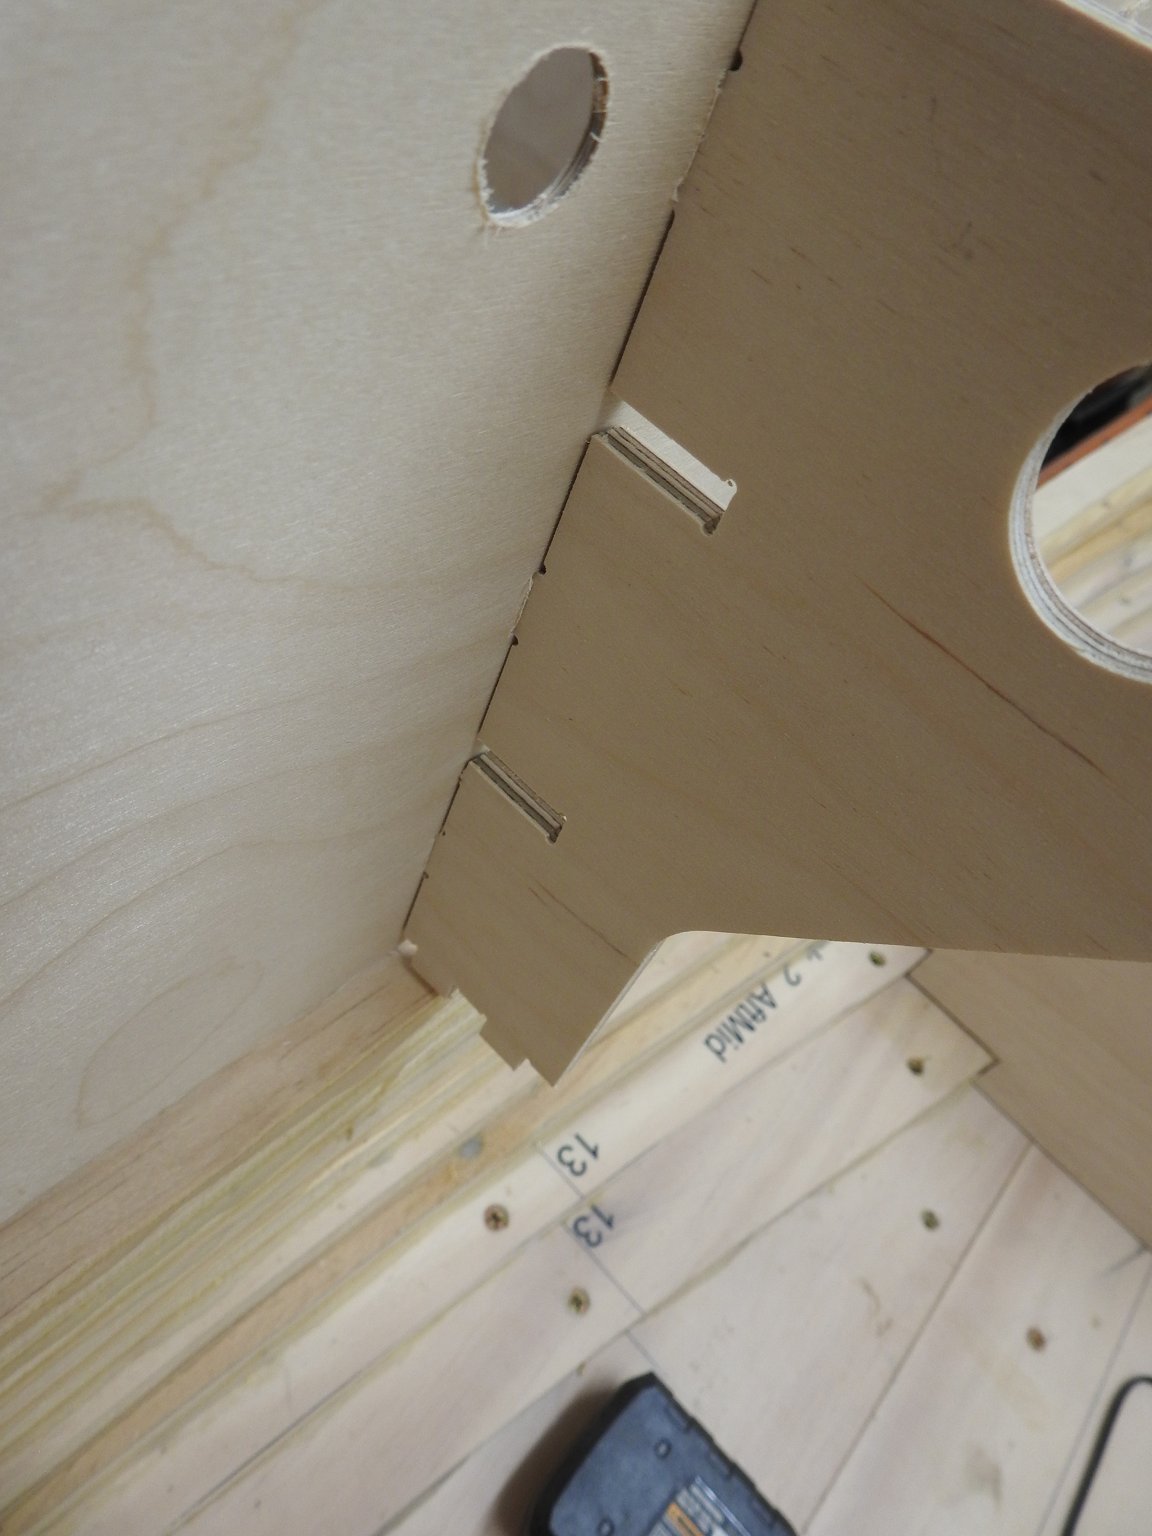
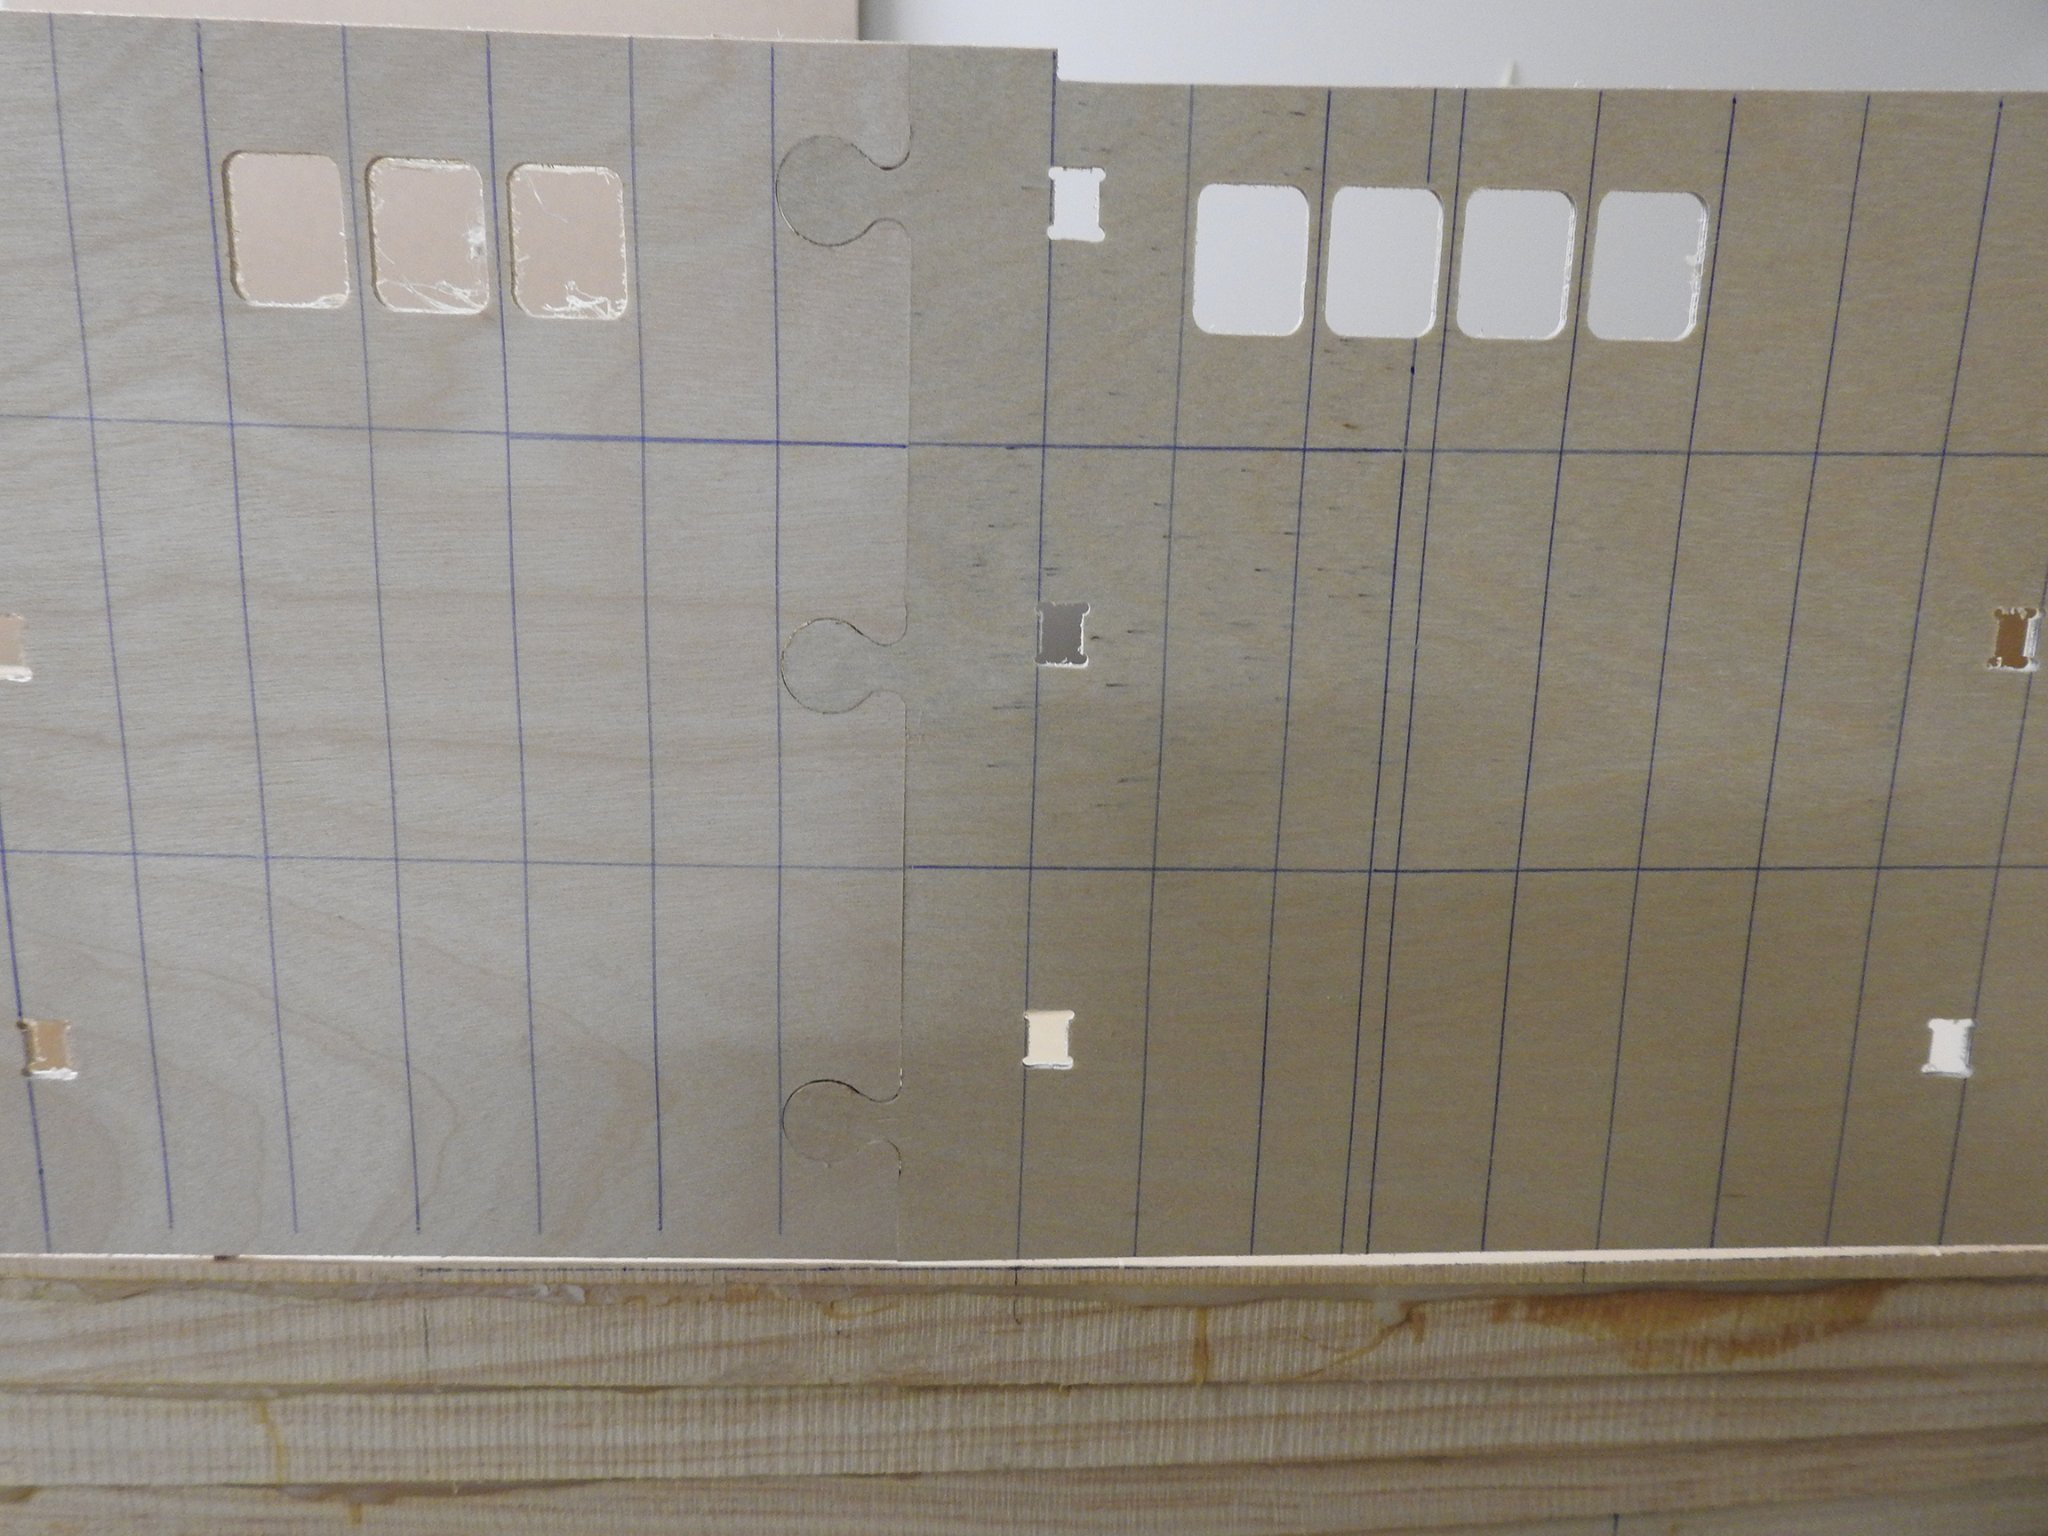
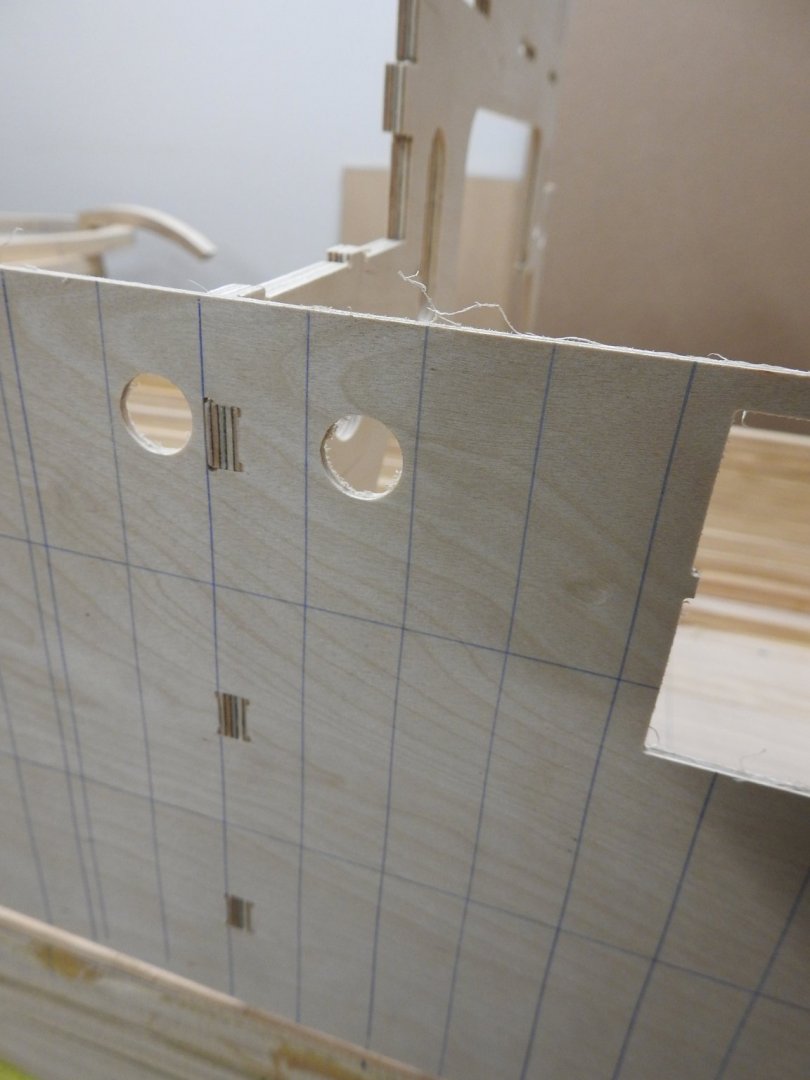
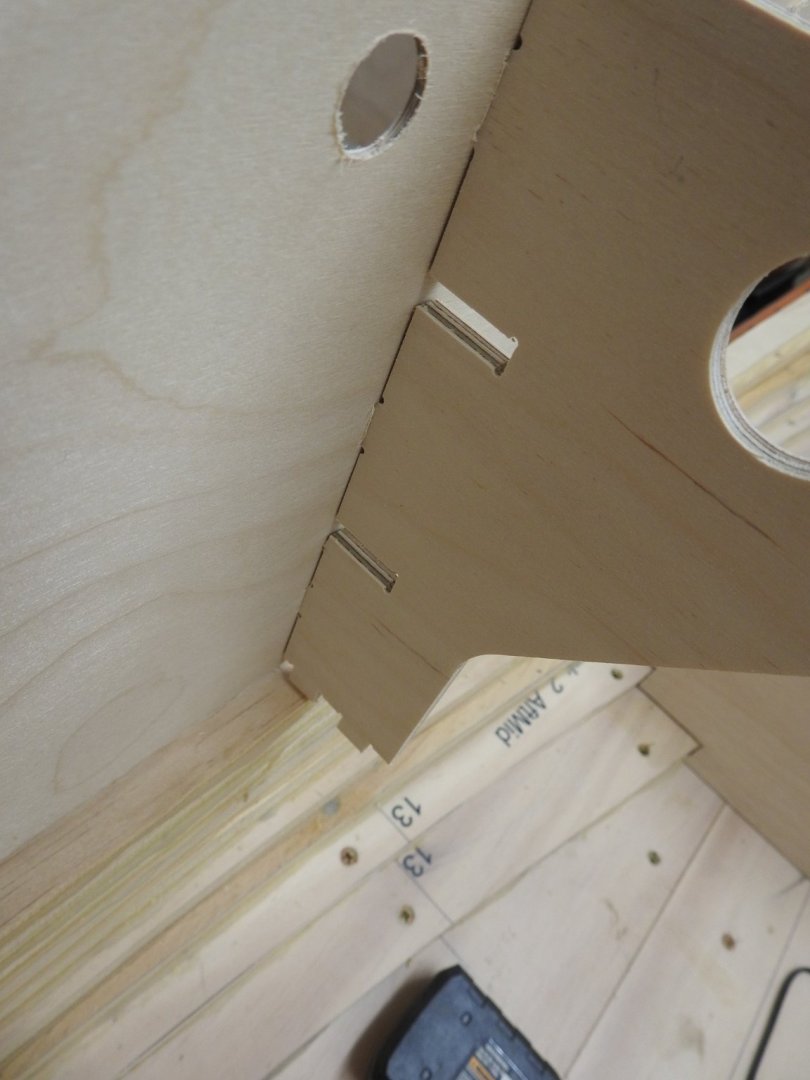
I have a confession to make, my joints are all a bit tight, I did offset the cuts a tiny bit to allow for this but not enough, live and learn but yeah every joint has had to be filed a bit to get it together and that has taken a lot longer to put together than it should , in saying that I reckon by 3 weeks from now the main structure will be done and ready to start cladding in 2mm ply. I allowed -.050 reduction but realistically I should have allowed more like .2mm The piles of parts on my bench are getting smaller and smaller and the sheets of parts less and less. but at least it all goes together, I have missed a few mortises and joints that I have had to jump onto the scroll saw to do.
- 454 replies
-
- 5
-
-
- Union Steamship Company
- Stepcraft 840
- (and 3 more)
-
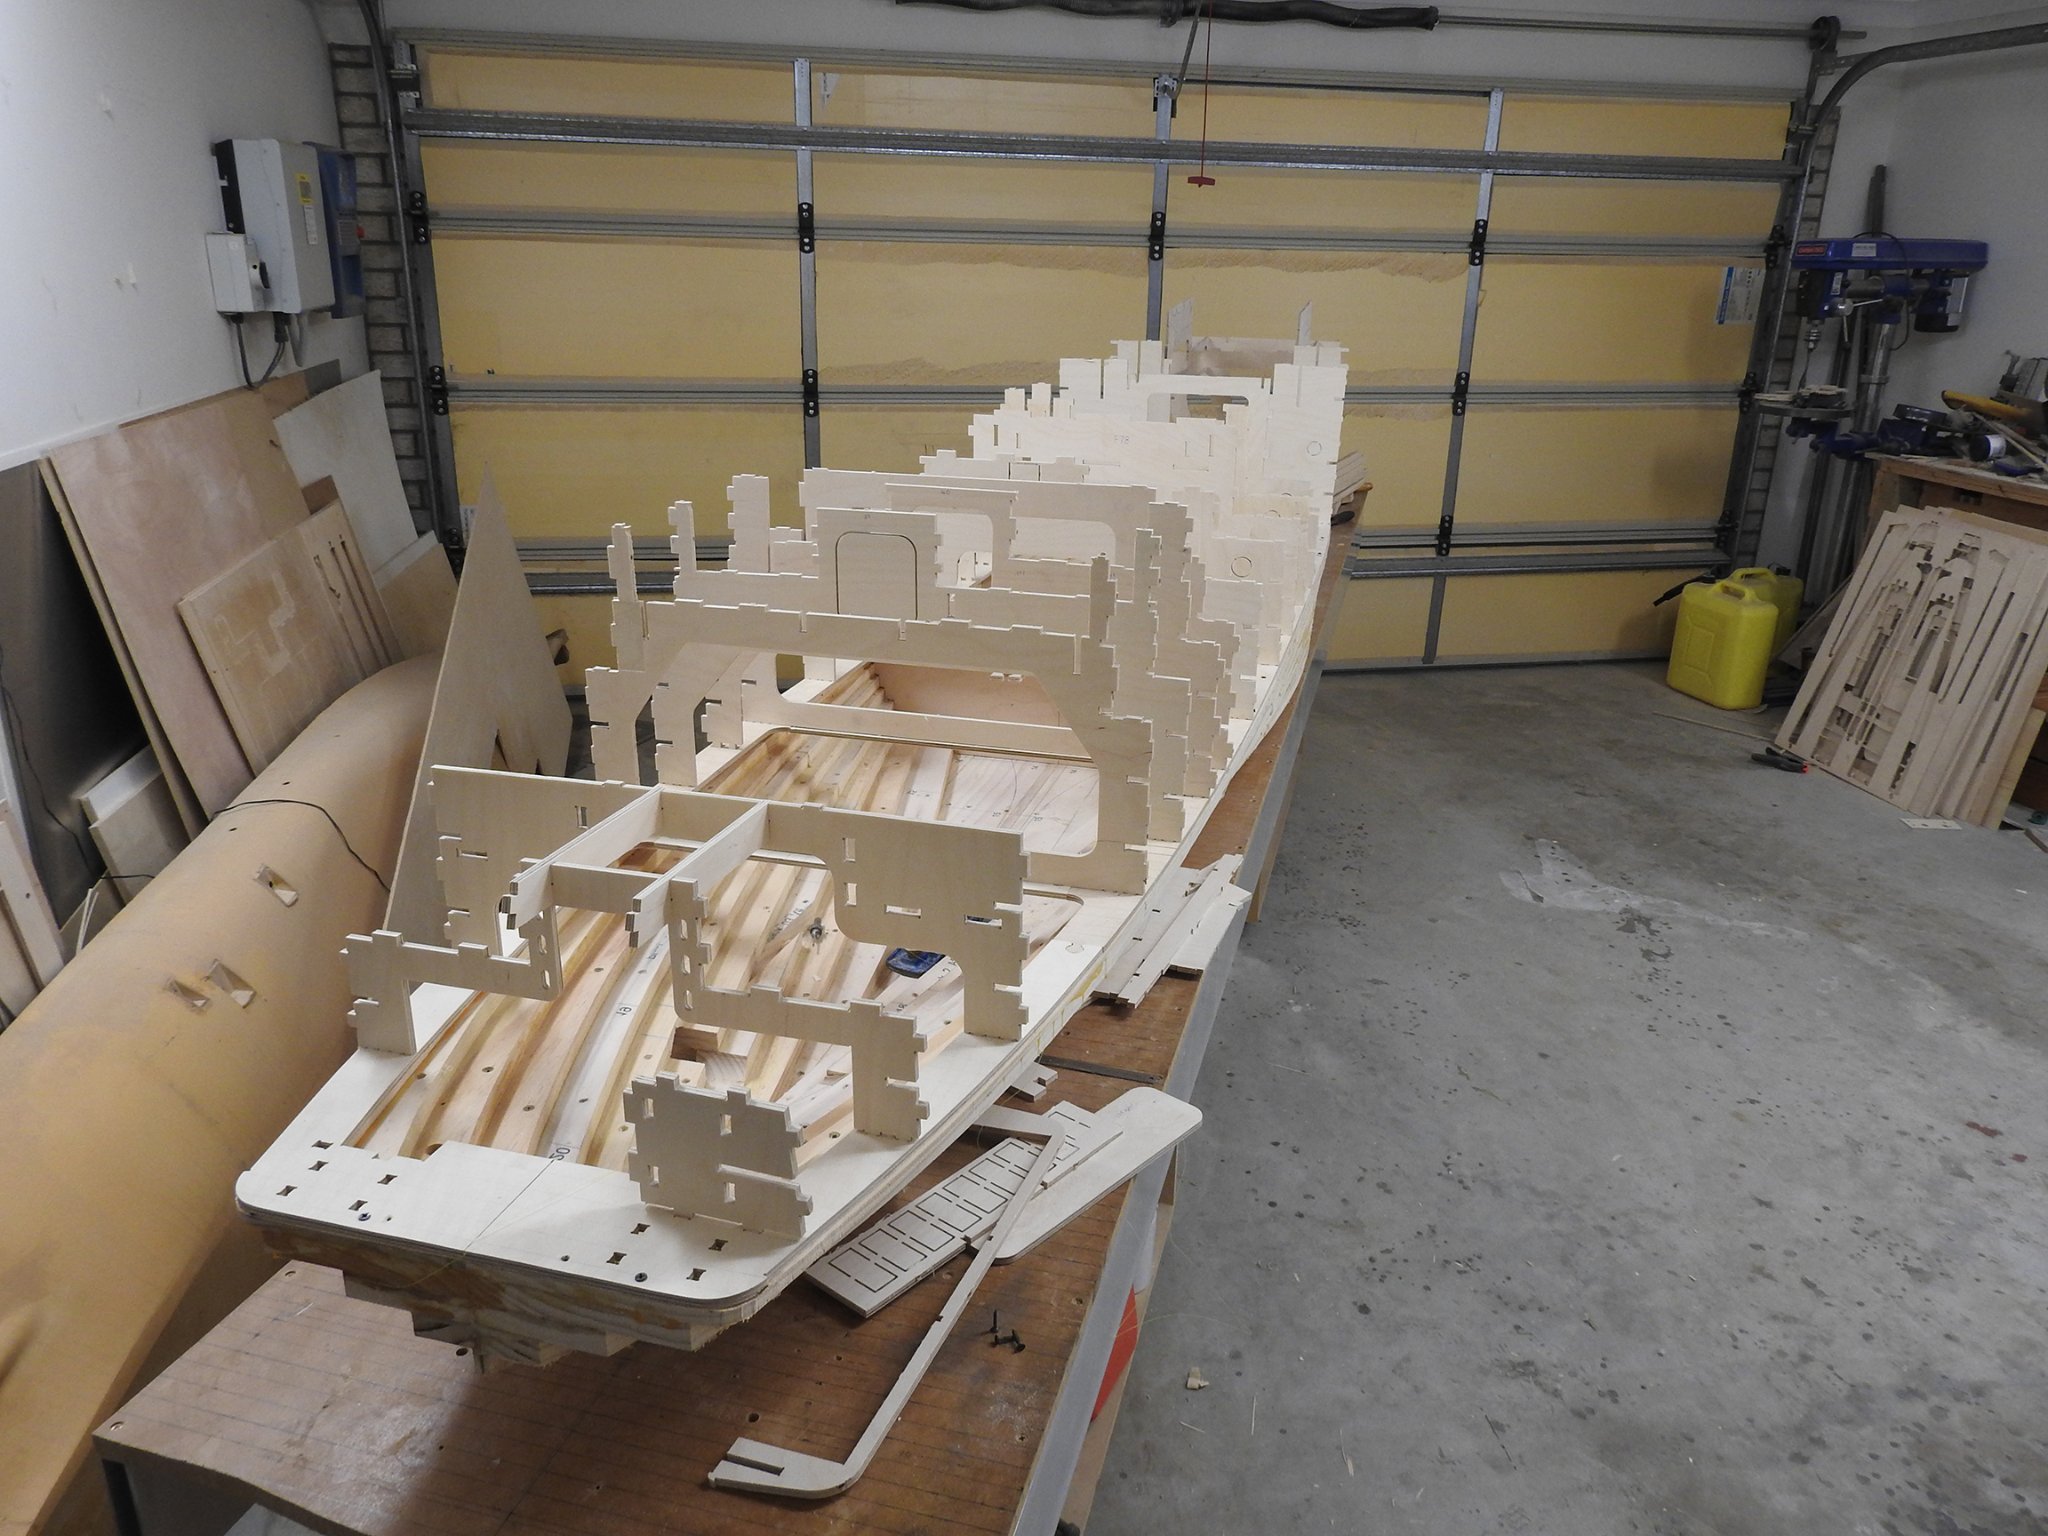
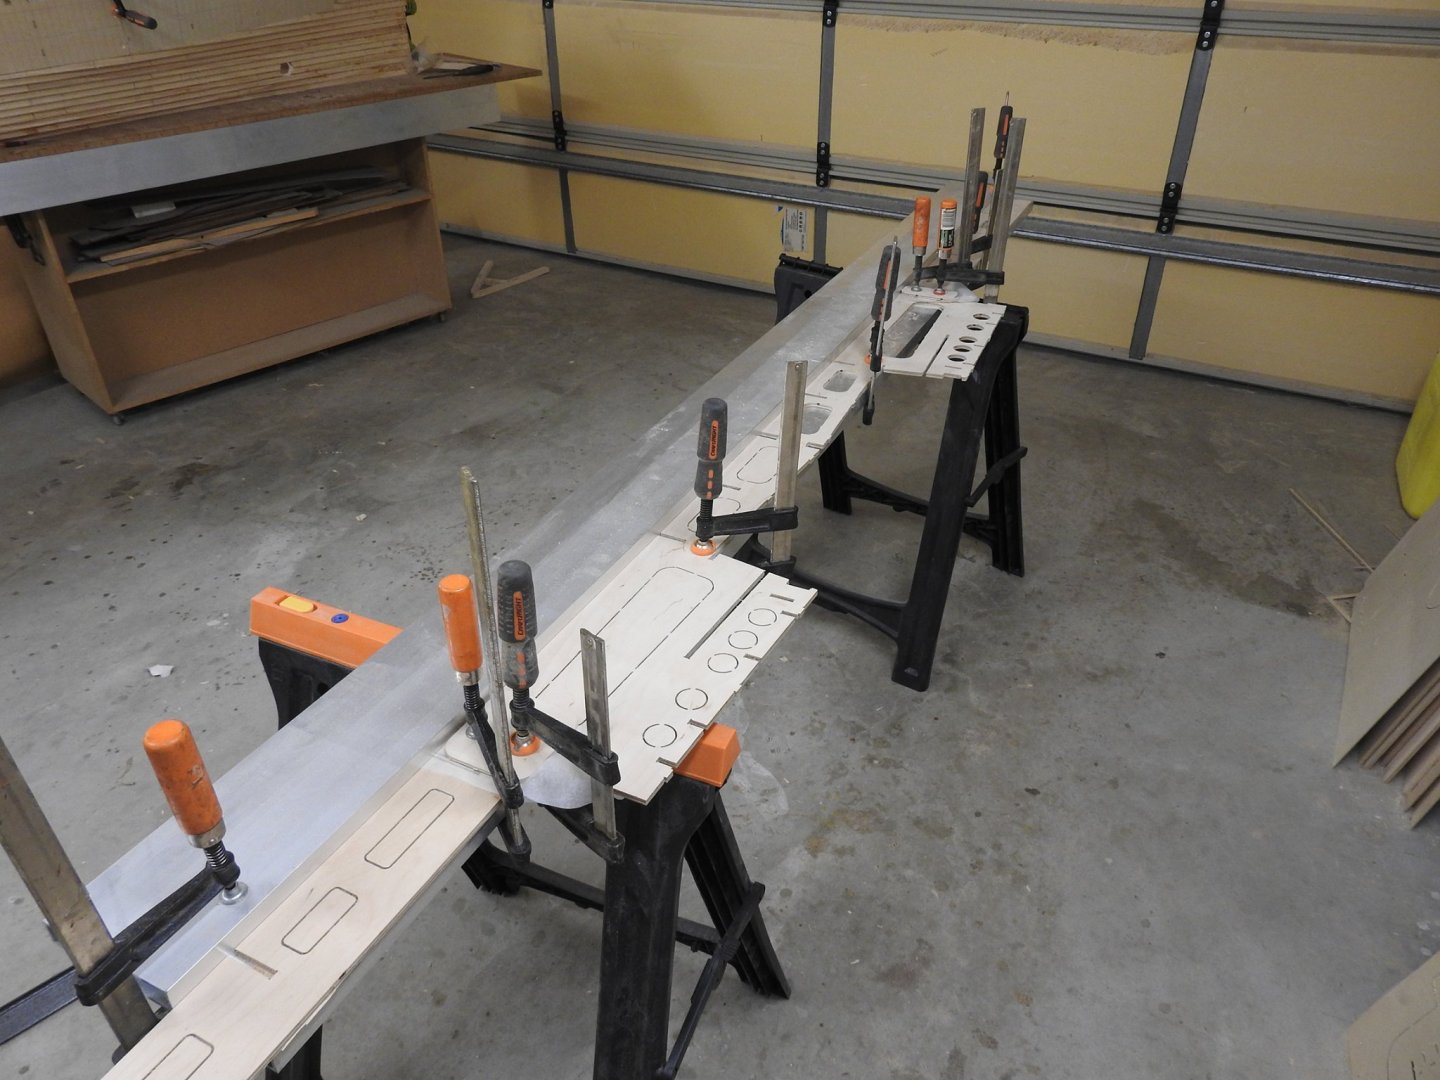
Most full frames up now and starting to fit the sections of longitudinals before they get glued together, we don't want any tight troublesome joints when trying to drop in a 3m long part


- 454 replies
-
- 12
-
-
- Union Steamship Company
- Stepcraft 840
- (and 3 more)
-
Thanks @Haze Gray It's a Stepcraft 840 CNC with 2mm cutter, not'a laser, this will carve as well, not a fan of lasers. I also build Acoustic, Classical and Jazz guitars so wanted this for both jobs I can carve my 230mm lifeboats hulls and internal plugs for example and use them to vacuum form them from 1mm styrene which is what I am going to do. Picture of it on first page of blog. @Yvesvidal I have kept the structure as simple as it can be , because the covering is only 2mm I have to make the framework denser to avoid buckling, at the same time as keep the topsides lightweight. @Imagna The other hull is the first attempt at this that I talk about at start of the blog, I have not disposed of it yet as I have to salvage brass work from it.
- 454 replies
-
- 3
-
-

-
- Union Steamship Company
- Stepcraft 840
- (and 3 more)
-
Thanks Hof Well today was a milestone, I completed step 1 and started step 2 erection of main frames. The ones with the tenons driven home are in, 2 are just sitting there at the moment. but once all the frames are in things will get interesting, I was planning on doing this at Xmas so ahead of schedule. The importance of accurately shaping the top of the bread and butter portion can't be overstated, if it's out it will throw out everything, so I had to check the heights from the base board at every frame and get it within .5mm and lower, never higher if it's not spot on, that way I can unscrew the foundation plate a tad if it needs to come up a bit later, the foundation pieces on the top edge of the bread and Butter are not glued down of course so the whole top sides can be removed from lower once built to a point where it is strong and rigid and it can be removed and the hull carved and equipment can be fitted unencumbered, then it will be glued down. The above picture also has the first layer of the bow block laminations in place.

- 454 replies
-
- 11
-
-

-
- Union Steamship Company
- Stepcraft 840
- (and 3 more)
-
Love your model Keith, beautiful work, beautiful. So today while cutting a few more sheets I decided to try some joints, I was nervous about this but as you can see they are working well This will require some means of pushing down onto frame because even though tight we have this. The Puzzle joints to join panels are fine. Dry fitted and staying together on it's own. It will just need to be sandwiched between a couple of cauls and greaseproof paper to keep it flat.

- 454 replies
-
- 9
-
-
- Union Steamship Company
- Stepcraft 840
- (and 3 more)
-
How are you going Egilman?
-
Last night I cut the last sheet of structural parts, all that remains now is the tedious task of removing the parts from the sheets with a Dremel and sawblade and sanding and labelling the nearly 240 parts. I think I will be starting to assemble soon. I am considering a new approach to gluing, I found a product I used as a kid from Epiglass called Everdure which is an epoxy 2 part product that you thin with thinners and apply coats with less thinner as coats progress, this has the effect of turning the wood into plastic impregnating the wood right through, I am thinking that if I assemble the frame work (dry) and then do that it will also bond through capillary action just playing with the idea at the moment, Everdure may not have any bonding ability though..
- 454 replies
-
- 5
-
-
- Union Steamship Company
- Stepcraft 840
- (and 3 more)
-
Try out the curve boolean tool...its a life saver. Going to be a bit quiet this week as I start a new job as lead artist and have a lot to absorb initially.
-
Which CNC Machine to get?
Richard Dunn replied to KrisWood's topic in Modeling tools and Workshop Equipment
I have a D series Stepcraft 840 that can Profile and Carve, no complaints from me in terms of accuracy, it is maintenance heavy but if you look after it it looks after you. I built mine from kitset as although it is a big job it is essential to know how to take it apart for maintenance. I should add to , that this machine requires you degrease all the leadscrews and re-grease at most every 20 hours of runtime(as soon as grease goes dark), so if doing a big job its a pain to have to do every few days but normally it would not be running 24/7 like mine is right now on this huge model. I have now cut 35 sheets of 6.5mm and 2mm ply with no problems other than stupid user errors caused by getting to know the machine and UCCNC software. No complaints and support has been fantastic for me with parts and gear.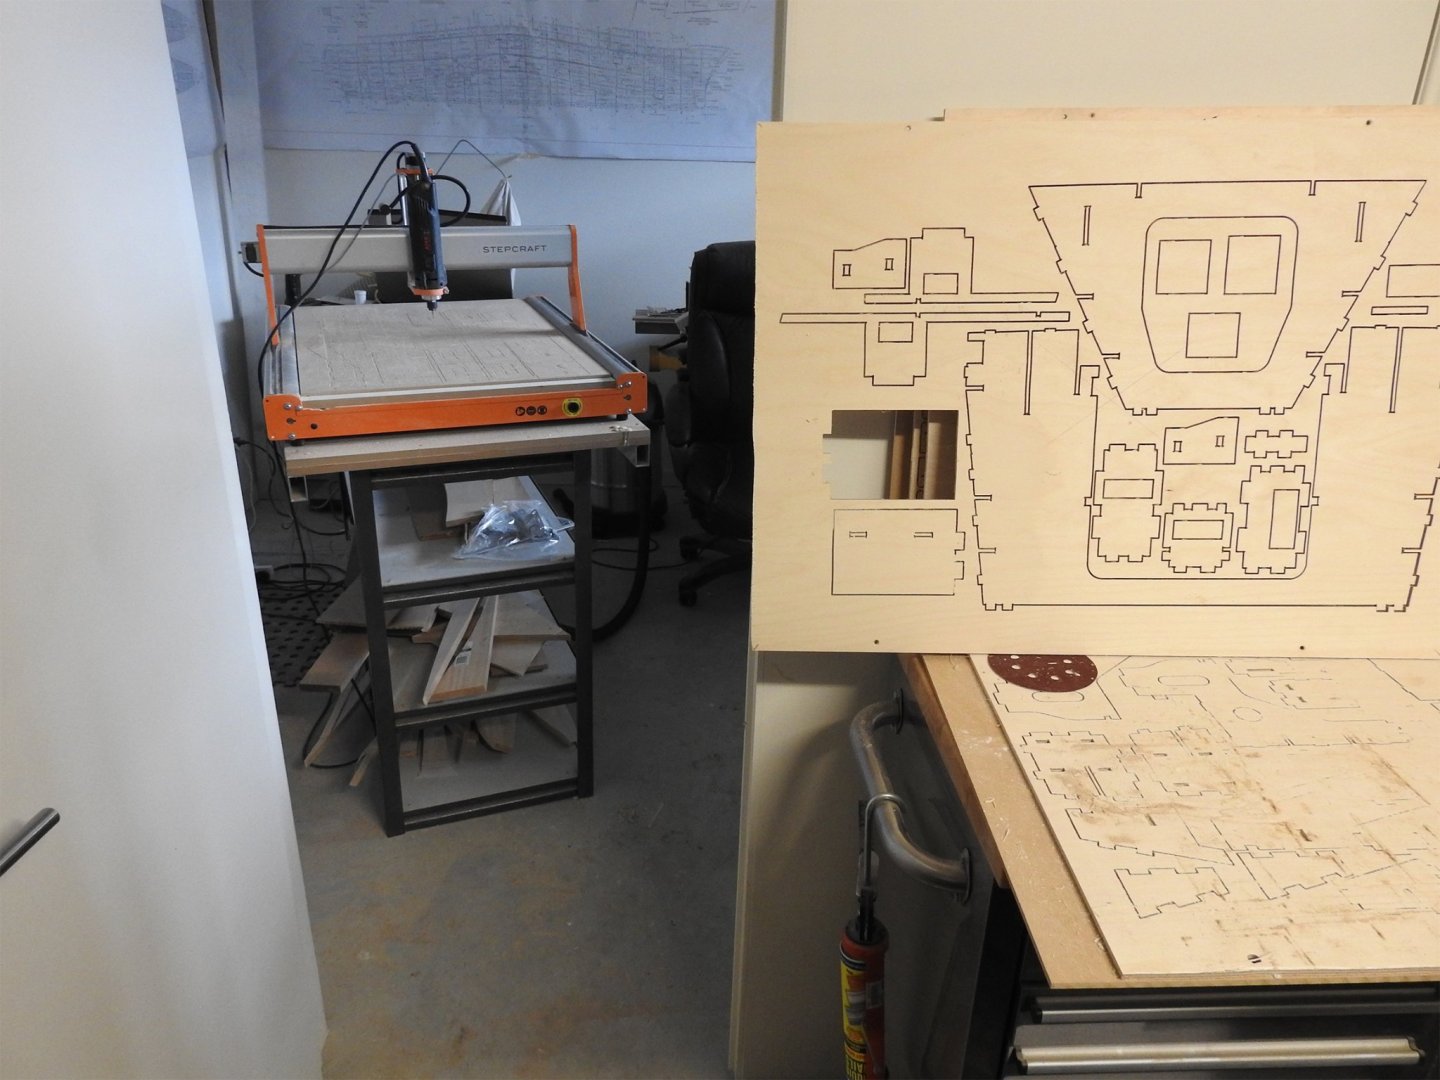
-
No problem I hope it is turning out to be the revelation I suspected it would be. My wife and I had a number of training courses on Udemy to at one time and they did well but due to the US tax laws we pulled them and I suspect it has had the effect of reducing a large number of good trainers from using the platform. We put a lot of effort into training and one large course can take 5 weeks to prepare, My Katana one did for example, you have to do practice runs, record, edit ,It is a lot of work and then of course you pay Udemy for their cut, the problem is when we do our Tax we have to declare our earnings from Udemy in Australia which is fine and expected but what got us was the the US tax people decided to take a huge lump as well for Tax, so we got taxed Twice!! This made it simply unviable to do sadly and I think that is why you will find many more on Gumroad now, but its much harder to find them, you have to know about it.
-
https://www.ak3d.de/all/3d_car_tutorial_book_animation/ That some training I bought a few years ago, never had time to do it yet but he's not a good trainer, but interesting course. One of those if they mess up, cover it up kind of tutorials where you don't get to see mistakes, I always leave the mistakes in as its a great opportunity to show how you fix them, yes it makes for a longer course but oh well. My katana modelling course on artstation was like that and ended up being about 80 videos.
-
Kevin I did not answer part of question. When working in Rhino you keep copies of all construction data on layers so you can go back and re loft, but you will see soon enough why its a hassle if it were procedural, the only time I use history is to loft a surface and then have to make changes to input curves, but 98% of time I turn it off. You have to plan ahead and once you have the idea its still fast. The only tool that Rhino lacks and I can say this is real-time updating sections, currently you have to re-project the lines every time you want to check them unless you spend 2-3k on ORCA plugin which has it, awesome tool but not for just that feature. you could probably script it in Grasshopper or make a macro to do it but I am nota programmer by any means, thats my wifes role, she is the coder.
-
To be honest Kevin most programs have some degree of history, Maya does, Max does Modo does, Rhino does BUT that does not make it a procedural program, what you seem to want is that, where you add an effect into a chain and can go back and tweak at later time.. personally I have never had use for it as it destroys the ability to be creative. you will find in hull creation its a burden not a help. if any other professional marine designers are watching , please confirm this. procedural modelling IMO is for small projects where you say for example add or Boolean solids and might need to tweak size of those solids after they have been filleted. In Naval Architecture modelling the tweaks are much much more targeted and might be aimed at just points on a curve or trims, things that cant be done on a procedural level without breaking the chain or redoing it. That my experience anyway.
-
Hi Kevin 1 has history but it get slow, I never use it and dont need to. 2 yes and variable radius fillets, they are the most stable fillets I have ever seen. 3Rhino rarely crashes and if it fails there are tools to diagnose problem and fix surface 4 Rhino has more options and customisable but that's not important 5 I've done whole REAL ships with no slowdown 6 use IGES or nurbs surface formats 7All rhinos tools are solid and you will only end up using a small collection to do anything. 8 Never needed support or help but heaps of training and good forum exist If I have ever had an issue I have been able to find fix in google in seconds, always in forum or knowledge base. I am not really interested in comparing the 2 programs, I don't have time for that, Rhino is superior for marine ...period Otherwise its Maxsurf, ship constructor or some other boat design program that does the same thing, don't forget grasshopper to, Rhinos scripting interface that uses nodes, you can do ANYTHING in that and make plugins etc.
-
All good? Me I am struggling to contain myself, I only have 4 6.5mm sheets to cut and framework is ready to assemble...but I'll be good.
-
Oh and go into settings/ modelling aids and set you nudge to arrow keys, use small increments as you need going to be on CNC today but will check in after each sheet
-
I would recommend tracing body plans with curve interpolated points use a few points as you can to get the shape and then play with analysis /curve curvature graph and practice fairing curves, plenty online about what is and what is not fair, but think of porcupines as exaggerated curve of the curve click and hold on this button and pick second one
-
Another is curve from 2 curves Think this, you have profile and plan you trace the sheer outline in plan and trace the sheerline in profile, 2 separate curves, but you can select both and it will create the result which is what you want, but it needs to be optimised and it will be point heavy
-
Just a tip, if you use image planes don't use the background image planes, I know it sounds right but you can only have one per camera and cant scale in 1D Type picture and choose picture from command line, this will let you load and image, as many as you want and scale however
-
In saying that the books that have lines that have been recreated in cad already like Alan Mcgowan's you could safely trace and get a pretty good result but you have to happy with very minor defects in surface but meah... lets face it once 12 inchs of timber planking and wales is on and adzed it does not really matter.
-
I will explain why Kevin Not Victory as such but any of those old ships of war have one very distinct feature in the lines that negates the way we modern designers do our job, normally we have single curve to deal with from sheer to keel or worst case sheer to flat of bottom where it meets the tangent of the rise of floor either way we can fair that curve easily but the old ships like Victory's Station lines are not "Fair "by our standards today but rather comprised of a series of arcs and curves that make a smooth shape but its not fair by our terms today, so every time we have to make corrections to a station we cant just adjust the waterlines and re section those to create new station because there are tons of subtle nuances in between those waterlines that make it very very hard, The stern and bow are not that big a deal, its the actual section shape. I hope that makes sense