RogerF
-
Posts
102 -
Joined
-
Last visited
Content Type
Profiles
Forums
Gallery
Events
Everything posted by RogerF
-
For what it's worth, OC, I intend painting as much of the railings and stairways etc. with the airbrush as possible before bending and fitting. Which is what I did with the PE railings on my 1/144 U-Boat which had difficult compound bends. I then touched up any areas where the paint had peeled off (it wasn't nearly as much as I'd anticipated) with a small paint brush. It also gave me 'random' areas of railing that I could weather, as rust or oily marking to cover the brass that had 'grinned through'. Looking at the main railings of Hood, they seem to be predominantly straight but those needing bending should be ok because the PE is so darn thin. I would suggest wrapping ordinary painter's masking tape around the tips of the tweezers you use to bend so there is some cushioning of the 'grip' you need when bending. It's also a good idea to roughen the surface of the PE with sandpaper before painting to provide a good key for the primer. Applying several very thin coats of primer and top coat usually gives more strength to the layers of paint than if the paint is applied in one thicker coat that covers at the first 'pass' with the airbrush. Hope this helps

-
Really excellent work OC. It's a reminder of just how much detail there is in this kit and we need to remember that the pictures are 8 to 10 times bigger than in real life. Amazing. How do you intend painting the resin parts now they're fitted on the wood deck? By hand?
-
The brass PE sheets in this Flyhawk kit are 0.11mm thick! I know because I'm working with the same PE and I measured it with a digital vernier calliper. It's enough to drive a man to drink! Come to think of it, I don't really need tissue-thin PE to do that - 'er indoors manages to get me on the bottle without even trying! 🥴
-
Thanks Craig, thanks OC. The idea with acrylic glue and the popsicle stick sounds good - stronger adhesive than tape. Closer examination of the decks reveals that the brass vents are intended to replace existing vent 'approximations' moulded on the deck surface. Ideally these should be first removed before fixing the brass ones. This calls for incredibly micro-surgical scalpel work and it will be virtually impossible (at least for me!) to get a flat surface upon which to glue the vents. But the moulded vent detail is so small that it will in all probability not even protrude above deck level once the wood deck is in place. So, either just leave the plastic moulded vents 'as is' (painting before applying the wood deck) and if they look good, leave as is and ditch the brass parts - or - glue the (by now painted) brass vents on top of the plastic mouldings. The vent heads of the brass vents are wider than their 'shafts' so trying to mount the wood deck over the vents once they are glued to the deck will not be possible, assuming the holes in the deck are sized for the shafts and not the heads - it would be just too easy to snap them off when gluing the deck down.
-
Thanks for the response OC. Brass is non-magnetic and the 'brass' vents are unfortunately not attracted by a magnet. I considered mounting on double-sided tape (see my last response) but the diameter of their bases (which would be the bit sticking to the tape, is less than 0.3mm and I'm afraid the airbrush would blow them off!
-
Yes indeed! Main instructions for the plastic parts, PE instructions, wooden decks and in my case, painting masks. I have spent far, far more time studying the instructions and comparing with plastic, PE and wooden deck parts, studying Draminski's 3D video and 3D drawings book "The Battlecruiser HMS Hood" and figuring out the ideal sequence of the build and painting, than I have actually spent building the darn thing and the further in I get the more questions present themselves. I've scratched off most of the remaining hair on my head pondering the answers. Still, as the old adage goes - "If you can't take a joke you should never have joined".
-
Love the way this is panning out OC. It looks as though you needed to widen the slot in the deck to accommodate the stair case in the above pic. Is this something that needs to be done for every stairwell? I hope not! Perhaps it results from having to remove that bent staircase you mentioned. Following your logical build order, I'm re-thinking my intended build sequences on the superstructure. I still want to airbrush as much of the added deck detail before fitting (range finders and ammo lockers) but that will necessitate having the decks painted first too Another thing that is puzzling me are the mushroom vents. You have already mounted some and they are plastic parts. There is a bag full of microscopic brass vents with the deluxe kit, and I'm thinking they will need to be painted before fitting (at least those that protrude from the wooden deck sections). So...... how on earth can they be painted?!!! Any ideas OC or have you already a plan of action in your brain?! The only solution I can think of is to mount them all on a strip of wood with double-sided sticky tape. But the bases have such a miniscule cross-section that I fear the vents may well not remain in place on the adhesive tape when 'blasted' by the airbrush but disappear into the great beyond never to be seen again. Mmmmm. That said, great progress OC and it's really enjoyable following your steps, knowing myself, by now, the architecture of the ship so well and seeing your approach to assemblies I've already partially tackled - at least up to the dry-fit stage. All power to you elbow Sir!!
-
I'm really enjoying catching up with your build OC and impressed with your progress. I sometimes think that I spend far too much time planing in my head and far too little time actually building. However my plans deviate a little from yours in some areas. 1. Once I've primed and painted the hull, I intend mounting the main and aft decks. Using the masks I will airbrush deck detail that will protrude above the wooden deck. 2. I intend to add the upper decks later when they are nearer completion. First the intermediate decking and then the weather deck paint job which I'm dreading! I think that he cut-outs for the armourment are of a darker grey than the decks so I will mask those areas of deck and where the wooden deck will be so I can spray the cortecine part. Then the cortecine (masking the grey area then the normal grey area beneath the wooden deck). Finally I'll add the wooden deck and mount the sub-assembly to the main decks. 3. I intend airbrushing the ammunition lockers on the sprues because I think it will be easier to do so than try to paint them once mounted. 4. I aim to attempt to add the PE funnel tops because I was surprised at how easy (for me!) it seemed to bend them to the required radius. Attaching might well prove more of a challenge, however. I will probably ditch the idea of fitting the PE stays since having no stays will look better than having misshapen ones which will probably result during final fitting of the funnel assembly to the deck mounts. When and just how I will paint the funnel exteriors and inners I am not yet sure, modelling in this scale really does pose problems that are not as significant in larger scale models. Work has started on the upper superstructure which will have essential staircases added prior to being airbrushed and mounted. May main concern here is knowing how to tackle the fore mast, two of the three legs of which thread through an upper deck at an angle - thinking cap needed again. Initial trial fitting of the plastic kit platform below the starfish platform is also a worry. Wooden decks - your experience OC??!!! I'm glad you've already fixed yours and as I expected, this will be no simple task. I plan to mount them directly to the plastic deck because I fear they may tend to gradually lift in places if adhering to several coats of paint rather than solid material hence masking while painting other areas. How strong is the wooden deck adhesive? Apart from the fiddly nature of the fitting, do you have any tips on the best way to approach the job and are there any pitfalls that you might care to share with me???!!!! Just thought I'd let you know I'm still alive and kicking and despite other circumstances playing a part, I'm a little unmotivated at the moment so progress has been halted for a while. Thinking and planning continues however, so I just need to get my head down and get on with it. Your excellent achievements so far do actually make me want to progress so, let's see how it all pans out.
-
Hi there OC, Am not much further on I'm afraid. There have been far too many distractions and I need enough time to airbrush the hull - prime and top layers. I will catch up with your build soon, it's looking great and you are taking one or two different approaches than I intend to take with some areas but I will comment on your thread/build later. Thank you for your kind enquiry, I will get back to Hood before Christmas I hope, but I always knew that Hood would be a long haul. Kind regards Roger
-
Thanks Mike, calling it a 1/700 scale model was a 'senior moment' I think, well that's my excuse and I'm sticking to it! The detail is still spectacular and she's looking great. Can't wait to see her finished.
-
Looking at these photos it's hard to believe that this is 1/700 scale. I'm currently working in 1/700 scale myself so I know just how fiddly this level of PE detailing really is. You must feel delighted that the results so close to finishing have turned out to be so spot-on. This represents a very fine example of the skilled model builders capabilities and I find the attention to detail in a model this tiny to be quite extraordinary. Excellent work Mike, I'm very much looking forward to the finished seascape - a seascape would be a step to far for me!!
-
The detail in this photo is amazing. When I consider: a. The scale b. The amount of detail visible here and the fact that much of it will be difficult to appreciate once the model is upright and c. The skill and patience essential in carrying out this work.. then I raise my cap to you Craig. If it's any compensation, it has helped to motivate me to return to my Hood after a laziness- and frustration-induced sabbatical and once a few ordered items have arrived, will see me returning to the fold myself - albeit with somewhat lower skill-levels. Excellent.
-
Were you using a pin-vice or drill or just your hands when drilling? I bought a little battery-powered, 3-speed drill that can be charged via USB. I have used it extensively and the only drill bit I managed to snap after buying it was a 0.3mm drill which stabbed my thumb when I was removing another drill from a box of 50 micro-drills and broke off its shank in the process, and yes, there was blood! It disappeared into the flesh of my thumb with alarmingly kittle pressure. This build has to be followed, but there is not a chance I'll be following suit. With Hood started, and a little more complex Bismarck to follow there is no way I could take on that Yamato beast but I'm really looking forward to a fellow "masochist" ruining his eyes, back and patience with this kit. The trouble with these 1/700 kits is that in the photographs they look so innocuous. Complex, yes but the parts appear much bigger than they are in reality and I think, "Mmmmm, that looks good to me, think I'll order one". It's only once the box contents have been examined that I accept my folly. As the Italian in 'allo, 'allo' would say "What a mistake-a da make-a". (any Brits reading will know what I'm talking about).
-
Until I joined this forum I thought I was the only one and felt so alone, now I feel safe to come out of the closet - there are DOZENS of us in here!
-
Amen to that! For me it's not just the super-delicate touch, patience, eye-strain and working at a slow, carefully measured pace, but the fact that my back starts to complain when it feels I've spent too long (2hours plus) bent over the desk fiddling with wafer-thin PE or microscopic AA guns and mast details. I would definitely switch to 1/350 scale if I had any room for ships bigger than 1/700! Frustration with certain tasks sees me switching to different assemblies before returning to other areas that I left unfinished through frustration or lack of clarity on sequences. Does anybody else lie awake at night pondering how to tackle some particularly quirky task?! My current problem relates to how I am going to be able to fit/paint a tripod mast, 2 legs of which pass through one deck before being anchored at the deck below. Answers on a postcard please - not here! Thanks Craig for your take on 1/700 builds.
- 174 replies
-
- 4
-

-
- prinz eugen
- trumpeter
- (and 2 more)
-
Really great work Craig, and I just love the detail, especially on the funnel. I'm not sure if you mentioned this before but, is this your first venture into 1/700 scale? What are your thoughts following (near) completion on the journey to get to this stage? Any particular aspects of the build that tested you more than others, (apart from needing to locate the AWOL deck railing!), unexpected obstacles and so forth. Did you need to develop new skills to tackle certain aspects? I know, I'm a nosey so and so!
- 174 replies
-
- 4
-
-
- prinz eugen
- trumpeter
- (and 2 more)
-
Glad the video was of interest. Seeing him attach the funnel stays has made me re-think - I might just try and add mine since they've been cut out ready. Might chicken out part way through mind, although I've learned quite a lot from watching his sequences and handling. Still, his model isn't perfect... red hull bottom?! Also I think all Hood's bollards were black and cleats grey. Masking tape pulling off bits of the boot line doesn't seem to faze him, I'll be mortified if, no, when it happens to me.🙄 I've not been completely idle myself, just slowly coming to terms with starship platforms. The fore mast starfish platform and superstructure are almost finished and I managed to cut out the two main platforms for the main mast without too many bent or damaged parts so I am gradually learning it would seem. It does seem to to take an inordinately length of time to get just this far but then it's not a race and it keeps me off the streets.
-
Full build on youtube. This is the first full build of FH's deluxe Hood I've come across. There are many interesting details to be found here. In particular there are (for me at least) interesting sequences of build where PE and plastic parts are combined, paint masking and as for the rigging.... well, not sure I'm up to that but by the time I get that far I'll probably do the same but not use copper wire for some areas as in this build. Now I just need to find the time to get on with my own model.😬
-
Some great work here Mike, most PE stuff is a challenge - even in 1/350 as you say - but the results are very rewarding. I'll be following a bit more closely now. Keep up the good work.
-
If I'd bothered to look below the waterline I'd have seen that she's still missing her propellers! There is so much detail that needs attention in these kits and it's all so time consuming. I'm not looking forward to all the staircases and ladders, rigging and railings and there are no less than 50 microscopic brass mushroom vents in 3 different sizes, some barely 1mm in height and a fraction of that in diameter, they look like an army of ants in a plastic bag! Some I can probably glue in place before I paint the steel deck parts but most are on the wooden deck so will need to be painted first - haven't worked out how yet! I've a very long way to go until I arrive at the stage you've reached, but I think it will be rewarding to see how she looks as she nears completion - even if there is a wealth of detail still to be addressed. Seeing your model approaching completion must provide motivation for you as you tackle the final stages I should imagine.

- 174 replies
-
- 7
-
-
- prinz eugen
- trumpeter
- (and 2 more)
-
She looks cracking, OC. A great model and some fine work from you to make it look so good. Is she finished now or are there areas that still need attention? It would be fair to say that your patience with all the detail has helped me persevere with my first foray into the world of 1/700. 🙂
- 174 replies
-
- 6
-
-
- prinz eugen
- trumpeter
- (and 2 more)
-
Wow, those are wickedly detailed parts. The rivet detail, however, looks very much overdone to me but may well look alright 'in the flesh'. I might try some of those AA guns and rocket launchers for my Hood though delivery times and customs can be a hassle. I've just finished 8 (only 7 are actually needed) 5,5 inch secondary armament guns in the standard FH plastic but it would be interesting to see if the move to 3D is worth it and indeed if they fit where they're supposed to fit!
- 174 replies
-
- 5
-
-
- prinz eugen
- trumpeter
- (and 2 more)
-
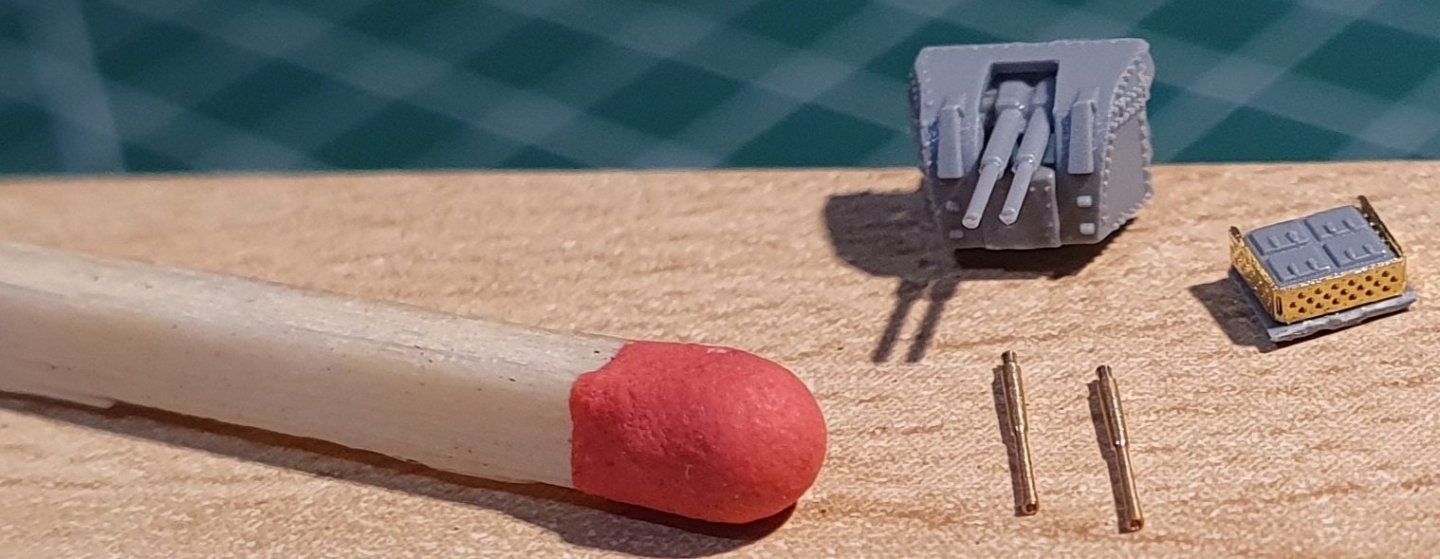
A fair amount of work done with not a lot to show! FH has provided brass replacement barrels for the 5,5 inch secondary armament but they are so tiny and drilling 14, 0,3mm holes in a part that is so tiny is something I decided to pass on for three good reasons. 1. FL's standard plastic parts are actually very good with no flash between barrels and are difficult enough to cement together (3 parts) as it is without worrying about breaking off glued-on brass parts. 2. If I had fitted the more intricate brass barrels (all 14 of them) they would probably have looked to be a smaller calibre than the pom-pom AA guns moulded in plastic. 3. I wanted to avoid drilling one or more 0.3 mm holes in my finger tips. Also, in places it's getting to the point where PE is approaching the of point of diminishing returns. The pic shows secondary armament without up-grade barrels and a piece (I know not what) which doesn't really need the PE embellishment but - what the heck.