HOLIDAY DONATION DRIVE - SUPPORT MSW - DO YOUR PART TO KEEP THIS GREAT FORUM GOING! (Only 72 donations so far out of 49,000 members - Can we at least get 100? C'mon guys!)
×


homer
-
Posts
133 -
Joined
-
Last visited
Content Type
Profiles
Forums
Gallery
Events
Everything posted by homer
-
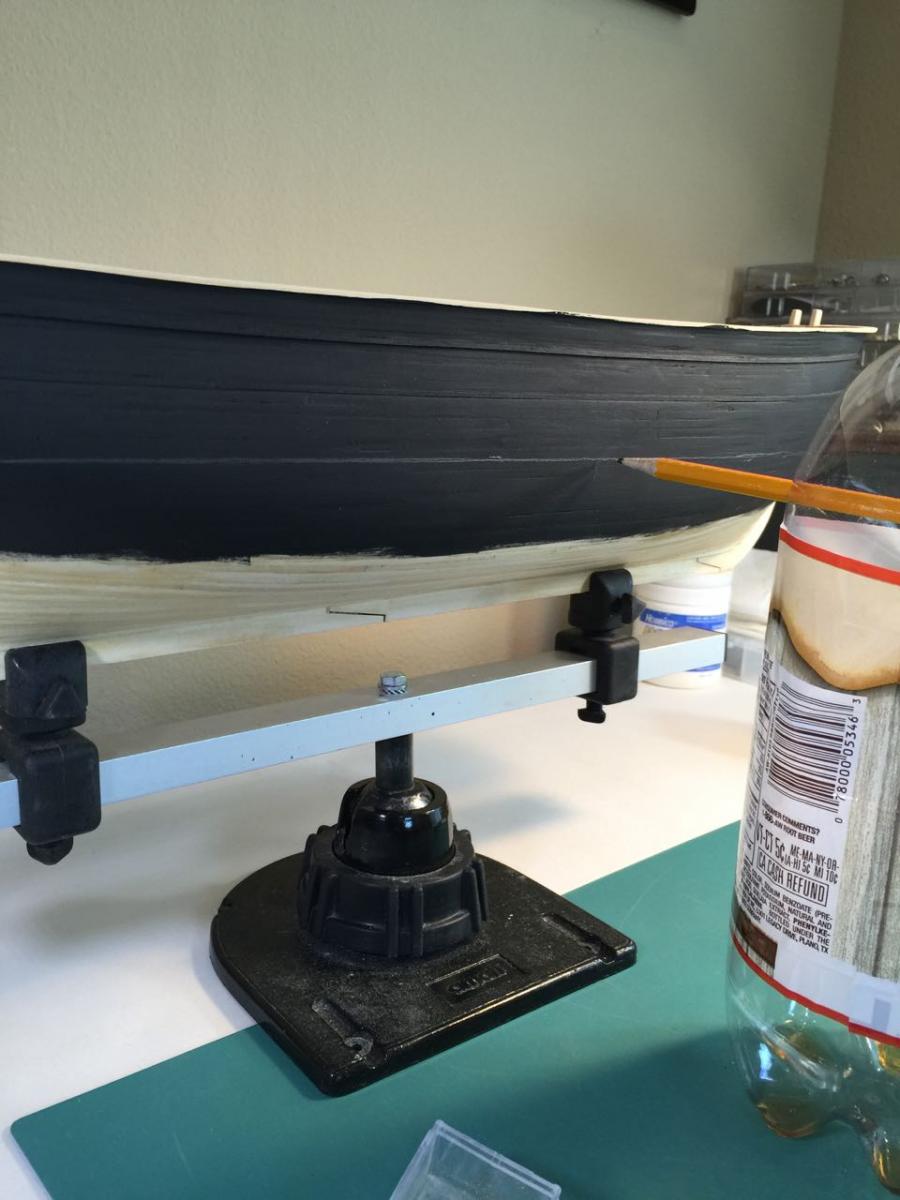
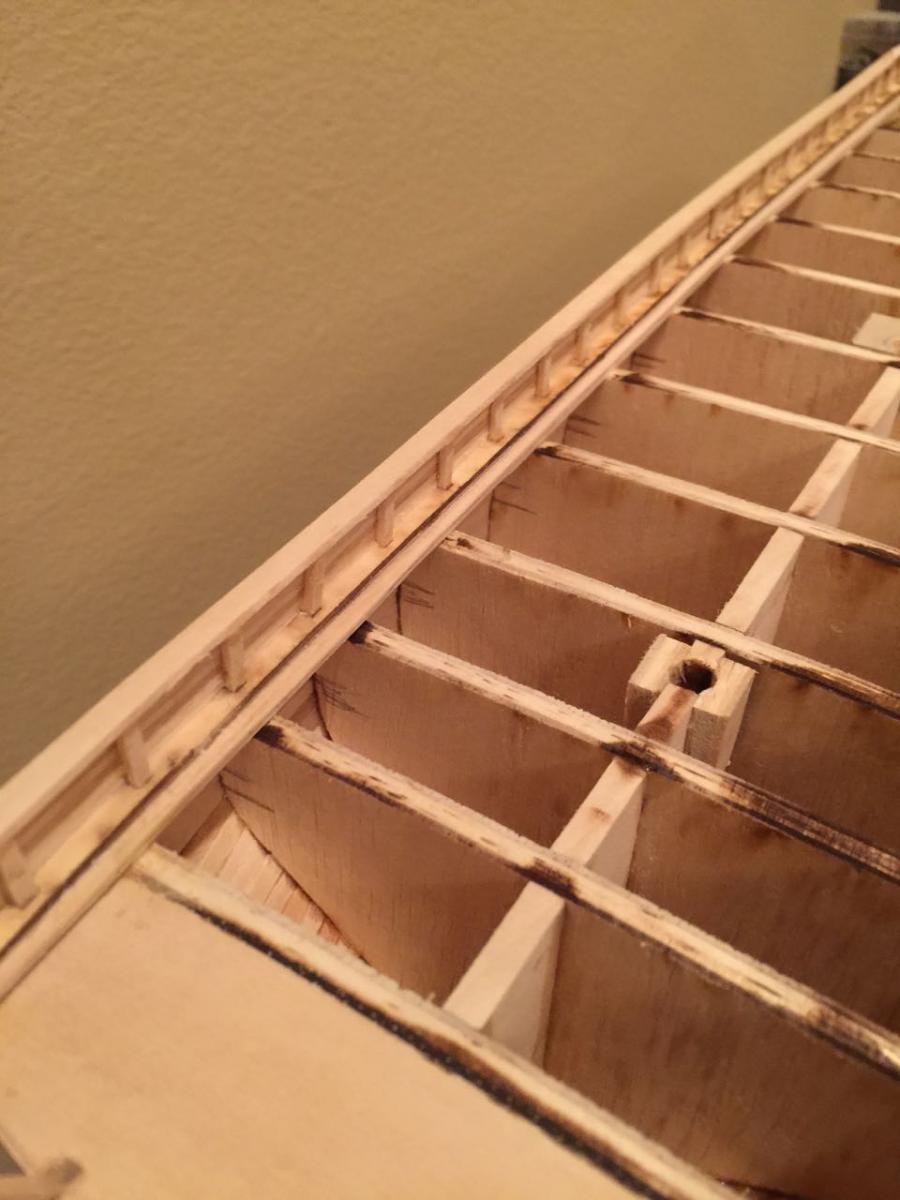
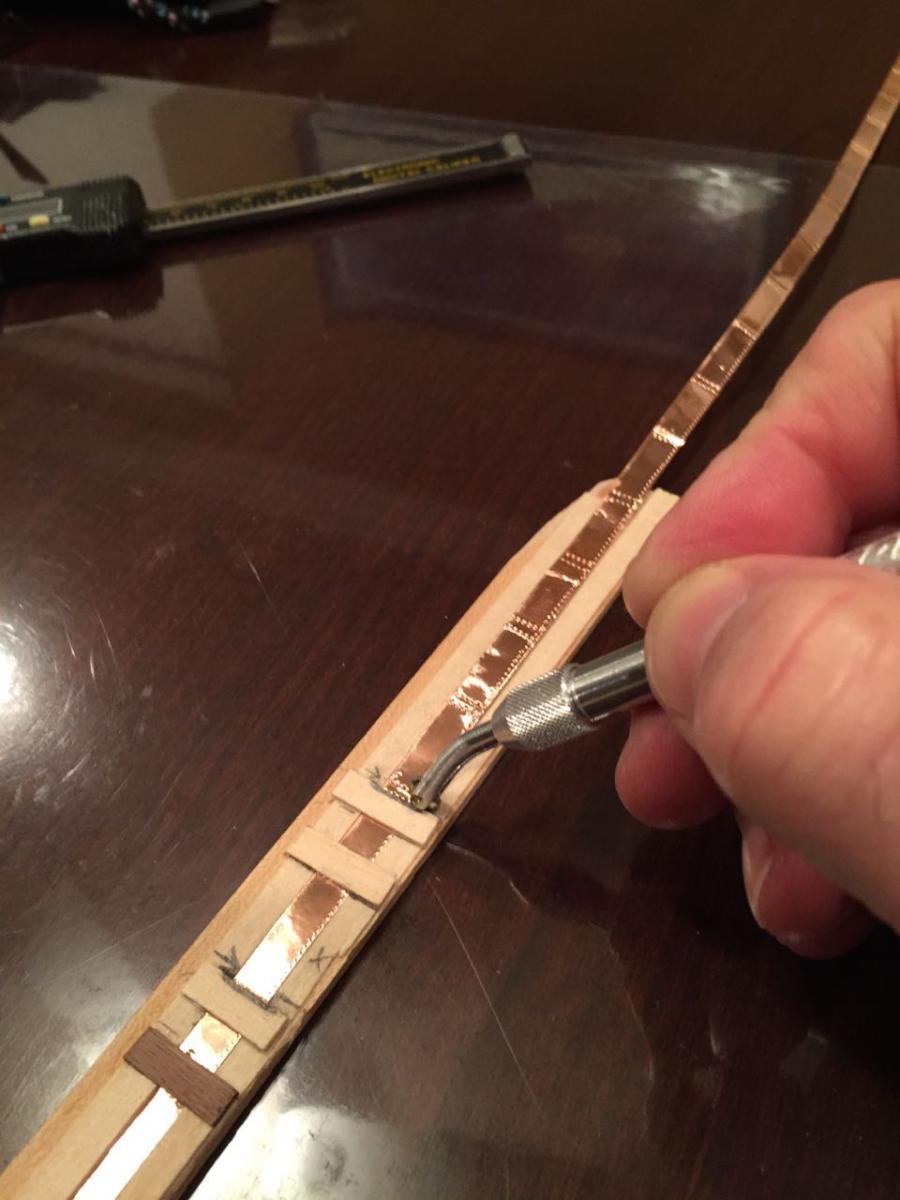
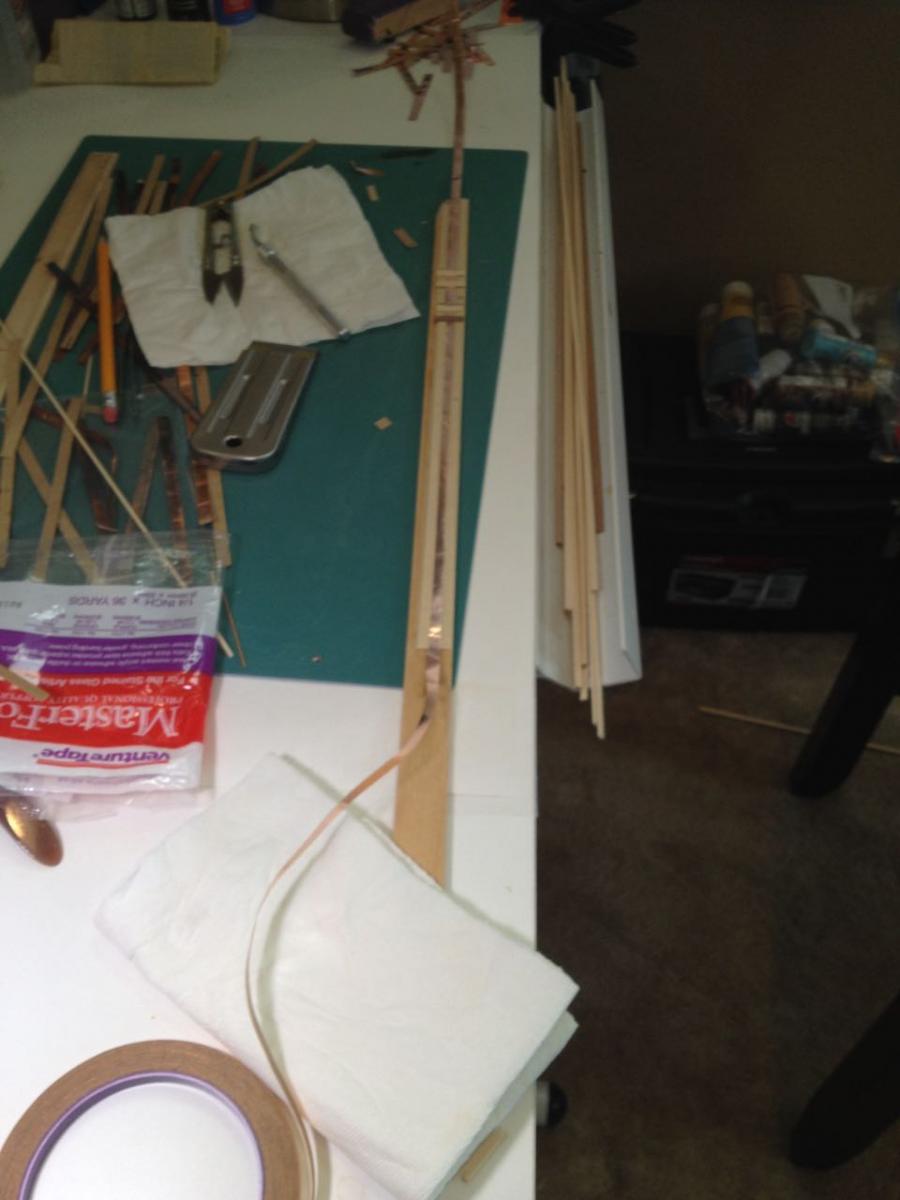
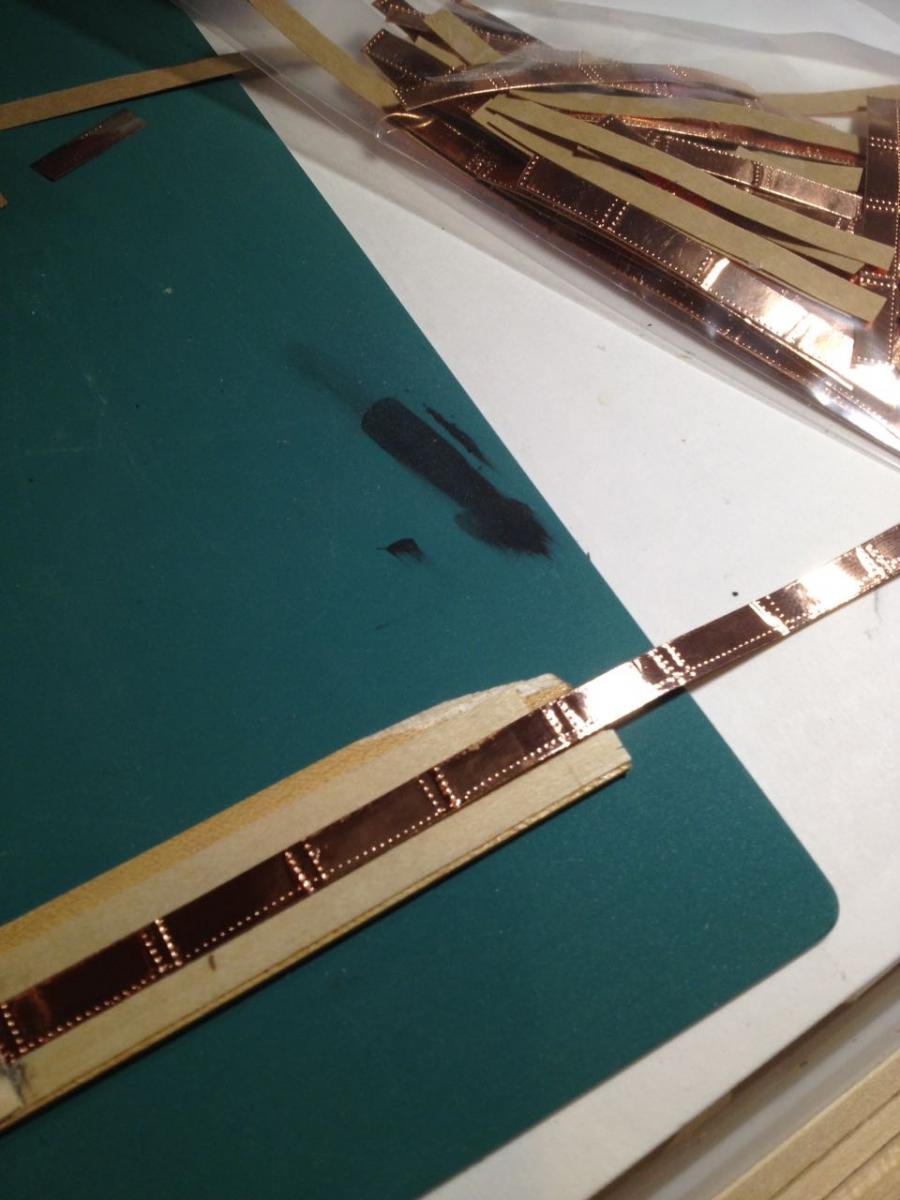
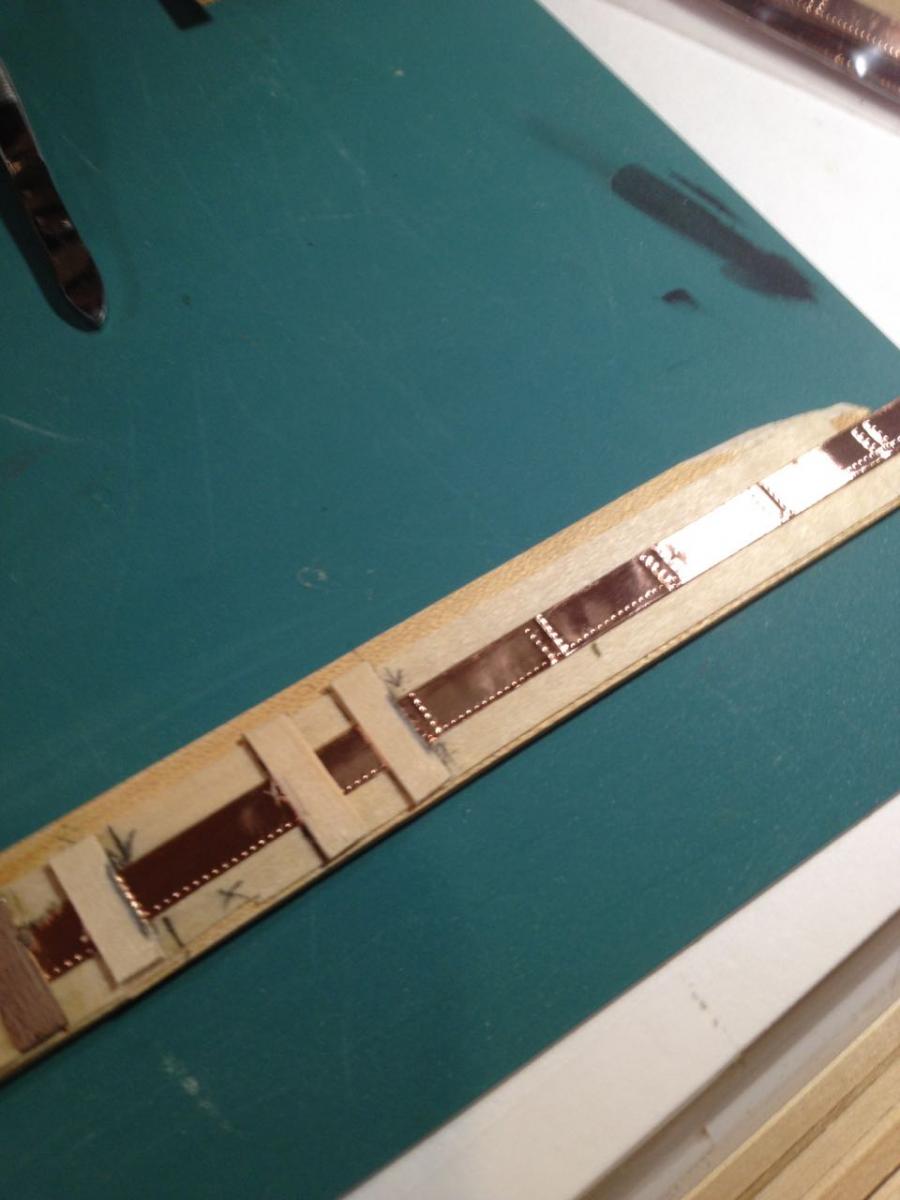
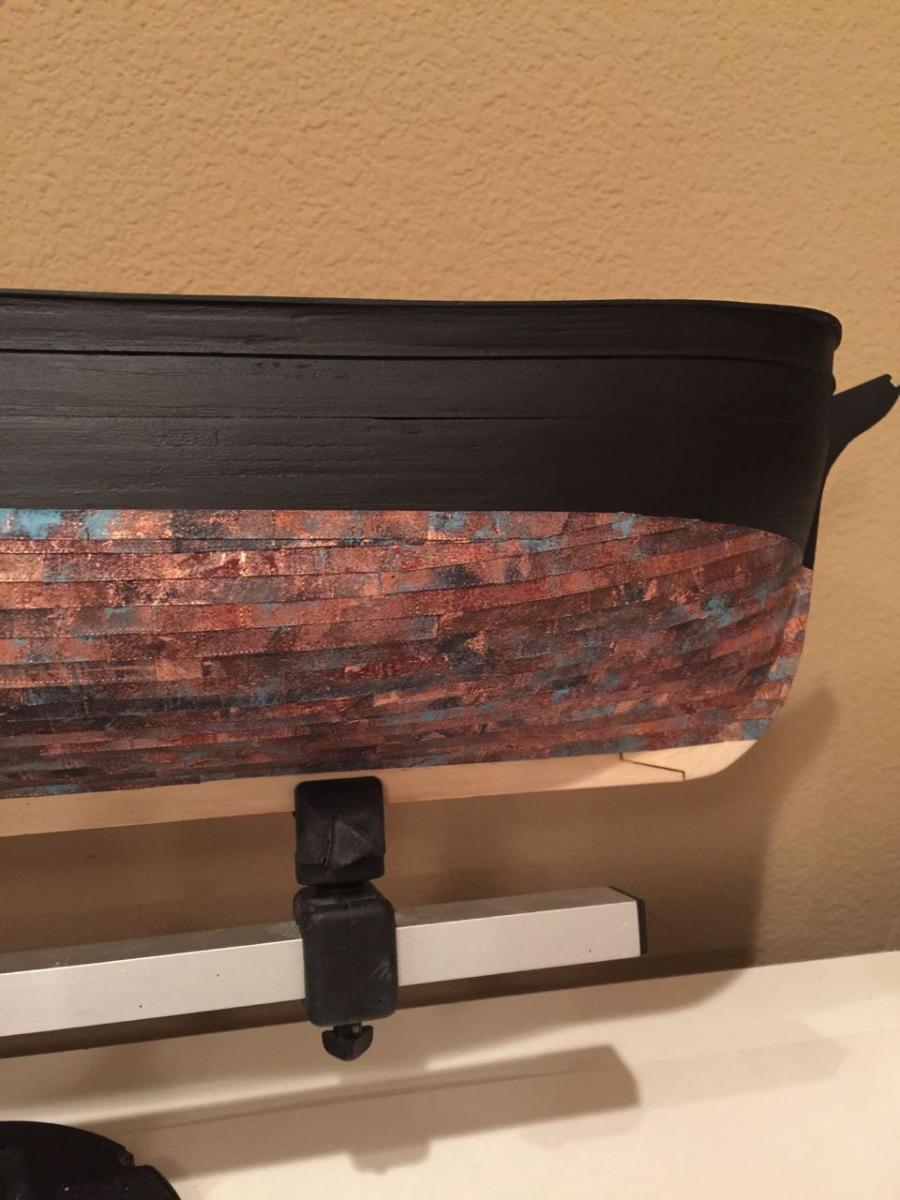
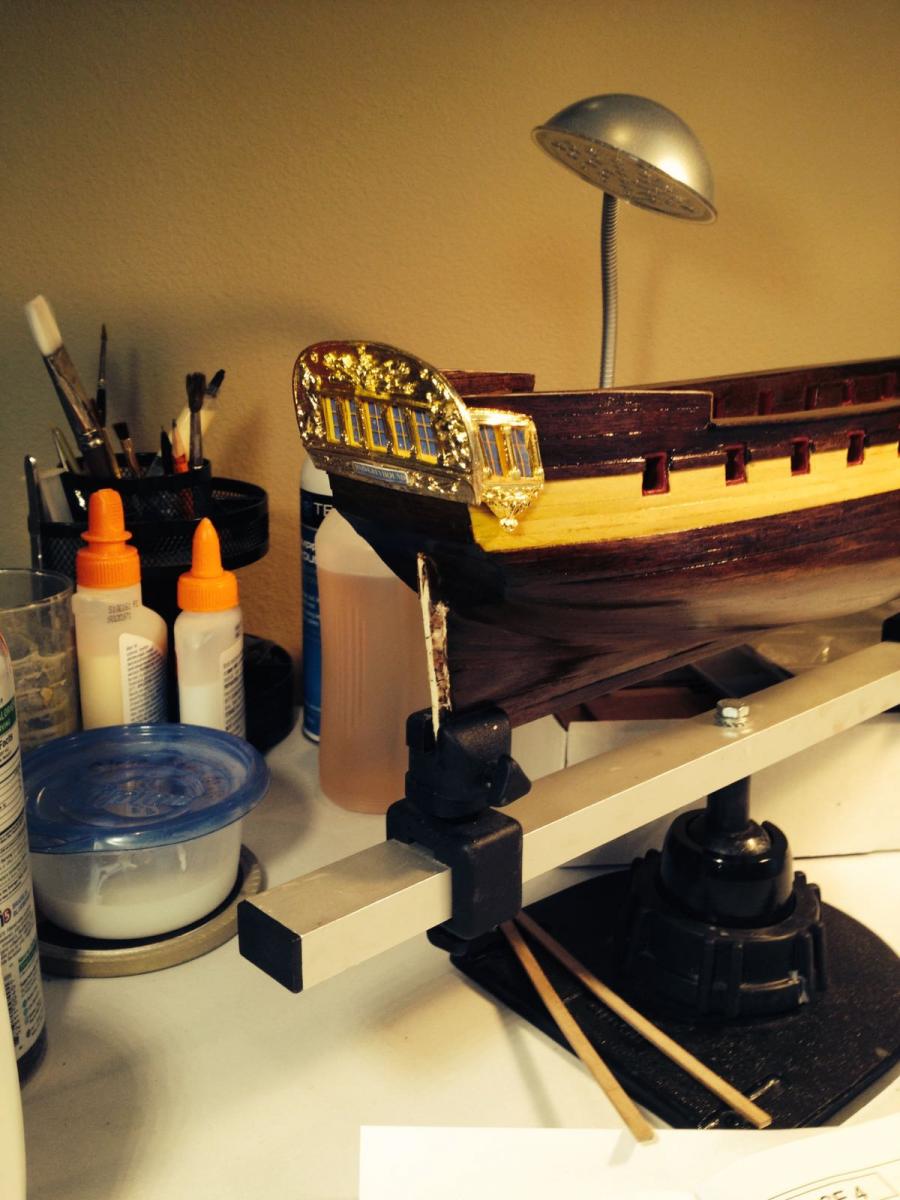
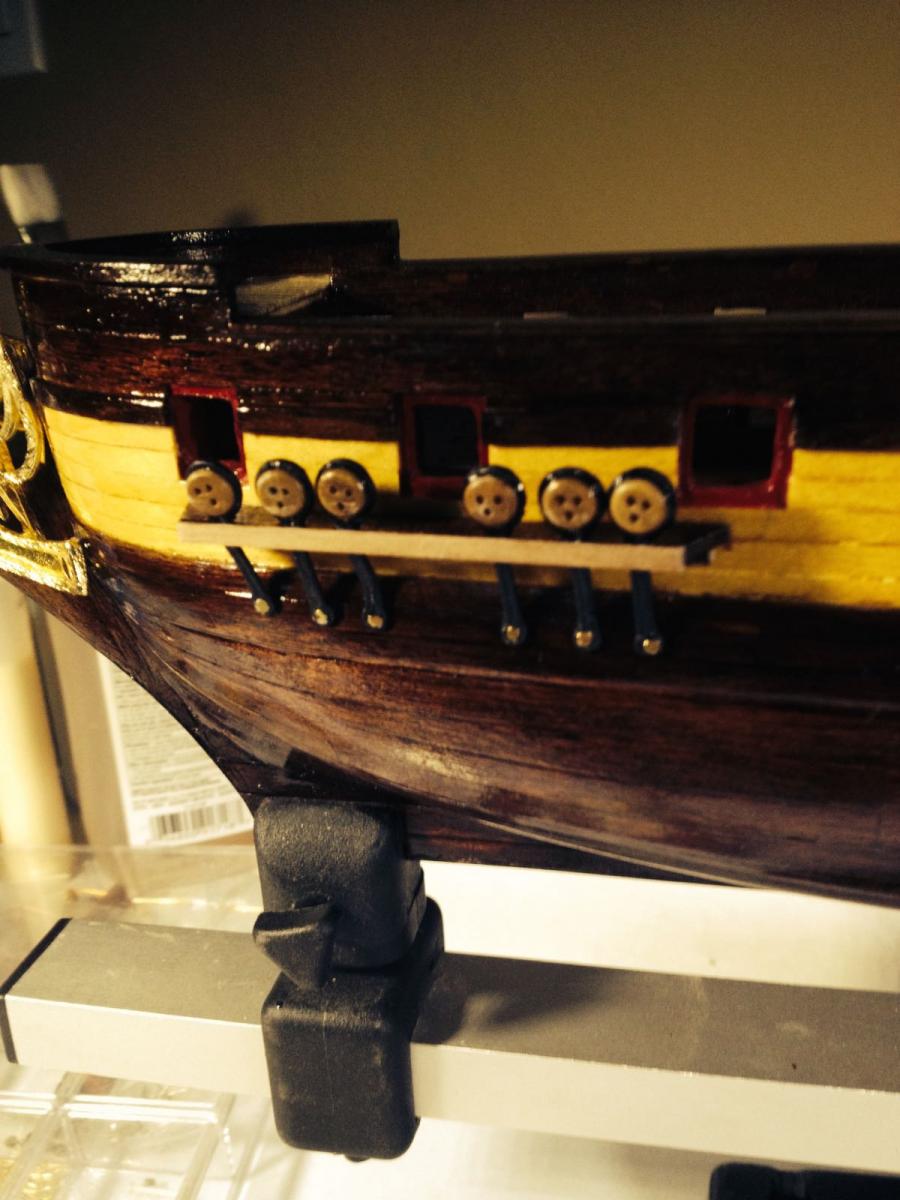
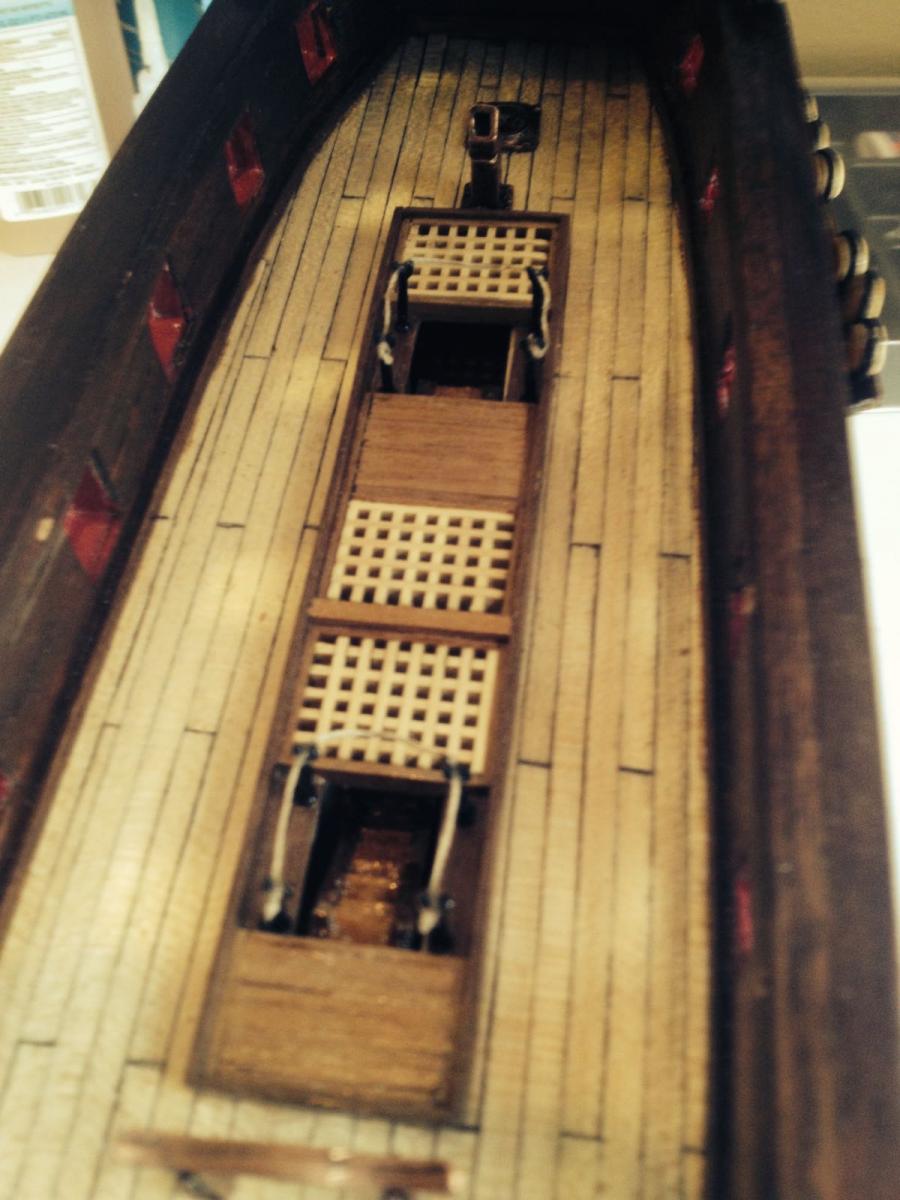
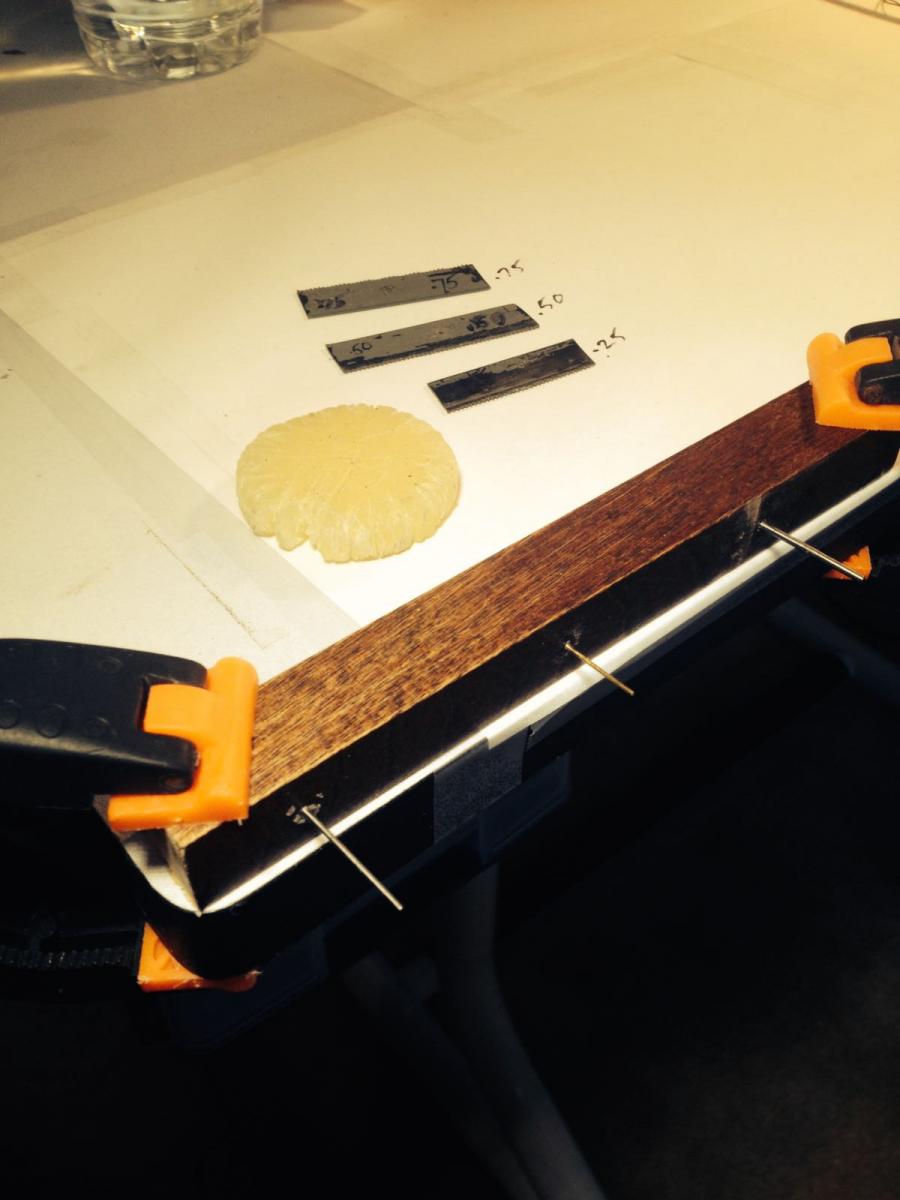
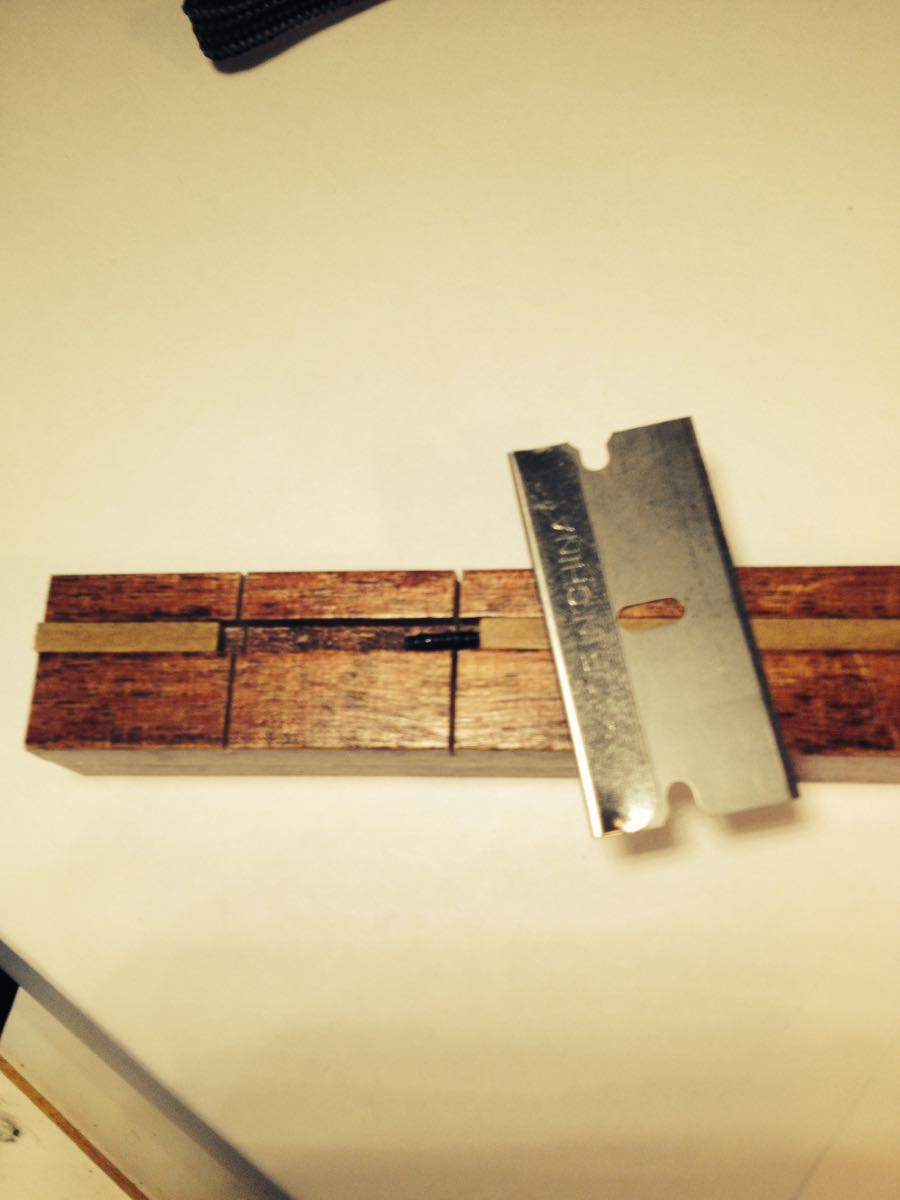
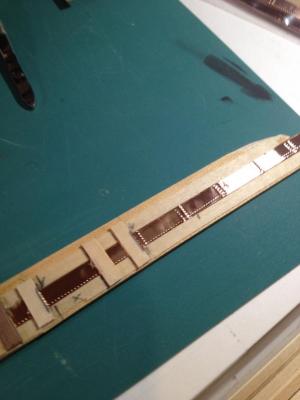
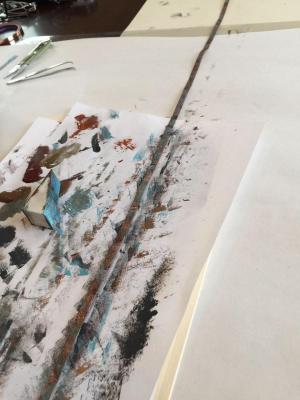
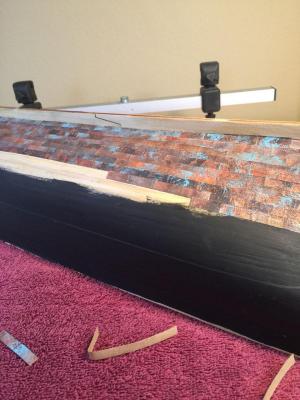
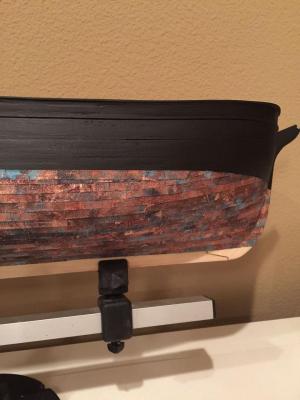
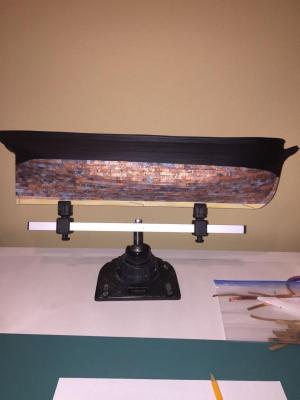
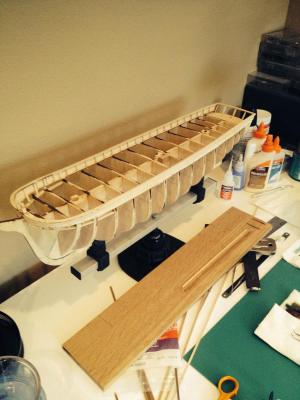
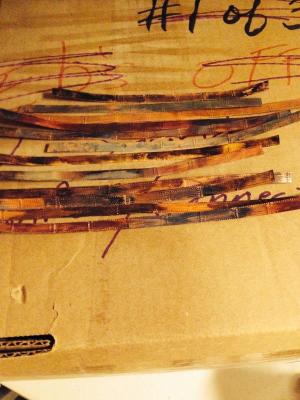
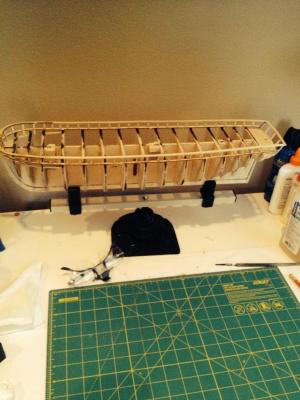
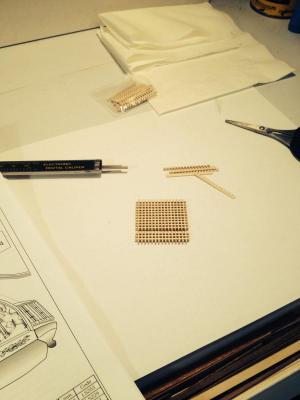
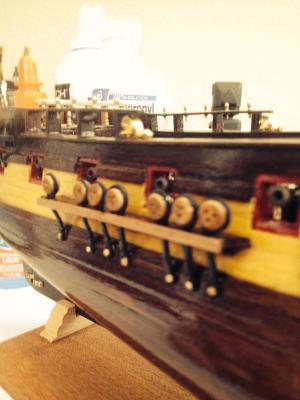
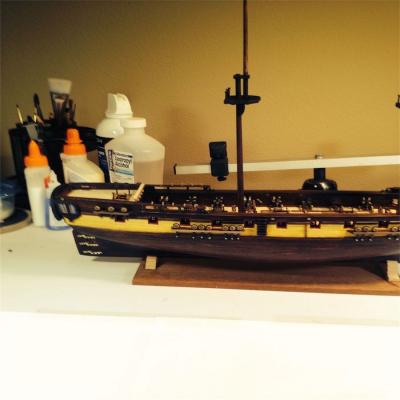
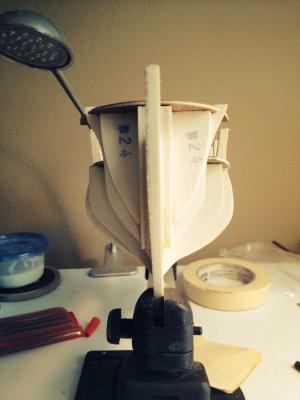
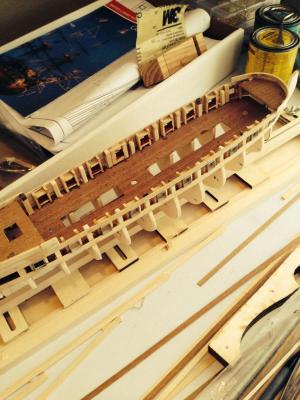
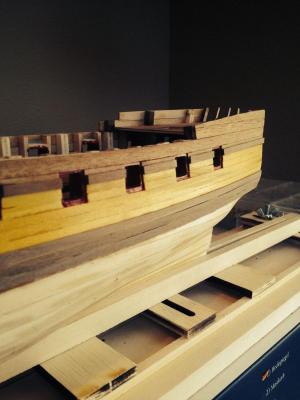
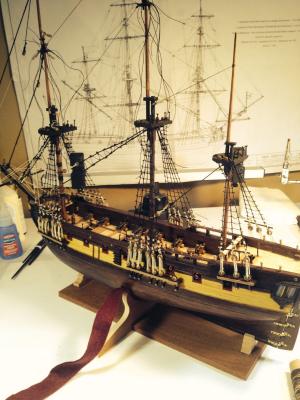
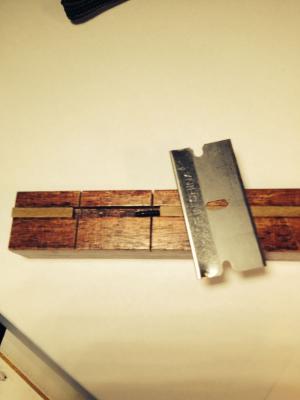
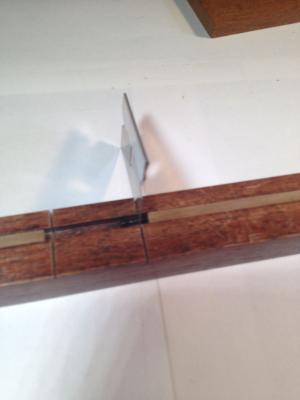
 My build continues on the Morgan. I enhanced the ponce wheel jig to make the copper plates. I took a strip of wood and lined it with very thin strips a quarter inch apart. These strips are just a hair thicker than the copper tape. I then played two more thin strips on top of the two previously glued down. Except, I pushed them closer together so there is a slight overhang such that the copper tape will slide between the bottom two and under the top two. I then laid some more thin cross strips that I could trace the vertical ponce lines. I put these just under 3/4" apart and the others are line up guides. I start by running the ponce wheel along one side of the entire horizontal strip. Then, as I pull the copper strip through the jig, I make the vertical lines. I keep repeating the process until done. I only put one horizontal line because the strips will overlap slightly as they are being applied to the hull. I've taken some pics of the hull completion. I also added the 1/8 X 1/8" waterway and sanded the top inside edge down. This will eventually taper into the ceiling planks. I have included pictures of the copper plate jig and ponce for making the plates. Of interest, I purchased chemicals to put a black, red, rust and patina affect on the copper. I did like the way some of them turned out but in the end, I used Acrylic pain with a make-up rubber do-hickey that my wife uses to apply her make-up (I think!). I would dip the soft rubber sponge thing into the paint, tap it a few times then dap it onto the copper plates. I had much more control of the coloring this way. If you recall, I posted a while back that I like the way the copper plates look on the Model Shipways box cover. So, I came close to that but added a patina look and while they are not the most realistic ... I like it and that's what counts!!! :-) Oh, while I was making the copper plates, I would constantly wipe with alcohol. Then, after the plates were painted I sprayed a clear matte finish onto them. This way, when I applied them to the hull, my prints wouldn't get on them. After they were all applied, I sprayed them again. I suspect they will continue to age as I've read on this site. So, we'll see what happens! Here are some pics:


- 56 replies
-
- 14
-

-
- Charles W Morgan
- Whaling Bark
- (and 1 more)
-
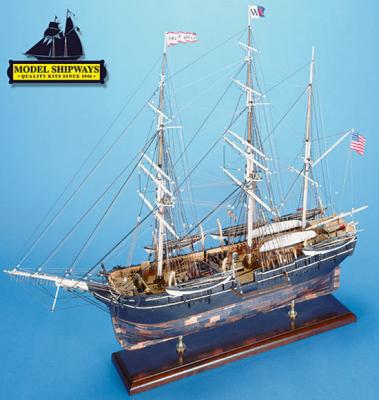
Hi Bruce, I recently started my Charles Morgan and will be watching your build as you're further along than I am! I just finished planking the hull and using some Hobby Lite to fill some low spots and any seam openings. I plan on coppering the hull. I'm not going to use shiny copper plates. I like the look of the hull pattern on the box cover and have tested many things to get similar copper colors. I know it isn't true to form but I really like the look. And, believe it or not, I found a Charles Morgan in a museum that had a similar color scheme on the hull! I asked Frank at Model Expo who built the one on the box and how they got the effect. He wasn't positive but thought the builder used a paper/cardboard stock with paint!!! I'm still testing the colors on the copper and will soon be involved in that application! When you write about some of the shipyard accidents you have had I can relate!!! I'm 58 and it seems I can be careful putting my hand into a delicate position. It's the pulling it away and smashing things att he same time that is upsetting!!! Glad I'm not the only one. You're doing a nice job and I'm almost ready to upload some more of my build pics. Talk to you soon. Ron
- 245 replies
-
- 1
-
-
- model shipways
- Finished
- (and 1 more)
-
I've started planking the area between the planksheer and top of wale. For the most part this went okay. However, I did end up having to add some HobbyLite filler to take care of some stuff at the bow. My question is this, I don't want the smooth filler to ultimately show through the black paint. It is different than the rest of the well fitted planks. Do you think I should try to scratch some horizontal lines to try and match the plank strips/lines????
- 56 replies
-
- 1
-
-
- Charles W Morgan
- Whaling Bark
- (and 1 more)
-
Oh, I also forgot to mention that I ordered the 2.5 Serving Machine from Alexy Damonoff. I'm pretty excited about this. I don't plan on making my own rope but this will definitely come in handy for serving etc.!
- 56 replies
-
- 1
-
-
- Charles W Morgan
- Whaling Bark
- (and 1 more)
-
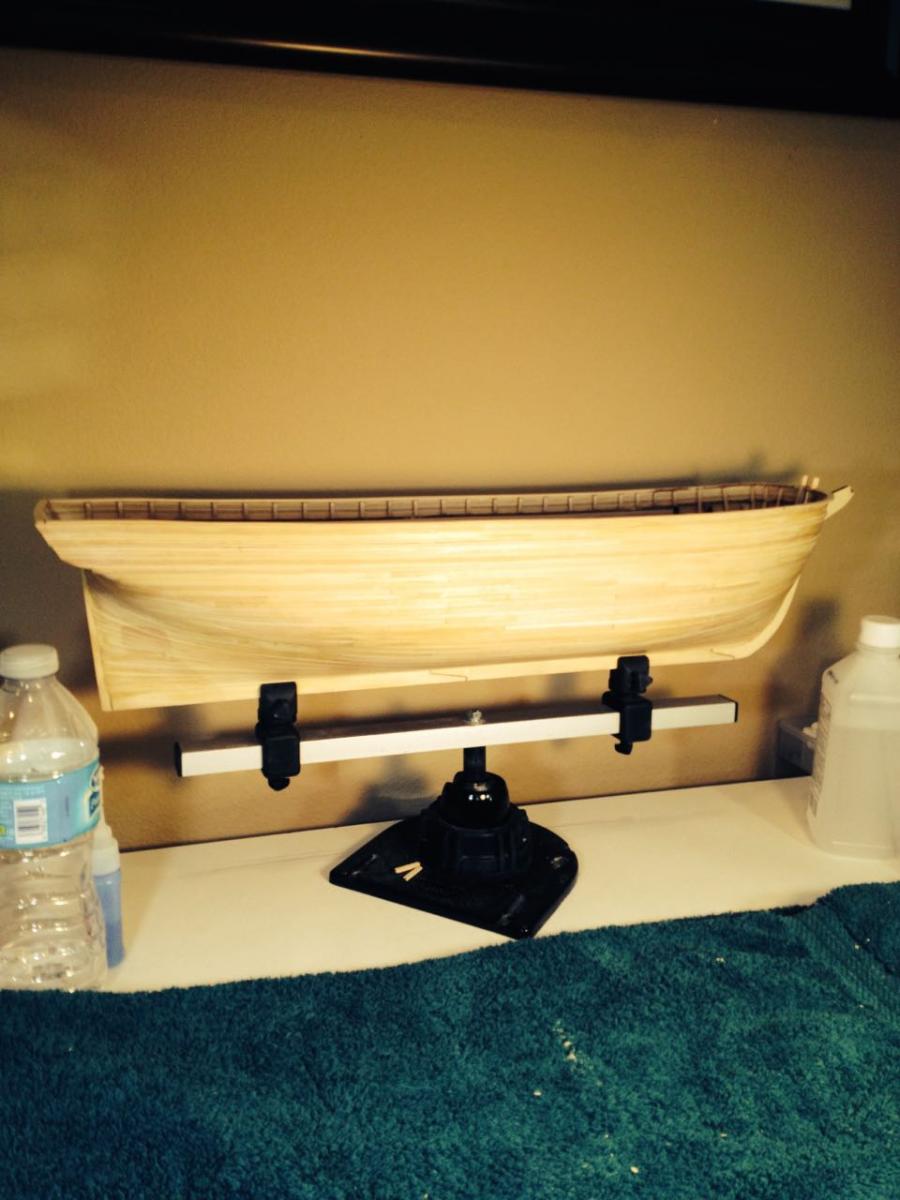
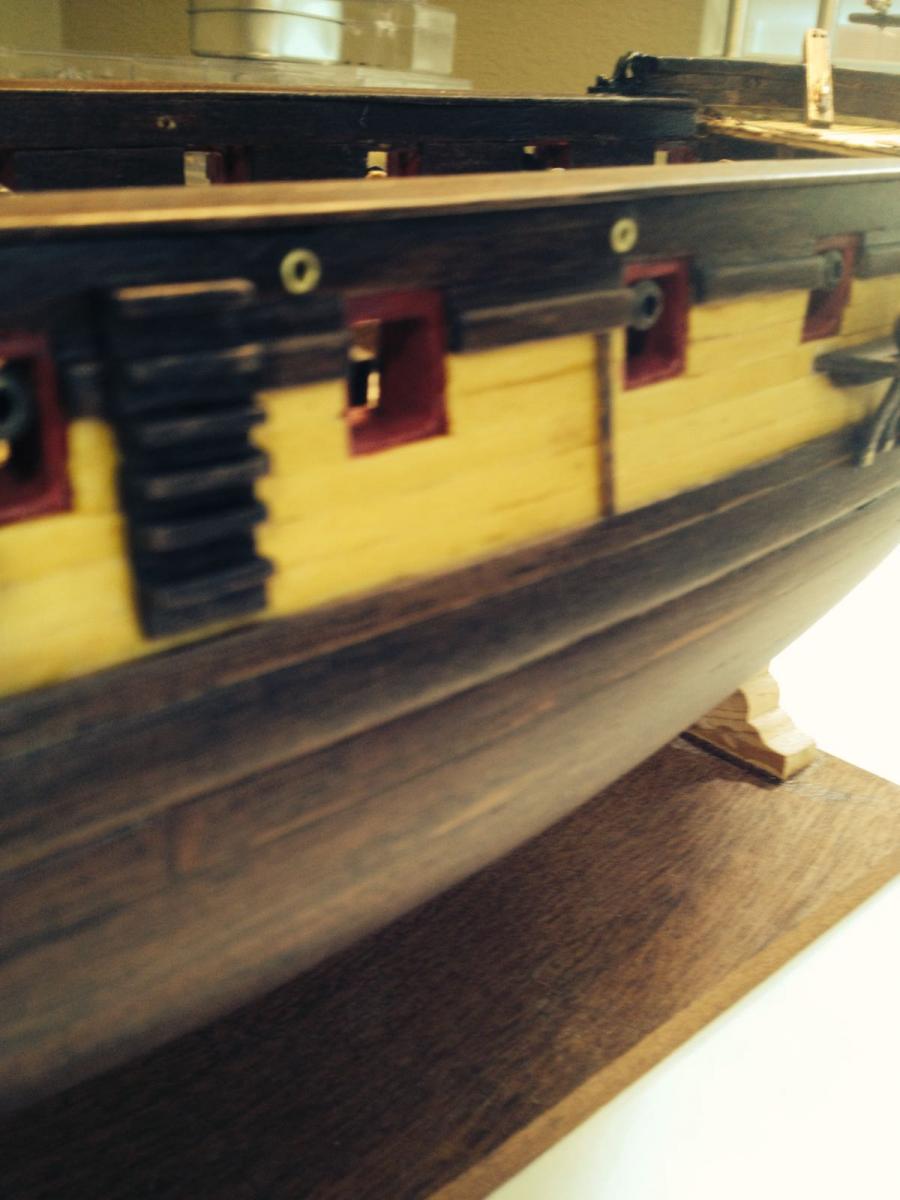
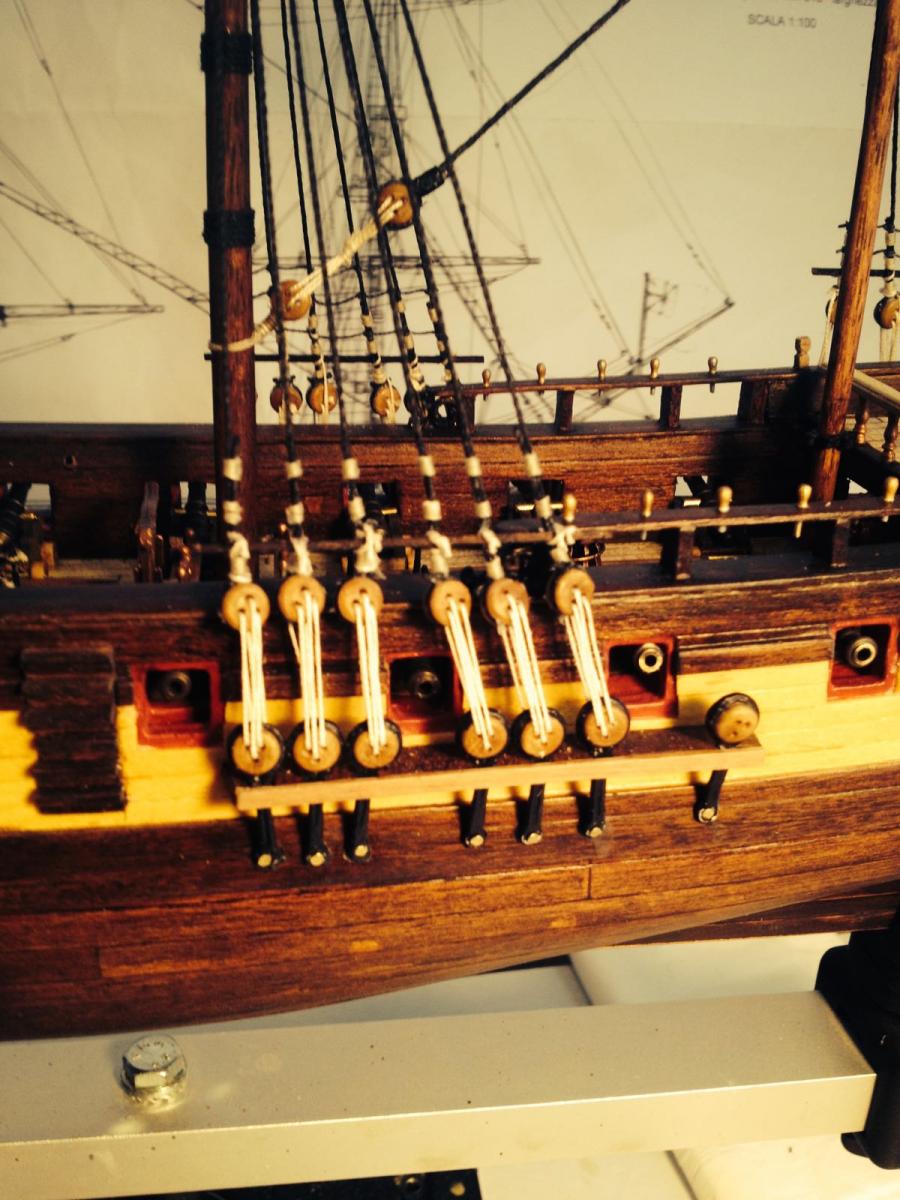
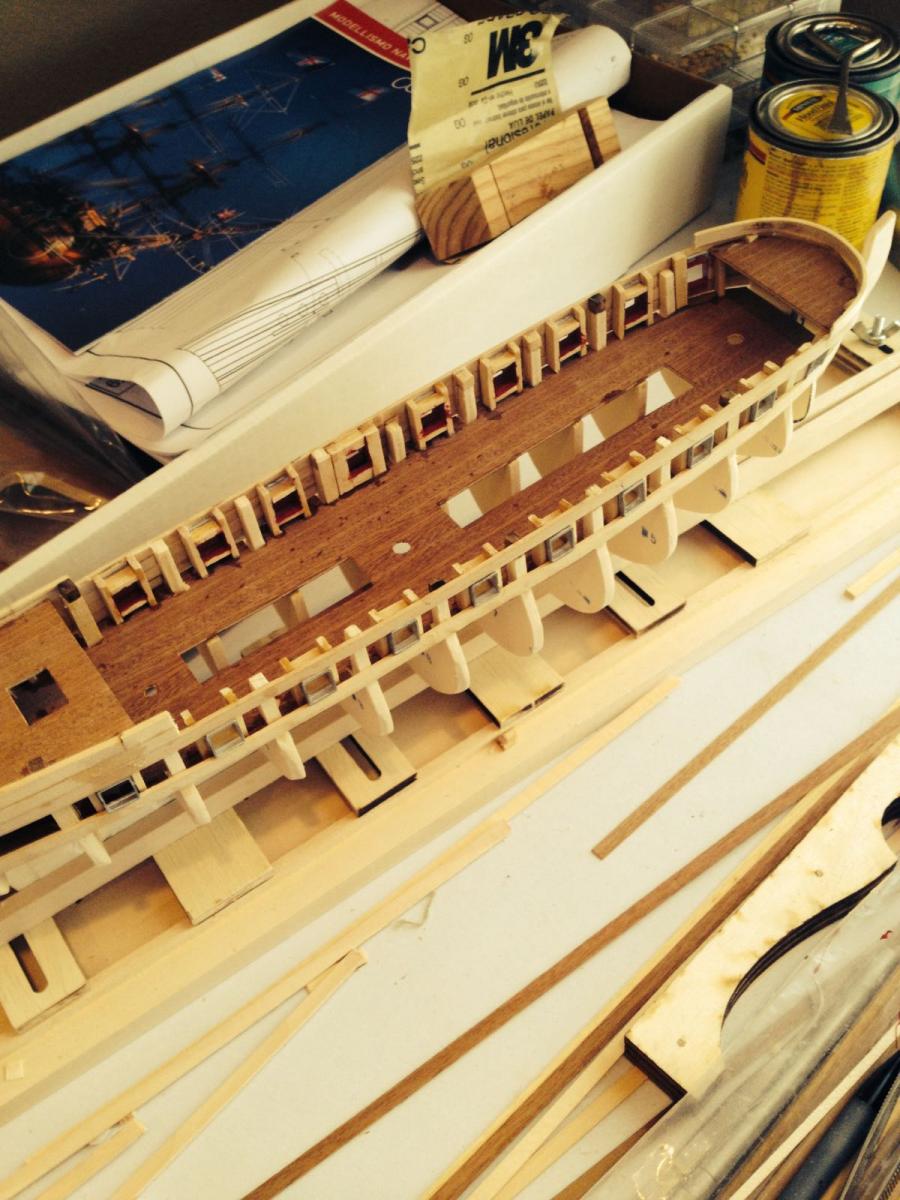
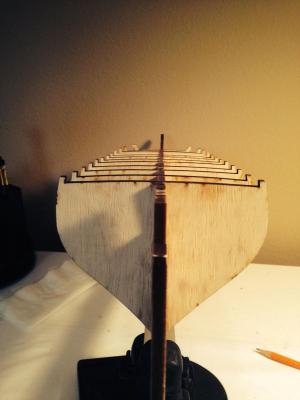
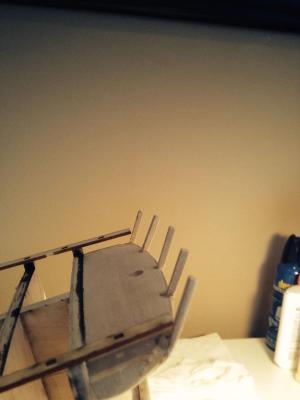
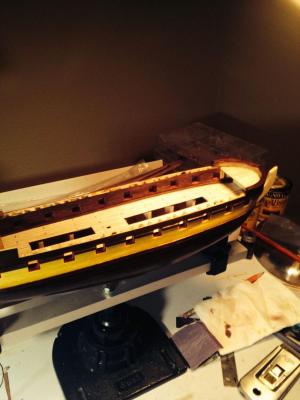
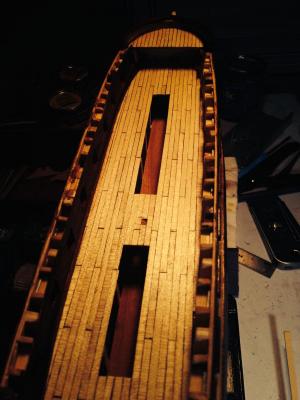
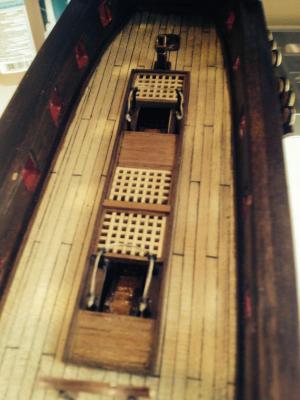
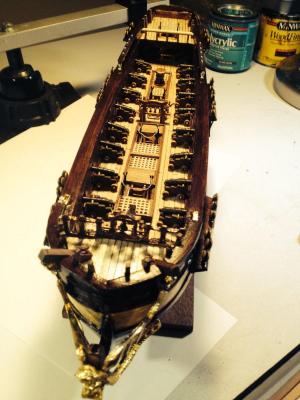
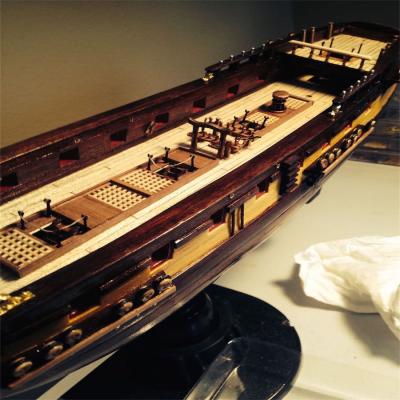
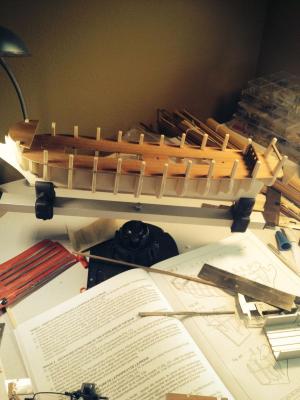
The build continues. I planked between the Planksheer and the Main Rail. Admittedly, I struggled at the bow. I only had to do some minor filling for now. I then took a small break and was messing around with how I will do the copper plates. I purchased some chemicals and applied then to the copper. I then made a bunch of plates on a copper strip and used Acrylic paint with very light strokes. Now, if you remember I very much like the look of the Charles Morgan on the box cover of Model Shipways box. I also did some intense searching and found two other Charles Morgan's built and one placed in a museum. It too had the same look at the box cover (it wasn't the same model). So, the jury is out how or which plates I'll use below the water line. I know what I want to do isn't true to form but darn it... I really like the look! I've uploaded some pics of where I'm at. On one you can see this jig I made to use the ponce wheel. But the jury is out on that too (I'm not that happy with it). Anyway, opinions welcome!!!! Ron /Homer

- 56 replies
-
- 6
-
-
- Charles W Morgan
- Whaling Bark
- (and 1 more)
-
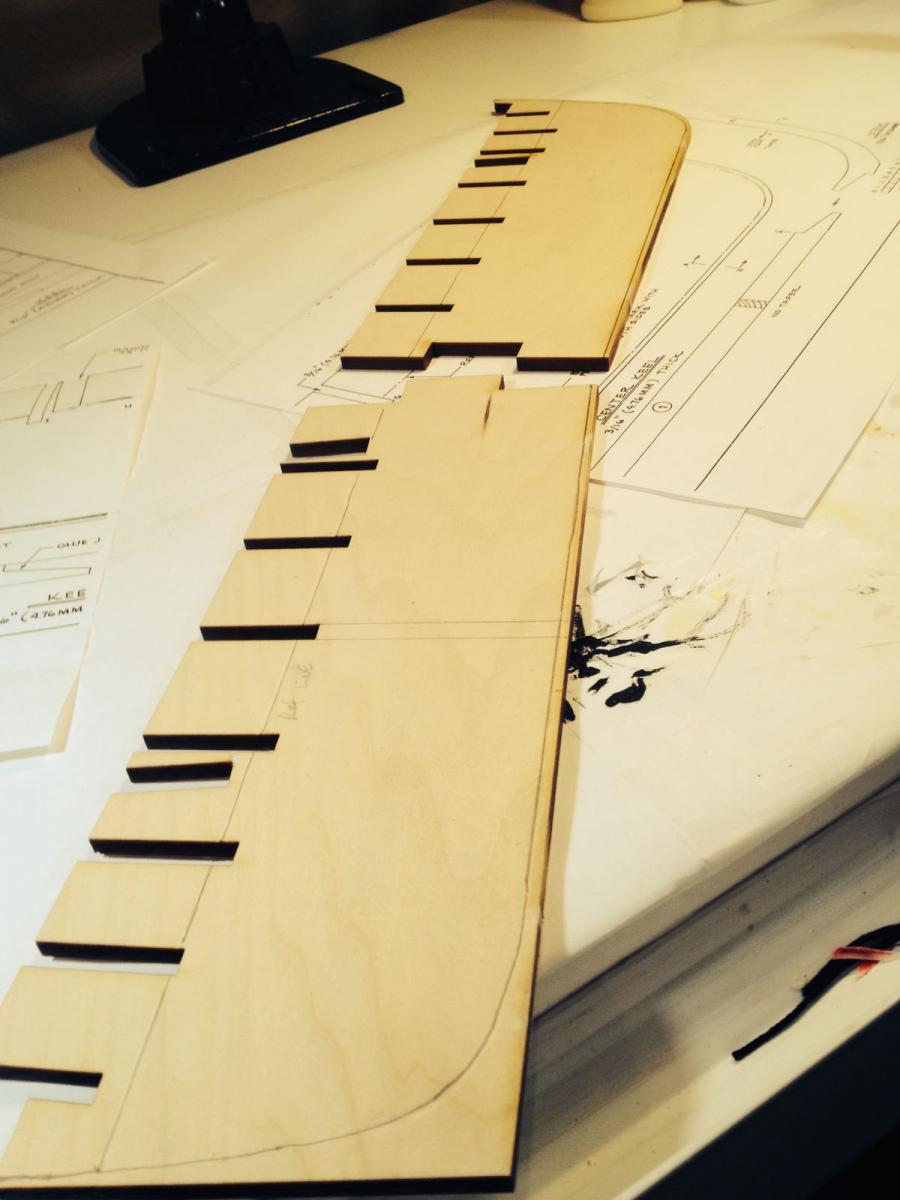
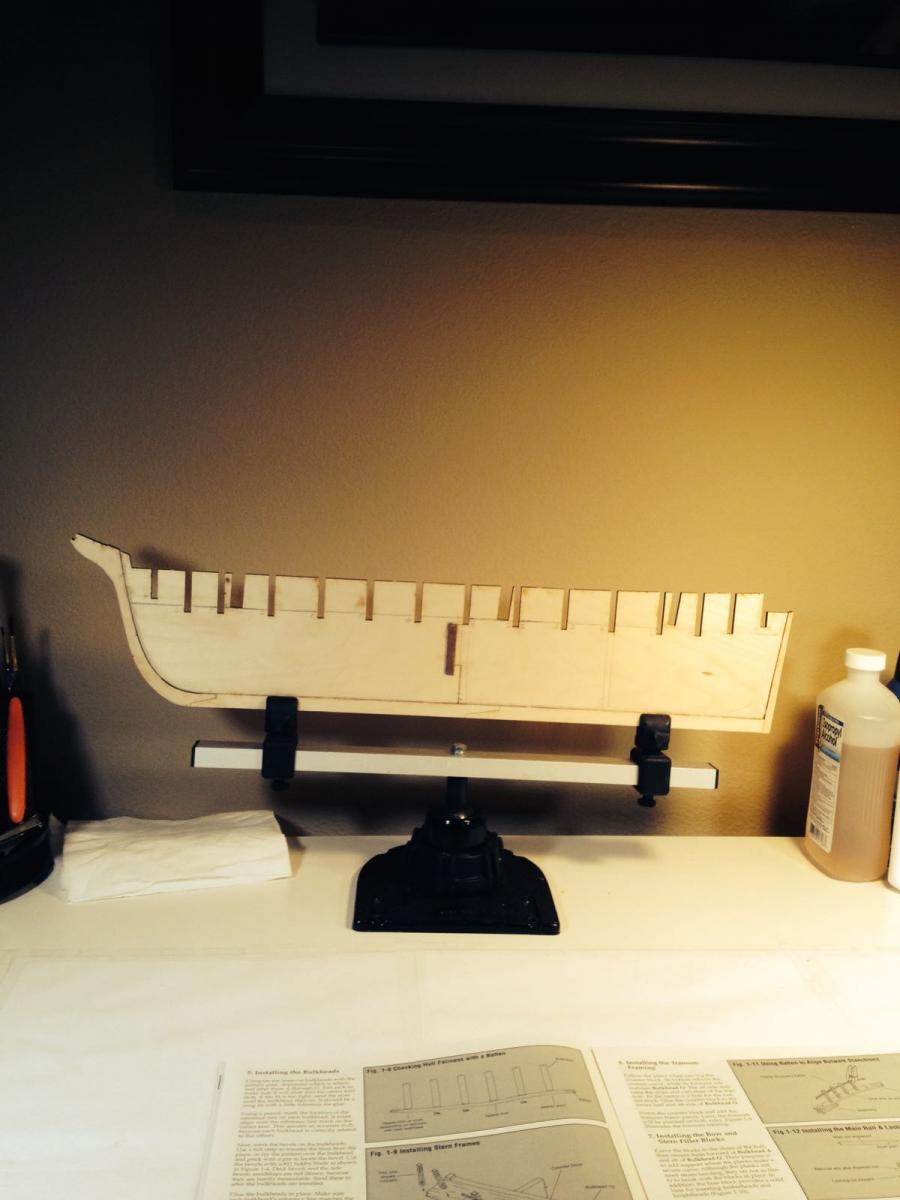
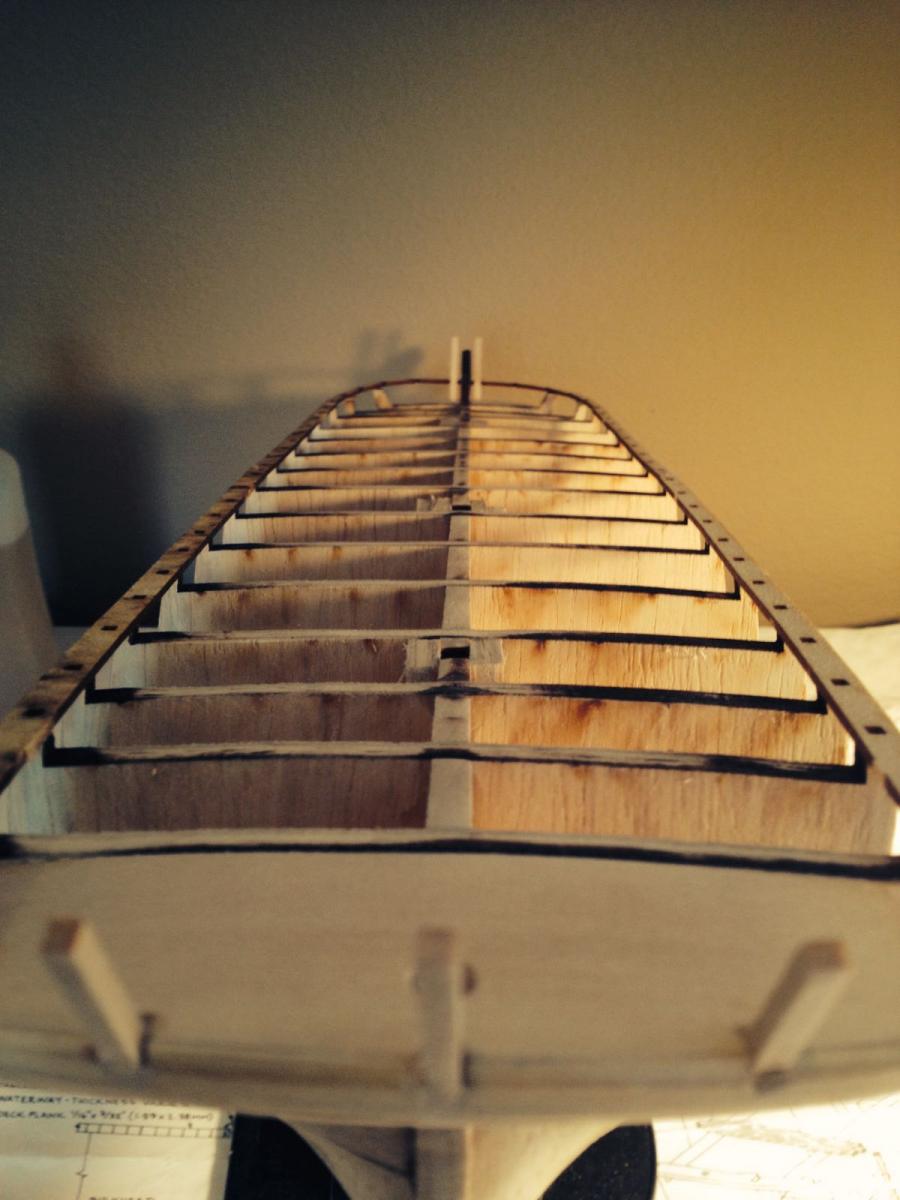
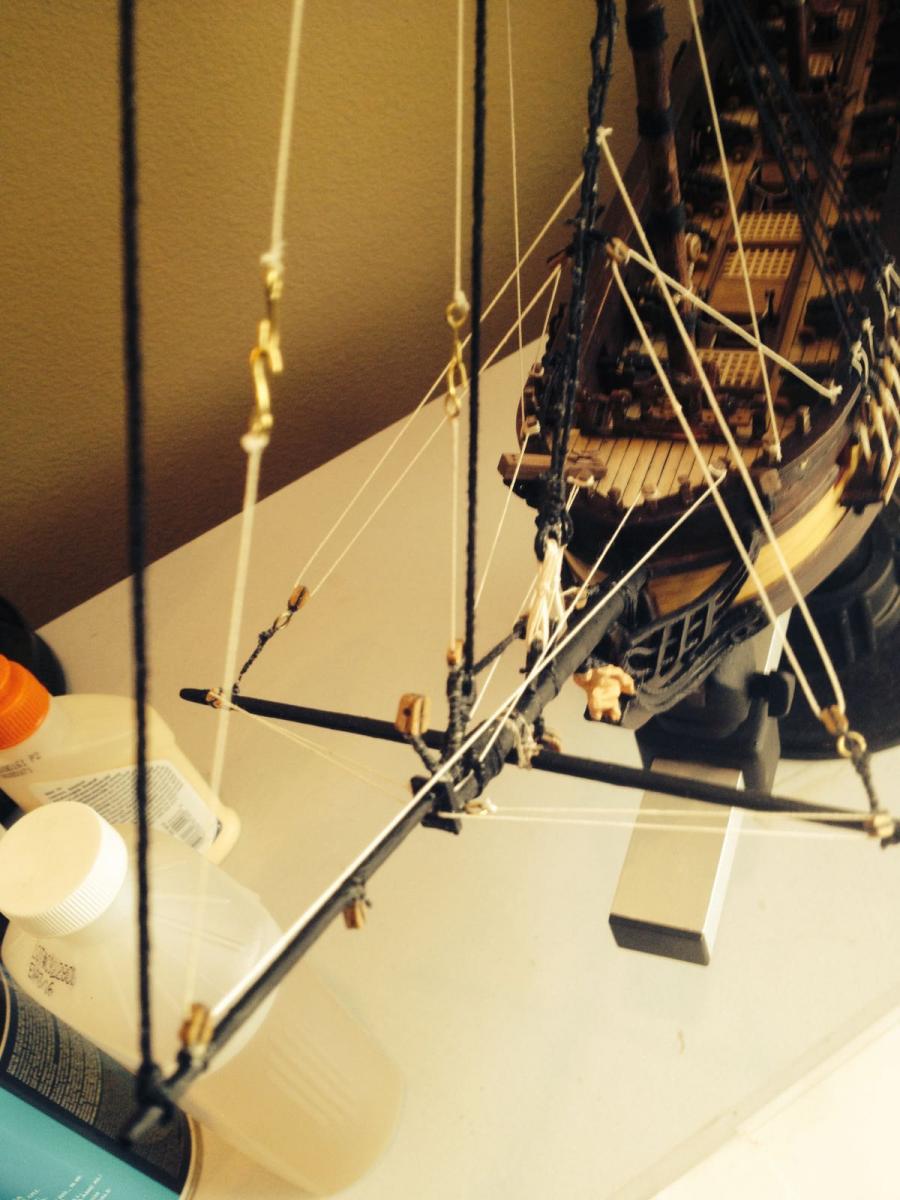
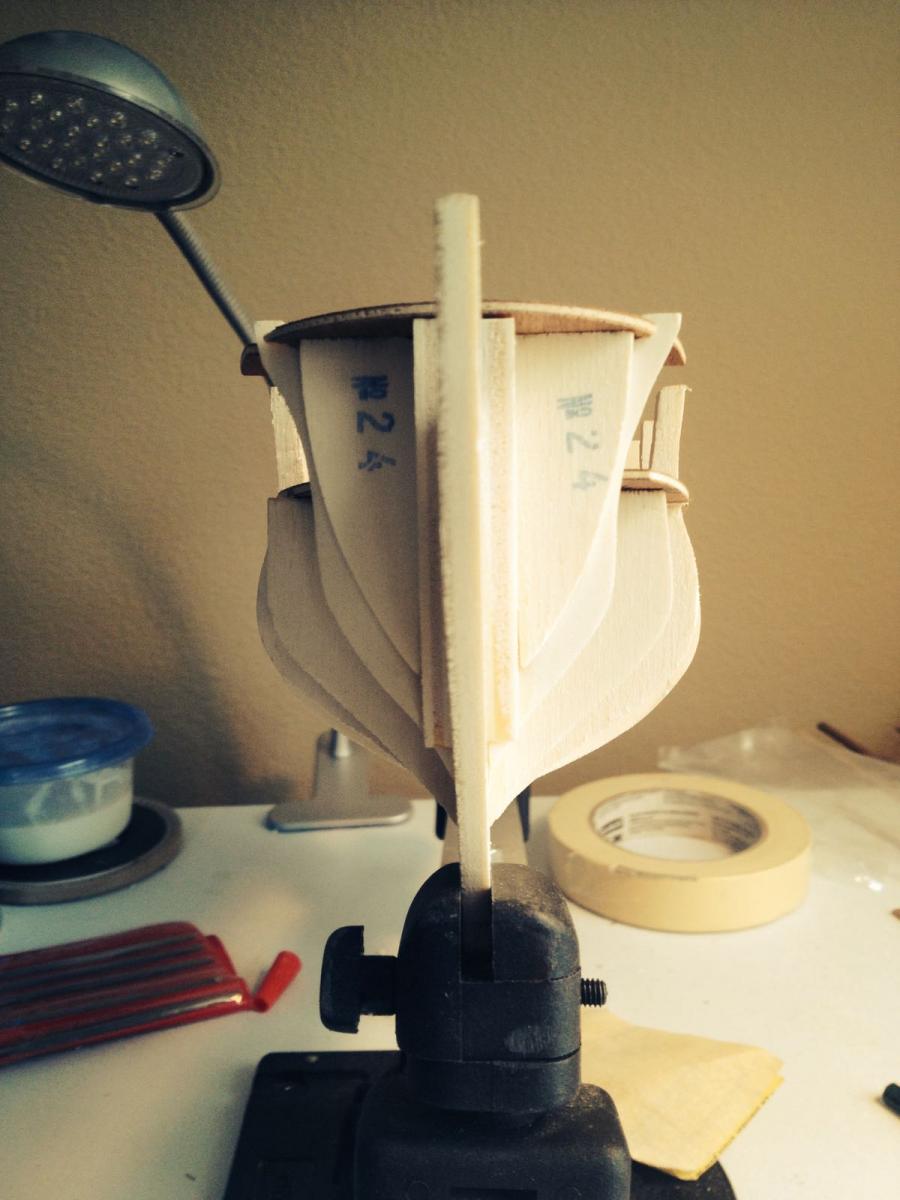
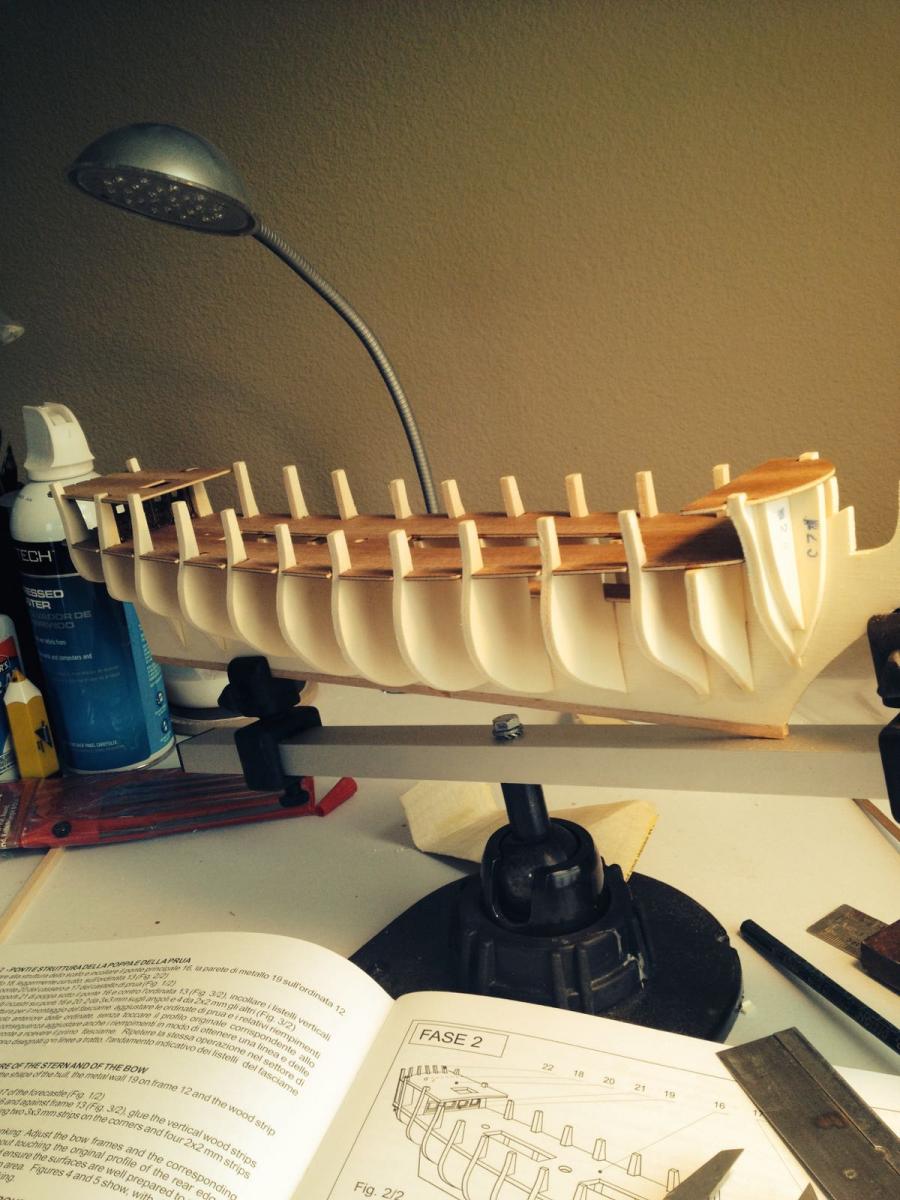
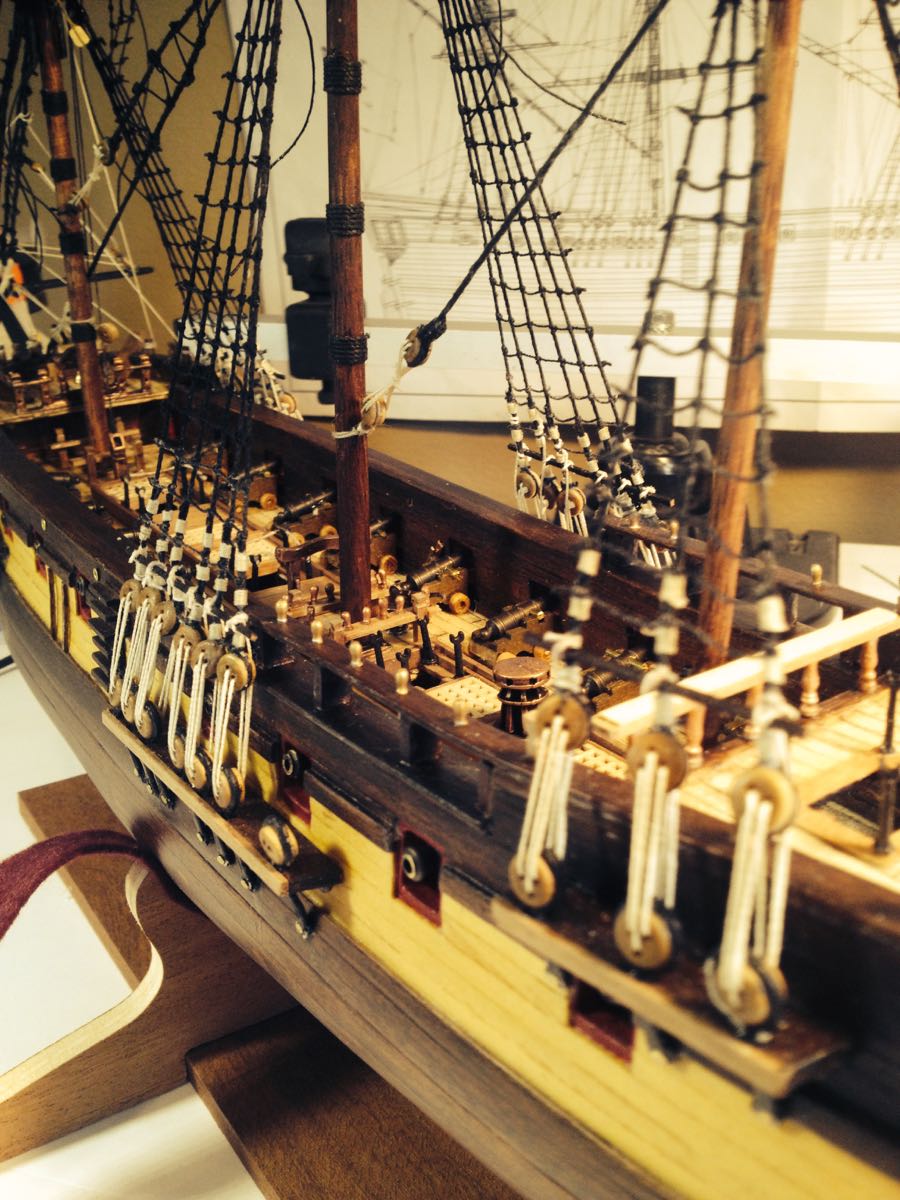
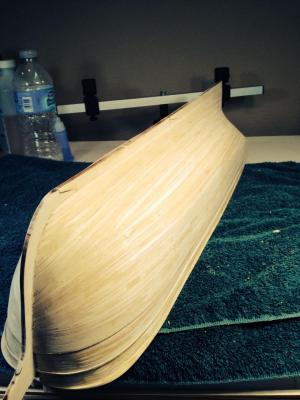
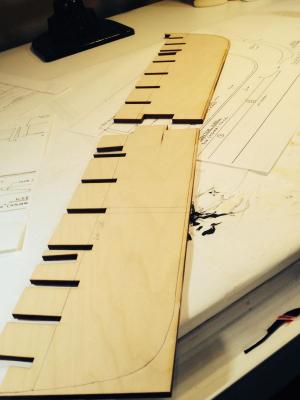
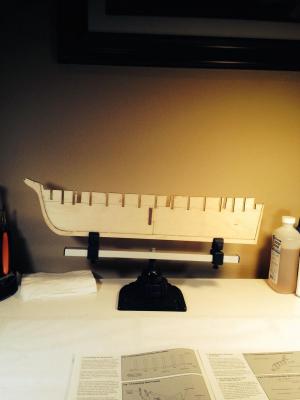
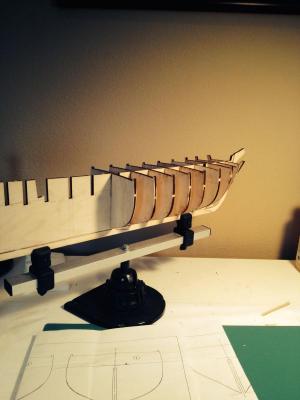
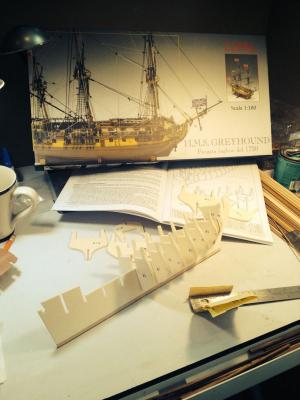
Hi everyone, I just finished building the Greyhound by Corel at 1:100 scale. I have placed a few pics of it in the Gallery. I just started my new build of the Charles Morgan and will post pics as I go! I purchased the kit from Model Expo and have been a long time customer of theirs. After inventory of everything in the box I was short 30 pieces of 1/16 X 3/32 X 24" and short 2 pieces of 1/16 X 1/4 X 24". I contacted Frank at Model Expo and these were sent out ASAP no problems! They do indeed stand behind their product. This is one reason I like getting things from them if they have what I'm looking for. The Keel, stem and stern post went together well and were all very straight. I tried something different this time and won't know how well it will work or how clean it will look until I start planking the hull. I took the center keel before gluing on the false keel, stem and stern pieces and after marking the bearding line used my Dremel tool sander instead of chisel. Then I glued the remaining flat surface to the full-size stem, false keel and stern pieces. I'd appreciate any input if others have done this and if it worked well for you. I then pre-shaped and dry fitted the bulkheads. Once square they were glued in place and I then did some additional bevel cutting and sanding. I suspect there will be some tweaking along the way. I then cut and installed the stern stems. Make sure you align the posts and watch the height making sure not to cut them too short. I then installed the Planksheer and even though I was careful I managed to break (several times) the part going around the bow. I then installed the stanchions and it's very important to make sure they are aligned and most important that when you install the mainrail (again I managed to break this very thin piece several times) they leave enough overhang so that it will accommodate the batten planks. I looked at a few other build logs at this point and of interest, after the hull was planked it was eventually sanded smooth. However, one would then have to add a fashion piece that is usually painted white along the outside of the plank sheer and I suppose main rail. This was troubling for me and I had to cut off all stanchions and realign to accommodate the stepped look. I really don't know if that was the correct thing to do or take the easy way out, sand the whole thing smooth and add the extra piece later??? Now, currently I'm struggling with the stanchions on the bow that go from the main rail down to the filler block. And, at the same time keep the exterior "future" planking aligned with the balance of other stepped planking. The problem is that the interior bow has this ceiling and waterway planks that are supposed to be sweeping up and smooth (just at the bow). I've taken this apart a few times and naturally busted up the plank sheer and main rail several times. I look at the blueprint sheets everything lines up but I just don't have the sweeping angle it needs. I'll keep messing with this until I get it! Meantime any advice is always welcome. Also, I'm thinking of getting a ropewalk jig. Is Model Expos as cheap as it looks? I'm also thinking of ordering a few different chemicals from Jax to oxidize the copper plates before I install them. I was then thinking of putting a sealer on them before handling and installing? I really like the way the Model Shipways picture on their kit looks. Frank said the guy that built it actually used paper! you could use a thick paper and still roll over it with the ponce wheel to get the rivet effect. But, I'll use the copper and will sample a bunch of different shades and methods. Do I want more realistic or what appeals to "me"!!!


- 56 replies
-
- 10
-
-
- Charles W Morgan
- Whaling Bark
- (and 1 more)
-
I just contacted Frank at Model Expo regarding the media used to plate their demo model of the Charles Morgan. He said the metal plates are actually painted paper? But suggests I experiment with copper. Of the pictures I can find of that demo model, it sure looks like they ran a riveter over the plates. I'm wondering if Frank did a typo and meant to say copper instead of Paper???? I'm going to follow up with him again. What I'd really like is to identify the shipwright that built their demo model for them???? Any ideas?? Ron
-
I just googled "how to darken / age copper and found this article. I suppose one could use these methods on self made plates. Here is the link http://www.wikihow.com/Darken-Copper if it will work!!! Ron
-
Thank you so much! Looks like Rosie the riveter does good work!!! MY next build will be either the Charles Morgan or the Victory. I plan on plating both of them. I'm getting close to finishing my current build on the Greyhound and already thinking ahead to next ship! I will try some of these steps. Thanks again! Does anyone know who actually built the demo model for ModelExpo? I know Ben Lankford designed it and they say it's an original by Mystic Seaport Series Model. I'll have to look into this further. Ron
-
I haven't found exactly what I am looking for. I like the look of the copper plating on Model Shipways box cover on their Charles Morgan ship kit. It has those multi colored aged plates. What type of product was used to get those "different" shades on the copper tape that was used??? Does anyone know how it was done??? Ron
-
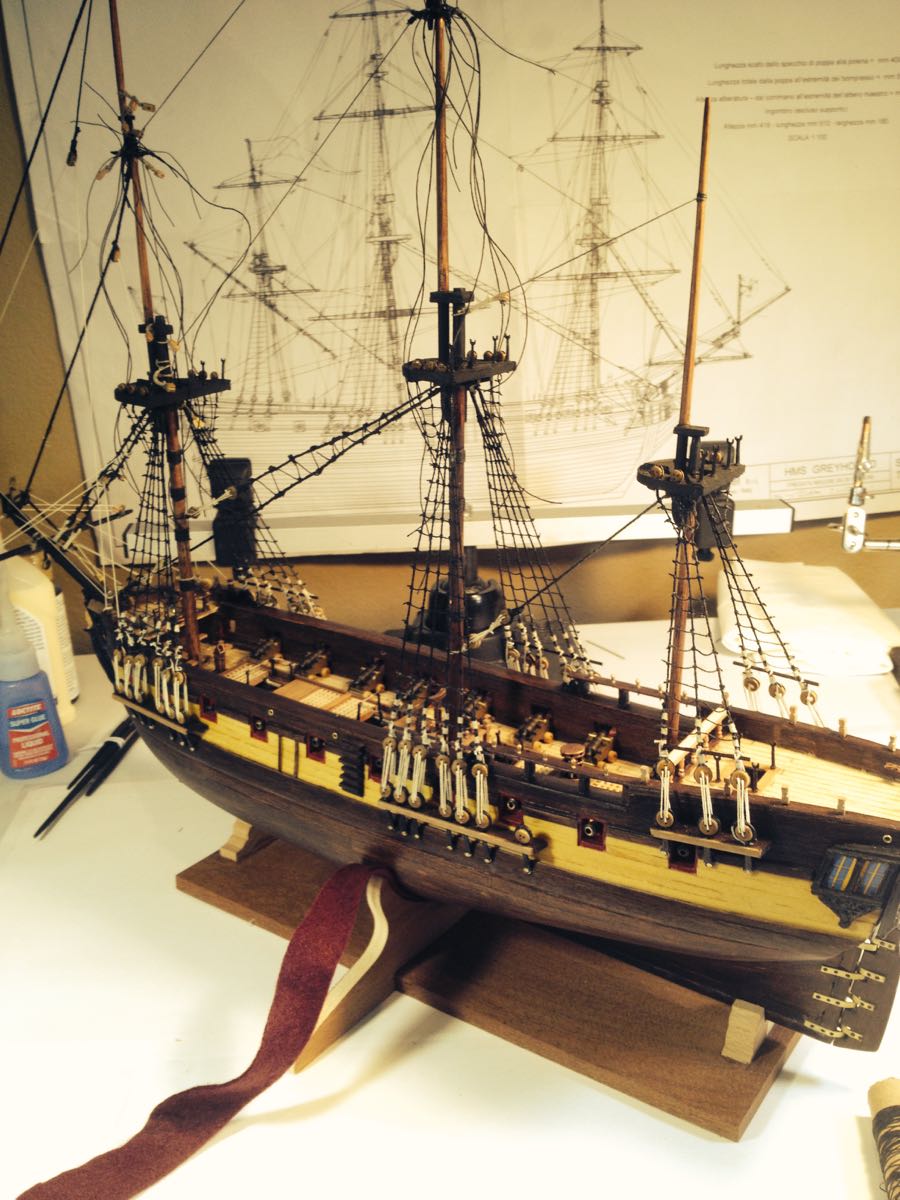
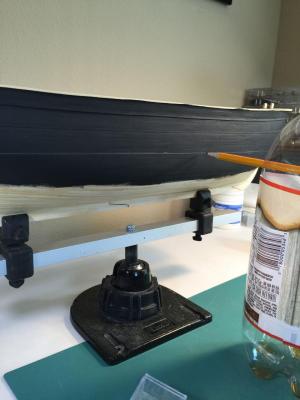
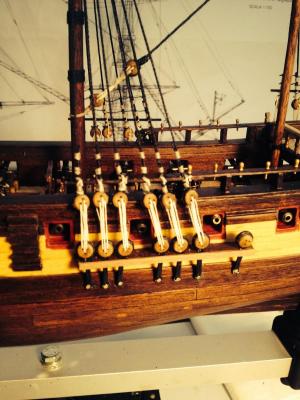
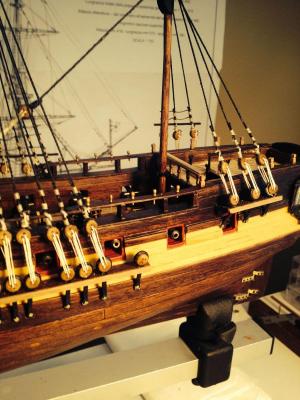
More pics as I bring the build log up to date. As you will note, as I got further into the build I flattened out the shine look and painted Corel's gold pieces to flat black. Unfortunately, the bulwarks and deck gratings were not to scale. Pulling it apart would have made matters worse. This is when I decided to either throw the thing in the trash or continue building and use the ship build as something to practice on. This is what I have done and will finish it up. I am currently working on the upper rat lines and from this point will post pics as I go. There are not very many builds of the Greyhound out there so this is one of the reasons I'll swallow my pride and keep posting! Again, while it is a poorly designed kit with inadequate and sub par build docs and wood, The full blame rests with me. I could have and should have researched the build further, bashed the kit, ordered better wood and replaced Corel's poor quality castings with my own builds. While this kit isn't Corel's best work, they do have some excellent kits and I have some waiting on the shelf to be built. What I don't understand is why Corel doesn't temporarily pull this product and make the appropriate adjustments. None the less, if you buy the kit from a good vendor such as ModelExpo they will stand behind the product and replace parts. Course, they will replace the parts with the same poor quality parts from Corel. I shouldn't be so hard on Corel. I am interested in what other members think about their products.


-
More pics as I bring the build log up to date. As you will note, as I got further into the build I flattened out the shine look and painted Corel's gold pieces to flat black. Unfortunately, the bulwarks and deck gratings were not to scale. Pulling it apart would have made matters worse. This is when I decided to either throw the thing in the trash or continue building and use the ship build as something to practice on. This is what I have done and will finish it up. I am currently working on the upper rat lines and from this point will post pics as I go. There are not very many builds of the Greyhound out there so this is one of the reasons I'll swallow my pride and keep posting! Again, while it is a poorly designed kit with inadequate and sub par build docs and wood, The full blame rests with me. I could have and should have researched the build further, bashed the kit, ordered better wood and replaced Corel's poor quality castings with my own builds. While this kit isn't Corel's best work, they do have some excellent kits and I have some waiting on the shelf to be built. What I don't understand is why Corel doesn't temporarily pull this product and make the appropriate adjustments. None the less, if you by the kit from a good vendor such as ModelExpo they will stand behind the product and replace parts. Course, they will replace the parts with the same poor quality parts from Corel. I shouldn't be so hard on Corel. I am interested in what other members think about their products.
-
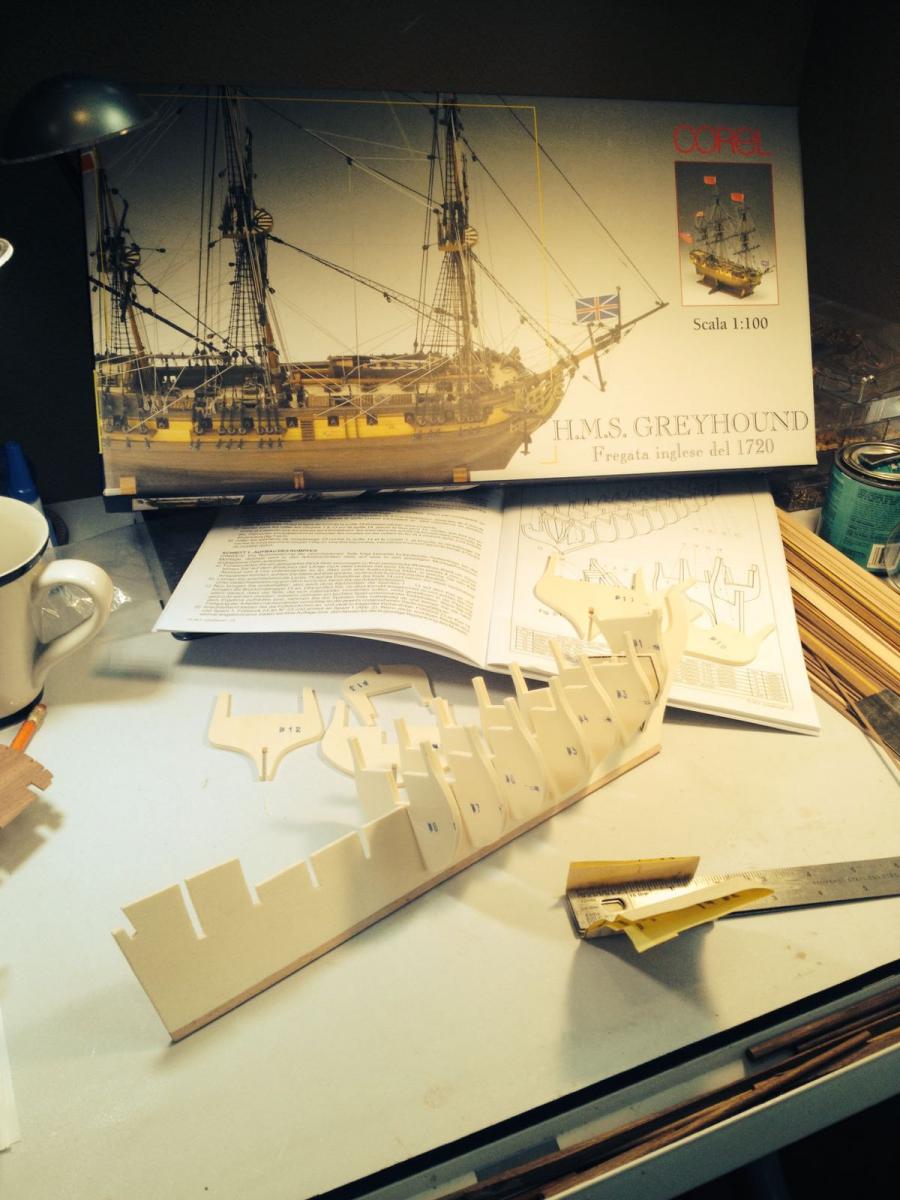
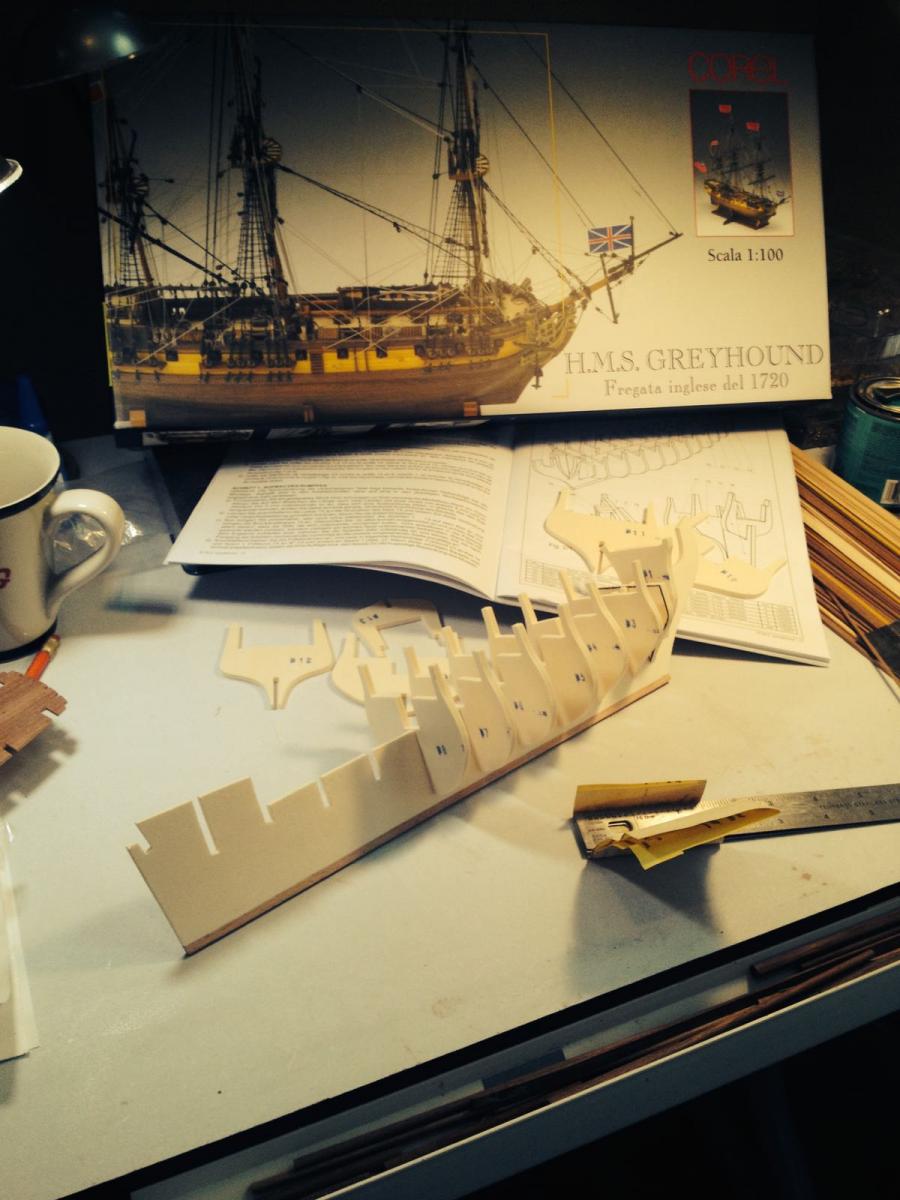
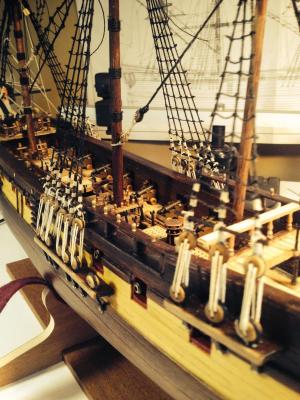
Hopefully I'm creating a new build log for my current build (my third ship) of the HMS Greyhound, 1:100 scale. I got it at ModelExpos' minimal price (I think) $69.00!!! Too good to pass up so I purchased it and added it to my stack of ships waiting to be built. I have quite a few waiting to be built safely tucked away in large sealed plastic containers in my garage on a rack. After completing my HMS Bounty by AL, which took almost two years I wanted to build something smaller that I might be able to complete quicker. So, I grabbed the HMS Greyhound out of the garage for my next kit. I've been hesitant to post anything on this kit because I'm embarrassed about how bad of a job I've done on it. My first kit, The Corsair came out well enough as a first build. I got a bit better and learned a lot more with the Bounty and then it all went to #@^&* on the Greyhound! First, let me say that it was / is the worst kit I've ever seen. Corel's parts, wood and especially instructions are absolutely terrible. I take some of the blame because I was anxious and time after time should not have moved forward until everything was correct. Bottom line, my frame went together a tad bit crooked. Then, I thought I could straighten it out as I moved on and then I planked the exterior and installed the gun ports (should have made my own). I noticed quickly that the instruction manual didn't match the separate large plan sheets that again, didn't match the picture on the box. Finally, out of desperation and disappointment I telephoned ModelExpo and they were very nice. They offered to send me a new keel and framework. While I shared in the mess up by finish planking the exterior, they asked me to pay for the veneers, which I thought was very fair. At first I said okay but before I hung up the phone I decided that I was over a month into it and didn't want to start over. I thanked ModelExpo for being so nice and decided to keep building and use this kit as (what I'll call) a practice kit to test different build methods. At least that is what I kept telling myself! Over the next couple months the project just kept getting worse. I was now out of scale. Family and friends kept saying it looks great. But, i knew anyone with any experience would notice things right off (why I don't really want to post it). I then took a look at this web site again since the crash (yes I was disappointed having lost my past build logs). I saw Ted Hamilton's build log on what started as the Greyhound and he encouraged me to keep going and sent me some build stats that did help. Since then I've tried to be more patient and rather than toss the thing in the trash (which I came close to doing a few times) I kept moving forward. The ship is not yet complete but for better or worse I'm still learning how to be a better craftsman. I've changed the ship from having too shiny an appearance to dulling it down and even painted Corel's shiny gold parts to a flat black. I personally liked the look better after doing this. I've decided to finish it up and not sure what I'll do with it as far as displaying it! Hopefully by swallowing my pride and posting pics of the build up to where I'm at now, you can see what I am talking about and try not to make the same mistakes. I have a lot of pics so I will start uploading a few at a time until I'm current. I will accept any advice as a learning experience that can only make me better. This is a great site and the people are even better! I'm happy to be a part of it even though I'm a novice. Ron


-
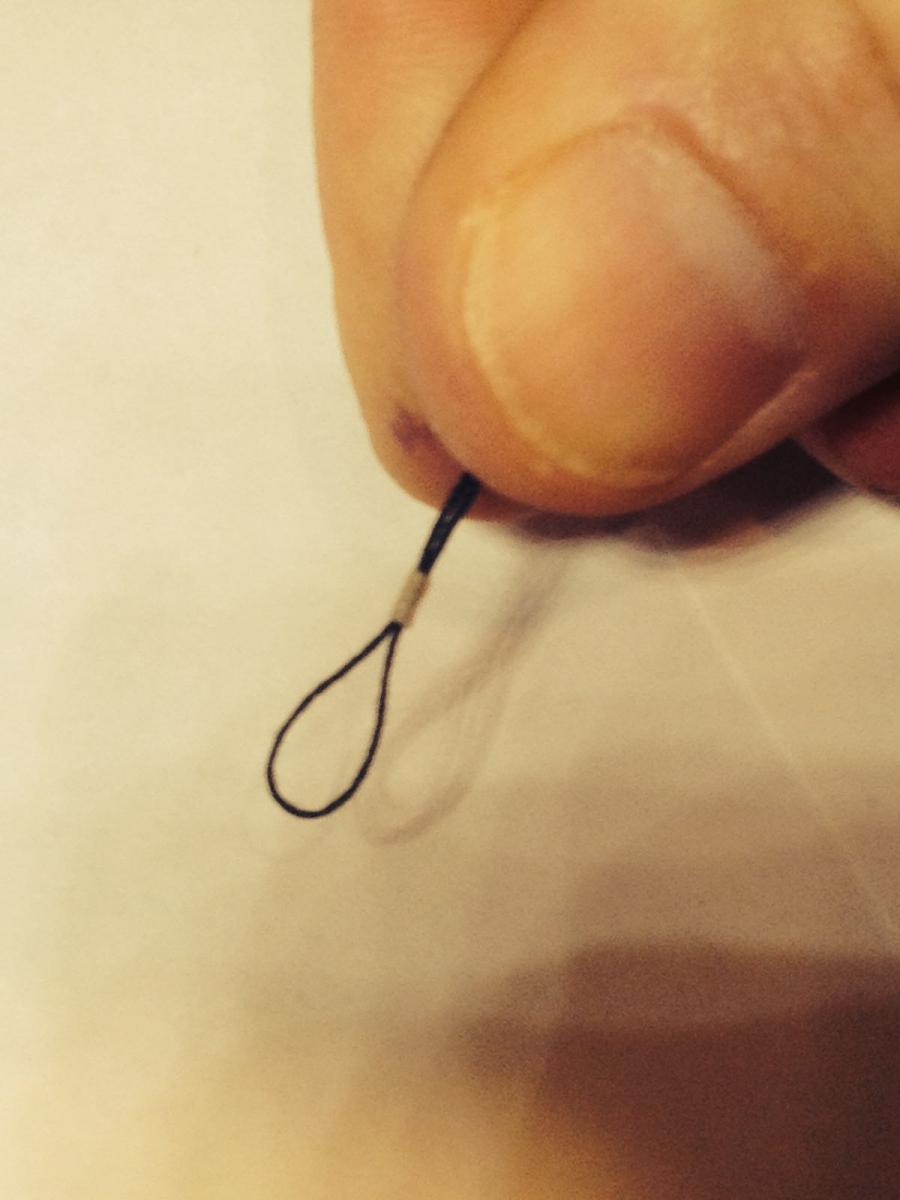
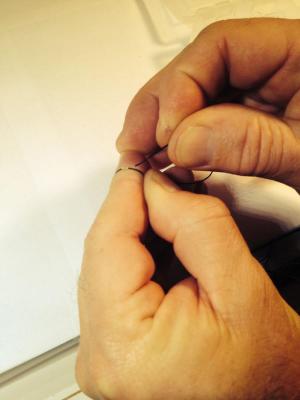
Here are some pics that might help describe the process! You need to practice to get the timing down. Wait too long it is too hard to pull off bit. Don't wait long enough or pull off inconsistently .. might fall apart! Practice with the types of rigging line you use and then you're set!! Good luck. Ron


-
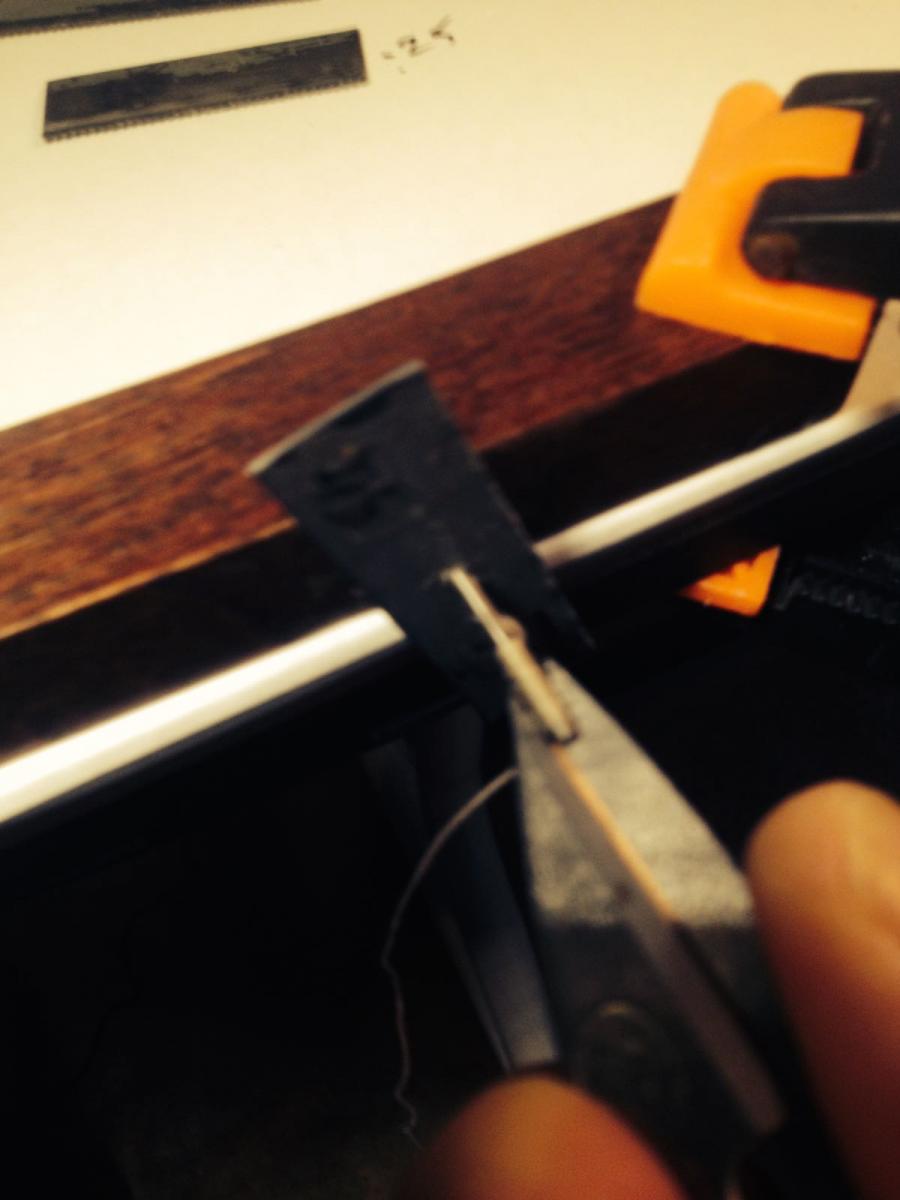
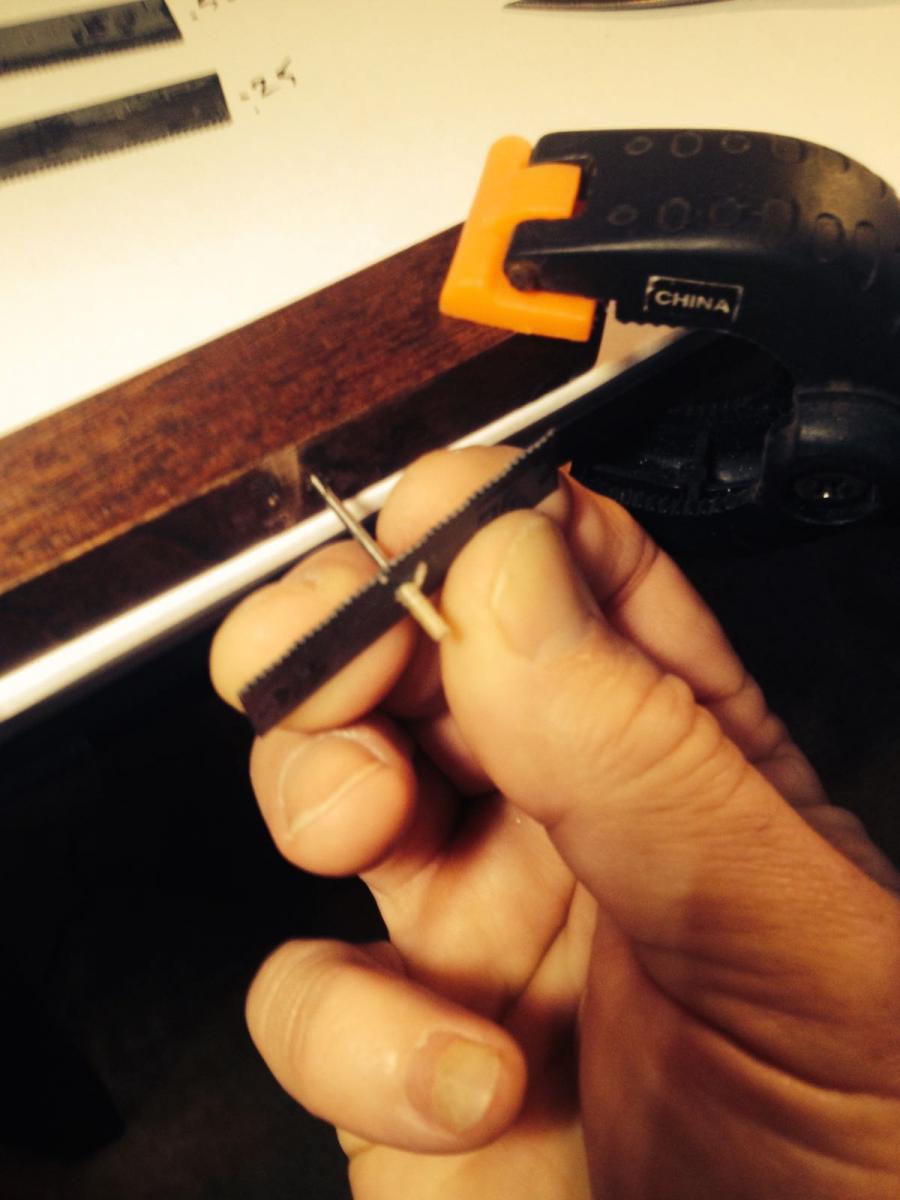
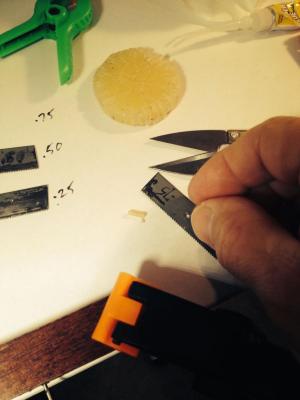
Hi Thanasis, that is a very good question and it did take a little bit of practice. I use the smooth side of old drill bits. I either permanently install them in a wood jig or hold them in a vise. I then cut a hack saw blade into 1 1/2 inch length. In the center of that I drill a hold the exact same diameter. Now, I take rigging wax and rub it on the drill bit and the flat sides of the hack saw piece. I then place the hack saw blade piece onto the bit and wind the seizing thread keeping each loop close until I get close to the end of the bit. Oh, I put small clips on the thread to weight it down. I then take ca (super glue) and wet the thread making sure it soaks in all around. I then somewhat quickly remove the clips, cut off the extra length of thread and then hold both ends of the hack saw blade and begin sliding it off as it catches the loops of thread. As I pull the head off with this blade piece it tightens the loops. Once off I knock it off the blade and let it dry for at least half hour. I then cut the seizing pieces in a jig I made that I can adjust for the seizing lengths. Now, when installed, I still pull up the dead eye line and attach as would normally do. I'll try and post a pic of the actually thread winding process and pulling off. All of this is on Hubert's web site that I joined a few years ago. I'll have to look back on this site to see what has been written about it before. Ron
-
The same for me Frank. I can't even say how sad I was when I heard about his passing.
-
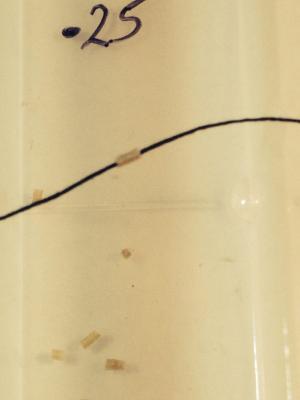
The last pic "ready for Deadeye" is a close up and only a quick sample. The seizing should be about half as long or cut in half to make two seizings. Ron
-
Deep sea salvage: Finding long lost treasures of the deep
homer replied to Kevin's topic in Nautical/Naval History
Very Interesting! -
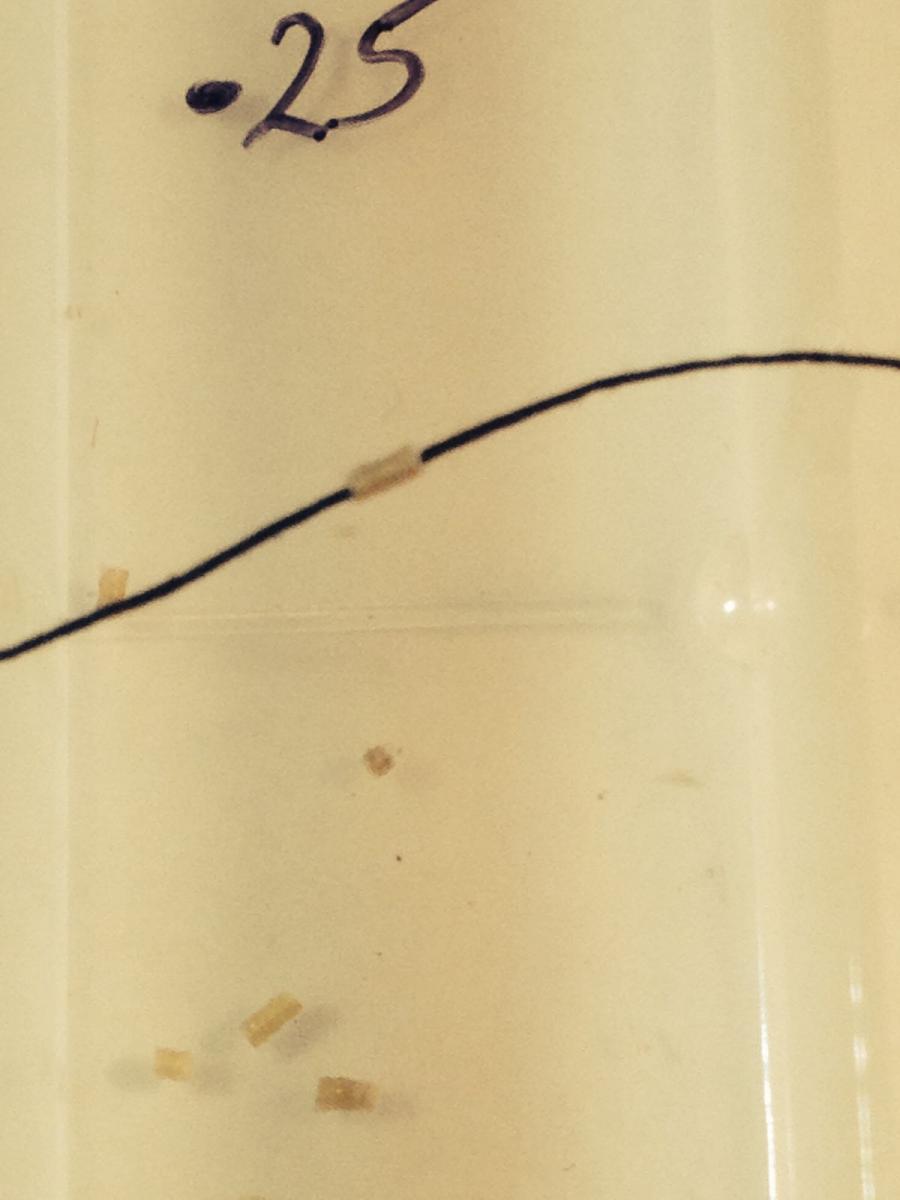
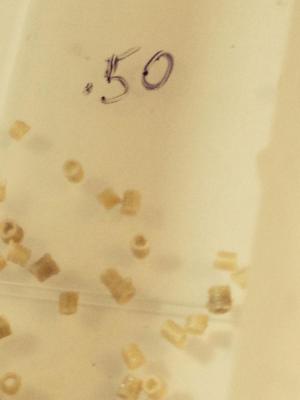
Here are a couple of pics of the Zip / Seizing process. If interested let me know and I can show you how I make the Zips.

-
Hi Captain, It does kind of look like shrink tubing! I'll try to take some close up pics of the zips / seizings by them self. You can see them on the Greyhound but have to zoom in. Ron
-
Hi Mtaylor and the learner, I will try to post a pic here if I can do it correctly!!! Edmay, yes Hubert from ship models for dummies! He was such a nice person and his family has been gracious enough to keep his web site going. I reference it often.

-
The most silent disk sander
homer replied to Mike Y's topic in Modeling tools and Workshop Equipment
I also have the Proxxon Disc Sander and don't find it to be loud. But, do make sure you have exhaust suction...especially if using in the house. I've since moved it to a work station in the garage for the dirty / dusty work. However, I build the ships in the house (dedicated room). Ron -
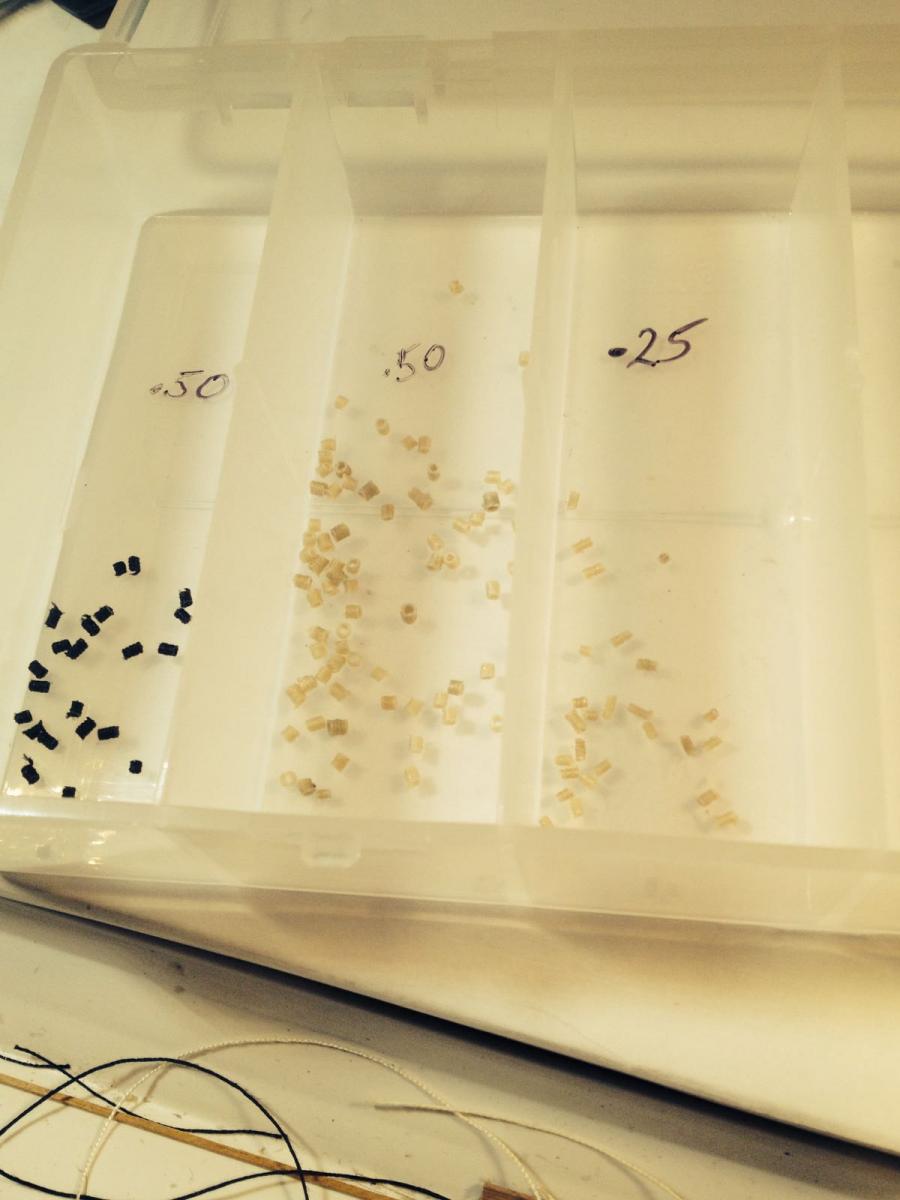
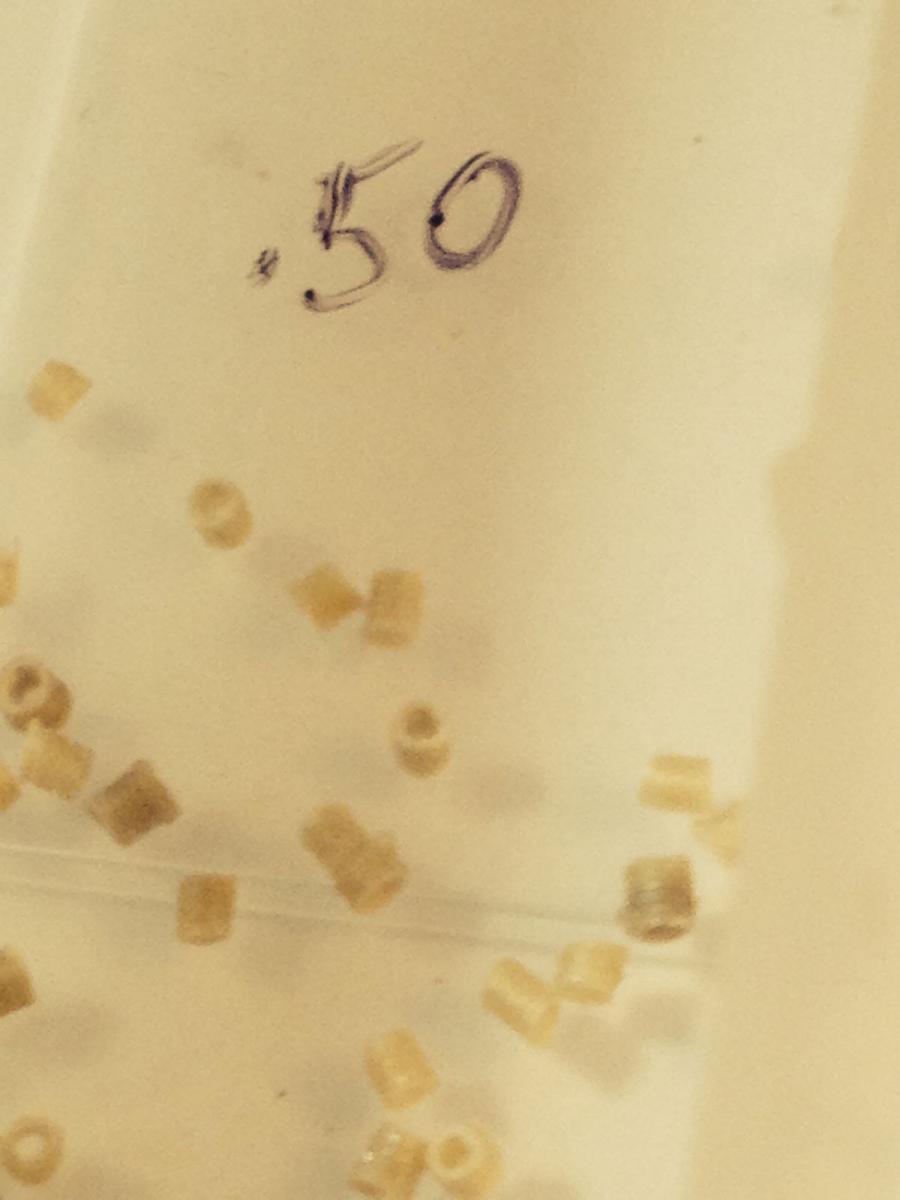
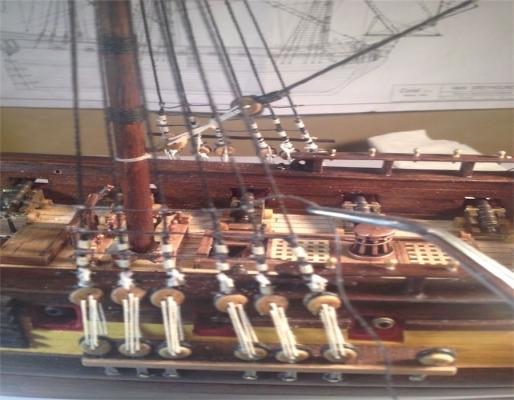
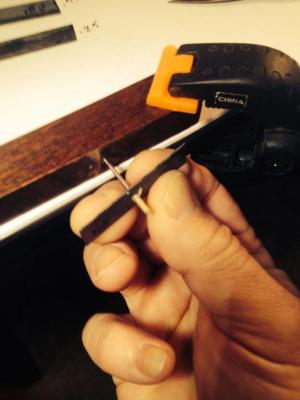
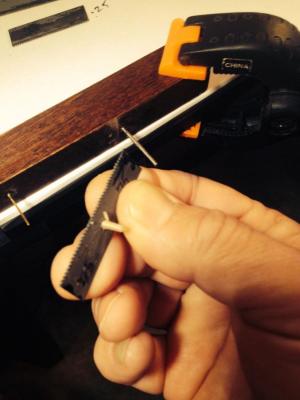
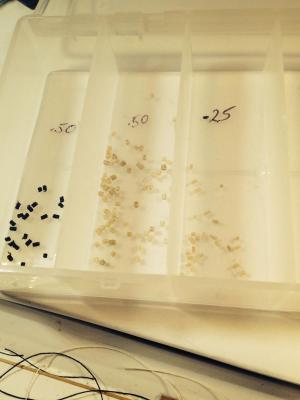
Quick question, I have been making zip ties to be used as seizings. I made the attached (if I can attach the pics) Jig to set the size and then cut the zips. I use a bit of ca on the ends of the shrouds to be able to pass the line through the zips. It's a clean look but I'm wondering how many of the members do this? I learned it from Hubert (recently passed). But would appreciate any input from members. I look forward to reading your responses. Ron / AKA Homer
-
Hi Gerald, I'm just finishing my third ship the Greyhound. I haven't yet decided if my next build will be the Morgan or the Victory. I have both ships waiting to be built. If my next build is the Morgan I will certainly reference your superb work on this ship. The HMS Bounty by AL took me about two years to finish. I suspect at the rate of my builds the Victory might take longer than the Morgan. It will be a last minute decision when I'm ready. Anyway, beautiful work! Ron AKA Homer