
DB789
-
Posts
425 -
Joined
-
Last visited
Content Type
Profiles
Forums
Gallery
Events
Everything posted by DB789
-
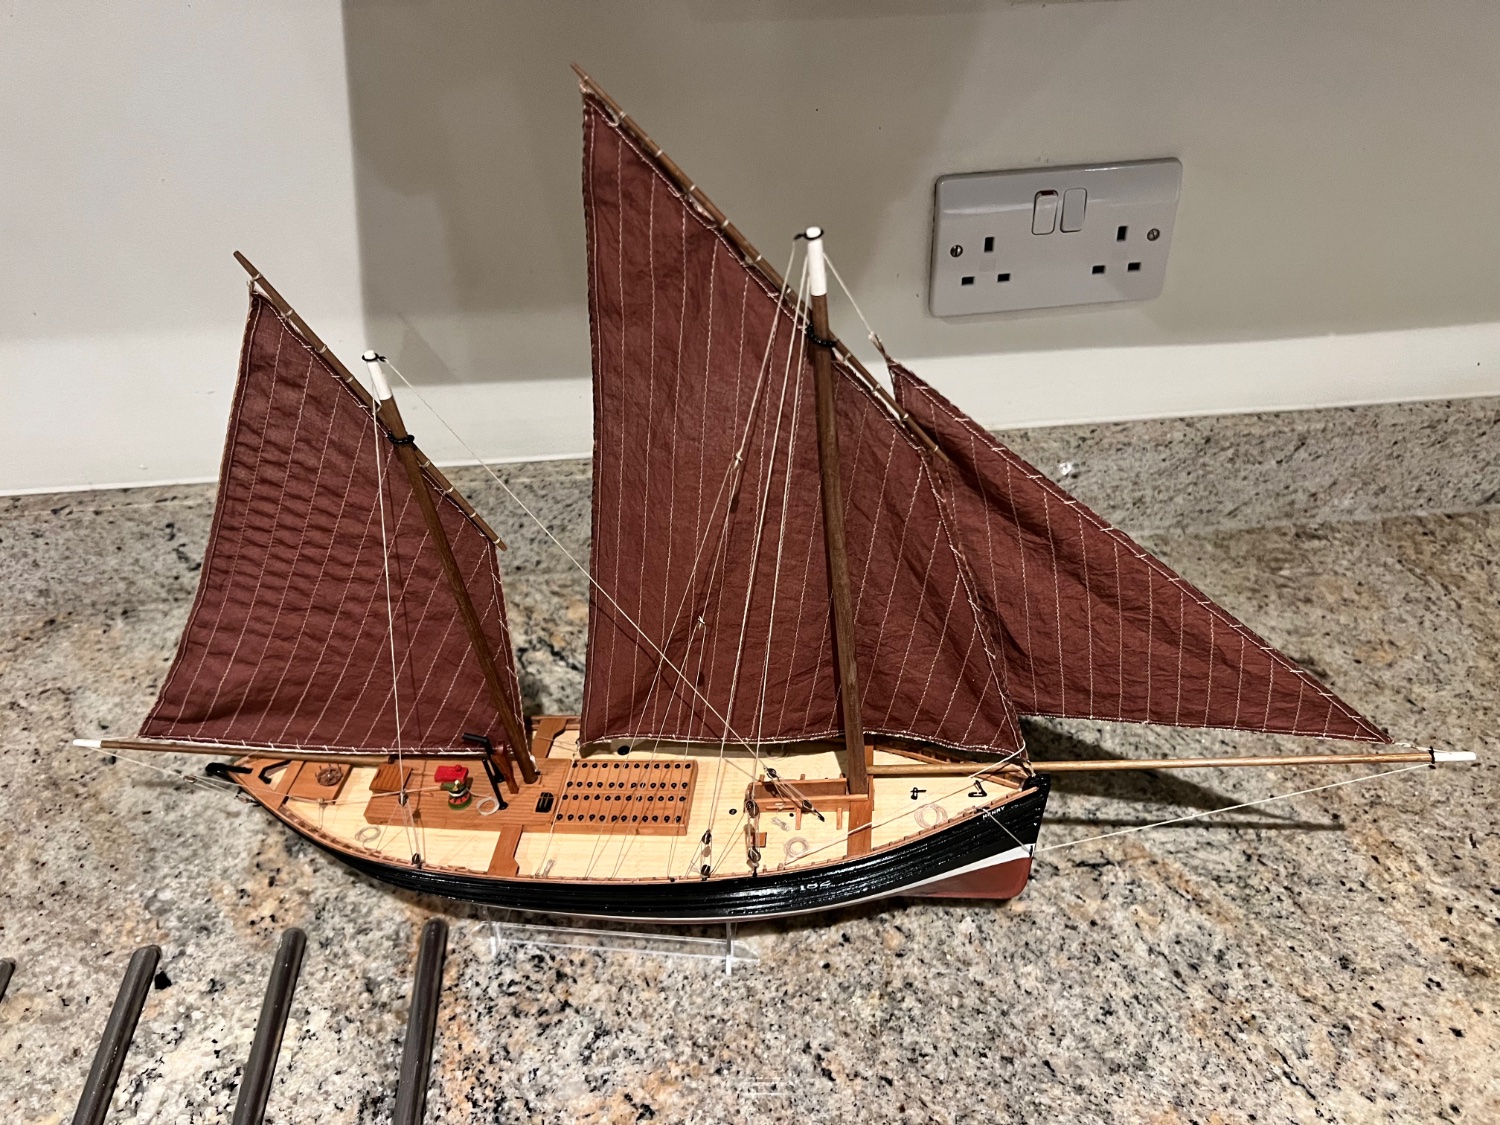
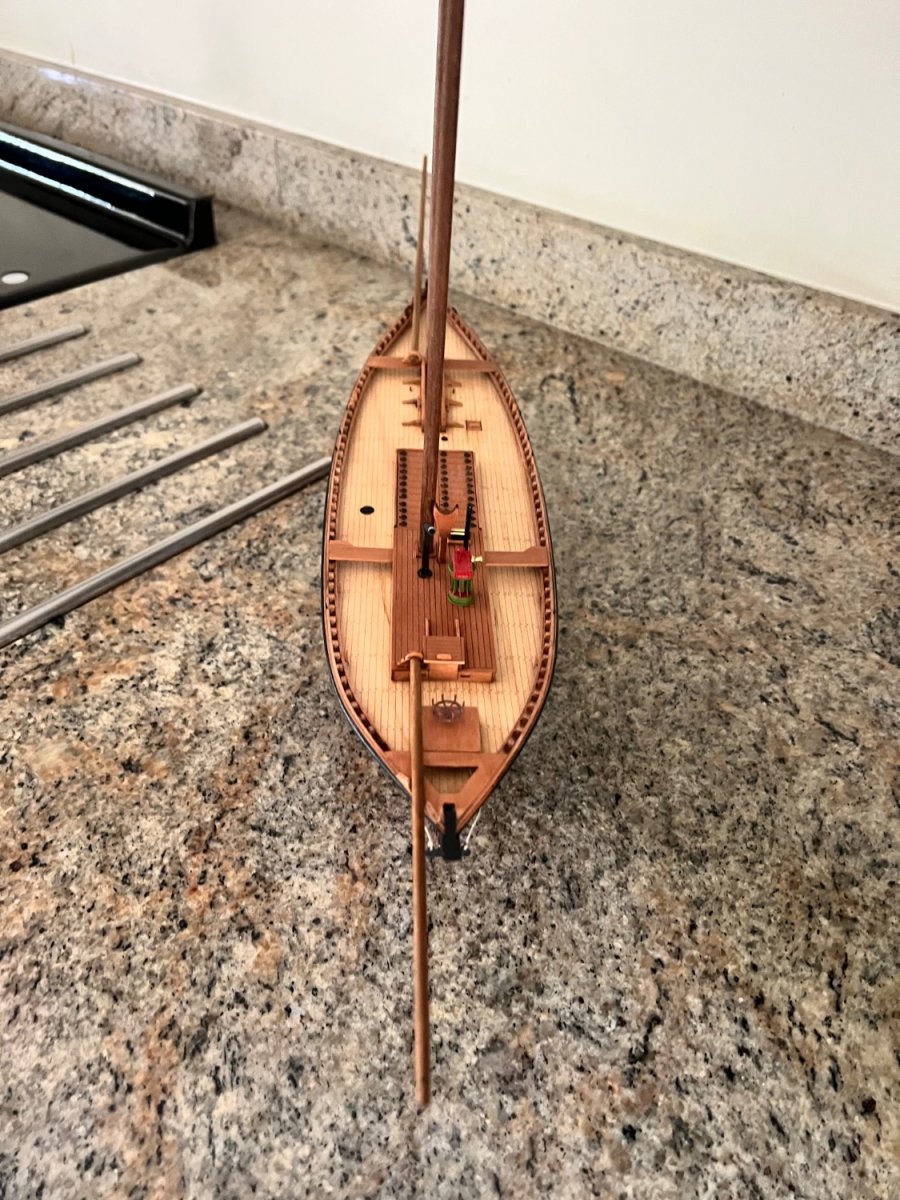
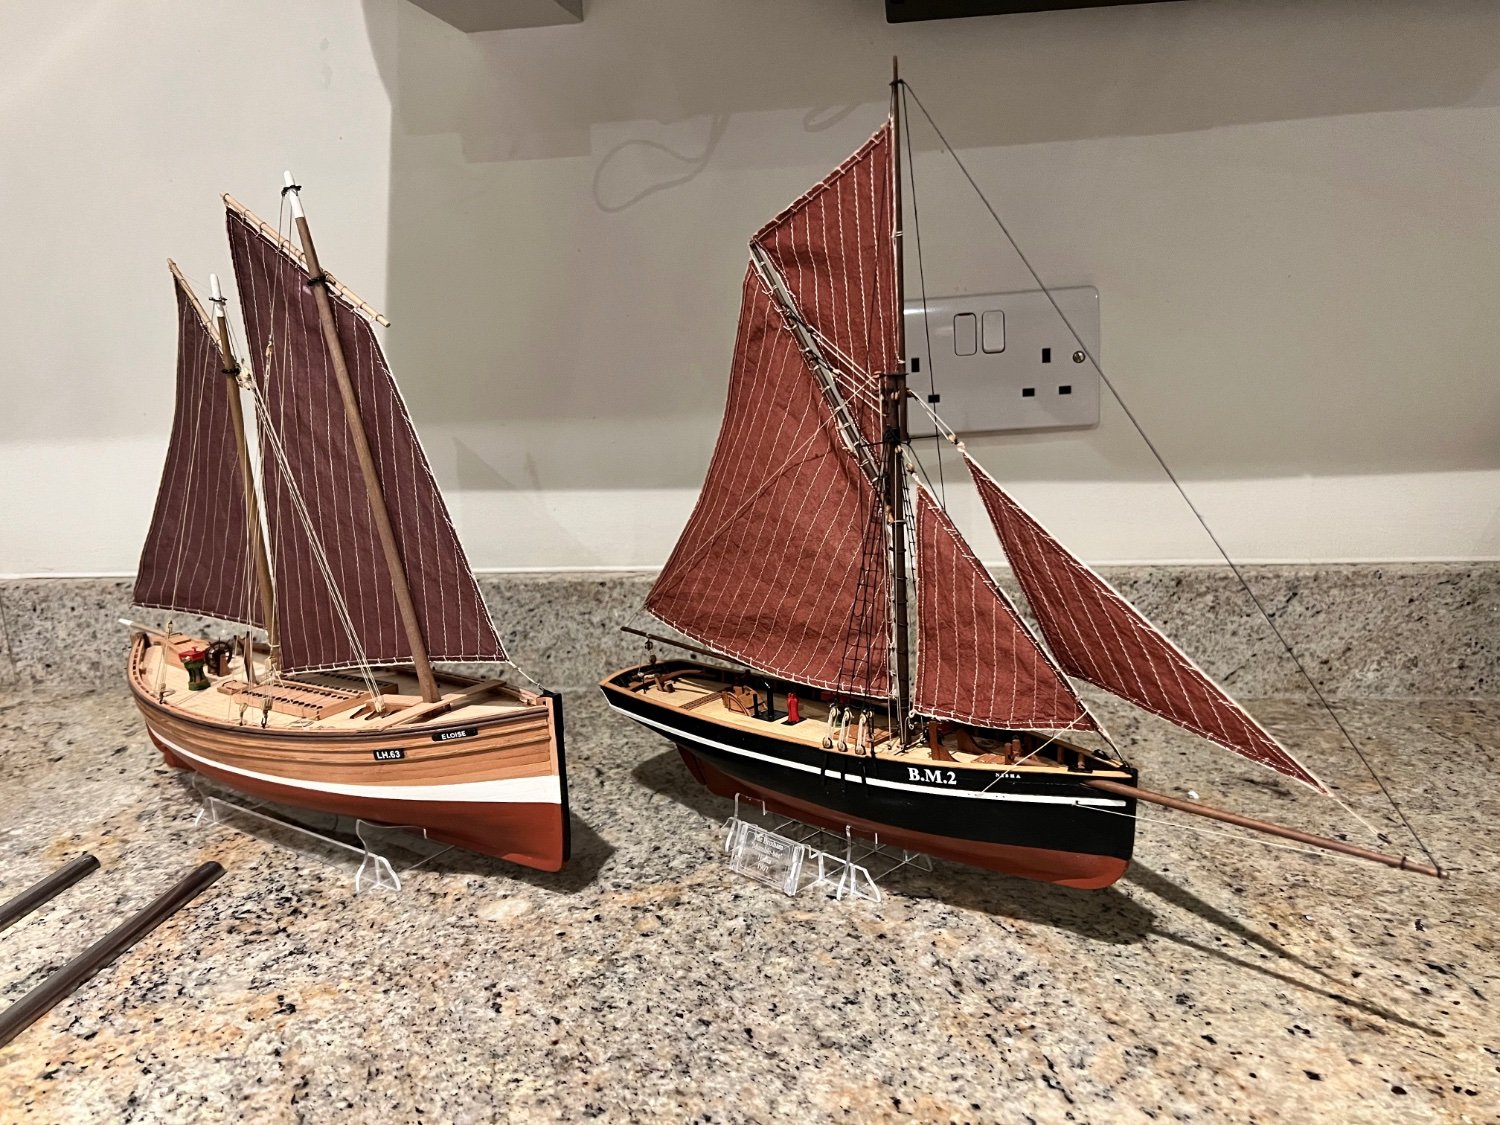
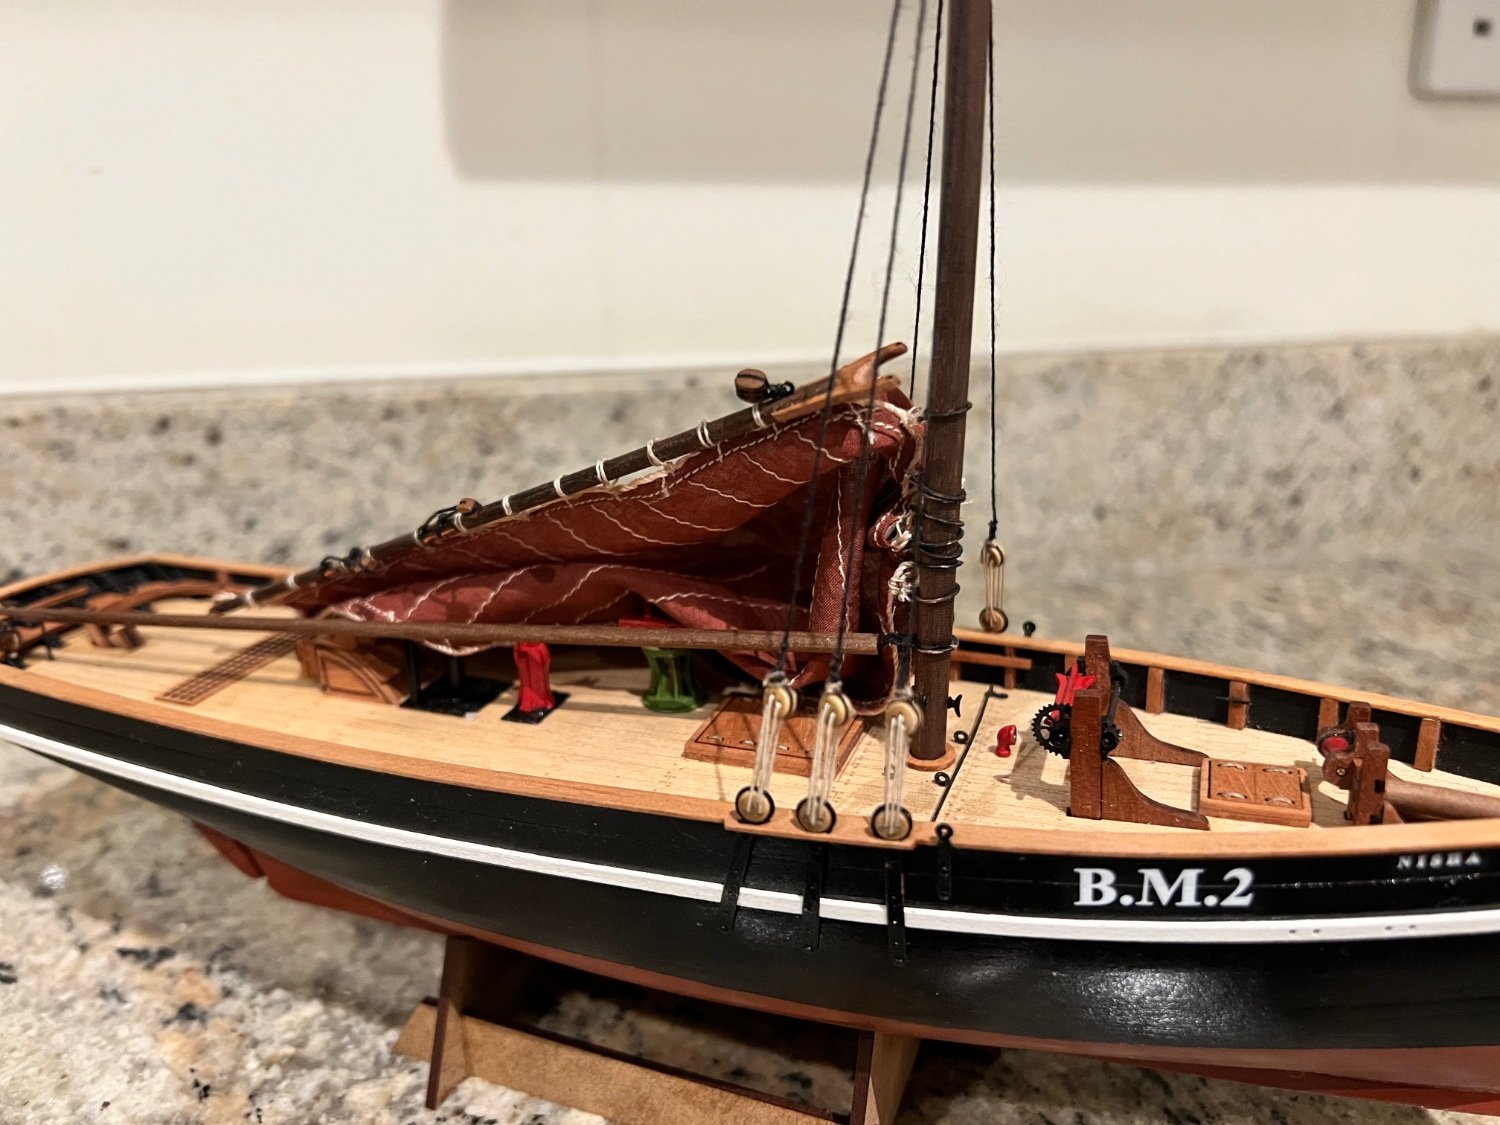
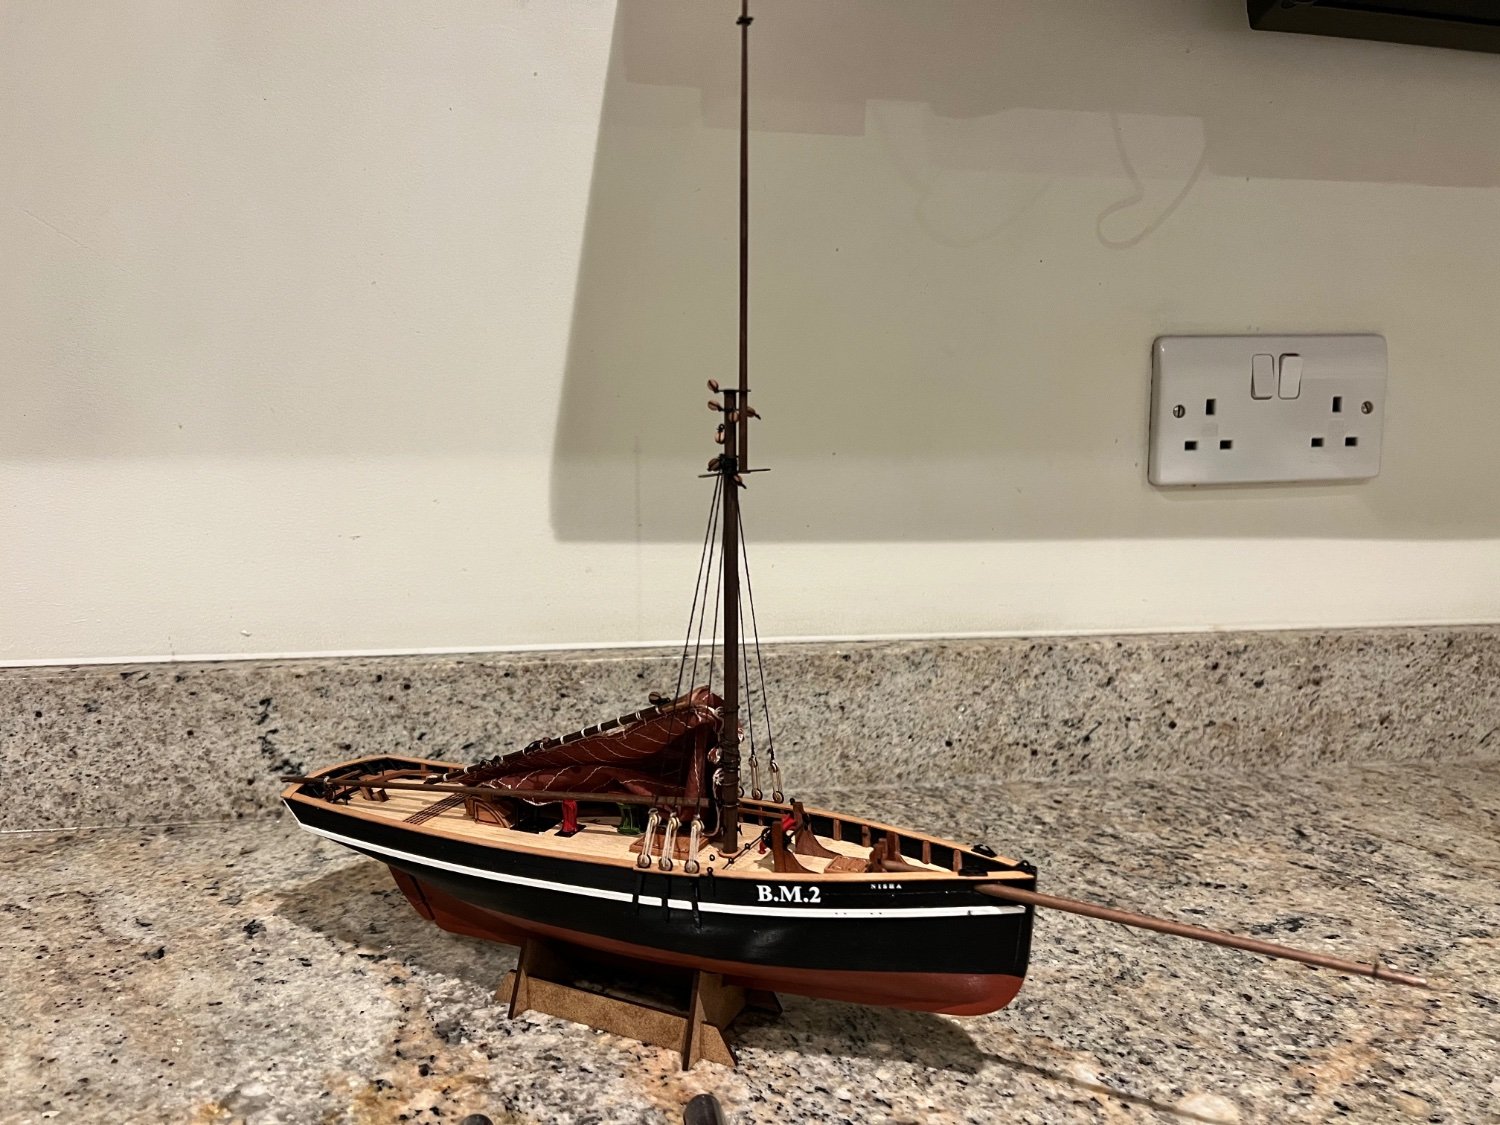
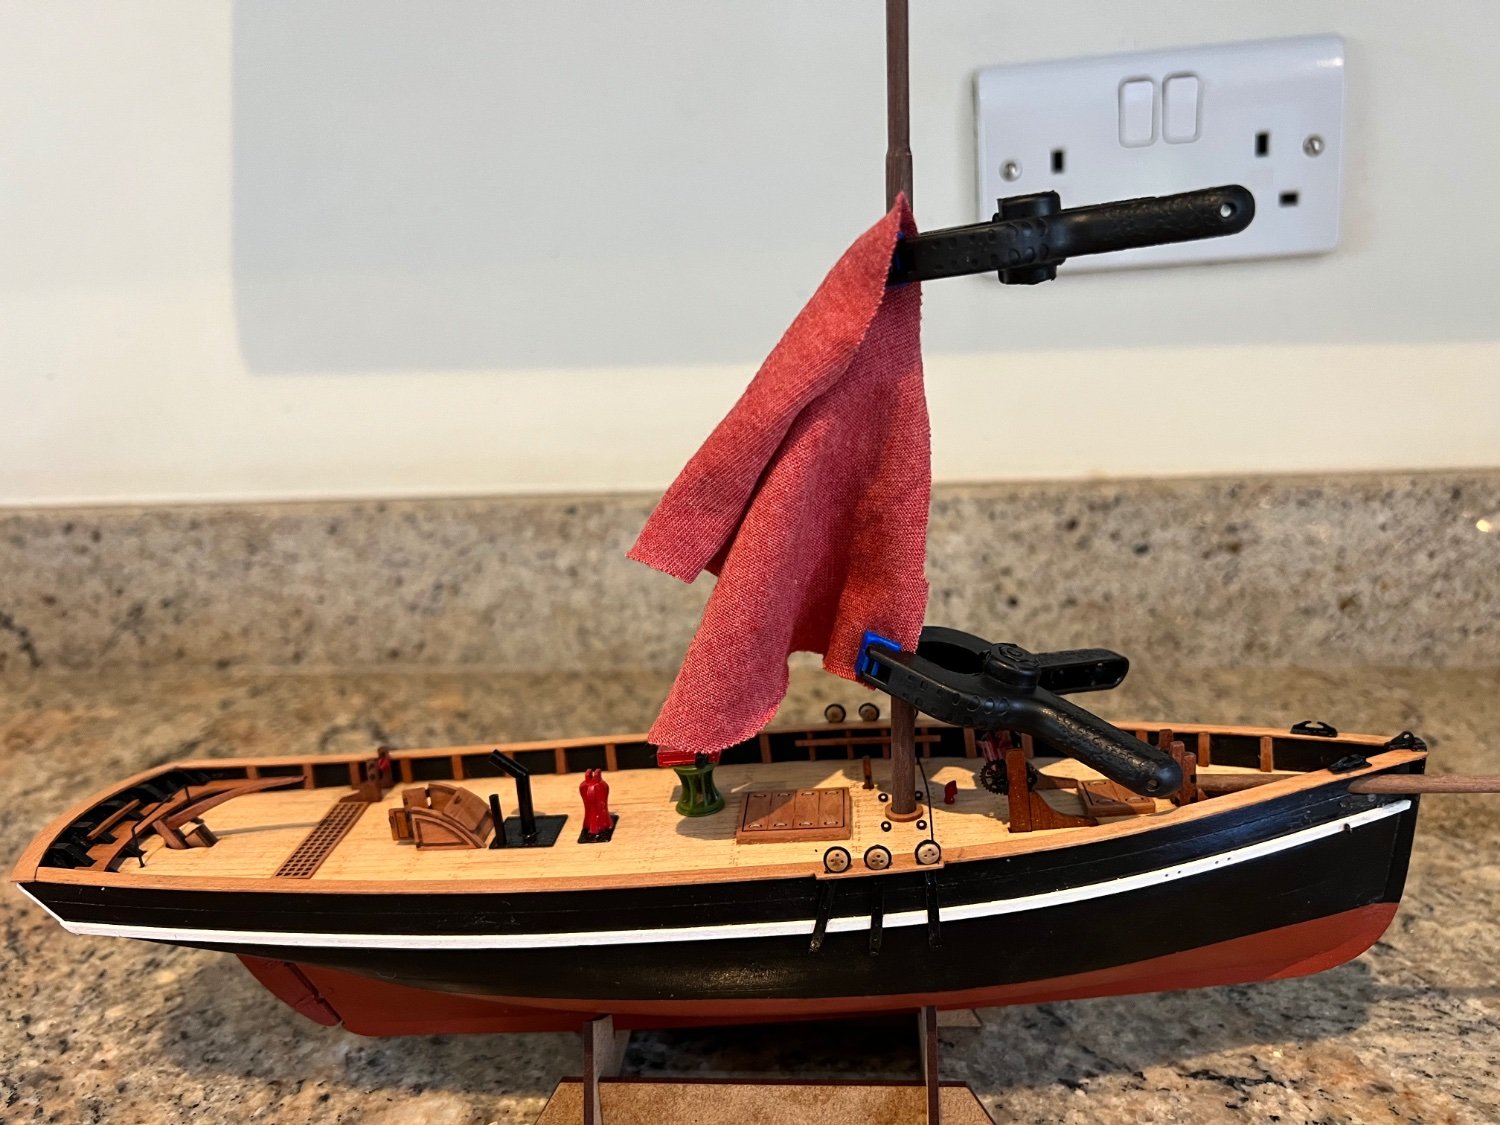
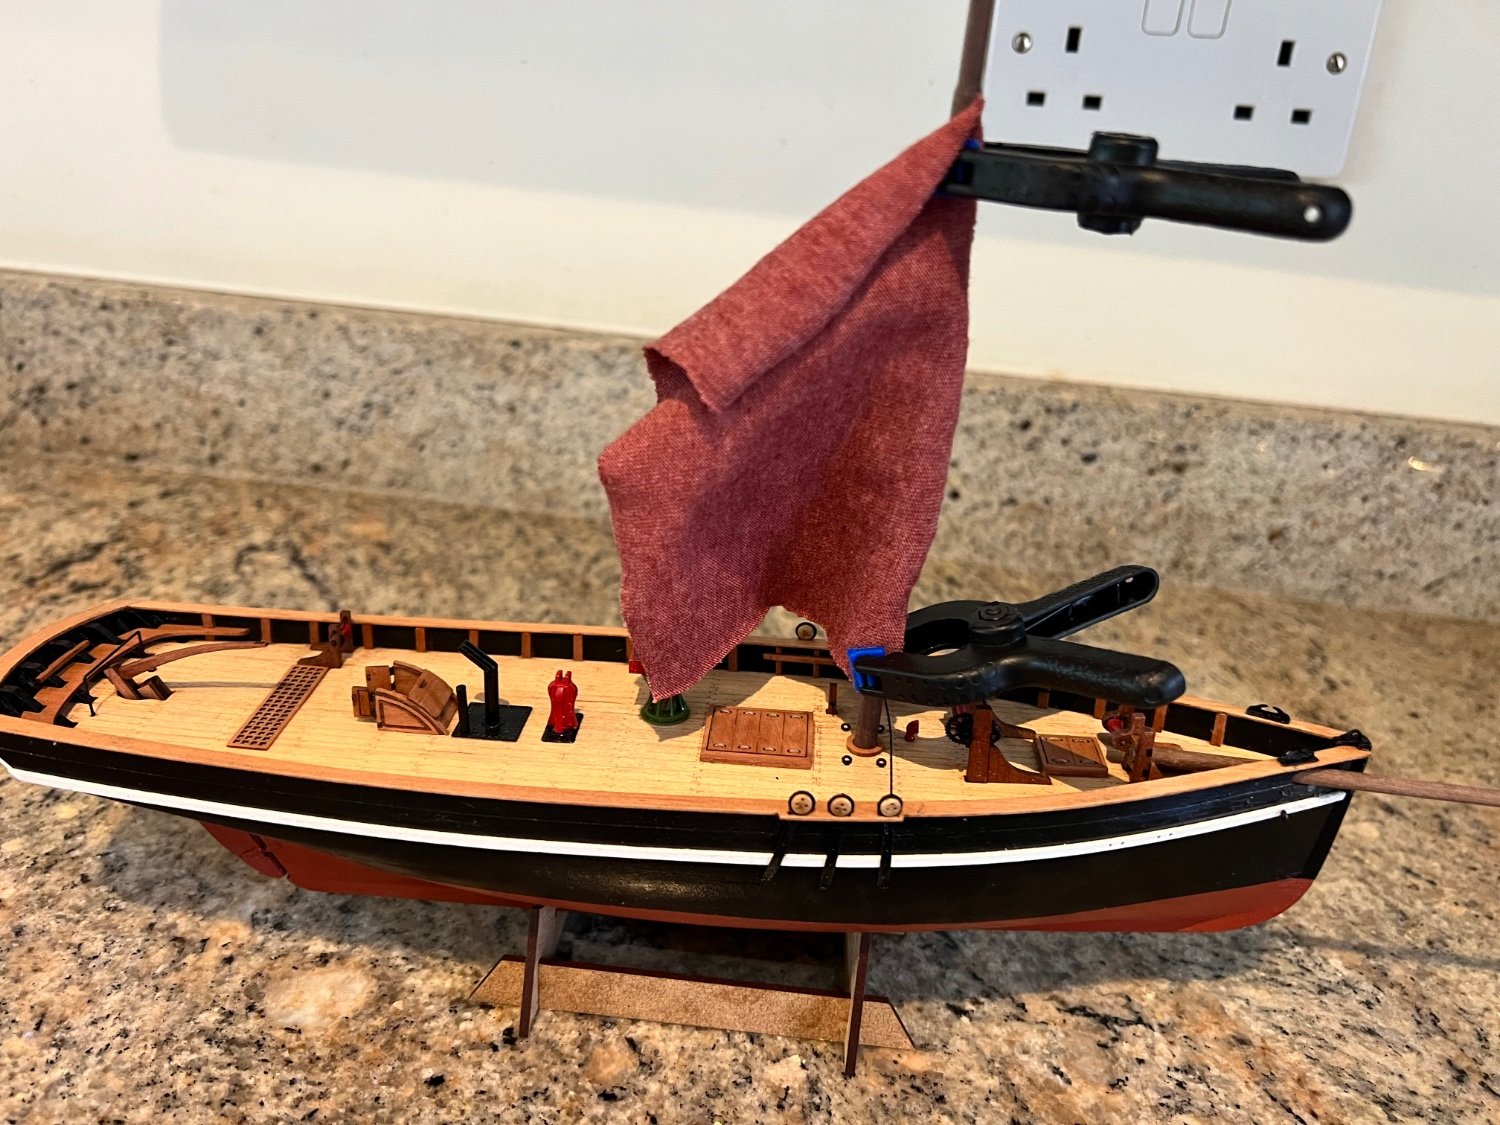
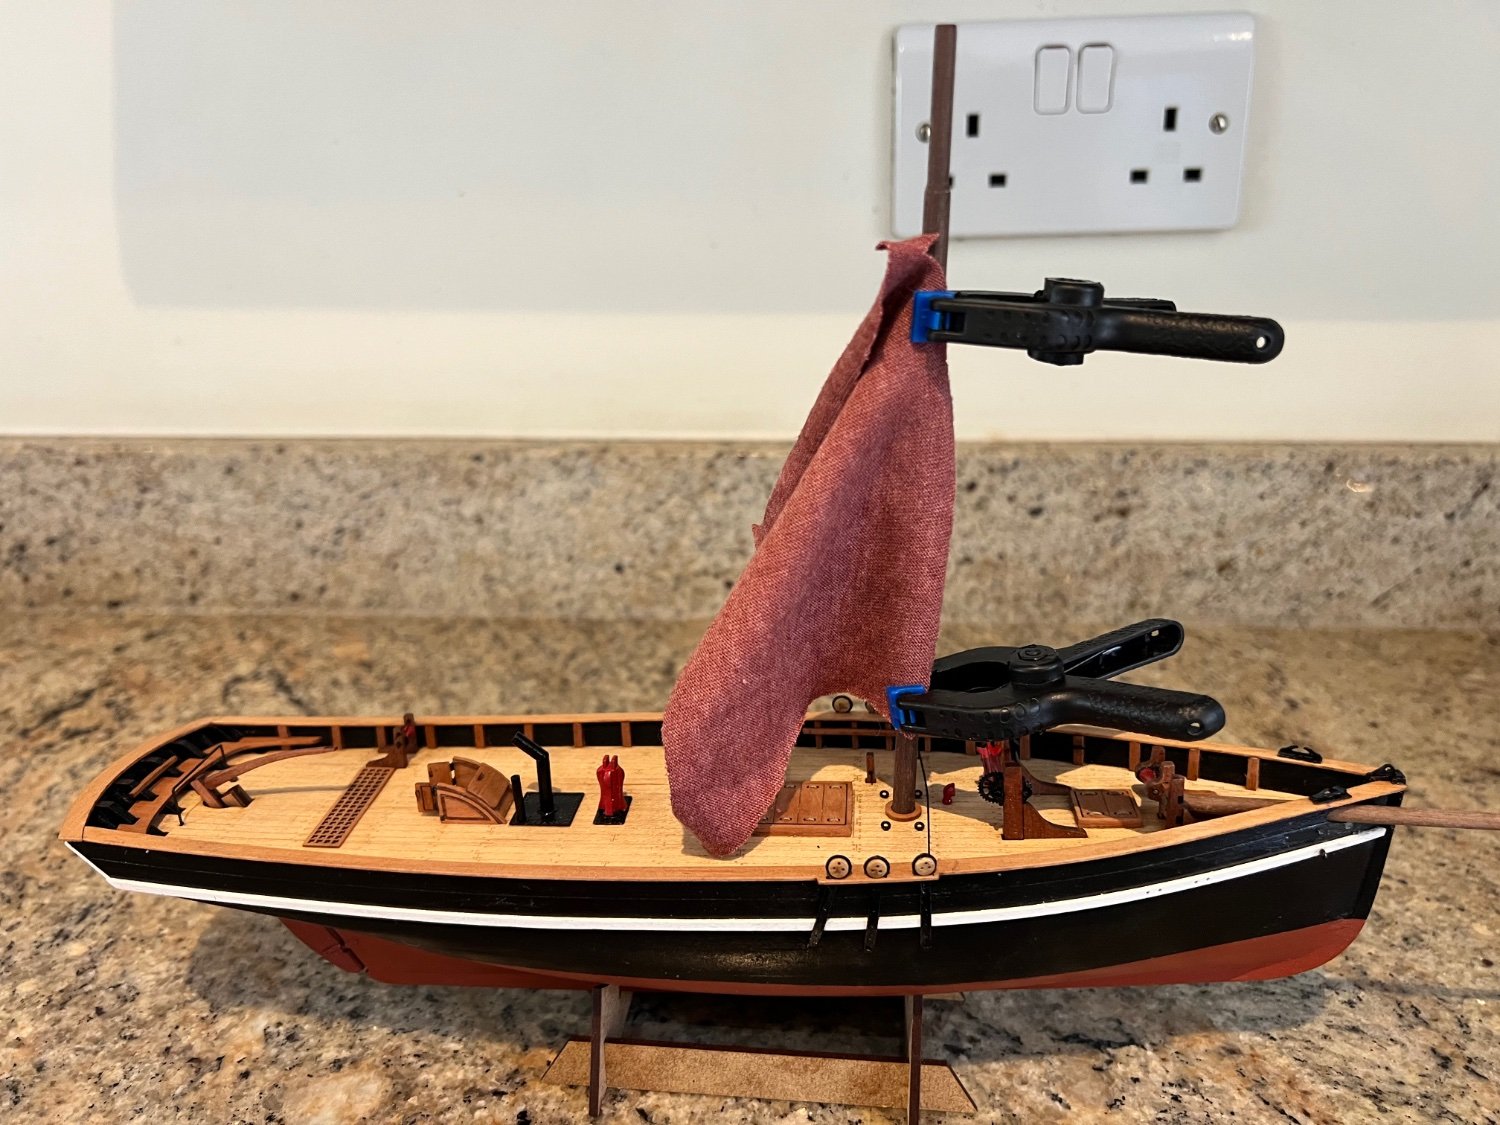
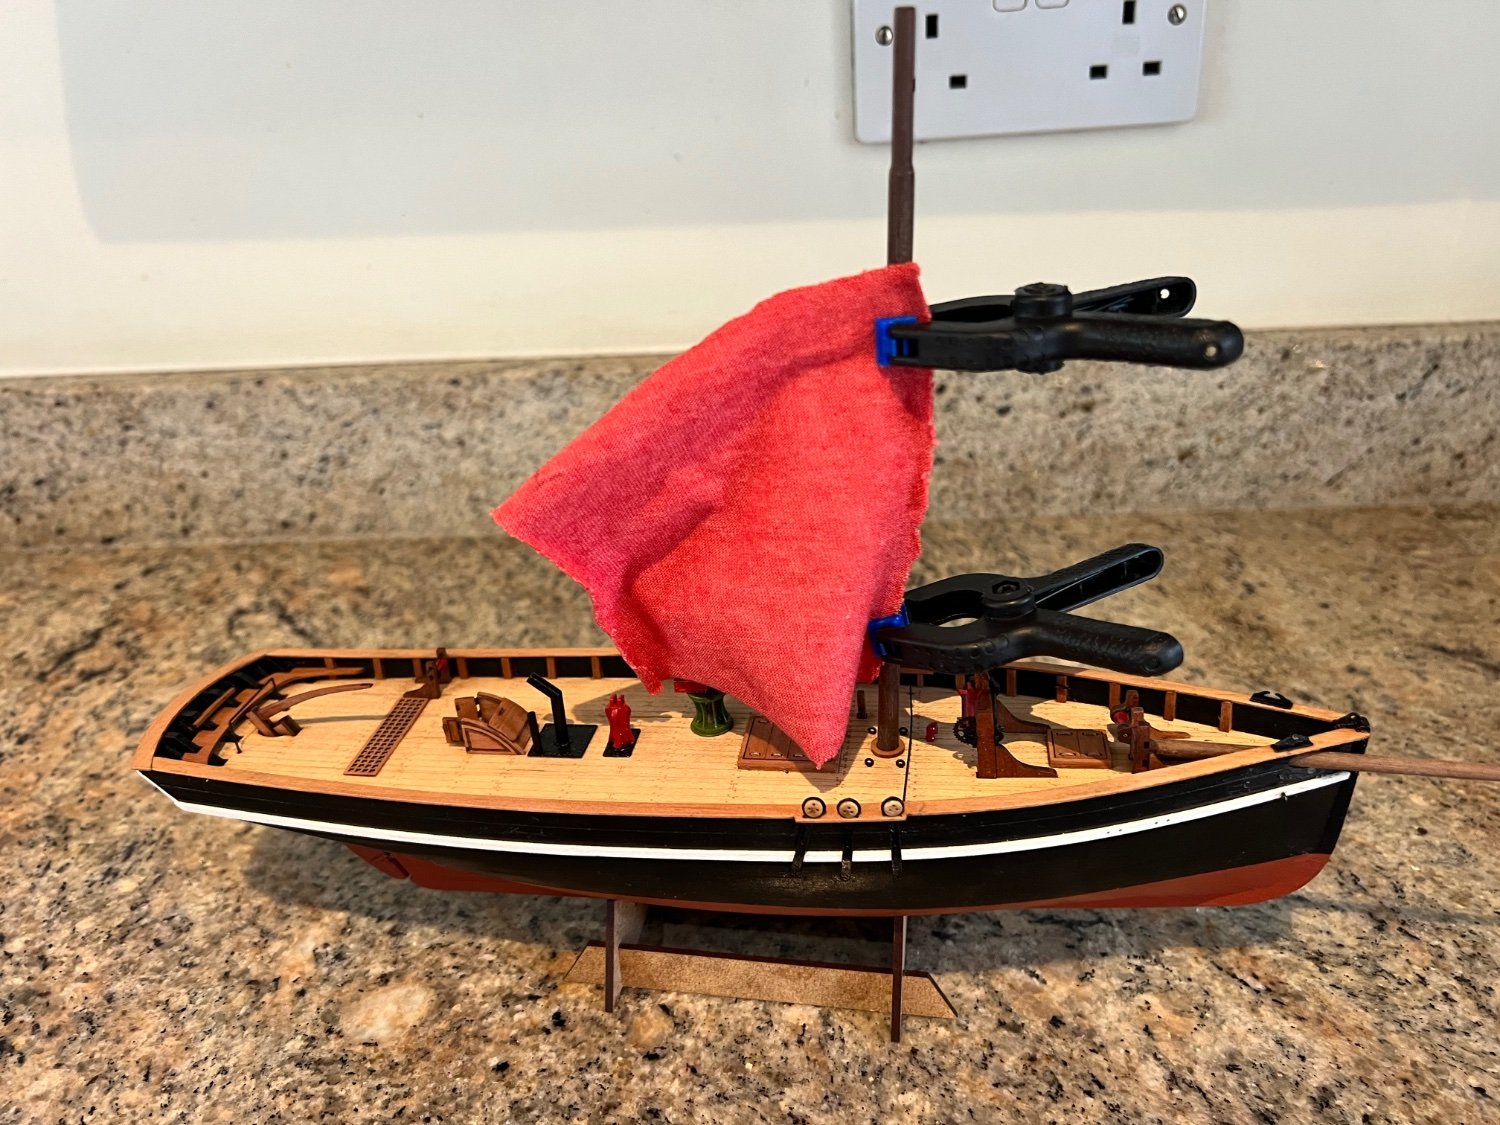
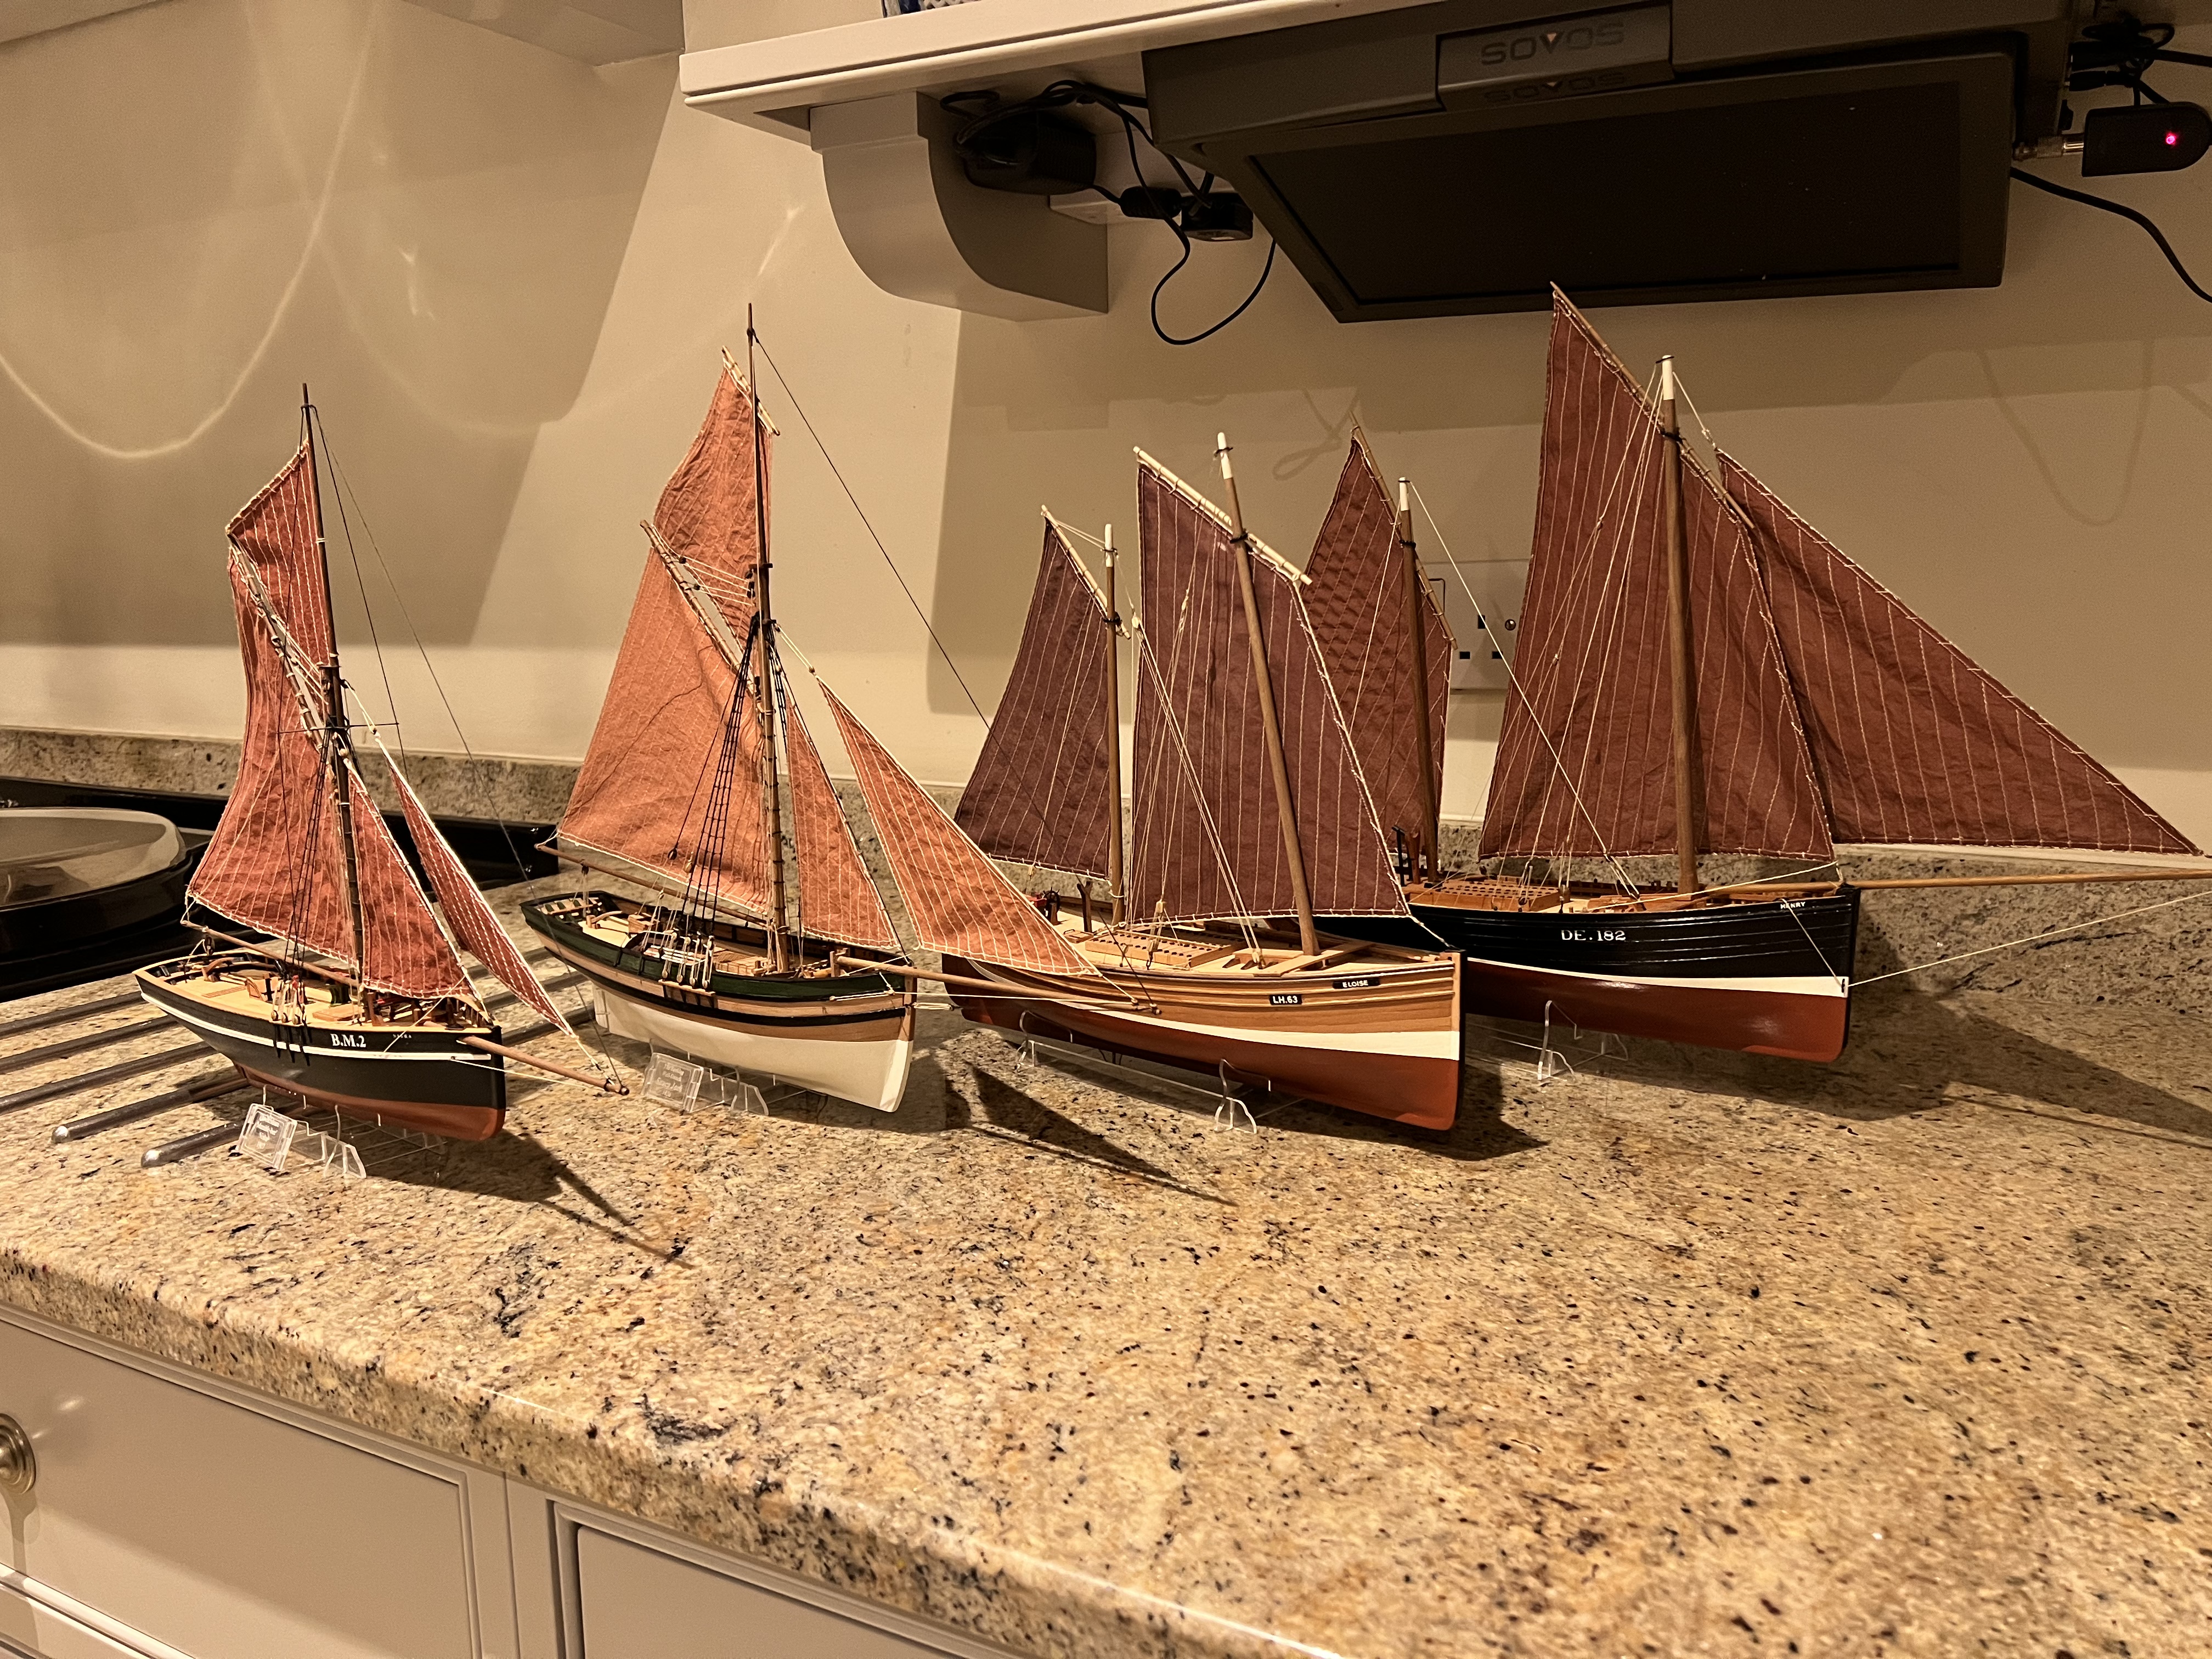
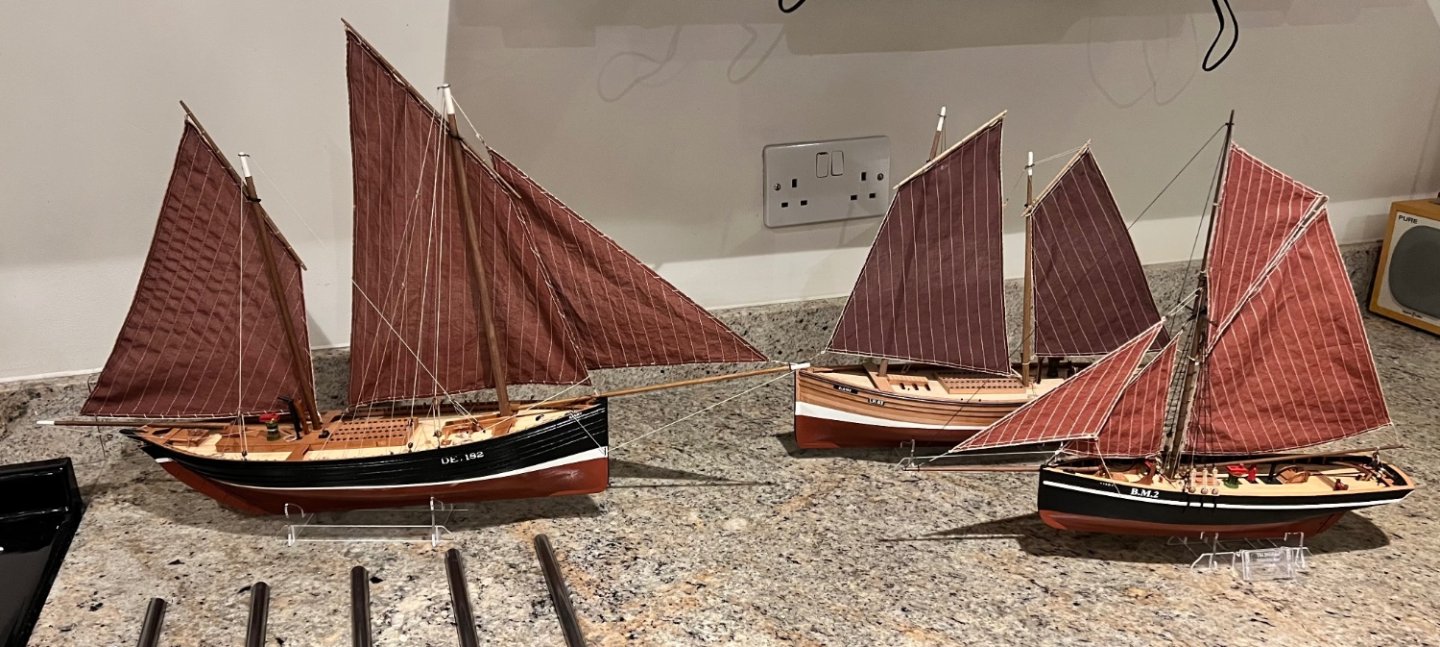
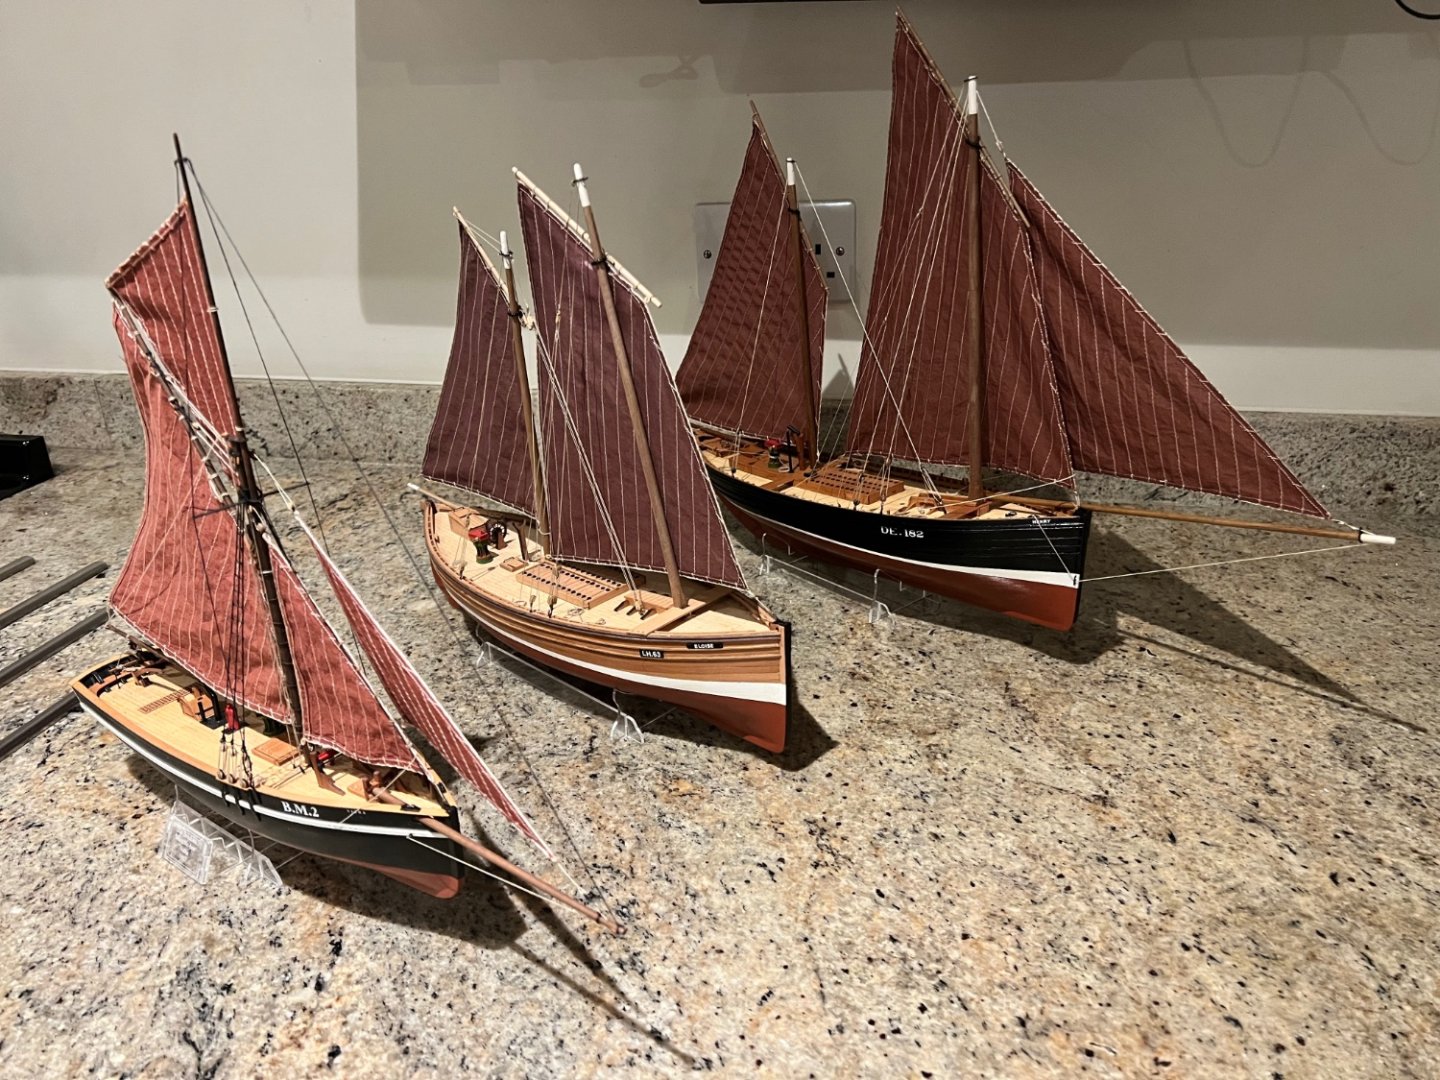
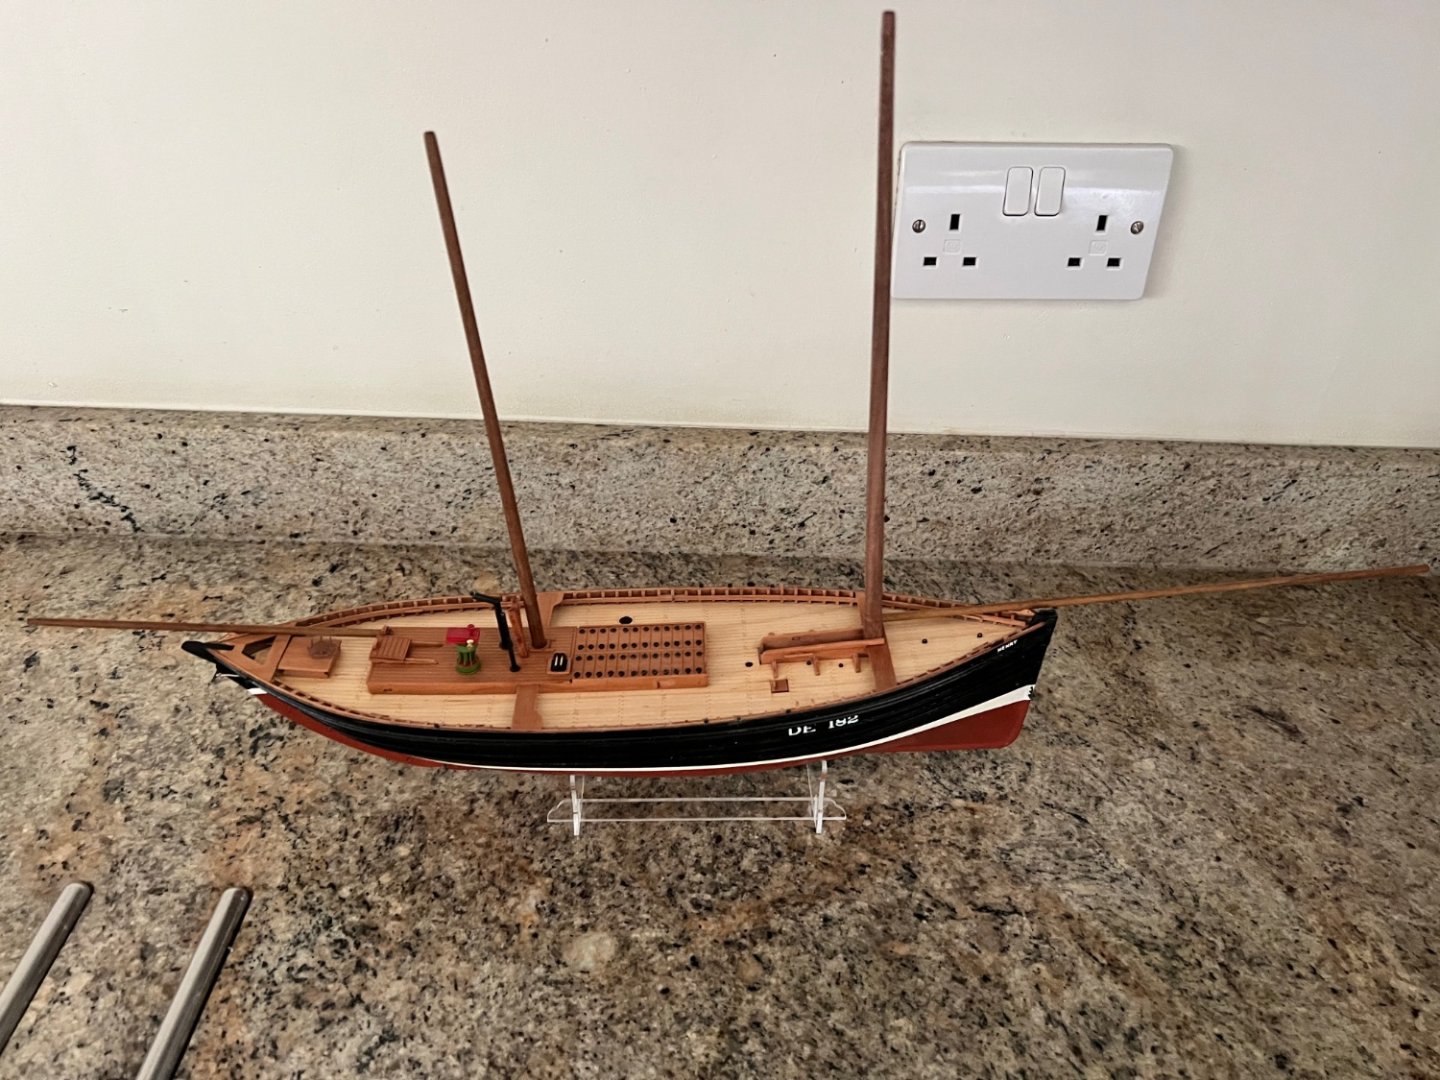
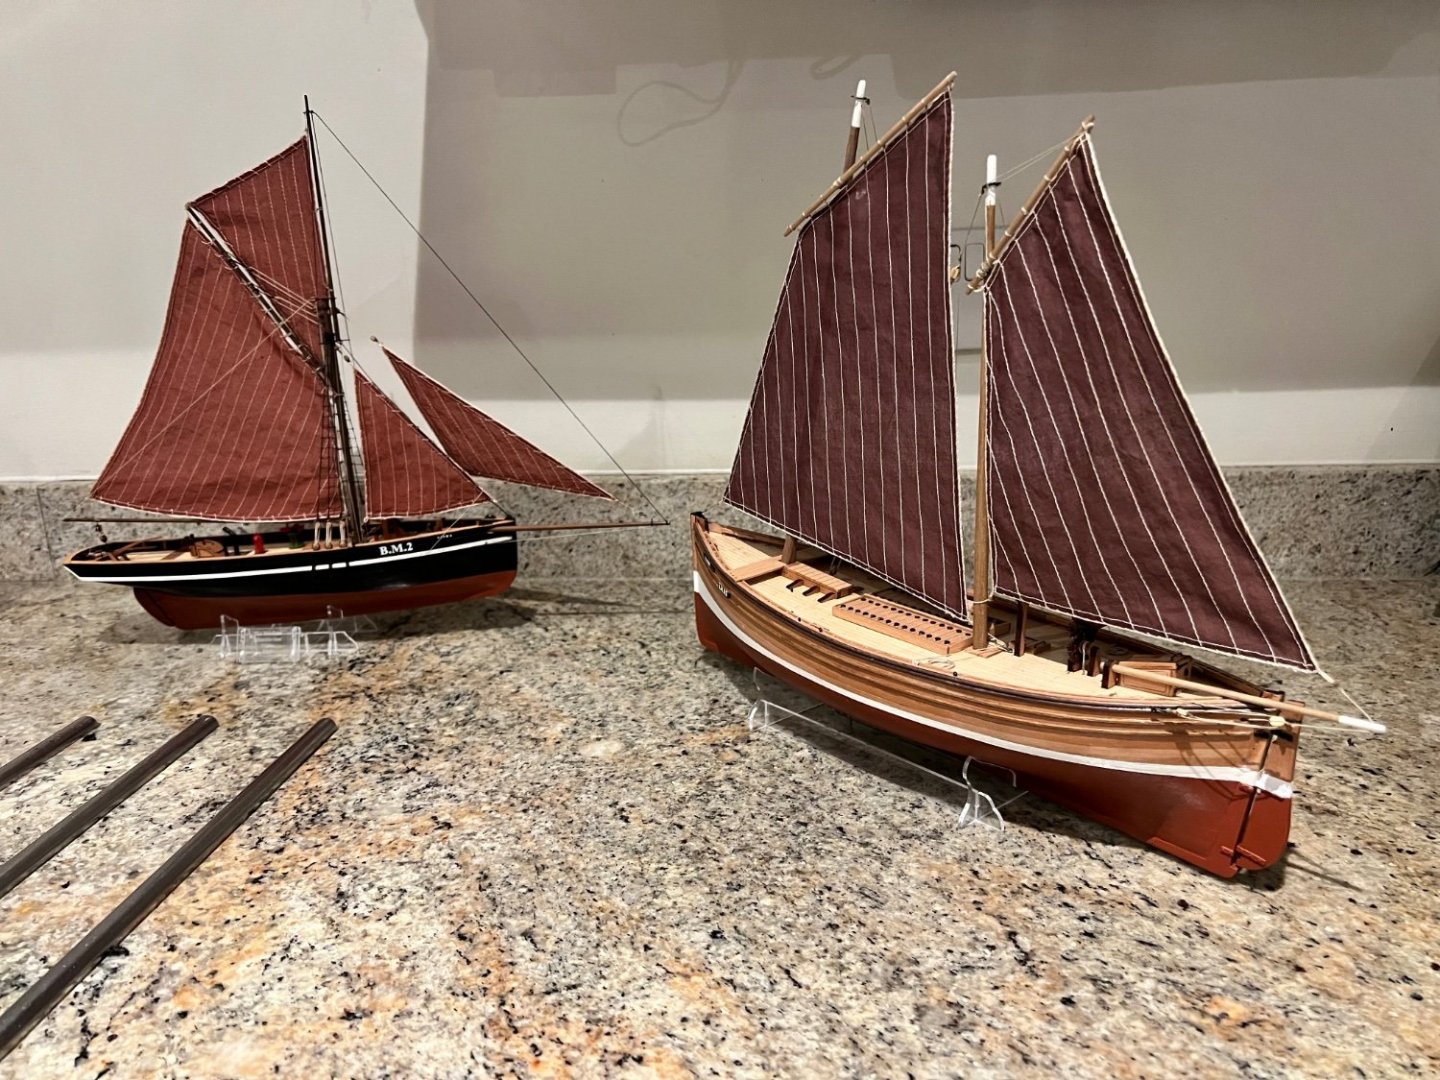
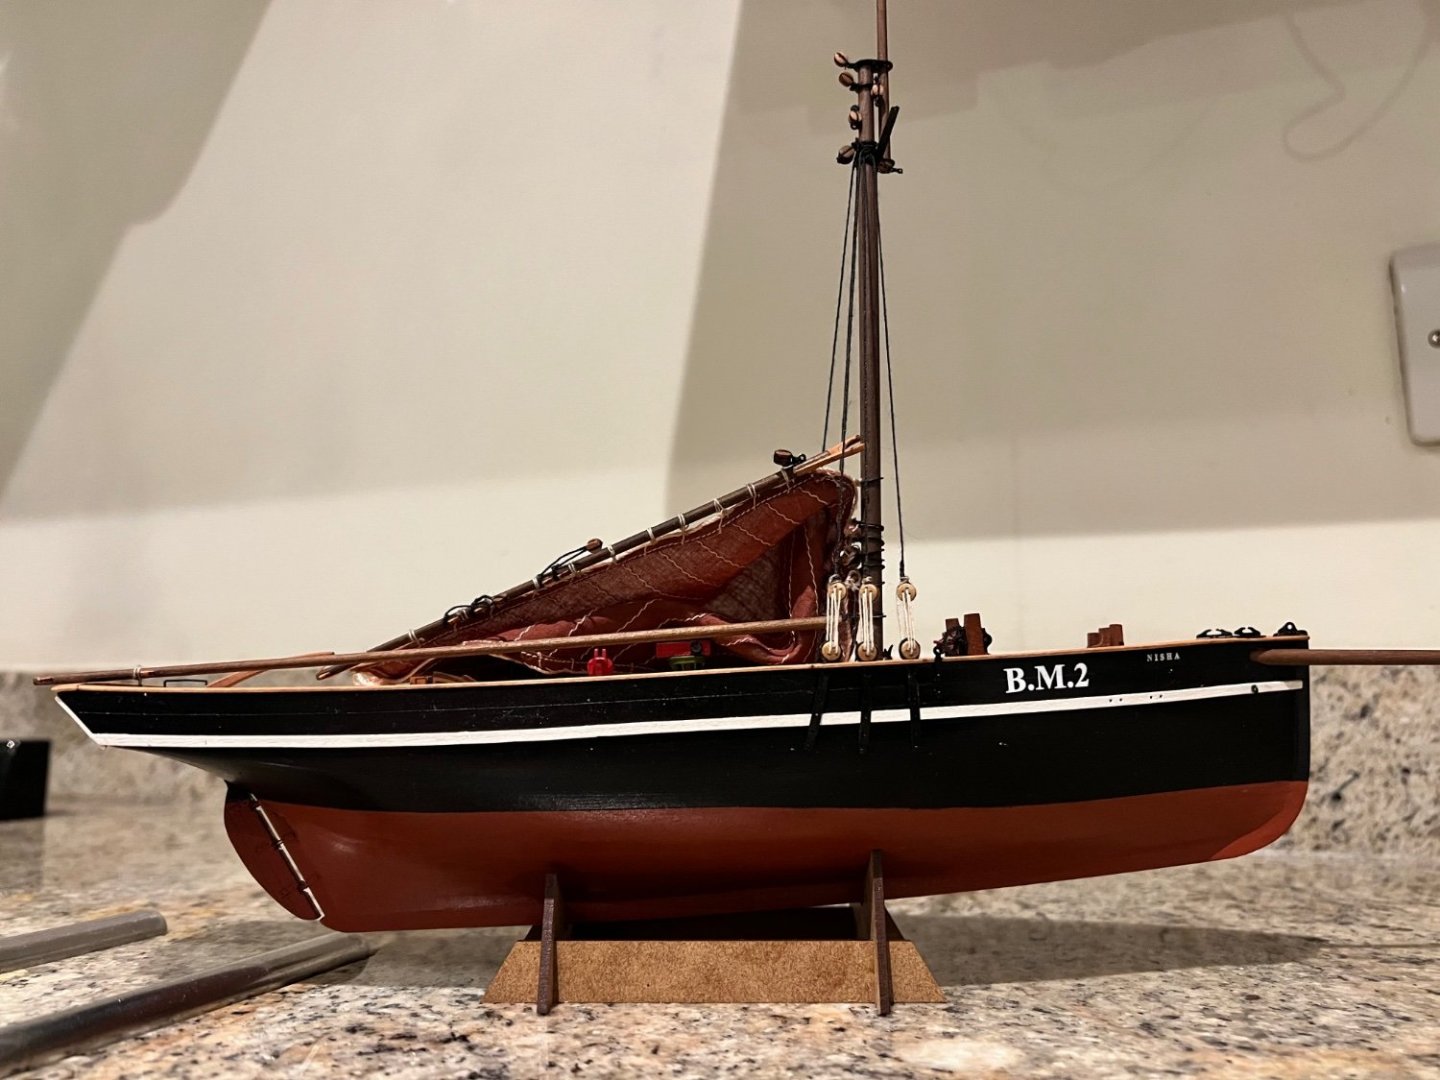
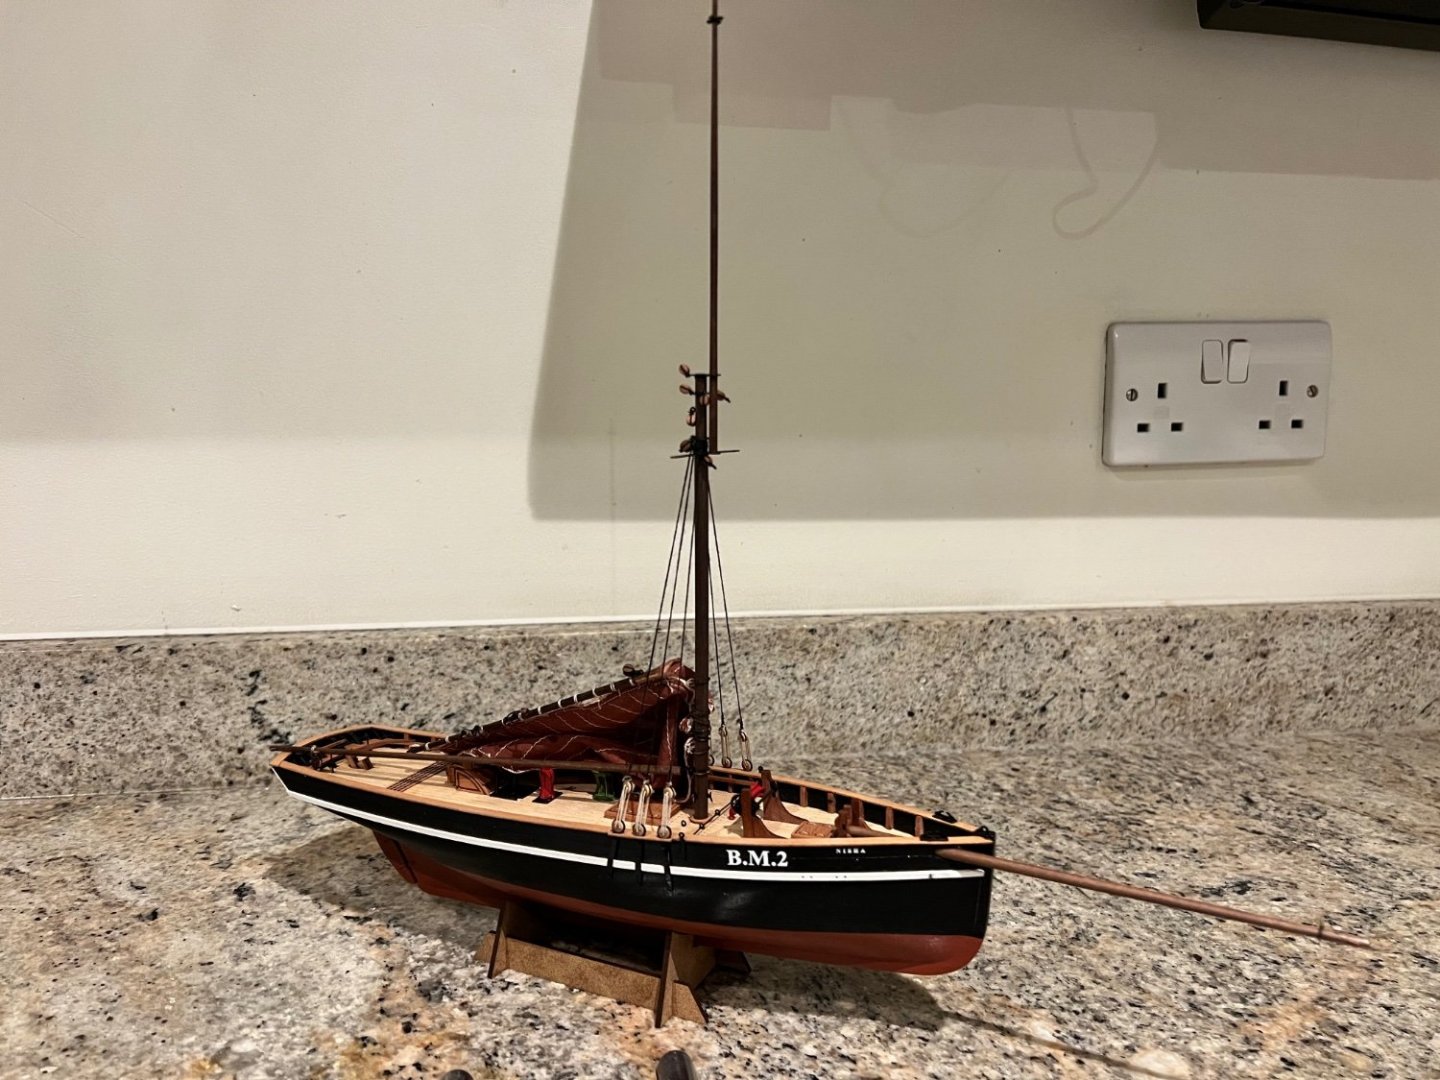
 The Zulu is finally complete. Not very different from my last set of photos but the last finishing touches done now. The varnish on the hull is Vallejo matt polyurethane - but has come up quite glossy, not sure why. Another great kit from Vanguard enabling an inexperienced modeller, such as me, to build a super looking boat. Nisha and Fifie welcome Zulu to the fishing fleet. The three fishers so far. Including bowsprit and boom, Zulu is by far the largest and a much bigger sail area. Onto Saucy Jack next. Thanks to everyone for all the help and encouragement with this build. The building logs have been invaluable.
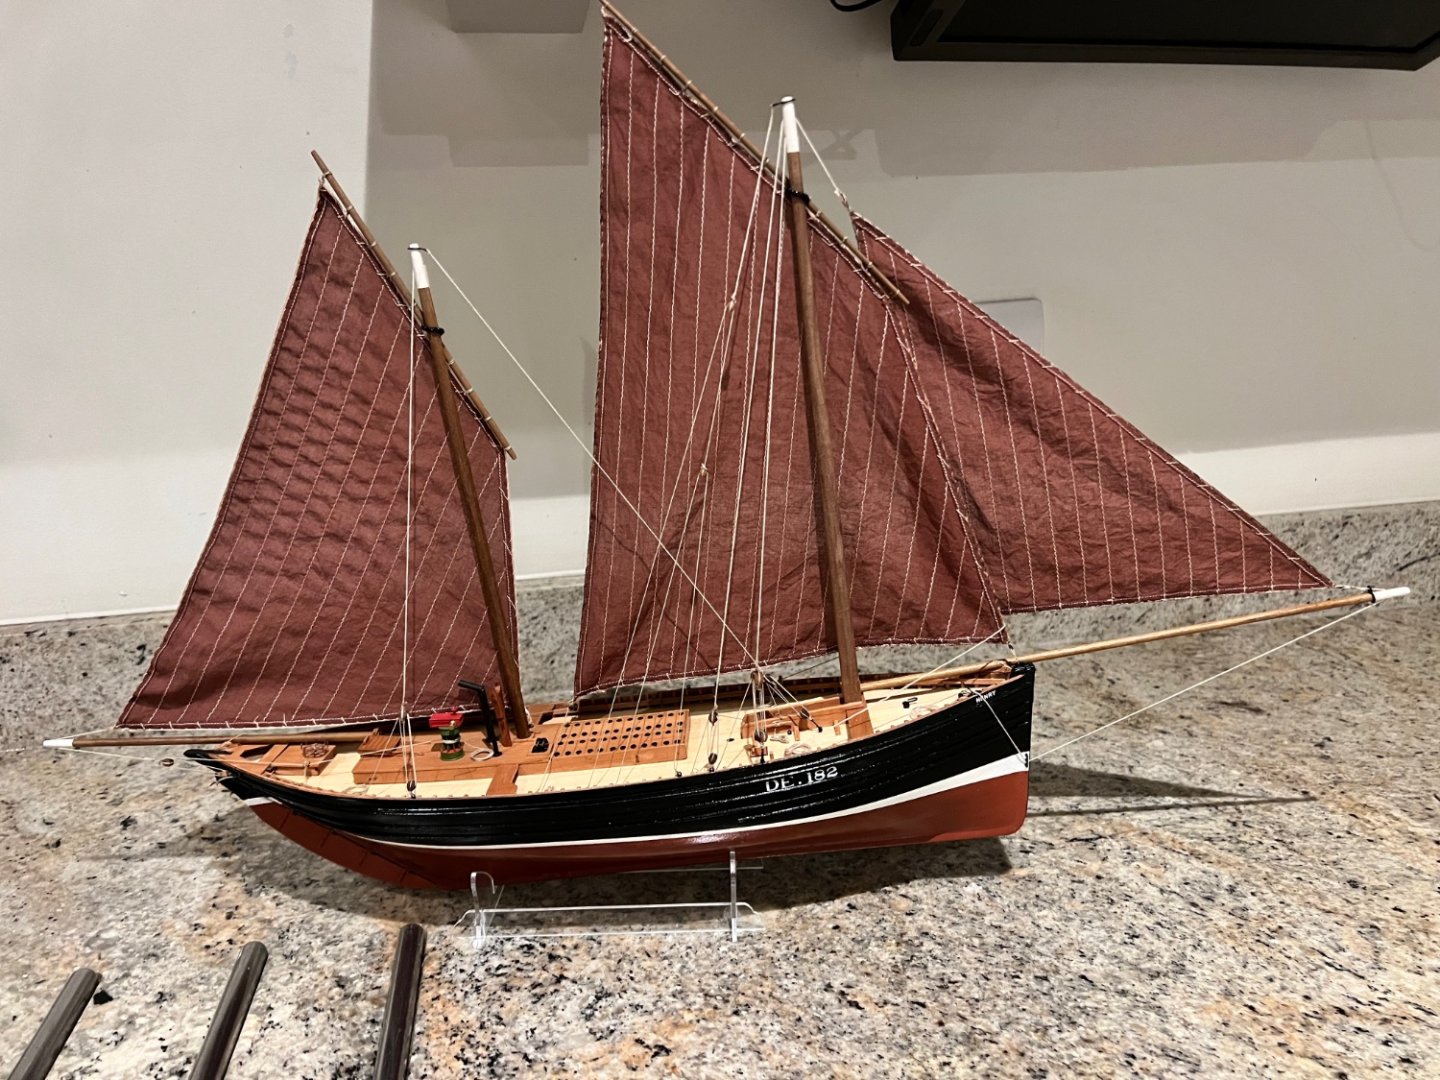

- 14 replies
-
- 10
-

-

-
- lady isabella
- zulu
- (and 2 more)
-
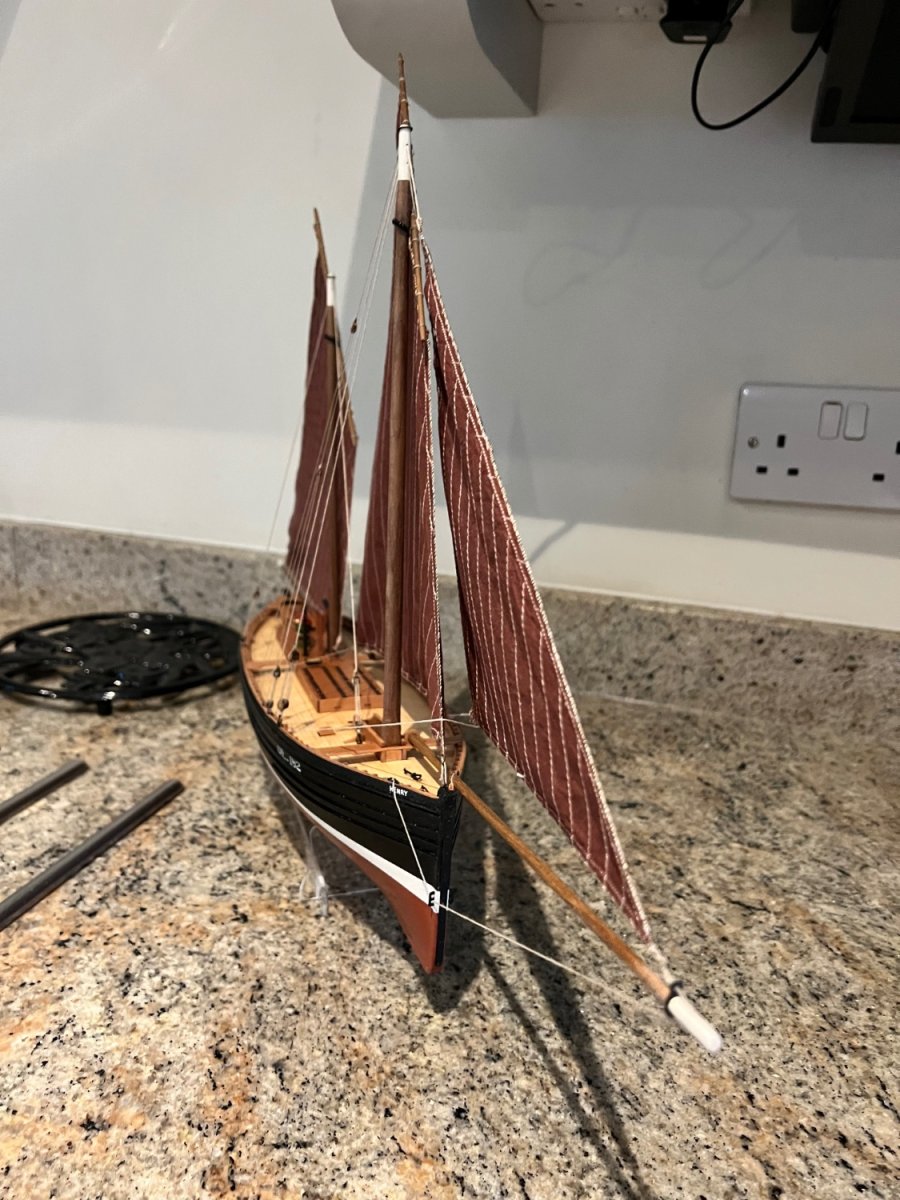
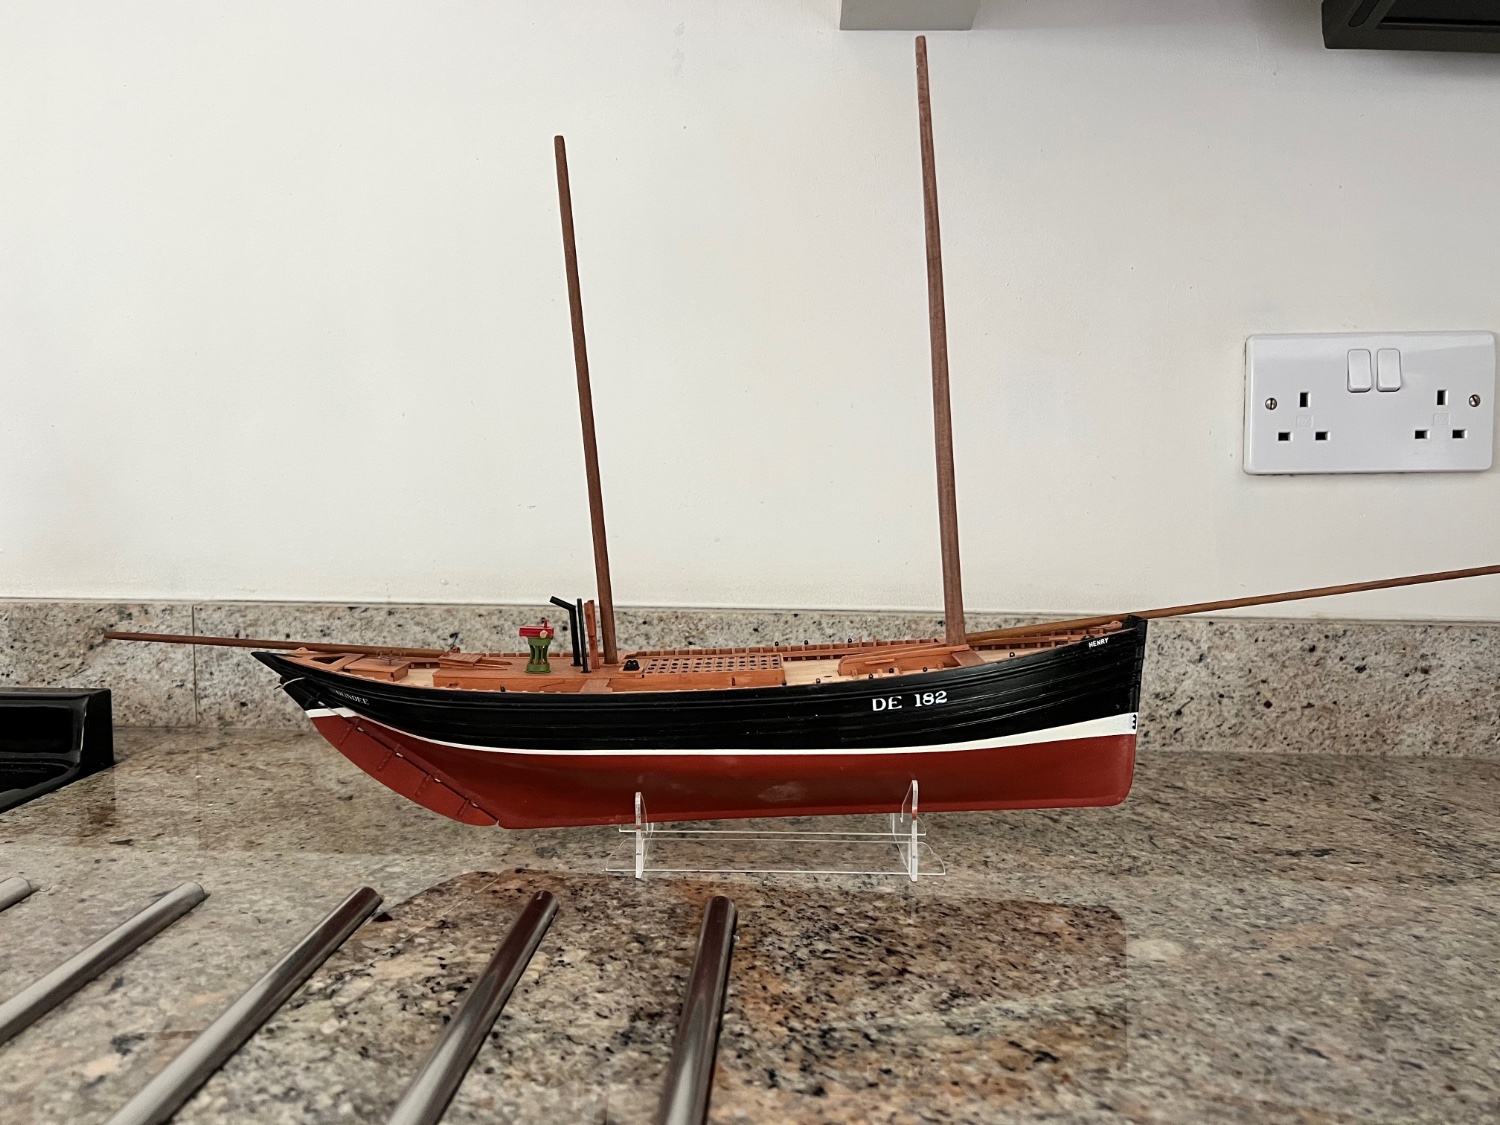
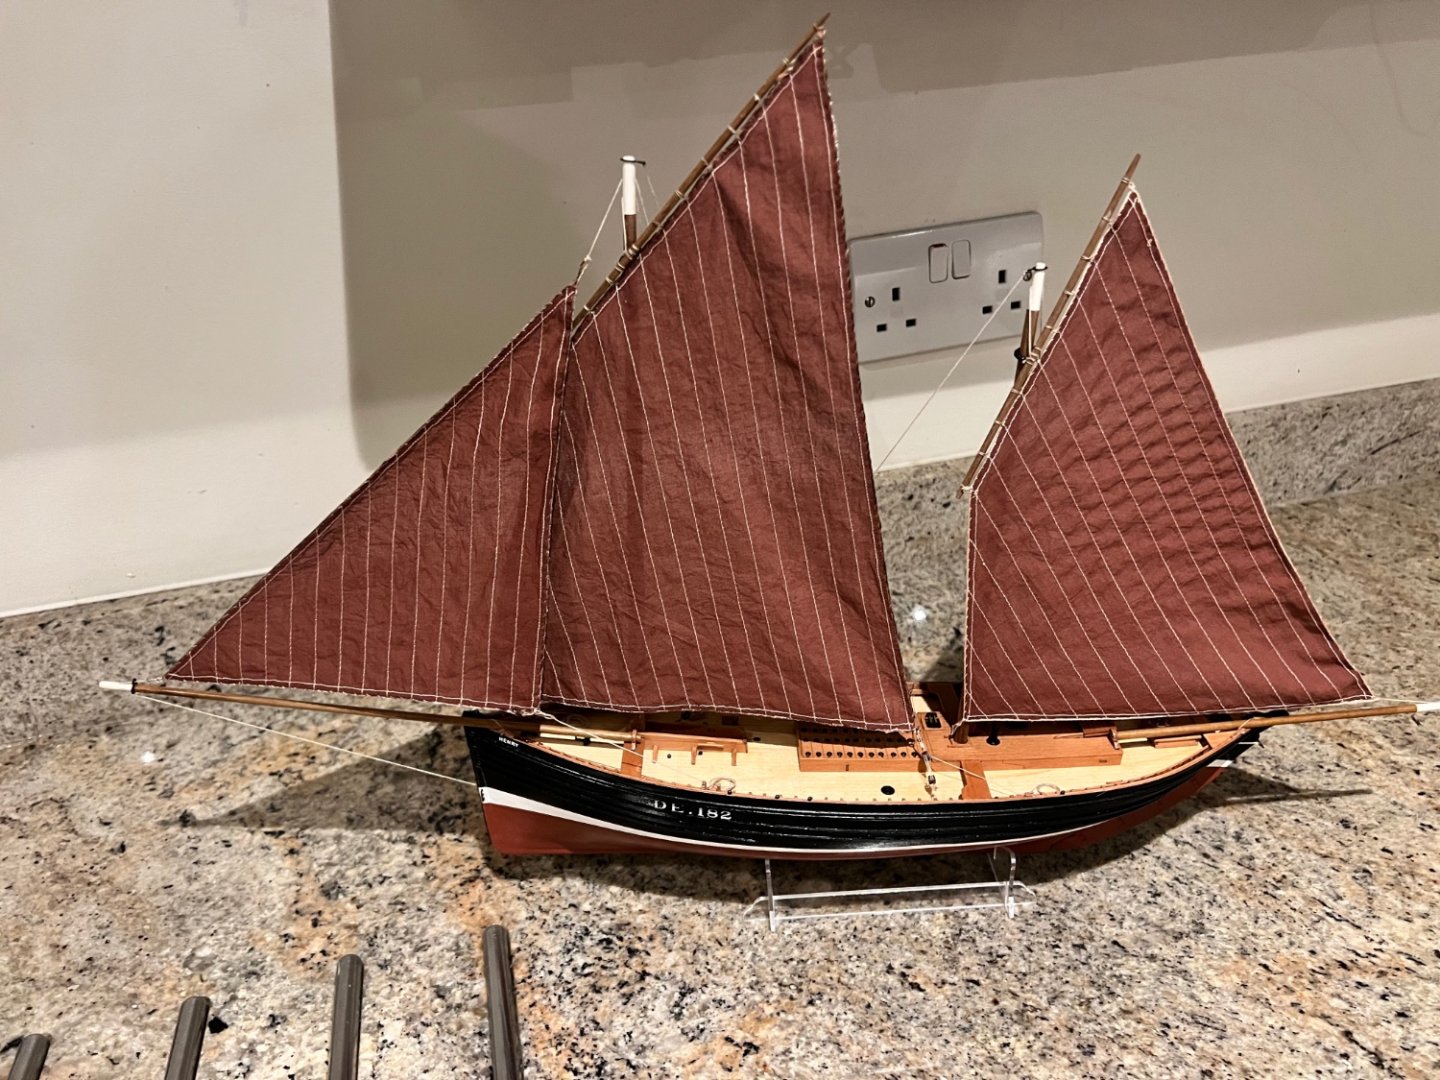
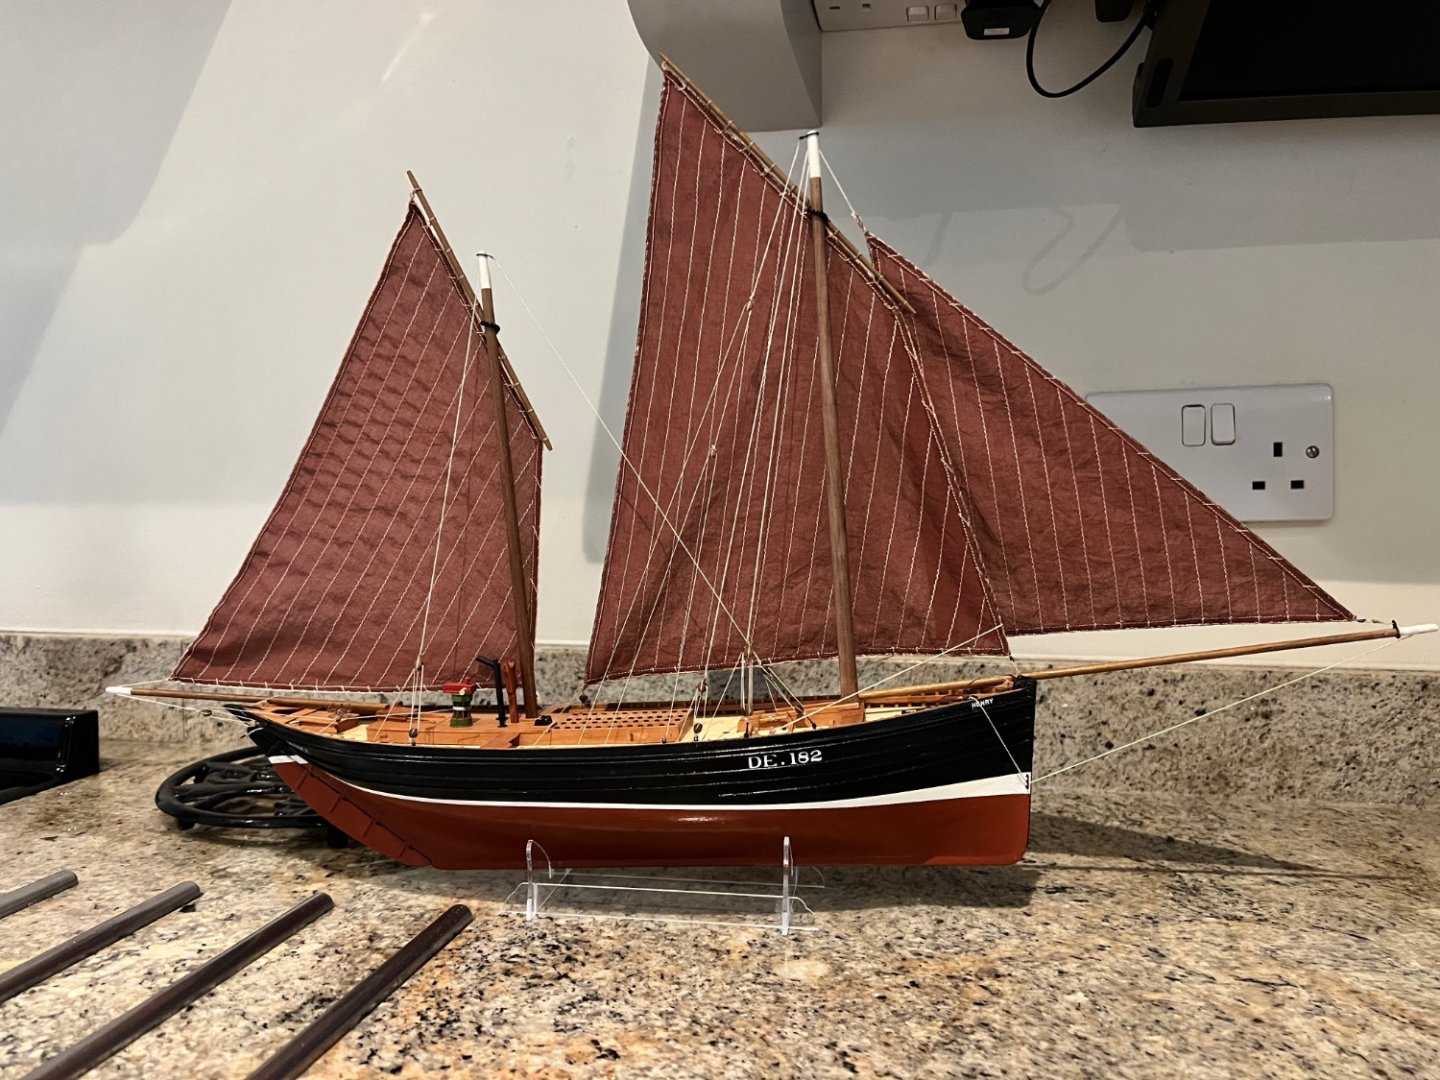
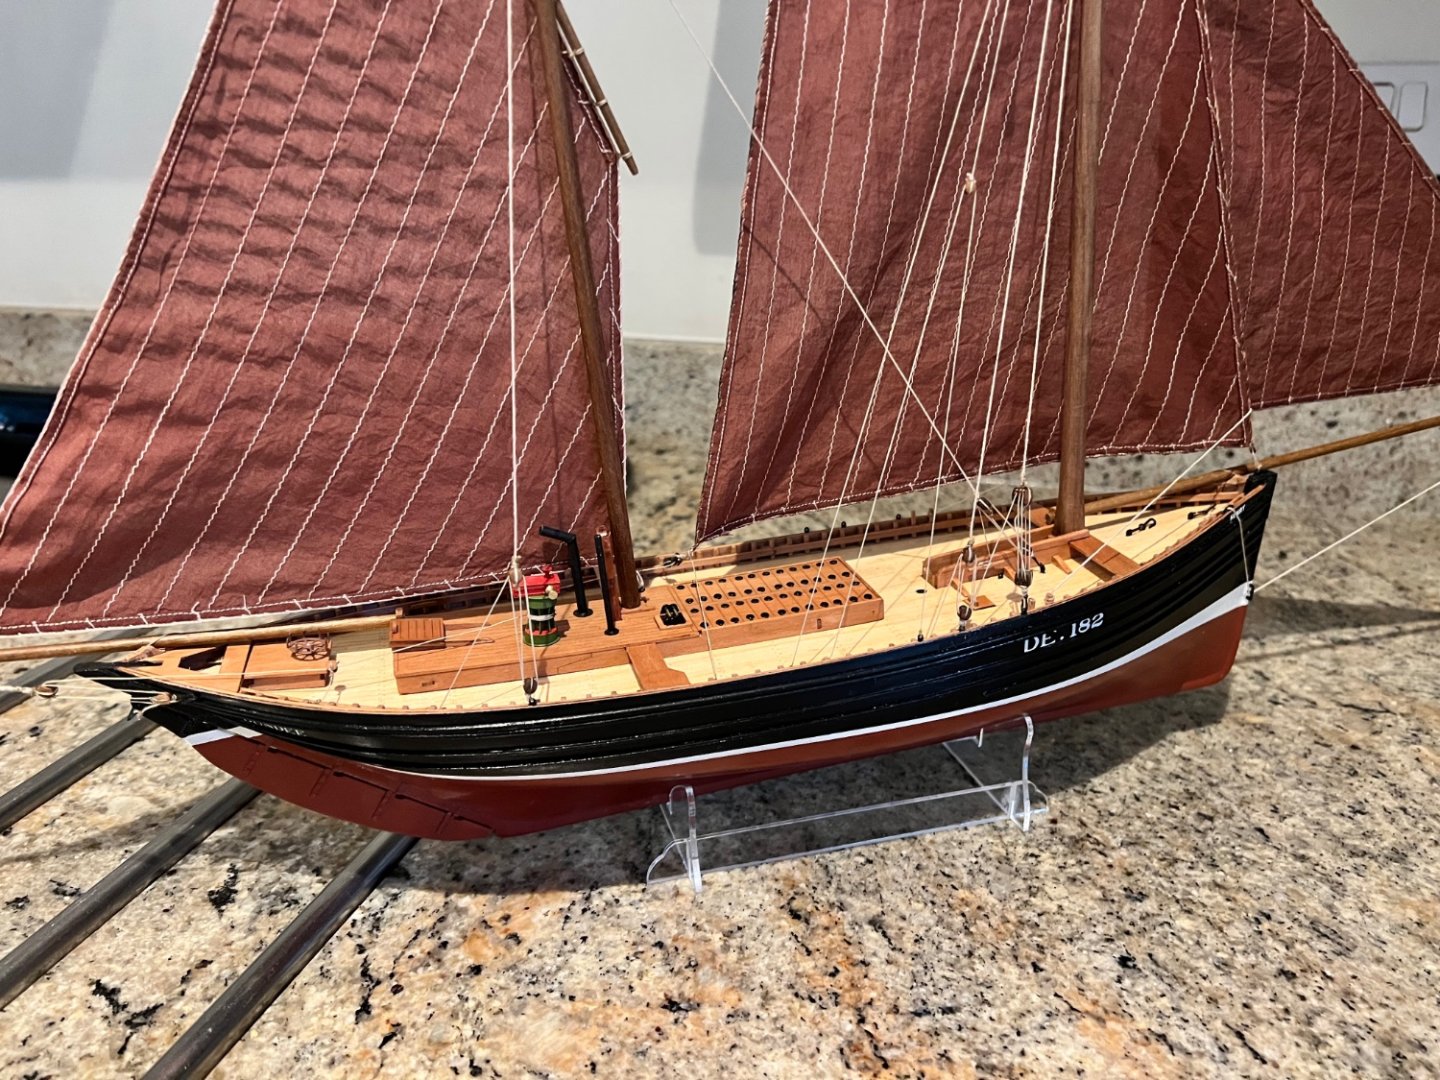
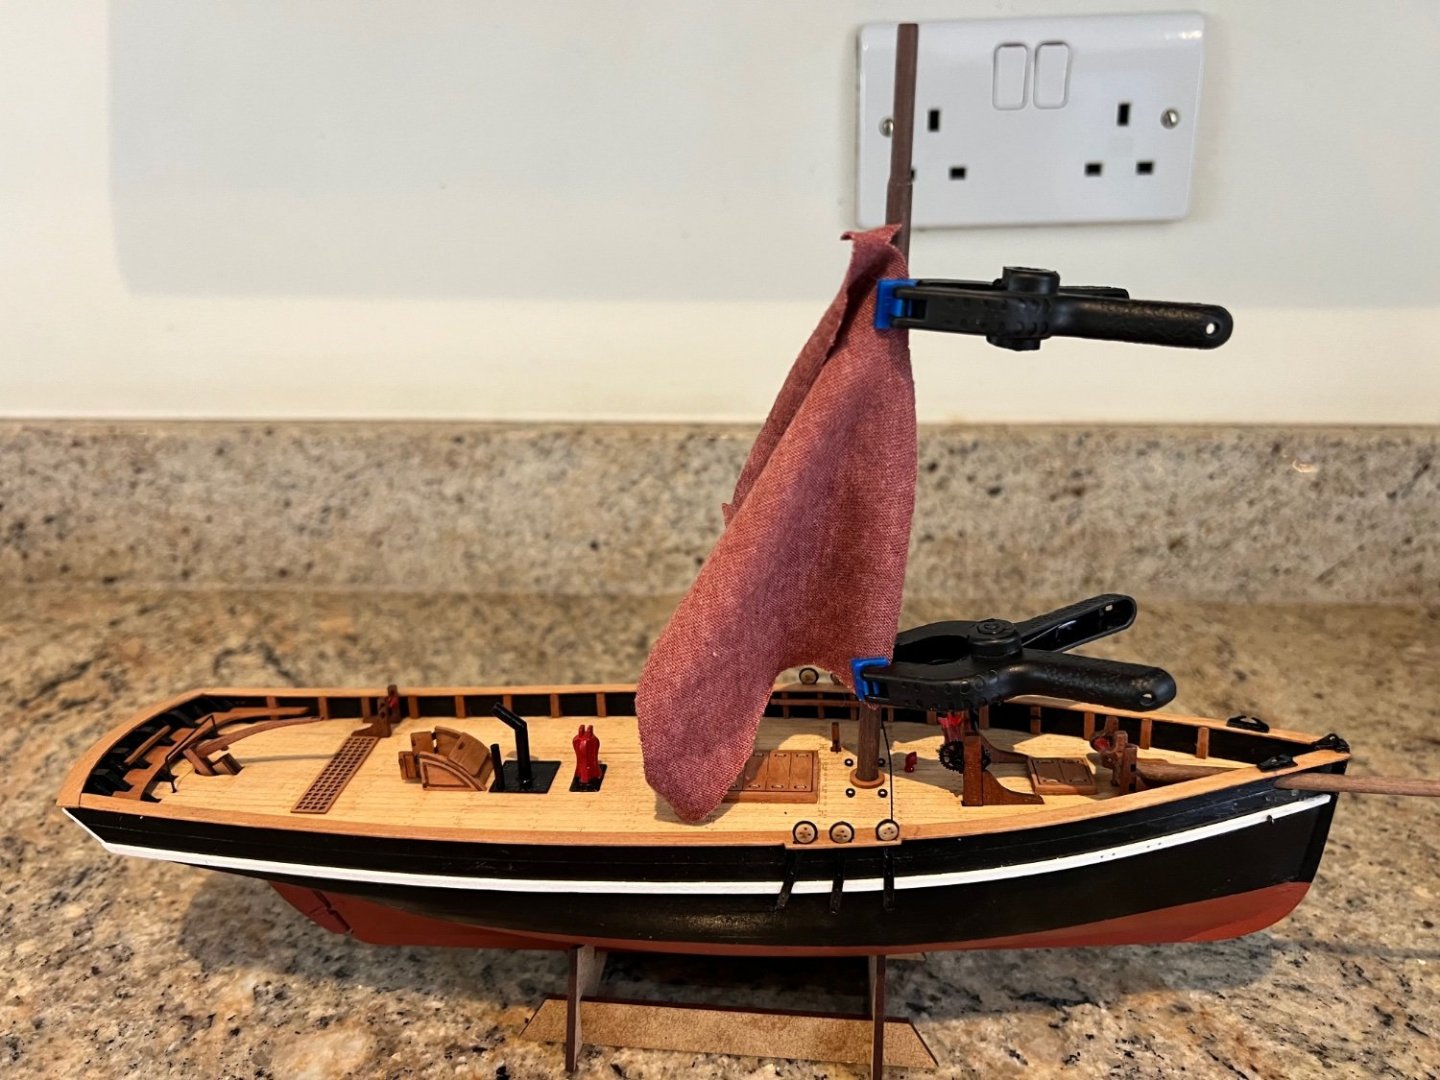
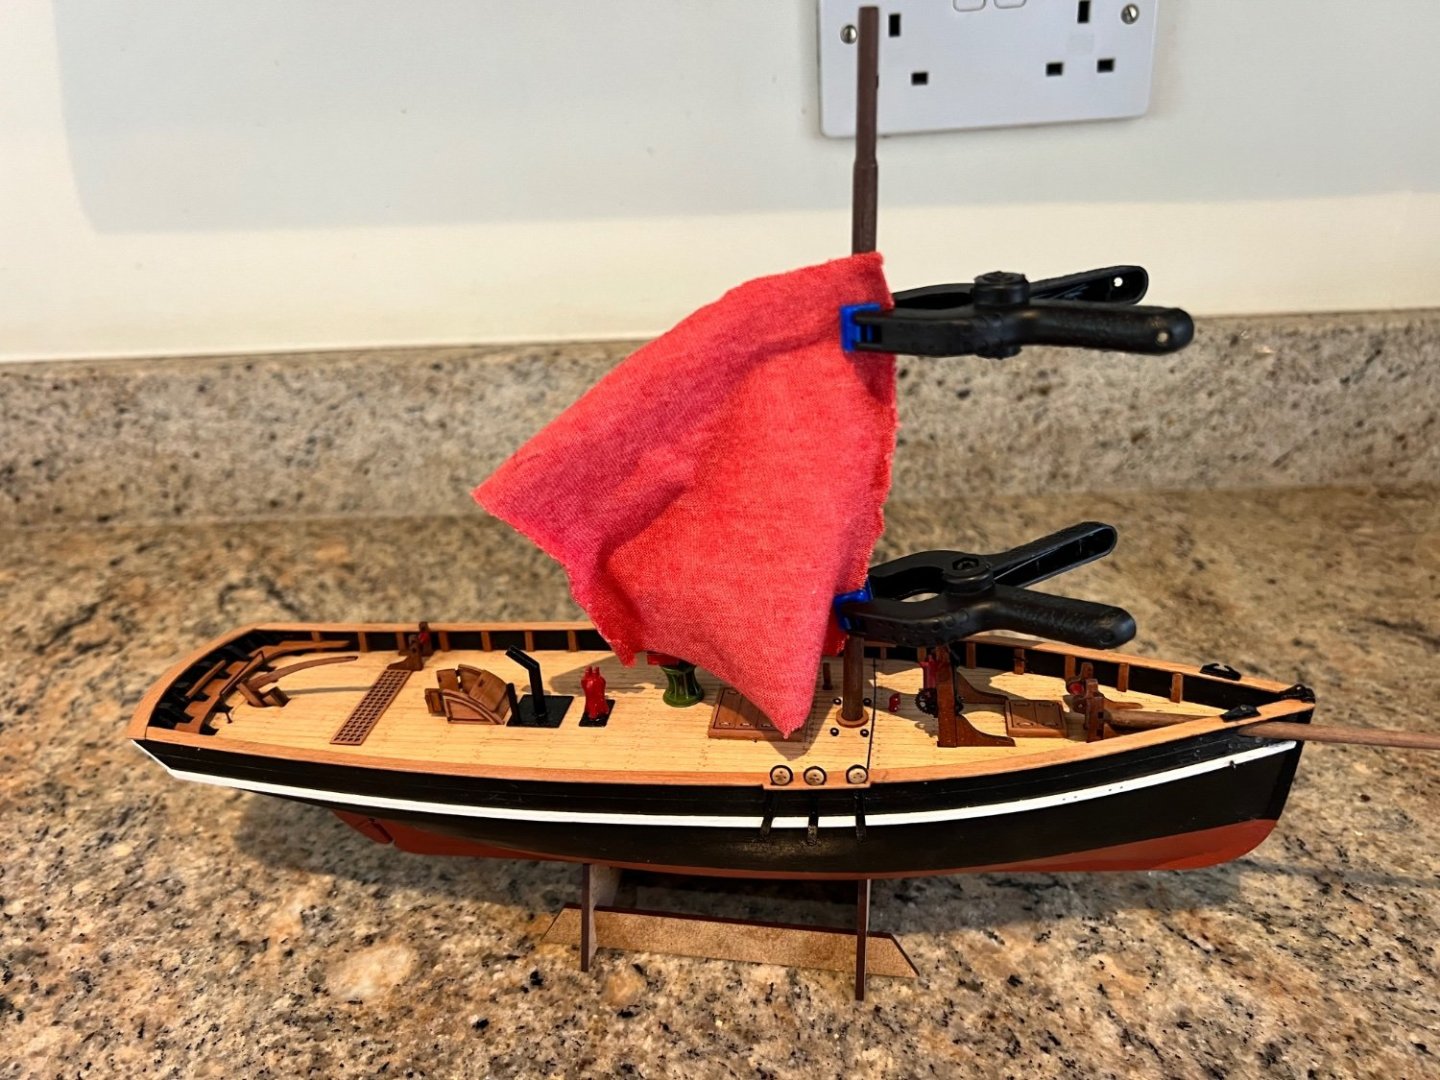
Very nearly finished. Just a few small jobs left to do. Need to touch up the paint in places, revarnish the black part of the hull, fix that the fishing number is “182” on one side and “82” on the other, and I need to add coils to where the ropes are belayed. Rigging was very straightforward, slightly more complicated than the Fifie but not much, and much easier than Nisha. The only material change to the rigging I have made is to add a mainsail sheet running to the starboard bulwark. Whilst on the starboard tack, as the model is presented, the blocks arrangement attached to the port bulwark would only take the pressure of the sail if the clew of the sail was outboard of the port bulwark. I tried to add wire to the bottom edge of the sails to give them the full of wind look that Eke achieved so effectively on his Zulu. Unfortunately the wires I used were too bendy and no elastic memory (think that’s the right term) so ended up with a too wavy sail edge which tended to ride high in the middle of the sail. So out the wires came again. This kit builds into another stunning boat despite my best efforts to wreck it! May not have a chance to finish her off entirely for a week or two being school holidays for the kids.


- 14 replies
-
- 7
-
-
- lady isabella
- zulu
- (and 2 more)
-
Thank you so much for all the encouragement. Eke and BE I’ve really benefited from your excellent Zulu building logs and Andy’s log when building Nisha. Plus of course, Chris’s great kits. Dan
-
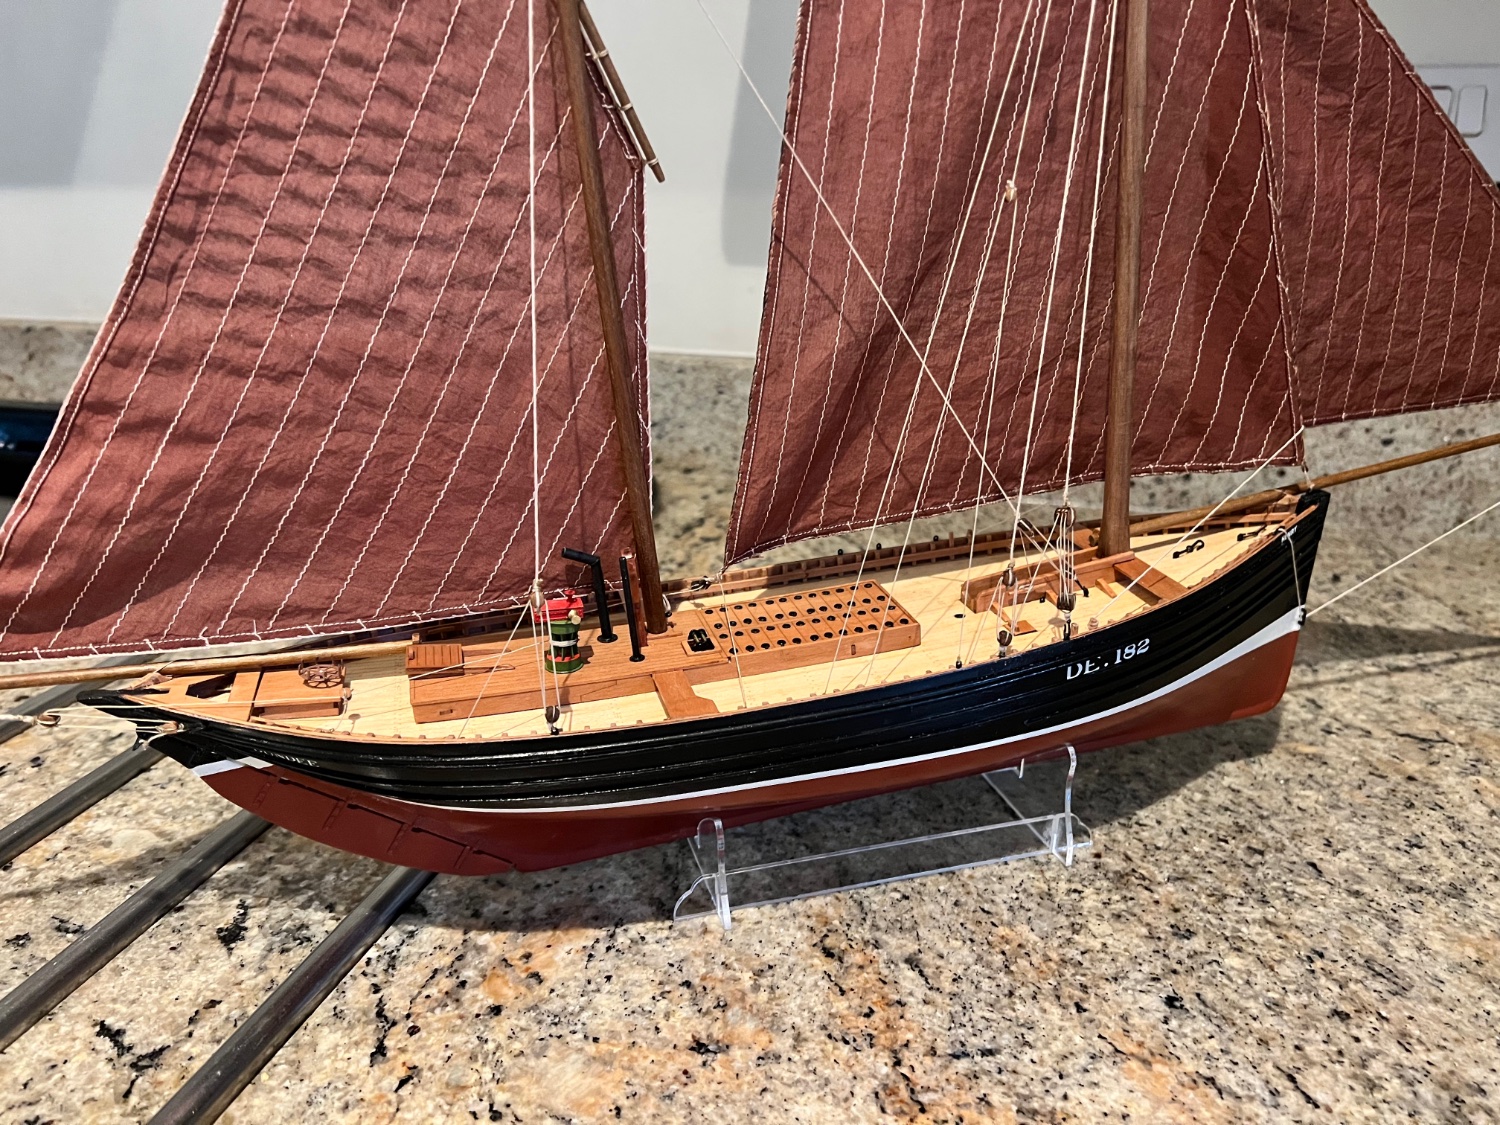
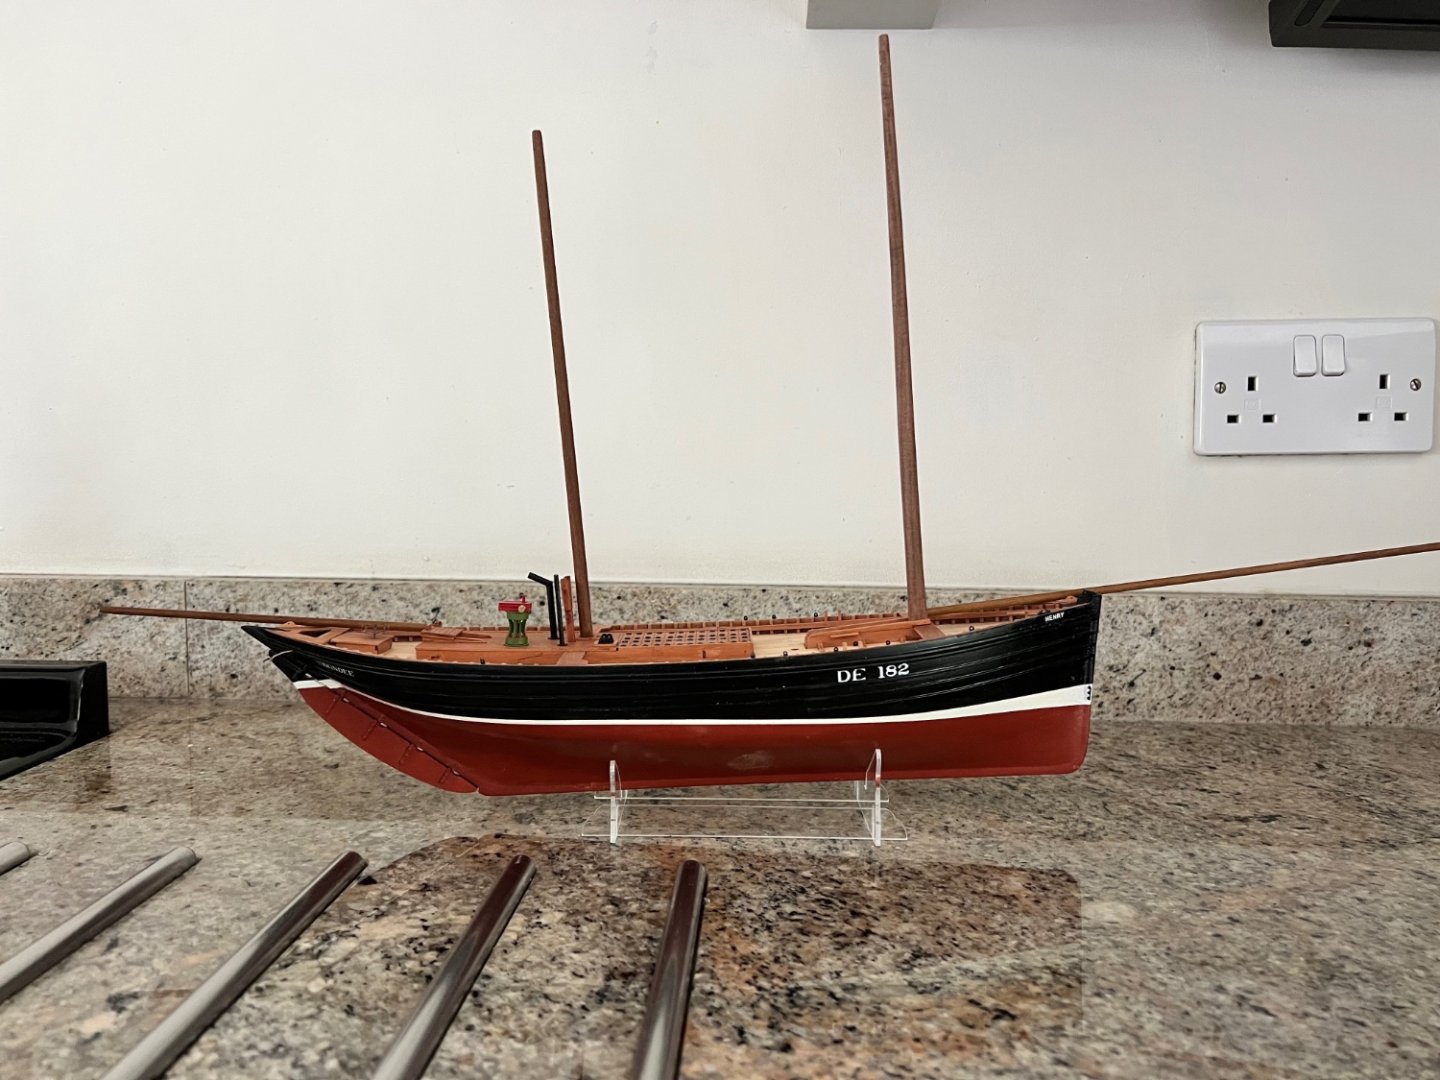
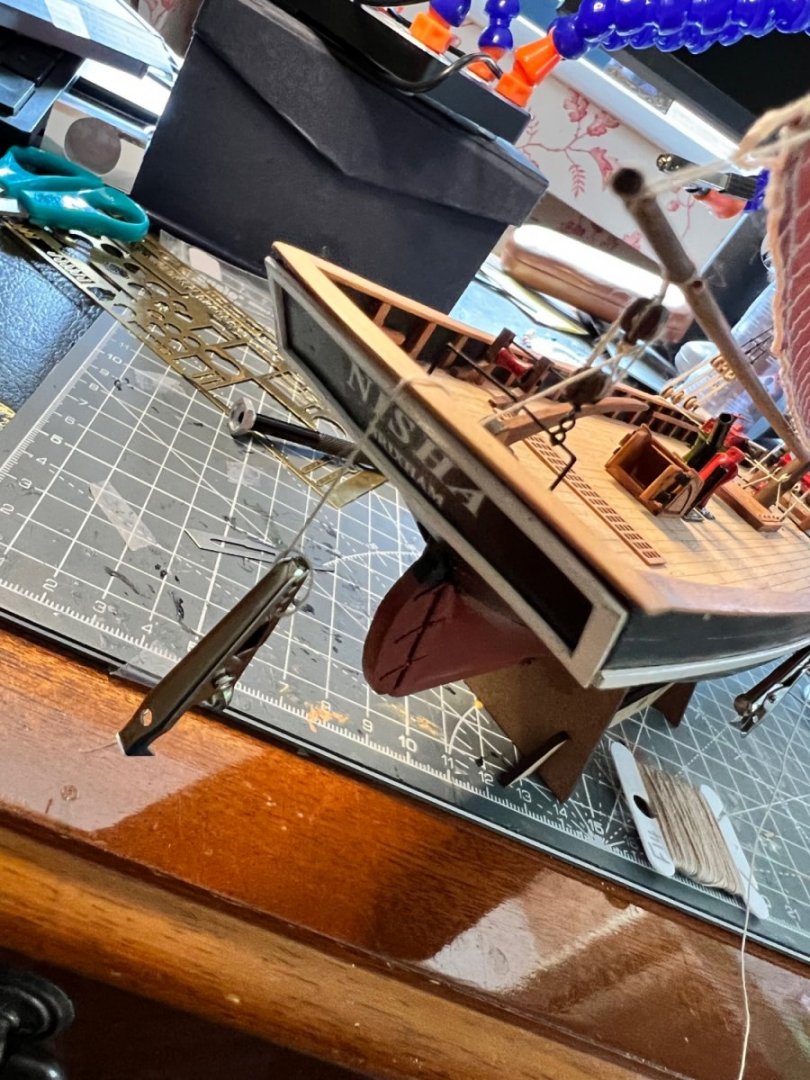
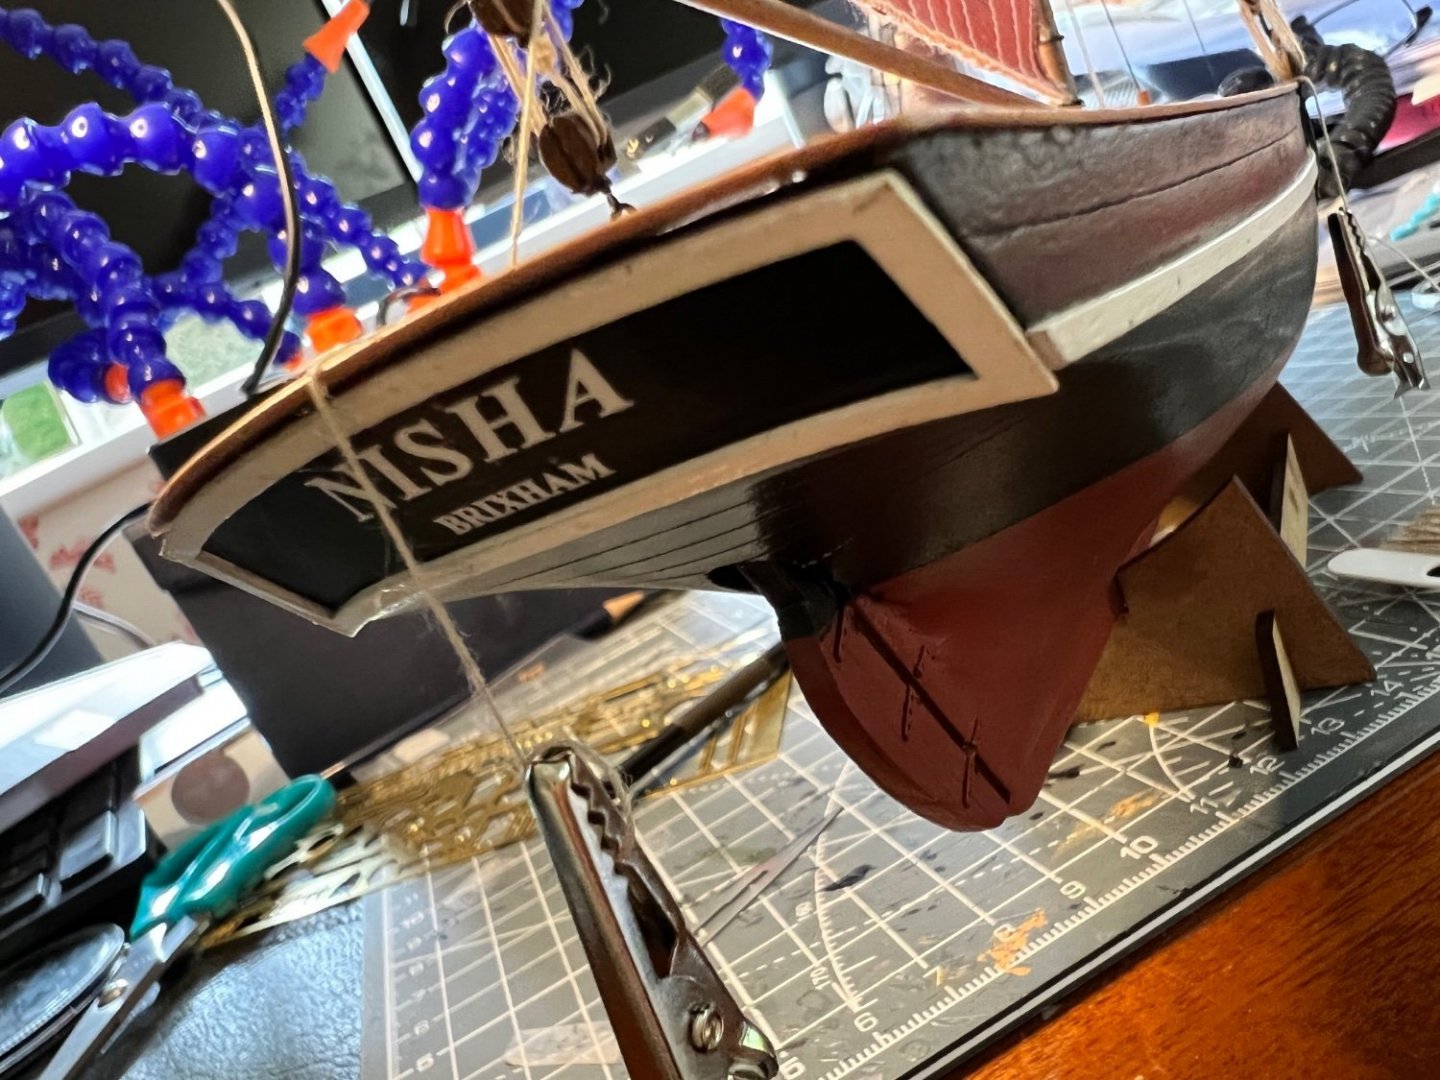
Apologies for the lack of updates and photos. Made some good progress on the Zulu. She’s been a pretty straightforward build even for a beginner like me. The biggest challenge was planking the stern (described above) and painting the waterline + bootstrap. The issue here was the same as on the Fifie. If you measure where the waterline should be on the stem and rudder posts on the plans (these plans are 100% scale unlike Nisha’s) and then use the waterline marker, the waterline is much too high amidships. So as on Fifie I kept the stem and rudder post measurements and used Tamiya masking tape to join them with a curve that went roughly through the correct level amidships. Due to the more complex shape of Zulu’s hull the line is less satisfactory but OK. Much of the last fortnight was spent trying to improve this. I had planned to ditch the chaos black spray as it chips so easily, so initially used Humbrol matt black enamel but the effect just wasn’t as clean, so reverted to Chaos and used the enamel to fill any chips which is barely noticeable after a coat of matt poly varnish. I’ve copied Eke on using Woodland Scenics Roman lettering on the hull which has turned out well. She has a fictional Dundee fishing number (still working on these and needs a “dot”) and “Dundee” on her starboard quarter. Her name “Henry” after my son is on the bows in BECC lettering. I’ve struggled to get the Woodland Scenics dry transfer lettering onto the hull neatly at a much smaller font so used BECC instead. The fonts are at odds though and the Roman lettering looks better. I may have another go to get them on. Shaping the masts, etc. using a drill was harder than on the other Vanguard boats as the lengths of wood provided were almost exact for their use and didn’t have any excess to go in the drill bit. Even with cushioning around it the drill chuck damaged the wood on the mast. Need to paint white tips on the masts, boom and bowsprit. The deck fittings are beautifully produced as usual and we’re a pleasure to assemble and fit.


- 14 replies
-
- 7
-
-
- lady isabella
- zulu
- (and 2 more)
-
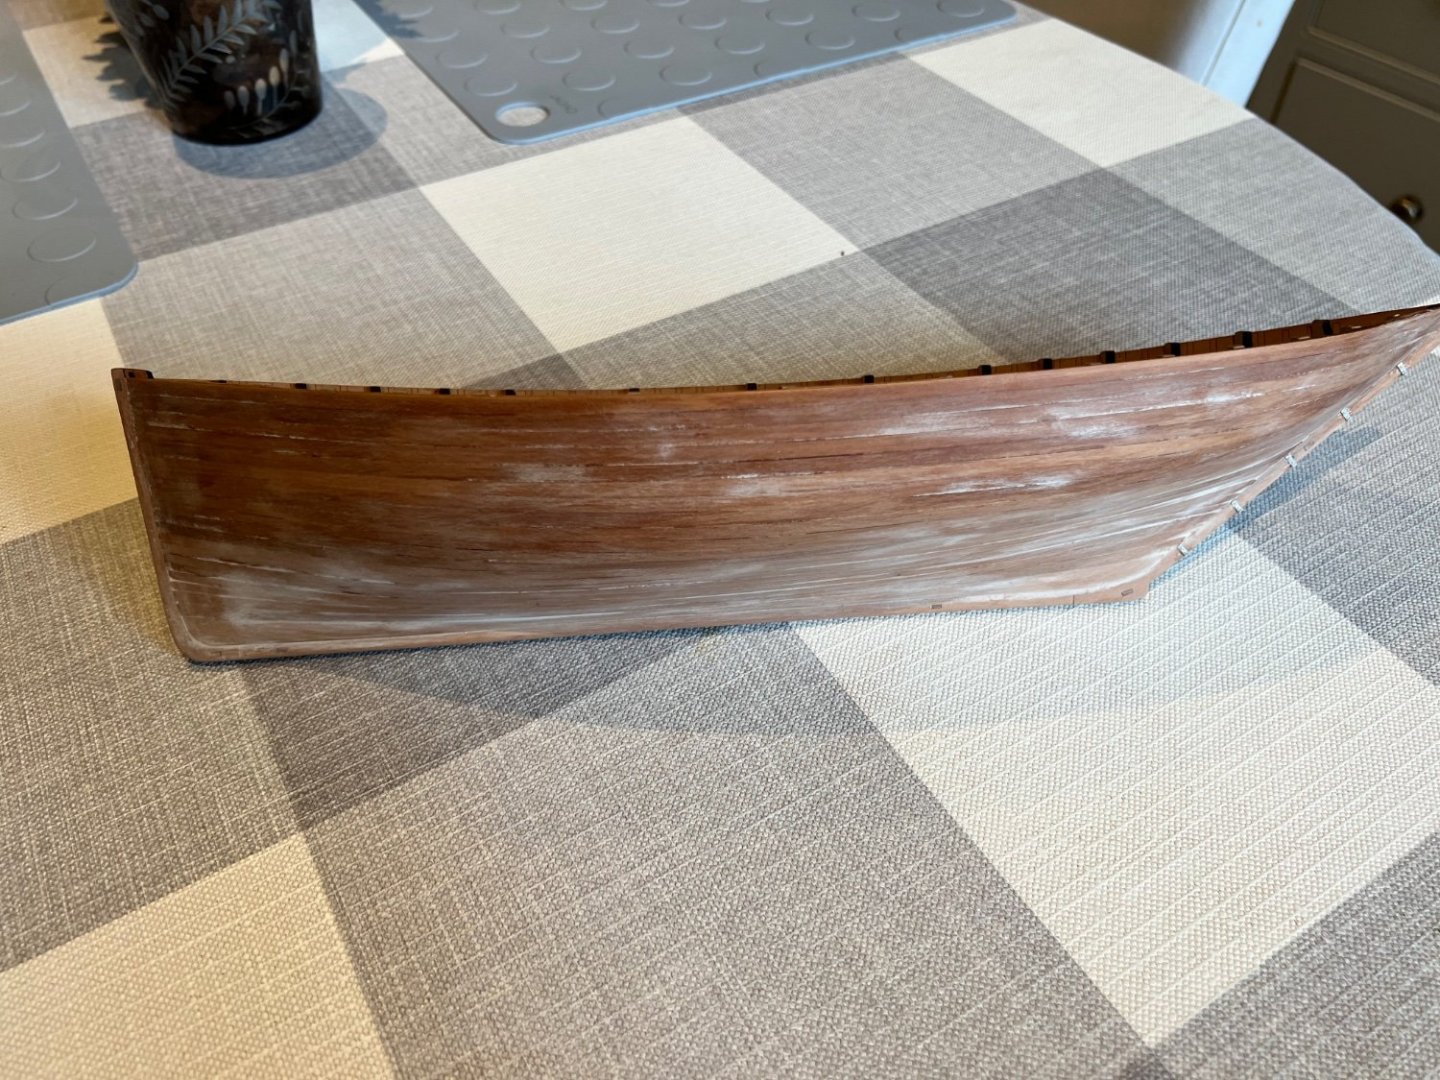
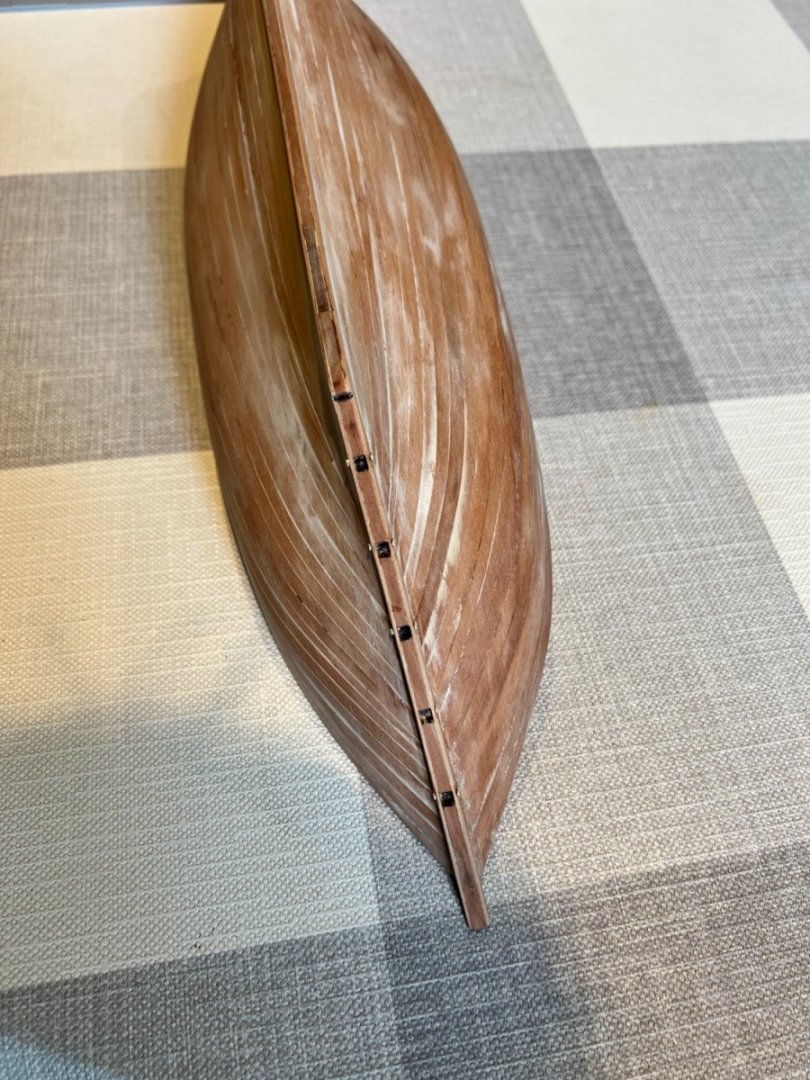
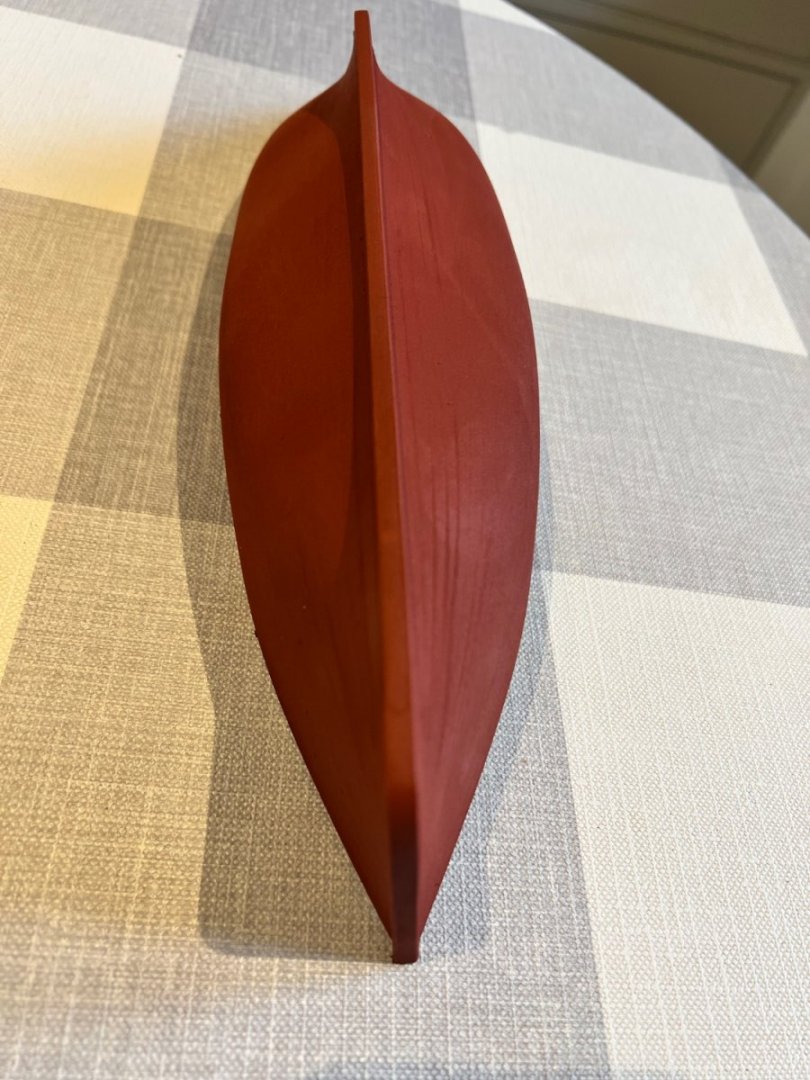
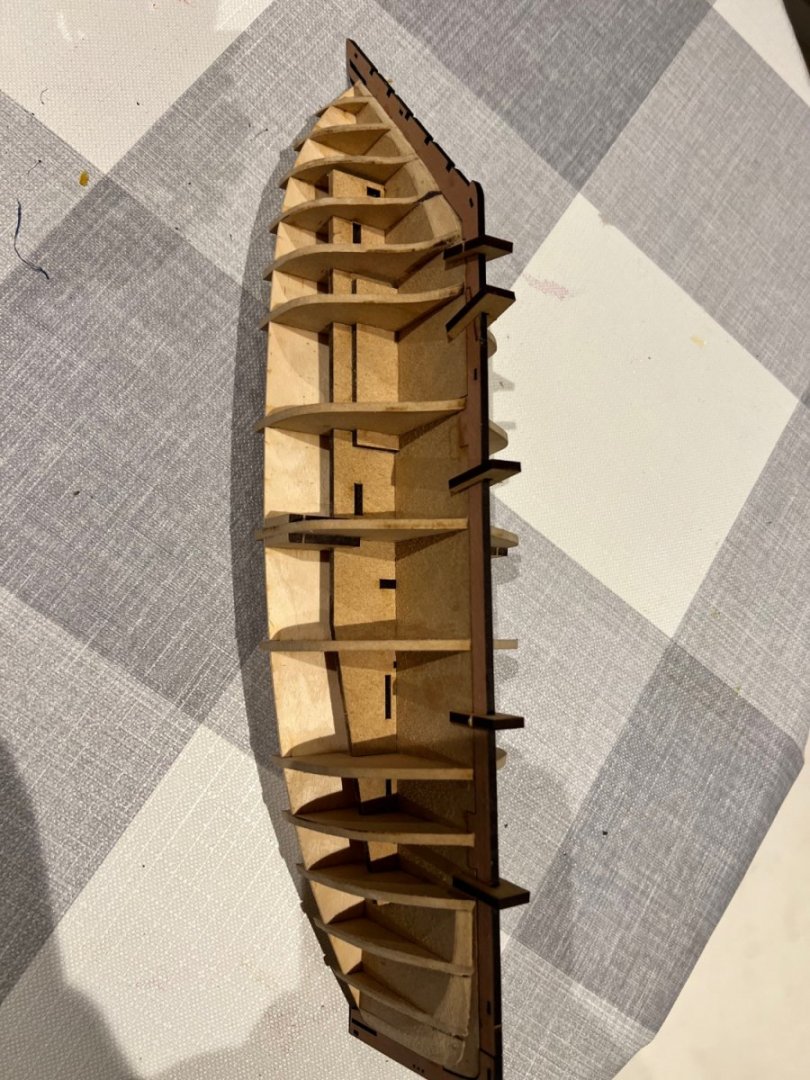
Second planking is now complete. I’ve continued to find the stern of the Zulu tricky to plank (my lack of skills/patience, nothing to do with the model). On the port side the upper hull was looking quite good and I used a mixture of PVA and sanding dust from the pear wood as filler which looked good. However, I have a rule that I can experiment on these smaller boats to increase my skill and knowledge. I wanted to apply Danish oil to the bare wood hull but this came up very blotchy, not being absorbed by the areas which had glue filler on. The Danish oil effect together with needing more filler at the stern meant that bare wood was no longer an option above the waterline. Luckily the young owner has finally agreed to a black painted hull. First coat of paint showed up quite a few big blemishes. I want some planks to show through the paint as they would have done on the original boats, but not too much or two messy. Above was too much and too messy. So back to filling and sanding. Another coat of paint and I’m happy. The attractive lines of the Zulu are now clear to see. Annoyingly the carpet monster gobbled one of the brass PE rudder hinges but I’ve substituted a spare from Nisha, it’s smaller but barely noticeable. In other news, Vanguard’s Saucy Jack turned up today together with sails and will be my next build when the Zulu is complete. Thanks Chris!

- 14 replies
-
- 3
-
-
- lady isabella
- zulu
- (and 2 more)
-
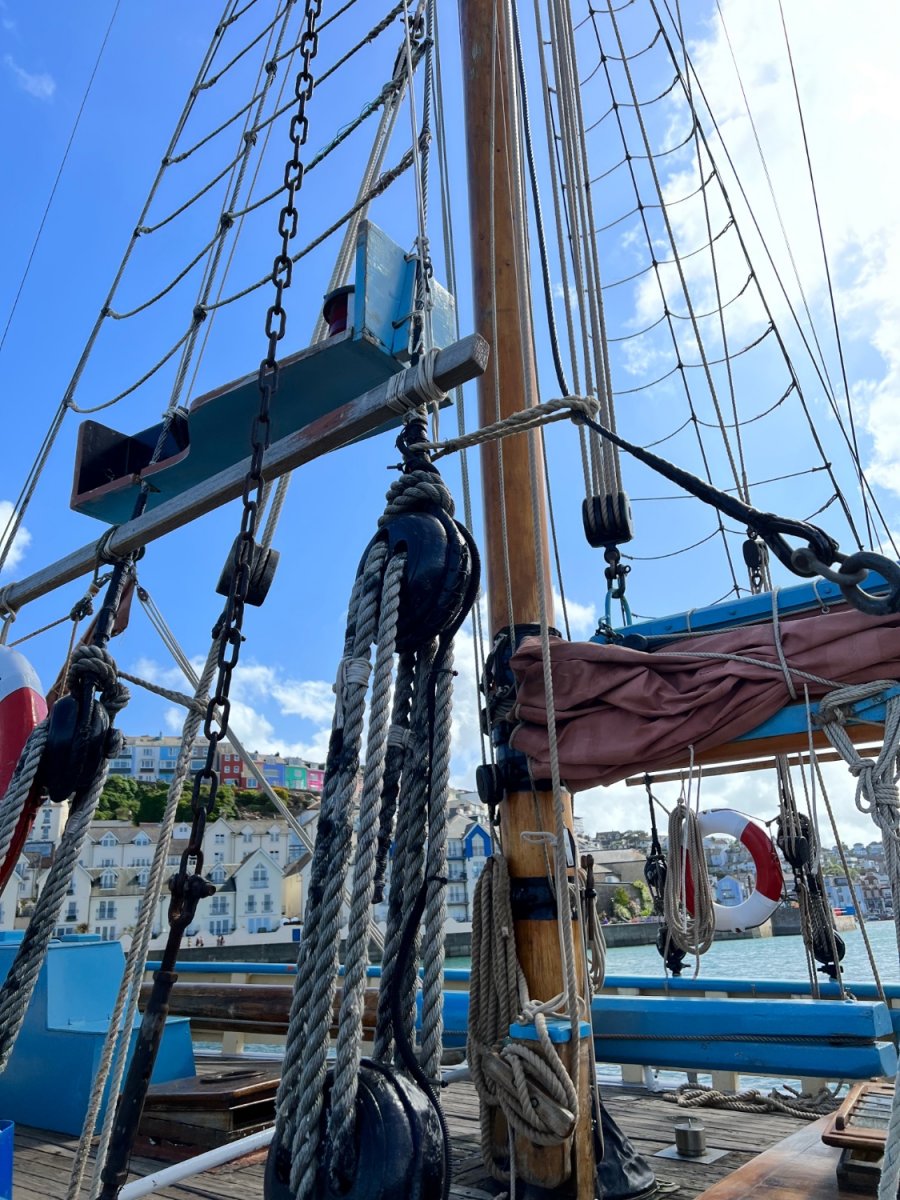
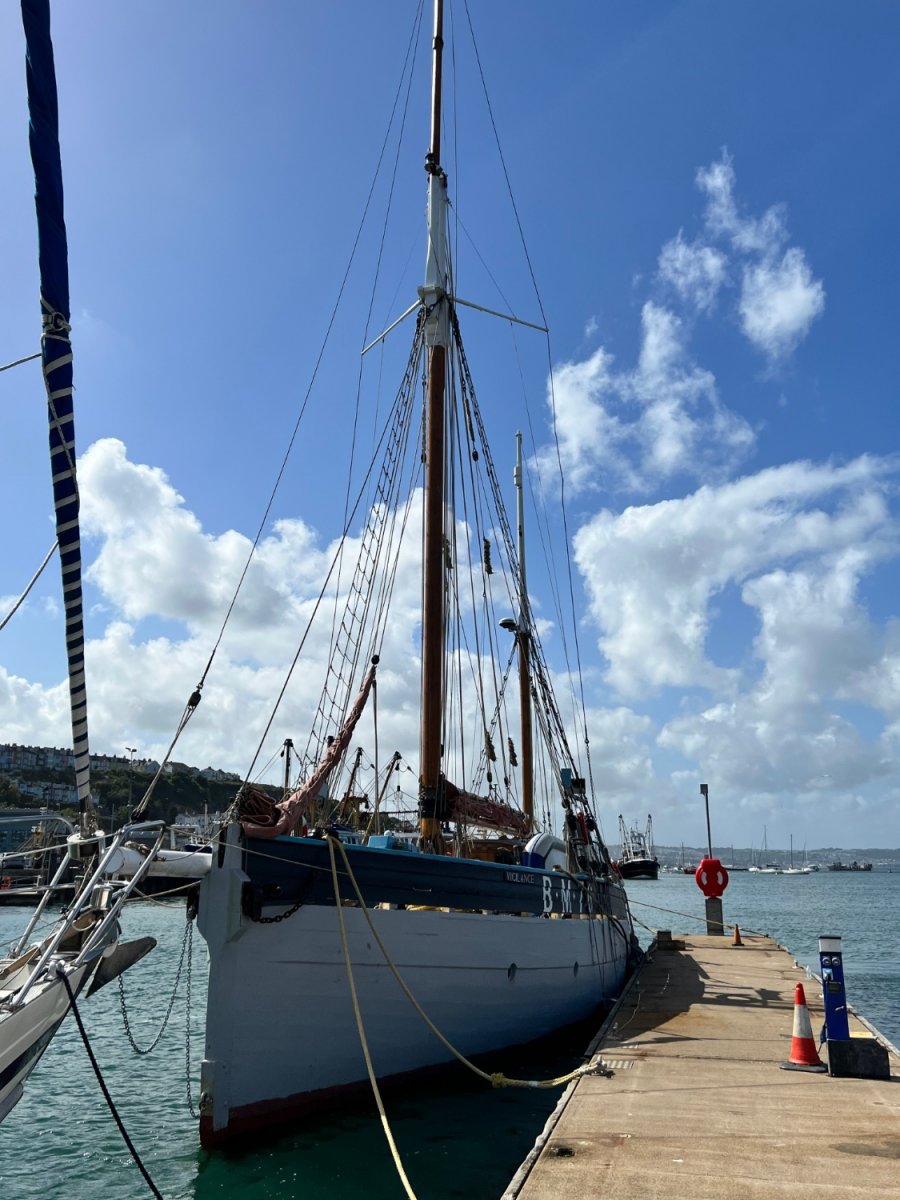
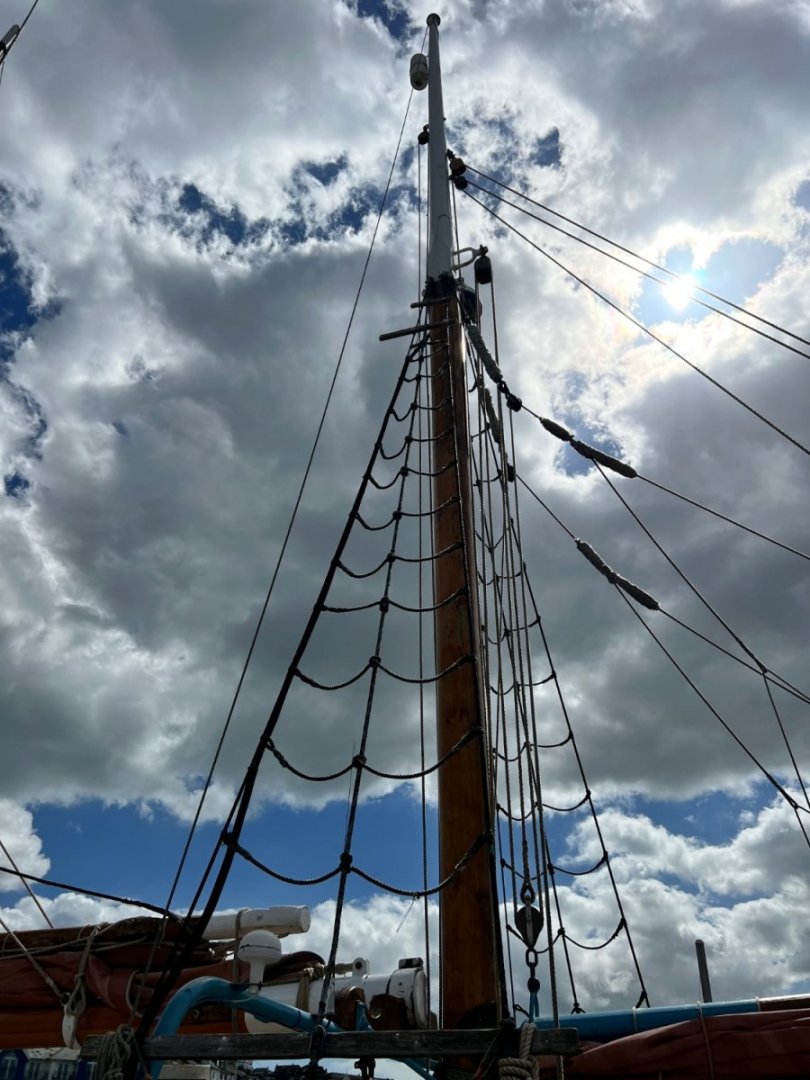
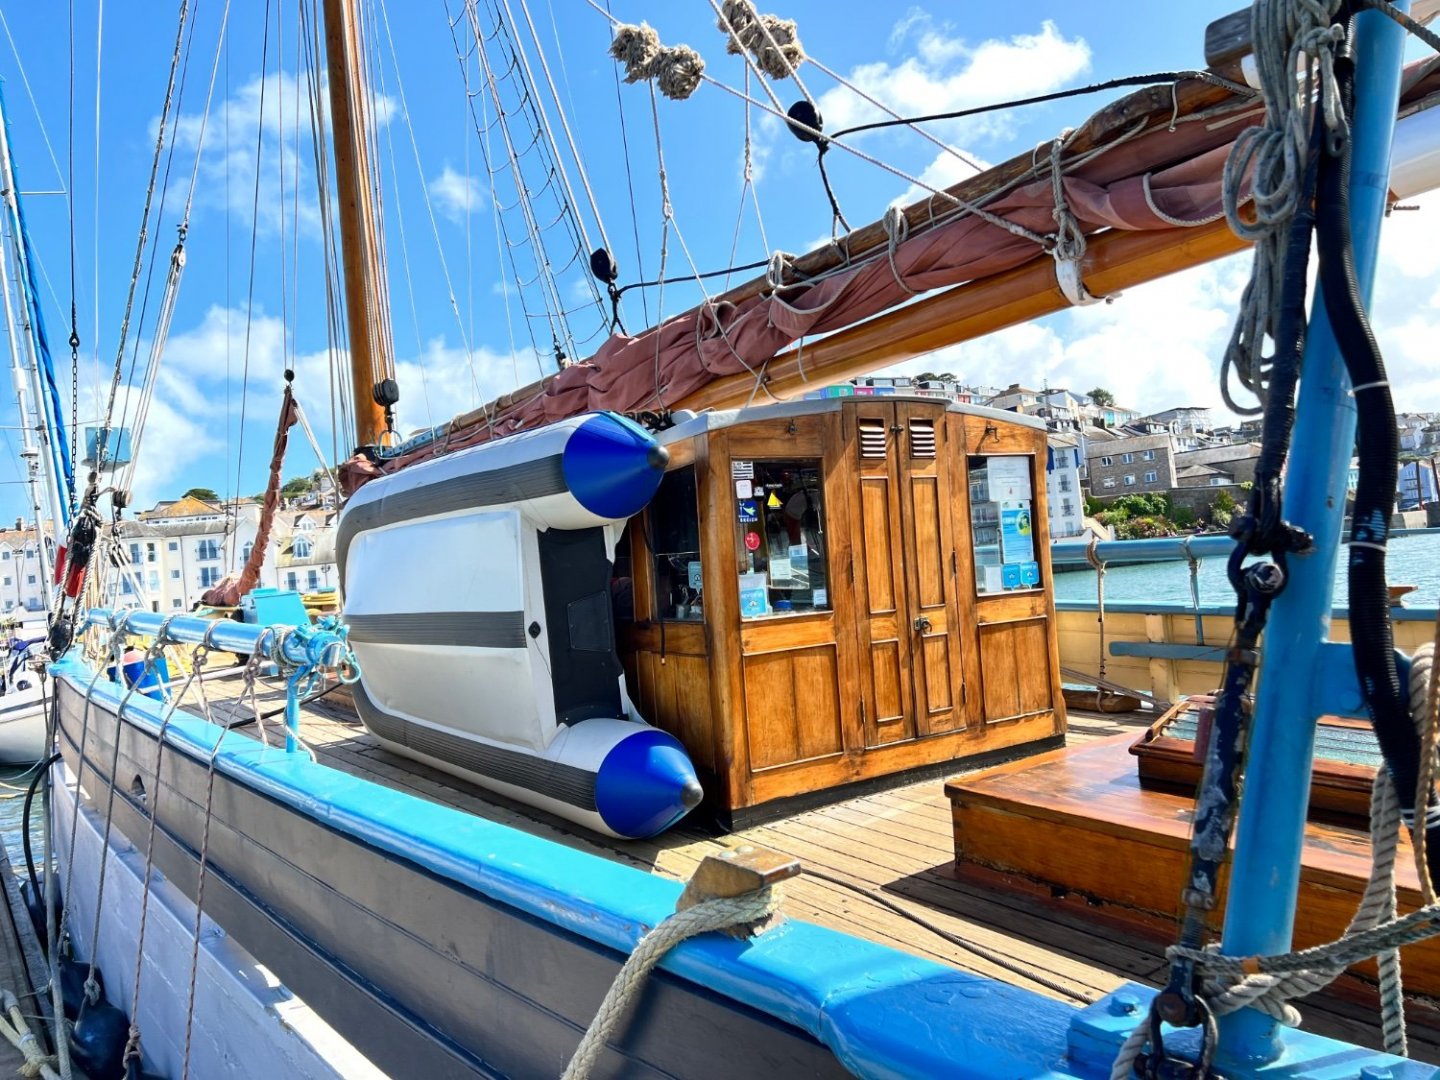
Some more detail photos. Steam winch. Likely a more modern version of the Elliott & Garood’s model drawn in March. Aft and mizzen rigging. Modern deckhouse and main boom.


- 62 replies
-
- 4
-
-
- Nisha
- Vanguard Models
- (and 1 more)
-
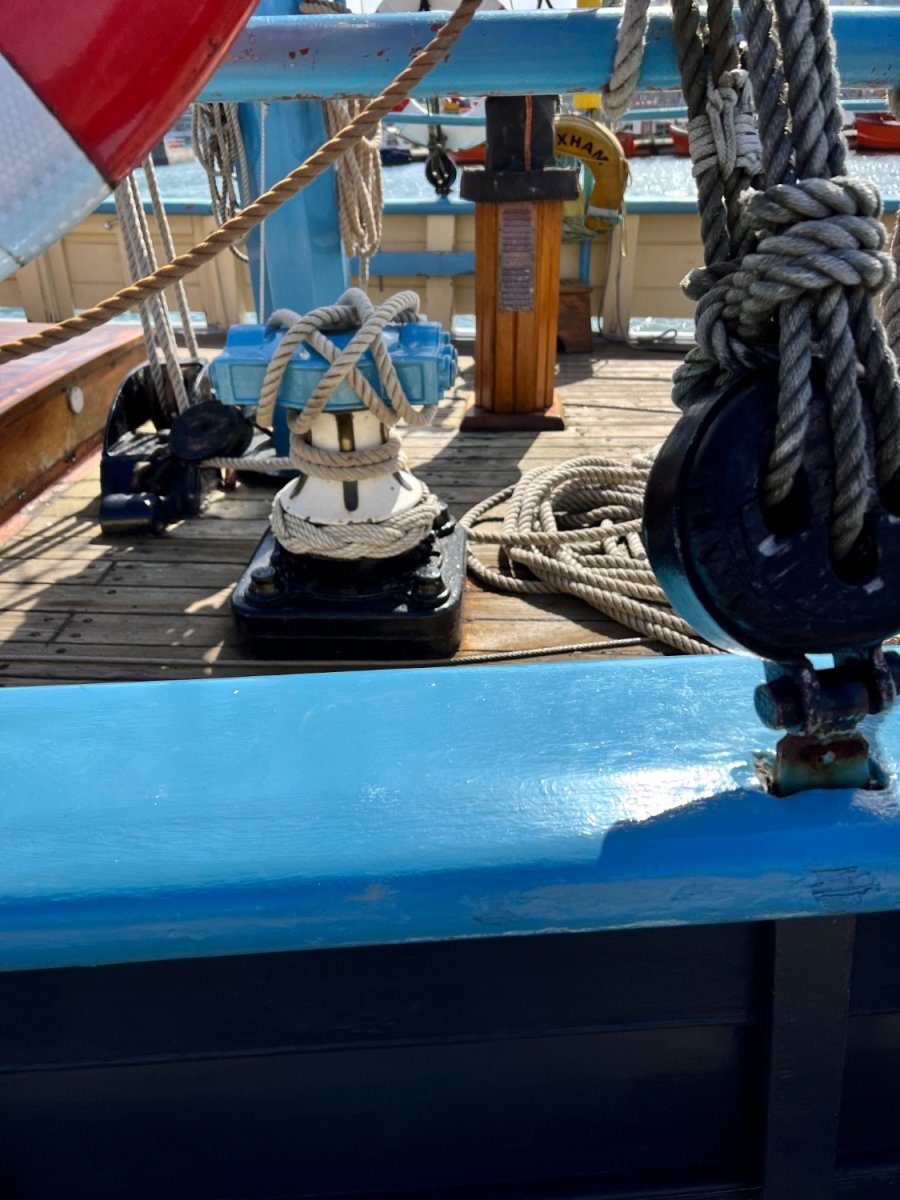
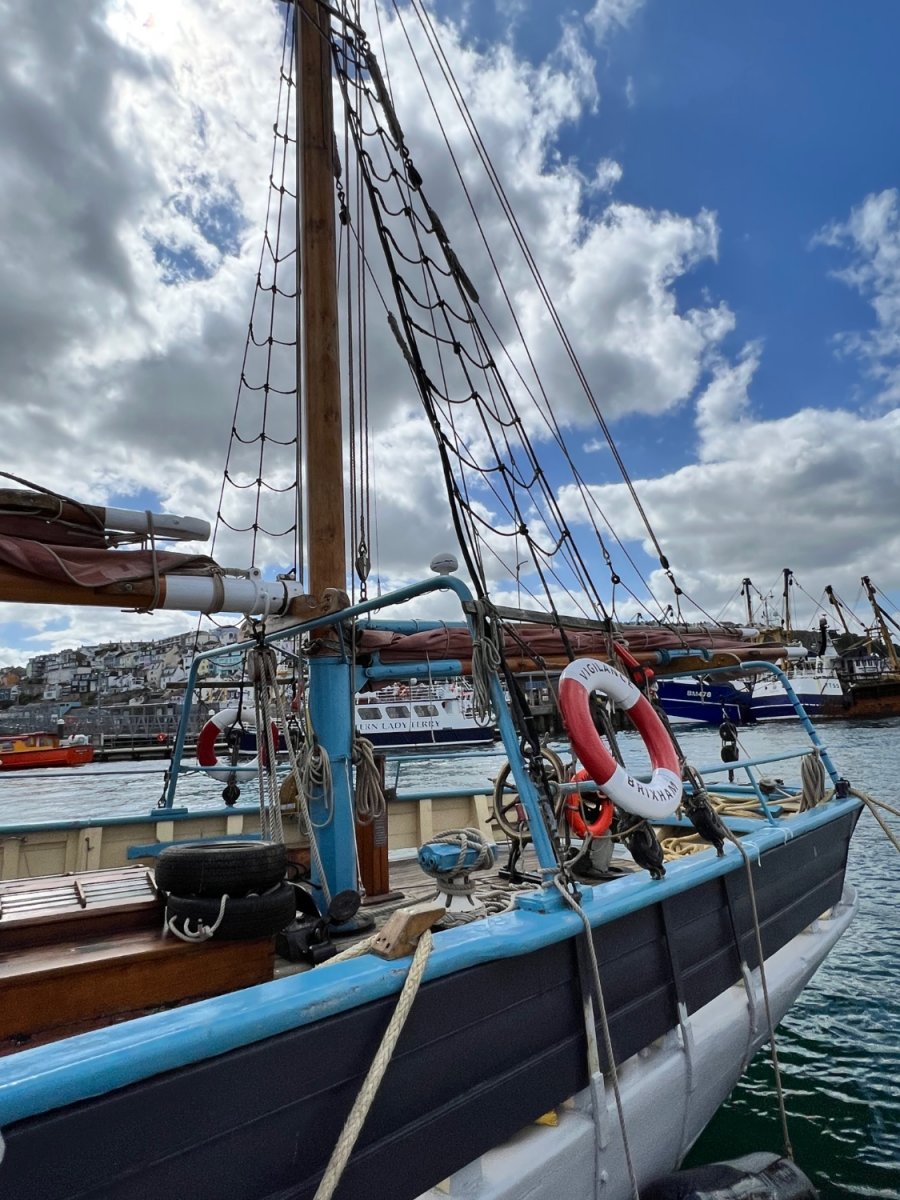
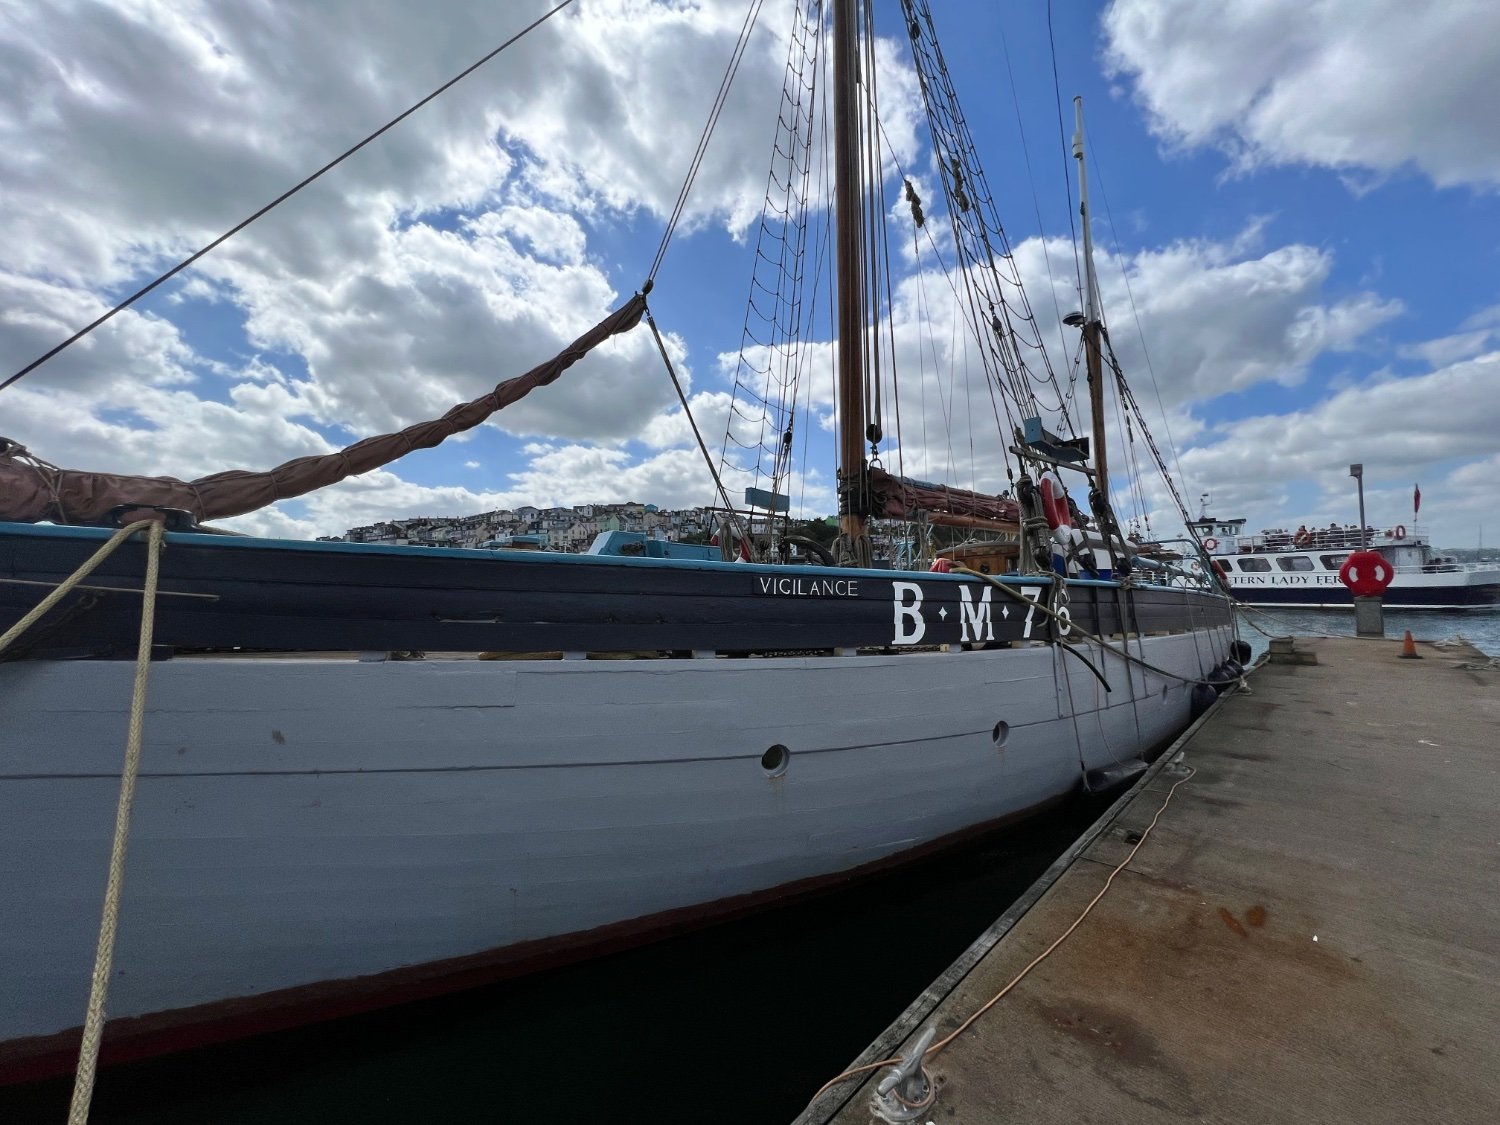
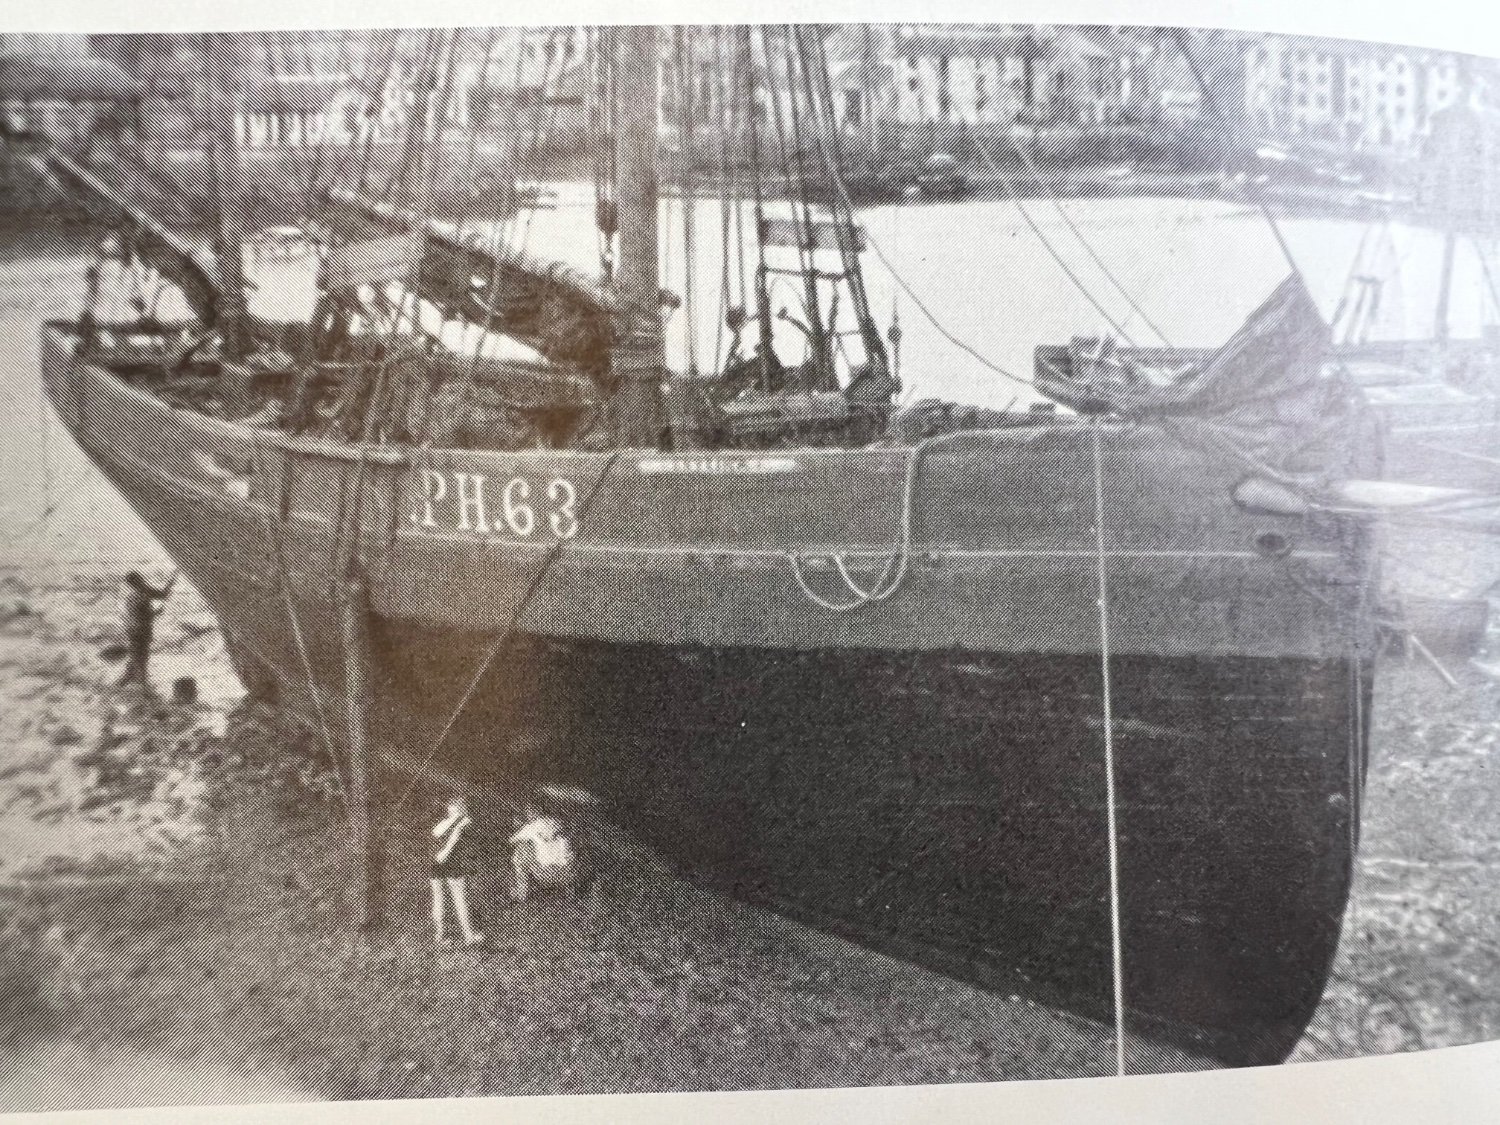
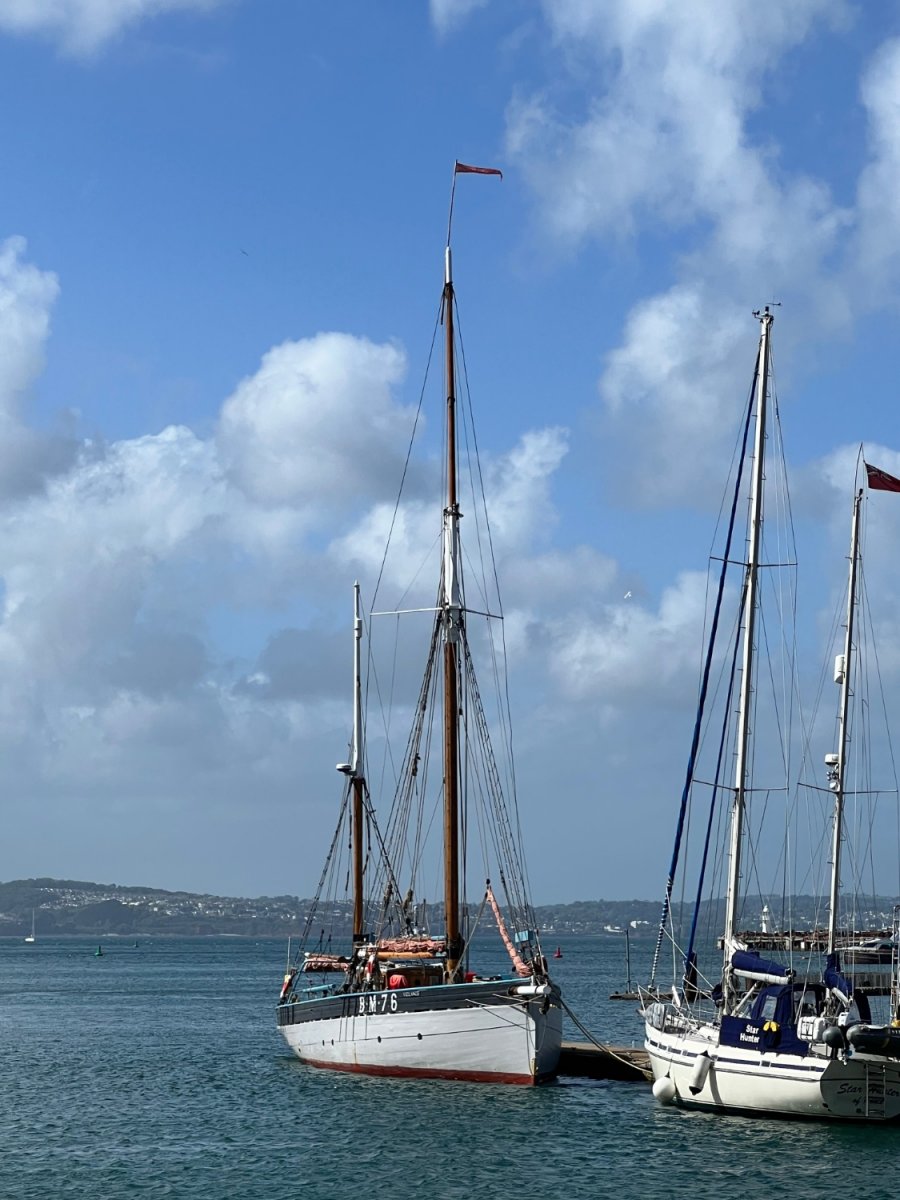
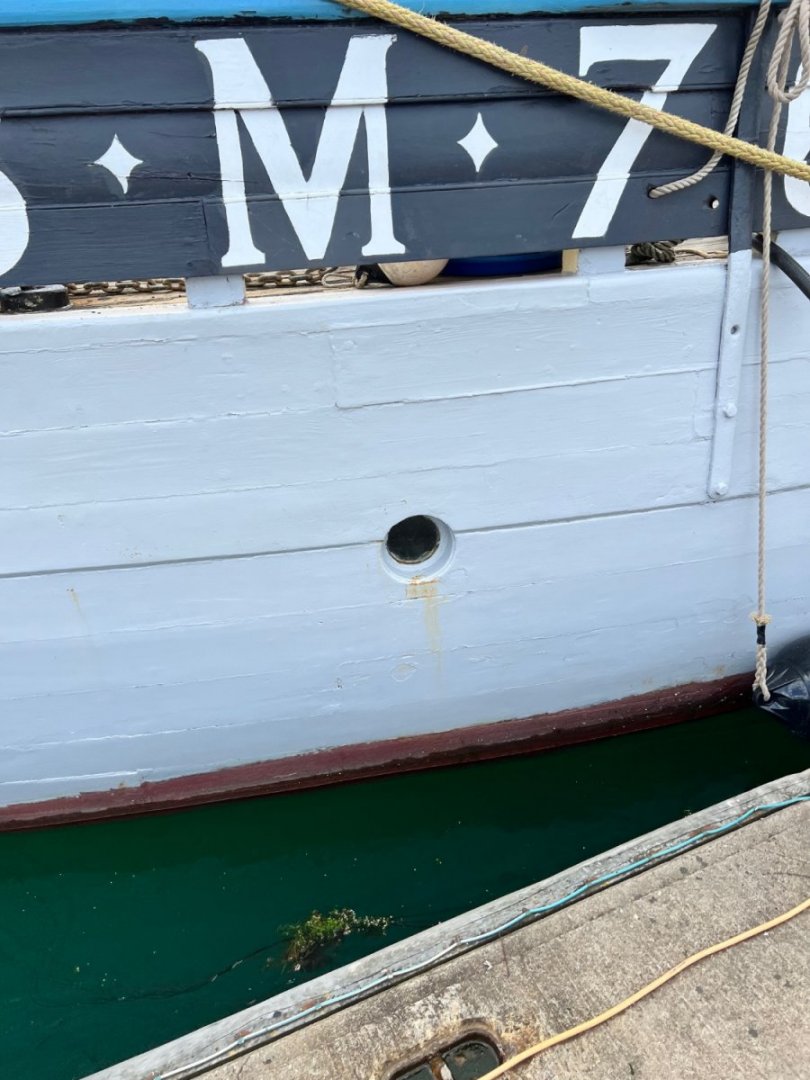
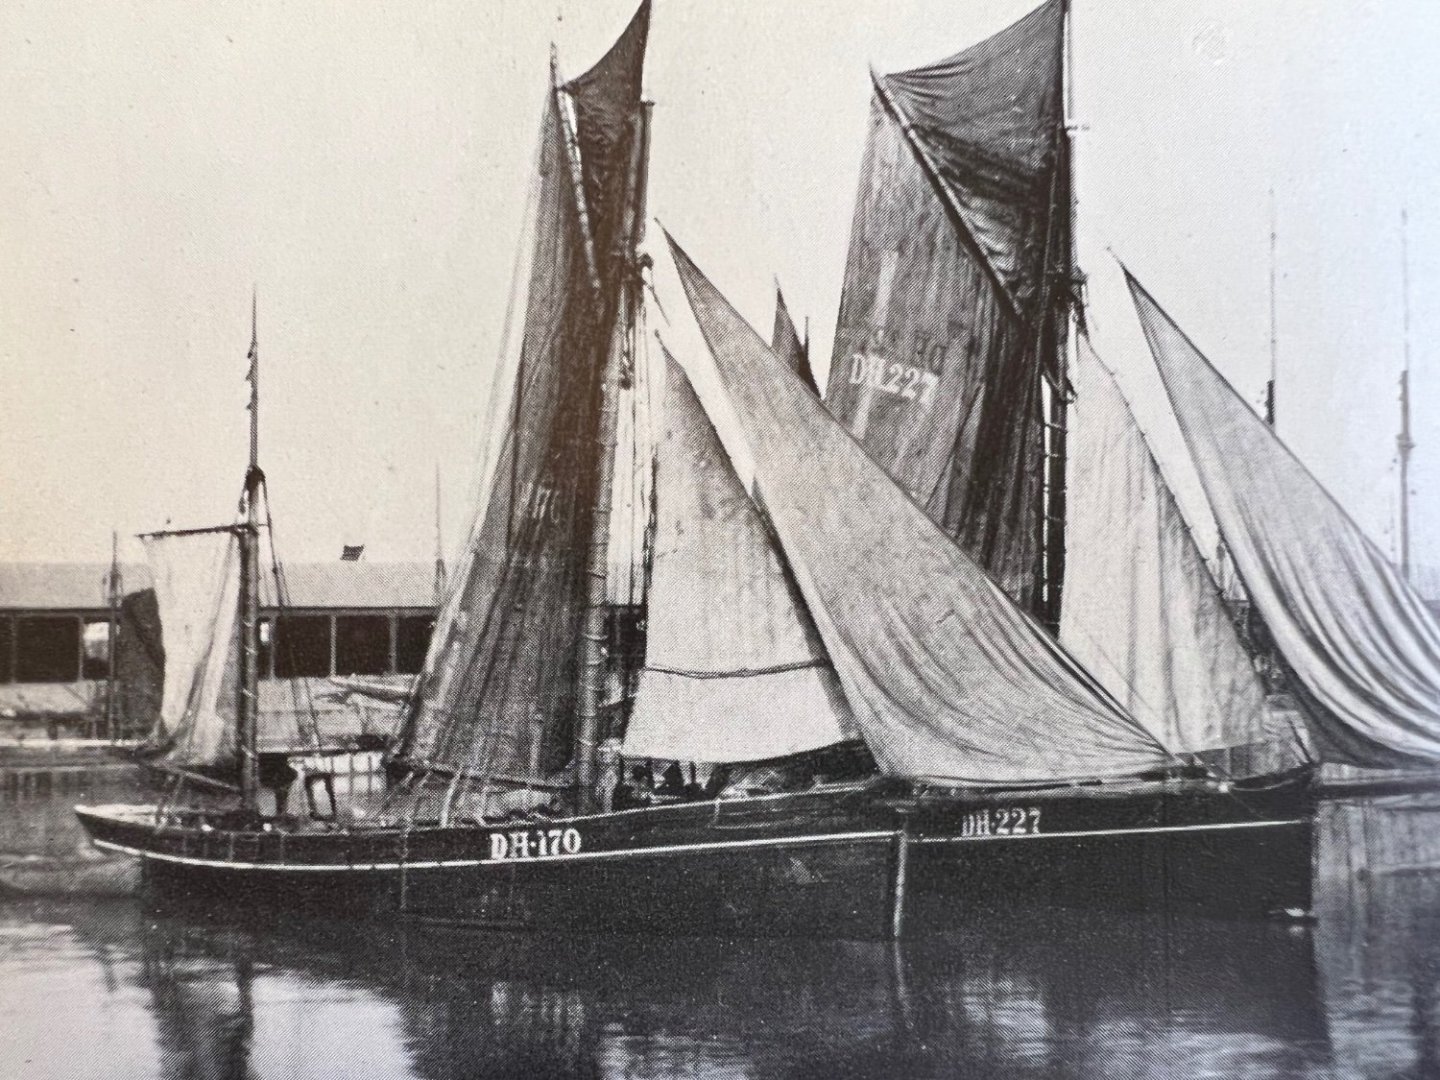
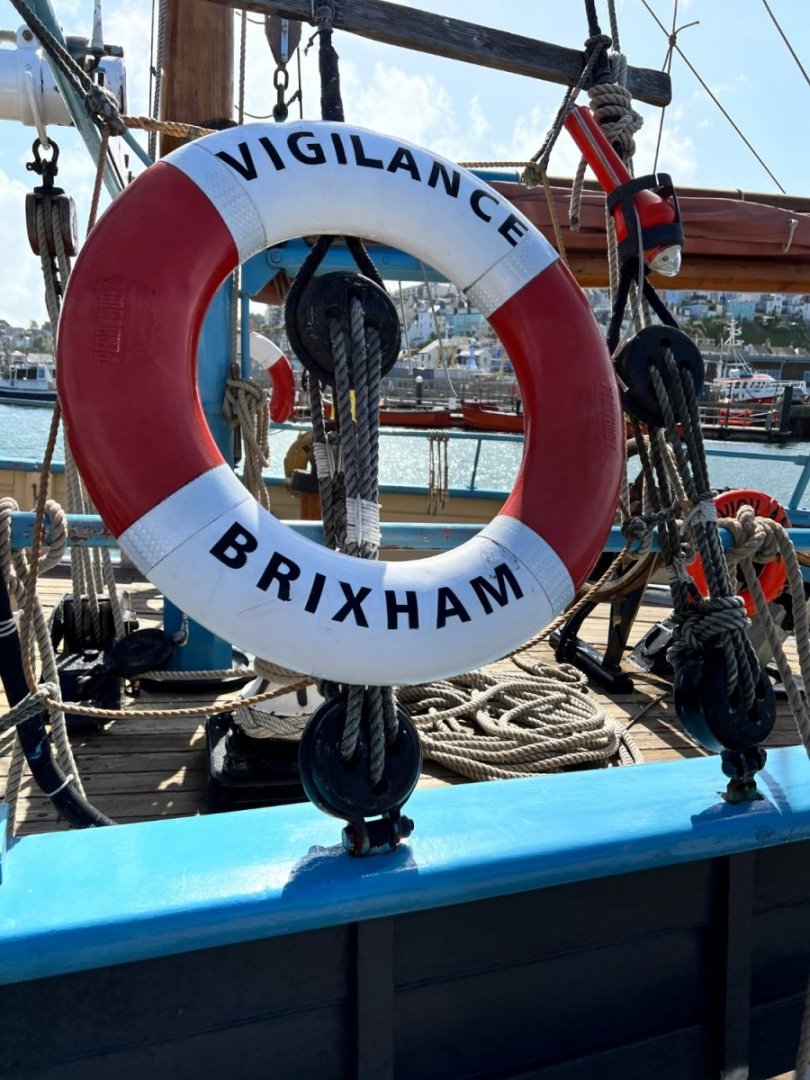
Sorry for the delay in putting more photos up. Vigilance has scuppers running the full circumference of the boat where we put a rubbing strip. Modern photos of Pilgrim also show scuppers running almost her entire length. I didn’t realise this. It’s really hard to tell from old black and white photos in March whether most Brixham boats had such extensive scuppers or not. Is that a white stripe or scuppers in the photo below? (DH is Dartmouth where Brixham boats were registered before Brixham had its own registry) Maybe Nisha had scuppers all around, she came from the same yard as Vigilance. I can’t tell from the plans. If so, it would be very hard to model this as the supports for the bulwarks are the timberheads which in these models are false and supported by the bulwark. Pretty sure that Erycina did not have such extensive scuppers. See photo below. The rough planking of the hull is also very noticeable on Vigilance, maybe just age, but I can certainly model that…😁

- 62 replies
-
- 1
-
-
- Nisha
- Vanguard Models
- (and 1 more)
-
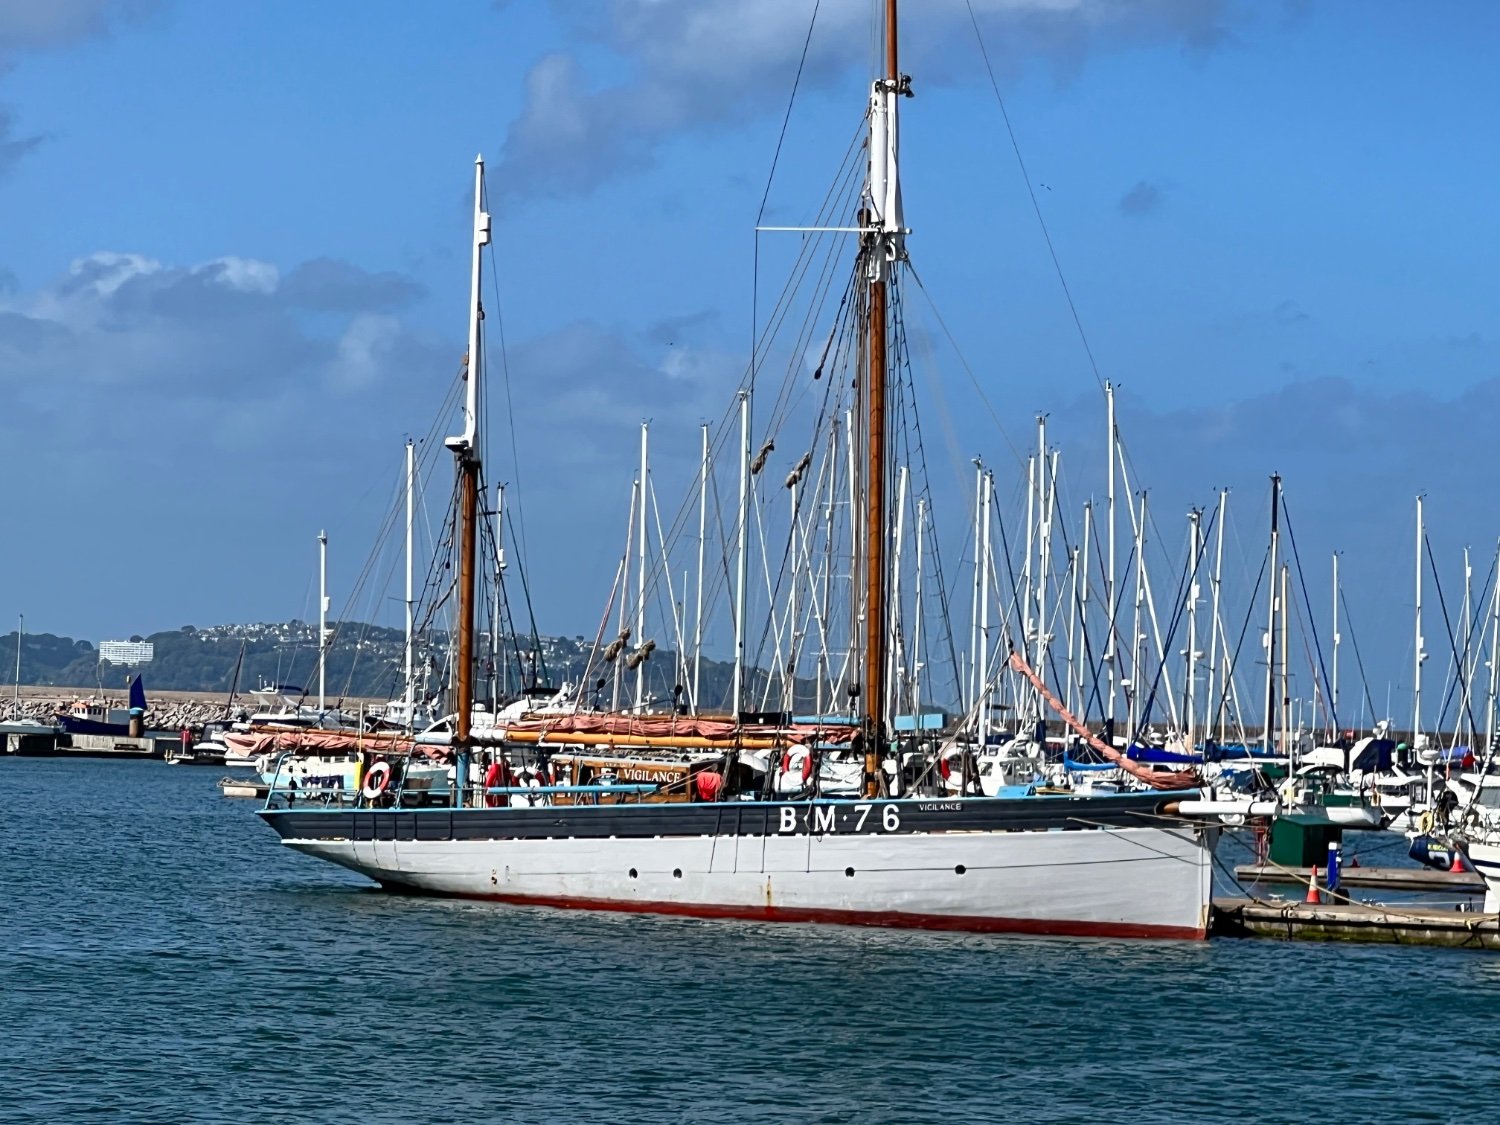
Your Erycina is looking super. You mentioned that you might add nav lights to her shrouds. If you are building these from scratch, these are what they look like on Vigilance.


-
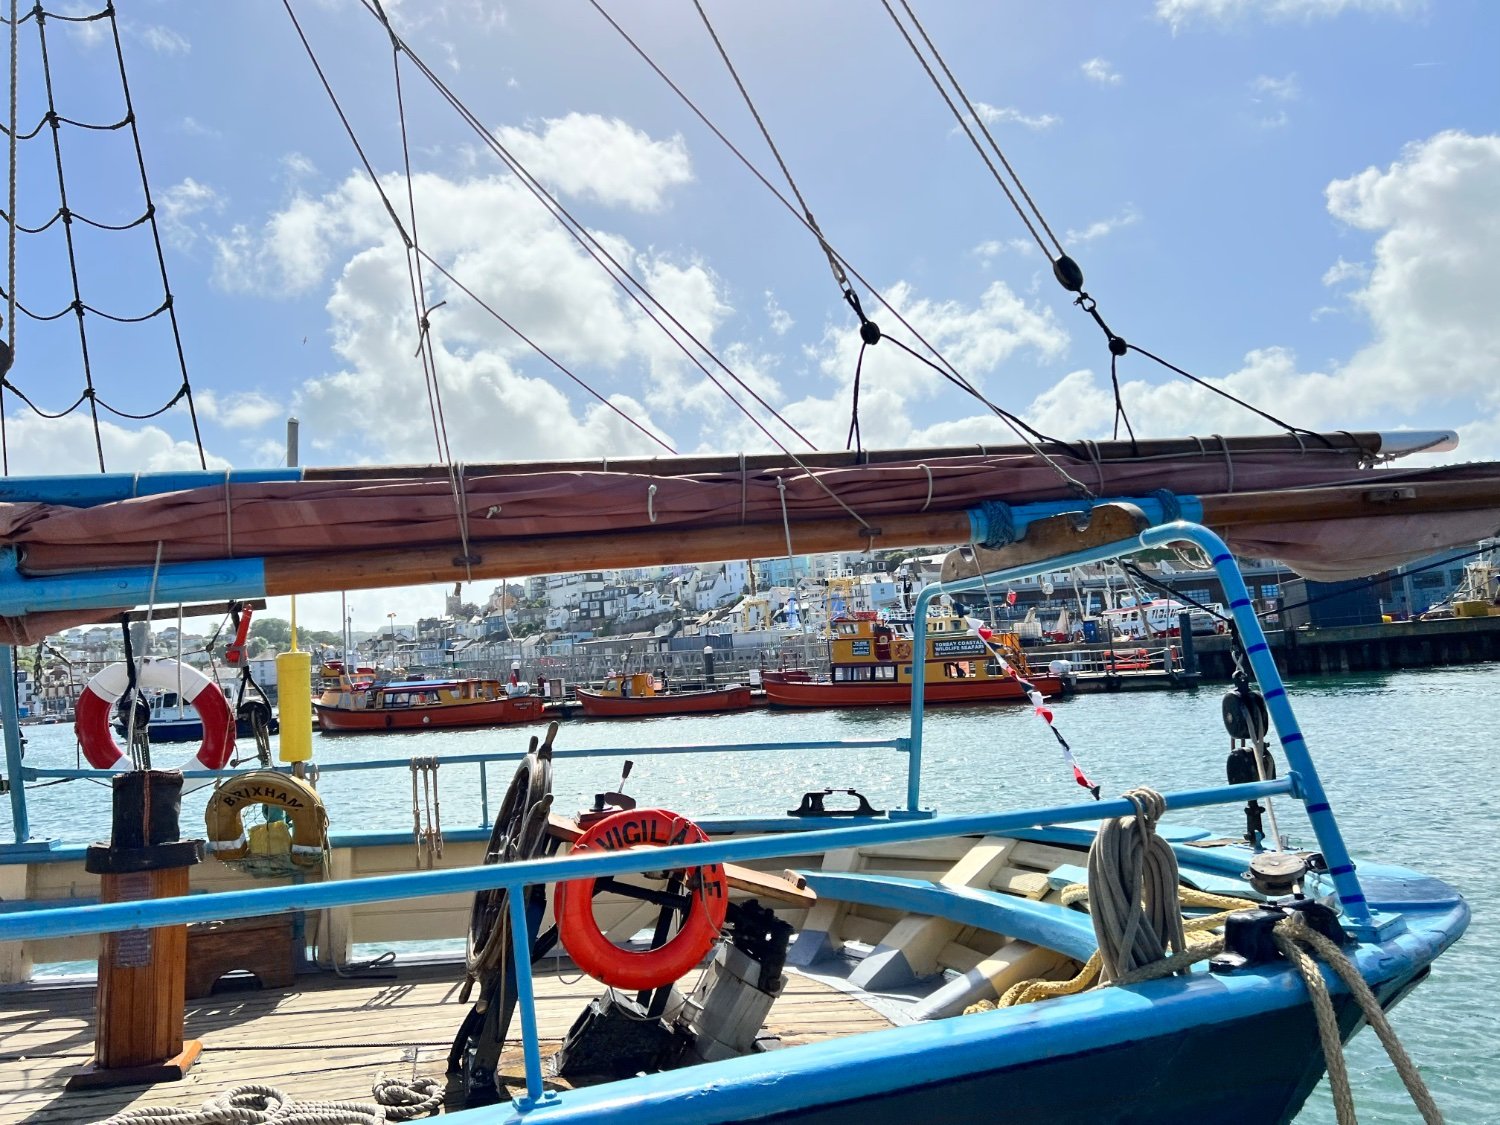
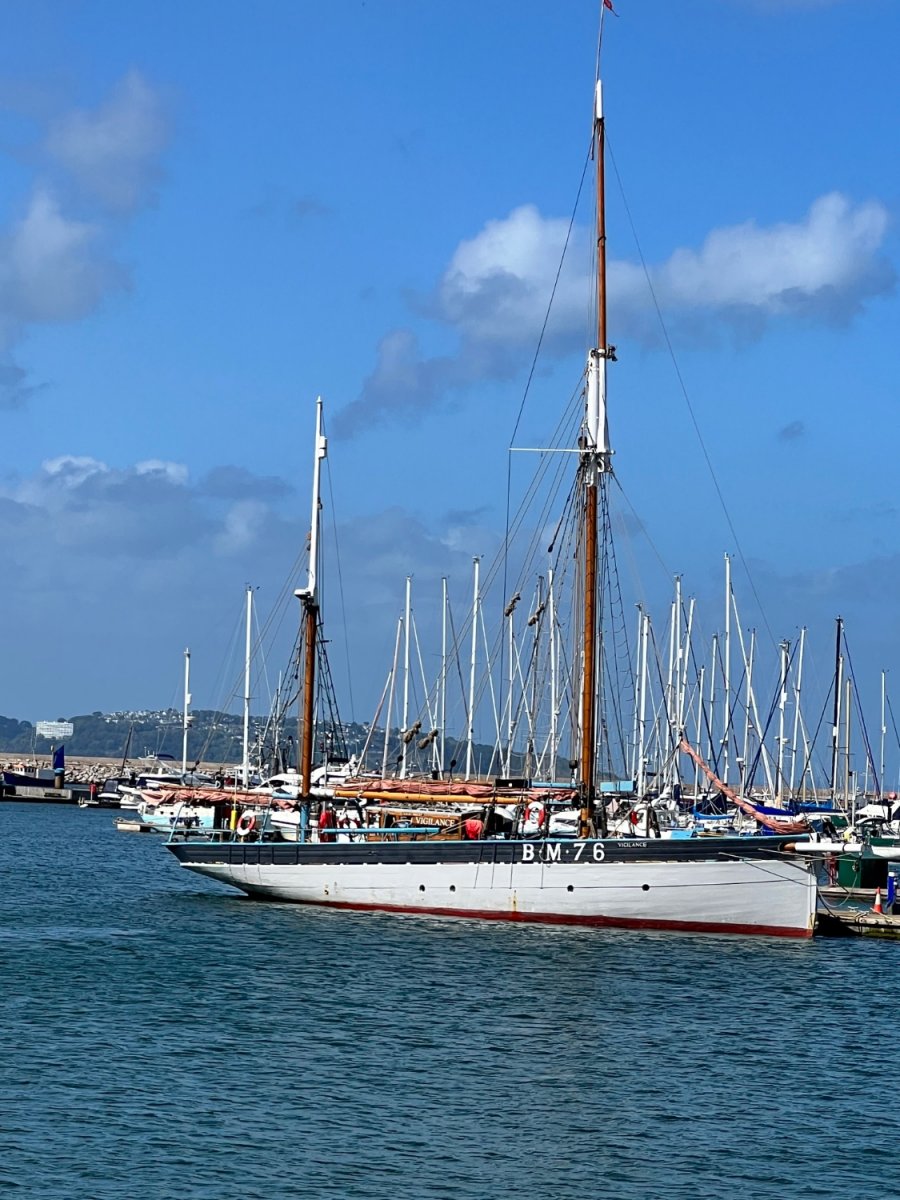
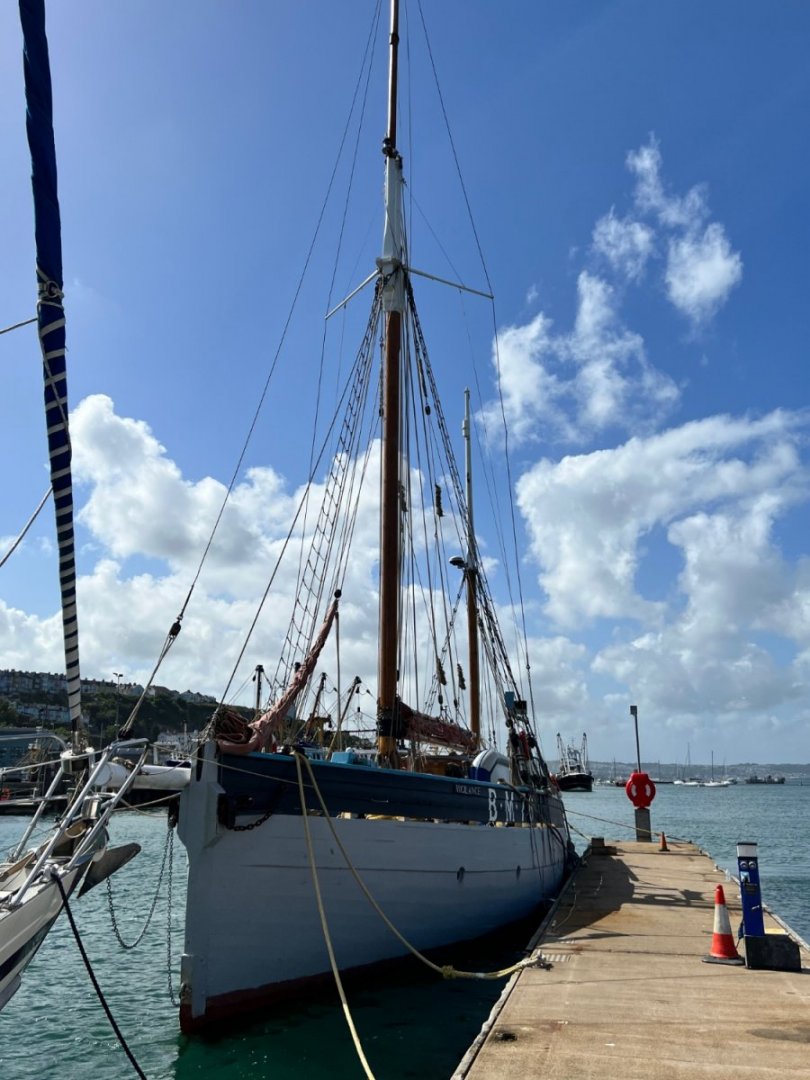
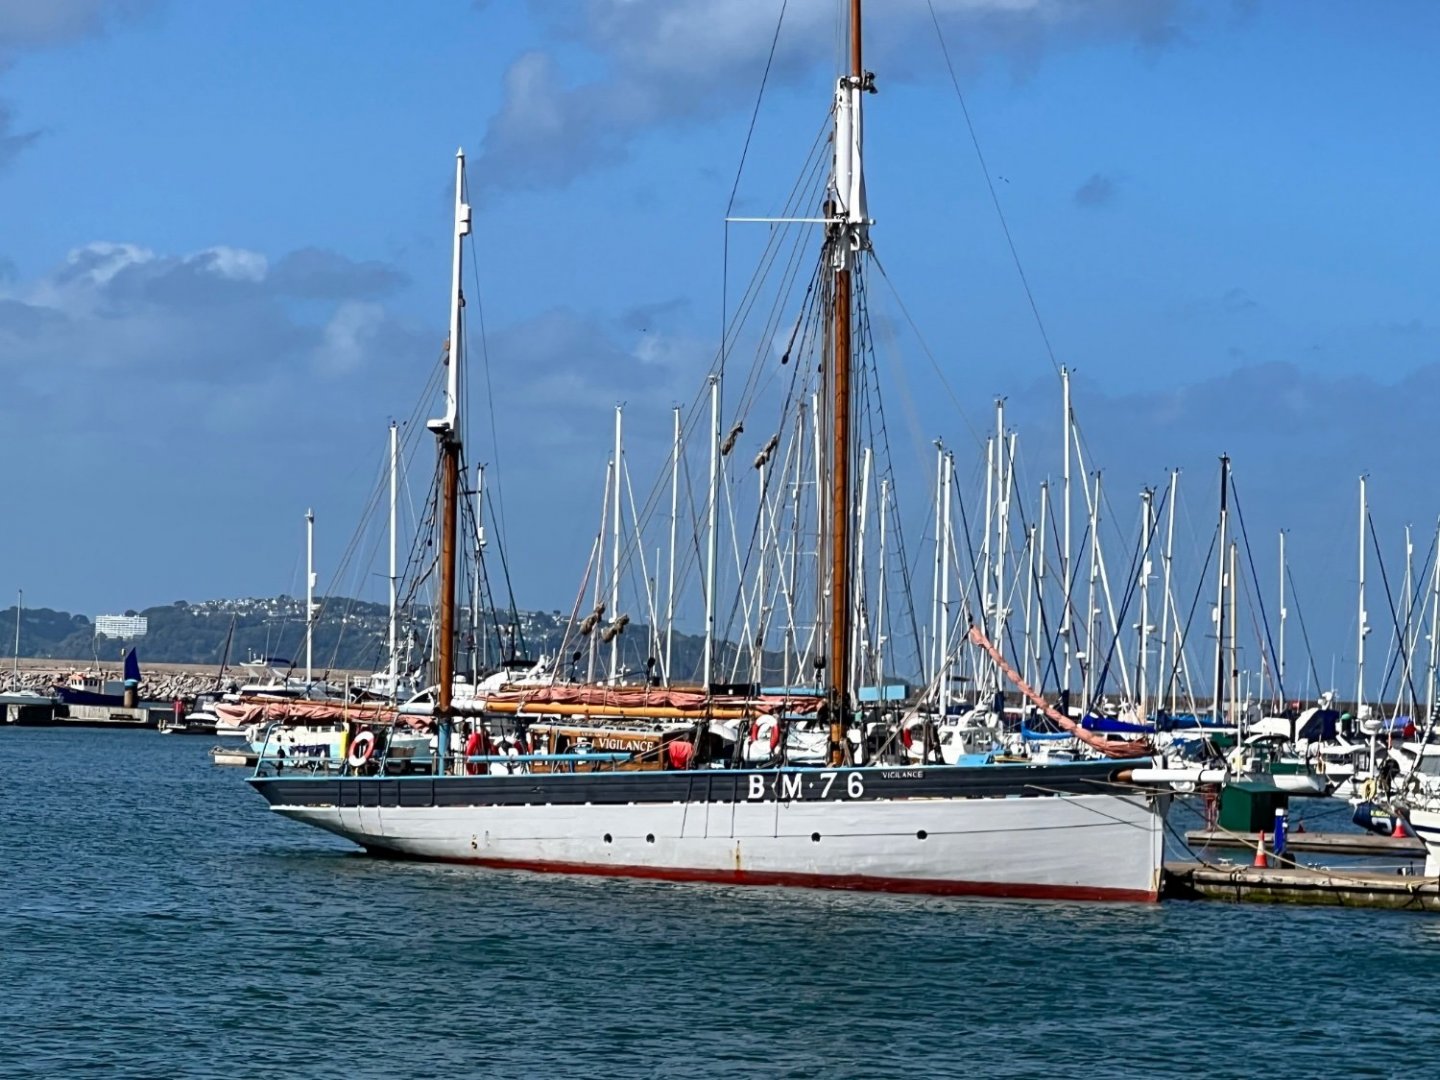
I was visiting Devon this weekend and managed to fit in a visit to Brixham (had to bribe my wife and kids with lunch at Rockfish in return). I knew Pilgrim wouldn’t be there from her sailing schedule, but Vigilance was. I’ve taken some detailed photos which may be of use for modellers of both Nisha and Erycina. Vigilance was the last smack to be built in Upham’s yard in Brixham in 1926, the same yard as Nisha was built in 1907. She’s much larger than Nisha at 78ft and a ketch rather than a cutter. In size and rig she’s more similar to Erycina but has a rounded transom. Vigilance has been significantly modified. Most notably a deckhouse now stands where the main hatch would have been, the trawling gear has been removed, there’s a metal frame supporting the boom and mounting instruments astern and portholes cut in the hull sides. I’ll add a few more posts detailing things that I thought were of interest.
- 62 replies
-
- 5
-

-
-
- Nisha
- Vanguard Models
- (and 1 more)
-
Hi Glomar, I had the same problem with Chaos Black chipping on my Nisha build. Chaos black gives a superb finish and colour so long as you don’t damage it. As others have suggested, if you are fixing the waterline then respraying the entire side makes sense. But, if like me you repeatedly chip the paint at sites away from the waterline, you can spray through an opening (I used clingfilm which I wouldn’t recommend as it stuck to the hull in places and took more paint off) such as a card with a hole in it and only respray a part of the hull and only need to mask areas nearby where you are repainting. See my Nisha build for my trials and tribulations. I am brush painting going forward! I don’t know on the varnish. I did coat Nisha’s hull in polyurethane matt varnish to prevent more chips happening. That approach has its own problems - instead of chips in the paint I had peeling varnish when I had to fit the chainplates, etc. I used BECC lettering to change the name of my Fifie build. The stick on letters are limited in terms of fonts available, but worked fine. They are ever so slightly raised compared to a water slide decal but it’s not noticeable after I varnished over the top of them. Hope that helps. Dan
-
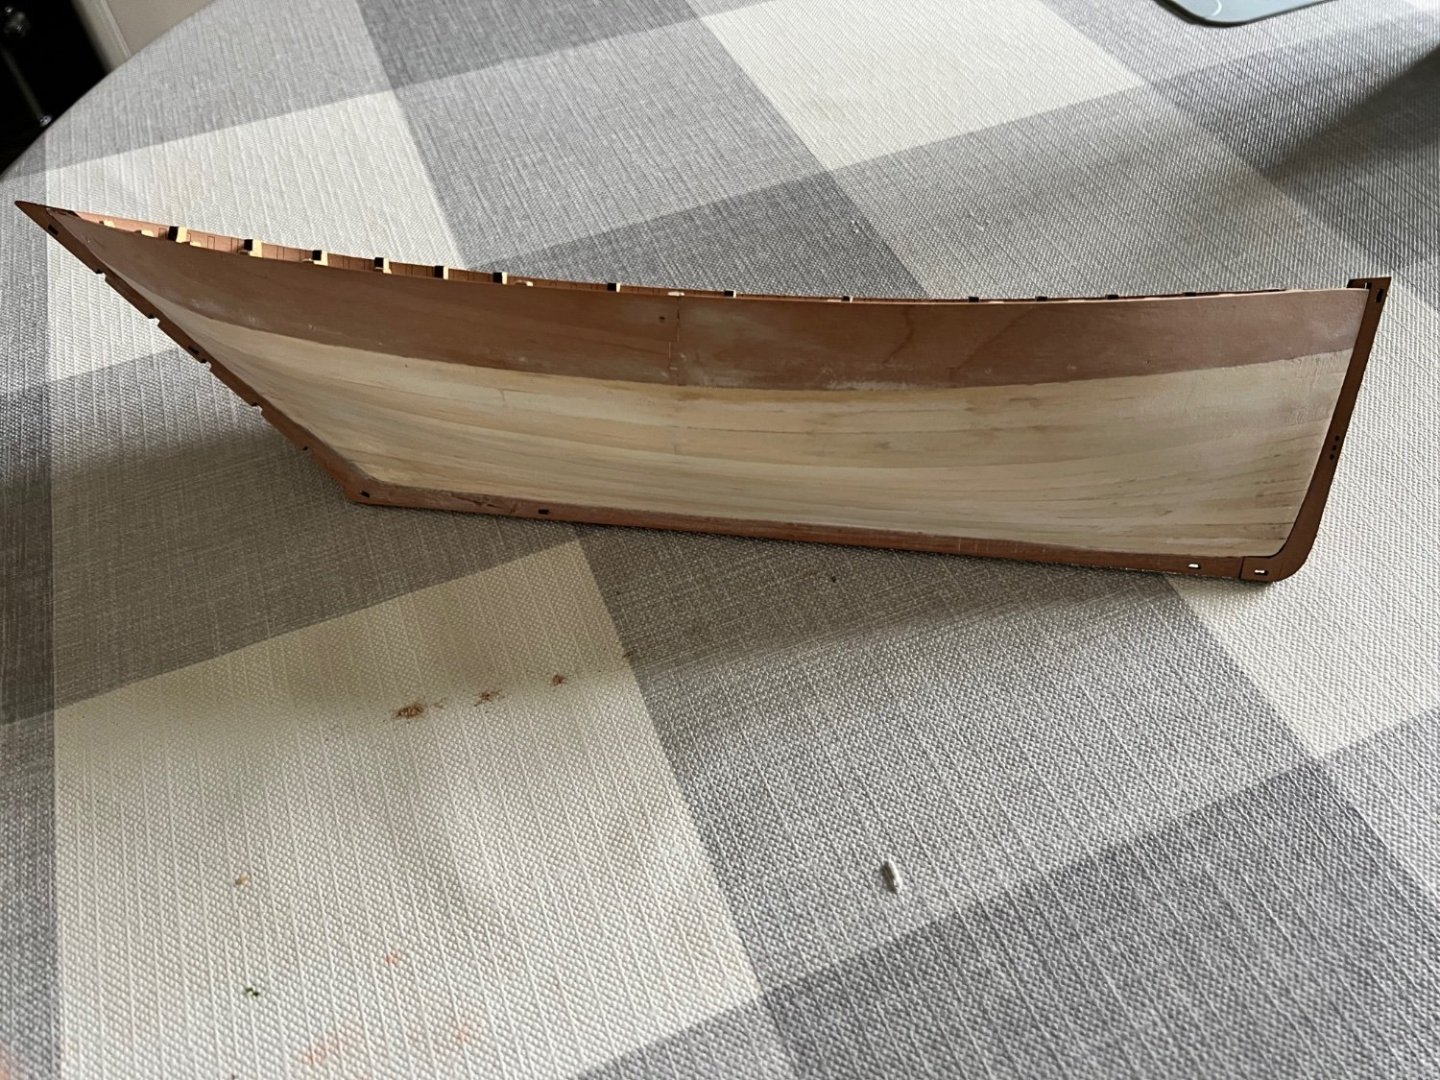
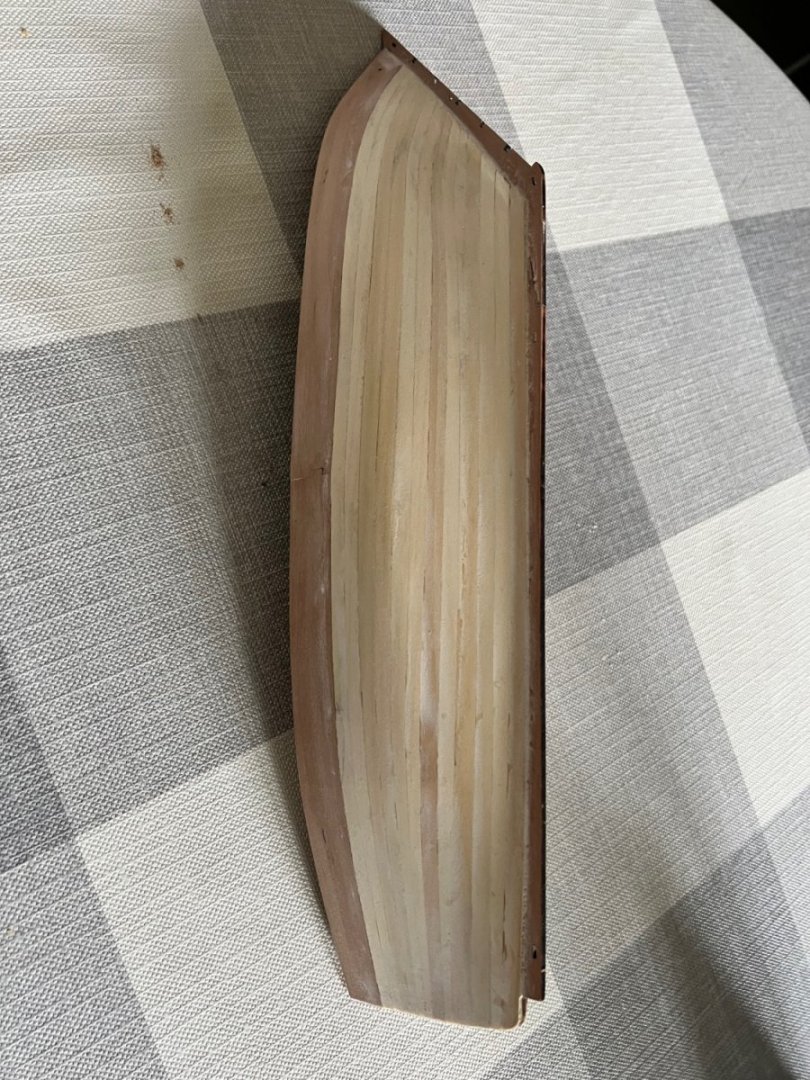
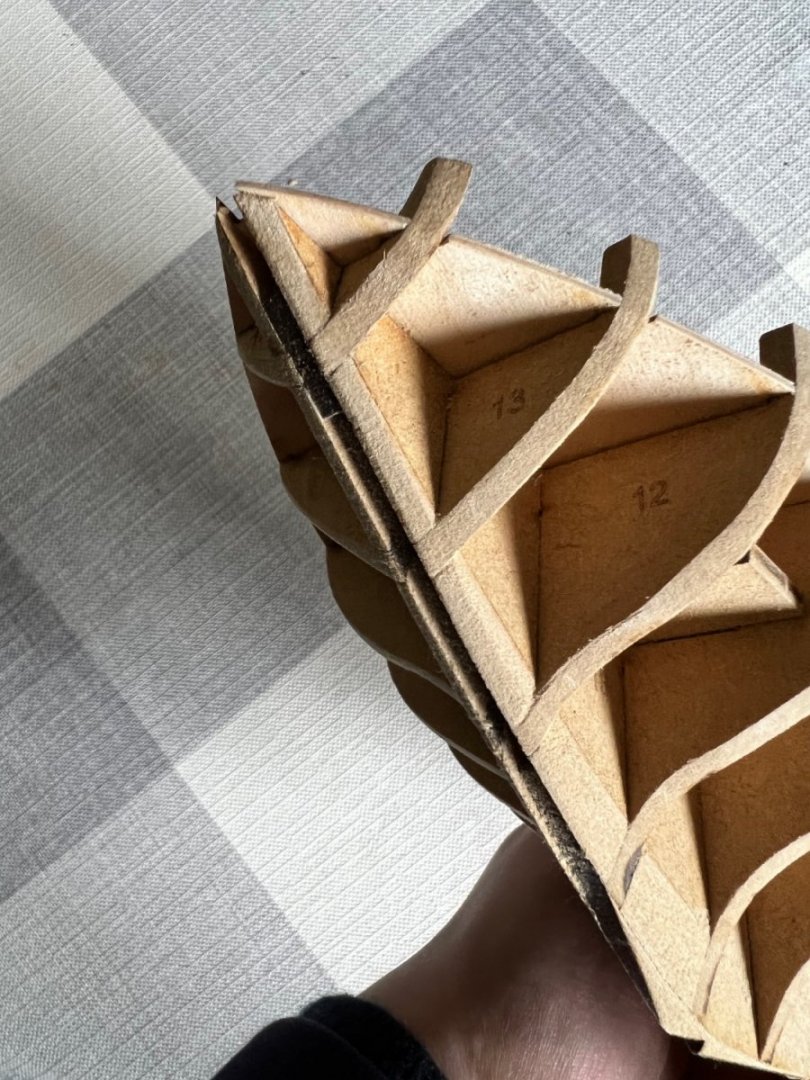
First planking is complete. What I found tricky with the Zulu was whether to taper the planks at the stern or not. The raked sternpost is much longer than either the middle bulkhead or the stem so if the hull side was flat you would taper from the stern (wide end) towards the bow. But there’s significant curvature towards the stern of the Zulu and the planks fit around this curve much better if tapered at the stern end (they need edge bending too). I’ve been experimenting and my first planking is untidy but as a smooth base for the second planking will do the job. Any guidance on how to approach this better would be much appreciated. I’m still very much learning as I go along. I don’t know whether to taper the second planking at the stern or not and then just add stealers below the waterline. As the owner still wants an unpainted upper hull, I’d like to make sure I do a better job on the second planking. The end result is smooth to the touch although it doesn’t look that way in the photos. With stem post fitted. I haven’t tried fitting the rabbet patterns yet, so the first planking may yet need some more aggressive sanding at bow and stern to ensure the rabbet is deep enough. Thanks Dan
- 14 replies
-
- 6
-
-
- lady isabella
- zulu
- (and 2 more)
-
Craig, that’s a great choice of green, I really like it. I don’t have an airbrush so I need to find an equivalent in enamels as I’ll stick to the red oxide spray I use for the lower hull and brush paint the upper works when I get round to Erycina. I do like the contrast between the natural timberheads and the green bulwark but I suspect you’re right - no working boat would have bothered keeping it that way. That photo of Erycina shows how shabby these boats became with constant wear and tear.
-
That’s the plan. These are great kits and your instructions and build log are superb. I don’t see the point of trying other kit makers with worse instructions and lower quality materials. I never thought I’d find fishing boats interesting but they’re great looking boats and I like that I can build them quite quickly. I don’t know if I’ve got the patience to build something really impressive such as Sphinx or Indefatigable - we’ll see - maybe the former one day!
- 14 replies
-
- 1
-
-
- lady isabella
- zulu
- (and 2 more)
-
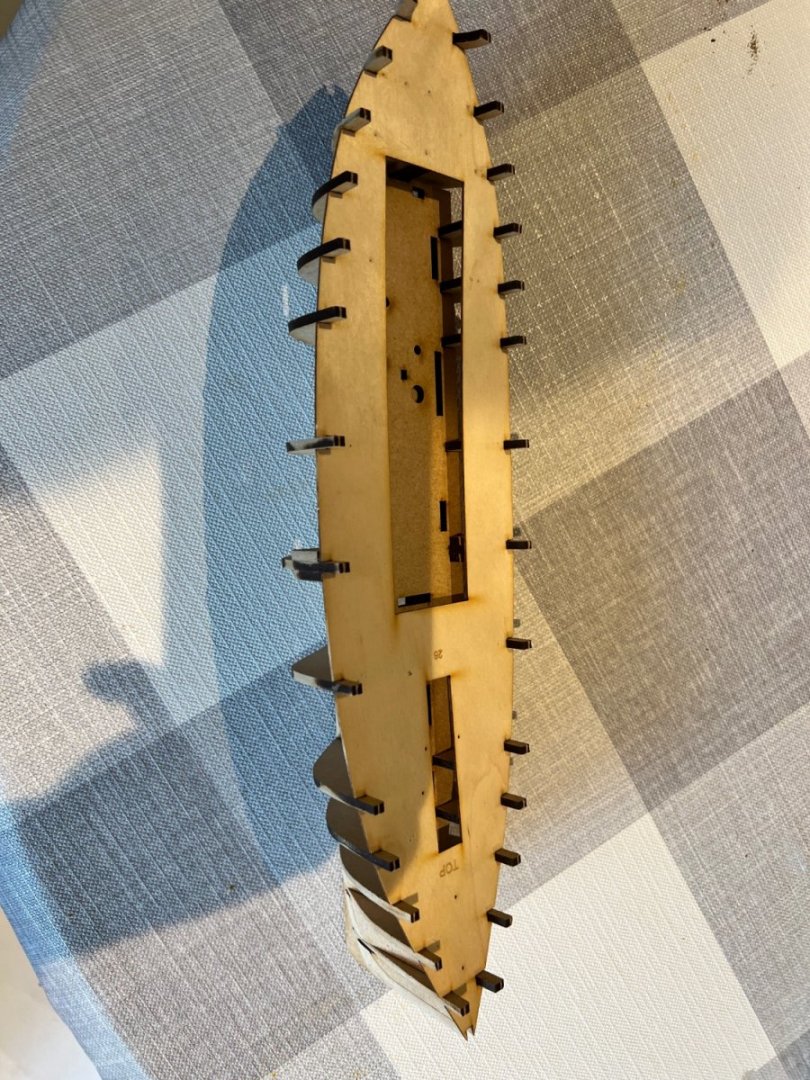
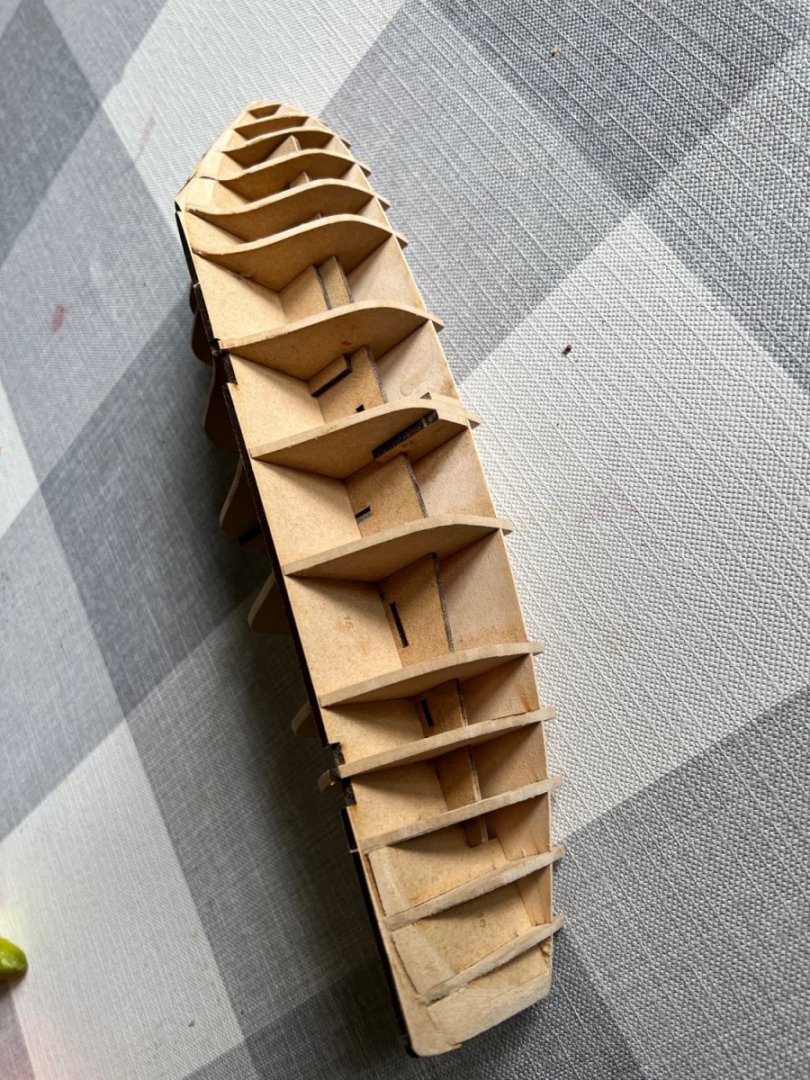
This is my third build and third Vanguard fishing boat, having previously built the Fifie and Nisha. Another beautiful kit arrived from Vanguard full of excellent high quality parts and superb instructions. The build logs on here from Blue Ensign, Eke and James H are so impressive and thorough that I don’t know if this log will add much. Maybe just the perspective of someone at beginner level on this build. There is the added complication that this model has been commissioned by my four year old son. Annoyed that I named the Fifie after his sister he demanded that I build a “bigger” boat for him and named it after him. I offered him Nisha during construction but she was dismissed for being “too small and I don’t like the colour black”. I showed him the Vanguard models webpage and asked him to choose one and he selected the Zulu - well second choice was the Zulu - he really wanted the Sphinx painted a lurid bright blue, a few tears later expectations were suitably managed and the Zulu accepted. The owner has agreed to an unpainted upper hull but I hope to persuade him that black or dark green might look better. So work started. Bulkheads, inserts, lower deck and false main deck slotted together perfectly and were glued. In my typical clumsy way I managed to break the aft bulkhead 14 and the adjoining insert part #19 whilst test fitting them. Despite the parts of the Zulu being large some of the parts have very narrow “bridges” that break easily. Neither snapped off entirely and both have glued fine. The hull was then faired Stern post and keel were glued on using the ingenious alignment pieces. The stem post was dry fitted. The distinctive Zulu lines are becoming apparent. The superstructure was prepared up to the end of step #2 but not yet faced with outer panels. I’ll do those whilst the bulwarks are drying to shape.


- 14 replies
-
- 6
-
-
- lady isabella
- zulu
- (and 2 more)
-
Thank you!
-
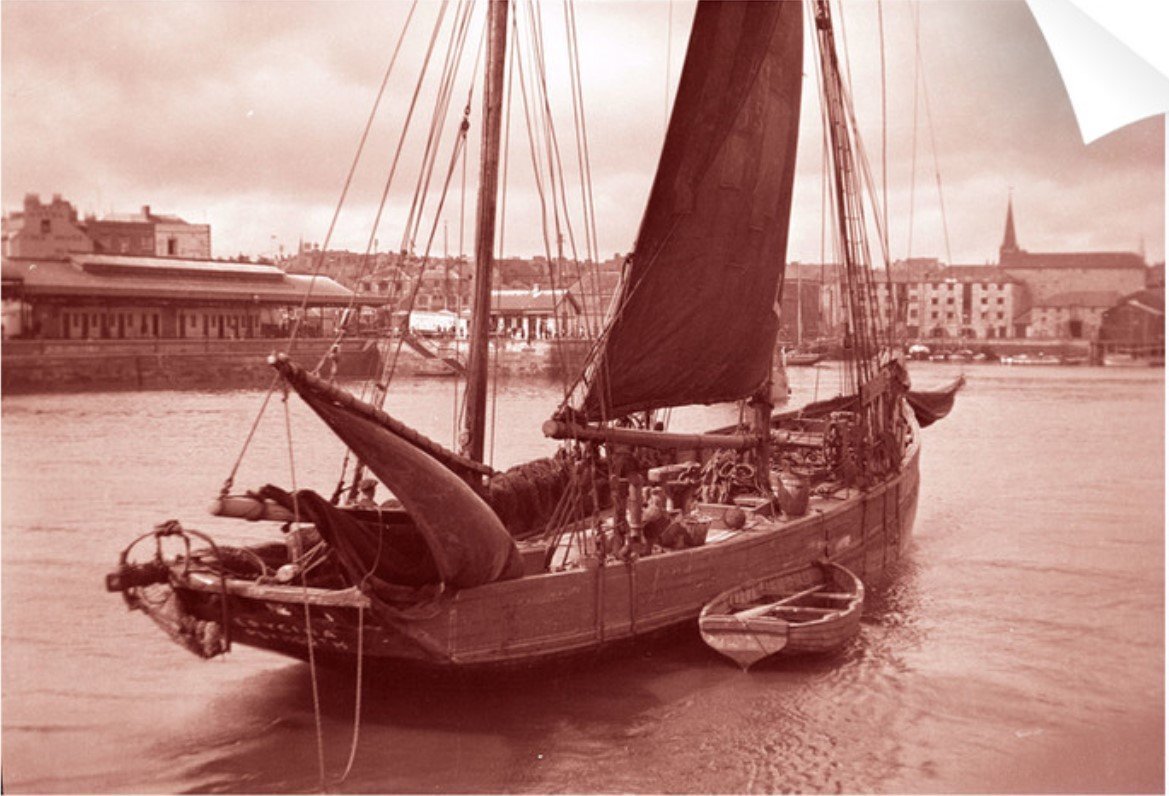
Craigie, In reply to your message on my finished Nisha thread, thank you - not as tidy as your Nisha! I'm looking forward to seeing your Erycina, she looks great so far. I like your idea of a black hull with dark green above the white rubbing strake and I may copy you. It was this photo of Erycina (you've probably already seen it) near the end of her life in 1934 that got me thinking that not all the running rigging should be tied off at the base of the mast for Nisha. In the photo Erycina is 52 years old and showing her age - quite a contrast to the immaculate yacht-like models we build. I don't have the skill to do so, but I'd love to see someone build a battered, weathered version of Erycina more like the working boat she was. I may contact the Royal Maritime Museum and see if they will send out a higher resolution version of the photo, unless someone has it already? Photograph of 'Erycina' (1882) under sail in September 1934 off the Barbican, Plymouth posters & prints by H Oliver Hill (rmg.co.uk) I am building the Zulu next and will build Saucy Jack before Erycina if Chris gets the Saucy Jack sail sets in. I'd like Erycina to be my last fishing boat (perhaps excepting Ranger which will depend upon when her kit is launched) before I pluck up the courage to tackle one of the Vanguard warships. Dan
-
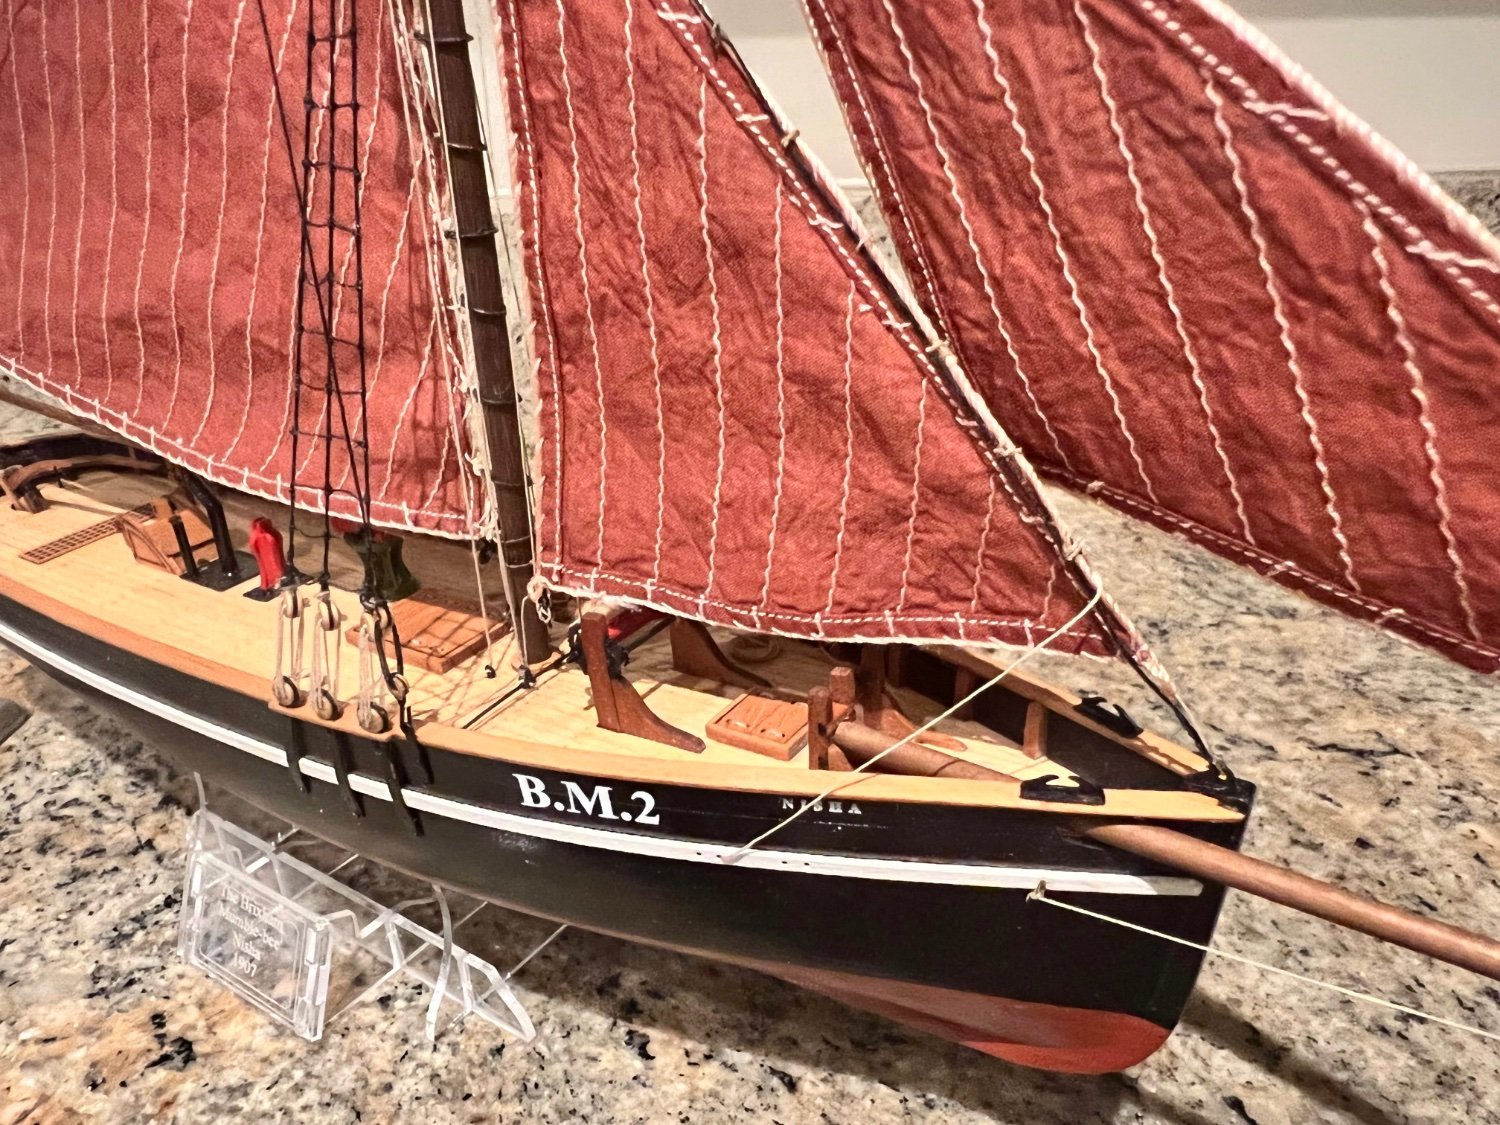
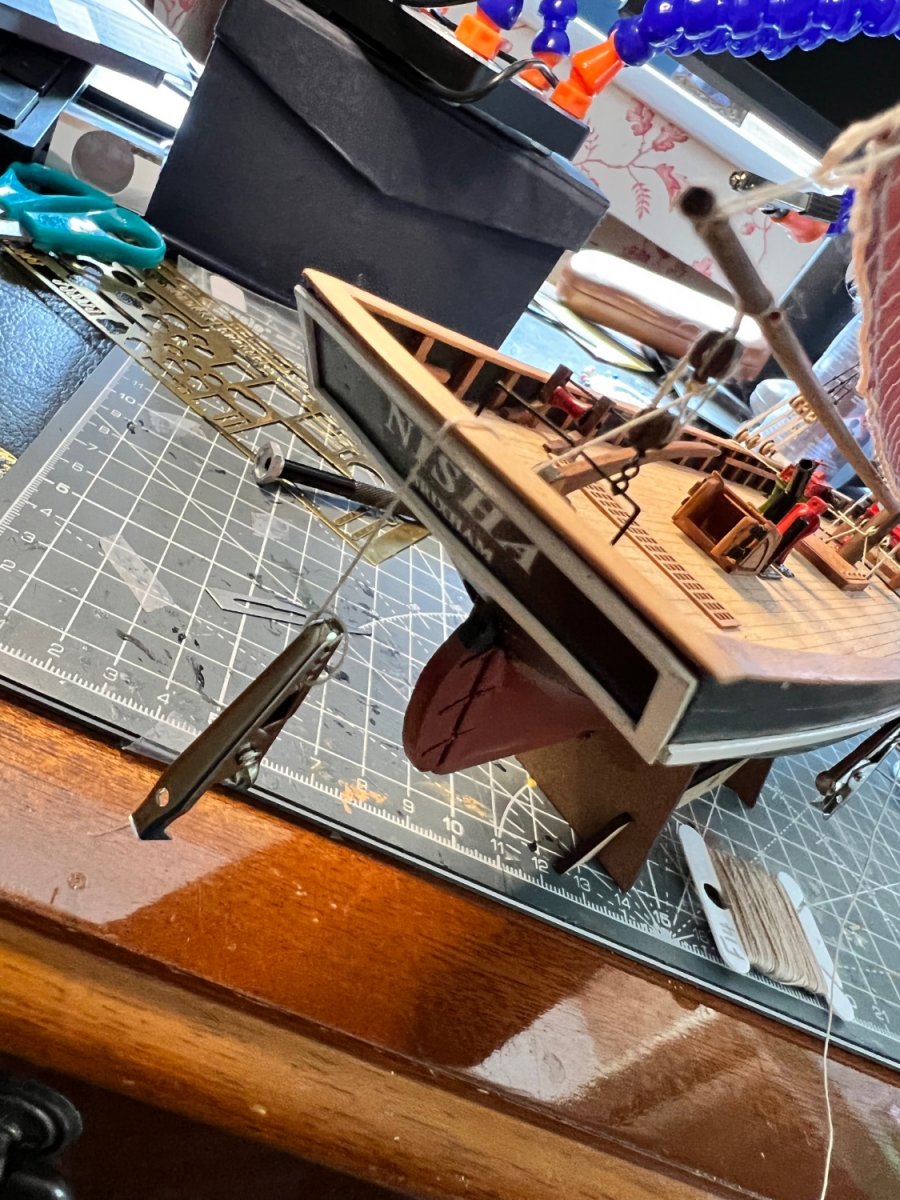
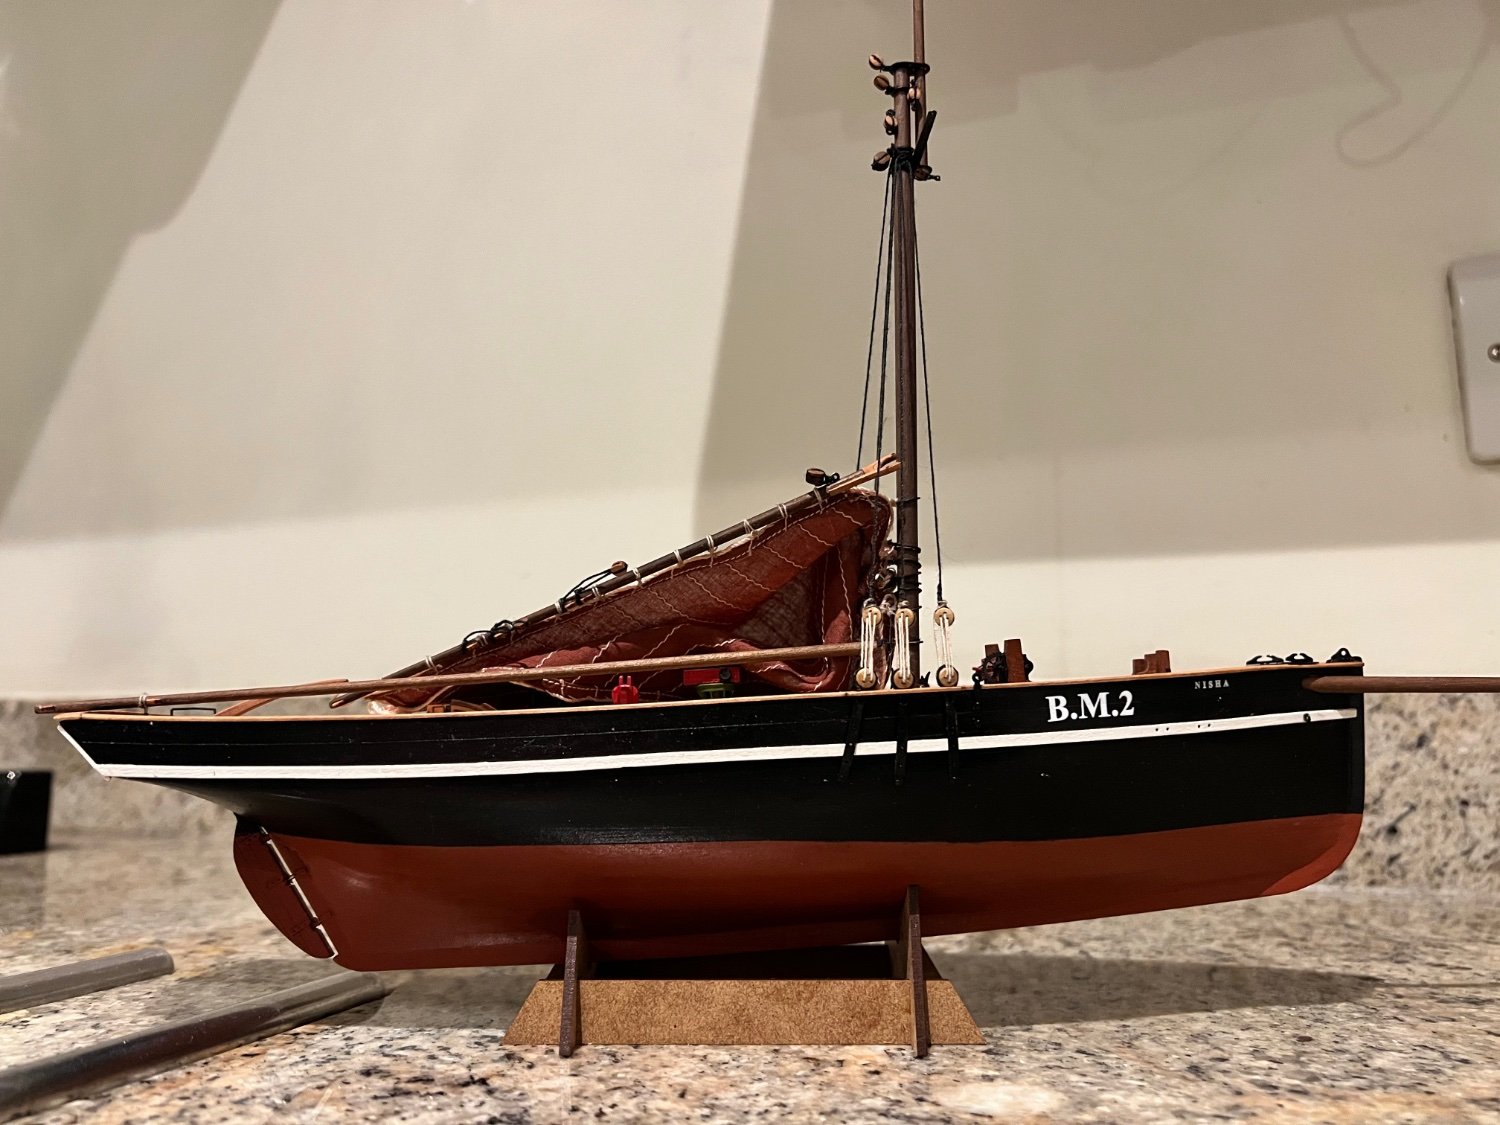
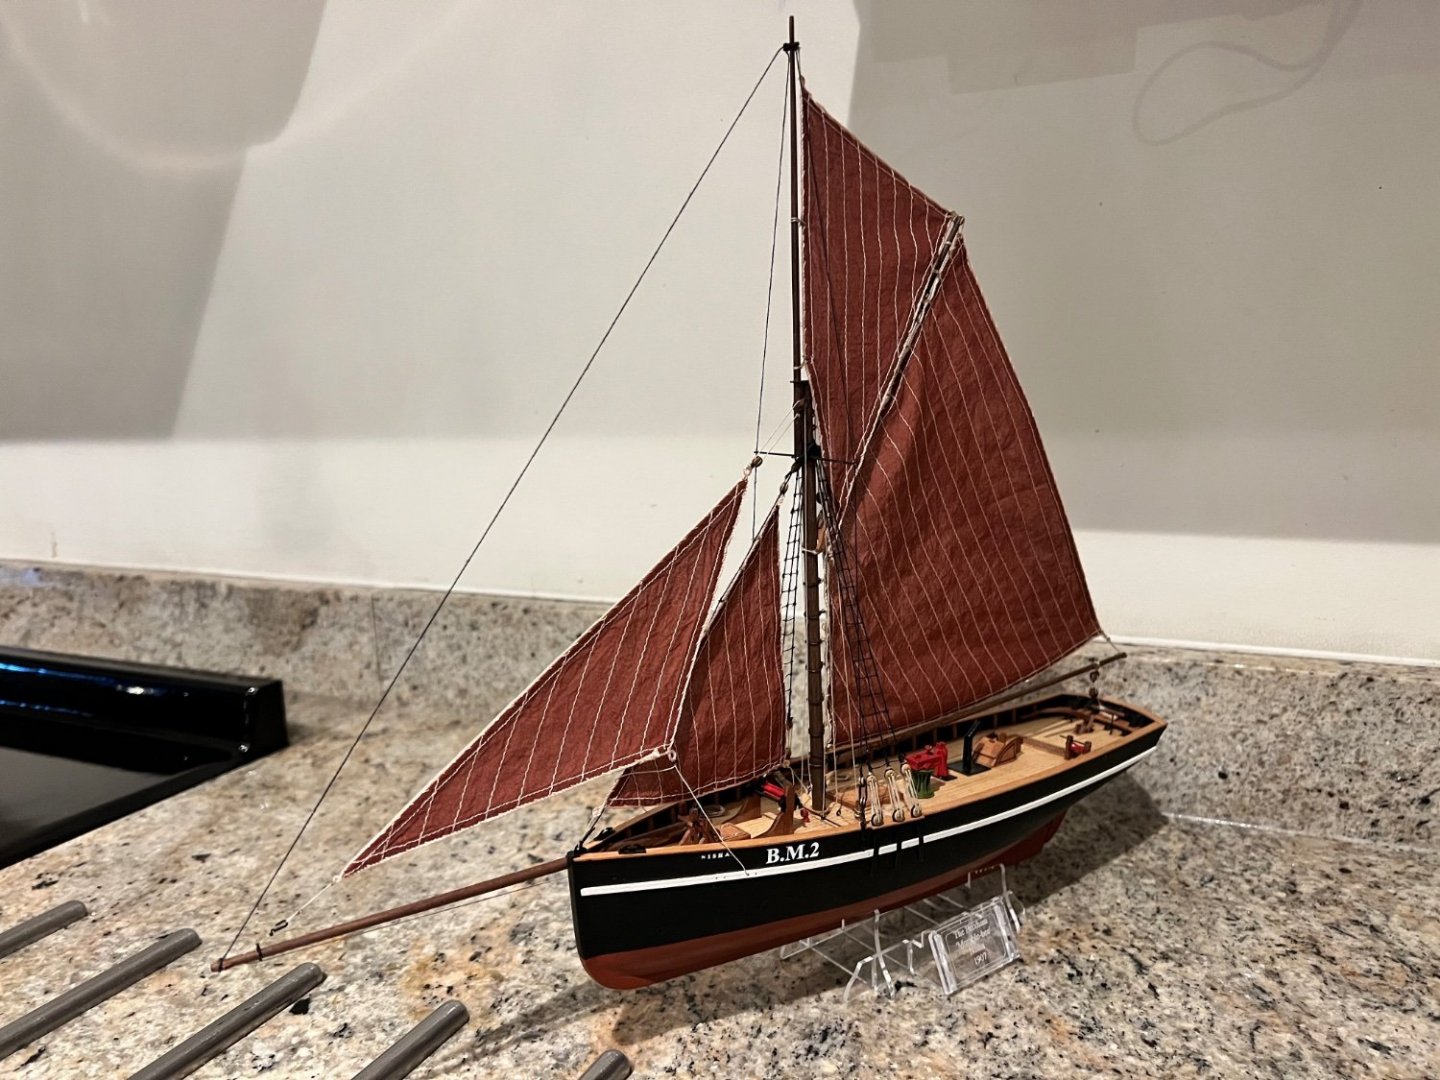
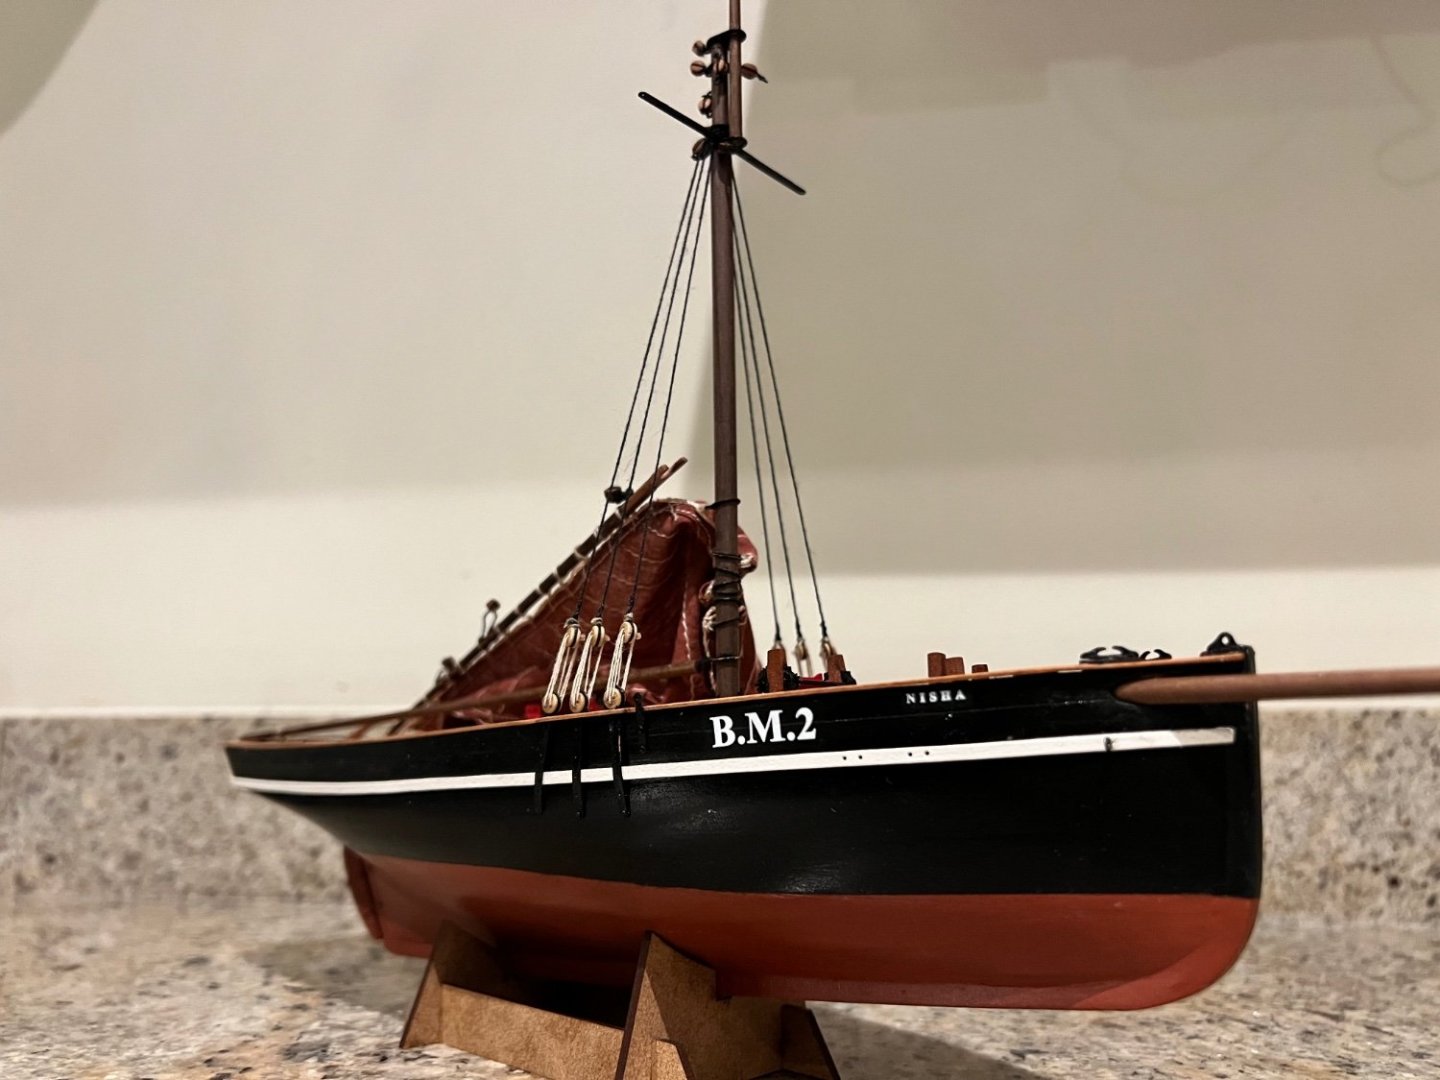
Nisha is complete, a month and a day since I started building her. She has been a lot of fun to build with plenty of challenges (learning points). I’m very happy with the unintentional colour the sails ended up. Think I’ll use this colour when I build Erycina too (75% cocoa brown: 25% scarlet). I found the rigging quite hard despite being relatively simple compared to most of the models on MSW. Still developing my techniques and need to be less reliant on CA glue. I stick to my previous conclusion that Nisha for someone who is a complete beginner, such as me, is tricky as a first build but makes an ideal second build. Compared to Vanguard’s Fifie she is smaller, fiddlier, harder to plank, I broke lots more pieces during construction and the rigging is considerably more demanding. All challenges I welcomed on a second build but could have put me off during a first build. The Fifie was the ideal first build for me. I’ve changed the way the lines are secured from that shown on the plans. There are 7 lines coming down the mast plus the inner jibsheet which need securing. The inner jibsheet goes through the ring on a runner but the plans suggest it is just tied to the ring. I think that’s unlikely as it leaves no scope for the crew to trim the sails so I’ve tied off the jibsheet to the windward rails below the deadeyes. 4 cleats on the masts are also likely too few to secure the other 7 lines so I have taken several other lines through the loops at the mast foot and then tied them off to the railing below the deadeyes on both sides. Nisha is built on the starboard tack (as all of Chris's fishing boats seem to be). So I think that the leeward / port flying jibsheet should be taught and the windward / starboard flying jibsheet should be loose. I’m not sure that these changes are accurate and I couldn’t find clear enough photos in March’s Sailing Trawlers to confirm but based on having a bit of sailing experience it makes more sense to me. Fifie welcomes Nisha to the fishing fleet! Off fishing. Thanks to Chris for creating another superb kit that has enabled a beginner such as me to build a second stunning boat, I have no doubt that if I’d bought a mass market kit I’d never have finished even the first build and certainly not have ended up with two fine looking fishing boats. Also thanks to Andyrew, Andrew Johnson, James H, Craigie and others for their valuable advice and excellent build logs which have been a huge help during the build. Next addition to the fishing fleet will be the Zulu. Dan


- 62 replies
-
- 16
-
-
- Nisha
- Vanguard Models
- (and 1 more)
-
She’s looking great Jonathan. I thought there was going to be a gap between the port and starboard gunwales and the stern board but instead I opted for a not very noticeable gap between my stern gunwale and the stern board but it is why I rarely show photos of my Nisha from astern… I have to own up that my colour scheme was entirely borrowed from AJohnson. Dan
- 38 replies
-
- 3
-
-
- Nisha
- Vanguard Models
- (and 1 more)
-
Just a brief update. The mast and spars are complete and the mast stepped. Tapering and shaping them with a drill worked well. I need to massively improve my tying on / seizing of blocks which are scruffy on close inspection. This is the first boat with proper rigging that I’ve built, the Fifie has very little rigging in comparison As per the instructions the mainsail and main gaff were attached before the mast was stepped. I’ve fitted the main shrouds this evening and will make a start on the ratlines tomorrow - slightly dreading these! The decals are on, but have silvered. I hated water slide decals as a kid making plastic models and I hate them today. I did spray gloss varnish onto the areas where the decals were due to go and use the Revell decal softening solution, but to no avail. I’m unlikely to use any decals provided on future builds. I prefer the BECC self-adhesive letters. My third build has turned up in the dockyard. Yes, another Vanguard trawler, the Zulu. Beautifully packaged and promptly delivered as always - thanks Chris! I look forward to building her but won’t start until Nisha is complete.


- 62 replies
-
- 8
-
-
- Nisha
- Vanguard Models
- (and 1 more)
-
Ranger looks stunning. Very much look forward to building her when you get the sails and do launch her.
-
Well what a waste of time all that dyeing was. Exactly the same mixture of 75:25 cocoa brown to scarlet as dye 8 and all other variables identical, but the sails have come out an entirely different colour. The linen sails have absorbed the dye very differently to the cotton swatches. I was expecting some difference due to the weave being less noticeable… but not this much. Nevertheless, the sails are a colour that will still look good on Nisha, but not what I’d planned. Guess we’ll have to continue a hit and miss approach to dyeing sails!
- 62 replies
-
- 5
-
-
- Nisha
- Vanguard Models
- (and 1 more)
-
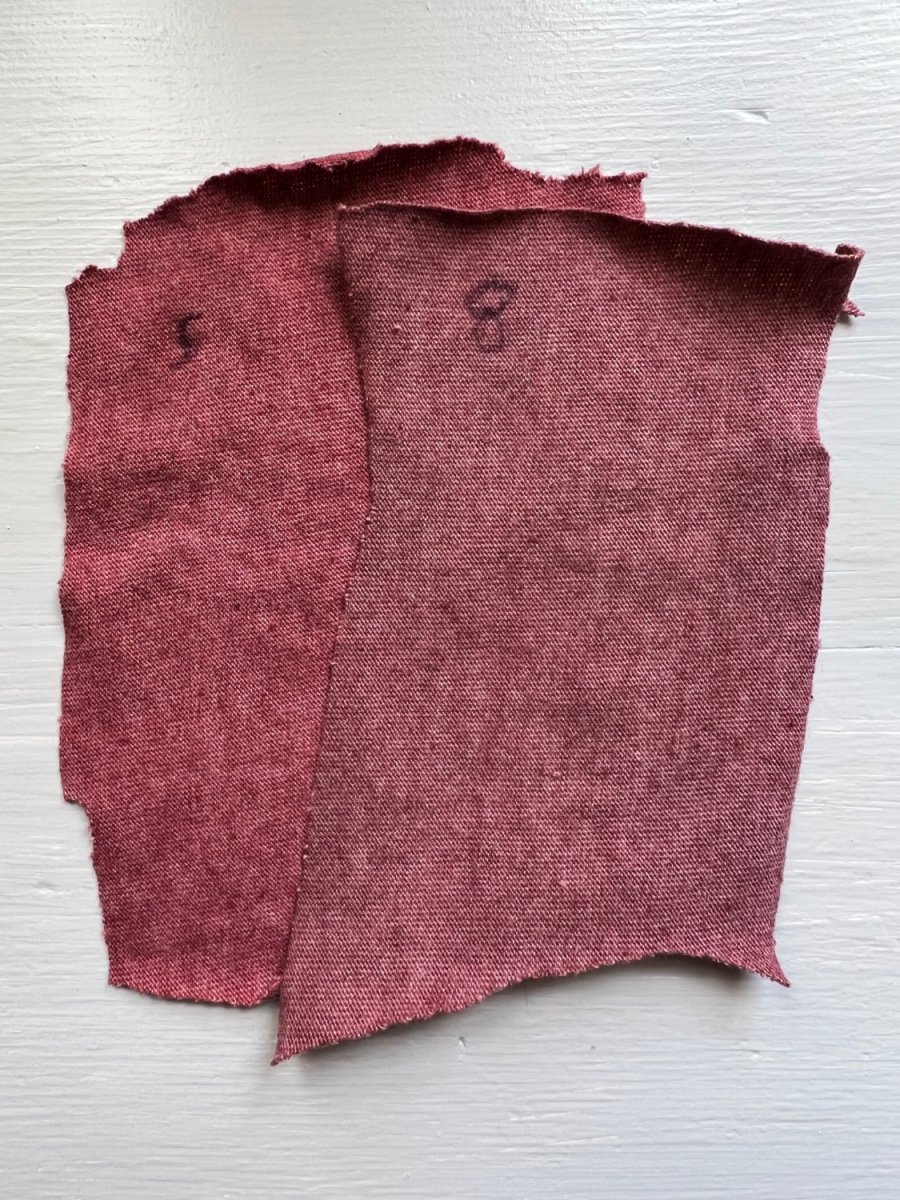
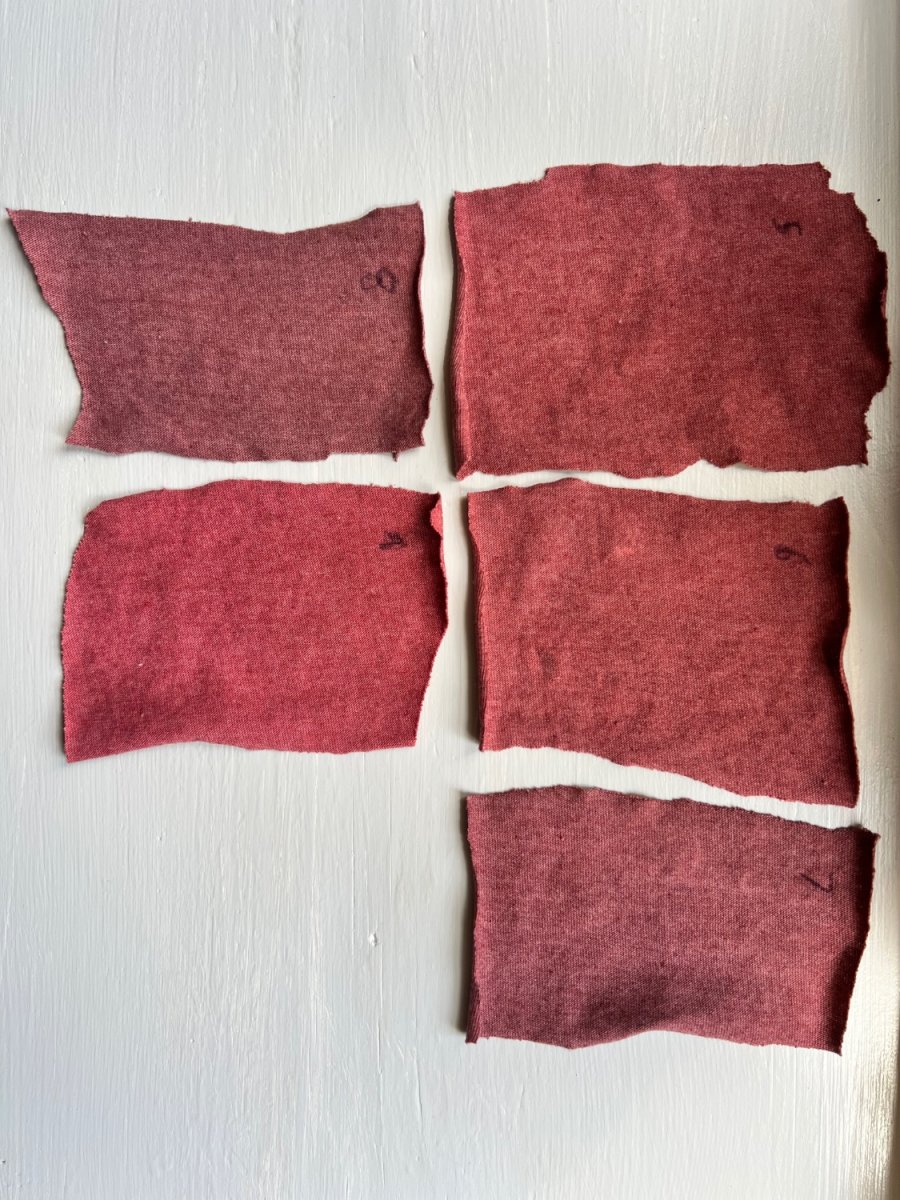
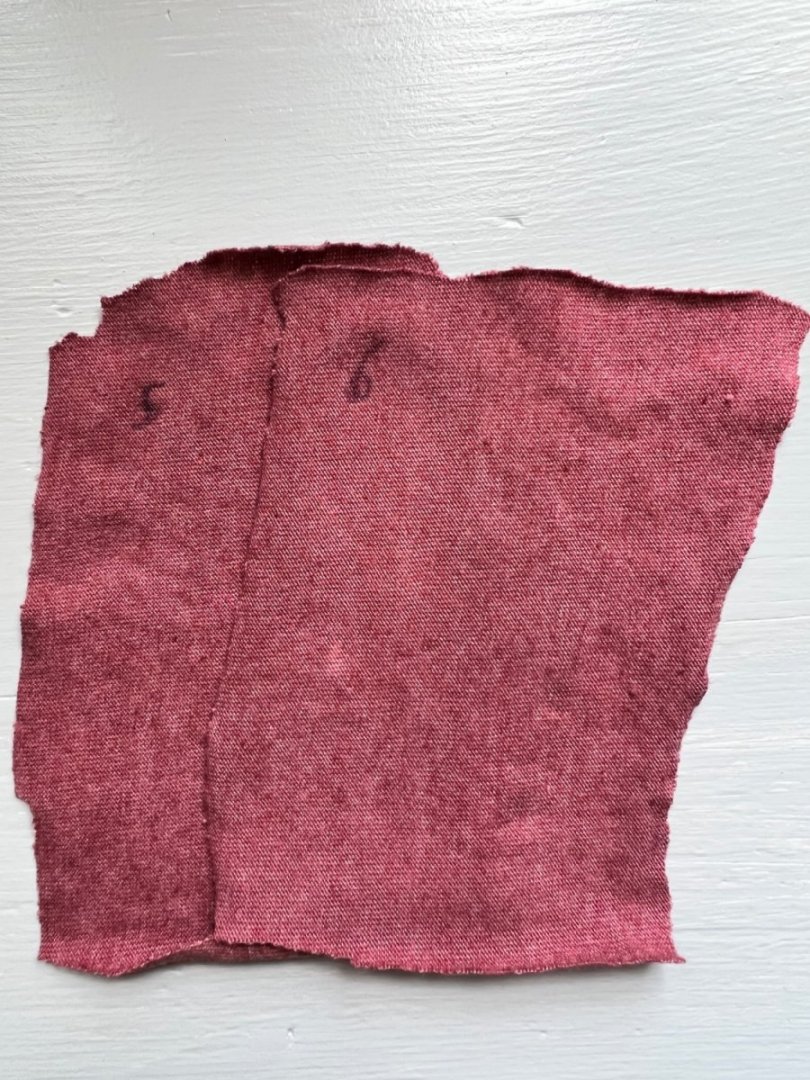
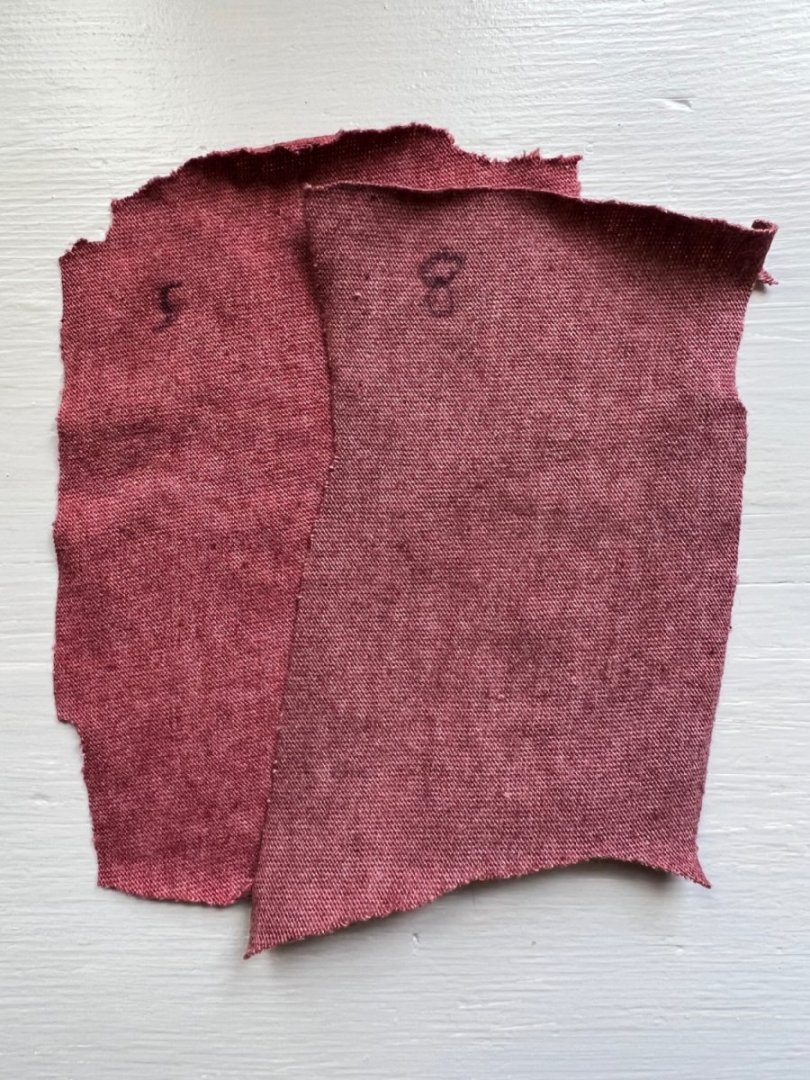
Thanks for the feedback! You’re both right, 9 is too red. I’ve dyed two more based on 5 and 8 but added some yellow. The middle two are the ones with yellow added. I quite like the warmth and seemly better colour saturation I’m the yellow adds to the sails which may be more like they were in real life. The top sample is 5, the next down is 5 with 10ml golden yellow and 10 ml neon yellow added. The bottom sample is 8 and the second from bottom is 8 with 10ml golden yellow added. Think I’m graduating towards 8 too without the yellow for this build - but I may add some yellow for one of the other fishing boats.

- 62 replies
-
- 2
-
-
- Nisha
- Vanguard Models
- (and 1 more)
-
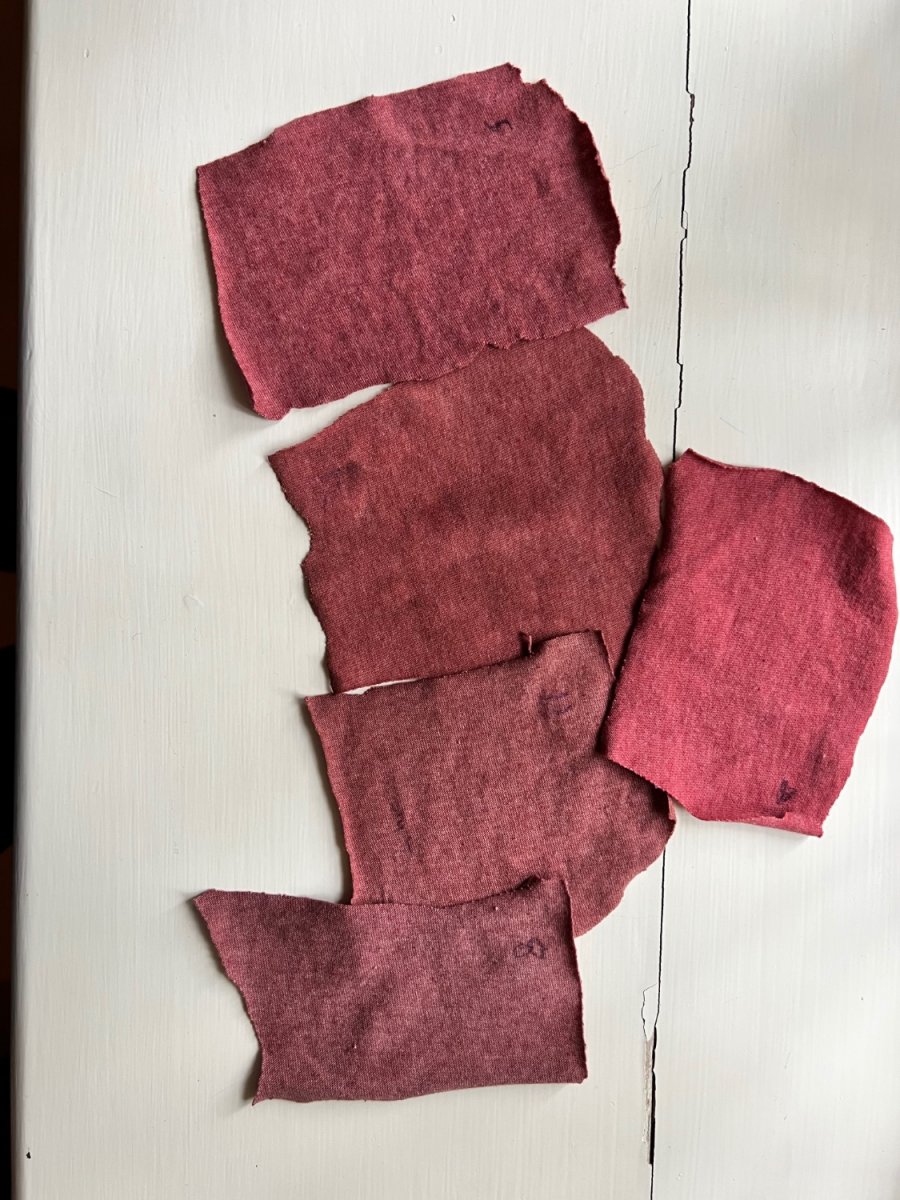
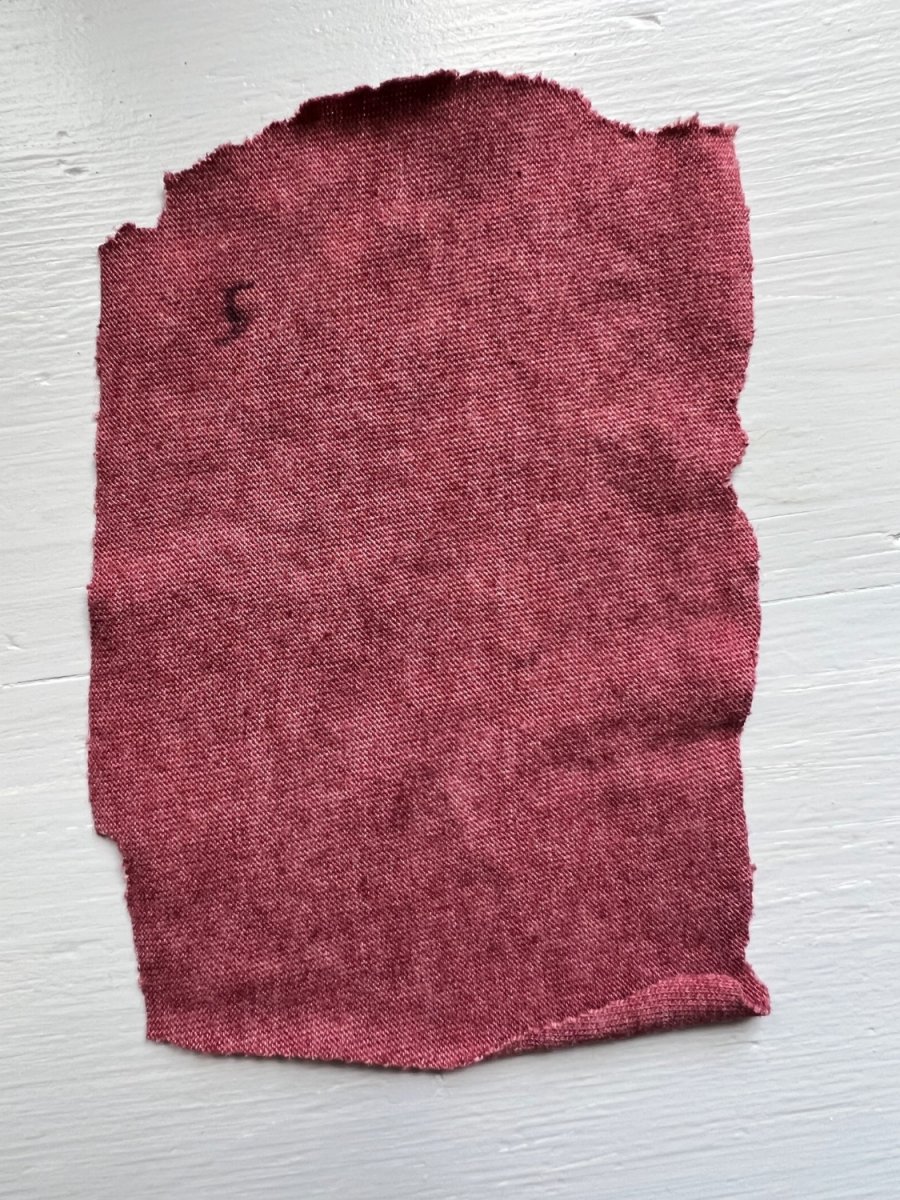
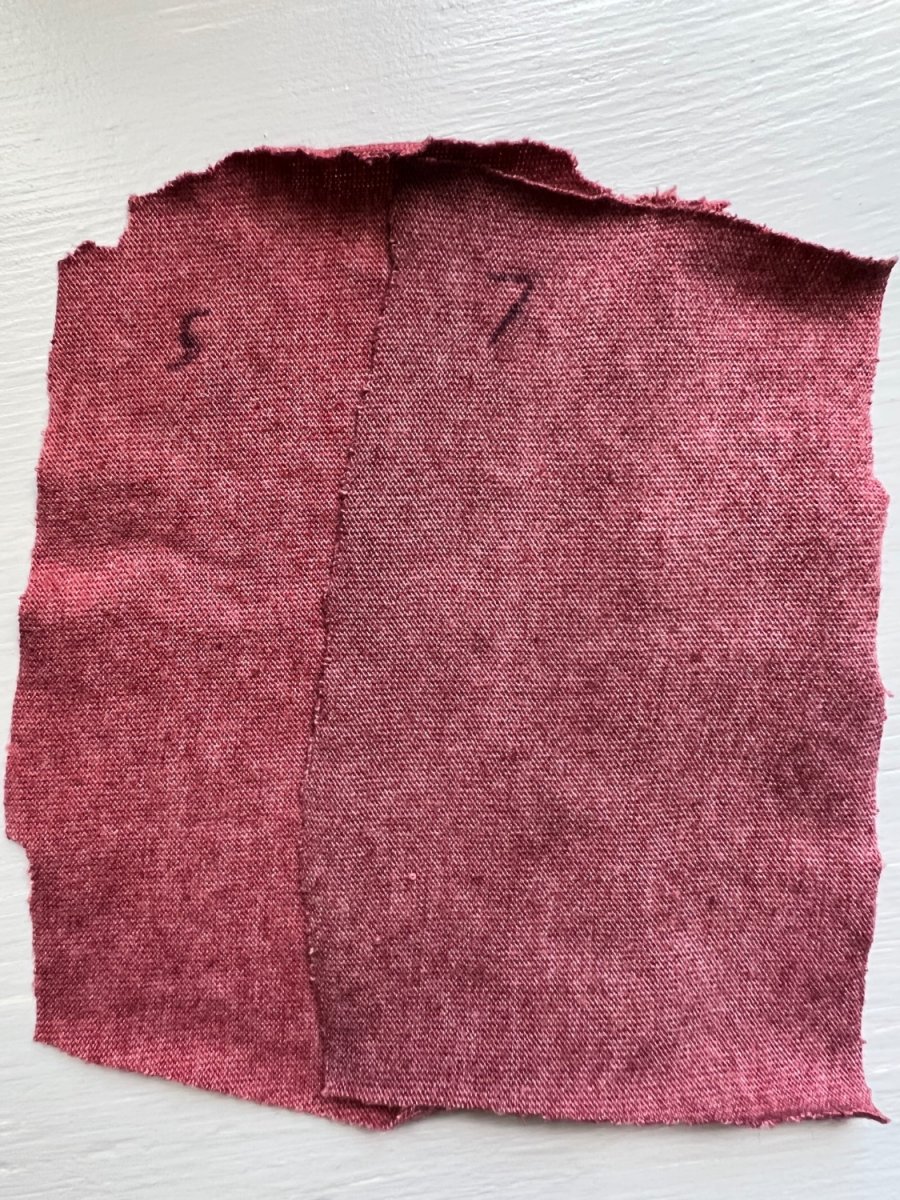
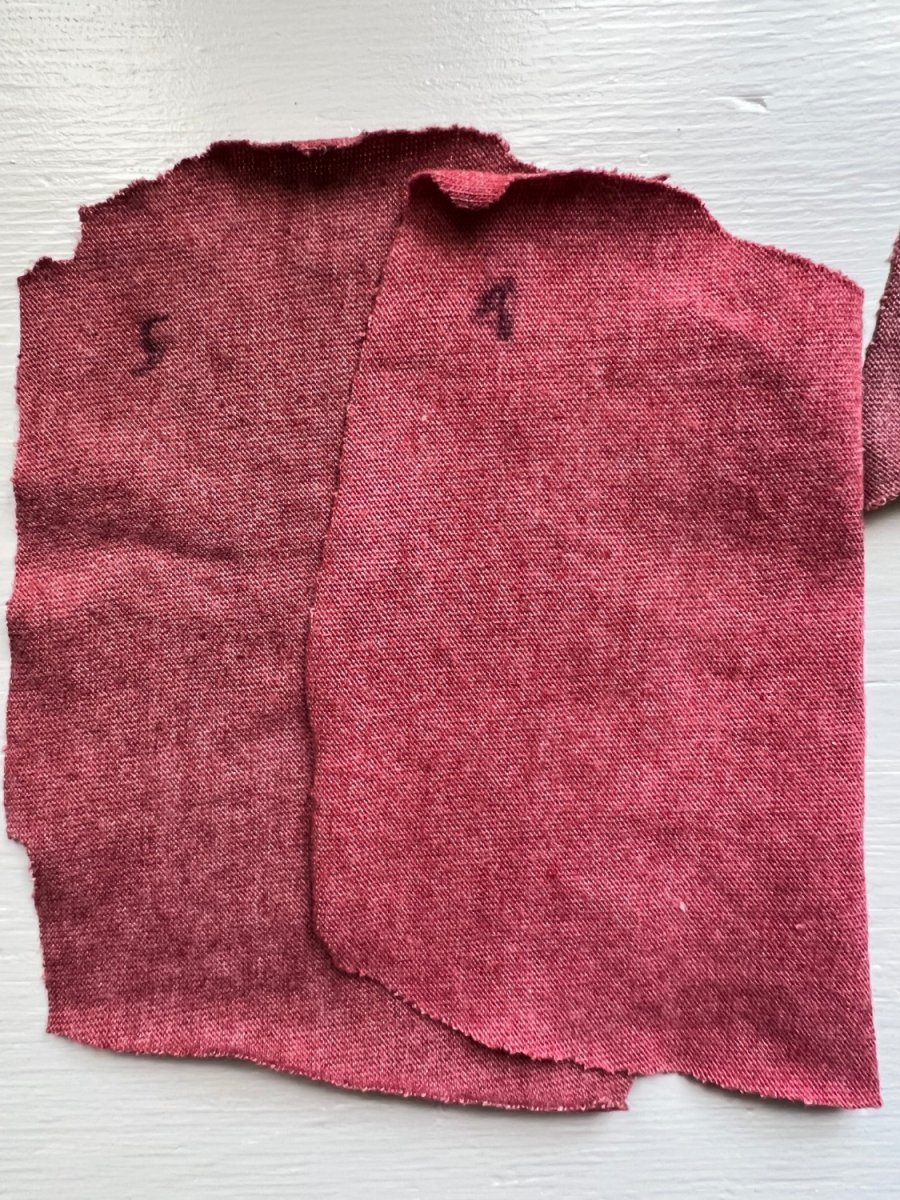
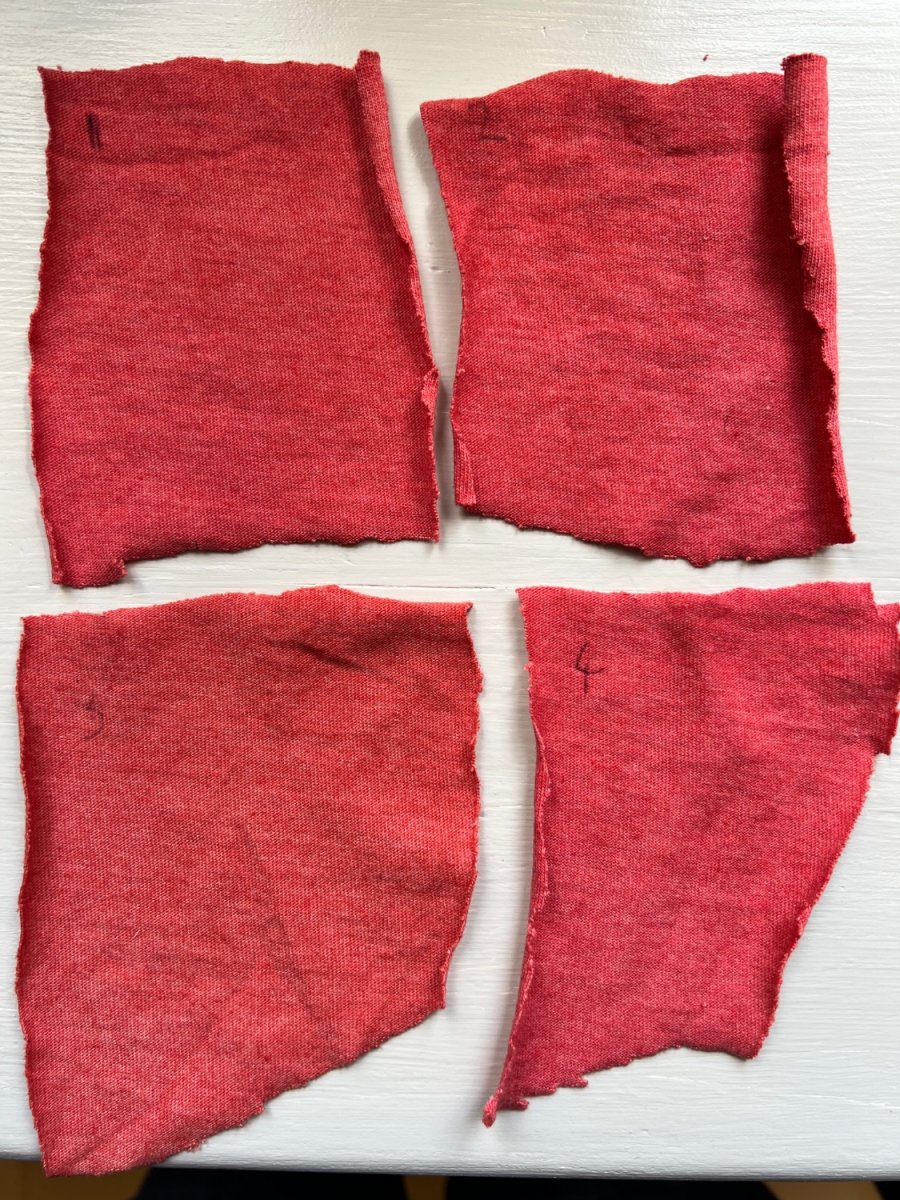
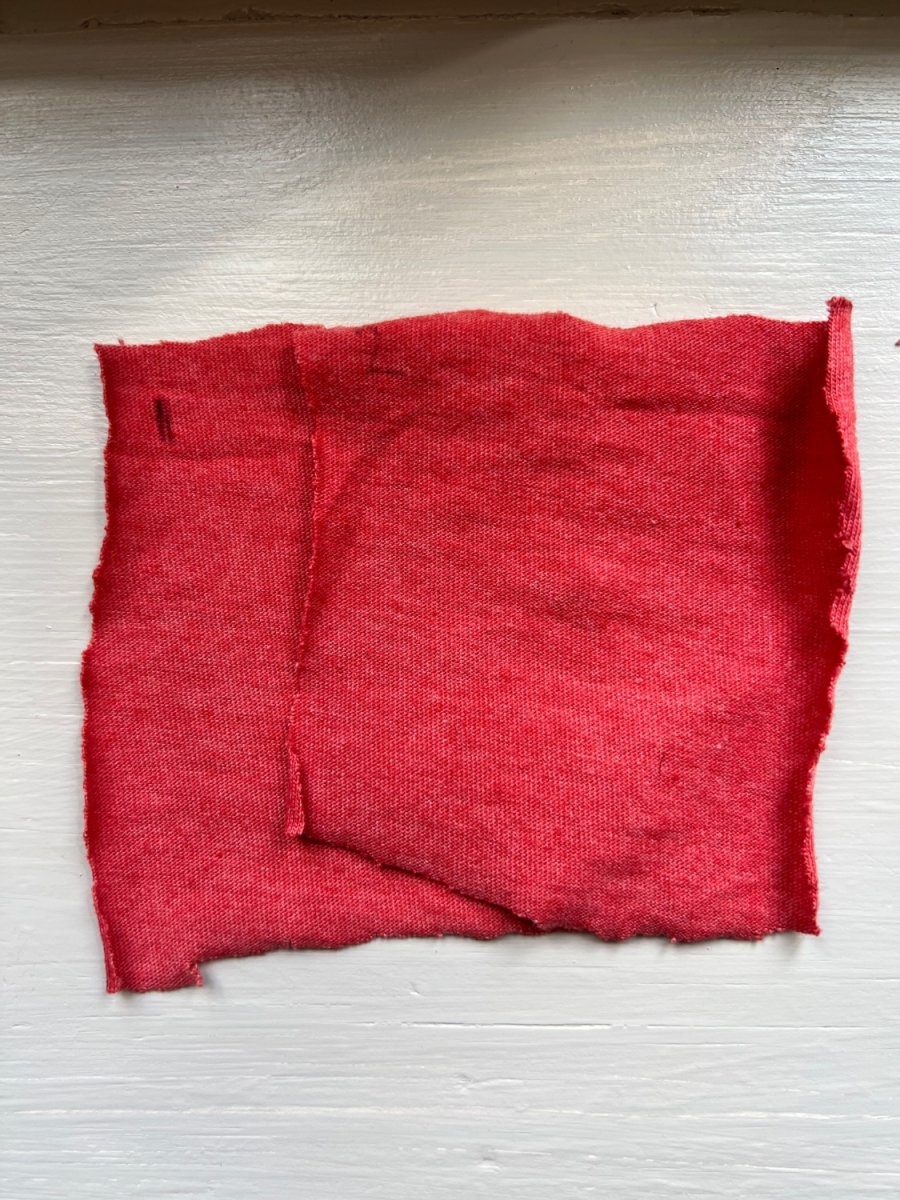
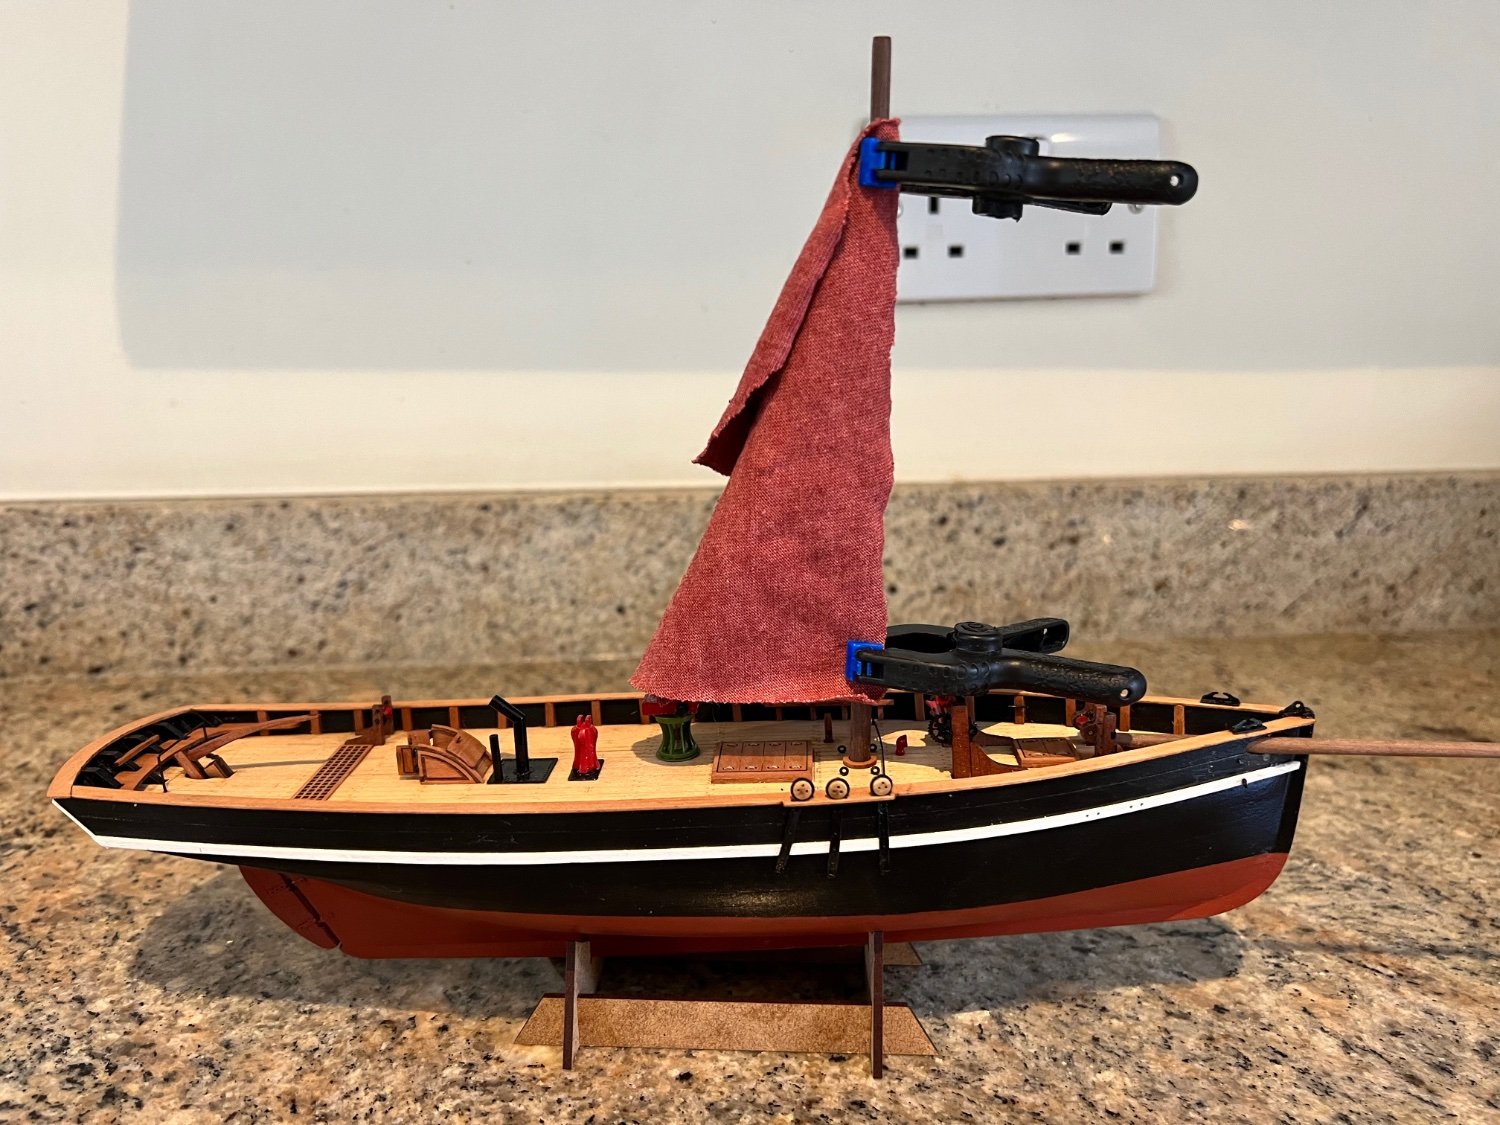
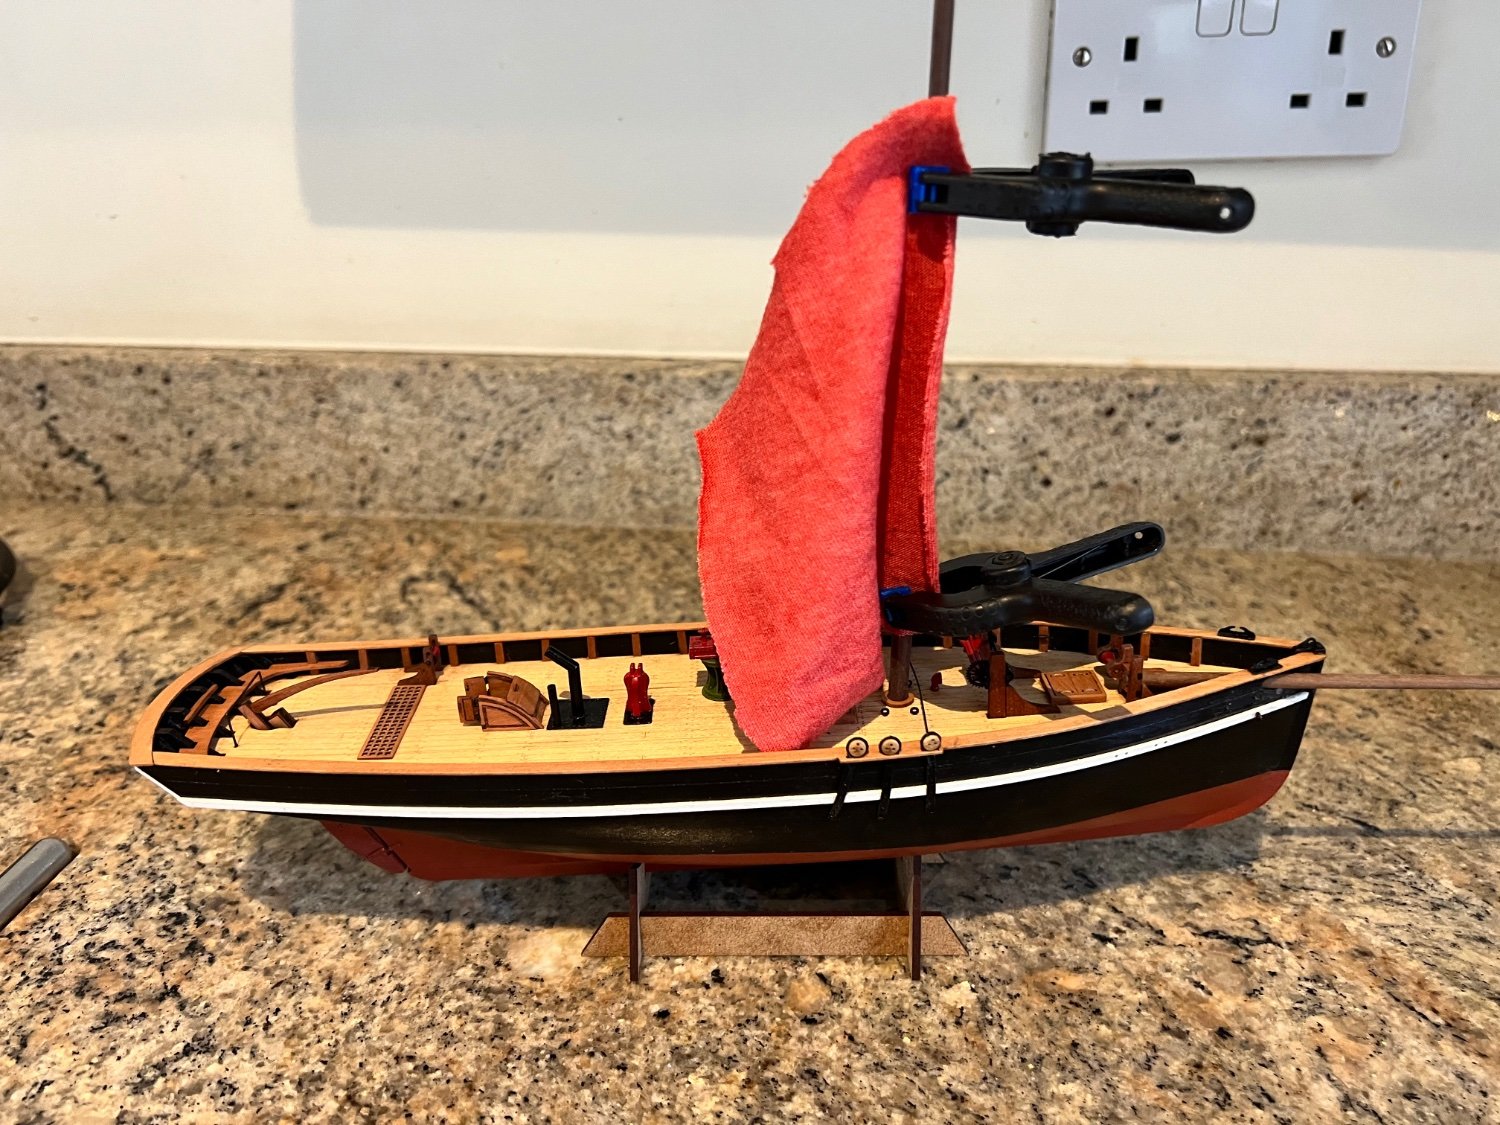
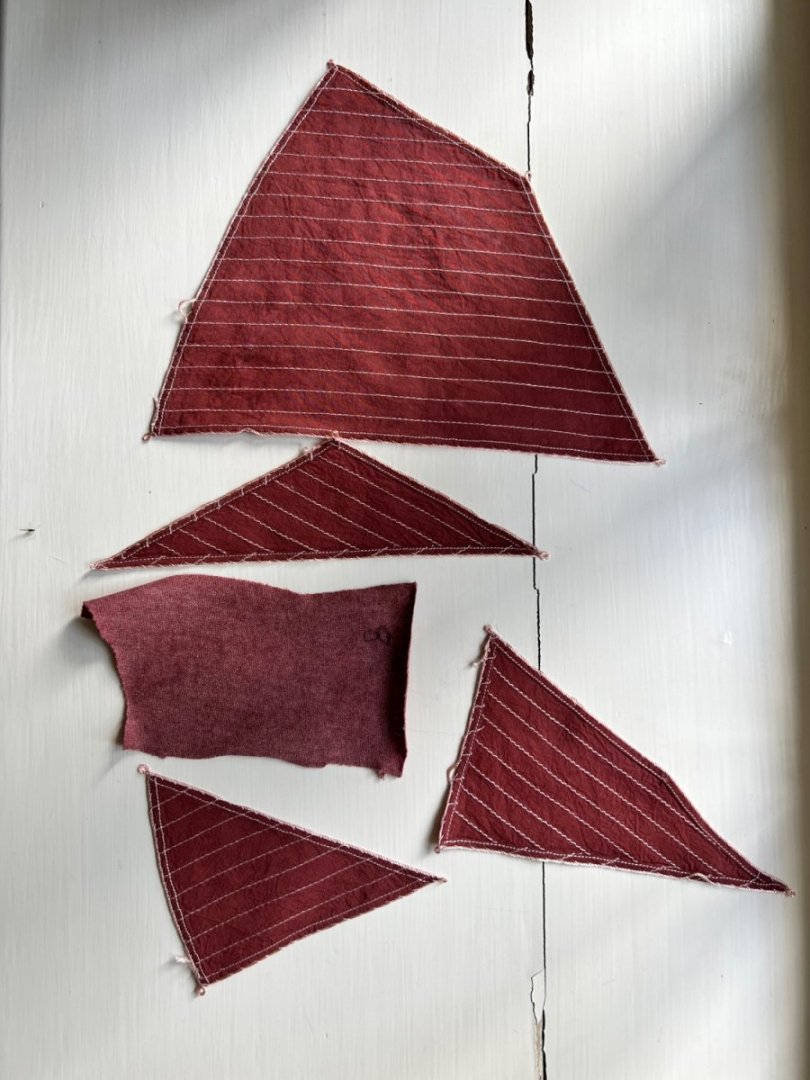
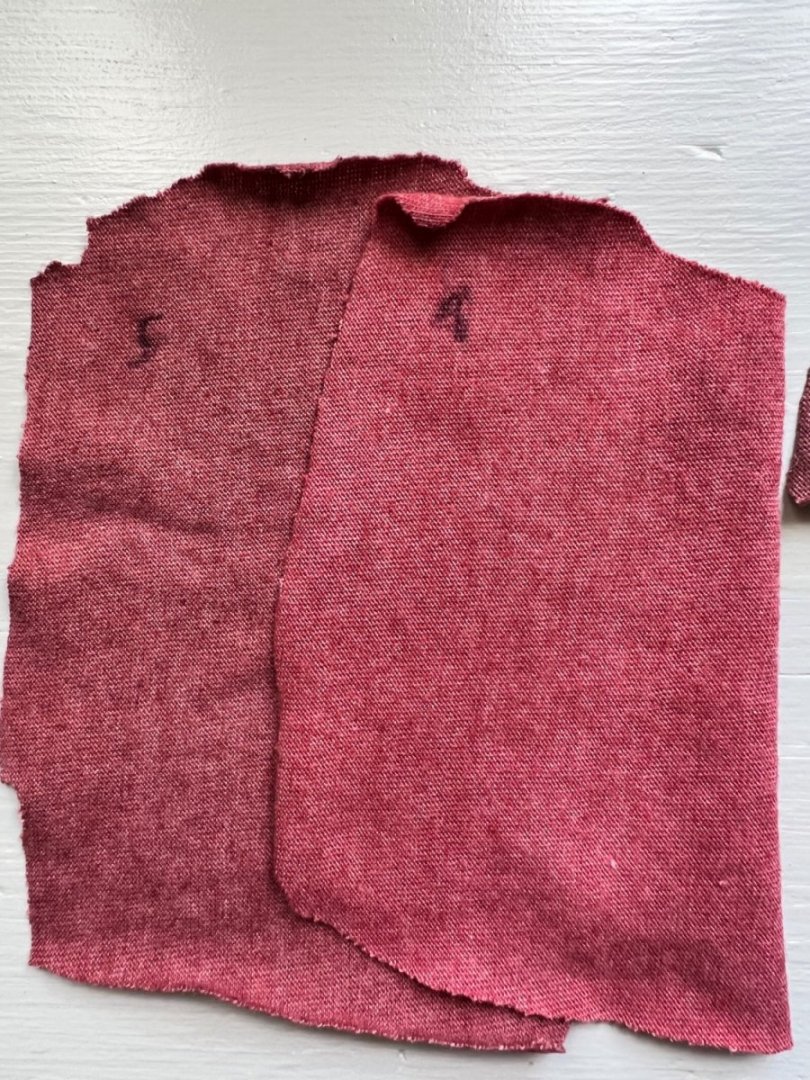
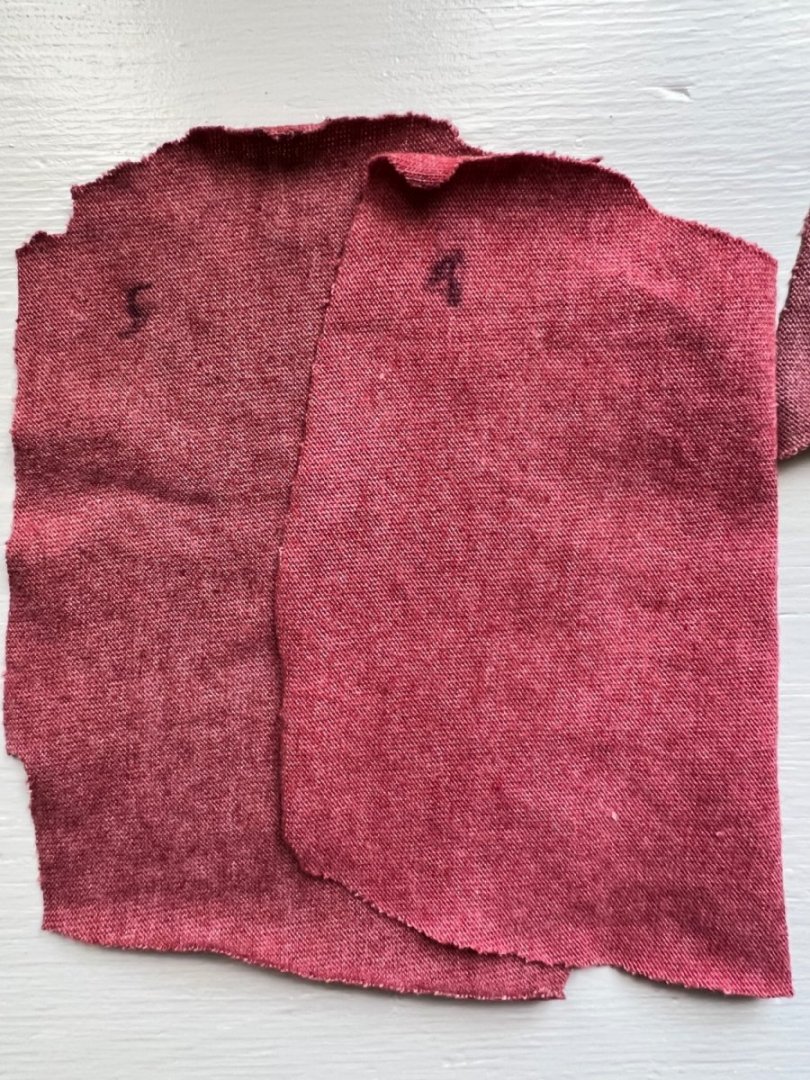
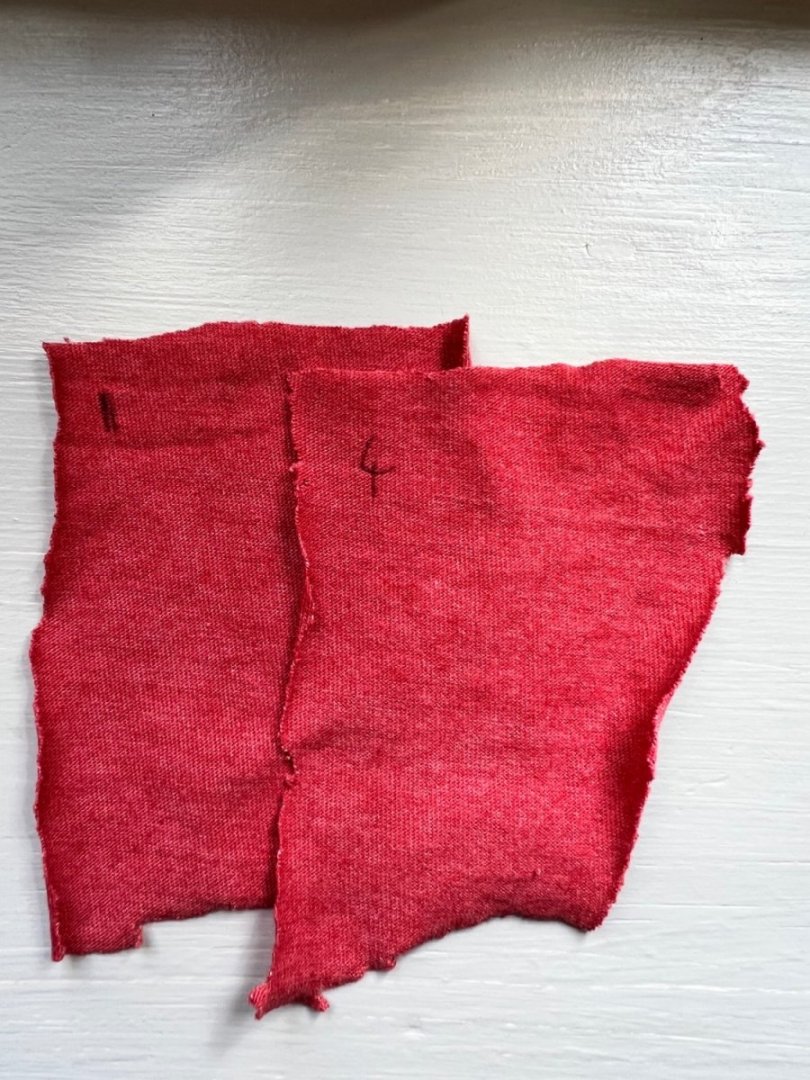
There’s not much I’ve found on MSW about dyeing sails so I’ve been testing different colour RIT dyes and mixtures. I’ve never done dyeing before so here goes - these are my results so far. Unless otherwise stated all fabric swatches have been left in the dye for 20 minutes and the dye mixes are for 1 litre of water. The fabric is 100% cotton T-shirt type fabric which is much lower quality that the Vanguard linen sails. I appreciate that the colour in real life differs from a photo but they seem a pretty close representation and hopefully people will find this little guide useful. I tried some reds first based on the scarlet dye. The reds are probably too red for sails, but I’ll include them in case anyone wants very red sails. Dye 1 is RIT’s colour formula “Poinsetta Red”. (7ml Scarlet + 2ml lemon yellow) Dye 2 is RIT’s colour formula “Maraschino Cherry”. (15ml scarlet + 2ml tangerine) Dye 4 is RIT’s colour formula “Flame Red”. (15ml scarlet, 5ml golden yellow, 0.7ml sunshine orange) Dyes 1, 2 & 4 are almost identical. Dye 2 on Nisha - too bright won’t go with this one. Dye 3 is a bit different “Blazing Red”. (10ml scarlet, 10ml neon yellow, 10ml golden yellow). Whilst this colour is too bright for me, adding a lot more yellow to the mix could liven up some I’d rather dead brown colours. Dye 3 on Nisha. Too gaudy? Adds to colour contrast. The yellow gives it more life than the purer reds. Could consider it! So having decided that the red and yellow mixes are probably too bright for Nisha I experimented with some mixes of cocoa brown and red. I used cocoa brown on my Fifie which looks great but is a proper brown colour and I think too dark for Nisha. I read somewhere that the English boats had brighter coloured sails than the Scottish drifters. So I’ve tried some mixes of scarlet and cocoa brown. I’ve also experimented to see what the effect is from both doubling the amount of dye in the mix whilst keeping the proportion the same and also leaving the fabric in for 40 minutes rather than 20. My “control” for this is Dye 5 (10ml scarlet + 10ml cocoa brown - 50:50). Firstly I compare these to the Fifie sails, 100% cocoa brown. Note the much finer fabric the sails are made of which has a less obvious weave and provides a more consistent colour than the rough T-shirt cotton weave. Dye 5 on Nisha, definitely a contender: Dye 6 is the same dye mix but the sample has been left in for 40 mins rather than 20 mins which according to RIT should make it darker. In practice this makes no difference whatsoever. Dye 7 is the same proportion of dye but double the dosage as Dye 5. So 20ml scarlet + 20ml cocoa brown. This does make a difference but not much. Produces a slightly darker, duller version of Dye 5. Dye 7 on Nisha: Dye 8 is 5ml scarlet and 15ml cocoa brown (25:75). Very similar in outcome to Dye 7. Dye 8 on Nisha: Dye 9 is 15ml scarlet and 5ml cocoa brown (75:25). Dye 9 on Nisha: 5, 8 & 9 are contenders with I think 9 being my favourite so far. What do you all reckon? Any feedback welcome! I may experiment with adding some yellow to dye mixes 5, 8 and 9 to make the sails a little more tan / orange and alive. In the meantime Nisha has grown a bowsprit and dead eyes. I’ve fixed the rudder by drilling a hole for a length of 1mm brass rod in both rudder and stern post in place of the middle spigot so it’s firm and strong now. Repair is almost invisible.


- 62 replies
-
- 5
-
-
- Nisha
- Vanguard Models
- (and 1 more)
-
Craigie, That’s how I felt with the Fifie’s sails too. Interesting to know that your sails were 50:50 scarlet with cocoa brown, I was guessing from your photos that it was 100% cocoa brown as I did with the Fifie. I’ve ordered a selection of RIT dyes and some cotton rag and will start experimenting. Thanks Dan