


DocRob
-
Posts
1,296 -
Joined
-
Last visited
Content Type
Profiles
Forums
Gallery
Events
Everything posted by DocRob
-

Honda RC166 by DocRob - FINISHED - Tamiya - 1/12 - multimedia
DocRob replied to DocRob's topic in Non-ship/categorised builds
Thank you shipman, and yes your mentioned MV Agusta would be very welcome, even if I´m not very deeply interested in motorbikes. Fascinating subjects nonetheless. I wish, I could lay my hand on a MFH Ducati 750, as I like twins a lot. Tamiya is still providing new motorcycle kits, so at least, there is hope, but I guess, the RC166 was somebodies pet project with Tamiya Cheers Rob -
Honda RC166 by DocRob - FINISHED - Tamiya - 1/12 - multimedia
DocRob replied to DocRob's topic in Non-ship/categorised builds
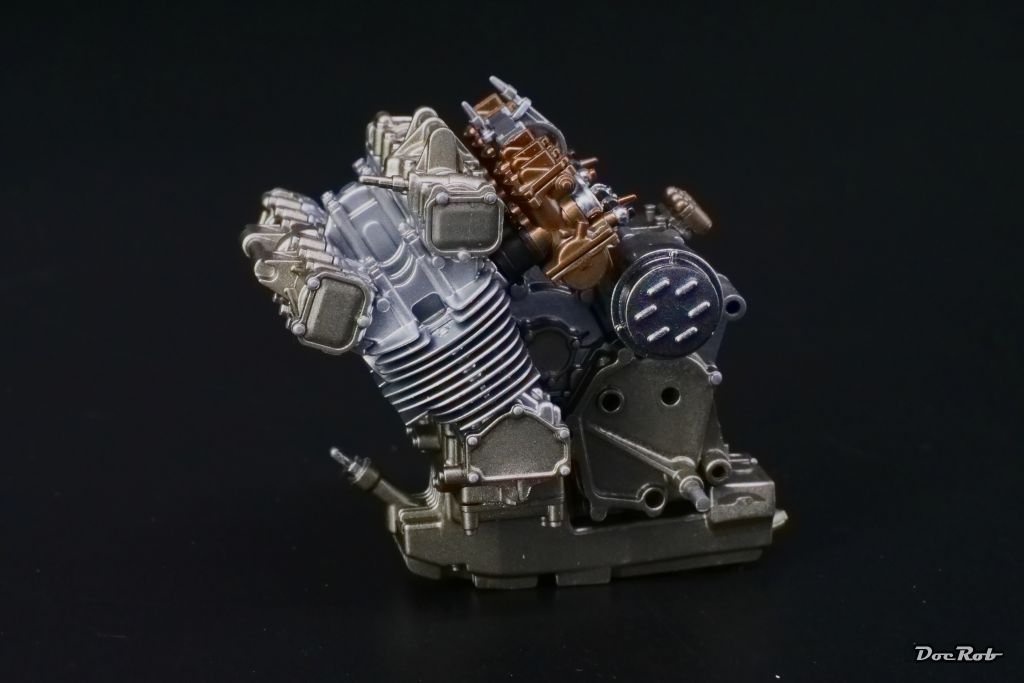
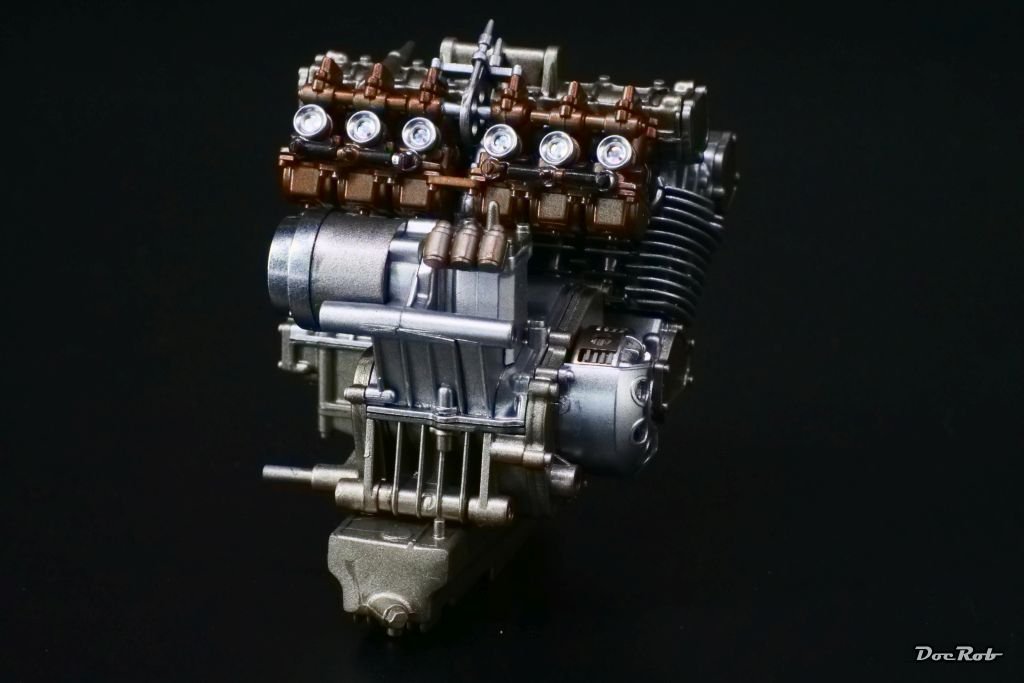
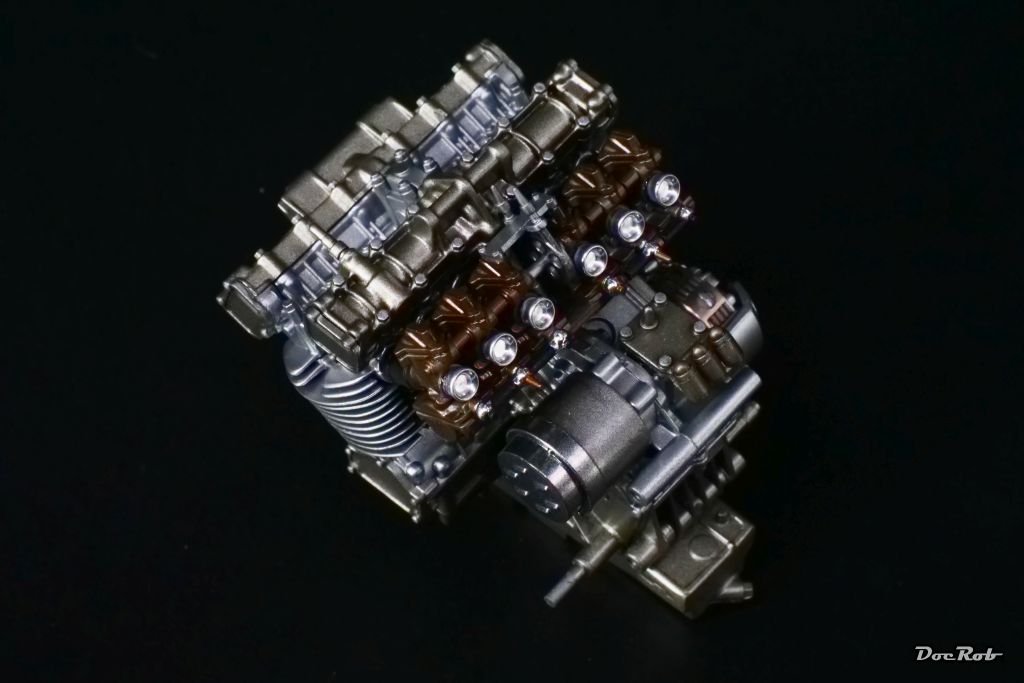
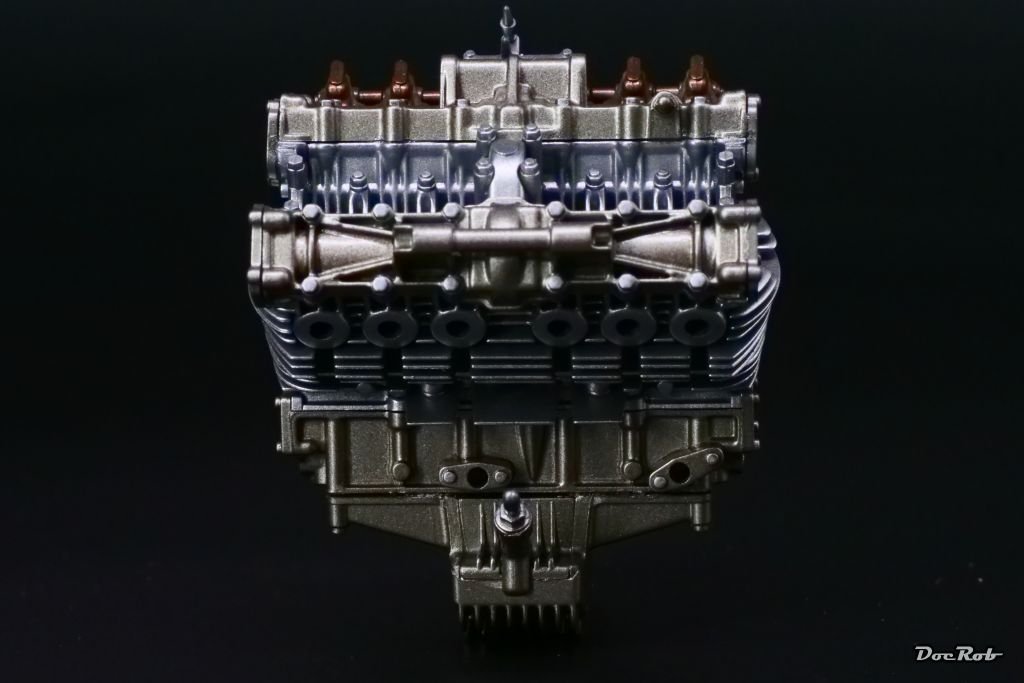
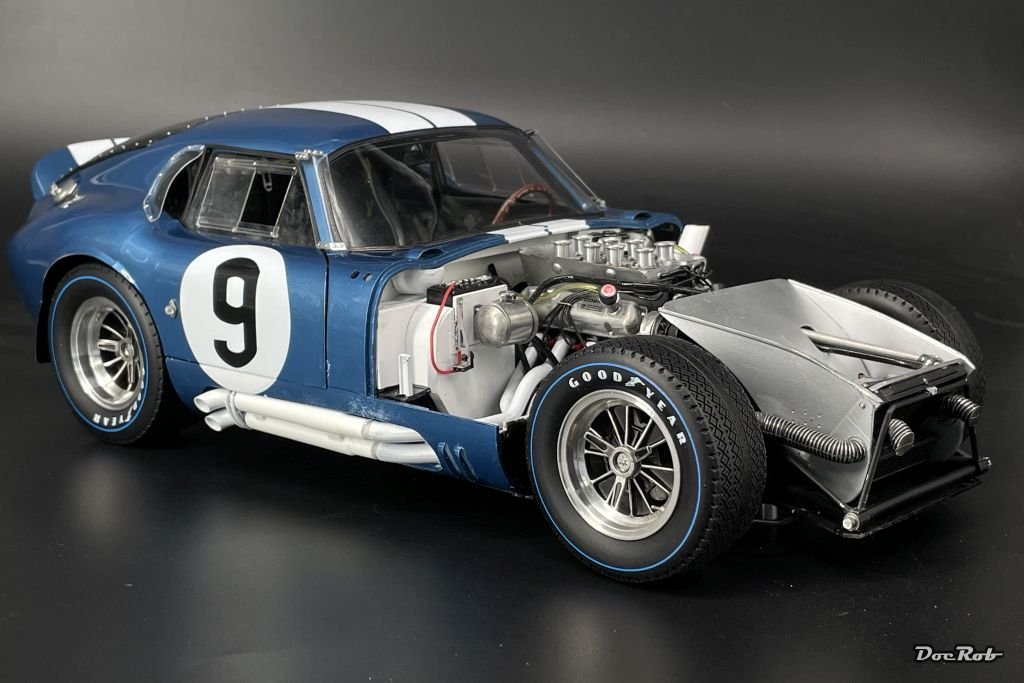
I started with the engine and I have to say, this kit is absolutely fantastic, even by Tamiya´s standards. I built their big F4-U and the 1/48 P-38, which were excellent kits, but the Honda is even better. The engine is very complex, but so well engineered and the parts are fitting perfectly. The cooling ribs are a piece of art and are only possible to be casted in plastic, as there are several thin parts, which get stacked onto each other, genius. I used Extreme Metal colors for the engine, matte aluminum for the block, titanium for the oil pan and other parts and a mix from titanium and copper for the carburetors. The air funnels are turned aluminum and the clutch consists from PE clutch discs and a pre fabricated metal cage. I used a brown panel liner for accentuation and painted all the screwheads with silver. Cheers Rob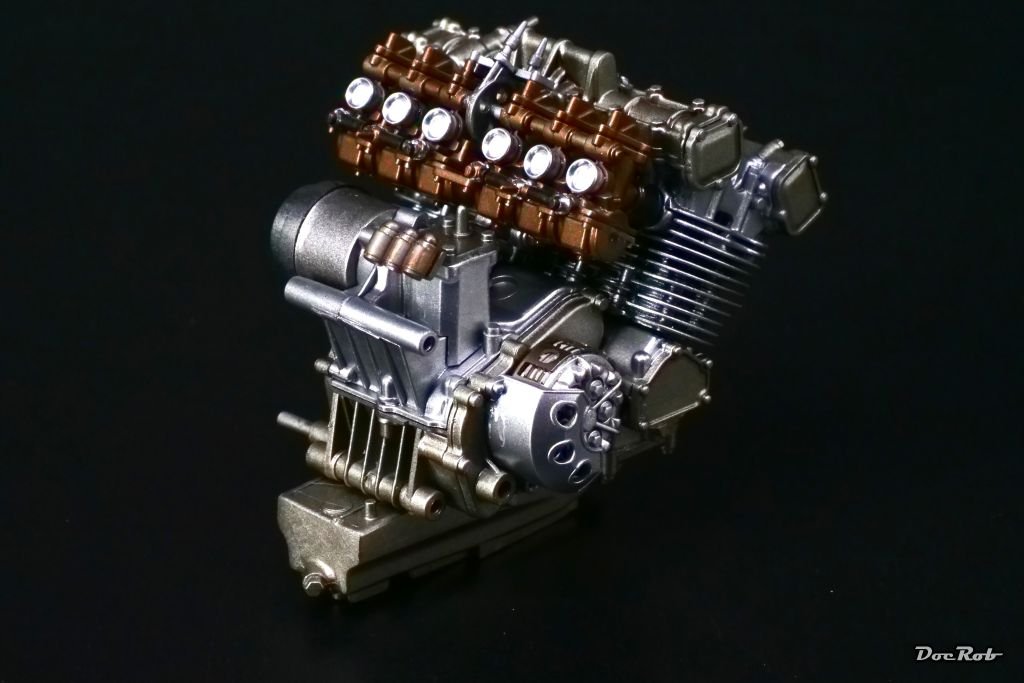
- 44 replies
-
- 16
-

-

-
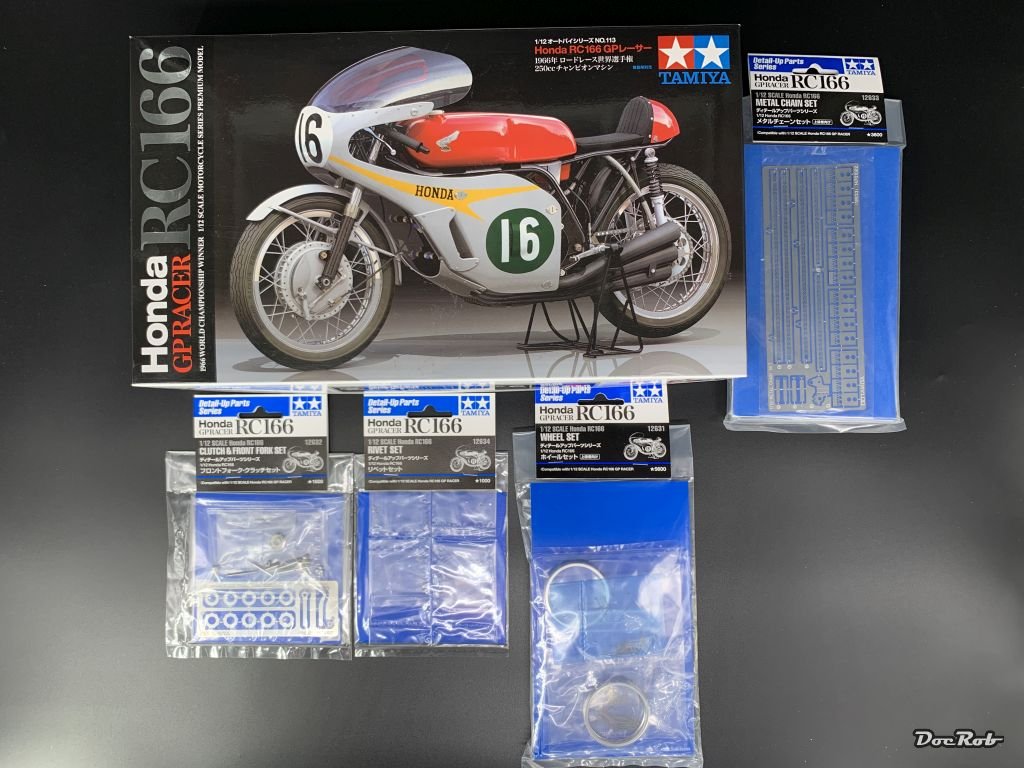
Since a while, I desired to start the build of the famous Honda RC166 from Tamiya, driven by Mike Hailwood, who won the world championship in 1966 and 1967 with this bike. What a change after the big Cobra of the same scale, I finished recently. Instead of the big block, there is a tiny engine build in, but it´s very special. It has a displacement of only 250 ccm but has six cylinders, generating about 60 PS with a max of 18.000 revolutions. The max. speed was 245 km/h. The Tamiya kit dates back to 2009 and I will add all the available extra sets from Tamiya, which I got for relatively small coin directly in Japan. There is a set of metal parts for the front fork, clutch and air intake funnels, another for the metal spoked wheels, one for the numerous metal rivets and one for building up a PE chain. The latter I won´t use, because I have a 3D printed chain set from Falcon. Cheers Rob
- 44 replies
-
- 10
-
-
Absolutely fantastic, Craig, what a beautiful Porsche with perfect finish. You could get a real speed ticket with this one. Cheers Rob
-
Looking very good, Alan. I can only raise my hat to your patience with the track assembly. These links must be ultra tiny, but they look very realistic now. The abrasion on the hull and turret helped a lot, to improve. You could add a brown wash for more contrast. BTW, there is no actual Bernie Gunther novel, unfortunately. Kerr died some years ago and I read them all. After reading your post, I searched big A for a long lost novel, but found the complete series of 14 books for 3,99€ for Kindle. I read the first books in German and I want to read them again in English sometime later and bit. Cheers Rob
-
Nice progress on that tiny bugger, Alan. I hear you on the difficulties with the DSPIAE circle cutter. Mine works with different materials, masking sheet, 0,5 mm styrene, ..., but it always needs a lot of trying to get the results right. The downforce of the cutting needle is the decisive matter and not so easy to adjust right. It also helps, to have the cutting needle aligned correctly, if it has to turn, before cutting, it easily tears masking sheet. Maybe a bit late, but the white winter camo was applied on the field, often not perfectly and irregular. The hairspray method would have been another approach. Base color first, then two thin layers of hairspray, on with the white after drying and then dampening the surface and use different tools for abrasion. The result looks less regular, like with the real thing. Cheers Rob
-
Muchas gracias Ken and Dan and fimapa. The MFH kits do look very close to the real thing with all their enclosed detail. Pricey models, but worth it to my eye without the need of any aftermarket items. I actually had so much fun with the build, besides the woes at the end, that I already ordered another MFH kit, adding to my stash. It took almost six month to finish the Cobra, but I hope the next project will be a bit quicker and easier. Cheers Rob
-
An absolute beauty, Craig. First you convinced me on the yellow and now, I even like the car, you are a magician . The interior looks fantastic, absolutely leathery with the stitching and choice of leather color. I can only envy your perfect closing doors, as I couldn´t do it with the Cobra Coupe, even with added magnets and many hours of adjusting. Cheers Rob
-
Thank you Chris, it´s "near finished" though, but never mind . Cheers Rob
-
Muchas gracias, Jack, Alan and Walter. The Cobra tested my patience and not everything went to plan, but about 90% were pure joy. The dreadful 10% accumulated towards the end and spoilt the experience a bit. All this is my fault, as I should have chosen a simpler MFH kit. The Cobra had it all, doors, hood, front lights under plexy, lots of vac parts, riveted on, ... , only missing wire spoked wheels. Lessons learned, my next MFH build will probably be a F1 car and definitely not my Ferrari 250 TRI from ´61. Cheers Rob
-
Thank yo Craig, I´ve seen the MS670, but had hoped for something else from France. If I would like to go that way, I would purchase the MS11 with the highly visible identical 12 cylinder engine, but somehow I don´t like the Matra blue. It looks toyish to me. I´m still contemplating about the Brabham BT45, a very radical design with the flat 12 Alfa engine. Cheers Rob
-
I saw it coming, Craig. Since they showed the French flag some days ago, I hoped for a Citroen DS or SM, maybe in rally outfit, but as they had the engine ready for the Matra MS11, I was somehow sure, it would be something like the MS670. I´m not biting but still have other temptations in the MFH lineup. Cheers Rob
-
Thank you Yves, in the end, I´m mildly satisfied with the outcome of the build. There are a lot of areas, which leave something to be desired. The bonnet doesn´t open as planned, the doors doesn´t fit perfectly and I will try to tweak a bit there, but I´m happy that I got through the sometimes frustrating finish and have an eyecatcher of a beautiful car, when you don´t look to close. I should have chosen another car as my first MFH build. I learned a lot though and new skills will remain, when remembering the sad parts of the build will be long gone. Cheers Rob
-
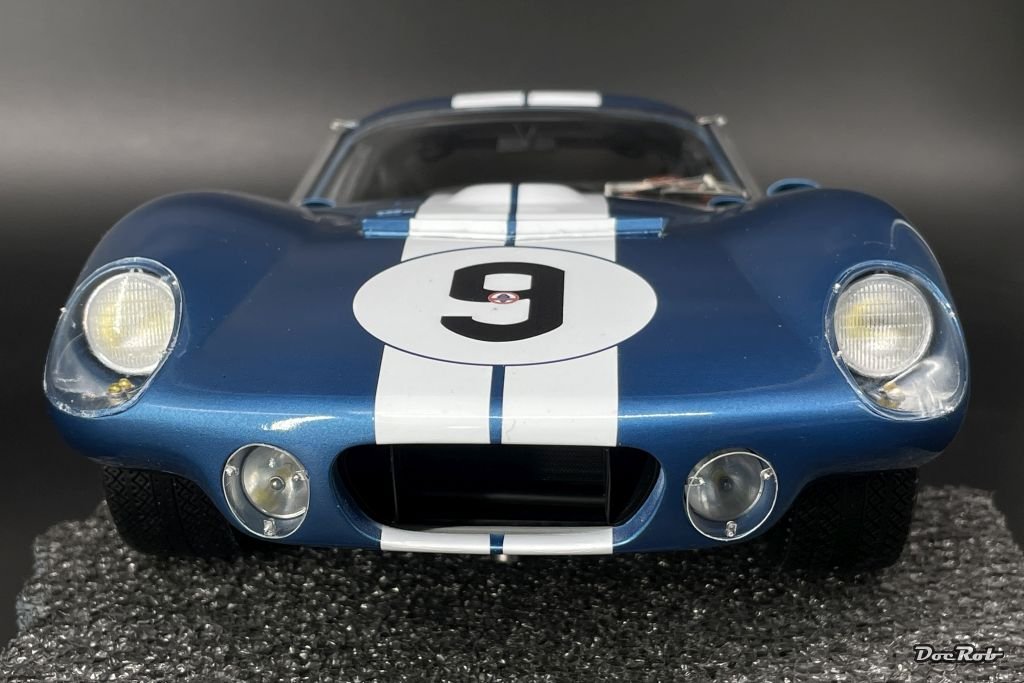
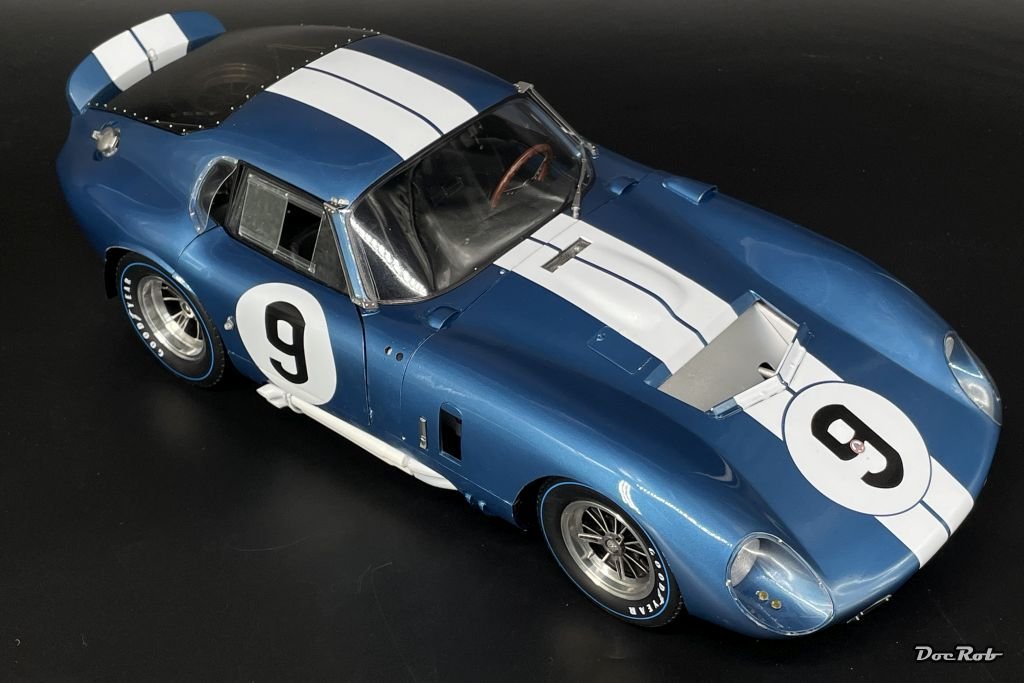
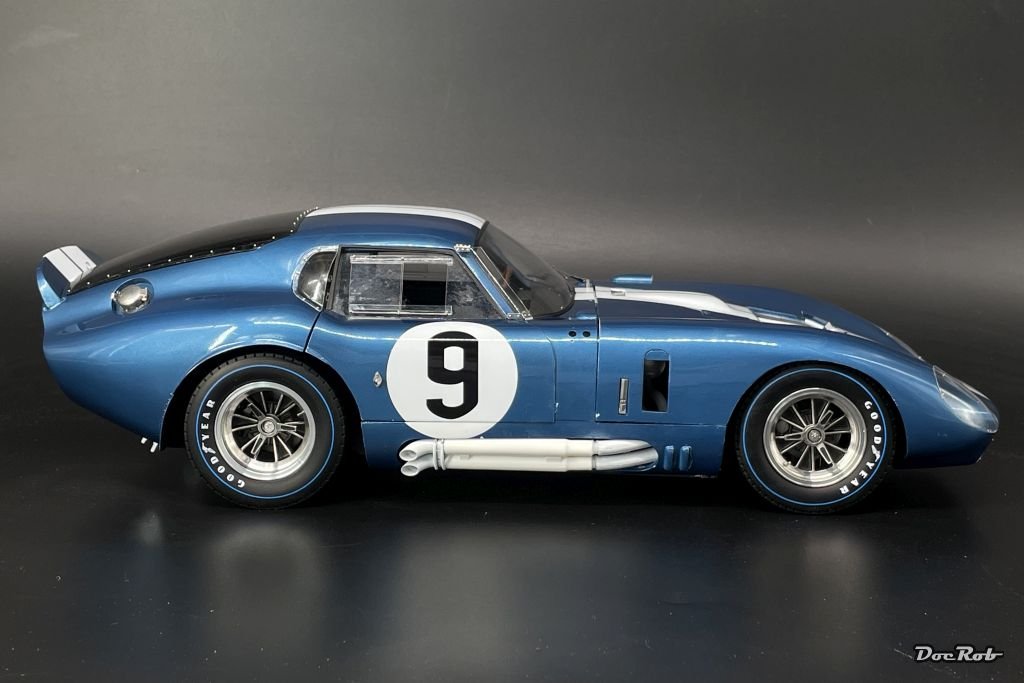
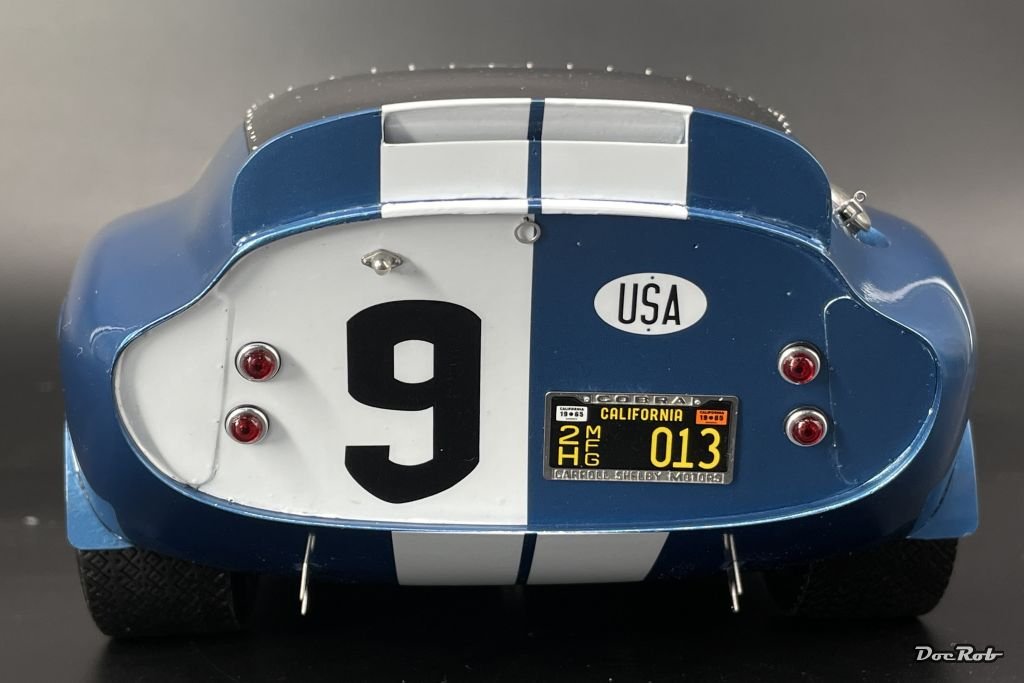
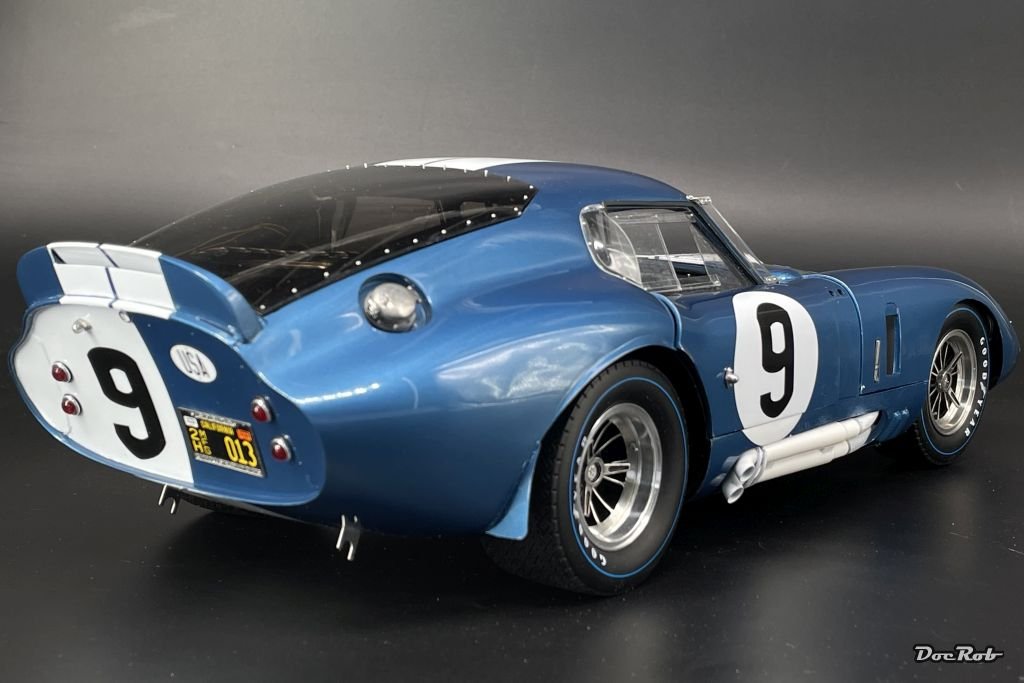
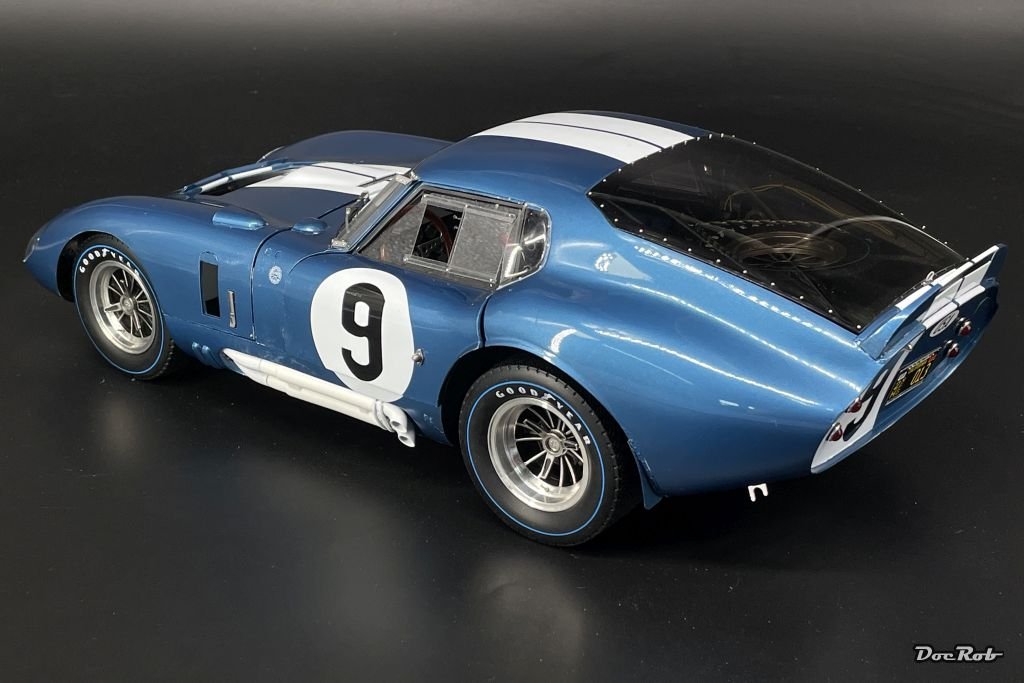
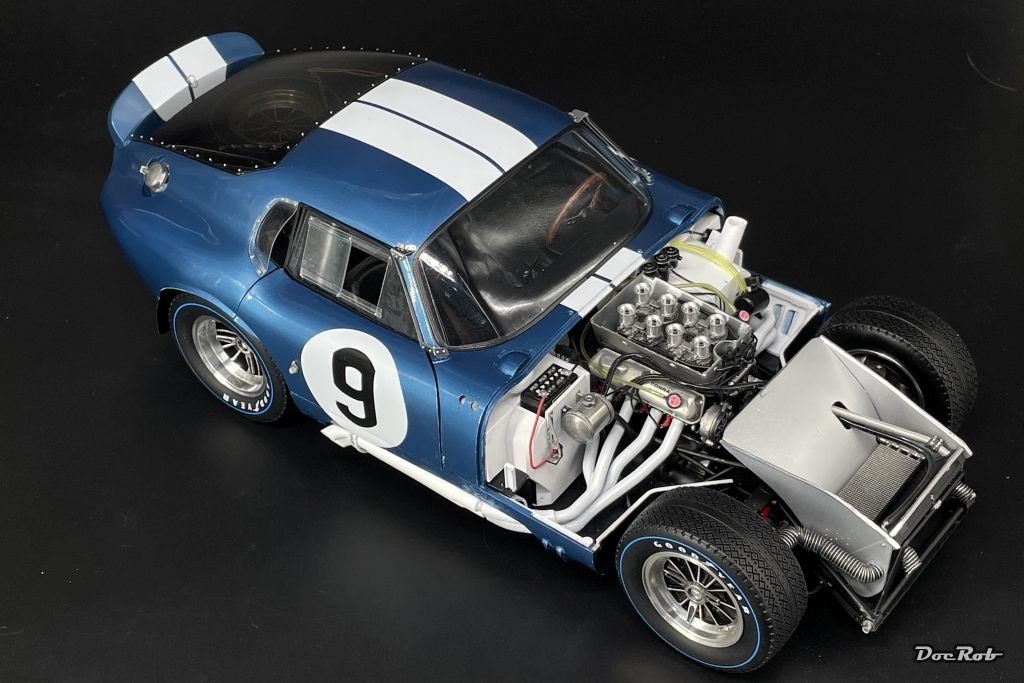
The Cobra Coupe is almost done, what a relief. Last steps were adding the exhaust sidepipes, adding the wheels, mounting the wiper and also doing a lot of touch up work. The exhausts were fiddly to attach, but again, clever design by MFH helped a lot and with a little wiggling they snapped in place, without breaking the manifolds loose, which would have been very bad. The wheels were a joy to assemble and easy to attach with their turned and threaded aluminum axles and fitting nuts. The nuts also received the three winged securing nuts and a tiny PE logo in the middle. The wiper was a multi part affair, made from cast white metal and several bended PE parts. There are only a few parts missing now, which I hope to find during cleaning the bench. Last and most dreaded was the assembly of the hood. I cut the hinges and was only able to close the hood perfectly with a tiny bit of force. I added two tiny aluminum rivets with 0,5 mm diameter to secure the hood in it´s appropriate place, phew, done . Some outdoor pics will follow later, when the sun is shining and all the touch ups are done. Cheers Rob

- 225 replies
-
- 15
-
-
-
Great finish, Craig, I don´t know how to describe it better, but the yellow seems to have some depth. Cheers Rob
-
Thank you Craig and Walter. Looking at all the details in reflection is a pure joy and let forget the fails a bit more easily. It´s also great to have the finish line in vicinity. Cheers Rob
-
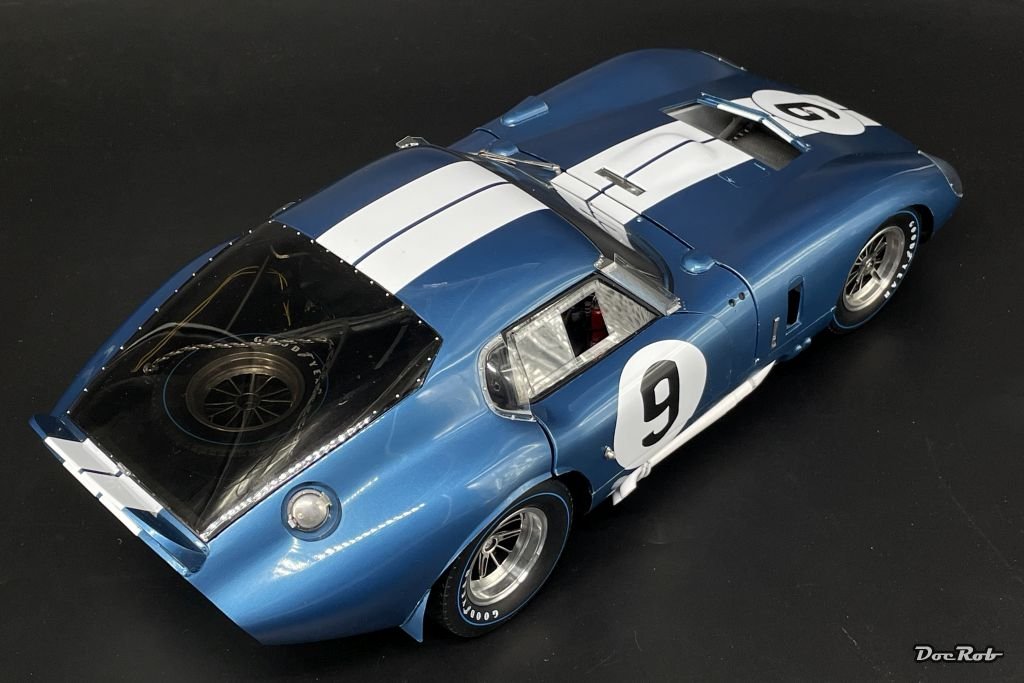
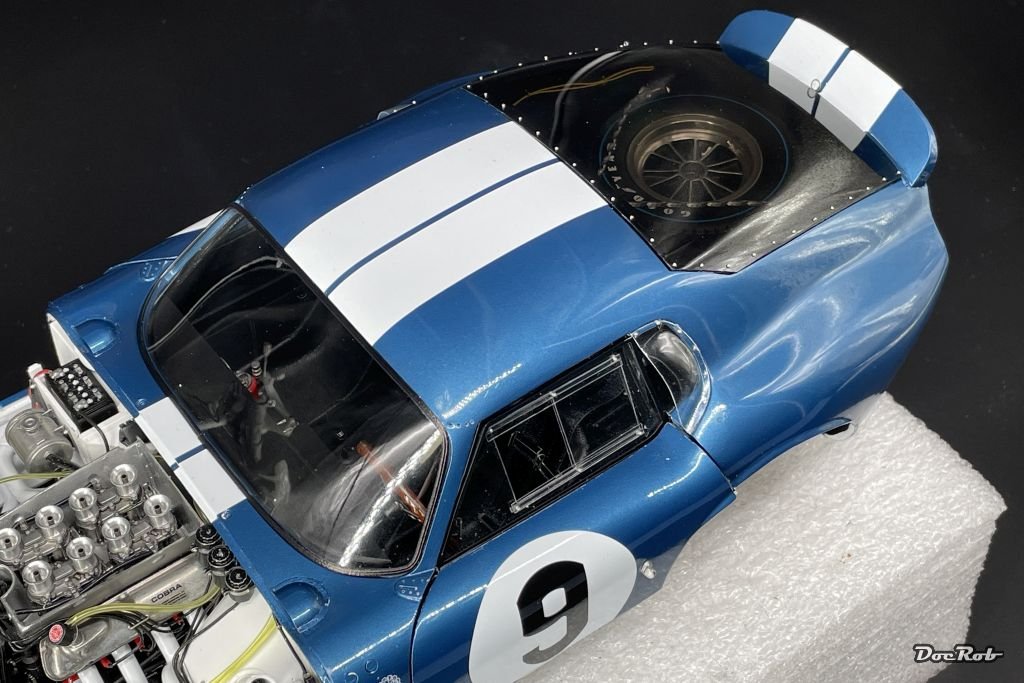
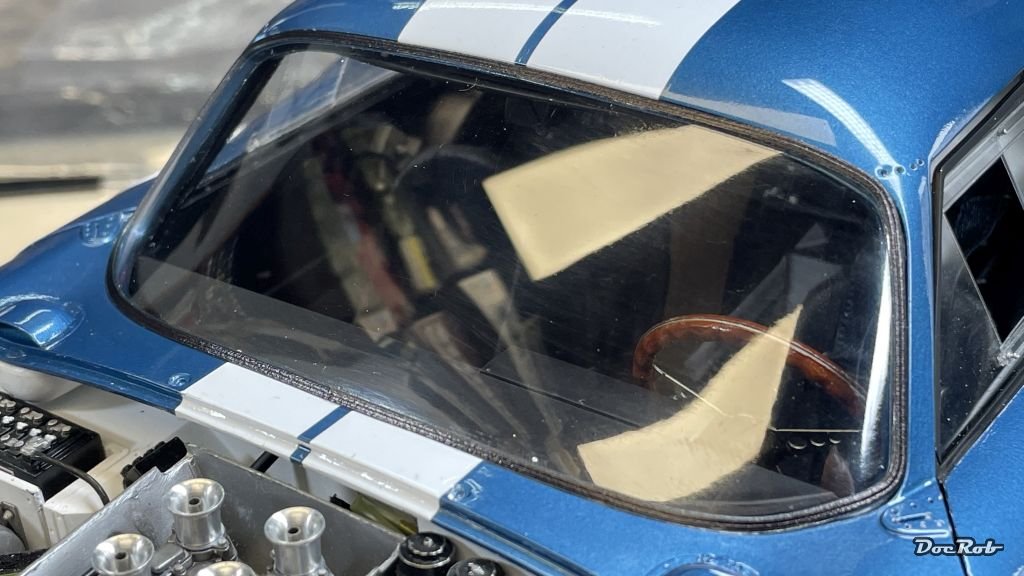
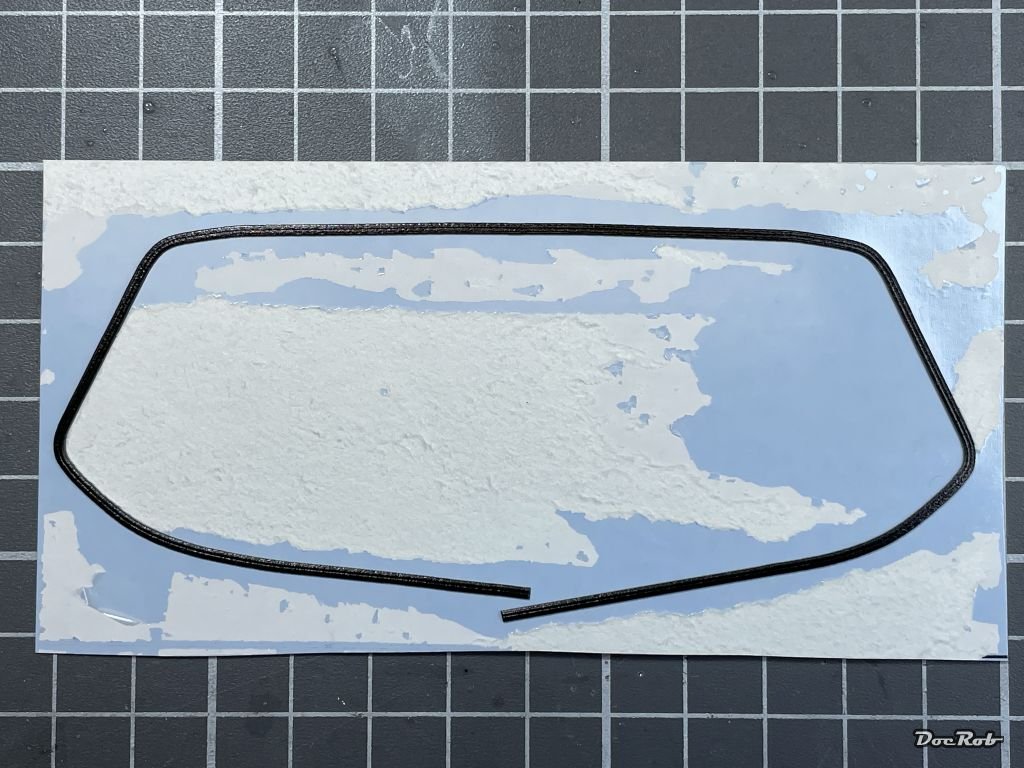
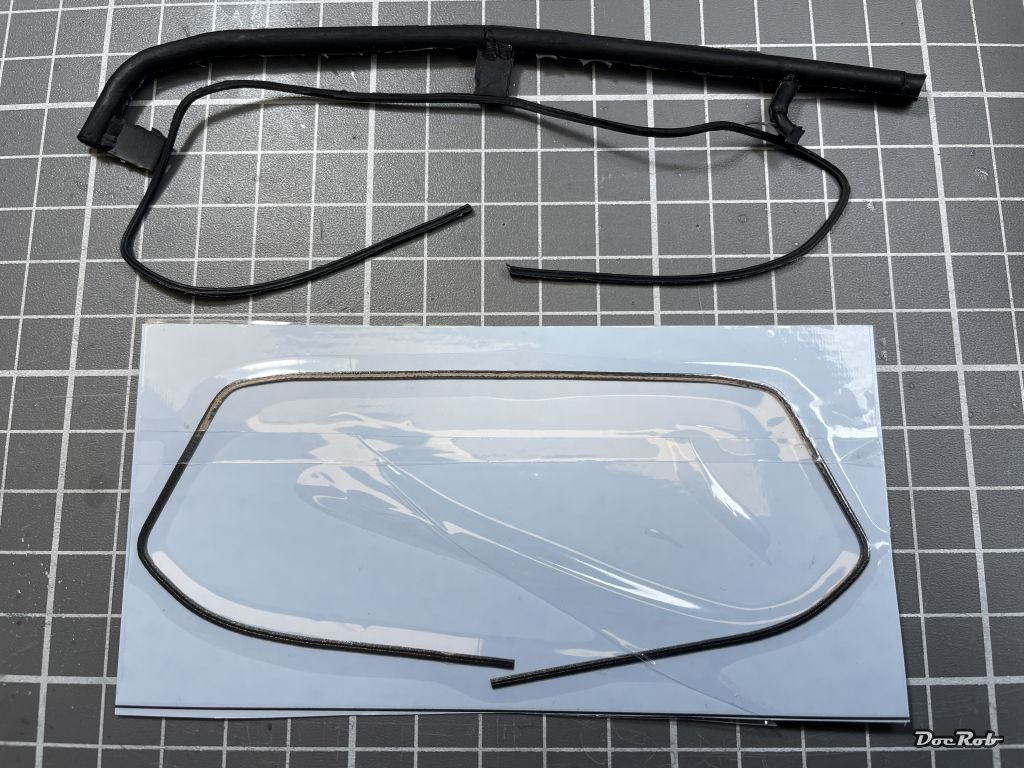
I continued with the glazing, starting with the windscreen. This is again a clear vacuum formed part, which needed to be cut to fit. There is a tiny sill, where the screen sits recessed into. After fitting it properly, I used transparent adhesive double sided tape of 1 mm width again (best stuff ever for these cases) and with a deep breath pushed the windscreen in. There are two possibilities supplied with the kit for the sealings, one made by rubber (upper) and another, which the manual calls UV print. Never heard of, but luckily found a descriptive video build from Pooh´s on YT, which described it as a kind of decal and this seems to be the case, maybe like the Quinta sets. After removing the protective foil, it looked like this, not very appealing. ...but it worked very well. I dampened the backing paper and after a minute, it came loose from the sheet and was easily applied onto the windscreen. Thanks again to Pooh, because nothing about the how to with this part was mentioned in the manual. I was on a roll and added the bubbly plexy side ducts behind the door´s windows, again with double sided tape and in this case with some rivets. Most of the glazing is done now, except for the vizor screens on the side of the windscreen. Cheers Rob
- 225 replies
-
- 13
-
-
-
Thank you Ken, the benefit of the vacuum formed clear parts is, they are absolutely clear, thin and distortion free. The downside, you have to cut and sand them to fit and they scratch very easily. Cheers Rob
-
Thank you Craig and Alan. It was tedious, but worth it. What I feared most was that one or more rivets would not align, which would have looked ridiculous. The riveting is like the cherry on the cake and looks so old school with modern gluing techniques making these beautiful details obsolete. Cheers Rob
-
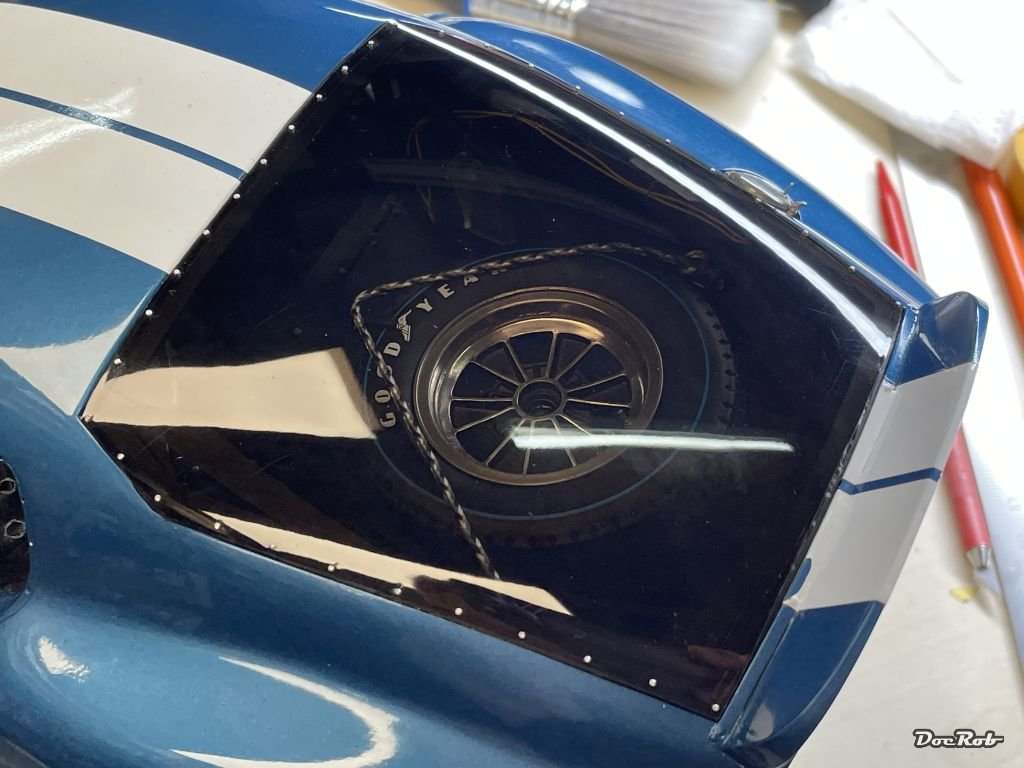
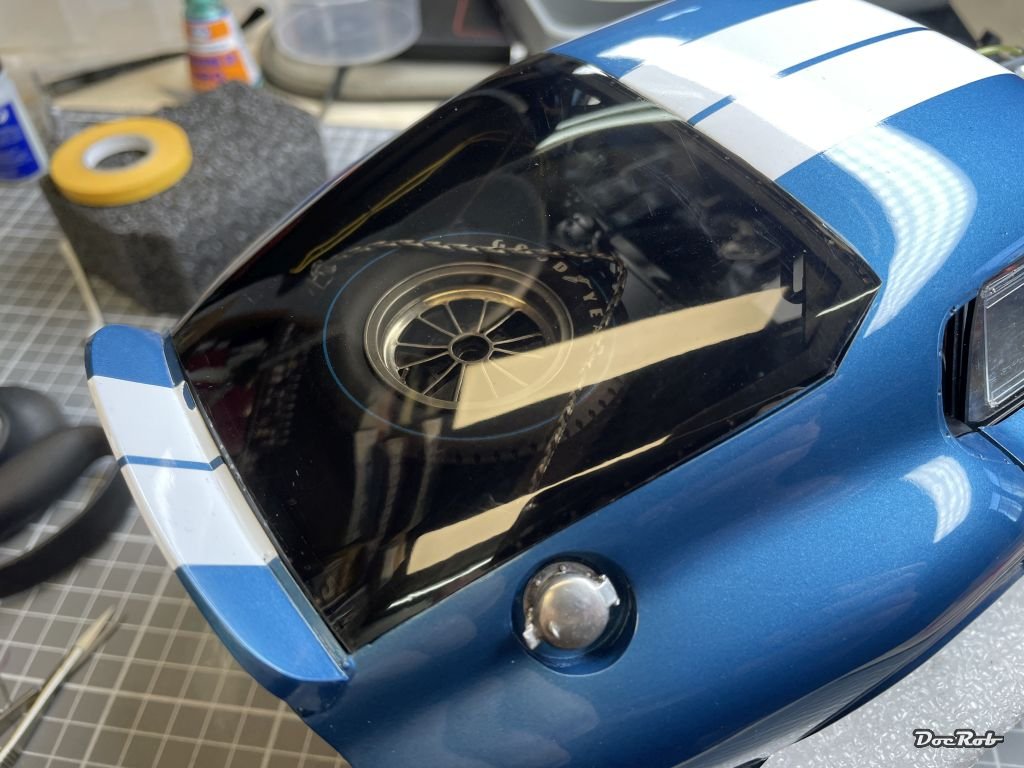
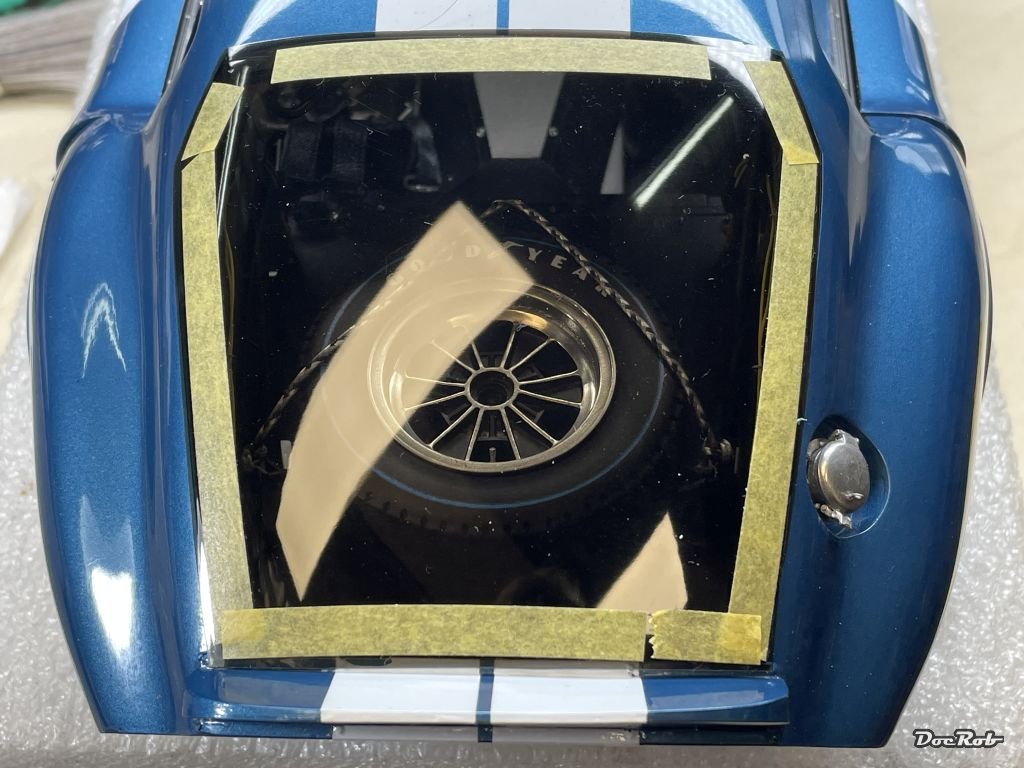
Today, I started the next nailbiter sequence with glazing the rear hatch. This is a tinted vacuum formed part, which needed to be cut to fit and then applied onto it´s framing and "secured" with rivets. Shockingly, there was nearly no visible marking on the vac part: With a strong light and Kabuki tape, I tried to mark the borders as good as possible. Then I cut to shape little by little and effectively a bit too much at the lower end, where the marking still showed some excess. Next, I drilled all the rivet holes with a 0,6 mm drill bit and applied 1mm wide transparent double sided adhesive tape (red tinted cover paper) around the framing, exactly over the line of rivets, covering the pre drilled holes. I took great care, not to touch the tape and leave fingerprints on it, which might later show. On with the clear part, one deep breath, steadying the fingers and go. There is only one attempt and it has to sit correct. Finally I did the riveting job. I used a steel needle to mark the still visible holes on the vac part and drilled them with a 0,6 mm drill bit. The adhesive tape got pulled into the hole by the drill bit a little, which was exactly what I was after, as it will hold the rivets in place without further gluing. On with the magnifier and the sharp tweezers and applying about 40 of the tiny rivet buggers. Now I have to relax my eyes and am happy not to have scratched the clear part. Cheers Rob


- 225 replies
-
- 15
-
-
-
Thank you Craig, how often have I watched these videos by Pooh . At the stage shown, I had everything fitting, after thinning the hood a lot, where the air intakes are. I also thinned the hood in the area of the hinges mounts, to raise the entire hood by a millimeter. At this stage, test fitting was relatively simple, but by the time, where the chassis is finally married with the body, there numerous interfering components everywhere and you have to get everything aligned in one go. Like I said, I have a small step between the chassis and the front of the main body part. It´s about a millimeter, but I can´t do anything about it other than lower some internal fairings a bit, which didn´t better the situation significantly. Pooh has these videos in a even more detailed version online, but the final attachment of the hood was either problem free with his build or the cursing and manipulating of parts was off camera (my guess). It looks like a snap fit, which I doubt. The hinges are gone now and I have to live with my attaching method. Cheers Rob
-
No pain, no gain , Yves but thank you. What I grieve most at the moment, is that there are so many delicate steps concentrated right now, which make the finalization of the Cobra a bit unrelaxed. Many of my issues are possibly caused by my inexperience. I´m a bit out of my comfort zone, which I wasn´t for most parts of the build. However, I´m on the last pages of the manual and one way or another the Cobra will cross the finish line. Cheers Rob
-
I´m sorry to hear about your experiences, Craig. I thought about 2K clear coats for my car projects as well, but then tried the Zero Paints clear lacquer and was absolutely satisfied. It sprays very well, thinned with leveling thinner, but needs to be sanded and polished afterwards, which is a relatively simple task. Another benefit is the relatively fast drying time, which helps to prevent from dust particles sticking in the fresh coat. The shine on the Cobra is perfect to my eye and so this will be my new go to clear coat for car projects. Cheers Rob
-
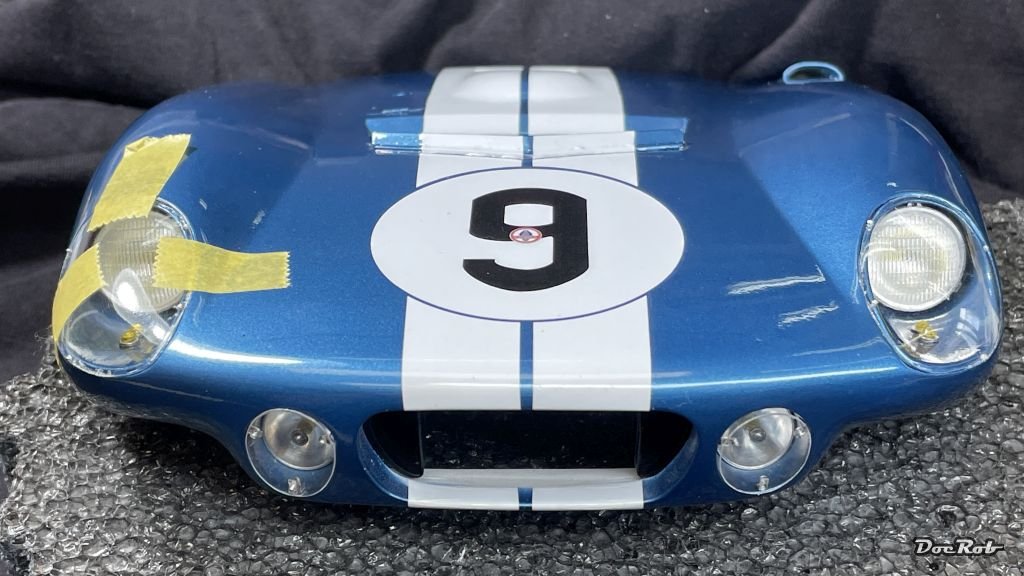
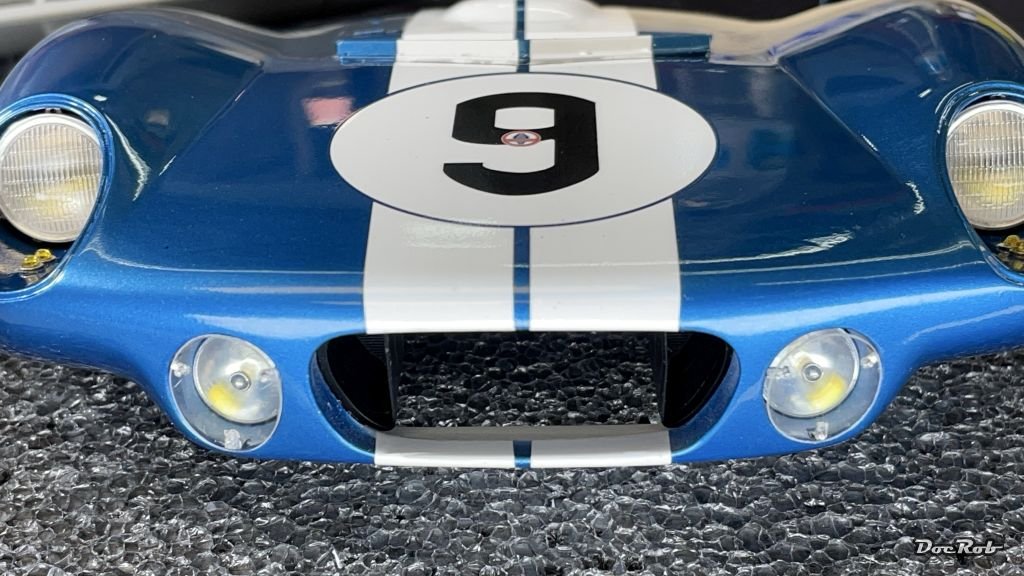
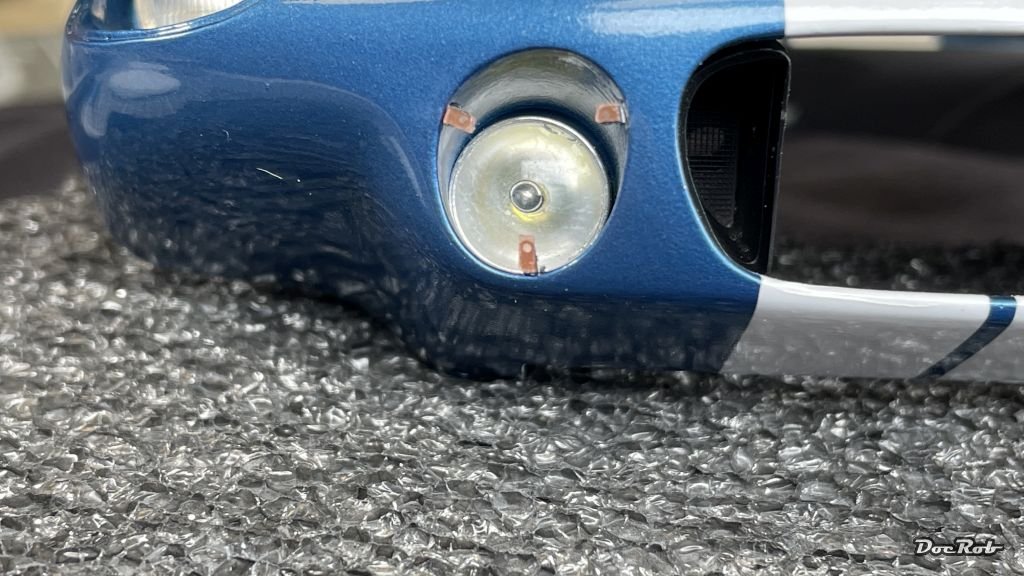
I finished the front section today, what a relief. I feared this step and I was right, as it was extremely difficult. The result wasn´t perfect, but it had to be done with the first attempt. The lower (fog?) lights received a flat acetate cover. My sheet was scratched (my fault) and I tried half successful to polish the scratches out. I glued the three angled PE parts into the light housing with ca and then applied double sided clear adhesive tape onto the fronts. Then I drilled the 0,6 mm holes for the rivets and applied the clear cover onto the adhesive tape. Last were the rivets. Sounds easy, but isn´t. First prob is working with the acetate, sanding it to contour leads to a massive build up of burr, which need to be removed with a sharp blade. Drilling is equally difficult for the same reason. Never use a PCB drill for thin acetate sheet, the burr is enormous, better use a classic HSS drill with appropriate angles. Alignment of holes in PE and acetate is also an issue. Next were the plexy covers for the headlights, again vac parts, which need to be cut to fit. You have to be very precise, as there is only a tiny edge to glue the clear part onto the body. Before I did this, I marked the holes for the rivets with a needle and drilled off the model. I used Revell Contacta Clear for gluing as it doesn´t fog the acetate. I suspect, it´s a kind of PVA glue, thinned with water. From the distance the front looks ok and I´m happy to got it done. Cheers Rob

- 225 replies
-
- 12
-
-
-
I think you are right, a pristine Cobra with flat tyres would look a bit odd. Cheers Rob
