


DocRob
-
Posts
1,296 -
Joined
-
Last visited
Content Type
Profiles
Forums
Gallery
Events
Everything posted by DocRob
-
 Wow Greg, I had to catch up a bit on your dio and have to say, it´s one of the most entertaining and educating logs of the last time. Bummer with the resin not curing. I haven´t dared to use clear 2K resin for models bases until now, but used it with furniture. I always poured not more than one centimeter per layer for proper bubble free curing and less heat emission. I love your setting with the slimy ground, the sunken barrels and the worn boat and hope, you will pull through that obstacle ridden phase. Cheers Rob
 -
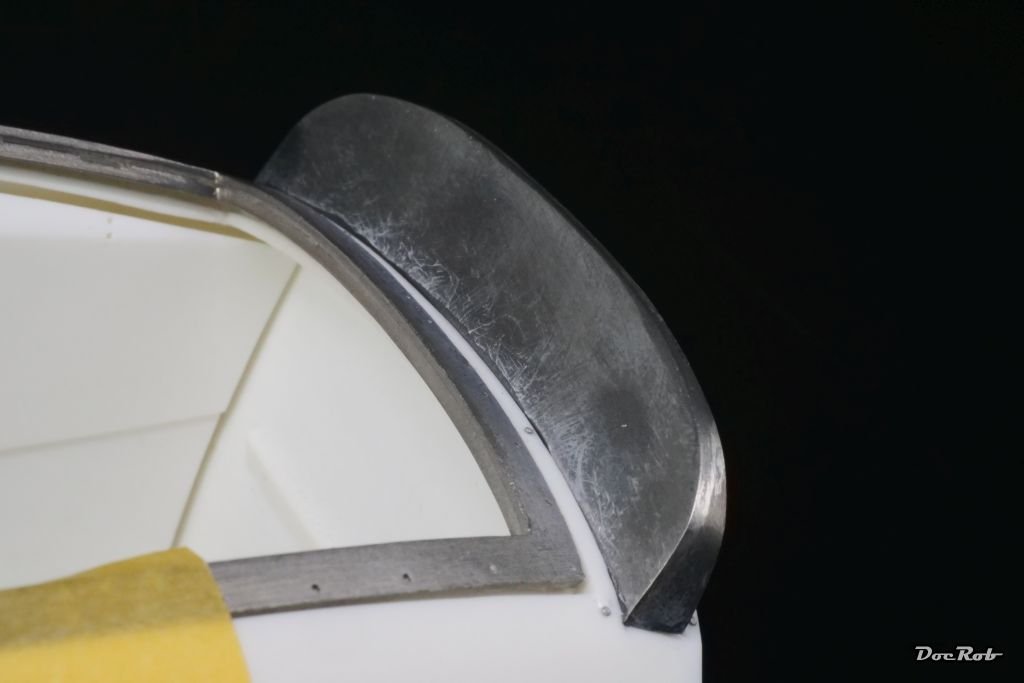
Thank you for showing, Craig. The tape, I used was the only I could find on my island. It´s thin and transparent, but when applied not transparent enough to let the body color look through undisturbed. I will check the tape you mentioned, but as it´s black, I can only use it for the tailgate, where the frame is black. It is difficult to find good double sided tapes here, even through the big A. Many articles doesn´t get sent here, but my wife is in Berlin next week and I will use my chance. Cheers Rob
-
Jaguar XJR-9 LeMans by CDW - Model Factory Hiro - 1:43 Scale
DocRob replied to CDW's topic in Non-ship/categorised builds
Very nice Craig, love the Jaguar in this livery, but prefer the version with open rear wheel wells. I hadn´t any missing parts in my two kits (Crocker and Cobra), but haven´t checked all the others. As I do the checking along cleaning and sorting, I will do it only before I start with a new build. I don´t have the space and assorting boxes, to keep all the parts of all the MFH kits checked, when they arrive here. I usually print out the inventory pages from the MFH site and check against them. These pages are also very helpful during the build for identifying parts. Cheers Rob -
Thank you Craig, I hope the fix will allow a good fit along all the other measures I took. The Februar kit is not a rumor anymore. It´s published on the MFH site. https://www.modelfactoryhiro.com/pic-labo/llimg/12_131_000.jpg Cheers Rob
-
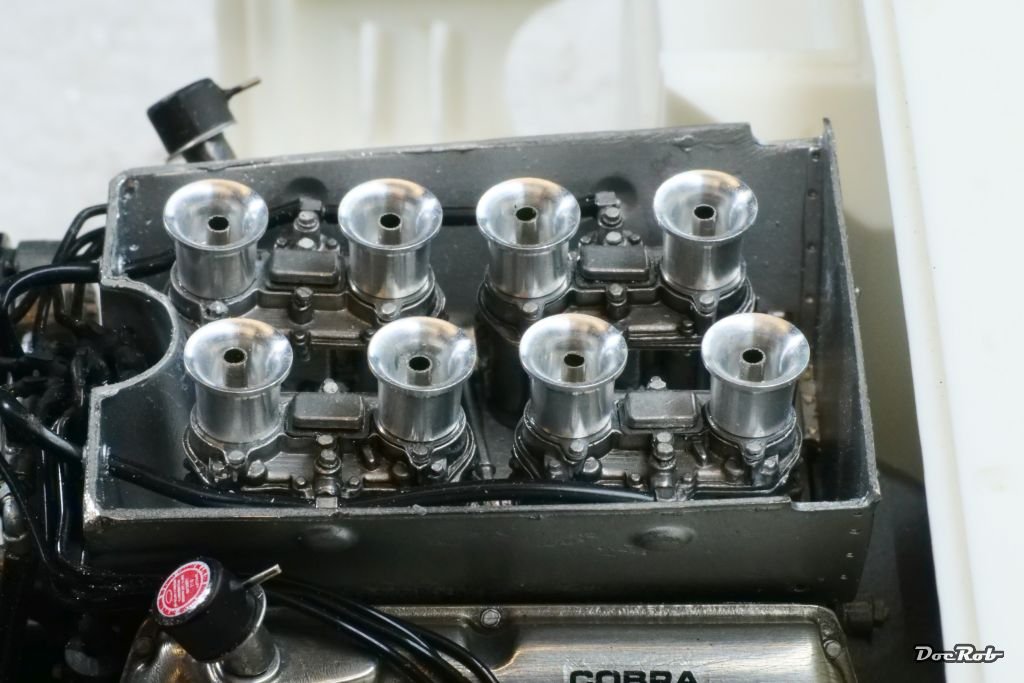
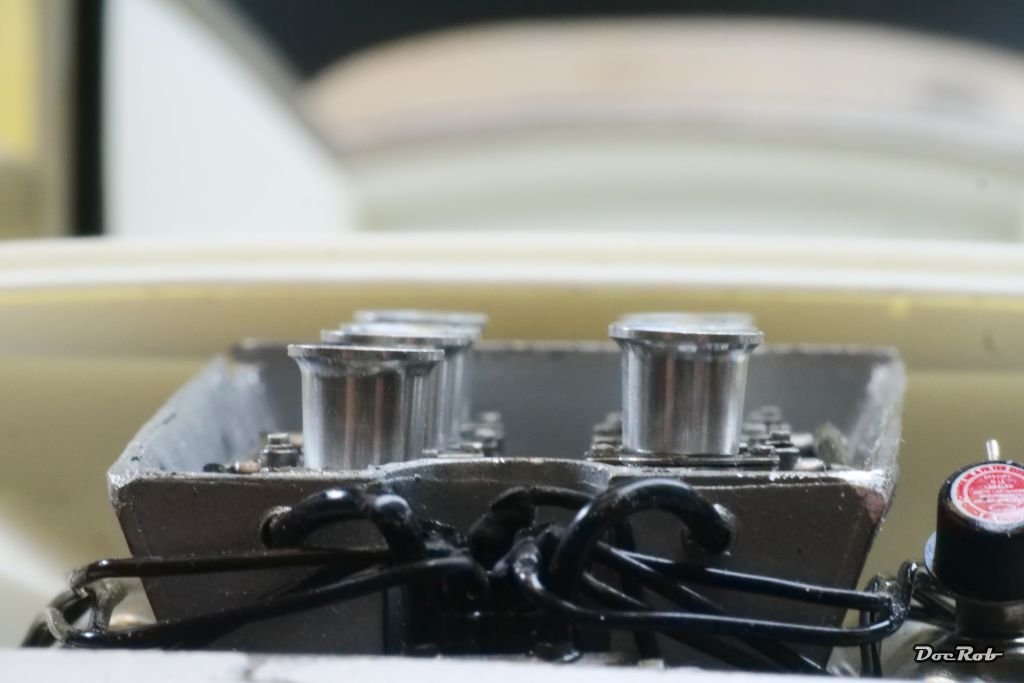
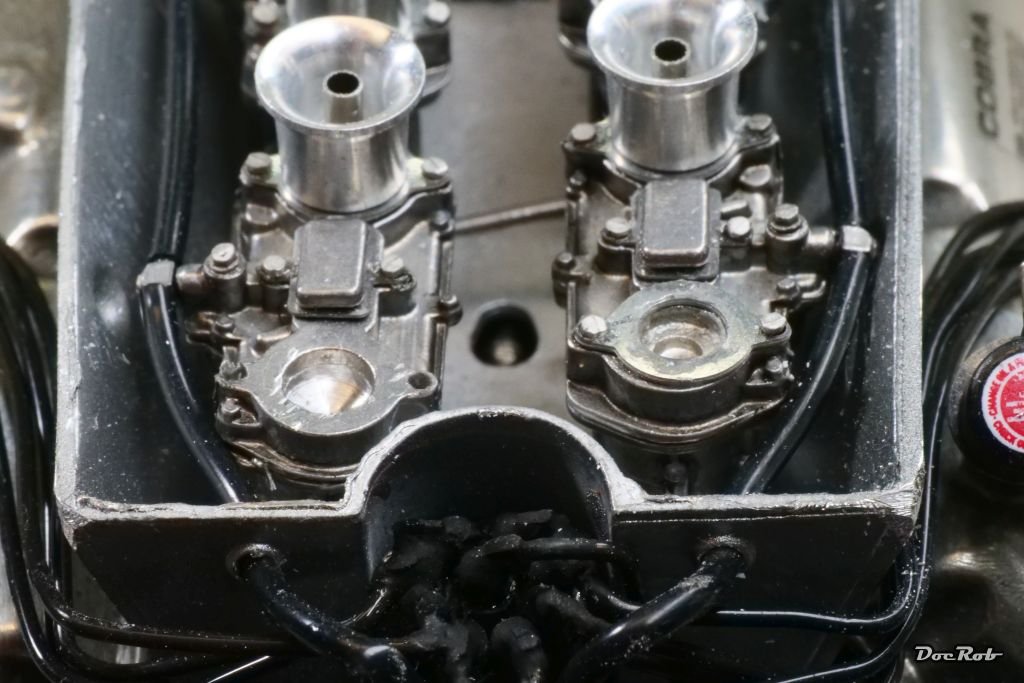
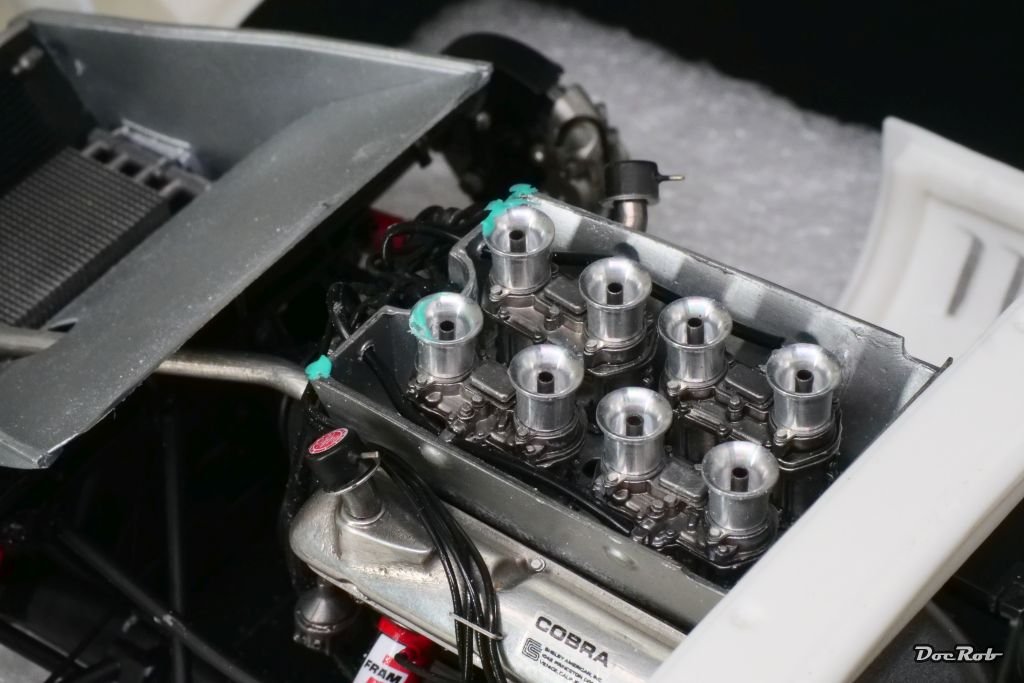
Poco a poco (little by little, like they say here where I live. I forgot to include the engine firewall into my final? assembly check. Getting everything together with the firewall, is extremely delicate, like a 3D puzzle, but after a lot of shuffling and breaking some pats off, it fits. Next, I reworked the areas of the bonnet, which connect with the chassis hinges for a better fit. Some modifications of the existing parts were needed. I also tested, how I could fit my first vac formed window in place with double sided transparent adhesive tape, which didn´t look promising at all. I need some better tape and luckily my wife flies to Berlin next week, where it is easier to get hold of better stuff. Finally, I found another method to lower the obstructing first cylinder funnels a tiny bit for a better bonnet fit. I removed the PE seal? under the aluminum funnel with a sharp blade and deepened the holes, which accept the funnels first with a 2 mm drill bit, then the outer diameter with a 3 mm drill bit (left side without PE and drilled out). As you can see, the front left funnel sits a bit less than a millimeter deeper, than the others. Not a lot, but it sure helps. I reglued the funnels and the rivets besides and like the result. You have to know, that something is missing to find it. Cheers Rob
- 225 replies
-
- 14
-

-

-
Good idea with the magnetic holder for the tiny engine. I have one as well, and will use it for my 1/43 Williams, when time comes. Cheers Rob
-
Thank you for your thoughts ,Mark, I already sanded and grinded the bonnet paper thin (the last pic of post #65), where it obstructs. The intakes are made from aluminum with an insert of stainless steel tube. I will not reduce the height of these. It looks worse on the pictures, but with only a tiny bit of force, I can push the bonnet into place and there, I will secure it with two nearly invisible aluminum rivets of 0,5 mm diameter. Cheers Rob
-
Congratulations, you´ve done it and your DoK looks fantastic. You made it look easy through your log, even with the few obstacles you mastered. I´m a bit jealous, as you browsed seemingly unfazed through the rigging stage, where I still shy away. Cheers Rob
- 207 replies
-
- 3
-
-
- vanguard models
- Duchess of Kingston
- (and 1 more)
-
I like scraping away the molding lines with a sharp blade with MFH kits. Works often better than files do. Cheers Rob
-
I read about the issues with the 917 as well Craig. I think, it´s very difficult to produce extremely high detailed kits and then everything has to fit under the hood literally. The resin bodies are thicker than the real thing and everything has to be assembled absolutely error free with tightest tolerances. I was about to buy the actual re released Alfa Romeo Tipo 33 Stradale, but shied away, because of the swing doors and huge bonnet and rear body. The only log about an Alfa build was a series of YT-videos, actually a double build. With both, the rear end wasn´t fully closed and that put me off. I hope F1 cars are a bit more forgiving, as I plan to build some soon from my stash. At least, there are no working doors or bonnets to take into consideration.
-
Thank you Egilman and you are absolutely right. If there is something minor off, it will haunt you later. I had the same with the Crocker, where I had to seriously tweak some sub assemblies to get everything together. With cars, it´s even more difficult, as tolerances are tight and there are more parts potentially obstructing involved. One difficulty with these cars is, you can´t foresee all the possible implications, which can arise in earlier stages of the build and you can´t really test fit early on. You have to build as precisely as possible and hope for the best. Thank you for believing into my trouble shooting skills. I´m sure, I can sort out the problem sufficiently, maybe with a bit of improvisation. Cheers Rob
-
Thank you Mark, I will not alter the fit of the engine, if I can find another way to solve the problem. The chassis engine combo is one unit now and there is no way to separate these without destruction. Cheers Rob
-
I hope so Craig, there are limits about what I can further do. I may end with a bonnet, which not falls into place by itself, but needs a little push and two tiny rivets for fixing it closed. I could live with that. This is a very critical phase of the build and I don´t want to rush it, but I feel, in the end everything will come together sufficiently. Cheers Rob
-
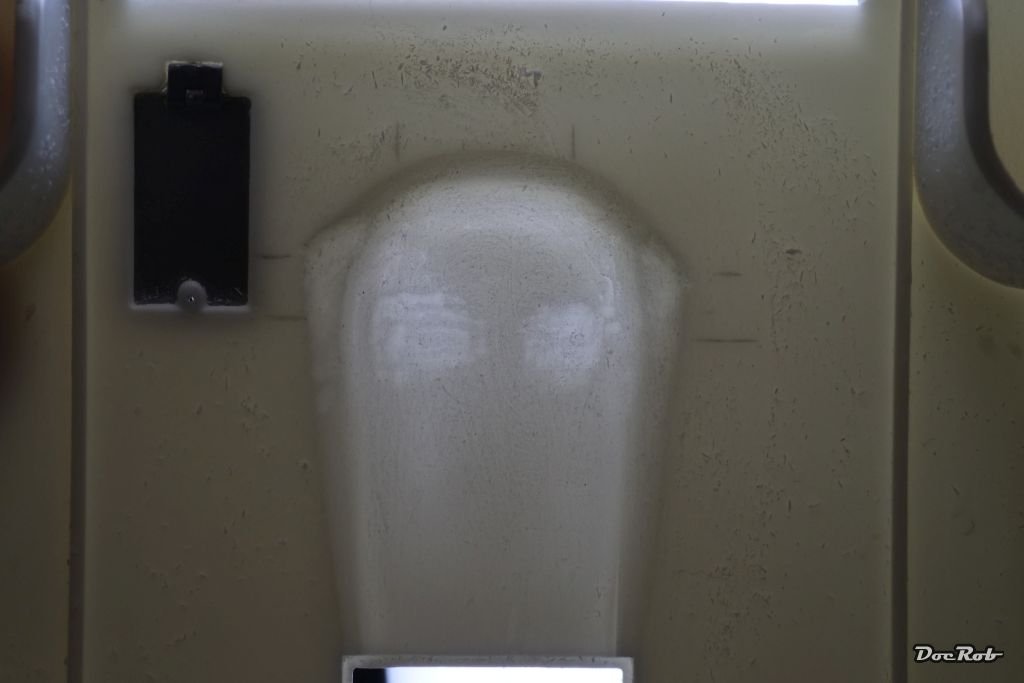
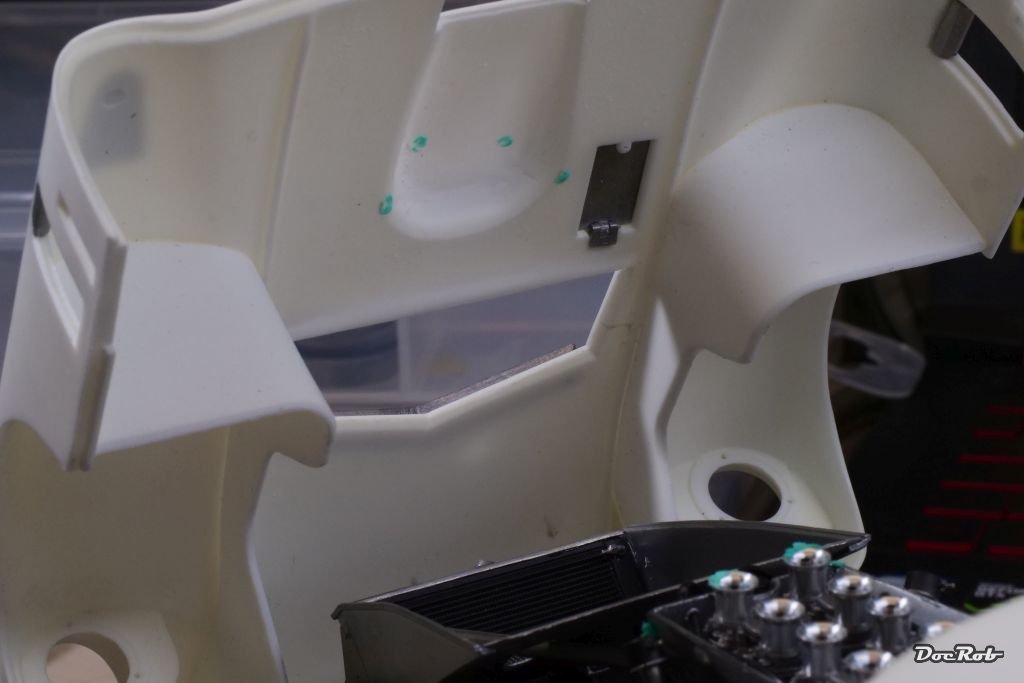
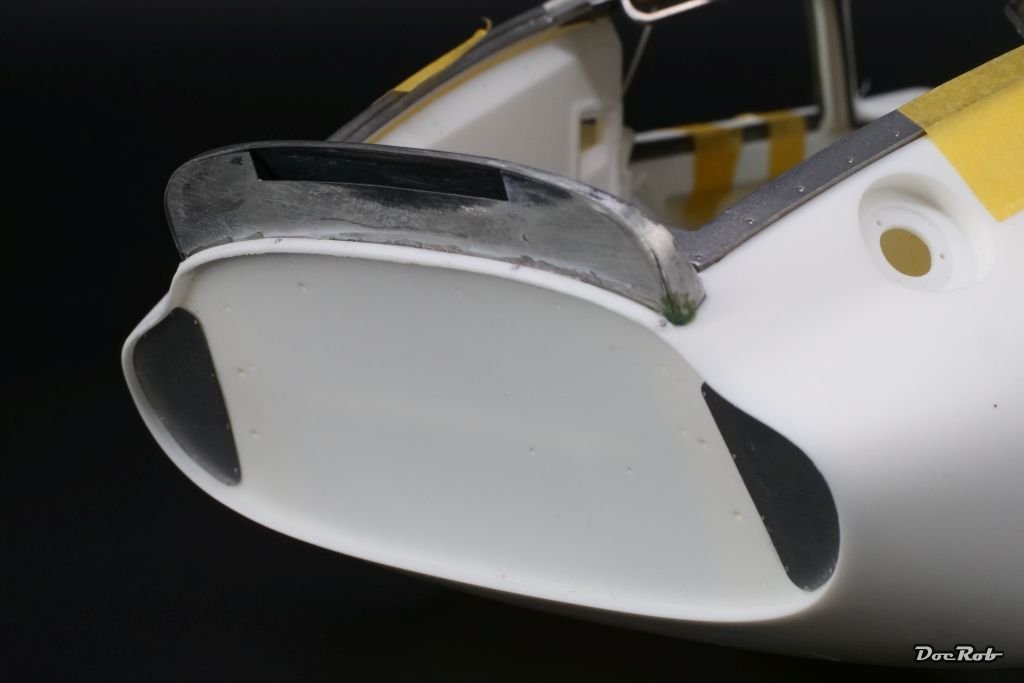
I dreaded the day, but it had to be done. I speak about final test fitting of the main components, in this case the body to bonnet fit. This is quite delicate, as so many parts and sub assemblies are involved and the process is painful with some loosened parts, etc. and takes hours. First, I screwed the body to the chassis. All doors and internal parts are only fixed preliminary. Then I mounted the bonnet to it´s hinges on the chassis and got that: When I force the bonnet down, it will more or less fit, but without locking it somehow, it will open like shown. I tried to identify the protruding parts and attempted to look, where they interfere, not an easy business, with only two tiny openings to see through on the sides of the bonnet. As I identified the possible culprits, I dabbed some liquid mask onto them and closed the bonnet and bingo got the interfering locations. In an iterative process, I removed the material as much as I dared and now the bonnet is paper thin, where the front funnels sit. It closes a bit better now, but not near as perfect as it should. At some point, I have no more possibilities to enhance the fit, as I also thinned the part in front, where the hinges meet the bonnet, to raise the bonnet a tiny bit. I will make a final try and then, I will add two tiny bolts, which force the bonnet into place and can be removed to open the bonnet. Cheers Rob

- 225 replies
-
- 15
-
-
-
Absolutely fantastic work on your chebec, Yves. It looks as if you were building the real thing. I also really like your neat photography and thorough description, which taught me one thing, I´m not up to such a kit right now and I had my eye on La Coureur for a while, but when I feel I am, I will seek out your log as a helpful source. Cheers Rob
-
Tweezers can be awkward with these rivets, but I still prefer working with them. I also have a wax pencil, which should be similar to your bees wax method. The difficult part is releasing the tiny rivet from the wax. With tweezers this is guaranteed, one way or the other . Cheers Rob
-
Well no, no riveting tool for the Cobra. There are about 300 to 400 tiny rivets made from cast white metal with the kit. They have different heads and diameters, but the ones, I have to apply in heavy doses now possess a 0,5 mm shaft, which means, there need to be numerous holes drilled with a 0,6 mm diameter. To add to that, most of the holes shouldn´t be drilled through, which makes it a bit more awkward. The tiny buggers will be glued in then with CA glue, not too easy with these little thingies, sometimes hard to pick with pointed tweezers. Cheers Rob
-
Phantastic news Chris, I ordered the Sphinx´s boats along with some figures immediately. Having build one boat for my DoK, I don´t feel like building three for Sphinx anymore . All the best for your health. Cheers Rob
-
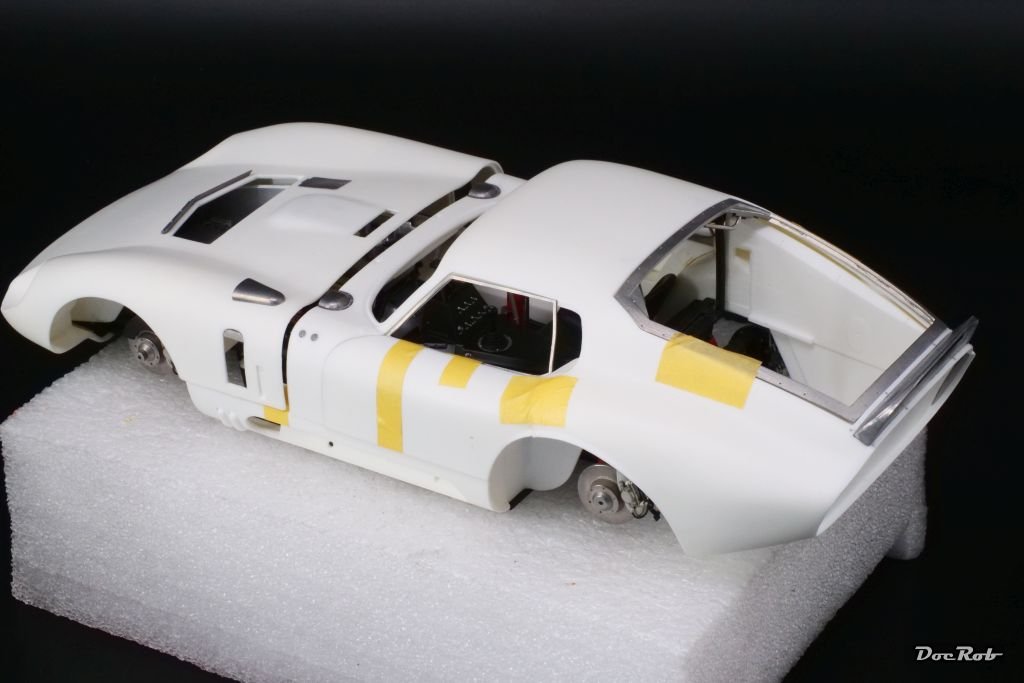
You nailed it Craig. I try to figure out, how far I should go with the body preps. On the outside, I will only add the PE flaps on the rear wheel wells. I don´t want to have too many obstructing parts added before painting and polishing. Shake and bake they are not, these MFH kits, but very often you wonder, how some delicate parts fall together miraculously due to clever design. I think, that´s the motivating essence of MFH kits, it´s often demanding, but you always feel the clever engineering behind all. Cheers Rob
-
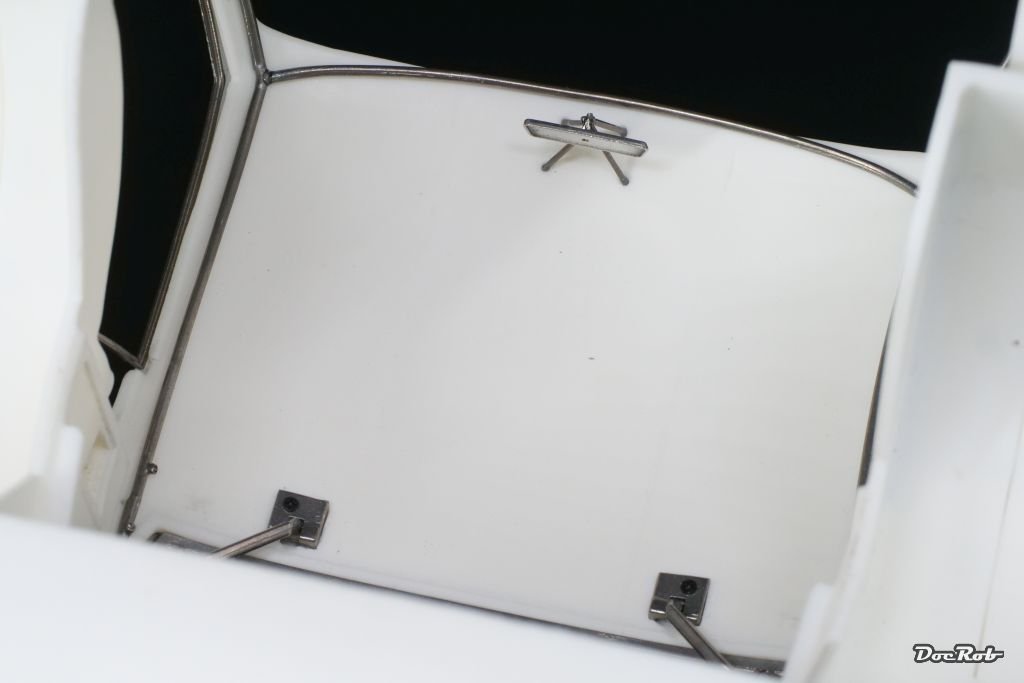
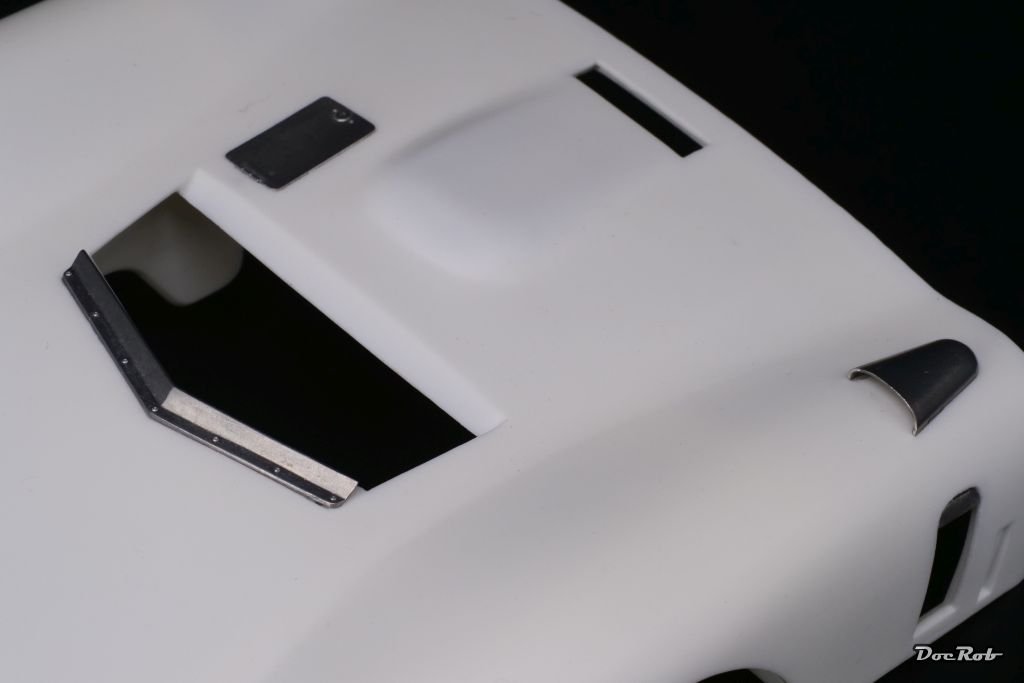
Preparations, preparations and no end in sight. I added the rear spoiler, which was not easy and needed a lot of sanding and bending and a bit of filling to sit right. The bonnet got some scoops and hatches and a spoiler, which is bolted on with tiny rivets. These rivets go everywhere in great numbers now, as they hold the clear parts in place and are added around the rear spoiler too. Painting will start with the interior and I added some internal framing and the rear view mirror as further preparation. I also cut my first clear vac part ever, a task that needed to be done more often in the next steps, as I plan to prepare all the panes and windshield before painting. After a lot of searching, I found some thin clear double sided adhesive tape on my island, which I intend to use, to install the clear parts. Cheers Rob
- 225 replies
-
- 11
-
-
I just stumbled over this notification on the MFH site. I don´t know, if it means, there is a chance of a re-pop, while other kits strictly say "Out Of Stock" Bah, I thought, I can resist the hype you started with 1/43 kits Craig but I´m weak. I just ordered a 1/43 Williams FW16 kit, as a test mule for my 1/12 kit. I also wiped my magnifiers Cheers Rob
-
You´ll love it Craig. Having enjoyed their Crocker build immensely as my first MFH kit, I know you will have loads of fun during the build. I thought about buying this one too and maybe even do so soon. Cheers Rob
-
You have to check their homepage daily, Craig. It happened to me three times now, that a kit was sold out in one or two days in the pre -release phase. The last was the Alfa Tipo 33 Stradale, announced together with the McLaren. I thought about buying it for two or three days and whoops the decision was made by others . Cheers Rob
-
I have only some minutes, therefore a short answer, Craig. I never tried soldering MFH white metal parts and use only CA for construction. I feel very comfortable with Colle 21 CA, which can be found on SpotModel. I follow the information on the MFH page daily, where they announce their regular releases about one month ahead. You can pre order then or wait until the kit is released, but bear in mind, a kit can be sold out in the pre order phase. This happened with the re-release of the McLaren F1 GTR '95 kit. SpotModel obviously ordered some and they will have stock, when the kit hits their shelves. I bought the Williams FW16 limited edition on the first day of the pre order phase luckily, because it was gone minutes later. It seems, that MFH sometimes re releases older kits, but I´ve never seen them release a kit for a third time, but I stay corrected. To me prices are best directly from MFH by far. Cheers Rob
-
I can only confirm your approach as well as the ultra rapid and thorough customer service by MFH. I always check all the parts after cleaning, when they are left to dry against the manual and sort them into similar kind of boxes, like you did. When I start a step, I identify all parts needed and more important all parts, which need to be added later. This is immensely important for larger steps like the chassis and the body parts, where there are subassemblies added from nearly all steps of the manual. Next I look for how the individual parts are connected and measure the diameters for drilling ALL needed holes. This, I check twice, as it is sometimes impossible to reach areas with a drill bit, when assembled. Until now, I never had issues with missing or badly casted parts, but lost some parts (my fault) of my Crocker motorcycle, which were immediately sent by MFH. When I bought a kit from them, it took no more than six days to reach my doorstep, faster than parcels even from the Spanish mainland. Cheers Rob

