


DocRob
-
Posts
1,260 -
Joined
-
Last visited
Content Type
Profiles
Forums
Gallery
Events
Everything posted by DocRob
-

F4U-1A Corsair by DocRob - FINISHED - Tamiya - 1/32
DocRob replied to DocRob's topic in Non-ship/categorised builds
Thank you Chris, with a bit more distance, I start to like the Corsair. I may even paint the pilot figure, a little challenge in it's own, at least for me. In fact, I'm blushing a bit with so much praise, but the Corsair is an easy kit to shine with, as it nearly builds itself and I could fully concentrate on painting and weathering. Cheers Rob -
F4U-1A Corsair by DocRob - FINISHED - Tamiya - 1/32
DocRob replied to DocRob's topic in Non-ship/categorised builds
I will not ignore you Egilman, your input to my Corsair build was priceless and I'm very thankful for it. I only build for fun and living very remote, never attend competitions or shows. The only real competition is challenging myself with new techniques and hopefully succeed. Thank you again for your warm reception of my bent wing bird, comments like yours are very motivating. Cheers Rob -
Absolutely beautiful work Grant, I really like your weathering methods. I will savour your log later completely, where I just stumbled into right now. Cheers Rob
- 333 replies
-
- 10
-

-
F4U-1A Corsair by DocRob - FINISHED - Tamiya - 1/32
DocRob replied to DocRob's topic in Non-ship/categorised builds
Muchas gracias Egilman, I always try to emphasize on the scale effect, when it comes to painting and weathering. Some Corsairs, I've seen build looked amazing, but the weathering sometimes didn't look right scale wise. Another subject, I try to keep in mind is, how reflective are different materials and coats in there usual lighting condition, an area often overlooked in modeling. One of my driving forces in modeling ist to replicate materials as good as possible with the tools and techniques I have learned. In other words, de-plastic plastic kits . I'm on thin ice here, I never built a 350 scale ship and I'm no expert on the USS Arizona either. I'm more of an imaginative builder and painter and therefore fear subjects too well documented . I have a ME-BF 109 started since years, but it's a shelf queen now. There are just too many experts out there, to show them my interpretation. The Hobby Boss plastic of the USS Arizona looks horrible, but with all the PE, printed parts and wooden deck, it should look decent in the end. I'm still undecided about the next build, it will be a spontaneous decision. Cheers Rob -
F4U-1A Corsair by DocRob - FINISHED - Tamiya - 1/32
DocRob replied to DocRob's topic in Non-ship/categorised builds
Thank you Chris, Ken and Kevin, writing this blog was a pleasure and helped me documenting my work. It also helped me a lot through your input to clear a lot of questions I had, that's what forums are made for . Thank you Chris for changing the title. In LSM, where I also posted this blog and which is my other 'home' in modelling, there is a finished build section and I have to adapt here . Kevin, I liked your Fokker which carries the same livery, I chose for my future build in 1/32 and I'm looking forward to your next build. Cheers Rob -
F4U-1A Corsair by DocRob - FINISHED - Tamiya - 1/32
DocRob replied to DocRob's topic in Non-ship/categorised builds
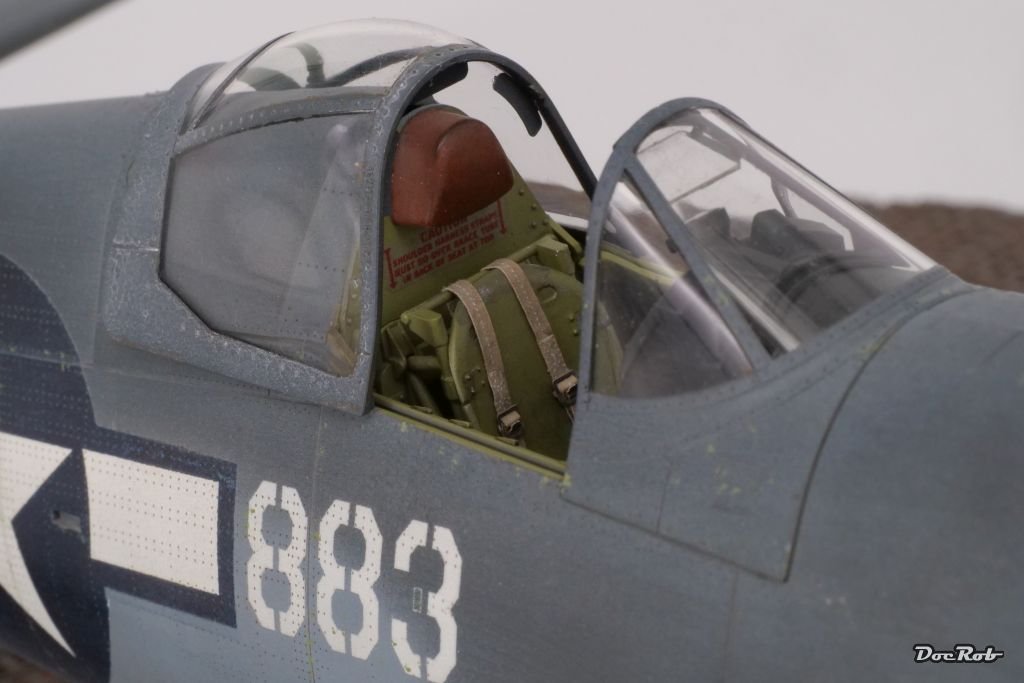
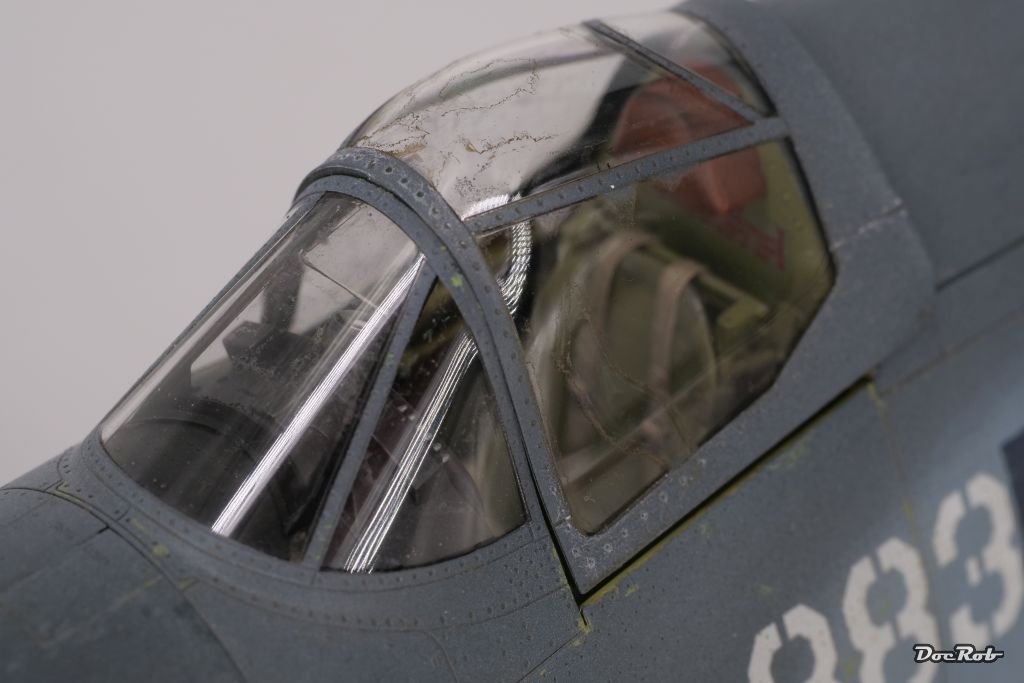
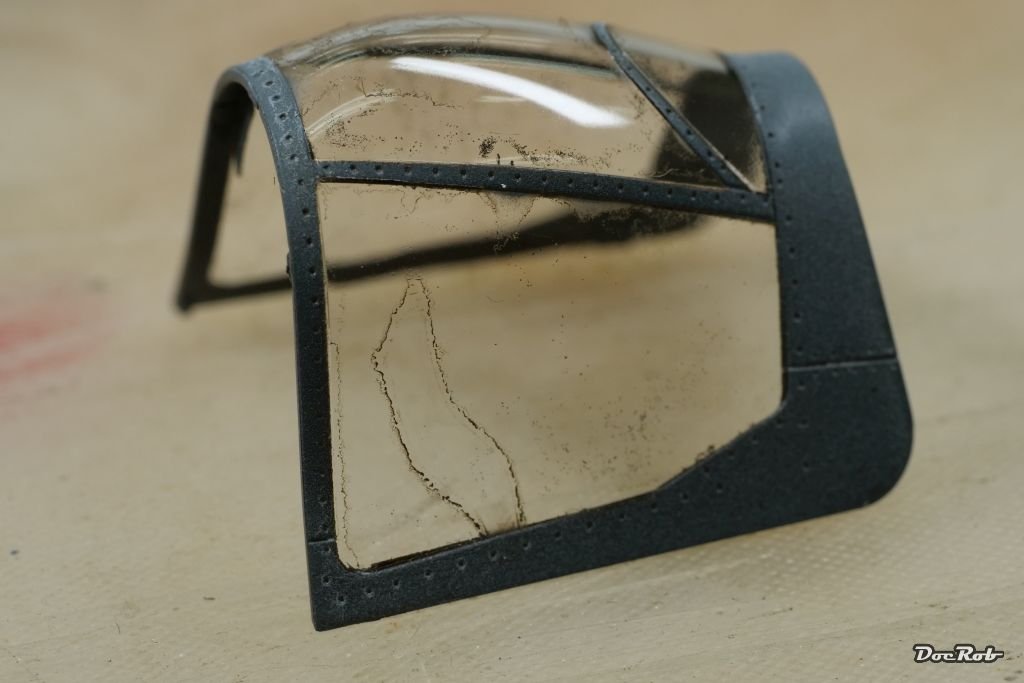
Thank you, you should definitely build one David. Skill sets are only limited by not developing them and I'm often amazed, what is achiveable with a bit of planning and trying out. I was using good Kabuki tape for masking in my opinion the best material, as it cuts very precise, it doesn't shrink and it adheres well, even in tight spots and corners. Most of the residues on the clear parts were from the inside, like caused by fumes and not through the color application directly. I have to establish a better workflow, when using lacquer paints with their aggressive thinners. I never had these issues with acrylics, but the lacquers spray so well. I will dig into that with other builds and test, if a bath in Future may help. Cheers Rob -
F4U-1A Corsair by DocRob - FINISHED - Tamiya - 1/32
DocRob replied to DocRob's topic in Non-ship/categorised builds
Thank you popeye, the masking was one of the main aims through that build and I have to say, it worked great. Much easier to weather according to the weathering of the whole plane, controllable in color and rendition and no silvering issues. The process is tedious and time consuming, but that's the price for not having reflective stencils under the harsh light of the final photos of your build. Cheers Rob -
F4U-1A Corsair by DocRob - FINISHED - Tamiya - 1/32
DocRob replied to DocRob's topic in Non-ship/categorised builds
Thank you James and Edward, in review it was a fun project and mostly successful. My emphasize was on painting and weathering, the build was just routine. Again, I learned a lot with this build, as I normally chose my subjects with an idea to incorporate new techniques. I get easily bored and have to feed my patience with challenges constantly. Like James mentioned, it's best to chose a certain point and call the project done, because is a build really ever done entirely ? My next project will be a maritime one, as on Large Scale Modeler starts a 'All Wet' group build on Sunday. I'm not finally decided, but these are my options: - Fore Models Schnellboot S-38 in 1/72 along with a crew. - Industria Mechanika's Long Nose Submersible, a steam punk mini submarine in 1/35 - USS Arizona from Eduard which is based on a Hobby Boss kit, with added metal barrels, tons of PE, printed parts and a wooden deck Or I continue with the rigging of my Duchess of Kingston build Cheers Rob -
F4U-1A Corsair by DocRob - FINISHED - Tamiya - 1/32
DocRob replied to DocRob's topic in Non-ship/categorised builds
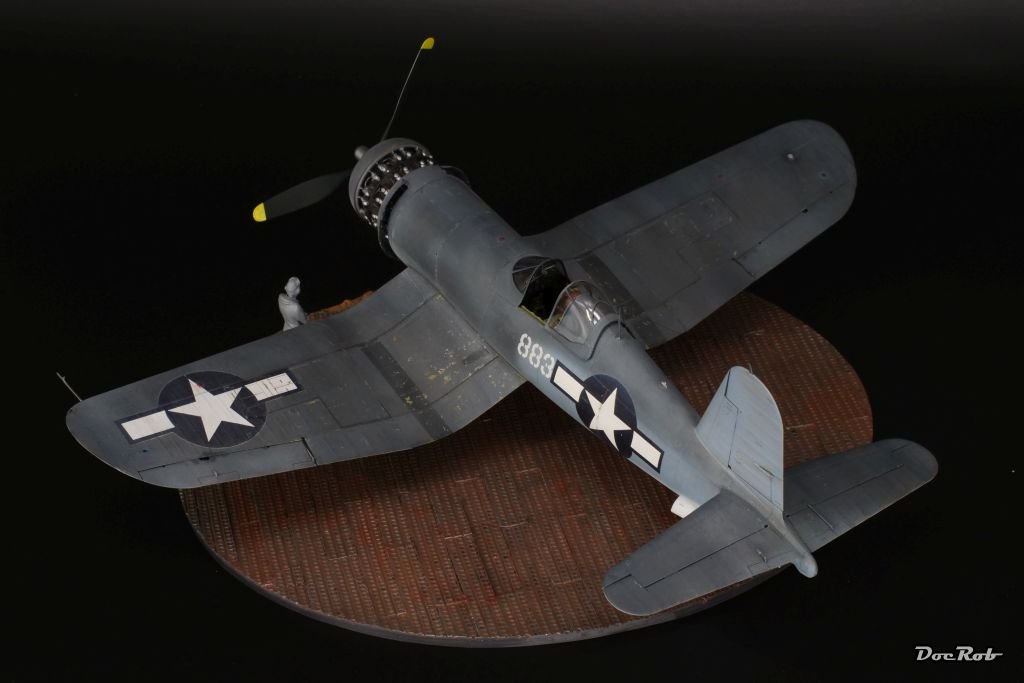
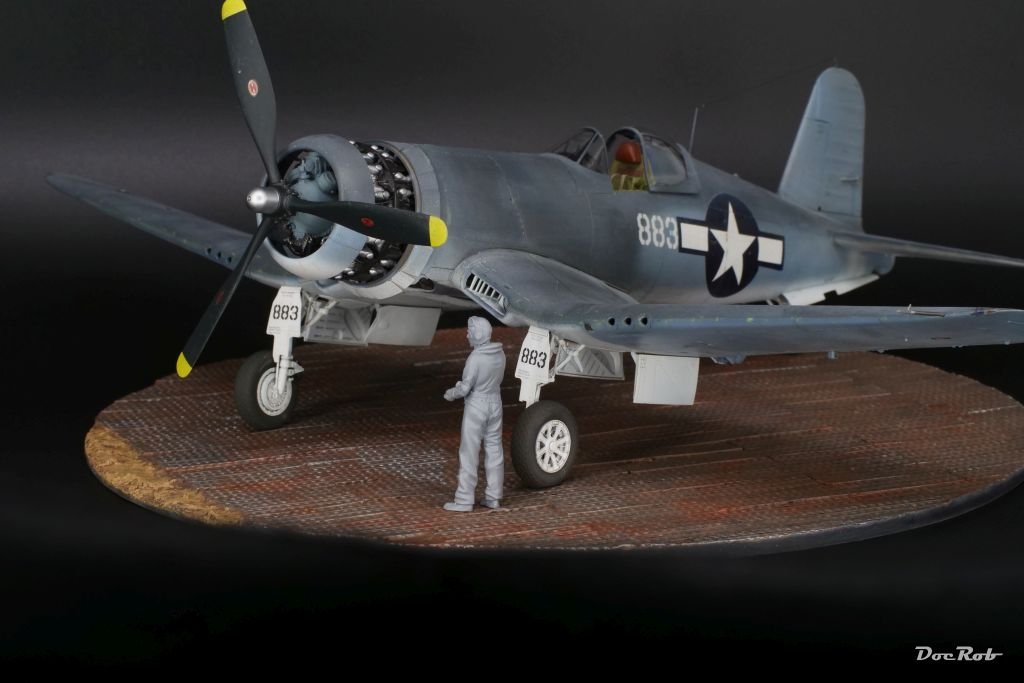
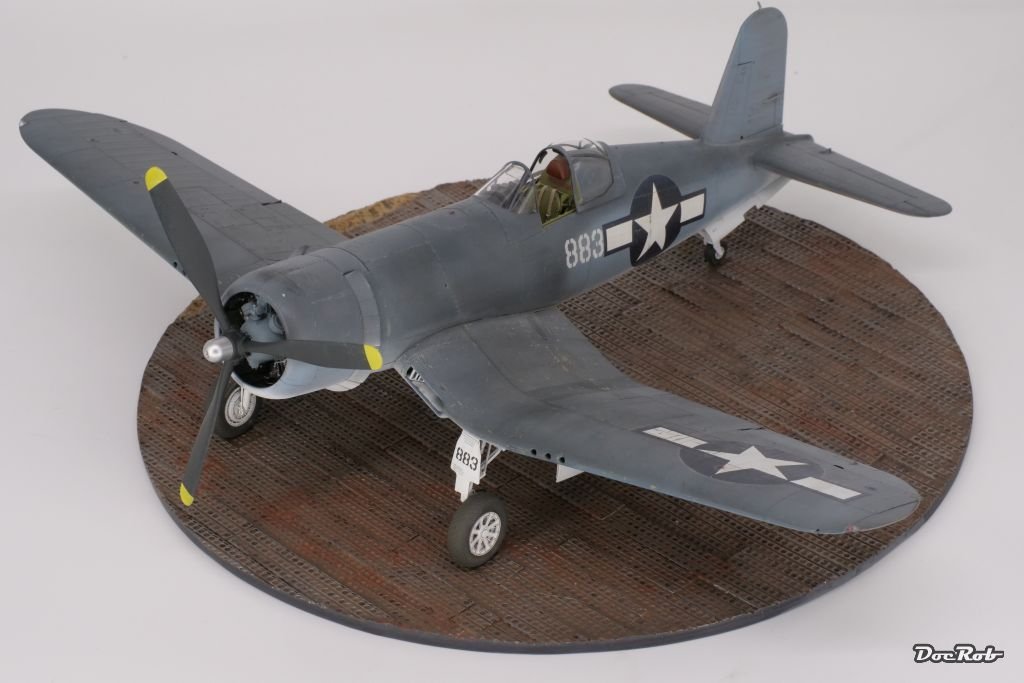
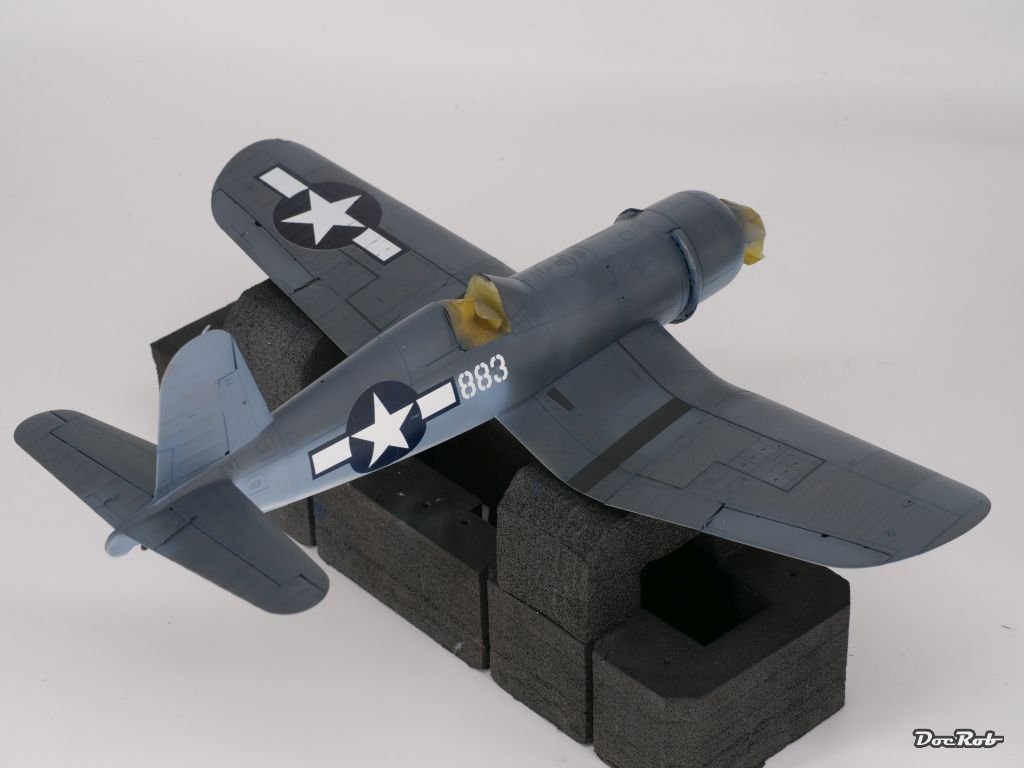
Well, the Corsair is called finished and I'd like to thank you for your input and your encouragement. I could have done more weathering and finishing in the end, but I got a bit worn out. Not because of the build or the painting, which was especially fun, but with the latest steps of the build, like clear coating, adding bits and pieces, ... tried my patience, as a lot went wrong, in a phase of the build, where I hated it most, after painting. I want to end the modeling year on a good term though and have to say, I'm more or less pleased with the result. The planned painting scheme including double layer chipping and masking for markings and stencils all went well. The build itself was a no brainer, with the Tamiya quality and was more a time consuming obstacle to get to the painting stage. I have to raise my hat to the Tamiya engineers. This is maybe the best kit, ever made in plastic, being complex and full of innovative design ideas. The level of detail you get out of the box is impressive, except maybe for the rubber wheels. The non painted pilot next to the Corsair is a symbol for the ambivalent ending this build took and that's why he's there. Maybe I paint him later, but first I have to clean my workbench and get some distance. Cheers Rob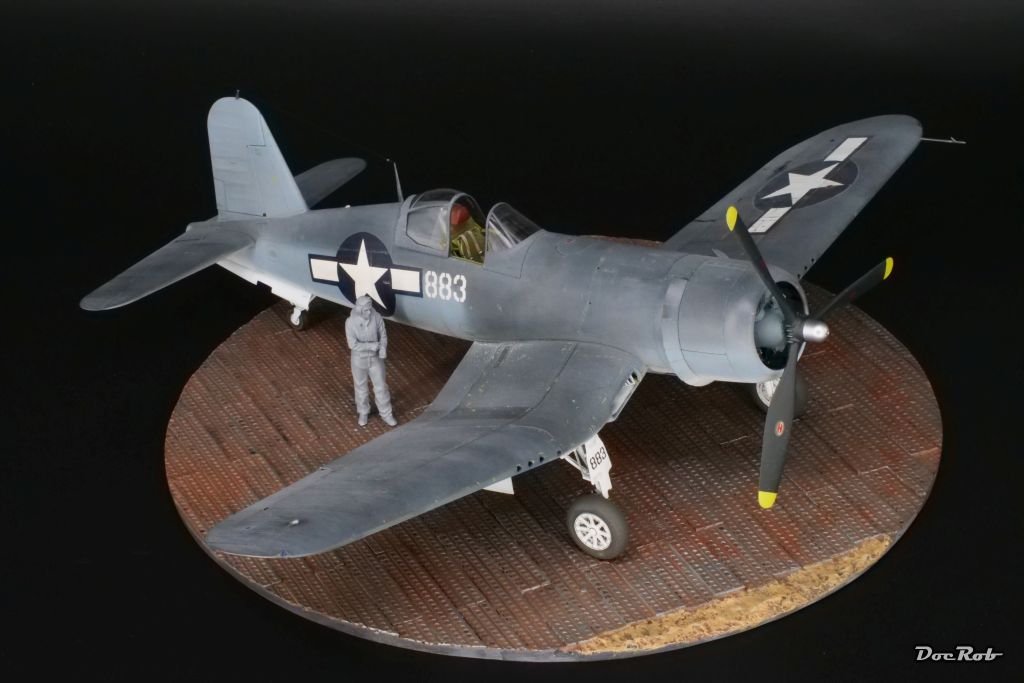
- 160 replies
-
- 19
-
-

-
A fantastic project Mustafa and lots of admirable work going into it. I really like larger scale ships, where detailing is pure fun. When I'm grown up wooden modelling wise, I will build something similar. It's a pure pleasure to follow your wonderful build and the comprehensive documentation. Cheers Rob
-
F4U-1A Corsair by DocRob - FINISHED - Tamiya - 1/32
DocRob replied to DocRob's topic in Non-ship/categorised builds
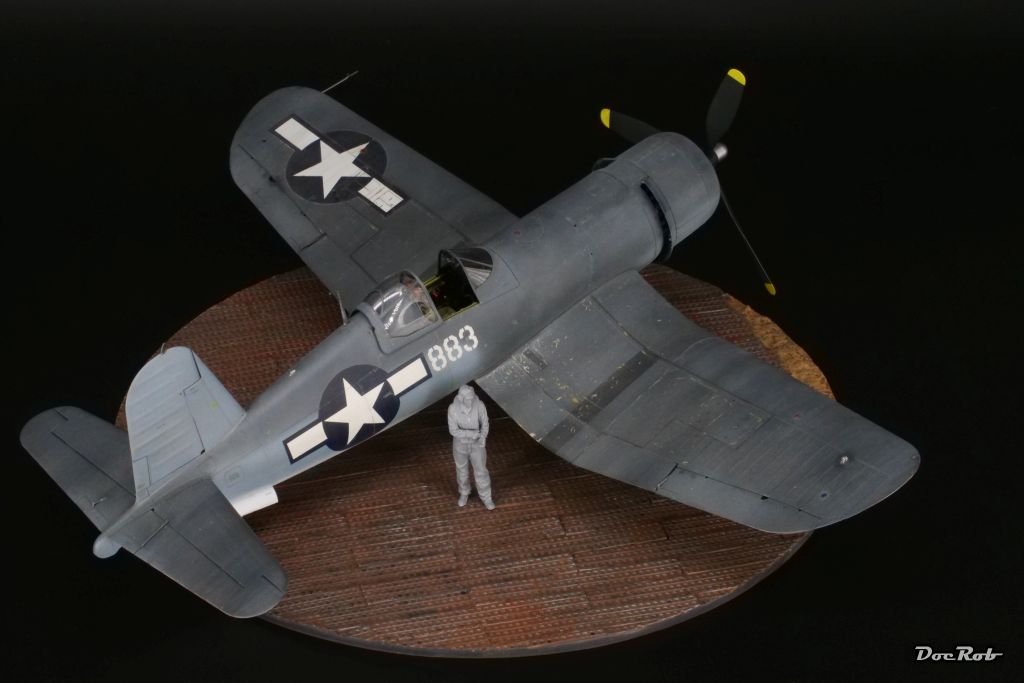
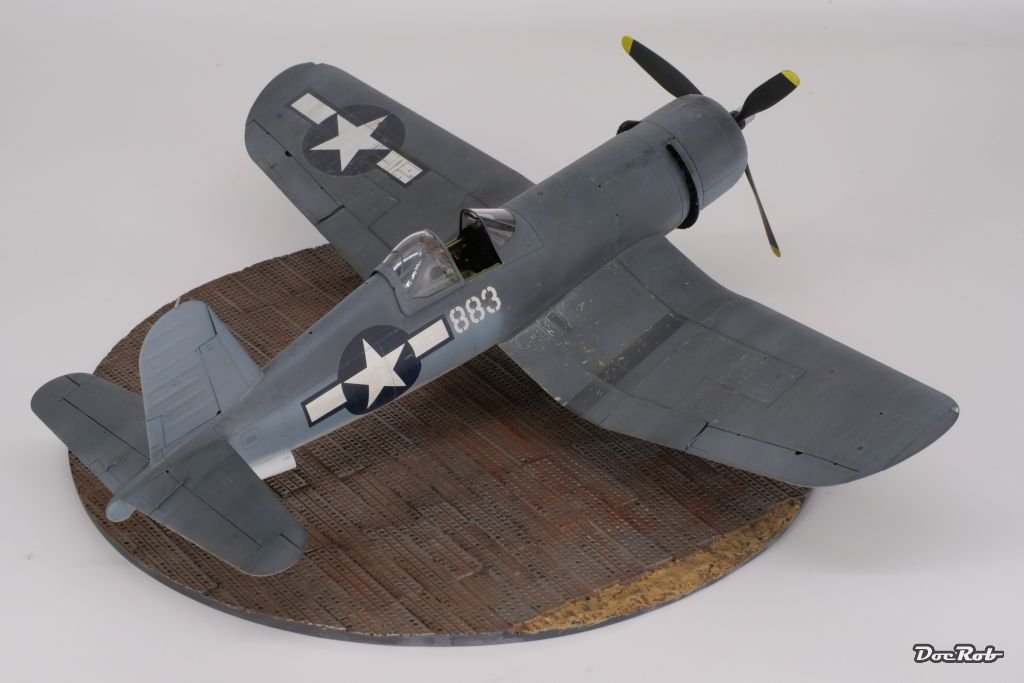
Thank you @Old Collingwood, @Egilman, @Canute and @NavyShooter, I'm lucky that I was able to solve these issues close to the finish line, the time where it hurts most and is most daunting, at least to me, as I'm not blessed with a great deal of patience. I will go on to the finishing touches and will call the build done soon. The base is made by Zoukei Moura, it is casted resin and ready painted. I have three different of these bases for a quick presentation of different planes, when I'm to lazy to build a dio for the kit. Cheers Rob -
F4U-1A Corsair by DocRob - FINISHED - Tamiya - 1/32
DocRob replied to DocRob's topic in Non-ship/categorised builds
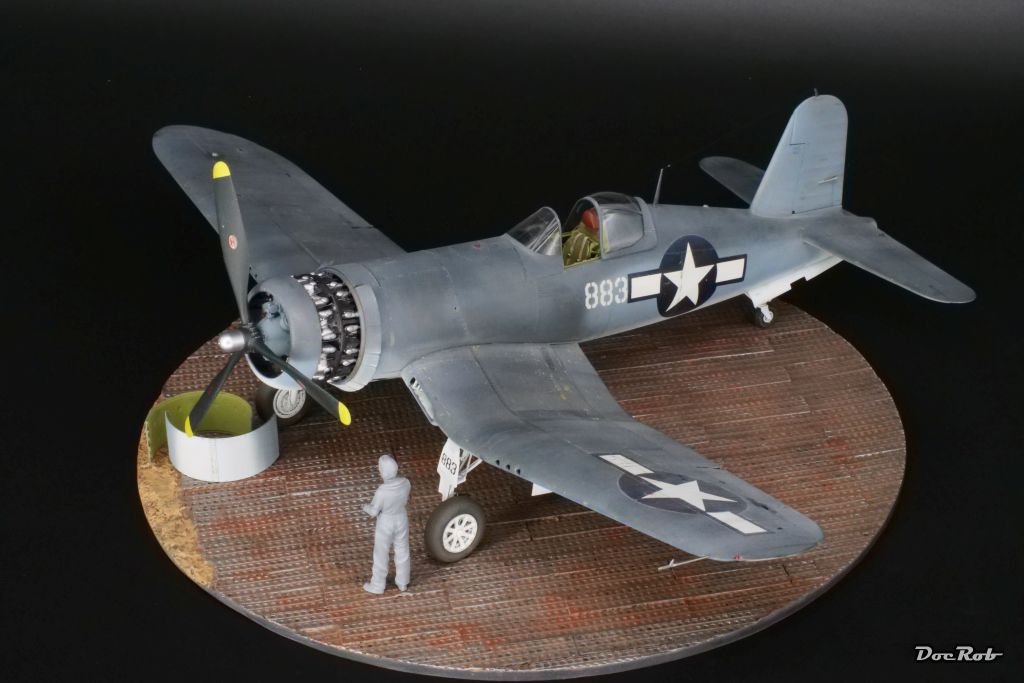
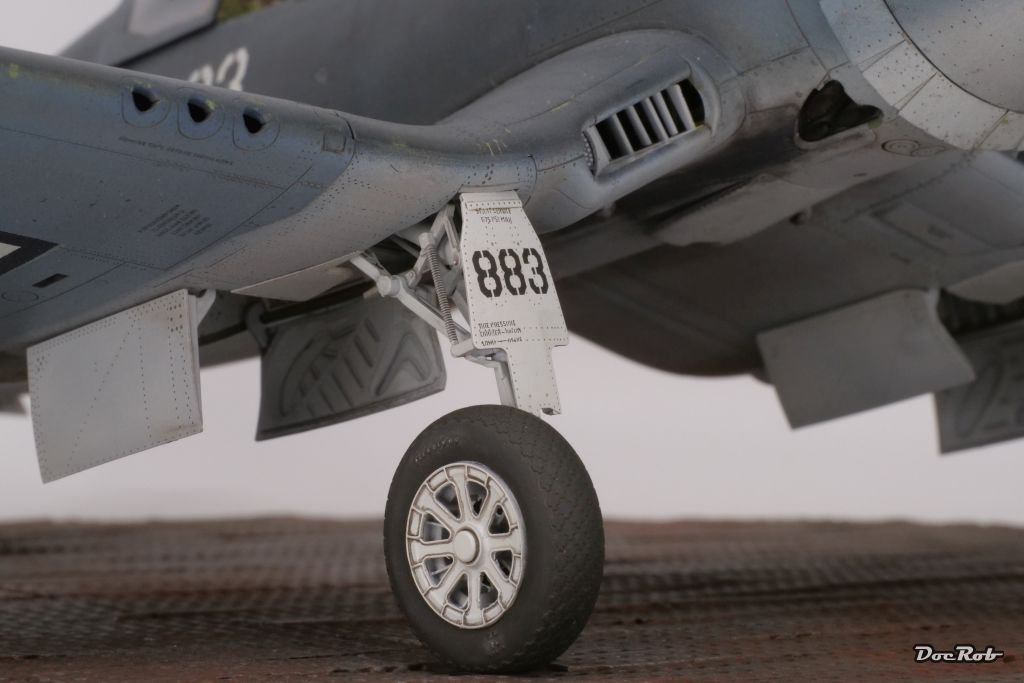
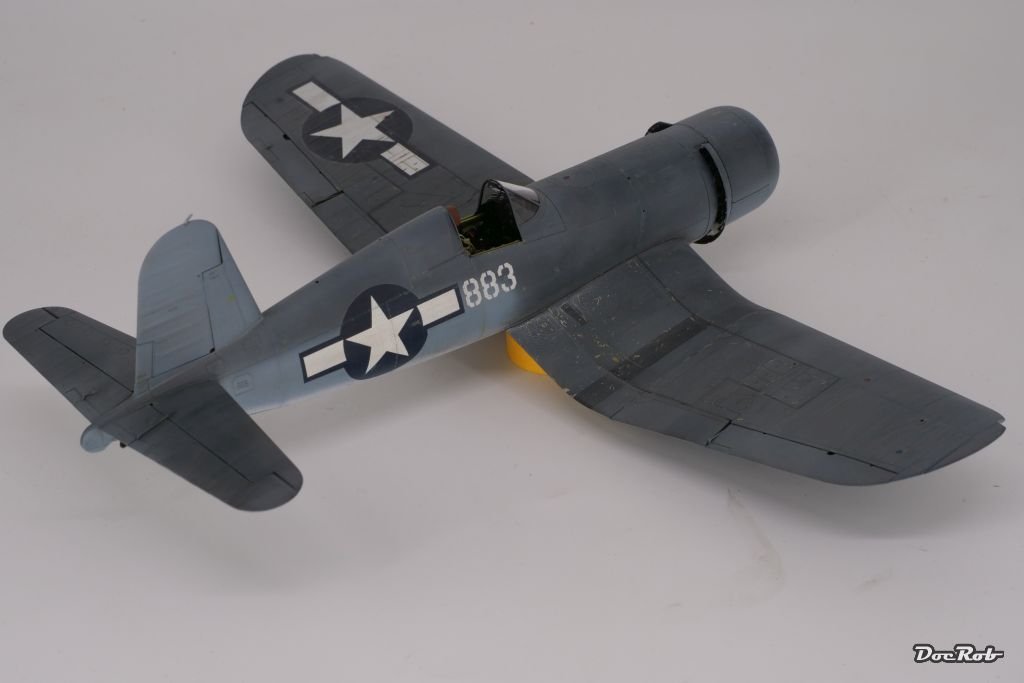
After a lot of swearing, cleaning up the gooey mess into which the blue tack turned, which I used for masking the cooling fairings, I finally finished with these issues and did something more productive. I added the landing gear, a trouble free affair and the landing gear doors, which still need a bit of weathering to fit in. Then I cleaned the clear parts and refitted them, luckily without any issues. ...and now it starts to look like a Corsair, but still a lot of things to do. Cheers Rob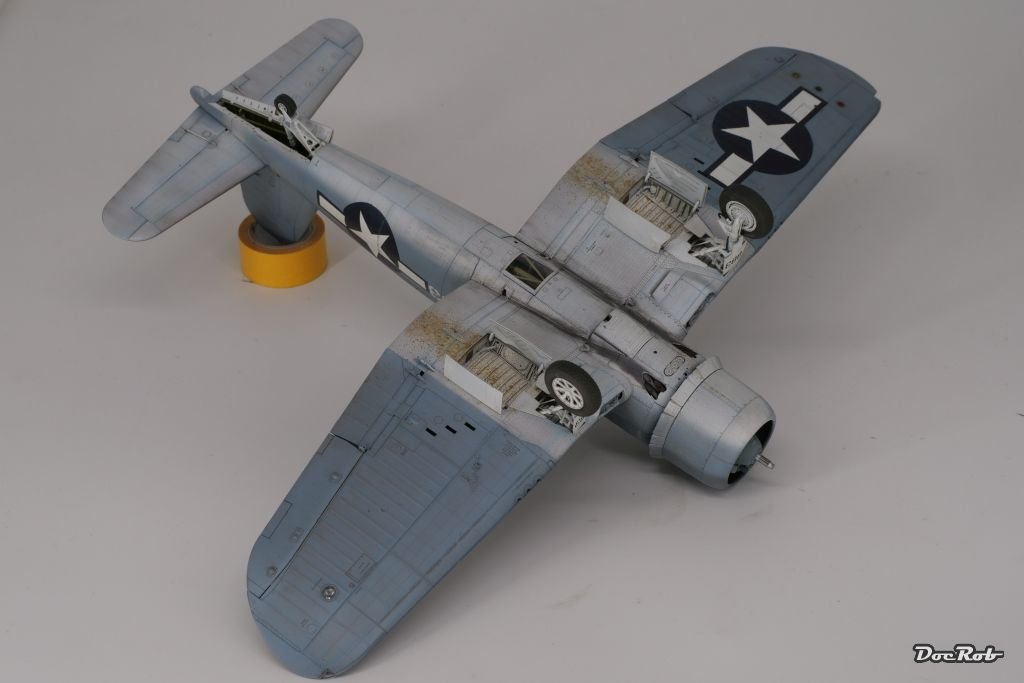
- 160 replies
-
- 18
-
-
-
F4U-1A Corsair by DocRob - FINISHED - Tamiya - 1/32
DocRob replied to DocRob's topic in Non-ship/categorised builds
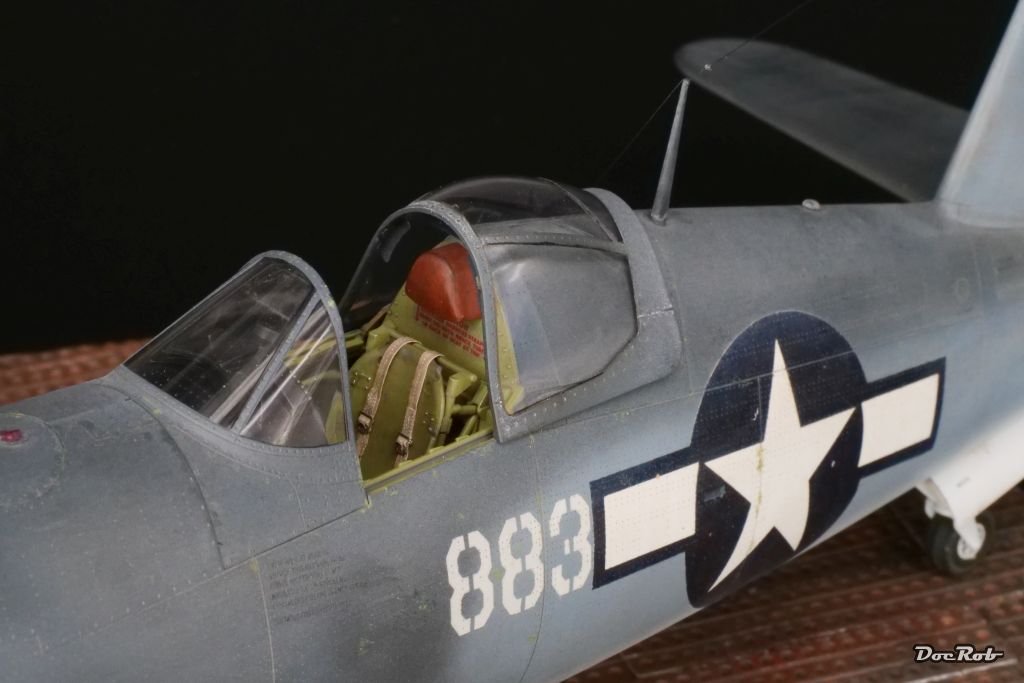
I use Revell's Contacta Clear for canopies and similar parts, which may is a thinned variant of PVA. I had some issues with masking fluids onto pledged canopies, but maybe that was caused, because I left the masks on for some weeks. I like to do painting and weathering of canopies along the rest of the build, to get the looks right. But this also means, long time masking. I tried a lot of different liquid masks, but Microscale's was the worst for me. It's so hard to remove, that I almost binned a build, because of it. Now I'm using mainly Mr. Hobby Sol R and Sol neo. One is water based and less aggressive. I was lucky, I was able to clean the residues, but it was a tough job to pry away the clear parts already glued in place without destroying them. I feel with you about your nose glazing and having to strip them. I'm a clear parts coward, but my luck with them often fails, even when I'm really careful. Cheers Rob -
F4U-1A Corsair by DocRob - FINISHED - Tamiya - 1/32
DocRob replied to DocRob's topic in Non-ship/categorised builds
I normally dip my canopies in Pledge and never had issues with CA fumes. I have to test it for the thinned lacquer colors though. Cheers Rob -
F4U-1A Corsair by DocRob - FINISHED - Tamiya - 1/32
DocRob replied to DocRob's topic in Non-ship/categorised builds
That is what I think happened here. The solvents soak through the masks and only the fumes can irritate clear parts as happend here with the lower fuselage window, which had residues on the inside, not on the masked outside. Same with the armored glass under the windscreen. When I have a spare canopy on one of my next builds, I will try to solve the problem with a coat of Pledge on the clear parts. I skipped that here, because the parts were extremely clear, with no need to enhance that. The little color bleeding I had, was easily removed with a toothpick. Cheers Rob -
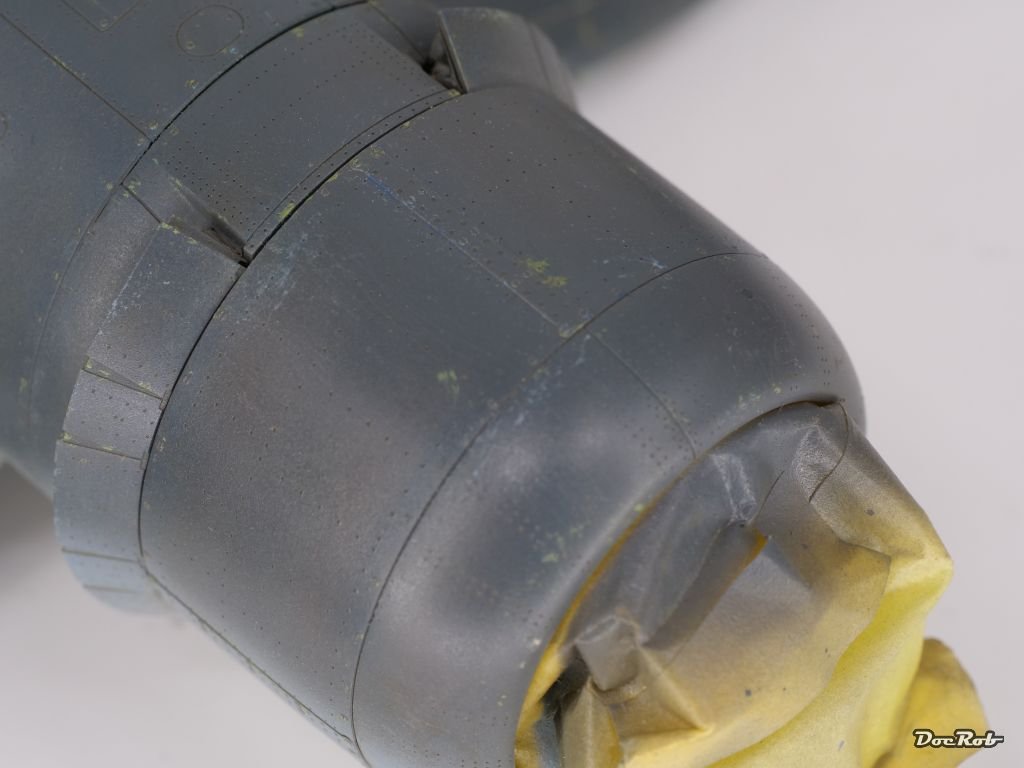
F4U-1A Corsair by DocRob - FINISHED - Tamiya - 1/32
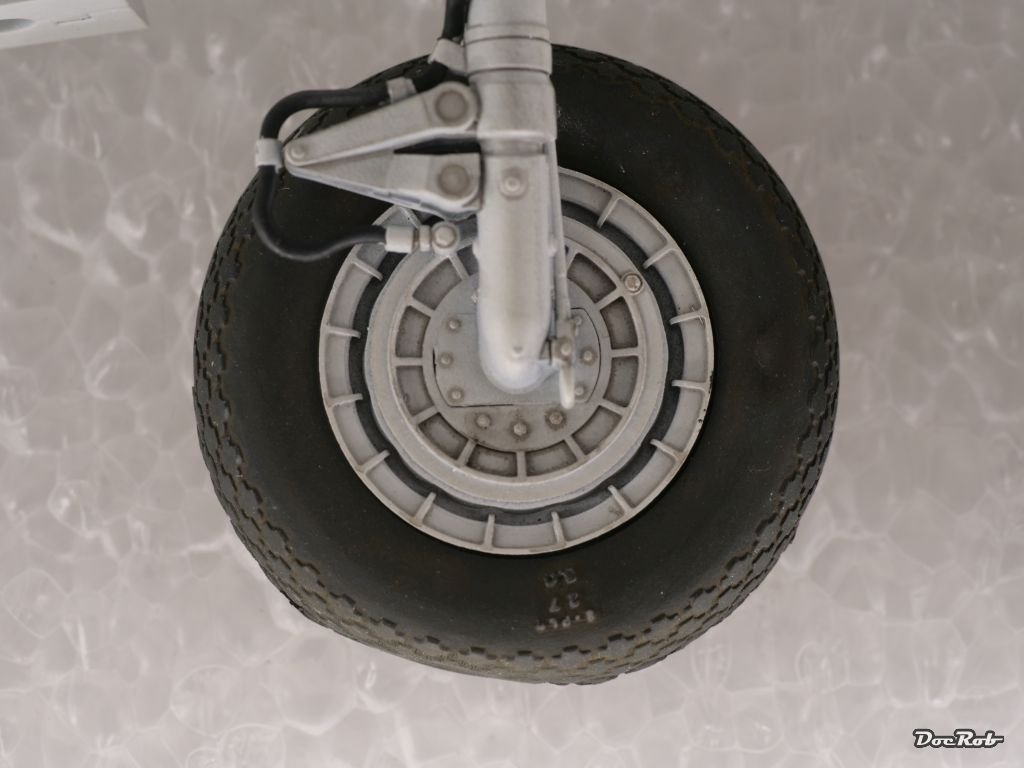
DocRob replied to DocRob's topic in Non-ship/categorised builds
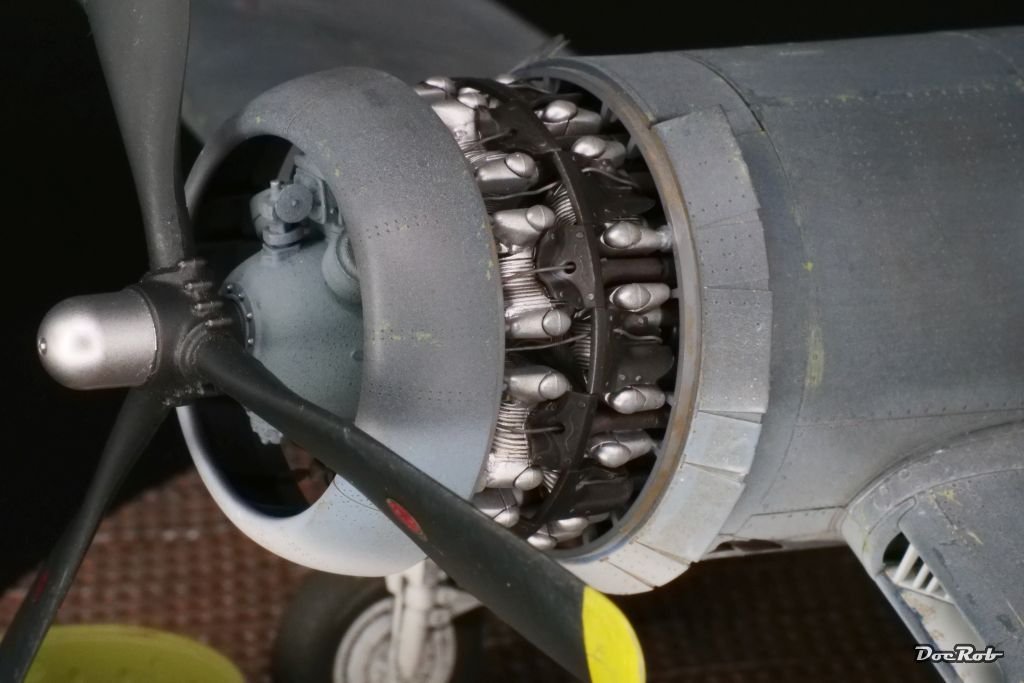
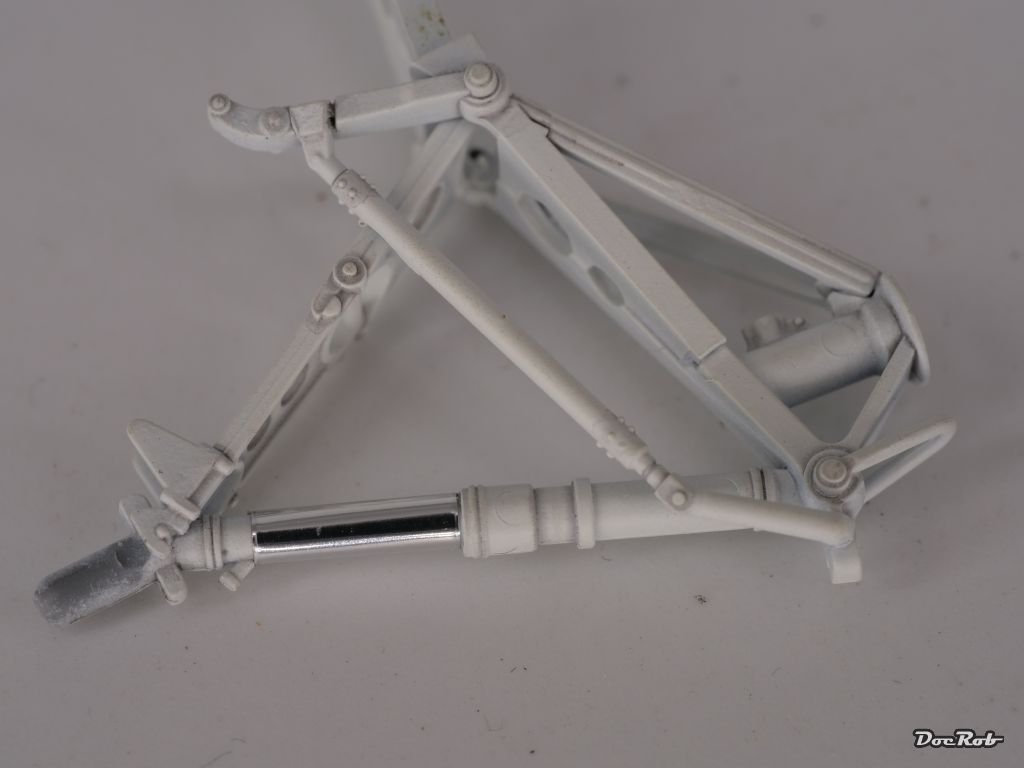
An hour ago, I almost binned the Corsair. I hate fails and I hate re-dos and after removing a lot of masking material, I almost reached that point, but told myself to lean back and take a deep breath. What happened, I don't know exactly. I had residues on all the transparent parts, which were masked with the most possible care. No bleedings, but possibly grey misted residues from the lacquer colors and their thinners, which went through the masking material. I also masked the radiator openings around the cowlings with blue tack, that went goo and is very hard to remove. It took about an hour to get rid of half of it. The good thing, I wear a respirator mask. I don't want to know, what these stuff would have made with my brain without it. I tried to clean the canopy with a cotton swab and wooden toothpicks and it worked luckily. The greater problem were the other transparent parts, like windscreen, lower fuselage window, and armor glass with gunsight, which were glued in place. I carefully removed them and cleaned them. Before all these troubles, I matte coated the plane with Tamiya's flat clear lacquer, but it was still too shiny for my taste, maybe semi matte, but not flat. Out with the Pledge after drying, added 30% of Tamiya X Flat clear (never more) and sprayed again. Now the Corsair looks like this. To relax a bit, I continued with the undercarriage, which received some washes, followed by iron pigments rubbed on, to get a painted metal feel and finally, I had to re do the pistons, which were chrome taped. The tape is not made to adhere to small diameter parts, as it loosened itself and I had to remove it. Instead, I used my trusty Uschi chrome pigments to let them shine a bit. The tyres were airbrushed in two different near blacks, one for the flanks and one for the running surface and than pronounced with pigments., which is my usual practice. The wheels are from Eduard and much better than these rubber thingies supplied with the kit. Cheers Rob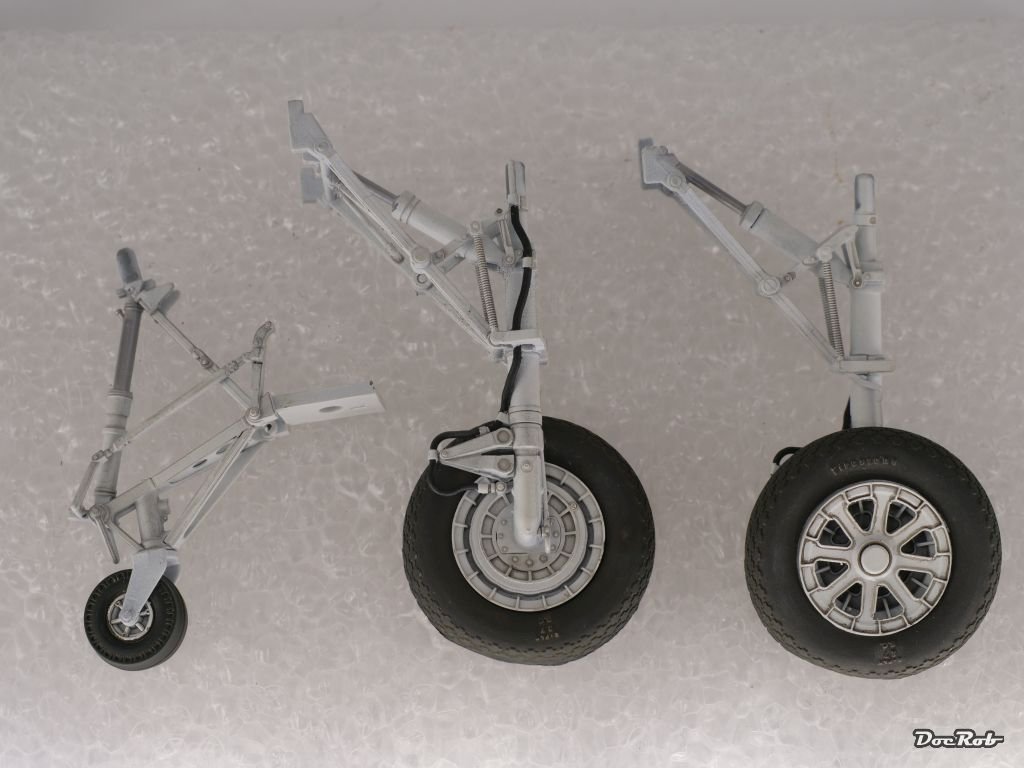

- 160 replies
-
- 15
-
-
-
F4U-1A Corsair by DocRob - FINISHED - Tamiya - 1/32
DocRob replied to DocRob's topic in Non-ship/categorised builds
Thank you Ken, I always try to learn something new with every build and like to share my experiences as much, as I like to read these of fellow modellers, which very often helped me during my builds. Cheers Rob -
F4U-1A Corsair by DocRob - FINISHED - Tamiya - 1/32
DocRob replied to DocRob's topic in Non-ship/categorised builds
Muchas gracias, I'm indeed seeing the finish line with this very entertaining build. I will apply a matte coat next and see, if more has to be done. Cheers Rob -
F4U-1A Corsair by DocRob - FINISHED - Tamiya - 1/32
DocRob replied to DocRob's topic in Non-ship/categorised builds
Thank you Egilman, I'm blushing, but am also pleased, you like my efforts. With every build, I have a certain goal in mind and in this case it was all about painting and weathering. I was bored a little about the construction phase and was looking forward to the final stages and to get he looks, like I had them imagined. The airbrushing sequence plan was made long before I even started cutting plastic from the sprues. The finishing weathering touches were developed accordingly. I find it very difficult to give dark coatings a good depth and believable weathering. When I start a project, I try to absorb as many informations and pictures as possible to get a feel for the subject. Historical pictures are sometimes difficult to read, with strange color renditions and are often retouched (one of the first uses of airbrushes) . Actual pictures of restored builds are not better, the restauration process altered the appearance of the subject often. What helps me, forming a picture is what I call 'enhanced imagination'. I use all these sources, try to evaluate their correctness and analyze where they could fail. Then I add a dose of gathered experience with materials in real live, like how paint flakes, how wear shows on different material, how corrosion effects material,... When I was young, I made 3D animations on my 486 PC and was always on the hunt to collect surface textures with an early digital camera, to let the 3D Models look realistic. I kept that open mind and 'brain collect' looks of materials and textures, which I visualize, when I start a project. As you can see, the creative process is more or less finished with the how-to plan and the rest is applied techniques. Thanks again for your encouraging words, as I'm living in a remote spot of the world with no other modelers around and only the forums for bein connected to like minded fellow modelers. Cheers Rob- 160 replies
-
- 12
-
-

-
F4U-1A Corsair by DocRob - FINISHED - Tamiya - 1/32
DocRob replied to DocRob's topic in Non-ship/categorised builds
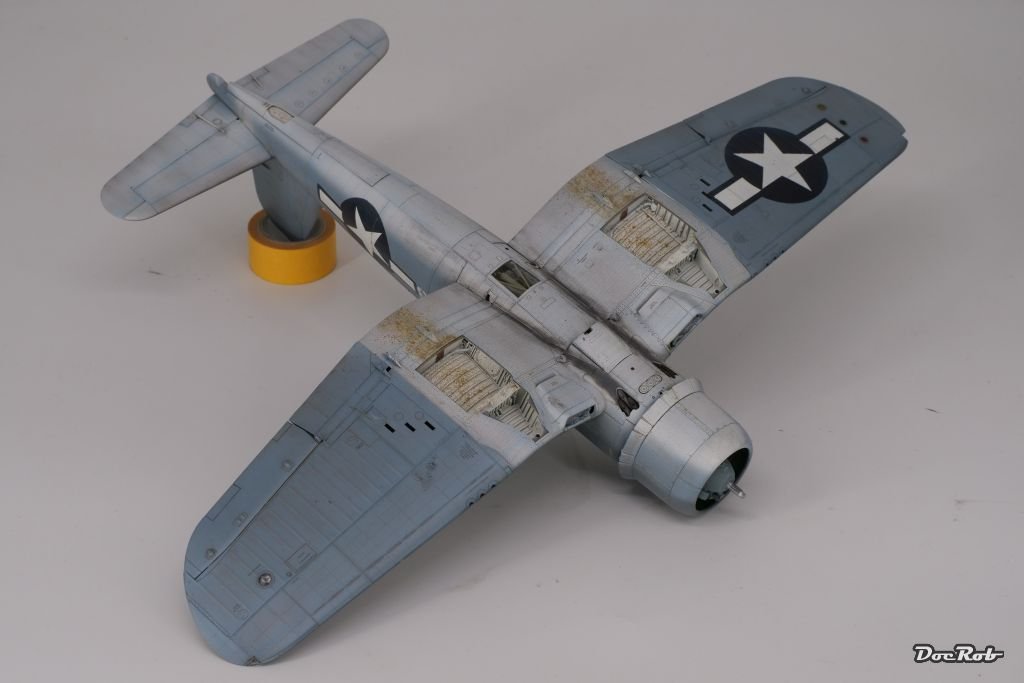
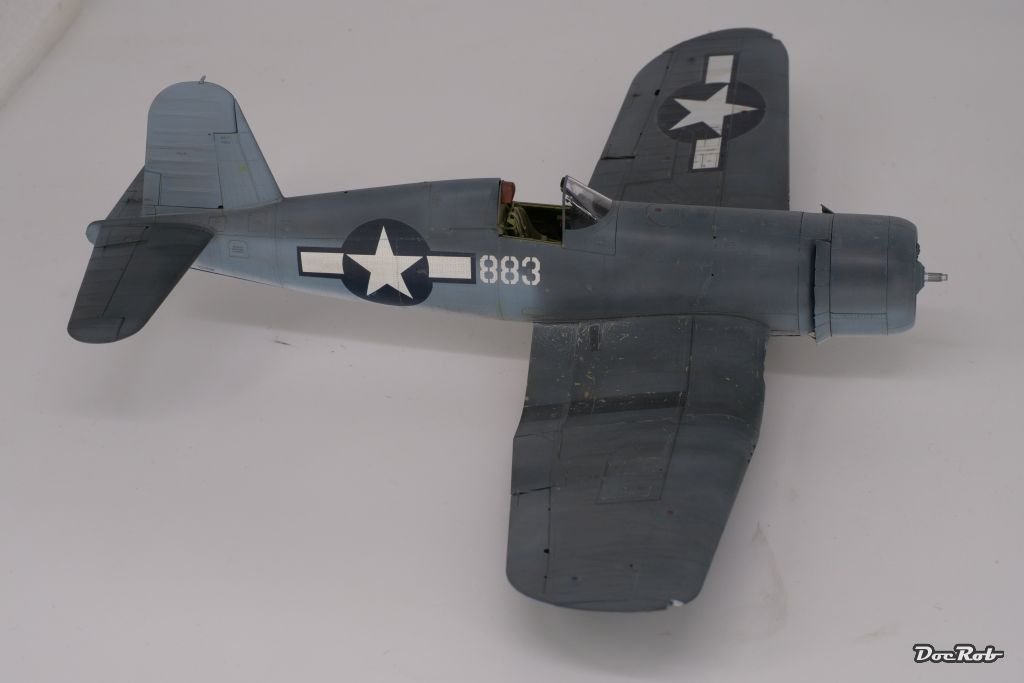
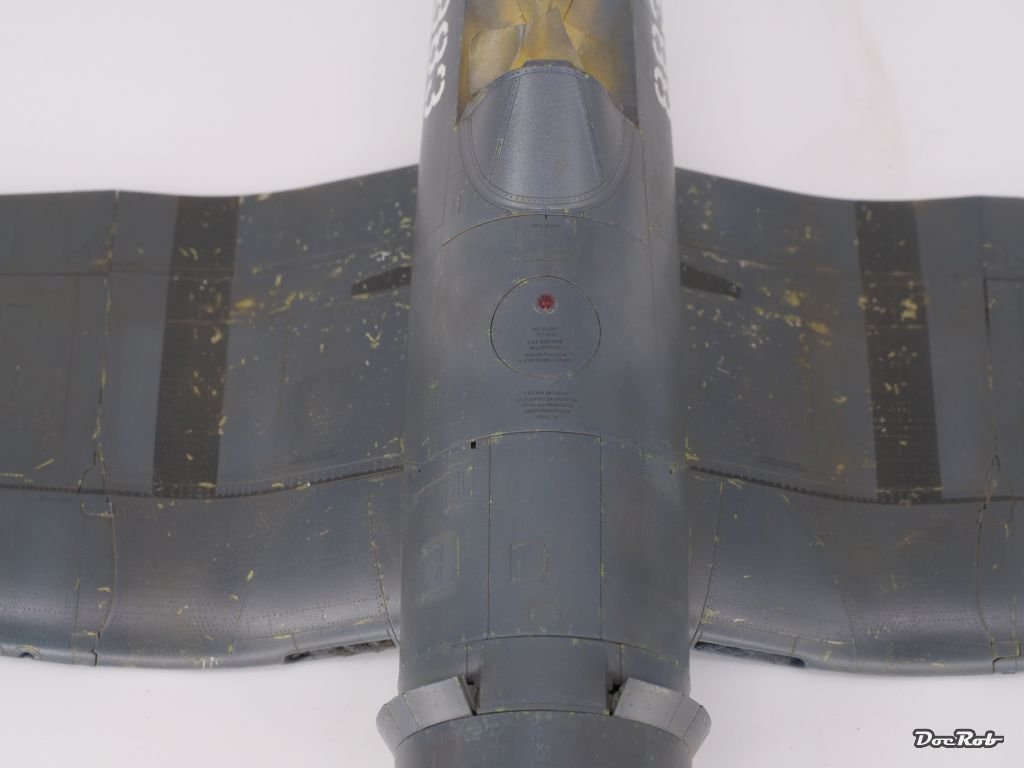
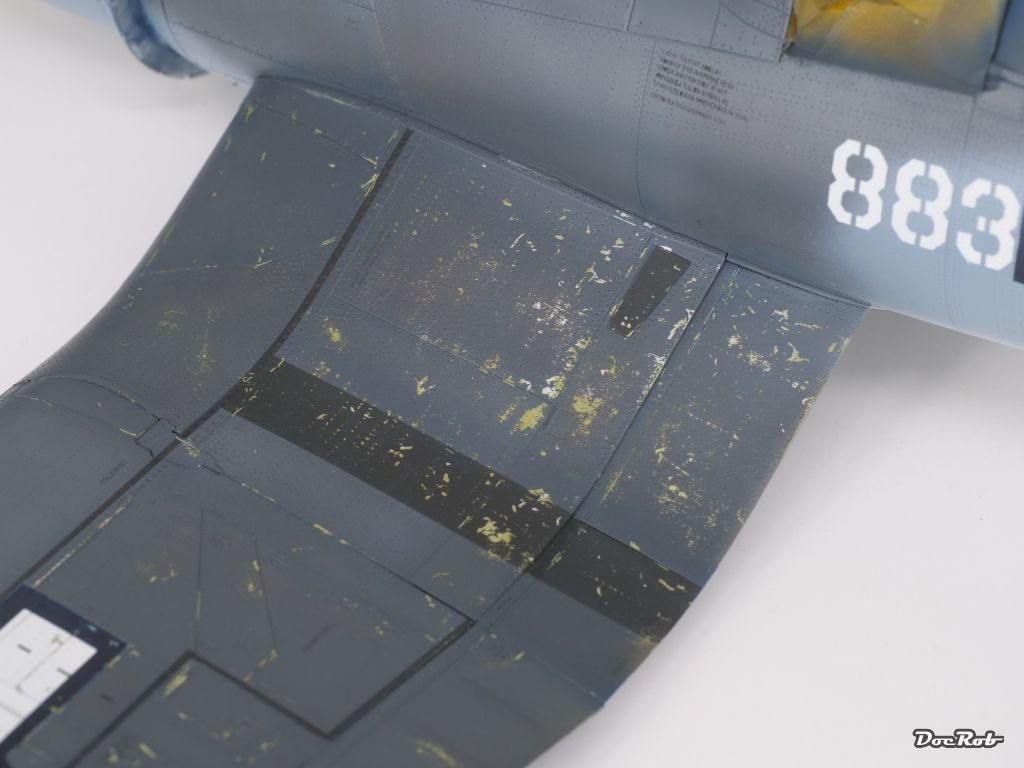
Some more weathering done. I've seen many corsair builds, where the whingroots were weathered and chipped like hell and the fuselage, nada, not a bit. I did some brush chipping with interior green and then added a variety of other stuff, to let especially the top color look a bit more interesting. I used AK's pencils in different grey and blue shades, creating chips and various dots everywhere. I used an old brush and dry brushed some of the intermediate blue for highlighting onto the darker blue. Then I used Tamiya's weathering pastels in different light colors and dabbed these onto the rivet lines and then brushed them smooth. This simulates an oil canning effect a bit and can best be seen in the spine section of the plane. I dabbed more pastels onto the upper parts of the fuselage to resemble sun bleached parts. Fine sandpaper was carefully used for some abrasion effects. I like the result now and will wait for a day or two and decide then, if I find something is left out. Weathering has to be logical and well believable distributed, where it helps to lean back and evaluate a bit. The results show better to the real eye than on the photos, but I will show some anyway. Cheers Rob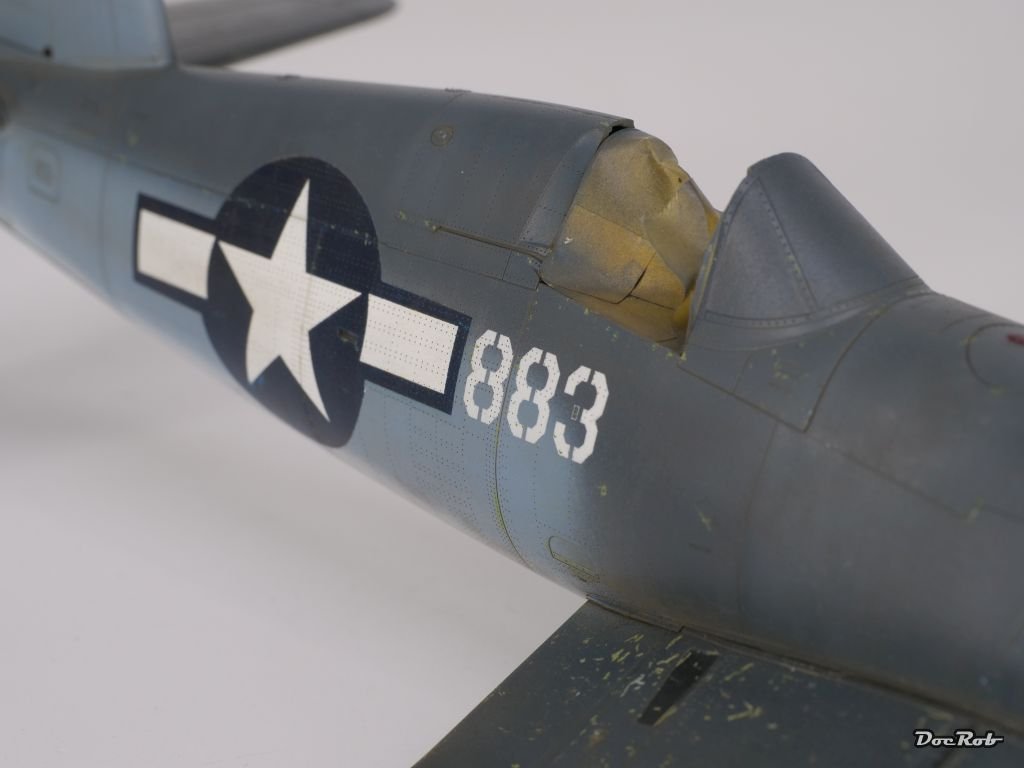
- 160 replies
-
- 17
-
-
-
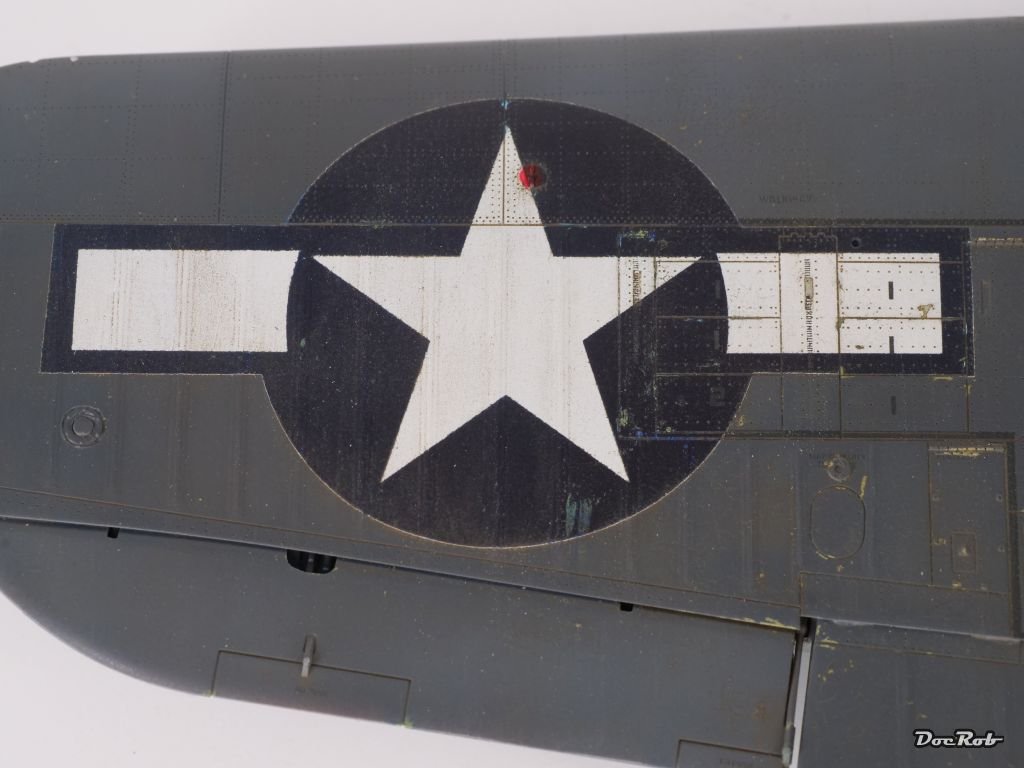
F4U-1A Corsair by DocRob - FINISHED - Tamiya - 1/32
DocRob replied to DocRob's topic in Non-ship/categorised builds
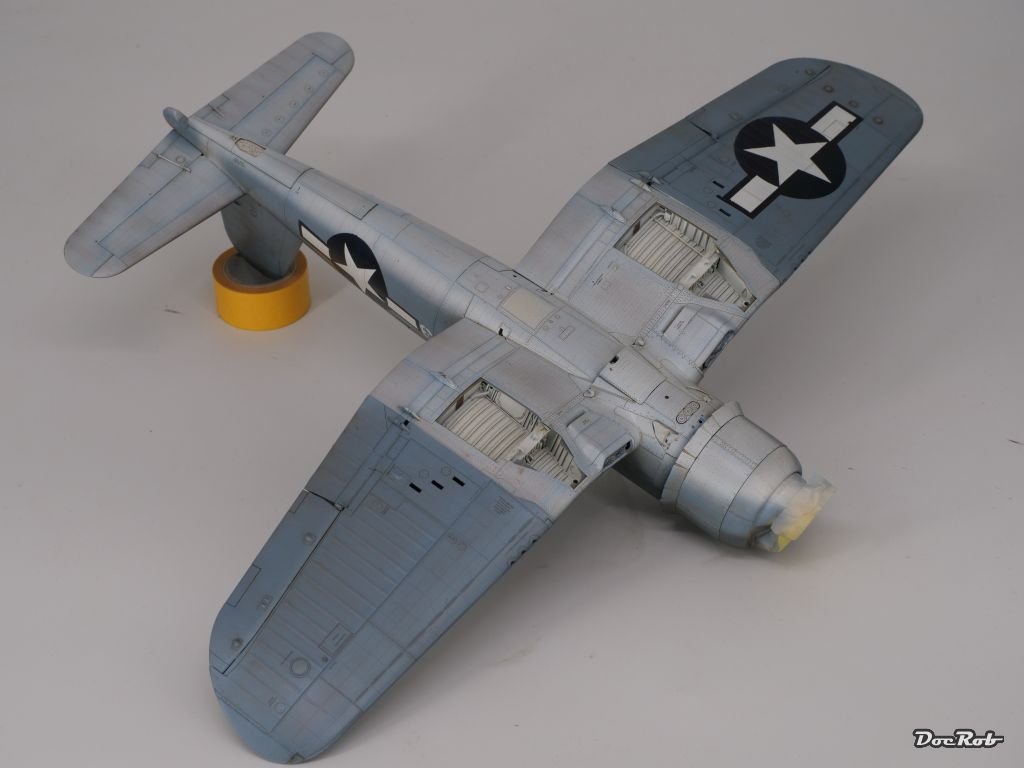
Thank you OC, it's a fun project and I like to build up paint and weathering in a layered fashion. The key for doing that, is work in very thin layers, not to destroy the superficial detail, which pleases the eye so much. On the wing roots, I applied, aluminum, pre shading, hairspray, interior yellow, clear, hairspray again, sea blue, black for the markings and clear coat, nine coats in all and all the detail is still there. Multiple layers create depth, which is the goal of the process. I'm thinking about adding another layer onto the sea blue, to enhance the depth furthermore with some oil color post shading. Cheers Rob -
F4U-1A Corsair by DocRob - FINISHED - Tamiya - 1/32
DocRob replied to DocRob's topic in Non-ship/categorised builds
Today, I muddied my Corsair up with Flory's dark grime wash, a clay based liquid, which I applied over the whole airframe, after adding a drop of soap for better distribution, with a flat brush and let dry for about half an hour. The stuff is dried by then and looks totally grimy and dead flat. Then, I wiped the excess away with a dry piece of cotton cloth in the direction of the airflow and the very fine clay stays in all the panel lines and other crevices. The best part about this wash, you determine the grade of dirt or you can remove it completely wiped down with water, if something went wrong. It's clearly more visible on the lighter underside, but also noticeable on the darker upper side. The good think, my pre shading is still full visible. As a break, I made some detail painting on the landing gear, adding the brake lines and other tiny bits and pieces (not shown) and chromed the cylinders with AK's chrome tape for the first time. It worked ok, a bit more adhesion would have been great on these parts with small diameters, but it looks chrome to me, so thumbs up. Cheers Rob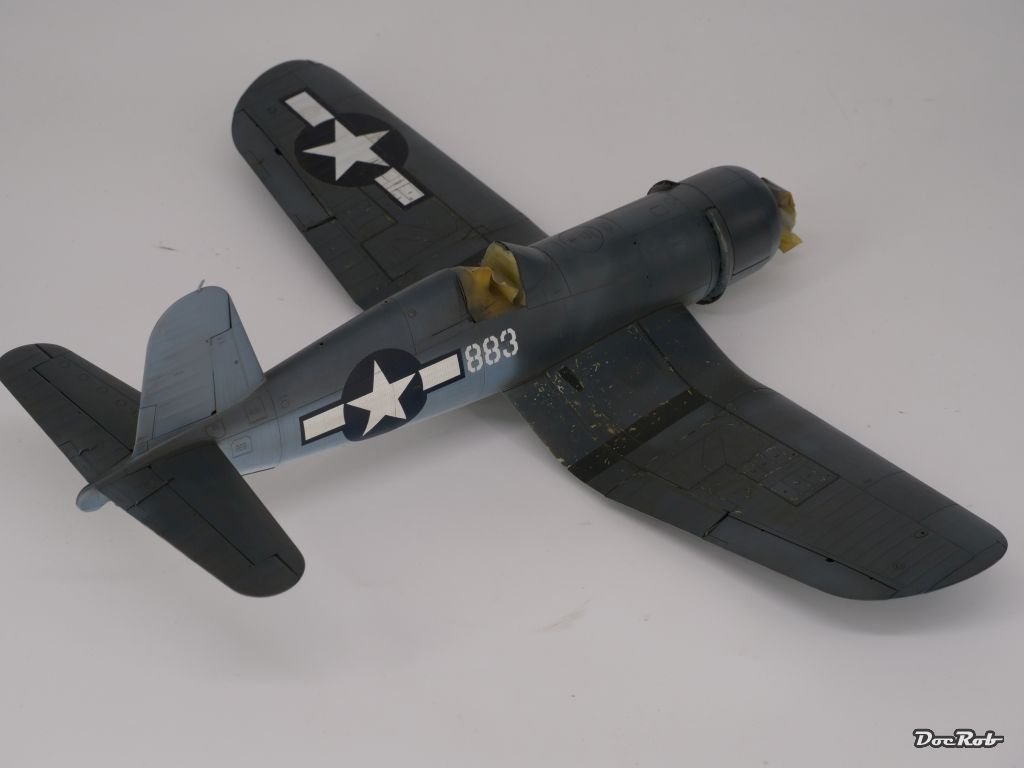
- 160 replies
-
- 15
-
-
-
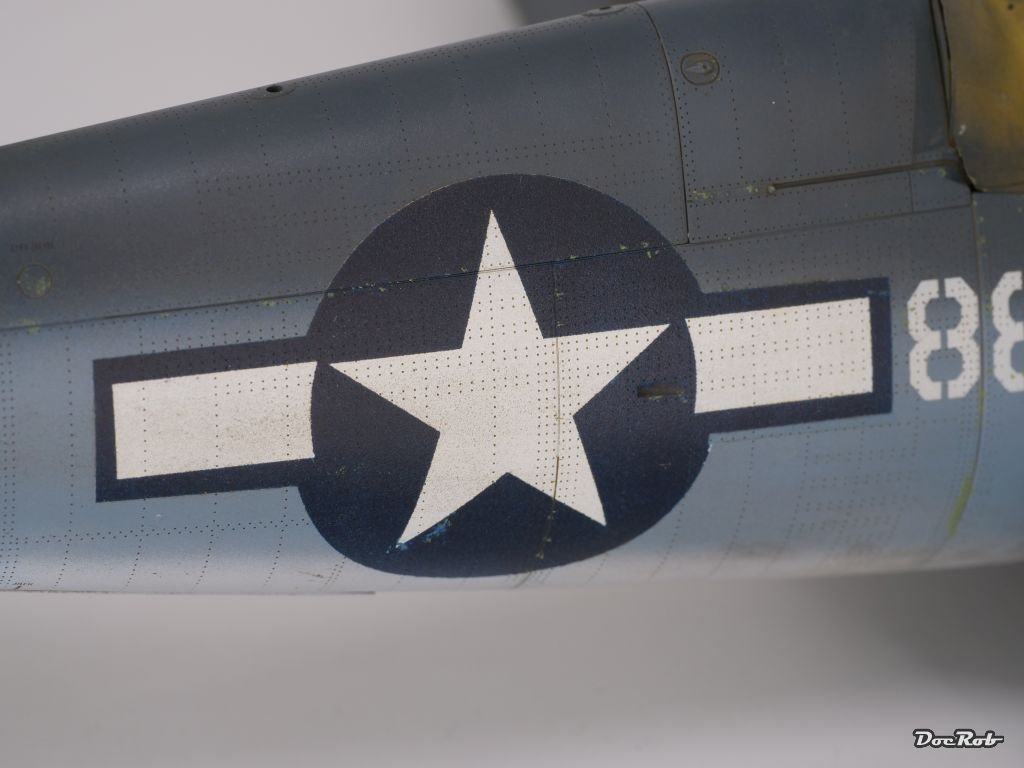
F4U-1A Corsair by DocRob - FINISHED - Tamiya - 1/32
DocRob replied to DocRob's topic in Non-ship/categorised builds
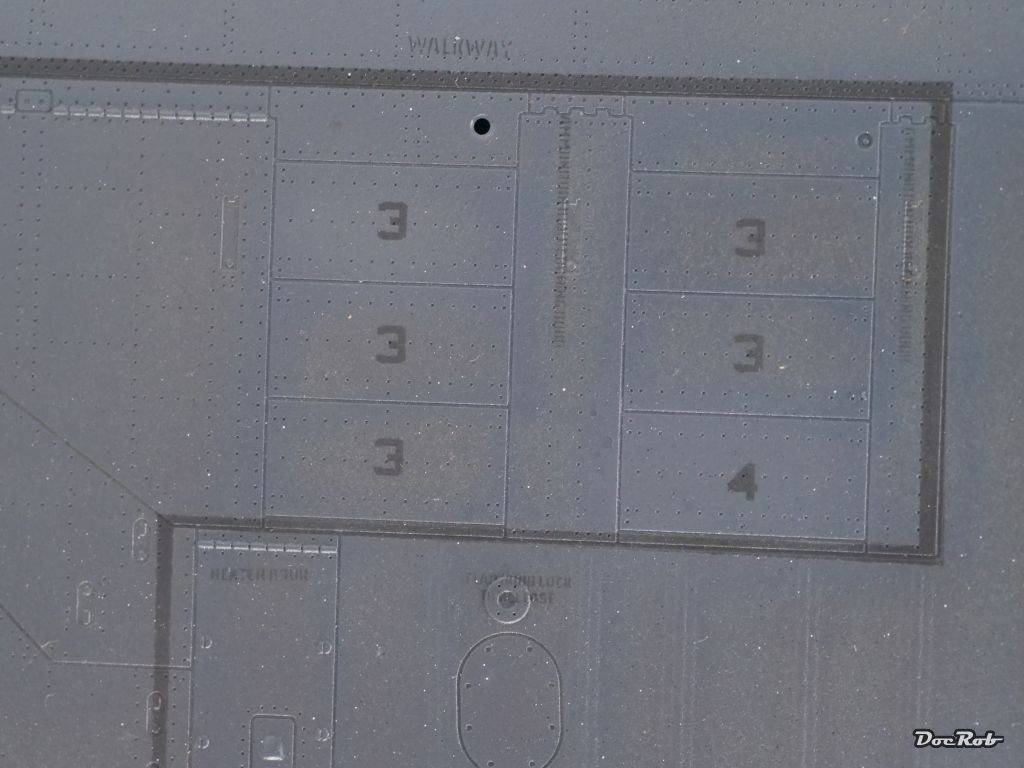
Thank you Gentlemen, right now, the chipping looks a bit harsh too my eye, but that's on purpose, because washes, filters and further weathering will tune it down a bit. The benefit in using masks for the walkways, insignia and stencils is, you can chip through them with the hairspray beneath. I always liked chipping best, when simulating the real thing, like tear and abrasion, instead of painting something on. I will have to do so in some spots of the fuselage, only to match the wing chipping. Cheers Rob -
F4U-1A Corsair by DocRob - FINISHED - Tamiya - 1/32
DocRob replied to DocRob's topic in Non-ship/categorised builds
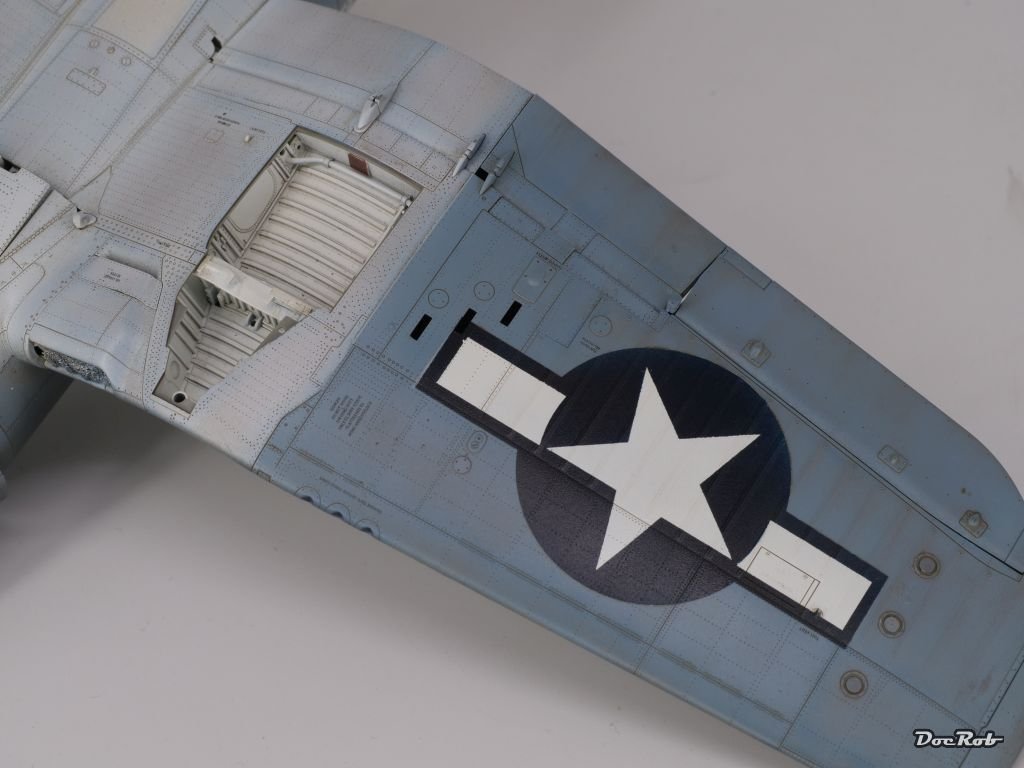
Do you remember the hairspray? I covered the chipped primer with a coat of clear and applied hairspray onto it, before I airbrushed the wing color, walkways, insignia and stencils. Now was the exiting moment to see, if it still works after so many layers of paint. I dampened the areas with water and a drop of soap and let it soak for half an hour. The paint was a bit more resistant, than the primer chipping, but it worked. Using different tools, like toothpicks, a stiff brushes and some tweezers, I got what I wanted. Now the whole plane was covered with a clear coat as preparation for further weathering. Cheers Rob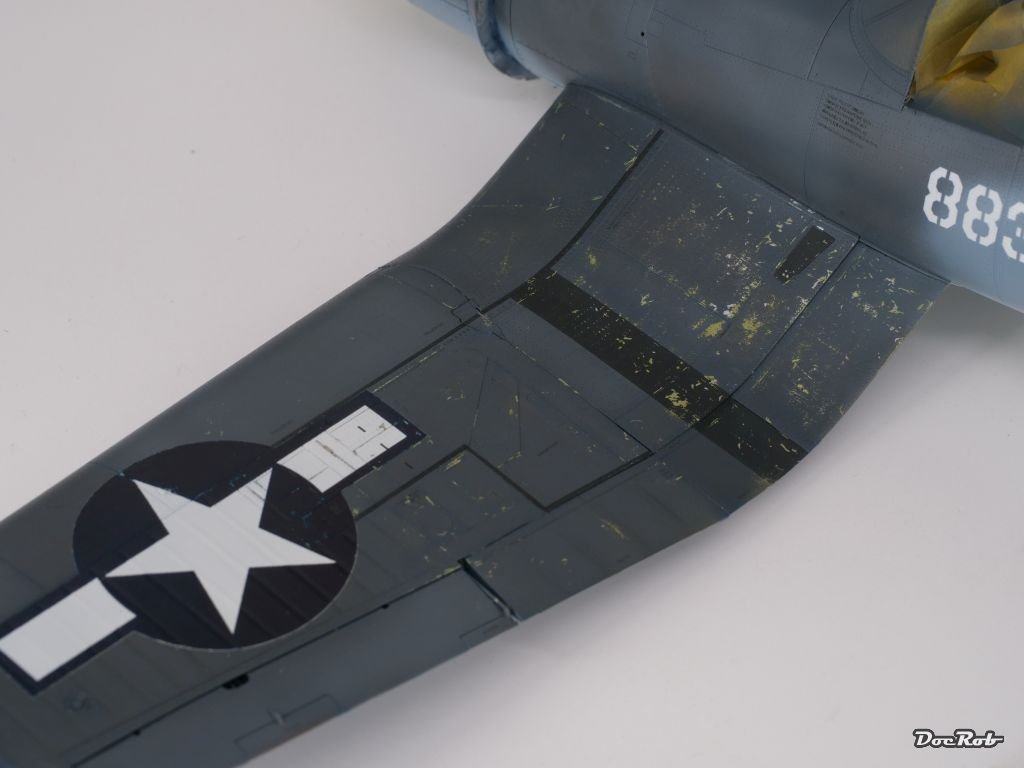
- 160 replies
-
- 16
-
-
F4U-1A Corsair by DocRob - FINISHED - Tamiya - 1/32
DocRob replied to DocRob's topic in Non-ship/categorised builds
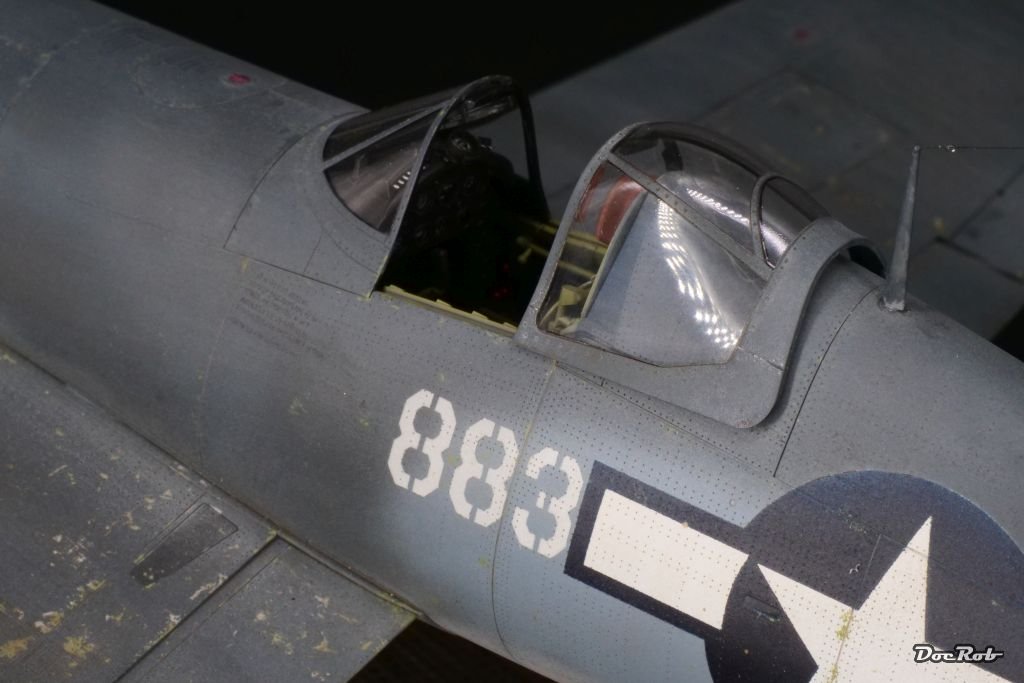
Yesterday, I finished to apply all the stencils on the wings, that were covered by other masks before. ...and while having the Nato black in the airbrush, I added the stencils on the wheel covers. ... and then I realised, my god, I had completely forgotten to apply the 883's to the side of the fuselage. No big deal, except for covering the whole plane again, with different materials, in case of some white color bubbling somewhere unwanted. I also made the corrections to the stars and bars, while being on it. I think, the airbrushing phase is done so far, except for clear coats. Cheers Rob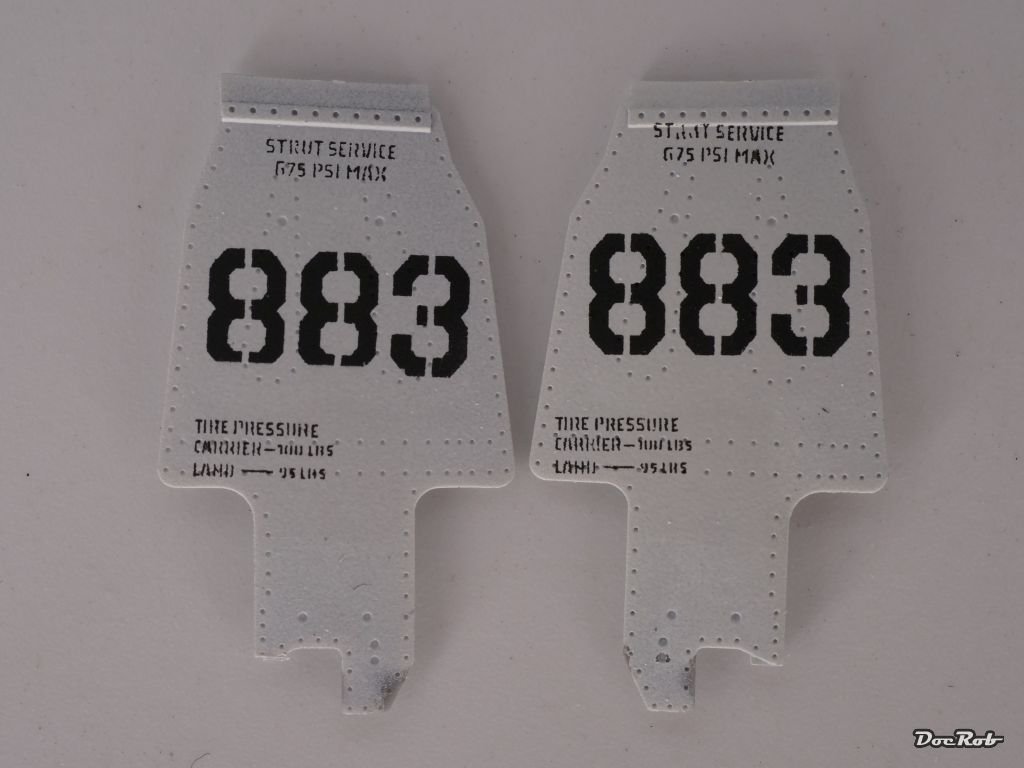
- 160 replies
-
- 19
-
-