
HOLIDAY DONATION DRIVE - SUPPORT MSW - DO YOUR PART TO KEEP THIS GREAT FORUM GOING! (Only 13 donations so far - C'mon guys!)
×


DocRob
-
Posts
1,257 -
Joined
-
Last visited
Content Type
Profiles
Forums
Gallery
Events
Everything posted by DocRob
-
 Thanks, the next steps will determine the fate of the build. Closing the canopy is very delicate with a lot of stuff going in. I also made an error, right in the beginning, drilling the holes for the FUG's antennae posts to far to the rear on the upper canopy half and I hope, I find a good antennae alignment, but not the correct one. There is no way of filling and re drilling in the clear part. If I ever build another Arado 234 (quite possible), it will be a one seater for sure. Cheers Rob
 -
Good to have you here Ken. The backward facing operator was a common design with German night fighters, like it had been done in the He-219. With the Uhu, it might have been space issues, keeping the radar equipment behind the operator and not between pilot and operator. With the Arado, I don't know, why they have chosen this layout. Cheers Rob
-
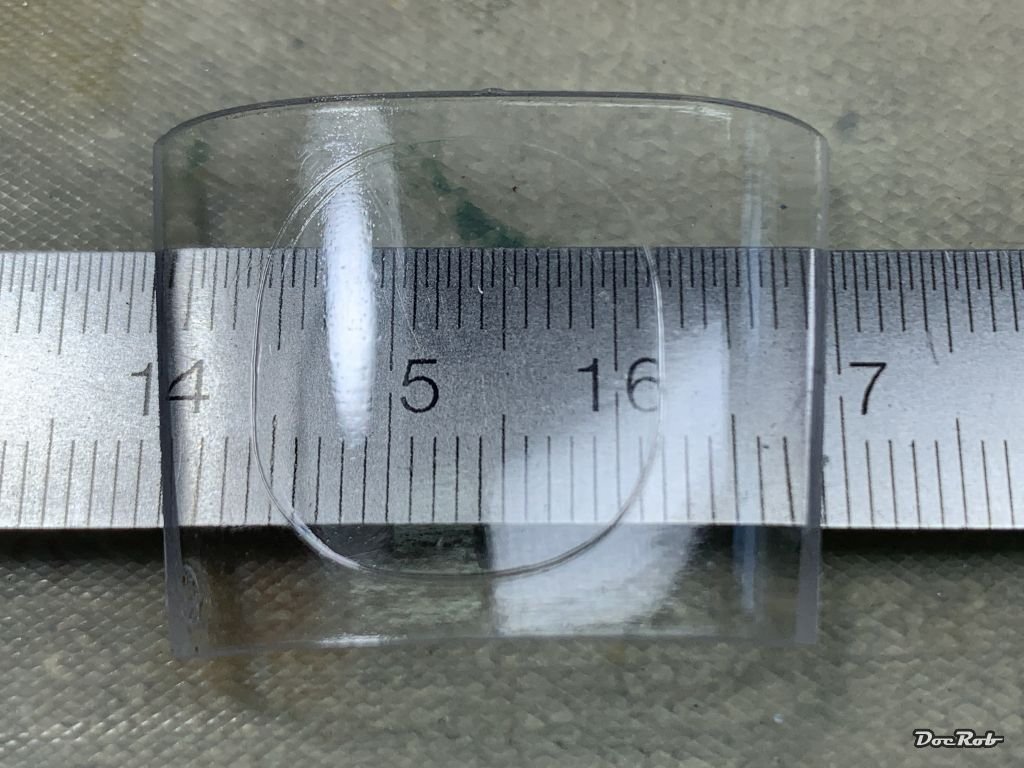
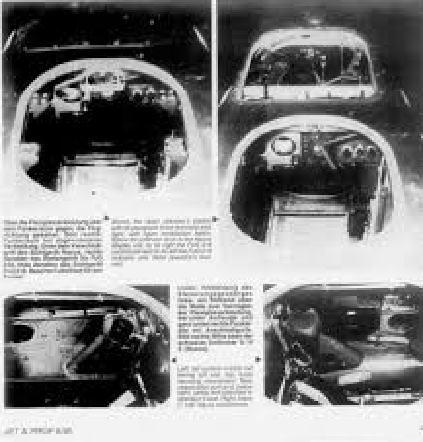
Thank you for your thoughts Egilman, I know the Nachtigall is almost as rare as the Caudron, I built with only a few being altered from -B2 to the -B2N version. My sources leave me to think that four to five Nachtigall Arados were built and flight. The Kagero book states firstly there were two converted from the reconnaissance version. Later one of those crashed and three (more?) formed a unit which tried to hunt Mosquitos, but without success. Generally the suitability to the nightfighter role was put into question by the pilots, because of lots of light refractions in the huge canopy and the lack of frontal armor. The specific layout of these B2N are highly obscured and every kit and every illustration shows another interpretation of the bird. Questionable areas are mainly the rear station, the Naxos antennae, the radar and the gun pod. The kit supplies a clear part for the radar station of the aft cockpit, with an engraved oval opening. The hatch engraving is out of the middle and too small for an entry hatch to my eye. If nobody knows the truth, you can go freestyling and that is what I did. I widened and squared the opening and after painting, I will add the hatch, which I assume would have been locked in place with some handles and without hinges. The only picture of the real thing, which showed up during my build over on LSM, was a tiny facsimile of the rear hatch, which is very blurry. I was not able to find the publication, where it was published. I know, it's more oval than mine, but I can live with that. Cheers Rob
- 79 replies
-
- 11
-

-
Fly is a Czech company producing a wide array of kits mostly in plastic, but with added resin and PE. Their models tend to be a bit off the trotten paths, which is very refreshing, but often not so easy to build with the short run technique used. Cheers Rob
-
If you followed me until this point, I may can interest you into the process of the build, which was not without difficulties and can be read here. Arado 234 Nachtigall on Speed - LSM 1/35 and Larger Work In Progress - Large Scale Modeller After evaluating, what I had done, re-reading my LSM thread to catch up, I wanted to close the canopy now and started to add detail to the cockpit and bezeled and wired the instrument panel with the Yahu PE parts, which are cleverly done. The manual calls for 1mm pre drilling, where the dials should go and the backside of the dials has a protrusion, to place them. The bezels have a little nub for aiding the placement, which has it's counterpart on the dial. This way, you can be sure, the instruments are orientated correct. Cheers Rob
- 79 replies
-
- 11
-
-

-
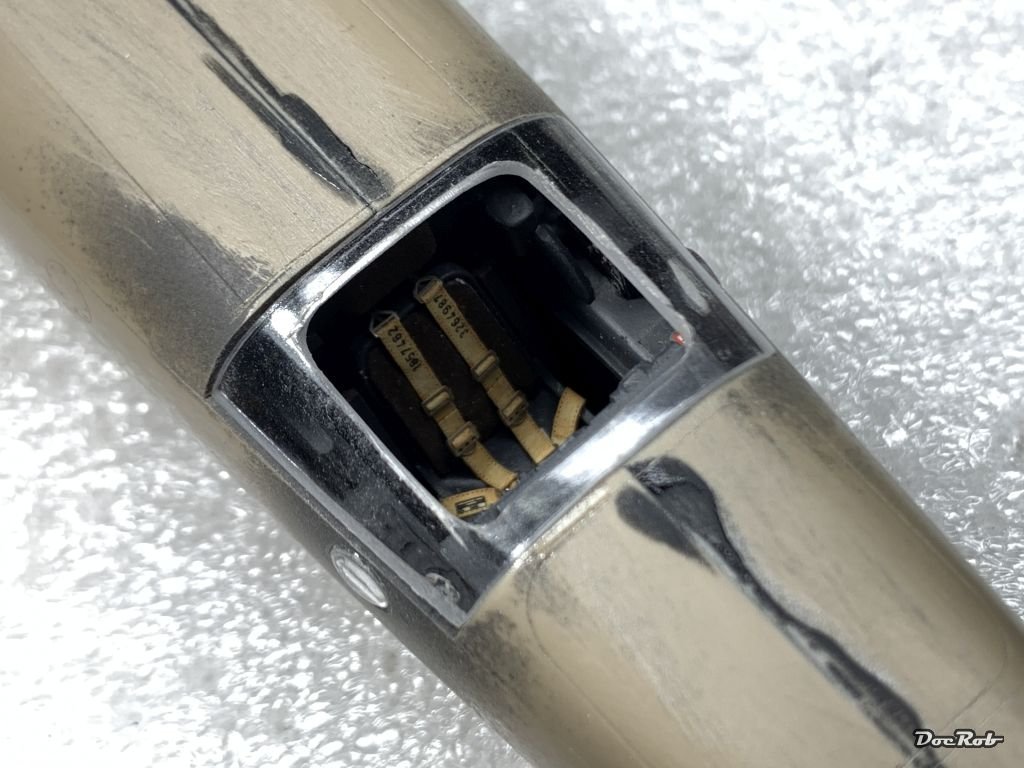
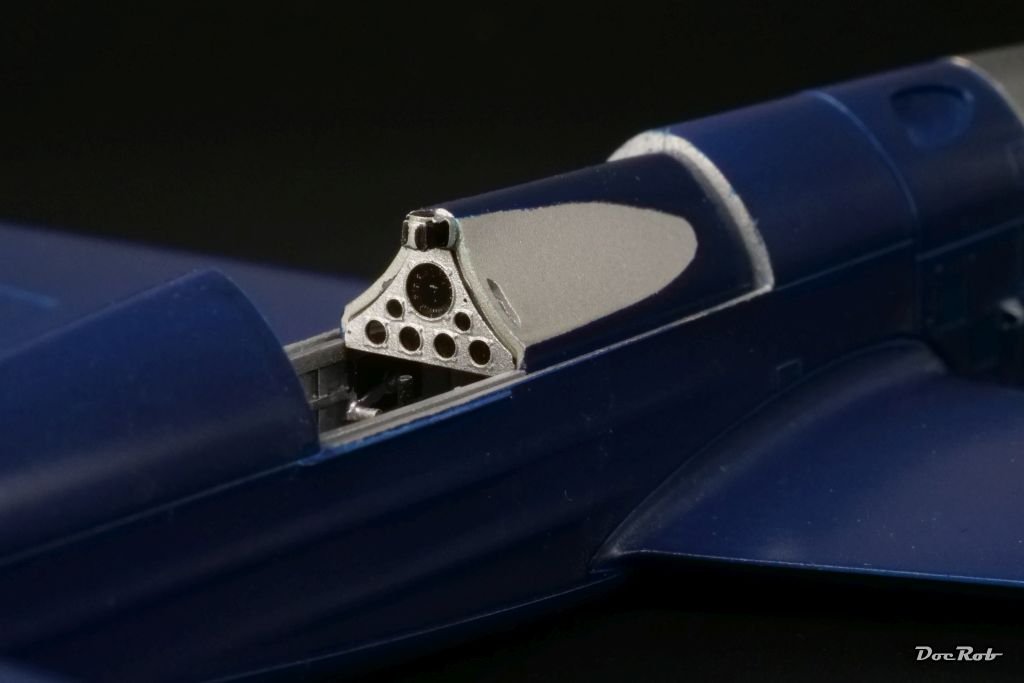
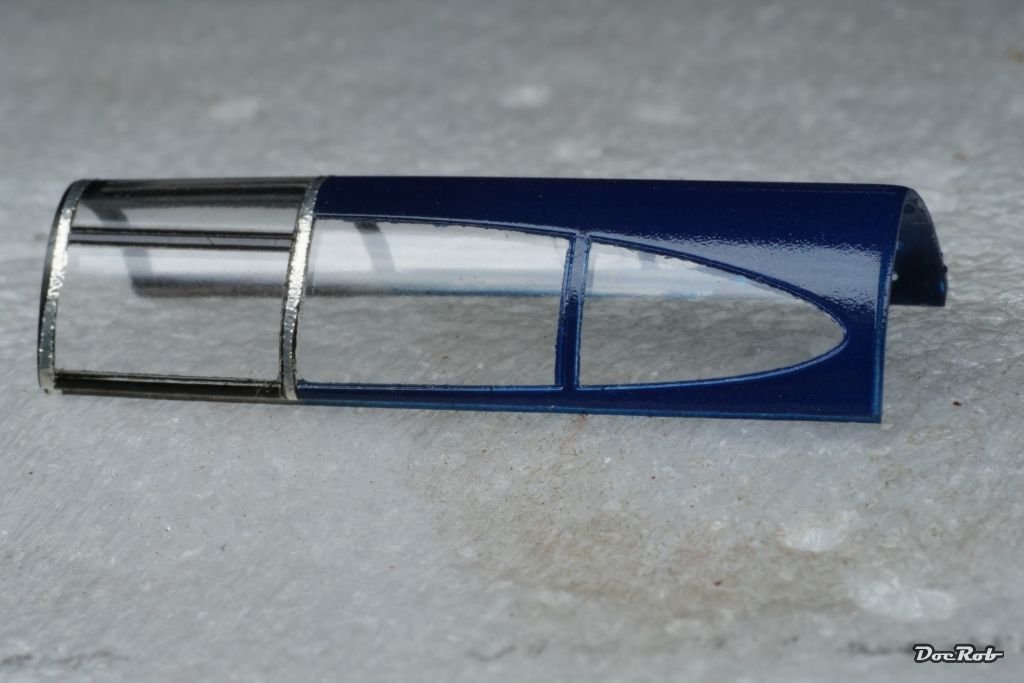
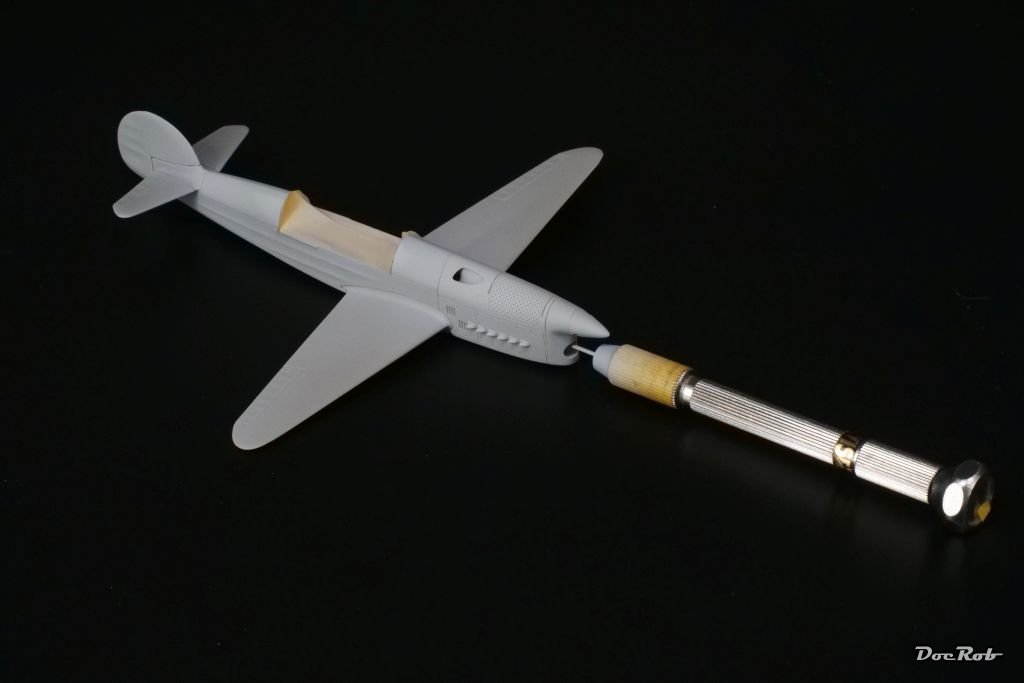
Hola fellow Modelistas, after some positive resonance in another thread, I will do a WIP about my build of the Fly Arado 234. I bought the kit some years ago and always had the itch to built it soon and as a nightfighter.B-2N version. Now, that ZM announced a new 234, I felt it is about time to build mine without being tempted to buy a new one. I call that, err, stash management . I always had a soft spot for the sleek and slender silhouetted Arado jet. It's technical advantages, design and engineering makes it a standout. Generally I don't really much enjoy to build German subjects, but some are so fascinating, that I make an exception. The kit looks great in the seemingly small box, the plastic is a little crude in spots and the amount of cleanup is a little higher, than with some of the usual suspects, but nothing to worry about. The resin parts are breathtaking in detail and seem to fit very good to the plastic. on some of the bigger parts it's not even necessary to remove the pouring stubs. I will not bore you with a review, because James Hatch made a brilliant one on LSM. This is a different version of the 234, but all the main components are the same. 1:32 Arado Ar 234B-2/S3 - Aircraft Reviews - Large Scale Modeller There is not a lot of AM around and I will use the masks from Fly, seatbelts from HGW, a Neptun antler from Master and last but not least the Yahu Cockpit set, which is not a PE IP-board, but single bezels with dials. This is clever, as the kit provided ones are good and very visible and the different panels which consist of instruments are in various different places in the cockpit. The dials and bezels are printed in Colour and in a very shiny finish, and the manual recommends, that you cover some flat base on the bezels and keep the dials like they are in high gloss finish. I also have the two Kagero monographs along, which show a lot of plans, renderings and pics, but unfortunately don't show the night fighter layout. An here is where the trouble starts. I have no idea, how the window of the operator in the back looks. Even the Fly box art of two different issues show a rectangle window on mine and a oval window on the actual version. If somebody can enlighten me, I will be pleased. The Yahu set Being a short run kit without locator pins test fitting is a lot and so I cleaned the mayor components and was positively surprise, be the seemingly good fit. I decided to start with the surgery of the fuselage and canopy, because if I would have had a mayor fail here, there would have been no WIP. First was the fuselage opening for the operator in the back. It is necessary to remove a rectangle part from the fuselage, to insert the provided clear part. I used dynotape for the borders and cut with a saw and scalpels. After a little sanding it looks like this. And here is a little preview of what's in the fuselage. The backward facing place of the operator is supplied in resin parts, which seem to fit without cutting and grinding, splendid. I only cut the cast block of the backward bulkhead, only to get the opening in it into the fuselage. The second area of surgery was the canopy and it proved to be not too easy. you have to drill elliptical holes for the struts which carry the Neptun radar. Boy, how I hate to drill, grind and cut into clear parts. I used the measurements in the manual and copied them onto Kabuki tape onto the canopy. Then I drilled and grinded. You have to be precise while doing it, anticipating the angle of the struts. The result looks like this. The upper struts are a bit to much to the back, but I hope, I can arrange the struts properly, because filling and drilling again is no option. I did all these surgeries, before applying a coat of Future to the cockpit, which hopefully enhances the clearness and makes applying the provided decals trouble free. Like James, I firstly wanted to open the front and rear canopy, but after the drilling job, I'm not that sure anymore. While cutting the fuselage with the dynotape, I noticed black residues after removing the tape, a killer for a clear canopy. So for now, the bird will stay closed up. That's where I am now, reading my books about the 234. Be warned, that will not be a fast build, because there are others in line and I will do it proper. Cheers Rob
- 79 replies
-
- 12
-
-
It has been a while, since I was working on the Nachtigall, which I started 2019, but the kit, resting on the shelf was never forgotten. I need all my cojones to continue with it and after finishing some builds lately, I initially wanted to start the 1/32 HKM Do-335 B2, but then remembered the Arado. I love planes that may look quirky, but are so much ahead of their time engineering- and design wise, that they ultimately attract me, the more unusual the better. The Arado even beats the Pfeil in that subjective category and now, I hope I can pull the build through, having most of the difficult work already done. If it's ok with the Admin's, I will copy the first post of my initial thread on Large Scale Modeler as an introduction, link the LSM-thread and continue it on both sites. Cheers Rob
-
Thank you Mark, I may have to tie it down in the display shelf or whoosh, it's gone . Cheers Rob
-
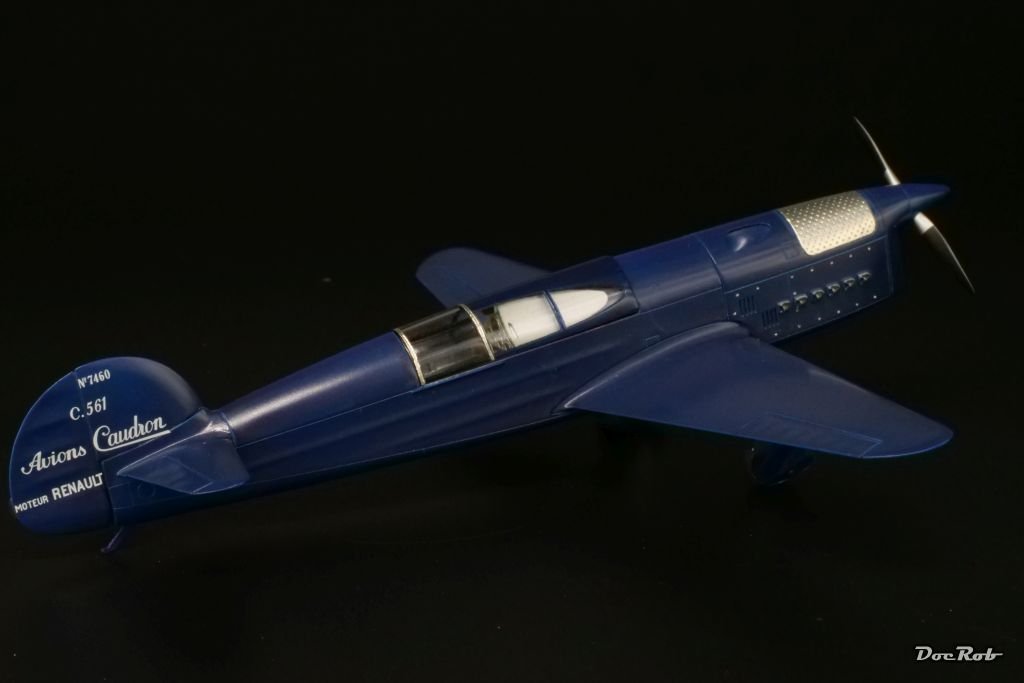
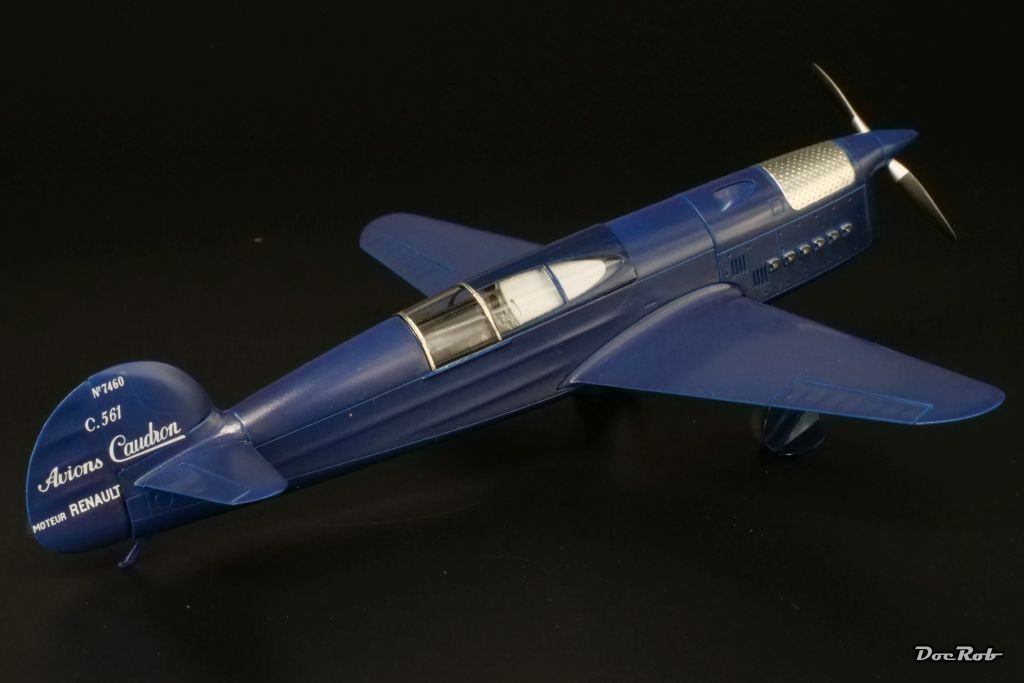
I think there are still some resin kits out there, which are badly cast and designed, but the Caudron was a perfect kit to start a full resin build. I already ordered another of their racer kits, albeit in 1/72 normally not my scale. My scars are a less deep it seems, but I had my run ins with mediocre resin kits as well some years ago and never finished them, but will do later. Cheers Rob
-
Thank you Phil, it will not be my last racing plane, as I already ordered another one. Cheers Rob
-
Sharp about sums it up, design wise Popeye. It was a pure pleasure build and now that I think about it my first full resin plane kit. Cheers Rob
-
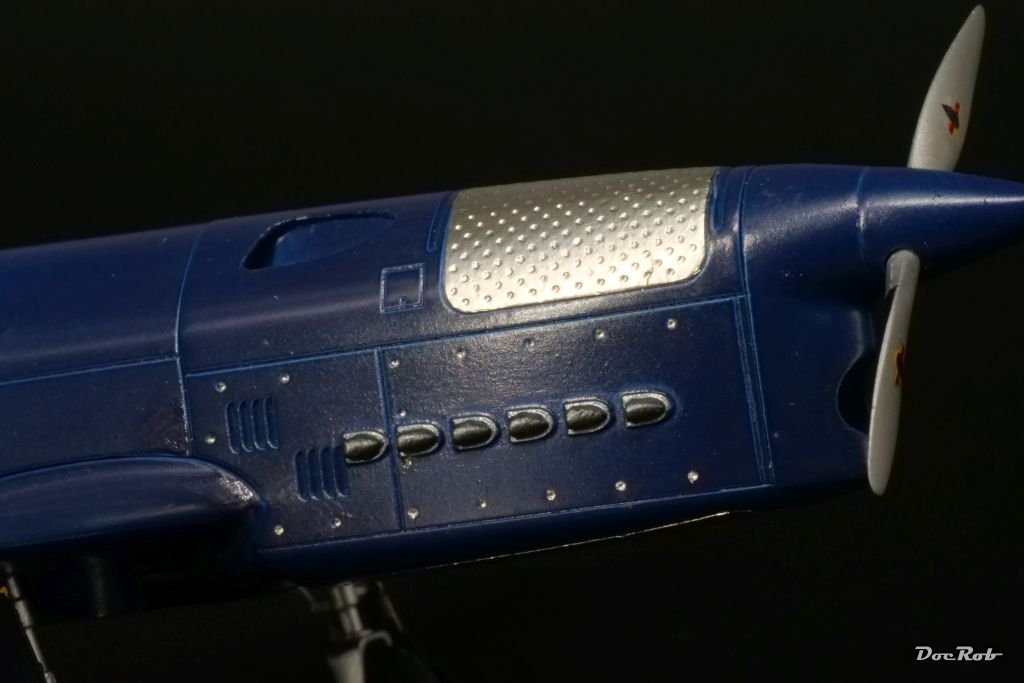
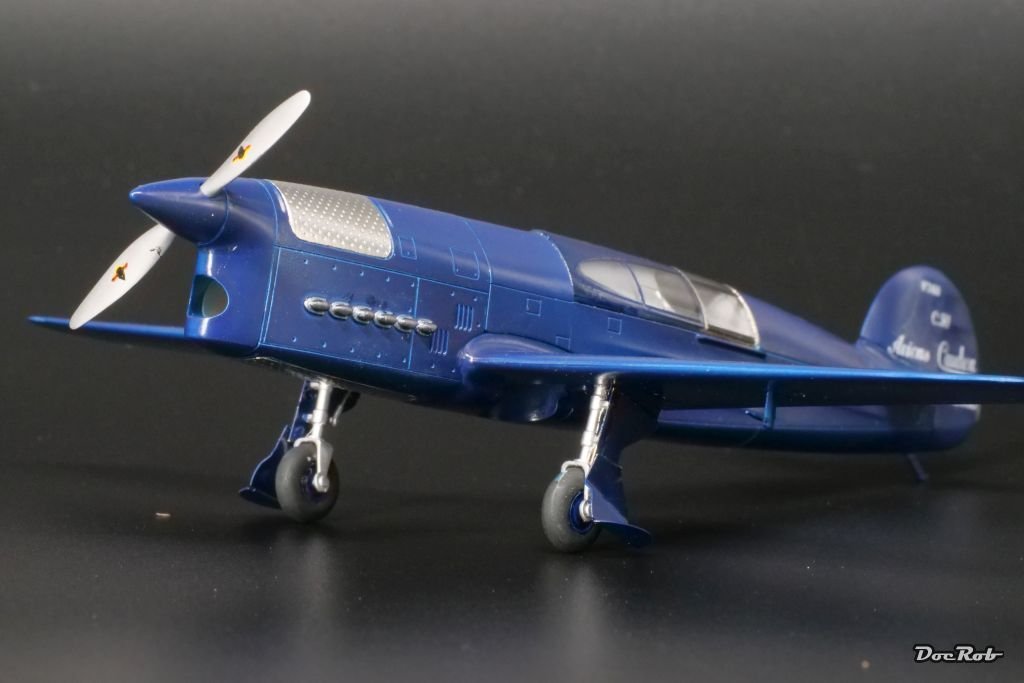
Post Scriptum to a finished build. A member on LSM addressed, what was gnawing on me all the time. The prominent fasteners of the engine cowling in their high shine appearance. After trying different methods, I found one working satisfactory but it was delicate. I adhered strips of Bare Metal Foil over the area, pushed and turned a sharpened toothpick into the holes and then carefully removed the foil with the toothpick still pushed into the hole, tell me about finger gymnastics . Now I can put this build onto the shelf and find my sleep without having to care about this brainbug. Cheers Rob
- 62 replies
-
- 13
-
-
-
Thank you Ken, about the next build, I'm not so sure, too many tempting projects. Waiting for the Caudron's colors to arrive, I toyed a little with a Hong Kong Model 1/32 Dornier Do 335 B2 and there is my still to finish 1/32 Fly Arado 234 waiting. Another option is the huge Wingnut Wings AEG G.IV night bomber,... ... and there is always the rigging of the Duchess of Kingston to be done, lastly the reason, why I signed up to MSW. Cheers Rob
-
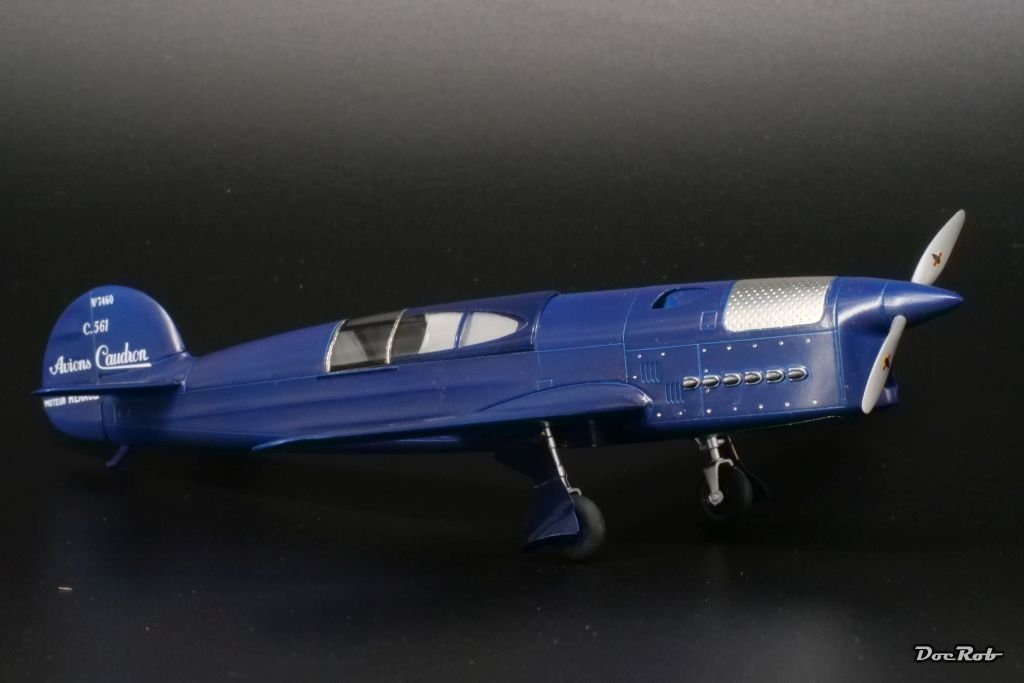
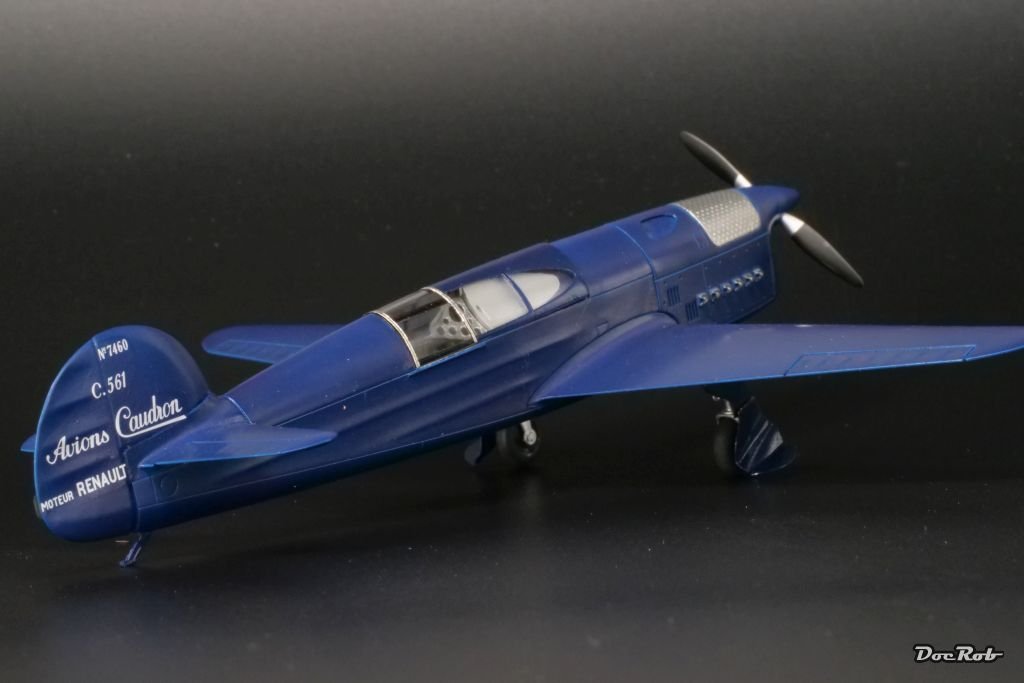
Thank you Gentlemen, after the time consuming and tedious work on USS Arizona, this was a welcoming fast project. I have to tip my hat to SBS Models, as the created a tamiaesque resin kit. I have another racer in my mind to be build in near future. It will be green. Thank you all for contributing and following, I took a lot of precious information out of your input about the Caudron. Cheers Rob
-
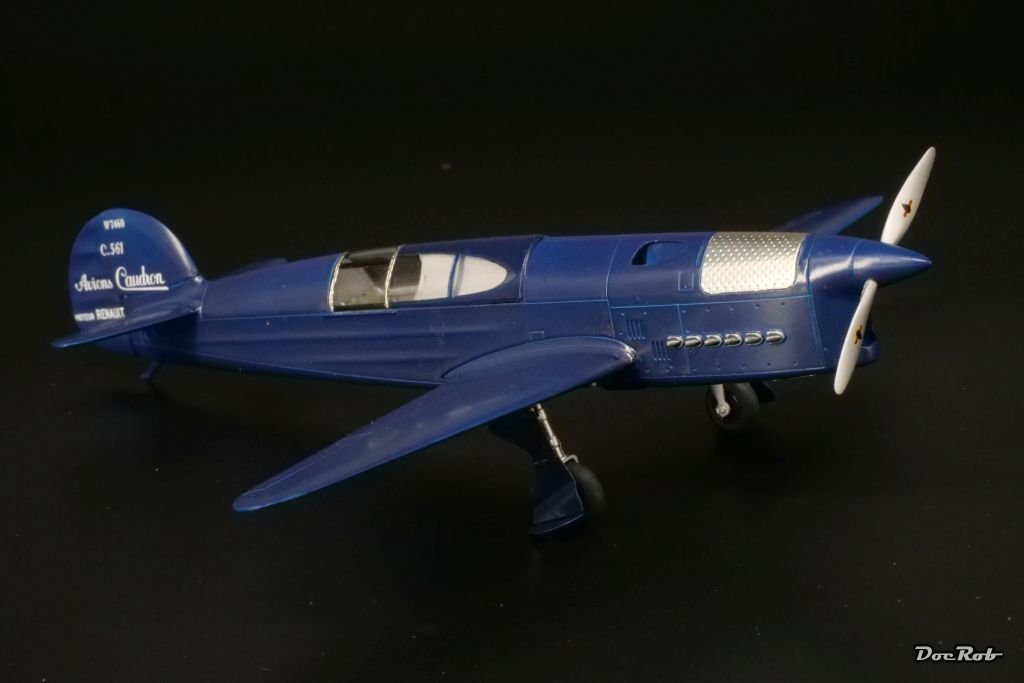
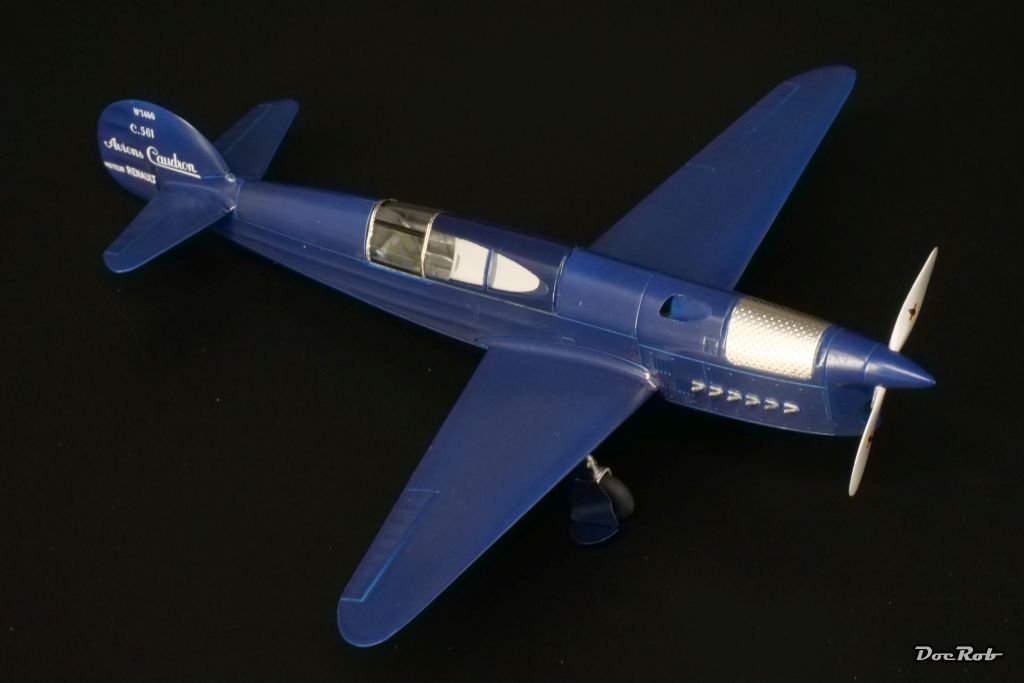
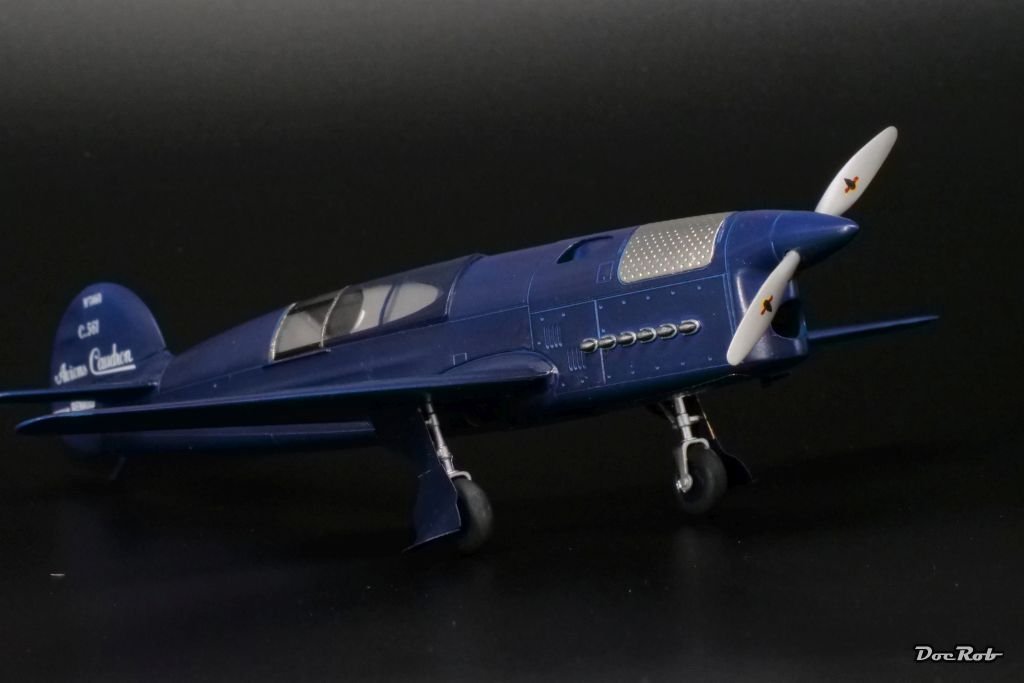
I couldn't resist, as racers seem to let me go fast . Decals went on beautifully and luckily there are only four of them. I glued in the propeller blades and went through the painful task of denting all the chrome cowling holes with a toothpick. I will need some finishing touches, but then the beautiful Caudron is done. The kit was near perfect and an absolut fun to build. This will not be my last racing plane, there is another green one in the pipeline. Cheers Rob
- 62 replies
-
- 16
-
-
-
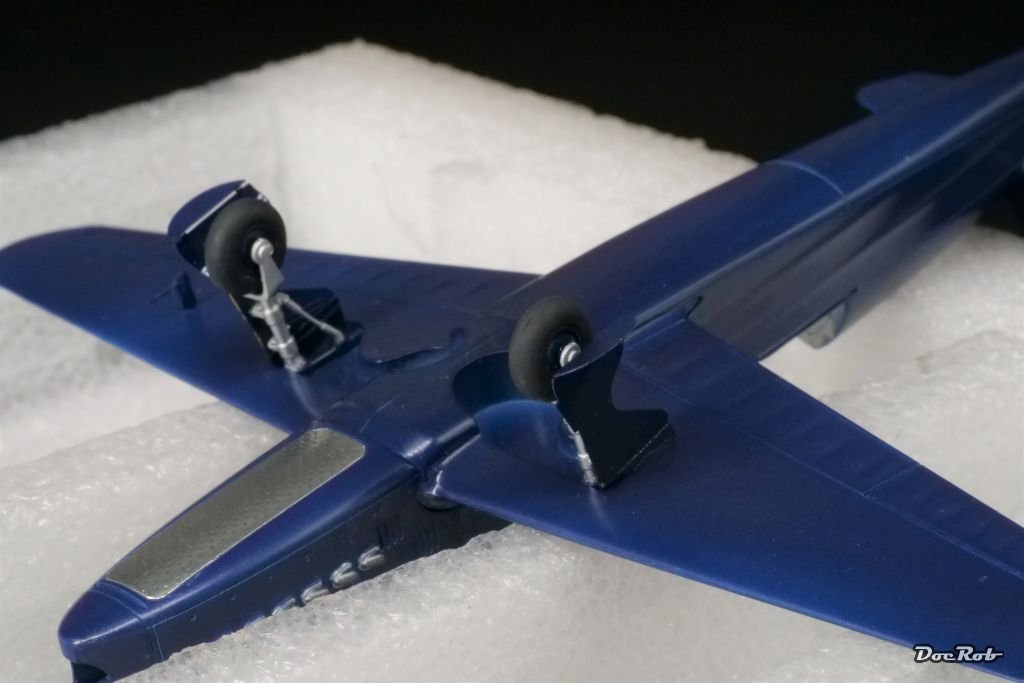
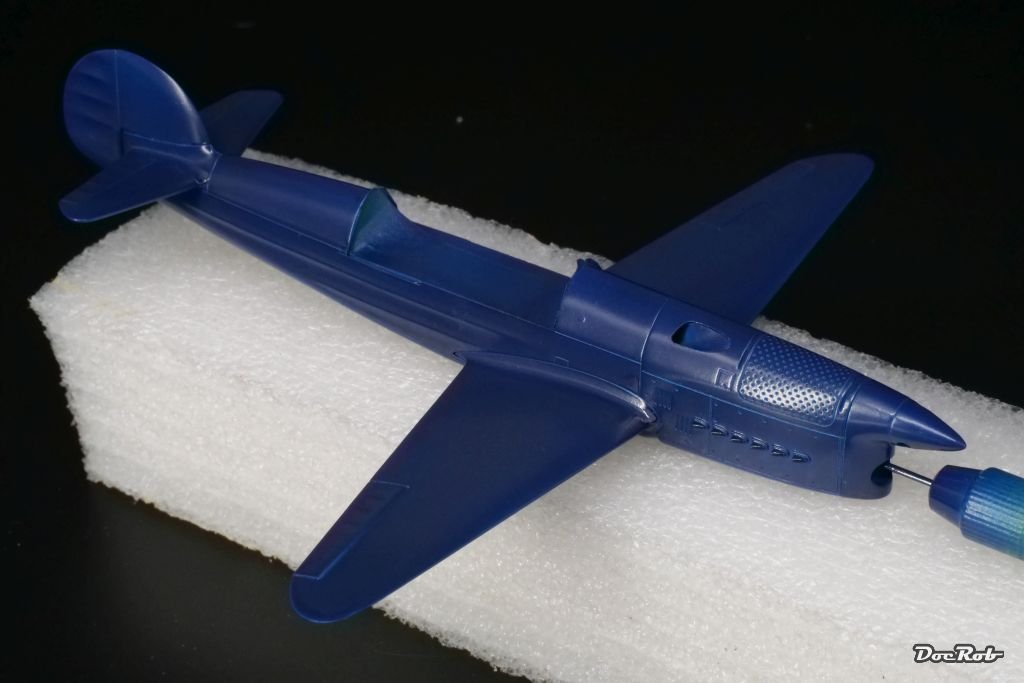
I finally added the undercarriage, which is a mix out of brass casted wheel struts, resin struts and three PE pars per side plus the resin wheel of course. Assembling the struts was easy, but the photoetched parts were a bit difficult to position, though the manufacturer etched some marks, where the gluing points are, luckily. Tomorrow I will add the prop blades and decals and the blue beauty will be eye candy in my display shelf. Cheers Rob
-
Thank you Kevin, the Royal Blue behaved well in the end, but needed some passes, until it had the right opacity. With such a translucent color and the need for a 'flooded' application for the shine, it was always on the verge of running. Cheers Rob
-
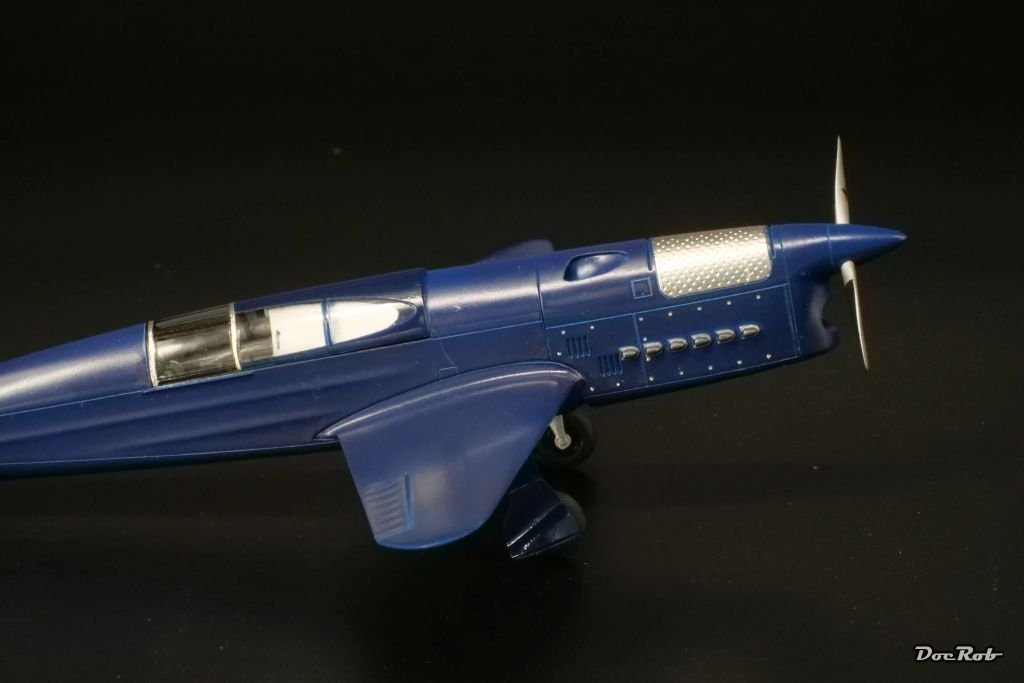
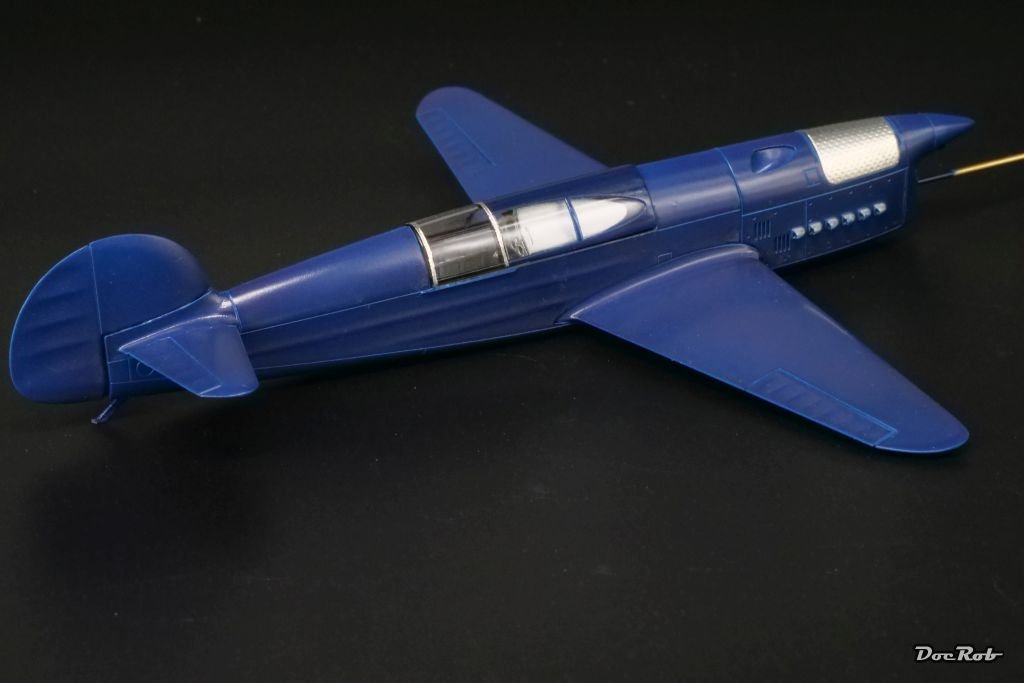
The sparse IP was added to the front cockpit part. It's made from a PE board over acetate film dials and I glued them with Pledge, to risk no fogging and have shiny 'glass' dials. The canopy was a bit adventurous to paint, masked with the supplied and well fitting Kabuki masks and Kabuki tape from the inside, then sprayed gloss black for the rear framing. These parts got over masked after drying and the rest of the canopy was airbrushed with the blue fuselage color. Photos show, that the rear vertical spars were metal colored and to replicate this, I applied 0,5mm strips of Bare Metal Foil onto the frames, cut on my Inifini template. Lastly, I painted the exhausts silver, but that will be retouched with a metallic black on top, that only a silver base will show. The canopy is only loosely fitted on the pics. Well, I think it starts to look fast now. Cheers Rob
- 62 replies
-
- 12
-
-
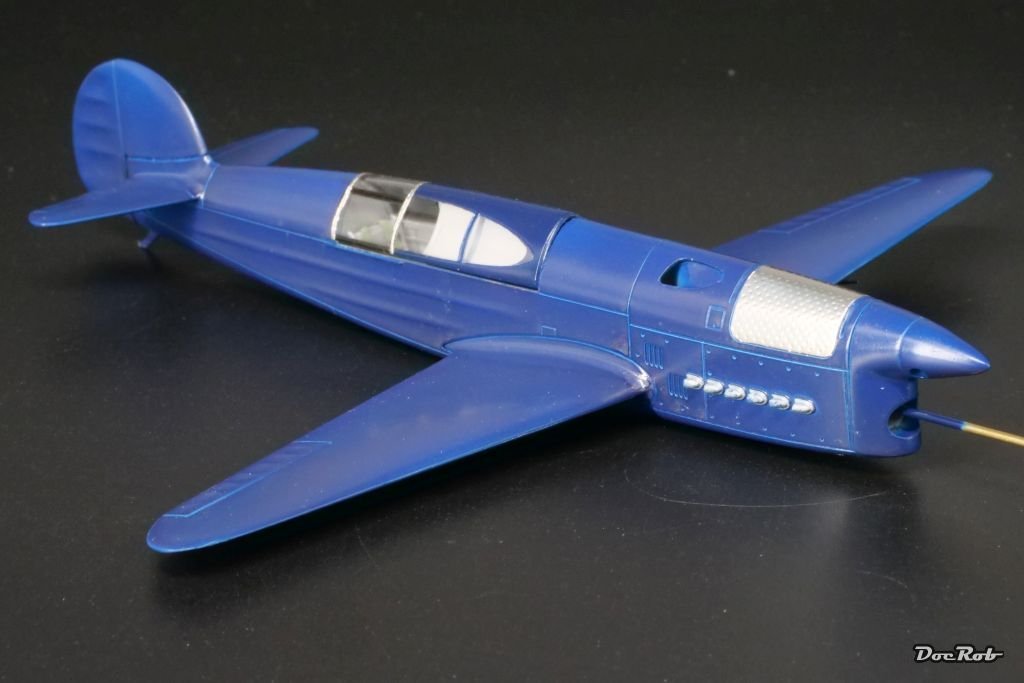
The blue color settled nicely, while drying overnight. The sheen has been a little less, but I like the look scale wise. There is a slightly lighter panel accentuation visible, due to the very transparent character of the blue color. I like the effect and it spares me another panel line wash or similar, as I often found, lighter panel borders appear more real than dark ones. The next bit was the nerve straining task of foiling the cowling with Bare Metal Foil. I made a test on the unpainted model, which was not too bad, but lacked perfection. The first try on the painted plane was not satisfactory, it seems, i struggle with keeping a straight line with the scalpel, to cut the borders inside the fine panel lines. I removed this attempt and nervously applied a new foil. It came out not perfect, but will have to do. Cheers Rob
- 62 replies
-
- 12
-
-
-
Thank you Gentlemen, I will check how the paint has cured next thing. What I learned about blue tones is, that they tend to look more different under changing lighting conditions and camera settings and not by little. I guess, that's what it makes so hard to detect the right hue, even from color pictures. Cheers Rob
-
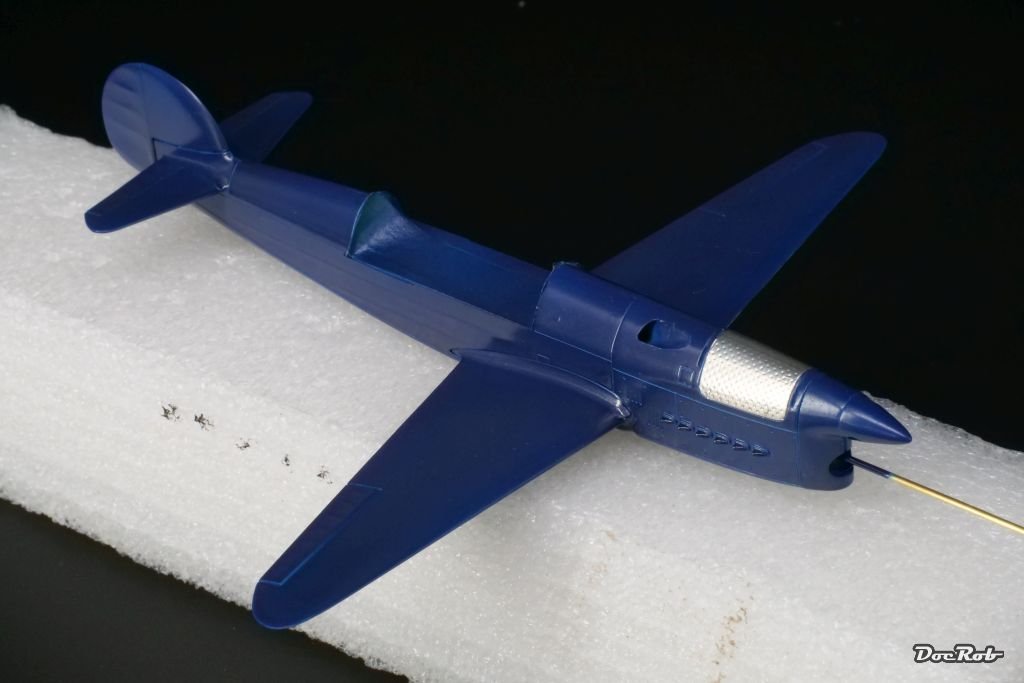
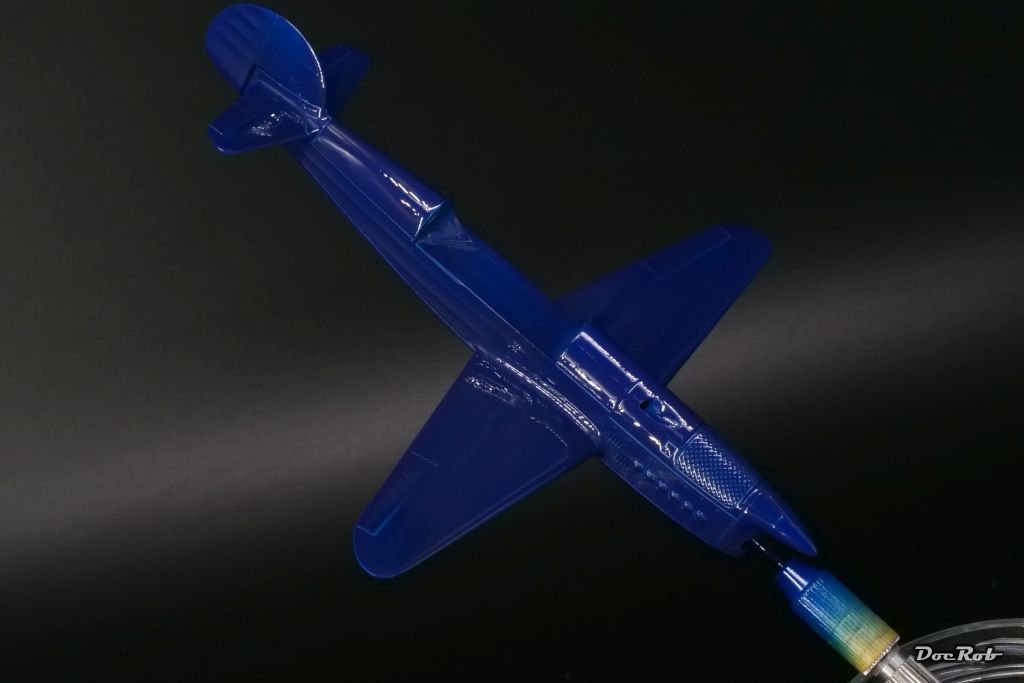
On with the Caudron. After almost two weeks my color order arrived and I got back in the tracks. I masked the canopy with the supplied Kabuki masks, which fittet, who wonders, perfectly. The airframe was primed with Mr. Surfacer 1500, after a rub with an alcohol soaked cloth. There was no place to hold the plane while spraying, so I inserted a 1mm brass rod into a pre drilled hole in the air duct. My pin vise worked as a handle than. Then it was time for the blue. After lots of considerations, I went with a dark gloss blue, namely Tamiya X-3 Royal blue. The picture was taken immediately after spraying and I hope the gloss will remain Cheers Rob
- 62 replies
-
- 13
-
-
Honda RC166 Grand Prix Racer by CDW - FINISHED - Tamiya - 1/12
DocRob replied to CDW's topic in Non-ship/categorised builds
I only built one bike so far, the Tamiya Ducati Panigale and it may tease you. It's an easy build, but painting is the challenge. I loved to replicate all the different metals, modern bikes are made of. This build was so much fun, that more bikes will follow, the Honda you are building is on the schedule as well as a Honda Dax with a very uncommon livery. Cheers Rob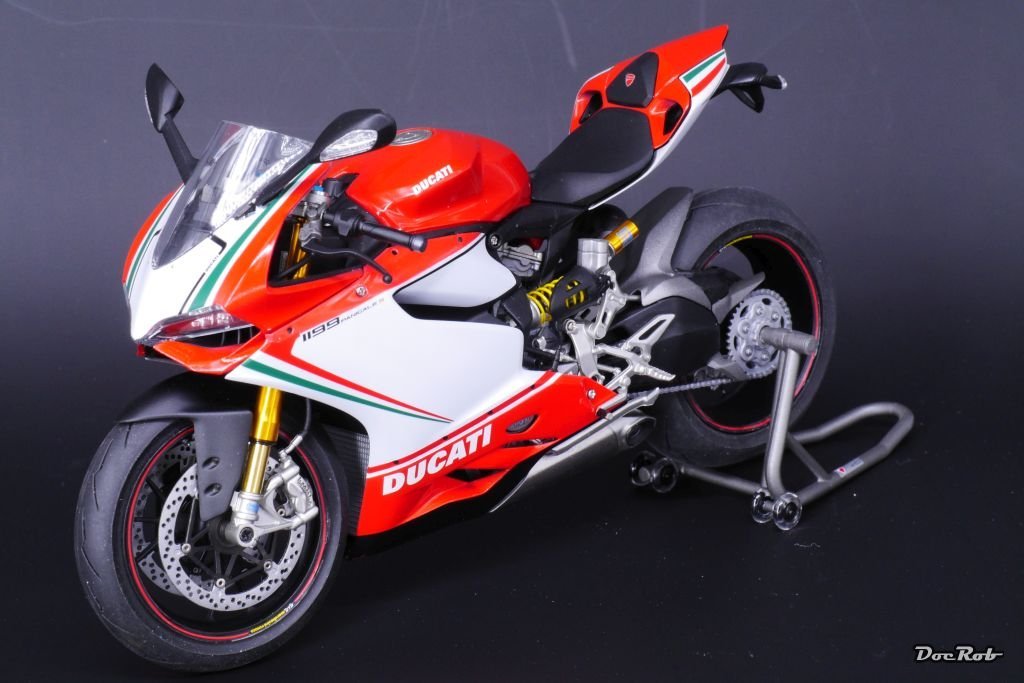
-
Matt Clear Coat
DocRob replied to aliluke's topic in Painting, finishing and weathering products and techniques
Exactly my feeling Alistair, on my island, it's impossible to get rattle cans sent to. Not too bad except for my formerly loved Tamiya grey primer. Some years ago, I changed therefore to Mr. Surfacer primer jars, but only yesterday two European online sellers claimed, that they are not allowed to send them anymore. Before I leave my island, I will find other ways or skip modeling . Cheers Rob -
Honda RC166 Grand Prix Racer by CDW - FINISHED - Tamiya - 1/12
DocRob replied to CDW's topic in Non-ship/categorised builds
Nice gal, but I wouldn't add her. Instead there is a Mike Hailwood resin figure out there from the Greek company GF Models. This also show, how small the bike really is and how the driver would have to fold himself in. I couldn't get one until now, but seriously consider it for my build. gf-12-009-_honda_rc_166_-_162_tamiya.jpg (960×720) (gf-models.eu) Cheers Rob -
Bismarck greys?
DocRob replied to Ian B's topic in Painting, finishing and weathering products and techniques
On Scalemates you can download the Tamiya manual, which gives usually a good idea for the colors from their recommendable system. German Battleship Bismarck, Tamiya 78013 (2005) (scalemates.com) There is a section for downloadable (.pdf) instructions. Cheers Rob