


DocRob
-
Posts
1,296 -
Joined
-
Last visited
Content Type
Profiles
Forums
Gallery
Events
Everything posted by DocRob
-
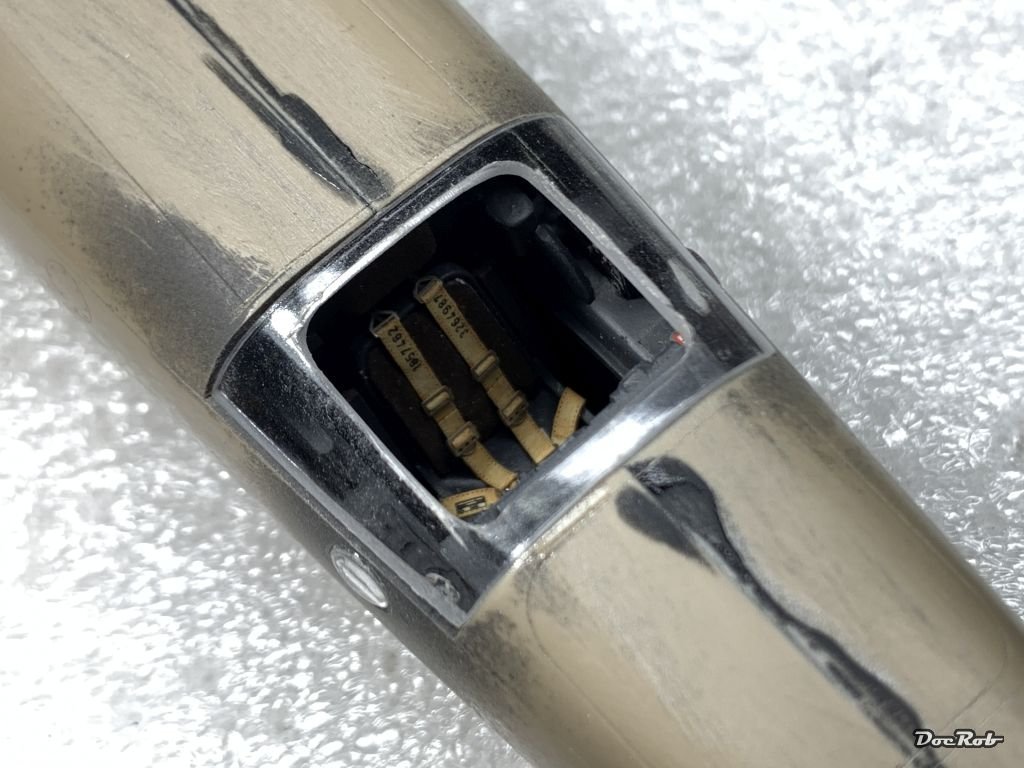
 Thank you Ken. Meanwhile, there is some detail work to be done. I added the PE hinges to the wheel doors and the breaking parachute release mechanism to the fuselage, where I used 0,55 mm brass rod instead of the supplied thread. Cheers Rob
- 79 replies
-
- 12
-

-
Catching up very late, but this is absolutely beautiful, well built and refined with lots of detail, chapeau. Cheers Rob
-
I saw this lovely kit for the first time today and yes, I want to build it. Right down my alley. a small precious boat in larger scale. Cheers Rob
- 216 replies
-
- 3
-
-
- masterkorabel
- ships
- (and 3 more)
-
Curtiss BF 2C-1 by CDW - FINISHED - Hasegawa - 1:32 scale
DocRob replied to CDW's topic in Non-ship/categorised builds
Hannants in the UK has them available: Yellow Wings Aircraft decals - YW32008 | Hannants Cheers Rob -
Honda RC166 Grand Prix Racer by CDW - FINISHED - Tamiya - 1/12
DocRob replied to CDW's topic in Non-ship/categorised builds
It will take some days to get here, but I will post pictures. They have more chain sets in their catalogue. You have to open the .PDF on their site. Falcon Scale Models - Catalog / Katalog Cheers Rob -
Honda RC166 Grand Prix Racer by CDW - FINISHED - Tamiya - 1/12
DocRob replied to CDW's topic in Non-ship/categorised builds
I ordered the resin chain and if you are still interested, I will post some pictures, when it arrives. Could come handy for your second Honda - hint . Cheers Rob -
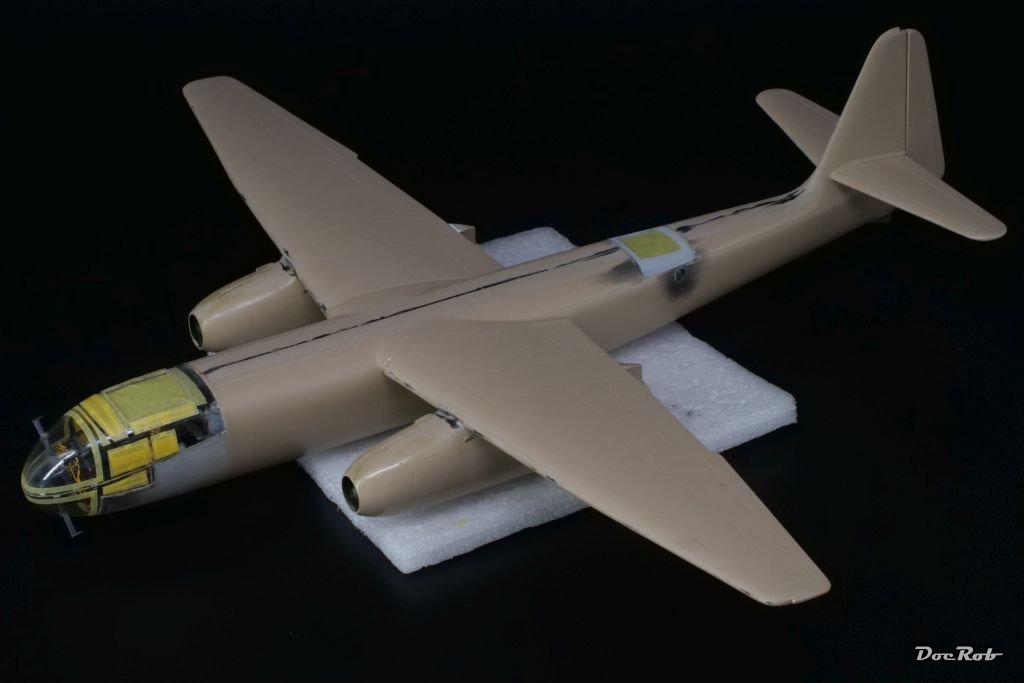
The thing got wings finally and it's tail. Fit is good so far, but a little filling will be needed at the wingroots. The Arado is a big kite and one of the main goals until the finish is not to knock off the protruding FUG antenna posts. She will not be a tail sitter, my glued in weight was sufficient. Cheers Rob
- 79 replies
-
- 13
-
-
Thank you Craig, it's not the nicest of joins, but I guess painted and maybe decaled it will look ok. Decaled means, Fly provided strips of decal with bolt detail to apply over the canopy framing. I'm not finally decided, if I use these. I will look for the videos you recommended. Sometimes I watch modeling related footage during building sessions. I never spent so much time around clear parts with cutting, sanding, drilling, filling masking, gluing in parts of different materials, ... The cockpit is indeed the focal point of the Arado. Cheers Rob
-
I took all my guts and glued the canopy shut, first the lower half, followed bey the upper glasshouse. I used Tamiya cement and after the glue had settled, ran Revell Contacta Clear over the seams three times for filling and sealing. The radio operator compartment was closed as well and received the same treatment. Cheers Rob


- 79 replies
-
- 16
-
-
The masking was done a long time ago and I have to say, it was maybe the easiest part of this build . Cheers Rob
-
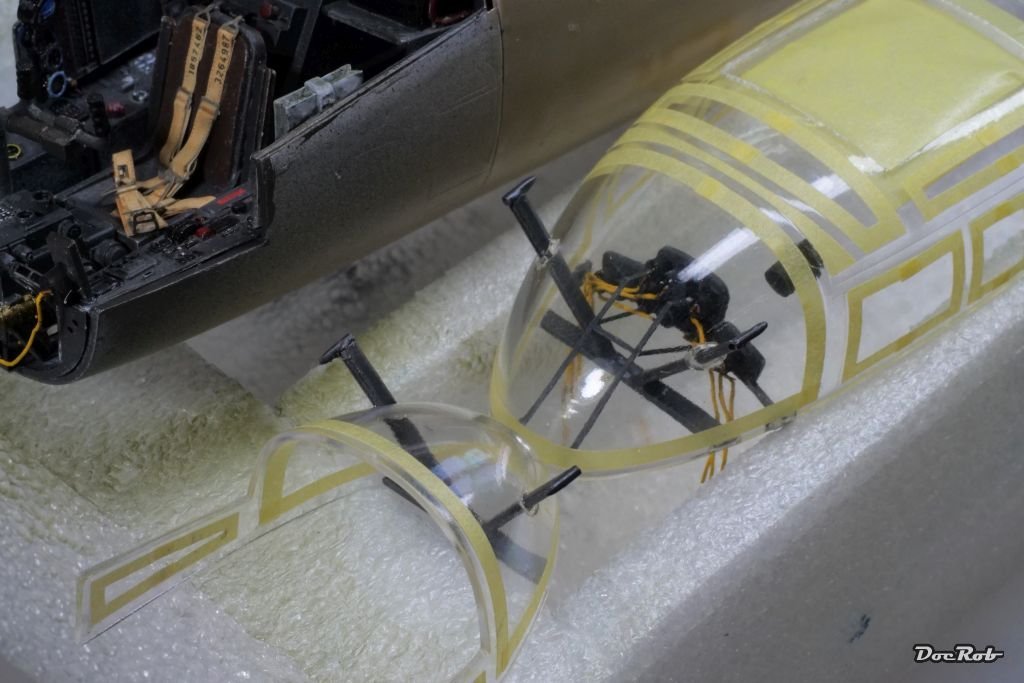
Slowly progressing with the cockpit. After finally gluing in the instrument panels struts, I added the struts for the FUG antennas and hope they are more or less correct aligned. Not an easy job, because the cockpit is slightly tilted to the front and you have only the curved canopy shapes for orientation. I finally made some touchups and let some Pledge run around the drilled holes in the clear cockpit parts. Next will be final masking and then the canopy will be glued in place, first the upper half, then stowing the cables and then the lower half. Cheers Rob
- 79 replies
-
- 15
-

-
-
Honda RC166 Grand Prix Racer by CDW - FINISHED - Tamiya - 1/12
DocRob replied to CDW's topic in Non-ship/categorised builds
Wow, what a beauty Craig with only one thing missing. You have to build a second one to present them side by side with and without fairing. I can't say, which I like better. It's a pity to hinder the eye wandering over the precious engine and other details, but the slender look of the faired bike with your beautiful paintjob is a stand out as well. Decisions, decisions, at least for my build to come. Cheers Rob -
I managed to get some of the hard stuff done. I'm never to keen about gluing parts into canopies, but here it's a bit more than the odd rearview mirror and it's a mix of materials, plastic, resin and PE. The canopy was bathed in Pledge before masking, a long time ago and my recent glue tests showed, that there is no fogging with my CA and Tamiya cement. I somehow fiddled in the IP and the IP framing, after I installed the base strips for the antler struts. It was not easy to align the parts without smearing glue somewhere on the inside of the canopy, but I think, I got it done. The IP got two shim parts made from styrene, where they meet the canopy for a larger gluing surface. Now I let that dry until tomorrow and then will attach the lower struts of the IP framing and make some touch ups. Cheers Rob
- 79 replies
-
- 14
-
-
Th Arado was also a great reconnaissance airplane, being able to fly very high and having less engine vibrations, than prop driven planes. It was a very steady camera base and delivered pictures of unmatched sharpness. Cheers Rob
-
Thanks, the next steps will determine the fate of the build. Closing the canopy is very delicate with a lot of stuff going in. I also made an error, right in the beginning, drilling the holes for the FUG's antennae posts to far to the rear on the upper canopy half and I hope, I find a good antennae alignment, but not the correct one. There is no way of filling and re drilling in the clear part. If I ever build another Arado 234 (quite possible), it will be a one seater for sure. Cheers Rob
-
Good to have you here Ken. The backward facing operator was a common design with German night fighters, like it had been done in the He-219. With the Uhu, it might have been space issues, keeping the radar equipment behind the operator and not between pilot and operator. With the Arado, I don't know, why they have chosen this layout. Cheers Rob
-
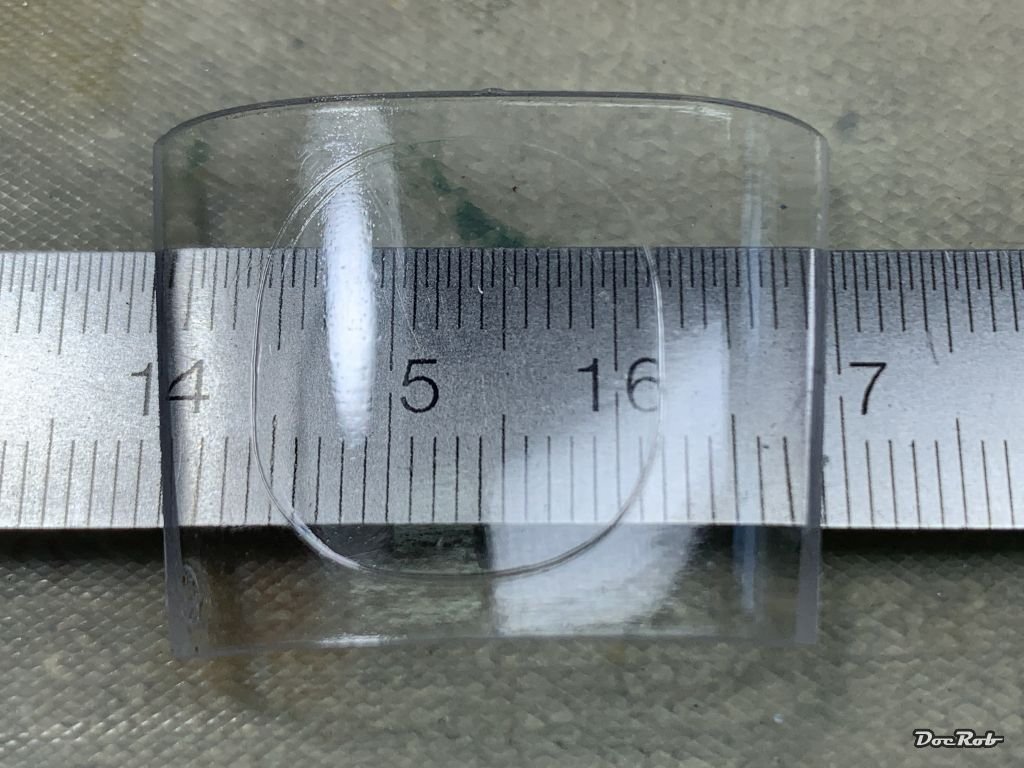
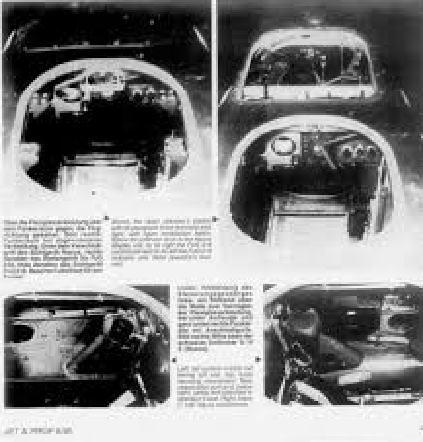
Thank you for your thoughts Egilman, I know the Nachtigall is almost as rare as the Caudron, I built with only a few being altered from -B2 to the -B2N version. My sources leave me to think that four to five Nachtigall Arados were built and flight. The Kagero book states firstly there were two converted from the reconnaissance version. Later one of those crashed and three (more?) formed a unit which tried to hunt Mosquitos, but without success. Generally the suitability to the nightfighter role was put into question by the pilots, because of lots of light refractions in the huge canopy and the lack of frontal armor. The specific layout of these B2N are highly obscured and every kit and every illustration shows another interpretation of the bird. Questionable areas are mainly the rear station, the Naxos antennae, the radar and the gun pod. The kit supplies a clear part for the radar station of the aft cockpit, with an engraved oval opening. The hatch engraving is out of the middle and too small for an entry hatch to my eye. If nobody knows the truth, you can go freestyling and that is what I did. I widened and squared the opening and after painting, I will add the hatch, which I assume would have been locked in place with some handles and without hinges. The only picture of the real thing, which showed up during my build over on LSM, was a tiny facsimile of the rear hatch, which is very blurry. I was not able to find the publication, where it was published. I know, it's more oval than mine, but I can live with that. Cheers Rob
- 79 replies
-
- 11
-
-
Fly is a Czech company producing a wide array of kits mostly in plastic, but with added resin and PE. Their models tend to be a bit off the trotten paths, which is very refreshing, but often not so easy to build with the short run technique used. Cheers Rob
-
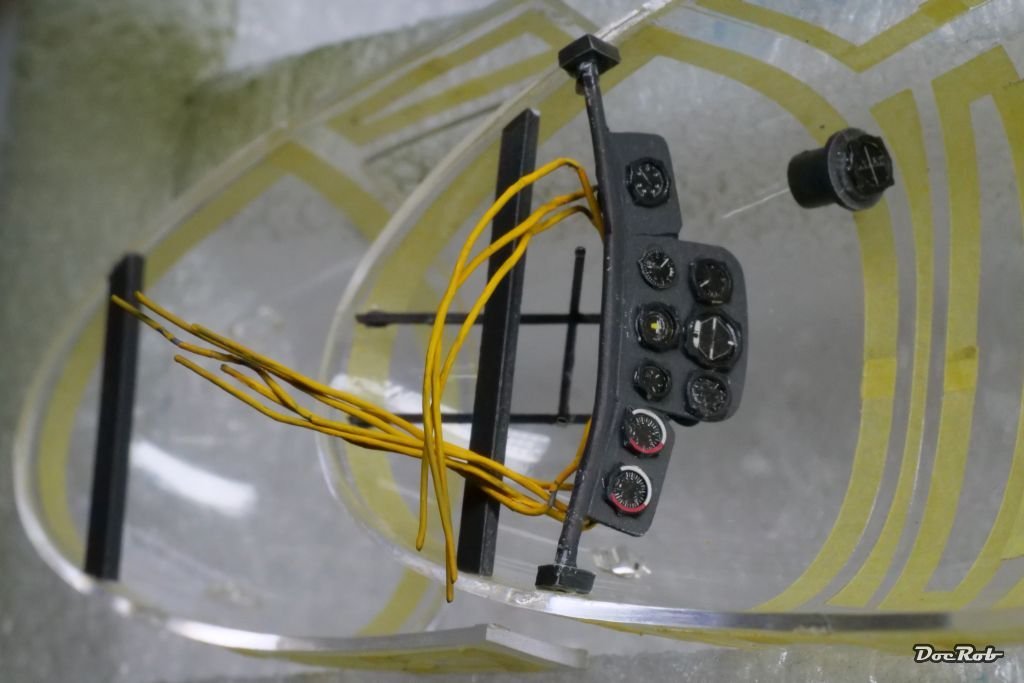
If you followed me until this point, I may can interest you into the process of the build, which was not without difficulties and can be read here. Arado 234 Nachtigall on Speed - LSM 1/35 and Larger Work In Progress - Large Scale Modeller After evaluating, what I had done, re-reading my LSM thread to catch up, I wanted to close the canopy now and started to add detail to the cockpit and bezeled and wired the instrument panel with the Yahu PE parts, which are cleverly done. The manual calls for 1mm pre drilling, where the dials should go and the backside of the dials has a protrusion, to place them. The bezels have a little nub for aiding the placement, which has it's counterpart on the dial. This way, you can be sure, the instruments are orientated correct. Cheers Rob
- 79 replies
-
- 11
-
-
-
Hola fellow Modelistas, after some positive resonance in another thread, I will do a WIP about my build of the Fly Arado 234. I bought the kit some years ago and always had the itch to built it soon and as a nightfighter.B-2N version. Now, that ZM announced a new 234, I felt it is about time to build mine without being tempted to buy a new one. I call that, err, stash management . I always had a soft spot for the sleek and slender silhouetted Arado jet. It's technical advantages, design and engineering makes it a standout. Generally I don't really much enjoy to build German subjects, but some are so fascinating, that I make an exception. The kit looks great in the seemingly small box, the plastic is a little crude in spots and the amount of cleanup is a little higher, than with some of the usual suspects, but nothing to worry about. The resin parts are breathtaking in detail and seem to fit very good to the plastic. on some of the bigger parts it's not even necessary to remove the pouring stubs. I will not bore you with a review, because James Hatch made a brilliant one on LSM. This is a different version of the 234, but all the main components are the same. 1:32 Arado Ar 234B-2/S3 - Aircraft Reviews - Large Scale Modeller There is not a lot of AM around and I will use the masks from Fly, seatbelts from HGW, a Neptun antler from Master and last but not least the Yahu Cockpit set, which is not a PE IP-board, but single bezels with dials. This is clever, as the kit provided ones are good and very visible and the different panels which consist of instruments are in various different places in the cockpit. The dials and bezels are printed in Colour and in a very shiny finish, and the manual recommends, that you cover some flat base on the bezels and keep the dials like they are in high gloss finish. I also have the two Kagero monographs along, which show a lot of plans, renderings and pics, but unfortunately don't show the night fighter layout. An here is where the trouble starts. I have no idea, how the window of the operator in the back looks. Even the Fly box art of two different issues show a rectangle window on mine and a oval window on the actual version. If somebody can enlighten me, I will be pleased. The Yahu set Being a short run kit without locator pins test fitting is a lot and so I cleaned the mayor components and was positively surprise, be the seemingly good fit. I decided to start with the surgery of the fuselage and canopy, because if I would have had a mayor fail here, there would have been no WIP. First was the fuselage opening for the operator in the back. It is necessary to remove a rectangle part from the fuselage, to insert the provided clear part. I used dynotape for the borders and cut with a saw and scalpels. After a little sanding it looks like this. And here is a little preview of what's in the fuselage. The backward facing place of the operator is supplied in resin parts, which seem to fit without cutting and grinding, splendid. I only cut the cast block of the backward bulkhead, only to get the opening in it into the fuselage. The second area of surgery was the canopy and it proved to be not too easy. you have to drill elliptical holes for the struts which carry the Neptun radar. Boy, how I hate to drill, grind and cut into clear parts. I used the measurements in the manual and copied them onto Kabuki tape onto the canopy. Then I drilled and grinded. You have to be precise while doing it, anticipating the angle of the struts. The result looks like this. The upper struts are a bit to much to the back, but I hope, I can arrange the struts properly, because filling and drilling again is no option. I did all these surgeries, before applying a coat of Future to the cockpit, which hopefully enhances the clearness and makes applying the provided decals trouble free. Like James, I firstly wanted to open the front and rear canopy, but after the drilling job, I'm not that sure anymore. While cutting the fuselage with the dynotape, I noticed black residues after removing the tape, a killer for a clear canopy. So for now, the bird will stay closed up. That's where I am now, reading my books about the 234. Be warned, that will not be a fast build, because there are others in line and I will do it proper. Cheers Rob
- 79 replies
-
- 12
-
-
It has been a while, since I was working on the Nachtigall, which I started 2019, but the kit, resting on the shelf was never forgotten. I need all my cojones to continue with it and after finishing some builds lately, I initially wanted to start the 1/32 HKM Do-335 B2, but then remembered the Arado. I love planes that may look quirky, but are so much ahead of their time engineering- and design wise, that they ultimately attract me, the more unusual the better. The Arado even beats the Pfeil in that subjective category and now, I hope I can pull the build through, having most of the difficult work already done. If it's ok with the Admin's, I will copy the first post of my initial thread on Large Scale Modeler as an introduction, link the LSM-thread and continue it on both sites. Cheers Rob
-
Thank you Mark, I may have to tie it down in the display shelf or whoosh, it's gone . Cheers Rob
-
I think there are still some resin kits out there, which are badly cast and designed, but the Caudron was a perfect kit to start a full resin build. I already ordered another of their racer kits, albeit in 1/72 normally not my scale. My scars are a less deep it seems, but I had my run ins with mediocre resin kits as well some years ago and never finished them, but will do later. Cheers Rob
-
Thank you Phil, it will not be my last racing plane, as I already ordered another one. Cheers Rob
-
Sharp about sums it up, design wise Popeye. It was a pure pleasure build and now that I think about it my first full resin plane kit. Cheers Rob
